

Page 1

5U000313C0A rev.01
User MAnUAl p1000 rev.01
p1000
User ManUal
Page 2

User Manual
Thank you for choosing our Pantech P1000 mobile phone.
The user guide contains important information about using
your handset. Please read the manual thoroughly, pay
attention to the safety information and warranty on the back
page and be alert to the exclusions and limitations of your
warranty, related to the use of unauthorized components.
Some information in this manual may differ from your phone,
depending on your software version and network provider.
This user manual can be changed at any time without any
notice for typographical errors, improvement of software,
limitation of the warranty and legal information. Such changes
will incorporate to new editions.
Page 3

1. Getting Started
Phone overview ......................................................................................................8
Menu overview .......................................................................................................9
SIM card and battery ............................................................................................11
Turn on/off the phone ..........................................................................................13
Display indications ................................................................................................13
Keypad lock ...........................................................................................................14
Memory card ........................................................................................................ 14
Entering text ........................................................................................................ 16
2. Calls & address book
Making, receiving & ending a call ........................................................................20
Options during a call .............................................................................................21
Call Setting ............................................................................................................23
Checking all calls ..................................................................................................25
Speed dialing ........................................................................................................26
Using address book ...............................................................................................27
Call waiting & caller identification .......................................................................29
Using your headset ...............................................................................................29
Service number & fixed number ......................................................................... 30
3. Messages
Messages .............................................................................................................. 34
Receive message .................................................................................................. 35
Creating & send new message ............................................................................ 37
Message templates ............................................................................................. 37
Creating new multimedia message.................................................................... 38
2
Page 4

Message settings ................................................................................................. 39
Setting voice message ......................................................................................... 40
4. Multimedia
Camera ................................................................................................................. 44
Pictures album .....................................................................................................49
Audio/Video player .............................................................................................. 50
Audio player settings ........................................................................................... 52
Video player settings ...........................................................................................54
FM radio ............................................................................................................... 55
Games .................................................................................................................. 56
5. Useful Features
Calendar ................................................................................................................60
Alarm .....................................................................................................................61
Stopwatch, calculator & unit converter ..............................................................61
Notes & sound recorder ........................................................................................62
World clock ............................................................................................................62
vCard......................................................................................................................63
vCalendar ............................................................................................................. 63
6. Connectivity
Bluetooth ............................................................................................................. 68
Using the internet ................................................................................................ 70
Connect to PC .......................................................................................................72
7. Settings
Date & time ...........................................................................................................76
3
Page 5

Language ............................................................................................................. 76
Ringtones & alerts & tones .................................................................................. 76
Decorating the display ......................................................................................... 77
Network. ...............................................................................................................77
Locks ..................................................................................................................... 78
To enable fixed dialing.........................................................................................79
Reset ..................................................................................................................... 79
8. Appendix
Error message .......................................................................................................82
Troubleshooting checklist .................................................................................... 83
Safety information............................................................................................... 84
Safety precautions ................................................................................................85
About the battery usage ..................................................................................... 86
Disposal of Waste Electrical & Electronic Equipment ......................................... 88
Declaration of conformity for CE ......................................................................... 89
Warranty .............................................................................................................. 89
4
Page 6

5
Page 7

Page 8

Getting Started
Phone overview
Menu overview
SIM card and battery
Turn on/off the phone
Display indications
Keypad lock
Memory card
Entering text
1
Page 9
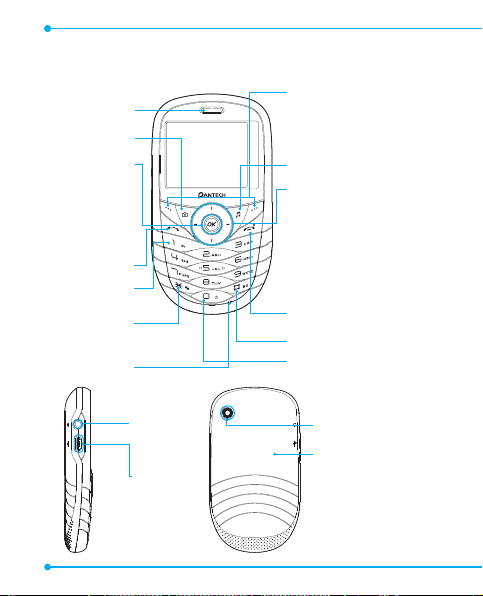
Phone overview
Earpiece
Camera key
OK key
Press for
confirmation
or launch the
WAP directly.
Send key
Voicemail
Vibrate mode
Microphone
Left /Right Soft key
Perform the functions shown
at the bottom line of the display.
MP3 key
Four-way menu navigation and
short cuts
Scroll through the menu options.
Contacts menu
Left : Access
Up : Access
Messages menu
Right : Access
Fun&Games menu
SIM services menu
Down : Access
End key/Power on and off
Keypad Lock
Prefix international call key
Earpiece
Camera
microSD card slot
USB Slot
8
Page 10
Menu overview
Messages*
Write message
Inbox
Drafts
Outbox
Sent messages
Delete messages
Broadcast message
Templates
Message settings
Contacts
Quick search
Add new contact
Speed dial
Caller groups
My number
Extra numbers
Contacts settings
Call history
SIM1 call history**
SIM2 call history**
File manager
Multimedia
Camera
Image viewer
Video recorder
Video player
Audio player
FM radio
Schedule FM record
Fun & Games
* SIM dependent
** Need SIM1 or SIM2
*** Network dependent
9
01
02
03
04
05
06
07
08
Page 11
Settings
Display
User profiles
Call settings
Phone settings
Network settings**
Security settings
Dual SIM settings
Software version
Services***
Homepage
Bookmarks
Recent pages
Offline pages
Input address
Service inbox
Settings
SIM services*
Restore factory
settings
Organizer
Bluetooth
Alarm
Calendar
Notes
World clock
Sound recorder
Calculator
Unit converter
Stopwatch
10
* SIM dependent
** Need SIM1 or SIM2
*** Network dependent
Page 12
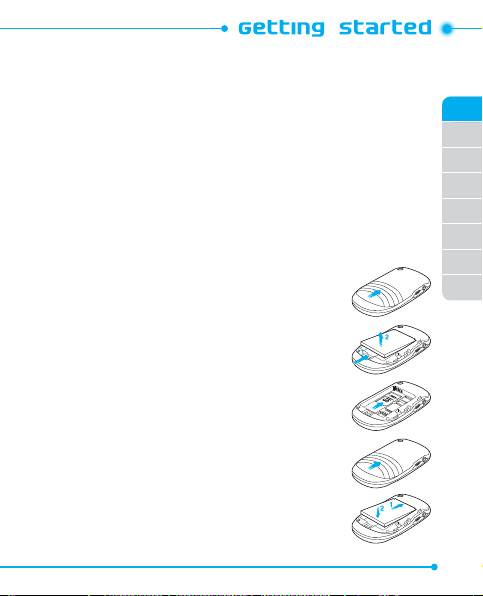
SIM card and battery
About your SIM card
When you subscribe to your network operator, you receive a SIM
(Subscriber Identity Module) card containing your registration information,
PIN code, etc.
About your battery
Your phone uses a Li-Ion battery. Make sure to use an authorized battery
and charger only. For more details, please inquire at your nearest dealer.
To install/remove SIM1/SIM2 card
1. Remove the battery cover from the unit.
2. Remove the battery.
3. Push the SIM1/SIM2 card in the arrow direction as
shown.
To install/remove battery
1. Remove the battery cover from the unit.
2. Put the contacts of the battery into the hole located at
the up of the unit, and insert and press the bottom side
of the battery until you hear the “click”.
11
01
02
03
04
05
06
07
08
Page 13
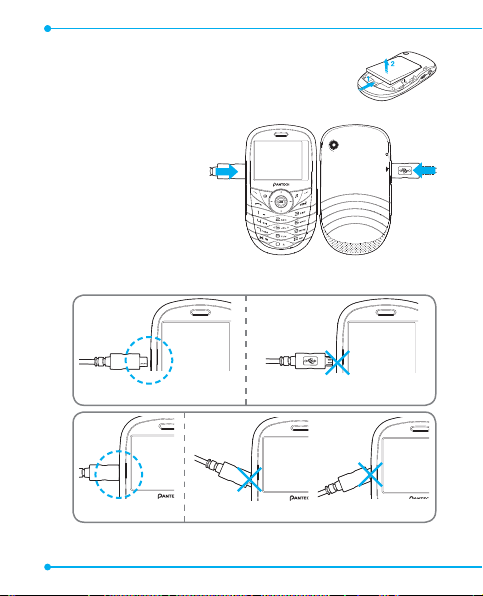
3. To remove the batter y, push the bottom of the
battery upwards and remove the battery.
To charge your battery
1. To charge, connec t the
charger adapter. Make
sure you align the gold
contacts at the battery
end with contacts on the
phone. If the contacts at
the battery is not properly
aligned, damage could
occur to the phone and the battery.
Correct Incorrect
Correct Incorrect
2. To remove the adapter connection, pull the adapter away.
12
Page 14
Battery performance
Battery Type Capacity Standby Time Talk Time
Standard
Lithium-Ion
(Li-ion)
1100mAh 480 Hour 330 Min.
Turn on/o the phone
To turn on
1. Press and hold .
To turn o
1. Press and hold .
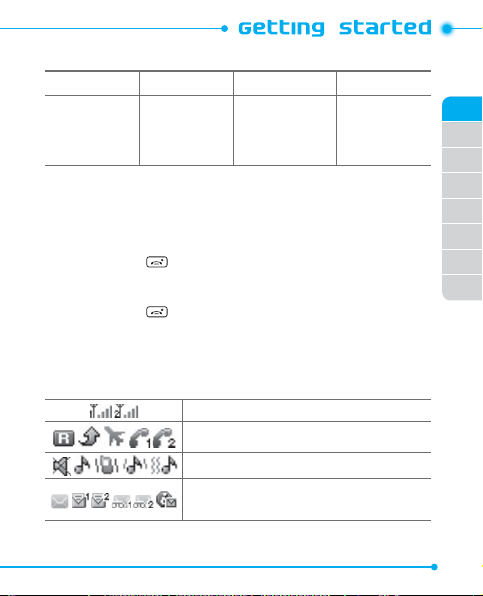
Display indications
Essential icons
SIM1 signal strength / SIM2 signal strength
Roaming/Forwarding* / Flight mode / SIM1
Missed Call / SIM2 Missed Call
Silent/Ring/Vib/Vib and Ring/Vib then Ring
Unread SMS / Unread SIM1 MMS / Unread SIM2
MMS / Unread SIM1 Voicemail / Unread SIM2
Voicemail/ Wap msg
13
01
02
03
04
05
06
07
08
Page 15
Wap busy/GPRS
Alarm/SD Card/Ear Mic/Java/Stopwatch
Lock
Bluetooth Connect/Bluetooth
Battery strength
* Network dependent
Keypad lock
To lock the keypad
1. Press and hold .
To unlock the keypad
1. Press
Unlock
> OK.
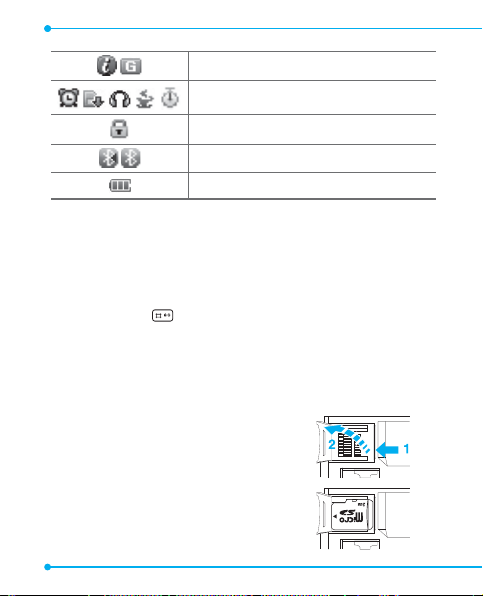
Memory card
You can use microSD card as memor y card. It
gives you space to save pictures, videos, music
and etc.
Inserting and removing the memory
card
1. Remove the battery cover from the unit.
14
Page 16
2. Remove the battery.
3. Push memory card cover upward(1) and
open it(2).
4. Put the memory card into the slot.
5. Close the memory card cover(1) and pull it
downward(2).
Using memory card
You can save, move and delete the files in your external memory card. You
can also move and copy the files to computer from your external memor y
card.
To copy the le to the card
1. Press
Menu
>
2. Select the file >
3. Select
Memory card
File manager > Phone
Options
>
.
Copy
.
.
To move the le to the card
1. Press
Menu > File manager > Phone
2. Select the file >
3. Select
Options
Memory card
>
.
Move
.
.
To delete the le from the card
1. Press
Menu
>
2. Select the file from the card >
File manager
.
Options
>
Delete
.
To move the le from the card to the computer
1. Connect the data cable with mobile and the computer.
15
01
02
03
04
05
06
07
08
Page 17
2. Select
Mass storage
.
3. Follow the instruction on your computer screen.
4. To disconnect, disconnect the data cable.
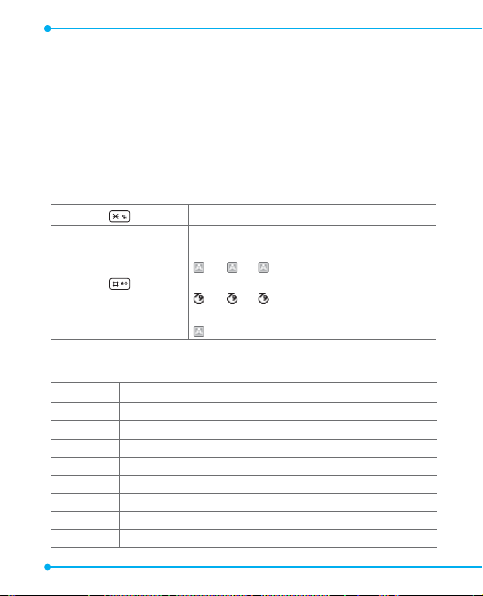
Entering text
You can enter text with multitap, predictive, numeric or symbol.
Useful keys
Display symbols
Change the text input mode
Multitap (first letter caps/all small caps/all caps)
Abc, abc, ABC
Predictive(first letter caps/all small caps/all caps)
Abc, abc, ABC
Numeric
123
Key characters by language
Key English
1
2
3
4
5
6
7
8
16
. , - ? ! ‘ @ : # $ / _ 1
a b c 2
d e f 3
g h i 4
j k l 5
m n o 6
p q r s 7
t u v 8
Page 18
9
0
w x y z 9
Space 0
Predictive mode (T9)
The T9 mode automatically compares your keystrokes with an internal
linguistic dictionary to determine the correct word. It will appear the most
commonly used word first.
1. Press and hold
2. Press
to change the mode as T9.
to to input text. For example, to write ‘Hello’ press
.
Multi-tap input mode
Press the key labeled with the target letter once for the first letter; press it
twice for the second letter, and so on.
1. Press and hold
2. Press
to change the mode as multi-tap.
to to input text repeatedly. To write the letter “C”, press
3 times.
Numeric mode
You can input numbers in this mode.
1. Press
2. Press
to change the mode 123.
to and .
17
01
02
03
04
05
06
07
08
Page 19

Page 20

Calls & address book
Making, receiving & ending a call
Call waiting & caller identification
Options during a call
Using address book
Service number & fixed number
Using your headset
2
Call Setting
Checking all calls
Speed dialing
Page 21

Making, receiving & ending a call
To make a call
1. Enter the area code and phone number.
2. Press
To answer a call
1. Press or
To end a call
1. Press .
To reject a call
1. Press or
To make a call using call list
Your phone logs dialed, received and missed call numbers.
1. Press
2. Select SIM1 or SIM2.
3. Select a number.
4. Press
5. Select SIM1 voice call or SIM2 voice call.
To make a call during a call
1. Enter the phone number or look it up in
2. Press
20
.
Answer
.
Reject
.
to display the
to dial the selected number.
to dial the second call. The first call is automatically put on
hold.
Call history
list.
Contacts
.
Page 22
To make an international call
1. Press and hold key for the international prefix until the ‘+’
character appears.
2. Type the country code, area code, and phone number.
3. Press
.
To reply to a missed call**
1. Press
View
2. Select a number to call.
3. Press
to display the list of missed calls.
.
To answer a second call**
1. Press . The first call is automatically put on hold.
2. Press
3. The call on hold is automatically reconnec ted.
to end the second call.
Options during a call
Microphone o and on
To switch your phone’s microphone o
1. Press
Mute
.
To switch your phone’s microphone back on
1. Press
Unmute
.
To talk on speaker
1. Press [ ].
21
01
02
03
04
05
06
07
08
Page 23

To put a call on hold and return**
To put a call on hold
1. Press
Options
To return to a held call
1. Press
Options
>
Hold
.
>
Retrieve
To switch between two calls
1. Press
Options
>
Swap
.
.
Multi-party calls***
You can talk with more than one person or conference call.
To make a multi-party call
1. Call the first participant.
2. Call the second participant. The first call is automatically put on hold.
3. Press
Options
To add a caller to a multi-party call
1. Press
Options
To search a number in address book during a call
1. Press
Options
2. Select a number >
To search for a name or group in address book
Enter the first letters of the name for Name Search. The entries are displayed
starting with the first entry matching your input.
22
>
Conference
>
Conference
>
Contacts
>
.
.
.
Quick search
.
Page 24

To view the details of highlighted entry in address book
1. Press OK.
For the address book, see page 27.
To read a message during a call
1. Press
Options
>
Inbox
> select a message
Messages
2. Press
To write a message during a call
1. Press
Options
>
For creating message, see page 37.
note: During the call, you can only send text messages. Multimedia messages cannot
be sent.
Messages
.
.
Call Setting
To set call forwarding***
You can divert incoming calls to another phone number.
1. Press
Menu > Settings > Call settings > SIM1 or SIM2 call settings
>
Call divert
.
2. Select a divert option.
3. Select
Activate > To new number / To voice mail
4. Press
OK
For voice mail number setting, see page 40.
.
To cancel call forwarding**
You can cancel call forwarding.
.
23
01
02
03
04
05
06
07
08
Page 25

1. Press
Menu > Settings > Call settings > SIM1 or SIM2 call settings
>
Call divert
.
2. Select a divert option.
3. Select
Deactivate
4. Press OK.
To check call forwarding status**
You can check call forwarding is set or not.
1. Press
Menu > Settings > Call settings > SIM1 or SIM2 call settings
>
Call divert
.
2. Select a divert option.
3. Select
4. Press
Query status
OK
.
.
To set auto redial
1. Press
Menu > Settings > Call settings > Advanced settings > Auto
redial
.
2. Select
On
or Off.
To answer with any key press
1. Press
Menu
>
Settings
2. Press
Options > Customize > Answer mode
3. Select
Any key
4. Press
OK
.
5. Press
Yes
note: You can answer with any key except and
24
.
>
.
User profiles
> select a profile.
.
Reject
.
Page 26

Checking all calls
You can view information about all Call histor y.
For more options for all, missed, dialed and received calls, press OK.
To view missed calls
1. Press
Menu > Call history > SIM1 or SIM2 call history
2. Press
Missed calls
.
To view dialed calls
1. Press
Menu > Call history > SIM1 or SIM2 call history
2. Press
Dialled calls
.
To view received calls
1. Press
Menu > Call history > SIM1 or SIM2 call history
2. Press
Received calls
.
To delete call logs
1. Press
Menu > Call history > SIM1 or SIM2 call history
2. Press
Delete call logs
.
To view total call time
1. Press
Menu > Call history > SIM1 or SIM2 call history
2. Press
Call time
3. To reset press
.
Reset all > OK
.
To view data transmitted information
1. Press
Menu > Call history > SIM1 or SIM2 call history
.
.
.
.
.
.
25
01
02
03
04
05
06
07
08
Page 27

2. Press
GPRS counter
•
Last sent:
•
Last received:
•
All sent:
•
All received:
•
Reset counter:
.
You can view sent of transmitted in previous sessions, in
byte(s).
You can view received of transmitted in previous
sessions, in byte(s).
You can view all sent transmitted data in byte(s).
You can view all received transmitted data in bytes.
You can reset each counter.
Speed dialing
You can dial quickly using speed dialing. It can be saved of 8 numbers from
2 to 9.
: Voice mail
: Prefix for international call
To set speed dial
1. Press
Menu > Contacts > Speed dial
2. Select an empty entry and press
3. Select a person and number >
To update speed dial
1. Press
Menu > Contacts > Speed dial
2. Select a number and press
3. Update information and press
26
OK
Options
OK
Edit
.
.
.
.
.
>
Edit
.
Page 28

To remove from speed dial
1. Press
Menu > Contacts > Speed dial
2. Select a number and press
3. Press
OK
.
Options
>
.
Delete
.
Using address book
You can save names, phone numbers, and information up to 500 contacts
on the SIM or phone. Entries can be depends on the capacity of the SIM
card.
To add a contact
1. Press
Menu > Contacts > Add new contact
2. Choose
To SIM1, To SIM2 or To phone
3. Press
OK
.
To view contacts list
1. Press
Menu > Contacts > Quick search
To search for a phone number
1. Press
Menu > Contacts > Quick search
2. Input a name.
3. Press [
] to view detail information.
To call from contacts list
1. Press
Menu > Contacts > Quick search
2. Select a contact.
.
for place to save.
.
.
.
27
01
02
03
04
05
06
07
08
Page 29

3. Press .
To forward contacts details
1. Press
Menu > Contacts > Quick search
2. Select a contact >
3. You can send the information as
Bluetooth
Options
.
To delete a contacts entry
1. Press
Menu > Contacts > Quick search
2. Select a contact >
3. Press
OK
Options
.
To add member to a groups
1. Press
Menu > Contacts > Caller groups
2. Select group.
3. Press
Options > View members
4. Press
Options > Add members
5. Press
Add
>
Yes
.
To delete member from a groups
1. Press
Menu > Contacts > Caller groups
2. Select group.
3. Press
Options > View members
4. Select member.
5. Press
Options
>
Yes
Remove
.
6. Press
28
>
>
.
.
Send contact
As text/multimedia message or Via
Delete
.
.
.
.
.
.
.
.
Page 30
To edit a group setting
1. Press
Menu > Contacts > Caller groups
2. Select group.
3. Press
Options
>
OK
Group settings
.
4. Edit settings.
5. Press
.
.
Call waiting & caller identication
To activate call waiting***
1. Press
Menu > Settings > Call settings > SIM1 or SIM2 call settings
>
Call waiting
2. Select
.
Activate > OK
.
Caller identication***
1. Press
Menu > Settings > Call settings > SIM1 or SIM2 call settings
>
Caller ID
.
Options Description
Set by network Caller ID setting will be automatically set.
Hide ID Caller ID will be not sent.
Send ID Caller ID will be sent.
Using your headset
You can send or receive a call using your headset.
29
01
02
03
04
05
06
07
08
Page 31

When you connect your headset to the jack the button on the headset
works as follows.
While in standby mode
1. Press and hold the button to list recent calls.
Service number & xed number
To call your service numbers*
You can see the service number to reach the service provider.
1. Press
Menu > Contacts > Extra numbers > SIM1 or SIM2 service
dialing number
2. Select a number > press
To view xed dial list
Fixed dialing is a service that limits your access to specific numbers in the
address book list recorded on the SIM. Input the PIN2 to set up or cancel
this service.
1. Press
Menu > Settings > Security settings > SIM1 or SIM2 security
settings > Fixed dial > Fixed dial list
note: PIN2 must be correctly entered within 3 times. PIN2 code is dependable by your
SIM.
30
.
or
Call
.
.
Page 32

31
01
02
03
04
05
06
07
08
Page 33

Page 34

Messages
Creating & send new message
Creating new multimedia message
3
Messages
Receive message
Message templates
Message settings
Setting voice message
Page 35

Messages
You can send, receive and save the text message and multimedia message.
Managing memory
You can save up to 100 messages in the phone memor y. You can move or
copy text message to SIM card. Multimedia message will not be copy to
SIM card. When the message fully saved in the phone and SIM memor y,
will appears. And, when the multimedia message fully saved in the
phone,
will appear.
To move the message to SIM
1. Press
Menu > Messages > Inbox
2. Select a message >
note:
When you move message to SIM, the message which is saved in the
phone memory will be deleted. Maximum saved message is dependable by
your SIM.
To move the message to phone
1. Press
Menu > Messages > Inbox
2. Select a message >
To delete message in each mailbox
1. Press
Menu > Messages > Inbox
2. Select a message >
3. Press
OK
.
To reply the message
1. Press
Menu > Messages > Inbox
34
Options > Advanced > Move to SIM
Options > Advanced > Move to phone
Options
.
.
.
>
Delete
.
.
.
.
Page 36

2. Select a message >
To view free text message memory space information
1. Press
Menu > Messages > Message settings > Text message >
SIM1 or SIM2 message settings > Memory status
Options > Reply
.
.
To view free multimedia message memory space information
1. Press
Menu > Messages > Message settings > Multimedia
message > Common settings > Memory status
.
Receive message
To view new received message
1. Press
Menu > Messages > Inbox
2. Select a received message >
To read message using inbox
1. Press
Menu > Messages > Inbox
2. Select a received message >
To save new numbers from received message
1. Press
Menu > Messages > Inbox
2. Select a received message >
3. Press
Options > Advanced > Use number
4. Select number.
5. Press
Options > Save to contacts
note:
You can use number only if number is included in the message.
.
OK
.
.
OK
.
.
OK
.
.
.
35
01
02
03
04
05
06
07
08
Page 37

To save the selec ted URL address in the list
1. Press
Menu > Messages > Inbox
2. Select a received message >
3. Press
Options > Advanced > Use URL
note:
You can use URL only if URL is included in the message.
.
OK
.
.
To save the objec t in the received multimedia message
1. Press
Menu > Messages > Inbox
2. Select a received multimedia message >
3. Select
Options > Save objects > Tex t / Picture / Sound / Video
4. It will be saved in one of the categories at
.
OK
File manager
To listen to receive voice message
1. Press
Menu > Messages > Message settings > Text message >
SIM1 or SIM2 message settings > Voicemail server
2. Press
Options > Call voicemail
.
It will automatically call to the voice-mail center.
To view cell broadcast messages
1. Press
Menu > Messages > Broadcast message > SIM1 or SIM2
36
broadcast message
2. Press
OK
for following sub menus:
•
Receive mode
•
Read message
•
Channel settings
.
.
.
.
.
Page 38

Creating & send new message
To send new text message
1. Press
Menu > Messages > Write message
2. Write the message.
3. Press
Options > Send to > Add form Contacts
4. Find the recipient and press
5. Press
Options > Send
6. Select
By SIM1 or By SIM2
note:
If message failed to be sent, it will be saved in Outbox.
Add
.
.
.
.
.
Message templates
When you often use same phrases you can save the message for template
message.
To edit the saved template message
1. Press
Menu > Messages > Templates > Tex t/Multimedia
message
2. Select the message.
3. Press
4. Write the message.
5. Press
.
Options > Edit
Options > Save
.
.
37
01
02
03
04
05
06
07
08
Page 39

Creating new multimedia message
You can add picture, sound, video and other file to multimedia message. It
has a limitation of 300Kb or else an error message will pop up.
To add subject on the message
1. Press
Menu > Messages > Write message
2. Press
Options > Add subject
3. Write a subject.
4. Press
Options > Done
5. Press
Options > Send to
To add saved pic ture on the message
1. Press
Menu > Messages > Write message
2. Press
Options > Add picture
3. Press
My pictures > Phone or Memory card
4. Press
Foto
5. Write the message.
6. Press
> select a picture > OK.
Options > Send to
To add saved sound on the message
1. Press
Menu > Messages > Write message
2. Press
Options > Add sound
3. Press
My sounds > Memory card
4. Press
Audio
5. Write the message.
6. Press
38
> select a sound > OK.
Options > Send to
.
.
.
.
.
.
.
.
.
.
.
.
Page 40

To add saved video on the message
1. Press
Menu > Messages > Write message
2. Press
Options > Add video
3. Press
My videos > Memory card
4. Press
Video
5. Write the message.
6. Press
> select the video > OK.
Options > Send to
.
.
.
.
To add other le on the message
1. Press
Menu > Messages > Write message
2. Press
Options > Advanced > Insert attachment
3. Press
Phone or Memory card
4. Select the folder > select the file >
5. Write the message.
6. Press
Options > Send to
.
.
.
.
OK
.
Message settings
Before you can send or receive messages using your phone, you must
configure their settings first. This information is normally pre-populated in
the phone by your service provider.
To set text message setting
1. Press
Menu > Messages > Message settings
2. Select
Text massage
3. Select
SIM1 or SIM2 message settings
.
.
.
39
01
02
03
04
05
06
07
08
Page 41

4. Set each option > OK.
note:
The message format depends on the SIM.
To set proles for multimedia message
1. Press
Menu > Messages > Message settings
2. Select
Multimedia message > Profiles
3. Select
SIM1 or SIM2
4. Select one >
5. Press
Edit profile
Options
>
.
.
Done
.
To set sending options for multimedia message
1. Press
Menu > Messages > Message settings
2. Press
Multimedia message > Common settings > Sending.
3. Set each option > OK.
To set receiving method for multimedia message
1. Press
Menu > Messages > Message settings
2. Press
Multimedia message > Common settings > Retrieval
3. Set each option >
OK
.
Setting voice message
To set receiving voice mail
1. Press
Menu > Messages > Message settings > Text message >
SIM1 or SIM2 message settings > Voicemail server
2. Press
Options > Edit
3. Enter the name and number of the voice mail center.
40 40
.
.
.
.
.
.
.
Page 42

4. Press OK.
5. Press
Yes
.
01
02
03
04
05
06
07
08
41
41
Page 43

Page 44

Multimedia
Audio player settings
Video player settings
4
Camera
Pictures album
Audio/Video player
FM radio
Games
Page 45

Camera
You can take pictures and record movies using built-in camera. The photos
and video clips can be saved and sent using multimedia message.
White balance
Camera mode
Video mode
Brightness
Options Back
Scene mode
Delay timer
Recording/Pause
To set camera settings
1. Press
2. Press
3. Set the options >
44
Menu > Multimedia > Camera
Options
before you take a picture.
OK
.
.
Storage
Resolution
Quality
Cont.shot
Zoom
Page 46

Icons for camera
Icon Name Description
Camera Mode
Zoom
Brightness
x1, x1.2, x1.4, x1.6, x1.8
x2, x2.2, x2.4, x2.6, x2.8
x3
-4, -3, -2, -1
0
+1, +2, +3, +4
Settings for camera
Icons Name Sub Name Description
Normal, Grayscale, Sepia, Sepia green,
Sepia blue, Color invert
), Daylight ( ),
Auto (
Tungsten (
Cloudy (
Auto ( ), Night ( )
Off (
10 sec. (
Off ( ),1 shot ( ),
3 shot ( ),5 shot ( )
160x128 (
640x480 (
1280x1024 (
), Fluorescent ( ),
)
), 5 sec. ( ),
),15 sec. ( )
), 320x240 ( ),
), 800x600( ),
)
Effect
WB
Scene mode
Delay timer
Cont. shot
Resolution
45
01
02
03
04
05
06
07
08
Page 47

Image quality Low (
Advanced
settings
Shutter sound Sound 1, Sound 2, Sound 3, Off
Anti-flicker 50Hz, 60Hz
Storage
Restore default
Phone (
Icons for video
Icon Name Description
Video Mode
Zoom
Brightness
Settings for video
Icons Name Sub Name Description
Effect
WB
Night mode
46
Normal, Grayscale, Sepia, Sepia
green, Sepia blue, Color invert
Auto (
Tungsten (
Cloudy (
Off ( ), On ( )
), Normal ( ), High ( )
), Memory card ( )
x1 x1,2 x1,4 x1,6 x1,8
x2 x2,2 x2,4 x2,6 x2,8
x3
-4, -3, -2, -1,
0
+1, +2, +3, +4
), Daylight ( ),
), Fluorescent ( ),
)
Page 48

Shutter sound On, Off
Advanced
settings
Anti-flicker 50Hz, 60Hz
Video quality Low (
Restore default
), Normal ( ), High ( )
To zoom in and out
1. Press / .
To increase or decrease the brightness
1. Press / .
To take a picture
1. Press
Menu > Multimedia > Camera
2. Focus on the object > press
note:
Your photo will be saved automatically to File manager > driver > Foto.
OK
.
or .
To change to video camera mode
1. Press
Menu > Multimedia > Camera
2. Press
while camera mode is activated.
3. Focus on the object > press
.
OK
.
To view the taken picture
1. Press
Menu > Multimedia > Image viewer
2. Select the picture >
OK
.
.
47
01
01
02
02
03
03
04
04
05
05
06
06
07
07
08
08
Page 49

After taking pictures
To Press
Send as message or via
Bluetooth
Set as standby screen
Set as screen saver
Set a photo for a specific
contact
Delete the photo
Options > Send > As multimedia message
or
Via Bluetooth
Options > Use as > Wallpaper
Options > Use as > Screen saver
Options > Use as > Caller picture
Options > Delete
To record a video
1. Press
Menu > Multimedia > Video recorder
2. Put the camera where to record > press
3. Press
note:
> Videos.
.
Your video will be saved automatically to File manager > Memory card
OK
To set video settings
1. Press
Menu > Multimedia > Video recorder
2. Press
Options
3. Set the options >
before recording a video.
OK
.
To change to camera mode
1. Press
Menu > Multimedia > Video recorder
2. Press
48
while video camera mode is activated.
.
.
.
.
Page 50

3. Focus on the object > OK.
After recording video clips
To Press
Send as message or via
Bluetooth
Delete the video clip
Options > Send > As multimedia
message
or
Via Bluetooth
Options > Delete
During recording a video
To Press
Receive an incoming call
Stop recording
Pause recording
Deactivate pause
or
Answer
To view the record video clip
1. Press
Menu > Multimedia > Video player
2. Select the video clip >
OK
.
.
Pictures album
You can view, send, and delete the saved pictures. The supported formats
are JPEG, GIF, BMP, WBMP and PNG.
49
01
02
03
04
05
06
07
08
Page 51

To view the saved pic tures
1. Press
Menu > Multimedia > Image viewer
2. Select a picture >
Options > View
.
.
To set as wallpaper in the display
1. Press
Menu > Multimedia > Image viewer
2. Select a picture >
3. Press
OK
Options > Use as > Wallpaper
.
.
To move or copy a picture to other folder
1. Press
Menu > File manager
2. Select driver >
3. Select a picture.
4. Press
5. Select target folder >
Foto
Options > Copy or Move
.
.
.
OK
.
To send pictures using multimedia message/Via Bluetooth
1. Press
Menu > Multimedia > Image viewer
2. Select a picture.
3. Press
Options > Send > As multimedia message/Via Bluetooth
.
Audio/Video player
You can play MP3s and video clips with the audio/video player.
note:
Do not use this feature illegally. Sound and video can be protected
by copyright. It is illegal to copy such sound / video tracks for the purpose
of selling or distribution. Pantech does not in any way support the
unauthorized use of content on your phone media player.
50
.
.
Page 52

<Audio player > <Video player >
Volume controls
Spectrum
Video image
Playing time
Duration
Loop
Player controls
Icons for player
Icon Audio player Video player
Volume Volume
Short press
- Previous track
Long press
- Fast rewind
Short press
- Next track
Long press:
- Fast forward
Pause Pause
Play Play
Play All Play Once
Long press: Fast
rewind
Long press: Fast
forward
51
01
02
03
04
05
06
07
08
Page 53

Repeat One Repeat One
Repeat All
Random
To play audio
1. Press
Menu > Multimedia > Audio player
2. Press
OK
.
To play video clips
1. Press
Menu > Multimedia > Video player
2. Select a video clip >
Options
To use audio/video controls
To Press
Play or Pause
Stop
Rewind Hold
Fast forward Hold
Control volume Navi key up or down
OK
Stop
Audio player settings
To set all les to play automatically
52
Switch to full screen
.
Play
.
.
>
Page 54

1. Press
Menu > Multimedia > Audio player
2. Press
Options
3. Select
4. On audio player, press
5. You can see all MP3 files on memor y card.
.
List auto gen.
> On.
.
To set a le to play manually
1. Press
Menu > Multimedia > Audio player
2. Press
Options
3. Select
4. On audio player, press
5. You can add a file to play from memory card.
.
List auto gen.
> Off.
.
To set play mode
1. Press
Menu > Multimedia > Audio player
2. Press
Options
3. Select a mode >
.
OK
.
To set background play
1. Press
Menu > Multimedia > Audio player
2. Press
Options
3. Select
.
Background play
> On.
To set Bluetooth
1. Press
Menu > Multimedia > Audio player
2. Press
Options
3. Select
.
BT stereo output
> On.
.
01
02
03
53
04
05
06
07
08
.
.
.
.
Page 55

4. Select
BT stereo headset
.
To set spectrum
1. Press
Menu > Multimedia > Audio player
2. Press
Options > Spectrum display
3. Select a style.
note:
When you listen to music using Bluetooth, the spectrum will be
blocked.
Video player settings
To set play mode
1. Press
Menu > Multimedia > Video player
2. Select a file to play.
3. Press
Options
>
Play
4. Press
5. Select a repeat mode >
To set Bluetooth
1. Press
2. Select a file to play.
3. Press
4. Press
5. Select
6. Select
54
Options
Menu > Multimedia > Video player
Options > Play
Options
BT stereo output > On
BT stereo headset
.
.
On
.
.
.
.
.
.
.
.
.
Page 56

FM radio
You can listen to the radio and record it using built-in FM radio function.
Before you hear the FM radio, you should connec t your headset to the jack.
note:
The FM radio quality depends on your area.
Channel
Time
Volume
Icons for FM Radio
Icon Description
To play FM radio
1. Press
Menu > Multimedia > FM radio
2. Press
OK
.
Volume
Previous Channel
Next Channel
Power On
Power Off
Recording
.
Play control
55
01
02
03
04
05
06
07
08
Page 57

To use FM radio controls
To Press
On or Off
Seek previous channel Press
Seek next channel Press
Control volume Navi key up or down
OK
To add a channel to channel list automatically
1. Press
Menu > Multimedia > FM radio
2. Press
Options
3. Select
.
Preset auto search
.
.
To add a channel to channel list manually
1. Press
Menu > Multimedia > FM radio
2. Press
Options
>
3. You can add a channel manually.
Channel list
.
.
To set play mode
1. Press
Menu > Multimedia > FM radio
2. Press
Options
>
3. Select a mode.
4. Press
Settings
OK
.
.
.
Games
You can play pre-installed demo game or download games. It is easy to
56
Page 58

download and you can preview them beforehand. You will only be able to
view games that are available on your mobile.
Play java games
1. Press
Menu > Multimedia > Fun & Games > Java
2. Select to play pre-installed games.
.
Play games
1. Press
Menu > Multimedia > Fun & Games > Games
2. Select to play games (
F1 race / Copter
).
.
Java settings
1. Press
Menu > Multimedia > Fun & Games > Java settings
2. Set the options.
3. Press
OK
.
.
Games settings
1. Press
Menu > Multimedia > Fun & Games > Games > Games
settings
.
2. Set the options.
3. Press
OK
.
57
01
02
03
04
05
06
07
08
Page 59

Page 60

Useful Features
Stopwatch, calculator & unit converter
Notes & sound recorder
5
Calendar
Alarm
World clock
vCard
vCalendar
Page 61

Calendar
Calendar helps you manage your schedule including your time for calls or
special days. You can set alarms service on a set date with this function.
To view calendar
1. Press
Menu > Organizer > Calendar
note:
Monthly view is displayed as default.
In the monthly view
To Press
Move to another day
Move to another week
for Previous
for Next
for Previous
for Next
To create a new event and edit
1. Press
Menu > Organizer > Calendar
2. Select a day >
3. On the
registration.
4. Input the events >
note:
You can create up to 25 events including schedule, task and Note.
You can create events for dates from 01/01/1970 to 12/31/2030.
60
Options > Add event
Add event
screen, select and input an event item by item for
OK
.
.
.
.
Page 62

Alarm
To set an alarm
1. Press
Menu > Organizer > Alarm
2. Select an alarm > edit a new alarm >
.
OK
.
To view the saved alarms
1. Press
Menu > Organizer > Alarm
.
To edit existing alarms
1. Press
Menu > Organizer > Alarm
2. Select an alarm >
Edit
.
.
Stopwatch, calculator & unit converter
To use stopwatch
1. Press
Menu > Organizer > Stopwatch
2. Select
Split timing
3. Press
Start
.
To view the records
1. Press
Menu > Organizer > Stopwatch
2. Select
View records
To use the calculator
1. Press
Menu > Organizer > Calculator
2. Use
/ / / / OK to calculate.
or
Lap timing
.
.
.
.
.
61
01
02
03
04
05
06
07
08
Page 63

3. Press to use the decimal point.
To use the conver ter
1. Press
Menu > Organizer > Unit converter
2. Select a item to use.
3. Select the current unit and the unit to be changed.
4. Enter the figure.
Notes & sound recorder
To use notepad
1. Press
Menu > Organizer > Notes
2. To create new memo, press
3. To edit memo, press
Options
Add
>
To record sound
1. Press
Menu > Organizer > Sound recorder
2. Press
Options > New record
3. To pause recording, press
4. To stop recording, press
5. To listen to the recording, press
Stop
.
Pause
.
World clock
You can see world clock.
View World clock
62
.
or
Options
>
Edit
.
.
Options > Play
.
New note
.
.
.
Page 64

1. Press
Menu > Organizer > World clock
2. Use
/ to view world clock.
.
vCard
You can send your information by sending it as message or Via Bluetooth.
To create your own number
1. Press
Menu > Contacts > My number
2. Press
Edit my number
3. Press
OK
.
> edit the file.
.
To send my number
1. Press
Menu > Contacts > My number
2. Press
Send my number > As text/multimedia message or Via
Bluetooth
.
.
To update information
1. Press
Menu > Contacts > My number
2. Press
Edit my number
3. Update information.
4. Press
OK
.
.
.
vCalendar
You can send your schedule information by sending it as message or
Bluetooth.
63
01
02
03
04
05
06
07
08
Page 65

To create my schedule
1. Press
Menu > Organizer > Calendar
2. Press
Options > Add event
3. Select event and edit schedule.
4. Press
OK
.
To send my schedule
1. Press
Menu > Organizer > Calendar
2. Press
Options > View
3. Press
Options > Send vCalendar > As text/multimedia message
or
Via Bluetooth
To update information
1. Press
Menu > Organizer > Calendar
2. Press
Options > View
3. Press
Options > Edit
4. Update information.
5. Press
OK
.
64
.
.
.
> select a schedule.
.
.
> select a schedule.
.
Page 66

65
01
02
03
04
05
06
07
08
Page 67

Page 68

Connectivity
Using the internet
6
Bluetooth
Connect to PC
Page 69

Bluetooth
Bluetooth technology enables cost-free wireless connections between
electronic devices within a maximum range of 33 feet (10 meters). With a
Bluetooth connection can be used to send images, texts, business cards,
calendar notes, or to connect to computers using Bluetooth technology.
Your mobile phone supports:
• Connect to PC to access internet.
• Connect to Hands-Free.
• Connect to electronic devices.
note:
There may be restrictions on using Bluetooth communication in
certain areas. Check with your local authorities.
To activate Bluetooth
1. Press
Menu > Organizer > Bluetooth > Power
2. Select
On
.
To add a audio device
1. Press
Menu > Organizer > Bluetooth > Inquiry audio device
2. The available device will list up.
3. To select the device and press
4. Enter passcode >
To add a device
1. Press
Menu > Organizer > Bluetooth > My device
2. Press
Inquiry new device > OK
68
OK
Pair
.
.
.
.
.
.
Page 70

3. The available device will list up.
4. To select the device and press
5. Enter passcode >
OK
Pair
.
.
To call using hands-free
1. Press the button to call the last person.
To receive a call using hands-free
1. Press the button to receive the call.
To send an object
1. Press
Menu > File manager
.
2. Select the driver and select a file.
3. Press
Options > Send > Via Bluetooth
4. Select the device >
5. Enter passcode >
note:
If the other Bluetooth device requests pairing, the object is sent
after pairing is completed.
OK
Pair
.
.
.
To receive an objec t
When you receive the object a pop-up message will displayed if the
authorization is enable.
To activate the authorization
1. Press
Menu > Organizer > Bluetooth > My device
2. Select a device.
3. Press
Options > Connect
.
.
69
69
01
01
02
02
03
03
04
04
05
05
06
06
07
07
08
08
Page 71

To view the FTP supported device
1. Press
Menu > Organizer > Bluetooth > My device
2. Select a device.
3. Press
Options > Connect > FTP profile
To set the visibility
1. Press
Menu > Organizer > Bluetooth > Settings
2. Press
Visibility
On
.
or Off.
3. Select
To name the phone
1. Press
Menu > Organizer > Bluetooth > Settings
2. Press
Change device name
.
Using the internet
To access internet
1. Press
Menu > Services > Homepage
note:
It will access your Wireless Web service provider’s homepage.
To set new bookmarks
1. Press
Menu > Services > Bookmarks
2. Press
Options > Add bookmark
3. Edit title and address.
4. Press
OK
.
5. Press
Yes
.
70
.
.
.
.
.
.
.
Page 72

To send bookmarks
1. Press
Menu > Services > Bookmarks
2. To send via message, press
message
.
Options > Send > As text/multimedia
.
To input address
1. Press
Menu > Services > Input address
2. Enter the web address >
OK
.
To view visited sites
1. Press
Menu > Services > Recent pages
2. To open, press
Options > Go to
.
To set the security
1. Press
Menu > Services > Settings > Service message settings
2. Set each options.
3. Press
OK
.
To clear cookies, cache and history
1. Press
Menu > Services > Settings
2. Press
Clear cache / Clear cookies
.
.
To select SIM
1. Press
Menu > Services > Settings > Select SIM
2. Select
Always ask, SIM1 or SIM2
.
To set prole
1. Press
Menu > Services > Settings > Profiles
01
02
.
.
.
.
03
04
05
06
07
08
.
71
Page 73

2. Select
SIM1 or SIM2
3. Select profile.
4. Press
Options > Activate profile
.
.
To edit WAP proles
1. Press
Menu > Services > Settings > Profiles
2. Select
SIM1 or SIM2
3. Press
Options > Edit profile
4. Set each option.
5. Press
Done
6. Press
Yes
.
.
.
.
Connect to PC
To connect to PC
1. Connect the data cable with mobile and the computer.
2. Press
Mass storage
3. Follow the instruction on your computer screen.
4. To disconnect, disconnect the data cable.
To set connection for port
1. Connect the data cable with mobile and the computer.
2. Press
COM port
To use webcam
1. Connect the data cable with mobile and the computer.
72
.
.
.
Page 74

2. Press
Webcam
.
3. Run PC webcam application.
4. Follow the instruction on your computer screen.
73
01
02
03
04
05
06
07
08
Page 75

Page 76

Settings
Ringtones & alerts & tones
Decorating the display
To enable fixed dialing
7
Date & time
Language
Network
Locks
Reset
Page 77

Date & time
To set up
1. Press
Menu > Settings > Phone settings > Time and date
2. Set each option >
OK
.
Language
To set up
1. Press
Menu > Settings > Phone settings > Language
2. Select the language.
3. Press
OK
.
Ringtones & alerts & tones
To set ringtones
1. Press
Menu > Settings > User profiles >
2. Press
Options > Customize > Tone settings > SIM1 or SIM2
incoming call
3. Select ring tone.
4. Press
To set key pad tones
1. Press
2. Press
3. Select keypad tone.
76
.
OK
.
Menu > Settings > User profiles >
Options > Customize > Tone settings > Keypad
.
.
Select a profile.
select a profile.
.
Page 78

4. Press OK.
To set volume
1. Press
Menu > Settings > User profiles
2. Press
Options > Customize > Volume
3. Select the volume.
4. Press
OK
.
> select a profile.
.
Decorating the display
To set the display
1. Press
Menu > Settings > Display
.
To enter greeting message
1. Press
Menu > Settings > Phone settings > Greeting text
To set time for backlight
1. Press
Menu > Settings > Phone settings > LCD backlight
2. Edit LCD brightness and time.
Network
To select network
1. Press
Menu > Settings > Network settings > SIM1 or SIM2
network settings > Network selection > Selection mode
2. Select
Automatic or Manual
.
01
02
03
04
05
06
07
08
.
.
.
77
Page 79

Locks
To lock/unlock the phone
1. Press
Menu > Settings > Security settings > Phone lock
2. Enter passcode >
note:
The default password is ‘0000’.
To change phone password
1. Press
Menu > Settings > Security settings > Change password >
Phone password
2. Enter old passcode > enter new passcode >
To lock the PIN
1. Press
Menu > Settings > Security settings > SIM1 or SIM2 security
settings > SIM lock
2. Enter
PIN code > OK
note:
PIN code is dependable by your SIM.
To change PIN 1
1. Press
Menu > Settings > Security settings > SIM1 security
settings > Change password > SIM1 PIN1
note:
PIN1 code is dependable by your SIM.
To change PIN 2
1. Press
Menu > Settings > Security settings > SIM2 security
settings > Change password > SIM2 PIN1
note:
PIN2 code is dependable by your SIM.
78
OK
.
.
.
.
.
OK
.
or
PIN2
.
or
PIN2
.
Page 80

To enable xed dialing
To enable
1. Press
Menu > Settings > Security settings > SIM1 or SIM2 security
settings > Fixed dial
2. Enter passcode >
For xed dialing, see page 30.
.
OK
.
Reset
To reset the conguration
1. Press
Menu > Settings > Restore factory settings
2. Enter passcode >
note:
It will returns configuration settings to default.
The default password is ‘0000’.
OK
.
01
02
03
04
05
06
79
07
08
.
Page 81

Page 82

Appendix
Troubleshooting checklist
Disposal of Waste Electrical & Electronic Equipment
About the battery usage
Declaration of conformity for CE
8
Error message
Safety information
Safety precautions
Warranty
Page 83

Error message
If you experience any problem while using your mobile phone, please refer
to the following checklist. If the problem still persists, contact your dealer or
nearest carrier.
When the “
Make sure the SIM card is correctly installed. Check to see if the SIM card
is working properly. If it does not work, try to clean the contact points of the
card. If it is out of order, take it to the nearest carrier.
When the “
locked state:
Enter the phone password. The default password is”0000”. If you cannot
remember the password, contact the nearest carrier.
When the “
appears:
Input SIM1 or SIM2 PIN. If you cannot remember it, contact the nearest
carrier. You cannot receive calls if your mobile phone becomes locked after
entering the incorrect PIN on SIM dependency consecutive attempts.
When the “
If you cannot make/receive a call when you are indoors or undergrounds
where the signal strength is poor, move toward a window or go out to an
open area. If you still cannot make a connection, contact the nearest carrier.
82
Insert SIM
” message appears:
Input phone lock code
Input SIM1 PIN
No Service
” or “
” or “
Network search
” message appears in Phone
Input SIM2 PIN
” message
” appears:
Page 84

Troubleshooting checklist
When audio quality is poor:
End a call and try again.
When the other party cannot hear you speaking:
Your phone may be set to MUTE. Disable the MUTE function.
When battery lifetime is shorter than usual:
This may happen when you are in an area with low signal strength. Turn off
your phone when it is not in use. Change the battery when battery energy
is exhausted.
When your mobile phone does not turn on:
Make sure your battery is charged. Check to see if your phone works while
recharging the battery.
When you are unable to send a message:
Either you are not registered to receive an SMS service, or you may be in
an area where your network service provider cannot provide such a service.
When you are unable to make a call:
Your phone may be set to “fixed dial”. Cancel the “fixed dial” function.
When you are unable to charge the battery:
This may be the result of one of the following three cases.
1. Your charger may be out of order. Contact your nearest dealer.
2. You may be attempting to use the phone in an overly hot/cold
83
01
02
03
04
05
06
07
08
Page 85

temperature. Try changing the charging environment.
3. Your batter y may have not been connec ted to the charger properly.
Check the connector.
When you are unable to input data into your Address Book:
Your Address Book memory may be full. Try deleting some entries from
your Address Book.
When you are unable to select a certain function:
You may not have subscribed to that function, or your network service
provider may be in an area where such service cannot be provided.
Contact your local service provider.
Safety information
The following list shows how to maintain your mobile phone, together with
precautions to take.
•
Keep your mobile phone and its accessories out of the reach of children.
• Maintain your mobile phone in dry conditions and keep it within normal
operating temperatures. Temperatures higher than 55°C (131°F) or lower
than -20°C (-4°F) may damage your phone.
•
Do not use or store your mobile phone in dusty, dirty areas.
•
Do not attempt to disassemble your mobile phone.
•
Do not drop or cause severe impact to your mobile phone.
•
Do not use chemical products, cleaning solvents or detergents to clean your
mobile phone.
•
If your mobile phone does not work properly, contact your dealer
84
Page 86

immediately.
•
Use only authorized batteries, battery chargers and accessories. Any
malfunction or damage caused by the use of unauthorized batteries,
battery chargers and accessories will void the limited product warranty.
•
Ensure that the battery and battery charger do not come in contact with
conductive objects.
Safety precautions
Using a mobile phone while driving may be prohibited.
Please check local laws and regulations with regard to the prohibition of
mobile phone use while driving, and comply with them.
Use of your phone while you are driving may disturb your concentration
and so cause an accident. Always switch your phone off as soon as
possible.
Should you use your phone in an emergency, either use a hands free
device built into your car or pull over in a safe place first.
Switch o in restricted areas
Always switch your phone off in areas where mobile phone use is restricted.
Switch o in explosive or dangerous areas
Always switch your phone off in areas with explosive or dangerous
materials (such as fuels, fuel stations or areas containing chemical goods)
and obey any instructions or signals. Do not remove your mobile phone’s
battery in such areas.
85
01
02
03
04
05
06
07
08
Page 87

Switch o in aircraft
Always switch your phone off or select
Settings > Dual SIM settings > Flight mode
The electromagnetic waves emitted by your phone may affect the
electronic navigation equipment in the aircraft.
Switch o in hospitals and near medical equipment
Always switch your phone off in hospitals, and obey the regulations or rules
of the hospital.
Switch your phone off when using medical equipment for private purposes,
if possible. Always consult with the medical equipment’s manufacturer or
an expert regarding phone use near the medical equipment.
Installing a hands free device in your vehicle
Install vehicle hands free devices away from the steering wheel and airbag
expansion area, otherwise injury may result.
Mobile phones and other electronic devices
Mobile phones emit electromagnetic waves that may affect nearby
electronic devices. When it is switched on, do not place your phone close
to delicate electronic equipment.
About the battery usage
Your phone is powered by a Lithium Ion (Li-Ion) battery. This means that,
unlike other forms of battery technology, you can recharge your battery
while some charge remains without reducing your phone’s autonomy due
86
Flight mode on
) when you are in an aircraft.
(press the
Menu
>
Page 88

to the “batter y memory effect” inherent in those technologies.
•
Do not use a damaged battery or charger.
•
Do not disassemble or open crush, bend or deform, puncture or shred.
•
Do not modify or remanufacture, attempt to insert foreign objects into
the battery, immerse or expose to water or other liquids, expose to fire,
explosion or other hazard.
• Do not put your battery into contact with conductive objects.
• Dispose of and recycle used batteries in accordance with local regulations.
Do not dispose of batteries by burning, they may explode.
• Do not use an unauthorized charger.
• Only use the battery for the system for which it is specified.
• Only use the battery with a charging system that has been qualified with
the system per this standard. Use of an unqualified battery or charger may
present a risk of fire, explosion, leakage, or other hazard.
• Do not short circuit a battery or allow metallic conductive objects to contact
battery terminals.
• Replace the battery only with another battery that has been qualified with
the system per this standard, IEEE-Std-1725-2006. Use of an unqualified
battery may present a risk of fire, explosion, leakage or other hazard.
• Promptly dispose of used batteries in accordance with local regulations
• Battery usage by children should be supervised.
• Avoid dropping the phone or battery. If the phone or batter y is dropped,
especially on a hard surface, and the user suspects damage, take it to a
severe center for inspection.
• Use your battery for the specified purpose only.
87
01
02
03
04
05
06
07
08
Page 89

• The closer you are to your network’s base station, the longer your phone
usage time because less battery power is consumed for the connection.
• The battery recharging time varies depending on the remaining batter y
capacity and the battery and charger type you use.
• Battery life inevitably shortens over time.
• Use an authorized battery and charger only.
• Since overcharging may shorten battery life, remove the phone from
its charger once it is fully charged. Unplug the charger, once charging is
complete. Leaving the battery in hot or cold places, especially inside a car in
summer or winter, may reduce the capacity and life of the battery. Always
keep the battery within normal temperatures.
• To prevent injury or burns, ensure that no metal objects come into contact
with the + and – terminals of the battery.
Disposal of Waste Electrical & Electronic
Equipment
•
This symbol on the product or on its packaging
indicates that this product must not be disposed of
with your other household waste (This product is
covered by the European Directive 2002/96/EC).
•
Instead it shall be handed over to the appliance
collection facilities for the recycling of electrical and
electronic equipment.
88
Page 90

•
The correct disposal of this product will help prevent potential negative
consequences for the environment and human health.
•
For more information about disposal of your old appliance, please contac t
your local city office, your household waste disposal service or the shop
where you purchased the product.
Declaration of conformity for CE
This document declares that Pantech
P1000 is approved for use in the EU
the essential requirements and other applicable provisions of the R&TTE
Directive 1999/5/EC.
Member States and which also meets
Warranty
Pantech Co., Ltd. (hereinafter “the Company ”) warrants to the original
retail purchaser of this handheld portable cellular telephone including
all accessories as contained within the original gift box (hereinafter “the
Product”) that the Product is at the time of its original purchase free of
defects in materials and workmanship. This limited warranty is subject to the
following terms and conditions:
1. This limited warranty is given only to the original customer who
purchased the Product through an authorized sales channel (hereinafter
“the Customer”).
89
01
02
03
04
05
06
07
08
Page 91

2. This limited warranty shall last for the certain period set forth in the
guarantee certificate contained within the original gift box. This limited
warranty may not be assigned, transferred or given to any subsequent
purchaser or acquirer of the Product.
3. This limited warranty guarantees that the Company or its authorized
service center will, at their discretion, without charge, repair or replace a
defective Product, which may involve the use of functionally equivalent
reconditioned unit.
4. This limited warranty does not apply to any of the Product:
(a) whose mechanical or electronic serial number or IMEI number has
been removed, altered or defaced;
(b) whose label has been removed, altered or damaged;
(c) whose defects are in appearance, cosmetic, decorative or structural
items such as framing and non-operative parts;
(d) damaged due to abnormal use or conditions, accident, mishandling,
neglect, unauthorized alteration, misuse, improper installation or
repair or improper storage;
(e) damaged from exposure to moisture, humidity, excessive temperatures
or extreme environmental conditions;
(f) damaged due to soaking and leaking by any liquid or spills of food;
(g) damaged from external causes such as fire, flooding, dirt, sand,
weather conditions, battery leakage, blown fuse, theft or improper
90
Page 92

usage of any electrical source;
(h) damaged resulting from connection to, or use of any accessory or other
product not approved or authorized by the Company.
5. This limited warranty disclaims liability for removal or reinstallation of the
Product, for geographic coverage, for inadequate signal reception by the
antenna or for communications range or operation of the cellular system
as a whole.
6. In the event of the Product failure, the Customer should take the following
actions:
(a) Refer to the user manual in order to identify and possibly correct the
problem.
(b) If the problem cannot be resolved by reference to the user manual,
the Customer should then contact the authorized service center of the
Company.
(c) Before the Customer moves to obtain repairs or replacement within
the terms of this limited warranty, the Customer should ensure all the
information indicated in the guarantee certificate is to hand.
(d) Before returning any unit for service, be sure to back up data and
remove any confidential, proprietary, or personal information from
the Product. The Company or its authorized service center is not
responsible for damage to or loss of any programs, data, or removable
storage media.
91
01
02
03
04
05
06
07
08
Page 93

THE EXTENT OF THE COMPANY’S LIABILITY UNDER THIS WARRANTY IS
LIMITED TO THE REPAIR OR REPLACEMENT PROVIDED ABOVE AND, IN NO
EVENT, SHALL THE COMPANY’S LIABILITY EXCEED THE PURCHASE PRICE
PAID BY THE CUSTOMER. ALL IMPLIED WARRANTIES OF SATISFACTORY
QUALITY OR FITNESS FOR A PARTICULAR PURPOSE SHALL BE LIMITED
TO THE DURATION OF THIS LIMITED WARRANTY. IN NO EVENT SHALL THE
COMPANY BE LIABLE FOR INCIDENTAL OR CONSEQUENTIAL LOSSES OR
DAMAGES OF ANY NATURE WHATSOEVER, INCLUDING BUT NOT LIMITED
TO LOST PROFITS OR COMMERCIAL LOSS, TO THE FULLEST EXTENT THAT
THOSE LOSSES OR DAMAGES CAN BE DISCLAIMED BY LAW. THE COMPANY
DOES NOT EXCLUDE OR LIMIT LIABILITY FOR PERSONAL INJURY OR DEATH
RESULTING FROM ITS OWN NEGLIGENCE.
92
Page 94

93
01
02
03
04
05
06
07
08
Page 95

94
Page 96

95
Page 97

 Loading...