

Page 1

User Manual
Thank you for purchasing the Verizon
4G LTE Mobile Hotspot MHS291LVW.
The MHS291LVW is a Global ReadyTM
wireless device that enables high-speed
wireless communication from your
computer and easily connects at high
speeds to the Internet, your corporate
Intranet, and your email while you’re
away from the office or out of the
country.
The MHS291LVW is simple to install and
use.
Page 2

2 Table of Contents
Table of Contents
Before Using 5
About this User Manual .....................................................................................................5
Product Features ...................................................................................................................5
Getting Started 6
System Requirements .........................................................................................................6
Introduction to the Verizon 4G LTE Mobile Hotspot MHS291LVW ....................7
Managing the Back Cover .................................................................................................8
Installing/Removing the 4G LTE SIM Card ...................................................................9
Managing the Battery ...................................................................................................... 10
To Install USB Driver 13
Using Mobile Hotspot 16
Activate Your Mobile Hotspot ...................................................................................... 16
Connecting to the Mobile Hotspot ............................................................................16
Page 3

Table of Contents 3
HARDWARE
Idle Screen 19
Settings 20
Wi-Fi Info ............................................................................................................................... 20
Connected Devices ........................................................................................................... 20
Messages .............................................................................................................................. 20
Network Settings ...............................................................................................................21
Wi-Fi Settings ...................................................................................................................... 21
Software Update ................................................................................................................23
About Jetpack .....................................................................................................................24
SOFTWARE
Start the Verizon Wireless Manager 26
My Jetpack Home ..............................................................................................................27
Data Usage ...........................................................................................................................27
Connected Devices ........................................................................................................... 28
Jetpack Settings 29
Jetpack .................................................................................................................................. 29
Wi-Fi ........................................................................................................................................32
Advanced .............................................................................................................................33
Messages 40
Page 4

4 Table of Contents
About Jetpack 41
Internet Status .................................................................................................................... 41
Jetpack Info .........................................................................................................................41
Diagnostics .......................................................................................................................... 42
Statistic & Logs ...................................................................................................................43
Help and Support .............................................................................................................. 44
Troubleshooting 45
Windows XP(SP3) ..............................................................................................................45
Windows Vista(SP2) ..........................................................................................................46
Windows 7 / Vista(SP2) .................................................................................................... 47
Windows 7 ...........................................................................................................................48
Glossary 49
Safety and Warranty 52
Regulatory Notices ...........................................................................................................52
Warnings and Cautions ................................................................................................... 52
Product Handling .............................................................................................................. 53
Safety Information for Mobile Hotspot .....................................................................54
Safety Information for FCC RF Exposure ...................................................................58
SAR Information .................................................................................................................59
FCC Compliance Information ........................................................................................ 60
12-Month Limited Warranty .......................................................................................... 61
Page 5

Before Using 5
Before Using
About this User Manual
You will find all the information you need to install and to use the mobile
hotspot in this user manual.
Before using the mobile hotspot , you must properly install the mobile
hotspot software by closely following the installation instructions.
Product Features
• Advanced antenna design: Efficient, innovative internal antenna design
optimizes data transfer rate and sensitivity to network signals.
• Supports 4G and 3G network technologies.
• Connected devices up to 10 user in mobile broadband coverage area.
• Data Speeds
- LTE bands: Typical download speeds of up to 5 to 12 Mbps in Mobile
Broadband coverage area.
- CDMA bands: Typical download speeds of 600 Kbps to 1.4 Mbps and
upload speeds of 500 to 800 Kbps in Mobile Broadband coverage
area.
• Supports Windows 8, 7 SP1, Vista SP2 and XP SP3 or higher systems with
installed driver.
Page 6

6 Getting Started
Getting Started
System Requirements
Item Required Specification
Operating system
Windows 8 (32-bit/64-bit), Windows 7 SP1
(32-bit/64-bit), Windows Vista SP2 (32-bit/64-bit),
Windows XP SP3 32-bit or higher
Internet Browser
Microsoft Internet Explorer 7 or higher, Mozilla
Firefox 3.6 or higher, Google Chrome 9 or higher,
Apple Safari 5 or higher, Opera 9 higher
Port One Type-A USB Port (USB 2.0 only)
Note
• To use Wi-Fi mode, your computer needs Wi-Fi capability and internet
browser software only.
• USB 3.0 is not supported.
Page 7
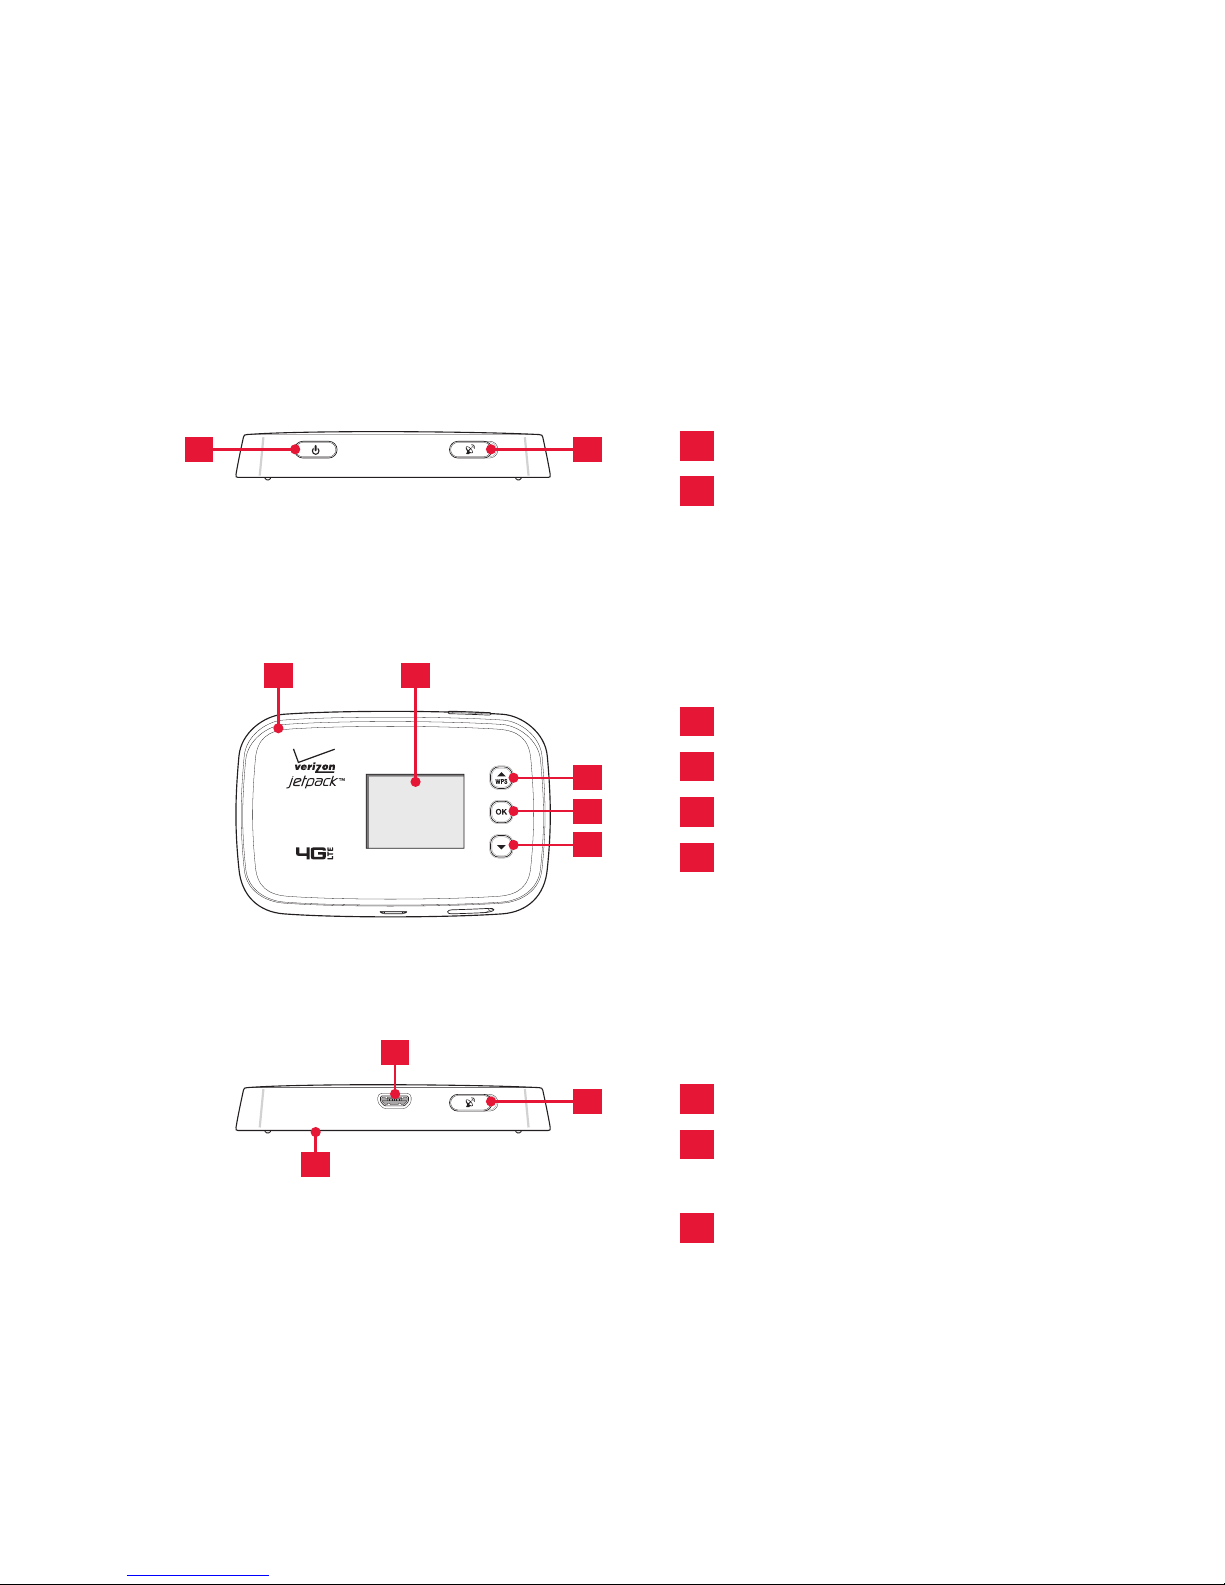
Getting Started 7
7
Back Cover
8
Micro USB/
Charger Port
9
External Antenna
Adapter Port
9
7
8
Note
The external antenna adapter ports are for RF test, debugging and etc.
Introduction to the Verizon 4G LTE Mobile
Hotspot MHS291LVW
The Verizon 4G LTE mobile hotspot can be used to access the Internet,
your company’s intranet, or you can use it to send and receive email. It
is extremely useful when you are away from the office, on the road, or
wherever a wireline Internet access is not readily available.
3
Red Lighting Effect
4
Status Display
5
Scroll Key
6
OK key
5
6
5
43
1
Power/Lock
2
External Antenna
Adapter Port
21
Page 8
8 Getting Started
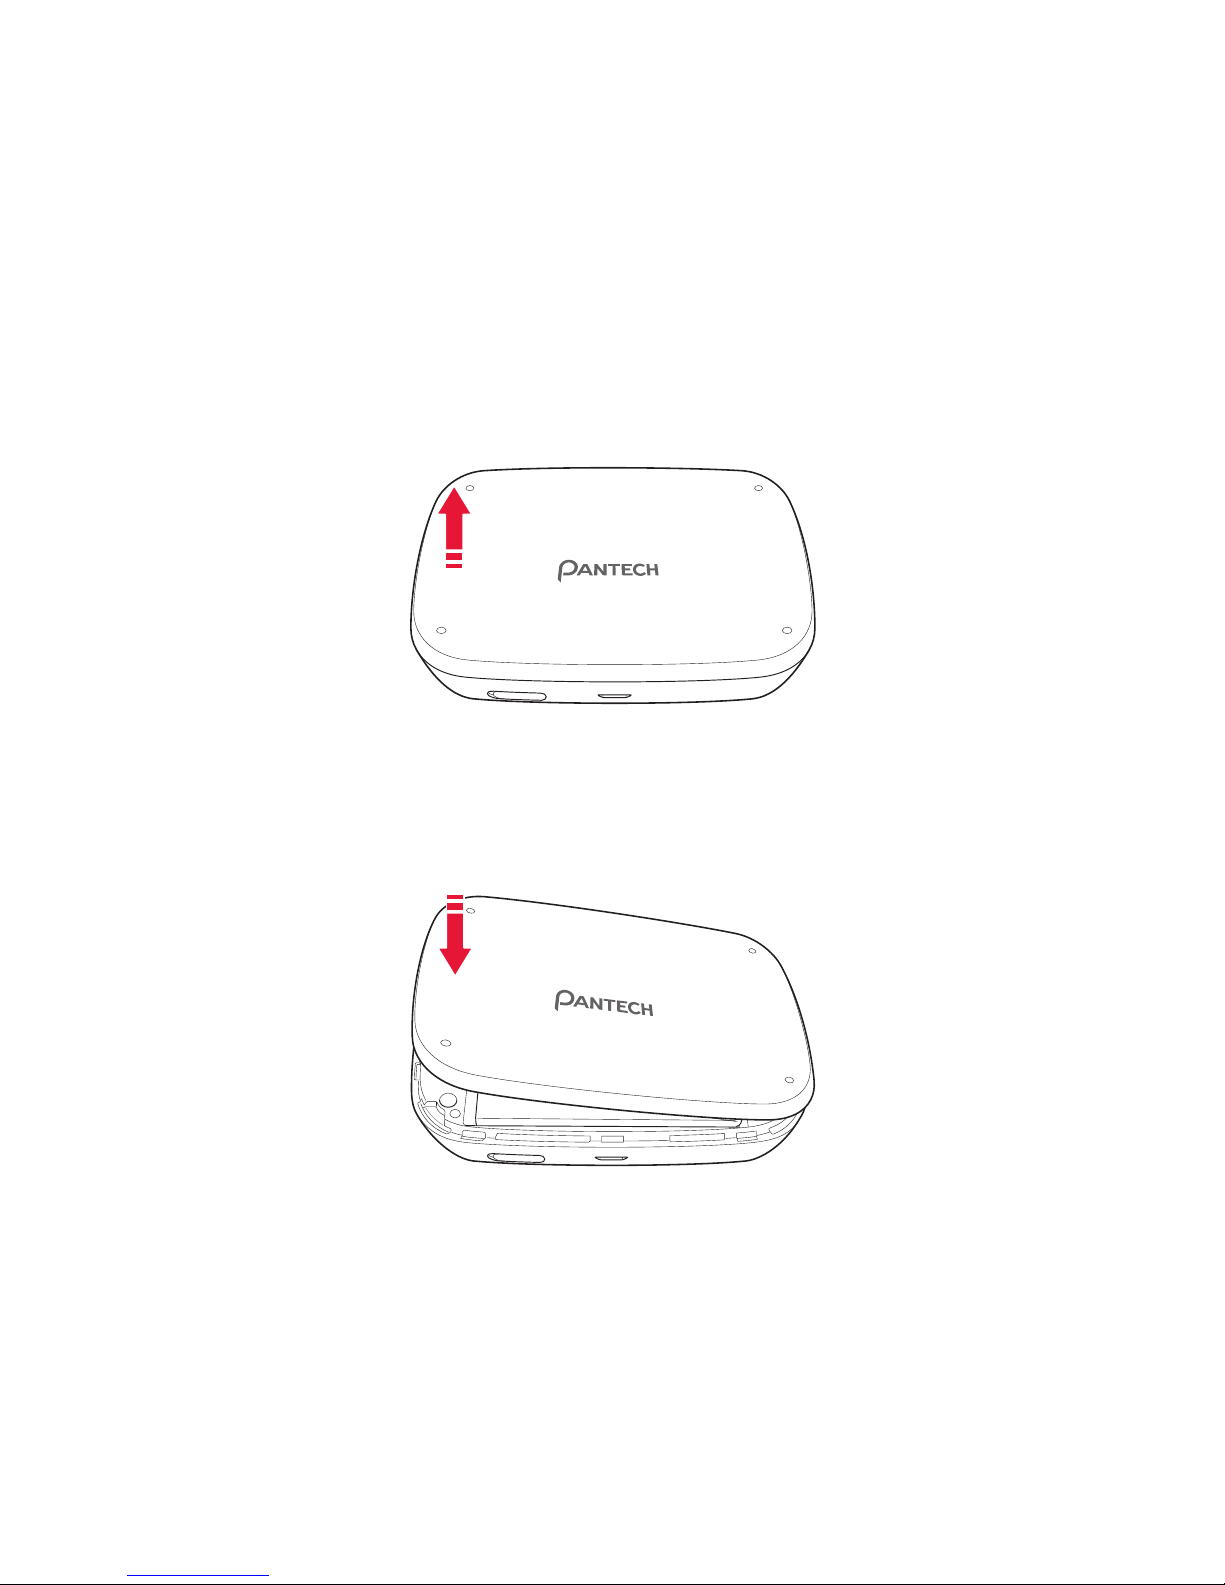
Managing the Back Cover
Removing the back cover
1. Turn off your mobile hotspot and hold it securely with both hands with
the front facing out.
2. Place your finger nail in the groove at the left of the mobile hotspot,
and then lift it up.
Closing the back cover
Place the back cover over the battery compartment and press it downward
until it clicks into place.
Page 9
Getting Started 9
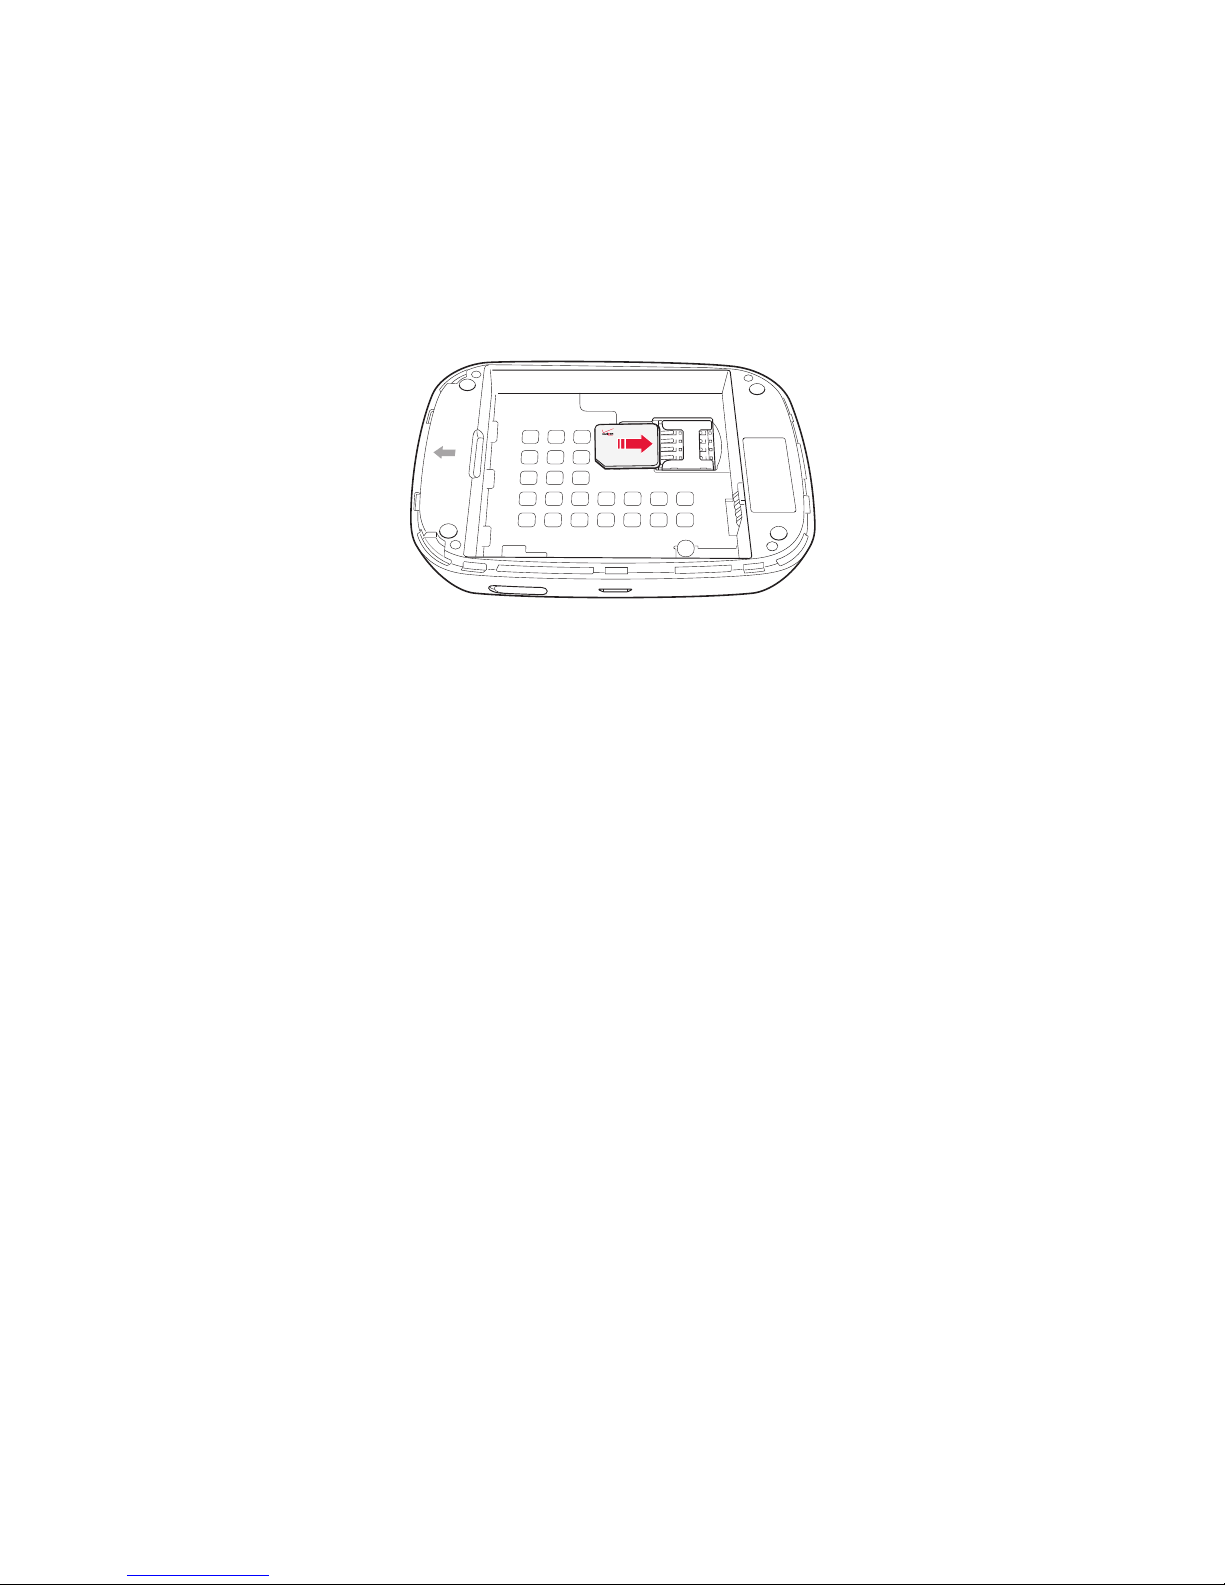
Installing/Removing the 4G LTE SIM Card
1. Turn off your mobile hotspot and remove the back cover and battery.
2. Insert the SIM card into the slot. Position the SIM card (“SIM” is inscribed
near the slot opening) with the Verizon logo facing up and slide into
place until it’s fully inserted. Then, close the back cover.
3. To remove the SIM card, turn off your mobile hotspot and remove the
back cover. Gently pull the SIM card out to remove it.
About the SIM Card
Your SIM (Subscriber Identity Module) Card is a small rectangular plastic
card that stores your phone number and important information about your
wireless service.
You can move the SIM Card from one device to another and your wireless
service will work seamlessly as long as you have a compatible device and
service plan. To see which devices are compatible with the Verizon Wireless
SIM Card, visit verizonwireless.com/certifieddevice.
Page 10

10 Getting Started
Managing the Battery
Installing/Removing the battery
1. Insert your finger tip into slot at the left of the mobile hotspot and
gently lift back cover to remove.
2. Slide the battery into the slot by aligning the contacts and press down
until you hear the “click”.
3. Align the cover tabs with the slots on the back of the device and gently
press the battery cover onto the mobile hotspot until it snaps into
place.
4. To remove the battery, turn off your mobile hotspot and remove the
back cover.
5. Insert your fingernail into the slot and lift the battery from the
compartment.
Page 11

Getting Started 11
Charging the battery
1. Connect the USB cable into the
Wall/USB Charger.
Note
Make sure to align the connector as indicated in the image. Otherwise,
the charging connector may become damaged and the battery will not
be charged.
2. Plug the USB cable into the
mobile hotspot’s charging port.
Page 12
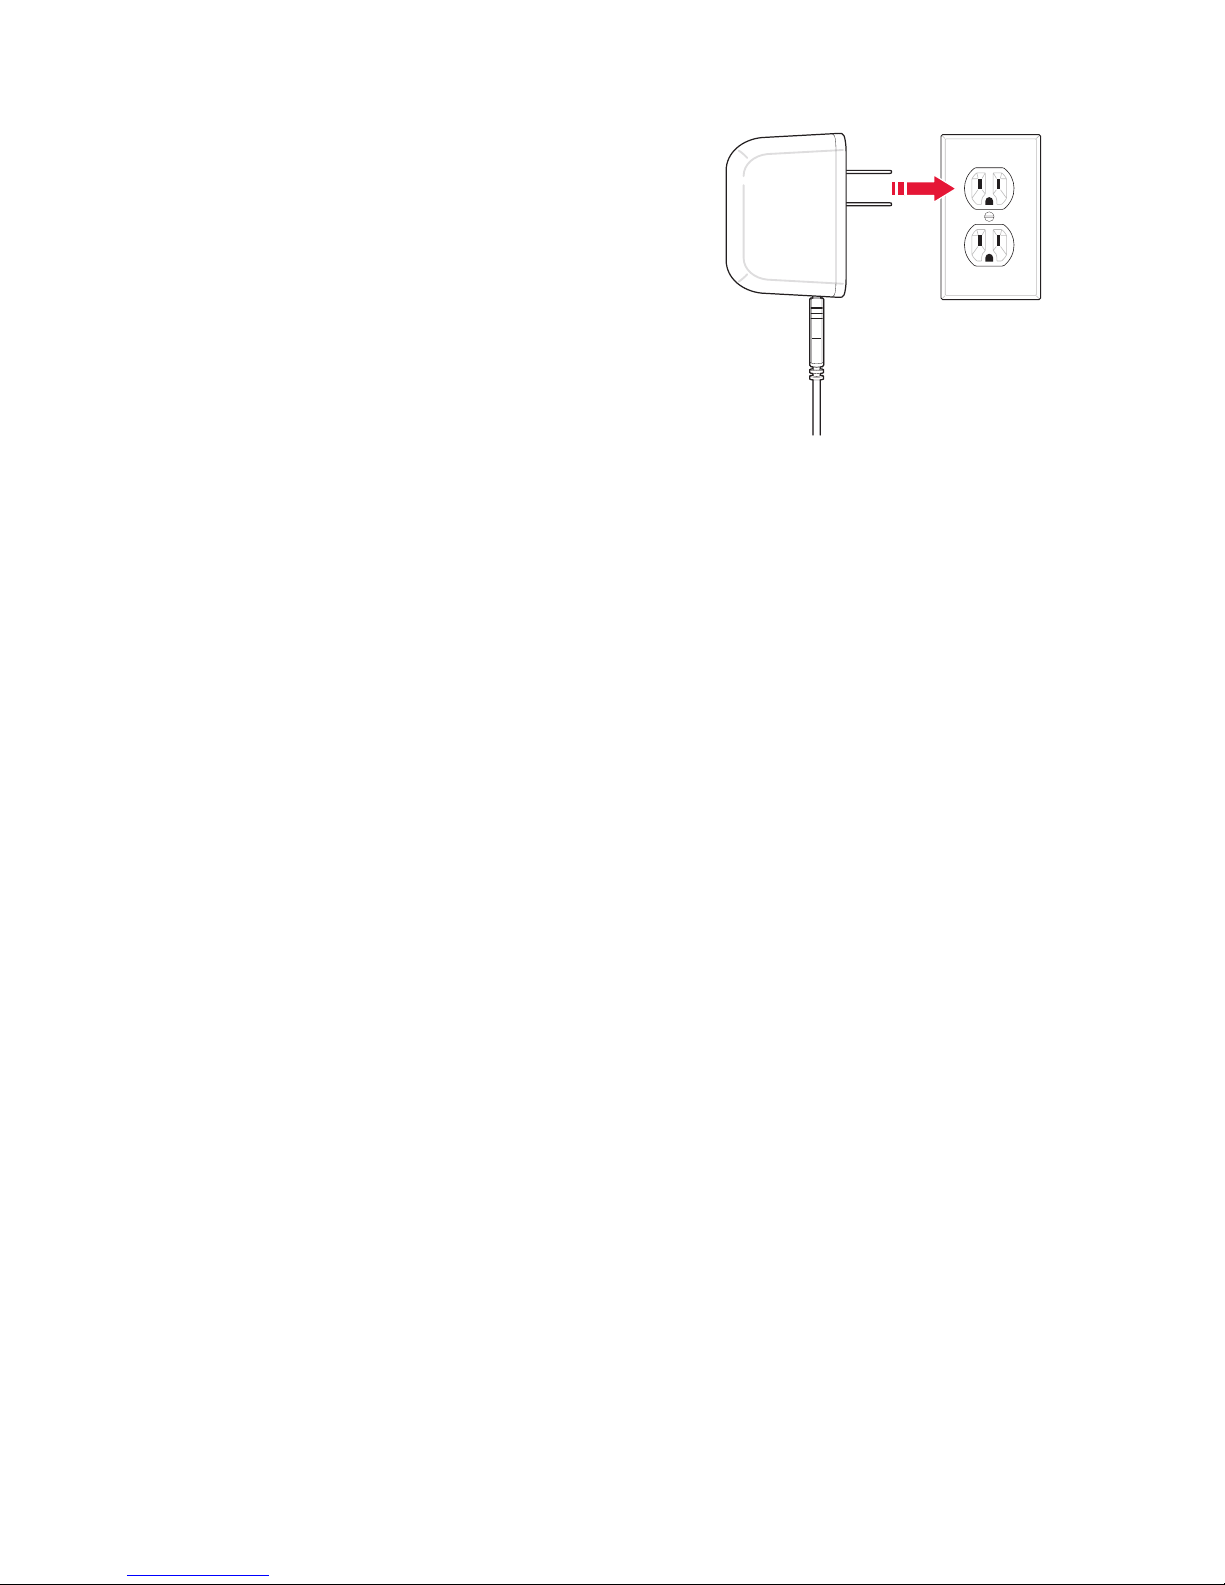
12 Getting Started
3. Plug the Wall/USB Charger into
an electrical outlet. The battery
starts charging.
4. Disconnect the charger when the battery is fully charged.
About the battery
The mobile hotspot uses a Lithium Ion (Li-Ion) battery. Make sure to use the
authorized battery and charger only. Maximum hours to use the battery
might vary depending on service types offered by the service provider and
temperatures. For more details, contact your nearest dealer.
Caution
Risk of explosion if battery is replaced by an incorrect type. Dispose of
used batteries according to the instruction.
Page 13
To Install USB Driver 13
To Install USB Driver
Please check if the USB port is USB 3.0 port, if then use another port which
supporting USB 2.0. The use of blue pantone thermoplastics in USB 3.0 ports
is recommended on systems with a mix of USB 2.0 and USB 3.0 ports.
If your computer only has USB 3.0 ports, try to update the USB 3.0 host
controller driver.
1. Turn on your computer.
2. Plug the USB cable into the mobile hotspot’s micro USB port. Then
connect the USB cable into your computer’s USB port.
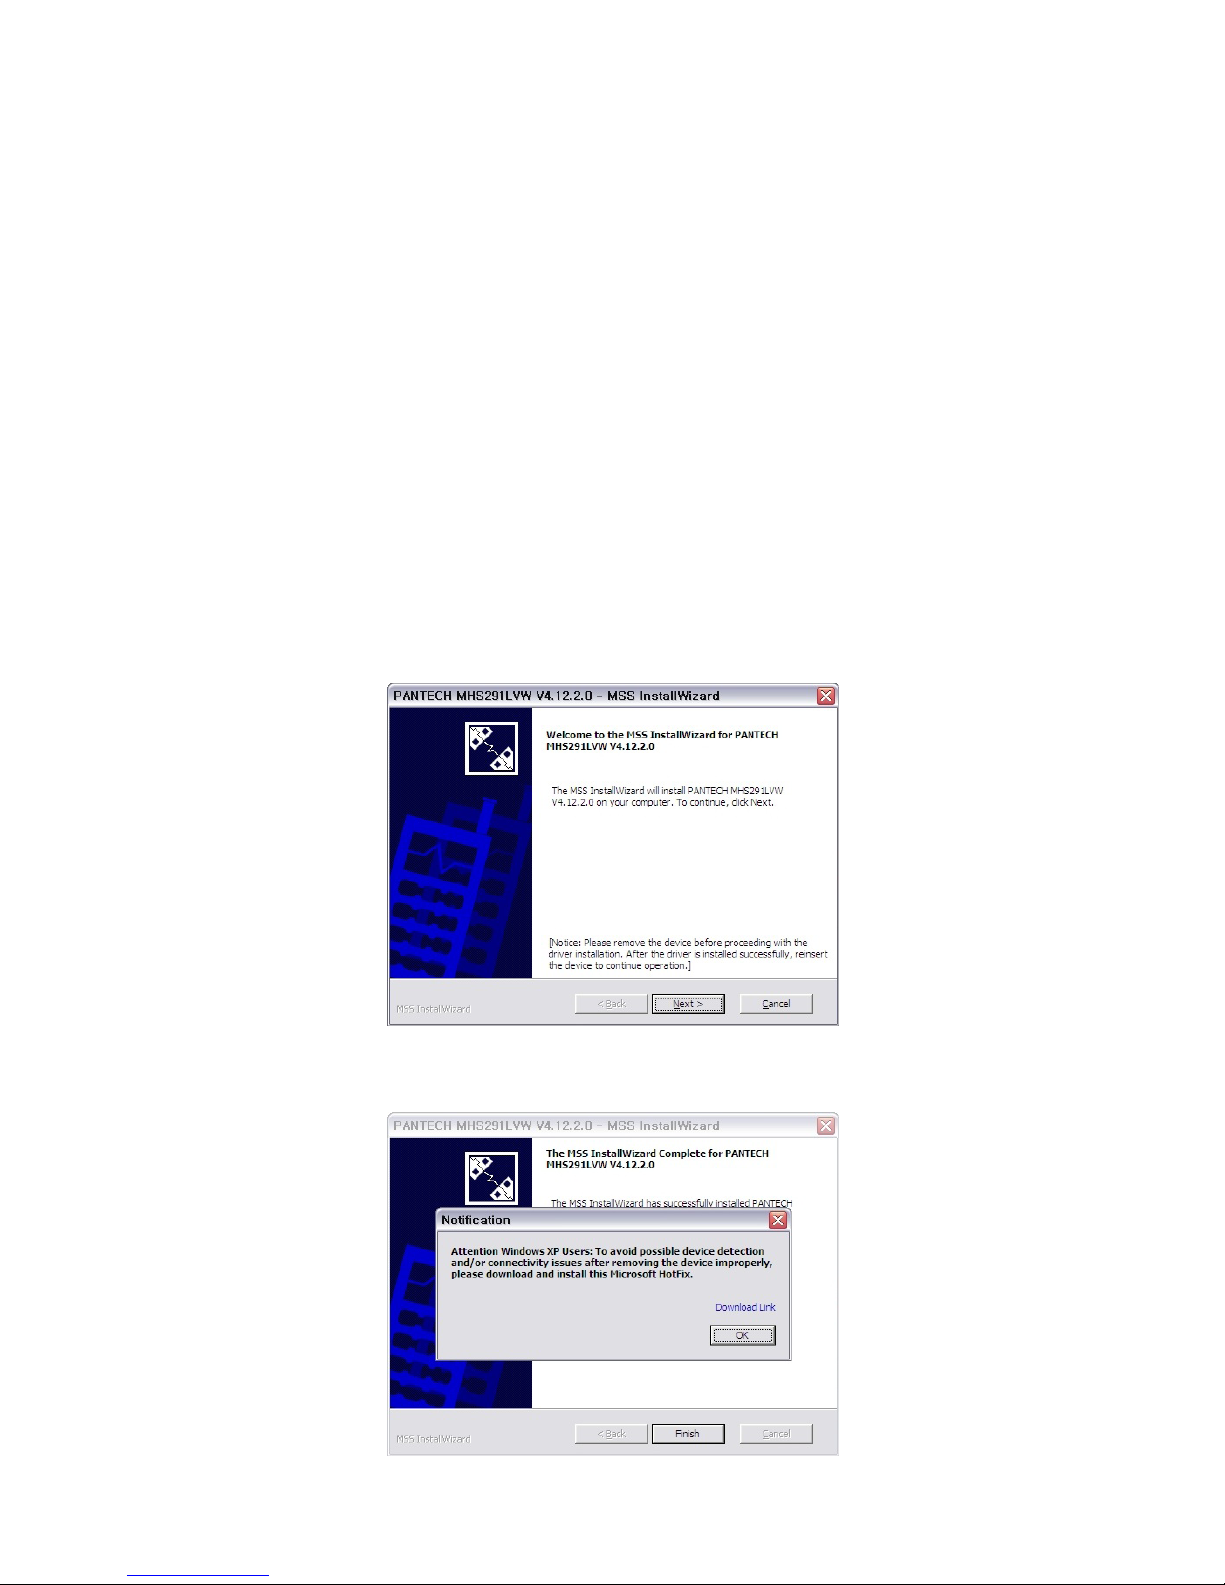
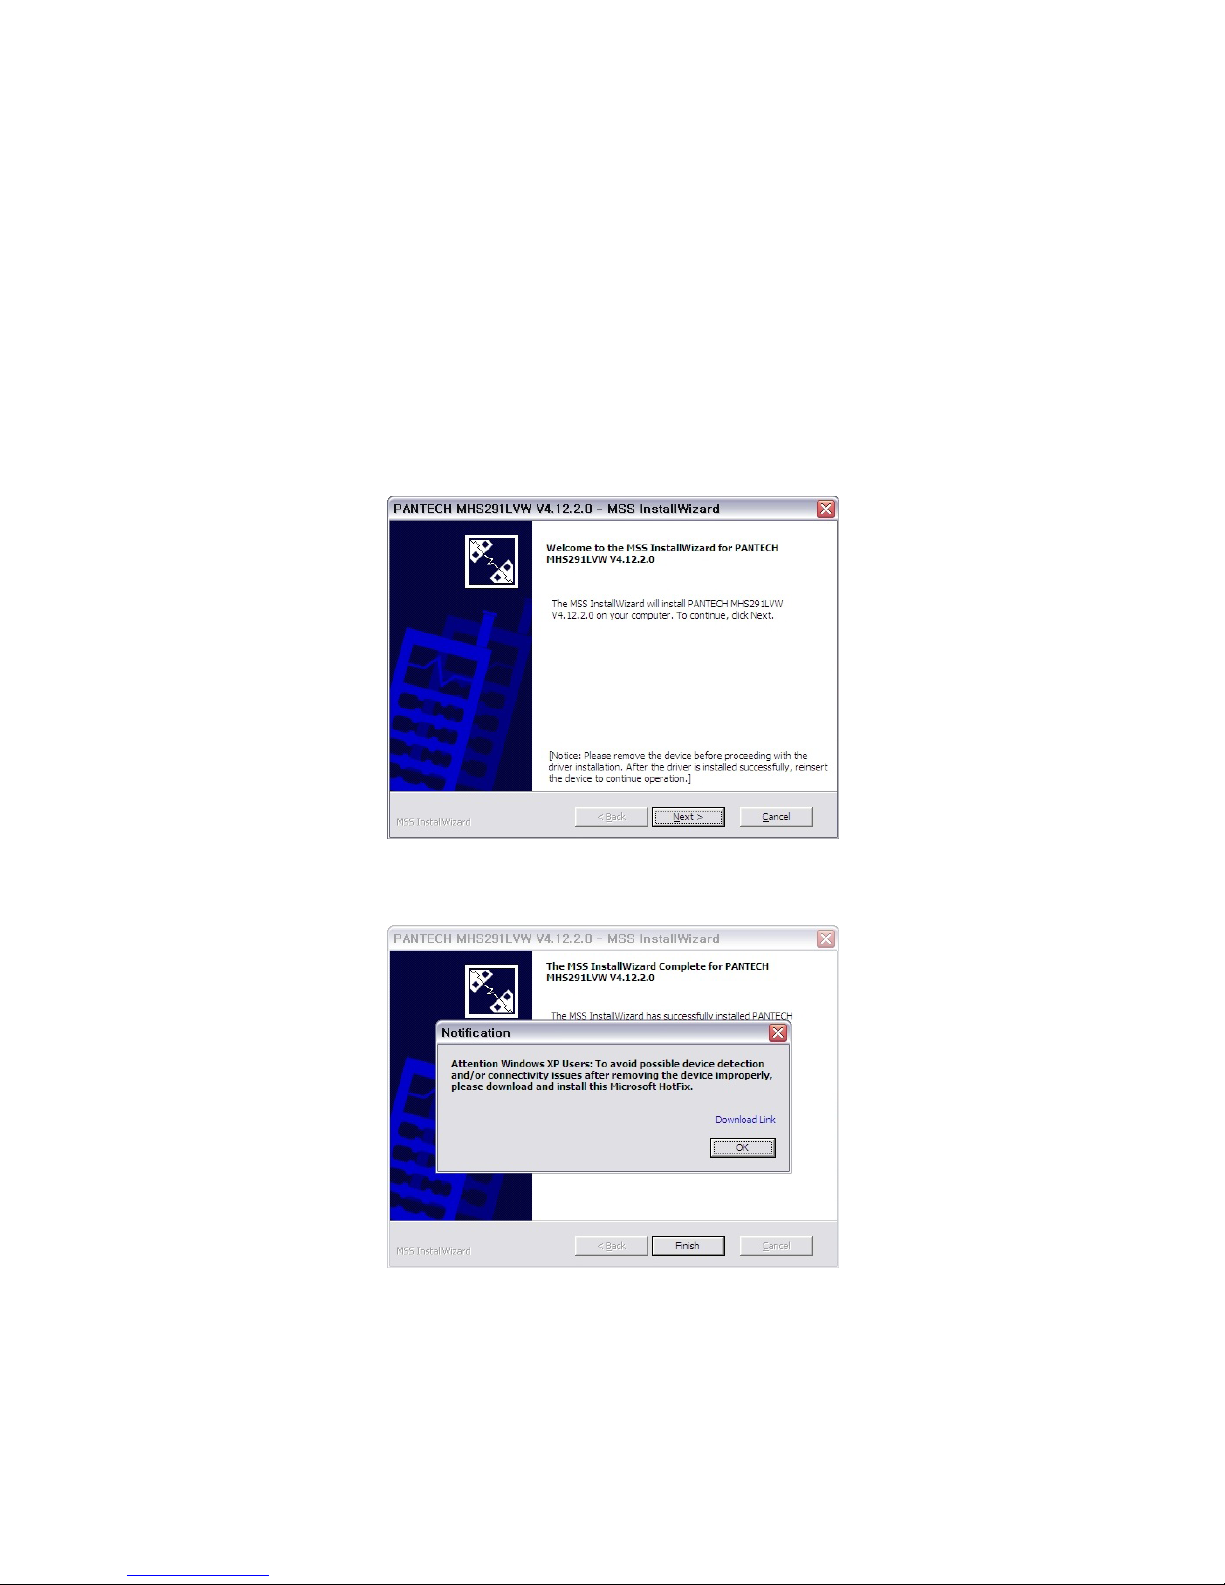
3. The install wizard screen will appear automatically. Click Next > Install
to continue the installation. It might take a few minutes.
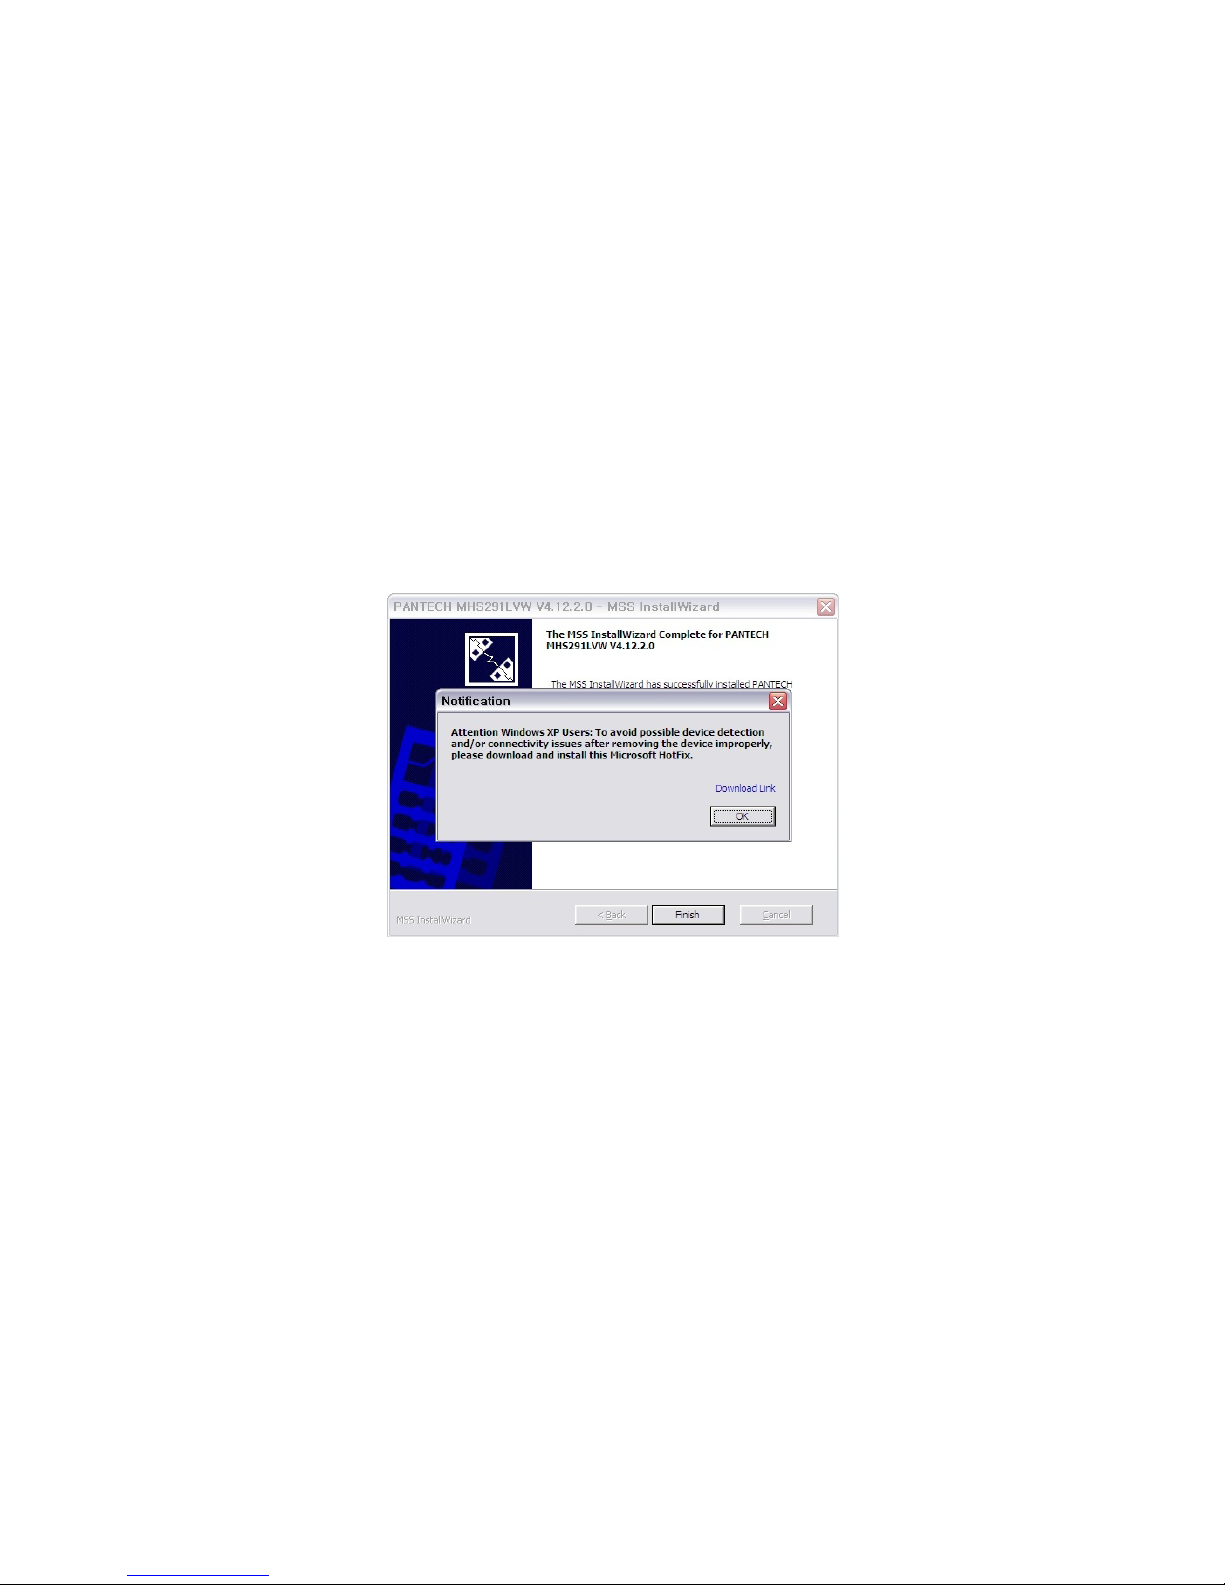
4. If prompted during the installation to install the Windows XP Hotfix,
you can choose whether or not to install this fix.
Page 14
14 To Install USB Driver
5. To continue without installing the Hotfix, at the prompt, click OK. Then
click Finish to complete the installation.
If your computer won’t recognize the mobile hotspot, follow the steps
below.
1. Open the My Computer folder and double-click Verizon Mobile.
2. Open the Windows folder and double-click the driver file.
3. The install Wizard screen will appear automatically. Click Next > Install
to continue the installation. It might take a few minutes.
4. If prompted during the installation to install the Windows XP Hotfix,
you can choose whether or not to install this fix.
5. To continue without installing the Hotfix, at the prompt, click OK. Then
click Finish to complete the installation.
Page 15
To Install USB Driver 15
To install the Windows Hotfix, follow the steps below.
1. When the prompt appears, leave the installation manager open, use
the Wi-Fi manager(Windows OS) or AirPort menu bar icon(Max OS) to
connect to the MHS291LVW wireless network.
2. Connect to the network name found on the sticker that appears on
the back of the mobile hotspot as well. The network name or SSID is in
the format Verizon-291LVW-XXXX Secure, where XXXX are four digits
unique to your device.
3. Enter the 8-digit Wi-Fi/Admin password. The password appears on the
back of the mobile hotspot as well.
4. Return to the installation manager. Now click Download Link in the
prompt and install the Windows Hotfix.
5. Follow the onscreen instructions. When complete, click OK on the
prompt. Then click Finish to complete the installation.
Page 16

16 Using Mobile Hotspot
Using Mobile Hotspot
Activate Your Mobile Hotspot
If the device has not been activated yet, follow the instructions below to
activate it. Depending on your state of account or how and where you
purchased your device, it may be ready to use or may need process to be
activated on your Verizon account.
• If you purchased your device at a Verizon Store, it is probably activated
and ready to use.
• If you received your device in the mail, you can activate it by clicking My
Jetpack Home > My Verizon Wireless.
Connecting to the Mobile Hotspot
You can connect your computer to your mobile hotspot using Wi-Fi.
1. Turn on your computer and mobile hotspot.
2. On your computer, use the Wi-Fi manager(Windows OS) or AirPort
menu bar icon(Max OS) to connect to the MHS291LVW wireless
network.
Note
The steps to connect to a Wi-Fi network vary depending on your
operating system and whether you use the native application or thirdparty software. Generally, you click an icon in the Windows notification
area where you can select View Available Wireless Networks, or click
the Airport icon in the menu bar on a Mac. If you are unfamiliar with
wireless networking on your computer, consult the computer help
system.
Page 17

Using Mobile Hotspot 17
3. Connect to the network name found on the sticker that appears on
the back of the mobile hotspot as well. The network name or SSID is in
the format Verizon-291LVW-XXXX Secure, where XXXX are four digits
unique to your device.
4. Enter the 8-digit Wi-Fi/Admin password. The password appears on the
back of the mobile hotspot as well.
5. You can change device settings by connecting to the on-device web
page. Refer to page 29 for more information.
Page 18

HARDWARE
Idle Screen
Settings
Page 19
Idle Screen 19
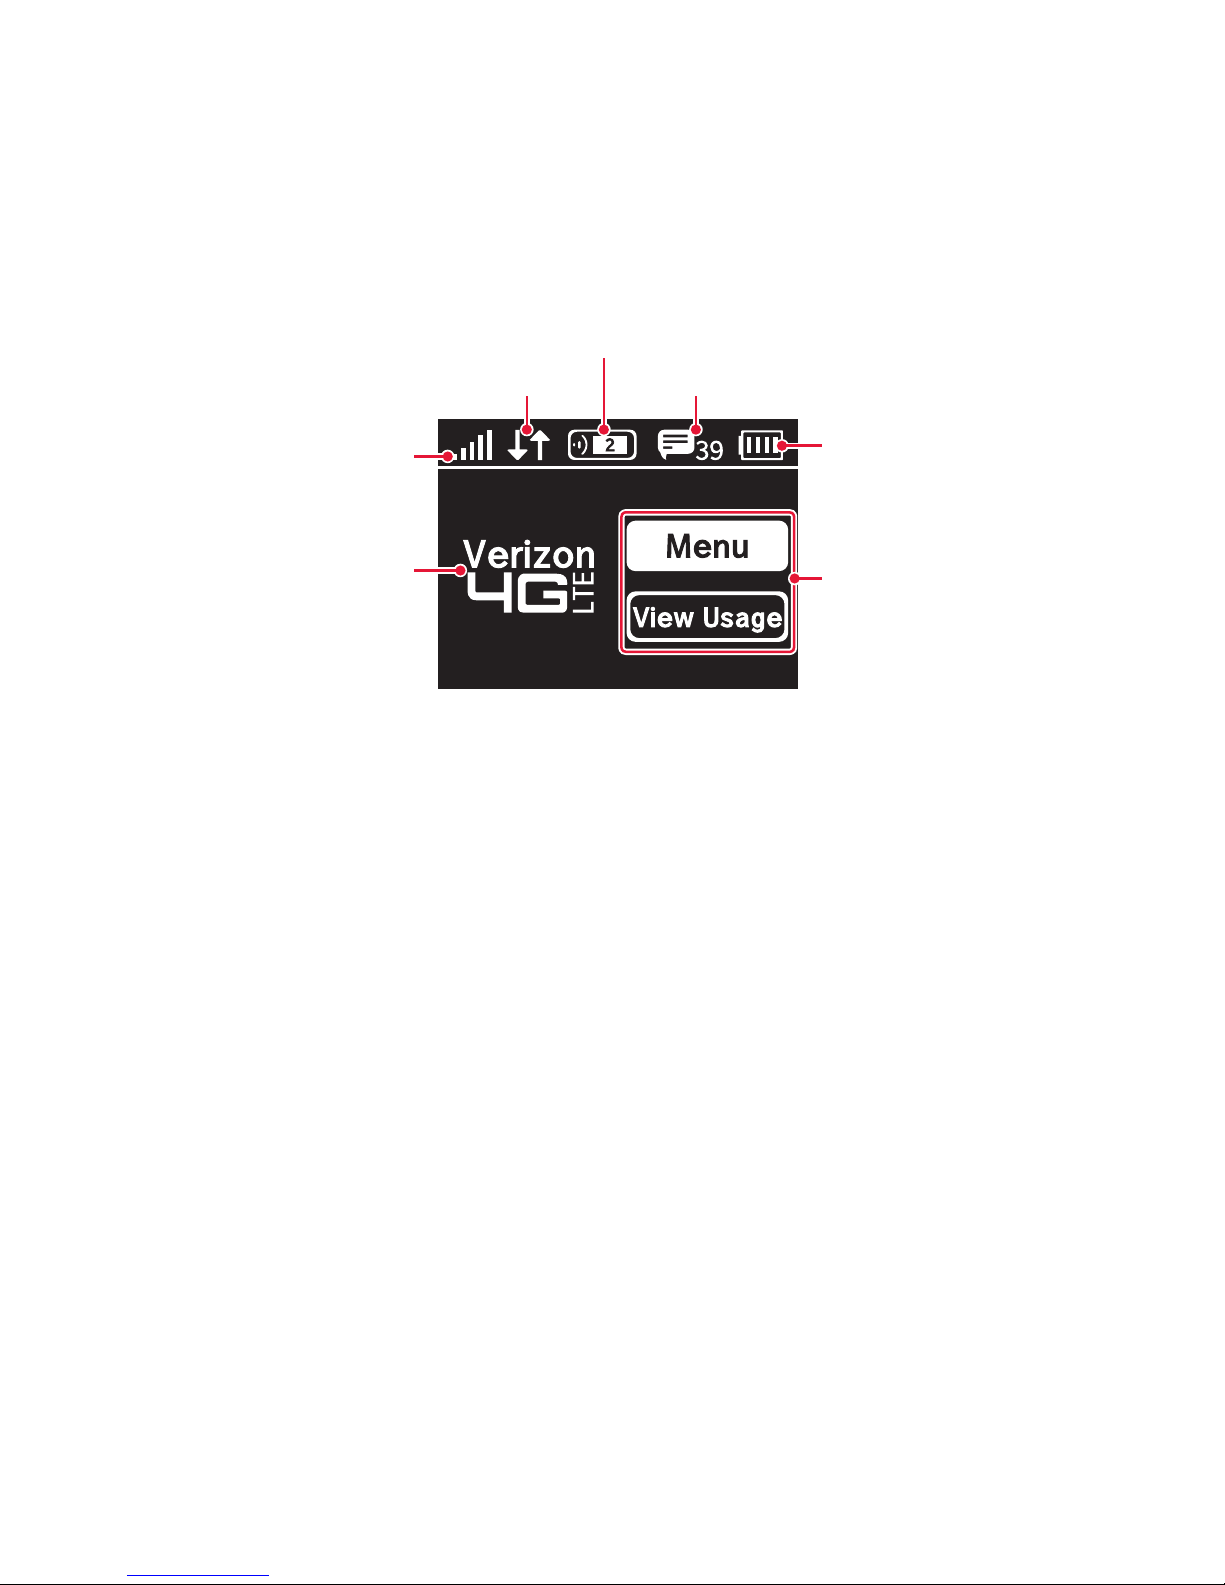
Idle Screen
The icons on the LCD screen indicate the status of the mobile hotspot.
Connected device status
Data transmitting status
Network signal strength
Data Type & Roaming
Status
Message status
Battery status
Menu
Page 20

20 Settings
Settings
Wi-Fi Info
1. In the idle screen, select Menu and press .
2. Select Wi-Fi Name/Password and press .
3. You can see the current Wi-Fi information about the mobile hotspot.
Connected Devices
1. In the idle screen, select Menu and press .
2. Select Connected Devices and press .
3. Select device name and press .
4. You can disconnect the device by selecting Disconnect and press .
Messages
1. In the idle screen, select Menu and press .
2. Select Messages and press .
3. Select a message and press .
4. You can delete a message by selecting Delete and press .
Page 21

Settings 21
Network Settings
Network Select
1. In the idle screen, select Menu and press .
2. Select Network Settings and press .
3. You can change the network type by selecting Global Mode, LTE/
CDMA Mode or GSM/UMTS Mode and press .
Wi-Fi Settings
Start WPS
1. In the idle screen, select Menu and press .
2. Select Wi-Fi Settings > Start WPS and press .
3. Select WPS and press .
4. Press the WPS button on your wireless router within 2 minutes to setup
connection.
Wi-Fi Band Select
1. In the idle screen, select Menu and press .
2. Select Wi-Fi Settings > Wi-Fi Band Select and press .
3. You can change Wi-Fi band by selecting 2.4GHz or 5.0GHz and press
.
Page 22

22 Settings
Wi-Fi Network Mode
1. In the idle screen, select Menu and press .
2. Select Wi-Fi Settings > Wi-Fi Network Mode and press .
3. You can change Wi-Fi network mode by selecting 802.11b+802.11g,
802.11b only, 802.11g only or 802.11b+802.11g+802.11n, and press
.
Broadcast SSID
1. In the idle screen, select Menu and press .
2. Select Wi-Fi Settings > Broadcast SSID and press .
3. You can set Broadcast SSID by selecting On or Off and press .
AP Isolation
1. In the idle screen, select Menu and press .
2. Select Wi-Fi Settings > AP Isolation and press .
3. You can set AP Isolation by selecting On or Off and press .
Wi-Fi On/Off
1. In the idle screen, select Menu and press .
2. Select Wi-Fi Settings > Wi-Fi On/Off and press .
3. You can turn Wi-Fi on or off by selecting On or Off and press .
Max Connections
1. In the idle screen, select Menu and press .
2. Select Wi-Fi Settings > Max Connections and press .
3. You can set maximum number of devices (up to 10) that can be
connected.
Page 23

Settings 23
Software Update
Check for Update
The Check for Update menu allows you to update software.
1. In the idle screen, select Menu and press .
2. Select Software Update > Software Check and press .
3. Select Check Now and press .
4. Follow the steps to update.
Reset Factory Settings
1. In the idle screen, select Menu and press .
2. Select Software Update > Factory Reset and press .
3. Select Yes and press .
4. The mobile hotspot will be reboot automatically.
Page 24

24 Settings
About Jetpack
Jetpack Info
1. In the idle screen, select Menu and press .
2. Select About Jetpack > Jetpack Info and press .
3. You can see detailed information about the MHS291LVW.
Note
You can change the admin password. Refer to page 29 for more
information.
Data Usage
1. In the idle screen, select Menu and press .
2. Select About Jetpack > Data Usage and press .
3. You can see the usage history details.
Page 25

SOFTWARE
Start the Verizon Wireless Manager
Jetpack Settings
Message Center
About Jetpack
Page 26

26 Start the Verizon Wireless Manager
Start the Verizon Wireless
Manager
You can configure the Wi-Fi settings on your device using the easy-to-use
web-based User Interface(Verizon Wireless Manager).
1. Turn on your computer and turn on the mobile hotspot.
2. On your computer, use the Wi-Fi manager(Windows) or the AirPort
menu bar icon(Mac) to connect wirelessly to the mobile hotspot
wireless network.
Note
The steps to connect to a Wi-Fi network vary depending on your
operating system and whether you use the native application or thirdparty software. Generally, you click an icon in the Windows notification
area where you can select View Available Wireless Networks, or click
the Airport icon in the menu bar on a Mac. If you are unfamiliar with
wireless networking on your computer, consult the computer help
system.
3. Connect to the network name found on the sticker that appears on the
back of the mobile hotspot. The network name or SSID is in the format
Verizon-291LVW-XXXX Secure, where XXXX are four digits unique to
your device.
4. Enter the 8-digit Wi-Fi/Admin password. The password appears on the
back of the mobile hotspot.
5. Open the web browser on your computer. To start the Verizon Wireless
Manager, enter my.jetpack in the browser’s address line then press
Enter key.
6. Type your Wi-Fi/Admin password in the Sign In field in the upper right
corner of the window and click Sign In.
Page 27

Start the Verizon Wireless Manager 27
My Jetpack Home
1. Click My Jetpack Home.
2. You can see the current status information.
Data Usage
1. Click Data Usage.
2. You can review your usage history.
Page 28

28 Start the Verizon Wireless Manager
Connected Devices
1. Click Connected Devices.
2. Click Edit and adjust settings for connected devices.
• Enter the nickname of a device in the Nickname field.
• To add a device to Blocked Device Info, select Blocked Device
Only from Device Filtering drop-down list, Then click Block next to
Nickname field. You can also block a device by click Add and enter
the MAC Address.
• To delete a device from Blocked Device Info, select Blocked Device
Only from Device Filtering drop-down list. Then click Allow next to
nickname.
• To add a device to Allowed Device Info, select Allowed Device
Only from Device Filtering drop-down list. Then click Allow next to
Nickname field. You can also allow a device by click Add and enter
the MAC Address.
• To delete a device from Allowed Device Info, select Allowed Device
Only from Device Filtering drop-down list. Then click Delete next to
nickname.
3. Click Save Changes.
Page 29

Jetpack Settings 29
Jetpack Settings
Jetpack
Jetpack Admin Password
1. Click Jetpack Settings > Jetpack > Jetpack Admin Password.
2. Enter your password in the Enter Current Password field.
3. Enter the new password in the New Password field. Then enter the new
password again in the Confirm New Password field.
4. Click Save Changes.
Page 30

30 Jetpack Settings
Preferences
1. Click Jetpack Settings > Jetpack > Preferences.
2. Adjust settings.
• Turn off Display After: Select the amount of time that expires before
the display turns off.
• Automatic shutdown: Select the amount of time that expires before
the device automatically shuts down.
• Check USB Mode: Enables or disables the USB tethered mode feature.
3. Click Save Changes.
Software Update
1. Click Jetpack Settings > Jetpack > Software Updates.
2. Click Check for update to check for new software updates and follow
the instructions.
Page 31

Jetpack Settings 31
Backup and Restore
1. Click Jetpack Settings > Jetpack > Backup and Restore.
2. To download(backup) the settings file to your computer, enter your
administration password in the Enter Jetpack Admin Password field
in the Back up section and click Download. Then click Save in the File
Download pop-up screen to save the settings file to a specified location
on your computer.
3. To restore a setting file from your PC, enter your administration
password in the Enter Jetpack Admin Password field in the Restore
section and click and select the file you want to restore. Then click
Restore Now.
4. If you want to enables the factory reset feature, click the checkbox next
to Allow to restore Factory Defaults.
5. Click Save Changes.
Page 32

32 Jetpack Settings
Wi-Fi
1. Click Jetpack Settings > Wi-Fi.
2. Adjust settings for Wi-Fi.
• Wi-Fi On/Off: Turn Wi-Fi on or off.
• Wi-Fi Name (SSID): Enter the name of the MHS291LVW device’s
wireless network.
• Display the Wi-Fi Name on Jetpack screen: Displays the current
Wi-Fi name.
• Broadcast Network Name (SSID): Displays the current Wi-Fi name.
• Security: Select the security type used to encrypt the wireless
network.
• Wi-Fi Password (Key): Enter the new password of the Wi-Fi
connection.
• Display the Wi-Fi Password on Jetpack screen: Displays the current
Wi-Fi password.
• Frequency (Channel): Select the frequency and channel. If channel
setting is available, select Auto. If Auto is not available, you can
experiment to see which channel provides the best results, or use
the default settings.
Page 33

Jetpack Settings 33
• Max Wi-Fi Connections: Select the maximum number of devices that
can be connected.
• 802.11 Mode: Select the wireless network technology used. 802.11g
+ 802.11b + 802.11n is most compatible, allowing both 802.11b,
802.11g, and 802.11n devices to connect to the wireless network.
• Wi-Fi Multimedia (WMM) Mode: Wi-Fi Multimedia enables your
device to stream multimedia files.
• Wi-Fi Privacy Separation: Enables or disables the privacy separation
feature.
3. Click Save Changes.
Advanced
Networks
1. Click Jetpack Settings > Advanced > Networks.
2. Adjust settings.
• Network Type: Select the preferred network type to change the type
of technology you want to use to connect to the internet.
• 4G LTE APN: Enter a new APN (Access Point Name).
3. Click Save Changes.
Page 34

34 Jetpack Settings
Network Selection
Automatic Selection
1. Click Jetpack Settings > Advanced > Networks.
2. Select GSM/UMTS Mode from Network Type drop-down list.
3. Select the network subtype from Sub type drop-down list.
4. Select Automatic from Network Selection drop-down list.
5. Click Save Changes.
Manual Selection
1. Click Jetpack Settings > Advanced > Networks.
2. Select GSM/UMTS Mode from Network Type drop-down list.
3. Select the network subtype from Sub type drop-down list.
4. Select Manual from Network Selection drop-down list.
5. Click Save Changes.
6. Click select next to a desired network.
Manual DNS
1. Click Jetpack Settings > Advanced > Manual DNS.
2. Enter the DNS address.
3. Click Save Changes.
Page 35

Jetpack Settings 35
SIM
1. Click Jetpack Settings > Advanced > SIM.
2. To lock the SIM card, select Turn on PIN Lock from Desired Action
drop-down list. Enter the PIN code in the Enter Current SIM PIN field.
3. Click Save Changes.
GPS
1. Click Jetpack Settings > Advanced > GPS.
2. To enable the GPS, click Start > Apply.
3. Click Yes to accept the notification.
Page 36

36 Jetpack Settings
Firewall
1. Click Jetpack Settings > Advanced > Firewall.
2. Adjust settings.
• VPN Passthrough: If this is On, this feature allows VPN clients to
connect through the mobile hotspot to remote VPN servers. If this is
Off, VPN clients will not be allowed to connect.
• Enable DMZ: Enables or disables the DMZ feature. The DMZ feature
allows all unknown traffic to be sent to a designated IP address.
• Destination IP Address: Enter the IP address for the DMZ feature.
3. Click Save Changes.
Note
The Port Forwarding and DMZ features cannot be used simultaneously.
Page 37

Jetpack Settings 37
LAN
1. Click Jetpack Settings > Advanced > LAN.
2. Adjust settings.
• IP Address: Enter the IP address for the mobile hotspot.
• Subnet Mask: Enter the subnet mask address for the mobile hotspot.
The default value 255.255.255.0 is standard for small networks. If you
change the IP Address, ensure you use the current subnet mask for
IP address range.
• Host Name: Enter the network name for connected device.
• MAC Address: Displays the MAC(Media Access Controller) or physical
IP address for the mobile hotspot.
• DHCP Server: Enables or disables the DHCP server.
• Start DHCP Address Range At: Enter the start range of IP address
reserved for use by DHCP server table of the mobile hotspot.
• DHCP Address Range: Displays the current range of IP address
reserved for use by DHCP server table of the mobile hotspot.
• Turn on IPv6: Enables or disables the IPv6.
• Link Local Address: Displays the local address when IPv6 is enabled.
• Global Address: Displays the global address when IPv6 is enabled.
3. Click Save Changes.
Page 38

38 Jetpack Settings
Port Filtering
1. Click Jetpack Settings > Advanced > Port Filtering.
2. The Port Filtering allows you to block outgoing internet connections.
When the Port Filtering is enabled, you must select a port filtering
application in the Applications to allow that application to connect to
the internet.
3. Enable each port filtering application that are needed to access the
internet.
4. Click Add Custom Application to define and enable custom port
filtering application. You need to know details of the traffic used by the
applications you wish to add.
5. Enter the Application name, Begin port and End port. Then select the
protocol used by port range.
6. Click Save Changes.
Page 39

Jetpack Settings 39
Port Forwarding
1. Click Jetpack Settings > Advanced > Port Forwarding.
2. The Port Forwarding allows you to forward incoming traffics from
the internet to a particular connected computer or device that are
connected to the wireless network of the mobile hotspot.
3. Click Save Changes.
Note
The Port Forwarding and DMZ features cannot be used simultaneously.
Page 40

40 Messages
Messages
1. Click Messages.
2. You can see the received messages.
3. Click to delete a message. You can also click Delete All to delete all
messages.
Page 41

About Jetpack 41
About Jetpack
Internet Status
1. Click About Jetpack > Internet Status.
2. You can see the detailed information about current internet status.
Jetpack Info
1. Click About Jetpack > Jetpack Info.
2. You can see the detailed information about the mobile hotspot.
Page 42

42 About Jetpack
Diagnostics
1. Click About Jetpack > Diagnostics.
2. You can see the information about the mobile hotspot firmware
and other system-level information. This screen is used mostly for
troubleshooting and is not required for normal operation.
Page 43

About Jetpack 43
Statistic & Logs
1. Click About Jetpack > Help and Support > Statistics.
2. You can see the data usage statistics. Click Reset to reset the statistics.
3. Click Logs.
4. You can see detailed usage logs.
• To export a log file, click and select start date and end date. Then
click Export File.
• To review the log for specified time period, click and select start
date and end date. Then click Filter File.
• To change the period of time that system log is deleted, select a
option from Auto Clear drop-down list and then click Apply.
Page 44

44 About Jetpack
Help and Support
1. Click About Jetpack > Help and Support.
2. It allows you to provide contact information and useful links for you to
use the mobile hotspot.
Page 45

Troubleshooting 45
Troubleshooting
Windows XP(SP3)
Symptom 1
The RNDIS device no longer works correctly. For example, the data
application on the computer may report an error that the data transmission
has failed. To resolve this problem, you have to restart the computer.
Resolution
Consider the following scenario:
• A Remote Network Driver Interface Specification (RNDIS) device is
installed on a Windows XP-based computer, such as a USB radio device.
• You perform a surprise removal of the RNDIS device from the computer.
• You attach the RNDIS device to the computer again.
Please proceed by installing the Microsoft Hotfix located at the following
Web site:
http://support.microsoft.com/kb/959765
Page 46

46 Troubleshooting
Windows Vista(SP2)
Symptom 1
A bus driver that manages a Network Driver Interface Specification (NDIS)
miniport is not loaded as expected. Therefore, a yellow exclamation mark (!)
appears in Device Manager next to the device that is driven by the miniport.
The driver also displays error code 38 (CM_PROB_DRIVER_FAILED_PRIOR_
UNLOAD).
For example, this problem may occur on a bus driver that manages a USB
composite device that includes a network adapter.
Resolution
Consider the following scenario:
• You are running a Windows Vista-based computer.
• You resume the computer from standby.
Please proceed by installing the Microsoft Hotfix located at the following
Web site:
http://support.microsoft.com/kb/948278
Page 47

Troubleshooting 47
Windows 7 / Vista(SP2)
Symptom 1
The communication between the modem and the computer stops.
Additionally, a yellow exclamation mark (!) appears next to the device name
in Device Manager.
Resolution
Consider the following scenario:
• You have a computer that is running Windows 7, Windows Server 2008
R2, Windows Vista or Windows Server 2008.
• You attach a USB Remote Network Driver Interface Specification (RNDIS)
device to the computer through an external USB hub.
• You remove the modem from the USB hub and then reattach.
Please proceed by installing the Microsoft Hotfix located at the following
Web site:
http://support.microsoft.com/kb/2477042
Symptom 2
The NDIS device is not completely removed from the fault-tolerant system.
The fault-tolerant system cannot fail over to another NDIS device. Therefore,
the system is in a non-redundant state.
Resolution
Consider the following scenario:
• You use a fault-tolerant system that is running Windows Server 2008 R2
or Windows 7.
• You suddenly remove a Network Driver Interface Specification (NDIS)
device from the system.
Please proceed by installing the Microsoft Hotfix located at the following
Web site:
http://support.microsoft.com/kb/2471472
Page 48

48 Troubleshooting
Windows 7
Symptom 1
Windows does not load the WWAN adapter driver. Additionally, you receive
an error message that resembles the following:
Windows cannot load the device driver for this hardware because a previous
instance of the device driver is still in memory.
Resolution
Consider the following scenario:
• You have a Windows 7-based or Windows Server 2008 R2-based
computer that uses a third-party Wireless Wide Area Network (WWAN)
adapter.
• You plug a SIM card into the WWAN adapter and then connect to the
network by using the adapter.
• You put the computer into sleep mode.
• You remove the SIM card from the WWAN adapter, and then you plug
the SIM card back into the adapter.
• You resume the computer from sleep mode.
Please proceed by installing the Microsoft Hotfix located at the following
Web site:
http://support.microsoft.com/kb/2688892
Page 49

Glossary 49
Glossary
• 1X — Internet at 1/10 the speed of EV-DO.
• 3G — Third Generation. 3G refers to the third generation of mobile
telephony technology.
• 4G LTE — Fourth Generation. 4G LTE refers to the fourth generation of
mobile telephony technology.
• 802.11 (b, g, n) — A set of WLAN communication standards in the 2.4,
3.6 and 5 GHz frequency bands.
• bps — Bits per second. The rate of data flow.
• Broadband — High-capacity high-speed transmission channel with a
wider bandwidth than conventional modem lines. Broadband channels
can carry video, voice, and data simultaneously.
• CDMA — Code Division Multiple Access. It is the underlying channel
access method used by some mobile phone standards.
• DHCP — Dynamic Host Configuration Protocol. Software found in
servers and routers that automatically assigns temporary IP addresses to
clients logging into an IP network.
• DHCP Server — A server or service with a server that assigns IP
addresses.
• DNS — Domain Name System. A system for converting host names and
domain names into IP addresses on the Internet or on local networks
that use the TCP/IP protocol.
• EDGE — Enhances Data rates for GSM Evolution. A digital mobile phone
technology that allows improved data transmission rates as a backwardcompatible extension of GSM.
• GSM — A computer program embedded in an electronic device.
Firmware usually contains operating code for the device.
• Hotspot — A Wi-Fi (802.11) access point or the area covered by an
access point. Used for connecting to the Internet.
Page 50

50 Glossary
• HTTP — Hypertext Transfer Protocol. An application-level protocol for
accessing the World Wide Web over the Internet.
• IP — Internet Protocol. The mechanism by which packets are routed
between computers on a network.
• IP Type — The type of service provided over a network.
• IP address — Internet Protocol address. The address of a device
attached to an IP network (TCP/IP network).
• Kbps — Kilobits per second. The rate of data flow.
• LAN — Local Area Network. A type of network that lets a group of
computers, all in close proximity (such as inside an office building),
communicate with one another. It does not use common carrier circuits
though it can have gateways or bridges to other public or private
networks.
• MAC Address — Media Access Control. A number that uniquely
identifies each network hardware device. MAC addresses are 12-digit
hexadecimal numbers. This is also known as the physical or hardware
address.
• Mbps — Megabits per second.
• Network Technology — The technology on which a particular network
provider’s system is built; such as CDMA or EVDO.
• Port — A virtual data connection used by programs to exchange data. It
is the endpoint in a logical connection. The port is specified by the port
number.
• Port Forwarding — A process that allows remote devices to connect to
a specific computer within a private LAN.
• Port Number — A 16-bit number used by the TCP and UDP protocols
to direct traffic on a TCP/IP host. Certain port numbers are standard for
common applications.
• Protocol — A standard that enables connection, communication, and
data transfer between computing endpoints.
• Proxy — A firewall mechanism that replaces the IP address of a host on
the internal (protected) network with its own IP address for all traffic
passing through it.
Page 51

Glossary 51
• Router — A device that directs traffic from one network to another.
• SIM — Subscriber Identification Module. Found in LTE and GSM network
technology, the SIM is a card containing identification information
for the subscriber and their account. The SIM card can be moved to
different devices.
• SSID — Service Set IDentifier. The name assigned to a Wi-Fi network.
• TCP/IP — Transmission Control Protocol/Internet Protocol. The set
of communications protocols used for the Internet and other similar
networks.
• USB — Universal Serial Bus. A connection type for computing device
peripherals such as a printer, mobile modem, etc. USB connectors may
be used for data transfer or charging.
• USB Port Types — The USB ports on computers and hubs have a
rectangular Type A socket, and peripheral devices have a cable with
a Type A plug. Peripherals that do not have an attached cable have a
square Type B socket on the device and a separate cable with a Type A
and Type B plug. Ports and connectors are available in different sizes (for
example, standard, mini, and micro).
• VPN — Virtual Private Network. A secure private network that runs over
the public Internet. Commonly used to connect to an office network
from elsewhere.
• WCDMA — Wideband Code Division Multiple Access. An air interface
standard found in 3G mobile telecommunications networks. The mostcommonly used member of the UMTS family.
• WWAN — Wireless Wide Area Network. A public network that extends
beyond architectural, geographical, or political boundaries (unlike a
LAN, which is usually a private network located within a room, building,
or other limited area).
• WEP — Wired Equivalent Privacy. An IEEE standard security protocol for
802.11 networks. Superseded by WPA and WPA2.
• WPA/WPA2 — Wi-Fi Protected Access. A security protocol for wireless
802.11 networks from the Wi-Fi Alliance.
Page 52

52 Safety and Warranty
Safety and Warranty
Regulatory Notices
MHS291LVW complies with Parts 15, 22, 24, and 27 of the FCC rules. This
mobile hotspot must not be co-located or operated in conjunction with any
other antenna or transmitter. If you use this mobile hotspot in any other
configuration, the FCC RF Exposure compliance limit can be exceeded.
Warnings and Cautions
• Modifying or changing this mobile hotspot without express
authorization can nullify compliance with RF exposure guidelines.
• This mobile hotspot has been tested and found to comply with the
limits pursuant to Part 15, 22, 24, and 27 of the FCC Rules.
These limits are designed to provide reasonable protection against
harmful interference when appropriately installed. This mobile hotspot
generates, uses, and can radiate radio frequency and, if not installed
and used according to the instructions provided, it may cause harmful
interference to radio communication. However, there is no guarantee
that interference will not occur in any particular installation.
• If this mobile hotspot does cause harmful interference with radio or
television signals (determine this by turning the mobile hotspot off and
on), attempt to correct the interference by trying one or more of the
following:
- Increase the separation between the mobile hotspot and receiver.
- Connect the mobile hotspot into a different outlet than the receiver.
- Consult the dealer or an experienced radio/TV technician for help.
Page 53

Safety and Warranty 53
• This mobile hotspot does not exceed the Class B limits for radio noise
emissions from digital apparatus as set out in the interference causing
equipment standard entitled “Digital Apparatus”, ICES-003 of the
Department of Communications.
• If you have purchased this product under a United States Government
contract, it shall be subject to restrictions as set forth in subparagraph
(C)(1)(ii) of Defense Federal Acquisitions Regulations (DFARs) Section
252.227-7013 for Department of Defense contracts, and as set forth in
Federal Acquisitions Regulations (FARs) Section 52.227-19 for civilian
agency contracts or any successor regulations. If further government
regulations apply, it is your responsibility to ensure compliance with
such regulations.
WARNING
• This product contains a chemical known to the State of California to
cause cancer.
• This product contains a chemical known to the State of California to
cause birth defects or other reproductive harm.
Product Handling
• Keep the mobile hotspot in a dry and clean place. (Storage temperature:
-22°F to 149°F [- 30°C to 65°C]). Keep your device away from liquids, dust
and excessive heat.
• Operating temperature : 149°F (65°C)
• This device may cause harmful interference, and must accept any
interference received, including interference that may cause undesirable
operations.
Page 54

54 Safety and Warranty
Safety Information for Mobile Hotspot
READ THIS INFORMATION BEFORE USING YOUR MOBILE HOTSPOT
Exposure to radio frequency signals
Your mobile hotspot is a low power radio transmitter and receiver. When
it is ON, it receives and also sends out radio frequency (RF) signals. In
August 1996, the Federal Communications Commissions (FCC) adopted RF
exposure guidelines with safety levels for mobile hotspot. Those guidelines
are consistent with the safety standards previously set by both U.S. and
international standards bodies:
* ANSI C95.1 (1992)
** NCRP Report 86 (1986)
*** ICNIRP (1996)
Those standards were based on comprehensive and periodic evaluations of
the relevant scientific literature. For example, over 120 scientists, engineers,
and physicians from universities, government health agencies, and industry
reviewed the available body of research to develop the ANSI Standard
(C951).
The design of your device complies with the FCC guidelines (and those
standards).
* American National Standards Institute.
** National Council on Radiation Protection and Measurements.
*** International Commission on Nonionizing Radiation Protection.
Antenna safety
Use only the an approved replacement antenna. Unauthorized antennas,
modifications, or attachments could result in violation of FCC regulations.
Please contact your local dealer for replacement antenna.
Do not use the mobile hotspot with a damaged antenna. If a damaged
antenna comes into contact with the skin, a minor burn may result. Please
contact your local dealer for replacement antenna.
Page 55

Safety and Warranty 55
Electronic devices
Your mobile hotspot is a low power radio transmitter and receiver. When
it is ON, it receives and also sends out radio frequency (RF) signals. Most
modern electronic equipment is shielded from RF energy. However, certain
electronic equipment may not be shielded against the RF signals from your
mobile hotspot. Therefore, use of your device must be restricted in certain
situations.
Pacemakers
The Health Industry Manufacturers Association recommends that a
minimum of six inches (6”) separation must be maintained between a
mobile hotspot and a pacemaker to avoid potential interference with the
pacemaker. These recommendations are consistent with the independent
research by and recommendations of Wireless Technology Research. Persons
with pacemakers:
• ALWAYS keep the mobile hotspot more than six inches from your
pacemaker when the mobile hotspot is turned on.
• If you have any reason to suspect that interference is taking place, turn
your mobile hotspot OFF immediately.
Other medical devices
If you use any other personal medical device, consult the manufacturer of
your device to determine if they are adequately shielded from external RF
energy.
Your physician may be able to assist you in obtaining this information.
Turn your mobile hotspot OFF in healthcare facilities when any regulations
posted in these areas instruct you to do so. Hospitals or healthcare facilities
may be using equipment that could be sensitive to external RF energy.
Vehicles
RF signals may affect improperly installed or inadequately shielded
electronic systems in motor vehicles. Check with the manufacturer or
its representative regarding your vehicle. You should also consult the
manufacturer of any equipment that has been added to your vehicle.
Page 56

56 Safety and Warranty
Posted facilities
Turn your device OFF where posted notices require so.
Other safety guidelines
Aircraft
FCC regulations prohibit using your device while in the air. Turn your device
OFF before boarding an aircraft. Always request and obtain prior consent
and approval of an authorized airline representative before using your
device aboard an aircraft.
Always follow the instructions of the airline representative whenever using
your device aboard an aircraft, to prevent any possible interference with
airborne electronic equipment.
Blasting areas
To avoid interfering with blasting operations, turn your device OFF when in
a “blasting area” or in areas posted: “Turn off two-way radio.” Obey all signs
and instructions.
Potentially explosive atmospheres
Turn your device OFF when in any area with a potentially explosive
atmosphere and obey all signs and instructions. Sparks in such areas could
cause an explosion or fire resulting in bodily injury or even death.
Areas with a potentially explosive atmosphere are often, but not always,
clearly marked. They include fueling areas such as gas stations; below
deck on boats; fuel or chemical transfer or storage facilities; vehicles using
liquefied petroleum gas (such as propane or butane); areas where the
air contains chemicals or particles, such as grain, dust, or metal powders;
and any other area where you would normally be advised to turn off your
vehicle’s engine.
Page 57

Safety and Warranty 57
Precautions
Your mobile hotspot is a high quality piece of equipment. Before operating,
read all instructions and cautionary markings in the User Guide.
• DO NOT use this equipment in an extreme environment where high
temperature or high humidity exists.
• DO NOT abuse the equipment. Avoid striking, shaking or shocking.
When not using, lay down the unit to avoid possible damage due to
instability.
• DO NOT expose this equipment to rain or spilled beverages.
• DO NOT use unauthorized accessories.
• DO NOT disassemble the device. If service or repair is required, return
unit to an authorized service center. If unit is disassembled, the risk of
electric shock or fire may result.
• Data transmission and reception cannot be guaranteed because of the
nature of wireless communications. Data can be delayed, corrupted or
lost during transmission. Even though it is quite rare that significant
data delay or loss occurs if the USB device is used in a normal manner,
this USB device should not be used in cases that data transmission
or reception failure could result in damage of any kind to the user or
another party, including but not limited to personal injury, death or loss
of personal property. Personal Communications Devices, LLC., bears no
responsibility for damages or losses of any kind resulting from delays or
errors in data transmission using the mobile hotspot, or for failure of the
mobile hotspot to transmit or receive such data.
Page 58

58 Safety and Warranty
Safety Information for FCC RF Exposure
WARNING! READ THIS INFORMATION BEFORE USING
CAUTIONS
In August 1996 the Federal Communications Commission (FCC) of the
United States with its action in Report and Order FCC 96-326 adopted
an updated safety standard for human exposure to radio frequency
electromagnetic energy emitted by FCC regulated transmitters. Those
guidelines are consistent with the safety standard previously set by both
U.S. and international standards bodies. The design of this mobile hotspot
complies with the FCC guidelines and these international standards.
Body-worn operation
This device was tested in multiple computer congurations with USB
port congurations for typical near-body operations with the back of
the mobile hotspot kept 10 mm from body. To maintain compliance
with FCC RF exposure requirements it can be used in computers with
substantially similar physical dimensions, construction, and electrical and
RF characteristics, and that maintain a minimum 10 mm separation distance
between the user’s body and the back of the mobile hotspot, including the
antenna. The antenna(s) used for this device must not be co-located or must
not operate in conjunction with any other antenna or transmitter within a
host device.
* CE: The Body SAR tests has been performed at 15 mm.
Note
For more information about RF exposure please visit the FCC website at
www.fcc.g
ov.
Page 59

Safety and Warranty 59
SAR Information
THIS MODEL MEETS THE GOVERNMENT’S REQUIREMENTS AND
EUROPEAN UNION (EU) STANDARDS FOR EXPOSURE TO RADIO WAVES.
Your mobile hotspot is a radio transmitter and receiver. It is designed and
manufactured not to exceed the emission limits for exposure to radio
frequency (RF) energy set by the Federal Communications Commission of
the U.S. Government. These limits are part of comprehensive guidelines
and establish permitted levels of RF energy for the general population. The
guidelines are based on standards that were developed by independent
scientific organizations through periodic and thorough evaluation of
scientific studies. The standards include a substantial safety margin
designed to assure the safety of all persons, regardless of age and health.
The exposure standard for wireless mobile hotspot employs a unit of
measurement known as the Specific Absorption Rate, or SAR. The SAR limit
set by the FCC is 1.6 W/kg* and EU standards is 2.0 W/ kg. Tests for SAR are
conducted with the device transmitting at its highest certified power level
in all tested frequency bands. Although the SAR is determined at the highest
certified power level, the actual SAR level of the device while operating can
be well below the maximum value. This is because the device is designed
to operate at multiple power levels so as to use only the power required to
reach the network. In general, the closer you are to a wireless base station
antenna, the lower the power output.
Before a device model is available for sale to the public, it must be tested
and certified to the FCC that it does not exceed the limit established by
the government adopted requirement for safe exposure. The tests are
performed in positions and locations (e.g., at the ear and worn on the
body) as required by the FCC for each model. The highest SAR value for
this model device when tested for use at the when worn on the body, as
described in this user guide, is 1.516 W/Kg. (Body-worn measurements
differ among device models, depending upon available accessories and
FCC requirements). While there may be differences between the SAR levels
of various devices and at various positions, they all meet the government
requirement for safe exposure. The FCC has granted an Equipment
Authorization for this model device with all reported SAR levels evaluated
Page 60

60 Safety and Warranty
as in compliance with the FCC RF exposure guidelines. SAR information
on this model is on file with the FCC and can be found under the Display
Grant section of http://www.fcc.gov/oet/fccid after searching on FCC ID:
JYCORBIT.
Additional information on Specific Absorption Rates (SAR) can be found on
the Cellular Telecommunications Industry Association (CTIA) web-site at
http://www.ctia.org.
* In the United States and Canada, the SAR limit for mobile phones
used by the public is 1.6 watts/kg (W/kg) averaged over one gram of
tissue. The standard incorporates a substantial margin of safety to give
additional protection for the public and to account for any variations in
measurements.
* CE Max SAR : 0.898 W/Kg.
The Declaration of Conformity at the back of this guide demonstrates
your device’s compliance with the European Radio & Terminal
Telecommunications Equipment (R&TTE) directive.
FCC Compliance Information
This device complies with Part 15 of FCC Rules.
Operation is subject to the following two conditions:
(1) This device may not cause harmful interference, and
(2) This device must accept any interference received. Including
interference that may cause undesired operation.
Information to the user
NOTE: This equipment has been tested and found to comply with the limits
for a Class B digital device, pursuant to part 15 of the FCC Rules.
These limits are designed to provide reasonable protection against harmful
interference in a residential installation.
Page 61

Safety and Warranty 61
This equipment generates, uses, and can radiate radio frequency energy
and, if not installed and used in accordance with the instructions, may
cause harmful Interference to radio communications. However, there is no
guarantee that interference will not occur in a particular Installation. If this
equipment does cause harmful interference to radio or television reception,
which can be determined by turning the equipment off and on, the user
is encouraged to try to correct the interference by one or more of the
following measures:
• Reorient or relocate the receiving antenna.
• Increase the separation between the equipment and receiver.
• Connect the mobile hotspot into a different outlet than the receiver.
• Consult the dealer or an experienced radio/TV technician for assistance.
CAUTION
Changes or modifications that are not expressly approved by the
responsible party of Compliance could void the user’s authority to operate
the equipment.
12-Month Limited Warranty
Personal Communications Devices, LLC. (the “Company”) warrants to the
original retail purchaser of this mobile hotspot, that should this product or
any part thereof during normal consumer usage and conditions, be proven
defective in material or workmanship that results in product failure within
the first twelve (12) month period from the date of purchase, such defect(s)
will be repaired or replaced (with new or rebuilt parts) at the Company’s
option, without charge for parts or labor directly related to the defect(s).
The antenna, keypad, display, rechargeable battery and battery charger,
if included, are similarly warranted for twelve (12) months from date of
purchase.
This Warranty extends only to consumers who purchase the product in the
United States or Canada and it is not transferable or assignable.
Page 62

62 Safety and Warranty
This Warranty does not apply to:
(a) Product subjected to abnormal use or conditions, accident,
mishandling, neglect, unauthorized alteration, misuse, improper
installation or repair or improper storage;
(b) Product whose mechanical serial number or electronic serial number
has been removed, altered or defaced.
(c) Damage from exposure to moisture, humidity, excessive temperatures
or extreme environmental conditions;
(d) Damage resulting from connection to any accessory or other product
that are not approved by the Company;
(e) Defects in appearance, cosmetic, decorative or structural items such as
framing and nonoperative parts;
(f) Product damaged from external causes such as fire, flooding, dirt, sand,
weather conditions, battery leakage, blown fuse, theft or improper
usage of any electrical source.
The Company disclaims liability for removal or reinstallation of the product,
for geographic coverage, for inadequate signal reception by the antenna or
for communications range or operation of the cellular system as a whole.
When sending your wireless device to Personal Communications Devices
for repair or service, please note that any personal data or software stored
on the device may be inadvertently erased or altered. Therefore, we strongly
recommend you make a back up copy of all data and software contained
on your device before submitting it for repair or service. This includes all
contact lists, downloads (i.e. third-party software applications, ringtones,
games and graphics) and any other data added to your device. In addition,
if your wireless device utilizes a SIM or Multimedia card, please remove
the card before submitting the device and store for later use when your
device is returned, Personal Communications Devices is not responsible for
and does not guarantee restoration of any third-party software, personal
information or memory data contained in, stored on, or integrated with
any wireless device, whether under warranty or not, returned to Personal
Communications Devices for repair or service.
Page 63

Safety and Warranty 63
To obtain repairs or replacement within the terms of this Warranty, the
product should be delivered with proof of Warranty coverage (e.g. dated bill
of sale), the consumer’s return address, daytime phone number and/or fax
number and complete description of the problem, transportation prepaid,
to the Company at the address shown below or to the place of purchase for
repair or replacement processing. In addition, for reference to an authorized
Warranty station in your area, you may telephone in the United States (800)
229- 1235, and in Canada (800) 465-9672 (in Ontario call 416-695-3060).
THE EXTENT OF THE COMPANY’S LIABILITY UNDER THIS WARRANTY IS
LIMITED TO THE REPAIR OR REPLACEMENT PROVIDED ABOVE AND, IN NO
EVENT, SHALL THE COMPANY’S LAIBILITY EXCEED THE PURCHASE PRICE
PAID BY PURCHASER FOR THE PRODUCT.
ANY IMPLIED WARRANTIES, INCLUDING ANY IMPLIED WARRANTY OF
MERCHANTABILITY OR FITNESS FOR A PARTICULAR PURPOSE, SHALL BE
LIMITED TO THE DURATION OF THIS WRITTEN WARRANTY. ANY ACTION
FOR BREACH OF ANY WARRANTY MUST BE BROUGHT WITHIN A PERIOD OF
18 MONTHS FROM DATE OF ORIGINAL PURCHASE. IN NO CASE SHALL THE
COMPANY BE LIABLE FOR AN SPECIAL CONSEQUENTIAL OR INCIDENTAL
DAMAGES FOR BREACH OF THIS OR ANY OTHER WARRANTY, EXPRESS OR
IMPLIED, WHATSOEVER. THE COMPANY SHALL NOT BE LIABLE FOR THE
DELAY IN RENDERING SERVICE.
UNDER THIS WARRANTY OR LOSS OF USE DURING THE TIME THE PRODUCT
IS BEING REPAIRED OR REPLACED.
No person or representative is authorized to assume for the Company any
liability other than expressed herein in connection with the sale of this
product.
Some states or provinces do not allow limitations on how long an implied
warranty lasts or the exclusion or limitation of incidental or consequential
damage so the above limitation or exclusions may not apply to you. This
Warranty gives you specific legal rights, and you may also have other rights,
which vary from state to state or province to province.
Page 64

64 Safety and Warranty
IN USA:
Personal Communications Devices, LLC
1516 Motor Parkway
Hauppauge, NY 11749
1-800-229-1235
IN CANADA:
PCD Communications Canada Ltd.
5535 Eglinton Avenue West, Suite 210
Toronto, Ontario
M9C 5K5
1- 800-465-9672
©2013 Verizon Wireless. All Rights Reserved.
 Loading...