

USING A microSDTM CARD
A microSDTM card stores sounds, videos, images, photos, music, and other files.
A 1GB microSDTM card is pre-installed in your phone.
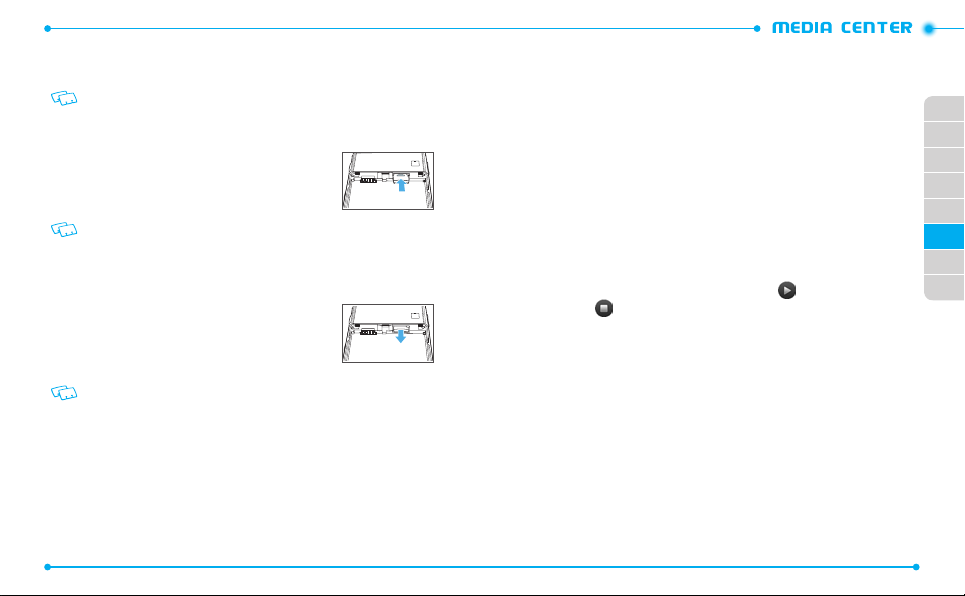
INSTALLING A microSDTM CARD
To install your microSDTM card:
1. Remove the battery cover and the battery.
2. Press the microSD
contacts facing down.
3. Replace the battery and the battery cover.
To prevent possible damages, please keep the microSDTM card slot closed at all times
regardless of whether a microSDTM card is inserted or not.
REMOVING A microSDTM CARD
To remove the microSDTM card:
1. Remove the battery cover and the battery.
2. Gently pull the exposed edge of the microSDTM card in
with your fingertip to release it from the slot.
3. Remove the microSDTM card.
4. Replace the battery and the battery cover.
• To ensure the proper function of removable memory, please use a microSDTM card.
90
TM
card into the slot with the gold
SEARCH
With the BING search engine, you can search for information or pages on the BING
website. Accessing the web may incur additional charges.
1. Unlock the screen and tap
Search
.
2. Enter a keyword in the search field and find information.
MUSIC & TONES
Music & Tones allows you to manage ringtones, music and sounds files. It also allows
you to get new ringtones.
MY RINGTONES
To play downloaded tunes or tones:
1. Unlock the screen, tap
2. Tap
My Ringtones
3. Scroll to the tune or tone you want to play and tap .
4. To stop, tap .
To delete downloaded tunes or tones:
1. Unlock the screen, tap
2. Tap
My Ringtones
3. Tap
More
and then tap
4. Tap
Yes
to confirm.
To assign downloaded tunes or tones:
1. Unlock the screen, tap
2. Tap
My Ringtones
3. Tap the tune or tone you want.
4. Tap one of the following options to select:
•
Set As Ringtone:
•
Set As Contact ID:
Media Center
and then tap
.
Media Center
and then tap
.
Erase All
.
Media Center
and then tap
.
Sets the tune or tone as the call ringtone.
Sets the tune or tone as a caller ID ringtone.
Music & Tones
Music & Tones
Music & Tones
.
.
.
01
02
03
04
05
06
07
08
91
•
Set As Alert Sound
Multimedia Messages
•
Rename:
•
Lock / Unlock:
•
Erase:
•
File Info:
: Sets the tune or tone as one of
/
Voicemail
Renames the sound.
Locks or unlocks the sound.
Deletes the sound.
Allows you to view the properties of the sound.
.
All Messages
MY MUSIC
The My Music menu allows you to play back and manage music files stored on a
memory card.
1. Unlock the screen and tap
2. Tap one of the following options to select:
•
Play All Songs
•
•
•
•
•
•
•
•
•
: Allows you to play all songs.
All Songs
: Allows you to view or play all songs.
Playlists
: Allows you to create or view playlists. Once you have created playlists, you can
play songs by playlist.
Artists
: Allows you to view or play your songs by artist.
Genres:
Allows you to view or play your songs by genre.
Albums:
Allows you to view or play your songs by album.
Manage My Music
Sync Music
: Synchronizes music files with a PC.
Airplane Mode
Music Only Mode
My Music
. You can also press and hold .
: Allows you to manage your music files.
: Activates Airplane mode. Refer to
: Activates Music Only mode. Refer to
page 59
.
page 59
.
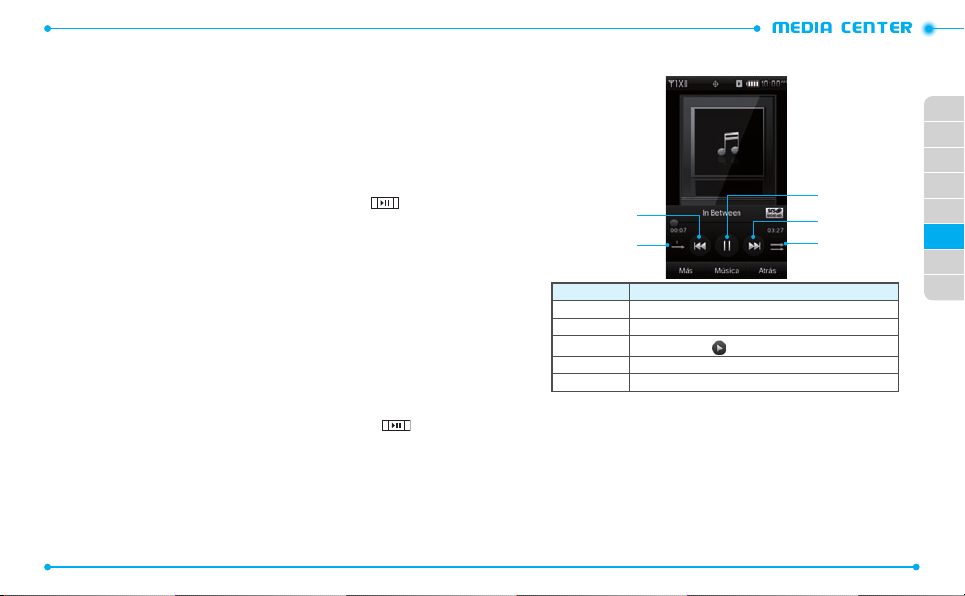
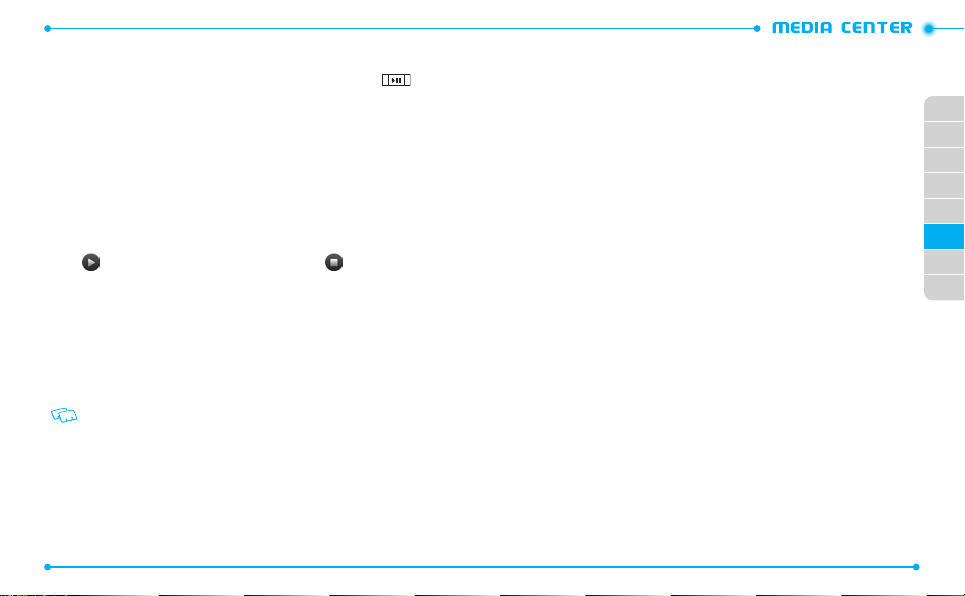
PLAYING MUSIC
1. Unlock the screen and tap
My Music
. You can also press and hold .
2. Tap a music category.
3. Tap a music file from the category.
During playback, rotate the phone counter-clockwise and scroll left or right
to an album. Tap the desired album to view the music file list or to play a
music file.
92
/
Text Messages /
4. Control playback with the following keys:
1
2
Number
1 Skips backward. Scans backward in a file (tap and hold).
2 Changes the repeat mode (Repeat Off, Repeat All, Repeat Track).
3
Pauses playback. Tap
4 Skips forward. Scans forward in a file (tap and hold).
5 Turns Shuffle mode on or off.
Tap
More
and adjust the following options during playback:
•
Song Info:
Displays the information about the currently playing music file.
•
Sound Effect
Airplane Mode
Music Only Mode
: Changes the sound effects (
: Activates Airplane mode (ON /
: Activates Music Only mode (ON /
•
•
Function
to resume playback.
SRS WOW HD
OFF
/
Normal
). Refer to
OFF
). Refer to
3
4
5
/
SRS CS Headphone
page 59
.
page 59
01
02
03
04
05
06
07
08
).
.
93
CREATING A PLAYLIST
1. Unlock the screen and tap
2. Scroll down and tap
3. Tap
Yes
to create a new playlist.
If there are saved playlists, tap
4. Enter a title for your playlist and tap
Playlists
My Music
. You can also press and hold .
.
Create New
Done
5. Tap the music files you want to include and tap
MY SOUNDS
To select a desired sound:
1. Unlock the screen, tap
2. Tap
My Sounds
.
Media Center
and then tap
3. Tap next to the sound you want to play. To stop, tap .
4. Tap a sound file. The following options are available:
•
Send:
Allows you to send the sound as a picture message.
•
To Online Album:
•
Rename
• Move To Card / Move To Phone
card or to the phone memory.
• Lock / Unlock
•
Erase
•
File Info
The preloaded sounds cannot be renamed, locked, or deleted.
Allows you to upload the selected tone to the online server.
: Renames the sound.
: Locks or unlocks the sound.
: Deletes the sound.
: Allows you to view the properties of the sound.
: Allows you to move the selected sound to the memory
RECORDING NEW SOUNDS
1. Unlock the screen, tap
2. Tap
3. Tap
4. Tap
94
My Sounds
More
and then tap
Record
Media Center
.
Record New
to begin recording.
and then tap
.
.
.
Done
.
Music & Tones
Music & Tones
5. Tap
Stop
to finish recording. The recording is automatically saved to the
Sounds
menu.
SYNC MUSIC
Allows you to synchronize your music files from PC to your phone.
In order to use this option, you must insert a microSDTM card and plug in the USB cable
(included inbox) to your phone and connect it to a USB port on your PC.
1. Unlock the screen, tap
2. Tap
Sync Music
.
Media Center
and then tap
Music & Tones
3. Drag and drop the song(s) you want to sync from your PC to corresponding
.
folders. Once synchronization is complete, tap
disconnect the USB cable (included inbox).
4. Under
Music & Tones
menu, open
Cancel
or the Home Key, and
My Music
to view and play your music files.
PICTURE & VIDEO
My
01
02
.
03
04
05
06
07
08
MY PICTURES
The My Pictures menu allows you to view all the pictures you have taken, store selected
images in your phone, send pictures to the Online Album, delete images and access
additional picture options.
1. Unlock the screen, tap
2. Tap
My Pictures
3. Tap the desired picture and then tap
•
Camera
: Capture a new photo.
•
Move To Card / Move To Phone
.
card or to the phone memory.
•
Add Slideshow
•
Lock/Unlock
•
Erase
: Deletes the photo.
•
Erase All
: Deletes all photos.
Media Center
.
: Allows you to move the selected photo to the memory
: Create a Slideshow.
: Locks or unlocks the photo.
and then tap
More
Picture & Video
to access to the following options:
.
95
DELETING A PICTURE
1. Unlock the screen, tap
2. Tap
My Pictures
3. Tap
More
4. Tap the picture to be deleted and tap
5. Tap
Yes
to confirm.
.
and then tap
Media Center
Erase
.
and then tap
Erase
.
Picture & Video
V CAST VIDEOS
V CAST Videos is a service that provides various kinds of video clips such as TV show, sports,
and other entertainments. You can enjoy videos by downloading them to your phone.
1. Unlock the screen, tap
2. Tap
V CAST Video
Media Center
.
and then tap
Picture & Video
3. Navigate through the sub-menus and find a video you can download (not all
videos are available for downloading).
4. Scroll to the video clip you want, then read the description of the video clip and
tap the picture on right .
5. Tap
Save Video
6. Tap
.
Yes
to accept the charges. Tap
Phone Memory
or
Memory Card
select a memory location for saving the video and the video clip will begin
downloading.
7.
When the video is finished downloading, a message will appear on your phone.
8. Tap
Yes
and the video clip will begin playing and will be automatically saved
in
My Videos
.
96
MY VIDEOS
.
.
to
The My Videos menu allows you to view all the videos you have recorded, store selected
videos in your phone, send videos to the Online Album, delete videos, and access
additional video options.
1. Unlock the screen, tap
2. Tap
My Videos
3. Tap the desired video and then tap
•
Move To Card / Move To Phone
card or to the phone memory.
•
Lock/Unlock
•
Erase
: Deletes the video.
•
Camera
: Records a new video.
•
File Info:
Displays the following information about the selected video:
File / Date / Time / Duration / Size
Media Center
.
: Allows you to move the selected video to the memory
: Locks or unlocks the video.
and then tap
More
Picture & Video
to access the following options:
.
TAKE PICTURE
1. Unlock the screen, tap
2. Tap
Take Picture
3. Take a picture. Refer to
Media Center
.
page 8382
and then tap
for taking a picture.
Picture & Video
.
01
02
03
04
05
06
07
08
RECORD VIDEO
1. Unlock the screen, tap
2. Tap
Record Video
3. Record a video. Refer to
Media Center
.
page 8684
and then tap
Picture & Video
for recording a video.
.
ONLINE ALBUM
To access Online Album:
1. Unlock the screen, tap
2. Tap
Online Album
Media Center
.
and then tap
Picture & Video
.
3. Follow the on-screen prompts.
97

APPS
GAMES
DOWNLOADING NEW GAMES
To download games and applications:
1. Unlock the screen and tap
2. Tap
Games
and then tap
3. Follow the on-screen prompts and download games to your phone.
PLAYING DOWNLOADED GAMES
1. Unlock the screen and tap
2. Tap
Games
.
3. Select the game you want and tap
DELETING A DOWNLOADED GAME
1. Unlock the screen and tap
2. Tap
Games
3. Tap
and then tap [reversed tri-angle image].
Manage Apps
4. Tap the application to be deleted and then tap
Applications may vary by wireless device model.
BROWSE & DOWNLOAD
DOWNLOADING NEW APPLICATIONS
To download tools that can help you navigate to entertainment spots, restaurants,
and provide you with up-to-date weather information:
1. Unlock the screen and tap
2. Tap
Browse & Download
3. Follow the on-screen prompts.
98
and tap
Apps
.
Shop Apps
Apps
.
Play
Apps
.
Erase
.
Apps
.
and then tap
.
.
Shop Apps
Yes
to confirm.
.
DOWNLOADING CITY ID
The City ID application allows you to view the city and state information of the
currently connected phone number while making or receiving a call or during a call.
1. Unlock the screen and tap
2. Tap
Browse & Download
Apps
.
and then tap
City ID
.
3. Follow the on-screen prompts.
The free trial is available when you use the application for the first time. If the free trial
period expires, the subscribe notification will appear.
EXTRAS
DOWNLOADING NEW APPLICATIONS
To download Applications:
1. Unlock the screen and tap
2. Tap
Extras
.
Apps
.
3. Follow the on-screen prompts.
DIRECTIONS
The Directions menu allows you to find locations, search local information, and get
directions while on the move.
1. Unlock the screen and tap
2. To download the application, tap
VZ Navigator
Purchase
.
and follow the on-screen prompts.
01
02
03
04
05
06
07
08
99

CDM8992
MESSAGING MENU
This chapter addresses messaging functions that
NEW MESSAGE NOTIFICATION
CREATING A NEW MESSAGE
VIEWING RECEIVED AND SENT MESSAGES
DELETING RECEIVED AND SENT MESSAGES
VIEWING DRAFT MESSAGES
DELETING DRAFT MESSAGES
CDM8992
7
allow you to send and receive messages.
Messaging functions including:
MANAGING THE TEMPLATE BOX
CHANGING THE MESSAGE SETTINGS
ACCESSING YOUR VOICEMAILS
ACCESSING VISUAL VOICEMAILS
EMAIL & IM

NEW MESSAGE NOTIFICATION
When a new message notification appears on the screen, tap
the message, or tap
View Later
to review at another time.
CREATING A NEW MESSAGE
You can create text messages, picture messages, video messages, and voice messages.
TEXT MESSAGE
1. Unlock the screen and tap
2. Tap
New Message
3. Tap the
Add Recipient
from. To enter a number manually, tap
4. Select or enter a phone number or an email address, and tap
5. Tap the
Add Text
6. Enter the message text and tap
While entering text, you can add a template, graphic, sound, name card, or
change formatting of text or language by tapping
To use the virtual QWERTY Keyboard, rotate the phone counter-clockwise.
7. Tap
More
and use the following options:
•
Save as Draft
•
8. Tap
: Saves the message in the draft box.
Priority Level
: Changes the priority level of the message.
Send
to send the message.
PICTURE MESSAGE
1. Unlock the screen and tap
2. Tap
New Message
3. Tap the
Add Recipient
from. To enter a number manually, tap
4. Select or enter a phone number or an email address, and tap
102
Message
and then tap
.
Text Message
.
field and tap the option you want to retrieve a number
Enter Number
.
field.
Done
.
More
.
Message
and then tap
.
Picture Message
.
field and tap the option you want to retrieve a number
Enter Number
.
View Now
Done
Done
.
.
to view
5. Tap the
Add Picture
6. Tap a picture and then tap
field.
Add to Message
.
7. Tap the text field.
When Callback # is set to on, the callback number is automatically inserted to the
text field.
8. Enter the message text and tap
To use the virtual QWERTY Keyboard, rotate the phone counter-clockwise.
9. Tap the
Add Sound
10. Tap the
Add Subject
11. Enter the message subject and tap
12. If necessary, tap the name card field and then tap
Contacts
. If
13. Tap
14. Tap
From Contacts
More
and use the following options:
•
Preview
: Allows you to preview the message.
•
Save as Draft
•
•
•
: Saves the message in the draft box.
Add Slide
: Adds another slide to the message.
Remove Picture / Sound / Slide
Priority Level
: Changes the priority level of the message.
Send
to send the message.
Done
.
field and then tap a sound file.
field.
Done
.
is chosen, tap the desired contact.
: Deletes the added picture, sound or slide.
My Name Card
VIDEO MESSAGE
1. Unlock the screen and tap
2. Tap
New Message
3. Tap the
Add Recipient
from. To enter a number manually, tap
Message
and then tap
.
Video Message
.
field and tap the option you want to retrieve a number
Enter Number
.
4. Select or enter a phone number or an email address, and tap
5. Tap the
Add Video
6. Tap a video and then tap
field.
Add Text
.
Done
01
02
03
04
05
or
From
06
07
08
.
103

7. Tap the text field.
When Callback # is set to on, the callback number is automatically inserted to the
text field.
8. Enter the message text and tap
To use the virtual QWERTY Keyboard, rotate the phone counter-clockwise.
9. Tap the
Add Subject
10. Enter the message subject and tap
field.
Done
.
Done
11. If necessary, tap the name card field and then tap
Contacts
. If
12. Tap
More
and use the following options:
•
Preview
: Allows you to preview the message.
•
Save as Draft
•
Remove Video
•
Priority Level
13. Tap
Send
to send the message.
From Contacts
: Saves the message in the draft box.
: Deletes the added video.
: Changes the priority level of the message.
is chosen, tap the desired contact.
VOICE MESSAGE
1. Unlock the screen and tap
2. Tap
New Message
3. Tap
Record
to start recording your voice.
4. When you are finished, tap
5. Tap
Add to Message
6. Tap the
Add Recipient
Message
and then tap
Voice Message
Stop
to stop recording.
.
to add it to the message.
field and then tap the option you want to retrieve a
number from. To enter a number manually, tap
7. Select or enter a phone number or an email address, and tap
8. Tap the text field.
When Callback # is set to on, the callback number is automatically inserted to the
text field.
104
.
.
Enter Number
My Name Card
.
Done
9. Enter the message text and tap
To use the virtual QWERTY keyboard, rotate the phone counter-clockwise.
10. Tap the
Add Subject
11. Enter the message subject and tap
12. If necessary, tap the name card field and then tap
Contacts
. If
13. Tap
or
From
14. Tap
From Contacts
More
and use the following options:
•
Preview
: Allows you to preview the message.
•
Save as Draft
•
•
: Saves the message in the draft box.
Remove Voice Recording
Priority Level
: Changes the priority level of the message.
Send
to send the message.
Done
.
field.
Done
.
is chosen, tap the desired contact.
: Deletes the added voice recording.
My Name Card
01
or
From
02
03
04
05
06
07
VIEWING RECEIVED AND SENT MESSAGES
When you access the Message menu, received and sent messages are displayed in the
list. All stored messages are sorted and listed by time order.
To view a received or sent message:
1. Unlock the screen and tap
2. Tap
Inbox
3. While viewing the message, tap
.
and then tap the message you want to view.
•
Reply with Picture Message
•
Reply with Video Message
•
Reply with Voice Message
•
Erase
: Deletes the message.
•
Erase All Messages
•
Lock/Unlock
: Locks or unlocks the message.
Message
: Allows you to send a reply as picture message.
: Allows you to send a reply as video message.
: Allows you to send a reply as voice message.
: Delete all stored messages in the list.
.
More
to access the following options:
08
105

DELETING RECEIVED AND SENT MESSAGES
1. Unlock the screen and tap
2. Tap
More
and then tap
3. Select the messages you want to delete and tap
4. Tap
Yes
to confirm.
Message
Erase
.
. To delete all messages, tap
VIEWING DRAFT MESSAGES
Draft messages are the messages you saved for editing and sending later.
1. Unlock the screen and tap
2. Tap
More
and then tap
Message
Drafts
.
.
3. Tap a draft message.
4. If necessary, edit and send the message. Tap
More
DELETING DRAFT MESSAGES
1. Unlock the screen and tap
2. Tap
More
and then tap
3. From the list, tap
All Drafts
.
4. Tap the messages you want to delete and then tap
5. Tap
Yes
to confirm.
More
Message
Drafts
.
and then tap
.
Erase
. To delete all messages, tap
MANAGING THE TEMPLATE BOX
With the
Quick Text
templates are retrieved into a new message.
CREATING A NEW TEMPLATE
1. Unlock the screen and tap
2. Tap
3. Tap
106
menu, you can create, edit, and delete text templates. The stored
More
New
.
and then tap
Message
Quick Text
.
.
Erase All Messages
Erase
.
to use other editing options.
Erase
Erase
.
4. Enter the message text and tap
Save
. The saved template is displayed on the
top of the list.
.
EDITING A TEMPLATE
1. Unlock the screen and tap
2. Tap
More
and then tap
Message
Quick Text
.
.
3. Tap the template you want to edit.
4. Change the text and tap
Save
.
DELETING A TEMPLATE
1. Unlock the screen and tap
2. Tap
More
and then tap
Message
Quick Text
.
.
3. Tap X next to the template you want to delete.
4. Tap
Yes
to confirm.
CHANGING THE MESSAGE SETTINGS
You can customize the default settings for sending and receiving messages.
1. Unlock the screen and tap
2. Tap
More
and then tap
•
Messages View
•
Language
: Changes the language for the display text.
•
Entry Mode
: Changes the default text input mode.
•
Auto Save Sent
sending them.
•
Auto Erase Inbox
when the message inbox is full.
•
TXT Auto View
text message comes in.
•
Multimedia Auto Receive
media attachments when a picture, video, or voice message comes in.
•
Voicemail #
: Allows you to change the voicemail number.
•
Callback #
: Allows you to insert the callback number to the text input field.
•
Signature
: Allows you to insert a signature to the end of the message.
Message
Settings
: Changes the display sort order of received messages.
: Allows you to set the phone to automatically save messages after
: Allows you to set the phone to automatically delete old messages
: Allows you to set the phone to display the message text when a new
: Allows you to set the phone to automatically download
.
. The following message settings are available:
01
02
03
04
05
06
07
08
107

•
Messaging Font Size
•
Delivery Receipt
are delivered.
: Allows you to change the message font size.
: Allows you to set the network to inform you when your messages
ACCESSING YOUR VOICEMAILS
The Voicemail menu allows you to access your voicemail box and listen to voicemails.
1. Unlock the screen and tap
2. Tap
Voicemail
3. When you hear a system greeting, tap
Message
and then tap
.
Call Voicemail
Keypad
.
and tap # to interrupt it, if
applicable.
If you are registered for Visual Voice Mail (VVM), VVM application will be performed.
4. Follow the prompts to enter your password and retrieve your voicemails.
The speed dial number 1 is assigned for your voicemail box. From the dial screen, tap
and hold 1 as a speed dial to your voicemail.
ACCESSING VISUAL VOICEMAILS
The Visual Voicemail service provides you with a new way of accessing voicemails. You
can view the list of voicemails and read voicemails, instead of listening to. You may be
charged to use this service.
1. Unlock the screen and tap
2. Tap
Voicemail
3. Tap
Subscribe Visual Voicemail for $2.99/month
4. After the voice prompts, tap
application and use the service.
108
Message
and then tap
Purchase
.
Call Voicemail
.
.
to download the Visual Voicemail
EMAIL & IM
The Email & IM menu allows you to use email services and messenger service. You may
be charged to use this service.
MOBILE EMAIL
The Mobile Email menu allows you to send and receive emails on your phone.
1. Unlock the screen and tap
2. Tap
Email
and then tap
3. Log into the website and use the email service.
MOBILE WEB MAIL
The Mobile Web Mail menu allows you to send and receive emails on the popular
websites preset by your service provider.
1. Unlock the screen and tap
2. Tap
Email
and then tap
3. Log into the webmail account and use the webmail service.
MOBILE IM
With Mobile IM, you can use the internet messenger service on your phone.
1. Unlock the screen and tap
2. Tap
Mobile IM
3. Log into the mobile messenger and chat with your friends.
.
Message
Mobile Email
.
Message
Mobile Web Mail
Message
.
.
.
.
01
02
03
04
05
06
07
08
109

CDM8992
This chapter addresses the safety guidelines and precautions to follow when
SAFETY AND WARRANTY
operating your phone. Before operating your phone, please be aware of all
the safety details. This chapter contains the terms and conditions of services
and the warranty for your phone. Please review them thoroughly.
SAFETY INFORMATION FOR WIRELESS
SAFETY INFORMATION FOR FCC RF EXPOSURE
HANDHELD PHONES
SAR INFORMATION
CDM8992
HEARING AID COMPATIBILITY (HAC) FOR
WIRELESS TELECOMMUNICATIONS DEVICES
AVOID POTENTIAL HEARING LOSS
FCC COMPLIANCE INFORMATION
12 MONTH LIMITED WARRANTY
8
FDA CONSUMER UPDATE

SAFETY INFORMATION FOR WIRELESS HANDHELD PHONES
READ THIS INFORMATION BEFORE USING YOUR HANDHELD
PORTABLE CELLULAR TELEPHONE
EXPOSURE TO RADIO FREQUENCY SIGNALS
Your wireless handheld portable telephone is a low power radio transmitter
and receiver. When it is ON, it receives and also sends out radio frequency (RF)
signals. In August 1996, the Federal Communications Commissions (FCC) adopted
RF exposure guidelines with safety levels for handheld wireless phones. Those
guidelines are consistent with the safety standards previously set by both U.S. and
international standards bodies:
ANSI C95.1 (1992) *
NCRP Report 86 (1986) *
ICNIRP (1996) *
Those standards were based on comprehensive and periodic evaluations of the
relevant scientific literature. For example, over 120 scientists, engineers, and
physicians from universities, government health agencies, and industry reviewed
the available body of research to develop the ANSI Standard (C951).
The design of your phone complies with the FCC guidelines (and those standards).
1*: American National Standards Institute.
2*: National Council on Radiation Protection and Measurements.
3*: International Commission on Nonionizing Radiation Protection.
ANTENNA SAFETY
Use only the supplied or an approved replacement antenna. Unauthorized
antennas, modifications, or attachments could impair call quality, damage the
phone, or result in violation of FCC regulations. Please contact your local dealer for
replacement antenna.
112
Do not use the phone with a damaged antenna. If a damaged antenna comes
into contact with the skin, a minor burn may result. Please contact your local
dealer for replacement antenna.
DRIVING SAFETY
Talking on the phone while driving is extremely dangerous and is illegal in some
states. Remember, safety comes first. Check the laws and regulations on the use
of phones in the areas where you drive. Always obey them. Also, if using your
phone while driving, please:
• Give full attention to driving. Driving safely is your first responsibility.
• Use hands-free operation, if available.
• Pull off the road and park before making or answering a call, if driving conditions
so require.
If you must use the phone while driving, please use one-touch, speed dialing, and
auto answer modes.
An airbag inflates with great force. DO NOT place objects, including both installed
or portable wireless equipment, in the area over the airbag or in the air bag
deployment area. If in-vehicle wireless equipment is improperly installed and the
air bag inflates, serious injury could result.
WARNING:
Failure to follow these instructions may lead to serious personal injury and
possible property damage.
ELECTRONIC DEVICES
Your wireless handheld portable telephone is a low power radio transmitter and
receiver. When it is ON, it receives and also sends out radio frequency (RF) signals.
Most modern electronic equipment is shielded from RF energy. However, certain
electronic equipment may not be shielded against the RF signals from your wireless
phone. Therefore, use of your phone must be restricted in certain situations.
01
02
03
04
05
06
07
08
113
 Loading...