

Page 1
User Guide
CDM8992
Page 2

CHAPTER 1. BEFORE USING
BEFORE USING ...............................................................................................7
INSIDE THE PACKAGE ................................................................................................8
HANDSET DESCRIPTIONS .........................................................................................9
KEY DESCRIPTIONS ................................................................................................ 11
DISPLAY INDICATORS ............................................................................................12
INSTALLING THE BATTERY ..................................................................................... 17
REMOVING THE BATTERY ......................................................................................18
CHARGING THE BATTERY....................................................................................... 18
BATTERY HANDLING INFORMATION ..................................................................... 20
CHAPTER 2. BASIC OPERATION
BASIC OPERATION ........................................................................................21
TURNING THE PHONE ON AND OFF....................................................................... 22
USING THE TOUCH SCREEN ....................................................................................22
USING THE HOME SCREEN .................................................................................... 24
LOCKING OR UNLOCKING THE TOUCH SCREEN AND KEYS .................................... 26
USING THE TASK MANAGER .................................................................................. 26
MENU SUMMARY .................................................................................................27
MAKING A CALL.....................................................................................................31
ANSWERING A CALL..............................................................................................31
MISSED CALL NOTIFICATION .................................................................................31
WAIT/PAUSE FEATURE ..........................................................................................32
MAKING AN INTERNATIONAL CALL ...................................................................... 33
3-WAY CALLING .................................................................................................... 33
2
CALL WAITING FUNCTION ..................................................................................... 33
CALLING A NUMBER FROM CONTACTS ................................................................. 34
ADJUSTING THE MASTER VOLUME .......................................................................34
SPEAKERPHONE MODE .........................................................................................34
AVAILABLE OPTIONS DURING A CALL ................................................................... 35
MAKING AN EMERGENCY CALL ............................................................................ 35
USING THE DIRECTORY SERVICE ............................................................................ 36
CHAPTER 3. MEMORY FUNCTION
MEMORY FUNCTION .....................................................................................37
ENTERING TEXT .....................................................................................................38
STORING A PHONE NUMBER ................................................................................. 40
EDITING CONTACT ENTRIES ................................................................................... 42
DEFAULT NUMBERS ............................................................................................... 44
BACKUP ASSISTANTTM ..........................................................................................44
SENDING A NAME CARD ....................................................................................... 44
SPEED DIALING ...................................................................................................... 45
CHAPTER 4. MENU FUNCTION
MENU FUNCTION..........................................................................................47
RECENT CALLS ....................................................................................................... 48
MY VERIZON ..........................................................................................................50
VOICE COMMANDS................................................................................................ 50
CALCULATOR ..........................................................................................................53
TIP CALCULATOR ....................................................................................................54
3
Page 3

CALENDAR ............................................................................................................. 54
ALARM CLOCK ....................................................................................................... 56
STOP WATCH .......................................................................................................... 57
WORLD CLOCK ....................................................................................................... 57
UNIT CONVERTER ..................................................................................................58
NOTEPAD ............................................................................................................... 58
USB MASS STORAGE ............................................................................................. 59
AIRPLANE MODE ................................................................................................... 59
MUSIC ONLY MODE ...............................................................................................59
BLUETOOTH ...........................................................................................................60
SOUND SETTINGS ..................................................................................................63
DISPLAY SETTINGS ................................................................................................65
TOUCH SETTINGS ................................................................................................... 68
PHONE SETTINGS .................................................................................................. 68
CALL SETTINGS ......................................................................................................74
MEMORY ............................................................................................................... 76
USB MODE ............................................................................................................. 79
PHONE INFO .......................................................................................................... 79
CHAPTER 5. CAMERA
CAMERA .......................................................................................................81
TAKING A PHOTO ...................................................................................................82
VIEWING PHOTOS.................................................................................................. 83
USING PHOTO OPTIONS.........................................................................................83
RECORDING A VIDEO ............................................................................................. 83
4
VIEWING VIDEOS ................................................................................................... 85
USING VIDEO OPTIONS ..........................................................................................85
USING CAMERA AND CAMCORDER SETTINGS ......................................................86
CHAPTER 6. MEDIA CENTER
MEDIA CENTER .............................................................................................89
USING A microSDTM CARD ..................................................................................... 90
SEARCH .................................................................................................................. 91
MUSIC & TONES .....................................................................................................91
PICTURE & VIDEO ..................................................................................................95
APPS ......................................................................................................................98
CHAPTER 7. MESSAGING MENU
MESSAGING MENU .....................................................................................101
NEW MESSAGE NOTIFICATION ............................................................................ 102
CREATING A NEW MESSAGE ...............................................................................102
VIEWING RECEIVED AND SENT MESSAGES......................................................... 105
DELETING RECEIVED AND SENT MESSAGES ....................................................... 106
VIEWING DRAFT MESSAGES ...............................................................................106
DELETING DRAFT MESSAGES ..............................................................................106
MANAGING THE TEMPLATE BOX .........................................................................106
CHANGING THE MESSAGE SETTINGS ..................................................................107
ACCESSING YOUR VOICEMAILS............................................................................ 108
ACCESSING VISUAL VOICEMAILS .........................................................................108
EMAIL & IM .........................................................................................................109
5
Page 4

CHAPTER 8. SAFETY AND WARRANTY
SAFETY AND WARRANTY ...........................................................................111
SAFETY INFORMATION FOR WIRELESS HANDHELD PHONES .............................112
SAFETY INFORMATION FOR FCC RF EXPOSURE .................................................. 117
SAR INFORMATION ..............................................................................................118
HEARING AID COMPATIBILITY (HAC) FOR WIRELESS TELECOMMUNICATIONS
DEVICES ...............................................................................................................120
FDA CONSUMER UPDATE ....................................................................................121
AVOID POTENTIAL HEARING LOSS ......................................................................130
FCC COMPLIANCE INFORMATION ........................................................................132
12 MONTH LIMITED WARRANTY ........................................................................133
6
BEFORE USING
This chapter provides important information about using the
BEFORE USING
CDM8992 including:
HANDSET DESCRIPTIONS
INSTALLING THE BATTERY
REMOVING THE BATTERY
BATTERY HANDLING INFORMATION
1
INSIDE THE PACKAGE
KEY DESCRIPTIONS
DISPLAY INDICATORS
CHARGING THE BATTERY
CDM8992
Page 5

PRODUCT SAFETY
& WARRANTY
GUIDE
INSIDE THE PACKAGE
This package should include all items pictured below. If any are missing or
different, immediately contact the retailer where you purchased the phone.
Standard Battery Pre-installed 1 GB
microSDTM Card
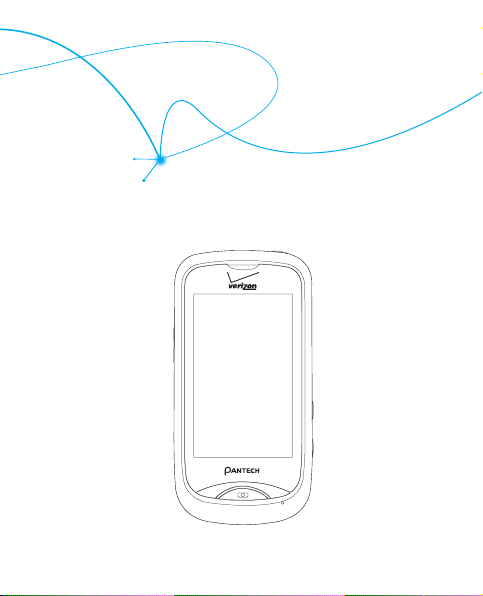
HANDSET DESCRIPTIONS
1
2
3
01
02
5
03
6
04
7
05
06
07
08
8
Handset QRG Product Safety &
Warranty Guide
Battery Cover Wall/USB Adapter USB Cable
4
1. Lock/Power Key
2. Earpiece
3. Touch Screen
4. Home Key
5. Wrist Strap Eyelet
6. Headset Jack
7. Volume Keys
9
Page 6

HANDSET DESCRIPTIONS
8
9
8. Self-Portrait Mirror
9. Speaker
10. Camera Lens
10
10
11. Charging/Data Jack
12. AVC Key
13. Camera Key
KEY DESCRIPTIONS
The following list correlates to the previous page’s phone illustration.
1. Lock/Power Key
2. Earpiece
3. Touch Screen
functions.
11
12
13
4. Home Key
view the touch screen in 3D view. Tap and hold to open the Task Manager
screen.
5. Wrist Strap Eyelet
purchased separately).
6. Headset Jack
conversations or for listening to music.
7. Volume Keys
to adjust the phone’s volume. When a call comes in, press to silence the call
ringtone. During a call, press to adjust the earpiece volume. In Speakerphone
mode, press to adjust the speaker volume. During playback, press to adjust
the music volume.
8. Self-Portrait Mirror
recording videos.
9. Speaker
speaker.
10. Camera Lens
: Press and hold to turn the phone on or off.
: Allows you to hear the other caller.
: Tap the touch screen to access the menu or perform phone
: Tap to return to the Menu mode screen. In Menu mode, tap to
: Accessory eyelet (attach optional straps and lanyards –
: Plug in an optional headset for convenient handsfree
: With the phone in the unlocked, from the Menu mode, press
: Displays your reflection when taking photos or
: Music, ringtones, and sounds are played through the external
: The lens of your built-in camera and camcorder.
01
02
03
04
05
06
07
08
11
Page 7

11. Charging/Data Jack
: Connects to the USB cable for data transferring or
charging when attached to the Wall/USB Adapter.
12. AVC Key
: With the phone in the unlocked, from the Menu mode, press to
launch the Voice Commands menu.
13. Camera Key
: With the phone in the unlocked, from the Home screen, press
to turn on the camera; Press and hold to turn on the camcorder. In Camera
mode, press to take a photo, or in Camcorder mode, press to record a video.
DISPLAY INDICATORS
Icon Icon Descriptions
D Signal Strength:
bars indicate a stronger signal.
3G Signal Strength
More bars indicate a stronger signal.
1X Signal Strength:
More bars indicate a stronger signal.
3G & 1X Signal Strength:
CDMA 1X networks. More bars indicate a stronger signal.
3G & D Signal Strength:
digital networks. More bars indicate a stronger signal.
Airplane Mode:
Music Only Mode
Roaming: Indicates your phone is outside of the home service area.
Femto Cell: Indicates that this area has enhanced service coverage
indoors.
12
Indicates your phone is in the digital network. More
: Indicates your phone is in the EVDO (3G) network.
Indicates your phone is in the CDMA 1X network.
Indicates your phone is in the EVDO (3G) and
Indicates your phone is in the EVDO (3G) and
Transmitting and receiving information is restricted.
: Indicates your phone is in Music Only mode.
Icon Icon Descriptions
SSL (Secured Socket Layer)
between client and server has been established during data
communication using encryption.
Voice Privacy
Data Call
Dormant: Indicates phone is in a dormant state during a data call. Phone
reverts to Dormant mode when there hasn't been activity on a page for
some time - the connection is still active and you can make and receive calls.
No Service
TTY
Voice Call
E911
Location On
Bluetooth
Bluetooth Active
Bluetooth Connected
phone.
Music Pause Mode:
Music Playing Mode
AVR Active:
: Indicates Voice Privacy mode is active.
: Indicates a data call is in progress.
: Indicates no phone service is available.
: Indicates TTY mode is active.
: Indicates a voice call is in progress.
: Location (GPS) service is set to E911 Only for emergency calls.
: Location (GPS) service is set to Full Detection.
: Indicates Bluetooth® mode.
Advanced Voice Command feature is active.
: Indicates that secure communication
: Indicates Bluetooth Active mode.
: Indicates a Bluetooth device is paired with your
Indicates that music playback is paused.
: Indicates that music is playing.
01
02
03
04
05
06
07
08
13
Page 8

Icon Icon Descriptions
AVR Listening:
Battery Level:
stronger the power.
All Sounds O:
Alarm Only:
Vibrate On:
Voicemail:
Alert Voicemail
Missed Calls:
Message:
Alert Messages
Calendar Appointment:
Alarm On:
Speakerphone:
14
Indicates your phone recognizes your voice command.
Indicates the battery charging level - the more bars, the
Indicates phone sounds are set to o.
Indicates the phone will alert you only with an alarm tone.
Indicates Alert Vibrate for incoming calls is set to on.
Indicates you have a new voicemail.
: Indicates a new voicemail.
Indicates you have missed calls.
Indicates you have new messages.
: Indicates a new message.
Indicates an alarm is set.
Indicates Speakerphone mode is active.
Indicates an alarm for your appointment is active.
Recent Call Icons
Dialed Call Missed Call
Received Call
New Contact Icons
Mobile WL Messenger
Mobile 2 Address
Home Ringtone
Business Group
Fax Speed Dial
Personal E-mail Title
Business E-mail Company
IM Screen Name Birthday
AIM Note
Yahoo!
01
02
03
04
05
06
07
08
15
Page 9

Message Icons
Unread Message Received Read Message
Read Message Multiple Message Sent
Unread EMS Message Delivered
Read EMS
Unread MMS Notication
Read MMS Notication Multiple Message Failed
Unread Corrupt Message Pending Message Send
Read Corrupt Message Multiple Message Pending
Unread Wap Push Incomplete Delivery
Read Wap Push
Unread MMS Text Message Draft
Read MMS Picture Message Draft
Sent Message Priority
Received Unread Message Message Locked
16
Multiple Message Delivered
Sent Message Delivery
Failed
Multiple Message
Incomplete
INSTALLING THE BATTERY
1. Slide the battery into the slot (1) by aligning the
contacts and push down (2) until you hear the “click.”
Correct Incorrect
2. Align the cover tabs with the slots on the back of the
phone and slide the battery cover onto the unit until
it snaps into place.
If the battery is not correctly placed in the
compartment, the phone will not turn on and/or the
battery may detach during use.
Correct Incorrect
01
02
03
04
05
06
07
08
17
Page 10

REMOVING THE BATTERY
1. To remove the battery cover, insert your finger tip
into the slot (1), then push down on the top of the
battery cover and slide it off (2).
2. Insert your fingernail into the slot and lift the battery
from the compartment.
3. Align the cover tabs with the slots on the back of the
phone and slide the battery cover onto the unit until
it snaps into place.
CHARGING THE BATTERY
1. Connect the USB data cable into the cableless wall
adapter.
2. Plug the USB data cable into the phone’s charging/
data jack (making sure to align the connector as
it appears in the image to the right) and the wall
adapter end into an electrical outlet.
18
If the battery connector is not properly aligned, damage could occur to the charging
connector and the phone may not be charged.
Correct
Correct
Incorrect
Incorrect
3. To remove the wall charger, unplug the USB data
cable from the phone’s charging/data jack.
• When you charge the battery with the handset
powered off, you will see a charging status screen.
After charging is completed, the Charge Complete
message appears and you cannot operate the phone
until it is powered on. To turn your phone on, press and
hold the Power Key until your display turns on.
•
The battery may not be fully charged at the time of
purchase. Fully charge the battery before using.
•
It is more efficient to charge the battery with the
handset powered off.
•
Battery operating time gradually decreases over time.
•
If the battery fails to perform normally, you may need
to replace the battery.
01
02
03
04
05
06
07
08
19
 Loading...