

Page 1

070816_PantechGSGFinal 수정.indd 1 2007-08-16 ¿ÀÈÄ 1:50:17
Page 2

2
Table of Contents
Set up Your Pantech Duo 4
What’s in the Box? 4
Insert Battery 5
Insert microSD™ Card 5
Charge Battery
5
Get to Know Your Pantech Duo
6
Get to Know Your Pantech Duo 6
Check Your AT&T Wireless Network Connection 7
Learn to Navigate & Type
8
Use the Phone 10
Make a Phone Call 10
Set Up Voicemail 11
Check Voicemail
11
Use Text/Multimedia Messaging & IM 12
Send a Text/Multimedia Message 12
Instant Messaging
12
Browse the Web & Shop Online 15
Go to Web Pages 15
Use MEdia Net
16
AT&T Mall
17
Set up Your Email 18
Personal Email Setup With Xpress Mail 20
Send and Receive Personal Email 22
Corporate Email Setup With Xpress Mail
22
070816_PantechGSGFinal 수정.indd 2 2007-08-16 ¿ÀÈÄ 1:50:21
Page 3

Send and Receive Corporate Email 25
Connect to Other Devices 26
Sync Your Device to Your PC 26
Set up Bluetooth®
27
Listen to Music & Watch TV & Video 28
AT&T Music 28
Transfer Music & Video to Your Device
29
Play Music 30
Stream Music (XM Radio®)
30
Watch Cellular Video 31
Watch MobiTV®
31
Use the Camera 32
Take & Send a Picture 32
Take & Send a Video
33
Office Mobile 34
Office Mobile 34
View Your Documents
34
Manage Contacts and appointments 35
Add a Contact 35
Schedule an Appointment
35
Troubleshooting 36
Tips & Tricks 40
3
070816_PantechGSGFinal 수정.indd 3 2007-08-16 ¿ÀÈÄ 1:50:21
Page 4

BatteryAC Travel ChargerPantech Duo USB Cable 3.5mm Headset Adapter
What’s in the Box? Insert Battery
4
What’s in the Box?
To get started, we recommend the following:
Carefully follow the step-by-step instructions in this guide to set up your device.
Review the User Manual (by clicking the proper link) on the Getting Started CD to learn about the full power
of the Pantech Duo.
Take note of the following components included in the box:
Insert Battery
1. Align the contacts on the battery with the contacts in the back of the device.
2. Push the battery down until it locks into place.
•
•
Set up Your Pantech Duo
070816_PantechGSGFinal 수정.indd 4 2007-08-16 ¿ÀÈÄ 1:51:14
Page 5

Insert microSD™ Card
A microSD™ Card is a removable memory card that may increase data storage capacity of the
device.
1. Slide open your device to reveal the Number Pad.
2. Remove the cover on the top of the device, that reads “microSD™”.
3. Insert the narrow end of the microSD™ Card into the slot, then replace the cover.
Note: microSD™ Card sold separately
Charge Battery
1. Plug the AC Travel Charger into a standard AC wall outlet.
2. Plug the travel charger into the jack on the bottom of the phone. The indicator
light at the top of the device is red while charging, and green when fully charged.
Note: When charging is complete, unplug the charger from the power outlet.
5
Insert microSD™ Card, Charge Battery
070816_PantechGSGFinal 수정.indd 5 2007-08-16 ¿ÀÈÄ 1:51:38
Page 6

Get to Know Your Pantech Duo
6
Get to Know Your Pantech Duo
Turn On/Off Your Device
Press and hold the END key.
Answer a Phone Call
Press and hold the SEND key.
Lock/Unlock Your Device Keypad
To Lock the device, press and hold the LOCK key. To unlock the device, press the LEFT
SOFT
key , followed by the * key.
Backlight
After 10 seconds your screen will dim to save battery power. To turn your screen on, press any
key, or open one of the keypads.
Change Backlight Settings
Press the LEFT SOFT key to enter the “Start” menu. Select “Settings”, then Click
“Power Management”. Scoll down to “Display time out”, or “Backlight time out on battery”,
Press the LEFT or RIGHT side of the NAVIGATION key to change the Display Time Out
settings.
Get to Know Your Pantech Duo
070816_PantechGSGFinal 수정.indd 6 2007-08-16 ¿ÀÈÄ 1:51:42
Page 7

Check Your AT&T Wireless Network Connection
7
Check Your Wireless AT&T Connection
On the top right corner of the home screen, you will find the network coverage indicator.
Full wireless 3G data coverage
Full wireless coverage (no data coverage)
No wireless coverage
Wireless is turned off
x
G
3
070816_PantechGSGFinal 수정.indd 7 2007-08-16 ¿ÀÈÄ 1:51:45
Page 8

8
Learn to Navigate & Type
Your Pantech Duo has two separate keyboards. If you want to insert a number, use the Number Pad, and if you want to
enter letters, use the QWERTY Keyboard.
Number Pad
To use the Number Pad, ensure that the QWERTY Keyboard is closed, then
hold the phone vertically and slide the screen up.
Note: The QWERTY Keyboard must be closed before sliding open the Number Pad.
To select the bottom left and right items on the
screen, use the LEFT and RIGHT SOFT keys.
To move around the screen, press the
NAVIGATION
key up, down, left or right.
Press the center of the NAVIGATION key
to select.
Learn to Navigate & Type
070816_PantechGSGFinal 수정.indd 8 2007-08-16 ¿ÀÈÄ 1:51:47
Page 9

9
QWERTY Keyboard
To use the QWERTY Keyboard, ensure that the Number Pad is closed, then hold the phone horizontally and slide the
screen up.
Note: The Number Pad must be closed before sliding open the QWERTY Keyboard.
To move around the screen, press the
NAVIGATION
key up, down, left or right.
Press the center of the NAVIGATION key
to select. The NAVIGATION key is now
oriented to landscape just like the screen.
To select the bottom left and
right items on the screen, use the
LEFT
and RIGHT SOFT keys.
To type a single uppercase letter,
press CAPS/SHIFT key, and then
press the corresponding key.
To enter a number or symbol, press
the FUNCTION key, and then press
the corresponding key.
070816_PantechGSGFinal 수정.indd 9 2007-08-16 ¿ÀÈÄ 1:52:45
Page 10

10
Make a Phone Call
1. On the Home screen, perform one of the following:
Type a phone number. AT&T recommends that you use the Number Pad for entering
numbers.
Press the RIGHT SOFT key to enter the “Contacts” menu. Use the
NAVIGATION
key to highlight and select the contact you wish to call.
Slide out the “QWERTY” keyboard and type part of a contact name. Using the
NAVIGATION
key ,highlight and select the contact you wish to call.
2. Press the SEND
key .
3. To end the call, press the END
key .
Note: to turn the speakerphone on or off during a call, press the “Send” key .
•
•
•
Use the Phone
Steps?
3
Takes?
2 minutes
Make a Phone Call
070816_PantechGSGFinal 수정.indd 10 2007-08-16 ¿ÀÈÄ 1:52:46
Page 11

11
Set Up Voicemail
1. Press and hold the 1 key on your Pantech Duo to connect to the AT&T voicemail system.
2. Create your password.
3. Record your name.
4. Record a greeting.
Check Voicemail
1. Press and hold the 1 key.
2. Follow the voice prompts.
Check Voicemail Messages From Other Devices
1. Dial your 10-digit wireless number.
2. Press the
* key when you hear your personal greeting. (Press the # key in Puerto Rico)
3. Enter your personal password that you created while setting up your voicemail.
Set Up Voicemail, Check Voicemail
Steps?
4
Takes?
4 minutes
070816_PantechGSGFinal 수정.indd 11 2007-08-16 ¿ÀÈÄ 1:52:46
Page 12

12
Send a Text/Multimedia Message
1. On the Home screen, press the LEFT SOFT key to enter the “Start” menu.
2. Select “Messaging”.
3. Select “Messages”.
4. Press the RIGHT SOFT
key to enter the menu.
5. Select “New”.
6. Choose “Multimedia Message” or “Text Message”.
7. In the “To” field, type a phone number, or press the
center of the to NAVIGATION key select a contact.
8. Type a message.
To add or attach an item to the message, press the RIGHT SOFT key
to enter the menu. Select “Add Item” and select the type of
item to attach. Choose the desired item from the list.
9. Press the LEFT SOFT key to select “Send”.
Note: Additional charges may apply.
Steps?
9
Takes?
2 minutes
Use Text/Multimedia Messaging & IM
Send a Text/Multimedia Message
070816_PantechGSGFinal 수정.indd 12 2007-08-16 ¿ÀÈÄ 1:52:51
Page 13
13
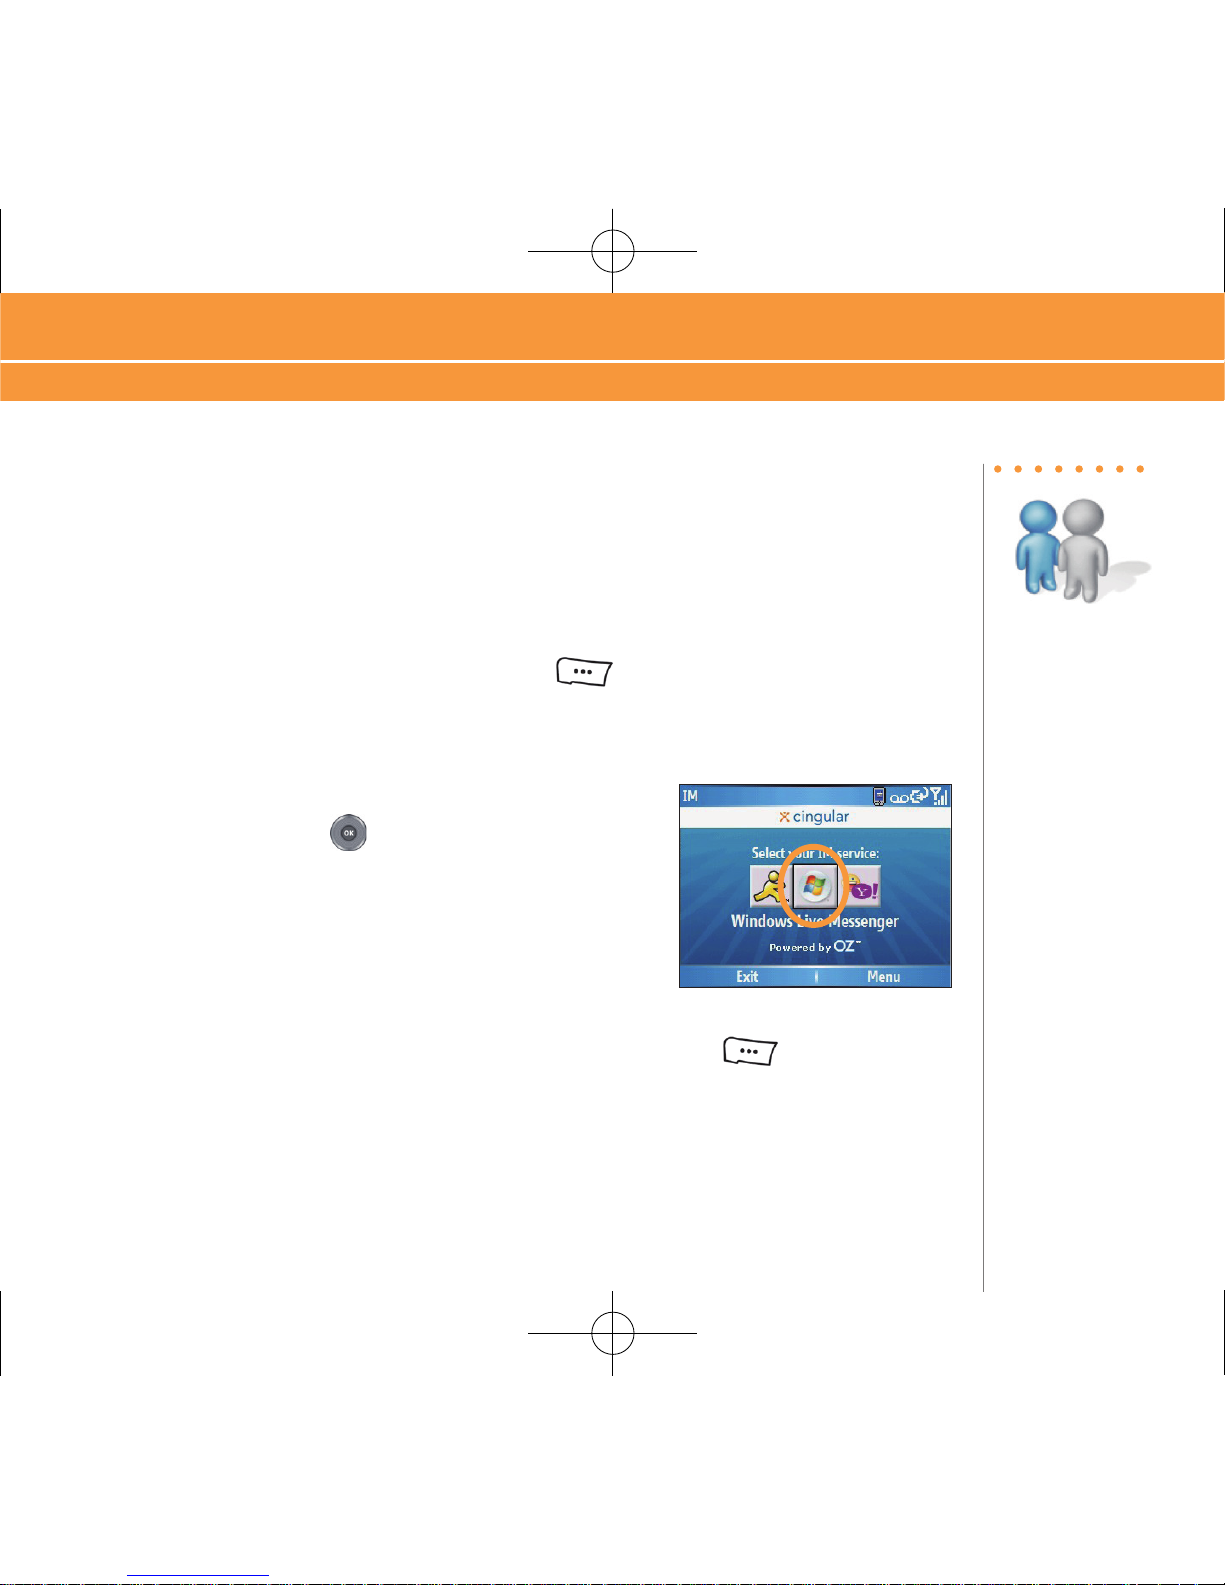
Instant Messaging
If you subscribe to an instant messaging (IM) service such as Yahoo!®, AOL®, or Windows Live™,
you can have the convenience and fun of IM on your Pantech Duo.
Set Up
1. On the Home screen, press the LEFT SOFT key to select “Start”.
2. Select “IM & Email”.
3. Select “IM”.
4. Highlight your desired IM service and press the center of
the NAVIGATION key .
5. Enter your user name and password and press the LEFT SOFT
key to select “Sign
In”.
Instant Messaging
Steps?
5
Takes?
1 minute
070816_PantechGSGFinal 수정.indd 13 2007-08-16 ¿ÀÈÄ 1:52:52
Page 14

14
Add A Contact
1. While signed in, press the RIGHT SOFT key to enter the menu.
2. Select “Add Buddy”.
3. Press the LEFT SOFT
key to select “Add”.
Note: Additional charges may apply.
Instant Messaging
Steps?
3
Takes?
1 minute
070816_PantechGSGFinal 수정.indd 14 2007-08-16 ¿ÀÈÄ 1:52:53
Page 15

Typing Tips:
To Capitalize
a letter, press
the CAPS/
SHIFT
key
, then
press the
appropriate
letter key.
To insert
symbols such
as @, _ and
/, press the
FUNCTION
key , then
press the
appropriate
letter key.
15
Go to Web Pages
Use Internet Explorer® to access web sites.
1. On the Home screen, press the LEFT SOFT key to enter the “Start Menu”.
2. Press the LEFT SOFT
key again for more options.
3. Select “Internet Explorer”.
4. Press the RIGHT SOFT
key to enter the menu.
5. Click “Address Bar”.
6. In the text field that appears, type the URL (e.g.
www.att.com) that you wish to go to.
7. Press the LEFT SOFT
key to click “Go”.
Note: Additional charges may apply.
Go to Web Pages
Browse the Web & Shop Online
070816_PantechGSGFinal 수정.indd 15 2007-08-16 ¿ÀÈÄ 1:52:54
Page 16

16
Use MEdia Net
MEdia Net® brings your favorite web pages, downloads and more to your wireless device.
1. On the Home Screen, press the LEFT SOFT key to select “Start”.
2. Select “MEdia Net”.
Note: Additional charges may apply.
Use MEdia Net
070816_PantechGSGFinal 수정.indd 16 2007-08-16 ¿ÀÈÄ 1:52:55
Page 17

Note:
For web
browsing,
AT&T
recommends
a data plan.
If you do
not have a
data plan
associated
with your
account,
please visit
att.com/
wireless or call
1-800-331-0500
17
AT&T Mall
Personalize your device with downloadable games, graphics and ring tones.
Browse thousands of ring tones in “Shop Tones”.
Select “Shop Games” to find games that turn your down-time into fun time.
Personalize your phone with unique art at “Shop Graphics”.
Go to “Shop Multimedia” to find an MMS greeting card that’s perfect for the occasion.
Subscribe to useful applications and cool tools discovered at “Shop Applications”.
1. On the Home screen, press the LEFT SOFT
key to enter the “Start” menu.
2. Select “AT&T Mall”.
3. Select the “Mall” you wish to enter.
Note: Additional charges may apply.
•
•
•
•
•
AT&T Mall
070816_PantechGSGFinal 수정.indd 17 2007-08-16 ¿ÀÈÄ 1:52:56
Page 18

18
Personal Email Setup With Xpress Mail
Xpress Mail automates the setup process, and will work with the majority of email services such as
Yahoo!® or AOL®.
1. Highlight “Get Xpress Mail” on the Home Screen and press
the center of the NAVIGATION key .
2. Highlight “Install Now”and press the center of the
NAVIGATION
key .
3. Highlight “Download Now” and press the center of the NAVIGATION key . (Download
time will vary depending on your service area).
Steps?
7
Takes?
8 minutes
Set up Your Email
Personal Email Setup With Xpress Mail
070816_PantechGSGFinal 수정.indd 18 2007-08-16 ¿ÀÈÄ 1:52:56
Page 19

Note:
For using
email on your
device, AT&T
recommends
a data plan.
If you do not
have a data
plan associated
with your
account, please
visit
att.com/
wireless or call
1-800-331-0500
19
4. Press the LEFT SOFT key to select “Yes” to
continue the download.
5 Press the RIGHT SOFT
key to accept the license
agreement.
6. Type your 10-digit mobile (cell) number (numbers only)
and press “Next”.
070816_PantechGSGFinal 수정.indd 19 2007-08-16 ¿ÀÈÄ 1:52:57
Page 20

20
7. Select “Portal or ISP” then press the RIGHT SOFT key
to select “Next”.
8. Choose your provider and press “Next”. (If your
provider is not listed highlight “More” then press
“Next” to view an additional list of personal email
providers.)
9. Enter your User Name and Password and press
“Next”.
Personal Email Setup With Xpress Mail
070816_PantechGSGFinal 수정.indd 20 2007-08-16 ¿ÀÈÄ 1:52:57
Page 21

21
10. Press “Register” and wait for the registration process
to complete.
11. After successfully registering, your Pantech Duo will
automatically display the Messaging section with
your personal email account.
070816_PantechGSGFinal 수정.indd 21 2007-08-16 ¿ÀÈÄ 1:52:57
Page 22

22
Send and Receive Personal Email
1. On the Home screen press “Start”, then press
“Messaging”, and select “Yahoo” (or your personal
email provider).
2. Press “Menu” and press “Send/Receive” to synchronize your email.
3. Press “New” to compose a new email.
4. When you are finished composing your message select “Send”.
Corporate Email Setup With Xpress Mail
With Xpress Mail, you can access your corporate email account (like Microsoft® Exchange or
Lotus Notes®) from your device without support from IT. First, you will have to register and
install Redirector® on your PC. This computer must remain on and connected to the corporate
network while you are setting up Xpress Mail. This feature may be prohibited or restricted in some
networks or on some PCs. Contact your network professional for more information.
Steps?
4
Takes?
6 minutes
Send and Receive Personal Email, Corporate Email Setup With Xpress Mail
070816_PantechGSGFinal 수정.indd 22 2007-08-16 ¿ÀÈÄ 1:52:57
Page 23

23
Start on your desktop or laptop computer
1. Navigate to http://xpressmailpe.wireless.att.com in your browser of choice.
2. Click “Register Now” and fill in the
required form fields.
3. On the download page, click “Download”
4. Click “Open” or “Run” and the desktop software will begin to download.
5. Click “Yes” when asked whether or not you want to install the desktop software.
6. Click “Next to begin setup and follow the on-screen instructions. When prompted for a user
name and password, use those created in Step 2.
7. When Xpress Mail has successfully connected to your corporate email account, you will
receive a message confirming that your software is installed and you are now connected to
Xpress Mail.
Steps?
7
Takes?
8 minutes
070816_PantechGSGFinal 수정.indd 23 2007-08-16 ¿ÀÈÄ 1:52:58
Page 24

24
Complete the Setup Process on Your Device
1. Highlight “Get Xpress Mail” on the Home Screen and press the center of the NAVIGATION
key .
2. Highlight “Install Now” and press the RIGHT SOFT key .
3. Highlight “Download Now” and press the center of the NAVIGATION
key on the
download page.
4. Press the LEFT SOFT
key to select “Yes” to continue the download.
5. Press the RIGHT SOFT
key to select “OK” and accept the license agreement.
6. Enter your 10 digit (mobile) number and press the RIGHT SOFT
key to select “Next”.
7. Select “Work” and press the RIGHT SOFT
key to
select “Next”.
8. Select “Professional Edition” and press the RIGHT SOFT
key to select “Next”.
Steps?
12
Takes?
10 minutes
Corporate Email Setup With Xpress Mail
070816_PantechGSGFinal 수정.indd 24 2007-08-16 ¿ÀÈÄ 1:52:59
Page 25

25
9. Select “Register Device” and press the RIGHT SOFT key to select “Next”.
10. Enter the User Name and Password you created online earlier and press the RIGHT SOFT
key to select “Next”
11. Press the RIGHT SOFT
key to select “Register” and wait for the registration process
to complete.
12. After successfully registering, your device will automatically display the XM Settings section.
Press the RIGHT SOFT key to select “Inbox” to go to your work email inbox.
Send and Receive Corporate Email
1. On the Home screen press the LEFT SOFT key to enter the ”Start” menu
2. Select “Messaging”, then select “Xpress Mail”.
3. Select “Menu”, then press “Send/Receive” to synchronize your email to your PC.
4. Press “New” to compose a new email.
5. When you are finished composing your message, press “Send”.
Steps?
5
Takes?
2 minutes
Send and Receive Corporate Email
070816_PantechGSGFinal 수정.indd 25 2007-08-16 ¿ÀÈÄ 1:53:00
Page 26

Note:
When you
connect your
Pantech
Duo to your
computer,
Microsoft®
ActiveSync®
will
immediately
synchronize.
While your
device is
connected,
every change
on either the
computer or
the device
will be
synchronized.
26
Sync Your Device to Your PC
If You Have Windows Vista™ on Your PC
When you connect your Pantech Duo to your computer for the first time Windows® Mobile
Device Center should automatically start and ask you to create a Windows® Mobile partnership
with your device. Finish the setup wizard and Windows Mobile Device Center will synchronize
your Pantech Duo automatically.
Note: If Windows Mobile Device Center does not start click Start > Windows Mobile Device Center. If you do
not have Windows Mobile Device Center on your Windows Vista™ computer then you must download the
software from the Microsoft site.
If You Have Windows® XP on Your PC
Before you connect your device to your PC, you must install Microsoft® ActiveSync® 4.5 or higher
on your PC, which can be installed from the Getting Started CD.
1. After closing all open programs on your PC, insert the Getting Started CD into the CD drive
of your PC.
2. Follow the instructions on the installation wizard screen to install Microsoft® ActiveSync®.
3. Connect Your Device to Your PC with USB cable included in the box.
4. In Microsoft® ActiveSync®, follow the prompts in the Install Wizard, and select the items you
wish to synchronize.
5. Click “Sync”.
Connect to Other Devices
Sync Your Device to Your PC
070816_PantechGSGFinal 수정.indd 26 2007-08-16 ¿ÀÈÄ 1:53:00
Page 27

27
Set up Bluetooth®
1. On the Home screen, press the LEFT SOFT key to enter the “Start Menu”.
2. Press the LEFT SOFT
key again for more options.
3. Select “Settings”.
4. Select “Connections”.
5. Select “Bluetooth”.
7. Press the RIGHT SOFT
key to enter the menu.
8. Select “Turn On Bluetooth”.
9. To connect to another Bluetooth® device:
Select “Add New Device”.
Select the Bluetooth® device you wish to add.
If required, type the passkey for the Bluetooth® enabled device on your Pantech Duo.
Once the Bluetooth® is paired with the Pantech Duo, you are ready to use Bluetooth®.
•
•
•
•
Steps?
9
Takes?
2 minutes
Set up Bluetooth®
070816_PantechGSGFinal 수정.indd 27 2007-08-16 ¿ÀÈÄ 1:53:00
Page 28

Note:
The number of
files you can
store depends
on the size
and format
options of the
memory card.
A microSD™
memory card
is preferable to
copy songs to
your phone.
Listen to Music & Watch TV & Video
28
AT&T Music
AT&T Music provides the ultimate music experience.
Transfer and listen to your music with Windows Media® Player.
Purchase tracks from digital music stores.
Stream dozens of commercial free XM music stations with “XM Radio®”.
Watch the latest music videos by clicking on “Music Video”.
Personalize with ringtones and Answer Tones under “Shop Music”.
Instantly ID the title and artist of a song with “Music ID”.
Get the latest music news, charts and concert info from the “The Buzz”.
Note: Additional charges may apply.
•
•
•
•
•
•
•
AT&T Music
070816_PantechGSGFinal 수정.indd 28 2007-08-16 ¿ÀÈÄ 1:53:01
Page 29

29
Transfer Music & Video to Your Device
To transfer music to your device, you will need:
Microsoft® ActiveSync® installed on your PC (to install Microsoft® ActiveSync® on your
PC, see “Sync Your Device to Your PC” on page 20).
Windows Media® Player 10 (or higher) installed on your PC. You can download this at:
http://www.microsoft.com/mediaplayer
1. Connect your device to your PC.
2. Close ActiveSync® (it will automatically open when you connect your device).
3. Open Windows Media® Player on your PC.
4. Click “Media Library”, then highlight the music you want to copy.
5. Right-click on it, then click “Add to Playlist”.
6. Click “Sync List” (The songs will appear in the “Sync List” pane on the right).
7. Click “Start Sync”.
•
•
Steps?
7
Takes?
3 minutes
Transfer Music & Video to Your Device
070816_PantechGSGFinal 수정.indd 29 2007-08-16 ¿ÀÈÄ 1:53:01
Page 30

30
Play Music
1. On the Home screen press the LEFT SOFT key to select “Start”.
2. Select “AT&T Music”.
3. Select “Windows Media Player”.
4. Select “My Music”.
5. Select “All Music”.
6. Select the song you wish to play.
Stream Music (XM Radio®)
1. On the Home screen press the LEFT SOFT key to select “Start”.
2. Select “AT&T Music”.
3. Select “XMRadio”. You can also choose from other music applications such as: “Streaming
Music”, “Shop Music” and more.
Note: To TURN OFF the music, press the “Right Soft” key then select “Mute/Unmute”.
Play Music, Stream Music (XM Radio®)
Steps?
6
Takes?
1 minutes
070816_PantechGSGFinal 수정.indd 30 2007-08-16 ¿ÀÈÄ 1:53:02
Page 31

31
Watch Cellular Video
Cellular Video brings you quick, on-demand access to high quality news, sports, weather and
entertainment video clips.
1. On the Home screen press the LEFT SOFT
key to select “Start”.
2. Select “Cellular Video”.
3. Select the show you wish to view.
Watch MobiTV®
MobiTV® brings your phone to life. Watch news, sports, weather, and entertainment clips via
AT&T’s high-speed data network while on the go.
1. On the Home screen press the LEFT SOFT key to select“Start”.
2. Select “MobiTV”.
3. Select the show you wish to view.
Watch Cellular Video, Watch MobiTV®
070816_PantechGSGFinal 수정.indd 31 2007-08-16 ¿ÀÈÄ 1:53:02
Page 32

Use the Camera
32
Take & Send a Picture
1. Press and hold the CAMERA key on the top right hand side of the device.
2. Select the CAMERA
key again to take a picture.
3. After the picture has been taken, press the RIGHT SOFT
key to enter the menu, and
select “Send Via Multimedia Msg.” or “Send Via Email”.
4. In the “To” field, type a phone number or the name of a saved contact (if sending via MMS)
or an email address (if sending via email).
5. Type a message (optional).
6. Select “Send”.
Take & Send a Picture
Steps?
6
Takes?
2 minutes
070816_PantechGSGFinal 수정.indd 32 2007-08-16 ¿ÀÈÄ 1:53:03
Page 33

33
Take & Send a Video
1. Press and hold the CAMERA key on the top right hand side of the device.
2. Press the RIGHT SOFT
key to enter the menu, and select “Camcorder”
3. Select the CAMERA
key to start recording.
4. Select the CAMERA
key again to stop recording.
5. Press the RIGHT SOFT
key to enter the menu, and select “Send Via MMS or Email”
6. In the “To” field, type a phone number or the name of a saved contact (if sending via MMS)
or an email address (if sending via email).
7. Type a message (optional).
8. Select “Send”.
Note: When taking, processing, or using the camera obey all laws that may restrict your use of the Pantech
Duo.
Take & Send a Video
Steps?
8
Takes?
2 minutes
070816_PantechGSGFinal 수정.indd 33 2007-08-16 ¿ÀÈÄ 1:53:03
Page 34

Office Mobile
34
Office Mobile
Microsoft® Office Mobile provides an easy way to view, edit and download many different forms
of documents such as:
Microsoft® Office Excel® (spreadsheets)
Microsoft® Office PowerPoint®
Microsoft® Office Word (text)
1. On the Home screen, press the LEFT SOFT
key to enter the “Start” menu.
2. Select “Office Mobile”.
3. Select the application you wish to use.
View Your Documents
1. On the Home screen, press the LEFT SOFT key to enter the “Start” menu.
2. Select “My Stuff”.
3. Select the folder you wish to view.
4. Select the file you wish to view.
•
•
•
Office Mobile, View Your Documents
070816_PantechGSGFinal 수정.indd 34 2007-08-16 ¿ÀÈÄ 1:53:04
Page 35

Manage Contacts and appointments
35
Add a Contact
1. On the Home screen, press the LEFT SOFT key to enter the “Start” menu.
2. Select “Contacts”.
3. Press the LEFT SOFT
key to select “New”.
4. To save the information to your SIM card, select “SIM Contact”.
5. Type the contact information.
6. Select “Done”.
Schedule an Appointment
1. On the Home screen, press the LEFT SOFT key to enter the “Start” menu.
2. Select “Calendar”.
3. Press the RIGHT SOFT
key to enter the menu.
4. Select “New Appointment”.
5. Type the appointment information.
6. Select “Done”.
Note: To change the calendar views, press the “Left Soft” key .
Add a Contact, Schedule an Appointment
Steps?
6
Takes?
2 minutes
Steps?
6
Takes?
2 minutes
070816_PantechGSGFinal 수정.indd 35 2007-08-16 ¿ÀÈÄ 1:53:04
Page 36

Troubleshooting
36
Troubleshooting
Why doesn’t my phone synchronize with my PC?
Your phone has already been installed with Microsoft® ActiveSync® from the factory. However, you also need to install
Microsoft® ActiveSync® from the CD that comes with your device onto your PC before you can synchronize data. See
page 20 for setting up ActiveSync®.
To synchronize, first you must connect your phone via a USB data cable or via Bluetooth® wireless interface. If you
plan to use a USB data cable, connect your cable to the phone on one end and the other to a USB port on your PC. If
you plan to use the Bluetooth® wireless interface, your PC must also have Bluetooth® capability. For first time setup,
you must create a partnership of your phone name with the PC name via Bluetooth®. See page 21 for Bluetooth®
Partnership.
Why can’t I beam a file from two Bluetooth® enabled devices?
Your Bluetooth® may be off. Ensure that your Bluetooth® in ON (see page 21 for information on how to turn
Bluetooth® on) for both your phone and the other device. They should both be within close range of 30 ft. If
your device gives an error and did not accept the file, Object Exchange may not be supported. Check the device
manufacturer for its limitation on Bluetooth® file transfer capability. Not all devices support Bluetooth® functionality.
070816_PantechGSGFinal 수정.indd 36 2007-08-16 ¿ÀÈÄ 1:53:04
Page 37

37
Why doesn’t the Voice Command work?
Ensure that you turn on Voice Command by pressing and holding the record button (default setting). If not, go to Voice
Command in the Application folder and check that it is enabled and the voice button is set to the RECORD button.
The RECORD button is the lower button, next to the CAMERA button on the right side of the phone. Press and
hold until a microphone icon appear on the screen. Talk into the microphone and give it a command. For example,
you can say “Call 255-250-2525” and the phone will dial the number; you can say “Show Bob” and the phone will
show Bob’s contact number; or, you can say “Play music” and it will prompt you for the song you want to listen to. The
phrases are limited. You can also say “Help” for a help topic.
Why is Media Player still playing when I return to the main menu?
You can open more than one application. To turn off the Windows Media® Player that is in the background, go to
Windows Media® Player or the Task Manager in the Applications folder. Task Manager will show the application(s) that
is running. Select the application and press stop.
070816_PantechGSGFinal 수정.indd 37 2007-08-16 ¿ÀÈÄ 1:53:04
Page 38

38
©2007 AT&T Knowledge Ventures. All rights reserved. AT&T, AT&T logo, Cingular and Cingular logos are trademarks
of AT&T Knowledge Ventures and/or AT&T affiliated companies. Some features may require monthly access and/or
per use charges. This phone is sold for use on AT&T’s wireless systems. It may not be compatible with other wireless
systems. Battery life, talk and standby times are approximate and depend on network configuration, signal strength,
features selected, and customer usage patterns.
WARNING: This product contains small parts. Keep your mobile phone and any small parts out of small children’s reach.
To take advantage of all the benefits and service features, you may need to purchase additional hardware or software,
pay monthly access and/or per use charges. This device contains a Lithium Ion Battery. Dispose of batteries according
to local regulations, (e.g. recycling). Do not dispose of as household waste.
Image of device on front panel is simulated. Dual slide operates individually, and not simultaneously.
Microsoft, Outlook, Excel, Windows Mobile, PowerPoint, ActiveSync, Windows, Windows Live, Windows Media,
Exchange, Internet Explorer, and the Internet Explorer logo are either registered trademarks or trademarks of Microsoft
Corporation in the United States and/or other countries. The Bluetooth word mark and logos are owned by the
Bluetooth SIG, Inc. and any use of such marks by AT&T Wireless is under license. The GSM lettermark is a trademark of
the GSM Association.
Pantech, Pantech Duo, and the Pantech Duo logo are either registered trademarks or trademarks of Pantech Co., Ltd.
in the United States and/or other countries.
IBM, Lotus, and Notes are trademarks of International Business Machines Corporation in the United States, other
countries, or both.
070816_PantechGSGFinal 수정.indd 38 2007-08-16 ¿ÀÈÄ 1:53:05
Page 39

39
070816_PantechGSGFinal 수정.indd 39 2007-08-16 ¿ÀÈÄ 1:53:05
Page 40

Phone
TO: DO:
Turn the speakerphone on and off during a call Select Menu, then click “Speakerphone On or Off”.
Change volume during a call Press the left and right buttons of the navigation
key .
Switch between Default and Vibrate notification
profiles
Press and hold the vibrate/Lock key.
Change phone service settings Select “Start”, then select “Settings”. Select “Phone”
and select the desired phone services.
Use the phone while out of the country Contact AT&T to enable international voice and data
roaming.
Browser
TO: DO:
View a page in full-screen mode On a web page, select “Menu” , then select “View”,
then choose “Full Screen”.
Change the size of the text on web pages On a web page, select “Menu”, then select “Zoom”
and select the size you want.
Navigating the Screen
TO: DO:
Scroll up/down/left/right on the screen
Press the navigation key up, down, left or right.
Tips & Tricks
40
070816_PantechGSGFinal 수정.indd 40 2007-08-16 ¿ÀÈÄ 1:53:05
Page 41

Launch a program or select an item
Press the center of the navigation key .
Typing
TO: DO:
Insert a period
Press the Period key
Insert a space
Press the SPace key.
Start a new line
Press the enter key.
Delete letter(s)
Press the deLete key.
Capitalize a letter
Press the caPS/Shift key.
Double-click the caPS/Shift key to lock/unlock capital letters.
Insert symbol
Press the function key
Double-click the function key to lock/unlock symbol keys.
Function Keys
The following keys when pressed at the same time, while on the Home Screen, will take you to the associated entry.
TO: DO:
Turn Bluetooth® On/Off FN + B
Launch AT&T Mail FN + C
Launch AT&T Music FN + M
Launch MEdia Net® FN + W
Launch AT&T Video FN + V
41
070816_PantechGSGFinal 수정.indd 41 2007-08-16 ¿ÀÈÄ 1:53:05
Page 42

QWERTY Keyboard Features
QWERTY Keyboard View
Function Key
To enter a number or
a symbol, press the
function key, and press the
corresponding key.
CAPS/Shift Key
Press this key then a
letter key to type a single
uppercase letter.
USB, Charge Port,
3.5mm Stereo
Headphone Adaptor
Enter Key
Press to create a new
line while writing a
message.
Clear/Back Key
Press to return to previous
screen.
Left Soft Key
Press to access the
“Start” menu from the
Home Screen.
Right Soft Key
Press to select a menu
function or access contacts
from home screen.
Delete Key
Press to delete a
number or letter.
Space Key
Press to enter a
space.
070816_PantechGSGFinal 수정.indd 42 2007-08-16 ¿ÀÈÄ 1:53:09
Page 43

Number Pad View
Volume Keys
Press to adjust the volume
during a call, or otherwise.
Send Key
Press to answer an
incoming call.
Home Key
Press to access the
Home Screen.
Clear/Back Key
Press to return to previous
screen.
Right Soft Key
Press to select a menu
function or access contacts
from home screen
Navigation Key
Press left, right, up and
down to scroll through
menus; press the center of
the Navigation key to select
an item
End Key
Press to end call; press and
hold to lock device.
Voice Record Key
Press from home screen to
access AT&T music screen
Camera Key
Press to activate camera or
to take a picture.
microSD Card Slot
Left Soft Key
Press to access the
“Start” menu from the
Home Screen.
QuickList/Lock Key
Press to access the “Quick
List”; press and hold to lock
device.
Number Pad Features
070816_PantechGSGFinal 수정.indd 43 2007-08-16 ¿ÀÈÄ 1:53:10
Page 44

Applications
Select Internet Explorer to browse the web and
WAP sites, and to download new programs and
files from the internet.
Select Contacts to view your contact list or add a new
contact.
Select Messaging to send and receive SMS and
MMS text messages, and email
Select Calendar to view your calendar or add a new
appointment.
Select Call History to view all phone calls made,
received and missed.
Select IM to keep in contact with friends and family
in real-time.
Select AT&T Music to play video and audio files
stored on the phone or network and get other
music related services.
Select MEdiaNet to access your favorite content
(weather, news, etc.) and download items like ring
tones and games.
Select AT&T Mall to enjoy multi-functional and
convenient AT&T services.
Select Settings to view the main list of options. You
can also access additional options from the menu in
each application.
Select Office Mobile to view, edit, and open
Microsoft Word® and Excel® documents, as well
as compressed files.
Select My Stuff to view the list of saved pictures,
ringtones, videos, or templates.
Select Games to view a list of games, such as
Bubble Breaker® and Solitaire®.
Select Applications to view a list of entertainment
applications such as Camera, Speed Dial, and Voice
Command.
Status Indicators
Battery level. Signal strength.
Low battery. New email or text message.
Battery charging. New voice mail
070816_PantechGSGFinal 수정.indd 44 2007-08-16 ¿ÀÈÄ 1:53:12
Page 45

1
1
2
2
Open Your Pantech Duo
To use the Number Pad, ensure that the QWERTY Keyboard is closed, then hold the phone vertically and slide the
screen up.
To use the QWERTY Keyboard, ensure that the Number Pad is closed, then hold the phone horizontally and slide the
screen up
070816_PantechGSGFinal 수정.indd 45 2007-08-16 ¿ÀÈÄ 1:53:24
Page 46

070816_PantechGSGFinal 수정.indd 46 2007-08-16 ¿ÀÈÄ 1:53:24
Page 47

070816_PantechGSGFinal 수정.indd 47 2007-08-16 ¿ÀÈÄ 1:53:24
Page 48

070816_PantechGSGFinal 수정.indd 48 2007-08-16 ¿ÀÈÄ 1:53:24
Page 49

070816_PantechGSGFinal 수정.indd 49 2007-08-16 ¿ÀÈÄ 1:53:24
Page 50

070816_PantechGSGFinal 수정.indd 50 2007-08-16 ¿ÀÈÄ 1:53:25
Page 51

070816_PantechGSGFinal 수정.indd 51 2007-08-16 ¿ÀÈÄ 1:53:25
Page 52

101706 GH68-12541A
Where can I find more information?
To learn more about using your Pantech Duo, please refer to the User
Guide PDF on the Getting Started CD.
Insert the Getting Started CD into the CD drive of your computer to
access the User Guide PDF.
Online Help
A tutorial may be found at:
att.com/tutorials
Additional Help
Refer to the ActiveSync® USB Connection Troubleshooting Guide at:
http://www.microsoft.com/windowsmobile/help/activesync/default.mspx
070816_PantechGSGFinal 수정.indd 52 2007-08-16 ¿ÀÈÄ 1:53:26
 Loading...