

Page 1

User Guide
C781R3
Page 2

CHAPTER 1. BEFORE USING
BEFORE USING ...............................................................................................7
INSIDE THE PACKAGE ................................................................................................8
HANDSET DESCRIPTIONS .........................................................................................9
DISPLAY INDICATORS ............................................................................................ 12
FEATURE OVERVIEW .............................................................................................20
INSTALLING THE SIM CARD AND BATTERY ........................................................... 21
REMOVING THE BATTERY ...................................................................................... 24
CHARGING THE BATTERY....................................................................................... 25
BATTERY HANDLING INFORMATION ..................................................................... 26
USING A MEMORY CARD .................................................................................................... 28
CONNECTING TO THE HEADSET JACK ................................................................................. 29
CHAPTER 2. BASIC OPERATION
BASIC OPERATION ........................................................................................31
TURNING THE PHONE ON AND OFF....................................................................... 32
MENU ACCESS ....................................................................................................... 32
MENU SUMMARY.................................................................................................. 33
MAKING A CALL..................................................................................................... 40
ABOUT PUSH TO TALK ........................................................................................... 40
TURNING PTT ON/OF ............................................................................................. 41
USING A PUSH TO TALK (PTT) ALERT .................................................................... 41
USING A PUSH TO TALK (PTT) BARGE ................................................................... 42
ANSWERING CALLS ............................................................................................... 43
ANSWERING PTT CALLS ........................................................................................ 43
2
Page 3

ENDING A CALL ..................................................................................................... 44
MISSED CALL NOTIFICATION .................................................................................44
WAIT/PAUSE .......................................................................................................... 44
MAKING AN INTERNATIONAL CALL ......................................................................45
3 WAY CALLING ..................................................................................................... 45
CALL WAITING ....................................................................................................... 46
VOLUME QUICK ADJUSTMENT ..............................................................................46
CALLER ID .............................................................................................................. 46
VIBRATE MODE ......................................................................................................47
MUTE FUNCTION ................................................................................................... 47
SPEAKERPHONE .................................................................................................... 47
FLASHLIGHT .......................................................................................................... 47
VOICE DICTATION ................................................................................................... 48
TEXT TO SPEECH .................................................................................................... 48
AVAILABLE OPTIONS DURING A CALL ................................................................... 49
MAKING AN EMERGENCY CALL ............................................................................ 50
MOTION DETECTION .............................................................................................. 50
CHAPTER 3. MEMORY FUNCTION
MEMORY FUNCTION .....................................................................................53
STORING A PHONE NUMBER .................................................................................54
TEXT INPUT ............................................................................................................ 60
USING THE TEXT INPUT MODE .............................................................................. 61
ONE, TWO, THREE DIGIT SPEED DIALING .............................................................. 63
3
Page 4

CHAPTER 4. MENU FUNCTION
MENU FUNCTION..........................................................................................67
CONTACTS ..............................................................................................................68
MESSAGING ........................................................................................................... 76
RECENT CALLS ....................................................................................................... 88
MEDIA CENTER ...................................................................................................... 92
VZ NAVIGATOR .......................................................................................................98
SETTINGS & TOOLS ................................................................................................ 99
CHAPTER 5. SAFETY AND WARRANTY
SAFETY AND WARRANTY ...........................................................................145
SAFETY INFORMATION FOR WIRELESS HANDHELD PHONES .............................146
GENERAL SAFETY ................................................................................................ 151
SAFETY INFORMATION FOR FCC RF EXPOSURE ..................................................155
SAR INFORMATION ..............................................................................................156
HEARING AID COMPATIBILITY (HAC) FOR
WIRELESS TELECOMMUNICATIONS DEVICES......................................................158
TELETYPEWRITER (TTY ) DEVICES ....................................................................... 160
FDA CONSUMER UPDATE .................................................................................... 160
EMERGENCY CALLS ............................................................................................. 169
COMPLIANCE WITH OTHER FCC REGULATIONS ..................................................171
AVOID POTENTIAL HEARING LOSS ...................................................................... 171
FCC COMPLIANCE INFORMATION ........................................................................ 174
RECYCLE YOUR CELL PHONE! ..............................................................................175
12 MONTH LIMITED WARRANTY ........................................................................176
4
Page 5

5
Page 6

Page 7

This chapter provides important information about using the Ravine®
INSIDE THE PACKAGE
HANDSET DESCRIPTIONS
DISPLAY INDICATORS
FEATURE OVERVIEW
INSTALLING THE SIM CARD AND BATTERY
C781R3 including:
REMOVING THE BATTERY
CHARGING THE BATTERY
BATTERY HANDLING INFORMATION
USING A MEMORY CARD
CONNECTING TO THE HEADSET
BEFORE USING
1
Page 8

INSIDE THE PACKAGE
This package should include all items pictured below. If any are missing or different,
immediately contact the retailer where you purchased the phone.
Handset QRG
Battery Cover Wall/USB
8
Standard
Battery
(Quick Reference
Guide)
Charger
SIM Card
(Pre-installed)
Product Safety &
Warranty Guide
USB Cable Global Support
Kit
Page 9
HANDSET DESCRIPTIONS
1
2
3
4
5
6
7
8
1. Earpiece:
the other caller.
2. Main Display Screen
Displays all the information
needed to operate your
phone.
3. [ B ] Directional Keys
Allows you to scroll through
phone menu options and
provides a shortcut to phone
functions from idle mode.
4. [ C ] Left Soft Key
15
access the Messaging menu
14
or access the function listed
13
above the key.
12
11
5. [ E ]
10
idle mode, press once to start
taking a picture. If pressed one
more time, it toggles to the
video recording mode.
9
6. [ G ] SEND Key
make or receive a call. In idle
mode, press to access the All
Calls list.
Allows you to hear
:
: Press to
Camera/Video Key:
: Press to
01
02
03
04
:
05
In
9
Page 10

18
19
17
15
16
7. [ 1 ] Voicemail Key
: In idle mode, press and hold to automatically connect
to your voicemail box.
8. [ K ] Shift Key
: Press to enter an asterisk (*) character for calling features.
In text entry mode, press to change the character input type. Press and hold to
display the plus sign (+) for international dialing.
9. [ J ] Vibrate Mode Key
: Press and hold to activate/deactivate vibrate mode
in idle mode. Press to enter the (#) character for calling features. In text entry
mode, press to add a space.
10
. [ I ] CLR Key
: Press to clear a character from the display. Press and hold to
clear all characters. Within a menu, press to return to the previous menu. Press
and hold to activate the G’zGEAR function in idle mode.
11.
[ H ] END/PWR Key
10
: Press and hold to turn the phone on/off or press to end
20
Page 11
21
22
23
24
a call or browser session. Within a menu, press to return to idle mode.
12
. [ F ] Speakerphone / Flashlight Key
speakerphone on or off. Press and hold to turn the flashlight on or off.
13
. [ A ] Center Select Key
allows you to accept choices when navigating through the menu.
14
. [ D ] Right Soft Key
access the function listed above the key.
15
. Microphone
16
. External Speaker
17.
Front Display Screen
strength, time and date.
: Press to access the MENU from idle mode. It also
: Press to access the Contacts menu in idle mode or
: Allows the other caller to hear you.
: Allows you to listen to music, sounds or ringtones.
: Displays incoming calls, messages, signal, battery
: With the flip open, press to turn
25
01
02
03
26
04
05
27
11
Page 12
18.
Camera Lens
19.
Flashlight
20.
Sim Card Slot
installed in the device (located under the battery).
21.
Headset Jack
hands-free conversations.
22.
[N] PTT Key / Red Side Key
List or press and hold to make a PTT Call. When not in PTT Mode, press to
access the selected shortcut application.
23.
[
L M
the voice volume during a call.
24.
Voice Commands Key
mode.
25.
Charging / Data Port
charging when attached to the Wall/USB Charger.
26.
microSD Card Slot
27.
Charging Terminals
: Built-in camera lens.
: Built-in flashlight
: Allows you to insert a SIM card. The SIM Card comes pre-
: Allows you to plug in an optional headset for convenient,
: In PTT Mode, press to access the PTT Contact
] Volume Keys
: Press to adjust the master volume in idle mode or adjust
: Press to activate the voice command function in idle
: Connects to the USB cable for data transferring or
: Allows you to insert a microSD card.
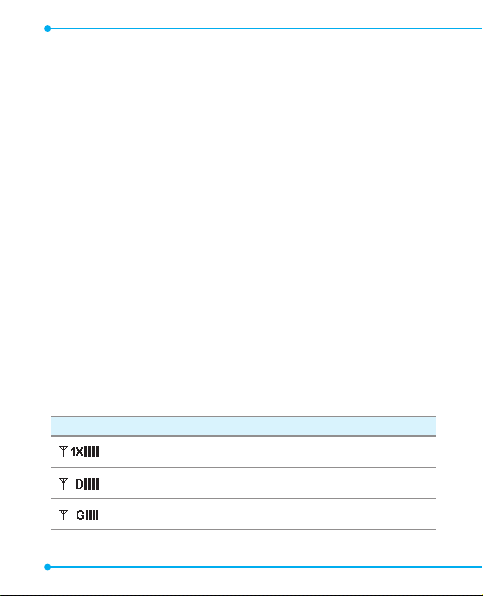
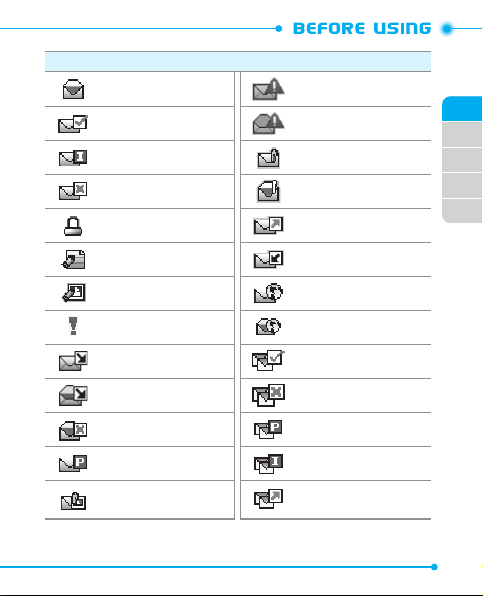
DISPLAY INDICATORS
Main Indicator Icons
1X Signal Strength
D Signal Strength
GSM Signal Strength
12
: 1X service is available.
: Digital service is available.
: GSM service is available.
Page 13

Main Indicator Icons
GPRS Signal Strength
3G Signal Strength
Airplane Mode
Roaming
Femto Cell
Cell).
SSL (Secured Socket Layer)
between client and server has been established during data communication using encryption.
Voice Privacy
Data Call
Dormant
Dormant mode when there hasn’t been activity on a page for some time.
The connection is still active and you can make and receive calls.
No Service
TTY
: TTY mode is active.
Voice Call
* No icon indicates the phone is in idle mode.
E911
: Location Service of your phone is E911.
: GPRS service is available.
: 3G service is available.
: Transmitting and receiving information is restricted.
: The phone is outside of the home service area.
: The phone is connected to the network extender.(Femto
: Indicates that secure communication
: Indicates Voice Privacy mode is active.
: Data Session is in progress.
: Phone is in a dormant state during a data call. Phone reverts to
: Phone cannot receive a signal from the system.
: A call is in progress.
13
01
02
03
04
05
Page 14
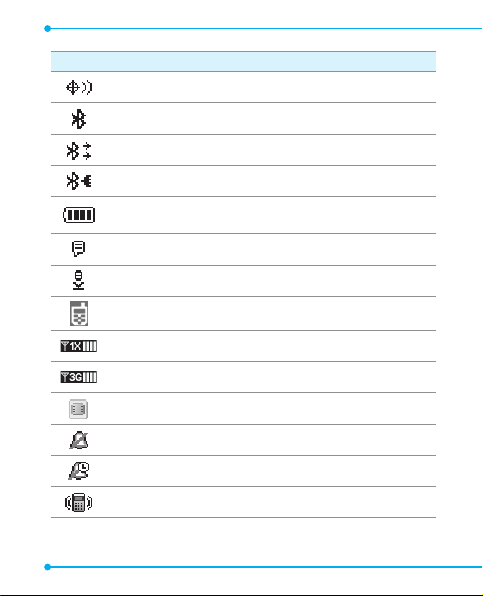
Main Indicator Icons
Location On
: Location Service of your phone is Location On.
Bluetooth
: Indicates Bluetooth mode.
Bluetooth Active
Bluetooth Connected
Battery Level
: Indicates Bluetooth Active mode.
: Indicates a Bluetooth Device is connected.
: Battery charging level - the more blocks, the stronger
the charge.
AVR Active
: AVR mode is active.
AVR Listening
PTT In Use
: Indicates AVR listening.
: Indicates you have a PTT call.
1x and PTT services are available.
3G and PTT services are available.
SIM Card
: Indicates SIM Card memory in use.
All Sounds O
Alarm Only
Vibrate Only
14
: All sounds are set to o.
: Phone will alert you only with an alarm alert.
: Phone will vibrate when call is received.
Page 15
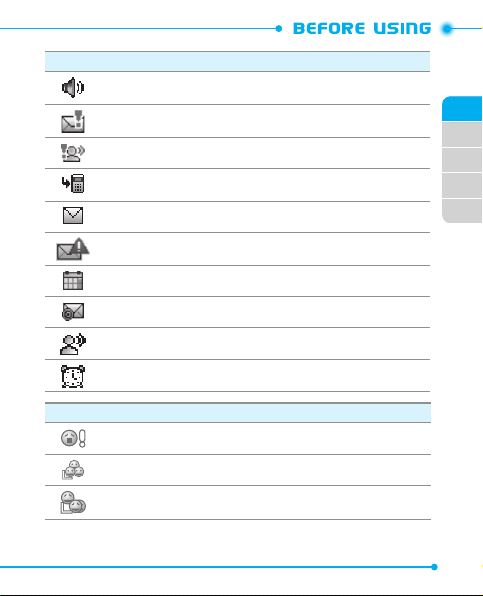
Main Indicator Icons
Speaker
: Speakerphone mode is active.
Urgent Message
Urgent Voicemail
Missed Calls
Message
CMAS Alert
Calendar Appointment
Mobile Email
Voicemail
Alarm On
PTT Alert
PTT Connected To Enterprise Group
PTT Connected To Group
: Indicates you have an urgent message.
: Indicates you have an urgent voicemail.
: Indicates you have missed calls.
: Indicates you have a new message.
: Indicates you have a CMAS message.
: Event Alarm is active.
: Indicates you have an email.
: Indicates you have voicemail messages.
: Appears when an alarm is set.
PTT Icons
15
01
02
03
04
05
Page 16
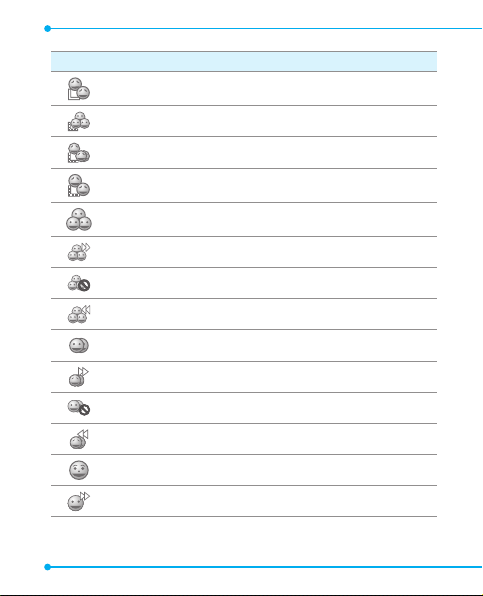
PTT Icons
PTT Connected To Individual
PTT Connecting To Enterprise Group
PTT Connecting To Group
PTT Connecting To Individual
PTT Enterprise Group
PTT Enterprise Group Dialed
PTT Enterprise Group Do Not Disturb
PTT Enterprise Group Received
PTT Group Available
PTT Group Dialed
PTT Group Do Not Disturb
PTT Group Received
PTT Individual Available
PTT Individual Dialed
16
Page 17
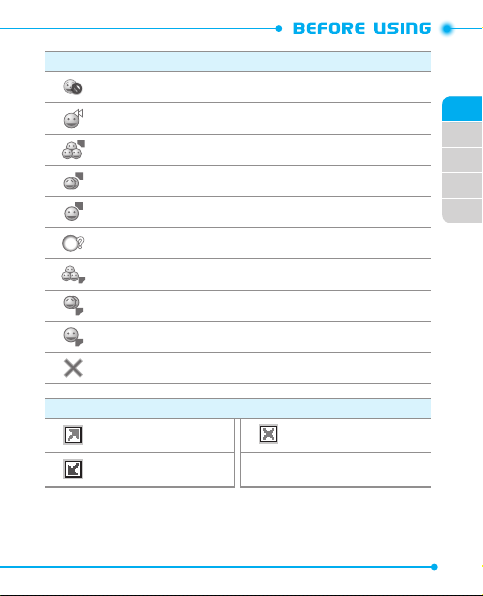
PTT Icons
PTT Individual Do Not Disturb
PTT Individual Received
PTT Listening To Enterprise Group
PTT Listening To Group
PTT Listening To Individual
PTT Missed Call
PTT Talking To Enterprise Group
PTT Talking To Group
PTT Talking To Individual
PTT Unavailable
Recent Call Icons
Dialed Call Missed Call
Received Call
17
01
02
03
04
05
Page 18
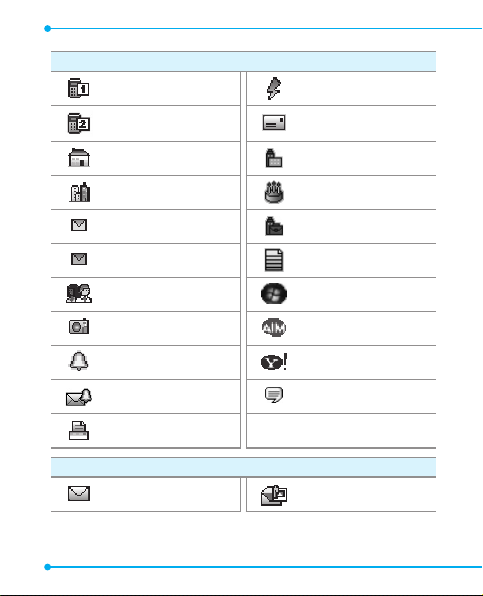
New Contact Icons
Mobile1 Speed Dial
Mobile2 Home/Work Address
Home Company
Business Title
Personal Email Birthday
Business Email Notes!
Group WL Messenger
Picture AIM
Ringtone Yahoo!
Message Tone IM Screen Name
FAX
Message Icons
New/Unread Message Read MMS
18
Page 19
Message Icons
Opened/Read Message Unread CMAS
Message Delivered Read CMAS
Incomplete Delivery Unread EMS
Sent Message Delivery
Failed
Message Locked Sent Message
Text Message Draft Received Message
Picture Message Draft Unread WAP Push
Priority Read WAP Push
Unopened MMS Notication
Opened MMS Notication Multiple Message Failed
Corrupt Message Multiple Message Pending
Pending Message Sent
Unread MMS
Read EMS
Multiple Message
Delivered
Multiple Message
Incomplete
Multiple Message
Sent
19
01
02
03
04
05
Page 20

FEATURE OVERVIEW
WATER RESISTANCE
The C781R3 is water resistant. It provides reliable performance for outdoor activities
and in wet conditions such as driving rain or high humidity.
The tested device meets the requirements of the MIL-STD-810G (Rain & immersion 1m,
30min) standard.
CAUTION:
The Water Resistance feature does not guarantee protection against the
usage of this device underwater. Do not use the handset underwater.
We do not take responsibility for waterlogging due to the negligence of
.
the user
To maintain water resistance:
• Securely close the Charging/Data Port cover,
Jack cover.
• Completely close the battery cover and slide the battery cover lock to the LOCK
position.
• Make sure that the handset is completely dried up before you open any cover. When
wet, clean the handset with a dry cloth, swish water from the handset, and dry it
thoroughly before use.
SHOCK RESISTANCE
The rugged construction of the C781R3 provides outstanding shock and vibration
resistance. The tested device meets the requirements of the MIL-STD-810G (Drop 1.5m)
standard.
CAUTION:
The shock and vibration resistance features do not guarantee protection
against every type of shock and vibration. Your handset may be damaged or
malfunction depending on the severity of the shock or vibration.
DUST RESISTANCE
For additional peace of mind, the C781R3 is also dust resistant. The device was tested
using silica flour at a temperature of 95°F and meets the MIL-STD-810G (DUST)
standard.
20
microSD™
card cover and the Headset
Page 21
• Your handset can be rinsed with clean water when dirty. To ensure water resistance,
make sure that all covers are securely closed before rinsing.
• Periodically, clean the Charging Terminals and Battery Terminals with a dry cloth
or cotton swab. Dust may cause electrical connection problems. Avoid wiping with
excessive force, which can damage the terminals.
OPERATION TEMPERATURE
0 - 50 ◦C (without adaptor), 0 - 45 ◦C (with adaptor)
Battery Terminals
CAUTION
• Do not clean terminals inside the handset, or they may be damaged.
• If mud or sand is adhered to the handset, do not use it until wiping completely.
• Do not place the handset directly on sand. If sand gets into the Earpiece or Speaker,
sounds may be difficult to hear. Sand getting into the handset’s hinge can cause
problems such as overheating.
INSTALLING THE SIM CARD AND BATTERY
Your wireless device comes with a SIM card installed which along with a Global Feature
on your account, enables you to make calls and access email in GSM Networks while
traveling overseas.
Should your SIM card be lost or damaged, please follow these instructions for the
installation of your new SIM.
21
01
02
03
04
05
Page 22

CAUTION
• Wipe your handset before opening the battery cover to prevent moisture or dust
from entering.
• Failure to follow the below directions for installing/removing the battery could result
in product failure.
• Fully charge the battery before using the handset for the first time.
1. Remove the battery cover and battery, as
instructed on page 24. Slide the SIM card
into the slot in the direction of the arrow
shown in the figure.
- To remove the SIM card, pull out the SIM
card in the opposite direction of the arrow.
2. Slide the battery into the slot by aligning the
contacts (1) and press down until you hear
“click (2).”
Make sure that the sticker on the battery is put inside when you replace the back
cover. Otherwise it may affect the water resistance function.
22
Page 23
3. Insert the battery cover into the slots (1) and
press the battery cover in the direction of the
arrow (2).
4. Press down firmly on the side of the battery
cover at each arrow point, as shown in the
figure.
5. Slide the battery cover latch to the LOCK
position in the direction of the arrow shown
in the figure.
CAUTION
• Do not twist the battery cover as shown in the figure below. Doing so can damage
the handset and the battery cover.
• Do not press hard on the battery cover with the battery cover tabs running over the
handset because you may damage the battery cover tabs.
• Be careful not to get the tab of the battery caught between the edges of battery
cover and the handset. Failure to do so will result in the loss of water resistance.
• If you are using a wrist strap (sold separately), be careful not to get it caught
between the battery cover and the handset. Failure to do so will result in the loss of
water resistance.
23
01
02
03
04
05
Page 24

REMOVING THE BATTERY
1. Slide the battery cover latch to the FREE
position in the direction of the arrow as
shown in the figure.
2. Insert your thumb in the right side groove
and pull up the battery cover in the direction
of the arrow.
3. Remove the battery by pulling the tab up.
Do not leave the removed battery in direct sunlight, or near heat sources such as an
open flame or stove. Otherwise, it may malfunction or cause a fire by bursting or
igniting. Do not hit, or exert excessive shock on the battery, as it can ignite or break.
24
Page 25

CHARGING THE BATTERY
1. Connect the USB cable into the Wall/USB
Charger.
2. Plug the USB cable into the phone’s Charging/
Data Port. Plug the Wall/USB Charger into an
electrical outlet. The battery starts charging.
3. Disconnect the charger when the battery is
fully charged.
• Hold the small connector with the USB mark facing up. When inserting the
connector into the Charging/Data Port on the handset, hold the connector straight
against the port without tilting it vertically or horizontally and gently insert it.
If the battery connector is not properly aligned, damage could occur to the charging
connector and the phone may not be charged.
• Failure to completely reseal the Charging/Data Port cover after charging may allow
water or other liquids to enter the casing, damaging the handset.
• The Phone used be sure to L.P.S(Limited Power Sources) power supplies.
• The connection to USB interfaces has to be limited to USB 2.0 version or higher.
Correct Incorrect
Correct Incorrect
01
02
03
04
05
25
Page 26

4. To remove the wall charger, unplug the USB
cable from the phone’s Charging/Data Port.
• When you charge the battery with the handset
powered off, you will see a charging status
screen. After charging is completed, the Charge
Complete message appears and you cannot
operate the phone until it is powered on. To turn
your phone on, press and hold the
H
until your display turns on.
• The battery may not be fully charged at the time of purchase. Fully charge the
battery before using.
• It is more efficient to charge the battery with the handset powered off.
• Battery operating time gradually decreases over time.
• If the battery fails to perform normally, you may need to replace the battery.
END/PWR Key
BATTERY HANDLING INFORMATION
Do not install the battery in humid places, like a bathroom, or places where water or liquid can come
into contact with the handset or battery. Otherwise, the electrical circuits may short or erode and cause
the handset to malfunction.
DO’S
•
Only use the battery and charger approved for use with the
included with the phone may damage your phone or battery.
• Only use the battery for the system for which it is specified.
• Only use or replace the battery with a charging system or another battery that has been qualified with the
system per this standard, IEEE-Std-1725-2006. Use of an unqualified battery or charger may present a risk of
fire, explosion, leakage, or other hazard.
• Only use the battery for its original purpose. As an improper battery use may result in a fire, explosion or
other hazard.
• Try to keep batteries in a temperature between 41°F (5°C) and 95°F (35°C). If the battery is stored in
temperatures above or below the recommended range, give it time to warm up or cool down before using.
• Store the discharged battery in a cool, dark, and dry place.
• Purchase a new battery when its operating time gradually decreases after fully charging.
26
C781R3
. Using any charger other than the one
Page 27
• Properly and promptly dispose of the battery according to local laws.
• Battery usage by children should be supervised.
• Dispose of used battery according to the instructions.
• Completely drain the battery before recharging. It may take one to four days to completely drain.
• When the device is not used for long period, remove the battery from the device.
DON’TS
•
Don’t attempt to disassemble or open the battery – it is a sealed unit with no serviceable parts.
Don’t crush, bend or deform, puncture or shred the battery.
•
Don’t drop the phone or battery. If the phone or battery is dropped, especially on a hard surface, and the user
•
suspects damage, take it to a service center for inspection.
Don’t leave the battery in extremely hot or cold temperatures. Otherwise, it could significantly reduce the
•
capacity and lifetime of the battery.
Don’t modify or remanufacture, attempt to insert foreign objects into the battery, immerse or expose to water
•
or other liquids, expose to fire, explosion or other hazard.
Don’t accidentally short-circuit the battery by carrying it in your pocket or purse with other metallic objects
•
such as coins, clips and pens. This may critically damage the battery, and may cause fire or injury.
Don’t short-circuit a battery or allow metallic conductive objects to contact battery terminals.
•
Don’t dispose of the battery by placing into a fire.
•
Don’t use the battery with damage or a leak.
•
CAUTION
There is a risk of explosion if battery is replaced by an incorrect type. Lithium ion
batteries are recyclable. When you replace your battery, please request the repair
center to recycle the battery in accordance with RBRC standards. When disposing of
the battery by yourself, please call RBRC at (800) 822-8837 for proper disposal tips.
Never touch any fluid that might leak from the battery. Such liquid when in contact
with the eyes or skin, could cause injury to the skin or eyes. Should the liquid come into
contact with the eyes, irrigate the eyes thoroughly with clean water and immediately
seek medical attention. In the event the liquid comes into contact with the skin or
clothing, wash it away immediately with clean water.
27
01
02
03
04
05
Page 28

USING A MEMORY CARD
The
C781R3
supports the use of a microSD™ memory card as a source of external memory.
USING A microSD™ CARD
By using a microSD™card, you can store sounds, videos, images, photos, and other files.
INSTALLING A microSD™ CARD OPTIONAL
1. Open the microSD
the microSD
contacts facing up.
2. Press the microSD
you hear the “click”, then close the microSD
card cover.
3.
“CARD INSERTED. PICTURE, VIDEO & SOUND
WILL BE SAVED TO CARD MEMORY. ACCEPT
CHANGES?”
4. Press the
CAUTION
•
Whenever installing or removing a memory card, make sure the handset is turned off
and that the Wall/USB Charger is not connected.
•
When installing or removing a memory card, avoid touching the memory card
contacts and avoid damaging the memory card. Either can cause malfunction or
loss of data.
•
The front and back of the memory card look different. When inserting the memory
card, make sure the correct side is facing up. If not, the memory card may not fit
in the memory card slot, or the memory card and/or memory card slot may be
damaged.
•
Do not forcibly insert the memory card into the memory card slot. Hold it with the
contacts facing down and carefully insert it.
•
Failure to completely reseal the memory card slot after installing may result in
damage if the handset is exposed to water.
28
TM
card cover, and insert
TM
card into the slot with the gold
TM
card into the slot until
will appear on the display.
Center Select Key [Yes
] to confirm.
TM
Page 29
REMOVING A microSD™ CARD
1. Open the microSD
thumb to press and release the microSD
TM
card cover, and use your
TM
card.
2. Press the memory card inward, gently, until it
pops out.
3. Remove the microSD
microSD
CAUTION
• Never remove a memory card from the handset while it is being accessed. Doing so
can damage the memory card or the data stored on it.
• The memory card is very small. Make sure you do not drop it.
• To ensure the proper function of removable memory, please use a microSD
• Failure to completely reseal the memory card slot after removing may result in
damage if the handset is exposed to water.
TM
card cover.
TM
card and close the
TM
card.
CONNECTING TO THE HEADSET JACK
You can connect a compatible device equipped with a standard 2.5mm plug to your handset for
safe, convenient, hands-free conversations.
1. To open the Headset Jack cover, insert your
fingertip into the notch and open the cover.
2. Plug the connector into the Headset Jack.
CAUTION
• Do not forcibly insert/remove the connector
into/from the Headset Jack. Carefully insert/
remove it.
• Failure to completely reseal the Headset Jack
cover after use may result in damage if the
handset is exposed to water.
29
01
02
03
04
05
Page 30

Page 31

BASIC OPERATION
This chapter addresses and explains the basic features for
TURNING THE PHONE ON AND OFF
USING A PUSH TO TALK (PTT) ALERT
USING A PUSH TO TALK (PTT) BARGE
MAKING AN INTERNATIONAL CALL
MENU ACCESS
MENU SUMMARY
MAKING A CALL
ABOUT PUSH TO TALK
ANSWERING CALLS
ANSWERING PTT CALLS
ENDING A CALL
MISSED CALL NOTIFICATION
WAIT/PAUSE
2
C781R3 including:
3 WAY CALLING
VOLUME QUICK ADJUSTMENT
AVAILABLE OPTIONS DURING A CALL
MAKING AN EMERGENCY CALL
CALL WAITING
CALLER ID
VIBRATE MODE
MUTE FUNCTION
SPEAKERPHONE
FLASHLIGHT
VOICE DICTATION
TEXT TO SPEECH
MOTION DETECTION
Page 32

TURNING THE PHONE ON AND OFF
TURNING ON
1. Press and hold the
END/PWR Key
H until the phone display turns on.
2. Enter your 4-digit lock code if the phone is locked. The default lock code is the
last 4 digits of your phone number.
Avoid any unnecessary contact with the internal antenna area while your handset is on.
TURNING OFF
1. Press and hold the
• Immediately change or recharge the battery when BATTERY LOW appears on the
display.
•
Turn the phone off before removing or replacing the battery. If the phone is on,
unsaved data may be lost.
END/PWR Key
H until the phone display turns off.
MENU ACCESS
Your phone can be customized via the menu. Each function can be accessed by scrolling
Directional Key
with the
item.
1. To access the menu, press the
2. To scroll through the menu, press the
right.
3. To return to the previous page, press the
4. To exit the current menu, press the
5. To access the Messaging menu, press the
6. To access the Contact List, press the
All directions in this manual are based on the Grid menu layout and the HUD display
theme. If you have changed the settings, the directions may vary.
32
or by pressing the number that corresponds with the menu
Center Select Key [MENU
Directional Key B
CLR Key
END/PWR Key
Left Soft Key
Right Soft Key
I.
H.
D [
].
up, down, left or
C [
Message
Contacts
].
].
Page 33

MENU SUMMARY
Main Menu 2nd DEPTH 3rd DEPTH 4th DEPTH
Contacts
Messaging
* These options appear when PTT Mode is turned on.
1. New Contact
2. Contact List
3. Groups
4. Backup Assistant
5. Speed Dials
6. In Case of Emergency
4.* New PTT Contact
5.* PTT Contact List
6.* PTT Group
7. My Name Card
1. New Message
2. Messages
3. Drafts
4. Voicemail
5. Mobile IM
6. Mobile Email
Business
Personal
1. TXT Message
2. Picture Message
3. Video Message
4. Voice Message
33
01
02
02
03
04
05
Page 34

Main Menu 2nd DEPTH 3rd DEPTH 4th DEPTH
1. Missed
2. Received
3. Dialed
4. All
5. View Timers
1. Apps
2. Mobile Web
3. Tunes & Tones
4. Picture & Video
1. My Ringtones
2. My Sounds
1. Verizon Videos
2. My Pictures
3. My Videos
4. Take Picture
5. Record Video
6. Online Album
34
Recent Calls
Mobile Web
Media Center
Mobile Email
Apps
VZ Navigator
1. Record New
Page 35

Main Menu 2nd DEPTH 3rd DEPTH 4th DEPTH
Settings & Tools
1. My Verizon
2. Master Volume
3. Tools
4. Bluetooth 1. Add New Device
5. Keyguard Settings
6. PTT Settings
1. Voice Commands
2. Calculator
3. Calendar
4. Alarm Clock
5. Stop Watch
6. Countdown Timer
7. World Clock
8. Notepad
9. USB Mass Storage
10. G’z GEAR
1. Keyguard Timer
2. Unlock Options
1. PTT Mode
2. PTT Alert
3. PTT Missed Call
4. Tutorial
1. Earth compass
2. Walking Counter
3. Thermometer
4. Tides
5. Sunrise Sunset
6. Astro Calender
7. Star Gazer
8. Setup
9. How To Use
1. Tone
2. Vibrate
35
01
02
02
03
04
05
Page 36

Main Menu 2nd DEPTH 3rd DEPTH 4th DEPTH
1. Easy Set-up
2. Call Sounds
3. Alert Sounds
7. Sounds Settings
4. Keypad Volume
5. Digit Dial Readout
6. Service Alerts
7. Power On/Off
1. Easy Set-up
2. Banner
8. Display Settings
36
3. Backlight
4. Wallpaper
5. Display Themes
1. Call Ringtone
2. Call Vibrate
3. Caller ID Readout
1. TXT Message
2. Multimedia
Message
3. Voicemail
4. Emergency Tone
5. Missed Call
6. PTT Alert
1. ERI
2. Minute Beep
3. Call Connect
4. Software update
1. Power On
2. Power Off
1. Personal Banner
2. ERI Banner
1. Display
2. Keypad
1. My Pictures
2. My Videos
3. Animation
Page 37

Main Menu 2nd DEPTH 3rd DEPTH 4th DEPTH
6. Main Menu Settings
7. Dial Fonts
8. Menu Font Size
9. Clock Format
1. Airplane Mode
2. Set Shortcuts
3. Voice Commands
9. Phone Settings
* This option will not appear if PTT Mode is turned on.
Settings
4. Language
5. Time & Date
6. Location
7. Current Country
8. Security
1. Menu Layout
2. Replace Menu
Items
3. Position Menu
Items
4. Reset Menu
Settings
1. Main Clock
2. Front Clock
1. Set My Shortcuts
2. Set Directional
Keys
3.* Set Red Side Key
1. Confirm Choices
2. Sensitivity
3. Adapt Voice
4. Prompts
5. VoiceMode
Training
6. About
1. Edit Codes
2. Restrictions
37
01
02
02
03
04
05
Page 38

Main Menu 2nd DEPTH 3rd DEPTH 4th DEPTH
9. SIM Security
10. Global Data
Roaming
11. System Select
12. Motion Detection
1. Answer options
2. Auto Retry
3. TTY Mode
10. Call Settings
* These options will not appear if PTT Mode is turned on.
38
4. One Touch Dial
5. Voice Privacy
6. DTMF Tones
7. PTT Mode
8. Assisted Dialing
9. Noise Reduction
3. Phone Lock
Setting
4. Lock Phone Now
5. Restore Phone
1. PIN Code
2. SIM Lock
1.* Network Mode
2.* CDMA Settings
3.* GSM Settings
1. G'zGEAR
2. My Pics/Videos
Page 39

Main Menu 2nd DEPTH 3rd DEPTH 4th DEPTH
1. Save Options
11. Memory
12. USB Mode
13. Phone Info
14. SIM Info
15. Tutorial
16. Set Up Wizard
2. Phone Memory
3. Card Memory
1. My Number
2. SW/HW Version
3. Icon Glossary
4. Software Update
5. Operating System
1. Push To Talk
2. G'zGEAR
3. Voice Dictation
4. Message Readout
1. Pictures
2. Videos
3. Sounds
1. Phone Memory
Usage
2. My Pictures
3. My Videos
4. My Ringtones
5. My Sounds
6. My Contacts
7. Move All To Card
1. CDMA Number
2. GSM Number
1. Status
2. Check New
39
01
02
02
03
04
05
Page 40

MAKING A CALL
BY DIALING THE PHONE NUMBER
1. First, gently open the folding cover of the phone.
2. Enter the phone number including the area code if needed and press the
Key
G.
3. To end the call, press the
When you place or receive a call from phone numbers stored in your Contact List, the
name will be displayed.
END/PWR Key
H.
USING THE SPEED DIALING FUNCTION
1. If the speed dial is set, press the speed dial number you wish to connect to, and
hold the last digit number you have assigned for the speed dial.
“
Speed Dial
2. To end the call, press the
” message appears, and your call is connecting to the contact.
For more information on how to set one-touch dial, please refer to ONE TOUCH DIAL on
END/PWR Key
page 137.
H.
USING THE CONTACT LIST
1. Press the
Right Soft Key
2. Select the contact and press the
3. To end the call, press the
If more than 1 number is saved, pressing the SEND Key will dial the default number.
D [
Contacts
SEND Key
END/PWR Key
].
G.
H.
ABOUT PUSH TO TALK
Push to Talk calls may only be made with other Verizon Wireless Push to Talk
subscribers, and only from the National Enhanced Services Rate and Coverage
Area. A Push to Talk call is terminated by pressing the
automatically time out after 20 seconds of inactivity. While you are on a Push
to Talk call, voice calls received will go directly to Voice Mail. When you are on
40
END/PWR Key
SEND
H or will
Page 41

a voice call, you cannot receive a Push to Talk call. You cannot prevent others
who have your wireless phone number from entering you into their Push to
Talk Contact List. Only one person can speak at a time during Push to Talk calls.
When using your phone keypad to make a Push to Talk call, you must enter the
10-digit phone number of the called party. Your Push to Talk service cannot be
used for any applications that tether your phone to computers or other devices
for any purpose. Push to Talk-capable phone and Calling Plan required. If you
wish to switch from a Push to Talk Calling Plan to another Calling Plan, you must
first stop using your Push to Talk-capable phone and purchase or provide another
compatible phone.
TURNING PTT ON/OF
1. From idle mode, press the
2. Select
Settings & Tools
3. Select
Call Settings
Center Select Key [OK
press the
4. Press the
Directional Key
Center Select Key [OK
USING A PUSH TO TALK (PTT) ALERT
The Push To Talk (PTT) feature allows you to use your phone like a Walkie-Talkie to
communicate with Verizon Wireless PTT subscribers.
An alert call is a call to notify a called party that the calling party wants to talk using a
tone. The called party has option to answer or ignore the call.
BY DIALING THE PHONE NUMBER
1. Enter the phone number and press the
“Press PTT Key To Alert”
Left Soft Key
C [
2. Press the
PTT Key/Red Side Key
alert.
Center Select Key [MENU
and press the
, press the
Center Select Key [OK
Center Select Key [OK
].
], select
].
N up or down to select On/
].
Left Soft Key
C [
message appears on your main display screen.
Alert
] is not available when PTT Mode is set to Off.
N on the left hand side of the phone to
].
PTT Mode
Off
, then press the
Alert
].
then
41
01
02
02
03
04
05
Page 42

3.
Press and hold the PTT Key/Red Side Key N while talking and then release
PTT Key/Red Side Key
the
N to let the other party talk.
USING THE PTT CONTACT LIST
1. From the idle mode, press the
Contact List.
2. Select the contact and press the
“Press PTT Key To Alert”
3.
Press and hold the PTT Key/Red Side Key N while talking and then release
PTT Key/Red Side Key
the
You can hear the response while the
PTT Key/Red Side Key
Left Soft Key
message appears on your main display screen.
N.
PTT Key/Red Side Key
N to access your PTT
C [
Alert
].
N is released.
USING A PUSH TO TALK (PTT) BARGE
A barge call automatically connects to the other party. The called party does not have
the option to ignore the call.
BY DIALING THE PHONE NUMBER
1. Enter the phone number.
2. Press and hold the
phone.
3. Wait until the “
on the display. Speak while pressing down the
4. Release the
5. Press the
USING THE PTT CONTACT LIST
1. From the idle mode, press the
Contact List.
2. Press and hold the
phone.
42
PTT Key/Red Side Key
OK to Talk
” tone sounds and the message “
PTT Key/Red Side Key
END/PWR Key
H to end the call.
PTT Key/Red Side Key
N on the left hand side of the
PTT Key/Red Side Key
N to let the other party talk.
PTT Key/Red Side Key
N to access your PTT
N on your left hand side of the
Talking to
” appears
N.
Page 43

3. Wait until the “
on the display. Speak while pressing down
4. Release the
5. Press the
OK to Talk
PTT Key/Red Side Key
END/PWR Key
H to end the call.
” tone sounds and the message “
PTT Key/Red Side Key
N to let the other party talk.
Talking to
N.
” appears
ANSWERING CALLS
1. Press the
SEND Key
Depending on your phone’s settings, you may also answer incoming calls by opening
the phone or by pressing
2. To ignore incoming calls, press the
G to answer the incoming call.
any key
.
Right Soft Key
D [
Ignore
].
ANSWERING PTT CALLS
INCOMING BARGE CALL
When you receive a barge call, you will hear the calling party speaking through the
speakerphone. The calling party’s phone number will appear on your display. If the
calling party’s number has already been registered in your PTT Contact List, the contact
name will replace the phone number on the display.
1. Press and hold the
2. Release the
3. Press the
INCOMING ALERT CALL
When you receive an alert, you will hear the “
” will be displayed with the phone number or contact name of the calling party.
Alert
The PTT Alert tone repeats every 5 seconds until you answer or ignore the call. If you
do not answer an incoming alert within 20 seconds, the PTT call will be automatically
disconnected.
PTT Key/Red Side Key
PTT Key/Red Side Key
END/PWR Key
H to end the call.
N to talk.
N to let the other party talk.
PTT Alert
” tone. The message “
Incoming
43
01
02
02
03
04
05
Page 44

1. Answer or ignore the alert.
To answer the alert, press and hold the
talking.
To ignore the alert, press the
2. Release the
3. Press the
PTT Key/Red Side Key
END/PWR Key
H to end the call.
PTT Key/Red Side Key
Right Soft Key
D [
N to let the other party talk.
Ignore
].
ENDING A CALL
1. Press the
END/PWR Key
H.
MISSED CALL NOTIFICATION
When an incoming call is not answered, the missed call notification appears on the
display.
DISPLAY THE MISSED CALL FROM THE NOTIFICATION
1. Select
View Now
2. To dial the phone number, press the
and press the
Center Select Key [OK]
SEND Key
G.
.
DISPLAY A MISSED CALL FROM IDLE MODE
1. Press the
Center Select Key [MENU
Missed
.
and press the
Select Key [OK]
2. Select
3. Select the missed call and press the
4. To dial the phone number, press the
], select
Recent Calls
Center Select Key [OK]
Center Select Key [OPEN
SEND Key
G.
and press the
.
].
WAIT/PAUSE
Pauses are used for automated systems (i.e., voice mail or calling cards). The numbers
entered after the pause will automatically be dialed after the pause. It is useful for
dialing into systems that require a code.
44
N and begin
Center
Page 45

WAIT
The phone stops dialing until you press the
SEND Key
G to dial the next number.
1. Enter the phone number.
2. Press the
3. Select
Right Soft Key
Add Wait
D [
and press the
Options
].
Center Select Key [OK]
.
4. Enter additional number(s).
SEND Key
5. Press the
G to dial.
2SEC PAUSE
The phone waits 2 seconds before sending the next digits automatically.
1. Enter the phone number.
2. Press the
3. Select
Right Soft Key
Add 2-Sec Pause
D [
Options
and press the
].
Center Select Key [OK]
.
4. Enter additional number(s) (pin number or credit card number).
5. Press the
SEND Key
G to dial.
MAKING AN INTERNATIONAL CALL
1. Press and hold the
- The “+” symbol, required for international calls appears.
2. Enter the country code, area code, and phone number.
3. Press
SEND Key
If you set Assisted Dialing to On, regardless of the user’s intention, the entered phone
numbers maybe changed to the wrong number by the auto-correct function.
Shift Key
K.
G to make a call.
3 WAY CALLING
You can talk to two participants at the same time. During the call, the normal airtime
rates will be applied for each of the two calls.
1. Enter the phone number and press the
2. When you have connected, enter the second phone number to call and press
the
SEND Key
G.
SEND Key
G.
45
01
02
02
03
04
05
Page 46

3. When you’re connected to the second party, press the
begin your 3-Way call.
If one of the participants hangs up during the call, you and the remaining participant
stay connected. If you initiated the call and are the first one to hang up, all three calls
are disconnected.
SEND Key
CALL WAITING
If you are on a call and you receive another incoming call, you will hear one beep and
the caller’s phone number will appear on the display. With Call Waiting, you may put
the active call on hold while you answer the other incoming call.
1. Press the
SEND Key
automatically be placed on hold. To switch back, press the
again.
G to answer the other call. The first call will
SEND Key
VOLUME QUICK ADJUSTMENT
ADJUSTING THE MASTER VOLUME
1. Press the
Volume Keys
- To check the ringtone’s volume, press the
2. Press the
Center Select Key [SET
to adjust the master volume level.
L M
Left Soft Key
] to save.
C [
ADJUSTING THE VOLUME DURING A CALL
1. To increase the volume, press the
2. To decrease the volume, press the
Volume Keys
Volume Keys
up.
L M
down.
L M
CALLER ID
Caller ID displays the name and the phone number of the person calling. If the caller’s
information is not stored in your contact list, only the phone number is displayed.
46
G again to
G
Play
].
Page 47

VIBRATE MODE
Vibrate mode mutes the tones and activates an alert for an incoming call or message.
1. To activate, press and hold the
2. To deactivate, press and hold the
Vibrate Mode Key
Vibrate Mode Key
J.
J again.
MUTE FUNCTION
If you activate the mute function while you are talking on the phone, the person you are
speaking with cannot hear any sounds from you but, you are still able to hear them. To
activate mute function:
1. During a call, press the
2. Press the
Left Soft Key
Left Soft Key
C [
Unmute
C [
Mute
].
] to deactivate the mute function.
SPEAKERPHONE
The Speakerphone feature lets you hear audio through the speaker and talk without
holding the phone.
1. To activate, with the flip open, press the
2. To deactivate, press the
Speakerphone / Flashlight Key
Speakerphone
/
Flashlight Key
F again.
F.
FLASHLIGHT
Your phone provides you of the flashlight function. To activate the flashlight:
1. In the idle mode, press and hold the
- The flashlight turns on.
2. Press and hold the
flashlight.
- The flashlight turns off after the “
Speakerphone
Speakerphone
/
Flashlight Key
Flash Off
/
Flashlight Key
F to deactivate the
” message appears on the display.
F.
47
01
02
02
03
04
05
Page 48

VOICE DICTATION
By using the voice dictation function, you can input the text by speaking your words
instead of using the keypad.
1. Press the
Left Soft Key
Center Select Key [OK]
2. Select the desired message type to send and press the
3. Enter the email address or phone number in the “
Select Key [OK]
4. In the
Text
the handset. Release the
5. When entered text is correct, press the
C [
Message
.
.
field, press and hold the
Voice Commands Key
], select
New Message
Center Select Key [OK]
To
” field and press the
Voice Commands Key
O after one word.
Center Select Key [OK]
O, and speak into
incorrect, amend the text by using the keypad. For details on how to use the
keypad, see page 60, “TEXT INPUT.”
• Voice dictation mode cannot be used when the Bluetooth® connection is in use.
• The voice dictation function supports US English only.
• Before using voice dictation, the phone should be trained by your voice.
TEXT TO SPEECH
READING OUT UNREAD MESSAGES WITH THE FLIP OPEN
With the flip open, the handset reads out the text information with a synthetic voice.
1.
With the flip open in idle mode, press and hold the Voice Commands Key O.
- The handset reads out unread received messages one after another for you
with a synthetic voice.
2. Press the
48
3. Press the
Left Soft Key
currently being read.
Center Select Key [REPLY
reading message.
C [
Again
] to go back to the top of the message
] to create a reply message for the currently
and press the
.
Center
to confirm. If
Page 49

4. Press the
5. Press the
Right Soft Key
CLR Key
D [
Options
] to select the desired options.
I to stop reading out.
6. The handset returns to idle mode when reading out is done for all the unread
messages or when the
END/PWR Key
H is pressed to abort reading.
READING OUT UNREAD MESSAGES WITH THE FLIP CLOSED
With the flip closed, the handset reads out the text information with a synthetic voice.
1. With the flip closed, press and hold the
Voice Commands Key
O.
- The handset reads out unread received messages one after another for you
with a synthetic voice.
2. The handset returns to idle mode when reading out is done for all the unread
messages.
Reading out will continue even when the flip is opened while reading out is in
progress.
AVAILABLE OPTIONS DURING A CALL
During a phone call, you can access the following features by pressing the
D [
Options
]. Press the
Key
options:
•
Messaging
•
Contact List
•
Recent Calls
•
Bluetooth Menu
•
Main Menu
•
Notepad
•
Voice Record
•
Voice Privacy
Center Select Key [OK]
to select any of the following
Right Soft
49
01
02
02
03
04
05
Page 50

MAKING AN EMERGENCY CALL
The 911 feature automatically places the phone in Emergency Call Mode when you dial
the preprogrammed emergency number, 911. It also operates in Lock Mode and out of
the service area.
MAKING AN EMERGENCY CALL IN LOCK MODE
1. Enter any of the numbers 911, *911, #911 or 112 and press the
The phone maintains Emergency Mode for 5 minutes. When the call ends, the phone
returns to Lock Mode.
SEND Key
MAKING AN EMERGENCY CALL IN ANY NETWORK MODE
1. Enter any of the numbers
G
in
ALL NETWORK MODE
The phone will stay in Emergency Mode for 5 minutes in CDMA Mode. While the
phone is in Emergency Mode, the phone can receive an incoming call or you can make
outgoing calls even in the Emergency Callback Mode. In this case, making a call can
automatically end the Emergency Callback Mode.
The 911 call does not appear in the recent calls list.
911, *911, #911
-
CDMA Mode, GSM Mode
or
112
and press the
and
Global Mode
MOTION DETECTION
Using the Motion Detection function, you can control your handset just by
shaking it.
By default, the Motion Detection function is set to
Detection function:
50
OFF
. To use the Motion
G.
SEND Key
.
Page 51

1. From idle mode, press the
[
MENU
] and select
press the
Center Select Key [OK]
2. Select
Phone Settings
Select Key [OK]
then press the
3. Select
G’zGEAR
4. Select
On
and press the
[
SET
].
Center Select Key
Settings&Tools
.
and press the
, and select
Motion Detection
Center Select Key [OK]
or
My Pics/Videos
Center Select Key
, then
Center
.
.
When shaking the handset, be sure to hold the
handset firmly as shown in the figure and shake it
from the right to left or vice versa.
When shaking the handset, make sure you do not hit the handset against nearby
objects.
51
01
02
02
03
04
05
Page 52

Page 53

MEMORY FUNCTION
This chapter addresses memory functions including:
3
STORING A PHONE NUMBER
USING THE TEXT INPUT MODE
ONE, TWO, THREE DIGIT SPEED DIALING
TEXT INPUT
Page 54

STORING A PHONE NUMBER
ADDING A NEW CONTACT
1. Enter the phone number you want to save.
2. Press the
Left Soft Key
If PTT Mode is set to on, you must access by pressing the
To Contacts and press the
3. Select
Add New Contact
4. Select the type of number and press the
name of contact.
- You can also store additional information such as the fax number, email
address, and birthday information.
5. Press the
Center Select Key [SAVE
• Select Update Existing to add another phone number to a contact already stored
in memory.
•
You can also save the phone number to the SIM card.
STORING A PHONE NUMBER INTO SIM CARD
You can copy or move contact information to the SIM card.
The SIM card can store up to 5 contacts entries.
1. Press the
Right Soft Key
to copy or move.
2. Press the
Right Soft Key
3. Select [
Copy & Move
4. Select either [
Key [OK]
.
OPTIONS TO CUSTOMIZE YOUR CONTACTS
Once the basic phone number and name information is stored in your
can edit and/or customize the entries.
54
C [
] and press the
Move to SIM
Save
].
Center Select Key
and press the
D [
Contacts
D [
Options
] or [
Copy to SIM
[OK] as the Left Soft Key will show as Alert.
Center Select Key [OK]
Center Select Key [OK]
].
] and select the contact you would like
].
Center Select Key [OK]
] and then press the
Right Soft Key
.
D select Save
.
, then enter the
Center Select
Contacts
, you
Page 55

1. Press the
Right Soft Key
D [
Contacts
] and select the contact you would like
to edit.
2. Press the
Left Soft Key
C [
Edit
3. Edit the information and press the
].
Center Select Key [SAVE
] to save.
ADDING OR CHANGING GROUPS
To organize your Contacts into groups:
1. Press the
Right Soft Key
D [
Contacts
], then select the contact you want to
add to a group.
2. Press the
Left Soft Key
C [
Edit
3. Select
Group
MARK
, press the
Personal
].
Left Soft Key
4. Select either
[
5. Press the
- To create a new group, press the
the
Center Select Key [SAVE
6. Press the
Center Select Key [SAVE
].
Left Soft Key
or
C [
Business
Done
C [
Set
and then press the
].
Right Soft Key
] after entering the group name.
] to update the contact entry.
].
D [
Center Select Key
New
], and then press
CHANGING THE CALL RINGTONE & MESSAGE TONE
You can identify who is calling by setting different ringtones for different phone
numbers in your Contacts.
1. Press the
Right Soft Key
D [
Contacts
], then select the contact whose
ringtone you want to edit.
2. Press the
Left Soft Key
C [
Edit
3. Select
Ringtone or Message Tone
4.
To listen to the selected tone, press the
To stop press the
Key
5. Press the
Left Soft Key
[OK].
Center Select Key [SAVE
].
and press the
Left Soft Key
Left Soft Key
C [Play].
C [
Set
C [Stop]. To select, press the Center Select
] to update the contact entry.
01
02
02
03
04
05
].
55
Page 56

ADDING OR CHANGING THE PICTURE ID
To select a picture or graphic to assign to a Caller ID:
1. Press the
Right Soft Key
D [
Contacts
], then select the contact you want to
edit.
2. Press the
Left Soft Key
3. Select the
4. Select the picture to set and press the
Picture
C [
Edit
and press the
].
Left Soft Key
Left Soft Key
selected picture.
5. Press the
6. Press the
Center Select Key [OK]
Center Select Key [SAVE
to select the image.
] to update the contact entry .
ADDING OR CHANGING AN EMAIL ADDRESS
To add or change an email address:
1. Press the
Right Soft Key
D [
Contacts
], then select the contact you want to
edit.
2. Press the
3. Select
Left Soft Key
Personal Email
C [
Edit
or
Business Email
].
to edit.
4. Enter the new email address and press the
the contact entry.
ADDING OR CHANGING HOME ADDRESS /WORK ADDRESS
To add or change address information:
1. Press the
Right Soft Key
D [
Contacts
], then select the contact you want to
edit.
2. Press the
3. Select
Left Soft Key
Home Address
C [
Edit
or
Work Address
].
and press the
to edit.
4. Enter the new address and press the
5. Press the
Center Select Key [SAVE
56
Center Select Key [SAVE
] to update the contact entry.
C [
Set
].
C [
View
] to view the
Center Select Key [SAVE
Left Soft Key
] to save.
] to update
C [
Set
]
Page 57

ADDING OR CHANGING COMPANY/TITLE/NOTES
To add or change information:
1. Press the
Right Soft Key
D [
Contacts
], then select the contact you want to
edit.
2. Press the
Left Soft Key
C [
Edit
3. Select
Company, Title
4. Enter the new text information and press the
].
, or
Notes
to edit.
Center Select Key [SAVE
update the contact entry.
ADDING OR CHANGING BIRTHDAY
To add or change information:
1. Press the
Right Soft Key
D [
Contacts
], then select the contact you want to
edit.
2. Press the
Left Soft Key
C [
Edit
3. Select
Birthday
4. Press the
to edit.
Left Soft Key
information and press the
5. Press the
Center Select Key [SAVE
].
C [
Set
], then select the desired month and date
Center Select Key [OK]
.
] to update the contact entry.
ADDING A SPEED DIAL ENTRY
To add a Speed Dial entry:
1. Press the
Right Soft Key
D [
Contacts
], then select the contact you want to
add to Speed Dial.
2. Press the
Left Soft Key
C [
Edit
].
3. Select the phone number you want to add to Speed Dial and press the
Soft Key
D [
Options
4. Select
Set Speed Dial
Dial location then press the
5. To assign the entry select
6. Press the
].
and press the
Center Select Key [SET
Yes
then press the
Center Select Key [SAVE
Center Select Key [OK]
, choose a Speed
].
Center Select Key [OK]
] to update the contact entry.
01
02
02
03
] to
04
05
Right
.
57
Page 58

ADDING OR CHANGING AN IM SCREEN NAME
To add or change a IM screen name:
1. Press the
Right Soft Key
D [
Contacts
], then select the contact you want to
edit.
2. Press the
3. Select
Left Soft Key
IM Screen Name
C [
Edit
].
, then press the
Left Soft Key
C [
Set
].
4. Select either AIM, Yahoo! or WL Messenger and press the Center Select Key [OK].
5. Enter the user’s Screen Name and press the
6. Press the
Center Select Key [SAVE
Center Select Key [OK]
] to update the contact entry.
EDITING CONTACT ENTRIES
ADDING A PHONE NUMBER FROM IDLE MODE
1. Enter the phone number you want to save (up to 32 digits).
2. Press the
Left Soft Key
If PTT Mode is set to on, you must access by pressing the
To Contacts and press the
3. Select
Update Existing
4. Select the contact to update and press the
5. Select
Mobile 1, Mobile 2, Home, Business
Select Key [OK]
.
C [
Save
Center Select Key
and press the
].
Right Soft Key
[OK] as the Left Soft Key will show as Alert.
Center Select Key [OK]
Center Select Key [OK]
or
Fax
and press the
.
6. If a phone number is already assigned to the category you selected, select
to update and then press the
7. Press the
Center Select Key [SAVE
Center Select Key [OK]
] to update the contact entry.
.
ADDING A PHONE NUMBER FROM THE CONTACT LIST SCREEN
1. Press the
Right Soft Key
2. Select the contact to update and press the
D [
Contacts
]. Your
Left Soft Key
Contacts
display alphabetically.
C [
Edit
3. Enter the phone number in the appropriate field.
4. Press the
Center Select Key [SAVE
58
] to update the contact entry.
to save.
D select Save
.
Center
Yes
].
Page 59

DEFAULT NUMBERS
The phone number saved when a Contact is created is the Default Number. If more
than one number is saved in a Contact entry, another number can be set as the Default
Number.
The Default Number can not be deleted. The entire Contact entry can be deleted or
another number can be assigned as the Default Number allowing you to delete the
original number and keep the Contact entry.
CHANGING THE DEFAULT NUMBER
1. Press the
Right Soft Key
2. Select the contact to update and press the
3. Select the number to assign as the default number and press the
Key
D [
Options
4. Select
Set As Default
5. Select
Yes
6. Press the
then press the
Center Select Key [SAVE
D [
Contacts
].
and press the
Center Select Key [OK]
]. Your
Contacts
Left Soft Key
Center Select Key [OK]
display alphabetically.
C [
.
to set as the default number.
] to update the contact entry.
Edit
].
Right Soft
EDITING STORED PHONE NUMBERS
1. Press the
Right Soft Key
D [
Contacts
]. Your
Contacts
display alphabetically.
2. Select the contact entry you want to edit and press the Left Soft Key C [Edit].
3. Select and edit the phone number as necessary and press the
Key
[
SAVE
] to update the contact entry.
Center Select
DELETING
DELETING A PHONE NUMBER FROM A CONTACT
1. Press the
Right Soft Key
2. Select the contact to update and press the
D [
Contacts
]. Your
Left Soft Key
Contacts
display alphabetically.
C [
Edit
].
3. Select the number to delete.
4. Press and hold the
5. Press the
CLR Key
to delete.
Center Select Key [SAVE
] to update the contact entry.
59
01
02
02
03
04
05
Page 60

DELETING A CONTACT ENTRY
1. Press the
2. Press the
Select Key [OK]
3. Select
Right Soft Key
Right Soft Key
Yes
and press the
D [
D [
.
Center Select Key [OK]
Contacts
] and select the contact to delete.
Options
], select
Erase
to erase.
and press the
DELETING A SPEED DIAL
1. Press the
Right Soft Key
2. Press the
Left Soft Key
3. Select the phone number which has speed dial and press the
D
[
Options
4. Select
Remove Speed Dial
5. Select
Yes
6. Press the
and press the
Center Select Key [SAVE
].
D [
Contacts
C [
] and select the contact to edit.
Edit
].
and press the
Center Select Key [OK]
] to update the contact entry.
Right Soft Key
Center Select Key [OK]
to erase.
TEXT INPUT
The text entering mode (Alpha editor) allows you to input text, numbers and symbols.
The default mode is [
60
Abc
] mode.
Key Key Functions
Abc
C
0
J
K
I
: Press to change mode. [T9 Word][Abc][ABC][123][T9 Palabra]
[Symbols]
Next
: Press to view the next matching word in the predictive mode.
Space
: Press to select the word in predictive mode and/or add a
space.
Caps Lock
: Press to select upper or lowercase letters. Press and hold
to change mode.
Clear
: Press to delete a character to the left of the cursor. Press and
hold to delete an entire word.
Center
.
Page 61

USING THE TEXT INPUT MODE
There are six modes for entering text, numbers, symbols, and punctuation.
ABC MULTITAP TEXT INPUT MODE
Use the alphanumeric keypad to enter letters, numbers and characters.
Each of the following keys will scroll through these sequential options listed by
language. The limitation is 160 characters. Press the key labeled with the target
letter once for the first letter press twice for the second letter and so on. Press and
hold the key labeled with the target number for that number.
Key English Spanish
1
2
3
4
5
6
7
8
9
By selecting ABC mode, the text input only appears in capital letters.
PREDICTIVE MODE
T9 Word mode incorporates a built-in-dictionary to determine a word based on the
entered characters. A word can be entered more quickly by pressing each key once per
character. To type the word “Hello” follow these steps:
1. Press the
Left Soft Key
Center Select Key [OK]
C [
.
. @ ? ! - , & : ‘ / and 1
a b c 2 a á b c 2
d e f 3 d e é f 3
g h i 4 g h i í 4
j k l 5
m n o 6 m n ñ o ó 6
p q r s 7
t u v 8
w x y z 9
Message
], select
New Message
and press the
61
01
02
02
03
04
05
Page 62

2. Select
TXT Message
3. Enter the email address or phone number in the “
Select Key [OK]
Word
and press the
4. Press
4, 3, 5, 5, 6
the next word.
5. To select the word and add a space, press the
and press the
. In the
Text
field, press the
Center Select Key [OK]
Center Select Key [OK]
Left Soft Key
.
to write “
Hello
”. Press the 0 Key to view
J
.
To
” field and press the
C [
Key.
NUMERIC MODE
Allows you to enter numbers.
1. From the text entry screen, press the
press the
Center Select Key [OK]
2. Press the corresponding keys to input the number.
Left Soft Key
.
C [
Abc
USING PALABRA MODE TEXT INPUT
Palabra mode is a T9 mode for Spanish input.
To type the message “Llame la oficina,” follow these steps from the text entry screen:
1. From the text entry screen, press the
then press the
2. Press
3. Press
4. Press
“
Llame la oficina
Center Select Key [OK]
5 5 2 6 3
J
to complete the word and add a space.
5 2 J 6 3 4 2 4 6 2 1 J
” is displayed
.
Left Soft Key
.
C, select
SYMBOL MODE
Allows you to enter symbols.
1. From the text entry screen, press the
and press the
2. Select the symbol you wish to enter by using the
Center Select Key [OK]
62
Center Select Key [OK]
to select.
Left Soft Key
.
C [
Abc
Directional Key B
Abc
], select
T9 Palabra
.
], select
], select
123
Symbols
. Press the
Center
T9
and
,
Page 63

USING VOICE DICTATION MODE TEXT INPUT
By using the voice dictation function, you can input the text by speaking your words
instead of using the keypad.
1. Press the
Left Soft Key
C [
Message
], select
Center Select Key [OK]
.
2. Select the desired message type to send and press the
3. Enter the email address or phone number in the “
Select Key
[OK]
New Message
4. In the
the handset. Release the
5. When entered text is correct, press the
.
Text
field, press and hold the
Voice Commands Key
Voice Commands Key
Center Select Key [OK]
O after one word.
and press the
Center Select Key [OK]
To
” field and press the
O, and speak into
to confirm.
Center
If incorrect, amend the text by using the keypad. For details on how to use
keypad, see page 60, “TEXT INPUT.”
• Voice dictation mode cannot be used when the Bluetooth® connection is in use.
• The voice dictation function supports US English only.
ONE, TWO, THREE DIGIT SPEED DIALING
Ideal for frequently dialed numbers, this feature allows contact entries to be dialed via
the keypad with only one, two or three key presses.
ONE TOUCH SPEED DIALING:
If the speed dial is set to one digit number, press and hold the number you wish to
connect to for more than1 second.
TWO DIGIT SPEED DIALING:
If the speed dial is set to two digit numbers, press the first digit then press and
hold the second digit of the number to dial.
01
02
02
.
03
04
05
63
Page 64

THREE DIGIT SPEED DIALING:
If the speed dial is set to three digit numbers, press the first and second digits
then press and hold the third digit of the number to dial.
The following speed dial entries are already assigned to your Verizon Wireless Account
Information:
Speed Dial No. Services
1 Voicemail
95 #Warranty Center
96 #DAT A
97 #BAL
98 #MIN
99 #PMT
411 Directory Assistance
64
Page 65

65
01
02
02
03
04
05
Page 66

Page 67

This chapter addresses accessing the menu and using its functions
MENU FUNCTION
and features to customize your
4
C781R3.
CONTACTS
MESSAGING
RECENT CALLS
MEDIA CENTER
VZ NAVIGATOR
SETTINGS & TOOLS
Page 68

CONTACTS
NEW CONTACT
For details on adding a new contact, see page 54.
CONTACT LIST
You can review all the entries stored in your Contact List or quickly find an entry by
entering a name or its character.
1. Press the
Center Select Key [MENU
Select Key [OK]
2. Select
3. Enter a name in the
.
Contact List
then press the
Go To
4. To edit the contact, press the
the
Center Select Key [VIEW
GROUPS
Allow you to classify phone entries into groups with up to 20 contacts in each group.
The default groups - Personal and Business - cannot be erased or renamed.
TO ADD NEW GROUP
1. Press the
Center Select Key [MENU
Select Key [OK]
2. Press the
. Select
Left Soft Key
3. Enter a new group name and press the
TO ASSIGN PHONE NUMBER TO GROUP
1. Press the
Center Select Key [MENU
Select Key [OK]
. Select
2. Select the group to add the contact to and press the
68
], select
Center Select Key [OK]
field or select the contact.
Left Soft Key
C [
].
], select
Groups
then press the
C [
New
].
Center Select Key [SAVE
], select
Groups
then press the
Contacts
and press the
.
Edit
]. To view the details, press
Contacts
and press the
Center Select Key [OK]
Contacts
and press the
Center Select Key [OK]
Center Select Key [VIEW
Center
Center
.
].
Center
.
].
Page 69

3. To add a contact, press the
add and press the
[
Done
] to add.
Center Select Key [ADD
Center Select Key [MARK
]. Select the contact to
] then press the
Left Soft Key
C
TO CHANGE GROUP NAME
1. Press the
Center Select Key [MENU
Select Key [OK]
. Select
2. Select the group to rename, press the
Rename
, then press the
3. Edit the group name and press the
], select
Groups
then press the
Right Soft Key
Center Select Key [OK]
Center Select Key [SAVE
Contacts
and press the
Center Select Key [OK]
D [
Options
.
].
Center
.
], select
ERASE GROUP
1. Press the
Center Select Key [MENU
Select Key [OK]
. Select
2. Select the group to erase and press the
Erase Group
3. Select
and press the
Yes
and press the
], select
Groups
then press the
Right Soft Key
Center Select Key [OK]
Center Select Key [OK]
Contacts
and press the
Center Select Key [OK]
D [
Options
.
to erase the group.
Center
.
]. Select
NEW PTT CONTACT
1. Enter the phone number you want to save.
2. Press the
Right Soft Key
3. Select
Save To PTT Contacts
4. Enter the
Name, PTT Number
5. Press the
Center Select Key [SAVE
If PTT Mode is disabled, the PTT menu options will not appear such as “New PTT
Contact”, “PTT Contact List” and “PTT Groups”
D [
Options
and press the
, and
].
Center Select Key [OK]
PTT Group
].
.
.
PTT CONTACT LIST
You can review all the entries stored in your PTT Contact List or quickly find an entry by
entering a name or its character.
69
020102
03
04
05
Page 70

1. Press the
Center Select Key [MENU
Select Key [OK]
2. Select
PTT Contact List
3. Enter a name in the
.
Go To
], select
Contacts
then press the
Center Select Key [OK]
field or select the PTT contact.
and press the
PTT Contact information appears.
You can also press the
Soft Key
when PTT Mode is active.
Right Soft Key
D [Options] to access PTT Contact List. The PTT Contact List option appears
D [Contacts] from idle mode, and press
PTT GROUP
You can review all the entries stored in your PTT Group or quickly find an entry by
entering a name or its character.
1. Press the
Center Select Key [MENU
Select Key [OK]
2. Select
PTT GROUP
3. Enter a name in the
.
then press the
Go To
], select
Contacts
Center Select Key [OK]
field or select the PTT group.
and press the
.
PTT Group information appears.
TEMP PTT GROUP
A Temp PTT Group allows you to quickly communicate with multiple contacts on a
single PTT call. Temp PTT Groups can be created directly on your phone and are not
permanently saved to your PTT Group list (unless you choose to save it). The following
operation assigns a PTT Contacts to the Temp PTT Group.
ADDING PTT CONTACTS
1. In the idle mode, press the
Center Select Key [OK]
press the
Select Key
2. Press the
Right Soft Key
Center Select Key [OK
press the
3. Press the
Center Select Key [ADD
Select Key
70
[OK].
[
MARK
Center Select Key [MENU
D [
Options
].
], then
Left Soft Key
], select
. Select
], then select
PTT Contact List
Contacts
and press the
Temp PTT Group
], select a PTT Contact entry, press the
C [
Done
].
Center
.
Right
Center
, then
Center
and
Center
Page 71

VIEWING TEMP PTT GROUP MEMBERS
1. In the idle mode, press the
press the
Center Select Key [OK]
Select Key
press the
[OK].
Right Soft Key
Center Select Key [OK
2. Press the
Center Select Key [MENU
. Select
PTT Contact List
D [
Options
], then select
].
], select
Contacts
and press the
Temp PTT Group
, then
Center
and
3. Select the Temp PTT Group entry. You can selec t one of the following options:
- Press the
- Press the
Left Soft Key
Right Soft Key
C [
D [
Remove
] to remove the entry.
Options
] to select the desired options.
BACKUP ASSISTANT
Backup Assistant is a wireless service that saves a copy of your phone’s address book to a
secure web site. If your phone is lost, stolen or damaged, Backup Assistant restores your
saved address book to a new phone - wirelessly! Schedule daily automatic backups or
manually backup your phone book at your convenience. Login to your web account and
get full access to your address book. You can view, print, add, delete and edit contacts.
Changes are sent to your phone with one click!
Visit Web site:
1. Press the
2. Select
https://www.verizonwireless.com/backupassistant/
Center Select Key [MENU
Select Key [OK]
.
Backup Assistant
and press the
], select
Contacts
Center Select Key [OK]
and press the
to launch the
.
Center
application.
SPEED DIALS
Calls can be placed to numbers stored in speed dial by pressing & holding the location
number on the keypad. For a 2-digit location number, press the first number then press
and hold the second number. For a 3-digit location number, press the first number and
second numbers then press and hold the third number.
1. Press the
Center Select Key [MENU
Select Key [OK]
. Select
Speed Dials
], select
Contacts
then press the
and press the
Center
Center Select Key [OK]
.
71
020102
03
04
05
Page 72

2. Select the Speed Dials position or enter the Speed Dial digit and press the
Center Select Key [SET
3. Select the
4. Select the number to assign the speed dial to and press the
[OK]
.
5. Select
Yes
Unassigned appears if the location is available.
Contact
and press the
and press the
].
Center Select Key [OK]
Center Select Key [OK]
.
Center Select Key
.
TO ERASE A SAVED SPEED DIAL
1. Press the
Select Key [OK]
2. Select the
3. Press the
4. Select
Yes
Center Select Key [MENU
. Select
Speed Dial
entry to erase.
Right Soft Key
and press the
], select
Speed Dials
then press the
D [
Remove
].
Center Select Key [OK]
Contacts
and press the
Center Select Key [OK]
.
IN CASE OF EMERGENCY
Your phone has a special menu to organize your emergency contacts and personal
information.
TO ASSIGN EMERGENCY CONTACTS
Follow the procedures below to register a Contact to be contacted in case of emergency
or to register a medical record number or other personal information.
1. Press the
Center Select Key [MENU
Select Key [OK]
Key [OK]
2. Select
[
ADD
3. Select
. Select
.
Contact 1, Contact 2
].
From Contacts/New Contact
4. Select the desired contact entry and press the
5. When adding a new contact, select
Key [OK]
.
72
], select
In Case of Emergency
or
Contact 3
and press the
and press the
New Contact
Contacts
and press the
then press the
Center Select Key
Center Select Key [OK]
Center Select Key [OK]
and press the
Center Select
Center
.
Center
.
.
Center Select
Page 73

6. Enter the contact information and press the
7. The contact name will be displayed in place of
Contact 3
.
TO REASSIGN EMERGENCY CONTACTS
1. Press the
Center Select Key [MENU
Select Key [OK]
Key [OK]
2. Select the contact to re-assign and press the
3. Select
4. Select
from your
press the
Center Select Key [SAVE]
5. Press the
TO ERASE ASSIGNED EMERGENCY CONTACTS
1. Press the
Select Key [OK]
Key [OK]
2. Select the contact to erase and press the
3. Select
TO CALL AN ASSIGNED EMERGENCY CONTACT
1. Press the
Select Key [OK]
Key [OK]
2. Select the contact to call and press the
SEND Key
. Select
.
Re-assign
and press the
From Contacts
Contact List
Center Select Key [OK],
Center Select Key [OK]
Center Select Key [MENU
. Select
.
Unassign
and press the
Center Select Key [MENU
. Select
.
G.
], select
In Case of Emergency
Center Select Key [OK]
and press the
. When adding a new contact, select
In Case of Emergency
In Case of Emergency
Center Select Key [OK]
enter the contact information, and press the
.
.
], select
Right Soft Key
Center Select Key [OK]
], select
Left Soft Key
Center Select Key [SAVE
Contact 1, Contact 2
Contacts
and press the
then press the
Right Soft Key
Contacts
then press the
Contacts
then press the
D [
.
. Select a contact
New Contact
and press the
D [
.
and press the
C [
Call
Center Select
Center Select
Options
Center Select
] or press the
].
or
Center
Options
Center
Center
020102
03
04
].
05
and
].
73
Page 74

TO ADD PERSONAL INFO
To store a Medical Record Number or other information that may be useful in case of
an emergency:
1. Press the
Center Select Key [MENU
Select Key [OK]
Key [OK]
2. Select
3. Select
. Select
.
Personal Info
Note 1, Note 2
and press the
or
4. Enter the information and press the
5. The information you entered now appears in place of
Note 3
.
], select
In Case of Emergency
Center Select Key [VIEW
Note 3
and press the
Center Select Key [SAVE
Contacts
and press the
then press the
Center Select Key [ADD
Note 1, Note 2
TO EDIT SAVED PERSONAL INFO
1. Press the
Center Select Key [MENU
Select Key [OK]
Key [OK]
2. Select
. Select
.
Personal Info
and press the
3. Select the note to edit and press the
4. Press the
Center Select Key [EDIT
Key
[
SAVE
].
], select
In Case of Emergency
Center Select Key [VIEW
Center Select Key [VIEW
]. Edit the note and press the
Contacts
then press the
and press the
TO ERASE SAVED PERSONAL INFO
1. Press the
Center Select Key [MENU
Select Key [OK]
Key [OK]
2. Select
. Select
.
Personal Info
3. Select the note to erase and press the
4. Select
Yes
and press the
74
and press the
], select
In Case of Emergency
Center Select Key [VIEW
Right Soft Key
Center Select Key [OK]
Contacts
then press the
.
and press the
D [
Erase
Center
Center Select
].
].
].
or
Center
Center Select
].
].
Center Select
Center
Center Select
].
].
Page 75

MY NAME CARD
A Name Card with the handset’s mobile number automatically appears.
EDIT MY NAME CARD
1. Press the
Center Select Key [MENU
Select Key [OK]
2. Press the
3. Edit the
your changes.
SEND MY NAME CARD VIA TXT, PICTURE OR VIDEO MESSAGE
1. Press the
Select Key [OK]
2. Press the
3. Select the message type and press the
4. Enter the recipient’s contact information and press the
5. Enter any additional message information and press the
[
SEND
SEND MY NAME CARD WITH VOICE MESSAGE
1. Press the
Select Key [OK]
2. Press the
3. Select
4. To record a new voice message, press the
recording. Press the
5. Enter the recipient’s contact information in the
Select Key [OK]
6. Enter any additional message information and press the
[
SEND
. Select
Left Soft Key
My Name Card
Center Select Key [MENU
. Select
Right Soft Key
].
Center Select Key [MENU
. Select
Right Soft Key
Send via Voice Message
Center Select Key [STOP
.
].
], select
My Name Card
C [
options and press the
My Name Card
D [
My Name Card
D [
Edit
].
Send
Send
and press the
], select
].
], select
].
then press the
then press the
Center Select Key [OK]
then press the
Contacts
and press the
Center Select Key [OK]
Center Select Key [OK
Contacts
and press the
Center Select Key [OK]
Center Select Key [OK]
Center Select Key
Contacts
and press the
Center Select Key [OK]
Center Select Key [OK]
Center Select Key [OK]
] to stop recording and save it.
To
field and press the
Center Select Key
.
Center
] to save
Center
Center
to start
Center
.
020102
03
04
05
.
.
.
.
75
Page 76

SEND MY NAME CARD TO ANOTHER BLUETOOTH DEVICE
Turn Bluetooth on for both devices (steps 1-4) and turn Discovery Mode to On.
Please refer to Bluetooth on page 114.
1. Press the
Select Key [OK]
2. Press the
3. Select
4. With
Add New Device
Send via Bluetooth
Center Select Key [MENU
. Select
Right Soft Key
], select
My Name Card
D [
Send
].
and press the
selected, press the
Contacts
then press the
Center Select Key [OK]
Center Select Key [OK]
will prompt you with the following message on the LCD screen:
YOU ARE CONNECTING TO IN DISCOVERABLE MODE
Press the
Center Select Key [OK]
5. Select the desired device and press the
You can also turn Bluetooth on/off through MY SHORTCUTS by pressing the
B right in idle mode.
Key
.
Center Select Key [PAIR
6. If applicable, the device may prompt you for the passkey.
7. The screen displays
Always Ask
Before Connecting To [Device Name]
or
Always Connect
and press the
Center Select Key [OK]
8. The information is then sent via Bluetooth to the receiving device.
MESSAGING
Verizon Wireless voice coverage is available in multiple destinations worldwide, so
you’ll use one number wherever you travel. Plus, stay connected to email, text and
picture messaging, web, and wireless networks while you’re on the go in multiple data
destinations around the world. Visit www.vzw.com/vzglobal for details.
WHEN A NEW MESSAGE ARRIVES
1. The received message display appears when a new message arrives.
2. To display the message, select
[OK]
.
76
View Now
and press the
and press the
Center
Center Select Key [OK]
.
. The handset
PLACE DEVICE
.
].
Directional
, select either
.
Center Select Key
.
Page 77

NEW MESSAGE
TXT MESSAGE
• The SIM card must be installed in order to send TXT Messages in GSM mode.
• The SIM Card is pre-installed in your phone.
1. Press the
Left Soft Key
C [
Message
], select
Center Select Key [OK]
[OK]
.
. Select
TXT Message
2. Enter the email address or phone number and press the
[OK]
. Or press the
•
From Contacts
Recent Calls
•
Groups
•
To Contacts
•
To PTT Contacts
•
Right Soft Key
: Search for a phone number which is stored in the contacts list.
: Search for a phone number which is stored in the recent calls list.
: Search the groups stored in the contacts list.
: Save the number or email you’ve just entered to the contacts list.
: Save the number you’ve entered to the PTT contact list.
D [
3. Move to the Text field by pressing the
Right Soft Key
•
Insert Quick Text
Save As Draft
•
Add
•
Format Text
•
Priority Level
•
Save As Quick Text:
•
Cancel Message
•
4. Enter the message and press the
D [
Options
] to access the following options:
: Inserts already written sentences in TXT message.
: Save the TXT message to the Drafts folder.
: Attach Graphic, Animation, Sound, Name Card, or Contact.
: Edit the Alignment, Font Size, Font Style, Font Color and Background Color.
: Set the level of the priority to High or Normal.
Save the text as quick text
: Cancel message.
Center Select Key [SEND
New Message
and press the
Center Select Key
Center Select Key
Add
] to access the following options.
Center Select Key [OK
].
PICTURE MESSAGE
• The SIM card must be installed in order to send Picture Messages in GSM mode.
• The SIM Card is pre-installed in your phone.
1. Press the
Left Soft Key
C [
Message
], select
Center Select Key [OK]
Key [OK]
.
. Select
Picture Message
New Message
and press the
and press the
] and press the
and press the
Center Select
77
020102
03
04
05
Page 78

2. Enter the email address or phone number and press the
[OK]
. Or press the
•
From Contacts
Recent Calls
•
Groups
•
To Online Album
•
To Contacts
•
To PTT Contacts
•
Right Soft Key
: Search for a phone number which is stored in the contacts list.
: Search for a phone number which is stored in the recent calls list.
: Search the groups stored in the contacts list.
: Send picture message by using online address.
: Save the number or email you’ve entered to the contacts list.
: Save the number you’ve just entered to the PTT contacts list.
D [
Add
] to access the following options.
3. Enter the message in the Text field.
4. Select
Picture
picture and press the
5. Select
Sound
sound and press the
6. Select
Name Card
Card
or
From Contacts
7. Select
Subject
8. Press the
Right Soft Key
•
Preview
: Preview a written Picture Message.
Save As Draft
•
•
•
•
•
•
9. Press the
: Save the Picture Message.
Insert Quick Text
Add Slide
: Add another message.
Priority Level
: Set the level of the priority to High or Normal.
Save As Quick Text
Cancel Message
Center Select Key [SEND
and press the
and press the
and write the subject.
: Cancel message.
Left Soft Key
Center Select Key [OK]
Left Soft Key
Center Select Key [OK]
. Press the
and press the
D [
: Inserts already written sentences in Picture Message.
: Save the text as quick text.
C [
to select.
C [
to select.
Left Soft Key
C [
Center Select Key [OK]
Options
] to access the following options.
].
VIDEO MESSAGE
• The SIM card must be installed in order to send Video Messages in GSM mode.
• The SIM Card is pre-installed in your phone.
1. Press the
Center Select Key [OK]
[OK]
78
Left Soft Key
.
C [
. Select
Message
], select New Message and press the
Video Message
My Pics
]. Select the desired
Sounds
]. Select the desired
Add
] and select
and press the
Center Select Key
My Name
.
Center Select Key
Page 79

2. Enter the email address or phone number and press the
[OK]
. Or press the
•
From Contacts
Recent Calls
•
Groups
•
To Online Album
•
To Contacts
•
To PTT Contacts
•
Right Soft Key
: Search for a phone number which is stored in the contacts list.
: Search for a phone number which is stored in the recent calls list.
: Search the groups stored in the contacts list.
: Send video message by using online address.
: Save the number or email you’ve entered to the contacts list.
: Save the number you’ve just entered to the PTT contacts list.
D [
Add
] to access the following options.
Center Select Key
3. Enter the message in the Text field.
4. Select
Video
and press the
and press the
5. Select
Name Card
Card
or
From Contacts
6. Select
Subject
7. Press the
Right Soft Key
•
Preview
: Preview a written Video Message.
Save As Draft
: Save the Video Message.
•
Insert Quick Text
•
Priority Level
: Set the level of the priority to High or Normal.
•
Save As Quick Text
•
Cancel Message
•
8. Press the
Center Select Key [SEND
Center Select Key [OK]
Left Soft Key
C [
Videos
]. Select the desired video
to select.
. Press the
Left Soft Key
and press the
C [
Add
] and select
Center Select Key [OK]
and write the subject.
D [
Options
] to access the following options.
: Inserts already written sentences in Video Message.
: Save the text as quick text.
: Cancel message.
].
VOICE MESSAGE
• The SIM card must be installed in order to send Voice Messages in GSM mode.
• The SIM Card is pre-installed in your phone.
1. Press the
Left Soft Key
C [
Message
], select
Center Select Key [OK]
[OK]
.
2. To record a new
recording. Press the
. Select
Voice Message
Voice Message
, press the
Center Select Key [STOP
New Message
and press the
Center Select Key [OK]
] to stop recording and save it.
My Name
.
and press the
Center Select Key
to start
79
020102
03
04
05
Page 80

3. Enter the email address or phone number and press the
[OK]
. Or press the
•
From Contacts
Recent Calls
•
Groups
•
To Online Album
•
To Contacts
•
To PTT Contacts
•
4. From the
Key
C [
5. Select
6. Select
Card
or
7. Select
8. Press the
•
Review
Save As Draft
•
Insert Quick Text
•
Priority Level
•
Save As Quick Text
•
Cancel Message
•
9. Press the
Right Soft Key
: Search for a phone number which is stored in the contacts list.
: Search for a phone number which is stored in the recent calls list.
: Search the groups stored in the contacts list.
: Send the recorded voice message to the Online Album.
: Save the number or email you’ve entered to the contacts list.
: Save the number you’ve just entered to the PTT contacts list.
Voice
field, you can re-record the message by pressing the
Record
].
Text
and enter the message.
Name Card
. Press the
From Contacts
Subject
and write the subject.
Right Soft Key
: Review a written Voice Message.
: Save the Voice Message.
: Inserts already written sentences in Voice Message.
: Set the level of the priority to High or Normal.
: Save the text as quick text.
: Cancel message.
Center Select Key [SEND
D [
Left Soft Key
and press the
D [
Options
Add
] to access the following options.
C [
Add
Center Select Key [OK]
] to access the following options.
].
INBOX
When the
Inbox View
is set to
Time
and Sent folders.
Contact is the default setting. This option appears when the Inbox View is set to Time.
1. Press the
Left Soft Key
Select Key [OK]
.
2. Select a message and press the
message, press the
80
, all messages are managed separately in Inbox
C [
Message
], select
Inbox
Center Select Key [OPEN
Left Soft Key
C [
Erase
] and press the
Center Select Key
] and select
.
and press the
]. To delete a
Center Select Key
Left Soft
My Name
Center
Page 81

[OK]
to select
Yes
[
. With the message opened, press the
Options
] to access the following options.
•
Play Again
: Play a received picture or voice message.
•
Erase
: Erase an inbox message.
•
Reply w. Copy
•
•
•
•
•
•
•
•
•
•
•
•
•
• Emergency (CMAS) Alert text is displayed on receipt regardless on the TXT Auto View
• If there are unread CMAS messages, appropriate CMAS message pending icon will be
: Reply with the original message included.
Forward
: Forward the message.
Save Picture (MMS Picture)
Save Video (MMS Video)
Save As Ringtone (MMS Sound)
Save Sound (MMS Sound)
Save Objects (EMS Save Objects)
Save Name Card
Save As Quick Text
Lock/Unlock
: Lock or unlock the message.
Add To Contacts
Extract Addresses
received message.
Text to Speech
Message Info
EMERGENCY (CMAS) ALERT MESSAGES
settings.
displayed on the system status bar.
: Save a picture to the My Pictures folder.
: Save a video to the My Videos folder.
: Save a sound to the My Ringtones folder.
: Save a sound to the My Sounds folder.
: Save a name card to the contacts.
: Save a number to contacts.
: Read out the text message.
: Show received TXT, Picture, Video, or Voice message information.
: Save a graphic, sound, name card.
: Save the text in received msg to Quick Text.
: Extract all phone numbers, Email addresses and URLs from the
Right Soft Key
D
SENT
Manages
TXT, Picture, Video
1. Press the
Left Soft Key
Key [OK]
.
2. Select a message and press the
message, press the
[OK]
to select
3. With the message opened, press the
Yes
.
, and
C [
Message
Left Soft Key
Voice
messages already sent or waiting to be sent.
], select
Sent
and press the
Center Select Key [OPEN
C [
Erase
] and press the
Right Soft Key
]. To delete a
Center Select Key
D [
Options
Center Select
] to access
the following options.
81
020102
03
04
05
Page 82

•
Play Again
: Play a sent picture or voice message.
Forward
: Forward the TXT, Picture, Video, and Voice message.
•
Erase
: Erase a sent message.
•
Lock/Unlock
: Locks or unlock the TXT, Picture, Video, and Voice message.
•
Save As Quick Text
•
when composing a message.
Add To Contacts
•
Text to Speech
•
View Name Card
•
Message Info
•
: Save text as quick text and use those pre-populated phrases quickly
: Save number to contacts.
: Read out the text message.
: View included name card with in message.
: Show sent TXT, Picture, Video, or Voice message information.
MESSAGES
When the
Inbox View
is set to
Contact
, all messages sent to or received from a contact
are managed in the combined messages folder.
1. Press the
Center Select Key [Menu
Select Key [OK]
2. Select
Messages
.
and press the
3. Select the contact name to view and press the
], select
Messaging
Center Select Key [OK]
Center Select Key [OK]
and press the
.
latest message will be shown.
4. Press the
Directional Key
5. With the message opened, press the
the following options.
•
Forward
: Forward the TXT, Picture, Video or Voice message.
Lock/Unlock
: Locks or unlock the TXT, Picture, Video or Voice message.
•
Save as Quick Text
•
Add To Contacts
•
Message Info
•
EMERGENCY (CMAS) ALERT MESSAGES
• Emergency (CMAS) Alert text is displayed on receipt regardless on the TXT Auto View
settings.
• If there are unread CMAS messages, appropriate CMAS message pending icon will be
displayed on the system status bar.
82
B right to view the next message.
Right Soft Key
: Save the text as quick text.
: Save the number to contacts.
: Show received and sent TXT, Picture, Video, or Voice message information.
D [
Options
Center
. The
] to access
Page 83

DRAFTS
The Drafts folder contains any draft messages or saved messages. If a message was
interrupted by a voice call or other interrupting event, the message will automatically
be saved here.
1. Press the
Left Soft Key
C [
Message
], select
Drafts
Select Key [OK]
.
2. Select a message to edit and press the
and press the
Center Select Key [EDIT
Center
].
Edit the message.
3. To delete a message, press the
Select Key [OK]
4. Press the
•
Send
Lock/Unlock
•
Add To Contacts
•
Erase Drafts
•
to select
Right Soft Key
: Send a selected message.
: Locks or unlock the TXT, Picture, Video, or Voice message.
: Save number to contacts.
: Erase all drafts messages.
Yes
D [
Left Soft Key
C [
.
Options
] to access the following options.
Erase
] and press the
Center
VOICEMAIL
New voicemail alerts are sent by your network. These messages indicate how many
new and urgent voicemails are in your voicemail box.
WHEN A NEW VOICEMAIL ARRIVES
When you receive a new voicemail message you’ll hear a sound and a Voicemail icon
appears in the display.
1. Select
Listen Now
and press the
Center Select Key [OK]
to access your
voicemail box.
2. Select
Listen Later
and press the
Center Select Key [OK]
to ignore the
voicemail message and return to idle mode.
TO ACCESS YOUR VOICE MAILBOX
1. To dial your voicemail box directly, press
SEND Key
G.
K, 8, 6
and then press the
83
020102
03
04
05
Page 84

Shortcut
: In idle mode, press and hold 1 to access Voicemail.
One Touch Dial must be enabled, please see page 137 for details.
2. Follow the prompts to enter your password and listen to your messages.
MOBILE IM
Mobile IM allows you to enjoy Instant Messaging on your phone.
LAUNCHING MOBILE IM
1. Press the
Center Select Key [MENU
Select Key [OK]
2. Select
Mobile IM
.
and press the
3. When you access this application for the first time, an
will appear. Select
4. Select either
[OK]
.
5. Enter your
Accept
AIM, Windows Live
Login ID
and
], select
Center Select Key [OK]
by pressing the
or
Yahoo!®
Password
and press the
Messaging
and press the
.
Accept/Decline
Left Soft Key
C [
and press the
Center Select Key [Sign In
MOBILE EMAIL
USING MOBILE EMAIL
To read and send e-mail from your e-mail accounts:
1. From idle mode, press the
press the
Center Select Key [OK]
2. Select
Mobile Email
3. Select the desired option, then press the
Center Select Key [MENU
.
and then press the
], select
Center Select Key [OK]
Center Select Key [OK]
4. Follow the on-screen prompts.
SETTINGS
The
Settings
menu allows you to configure settings for messages sent or received on
your phone. To access message settings:
1. Press the
Center Select Key [MENU
84
], then press
Messaging
Center
screen
Accept
].
Center Select Key
Messaging
, then
.
.
.
].
Page 85

2. Press the
Left Soft Key
C [
Settings
3. Select one of the following menus, then press the
] to display available menus.
Center Select Key [OK]
INBOX VIEW
1. Select
Time
or
Contact
•
Time
: Sorts received and sent messages into Inbox and Sent folders by time.
Contact
: Groups all received and sent messages by each contact.
•
Contact is the default setting.
, then press the
Center Select Key [OK]
.
ENTRY MODE
Allows you to set the default Entry Mode for messaging.
1. Select
T9 Word, Abc, ABC, 123
Key [OK]
.
, or
T9 Palabra
then press the
Center Select
AUTO SAVE SENT
1. Select
On, Off
, or
Prompt
• On: All sent messages are saved in Sent.
Off
: All sent messages are not saved in Sent.
•
Prompt
: The Yes or No dialogue box will be displayed after sending a message.
•
, then press the
Center Select Key [OK]
.
AUTO ERASE INBOX
Allows you to set whether Inbox messages are deleted automatically when new
messages arrive and Inbox is full.
1. Select On or
Off
• On: The oldest read message will be deleted from the Inbox automatically once full.
Off
•
, then press the
: The oldest read message will not be deleted automatically from the Inbox once full.
Center Select Key [OK]
.
MESSAGING FONT SIZE
Allows you to set the message font size.
1. Select
Small, Normal
, or
Large
, then press the
Center Select Key [OK]
TXT AUTO VIEW
1. Select
On
or
Off
, then press the
Center Select Key [OK]
.
.
020102
03
04
05
.
85
Page 86

• On: TXT messages are displayed automatically when received.
Off
: TXT messages are displayed by going into the Inbox, or by responding to the
•
message prompt.
MULTIMEDIA AUTO RECEIVE
1. Select
On
or
Off
• On: Picture, Video and Voice messages are downloaded automatically.
Off
•
responding to the message prompt.
, then press the
: Picture, Video and Voice messages must be retrieved from the Inbox or by
Center Select Key [OK]
TUTORIAL
Introduces the user to the basic concepts and features of the phone functions.
1. Select the desired option.
2. Press the
Center Select Key [OK]
to view the tutorial.
VOICEMODE TRAINING
Trains the phone to your voice before using Voicemode.
1. Read all instructions before starting Voicemode Training.
Press the
Left Soft Key
[Back] to go back to the previous page.
2. Press the
3. Press and hold down the
C [Next] to read the next page, or press the
Left Soft Key
C [
Next
Voice Commands Key
] to begin.
O while you speak the on-
screen text aloud.
4. Release the
Voice Commands Key
O when completed the sentence, then the
next sentence appears.
Press the
Left Soft Key
Right Soft Key
the
C [Save] to stop and save what you have completed, or press
D [Back] to finish the Voicemode Training.
QUICK TEXT
Allows you to create a new Quick Tex t or edit the predefined Quick Text.
1. To create a new Quick Text, press the
86
and press the
Select Key
Center Select Key [OK
[
SAVE
].
Right Soft Key
D [
]. Enter the new text and press the
.
Options
Right Soft Key
], select
Center
D
New
Page 87

2. To edit the predefined Quick Text, select the Quick Text from the list, then press
the
Center Select Key [EDIT
3. To change the Quick Text position, press the
then press
Move
position, then press the
4. To erase a saved Quick Text, press the
press the
Center Select Key [OK]
].
. Press the
Directional Key
Center Select Key [SAVE
Right Soft Key
B up or down to scroll to desired
].
Left Soft Key
C [
.
Erase
D [
Options
]. Select
],
Yes
and
EMERGENCY CMAS ALERTS
Allows you to select the receiving of Emergency Alerts from emergency message server.
1. When there is a new emergency alert, a message appears on the phone, then
press
Receive Alerts
.
2. To receive additional alerts in addition to Presidential Alerts, mark/unmark
additional alerts you want, then press the
• Extreme Alert/Severe Alert: Imminent Threat to Life and Property.
• AMBER Alert: Child Abduction Emergency Alerts.
Presidential Alerts are mandatory.
3. To set the alert reminder, press
Minutes
,
[OK]
.
4. To activate
the
Center Select Key [OK]
Every 15 Minutes
Alert Vibrate
, or
, press
.
Left Soft Key
Alert Reminder
Off
, and then press the
Alert Vibrate
C [
, select
Once, Every 2
, select On or
Done
].
Center Select Key
Off
, and then press
VOICEMAIL #
1. Enter a new voicemail number or edit the voicemail number then press the
Center Select Key [OK]
2. Press the
Left Soft Key
.
C [
Add
], then press
2-Sec Pause
or
Wait
.
CALLBACK #
Allows you to use or edit the default callback number so that the recipient can callback
or reply.
87
020102
03
04
05
Page 88

1. Select On or
2. If
[OK]
Off
On
, then press the
is selected, enter a new callback number then press the
Center Select Key [OK]
.
.
SIGNATURE
Allows you to create a signature that can be automatically inserted at the end of each
message.
1. To deactivate Signature function, select
[OK]
.
2. To insert a Signature, select
then press the
Center Select Key [OK]
None
and press the
Custom
, enter your signature in the text entry field
.
Center Select Key
DELIVERY RECEIPT
Allows you to set delivery receipts for sent messages.
1. Select On or
• On: Request to receive the delivery acknowledgement.
•
Off
, then press the
Off
: Do not request to receive the delivery acknowledgement.
Center Select Key [OK]
.
OPTIONS
To erase all messages stored in your Message or Drafts folders:
1. From idle mode, press the
press the
Center Select Key [OK]
2. Press the
Right Soft Key
•
Erase Sent/Received
Erase Drafts
: Allows you to delete unlocked messages stored in Drafts.
•
Erase All Messages
•
Center Select Key [MENU
], select
Messaging
.
D [
Options
: Allows you to delete unlocked messages stored in Sent/Received.
: Allows you to delete unlocked messages stored in your phone.
] to access the following options:
RECENT CALLS
The Recent Calls menu is a list of the last phone numbers or Contact entries for calls you
placed, accepted, missed or blocked. It is continually updated as new numbers are added to
the beginning of the list and the oldest entries are removed from the bottom of the list.
88
Center Select Key
, then
Page 89

MISSED
Displays information about the 90 most recently missed calls.
1. Press the
Center Select Key [MENU
Select Key [OK]
. Select
2. Select an entry and press the
3. Press the
Right Soft Key
•
Save to Contacts
Save to PTT Contacts
•
If save doesn’t appear, that entry is already in your Contacts list.
•
Details
Erase
•
Lock/Unlock
•
Erase All
•
View Timers
•
4. Press the
•
TXT Message
Picture Message
•
Video Message
•
Voice Message
•
• When a PTT call is initiated, accessing the Message function is not available by using
• After 90 missed calls, the oldest call will automatically be erased from the history.
: Store the phone number in your
: Store the phone number in your PTT Contacts.
: Displays details about the caller if entered in Contacts.
: Erase a call listing.
: To lock or unlock a call listing.
: Erase all the call listing.
: Display usage time.
Left Soft Key
: Send a TXT message to the contact.
: Send a Picture message to the contact.
: Send a Video message to the contact.
: Send a Voice message to the contact.
Left Soft Key
the
C as it indicates a PTT call alert.
], select
Missed
and press the
Center Select Key [OPEN
D [
Options
C [
Message
Recent Calls
and press the
Center Select Key [OK]
] to view the entry.
] to access the following options:
Contacts
.
] to access the following options.
Center
.
RECEIVED
Displays information about the 90 most recently received calls.
1. Press the
Center Select Key [MENU
Select Key [OK]
. Select
2. Select an entry and press the
3. Press the
Right Soft Key
•
Save to Contacts
Save to PTT Contacts
•
: Store the phone number in your Contacts.
: Store the phone number in your PTT Contacts.
], select
Received
and press the
Center Select Key [OPEN
D [
Options
] to access the following options:
Recent Calls
and press the
Center Select Key [OK]
] to view the entry.
Center
.
89
020102
03
04
05
Page 90

If the saving option doesn’t appear, the selected entry is already in your contact list.
•
Details
: Displays details about the caller if entered in Contacts.
Erase
: Erase a call listing.
•
Lock/Unlock
: To lock or unlock a call listing.
•
Erase All
: Erase all the call listing.
•
View Timers
: Display usage time.
•
4. Press the
Left Soft Key
C [
Message
•
TXT Message
: Send a TXT message to the contact.
Picture Message
•
Video Message
•
Voice Message
•
• When a PTT call is initiated, accessing the Message function is not available by using
• After 90 received calls, the oldest call will automatically be erased from the history.
: Send a Picture message to the contact.
: Send a Video message to the contact.
: Send a Voice message to the contact.
Left Soft Key
the
C as it indicates a PTT call alert.
] to access the following options.
DIALED
Displays information about the 90 most recently dialed numbers.
1. Press the
Center Select Key [MENU
Select Key [OK]
. Select
2. Select an entry and press the
3. Press the
Right Soft Key
•
Save to Contacts
Save to PTT Contacts
•
If save doesn’t appear, that entry is already in your Contacts list.
•
Details
Erase
•
Lock/Unlock
•
Erase All
•
View Timers
•
4. Press the
•
TXT Message
Picture Message
•
90
: Store the phone number in your Contacts.
: Store the phone number in your PTT Contacts.
: Displays details about the caller if entered in Contacts.
: Erase a call listing.
: To lock or unlock a call listing.
: Erase all the call listing.
: Display usage time.
Left Soft Key
: Send a TXT message to the contact.
: Send a Picture message to the contact.
], select
Dialed
and press the
Center Select Key [OPEN
D [
Options
C [
Message
Recent Calls
Center Select Key [OK]
] to access the following options:
] to access the following options.
and press the
.
] to view the entry.
Center
Page 91

•
Video Message
: Send a Video message to the contact.
Voice Message
•
: Send a Voice message to the contact.
• When a PTT call is initiated, accessing the
Left Soft Key
using the
C as it indicates a PTT call alert.
Message
function is not available by
• After 90 dialed calls, the oldest call will automatically be erased from the
history.
ALL
Displays information about the most recently received, dialed and missed calls.
1. Press the
Center Select Key [MENU
Select Key [OK]
You can also view the entry by using the
. Select
2. Select an entry and press the
3. Press the
Right Soft Key
•
Save to Contacts
Save to PTT Contacts
•
If save doesn’t appear, that entry is already in your Contacts list.
•
Details
Erase
•
Lock/Unlock
•
Erase All
•
View Timers
•
4. Press the
•
TXT Message
Picture Message
•
Video Message
•
Voice Message
•
: Store the phone number in your Contacts.
: Store the phone number in your PTT Contacts.
: Displays details about the caller if entered in Contacts.
: Erase a call listing.
: To lock or unlock a call listing.
: Erase all the call listing.
: Display usage time.
Left Soft Key
: Send a TXT message to the contact.
: Send a Picture message to the contact.
: Send a Video message to the contact.
: Send a Voice message to the contact.
When a PTT call is initiated, accessing the
Left Soft Key
using the
], select
All
and press the
Recent Calls
Center Select Key [OK]
SEND Key
G in idle mode.
Center Select Key [OPEN
D [
Options
] to access the following options:
C [
Message
] to access the following options.
Message
C as it indicates a PTT call alert.
and press the
.
] to view the entry.
function is not available by
VIEW TIMERS
Timers allow you to check your usage time and manage your calls.
Center
91
020102
03
04
05
Page 92

1. Press the
Center Select Key [MENU
Select Key [OK]
2. Select
. Select
Last Call, All Calls, Received Calls, Dialed Calls, Roaming Calls
View Timers
], select
Recent Calls
and press the
and press the
Center Select Key [OK]
Transmit Data, Received Data, Total Data, Last Reset, Lifetime Calls
Lifetime Data Counter
3. Press the
Left Soft Key
4. Press the
Right Soft Key
Lifetime Calls and Lifetime Data Counter cannot be reset to the default setting value.
to view the information.
C [
Reset
] to reset the highlighted timer.
D [
Reset All
] to reset all timers.
MEDIA CENTER
Your phone provides a unique feature - Media Center - that enables you to download
ringtones, wallpapers, games and more from your network to your phone. Please
contact your service provider for the availability of these services.
APPS
To download tools that can help you navigate to entertainment, sports, restaurants,
and provide you with up-to-date weather information:
1. From idle mode, press the
and press the
Key
[OK].
Or press the
2. Select
SHOP APPS
3. Follow the on-screen prompts.
MOBILE WEB
Find the news you want or let it come to you. Now, a few seconds is all it takes to get
up-to-the-minute information.
92
Center Select Key [MENU
Center Select Key [OK
Center Select Key
[MENU], select Apps and press the
and press the
]. Select
Apps
and press the
Center Select Key [OK
], select
Center Select Key
].
Center
Media Center
Center Select
.
,
and
[OK].
Page 93

STARTING THE MOBILE WEB
1. From idle mode, press the
press the
Center Select Key [OK
2. The browser launches. Or you can access
Center Select Key [MENU
].
Mobile Web
EXIT
Press the
END/PWR Key
H to exit out of the browser and return to idle mode.
TUNES & TONES
USING MY RINGTONES
1. Press the
Center Select Key [MENU
Center Select Key [OK]
[OK]
.
2. Select
My Ringtones
and press the
3. Select the desired sound and press the
4. Press the
Center Select Key [STOP
[
Set As
] to access the following options:
•
Ringtone
: Set as ringtone
Contact ID
: Set as contact ID
•
Alert Sounds
: Set as alert sound for All Messages, Text Messages, Multimedia Messages,
•
or Voicemail
. Select
Tunes & Tones
], select
Center Select Key [OK]
Center Select Key [PLAY
] to stop playing. Press the
USING MY SOUNDS
1. Press the
Center Select Key [MENU
Center Select Key [OK]
[OK]
.
2. Select
My Sounds
3. Select
Record New
and press the
and press the
. Select
Tunes & Tones
], select
Center Select Key [OK]
Center Select Key [OK
recording or select the desired sound and press the
to play.
], select
through
Media Center
and press the
Media Center
and press the
.
Center Select Key [PLAY
Mobile Web
Media Center
and press the
Center Select Key
.
] to play.
Left Soft Key
and press the
Center Select Key
] to start your own
, and
C
.
020102
03
04
05
]
93
Page 94

4. Press the
Center Select Key [STOP
Press the
Left Soft Key
•
Ringtone
: Set as ringtone
Contact ID
: Set as contact ID
•
Alert Sounds
•
5. Press the
For downloaded or recorded sound:
•
•
•
•
•
•
•
•
For preloaded sound:
•
•
•
: Set as alert sound for All Messages, Text Messages, Multimedia Messages,
or Voicemail
Right Soft Key
Send
: Send the sound.
Send Via Email
To Online Album
Rename
Lock/Unlock:
Erase
Erase All
File Info
Send
To Online Album
File Info
: Send the sound via email
: Upload the selected sound to Online Album.
: Rename the sound’s title.
Lock/unlock the selected sound.
: Erase the selected sound.
: Erase all the sounds.
: Displays information for the selected sound.
: Send a sound.
: Upload the selected sound to Online Album.
: Displays information for the selected sound.
] to stop playing.
C [
Set As
] to access the following options:
D [
Options
] to access the following options:
PICTURE & VIDEO
USING VERIZON VIDEOS
By accessing to
Verizon Videos
, you can watch your favorite television shows while on
the go. Please contact your service provider for the availability of service.
USING MY PICTURES
In My Pictures you can view all the pictures you have taken, send pictures to the Online
Album, delete images and access additional picture options.
1. Press the
Center Select Key [OK]
2. Select
94
Center Select Key [MENU
Picture & Video
.
and press the
], select
Media Center
Center Select Key [OK]
and press the
.
Page 95

3. Select
My Pictures
4. Select the desired image then press the
and press the
Center Select Key [OK]
Center Select Key [VIEW
.
] to display
the enlarged image.
5. Press the
Right Soft Key
•
Send
: Send a Picture Message, or upload To Online Album. You can send Via Bluetooth
or Via Email.
•
Set As
: Assigns the selected picture as
•
Full View
: Displays the full viewing image.
•
Rotate
: Use the
•
Zoom
: Use the
out the picture.
•
Resize
: Resizes the selected picture.
•
Crop
: Crops the selected picture in a different size.
•
Rename
: Renames the selected picture.
•
Move
: Moves the selected picture to the card memory.
•
Lock/Unlock
•
File Info
: Displays information about the selected picture.
D [
Options
] to access the following options:
Wallpaper
Left Soft Key
C [Rotate(L)] or
Left Soft Key
C [ Zoom-] or
: Locks/unlocks the selected picture.
Right Soft Key
or
Picture ID
Right Soft Key
D [Zoom+] to zoom in/
.
D [Rotate(R)].
To erase the picture:
Center Select Key [MENU
1. Press the
Center Select Key [OK]
2. Select
Picture & Video
3. Select
My Pictures
and press the
4. Select the desired image. Press the
Yes
5. Select
and press the
], select
.
and press the
Center Select Key [OK]
Center Select Key [OK]
Left Soft Key
Center Select Key [OK
Media Center
C [
Erase
].
and press the
.
.
] to erase.
USING MY VIDEOS
In My Videos you can play the videos you have taken by using your phone, send videos
to the Online Album, or set video as wallpaper in your phone.
1. Press the
Center Select Key [MENU
Center Select Key [OK]
2. Select
Picture & Video
3. Select
My Videos
and press the
.
and press the
Center Select Key [OK]
], select
Media Center
Center Select Key [OK]
and press the
.
.
95
020102
03
04
05
Page 96

4. Select the desired video then press the
Center Select Key [PLAY
video.
Right Soft Key
5. Press the
•
Send
: Send a Video Message, or upload To Online Album. You can send Via Bluetooth
or Via Email.
•
Record Video
•
Verizon Videos
•
Set As Wallpaper
•
Manage Videos
•
Rename
: Renames the selected video.
•
File Info
: Displays information about the selected video.
D [
Options
] to access the following options.
: Record a new video
: Connect to the Verizon Videos service.
: Assigns the selected video as wallpaper
: Choose to either
Erase, Lock
or
Unlock
To erase the video:
1. Press the
Center Select Key [MENU
Center Select Key [OK]
2. Select
Picture & Video
3. Select
My Videos
and press the
4. Select the desired video. Press the
5. Select
Yes
and press the
], select
.
and press the
Center Select Key [OK]
Center Select Key [OK]
Left Soft Key
Center Select Key [OK
Media Center
TAKING PICTURES
1. To access the camera, with the flip open, press the
2. Focus the object.
3. Press the
Directional Key B
left or right to zoom in or out.(Except for the
2048X1536 resolution mode).
4. Press the
Right Soft Key [Options
Name Description
Auto Focus On, Off
Resolution 2048X1536, 1600X1200, 1280X960, 640X480, 320X240, 160X120
Self Timer Off, 3 Seconds, 5 Seconds, 10 Seconds
Flash Off, On, Only This Shot
96
] to access the following options.
the video.
.
C [
Erase
].
Camera/Video Key
] to play the
and press the
.
] to erase.
E.
Page 97

Name Description
Brightness -5, -4, -3, -2, -1, 0, +1, +2, +3, +4, +5
White Balance Auto, Sunny, Cloudy, Tungsten, Fluorescent
Shutter Sound Shutter, Silent
Color Effects Normal, Black & White, Negative, Sepia, Green, Aqua
Multishot Off, On
Night Mode Off, On
Viewfinder Main Display, Front Display
Memory Phone, Card
5. Press the
Center Select Key [TAKE
- When the
Auto Focus
focus the object, then release the
6. To save the picture, press the
without saving, press the
Message, press the
Center Select Key [SEND
] to take the picture.
is On, press and hold the
Center Select Key [OK]
Left Soft Key
Right Soft Key
C [
D [
].
Center Select Key [TAKE
to take a picture.
Save
]. To take another picture
Erase
]. To send as a Picture
RECORDING VIDEO
1. To access the video camera, with the flip open, press the
2.
Press the Camera/Video Key E once again to use the video recording mode.
Camera/Video Key E.
3. Focus the object.
4. Press the
Directional Key B
5. Press the
Right Soft Key
Name Description
Recording Light Off, On, Only This Shot
Brightness -5, -4, -3, -2, -1, 0, +1, +2, +3, +4, +5
White Balance Auto, Sunny, Cloudy, Tungsten, Fluorescent
Shutter Sound On, Off
Recording Time 60 Seconds for Video MSG, 60 Minutes for Save
left or right to zoom in or out.
D [
Options
] to access the following options.
] to
97
020102
03
04
05
Page 98

Name Description
Call Interruption Allow, Block
Viewfinder Main Display, Front Display
Memory Phone, Card
6. Press the
Center Select Key [REC
Key
[
STOP
] to stop recording.
7. To save the video, press the
without saving, press the
Message, press the
Center Select Key [SEND
] to record a video and press the
Left Soft Key
Right Soft Key
C [
D [
Save
Erase
].
]. To take another video
]. To send as a Video
USING ONLINE ALBUM
1. Press the
Center Select Key [MENU
Center Select Key [OK]
2. Select
Picture & Video
3. Select
Online Album
and press the
.
and press the
], select
Media Center
Center Select Key [OK]
Center Select Key [OK
and press the
.
].
4. The browser launches, and the Online Album sign-on screen appears.
5. Follow the on-screen prompts.
VZ NAVIGATOR
VZ Navigator — Now you can find the address of a great restaurant or the nearest ATM.
Check movie times. Discover the latest hot spots. And know exactly how to get
where you’re going.
VZ Navigator puts all the advanced features of the latest GPS devices and systems
on your wireless device — at a fraction of the price.
VZ Navigator provides:
• Heads-up, voice-prompted, turn-by-turn directions with auto-rerouting if you
miss a turn
• Local search of nearly 14 million points of interest in the U.S.
98
Center Select
Page 99

• Detailed color maps that can be quickly panned and zoomed With VZ Navigator,
you’ll know exactly where you are, what’s around you and how to get there.
Download, subscription, and airtime required for use; only in National Enhanced
Services Coverage Area; accuracy and completeness of information is not
guaranteed; information about location of device will be used to deliver service.
1. Press the
2. Press the
Center Select Key [MENU
Center Select Key [OK]
.
], select
VZ Navigator
.
3. Follow the on-screen prompts.
To use VZ Navigator, your phone’s location capabilit y must first be enabled.
To turn Location On, see details on page 130.
Changing VZ Navigator setting does not automatically enable retrieval of the location
of the phone, you must still grant VZ Navigator access to the location capability before
it can acquire the phone’s location.
The first time you run VZ Navigator, you will be prompted to grant this permission to
the application.
SETTINGS & TOOLS
MY VERIZON
To access your Verizon account information:
1. Press the
Center Select Key [MENU
Center Select Key [OK]
2. Select
My Verizon
and press the
- Launches the web browser to My Verizon Web site.
Shortcut
: In idle mode, press the
MASTER VOLUME
1. Press the
Volume Keys
- To check the ringtone’s volume, press the
2. Press the
Center Select Key [SET
], select
Settings & Tools
.
Center Select Key [OK]
Directional Key
B left to access My Verizon.
L M
to adjust the master volume level.
Left Soft Key
] to save.
and press the
.
C [
Play
].
99
020102
03
04
05
Page 100

TOOLS
USING VOICE COMMANDS
Your phone is equipped with an AVC (Advanced Voice Commands) feature. This feature
allows you to make calls or use the phone’s functions by simply using your voice. All you
have to do is talk into the phone and the phone will recognize your voice and complete
tasks by itself.
1. Press the
Center Select Key [MENU
Center Select Key [OK]
Select
Voice Commands
Shortcut
: With the flip open, press the
phone to access Voice Commands.
2. The phone displays the
], select
. Select
Tools
and press the
then press the
Voice Commands
Settings & Tools
Center Select Key [OK]
Center Select Key [OK]
Voice Commands Key
O on the left side of your
menu and prompts you to say the
name of the command you want to use. To complete your task, simply follow
the voice prompts. You c an speak the name of the command after you hear a
beep.
You can hear a beep in the Tone Only Mode (MENU > Settings & Tools > Phone
Settings > Voice Commands Settings > Prompts > Mode > Tones Only) while you can
see a prompt without a beep sound in the Prompts, Readout + Alerts, or Readout.
3. Select either
<Item>
Center Select Key [OK]
Call <Name or #>, Send <MSG Type>, Go To <Menu>, Check
,
Contact <Name>, Redial, My Verizon
or
Help
and press the
.
4. When it recognizes one of these commands, the phone launches the
associated application. If the phone does not hear a command within
approximately eight seconds, AVC mode will turn itself off.
CALL <NAME OR #>:
Use the
Call
command to voice dial a name from your Contact List or a phone number.
When dialing a number, pronounce each digit, but do not pause noticeably between
the digits.
100
and press the
.
.
 Loading...