

Page 1

SCANNDY MANUAL
Page 1
SCANNDYbasic
Manual
Page 2

SCANNDY MANUAL
Page 2
© 2014 by advanced PANMOBIL systems GmbH & Co. KG
This manual contains proprietary information of advanced PANMOBIL systems GmbH & Co. KG. It
is intended solely for the information and use of parties operating and maintaining the equipment
described here in. Such proprietary information may not be used, reproduced, or disclosed to any
other parties for any other purpose without the expressed written permission of advanced
PANMOBIL systems GmbH & Co. KG.
Software and product improvement
The software is provided strictly on an “as is” basis. The user shall not modify, merge, or
corporate any form or portion of a licensed program with other program material, create a
derivative work from a licensed program, or use a licensed program in a network without written
permission from PANMOBIL. The user agrees not to decompile, disassemble, decode, or reverse
engineer any program delivered to the user or any portion thereof. PANMOBIL reserves the right
to make changes to any software or product to improve reliability, function, or design. PANMOBIL
does not assume any product liability arising out of, or in connection with, the application or use of
any product, circuit, or application described here in. No license is granted, either expressly or by
implication, estoppel, or otherwise under any PANMOBIL intellectual property rights. An implied
license only exists for equipment, circuits, and subsystems contained in PANMOBIL products.
Trademarks
PANMOBIL and SCANNDY are registered trademarks. Bluetooth is a registered trademark of
Bluetooth SIG. Microsoft and Windows are either registered trademarks or trademarks of
Microsoft Corporation. All other product or service names are the property of their respective
owners. Please contact for more information:
advanced PANMOBIL systems GmbH & Co. KG
Hansestraße 91
D-51149 Cologne
Germany
Warranty
For the complete PANMOBIL hardware product warranty statement
go to: www.PANMOBIL.com
Page 3
SCANNDY MANUAL
Page 3
PRODUCT REFERENCE
SCANNDYBasic II
Introduction
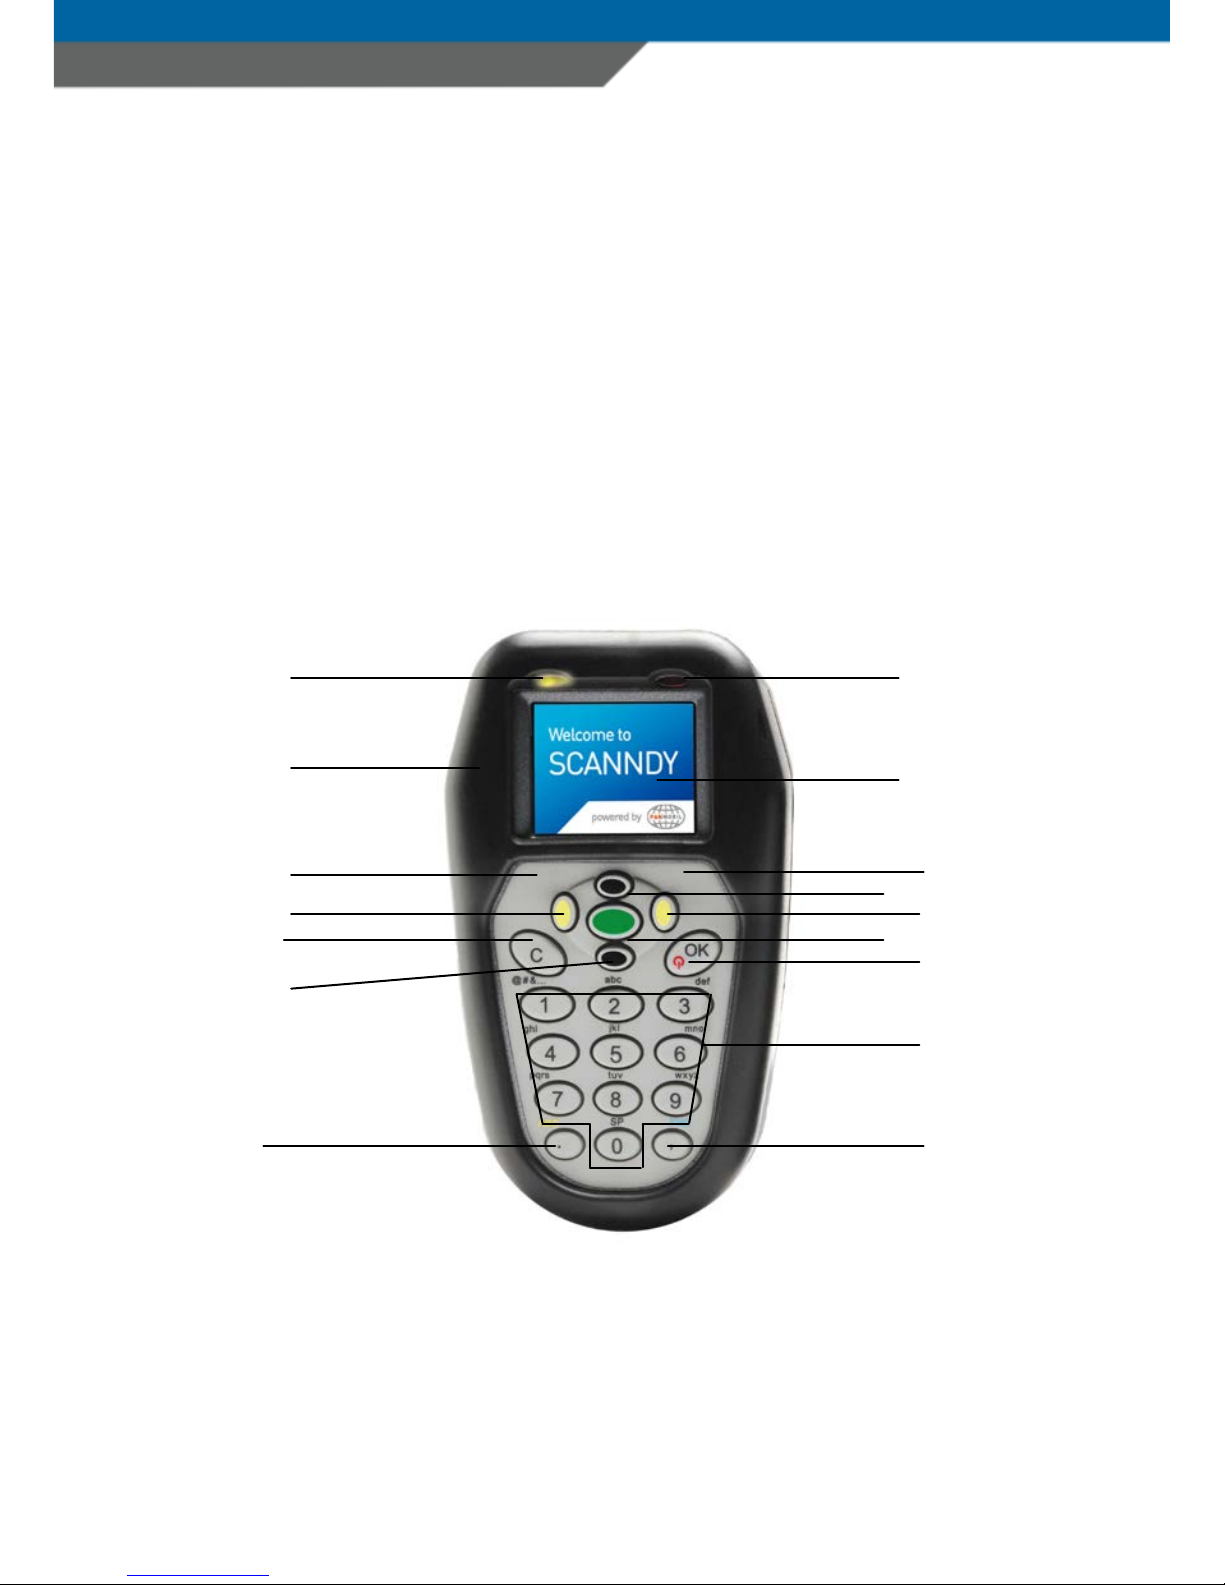
PANMOBILs SCANNDYBasic series devices capture and store barcode and
RFID data for a variety of uses, and transmit barcode and RFID data to a host
via USB connection, Bluetooth WIFI ore GPRS. This document provides basic
instructions for using the SCANNDYBasic series device.
1
2 3 4
7
8
9
10
11
12
13
14
15
16
5
6
Page 4

SCANNDY MANUAL
Page 4
No.
Description
Function
1
Left LED (green)
Left LED (red)
Green LED: Lights up green when the device is
powered ON.
Is flashing green (2 sec.) when the battery is low
(Other function can be defined by API)
Red LED: Lights up red if connect to ext. power
for the time the battery is charging
(Docking station or direct connect cable)
2
Right LED (yellow)
Right LED (blue)
Yellow LED:
Lights up yellow when a Barcode or RFID Tags
was read successfully.
Is flashing yellow (500ms) when connected to
USB (USB Memory stick mode)
(Other function can be defined by API)
Blue LED:
Bluetooth: Lights up blue when Bluetooth
connection is established
Wi-Fi: Flashing (every 1 sec.) while connecting to
a Wi-Fi network.
Flashing (every 5 sec.) when Wi-Fi is connected
(Other function can be defined by API)
3
Rubber protector Protective rubber covers to protect the device
against splash, dust and drops.
It is recommended to not use the device without
the rubber protector.
4
Full colour OLED
Display
Full colour OLED Display 1.45” 160 x 128
5+6
Hidden Reset key The hidden system reset keys are located in the
upper left and right corner of the rubber keypad.
Press the rubber keypad on both corners at the
same time to reset the device.
NOTE! A system reset can effect in loss of data
and/or configuration settings!
7
Navigation key LEFT
Press the left navigation key to move the cursor
Page 5

SCANNDY MANUAL
Page 5
to the left side
(Other function can be defined by SFL or API)
8
Navigation key UP Press the up navigation key to move the cursor
up (Other function can be defined by SFL or API)
9
Navigation key
RIGHT
Press the right navigation key to move the
cursor to the right side
(Other function can be defined by SFL or API)
10
Cancel/Clear key Press the Cancel/clear key to cancel a function
or to clear keyboard inputs
(Other function can be defined by SFL or API)
11
Trigger key Press the Trigger key to start the barcode or
RFID reader (Other function can be defined by
SFL or API)
12
ON/OFF OK key Default: ON/OFF button
When OFF: press the OK button short to boot the
device
When ON: press the OK button for 3 sec. to shut
the device OFF
When ON: press the OK button short to confirm
messages or inputs
(Other function can be defined by SFL or API)
13
Navigation key
DOWN
Press the down navigation key to move the
cursor down (Other function can be defined by
SFL or API)
12+13
Launcher Mode Fall back Configuration mode
Follow the instructions below to set the device
into the launcher mode
1. Switch Off the device
2. Press and hold key 13 (DOWN) and key
12 (OK) until you hear a beep (this can
take several seconds)
3. Connect the device to a PC via USB
4. The device will be mounted as a
removable drive “SCANNDY”
Page 6
SCANNDY MANUAL
Page 6
5. You can now modify and save the
settings
6. Press key 11 (Trigger) until you hear a
beep
The device will restart with the new settings
14
Alpha/numerical
keys
Press this keys short to input digits or
alphabetical characters
(Other function can be defined by SFL or API)
15
Dot / numeric/alpha
toggle key
Press this key short to input the dot character
Press this key for 1 sec. to switch from numeric
to alpha mode and vice versa
(Other function can be defined by SFL or API)
16
Comma / Function
key
Press this key short to input the comma
character
Press this key for 1 sec. to switch to switch to
function key mode and vice versa
(Other function can be defined by SFL or API)
No.
Description
Function
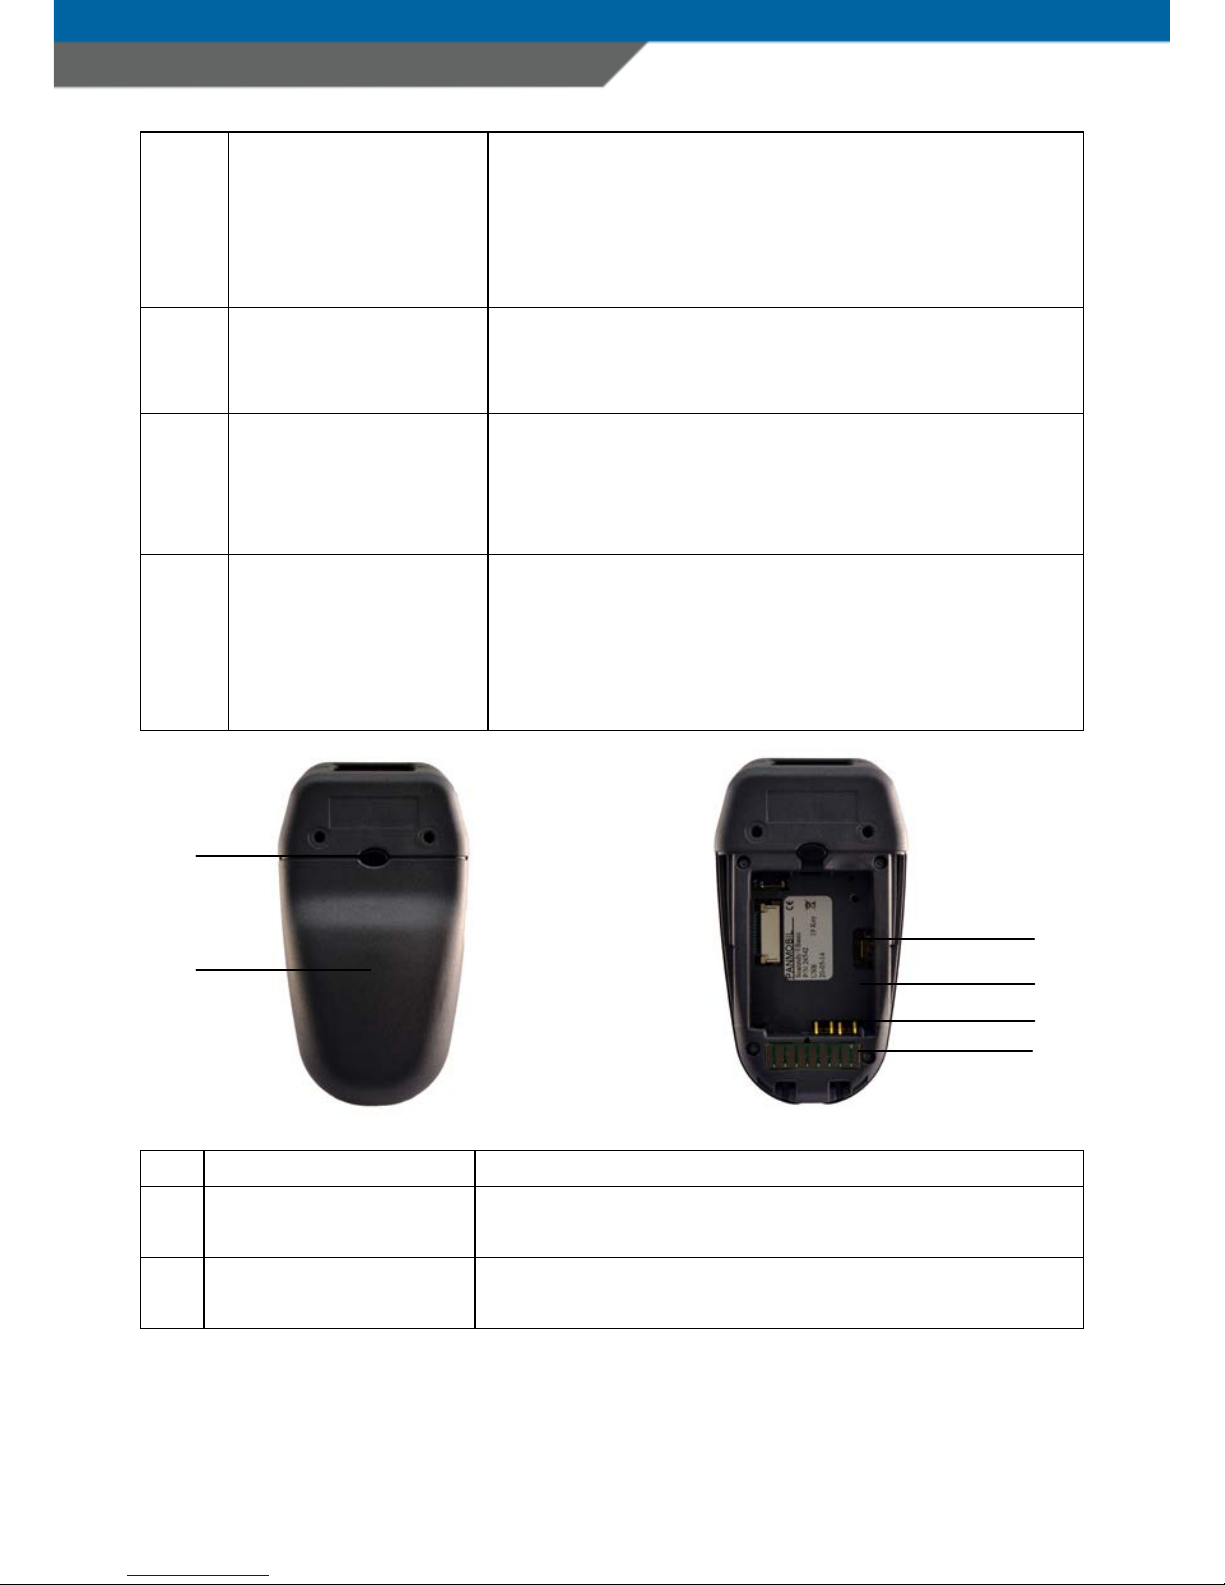
17
Battery cover
release button
Press this button to unlock the battery cover
18
Battery cover Open the battery cover to access the
rechargeable battery
17
19
20
21
18
22
Page 7
SCANNDY MANUAL
Page 7
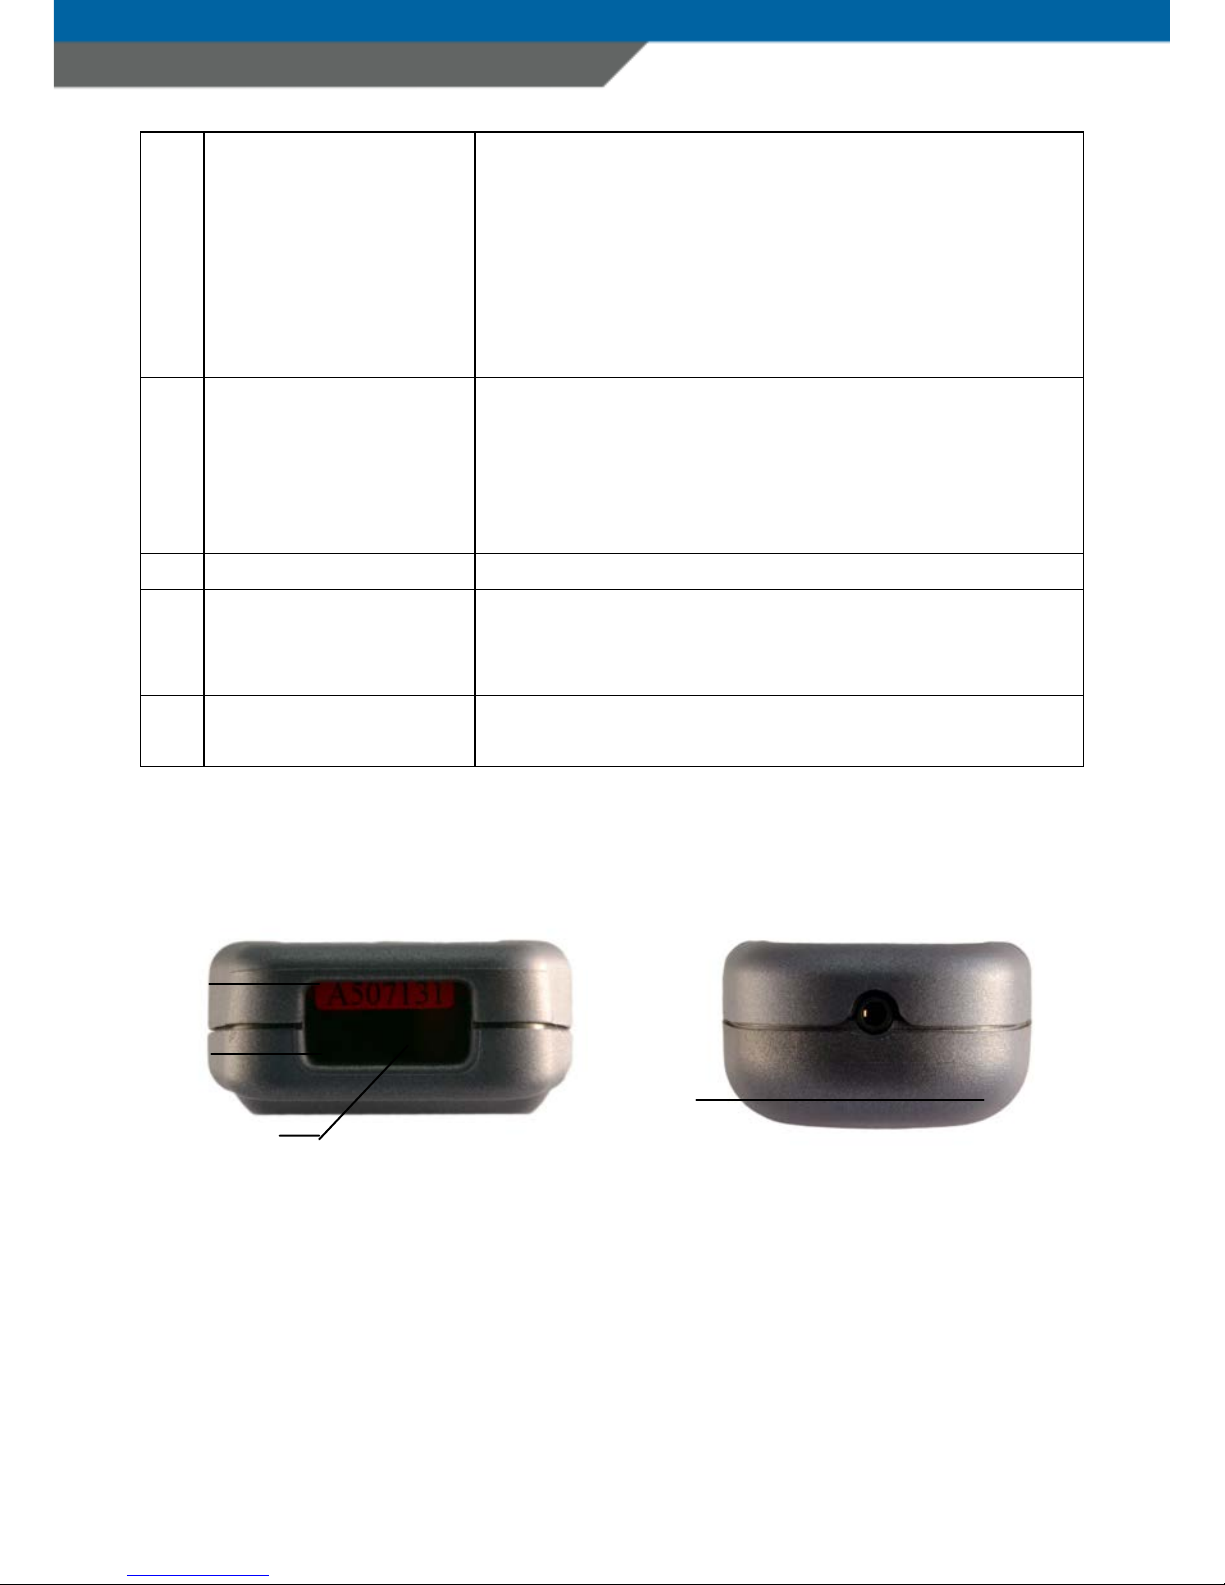
19
Direct link interface Interface to connect the cable directly.
Note! The interface can be USB or RS232.
Please read the product label to see the interface
type.
Do not connect an USB configured device to a
RS232 cable or the other way around. This could
damage components inside the device.
19
Clock reset switch Press this switch with a paper clip to reset the
system clock
Note! For the case that the device does not power
ON when pressing the OK button, please perform
a clock reset.
20
Product label
Product and device information label
21
Battery contacts Battery contacts for charging the Li-Ion battery
TAKE CARE TO NOT DAMAGE THIS PINS WHEN
INSERTING THE RECHARGEABLE BATTERY
22
Tec Pack interface Interface to connect additional modules for
ScanndyBasic devices
23
24
26
25
Page 8
SCANNDY MANUAL
Page 8
No.
Description
Function
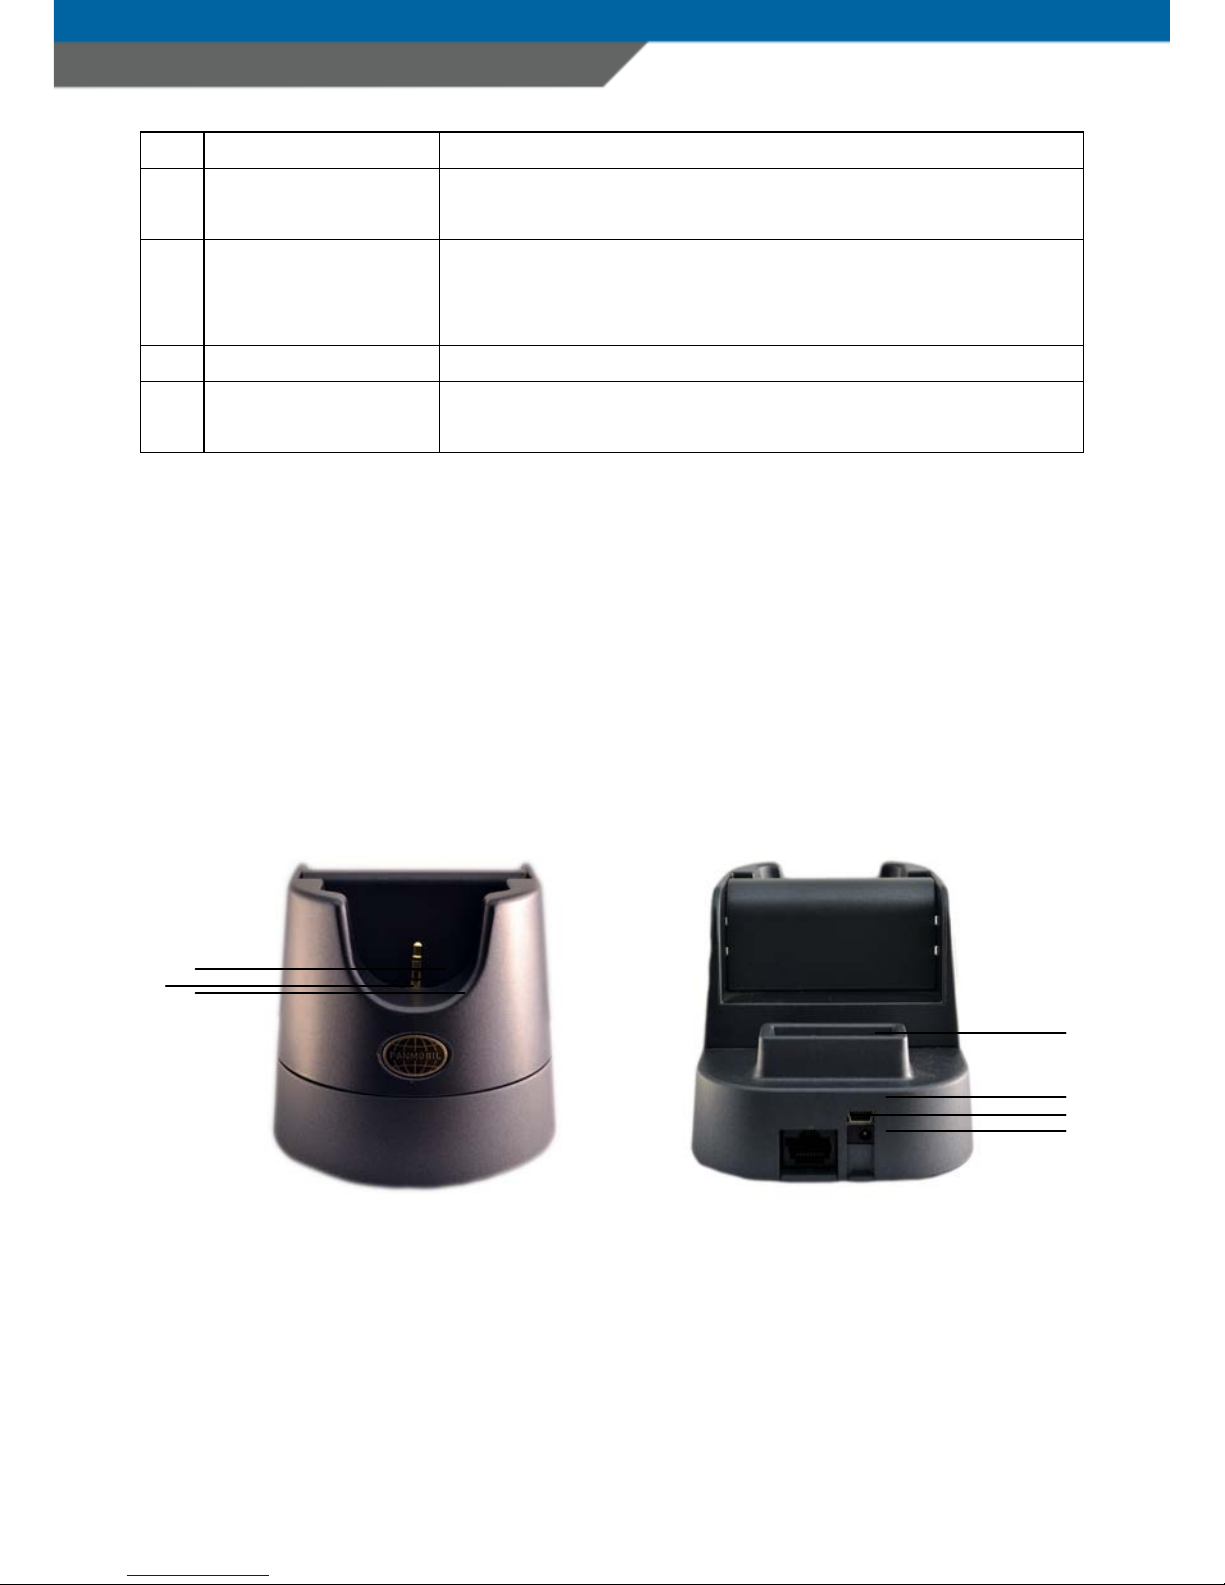
23
Serial number
label
Unique device serial number
24
Protection glass
for barcode and
RFID reader
Keep this glass free of dirt and scratch to have the
best reader performance.
25
Barcode reader
1D Laser Barcode reader or 1D/2D Code Imager
26
RFID Antenna
(option)
Antenna for RFID reader/writer
SCANNDYBASIC DOCKINGSTATION
1
2
3
4
5
6
7
Page 9

SCANNDY MANUAL
Page 9
Nr.
Description
Function
1 Communication
and battery
charging interface
USB Host interface
Optional RS232 interface
Device battery charging interface
2 Power LED
(green)
Charging LED
(spare battery)
(red)
Constant green when the docking station is
powered ON
constant red while spare battery is charging inside
the spare battery charging slot (4)
3 Blue LED Bluetooth connection LED
Constant blue when a device is connect via Bluetooth
4
Spare battery
charging slot
Charges the spare battery
5
USB Interface
Mini USB to PC interface
6 Main
communication
interface
RJ45 main communication interface. Please verify
the product label to learn about the interface type
7 Connector for
power supply
Connector for power supply.
DO NOT USE OTHER POWER ADAPTERS THAN THE
ORIGINAL FROM PANMOBIL!!
Page 10
SCANNDY MANUAL
Page 10
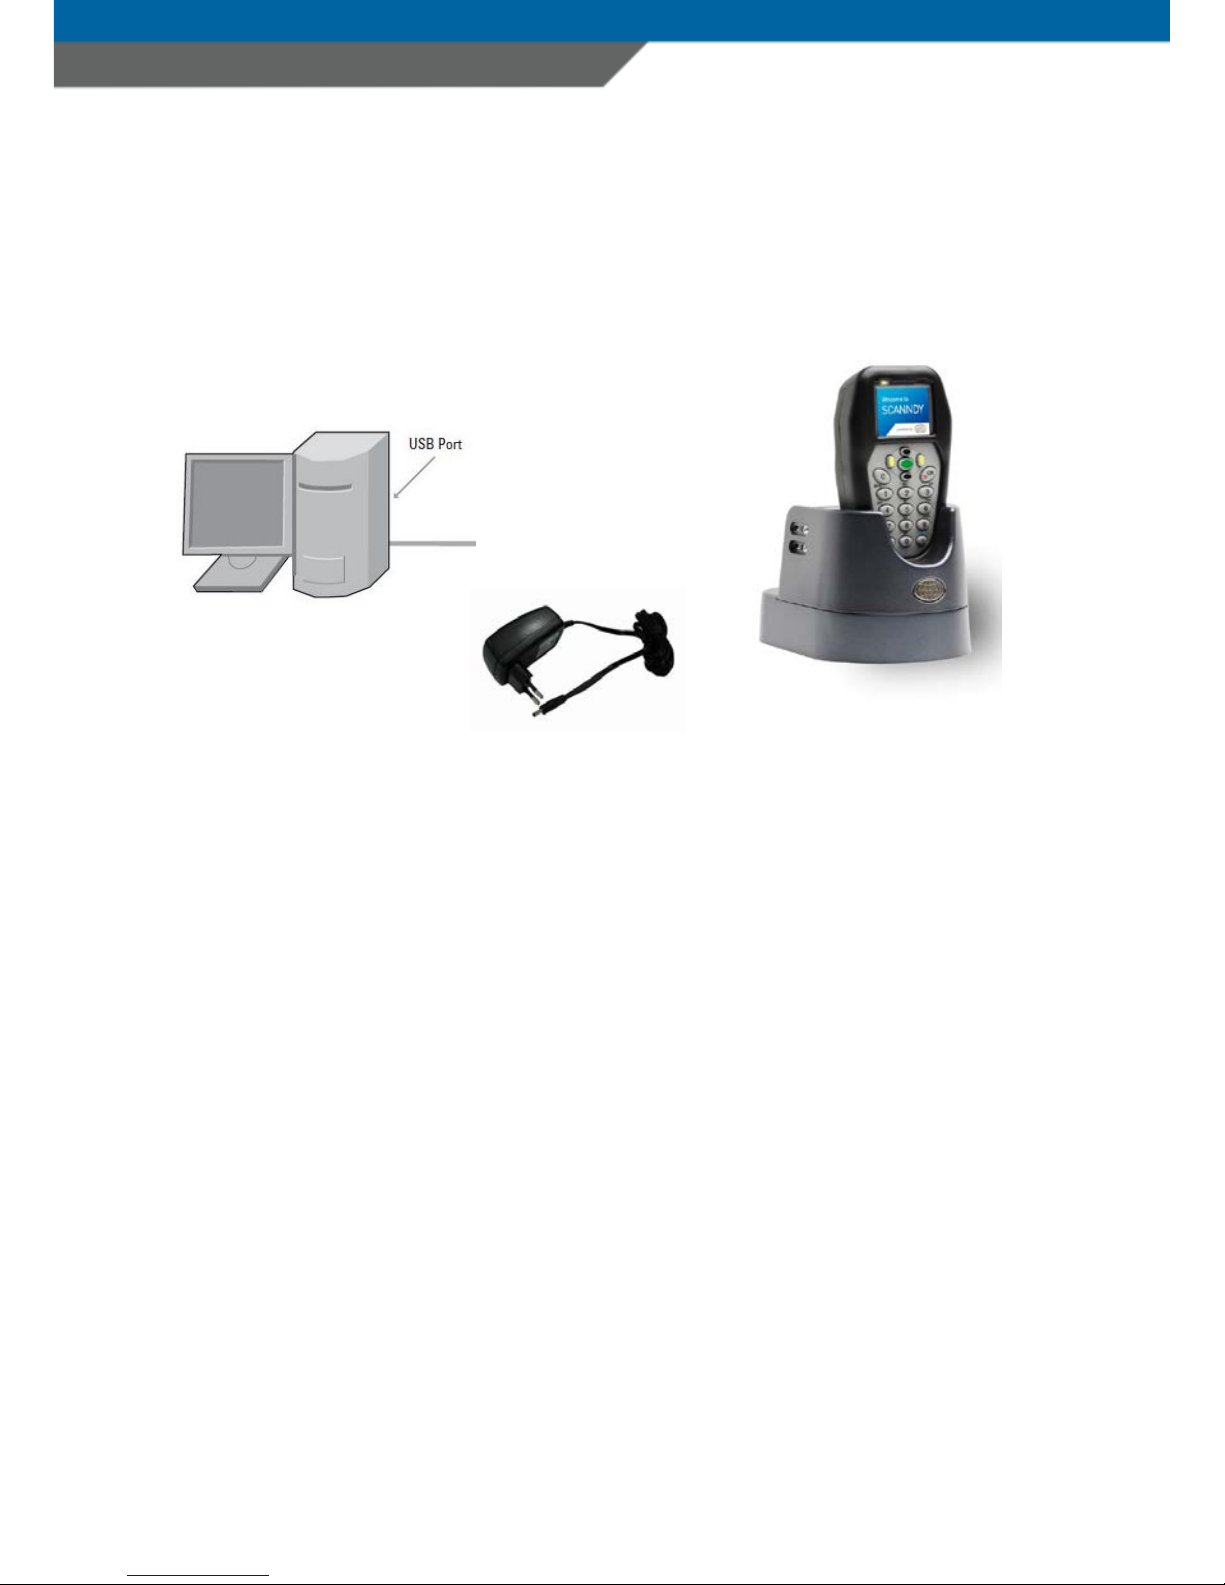
CHARGING THE BATTERY
Before the first operation, the main battery should be charged for minimum 5
hours. The red LED (1) lights solid red as long as the battery is charging. When
the battery is fully charged the red LED (1) turns off.
1. Remove the USB protection cap (7) from the device
2. Connect the device to the USB port of a PC or to the USB power
adapter (accessory)
3. The red LED (1) lights solid red as long as the battery is charging
4. The battery is fully charged when the red LED (1) turns off
A full recharge of the battery takes approximately 4 hours when using the
external power adapter (accessory). Recharging the battery from USB
interface of a PC may take longer.
Page 11
SCANNDY MANUAL
Page 11
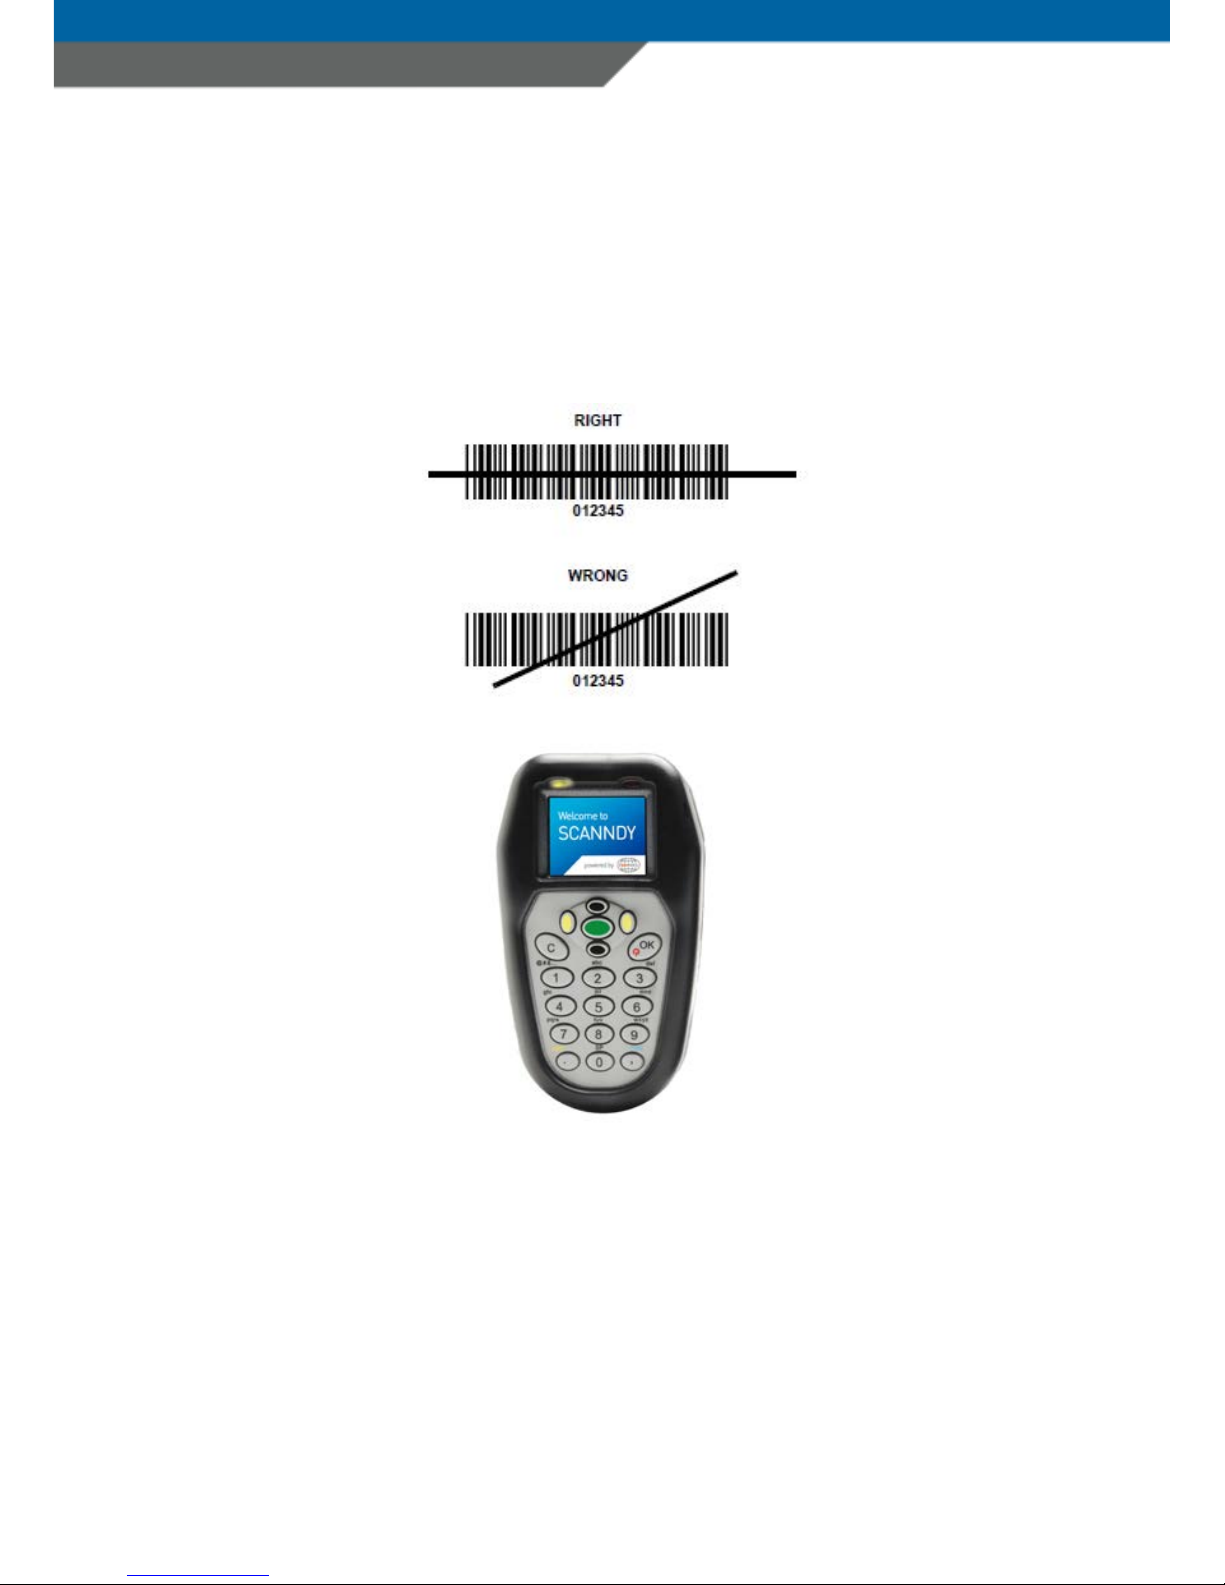
SCANNING BARCODE (1D Laser)
1. Aim the scanner at the barcode
2. Press the Trigger button (3)
3. Ensure the scan line crosses every bar and space of the symbol
The device beeps and the right LED (2) turns green to indicate a successful
decode. See the SFL script or API reference guide to learn how to define
beeps and vibrate alerts.
Page 12
SCANNDY MANUAL
Page 12
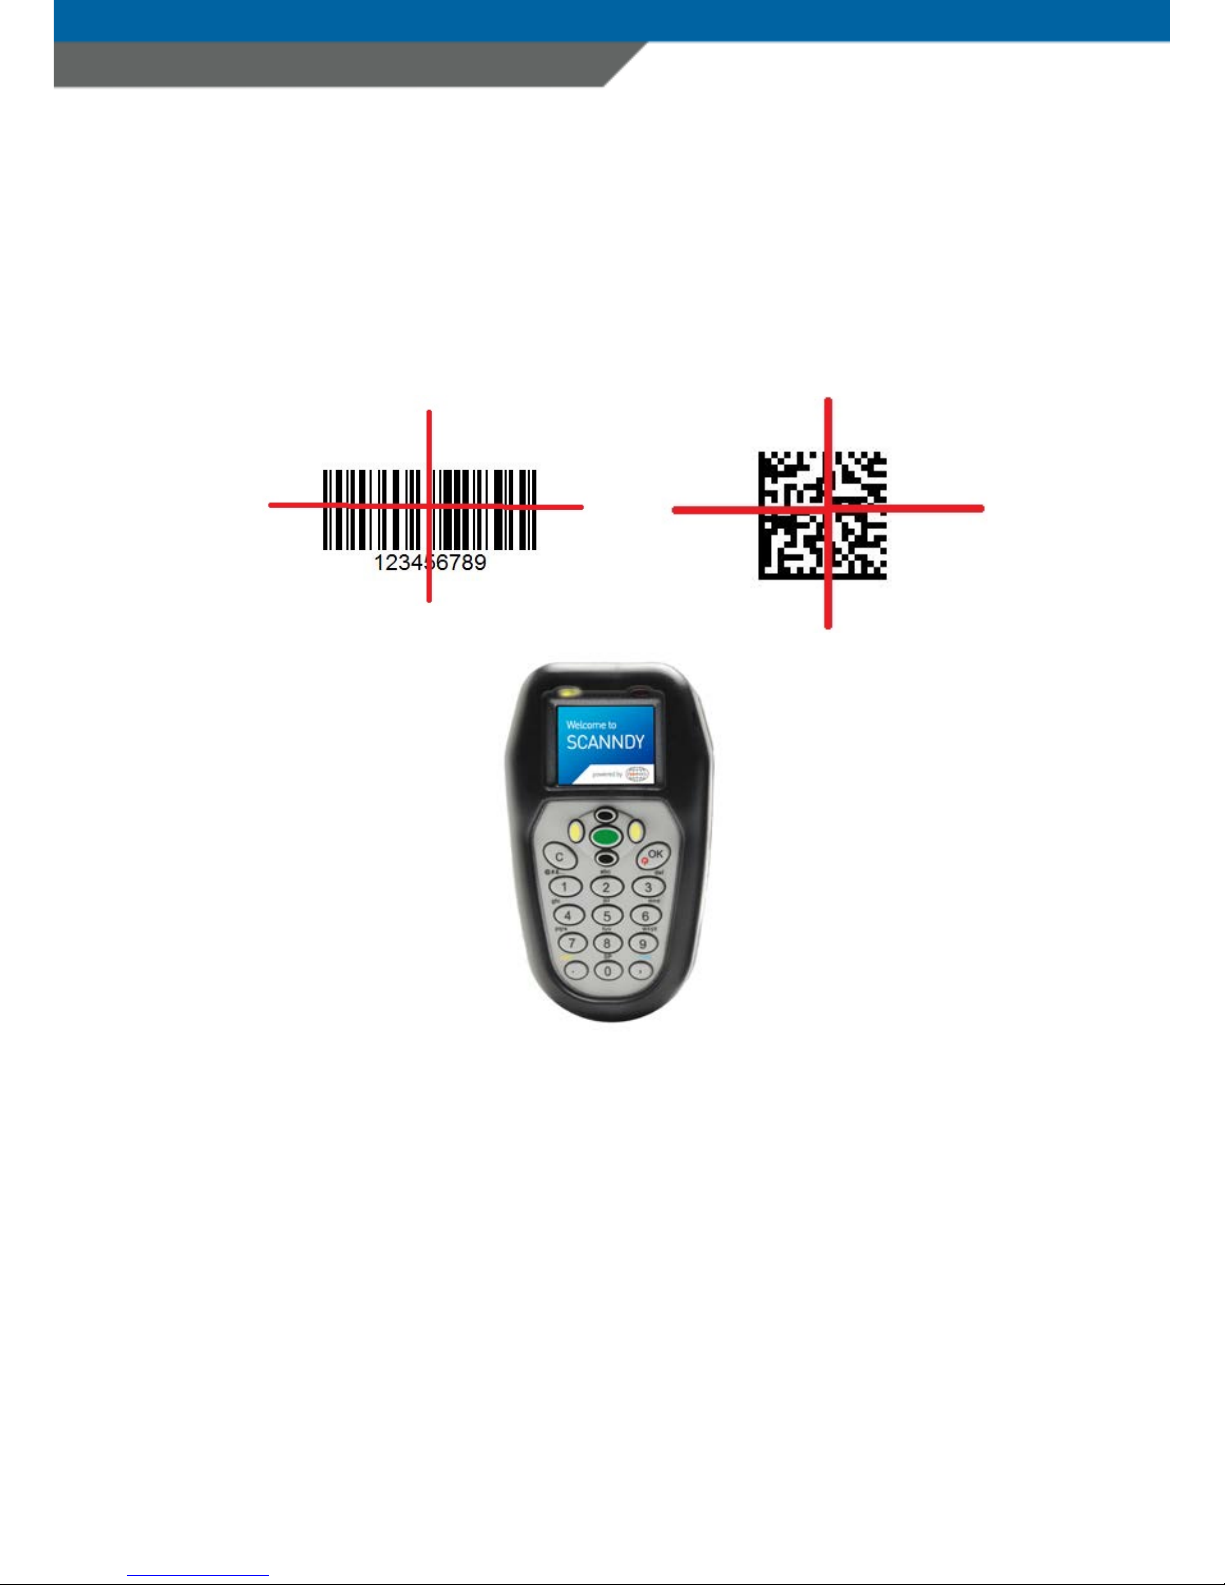
SCANNING BARCODE (1D/2D Imager)
1. Aim the scanner at the barcode
2. Press the Trigger button (3)
3. The device decodes the code nearest to the cross centre
The device beeps and the right LED (2) turns green to indicate a successful
decode. See the SFL script or API reference guide to learn how to define
beeps and vibrate alerts.
Page 13
SCANNDY MANUAL
Page 13
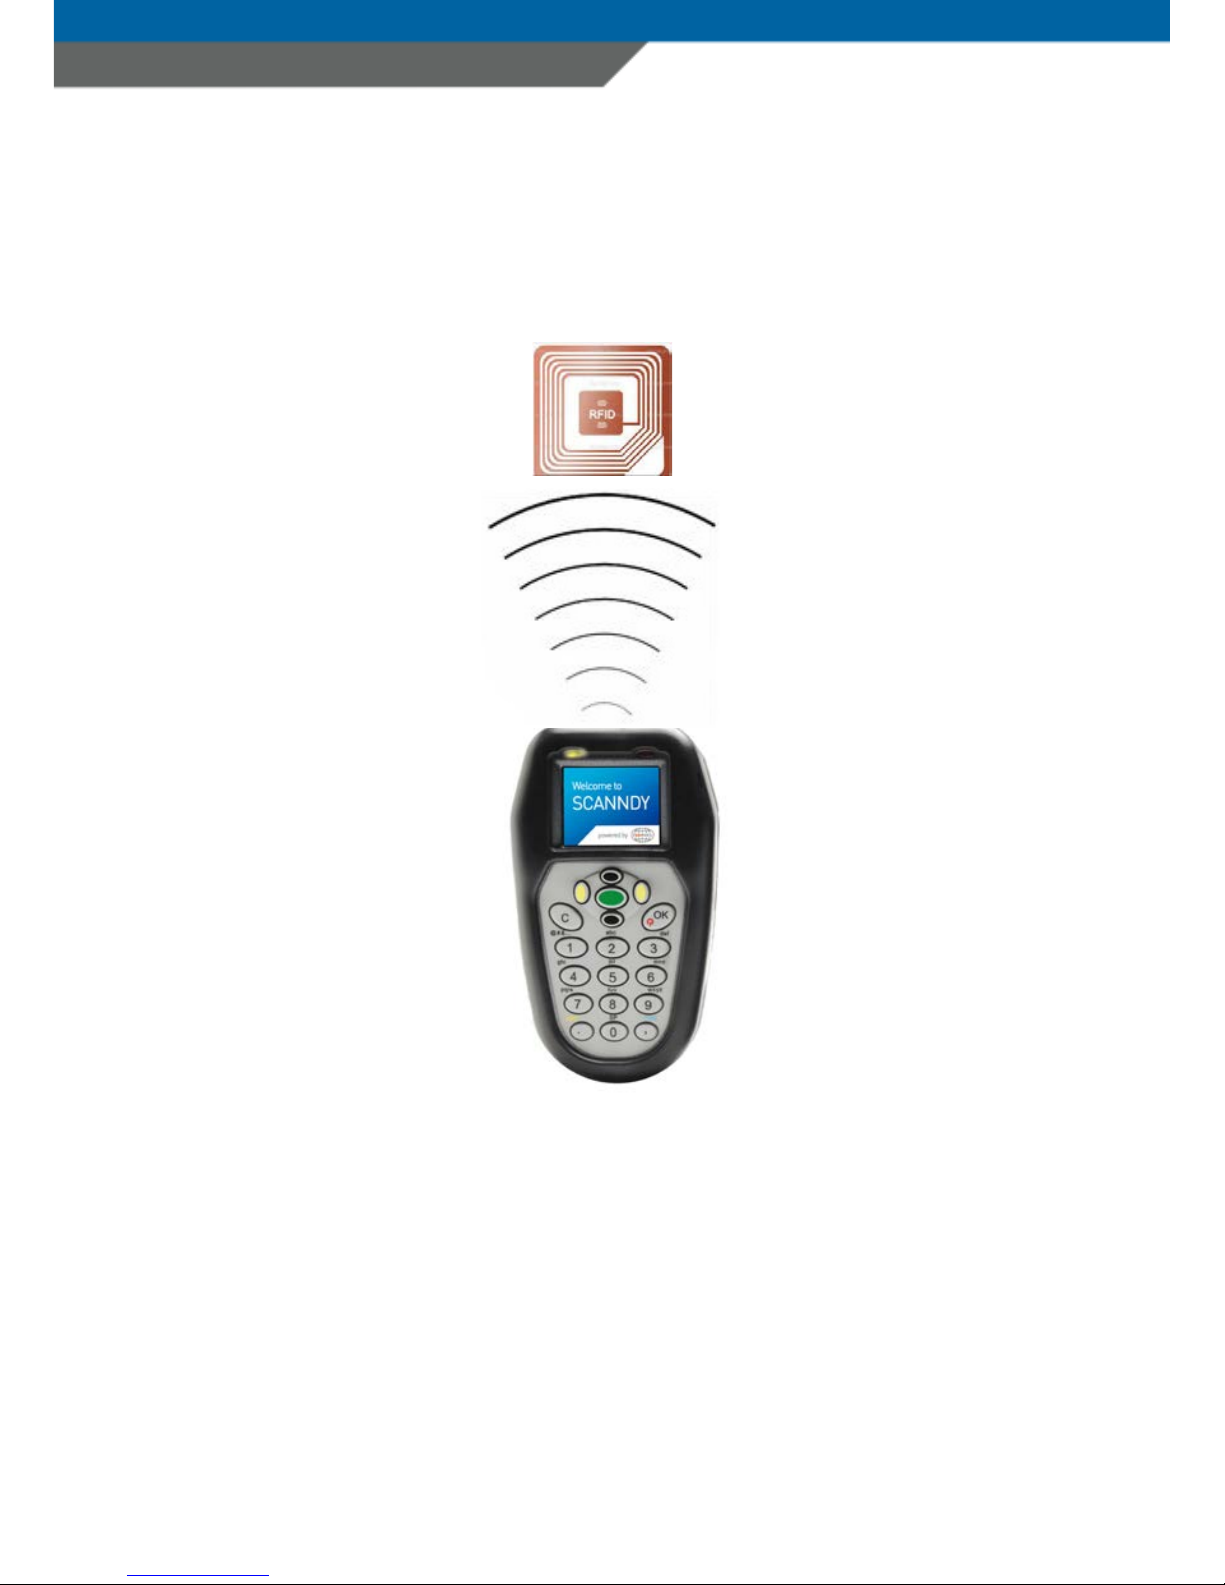
SCANNING RFID
1. Aim the scanner at the RFID Tag
2. Make sure the Tag is within the reader field
3. Press the Trigger button (3) to read data from the RFID Tag
The device beeps and the right LED (2) turns green to indicate a successful
decode. See the SFL script or API reference guide to learn how to define
beeps and vibrate alerts.
Page 14

SCANNDY MANUAL
Page 14
BLUETOOTH CONNECTION
Pairing
For Bluetooth enabled devices to pair to a Bluetooth enabled host.
Note!
The following description is only valid for devices with factory installed
software. Devices with custom software can behave different, depending on
the programming.
1. Connect the device to the host using the USB port and brows the drive
“Scanndy”. And search for the file *.sfl
2. Open the file *.sfl with the text editor and verify the setting for the
Bluetooth profile
Example for Bluetooth SPP (SerialPortProfile)
Config {
[Uni]
Outmode=btser
}
Example for Bluetooth HiD (HumanInterfaceDevice)
Config {
[Uni]
Outmode=bthid
}
Set the Bluetooth profile supported by the host or required by the
application.
•
Serial Port Profile (SPP)
- The scanner connects to the host via
Bluetooth and emulates a serial connection. The scanner accepts an
incoming connection requested from a Bluetooth host.
Page 15

SCANNDY MANUAL
Page 15
•
Bluetooth Keyboard Emulation (HID)
The scanner connects to the host via Bluetooth and emulates a
keyboard. The scanner accepts an incoming connection requested
from a Bluetooth host.
(See the SFL reference manual for further information)
3. Save the settings that have been made and open the file “config.ini” to
verify the general Bluetooth settings.
Example:
[BT]
Devname=SCANNDY808240
Master key=1234
Slave key=1234
Security=0
Available=0
Dirty=0
Defaddress=000000000000
Address=000000000000
SPPchannel=3
For further information please refer to the config_ini reference guide.
4. Save the settings and disconnect the device prom the PC.
On the host PC, launch the third party Bluetooth pairing application
and place the application into discover Bluetooth device mode.
5. Select the device with the device name configured in the file config.ini
from the discovered device list. The Bluetooth application may prompt
you to scan a passkey it generated, or for you to create and then scan
a pin.
6. If the Bluetooth application prompts you to generate a pin, enter the
configured Bluetooth pin
DEFAULT: 1234
Page 16

SCANNDY MANUAL
Page 16
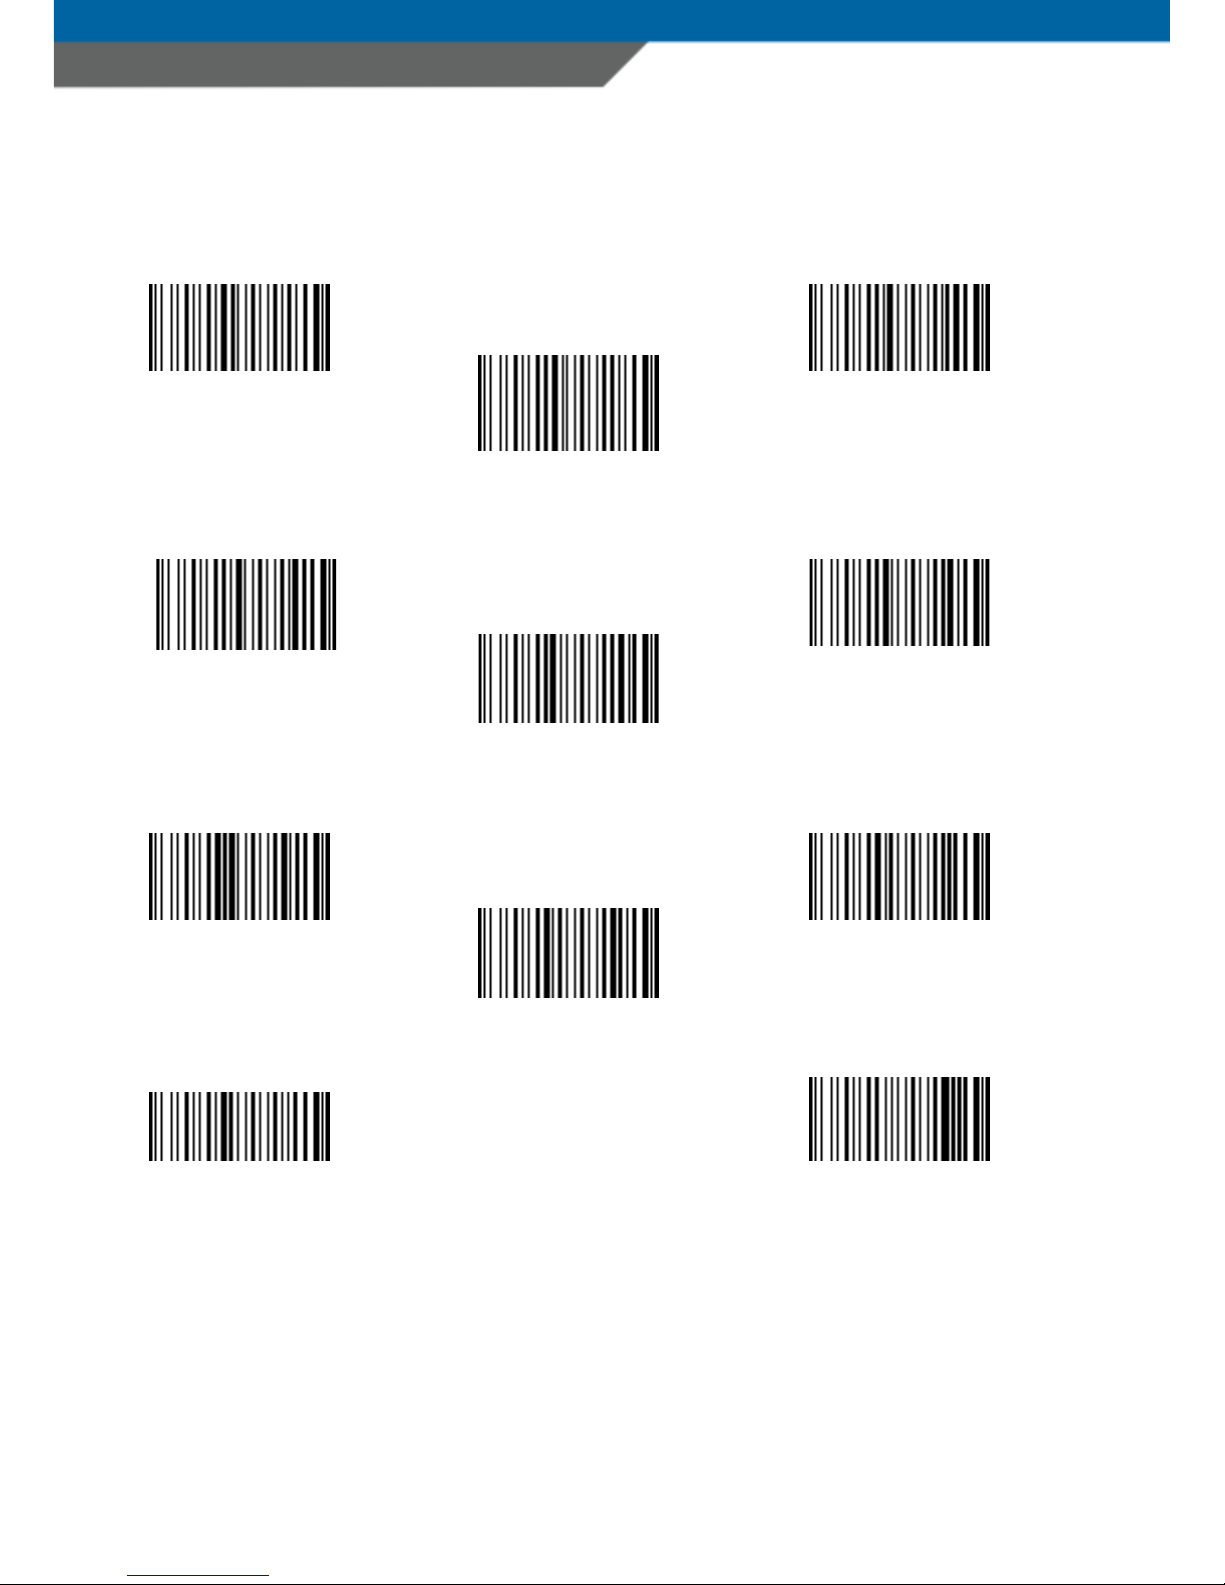
7. If the Bluetooth application prompts you to enter the pass key it
generated, scan
numeric barcodes on page 12
and confirm by
scanning ENTER
8. The right LED (2) lights constant blue as long as the device is
connected
The Bluetooth configuration can be seen in the device system menu
alternatively. Read the system menu description for Bluetooth settings on
page 24.
Page 17
SCANNDY MANUAL
Page 17
NUMMERIC BARCODES FOR BLUETOOTH PAIRING
6
2
3
4
1
5
7
8
9
0
ENTER
Page 18

SCANNDY MANUAL
Page 18
Wi-Fi CONNECTION
For Wi-Fi enabled devices to connect to a host.
Note!
The following description is only valid for devices with factory installed
software. Devices with custom software can behave different, depending on
the programming.
1. Connect the device to the host using the USB port. Brows the drive
“Scanndy”. and search for the file *.sfl
2. Open the file *.sfl and make sure the output mode is set for Wi-Fi
Example for Wi-Fi output
Config {
[Uni]
Outmode=Wi-Fi
Outproto=plain
}
(See the SFL reference manual for further information)
3. Save the settings that have been made and open the file “config.ini” to
verify the general Wi-Fi settings.
Example:
[Wi-Fi]
Host=127.0.0.1
Port=80
Dhcp=1
Ip=
Netmask=
Gateway=
Crypt=2
Ssid=ssid
Wepkey=
Page 19

SCANNDY MANUAL
Page 19
Wpapsk=
Mode=2
Region=48
Channel=0
Bssid=
For further information please refer to the config_ini reference guide.
4. Save the settings and disconnect the device prom the PC
5. The right LED (2) lights flashes blue (every 1 sec.) for the time the
device is trying to connected to the wireless network and to the host
6. The right LED (2) flashes blue (every 5 sec.) for the time the device is
connected
The Wi-Fi configuration can be seen in the device system menu alternatively.
Read the system menu description for Wi-Fi settings.
Transmitting Barcode and/or RFID data to a host
Batch mode
All Barcode and RFID data scanned in batch mode are saved in the file
“Output.txt” on the removable drive “Scanndy”. Connect the device to the host
PC via USB and use the Windows-Explorer to navigate to the device
“SCANNDY”. Copy the file “Output.txt” to the host.
To clear the data from the device, delete the file “Output.txt”
Page 20

SCANNDY MANUAL
Page 20
Transmitting data from a Bluetooth or Wi-Fi device
When the scanner is paired to a host via Bluetooth, data transmits to the host
after each scan and is not stored on the scanner unless the scanner moves
out of range of the host. For out of range usage you can configure the device to
either store the data in a cache memory or do not allow scanning.
If the device was configured to store the out of range captured data, it stores
the data in a file Cache.txt. After reconnect it transmits all cached data to the
host.
(See the SFL reference manual to see how to set the device to cache out
of range data)
Bidirectional communication for Bluetooth and Wi-Fi
connected devices
For applications that require bidirectional communication between the device
and the host, PANMOBIL devices support an embedded communication
protocol SCOMP and REMOTE mode.
(See the SCOMP reference manual to see how to set the device to use SCOMP
protocol and/or REMOTE mode)
Note!
If the device is set to use SCOMP communication protocol, it is mandatory for
that the host application to support SCOMP protocol, too.
Page 21
SCANNDY MANUAL
Page 21
SCANNDY SYSTEM MENU
Note!
The following description is only valid for devices with factory installed
software. Devices with custom software can behave different, depending on
the programming.
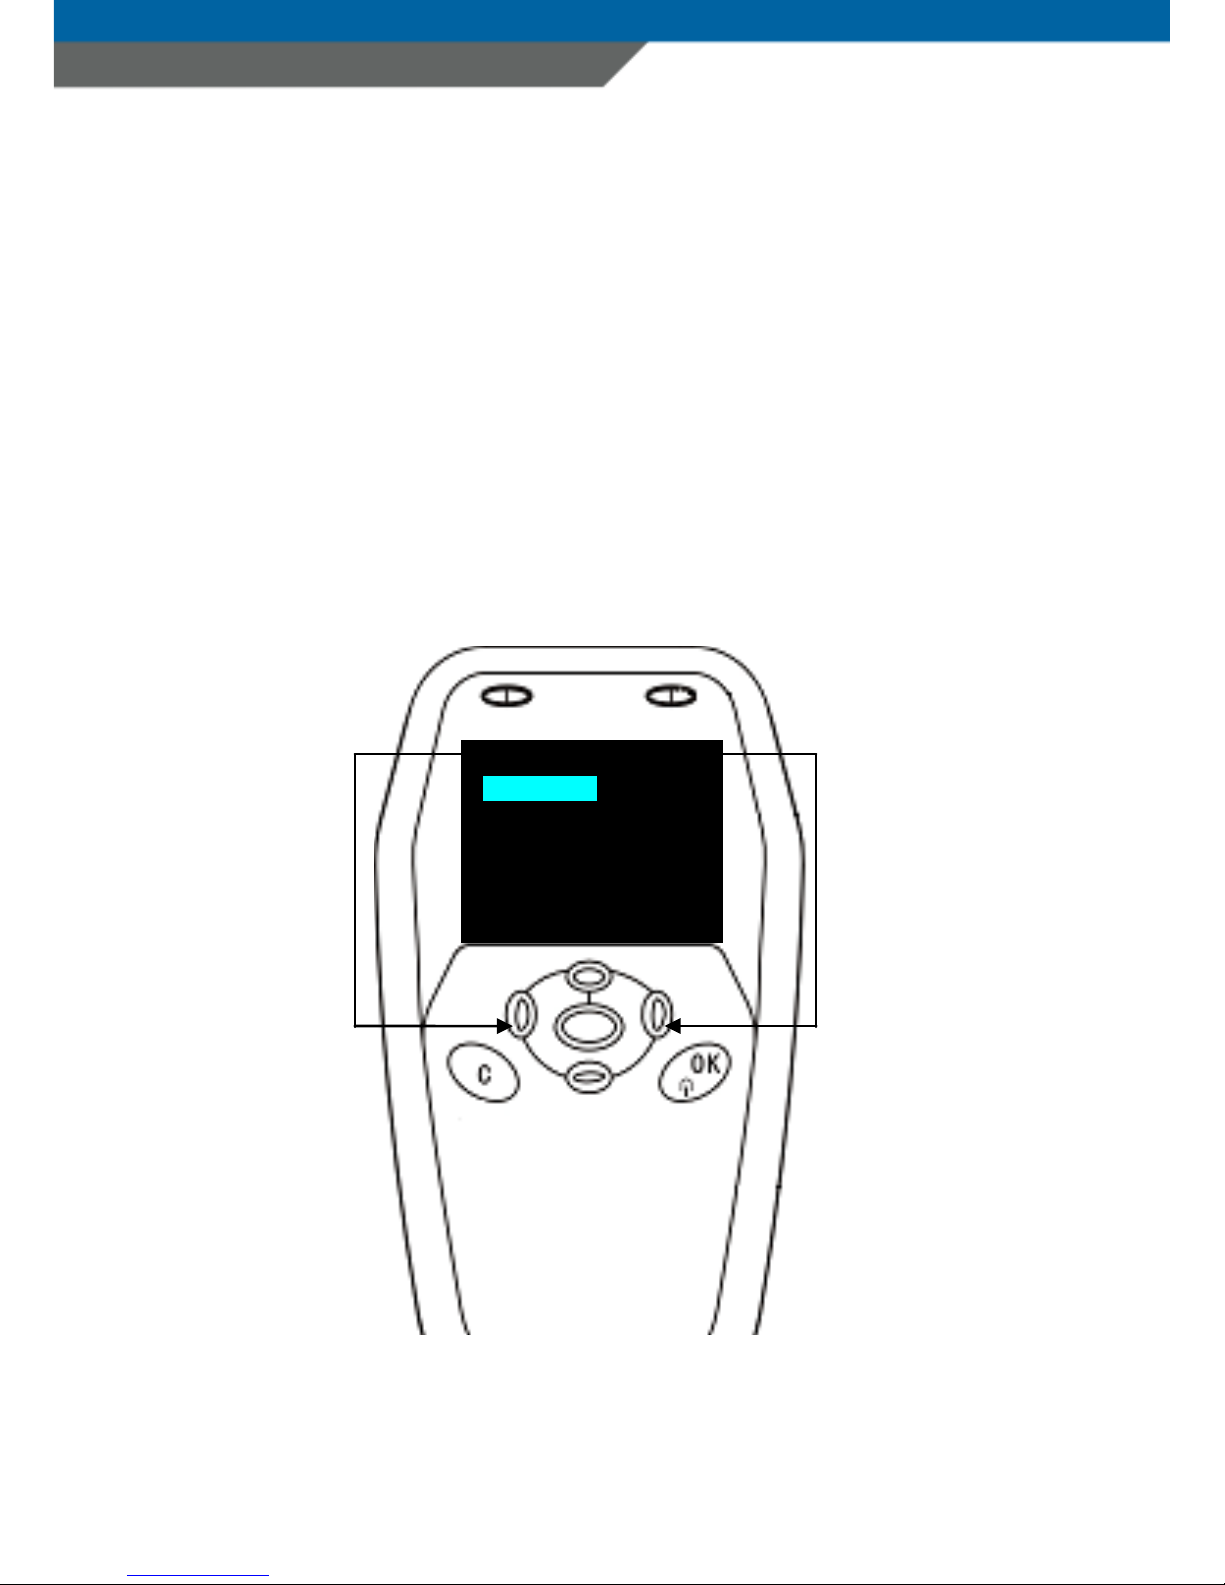
From the application main menu press the key “C” to enter the SCANNDY
system menu. To protect the system settings from unauthorized access, you
will be prompted to enter a password.
In factory default the system menu password is left blank
simply press the key OK if you are prompted to enter the password.
Select System
Run Program
Date & Time
Barcode
Bluetooth
Wi-Fi
UHF
Use the up (8) and down (13) navigation keys to highlight a menu item.
Use the navigation key left (7) to select a menu item or right (9) to exit a sub menu.
Page 22

SCANNDY MANUAL
Page 22
Menu item RUN PROGRAM
Highlight the menu item “Run Program” and press the left (7) navigation key
to exit the system menu and return to the installed application.
Menu item DATE&TIME
Highlight the menu item Date & Time and press the left (7) navigation key to
enter the Date & Time settings.
Simply type the date and time by using the numeric keys (14) the entered key
will overwrite the existing entry. Press the left (7) navigation key to accept and
save the entered Date & Time or press the right (9) navigation key to cancel
the input and return to the main menu.
Select System
Run Program
Date & Time
Barcode
Bluetooth
Wi-Fi
UHF
Display
Sound
Power
Password
Detect Hardware
Reset dev ice
Accept Cancel
Date:
2014-06-26
Time:
14:22:27
Page 23

SCANNDY MANUAL
Page 23
Menu item Barcode
Highlight the menu item Barcode and press the left (7) navigation key to enter
the Barcode settings.
Highlight the Barcode menu item Symbology and press the left (7) navigation
key to enter the symbology menu.
Enabled Barcode symbology are marked with the character “*”
To disable or enable Barcode symbology, highlight the corresponding
symbology and press the button Trigger (11)
To enter the Barcode symbology settings, highlight the corresponding
symbology and press the left (7) navigation key.
Example for Code39 settings:
Select Back
Symbology
Terminator
Preamble
Postamble
Post/Term Format
Select Back
*Code 39
*Code 128
*EAN-13
UPC-A
*EAN-8
…….
Select Back
Full ASCII: OFF
Enable Chk: OFF
Send Chk : OFF
Sens Srar : OFF
Set code length
…….
Page 24

SCANNDY MANUAL
Page 24
To change the barcode symbology configuration, highlight the corresponding
menu item and press the left (7) navigation key. The modified configuration
will be saved automatically when pressing the right (9) navigation key to exit
the sub menu.
Use the same procedure for all Barcode symbology settings.
Menu item Bluetooth
Highlight the menu item Bluetooth and press the left (7) navigation key to
enter the Bluetooth settings.
Highlight the menu item Bluetooth and press the left (7) navigation key to
enter the connection selection.
Highlight the menu item “Connect last dev” to reconnect to the last paired
device.
Select Back
Bluetooth: OFF
Search Device
Show Local Mac
Set Remote Mac
Set Devic e N ame
Master Access key
Slave Access key
Set Security Stat
Reset BT
Select Back
Connect last dev
Search device
Page 25

SCANNDY MANUAL
Page 25
Select “Search device” to search devices in range. The Scanndy device will
show a list with devices in range by device name. Highlight and select the
device you want to connect to.
Select the menu item “Show Local MAC” from the Bluetooth menu to see the
Bluetooth MAC addresses of the Scanndy device. The local MAC address is
read only and cannot be changed.
Highlight the menu item “Connect last dev” to reconnect to the last paired
device.
Select the menu item “Set Remote MAC” from the Bluetooth menu to set the
Bluetooth MAC address of the device you want the Scanndy to connect to and
enter the MAC address by using the numeric keypad. For alphabetical
characters press and hold the alpha/numeric toggle key (15) for 1 sec. to
toggle between alpha and numeric input mode.
Show local MAC
Local address:
90507B698105
Press any key…
Set Remote MAC
Enter address:
90004EA20063
Page 26

SCANNDY MANUAL
Page 26
Press the OK key (12) to save the entered address and return to the Bluetooth
main menu.
Select the menu item “Set Device Name” from the Bluetooth menu to set the
Bluetooth Name for the Scanndy device. This is the name to identify the
Scanndy device when searching the Bluetooth neighbourhood from a distant
device. Enter the device name for the Scanndy by using the alpha/numeric
keypad (14). For alphabetical characters press and hold the alpha/numeric
toggle key (15) for 1 sec. to toggle between alpha and numeric input mode.
Note!
The factory default device name is a combination of the device name and
device serial number. Example: Scanndy207858
Press the OK key (12) to save the entered device name and return to the
Bluetooth main menu.
Set BT Dev Name
Enter BT name:
Scanndy207858
Page 27

SCANNDY MANUAL
Page 27
Select the menu item “Master Access key” from the Bluetooth menu to set the
Bluetooth Access key for connections initiated by the Scanndy device
configured for Master mode. The Scanndy device will prompt the distant
device to confirm this connection key. Enter the access key by using the
numeric keypad. For alphabetical characters press and hold the
alpha/numeric toggle key (15) for 1 sec. to toggle between alpha and numeric
input mode.
Note!
The factory default Master Access key is 1234.
Press the OK key (12) to save the entered key and return to the Bluetooth main
menu.
Select the menu item “Slave Access key” from the Bluetooth menu to set the
Bluetooth Access key for incoming connections initiated by a distant device.
This is the access key the Scanndy device must confirm when it is prompted by
the distant device. Enter the access key by using the numeric keypad. For
alphabetical characters press and hold the alpha/numeric toggle key (15) for 1
sec. to toggle between alpha and numeric input mode.
Note!
The factory default Slave Access key is 1234.
Set BT Access key
Key:
1234
Set BT Access key
Key:
1234
Page 28

SCANNDY MANUAL
Page 28
Press the OK key (12) to save the entered key and return to the Bluetooth main
menu.
Select the menu item “Set Security Status” from the Bluetooth menu to set
the Bluetooth security ON or OFF.
Note!
In factory default the security status is set to OFF.
Press the left navigation key (7) to change the settings and press the OK key
(12) to save the entered status and return to the Bluetooth main menu.
Select the menu item “Reset BT” from the Bluetooth menu to reset Bluetooth
to factory default.
Note!
All Bluetooth settings will be reset to factory default!
Set Security Stat.
Security : OFF
Reset Bluetooth
BT settings will be lost!!
OK to reset, any other to quit.
Page 29

SCANNDY MANUAL
Page 29
Press the OK key (12) to reset the Bluetooth settings or any other key to return
to the Bluetooth main menu.
Menu item Serial
Highlight the menu item Serial and press the left (7) navigation key to enter
the Serial connection settings.
Note!
The settings in this section are only valid for Scanndy devices with serial
RS232 Interface.
Highlight the menu item and set the parameters from the parameter list
according to the requirements of the receiving application. Press the right
navigation key (9) to save the settings and return to the main menu.
Select Back
Bitrate 9600
Parity None
DataBit 8
StopBits 1
DefPort Com2
Page 30

SCANNDY MANUAL
Page 30
Menu item Display
Highlight the menu item Display and press the left (7) navigation key to enter
the Display settings.
Highlight the menu item “Set Contrast” and press the left navigation key (7) to
set the Display contrast. Use the up key (8) to increase the contrast. Use the
down key (13) to decrease the contrast. Press the OK key (12) to save the
settings and return to the Display menu.
Highlight the menu item “Set normal dir” and press the left navigation key (7)
to set the Display to normal direction.
Highlight the menu item “Set reverse dir” and press the left navigation key (7)
to set the Display to reverse direction.
Highlight the menu item “Screen saver” and press the left navigation key (7) to
set the delay for the screen saver if the Display has not been used for a certain
time. Input a value in seconds.
Highlight the menu item “Set Display Off” and press the left navigation key (7)
to set the delay for the Display to switch off if it has not been used for a certain
time. Input a value in seconds.
Note! In order to ensure a long Display life time, it is recommended to use the
screen saver or Display Off function to protect the OLED Display against
burn-in.
Select Back
Set Contrast
Set normal dir
Set revers e dir
Screen saver
Set Display off
Page 31

SCANNDY MANUAL
Page 31
Press the right navigation key (9) to save the settings and to return to the main
menu.
Menu item Sound
Highlight the menu item “Sound” and press the left (7) navigation key to enter
the Sound settings.
Highlight a menu item and press the left navigation key (7) to change the
settings. Press the right navigation key (9) to save the settings and return to
the main menu.
Menu item Power
Highlight the menu item “Power” and press the left (7) navigation key to enter
the Power settings.
To see the battery status:
Select Back
Key click is ON
Startbeep is ON
Stopbeep is ON
Volume = 1
Select Back
Battery State
Always Power ON
1 minute
2 minutes
3 minutes
5 minutes
Page 32

SCANNDY MANUAL
Page 32
Highlight a menu item and press the left navigation key (7) to change the
settings. Press the right navigation key (9) to save the settings and return to
the main menu.
Select from the parameter list the time in minutes after which the device
should shut down automatically if it was not used for a certain time.
Note! In order to achieve a long battery runtime, it is recommended to use the
auto shutdown function.
Menu item Security
Highlight the menu item “Security” and press the left (7) navigation key to
assign a system menu protection password.
Note! The password may contain digits only. Make sure to use a combination
of digits to which you can remember later. In the factory default the System
password is left blank. Simply confirm with OK key (12) if you are prompted to
enter the password.
Press the OK key (12) to save the entered password or press the “C” key to
cancel and return to the main menu.
Input password:
***
Page 33

SCANNDY MANUAL
Page 33
Menu item UHF Settings
Highlight the menu item “UHF Settings” and press the left (7) navigation key to
enter the configuration for the UHF RFID reader/writer.
Region
Highlight the menu item “Region” to set the frequency for the region the
device is used.
Note!
Changing the frequency (Region) may have influence on the UHF
reading/writing performance because of the mismatch with the reader
antenna.
Press the left navigation key (7) to save the settings and return to the UHF
Setting menu or press the right navigation key (9) to cancel.
Power save mode
Highlight the menu item “Power save mode” and press the left navigation key
(7) to change the settings. Select the power save mode value and press the left
navigation key (7) to save the settings and return to the UHF Setting menu, or
press the right navigation key (9) to cancel.
Select Back
Region
Power save mode
R/W Power (cdbm)
*Fast comm.
Gen2 session
Page 34

SCANNDY MANUAL
Page 34
R/W Power
Highlight the menu item “R/W Power (cdbm) and press the left navigation key
(7) to change the Read/Write power of the UHF reader/writer module. The
power can be set from 1dBm to 23dBm.
Input the value as follows:
Value in dBi * 100
Example: 18dBi * 100 input = 1800
Press the OK key (12) to save then settings and return to then UHF Setting
menu.
Fast comm
Highlight then menu item “Fast comm.” And press then left navigation key (7)
to select or unselect then fast communication option.
Gen2 session
Highlight the menu item “Gen2 session” and press then left navigation key (7)
to setup the session options.
By setting the session ID, you can optimize the communication between the
reader and the tag. This setting can very helpful if several different Tags and
Tag populations are in the reading field are.
For further information about Gen2 Sessioning, please refer to the EPC GEN2
Tag protocol description
Press then right navigation key (9) to save the settings and return to the main
menu.
Page 35

SCANNDY MANUAL
Page 35
Highlight the menu item “Run program” and press the left navigation key (7)
or press the right navigation key (9) to leave the system menu and start the
installed application.
Troubleshooting
Problem
Possible Solution
Device does not
power on
- Make sure the battery is inserted
correctly
- Make sure the battery is charged
Laser comes on but
device does not
decode barcode
- Ensure the device is configured to read
the type of code being scanned
- Ensure the code is not defaced
- Move the device closer to or further from
the code
Select System
Run Program
Date & Time
Barcode
Bluetooth
Wi-Fi
UHF
Display
Sound
Power
Password
Detect Hardware
Reset dev ice
Page 36

SCANNDY MANUAL
Page 36
ADVANCED DEVICE CONFIGURATION
The config.ini file contains the most common device settings.
For information about the configuration for options like Bluetooth, Wi-Fi, UHF
RFID as well as Barcode configuration please refer to the document
Config_ini.pdf
REGULATORY INFORMATION
Interference statement:
This device complies with Part 15 of the FCC Rules.
Operation is subject to the following two conditions:
(1) This device may not cause harmful interference, and
(2) This device must accept any interference received, including interference
that may cause undesired operation.
Modification statement:
The FCC requires the user to be notified that any changes or modifications
made to this device and are not explicit approved by advanced PANMOBIL
systems GmbH & Co. KG, may void the user’s authority to operate the
equipment.
Class B digital devices regulatory notice:
This equipment has been tested and confirmed to comply with the limits for a
Class B digital device, pursuant to Part 15 of the FCC Rules. These limits are
designed to provide reasonable protection against harmful interference in a
residential installation. This equipment generates, uses, and can radiate radio
frequency, energy and, if not installed and used in accordance with the
instructions, may cause harmful interference to radio communications.
However, there is no guarantee that interference will not occur in a particular
installation. If this equipment does cause harmful interference to radio or
television reception, which can be determined by turning the equipment off
and on, the user is encouraged to try to correct the interference by one or
more of the following measures:
Page 37

SCANNDY MANUAL
Page 37
· Reorient or relocate the receiving antenna
· Increase the separation between the equipment and receiver
· Connect the equipment into an outlet on a circuit different from that to which
the receiver is connected
· Consult the dealer or an experienced radio or television technician for help
Wireless notice
This product emits radio frequency energy, but the radiated output power of
this device is far below the FCC radio frequency exposure limits.
Nevertheless, the device should be used in such a manner that the potential
for human contact with the antenna during normal operation is minimized.
The system antenna(s) used for this transmitter must not be co-located or
operating in conjunction with any other antenna or transmitter.
EU:
This equipment is intended to be commercialized in all the countries of the
European Union and there is no commercialization or operational restrictions
in any of the countries.
Hereby, advanced PANMOBIL systems GmbH & Co. KG declares that this
Bluetooth barcode scanner is in compliance with the essential requirements
and other relevant provisions of Directive 1999/5/EC
European countries, where this equipment can be used are : Austria (AT) Belgium (BE) - Bulgaria (BG) - Switzerland/Liechtenstein (CH) - Cyprus (CY) Czech Republic (CZ) - Germany (DE) – Denmark (DK) - Estonia (EE) - Finland
(FI) - France (FR) - Greece (GR) - Hungary (HU) - Ireland (IE) - Iceland (IS) Lithuania (LT) – Luxembourg (LU) - Latvia (LV) - Malta (MT) - Netherlands (NL)
- Norway (NO) - Portugal (PT) - Romania (RO) - Sweden (SE) - Slovenia (SI) –
Slovak Republic (SK) - United Kingdom (UK)-Italy (IT)-Poland (PO)-Spain (SP).
Page 38

SCANNDY MANUAL
Page 38
HEALTH AND SAFETY RECOMMENDATIONS
Ergonomic Recommendations
Caution: In order to avoid or minimize the potential risk of ergonomic injury
follows the recommendations below. Consult with your local Health & Safety
Manager to ensure that you are adhering to your company’s safety programs
to prevent employee injury.
- Keep Objects that are used frequently within easy reach
- Reduce or eliminate repetitive motion
- Reduce or eliminate excessive force
- Maintain a natural position
- Improve work procedures
- Perform tasks at correct heights
- Provide adjustable workstations
- Provide adequate clearance
- Reduce or eliminate direct pressure
- Reduce or eliminate vibration
- Provide a suitable working environment
Vehicle Installation
RF signals may affect improperly installed or inadequately shielded electronic
systems in motor vehicles. You should consult the manufacturer of any
equipment that has been added to your vehicle. An air bag inflates with great
force. DO NOT place objects in the area over the air bag or in the air bag
deployment area. Improperly installed wireless equipment could result in
serious injury when the air bag inflates. Position your device in easy reach.
Make sure your device is accessible without removing your eyes from the
road.
Page 39

SCANNDY MANUAL
Page 39
Safety on the Road
Do not take note or use the device while driving. When driving a car, driving is
your first responsibility – GIVE FULL ATTENTION TO DRIVING.
Warnings for Use of Wireless Devices
Please observe all warning notices with regard to the usage of wireless
devices.
Potentially Hazardous Atmospheres – Vehicle Use
You are reminded to observe restrictions on the use of radio devices in fuel
depots, chemical plant and areas where the air contains chemical or particles
such as gain, dust or metal powders and any other area where you would be
advised to turn off your vehicle engine.
Safety in Aircrafts
Switch off your wireless device whenever you are instructed to do so by airport
or airline staff.
Consult airline staff and ask for its use in flight.
Safety in Hospitals
Wireless devices transmit radio frequency and may affect medical electrical
equipment. Wireless devices should be switched off wherever you are
requested to do so in hospitals or healthcare facilities to prevent interference
with sensitive medical equipment.
Pacemakers
It is recommended by Pacemaker manufacturers to maintain a minimum of
15cm (6 Inches) between a handheld wireless devices and a pacemaker to
avoid potential interference. These recommendations are consistent with
independent research and recommendations by Wireless Technology
Research. Persons with Pacemakers:
Page 40

SCANNDY MANUAL
Page 40
- Should not carry the device in a breast pocket
- Should use the ear furthest from the pacemaker to minimize the
potential of interference.
- Should ALWAYS keep the device more than 15cm (6 Inches) from their
pacemakers when turned on.
- Turn OFF your device if you have any reason to suspect that
interference is taking place.
Other Medical Devices
Please consult the manufacturer of the medical device to determine if the
operation of your wireless product may interfere with the medical device.
RF Exposure Guidelines
Safety Information
Reducing RF-Exposure – Use properly
Only operate the device in accordance with the instructions supplied.
International
The device complies with international standards covering human exposure to
electromagnetic fields from radio devices.
EU
To comply EU RF exposure requirements, this device must be operated in the
hand with a minimum separation distance of 20cm from a person’s body.
Other operation configurations should be avoided.
US and Canada
To comply with FCC exposure compliance requirement, the antenna used for
this transmitter must not be co-located or operating in conjunction with any
other transmitter/antenna expect those already approved in this filling.
Page 41

SCANNDY MANUAL
Page 41
Handheld Devices
To comply with FCC RF exposure requirements the device must be operated in
the hand with a minimum separation distance of 20cm from a person’s body.
Other operation configurations should be avoided.
Laser Devices
Use of controls or adjustments or performance of procedures other than
those specified herein may result in exposure to hazardous visible laser light.
The laser scanner utilizes a low-power laser diode. Although staring directly
at the laser beam momentarily causes no known biological damage, avoid
staring into the beam as one would with any very strong light source, such as
sunlight. Avoid that the laser beam hits the eye of an observer, even through
reflective surfaces like mirrors, etc.
The following information is shown on the laser scanner device class label:
Limited Warranty
The manufacturer warrants that the product will be free of defects in material
and workmanship for 2 years from the date of shipment. The manufacturer
will, at its option, either repair, replace the defective products. Such repair or
replacement shall be buyer's sole remedy in the event of manufacturer's
breach of this limited warranty. Repaired or replaced parts or product may
include new, reconditioned or remanufactured parts and equipment at
manufacturer's option. All costs associated with shipment to manufacturer for
warranty service, including but not limited to freight, duties, insurance and
customs fees are buyer's responsibility. Manufacturer will pay the freight
Page 42

SCANNDY MANUAL
Page 42
costs (duties, insurance, customs and any other fees) associated with the
return shipment to buyer. The method of shipment will be at the
manufacturer's discretion. Repair or replacement of any parts or equipment
does not extend the period of warranty provided for herein.
THIS LIMITED WARRANTY IS MANUFACTURER'S ONLY WARRANTY.
MANUFACTURER DOES NOT GIVE WARRANTIES OF MERCHANTABILITY OR
WARRANTIES OF FITNESS FOR A PARTICULAR PURPOSE.
To take advantage of this warranty, buyer should contact the seller not the
manufacturer. The warranty set forth herein does not cover and manufacturer
will have no obligations hereunder if any non-conformance is caused in whole
or in part by; accident, transportation, neglect, misuse, alteration,
modification, or enhancement of the products or incorporation, interfacing,
attachment of any feature, program, or device to the products by a person or
entity other than manufacturer, failure to provide a suitable installation
environment, use of the products for other than the specific purpose for which
the products are designed or any use of the product not in accordance with the
User Guide or other misuse or abuse of the product. The warranty does not
cover problems linked to batteries.
Declaration of conformity
These devices has been tested and found to comply with the limits for a class
B digital device, pursuant to part 15 of the FCC rules. These limits are
designed to provide reasonable protection against harmful interference in a
residential installation. This equipment generates uses and can radiate radio
frequency energy and, if not in-stalled and used in accordance with the
instructions, may cause harmful interference to radio communications. The
appearance of disturbance in particular installations is not excluded. In the
case that these devices should disturb your surroundings by their powering on
and off, please inform advanced PANMOBIL systems GmbH & Co. KG
immediately.
Page 43

SCANNDY MANUAL
Page 43
The user is cautioned that any changes or modifications not expressly
approved by advanced PANMOBIL systems GmbH & Co. KG could void the
user's authority to operate the equipment.
Consumer electronics
These devices has been tested and found to comply with the limits for class B
digital devices, pursuant to the CE EMC directive.
For more information, please contact us at:
advanced PANMOBIL systems GmbH & Co. KG
Hansestraße 91
51149 Cologne
E-mail: [email protected]
 Loading...