

Page 1

Day Two Side Panel
Part Number(s) : S**SPD2*
© Panduit Corp. 2017
Front of
Cabinets
INSTALLATION INSTRUCTIONS
Day Two Side Panel
S**SPD2*
Installed
• Day Two Side Panel will t between two S-Type
cabinets or an S-Type and N-Type cabinet.
The Side Panel would only be mounted to the
S-Type Cabinet.
• Will not work on cabinets where the left-hand
cabinet door is hinged on the right-hand side and
the right-hand cabinet door is hinged on the
left-hand side.
V00029MI
Tool List:
• T25 Torx driver
Front Panel
Qt y. 1
M5x0.8 x 12mm
Button Head Torx Screw
Qty: 18
For Technical Support: www.panduit.com/resources/install_maintain.asp
Rear Panel
Qt y. 1
M5x0.8 x 8mm
Button Head Serrated Torx Screw
Qty: 10
Page 1 of 6
Filler Panel
Qt y. 2
M6x1 x 12mm
Button Head Torx Screw
Qty: 6
Page 2
© Panduit Corp. 2017
INSTALLATION INSTRUCTIONS
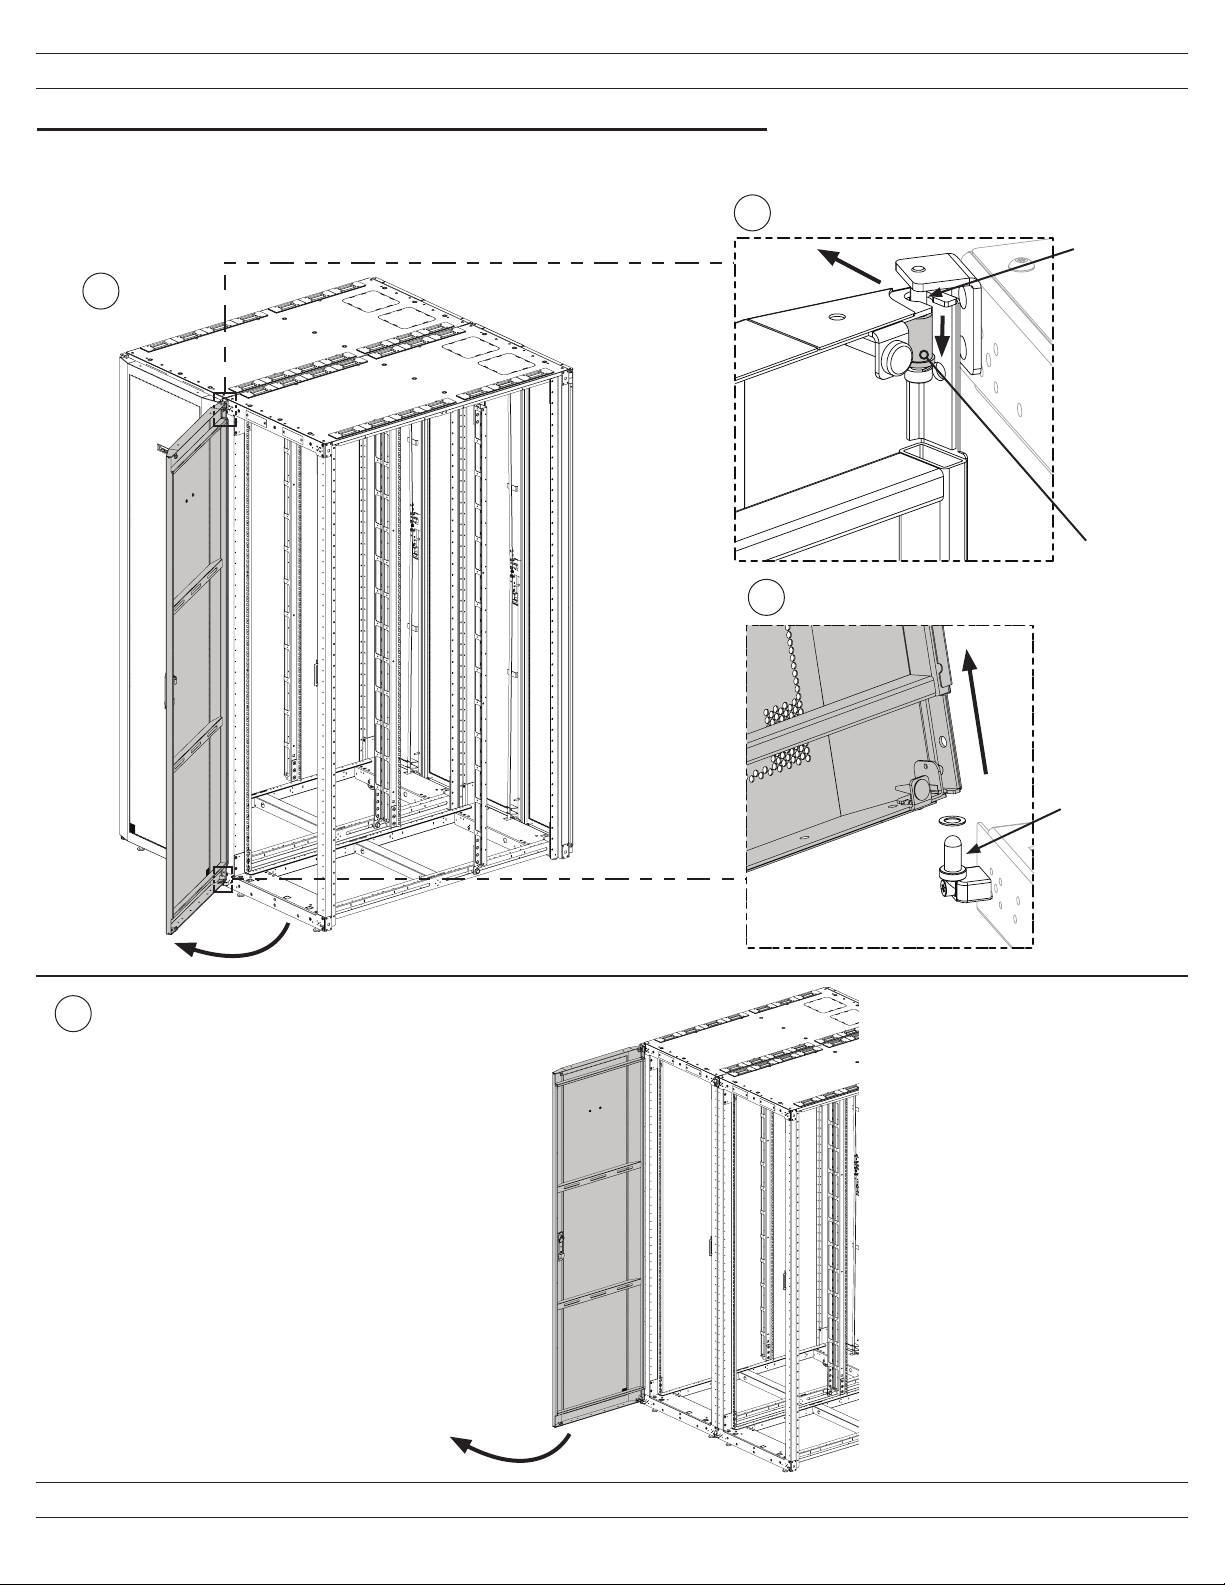
Prepare front of Cabinets for Installation of Front Panel
• Open Front Door of right-side Cabinet to approximately 90° and pull down Compression Sleeve at top door hinge.
• Pull Single Hinge Door away from cabinet so that Top Hinge Screw ts through cut-out of door.
• Lift bottom of door off Bottom Hinge Pin
• Open Front Door of left-side Cabinet to approximately 90°.
1
2
3
V00029MI
Top Hinge
Screw
Compression
Sleeve
(Pull Down)
Front of
Cabinets
4
Open the Front Door of left-side Cabinet.
It is not necessary to remove
the Front Door of left-side Cabinet.
Bottom Hinge
Pin
For Technical Support: www.panduit.com/resources/install_maintain.asp
Page 2 of 6
Page 3

© Panduit Corp. 2017
INSTALLATION INSTRUCTIONS
V00029MI
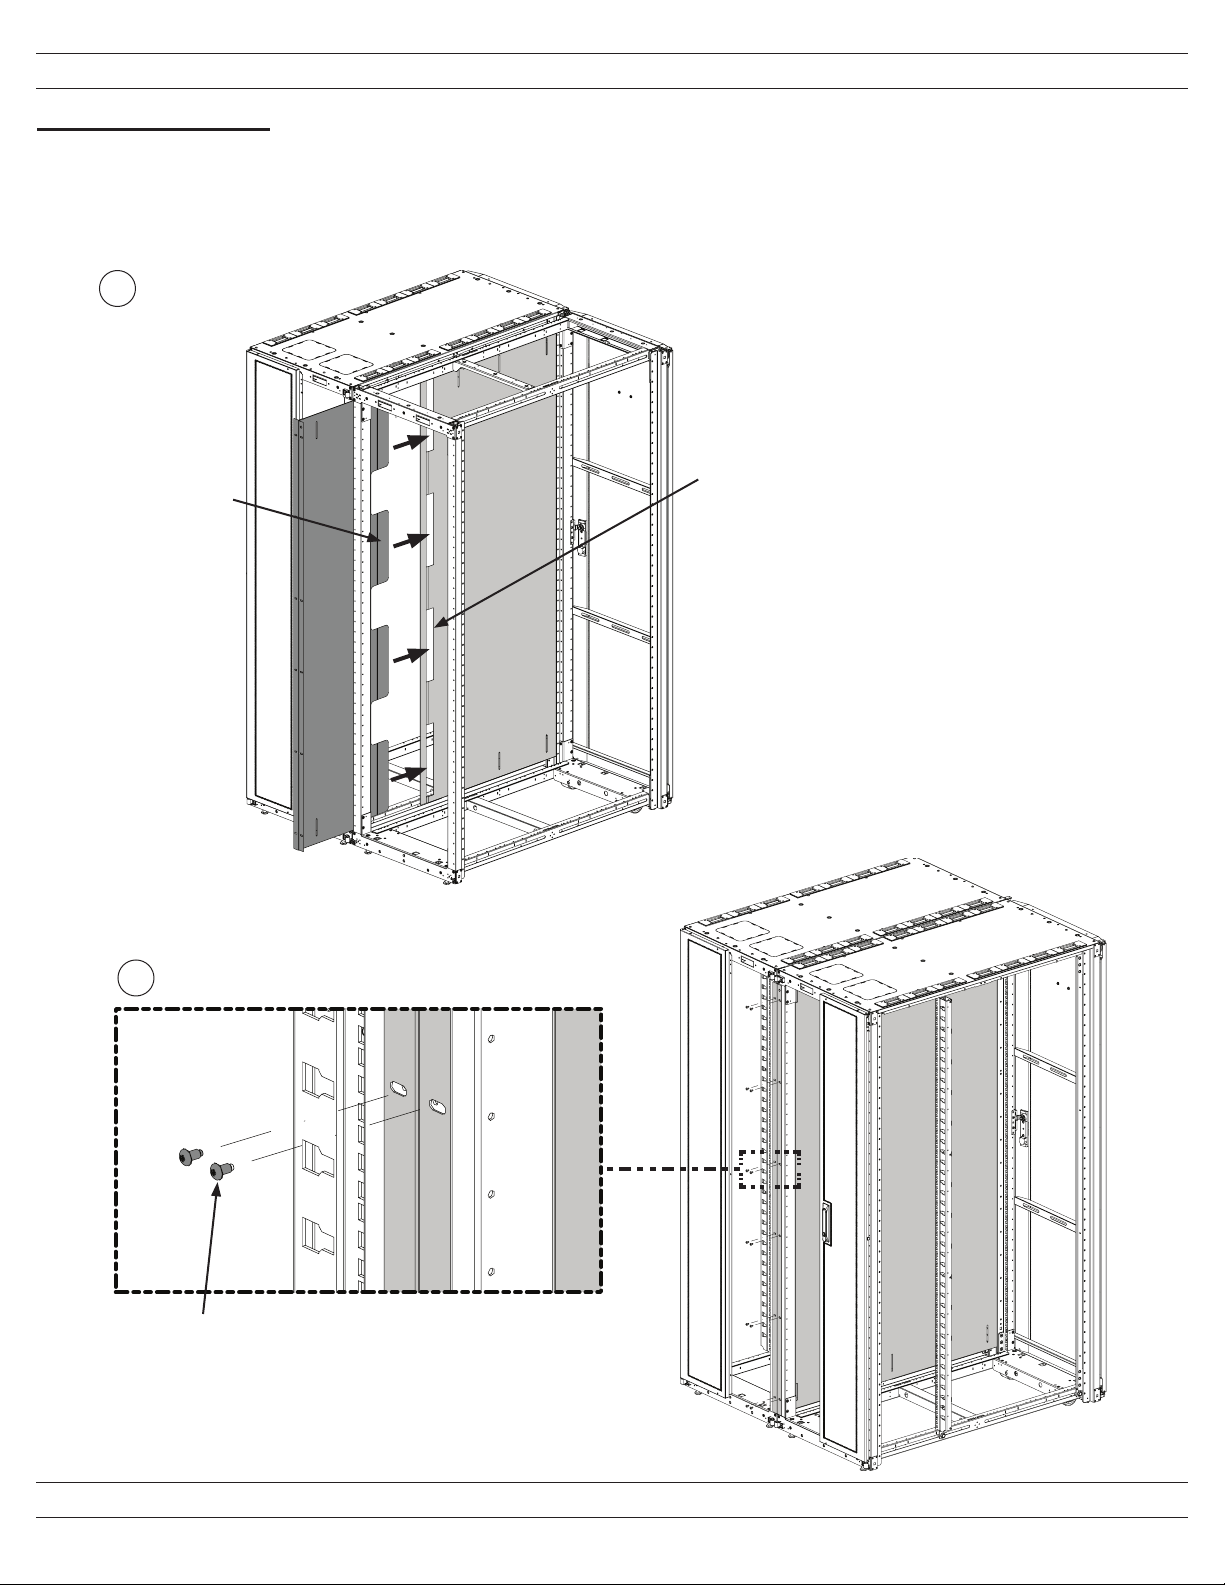
Install Front Panel
• Slide the Day Two Front Panel through the gap between the two cabinet post until the anges contact the Cabinet Post.
• Secure Day Two Front Panel to Cabinet Posts with M5x0.8 x 12mm Button Head Torx screws screws through the front of
Cabinet post and M6x1 x 12mm Button Head Torx screws through the side of the Cabinet post.
• Re-install Right-side Door.
1
Diamond cut-out in the Panel should
be at the top of the cabinets.
Note: The Panel attaches to the inside of the
frame on the hinged side of the door. This is
to avoid interference with the mounting screw
heads when opening. In the case where the
door is hinged on the opposite side, the
panel can be rotated 180°.
2
M5x0.8 x 12mm
Button Head Torx Screw
3
M6x1 x 12mm
Button Head Torx Screw
For Technical Support: www.panduit.com/resources/install_maintain.asp
Page 3 of 6
Page 4

© Panduit Corp. 2017
INSTALLATION INSTRUCTIONS
Prepare rear of Cabinets for Installation of Rear Panel
• Open Rear Split Doors to approximately 90°.
• Remove the left-side Split Door from the right-side cabinet by lifting up and away from Cabinet frame.
• Remove the right-side Split Door from the left-side cabinet by lifting up and away from Cabinet frame.
Remove left-side Split Door from
the right-side cabinet.
Top H inge
V00029MI
Bottom Hinge
Remove right-side Split Door
from the left-side cabinet.
Rear of
Cabinets
For Technical Support: www.panduit.com/resources/install_maintain.asp
Page 4 of 6
Page 5
© Panduit Corp. 2017
INSTALLATION INSTRUCTIONS
Install Rear Panel
• Slide the Rear Panel through the gap between the two cabinet post and insert the Tabs from the Rear
Panel into the slots of the Front Panel.
• Secure Rear Panel to Cabinet Posts with M5x0.8 x 12mm Button Head Torx screws.
• Re-install Split Doors.
1
V00029MI
Rear Panel tabs
Rear of
Cabinets
2
Front Panel slots
Note: Some components removed
from view for clarity purposes.
M5x0.8 x 12mm
Button Head Torx Screw
For Technical Support: www.panduit.com/resources/install_maintain.asp
Page 5 of 6
Page 6
© Panduit Corp. 2017
INSTALLATION INSTRUCTIONS
V00029MI
Install Filler Panels
• Slide the Filler Panels through the gap between the two cabinet post and position one each at top and bottom of Cabinet.
• Secure both Filler Panels from back side of Side Panel with M5x0.8 x 8mm Button Head Torx screws.
• Adjust Filler Panels up or down to close any air gaps.
1
Bottom Panel
side view
Front of
Cabinets
2
Top Panel
side view
Front of
Cabinets
For Instructions in Local Languages
and Technical Support:
www.panduit.com/resources/install_maintain.asp
www.panduit.com
Page 6 of 6
M5x0.8 x 8mm
Button Head Serrated Torx Screw
E-mail:
techsupport@panduit.com
Phone:
866-405-6654
 Loading...