

Page 1

Page 2

CONTENTS
Getting Started
INTRODUCTION AND SAFE OPERATION .......................................... 2
GENERAL PRECAUTIONS ...................................................................... 4
WARRANTY INFORMATION ............................................. .................... 5
GENERAL DESCRIPTION ....................................... .................... ............ 6
KEYBOARD & LCD DISPLAY ............................................ .................... 7
BATTERIES .. ........ ............ ......... ............ ........ ............ ........ ............ ........ .... 8
OPTIONAL AC A DAPTER................................................ .................... .... 9
TAPE CASSETTE .............................................. .................... .................. 10
LABEL CODE .................................................... .................... .................. 11
LAMINATED INDUSTRIAL TAPE SEPARATOR TOOL ................... 12
PRINT HEAD & ROLLERS .................................. .................... .............. 13
TAPE CUTTER .............................................. .................... .................... .. 15
CARRYING CASE ..................................................... .................... .......... 16
For Your Information
POWER KEY .................................. .................... .................... .................. 18
CODE & CAPS KEYS ................................................... ..........................1 9
CURSOR KEYS ..................................... .................................................. 21
SPACE KEY ........................................... .................... .............................. 23
RETURN KEY ........................................................ .................... .............. 24
BACKSPACE KEY ........................................ .................... ...................... 27
CLEAR FUNCTION ...................................... .................... ...................... 29
ACCENT FUNCTION ................................................ .................... .......... 30
SYMBOL FUNCTION ....................................... ...................................... 32
LENGTH FUNCTION ................................................ .............................. 34
SIZE FUNCTION ....................................... .............................................. 36
UNDERLINE FUNCTION ......................................................... .............. 39
FRAME FUNCTION ...................................................................... .......... 40
HOR IZO NTAL ALI GNM ENT FUN CTIO N . ................................ .... .... .. 42
MIRROR PRINTING FUNCTION ........................................ .................. 43
PRINT KEY, COPIES & FEED FUNCTIONS ........................................44
SERIALIZATION FUNCTION ..................................... ..........................4 5
ROT ATE L EGEN D FUN CTIO N ... .... .................................... .... .... .... ......47
REPEAT LEGEND FUNCTION ....................................... .................... .. 49
LINE DRAWING FUNCTION .............................................. .................. 51
PAGE FUNCTION ................................................. .................... .............. 53
MEMO RY FIL E FUN CTIO NS ...................................... .... .... .................. 55
BARCODE FUNCTION .................... ...................................................... 60
TRO UBL ESH OOTIN G . ..................................... .... .... .... .......................... 65
ERROR MESSAGE LIST .......................................................... .............. 66
SPECI FIC A TIO NS .... .... ..................................... .... .... .... .......................... 70
TECHNICAL SUPPORT CONTACTS ................................................. .. 70
i
Page 3

ii
Page 4

Getting started
1
Page 5

INTRODUCTION AND SAFE OPERATION
The LS7 printer was designed specifically to make cable, patch panel, faceplate and facility
marking effortless. This palm-sized printer combines high quality thermal transfer print, fast
loading tape cassettes and industrial label materials to eliminate concerns a bout labels falling
off.
This manual will guide you step by step through the set-up, operation, and troubleshooting of
the LS7 Printer. If you have problems not covered herein, contact your local Panduit Sales
Representati ve or call Panduit Technical Support at 866-871-4571 (outside the US, refer to
page 70 for contact information).
SAFE OPERATION PRACTICES
The following general safety practices supplement the specific warnings and cautions
depicted elsewhere in this manual. They are recommended precautions that must be
understood and applied during the operation and maintenance of this printer.
Do Not Operate In An Explosive Environment
Do not operate t he printer in the pre sence of flammable gases or f umes. Opera tion of this
printer in such an environment cons titutes a definite safety hazard.
Do Not Operate In W et Or Damp Areas
Do not operate this printer in wet or damp areas. Operation of the printer in such an
environment constitutes a defini te safety hazard.
Do Not Substitute Parts Or Modify Equipment
Because of the danger of int roducing additional hazards, do not install substitute parts or
perform an unauthorized modification to the printer or its accessories. The proper
components for service and repair may be obtained from Panduit Corp.
WAR NI NG:
When the printer has been i n use for a n extended period of tim e, t he printer motor ma y
become hot. DO NOT touch the printer motor with bare hands.
Patent numbers a nd patent publication num bers which a re re lat ed to this product are a s
follows: USP4839742, USP4927278, USP4976558, USP4983058, USP5009530,
USP5069557, USP5120147
2
Page 6

Information to USA Users
NOTE: This printer has been tested and found to comply with the limits for a Class A digital
devi ce, pursu ant to Part 15 of FCC rule s. Th ese limi ts are de sign ed to prov ide reason ab le
protection against harmful i nterference when the printer is operated i n a commercial
environment. This printer generates, uses, and can radiate radio frequency energy and, if not
used i n ac cordanc e wi th this i n structi on manual, may ca use harmf ul inte rfe renc e to ra dio
communications. Operation of this printer in a residential area is likely to cause interference
in which case the user will be required to correct the interference at his own expense.
Information to Canadian Users
This Class A digital apparatus complies with Canadian ICES-003.
Cet appareil numérique de la class A est conforme à la norme NMB-003 du Canada.
It is possible that infrequent electrical phenomena (static discharge, power line fluctuations)
may cause printer function to be temporarily interrupted. In this case, the printer will usually
reset itself. In extreme cases, the user should remove then re-apply power (battery and/or AC
Adapter).
3
Page 7

GENERAL PRE CAUTIO NS
WARNIN G: Observe the following warnings in orde r to avoi d damage to the
LS7 or its accessories.
● Use only Panduit LS7 tapes with this machine (green colored cassettes).
● Use only the LS7-ACS, AC adapter designed exclusively for this machine. Use of any
other adapter will voi d the warranty.
● Do not use the machine in dusty places, and keep it out of both direct sunlight and rain.
● Do not expose the machine to high temperatures or high humidity. Never leave it on the
dashboard or in the back of your car.
● Do not touch the print head mechanism. If the head is touched, clean it immediately with
a cotton swab to avoid permanent damage.
● Do not pull on the tape being fed from the LS7. This may damage the tape cassette.
CAUTION: Observe the following cautions in order to prevent malfunction of
the LS7.
● When the AC adapter (LS7-ACS) is connected, unplugging the adapter from the electri-
cal outlet before unplugging it from the machine can delete all text files in the memory,
even if batteries are installed.
● Use six AA (AM3, LR6) alkaline batteries in this machine.
4
Page 8

WARR ANTY INFORM AT ION
Our products are warranted to be free from defects in material and workmanship at the time
of sale but our obligation under this warranty is limit ed to th e repl acemen t of any product
proved to be defective within 6 months (for product) or 90 days (for printers) from the date
of delivery. Printer warranty is void if Panduit printers are modified, altered or misused in
any way. Use of Panduit printers with any product other than the specified Panduit products
for which the printer was designed, constitutes misuse. Before using, user shall determine the
suitability of the product for his intended use and user assumes all risk and liability
whatsoever in connection therewith.
This warranty is made in li eu of and excludes all other warranties, expressed or implied.
THE IMPLIED WARRANTIES OF MERCHANTABILITY AND FITNESS FOR A
PARTICULAR USE ARE SPECIFICALLY EXCLUDED. Neither seller nor manufac turer
shall be li able for a ny other injur y, loss or damage, whethe r dir ect or consequential, arising
out of the use of, or the inability to use the product.
The information contained in this literature is based on our experience to date and is believed
to be reliable. It is intended as a guide for use by persons having technical skill at their own
discretion and risk. We do not guarantee favorable results or assume any liability in
connection wi th its use. Dim ensions contained herein are for re fe rence purposes only. For
specific dimensional requirements consult the factory. This publication is not to be taken as a
license to operate under, or a recommendation to infringe any existing patents. This
supersedes and voids all previous literature, etc.
5
Page 9

TOP VIEW
Tape cutter lever
GENERAL DES CRIPT ION
AC adap ter connector
BOTTOM VIEW
Battery
compartment
Tape com par t men t
6
Back cover
Tape releas e lever
Print head
Tape ex it slot
Page 10
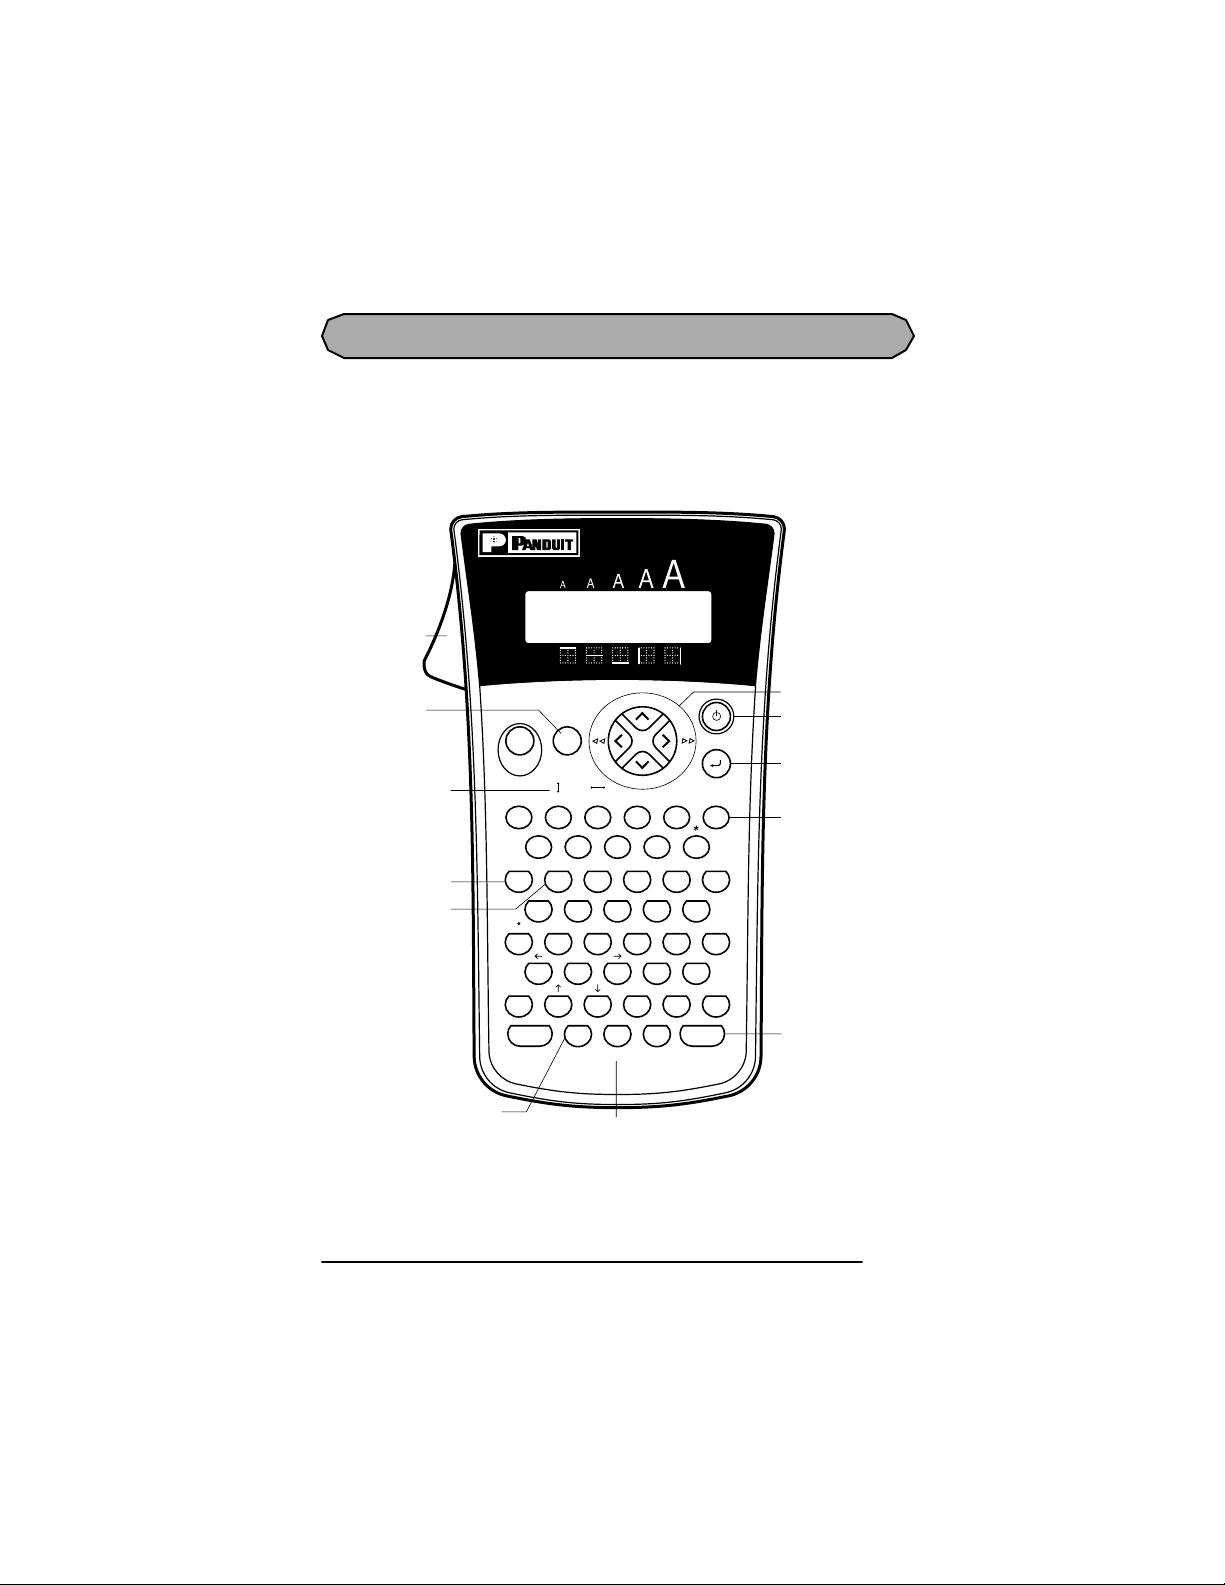
KEY BOARD & LCD DIS PL AY
y
LS7
Tape cutter
lever
Symbol key
Line drawing keys
Length key
Page key
Repeat legend key
Rotate
Repeat
Legend
Copies
Feed
Sym.
Print
Line ClearSize Frame
319BS57
@
24680
PageLength
E?QOUT
/
WR I PY
D!ALJ
SK,H
Caps
ZCBM.
Code
Legend
Home
End
Line
Underline
¢
$
Align
Mirror Accent
-%
G
F
X
[]
V
Serialize BarcodeRepeat
N
Serialize ke
#"'
Auto
Length
)(
;&
Space
Rotate
Underline
Frame
File
?
!
:
Cursor keys
Power key
Return / File
memory key
Backspace key
Space / Rotate key
7
Page 11

BATTERIES
This lightweight and portable machine can be used anywhere by installing six (6) AA (AM 3,
LR6) alkaline batteries. When changing the batteries, always repla ce all six at the sa me
time.
To change the batteries:
1 Remove the back cover by pressing in on the rough area at the top end of the machine
and pulling off the cover. Pulling off the back cover lifts up the tape release lever.
2 If batteries are already installed, remove them.
3 Insert six new batteries, making sure that they face the direction shown in the illustra-
tion on the bottom of t he battery compartment. The positive ends of the three batteries
in the bottom row point towards the bottom of the machine, while the positi ve ends of
the top three batteries point in the opposite direction.
4 Attach the back cover by inserting the tab on the bottom end of the cover into the slot
on the bottom end of the machine, then pushing down firmly on the top end of the
cover until it snaps into place.
☞ Be sure to insert the new batteries within five minutes of removing the old ones, oth-
erwise the text shown in the LCD display and any text files stored in the memory will
be lost (unless the machine is plugged into an electrical outlet with the AC adapter).
If alkaline batteries are not used, large fonts and barcodes cannot be printed.
8
Page 12

OP TION AL AC ADAPTER
The AC adapter (LS7-ACS ) al lows you to use this machine whe rever there i s an electrical
outlet.
To connect the optional A C ada pter:
1 Insert the plug on the adapter cord into the connector marked DC IN 9.5V on the bot-
tom end of the machine.
2 Insert the plug on the adapter into the nearest standard electrical outlet.
☞ Only use the AC adapter (par t no. LS7-ACS) designed exclusively for this machine.
When the AC adapter is connected, unplugging the adapter from the electrical outlet
before unplugging it from the machine can delete all text files in the memory, even if
batteries are installed.
It i s re commende d t hat you use the AC adapt er when pr inting large font s and barcodes on 3/4” (18-mm)-wide tape since these operations can quickly drain the batteries.
9
Page 13
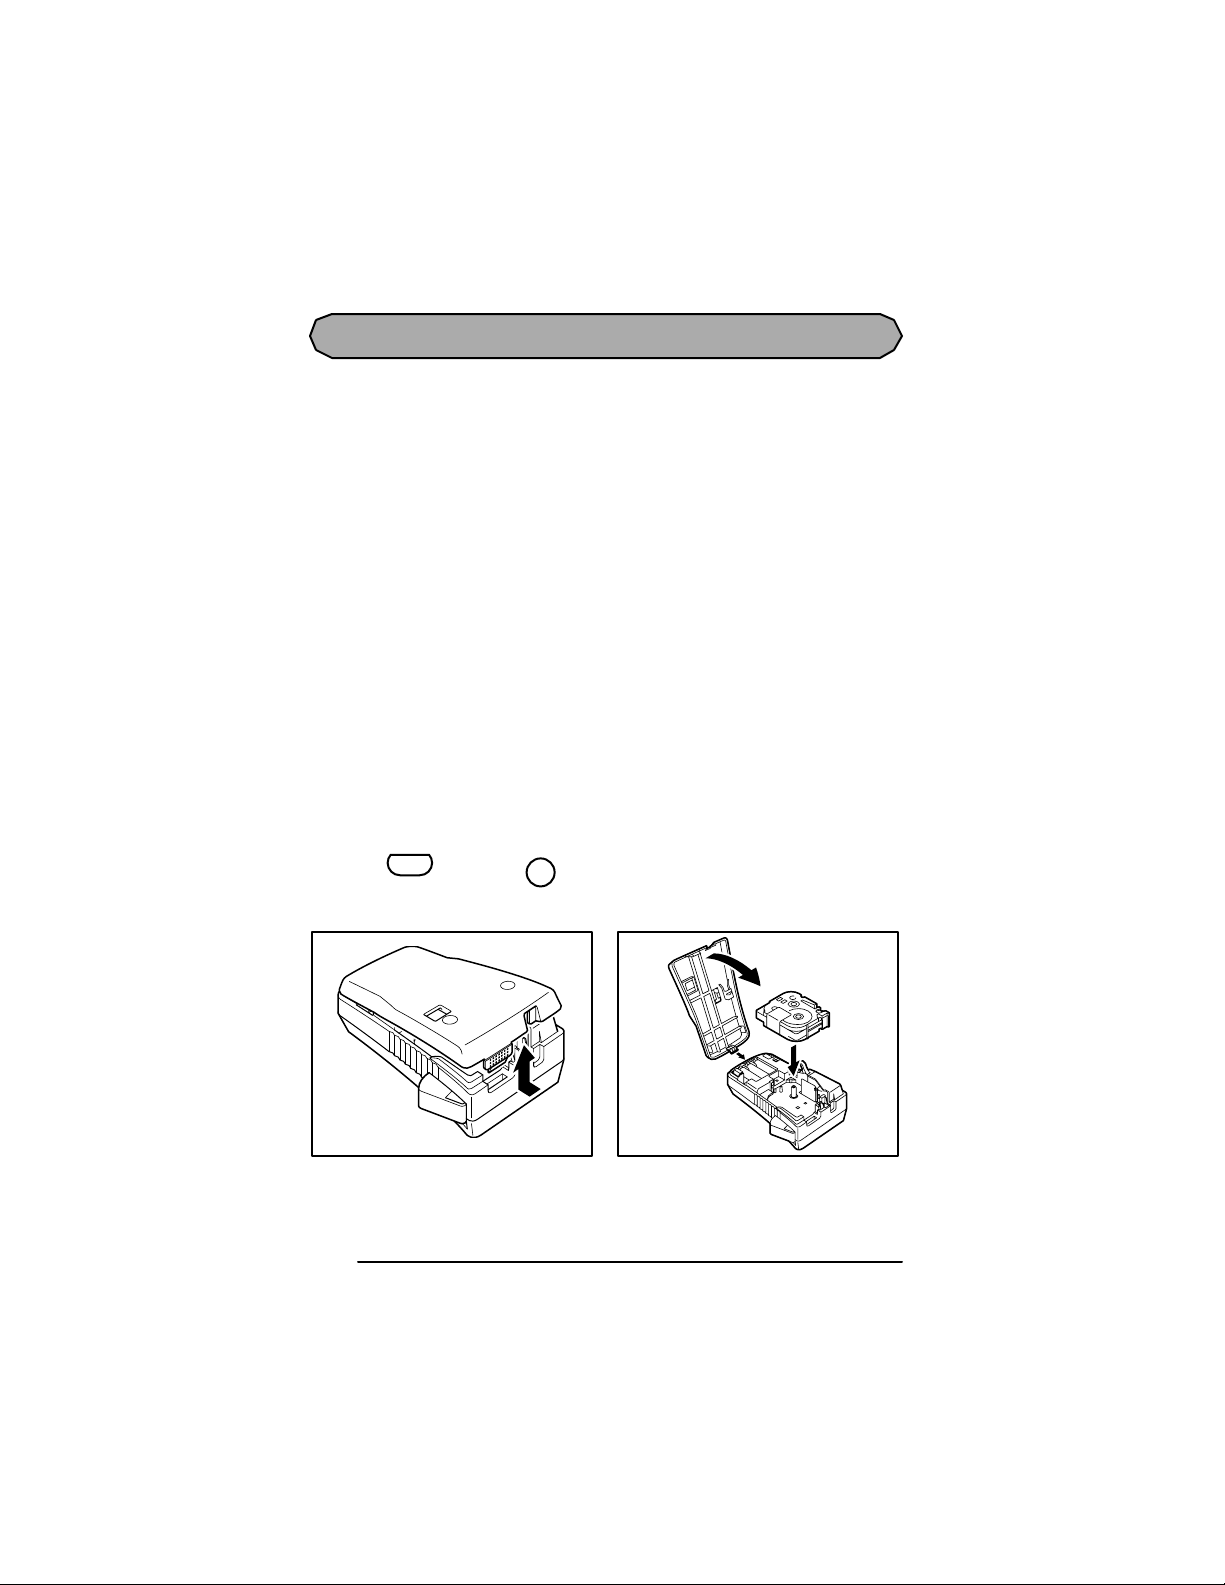
TAPE CA SSETTE
A single LS7 tape cassette is supplied with this unit. This machine has been designed to
allow the tape cassette to be changed quickly and easily.
To change the LS7 tape cassette:
1 Remove the back cover by pressing in on the rough area at the top end of the machine
and pulling off the cover. Pulling off the back cover lifts up the tape release lever.
2 If a tape cassette is already installed, remove it by pulling it straight out.
3 If the ink ribbon in the other tape cassette is loose, use your finger to wind the toothed
wheel in the direction of the arrow on the cassette until there is no slack in the ribbon.
☞ If you are using a new tape cassette provided with a stopper, be sure to remove
the stopper before installing the cassette.
Make sure that the end of the tape feeds under the cassette tape guides.
4 I nsert the t ape c a sset te firmly into the ta pe co mpartme nt, ma king s ure t h at the enti re
back of the cassette touches the bottom of the compartment.
☞ When inserting the tape cassette, make sure that the inner ribbon does not catch
on the corner of the metal guide.
5 Attach the back cover by inserting the tab on the bottom end of the cover into the slot
on the bottom end of the machine, then pushing down firmly on the top end of the
cover until it snaps into place.
6 Turn on the machine if it is off, and then feed the tape to remove any slack by holding
down and pressing once.
Code
7 Press in the tape cutter lever to cut off any excess tape.
Feed
Sym.
10
Page 14

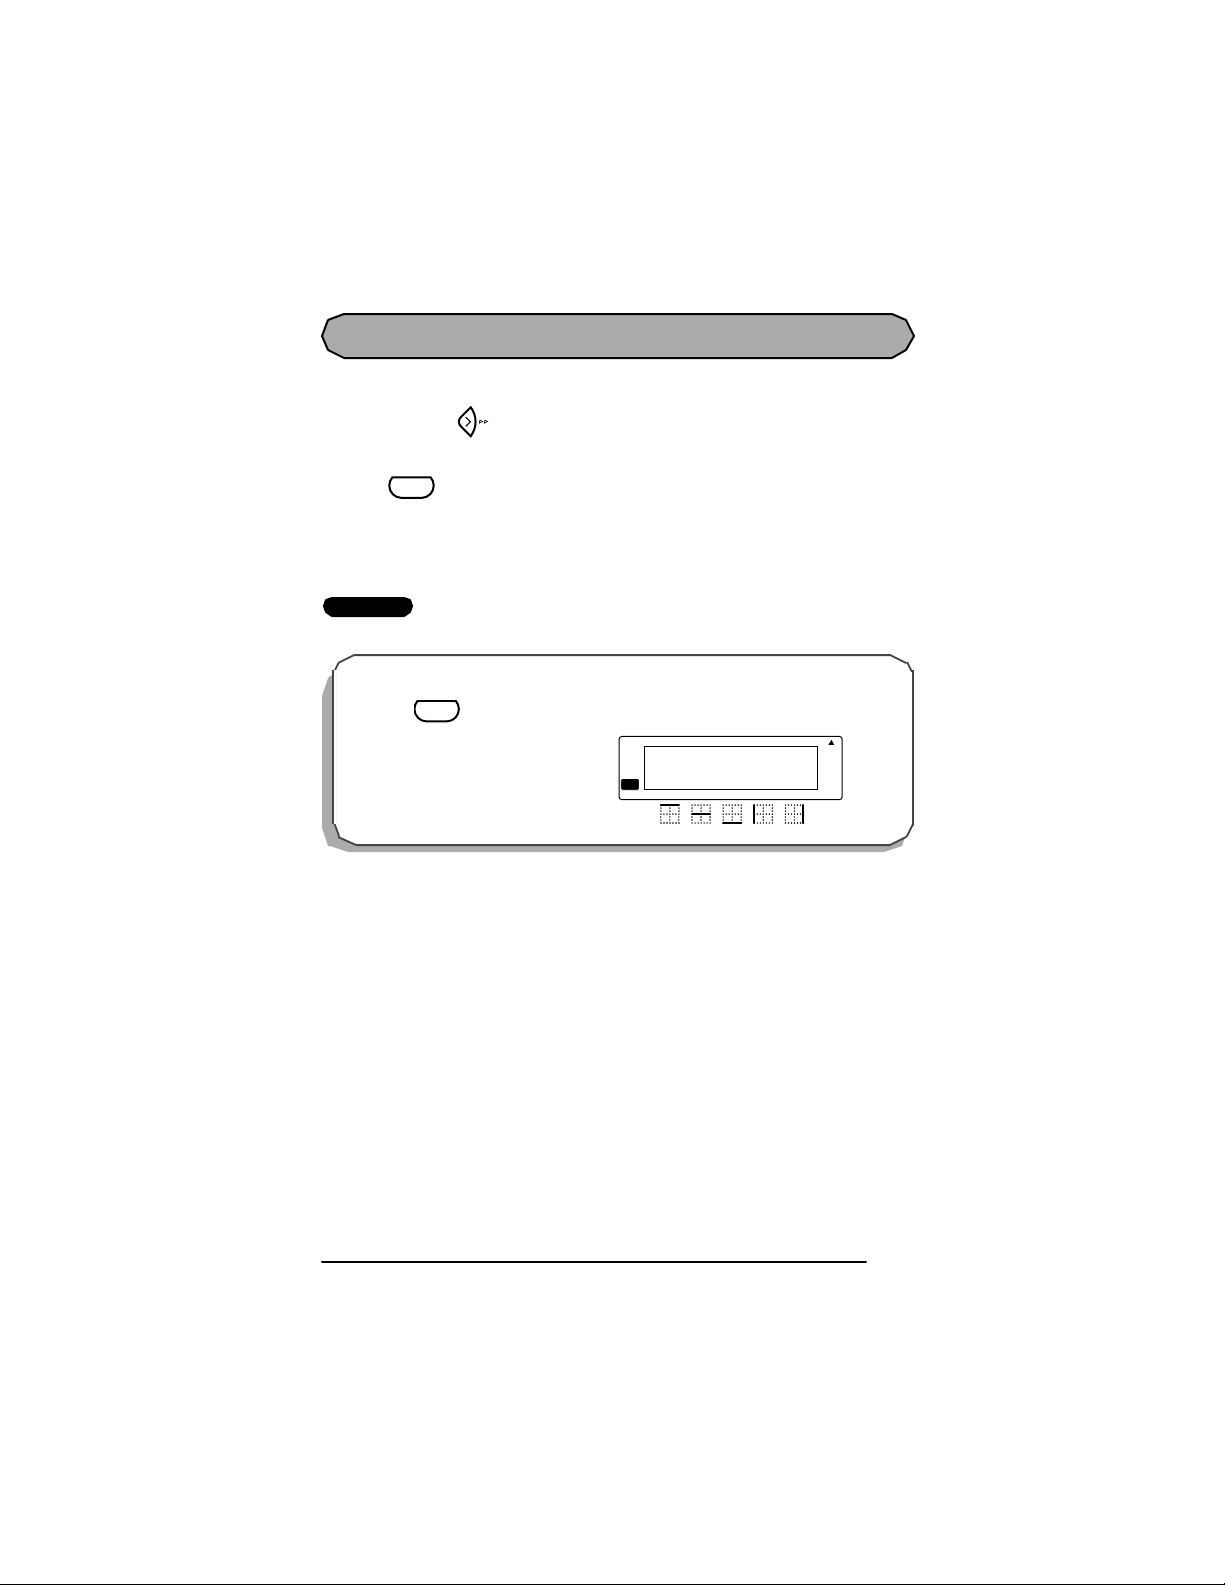
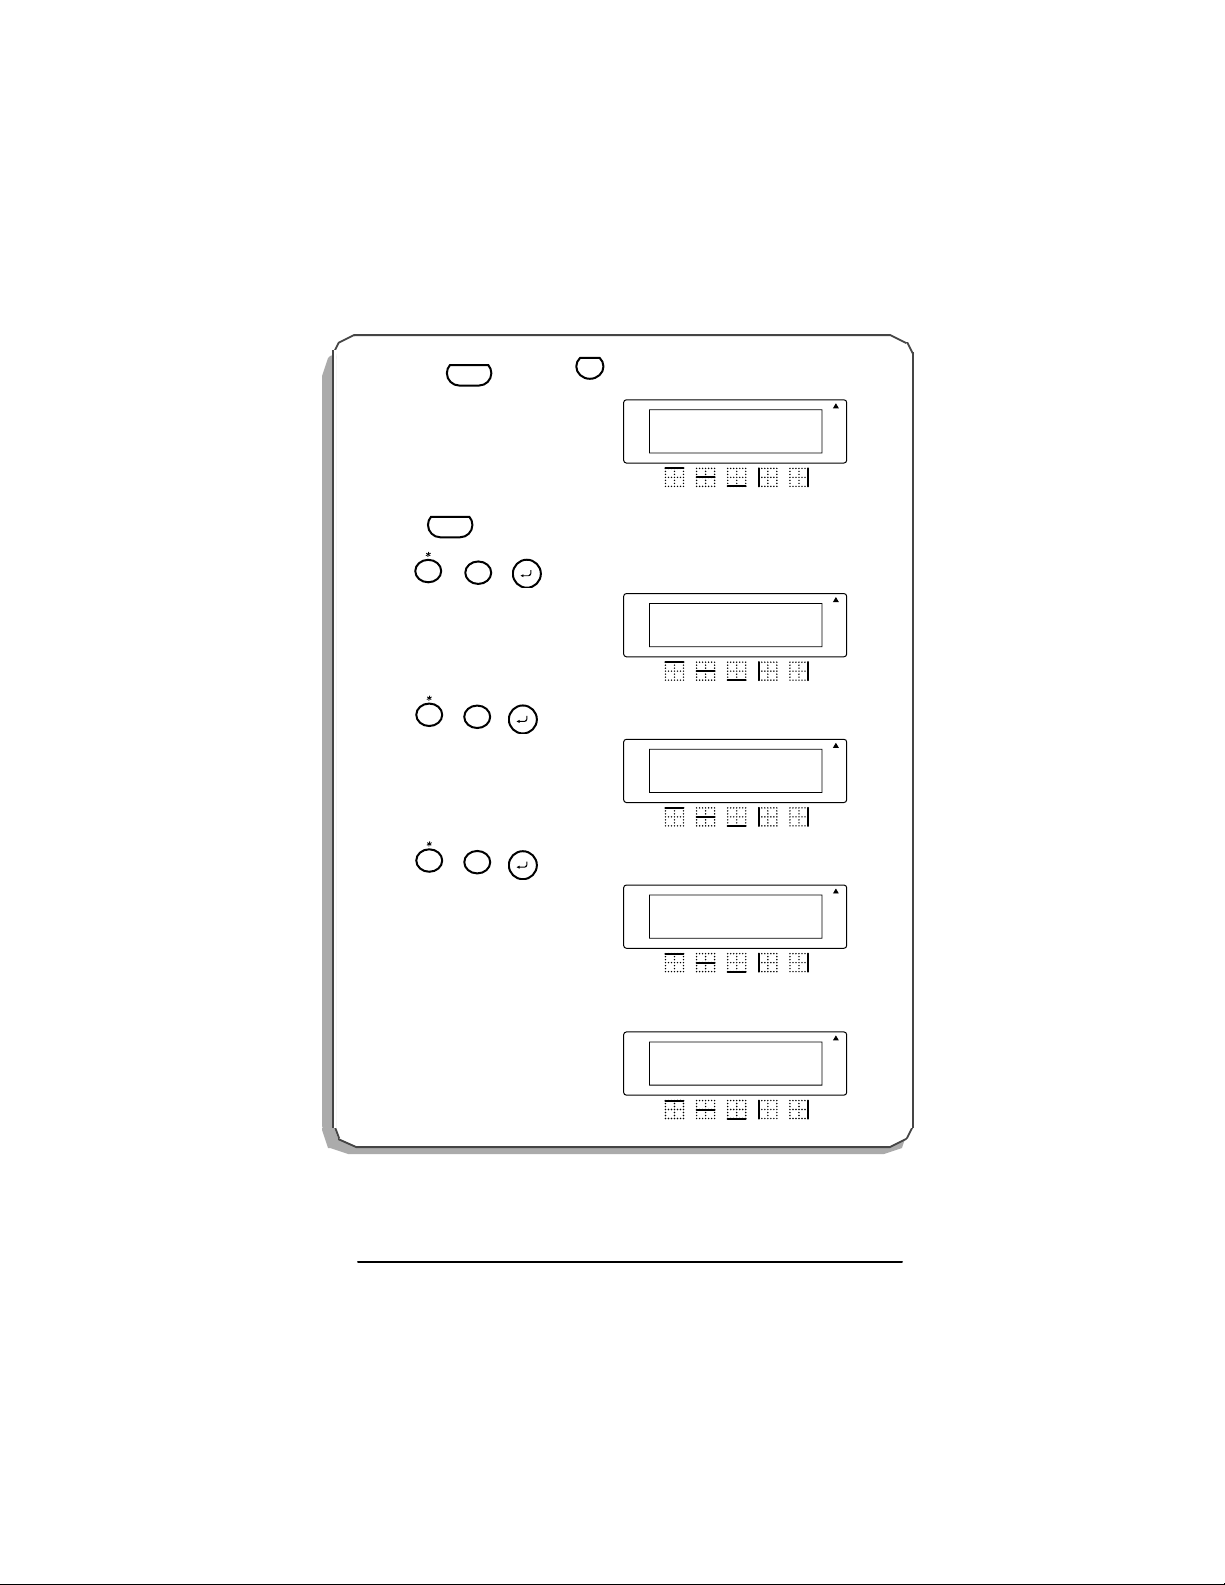
L ABEL COD E
The “LABEL CO DE ” message appears on the display when the following tape cassettes are
loaded:
Part Number Tape Width Color Label Code
LS7-50-1 1/2" (12 mm ) Black/White 1
LS7-50-2 1/2" (12 mm) Black/Clear 1
Future ——
See Tape
Cassette
The Labe l Code m ust be ent er ed in or der for the pr inter to function wit h t he tape ca ssette
listed. Future parts may require Label Code entry.
The Label Code is printed on the cassette and can be viewed with the cassette either
unloaded or loaded in the printer.
☞ The majority of tape cass ettes do not require manual entry of a Label Code.
EXAMPLE
To en t e r a La be l Code us ing LS7- 50 -1:
File
● Press
Size
1
. Prin ter is now re ady
for operation .
Rotate A
LABEL CODE
_
Caps
Repeat
Legend
Rotate A
1:
Caps
Repeat
Legend
A
A
A
A
A A
A A
Auto
Underline
Frame
Length
Auto
Underline
Frame
Length
11
Page 15
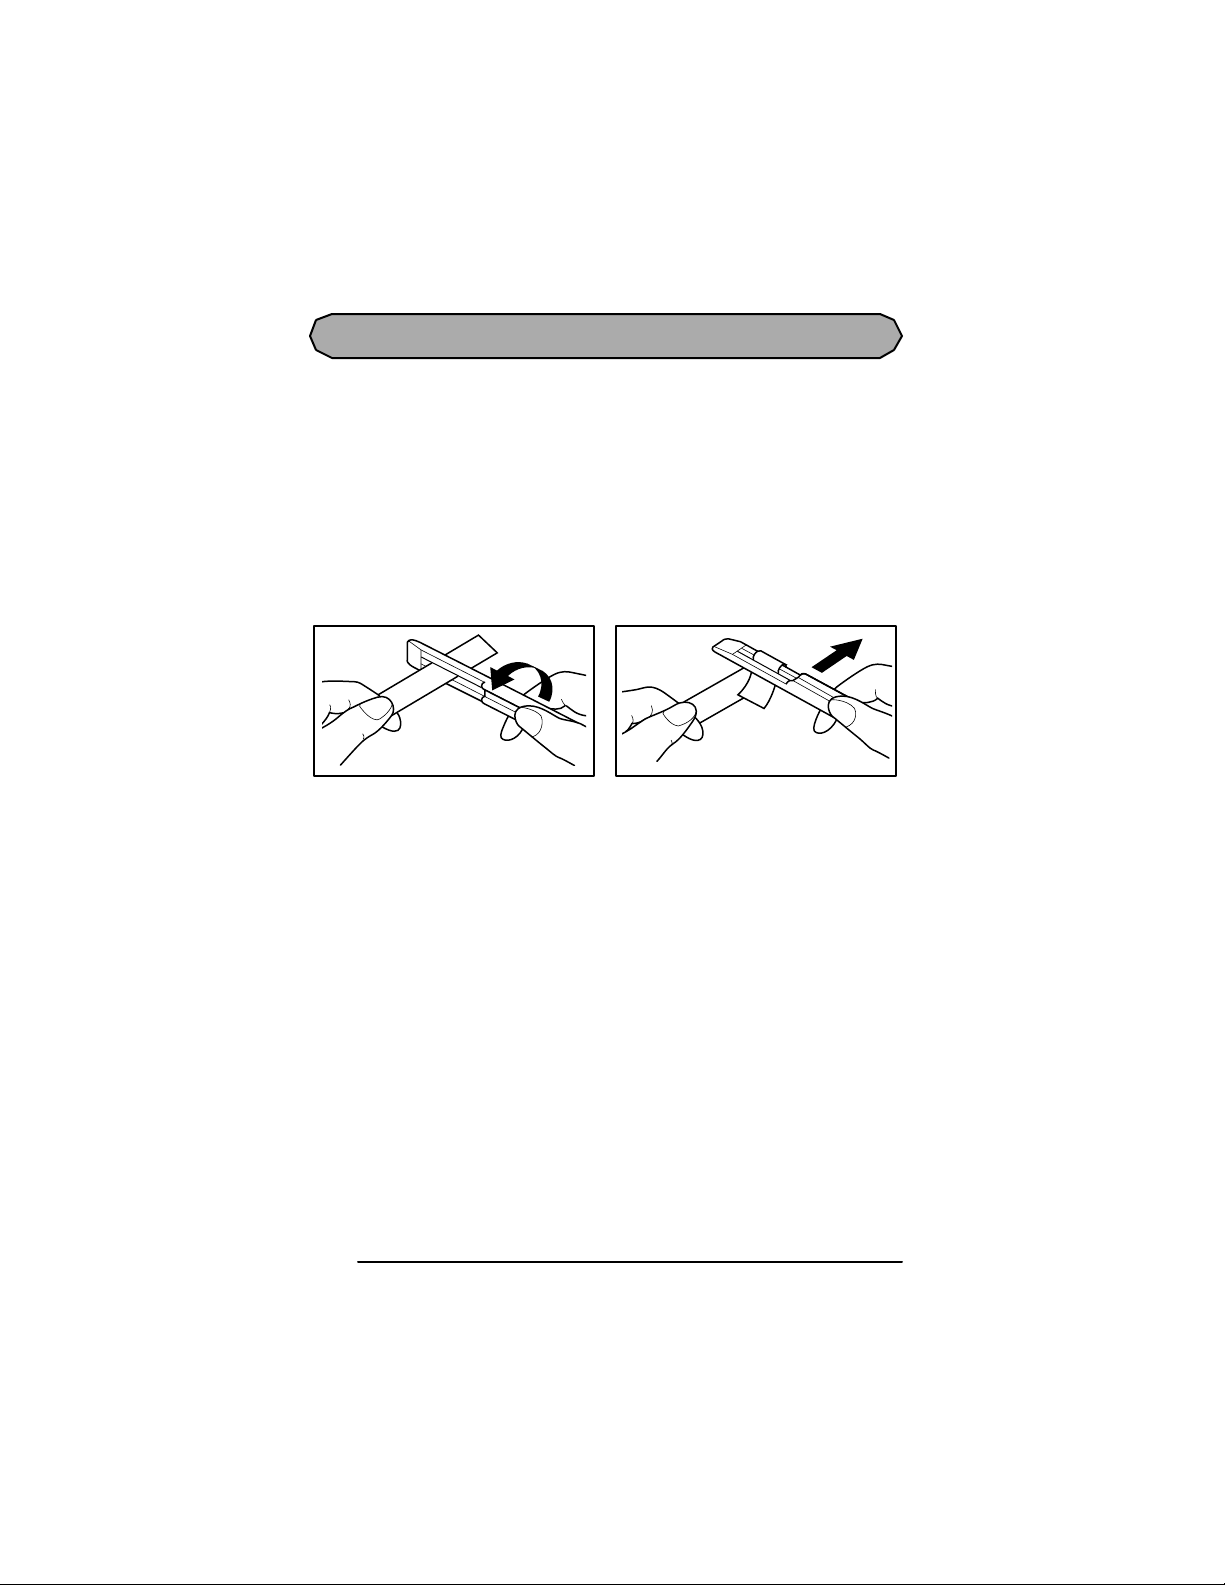
LAMINATED INDUSTRIAL TAPE SEPARATOR TOOL
LAMINA TED INDUS TRIAL TAP E
The enclosed tape separator enables you to easily remove the backing from labels printed on
laminated tapes.
1 Hold the tape in one hand, with the printed surface facing up, and hold the tape separa-
tor in your other hand.
2 Pass the tape halfway through the long narrow hole in the tape separator.
3 Turn the tape separator three-quarters of a turn towards you, and then pull the tape sep-
arator away from you as shown below.
4 Peel off the label backing.
H
G
F
E
D
C
B
A
F
E
D
C
B
A
12
Page 16

PRIN T HEAD & ROLL ERS
Occasionally, specks of dust or dirt become attached to the machine’s print head and rollers.
This is particularly likely when you are using the unit outdoors or in a very dusty
environment. If a section of t he print head is covered w ith dust , a bla nk horiz ontal streak
may a ppear t hrough the labe l text. Ther efore, the machine’s hea d may ne ed to be c leaned
from time to time.
To clean the print head and rollers:
1 Turn off the machine.
2 Remove the back cover, and then remove the tape cassette if one is installed. The print
head and rollers are located in the tape compartment.
3 Print head: U se a dry cotton swab to gently wi pe the pri nt he ad wi th an up-and-down
motion.
Rollers: Use a dry cotton swab to wipe each roller with an up-and-down motion while
rotating them with your finger.
4 Install a tape cassette, attach the back cover, and then try printing again.
5 If dust stil l remains, use Panduit Cleaning Cassette (LS7-CLN).
If none of the above works, contact Technical Support at 866-871-4571.
13
Page 17

Print head
Print head
Rollers
C otton swab
Gently wipe off this
bl ack line.
14
Page 18

TAPE CUTTER
With use , th e tape c utte r may bec ome cove red with adhes ive, ma king it d ifficu lt to cut the
tape. If the tape cannot be cut correctly, clean the tape cutter blades as explained below.
☞ To avoid injuries, be extremely careful not touch the cutter blades with bare hands.
To clean the tape cutter blades:
1 Turn off the machine.
2 Remove the back cover, and then remove the tape cassette if one is installed. The tape
cutter is located near the tape exit slot.
3 Using a cotton swab dipped in isopropyl (rubbing) alcohol, wipe the tape cutter blades
with an up-and-down motion.
Ta pe cu tt er bl ade
Be careful not to touch the cutter blades with bare hands.
T ape cu t te r blade
C o tt on swab
15
Page 19

CARRYING CASE
The enclos ed hard case is designed to protect your LS7 and its accessories while you store or
carry them. Therefore, keep them in this carrying case whenever they are not being used.
Before opening the carrying case, be sure that the side with the Panduit logo faces upward.
1LS7
2 Six AA batteries
3 Tape cas sette
☞ Stan d up the tape cas settes so that the
end with the label attached faces
upwards.
Th is compartment ca n store up to five
1/4” ( 6-mm)-, 3/8” (9- mm)- o r 1 /2”
(12-mm) -wide c assettes, four 3/4”
(18-mm)-w ide cassettes, or a comb i natio n of three 1/ 2 ” (1 2- mm)- and two
3/4” (1 8-mm )-w ide c as se tt e s.
16
4 Tape Separator Tool
5 AC adap t er
☞ This compartment can store the
optio nal AC adap te r (mod el LS7 ACS), designed exclusively for the
LS7.
6Operator’s Man ual (LS7-MAN-A)
Page 20

For your
information
17
Page 21

POW ER KEY
The power ke y ( ) is located in the top right-hand c orner of the keyboa rd. If batteries
have be en inst all ed or the machi ne has been plugged in using the optional AC a dapter, the
previous session’s i nfor mation is displayed w hen the machine is turned on. This feature
allows you to stop work on a label, turn off the machine, and return to it later without having
to re-enter the text.
The machine will automatically turn off if no key is pressed within 5 minutes. The machine’s
internal memory s tores the current session’s information and displays it when you turn on the
machine again.
To turn on the machine:
● Press . The previous session’s information appears in the LCD display.
To turn off the machine:
● Press . The current session’s information is stored in the internal memory.
18
Page 22

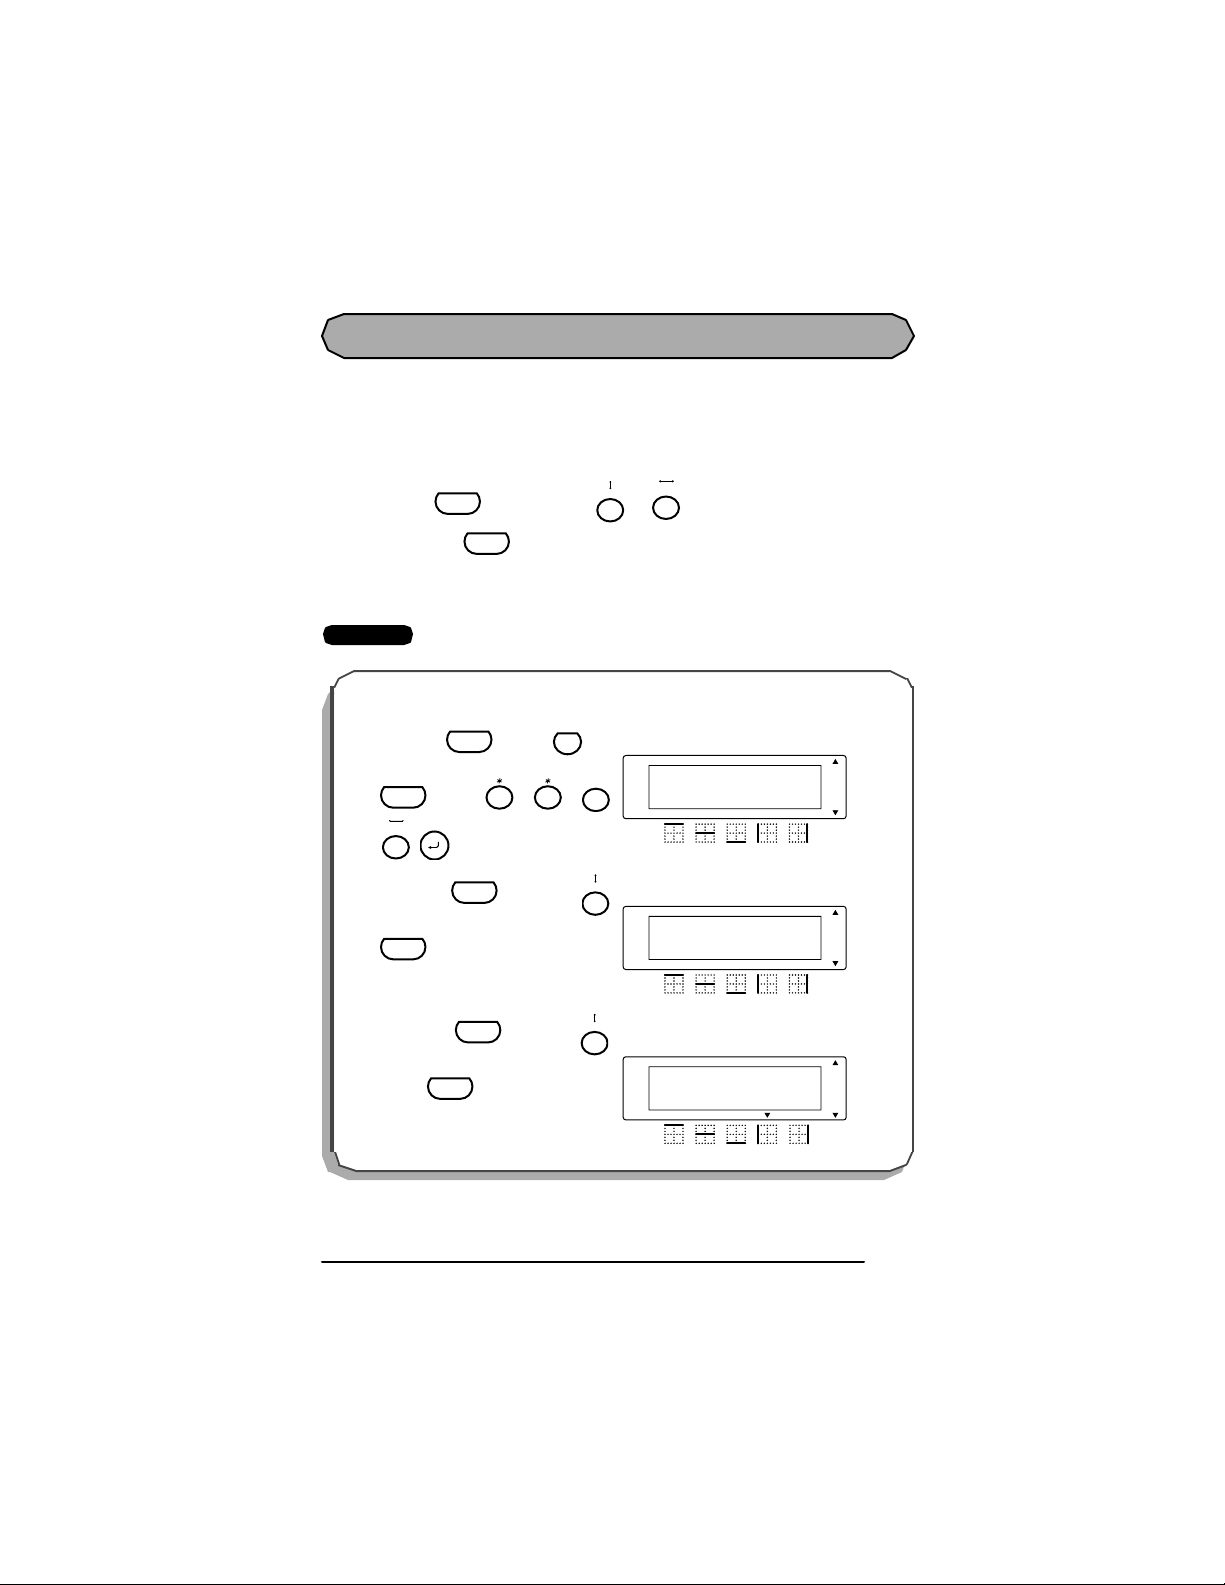
CODE & CAPS KEYS
Most characters can be entered simply by pressing their keys. However, to use special functions or to enter capital letters, accented characters and some symbols, the following special
keys are necessary.
CODE KEY
To use a function or type in characters printed either above or below a key:
● Hold down and press the ke y e ither im medi ately below or im medi ately above
the desired function or character written in orange.
EXAMPLE
Code
To s tart the accent fun ction:
● Hold down a nd press
once.
Code
Accent
O
Rotate A
ACCENT
a-u/A-U?
Caps
Repeat
Legend
A
A
A A
Auto
Underline
Frame
Length
19
Page 23

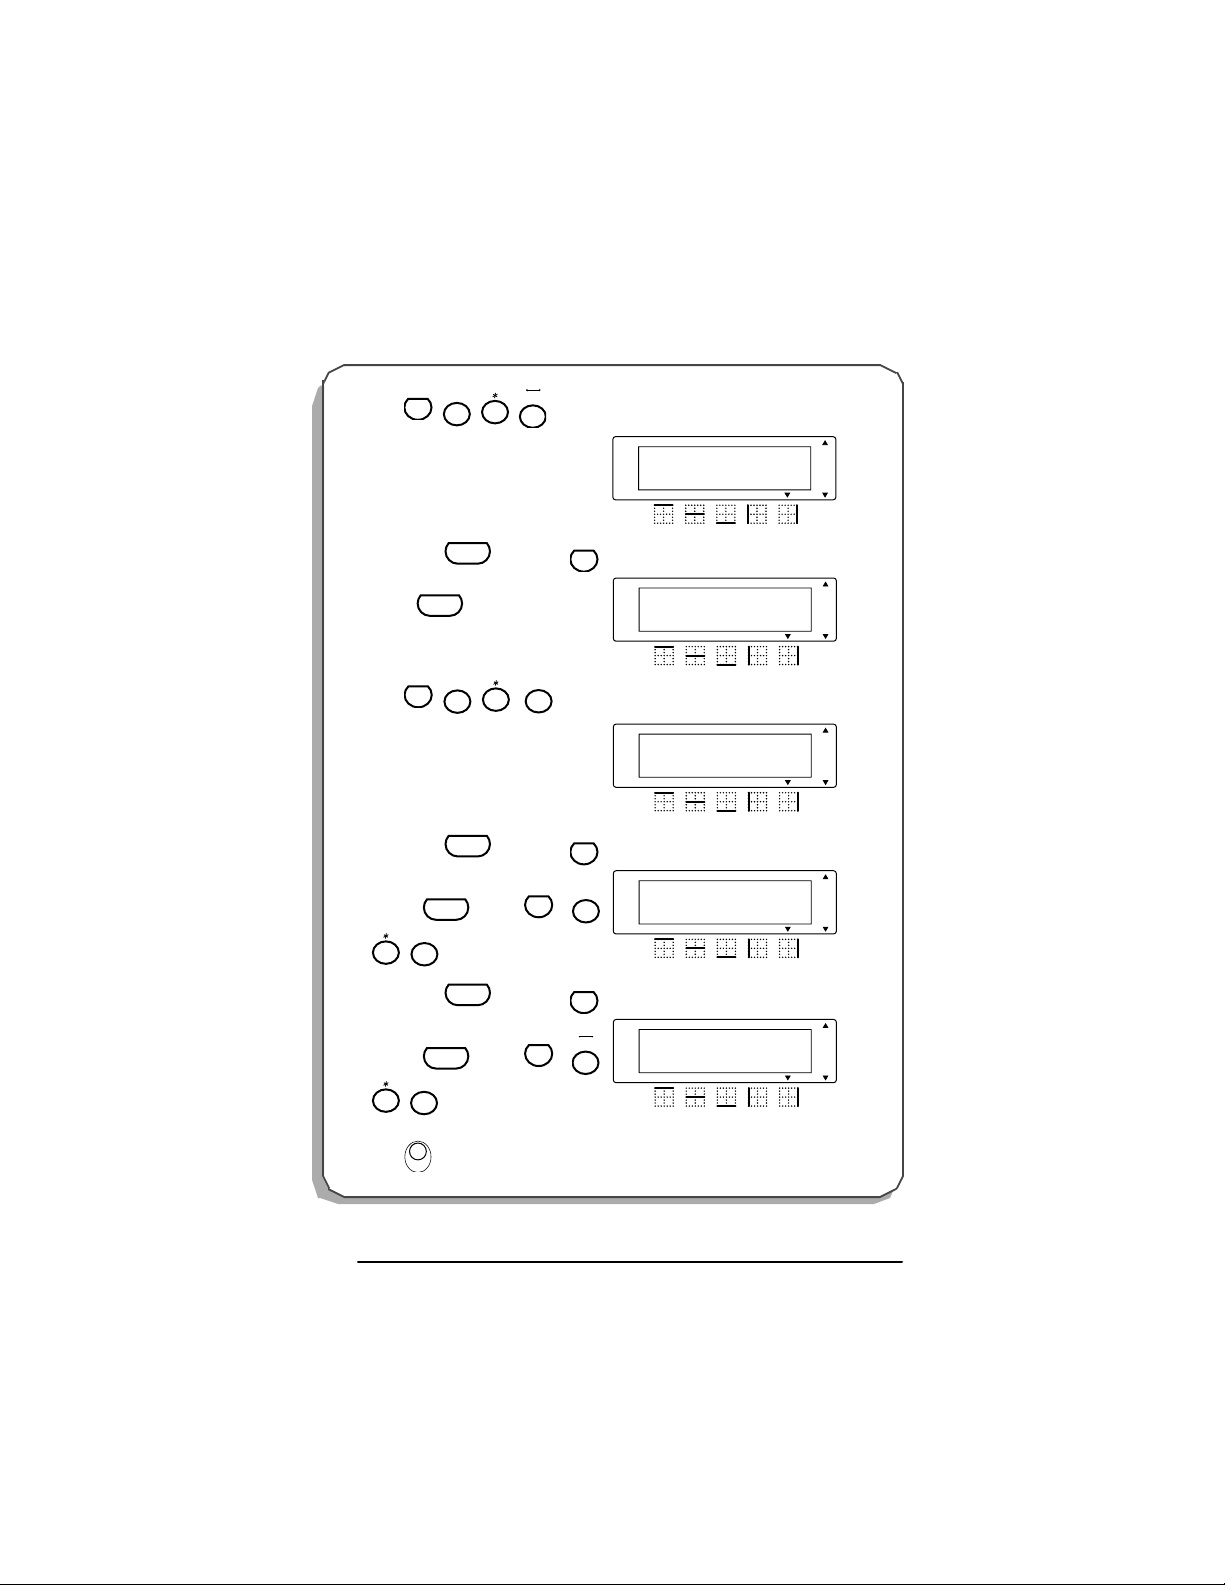
CAPS KEY
To type capital letters continuously:
1 Press until the Cap s indicator ( ) on the left side of the display lights up.
Caps
2 Press the keys of the desired letters.
☞ To ex i t Caps mode, press until the Caps indicator goes off.
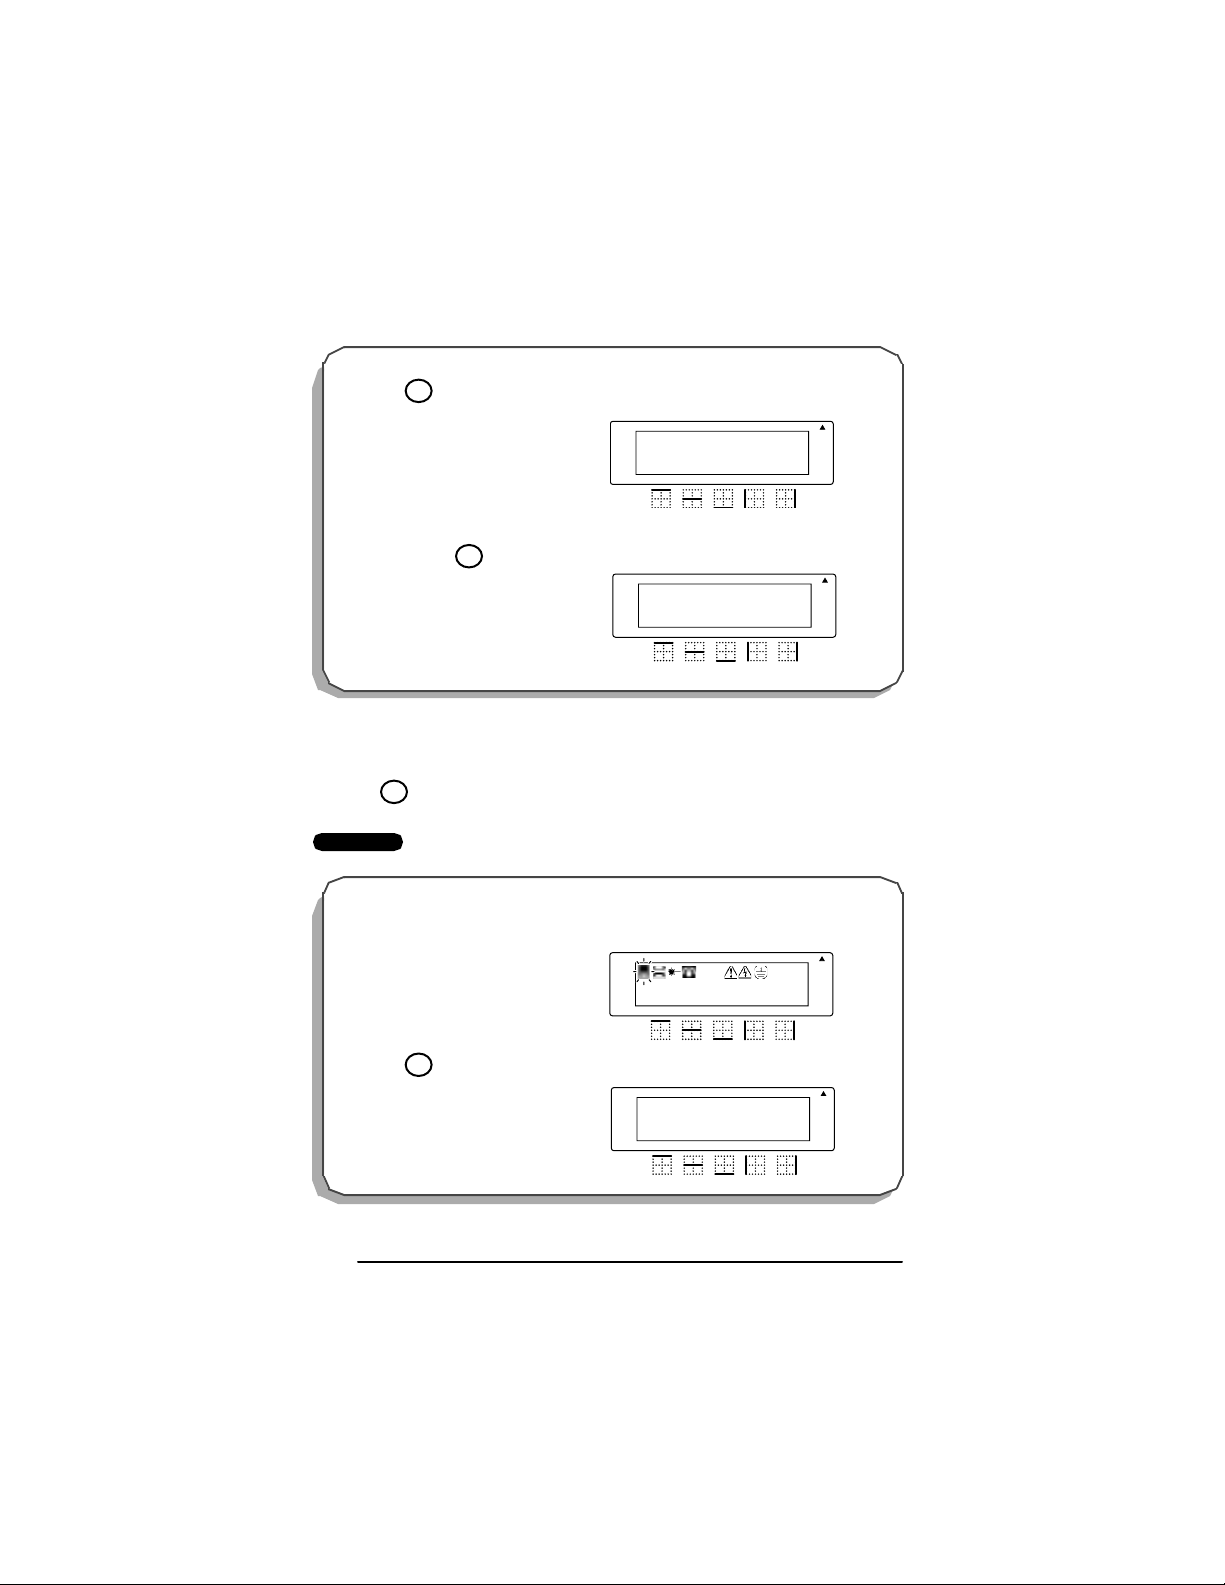
EXAMPLE
To t y pe i n “ J OHN”:
Caps
Caps
1 Press once.
2 Press , , , then
Caps
once ea ch .
"
Accent
J
H
O
N
Barcode
Rotate A
1: _
Caps
Repeat
Legend
Rotate A
1:JOHN_
Caps
Repeat
Legend
A
A
A
A
A A
A A
Auto
Underline
Frame
Length
Auto
Underline
Frame
Length
20
Page 24

CURSOR KEY S
The machine’s LCD display shows two rows of 11 characters; however, the text that you cre-
ate ca n be up to 99 c hara cte rs long. You ca n revi ew and edit your t ext by using t he cursor
keys ( , , , ) to move the cur sor so tha t diff er ent parts are shown in the
display.
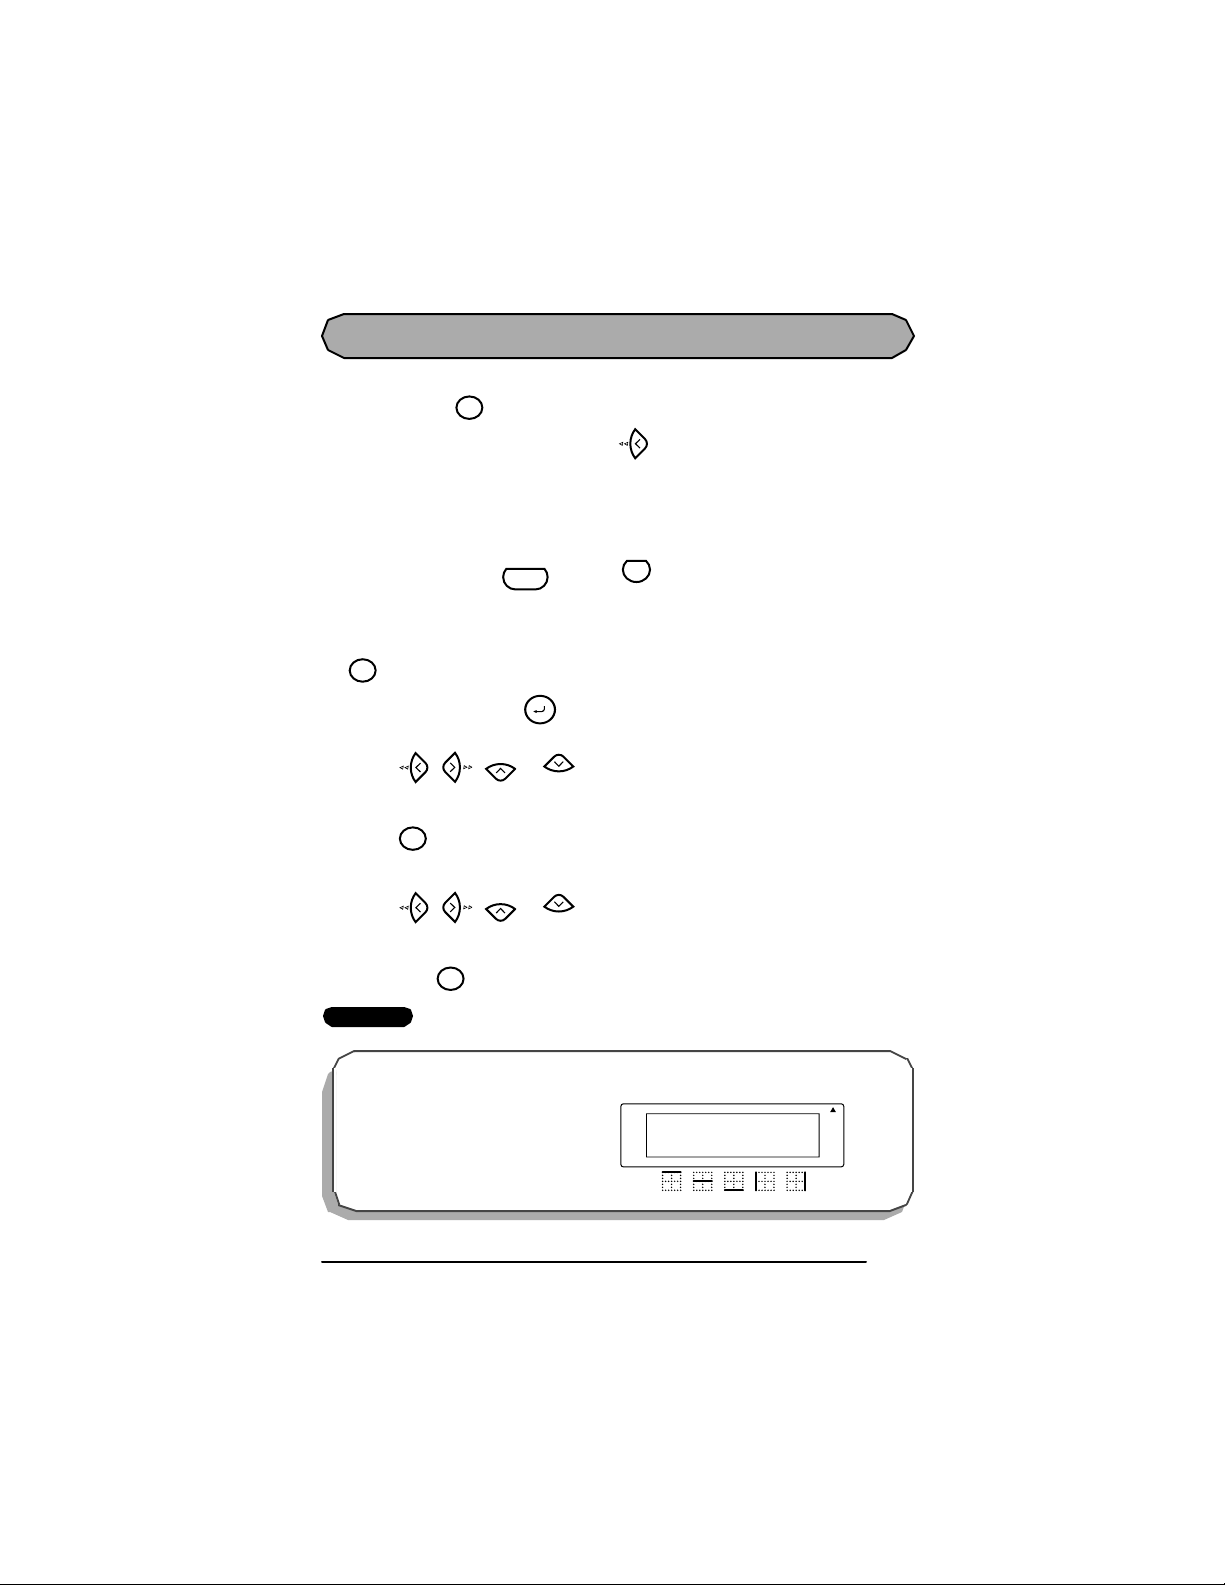
LEFT CURSOR KEY
To move the cursor one character to the left:
● Press once.
To move the cursor several characters to the left:
● Hold down until the cursor moves to the desired position.
To move the cursor to the beginning of the current line:
Home
End
● Hold down and pres s .
Code
RIGHT CURSOR KEY
To move the cursor one character to the right:
● Press once.
To move the cursor several characters to the right:
● Hold down until the cursor moves to the desired posit ion.
To move the cursor to the end of the current line:
● Hold down and pres s .
Code
21
Page 25

UP CURSOR KEY
To move the cursor up to the previous line:
● Press once.
Home
To move the cursor up several lines:
● Hold down until the cursor moves to the desired position.
Home
To move the cursor to the beginning of the entire text:
● Hold down and press .
Code
Home
DOWN CURSOR KEY
To move the cursor down to the following line:
● Press once.
End
To move the cursor down several lines:
● Hold down until the cursor moves to the desired position.
End
To move the cursor to the end of the entire text:
● Hold down and press .
Code
End
22
Page 26
SPACE KEY
The Space key lets you add blank spaces between characters in your text. It is different from
the right cursor key ( ), which just moves the cursor without adding blank spaces.
To add a space:
● Press .
EXAMPLE
Space
Rotate
To add a space:
Space
Rotate
● Press
.
Rotate A
1:JOHN_
Caps
Repeat
Legend
A
A
A A
Auto
Underline
Frame
Length
23
Page 27

R ETU RN KE Y
Like on a typewriter or word process or, this mac hine’s retur n key ( ) is used to e nd a
File
line of text and start another one. When you have finished entering one line of text, press the
return key to add a return mark ( ) to the end of the line and start a new one.
☞ A maximum of four text lines can be entered. If you press when the cursor is
File
located in the fourth line, the error message “4 LINE LIMIT!” will appear.
The number of text lines that can be printed on the installed tape depends on the tape
width.
Tape width
Maximum number of
lines that can be printed
1/4” (6 mm ) 1
3/8” (9 mm ) 2
1/2” (12 mm) 2
3/4” (18 mm) 4
All Widths
Rotated Legend
10
The return key can also be used to select an item from a list (e.g., add a symbol or accented
character to the text) or to apply a selected setting.
Some question asking you to confirm a command may appear on the LCD display, especially
when the func tion that you have c hosen w ill delete or a ff ect text. In these c ases, press ing
File
is the same as answering “yes”.
☞ To answer “no”, press . Refer to BACKSPACE KEY on pages 27 and 28.
Clear
BS
24
Page 28

To add a new line of text:
R
L
1 Press , , or to position the cursor to the right of the character that
Home
End
will end the line.
2 Press . The return mark ( ) appears at the end of the line and the cursor moves
File
to the new line.
EXAMPLE
To add a se c o nd li ne of t ext :
A
A
A
A
A A
A A
Auto
Underline
Frame
Length
Auto
Underline
Frame
Length
● Press .
File
Rotate A
1:John Smith
Caps
Repeat
Legend
Rotate A
1:John Smith
2:
Caps
epeat
egend
25
Page 29
To apply a selected item:
● Press once.
File
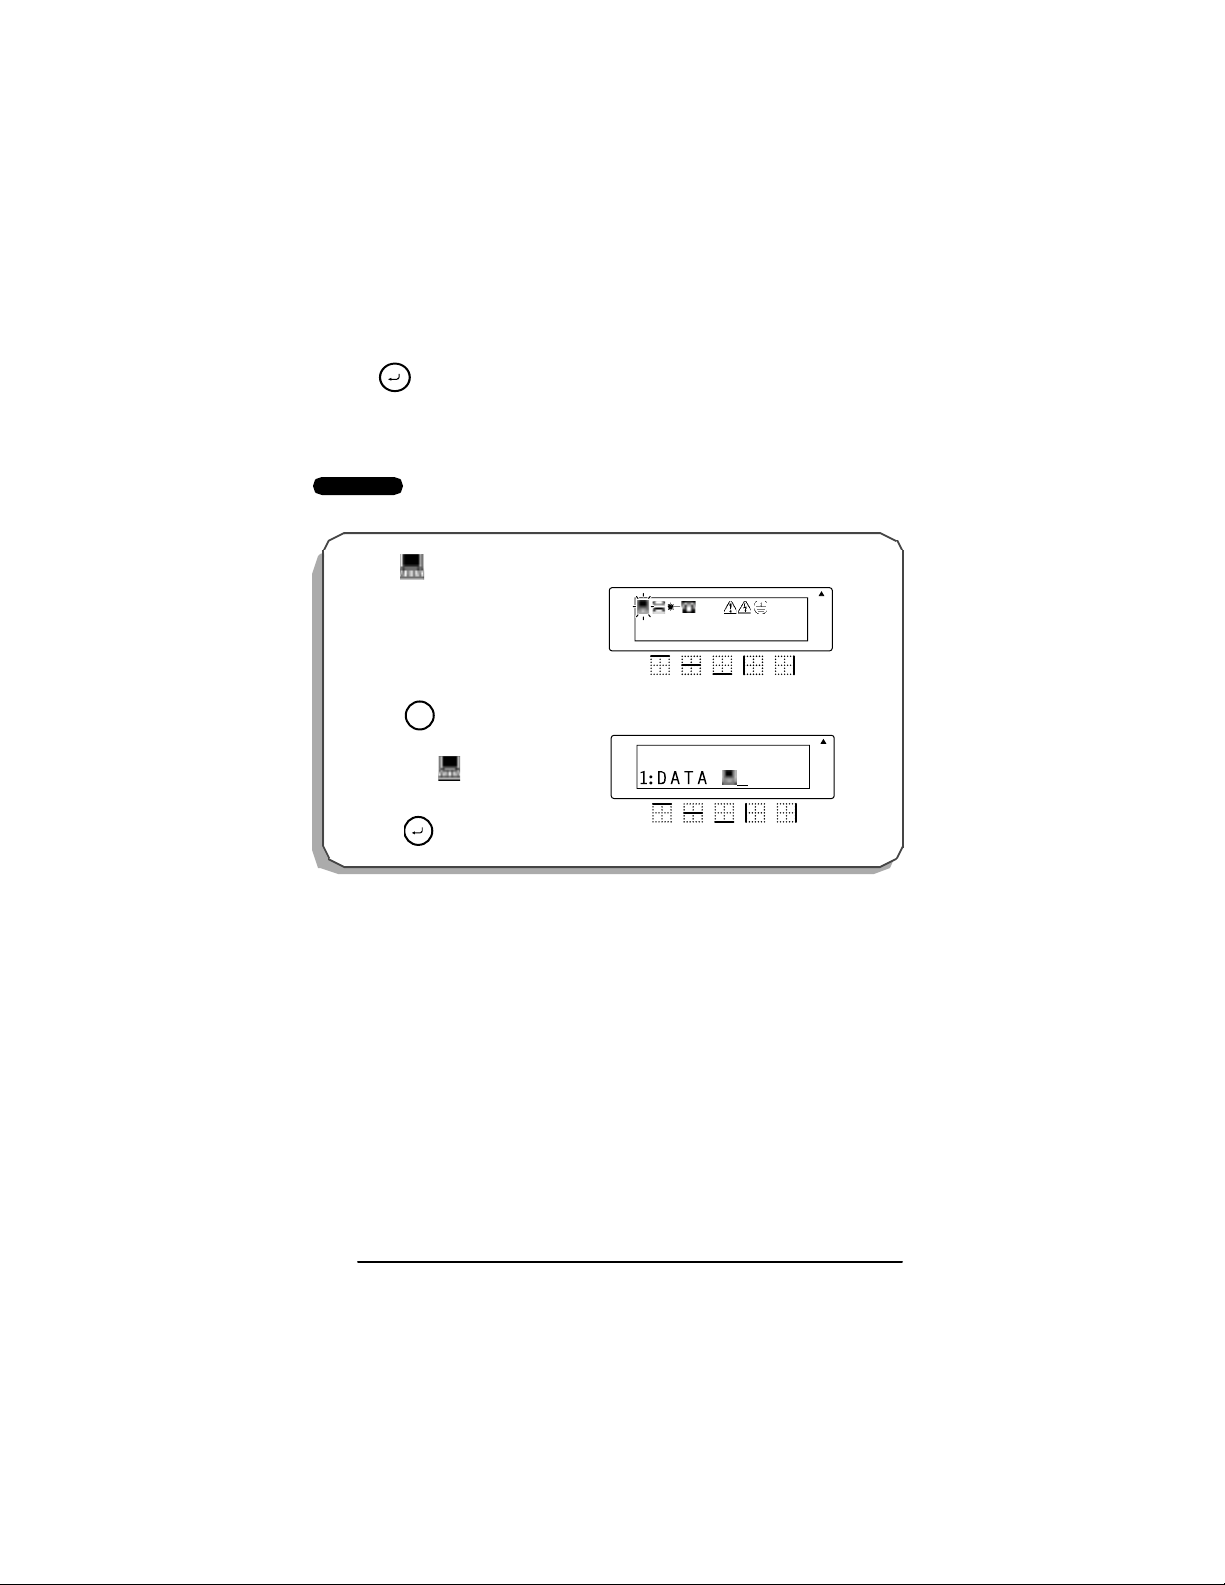
EXAMPLE
To add “” to your text:
●
●
Feed
Press once
Sym.
Then select ,
File
● Then
Rotate A
1:DATA_
Caps
Repeat
Legend
Rotate A
Rotate A
Caps
Caps
Repeat
Repeat
Legend
A
A
A
A
+=
A
A
A A
A A
A A
Auto
Length
Auto
Auto
Length
Length
Underline
Frame
Underline
Underline
Frame
Frame
26
Page 30
BACKSPACE KEY
The backspace key ( ) allows you to remove characters to the left of the cursor’s current
Clear
BS
position. It di ff ers from the left cursor key ( ), which only moves the cursor without
deleting any characters.
The backspace key can also be used to quit most functions and return to the previous display
without changing the text.
☞ The bac kspace ke y cannot be used to quit the barcode function. To quit t he barcode
function, hold down and press .
Code
N
Barcode
Some questions asking you to confirm a command ma y appe ar on t he LCD display, es pecially when the function that you have chosen will delete or affect text. In these cases, press-
Clear
ing is the same as answering “no”.
BS
☞ To answer “yes”, press . Refer to RETURN KEY on pages 24 to 26.
File
To delete one character:
1 P ress , , or to po sition the cur sor be low th e ch ara cter imme di-
Home
End
ately to the right of the one that you wish to delete.
2 Press once.
Clear
BS
To delete a sequence of characters:
1 P ress , , or to po sition the cur sor be low th e ch ara cter imme di-
Home
End
ately to the right of the last character that you wish to delete.
2 Hold down until all of the characters that you wish to delete are deleted.
Clear
BS
EXAMPLE
To de lete “9” in legend “012-345-6789”:
Rotate A
Caps
Repeat
Legend
A
1:2-345-6789
A
A A
Auto
Underline
Frame
Length
27
Page 31
deleted.
Leg
Clear
BS
Clear
BS
Rotate A
1:12-345-678
Caps
Repeat
end
Rotate A
1:012-345
Caps
Repeat
Legend
1 Pr ess o nce .
To dele t e “-678”:
2 Hold down until “-678” are
To quit a function without changing your text:
● Press to return to your text.
Clear
BS
EXAMPLE
To quit the symbol function without adding a symbol to your text:
A
A
A
A
A A
A A
Auto
Underline
Frame
Length
Auto
Underline
Frame
Length
● Press .
28
Clear
BS
Rotate A
1:DATA_
Caps
Repeat
Legend
Rotate A
1:DATA
Caps
Repeat
Legend
A
A
A
+=
A
A A
A A
Auto
Underline
Frame
Length
Auto
Underline
Frame
Length
Page 32

CLE AR FUN CTI O N
The clear function is used to remove all characters from the display so that you can begin
entering new text. Although all of the text is erased, the Caps mode does not change.
To delete all of the text:
● Hold down and press . All of the text is erased from the display.
Code
EXAMPLE
Clear
BS
To clear the display:
●
Hold down and press .
Code
Clear
BS
Rotate A
Caps
Repeat
Legend
Rotate A
Caps
Repeat
Legend
A
A
A
A
A A
A A
Auto
Underline
Frame
Length
Auto
Underline
Frame
Length
29
Page 33

ACCENT FUNCTION
The accent functi on can be used to add accented characters to your text. The accented
characters are groupe d according to the capital or lowercas e le tter that they are combined
with. The following accented characters are available:
Letter Accented ch aracters Letter Accented ch aracters
a à á ä â ã æ I Í Ï Î
A À Á Ä Â Ã Æ n ñ
c ç N Ñ
C Ç o ó ö ô õ
e è é ë ê˜eOÓ Ö Ô Õ
E
È É Ë Ê˜E
i í ï î U Ù Ú Ü Û
To type in an accented character:
1 Hold down a nd pr es s . The me ssage “ACCENT a–u/A–U? ” appears on
Code
Accent
O
the display.
2 Press the key of the letter in the desired accented character.
☞ If you wish to type in a capital letter, press to enter Caps mode (the Caps
indicator lights up) before pressing the letter key.
3 Press or until the desired accented character flashes.
u ù ú ü û
Caps
4 Press . The accented character is added to the text.
File
☞ To type in a series of accented characters, hold down before pressing
File
Code
. Then, continue adding accented characters by selecting them as explained
in steps 2 and 3, and holding down while pressing . Press just
File
Code
File
after selecting the last character in the series.
30
Page 34

EXAMPLE
t
R
Leg
R
L
To add the accented ch ara cter “Ë”:
1 Hold down and press .
2Press .
3Press .
Code
Caps
Page
E
Accen
O
4 Press until “Ë” fl a shes.
5Press .
File
Rotate A
ACCENT
a-u/A-U?
Caps
Repeat
Legend
Rotate A
ACCENT
a-u/A-U?
Caps
epeat
end
Rotate A
ÈÉËÊE
1: N O
Caps
epeat
egend
Rotate A
ÈÉËÊE
1: N O
Caps
Repeat
Legend
Rotate A
1: N O Ë
Caps
Repeat
Legend
A
A
A
A
A
A
A A
A
A A
A
A A
˜
A
A A
˜
A
A A
Auto
Underline
Frame
Length
Auto
Underline
Frame
Length
Auto
Underline
Frame
Length
Auto
Underline
Frame
Length
Auto
Underline
Frame
Length
31
Page 35

SYMBOL FUNCTION
In addition to the letters, symbols and numerals on the key tops, there are 9 additional marks
available with the symbol function. These symbols are shown below.
Symbols
+=
Data Fax
Fiber
Optic
Phone Plus Equals Caution
Shock
Haz ard
To type in a symbol:
1 Press . A row of symbols appears in the display.
Feed
Sym.
2 Press or until the desired symbol flashes.
3 Press . The symbol appears in the text.
File
☞ To type in a series of symbols, hold down before pressing . Then,
Code
continue adding sy mbols by select ing them as explained in steps 2 and 3, and
holding down while pressing . Press just after selecting the
Code
File File
last symbol in the series.
Ground
File
32
Page 36
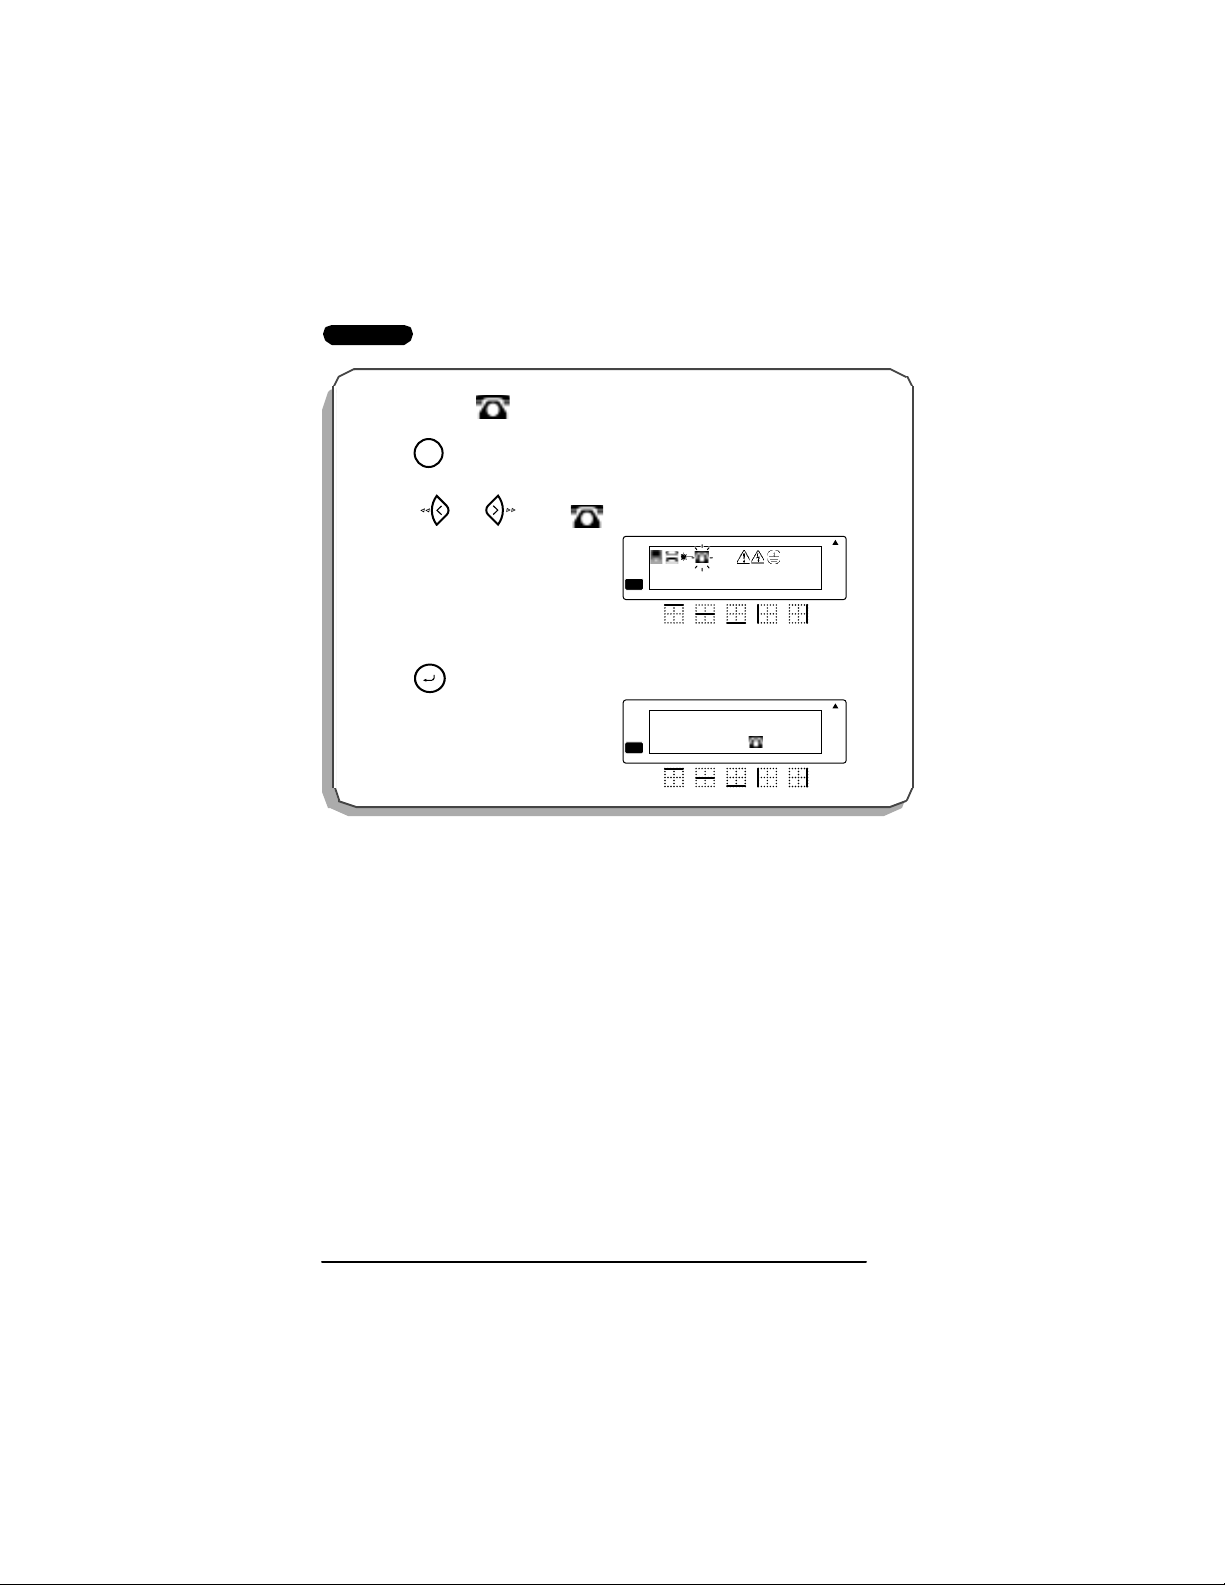
EXAMPLE
To add the symbol “”:
1Press .
Feed
Sym.
2 Press or until “”
flashes.
File
Rotate A
Caps
Repeat
Legend
3Press .
Rotate A
Caps
Repeat
Legend
A
A
+=
1:PHONE
A
A
1:PHONE
A A
A A
Auto
Underline
Frame
Length
Auto
Underline
Frame
Length
33
Page 37

LENGTH FUNCTI ON
Although the length of the printed label automatically adjusts to fit the length of the entered
text, ther e may be times when you will want to make a l abel with a specific length. The
length f unction all ows you to set the label l ength betw een 0.25" and 11.80" (6.4 and 299.7
mm).
The def aul t l ength set ting is OFF. If ON is selected, the Length indic ator at the botto m of
the display l ights up. The default length whe n ON is 0.65" (16.5 mm ) - the width of a
Panduit Modular Jack.
To turn on or off the length function:
1 While holding down , pr ess once to display the current setting (ON or
Code
OFF).
2 While still holding down , continue pressing until the desired label length
Code
setting is displayed.
☞ The Length indicator lights up when ON is selected.
3 Release . If ON was selected, the current label length setting is displayed.
Code
To set the length of the label:
4 Use the number keys to enter a length.
5 Press .
File
☞ Cut marks are printed on the labels when Length Function is set.
Length
Q
Length
Q
34
Page 38

EXAMPLE
R
Leg
R
L
R
L
R
Leg
To select a labe l length of 10.5":
1 Hold d own an d pr ess
once.
2 Keep h eld down an d con tinue
pre ssing until ON is displayed.
3 Release .
4Press "1050".
5Press .
Code
Code
Length
Q
Code
File
Length
Q
Rotate A
A
LENGTH inch
OFF
Caps
epeat
end
Rotate A
A
LENGTH inch
ON
Caps
epeat
egend
Rotate A
A
LENGTH inch
00.65
Caps
epeat
egend
Rotate A
A
LENGTH inch
10.50
Caps
epeat
end
A
A
A
A
A A
A A
A A
A A
Auto
Underline
Frame
Length
Auto
Underline
Frame
Length
Auto
Underline
Frame
Length
Auto
Underline
Frame
Length
35
Page 39

SIZE FUNCTION
The character size of the entire text can be adjusted using the size function. Since the
character size that can be used depends on the width of the tape, the following table shows
the character sizes that can be used with each tape width.
Tape width Sizes (in points)
1/4" (6 mm) 12, 9
3/8" (9 mm) 18, 12, 9
1/2" (12 mm) 24, 18, 12, 9
3/4" (18 mm) 36, 24, 18, 12, 9
The default size setting is AUTO. The currently selected size setting is always shown by the
indicators at the top of the display.
With the AUTO size setting, the machine compares your text with the width of the installed
tape and automatically adjusts the characters to the largest size possible. However, six other
point si zes are a lso avai labl e.
Setting
(in points)
Size
36
ABC
24
18
12
9
6
☞ If the AUTO size setting is selected and only one line of characters has been entered,
the text can be printed with a character size slightly larger than the maximum for the
installed tape under any of the following conditions.
36
ABC
ABC
ABC
ABC
ABC
• Only font
available for
Rotated Text ON.
Page 40

•1/2” (12-mm)- or 3/4” (18-mm)-wide tape is installed and the text contains only
capital letters
•3/4” (18- mm)- wide t ape is install ed and t he characte rs are not formatt ed (i .e., the
underli ne or frame setting is not applied)
Tape
width
Te xt
1/4”
(6 mm)
3/8”
(9 mm)
1/2”
(12 mm)
3/4”
(18 mm)
lines
1 12 pts 1 8 p ts
All caps: 29 pts
Not all cap s: 24 pts
2 N /A 9 p ts 1 2 pts 1 8 pts
3 N/A N/A N/A 12 pts
4 N/A N/A N/A 9 pts
Length
Dependent
6 pt s (o nly fon t siz e av aila ble ) for R o ta ted Le g end or R epe at L e gen d ON
A ll caps , not formatted : 57 pts
A ll caps , formatted: 45 p ts
Not all caps, not formatted: 45 pts
Not all caps, formatte d: 36 pts
To change the size setting:
1 While holding down , press once, and keep held down to display
Code
Size
1
Code
the current size setting.
2 While still holding down , cont inue pressing until t he desired size setting
Code
Size
1
is displayed.
☞ The current character size setting is also shown by the size indicators above the
display.
3 Release to apply the selected size setting to the entire text.
Code
EXAMPLE
To select the 24 poin t s ize set tin g:
1 While holding down , press
Size
once, and keep held
1
down.
Code
Code
Rotate A
SIZE
AUTO
Caps
Repeat
Legend
A
A
A A
Auto
Underline
Frame
Length
37
Page 41

To select the 24 poin t s ize set tin g:
2 Wh ile still holding do wn , con-
tinue pressing until 24 is d ispla yed.
3 Release .
Size
1
Code
Code
Rotate A
SIZE
24
Caps
Repeat
Legend
A
A
A A
Auto
Underline
Frame
Length
38
Page 42
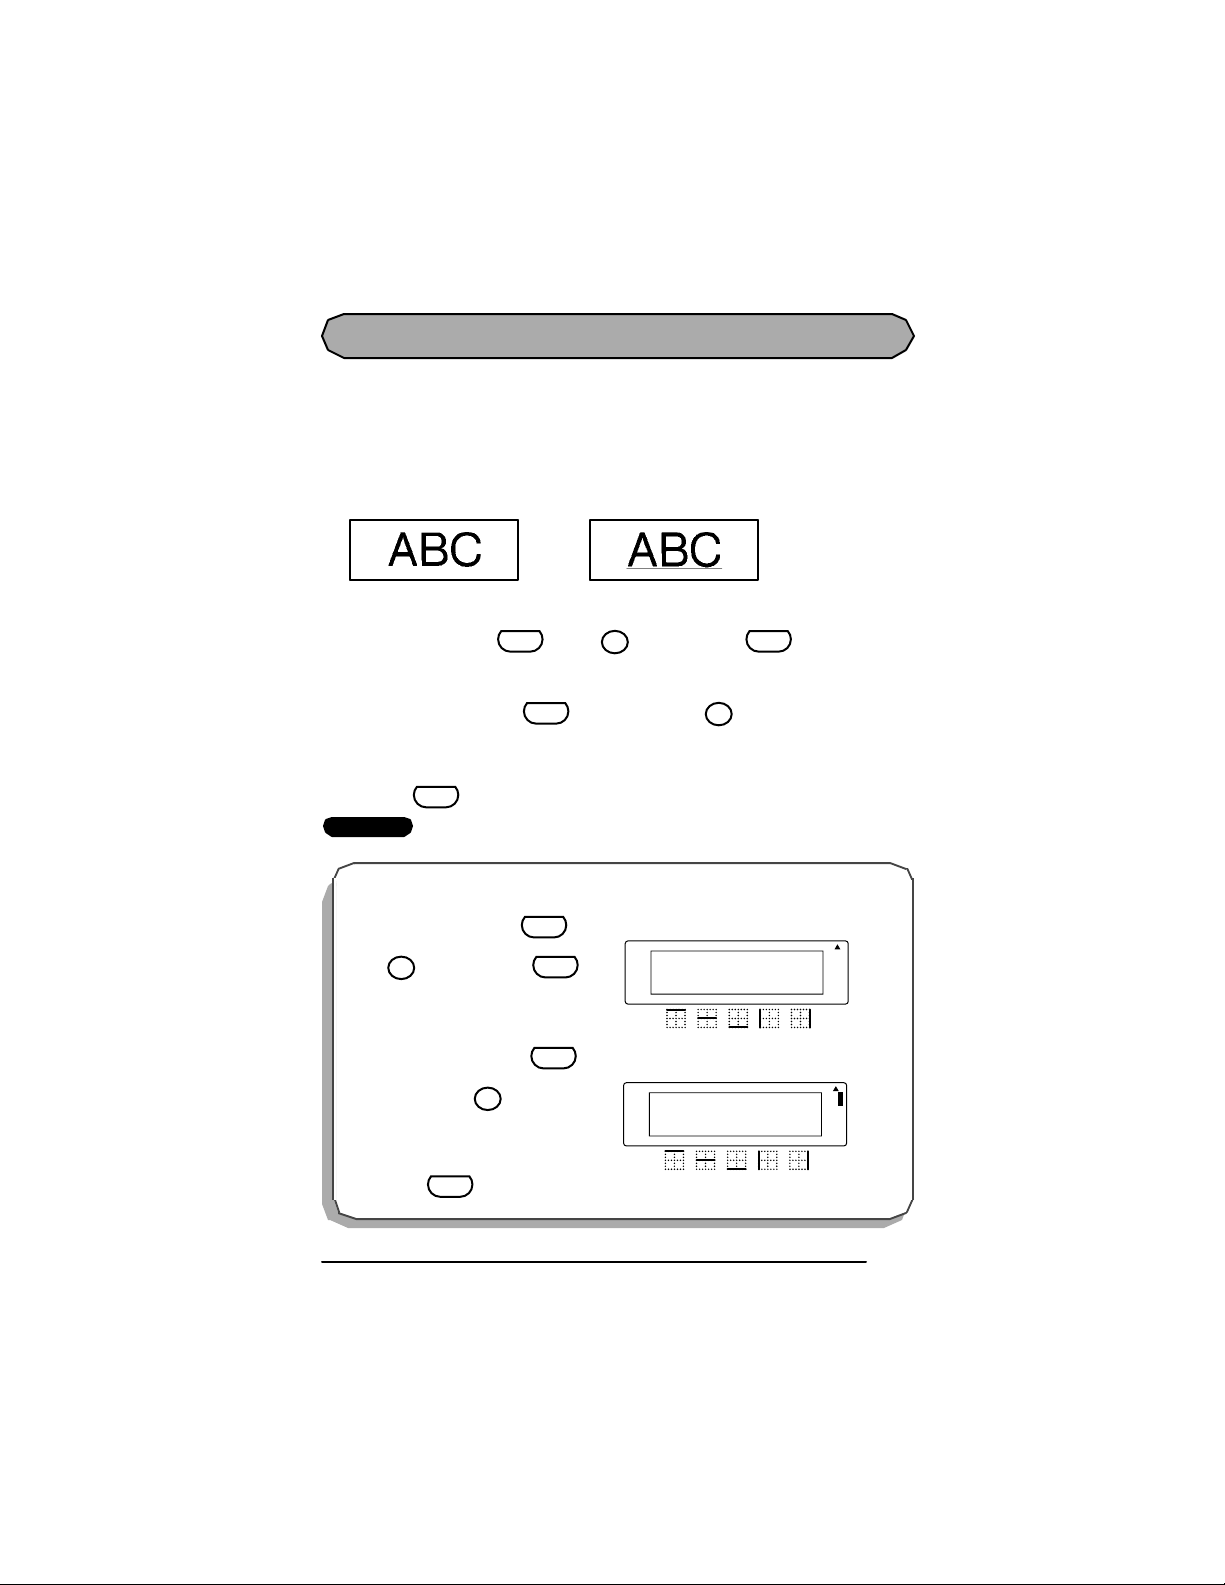
UNDERLINE FUNCTION
You can add emphasis to your text by underlining it.
The default underline setting is OFF. When the underline function is set to ON, the Unde r-
line indicator on the right side of the display lights up.
☞ If a frame has been chosen while the ON underline setting is selected, the frame set-
ting changes back to OF F and the text is underlined.
OFF ON
To change the underline setting:
1 While holding down , press once, and keep held down to dis-
Code
play the current underline setting.
2 While still holding down , continue pressing until the desired underline
Code
setting is displayed.
☞ The Underline indicator lights up when the ON setting is selected.
3 Release to apply the selected underline setting to the entire text.
Code
EXAMPLE
To s el ect the ON underl i ne setting:
Underline
7
Code
Underline
7
1 While holding down , press
Underline
once, and keep held
7
Code
Code
down.
2 While still hold ing do wn , con-
ti nue pre ss ing
Underline
until ON is dis-
7
Code
played.
3 Release .
Code
Rotate A
A
UNDERLINE
OFF
Caps
Repeat
Legend
Rotate A
A
UNDERLINE
ON
Caps
Repeat
Legend
A
A
A A
A A
Auto
Underline
Frame
Length
Auto
Underline
Frame
Length
39
Page 43

FRAME FUNCTION
With the frame function, you can choose from various frames and highlights to make more
decorative or emphasized text.
The following frame settings are available:
OFF DIAMOND
ROUND SLANT
DOT
The default frame setting is OFF. When any setting other than OFF is selected, the Frame
indicator on the right side of the display lights up.
☞ If the ON underline setting has been chosen when a frame is selected, the underline
setting changes back to OF F and the text is framed.
To change the frame setting:
Code
Frame
9
Code
Frame
9
1 While holding down , press once, and keep held down to display
Code
the current fram e setti ng.
2 While still holding down , continue pressing until the desired frame set-
ting is displayed.
☞ The Frame indicator lights up when any setting other than OFF is selected.
3 Release to apply the selected frame setti ng to the entire text.
Code
40
Page 44

EXAMPLE
To s el ect the DOT fra m e set ting:
1 While holding down , press
Frame
once, and keep held
9
Code
Code
down.
2 While still hold ing do wn , con-
tinue pr essing u ntil DOT is dis-
Frame
9
Code
played.
3 Release .
Code
Rotate A
FRAME
OFF
Caps
Repeat
Legend
Rotate A
FRAME
DOT
Caps
Repeat
Legend
A
A
A
A
A A
A A
Auto
Underline
Frame
Length
Auto
Underline
Frame
Length
41
Page 45
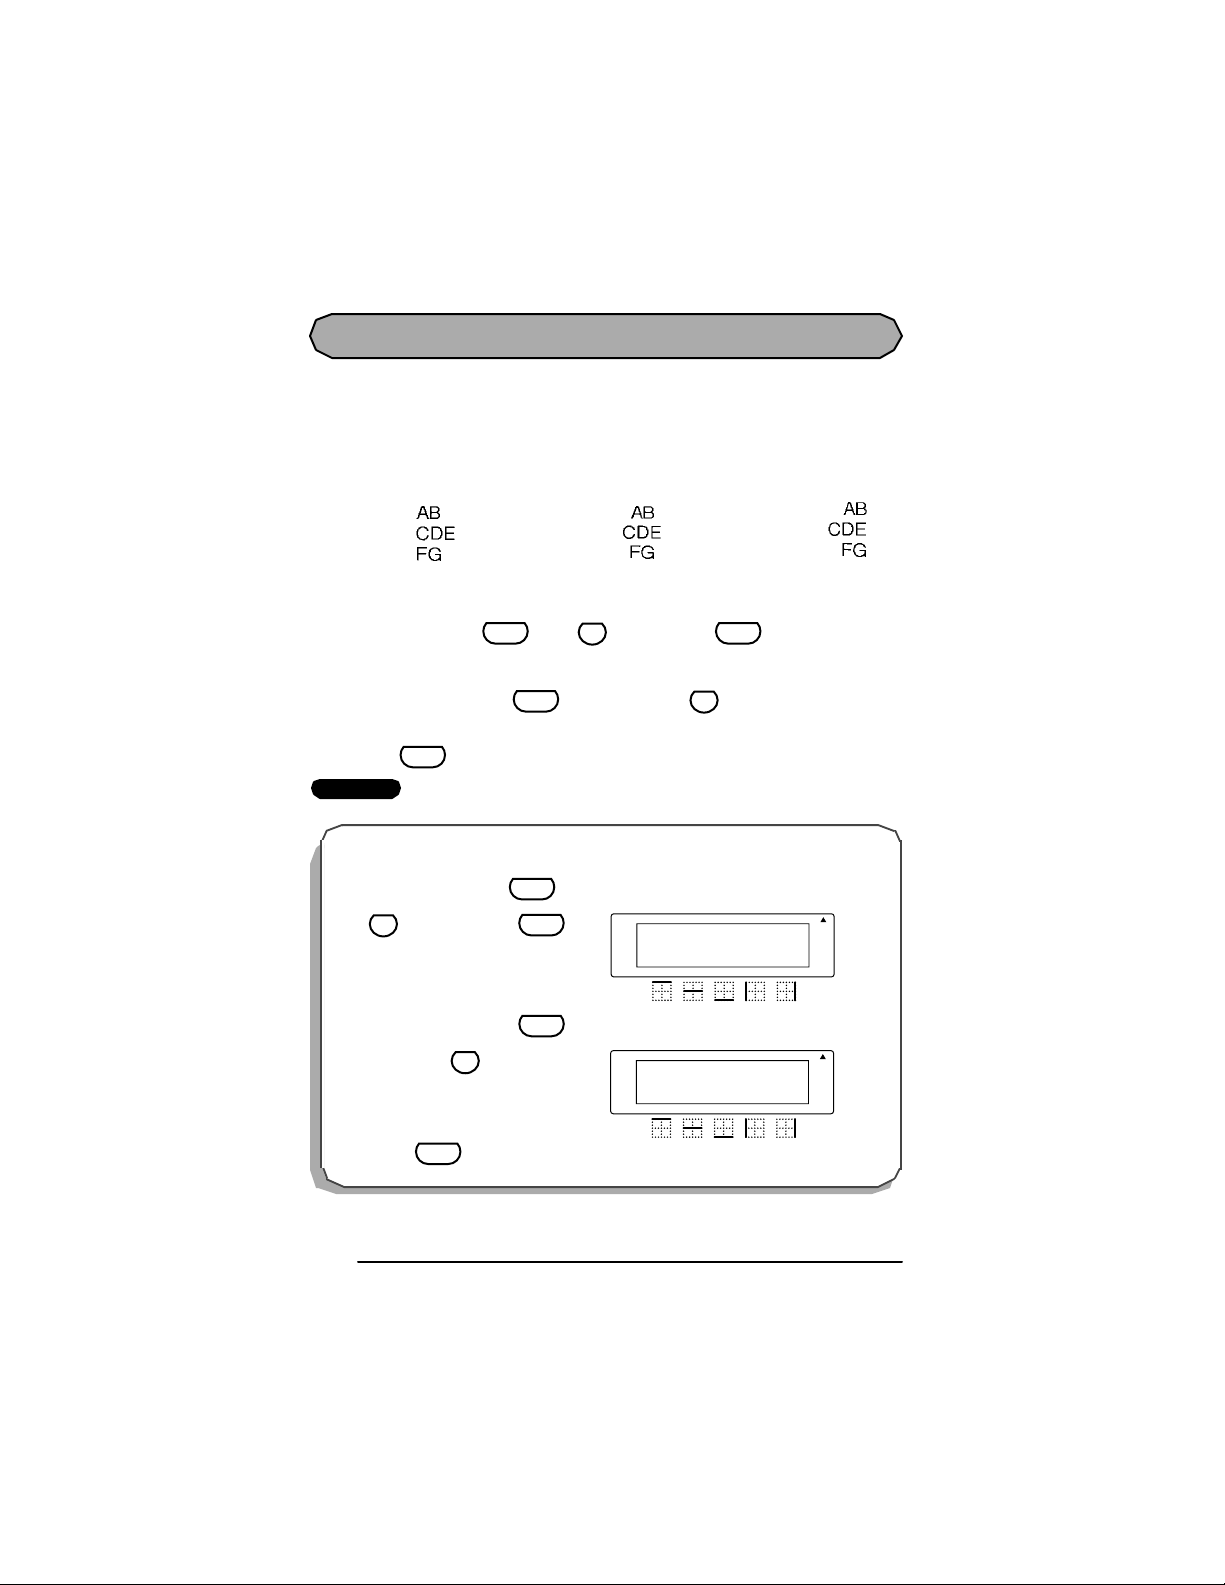
HORIZONTAL ALIGNMENT FUNCTION
You can choose to align lines in the text in one of three ways. In addition, if the length func-
tion was used to se t the le ngth of the labe l, the tex t w ill a lign w it hin th e lab el ac cording to
the selected horizontal alignment setting.
The def aul t hor izontal a lignment set ting is CENTER; however, two other settings ar e al so
available:
LEFT CENTER RIGHT
To change the horizontal alignment setting:
Code
Align
T
Align
Code
T
1 While holding down , press once, and keep held down to display
Code
the current horizontal alignment setting.
2 While still holding down , continue pressing until the desired horizontal
alignment setting is displayed.
3 Release to apply the selected horizontal alignment setting to the entire text.
Code
EXAMPLE
To s el ect the RI GH T hor iz ontal alignmen t s etting:
1 While holding down , press
Align
once, and keep held
T
Code
down.
2 While still hold ing do wn , con-
tinu e pressing u ntil RIGHT is dis-
Align
T
played.
3 Release .
Code
42
Code
Code
Rotate A
A
H.ALIGNMENT
LEFT
Caps
Repeat
Legend
Rotate A
A
H.ALIGNMENT
RIGHT
Caps
Repeat
Legend
A
A
A A
A A
Auto
Underline
Frame
Length
Auto
Underline
Frame
Length
Page 46
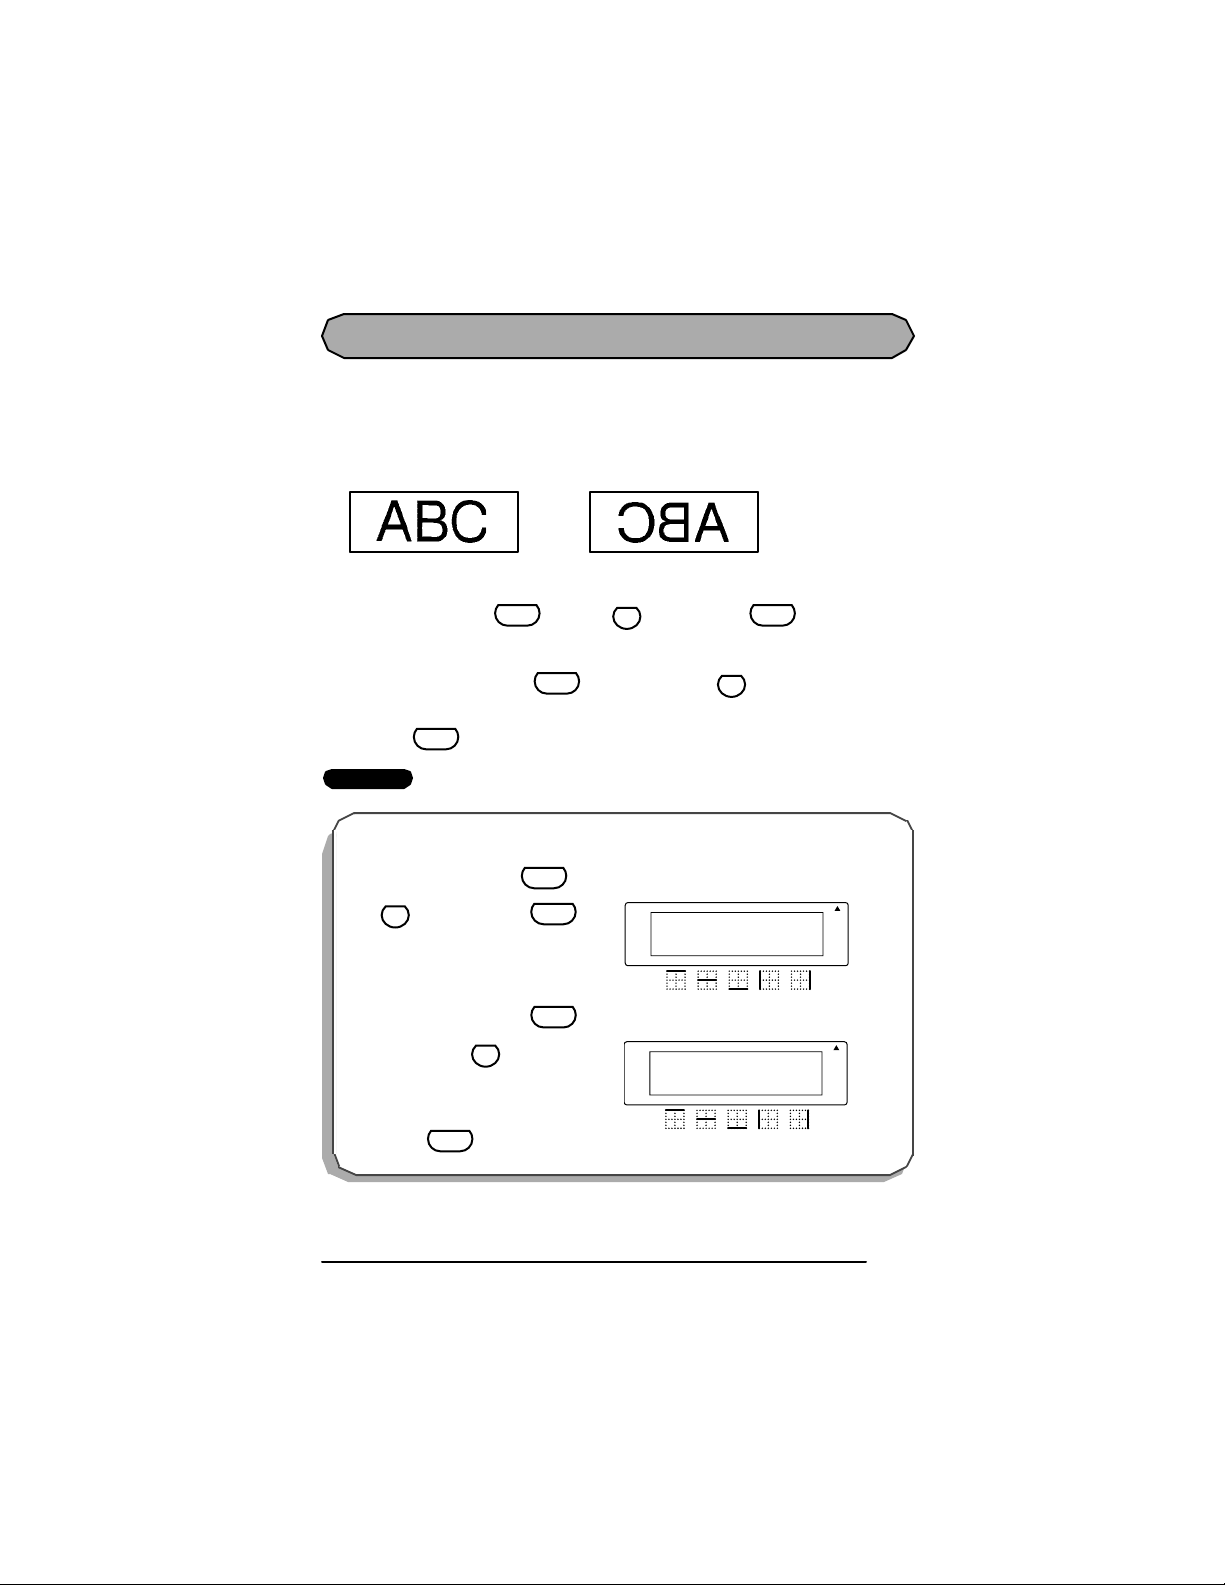
MIRROR PRINTING FUNCTION
R
L
With this function, you can print your text so that the characters can be read from the adhesive side of the tape. If mirror-printed labels are attached to glass or some other clear material, they can be read correctly from the opposite side.
The default mirror printing setting is OFF.
OFF ON
To change the mirror printing setting:
1 While holding down and press once, and keep held down to dis-
Code
play the current mirror printing setting.
2 While still holding down , continue pressing until the desired m irror
Code
printing setting is displayed.
3 Release to apply the selected mirror printing setting to the entire text.
Code
EXAMPLE
To s el ect the ON mirror print ing set ting:
Mirror
U
Code
Mirror
U
1 While holding down , press
Mirror
once, and keep held
U
Code
Code
down.
2 While still hold ing do wn , con-
tinue pressing until ON is d is-
Mirror
U
Code
played.
3 Release .
Code
Rotate A
MIRROR
OFF
Caps
Repeat
Legend
Rotate A
MIRROR
ON
Caps
epeat
egend
A
A
A
A
A A
A A
Auto
Underline
Frame
Length
Auto
Underline
Frame
Length
43
Page 47
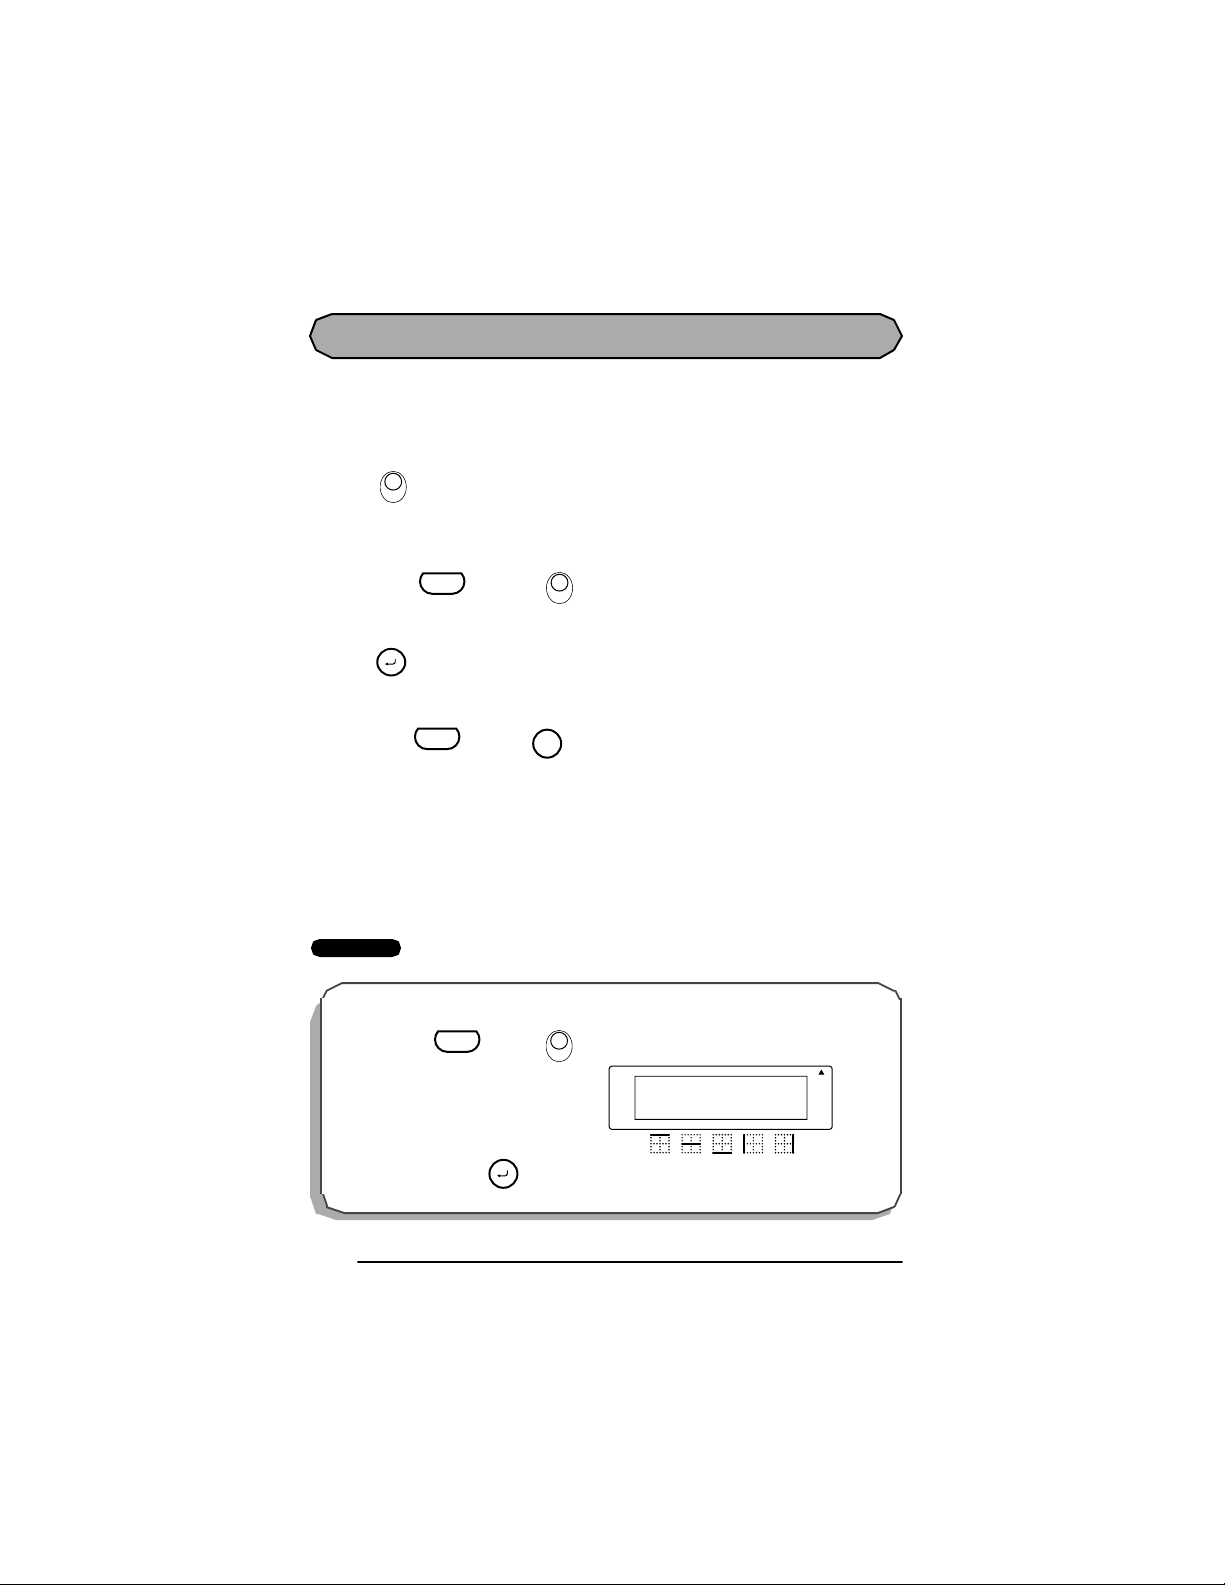
P RINT KEY, COP IES & FE ED FUNCTION S
s
s
s
After you ha ve enter ed your text and chos en the de sired format s ettings, you a re ready to
print the label.
To print a label:
Copie
● Press once. The message “COPIES 01/01” is dis pl ayed wh il e the labe l is be ing
To print copies of a label:
● Hold down and pr ess . The mes sage “COPIES 01” is displayed. Ent er
● Press .
To fe ed the tape:
● Hold down and press . The message “FEED” appears while 1” (24 mm) of
To cut the tape:
● Press in the tape cutter lever.
PrintPrint
printed. The label is fed out of the tape exit slot at the top end of the machine.
Copie
Code
PrintPrint
between 01 and 99 copies.
File
Code
Feed
Sym.
tape is fed out.
☞ In orde r to prev ent damaging the tape, do not try to c ut it while printing or
feeding. Pressing in the tape cutter lever too far may break it.
Check your cassette before printing a large number of copies to ensure
sufficient tape is available.
EXAMPLE
To make 3 copies of a label:
1 Ho l d do w n and pr e ss
Code
2Enter “03” an d pr es s .
44
Copie
PrintPrint
.
Rotate A
COPIES
03
Caps
Repeat
File
Legend
A
A
A A
Auto
Underline
Frame
Length
Page 48

SERIALIZATION FUNCTION
S
e
e
This func tion ca n be used to pri nt m any copi es of the same t ext while i ncrea sing a c ertain
value in the text after each label is printed. This type of automatic incrementation is very useful when printing serial number labels, patch panel labels or other labels requiring ascending
codes.
To use the numbering function:
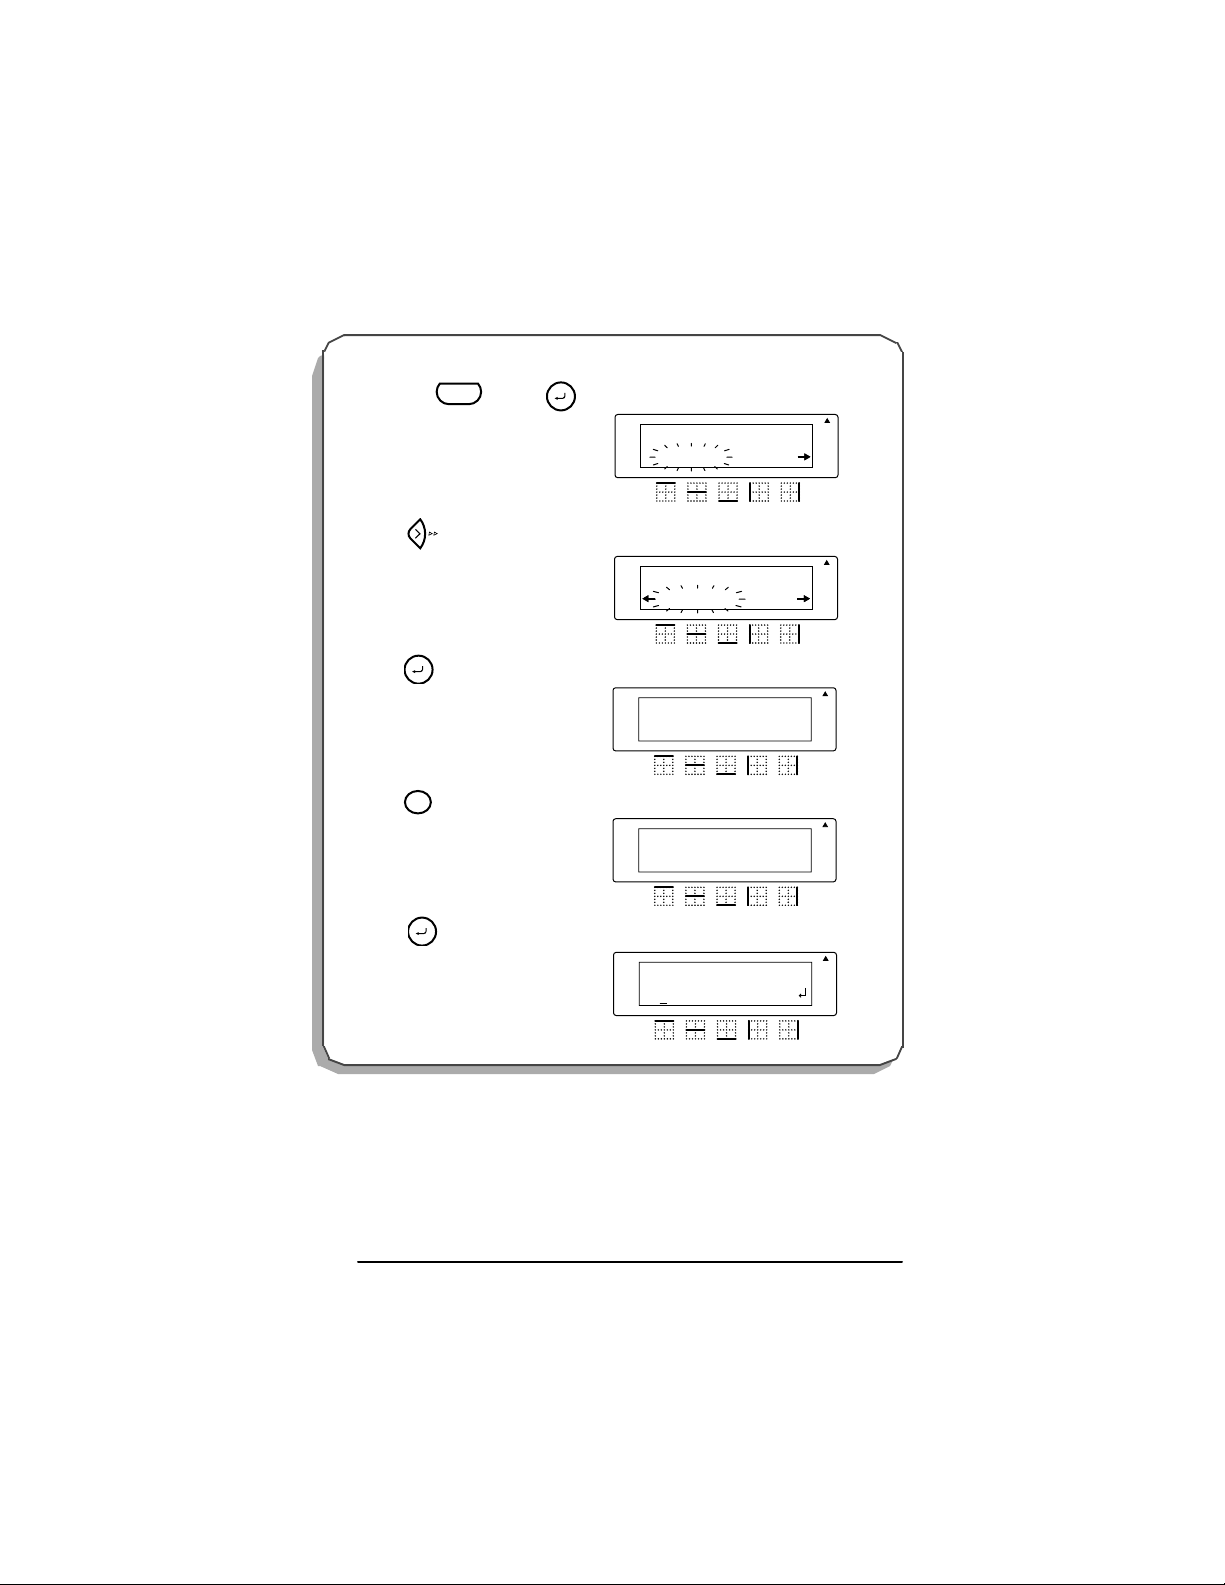
1 Hold down and press . The message “SERIALIZE NUMERIC”
Code
appears in the dis play. Cont inue to hold down
between NUMERIC and ALPHABETIC serialization.
2 When you rel ease
, th e message “START VALUE” appears in the dis-
Code
play. Type the number or letter of the first value to be printed and press .
V
erializ
Code
and
press
V
Serializ
to toggle
File
3 The message “END VALUE” appea rs in the displa y.
File
Ty pe th e nu m ber or l e tt e r of
the last va lue to be pr inted and press .
4 The message “IN CR EM EN T BY ” appears in the di splay.
File
Ty pe th e nu m ber o f th e
increment value desired and press .
5 Th e seri aliza tion w ill be denot ed on t he displa y as a “ΩΩΩΩ" for a one digit serialization
and “ΩΩ
ΩΩ“ for a two digit serialization.
ΩΩΩΩ
☞ Check your cassette before printing a large serialization to ensure sufficient tape is
available.
To print a fo ur position pat ch panel label for Building A:
1 Position the curs or next to the “A”.
Rotate A
1: A _
Caps
Repeat
Legend
A
A
A A
Auto
Underline
Frame
Length
45
Page 49
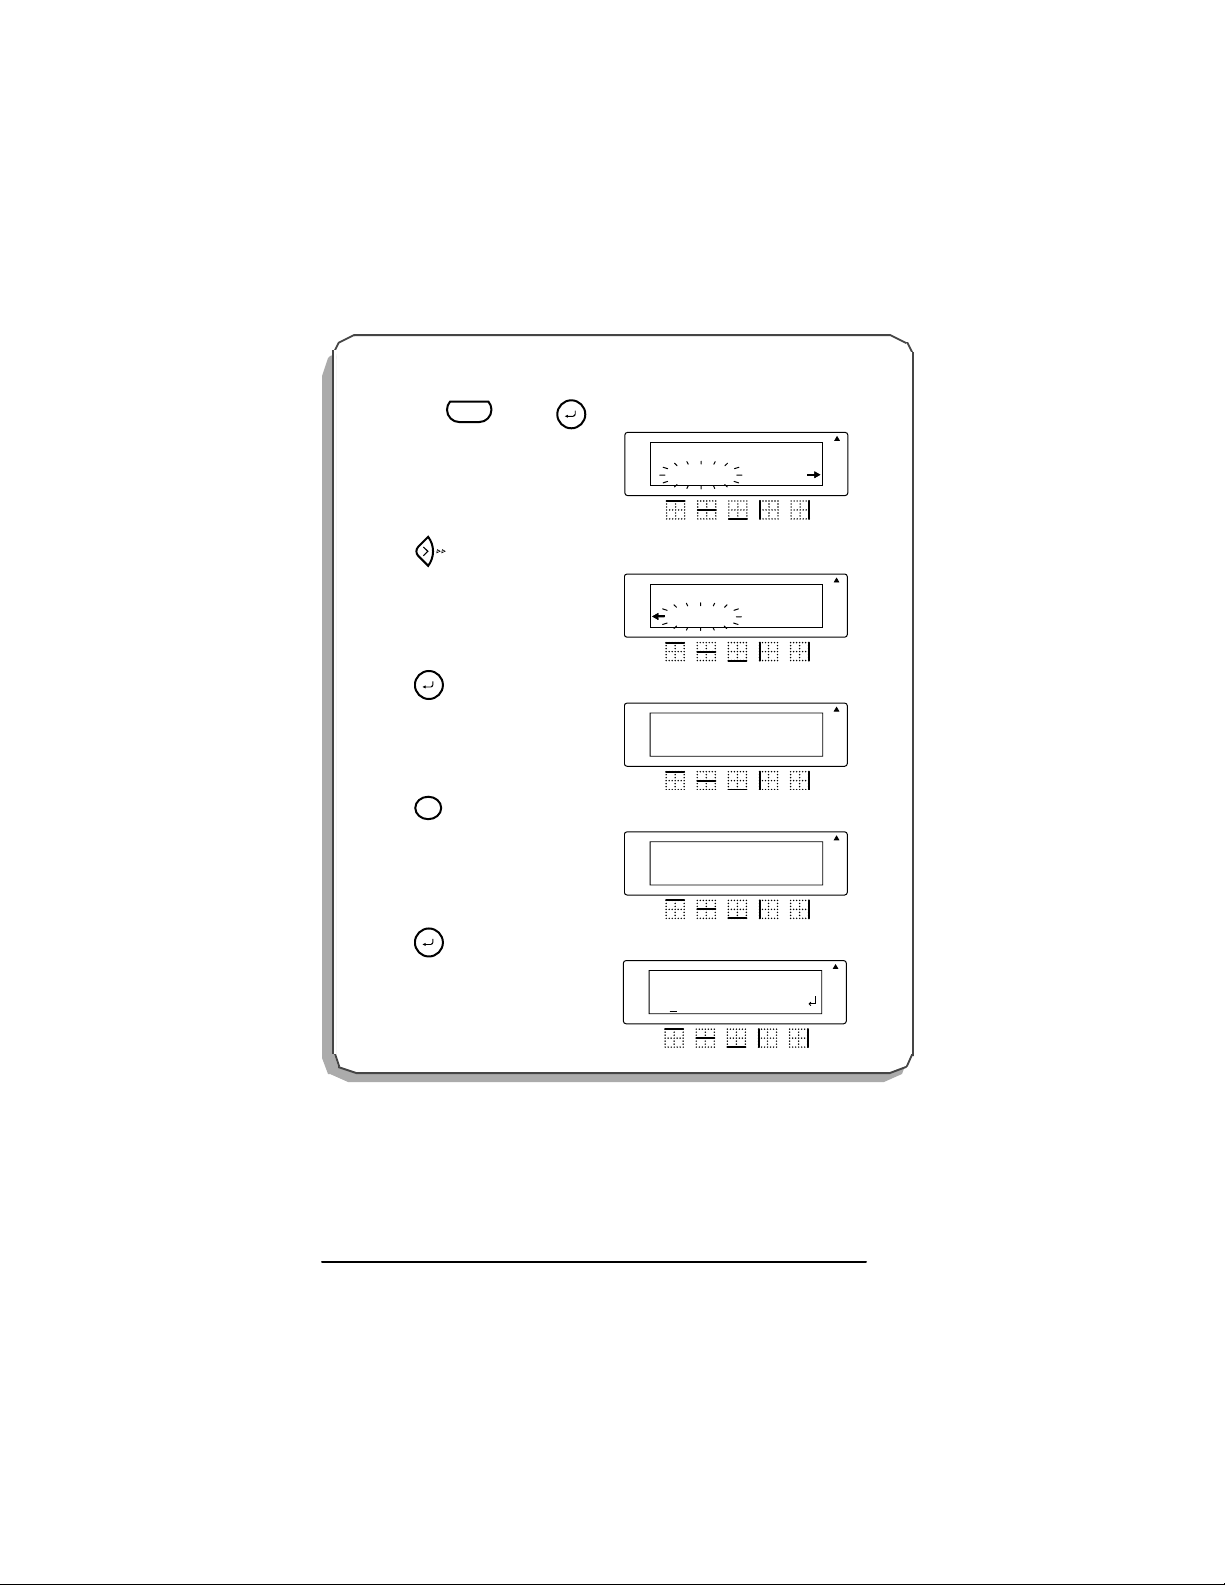
2 Ho l d do w n
S
e
Code
and press
V
erializ
.
Rotate A
A
SERIALIZE...
NUMERIC
Caps
Repeat
Legend
A
A A
Auto
Underline
Frame
Length
3 Release .
4Press .
5Press
6Press
7 Serialization is displayed as
Code
File
Size
0
1
File
$
0
4
File
Size
0
1
ΩΩ.
ΩΩ.
ΩΩ.ΩΩ.
Rotate A
A
A
START VALUE
01
Caps
Repeat
Legend
Rotate A
A
A
END VALUE
04
Caps
Repeat
Legend
Rotate A
A
A
INCREMENT BY
01
Caps
Repeat
Legend
Rotate A
1: A ΩΩ
Caps
Repeat
Legend
A
A
A A
A A
A A
A A
Auto
Underline
Frame
Length
Auto
Underline
Frame
Length
Auto
Underline
Frame
Length
Auto
Underline
Frame
Length
46
Page 50

ROTAT E LEGEND FUNCTION
The rotate legend function is used when a label must be oriented vertically yet read horizontally. A common need for this function is terminal block labeling.
To enable the rotate legend function:
1 Hold down and press
Code
Space
until “ON” appears in the display.
Rotate
☞ When Rotate Legend is enabled, the largest font size available is 6 pt.
☞ The number of characters is limited by the tape width:
3/4" 10 characters
1/2" 6 characters
3/8" 5 characters
1/4" 3 characters
Uses: Terminal Block Labeling, Vertical Labels
EXAMPLE
To pri n t a ter mina l block label numbered 1-10:
1 Ho l d do w n
Code
and
until ON is displayed. Release .
2 Hold do wn and p ress
Code
until ON is d is played. Release .
Press
File
0 0
.
press
@
2
Space
Rotate
Code
Code
Length
Q
Line
Rotate A
ROTATE LEGND
ON
Caps
Repeat
Legend
Rotate A
LENGTH inch
00.25
Caps
5
Repeat
Legend
A
A
A
A
A A
A A
Auto
Underline
Frame
Length
Auto
Underline
Frame
Length
47
Page 51

3 H o ld do wn
S
e
s
Code
and press
until NUMERIC is displa yed
Size
.
Code
File
Size
0
1
File
0
1
File
Size
0
1
4 Release
5Press .
6Press .
7Press .
V
erializ
Rotate A
.
SERIALIZE...
NUMERIC
Caps
Repeat
Legend
Rotate A
START VALUE
01
Caps
Repeat
Legend
Rotate A
END VALUE
10
Caps
Repeat
Legend
Rotate A
INCREMENT BY
01
Caps
Repeat
Legend
A
A
A
A
A
A
A
A
A A
A A
A A
A A
Auto
Underline
Frame
Length
Auto
Underline
Frame
Length
Auto
Underline
Frame
Length
Auto
Underline
Frame
Length
ΩΩ.
8 Serialization is disp layed as
9Press .
Copie
PrintPrint
ΩΩ.
ΩΩ.ΩΩ.
Rotate A
1: ΩΩ
Caps
Repeat
Legend
A
A
A A
Auto
Underline
Frame
Length
48
Page 52

REPEA T LEGEND FUNCTION
t
d
t
d
The repeat legend function is used to duplicate a legend over the length of a label. Using the
com bined f unc tiona lity of ro tated le ge nd and r epeat le gend pr oduces an excellent quality
label for marking cables and wires prior to or after installation.
To enable the repeat legend function for marking wires or other curved surfaces:
1 Hold down and press
2 Hold down and press
Code
Code
☞ When Repeat Legend is enabled, Length
X
until “ON” appears in the display.
Repea
Legen
Space
until “ON” appears in the display.
Rotate
Length
must be ON and the largest font avail-
Q
able is 6 pt.
Uses: Wire and cable marking
EXAMPLE
To pri n t a wire marker with len gth of 1.0” that reads “D101” using LS7-75-1 cassette:
1 Ho l d do w n
Code
and
until ON is displayed. Release .
press
Repea
Legen
Code
X
Rotate A
A
A
A A
REPEAT LEGND
ON
Repeat
Legend
2 Hol d down and p r ess
Code
until ON is displayed. Release .
Space
Rotate
Code
Rotate A
A
A
ROTATE LEGND
A A
ON
Repeat
Legend
Auto
Underline
Frame
Length
Auto
Underline
Frame
Length
49
Page 53

3 Hold down and press
s
Code
until ON is dis played. Release .
Size
4Press
File
0
0 0
1
.
5Press
6Press .
D
Copie
PrintPrint
Size
1
Size
.
0
1
Code
Length
Q
Rotate A
A
LENGTH inch
ON
Caps
Repeat
Legend
Rotate A
A
LENGTH inch
01.00
Caps
Repeat
Legend
Rotate A
Caps
Repeat
Legend
A
1:D101
A
A
A
A A
A A
A A
Auto
Underline
Frame
Length
Auto
Underline
Frame
Length
Auto
Underline
Frame
Length
50
Page 54
LINE DRA W ING FUNCTION
The line function is used to separate legends for easier recognition. The line function has two
vertical line posi tions (lef t and r ight edge) and three horizont al posi tions (labe l top, every
line and label bottom).
To enable/disable the line function:
Line
Length
Q
Line
or to toggle betwee n the li ne p osi-
5
3
Rotate A
LENGTH inch
¢
6
00.65
Caps
Repeat
Legend
A
A
A A
Auto
Length
Underline
Frame
1 Hold down and press either
t io ns. R elease when the desired li ne position is di sp la y e d.
Code
Code
☞ Can be combined with the length, serialization and symbol functions.
Uses: Faceplate, patch panel and 110 block marking
EXAMPLE
To print a fo ur position pat ch panel la bel ser ialized 100 thru 103 divided by lines:
1 Ho l d do w n and pr e ss unt il
LENGTH ON is displayed. Release
Code
Line
5
Code
. Press
File
.
0 0
2 H old do wn
Code
and
press
until LEFT EDGE is displayed. R elease
.
Code
3 Hold do wn and p ress
until
Rel ea se .
Code
RIGHT EDGE
Code
is displayed.
Line
Line
Rotate A
3
VERTCL LINE
LEFT EDGE
Caps
Repeat
Legend
3
Rotate A
VERTCL LINE
RIGHT EDGE
Caps
Repeat
Legend
A
A
A
A
A A
A A
Auto
Underline
Frame
Length
Auto
Underline
Frame
Length
51
Page 55

4Press .
e
s
5 Hold down
6Press .
7Press .
8Press
9Press
Size
1
Code
Release .
Code
0 0
0
0
Copie
PrintPrint
.
and press
Line
3
Size
1
File
File
File
.
V
Serializ
Rotate A
Caps
Repeat
Legend
A
1:1 _
.
Rotate A
A
SERIALIZE...
NUMERIC
Caps
Repeat
Legend
Rotate A
A
START VALUE
00
Caps
Repeat
Legend
Rotate A
A
END VALUE
03
Caps
Repeat
Legend
Rotate A
A
INCREMENT BY
01
Caps
Repeat
Legend
Rotate A
Caps
Repeat
Legend
A
1:1 ΩΩ
A
A
A
A
A
A
A A
A A
A A
A A
A A
A A
Auto
Underline
Frame
Length
Auto
Underline
Frame
Length
Auto
Underline
Frame
Length
Auto
Underline
Frame
Length
Auto
Underline
Frame
Length
Auto
Underline
Frame
Length
52
Page 56

PA GE FUNCTION
The page function is used to group multiple labels in a file. A file is a document consisting of
up to 8 pages (labels). The page function is useful when labeling a group of items that have
non-serialized unique legends and must be grouped together.
To enable the page function:
1 Hold down and press
Code
enter te xt onto a p age.
☞ Default position is page 1 of any label file.
☞ A page with no data is printed when Length function is set.
A page with no data is not printed, but the margin between the pages is printed, when
Length function is not set.
Uses: Faceplate, patch panel and 110 block marking
EXAMPLE
To print a four position faceplat e label with the legend A205, A207, B101, C506 sepa rated
by lines:
1 Ho l d do w n and pr e ss unt il
LENGTH ON is displayed. Release
Code
Line
5
Code
. Press
File
.
0 0
Page
t o move to pages 1 thru 8. Releas e t o
E
Length
Q
¢
6
Rotate A
A
LENGTH inch
00.65
Caps
Repeat
Legend
A
A A
Code
Auto
Underline
Frame
Length
2 Hold do wn and p ress
until
Rel ea se .
Code
RIGHT EDGE
Code
is displayed.
Line
3
Rotate A
VERTCL LINE
RIGHT EDGE
Caps
Repeat
Legend
A
A
A A
Auto
Underline
Frame
Length
53
Page 57
@
s
A
3Press
4 Hold down and press
2
Code
Line
(page 1).
0
5
until LABEL PAGE 2 is displayed.
Release .
5Press
6 Hold down and press
Code
@
A
2
Code
Underline
0
7
until LABEL PAGE 3 is displayed.
Release . Press
7 Hold down and press
until
Release . Press
8Press .
Code
Size
.
0
1
Code
LABEL PAGE 4
Code
¢
.
0
6
Copie
PrintPrint
B
is displayed.
C
A
A
A
A
A A
A A
Auto
Underline
Frame
Length
Auto
Underline
Frame
Length
Page
E
Rotate A
1:A205
Caps
Repeat
Legend
Rotate A
LABEL PAGE
2
Caps
Repeat
Legend
.
Rotate A
1:A207_
Caps
Repeat
Legend
Page
E
Rotate A
Size
1
1:B101_
Caps
Repeat
Legend
Page
E
Rotate A
Line
5
1:C506_
Caps
Repeat
Legend
A
A
A
A
A
A
A A
A A
A A
Auto
Underline
Frame
Length
Auto
Underline
Frame
Length
Auto
Underline
Frame
Length
54
Page 58

MEMORY FILE FUNCTIONS
You can use the memory to store your most frequently us ed text files. The text remains in the
memory, even after all characters are removed from the display using the clear function (see
page 29).
When a file is stored, it is given a number to make recalling it easier. A maximum of 9 text
files or a bout 300 cha ra cters can be s tore d in the memor y. A stored text file c an c ontai n a
maximum of 99 characters.
Since a copy of the stored text file is recalled when the recal l function is used, the text can be
edited or printed without changing the originally stored file. When a file is no longer needed
or more space is necessary, the memory delete function can be used to delete it.
☞ When inser ting new batt eries, be sure to insert the ne w ones wi thin five minutes of
removi ng the old ones, othe rwi se any t ex t files stored in the m em ory will be los t
(unless the machine is plugged into an electrical outlet with the AC adapter).
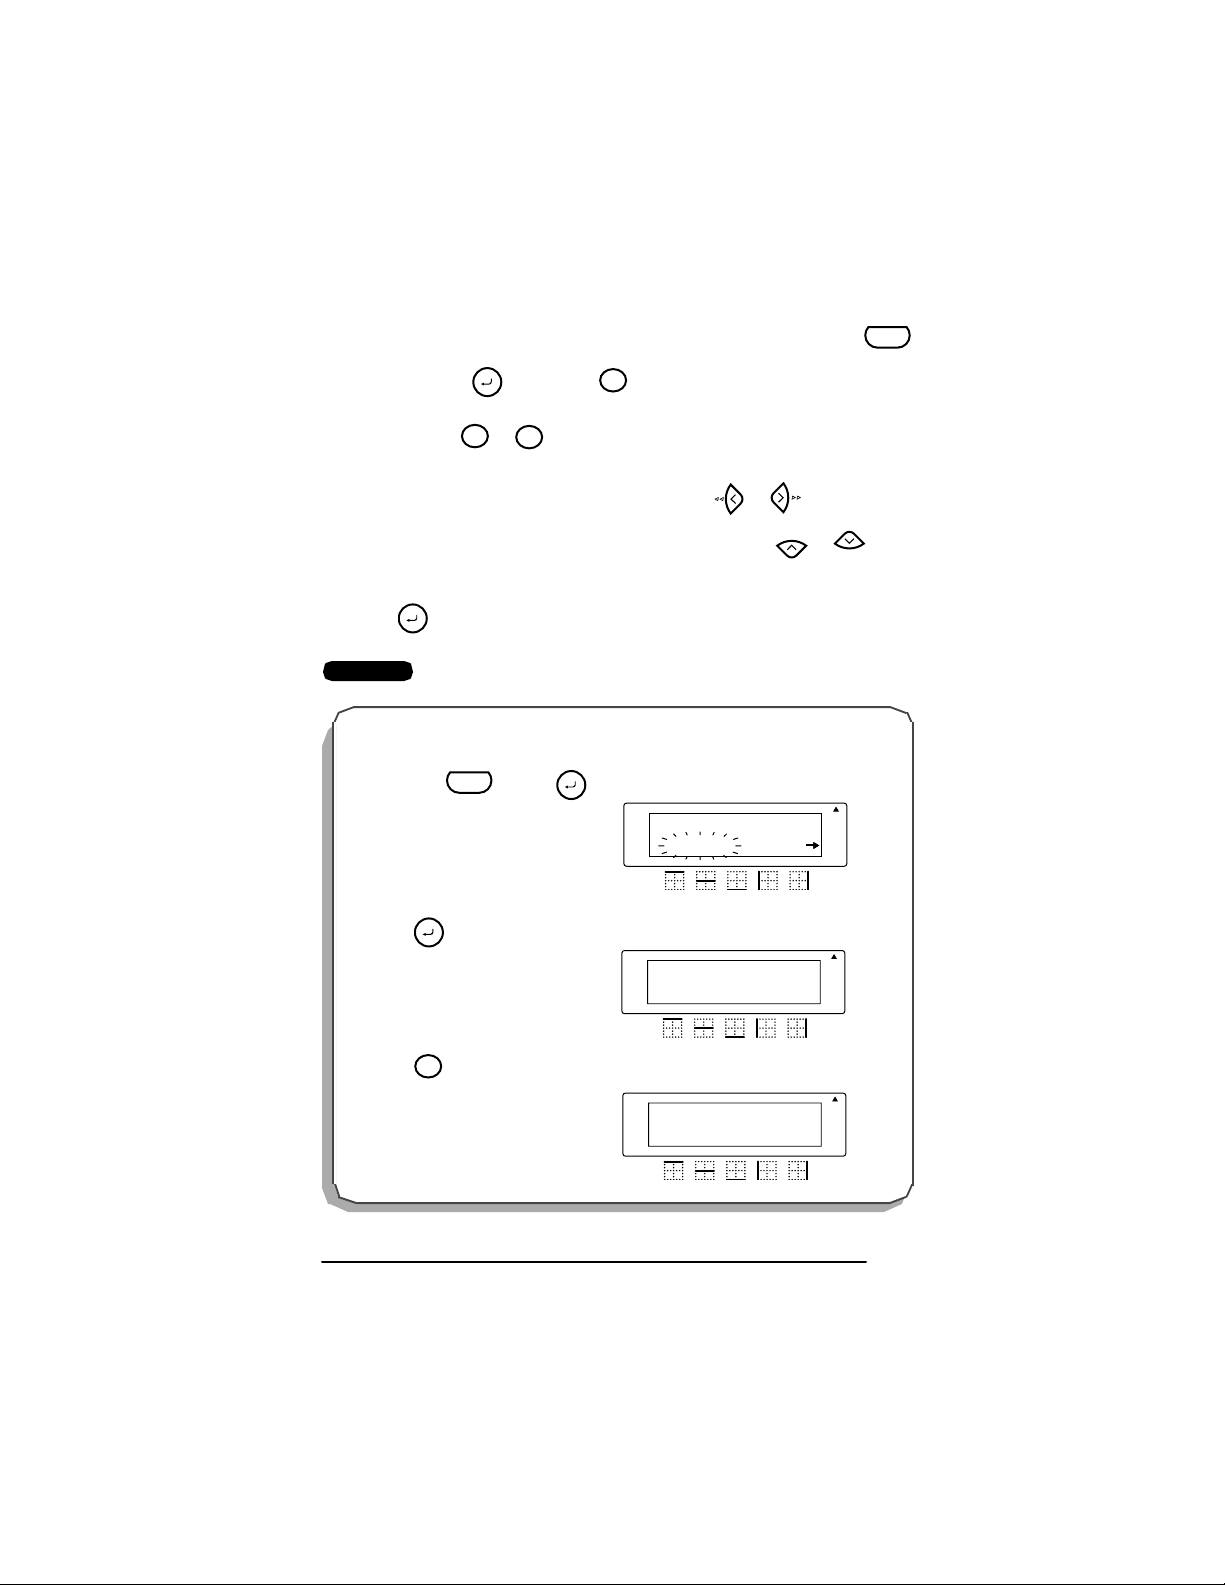
STORING TEXT
To store a text file:
1 Hold down and press .
Code
2 Press or until STORE flashes on the display.
File
3 Press . The message “STORE SELECT 1–9?” appears on the display.
File
Frame
4 Press the key ( to ) of the file number where you wish to store the text. The
Size
9
1
text is stored under the selected file number and the text previously shown in the display reappears.
☞ If a file is already stored under the sel ected fil e number, the me ssage “OVER-
WRITE?” appears in the display and you must decide whether or not to overwrite it (delete it from the memory and store the new one).
☞ If 300 characters have already been stored, the error message “MEMORY FULL!”
appears in the display. If this occurs, an existing text file must be deleted before the
new one can be stored.
To qu it the store function without storing the text, hold down and press
File
(or press just ).
Clear
BS
Code
55
Page 59

To overwrite the stored file with the new one:
● Press to delete the previously s tored file and store the new one under the selected
File
number.
☞ To go bac k and choos e another file n umber w ithout overwriting the text f ile ,
Clear
press , and then select a different file number.
BS
RECALLING TEXT
To recall a text file:
1 Hold down and press .
Code
2 Press or until RECALL flashes on the display.
3 Press . The message “RECALL SELECT 1–9?” appears on the display.
File
File
☞ To quit the recall function without recalling the text file, hold down and
File
press (or press just ).
4 Pre ss t he key ( to ) of the file numbe r cont aini ng the t ext tha t you w ish t o
Size
1
Clear
BS
Frame
9
Code
recall. The text stored under the selected file number is shown.
☞ To see other parts of the displayed text file, press or .
To display the text stored under other file numbers, press or , or the
Home
End
key of a different file number.
5 Pre ss . Any text previous ly entered in the display is er ased and the text stored
File
under the selected file number is recalled into the display.
DELETING A FILE
To delete a text file:
1 Hold down and press .
Code
File
2 Press or until CLEAR flashes on the display.
3 Press . The message “CLEAR SELECT 1–9?” appears on the display.
File
56
Page 60
☞ To qu it the file delete function without deleting the text file, hold down
and press (or press just ).
File
Size
4 Press the key ( to ) of the file number c ontai ning t he text tha t you wish to
Frame
1
9
Clear
BS
Code
delete. The text stored under the selected file number is shown.
☞ To s ee other parts of the selected text file, press or .
To display the text stored under other file numbers, press or , or the
key of a different file number.
5 Press to delete the text file that was selected.
File
EXAMPLE
To s tore t ext under file n u m ber 8:
1 Ho l d do w n and pr e ss .
Code
File
Rotate A
FILE
STORE
Repeat
Legend
2Press .
File
Rotate A
STORE
SELECT 1-9?
Caps
Repeat
Legend
3Press .
8
Rotate A
1: A ΩΩ
Caps
Repeat
Legend
Home
A
A
A
A
A
A
A A
A A
A A
End
Auto
Underline
Frame
Length
Auto
Underline
Frame
Length
Auto
Underline
Frame
Length
57
Page 61
To recall the te xt from file number 4:
1 Hold down and press .
Code
File
Rotate A
FILE
Repeat
Legend
A
STORE
A
A A
Screen 104? ??
Auto
Underline
Frame
Length
2 Press until RECALL flashes on
the display.
3Press .
4Press .
File
$
4
File
5 Press .
Rotate A
A
A
FILE
RECALL
Repeat
Legend
Rotate A
A
A
RECALL
SELECT 1-9?
Caps
Repeat
Legend
Rotate A
A
A
RECALL
[4]John Smit
Caps
Repeat
Legend
Rotate A
1:John Smith
Caps
Repeat
Legend
A
A
A A
A A
A A
A A
Auto
Underline
Frame
Length
Auto
Underline
Frame
Length
Auto
Underline
Frame
Length
Auto
Underline
Frame
Length
58
Page 62
To del ete the text stored under file number 8:
L
L
L
1 Ho l d do w n and pr e ss .
Code
File
Rotate A
FILE
Repeat
Legend
A
Screen 104? ??
STORE
A
A A
Auto
Underline
Frame
Length
2 Press until CLEAR flashes on the
dis play.
3Press .
File
4Press .
8
File
5Press .
Rotate A
A
A
FILE
CLEAR
Repeat
egend
Rotate A
A
A
CLEAR
SELECT 1-9?
Caps
Repeat
egend
Rotate A
A
A
CLEAR
[8]AΩΩ
Caps
Repeat
egend
Rotate A
1:John Smith
Caps
Repeat
Legend
A
A
A A
A A
A A
A A
Auto
Underline
Frame
Length
Auto
Underline
Frame
Length
Auto
Underline
Frame
Length
Auto
Underline
Frame
Length
59
Page 63

BARCODE FUNCTION
e
e
The barcode function enables barcodes to be printed as part of labels. Four different param-
eters enable you to create custom barcodes.
Parameter Settings
PROTOCOL CODE 39
WIDTH (barcode width) LARGE, SMALL
HUMAN READABLE
(numbers printed below barcode)
CHECK DIG. (check digit) OFF, ON
The default settings are C ODE 39 PR OT OCOL, LA RG E WID TH , HUMAN RE AD-
ABLE set to ON, and CHECK DIG. set to OFF.
Barcodes must be entered according to the following rules:
Number of digits (includ-
Protocol
ing check digits and start
and stop codes)
ON, OFF
Characters that
can be used
Notes
CODE 39 4 through 22
Numbers, letters,
spaces, and
symbols –, $, /, +,
and %.
The asterisk (*)
is not needed as
start and stop
codes.
To use the b arcode fu nction:
1 Hold down and press .
Code
N
Barcod
☞ To change the data or parameters of a barcode that has already been created,
position the cursor below the barcode mark ( ) before holding down
and pressing .
N
Barcod
A l abel can onl y cont ain one barcode. If a barcode has al re ady be en entere d
when is held down and is pre ssed, the error message “1 BAR
Code
N
Barcode
CODE / LABEL” will appear.
To qu it the barcode function without making any changes, hold down
60
Code
Code
Page 64

and press .
N
Barcode
2 Type in the new barcode data or edit the old data.
To change the barcode parameter settings:
1 Press .
Home
☞ To return to the barcode data display without changing any parameter settings,
Clear
press .
BS
2 Press or until the parameter that you wish to change appears.
3 Press or until the desired setting is displayed.
Home
End
4 Repeat steps 2 and 3until all parameters are set as you wish.
5 Press .
File
To add a special character to the barcode data:
1 Press or until the cursor is below the character immediately to the right of
where you want to add special character.
2 Press .
3 Press or until the desired special character is displ ayed.
Feed
Sym.
Home
End
4 The following special characters can only be entered when using protocols CODE 39.
Symbol Character
1+
2$
5 Press to add the selected special character to the barcode data.
File
To add the barcode to your text:
1 Press .
File
61
Page 65

To delete the barcode from your text:
1 Press , , or until the cursor is positioned either below the right
Home
End
half of the barcode mark or immediately to the right of the entire barcode mark.
2 Press . The message “OK TO CLEAR? ”.
Clear
BS
File
3 Press .
62
Page 66

EXAMPLE
e
To add a barcode to the label:
1 Hold down and press .
2Press .
3 Press until the CHECK DIG.
parameter is dis played.
4 Press or until ON is dis -
played.
5Press .
Code
Home
Home
End
File
N
Barcod
Rotate A
A
CODE 39
**
Repeat
Legend
Rotate A
A
WIDTH
SMALL
Repeat
Legend
Rotate A
A
CHECK DIG.
OFF
Repeat
Legend
Rotate A
A
CHECK DIG.
ON
Repeat
Legend
Rotate A
A
CODE 39
* *
Repeat
Legend
A
A
A
A
A
A A
A A
A A
A A
A A
Auto
Underline
Frame
Length
Auto
Underline
Frame
Length
Auto
Underline
Frame
Length
Auto
Underline
Frame
Length
Auto
Underline
Frame
Length
63
Page 67

Size
6 Press , , , , then
Line
.
5
@
1
2
File
Line
$
4
3
7Press .
Rotate A
CODE 39
12345F
* *
Repeat
Legend
Rotate A
1:
Caps
Repeat
Legend
A
A
A
A
A A
A A
Auto
Underline
Frame
Length
Auto
Underline
Frame
Length
64
Page 68

TROUBLESHOOTING
Problem Remedy
1. The printer is asking for
“LABEL CODE”.
2. The dis play stays blank
after you have turned on
the machine.
3. The machine does not print
or the printed characters
are blurred.
4. The text files that you
stored in the memory are
no longer there.
5. The printed characters are
not formed properly.
6. A blank horizontal white
line appears through the
printed label.
• Enter LABEL CODE printed on tape cassette.
• Chec k that the c orrect AC ada pter (LS7-ACS) is
being used and that it is connected correctly.
• If you are using alkaline batteries, check that they
are correctly inserted.
• If the batteries are low, replace them with new
ones.
• Chec k that the c orrect AC ada pter (LS7-ACS) is
being used and that it is connected correctly.
• Check that the tape cassette has been inserted
properly.
• If the tape cassette is empty, replace it with a new
one.
• Make sure that the back cover has been attached.
• If the batteries are low, replace them with new
ones.
• If you are using alkaline batteries, they may be
low. Try using the AC adapter or replace the
batteries with new ones.
• Chec k that the c orrect AC ada pter (LS7-ACS) is
being used and that it is connected correctly.
• Clean the print head as explained on page 13 and
14.
7. Striped tape appears. • You have reached the end of the tape.
Replace the tape cassette with a new one.
8. The machine has “locked
up” (i.e., nothing happens
when a key is pressed).
• Turn off the machine, and then while holding
down and , turn the machine back
Code
Clear
BS
on. WARNING: The text in the display, all format
settings, and all text files s tored in the memory are
erased.
65
Page 69

ERROR MESSAGE LIST
e
S
e
Error
Message
1 BAR CODE
/ LABEL
1 SERIALIZE
LIMIT!
10 LINE
LIMIT!
4 DIGIT
MIN.!
4 LINE
LIMIT!
Cause Remedy
• This message appears if a
barcode has already been
added to the label when you
hold down and press
N
Barcod
Code
.
• This message appears if a
serialization has already
been added to the label when
you hold down and
V
press .
erializ
Code
• This message appears if ten
lines already exist when you
File
press using the Rotate
function.
• This message appears when
less than the minimum four
digit s are entered as barcode
data.
• This mes sage appears if four
lines already exist when you
File
press .
• Limit the number of
barcodes in the text to one.
• Limit the number of
serializations in the text to
one.
• Limit the number of lines in
the text to ten.
• Enter a minimum of four
File
digits before pressing .
• Limit the number of lines in
the text to four.
BATTERIES
WEAK!
• This message appears when
the installed alkaline
• Replace the batteries or use
the AC adapter.
batteries become weak.
66
Page 70

Error
Message
BUFFER
EMPTY!
BUFFER
FULL!
CAN’T
HERE!
CHANGE
ADAPTER
CHECK
TA PE!
Cause Rem edy
• This message appears if you
try to print, but no text has
been entered.
• This message appears if you
try to store a text file in the
memory, but no text has
been entered in the display.
• This message appears if you
try to enter a character,
symbol, barcode, return or
space after 99 characters
have already been entered.
• This message appears if a
character, symbol, space or
return is entered while the
cursor is located below the
right half of a barcode and
“ΩΩΩΩ" mark.
• This message appears if a
high-voltage adapter is
being used.
• This message appears if you
try to print a label or feed the
tape when a tape cassette is
not installed.
• This message appears if you
install a non-Panduit tape
cassette.
• This message appears if the
tape cassette is not properly
seated.
• Enter text before printing.
• Enter text before storing.
• Delete some existing text so
that more can be entered.
• Move the cursor or delete
the barcode and “ΩΩΩΩ" mark
before entering the
character, symbol or return.
• Remove the high-voltage
adapter and connect the AC
adapter (LS7-ACS).
• Install a tape cassette.
• Install a Panduit (green
colored) tape cassette.
• Remove the back cover of
the printer and re-install
cassette in printer.
67
Page 71

Error
Message
FUNCTION
NOT ALLOWED !
INVA LID
VA LUE
LABEL CO DE • This message appears if the
LINE
LIMIT!
MEMORY
FUL L!
NO
FILES!
REPLACE
BATTERIES!
RO M
PROBLEM!
• This message appears if
• T hi s me s sa ge ap pe ars if Size
• This message appears if you
• This message appears if the
• This message appears if you
• This message appears if you
• This message appears if the
• This message appears if
Cause Remedy
Size, Frame or Barcode is
set when Rotat e function is
being selected.
is set when Repeat Legend
function is being s elected.
input the wrong value for the
function selected.
tape cassette in the printer
requires manual entry of a
label code.
number of lines in the text is
greater than the maximum
number of lines possible for
the installed tape.
try to store a text file after
300 characters have already
been stored in the memory.
try to recall or delete a text
file from the memory when
none are stored.
installed alkaline batteries
are about to run out.
there is a problem with the
machine’s read only
memory.
• Del ete Rotate function.
• Del ete Repeat Legend
function.
• Re-input valid value.
• Enter the label code printed
on the tape cassette.
• Reduce the number of lines
or install a tape of greater
width.
• Delete an unwanted file to
make room for the new one.
• Store a text file first.
• Replace the batteries or use
the AC adapter.
• Co ntact Technical Support at
866-871-4571 (outside the
US, refer to page 70 for
contact information).
68
Page 72

Error
Message
SET
LENGTH!
SYSTEM
ERROR!
TEXT
TOO HIGH!
TEXT
TOO LONG!
VALUE
TOO SMALL!
Cause Rem edy
• This message appears if
length has not been set when
Rotate and Repeat Legend
are selected.
• This message appears if
there is a problem with the
machine’s software.
• This message appears if the
size of the text is larger than
the width of the installed
tape.
• This message appears if the
length of the text is longer
than the label length that has
been set using the Length
function.
• This message appears if the
number of characters is
more than the limit of an
installed tape when Rotate
function is selected.
• This message appears if the
last value set to be printed is
less than the selected value
in the text using the
Serialize function.
• Set length between 0.25"
and 11.80" (6.4 and 299.7
mm).
• Contact Technical Support at
866-871-4571 (outside the
US, refer to page 70 for
contact information).
• Reduce the size of the
characters or install a wider
tape.
• Delete some of the text or
increase the set label length.
• Delete Rot ate function.
• Press the key of the value
that is greater than the value
in the text.
69
Page 73

SPECIFICATIONS
HARDWARE
Input device: Keyboard with 52 keys (including the power key)
LCD: 12 characters × 2 lines (7 × 5 dots/character)
17 indicators
Prin t ta pe: LS 7 Ta pe
Four widths available:
1/4” (6 mm)
3/8” (9 mm)
1/2” (12 mm)
3/4” (18 mm)
Powe r su pp ly: Six AA (AM3, LR6) alkaline batteries or optional AC adapter (LS7-ACS)
Auto power-off if no key is pressed for 5 minutes
Print head: 128 dot/180 dpi
Dimensi ons: 4 3/4” (121 mm) (W) × 7 31/64” (190 mm) (D) × 2 51/64” (71 mm) (H)
Weight : 1.1 lbs. (520 g) (without a tape cassette and batteries installed)
SOFTWARE
Buffer size: Maximum 99 characters
Memory size: 300 characters
Character size: Five sizes (9, 12, 18, 24 and 36 points) + AUTO for non-rotated text
One size (6 point) for rotated text
TECHNICAL SUPPORT CONTACTS
For technical support in the U.S., call 866-871-4571. For other countries, contact the Panduit
Headquarters nearest you:
Headquarters
PANDUIT Canada
PANDUIT Latin America
PANDUIT Europe Ltd.
PANDUIT Asia Pacific Pte. Ltd.
PANDUIT Australia Pty. Ltd.
PANDUIT Japan
70
Location Phone
Markham, Ontario (905) 475-6922
Jalisco, M exico (52) 3 666 2501
Westgate, London UK (44) 208 601 7200
Singapore (65) 379 6700
Victoria, Australia (61) 3 9794 9020
Tokyo, Japan (81) 3 3767 7011
Page 74
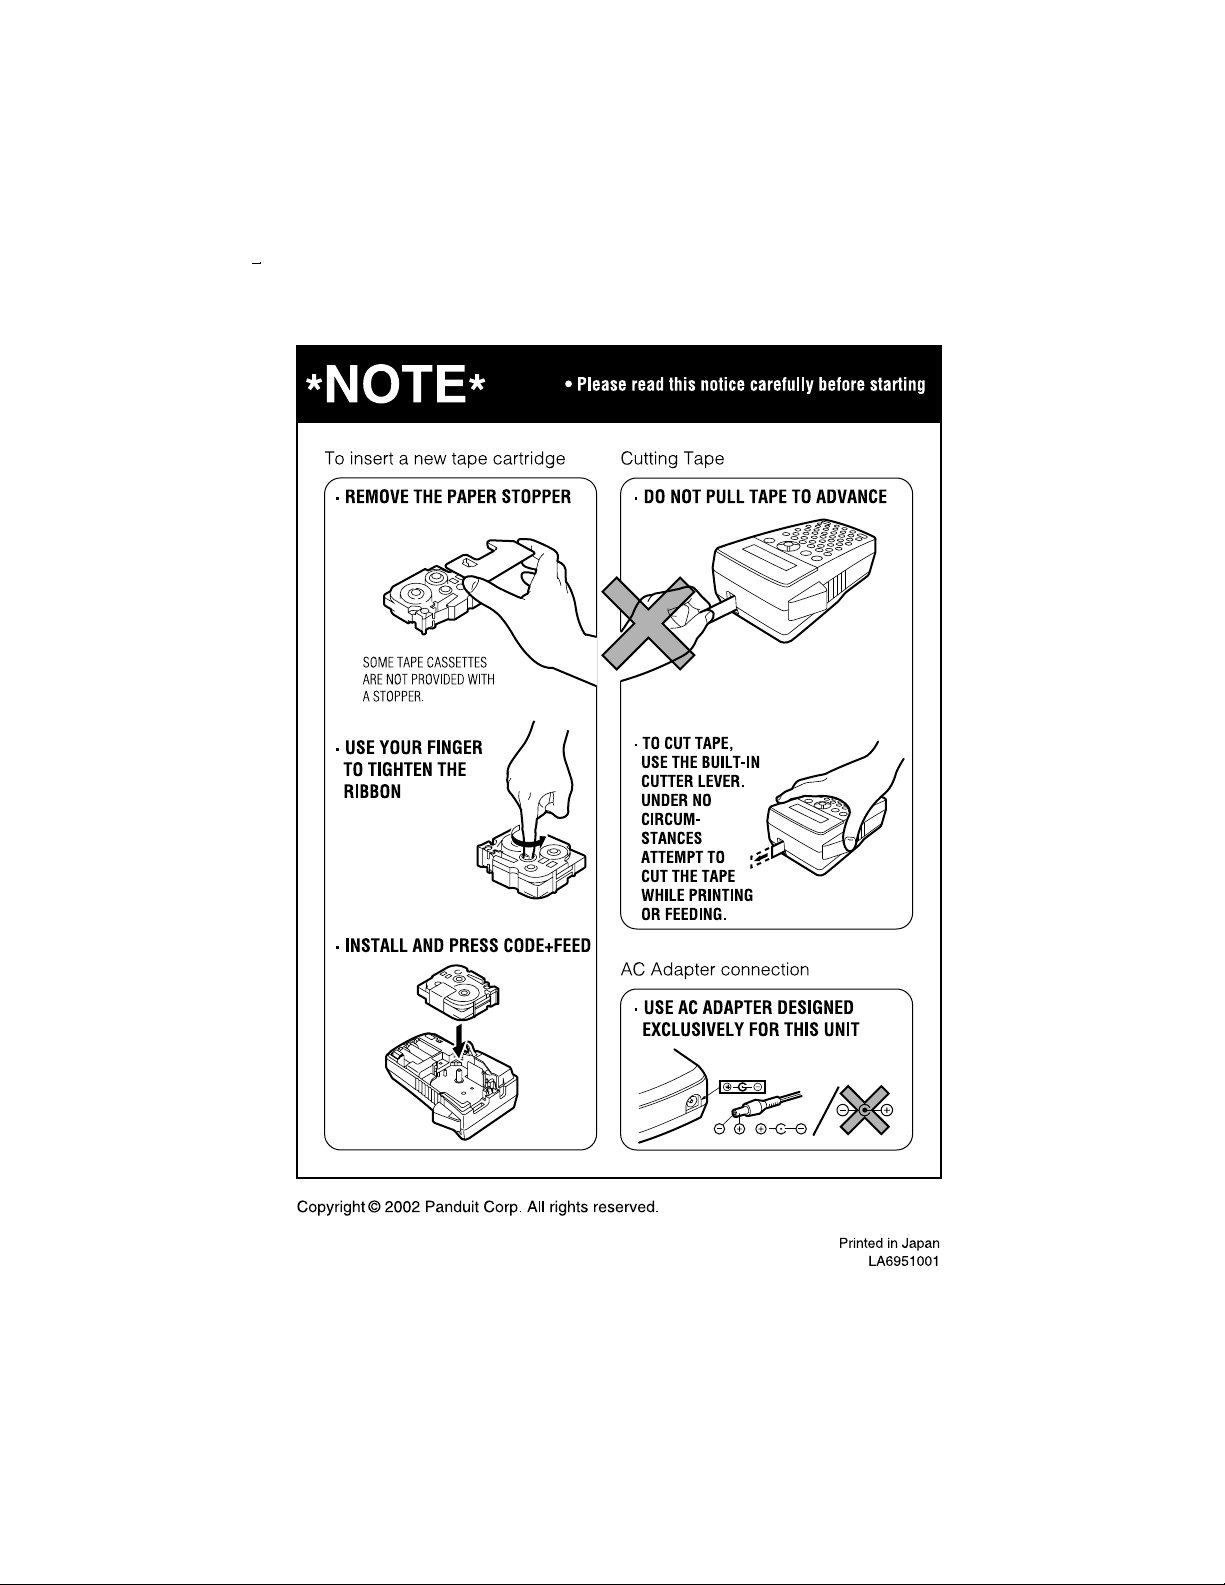
 Loading...