

Page 1

© Panduit Corp. 2016
IAEBH5E / IAEBH6 / IAEBH6X / IAEBH5ES / IAEBH6S/
Shielded
Bulkhead w/
Nut
(For IAEBH5ES,
(For IAEBH5E,
UTP
Face Seal
Te t he r
Industrial Jack
Flex Tail
Shielded
(For MPSI588T)
(For MPI588T)
UTP
Plug Holder
Tether w/ Cap
(Optional)
Industrial Plug
MPSI588T / MPI588T
IAEBH6
w/ Cap
IAEBH6S,
Bulkhead
Seal
IAEBH6XS/ IAEBH (jack module not included)
Jack Module
Jack Module
Modular Plug
Modular Plug
and IAEBH6XS)
and IAEBH6X)
1
2
{not to scale}
Ø 1-13/64"
(30.6mm)
1-7/8"
(47.6mm)
1-7/8"
(47.6mm)
Enclosure Wall
Insert Bulkhead into prepared opening from outside of enclosure.
While holding Bulkhead in place, secure with Nut on inside of
enclosure. Hand turn Nut 4-1/4 to 5 full turns. Be careful not to
tighten to the point the Bulkhead Seal is over compressed and
displaced from the enclosure wall and the Bulkhead.
Note: If using wrench, flats on Nut should be on the outside.
Inside of Enclosure Outside of Enclosure
or Outlet Plate
Min. thickness: 0.035" (20 gauge)
Max. thickness: 0.135" (10 gauge)
Bulkhead
Seal
Nut
Bulkhead Opening Requirements
Note: Bulkhead combination must be used on a flat surface of a NEMA Type 12 Enclosure to maintain rating.
IndustrialNet TX Bulkhead Connectors
Part Numbers: IAEBH5E, IAEBH5ES, IAEBH6, IAEBH6S, IAEBH,
MPSI588T, MPI588T, IAEBH6XS, IAEBH6X
INSTALLATION INSTRUCTIONS
PN367D
Installation for Industrial Jack Module
For Technical Support: www.panduit.com/resources/install_maintain.asp
Page 1 of 4
Page 2
© Panduit Corp. 2016
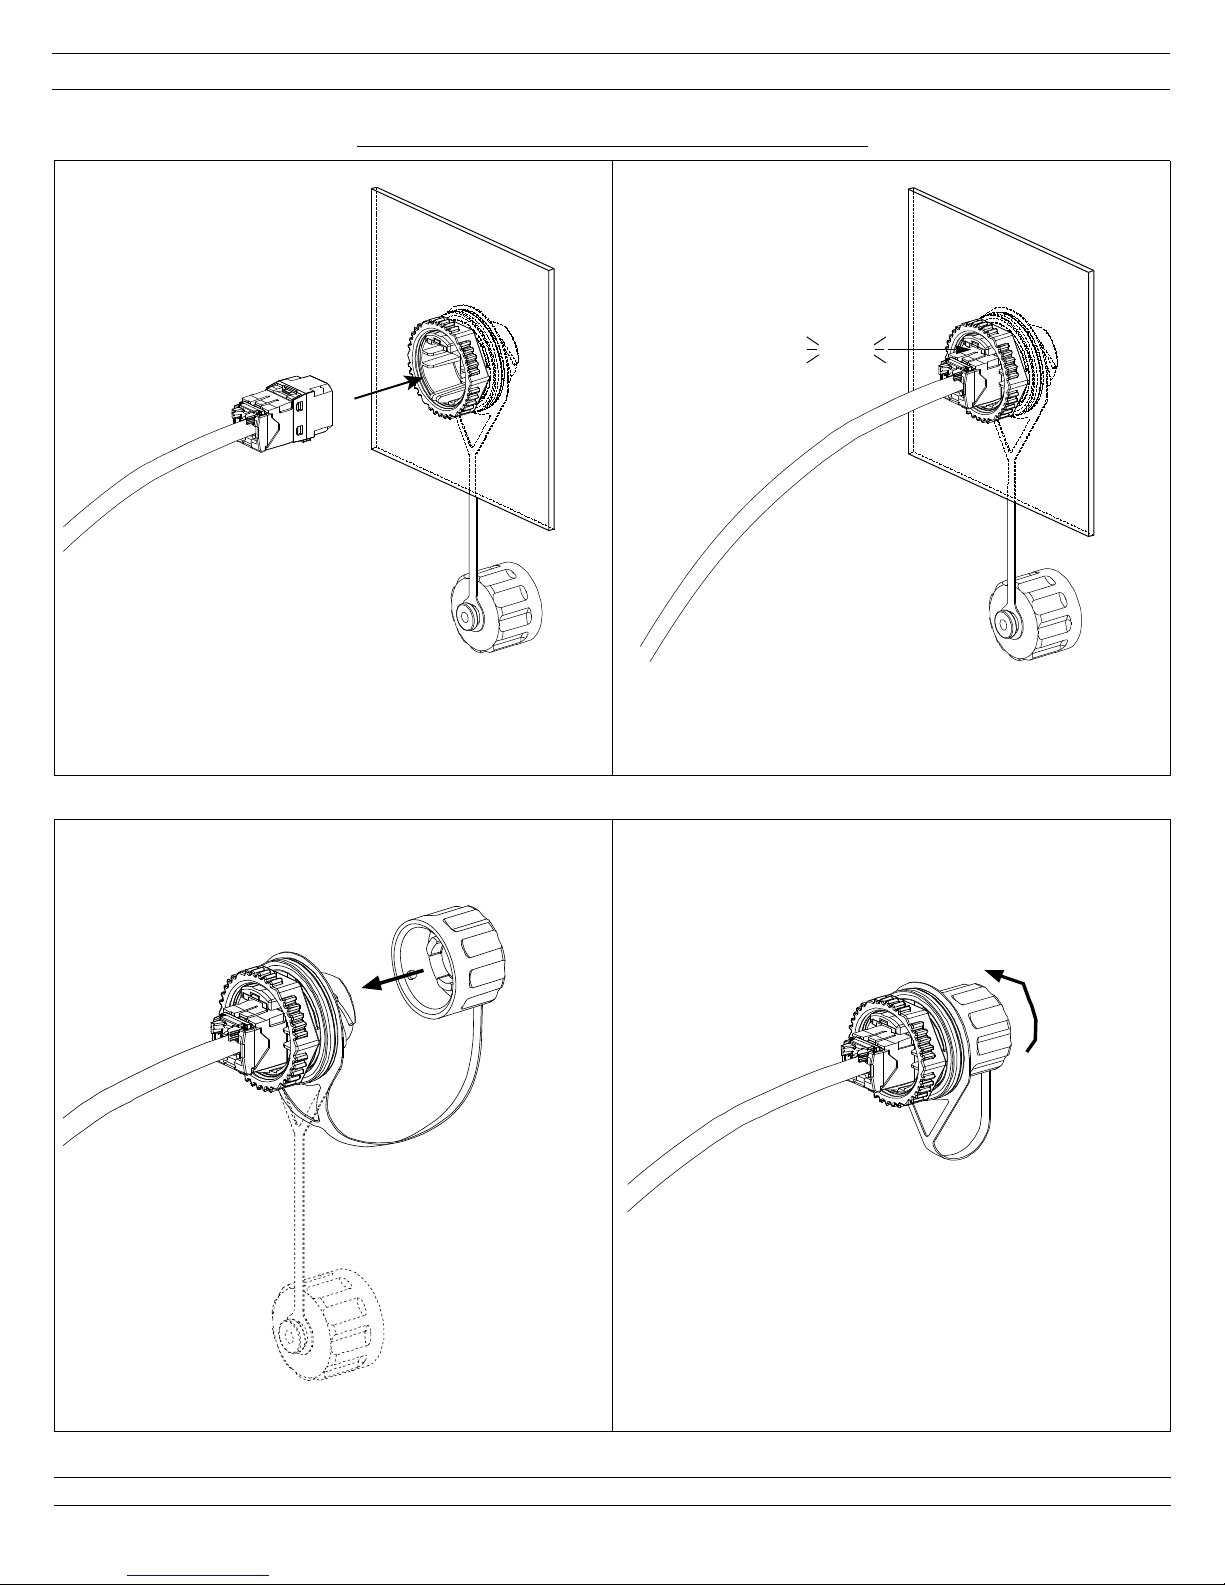
Tethered cap for sealing industrial jack module when
not in use with industrial modular plug.
5
(Enclosure wall removed from views for clarity)
6
34
Terminate jack module.
See Panduit installation instruction PN403* for UTP jack module
termination instructions and PN366* for shielded jack module.
Properly orient jack module as shown and insert
into bulkhead until it clicks into position.
Click
INSTALLATION INSTRUCTIONS
Installation for Industrial Jack Module
PN367D
*Denotes revision level of installation instruction.
For Technical Support: www.panduit.com/resources/install_maintain.asp
Page 2 of 4Page 2 of 4
Page 3

© Panduit Corp. 2016
(OR)
Optional
Flex Tail
Tethered a
Slide flex tail onto cable and route cable through rear
of modular plug housing.
See Panduit installation instruction PN85* for termination
instructions of UTP modular plug, or PN234* for shielded.
Test cord before installing into plug holder. After termination, align
plug latch with notched opening in black plug holder. Depress latch
and press plug module firmly into the plug holder until fully seated.
Shielded
(For MPSI588T)
(For MPI588T)
UTP
12
Modular Plug
Modular Plug
Click
Flex Tail
4
5
Tighten flex tail by hand a total of 3 to 3-1/4" full turns. For IP67
intrusion protection, cable must be circular in shape.
Note: Patch cord performance should be verified before a plug is
pushed back into position, as the plug holder assembly is not
intended to be reused.
Tethered cap option for sealing industrial modular plug
when not in use with industrial jack module.
3
INSTALLATION INSTRUCTIONS
Installation for Industrial Modular Plug
PN367D
*Denotes revision level of installation instructions.
For Technical Support: www.panduit.com/resources/install_maintain.asp
Page 3 of 4
Page 4

© Panduit Corp. 2016
Enclosure Wall
or Outlet Plate
Align
Modular plug removed
from view for clarity
key w/ keyway
1
2
1
2
Note: Bulkhead combination must be used on a flat surface of a NEMA Type 12 Enclosure to maintain rating.
INSTALLATION INSTRUCTIONS
Installation for Industrial Modular Plug to Industrial Jack Module
PN367D
For Instructions in Local Languages
and Technical Support:
www.panduit.com/resources/install_maintain.asp
www.panduit.com
Page 4 of 4
E-mail:
techsupport@panduit.com
Phone:
866-405-6654
 Loading...