


User Guide
Rev. 0
1

2

Summary
1 General Info
1.1 Introduction
1.2 Symbols
1.3 Features of the Wheelchair
1.4 Usage
1.5 General recommendations
2 Safety
2.1 Movement: Getting into and out of the
Wheelchair
2.2 Start using the wheelchair
Determining tipping point
6
6
7
8
9
9
10
11
14
14
16
2.3 Negotiating Objects
2.4 Pavements
2.5 Ascent and Descent – stairs and steps
2.6 Narrow Openings
2.7 Use in Lifts
2.8 Tire Pressure
2.9 Quick-Release Wheels
2.10 General Maintenance
2.11 Expected Lifetime of the Wheelchair
2.12 Prevent Accidents
Movements
Speed
17
18
18
19
19
20
22
22
23
Use of brakes
3

24
3 Transport by Vehicle
3.1 Transport with a Helper or Carer
3.2 Transport without Assistance
4 Parts Description
5 Using the wheelchair
5.1 Use
5.2 Closing the backrest
5.3 Opening the backrest
5.4 Lifting the wheelchair
5.5 Fast rear wheel extraction
24
26
28
30
30
31
33
36
36
38
40
5.6 Locking and unlocking the brakes
5.7 Pelvic Belt
5.8 Push handles
41
42
44
5.9 Multi-Seating
5.10 Sandy add-on Wheel
46
48
6 Settings
6.1 Backrest Height adjustment
6.2 Backrest Angle adjustment
6.3 Wheel Guard Width adjustment
6.4 Footrest Height adjustment
6.5 Front Wheel Height adjustment
49
50
51
52
53
56
6.6 Anti-tipping adjustment
6.7 Seat Height adjustment
6.8 Seat Vibration Damping adjustment
6.9 Backrest Distance adjustment
6.10 Brake adjustment
4
58
60
62

64
7 Maintenance
Declaration of Conformity
WARRANTY
PLATE AND CE MARKING
WARRANTY COUPON
66
68
70
71
5

1 General
Info
1.1 Introduction
Engineering and innovation are key values of Pandhora S.R.L.,
and we are able to pursue these new ideas thanks to the professionalism and daily commitment of our team.
We carefully study new solutions to offer innovative and technically advanced products with the goals of practical and elegant
design, high comfort and reliability. We believe that continuous
research and a multidisciplinary approach are key in order to
meet these goals. We exist to serve the needs of our customers.
6

1.2 Symbology
When reading this manual you may see these important
symbols:
This symbol indicates that you must take special care
to avoid damage to things or people, breakages, or
dangerous situations in general.
This symbol indicates actions or procedures to be
avoided absolutely.
5
6
5
General information to improve usage.
Essential tool: You need to have a spanner for 5mm
nuts or bolts.
Essential tool: You need to have a spanner for 6mm
nuts or bolts.
Essential tool: You need to have an allen key for bolts with a 5mm hexagonal slot.
6
Essential tool: You need to have an allen key for bolts with a 6mm hexagonal slot.
7

1.3 Features of the
wheelchair
The Pandhora EVO is a lightweight wheelchair with an attractive
design and is intended to serve dual functions.
The Pandora EVO is constructed from high-grade materials and
its soft lines are designed to have elegance when in motion.
A wide range of accessories allows you to customize the Pandhora EVO to make it personal to you.
The bearing structure was designed to be robust and elegant and
has been developed to withstand high stress, making the Pandhora EVO very sporty.
The Pandhora EVO’s MULTI-SEATING option allows the user to
quickly and simply adjust the seat and seated posture, thanks to
the patented backrest.
8

1.4 Usage
The Pandhora EVO wheelchair is a self-propelled model, so motion
is created manually by pushing the handrails of the rear wheels.
This can have a rehabilitative effect and keeps the user active,
making the EVO suitable for a wide range of users with different
requirements.
The EVO can be used safely both inside and outside, including with
the full range of accessories and congurations. In the case of users
with a serious reduction in physical ability it is always recommended to use the wheelchair with the presence of a carer. The EVO
is not recommended for use on particularly rough terrain such as
mountain paths, sandy soil, acidic environments, or on slopes greater than the safe working angle.
The EVO is suitable for teenagers and adults.
1.5 General recommendations
Before you start using your wheelchair, we recommend that you
read the instructions carefully, paying particular attention to the
chapter dedicated to safety.
9

2 Safety
The Pandhora EVO wheelchair is a medical device.
For this reason it is strictly forbidden to give others
your own mobility aid, even if only temporarily.
It is forbidden to make modications to the wheelchair without the approval of the original manufacturer. Altering the design of the wheelchair may
create stability and resistance problems resulting
in danger for the user.
FAILURE TO FOLLOW ALL INSTRUCTIONS IN THIS
USE AND MAINTENANCE MANUAL AUTOMATICALLY
EXCLUDES THE COMPANY FROM ANY RESPONSIBILITY AND INVALIDATES IMMEDIATELY ANY WARRANTY PROVIDED WITH THE WHEELCHAIR AND PERMITS
10
PANDHORA SRL TO BRING CHARGES DIRECTLY ON
THE END USER TO SETTLE ANY COMPENSATION OR
DAMAGES.

2.1 Movement: getting into
and out of the wheelchair
When transferring into or out of the wheelchair, do not place the
feet on the front platform. This could result in the tipping forward
of the wheelchair with possible damage to the user or anyone
nearby. Getting into or out of the wheelchair should always be
treated with extreme caution, even by experienced users, and
must only be done after receiving instructions from a qualied
consultant. Always seek assistance from a carer if required. Only
work within your capability and degree of autonomy.
General guidance for safe and secure transfers:
• Place the wheelchair on a at, dry, solid surface. Avoid transferring on sloping ground, soil or particularly rugged terrain that
may make the wheelchair unstable and potentially cause the user
to fall and the wheelchair to overturn.
• Apply the brakes on the wheelchair (see chapter 5.6 “Locking
and Unlocking the Brakes”).
• If required, lean on stable nearby object. If possible, use
your arms to support yourself while lifting and moving
(see pic. 1, 2).
If the user is physically unable to move alone, or if in a
problematic environment, use the help of a carer
(see pic. 3).
11
Pic. 1
12

Pic. 2
When transferring into or out
of the wheelchair do not push
down on or sit
on the wheel sideguards. They
could bend or break
with the risk of injury.
Pic. 3
13

2.2 Start using the wheelchair
The EVO is an active wheelchair designed for people with physical disabilities who may wish to perform intense external activity.
It is ideal for indoor locations (at home or at work) and outdoor
leisure, but requires that the ground/area is solid and not
slippery.
To nd the tipping point, a carer or consultant must
always be present, and must be positioned just behind
the wheelchair to prevent it from tipping completely.
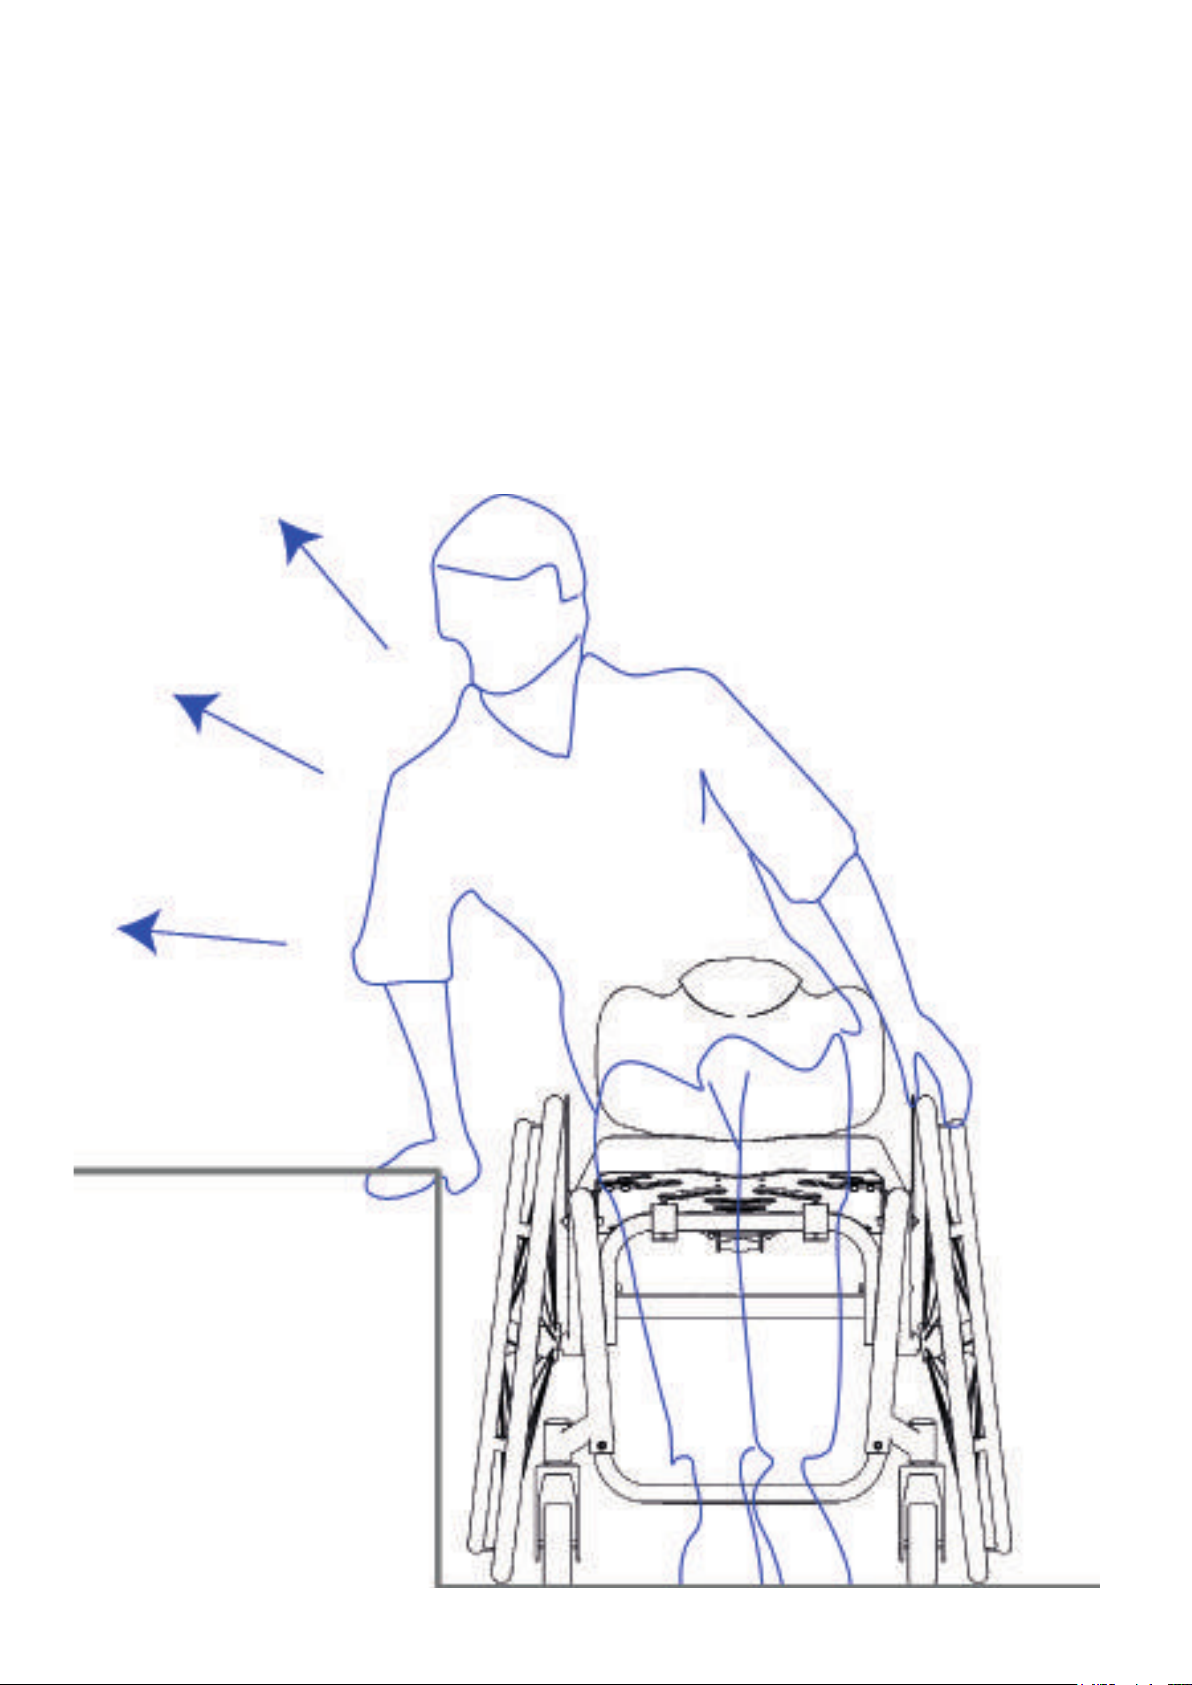
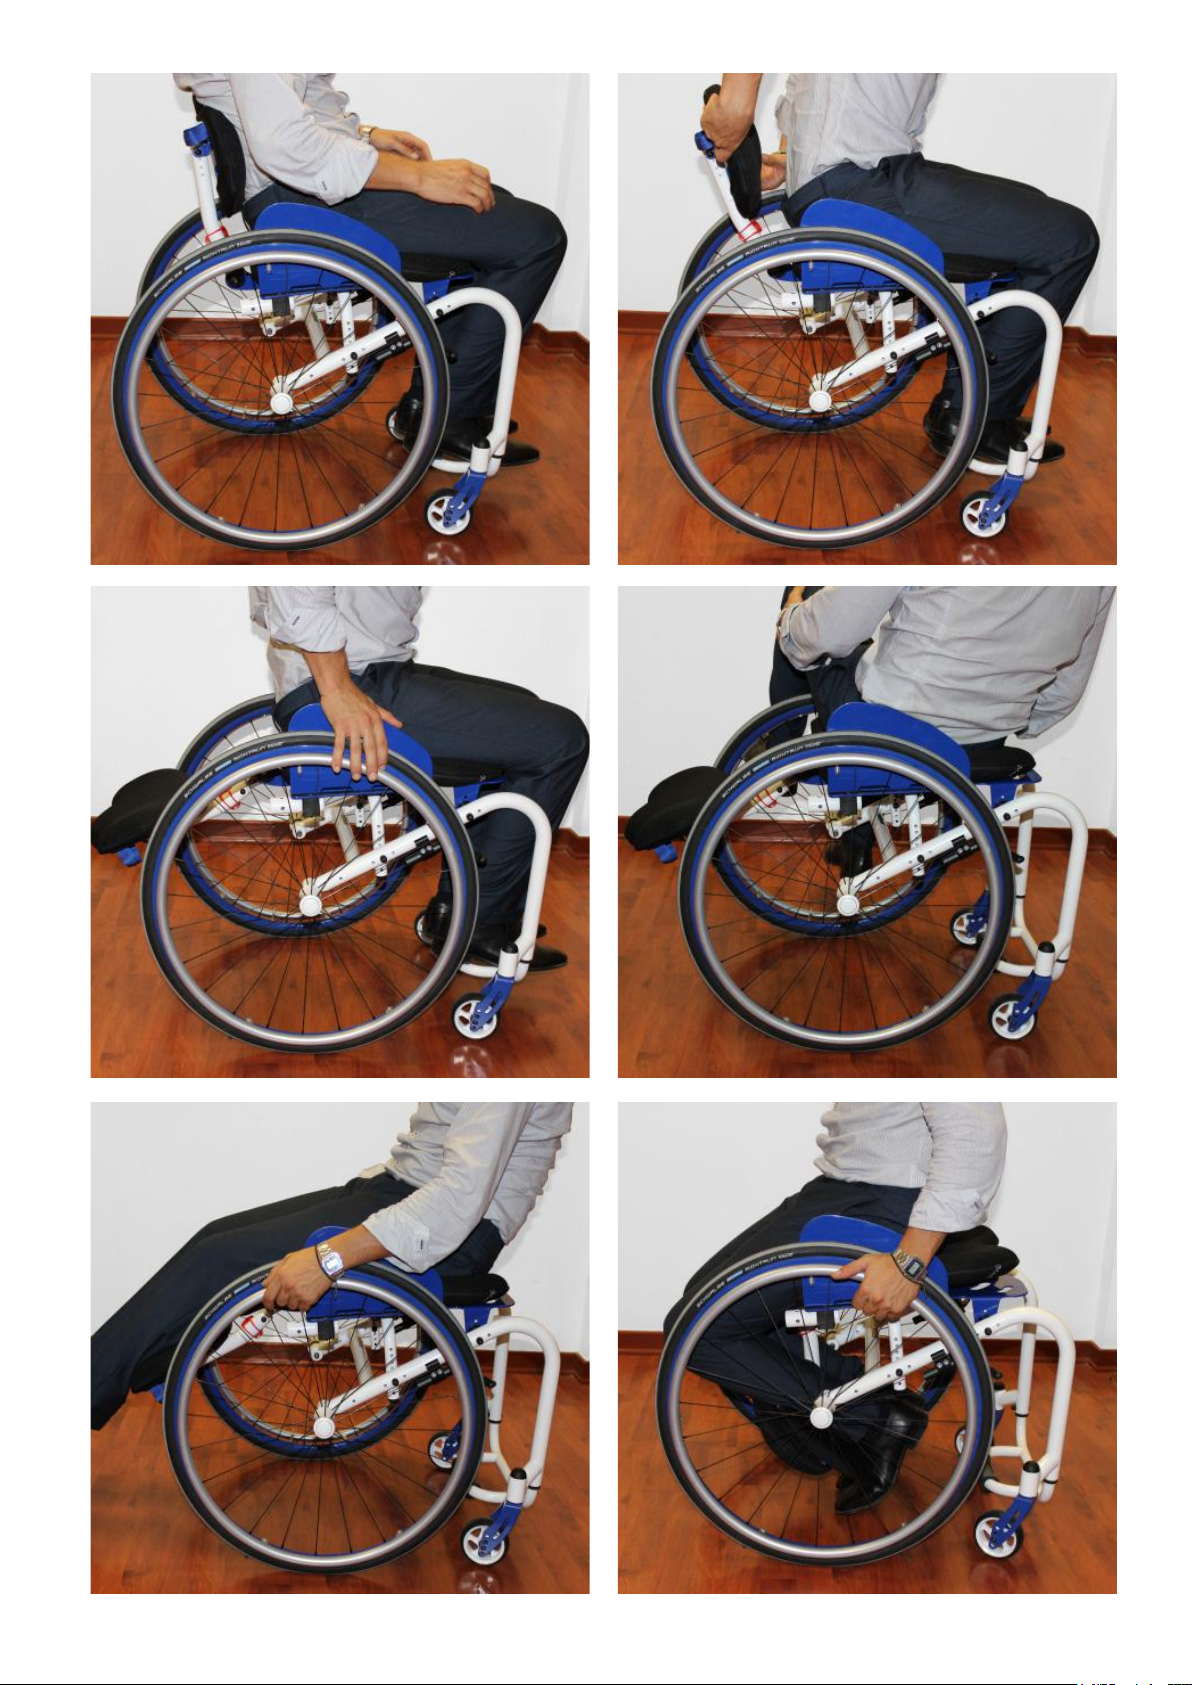
To determine the tipping point and therefore understand the safe
limits of your maneuvers, proceed as follows (see pic. 4):
• You are sitting in your wheelchair. Move forward strongly
holding the handrails of the rear wheels. With as light pulling
back of the handrails while shifting your body weight back, the
front of the wheelchair will rise up.
• As soon as the front wheels begin to rise, quickly push your
bodyweight forward and reverse push on the handrails in order
to keep the tip under control. This will allow you to nd the tipping
point.
14

Pic. 4
TO PREVENT TIPPING OVER DURING THE NORMAL USE OF
THE WHEELCHAIR IT IS RECOMMENDED TO INSTALL THE ANTI-TIPPING SYSTEM SUPPLIED AS AN ACCESSORY ON THIS
MODEL. (see chapter 6.6)
15

2.3 Negotiating Objects
Do not reach down so far forward, sideways or backward to pick
up or place objects: there is a risk of tipping or loss of balance of
the wheelchair, especially if the wheelchair has been congured
with a reduced width or if the seated position is high. (see pic. 5).
The risks include;
• Overturning in case of reaching
forward;
• Loss of balance in case of
reaching towards the side;
• Overturning in case of reaching
for an object placed behind the
backrest; (see pic. 6)
Pic. 5
Pic. 6
16

2.4 Pavements
Be careful - before you manoeuvre down a kerb by
yourself, you need to properly evaluate the height
of the kerb. If it is too high, there is a risk of tipping
over. (see g. 7, g. 8).
Pic. 7
Pic. 8
17

2.5 Ascent and Descent –
Stairs and Steps
To climb up a step, tilt your upper body forward; for descents, instead, lean back into the backrest and brake the wheelchair with
the handrails. In case of climbs with a slope of more than 1%, it is
recommended to get assistance from a carer.
In the case of a climb, it is dangerous to carry heavy
bags, especially in seatback pockets. Danger of
tipping.
We recommend for your own safety use the help of two people
to ascend and descend difcult stairs or steps. For the descent the
wheelchair must be rolled on the big rear wheels and accompanied step by step.
For the ascent, turning your back to the step or steps, the person
assisting must pull the wheelchair from behind step by step.
If the wheelchair is lifted, there is a danger of overreach and fall.
2.6 Narrow openings
18
When you manoeuvre through narrow areas such
as building entrances, doors etc., be careful not to
knock your elbows - danger of injury.

2.7 Use in lifts
Elevators and lifts are particularly dangerous for the
user. Automatically closing doors involve the risk of
causing injury to hands!
2.8 Tire Pressure
To ensure the correct braking and coasting characteristics of the
wheelchair, it is necessary that the tires are always well inated.
Pic. 9
• Remove the plastic cap cove-
ring the valve with your ngers
(see pic. 9).
• Use an appropriate compressor or pump to add pressure to
the inner tube until the correct
value is shown (see table 1 or
value reported on the wheels).
• Replace the plastic cap.
19

Check the correct tire pressure every week, according
to “table 1”. An inadequate pressure (especially if
the pressure is low) causes an incorrect action of the
parking brakes on the wheel, which can cause them
to fail to stop the wheelchair.
TYRE TYPE PRESSURE
Anti Puncture Marathon Plus 10 BAR 1000 kPA
High Pressure 7 BAR 700 kPA
High pressure reinforced 7 BAR 700 kPA
Table 1
2.9 Quick-Release wheels
Check the correct insertion of the rear wheels studs
without any person sitting in a wheelchair.
Release the parking brakes. Lift the rear wheel from
the ground using the handles on the back of the wheelchair. Hold the rear wheel hub, taking care to insert
ngers between the spokes. Push and pull the wheel
20
(as indicated by the arrow) for proper insertion.
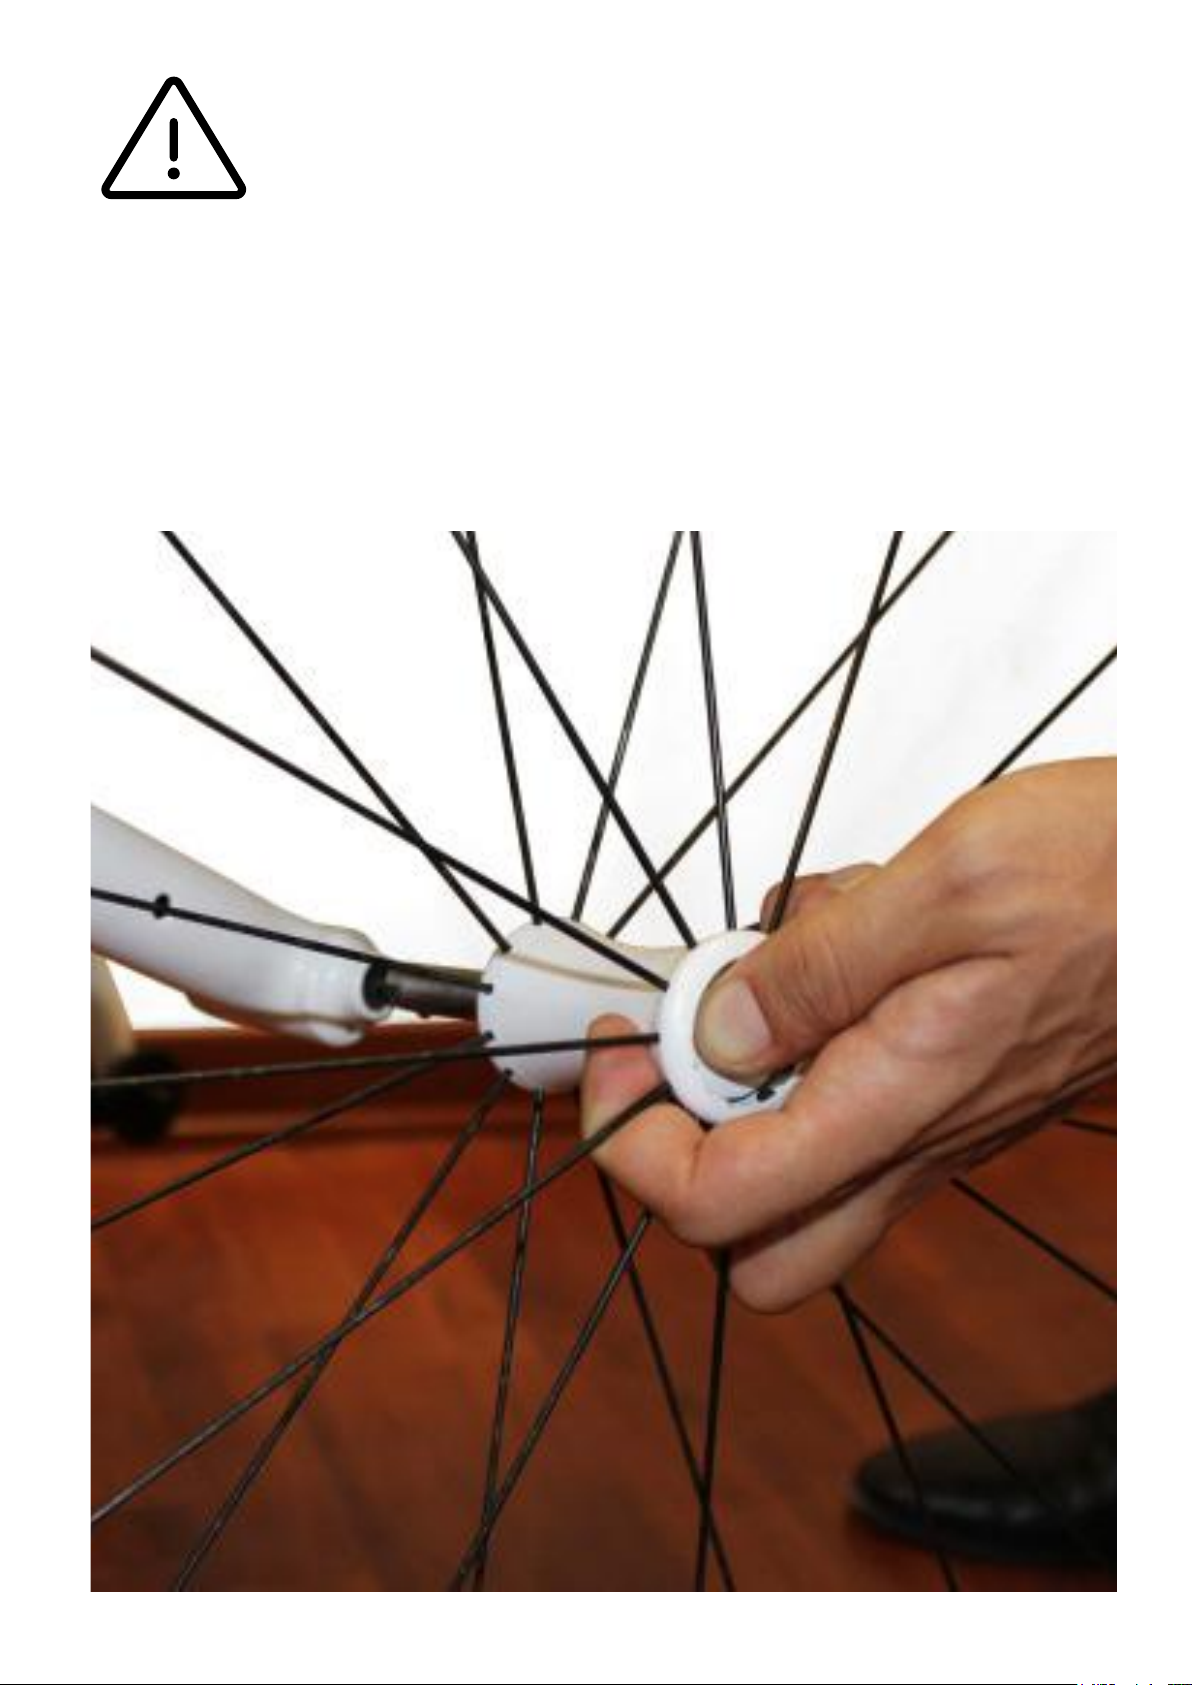
Checking the rear wheels studs is one of the procedures that the user should perform periodically.
A wrongly inserted stud could cause the unthreading of the studs
from the rear wheel, causing the subsequent overturning of the
wheelchair and possible injury to the user. (see pic. 10)
Pic. 10
21

2.10 General maintenance
After each operation, tighten all screws and nuts. The
daily use of the wheelchair can cause a loosening of
screws and nuts. It is advisable to check at least once
a month the correct location and tension of all screws
and bolts across the wheelchair and if necessary request the assistance of authorized
(Pandhora approved) personnel for maintenance of
the wheelchair.
2.11 Expected lifetime of the
wheelchair
Expecting that the wheelchair will be used every day and therefore will be subjected to stresses that cause an inevitable attrition
of the parts, on average the wheelchair has an expected product
lifetime of 5 years. This expected lifetime can only be achieved
with correct use and a proper maintenance.
22

2.12 Prevent accidents
Movements
When using the wheelchair avoid high stress movements because
this could cause the wheelchair to overturn. In case of obstacles or
gradients, avoid sudden manoeuvres (e.g. sudden braking) as the
danger of slipping increases on wet surfaces or uneven terrain.
Overcome obstacles like steps or thresholds with caution (get help
from an attendant). For added safety it is recommended to only
move on inclined planes or areas deemed dangerous in other
ways with a guide present behind the wheelchair.
Speed of Use
Always adapt the speed of the wheelchair use to the circumstances and conditions of the moment. It is generally recommended to
keep speed consistent and to avoid acceleration or sudden changes in direction.
Use of brakes
The pressure brakes are designed to immobilise the wheelchair
when stationary.
For safety reasons we do not recommend using the
brakes while in motion.
Be careful when using braking devices to avoid
injury to hands and ngers.
23

3 Transport by car or other
means of transport
Fig. 11
The wheelchair should never be used as a seat when you use a car
or another means of transport. Disassemble the wheelchair (as spe-
cied in the instructions for use) and put it inside the car, or place
it in such a way as to avoid accidents in case of sudden movement.
Occupy a suitable place inside the car or the means of transport
and fasten the seatbelts. (see pic. 11).
24

Use extreme caution when transporting the wheelchair. If required, seek instruction from the experienced and specialized staff at our authorized dealers. If transporting the wheelchair appears to be
risky or complicated, it is appropriate to request the
help of a companion.
3.1 Transport with the presence
of a companion
Pic. 12
If the user’s disability or physical strength does not allow for autonomous moving and loading of the wheelchair, it is advisable to
ask for the help of a companion. (see pic. 12).
25

• Release the parking brakes and remove the rear wheels (see
Chapter 5.5 “Quick extraction of rear wheels”).
• Lower the backrest (see paragraph 5.2 “Closing the Backrest “).
Take the wheelchair with one hand on the front frame and with
the other on the rear frame (to make lifting less strenuous).
• Lift the wheelchair into the car (ideally in the car trunk or between the front and rear seats).
• Load the rear wheels.
3.2 Load the wheelchair
independently
26
Pic. 13
Pic. 14
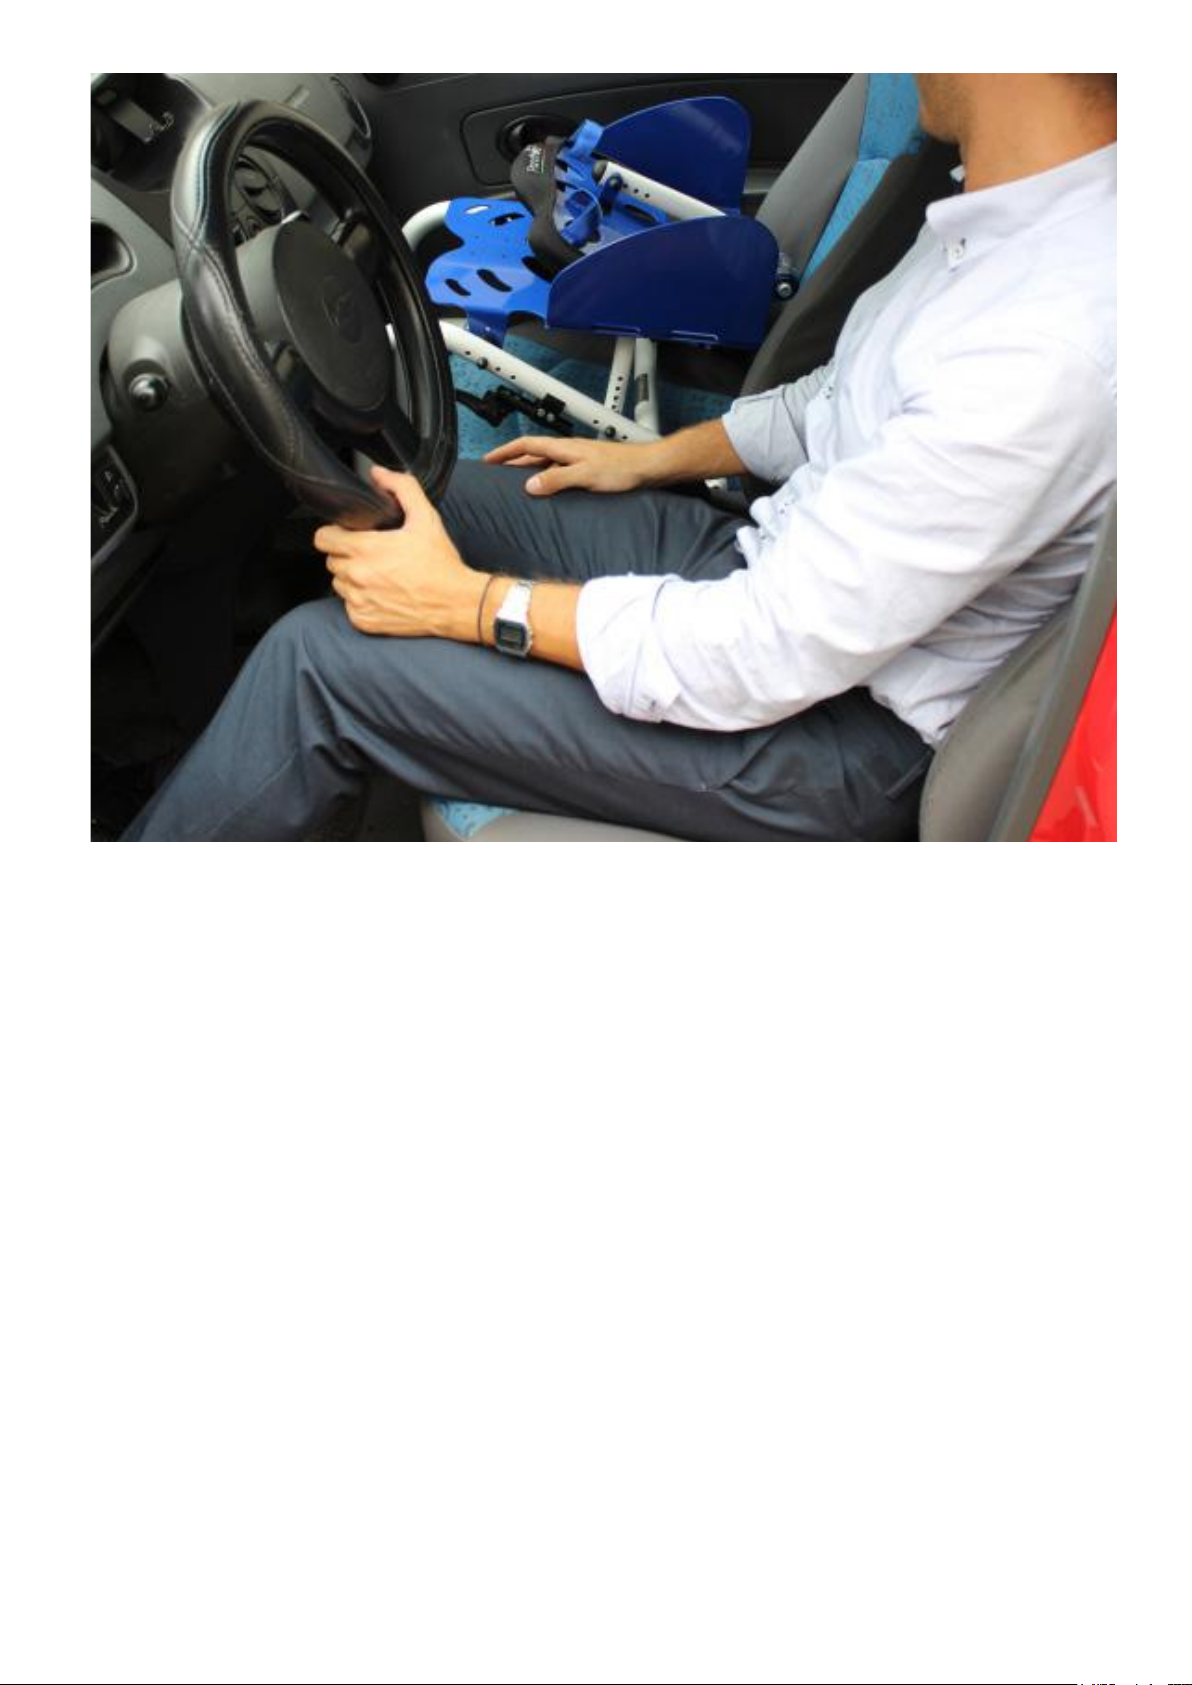
The following operations are indicated for independent people
with sufcient strength to perform all the processes independently
and safely.
• Move closer to the point of ascent (driver’s seat).
• Brake the wheelchair with brakes and transfer into the vehicle.
• Release the parking brake of the wheelchair and remove the
rear wheels.
• Lower the backrest, take the wheelchair with one hand on the
front frame and the other on the rear frame (to make lifting less
strenuous) and lift the wheelchair into the car.
• Finally load the rear wheels separately (see pic. 13 and 14).
27
4 Separate Parts
Description
6
2
1
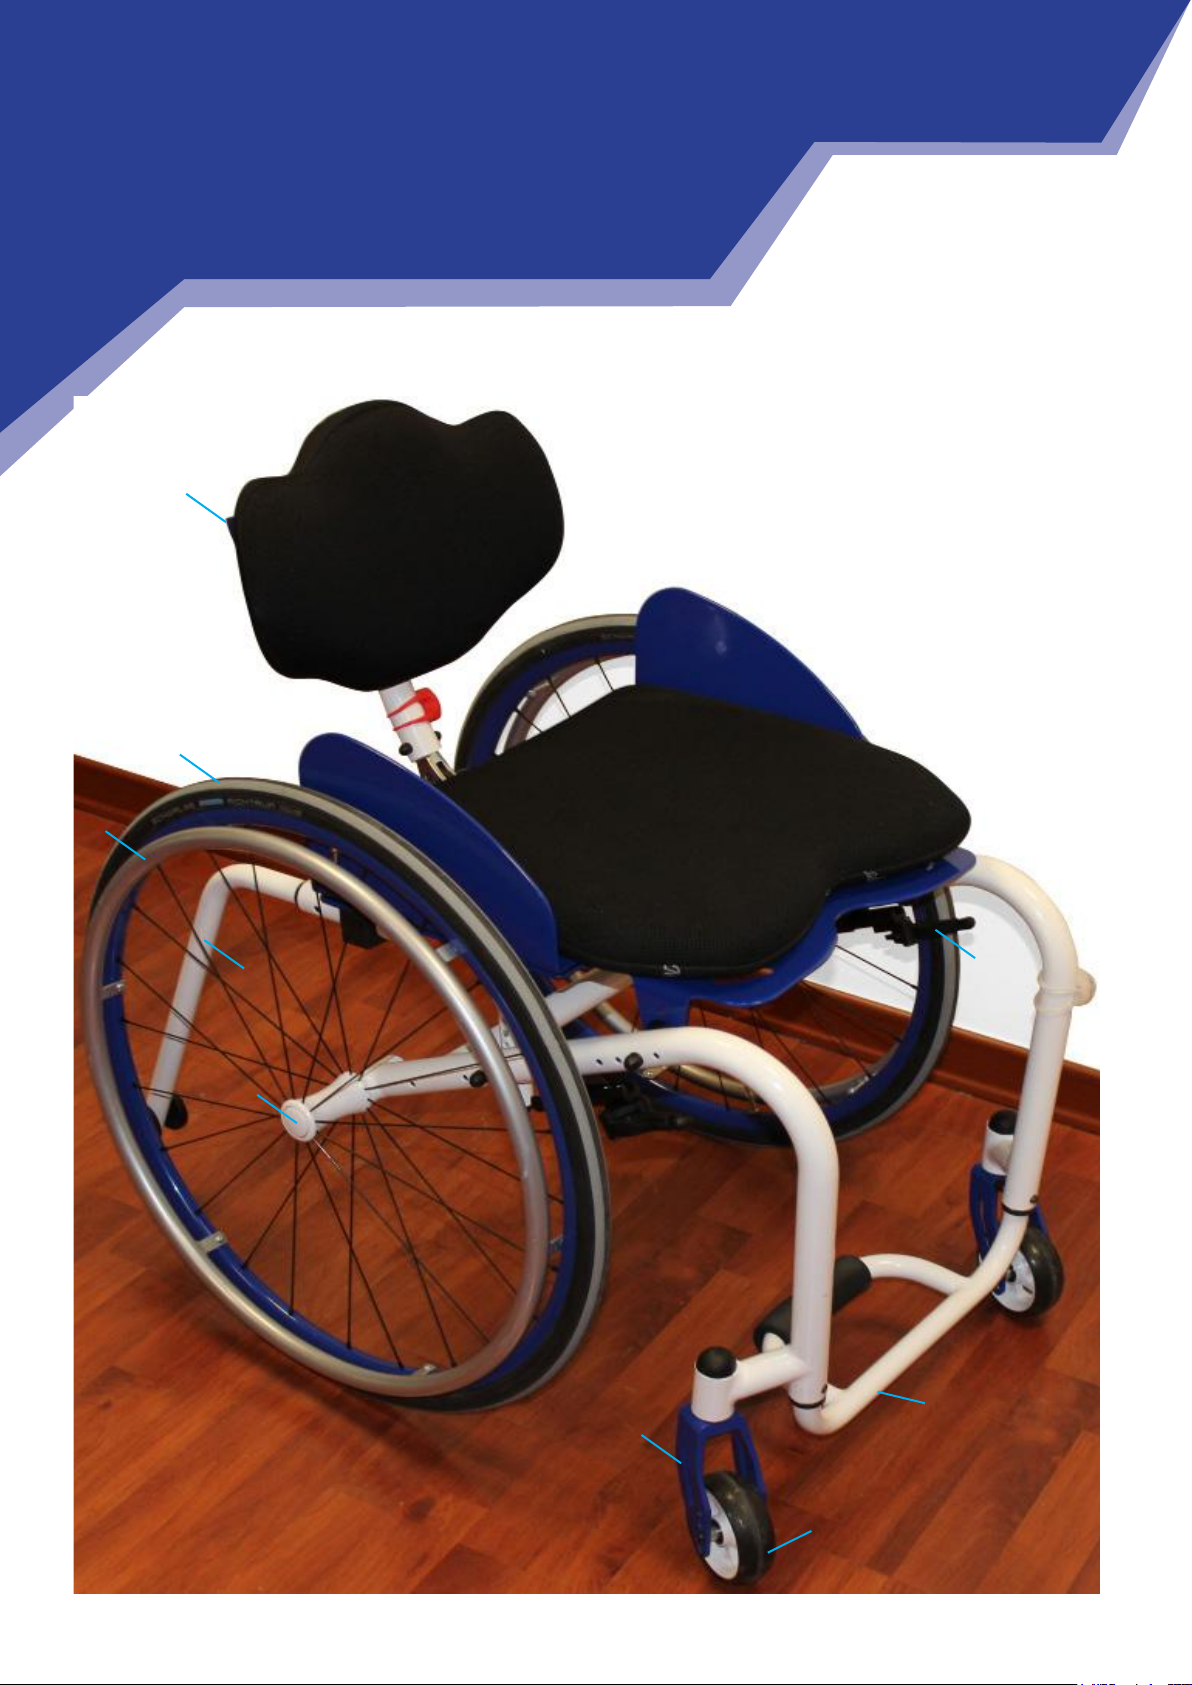
Pic. 15
9
8
10
7
3
5
4
28
11
13
12

1 Clothing guards
2 Adjustable backrest
3 Seating
4 Wheelchair frame
5 Parking Brakes
6 Pushing handles
7 Anti-tip
8 Rear wheel tire
9 Ring handrails
10 Quick release pin
11 Front fork
12 Front wheel
13 Adjustable footrest
29

5 Using the wheelchair
5.1 Use
The Pandhora EVO wheelchair falls within the rigid frame cate-
gory. Thanks to its light weight, adaptability and conguration it
is indicated for daily use by active users and by users with serious
illnesses; for indoor and outdoor use. (see pic. 15)..
Do not adjust the wheelchair when situated on
uneven ground. Once adjusted, use caution and
avoid sudden acceleration or braking.
The maximum possible slope in order to avoid
backward tipping is 3° (6%).
The maximum load supported by the Pandhora
30
EVO wheelchair is 120 kg.

5.2 Closing the Backrest
Perform this operation taking care that the ngers
and hands do not go between the back tube and the
side guards during the closure of the backrest - it is
better to grip the push handles. (see pic. 16).
• Remove the pillow or soft supports on the seat.
• Push the lever under the rear of the frame.
• Hold the backrest with the handle and prepare to
guide the backrest forward.
Pic. 16
31

Pic. 17
• Press the back button and push the backrest forward.
(see pic. 17, 18 and 19).
Pic. 18
32

Pic. 19
5.3 Opening the Backrest
Perform this operation taking care that the ngers and
hands do not go between the back tube and the
side guards.
• Push the lever under the tubular frame from the inner
side.
• Rotate the backrest backward to the desired position.
• Place the pillow or soft supports on the seat.
Before using the wheelchair, always check that
the backrest is open and locked.
33

Pic. 20
Press the front button and push the backrest back.
(see pic. 20 and 21)
Pic. 21
34

Pic. 22
To lock it in the open position, press the rear button.
(see pic. 22 and 23)
Pic. 23
35

5.4 Lifting the wheelchair
It is advisable, in order to decrease the effort to perform
this action, to reduce the wheelchair to a
minimum conguration so as to have less weight to lift.
The wheelchair can be lifted and transported in
different ways.
We recommend:
• Remove the rear wheels to decrease the weight (see
Chapter 5.5 “Quick extraction of rear wheels”).
• Close the wheelchair to get a better balance during
the lifting (see Chapter 5.2 “Closing the Backrest”).
• Grasp the wheelchair on the back of the seat with one
hand and the front frame with the other hand.
• Lift the wheelchair.
5.5 Fast rear wheel extraction
This allows the rear wheels to be removed practically and quickly.
This may be used to facilitate transport
by car or when negotiating narrow passages.
Remove the wheel
• Release the brakes.
• Slightly lift the wheel of the wheelchair from the ground.
• Grasp the wheel by the spokes around the hub, press the pin
button with your thumb and pull outward (without releasing the
pin). (see pic. 24).
36

Pic. 24
Attach the wheel
• Release the brakes.
• Slightly lift the wheelchair off the ground.
• Grasp the wheel by the spokes around the hub, press the pin button with your thumb and without
releasing insert the PIN into the end in the axle slot.
• Release the pin button to lock the wheel.
Make sure that the quick-draw pins are fully seated. Always test by grabbing the wheels for the
hub and pulling away from the frame. If the wheels move away from the frame they are not correctly attached.
37

5.6 Locking and unlocking the
brakes
Lock the brakes
Push the lever forward if ‘push-to-lock’ brakes are used. Pull the lever backwards if ‘pull-to-lock’ brakes or ‘scissor brakes’ have been
mounted. (See pic. 25, 26, 27, 28).
Pic. 25 Pic. 26
1 2
Pic. 27 Pic.28
3 4
38

Release the brakes
Pull the lever backwards if ‘push-to-lock’ brakes are used. Push the
lever forward if the ‘pull-to-lock’ or ‘scissor brakes’ have been tted. (see pic. 29, 30, 31, 32).
Pic. 29
1
3 4
Pic. 31
Pic.30
2
Pic. 32
Pressure Brakes work by applying leverage directly
onto the tires. For this reason the effectiveness of the
brake depends on its correct positioning and the correct air pressure in the tires.
The brake is a safety device and should not be used
to brake the wheelchair during the motion, as it could
cause the vehicle to overturn.
39

5.7 Pelvic Belt
The pelvic belt and the restraint belt, being accessories, must be
acquired separately for this model.
The belt can help to provide the user with greater stability, especially for users with little control of the torso. The user is bound to
the backrest at the waistline level leaving the upper torso free to
move. The pelvic belt is rmly anchored to the backrest.
The use is quite easy; open the locking hook by pressing sideways
and pulling the two sides off simultaneously. Once the belt has been
arranged you can close the hook by inserting one side into the other.
(see pic. 33).
40
Pic. 33

5.8 Push handles (patented)
Pandhora EVO wheelchair is equipped with an innovative and patented system that replaces the usual rigid push handles with customizable nautical bands (which are practically indestructible). In this
way the weight of the wheelchair is further reduced and also have
zero footprint.
It should be noted that these innovative push handles avoid common
inammation of the wrist due to incorrect position while pushing the
wheelchair. Force is distributed directly on the forearms, greatly
reducing effort. (see pic. 34).
Pic. 34
41

5.9 Multi-Seating (patented
The Pandhora EVO Wheelchair is the only wheelchair in the world with of a mechanism (patented) that allows the backrest to be
able to rotate from 0° to 300° with a simple movement.
This allows the user to be able to change position at any time with
a simple movement:
• Push the button at the base of the back tube in the direction in
which you want to move the backrest.
• Place the backrest in the desired position. (see pic. 35, 36, 37,
38).
In this way the backrest can also be rotated backward and up
towards the front to be used as a leg rest. In
the case of active users this can bring improved blood circulation
and greatly diminished spasms. (see pic. 39).
An additional backrest can be mounted on request to use as a
legs rest in the front of the chair.
By adding a simple pillow to the backrest it may be reclined until
the knees can rest on the back of the backrest, which allows the
user to take a position that widens the diaphragm, providing an
improvement in breathing. (see pic. 40)
42
Pic. 35 Pic. 36
Pic. 37 Pic. 38
Pic. 39 Pic. 40
43

5.10 Sandy (add-on)
SANDY - The only sea-wheel in the world that allows the user to
climb with the front platform of the Pandhora EVO wheelchair. The
size of the wheelchair remains unchanged and the wheel is simple
to remove and easy to carry.
Excellent for towing, can be used for driving if matched to rear
beach wheels.
The installation of the front wheel takes place in a few simple steps:
• Thanks to its shape, the sea wheel remains rmly on the ground.
(see g. 41).
• Turn the upper retainer. (see g. 42).
• Raise the front wheels. (see g. 43).
• Place the Sea-Wheel in the correct position on the tubular frame.
• Turn the upper retainer in the opposite direction.
• Tighten with the knob. (see g. 44).
Pic. 41
44

Pic. 42
Pic. 43 Pic. 44
45

6 Settings
Pandhora EVO wheelchair is a medical device designed to meet
the needs of the individual user.
The wheelchair should not be used by anyone
other than the owner/intended user.
The wheelchair has been designed specically for the purchaser
and only for this user - stability, handling and resistance characteristics are guaranteed only for this person. Allowing another person to
use the wheelchair might cause the wheelchair to become unstable
with unpredicatble consequences that could lead to the wheelchair
tipping over with serious consequences for both the wheelchair and
the user.
Do not make any changes to the design or set up
of the wheelchair. All the possible adjustments the
46
user is permitted to make are provided in this chapter but must only be carried out for the purpose of
“maintenance” i.e. restoring the original characteristics (The ones with which the wheelchair was
provided).

For special needs or changes you should always directly contact
Pandhora S.R.L. and its technicians, to evaluate the changes and
to verify that they do not compromise the normal, safe use of the
wheelchair.
Changing the original parameters and congurations can seriously
compromise the safety of the wheelchair, causing damage to both
the wheelchair and its user.
At the end of each adjustment made to the wheelchair, scrupulously check that all parts are well
xed (check the closing of screws and bolts and the
smooth functioning of the moving parts). Always
run a test after each adjustment before resuming
the usual use of the wheelchair, if possible in the
presence of a competent companion or carer.
Have the wheelchair checked at least once every 4 months by staff
qualied and authorized for the maintenance of Pandhora S.R.L.
products.
47

6.1 Adjusting the backrest
height
You can adjust the height of the backrest upward and
6
downwards in 1.5 cm steps. (see pic. 45).
The steps are as follows:
• Using an allen wrench (hex key) and an M6 nut wrench, remove the bolts with their saddle nuts and
washers.
• Place the backrest at the preferred height.
• Re-insert the bolts into the hole at the selected height,
including saddle washers.
• Using an allen wrench (hex key) and a wrench for nut
M6, screw in the bolts and nuts.
Pic. 45
48

6.2 Backrest inclination
adjustment
Pandhora EVO has a backrest with continuous adjustment from 0°
to 300° (patented) and adjustable with a simple click. Press the
lever in the direction you want to move the backrest. The same
process should also be used when you want to completely tear
down the backrest for transport. (see pic. 46)
Pic. 46
49

6.3 Rail Width Adjustment
You can adjust the distance between the side guards
5
and the wheel according to your needs.
The guard sides are equipped with loops to translate
their position inward or outward.
• Using an allen wrench (hex key) and an M5 nut wrench, loosen the bolts.
• Place the side guards at the preferred distance.
• Using an allen wrench (hex key) and an M5 nut wrench, tighten the bolts. (see pic. 47)
Pic. 47
50
6.4 Adjusting the footrest
height
The Pandhora EVO wheelchair is equipped with an adjustable footrest. This adjustment serves to vary the distance of the footrest
from the seat plate to allow proper sitting.
The tube of the footrest has a series of holes that, coupled with the
hole in the frame of the wheelchair, allow height adjustment of the
footrest.
• Remove the two bolts (A) with an allen key for M5
5
bolts and two M5 nuts with a wrench.
• Slide the footrest tube up or down until you reach
the desired distance.
• Match the holes on the frame with those on the footrest tube (B) and with the bushings.
• Insert the bolts, close rmly and tighten with an allen key for M5 bolts and wrench for M5 nuts.
Pic. 48
51

4
6.5 Front wheel height adjustment
Front height adjustment is necessary when you
need to replace the front wheel with a wheel of
different size or just if you want to change the
front height of the wheelchair.
An adjustment may be needed to obtain the correct
front height of the wheelchair. The front height is
dependent on the size of the front wheel and fork
type used. (see pic. 49). To adjust the height:
Pic. 49
• Remove the bolts with a 4mm allen wrench.
• Locate the wheel into the holes present on fork, according to the desired height.
• Insert the bolts and tighten rmly.
52

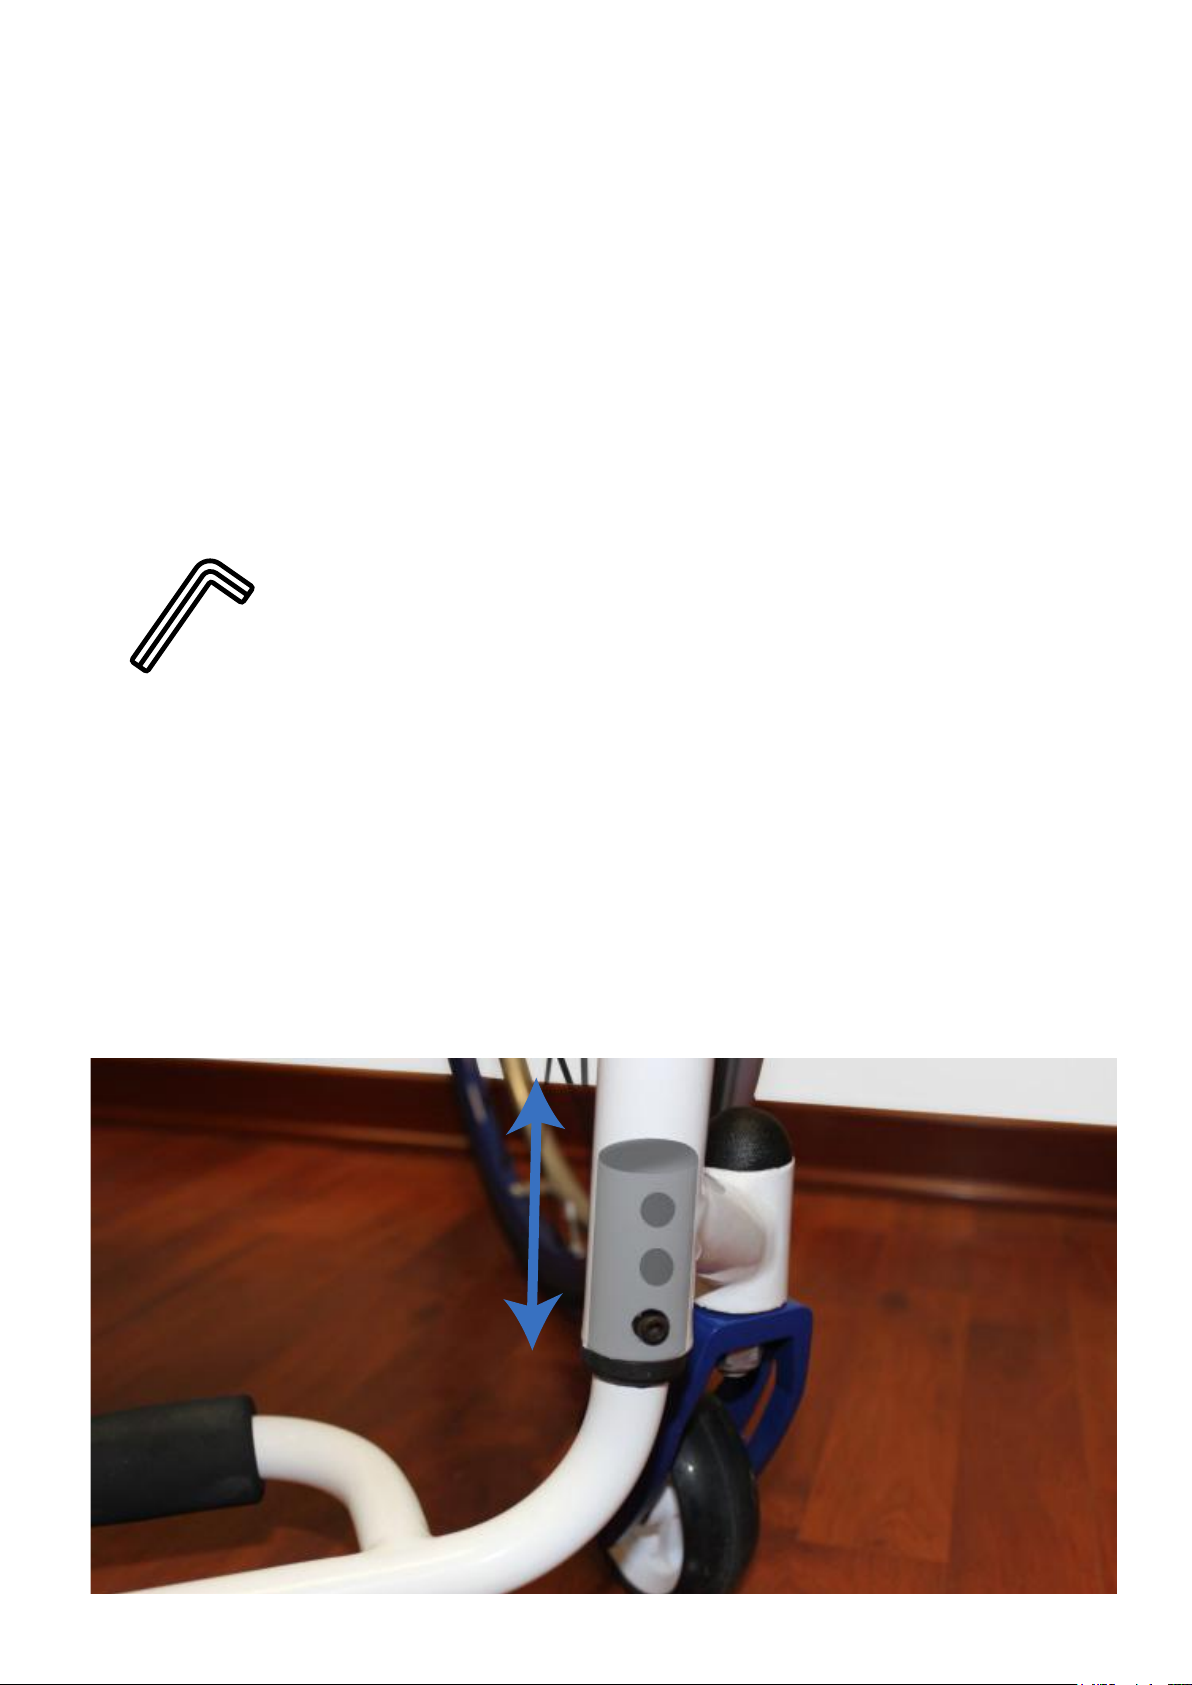
6.6 Anti-tipping adjustment
This accessory has been designed to prevent the wheelchair from
tipping over backwards. For good operation the anti-tip wheel
should be set at a distance of 2-3 cm from the ground.
The anti-tip wheel can be removed entirely if there is a need.
To remove the anti-tip wheel press with your thumb on the spring
plug-tip and pull the anti tip post out of its socket. (see pic. 50).
Alternatively to avoid having to remove the anti tip entirely, the
anti-tip can be rotated into horizontal position. (see pic. 51).
1
Pic. 50 Pic. 51
2
53

3
Pic. 52
Use your thumb to press on spring plug-tip and pull the anti tip
post out. (see pic. 52).
4
Pic. 53
54

1
Use your thumb
to press on spring
plug-tip and rotate the anti tip
post inwards into
the desired position.
2
Pic. 54
Pic. 55
Note that this is
simply to move
the anti tip out of
the way temporarily. The anti tip
will not function
unless
the spring plug is
locked into place.
(see pic. 53, 54,
55, 56)
3
Pic. 56
55

6.7 Adjusting Seat height
You can adjust the front and rear seat height by varying the angle
of the seat.
• Using an allen wrench for M6 bolts (hex key) and
6
In the same way it is also possible to move the seat closer to the
rear wheel axles, adjusting the Center of gravity (CoG).
M6 nut driver, remove the bolts with nuts and washers.
• Move the seat to the desired height by aligning the
holes in the front tube frame with those found on the
ns.
• Insert the bolts with nuts and washers and tighten.
• Repeat the same procedure for the rear.
Moving the location of the seat closer to the CoG makes the Chair
easier to tilt and more “reactive” for more active users. Moving
the location of the seat further away from the CoG makes the
chairs less easy to tilt and suitable for users who need more stability and security. (see pic. 57.58).
56

Pic. 57
Pic. 58
57

6.8 Damping seat adjustment
The Pandhora EVO is equipped with adjustable cushioning. Moving the seat tube forward increases the decline, thereby increasing the level of damping. By placing the seat in the rearmost
position the deection decreases until it becomes unnoticeable.
You should be very careful when adjusting the
damping/cushioning. The seat must not have a
reduction greater than 15mm. Adjustable only by
6
qualied personnel.
• Using an allen wrench for M6 bolts (hex key) and M6
nut driver, remove the nuts and bolts for each of the
collars.
• Move the clamps that hold the tire into place, aligning
the holes on the seat with the holes of the collars.
• Using an allen wrench for M6 bolts (hex key) and a
key for M6 nuts, reinsert the nuts and bolts for each of
the collars and tighten. (see pic.. 59)
58

Pic. 59
59

6.9 Adjusting the backrest
distance
The distance to the backrest can be adjusted in one easy step,
and allows for about 15mm of travel behind the plate that supports the back.
• Using an allen wrench (hex key) for M5 bolts and
5
Pic. 60
M5 nut driver, remove the nuts and bolts.
• Move the plate to the desired position, aligning the
holes in the plate that holds the back with those
found on the seat.
• Using an Allen wrench (hex key) for M5 bolts and
M5 nut driver, replace the nuts and bolts and tighten.
(see pic. 60)
60

6.10 Brake adjustment
The parking brake is a very important element that requires an
adequate adjustment in order to always guarantee good braking
characteristics.
The Pandhora EVO has been designed so that the brake is easy
to adjust. The position of the rear wheel brake depends on the
wheelchair’s conguration.
Check for correct brake function by completing
braking tests. Check for proper locking of the
mechanism attachments by moving the brake lever
energetically. If the brake support should move or
slip during such tests, check the fastening of the
bolts.
Proper functioning of the brakes also depends on
the rear wheel tires being inated to the correct
pressure (refer to section 2.8 “tire pressure”).
Brakes are designed to stabilize the wheelchair
when stationary. For safety reasons you should
not use the brakes while the wheelchair is in motion.
61

To maintain the correct positioning of the brakes:
• Using an allen wrench (hex key) for M6 bolts loosen
6
Pic. 61
bolts A and B on the brake support.
• Then position the brake in order to nd the right setting.
• Fasten bolts A and B. (see pic. 61)
• Follow the same procedure for the other side.
A
B
62

63

7 Maintenance
A periodical check of your wheelchair is essential to maintain maximum efciency and durability. Thorough checks, repeated consistently, and proper use of the wheelchair (see chapters 2.0 “security” and 5.0 “riding the wheelchair”) will extend the working
life of the wheelchair. Go for a check-up at an authorized dealer
within 6 months from the date of purchase of the wheelchair.
Go for a check-up at an authorized dealer within
6 months from the date of purchase of the wheelchair. Failing to do so can immediately void the
warranty and relieve the company from any liability arising from possible faults or breakages.
Maintenance must be carried out once a year. We recommend
that you complete a thorough check of the state of the bearings - sand, water and dust will damage them. Apply light bicycle
oil without resins if required. Use warm water to clean the frame
with little soap or neutral detergent on a damp cloth. Wipe it dry
after washing and never use alkaline or acidic agents, or solvents.
The plastic parts should be cleaned with detergents specically
intended for this material. (see pic. 62)
64

Repairs
For repairs you can trust your dealer Pandhora, who will be able
to offer advice, support and repair services.
Spare parts
Spare parts are available through authorised dealers. For proper
delivery of spare parts it is necessary to indicate the wheelchair
identication number. The VIN (vehicle identication number) is
located on the CE sticker marking; a silver sticker placed on the
tube of the central frame. For safety reasons, only use spare parts and accessories authorized by Pandhora S.r.l.
Disposal
The packaging of the wheelchair can be recycled, where available. The metal parts can be removed and recycled. The fabric
parts and plastics are also recyclable. Disposal must be carried out
according to relevant national laws.
Pic. 62
65

Declaration of Conformity
Hereby the company Pandhora S.r.l. based in Via cervito n° 18
Zip Code: 84084 Fisciano, Salerno, Italy
phone & fax +39 089 825929 mobile +39 328 95 32 556
E-mail : info@pandhora.it website www.pandhora.it
VAT nr. 02726920420,
registration number 02726920420, Chamber of Commerce
VAT nr. 02726920420-REA 210485, with a responsible for design, manufacturing, packaging, and labeling.
This product is in the family of super lightweight wheelchair.
66

Ensures and declares
The product model Pandhora EVO is manufactured with high quality
materials and procedures in compliance with the essential requirements of Council directive 93/42/CEE concerning medical devices;
meet in full the rules listed in annexes I and VII to Directive 2007/47
CEE and transposition of 25 January 2010, the Italian Decree Law
37 of that directive.
The product above is classed as NON-invasive class I medical de-
vices as specied in annex IX and X to
Directive CEE 2004/47.
It also declares that the product:
• There is a measuring instrument
• Is sold nonsterile
We declare that the product described above has been manufactured in compliance with technical
procedures dened by the company and that all inspections and
tests were performed.
Salerno, Italy,10/10/2017
67

WARRANTY
For the wheelchairs we manufacture, we provide a guarantee period of two years from the completion of the certicate of purchase. The guarantee is valid for products with manufacturing defects
or malfunctions.
The warranty does not cover products which exhibit defects caused
by carelessness or improper use.
Through our resellers you can obtain information about and quotes
for repairs. For safety reasons, only use spare parts and accessories authorized by Pandhora. The use of spare parts and accessories not approved by Pandhora S.r.l. are reason for immediate
forfeiture of the guarantee. In order to ensure the efciency of the
wheelchair, it must be kept clean, organized and maintained
according to the instructions for use.
Attention:
We assume no liability for damage caused by the use of our wheelchairs when combined with any kind of part from other manufacturers (i.e. Unit trailer, electrical devices) that involve possibly
relevant dangers unless a particular product has been expressly
authorized in writing by the Pandhora S.r.l.
68

CONDITIONS:
1) the manufacturer covers the product with a warranty period of
2 (two) years from the date of delivery of the product stated on
the warranty card located within this manual. This coupon must be
completed and mailed within 15 days from the date of delivery,
under penalty of forfeiture thereof.
2) during the warranty period, Pandhora S.r.l. undertakes to replace or repair free of charge all components of aid resulting in dysfunction for operating or manufacturing faults, provided that they
are communicated directly to freight forwarder upon delivery.
3) for safety reasons use authorized spare parts and accessories,
on pain of forfeiture of the guarantee.
4) the warranty does not cover:
• Transport damage not reported directly to the shipper upon delivery.
• Damage to the wheels.
• Repairs made by unauthorized centers.
• Wear parts.
• Damage caused deliberately by persons or things.
• Damage caused by intent or gross negligence of the purchaser or
an incorrect and improper use of the
wheelchair.
• Damage to third parties.
69

5) the warranty does not include any shipping or call charges.
6) If you have any doubts or questions regarding changes, contact
the manufacturer before taking any action.
Pandhora S.r.l. is not required to communicate technical changes made
to their products which are subject to change and updates if it considers them necessary.
The Pandhora S.r.l. declines all responsibilithings, animals and third
parties due to changes or misuse of the wheelchair.
PLATE AND CE MARKING
The CE label (see picture) on the wheelchair can be found on the
central part of the frame.
Via Cervito, 18
84084 Fisciano
(SA) ITALY
www.pandhora.it
Mod.
Carico Massimo/
Max Load
EVO
120 kg
Nr° di serie/
serial Nr°
Mese/anno di fabbricazione
Manufacturing date
L1/_ _ _ _
_ _ / 2017
Destinazione d’uso/
Intended use
70
Carrozzina ad autospinta/
self-propelled wheelchair

WARRANTY COUPON
IMPORTANT NOTE: data/user information specied in this coupon
will be treated in accordance with the regulations of the Act on the
protection of privacy.
This warranty card must be completed and shipped within 15 days
from date of delivery, under penalty of forfeiture thereof.
ASL/Reseller Name ___________________________________
Patient name/user _____________________________________
Address ____________________________________________
Locality ___________________________State _____________
ZIP Code _____________Phone__________________________
Aid art. N° ________________ ISO Code_________________
Freshman ____________________Delivery Date____________
Note:________________________________________________
____________________________________________________
___________________________________________________
Our help was recommended by:
Distributor/dealer’s stamp Date of sale
Date of
registration
71

Pandhora S.r.l
Phone & Fax: + 39 089 820 15 04, Mobile: +39 328 95 32 556
Via Cervito n°18, ZIP CODE: 84084, Fisciano (Salerno), ITALY
E-mail: info@pandhora.it
MADE FOR YOUR HEALTH
Mod. Pandhora Evo
Super Light-weight and compact, frame with unique body in Aerospace Aluminium,
thermally treated and ultra-strong.
Maximum Load: 120 kg
5,9 kg
SW
ribbon handles
www.pandhora.it
VAT nr. 02726920420
BRA variable
from 0° to 300°
Patented
BRH
*KHL
**
**Some measures may not be available as they are connected
32 34 36 38 40
12-1/213-1/414-1/4 15 15-3/4
32 34 36 38 40
12-1/2
*depends on SHF
to the SHF dimension and to the size of the front wheels. ( 5")
14-1/4 15 15-3/4
13-1/4
SHF
SHR
Shock absorbed
seat (adjustable)
45 46 47 48 49 50 51 52
17-3/418-1/418-1/2 19 19-1/419-3/4
37 38 39 40 41 42 43
14-1/2 15 15-1/415-3/416-1/416-1/2 17
extra breathable
20
depends on SD
COG
20-1/4
Adjustable sides guards
SD
It’s time to change
the Way to sit!
72
*COG
*for SD=420 mm
90 100 110 120
mm
3-3/4 4 4-1/4 4-3/4
 Loading...