

Panasonic of North America SC C50 User Manual

SC-C50
Wireless Speaker System
Système acoustique sans fil
Basic Owner’s Manual
Manuel d’utilisation Fonctions de base

Music is borderless and timeless, touching people’s
hearts across cultures and generations.
Each day the discovery of a truly emotive experience
from an unencountered sound awaits.
Let us take you on your journey to rediscover music.
Sans frontières, la musique est aussi intemporelle,
touchant le coeur des gens en traversant les cultures
et les générations.
Tous les jours, nous attendons la révélation d’une
expérience émotionnelle authentique à partir d’un son
venu de nulle part.
Permettez-nous de vous emmener en voyage pour
redécouvrir la musique.
02
(02)

Delivering the Ultimate Emotive Musical
Experience to All
At Technics we understand that the listening experience is not purely
about technology but the magical and emotional relationship between
people and music.
We want people to experience music as it was originally intended
and enable them to feel the emotional impact that enthuses and
delights them.
Through delivering this experience we want to support the
development and enjoyment of the world’s many musical cultures.
This is our philosophy.
With a combination of our love of music and the vast high-end audio
experience of the Technics team, we stand committed to building a
brand that provides the ultimate emotive musical experience by music
lovers, for music lovers.
Apportez à tous l’expérience musicale
empreinte d’émotions
Chez Technics, nous savons que l’expérience de l’écoute n’est pas
purement et simplement une question de technologie, mais de
relation magique entre les personnes et la musique.
Nous voulons que tout un chacun puisse ressentir la musique telle
qu’elle a été conçue à l’origine et lui permettre de ressentir le choc
émotionnel qu’il brûle de connaître.
En apportant ce vécu, nous cherchons à accompagner le
développement et le plaisir des nombreuses cultures musicales du
monde. Telle est notre philosophie.
Ici et maintenant, alliant l’amour de la musique et la grande
expérience musicale de l’équipe Technics, nous sommes pleinement
déterminés à construire une marque qui apporte le vécu musical
émotionnel aux fervents de la musique.
Director
Directeur
Michiko Ogawa
(03)
03
Thank you for purchasing this product.
Please read these instructions carefully before using this product, and save this manual for future use.
• About descriptions in this Owner’s Manual
- Pages to be referred to are indicated as “ ○○”.
- The illustrations shown may differ from your unit.
• A more detailed owner’s manual is available in “Owner’s Manual” (PDF format). To read it,
download it from the website.
www.technics.com/support/
• You will need Adobe Reader to browse or print “Owner’s Manual” (PDF format). You can
download and install a version of Adobe Reader that you can use with your OS from the
following website.
http://get.adobe.com/reader/
If you have any questions, visit:
U.S.A.: http://shop.panasonic.com/support
Canada: www.panasonic.ca/english/support
Register online at http://shop.panasonic.com/support (U.S. customers only)
Table of contents
IMPORTANT SAFETY INSTRUCTIONS 05
Installation 07
Control reference guide 08
Connections 09
Network settings 10
Available input sources 14
Basic
Using Bluetooth
®
15
Streaming music over the network 16
Licenses 17
Specifications 18
Others 20
Accessories
AC power supply cord (1)
K2CG3YY00209
• The smartphone on the cover page is not supplied with this unit.
• Product numbers provided in this Owner’s Manual are correct as of July 2018.
• These may be subject to change.
• Do not use AC power supply cord with other equipment.
(04)
04

IMPORTANT SAFETY INSTRUCTIONS
Read these operating instructions carefully before
using the unit. Follow the safety instructions on the
unit and the applicable safety instructions listed below.
Keep these operating instructions handy for future
reference.
1 Read these instructions.
2 Keep these instructions.
3 Heed all warnings.
4 Follow all instructions.
5 Do not use this apparatus near water.
6 Clean only with dry cloth.
7 Do not block any ventilation openings. Install in
accordance with the manufacturer’s instructions.
8 Do not install near any heat sources such as
radiators, heat registers, stoves, or other apparatus
(including amplifiers) that produce heat.
9 Do not defeat the safety purpose of the polarized
or grounding-type plug. A polarized plug has two
blades with one wider than the other. A groundingtype plug has two blades and a third grounding
prong. The wide blade or the third prong are
provided for your safety. If the provided plug does
not fit into your outlet, consult an electrician for
replacement of the obsolete outlet.
10 Protect the power cord from being walked on
or pinched particularly at plugs, convenience
receptacles, and the point where they exit from the
apparatus.
11 Only use attachments/accessories specified by the
manufacturer.
12 Use only with the cart, stand,
tripod, bracket, or table specified
by the manufacturer, or sold with
the apparatus. When a cart is used,
use caution when moving the cart/
apparatus combination to avoid injury
from tip-over.
13 Unplug this apparatus during lightning storms or
when unused for long periods of time.
14 Refer all servicing to qualified service personnel.
Servicing is required when the apparatus has been
damaged in any way, such as power-supply cord or
plug is damaged, liquid has been spilled or objects
have fallen into the apparatus, the apparatus has
been exposed to rain or moisture, does not operate
normally, or has been dropped.
Warning
AC power supply cord
• The power plug is the disconnecting device.
Install this unit so that the power plug can be
unplugged from the socket outlet immediately.
• Ensure the earth pin on the power plug is securely
connected to prevent electrical shock.
- An apparatus with CLASS I construction shall
be connected to a power socket outlet with a
protective earthing connection.
Caution
Unit
• Do not place sources of naked flames, such as lighted
candles, on this unit.
• This unit may receive radio interference caused by
mobile telephones during use. If such interference
occurs, please increase separation between this unit
and the mobile telephone.
Placement
• Place this unit on an even surface.
• To reduce the risk of fire, electric shock or product
damage,
- Do not install or place this unit in a bookcase, built-
in cabinet or in another confined space. Ensure this
unit is well ventilated.
- Do not obstruct this unit’s ventilation openings
with newspapers, tablecloths, curtains, and similar
items.
- Do not expose this unit to direct sunlight, high
temperatures, high humidity, and excessive
vibration.
English
Unit
• To reduce the risk of fire, electric shock or product
damage,
- Do not expose this unit to rain, moisture, dripping
or splashing.
- Do not place objects filled with liquids, such as
vases, on this unit.
- Use the recommended accessories.
- Do not remove covers.
- Do not repair this unit by yourself. Refer servicing
to qualified service personnel.
- Do not let metal objects fall inside this unit.
- Do not place heavy items on this unit.
(05)
05

IMPORTANT SAFETY INSTRUCTIONS
CAUTION
RISK OF ELECTRIC
CAUTION: TO REDUCE THE RISK OF ELECTRIC
Conforms to UL STD 62368-1.
Certified to CAN/CSA STD C22.2 No.62368-1.
THE FOLLOWING APPLIES IN THE U.S.A. AND
CANADA.
This device complies with Part 15 of FCC Rules and
RSS-Gen of IC Rules.
Operation is subject to the following two conditions:
(1) This device may not cause interference, and
(2) this device must accept any interference, including
interference that may cause undesired operation of
this device.
FCC ID: ACJ-SC-C50
IC: 216A-SCC50
This transmitter must not be co-located or operated
in conjunction with any other antenna or transmitter.
This equipment complies with FCC/IC radiation
exposure limits set forth for an uncontrolled
environment and meets the FCC radio frequency
(RF) Exposure Guidelines and RSS-102 of the IC radio
frequency (RF) Exposure rules. This equipment has
very low levels of RF energy that is deemed to comply
without maximum permissive exposure evaluation
(MPE). But it is desirable that it should be installed
and operated keeping the radiator at least 20 cm
(7 7/8”) or more away from person’s body (excluding
extremities: hands, wrists, feet and ankles).
SHOCK
DO NOT OPEN
SHOCK, DO NOT REMOVE SCREWS.
NO USER-SERVICEABLE PARTS
INSIDE.
REFER SERVICING TO QUALIFIED
SERVICE PERSONNEL.
The lightning flash with arrowhead
symbol, within an equilateral triangle, is
intended to alert the user to the presence
of uninsulated “dangerous voltage” within
the product’s enclosure that may be of
sufficient magnitude to constitute a risk of
electric shock to persons.
The exclamation point within an equilateral
triangle is intended to alert the user to
the presence of important operating and
maintenance (servicing) instructions in the
literature accompanying the appliance.
This device complies with FCC’s radiation
exposure limits set forth for an uncontrolled environment
THE FOLLOWING APPLIES ONLY IN THE U.S.A.
FCC Note:
This equipment has been tested and found to comply
with the limits for a Class B digital device, pursuant to
Part 15 of the FCC Rules.
These limits are designed to provide reasonable
protection against harmful interference in a
residential installation. This equipment generates,
uses and can radiate radio frequency energy and,
if not installed and used in accordance with the
instructions, may cause harmful interference to radio
communications.
However, there is no guarantee that interference will
not occur in a particular installation. If this equipment
does cause harmful interference to radio or television
reception, which can be determined by turning the
equipment off and on, the user is encouraged to try
to correct the interference by one or more of the
following measures:
• Reorient or relocate the receiving antenna.
• Increase the separation between the equipment
and receiver.
• Connect the equipment into an outlet on a circuit
different from that to which the receiver is
connected.
• Consult the dealer or an experienced radio/TV
technician for help.
FCC Caution: To assure continued compliance,
follow the attached installation instructions and use
only shielded interface cables when connecting to
peripheral devices.
Any unauthorized changes or modifications to this
equipment would void the user’s authority to operate
this device.
THE FOLLOWING APPLIES ONLY IN CANADA.
CAN ICES-3(B)/NMB-3(B)
This device is restricted to indoor use due to its
operation in the 5.15 to 5.25 GHz frequency range.
High-power radars are allocated as primary users (i.e.
priority users) of the bands 5.25 to 5.35 GHz and
5.65 to 5.85 GHz and that these radars could cause
interference and/or damage to LE-LAN devices.
The maximum antenna gain permitted for the device
is 2.6 dBi, to comply with the EIRP limit in 5250-5350
MHz, 5470-5725 MHz, and 5725-5825 MHz specified
for point-to-point operation.
Information on Disposal in other
Countries outside the European Union
This symbol is only valid in the European
Union.
If you wish to discard this product,
please contact your local authorities or
dealer and ask for the correct method of
disposal.
06
Product Identification Marking is located on the
bottom of the unit.
(06)

Installation
Installation
Turn off all the equipment before connection
and read the appropriate operating instructions.
Be sure to raise this unit when moving, and do
not drag this unit.
Notes on the speakers
These speakers do not have magnetic shielding.
Do not place them near TV, PC or other
equipment easily influenced by magnetism.
• Playing music at high volumes for a long period
can cause damage to the system and shorten
the life of the system.
• Decrease the volume in the following
conditions to prevent damage.
- When playing distorted sound
- When adjusting the sound quality
- When turning on/off this unit
For optimum sound effects
The quality and volume of the bass sound, sound
localization performance, sound ambience,
etc. will change depending on the installation
location of this unit, listening position, room
conditions, and other factors. Refer to the
information below when installing this unit.
Determining the installation location
• Place this unit on a flat safe surface.
Adjusting the distances between this unit
and the wall
• If you install this unit close to a wall or a
corner, the bass sound will be more powerful,
however, if the unit is too close to it, sound
localization performance and sound ambience
may deteriorate.
Adjusting with the Space Tune function
You can adjust the sound quality automatically
according to the installation location (near the
wall or the corner of the room).
Press and hold [ ] for 5 seconds.
• ”Space Tune (Auto)” is displayed.
Press [ ] again while “Space Tune (Auto)” is
displayed.
• A test tone outputs quite big while the
measurement is in progress.
• When the adjustment is complete, “Success”
is displayed.
• To cancel the adjustment in the middle,
press [
].
Unit care
Pull out the AC power supply cord from the
socket before maintenance. Clean this unit with
a soft cloth.
• When dirt is heavy, wring a wet cloth tightly
to wipe the dirt, and then wipe it with a soft
cloth.
• Do not use solvents including benzine, thinner,
alcohol, kitchen detergent, chemical wiper, etc.
Doing so may cause the exterior case to be
deformed or the coating to come off.
Using “Technics Audio Center”
If you install the dedicated app “Technics
Audio Center” (free of charge) on your tablet/
smartphone, you can stream music files from
the device on your network to this unit and
configure the settings of sound quality, etc.
For details, visit:
www.technics.com/support/
Firmware updates
Occasionally, Panasonic may release updated
firmware for this unit that may add or improve
the way a feature operates. These updates are
available free of charge.
• Update via Internet ( 10)
• For details of the update via USB flash memory,
refer to the following website.
www.technics.com/support/firmware/
To dispose of or transfer this
unit
Before disposing of or transferring this unit,
be sure to erase all the recorded information
by restoring the settings to factory default. To
restore the settings to factory default, press
and hold both [•DIMMER/-INFO] and [ ]
simultaneously for 5 seconds or longer while the
unit is on. The unit restarts automatically, and all
the settings are restored to factory default.
• Before you dispose of or transfer this unit
to a third party, be sure to log out of your
music streaming services accounts to prevent
unauthorized use of your accounts.
English
(07)
07
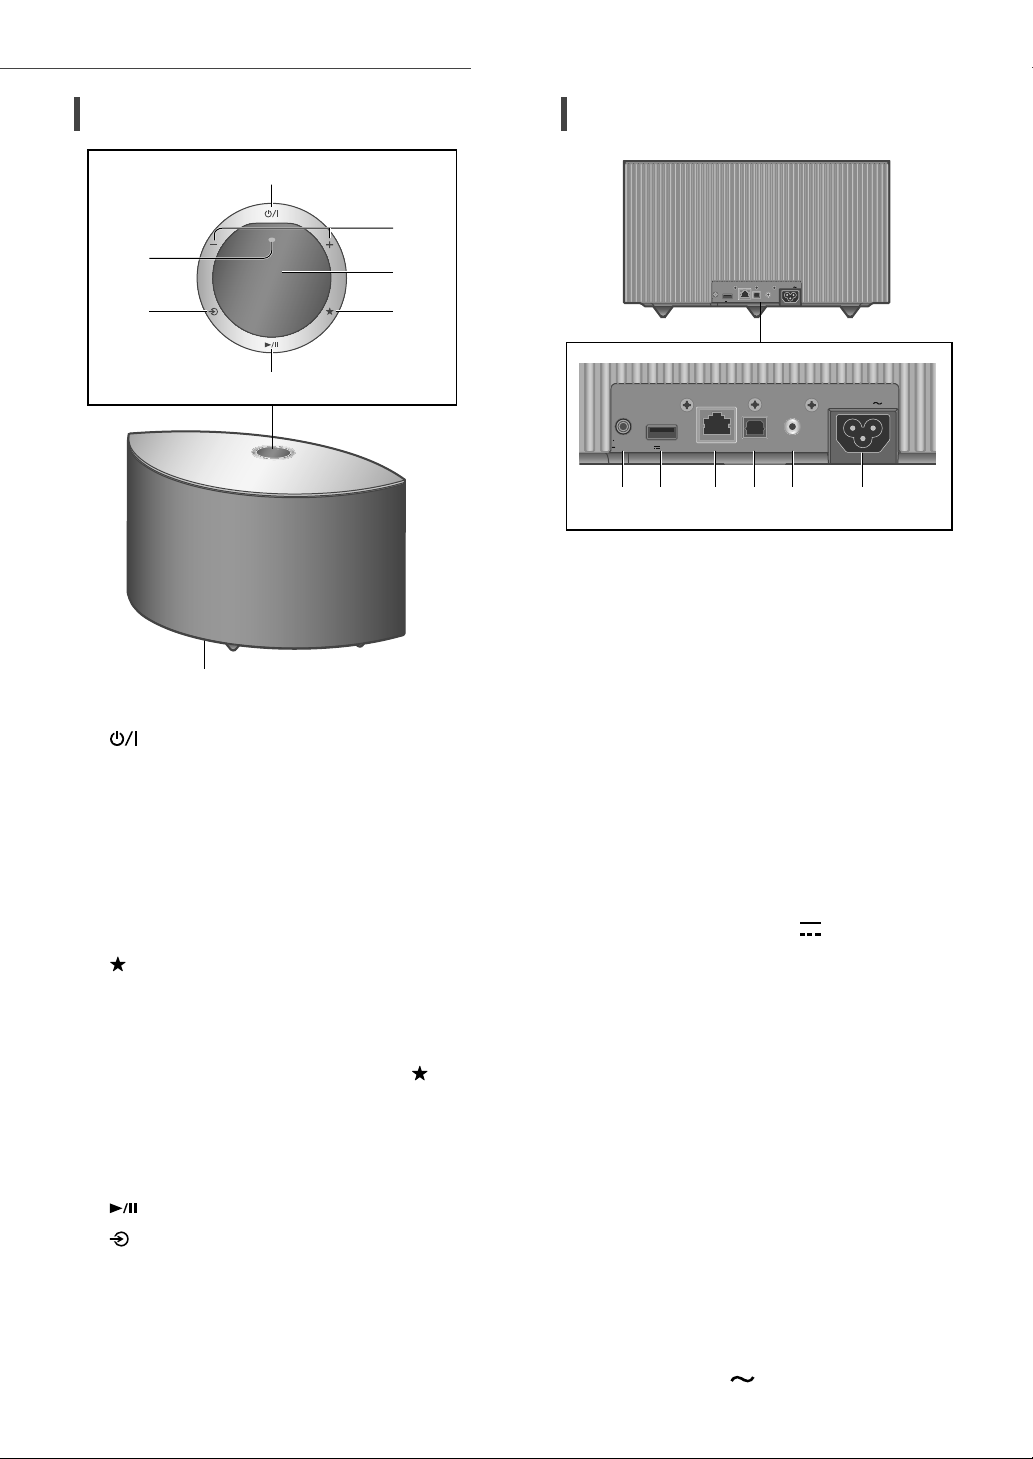
Control reference guide
This unit (front/top)
01 [ ] Standby/on switch
Press to switch the unit from on to standby
mode or vice versa. In standby mode, the
unit is still consuming a small amount of
power.
02 Adjust volume
• 0 (min) to 100 (max)
03 Display
Input source, etc. are displayed.
04 [ ] Favorite
You can register your favorite station or
playlist (USB, Podcasts, Spotify, etc.), and call
them.
• You can register up to 9 favorite stations or
playlists. To register, press and hold [
until “Memorised” is displayed while
a station tuned in or music is being
played back. Then, the station or music
is automatically registered to an unused
number from 1 to 9.
05 [ ] Play/Pause
06 [ ] Switch the input source
07 Built-in microphone
08 Product identification marking (Bottom
of this unit)
• The model number is indicated.
]
This unit (rear)
10BASE-T/
100BASE-TX
500mA5V
OPT INLAN AUX IN
AC IN
OPT INLAN AUX IN
) ( 09)
AC IN
500 mA)
DIMMER
INFO
10BASE-T/
100BASE-TX
DIMMER
INFO
500mA5V
09 [• DI M M ER / - IN F O]
Adjust the brightness of illumination of the
display and bottom of the unit.
• When the display is turned off, it will
light up for a few seconds only when you
operate this unit. Before the display turns
off, “Display Off” will be displayed for a few
seconds.
• Press [•DIMMER/-INFO] repeatedly to
switch the brightness.
• Press and hold [•DIMMER/-INFO] to
display the network status or settings. The
displayed items are changed by pressing
[•DIMMER/-INFO] repeatedly. (The
brightness does not change during this
period.)
10 USB-A terminal (DC 5 V
You can play back music stored on the
connected USB device using the dedicated
app “Technics Audio Center” (free of charge)
on your tablet/smartphone ( 09). For
details, visit:
www.technics.com/support/
• If a USB device is connected, [•DIMMER/-
INFO] is difficult to press. Remove the USB
device as necessary.
11 LAN terminal ( 11)
12 Optical digital input terminal
You can connect a CD player, etc. with
optical digital audio cable (not supplied) and
play back music. ( 09)
13 AUX IN terminal
You can connect a portable audio player, etc.
with an analog audio cable (3.5 mm (
(not supplied) and play back music. ( 09)
14 AC IN terminal (
1
/8”))
08
(08)

Connections
Basic
Connecting analog audio
output device
10BASE-T/
100BASE-TX
DIMMER
INFO
500mA5V
OPT INLAN AUX IN
Portable audio player, etc.
Note
• When enjoying video contents with this
function, the video and audio output may not
be synchronized.
AC IN
Analog audio
cable
(3.5 mm (1/8”))
(not supplied)
Connecting USB device
10BASE-T/
DIMMER
INFO
100BASE-TX
500mA5V
OPT INLAN AUX IN
AC IN
USB device
AC power supply cord
connection
Connect only after all other connections are
completed.
10BASE-T/
DIMMER
INFO
100BASE-TX
500mA5V
OPT INLAN AUX IN
AC IN
Connecting digital audio output
device
10BASE-T/
100BASE-TX
DIMMER
INFO
500mA5V
OPT INLAN AUX IN
CD player, etc.
Note
• When enjoying video contents with this
function, the video and audio output may not
be synchronized.
AC IN
Optical digital
audio cable
(not supplied)
English
To a household AC outlet
• Use only the supplied AC power supply cord.
• Do not connect the AC power supply cord until
all other connections are complete.
• Insert the plugs of the cables to be connected
all the way in.
• Do not bend cables at sharp angles.
• Wireless LAN (Wi-Fi®) setting may start when
this unit is turned on. If you stop the Wi-Fi
setting, press [ ]. To keep the Wi-Fi setting,
start the “Google Home” app and follow the
on-screen instructions. ( 11)
Note
• This unit consumes a small amount of AC
power ( 18) even when the unit is in standby
mode. Remove the plug from the main
electrical outlet if you will not be using the unit
for an extended period of time. Place the unit
so the plug can be easily removed.
(09)
09
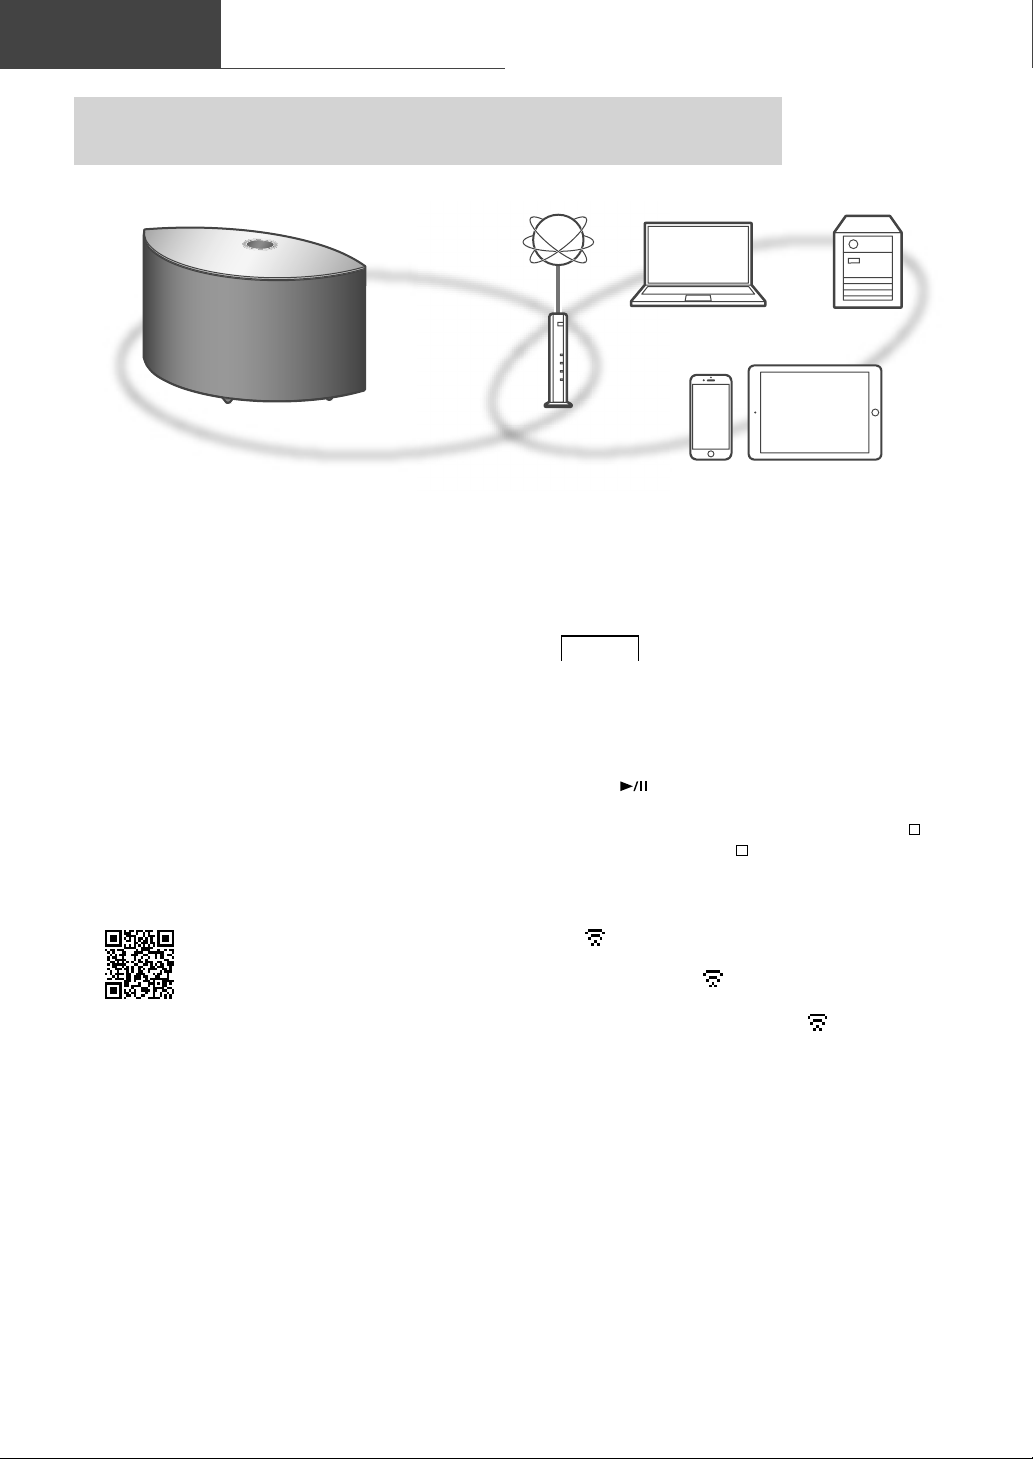
Basic
You can stream online music services or music files from your smartphone/tablet
to this unit.
This unit can be connected to a router using a LAN cable or built-in Wi-Fi®.
For a stable connection to the network, a wired LAN connection is recommended.
■
Preparation
If you install the “Google Home” app on your
smartphone/tablet, you can set up a connection
using the application.
• When using the Chromecast-enabled apps
to play music on this unit ( 16), set up a
connection using the “Google Home” app.
• Make sure that the Wi-Fi function is activated
on your smartphones/tablet.
1 Install the “Google Home” app on
your smartphone/tablet.
• To download the “Google Home” app, visit:
https://www.google.com/cast/setup/
2 Connect your smartphone/tablet to
the same network as this unit before
Network settings
Note
• After turning on this unit, it may take some
time until this unit is activated.
• If “Firmware update is available” is displayed
after the network connection is set up, the
firmware for this unit is available. Press and
hold [
update.
- The progress is displayed as “Updating
- When the update has finished successfully,
• “
not established. When the network connection
is established, “
The network setting using the “Google Home”
app may be available while “
the “Google Home” app and follow the onscreen instructions. ( 13)
] for 5 seconds or longer to start the
while updating. (“ ” stands for a number.)
“Success” is displayed. Turn this unit off and
on.
” blinks while the network connection is
setting.
%”
” disappears.
” blinks. Start
10
(10)
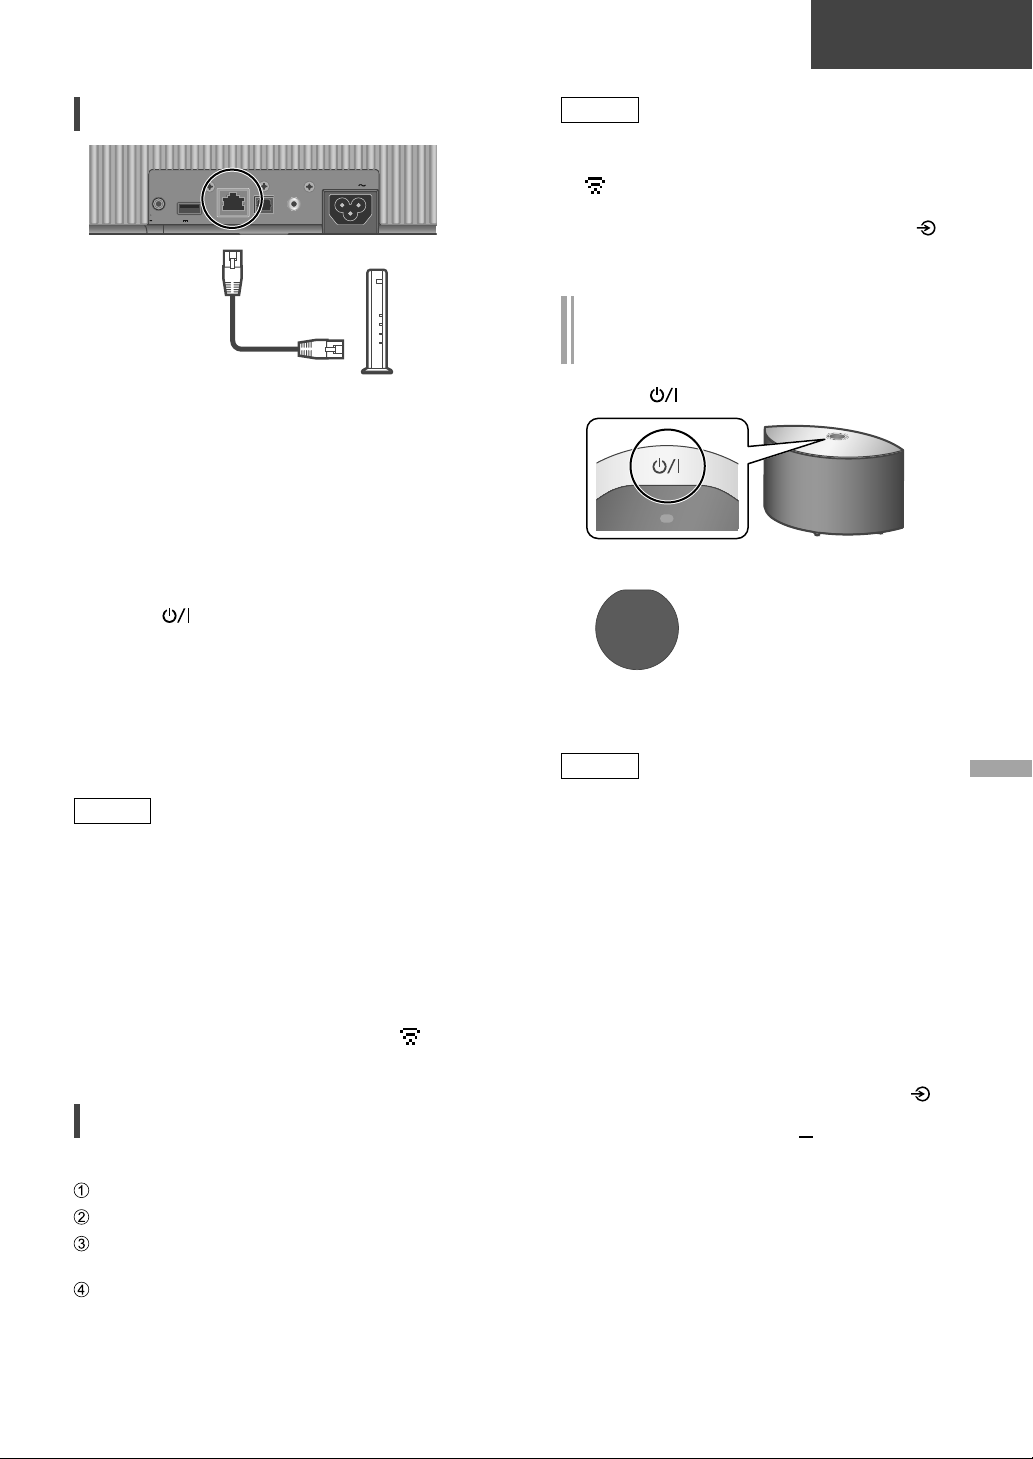
Basic
Wired LAN connection
10BASE-T/
DIMMER
INFO
LAN cable
(not supplied)
100BASE-TX
500mA5V
OPT INLAN AUX IN
AC IN
Broadband router, etc.
1 Disconnect the AC power supply
cord.
2 Connect this unit to a broadband
router, etc. using a LAN cable.
3 Connect the AC power supply cord to
this unit. ( 09)
4 Press [
(To use the Chromecast-enabled apps with
5
this unit ( 16))
] to turn this unit on.
Make sure to set up a connection
using “Google Home” app on your
smartphone/tablet.
Note
• While the AC power supply cord is
disconnected, the LAN cable must be
connected or disconnected.
• Use category 7 or above straight LAN cables
(STP) when connecting to peripheral devices.
• Inserting any cable other than a LAN cable in
the LAN port can damage the unit.
• Even when the Wi-Fi function is set to
“On”, the wired LAN function is activated
while a LAN cable being connected. (“
disappears.)
”
Wireless LAN connection
■
Preparation
Disconnect the AC power supply cord.
Disconnect the LAN cable.
Place this unit as close to the wireless router
as possible.
Connect the AC power supply cord to this
unit. ( 09)
Note
• The setting will be cancelled after the set time
limit. In that case, try the setting again.
” disappears when the Wi-Fi setting is
• “
complete.
• To cancel this setting in the middle, press [
or turn the unit to standby mode.
Network setting for the first time
using the “Google Home” app
1 Press [ ] to turn this unit on.
• “Wi-Fi Setup” starts blinking.
Wi-Fi
Setup
2 Start the “Google Home” app and
follow the on-screen instructions.
Note
• This unit will be displayed as “Technics-
SC-C50(“
****
set.)
• You can check your network information (SSID,
MAC address and IP address) from the “Google
Home” app or “Technics Audio Center” app.
• Some items on the “Google Home” app are
irrelevant to this unit.
• When this unit is turned off and on before
the Wi-Fi setting is complete, “Wi-Fi Setup”
is displayed again. Perform the Wi-Fi setting
or set the Wi-Fi function to “Off” so that it is
not displayed thereafter. To switch the Wi-Fi
function between “On” and “Off”, press [
to cancel the Wi-Fi setting in the middle,
press and hold the volume [ ] on the top and
[•DIMMER/-INFO] on the rear of this unit for
approx. 5 seconds.
• For other connection methods ( 12)
” if the device name is not set.
****
” stands for characters unique to each
]
]
English
(11)
11
Basic
Setting the network from the setup
Network settings (Continued)
menu
1 Press and hold [ ] on the top and
[•DIMMER/-INFO] on the rear of this
unit.
2 Connection methods (WPS/WPS PIN/
Wi-Fi Setup) are displayed in turn.
• The display changes every 5 seconds.
• If your wireless broadband
WPS
WPS PIN
64428147
Wi-Fi
Setup
3 Release [ ] and [•DIMMER/-INFO]
while the selected connection
method is displayed.
Note
• When using the Chromecast-enabled apps
to play music on this unit ( 16), set up a
connection using the “Google Home” app.
router supports the WPS (WiFi Protected Setup™) push
button (Using the WPS button)
• If your wireless broadband
router support the WPS PIN
code method (Using the WPS
PIN code)
• When using the “Google
Home” app to set up a
connection (Using the “Google
Home” app)
■
Using the WPS button
“WPS”
(When not using the Chromecast-enabled apps
with this unit)
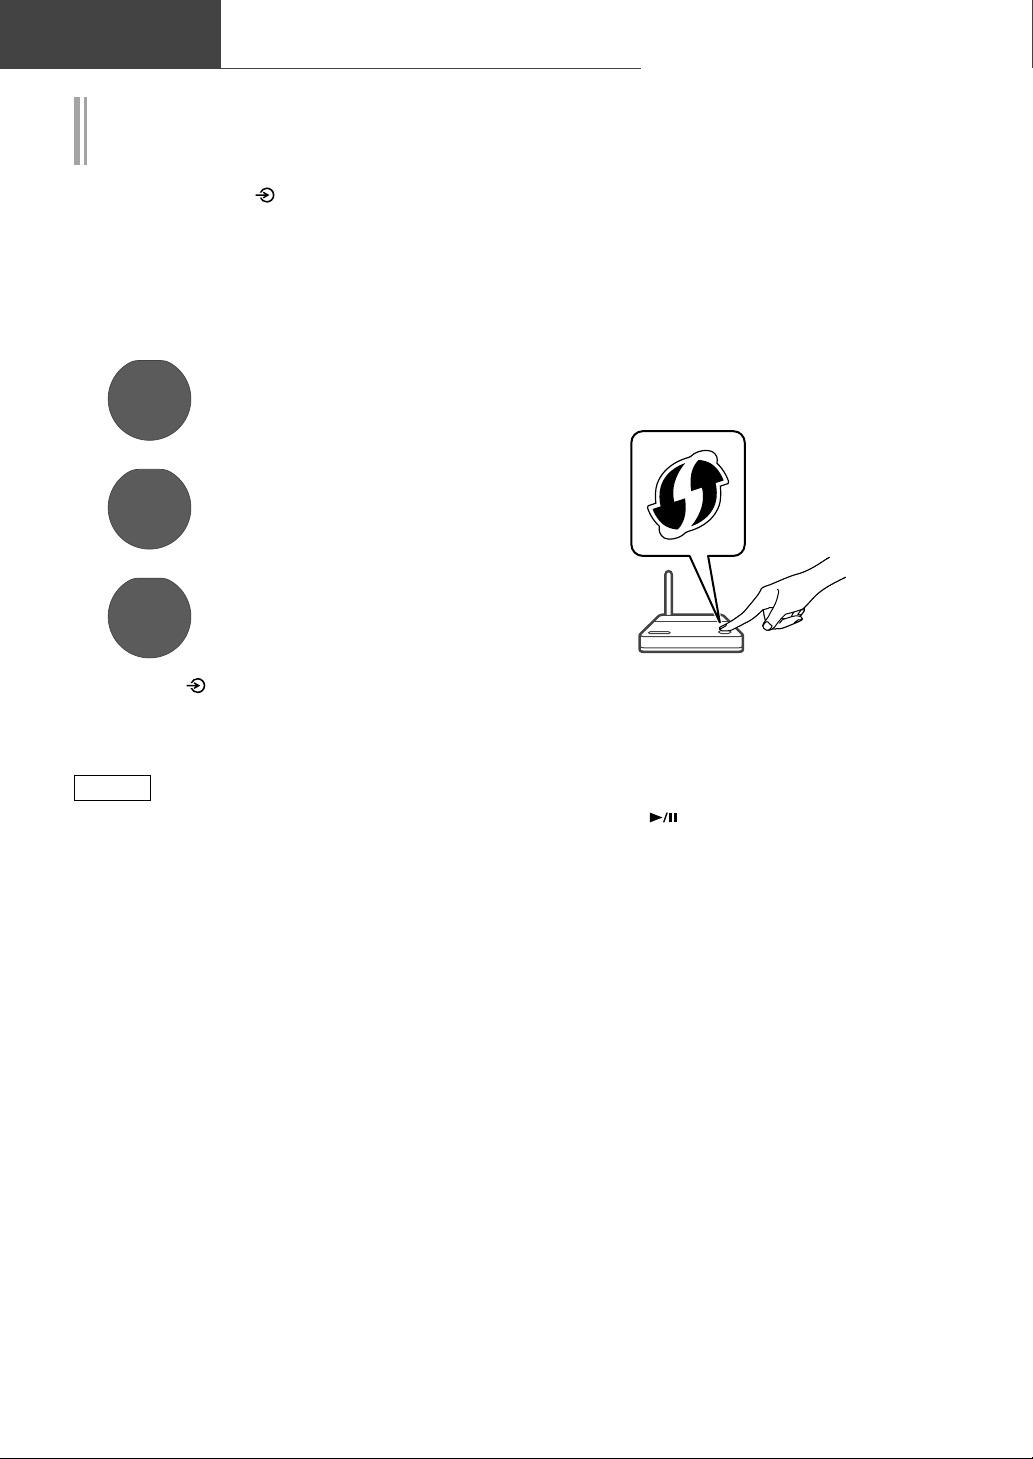
If your wireless router supports WPS, you can
set up a connection by pressing the WPS button.
• A compatible wireless router may have the
WPS identifier mark.
• Complete the settings within 2 minutes while
“WPS” is displayed.
1 After “WPS” is displayed, press the
WPS button on the wireless router.
Example:
• When the connection is established,
“Success” is displayed.
- “Fail” may be displayed if the connection
was not complete. Try this method again
from the setup menu. If “Fail” is still
displayed, try other methods.
2 Press [ ] to exit the setting.
■
Using the WPS PIN code
“WPS PIN”
(When not using the Chromecast-enabled apps
with this unit)
If your wireless router supports WPS, you can
set up a connection by entering the WPS PIN
code.
• For details on how to enter the PIN code, refer
to the operating instructions of the wireless
router.
• Complete the settings within 2 minutes while
“WPS PIN” and the PIN code are displayed.
1 Enter the PIN code into the wireless
router from PC, etc.
• When the connection is established,
“Success” is displayed.
- “Fail” may be displayed if the connection
was not complete. Try this method again
from the setup menu. If “Fail” is still
displayed, try other methods.
12
(12)
 Loading...