

Panasonic of North America RP HD605N User Manual
Basic Owner’s Manual
Digital Wireless Stereo Headphones
RP-HD605N
Thank you for purchasing this product.
Please read these instructions carefully before using this product, and save this manual for future use.
Register online at http://shop.panasonic.com/support
If you have any questions, visit:
http://shop.panasonic.com/support
P
Model No.
Two Riverfront Plaza, Newark, NJ 07102-5490
Panasonic Corporation of North America
http://shop.panasonic.com
© Panasonic Corporation 2018
Printed in China
TQBMXXXX
F02188SK0
TQBMXXX2-RP-HD605N_P_eng.fm 1 ページ 2018年1月10日 水曜日 午後3時7分
More detailed operating
instructions are available in
“Owner’s Manual (PDF format)”.
To read it, download it from the
website.
http://panasonic.jp/support/global/
cs/accessories/oi/rp_hd600n/
• Click the desired language.
Accessories
Please check and identify the supplied accessories.
To order accessories, refer to “Limited Warranty” on the
rear page.
∏ 1xUSB charging cord
∏ 1 x Detachable cord
∏ 1 x Carrying case
∏ 1 x Airplane adaptor
Caution: Use only the supplied USB charging cord when
connecting to a computer.
Maintenance
Clean this unit with a dry and soft cloth.
• Do not use solvents including benzine, thinner, alcohol, kitchen
detergent, a chemical wiper, etc. This might cause the exterior
case to be deformed or the coating to come off.
IMPORTANT SAFETY
INSTRUCTIONS
Read these operating instructions carefully before using the unit.
Follow the safety instructions on the unit and the applicable
safety instructions listed below. Keep these operating
instructions handy for future reference.
1 Read these instructions.
2 Keep these instructions.
3 Heed all warnings.
4 Follow all instructions.
5 Do not use this apparatus near water.
6 Clean only with dry cloth.
7 Do not block any ventilation openings. Install in accordance
with the manufacturer’s instructions.
8 Do not install near any heat sources such as radiators, heat
registers, stoves, or other apparatus (including amplifiers) that
produce heat.
9 Do not defeat the safety purpose of the polarized or
grounding-type plug. A polarized plug has two blades with one
wider than the other. A grounding-type plug has two blades
and a third grounding prong. The wide blade or the third prong
are provided for your safety. If the provided plug does not fit
into your outlet, consult an electrician for replacement of the
obsolete outlet.
10 Protect the power cord from being walked on or pinched
particularly at plugs, convenience receptacles, and the point
where they exit from the apparatus.
11 Only use attachments/accessories specified by the
manufacturer.
12 Use only with the cart, stand, tripod,
bracket, or table specified by the
manufacturer, or sold with the apparatus.
When a cart is used, use caution when
moving the cart/apparatus combination to
avoid injury from tip-over.
13 Unplug this apparatus during lightning
storms or when unused for long periods of
time.
14 Refer all servicing to qualified service personnel. Servicing is
required when the apparatus has been damaged in any way,
such as power-supply cord or plug is damaged, liquid has
been spilled or objects have fallen into the apparatus, the
apparatus has been exposed to rain or moisture, does not
operate normally, or has been dropped.
Safety precautions
A lithium ion battery that is recyclable
powers the product you have
purchased. Please call 1-800-8BATTERY for information on how to
recycle this battery.
This device complies with Part 15 of FCC Rules. Operation
is s
ubject to the following two conditions:
(1) this device may not cause interference, an
(2) this device must accept any interference, including
interference that may cause undesired operation of this
device.
FCC ID: ACJ-RP-HD605N
Model: RP-HD605N
This transmitter must not be co-located or operated in
conjunction with any other antenna or transmitter.
This equipment complies with FCC radiation exposure limits
set forth for an uncontrolled environment and meets the FCC
radio frequency (RF) Exposure Guidelines. This equipment
has very low levels of RF energy that is deemed to comply
without testing of specific absorption ratio (SAR).
d
FCC Note:
This equipment has been tested and found to comply with the
limits for a Class B digital device, pursuant to Part 15 of the
FCC Rules.
These limits are designed to provide reasonable protection
against harmful interference in a residential installation. This
equipment generates, uses, and can radiate radio frequency
energy and, if not installed and used in accordance with the
instructions, may cause harmful interference to radio
communications.
However, there is no guarantee that interference will not
occur in a particular installation. If this equipment does cause
harmful interference to radio or television reception, which
can be determined by turning the equipment off and on, the
user is encouraged to try to correct the interference by one or
more of the following measures:
• Reorient or relocate the receiving antenna.
• Increase the separation between the equipment and
receiver.
• Connect the equipment into an outlet on a circuit different
from that to which the receiver is connected.
• Consult the dealer or an experienced radio/TV technician for
help.
Any unauthorized changes or modifications to this equipment
would void the user’s authority to operate this device.
This device complies with Part 15 of the FCC Rules.
Operation is subject to the following two conditions: (1) This
device may not cause harmful interference, and (2) this
device must accept any interference received, including
interference that may cause undesired operation.
Responsible Party: Panasonic Corporation of North America
Two Riverfront Plaza, Newark, NJ 07102-5490
Support Contact: http://shop.panasonic.com/support
∫ Unit
WARNING:
To reduce the risk of fire, electric shock or product
damage,
• Do not expose this unit to rain, moisture, dripping or
splashing.
• Do not place objects filled with liquids, such as vases,
on this unit.
• Use the recommended accessories.
• Do not remove covers.
• Do not repair this unit by yourself. Refer servicing to
qualified service personnel.
• Avoid using or placing this unit near sources of heat.
• Do not use while operating a motorized vehicle. It may create a
traffic hazard and is illegal in many areas.
• Do not listen with this unit at high volume in places where you
need to hear sounds from the surrounding environment for
safety, such as at railroad crossings, and construction sites.
• Certification information can be found on the right side of the
headphones. Remove the right ear pad to see it.
∫ Allergies
• Discontinue use if you experience discomfort with the ear pads
or any other parts that directly contact your skin.
• Continued use may cause rashes or other allergic reactions.
This unit may receive radio interference caused by mobile
telephones during use. If such interference occurs, please
increase separation between this unit and the mobile
telephone.
This unit is intended for use in moderate and tropical climates.
The serial number of this product can be found on the left side
of the headphones.
Remove the left ear pad to see it.
Please note them in the space provided below and keep for
future reference.
MO DEL NU MBE R R P-H D605N
SERIAL NUMBER
User memo:
DATE OF PURCHASE
DEALER NAME
DEALER ADDRESS
TELE PH ONE N UMBE R
Limited Warranty
Panasonic Products Limited Warranty
Limited Warranty Coverage
If your product does not work properly because of a defect in
materials or workmanship, Panasonic Corporation of North
America (referred to as “the warrantor”) will, for the length of
the period indicated on the chart below, which starts with the
date of original purchase (“warranty period”), at its option
either (a) repair your product with new or refurbished parts,
(b) replace it with a new or a refurbished equivalent value
product, or (c) refund your purchase price. The decision to
repair, replace or refund will be made by the warrantor.
Product or Part Name Parts Labor
Headphones/
Earphones/Headset
All included
Accessories
During the “Labor” warranty period there will be no charge
for labor. During the “Parts” warranty period, there will be no
charge for parts. This Limited Warranty excludes both parts
and labor for non-rechargeable batteries, antennas, and
cosmetic parts (cabinet). This warranty only applies to
products purchased and serviced in the United States. This
warranty is extended only to the original purchaser of a new
product which was not sold “as is”.
Mail-In Service--Online Repair Request
Online Repair Request
To submit a new repair request and for quick repair status
visit our Web Site at
http://shop.panasonic.com/support
When shipping the unit, carefully pack, include all supplied
accessories listed in the Owner’s Manual, and send it
prepaid, adequately insured and packed well in a carton
box. When shipping Lithium Ion batteries please visit our
Web Site at
http://shop.panasonic.com/support
committed to providing the most up to date information.
Include a letter detailing the complaint, a return address and
provide a daytime phone number where you can be
reached. A valid registered receipt is required under the
Limited Warranty.
IF REPAIR IS NEEDED DURING THE WARRANTY
PERIOD, THE PURCHASER WILL BE REQUIRED TO
FURNISH A SALES RECEIPT/PROOF OF PURCHASE
INDICATING DATE OF PURCHASE, AMOUNT PAID AND
PLACE OF PURCHASE. CUSTOMER WILL BE
CHARGED FOR THE REPAIR OF ANY UNIT RECEIVED
WITHOUT SUCH PROOF OF PURCHASE.
Limited Warranty Limits and Exclusions
This warranty ONLY COVERS failures due to defects in
materials or workmanship, and DOES NOT COVER normal
wear and tear or cosmetic damage. The warranty ALSO
DOES NOT COVER damages which occurred in shipment,
or failures which are caused by products not supplied by the
warrantor, or failures which result from accidents, misuse,
abuse, neglect, mishandling, misapplication, alteration,
faulty installation, set-up adjustments, misadjustment of
consumer controls, improper maintenance, power line
surge, lightning damage, modification, introduction of sand,
humidity or liquids, commercial use such as hotel, office,
restaurant, or other business or rental use of the product, or
service by anyone other than a Factory Service Center or
other Authorized Servicer, or damage that is attributable to
acts of God.
THERE ARE NO EXPRESS WARRANTIES EXCEPT AS
LISTED UNDER “LIMITED WARRANTY COVERAGE”.
THE WARRANTOR IS NOT LIABLE FOR INCIDENTAL
OR CONSEQUENTIAL DAMAGES RESULTING FROM
THE USE OF THIS PRODUCT, OR ARISING OUT OF ANY
BREACH OF THIS WARRANTY.
(As examples, this excludes damages for lost time, travel to
and from the servicer, loss of or damage to media or
images, data or other memory or recorded content. The
items listed are not exclusive, but for illustration only.)
ALL EXPRESS AND IMPLIED WARRANTIES,
INCLUDING THE WARRANTY OF MERCHANTABILITY,
ARE LIMITED TO THE PERIOD OF THE LIMITED
WARRANTY.
Some states do not allow the exclusion or limitation of
incidental or consequential damages, or limitations on how
long an implied warranty lasts, so the exclusions may not
apply to you.
This warranty gives you specific legal rights and you may
also have other rights which vary from state to state. If a
problem with this product develops during or after the
warranty period, you may contact your dealer or Service
Center. If the problem is not handled to your satisfaction,
then write to:
Consumer Affairs Department
Panasonic Corporation of North America
661 Independence Pkwy
Chesapeake, VA 23320
PARTS AND SERVICE, WHICH ARE NOT COVERED BY
THIS LIMITED WARRANTY, ARE YOUR
RESPONSIBILITY.
1 year Not Applicable
90 days Not Applicable
as Panasonic is
As of April 2017
until
2018/2/22
B
1
2
3
4
F
C
Bluetooth
Bluetooth ON
RP-HD605N
D
E
B
B
D
D
D
E
B
D
D
TQBMXXX2-RP-HD605N_P_eng.fm 2 ページ 2018年1月10日 水曜日 午後3時7分
A
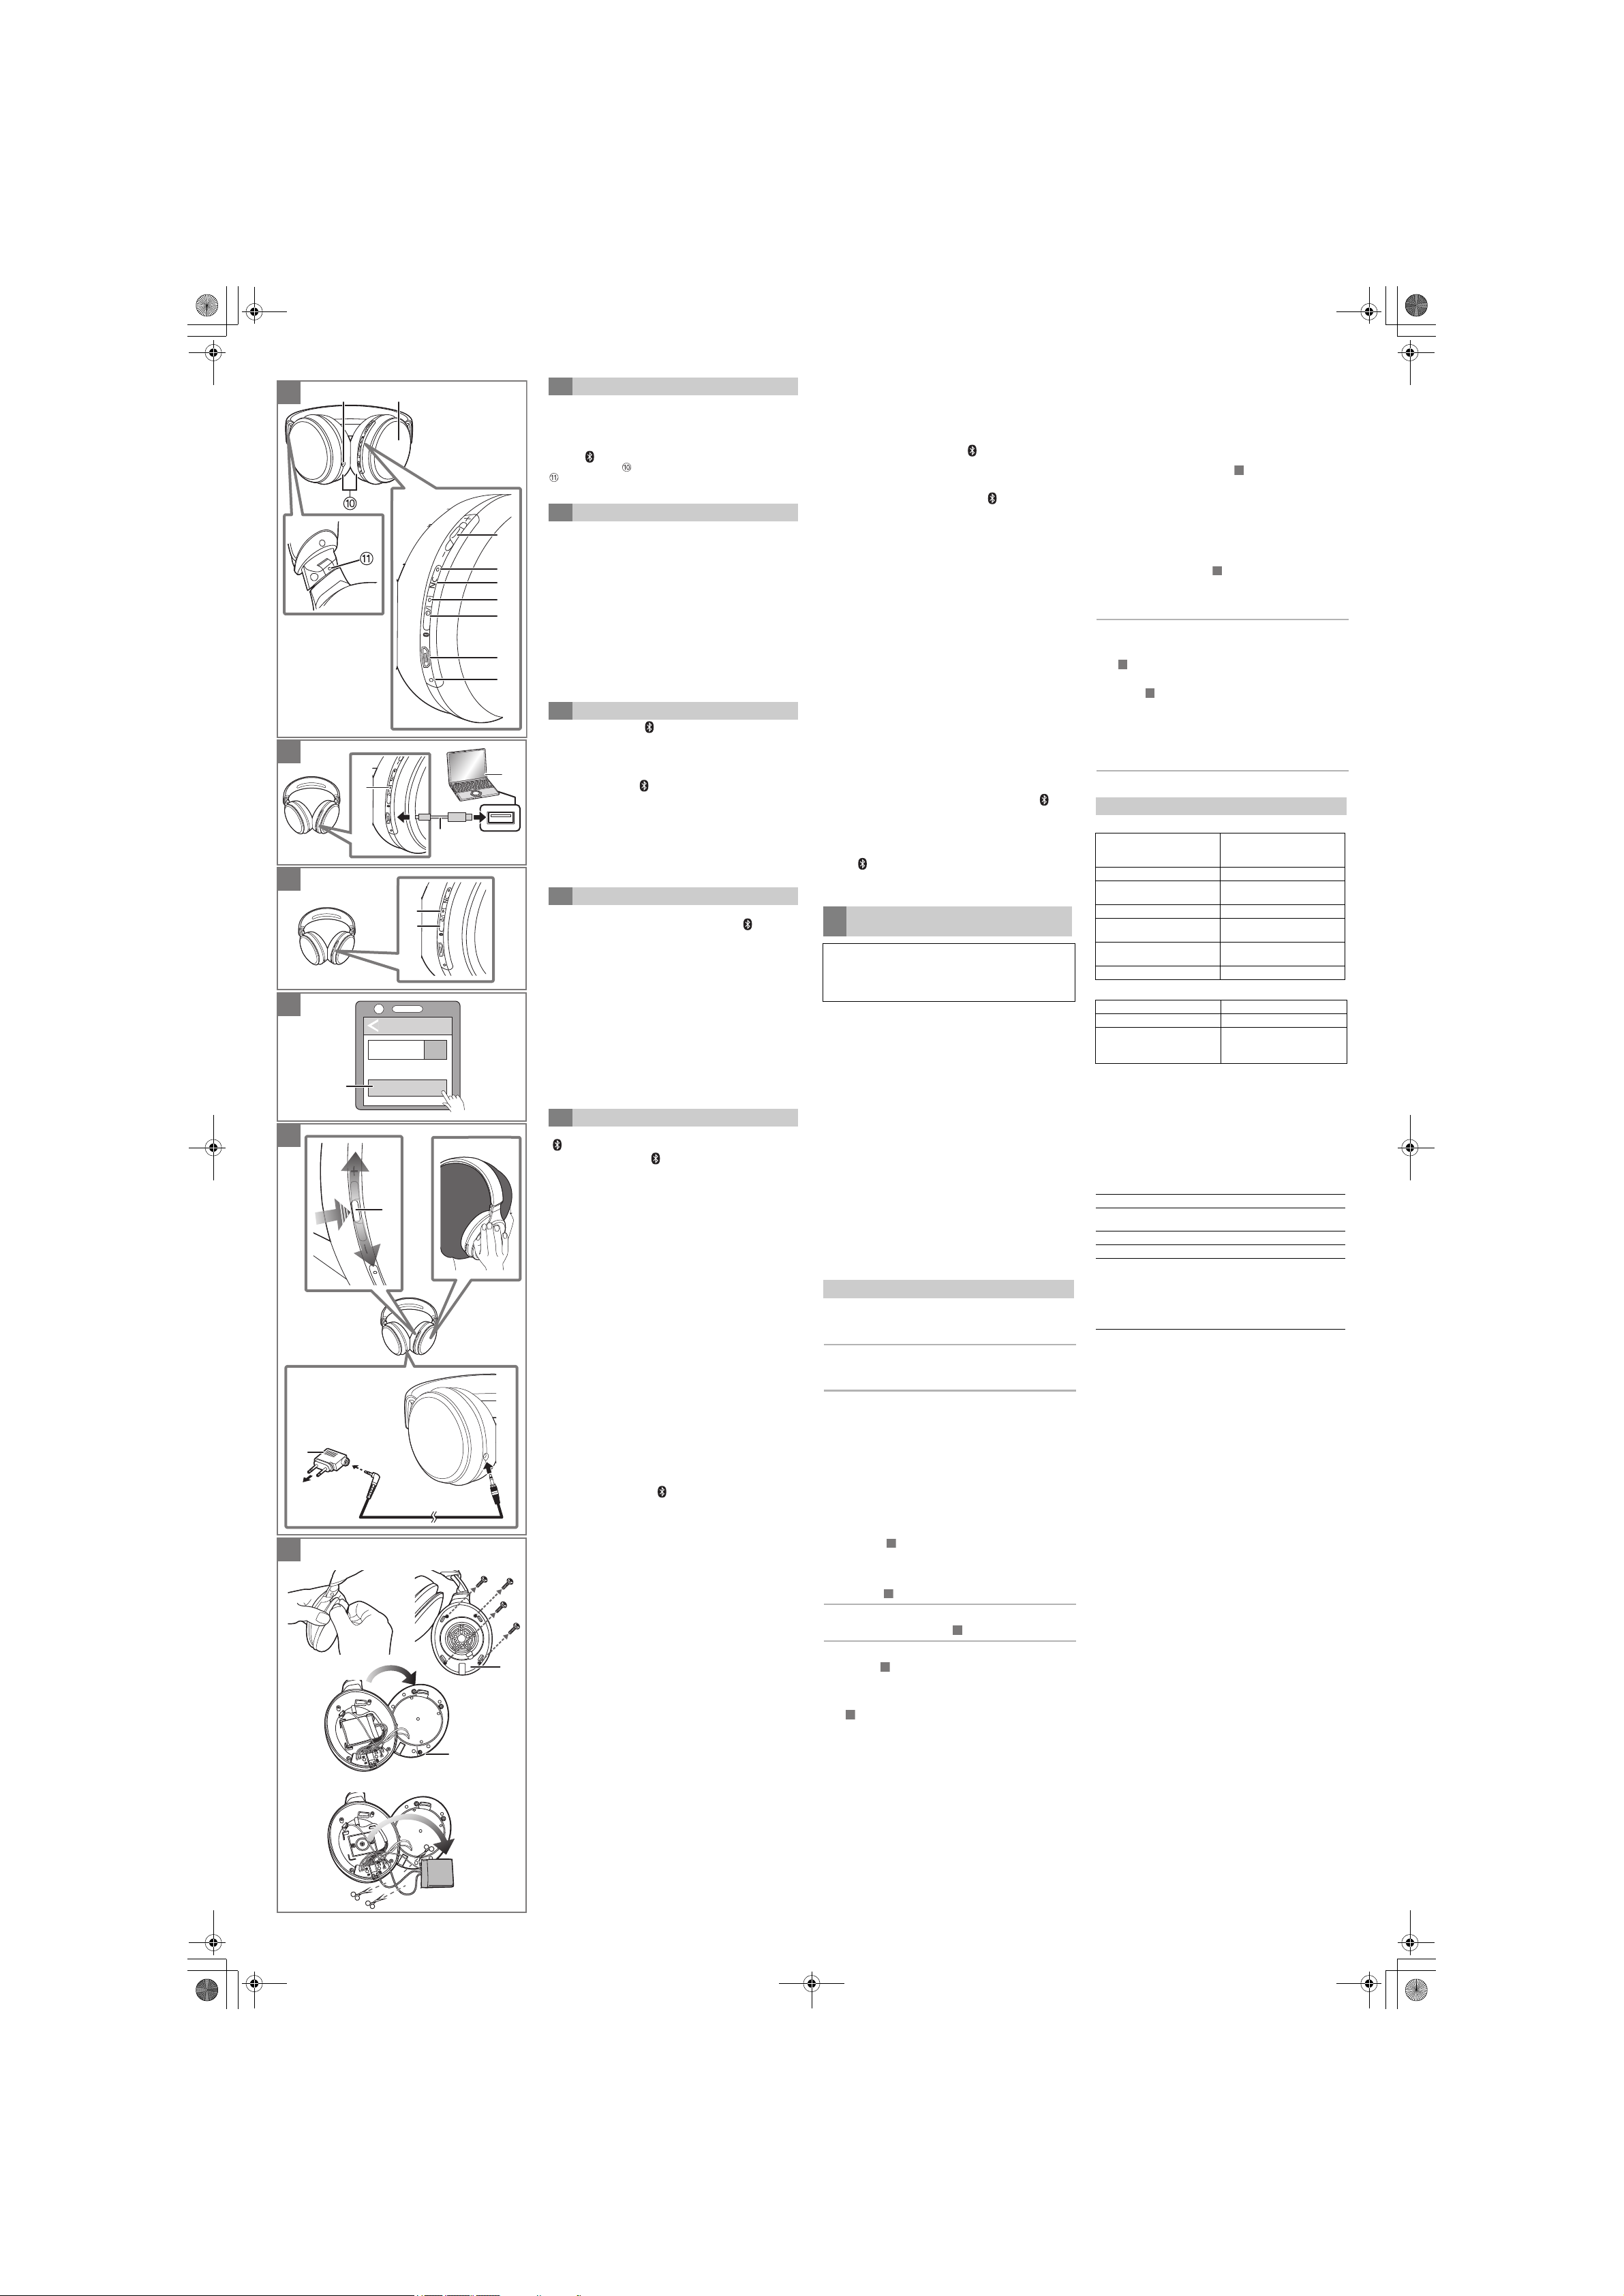
A Part names
a Right (R) side
1 Audio input terminal
2 Ambient sound enhancer sensor panel
3 [Multiple functions button] 4 Noise-canceling LED
5 [NC] button 6 Power/pairing LED
7 [Í/I ( )] button* 8 Charging terminal (DC IN)
9 Microphone Ear pad
Raised dot indicating the left side
* Í/I: Standby/ON
B Charging
The rechargeable battery (installed in the unit) is not
charged initially. Charge the battery before using the unit.
Connect this unit to a computer (a) using the USB
charging cord (supplied) (b).
• The power/pairing LED (c) lights in red when charging is in
progress. When charging is completed, the power/pairing LED
will go out.
• Charging will take approximately 4 hours from empty state to
fully charged.
• The power cannot be turned on while charging.
• Do not use any other USB charging cords except the supplied
one.
• When the battery starts running low, the blinking power/pairing
LED will turn from blue to red. A beep will sound every
1 minute. When the battery runs out, the power will turn off.
C Turning the power on/off
Press and hold [Í/I ( )] (a) of this unit for approx.
3 seconds until the power/pairing LED (blue) (b) blinks.
• A guidance message will be heard, and the power/pairing LED
(blue) will blink slowly.
∫ Activating a voice functions []
Press and hold [Multiple functions button]
(a) of this
unit for approx. 3 seconds.
∫ Making a multi-point connection [ ]
1 Register the unit to both the first Bluetooth® device and
the second Bluetooth
2 Connect the first Bluetooth
for music playback, and the unit.
3 Connect the second Bluetooth
used for calls, and the unit.
®
device.
®
device, which will be used
®
device, which will be
∫ Using the detachable cord (supplied)
While the unit is turned off, it can be used as normal
headphones by connecting the detachable cord (supplied).
(c)
• If you connect the detachable cord (supplied) when
connected via Bluetooth
®
, the Bluetooth® connection will
be lost. (The unit turns off.)
• The [Multiple functions button] does not work even while
the unit is turned on.
∫ Connecting to an airplane audio system
1 Connect the unit and the detachable cord (supplied). (c)
2 Connect the input plug (d) of the detachable cord
(supplied) to the airplane adapter (supplied) (e).
3 Connect the airplane adapter to the in-flight audio
system. (f)
Low volume.
• The ambient sound enhancer function is operating.
• Increase the volume of the unit. (
• Increase the volume on the Bluetooth
Sound from the device is cut off. / Sound quality is bad.
• Sound may be disrupted if signals are blocked. Do not fully cover this
unit with the palm of your hand, etc.
• The device may be out of the 10 m (33 feet) communication range.
Move the device closer to this unit.
• Remove any obstacle between this unit and the device.
• Switch off any wireless LAN device when not in use.
• A communication problem may arise if the battery is not fully
charged. Charge the unit. (
• If the unit and the Bluetooth
problem may be solved by changing the sound quality mode on the
®
device to give priority to connection. For details, refer to
Bluetooth
the operating instructions for the Bluetooth
You cannot hear the other person.
• Make sure that the unit and the Bluetooth® enabled phone are
turned on.
• Check if the unit and the Bluetooth® enabled phone are connected.
(l )
• Check the audio settings of the Bluetooth® enabled phone. Switch
the calling device to the unit if it is set to the Bluetooth
phone. (
l )
• If the volume of the other person’s voice is too low, increase the
volume of both the unit and the Bluetooth
Cannot make a phone call.
• Check if the Bluetooth
profile. For details on profiles, see “Listening to music” and “Making a
phone call” in “Owner’s Manual (PDF format)”. Also refer to the
operating manual for the Bluetooth® enabled phone.
l
®
®
compatible device supports “HSP” or “HFP”
)
l
®
device.
)
device are connected via LDAC, the
®
device.
®
enabled
®
enabled phone.
To turn the power off
®
device’s
®
device.
A
∫ Restoring to the factory settings
1 While the unit is turned off, press and hold [Í/I ( )] for
at least 5 seconds until the power/pairing LED starts
blinking alternately in blue and red.
2 While the power/pairing LED is blinking alternately in blue
and red, slide and hold the [Multiple functions button]
towards “+” and at the same time press and hold
[Í/I ( )] for at least 5 seconds.
• The default settings will be restored after the power/pairing
LED (blue) blinks fast and the unit turns off.
To remove the battery when disposing
F
of this unit
The following instructions are not intended for repairing
purposes but for the disposal of this unit. This unit is not
restorable once disassembled.
• When disposing of this unit, take out the battery
installed in this unit and recycle it.
• Disassemble after the battery runs out.
• Keep disassembled parts out of reach of children.
Regarding the handling of used batteries
• Insulate the terminals with adhesive tape or similar material.
• Do not disassemble.
∫ Batteries
• Do not heat or expose to flame.
• Do not leave the battery(ies) in a car exposed to direct sunlight
for a long period of time with doors and windows closed.
• Battery mishandling can cause electrolyte leakage which can
damage items the leaked fluid comes into contact with. If
electrolyte leaks from the battery, consult your dealer. Wash
thoroughly with water if electrolyte comes in contact with any
part of your body.
• When disposing of the batteries, please contact your local
authorities or dealer and ask for the correct method of disposal.
1 Remove the left ear pad.
2 Remove the 4 screws
3 Remove the part A in step 2.
4 Remove the battery, and cut off the wires one by one with
scissors.
Troubleshooting
Before requesting service, make the following checks. If you are in
doubt about some of the check points, or if the remedies indicated in
the chart do not solve the problem, refer to “Customer Services
Directory” on the front page if you reside in the U.S.A.
The unit does not respond.
• This unit can be reset when all operations are rejected. To reset the
unit, connect the unit to a computer using the USB charging cord.
(The pairing device information will not be deleted.)
Cannot charge the unit. /The power/pairing LED blinks during
charging.
• Make sure the computer is turned on and is not on standby or sleep
mode.
• Is the USB port you are currently using working properly? If your
computer has other USB ports, unplug the connector from its current
port and plug it into one of the other ports.
• If the measures mentioned above are not applicable, unplug the
USB charging cord and plug it in again.
• If the charge time and operating time become shortened, the battery
may have run down. (Number of charging times of the installed
battery: Approximately 300.)
The power/pairing LED does not light during charging. / Charging
takes longer.
• Is the USB charging cord connected firmly to the USB terminal of the
computer? (
• Make sure to charge in a room temperature between 10 oC and
35 oC (50 oF and 95 oF).
The power does not turn on.
• Is the unit being charged? The power cannot be turned ON during
charging. (
The device cannot be connected.
• Delete the pairing information for this unit from the Bluetooth®
device, then pair them again. (l)
No sound.
• Make sure that the unit and the Bluetooth® device are connected
correctly. (l)
• Check if music is playing on the Bluetooth
• Make sure that the unit is turned on and the volume is not set too
low.
• Pair and connect the Bluetooth® device and the unit again.
(
l
• Check if the Bluetooth® compatible device supports “A2DP” profile.
For details on profiles, see “Listening to music”
(PDF format)”
compatible device.
)
l
)
l
®
)
. Also refer to the operating manual for the Bluetooth®
device.
in “Owner’s Manual
Specifications
∫ General
Power supply DC 5 V, 500 mA
Operating time
Charging time
(77 oF))
Charging temperature range 10 oC to 35 oC (50 oF to 95 oF)
Operating temperature
range
Operating humidity range 35%RH to 80%RH
Mass (Weight) Approx. 268 g (X.X oz)
∫ Bluetooth
Frequency band 2402 MHz to 2480 MHz
Supported profiles A2DP, AVRCP, HSP, HFP
Supported codec
*1 It may be shorter depending on the operating conditions.
*2 Time taken to recharge from empty to full.
The Bluetooth® word mark and logos are registered trademarks
owned by the Bluetooth SIG, Inc. and any use of such marks by
Panasonic Corporation is under license.
Other trademarks and trade names are those of their respective
owners.
Siri® is registered trademark of Apple Inc.
QR Code is a registered trademark of DENSO WAVE
INCORPORATED.
Android is a trademark of Google Inc.
LDAC and LDAC logo are trademarks of Sony Corporation.
Qualcomm aptX is a product of Qualcomm Technologies
International, Ltd.
Qualcomm is a trademark of Qualcomm Incorporated, registered in
the United States and other countries, used with permission. aptX is
a trademark of Qualcomm Technologies International, Ltd.,
registered in the United States and other countries, used with
permission.
Other system names and product names appearing in this document
are in general the registered trademarks or trademarks of the
respective developer companies.
Note that the
*1
(SBC) Approx. 20 hours
*2
(25 oC
®
section
TM
mark and ® mark do not appear in this document.
(Internal battery: 3.7 V (Lipolymer 800 mAh))
Approx. 4 hours
0 oC to 40 oC (32 oF to 104 oF)
(no condensation)
Qualcomm®aptXTM,
SBC,
Qualcomm
LDAC
TM
®
aptXTM HD,
Press and hold [Í/I ( )] for approximately 3 seconds.
guidance message will be heard,
off.
• If the unit is not connected to a Bluetooth® device, a guidance
message will be heard andturn off the unit automatically
approximately 5 minutes after you have stopped using it. (Auto
power off) (Except for when noise-cancelling is turned ON.)
• Auto power off does not work when the detachable cord
(supplied) is connected.
and the power will be turned
D Connecting a Bluetooth® device
∫ Bluetooth® pairing
1 In the power-off state, press and hold [Í/I ( )] of this
unit until the power/pairing LED blinks in blue and red
alternately.
2 Select “RP-HD605N” (a) from the Bluetooth
menu.
• If prompted for a passkey, input the passkey “0000 (four
zeros)” of this unit.
• When the power/pairing LED (blue) blinks twice every
approx. 2 seconds, pairing (registration) is completed.
(Connection established)
∫ Connecting a paired Bluetooth® device
1 Turn on this unit.
2 Perform steps 2 of “Bluetooth
• When the power/pairing LED (blue) blinks twice every
approx. 2 seconds, pairing (registration) is completed.
(Connection established)
®
pairing”. (l above)
E Using the headphones
When using the functions below that are indicated with the
[ ] mark, connect the Bluetooth
∫ Listening to music []
Select and play the music on the Bluetooth
• The selected music is output to the speakers of the unit.
∫ Remote controlling (Available only if your Bluetooth®
device supports “AVRCP”)
(Operation example of [Multiple functions button] (a))
Play / Pause: Press [Multiple functions button].
Increase the volume: Slide the [Multiple functions button]
Decrease the volume: Slide the [Multiple functions button]
Forward to the start of
next track: Press [Multiple functions button]
Return to the start of
current track: Press [Multiple functions button]
Fast forward: Press the [Multiple functions button]
Fast rewind: Press the [Multiple functions button]
∫ Making a phone call []
1 Press [Multiple functions button] (a) on the unit and
answer the incoming call.
2 Start talking.
3 Press [Multiple functions button] to end the phone call.
• (HFP only) Reject a call / Change the call device: Press
[Multiple functions button] twice quickly.
• You can have the Bluetooth
by using the microphone of the unit and an app of the
®
Bluetooth
(
enabled phone.
l right, “Activating a voice functions”)
∫ Using noise-canceling
Press the [NC] button to adjust the volume of the
playback device.
• The unit switches between three modes, A, B, and C, each
time you press the [NC] button.
• When noise-canceling is set to ON, the noise-canceling
LED lights in green.
To switch between ON and OFF:
Press and hold [NC] button for at least 5 seconds.
∫ Using the ambient sound enhancer
Place your hand over the ambient sound enhancer
®
device and the unit.
towards “+”.
• Sliding and holding towards “+”
allows you to continuously raise
the volume.
towards “-”.
• Sliding and holding towards “-”
allows you to continuously lower
the volume.
twice quickly.
third quickly.
twice quickly; hold the second
press.
three times quickly; hold the third
press.
®
enabled phone make phone calls
sensor panel (R side) so that its entire surface is
covered. (b)
• Noise-canceling will turn OFF temporarily and the volume of the
playback sound will be lowered.
To switch between enabled and disabled:
Slide and hold the [Multiple functions button] (a) towards
“+” and at the same time press and hold [NC] for at least
5 seconds.
To set the ambient sound enhancer function to alwayson mode:
Press [NC] button twice quickly.
• To deactivate always-on mode, press the [NC] button or place
your hand over the ambient sound enhancer sensor panel (R
side) so that its entire surface is covered.
 Loading...