

Panasonic of North America JT H340PR1 User Manual
OperatingInstructions
Printer
Model No. JT‑H340PRSeries
Contents
Read Me First ............................................. 2
1. Getting Started ....................................... 3
Precautions............................................... 3
Name of each part & function ...................7
2. Operation................................................ 8
Battery Installation .................................... 8
Paper Installation...................................... 9
AC cable Set Up ..................................... 10
Charging Battery..................................... 11
3. Appendix............................................... 12
Troubleshooting ...................................... 12
How to care............................................. 13
How to attach the Option parts................ 13
Specifications.......................................... 14
Warranty Policy....................................... 17
Compliance Notice.................................. 17
For USA.................................................. 18
For CANADA .......................................... 19
Before operating this product, please read these instructions carefully and save this document
for future use.

Read Me First
Introduction
Thank you for purchasing the JT-H300PR series Panasonic Printer.
This manual describes the instructions for the printer.
Please read this manual carefully before using this product.
This Printer is equipped with “Bluetooth” wireless communication. [Class1 Device]
What’s in the Box?
1. Printer (Battery is not included.)
2. Safety Precautions
Options
1. Battery Pack : JT-H340BT-E1 / -E2
2. Battery Charger : JT-H100CG-55
3. AC Adaptor : JT-H300AD-P1
4. Belt Hook : JT-H340BH-P1
5. Wearable Case : JT-H340CA-P1
6. USB Cable : JT-H300CC-P1
7. AC Cord : JT-H300AC-U0 (North America version)
Other Equipment
1. Thermal Paper (Please ask our sales rep about the recommended Paper.)
2

1. Getting Started
Precautions
[Printer: JT‑H340PR]
1. Avoid Radio Frequency Interference
Do not place the printer near a television or radio receiver.
2. Avoid Stacking
Do not place heavy objects on the printer.
3. Keep Small Objects Away
Do not insert paper clips or other small objects into the printer.
Failure to observe this may cause heat or fire.
4. Keep Dry
Failure to observe this may cause heat or fire.
5. Do Not Disassemble the Printer
Do not attempt to disassemble the printer. Failure to observe this may cause heat or fire.
6. Do Not Touch
Keep your hands away from the paper cutter and the thermal head.
Failure to observe this may cause injury.
7. Do Not Use With Any Other Battery
The printer is designed for the specified JT-H340BT battery.
Using unspecified battery may cause smoke or fire.
CAUTION
8. Use only the specified AC adaptor and AC cord
Using unspecified AC adaptor or AC cord may cause smoke or fire.
9. Do Not Use In Aircrafts or Hospitals
This printer includes “Bluetooth” wireless communication.
Turn off the power switch in aircrafts or hospitals. Abnormal use may occur if used in close
proximity to electric instruments or electro-medical apparatus.
10. Do Not Hold this product for too long when the power on
Failure to observe this may cause a serious low-temperature burn.
Risk of explosion if battery is replaced by an incorrect type.
Dispose of used batteries according to the instructions and/or local requirements.
<NOTE>
Do not open the cover while the printer is operating.
Keep the thermal paper away from the direct exposure to light, high temperature, dust and
humidity.
3

Precautions
[Battery Pack:JT‑H340BT]
1. Avoid Heat
Do not throw the battery pack into a fire, heat above 140°F (60°C) or incinerate.
Failure to observe this may cause fire or explosion.
2. Keep Articles Away
Do not place the battery pack together with articles such as necklaces or hairpins when
carrying or storing. Failure to observe this may cause heat, fire or explosion.
3. Keep Dry
Failure to observe this may cause heat, fire or explosion.
4. Do Not Disassemble and Crush
Do not insert sharp object into the battery pack. Do not deform, disassemble, crush, or
modify the printer. Failure to observe this may cause heat, fire or explosion.
5. Do Not Short
Do not short the positive (+) and negative (-) contact. Failure to observe this may cause
heat, fire or explosion.
6. Avoid Extreme Heat, Cold, and Direct Sunlight
Do not charges, use or leave the battery pack for extended periods where it will be exposed
to direct sunlight or in a hot, or cold environment.
7. Do Not Put Into a Microwave Oven
Do not put the battery pack into a microwave oven or pressurized chamber.
Failure to observe this may cause explosion.
8. Do Not Use With Any Other Device
The battery pack is designed for the specified JT-H300PR / JT-H340PR printer and
JT-H100CG-55 charger. Do not use the battery with any other device.
CAUTION
9. Stop Using
Should the battery emit an abnormal odor, become hot to the touch, become discolored,
change shape, or become in any way different, remove it from the printer and stop using it.
Risk of explosion if battery is replaced by an incorrect type.
Dispose of used batteries according to the instructions and/or local requirements.
<NOTE>
Please charge the battery pack for at least 100minutes before first use.
Please ask our sales rep about the dispose method of the battery.
If the battery pack is not going to be used for a long period, please charge or discharge it until
the remaining battery capacity becomes 30% to 40% and store it in a cool, dry place.
4

Precautions
[Li-ion Battery Charger: JT‑H100CG‑55]
1. Keep Small Object Away
Do not insert paper clips or other small object into charger. Failure to observe this may cause
fire or electric shock.
2. Do Not Disassemble the Charger
Do not attempt to disassemble the charger. Failure to observe this may cause fire.
3. Keep Dry
Failure to observe this may cause heat or fire.
4. Do Not Short
Do not short the positive (+) and negative (-) contact.
Failure to observe this may cause heat or fire.
5. Do Not Use With Any Other Battery
The charger is designed for the specified JT-H340BT battery. Do not use the charger with
any other battery.
CAUTION Risk of explosion if battery is replaced by an incorrect type.
Dispose of used batteries according to the instructions and/or local requirements.
6. Do Not Touch the Plug with Wet Hands
Failure to observe this may cause electric shock.
7. Do Not Touch the Charger During a Lightning
Failure to observe this may cause electric shock.
8. Be Certain to Plug Fully Into the Outlet
Failure to observe this may cause electric shock or fire.
9. When Unplugging, Make Sure to Hold the Body of the Plug
Using damaged power strip may cause electric shock, short circuit or fire.
10. Do Not Use a Damaged Power-code or Plug
Failure to observe this may cause electric shock or fire
11. Clean the Dust off the Plug, Periodically
Failure to observe this may cause electric shock or fire.
12. Do Not Hold this product for too long when the power on
.
Failure to observe this may cause a serious low-temperature burn.
13. Do Not Use this product Outdoors.
Failure to observe this may cause electric shock or fire.
<NOTE>
To prolong the life of the battery, please remove it from the charger within 24 hours when
charging is complete.
Please charge the battery at temperature between 5 to 40 degrees centigrade.
5

Precautions
[AC Adaptor: JT‑H300AD‑P1]
1. Do Not Disassemble
Do not attempt to disassemble the charger.
Failure to observe this may cause electric shock or fire.
2. Keep Dry
Failure to observe this may cause heat or fire.
3. Do Not Use With Any Other Device
The AC Adaptor is designed for the specified JT-H300PR/ JT-H340PR printer. Do not use
the AC adaptor with any other device.
4. Do Not Exceed the Ratings of AC Outlet and Wirings, and Connect the AC Adaptor
Only within 100-240 V AC.
Exceeding the ratings may result in overheating or fire.
5. Do Not Touch the Plug with Wet Hands
Failure to observe this may cause electric shock.
6. Be Certain to Plug Fully Into the Outlet
Failure to observe this may cause electric shock or fire.
7. When Unplugging, Make Sure to Hold the Body of the Plug
Using damaged power strip may cause electric shock, short circuit or fire.
8. Do Not Use a Damaged Power-code or Plug
Failure to observe this may cause electric shock or fire.
9. Clean the Dust off the Plug, Periodically
Failure to observe this may cause electric shock or fire.
10. Do Not hold this product for too long when the power on
Failure to observe this may cause a serious low-temperature burn.
11. Do Not Use this product Outdoors.
Failure to observe this may cause electric shock or fire.
6
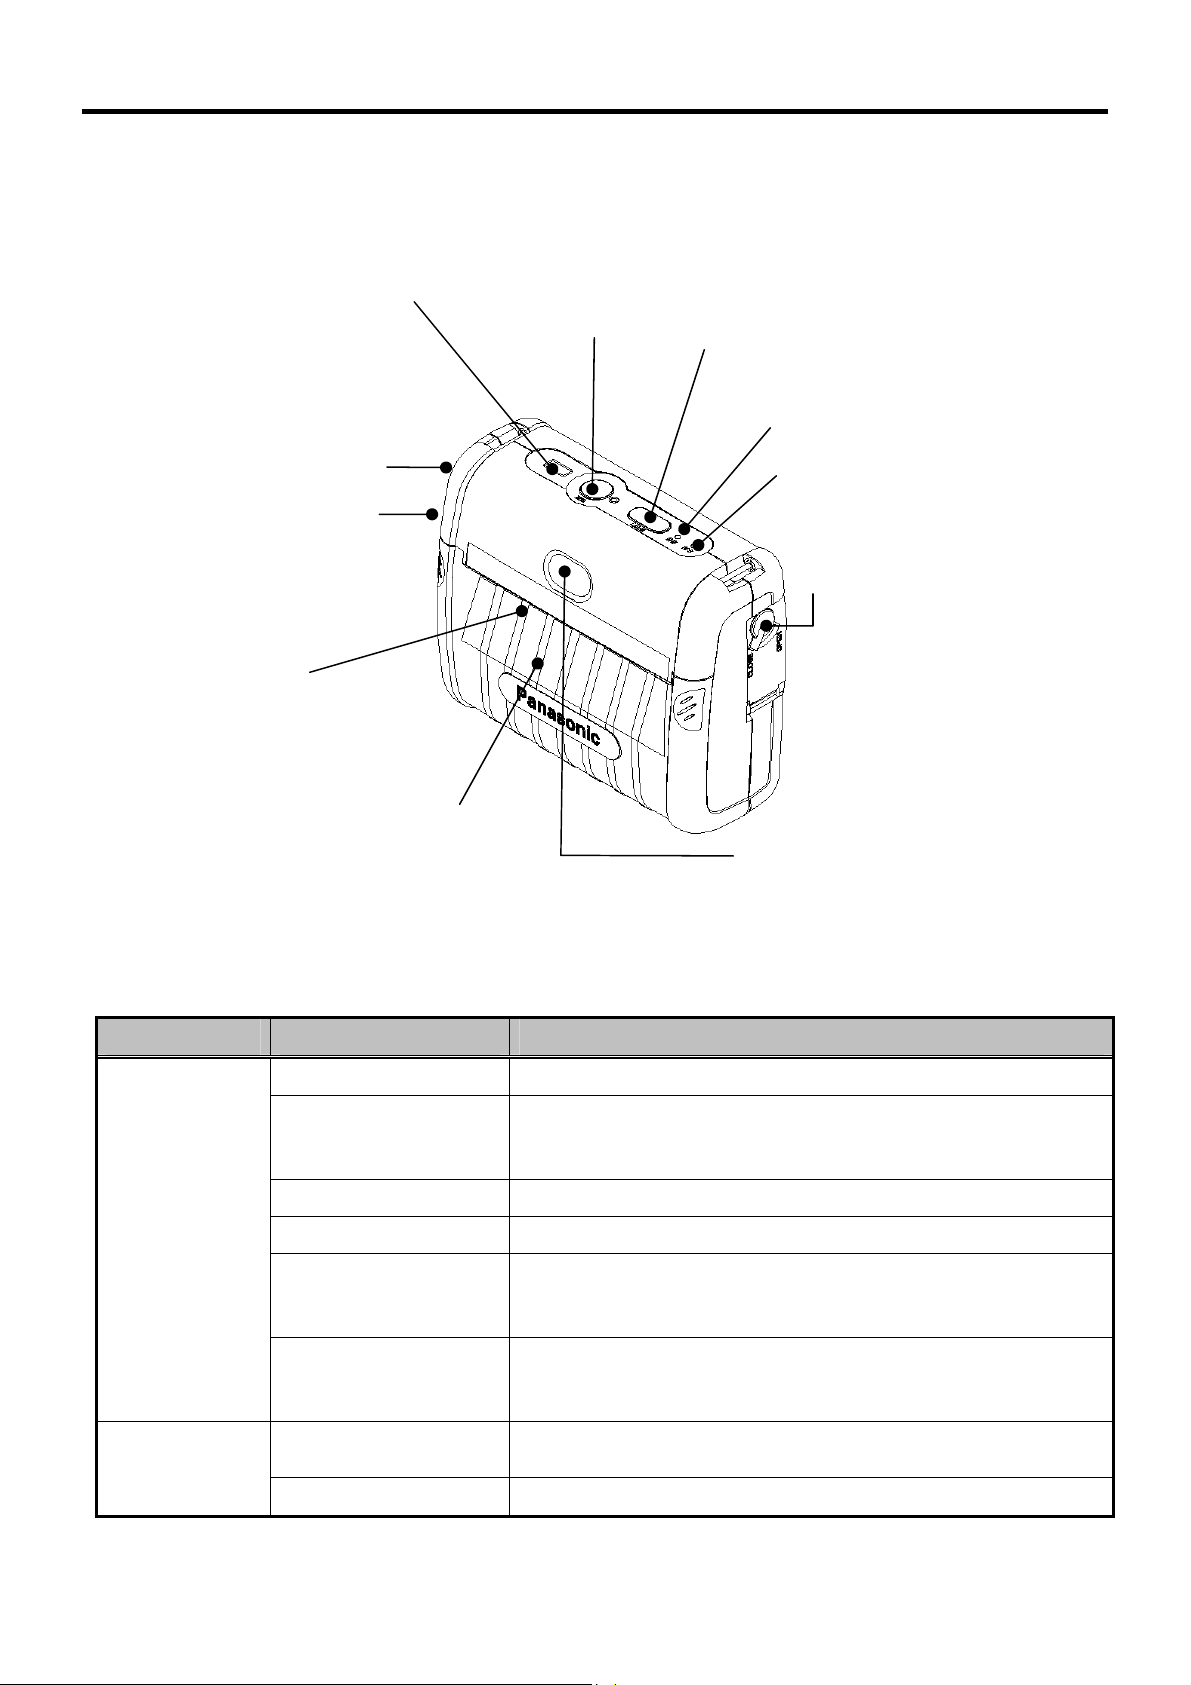
Name of each part & function
USB Connector
DC IN 9.5 V Jack
IrDA I/F
Power
Switch
Feed
(Press button to feed paper)
Receiving LED
Status LED
Battery Cover Lever
Paper Out
Paper Cover
Paper Cover
Lever
Receiving
LED Indicate Status
Off
Normal status.
1. Power-on (5 seconds lightning),
Green Light
2. Power-off (0.5 second lightning)
3. Battery Full Charge(at AC Adaptor connection)
Detect battery capacity low; printable.
Battry Charging(at AC Adaptor connection)
1. The cover of paper is open.
2. The paper is empty.
3. Others, the printer is out of order.
1. Detect Low voltage; not printable.
Status
LED
Orange Light
Red Light
Red Blink
(Fast)
Red Blink
2. Battry Charging Error or Preliminary charging
LED
(Slow)
Green Light
Green Blink
(at AC Adaptor connection)
1. Printing
2. Power-off(0.5 second lighting)
In communications.
7
2. Operation
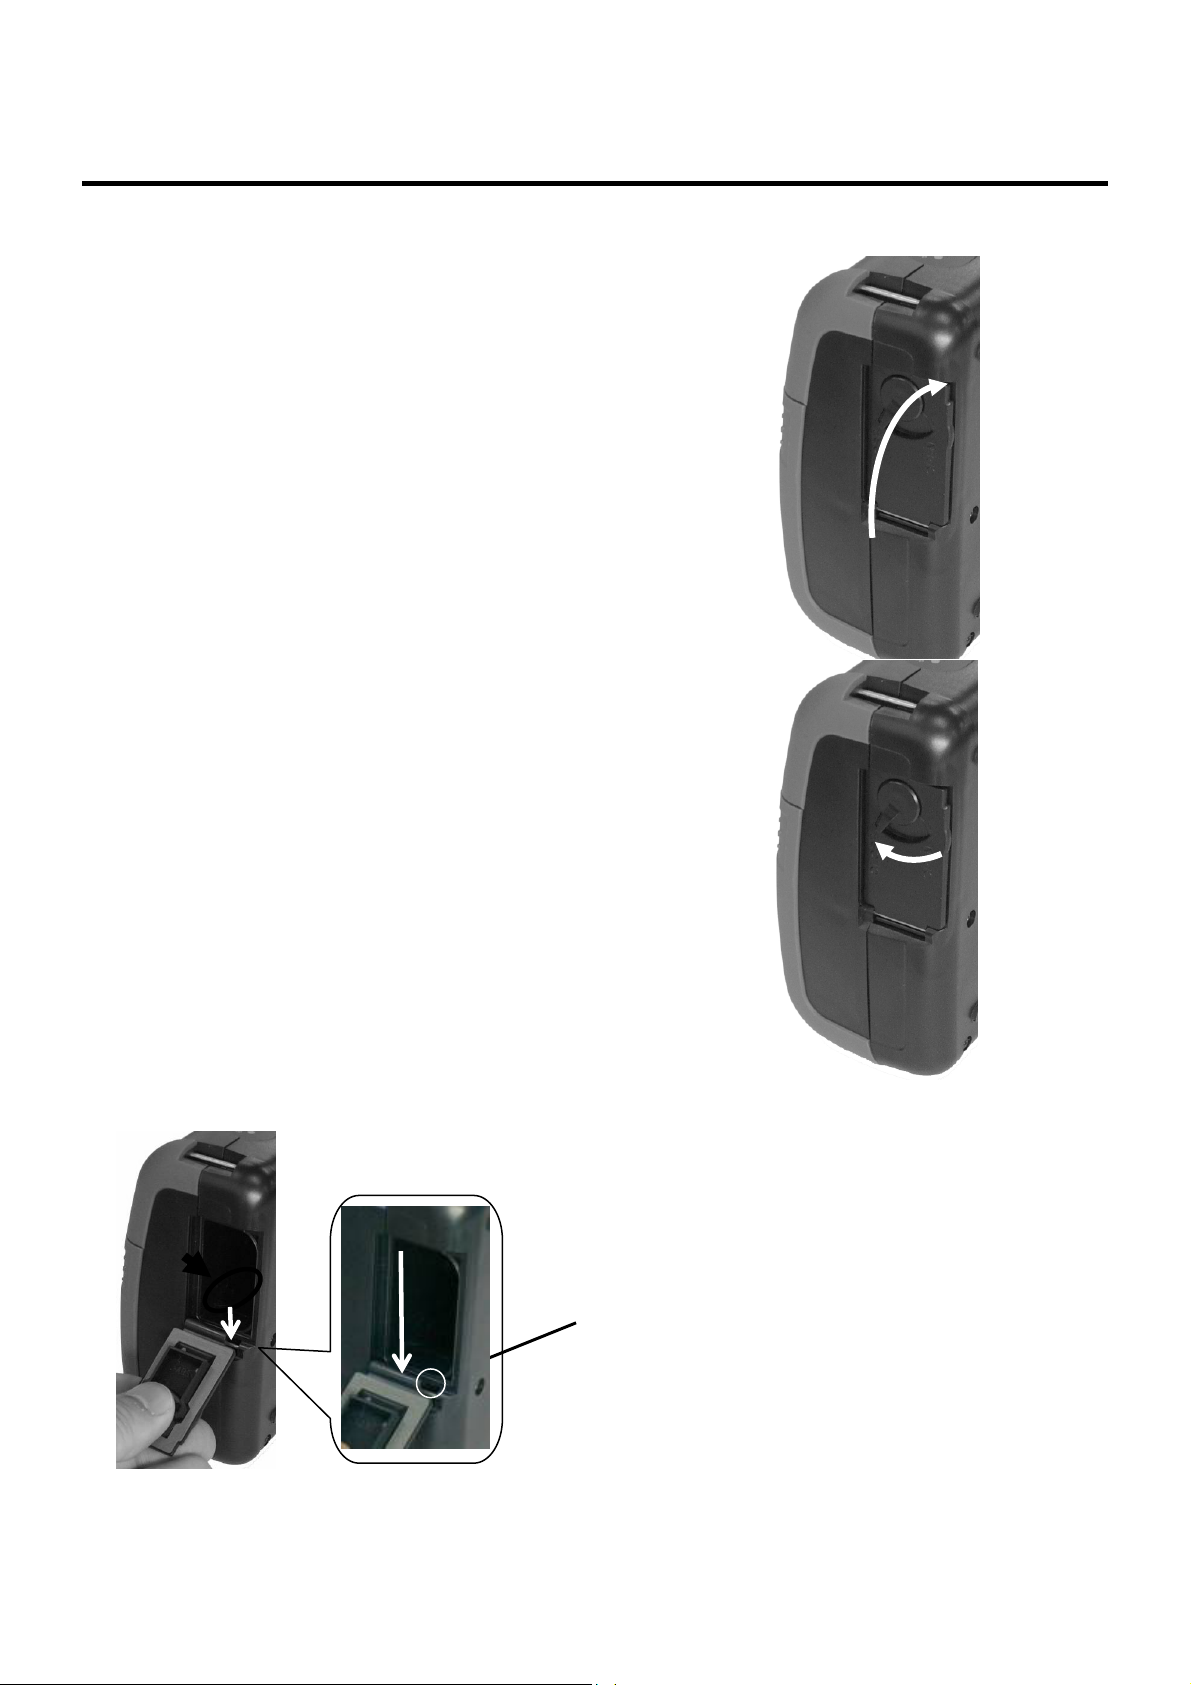
Battery Installation
<Open the Battery Cover>
1) Turn Off Power Switch
2) Slide Battery Cover Lever
3) Pull the Battery Cover up
4) Open the Battery Cover
5) Slide and insert the Battery completely to the printer.
<Close the Battery Cover>
1) Close the Battery Cover
2) Push down the Battery Cover.
3) Slide the Battery Cover Lever.
1)
2)
<NOTE>
8
If the Battery cover comes off, fit it as indicated.
Slide the hinge of the Battery Cover into the metal bar
and hook to it.
Metal bar
 Loading...