

Panasonic of North America JT H200PR1 User Manual
PRINTER
OPERATING INSTRUCTIONS
Model No.
JT-H200PR
Series
Contents
English
Read Me First ......................2
1. Getting Started.................3
2. Operation..........................7
3. Appendix ..........................9
Deutsch
Einführung............................13
1. Vorbereitung.....................14
2. Betrieb..............................18
3. Anhang............................20
Français
À lire en premier ..................24
1. Commençons...................25
2. Utilisation..........................29
3. Annexe.............................31
For USA ...............................35
For CANADA .......................36

Read Me First
Introduction
Thank you for purchasing the JT-H200PR series Panasonic Printer.
This manual describes the instructions for the printer.
Please read this manual carefully before using this product.
This Printer is equipped with “Bluetooth” wireless communication. [Class1 Device]
0560
What’s in the Box?
1. Printer (Battery is not included.)
2. Operation Instructions manual (this book)
Options
1. Battery Pack : JT-H100DP-50
2. Battery Charger : JT-H100CG-55
3. Wearable Case : JT-H200PR-C0
Other Equipment
1. Thermal Paper (Please ask our sales rep about the recommended Paper.)
2

1. Getting Started
CAUTION
■■■■ Precautions
[ Printer:JT-H200PR-∗∗ ]
1. Avoid Radio Frequency Interference
Do not place the printer near a television or radio receiver.
2. Avoid Stacking
Do not place heavy objects on the printer.
3. Keep Small Objects Away
Do not insert paper clips or other small objects into printer.
There is the risk of heat, fire or explosion.
4. Keep Dry
There is the risk of heat, fire or explosion.
5. Do Not Disassemble the Printer
Do not attempt to disassemble the printer. There is the risk of heat, fire or explosion.
6. Do Not Touch
Keep your hands away from the paper cutter and the thermal head.
There is the danger of injury.
7. Do Not Use With Any Other Battery
The printer is designed for the specified JT-H100DP-50 battery.
Do not use the printer with any other battery.
Dispose of used batteries according to the instructions and local requirements.
Risk of explosion if battery is replaced by an incorrect type.
8. Do Not Use In Aircrafts or Hospitals
This printer includes “Bluetooth” wireless communication.
Turn off the power switch in aircrafts or hospitals. Abnormal use may occur if used in close
proximity to electric instruments or electro-medical apparatus.
<NOTE>
Do not open the cover while the printer is operating.
Keep the thermal paper away from the direct exposure to light, high temperature, dust and
humidity.
3

CAUTION
■■■■ Precautions
[ Battery Pack:JT-H100DP-50 ]
1. Avoid Heat
Do not throw the battery pack into a fire or expose it to excessive heat. There is the risk of
explosion.
2. Keep Articles Away
Do not place the battery pack together with articles such as necklaces or hairpins when
carrying or storing. There is the risk of heat, fire or explosion.
3. Keep Dry
There is the risk of heat, fire or explosion.
4. Do Not Disassemble
Do not insert sharp objects into the battery pack. Do not deform, disassemble, or modify
the printer. There is the risk of heat, fire or explosion.
5. Do Not Short
Do not short the positive (+) and negative(-) contact.
There is the risk of heat, fire or explosion.
6. Avoid Extreme Heat, Cold, and Direct Sunlight
Do not charge, use or leave the battery pack for extended periods where it will be exposed
to direct sunlight or in a hot, or cold environment.
7. Do Not Put Into a Microwave Oven
Do not put the battery pack into a microwave oven or a pressurized chamber.
There is the risk of explosion.
8. Do Not Use With Any Other Device
The battery pack is designed for the specified JT-H200PR-∗∗ printer and JT-H100CG-55
charger. Do not use the battery with any other device.
Risk of explosion if battery is replaced by an incorrect type.
Dispose of used batteries according to the instructions and local requirements.
9. Stop Using
Should the battery emit an abnormal odor, become hot to the touch, become discolored,
change shape, or become in any way different, remove it from the printer and stop using it.
<NOTE>
Please charge the battery pack for at least 100minutes before first use.
Please ask our sales rep about the dispose method of the battery.
If the battery pack is not going to be used for a long period, please charge or discharge it until
the remaining battery capacity becomes 30% to 40% and store it in a cool, dry place.
4
CAUTION
■■■■ Precautions
[ Battery Charger:JT-H100CG-55 ]
1. Keep Small Objects Away
Do not insert paper clips or other small objects into charger.
There is the risk of heat or fire.
2. Do Not Disassemble the Charger
Do not attempt to disassemble the charger. There is the risk of heat or fire.
3. Keep Dry
There is the risk of heat or fire.
4. Do Not Short
Do not short the positive(+) and negative(-) contact. There is the risk of heat or fire.
5. Do Not Use With Any Other Battery
The charger is designed for the specified JT-H100DP-50 battery. Do not use the charger
with any other battery.
Dispose of used batteries according to the instructions and local requirements.
Risk of explosion if battery is replaced by an incorrect type.
6. Do Not Touch the Plug with Wet Hands.
There is the risk of electric shock.
7. Do Not Touch the Charger During a Lightning.
There is the risk of electric shock.
8. Be Certain to Plug Fully Into the Outlet.
There is the risk of electric shock or fire.
9. When Unplugging, Make Sure to Hold the Body of the Plug .
If the power strip is damaged, there is a risk of electric shock, short circuit or fire.
10. Do Not Use a Damaged Power-code or Plug.
There is the risk of electric shock or fire.
11. Clean the Dust off the Plug, Periodically.
There is the risk of heat or fire.
<NOTE>
To prolong the life of the battery, please remove it from the charger within 24 hours when
charging is complete.
Please charge the battery at temperature between 5 to 40 degrees centigrade.
5
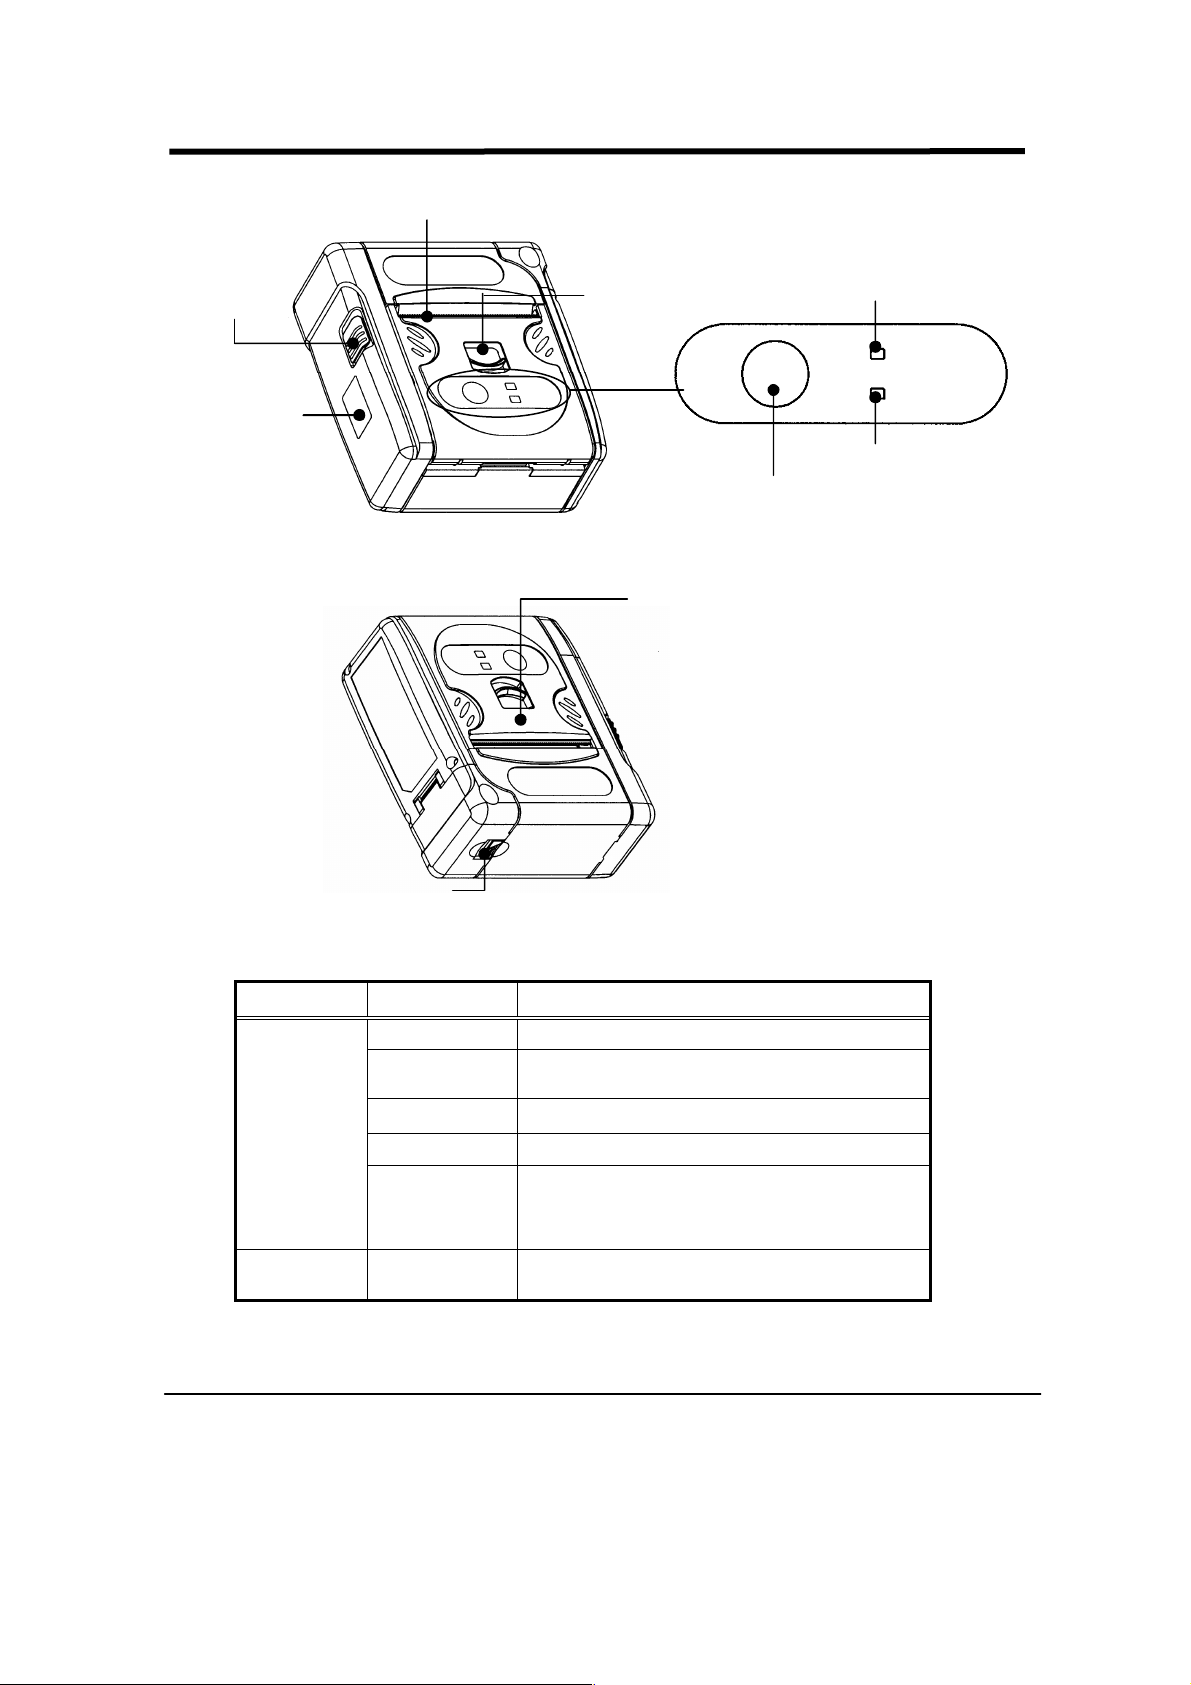
Feed
Paper
Cover
Power
Switch
Paper Out
■
■ Name of each part & function
■■
Status LED
Lever
Status
Feed
Receiving
IrDA I/F
Receiving LED
(Press button to feed paper)
Paper Cover
Battery Cover Lever
LED Indicate Status
Status
LED
Receiving
LED
6
Off Normal
Green Light
Orange Light Detect battery voltage low; still printable.
Red Light Detect battery voltage low; unprintable.
Red Blink
Green Blink During communication
1. Power-on (lights up for 5 seconds),
2. Power-off (lights up for 0.5 seconds)
1. The Paper Cover is open.
2. Paper is not in the printer.
3. Other errors, the printer is out of order.
2. Operation
1)
2)
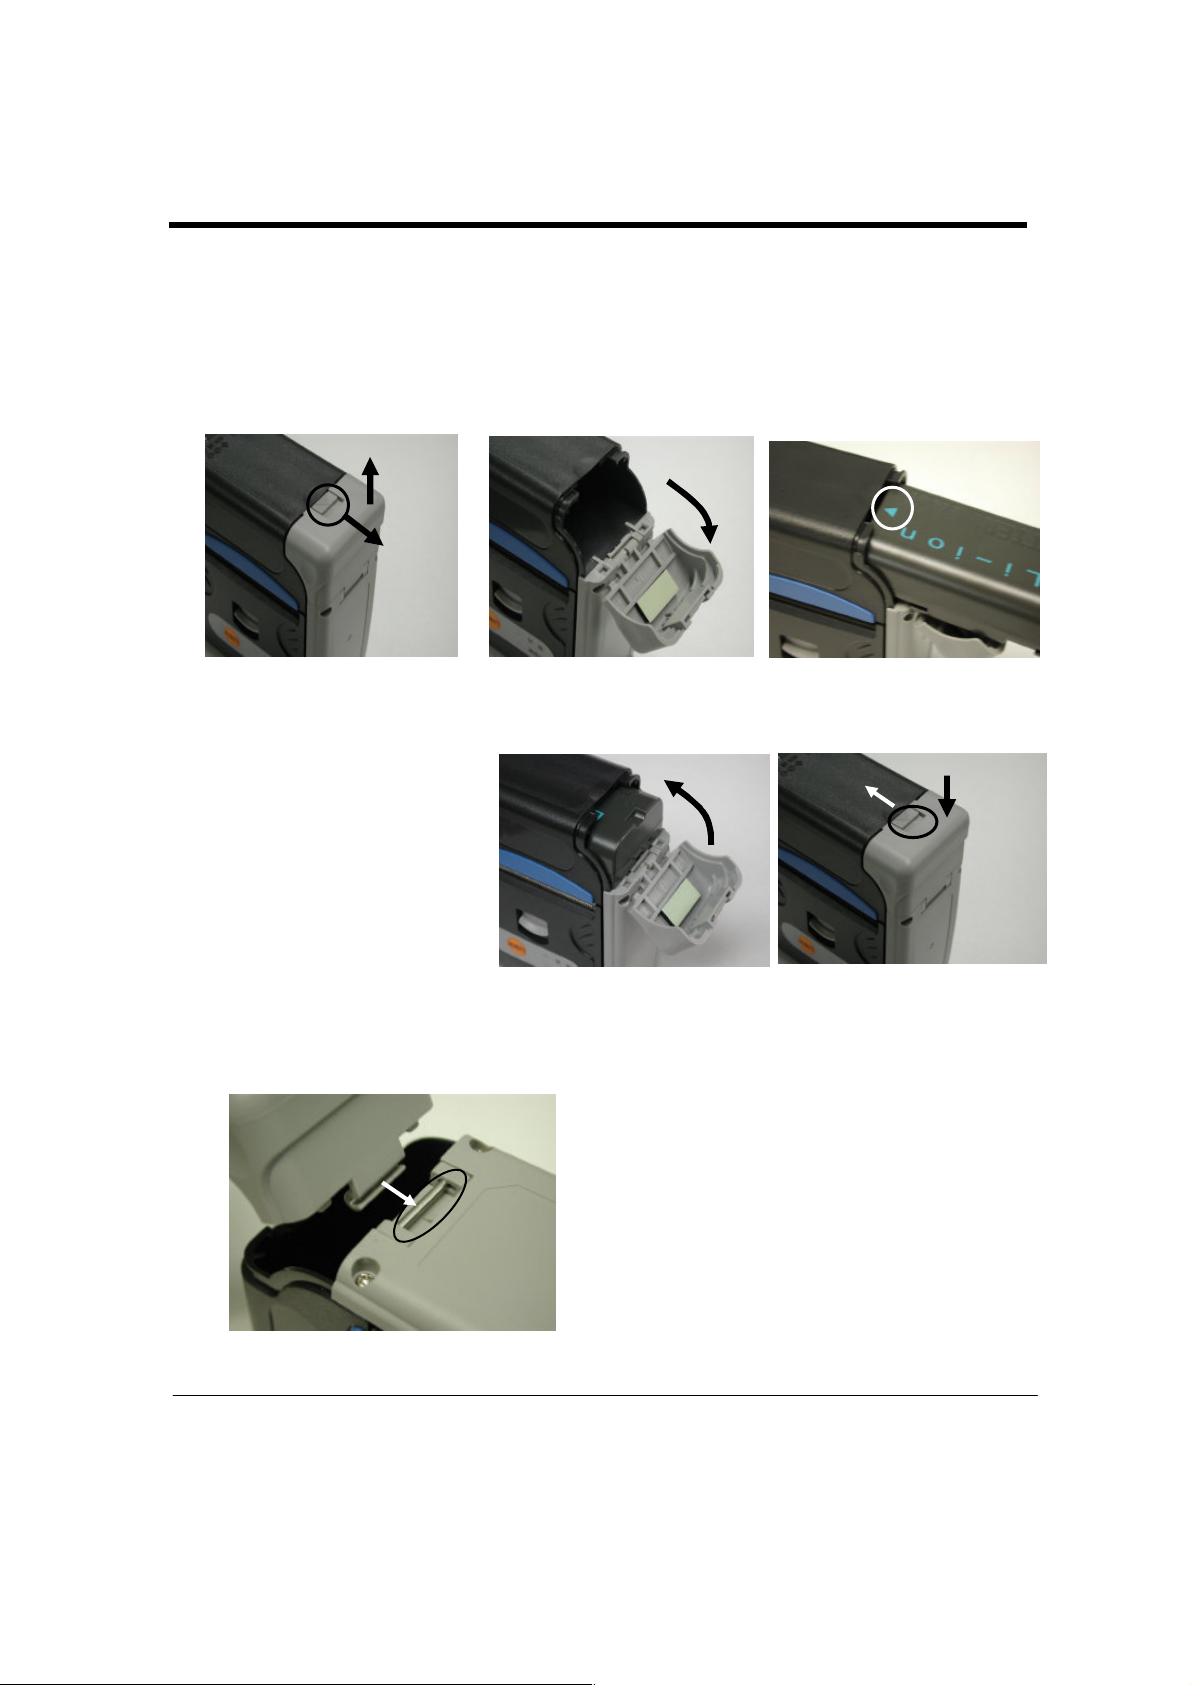
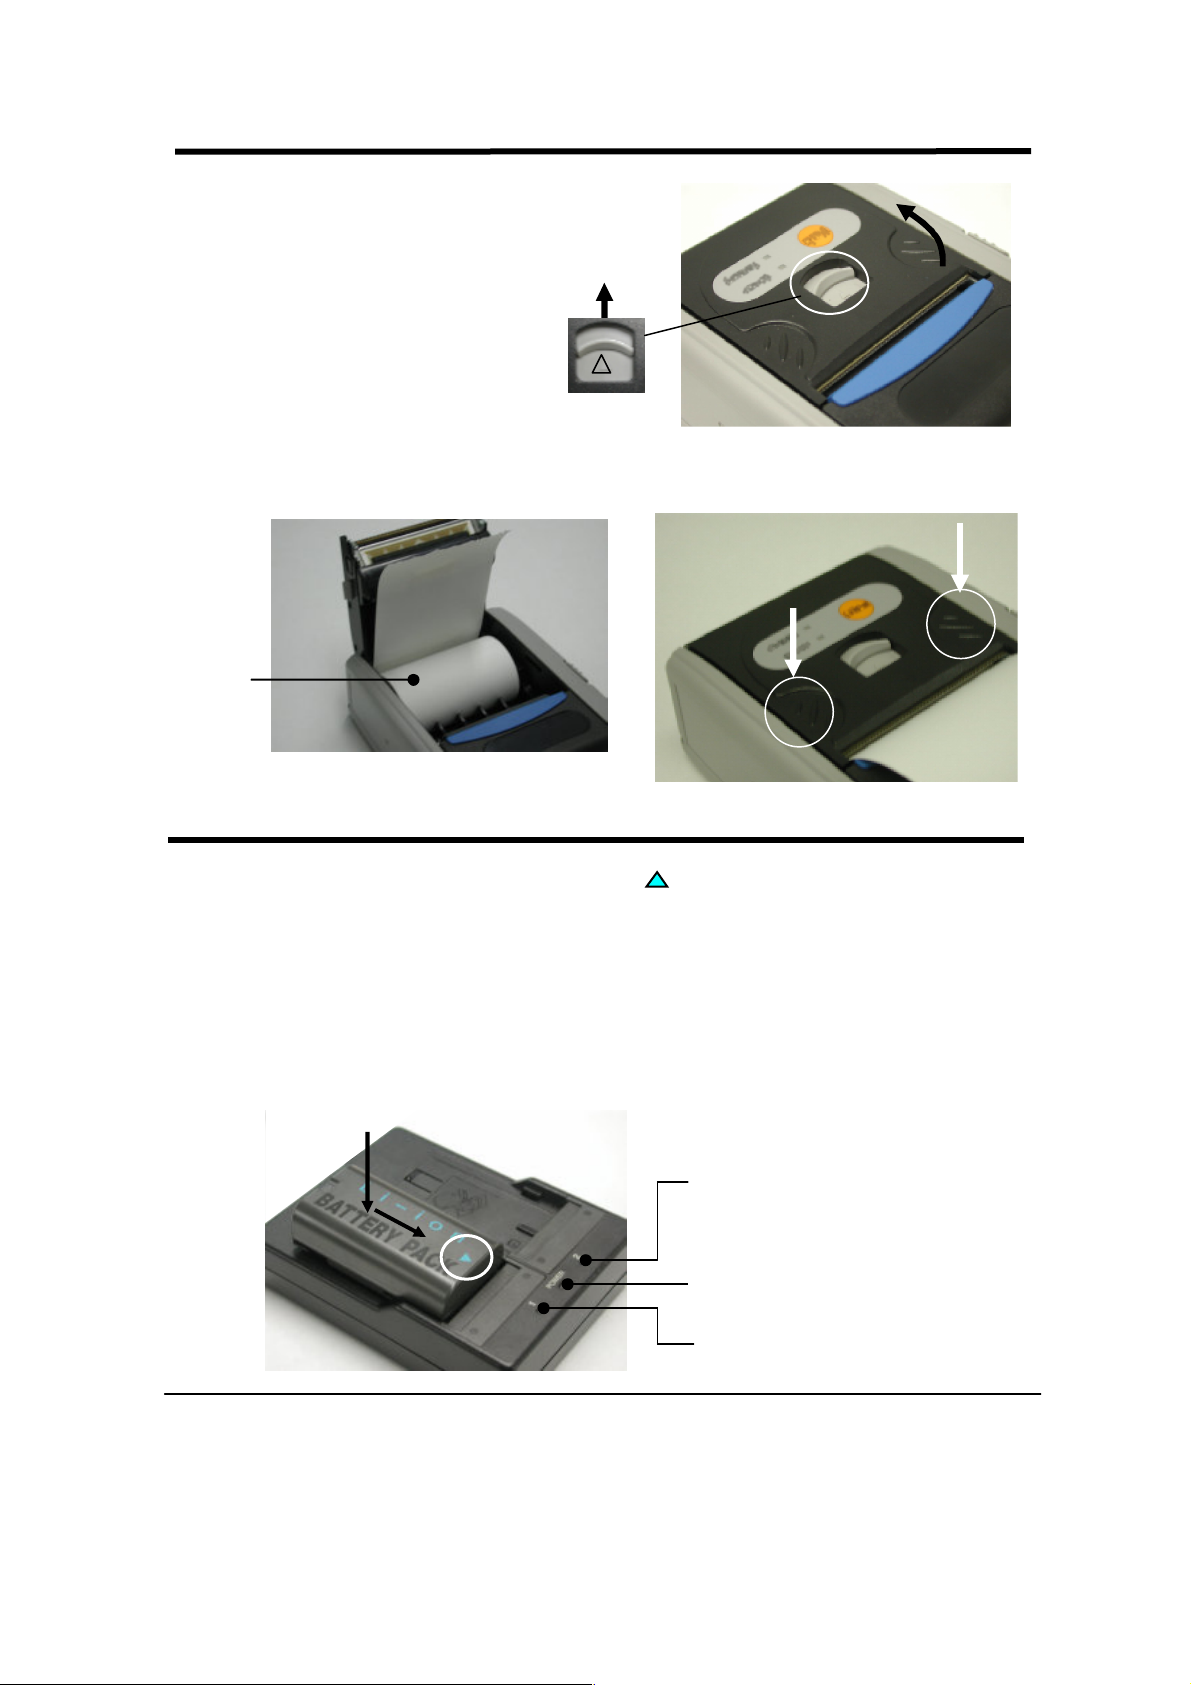
■■■■ Battery Installation
<Open Battery Cover>
1) Slide the Battery Cover Lever
2) Pull the Battery Cover up
3) Open the Battery Cover
4) Slide and insert the Battery completely to the printer
<Close Battery Cover>
1) Close the Battery Cover
2) Push down the Battery Cover
3) Slide the Battery Cover Lever
<NOTE>
If the Battery Cover comes off, fit it as indicated.
3)
1)
3)
4)
2)
7
* Slide the Battery Cover hinge into the metal
bar and hook to it.
Charger LED (
Slot2)
Charger LED (
Slot1)
, Charger LED
■
■ Paper Installation
■■
1) Slide the Paper Cover Lever
2) Open the Paper Cover
1)
2)
3) Install Paper (Paper must be tightly rolled and be confirmed that dust/sand is not on.)
4) Close the Paper Cover (Make sure that the Cover is closed completely)
4)
3)
Paper
4)
■■■■ Charging Battery
1) Put the Battery on the Charger slot and slide to direction.
2) When charging, Charger LED blinks green. When charging is completed
constantly lights green. Charging function is limited to one Battery at any moment even if
two Batteries are set to the Charger.
When charging is completed in one slot, the charging of another slot starts automatically.
* Charging Time: approx. 2H per Battery
3) Remove the Battery from the Charger after Charging.
:Green
Power LED :Red
:Green
8
3. Appendix
■■■■ Troubleshooting
Symptom Possible Cause Action
No Power in Printer
Nothing is printed
The print is faint
The orange or red
LED is lighting
even after
charging battery.
■
■ How to care
■■
1.Has the battery fully inserted?
2.Is the Power Switch on?
1.Is the power turned on?
2.Is the paper set correctly?
3.Are the LED signals lighting red?
4.Is the LED blinking red?
5. Are you using Bluetooth?
6.Are you using IrDA?
1.Isn’t the thermal head dirty?
2.Are you using the recommended
paper?
The life cycle of the battery pack
may have expired.
1.Charge the battery pack.
2.Move the Power Switch on.
1.Turn on power.
2.Check the print paper setting.
3.Charge the battery.
4.Make sure that the paper is
setting properly, or close the
paper cover completely.
5.Reduce the distance of the
device and the printer.
6. Adjust the angle of IrDA,
or clean up the window,
or avoid direct sunlight.
1.Clean it up.
2.Check the paper.
Replace the battery pack with a
new one.
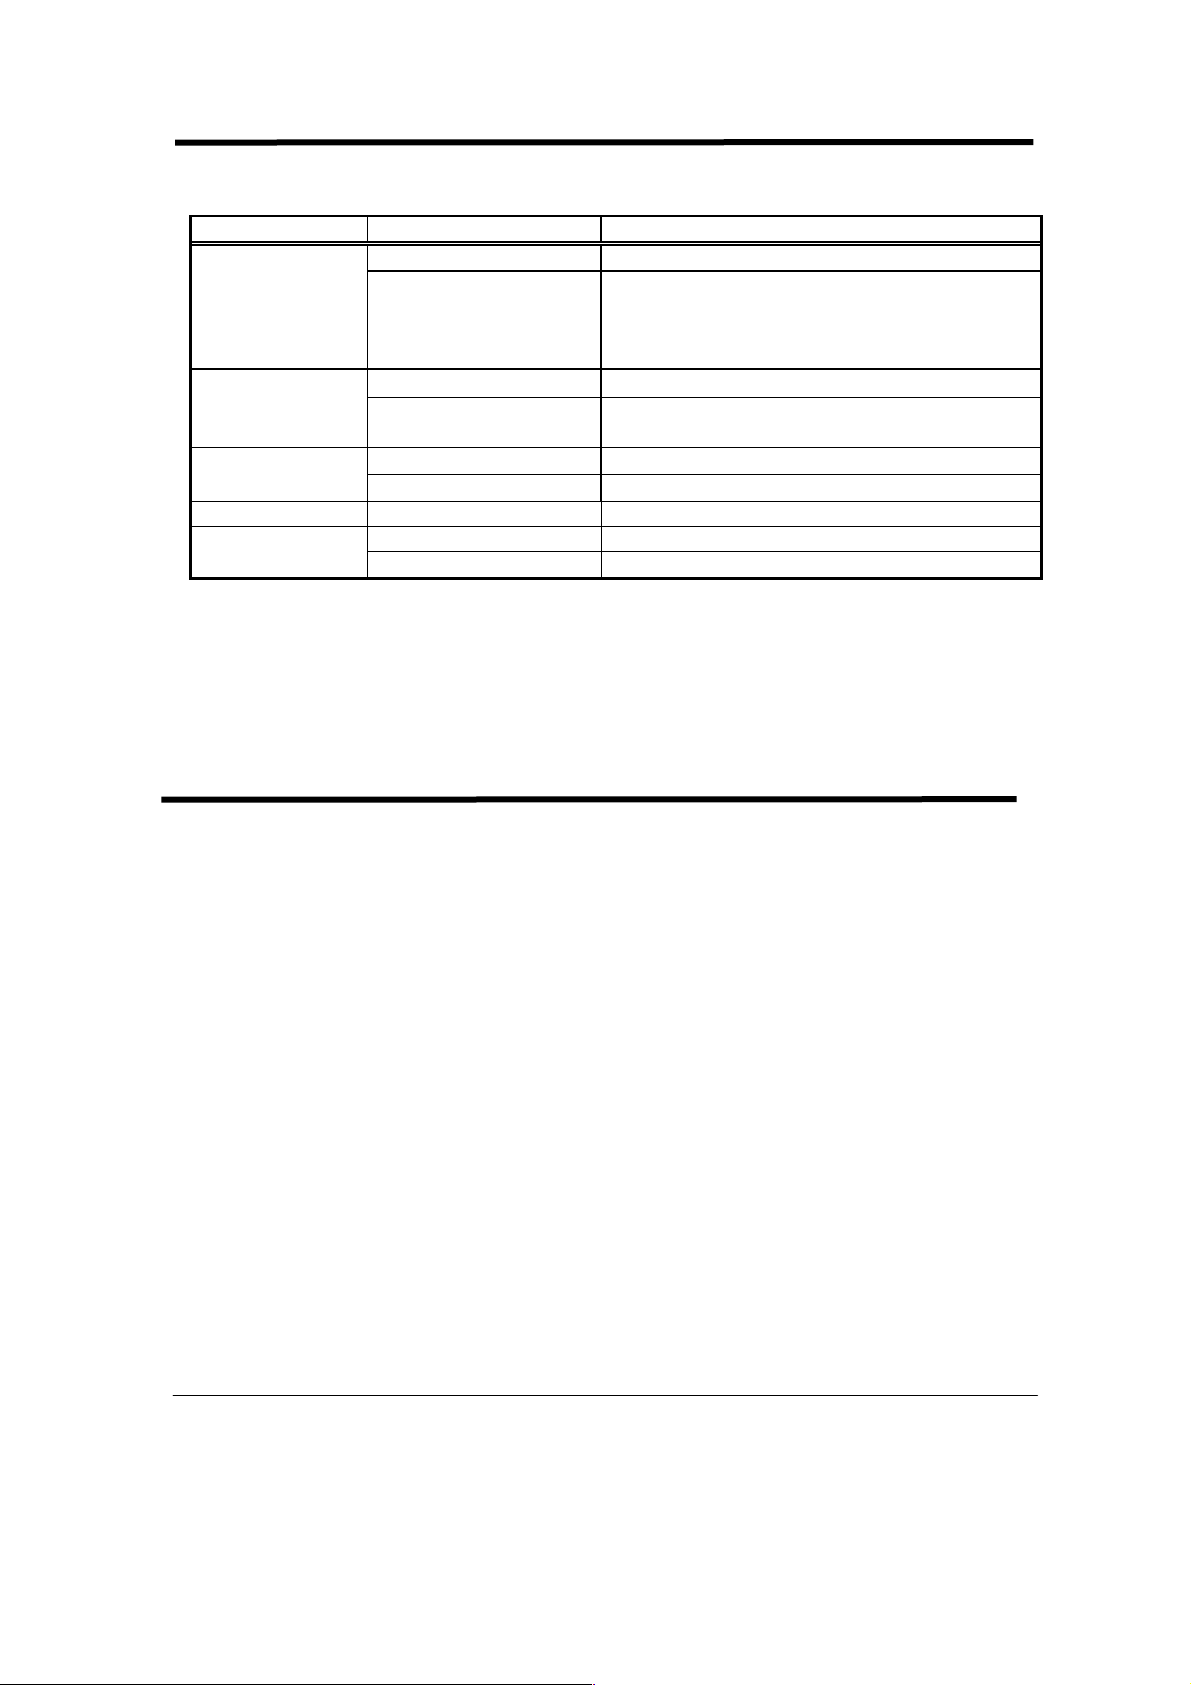
How to clean up the thermal head and the rubber roller.
1) Push the paper cover lever to open the paper cover.
2) Wipe off any dust/dirt using the cotton swab with a small amount of alcohol (ethanol).
(Do not use thinner, benzene series or kerosene series.)
3) Close the cover after alcohol volatilizes.
Thermal head
9
Rubber roller
■
■ Specifications
■■
[ Printer:JT-H200PR-∗∗ ]
Items Description Specifications
Printing Line Thermal Mechanical
Printing Speed Max. 80 mm/Sec
(Panasonic Test Standard)
Printing Width 48 mm (384 dots/ line) Head
Character font 12 x 24 dots (standard)
Printing Function Font Type Alpha-numeric, Barcode, 2D code
Life Time Head
Paper width 58 mm
Equal or more than 1 X 10⁸ pulse
Equal or more than 25 Km
+0 – 1 mm
Paper
(Recommended paper)
Roll direction Outside (outside surface; thermal)
Type1 Bluetooth V2.0+EDR (Class 2) 2.4 GHz Communication
Type2 IrDA V1.2 (Proprietary)
Power supply Battery Pack:JT-H100DP-50
Size Approx.W88 mm x L102 mm x D43 mm Size & Mass
Mass
Approx. 280 g (without paper)
Environment Operation temperature 0 to 40 degree centigrade (without paper)
[ Battery Pack:JT-H100DP-50*2 ]
Items Description Specifications
Type Lithium ion Battery 7.2 V Battery Cell
Rated capacity 1,150 mAh (standard discharging)
Life time 300 times discharge/charge or 1year *1
Size Approx. W70 mm x L38 mm x D20 mm Size & Mass
Mass
Environment Operation temperature 0 to 40 degree centigrade
*1: The battery is a consumable item therefore consumption and life time is just an indication
and may vary depending on usage and environment conditions.
*2: JT-H100DP-50; Europe version. Please contact Panasonic sales office for the North
America version battery.
Approx. 90 g
10
■ Specifications
[ Battery Charger:JT-H100CG-55]
Items Description Specifications
Power LED (Red) Power-on : lights up LED Indication
Charger LED
(Green: X 2 (Slot))
Charging
Function
Environment Operation temperature 0 to 40 degree centigrade
*3: Charging function is limited to one Battery at any moment even if two Batteries are set to
the Charger. Charging time varies depending on the remained capacity of the battery and
environment temperature.
*4: AC Power supply cable is not attached.
Charging time
Charging current Approx.1,200 mA(10 to 40degree centigrade)
Input AC110 V -240 V 50/60 Hz 0.23 A Power
Output DC7.2 V 1.2 A
Size Approx.W94 mm x L102 mm x D36 mm Size & Mass
Mass
1) Charging, Output short,
Abnormal temperature : 1Hz blinking
2)Complete charging : lights up continuously
3) No good mode : off
Charging 2-battery :Approx. 4 hours *3
Approx. 840 mA(0 to 10degree centigrade)
Approx. 170 g
■
■ Warranty Policy
■■
The warranty period and what is covered are according to the application, contract or
distributor. Please ask our sales rep.
<NOTE>
The out of term warranty is as follows:
- Any secondary damages as for the loose of Printing paper, data or business chances.
- Any damages by user including dropping, water contact or any other wrong use, other than
the purpose designed for.
11

■■■■ Compliance Notice
Hereby, we declare that this printer is in compliance with
the essential requirements and other relevant provisions
of Directive 1999/5/EC.
The declaration of conformity may be consulted at http://www.doc.panasonic.de
Comliance Notice – CE Mark
This equipment is in conformance with the reuirements of European Council Directive
listed below:
- R&TTE Directive 1999/5/EC
This notice is based upon compliance of the product to the following standards:
- EN 60950-1 :2006;
- EN 300 328 V1.7.1;
- EN 301 489-01 V1.6.1; EN 301 489-17 V1.2.1
Importer’s name and address to follow EU rules:
Panasonic Testing Centre
Panasonic Service Europe, a division of
Panasonic Marketing Europe GmbH
Winsbergring 15, 22525 Hamburg, F. R. Germany
12
 Loading...