

Panasonic of North America 932CR BT4509 User Manual
Weather Band Receiver
PP P/N PP105168
Operating Instructions
¡ Please read these instructions carefully before using this product and keep this manual for
future reference.
Safety Information
Q Read the operating instructions for the unit and
all other components of your truck audio system
carefully before using the system. They contain
instructions about how to use the system in a safe
and effective manner. We assume no responsibility
for any problems resulting from failure to observe the
instructions given in this manual.
This pictograph intends to alert you to
the presence of important operating
Warning
instructions and installation instructions.
Failure to heed the instructions may
result in severe injury or death.
Warning
Observe the following warnings when
using this unit.
T The driver should not operate the system while
driving.
Watching the display or operating the system will
distract the driver from looking ahead of the vehicle
and can cause accidents.
Always stop the vehicle in a safe location and use
the parking brake before watching the display or
operating the system.
T Use the proper power supply.
This product is designed for operation with a
negative grounded 12 V DC battery system. Never
operate this product with other battery systems,
especially a 24 V DC battery system.
T Do not disassemble or modify the unit.
Do not disassemble, modify the unit or attempt to
repair the product yourself. If the product needs to
be repaired, consult your dealership.
T Do not use the unit when it is out of order.
If the unit is out of order (no power, no sound) or
in an abnormal state (has foreign objects in it, is
exposed to water, is smoking, or smells), turn it off
immediately and consult your dealership.
T Any NOAA broadcast weather report, including
current and forecasts, may not reflect your
actual weather conditions at your exact time
and location. You should always pay attention
to your actual weather conditions to make safe
decisions accordingly.
T Keep accessories out of reach of infants.
Accessories can be ingested, so keep them out of
the reach of infants. If an infant ingests accessories, please seek immediate medical attention.
Q This manual uses pictographs to show you how to
use the product safely and to alert you to potential
dangers resulting from improper connections and
operations. The meanings of the pictographs are
explained below. It is important that you fully understand the meanings of the pictographs in order to use
this manual and the system properly.
This pictograph intends to alert you to the
presence of important operating instruc-
Caution
tions and installation instructions. Failure
to heed the instructions may result in injury
or material damage.
Observe the following warnings when
installing.
T Disconnect the lead from the negative (–) bat-
tery terminal before installation.
Wiring and installation with the negative (–) battery
terminal connected may cause electrical shock and
injury due to a short circuit.
Some cars equipped with the electrical safety
system have specific procedures of battery terminal
disconnection.
FAILURE TO FOLLOW THE PROCEDURE MAY
LEAD TO THE UNINTENDED ACTIVATION OF
THE ELECTRICAL SAFETY SYSTEM RESULTING
IN DAMAGE TO THE VEHICLE AND PERSONAL
INJURY OR DEATH.
T Never use safety-related components for
installation, grounding, and other such functions.
Do not use safety-related vehicle components (fuel
tank, brake, suspension, steering wheel, pedals,
airbag, etc.) for wiring or fixing the product or its
accessories.
T Check for piping, gasoline tank, electric
wiring, and other items before installing the
product.
If you need to open a hole in the vehicle chassis to
attach or wire the product, first check where the
wire harness, gasoline tank, and electric wiring are
located. Then open the hole from outside if possible.
T Never install the product in a location where it
interferes with your field of vision.
T Never have the power cord branched to supply
other equipment with power.
T After installation and wiring, you should check
the normal operation of other electrical equipment.
The continuation of their using in abnormal condi-
tions may cause fire, electrical shock or a traffic
accident.
T Make sure the leads do not interfere with driv-
ing or getting in and out of the vehicle.
T Insulate all exposed wires to prevent short
circuiting.
2

Caution
Observe the following cautions when
using this unit.
T Keep the sound volume at an appropriate
level.
Keep the volume level low enough to be aware of
road and traffic conditions while driving.
T This unit is designed for use exclusively in
trucks.
T Do not operate the unit for a prolonged period
with the engine turned off.
Operating the audio system for a long period of
time with the engine turned off will drain the battery.
T Do not expose the unit to direct sunlight or
excessive heat.
Otherwise these will raise the interior temperature
of the unit, and it may lead to smoke, fire, or other
damage to the unit.
T Do not use the product where it will be ex-
posed to water, moisture, or dust.
Exposure of the unit to water, moisture, or dust
may lead to smoke, fire, or other damage to the
unit. Make especially sure that the unit does not get
wet in truck washes or on rainy days.
T To ensure safety, never attempt to preset sta-
tions while you are driving.
T
Depending upon the transmission condition
of electro-magnetic waves, the geographical
reasons and/or the weather conditions, you may
not receive the NOAA radio partially or at all.
T Make sure that your weather radio can receive
properly before driving, especially, before use
in a critical condition.
T Set the volume level to low enough before the
AUX connection is completed.
Failure to observe this, the loud noise may come
out and damage your speakers and your hearing.
Direct connection of the speaker/headphone output
of an external device without any attenuator may
distort sound or damage the connected external
device.
T When using this unit, noise may occurs when
there is an electromagnetic-wave generator
such as a cellular phone near this unit, if that
noise is obvious and cannot be eliminated,
please keep an electromagnetic-wave generator such as a cellular phone away from this
unit.
Observe the following cautions when
installing.
T Refer wiring and installation to qualified
service personnel.
Installation of this unit requires special skills and
experience. For maximum safety, have it installed by
the dealership. We are not liable for any problems
resulting from your own installation of the unit.
T Follow the instruction to install and wire the
product.
Not following the instructions to properly install and
wire the product could cause an accident or fire.
T Take care not to damage the leads.
When wiring, take care not to damage the leads.
Prevent them from getting caught in the vehicle
chassis, screws, and moving parts such as seat
rails. Do not scratch, pull, bend or twist the leads.
Do not run them near heat sources or place heavy
objects on them. If leads must be run over sharp
metal edges, protect the leads by winding them
with vinyl tape or similar protection.
T Use the designated parts and tools for installa-
tion.
Use the supplied or designated parts and appropri-
ate tools to install the product. The use of parts
other than those supplied or designated may result
in internal damage to the unit. Faulty installation
may lead to an accident, a malfunction or fire.
T Do not block the air vent or the cooling plate of
the unit.
Blocking these parts will cause the interior of the
unit to overheat and will result in fire or other damage.
T Do not install the product where it is exposed
to strong vibrations or is unstable.
Avoid slanted or strongly curved surfaces for
installation. If the installation is not stable, the unit
may fall down while driving and this can lead to an
accident or injury.
T Installation Angle
The product should be installed in a horizontal posi-
tion with the front end up at a convenient angle.
The user should bear in mind that in some areas
there may be restrictions on how and where this
unit must be installed. Consult your dealer for
further details.
T Wear gloves for safety. Make sure that wiring
is completed before installation.
T To prevent damage to the unit, do not connect
the power connector until the whole wiring is
completed.
T Do not connect more than one speaker to one
set of speaker leads. (except for connecting to
a tweeter)
3
Safety Information (continued)
¡ Position the iPod device/iPhone model/USB device
Caution
Observe the following cautions when
using iPod
device.
¡ Do not connect a USB device directly to this unit.
If the USB device is connected directly to this unit
and an accident occurs, or if the brakes are applied
suddenly, the driver or passenger may bump into
the USB device and may get injured.
®
device/iPhone® model or USB
and USB extension cable so that they do not
obstruct your driving.
¡ Do not connect any device other than iPod device/
iPhone model/USB memory or a USB audio player.
Do not connect multiple USB devices to the USB
connector. Drawing power for multiple USB devices
from the connector could cause overheating and
smoking.
Caution
PLEASE FOLLOW THE LAWS AND REGULATIONS OF YOUR STATE, PROVINCE OR COUNTRY FOR
WIRING, INSTALLATION, AND USE OF THIS UNIT AND THE DEVICES TO BE CONNECTED.
The following applies only in the U.S.A.
Part 15 of the FCC Rules
FCC Warning:
This device complies with Part 15 of the FCC
Rules for Radio Receiver. Operation is subject
to the condition that this device may not cause
harmful interference. Any unauthorized changes
or modifications to this equipment may void the
user's authority to operate this device.
IMPORTANT NOTE:
To comply with the FCC RF exposure compliance
requirements, no change to the antenna or the
device is permitted. Any change to the antenna
or the device could result in the device exceeding the RF exposure requirements and void
user’s authority to operate the device.
This equipment complies with FCC radiation
exposure limits set forth for uncontrolled equipment
and meets the FCC radio frequency (RF) Exposure Guidelines in Supplement C to OET65. This
equipment has very low levels of RF energy that it
deemed to comply without maximum permissive
exposure evaluation (MPE). But it is desirable that it
should be installed and operated with at least 20 cm
and more between the radiator and person’s body
(excluding extremities: hands, wrists, feet and legs).
NOTICE
This equipment has been tasted and found to
comply with the limits for a Class B digital device,
pursuant to part 15 of the FCC Rules. These limits
are designed to provide reasonable protection
against harmful interference in a residential
installation. This equipment generates, uses and
can radiate radio frequency energy and, if not
installed and used in accordance with the instructions, may cause harmful interference to radio
communications. However, there is no guarantee
that interference will not occur in a particular
installation. If this equipment does cause harmful interference to radio or television reception,
which can be determined by turning the equipment off and on, the user is encouraged to try
to correct the interference by one or more of the
following measures:
¡ Reorient or relocate the receiving antenna
¡ Increase the separation between the equipment
and receiver.
¡ Connect the equipment into an outlet on a
circuit different from that to which the receiver
is connected.
¡ Consult the dealer or an experienced radio/ TV
technician for help.
This transmitter must not be co-located or operated
in conjunction with any other antenna or transmitter.
4

Contents
Safety Information ........................ 2
Contents .................................. 5
Features .................................. 6
Front AUX terminal (AUX1)
Rear AUX terminal (AUX2)
Sound control
CAN-readiness
Fault detection of external amplifier
Non-volatile memory
Illumination Interlock Control
30 days clock memory
Bluetooth
USB connector
Connectable devices ..................... 7
Compatible USB devices
Controls Layout ........................... 8
Preparation ................................ 9
First time power on
Clock Display Setting
Clock adjustment
General ....................................10
Power On/Off
Source Selection
Volume Adjustment
Indication at connecting external amplifier
Sound Controls ...........................12
Audio modes (Bass/Treble/Balance/Fader/
SQ)
Radio ......................................14
Operation Flow
Display Change
Station Preset
Manual preset memory
Tuning in a weather band station
USB (MP3/WMA) ......................... 16
Notes for USB device
Compatible USB devices
Operation Flow
Display change
Random, Scan, Repeat Play
For use with iPod ........................19
Operation Flow
Display change
Setting the iPod Control
Repeat, Shuffle Play
Bluetooth® - General ....................22
Registration of a Bluetooth® device to this
unit
Display change
Setting of PIN (Personal Identity Number)
code
Connection of the registered Bluetooth
device to this unit
®
®
®
Disconnection of the Bluetooth
Deletion of the registered data
device
Bluetooth® - Hands-Free Phone .......24
Phone answering
Phone hanging up
Switching between the private mode* and
hands-free mode
Incoming call rejection
Outgoing call termination
Setting of automatic answering function
Use of voice dial
Use of receiving/calling records or telephone
directory (phonebook)
Bluetooth® - Music Player ..............26
Music mode activation
Song selection
Pause
Notes on Bluetooth® ..................... 27
Frequency band used
Usage limitations
Influence from other devices
Application limitations
Alarm Setting ............................. 28
Alarm time setting
Turning ON/OFF the alarm
Activating snooze
Troubleshooting .......................... 30
If you suspect something wrong
Common
Radio
USB (MP3/WMA)
Bluetooth
Product servicing
®
Error Display Messages.................34
USB (MP3/WMA)
For use with iPod
Bluetooth
®
Notes on MP3/WMA .....................36
Cautions as to compressed audio files
Cautions as to the display of this unit
Recording MP3/WMA Files on a USB-Device
Copyright
No warranty
Maintenance .............................. 38
Cleaning this unit
Specifications ............................39
General
FM Stereo Radio
AM Radio
Weather Band Radio
Bluetooth
®
Specification from the Terminal End
(Rear Connector of This Unit) ..........40
5

Features
Front AUX terminal (AUX1)
Your mobile audio player and other devices are connectable to this unit without any difficulty.
Rear AUX terminal (AUX2)
For more convenient connection, rear AUX terminals
are now provided on the unit itself.
Sound control
SQ (Sound Quality)
You have four preset modes (FLAT, ROCK, POP and
VOCAL).
CAN-readiness
This unit is a CAN (Controller Area Network)-ready
device that provides communication with a steering
wheel remote control and other CAN-ready units.
Fault detection of external amplifier
When an anomaly of the connected external amplifier
is detected, “AMP FAULT” text appears (the sound
will be mute) and the power of this unit turned off
after 6 seconds to remind taking inspection with the
external amplifier.
Non-volatile memory
This unit stores the memories of each setting (tuner,
audio, mode, alarm time settings even if the power
supply is shut off or the power cable is unplugged.
Illumination Interlock Control
The intensity/illumination of display and button on
this unit is controlled by a PWM dimming module
located in the vehicle.
This unit is connected in the vehicle to dimming
analog signal (PWM signal). It’s capable of dimming
the backlighting based on a voltage supplied by a
PWM dimming module.
v 1.2
Profile)
®
®
audio systems.
®
®
devices
Version: 2.1+EDR
Bluetooth
This feature allows users to use a hands-free phone
and Bluetooth
Compatible Bluetooth
¡ Bluetooth
¡ HFP1.5 (Hands-Free Profile)
¡ OPP (Object Push Profile)
¡ A2DP (Advanced Audio Distribution Profile)
¡ AVRCP1.0 (Audio/Video Remote Control
¡ HSP v 1.1 (Headset Profile)
USB connector
The USB connector is equipped on the front panel.
By connecting a USB memory (not included) to the
USB connector via a USB extension cable (USB 2.0,
not included), you can enjoy MP3/WMA files stored
on the USB memory (not included) in your vehicle.
By connecting for iPod devices/iPhone models to
USB connector via a USB extension cable for iPod
devices and iPhone models (USB 2.0, not included),
you can enjoy music files stored on the compatible
with iPod devices and iPhone models in your vehicle.
Further information about the compatible with iPod
devices and iPhone models is described below.
* iPhone, iPod, iPod classic, iPod nano, iPod shuffle,
and iPod touch are trademarks of Apple Inc., registered in the U.S. and other countries.
“Made for iPod” and “Made for iPhone” mean that
an electronic accessory has been designed to connect specifically to iPod or iPhone, respectively, and
has been certified by the developer to meet Apple
performance standards. Apple is not responsible for
the operation of this device or its compliance with
safety and regulatory standards. Please note that the
use of this accessory with iPod or iPhone may affect
wireless performance.
30 days clock memory
This unit stores the memory of clock time for 30
days even if the power supply is shut off or the
power cable is unplugged.
6

Connectable devices
Compatible USB devices
¡ USB Mass Storage Class
For details as to whether your USB memory/
USB Audio is compatible with USB Mass Storage Class, please contact the USB memory/USB
Audio manufacturer.
Caution
We do not guarantee all of the USB devices
(USB memory/USB audio player) on market
are compatible and playable with this unit,
some exceptional USB devices may have
operation problem when connected to this
unit. If such problem occurs, please check
and contact the USB device manufacturer for
its compatible information.
¡ USB Standard Compatibility 1.1/2.0 Full Speed
¡ File System FAT12/16/32
¡ Maximum current less than 1 A
¡ Recommended capacity/partition:
Less than 32 GB/Only supported for 1 partition.
iPod compatibility
This unit supports only the following iPod models.
Supported iPod models are shown below. Older
models can not be supported.
Made for.
¡ iPod touch (4th generation)
¡ iPod touch (3rd generation)
¡ iPod touch (2nd generation)
¡ iPod touch (1st generation)
¡ iPod classic (160 GB only)
¡ iPod classic (120 GB only)
¡ iPod classic
¡ iPod nano (6th generation)
¡ iPod nano (5th generation)
¡ iPod nano (4th generation)
¡ iPod nano (3rd generation)
Made for.
¡ iPhone 4S
¡ iPhone 4
¡ iPhone 3GS
¡ iPhone 3G
¡ iPhone
* Operation check has been completed with software
available at the end of December, 2013. We do not
guarantee the operation with our future products
or upgraded software.
Caution
Correct function of iPhone 5, iPod touch (5th
generation) and iPod nano (7th generation) can
not be guaranteed when connected to this unit.
7

Controls Layout
)
BAND
(a page 14, 15, 23, 24, 25)
y / 5 Pause/Play
(a page 16, 19, 26)
APM Auto Preset Memory
(
a page 14)
a page 24, 25)
PHONE (
VOL Volume
(a page 11, 12)
ALM Alarm
(a page 28)
PUSH SEL Select
(a page 9, 12, 19, 22, 23, 25,
28)
age 24, 25
DISP Display
a page 9, 14, 17, 20, 22)
(
CLOCK (a page 9)
1 through 6 (Preset Buttons)
a page 14, 15, 22, )
(
SCROLL (a page 17, 20)
SCAN /iPod(a page 18, 20)
REPEAT/RANDOM
(a page 18, 21)
FOLDER {/}
(a page 16, 19)
TUNE/SEEK {/} (
FILE (File/Number) s/d
(
a page 16, 19, 23, 24, 26, 28)
a page 14, 15)
SRC Source (
14, 16, 19, 23)
POWER (
AUX
From line output of
external sound/audio
device (ex. Silicon-audio
player, HDD player, etc.)
a page 10,
a page 10)
8
Preparation
First time power on
Turn the key in the ignition until the ac-
1
cessory indicator lights.
Press [POWER].
2
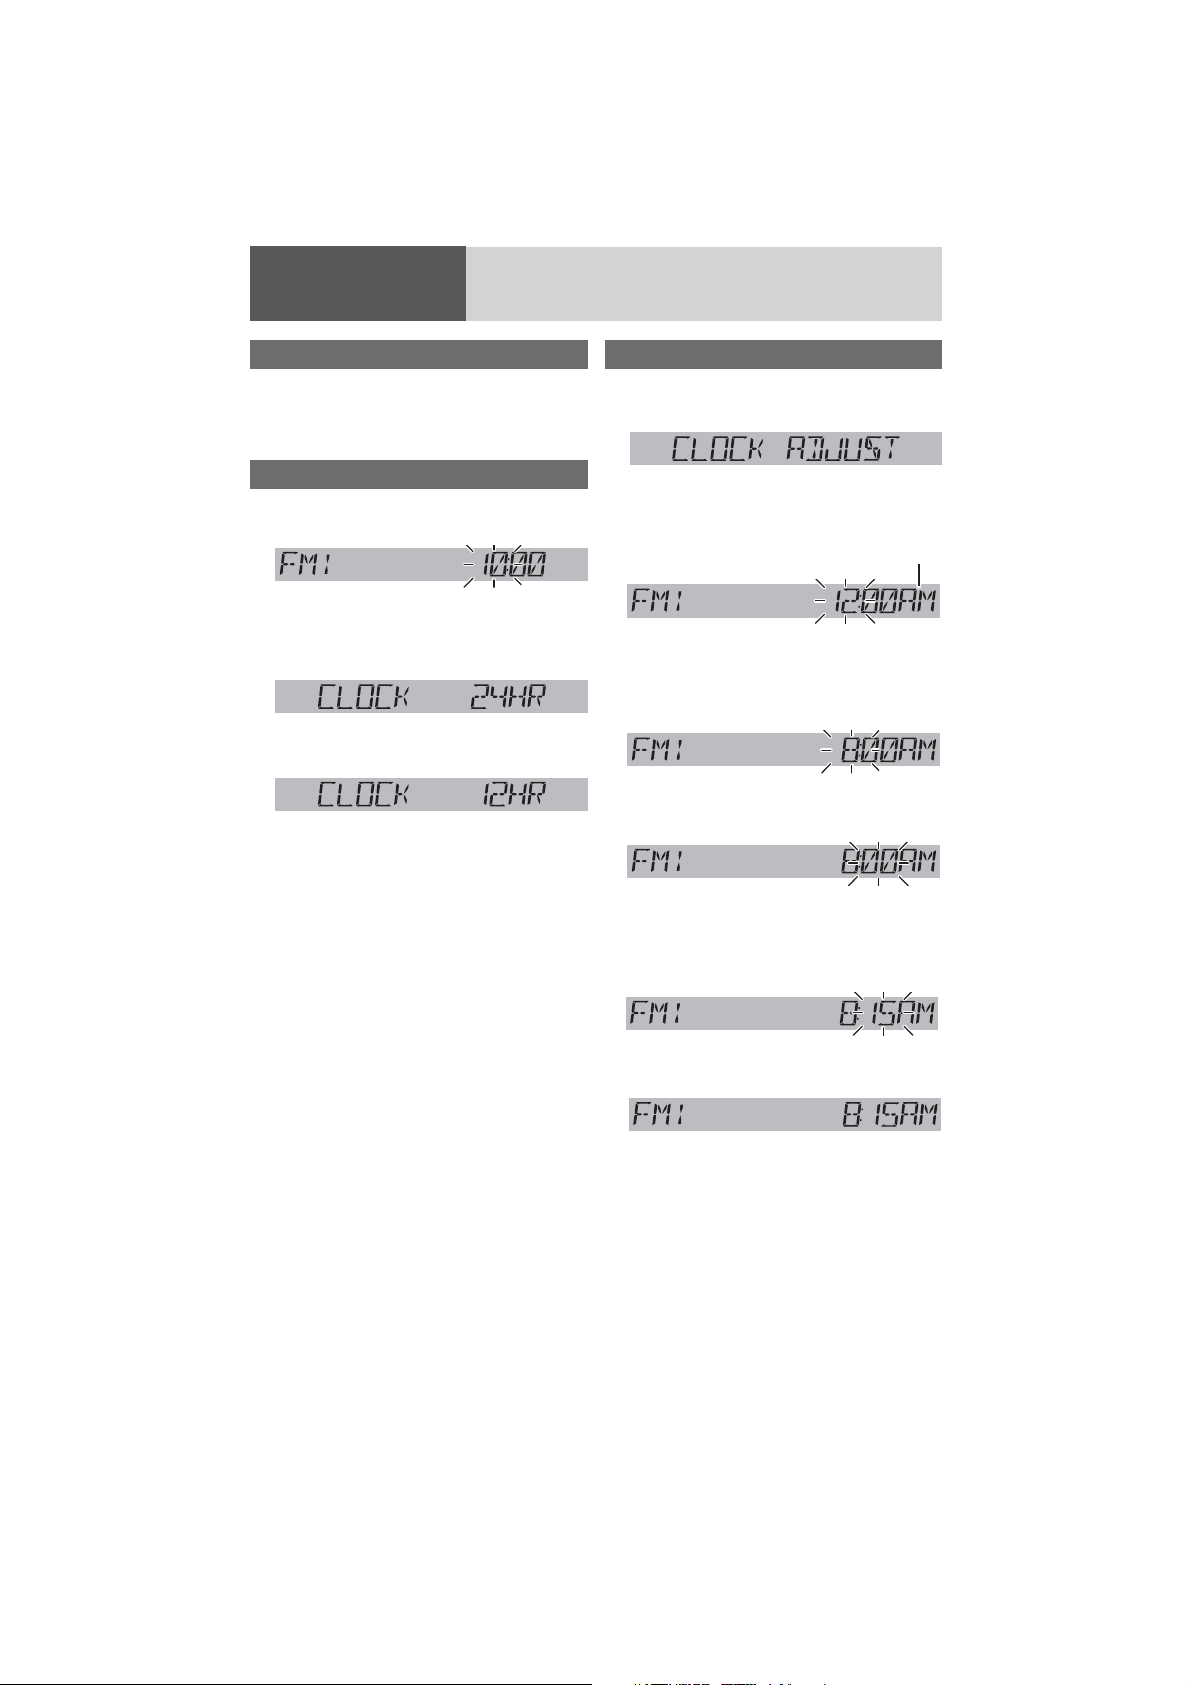
Clock Display Setting
Hold down [DISP](CLOCK) for more than
1
2 seconds to adjust clock setting.
Press [SEL] to open the clock display
2
setting display.
Press [d] or [s] to adjust.
3
the 24-hour system used (default)
cd
the 12-hour system used
Press [SEL] to determine the setting.
4
Notes:
¡ If no operation takes place for more than 5
seconds in the clock display setting, the display
returns to the regular mode.
¡ To exit from the clock display setting, press
[DISP].
Clock adjustment
*The 12-hour system is used for example.
Press [DISP](CLOCK).
1
(Clock display)
Hold down [DISP](CLOCK) for more than
2
2 seconds.
*Indicator for AM or PM time
Hour blinks
Adjust the hour.
3
[d] : Sets ahead.
[s] : Sets back.
Hour entered
Press [DISP](CLOCK).
4
Minute blinks
Adjust the minute.
5
[d] : Sets ahead.
[s] : Sets back.
Minute entered
Press [DISP](CLOCK).
6
Completed
Notes:
¡ Clock time is displayed when the unit is power off.
¡ “CLOCK ADJUST” is displayed when the clock is
not adjusted.
¡ Hold down [d] or [s] to change numbers
rapidly.
¡ When you want to readjust the time, repeat steps
2 to 6.
9
General
p
[VOL] (Volume)
AUX Connector (3.5 mm ø stereo)
From line output of external sound/audio device (ex. Silicon audio
player, HDD player, etc.)
Power On/Off
Set your car’s ignition switch to the ACC or ON
position.
Power on: Press [POWER].
Power off: Hold down [POWER] for more
One-Hour Timer
With the ignition off, pressing the [POWER] on
this unit will turn on the receiver and activate the
receiver’s one-hour timer. The receiver will turn off
automatically after one hour.
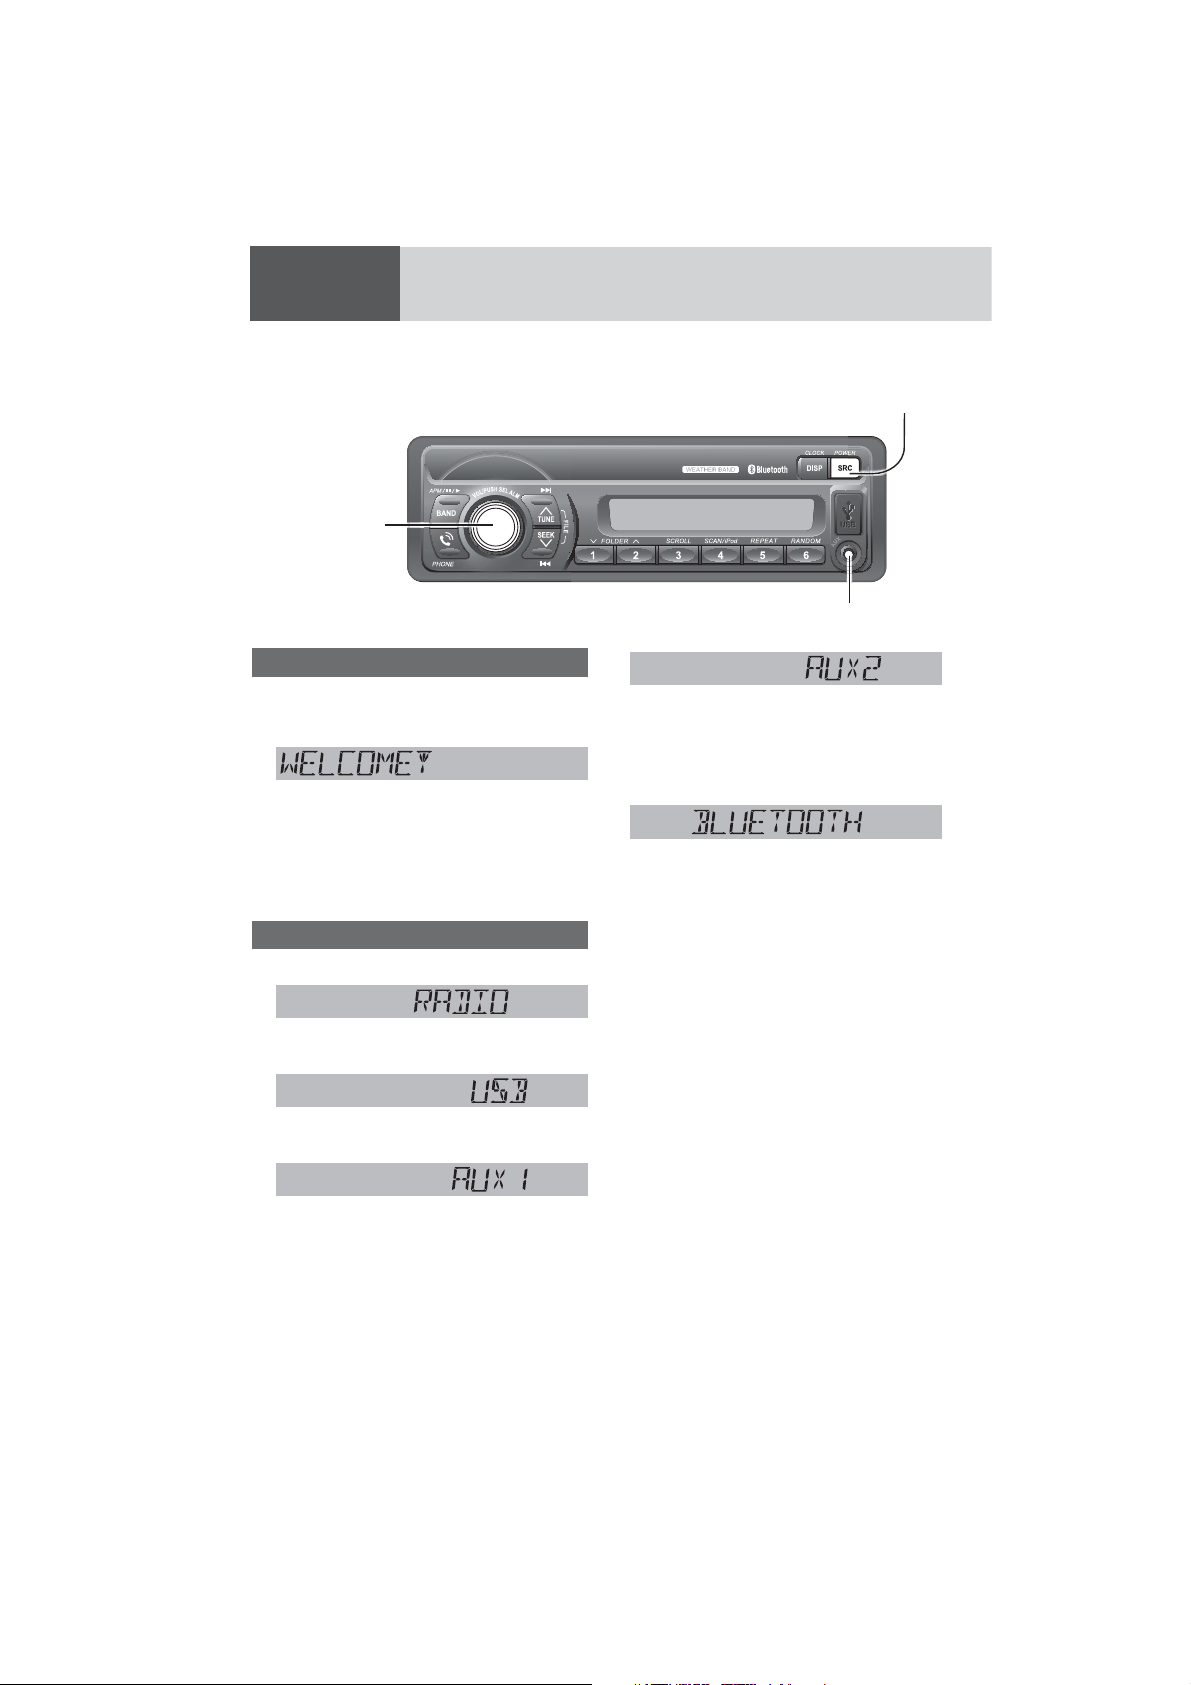
Source Selection
Press [SRC] to change the source.
than 1 second.
d
d
Radio
(
a page 14)
USB (a page 16)
iPod (
a page 19)
[SRC]
selects a source.
[POWER]
toggles power on/off.
When device connected to the rear AUX terminal of
this unit, the sound of connected audio device can be
output from car speakers.
d
Bluetooth
d
(Return to “RADIO”)
Notes:
¡ When an output signal from the rear AUX terminal
is detected, this unit automatically changes the
source to AUX2. If this unit no longer detects this
input signal, the source immediately before AUX2
resumes.
¡ When an output signal from the rear AUX terminal
is detected in the power-off mode of this unit, the
power is turned on with the AUX2 source selected.
If this unit no longer detects this input signal before manually selecting other sources, the power
of this unit is turned off.
(a page 22)
AUX2
®
d
When device connected to the front AUX terminal of
this unit, the sound of connected audio device can be
output from car speakers.
When no external device is
d
connected to rear AUX terminal,
“AUX” is displayed, and press
[SRC] to return to “RADIO”
10
AUX1

Volume Adjustment
(Setting Range: 0 to 40, Default: 18)
Turn [VOL] clockwise to increase the volume, and counterclockwise to decrease
the volume.
Up
Down
Indication at connecting external
amplifier
lights when an external amplifier is con-
nected.
Note: When an anomaly of the external amplifier is
detected, “AMP FAULT” appears (the sound will be
mute/
this unit is turned off after 6 seconds.
When an external amplifier is connected, the adjustable volume level: 0 to 33 (Maximum).
blinks repeatedly) and the power of
11

Sound Controls
[VOL]
selects a value in the
audio menu.
(PUSH SEL: Select)
selects items in the
audio menu.
Audio modes (Bass/Treble/Balance/Fader/SQ)
Push [SEL] (Select) to select the audio
1
mode in sequence.
Volume
Turn [VOL] (Volume) clock-
2
wise or counterclockwise
to change each level or
select a setting.
(Setting Range: 0 to 40, default: 18)
Bass
(Setting Range: –12 dB to +12 dB by 2 dB,
default: 0 dB)
Treble
(Setting Range: –12 dB to +12 dB by 2 dB,
default: 0 dB)
Balance
(Setting Range: 15 levels each and CENTER,
default: CENTER)
Fader
(Setting Range: 15 levels each and CENTER,
default: CENTER)
q: Up
w: Down
q: Increased
w: Decreased
q: Increased
w: Decreased
q: Right enhanced
w: Left enhanced
q: Front enhanced
w: Rear enhanced
Note: If no operation takes place for more than 5
seconds in audio mode (2 seconds in volume mode),
the display returns to the regular mode.
12

SQ (Sound Quality)
SQ is a function that can call up various sound types
at the touch of button in accordance with your listening music type.
(Selectable setting: FLAT/ROCK/POP/VOCAL default:
FLAT)
q, w: Select
(FLAT) flat frequency response:
does not emphasize any part. (default)
(ROCK) speedy and heavy sound:
exaggerates bass and treble.
(POP) wide-ranged and deep sound:
slightly emphasizes bass and treble.
(VOCAL) clear sound:
emphasizes middle tone and slightly emphasizes
treble.
Note: Settings of SQ, bass and treble are influenced
one another. If such an influence causes distortion to
the audio signal, readjust bass/treble or volume.
13
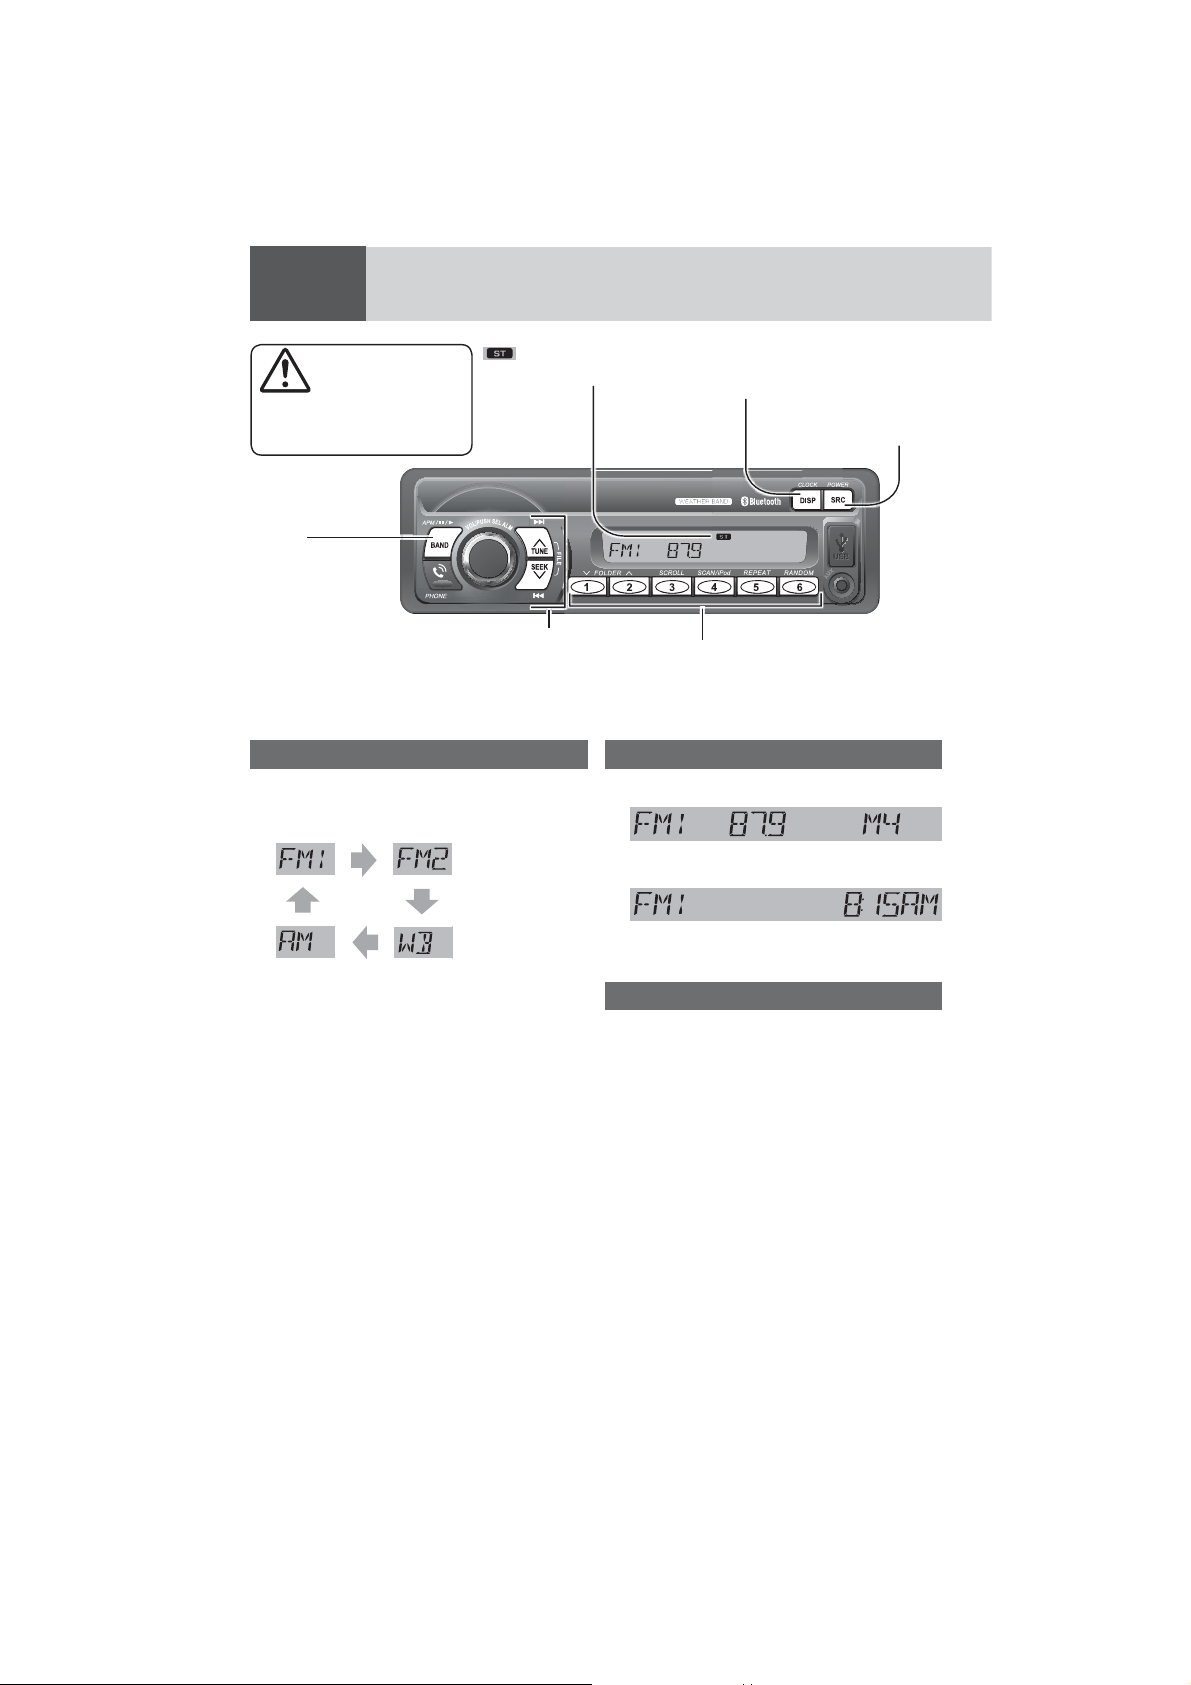
Radio
on t
(FM stereo) indicator
Caution
To ensure safety, never attempt to preset stations while
you are driving.
[BAND]
selects a band in the
radio source.
(APM) (Auto Preset
Memory)
executes APM in the
radio source (by holding it down for more
than 2 seconds).
lights while receiving an FM
stereo signal.
[TUNE}] / [TUNE{]
increases/decreases the frequency. (For seek tuning, hold it
down for more than 0.5 seconds
and release it.)
Operation Flow
Press [SRC] to select the radio source.
1
Press [BAND] to select a band.
2
Weather Band
(a page 15)
Select a station.
3
Frequency Adjustment
[TUNE{]: Lower / [TUNE}]: Higher
Note: For station search, hold down either of the but-
tons for more than 0.5 seconds and release it.
Preset Station Selection
Press the corresponding preset button
from [1] through [6] to tune in a preset
station.
[DISP] (Display)
switches the information
on the display.
[SRC]
selects a source.
Preset buttons [1] through [6]
select a preset station in the radio source,
preset the current station (by holding it
down for more than 2 seconds).
Display Change
Press [DISP] to change the display.
Radio mode display (Frequency)
cd
Clock display
Station Preset
The 6 stations with good reception will be automatically saved in the memory under preset buttons [1]
through [6].
Preset stations can be simply called up by pressing
[1] through [6].
Auto Preset Memory (APM)
With this operation, stations with good receiving
conditions can be automatically stored in the preset
memory.
Select a band.
1
Hold down [BAND] (APM) for more than
2
2 seconds.
The preset stations under best receiving conditions are received for 5 seconds each after presetting the stations (SCAN). To stop scanning, press
one of the buttons from [1] through [6].
Note: New stations overwrite existing saved stations.
14
 Loading...