

Page 1
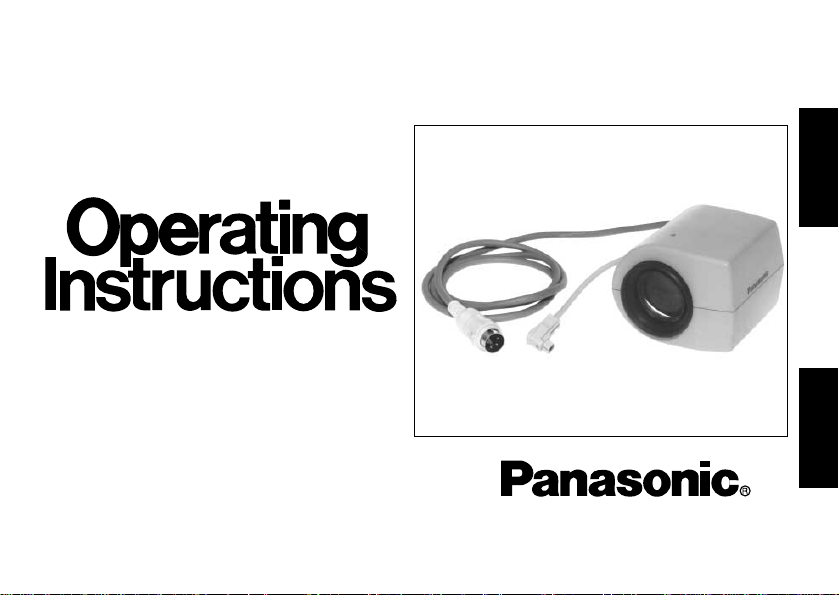
15X Zoom Lens
WV-LZ61/15
Before attempting to connect or operate this product,
please read these instructions completely.
ENGLISH
FRANÇAIS
Page 2
Note: Clean the lens face with care.
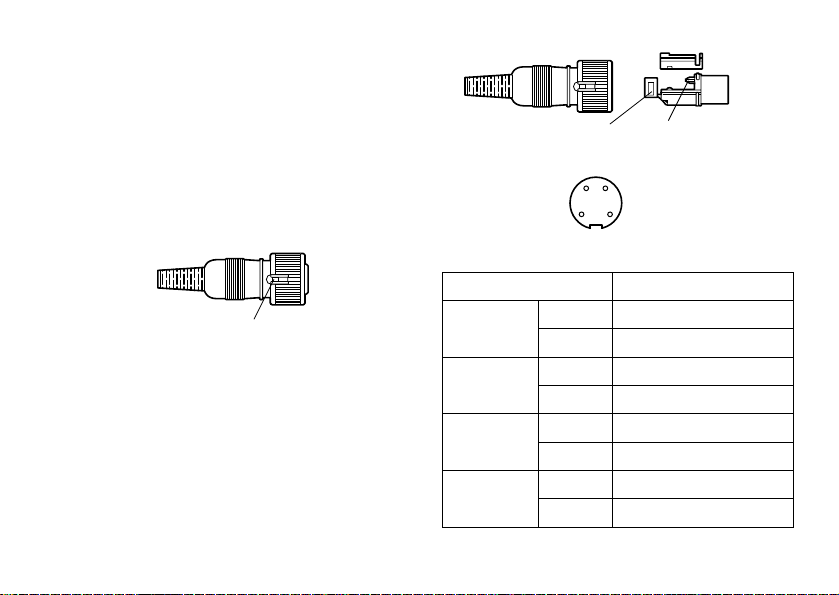
Push here to remove
Clamp
View from solder side
Solder
1 : Common
2 : Not used
3 : Focus
4 : Zoom
14
32
Do not clean the lens with strong or abrasive detergents. Use lens tissue or a cotton
tipped applicator and ethanol.
● Prepare the zoom and focus cable
1. Remove the connector terminal from the
connector supplied by pushing the lock pin.
2. Solder the cable to the pins of the supplied
connector according to the diagram shown
below.
The maximum cable length is also as shown
below.
Copper Wire Gauge
#20
(0.52 mm2)
#18
(0.83 mm2)
#16
(0.131 mm2)
#14
(2.08 mm2)
- 1 -
Maximum Cable Length
m70
ft 225
m 115
ft 375
m 165
ft 550
m 285
ft 930
Page 3

● Voltage Selector Setting
Set the Voltage Selector located on the rear of
the lens, to either 6V or 12V, according to system
requirements.
Switch position
Applicable
receiver or
controller
Operating
current supplied from
receiver or
controller
6 V, 120 mA 12 V, 50 mA
Made by
Panasonic
Position for
operating
any
Panasonic
products
Others
AMERICAN
DYNAMICS
PELCO, Molynx
Building Block
Video, etc.
12 V 50 mA or
9 V 65 mA or
more is necessary for operating the above
Notes:
• Lens control is disabled when the lens is
connected to a receiver or controller of less
than 12 V 50 mA or 9 V 65 mA.
• If the lens is connected to a receiver or controller of a lower current rating when the
voltage selector is at 6 V, a time lag may
occur to activate the lens after pressing the
controller button.
• If this lens is used in a Panasonic WVRC100 or WV-RC150 receiver with the lens
voltage selection switch set to the LOW
position and the lens voltage fine control set
to the default position, the zoom may not
function.
In such a case, set the lens voltage fine
control of the receiver to the maximum position or the lens voltage selection switch to
the HIGH position (lens voltage selector
also set to 12 V) before using the lens.
- 2 -
ENGLISH
Page 4

● Mount the Lens
ALC
DC VIDEO
ELC
ELCDCALC
VIDEO
ALC Lens Connector
ALC Lens Cable (4 pin)
1. Set the ALC selector on the camera to DC
position.
2. Mount the lens by turning it clockwise on the
lens mount of the camera.
3. Connect the ALC cable to the Auto Iris Lens
Connector on the side of the camera.
4. Connect the zoom and focus control cable
to the external equipment, such as a controller or receiver.
- 3 -
Page 5

● Flange-back Adjustment
1. Loosen the screws on the flange-back
adjusting ring of the camera.
2. Set the lens at wide position.
3. Shoot an object more than 10 meters (30
feet) away, then turn the flange-back ring of
the camera to bring the object into focus.
4. Set the lens at tele position.
5. Adjust the focus to bring the object into
focus.
6. Zoom out the object, then turn the flangeback adjusting ring again to bring the object
into focus.
7. Repeat the procedures 4 to 6 to be in focus
over the zoom range of the lens.
8. Tighten the screws on the flange-back
adjusting ring.
- 4 -
Screws
Flange-back
Adjusting Ring
Page 6

SPECIFICATIONS
Image Size: φ6 mm [4.8(H) x 3.6(V) mm]
Focal Length: 6 - 90 mm
Maximum Aperture Ratio: 1 : 1.6 (wide) - 1 : 2.6 (tele)
Iris Range: F1.6 - F176, Close
Angular Field of View H: 3.2° - 44.4°
Focusing Range: 2.0 m - ∞ (6.6 ft - ∞)
Focus Control: Far: –6 V (–12 V) DC 120 mA (50 mA), approx. 7.5 s
Zoom Control: Wide: –6 V (–12 V) DC 120 mA (50 mA), approx. 7 s
Filter Size: φ46 mm, P=0.75 mm
Mount: CS-mount, 1”-32UN
Ambient Operating Temperature: –10°C - +50°C (14°F - 122°F)
Dimensions: 79(W) x 67(H) x 87(D) mm [3-1/8”(W) x 2-5/8”(H) x 3-7/16”(D)]
Weight: 260 g (0.57 lbs.)
Dimensions and weight indicated are approximate.
Specifications are subject to change without notice.
V: 2.4° - 33.6°
Near: +6 V (+12 V) DC 120 mA (50 mA), approx. 7.5 s
Tele: +6 V (+12 V) DC 120 mA (50 mA), approx. 7 s
STANDARD ACCESSORY
4-pin Connector .......................................... 1 pc.
- 5 -
Page 7

Video Imaging Systems Company
A Division of Panasonic Broadcast & Television Systems Company
A Unit of Matsushita Electric Corporation of America
Executive Office: One Panasonic Way 4H-2, Secaucus, New Jersey 07094
Regional Offices:
Northeast: One Panasonic Way, Secaucus, NJ 07094 (201) 348-7303
Southeast: 1225 Northbrook Parkway, Suite 1-160, Suwanee, GA 30024 (770) 338-6838
Midwest: 1707 North Randall Road, Elgin, IL 60123 (847) 468-5211
Southwest: 8105 Beltsline Road, Suite 100, Irving, TX 75063 (927) 915-1334
Western: 6550 Katella Ave., Cypress, CA 90630 (714) 373-7840
PANASONIC CANADA INC.
5770 Ambler Drive, Mississauga, Ontario, L4W 2T3 Canada (905)624-5010
PANASONIC SALES COMPANY
DIVISION OF MATSUSHITA ELECTRIC OF PUERTO RICO, INC.
San Gabriel Industrial Park, 65th Infantry Ave. KM. 9.5 Carolina, P.R. 00630 (809)750-4300
N1098-1029 YWV8QA5113BN Printed in Japan
N 19 Imprimé au Japon
 Loading...