

Panasonic WV-LZ61, WV-LZ15 Operating Instructions
15X Zoom Lens
WV-LZ61/15
Before attempting to connect or operate this product,
please read these instructions completely.
ENGLISH
FRANÇAIS
Note: Clean the lens face with care.
Push here to remove
Clamp
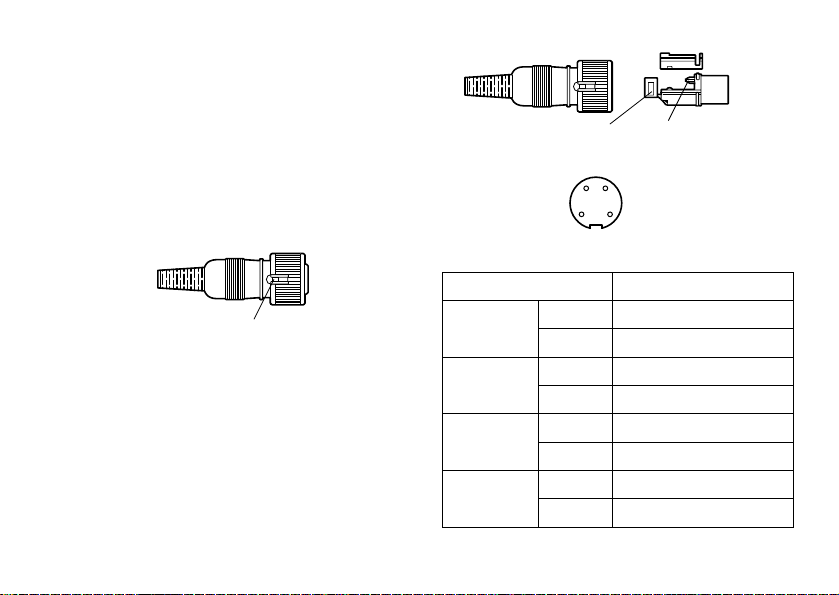
View from solder side
Solder
1 : Common
2 : Not used
3 : Focus
4 : Zoom
14
32
Do not clean the lens with strong or abrasive detergents. Use lens tissue or a cotton
tipped applicator and ethanol.
● Prepare the zoom and focus cable
1. Remove the connector terminal from the
connector supplied by pushing the lock pin.
2. Solder the cable to the pins of the supplied
connector according to the diagram shown
below.
The maximum cable length is also as shown
below.
Copper Wire Gauge
#20
(0.52 mm2)
#18
(0.83 mm2)
#16
(0.131 mm2)
#14
(2.08 mm2)
- 1 -
Maximum Cable Length
m70
ft 225
m 115
ft 375
m 165
ft 550
m 285
ft 930

● Voltage Selector Setting
Set the Voltage Selector located on the rear of
the lens, to either 6V or 12V, according to system
requirements.
Switch position
Applicable
receiver or
controller
Operating
current supplied from
receiver or
controller
6 V, 120 mA 12 V, 50 mA
Made by
Panasonic
Position for
operating
any
Panasonic
products
Others
AMERICAN
DYNAMICS
PELCO, Molynx
Building Block
Video, etc.
12 V 50 mA or
9 V 65 mA or
more is necessary for operating the above
Notes:
• Lens control is disabled when the lens is
connected to a receiver or controller of less
than 12 V 50 mA or 9 V 65 mA.
• If the lens is connected to a receiver or controller of a lower current rating when the
voltage selector is at 6 V, a time lag may
occur to activate the lens after pressing the
controller button.
• If this lens is used in a Panasonic WVRC100 or WV-RC150 receiver with the lens
voltage selection switch set to the LOW
position and the lens voltage fine control set
to the default position, the zoom may not
function.
In such a case, set the lens voltage fine
control of the receiver to the maximum position or the lens voltage selection switch to
the HIGH position (lens voltage selector
also set to 12 V) before using the lens.
- 2 -
ENGLISH
 Loading...