

Panasonic Viera TX-P42VT30E, Viera TX-P50VT30E, Viera TX-P55VT30E, Viera TX-P65VT30E Operating Instructions Manual
T
QB0E2131U1G
Operating Instructions
Plasma Television
T hank you for purchasing this Panasonic product.
Please read these instructions carefully before operating this product and retain
them for future reference.
T he images shown in this manual are for illustrative purposes only.
Please refer to Pan European Guarantee Card if you need to contact your local
Panasonic dealer for assistance.
English
M odel No.
TX-P42VT30E
TX-P50VT30E
For more detailed instructions, refer to the Operating
Instructions on the CD-ROM.
To view the Operating Instructions on the CD-ROM, you
need a computer equipped with a CD-ROM drive, and
Adobe® Reader® (Version 8.0 or later is recommended)
installed on your computer.
D epending on the operating system or settings on your
computer, the Operating Instructions may not start
automatically.
I n this case, open the PDF file under the “MANUAL” folder
manually to view the instructions.
Contents
Be Sure to Read
Safety Precautions······················································2
M aintenance ································································ 3
Quick Start Guide
Accessories ···································································3
Identifying Controls ···················································6
B asic Connection ························································ 8
Auto Setup ··································································10
U sing “VIERA Connect” ···········································14
H ow to Use VIERA TOOLS ······································14
V iewing 3D images ··················································15
H ow to Use Menu Functions ································21
Specifications ·····························································28
Safety Precautions
2
Safety Precautions
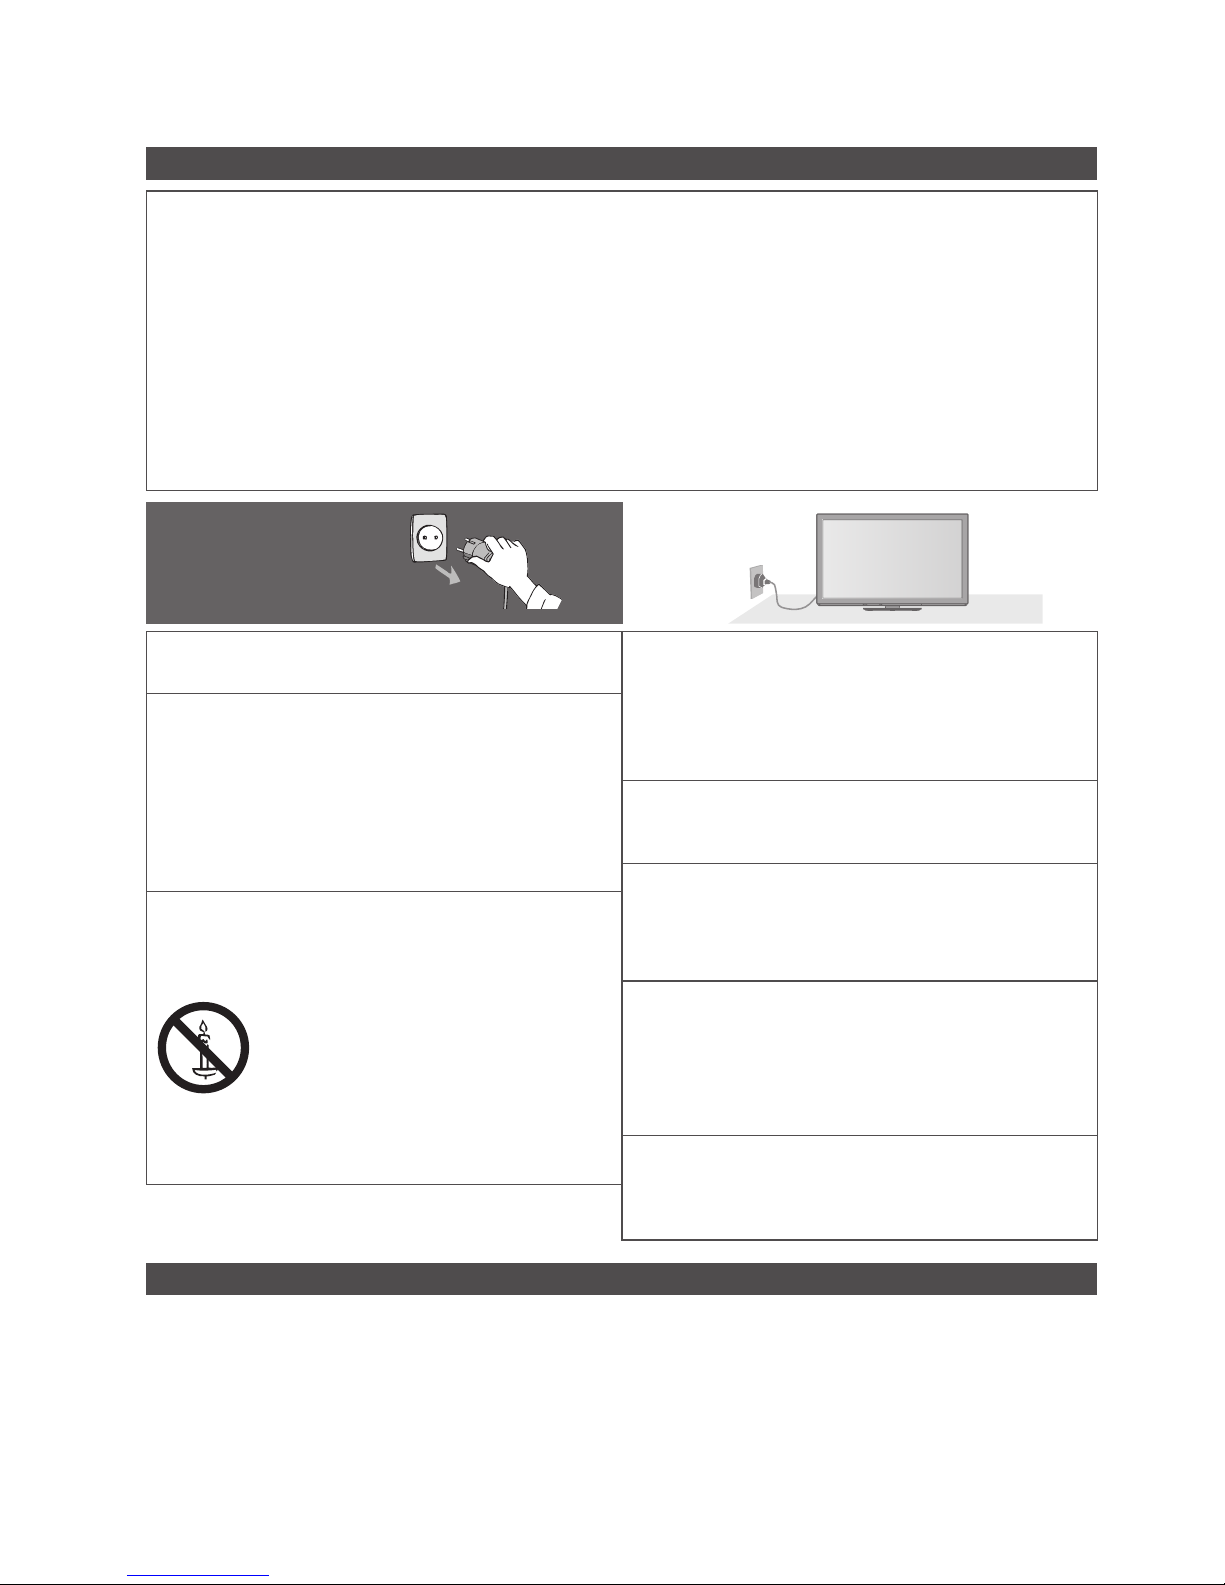
Warning
Handling the mains plug and lead
•
I nsert the mains plug fully into the socket outlet. (If the mains plug is loose, it could generate heat and cause fire.)
•
E nsure that the mains plug is easily accessible.
•
E nsure the earth pin on the mains plug is securely connected to prevent electrical shock.
•
A n apparatus with CLASS I construction shall be connected to a mains socket outlet with a protective earthing
connection.
•
D o not touch the mains plug with a wet hand. (This may cause electrical shock.)
•
D o not damage the mains lead. (A damaged lead may cause fire or electrical shock.)
•
D o not move the TV with the lead plugged in the socket outlet.
•
D o not place a
heavy object on the lead or place the lead near a high-temperature object.
•
D o not twist the lead, bend it excessively, or stretch it.
•
D o not pull on the lead. Hold onto the mains plug body when disconnecting lead.
•
D o not use a damaged mains plug or socket outlet.
If you find any abnormality,
remove the mains plug
immediately!
AC 220-240 V
50 / 60 Hz
Power source
•
T his TV is designed to operate on AC 220-240 V, 50/60 Hz.
Do not remove covers and NEVER modify
the TV yourself
•
D o not remove the rear cover as live parts are accessible
when it is removed. There are no user serviceable parts
inside. (High-voltage components may cause serious
electrical shock.)
•
H ave the TV checked, adjusted, or repaired at your local
Panasonic dealer.
Do not expose to direct sunlight and other
sources of heat
•
Avoid exposing the TV to direct sunlight and other sources
of heat.
To prevent the spread
of fire, keep candles or
other open flames away
from this product at all
times
Do not expose to rain or excessive moisture
•
T o prevent damage which might result in electric shock
or fire, do not expose this TV to rain or excessive moisture.
This TV must not be exposed to dripping or splashing
water and obj
ects filled with liquid, such as vases, must
not be placed on top of or above the TV.
Do not insert foreign objects into the TV
•
D o not allow any objects to drop into the TV through the
air vents. (Fire or electrical shock may result.)
Do not place the TV on sloped or unstable
surfaces, and ensure that the TV does not
hang over the edge of the base
•
T he TV may fall off or tip over.
Use only the dedicated pedestals /
mounting equipment
•
U sing an unapproved pedestal or other fixtures may make
the TV unstable, risking injury. Be sure to ask your local
Panasonic dealer to perform setup.
•
U se approved pedestals (p.4) / wall-hanging brackets.
Do not allow children to handle SD Card
•
A s with any small object, SD Cards can be swallowed by
young children. Please remove SD Card immediately after
use and store out of reach of children.
Caution
When cleaning the TV, remove the mains
plug
•
Cleaning an energized TV may cause electrical shock.
Do not block the rear air vents
•
Blocked ventilation by newspapers, table cloths, curtains,
etc. may cause overheating, fire or electrical shock.
Safety Precautions | Maintenance | Accessories
3
When the TV is not going to be used for a
long period of time, remove the mains plug
•
T his TV will still consume some power even in the Off mode,
as long as the mains plug is still connected to a live socket
outlet.
Transport only in upright position
•
Transporting the TV with its display panel facing upward or
downward may cause damage to the internal circuitry.
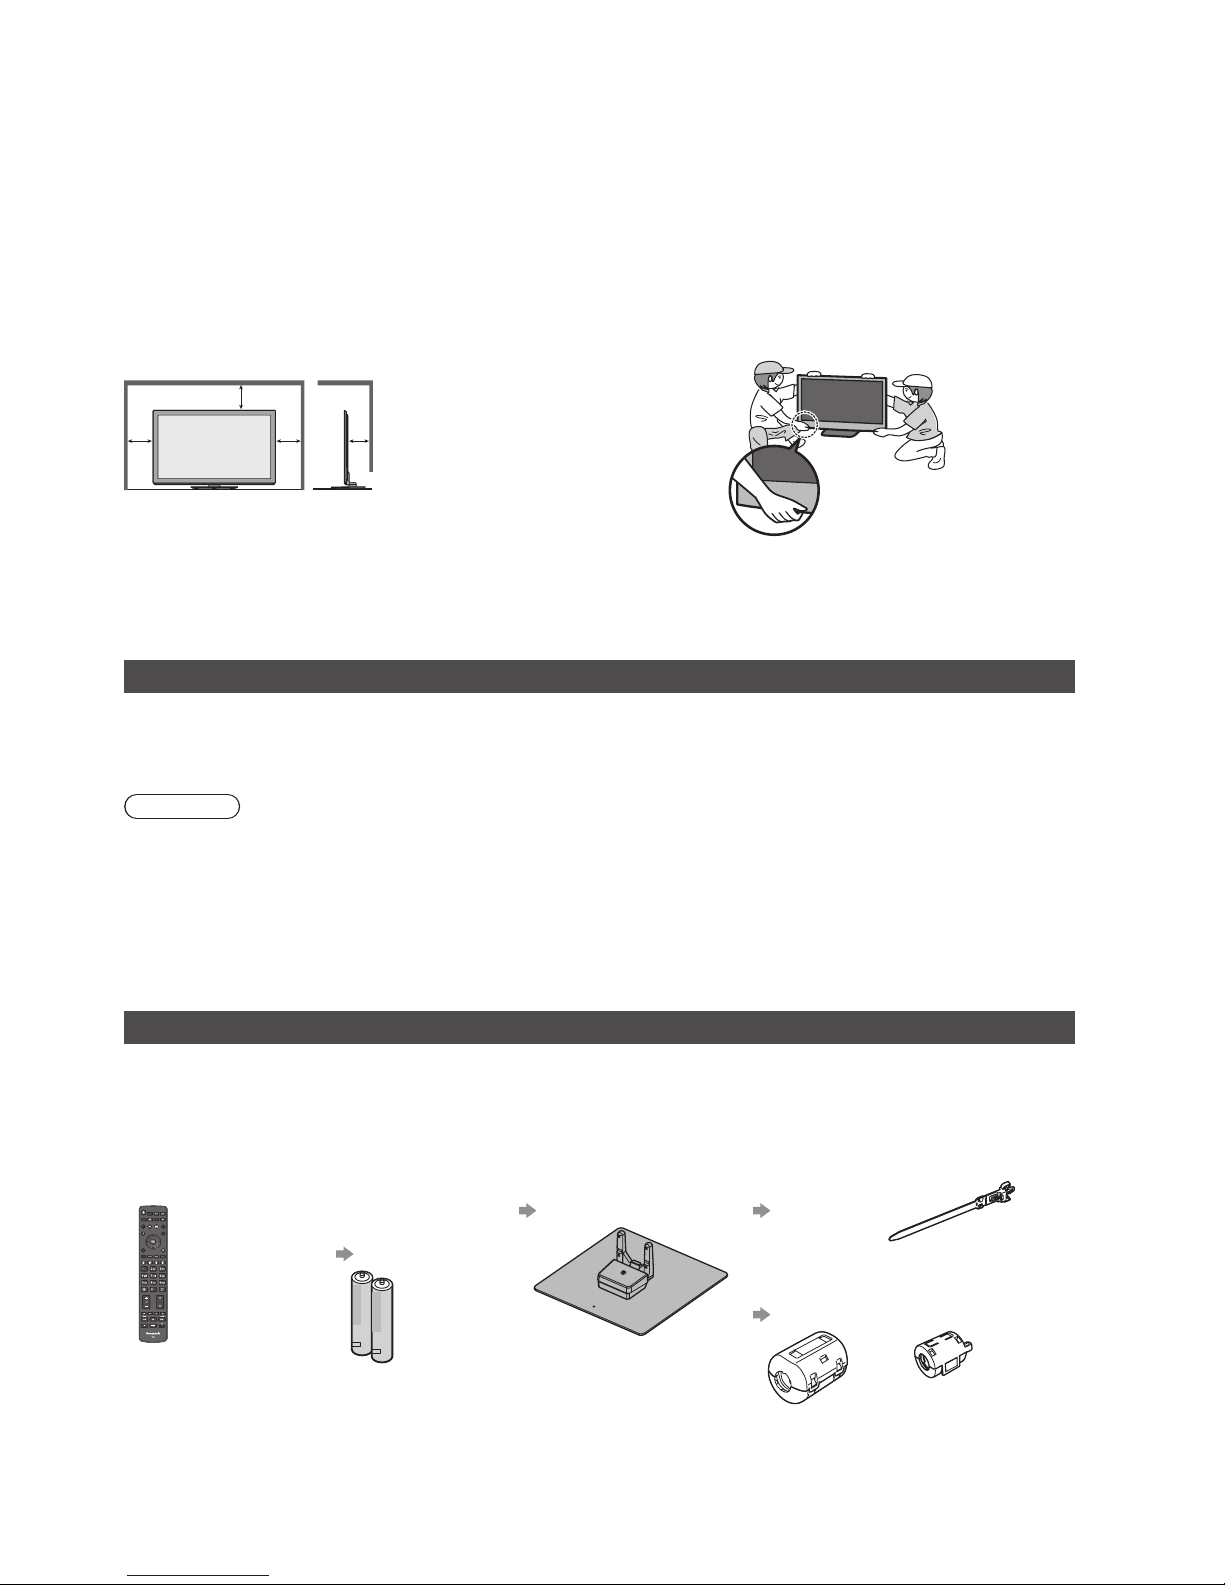
Allow sufficient space around the TV for
radiated heat
M inimum distance
•
When using the
pedestal, keep the space
between the bottom of
the TV and the surface
where the TV is set.
•
I n case of using
Wall-hanging bracket,
follow the manual of it.
10
10
10
7
(cm)
Do not expose your ears to excessive
volume from the headphones
•
Irreversible damage can be caused.
Do not apply strong force or impact to the
display panel
•
T his may cause damage resulting in injury.
The TV is heavy. Handle the TV by 2 or more
people. Support as shown to avoid injury by
the TV tipping or falling.
Maintenance
First, remove the mains plug from the socket outlet.
Display panel, Cabinet, Pedestal
Regular care :
G ently wipe the surface of the display panel, cabinet,
or pedestal by using a soft cloth to clean the dirt or
fingerprints.
For stubborn dirt :
D ampen a soft cloth with clean water or diluted neutral detergent
(1 part detergent to 100 parts water). Then wring the cloth and
wipe the surface. Finally, wipe away all the moisture.
Caution
•
D o not use a hard cloth or rub the surface too hard. This may cause scratches on the surface.
•
T ake care not to subject the TV’s surfaces to water or detergent. A liquid inside the TV could lead to product failure.
•
T ake care not to subject the surfaces to insect repellent, solvent, thinner or other volatile substances. This may degrade
surface quality or cause peeling of the paint.
•
T he surface of the display panel is specially treated and may be easily damaged. Take care not to tap or scratch the surface
with your fingernail or other hard objects.
•
D o not allow the cabinet and pedestal to make contact with a rubber or PVC substance for a long time. This may degrade
surface quality.
Mains plug
Wipe the mains plug with a dry cloth at regular intervals. Moisture and dust may lead to fire or electrical shock.
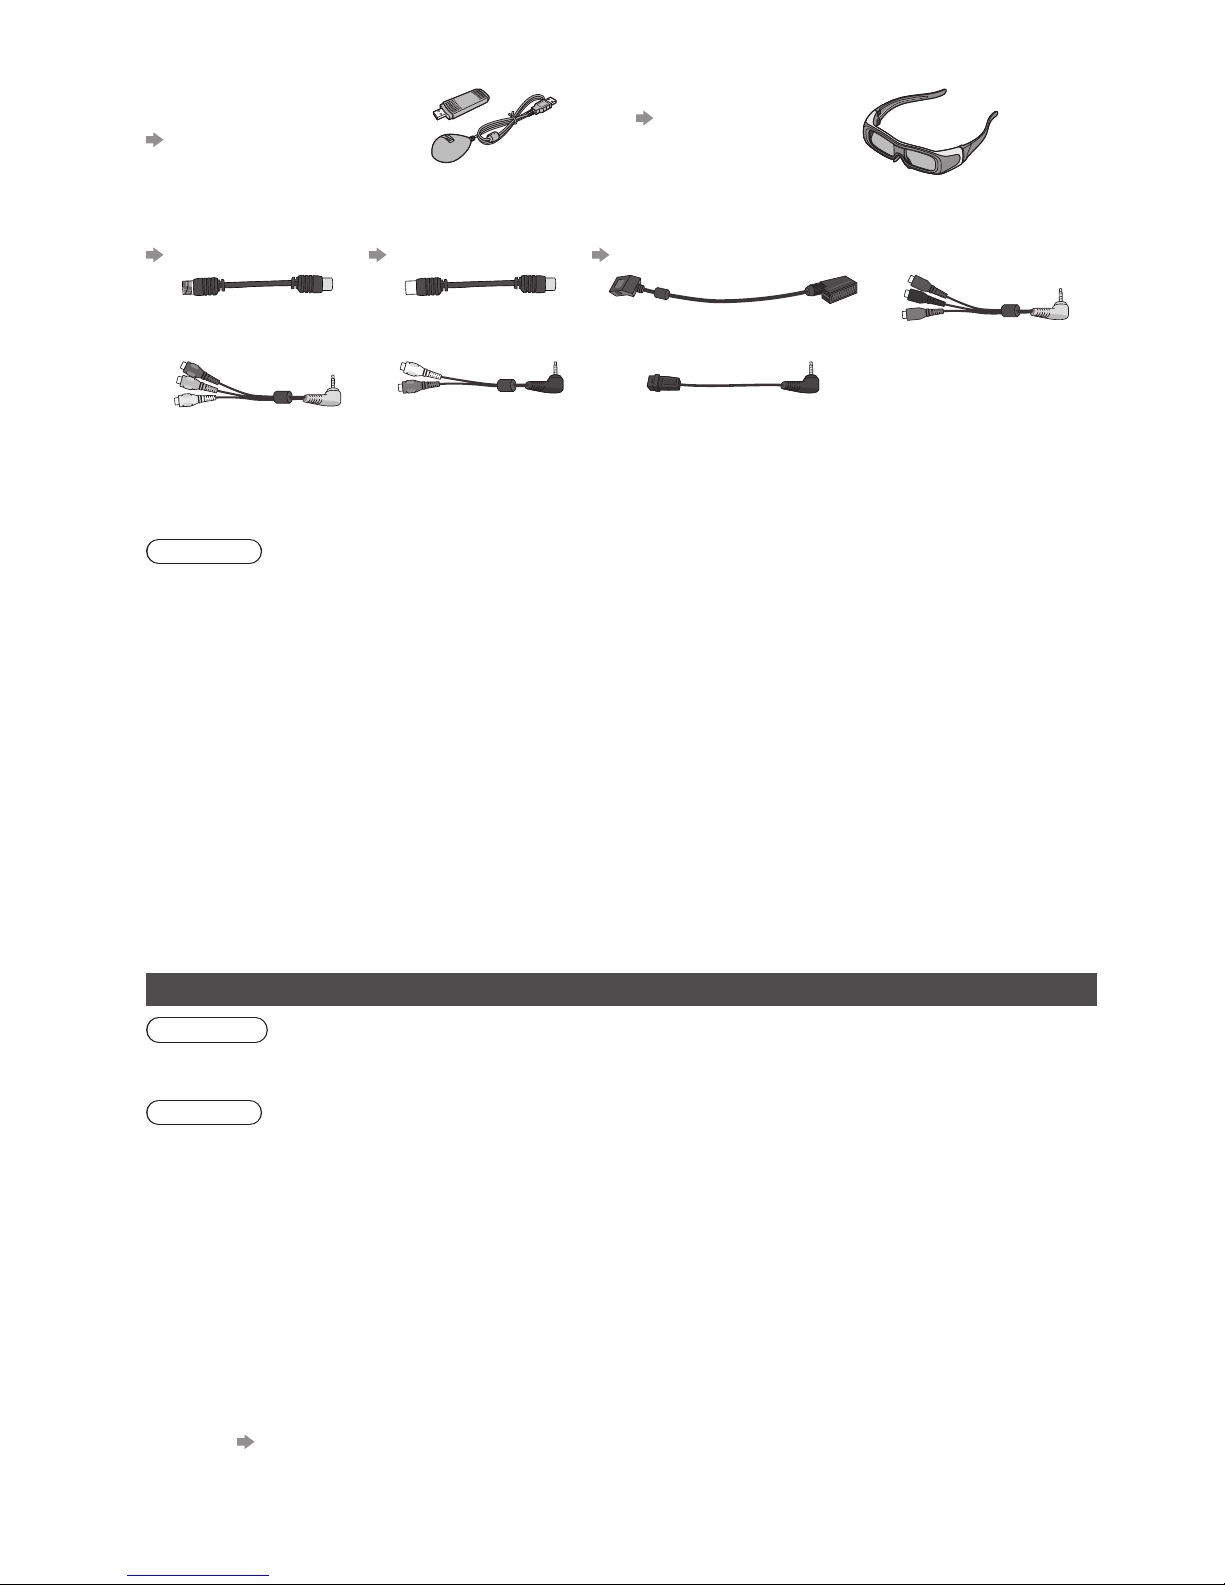
Accessories
Remote Control
•
N2QAYB000593
Batteries for the
Remote Control (2)
•
R6
(p. 6)
Pedestal
(p. 4)
Clamper
(p. 8)
Ferrite core (2)
(Large size)
(p. 9)
Ferrite core
( Small size)
U se the Ferrite cores to comply with the
EMC standard.
Operating Instructions
Pan European Guarantee Card
Accessories
4
Wireless LAN Adaptor and
exclusive stand
(p. 9)
3D Eyewear set (2)
(p. 16)
Terminal adaptors
•
Satellite adaptor
(p. 8)
•
RF adaptor
(p. 8, 9)
•
SCART adaptor
(p. 8, 9)
•
COMPONENT adaptor
•
C omposite adaptor
•
Audio adaptor
•
O ptical digital audio adaptor
•
Accessories may not be placed all together. Take care not to throw them away unintentionally.
•
T his product contains possibly dangerous parts (such as plastic bags), that can be breathed in or swallowed by young
children accidentally. Keep these parts out of reach of young children.
■ Wireless LAN Adaptor
Caution
B e aware of the following limits before using the supplied Wireless LAN Adaptor.
•
T o use the Wireless LAN Adaptor, an access point needs to be obtained.
•
D o not use the Wireless LAN Adaptor to connect to any wireless network (SSID∗) for which you do not have usage rights.
Such networks may be listed as a result of searches. However, using them may be regarded as illegal access.
∗
SSID is a name for identifying a particular wireless network for transmission.
•
D o not subject the Wireless LAN Adaptor to high temperatures, direct sunlight or moisture.
•
D o not bend, or subject the Wireless LAN Adaptor to strong impacts.
•
D o not disassemble or alter the Wireless LAN Adaptor in any way.
•
D o not attempt to install the Wireless LAN Adaptor in any incompatible device.
•
D o not remove the Wireless LAN Adaptor from the TV’s USB port during operations.
•
D ata transmitted and received over radio waves may be intercepted and monitored.
•
T o avoid malfunctions caused by radio wave interference, keep the TV away from the devices such as other wireless LAN
devices, microwaves and the devices that use 2.4 GHz and 5 GHz signals when using the Wireless LAN Adaptor.
•
When noises occur due to the static electricity, etc., the TV might stop operating for the protection of the devices. In this case,
turn the TV Off with Mains power On / Off switch, then turn it On again.
•
D epending on the area, this Wireless LAN Adaptor may not be available.
•
Additional information for Wireless LAN Adaptor and access point may be on the following web site. (English only)
http://panasonic.jp/support/global/cs/tv/
Attaching / removing the pedestal
Warning
Do not disassemble or modify the pedestal.
•
O therwise the TV may fall over and become damaged, and personal injury may result.
Caution
Do not use any pedestal other than the one provided with this TV.
•
O therwise the TV may fall over and become damaged, and personal injury may result.
Do not use the pedestal if it becomes warped or physically damaged.
•
If you use the pedestal while it is physically damaged, personal injury may result. Contact your nearest Panasonic dealer
immediately.
During set-up, make sure that all screws are securely tightened.
•
If insufficient care is taken to ensure screws are properly tightened during assembly, the pedestal will not be strong enough
to support the TV, and it might fall over and become damaged, and personal injury may result.
Ensure that the TV does not fall over.
•
If the TV is knocked or children climb onto the pedestal with the TV installed, the TV may fall over and personal injury may
result.
Two or more people are required to install and remove the TV.
•
If two or more people are not present, the TV may be dropped, and personal injury may result.
When removing the pedestal from the TV, do not remove the pedestal by the methods other than the specified
procedure.
(p. 5)
•
O therwise the TV and / or pedestal may fall over and become damaged, and personal injury may result.
Accessories
5
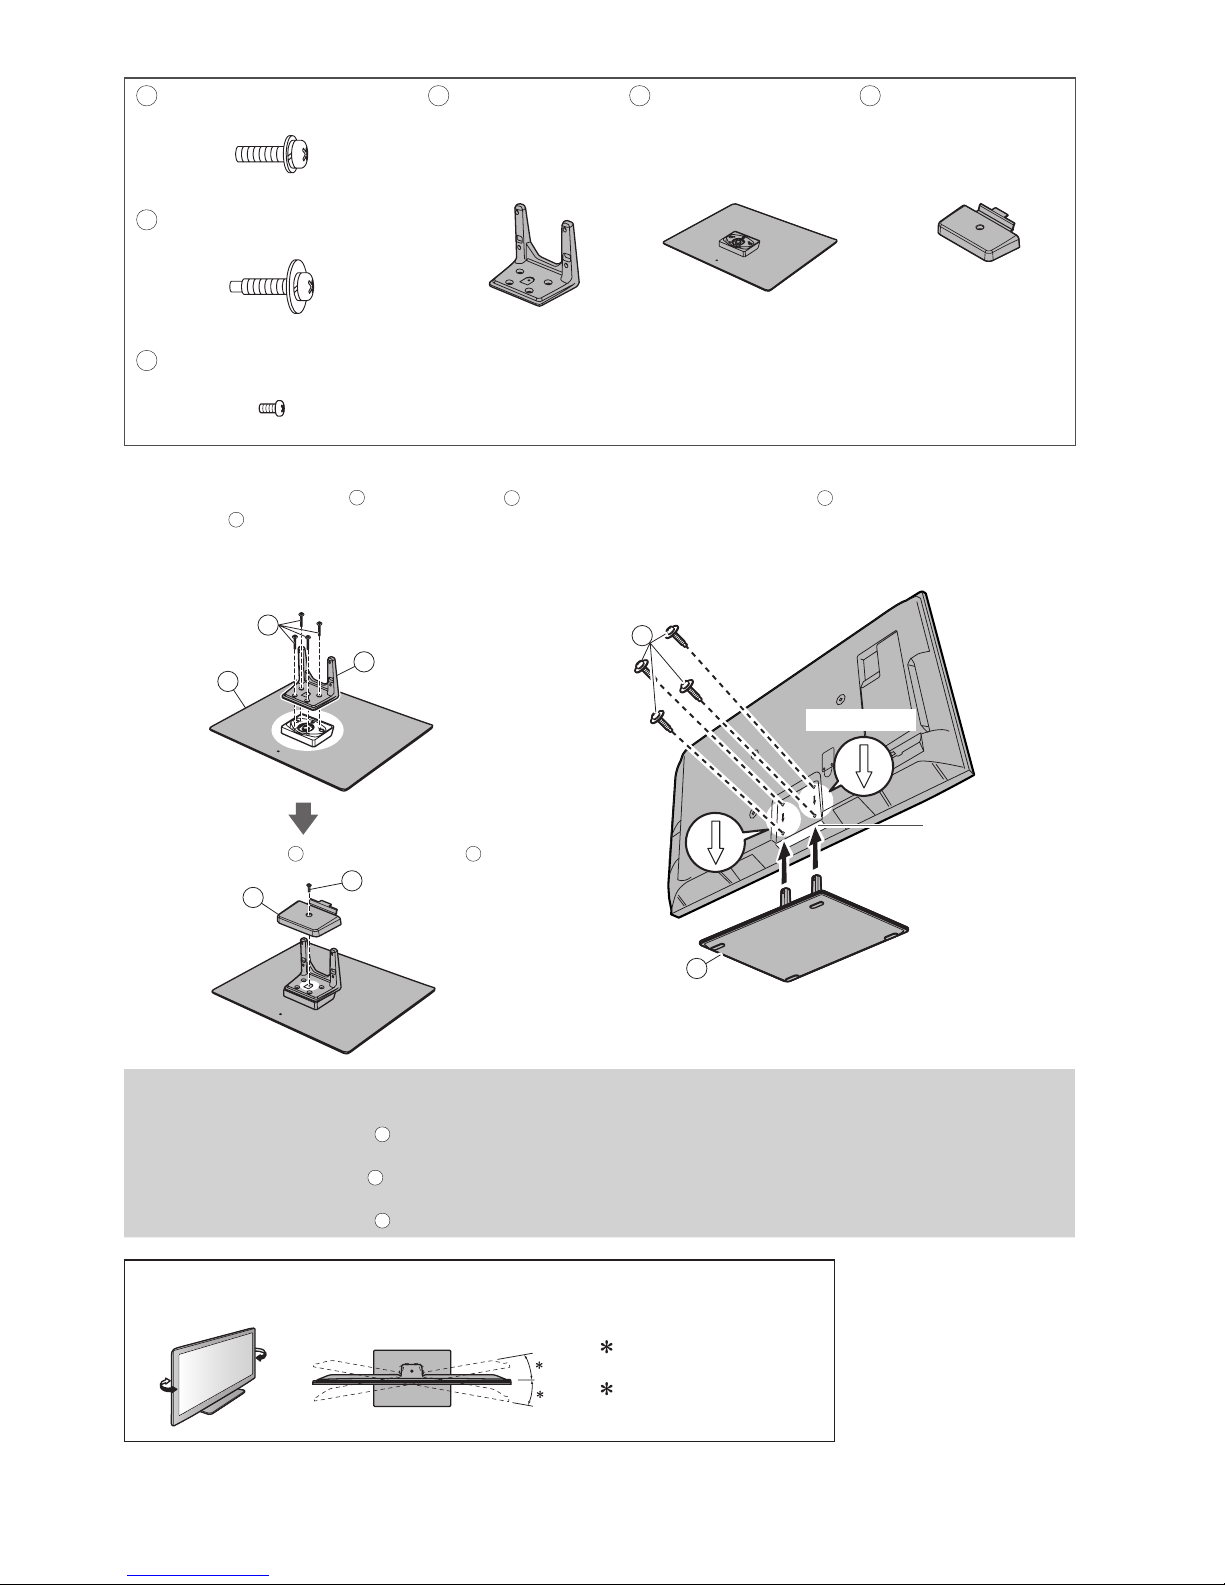
A
Assembly screw (4)
( silver)
M5 × 20
D
Pole
•
TBL5ZA3055
(TX-P42VT30E)
•
TBL5ZA3065
(TX-P50VT30E)
E
Base
•
TBL5ZX0063
(TX-P42VT30E)
•
TBL5ZX0067
(TX-P50VT30E)
F
Cover
•
TBL5ZB3045-1
(TX-P42VT30E)
•
TBL5ZB3054-1
(TX-P50VT30E)
B
Assembly screw (4)
( black)
M5 × 25
C
Assembly screw
( black)
M4 × 8
1
Assembling the pedestal
U se the assembly screws
A
to fasten the pole D to
the base E securely.
•
M ake sure that the screws are securely tightened.
•
F orcing the assembly screws the wrong way will
strip the threads.
2
Securing the TV
U se the assembly screws
B
to fasten securely.
•
T ighten the four assembly screws loosely at first, then
tighten them firmly to fix securely.
•
C arry out the work on a horizontal and level surface.
B
E
H ole for pedestal
installation
(View from the bottom)
Arrow mark
A
E
D
Front
A ttach the cover F with assembly screw C
F
C
Removing the pedestal from the TV
B e sure to remove the pedestal in the following way when using the wall-hanging bracket or repacking the TV.
1 Remove the assembly screws
B
from the TV.
2 Pull out the pedestal from the TV.
3 Remove the assembly screw C from the cover.
4 Pull out the cover.
5 Remove the assembly screws A from the pole.
Adjusting the panel to your desired angle
•
D o not place any objects within the full rotation range.
(View from the top)
: 15°
(TX-P42VT30E)
: 10°
(TX-P50VT30E)
Identifying Controls
1
15
16
18
20
21
22
23
24
26
27
28
17
25
2
4
6
19
11
3
5
7
8
9
10
12
13
14
6
Identifying Controls
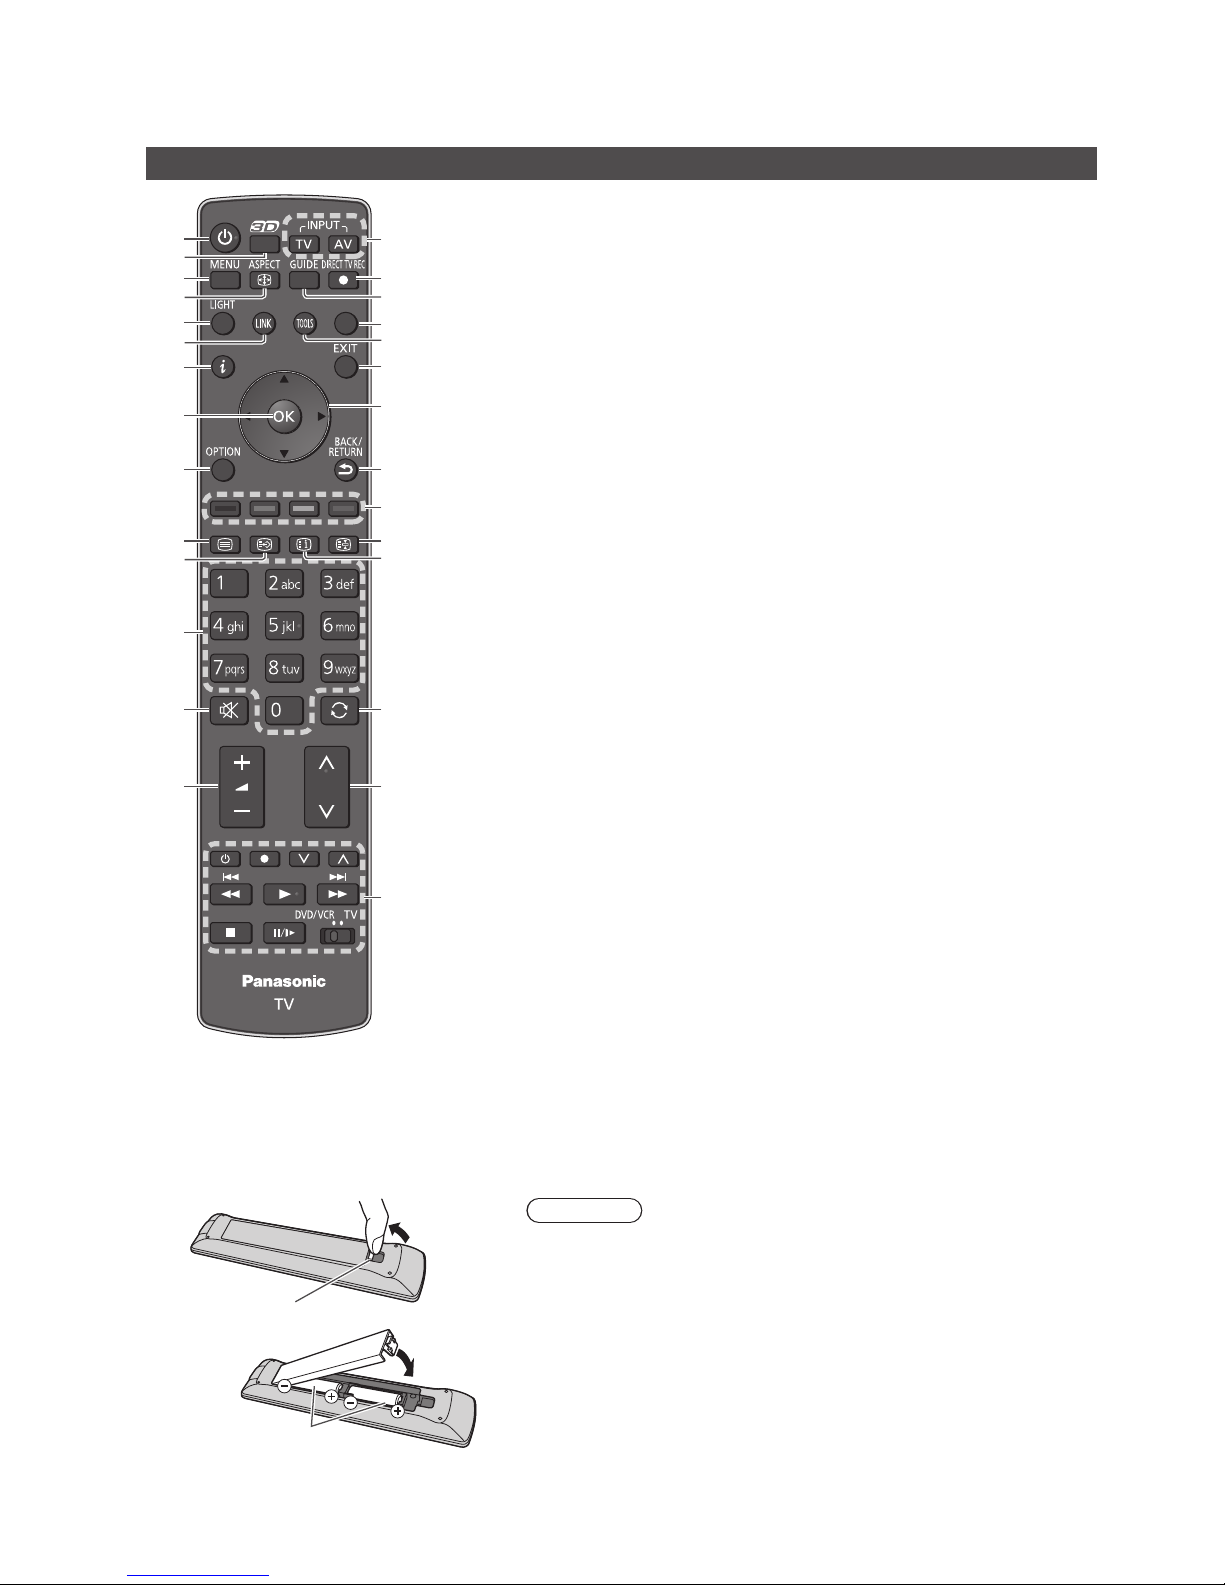
Remote Control
1
Standby On / Off switch
•
Switches TV On or Off standby
2
3D button
•
Switches to the viewing mode
between 2D and 3D
3
[Main Menu]
•
Press to access Picture, Sound,
Timer and Setup Menus
4
Aspect
•
C hanges aspect ratio
5
Light
•
L ights the buttons (numeric,
sound mute, last view, volume,
channel) for about 5 seconds
6
[VIERA Link Menu]
7
Information
•
D isplays channel and programme
information
8
OK
•
C onfirms selections and choices
•
Press after selecting channel
positions to quickly change
channel
•
D isplays the Channel List
9
[Option Menu]
•
E asy optional setting for viewing,
sound, etc.
10
Teletext
•
Switches to teletext mode
11
Subtitles
•
D isplays subtitles
12
Numeric buttons
•
C hanges channel and teletext
pages
•
Sets characters
•
When in Standby mode, switches
TV On (Press for about 1 second)
13
Sound Mute
•
Switches sound mute On or Off
14
Volume Up / Down
15
Input mode selection
•
TV - switches DVB-S / DVB-C /
DVB-T / Analogue mode
•
AV - switches to AV input mode
from Input Selection list
16
Direct TV Recording
•
R ecords programme immediately
in DVD Recorder / VCR with Q-Link
or VIERA Link connection
17
TV Guide
18
[VIERA Connect]
•
D isplays VIERAConnect home
screen
19
VIERATOOLS
•
D isplays some special feature
icons and accesses easily
20
Exit
•
R eturns to the normal viewing
screen
21
Cursor buttons
•
M akes selections and adjustments
22
Return
•
R eturns to the previous menu
/ page
23
Coloured buttons
(red-green-yellow-blue)
•
U sed for the selection, navigation
and operation of various
functions
24
Hold
•
Freeze / unfreeze picture
•
H olds the current teletext page
(teletext mode)
25
Index
•
R eturns to the teletext index page
(teletext mode)
26
Last view
•
Switches to previously viewed
channel or input mode
27
Channel Up / Down
28
Connected equipment operations
■ Installing / removing remote’s batteries
1
Pull open
H ook
Caution
•
I ncorrect installation may cause battery leakage and corrosion, resulting
in damage to the remote control.
•
D o not mix old and new batteries.
•
D o not mix different battery types (such as alkaline and manganese
batteries).
•
D o not use rechargeable (Ni-Cd) batteries.
•
D o not burn or breakup batteries.
B atteries must not be exposed to excessive heat such as sunshine, fire or
the like.
•
D o not disassemble or modify the remote control.
2
N ote the correct
polarity (+ or -)
Close
Identifying Controls
6
7
5
2
3
4
12
1
9 10 11 8
7
T V
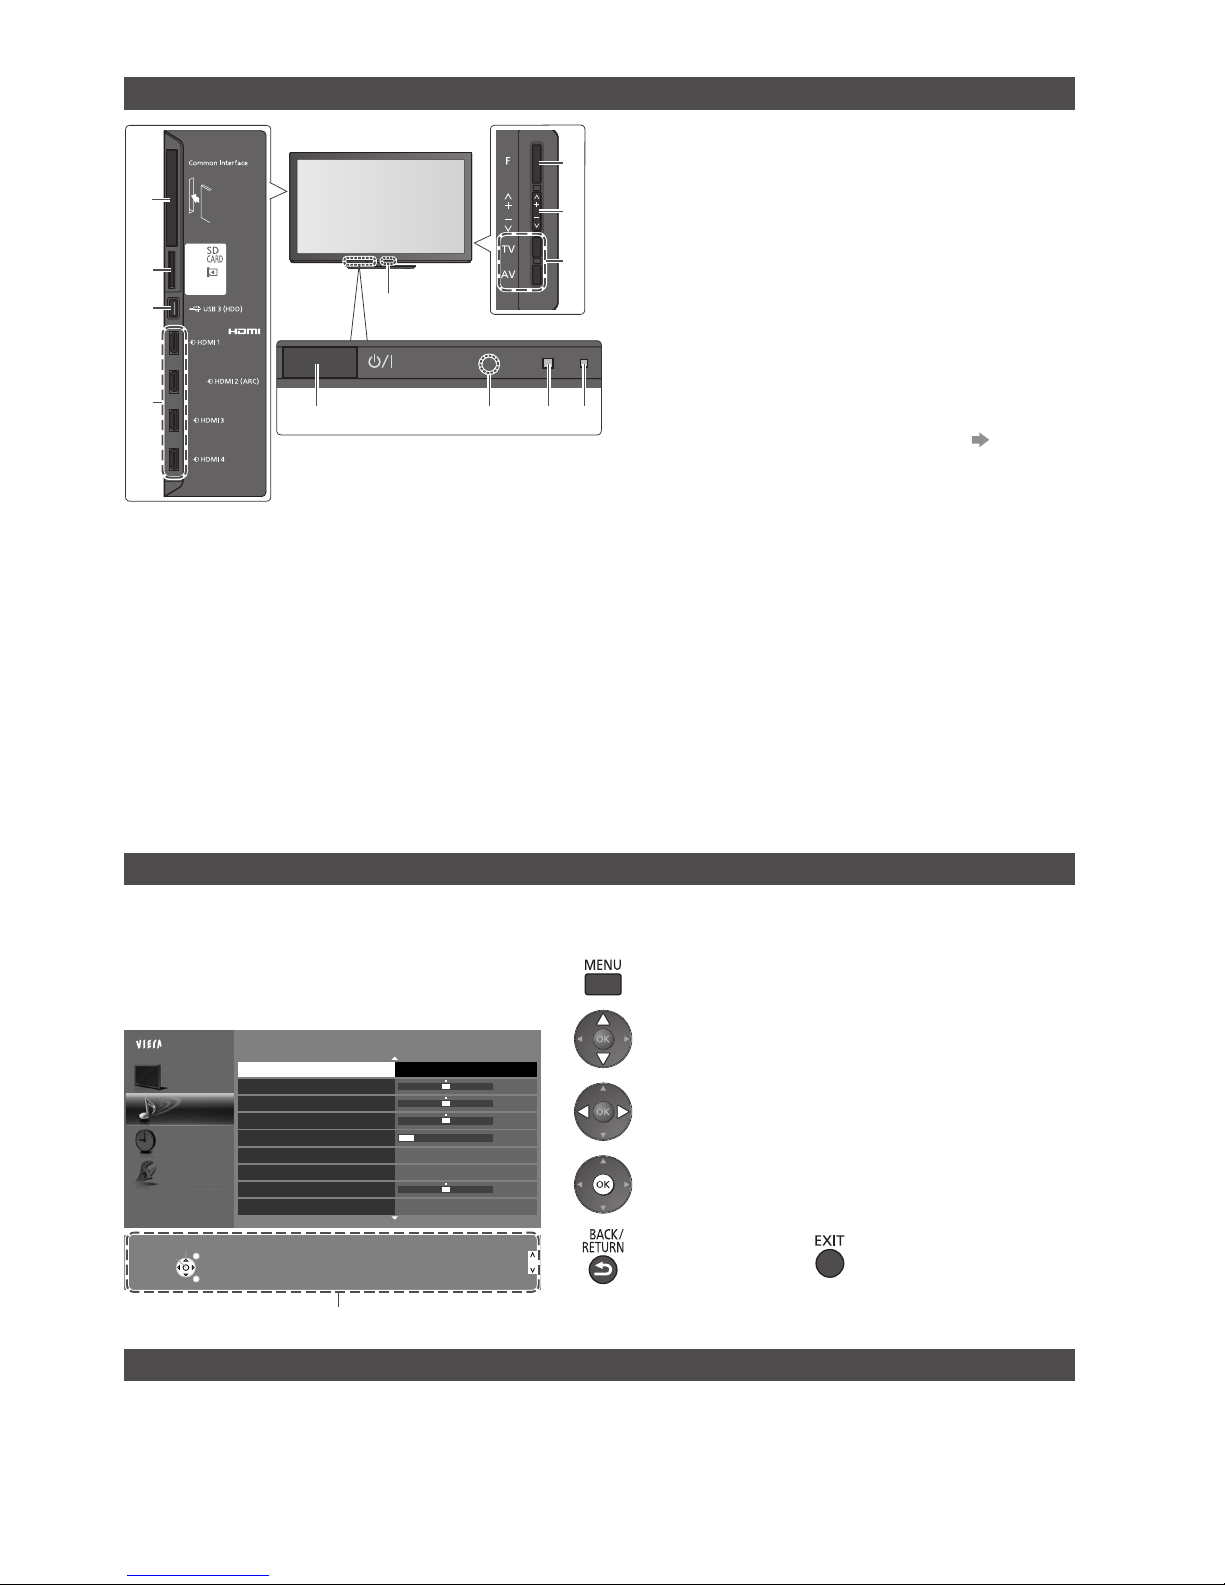
Using the On Screen Displays - Operation guide
M any features available on this TV can be accessed via the On Screen Display menu.
Operation guide
O peration guide will help you to operate by using the
remote control.
Example : [Sound Menu]
Main Menu
Picture
Sound
Timer
Setup
1/2
0
0
0
0
11
M ode Music
B ass
Treble
B alance
H eadphone Volume
Surround
Auto Gain Control
V olume Correction
Speaker Distance to Wall
Off
Off
Over 30cm
Select
EXIT
Selects the basic sound mode.
P age up
C hange
RETURN
P age down
O peration guide
How to use remote control
O pen the main menu
M ove the cursor / select the menu item / select from a
range of options
M ove the cursor / adjust levels / select from a range of
options
Access the menu / store settings after adjustments have
been made or options have been set
R eturn to the
previous menu
Exit the menu system
and return to the normal
viewing screen
Auto power standby function
T he TV will automatically go to Standby mode in the following conditions :
•
no signal is received and no operation is performed for 30 minutes in Analogue TV mode
•
[Off Timer] is active in the Timer Menu (p.24)
•
no operation is performed for the period selected in [Auto Standby] (p.24)
•
T his function does not affect the recording of Timer Programming, Direct TV Recording and One Touch Recording.
1
CI slot
2
SD Card slot
3
USB 3 port
4
HDMI1 - 4 terminal
5
Function select
•
[Volume] / [Contrast] / [Brightness] / [Colour] /
[Sharpness] / [Tint] (NTSC signal) / [Bass]∗ / [Treble]∗ /
[Balance] / [Auto Setup]
∗ [Music] or [Speech] mode in the Sound Menu
6
C hannel Up / Down, Value change (when using the F
button), Switching the TV On (press either button for
about 1 second when in Standby mode)
7
Changes the input mode
8
Mains power On / Off switch
•
U se to switch the mains power.
If you turned the TV Off during Standby mode by the
remote control last time, the TV will be in Standby
mode when you turn the TV On with Mains power On
/ Off sw
itch.
9
Remote control signal receiver
•
D o not place any objects between the TV remote
control signal receiver and remote control.
10
C.A.T.S. (Contrast Automatic Tracking System)
sensor
•
Senses brightness to adjust picture quality when [Eco
Mode] in the Picture Menu is set to [On] (p. 22)
11
Power and Timer LED
•
Red : Standby
Green : On
Orange : Timer Programming On
Orange (flash) :
R ecording of Timer Programming, Direct TV
Recording or One Touch Recording in progress
Red with orange flash :
Standby with Timer Programming On, Dire
ct TV
Recording or One Touch Recording
•
T he LED blinks when the TV receives a command
from the remote control.
12
Infrared transmitter for 3D Eyewear
•
D o not place any objects between the transmitter
and 3D Eyewear.

Basic Connection
8
Basic Connection
External equipment and cables shown are not supplied with this TV.
Please ensure that the unit is disconnected from the mains socket before attaching or disconnecting any leads.
T here are
some restrictions on placement for viewing 3D images. For details (p. 15, 20)
Example 1 Connecting dish or aerial
TV only
T o ensure your satellite dish is correctly installed, please consult your local dealer.
•
Also please consult the received satellite broadcasting companies for details.
•
F or digital cable, digital terrestrial and analogue
broadcasts
R ear of the TV
Terrestrial aerial
AC 220-240 V
50/60 Hz
M ains lead
RF cable
•
F or digital satellite broadcasts
Satellite dish
Satellite cable
Cable
Satellite adaptor
(supplied)
RF adaptor
(supplied)
■ Clamper (Standard accessory / Attached with the mains lead)
Attach the clamper Bundle the cables To remove from the TV : To loosen :
hole
I nsert the
clamper in a
hole
hooks
Set the
tip in the
hooks
K eep pushing
both side
snaps
snaps
k nob
K eep pushing
the knob
•
D o not bundle the Satellite cable, RF cable and mains lead together (could cause distorted image).
•
F ix cables with clampers as necessary.
•
When using the optional accessory, follow the option’s assembly manual to fix cables.
Example 2 Connecting DVD Recorder / VCR and Player
TV, DVD Recorder / VCR and Player
RF IN
RF OUT
R ear of the TV
Cable
Terrestrial
aerial
AC 220-240 V
50/60 Hz
M ains lead
RF cable
RF adaptor
(supplied)
RF cable
DVD Recorder or VCR
Player /
3D-compatible player
Fully wired SCART cable
Fully wired HDMI
compliant cable
SCART adaptor
(supplied)

Basic Connection
9
Example 3 Connecting DVD Recorder / VCR and Set top box
TV, DVD Recorder / VCR and Set top box
RF IN
RF OUT
R ear of the TV
Terrestrial
aerial
M ains lead
AC 220-240 V
50/60 Hz
Fully wired HDMI
compliant cable
Fully wired
SCART cable
Fully wired
SCART cable
RF adaptor
(supplied)
SCART adaptor
(supplied)
Set top box
DVD Recorder or VCR
RF cable
RF cable
Cable
■ Connecting to the network environment (Network connections)
T o enable the network service functions (VIERA Connect, etc.), you need to connect the TV to a broadband network
environment.
•
If you do not have any broadband network services, please consult your retailer for assistance.
•
C onnect with LAN cable (Wired connection) or Wireless LAN Adaptor (Wireless connection).
•
Setup of the network connection will start after the tuning (when first using the TV) (p. 11 - 13)
I nternet
environment
I nternet
environment
Wired connection
Wireless connection
Access point
LAN cable
Wireless LAN Adaptor and exclusive stand
(supplied)
R ear of the TV
L ess
than
10cm
L ess
than
10cm
F errite core - Large size (supplied)
Installing the Ferrite core
Pull back the tabs
(in two places)
Wind the cable
twice
Press the cable
through and close
•
I nsert the Wireless LAN Adaptor to the stand straightly and
completely.
•
C onnect to the USB 1 or 2 port.
Note
•
T o watch 3D contents (p. 15)
•
C onnect to the TV’s AV1 for a DVD Recorder / VCR supporting Q-Link.
•
F or HDMI-compatible equipment, possible to connect to HDMI terminals (HDMI1 / HDMI2 / HDMI3 / HDMI4) by using HDMI
cable.
•
P l ease also read the manual of the equipment being connected.
•
K eep the TV away from electronic equipment (video equipment, etc.) or equipment with an infrared sensor. Otherwise,
distortion of image / sound may occur or operation of other equipment may be interfered.
 Loading...