

Panasonic TX-26LX70, TX-32LX70, Viera TX-26LX70L, Viera TX-32LX70L Operating Instructions Manual

TV
PROGRAMME
ASPECT
INPUT
RETURN
EXIT
MENU
OK
OPTION
DIRECT TV REC
VCR
132
465
798
0
REC
VCR DVD
TEXT F.P. INDEX HOLD
Operating Instructions
LCD Television
English
Please read these instructions before operating your set and retain them for future reference.
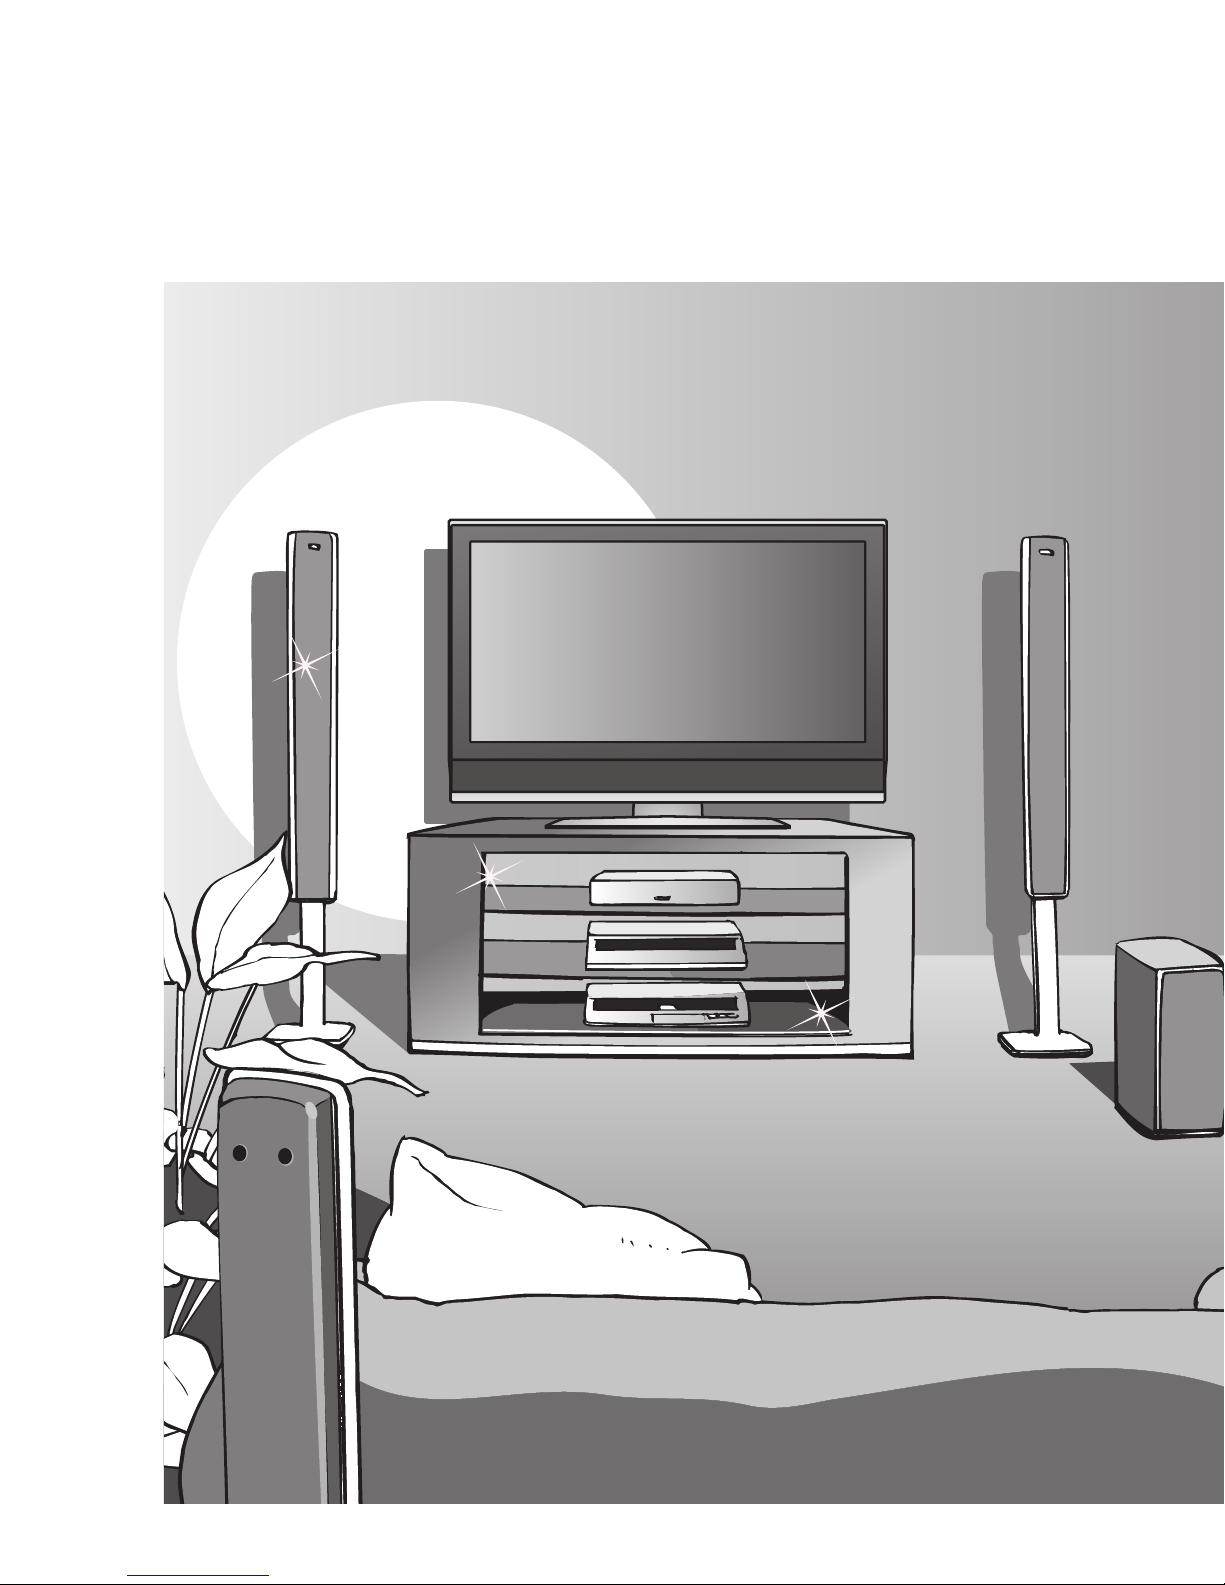
The images shown in this manual are for illustrative purposes only.
Model No. TX-26LX70L
TX-32LX70L
2
3
Viewing Advanced FAQs, etc.Quick Start Guide
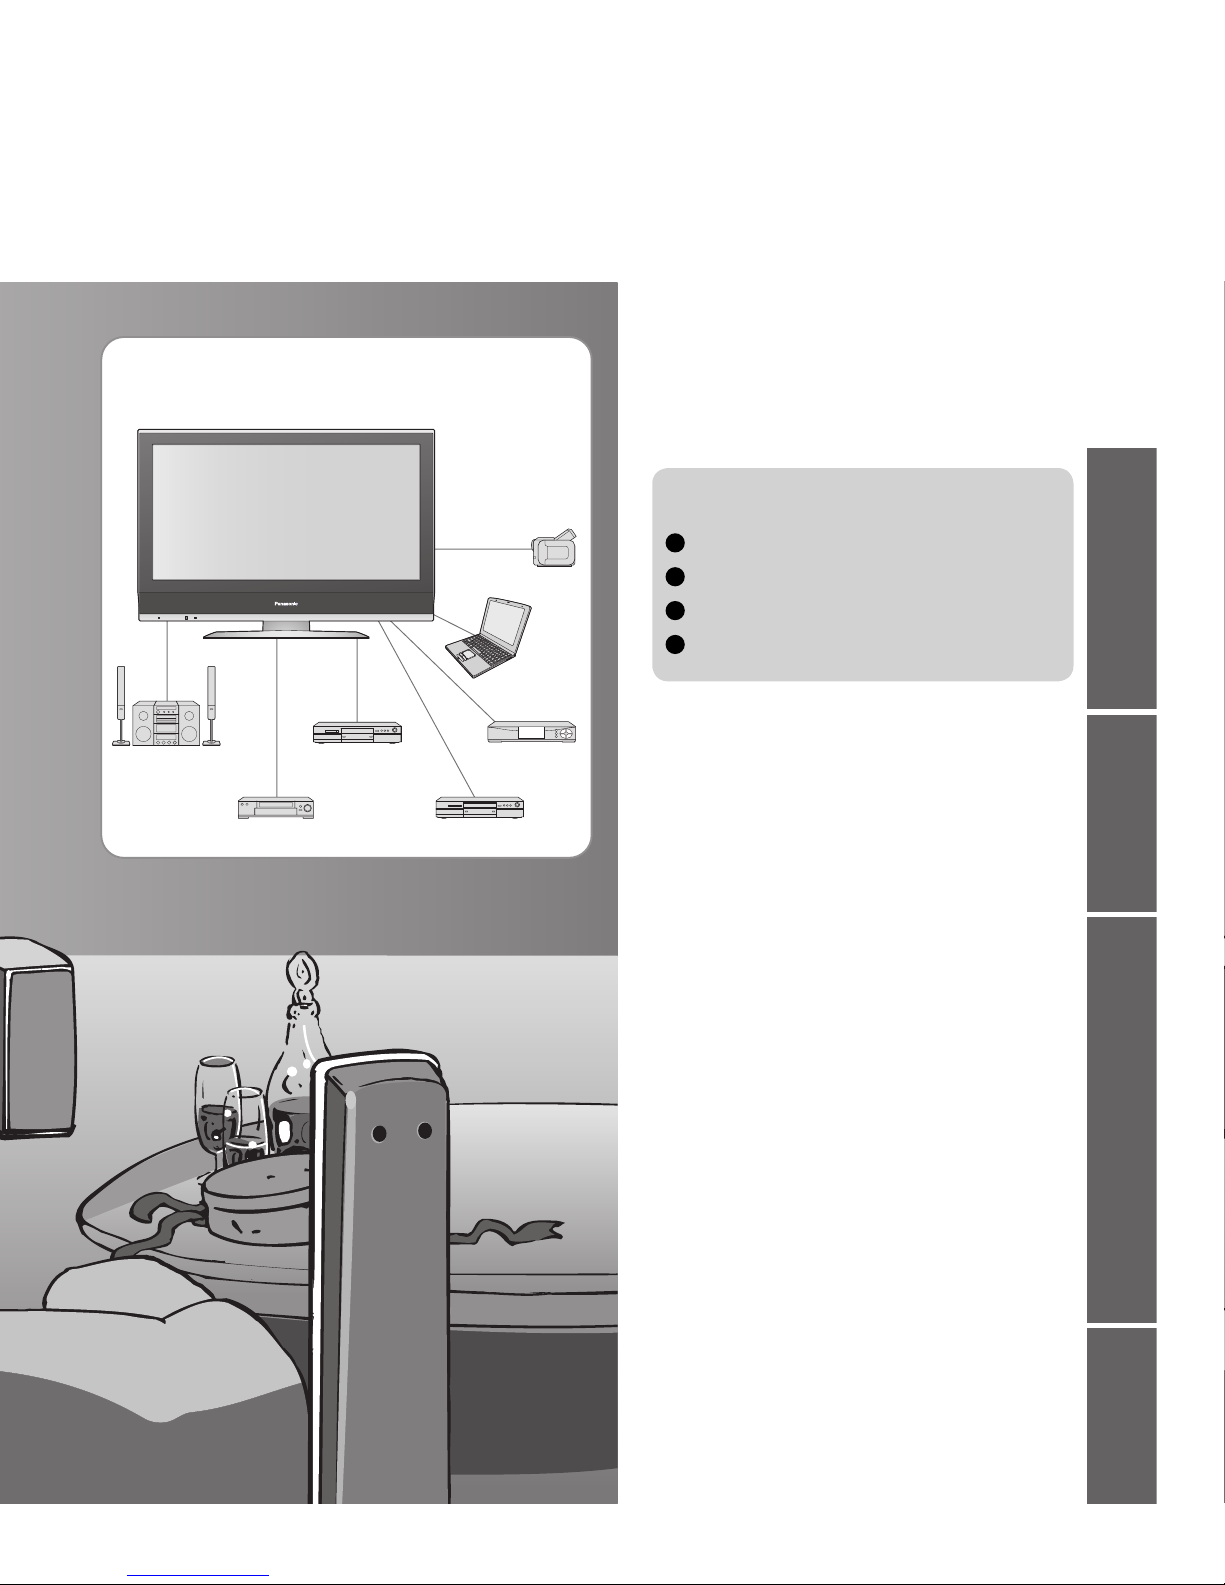
Turn your own living room into a movie theatre!
Experience an amazing level of multi-
media excitement
Amplifi er with
Speaker system
3
Viewing Advanced FAQs, etc.Quick Start Guide
media excitement
Enjoy rich multi-media
Camcorder
Amplifi er with
Speaker system
VCR
DVD player
DVD Recorder
Personal
computer
Set top box
Contents
•
Safety Precautions ······································ 4
(Warning / Caution)
•
Notes ··························································· 5
•
Maintenance ··············································· 5
Be Sure to Read
Advanced Features
•
How to Use Menu Functions ····················· 18
(picture, sound quality, etc.)
•
Editing and Setting Channels
······················ 22
•
Control Channel Audience ························ 24
•
Restore Settings ······································ 25
•
Input Labels ·············································· 26
•
Displaying PC Screen on TV ·····················27
•
Q-Link Functions ······································· 28
•
HDMI Functions ·······································29
(HDMI terminal / VIERA Link)
•
External Equipment ··································· 32
Basic Features
•
Watching TV ·············································· 12
•
Watching Videos and DVDs ······················ 14
•
Viewing Teletext ········································16
Enjoy your TV!
•
Technical Information ································34
•
FAQs ·························································37
•
Licence ······················································ 39
•
Specifi cations ············································ 39
FAQs, etc.
Accessories / Options
·········· 6
Identifying Controls
··············· 7
Basic Connection
··················· 8
Auto Setup
······························· 10
Quick Start Guide
4 5
Safety Precautions
AC 220-240 V
50 / 60 Hz
Warning & Caution
Example 1
Example 2
IMPORTANT: THE MOULDED MAINS PLUG
FOR YOUR SAFETY, PLEASE READ THE FOLLOWING TEXT CAREFULLY.
The wire which is coloured BLUE must be connected to the terminal in the mains plug
which is marked with the letter N or coloured BLACK.
The wire which is coloured BROWN must be connected to the terminal in the mains plug which is
marked with the letter L or coloured RED.
Under no circumstances should either of these wires be connected to the Earth terminal of the
three pin mains plug, marked with the letter E or the earth symbol .
How to replace the fuse.
For plug type shown in example 1:
Lift out the removable fuse compartment with a screwdriver and replace the fuse, then refi t
securely into the mains plug (see example 1).
For plug type shown in example 2:
Lift open the fuse compartment, in the mains plug, with a screwdriver, and replace the fuse, then
press the fuse cover down securely (see example 2).
As the colours of the wire in the mains lead of this appliance may not correspond with the coloured
markings identifying the terminals in your mains plug, proceed as follows.
IMPORTANT: – The wires in this mains lead are coloured in accordance with the following code: –
Blue: Neutral Brown: Live
If a new mains plug is to be fi tted, please observe the wiring code as shown below.
If in any doubt, please consult a qualifi ed electrician.
If the fi tted moulded mains plug is unsuitable for the socket outlet in your home, then the fuse shall be
removed and the mains plug cut off and disposed of safety. There is a danger of severe electrical shock
if the cut off mains plug is inserted into any 13 amp socket.
If the mains plug contains a removable fuse cover, you must ensure that it is refi tted when the fuse is replaced.
If you lose the fuse cover the mains plug must not be used until a replacement cover is obtained.
A replacement fuse cover may be purchased from your local Panasonic Dealer.
This appliance is supplied with a moulded three pin mains plug for your safety and convenience. A 5 amp fuse is
fi tted in this mains plug. Shall the fuse need to be replaced, please ensure that the replacement fuse has a rating
of 5 amps and that it is approved by ASTA or BSI to BS1362.
Check for the ASTA mark
ASA
or the BSI mark on the body of the fuse.
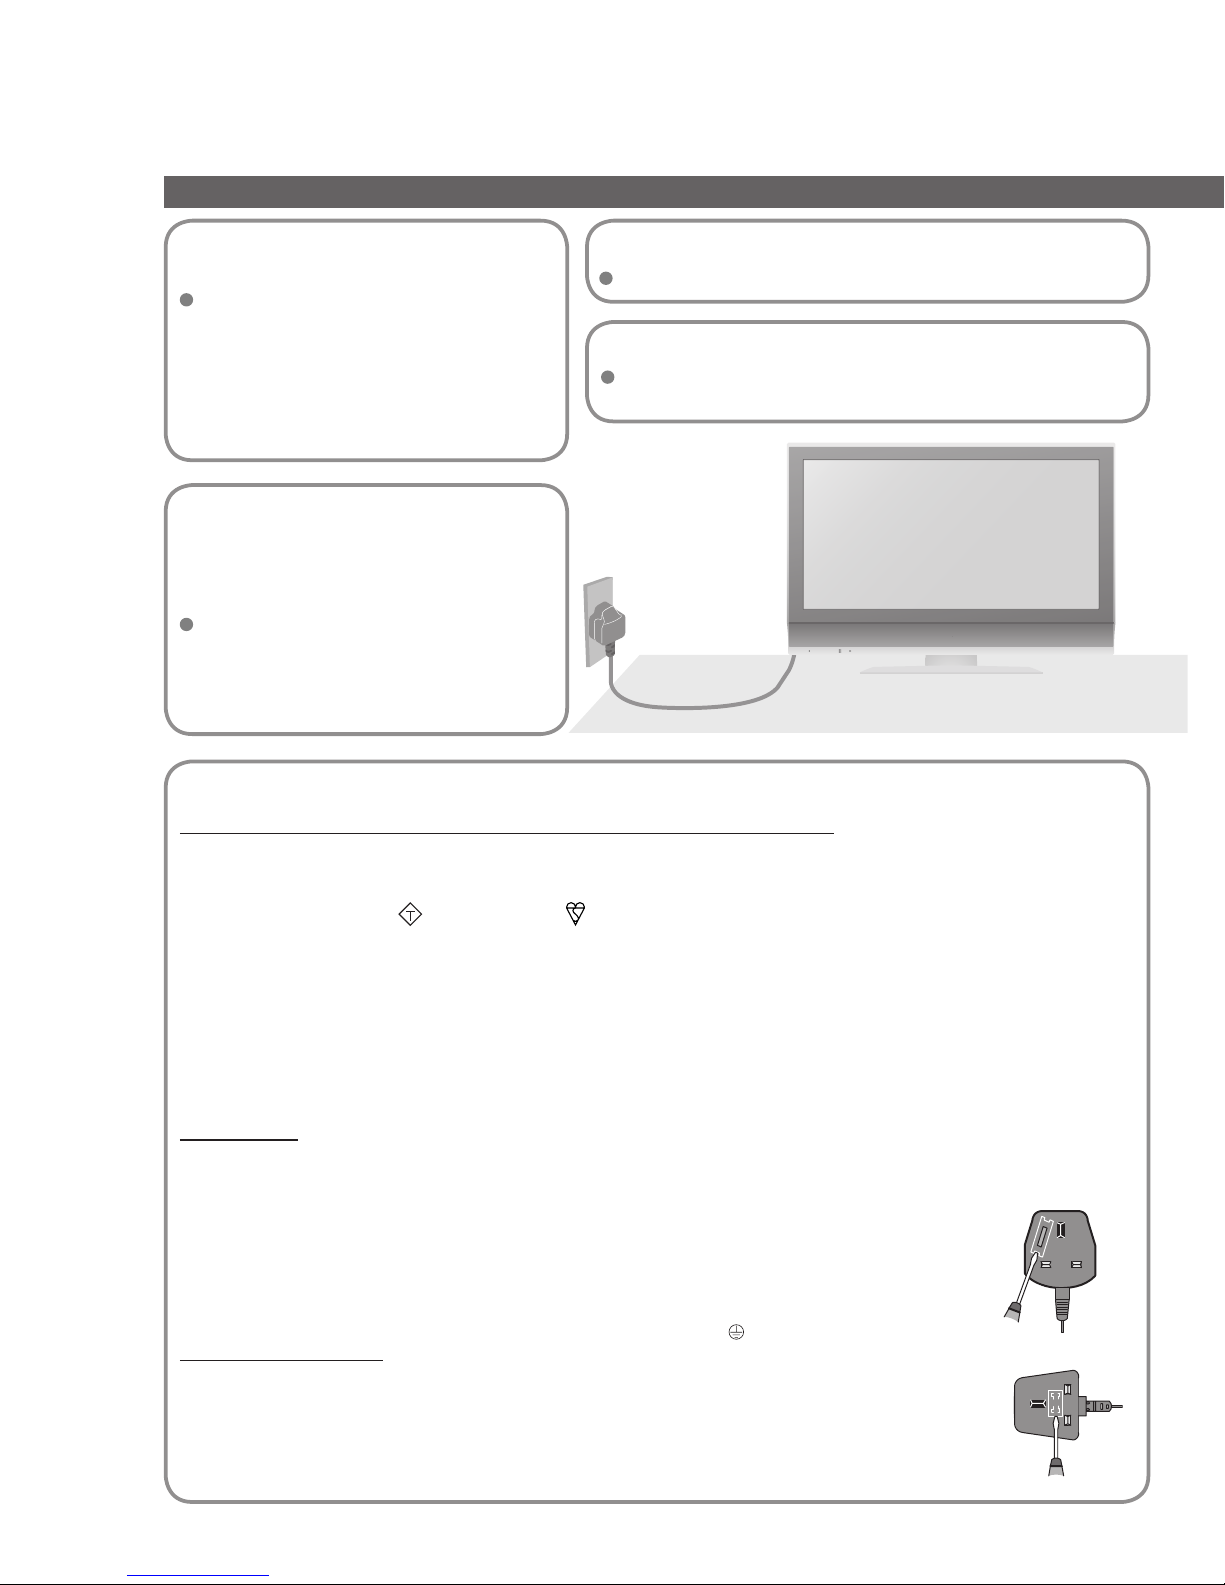
Handling the mains plug
Ensure that the mains plug is easily
accessible at all times. The On / Off
switch on this model does not fully
disconnect the TV from the mains supply.
Remove the mains plug from the wall
socket when the TV is not used for a
prolonged period of time.
Do not expose to direct
sunlight and other
sources of heat
Avoid exposing the TV to direct sunlight
and other sources of heat. To prevent fire
never place any type of candle or naked
flame on top or near the TV.
Use only the dedicated
stands / mounting
equipment
Using an unauthorized stand or other
fixtures may make the TV shaky, risking
injury. Be sure to ask your local Panasonic
dealer to perform setup.
Use optional stands / mounts (p. 6).
Do not place the TV
on sloped or unstable
surfaces
The TV may fall off or tip over.
Do not expose to rain or
excessive moisture
To prevent damage which might result in
electric shock or fire, do not expose this TV
to rain or excessive moisture.
This TV must not be exposed to dripping or
splashing water and objects filled with liquid,
such as vases, must not be placed on top of
or above the TV.
Do not block the rear
ventilation openings
Ventilation should not be impeded by
covering the ventilation openings with
items such as newspapers, tablecloths and
curtains.
Power source
This TV is designed to operate on 220-240V, 50 / 60 Hz AC.
Do not remove the cover
Do not remove the rear cover as live parts are accessible
when it is removed. There are no user serviceable parts inside.
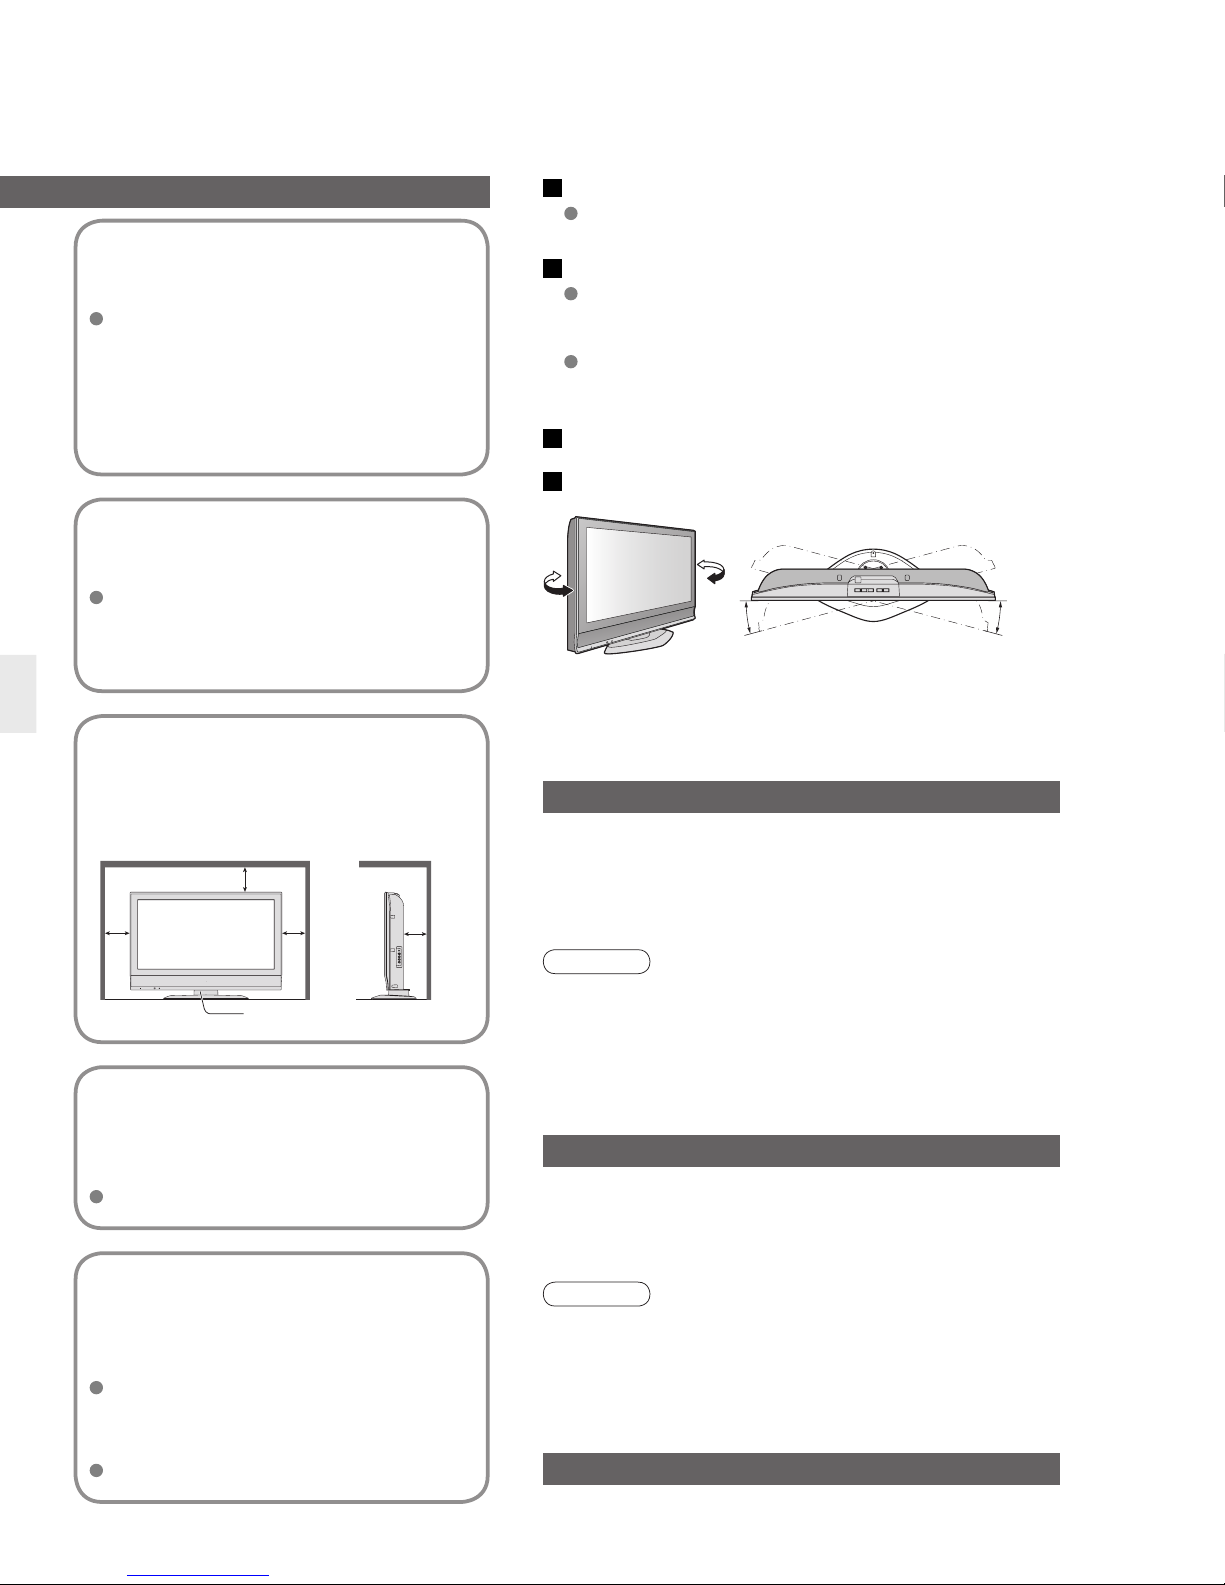
Allow suffi cient space
around the TV for radiated
heat
10
Minimum distance
Electronic equipment
In particular, do not place video equipment near the TV
(electromagnetic interference may distort images / sound).
Equipment with an infrared sensor
This TV also emits infrared rays (this may affect
operation of other equipment).
Keep the TV away from these equipment
Notes
Display panel
Cabinet
Mains plug
Regular care: Gently wipe the surface clean of dirt by using a
soft cloth.
Major contamination: Wipe the surface clean using a soft cloth
dampened with clean water or diluted neutral detergent by
100 times of water. Then, using a soft dry cloth, evenly wipe
the surface clean until it is dry.
Regular care: Wipe the surface clean using a soft dry cloth.
Major contamination: Dampen a soft cloth with clean water or
water containing a small amount of neutral detergent. Then,
wring the cloth and wipe the surface clean with it. Finally, wipe
the surface clean with a dry cloth.
Wipe the mains plug with a dry cloth at regular intervals.
(Moisture and dust may lead to fi re or electrical shock.)
First, remove the mains plug from the socket outlet.
Caution
•
The surface of the display panel has been specially treated
and may be easily damaged.
Do not tap or scratch the surface with your fi ngernail or
other hard object.
•
Use care not to subject the surface to insect repellent,
solvent, thinner, or other volatile substances
(this may degrade surface quality).
Caution
•
Use care not to subject the TV’s surfaces to detergent.
(A liquid inside the TV could lead to product failure.)
•
Use care not to subject surfaces to insect repellent, solvent,
thinner, or other volatile substances
(this may deteriorate the surface by peeling the paint).
•
Do not allow the cabinet to make contact with a rubber or
PVC substance for a long time.
Maintenance
Use only the dedicated
stands / mounting
equipment
Using an unauthorized stand or other
fixtures may make the TV shaky, risking
injury. Be sure to ask your local Panasonic
dealer to perform setup.
Use optional stands / mounts (p. 6).
Do not place the TV
on sloped or unstable
surfaces
The TV may fall off or tip over.
Do not expose to rain or
excessive moisture
To prevent damage which might result in
electric shock or fire, do not expose this TV
to rain or excessive moisture.
This TV must not be exposed to dripping or
splashing water and objects filled with liquid,
such as vases, must not be placed on top of
or above the TV.
Do not block the rear
ventilation openings
Ventilation should not be impeded by
covering the ventilation openings with
items such as newspapers, tablecloths and
curtains.
Adjust the LCD panel to your desired angle
15°15° 15°
(View from the top)
If no signal is received and no operation is performed in TV mode
for 30 minutes, the TV will automatically go to standby mode.
Auto power standby function
Transport only in upright position
Allow suffi cient space
around the TV for radiated
heat
10
10
10
10
(cm)
TV Stand
Minimum distance
6
7
Quick Start Guide
TV
OK
132
465
798
0
+
-
-
+
F TV AV
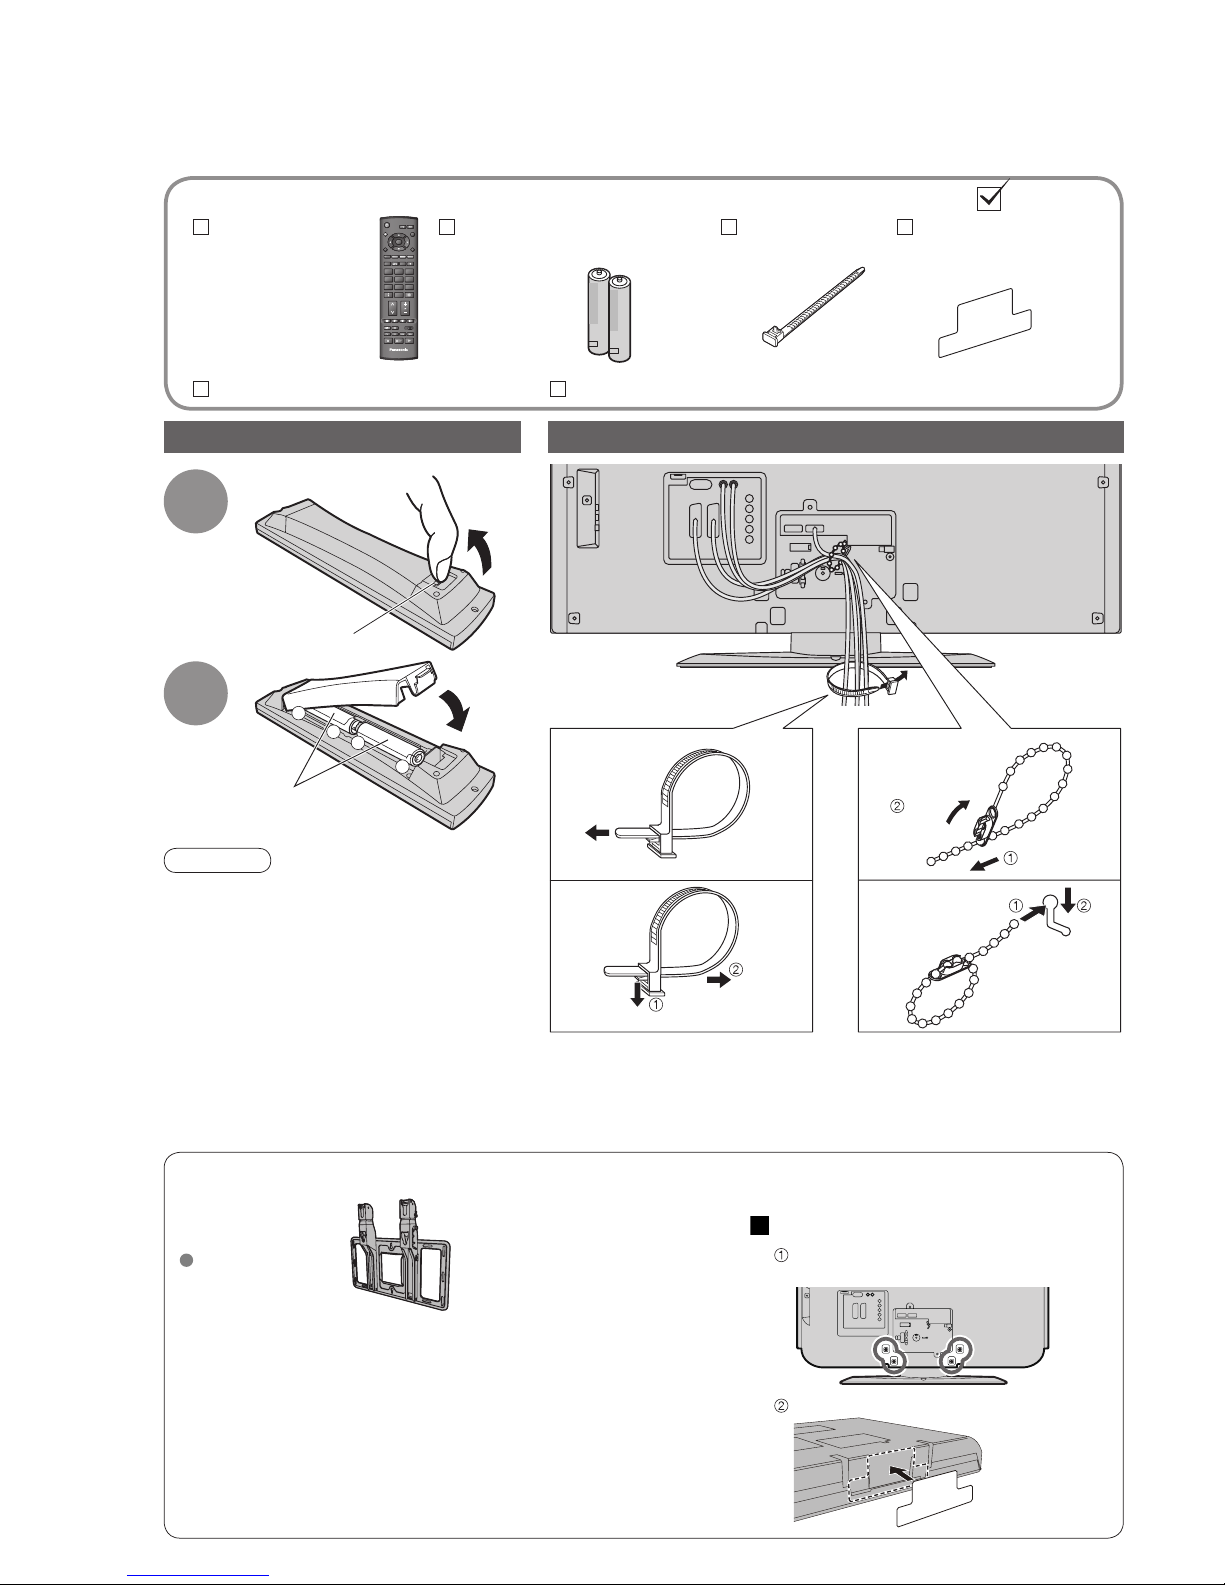
Identifying ControlsAccessories / Options
Batteries for the Remote
Control Transmitter
(2)
•
R6 (UM3)
Clamper
Remote Control
Transmitter
•
EUR7651120
Standard accessories
Check that you have the accessories and items shown
Operating Instructions
Pan European Guarantee Card
Installing remote’s batteries
Caution
•
Incorrect installation may cause battery
leakage and corrosion, resulting in
damage to the remote control.
•
Do not mix old and new batteries.
•
Do not mix different battery types (such
as alkaline and manganese batteries).
•
Do not use rechargeable (Ni-Cd)
batteries.
•
Do not burn or breakup batteries.
Using the clamper
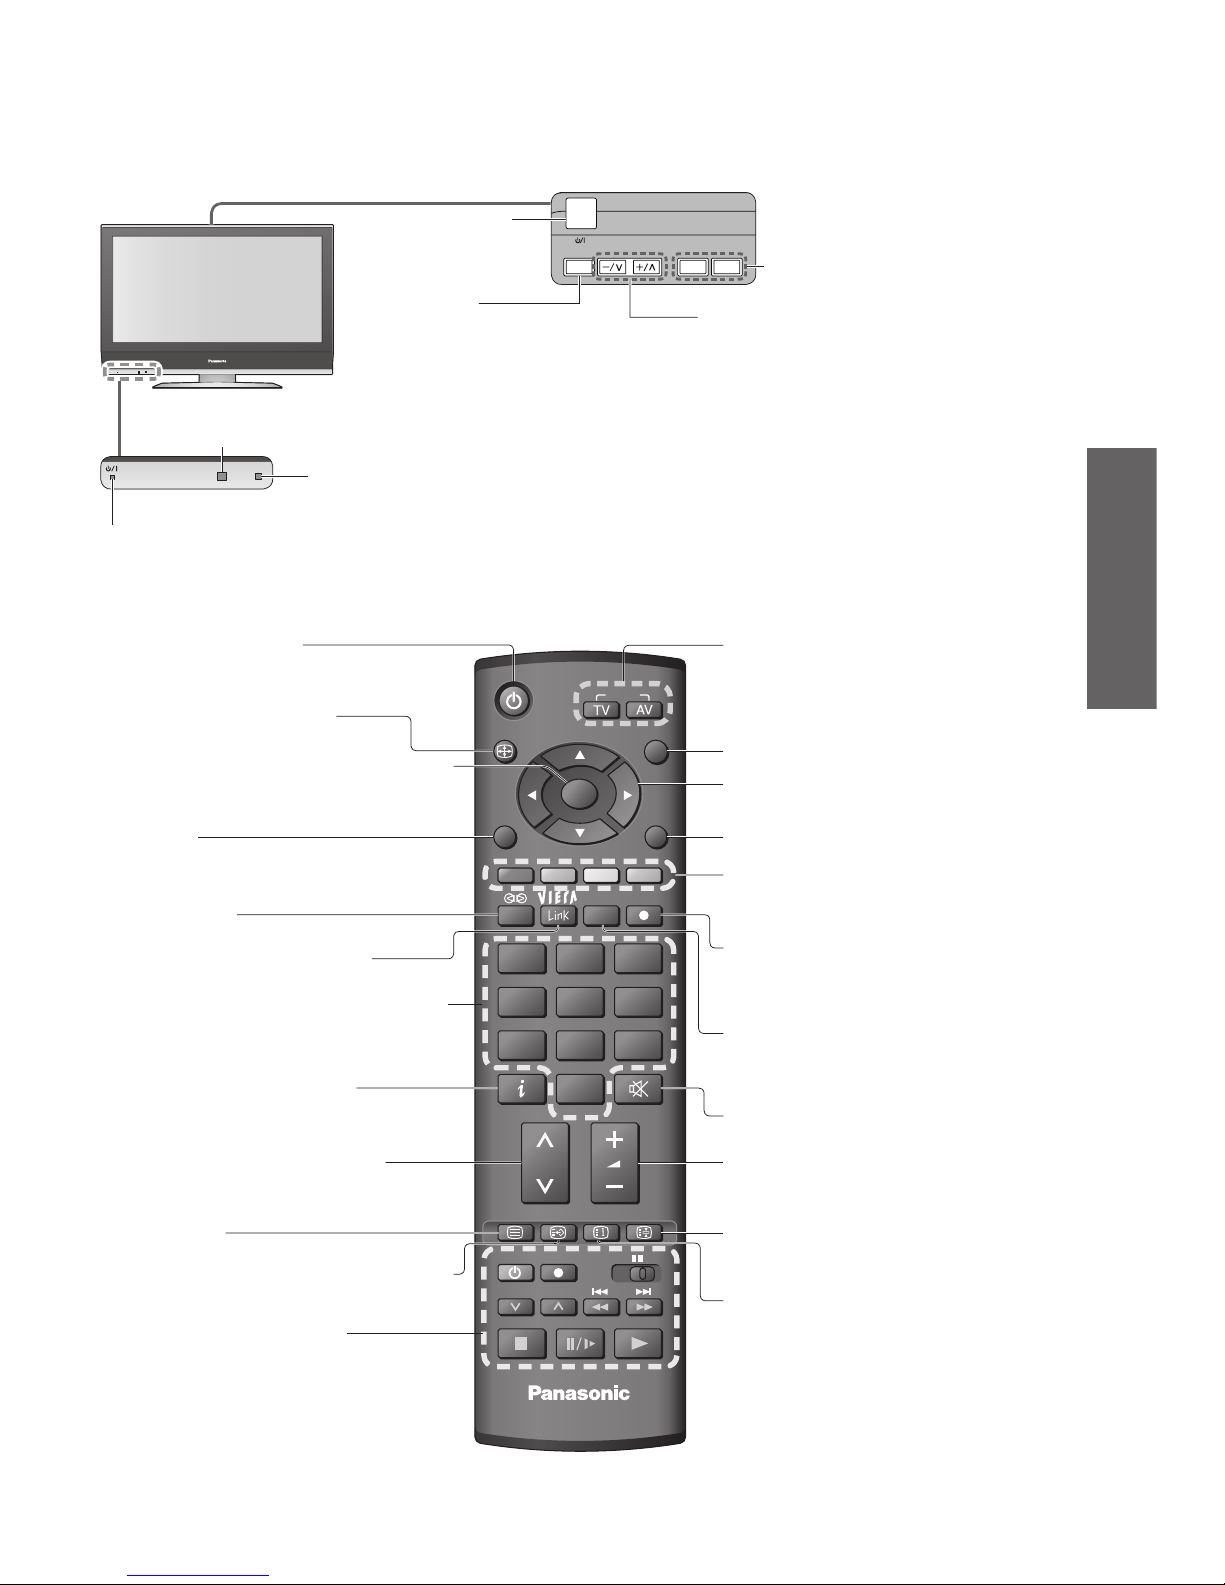
Standby On / Off switch
(Switches TV On or Off standby)
Changes aspect ratio (p. 13)
Selects programmes in sequence
Access VIERA Link Menu
OK button to confi rm selections and choices
Press after selecting programme positions to
quickly change programme.
VCR / DVD operations (p. 15)
Programme Information (p. 13)
Programme / channel change buttons (0-9)
and Teletext page buttons.
When in Standby mode, switches TV On.
Main Menu
Press to access VIERA Link, Picture,
Sound and Setup menus
Viewing a favourite teletext channel (p. 17)
Surround (p. 20)
1
Pull
open
Hook
2
Note the correct
polarity (+ or -)
Close
Remote control
signal receiver
Power LED
•
Standby: red
On: green
Teletext (p. 16)
•
Do not bundle the RF cable and mains lead together (could cause
distorted image).
•
Fix cables with clampers as necessary.
•
When using the optional accessory, follow the option’s assembly
manual to fi x cables.
To tighten:
Keep the
knob pressed
Rear of the TV
To loosen:
Clamper
(Standard accessory)
Clamper
that bundle
mains lead
Bundle the
cables:
Hook the
clamper:
Tight
Lock
Bottom Sheet
Use when removing the
TV Stand (see below)
Optional accessories
Wall-hanging
bracket
TY-WK32LR2W
WARNING!
•
Failure to use a Panasonic bracket or choosing to mount the unit
yourself will be done at the risk of the consumer.
Any damage resulting from not having a professional installer
mount your unit will void your warranty.
•
Always be sure to ask a qualifi ed technician to carry out set-up.
Incorrect fi tting may cause equipment to fall, resulting in injury
and product damage.
•
Do not mount the unit directly below ceiling lights (such as
spotlights, fl oodlights or halogen lights) which typically give off
high heat. Doing so may warp or damage plastic cabinet parts.
How to remove the TV Stand
Remove four screws and take the
TV Stand.
Rear of
the TV
Please contact your nearest Panasonic dealer to purchase the recommended
wall-hanging bracket. For additional details, please refer to the wall-hanging
bracket installation manual.
Attach the Bottom Sheet.
Bottom of
the TV
7
Quick Start Guide
TV
PROGRAMME
ASPECT
INPUT
RETURN
EXIT
MENU
OK
OPTION
DIRECT TV REC
VCR
132
465
798
0
REC
VCR DVD
TEXT F.P. INDEX HOLD
F TV AV
Identifying ControlsAccessories / Options
•
Identifying Controls
•
Accessories / Options
Cursor buttons to make selections and
adjustments
Standby On / Off switch
(Switches TV On or Off standby)
Sound mute On / Off
Changes aspect ratio (p. 13)
Selects programmes in sequence
Access VIERA Link Menu
(p. 31)
OK button to confi rm selections and choices
Press after selecting programme positions to
quickly change programme.
VCR / DVD operations (p. 15)
Volume
Programme Information (p. 13)
Teletext Index (p. 17)
Coloured buttons used for the
selection, navigation and operation of
various functions
EXIT (Returns to TV screen)
DIRECT TV Recording
To immediately record programme in VCR /
DVD recorder with Q-Link connection
(p. 28)
Programme / channel change buttons (0-9)
and Teletext page buttons.
(p. 12 and p. 16)
When in Standby mode, switches TV On.
Option menu
Sets the preferred settings of viewing
and sound options easily (p. 13)
Main Menu
Press to access VIERA Link, Picture,
Sound and Setup menus
(p. 18)
Viewing a favourite teletext channel (p. 17)
Surround (p. 20)
Changes the input mode
TV -
changes TV mode
(p. 14)
AV - changes AV input mode (p. 14)
Returns to the previous menu
Still picture (p. 13)
Teletext Hold (p. 17)
Increases or decreases the programme
position by one. When a function is
already displayed, press to increase or
decrease the selected function. When in
Standby mode, switches TV On.
Mains power
On / Off switch
C.A.T.S. (Contrast Automatic Tracking System) sensor
(senses brightness to adjust picture quality in “Auto” Mode in Picture Menu) (p. 20)
Remote control
signal receiver
Changes the
input mode
Function select
•
Volume / Contrast / Brightness /
Colour / Sharpness /
Tint (NTSC mode) / Bass / Treble /
Balance / Auto Setup (p. 22)
Power LED
•
Standby: red
On: green
Teletext (p. 16)
8
9
Quick Start Guide
L
R
Y
P
B
P
R
PC
AUDIO OUT
V
I
D
E
O
A
U
D
I
O
C
O
M
P
O
N
E
N
T
L
R
L
R
Y
P
B
P
R
PC
AUDIO OUT
V
I
D
E
O
A
U
D
I
O
C
O
M
P
O
N
E
N
T
L
R
RF IN
RF OUT
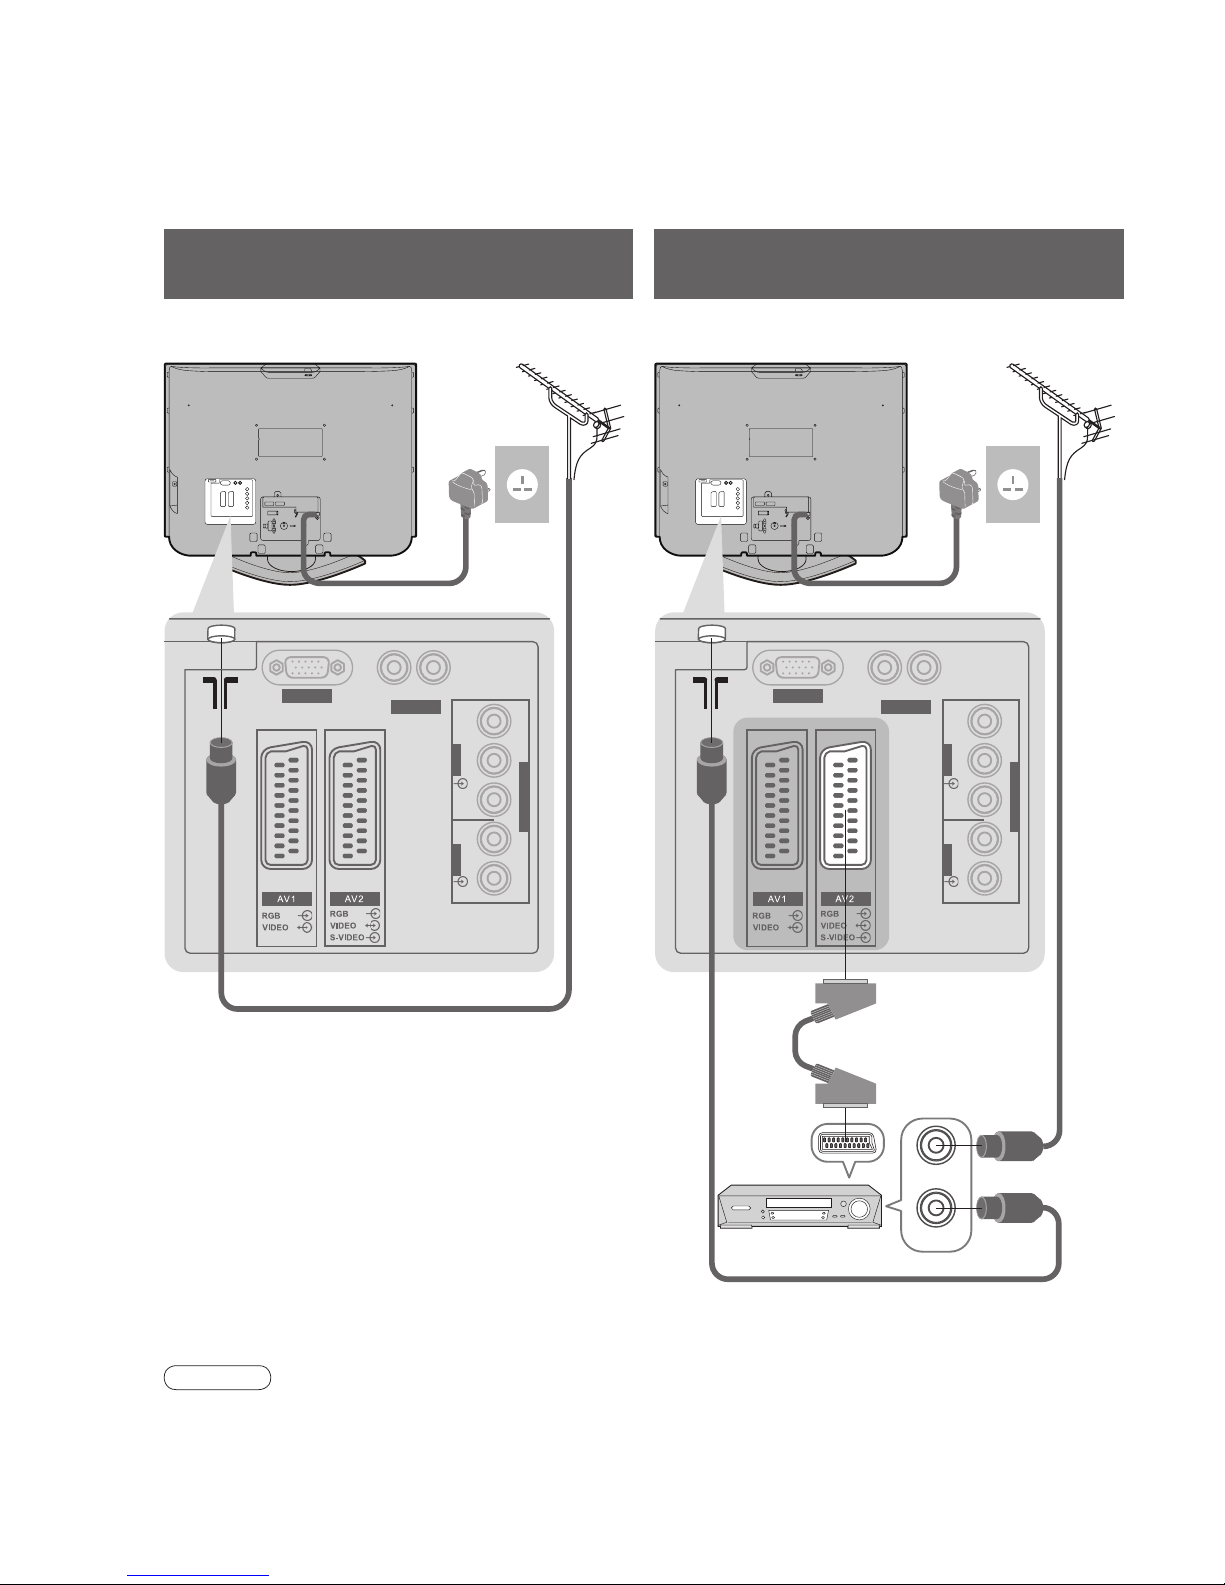
Basic Connection
Mains lead
Mains lead
SCART cable
(fully wired)
DVD Recorder or VCR
RF
cable
Aerial AerialRear of the TV Rear of the TV
External equipment and cables shown are not supplied with this TV.
Please ensure that the unit is disconnected from the mains socket before attaching or disconnecting any leads.
Example 1
Connecting aerial
Example 2
Connecting DVD Recorder / VCR
RF cable
RF cable
TV only TV, DVD Recorder or VCR
AC 220-240 V
50 / 60 Hz
AC 220-240 V
50 / 60 Hz
Note
•
Connect to AV1 / 2 for a DVD Recorder / VCR supporting Q-Link (p. 28).
SCART cable
(fully wired)
Rear of the TV
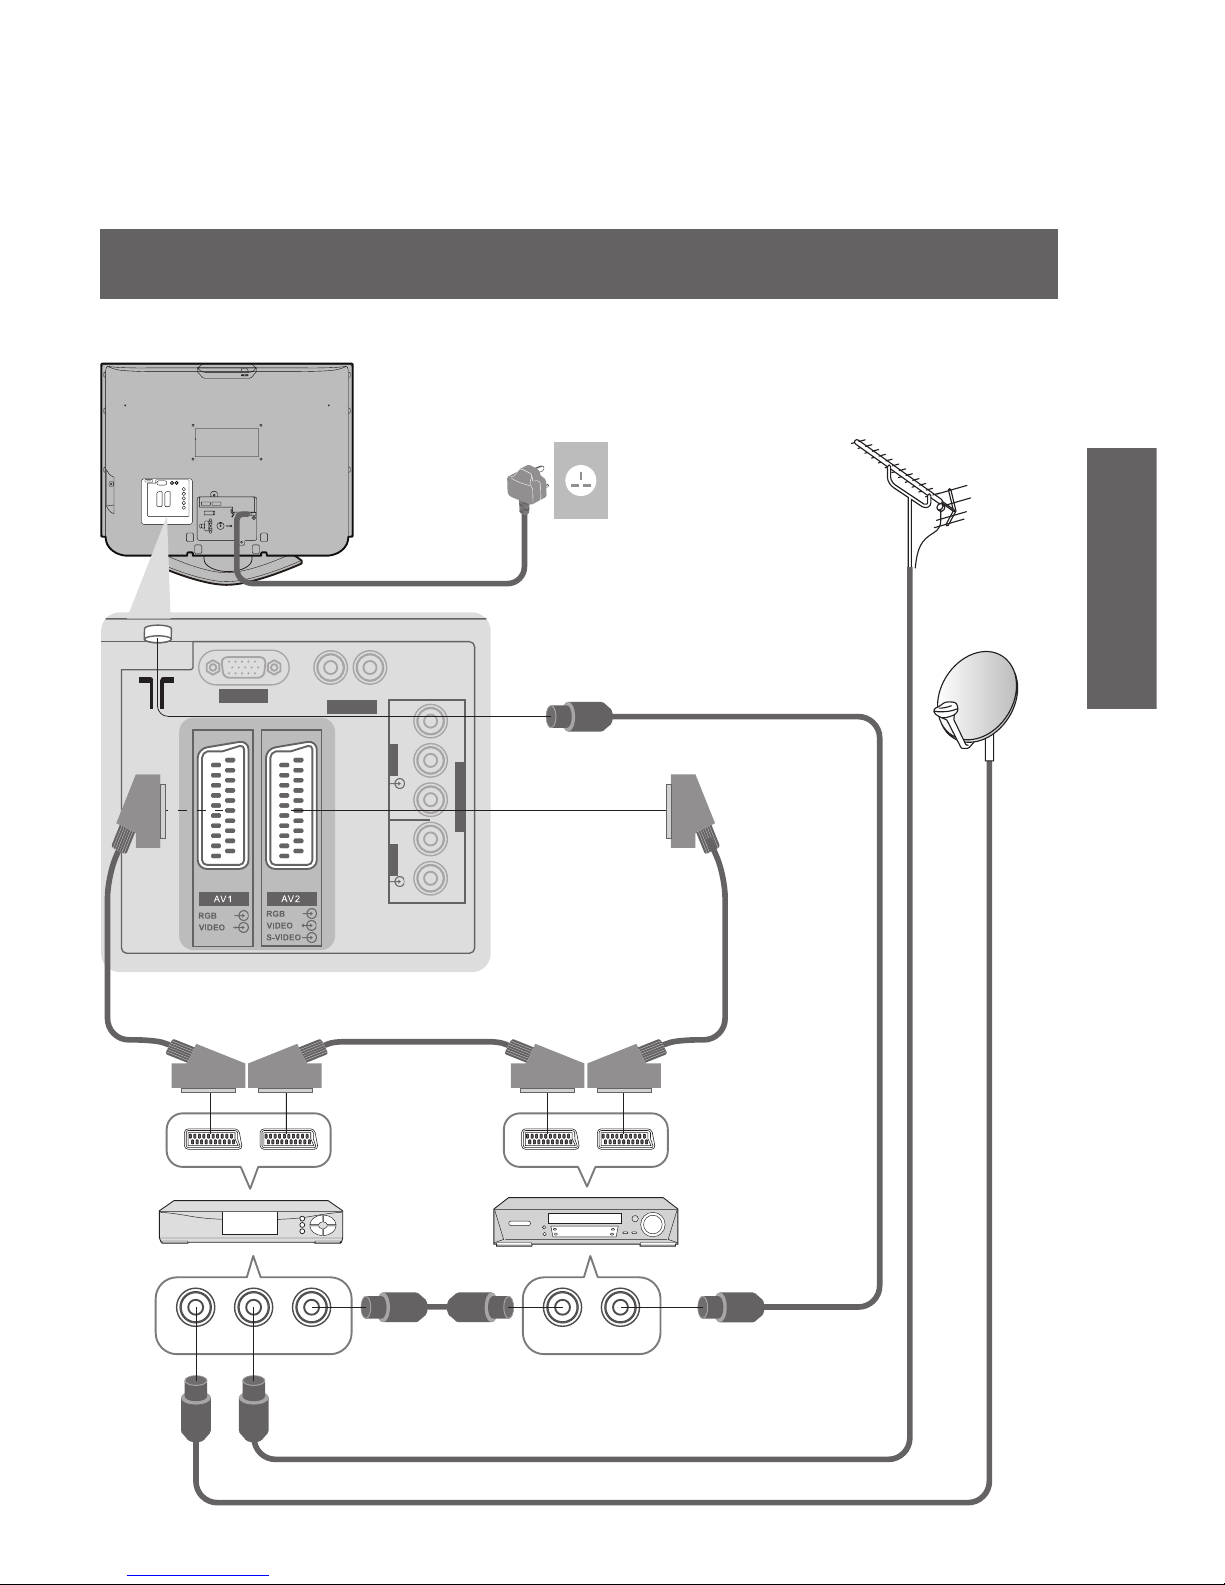
Example 3
Connecting DVD Recorder / VCR and Set top box
TV, DVD Recorder / VCR and Set top box
9
Quick Start Guide
RF OUTRF IN RF OUTRF INRF IN
L
R
Y
P
B
P
R
PC
AUDIO OUT
V
I
D
E
O
A
U
D
I
O
C
O
M
P
O
N
E
N
T
L
R
•
Basic Connection
DVD Recorder
or VCR
SCART cable
(fully wired)
RF cable
Aerial
Mains lead
Rear of the TV
Set top box
Example 3
Connecting DVD Recorder / VCR and Set top box
AC 220-240 V
50 / 60 Hz
RF cable
RF cable
TV, DVD Recorder / VCR and Set top box
SCART cable
(fully wired)
SCART cable
(fully wired)
RF cable
10
11
Quick Start Guide
INPUT
ASPECT
OPTION
DIRECT TV REC
VCR
132
465
798
0
PROGRAMME
REC
VCR DVD
TEXT F.P. INDEX HOLD
TV
RETURN
EXIT
MENU
OK
Country
Portugal
Spain
Italy
France
Austria
Germany
Netherlands
Hungary
Czech
E.Eu
Ireland
Poland
Switzerland
Belgium
Finland
Norway
Sweden
Denmark
Greece
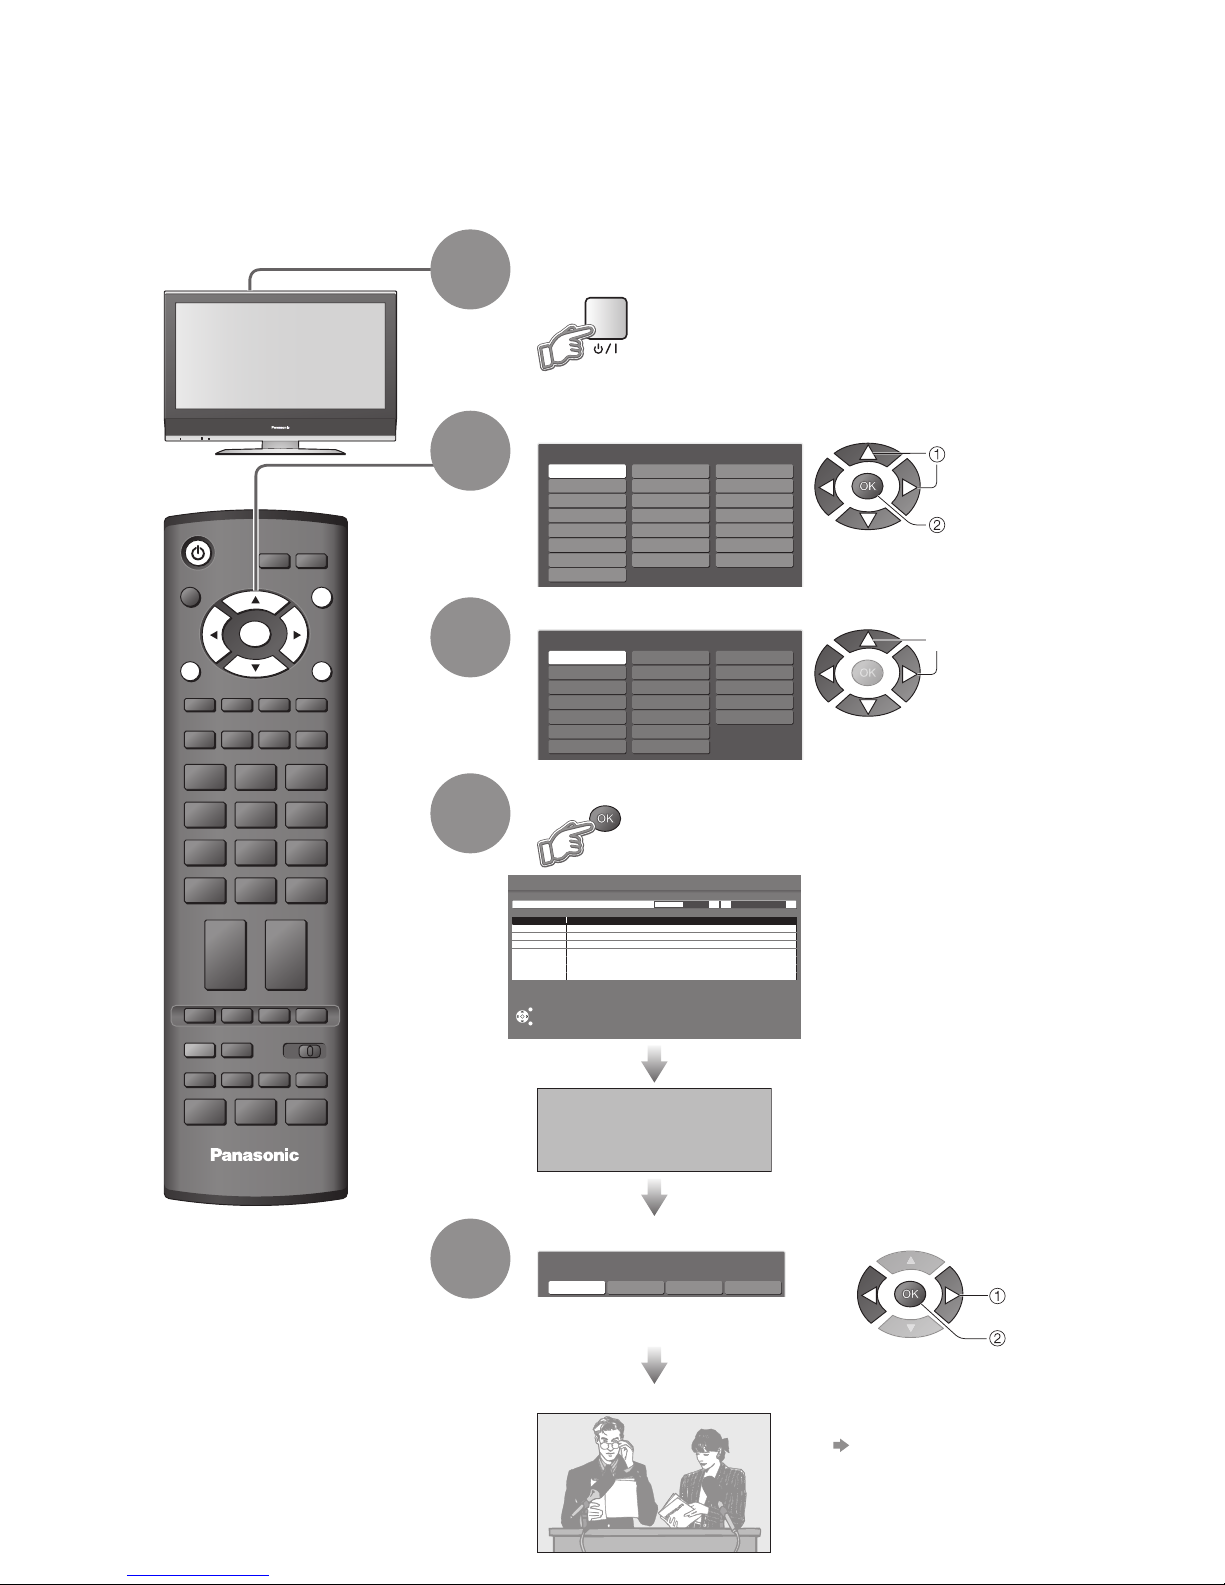
Auto Setup
EXIT
This will take about 3 mins.
RETURN
Scan 214178
CH 29
Channel Service Name
CH 33
DOWNLOAD IN PROGRESS
PLEASE WAIT
Programme : 63
Remote control unavailable
Menüsprache
Slovenčina
Čeština
Еλληνικά
Italiano
Français
English
Srpski
Deutsch
Português
Türkçe
Suomi
Polski
Românǎ
Hrvatski
Nederlands
Slovenščina
Български
Magyar
Svenska
Dansk
Norsk
Español
Viewing Mode
Dynamic Normal Cinema Auto
Plug the TV into mains socket and switch On
(Takes a few seconds to be displayed)
1
Auto Setup
Search and store TV channels automatically.
These steps are not necessary if the setup has been completed by your local dealer.
Auto Setup is now complete and your TV is ready for viewing.
•
You can now use the remote
control to turn On the TV or turn
the TV to standby mode.
(Power LED: On)
3
•
To edit channels
Editing and Setting Channels
(p. 22)
Note
•
If tuning have failed “Auto Setup”
•
If downloading have failed “Download”
•
If you turned the TV Off during Standby mode last time, the TV will be in Standby mode when you turn the TV On
with Mains power On / Off switch.
Using the
On Screen
Displays
Select your country
4
Start Auto Setup
•
If a compatible recording equipment
with Q-Link or similar technologies
(p. 28) is connected, channel
information is automatically
downloaded to the equipment.
•
Auto Setup will start to search for
TV channels and store them.
The sorted programme order
depends upon the TV signal,
the broadcasting system and
reception conditions.
2
Select the language
select
store
select
•
Also possible to change the setting
in Picture Menu (p. 20)
5
Select the picture setting
select
set
11
Quick Start Guide
Select
EXIT
Change
RETURN
Mode Music
Bass
Treble
Balance
Headphone Volume
Surround Off
Volume Correction
MPX Stereo
Sound Menu
Reset to Default Set
MENU
EXIT
RETURN
(example: Sound Menu)
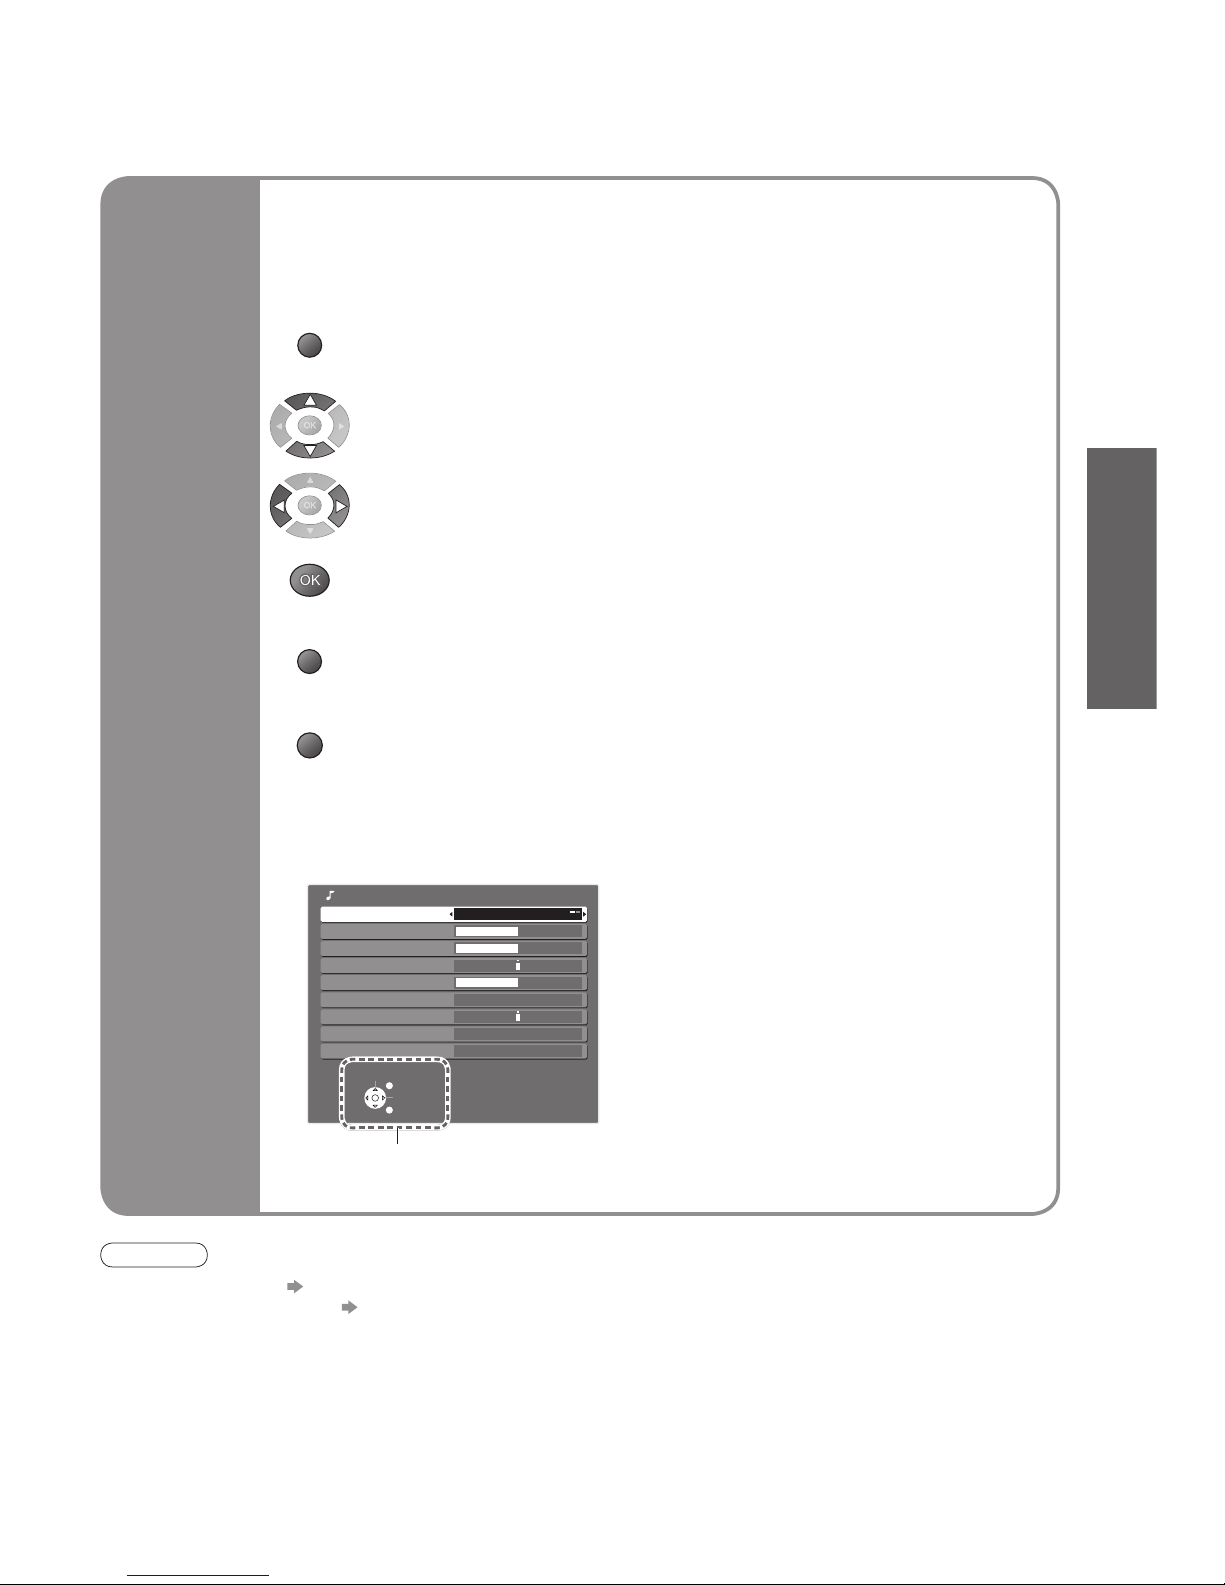
On-screen operation
guide will help you.
■
ON SCREEN HELP Instructions box
Open the main menu
Return to the previous menu
Move the cursor / select the menu
Move the cursor / adjust levels / select from a range of options
Access the menu / store settings after adjustments have been made or options
have been set
Many features available on this TV can be accessed via the On Screen Display
menu.
Note
•
If tuning have failed “Auto Setup” (p. 22).
•
If downloading have failed “Download” (p. 21).
•
If you turned the TV Off during Standby mode last time, the TV will be in Standby mode when you turn the TV On
with Mains power On / Off switch.
■
How to use remote control
•
Auto Setup
Using the
On Screen
Displays
Exit the menu system and return to the normal viewing screen
12
13
Viewing
INPUT
RETURN
MENU
DIRECT TV REC
PROGRAMME
REC
VCR DVD
TEXT F.P. INDEX
TV
ASPECT
OK
OPTION
VCR
132
465
798
0
HOLD
EXIT
1 BBS
CH05 SC1 PAL Corontation Street
VCR
132
465
798
0
•
To select the two-digit programme number, e.g. 39
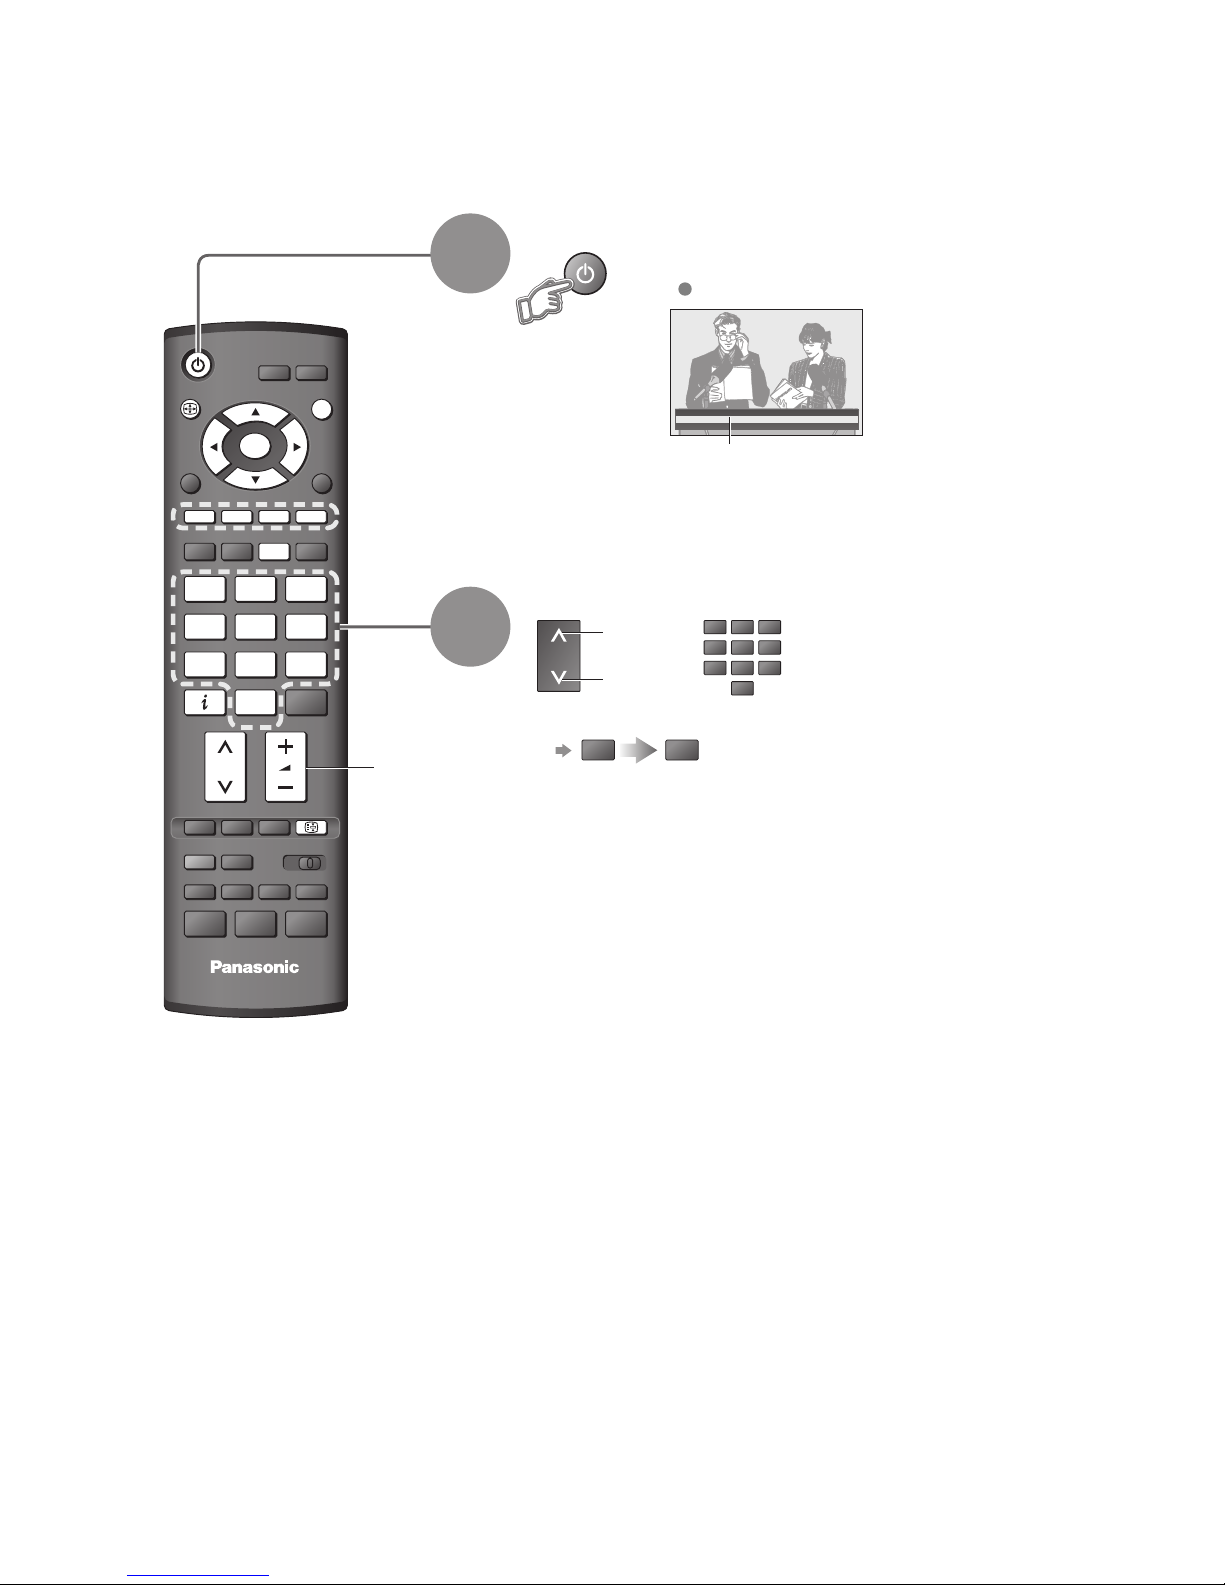
Watching TV
Select a channel
up
2
Information banner
Turn power on
Mains power On / Off switch should be On.
(Press for about 1 second)
down
or
1
Hold
9
(in a short time)
3
■
Other useful functions (Operate after )
Change
aspect
ratio
A
A
A
Volume
Display the
current
programme
status
Display
information
banner
 Loading...