

Panasonic Viera VT50H, Viera TH-P55VT50H, Viera TH-P65VT50H Operating Instructions Manual
Information on Disposal in other Countries outside the European Union
This symbol is only valid in the European Union. If you wish to discard this product, please contact
your local authorities or dealer and ask for the correct method of disposal.
Customer’s Record
The model number and serial number of this product may be found on its rear panel. You should note this serial
number in the space provided below and retain this book, plus your purchase receipt, as a permanent record of
your purchase to aid in identification in the event of theft or loss, and for Warranty Service purposes.
Model Number Serial Number
Web Site: http://panasonic.net
M0412-0
© Panasonic Corporation 2012
Printed in Thailand
Operating Instructions
Plasma Television
VT50H series
Thank you for purchasing this Panasonic product.
Please read these instructions carefully before operating this product and
retain them for future reference.
The images shown in this manual are for illustrative purposes only.
English
TQB4TC0274
SDXC Logo is a trademark
of SD-3C, LLC.
“Full HD 3D Glasses™” logo and “Full HD 3D Glasses™”
word are trademark of Full HD 3D Glasses Initiative
DLNA®, the DLNA Logo and
DLNA CERTIFIED™ are
trademarks, service marks,
or certification marks of
the Digital Living Network
Alliance.
Manufactured under license
from Dolby Laboratories.
Dolby and the double-D
symbol are trademarks of
Dolby Laboratories.
Manufactured under license under U.S. Patent Nos:
5,956,674; 5,974,380; 6,487,535 & other U.S. and
worldwide patents issued & pending. DTS, the Symbol,
& DTS and the Symbol together are registered
trademarks & DTS 2.0+Digital Out is a trademark of
DTS, Inc. Product includes software. © DTS, Inc. All
Rights Reserved.
“AVCHD”, “AVCHD 3D” and
“AVCHD Progressive” are
trademarks of Panasonic
Corporation and Sony
Corporation.
QuickTime and the
QuickTime logo are
trademarks or registered
trademarks of Apple
Inc., used under license
therefrom.
RealMedia, RealVideo and
RealAudio are trademarks
or registered trademarks of
RealNetworks, Inc.
DivX®, DivX Certified®, DivX
®
HD and associated
Plus
logos are trademarks of
Rovi Corporation or its
subsidiaries and are used
under license.
THX and the THX Logo are trademarks of THX Ltd., which may be registered in some jurisdictions. All rights
reserved.
The Bluetooth
®
word mark and logos are registered trademarks owned by the Bluetooth SIG, Inc. and any use
of such marks by Panasonic Corporation is under license. Other trademarks and trade names are those of their
respective owners.
HDMI, the HDMI Logo, and High-Definition Multimedia Interface are trademarks or registered trademarks of HDMI
Licensing LLC in the United States and other countries.
Windows is a registered trademark of Microsoft Corporation in the United States and other countries.
VGA is a trademark of International Business Machines Corporation.
S-VGA is a registered trademark of the Video Electronics Standard Association.
See page 111 for more information.
2
“RealD 3D” is a trademark of RealD.
Panasonic does not guarantee operation and performance
of peripheral devices made by other manufacturers; and we
disclaim any liability or damage arising from operation and/
or performance from usage of such other maker’s peripheral
devices.
The recording and playback of content on this or any
other device may require permission from the owner of the
copyright or other such rights in that content. Panasonic has
no authority to and does not grant you that permission and
explicitly disclaims any right, ability or intention to obtain
such permission on your behalf. It is your responsibility to
ensure that your use of this or any other device complies with
applicable copyright legislation in your country. Please refer
to that legislation for more information on the relevant laws
and regulations involved or contact the owner of the rights in
the content you wish to record or playback.
Contents
Be Sure to Read
Safety Precautions ···············································4
Quick Start Guide
Accessories / Options ···········································6
Identifying Controls ············································· 11
Basic Connection················································14
Auto Tuning ························································17
This product is licensed under the AVC patent portfolio
license for the personal and non-commercial use of a
consumer to (i) encode video in compliance with the AVC
Standard (“AVC Video”) and/or (ii) decode AVC Video that
was encoded by a consumer engaged in a personal and
non-commercial activity and/or was obtained from a video
provider licensed to provide AVC Video. No license is granted
or shall be implied for any other use.
Additional information may be obtained from MPEG LA, LLC.
See http://www.mpegla.com.
“Full HD 3D Glasses™” Logo indicates compatibility between
TV products and 3D Eyewear which are compliant with the
“Full HD 3D Glasses™” format, and does not indicate picture
quality of TV products.
Notice for Digital terrestrial broadcasting
functions
●
Function related to Digital broadcasting will work in the
areas where the digital terrestrial broadcasting services
are received. Consult your local Panasonic Dealer with
coverage areas.
●
Not all the features are available depending on the country,
area, broadcaster and service provider.
●
This TV has the capability for Digital broadcasting
specifications. But future Digital broadcasting services
cannot be guaranteed.
Do not display any still part of the image for
a long period
In such cases the still part of the image remains dimly on the
plasma screen (“image retention”). This is not considered a
malfunction and is not covered by the warranty.
Enjoy your TV!
Basic
Using “VIERA Connect” ······································21
Watching TV ·······················································22
Using TV Guide (Digital TV) ·······························26
Watching External Inputs ····································28
Viewing 3D images ·············································30
How to Use VIERA TOOLS ································37
How to Use Menu Functions ······························38
Advanced
Tuning and Editing Channels ·····························46
Timer Programming ············································50
Child Lock ···························································53
Shipping Condition ·············································54
Updating the TV Software ··································55
Displaying PC Screen on TV ······························56
Advanced Picture Settings ·································57
USB HDD / SD Card Recording ·························59
Using Media Player ············································63
Using Network Services (DLNA / VIERA Connect)
Link Functions (VIERA Link) ·······························85
External Equipment ············································92
····74
Typical still image parts:
●
Channel number, channel logo and other logos
●
Still or moving pictures viewed in 4:3 or 14:9 aspect ratio
●
Video games
●
Images from PC
To avoid image retention, the contrast is lowered
automatically and the screen becomes dim after a few
minutes if no signals are sent or no operations are
performed. (p. 105)
Others
Technical Information··········································95
FAQs·································································105
Maintenance ·····················································108
Specifications ···················································109
Licence ····························································· 111
3
Safety Precautions
Warning
Safety Precautions
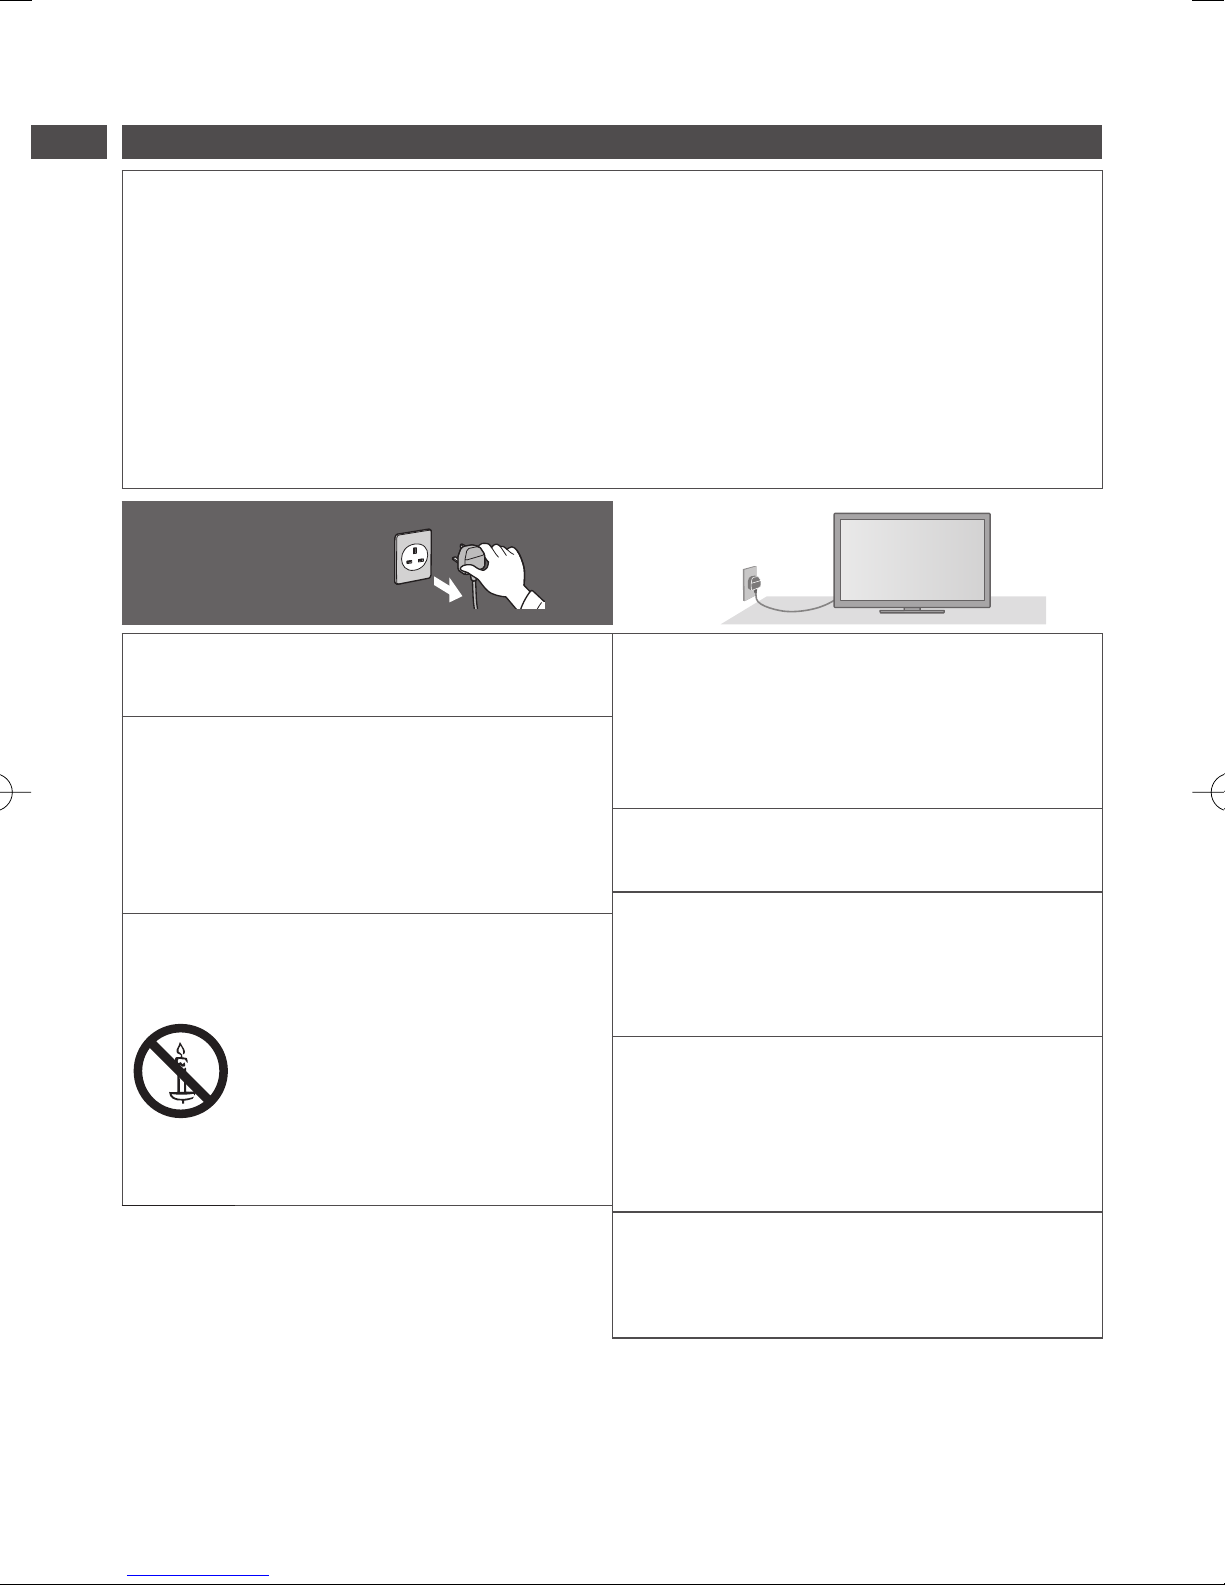
Handling the mains plug and lead
●
Insert the mains plug fully into the socket outlet. (If the mains plug is loose, it could generate heat and cause fire.)
●
Ensure that the mains plug is easily accessible.
●
Ensure the earth pin on the mains plug is securely connected to prevent electrical shock.
An apparatus with CLASS I construction shall be connected to a mains socket outlet with a protective earthing
•
connection.
●
Do not touch the mains plug with a wet hand. (This may cause electrical shock.)
●
Do not use any mains lead other than that provided with this TV. (This may cause fire or electrical shock.)
●
Do not damage the mains lead. (A damaged lead may cause fire or electrical shock.)
Do not move the TV with the lead plugged in the socket outlet.
•
Do not place a heavy object on the lead or place the lead near a high-temperature object.
•
Do not twist the lead, bend it excessively or stretch it.
•
Do not pull on the lead. Hold onto the mains plug body when disconnecting the lead.
•
Do not use a damaged mains plug or socket outlet.
•
AC 220-240 V
If you find any
abnormality, remove the
mains plug immediately!
50 / 60 Hz
Power source
●
This TV is designed to operate on:
AC 220-240 V, 50 / 60 Hz
•
Do not remove covers and NEVER
modify the TV yourself
●
Do not remove the rear cover as live parts are
accessible when it is removed. There are no user
serviceable parts inside. (High-voltage components
may cause serious electrical shock.)
●
Have the TV checked, adjusted, or repaired at your
local Panasonic dealer.
Do not expose to direct sunlight and
other sources of heat
●
Avoid exposing the TV to direct sunlight and other
sources of heat.
To prevent the spread
of fire, keep candles
or other open flames
away from this product
at all times
Do not expose to rain or excessive
moisture
●
To prevent damage which might result in electric shock
or fire, do not expose this TV to rain or excessive
moisture. This TV must not be exposed to dripping or
splashing water and objects filled with liquid, such as
vases, must not be placed on top of or above the TV.
Do not insert foreign objects into the TV
●
Do not allow any objects to drop into the TV through
the air vents. (Fire or electrical shock may result.)
Do not place the TV on sloped or
unstable surfaces, and ensure that the
TV does not hang over the edge of the
base
●
The TV may fall off or tip over.
Use only the dedicated pedestals /
mounting equipment
●
Using an unapproved pedestal or other fixtures may
make the TV unstable, risking injury. Be sure to ask
your local Panasonic dealer to perform setup.
●
Use approved pedestals (p. 8) / wall-hanging brackets
(p. 7).
Do not allow children to handle SD Card
●
As with any small object, SD Cards can be
swallowed by young children. Please remove SD
Card immediately after use and store out of reach of
children.
4
Caution
This appliance is intended for use in
tropical climates
When cleaning the TV, remove the mains
plug
●
Cleaning an energised TV may cause electrical shock.
When the TV is not going to be used for
a long period of time, remove the mains
plug
●
This TV will still consume some power even in the Off
mode, as long as the mains plug is still connected to a
live socket outlet.
Transport only in upright position
●
Transporting the TV with its display panel facing upward
or downward may cause damage to the internal circuitry.
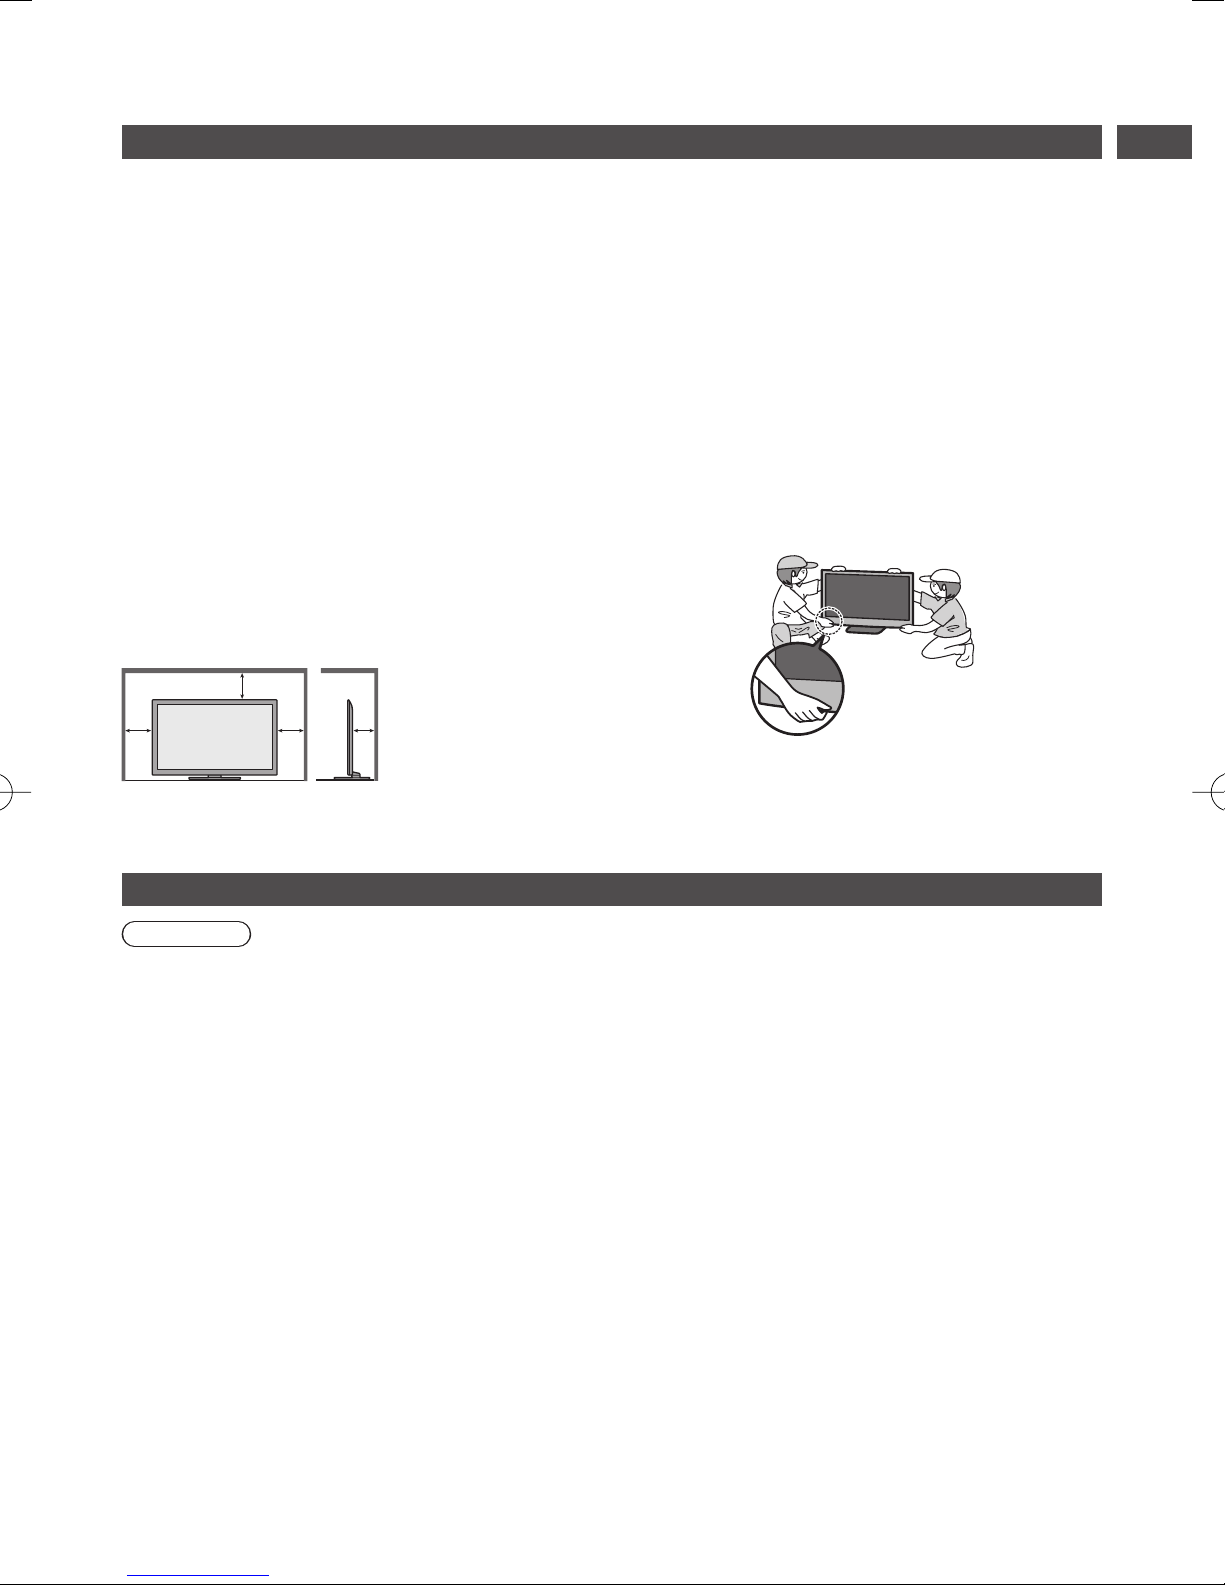
Allow sufficient space around the TV for
radiated heat
Minimum distance
10
10
10
●
When using the
pedestal, keep the
space between the
bottom of the TV and
7
the surface where the
TV is set.
●
In case of using
Wall-hanging bracket,
(cm)
follow the manual of it.
Do not block the rear air vents
●
Blocked ventilation by newspapers, table cloths,
curtains, etc. may cause overheating, fire or electrical
shock.
Do not expose your ears to excessive
volume from the headphones
●
Irreversible damage can be caused.
Do not apply strong force or impact to the
display panel
●
This may cause damage resulting in injury.
The TV is heavy. Handle the TV with 2 or
more people. Support as shown to avoid
injury by the TV tipping or falling.
Safety Precautions
Built-in wireless LAN / Bluetooth
Warning
Radio waves
●
Do not use the TV, 3D Eyewear and VIERA Touch Pad Controller in any medical institutions or locations with medical
equipment. Radio waves from the TV, 3D Eyewear and VIERA Touch Pad Controller may interfere with the medical
equipment and cause accidents due to the malfunction.
●
Do not use the TV, 3D Eyewear and VIERA Touch Pad Controller near any automatic control equipment such as
automatic doors or fire alarms. Radio waves from the TV, 3D Eyewear and VIERA Touch Pad Controller may interfere
with the automatic control equipment and cause accidents due to the malfunction.
●
Keep the distance at least 22 cm from the built-in wireless LAN part, 3D Eyewear and VIERA Touch Pad Controller
when you have a cardiac pacemaker. Radio waves from them may interfere with the operation of the pacemaker.
●
Do not disassemble or alter the built-in wireless LAN, 3D Eyewear and VIERA Touch Pad Controller in any way.
5
Caution
■ Built-in wireless LAN
●
To use the built-in wireless LAN, an access point needs to be obtained.
●
Do not use the built-in wireless LAN to connect to any wireless network (SSID∗) for which you do not have usage
rights. Such networks may be listed as a result of searches. However, using them may be regarded as illegal access.
Safety Precautions | Accessories / Options
∗SSID is a name for identifying a particular wireless network for transmission.
●
Do not subject the built-in wireless LAN to high temperatures, direct sunlight or moisture.
●
Data transmitted and received over radio waves may be intercepted and monitored.
●
The built-in wireless LAN uses 2.4 GHz and 5 GHz frequency bands. To avoid malfunctions or slow response caused
by radio wave interference, keep the TV away from the devices such as other wireless LAN devices, microwaves,
mobile phones and the devices that use 2.4 GHz and 5 GHz signals when using the built-in wireless LAN.
●
When noises occur due to the static electricity, etc., the TV might stop operating for the protection of the devices. In
this case, turn the TV off with Mains power On / Off switch, then turn it on again.
●
Additional information for built-in wireless LAN and access point may be on the following website. (English only)
http://panasonic.jp/support/global/cs/tv/
■ Bluetooth
●
The TV, 3D Eyewear and VIERA Touch Pad Controller use the 2.4 GHz radio frequency ISM band (Bluetooth®). To
avoid malfunctions or slow response caused by radio wave interference, keep the TV, 3D Eyewear and VIERA Touch
Pad Controller away from the devices such as other wireless LAN devices, other Bluetooth devices, microwaves,
mobile phones and the devices that use 2.4 GHz signal.
®
wireless technology
Accessories / Options
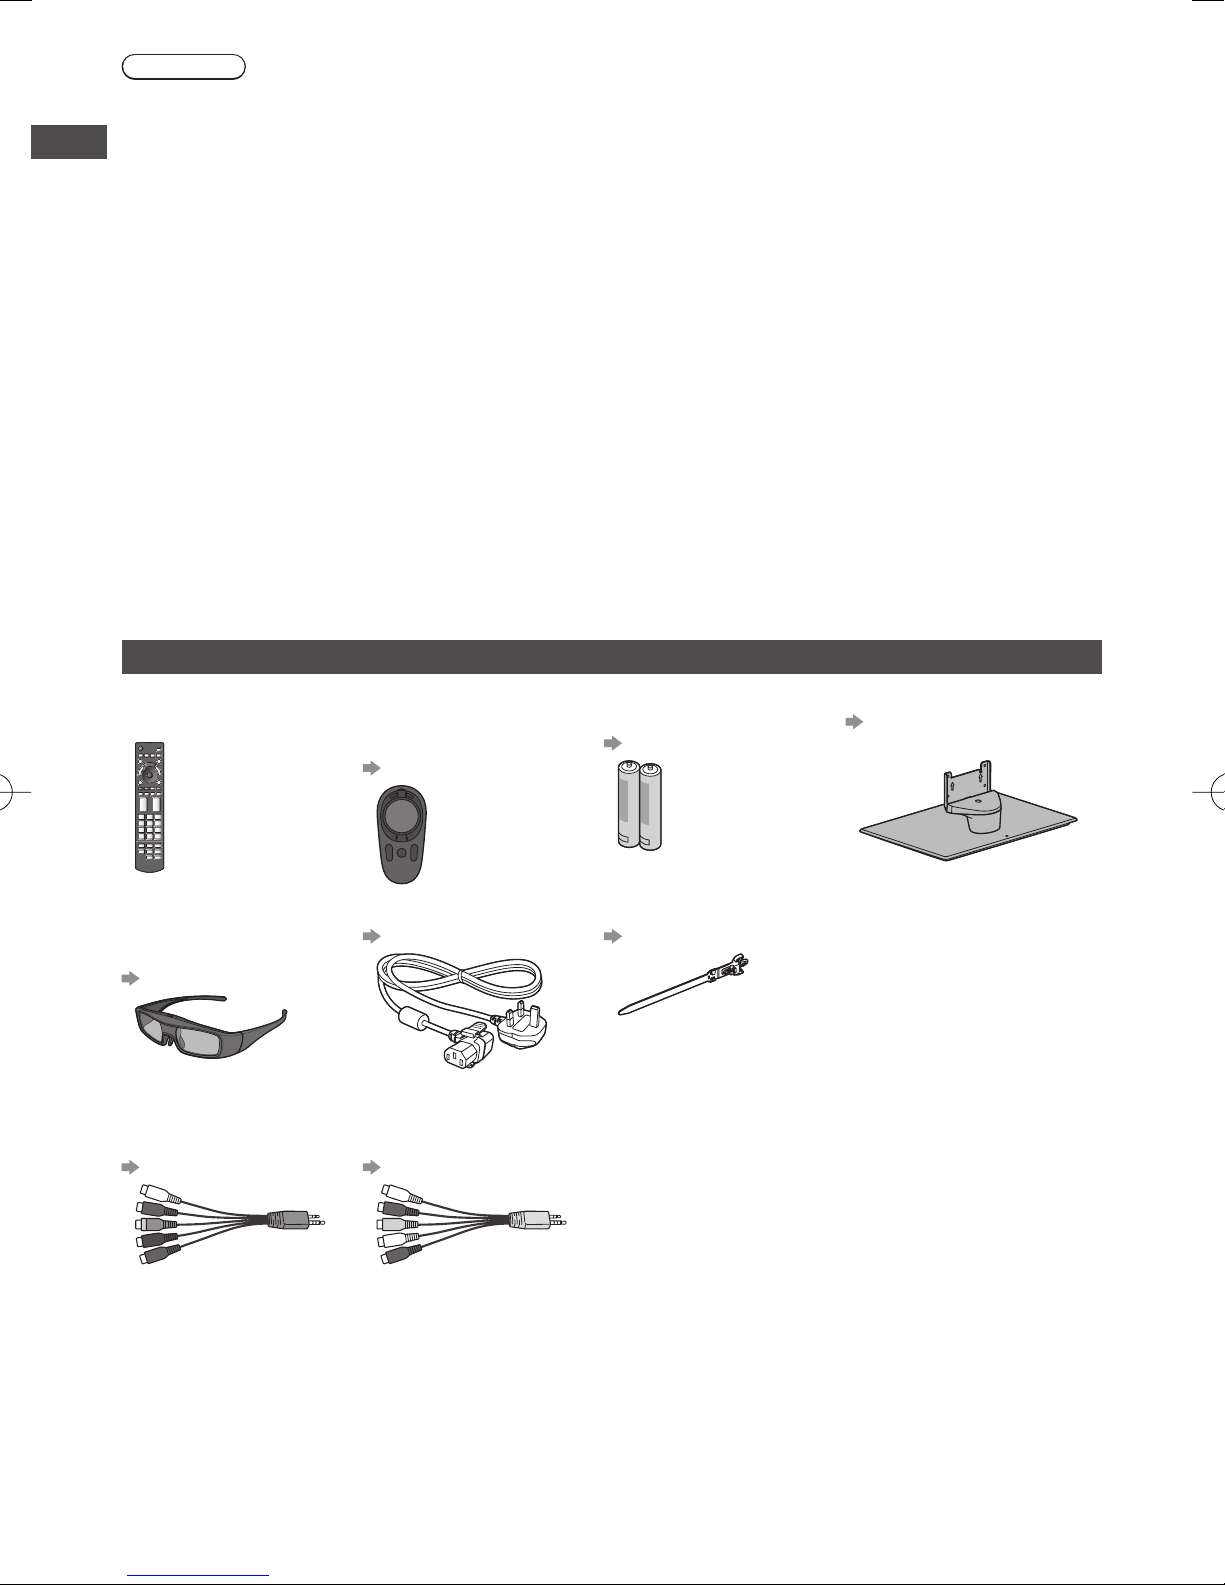
Standard accessories
Remote Control
●
N2QAYB000746
3D Eyewear
(TY-ER3D4MA)
●
N5ZZ00000260
(p. 31)
Terminal adaptors Operating Instructions
●
AV2 IN (COMPONENT /
VIDEO) adaptor
(p. 92, 93)
VIERA Touch Pad
Controller
●
N2QBYB000016
(p. 8, 12)
Mains lead
(p. 14)
●
AV1 IN / AUDIO OUT
adaptor
(p. 92)
Batteries (4)
●
R6 (AA)
(p. 8)
Clamper
(p. 16)
Pedestal
(p. 8)
●
Accessories may not be placed all together. Take care not to throw them away unintentionally.
●
This product contains possibly dangerous parts (such as plastic bags), that can be breathed in or swallowed by
young children accidentally. Keep these parts out of reach of young children.
6

Optional accessories
Please contact your local Panasonic dealer to purchase the recommended optional accessories. For additional details,
please read the manual of the optional accessories.
3D Eyewear set
(Rechargeable type)
●
TY-ER3D4MW
●
TY-ER3D4SW
Communication Camera
●
TY-CC20W
Wall-hanging bracket
●
TY-WK5P1RW (55” class)
●
If you need 3D Eyewears additionally, please purchase this optional accessory.
●
Use Panasonic 3D Eyewear for active 3D supporting Bluetooth wireless technology.
●
For more information (English only):
http://panasonic.net/avc/viera/3d/asia.html
●
This camera can be used on VIERA Connect (p. 21, 75).
●
Depending on the area, this optional accessory may not be available.
For details, consult your local Panasonic dealer.
●
TY-WK6P1RW (65” class)
Accessories / Options
a: 500 mm
b: 300 mm
●
Tilting angle for this TV: 0 (vertical) to 20 degrees
Rear of the TV
a
b
(View from the side)
Holes for wall-hanging bracket installation
Depth of screw:
(55” class) minimum 10 mm, maximum 16 mm
(65” class) minimum 17 mm, maximum 23 mm
Type of screw: M8
Screw for fixing the TV onto the wall-hanging bracket (not supplied with
the TV)
●
Tilting angle for this TV: 0 (vertical) to 10 degrees
a: 684 mm
b: 300 mm
Warning
●
Using other wall-hanging brackets, or installing a wall-hanging bracket by yourself have the risk of personal injury and
product damage. In order to maintain the unit’s performance and safety, be absolutely sure to ask your dealer or a
licensed contractor to secure the wall-hanging brackets. Any damage caused by installing without a qualified installer
will void your warranty.
●
Carefully read the instructions accompanying optional accessories, and be absolutely sure to take steps to prevent
the TV from falling off.
●
Handle the TV carefully during installation since subjecting it to impact or other forces may cause product damage.
●
Take care when fixing wall brackets to the wall. Always ensure that there are no electrical cables or pipes in the wall
before hanging bracket.
●
To prevent fall and injury, remove the TV from its fixed wall position when it is no longer in use.
7
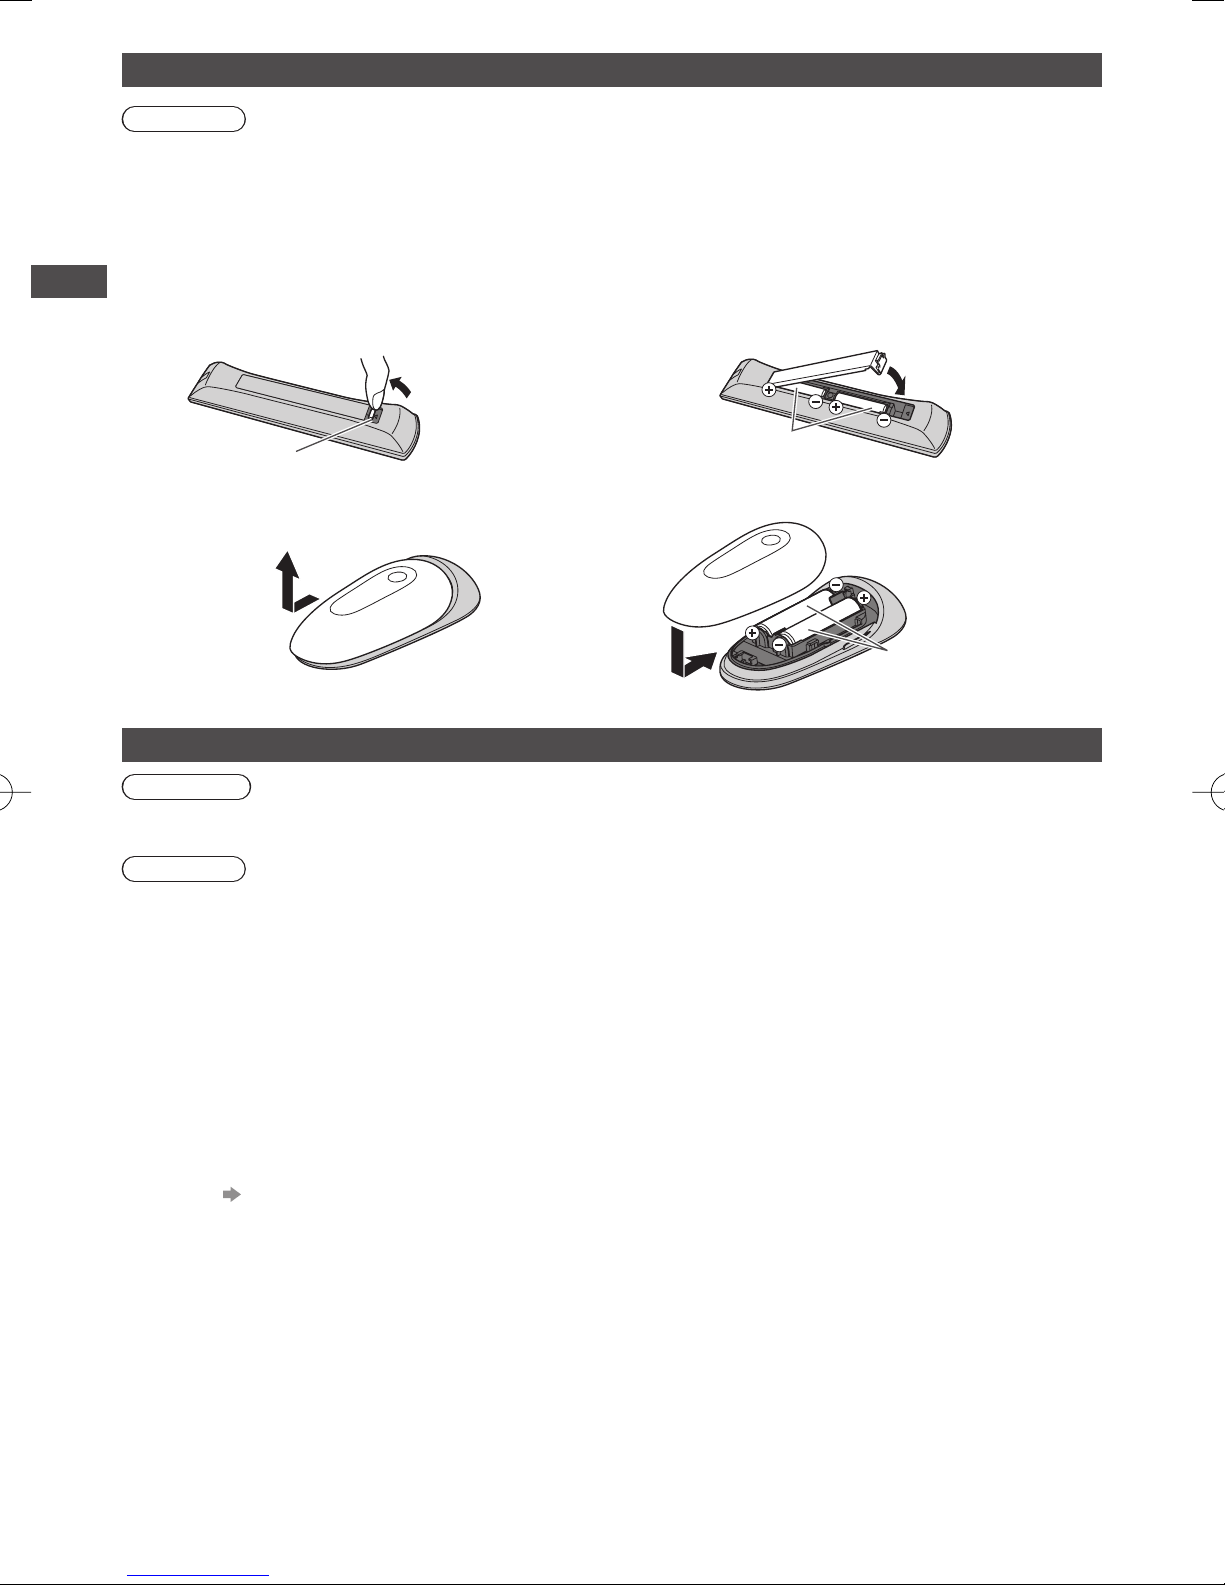
Installing / removing batteries
Caution
●
Incorrect installation may cause battery leakage and corrosion, resulting in damage to the remote control / touch pad
controller.
●
Do not mix old and new batteries.
●
Do not mix different battery types (such as alkaline and manganese batteries).
●
Do not use rechargeable (Ni-Cd) batteries.
●
Do not burn or break up batteries.
Batteries must not be exposed to excessive heat such as sunshine, fire or the like.
●
Do not disassemble or modify the remote control / touch pad controller.
Accessories / Options
■ Remote Control
1
Pull open
Hook
2
Note the correct polarity
Close
(+ or -)
■ VIERA Touch Pad Controller
1
Slide open
2
Close
Note the correct polarity
(+ or -)
Attaching / removing the pedestal
Warning
Do not disassemble or modify the pedestal.
●
Otherwise the TV may fall over and become damaged, and personal injury may result.
Caution
Do not use any pedestal other than the one provided with this TV.
●
Otherwise the TV may fall over and become damaged, and personal injury may result.
Do not use the pedestal if it becomes warped or physically damaged.
●
If you use the pedestal while it is physically damaged, personal injury may result. Contact your local Panasonic
dealer immediately.
During set-up, make sure that all screws are securely tightened.
●
If insufficient care is taken to ensure screws are properly tightened during assembly, the pedestal will not be strong
enough to support the TV, and it might fall over and become damaged, and personal injury may result.
Ensure that the TV does not fall over.
●
If the TV is knocked or children climb onto the pedestal with the TV installed, the TV may fall over and personal injury
may result.
Two or more people are required to install and remove the TV.
●
If two or more people are not present, the TV may be dropped, and personal injury may result.
When removing the pedestal from the TV, do not remove the pedestal by the methods other than the specified
procedure. (p. 10)
●
Otherwise the TV and / or pedestal may fall over and become damaged, and personal injury may result.
8
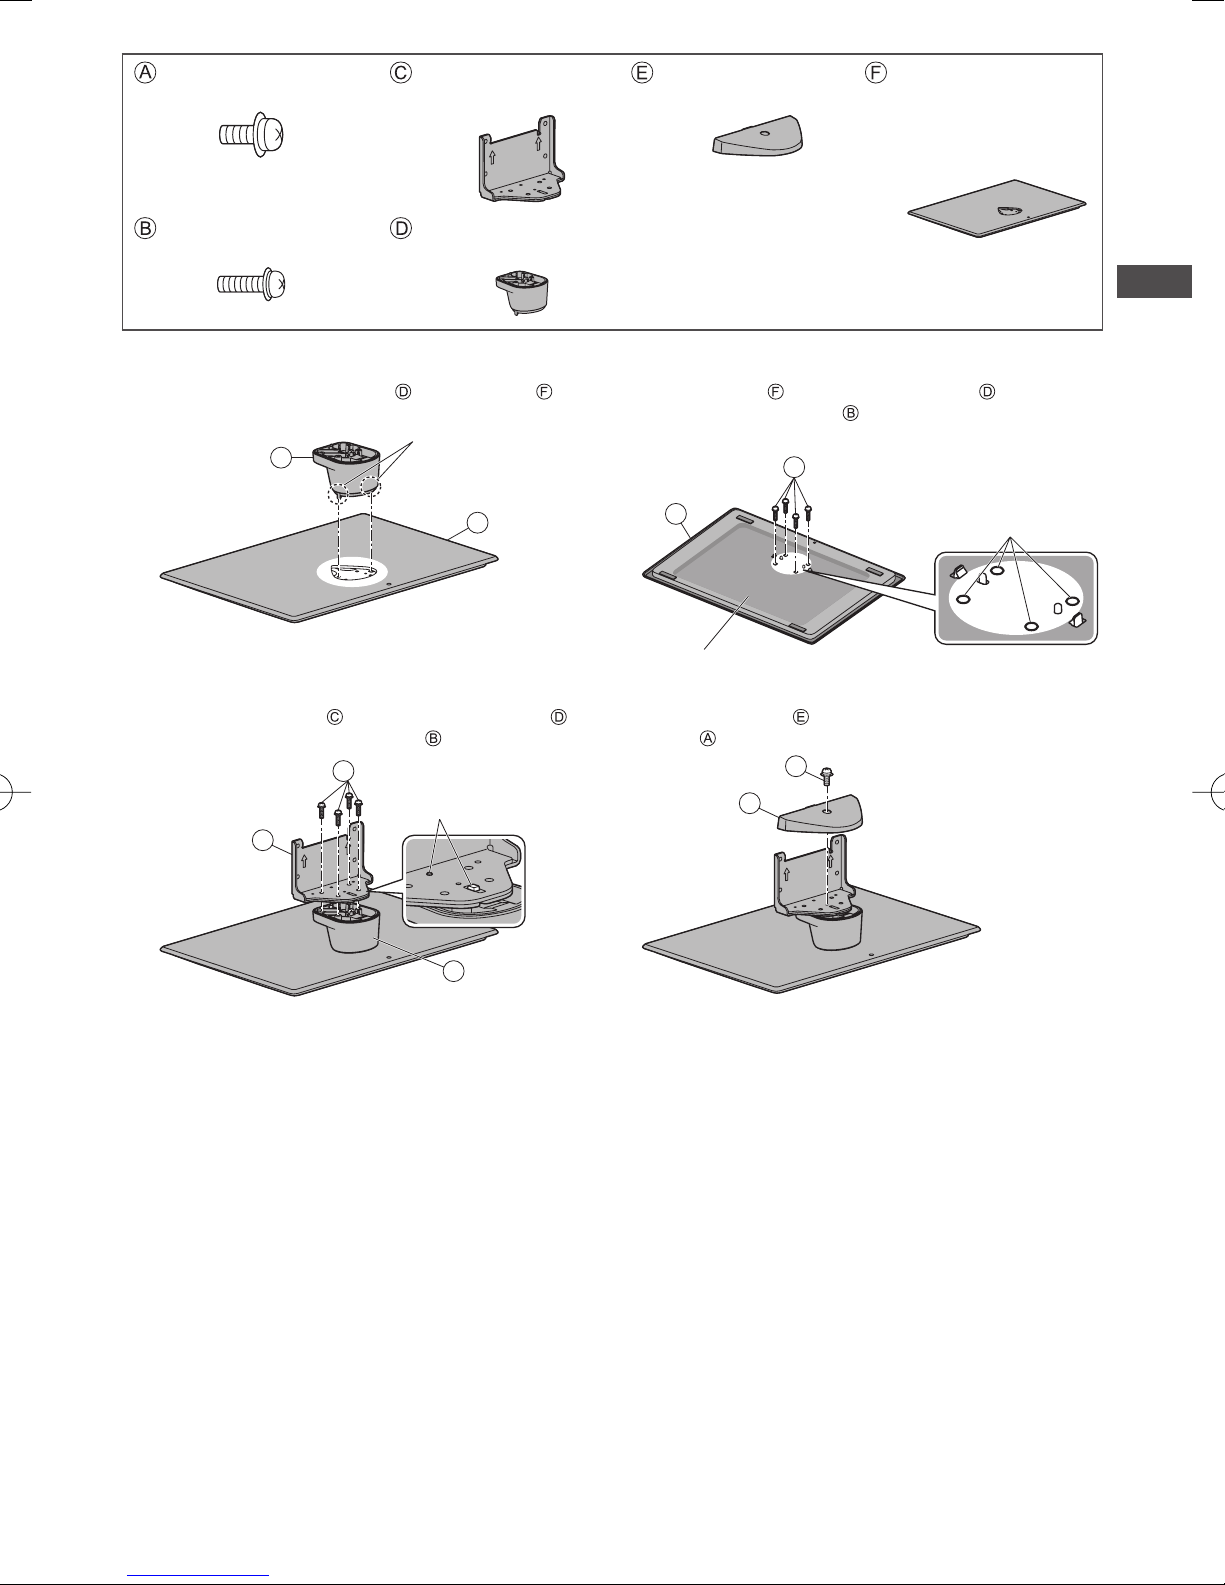
Assembly screw
(black)
M4 × 10
Assembly screw (12)
(silver)
Bracket
●
TXFBL5Z0054
Neck
●
TXFBL5Z0086
Cover
●
TXFBL5Z0056
Base
●
●
TBL5ZX0328
(55” class)
TBL5ZX0381
(65” class)
M5 × 16
■ Assembling the pedestal
Insert the tabs of the neck into the base
1
firmly
Tabs (bottom)
D
F
Attach the bracket to the tabs of the neck
3
and fix with assembly screws
B
Tabs (top)
C
Turn the base over and fix the neck securely
2
with assembly screws
●
Do not hold the neck when turning over the base.
B
F
Back of the base
Attach the cover and fix securely with assembly
4
screw
A
E
Screw hole
Accessories / Options
D
9
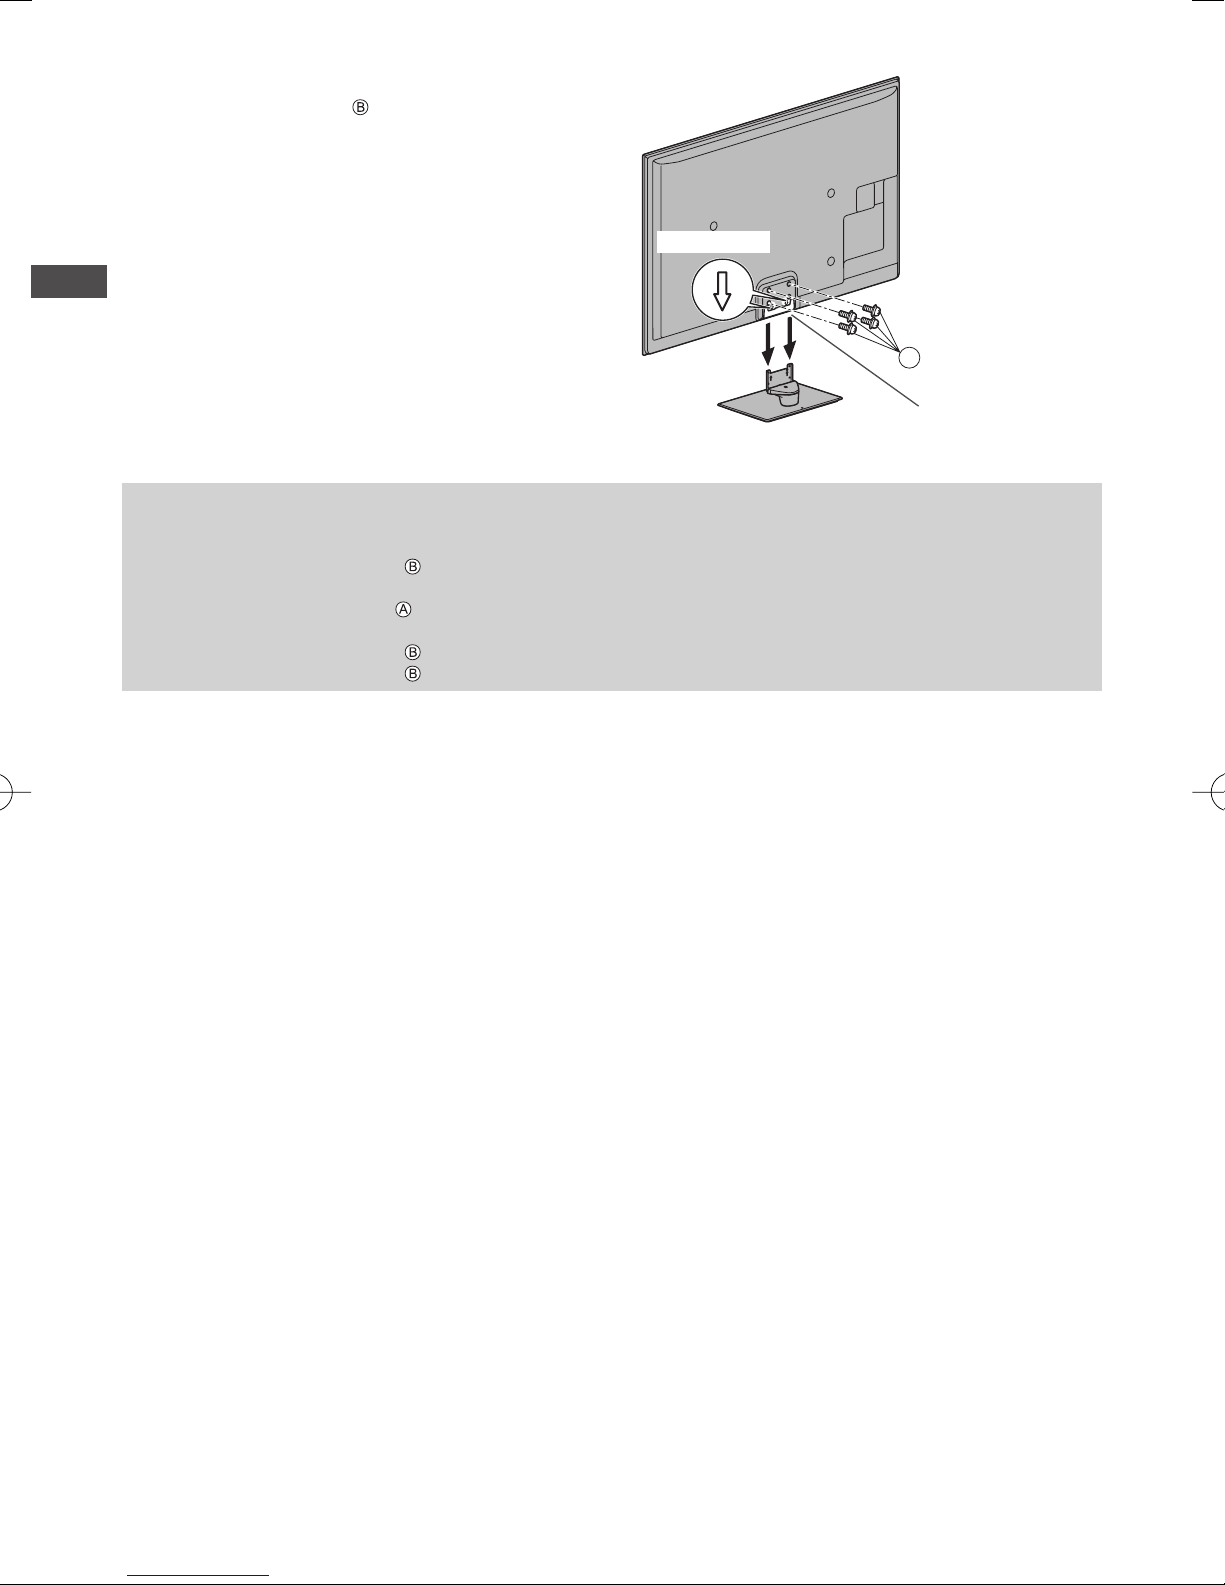
■ Securing the TV
Use the assembly screws to fasten securely.
●
Tighten the four assembly screws loosely at first, then
tighten them firmly to fix securely.
●
Carry out the work on a horizontal and level surface.
Arrow mark
Accessories / Options
B
Hole for pedestal
installation
Removing the pedestal from the TV
Be sure to remove the pedestal in the following way when using the wall-hanging bracket or repacking the TV.
1 Remove the assembly screws from the TV.
2 Pull out the pedestal from the TV.
3 Remove the assembly screw from the cover.
4 Pull out the cover.
5 Remove the assembly screws
6 Remove the assembly screws
from the bracket.
from the Back of stand and pull out the neck.
10
Identifying Controls
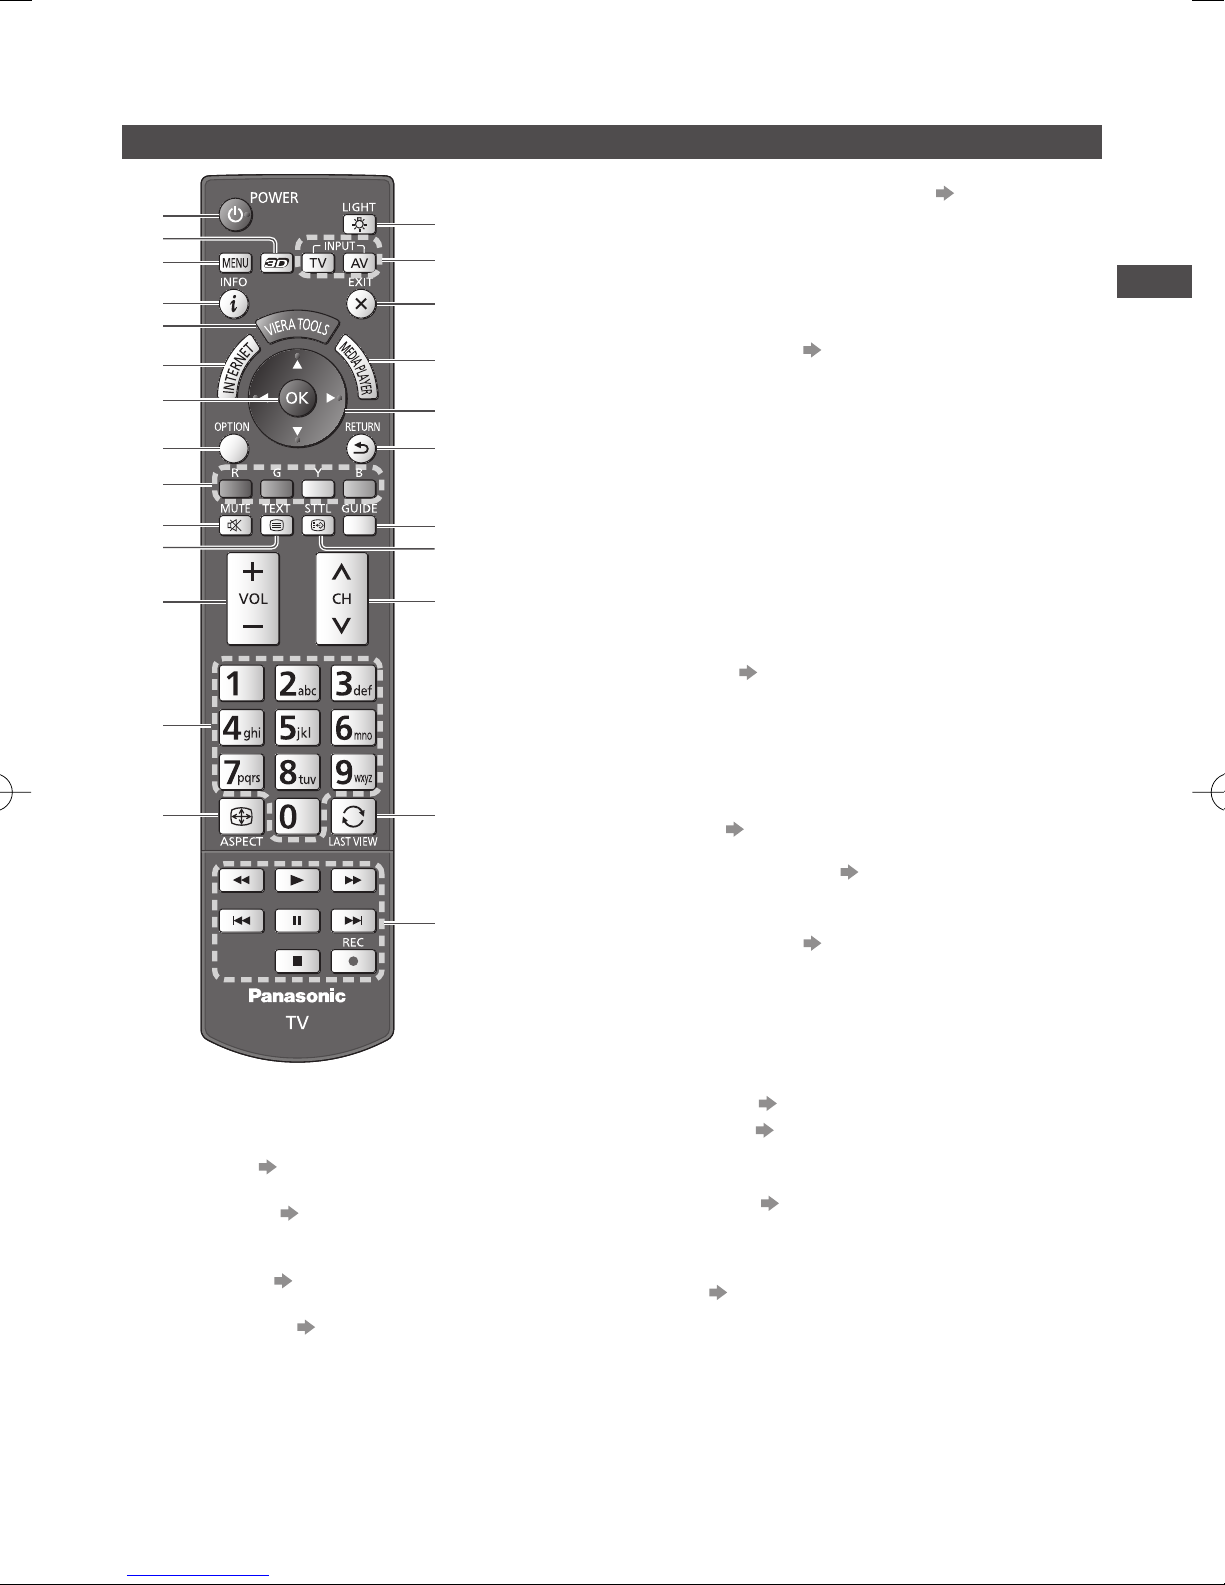
Remote Control
1
2
3
4
5
6
7
8
9
10
11
12
13
14
Standby On / Off switch
1
●
Switches TV on or off standby.
3D button (p. 34)
2
●
Switches the viewing mode between 2D and 3D.
[Main Menu] (p. 38)
3
●
Press to access Picture, Sound, Network, Timer
and Setup Menus.
Information (p. 23)
4
●
Displays channel and programme information.
VIERA TOOLS (p. 37)
5
●
Displays some special feature icons and accesses
easily.
15
16
17
18
19
20
21
22
23
24
25
INTERNET ([VIERA Connect]) (p. 21, 75)
6
●
Displays VIERA Connect home screen.
OK
7
●
Confirms selections and choices.
●
Press after selecting channel positions to quickly
change channel.
●
Displays the Channel List.
[Option Menu] (p. 24)
8
●
Easy optional setting for viewing, sound, etc.
Coloured buttons
9
●
Used for the selection, navigation and operation of
various functions.
Sound Mute
10
●
Switches sound mute on or off.
Teletext
11
●
This button is not used for this model.
Volume Up / Down
12
Numeric buttons
13
●
Changes channel.
●
Sets characters.
●
When in Standby mode, switches TV on.
Aspect (p. 24)
14
●
Changes aspect ratio.
Light
15
●
Lights the buttons for about 5 seconds (except the
buttons “25”).
Input mode selection
16
●
TV - switches Digital TV / Analogue TV.
(p. 22)
●
AV - switches to AV input mode from Input
Selection list.
Exit
17
●
Returns to the normal viewing screen.
[Media Player] (p. 64)
18
●
Switches to SD Card and USB device viewing /
listening mode.
Cursor buttons
19
●
Makes selections and adjustments.
Return
20
●
Returns to the previous menu / page.
TV Guide (p. 26)
21
Subtitles (p. 23)
22
●
Displays subtitles.
Channel Up / Down
23
Last view (p. 25)
24
●
Switches to previously viewed channel or input
mode.
Operations for contents, connected equipment,
25
etc.
(p. 29, 61, 62, 64, 81, 90)
(p. 28)
Identifying Controls
11
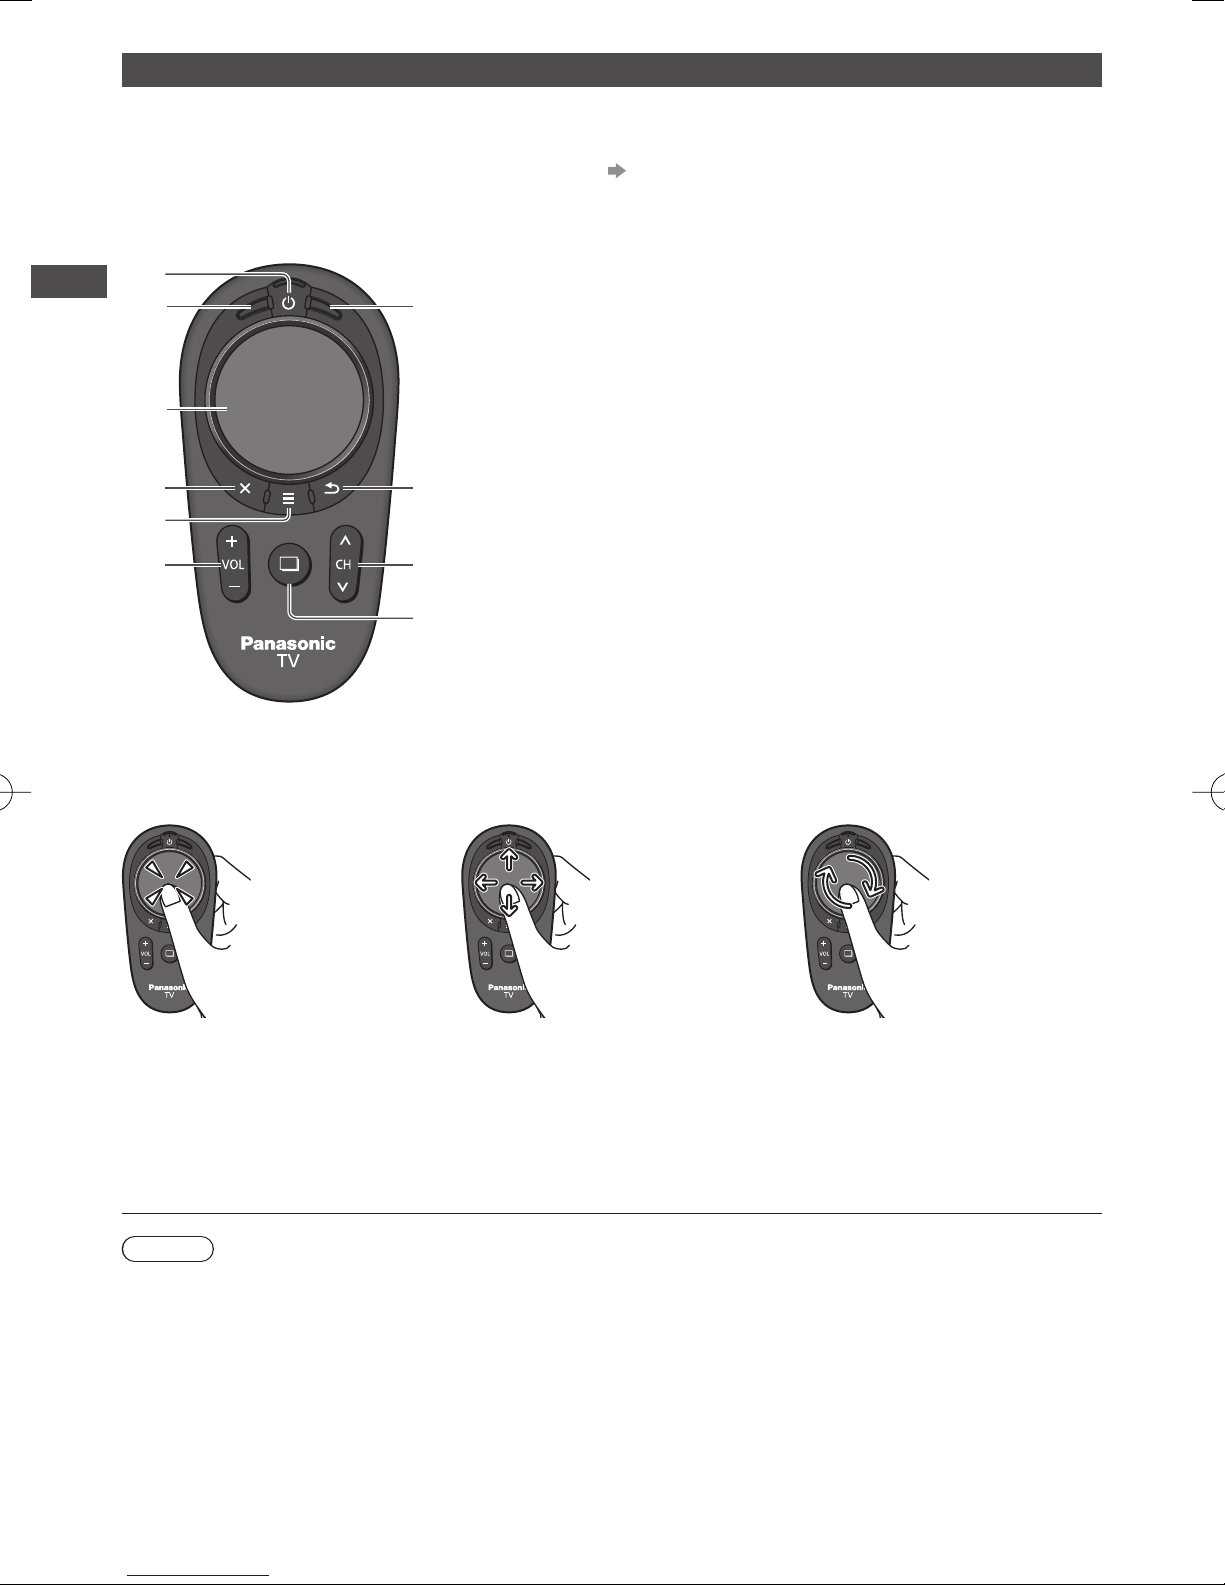
VIERA Touch Pad Controller
This touch pad controller is designed for the convenient operations, especially, on VIERA Connect or internet contents.
You can operate the TV intuitively with this controller.
●
The touch pad controller can be used by registering to this TV with Bluetooth wireless technology. Setup screen to
register will appear in “Auto Tuning” for first using the TV.
●
After registering, you can operate the TV without pointing this controller at the TV (except Standby On / Off switch).
●
To use Standby On / Off switch, point the controller directly at the TV's remote control signal receiver (p. 13) because
it works with the infrared. (You can operate the switch without registration.)
Standby On / Off switch
1
∗
2
Identifying Controls
∗
3
4
5
6
∗
The behaviour may vary depending on
the mode or content.
7
8
9
10
∗
1
●
Same function of the remote control button 1 (p. 11).
OK
2
Touch pad (see below)
3
Exit
4
●
Same function of the remote control button 17 (p. 11).
VIERA TOOLS / On-screen remote control
5
●
VIERA TOOLS: Same function of the remote control button 5
(p. 11).
●
On-screen remote control: Press and hold to display the remote
control GUI (Graphical User Interface). Press again to move the
position of GUI. (To change the page of GUI, slide your finger to
the left / right on the touch pad.)
Volume Up / Down
6
●
Same function of the remote control button 12 (p. 11).
[Option Menu]
7
Return
8
●
Same function of the remote control button 20 (p. 11).
Channel Up / Down
9
●
Same function of the remote control button 23 (p. 11).
INTERNET ([VIERA Connect])
10
●
Same function of the remote control button 6 (p. 11).
(p. 19)
■ Touch Pad
●
Tap the centre of the pad for “OK”.
Note
●
It is recommended to hold the touch pad controller with your hand when using.
●
The battery power will be used whenever you use the touch pad controller (including the touch of the touch pad) even
if not operating the TV. It may decrease the battery life.
●
Slide your finger to move the cursor
(on internet contents or [Cursor
Settings] in [VIERA Touch Pad
Controller] (p. 43)), select the item,
adjust levels, etc.
●
Trace the fringe to scroll.
12
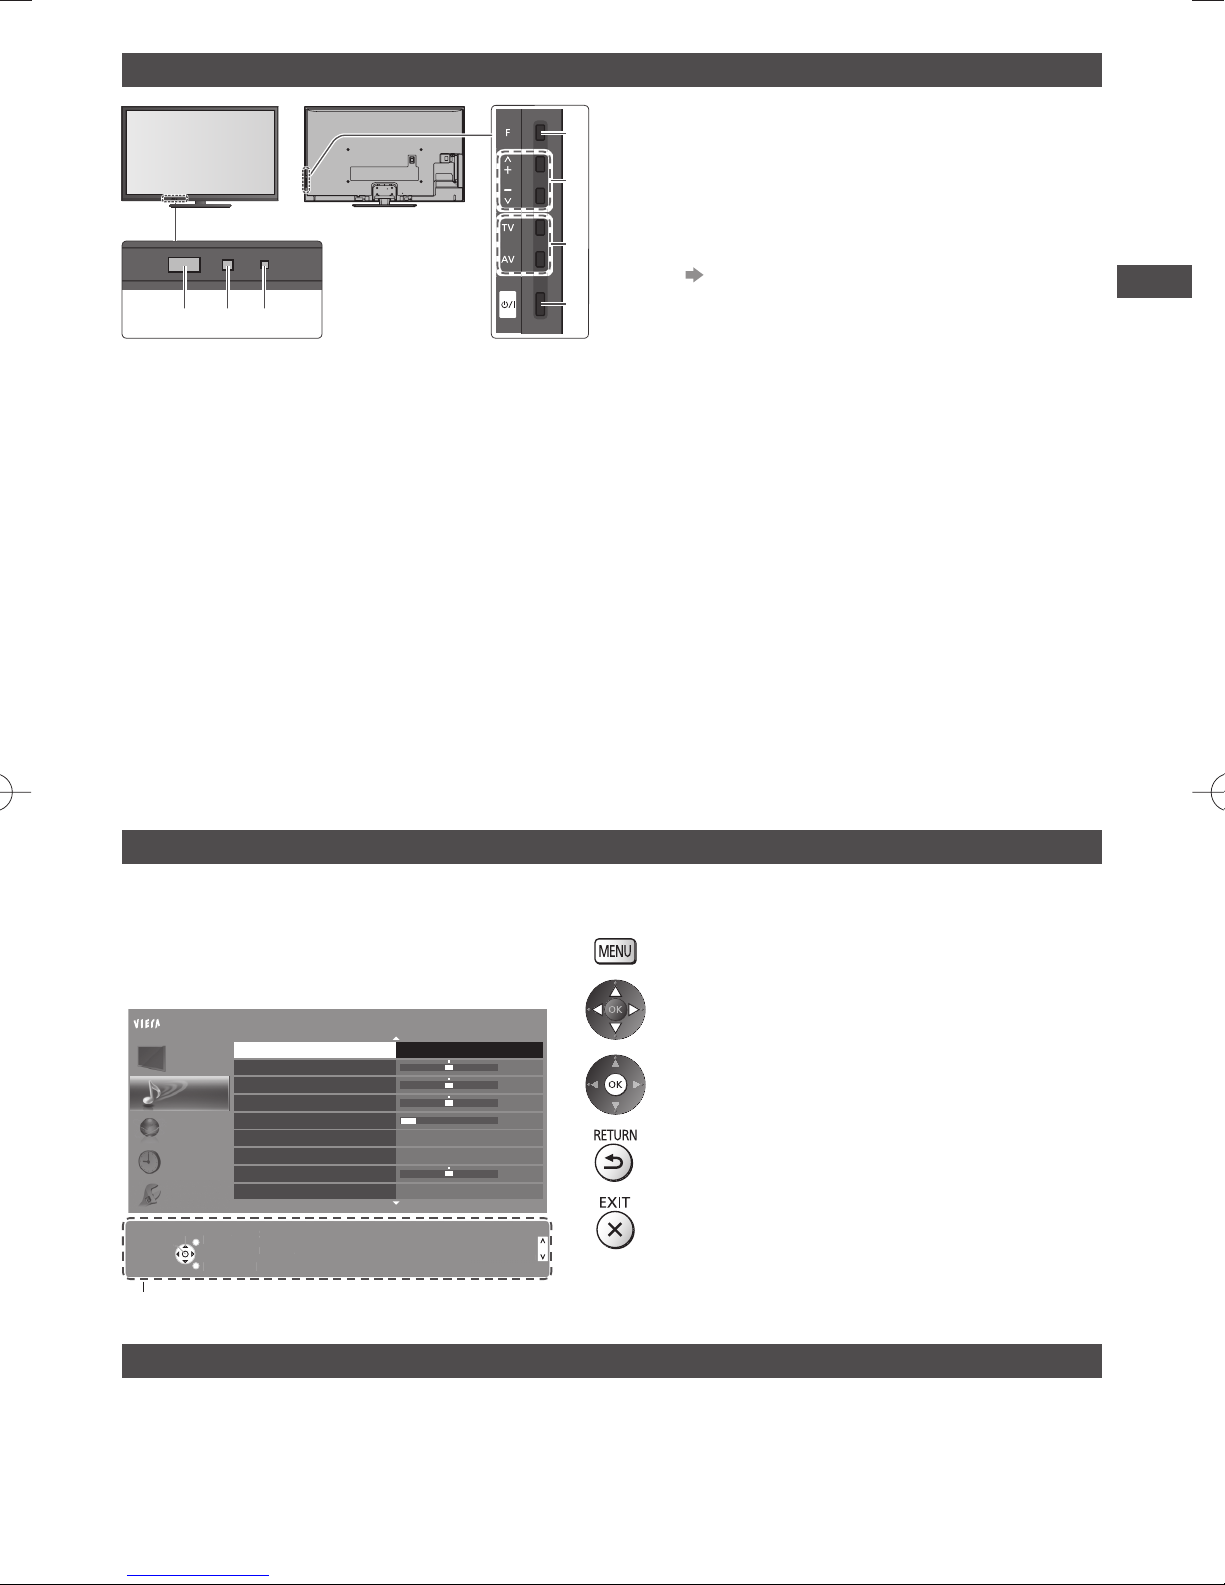
Indicator / Control panel
S
t
T
S
ode
p
C
ge
RETURN
n
5 6 7
Rear side of the TV
Function select
1
●
[Volume] / [Contrast] / [Brightness] / [Colour] /
[Sharpness] / [Tint] (NTSC signal) / [Bass]∗ /
[Treble]∗ / [Balance] / [Digital TV Auto Tuning] /
[Analogue TV Auto Tuning]
∗ [Music] or [Speech] mode in the Sound Menu
Channel Up / Down, Value change (when using the
2
F button), Switching the TV on
Changes the input mode
3
Mains power On / Off switch
4
●
Use to switch the mains power.
If you turned the TV off during Standby mode
by the remote control last time, the TV will be
in Standby mode when you turn the TV on with
Mains power On / Off switch.
●
When pressing the control panel button (1 - 4), the
control panel guide appears on the right side of the
screen for 3 seconds to highlight the pressed button.
Remote control signal receiver
1
5
●
Do not place any objects between the TV remote
control signal receiver and remote control.
2
C.A.T.S. (Contrast Automatic Tracking System)
6
sensor
●
3
Senses brightness to adjust picture quality when
[Eco Mode] in the Picture Menu is set to [On].
(p. 40)
Power and Timer LED
4
7
Red: Standby
Identifying Controls
Green: On
Orange: Timer Programming On
Orange (flash):
Recording of Timer Programming or One
Touch Recording in progress
Red with orange flash:
Standby with Timer Programming On or One
Touch Recording
●
The LED blinks when the TV receives a command
from the remote control.
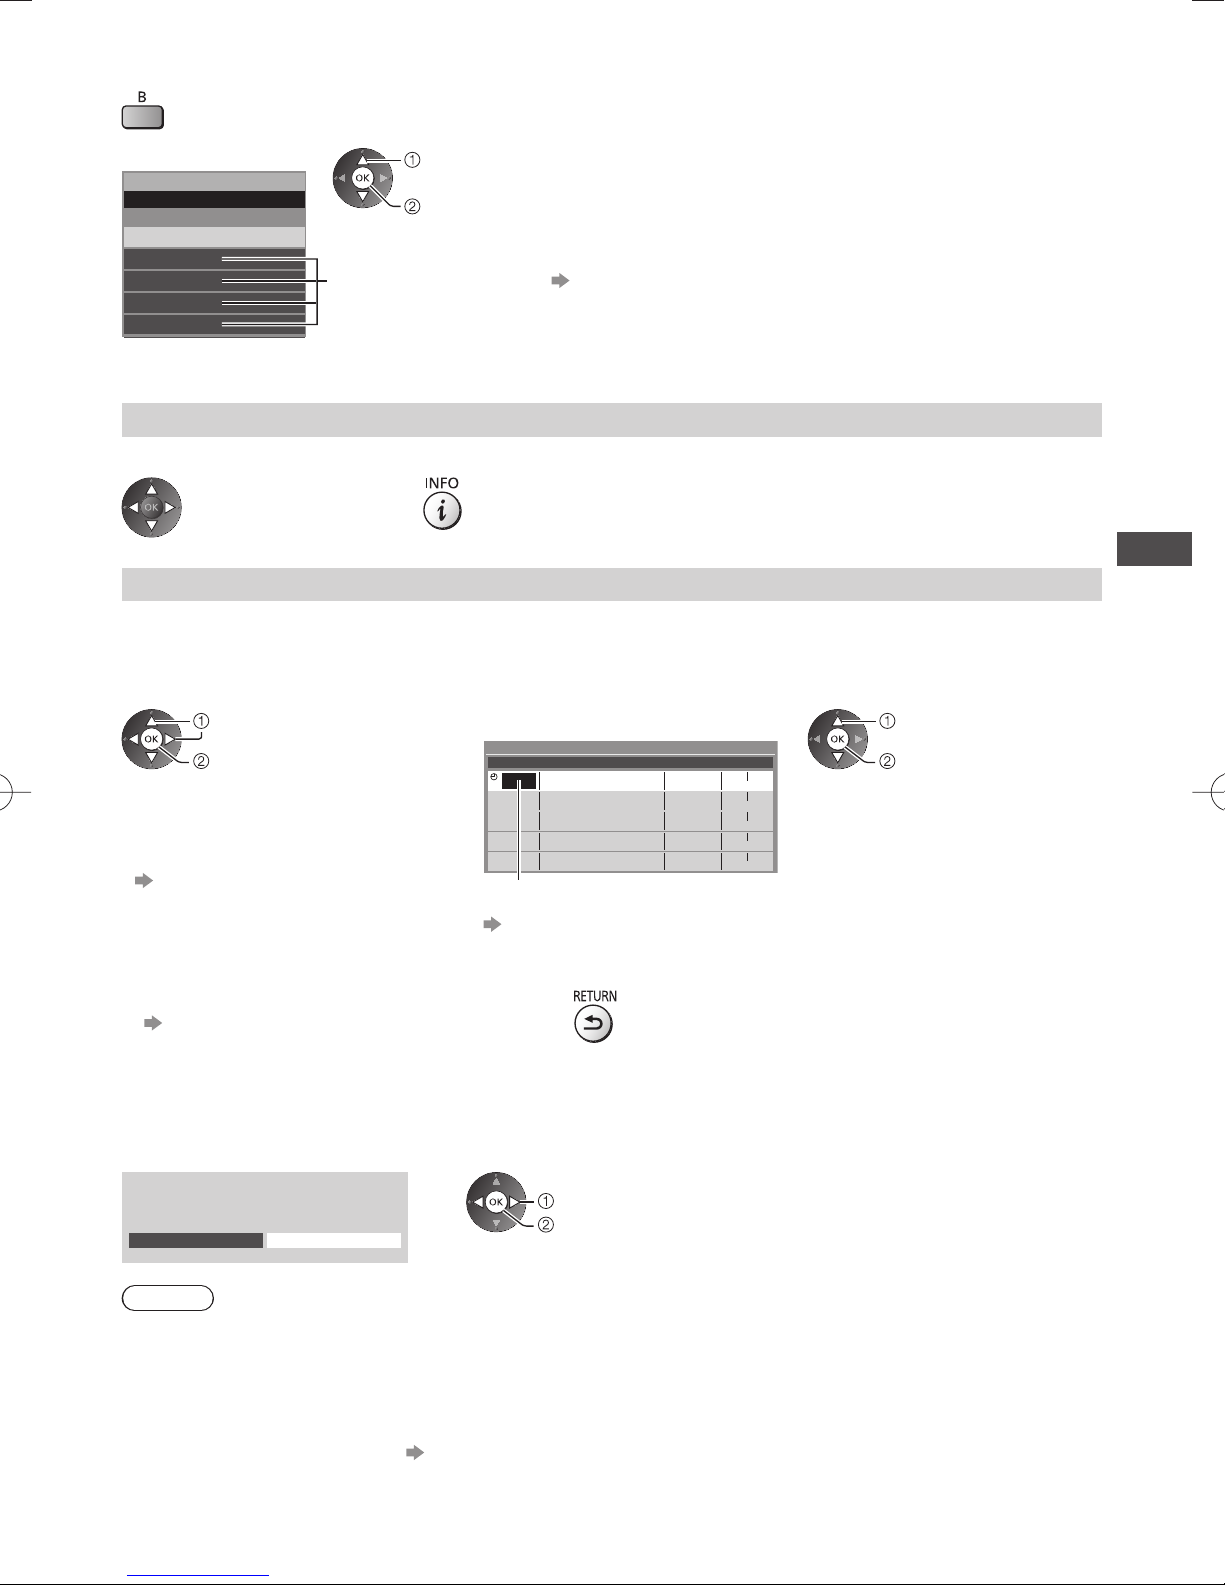
Using the On Screen Displays - Operation guide
Many features available on this TV can be accessed via the On Screen Display menu.
■ Operation guide
Operation guide will help you to operate by using
the remote control.
Example: [Sound Menu]
Main Menu
Mode
Picture
Bass
Treble
Sound
Balance
Headphone Volume
Network
Surround
Auto Gain Control
Timer
Volume Correction
Speaker Distance to Wall
Setup
Select
elec
EXIT
Change
han
Operation guide
EXI
RETURN
Selects your favourite sound
elects your favourite sound
mode.
m
.
Music
Off
Off
Over 30cm
Page up
Page u
Page down
Page dow
1/2
11
■ How to use remote control
0
0
0
0
Open the main menu
Move the cursor / select from a range of options /
select the menu item (up and down only) / adjust
levels (left and right only)
Access the menu / store settings after adjustments
have been made or options have been set
Return to the previous menu
Exit the menu system and return to the normal
viewing screen
Auto power standby function
The TV will automatically go into Standby mode in the following conditions:
No signal is received and no operation is performed for 30 minutes in Analogue TV.
•
[Off Timer] is active in the Timer Menu. (p. 24)
•
No operation is performed for the period selected in [Auto Standby] (p. 43).
•
●
This function does not affect the recording of Timer Programming and One Touch Recording.
13
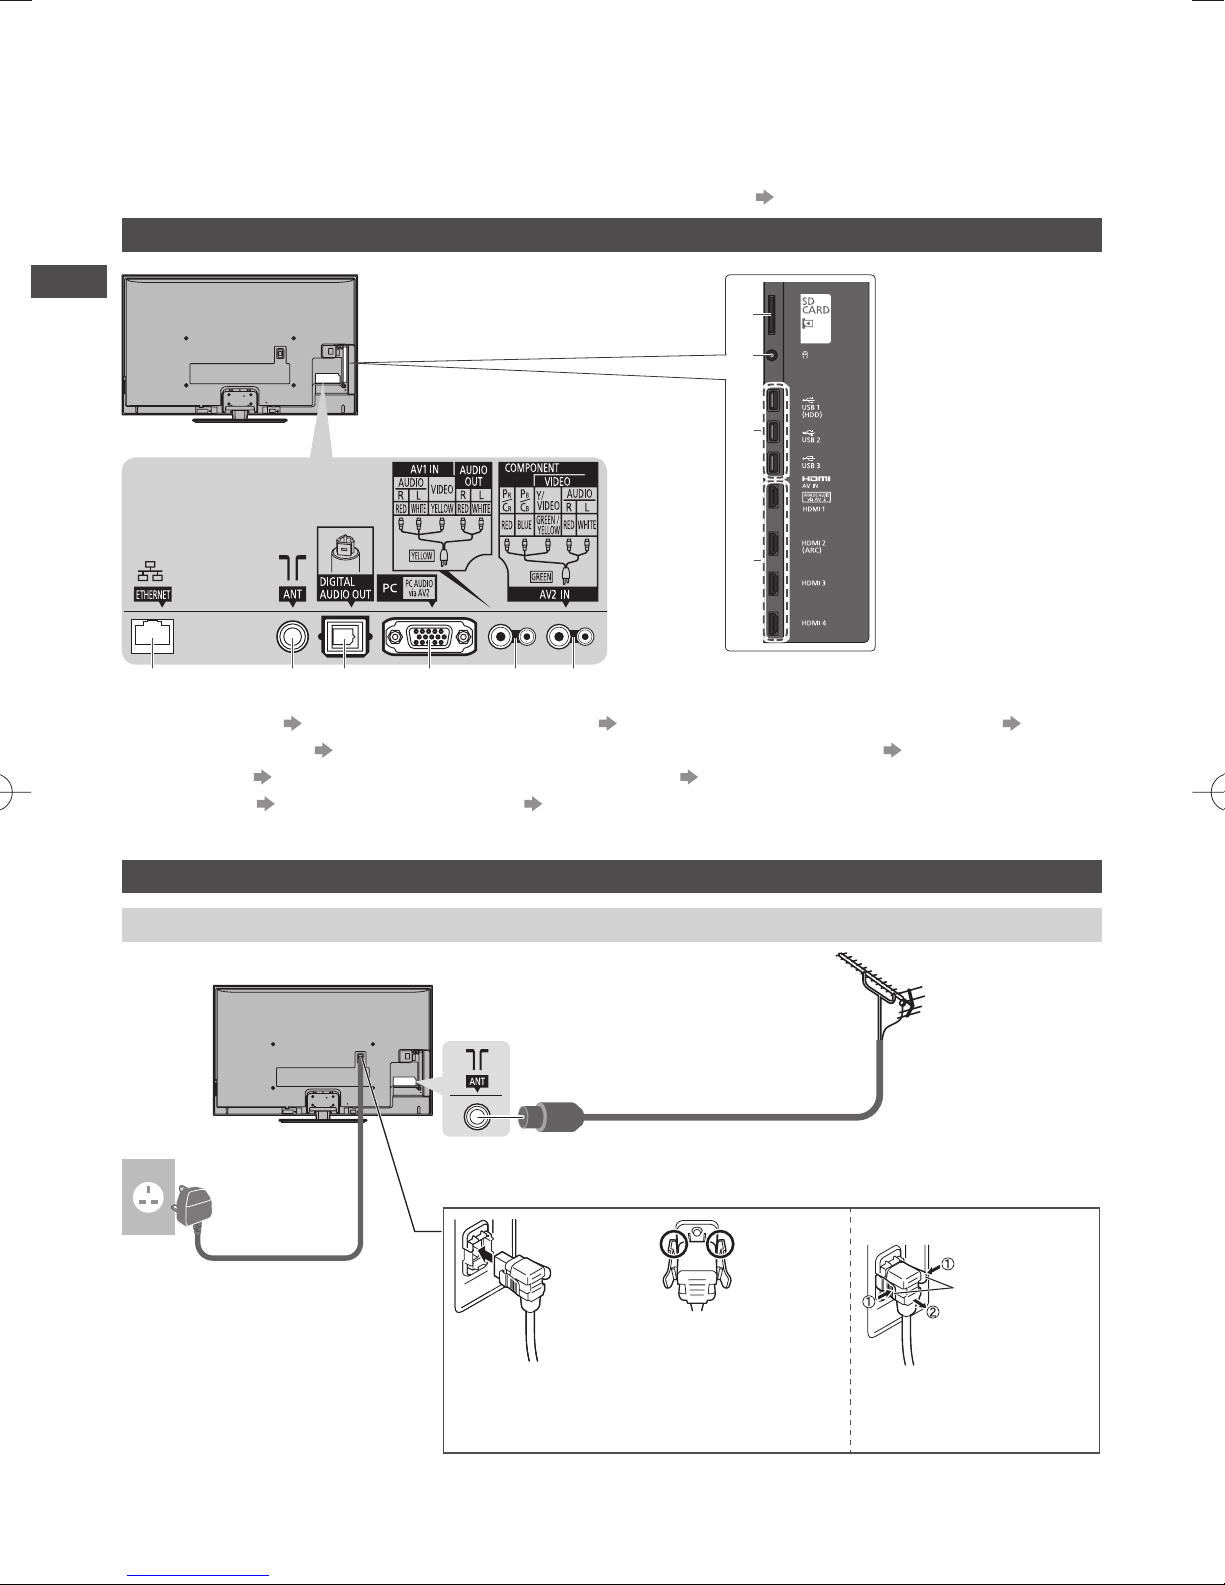
Basic Connection
External equipment and cables shown are not supplied with this TV.
Please ensure that the unit is disconnected from the mains socket before attaching or disconnecting any leads.
When disconnecting the mains lead, be absolutely sure to disconnect the mains plug at the socket outlet first.
There are some restrictions on placement for viewing 3D images. For details (p. 30, 31)
Terminals
Basic Connection
SD Card slot (p. 59, 63)
1
Headphone jack (p. 93)
2
USB 1 - 3 (p. 59, 63, 93)
3
HDMI1 - 4 (p. 15, 92)
4
Connections
1
2
3
4
6 7 8 9 10 5
ETHERNET (p. 16, 76)
5
Antenna terminal (see below)
6
DIGITAL AUDIO OUT (p. 92)
7
PC (p. 93)
8
AV1 IN / AUDIO OUT (p. 92)
9
AV2 IN (p. 92, 93)
10
Mains lead and aerial
Mains lead
AC 220-240 V
50 / 60 Hz
■ Digital TV, Analogue TV
■ Mains lead
Make sure that
Push until both side
tabs click
the mains lead is
securely fixed
Aerial
RF cable
To remove from the TV:
tabs
Press both tabs and pull on
mains connector to release
14
Note
●
Keep RF (antenna) cable away from the mains lead to avoid and minimise mains interference pickup.
●
Do not place the RF cable under the TV.
●
To obtain optimum quality picture and sound, an aerial, the correct cable (75 Ω coaxial), and the correct terminating
plug are required.
●
If a communal aerial system is used, you may require the correct connection cable and plug between the wall aerial
socket and the TV.
●
Your local Television Service Centre or dealer may be able to assist you in obtaining the correct aerial system for your
particular area and the accessories required.
●
Any matters regarding aerial installation, upgrading of existing systems or accessories required, and the costs
incurred, are the responsibility of you, the Customer.
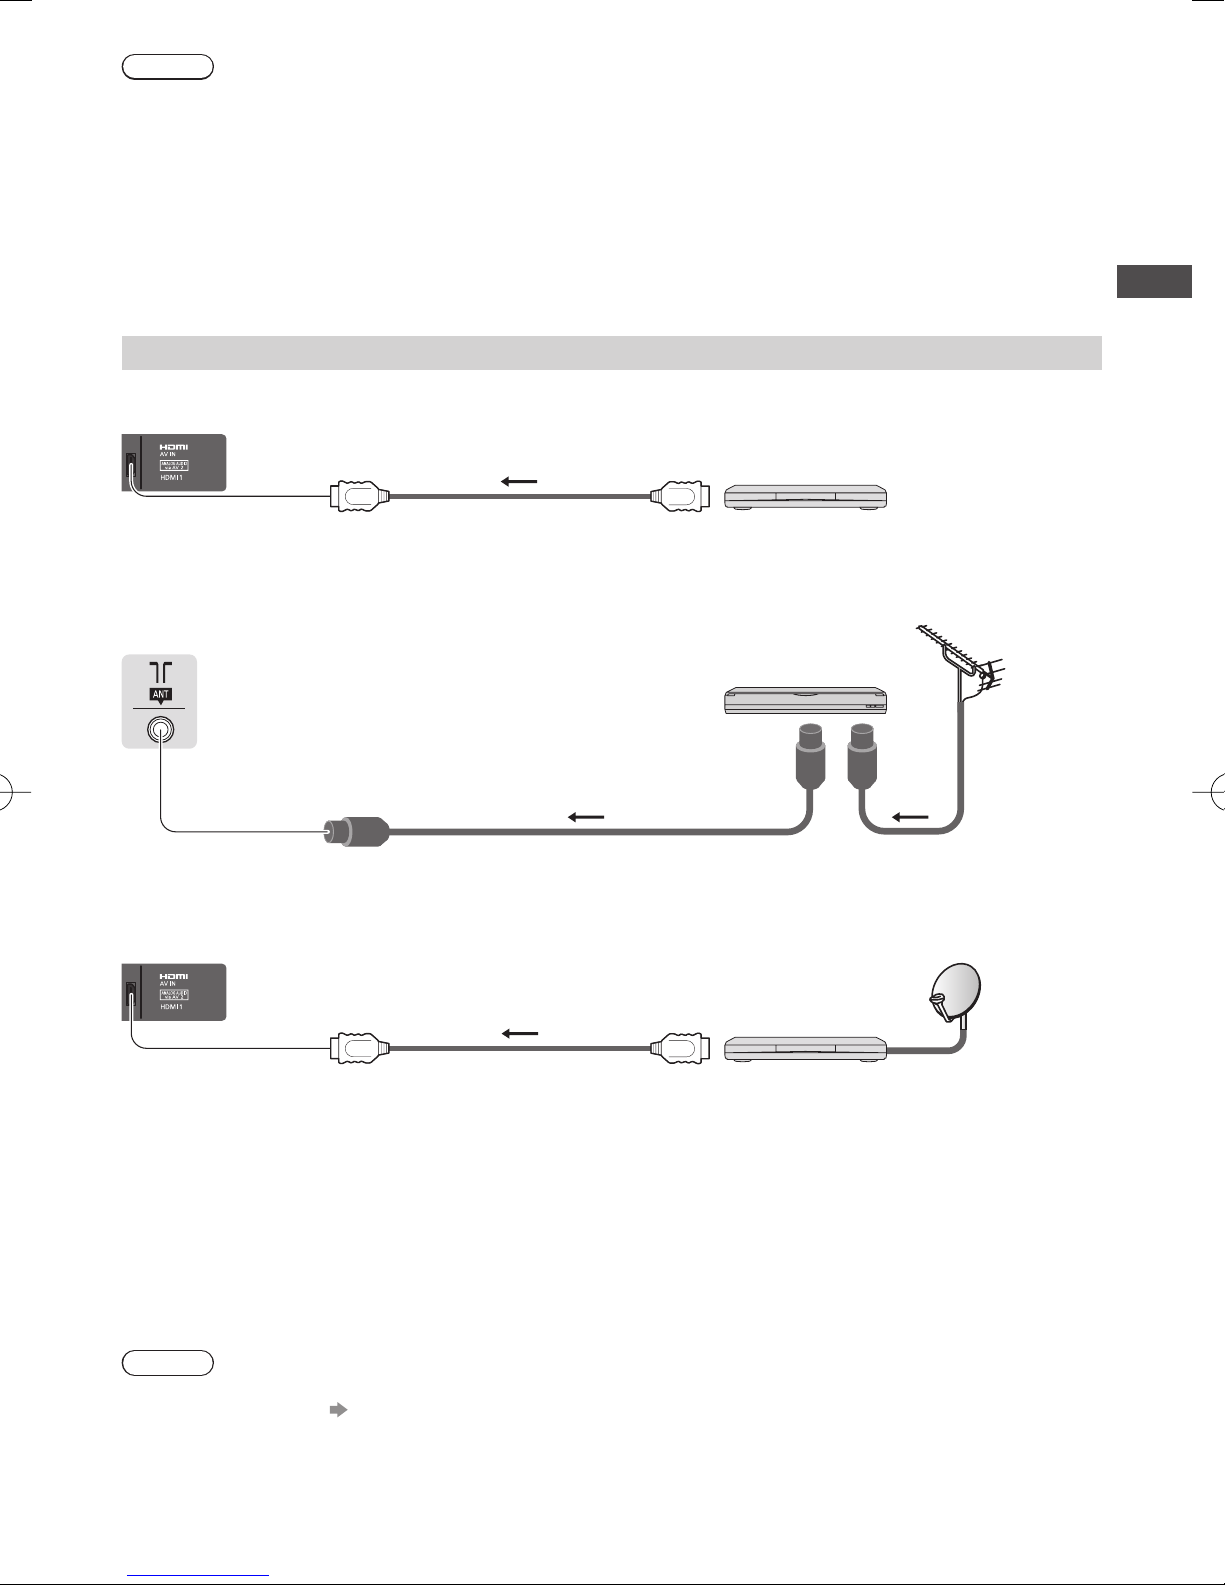
AV devices
■ Player / 3D compatible player
TV
Player /
3D-compatible player
Basic Connection
■ DVD Recorder / VCR
TV
■ Set top box
TV
HDMI cable
RF cable
HDMI cable
Aerial
DVD Recorder / VCR
RF cable
Satellite dish
Set top box
Note
●
Check the type of terminals and cable plugs are correct when connecting.
●
VIERA Link connection (p. 85, 86)
●
Please also read the manual of the equipment being connected.
●
Keep the TV away from electronic equipment (video equipment, etc.) or equipment with an infrared sensor.
Otherwise, distortion of image / sound may occur or operation of other equipment may be interfered.
●
When using a HDMI cable, use the fully wired one.
15

Network
To enable the network service functions (VIERA Connect, etc.), you need to connect the TV to a broadband network
environment.
●
If you do not have any broadband network services, please consult your retailer for assistance.
●
Prepare the internet environment for wired connection or wireless connection.
●
Setup of the network connection will start after the tuning (when first using the TV). (p. 18, 19)
■ Wired connection
TV
Basic Connection
LAN cable (Shielded)
●
Use the Shielded Twist Pair (STP) LAN cable.
Internet environment
■ Wireless connection
Access point
Internet environment
Built-in wireless LAN
Using clamper
●
Do not bundle the RF cable and mains lead
together (could cause distorted image).
●
Fix cables with clampers as necessary.
●
When using the optional accessory, follow the
option’s assembly manual to fix cables.
■ Clamper (Standard accessory)
Attach the clamper Bundle the cables
hole
Insert the
clamper in a hole
To remove from the TV: To loosen:
snaps
Keep pushing
both side snaps
hooks
knob
Keep pushing
the knob
Set the tip in
the hooks
16

Auto Tuning
Search and store TV channels automatically.
●
These steps are not necessary if the setup has been completed by your local dealer.
●
Please complete connections (p. 14 - 16) and settings (if necessary) of the connected equipment before starting Auto
Tuning. For details of settings for the connected equipment, read the manual of the equipment.
Plug the TV into mains socket and switch on
1
Select your language
2
Select the mode to tune
3
Select [Start Auto Tuning]
4
●
Takes a few seconds to be displayed.
●
If the red LED shows on the TV, press the Standby On / Off switch on the
remote control.
OSD Language
English
TV Signal Selection
Digital TV
Analogue TV
Start Auto Tuning
TV Signal Selection
Digital TV
Analogue TV
Start Auto Tuning
中⽂
select
set
select
tune / skip tuning
: tune (search for the available channels)
: skip tuning
select
access
■ When you select the analogue TV signal, select your area
Analogue TV Channel Plan
Asia/W.Europe
CIS/E.Europe
China
Hong Kong
NZ/Indonesia
CATV/Other
●
select
access
When selecting [CATV/Other], press the
OK button, and then select the Channel
Plan from Indian CATV, South Africa,
American System, American CATV or
Japan CATV.
Auto Tuning
●
Auto Tuning
Digital TV Scan
Analogue TV Scan
This will take about 10 minutes.
Digital TV: 4 Analogue TV: 2
Auto Tuning starts
Auto Tuning will start to search for TV channels and store them.
The stored channels and sorted channel order vary depending on the area,
broadcasting system and conditions of signal reception.
CH C1 69
CH 1 120
CH
62
62
62
62
29
33
Channel Name
CBBC Channel
BBC Radio Wales
E4
Cartoon Nwk
Searching
Digital TV
Digital TV
Digital TV
Digital TV
Analogue TV
Analogue TV
Type
10
10
10
10
-
-
Quality
17
5
Auto Tuning
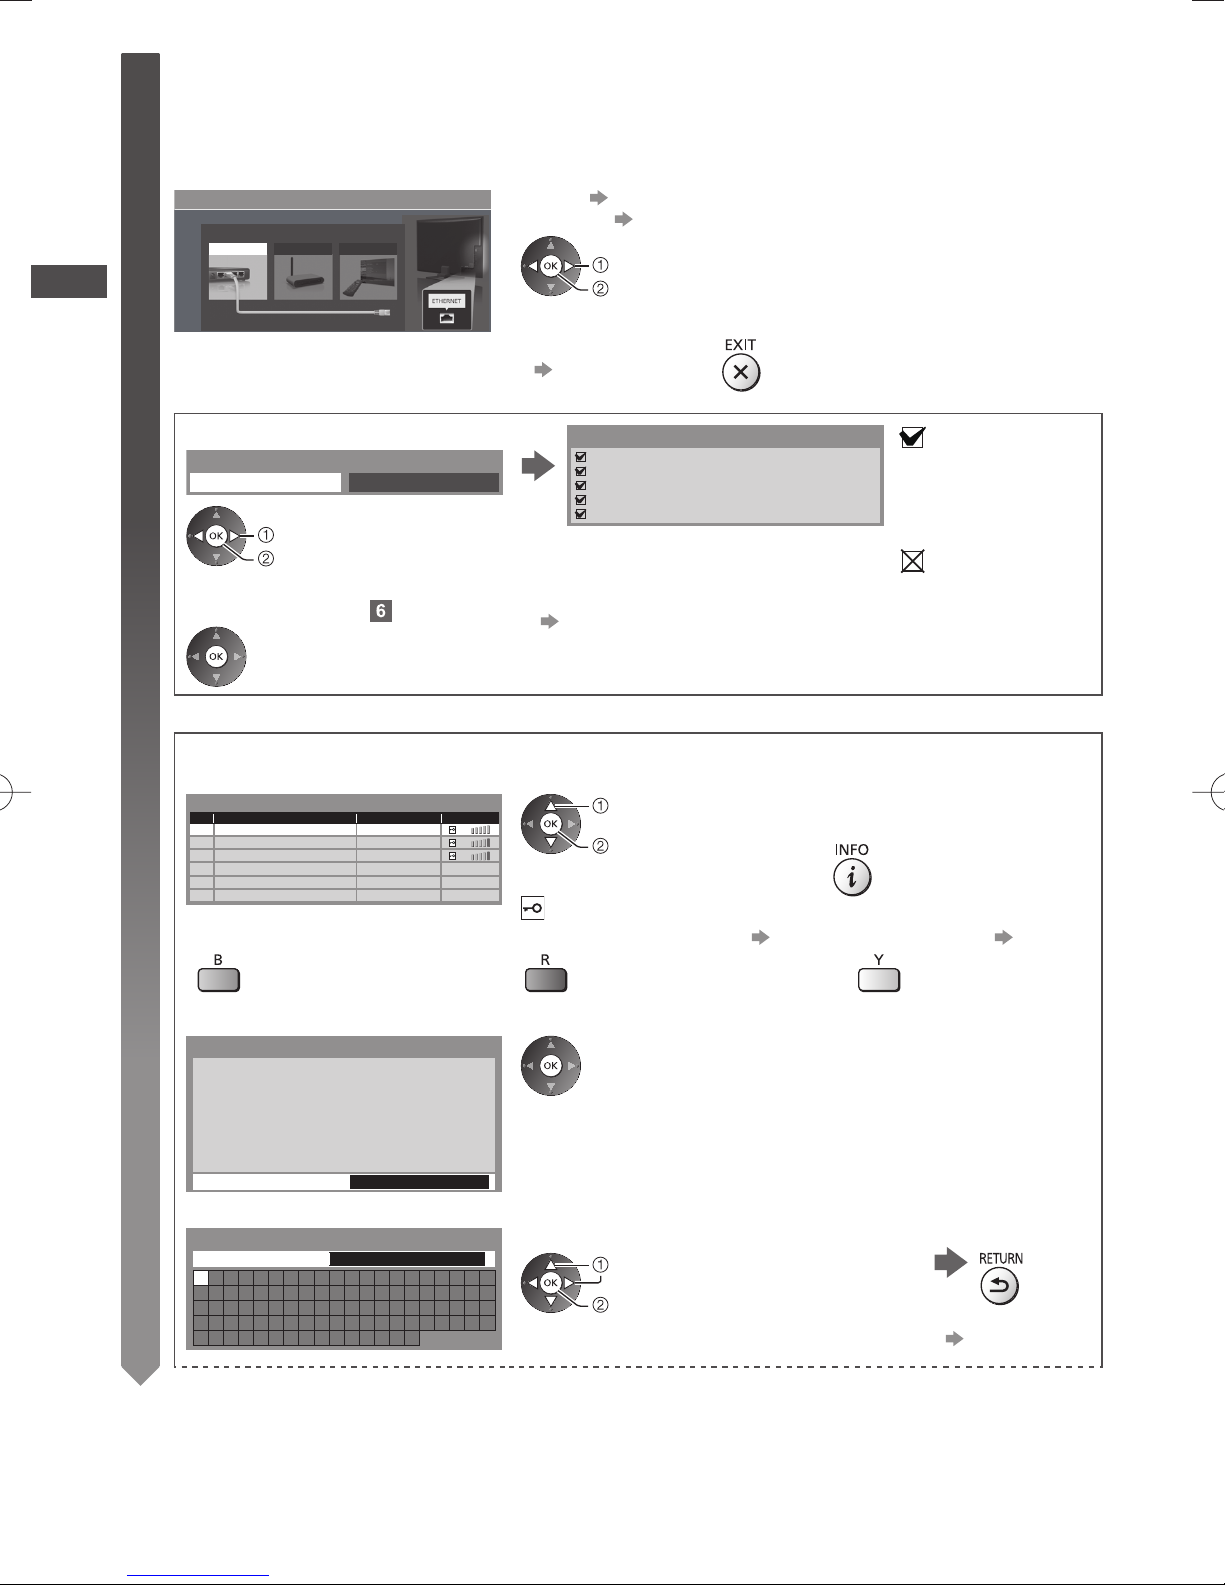
Setup the network connection
Setup the network connection to enable the network service functions such as VIERA Connect, etc. (p. 21, 75).
●
Please note that this TV does not support wireless public access points.
●
Ensure the network connections (p. 16) and network environment are completed before starting setup.
Select the network type
Network Setup
Select Wired or Wireless
Wired Wireless Set later
[Wired] “Wired connection” (p. 16)
[Wireless] “Wireless connection” (p. 16)
select
●
access
To setup later on or skip this step
Select [Set later] or
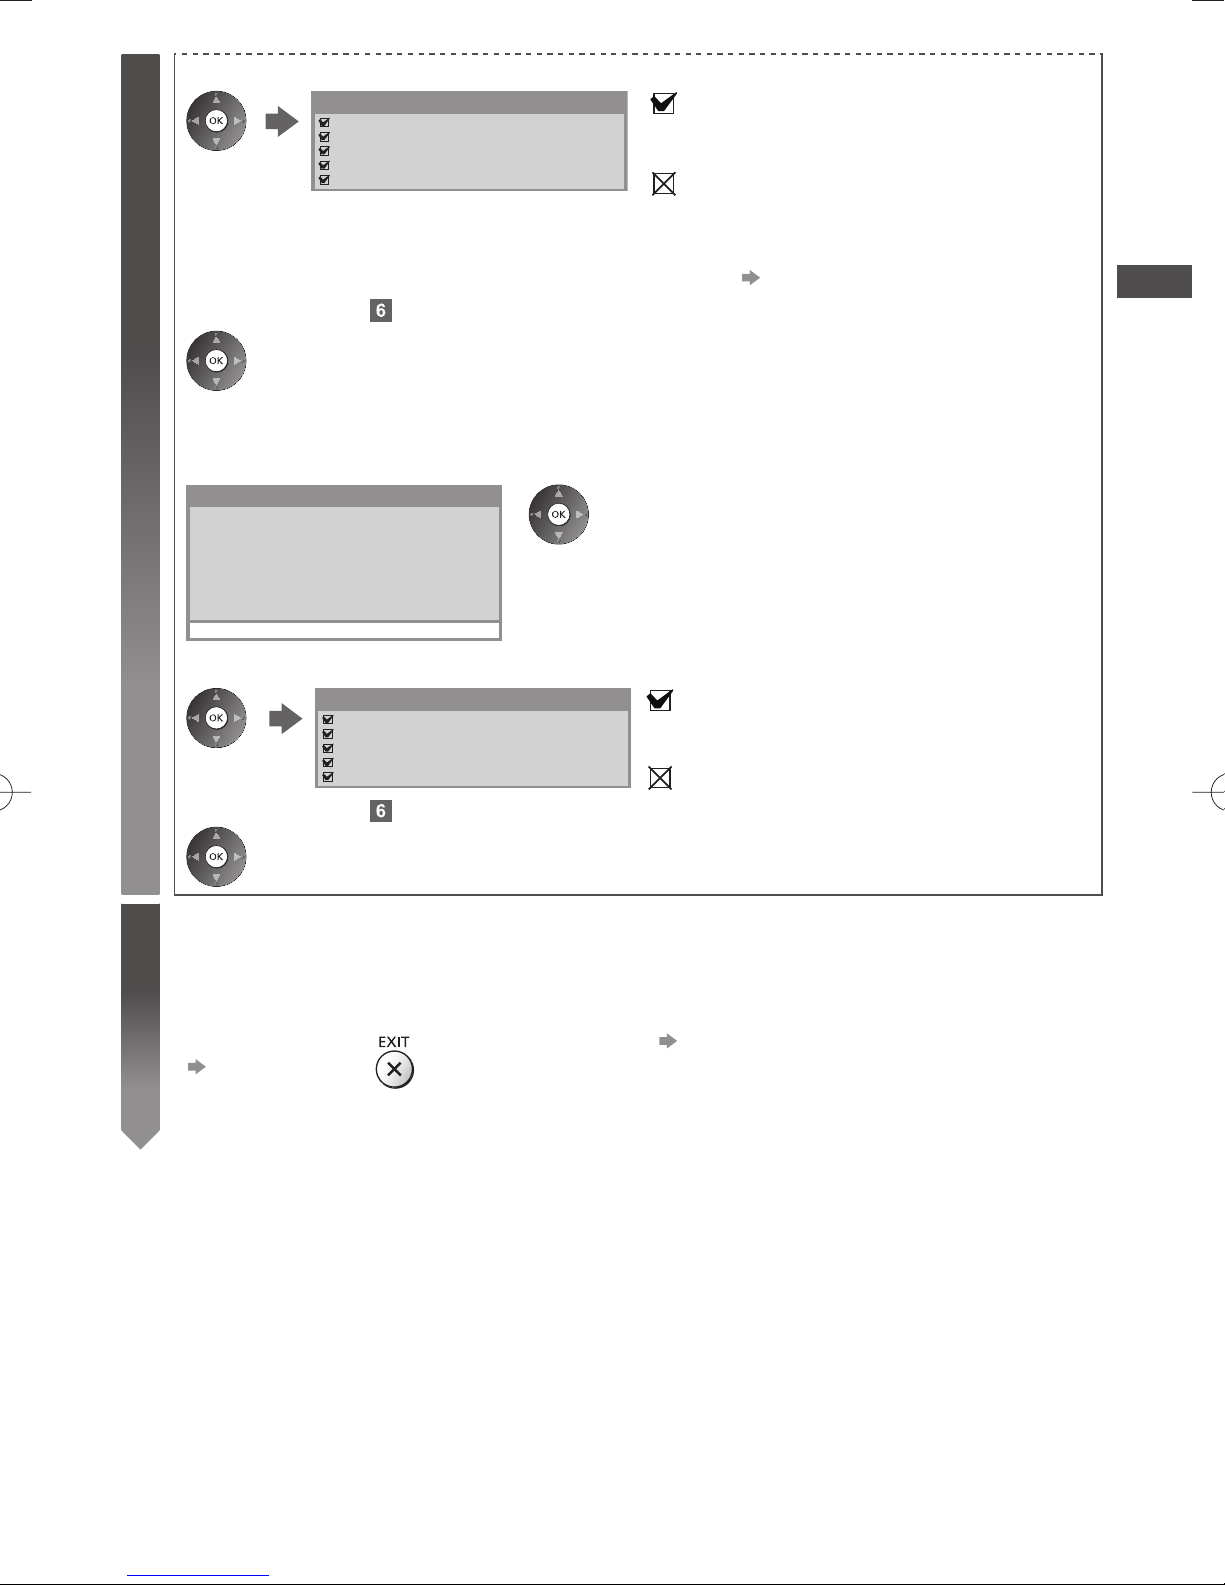
■ [Wired]
1. Select [Auto]
Acquire IP Address
Auto Manual
Connection Test
Check network cable connection.
Check acquired IP address.
Check for devices using same IP address.
Check gateway connection.
Check server connection.
select
access
2. Go to the next step
Automatically setup is done and the test of the
network connection starts.
●
To set manually, select [Manual] and set each item.
For details (p. 78)
(Press twice)
■ [Wireless]
Access points found automatically are listed.
1. Select your desired access point
Available Wireless Networks
No. Network Name(SSID) Status Wireless type
1
Access Point A
2
Access Point B
3
Access Point C
●
To search access points again
11n(2.4GHz)
11n(5GHz)
11n(5GHz)
: Encrypted access point
●
To set [WPS(Push button)] (p. 19)
2. Access the encryption key input mode
Encryption Key Setting
Connection will be made with the following settings: Network Name(SSID) : Access Point A
Security type : WPA-PSK
Encryption type : TKIP
Please input the encryption key.
Encryption key
●
3. Enter the encryption key of the access point (English only)
Wireless Network Settings
Encryption key
A B C D E F G H I J K L M N O P Q R S T
U V W X Y Z 0 1 2 3 4 5 6 7 8 9 ! : #
a b c d e f g h i j k l m n o p q r s t
u v w x y z ( ) + - . _ @ / “ ‘ % & ?
, ; = $ [ ] ~ < > { } | ` ^ \
*
Set characters
●
select
access
If the selected access point is not encrypted, the confirmation
screen will be displayed. It is recommended to select the encrypted
access point.
select
set
You can set characters by using numeric buttons. (p. 104)
: succeeded
The test is successful
and the TV is
connected to the
network.
: failed
Check the settings and
connections. And then
select [Retry].
●
For the information of the
highlighted access point
●
To set manually (p. 80)
Store
18
4. After the access point setting is finished, perform the connection test
5
5. Go to the next step
Connection Test
Check wireless network connection.
Check acquired IP address.
Check for devices using same IP address.
Check gateway connection.
Check server connection.
(Press twice)
[WPS(Push button)]
1. Press the WPS button on the access point until the light flashes
2. Connect the TV with the access point
WPS(Push button)
1) Please press the ‘WPS’ button on the wireless
access point until its light flashes.
2) When the light is flashing select ‘Connect’ on
TV.
If you are unsure, please check the instruction
manual of the wireless access point.
Connect
●
Ensure that your access point supports WPS for this setup.
●
WPS: Wi-Fi Protected Setup™
●
If the connection has failed, check the settings and positions of
your access point. And then, follow the on-screen instructions.
: succeeded
The test is successful and the TV is connected to the
network.
: failed
Check the settings and connections. And then select
[Retry].
To set manually, select [Manual] and set each item.
For details
(p. 80)
Auto Tuning
3. After the access point setting is finished, perform the connection test
Connection Test
Check wireless network connection.
Check acquired IP address.
Check for devices using same IP address.
Check gateway connection.
Check server connection.
4. Go to the next step
: succeeded
The test is successful and the TV is connected to the
network.
: failed
Check the settings and connections. And then select
[Retry].
(Press twice)
Register the VIERA Touch Pad Controller to this TV
6
Select [Pairing]
Follow the on-screen instructions to use the touch pad controller (supplied).
●
To skip this step
●
To register later on or for detailed settings
[VIERA Touch Pad Controller] (p. 43)
Select [Set later] or
19
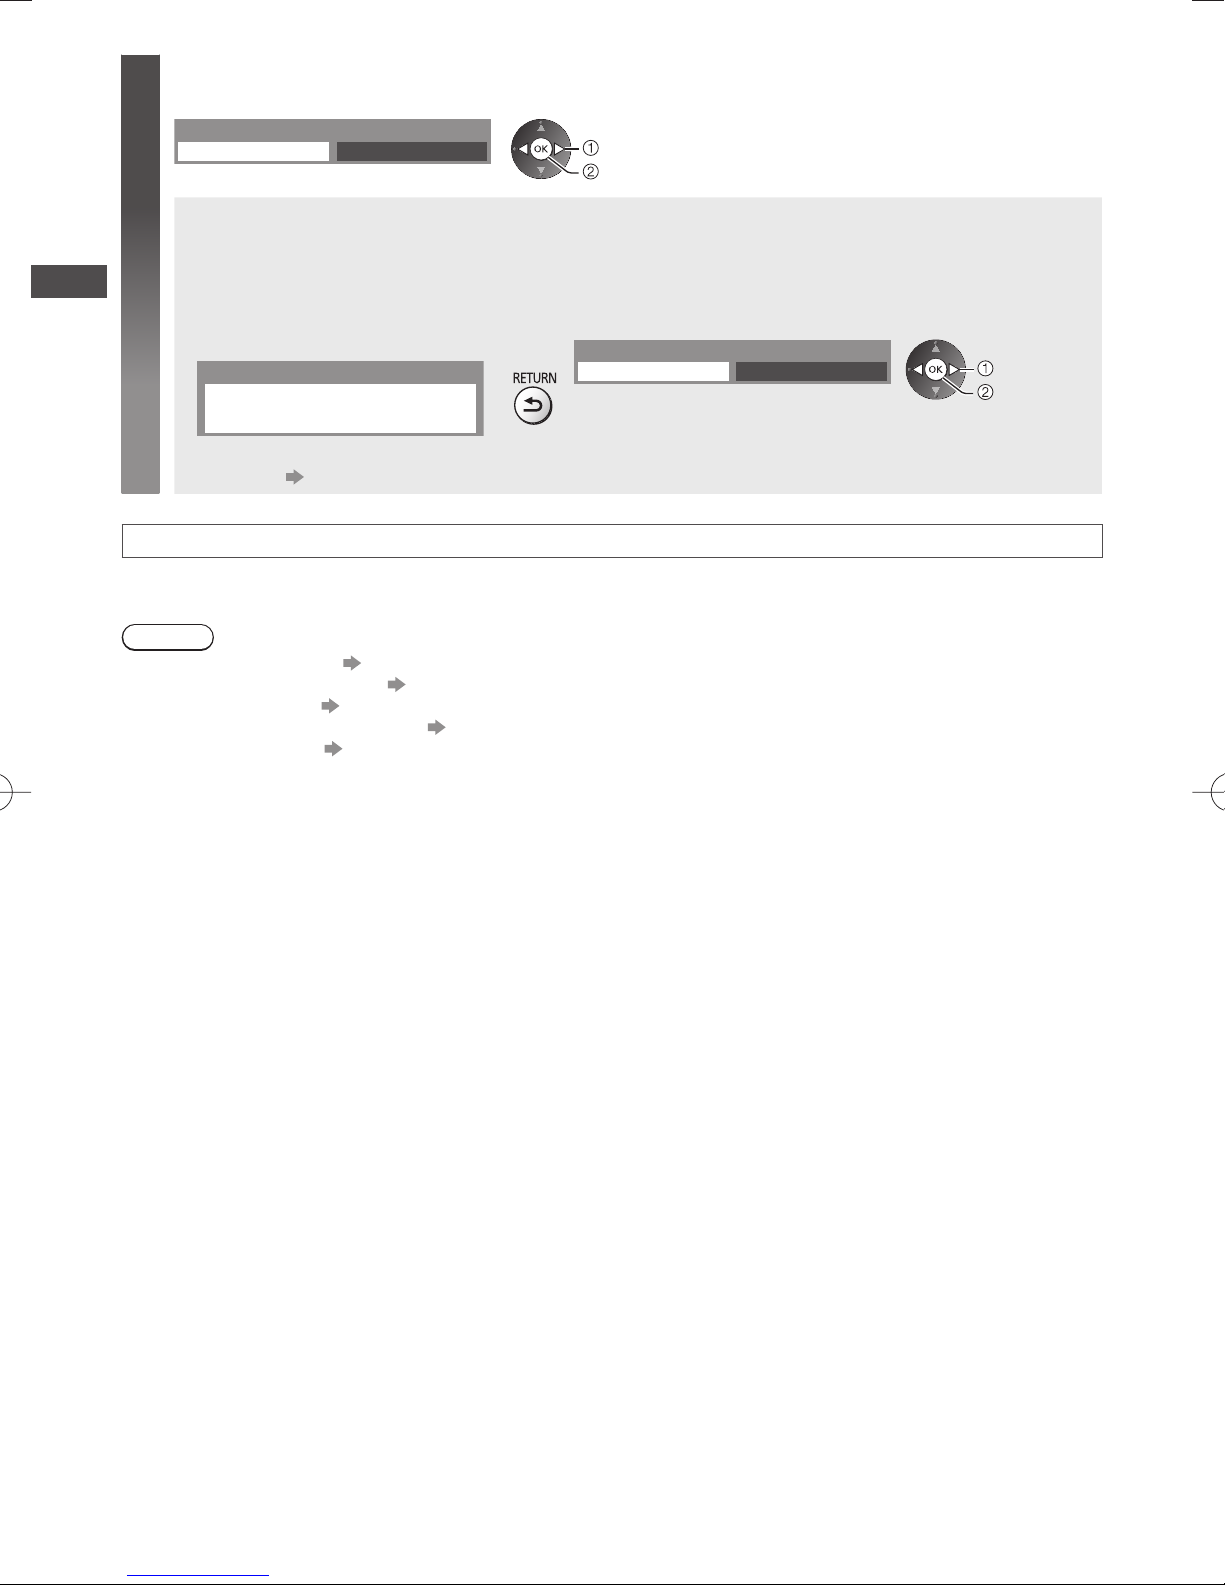
Select [Home]
7
Select [Home] viewing environment to use in your home environment.
Please select your viewing environment.
Home Shop
select
set
■ [Shop] viewing environment (for shop display only)
[Shop] viewing environment is the demonstration mode to explain main features of this TV.
Select [Home] viewing environment to use in your home environment.
●
Auto Tuning
Auto Tuning is now complete and your TV is ready for viewing
If tuning has failed, check the connection of the RF cable, and then, follow the on-screen instructions.
Note
●
To check the channel list “Using TV Guide (Digital TV)” (p. 26)
●
To edit or hide (skip) channels “Tuning and Editing Channels” (p. 46 - 49)
●
To retune all channels [Auto Tuning] in “Tuning and Editing Channels” (p. 48, 49)
●
To add the available TV mode later [Add TV Signal] (p. 44)
●
To initialise all settings [Shipping Condition] (p. 54)
You can return to viewing environment selection screen at the stage of Shop confirmation screen.
1 Return to viewing environment
selection screen
Shop
You have selected shop mode
To change viewing environment later on, you will need to initialise all settings by accessing Shipping
Condition.
[Shipping Condition] (p. 54)
2 Select [Home]
Please select your viewing environment.
Home Shop
select
set
20
Using “VIERA Connect”
VIERA Connect is a gateway to the internet services unique to Panasonic.
VIERA Connect allows you to access some specific websites supported by Panasonic, and enjoy internet contents
such as videos, games, communication tools, etc. from VIERA Connect home screen.
●
Some features of the websites may not be available.
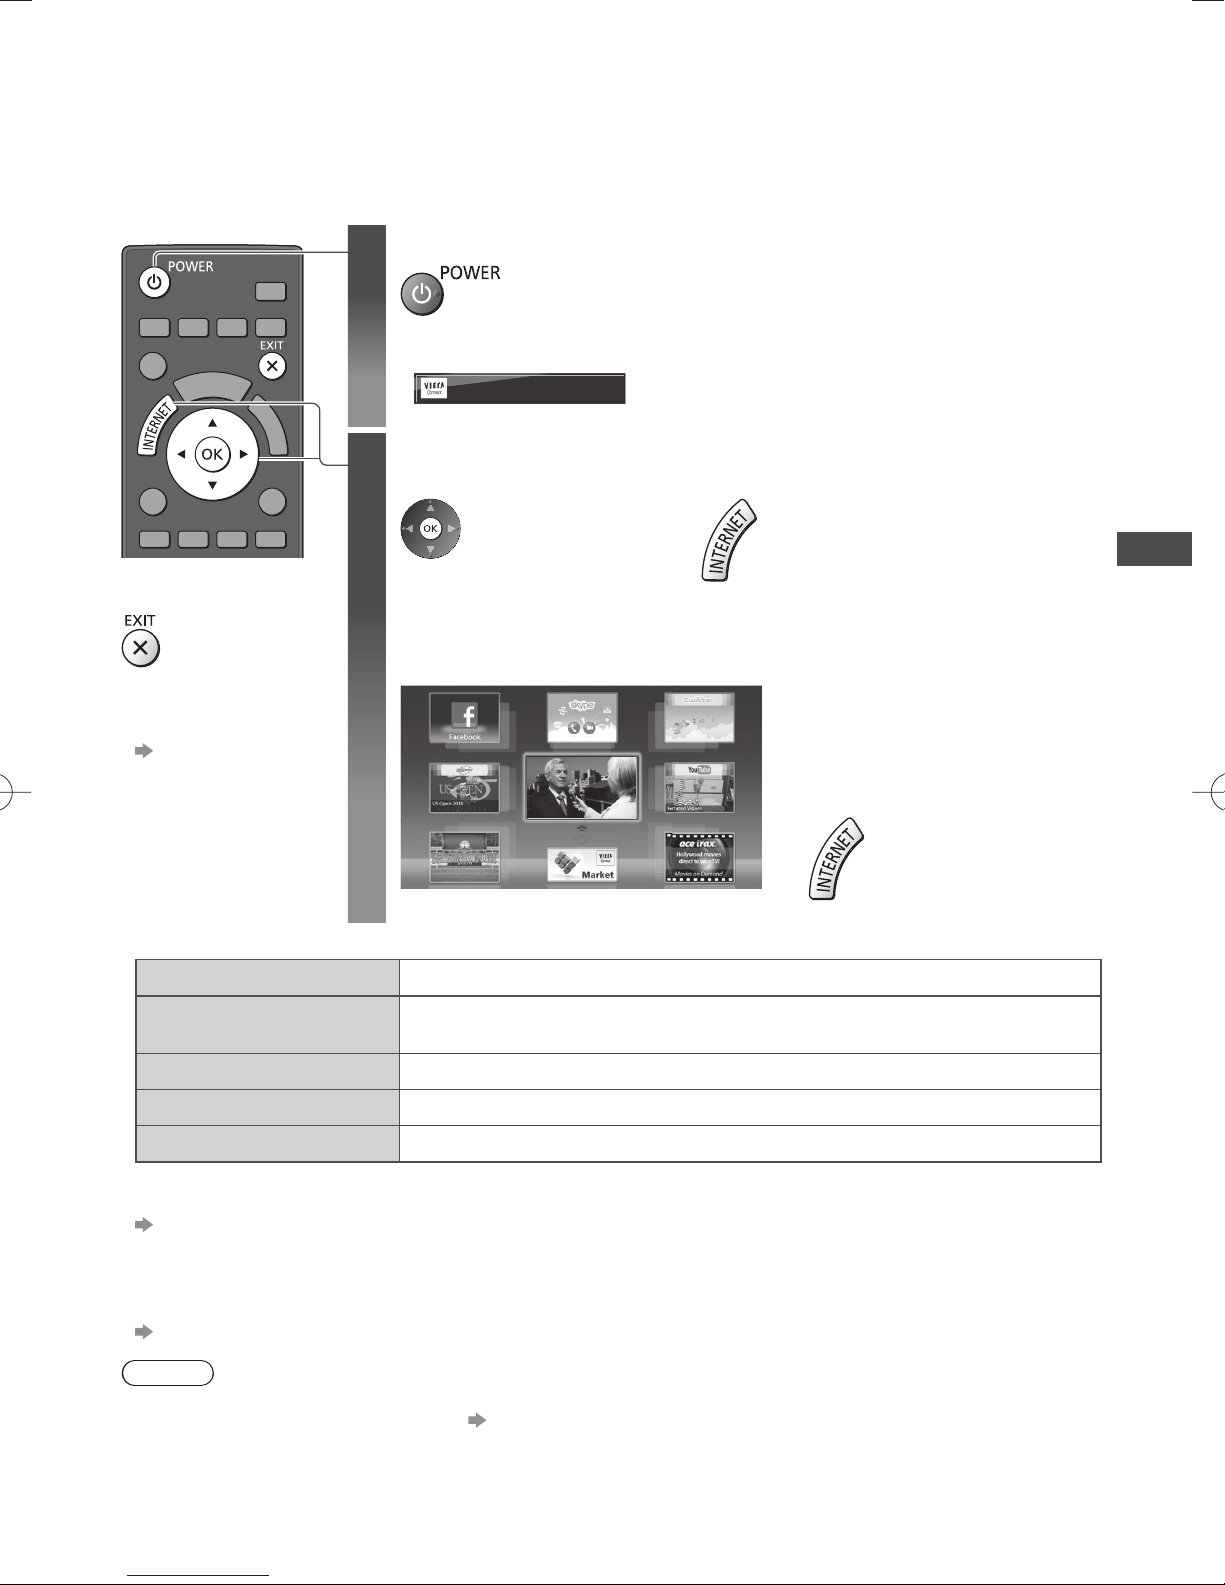
Turn power on
■
To exit from
VIERA Connect
●
To set the VIERA
Connect introduction
banner display off
[VIERA Connect
Banner] (p. 44)
1
●
Every time you turn on the TV, VIERA Connect introduction banner appears. The
banner is subject to change.
Enjoy selected internet content with VIERA Connect.
Simply press the OK / INTERNET button
Access VIERA Connect
2
While the banner is displayed
●
Depending on the usage conditions, it may take a while to read all the data.
●
Messages might be displayed before VIERA Connect home screen.
Please read these instructions carefully and follow the on-screen instructions.
Example: VIERA Connect home screen
MORE
BACK
or
●
Mains power On / Off switch should be on.
(p. 13)
●
To go to the next level, select
[MORE].
●
To back to the previous level,
select [BACK].
●
To return to VIERA Connect home
screen
Using “VIERA Connect”
●
Setup menu (Items in [Setup] may change without notice.)
Customize HomeScreen Changes the position of each services on VIERA Connect home screen
My Account
Lock Sets to restrict access to some services
Beep Sets beep sound On or Off when operating VIERA Connect
Notices Displays the information of VIERA Connect
●
You may operate the internet contents with the free cursor of the VIERA Touch Pad Controller (supplied).
●
Video communication requires an exclusive Communication Camera TY-CC20W.
“Optional accessories” (p. 7)
For details, read the manual of the Communication Camera.
●
You can connect a keyboard and a gamepad for character input and playing games in VIERA Connect. You can also
operate the TV with a keyboard or a gamepad other than VIERA Connect features.
For more information
“USB connection” (p. 102), “Bluetooth Setup” (p. 102), “Operations from Keyboard / Gamepad” (p. 103)
Confirms or removes the account information of the TV you entered on VIERA
Connect
Note
●
If you cannot access VIERA Connect, check the network connections (p. 16) and settings (p. 18, 19).
●
For more information of VIERA Connect (p. 75)
21
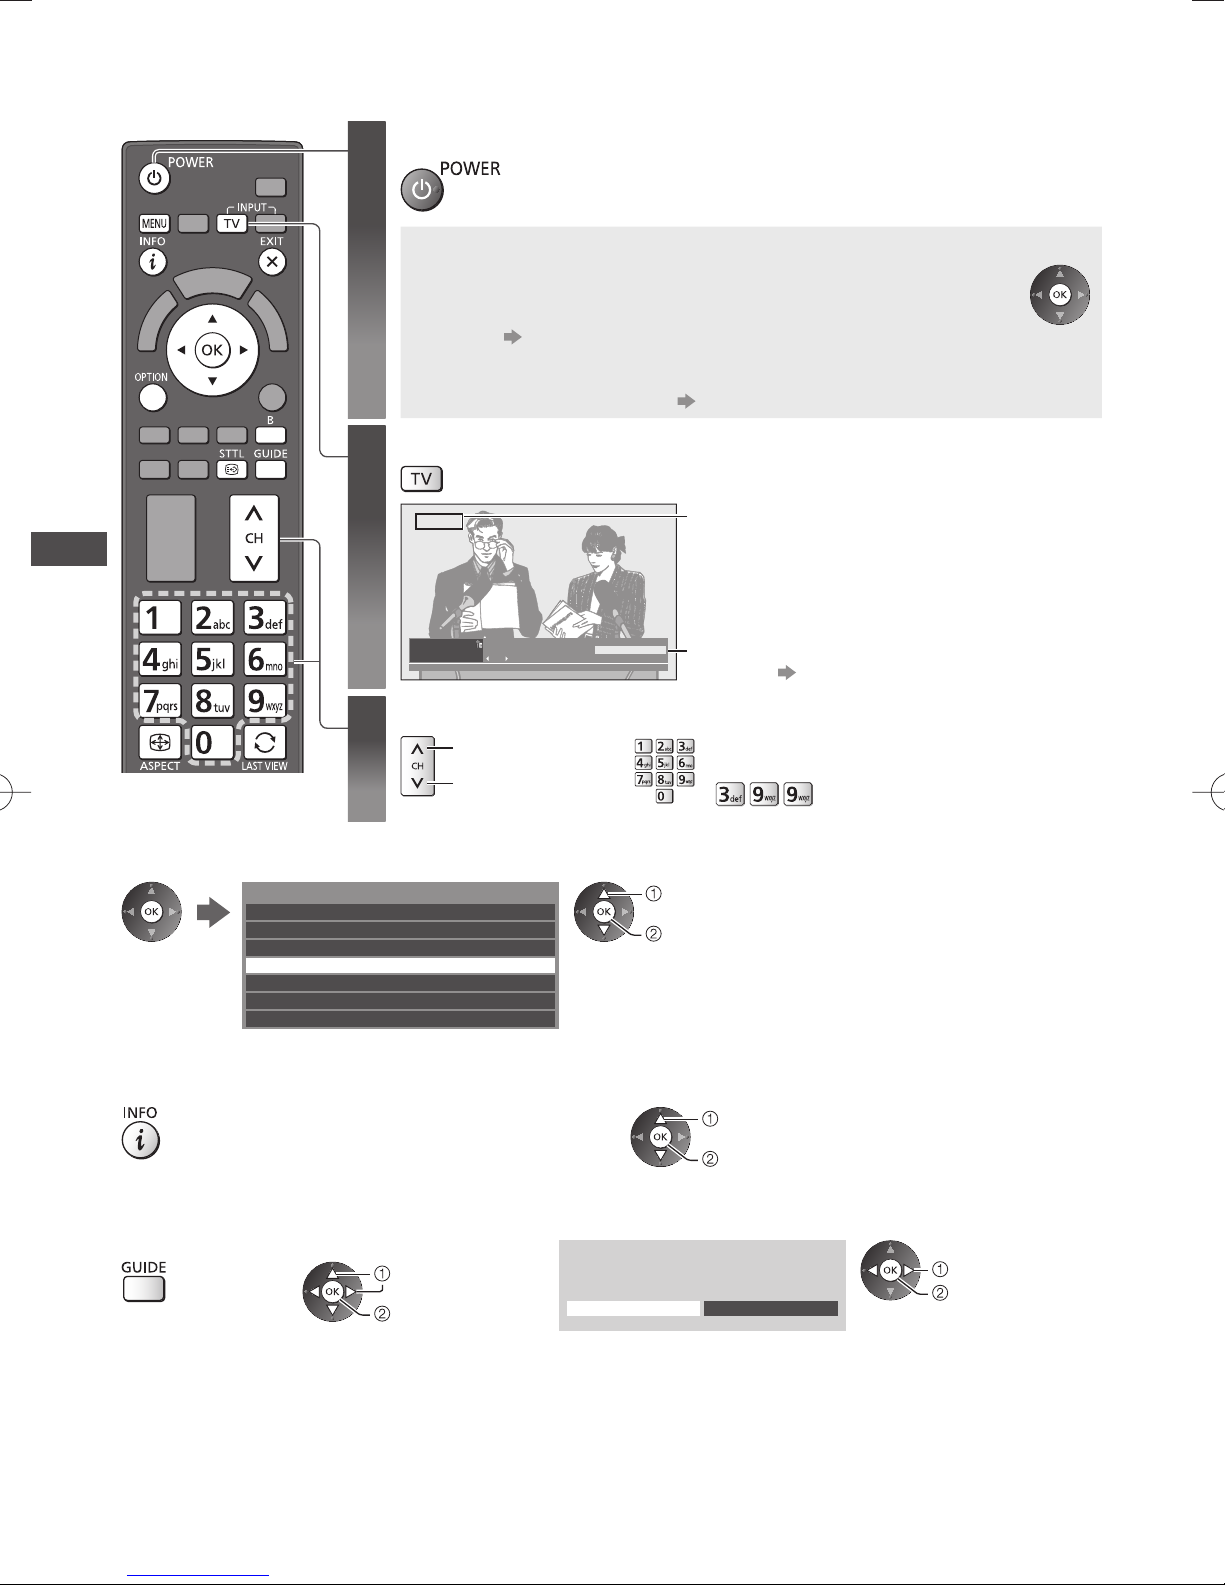
Watching TV
1
2
Watching TV
Turn power on
●
Mains power On / Off switch should be on. (p. 13)
■ VIERA Connect introduction banner appears
Every time you turn on the TV, this banner appears at the bottom of the
screen.
You can access to VIERA Connect easily and enjoy the various
contents.
●
To remove this banner, leave for about 5 seconds or press any
buttons (except the buttons to access VIERA Connect).
●
To set this banner display off [VIERA Connect Banner] (p. 44)
(p. 21)
Select Digital TV or Analogue TV
Digital TV
The selected mode is displayed.
●
You can also select the mode pressing the TV
button repeatedly on the TV (p. 13).
All Digital Channels
20:35
Information banner appears whenever you select
a channel
●
To select a more than two-digit channel
position number, e.g. 399
(p. 23)
up
down
Coronation Street
20:30 - 20:55
Now
or
1
BBC ONE WALES
Select a channel
3
■ To select from the Channel List
All Digital Channels
6 Cartoon Nwk
7 BBC Radio Wales
8 BBC Radio Cymru
1 BBC ONE Wales
2 BBC THREE
3 BBCi
4 CBBC Channel
select channel
watch
■ To select a channel using Information banner (p. 23)
1 Display Information banner if it is not displayed 2 While the banner is displayed, select the channel
select channel
watch
■ To select a channel using TV Guide (p. 26) (Digital TV)
1 Display TV
Guide
2 Select the current
programme or channel
select
access
3 Select [View]
Emerald
11: 00 - 11 :30
View
Timer Programming
select
watch
22
Other useful functions
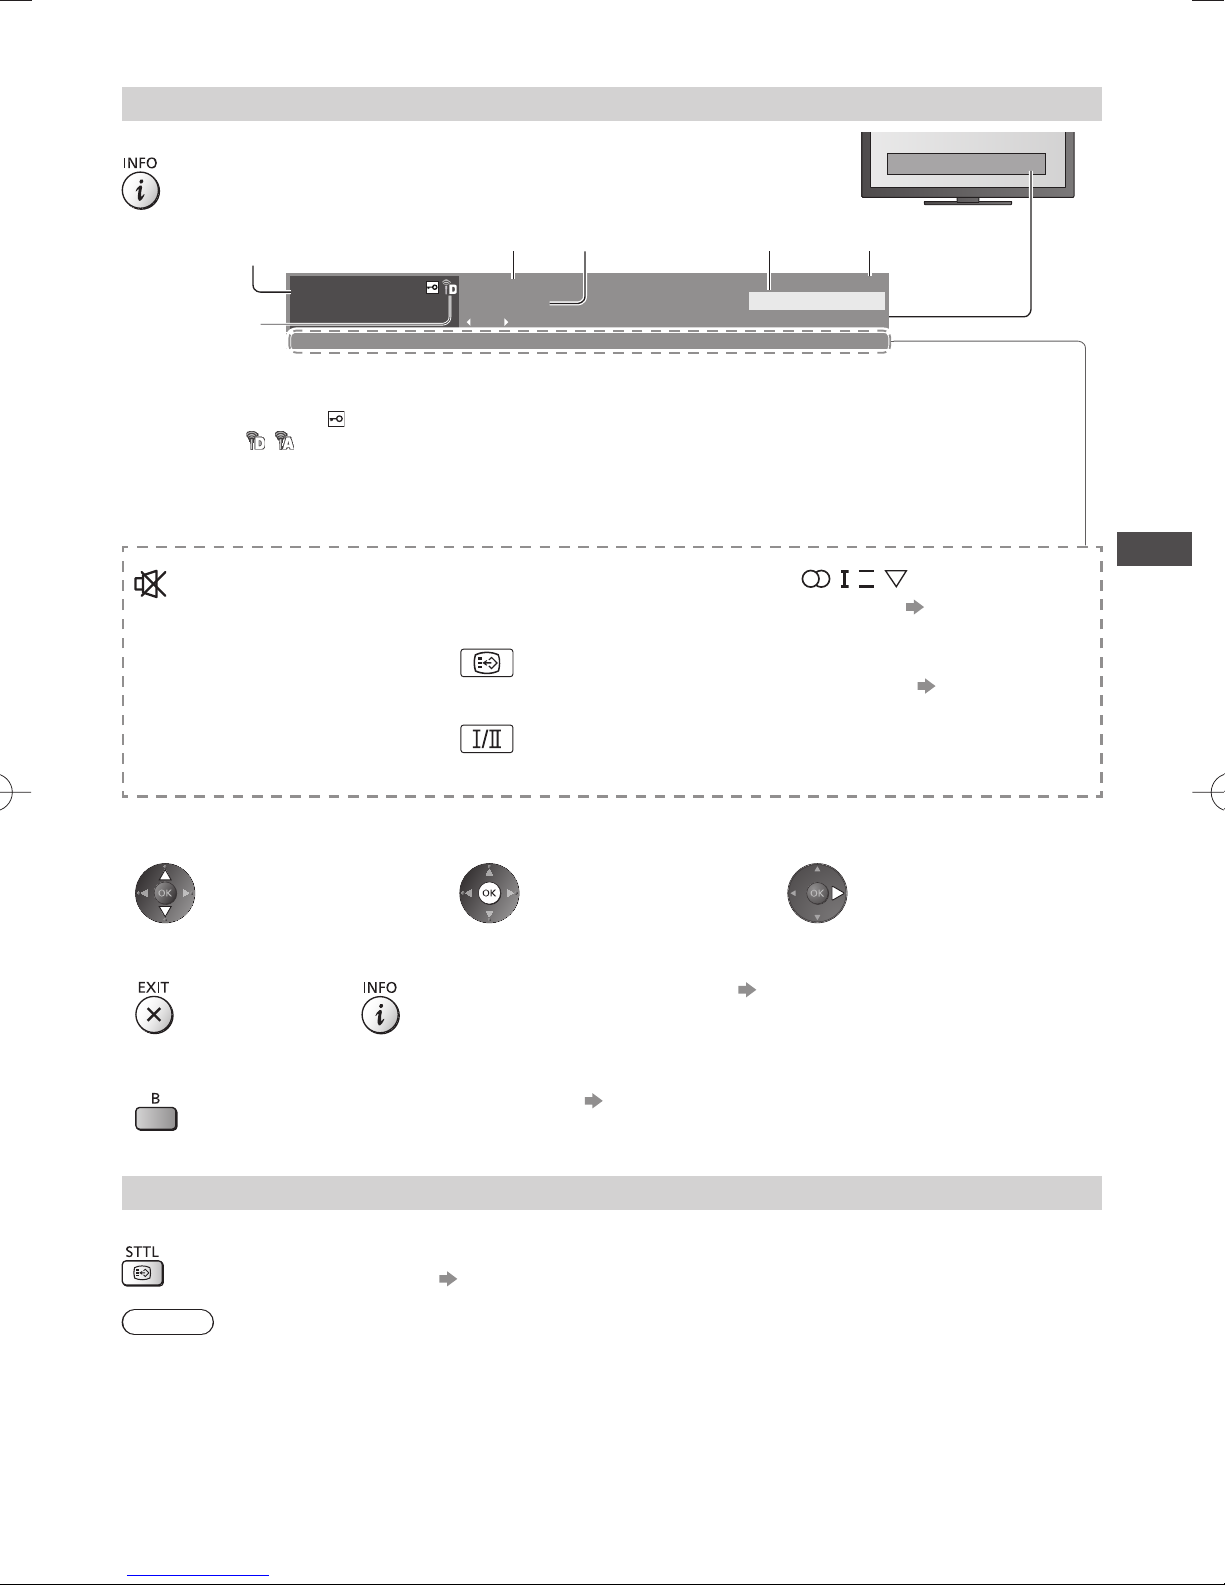
Display Information banner
Display Information banner
●
Also appears when changing a channel.
1
Example: Digital TV
1
BBC ONE WALES
2
Channel position and name
1
Channel type ([Radio], [Data], etc.) /
2
Encrypted channel ( ) /
TV mode ( , )
Programme
3
Current time
4
Features available / Message meanings
Sound mute on
[Bad signal]
Poor TV signal quality
3 4 5
Coronation Street
20:30 - 20:55
Now
Programme Start / Finish time (Digital TV)
5
Channel number, etc. (Analogue TV)
Category
6
[Dolby D+], [Dolby D], [HE-AAC]
Dolby Digital Plus, Dolby Digital or
HE-AAC audio track
Subtitle service available
Multiple image or audio available
6
All Digital Channels
20:35
II
, ,
Audio mode (p. 96)
1 - 90
Off Timer remaining time
●
,
For settings (p. 24)
Watching TV
●
To confirm another tuned channel
name
●
To hide
●
To select a favourite list (Digital TV)
if the favourite list is created in [Favourites Edit] (p. 46)
●
Extra information (Digital TV)
●
To watch the channel listed in the
banner
(Press again to hide the banner)
Display subtitles
Display / hide subtitles (if available)
●
To change the language (if available), press the button repeatedly.
●
Note
●
Subtitles may not be displayed properly in 3D images.
To set the default language [Preferred Subtitles] (p. 44)
●
Information on the next programme
(Digital TV)
●
To set display timeout
[Banner Display Timeout] (p. 44)
23
Display the selectable settings for the current status
Confirm or change the current status instantly
●
To change
[Multi Video] (Digital TV)
Selects the image (if available)
[Multi Audio] (Digital TV)
Selects between alternative language for sound tracks
(if available)
[Dual Audio] (Digital TV)
Selects stereo / monaural (if available)
[Subtitle Language] (Digital TV)
Selects the language in which subtitles should appear
(if available)
Off Timer
Watching TV
select
access
[Channel Colour Set] (Analogue TV)
Sets colour density
[MPX] (Analogue TV)
Selects multiplex sound mode (if available)
[Volume Correction]
Adjusts volume of individual channel or input mode
[Safely remove USB]
Takes this operation to remove the connected USB
device safely from the TV
Turn the TV to Standby mode automatically after a fixed period
1 Display the menu
select / change
store
(p. 39)
(p. 42)
2 Select [Timer]
select
Timer
access
3 Select [Off Timer] and set the time in 15-minute increments
Timer Programming
Off Timer
Auto Standby
Off
15
30
45
60
75
90
minutes
minutes
minutes
minutes
minutes
minutes
●
●
●
select [Off Timer]
select the time
access
store
To cancel, set to [Off] or turn the TV off.
To confirm the remaining time “Display Information banner” (p. 23)
When the remaining time is within 3 minutes, the remaining time will flash on
the screen.
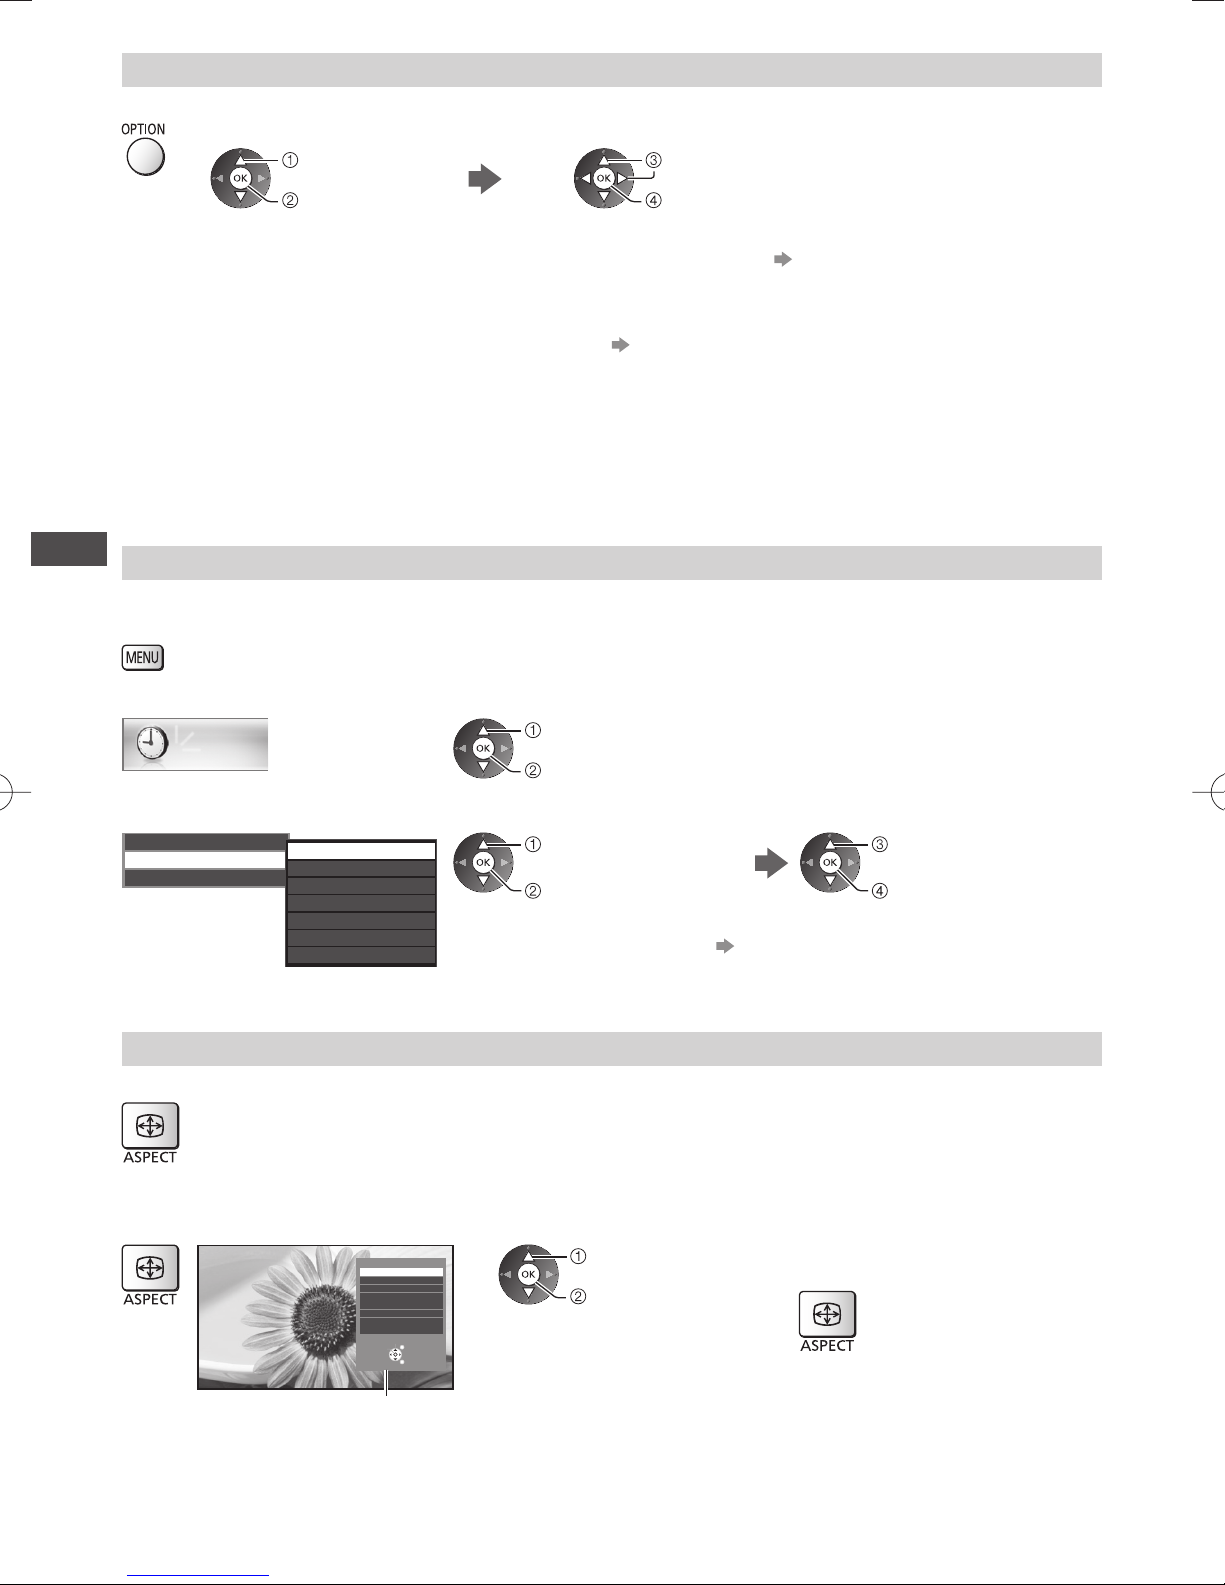
Aspect
Change the aspect ratio (image size)
Enjoy viewing the image at its optimum size and aspect.
(Press repeatedly until you reach the desired mode.)
■ To change the aspect ratio manually (if available)
1 Display Aspect Selection list 2 While the list is displayed, select the mode
●
Aspect Selection
16:9
14:9
Just
4:3
4:3 Full
Zoom1
Zoom2
Zoom3
Change
Select
EXIT
RETURN
select
store
You can also change the mode only
using the ASPECT button.
Aspect Selection list
24
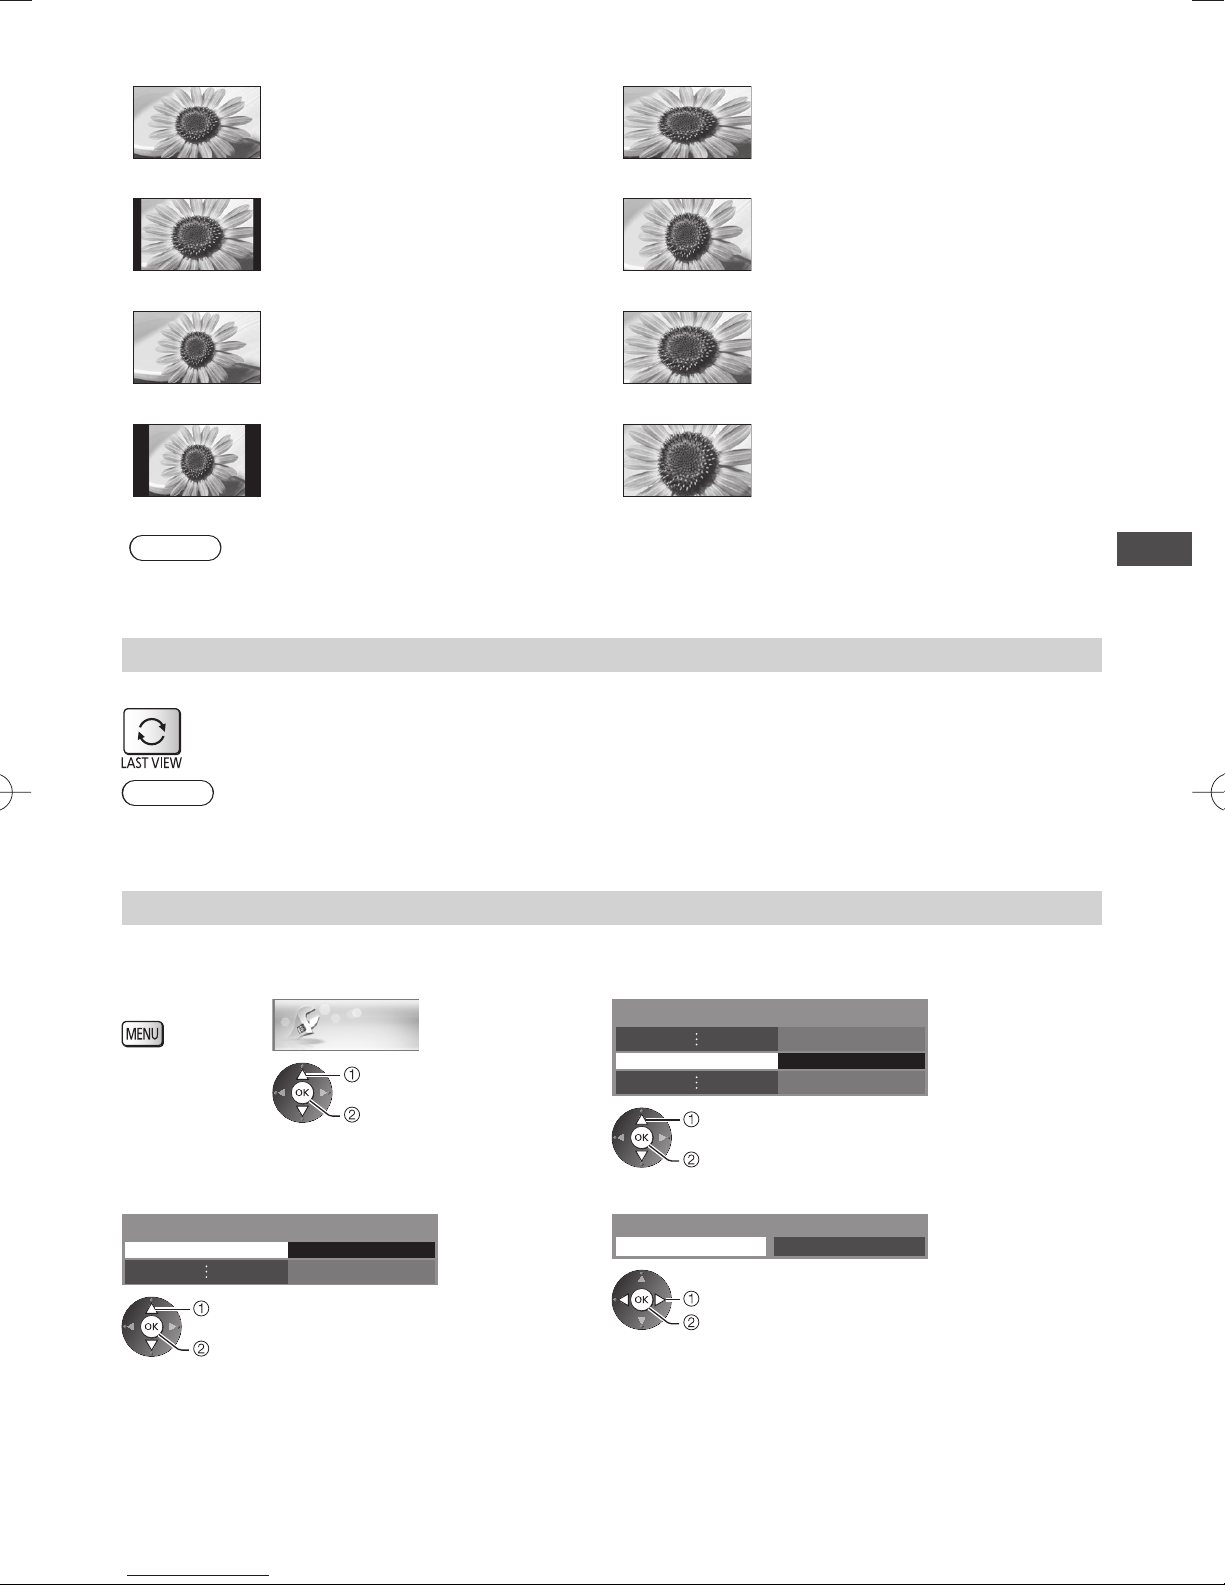
[16:9] [4:3 Full]
Directly displays the image at 16:9
without distortion (anamorphic).
[14:9] [Zoom1]
Displays the image at the standard
14:9 without distortion.
Displays a 4:3 image enlarged
horizontally to fit the screen.
●
For Digital TV or HD signal
Displays a 16:9 letterbox or 4:3 image
without distortion.
[Just] [Zoom2]
Displays a 4:3 image full-screen.
Stretching is only noticeable at the left
and right edges.
[4:3] [Zoom3]
Displays the image at the standard 4:3
without distortion.
Displays a 16:9 letterbox (anamorphic)
image full-screen without distortion.
Displays a 2.35:1 letterbox
(anamorphic) image full-screen without
distortion.
At 16:9, displays the image at its
maximum (with slight enlargement).
Note
●
Available aspect modes are reduced in Digital TV and PC input.
●
Aspect cannot be changed in 3D mode.
Last view
Switch to previously viewed channel or input mode easily
●
Press again to return to the current view.
Note
●
Switching channel is not available while the recording of Timer Programming or One Touch Recording is in progress.
●
Watching less than 10 seconds is not regarded as the previously viewed channel or input mode.
Watching TV
Change OSD language
You can change language for on-screen displays.
1 Display the
menu
2 Select [Setup]
Setup
select
access
4 Select [OSD Language]
Language
OSD Language Access
select
access
3 Select [Language]
Language Access
select
access
5 Select the language and set
OSD Language
English
select
set
中⽂
25
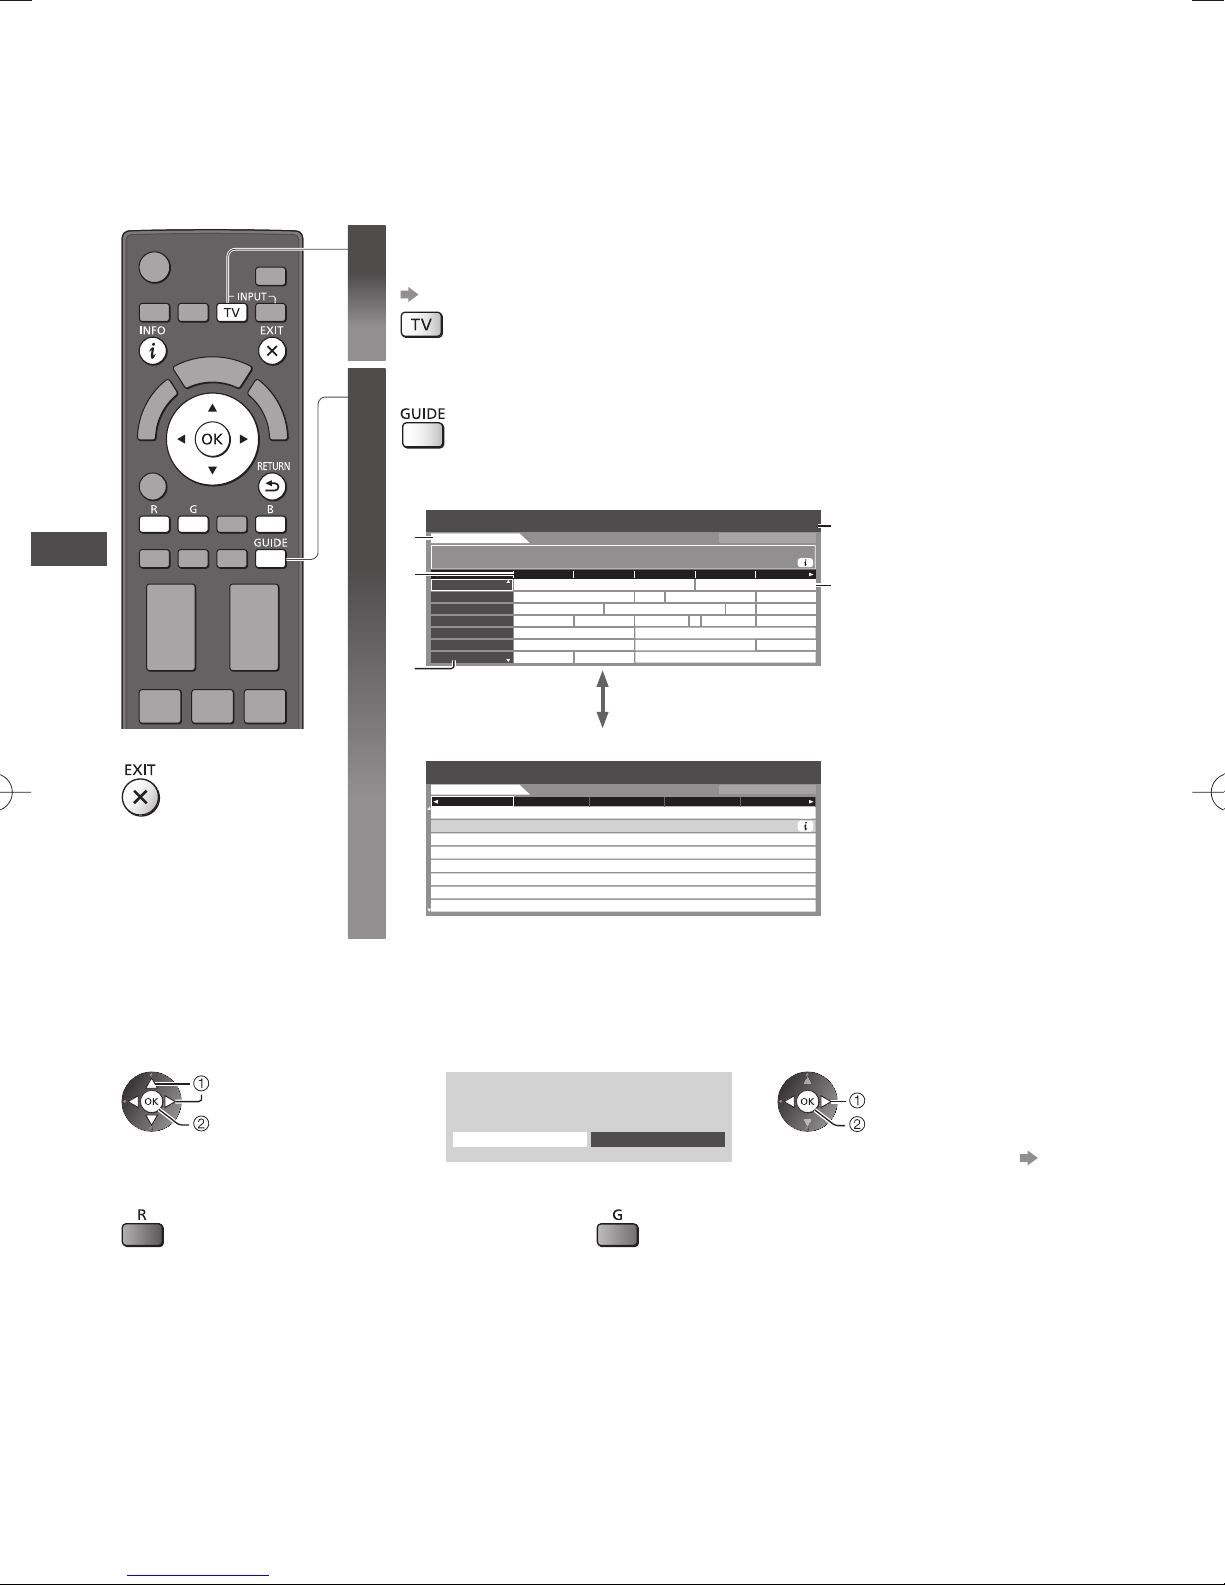
Using TV Guide (Digital TV)
TV Guide - Electronic Programme Guide (EPG) provides an on-screen listing of the programmes currently broadcast
and the forthcoming broadcasts over the next seven days (depending on the broadcasters).
●
When this TV is turned on for the first time, or the TV is switched off for more than a week, it may take some time
before TV Guide is completely shown.
If in Analogue TV
1
Select Digital TV
(p. 22)
View TV Guide
Using TV Guide (Digital TV)
2
2
3
5
●
Press again to change the layout ([Landscape] / [Portrait]).
View [Landscape] to see several channels.
View [Portrait] to see one channel by time.
Example: [Landscape]
TV Guide: Landscape
26th Wed
11 Home
11:00 - 12:30 In Memory of Lydia Shum (R) (S)
11
16
81
84
100
101
102
11:00 11:30 12:00 12:30 13:00
Time:
In Memory of Lydia Shum (R) (S)
Home
ETV China Financial Information S
World
阿笨與阿占(
Jade
Market Update Market Update
Pearl
Sapphire
Ruby
Gold
Topics NewsShopping
京都念慈菴 ⾼清劇場 : 新不了
Market Update Market Update
Business NewsMarket News
Drama 2Drama 1
2011/10/26 Wed 10:27
All Digital Channels
W E Your Jun Mao Xia
上海商
In
CCTV9 – Live
午間新
Station Close
Live
Current date and time
1
1
TV Guide date
2
TV Guide time
3
4
Programme
4
Channel position and
5
name
■
To return to TV
■ To watch the programme
1 Select the current programme
or channel
select
access
■ To the previous day
Example: [Portrait]
TV Guide: Portrait
26th Wed
Home11 World16 Jade81 Pearl84 Sapphire100
11:00 - 12:30
12:30 - 14:00
14:00 - 14:30
14:30 - 15:00
15:00 - 15:30
15:30 - 16:00
16:00 - 16:30
16:30 - 16:45
2 Select [View]
Emerald
11: 00 - 11 :30
View
In Memory of Lydia Shum (R) (S)
W E Your Jun Mao Xia
Jin Mao Xiang (R) (C/M) (S)
Women Plaza ll
Wealth Blog
Life Journey (R) (C/M)
Smart Class
News
Timer Programming
■ To the next day
2011/10/26 Wed 10:27
All Digital Channels
select
●
To use Timer Programming (p. 27)
watch
26
■ To view a channel list of the selected category
(Category list)
Favourites
All Digital Channels
All Digital Channels
Favourites1
Favourites2
Favourites3
Favourites4
●
To list favourite channels (p. 46)
Other useful functions
View details of the programme
1 Select the programme 2 View details
select category
view
●
Press again to return to TV Guide.
Timer Programming
The Timer Programming menu allows you to choose programmes that you want to remind watching or record to the
USB HDD or the SD Card. At the correct time, the TV will tune to the correct channel even if the TV is in Standby
mode.
1 Select the forthcoming programme 2 Select the function ([USB HDD Rec.], [SD Card Rec.] or [Reminder])
select
●
set
LED will turn to orange if
Timer Programming is set.
(Orange LED will flash if the recording
of Timer Programming is in progress.)
“Indicator / Control panel” (p. 13)
■ To check / change / cancel a timer
programming event
“Timer Programming” (p. 50 - 52)
(Timer Programming screen)
Timer Programming
Function No. Channel Name Date Start End
USB HDD Rec.
D 12 ABC ONE
<TIMER>
--- --/-- --:-- --:-----
--- --/-- --:--
---
--- --/-- --:-- --:-----
--- --/-- --:-- --:-----
10:462011/10/26
Wed
20:30
--:--
Wed
20:002011/10/26
(30 min.)
(--- min.)
(--- min.)
(--- min.)
(--- min.)
[USB HDD Rec.] / [SD Card Rec.] / [Reminder]
“Set timer programming event details” (p. 51)
■ To return to TV Guide
select
store
■ If you select the current programme
A confirmation screen asking whether you want to watch or record the programme appears.
Select [Timer Programming] and set [USB HDD Rec.] or [SD Card Rec.] to record from the time you finish the timer
programming event setting.
Using TV Guide (Digital TV)
Emerald
11: 00 - 11 :30
View
Timer Programming
Note
●
This function is not available in Analogue TV.
●
Timer Programming only works reliably if correct time information is received via the signal from the broadcaster or
service provider.
●
No other channel can be selected while the recording of Timer Programming is in progress.
●
When recording programmes to the USB HDD, be sure to format the USB HDD and enable it to record in [Recording
Setup]. When recording programmes to the SD Card, prepare the appropriate SD Card. For more information of the
USB HDD / SD Card Recording.
(p. 59, 100)
select
access
27
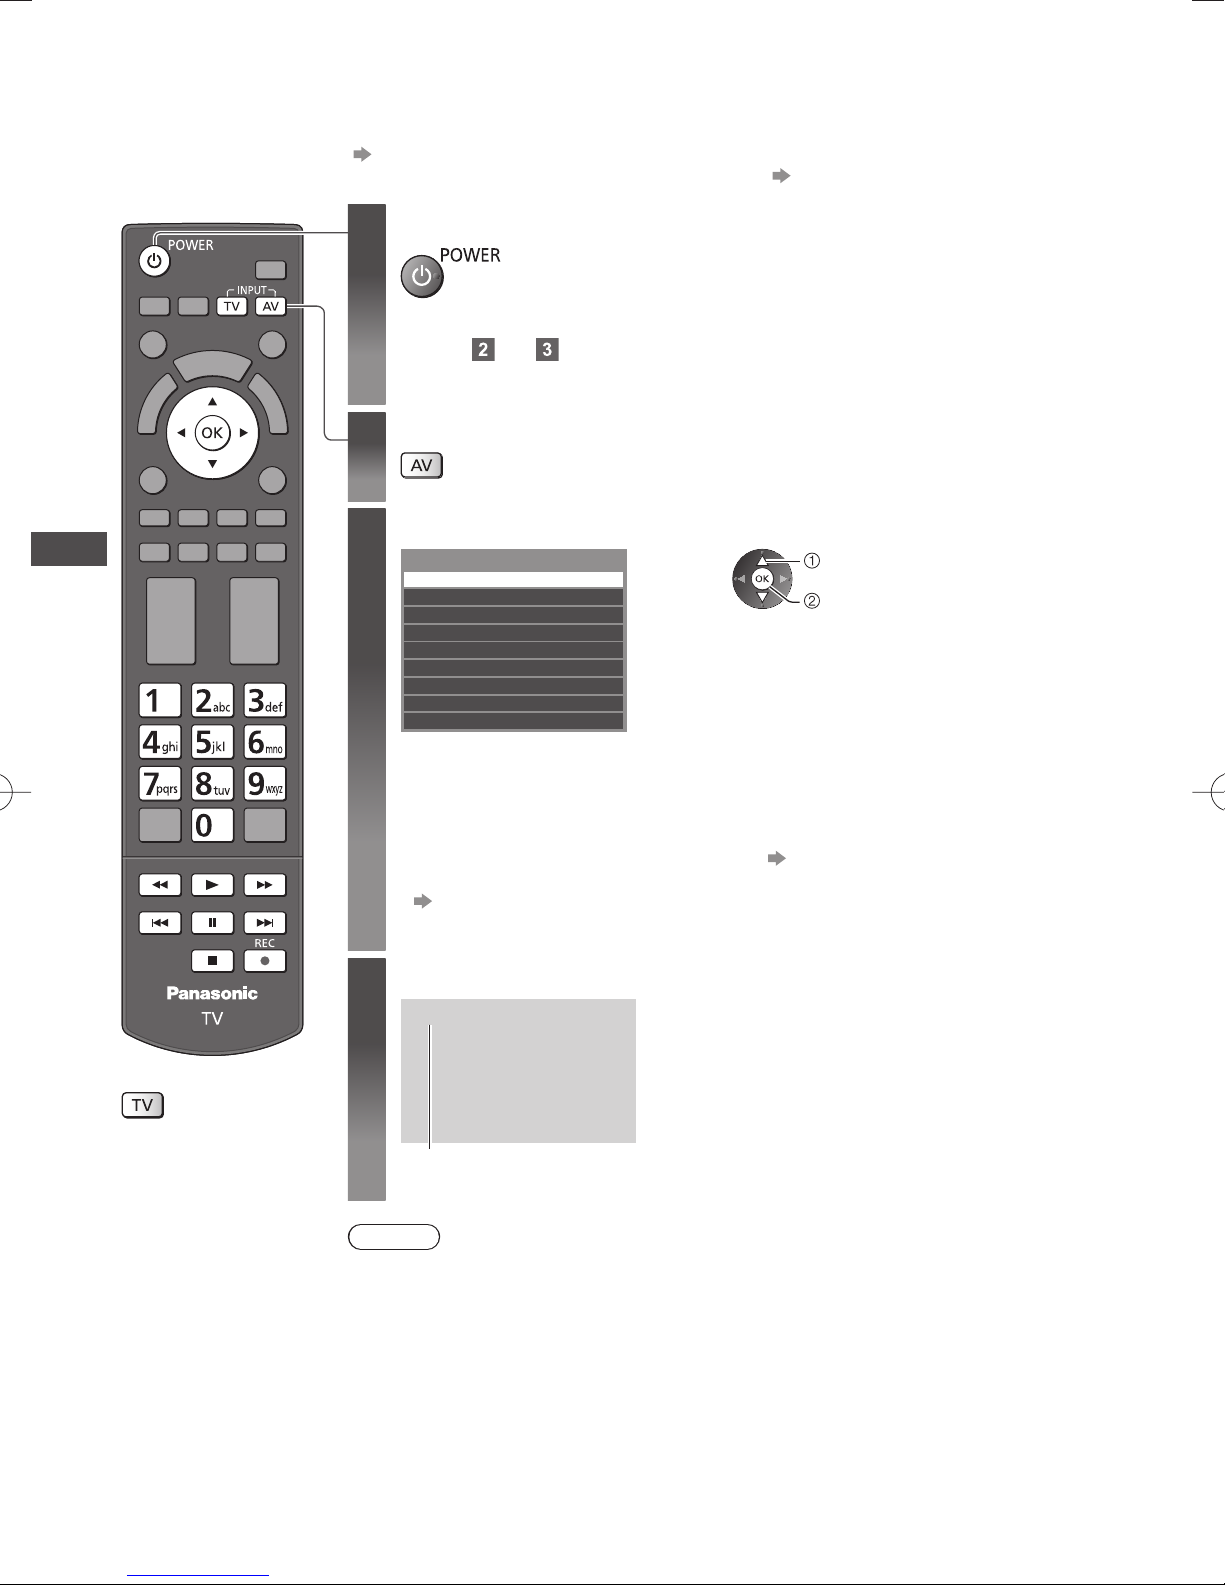
Watching External Inputs
Connect the external equipment (VCRs, DVD equipment, etc.) and you can watch through the input.
●
To connect the equipment (p. 14 - 16, 92 - 94)
The remote control is capable of operating the contents or external equipment.
Turn the TV on
1
If input mode is not switched automatically
Perform and
●
Check the setup of the equipment.
Display the input selection menu
2
Select the input mode connected to the equipment
3
Watching External Inputs
Input Selection
AV1
AV2
PC
HDMI1
HDMI2
HDMI3
HDMI4
TV
SD Card/USB
●
You can also select the input using the AV button on the remote control or the TV
(except [SD Card/USB]).
Press the button repeatedly until the desired input is selected.
●
To switch between [COMPONENT] and [VIDEO] in [AV2], move the indicator by
pressing left and right cursor button.
●
[SD Card/USB]: Switches to Media Player. “Using Media Player” (p. 63)
●
You can label or skip each input mode (except [SD Card/USB]).
“Input Labels” (p. 44)
Skipped inputs will not be displayed when the AV button is pressed.
(p. 29)
select
watch
View
4
AV1
■
To return to TV
Displays the selected mode
Note
●
If the external equipment has an aspect adjustment function, set it to [16:9].
●
For details, read the manual of the equipment or ask your local dealer.
28
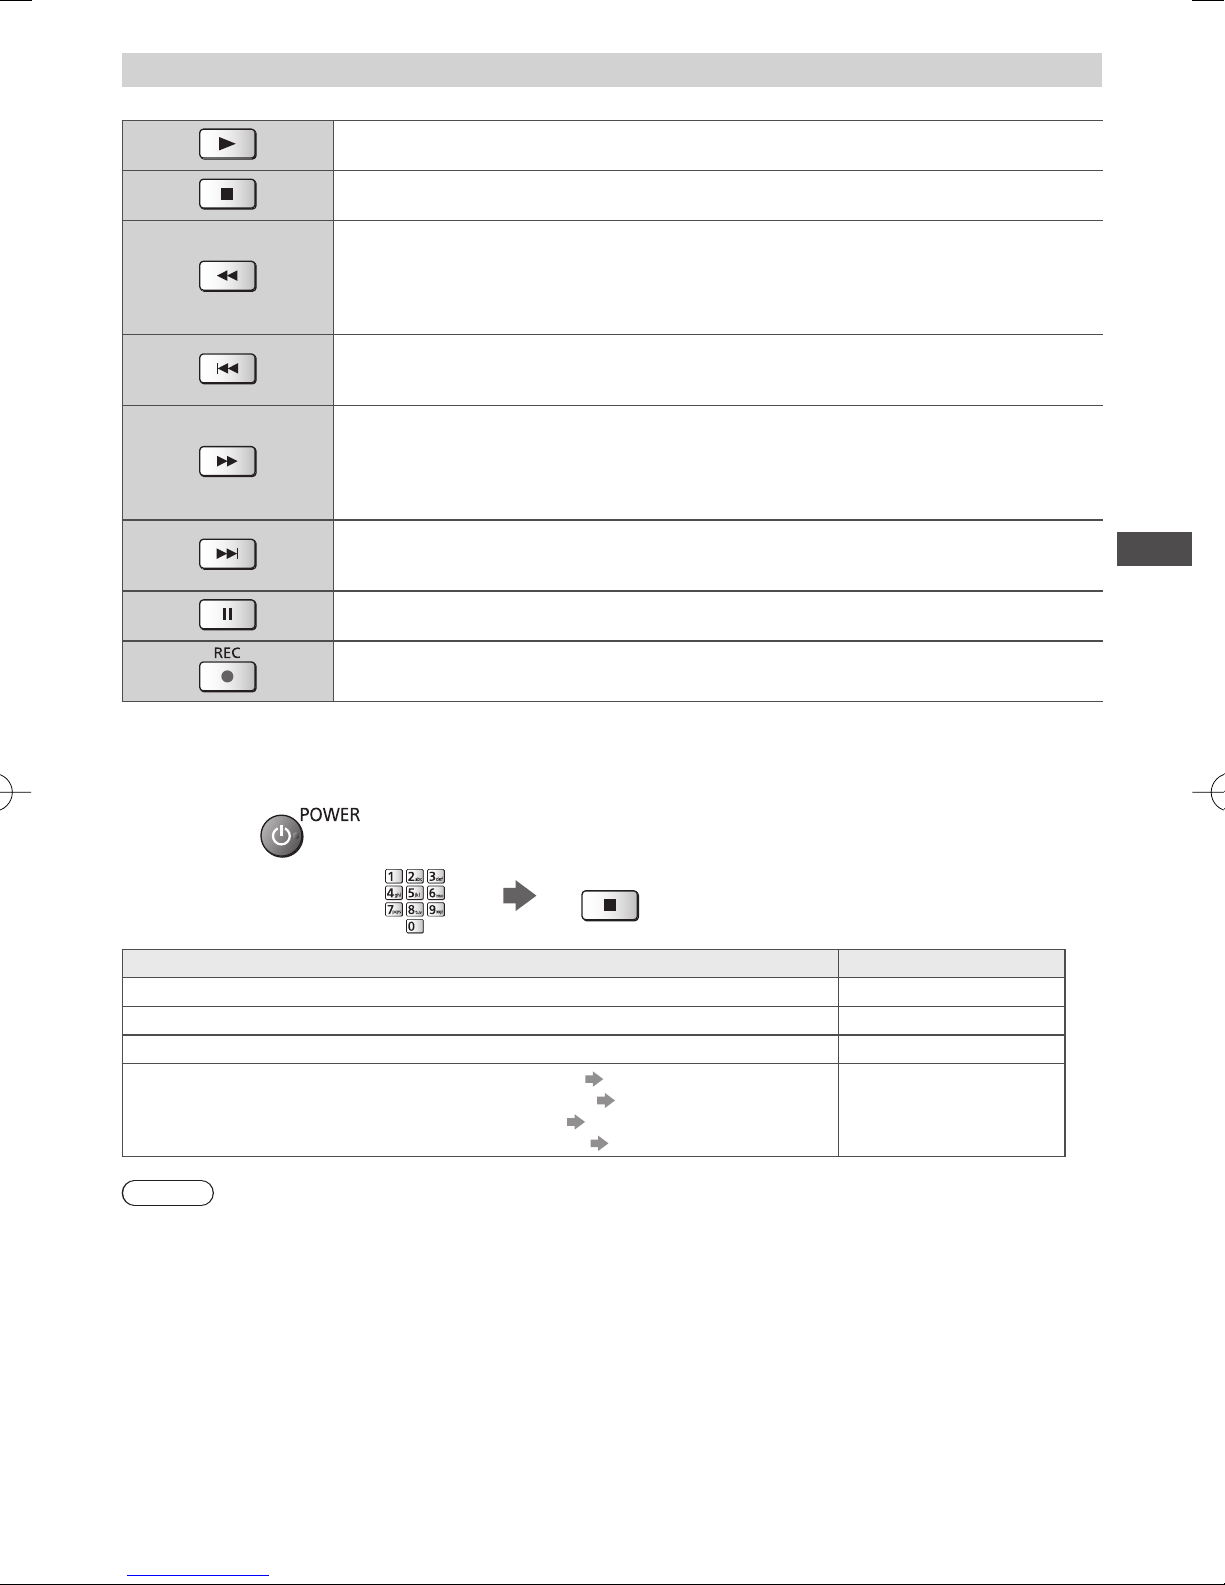
Operating contents or the equipment with the TV remote control
You can operate the contents in Media Player / media servers, recording functions or the connected equipment.
Play
Playback videocassette / DVD / video content
Stop
Stop the operations
Rewind / Search
VCR:
Rewind, view the picture rapidly in reverse
DVD / video content:
Press and hold to search backward
Skip
DVD / video content:
Skip to the previous track, title or chapter
Fast-forward / Search
VCR:
Fast-forward, view the picture rapidly forward
DVD / video content:
Press and hold to search forward
Skip
DVD / video content:
Skip to the next track, title or chapter
Pause
Pause / Resume
Record
Start recording
Watching External Inputs
How to change the code
Each type of the Panasonic equipment has its own remote control code.
Change the code according to the equipment you want to operate.
Press and hold
Enter the appropriate code,
see table below
DVD Recorder, DVD Player, Blu-ray Disc Player 70
Using USB HDD / SD Card Recording
Using in Video mode of Media Player
The equipment using in VIERA Link (p. 90)
Note
●
Confirm if the remote control works correctly after changing the code.
●
The codes may be reset to default values if batteries are replaced.
●
Some operations may not be possible on some equipment models.
during the following operations
Press
Type of the equipment, features Code
Player theatre, Blu-ray Disc theatre 71
VCR 72
Using in Video mode of DLNA (p. 81)
(p. 61, 62)
(p. 64)
73
(default)
29
 Loading...