

Page 1

Operating Instructions
Image management/DVD production software
VideoCam Suite 2.0
Thank you for using VideoCam Suite.
Before use, please read these instructions completely.
© Panasonic Corporation 2008
Page 2

Contents
Introduction
What you can do with this software
(basic operations) …………………………………
What you can do with this software
(advanced features) ………………………………
Read before starting operation ………………… 6
General precautions ……………………………… 7
Operating environments ………………………… 9
Optical discs and SD cards supported
for recording ……………………………………
Recording length of SD cards ……………… 12
11
Preparation
Connect the video camera to a computer … 13
Disconnecting the video camera from the computer ……… 14
Starting the software …………………………… 15
Exiting the software ………………………………………… 15
Basic operations
Feature overview ……………………………… 16
4
5
Importing content to a computer
([Simply Import to PC]) …………………………
Recording on discs in DVD-Video format
(Simply Create DVD-Video Disc) ……………
Viewing content on a computer ……………… 22
Playing video content ………………………………………… 23
Viewing photos ……………………………………………… 24
17
20
2
Page 3

Contents
Advanced Features
Feature overview ……………………………… 25
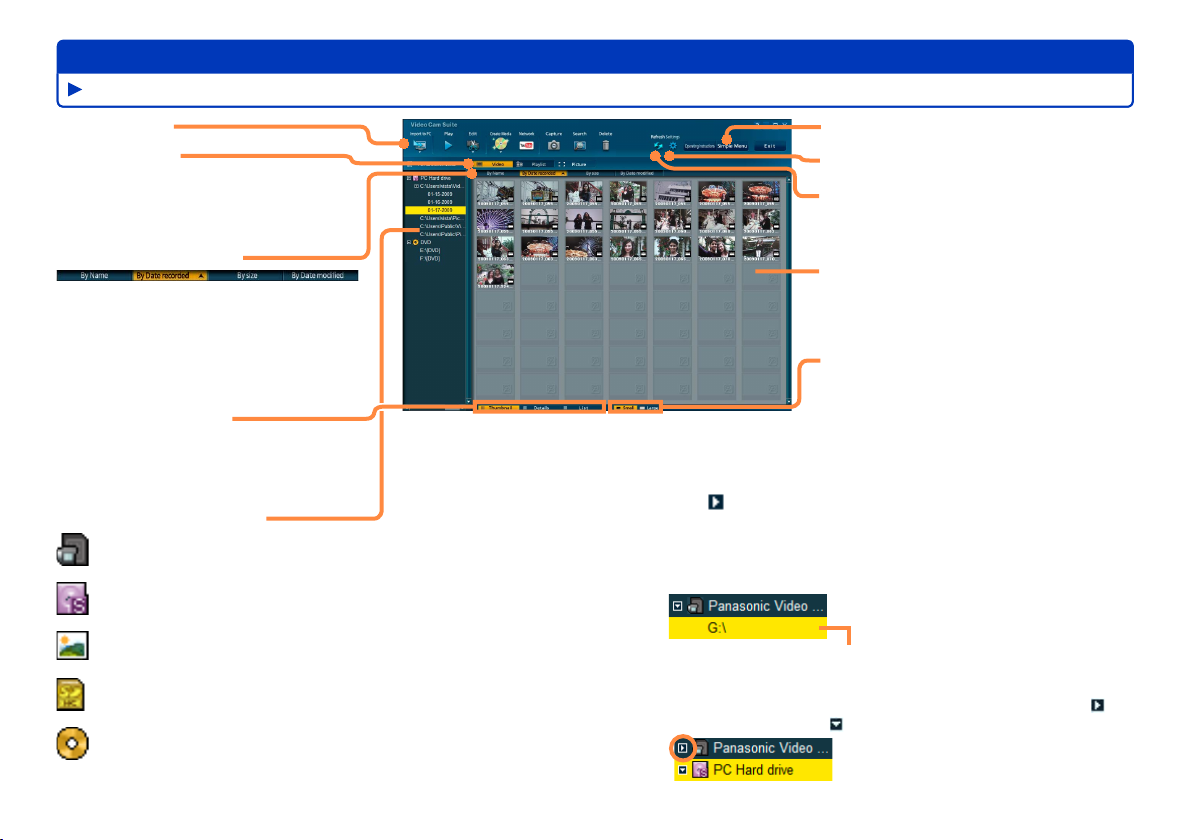
Main window ………………………………………26
Content preview area ………………………………………… 27
Importing content to a computer
([Import to PC]) …………………………………
Registering or deregistering destination folders ………… 31
Playing content ………………………………… 32
Delete content …………………………………… 34
Editing content on your computer ………… 35
Editing video content (basic operations) ……… 36
Selecting scenes to edit ……………………………………… 36
Saving edited videos ………………………………………… 36
Editing video content (Delete partially) ………38
Deleting selected portions of content ……………………… 38
Editing video content (Dividing scenes) ……… 41
Assigning the playback order/
adding opening titles/adding effects …………42
Assigning the playback order ……………………………… 42
Adding opening titles ………………………………………… 44
Adding scene transitions …………………………………… 46
Editing digital photos ……………………………48
Protecting and renaming content ………………49
Recording on optical discs and SD cards … 50
Recording ……………………………………………50
Recording formats …………………………………………… 50
Top menus …………………………………………………… 51
Automatic multi-disc recording ……………………………… 51
Additional recording on media with existing content ……… 52
28
[Create Media] menu ……………………………… 53
Recording video content ………………………… 54
Selecting video content to record …………………………… 55
Recording selected video content
(Create DVD-Video disc) …………………………………… 58
Recording selected video content (DVD-RAM (DVD-VR
format) or SD cards (SD-Video format)) …………………… 62
Creating discs from saved disc images …………………… 64
Recording photos ………………………………… 65
Recording with the DVD COPY function ……… 68
Using convenient features …………………… 70
Creating still pictures from video ………………70
Searching for desired content……………………71
Uploading content to YouTube …………………73
Other
Formatting discs ……………………………… 76
Advanced settings ……………………………… 79
Windows in this software ……………………… 83
Shortcut menus ………………………………… 93
Troubleshooting ………………………………… 96
Trademark and Licence Information ………… 103
3
Page 4
Introduction
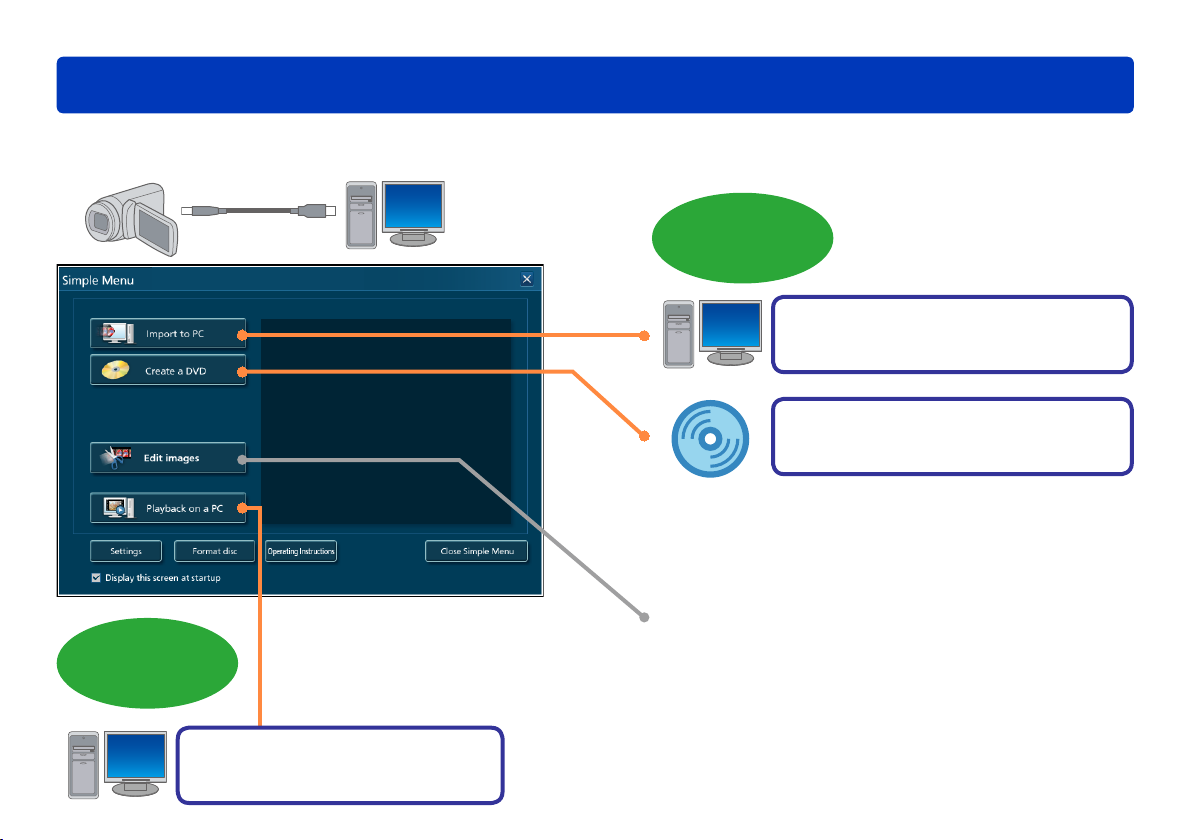
What you can do with this software (basic operations)
Connect a video camera with
recorded content to your computer
Recording
Import (save) content to
your computer (→17–19)
Recording on discs in
DVD-Video format (→20–21)
Create discs that can be played on most DVD
players.
Playback
Play back content on your
Advanced features (→5, 25)
computer (→22–24)
4
Page 5

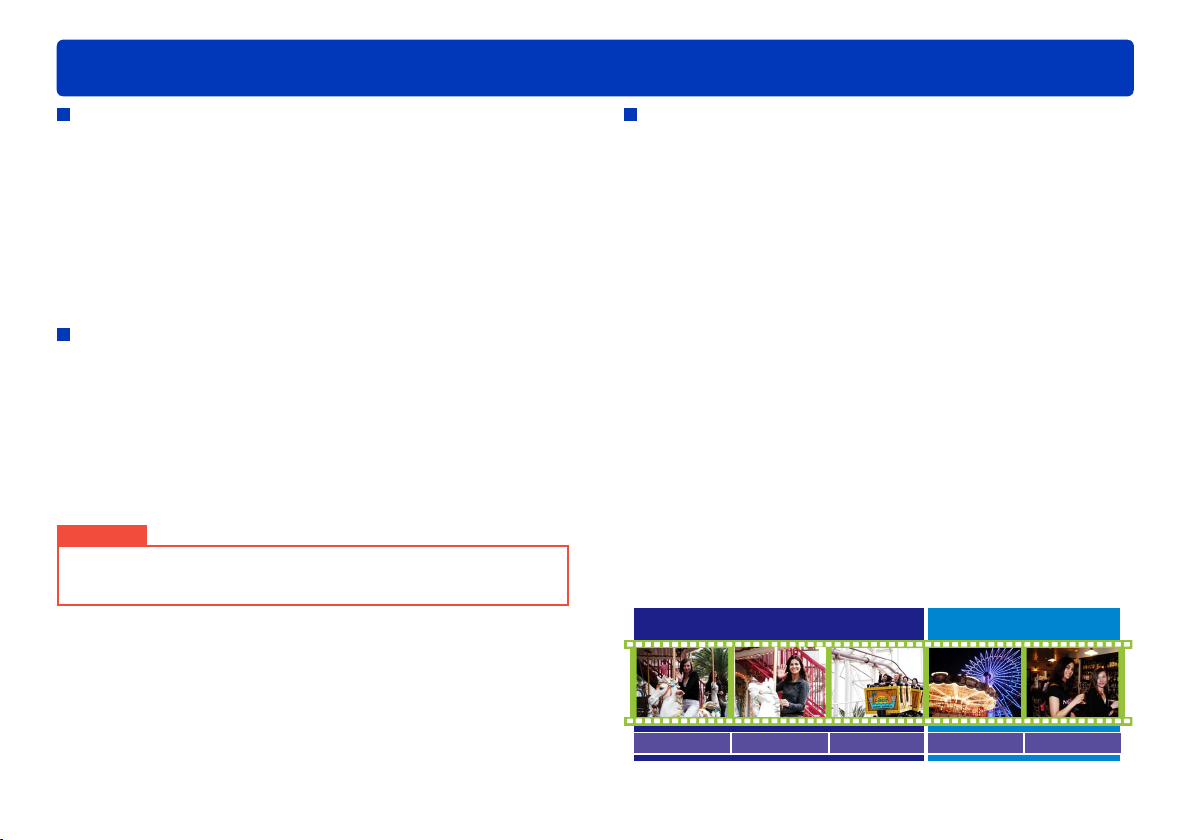
What you can do with this software (advanced features)
Connect a video camera with
recorded content to your computer
Introduction
Edit and
Record
Importing to a Computer (→28)
Editing
• Deleting selected portions of a scene (→38)
• Dividing scenes (→41)
• Assigning the playback order of scenes (→42)
• Adding opening titles (→44)
• Adding scene transitions (→46)
Creating Discs (→50)
Share on
YouTube
You can upload videos to
YouTube∗. (→73)
Your video can be accessed and
watched on the Internet.
∗
YouTube is a website for sharing
video content on the Internet
5
Page 6
Read before starting operation
Introduction
Contents of these operating instructions
The description of Windows® in these operating instructions is
●
based on the Windows Vista
●
Please note that the explanations and screen images in these
operating instructions may differ from the actual explanations
and screen images due to version upgrades of the software
and the use environments of PCs.
●
For instructions on using your computer, optical disc drive,
or video camera, or instructions on the Windows operating
system, refer to the respective Operating Instructions.
®
screen.
Steps to protect important image data
To be prepared in case of accidents or technical problems,
●
back up captured data that is important to you by importing it to
your computer and creating a disc or taking other measures.
●
Before deleting the original image data, confirm that it was
recorded correctly to your computer, to disc or to SD memory
card.
●
Do not modify or delete files or folders ([DCIM], [DVD_RTAV],
or others) used by this software.
Important
The recorded and/or edited content is for personal use only and may
●
not be reproduced or exported without permission from the copyright
holder.
Terms
DVD-Video
A format that can be played on most DVD players.
Scene
This means the image recorded during one recording (after
starting recording until it is stopped).
Video
In this software, “scenes” (video content with the same recording
date, for example) in the same folder are collectively referred to
as “videos.”
Top menu
A feature for displaying an interface similar to a table of contents
when a disc is played. (Top menu is not displayed on video
cameras. Top menus are only displayed on devices that support
this feature.)
SD cards
In these instructions, SD memory cards and SDHC memory
cards are collectively referred to as SD cards.
Video Video
1st Day 2nd Day
1st Scene Captured 2nd Scene Captured 3rd Scene Captured 1st Scene Captured 2nd Scene Captured
Scene Scene Scene Scene Scene
6
Page 7

General precautions
Introduction
Not compatible with the following video formats and
content
Video recorded on video cameras that are not compatible with
●
this software
●
Video created or edited with other software
●
Commercial DVD or Blu-ray video content
General information about using the software
Do not execute the following operations while the software is
running. Doing so may cause defects (damage to media, etc.).
●
Turn off the PC or video camera, or restart the PC.
●
Switch the user or log off.
●
Change the screen settings.
●
Use the screen saver or the power-saving functions (makes the
PC enter the standby or sleep modes after a certain time has
elapsed without any operation on the PC).
●
Use other software (especially software for writing to DVDs or
CDs, or recording/encoding software with a high CPU utilization
and large memory requirements).
●
Use the shared drive of another PC connected to the network.
Discs and drive
If the drive is being used by another software (Explorer, etc.),
●
the drive cannot be used with this software. Close the software
before using the drive with this software.
(If the drive is being used by this software, the drive cannot be
used with other software.)
●
Before using this software, ensure that the transfer mode of the
drive is set to [DMA]. If it is not set to [DMA], set it to [DMA] by
referring to the operating instructions of your drive. (It may be
impossible to set it to [DMA] depending on your PC.)
●
Use the type of discs recommended for your disc drive, and
avoid soiling or scratching them. Reading and recording may
not be possible with dirty or scratched discs.
Discs that are incompatible with the disc drive may not be
recognised, or recording may not be possible.
●
The recording speeds (2x, 4x, etc.) for drives and discs indicate
the maximum speed and not the actual recording speed.
(Speeds may vary depending on the combination of drive and
disc or the use conditions.)
Operations during disc recording
If the following actions are executed while the data is being
recorded onto a disc, recording may not complete properly, and
the disc, device, or data may be damaged.
●
Operations for user switching or logging off from Windows
●
Operation of other recording software.
●
Connection cables for a PC or a DVD device (an external DVD
drive) are inserted or removed, or the power is turned on or off.
●
Other USB devices such as SD card reader are installed or
removed.
●
This software is forcibly closed.
®
.
7
Page 8

General precautions
Introduction
Disc creation
You cannot record a video less than 2 seconds long.
●
(Video recorded in DVD-VR format must be at least 3 seconds
long.)
●
Conversion may be required when recording, depending on the
images. In this case, because the image has to be encoded
again, recording takes longer and image quality may also be
degraded.
●
When recorded in DVD-Video format, the end section of the
image may be shortened for about 0.5 seconds.
Playback and use of produced discs
●
Pictures on a disc cannot be imported. This software is not
capable of importing pictures from a disc recorded with the
DVD burner and a video camera connected.
●
For DVD-R discs with dual layer on single side, images may be
frozen or sounds may be inaudible for a moment when shifting
from the first layer to the second layer, depending on the player.
●
Normal playback may not be possible (a narrow, small, or
incomplete playback window may be displayed) when using
some models of older equipment (even if the equipment is
compatible with the disc) or with some types of recorded data.
SD cards
Recording on used SD cards may require formatting
●
(initialisation).
SD cards must be formatted by using video cameras
compatible with this software.
●
Do not insert or remove SD cards when importing data from SD
cards or recording data on discs. Removing SD cards then may
cause data corruption or SD card damage.
●
Use of SDHC memory cards requires SDHC-compatible
equipment.
●
If the write-protect switch has been set to [LOCK], recording is
not possible.
●
Initialising SD cards or deleting card data only modifies file
management information. Data on SD cards is not completely
deleted. We recommend physically destroying SD cards or
thoroughly deleting all data on SD cards when disposing of SD
cards or transferring ownership. Use discretion in managing
data on SD cards.
Functions using online services
●
Because YouTube™ services and specifications are subject
to change, operation of online services cannot be guaranteed
in the future. Available services and screens are subject to
change without notice.
(These services are valid as of December 1, 2008.)
●
Unless you are the copyright holder or you have obtained
permission from the copyright holder, do not upload videos
protected under copyright.
8
Page 9
Operating environments
System requirements
Introduction
PC
OS
RAM
Display
Hard disk
Necessary software
Sound
Drive
Interface
IBM® PC/AT compatible personal computer with an Intel® Pentium® 1.0 GHz or higher CPU (including compatible
CPU)
(When using Playback function, Intel® Pentium® 4 1.8 GHz or higher is recommended.)
Preinstalled
Microsoft® Windows Vista® Home Basic or Service Pack 1
Microsoft® Windows Vista® Home Premium or Service Pack 1
Microsoft® Windows Vista® Ultimate or Service Pack 1
Microsoft® Windows Vista® Business or Service Pack 1
Microsoft® Windows® XP Home Edition Service Pack 2/Service Pack 3
Microsoft® Windows® XP Professional Service Pack 2/Service Pack 3
Microsoft® Windows® 2000 Professional Service Pack 4
512 MB or more (1 GB or more recommended)
High Colour (16 bit) or more (32 bit or more recommended)
Desktop resolution of 1024 x 768 pixels or more (1280 x 1024 pixels or more recommended)
Video card complying with DirectX® 9.0c
DirectDraw® overlay support
PCI Express™ x 16 is recommended
Ultra DMA-33 or higher
450 MB or more free space for installing software
Recording to optical discs or SD cards requires twice the amount of free space as the size of the disc or SD card to be
●
created. When automatically splitting data over multiple DVDs, 17 GB of free space are required.
If the compression setting is enabled, errors will occur during recording. Clear the check for [Compress this drive to
●
save disk space] in [Properties] for the hard disk drive.
Windows Vista®: Microsoft® DirectX® 10 (preinstalled in Windows Vista®)
Windows® XP/2000: Microsoft® DirectX® 9.0c (preinstalled in Windows® XP SP2)
Installing the software on a computer that is not compatible with these versions DirectX® may cause the computer to
●
stop operating normally. If you are unsure if your PC is compatible, contact the manufacturer.
DirectSound® support
CD-ROM drive (for installation)
(When writing to DVD, a compatible drive and media are necessary.)
USB port (Hi-Speed USB (USB2.0))
Microsoft® DirectX® 10.1 (preinstalled in Windows Vista® SP1)
9
Page 10
Operating environments
Introduction
Video cameras
connected via USB
Content
Other requirements
Even if the system requirements mentioned in these operating
●
instructions are fulfilled, some personal computers cannot be used.
Supplied CD-ROM is available for Windows only.
●
This software is not compatible with Microsoft
●
Windows® 95, Windows® 98, Windows® 98 SE, Windows® Me, and
Windows NT
Operation is not guaranteed on Microsoft
●
Windows® XP Media Center Edition, Tablet PC Edition and not
compatible with 64 bit operation systems.
When 2 or more USB devices are connected to a PC, or when
●
devices are connected through USB hubs or by using extension
cables, proper operation is not guaranteed.
Operation on an upgraded OS is not guaranteed.
●
Operation on an OS other than the one pre-installed is not
●
guaranteed.
This software does not support the multi-boot environments.
●
Windows Vista®: Log on with an administrator account or a standard
●
user account before using this software. The software will not function
with a Guest account.
Windows® XP/2000: Log on with an administrator account before
using this software. (Installation and uninstallation of the software
requires an administrator account.)
This software does not support the multi-monitor environments.
●
For fonts and screen settings, use the standard Windows® settings.
●
Characters may not display properly depending on the settings.
This software cannot be used simultaneously with other time-shifting
●
image editing software or video capture products. Note that other
software running background processes, timer recording in particular,
may cause this software to malfunction.
®
.
Panasonic digital video cameras this software is provided with (SD card/Hard disk)
Content captured using Panasonic digital video cameras this software is provided with (SD card/Hard disk)
Mouse or equivalent pointing device,
SD card reader/writer (required for reading and writing to SD cards; performing these operations with SD cards 4 GB or
larger requires an SDHC-compatible SD card reader/writer),
and an environment with Internet access (required for online functions “YouTube Uploader”)
®
Windows® 3.1,
®
Windows Vista® Enterprise,
This software operates only when the built-in clock on the PC is set to
●
a value within the following range.
From 0:00 on January 1, 1970, to 23:59 on December 31, 2037.
If the built-in clock is set to a value outside this range, this software
may not be activated or operated properly.
This software can only handle images recorded with this software or
●
a Panasonic video camera that this software accompanied. Images
created with other video cameras, DVD recorders, software and
commercial DVD videos are not supported.
10
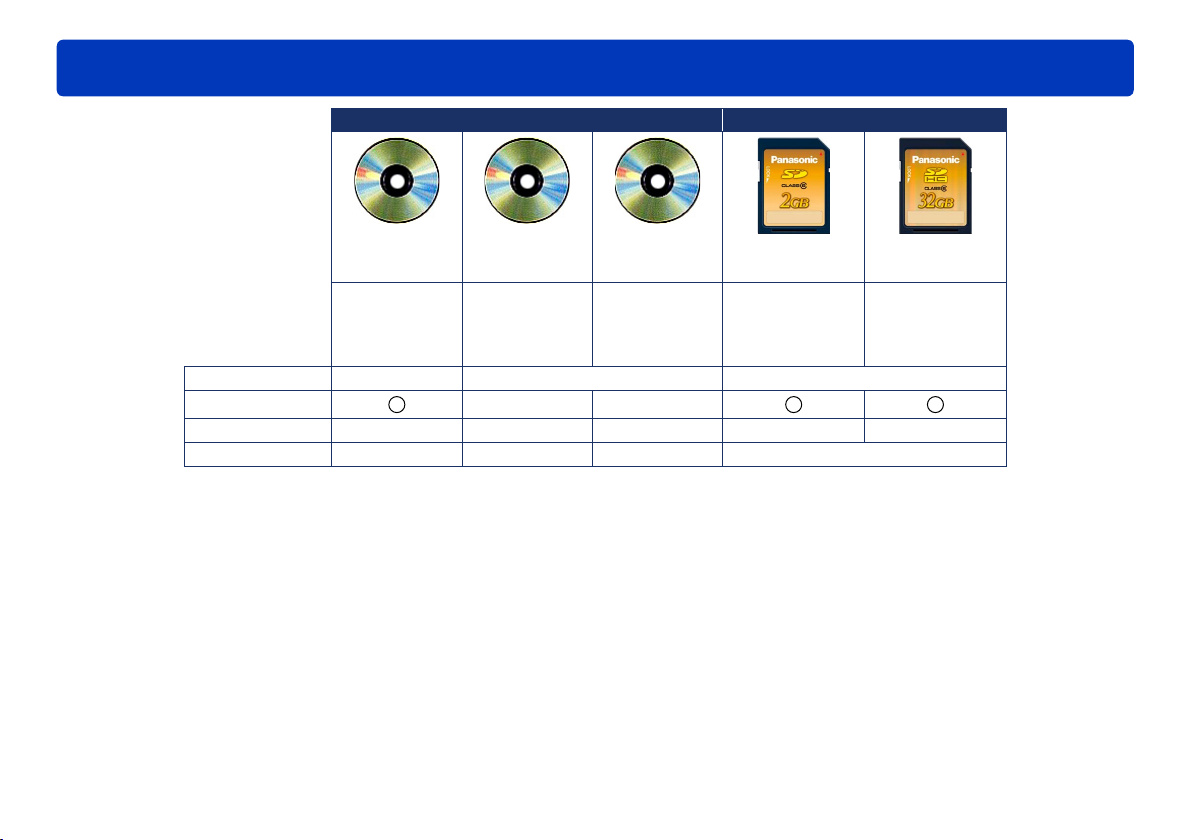
Page 11
Optical discs and SD cards supported for recording
DVD discs SD cards
1
12 cm
∗
2
∗
DVD-R DVD-RW SD
12 cm
Single sided/
12 cm
Single sided
256 MB - 2 GB 4 GB - 32 GB
Dual layer on
single side
3
∗
――
2∗4
――
∗
1
∗
2.6 GB and 5.2 GB double-sided DVD-RAM discs are not
supported.
2
∗
Can be formatted by using this software.
3
∗
DVD-Video can be played on most DVD players.
4
∗
Used DVD-RW discs can be used again for recording after
formatting.
5
∗
Includes miniSD cards (up to 2 GB), microSD cards (up to 2 GB)
and microSDHC cards (up to 8 GB). (As of November 2008.)
6
∗
Video recorded to SD cards must be at least 2 seconds long.
SD cards must have a capacity of at least 32 MB for video
recording. Additionally, operation is not guaranteed when
recording video to 32 MB – 128 MB SD cards.
SD cards of 8 MB – 128 MB can be used to store photos.
7
∗
SD cards must be formatted by using video cameras compatible
with this software.
memory card
Required
DVD-RAM
Single sided/
Double sided
Recording Format DVD-VR DVD-Video
Appending
Format Required
Picture ――― JPEG(DCF)
Playback of DVD-Video, DVD-VR and SD-Video content requires
●
equipment compatible with the respective formats.
8 cm discs are not supported.
●
Recording errors may occur, depending on the disc quality.
●
SD-Video
7
∗
5∗6
∗
SDHC
memory card
Required
∗
Introduction
7
11
Page 12

Recording length of SD cards
For SD-Video format
Approximate Recording Length Per Card
Recording mode
SD card capacity
(Highest picture quality)
4 GB 50 min 1 h 40 min 3 h 20 min
8 GB 1 h 40 min 3 h 20 min 6 h 40 min
16 GB 3 h 20 min 6 h 40 min 13 h 20 min
32 GB 6 h 40 min 13 h 20 min 26 h 40 min
XP
SP
(Standard)
(Longest recording time)
Introduction
LP
12
Page 13

Preparation
Connect the video camera to a computer
By connecting a compatible video camera to your computer with the included cable, you can import content on the internal recording media of
the video camera or on the SD card installed in the video camera to your computer or create discs.
Important
To avoid draining the battery of notebook computers or video
cameras, use an AC adapter with these devices.
Start the computer.
1
Turn on the video camera.
2
Connect the video camera to a computer.
SELECT USB FUNCTION
WEB MODE
DVD COPY
PC/RECORDER
PictBridge
ENTERSELECT
(Example of display on the
video camera)
If this type of message is
displayed, close the window.
3
Insert the USB cable included with the video camera firmly
into the USB port.
On the video camera, select [PC/
4
RECORDER].
This message varies depending on the video camera.
(Follow instructions in the video camera manual to complete
the settings for connection to a computer.)
Confirm that the video camera is
5
recognised by the computer.
The video camera is correctly recognised by the computer if
the video camera is added as a drive in [Computer] (or [My
Computer]).
(Example of display)
13
Page 14
Connect the video camera to a computer
Preparation
Tip
For further details, also refer to the video camera manual.
●
WEB MODE-compatible video cameras may display the YouTube
●
Uploader window. (Close the window when not using this function.)
To record to optical discs or SD cards, use a disc drive or SD card
●
reader/writer. (Some video cameras support recording to the SD card
in the video camera.)
Do not operate the video camera or disconnect the USB cable
●
during the transfer of video camera data. The software may
malfunction, and data may be lost.
SD card connection
When using an SD card slot or reader/writer, connect the device
before starting this software. (For connection instructions, refer to
the Operating Instructions of the computer or SD card.)
●
If you connect the device after startup, select the drive on the
[SD] tab of the [Settings] window, and then click [OK].
(→82)
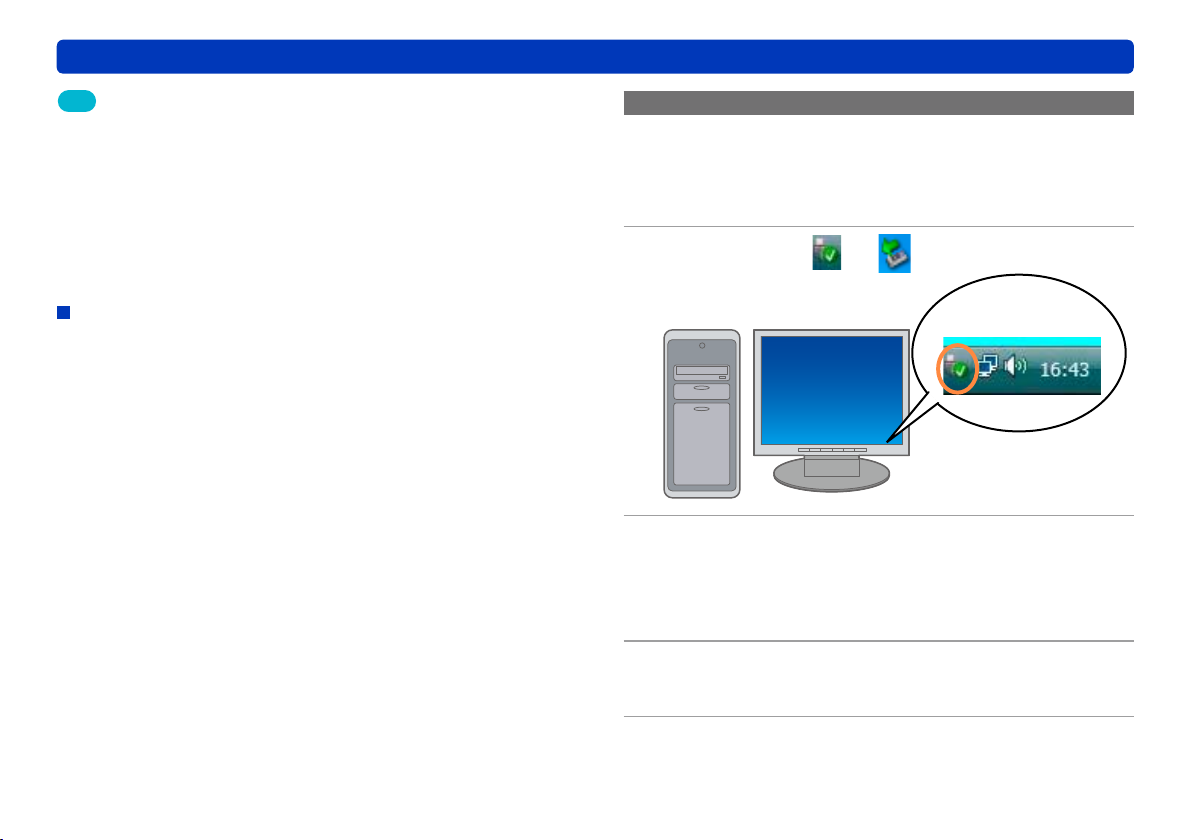
Disconnecting the video camera from the computer
Confirm that the video camera is not
1
recording or being accessed in some
way.
Double-click or in the task tray.
2
Example of the
task tray icon
Select [USB Mass Storage Device] and
3
click [Stop].
If multiple USB devices are displayed, you can double-click
each to check the video camera.
Disconnect the USB cable from the
4
computer.
Turn off the video camera.
5
14
Page 15
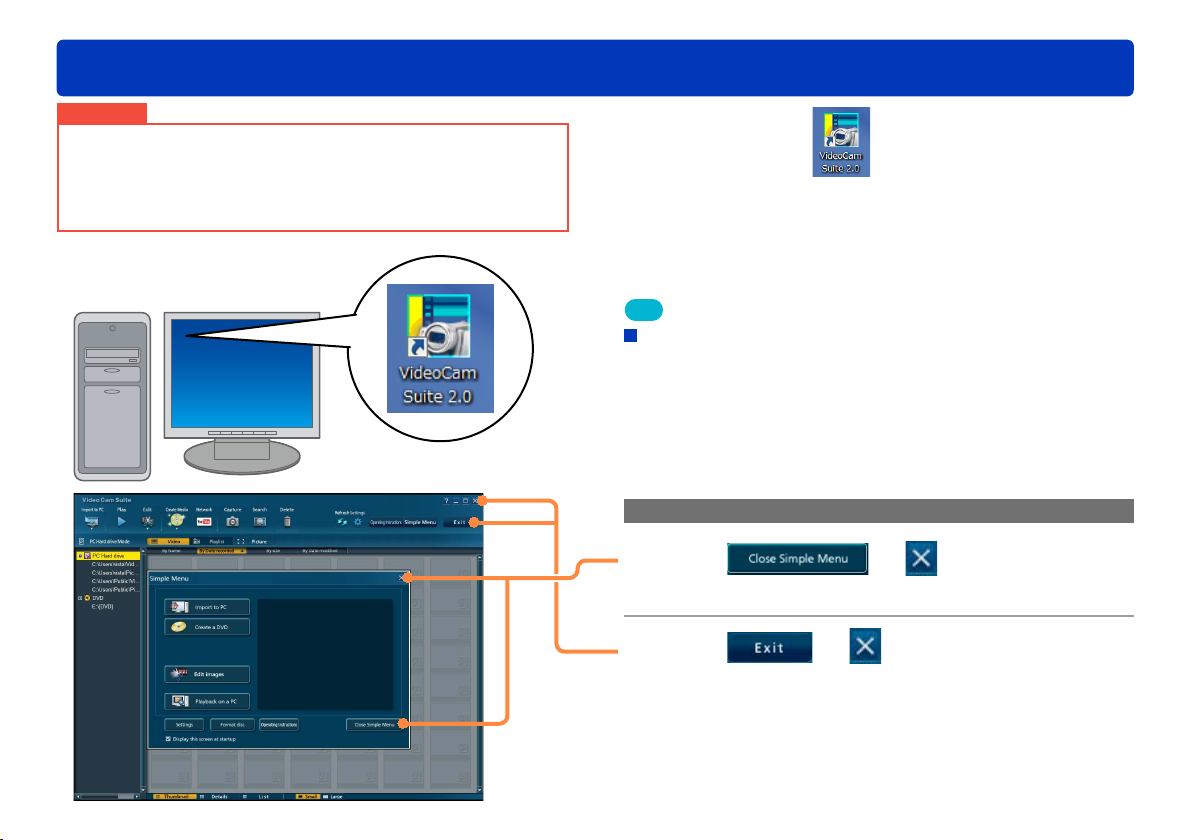
Starting the software
Important
Do the following before starting the software.
– Close other software and resident programs.
– Disable the screen saver or power-saving functions (functions to
make the computer enter standby or sleep mode when a specified
time has elapsed without any operations on the PC).
Preparation
Double-click on the desktop to
1
start the program.
Startup is also possible by selecting [Start]→[All Programs]→
[Panasonic]→[VideoCam Suite 2.0]→[VideoCam Suite].
Tip
First startup
A window is displayed regarding the licence agreement. Read the
●
agreement carefully before continuing.
From the Start menu, select [All Programs]→[Panasonic]→
●
[VideoCam Suite 2.0]→[Read this before starting], and then read the
supplemental explanations and late-breaking information.
Exiting the software
Click or .
1
The “Simple Menu” is closed.
Click or .
2
15
Page 16
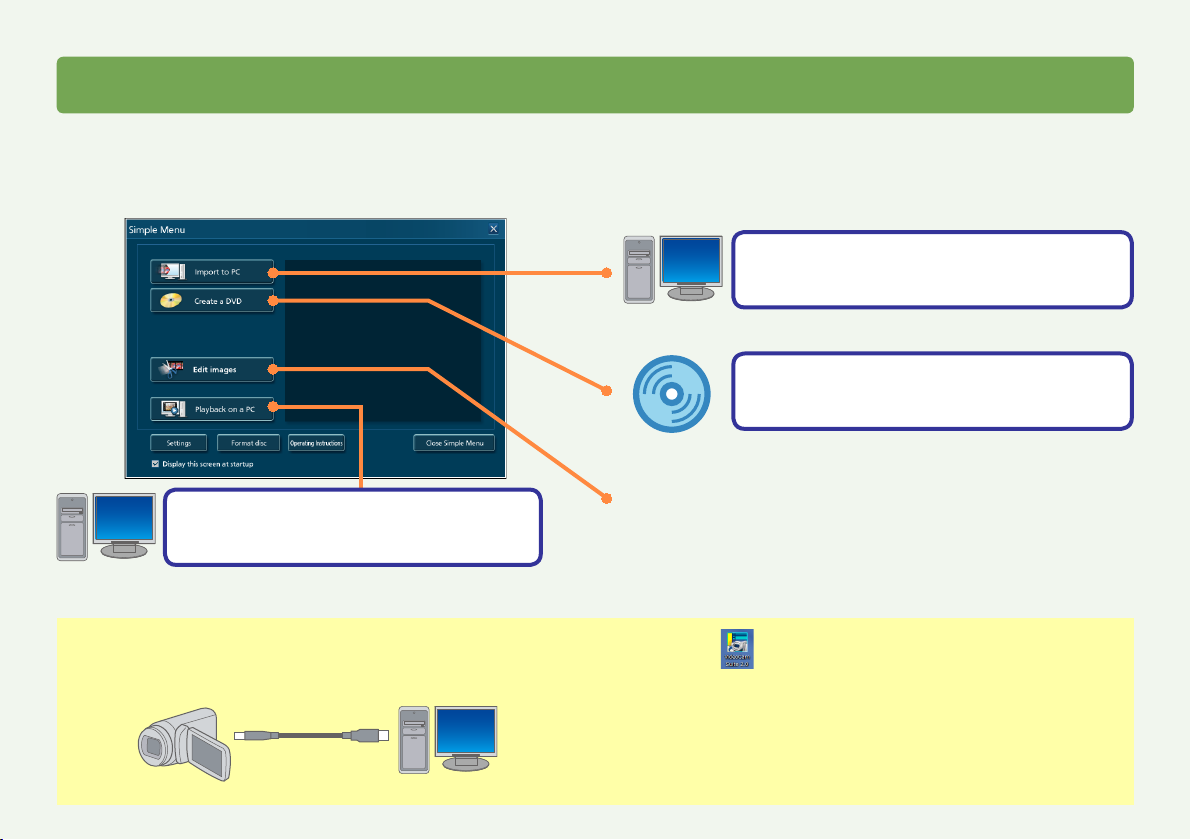
Basic operations
Feature overview
This section summarizes basic software operations. The following operations are possible using the [Simple Menu].
If the main window
(→26) is displayed instead of this one, click [Simple Menu] in the upper-right corner to display the [Simple Menu]. ●
Simple Menu
Viewing content you have imported
to your computer (→22–24)
Preparation:
Connect the video camera to the computer (→13)
●
If you have used the video camera to record content on an SD
card, insert that card in the video camera.
Video content or digital photos on your video camera
Import (save) content to
your computer (→17–19)
Recording on discs in
DVD-Video format (→20–21)
Advanced features (→25)
Double-click on the desktop to start the program. ●
(Startup is also possible by selecting [Start]→[All Programs]→
[Panasonic]→[VideoCam Suite 2.0]→[VideoCam Suite].)
The [Simple Menu] is displayed.
16
Page 17
Basic operations
Importing content to a computer ([Simply Import to PC])
Video content or digital photos on your video camera can be imported to your computer, where it will be grouped by recording date.
Preparation:
Connect the video camera to the computer (→13)
●
If you have used the video camera to record content on an SD
card, insert that card in the video camera.
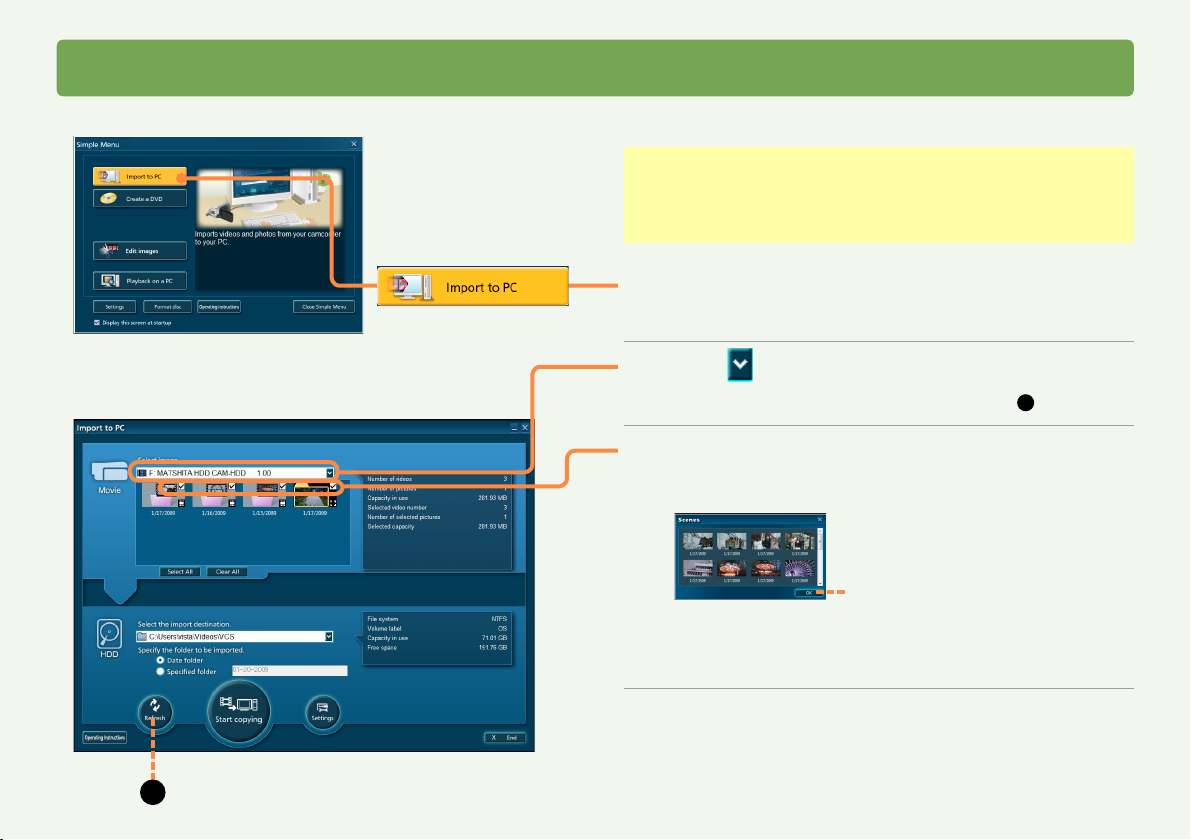
Click [Import to PC].
1
The [Import to PC] window is displayed.
Simple Menu
Click and select the video camera.
2
If the video camera is not listed, click [Refresh] (A). ●
Select items to import.
3
To check the content, as shown below, double-click a thumbnail
●
(small image). (Up to 24 thumbnails.)
Close confirmation window
A
Each time you click, items are selected or cleared.
●
You can select content based on the recording date. For
●
selection at a more detailed level (scenes) (→28)
17
Page 18
Importing content to a computer ([Simply Import to PC])
B C
Basic operations
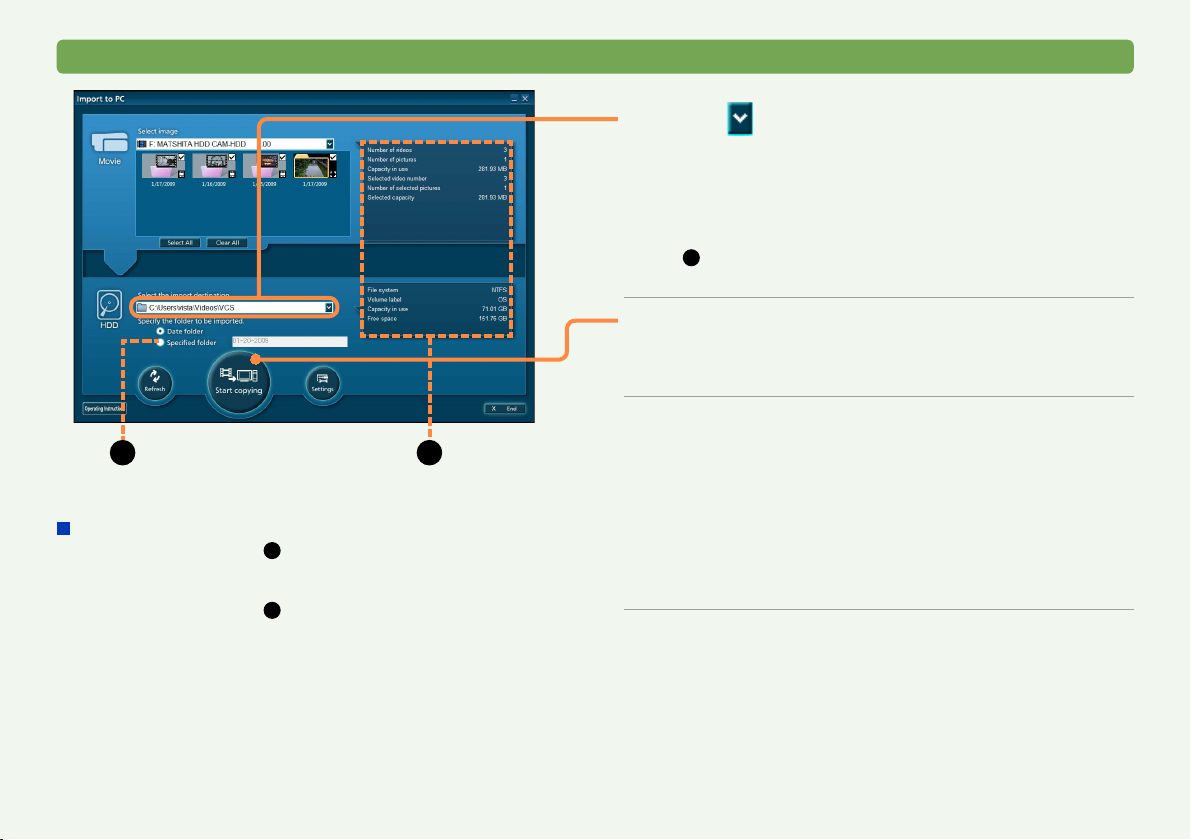
Click and select an importing
4
destination (a folder on your computer).
Subfolders for each recording date are created in the selected
folder, and the content is imported there.
Recording dates are used for the subfolder names.
To import all content to a single folder, select [Specified folder]
●
(B) and enter the name in the text box next to this option.
Note that these characters are not supported: \ / : * ? " < > |
Click [Start copying].
5
This button is not available unless you have selected at least
●
one video or photo.
Click [OK] when the confirmation
6
message is displayed.
If you click [Cancel], the previous window is displayed.
●
If importing is not possible
If the information area (C) displays yellow letters, nothing is
●
selected for importing, no media is loaded, or there is a similar
problem.
●
If the information area (
enough free space in the importing destination, or there is
another similar problem.
) displays red letters, there is not
C
Importing now begins, and the status is shown in the progress
indicator.
Importing the data takes time. Do not operate the computer until
●
importing is finished.
To cancel importing in progress, click [Cancel].
●
Click [OK] when a message is displayed
7
indicating importing is finished.
18
Page 19

Importing content to a computer ([Simply Import to PC])
Storage locations of imported content
Content is imported to subfolders (named with dates) in the folder
selected in step
To rename these date folders or your specified folder after
●
importing, right-click the folder and select [Properties], and then
change the name in [Title]. (Names are a maximum of 64 singlebyte characters.)
Content on optical discs or SD cards can also be
imported to your computer
In step 2, select the disc or an inserted SD card instead of your
video camera.
●
Top menus are not imported if you select only some items with
a top menu for importing.
Tip
Register a new folder to import content to a destination other than
●
folders displayed in step 4. (“Registering new folders” →31)
For further details on methods of importing (→28)
●
4, or to your specified folder.
Folder selected in step 4
Content imported here
(example: date folder)
Basic operations
19
Page 20
Basic operations
Recording on discs in DVD-Video format (Simply Create DVD-Video Disc)
Video content captured with a video camera can be recorded on DVD discs. DVD discs recorded this way can be played on most DVD players.
●
For a list of supported discs
●
Content that does not fit on a single disc will be automatically split and recorded over multiple discs. However, this function is not available if
the work area file system is FAT32. ([Work area setting]
●
Top menus (an interface for discs similar to a table of contents
menu design
●
If your video camera supports the “DVD COPY function”, you can automatically record the video content by performing some simple
operations.
Simple Menu
(→80)
(→68)
(→11)
→79)
→51) are also created automatically. For instructions on changing the top
Preparation:
Connect the video camera to the computer (→13).
●
If you have used the video camera to record content to an SD
card, insert that card in the video camera.
●
Load the DVD-R/RW disc to record to.
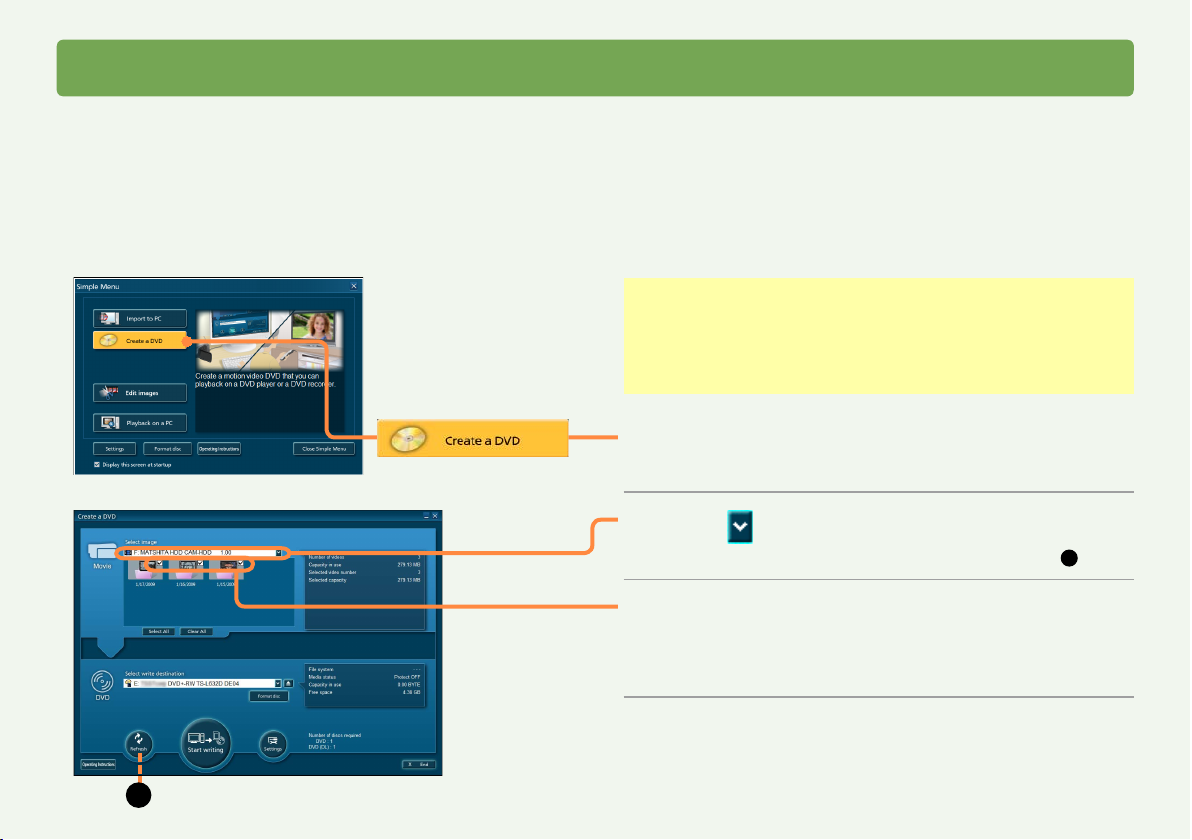
Click [Create a DVD].
1
The [Create a DVD] window is displayed.
Click and select the video camera.
2
If the video camera is not listed, try clicking [Refresh] (A). ●
A
Select the items to record.
3
Each time you click, items are selected or cleared.
●
You can select content based on the recording date. For
●
selection at a more detailed level (scenes) (→28)
20
Page 21
Recording on discs in DVD-Video format (Simply Create DVD-Video Disc)
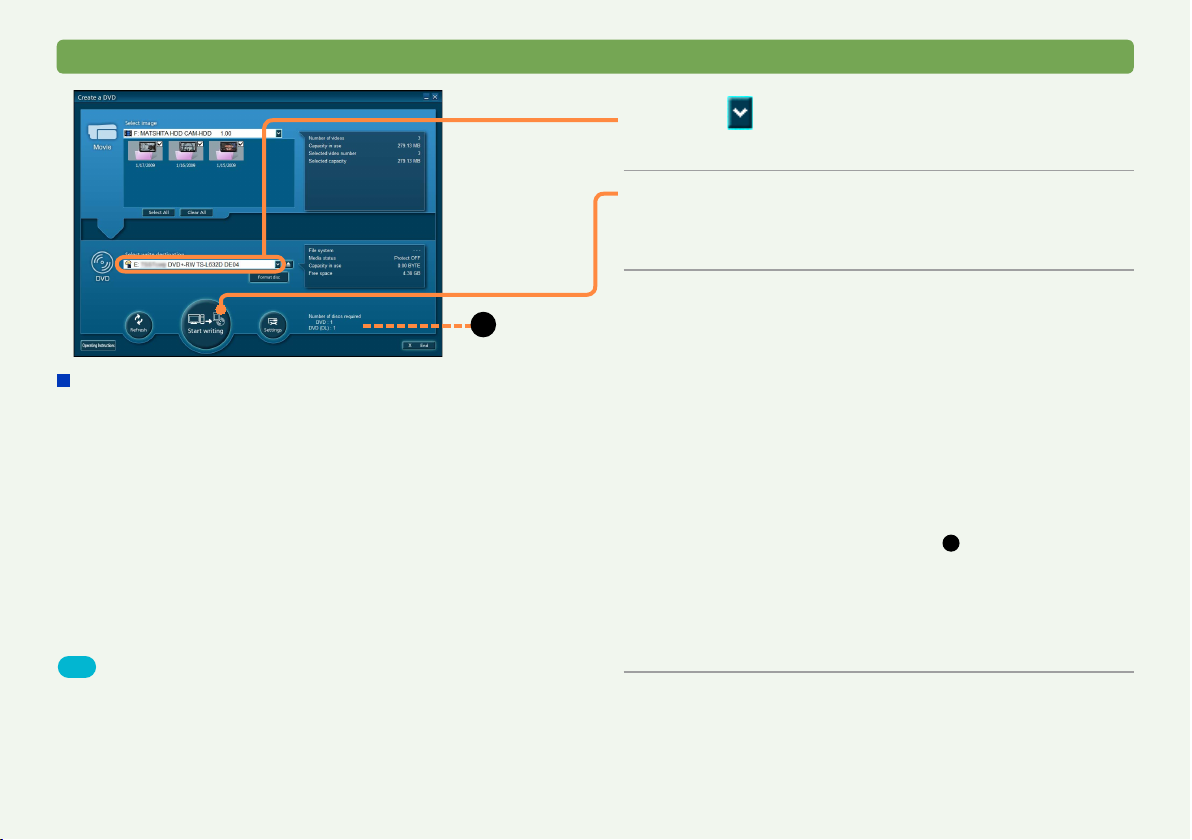
Click and select the DVD disc to
4
record to.
Click [Start writing].
5
This button is not available unless you have selected at least
●
one item.
Click [OK] when the confirmation
6
B
Content on SD cards or on your computer can also be
recorded to a DVD disc
In step 2, select an inserted SD card or a folder on your
computer instead of your video camera.
●
Data cannot be imported between the same kinds of media,
such as from one DVD disc to another or from one SD card to
another.
●
Different media cannot be used to record to a single media.
●
When the data size of one scene exceeds that of a single disc
after editing
discs. First, split the scene using “Dividing scenes”
edit function to reduce the size so that it can fit on a single disc,
and then record the data.
Tip
Discs created this way are for playback only. Additional content
●
cannot be recorded on them.
Lower-performance computers may require a significantly longer time
●
for disc recording.
Digital photos cannot be recorded with this function. To record photos
●
(“Recording photos”
For further details on recording on various media (→50)
●
(→35), the scene cannot be recorded on multiple
(→41) of the
→65)
message is displayed.
If you click [Cancel], the previous window is displayed.
●
Recording now begins, and the status is shown in the
progress indicator.
●
It takes time to record all the data. Do not operate the computer
until recording is finished.
●
Clicking [Cancel] when changing discs or during data conversion
will stop recording in progress. However, recording cannot be
stopped when data is being written.
●
Content that does not fit on a single disc during DVD recording
will be split and recorded over multiple discs. The approximate
number of discs needed is indicated (B). Follow the instructions
displayed to switch to a new disc.
●
During multi-disc recording, you can stop recording when it is
time to load the second or subsequent disc. Information about
the remaining content will be displayed then. To record the
remaining content later, refer to this information and select the
content again, and then resume recording.
Click [OK] when a message is displayed
7
indicating importing is finished.
Basic operations
21
Page 22
Viewing content on a computer
Video content and photos you have imported to your computer can be viewed on your monitor.
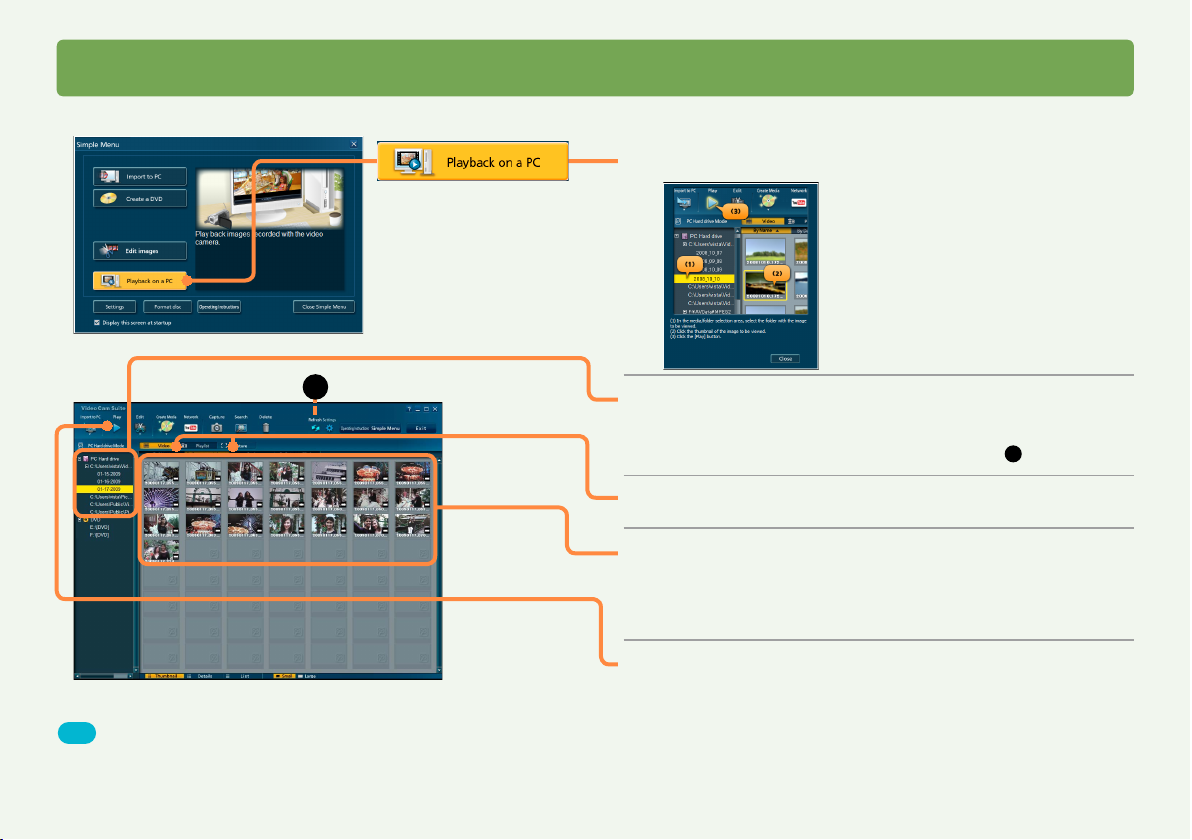
Click [Playback on a PC].
1
Simple Menu
Basic operations
After the window for assistance is
displayed, check the information and
click [Close] to close it.
A
Main Window
Tip
Alternatively, in step 2 you can select a connected video camera or
●
inserted media. Content shown as thumbnails can be played. For
further details on playback (→32)
Click the folder where you imported the
2
content to.
If the folder is not listed, try clicking [Refresh] (A). ●
Click [Video] or [Picture].
3
Click the folder or thumbnail for playback.
4
Content can also be played by right-clicking and selecting
●
[Playback] in the menu displayed, or by double-clicking
thumbnails.
Click [Play].
5
The selected video or photo is now played in the preview
window.
●
(→23–24)
For videos, selecting a folder will play all clips in the folder.
Selecting a thumbnail will play all scenes in the folder after that
scene, one after another.
22
Page 23
Viewing content on a computer
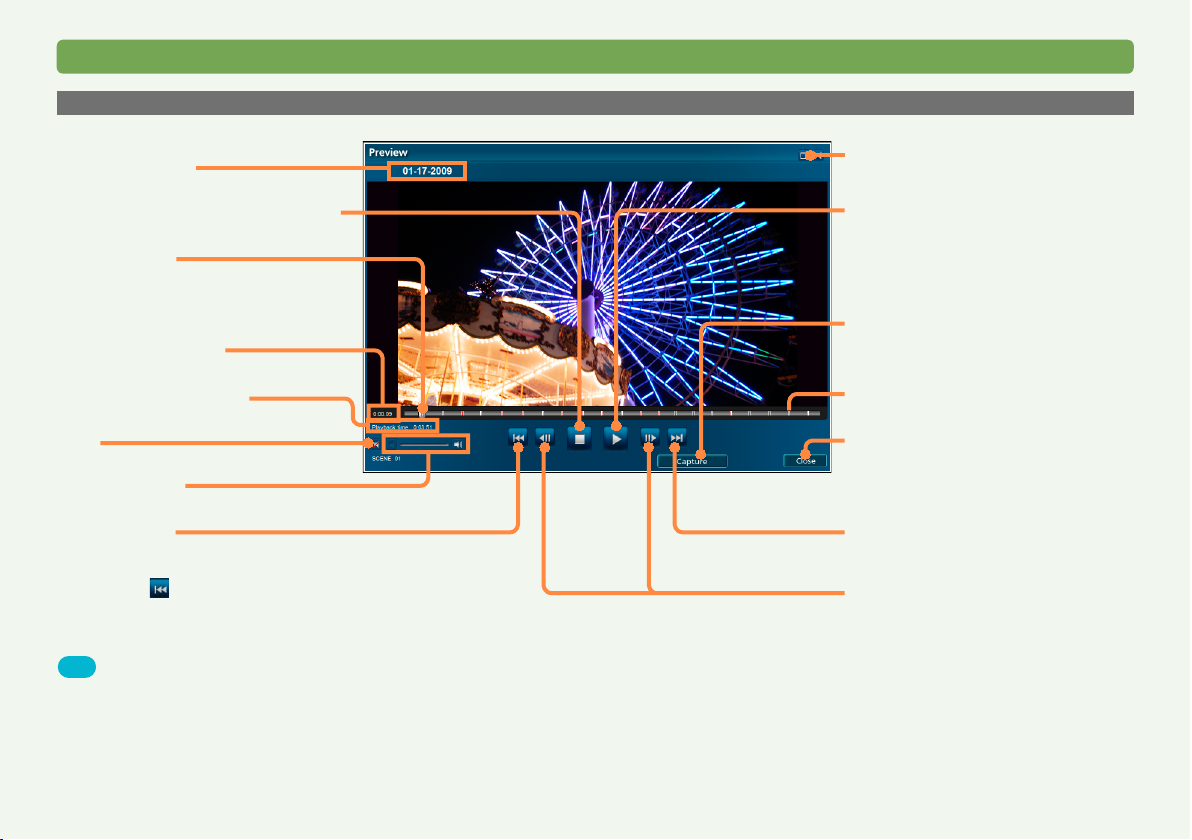
Playing video content
Basic operations
Current video title
Stop playback, return to start of video
Playback slider
Move the slider to change the
playback position
Current playback time
Total video playback time
Mute
Volume up/down
Previous video
Return to the beginning of the current
video
If you click within 1 sec. of start,
●
playback returns to beginning of the
previous video.
Tip
If no action is taken for about 3 seconds in full screen mode, the
●
controls are hidden. Move the mouse to display them again.
Double-click the screen to view content in full-screen mode. Double-
●
click again to view at the original size.
The [Capture] button is not shown during playback of video in DVD-
●
VR format.
Preview window for DVD-VR format
●
(→87)
View in full-screen mode
Play/Pause
Create still pictures from the paused
(→70)
video
Scene marker
Close window
Next video
Reverse/forward frame by frame
(when paused)
23
Page 24
Viewing content on a computer
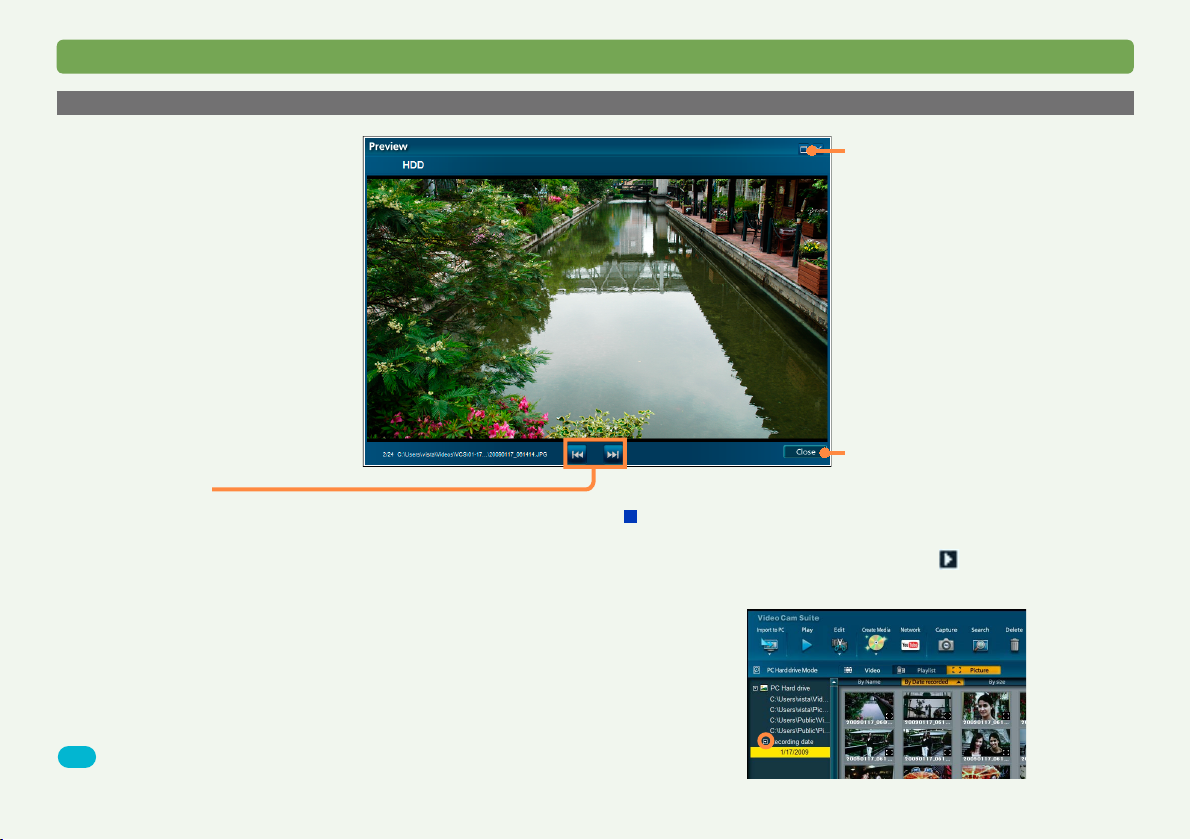
Viewing photos
Previous/next photo
Basic operations
View in full-screen mode
Close window
Viewing photos by recording date
You can view photos saved on your computer by recording date.
In the media/folder selection area, click
under [PC Hard drive]. Select a desired date to display all photos
captured on that date in the content viewing area.
by [Recording date],
Tip
Double-click the screen to view content in full-screen mode. Double-
●
click again to view at the original size.
24
Page 25
Advanced Features
Feature overview
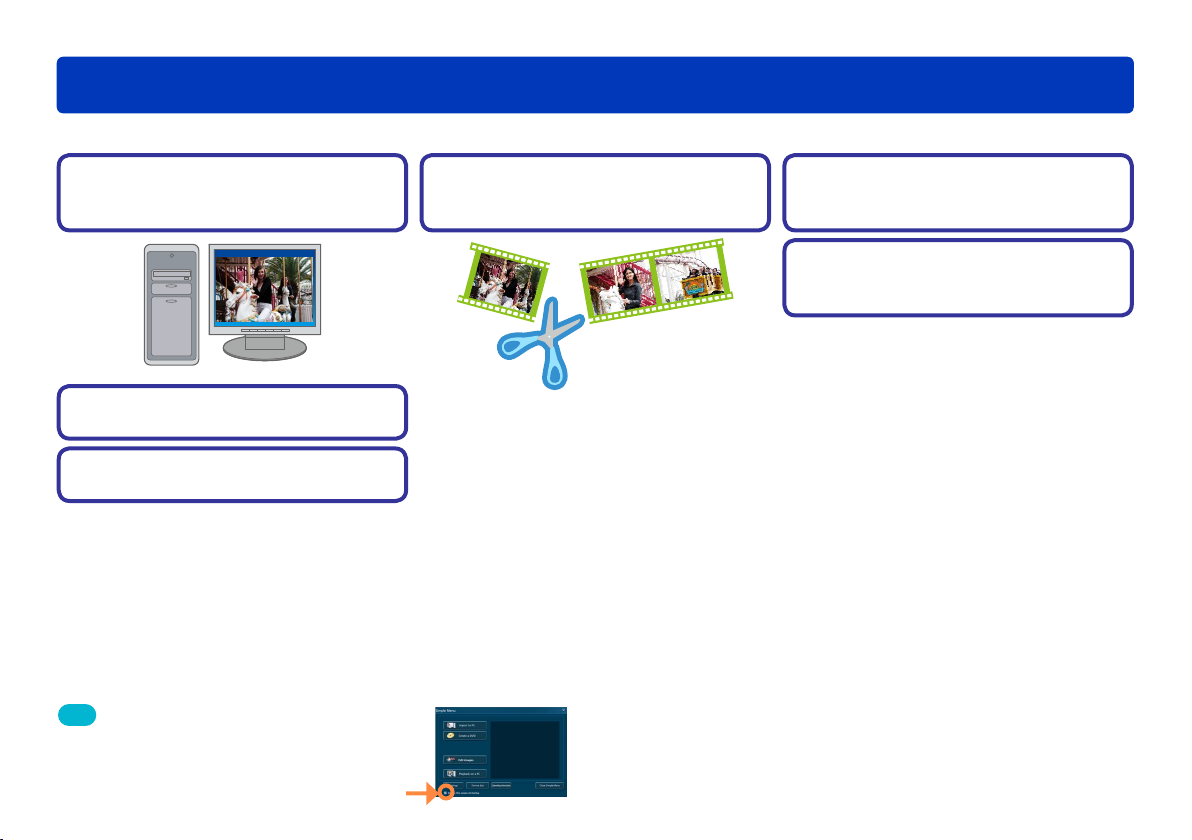
This section describes more advanced software operations. The following operations are possible.
Import content to your
computer (→28–31)
Edit content on your
computer (→35–49)
Record on optical discs and
SD cards (→50–69)
Use convenient features
(→70–75)
• Create still pictures from video
• Combine scenes
• Search for desired content
Play content (→32–33)
Delete content (→34)
Use the main window (→next page) for general operations such as importing, playback, and editing. This window is displayed when you close
the Simple Menu that appears immediately after the software starts up.
Tip
To prevent the [Simple Menu] from being
●
displayed at startup, clear the check mark by
[Display this screen at startup] in the lower-left
corner of the [Simple Menu].
• Deleting unnecessary portions of content
• Dividing scenes
• Assign the playback order
• Adding opening titles
• Adding scene transitions
• Edit digital photos
• Protect content/rename content
• Upload content to YouTube
25
Page 26
Feature overview
Main window
Advanced Features
Control buttons
Type of content
Video: video content
●
Picture: photo or other still picture
●
Playlist (shown only on video cameras
●
that support playlists)
Rearrange display order
Click to sort in ascending (▲) or
●
descending (▼) order. The order changes
each time you click.
For playlists, [By Date recorded] indicates
●
the order in which playlists were created
or updated.
Change display format
Information shown when viewing content
●
by [Details] varies depending on the type
of content.
Media/folder selection area
[Panasonic Video Camera]: Detected video cameras
[PC Hard drive]: Content imported to the computer using this software
[PC Hard drive] (Displayed when the [Picture] tab is selected):
Digital photos imported to the computer using this software
[SD]: Detected SD card drives
[DVD]: Detected DVD drives
Access the [Simple Menu] (→16)
Display the [Settings] panel (→79–82)
Update information in the areas for
media or folder selection and content
previewing
Content preview area
Content of media or folders selected in
●
the media/folder selection area is shown
here.
Resize thumbnails
By default, small thumbnails are
●
displayed.
Click to expand listed items. (Click again to close the
●
information.)
To examine media or folders:
This example illustrates how to examine video camera
content.
Click directly under [Panasonic Video Camera]. (The
file path, indicated here by G:\, varies depending on
the computer used.)
If nothing is listed under [Panasonic Video Camera], click ,
●
which will change to .
●
If [Panasonic Video Camera] is not listed, try clicking [Refresh].
26
Page 27
Advanced Features
Feature overview
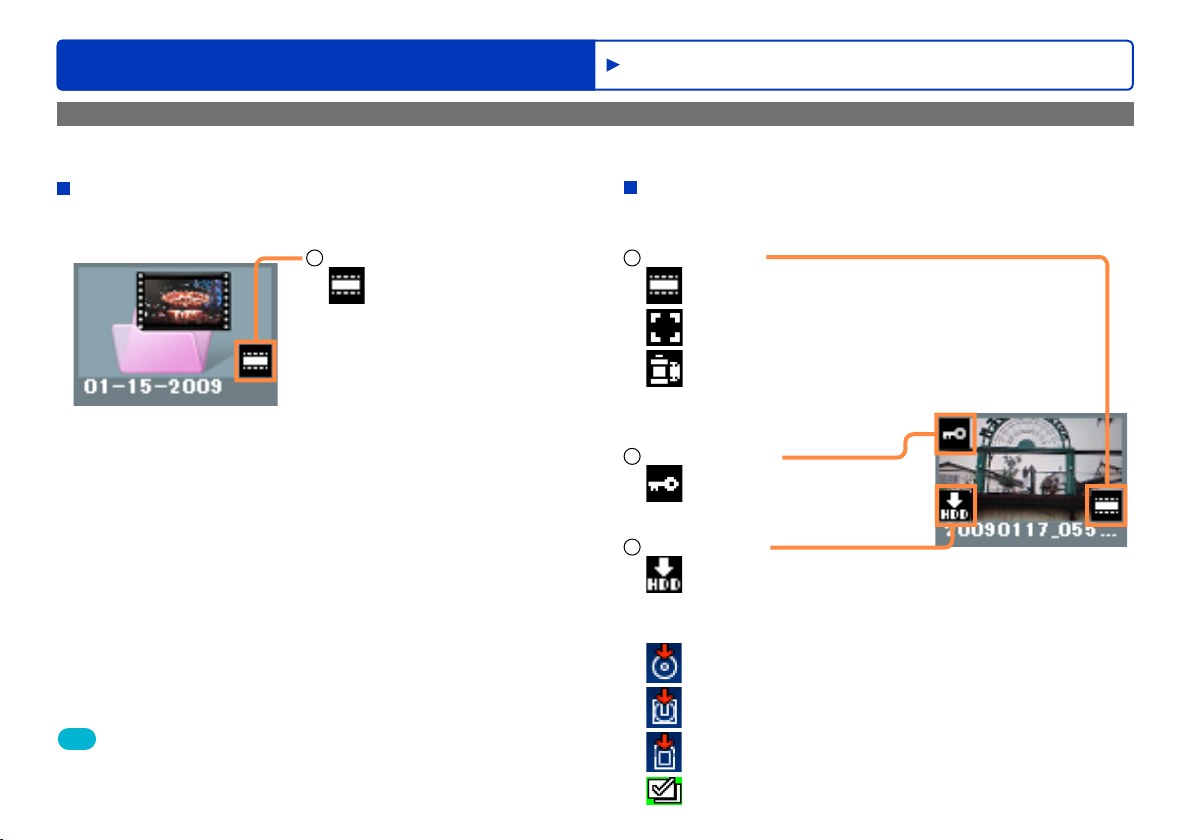
Content preview area
Content in the preview area is displayed as folders or thumbnails.
Folders
When importing to a date folder, videos with the same recording
date are saved in the same folder.
Type of content
1
: Video
Main window
Thumbnails
Thumbnails are small images representing video content or
photos.
Type of content
1
: Video
: Photo or other still picture
: Playlist
(shown only on video cameras
that support playlists)
Protection setting
2
: Protected content
Importing status
3
: Imported to the computer
(Shown only for content on the internal recording media of
the video camera or on the SD card installed in the video
camera. Not shown for SD card devices.)
: Recorded on DVD-R/RW disc
Tip
Up to 9,999 scene and photo thumbnails can be displayed.
●
For large amounts of content, it may take some time to display
●
thumbnails.
: Recorded on DVD-RAM disc
: Recorded on SD card
: Recorded using the DVD COPY function (→68)
27
Page 28
Advanced Features
Importing content to a computer ([Import to PC])
Videos and photos on the internal recording media of the video camera, an SD card installed in the video camera, an SD card which has been
connected using an SD card slot or a device such as an SD card reader/writer, or optical discs created with this software can be imported to
your computer. This content can also be edited after it is imported to the computer.
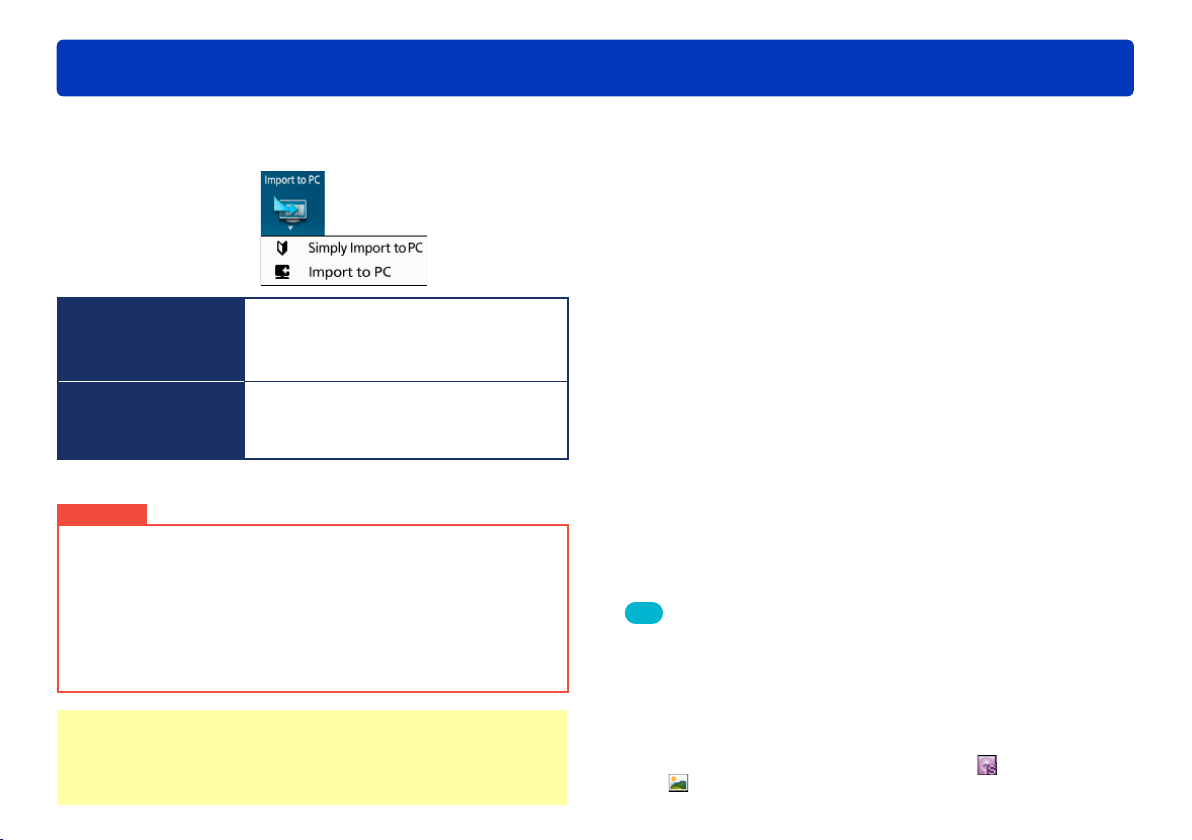
On the main window, click to display the [Import to PC] menu.
Used when importing all content to the
Simply import to PC
(For details →17)
Import to PC
(See information
starting on the next
page)
Important
Only video content or photos can be imported to your computer
●
using this software. Other data cannot be imported.
Importing requires 1.3 times more free space than the size of the
●
content.
Top menus are not imported.
●
Do not use Windows Explorer or other software to delete, modify,
●
or move content (folders or files) imported to the computer using
this software. This prevents the content from being managed by this
software.
computer.
●
Able to select images based on the
recording dates
Used when importing specific content.
●
Individual scenes can be selected.
Preparation:
Load the media to import from (connect the video camera and
●
computer, for example (→13))
When using SD cards, see “SD card connection” (→14).
(→35)
Tip
Note that content captured while using the world time function of
●
video cameras is imported to a separate folder even if it has the same
recording date.
DVD-Video or DVD-VR format content must be smaller than 4 GB
●
when it is imported to a computer hard disk in FAT or FAT32 format.
Importing playlists will produce content split into multiple scenes. To
●
view scenes of imported playlists, click the [Video] tab.
Up to 9,999 videos and photos can be stored in
●
and [PC Hard drive], respectively. (The maximum capacity may be
less than this, in some cases.)
[PC Hard drive]
28
Page 29

Importing content to a computer ([Import to PC])
A
Advanced Features
Click the drive or folder to import from.
1
If the drive or folder is not listed, try clicking [Refresh] (A). ●
Click [Video], [Playlist], or [Picture].
2
Click the content to select it for
3
importing.
Selected items are outlined in yellow.
To select multiple items, hold the [Ctrl] key while clicking the
●
thumbnails.
When a drive or folder is selected, all content in it is selected for
●
importing.
Click [Import to PC], and then select
4
[Import to PC].
The importing window (→next page) is displayed.
Importing is also possible by right-clicking items in step 3 and
●
selecting [Import to PC].
29
Page 30
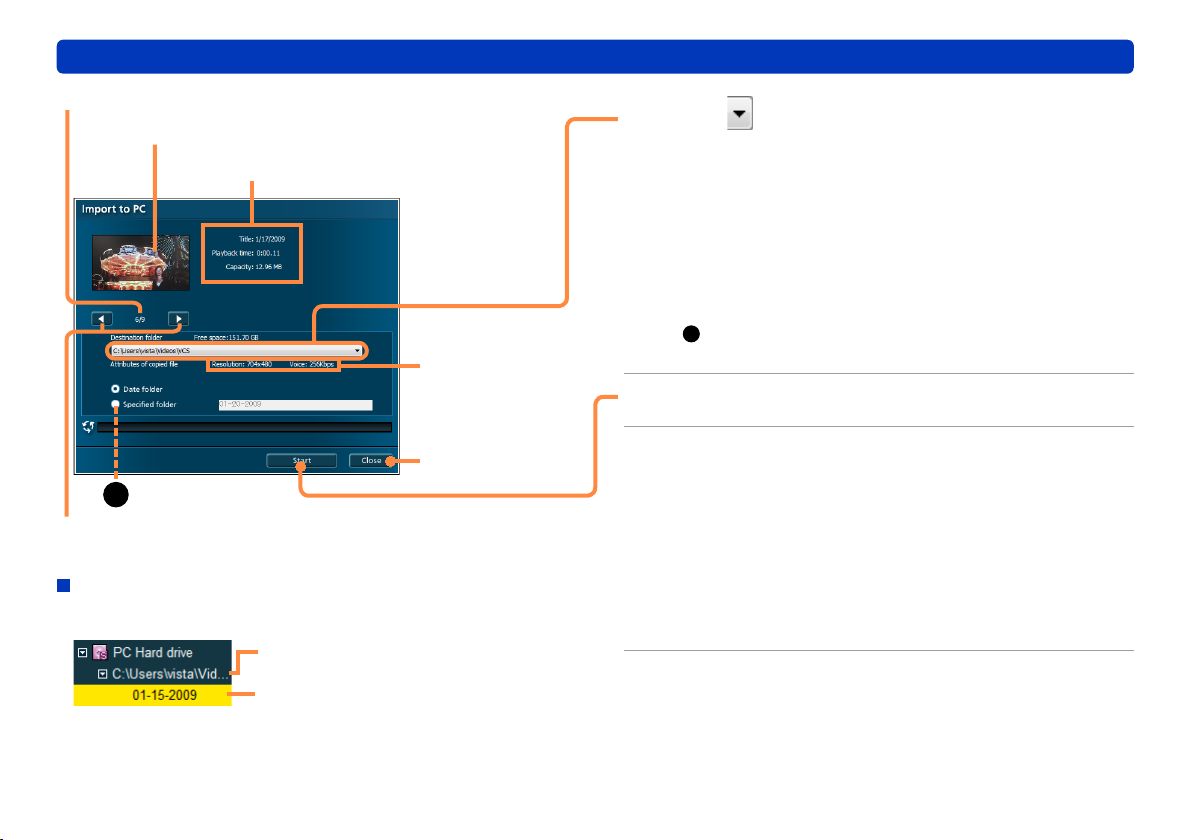
Importing content to a computer ([Import to PC])
Current item/total items
Thumbnail of content to import
Name, length, and size of content
Resolution and
audio format
Advanced Features
Click and select an import destination
5
(a folder on your computer).
You can register other folders on your computer, if desired.
●
(“Registering new folders”
Subfolders for each recording date are created in the selected
folder, and the content is imported there.
Recording dates are used for the subfolder names.
●
By default, folders are named with the most recent recording
date of content, in the order [month-day-year].
●
To import all content to a single folder, select [Specified folder]
(A) and enter the name in the text box next to this option.
Note that these characters are not supported: \ / : * ? " < > |
Click [Start].
6
→next page)
Close window
A
Previous/next
Storage locations of imported content
Content is imported to subfolders (named with dates or as
specified) in the folder selected in step
Folder selected in step 5
Content imported here
(example: date folder)
●
To rename these date folders or your specified folder after
importing, right-click the folder and select [Properties], and then
change the name in [Title]. (Names are a maximum of 64 singlebyte characters.)
5.
Click [Yes] when the confirmation
7
message is displayed.
To cancel this process, click [No].
●
Importing now begins, and the status is shown in the progress
indicator.
To cancel importing in progress, click [Cancel].
●
Importing the data takes time. Do not operate the computer until
●
recording is finished.
Click [OK] when a message is displayed
8
indicating importing is finished.
30
Page 31

Importing content to a computer ([Import to PC])
Registering or deregistering destination folders
Registering new folders
Click [Settings] on the main window.
1
(Otherwise, right-click [PC Hard drive] in the media/folder
selection area and select [Set Target folder].)
The settings panel is displayed.
Click the [PC HDD] tab.
2
Click [Add].
3
Select a folder to register and click [OK].
4
Click [OK] to close the [Settings] panel.
5
Folders you register are listed under [PC Hard drive] in the media/
folder selection area.
Advanced Features
Deregistering folders
Select the folder in [Registration folder] and click [Delete].
1
Click [OK] when the confirmation message is displayed.
2
Click [OK] to close the [Settings] panel.
3
Folders are only deregistered. The content itself is not deleted. ●
31
Page 32

Advanced Features
Playing content
You can play back the video content and photos stored on the internal recording media in the video camera, playlists on the video camera, an
SD card installed in the video camera, an SD card which has been connected using an SD card slot or a device such as an SD card reader/
writer, or on a disc created with this software.
●
Playback is possible only for content imported to the computer using this software. Content imported using Windows Explorer or similar
software cannot be played.
Preparation:
Load the media (insert media in the video camera and connect the
●
camera, for example (→13))
When using SD cards, see “SD card connection” (→14).
A
Click the drive or folder where content
1
for playback is stored.
If the drive or folder is not listed, try clicking [Refresh] (A). ●
Click [Video], [Playlist], or [Picture].
2
Click the folder or thumbnail for
3
playback.
For videos, selecting a folder will play all videos in the folder.
●
Selecting a thumbnail folder will play all scenes in the folder
after that scene, one after another.
Content can also be played by right-clicking and selecting
●
[Playback] in the menu displayed, or by double-clicking
thumbnails.
If you do not see the folder where desired content is stored,
●
select [Settings]→[PC HDD]→[Registration folder] (→80) and
switch to the drive where the desired content is.
Click [Play].
4
The content selected is now played in the preview window.
Sound is played in 2-channel mode.
For details about the preview window (→23–24)●
32
Page 33

Playing content
Tip
Top menus are not played. To play the top menu, use equipment that
●
supports top menu playback.
Depending on graphics features (such as [Windows Aero] in Windows
●
®
), your computer environment, and the content being played,
Vista
frames may be dropped and colour loss may occur during playback,
and playback may not be smooth. These problems are more likely to
occur in full-screen mode.
Additionally, in sections where the resolution or audio format changes,
noise may be produced, and playback may not be smooth.
For playlists, playback may stop momentarily when switching to the
●
next item, and the screen may go black.
If errors in reading a disc occur, playback may resume from the next
●
item after the affected position.
Advanced Features
33
Page 34

Advanced Features
Delete content
You can delete content imported to the computer using this software or content on SD cards in SD card slots or SD reader/writers. (Protection
of write-protected SD cards must be cleared first.) When using SD cards, see “SD card connection”
Click the folder where content for
1
deletion is stored.
Click the folder or thumbnail for deletion.
2
To select multiple thumbnails, hold the [Ctrl] key while clicking
●
the thumbnails.
Only one folder can be selected.
●
Click [Delete].
3
Click [OK] when the confirmation
4
message is displayed.
To cancel this process, click [Cancel]. ●
(→14).
Important
Once content has been deleted, it cannot be restored. Always
check content carefully before deletion.
When folders are deleted, all data in the folder is deleted, including
●
data other than the content.
Scenes that have been protected cannot be deleted. Additionally,
●
videos containing protected scenes cannot be deleted. First, clear
the protection. (→49)
Tip
Content can also be deleted by right-clicking thumbnails and selecting
●
[Delete] in the menu displayed.
When you delete all content in a folder, the folder itself is also deleted.
●
Deletion may take a long time, depending on the content.
●
34
Page 35

Editing content on your computer
Content imported to your computer can be edited. The following operations are possible.
Edit video content
(→36–47)
Deleting selected portions of a scene (→38)
●
●
Dividing scenes (→41)
●
Assigning the playback order of scenes (→42)
●
Adding opening titles (→44)
●
Adding scene transitions (→46)
Edit digital photos
(→48)
Protect content/rename
content (→49)
Advanced Features
Tip
Only video content and photos you have imported to your computer
●
can be edited. For information on importing (→17–19, 28–31)
Although files and folders for content imported to the computer using
●
other software may be displayed, they cannot be managed with this
software. Always use this software to import content to the computer.
New files are created after you edit content, leaving the original files
●
in the state before editing.
Editing requires an amount of free work space on the computer at
●
least equivalent to the size of the content for editing.
35
Page 36

Editing content on your computer
Editing video content (basic operations)
Video editing area
Advanced Features
Selecting scenes to edit
Click [Edit] and select [Video editing].
1
The video editing area is displayed.
Drag a scene to edit to the video editing
2
area.
Edit video content
Deleting selected portions of a scene (→38)
●
●
Dividing scenes (→41)
●
Assigning the playback order of scenes (→42)
●
Adding opening titles (→44)
●
Adding scene transitions (→46)
Saving edited videos
Click [Save].
1
Click and select a destination for saving
2
the file.
Edited scenes are saved in separate folders from the original
●
data.
When the destination hard disk is in FAT or FAT32 format,
●
MPEG2 files exceeding 4 GB cannot be produced.
Name of storage folder
(Can be changed as needed)
36
Page 37

Advanced Features
Editing content on your computer Editing video content (basic operations)
Click [OK].
3
Processing status is shown in the progress indicator.
When there are multiple scenes in the video editing area
●
Save each scene as an individual MPEG-2 file.
Combine scenes and save as a single MPEG-2 file.
To cancel editing, click [Cancel].
●
Click [OK] when a message is displayed
4
indicating that processing is finished.
Edited content is saved as a new file.
The file name is identified in the message indicating completion.
Click [Close] to close this window.
5
Tip
Recording date information will correspond to information of the
●
opening scene.
Up to approximately 12 hours of video content can be saved.
●
This software is only compatible with MPEG2 files with accompanying
●
information files.
Renaming files using Windows Explorer or similar software will
●
prevent the files from being managed by this software.
Conversion of some content may result in out-of-sync or dropped
●
frames, or conversion may fail.
Chapter points will not be maintained when creating DVD discs from
●
MPEG2 files produced with the [Merging into one scene] function.
(→56)
37
Page 38

Editing content on your computer
Editing video content (Delete partially)
Advanced Features
Deleting selected portions of content
Delete unneeded portions of video content or portions with shooting
errors as follows.
Only video content imported to your computer can be edited. First,
import the content to your computer.
Video content to be edited must be at least two seconds long. ●
Video editing area
(→17–19, 28–31)
Selected portion
Follow the steps in “Selecting scenes to
1
edit” (→36).
Click a scene.
2
Select only one scene. ●
Click [Edit] and select [Delete partially].
3
The [Delete partially] window is displayed.
Click to play the scene. Click to
4
pause playback at the starting position
for deletion.
Click to fine-tune the position. (→40)
Click [Set start point] to identify the
5
starting point.
Otherwise, you can drag ▼ to identify the starting point.
38
Page 39

Advanced Features
Editing content on your computer Editing video content (Delete partially)
Click again to resume playback.
6
Click to pause playback at the
ending position for deletion.
Click [Set end point] to identify the
7
ending point.
Otherwise, you can drag ▲ to identify the ending point.
Click [Select] to confirm this selection.
8
The portion that will be deleted is indicated in grey
●
Thumbnails of the starting and ending points are displayed.
●
To select multiple portions, repeat steps 3–7.
●
To clear the selection, click the corresponding thumbnail and
●
click [Release].
Play the video content to check the
For details about this window
(→next page)
Cancel editing
9
portion that will remain after deletion.
Click [Partially delete].
10
Results of editing are applied to the video editing area.
To save as a video
Follow the steps in “Saving edited videos” (→36). ●
39
Page 40

Advanced Features
Editing content on your computer Editing video content (Delete partially)
Image at the starting point
Selected portion
The portion that will be deleted is
indicated in grey
The ending edge of the selected
●
portion may not match the end
point, but the selection in grey is the
portion that will be deleted.
Length of content, from the
starting to ending point
Length of content retained
Length of content deleted
h: hours
m: minutes
s: seconds
f: number of frames
Section marker
Scenes are divided based on selected portions.●
Portion represented by the thumbnail
Image at the ending point
: Skip approx. 0.5 sec.
: Previous/next frame
Thumbnails at the beginning of each
section
Cancel editing
40
Page 41

Editing content on your computer
Editing video content (dividing scenes)
Scenes can be divided at desired positions.
Only content imported to your computer can be edited. First, import the content to your computer.
Video content to be divided must be at least four seconds long.
Follow the steps in “Selecting scenes to
1
edit”
Click a scene to edit.
2
Click [Edit] and select [Divide Scene].
3
The [Divide Scene] window is displayed.
Click to play the content.
4
Click to pause playback at the position
5
(→36).
Select only one scene.●
to divide scenes.
After pausing playback, you can adjust the position for division
●
by using the playback slider or previous/next frame buttons.
Content cannot be divided at a position where resulting scenes
●
would be less than two seconds.
Advanced Features
(→17–19, 28–31)
Playback
slider
h: hours m: minutes s: seconds f: number of frames
Previous/next frame buttons
Skip approx. 0.5 sec.
Click [Execute divide].
6
Results of editing are applied to the video editing area.
To save as a video
Follow the steps in “Saving edited videos” (→36). ●
41
Page 42

Editing content on your computer
Assigning the playback order/adding opening titles/adding effects
You can group content imported to your computer that was recorded on various dates and assign the playback order.
You can also add opening titles and scene transitions, such as fading.
Assigning the playback order
Click [Edit] and select [Video editing].
1
The video editing area is displayed.
Drag a scene to edit to the video editing
2
area.
Repeat this process to collect desired scenes.
●
To add video content or scenes from another folder, select the
●
folder and go to step 2.
Videos are expanded into scenes when added to the video
●
editing area.
To cancel this process, click [Close] (A).
●
Advanced Features
Video editing area
Tip
Changing the playback order of scenes/Deleting scenes in the video
●
editing area (→next page)
A
42
Page 43

Editing content on your computer
Advanced Features
Assigning the playback order/adding opening titles/
adding effects
Changing the order of scenes
1
Drag scenes to the desired position.
Deleting scenes in the video editing area
1
Click a scene to remove.
To select multiple scenes, hold the [Ctrl] key while clicking the
●
thumbnails.
2
Click [Delete].
1 2
Scenes are only removed from the video editing area. The content
●
itself is not deleted.
Deletion is also possible by right-clicking scenes and selecting
●
[Delete] in the menu displayed.
To save as a video
Follow the steps in “Saving edited videos” (→36). ●
43
Page 44

Editing content on your computer
Advanced Features
Assigning the playback order/adding opening titles/
adding effects
Adding opening titles
Titles can only be added to the opening scenes.
Preparation:
Arranging scenes and videos in the video editing area (→42)●
Click [Title].
1
The [Insert Title] window is displayed.
Enter the title and specify effects.
2
(For details about this window →next page)
If not all text is displayed, or if text covers images in the content,
●
change the font or reduce the size.
Click [OK].
3
A new opening title scene will be added. (This is indicated by
●
on the thumbnail.)
To change the titles, first delete the opening title scene, and
●
create a new title scene again.
To delete titled scenes in the video editing area, first delete the
●
adjacent scene labeled with an icon ( ).
Titles cannot be added to scenes labeled ( ).
●
44
Page 45

Editing content on your computer
[Insert Title] window
Advanced Features
Assigning the playback order/adding opening titles/
adding effects
Font
Font size
Text style
: Bold
: Italic
: Drop shadow
Title preview
Enter the title
(Up to 128 single-byte
characters on two lines.)
Title display duration
Click ▼ to specify how long
●
the title is displayed. (3, 5, or
10 seconds.)
Titles cannot be added to
●
scenes which lengths are less
than specified duration plus
2 seconds.
Add fade-in effects
Preview the title and
effects in the preview window
: Outline
Colour of outline [
Drop shadow colour [
Darken text background
Text colour
Click to select a colour. (→89)●
Text position
Cancel the title and effects
]
]
45
Page 46
Editing content on your computer
Effects are added here
Advanced Features
Assigning the playback order/adding opening titles/
adding effects
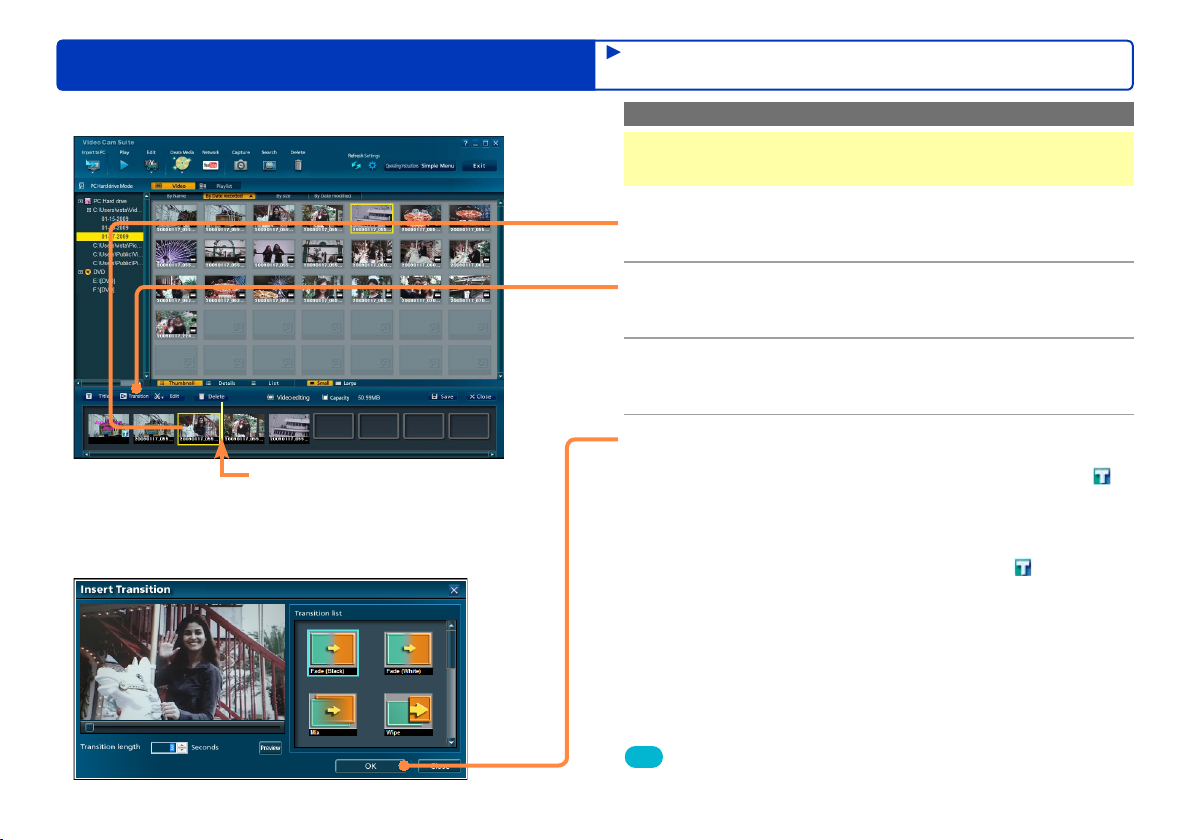
Adding scene transitions
Preparation:
Arranging scenes and videos in the video editing area (→42)●
Click the scene before the scene for
1
effects.
Click [Transition].
2
The [Insert Transition] window is displayed.
Specify the desired effect.
3
(For details about this window →next page)
Click [OK].
4
The effect is now added to the scene. (This is indicated by on
●
the thumbnail.)
To change the effect, delete the scene with the effect and create
●
a new one.
To delete scenes with effects in the video editing area, first
●
delete the adjacent scene labeled with an icon ( ).
Scenes with effects cannot be rearranged.
●
Tip
Effects cannot be added as the transition between scenes of different
●
aspect ratios.
46
Page 47
Editing content on your computer
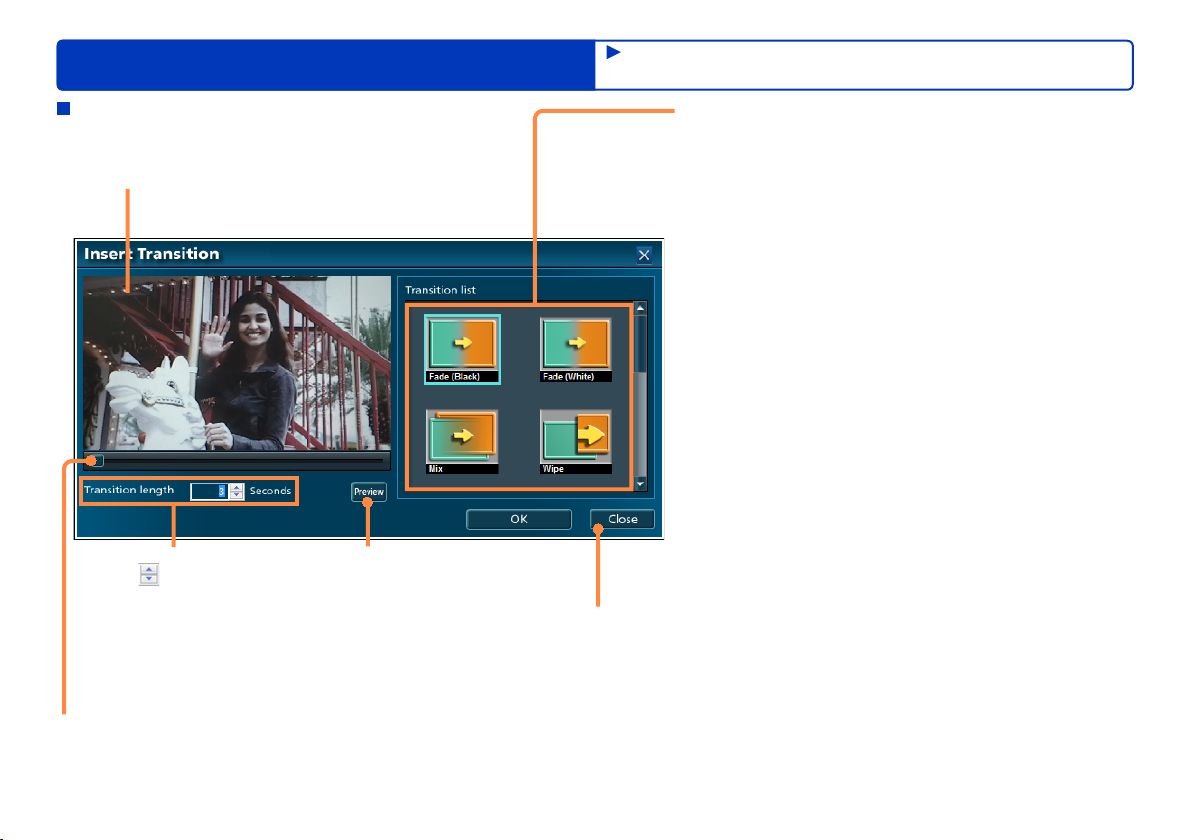
[Insert Transition] window
Preview window
Effect duration
Click to specify how long
●
the effect is displayed.
(3, 4, or 5 seconds.)
Transitions cannot be added
●
to scenes which lengths are
less than specified duration
plus 2 seconds.
Effect preview
Assigning the playback order/adding opening titles/
adding effects
Cancel the transition effects
Advanced Features
Effect
[Fade (Black)]/[Fade (White)]
The previous scene fades out to black or white, and the
next screen gradually fades in.
[Mix]
Scenes are momentarily superimposed as the next scene
fades in.
[Wipe]
The next scene is revealed as if a curtain is drawn back.
[Slide]
The previous scene slides right, revealing the next scene.
[Zoom-in]
The next scene appears in the centre of the previous
scene and gradually expands.
[Zoom-out]
The previous scene gradually shrinks, and the next scene
appears in the background.
[Stretch]
The previous scene shrinks, transforming into the next
scene.
[Corner wipe]
The next scene emerges from the upper-left corner,
moving toward the other corners.
[Corner slide]
The next scene slides diagonally down and to the right
from the upper-left corner.
[Corner zoom]
The next scene expands diagonally down and to the right
from the upper-left corner.
Playback position
Move the playback slider to
change the playback position.
47
Page 48

Editing content on your computer
Editing digital photos
Photos can be retouched or rotated.
Tip
Only photos imported to your computer can be edited. First, import the photos to your computer. (→17–19, 28–31)●
Photo after editing
Advanced Features
Click [Picture].
1
Click the thumbnail.
2
Click [Edit] and select [Edit Picture].
3
The window for photo editing is displayed.
Editing is also possible by right-clicking the thumbnail and
●
selecting [Edit Picture].
Edit the photo.
4
Click [Save].
5
Undo
Rotate right 90º
Retouch
Rotate left 90º
Click [OK] when the confirmation
6
message is displayed.
When the message is displayed, click [Yes] to retain the photo
before editing or [No] to delete it.
The saved photo will be named as follows.
●
“Edit Picture (serial number) of original file name”
48
Page 49

Editing content on your computer
Protecting and renaming content
Advanced Features
In the properties window, content can be renamed or protected from
accidental deletion.
●
Video, scenes, pictures, and folders can be renamed.
●
Only scenes and photos can be protected.
(Example of scene properties window)
In the content viewing or media/folder selection area of the
1
main window
Right-click a thumbnail or folder and
select [Properties].
The properties window is displayed.
To rename content
Change the name in [Title].
●
Names are a maximum of 64 single-byte characters.
To protect content or clear protection
Click [ON] or [OFF] in [Protect Setting].
Click [Close].
2
Tip
[Title] is the name as displayed in this software. The file name itself
●
cannot be changed by renaming the title.
Thumbnails of protected scenes and photos are labeled with this icon:
●
49
Page 50

Advanced Features
Recording on optical discs and SD cards
Image captured with video cameras or imported to computers can be recorded on optical discs and SD cards in a variety of formats.
This section describes some considerations and precautions to understand before recording.
●
Also refer to the description of drive settings
●
If your video camera supports the “DVD COPY function”, you can automatically record the video content by performing some simple
operations.
(→68)
Recording
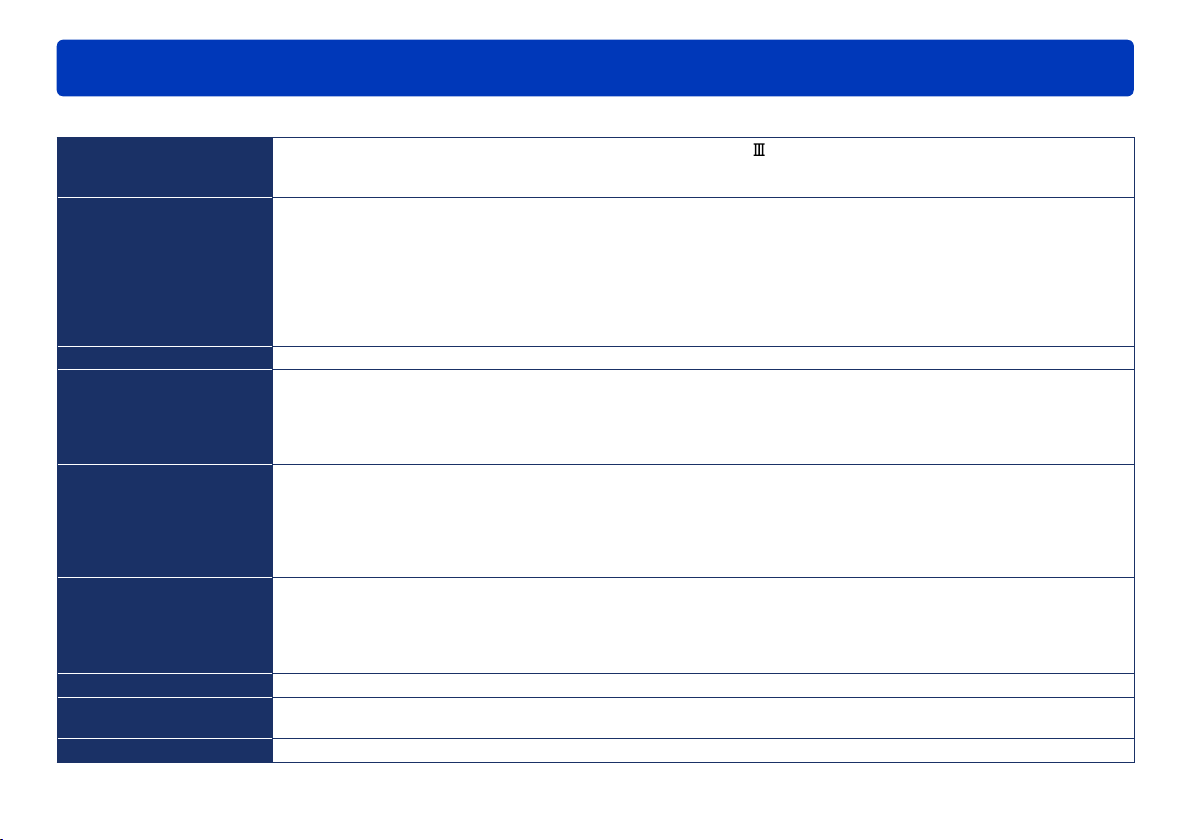
Recording formats
Several recording formats are available for video content and photos, and each format has particular characteristics. Choose the optimal
recording format for your needs.
Recording Format Characteristics Available Media Playback Equipment
(→7) and information on media supported for recording (→11).
DVD-Video format Additional recording is not possible for discs
DVD-VR format Additional recording is possible on discs
SD card (SD-Video)
format
DCF format
(Picture)
●
recorded with this software.
Top menus can be created.
●
●
recorded with this software.
Top menus cannot be created.
●
Recording format designed for recording video
●
content on SD cards.
Additional recording is possible on SD cards
●
recorded with this software.
Top menus cannot be created.
●
Format designed for recording photos on SD
● SD cards Playback or printing
cards.
DVD-R (12 cm, single-sided, single-sided/dual
layer)
DVD-RW (12 cm, single-sided)
Recording is not possible on prerecorded
●
discs. However, DVD-RW discs can be used
for recording after being formatted. (→76)
DVD-RAM
(12 cm, single-sided, double-sided)
SD cards SD-Video–compatible
Typical DVD players
DVD-VR-compatible
equipment and software
equipment (TVs, etc.)
is possible with DCFcompatible equipment
(digital cameras, TVs, and
printers. etc.)
50
Page 51

Recording on optical discs and SD cards Recording
Advanced Features
Top menus
Creating media with this software will create a “top menu”
interface that serves as a table of contents. To view content, select
thumbnails in the top menu. Customize the design of top menus as
desired when creating them.
●
Top menus cannot be created when recording to SD cards or
recording in DVD-VR format.
●
Top menus are displayed only on equipment that supports this
feature. They cannot be played on video cameras or in this
software.
●
Top menus are automatically created in the default design when
you use [Simply Create DVD-Video disc]
COPY Function]
(→68). To change the top menu design (→80)
(→20–21) or [DVD
Automatic multi-disc recording
Content will be automatically divided for recording over multiple
discs only under these conditions.
●
The content exceeds the capacity of one disc when you are
using [Simply Create DVD-Video disc]
Function]
●
More than 99 items of content are recorded to a disc using
[Simply Create DVD-Video disc]
Function]
Tip
Content is automatically divided so that the final scene fits on the disc.
●
When the data size of one scene exceeds that of a single disc after
●
editing (→35), the scene cannot be recorded on multiple discs. First,
split the scene using “Dividing scenes” (→41) of the edit function to
reduce the size so that it can fit on a single disc, and then record the
data.
The approximate number of discs needed is displayed, but recording
●
may require fewer or more discs.
Discs recorded this way are for playback only. Additional content
●
cannot be recorded on them.
During multi-disc recording, information about the remaining content
●
is displayed when recording stops to load the second and subsequent
disc. To record the remaining content later, refer to this information
and select the content again, and then resume recording.
(→68) to create media
(→68)
(→20–21) or [DVD COPY
(→20–21) or [DVD COPY
51
Page 52

Recording on optical discs and SD cards Recording
Additional recording on media with existing content
Formats supporting additional recording: DVD-RAM (DVD-VR) and
SD cards (SD-Video)
When recording additional content, you can add content to media
recorded with this software by using the same recording format as
the existing content.
Tip
Content cannot be added to protected DVD-RAM discs. Clear
●
protection settings with the equipment originally used to protect the
disc.
Additional content can also be recorded to SD cards when photos
●
have been recorded to the cards.
Advanced Features
52
Page 53

Recording on optical discs and SD cards
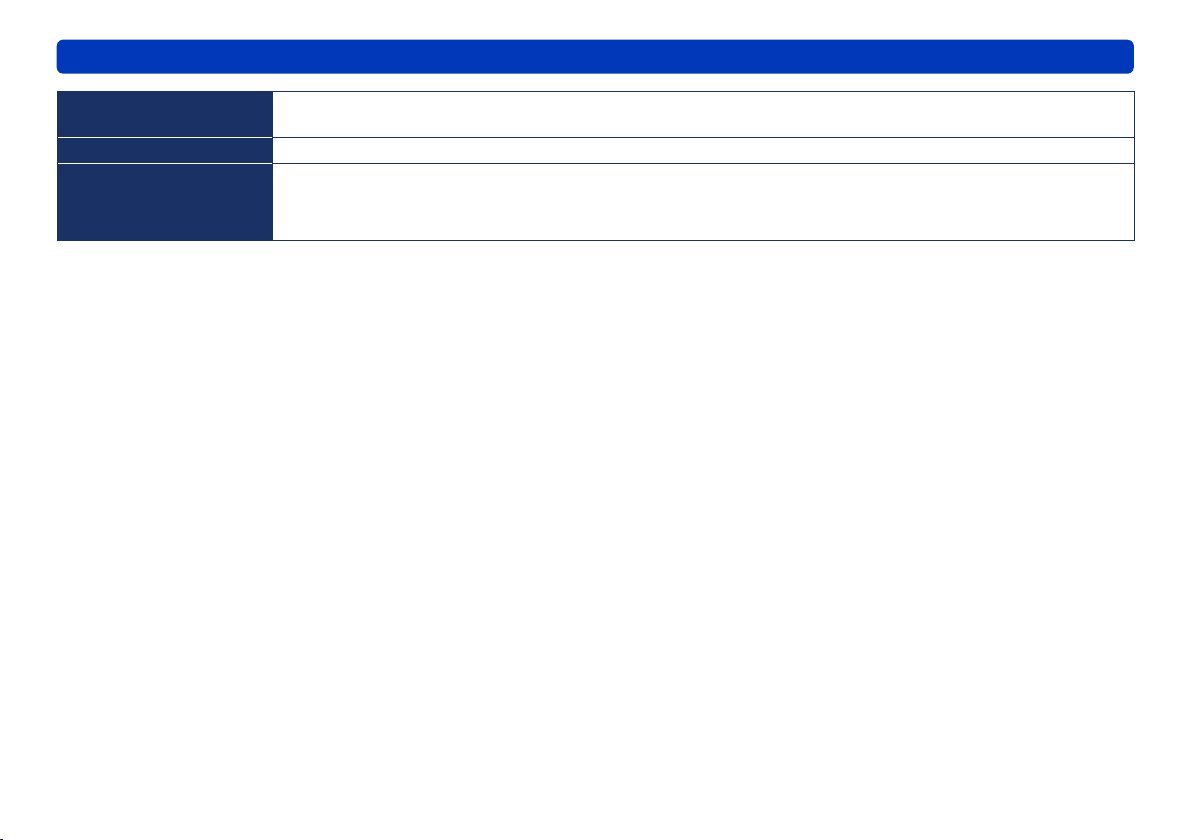
[Create Media] menu
The [Create Media] menu is used when recording to optical discs and memory cards.
In the main window, click this button to access the menu:
Advanced Features
Authoring menu
1
∗
1
∗
Content is automatically divided for recording over multiple discs if it
does not fit on one.
2
∗
Top menus are not created.
Media
Recording
Format
DVD-R/RW DVD-Video
DVD-R/RW DVD-Video
DVD-RAM DVD-VR
∗
SD cards SD-Video
SD cards DCF
Subject to recording
Content on the internal
●
recording media of the video
camera or on the SD card
installed in the video camera
Content imported to the
●
computer
Content imported to the
●
computer
2
Content imported to the
●
2
∗
computer
Recording
Order
By
recording
date
Any order
53
Page 54

Advanced Features
Recording on optical discs and SD cards
Recording video content
Video content and scenes can be selected from a variety of folders of content imported to the computer with this software to record in any order
on optical discs and SD cards.
Video and scenes can be combined on a single disc or SD card.
Video content of less than two seconds cannot be recorded. (Content for recording in DVD-VR format must be at least three seconds long.)
●
Preparation:
Import the video content to the computer
●
Exit all other software
●
Be sure to exit other software that may access the optical drive,
●
such as Windows Explorer.
Load the media for recording
●
When using SD cards, see “SD card connection” (→14).
●
When recording video content to SD cards, use a compatible video
●
camera to initialise the cards.
When adding content to DVD-RAM discs, clear any protection by
●
using the equipment originally used to protect the disc.
Recording requires twice the amount of free space (for a work
●
folder) as the capacity of the disc or SD card you are creating.
To change the work folder (→80)
Important
Do not do the following during recording. These operations
may prevent successful recording and damage discs or
equipment.
- Disconnect cables or cords of computer or DVD equipment or turn
equipment on or off
- Log off in Windows (as by switching users)
- Force this software to close
- Install or remove an SD card
Time required for recording
Recording will take some time. The amount of time required for
●
recording varies depending on disc specifications and optical drive
performance. For details, refer to the Operating Instructions of the
disc and drive.
Recording may take several hours especially in the following cases.
●
- Recording small video content in DVD-Video format (because
specifications require that dummy data be appended even to files
less than about 1 GB to make them about 1 GB)
54
Page 55

Advanced Features
Recording on optical discs and SD cards
Selecting video content to record
In the authoring area, add video content to record.
Authoring area
Recording video content
Click a folder on your computer.
1
Select [Video].
2
Click [Create Media] and select the type
3
of media to create.
For instructions with this option
(→20–21)
For instructions with this option
(→65–67)
This example illustrates the procedure when you select one of
the options labeled
The media authoring area is displayed.
For details about the [Create Media] menu (→53)●
.
55
Page 56

Advanced Features
Recording on optical discs and SD cards
Authoring area
Tip
Optical drives in use by this software cannot be used by other
●
software.
Content editing is not possible while the authoring area is displayed.
●
Complete any required editing (such as dividing scenes) in advance.
●
The scene point information is retained as chapter points even after
recording, except in the following cases.
- In DVD-Video format, the scene is after the 100th scene
- If selecting [Merging into one scene] when editing and saving video
(→37)
A B
Recording video content
Drag video content to the authoring area.
4
You can add scenes and videos. However, photos cannot be
●
added.
Repeat this process to choose the video content (up to 99
●
items). To select multiple items, hold the [Ctrl] key while clicking
the thumbnails.
To add video content from another folder, select the folder and
●
then perform step
cancelled if you select content in folders not on the computer.
●
Referring to [Capacity] (A) as a guideline, select an amount of
content that will fit on the disc or SD card. Note that the actual
amount of data recorded may be different.
●
Content will be recorded in the order you drag it to the authoring
area, one thumbnail after another. However, content can be
recorded as a single file when you record in DVD-VR format.
(→82)
●
When video content has been registered, the scenes in that
content will be automatically recorded in the order in which they
were shot.
●
To cancel authoring, click (B).
Removing content from the authoring area
Click a scene to remove.
1
To select multiple items, hold the [Ctrl] key while clicking the
●
thumbnails.
Click [Delete].
2
4. However, the current selection will be
2
1
Thumbnails are only removed from the authoring area. The
●
content itself is not deleted.
Removal is also possible by right-clicking thumbnails and
●
selecting [Delete] in the menu displayed.
56
Page 57

Advanced Features
Recording on optical discs and SD cards
Recording video content
Changing the order of content
Drag thumbnails to the desired position.
1
Click [Save].
5
For DVD-R/RW:
A window is displayed for creating the top menu.
(→next page)
For DVD-RAM (DVD-VR format) or SD cards (SD-Video
format):
A window is displayed for creating the disc or SD card.
(→62)
For continuous playback without interruption between individual
scenes, select the scenes you wish to play continuously and
combine them into a single MPEG2 file.
To combine scenes into single MPEG2 files
Use the “Editing content on your computer” ([Merging into one
scene]) operation
(→37).
57
Page 58

Advanced Features
Recording on optical discs and SD cards
Recording selected video content (Create DVD-Video disc)
Follow these steps when recording on DVD-R/RW discs.
1 2
Recording video content
When you click [Save] in step
A window is displayed for creating the
6
5 (→previous page)
top menu.
Click and select the media to record
7
on.
●
Video cameras cannot be selected as the destination.
Saving content in the authoring area as a disc image
By saving a disc image, you can use the image to record
discs later as needed.
Select [The folder to save DVD-Video image to] as
1
the recording destination.
2
Click and specify the folder where to save the
disc image.
(After step 1, the icon changes from to .)
By default, this folder is C:\MC_TMP\DVD_IMAGE\
VIDEO_TS. (Assuming Windows is installed on the C
drive.)
Any existing disc image is overwritten.
●
To create discs with a saved disc image (→64)
●
58
Page 59
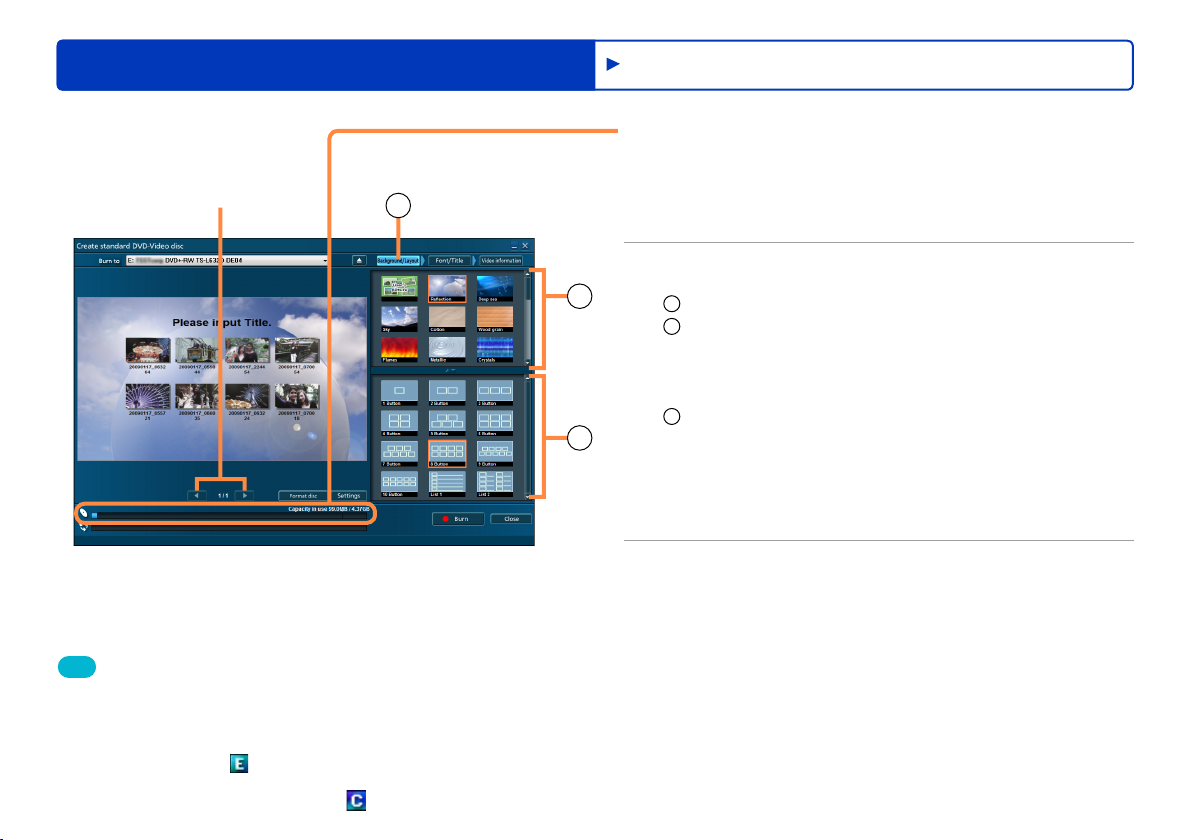
Advanced Features
Recording on optical discs and SD cards
Previous/next page
(if there are multiple
pages)
1
Recording video content
Check the space available for recording
8
on the media.
Content exceeding the available space is indicated in red. In this
●
case, click [Close] and remove video content from the authoring
area.
Determine a top menu design.
9
2
3
Click [Background/Layout].
1
Select your preferred design.
2
To use a particular image file as the background:
●
Select [User’s picture], specify a JPEG file on the computer,
and click [Open]. (Images with an aspect ratio of 4:3 are
displayed with black bars at right and left.)
Click to select the thumbnail layout.
3
If there are many thumbnails, they will be distributed on
●
multiple pages.
To choose different content, click [Close] and change your
●
selection in the authoring area.
Tip
Discs recorded this way are for playback only. Additional content
●
cannot be recorded on them.
When you record video that includes content in both aspect ratio of
●
16:9 and 4:3, aspect ratio of 16:9 is used. Content with a modified
aspect ratio is labeled
displayed with black bars at right and left.
Content with divided scenes is labeled .
●
(encoded). Content in aspect ratio of 4:3 is
59
Page 60

Advanced Features
Recording on optical discs and SD cards
Recording video content
Enter the title.
10
Click the title to enable input.
●
Enter the page title.
1
(Up to 64 single-byte characters.)
The same page title is displayed on all pages. For a titleless
●
1
2
3
11
top menu, leave the title information blank.
Enter thumbnail titles.
2
(Up to 24 single-byte characters.)
By default, thumbnails are labeled with the name of the video
●
or scene.
Click [Font/Title] and complete the font settings.
3
(For details
If not all text is displayed, or if text covers other images,
●
change the font or reduce the size.
To check information about each content ([Video information]
●
→90)
To change thumbnails ([Change thumbnail] For details →90)
●
Click [Burn].
If the message “Insert a new disc” is displayed, recording on the
●
current disc is not possible. The disc may already have been
recorded. Insert a blank or formatted disc.
If the computer hard disk is compressed, a message regarding
●
drive compression may be displayed and recording may not be
possible.
Clear the check for [Compress this drive to save disk space] in
[Properties] for the hard disk drive.
→89)
60
Page 61

Advanced Features
Recording on optical discs and SD cards
Click [OK] when the confirmation
12
message is displayed.
To cancel this process, click [Cancel].
●
Recording now begins, and the status is shown in the
progress indicator.
Recording will take some time. Do not operate the computer
●
until recording is finished.
Recording can be stopped by clicking [Cancel] when changing
●
discs or during data conversion. Recording cannot be stopped
when data is being written.
Click [OK] when a message is displayed
13
indicating that recording is complete.
Some optical drives may switch to a new disc automatically
●
before this final step in recording.
Recording video content
Tip
Advanced settings for the recording speed and other details are
●
available in the [Settings] window. (→80)
Notes on recording
When you record video that includes content in both aspect
●
ratio of 16:9 and 4:3, aspect ratio of 16:9 is used. Content in
aspect ratio of 4:3 is displayed with black bars at right and left.
●
When the hard disk where the work folder is stored is in FAT
or FAT32 format, video content exceeding 4 GB cannot be
recorded.
61
Page 62

Advanced Features
Recording on optical discs and SD cards
Recording selected video content (DVD-RAM (DVD-VR format) or SD cards (SD-Video format))
Follow these steps when recording on DVD-RAM discs in DVD-VR format, or when recording on SD cards.
Video recorded in DVD-VR format must be at least 3 seconds long.
●
●
Video recorded to SD cards must be at least 2 seconds long.
Additional portion to record
Recorded
Recording video content
When you click [Save] in step 5 (→57)
A window is displayed for creating the
6
media.
Click and select the media to record
7
on.
Any existing video on the media is also displayed.
●
To choose different content, click [Close] and change your
●
selection in the authoring area.
Example when recording in DVD-VR format
62
Page 63

Advanced Features
Recording on optical discs and SD cards
Example when recording in DVD-VR format
Tip
If there is unwanted content recorded on a DVD-RAM disc, formatting
●
the disc will delete all content (→76). Content cannot be removed
individually.
The audio track of content in DVD-VR format is recorded in Dolby
●
Digital format.
MPEG2 (SD-Video) refers to files conforming to SD-Video
●
specifications that are encoded in MPEG2 format.
MPEG-1 Layer2 is the only audio format available for SD-Video.
●
When you record video that includes content in both aspect ratio
●
of 16:9 and 4:3, aspect ratio of 16:9 is used. Content in aspect
ratio of 4:3 is displayed with black bars at right and left.
The image quality of video content recorded in SD-Video format may
●
be inferior to that of the original content. Additionally, depending on
the playback equipment, the image quality may be inferior to playback
on a computer, the audio track may skip, frames may be dropped, or
other problems may occur.
Recording video content
Check the space available on the media.
8
Content exceeding the available space is indicated in red. In this
●
case, click [Close] and remove video content from the authoring
area.
Click [Record].
9
Click [Yes] when the confirmation
10
message is displayed.
To cancel this process, click [No].
●
Recording now begins, and the status is shown in the
progress indicator.
Recording will take some time. Do not operate the computer
●
until recording is finished.
Recording cannot be stopped when data is being written.
●
Click [OK] when a message is displayed
11
indicating that recording is complete.
63
Page 64

Advanced Features
Recording on optical discs and SD cards
Creating discs from saved disc images
Disc images saved on the computer can be used to record discs as
needed.
Preparation:
Save the disc image (→58)●
Tip
This function can only be used with disc images saved with this
●
software.
Do not modify the [VIDEO_TS] folder created to store disc image
●
data. This may prevent the disc image from being used in recording.
Disc images saved on your computer can be played using software
●
for DVD playback. For details, refer to the DVD software Operating
Instructions.
Recording video content
In the [Simple Menu], click [Create a
1
DVD]. (→20)
The [Create a DVD] window is displayed.
2
Click and select [DVD image
selection].
Select the folder where the disc image is stored, and then click
You cannot change the selection of the video content.
[OK].
By default, this folder is C:\MC_TMP\DVD_IMAGE\VIDEO_TS.
●
(Assuming Windows is installed on the C drive.)
Click and select the DVD disc to
3
record on.
Click [Start writing].
4
Click [OK] when the confirmation
5
message is displayed.
Recording now begins, and the status is shown in the
progress indicator.
Recording will take some time. Do not operate the computer
●
until recording is finished.
Recording can be stopped by clicking [Cancel] when changing
●
discs or during data conversion. Recording cannot be stopped
when data is being written.
Content that does not fit on a single disc will be split and recorded
●
over multiple discs. Follow the instructions displayed to change
discs.
Click [OK] when a message is displayed
6
indicating that recording is complete.
64
Page 65

Advanced Features
Recording on optical discs and SD cards
Recording photos
Digital photos and other still pictures on your computer can be recorded on SD cards. These images are recorded in a format that can be
viewed on digital cameras and similar devices (DCF format). Images in BMP or PNG format are converted to JPEG format before saving.
For a list of supported SD cards
Preparation:
Insert the SD card. (See “SD card connection” →14)●
(→11)●
Click [Picture].
1
Click [Create Media] and select [Create
2
SD Card (Pictures)].
The media authoring area is displayed.
Authoring area
65
Page 66

Advanced Features
Recording on optical discs and SD cards
Authoring area
Recording photos
Drag photos for recording to the
3
authoring area.
●
Repeat this process to choose desired photos (up to 99 photos).
To select multiple items, hold the [Ctrl] key while clicking the
thumbnails.
●
The current selection will be cancelled if you select content in
folders not on the computer.
Removing photos from the authoring area
Click a photo to remove.
1
To select multiple items, hold the [Ctrl] key while clicking the
●
thumbnails.
Click [Delete].
2
1 2
Thumbnails are only removed from the authoring area. The
●
content itself is not deleted.
Removal is also possible by right-clicking thumbnails and
●
selecting [Delete] in the menu displayed.
Tip
DCF: Design rule for Camera File system. This recording format
●
conforms to file system specifications of the Japan Electronics and
Information Technology Industries Association (JEITA).
Photos in DCF format cannot be converted to video content.
●
Click [Save].
4
The window for creating DCF content for SD cards is
displayed.
66
Page 67

Advanced Features
Recording on optical discs and SD cards
Additional portion to record
Recorded
Folder structure and names of files created
DCIM
100_PMCL (Up to 9,999 photos per folder)
P1000001.JPG
…
P1000999.JPG
101_PMCL
…
999_PMCL
If there are multiple storage folders, photos are saved in the
●
highest-numbered folder.
If there are no storage folders, a folder named [100_PMCL] is
●
created.
As the file name, the final number in the folder is assigned.
●
Saved photos
Recording photos
Click and select the destination SD
5
card.
If the SD card already contains photos, the photos are
displayed.
To choose different content, click [Close] and change your
●
selection in the authoring area.
Check the space available on the card.
6
Content exceeding the available space on the SD card
●
is indicated in red. In this case, click [Close] and remove
thumbnails from the authoring area.
Click [Record].
7
Click [Yes] when the confirmation
8
message is displayed.
To cancel this process, click [No].
●
Recording now begins, and the status is shown in the
progress indicator.
Recording cannot be stopped when data is being written.
●
Do not operate the computer until recording is finished.
●
Click [OK] when a message is displayed
9
indicating that recording is complete.
67
Page 68

Advanced Features
Recording on optical discs and SD cards
Recording with the DVD COPY function
If the “DVD COPY function” is used with a video camera which supports this function, the software will start up automatically, and you can
record the video content on the internal HDD of the video camera onto a DVD disc. The second time this function is used, only the new content
is selected automatically for recording.
This is convenient when backing up content captured with the video camera.
Available when using video cameras equipped with the DVD COPY function. For details, refer to the Operating Instructions of the video camera.
●
●
DVD COPY works with video content captured on video camera hard disks. SD card content is not supported for backup, and neither are
photos.
●
Content is recorded in DVD-Video format on DVD-R/RW discs.
●
Content that does not fit on a single disc is automatically split and recorded over multiple discs.
Important
During recording, do not operate the computer or video camera or
●
disconnect the USB or power cables.
Before deleting video content from video cameras, always confirm
●
that all content was recorded correctly on the DVD disc.
Connect the video camera to the
1
computer. (→13)
Preparation:
On the [General] tab of the [Settings] window, select [Enables the
●
auto startup of the VideoCam Suite] (→79)
Exit the software if the software is activated.
●
Load a DVD-R/RW disc for recording
●
(For a list of supported discs →11)
Tip
Recording requires twice the amount of free space (for a work folder)
●
equivalent to the capacity of the disc. To change the work folder
(→80)
Discs recorded this way are for playback only. Additional content
●
cannot be recorded on them.
Video content recorded on the DVD disc cannot be returned to the
●
video camera.
Video content already recorded on disc with the DVD COPY function
●
is recognised as recorded. For this reason, the content cannot be
recorded again using the DVD COPY function.
For instructions on specifying details such as the recording speed and
●
playback method
(→79–80)
Select [DVD COPY] on the video camera.
2
This software now automatically starts up, new video content
on the video camera hard disk is selected, and the [DVD
COPY] window is displayed.
68
Page 69

Advanced Features
Recording on optical discs and SD cards
Recording with the DVD COPY function
Click and select the DVD disc to
3
record on.
The DVD COPY function automatically selects the video content
●
which has not yet been recorded and records it so you cannot
change the selection of the video content.
Click [Start writing].
4
Click [OK] when the confirmation
5
message is displayed.
Recording now begins, and the status is shown in the
progress indicator.
Recording will take some time. Do not operate the computer
●
until recording is finished.
Recording can be stopped by clicking [Cancel] when changing
●
discs or during data conversion. Recording cannot be stopped
when data is being written.
Content that does not fit on a single disc will be split and recorded
●
over multiple discs. Follow the instructions displayed to change
discs.
Click [OK] when a message is displayed
6
indicating that recording is complete.
This software is automatically closed, and the video camera
enters [PC/RECORDER] mode, when it is still connected to
the computer. (The display varies depending on the model.)
69
Page 70

Advanced Features
Using convenient features
Creating still pictures from video
You can save individual frames of video content as still image files. These images are saved in JPEG format. This feature is available only with
video content imported to the computer or on the internal recording media of the video camera or on the SD card installed in the video camera.
In the preview window (→23), pause
1
the video at the position to save a still
image.
Click [Capture].
2
In the save dialog box displayed, specify
3
where to save the image (
[OK] (
).
2
) and click
1
1
Tip
This operation is also possible by using [Capture] button.
●
The [Capture] button is not shown during playback of video in DVD-
●
VR format.
2
Name of storage folder
(Can be changed as needed)
Click [OK] when a message is displayed
4
indicating that the image has been
created.
70
Page 71

Using convenient features
Searching for desired content
You can search video content and photos by name, recording date, or comments entered in the properties window (→92).
This feature applies to content in folders you have registered as destinations for saving content on the computer.
Click a folder to search.
1
When [PC Hard drive] has been clicked, the video content in it
●
is searched.
Click [Video] or [Picture].
2
Click [Search].
3
The window for entering search conditions is displayed. ●
Enter the search conditions.
4
Clicking [Search by Keyword] enables this option.
1
Enter the keyword.
2
Enter up to three keywords, separated by a space. ●
Select the information [Search by Keyword] applies to.
1
2
3
3
[Comments (Memo)] refers to notes entered in [Comments
●
(Memo)] in the properties window.
Clicking [Search by Recording date] enables this
4
option.
Specify a range of recording dates.
5
Click [Close] to cancel searching.
6
(→80)
Advanced Features
4
5
6
71
Page 72

Advanced Features
Using convenient features
Searching for desired content
Click [Search].
5
Search results are
displayed
Click [Close].
6
The search conditions window is closed. Search results are
retained even after this window is closed.
Click .
7
The search results are now discarded.
Search results can also be cleared by clicking [Close] in the
●
upper-right corner of the screen.
72
Page 73

Advanced Features
Using convenient features
Uploading content to YouTube
Content imported to your computer can easily be uploaded to YouTube.
●
Because YouTube™ services and specifications are subject to change, operation of online services cannot be guaranteed in the future.
Available services and screens are subject to change without notice. (These services are valid as of December 1, 2008.)
●
Unless you are the copyright holder or you have obtained permission from the copyright holder, do not upload videos protected under
copyright.
Preparation:
Create an account on the YouTube website in advance, and
●
have your user name and password ready
●
When directly uploading video content recorded in the WEB
MODE from the video camera, check [Enables the auto startup
of the VideoCam Suite] on the [General] tab of the [Settings]
window.
(→79)
If your video camera does not support the WEB MODE:
Proceed from step 1.
If your video camera supports the WEB MODE:
Exit the software if it is running.
1
Connect the video camera containing the video content
2
recorded in the WEB MODE to the computer.
On the menu which appears when the video camera has
3
been connected to the computer, select [WEB MODE].
The YouTube uploader starts automatically, and thumbnails of
the video content shot in the WEB MODE are displayed. Then
proceed from step 3.
Alternatively, you can proceed from step 1.●
Click a scene to upload.
1
To select multiple scenes, hold the [Ctrl] key while clicking the
●
thumbnails. Up to 10 scenes can be uploaded at once.
Click [Network].
2
[YouTube Uploader] is displayed.
73
Page 74

Advanced Features
Using convenient features
(For details about this window →next page)
Uploading content to YouTube
Enter titles and other information shown
3
on YouTube for each scene.
Enter your YouTube user name and
4
password.
The user name is stored once you have entered them. ●
Click [Upload].
5
After reading the copyright verification
6
message, click to indicate acceptance,
and then click [OK].
Tip
Video content is uploaded after being compressed to a size suitable
●
for uploading. Compression may take some time, depending on the
performance of your computer.
74
Page 75

Advanced Features
Using convenient features
[YouTube Uploader] window
Selected scenes will be
uploaded.
(Up to 10 scenes)
(Click the check boxes to
select or clear scenes, as
desired)
Total scenes to upload
Information about the current
scene
User name and password
for the YouTube account
Used when reducing scenes
to 10 minutes or less
(→38–40)
The [Delete partially] window is displayed.
●
If you edit content, the results of editing are not
●
saved. Also note that the file size after editing is
not shown.
When video content recorded in the WEB MODE
●
is to be directly uploaded from the video camera,
the [Delete partially] button is not displayed.
Uploading content to YouTube
Thumbnails of scenes to
upload
Double-click a scene to play it.
●
File names of scenes to
upload
Enter scene information to
show on YouTube
Copy the information to all
scenes displayed
Start uploading
Close window
Display the proxy settings
window
For proxy server settings,
●
use the settings in your web
browser (such as Internet
Explorer) or contact your
Internet service provider for
configuration instructions.
75
Page 76

Other
Formatting discs
Format discs in the following situations. Use this software to format discs that you will use with this software.
●
When reusing DVD-RW discs
●
When using DVD-RAM discs that you have used in other equipment
(Formatting is not required when adding content to DVD-RAM discs recorded with this software.)
When deleting all data on DVD-RAM or DVD-RW discs
●
Important
Formatting deletes all data on a disc. This data cannot be
restored. Check the content carefully before formatting.
Before formatting, clear any protection for discs by using the
●
equipment originally used to protect the disc.
Tip
DVD-R discs can be used without formatting them. (Formatting is not
●
possible for these discs.)
Format both sides of double-sided discs, one side after another.
●
When recording video content to SD cards, use a compatible video
●
camera (→10) to format the cards.
76
Page 77

Formatting discs
In the [Simple Menu], click [Format disc].
1
Select the optical drive.
2
If the optical drive is not listed, click [Refresh] (A). ●
Select the type and method of
3
initialising.
DVD-RAM discs are initialised in UDF 2.0.
●
Simple erasure:
Simple erasure is performed.
In a brief period of about one minute, logical formatting is
performed. If data is recorded on a disc, only information in
the table of contents is deleted.
Complete erasure:
Complete erasure is performed.
Discs are physically formatted. Formatting may take a long
time, depending on the speed of the drive and type of disc.
Any data on a disc is deleted.
Click [Start].
4
Other
A
77
Page 78

Formatting discs
Click [Yes] when the confirmation
5
message is displayed.
If you click [No], the previous window is displayed.
●
A message is displayed indicating that complete erasure may
●
take some time. Click [Yes] to continue.
Click [OK] when a message is displayed
6
indicating that initialising is complete.
Click [Close].
7
Other
Tip
Formatting is also possible by clicking the [Format disc] button in
●
the window for creating top menus displayed during authoring, for
example.
78
Page 79

Advanced settings
In the [Settings] window, you can complete advanced settings for various functions.
●
To display all setting panels, click [Settings] in the [Simple Menu] window. To display only the setting panel for a particular operation
window, click [Settings] in that window.
Other
General settings panel
For general software settings.
[Work area setting]
1
Click ▼ and specify where the work area is located. (This area is
used temporarily during software operations.)
A folder named [MC_TMP] is created on the selected hard disk, and
this folder is used as the work area.
Refer to [Free space] and select a drive with sufficient space. The
1
2
3
●
amount of free space affects software operation in the following
ways.
- Less than 5 GB: Some functions may not work correctly
- Less than 300 MB: Some editing functions are not available
[Playback method]
2
Specify how videos are played.
[Playback from the start]: Always play videos from the start
[Playback from a previous point]: Resume playback from the
[Auto run Setting]
3
Automatically start this software when a video camera is connected
to the computer.
By default, this option is selected.
Auto run can also be activated or deactivated by right-clicking this
●
icon in the task tray:
Auto run must be checked when using the DVD COPY function or
●
WEB MODE function of the video camera.
previous position
79
Page 80

Advanced settings
PC HDD panel
Settings for registration of content folders on the computer and
display of file names.
1
2
[Registration folder]
1
Register folders to use when importing content to the computer.
Folders registered here are listed under [PC Hard drive] in the
media/folder selection area of the main window. (→26)
Registering folders
1. Click [Add].
2. Select a folder to register and click [OK].
3. Click [OK] to close the settings panel.
Registered folders are listed under [PC Hard drive] in the media/
folder selection area.
Up to 10 folders can be registered.
●
Removable drives and network folders cannot be registered.
●
Deregistering folders
1.
Select the folder in [Registration folder] and click [Delete].
2. Click [OK] when the confirmation message is displayed.
3. Click [OK] to close the settings panel.
Folders are only deregistered. The folder and the content itself is
●
not deleted.
[Display file extension]
2
Include file extensions such as mpg in the file names displayed.
By default, this option is [OFF]. ●
Disc creation panel
For DVD-Video recording settings. (→20, 58)
1
2
1
[Disc write speed setting]
Specify the disc write speed.
By default, this option is [Max. speed]. Normally, keep the setting
●
at [Max. speed]. If recording fails, specifying [Normal] may be
effective.
2
[Top menu setting]
You can change the top menu background automatically created
when you use [Simply Create DVD-Video disc] (→20–21) or [DVD
COPY Function] (→68) to create media.
Other
80
Page 81

Advanced settings
DVD-Video panel
For settings used in DVD-Video playback.
1
2
3
1
[Playback method]
Select how content is played back on DVD players and similar
equipment.
[Auto playback]: Start playback without showing the top menu
2
[Chapter Menu Setting]
Create a chapter menu (root menu) for direct access to scenes.
By default, this option is cleared.
●
3
[Menu Setting]
Animate top menu thumbnails.
[Use the motion menu]: Animate thumbnails
Selecting this option enables you to specify subsequent options.
[Play time (sec.)] (10, 20, or 30 seconds)
After starting from the beginning of the scene, repeat the animation
●
after the specified period.
[BGM is set to the motion menu]
Add background music to top menus. Click [Browse…] and select
●
audio files on the computer in WAVE format.
After starting from the beginning of the music, the track is repeated
●
after the period specified in [Play time (sec.)].
Note that background music and motion menu settings cannot be
●
checked in the window for creating top menus.
Other
81
Page 82

Advanced settings
Other
DVD-VR panel
For DVD-VR recording settings. (→62)
1
1
[Settings for writing to media]
[Merge multiple videos (files) into a single video.]
Record all content dragged to the authoring area as a single file.
(→56)
SD panel
For specifying the SD card drive.
1
1
[Target drive selection]
Select SD card drives shown in the media/folder selection area.
If selected drives are not recognised (as when you connect an SD
●
card drive after this software starts up), select the drive again and
click [OK].
82
Page 83
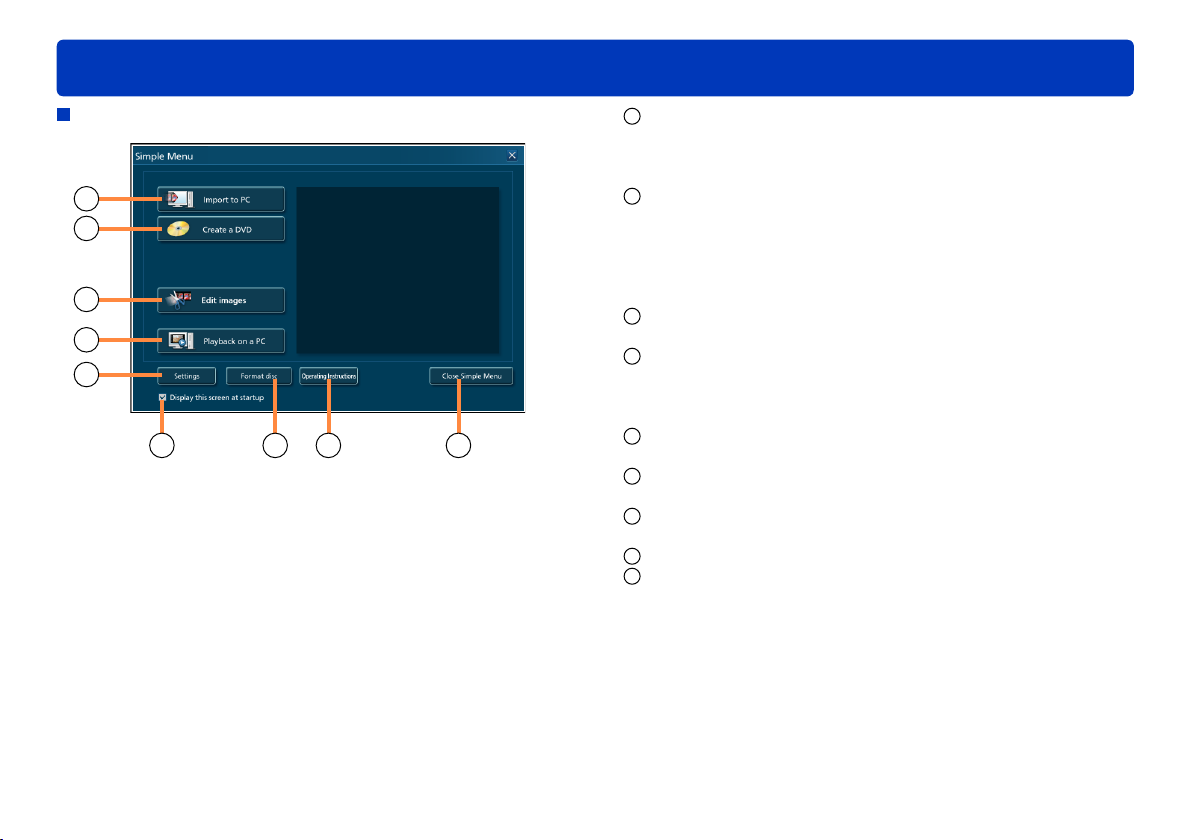
Windows in this software
Other
Simple Menu (→16)
1
2
3
4
5
9 6 7 8
1
[Import to PC]
Import content on the internal recording media of the video
camera or on the SD card installed in the video camera or on
optical discs or SD cards to your computer.
2
[Create a DVD]
Record video content on the computer, on the internal recording
media of the video camera, the SD card installed in the video
camera, the SD card which has been connected using an SD
card slot or a device such as an SD card reader/writer to DVDR/RW discs in DVD-Video format.
3
[Edit images]
Editing on the main window
4
[Playback on a PC]
Play content on the computer, the internal recording media of the
video camera, an SD card installed in the video camera, optical
discs, or SD cards.
5
[Settings]
Display the settings window
6
[Format disc]
Format discs
7
[Operating Instructions]
Display the operating instructions (this manual)
8
[Close Simple Menu]
9
[Display this screen at startup]
Clearing this option prevents the Simple Menu from being
displayed at startup, from the next startup.
(→22)
(→76)
(→20)
(→35)
(→79)
(→17)
(→25)
83
Page 84

Windows in this software
Other
Main window (→26)
7
2 3 4 5
14
6
8
1
10
1
Media/folder selection area
2
[Video]/[Playlist] (shown only on video cameras that support
playlists)/[Picture]
Types of content shown in the content viewing area
[Picture] is not shown during video editing or when creating video
●
content for recording to media.
[Refresh]
3
Update information in the media/folder selection area and
content viewing area
[Settings]
4
Display the settings window
[Operating Instructions]
5
Display the operating instructions (this manual)
[Simple Menu]
6
Display the Simple Menu
(→79)
12
9
13
11
7
[Import to PC] (→17–19, 28–31)
[Play] (→32–33)
[Edit] (→36–48)
[Create Media] (→53–67)
[Network] (→73–75)
[Capture] (→70)
[Search] (→71–72)
[Delete] (→34)
8
Indicates the selected media
[By Name]/[By Date recorded]/[By size]/[By Date modified]
9
For changing the display order
[Thumbnail]/[Details]/[List]
10
For changing the display format
11
For changing the thumbnail size
[Exit]
12
Exit this software
Content viewing area
13
The content of selected discs, SD cards, or folders in the media/
folder selection area
14
Help button/Minimize button/Maximize button/Exit button
●
Video editing area
Displayed at the bottom of the window when [Video editing] is
selected.
●
Authoring area (→55)
Displayed at the bottom of the window when [Create Media] is
selected.
(→38)
84
Page 85

Windows in this software
Other
[Import to PC] (→17)/[Create a DVD] (→20) window
1
3
4
6
8
9
Source for importing
1
Drives with loaded media are labeled with this icon:
●
[Import to PC] window: Shows the internal recording media of the
●
video camera, the SD card installed in the video camera, optical
discs, and SD cards.
[Create a DVD] window: Shows video cameras, SD cards, and
●
storage folders on the computer (→80). Disc cannot be selected
as sources for importing.
2
Eject media
10
(Example of [Create a DVD] window)
3
Content for importing
Thumbnails cannot be moved by dragging and dropping them.
●
[Select All]/[Clear All]
4
Select or clear all items for importing
5
Information about items selected for importing, such as total size
●
5
2
7
Shown in yellow if no media is loaded, no content is selected, or
there is another problem.
6
Destination for importing
●
Drives with inserted media are labeled with this icon:
7
Information about the destination selected for importing
●
Problems (items for which there is insufficient free space or the file
system is different, for example) are shown in red.
8
[Operating Instructions]
Display the operating instructions (this manual)
9
[Refresh]
Refresh the information shown
●
Click if a drive is not listed.
●
The content selection status returns to the default status.
10
[Settings]
Display the settings window
(→79)
85
Page 86

Windows in this software
Other
11 12
(Example of [Create a DVD] window)
11
[Start copying] (or [Start writing])
Start importing or writing the content.
The button displayed varies depending on the window.
●
If buttons cannot be clicked, check 5 and 7.
●
12
[End]
Close window
13
[Date folder]: Import to subfolders for each recording date
However, when importing video content in
the DVD-Video format, the scenes will be
[Specified folder]: Import all content to a single folder
imported altogether in one date folder.
13
(Example of [Import to PC] window)
86
Page 87

Windows in this software
Other
Window for importing to the computer
For details about this window (→30)
Preview window (video content)
For details about this window (→23)
For DVD-VR format
Some buttons are different in the case of video content in
DVD-VR format.
1
1
During playback: Reverse/forward playback at 2 x speed, with
no sound
Preview window (photos)
For details about this window (→24)
Editing video: window for creating titles
For details about this window (→45)
Editing video: window for inserting transitions
For details about this window (→47)
Editing video: Partially deleting window
For details about this window (→40)
87
Page 88

Windows in this software
Other
Window for creating top menus (→58–60)
1
3
4
5
6
1
Recording destination
2
During disc recording : Open/close drive tray
(Some drives may not close the tray automatically.)
When saving disc images : Display the folder selection
3
Top menu being edited
4
Change to the previous or next page
5
Indicates how much space is used
The ratio of space used to recording capacity is indicated as a bar.
●
Any portion of content exceeding the recording capacity is shown
in red.
If the disc already contains data, the total is indicated.
●
If no media is loaded, the recording capacity is set at 12 cm DVD
●
disc.
6
Recording progress
7
Capacity in use/recording capacity
8
[Settings]
Display the settings window
(→79)
screen
7 8 9
10
9
[Burn]
Start recording
10
2
[Close]
Close window
[Background/Layout] area (→59)
1
2
1
For selecting a background design
2
For selecting a thumbnail layout
88
Page 89

Windows in this software
Other
[Font/Title] area (→60)
4
6
8
3
5
7
9
3
4
6
8
10
1
[Disc title]
Text settings for page titles
2
[Video title]
Text settings for content titles
3
[Font]
For selecting the font
4
[Size]
For selecting the font size
5
[Style]
Click to add text styles
(Click again to remove text styles)
(Bold)/ (Italic)/ (Underlined)/ (Drop shadow)
5
7
9
6
[Color]
For selecting the text colour
To create colours:
●
2
1
2
1
Click [Define Custom Colors]
2
Click a desired colour
3
Click [Add to Custom Colors]
The colour is added to [Custom colors].
7
[Shadow]
When you have applied a drop shadow by clicking
select the drop shadow colour (see
[Align]
8
For selecting the text position
[Darken background around text]
9
Make text stand out against a darker background
10
[Change all video titles]
Selecting this option before completing text settings will apply
the settings to all content titles.
1 3
Adjust brightness
Colour you have
created
for colour settings)
6
in 5,
89
Page 90

Windows in this software
Other
[Video information] area
1
2
3
4
6
5
7
8
1
Video content selected on top menus
2
Current playback position
Move the playback slider to change the playback position.
●
3
Stop and return to beginning
4
Pause (click 5 to resume playback)
5
Play
6
Reverse/forward frame by frame (when paused)
7
[Change thumbnail]
Change the thumbnail
1. Click
2. Click
3. Click [Change thumbnail]
●
8
[Converting information]
Shows information about the selected content
●
5
for playback
4
to pause playback at the position to use as the
thumbnail
Fine-tune the playback position by moving 2 or using 6, as
●
needed.
In some cases, the thumbnail may be created from an image a few
frames after the specified image.
For content converted at the time of recording, information after
conversion is indicated in green.
90
Page 91

Windows in this software
Other
Authoring window for DVD-VR format/
SD cards (SD-Video format)
Example when recording in DVD-VR format
(→62)
1
9
6
7 3 4 5
1
Recording destination
2
[Settings]
Display the settings window
3
Capacity in use/recording capacity
4
[Record]
Start recording
5
[Close]
Close the window (cancel this operation)
6
Indicates how much space is used
The ratio of space used to recording capacity is indicated as a bar.
●
Any portion of content exceeding the recording capacity is shown
in red.
If the media already contains data, the total is indicated.
●
7
Recording progress
(→79)
8
During recording in DVD-VR format ( ): Open/close DVD
drive tray
(Some drives may not close the tray automatically.)
9
2
Content already recorded: (DVD-VR)/ (SD cards)
Content to record:
(DVD-VR)/ (SD cards)
8
91
Page 92

Windows in this software
Other
[YouTube Uploader] window
For details about this window (→75)
Properties window (→49)
Right-clicking video content, picture, a folder, or disc or SD card
and selecting [Properties] displays the [Properties] window,
enabling you to check relevant details. You can also rename
these items or add comments.
●
Some information may not be shown, depending on the type of
content or media.
Scene
1
7
2
3
6
Photo
1
7
DVD-RAM discs (DVD-VR format)
4
5
6
[Title]
1
Title of content
Video files, scenes, pictures and folders on the computer can be
●
renamed. (Up to 64 single-byte characters.)
[Protect Setting] (→49)
2
3
[Comments (Memo)]
Enter comments (up to 64 single-byte characters)
This information can be used when searching for content. (→71)
●
If this software crashes or is forced closed, entered comments
●
may be deleted.
[Disc Title]
4
Titles can be added to DVD-RAM discs.
5
[Playback time of Picture]
The playback time for photos recorded in DVD-VR format to
DVD-RAM discs can be specified, in a range of 1 - 10 seconds.
[Close]/[OK]
6
Apply any changes and close the window
[Recording date and time]
7
2
3
6
92
Page 93

Shortcut menus
Shortcut menus are displayed by right-clicking folders, media, content, and other screen elements.
Menu in the media/folder selection area
[Set Target folder] (When [PC Hard drive] or a folder is selected)
Add a new folder.
[Import to PC] (When media is selected)
Import all content on the media, or folder to the computer.
[Eject] (When an optical drive is selected)
Open the drive tray.
[Properties]
Enables you to check details about the folder or media.
(→31)
Other
(→17)
(→92)
93
Page 94

Shortcut menus
Menu in the content viewing area
Other
Example: when a video is selected
Video
Photo
[Playback]
Play the content.
[Import to PC] (When media is selected)
Import the selected content to the computer.
[Edit picture] (When a photo is selected)
For editing the selected photo.
[Delete Videos]/[Delete scenes]/[Delete Pictures]
Delete the selected content.
[Properties]
Enables you to check details about the content.
(→22–24)
(→17–19)
(→48)
(→34)
(→92)
94
Page 95

Shortcut menus
Video editing area menu Authoring area menu
Other
[Playback]
Verify editing results. Scenes within the video editing area will be
played back in order.
[Insert Title]
For adding a title to the first scene.
[Insert Transition]
For adding an effect as the transition between scenes.
[Delete partially] (When video content is selected)
Delete a portion of the selected video.
[Divide scene] (When video content is selected)
Divide the selected video.
[Delete]
Remove the selected content from video editing area.
[Properties]
Check details about the content, as needed.
(→41)
(→44–45)
(→46–47)
(→38–40)
(→43)
(→92)
[Delete]
Remove the selected content from the authoring area.
[Properties]
Check details about the content, as needed.
(→92)
(→56)
95
Page 96

Troubleshooting
Startup
Symptom Corrective Action
The software does not start.
The screen saver or the power-saving
functions do not operate.
Display/playback
Symptom Corrective Action
Video cannot be displayed.
Images do not play back properly.
Other
Windows Vista
Log on with an administrator account or a standard user account before using this software.
The software will not function with a Guest account.
Windows
Log on with an administrator account before using this software.
●
Multiple users cannot start the software at the same time. Make sure another user has not
started the software.
●
It takes time for the software to start, or the software may not start, if there are any damaged
or corrupted images.
While this software is started, the screen saver or the power-saving functions (function to make
the PC enter the standby or sleep modes after a certain time has elapsed without any operation
on the PC) are disabled. Since this software may not operate properly, the screen saver and
the power-saving functions must be disabled before starting this software.
You can display only videos recorded with this software or a video camera that this software
●
accompanied. This software cannot process videos created with other devices or software.
●
This software cannot process a video recorded with the video camera this software
accompanied if it was edited with other devices or software.
●
Close any other software that is running.
●
Update the device driver for the sound card or video card.
●
Images played may have frame drops, colour-dulling or a jerky effect depending on the
[Windows Aero] functions of Windows Vista
themselves. Also, there may be noise in the sound or images may not be played back
smoothly at the point where the resolution of the image and the sound are switched.
®
:
®
XP/2000:
®
, the environment of the PC in use or the images
96
Page 97

Troubleshooting
Symptom Corrective Action
Voice is not audible.
Media produced in the DVD-Video
format cannot be played back using
Windows Media
Video with an aspect ratio of 16:9 is
displayed at 4:3.
Even though the data is played back
on the video camera, top menu is not
played back.
When the produced disc is played back
on another device, zones surrounding
the image are not displayed.
Cannot play discs created with this
software.
When the produced disc is played
back, the end of the image is slightly
truncated.
When the produced disc is played back
with another device, it is not known how
to display the chapter menu.
®
Player.
Other
®
●
For Windows Vista
: From the start menu, select [Control Panel] → [Hardware and Sound]
→ [Sound] → [Speakers], and then click [Properties]. Confirm that [Use this device (enable)]
is selected in [Device usage] on the [General] tab or that [Speakers] and [Line input] are not
muted on the [Levels] tab.
●
For Windows
®
XP/2000: Confirm that [Volume Control] and [Line input] are not muted in
[Volume Control] window of the PC.
●
Voice will not play back while the image is paused.
The sound of MPEG2 files recorded on the media is in Dolby Digital format. This sound will not
be played back on PCs which do not have Dolby Digital Codec installed.
MPEG2 video with an aspect ratio of 16:9 may be played back at 4:3 in Windows Media Player
and similar software.
The top menu will be displayed on a player capable of playing back the top menu. The top
menu will not display on a video camera.
Portions of the area around the image may not be displayed on some playback equipment such
as televisions.
Play the disc in equipment compatible with the type of disc you have created.
When recorded in DVD-Video format, the end of an image may be truncated by about 0.5
seconds.
It is possible to move to the chapter menu by pressing the [MENU] button on the remote
controller while playing videos of the title on the chapter menu you want to display. (The name
of the button varies with the model of the device.)
97
Page 98

Troubleshooting
Connection/Import
Symptom Corrective Action
Automatic start-up (WEB MODE, DVD
COPY function, software start-up) does
not operate when the video camera is
connected if other software is already
open.
The video camera is connected but not
displayed on the window or recording
fails.
When an SD card is inserted, the card
is not displayed in the media/folder
selection area.
Thumbnails are not correctly displayed
on the importing window.
Other
Other software may cause this software’s automatic start-up function (WEB MODE, DVD COPY
function, software start-up) to fail to operate correctly when the video camera is connected to
your computer. Change the settings on the other software or uninstall it completely.
●
Click [Refresh] in the main window or other windows. This will update the drive information,
which may enable display.
●
If the video camera has not been set for connection with the PC, it will not be displayed. (For
details, refer to the operating instructions for the video camera.)
●
Some video cameras are not supported by Windows
●
Video cameras cannot be used as the destination for recording video.
●
SD cards are not displayed unless they are connected before this software is started. If you
connect the SD device or insert an SD card after startup, select the drive on the [SD] tab of
[Settings], and then click [OK].
●
An SDHC memory card (4 GB to 32 GB) will not be displayed unless using a reader/writer
that supports SDHC.
●
Since image data produced with video cameras other than compatible video cameras
or other software does not have thumbnail folders, they are not displayed.
●
The wrong TV system, NTSC or PAL, may have been selected when the software was
originally installed. Select “About VideoCam Suite 2.0” from “
window, and check the TV system. If the wrong system was selected, you will need to reinstall the software.
(→82)
®
2000.
(→10)
” at the top right of the main
Editing
Symptom Corrective Action
Images cannot be edited.
Results of editing do not match the
frames I selected.
Only content (video or photos) stored on the computer can be edited or used in media creation.
Import content stored on other media to your computer before use.
With some types of video content, frames may not match the frames selected during editing.
(→17, 28)
98
Page 99
Troubleshooting
Recording
Symptom Corrective Action
Data cannot be recorded.
Other
You cannot record a video less than two seconds long.
(Video recorded in DVD-VR format must be at least 3 seconds long.)
Cannot record photos to an optical disc. Photos cannot be recorded on an optical disc. Record photos to SD cards.
●
Close any other software using the drive.
An error message is displayed when I
select the drive to record to.
The image is distorted during burning
and is not burned properly.
Video with an aspect ratio of 16:9 is
recorded in 4:3.
Cannot record on the card or disc after
formatting it using Windows
Cannot add content to a DVD-RAM disc.
Cannot stop recording midway through.
A disc error message is displayed.
®
Explorer.
●
An error message may be displayed when media is replaced. Reselect the drive.
●
Other recording software may be interfering with operation. In this case, uninstall the other
recording software.
Close this software and restart the PC.
When you record video content with both aspect ratio of 16:9 and 4:3 to storage media, aspect
ratio of 16:9 is used. Content in aspect ratio of 4:3 is displayed with black bars at right and left.
When using this software to record on optical discs, use this software to format the discs
(→76). SD cards must be formatted by using video cameras compatible with this software
(→10).
Optical discs formatted by using applications other than this software (such as Windows
Explorer) are not supported.
●
Recording is not possible if a disc is protected. Clear the protection settings using the device
that was used to write-protect the disc.
●
You cannot record a video less than 3 seconds long in DVD-VR format.
●
With DVD-R/RW discs, recording can only be stopped by clicking [Cancel] when changing
discs or during data conversion, not when data is being written.
Recording is not possible using unsupported types of discs or discs in unsupported formats.
(For a list of supported discs:
→11)
(→65)
99
Page 100

Troubleshooting
Symptom Corrective Action
Error occurs while data are being
recorded.
Other
Consider the following as factors for this problem.
●
The media is not supported. (For a list of supported media:
●
When recording on SD cards, the cards must be formatted with a file system compatible with
this software.
Use compatible video cameras (→10) to format SD cards. (Recorded data will be deleted.)
●
There may be a compatibility problem between the drive and disc.
Use discs recommended for the drive. (With some discs, playback may not be
possible even if recording is completed normally. Check playback after recording.)
●
Recording may be affected by the state of the hard disk drive where the operating system is
installed or the drive used for working space.
Optimize the hard disk if necessary. From the Start menu, select [Computer] ([My
Computer]), right-click the hard disk icon and select [Properties]→[Tools]→[Defragment
Now]→[Continue]→[Defragment now] ([Properties]→[Tools]→[Defragment Now]→
[Defragment]). However, do not optimize the hard disk while this software is running.
●
Other software may be running.
Exit other applications. Using other software at the same time may cause recording to
fail, or it may damage discs. (In particular, do not use DVD or CD recording software
or other recording or encoding software that requires a large amount of memory.)
●
Other DVD writing software, packet writing software, or similar software that uses the optical
drive may be installed, or an ASPI driver may be installed.
Uninstall the other software and drivers and then reinstall this software.
●
Other software with features for reading UDF discs may be installed.
In this case, temporarily stop the software or uninstall it.
●
Multiple peripherals may be connected to the computer.
Particularly if you are using an external optical drive for recording, disconnect SD
card readers or other USB devices and check software operation. However, do not
connect or disconnect these devices during recording.
●
Video cameras, optical drives, hard disk drives, or SD card adapters may be connected via USB.
Use a different USB port (for example, a USB port on the back of the computer).
●
Operation may be affected by the firmware (a control program stored on the equipment) of your optical drive.
Update the firmware of your computer or optical drive. (Firmware updates may be
available on the manufacturer’s website.)
●
Operation may be affected by CD recording functions provided by the operating system as a standard feature.
Disable these functions.
→11)
100
 Loading...