

Page 1
English
Nederlands
Operating Instructions
Plasma Television
For more detailed instructions, refer to the
Operating Instructions on the CD-ROM.
To view the Operating Instructions on the CD-ROM,
you need a computer equipped with a CD-ROM
drive, and Adobe
recommended) installed on your computer.
Depending on the operating system or settings on your
computer, the Operating Instructions may not start
automatically.
In this case, open the PDF file under the “MANUAL”
folder manually to view the instructions.
®
Reader® (Version 8.0 or later is
Model No.
TX-P42XT50E
TX-P50XT50E
Contents
Be Sure to Read
Safety Precautions ······································ 2
Quick Start Guide
Accessories ·················································4
Identifying Controls ······································7
Basic Connection········································· 9
Auto Setup ·················································12
Using “VIERA Connect” ·····························16
Viewing 3D images ····································17
How to Use VIERA TOOLS ······················· 20
How to Use Menu Functions ·····················21
Maintenance ·············································· 22
Thank you for purchasing this Panasonic product.
Please read these instructions carefully before operating this product and
retain them for future reference.
The images shown in this manual are for illustrative purposes only.
Please refer to Pan European Guarantee Card if you need to contact your
local Panasonic dealer for assistance.
TQB0E2190P4
Page 2
Safety Precautions
Warning
English
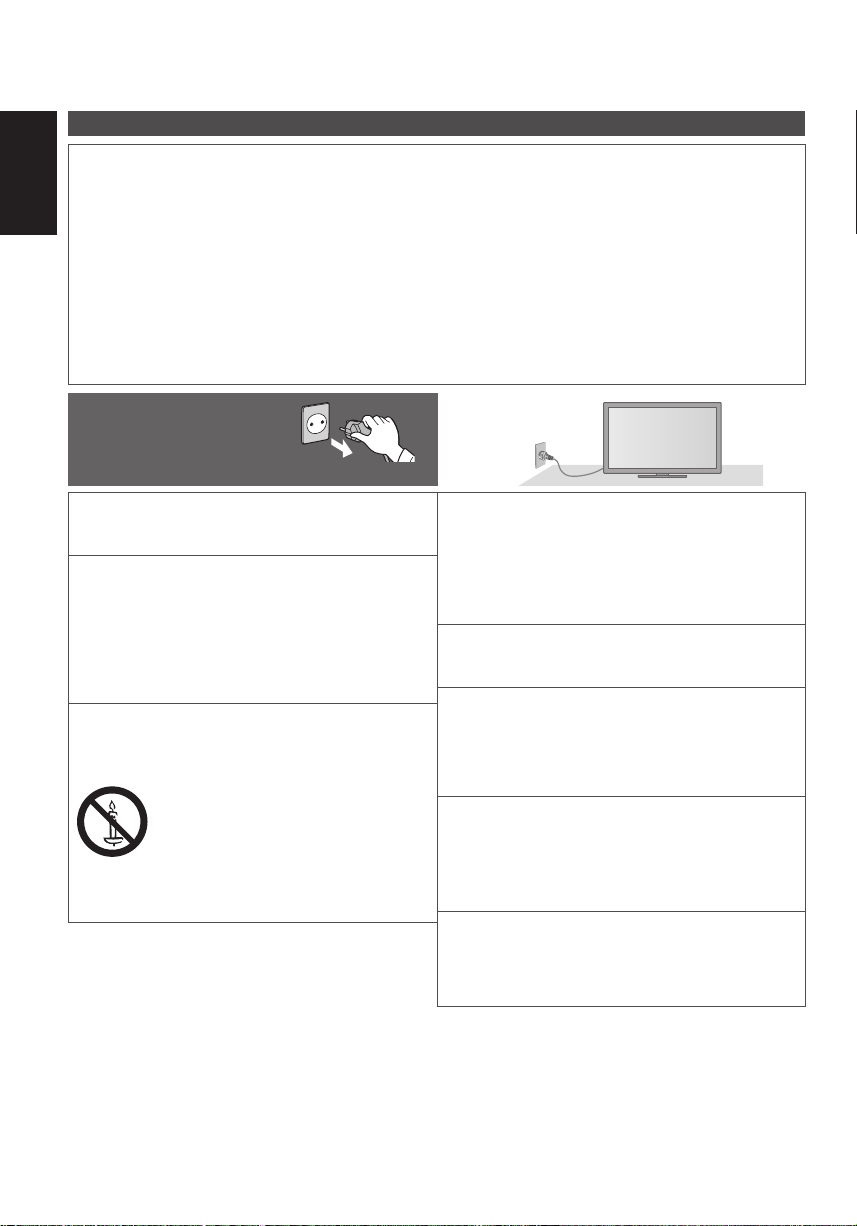
Handling the mains plug and lead
●
Insert the mains plug fully into the socket outlet. (If the mains plug is loose, it could generate heat and cause fire.)
●
Ensure that the mains plug is easily accessible.
●
Ensure the earth pin on the mains plug is securely connected to prevent electrical shock.
An apparatus with CLASS I construction shall be connected to a mains socket outlet with a protective earthing
•
connection.
●
Do not touch the mains plug with a wet hand. (This may cause electrical shock.)
●
Do not use any mains lead other than that provided with this TV. (This may cause fire or electrical shock.)
●
Do not damage the mains lead. (A damaged lead may cause fire or electrical shock.)
Do not move the TV with the lead plugged in the socket outlet.
•
Do not place a heavy object on the lead or place the lead near a high-temperature object.
•
Do not twist the lead, bend it excessively or stretch it.
•
Do not pull on the lead. Hold onto the mains plug body when disconnecting the lead.
•
Do not use a damaged mains plug or socket outlet.
•
If you find any abnormality,
remove the mains plug
immediately!
Power source
●
This TV is designed to operate on AC 220-240 V,
50 / 60 Hz.
Do not remove covers and NEVER
modify the TV yourself
●
Do not remove the rear cover as live parts are
accessible when it is removed. There are no user
serviceable parts inside. (High-voltage components
may cause serious electrical shock.)
●
Have the TV checked, adjusted, or repaired at your
local Panasonic dealer.
Do not expose to direct sunlight and
other sources of heat
●
Avoid exposing the TV to direct sunlight and other
sources of heat.
To prevent the spread
of fire, keep candles
or other open flames
away from this product
at all times
AC 220-240 V
50 / 60 Hz
Do not expose to rain or excessive
moisture
●
To prevent damage which might result in electric shock
or fire, do not expose this TV to rain or excessive
moisture. This TV must not be exposed to dripping or
splashing water and objects filled with liquid, such as
vases, must not be placed on top of or above the TV.
Do not insert foreign objects into the TV
●
Do not allow any objects to drop into the TV through
the air vents. (Fire or electrical shock may result.)
Do not place the TV on sloped or
unstable surfaces, and ensure that the
TV does not hang over the edge of the
base
●
The TV may fall off or tip over.
Use only the dedicated pedestals /
mounting equipment
●
Using an unapproved pedestal or other fixtures may
make the TV unstable, risking injury. Be sure to ask
your local Panasonic dealer to perform setup.
●
Use approved pedestals (p. 4) / wall-hanging brackets.
Do not allow children to handle SD Card
●
As with any small object, SD Cards can be
swallowed by young children. Please remove SD
Card immediately after use and store out of reach of
children.
2
Page 3
Radio waves
●
Do not use the TV in any medical institutions or locations with medical equipment. Radio waves from the TV may
interfere with the medical equipment and cause accidents due to the malfunction.
●
Do not use the TV near any automatic control equipment such as automatic doors or fire alarms. Radio waves
from the TV may interfere with the automatic control equipment and cause accidents due to the malfunction.
●
Keep the distance at least 22 cm from the TV when you have a cardiac pacemaker. Radio waves from the part
may interfere with the operation of the pacemaker.
Caution
When cleaning the TV, remove the mains
plug
●
Cleaning an energized TV may cause electrical shock.
When the TV is not going to be used for
a long period of time, remove the mains
plug
●
This TV will still consume some power even in the Off
mode, as long as the mains plug is still connected to a
live socket outlet.
Transport only in upright position
●
Transporting the TV with its display panel facing upward
or downward may cause damage to the internal circuitry.
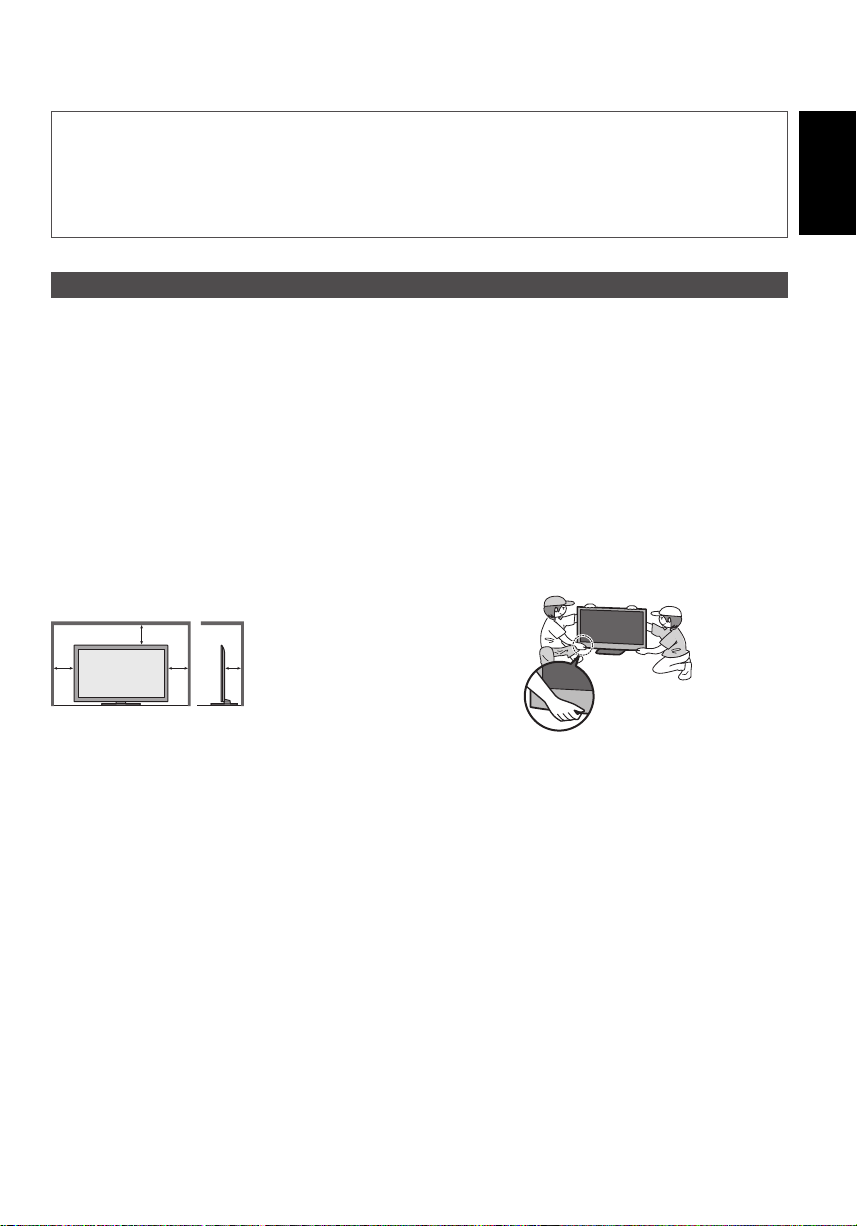
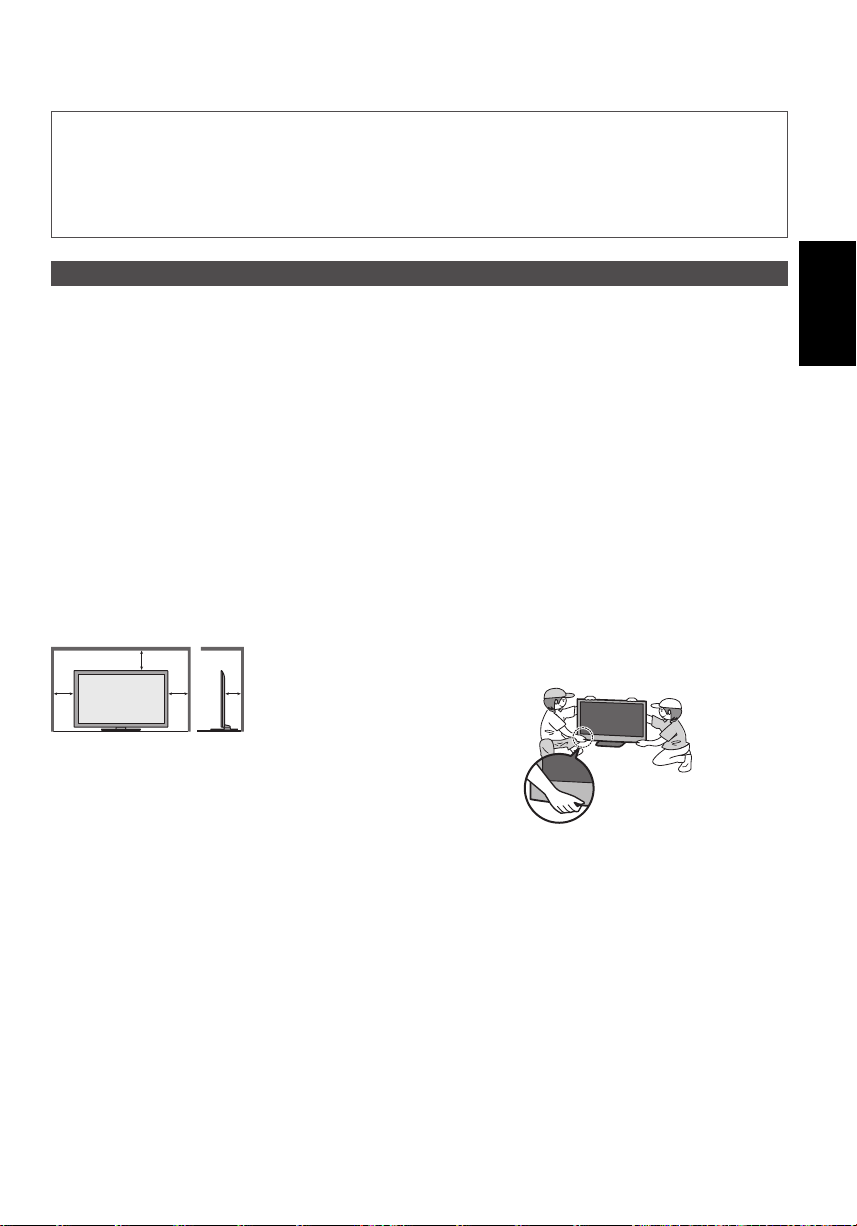
Allow sufficient space around the TV for
Do not block the rear air vents
●
Blocked ventilation by newspapers, table cloths,
curtains, etc. may cause overheating, fire or electrical
shock.
Do not expose your ears to excessive
volume from the headphones
●
Irreversible damage can be caused.
Do not apply strong force or impact to the
display panel
●
This may cause damage resulting in injury.
The TV is heavy. Handle the TV by 2 or
more people. Support as shown to avoid
injury by the TV tipping or falling.
radiated heat
Minimum distance
10
10
10
●
When using the
pedestal, keep the
space between the
bottom of the TV and
7
the surface where the
TV is set.
●
In case of using
(cm)
Wall-hanging bracket,
follow the manual of it.
English
Bluetooth® wireless technology
●
The TV uses the 2.4 GHz radio frequency ISM band (Bluetooth®). To avoid malfunctions or slow response caused
by radio wave interference, keep the TV away from the devices such as other wireless LAN devices, other Bluetooth
devices, microwaves, mobile phones and the devices that use 2.4 GHz signal.
3
Page 4
Accessories
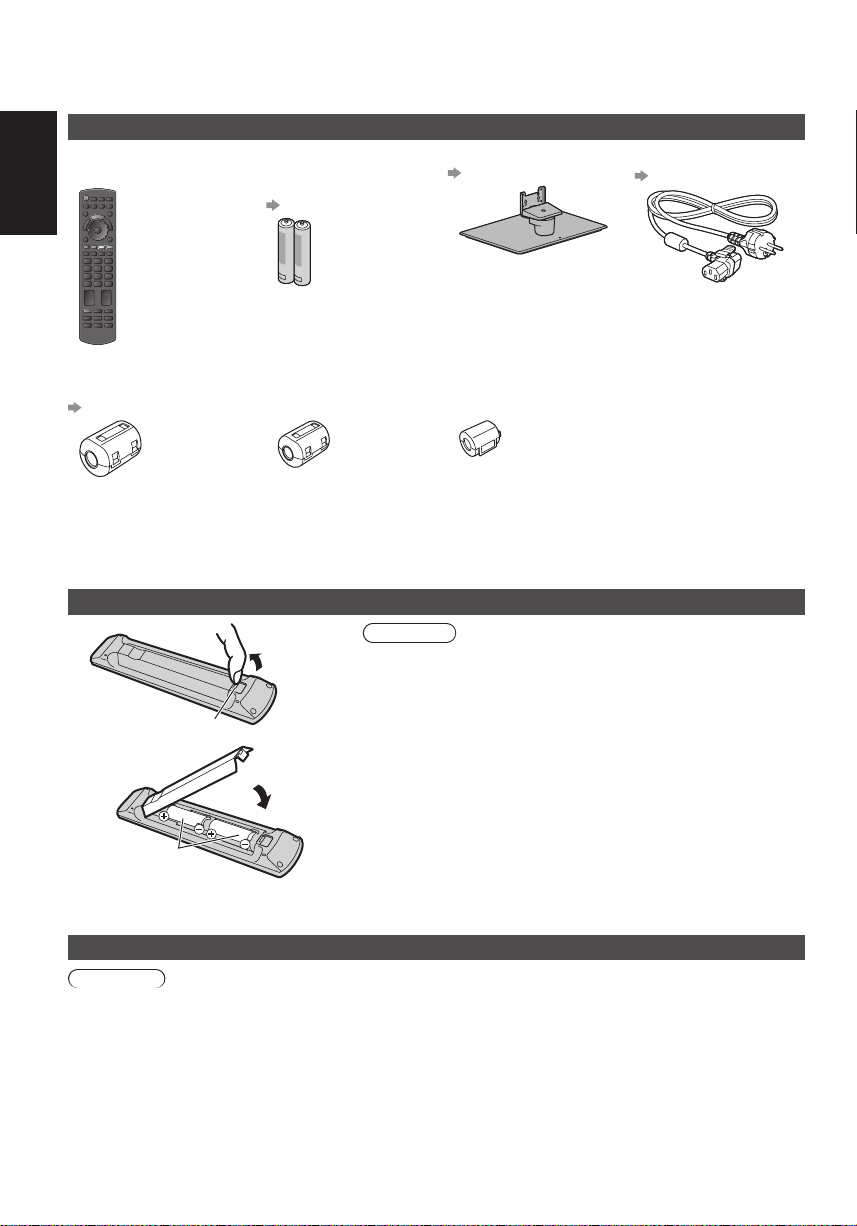
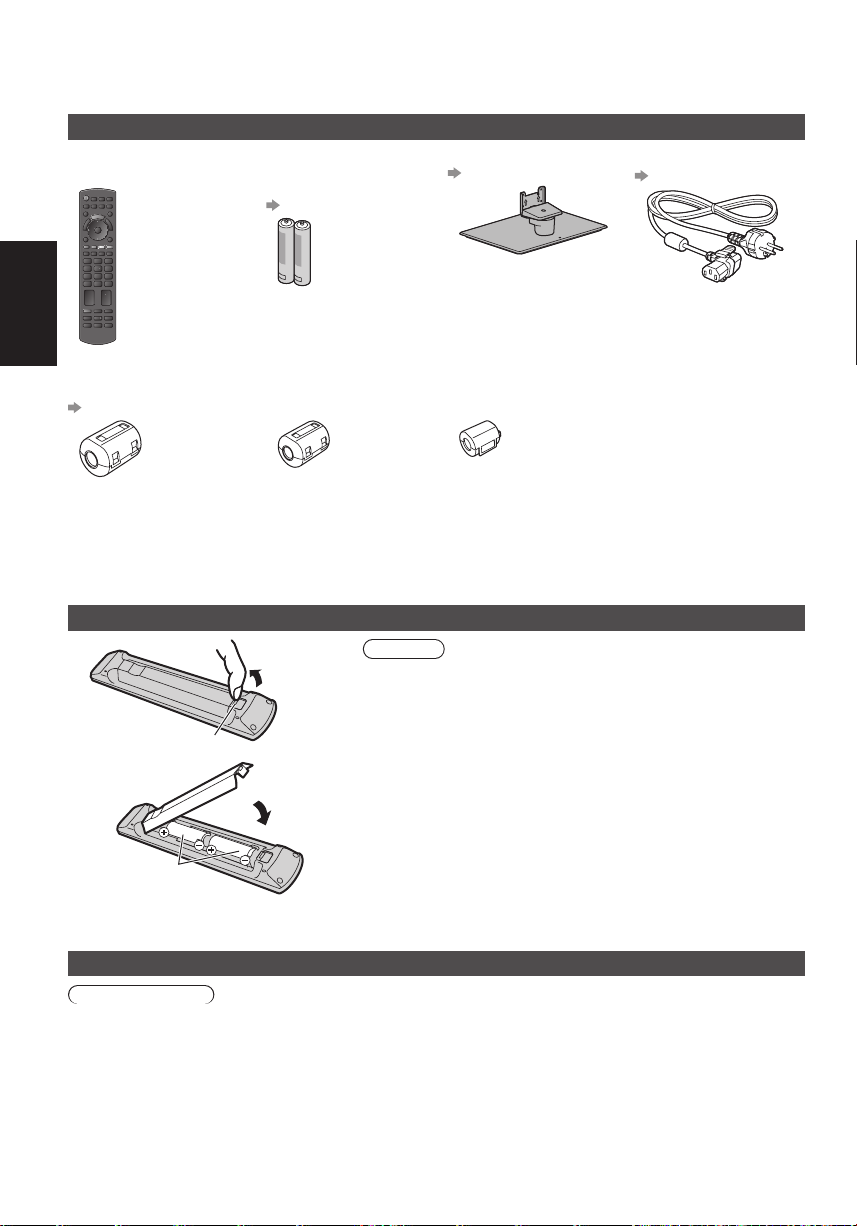
Standard accessories
English
Remote Control
●
N2QAYB000752
Ferrite core
for LAN cable (2)
(Large size)
(p. 11)
Batteries for the
Remote Control (2)
●
R6
(see below)
Ferrite core
for USB cable (2)
(Middle size)
Pedestal
(see below)
Ferrite core
for headphones
(Small size)
Mains lead
(p. 9)
Operating Instructions
Pan European Guarantee
Card
Use the Ferrite cores to comply with the EMC standard.
●
Accessories may not be placed all together. Take care not to throw them away unintentionally.
●
This product contains possibly dangerous parts (such as plastic bags), that can be breathed in or swallowed by
young children accidentally. Keep these parts out of reach of young children.
Installing / removing remote’s batteries
1
2
Note the correct
polarity (+ or -)
Pull Open
Hook
Close
Caution
●
Incorrect installation may cause battery leakage and corrosion,
resulting in damage to the remote control.
●
Do not mix old and new batteries.
●
Do not mix different battery types (such as alkaline and manganese
batteries).
●
Do not use rechargeable (Ni-Cd) batteries.
●
Do not burn or break up batteries.
Batteries must not be exposed to excessive heat such as sunshine,
fire or the like.
●
Do not disassemble or modify the remote control.
Attaching / removing the pedestal
Warning
Do not disassemble or modify the pedestal.
●
Otherwise the TV may fall over and become damaged, and personal injury may result.
4
Page 5
Caution
Do not use any pedestal other than the one provided with this TV.
●
Otherwise the TV may fall over and become damaged, and personal injury may result.
Do not use the pedestal if it becomes warped or physically damaged.
●
If you use the pedestal while it is physically damaged, personal injury may result. Contact your local Panasonic
dealer immediately.
During set-up, make sure that all screws are securely tightened.
●
If insufficient care is taken to ensure screws are properly tightened during assembly, the pedestal will not be strong
enough to support the TV, and it might fall over and become damaged, and personal injury may result.
Ensure that the TV does not fall over.
●
If the TV is knocked or children climb onto the pedestal with the TV installed, the TV may fall over and personal injury
may result.
Two or more people are required to install and remove the TV.
●
If two or more people are not present, the TV may be dropped, and personal injury may result.
When removing the pedestal from the TV, do not remove the pedestal by the methods other than the specified
procedure.
●
Otherwise the TV and / or pedestal may fall over and become damaged, and personal injury may result.
(p. 6)
Assembly screw (5)
(black)
M4 × 10
Assembly screw (7)
(silver)
M5 × 16
Bracket
●
TBL5ZA3238
Neck
●
TXFBL5Z0072
Cover
●
TXFBL5Z0073
Base
●
TBL5ZX0293
(TX-P42XT50E)
●
TBL5ZX0295
(TX-P50XT50E)
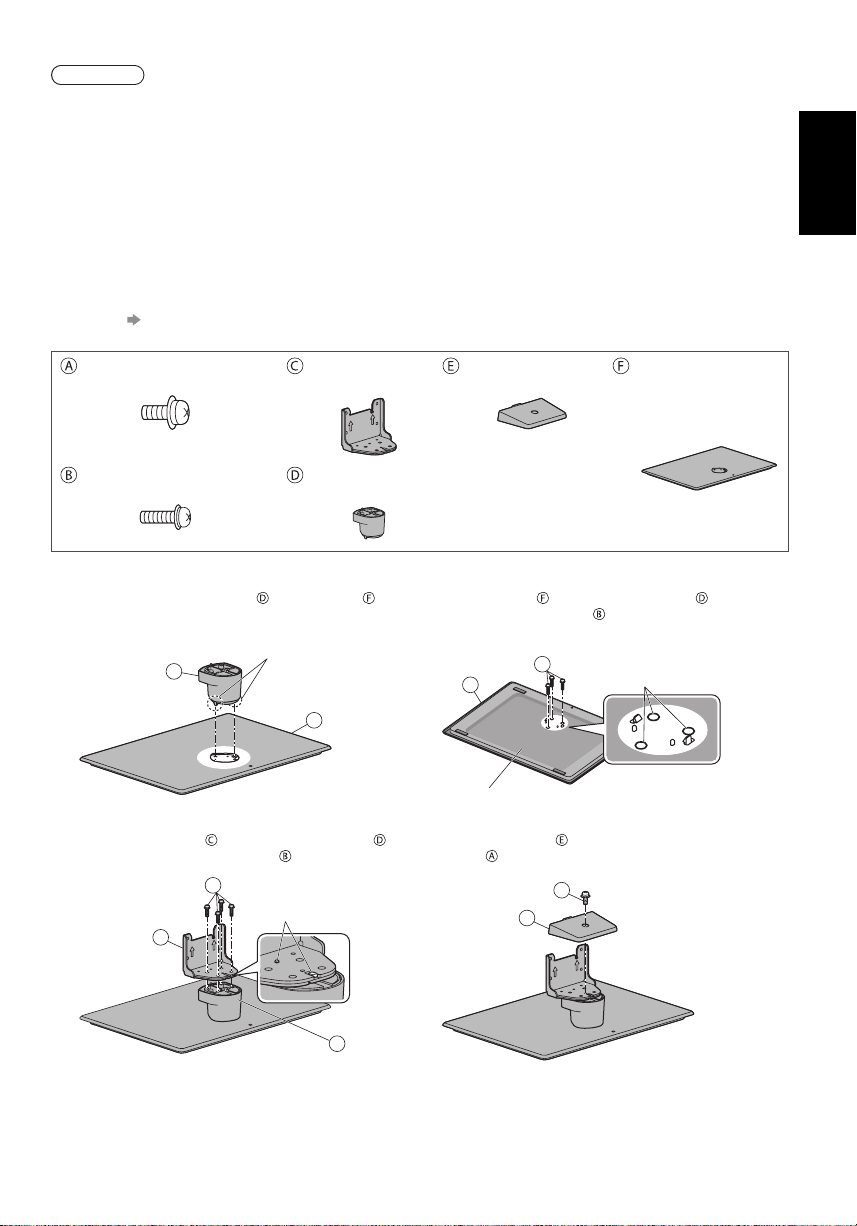
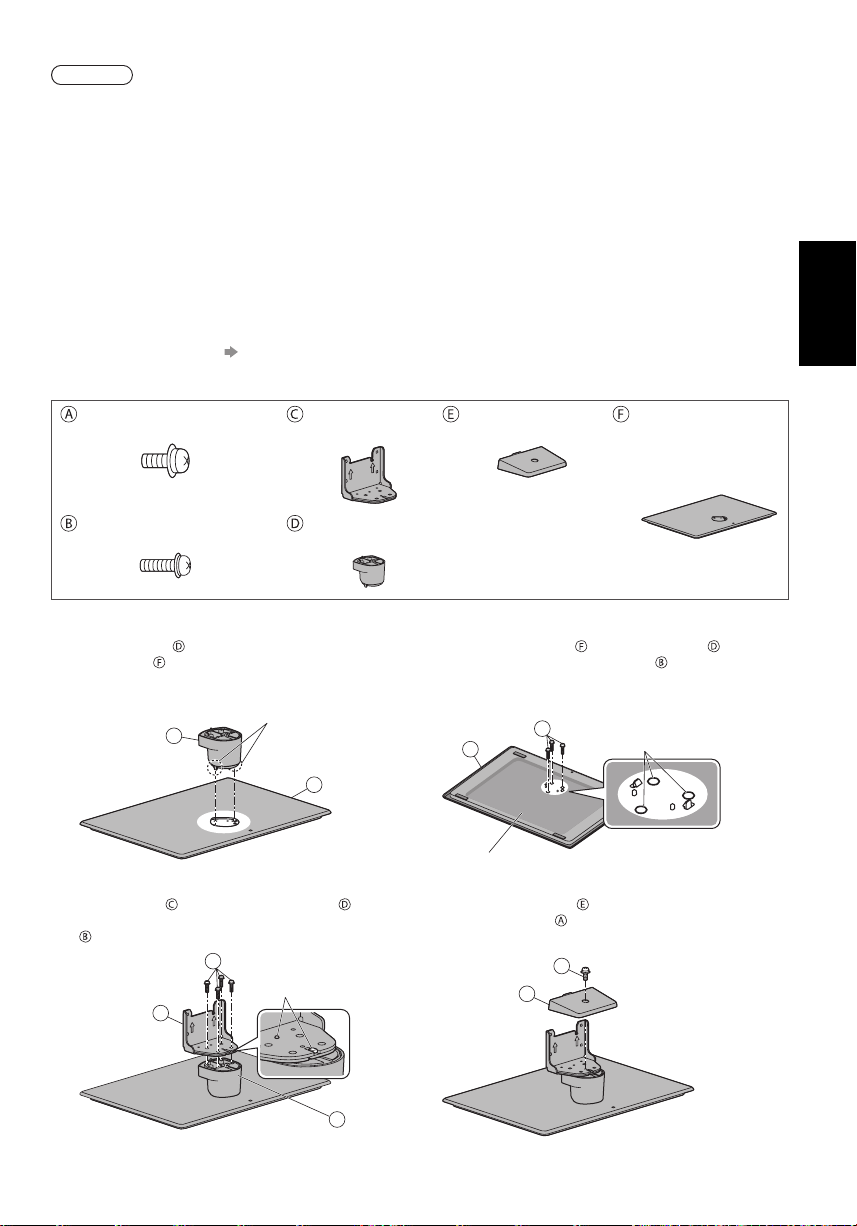
■ Assembling the pedestal
Insert the tabs of the neck into the base
1
firmly
D
Tabs (bottom)
Turn the base over and fix the neck securely
2
with assembly screws
●
Do not hold the neck when turning over the base.
B
F
Screw hole
English
F
Attach the bracket to the tabs of the neck
3
and fix with assembly screws
B
Tabs (top)
C
Back of the base
Attach the cover and fix securely with assembly
4
screw
A
E
D
5
Page 6
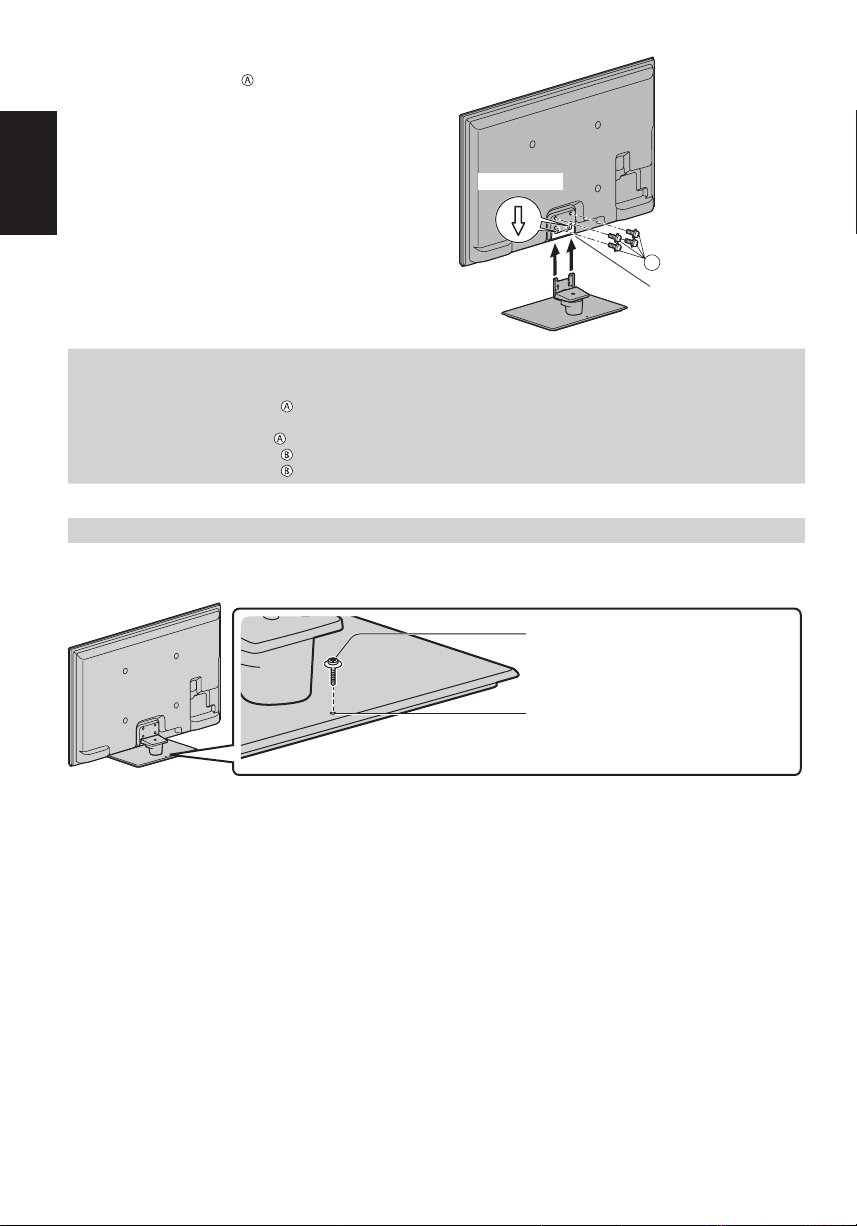
■ Securing the TV
Use the assembly screws to fasten securely.
●
Tighten the four assembly screws loosely at first, then
tighten them firmly to fix securely.
●
Carry out the work on a horizontal and level surface.
English
Removing the pedestal from the TV
Be sure to remove the pedestal in the following way when using the wall-hanging bracket or repacking the TV.
1 Remove the assembly screws
2 Pull out the pedestal from the TV.
3 Remove the assembly screw from the cover.
4 Remove the assembly screws
5 Remove the assembly screws
from the TV.
from the bracket.
from the back of the base and pull out the neck.
Arrow mark
A
Hole for pedestal
installation
Preventing the TV from falling over
Using the fall-prevent screw hole and a screw (commercially available), securely fix the body of the pedestal to the
installation surface.
●
The place where the pedestal is to be fixed should be thick enough and made of hard material.
Screw (not supplied)
Diametre: 3 mm
Length: 25 - 30 mm
Screw hole
6
Page 7
Identifying Controls
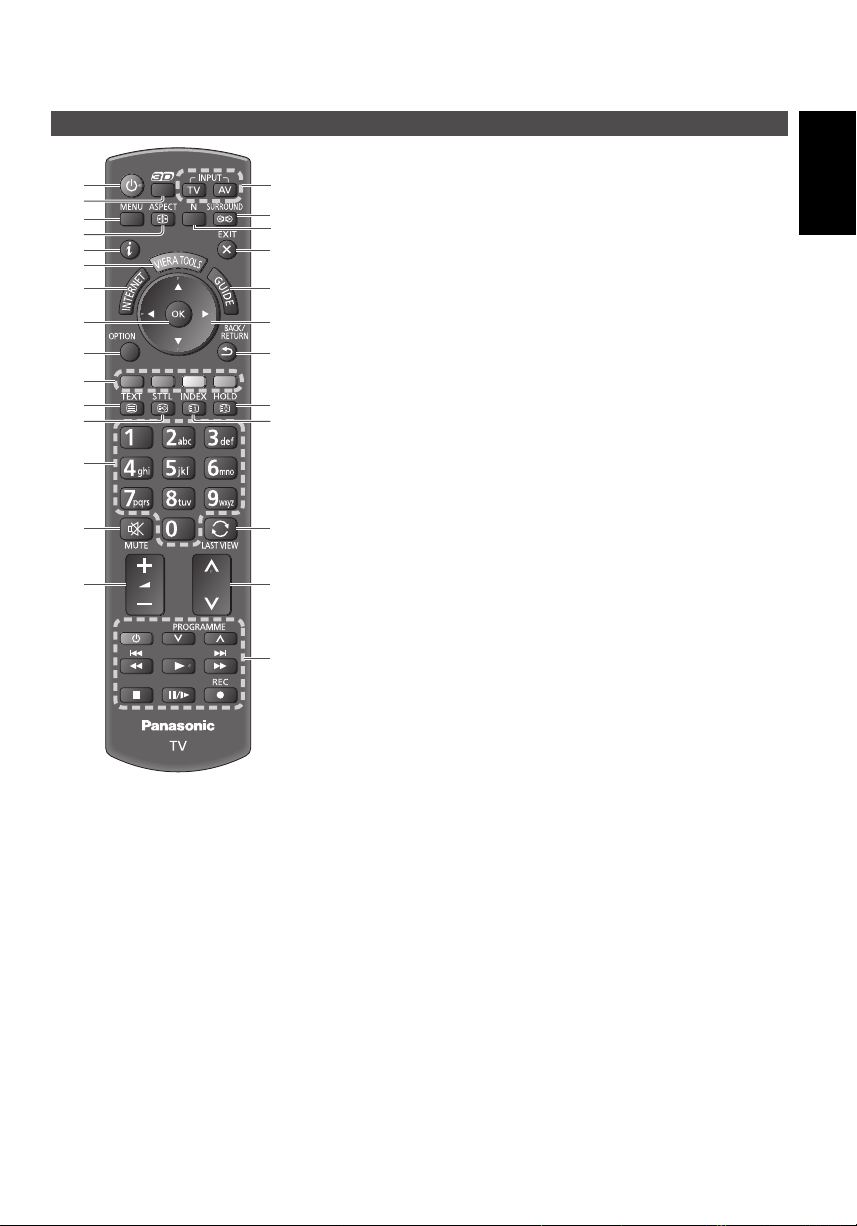
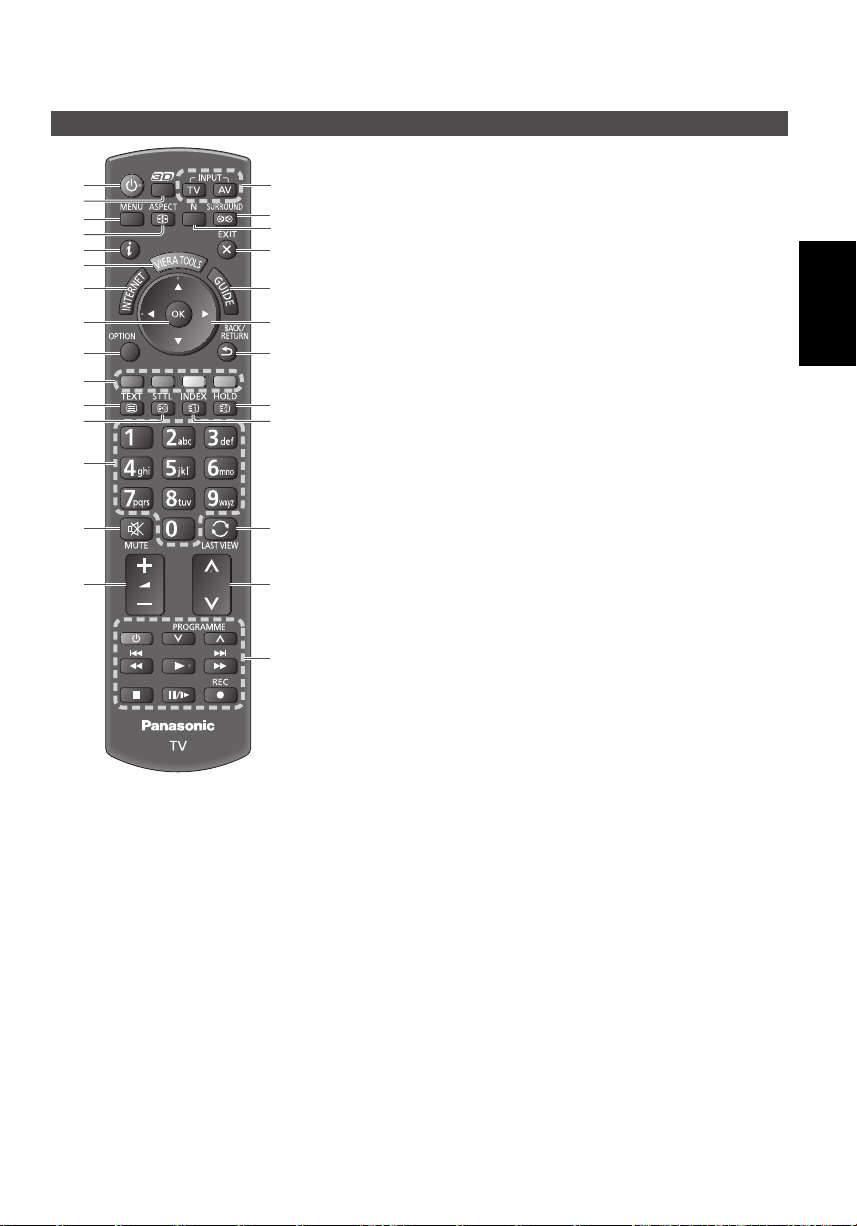
Remote Control
1
2
3
4
5
6
7
8
9
10
11
12
13
14
15
Standby On / Off switch
1
●
Switches TV on or off standby.
3D button
2
●
Switches the viewing mode between 2D and 3D.
[Main Menu]
3
●
Press to access Picture, Sound, Network, Timer
and Setup Menus.
Aspect
4
●
Changes aspect ratio.
Information
5
●
Displays channel and programme information.
VIERA TOOLS
6
●
Displays some special feature icons and accesses
easily.
INTERNET ([VIERA Connect])
7
●
Displays VIERA Connect home screen.
16
17
18
19
20
21
22
23
24
25
26
27
OK
8
●
Confirms selections and choices.
●
Press after selecting channel positions to quickly
change channel.
●
Displays the Channel List.
[Option Menu]
9
●
Easy optional setting for viewing, sound, etc.
Coloured buttons
10
(red-green-yellow-blue)
●
Used for the selection, navigation and operation of
various functions.
Teletext
11
●
Switches to teletext mode.
Subtitles
12
●
Displays subtitles.
Numeric buttons
13
●
Changes channel and teletext pages.
●
Sets characters.
●
When in Standby mode, switches TV on (Press for
about 1 second).
Sound Mute
14
●
Switches sound mute on or off.
Volume Up / Down
15
Input mode selection
16
●
TV - switches DVB-C / DVB-T / Analogue mode.
●
AV - switches to AV input mode from Input
Selection list.
Surround
17
●
Switches surround sound setting.
Normalise
18
●
Resets picture and sound settings to their default
levels.
Exit
19
●
Returns to the normal viewing screen.
TV Guide
20
Cursor buttons
21
●
Makes selections and adjustments.
Return
22
●
Returns to the previous menu / page.
Hold
23
●
Freezes / unfreezes the picture.
●
Holds the current teletext page (teletext mode).
Index
24
●
Returns to the teletext index page (teletext mode).
Last view
25
●
Switches to previously viewed channel or input
mode.
Channel Up / Down
26
Operations for contents, connected equipment,
27
etc.
English
7
Page 8
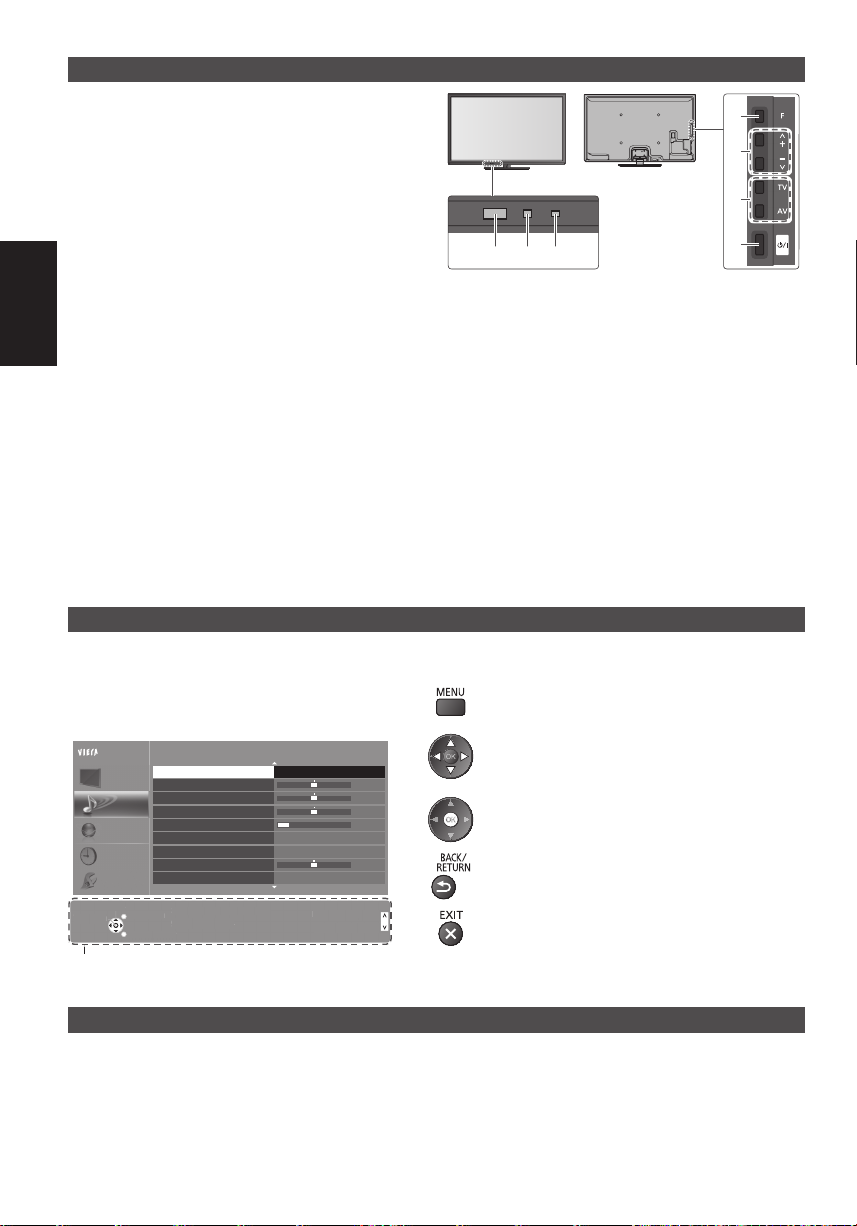
Indicator / Control panel
S
t
S
ode
Page
up
C
ge
RETURN
n
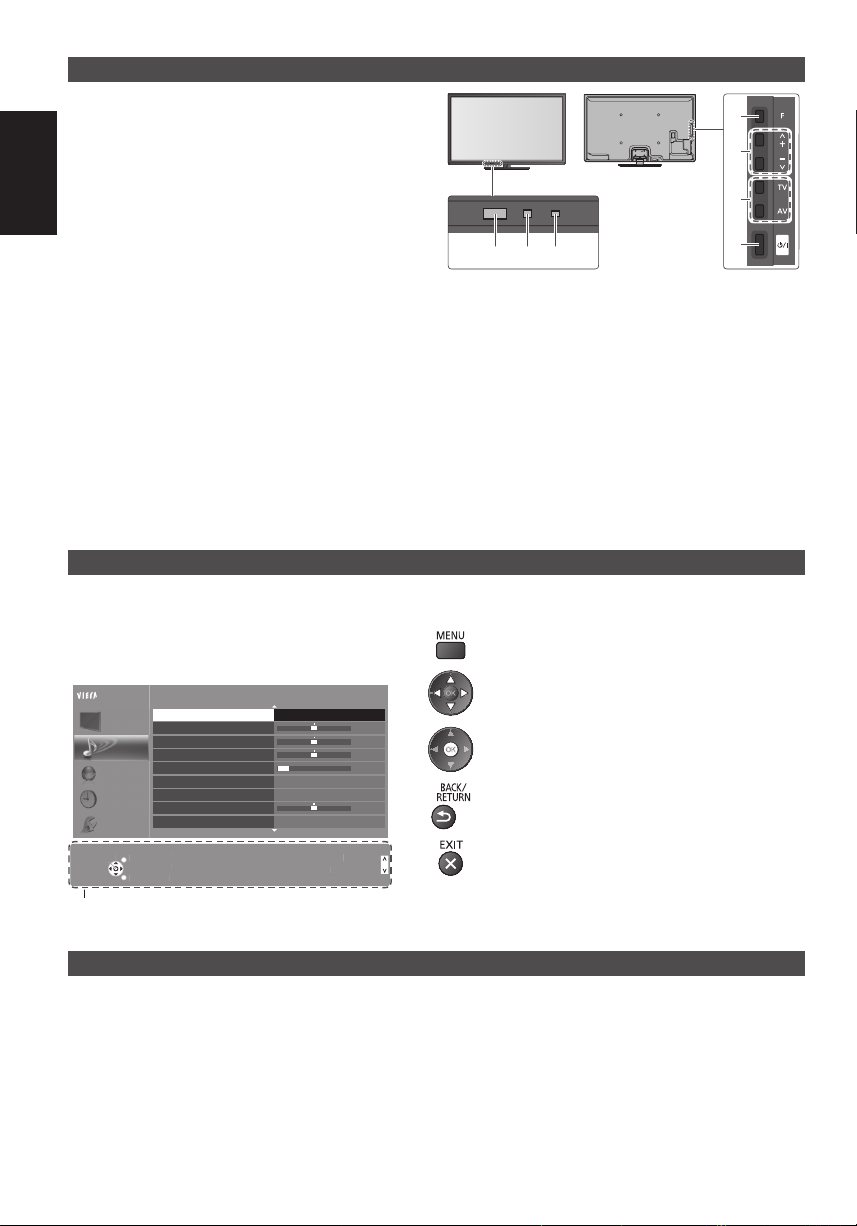
Function select
1
●
[Volume] / [Contrast] / [Brightness] / [Colour] /
English
[Sharpness] / [Tint] (NTSC signal) / [Bass]∗ /
[Treble]∗ / [Balance] / [Auto Setup]
∗ [Music] or [Speech] mode in the Sound Menu
Channel Up / Down, Value change (when using the
2
F button), Switching the TV on (press either button
for about 1 second when in Standby mode)
Changes the input mode
3
Mains power On / Off switch
4
●
Use to switch the mains power.
5 6 7
If you turned the TV off during Standby mode
by the remote control last time, the TV will be
in Standby mode when you turn the TV on with
Mains power On / Off switch.
When pressing the control panel button (1 - 4), the
control panel guide appears on the left side of the
screen for 3 seconds to highlight the pressed button.
Remote control signal receiver
5
●
Do not place any objects between the TV remote
control signal receiver and remote control.
C.A.T.S. (Contrast Automatic Tracking System)
6
sensor
●
Senses brightness to adjust picture quality when
[Eco Mode] in the Picture Menu is set to [On].
Power and Timer LED
7
Red: Standby
Green: On
Orange: Timer Programming On
Orange (flash):
Recording of Timer Programming or Direct TV
Recording in progress
Red with orange flash:
Standby with Timer Programming On or Direct
TV Recording
●
The LED blinks when the TV receives a command
from the remote control.
Using the On Screen Displays - Operation guide
Many features available on this TV can be accessed via the On Screen Display menu.
■ Operation guide
Operation guide will help you to operate by using the
remote control.
Example: [Sound Menu]
Main Menu
Picture
Sound
Network
Timer
Setup
Select
elec
EXIT
Change
han
RETURN
Operation guide
Mode Music
Bass
Treble
Balance
Headphone Volume
Surround
Auto Gain Control
Volume Correction
Speaker Distance to Wall
Selects your favourite sound
elects your favourite sound
mode.
m
.
Off
Off
Over 30cm
Page up
Page down
Page dow
1/2
11
■ How to use remote control
Open the main menu
Move the cursor / select from a range of options /
select the menu item (up and down only) / adjust
0
0
0
0
levels (left and right only)
Access the menu / store settings after adjustments
have been made or options have been set
Return to the previous menu
Exit the menu system and return to the normal
viewing screen
1
2
3
4
Rear side of the TV
Auto power standby function
The TV will automatically go into Standby mode in the following conditions:
No signal is received and no operation is performed for 30 minutes in Analogue TV mode.
•
[Off Timer] is active in the Timer Menu.
•
No operation is performed for the period selected in [Auto Standby].
•
●
This function does not affect the recording of Timer Programming and Direct TV Recording.
8
Page 9
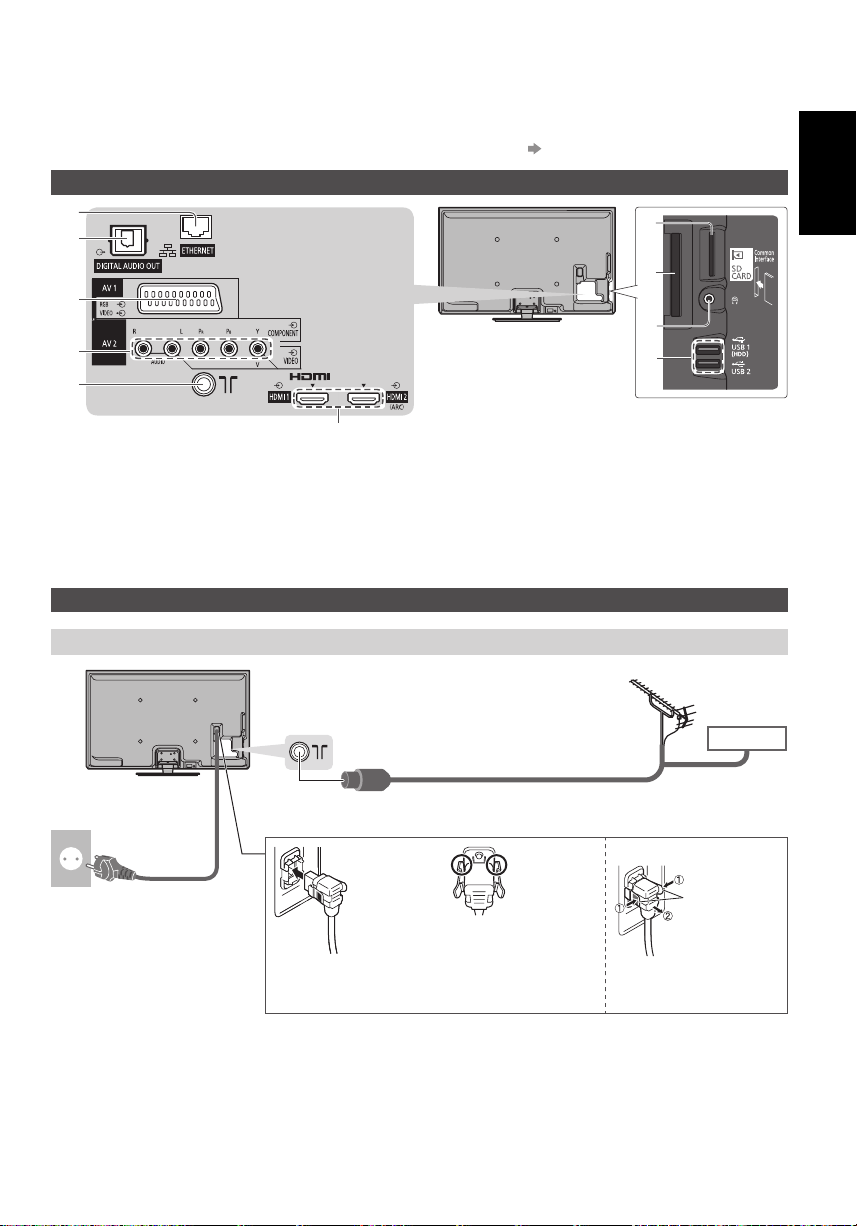
Basic Connection
External equipment and cables shown are not supplied with this TV.
Please ensure that the unit is disconnected from the mains socket before attaching or disconnecting any leads.
There are some restrictions on placement for viewing 3D images. For details
Terminals
5
6
7
8
9
(p. 17, 18)
1
2
3
4
English
SD Card slot
1
CI slot
2
Headphone jack
3
USB 1 / 2 port
4
ETHERNET
5
Connections
Mains lead and aerial
Mains lead
AC 220-240 V
50 / 60 Hz
10
6
7
8
9
10
■ DVB-C, DVB-T, Analogue
■ Mains lead
Push until both side
tabs click
DIGITAL AUDIO OUT
AV1 (SCART)
AV2 (COMPONENT / VIDEO)
Terrestrial / cable terminal
HDMI1 / 2
RF cable
To remove from the TV:
Make sure that
the mains lead is
securely fixed.
Press both tabs and pull
on mains connector to
release
Terrestrial aerial
Cable
tabs
9
Page 10
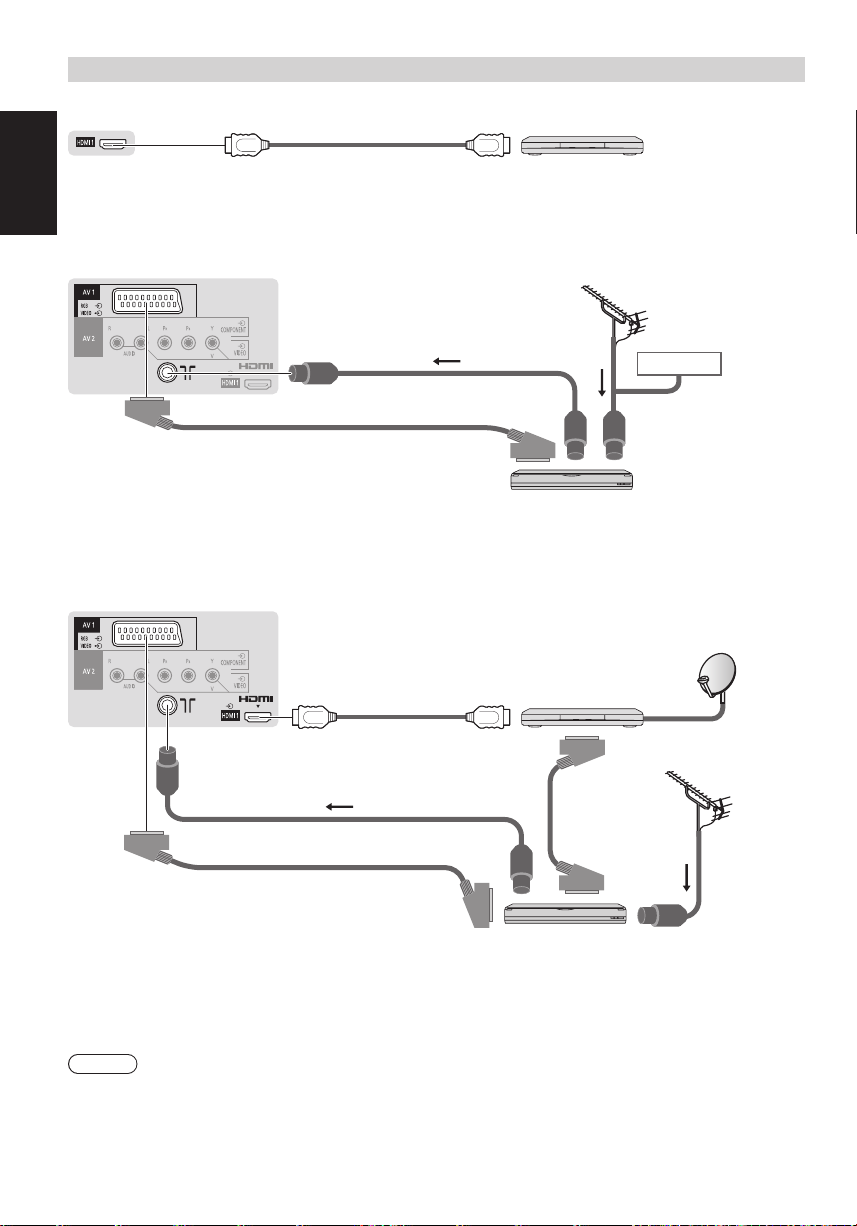
AV devices
■ Player / 3D compatible player
TV
English
■ DVD Recorder / VCR
TV
■ DVD Recorder / VCR and Set top box
TV
HDMI cable
SCART cable
Player /
3D-compatible player
Terrestrial aerial
Cable
RF cable
RF cable
DVD Recorder / VCR
Set top box
HDMI cable
SCART cable
RF cable
SCART cable
DVD Recorder / VCR
Note
●
Connect to the TV’s AV1 for a DVD Recorder / VCR supporting Q-Link.
●
Please also read the manual of the equipment being connected.
●
Keep the TV away from electronic equipment (video equipment, etc.) or equipment with an infrared sensor.
Otherwise, distortion of image / sound may occur or operation of other equipment may be interfered.
●
When using a SCART or HDMI cable, use the fully wired one.
●
Check the type of terminals and cable plugs are correct when connecting.
10
Terrestrial
aerial
RF Cable
Page 11
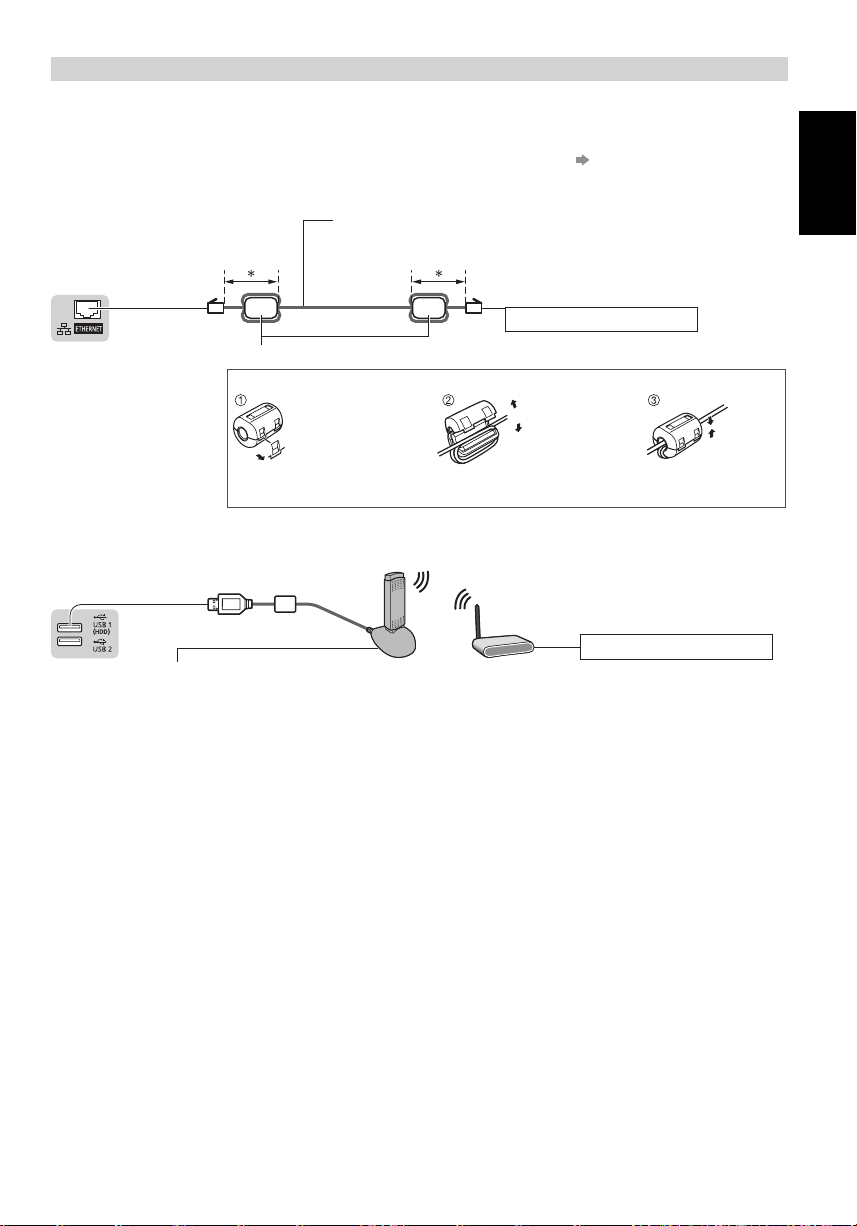
Network
To enable the network service functions (VIERA Connect, etc.), you need to connect the TV to a broadband network
environment.
●
If you do not have any broadband network services, please consult your retailer for assistance.
●
Prepare the internet environment for wired connection or wireless connection.
●
Setup of the network connection will start after the tuning (when first using the TV). (p. 13 - 15)
■ Wired connection
LAN cable (Unshielded)
●
Use the Unshielded Twist Pair (UTP) LAN cable.
English
TV
Ferrite core - Large size (supplied)
■ Wireless connection
TV
Wireless Adaptor (optional accessory)
●
Connect to the USB 1 or 2 port.
Installing the Ferrite core
Pull back the tabs
(in two places)
∗
Less than 10 cm
Internet environment
Wind the cable twice Close
Access point
Internet environment
11
Page 12
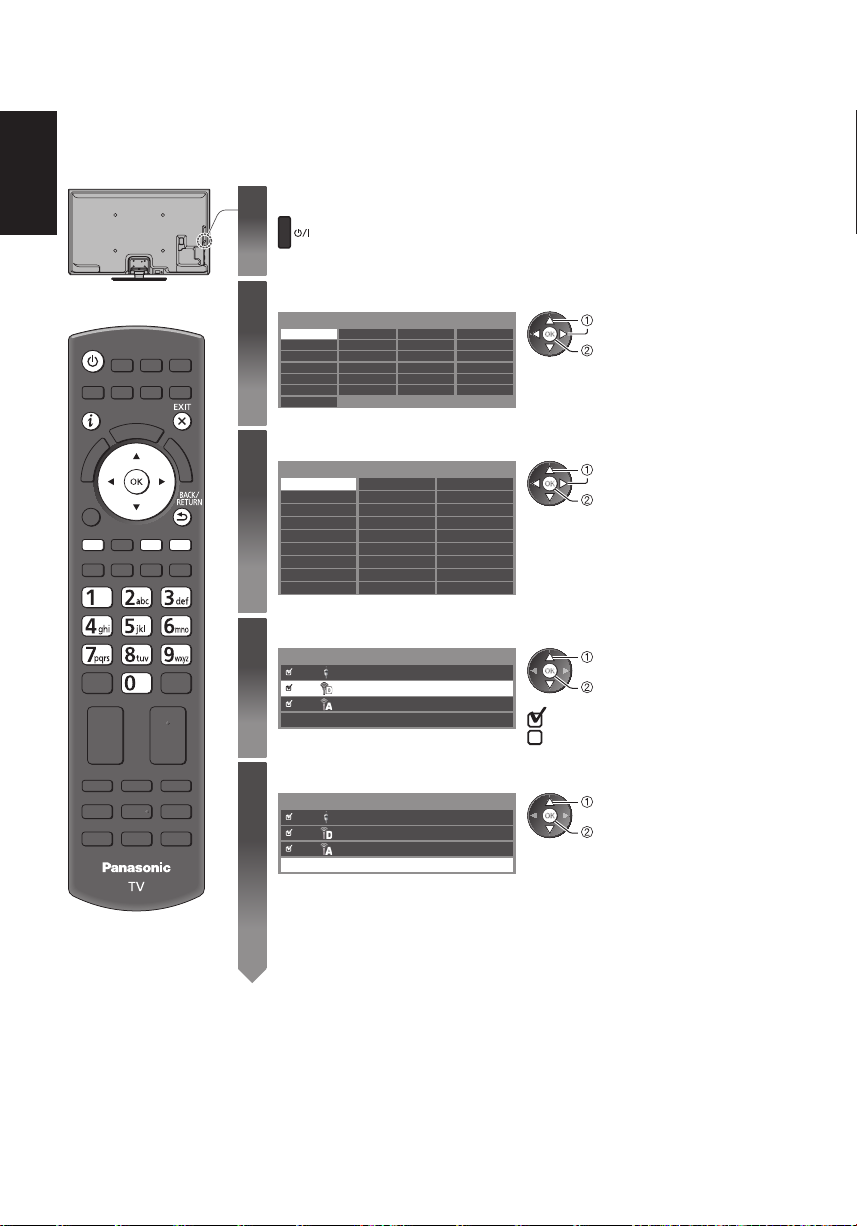
Auto Setup
Search and store TV channels automatically.
●
These steps are not necessary if the setup has been completed by your local dealer.
English
●
Please complete connections (p. 9 - 11) and settings (if necessary) of the connected equipment before starting Auto
Setup. For details of settings for the connected equipment, read the manual of the equipment.
Plug the TV into mains socket and switch on
1
2
3
4
●
Takes a few seconds to be displayed.
●
If the red LED shows on the TV, press the Standby On / Off switch on the
remote control for about 1 second.
Select the language
Menüsprache
Deutsch Dansk Polski Srpski
English Svenska čeština Hrvatski
Français Norsk Magyar Slovenščina
Italiano Suomi Slovenčina Latviešu
Español Türkçe Български eesti keel
Português Еλληνικά Română Lietuvių
Nederlands
select
set
Select your country
Country
Germany
Austria Sweden Czech
France Norway Hungary
Italy Finland Slovakia
Spain Luxembourg Slovenia
Portugal Belgium Croatia
Switzerland Netherlands Estonia
Malta Turkey Lithuania
Andorra Greece Others
Denmark
Poland
select
set
●
Depending on the country you select,
select your Region or store the Child LockPIN number (“0000” cannot be stored) by
following the on-screen instructions.
Select the mode to tune
TV Signal Selection
DVB-C
DVB-T
Analogue
Start Auto Setup
select
tune / skip tuning
: tune (search for the available channels)
: skip tuning
12
Select [Start Auto Setup]
5
TV Signal Selection
DVB-C
DVB-T
Analogue
●
Auto Setup will start to search for TV channels and store them.
The stored channels and sorted channel order vary depending on the country, area,
broadcasting system and conditions of signal reception.
Auto Setup screen varies depending on the country you select.
Start Auto Setup
select
access
Page 13
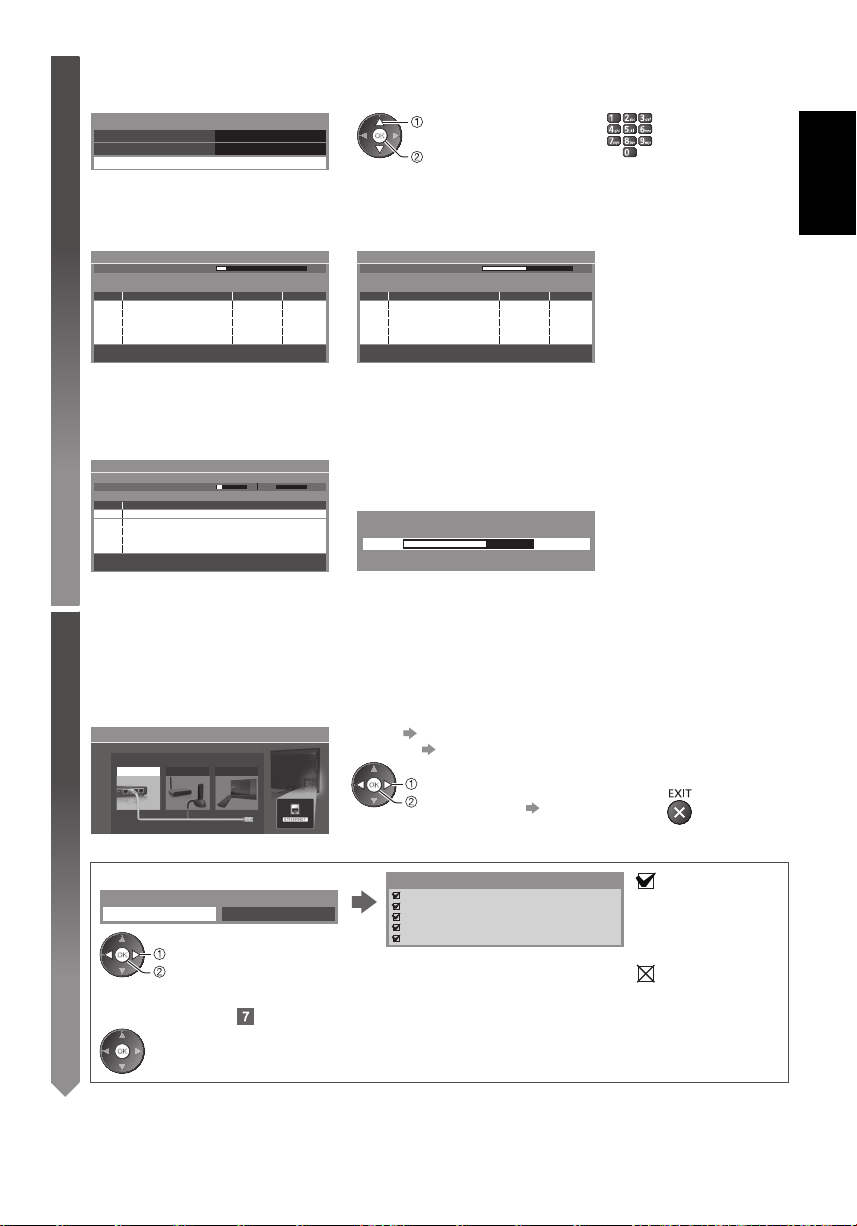
1 [DVB-C Network Settings]
●
5
Depending on the country you select, select your cable provider beforehand by following the on-screen
instructions.
DVB-C Network Settings
Frequency Auto
Network ID
Start Auto Setup
Auto
select [Start Auto Setup]
access
Normally set [Frequency] and [Network ID] to [Auto].
If [Auto] is not displayed or if necessary, enter [Frequency] and [Network ID] specified by your cable provider
with numeric buttons.
2 [DVB-C Auto Setup] 3 [DVB-T Auto Setup]
DVB-C Auto Setup
Progress
This will take about 3 minutes.
No. Channel Name Type
CBBC Channel
1
BBC Radio Wales
2
E4
3
Free TV: 3 Pay TV: 0 Radio: 0
0% 100%
Free TV
Free TV
Free TV
Searching
Quality
100
100
100
DVB-T Auto Setup
Progress
This will take about 3 minutes.
CH Channel Name Type
CBBC Channel
62
BBC Radio Wales
62
E4
62
62 100Cartoon Nwk
Free TV: 4 Pay TV: 0 Radio: 0
●
Depending on the country you select, the channel selection screen
CH 5 69
100
Free TV
100
Free TV
100
Free TV
Free TV
Searching
Quality
will be displayed after DVB-T Auto Setup if multiple channels have
the same logical channel number. Select your preferred channel or
exit the screen for automatic selections.
4 [Analogue Auto Setup] 5 Preset Download
Analogue Auto Setup
Scan
This will take about 3 minutes.
CH Channel Name
CH 29
CH 33 BBC1
Analogue: 2
Setup the network connection
6
Setup the network connection to enable the network service functions such as VIERA Connect, etc. (p. 16).
●
To setup the wireless connection, the Wireless Adaptor (optional accessory) is required. Please note that this
TV does not support wireless public access points.
●
Ensure the network connections (p. 11) and network environment are completed before starting setup.
CH 2 78 41CC 1
Searching
Select the network type
Network Setup
Select Wired or Wireless
Wired Wireless Set later
If Q-Link, VIERA Link or similar technology compatible recorder
is connected, channel, language and country / region settings are
automatically downloaded to the recorder.
Sending Preset Data
Please wait!
0% 100%
Remote control unavailable
●
If downloading has failed, you can download later through the
Setup Menu.
[Wired] “Wired connection” (p. 11)
[Wireless]
“Wireless connection” (p. 11)
●
select
access
To setup later on or skip this step
Select [Set later] or
■ [Wired]
1. Select [Auto]
Acquire IP Address
2. Go to the next step
Auto Manual
select
access
(Press twice)
Automatically setup is done and the test of the
network connection starts.
●
To set manually, select [Manual] and set each item.
Connection Test
Check network cable connection.
Check acquired IP address.
Check for devices using same IP address.
Check gateway connection.
Check server connection.
: succeeded
The test is successful
and the TV is
connected to the
network.
: failed
Check the settings and
connections. And then
select [Retry].
English
13
Page 14
English
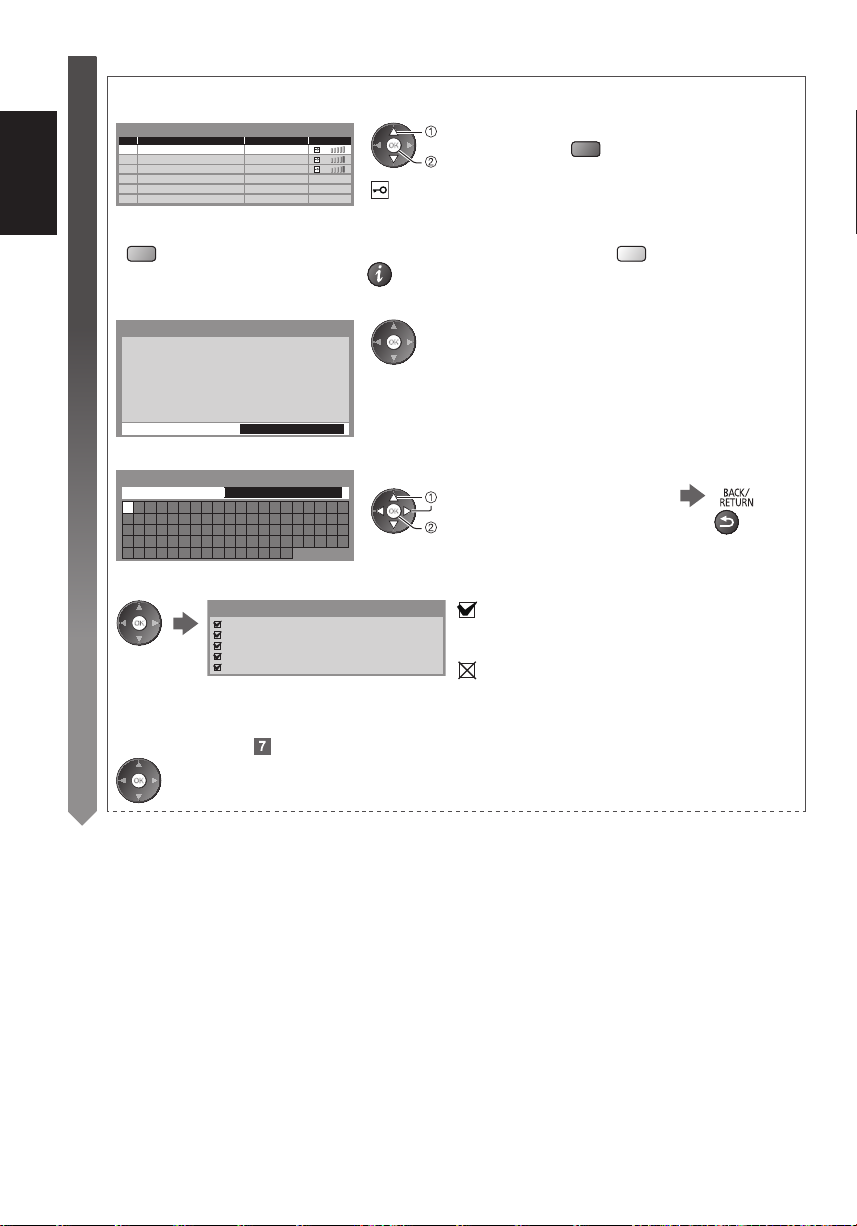
■ [Wireless]
6
Access points found automatically are listed.
1. Select your desired access point
Available Wireless Networks
No. Network Name(SSID) Status Wireless type
1
2
3
Access Point A
Access Point B
Access Point C
11n(2.4GHz)
11n(5GHz)
11n(5GHz)
●
To search access points again
(blue)
●
select
access
: Encrypted access point
For the information of the highlighted
access point
2. Access the encryption key input mode
Encryption Key Setting
Connection will be made with the following settings: Network Name(SSID) : Access Point A
Security type : WPA-PSK
Encryption type : TKIP
Please input the encryption key.
Encryption key
●
If the selected access point is not encrypted, the confirmation
screen will be displayed. It is recommended to select the encrypted
access point.
3. Enter the encryption key of the access point
Wireless Network Settings
Encryption key
A B C D E F G H I J K L M N O P Q R S T
U V W X Y Z 0 1 2 3 4 5 6 7 8 9 ! : #
a b c d e f g h i j k l m n o p q r s t
u v w x y z ( ) + - . * _ @ / “ ‘ % & ?
, ; = $ [ ] ~ < > { } | ` ^ \
Set characters
select
set
●
You can set characters by using numeric
buttons.
4. After the access point setting is finished, perform the connection test
Connection Test
Check wireless network connection.
Check acquired IP address.
Check for devices using same IP address.
Check gateway connection.
Check server connection.
5. Go to the next step
●
For [WPS(Push button)] (p. 15)
(red)
●
To set manually
(yellow)
Store
: succeeded
The test is successful and the TV is connected to the
network.
: failed
Check the settings and connections. And then select
[Retry].
●
To set manually, select [Manual] and set each item.
14
(Press twice)
Page 15
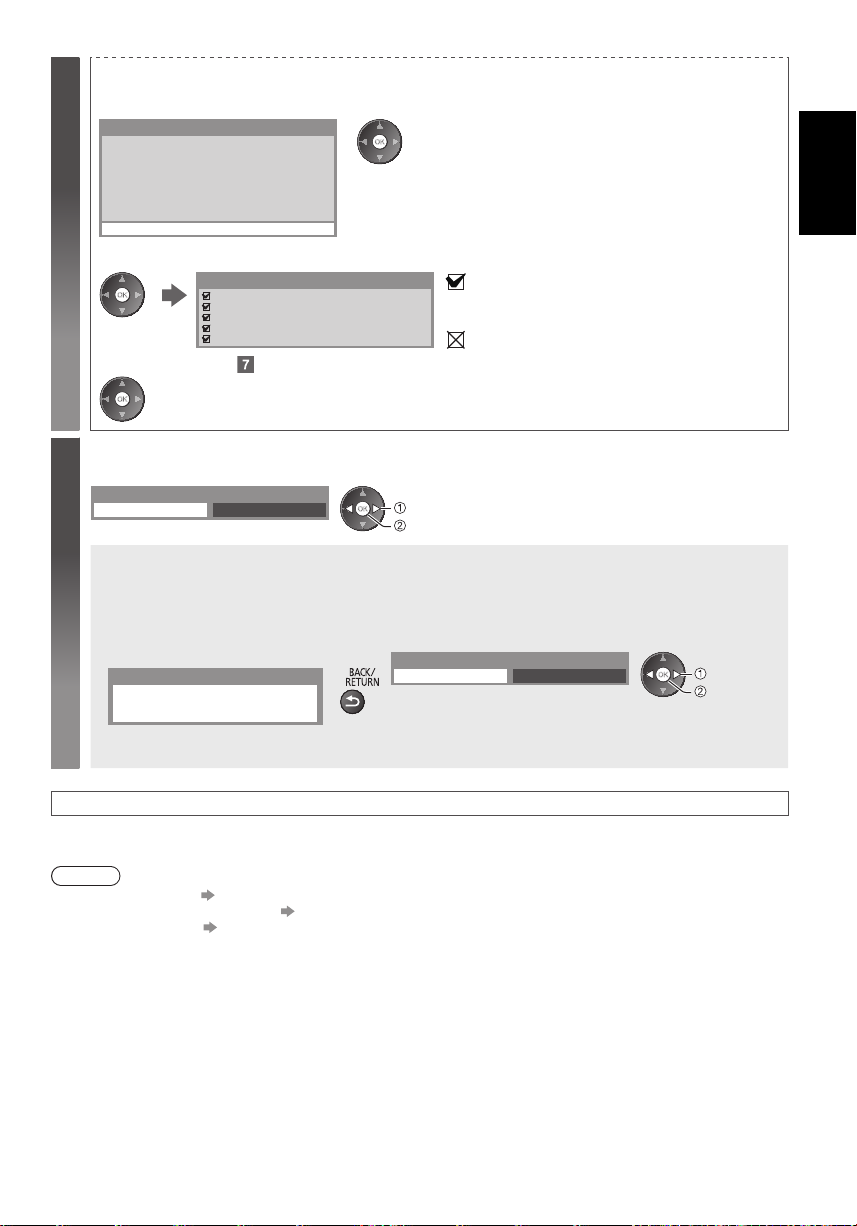
[WPS(Push button)]
6
1. Press the WPS button on the access point until the light flashes
2. Connect the Wireless Adaptor and the access point
WPS(Push button)
1) Please press the ‘WPS’ button on the wireless
access point until its light flashes.
2) When the light is flashing select ‘Connect’ on
TV.
If you are unsure, please check the instruction
manual of the wireless access point.
Connect
●
Ensure that your access point supports WPS for this setup.
●
WPS: Wi-Fi Protected Setup™
●
If the connection has failed, check the settings and positions of
your access point. And then, follow the on-screen instructions.
3. After the access point setting is finished, perform the connection test
Connection Test
Check wireless network connection.
Check acquired IP address.
Check for devices using same IP address.
Check gateway connection.
Check server connection.
4. Go to the next step
(Press twice)
: succeeded
The test is successful and the TV is connected to the
network.
: failed
Check the settings and connections. And then select
[Retry].
●
To set manually, select [Manual] and set each item.
Select [Home]
7
Select [Home] viewing environment to use in your home environment.
Please select your viewing environment.
Home Shop
select
set
■ [Shop] viewing environment (for shop display only)
[Shop] viewing environment is the demonstration mode to explain main features of this TV.
Select [Home] viewing environment to use in your home environment.
●
You can return to viewing environment selection screen at the stage of Shop confirmation screen.
1 Return to viewing environment
selection screen
Shop
You have selected shop mode
To change viewing environment later on, you will need to initialise all settings by accessing Shipping
Condition.
2 Select [Home]
Please select your viewing environment.
Home Shop
English
select
set
Auto Setup is now complete and your TV is ready for viewing.
If tuning has failed, check the connection of the RF cable, and then, follow the on-screen instructions.
Note
●
To retune all channels [Auto Setup] in the Setup Menu
●
To add the available TV mode later [Add TV Signal] in the Setup Menu
●
To initialise all settings [Shipping Condition] in the Setup Menu
15
Page 16
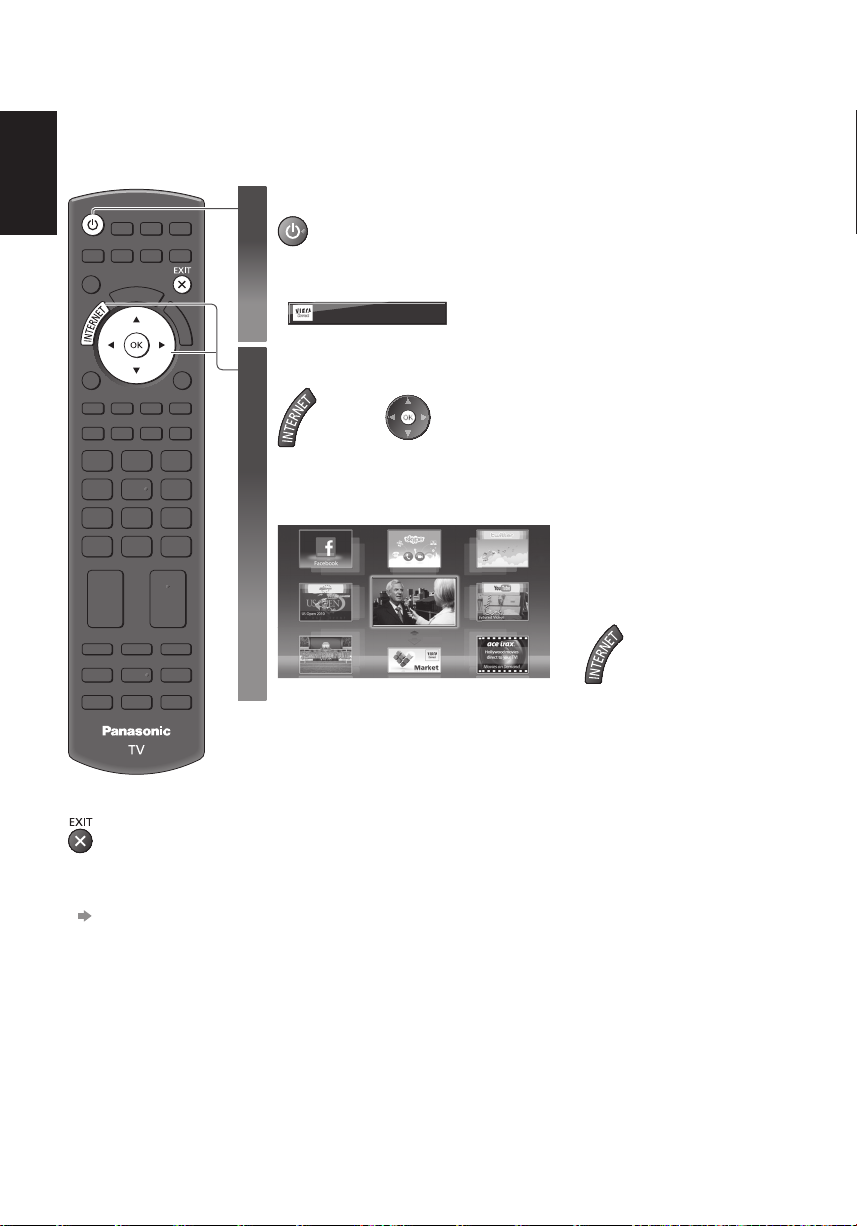
Using “VIERA Connect”
VIERA Connect is a gateway to the internet services unique to Panasonic.
VIERA Connect allows you to access some specific websites supported by Panasonic, and enjoy internet contents
English
such as videos, games, communication tools, etc. from VIERA Connect home screen.
●
This TV does not support full web browser function and some features of the websites may not be available.
Turn power on
1
●
Every time you turn on the TV, VIERA Connect introduction banner appears. The
banner is subject to change.
Enjoy selected internet content with VIERA Connect.
Simply press the OK / INTERNET button
Access VIERA Connect
2
While the banner is displayed
or
●
Depending on the usage conditions, it may take a while to read all the data.
●
Messages might be displayed before VIERA Connect home screen.
Please read these instructions carefully and follow the on-screen instructions.
Example: VIERA Connect home screen
MORE
BACK
●
Press for about 1 second.
●
Mains power On / Off switch should be on.
(p. 8)
●
To go to the next level, select
[MORE].
●
To back to the previous level,
select [BACK].
●
To return to VIERA Connect home
screen
■
To exit from
VIERA Connect
●
To set the VIERA
Connect introduction
banner display off
[VIERA Connect
Banner]
16
Page 17
Viewing 3D images
You can enjoy viewing 3D images with contents or programmes corresponding to the 3D effect by wearing the 3D
Eyewear.
This TV supports [Frame Sequential]
∗
1: The 3D format that the images for the left and right eyes are recorded with the high definition quality and alternately
played back.
∗
2, ∗3: Other available 3D formats
●
How to view the 3D images (p. 18)
Caution
To use 3D Eyewear safely and comfortably, please read these instructions fully.
Viewing 3D Content
●
Do not use the 3D Eyewear if you have a history of over-sensitivity to light, heart problems, or have any other existing
medical conditions.
●
Please stop using the 3D Eyewear immediately, if you feel tired, are not feeling well or experience any other
uncomfortable sensation. When you set the effect by using [3D Adjustment], take into account that the vision of 3D
images varies among different individuals.
●
Take an appropriate break after viewing a 3D movie.
●
Take a break of between 30 - 60 minutes after viewing 3D content on interactive devices such as 3D games or
computers.
●
Be careful not to strike the TV screen or other people unintentionally. When using the 3D Eyewear the distance
between the user and screen can be misjudged.
●
The 3D Eyewear must only be worn when viewing 3D content.
●
Use the 3D Eyewear where there is no interference from other devices with Bluetooth signal.
●
If you suffer from any eyesight problems (short / far-sighted, astigmatism, eyesight differences in left and right),
please ensure to correct your vision before using the 3D Eyewear.
●
Stop using the 3D Eyewear if you can clearly see double images when viewing 3D content.
●
Do not use the 3D Eyewear at a distance less than the recommended distance.
The recommended viewing distance is at least 3 times of the image height.
TX-P42XT50E: 1.6 m or more
TX-P50XT50E: 1.9 m or more
When the top and bottom area of the screen is blackened, such as movies, view the screen at a distance at least 3
times of the height of the actual image. (That makes the distance closer than above recommended figure.)
3D Eyewear Use
●
Pay special attention when children are using the 3D Eyewear.
3D Eyewear should not be used by children younger than about 5 - 6 years old, as a guideline. All children must be
fully supervised by parents or guardians who must ensure their safety and health throughout the using 3D Eyewear.
●
Before using the 3D Eyewear, ensure no breakable objects surrounding the user to avoid any accidental damage or
injury.
●
Remove the 3D Eyewear before moving around to avoid falling or accidental injury.
●
Use the 3D Eyewear only for the intended purpose and nothing else.
●
Do not use 3D Eyewear in the condition of high temperature.
●
Do not use if the 3D Eyewear is physically damaged.
●
Do not use devices (such as mobile phones or personal transceivers) that emit strong electromagnetic waves near
the 3D Eyewear as this may cause the 3D Eyewear to malfunction.
●
Stop using the 3D Eyewear immediately if a malfunction or fault occurs.
●
Stop using the 3D Eyewear immediately if you experience any redness, pain, or skin irritation around the nose or
temples.
●
In rare cases, the materials used in the 3D Eyewear may cause an allergic reaction.
1
∗
, [Side by Side]
2
∗
and [Top and Bottom]
3
∗
3D formats.
English
17
Page 18
3D Eyewear (optional)
●
Use the Panasonic 3D Eyewear that has this logo and supports
®
wireless technology.
®
wireless technology), and you can use the 3D
English
Bluetooth
“Full HD 3D Glasses™” logo indicates products that are compatible with the active shutter 3D
glasses technology standards licensed by the Full HD 3D Glasses Initiative. The RF mark on
the logo means the wireless system (Bluetooth
Eyewear and the TV that have the same mark together.
Note
●
Use the 3D Eyewear within approximately 3.2 m from the TV. You cannot view the 3D images with the 3D Eyewear
too far from the TV, because of the difficulty of receiving radio waves from the TV.
●
The range may be shortened depending on the obstacles between the TV and the 3D Eyewear, or the surrounding
environment.
●
There are differences in the viewing range of the 3D Eyewear among individuals.
●
The 3D Eyewear may not operate correctly at the outside of the viewing range.
To view the 3D images
You can enjoy the 3D images in a variety of ways.
(Frame Sequential, Side by Side and Top and Bottom are the supported 3D format.)
■ Playing back 3D-compatible Blu-ray disc (Frame Sequential format)
●
Connect the 3D-compatible player via a fully wired HDMI compliant cable.
●
If input mode is not switched automatically, select the input mode connected to the player.
●
If you use the non 3D-compatible player, the images will be displayed on 2D mode.
■ 3D-supported broadcast
●
Please consult the suppliers of contents or programmes for availability of this service.
■ 3D photos and 3D videos taken by 3D-compatible Panasonic products
●
Available in Media Player and Network services
■ 2D images converted to 3D
●
Set to [2D 3D] mode in [3D Mode Selection].
Preparations
Perform the First Registration when the 3D Eyewear is used for the first time. For details, read the manual of the 3D
Eyewear.
18
Turn the 3D Eyewear on and put it on
1
●
Connection status and battery status are displayed on the bottom right of the screen.
View the 3D images
2
●
Safety precautions will be displayed when you first watch the 3D image. Select [Yes] or [No] to continue to view
3D images.
If you select [Yes], this message will be displayed again in the same condition after Mains power On / Off
switch is next turned on. Select [No] if you do not want to display this message again.
●
Turn off the 3D Eyewear after using it.
Page 19
Changing 2D - 3D mode
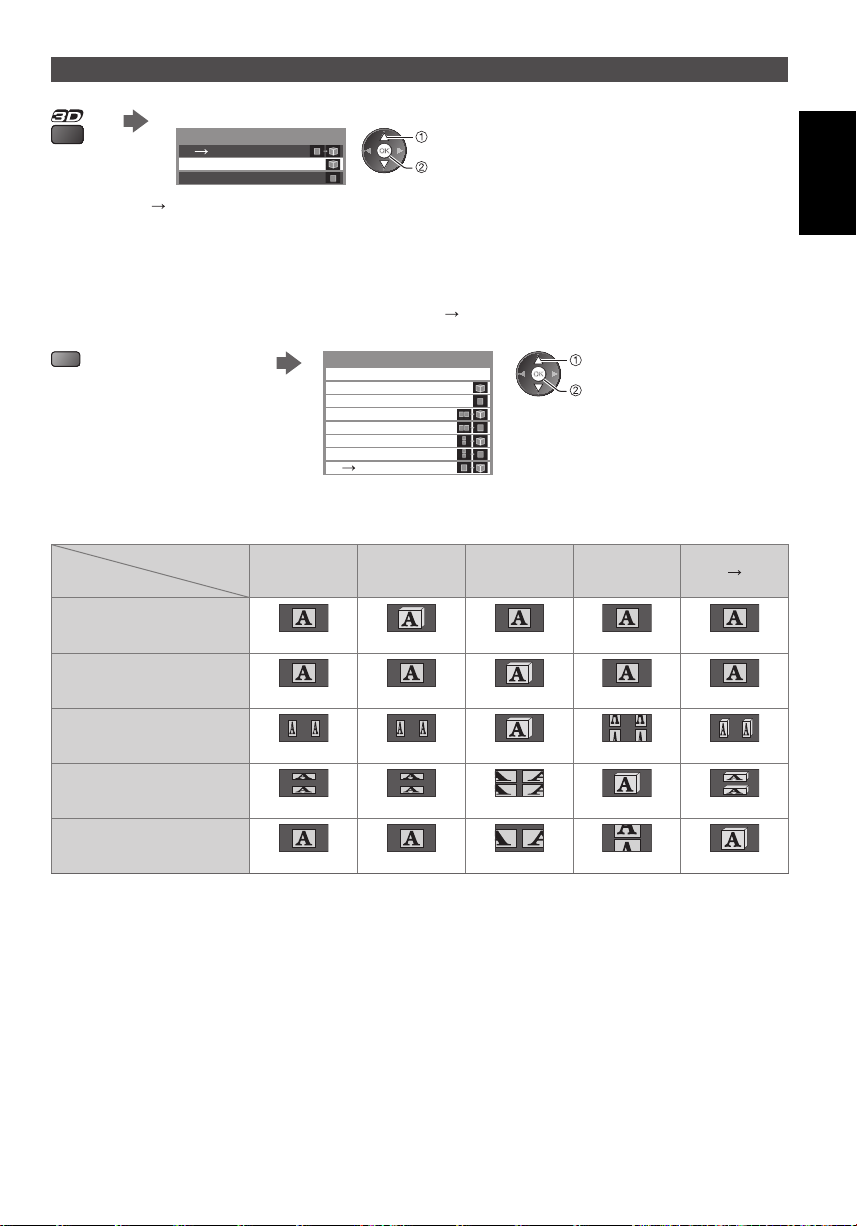
You can easily change the viewing mode between 2D and 3D using the 3D button.
[3D] / [2D] / [2D
Displays the appropriate image that you desire without selecting 3D format.
●
This mode may not work properly depending on the source image format. In this case, select the appropriate 3D
format manually.
Select the mode
3D Mode Selection
2D3D3D
2D
3D]:
●
select
set
Items of [3D Mode Selection] vary
depending on the condition.
■ To change 3D format manually
When the image is not changed properly using [3D], [2D] or [2D 3D] mode, use this manual setting.
During the above operation Select the mode
(red)
3D Mode Selection (Manual)
Original
Frame Sequential - 3D
Frame Sequential - 2D
Side by Side - 3D
Side by Side - 2D
Top and Bottom - 3D
Top and Bottom - 2D
2D 3D
Table of images that can be seen for each [3D Mode Selection (Manual)] and the source image format
If the picture appears to be abnormal, refer to the table below to choose the correct 3D mode.
Source
[3D Mode Selection]
image format
[Original]
[Frame
Sequential
- 3D]
[Side by Side
- 3D]
select
set
[Top and
Bottom - 3D]
[2D 3D]
English
Frame Sequential
Side by Side (Full)
Side by Side
Top and Bottom
Normal format (2D)
∗
1: When selecting [Frame Sequential - 2D], [Side by Side - 2D] or [Top and Bottom - 2D], the images will be displayed
without 3D effect.
●
Depending on the player or broadcasts, the image may be different from the above illustrations.
Normal 3D
1
∗
1
Normal 3D
Normal 3D
∗
1
∗
Normal 3D
1
∗
Normal 3D
19
Page 20
How to Use VIERA TOOLS
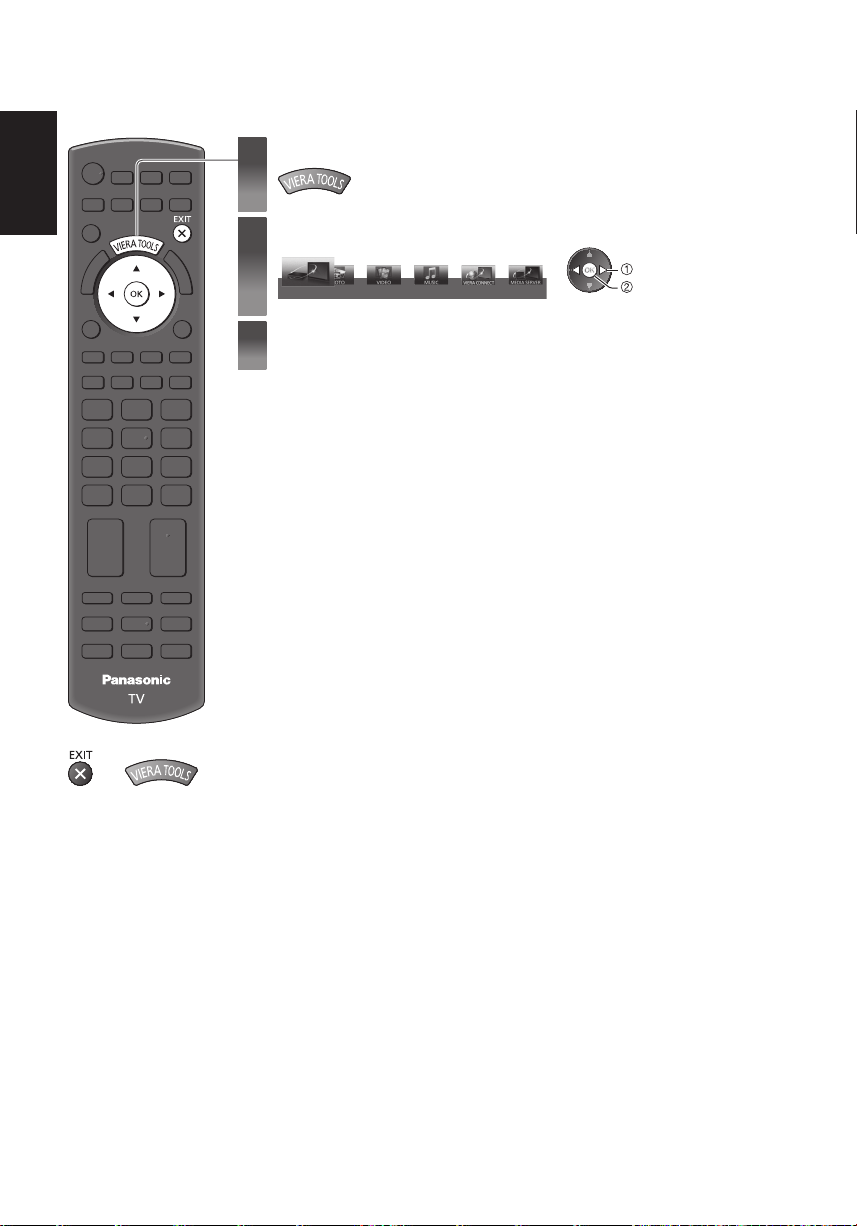
You can access some special features easily by using the VIERA TOOLS function.
English
Display icons of the feature
1
Select a feature
2
VIERA Link
Follow the operations of each feature
3
select
access
20
■
To return to TV
or
Page 21
How to Use Menu Functions
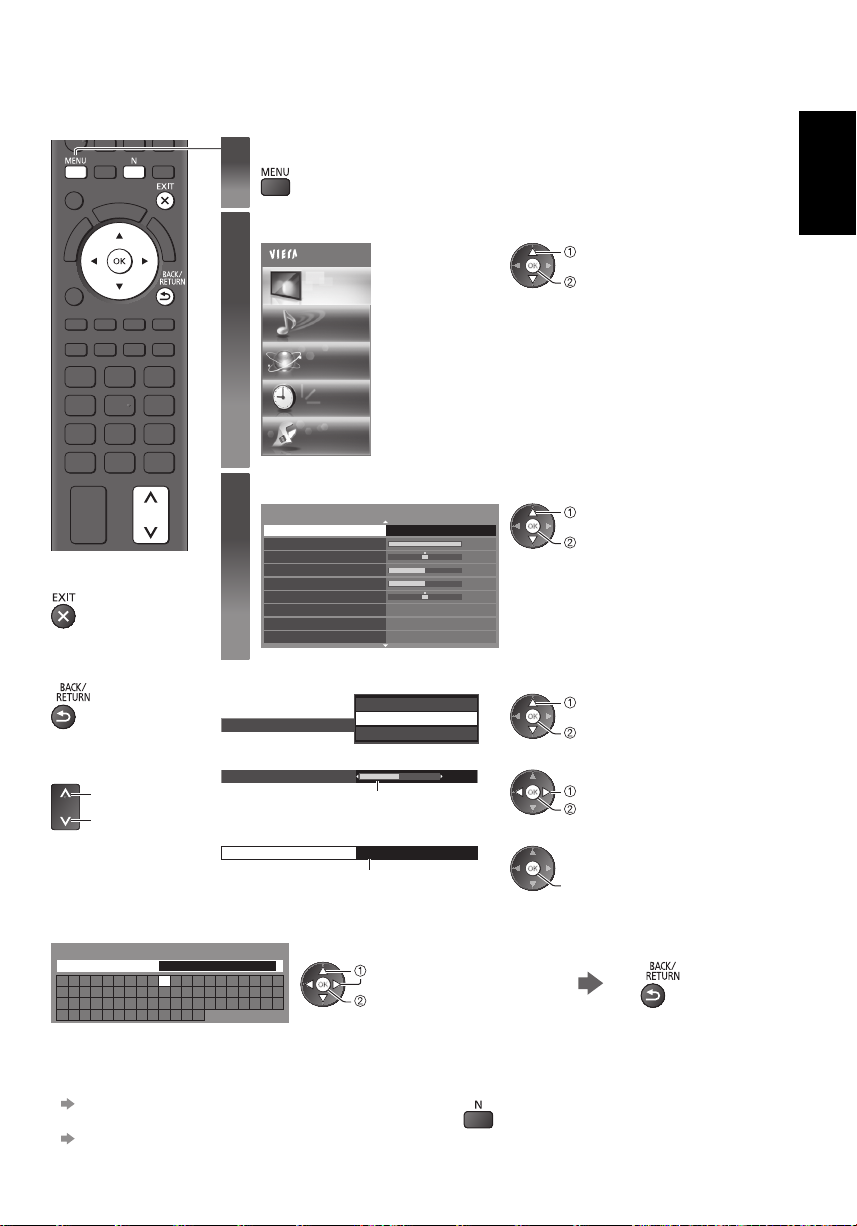
Various menus allow you to make settings for the picture, sound, and other functions.
Display the menu
1
2
●
Displays the functions that can be set (varies according to the input signal).
Select the menu
Main Menu
Picture
Sound
Network
Timer
select
access
English
Setup
Cool
Normal
Warm
Moved
Displays the next screen
■
To return to TV at
any time
■
To return to the
previous screen
■
To change menu
pages
up
down
Select the item
3
Viewing Mode Dynamic
Contrast
Brightness
Colour
Sharpness
Tint
Colour Balance
Vivid Colour
Eco Mode
■ Choose from among alternatives
Colour Balance
■ Adjust using the slide bar
Sharpness
■ Go to the next screen
Child Lock Access
■ Enter characters by free input menu
You can enter names or numbers freely for some items.
User input
Name
A B C D E F G H I J K L M N O P Q R S T
U V W X Y Z 0 1 2 3 4 5 6 7 8 9 ! : #
a b c d e f g h i j k l m n o p q r s t
u v w x y z ( ) + - . * _
●
You can set characters by using numeric buttons.
Set characters one by one
select
set
■ To reset the settings
●
Picture or sound settings only
[Reset to Defaults] in the Picture Menu or Sound Menu
●
To initialise all settings
[Shipping Condition] in the Setup Menu
Warm
Off
Off
1/2
60
0
30
5
0
5
●
Picture and sound settings together
(Also volume level and aspect mode are reset)
select
access
select
store
change
store
access
Store
21
Page 22
Maintenance
First, remove the mains plug from the socket outlet.
English
Display panel, Cabinet, Pedestal
Regular care:
Gently wipe the surface of the display panel,
cabinet, or pedestal by using a soft cloth to clean the
dirt or fingerprints.
Caution
●
Do not use a hard cloth or rub the surface too hard, otherwise this may cause scratches on the surface.
●
Take care not to subject the TV’s surfaces to water or detergent. Liquid inside the TV could lead to product failure.
●
Take care not to subject the surfaces to insect repellent, solvent, thinner or other volatile substances. This may
degrade surface quality or cause peeling of the paint.
●
The surface of the display panel is specially treated and may be easily damaged. Take care not to tap or scratch the
surface with your fingernail or other hard objects.
●
Do not allow the cabinet and pedestal to make contact with a rubber or PVC substance for a long time. This may
degrade surface quality.
Mains plug
Wipe the mains plug with a dry cloth at regular intervals. Moisture and dust may lead to fire or electrical shock.
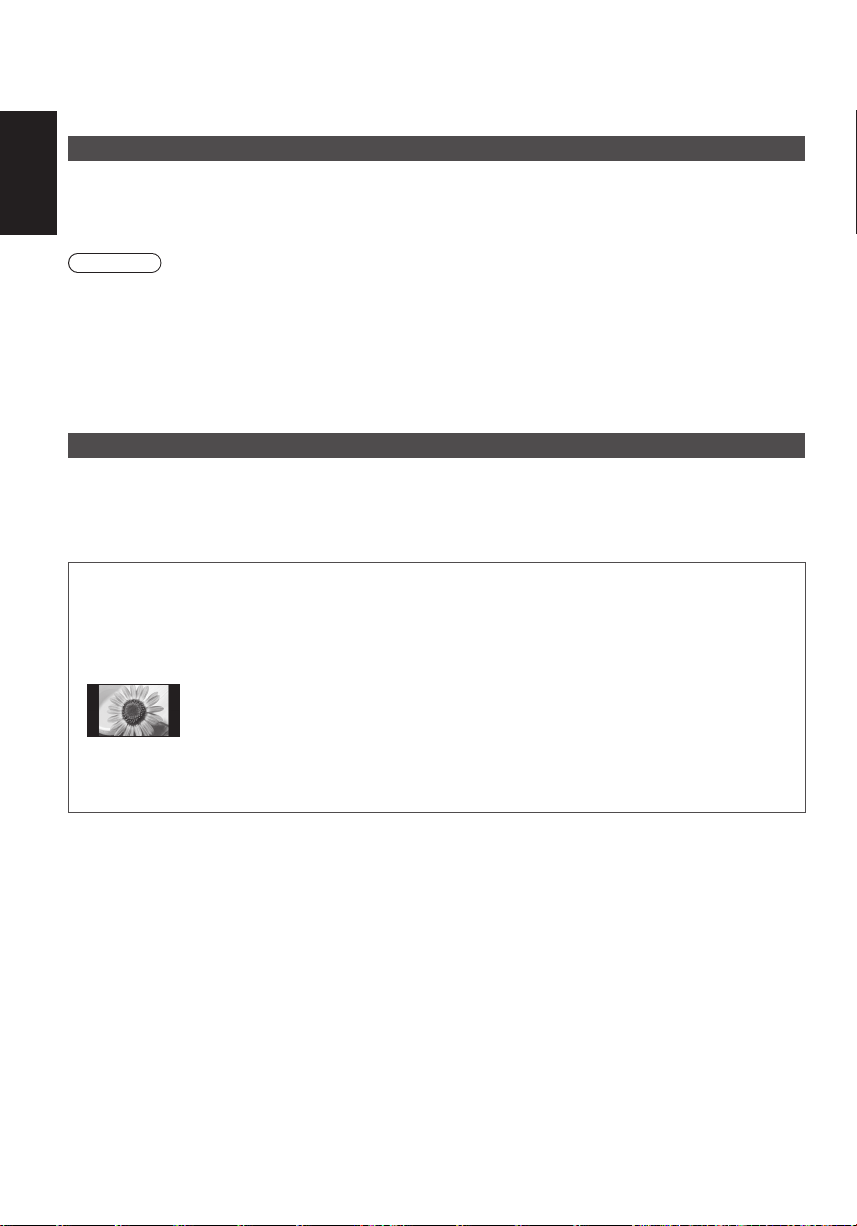
Do not display any still part of the image for a long period
In such cases the still part of the image remains dimly on the plasma screen (“image retention”). This is not
considered a malfunction and is not covered by the warranty.
Typical still image parts:
●
Channel number, channel logo and other logos
●
Still or moving pictures viewed in 4:3 or 14:9 aspect ratio
For stubborn dirt:
First clean the dust on the surface. Dampen a soft cloth with
clean water or diluted neutral detergent (1 part detergent to 100
parts water). Wring the cloth and wipe the surface. Finally, wipe
away all the moisture.
●
Video games
●
Images from PC
To avoid image retention, the contrast is lowered automatically and the screen becomes dim after a few minutes if
no signals are sent or no operations are performed.
22
Page 23
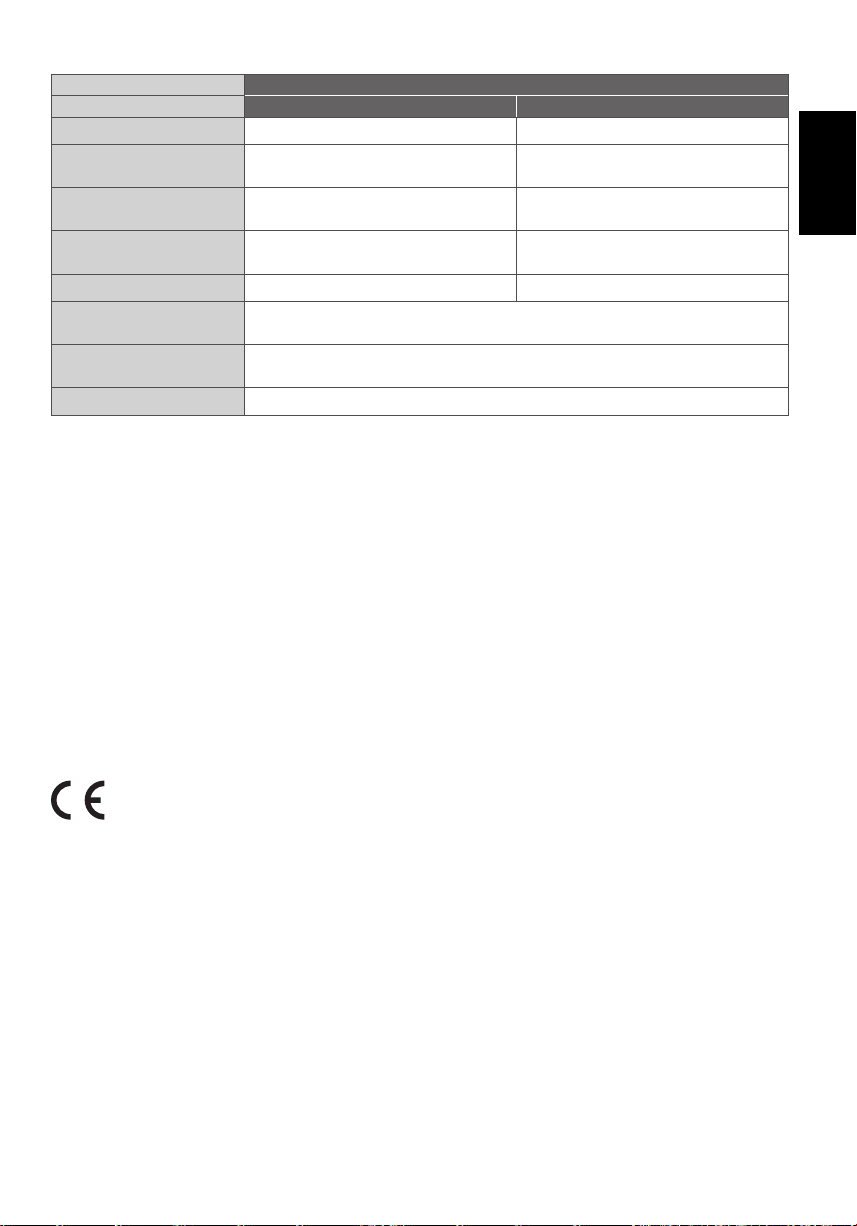
■ Product fiche
Manufacturer Panasonic Corporation
Model No. TX-P42XT50E TX-P50XT50E
Energy efficiency class B B
Visible screen size
(diagonal)
On mode average power
consumption
Annual energy
consumption
Rated power consumption 165 W 215 W
Standby power
consumption
Off mode power
consumption
Display resolution 1,024 (W) × 768 (H)
∗
1: Energy consumption XYZ kWh per year, based on the power consumption of the television operating 4 hours per
day for 365 days. The actual energy consumption will depend on how the television is used.
∗
2: when the TV is turned off with the remote control and no function is active
1
∗
2
∗
107 cm / 42 inches 127 cm / 50 inches
101 W 139 W
140 kWh 193 kWh
0.40 W
0.30 W
English
Plasma Television
Declaration of Conformity (DoC)
“Hereby, Panasonic Corporation declares that this TV is in compliance with the essential requirements and
other relevant provisions of the Directive 1999/5/EC, Directive 2004/108/EC, Directive 2006/95/EC and Council
recommendation 1999/519/EC.”
If you want to get a copy of the original DoC of this TV, please visit the following website:
http://www.doc.panasonic.de
Authorized Representative:
Panasonic Testing Centre
Panasonic Marketing Europe GmbH
Winsbergring 15, 22525 Hamburg, Germany
●
This equipment complies with the EMC standards listed below.
EN55013, EN61000-3-2, EN61000-3-3, EN55020, EN55022, EN55024
23
Page 24
Information for Users on Collection and Disposal of Old Equipment and used
Batteries
These symbols on the products, packaging, and/or accompanying documents mean that used
electrical and electronic products and batteries should not be mixed with general household waste.
English
For proper treatment, recovery and recycling of old products and used batteries, please take them to
applicable collection points, in accordance with your national legislation and the Directives 2002/96/EC
and 2006/66/EC.
By disposing of these products and batteries correctly, you will help to save valuable resources and
prevent any potential negative effects on human health and the environment which could otherwise
arise from inappropriate waste handling.
For more information about collection and recycling of old products and batteries, please contact your
local municipality, your waste disposal service or the point of sale where you purchased the items.
Penalties may be applicable for incorrect disposal of this waste, in accordance with national
legislation.
For business users in the European Union
If you wish to discard electrical and electronic equipment, please contact your dealer or supplier for
further information.
[Information on Disposal in other Countries outside the European Union]
These symbols are only valid in the European Union. If you wish to discard these items, please
contact your local authorities or dealer and ask for the correct method of disposal.
Note for the battery symbol (bottom two symbol examples):
This symbol might be used in combination with a chemical symbol. In this case it complies with the
requirement set by the Directive for the chemical involved.
Notice for DVB / Data broadcasting / IPTV functions
●
This TV is designed to meet the standards (as of August, 2011) of DVB-T (MPEG2 and MPEG4-AVC(H.264)) digital
terrestrial services and DVB-C (MPEG2 and MPEG4-AVC(H.264)) digital cable services.
Consult your local dealer for availability of DVB-T services in your area.
Consult your cable service provider for availability of DVB-C services with this TV.
●
This TV may not work correctly with the signal which does not meet the standards of DVB-T or DVB-C.
●
Not all the features are available depending on the country, area, broadcaster, service provider and network
environment.
●
Not all CI modules work properly with this TV. Consult your service provider about the available CI module.
●
This TV may not work correctly with CI module that is not approved by the service provider.
●
Additional fees may be charged depending on the service provider.
●
The compatibility with future services is not guaranteed.
●
Check the latest information on the available services at the following website. (English only)
http://panasonic.jp/support/global/cs/tv/
M0212-0
TQB0E2190U-G
Web Site: http://panasonic.net
© Panasonic Corporation 2012
Printed in Czech Republic
Page 25
Nederlands
Gebruiksaanwijzing
Plasmatelevisie
Raadpleeg de bedieningsinstructies op de cd-rom
voor gedetaileerdere instructies.
Als u de bedieningsinstructies op de cd-rom wilt
bekijken, hebt u een computer nodig met cdromdrive plus Adobe
versie 8.0 of hoger).
Afhankelijk van de instellingen van uw
besturingssysteem of computer, kan het zijn dat de
bedieningsinstructies niet automatisch verschijnen.
Open in dat geval het PDF-bestand in de map
“MANUAL” handmatig om de instructies weer te geven.
®
Reader® (bij voorkeur
Modelnr.
TX-P42XT50E
TX-P50XT50E
Inhoudsopgave
Belangrijke informatie
Veiligheidsmaatregelen ·······························2
Quick Start-handleiding
Accessoires ················································· 4
Bedieningsonderdelen ································· 7
Basisaansluitingen······································· 9
Automatisch instellen································· 12
VIERA Connect··········································16
3D-beeld weergeven ·································17
VIERA TOOLS ···········································20
Werken met de menufuncties ····················21
Onderhoud················································· 22
Hartelijk dank voor de aankoop van dit Panasonic-product.
Lees deze instructies aandachtig voordat u het product gebruikt en bewaar
ze zodat u ze later opnieuw kunt raadplegen.
De afbeeldingen in deze handleiding dienen slechts als voorbeeld.
Zie uw Europese Garantie als u contact wilt opnemen met uw plaatselijke
Panasonic-dealer voor assistentie.
Page 26
Veiligheidsmaatregelen
Waarschuwing
De stekker en het netsnoer
●
Steek de stekker van het netsnoer volledig in het stopcontact. (Als de stekker niet goed vast zit, kan dit warmte
opwekken, waardoor brand kan ontstaan.)
●
Zorg voor een makkelijke toegang naar de stekker van de voedingskabel.
●
Steek de geaarde stekker altijd in een goed werkend geaard stopcontact, om elektrische schokken te voorkomen.
Een apparaat met KLASSE I-constructie moet met een geaarde stekker op een geaard stopcontact worden
•
Nederlands
aangesloten.
●
Raak de stekker nooit met vochtige handen aan. (Dit kan elektrische schokken tot gevolg hebben.)
●
Gebruik geen ander netsnoer dan het netsnoer dat u bij deze tv hebt ontvangen. (Dit kan brand of elektrische
schokken tot gevolg hebben.)
●
Zorg ervoor dat het netsnoer niet beschadigd raakt. (Een beschadigd netsnoer kan brand of elektrische schokken
tot gevolg hebben.)
Verplaats de TV niet als de stekker nog in het stopcontact zit.
•
Plaats geen zware voorwerpen op het netsnoer en houd het netsnoer uit de buurt van hete voorwerpen.
•
Draai het netsnoer niet ineen, buig het niet overmatig en rek het niet uit.
•
Trek nooit aan het snoer. Houd bij het loskoppelen van het netsnoer niet het snoer maar de stekker zelf vast.
•
Gebruik geen beschadigde stekkers of stopcontacten.
•
Verwijder de stekker
onmiddellijk uit het
stopcontact als u iets opvalt
dat niet normaal is.
Stroomvoorziening
●
Deze TV is ontworpen om te werken op 220-240 V
wisselstroom, 50/60 Hz.
Verwijder geen deksels en pas de tv
NOOIT zelf aan
●
De achterste afdekplaat van de TV niet verwijderen,
anders kunt u in contact komen met de onderdelen
die onder spanning staan. Er zijn geen door de
gebruiker repareerbare onderdelen aan de binnenkant.
(Hoogspanningsonderdelen kunnen ernstige
elektrische schokken veroorzaken.)
●
Laat het systeem controleren, aanpassen en repareren
door uw Panasonic-dealer.
Stel het toestel niet bloot aan direct
zonlicht of andere warmtebronnen
●
De tv niet blootstellen aan direct zonlicht of andere
warmtebronnen.
Laat om brand te
voorkomen nooit
kaarsen of een andere
bron van open vuur
in de nabijheid van de
televisie.
220-240 V
wisselstroom,
50/60 Hz
Niet blootstellen aan regen of hoge
vochtigheid
●
Om schade te vermijden die een elektrische schok of
brand tot gevolg kan hebben, de tv niet aan regen of
hoge vochtigheid blootstellen. Plaats geen voorwerpen
gevuld met vloeistof, zoals vazen, op de tv of erboven.
De tv mag niet blootgesteld worden aan druppelend of
spattend water.
Stop geen vreemde objecten in de tv
●
Laat door de ventilatiegaten geen objecten in de TV
vallen. (Dit kan brand of elektrische schokken tot
gevolg hebben.)
Plaats de tv niet op een schuin
aflopende of onstabiel ondergrond, en
zorg ervoor dat de tv niet over de rand
van de basis hangt
●
Als u dat wel doet, kan de TV eraf vallen of omvallen.
Gebruik uitsluitend de speciale
standaards/bevestigingsmaterialen
●
Niet-gekeurde standaards of andere bevestigingen
kunnen onstabiliteit van de tv veroorzaken met een
risico op verwondingen. Vraag uw Panasonic-dealer
om het systeem te installeren.
●
Gebruik goedgekeurde standaards (p. 4)/
muurbevestigingssteunen.
Houd SD-kaarten uit de buurt van
kinderen
●
Net als andere kleine objecten, kunnen SD-kaarten
door jonge kinderen worden ingeslikt. Verwijder de
SD-kaart onmiddellijk na het gebruik en bewaar deze
buiten het bereik van kinderen.
2
Page 27
Radiogolven
●
Gebruik de tv niet in een medische inrichting of een andere plaats met medische apparatuur. De radiogolven van
de tv kunnen interfereren met de medische apparatuur en storing en ongevallen veroorzaken.
●
Gebruik de tv niet nabij automatische controleapparatuur zoals een automatische deur of brandalarm. De
radiogolven van de tv kunnen interfereren met de controleapparatuur en storing en ongevallen veroorzaken.
●
Bewaar altijd een afstand van minstens 22 cm tot de tv als u een pacemaker draagt. De radiogolven van deze
onderdelen kunnen de werking van de pacemaker verstoren.
Let op
Verwijder de stekker uit het stopcontact
als u de TV reinigt
●
Het reinigen van een apparaat waarop spanning staat,
kan elektrische schokken tot gevolg hebben.
Wanneer de TV voor een lange tijd niet
wordt gebruikt, haal de stekker uit het
stopcontact
●
Ook als de TV uitgeschakeld is, verbruikt deze nog
stroom zolang de stekker in het stopcontact zit.
Vervoer de TV alleen rechtop
●
Wanneer u de TV vervoert met het beeldscherm
omhoog of omlaag gericht, kan dit schade veroorzaken
aan de interne circuits.
Zorg voor voldoende ruimte rondom het
systeem in verband met de warmte die
wordt uitgestraald
Minimale afstand
10
10
10
●
Behoud bij gebruik van
de standaard de ruimte
tussen de onderkant
van de tv en de vloer.
7
●
Volg bij gebruik van de
muurbevestigingssteun
de handleiding bij deze
(cm)
steun.
Blokkeer de ventilatie-openingen aan de
achterzijde niet
●
Met een krant, tafelkleed, gordijn, etc. afgedekte
ventilering kan oververhitting, brand of elektrische shock
veroorzaken.
Stel uw gehoor niet bloot aan
een overmatig hard geluid via de
hoofdtelefoon
●
De beschadiging kan onherstelbaar zijn.
Oefen geen krachtige druk uit op het
beeldscherm en houd het vrij van
schokken
●
Dit kan leiden tot schade die letsels kan veroorzaken.
De TV is zwaar. Verplaats de TV altijd met
twee of meer personen. Ondersteun de
TV zoals is aangegeven om te voorkomen
dat de TV omvalt of valt en letsel
veroorzaakt.
Nederlands
Bluetooth® draadloze technologie
●
De tv gebruik de ISM-frequentieband van 2,4 GHz (Bluetooth®). Houd de tv uit de buurt van toestellen zoals andere
draadloze LAN-apparaten, andere Bluetooth-apparaten, magnetrons, mobiele telefoons en apparaten die 2,4GHzsignalen gebruiken om storing of vertraging door interferentie te vermijden.
3
Page 28
Accessoires
Standaardaccessoires
Afstandsbediening
●
N2QAYB000752
Batterijen voor de
afstandsbediening (2)
●
R6
(zie hierna)
Standaard
(zie hierna)
Netsnoer
(p. 9)
Nederlands
Ferrietkern
voor LAN-kabel (2)
(Groot)
(p. 11)
Gebruik de ferrietkernen om te voldoen aan de EMC-norm.
●
De accessoires mogen niet allemaal samen worden geplaatst. Zorg dat u ze niet per ongeluk weggooit.
●
Dit product bevat onderdelen die gevaarlijk kunnen zijn voor jonge kinderen (zoals plastic zakken), omdat ze per
ongeluk kunnen worden ingeslikt of het ademen kunnen belemmeren. Houd deze onderdelen buiten het bereik van
jonge kinderen.
Ferrietkern
voor USB-kabel (2)
(Middelgroot)
Ferrietkern
voor hoofdtelefoon
(Klein)
Gebruiksaanwijzing
Europese Garantie
Batterijen plaatsen/verwijderen
1
Opentrekken
Haakje
2
Sluiten
Let op
●
Bij onjuiste plaatsing kunnen batterijen gaan lekken en roesten,
waardoor de afstandsbediening beschadigd kan raken.
●
Gebruik geen oude en nieuwe batterijen door elkaar.
●
Gebruik geen verschillende batterijtypen door elkaar, bijvoorbeeld
alkaline- en mangaanbatterijen.
●
Gebruik geen oplaadbare batterijen (Ni-Cd).
●
Houd batterijen niet in het vuur en haal ze niet uit elkaar.
De batterijen mogen niet worden blootgesteld aan overmatige
warmte, zoals zonlicht, vuur, enz.
●
Demonteer of wijzig de afstandsbediening niet.
Plaats de batterijen
op de juiste manier
(+ of -)
De standaard bevestigen/verwijderen
Waarschuwing
De vloerstandaard niet demonteren of er wijzigingen in aanbrengen.
●
Anders bestaat de kans dat de tv omver valt en beschadigd wordt, hetgeen tot verwondingen kan leiden.
4
Page 29
Let op
Gebruik alleen de standaard die u bij deze tv hebt ontvangen.
●
Anders bestaat de kans dat de tv omver valt en beschadigd wordt, hetgeen tot verwondingen kan leiden.
De vloerstandaard niet gebruiken als deze verbogen, gebarsten of anderszins beschadigd is.
●
Als u de vloerstandaard gebruikt wanneer deze beschadigd is, kan deze verder beschadigd raken, hetgeen tot
verwondingen kan leiden. Neem onmiddellijk contact op met uw lokale Panasonic-dealer.
Zorg er tijdens de montage voor dat alle schroeven goed worden vastgedraaid.
●
Als tijdens de montage niet alle schroeven goed zijn vastgedraaid, bestaat de kans dat de standaard niet stevig
genoeg is om de tv te dragen. Hierdoor kan het toestel omvallen en beschadigd raken, met mogelijk persoonlijk letsel
tot gevolg.
Zorg dat de tv niet kan omvallen.
●
Als u tegen de tv stoot of kinderen op de vloerstandaard klimmen terwijl de tv erop is bevestigd, kan de tv omvallen,
met mogelijk persoonlijk letsel tot gevolg.
Het installeren en verwijderen van de tv dient door minimaal twee personen te worden uitgevoerd.
●
Als dit niet door minimaal twee personen wordt uitgevoerd, bestaat de kans dat de tv komt te vallen, met mogelijk
persoonlijk letsel tot gevolg.
Wanneer u de standaard van de tv verwijdert, mag u deze niet verwijderen op een andere manier dan met de
hier opgegeven methode. (p. 6)
●
Anders bestaat de kans dat de tv en/of de standaard omvalt en beschadigd worden hetgeen tot verwondingen kan
leiden.
Montageschroef (5)
(zwart)
M4 × 10
Montageschroef (7)
(zilver)
M5 × 16
Steun
●
TBL5ZA3238
Nek
●
TXFBL5Z0072
Deksel
●
TXFBL5Z0073
Steunplaat
●
TBL5ZX0293
(TX-P42XT50E)
●
TBL5ZX0295
(TX-P50XT50E)
■ De standaard monteren
Plaats de nek met de lipjes stevig in de
1
steunplaat
Lipjes
D
(onderkant)
Draai de steunplaat om en zet de nek stevig
2
vast met de montageschroeven
●
Houd de nek niet vast bij het omdraaien van de
steunplaat.
B
F
Schroefgat
Nederlands
F
Zet de steun op de lipjes van de nek en
3
bevestig deze stevig met de montageschroeven
B
Lipjes
(bovenkant)
C
D
Onderkant van steunplaat
Bevestig het deksel en zet het stevig vast met de
4
montageschroef
A
E
5
Page 30
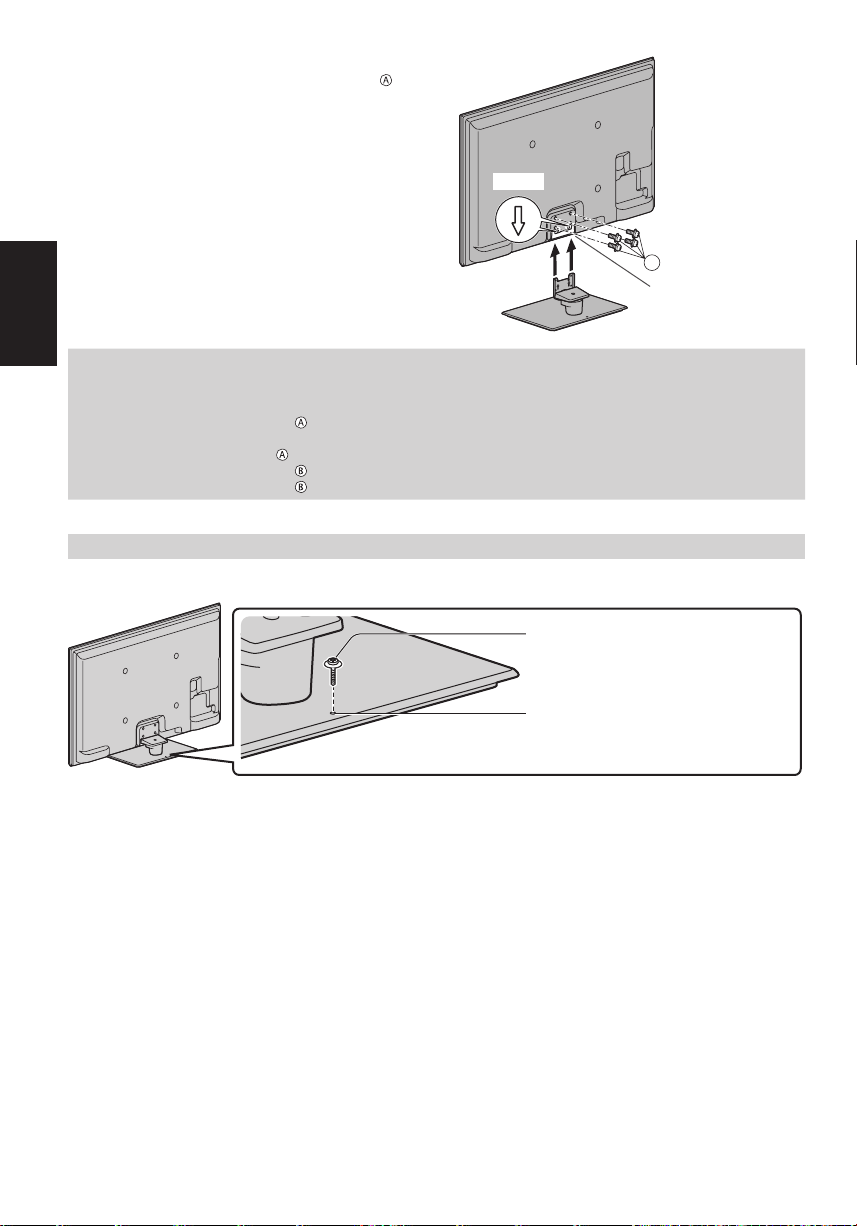
■ De tv bevestigen
Zet de tv goed vast met de montageschroeven .
●
Draai de vier montageschroeven eerst losjes vast en
draai ze daarna stevig aan.
●
Voer de werkzaamheden uit op een horizontale, vlakke
ondergrond.
Pijl
Nederlands
De standaard van de tv verwijderen
Verwijder de standaard op de volgende manier wanneer u de muurbevestigingssteun gebruikt of de tv opnieuw
inpakt.
1 Verwijder de montageschroeven
2 Trek de standaard van de tv.
3 Verwijder de montageschroef
4 Verwijder de montageschroeven
5 Verwijder de montageschroeven uit de onderkant van de steunplaat en trek de nek eruit.
uit de tv.
van het deksel.
van de steun.
A
Opening voor montage
van standaard
Voorkomen dat de tv omvalt
Zet de standaard stevig vast op de ondergrond met een schroef (in de handel verkrijgbaar) in het veiligheidsschroefgat.
●
De plaats waar de standaard wordt vastgezet, moet voldoende dik zijn en van een hard materiaal gemaakt zijn.
Schroef (niet meegeleverd)
Diameter: 3 mm
Lengte: 25 - 30 mm
Schroefgat
6
Page 31
Bedieningsonderdelen
Afstandsbediening
OK
8
●
1
2
3
4
5
6
7
8
9
16
17
18
19
20
21
22
10
11
12
23
24
13
14
15
25
26
27
Stand-bytoets
1
●
Zet de tv in stand-by of haalt de tv uit stand-by.
3D-toets
2
●
Schakelt over tussen de 2D- en 3D-stand.
[Hoofdmenu]
3
●
Geeft toegang tot de menu’s Beeld, Geluid,
Netwerk, Timer en Instellingen.
Beeldverhouding
4
●
Wijzigt de beeldverhouding.
Informatie
5
●
Geeft kanaal- en programma-informatie weer.
VIERA TOOLS
6
●
Geeft speciale functiepictogrammen weer voor
snelle toegang.
INTERNET ([VIERA Connect])
7
●
Toont het startscherm VIERA Connect.
Bevestigt selecties en keuzes.
●
Schakelt over naar de geselecteerde
kanaalpositie.
●
Toont de kanaallijst.
[Menu Opties]
9
●
Eenvoudige optionele instellingen voor weergave,
geluid enz.
Gekleurde toetsen
10
(rood, groen, geel, blauw)
●
Voor selectie, navigatie en de bediening van
verschillende functies.
Teletekst
11
●
Schakelt over naar de teletekstmodus.
Ondertitels
12
●
Geeft ondertitels weer.
Cijfertoetsen
13
●
Overschakelen naar een ander kanaal of een
andere teletekstpagina.
●
Tekst invoeren.
●
De tv aanzetten vanuit stand-by (ca. 1 seconde
ingedrukt houden).
Geluid uitschakelen
14
●
Schakelt het geluid uit en weer in.
Volume omhoog/omlaag
15
Selecteert de ingangsmodus.
16
●
TV: Overschakelen tussen DVB-C/DVB-T/
analoog.
●
AV: Overschakelen naar een AV-ingangsmodus in
de lijst met ingangssignalen.
Surround
17
●
Wijzigt de surround geluidsinstelling.
Normaliseren
18
●
Zet beeld- en geluidsinstellingen terug naar de
standaardwaarde.
Verlaten
19
●
Terugkeren naar het normale weergavescherm.
Tv-programmagids
20
Cursortoetsen
21
●
Voor selecties en aanpassingen.
Terug
22
●
Terugkeren naar het vorige menu of de vorige
pagina.
Vastzetten
23
●
Zet het beeld vast en geeft het vrij.
●
Zet de huidige teletekstpagina vast
(teletekstmodus).
Index
24
●
Terug naar de indexpagina van teletekst
(teletekstmodus).
Laatst bekeken
25
●
Schakelt terug naar het vorige kanaal of de vorige
invoermodus.
Kanaal omhoog/omlaag
26
Bediening van inhoud, aangesloten apparatuur
27
enz.
Nederlands
7
Page 32
Indicator/Bedieningspaneel
es
en
S
g
g
igen
g
Functie selecteren
1
●
[Volume] / [Kontrast] / [Helderheid] / [Kleur] /
[Scherpte] / [Tint] (NTSC-signaal) / [Laag]∗ /
[Hoog]∗ / [Balans] / [Auto set-up]
∗ [Muziek] of [Spraak]-stand in het menu Geluid
Kanaal omhoog/omlaag, waarde wijzigen (bij
2
gebruik van de F-knop), de tv inschakelen (druk in
de stand-bystand ongeveer 1 seconde op een van
beide knoppen)
Nederlands
Hoofdschakelaar
4
●
Hiermee zet u de tv aan of uit.
Wijzigt de ingangsmodus
3
Als de tv in de stand-bystand van de
afstandsbediening stond toen u hem uitschakelde,
wordt hij terug in de stand-bystand gezet als u
hem aanzet met deze schakelaar.
Als u op een toets van het bedieningspaneel (1 - 4)
drukt, wordt gedurende 3 seconden links in het
scherm een hulpaanduiding weergegeven voor de
ingedrukte toets.
Ontvanger afstandsbedieningssignalen
5
●
Plaats geen voorwerpen tussen de
signaalontvanger op de tv en de
afstandsbediening.
C.A.T.S.-sensor (Contrast Automatic Tracking
6
System)
●
Detecteert helderheid voor aanpassing van de
beeldkwaliteit als [Eco mode] in het menu Beeld is
ingesteld op [Aan].
Werken met de beeldschermmenu’s - Bedieningsinstructies
Veel tv-functies zijn toegankelijk via de beeldschermmenu’s.
■ Bedieningsinstructies
De bedieningsinstructies helpen u bij de bediening
met behulp van de afstandsbediening.
Voorbeeld: [Geluid]
Hoofdmenu
Wijzigen
Wijz
Bedieningsinstructies
Geluidsfunctie Muziek
Beeld
Laag
Hoog
Geluid
Balans
Hoofdtel. Volume
Netwerk
Surround
Automatisch volumebereik
Timer
Volume Correctie
Speakerafstand tot muur
Instellingen
Kies
Ki
Selecteer uw favoriete
Verlaten
Verlat
geluidsmodus.
Terug naar
Terug naar
electeer uw favoriete
eluidsmodus.
Uit
Uit
30cm en meer
Pagina omhoog
Pagina omhoo
Pagina omlaag
Pagina omlaa
1/2
0
0
0
11
0
5 6 7
Achterzijde van de tv
Voedings- en timerlampje
7
Rood: Stand-by
Groen: Aan
Oranje: Timer programmeren aan
Oranje (knipperend):
Er is een opname bezig met Timer
programmeren of Directe TV-opname
Rood met oranje knipperend:
Standby van Timer programmeren of Directe
TV-opname
●
Het lampje knippert wanneer de tv een opdracht
van de afstandsbediening ontvangt.
■ De afstandsbediening gebruiken
Het hoofdmenu openen
De cursor verplaatsen, een optie selecteren, een
menuonderdeel selecteren (alleen omhoog en
omlaag), het niveau instellen (alleen naar links en
rechts)
Het menu openen, gewijzigde instellingen of
opties opslaan
Terugkeren naar het vorige menu
Het menusysteem afsluiten en terugkeren naar het
normale scherm
1
2
3
4
Automatische stand-byfunctie
In de volgende omstandigheden schakelt de tv automatisch over naar de stand-bystand:
Er is gedurende 30 minuten geen signaal ontvangen en geen handeling verricht in de analoge tv-stand.
•
[Timer TV uitschakelen] is ingesteld in het menu Timer.
•
De tv is niet bediend tijdens de periode die is geselecteerd in [Automatisch in Stand-by].
•
●
Deze functie heeft geen invloed op het opnemen van een timerprogramma en een directe tv-opname.
8
Page 33
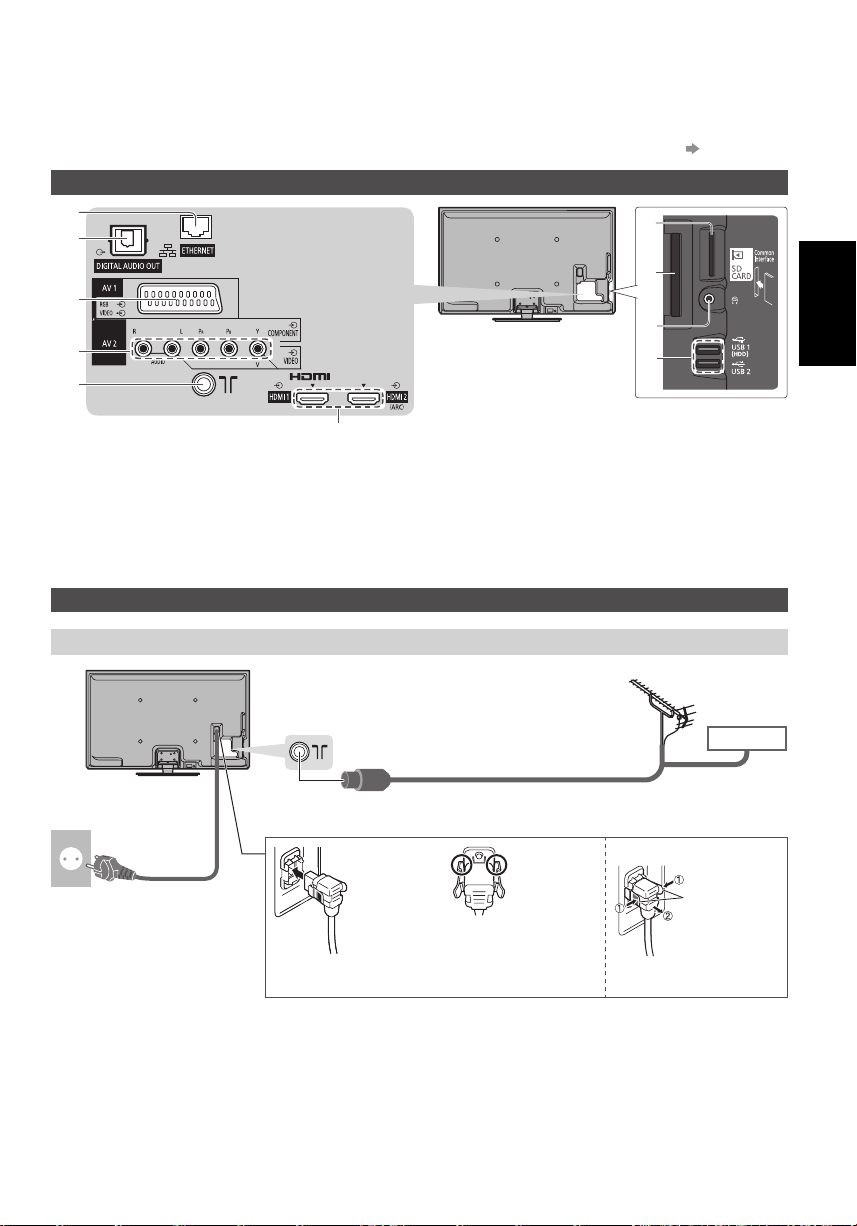
Basisaansluitingen
De afgebeelde externe apparatuur en kabels worden niet bij de tv meegeleverd.
Zorg ervoor dat de stekker van de tv niet in het stopcontact zit als u kabels aansluit of loskoppelt.
Er zijn enkele beperkingen op de plaatsing voor het weergeven van 3D-beelden. Voor meer informatie
Aansluitingen
5
6
7
8
9
1
2
3
4
(p. 17, 18)
Nederlands
SD-kaartsleuf
1
CI-sleuf
2
Ingang koptelefoon
3
USB-poort 1/2
4
ETHERNET
5
Verbindingen
Netsnoer en antenne
Netsnoer
220-240 V wisselstroom
50/60 Hz
10
10
■ DVB-C, DVB-T, analoog
■ Netsnoer
Indrukken tot beide lipjes
vastklikken
DIGITAL AUDIO OUT
6
AV1 (SCART)
7
AV2 (COMPONENT/VIDEO)
8
Aansluiting aardse ingang/kabel
9
HDMI1 / 2
RF-kabel
Van de tv verwijderen:
Controleer of het
netsnoer goed vastzit.
Druk beide lipjes in trek
het netsnoer eruit
Aardse antenne
Kabel
lipjes
9
Page 34
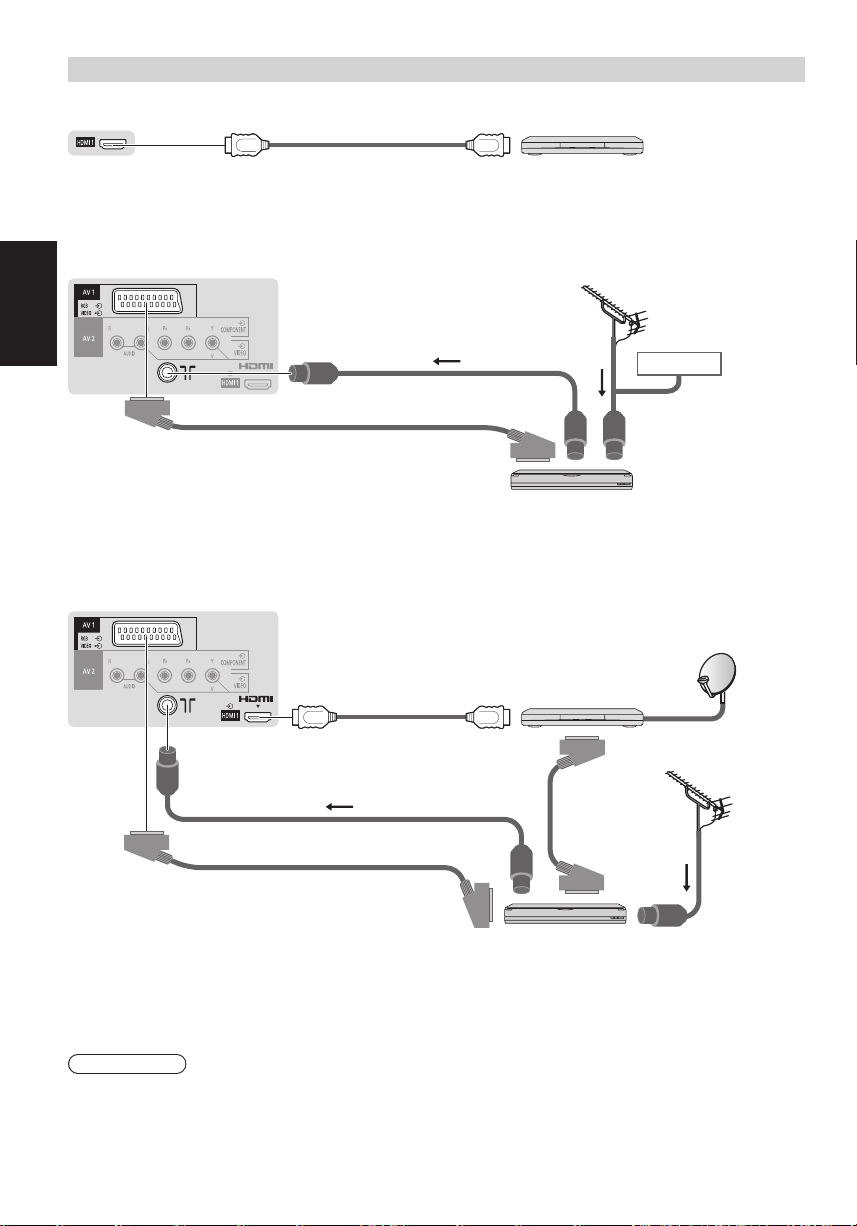
AV-apparaten
■ Speler/3D-compatibele speler
TV
■ DVD-/videorecorder
Nederlands
TV
■ DVD-/videorecorder en set-top box
TV
HDMI-kabel
SCART-kabel
HDMI-kabel
Speler/3D-compatibele speler
Aardse antenne
Kabel
RF-kabel
RF-kabel
DVD-/videorecorder
Set-top box
SCART-kabel
RF-kabel
SCART-kabel
DVD-/videorecorder
Opmerking
●
Sluit een DVD-recorder/videorecorder met Q-Link-ondersteuning aan op AV1 van de tv.
●
Lees ook de handleiding van het apparaat dat moet worden aangesloten.
●
Houd de tv uit de buurt van elektronische apparatuur (videoapparatuur enz.) en apparatuur met een infraroodsensor.
Anders kunnen het beeld en geluid vervormd worden en kan de bediening van andere apparatuur verstoord worden.
●
Gebruik een volledig bekabelde SCART- of HDMI-kabel.
●
Controleer of u de juiste aansluitingen en stekkers gebruikt voordat u de verbinding maakt.
10
Aardse
antenne
RF-kabel
Page 35
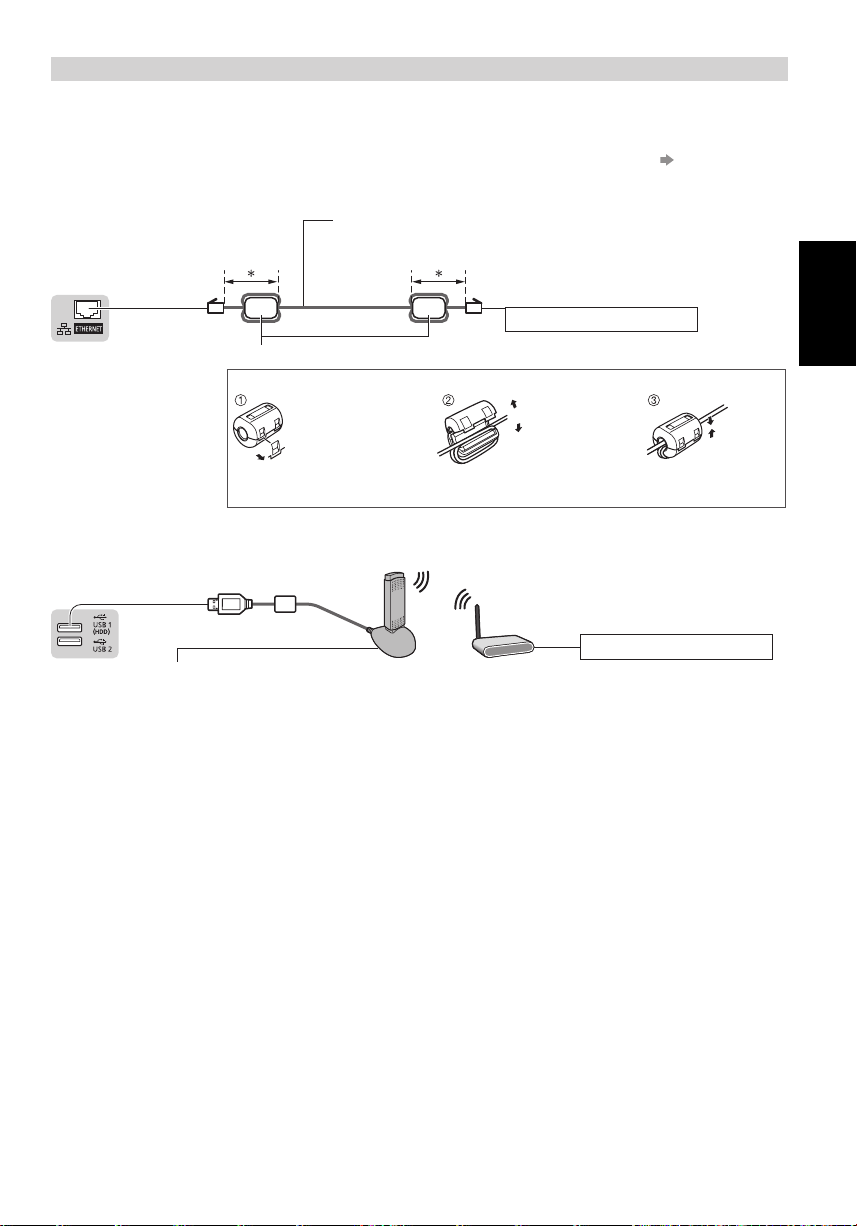
Netwerk
Als u de netwerkservicefuncties (VIERA Connect enz.) wilt gebruiken, moet u de tv op een breedbandnetwerk
aansluiten.
●
Raadpleeg uw leverancier voor hulp als u geen breedbandnetwerkservices hebt.
●
Zorg dat de internetomgeving gereed is voor het aansluiten van een bekabelde of draadloze verbinding.
●
Het instellen van de netwerkverbinding start na het afstemmen (bij het eerste gebruik van de tv). (p. 13 - 15)
■ Bekabelde verbinding
LAN-kabel (niet afgeschermd)
●
Gebruik een niet-afgeschermde dubbeldraadse (getwist paar) LANkabel (UTP).
TV
Ferrietkern - groot formaat (meegeleverd)
De ferrietkern installeren
∗
Minder dan 10 cm
Internetomgeving
Nederlands
Trek de lipjes achteruit
(op twee plaatsen)
■ Draadloze verbinding
TV
Draadloze adapter (optioneel accessoire)
●
Aansluiten op USB 1- of 2-poort.
Wind de kabel twee keer op Sluiten
Toegangspunt
Internetomgeving
11
Page 36
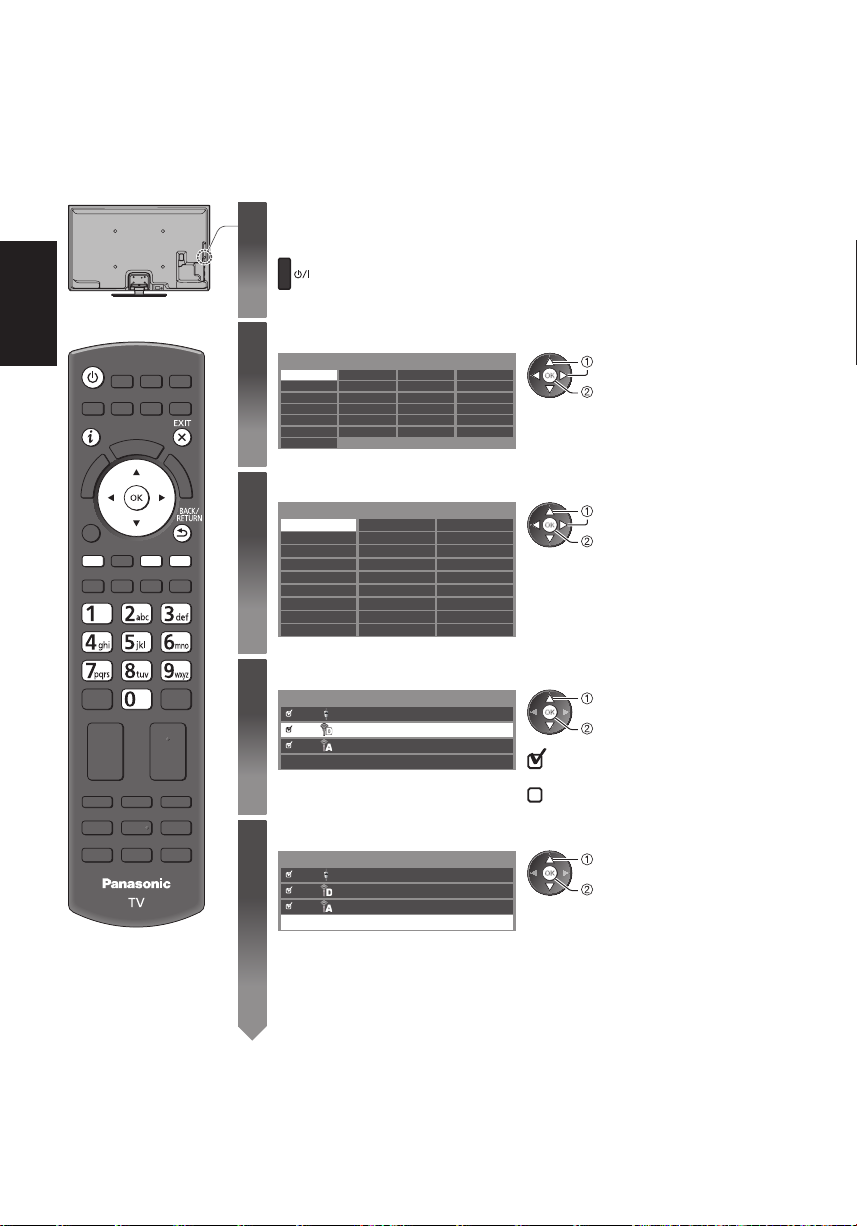
Automatisch instellen
U kunt tv-kanalen automatisch opzoeken en opslaan.
●
U mag deze stappen overslaan als uw dealer de tv al heeft ingesteld.
●
Voltooi alle verbindingen (p. 9 - 11) en instellingen (indien nodig) van de externe apparatuur voordat u de
automatische instelling uitvoert. Raadpleeg de handleiding bij het aangesloten apparaat voor informatie over de
instellingen ervan.
Steek de stekker van de tv in het stopcontact en
1
Nederlands
schakel de tv in
●
Het beeld verschijnt na enkele seconden.
●
Als het rode lampje op de tv brandt, drukt u 1 seconde op de stand-bytoets
op de afstandsbediening.
Selecteer uw taal
2
Menüsprache
Deutsch Dansk Polski Srpski
English Svenska čeština Hrvatski
Français Norsk Magyar Slovenščina
Italiano Suomi Slovenčina Latviešu
Español Türkçe Български eesti keel
Português Еλληνικά Română Lietuvių
Nederlands
Selecteer uw land
3
Land
Duitsland
Oostenrijk Zweden Tsjechië
Frankrijk Noorwegen Hongarije
Spanje Luxemburg Slovenië
Portugal België Kroatië
Zwitserland Nederland Estland
Malta Turkije Lithouwen
Andorra Griekenland Overige
Denemarken
Italië Finland Slovakije
Polen
selecteren
instellen
selecteren
instellen
●
Afhankelijk van het geselecteerde land
moet u ook de regio of de kinderslotcode
(mag niet 0000 zijn) selecteren. Volg de
aanwijzingen op het scherm.
12
Selecteer de stand waarin u wilt afstemmen
4
TV-signaal kiezen
DVB-C
DVB-T
Analoog
Selecteer [Start auto set-up]
5
TV-signaal kiezen
●
De tv-kanalen worden automatisch gezocht en opgeslagen.
De opgeslagen kanalen en de sorteervolgorde ervan verschillen afhankelijk van het
land, het gebied, het zendsysteem en de ontvangstkwaliteit.
Het instelscherm verschilt afhankelijk van het geselecteerde land.
Start auto set-up
DVB-C
DVB-T
Analoog
Start auto set-up
selecteren
afstemmen / afstemmen overslaan
: afstemmen (beschikbare kanalen
zoeken)
: afstemmen overslaan
selecteren
openen
Page 37
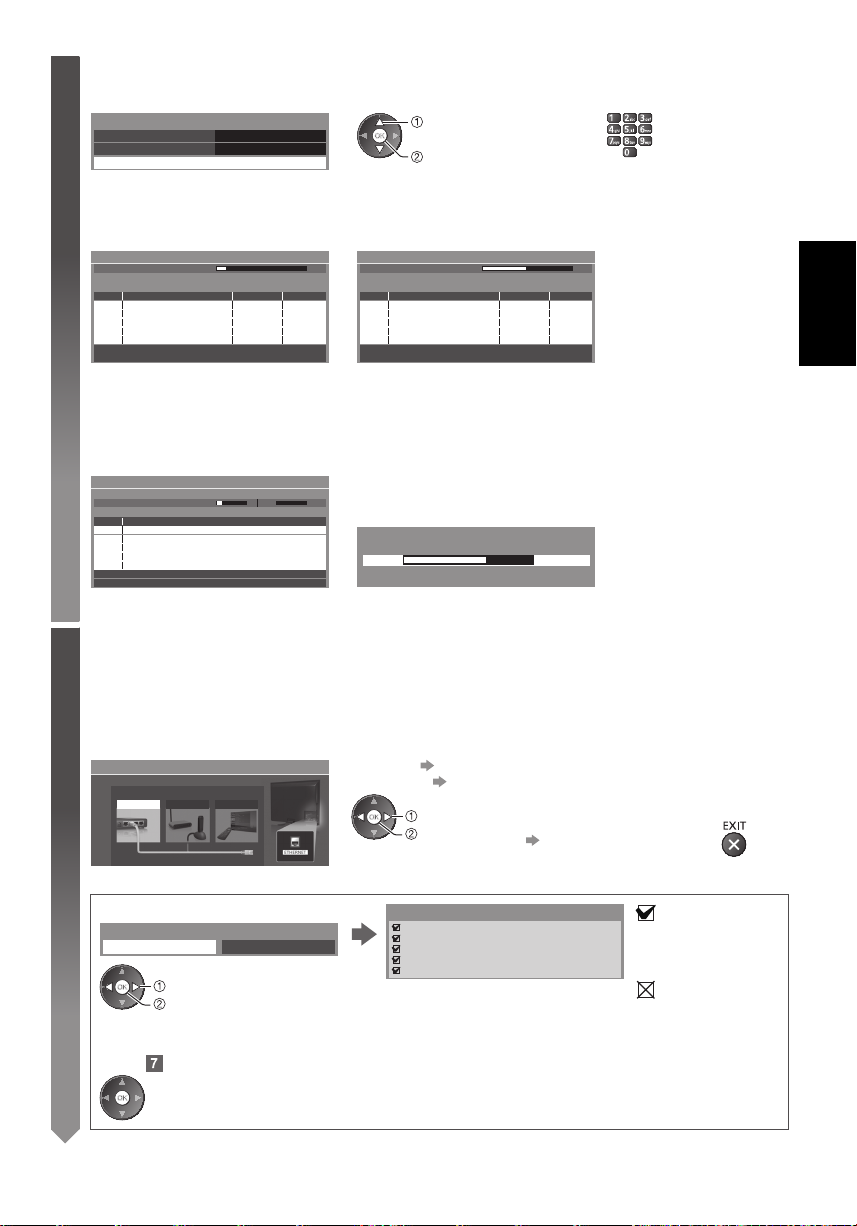
1 [DVB-C Netwerkinstellingen]
●
5
Afhankelijk van het geselecteerde land selecteert u eerst uw kabelmaatschappij. Volg de aanwijzingen op het
scherm.
DVB-C Netwerkinstellingen
Frequentie Auto
Netwerk ID
Start auto set-up
Auto
selecteer [Start auto set-up]
openen
Gewoonlijk stelt u [Frequentie] en [Netwerk ID] in op [Auto].
Als [Auto] niet wordt weergegeven of indien nodig, stelt u [Frequentie] en [Netwerk ID] met de cijfertoetsen in
met de gegevens van uw kabelmaatschappij.
2 [DVB-C auto set-up] 3 [DVB-T auto set-up]
DVB-C auto set-up
Voortgang
Dit duurt ongeveer 3 minuten.
Nr. Kanaalnaam Type
CBBC Channel
1
BBC Radio Wales
2
E4
3
Gratis tv: 3 Betaal tv: 0 Radio: 0
0% 100%
Gratis tv
Gratis tv
Gratis tv
Zoeken
Kwal.
100
100
100
DVB-T auto set-up
Voortgang
Dit duurt ongeveer 3 minuten.
Kan. Kanaalnaam Type
CBBC Channel
62
BBC Radio Wales
62
E4
62
62 100Cartoon Nwk
Gratis tv: 4 Betaal tv: 0 Radio: 0
●
Afhankelijk van het geselecteerde land, wordt na voltooiing van de
CH 5 69
Kwal.
100
Gratis tv
100
Gratis tv
100
Gratis tv
Gratis tv
Zoeken
automatische DVB-T-instelling het scherm voor de kanaalselectie
weergegeven als er meerdere kanalen hetzelfde logische nummer
hebben. Selecteer het gewenste kanaal of sluit het scherm voor
automatische selectie af.
4 [Analoge ATP/ACI afstemming] 5 Voorkeuze downloaden
Analoge ATP/ACI afstemming
Scannen
Dit duurt ongeveer 3 minuten.
Kan. Kanaalnaam
CH 29
CH 33 BBC1
Analoog: 2
Stel de netwerkverbinding in
6
Breng de netwerkverbinding tot stand om netwerkservices zoals VIERA Connect in te schakelen (p. 16).
●
Voor het opzetten van de draadloze verbinding is de draadloze adapter (optioneel accessoire) nodig. Deze
televisie ondersteunt geen draadloze publieke toegangspunten.
●
Zorg dat de netwerkverbindingen (p. 11) en de netwerkomgeving voltooid zijn voordat u met de instelling
CH 2 78 41CC 1
Zoeken
begint.
Selecteer het type netwerk
Netwerkinstelling
Selecteer Bedraad of Draadloos
Bedraad Draadloos
Later instellen
Als u een recorder aansluit die compatibel is met Q-Link, VIERA Link
of een gelijkaardige technologie, worden de instellingen voor kanaal,
taal en land/regio automatisch naar de recorder gedownload.
Overdracht voorkeuze gegevens
Even geduld a.u.b.
0% 100%
Afstandsbediening niet beschikbaar
●
Als het downloaden mislukt, kunt u het later opnieuw proberen via
het menu Instellingen.
[Bedraad] “Bekabelde verbinding” (p. 11)
[Draadloos] “Draadloze verbinding” (p. 11)
●
Later instellen of deze stap overslaan
Selecteer [Later instellen] of
selecteren
openen
■ [Bedraad]
1. Selecteer [Auto]
IP-adres ophalen
2. Ga naar de volgende
stap
Auto Handmatig
selecteren
openen
De instelling wordt automatisch uitgevoerd en de
netwerkverbinding wordt getest.
●
(Twee keer indrukken)
Voor handmatige instelling selecteert u [Handmatig]
en u stelt elk onderdeel in.
Verbindingstest
Controleer de aansluiting van de netwerkkabel.
Verkregen IP-adres controleren.
Controleer op apparaten met hetzelfde IP-adres.
Verbinding met gateway controleren.
Communicatie met server controleren.
: geslaagd
De test is geslaagd en
de tv is verbonden met
het netwerk.
: mislukt
Controleer de
instellingen en de
verbindingen. Selecteer
vervolgens [Probeer
opnieuw].
Nederlands
13
Page 38
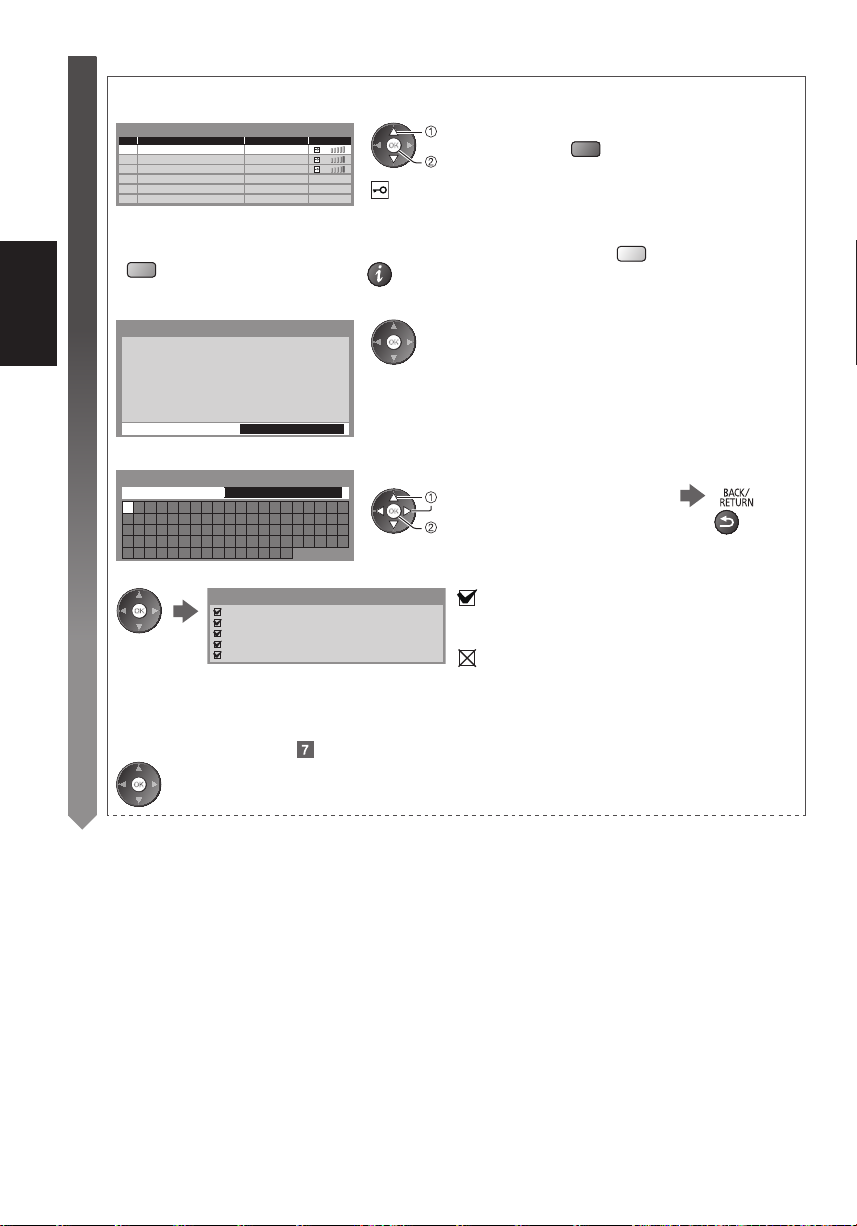
6
Nederlands
■ [Draadloos]
Automatisch gevonden toegangspunten worden in een lijst weergegeven.
1. Selecteer het gewenste toegangspunt
Beschikbare draadloze netwerken
Nr. Netwerknaam (SSID) Status Draadloos type
1
2
3
Access Point A
Access Point B
Access Point C
11n(2.4GHz)
11n(5GHz)
11n(5GHz)
●
Opnieuw naar toegangspunten
●
zoeken
(Blauwe)
2. Ga naar de invoermodus voor de coderingssleutel
Coderingssleutel-instelling
Verbinding wordt gemaakt met de volgende instellingen: Netwerknaam (SSID) : Access Point A
Type beveiliging : WPA-PSK
Coderingstype : TKIP
Voer de coderingssleutel in.
Coderingssleutel
3. Voer de coderingssleutel van het toegangspunt in
Draadloze netwerkinst.
Coderingssleutel
A B C D E F G H I J K L M N O P Q R S T
U V W X Y Z 0 1 2 3 4 5 6 7 8 9 ! : #
a b c d e f g h i j k l m n o p q r s t
u v w x y z ( ) + - . * _ @ / “ ‘ % & ?
, ; = $ [ ] ~ < > { } | ` ^ \
4. Nadat het toegangspunt is ingesteld, moet u de verbinding testen
Verbindingstest
Draadloze netwerkverbinding controleren.
Verkregen IP-adres controleren.
Controleer op apparaten met hetzelfde IP-adres.
Verbinding met gateway controleren.
Communicatie met server controleren.
5. Ga naar de volgende stap
selecteren
openen
: Gecodeerd toegangspunt
Meer informatie over het
gemarkeerde toegangspunt
●
Als het geselecteerde toegangspunt niet versleuteld is, wordt
een bevestigingsscherm weergegeven. Het is raadzaam om een
versleuteld toegangspunt te selecteren.
Voer de tekst in
selecteren
instellen
●
U kunt met de cijfertoetsen tekens invoeren.
: geslaagd
De test is geslaagd en de tv is verbonden met het
netwerk.
: mislukt
Controleer de instellingen en de verbindingen.
Selecteer vervolgens [Probeer opnieuw].
●
Voor handmatige instelling selecteert u [Handmatig]
en u stelt elk onderdeel in.
●
Voor [WPS (Push-knop)] (p. 15)
(Rode)
●
Handmatig instellen
(Gele)
Opslaan
14
(Twee keer indrukken)
Page 39
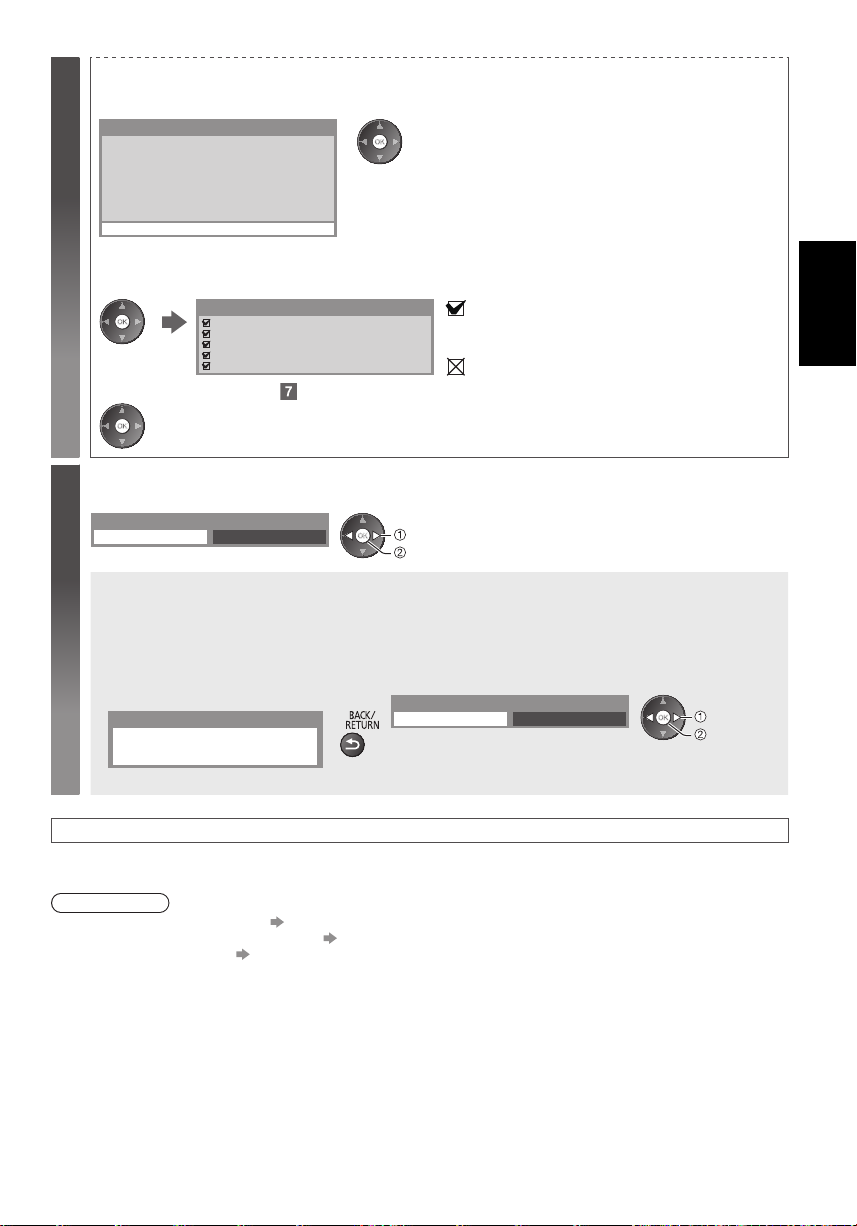
[WPS (Push-knop)]
6
1. Houd de WPS-knop op het toegangspunt ingedrukt tot het lampje knippert
2. Sluit de draadloze adapter en het toegangspunt aan
WPS (Push-knop)
1) Druk op de 'WPS'-knop op het draadloze
toegangspunt tot het lampje knippert.
2) Kies 'Verbinden' als het toegangspunt gereed is.
Raadpleeg voor meer informatie de handleiding
van het draadloze toegangspunt.
Verbinden
●
Controleer of het toegangspunt voor deze instelling WPS
ondersteunt.
●
WPS: Wi-Fi Protected Setup™
●
Als de verbinding is mislukt, controleert u alle instellingen en de
positie van uw toegangspunt. Volg daarna de aanwijzingen op het
scherm.
3. Nadat het toegangspunt is ingesteld, moet u de verbinding testen
Verbindingstest
Draadloze netwerkverbinding controleren.
Verkregen IP-adres controleren.
Controleer op apparaten met hetzelfde IP-adres.
Verbinding met gateway controleren.
Communicatie met server controleren.
4. Ga naar de volgende stap
(Twee keer indrukken)
Selecteer [Thuis]
7
Voor gebruik thuis selecteert u de weergaveomgeving [Thuis].
Selecteer weergave omgeving.
Thuis Winkel
: geslaagd
De test is geslaagd en de tv is verbonden met het
netwerk.
: mislukt
Controleer de instellingen en de verbindingen.
Selecteer vervolgens [Probeer opnieuw].
●
Voor handmatige instelling selecteert u [Handmatig]
en u stelt elk onderdeel in.
selecteren
instellen
■ [Winkel]-kijkomgeving (alleen voor gebruik in winkels)
De kijkomgeving [Winkel] is een demonstratiemodus die wordt gebruikt om de voornaamste functies van
deze tv voor te stellen.
Voor gebruik thuis selecteert u de weergaveomgeving [Thuis].
●
U kunt van het winkelbevestigingsscherm terugkeren naar het selectiescherm voor de weergaveomgeving.
1 Terugkeren naar de
omgevingsselectie
Winkel
U heeft de winkel-modus
Als u de weergaveomgeving later wilt wijzigen, moet u alle instellingen initialiseren via Fabrieksinstellingen.
geselecteerd
2 Selecteer [Thuis]
Selecteer weergave omgeving.
Thuis Winkel
Nederlands
selecteren
instellen
De automatische instelling is voltooid en de tv is klaar voor gebruik.
Als het afstemmen is mislukt, controleert u de aansluiting van de RF-kabel volgt u de instructies op het scherm.
Opmerking
●
Alle kanalen opnieuw afstemmen [Auto set-up] in het menu Instellingen
●
Een beschikbare tv-stand later toevoegen [Voeg TV-signaal toe] in het menu Instellingen
●
Alle instellingen initialiseren [Fabrieksinstellingen] in het menu Instellingen
15
Page 40
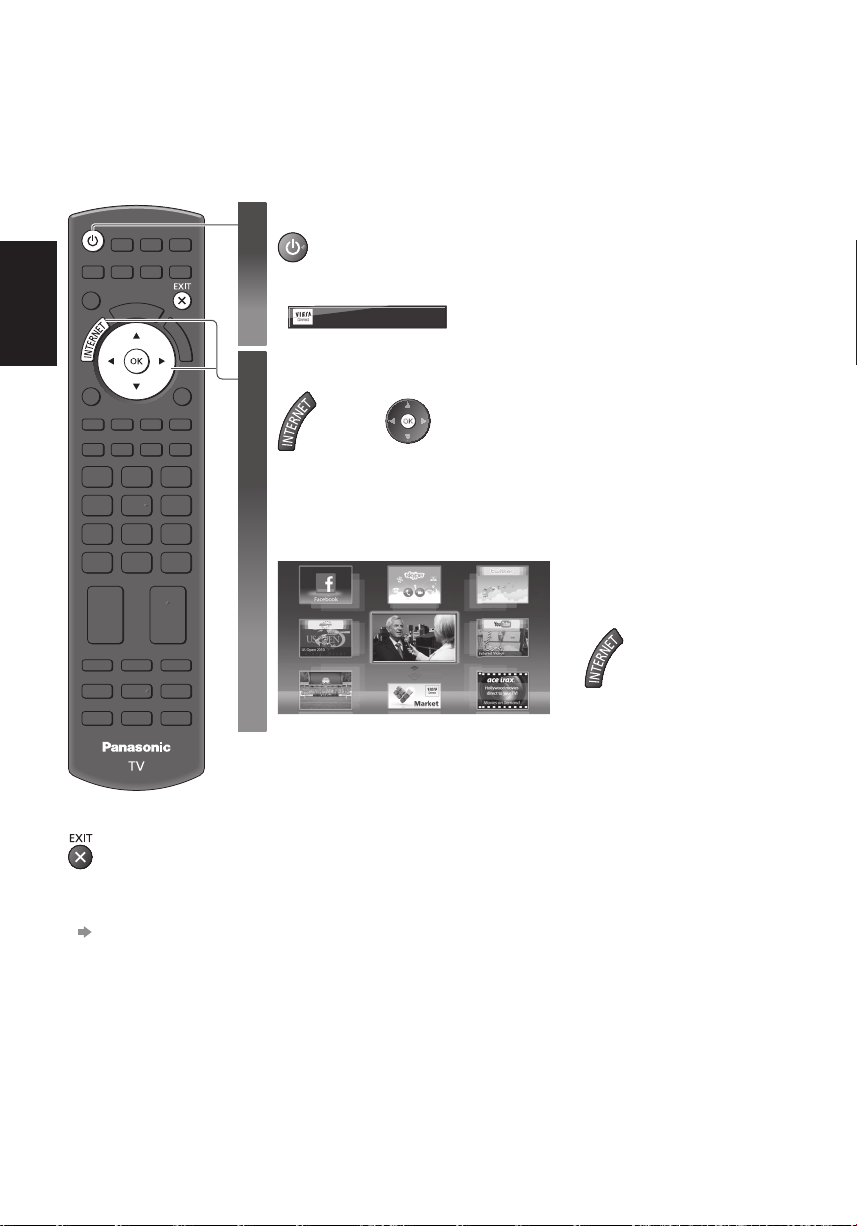
VIERA Connect
VIERA Connect is een gateway voor unieke internetdiensten van Panasonic.
Met VIERA Connect hebt u toegang tot geselecteerde websites die door Panasonic worden ondersteund en kunt u
video’s, games, communicatieprogramma’s enz. op internet gebruiken via het beginscherm van VIERA Connect.
●
De tv ondersteunt niet alle webbrowserfuncties en sommige functies van websites kunnen mogelijk niet gebruikt
worden.
Schakel de tv in
Nederlands
1
●
Elke keer dat u de televisie aanzet, wordt de introductiebalk van VIERA Connect
weergegeven. De balk kan veranderen.
Geniet van een exclusief aanbod van websites via VIERA Connect
Druk simpelweg op de OK / INTERNET-toets
Open VIERA Connect
2
Wanneer de balk wordt weergegeven
of
●
Afhankelijk van de gebruiksomstandigheden kan het even duren tot alle gegevens
zijn gelezen.
●
Er worden mogelijk berichten weergegeven voordat het startscherm van VIERA
Connect verschijnt.
Lees de instructies aandachtig door en volg de aanwijzingen op het scherm.
Voorbeeld: Startscherm VIERA Connect
●
Houd de knop ongeveer 1 seconde ingedrukt.
●
De hoofdschakelaar moet aan staan. (p. 8)
●
Verder gaan: selecteer [VERDER].
●
Terug gaan: selecteer [TERUG].
●
Terugkeren naar het startscherm
van VIERA Connect
■
VIERA Connect
verlaten
●
De introductiebalk
van VIERA Connect
uitschakelen
[VIERA Connect
Banner]
16
VERDER
TERUG
Page 41
3D-beeld weergeven
U kunt genieten van het bijzondere effect van 3D-beeld en -programma’s door een 3D-bril te dragen.
Deze tv ondersteunt de 3D-formaten [Frame Sequential]
∗
1: 3D-formaat waarbij de beelden voor het linker- en rechteroog zijn opgenomen in HD-kwaliteit (High Definition) en
afwisselend weergegeven worden.
∗
2, ∗3: Andere ondersteunde 3D-formaten
●
Naar 3D-beeld kijken (p. 18)
Let op
Lees deze instructies volledig zodat u de 3D-bril veilig en comfortabel leert gebruiken.
3D-inhoud weergeven
●
Gebruik de 3D-bril niet als u overgevoelig bent voor licht, hartproblemen hebt of als er een andere bestaande
medische toestand is die het gebruik niet toelaat.
●
Stop het gebruik van de 3D-bril onmiddellijk als u moe of misselijk wordt of een ander onaangenaam gevoel
gewaarwordt. Houd er, wanneer u het effect instelt met [3D-aanpassing], rekening mee dat verschillende mensen
3D-beeld verschillend waarnemen.
●
Neem een aangepaste pauze na het bekijken van een 3D-film.
●
Neem een pauze van 30 tot 60 minuten na het bekijken van 3D-inhoud op interactieve apparaten, zoals 3D-games of
-computers.
●
Zorg dat u niet per ongeluk op het tv-scherm of andere mensen slaat. Tijdens het gebruik van de 3D-bril kan de
afstand tussen de gebruiker en het scherm verkeerd worden beoordeeld.
●
De 3D-bril mag alleen worden gedragen tijdens het bekijken van 3D-inhoud.
●
Gebruik de 3D-bril waar er geen interferentie is met andere Bluetooth-apparaten.
●
Als u gezichtsproblemen hebt (bijziend/verziend, astigmatisme, verschil in het gezichtsvermogen links en rechts),
moet u uw gezichtsvermogen corrigeren voordat u de 3D-bril gebruikt.
●
Stop het gebruik van de 3D-bril als u duidelijk dubbele beelden ziet wanneer u 3D-inhoud bekijkt.
●
Gebruik de 3D-bril niet dichterbij dan de aanbevolen afstand.
De aanbevolen kijkafstand is minstens 3 keer de beeldhoogte.
TX-P42XT50E: 1,6 m of meer
TX-P50XT50E: 1,9 m of meer
Wanneer het bovenste en onderste deel van het scherm zwart is (bijvoorbeeld bij films), moet u naar het scherm
kijken op een afstand van minstens 3 keer de gebruikte beeldhoogte. (Dit betekent dat de afstand kleiner is dan de
hogervermelde aanbevolen waarde.)
De 3D-bril gebruiken
●
Let bijzonder op wanneer kinderen de 3D-bril gebruiken.
De 3D-bril mag niet worden gebruikt door kinderen jonger dan ongeveer 5-6 jaar. Wanneer kinderen de 3D-bril
gebruiken, moeten ze voortdurend onder toezicht blijven van een ouder of voogd die moet zorgen voor hun veligheid
en gezondheid.
●
Voordat u de 3D-bril gebruikt, moet u zorgen dat er geen breekbare objecten rond de gebruiker aanwezig zijn om
schade of letsels te voorkomen.
●
Zet de 3D-bril af voordat u gaat rondlopen om te vermijden dat u valt en letsels oploopt.
●
Gebruik de 3D-bril alleen voor het beoogde doel en niets anders.
●
Gebruik de 3D-bril niet bij hoge temperaturen.
●
Gebruik de 3D-bril niet als deze beschadigd is.
●
Gebruik geen apparaten (zoals mobiele telefoons of persoonlijke zendontvangers) die sterke elektromagnetische
golven uitzenden in de buurt van de 3D-bril omdat dit storingen in de werking van de 3D-bril kan veroorzaken.
●
Stop het gebruik van de 3D-bril onmiddellijk als een storing of defect optreedt.
●
Stop het gebruik van de 3D-bril onmiddellijk als u roodheid, pijn of irritatie van de huid rond de neus of slapen
gewaarwordt.
●
In zeldzame gevallen kunnen de materialen die in de 3D-bril worden gebruikt, een allergische reactie veroorzaken.
1
∗
, [Zij aan Zij]
2
∗
en [Boven en Onder]
3
∗
.
Nederlands
17
Page 42
3D-bril (optioneel)
●
Gebruik een 3D-bril van Panasonic die dit logo draagt en geschikt is
Het logo “Full HD 3D Glasses™” geeft aan dat een product compatibel is met de normen voor
3D-brillen met actievesluitertechnologie onder licentie van Full HD 3D Glasses Initiative. De RFmarkering op het logo staat voor het draadloze systeem (Bluetooth
geeft aan dat u de 3D-bril kunt gebruiken met een tv die dezelfde markering draagt.
voor Bluetooth
®
draadloze technologie.
®
draadloze technologie) en
Opmerking
●
Gebruik de 3D-bril binnen een afstand van ongeveer 3,2 meter van de tv. U kunt met de 3D-bril niet naar 3D-beeld
Nederlands
kijken als u zich te ver van de tv bevindt. In dat geval kan de bril het radiosignaal van de tv namelijk niet ontvangen.
●
Het bereik kan korter zijn. Dit is afhankelijk van hindernissen tussen de tv en de 3D-bril en andere
omgevingsfactoren.
●
Het gezichtsveld van de 3D-bril verschilt van persoon tot persoon.
●
De 3D-bril werkt mogelijk niet goed buiten het gezichtsveld.
Naar 3D-beeld kijken
U kunt op verschillende wijzen naar 3D-beeld kijken.
(De volgende 3D-formaten worden ondersteund: “Frame Sequential”, “Zij aan Zij” en “Boven en Onder”.)
■ Afspelen van 3D-compatibele Blu-ray-schijven (Frame Sequential-formaat)
●
Sluit de 3D-compatibele speler aan via een volledig bedrade HDMI-compatibele kabel.
●
Als de ingangsmodus niet automatisch wordt omgeschakeld, selecteert u deze zelf voor de aangesloten speler.
●
Als u een speler gebruikt die niet compatibel is met 3D, worden de beelden weergegeven in 2D.
■ 3D-uitzendingen
●
Raadpleeg de leveranciers van de inhoud of de programma’s omtrent de beschikbaarheid van deze dienst.
■ 3D-foto’s en 3D-video die zijn opgenomen op 3D-compatibele producten van Panasonic
●
Beschikbaar voor Mediaspeler en netwerkdiensten
■ Naar 3D geconverteerd 2D-beeld
●
Stel in op [2D 3D] in [3D-modusselectie].
Voorbereidingen
Voer de registratie uit wanneer u de 3D-bril voor het eerst gebruikt. Lees de handleiding van de 3D-bril voor meer
informatie.
18
Zet de 3D-bril aan en zet hem op
1
●
De verbindingsstatus en de batterijstatus worden rechtsonder in het scherm aangegeven.
Kijk naar het 3D-beeld
2
●
Wanneer u voor het eerst naar 3D-beeld kijkt, worden de veiligheidsmaatregelen weergegeven. Selecteer [Ja]
of [Nee] om verder te gaan met het bekijken van 3D-beeld.
Selecteer [Ja] als u dit bericht opnieuw wilt weergeven in deze situatie als u het toestel de volgende keer met
de hoofdschakelaar aanzet. Selecteer [Nee] als u dit bericht niet meer wilt weergeven.
●
Schakel de 3D-bril na gebruik uit.
Page 43
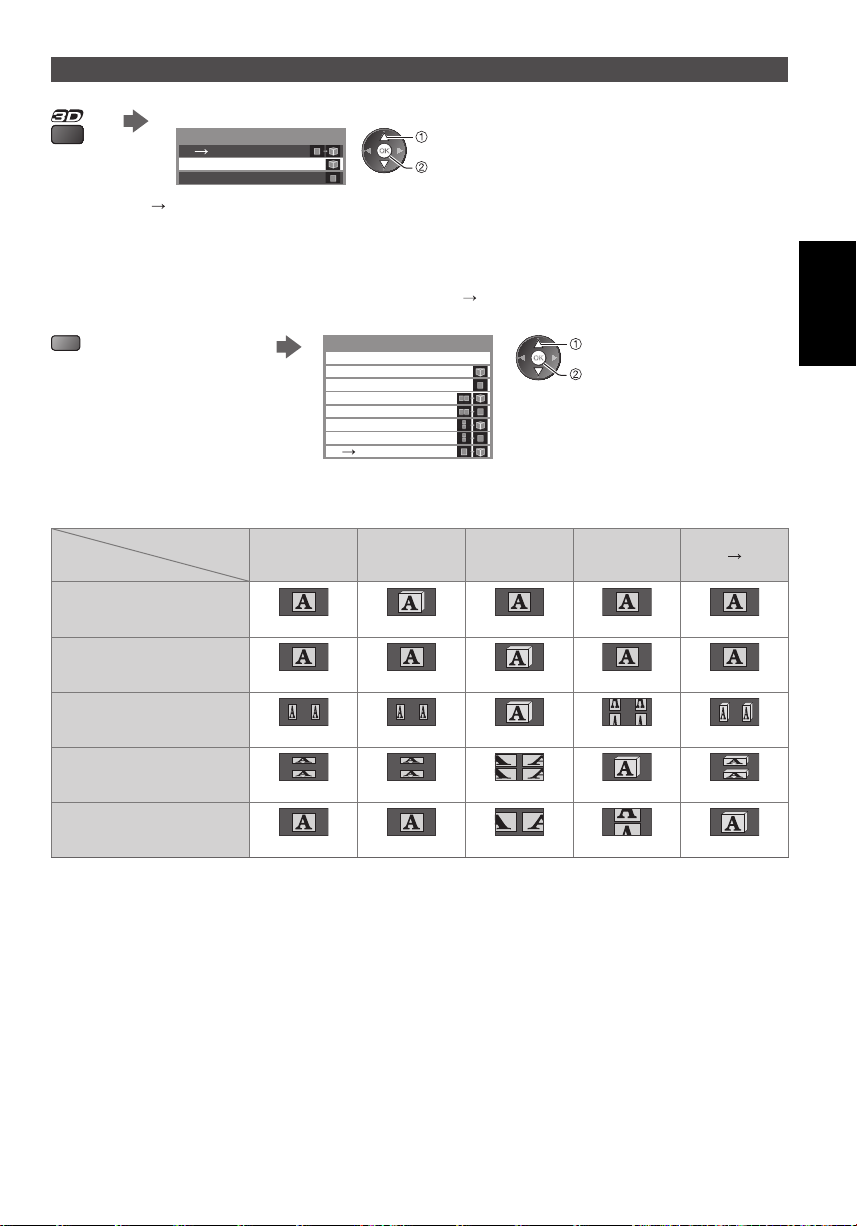
Overschakelen tussen 2D en 3D
Met de 3D-toets kunt u eenvoudig overschakelen tussen 2D en 3D.
[3D] / [2D] / [2D
Het 3D-formaat wordt automatisch geselecteerd.
●
Deze functie werkt niet voor alle beeldformaten. Selecteer indien nodig zelf het geschikte 3D-formaat.
3D]:
Selecteer de stand
3D-modusselectie
2D3D3D
2D
selecteren
instellen
●
De onderdelen in [3D-modusselectie]
kunnen verschillen naargelang de
situatie.
■ Het 3D-formaat handmatig wijzigen
Als het beeld niet correct wordt weergegeven met [3D], [2D] of [2D 3D], kunt u het handmatig instellen.
Tijdens de genoemde situatie Selecteer de stand
(Rode)
3D-modusselectie (Handmatig)
Origineel
Frame Sequential - 3D
Frame Sequential - 2D
Zij aan Zij - 3D
Zij aan Zij - 2D
Boven en Onder - 3D
Boven en Onder - 2D
2D 3D
Tabel met beeldweergaven bij verschillende instellingen van [3D-modusselectie (Handmatig)] en invoersignaal
Raadpleeg de onderstaande tabel om de juiste 3D-stand te kiezen als het beeld abnormaal lijkt.
Beeldformaat
[3D-modusselectie]
[Origineel]
[Frame
Sequential
- 3D]
[Zij aan Zij
- 3D]
selecteren
instellen
[Boven en
Onder - 3D]
[2D 3D]
Nederlands
Frame Sequential
Zij aan Zij (volledig)
Zij aan Zij
Boven en Onder
Normaal formaat (2D)
∗
1: Als u [Frame Sequential - 2D], [Zij aan Zij - 2D] of [Boven en Onder - 2D] selecteert, wordt het beeld zonder
3D-effect weergegeven.
●
Afhankelijk van de speler en de uitzending kan het beeld verschillen van de bovenstaande illustraties.
Normaal 3D
1
∗
Normaal 3D
Normaal 3D
1
∗
1
∗
Normaal 3D
∗
1
Normaal 3D
19
Page 44
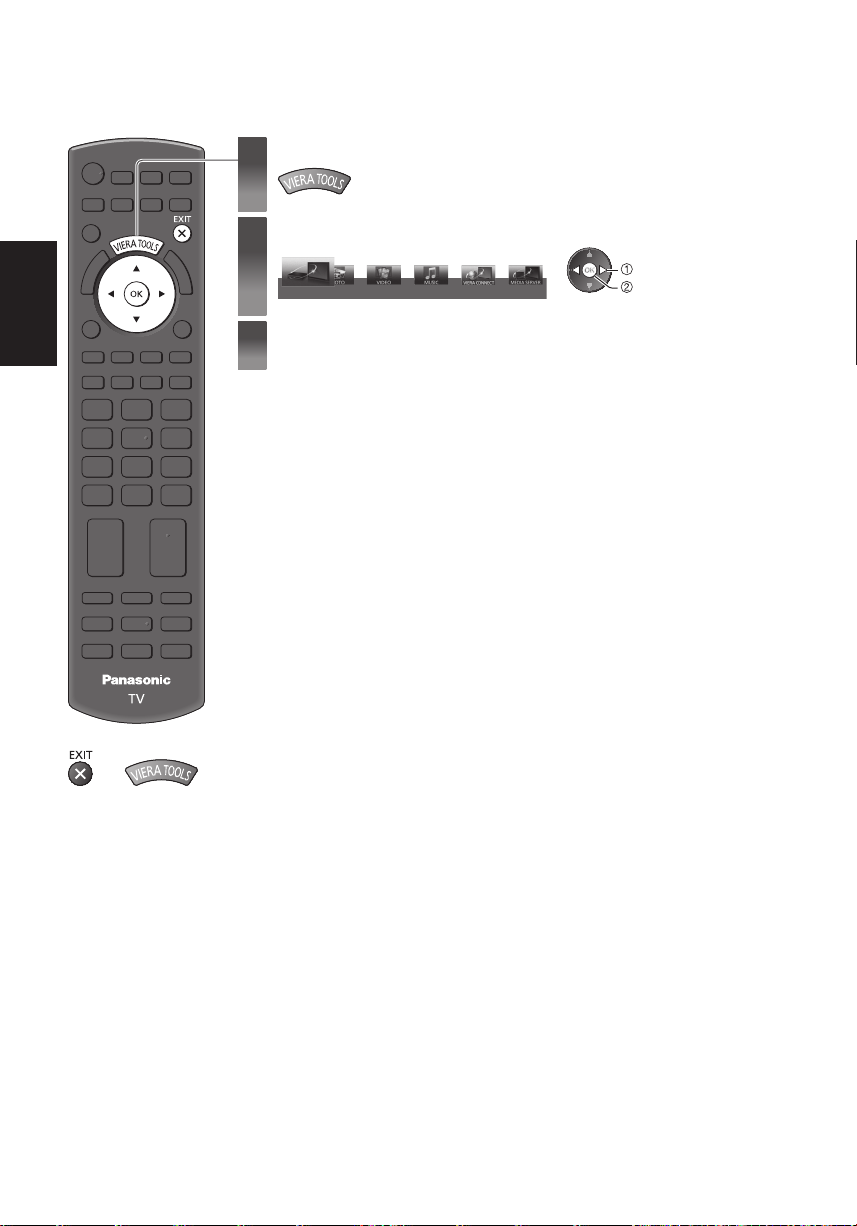
VIERA TOOLS
Met de functie VIERA TOOLS hebt u eenvoudig toegang tot een aantal speciale functies.
Geef de functiepictogrammen weer
1
Selecteer de gewenste functie
Nederlands
2
VIERA Link
Volg de instructies voor elke functie
3
selecteren
openen
20
■
Terug naar de tv
of
Page 45
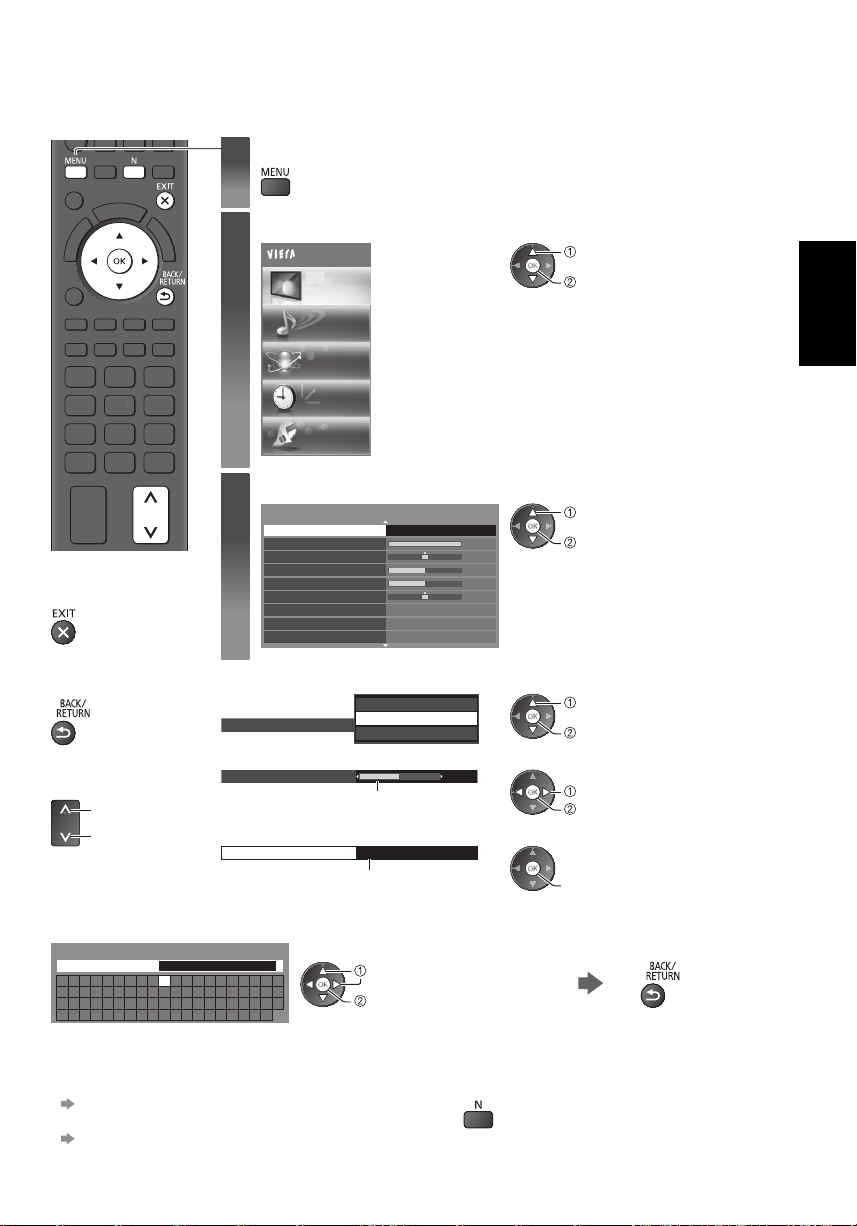
Werken met de menufuncties
U kunt via verschillende menu’s instellingen voor beeld, geluid en andere functies aanpassen.
Geef het menu weer
1
2
3
■
Terug naar de tv
(op elk gewenst
moment)
■
Terug naar het
vorige scherm
■
Naar een andere
menupagina
omhoog
omlaag
■ Tekst invoeren in een tekstveld
U kunt bij sommige onderdelen zelf tekst of een getal invoeren.
Gebruikersinput
Naam
ABCDEFGH I JKLMN
UVWXYZÉË Ï01234
abcdef ghi j k lmn
uvwxyzéëï!:#(
●
U kunt met de cijfertoetsen tekens invoeren.
■ Instellingen terugzetten
●
Alleen beeld- of geluidsinstellingen
[Fabrieksinstellingen] in het menu Beeld of Geluid
●
Alle instellingen initialiseren
[Fabrieksinstellingen] in het menu Instellingen
■ Een optie kiezen
Kleurtemp.
■ Aanpassen met de schuifbalk
Scherpte
■ Naar het volgende scherm gaan
Kinderslot Openen
OPQRST
56789
opqr st
)+-. *_
●
De instelbare functies worden weergegeven (afhankelijk van het
ingangssignaal).
Selecteer het menu
Hoofdmenu
Beeld
Geluid
Netwerk
Timer
Instellingen
Selecteer het onderdeel
Beeld Instelling Dynamisch
Kontrast
Helderheid
Kleur
Scherpte
Tint
Kleurtemp.
Levendige kleuren
Eco mode
Koel
Normaal
Warm
Warm
Uit
Uit
Verplaatst
Geeft het volgende scherm weer
Voer de letters een voor een in
selecteren
instellen
1/2
60
0
30
5
0
5
●
Zowel beeld- als geluidsinstellingen
selecteren
openen
selecteren
openen
selecteren
opslaan
wijzigen
opslaan
openen
(Het volumeniveau en de beeldverhouding
worden ook teruggezet)
Nederlands
Opslaan
21
Page 46
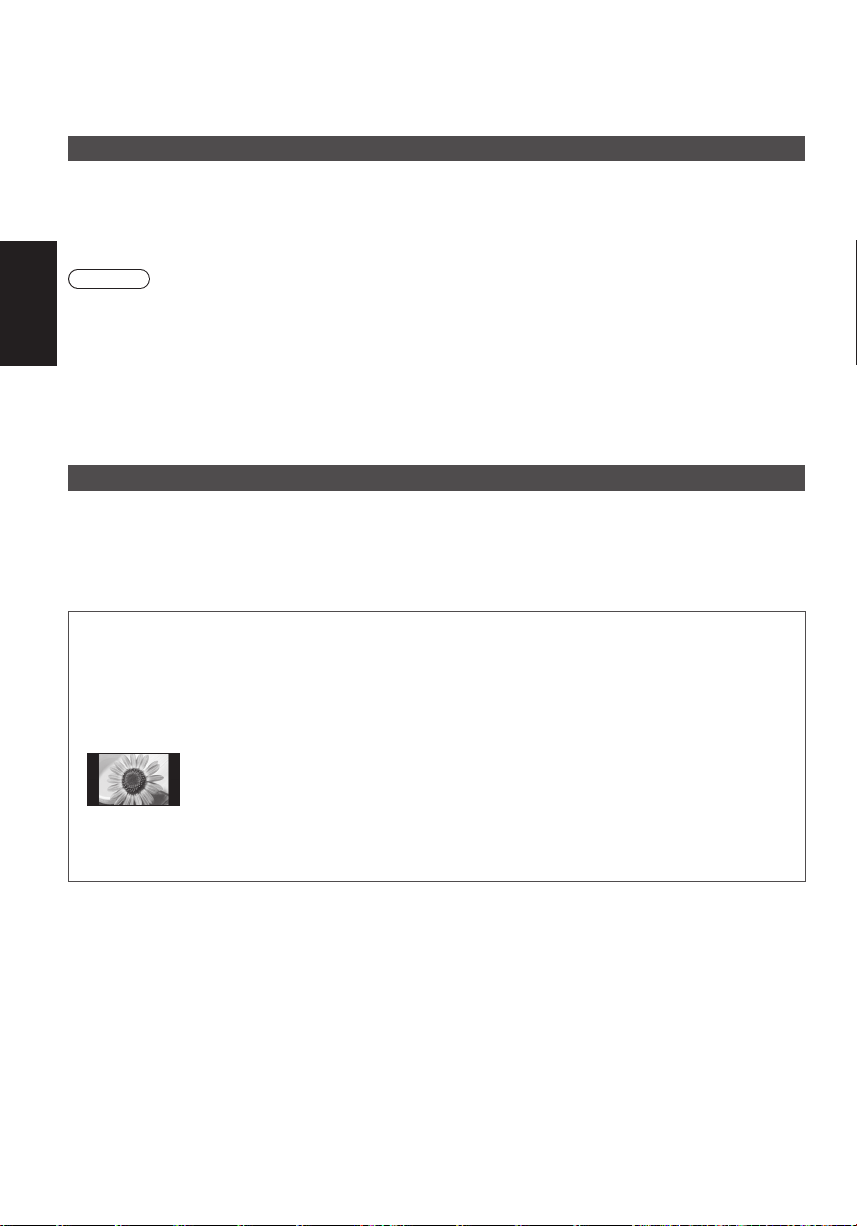
Onderhoud
Verwijder eerst de stekker van het netsnoer uit het stopcontact.
Beeldscherm, Behuizing, Standaard
Regelmatig onderhoud:
Veeg de buitenkant van het beeldscherm, de
behuizing of de standaard voorzichtig af met
een zachte doek om vuil of vingerafdrukken te
verwijderen.
Nederlands
Let op
●
Gebruik geen harde of ruwe doek en wrijf niet hard op het oppervlak omdat u daardoor krassen kunt maken.
●
Gebruik geen water of schoonmaakproducten op de tv. Wanneer een vloeistof in de tv terechtkomt, kan dit defecten
veroorzaken.
●
Zorg dat er geen insecticiden, oplosmiddelen, verdunners of andere vluchtige stoffen met de tv in aanraking komen.
Hierdoor kan de kwaliteit van het oppervlak afnemen of kan de verf afbladderen.
●
Het scherm is behandeld en voorzien van een gevoelige oppervlaktelaag. Tik en kras niet op het oppervlak met uw
vingernagel of een hard voorwerp.
●
Zorg dat de behuizing en de standaard niet gedurende langere tijd in contact zijn met rubber of pvc. Hierdoor kan
de kwaliteit van het oppervlak afnemen.
Netsnoerstekker
Maak de netsnoerstekker regelmatig schoon met een droge doek. Vocht en stof kunnen brand of een elektrische schok
veroorzaken.
Laat een beeld met stilstaande delen niet gedurende langere tijd op het scherm
staan
Het stilstaande deel van het beeld kan een afdruk achterlaten op het plasmascherm (inbranden). Dit verschijnsel is
geen defect en wordt niet door de garantie gedekt.
Stilstaande onderdelen in het beeld komen typisch voor bij:
●
Kanaalnummer, kanaallogo en andere logo’s
●
Weergave van stilstaand of bewegend beeld in de beeldverhouding 4:3 of 14:9
Voor hardnekkig vuil:
Verwijder eerst het stof aan de buitenkant. Bevochtig een
zachte doek met schoon water of een opgelost neutraal
schoonmaakproduct (1 deel schoonmaakproduct op 100 delen
water). Wring de doek uit en veeg het oppervlak schoon. Droog
vervolgens al het vocht af.
●
Videogames
●
Afbeeldingen van een pc
Om inbranden van het beeld te voorkomen, wordt automatisch het contrast verlaagd en het scherm gedimd als
gedurende enkele minuten geen signaal wordt verzonden en geen handeling wordt verricht.
22
Page 47
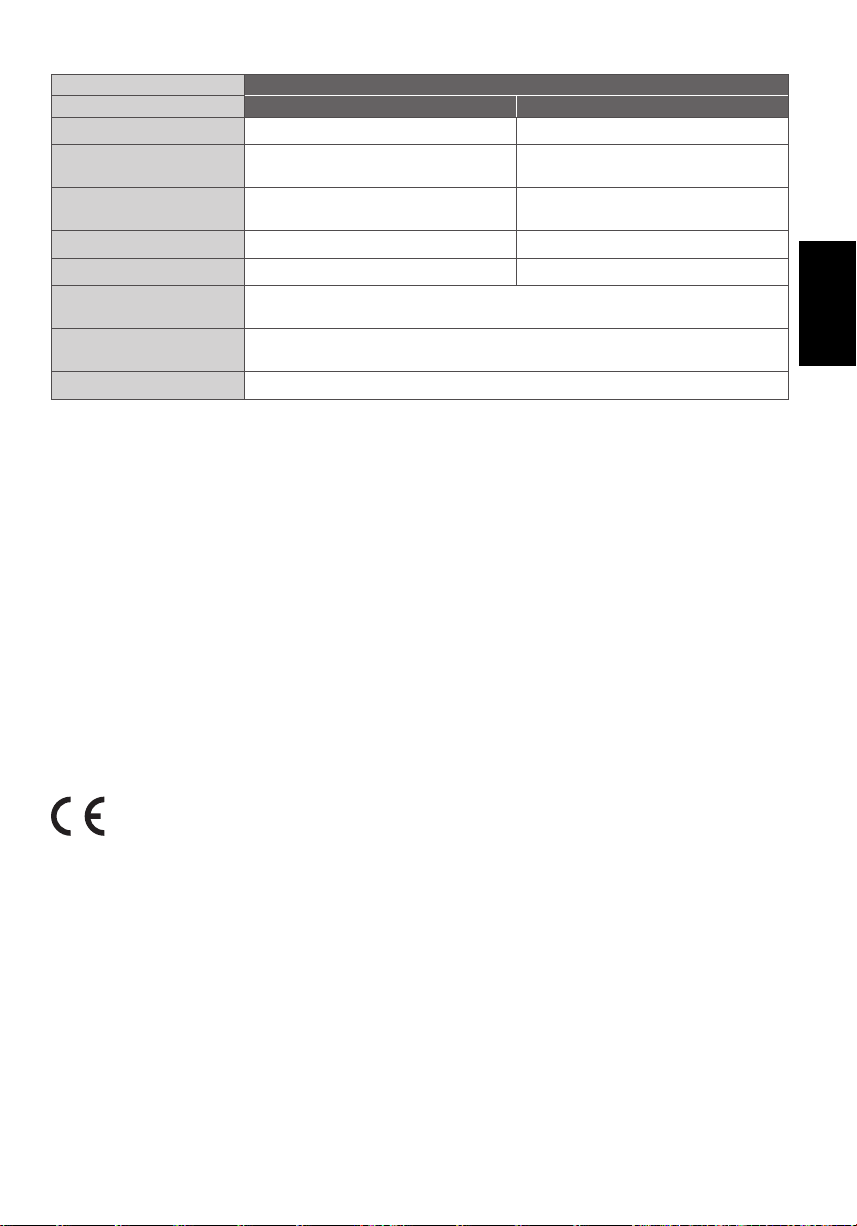
■ Productkaart
Producent Panasonic Corporation
Modelnr. TX-P42XT50E TX-P50XT50E
Energie-efficiëntieklasse B B
Zichtbare
schermdiagonaal
Elektriciteitsverbruik in de
gebruiksstand
Jaarlijks energieverbruik
Nominaal energieverbruik 165 W 215 W
Elektriciteitsverbruik in de
slaapstand
Elektriciteitsverbruik in de
uitstand
Schermresolutie 1.024 (B) × 768 (H)
∗
1: Energieverbruik XYZ kWh per jaar, gebaseerd op het elektriciteitsverbruik van de televisie wanneer deze
gedurende 365 dagen 4 uur per dag aanstaat. Het feitelijke energieverbruik is afhankelijk van de manier waarop de
televisie wordt gebruikt.
∗
2: Als de tv is uitgeschakeld met de afstandsbediening en er geen functies actief zijn
2
∗
107 cm / 42 inch 127 cm / 50 inch
101 W 139 W
1
∗
140 kWh 193 kWh
0,40 W
0,30 W
Nederlands
Plasmatelevisie
Conformiteitsverklaring (DoC)
“Panasonic Corporation verklaart hierbij dat deze tv voldoet aan de essentiële eisen en andere relevante bepalingen
van Richtlijn 1999/5/EG, Richtlijn 2004/108/EG, Richtlijn 2006/95/EG en Aanbeveling 1999/519/EG van de Raad.”
Bezoek de volgende website als u een kopie wenst van de oorspronkelijk eenvormigheidsverklaring van deze tv:
http://www.doc.panasonic.de
Bevoegde vertegenwoordiger:
Panasonic Testing Centre
Panasonic Marketing Europe GmbH
Winsbergring 15, 22525 Hamburg, Germany
●
Dit apparaat voldoet aan de volgende EMC-normen.
EN55013, EN61000-3-2, EN61000-3-3, EN55020, EN55022, EN55024
23
Page 48
Informatie voor gebruikers betreffende het verzamelen en verwijderen van oude
uitrustingen en lege batterijen
Deze symbolen op de producten, verpakkingen, en/of begeleidende documenten betekenen dat
gebruikte elektrische en elektronische producten en batterijen niet met het algemene huishoudelijke
afval gemengd mogen worden. Voor een correcte behandeling, recuperatie en recyclage van oude
producten en lege batterijen moeten zij naar de bevoegde verzamelpunten gebracht worden in
overeenstemming met uw nationale wetgeving en de Richtlijnen 2002/96/EC en 2006/66/EC.
Door deze producten en batterijen correct te verwijderen draagt u uw steentje bij tot het beschermen
van waardevolle middelen en tot de preventie van potentiële negatieve effecten op de gezondheid
van de mens en op het milieu die anders door een onvakkundige afvalverwerking zouden kunnen
ontstaan.
Nederlands
Voor meer informatie over het verzamelen en recycleren van oude producten en batterijen, gelieve
contact op te nemen met uw plaatselijke gemeente, uw afvalverwijderingsdiensten of de winkel waar u
de goederen gekocht hebt.
Voor een niet-correcte verwijdering van dit afval kunnen boetes opgelegd worden in overeenstemming
met de nationale wetgeving.
Voor zakengebruikers in de Europese Unie
Indien u elektrische en elektronische uitrusting wilt vewijderen, neem dan contact op met uw dealer
voor meer informatie.
[Informatie over de verwijdering in andere landen buiten de Europese
Unie]
Deze symbolen zijn enkel geldig in de Europese Unie. Indien u wenst deze producten te verwijderen,
neem dan contact op met uw plaatselijke autoriteiten of dealer, en vraag informatie over de correcte
wijze om deze producten te verwijderen.
Opmerking over het batterijensymbool (beneden twee voorbeelden):
Dit symbool kan gebruikt worden in verbinding met een chemisch symbool. In dat geval wordt de eis,
vastgelegd door de Richtlijn voor de betrokken chemische producten vervuld.
Kennisgeving over DVB/datatransmissie/IPTV-functies
●
Deze tv is ontworpen om te voldoen aan de normen (stand augustus 2011) voor DVB-T (MPEG2 en MPEG4AVC(H.264)) digitale aardse services en DVB-C (MPEG2 en MPEG4-AVC(H.264)) digitale kabelservices.
Raadpleeg uw lokale dealer voor de beschikbaarheid van DVB-T-services in uw gebied.
Raadpleeg uw kabelprovider voor de beschikbaarheid van DVB-C-services met deze tv.
●
Deze TV werkt mogelijk niet correct met een signaal dat niet voldoet aan de normen van DVB-T of DVB-C.
●
Afhankelijk van het land, het gebied, de zender, de serviceprovider en de netwerkomgeving zijn mogelijk niet alle
functies beschikbaar.
●
Niet alle CI-modules werken goed met deze tv. Raadpleeg uw serviceprovider over de beschikbare CI-module.
●
Deze tv werkt wellicht niet correct met een CI-module die niet is goedgekeurd door de serviceprovider.
●
Afhankelijk van de serviceprovider kunnen extra kosten worden aangerekend.
●
De compatibiliteit met toekomstige services is niet gegarandeerd.
●
U kunt de meest recente informatie over de beschikbare services op de volgende website bekijken. (alleen Engels)
http://panasonic.jp/support/global/cs/tv/
M0212-0
TQB0E2190B-G
Web Site: http://panasonic.net
© Panasonic Corporation 2012
Gedrukt in de Tsjechische Republiek
 Loading...