

Page 1
TQB0E2503P42
English
Nederlands
Română
Operating Instructions
LCD Television
Model No.
TX-55CS620E
For more detailed instructions, please refer to
[eHELP] (Built-in Operating Instructions).
●
How to use [eHELP]
Thank you for purchasing this Panasonic product.
Please read these instructions carefully before operating this product and retain them
for future reference.
Please carefully read the “Safety Precautions” of this manual before use.
The images shown in this manual are for illustrative purposes only.
Please refer to Pan European Guarantee Card if you need to contact your local
Panasonic dealer for assistance.
M0115-1015 English
(p. 15)
Page 2
Contents
Be Sure to Read
Important Notice··················································· 3
Safety Precautions ··············································· 3
Quick Start Guide
Accessories ························································ 6
Connections ························································ 7
Identifying Controls ··············································11
First time Auto Setup ············································13
Using your VIERA
Operations ·························································14
How to Use eHELP ··············································15
Others
FAQs ································································16
Maintenance ······················································17
Specifications ·····················································17
English
2
●
For information about the trademarks, refer to
[eHELP] (Support > Licence).
Page 3
Important Notice
Notice for DVB / Data broadcasting /
IPTV functions
●
This TV is designed to meet the standards (as of
August, 2014) of DVB-T / T2 (MPEG2 and MPEG4AVC(H.264)) digital terrestrial services, DVB-C
(MPEG2 and MPEG4-AVC(H.264)) digital cable
services.
Consult your local dealer for availability of DVB-T / T2
services in your area.
Consult your cable service provider for availability of
DVB-C services with this TV.
●
This TV may not work correctly with the signal which
does not meet the standards of DVB-T / T2 or DVB-C.
●
Not all the features are available depending on the
country, area, broadcaster, service provider and
network environment.
●
Not all CI modules work properly with this TV. Consult
your service provider about the available CI module.
●
This TV may not work correctly with CI module that is
not approved by the service provider.
●
Additional fees may be charged depending on the
service provider.
●
Compatibility with future services is not guaranteed.
●
Check the latest information on the available services
at the following website. (English only)
http://panasonic.net/viera/support
Panasonic does not guarantee operation and
performance of peripheral devices made by other
manufacturers; and we disclaim any liability or damage
arising from operation and/or performance from usage of
such other maker’s peripheral devices.
This product is licensed under the AVC patent portfolio
license for the personal and non-commercial use of a
consumer to (i) encode video in compliance with the
AVC Standard (“AVC Video”) and/or (ii) decode AVC
Video that was encoded by a consumer engaged in
a personal and non-commercial activity and/or was
obtained from a video provider licensed to provide AVC
Video. No license is granted or shall be implied for any
other use.
Additional information may be obtained from MPEG LA,
LLC.
See http://www.mpegla.com.
Transport only in upright position.
Safety Precautions
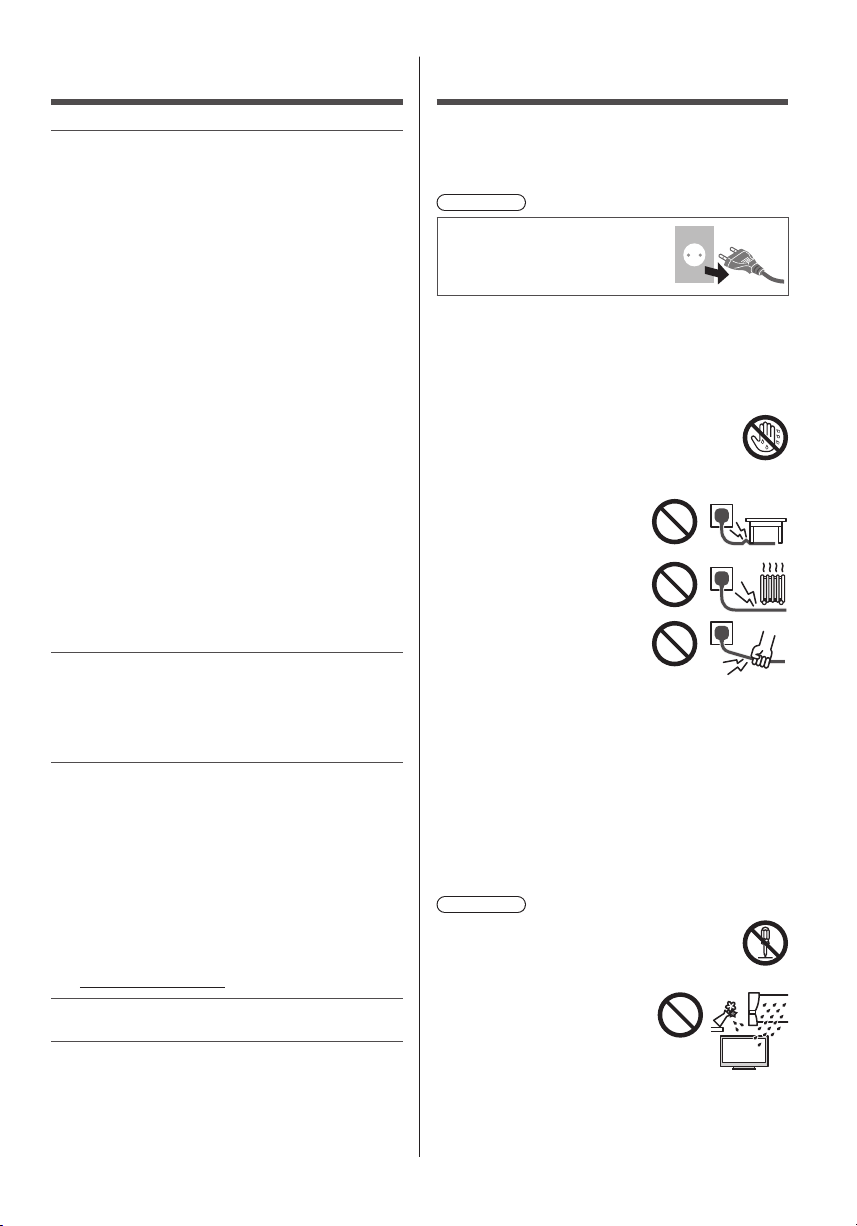
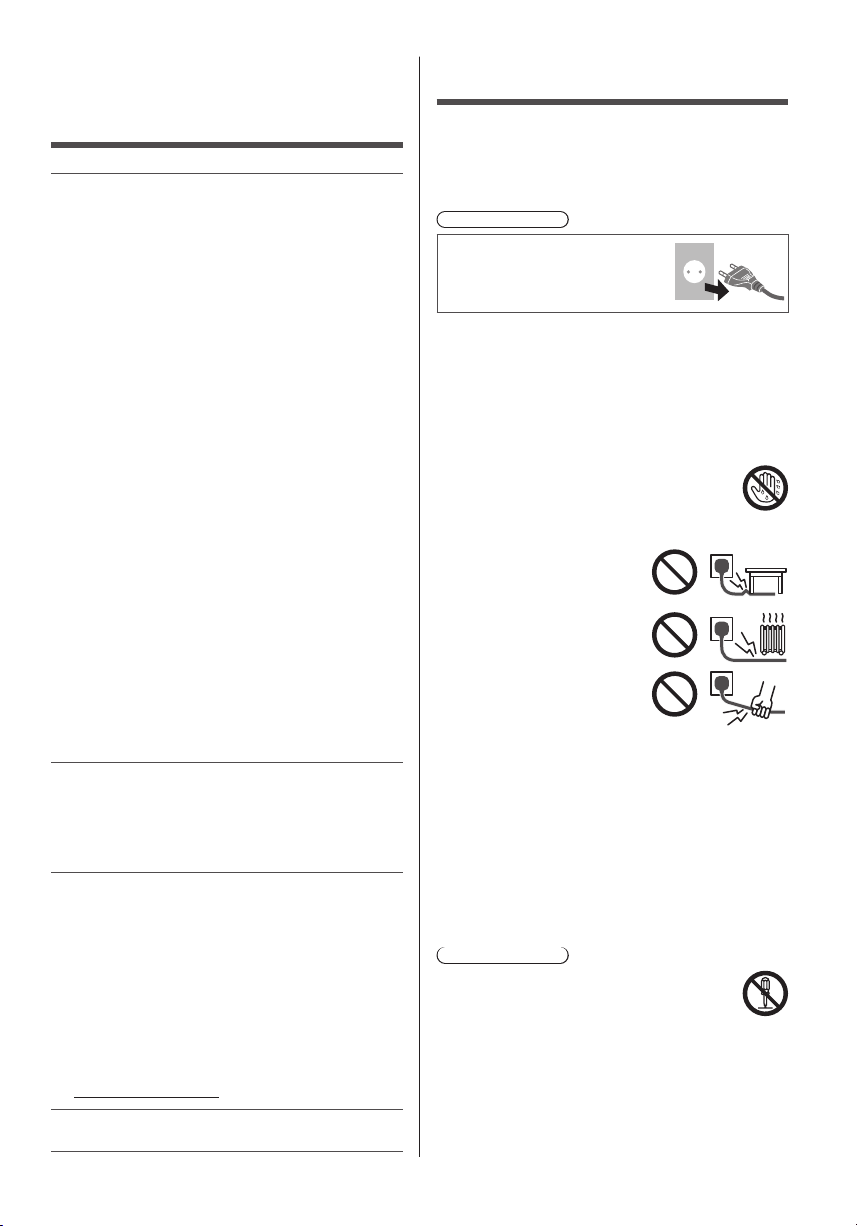
To help avoid risk of electrical shock, fire, damage or
injury, please follow the warnings and cautions below:
■ Mains plug and lead
Warning
If you detect anything unusual,
immediately remove the mains
plug.
●
This TV is designed to operate on AC 220-240 V,
50 / 60 Hz.
●
Insert the mains plug fully into the mains socket.
●
Ensure that the mains plug is easily accessible.
●
Disconnect the mains plug when cleaning the TV.
●
Do not touch the mains plug with wet
hands.
●
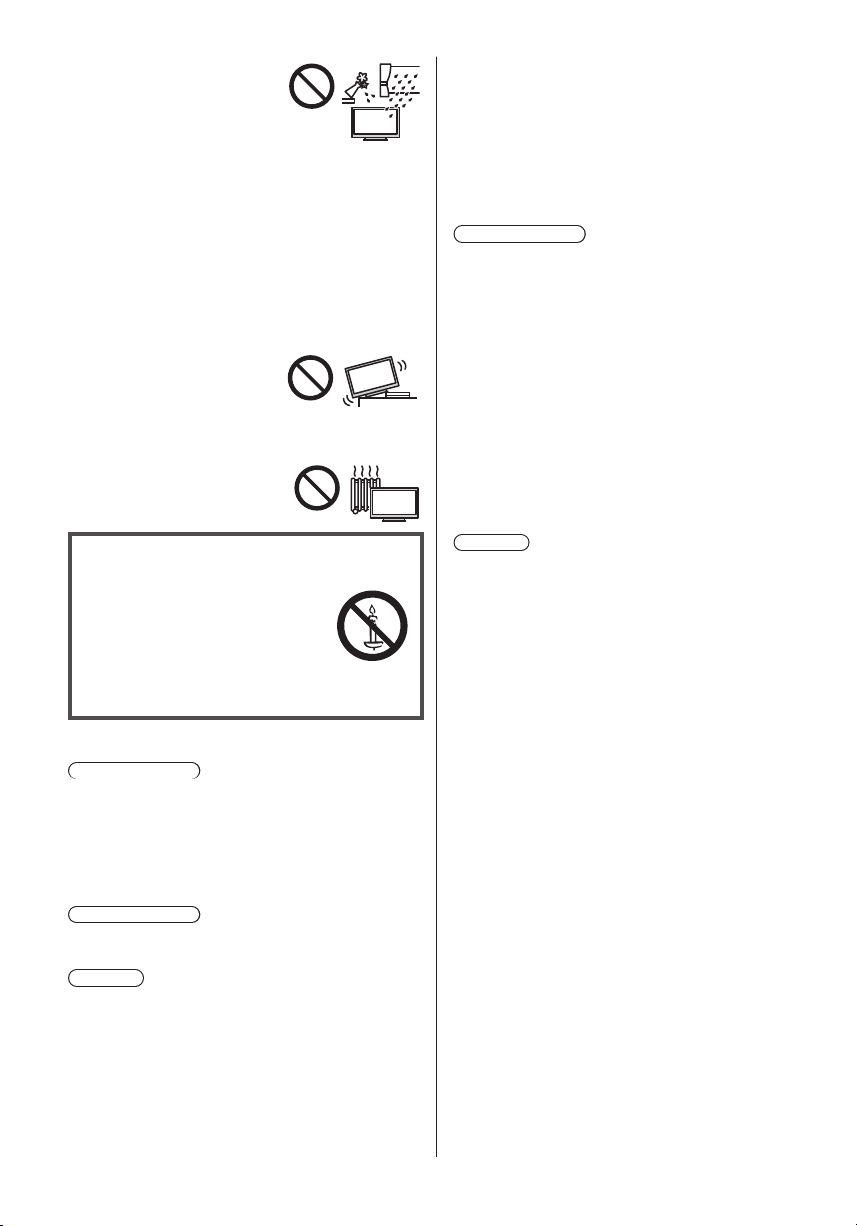
Do not damage the mains lead.
Do not place a heavy
•
object on the lead.
Do not place the lead near
•
a high temperature object.
Do not pull on the lead.
•
Hold onto the mains plug
body when disconnecting
the plug.
Do not move the TV with the lead plugged into a
•
mains socket.
Do not twist the lead, bend it excessively or stretch
•
it.
Do not use a damaged mains plug or mains
•
socket.
Ensure the TV does not crush the mains lead.
•
●
Do not use any mains lead other than that provided
with this TV.
■ Take care
Warning
●
Do not remove covers and never modify
the TV yourself as live parts are accessible
when they are removed. There are no user
serviceable parts inside.
●
Do not expose the TV to rain
or excessive moisture. This
TV must not be exposed to
dripping or splashing water
and objects filled with liquid,
such as vases, must not be
placed on top of or above
the TV.
English
3
Page 4
●
Do not insert foreign objects into the TV through the
air vents.
●
Do not use an unapproved pedestal / mounting
equipment. Be sure to ask your local Panasonic
dealer to perform the setup or installation of approved
wall-hanging brackets.
●
Do not apply any strong force or impact to the display
panel.
●
Ensure that children do not climb on the TV.
●
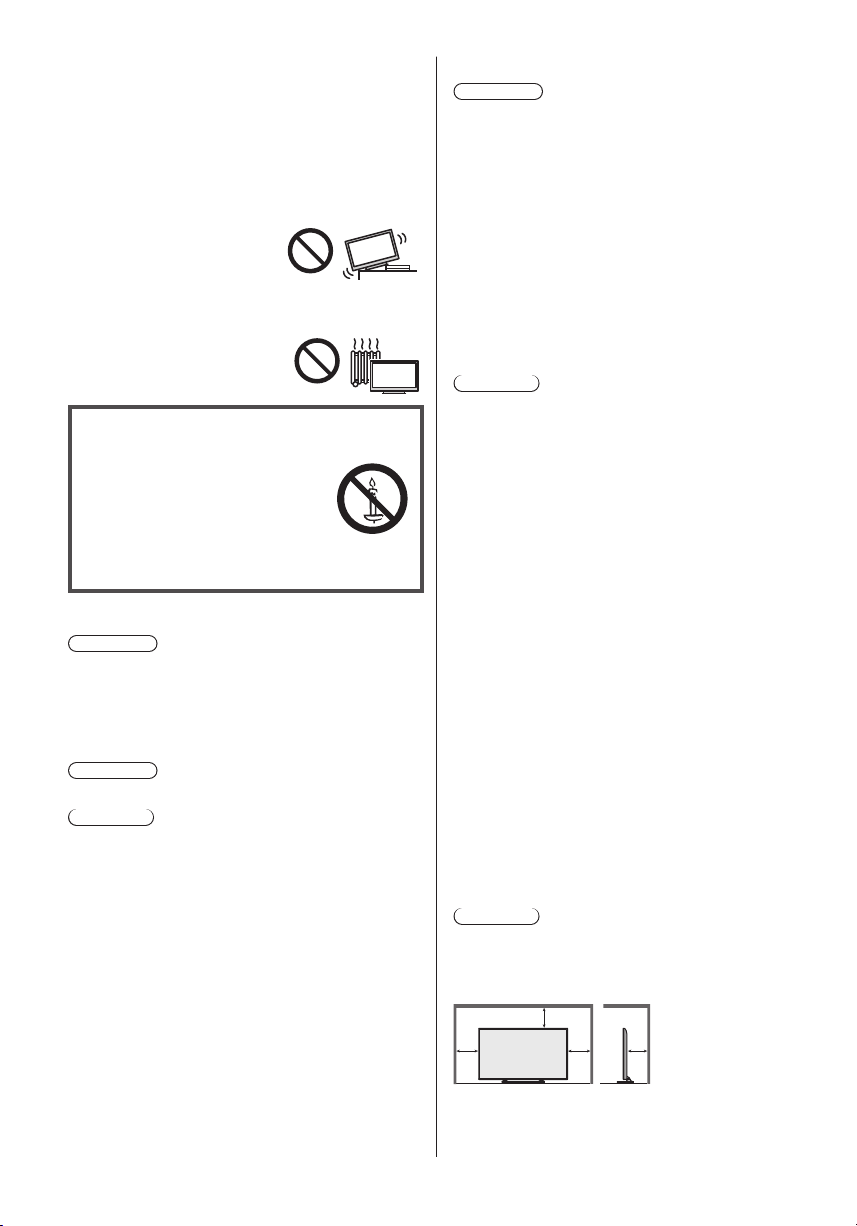
Do not place the TV on sloped
or unstable surfaces, and
ensure that the TV does not
hang over the edge of the
base.
●
This TV is designed for table-top use.
●
Do not expose the TV to direct
sunlight and other sources of
heat.
To prevent the
spread of fire, keep
candles or other
open flames away
from this product at
all times
■ Suffocation / Choking Hazard
Warning
●
The packaging of this product may cause suffocation,
and some of the parts are small and may present a
choking hazard to young children. Keep these parts
out of reach of young children.
■ Pedestal
Warning
●
Do not disassemble or modify the pedestal.
Caution
●
Do not use any pedestal other than the one provided
with this TV.
●
Do not use the pedestal if it becomes warped or
physically damaged. If this occurs, contact your
nearest Panasonic dealer immediately.
●
During setup, make sure that all screws are securely
tightened.
●
Ensure that the TV does not suffer any impact during
installation of the pedestal.
●
Ensure that children do not climb onto the pedestal.
●
Install or remove the TV from the pedestal with at
least two people.
●
Install or remove the TV according to the specified
procedure.
■ Radio waves
Warning
●
Do not use the TV in any medical institutions or
locations with medical equipment. Radio waves may
interfere with the medical equipment and may cause
accidents due to malfunction.
●
Do not use the TV near any automatic control
equipment such as automatic doors or fire alarms.
Radio waves may interfere with the automatic
control equipment and may cause accidents due to
malfunction.
●
Keep at least 22 cm away from the TV if you have a
cardiac pacemaker. Radio waves may interfere with
the operation of the pacemaker.
●
Do not disassemble or alter the TV in any way.
■ Built-in wireless LAN
Caution
●
Do not use the built-in wireless LAN to connect to any
wireless network (SSID*) for which you do not have
usage rights. Such networks may be listed as a result
of searches. However, using them may be regarded
as illegal access.
*
SSID is a name for identifying a particular wireless
network for transmission.
●
Do not subject the built-in wireless LAN to high
temperatures, direct sunlight or moisture.
●
Data transmitted and received over radio waves may
be intercepted and monitored.
●
The built-in wireless LAN uses 2.4 GHz and 5 GHz
frequency bands. To avoid malfunctions or slow
response caused by radio wave interference when
using the built-in wireless LAN, keep the TV away
from other devices that use 2.4 GHz and
5 GHz signals such as other wireless LAN devices,
microwave ovens, and mobile phones.
●
When problems occur due to static electricity, etc., the
TV might stop operating to protect itself. In this case,
turn the TV off at the Mains power On / Off switch,
then turn it back on.
●
Additional information for the wireless LAN and
access point may be on the following website.
(English only)
http://panasonic.net/viera/support
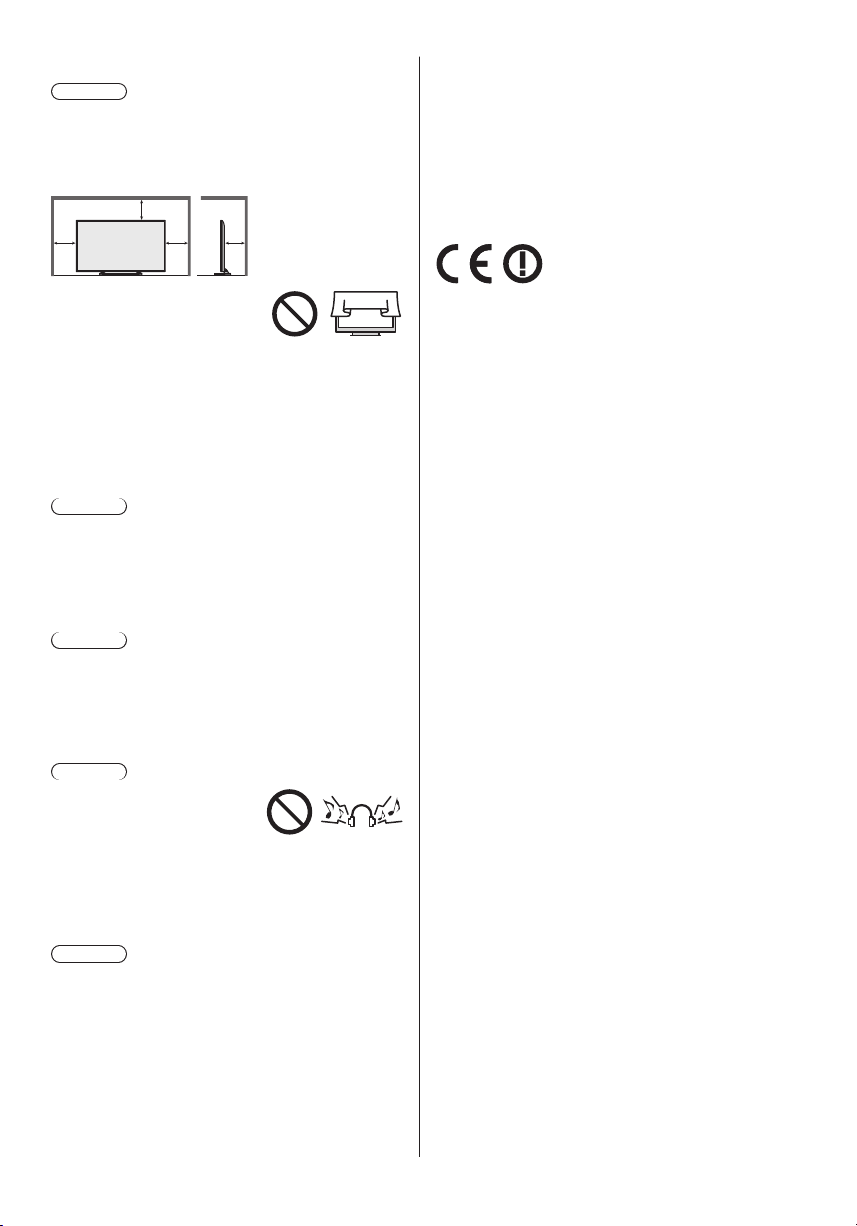
■ Ventilation
Caution
Allow sufficient space around the TV in order to help
prevent excessive heat, which could lead to early failure
of some electronic components.
Minimum distance:
10
10
10
10
(cm)
4
English
Page 5
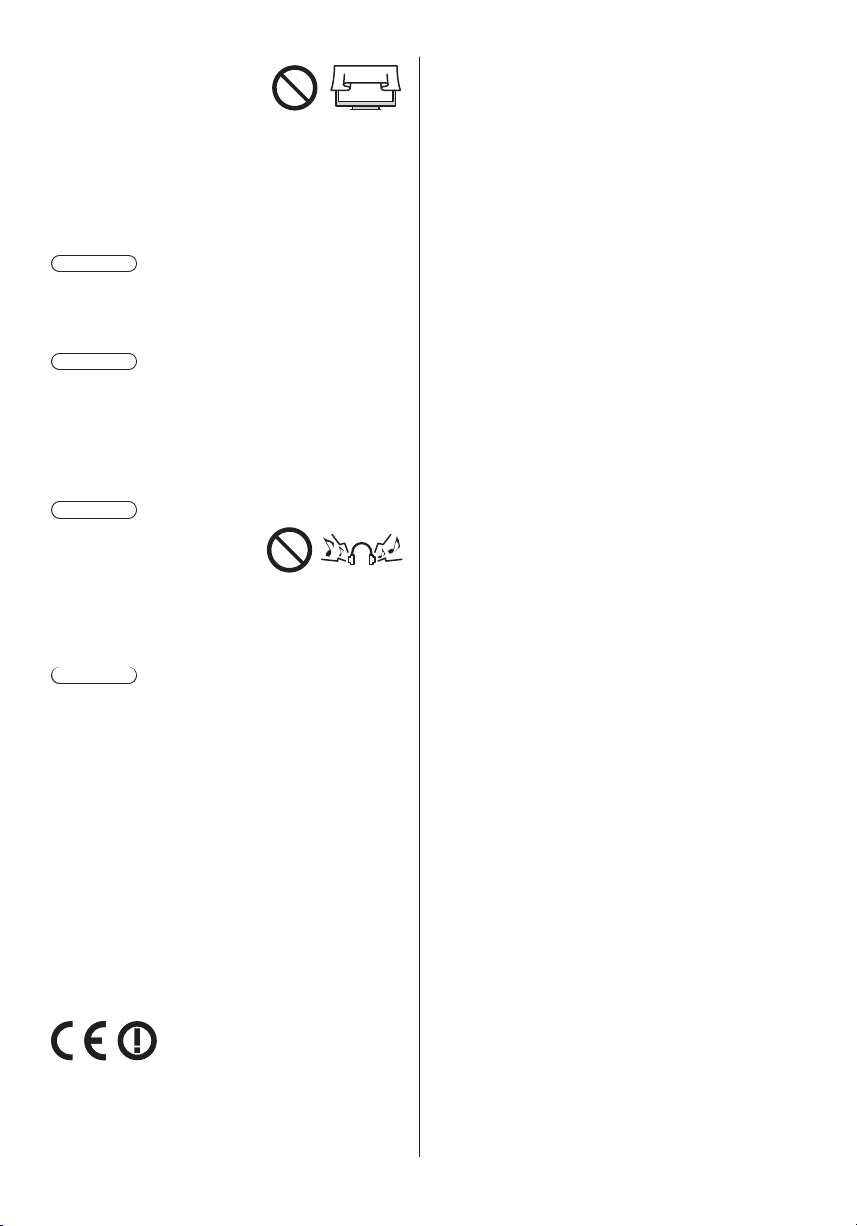
●
Ventilation should not be
impeded by covering the
ventilation openings with
items such as newspapers,
tablecloths and curtains.
●
Whether you are using a pedestal or not, always
ensure the vents at the bottom of the TV are not
blocked and there is sufficient space to enable
adequate ventilation.
■ Moving the TV
Caution
Before moving the TV, disconnect all cables.
●
Move the TV with at least two people.
■ When not in use for a long time
Caution
This TV will still consume some power even in the Off
mode, as long as the mains plug is still connected to a
live mains socket.
●
Remove the mains plug from the wall socket when
the TV is not in use for a prolonged period of time.
■ Excessive volume
Caution
●
Do not expose your ears to
excessive volume from the
headphones. Irreversible
damage can be caused.
●
If you hear a drumming noise in your ears, turn down
the volume or temporarily stop using the headphones.
■ Battery for the Remote Control
Caution
●
Incorrect installation may cause battery leakage,
corrosion and explosion.
●
Replace only with the same or equivalent type.
●
Do not mix old and new batteries.
●
Do not mix different battery types (such as alkaline
and manganese batteries).
●
Do not use rechargeable batteries (Ni-Cd, etc.).
●
Do not burn or break up batteries.
●
Do not expose batteries to excessive heat such as
sunshine, fire or the like.
●
Make sure you dispose of batteries correctly.
●
Remove the battery from the unit when not using for
a prolonged period of time to prevent battery leakage,
corrosion and explosion.
If you want to get a copy of the original DoC of this TV,
please visit the following website:
http://www.doc.panasonic.de
Authorized Representative:
Panasonic Testing Centre
Panasonic Marketing Europe GmbH
Winsbergring 15, D-22525 Hamburg, Germany
This TV is intended to be used in the following countries.
Albania, Andorra, Austria, Belgium, Bulgaria, Croatia,
Cyprus, Czech Republic, Denmark, Estonia, Finland,
France, Germany, Greece, Hungary, Italy, Iceland,
Latvia, Liechtenstein, Lithuania, Luxembourg, Malta,
Monaco, Montenegro, Netherlands, Norway, Poland,
Portugal, Romania, Slovakia, Slovenia, Spain, Sweden,
Switzerland, Turkey, Macedonia
The wireless LAN feature of this TV shall exclusively be
used inside buildings.
LCD Television
Declaration of Conformity (DoC)
“Hereby, Panasonic Corporation declares that this TV is
in compliance with the essential requirements and other
relevant provisions of the Directive 1999/5/EC.”
English
5
Page 6
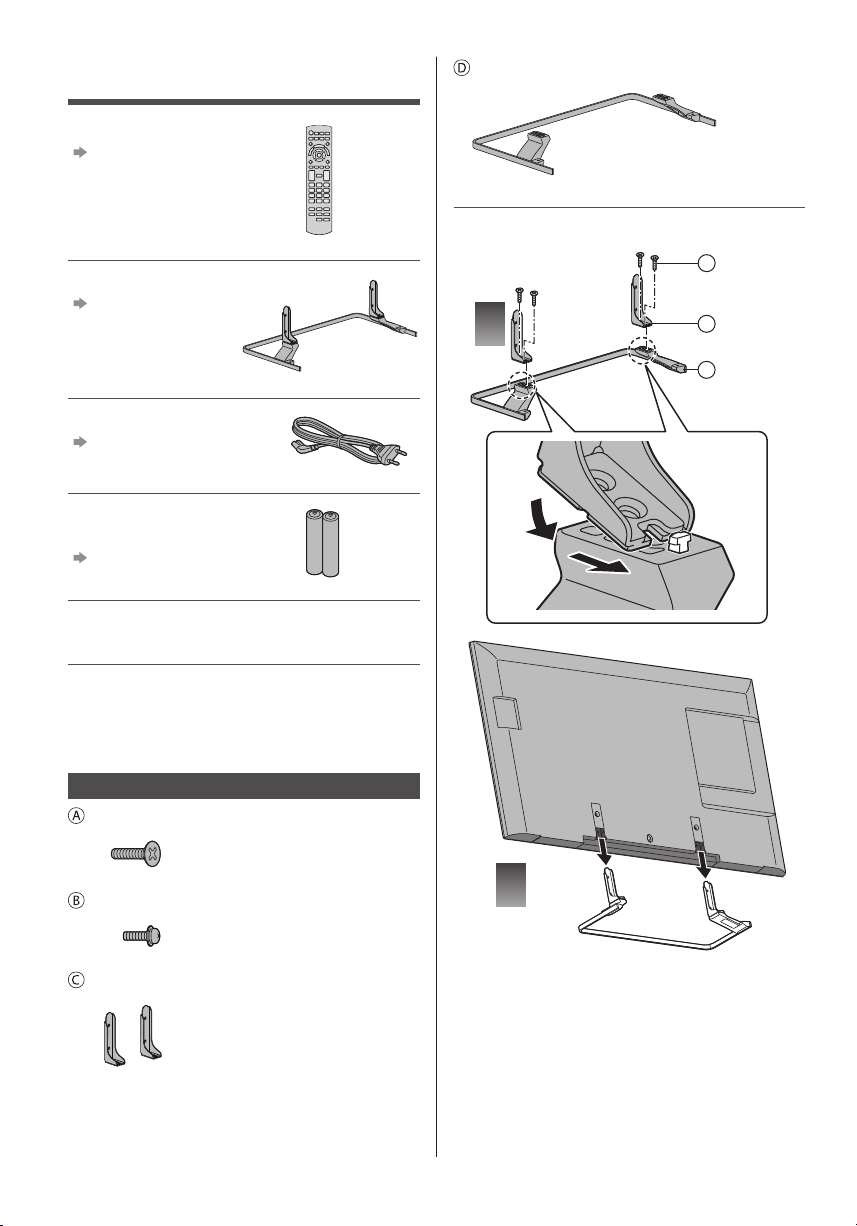
Accessories
Remote Control
(p. 11)
●
N2QAYB001010
Pedestal
(p. 6)
Mains lead
(p. 8)
Batteries (2)
●
R6
(p. 12)
Operating Instructions
Pan European Guarantee Card
Base
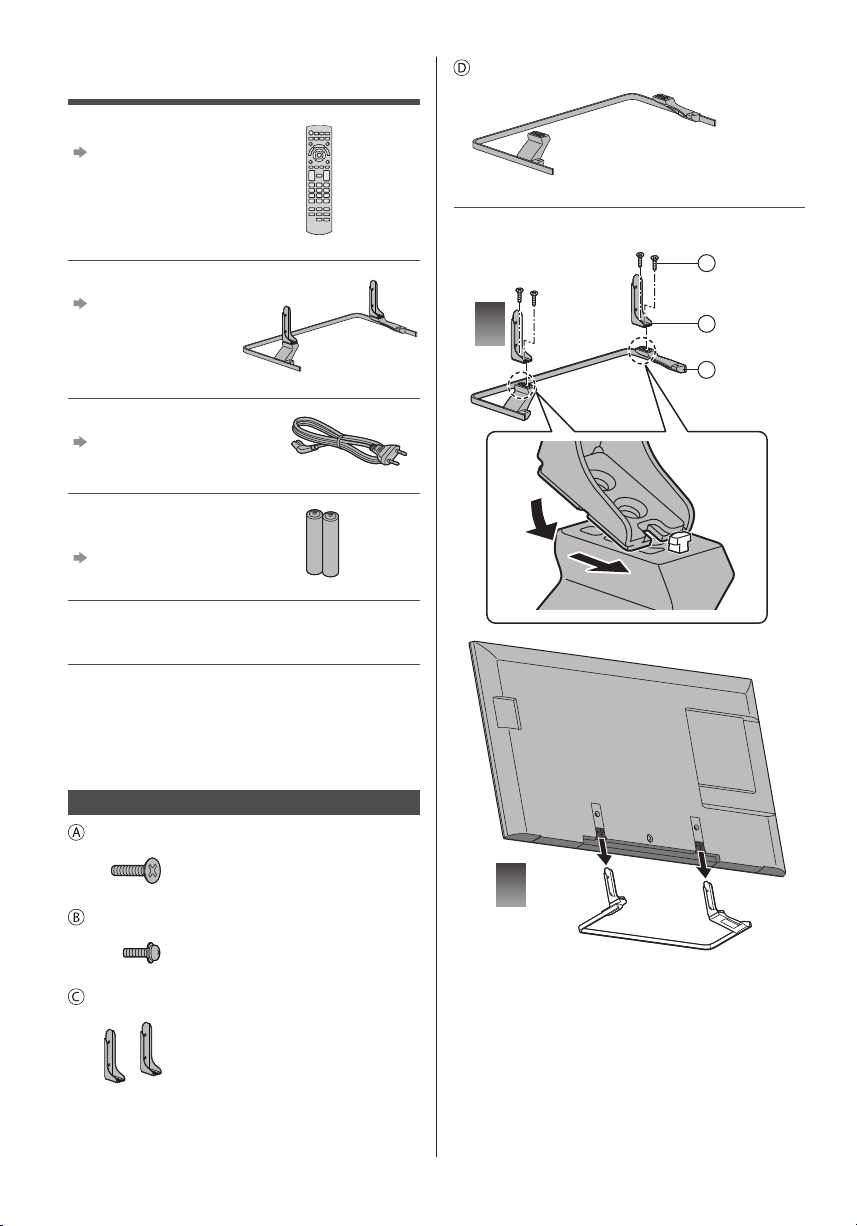
■ Assembling the pedestal
A
1
C
D
●
Accessories may not be placed all together. Take care
not to throw them away unintentionally.
●
For information about the optional accessories, refer
to [eHELP] (Support > Optional accessories).
Assembling / Removing the pedestal
Assembly screw (4)
M5 × 15
Assembly screw (4)
M4 × 12
Bracket (2)
English
6
2
Page 7
3
B
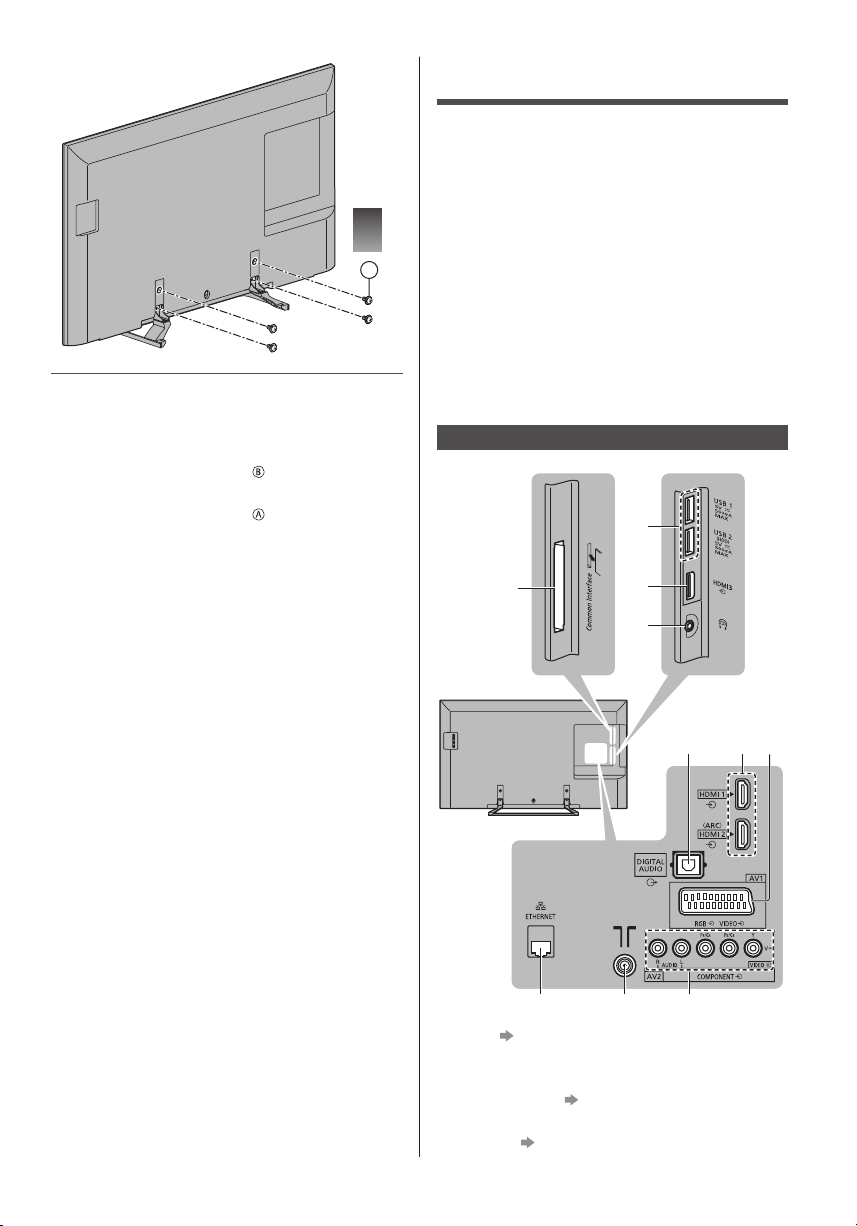
Removing the pedestal from the TV
Be sure to remove the pedestal in the following way
when using the wall-hanging bracket or repacking the
TV.
1 Remove the assembly screws
2 Pull out the pedestal from the TV.
3 Remove the assembly screws
from the TV.
from the bracket.
Connections
●
External equipment and cables shown are not
supplied with this TV.
●
Please ensure that the unit is disconnected from the
mains socket before attaching or disconnecting any
cables.
●
Check the terminal type and cable plugs are correct
for connection.
●
Use a fully wired HDMI compliant cable.
●
Use a fully wired SCART cable.
●
Keep the TV away from electronic equipment (video
equipment, etc.) or equipment with an infrared sensor,
otherwise distortion of image / sound may occur or
operation of other equipment may be affected.
●
Please also read the manual of the equipment being
connected.
Terminals
2
1
8
1 CI slot (p. 10)
2 USB 1 - 2 port
3 HDMI3
4 Headphone jack
5 DIGITAL AUDIO
6 HDMI1 - 2
(p. 9)
(p. 10)
3
4
5 6
7
109
English
7
Page 8
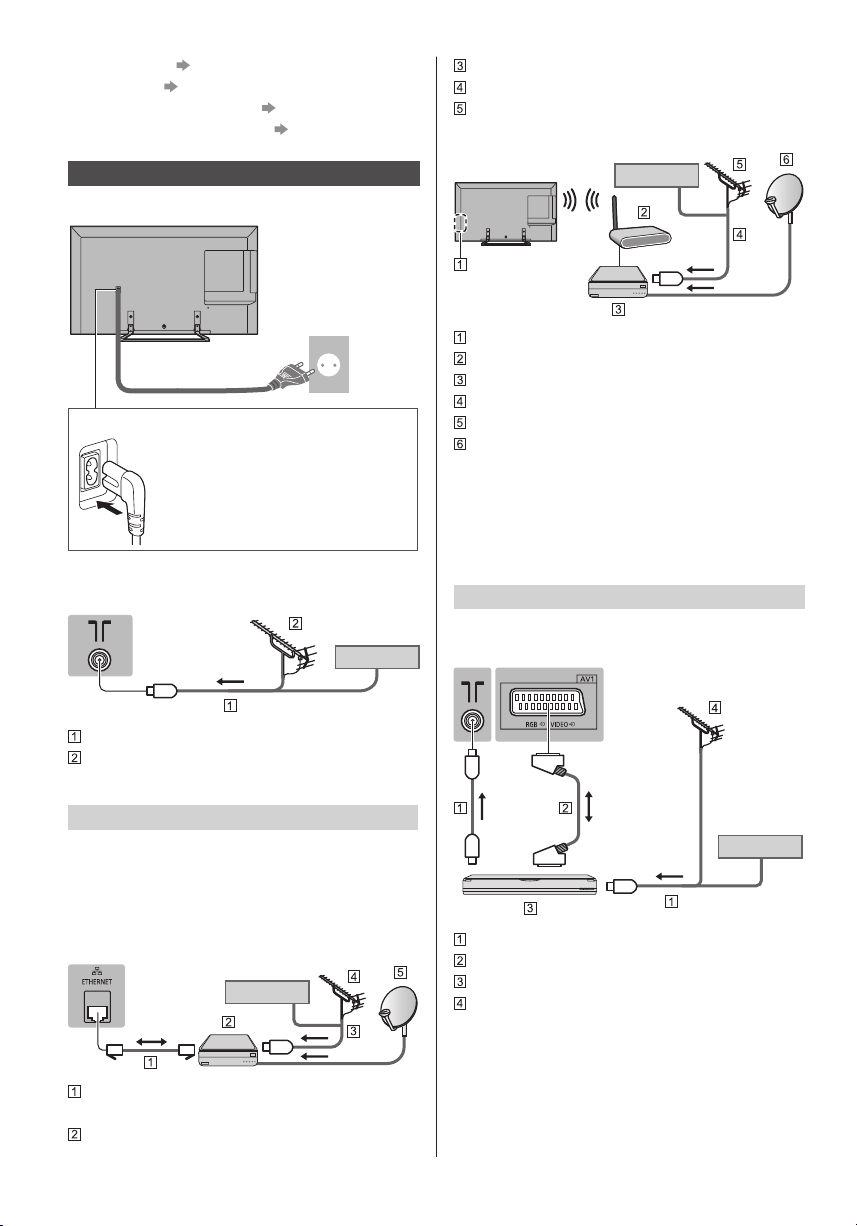
7 AV1 (SCART) (p. 8, 9)
8 ETHERNET
9 Terrestrial / cable terminal
10
AV2 (COMPONENT / VIDEO) (p. 9)
(p. 9)
(p. 8)
RF cable
Terrestrial aerial
Satellite dish
■ Wireless connection
Basic connections
■ Mains lead
AC 220-240 V
50 / 60 Hz
Mains lead
Insert the mains plug firmly into place.
●
When disconnecting the mains lead,
be absolutely sure to disconnect the
mains plug from the mains socket
first.
■ Aerial
TV
RF cable
Terrestrial aerial
●
For DVB-C, DVB-T, Analogue
Cable
Cable
Built-in wireless LAN
Access point
DVB-via-IP server
RF cable
Terrestrial aerial
Satellite dish
●
Depending on the network condition and broadcast,
this function may not be available.
●
For information about the connections, read the
manual of the DVB-via-IP server.
●
For details, refer to [eHELP] (Functions > DVB-viaIP).
AV devices
■ DVD Recorder / VCR
TV
DVB-via-IP client connection
This TV has DVB-via-IP client function and can connect
to DVB-via-IP server to watch broadcast streaming.
●
It is recommended to connect to DVB-via-IP server
with a LAN cable.
■ Wired connection
TV
Cable
LAN cable (Shielded)
●
Use Shielded Twist Pair (STP) LAN cable.
DVB-via-IP server
English
8
Cable
RF cable
SCART cable
DVD Recorder / VCR
Terrestrial aerial
Page 9
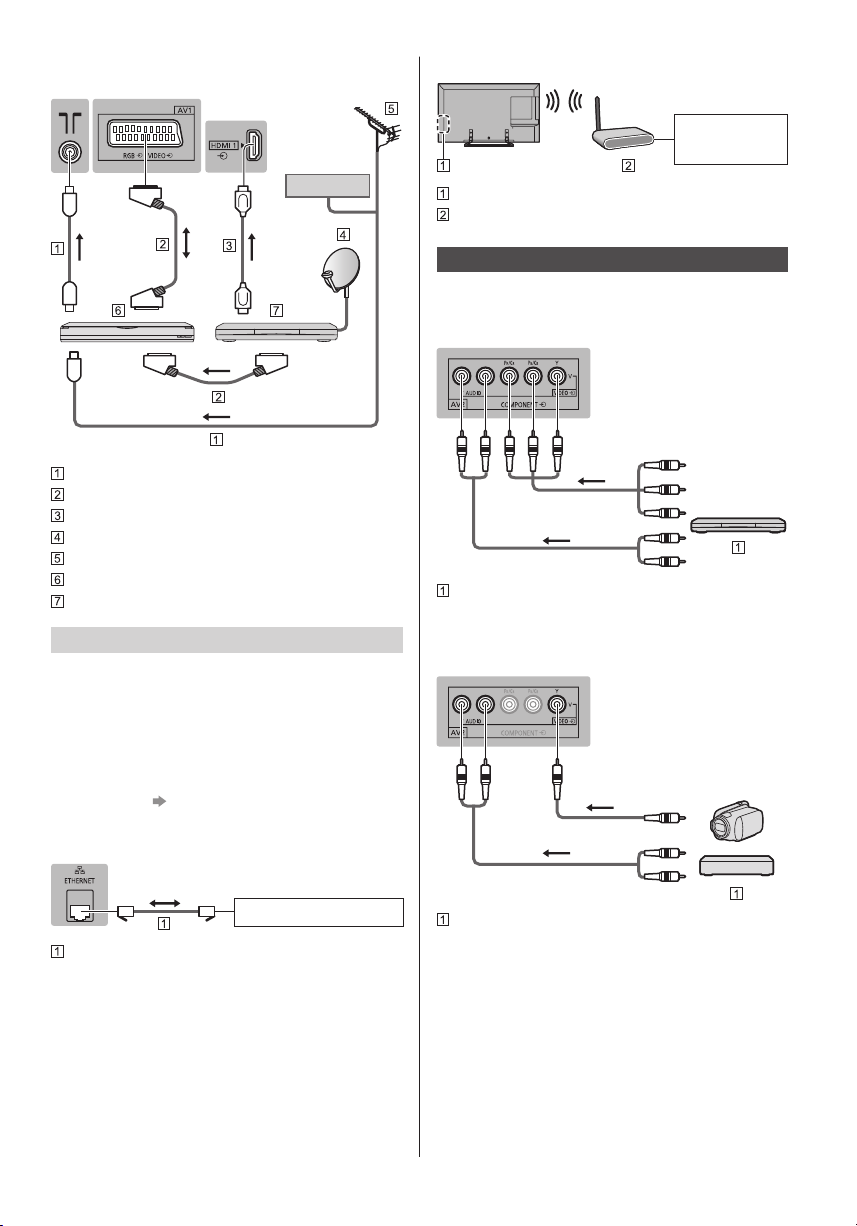
■ DVD Recorder (VCR) / Set top box
TV
■ Wireless connection
Internet
environment
Cable
RF cable
SCART cable
HDMI cable
Satellite dish
Terrestrial aerial
DVD Recorder / VCR
Set top box
Network
A broadband network environment is required to be able
to use internet services.
●
If you do not have any broadband network services,
please consult your retailer for assistance.
●
Prepare the internet environment for wired connection
or wireless connection.
●
Setup of the network connection will start when first
using the TV.
(p. 13)
■ Wired connection
TV
Built-in wireless LAN
Access point
Other connections
■ DVD Player
(COMPONENT equipment)
TV
(Viewing)
(Listening)
DVD Player
■ Camcorder / Game equipment
(VIDEO equipment)
TV
(Viewing)
(Listening)
Internet environment
LAN cable (Shielded)
●
Use Shielded Twist Pair (STP) LAN cable.
Camcorder / Game equipment
■ Amplifier (to listen with speakers)
●
Use HDMI2 for connecting an amplifier. This
connection is applicable when using an amplifier that
has ARC (Audio Return Channel) function.
As for an amplifier without ARC function, use DIGITAL
AUDIO.
●
To enjoy multi-channel sound from external
equipment (e.g. Dolby Digital 5.1ch), connect the
equipment to the amplifier. For information about the
connections, read the manuals of the equipment and
amplifier.
English
9
Page 10
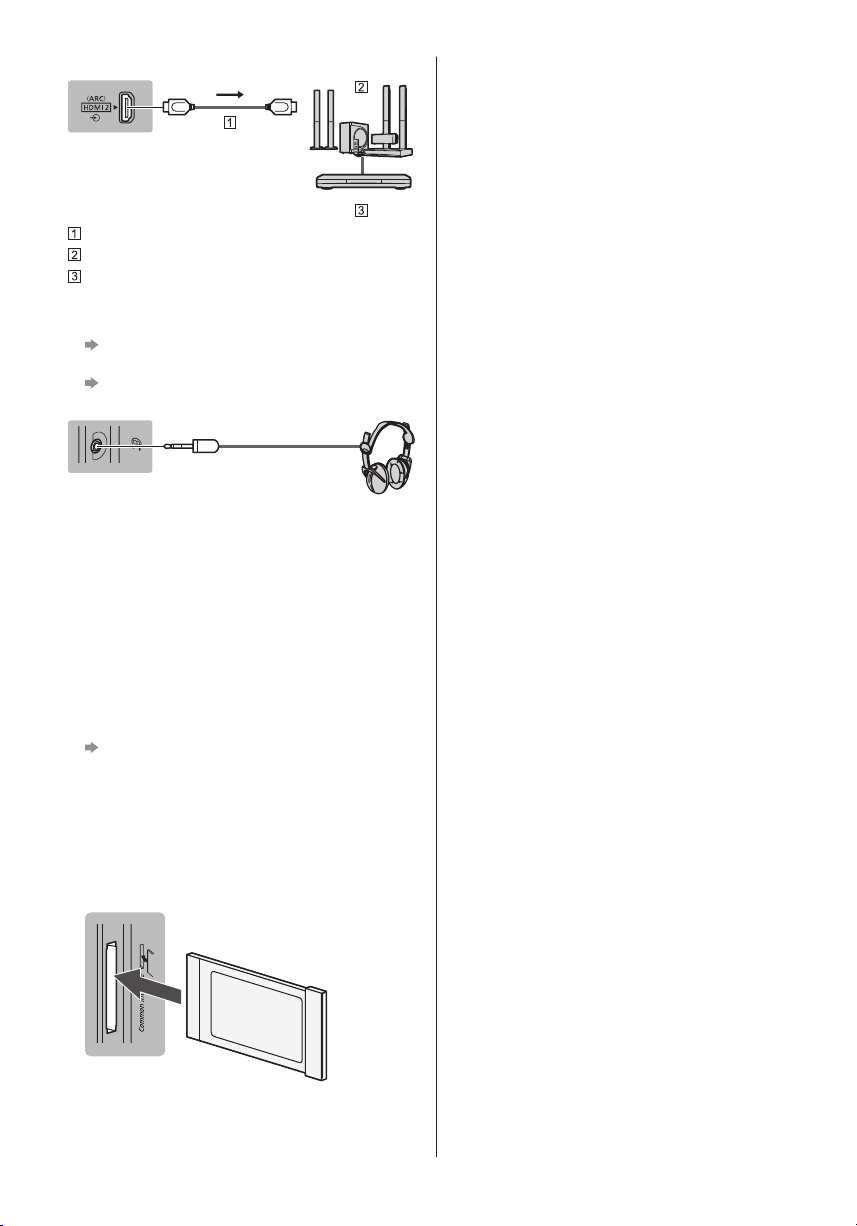
TV
HDMI cable
Amplifier with speaker system
External equipment (DVD Player, etc.)
■ Headphones
●
To adjust volume
[Headphone Volume] in the Sound Menu
●
To select the sound output to adjust volume
[Speaker Setting] in the Sound Menu
TV
(M3 stereo mini plug)
■ Common Interface
●
Turn the TV off with Mains Power On / Off switch
whenever inserting or removing the CI module.
●
If a smart card and a CI module come as a set, first
insert the CI module, then insert the smart card into
the CI module.
●
Insert or remove the CI module completely in the
correct direction as shown.
●
Normally encrypted channels will appear. (Viewable
channels and their features depend on the CI
module.)
If encrypted channels do not appear
[Common Interface] in the Setup Menu
●
There might be some CI modules in the market
with older firmware versions that do not work fully
interoperable with this new CI+ v1.3 TV. In this case,
please contact your content provider.
●
For details, refer to [eHELP] (Functions > Common
Interface), read the manual of the CI module, or
check with the content provider.
TV
■ VIERA Link
●
Use HDMI1 - 3 for VIERA Link connection.
●
For details, refer to [eHELP] (Functions > VIERA Link
“HDAVI Control™”).
10
CI module
English
Page 11
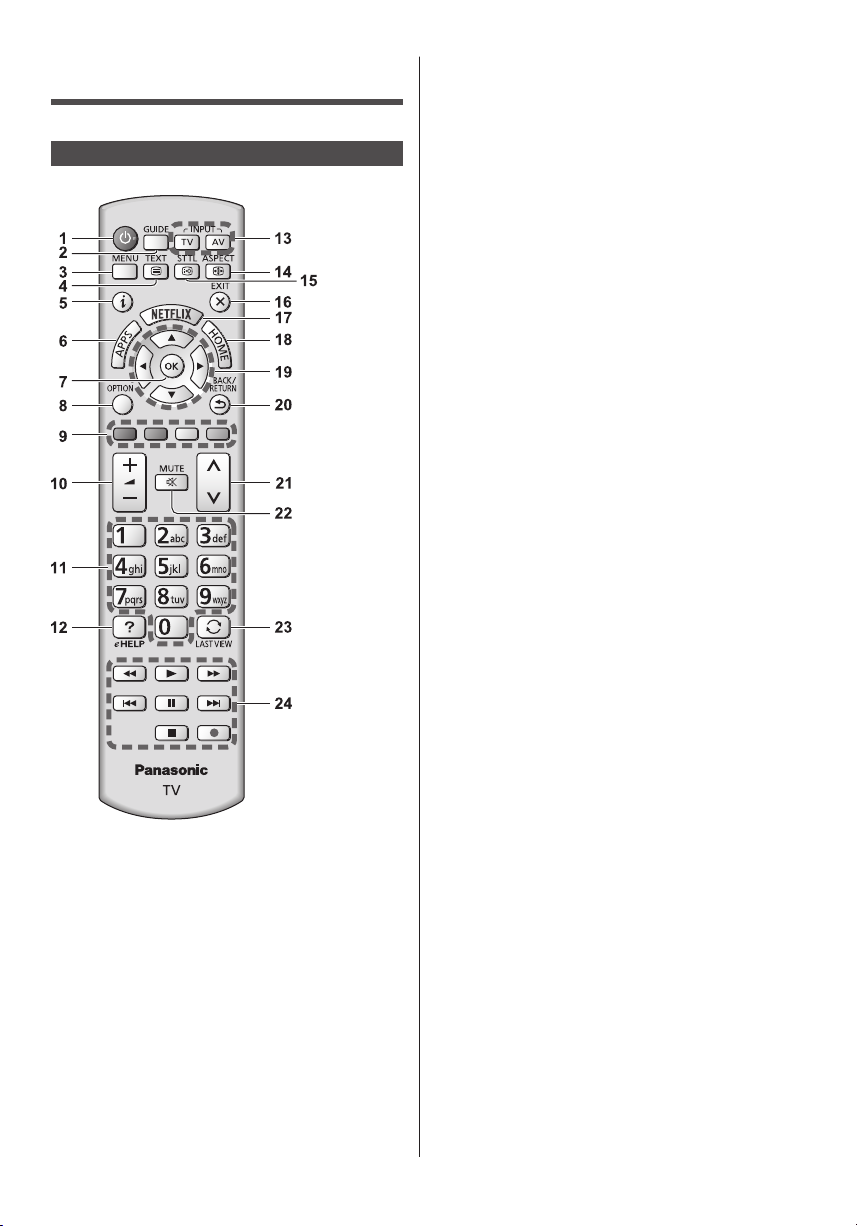
Identifying Controls
Remote Control
1 Standby On / Off switch
2 TV Guide
●
Displays Electronic Programme Guide.
3 [Main Menu]
●
Press to access Picture, Sound, Network, Timer,
Setup and Help Menus, etc.
4 Teletext button
5 Information
●
Displays channel and programme information.
6 APPS
●
Displays [APPS List] (applications list).
7 OK
●
Confirms selections and choices.
●
Press after selecting channel positions to quickly
change channel.
●
Displays channel list.
8 [Option Menu]
●
Easy optional setting for viewing, sound, etc.
9 Coloured buttons
(red-green-yellow-blue)
●
Used for the selection, navigation and operation of
various functions.
10
Volume Up / Down
11
Numeric buttons
●
Changes channel and teletext pages.
●
Sets characters.
●
When in Standby mode, switches TV on.
12
[eHELP]
●
Displays [eHELP] (Built-in Operating Instructions).
13
Input mode selection
●
TV - switches to DVB-C / DVB-T / DVB-via-IP /
Analogue.
●
AV - switches to AV input mode from Input
Selection list.
14
Aspect
●
Changes aspect ratio.
15
Subtitles
●
Displays subtitles.
16
Exit
●
Returns to [Home Screen].
17
Netflix
●
Accesses NETFLIX service directly.
●
You need a broadband network environment to use
this service.
●
This service is subject to stop or change without
notice.
18
HOME
●
Displays [Home Screen].
19
Cursor buttons
●
Makes selections and adjustments.
20
Return
●
Returns to the previous menu / page.
21
Channel Up / Down
22
Sound Mute On / Off
23
Last view
●
Switches to previously viewed channel or input
mode.
24
Operations for contents, connected equipment,
etc.
English
11
Page 12
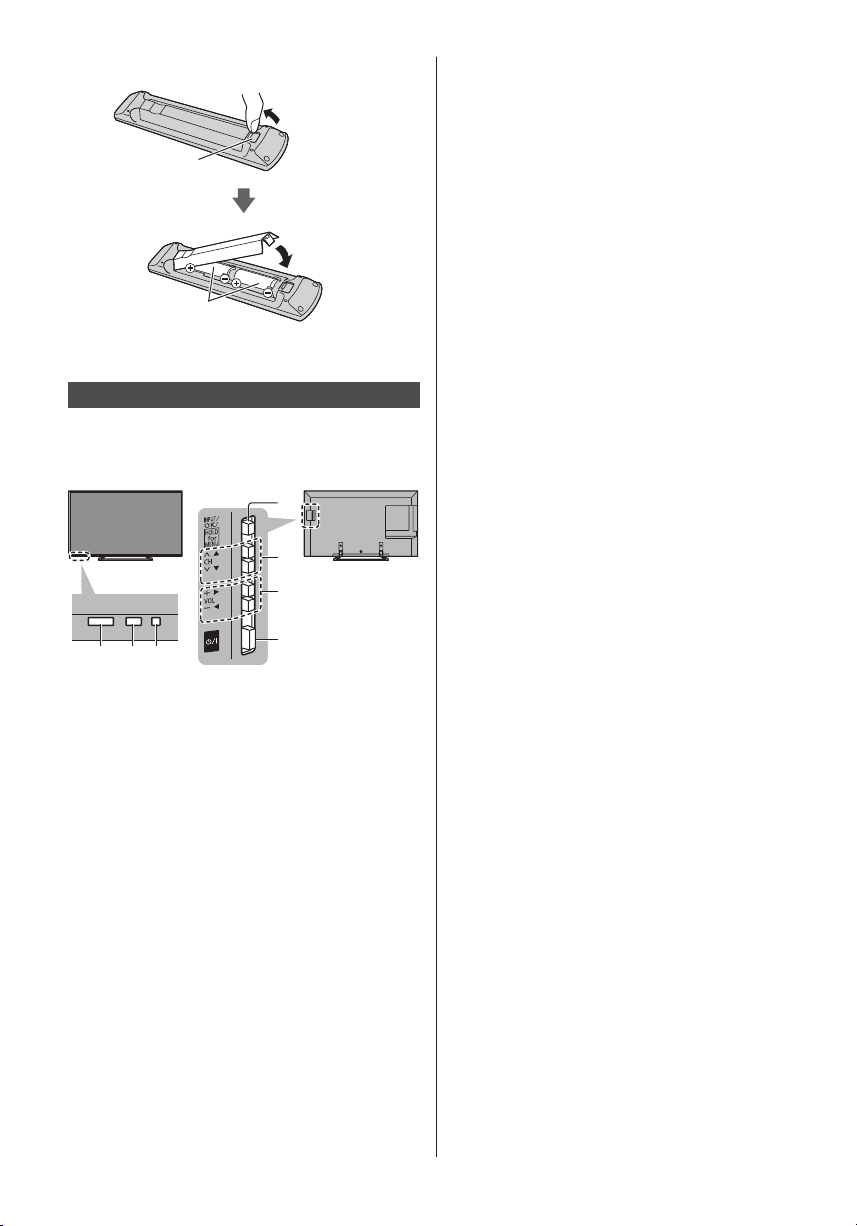
■ Installing / Removing batteries
1 2 3
Pull open
Hook
Close
Note the correct
polarity (+ or -)
Indicator / Control panel
●
When pressing 4, 5, 6 buttons, the control panel
guide appears on the right side of the screen for
3 seconds to highlight which button has been
pressed.
4
5
6
7
6 Volume Up / Down
●
Cursor Left / Right (when in the menu system)
7 Mains power On / Off switch
●
Use to switch the mains power.
1 Remote control signal receiver
●
Do not place any objects between the TV remote
control signal receiver and remote control.
2 Ambient sensor
●
Senses brightness to adjust picture quality when
[Ambient Sensor] in the Picture Menu is set to
[On].
3 Power LED
Red: Standby
Green: On
Orange: Standby with some functions (network
function, etc.) active
●
The LED blinks when the TV receives a command
from the remote control.
4 Input mode selection
●
Press repeatedly until you reach the desired mode.
[Main Menu]
●
Press and hold for about 3 seconds to display main
menu.
OK (when in the menu system)
5 Channel Up / Down
●
Cursor Up / Down (when in the menu system)
English
12
Rear side of the TV
Page 13

First time Auto Setup
When the TV is turned on for the first time, it will
automatically search for available TV channels and give
options to set up the TV.
●
These steps are not necessary if the setup has been
completed by your local dealer.
●
Please complete connections (p. 7 - 10) and settings
(if necessary) of the connected equipment before
starting Auto Setup. For information about the settings
for the connected equipment, read the manual of the
equipment.
1 Plug the TV into mains socket and
turn power on
●
Takes a few seconds to be displayed.
2 Select the following items
Set up each item by following the on-screen instructions.
Example:
Please select your viewing environment.
Home Shop
cannot be stored).
Tick the TV signal mode to tune, and then select
[Start Auto Setup]
: tune (search for the available channels)
: skip tuning
●
Auto Setup screen varies depending on the country
and the signal mode you select.
●
[DVB-C Network Settings]
Normally set [Frequency] and [Network ID] to [Auto].
If [Auto] is not displayed or if necessary, enter
[Frequency] and [Network ID] specified by your cable
provider with numeric buttons.
3 Select the type of [Home Screen]
The demonstration to explain how to use [my Home
Screen] is displayed. Confirm the demonstration by
following the on-screen instructions, and then select the
desired [Home Screen].
Example: [Home Screen Selection]
Example: [TV Home Screen]
■ How to use remote control
Move the cursor
Access the item / store the setting
Return to the previous item (if available)
Select the language
Select [Home]
Select [Home] viewing environment to use in your home
environment.
●
[Shop] is for shop display.
●
To change viewing environment later on, you will
need to initialise all settings by accessing Shipping
Condition.
Set up the network connection
Select your country
●
Depending on the country you select, select your
Region or store the Child Lock-PIN number (“0000”
Auto Setup is now complete and your
TV is ready for viewing.
If tuning has failed check the RF cable, and the network
connection, and then follow the on-screen instructions.
Note
●
The TV goes into Standby mode when no operation
is performed for 4 hours if [Auto Standby] in the Timer
Menu is set to [On].
●
The TV goes into Standby mode when no signal is
received and no operation is performed for
10 minutes if [No signal Power off] in the Timer Menu
is set to [On].
●
To retune all channels
[Auto Setup] in [Tuning Menu] (Setup Menu)
●
To add the available TV signal mode later
[Add TV Signal] in [Tuning Menu] (Setup Menu)
●
To initialise all settings
[Shipping Condition] in [System Menu] (Setup
Menu)
English
13
Page 14
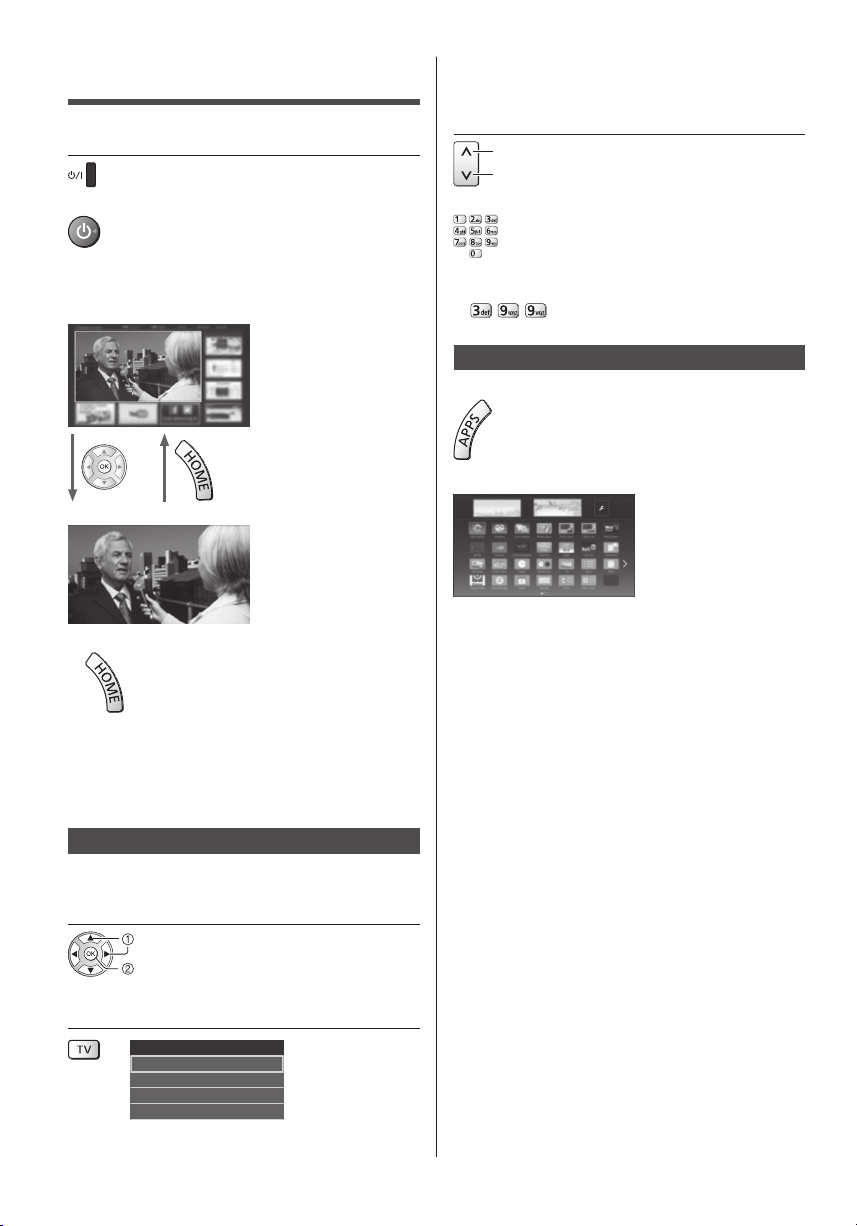
Operations
Turn power on
(TV)
or
(Remote Control)
●
Mains power On / Off switch should be on. (p. 12)
The last viewed [Home Screen] is displayed.
Example: [TV Home Screen]
Example: Selected content screen
●
To return to [Home Screen] at any time
●
Selectable modes vary depending on the channels
stored.
3 Select a channel
up
down
or
●
To select a channel position with 2 or more-digit, e.g.
399
To access each feature
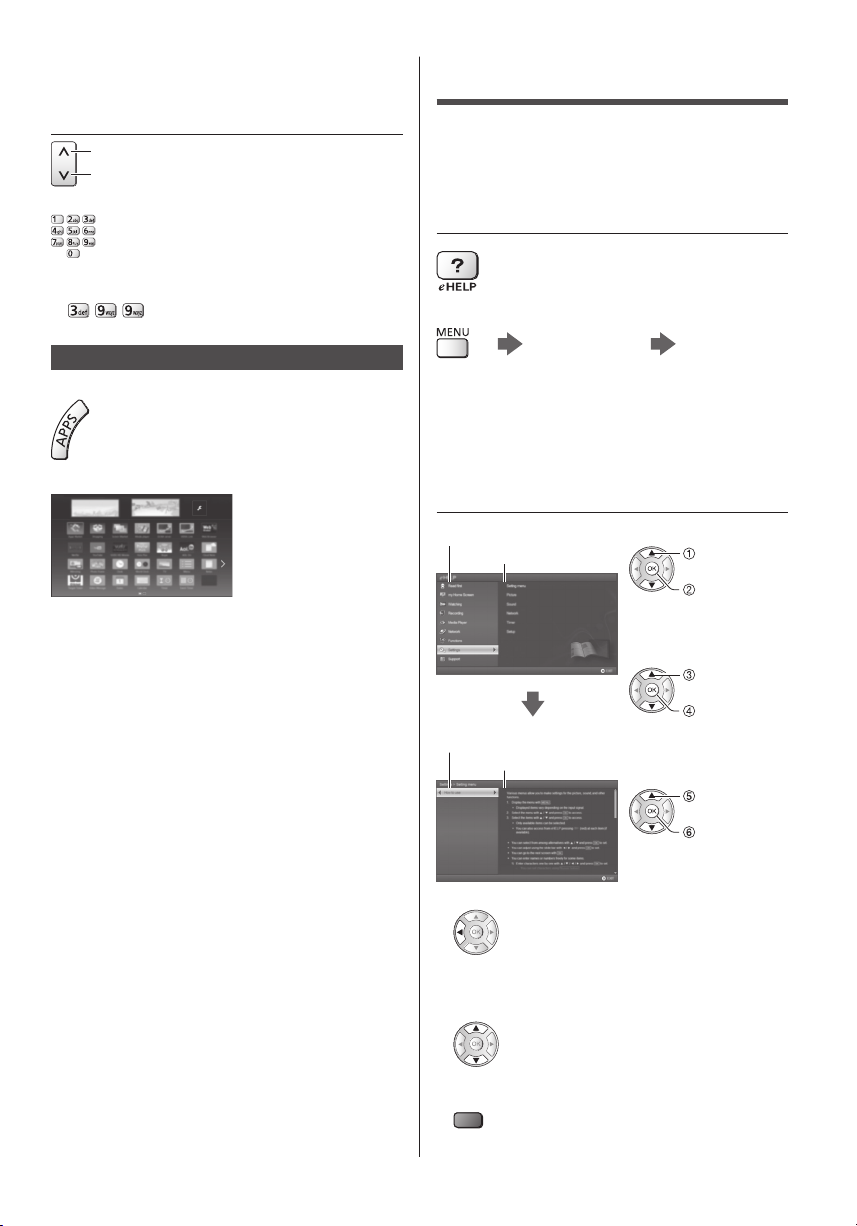
Access [APPS List] and select a feature
Example: [APPS List]
●
APPS is the applications (features) of the TV.
●
For operations of each feature and the setup of
[APPS List], follow the on-screen instructions or refer
to [eHELP] (my Home Screen > APPS List).
●
The [Home Screen] can be set up to display desired
information, to access specific features easily, to
select the default [Home Screen], etc. For details,
follow the on-screen instructions or refer to [eHELP]
(my Home Screen > my Home Screen).
Watching TV
1 Select the TV viewer from [Home
Screen]
select
access
2 Select the mode
TV Selection
DVB-C
DVB-T
DVB-via-IP
Analogue
English
14
Page 15
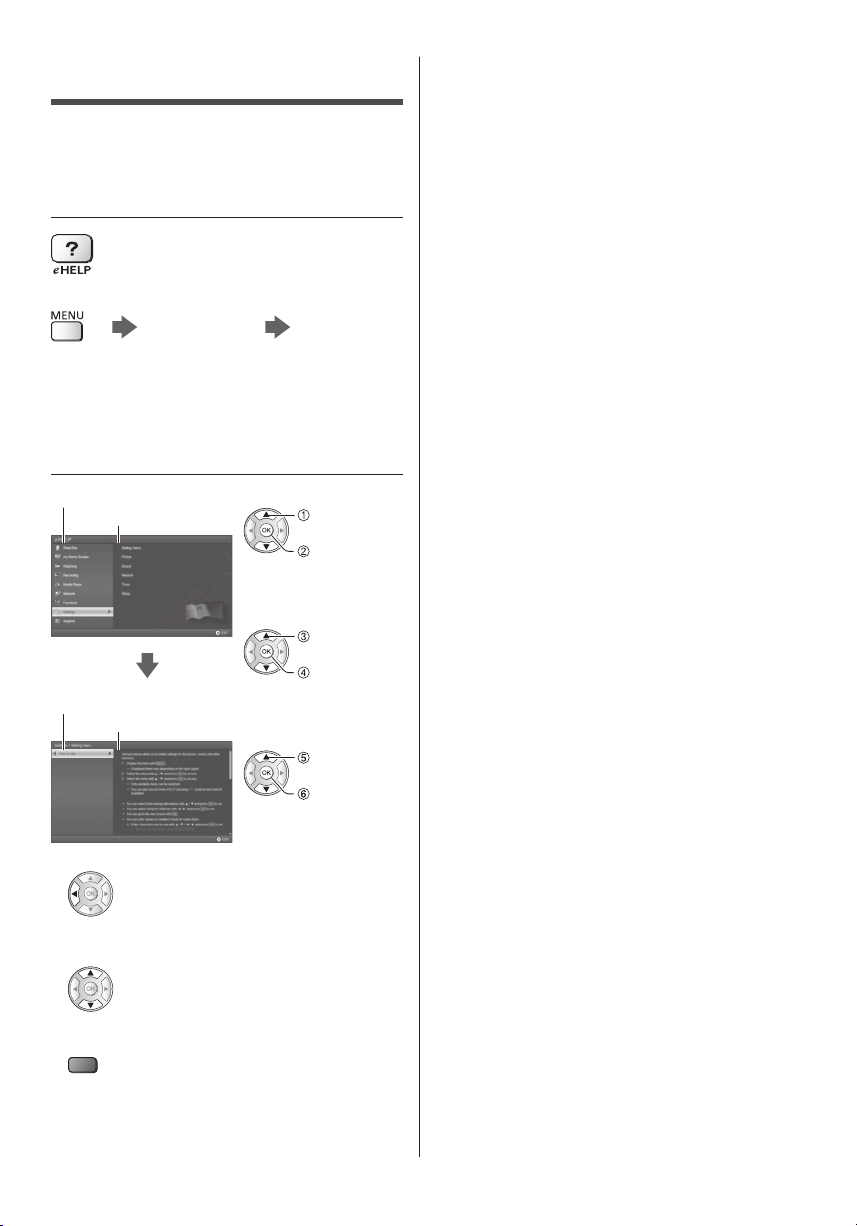
How to Use eHELP
[eHELP] is the detailed operating instructions built into
the TV, and gives a more detailed explanation for a
better understanding of the operation of each feature.
1 Display [eHELP]
or
[Help] [eHELP]
●
If the [eHELP] has been accessed previously since
the TV was turned on, the confirmation screen is
displayed to select whether to go to the [First page] or
to the [Last viewed page].
2 Select the category and item
Category field
Item field
Sub item field
Description
●
To return to the previous field
●
To scroll the description (if more than 1 page)
While the description is highlighted
●
To display the menu related to the description (only
for some descriptions)
(red)
●
To check the features of this TV
Read first > Features
select
category
access
select item
access
select sub
item
access
English
15
Page 16
FAQs
Before requesting service or assistance, please follow
these simple guides to solve the problem.
●
For details, refer to [eHELP] (Support > FAQs).
The TV does not switch on
●
Check the mains lead is plugged into the TV and the
mains socket.
The TV goes into Standby mode
●
Auto power standby function is activated.
The remote control does not work or is intermittent
●
Are the batteries installed correctly?
●
Has the TV been switched on?
●
The batteries may be running low. Replace them with
new ones.
●
Point the remote control directly at the TV’s remote
control signal receiver (within about 7 m and a
30 degree angle of the signal receiver).
●
Situate the TV away from sunshine or other sources
of bright light so they do not shine on the TV’s remote
control signal receiver.
No image is displayed
●
Check the TV is turned on.
●
Check the mains lead is plugged into the TV and the
mains socket.
●
Check the correct input mode is selected.
●
Check the setting of [AV2 ] ([COMPONENT] /
[VIDEO]) in [Input Selection] to match the signal being
output by the external equipment.
●
Is [Backlight], [Contrast], [Brightness] or [Colour] in
the Picture Menu set to the minimum?
●
Check all required cables and connections are firmly
in place.
(p. 12)
When pushed with a finger, the display panel moves
slightly and makes a noise
●
There is a little gap around the panel to prevent
damage to the panel. This is not a malfunction.
An unusual image is displayed
●
This TV has a built-in Self Test. Makes a diagnosis of
picture or sound problems.
[TV Self Test] (Help Menu)
●
Turn the TV off with Mains power On / Off switch,
then turn it on again.
●
If the problem persists, initialise all settings.
[Shipping Condition] in [System Menu] (Setup
Menu)
Parts of the TV become hot
●
Parts of the TV may become hot. These temperature
rises do not pose any problems in terms of
performance or quality.
English
16
Page 17
Maintenance
Specifications
First, remove the mains plug from the
mains socket.
Display panel, Cabinet, Pedestal
Regular care:
Gently wipe the surface of the display panel, cabinet,
or pedestal by using a soft cloth to remove dirt or
fingerprints.
For stubborn dirt:
(1) First clean the dust from the surface.
(2) Dampen a soft cloth with clean water or diluted
neutral detergent (1 part detergent to 100 parts
water).
(3) Wring out the cloth firmly. (Please note, do not let
liquid enter the TV inside as it may lead to product
failure.)
(4) Carefully wipe moisten and wipe away the stubborn
dirt.
(5) Finally, wipe away all the moisture.
Caution
●
Do not use a hard cloth or rub the surface too hard,
otherwise this may cause scratches on the surface.
●
Take care not to subject the surfaces to insect
repellent, solvent, thinner or other volatile substances.
This may degrade surface quality or cause peeling of
the paint.
●
The surface of the display panel is specially treated
and may be easily damaged. Take care not to tap or
scratch the surface with your fingernail or other hard
objects.
●
Do not allow the cabinet and pedestal to make
contact with a rubber or PVC substance for a long
time. This may degrade surface quality.
Mains plug
Wipe the mains plug with a dry cloth at regular intervals.
Moisture and dust may cause fire or electrical shock.
■ TV
Model No.
TX-55CS620E
Dimensions (W × H × D)
1 242 mm × 761 mm × 292 mm (With Pedestal)
1 242 mm × 719 mm × 56 mm (TV only)
Mass
19.0 kg Net (With Pedestal)
18.0 kg Net (TV only)
Power source
AC 220-240 V, 50 / 60 Hz
Panel
LED LCD panel
Sound
Speaker output
20 W (10 W + 10 W)
Headphones
M3 (3.5 mm) stereo mini Jack × 1
Connection terminals
AV1 input / output
SCART (Audio/Video in, Audio/Video out, RGB in)
AV2 input (COMPONENT / VIDEO)
VIDEO
RCA PIN Type × 1
1.0 V[p-p] (75 Ω)
AUDIO L - R
RCA PIN Type × 2
0.5 V[rms]
Y
1.0 V[p-p] (including synchronisation)
B/CB, PR/CR
P
±0.35 V[p-p]
HDMI 1 / 2 / 3 input
TYPE A Connectors
HDMI1 / 3: Content Type
HDMI2: Content Type, Audio Return Channel
●
This TV supports “HDAVI Control 5” function.
Card slot
Common Interface slot (complies with CI Plus) × 1
English
17
Page 18
ETHERNET
RJ45, IEEE802.3 10BASE-T / 100BASE-TX
USB 1 / 2
DC 5 V, Max. 500 mA [Hi-Speed USB (USB 2.0)]
DIGITAL AUDIO output
PCM / Dolby Digital, Fibre optic
Receiving systems / Band name
Check the latest information on the available services at
the following website. (English only)
http://panasonic.net/viera/support
DVB-C
Digital cable services (MPEG2 and MPEG4AVC(H.264))
DVB-T / T2
Digital terrestrial services (MPEG2 and MPEG4AVC(H.264))
PAL B, G, H, I
SECAM B, G
SECAM L, L’
VHF E2 - E12
VHF A - H (ITALY)
CATV (S01 - S05)
CATV S11 - S20 (U1 - U10)
VHF H1 - H2 (ITALY)
UHF E21 - E69
CATV S1 - S10 (M1 - M10)
CATV S21 - S41 (Hyperband)
PAL D, K
SECAM D, K
VHF R1 - R2
VHF R3 - R5
VHF R6 - R12
UHF E21 - E69
Operating conditions
Temperature
0 °C - 35 °C
Humidity
20 % - 80 % RH (non-condensing)
Built-in wireless LAN
Standard compliance and Frequency range
IEEE802.11a/n
5.180 GHz - 5.320 GHz, 5.500 GHz - 5.580 GHz,
5.660 GHz - 5.700 GHz
IEEE802.11b/g/n
2.412 GHz - 2.472 GHz
Security
WPA2-PSK (TKIP/AES)
WPA-PSK (TKIP/AES)
WEP (64 bit/128 bit)
*:
The frequency and channel differ depending on the
country.
Note
●
Design and Specifications are subject to change
without notice. Mass and Dimensions shown are
approximate.
●
For information about the power consumption, display
resolution, etc., refer to Product fiche.
●
For information about the open source software, refer
to [eHELP] (Support > Licence).
●
This equipment complies with the EMC standards
listed below.
EN55032, EN55020, EN55024, EN61000-3-2,
EN61000-3-3
*
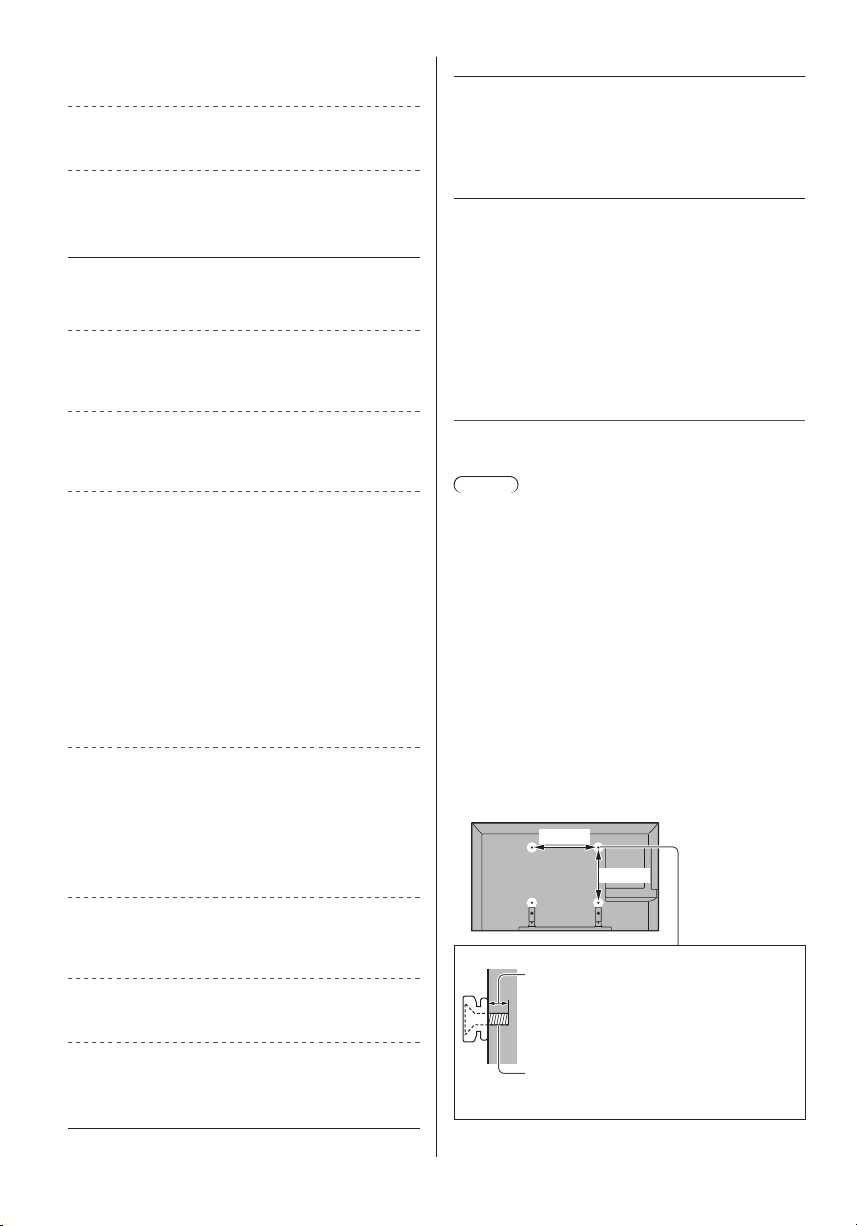
■ When using the wall-hanging bracket
Please contact your local Panasonic dealer to purchase
the recommended wall-hanging bracket.
●
Holes for wall-hanging bracket installation
Rear of the TV
400 mm
400 mm
PAL 525/60
Playback of NTSC tape from some PAL Video
recorders (VCR)
M.NTSC
Playback from M.NTSC Video recorders (VCR)
NTSC (AV input only)
Playback from NTSC Video recorders (VCR)
Aerial input
VHF / UHF
English
18
(View from the side)
Depth of screw
minimum: 10 mm
maximum: 16 mm
Diameter: M6
Screw for fixing the TV onto the
wall-hanging bracket (not supplied with
the TV)
Page 19

Page 20
Disposal of Old Equipment and Batteries
Web Site: http://panasonic.net
© Panasonic Corporation 2015
Only for European Union and countries with recycling systems
These symbols on the products, packaging, and/or accompanying documents mean that
used electrical and electronic products and batteries must not be mixed with general
household waste.
For proper treatment, recovery and recycling of old products and batteries, please take
them to applicable collection points in accordance with your national legislation.
By disposing of them correctly, you will help to save valuable resources and prevent any
potential negative effects on human health and the environment.
For more information about collection and recycling, please contact your local
municipality.
Penalties may be applicable for incorrect disposal of this waste, in accordance with
national legislation.
Note for the battery symbol (bottom symbol):
This symbol might be used in combination with a chemical symbol. In this case it
complies with the requirement set by the Directive for the chemical involved.
Customer’s Record
The model number and serial number of this product may be found on its rear panel. You should note this serial
number in the space provided below and retain this book, plus your purchase receipt, as a permanent record of
your purchase to aid in identification in the event of theft or loss, and for Warranty Service purposes.
Model Number Serial Number
English
TQB0E2503U-2
Printed in the Czech Republic
Page 21
Nederlands
Gebruiksaanwijzing
LCD-televisie
Modelnr.
TX-55CS620E
Raadpleeg de [eHELP] (ingebouwde
bedieningsinstructies) voor gedetailleerde
instructies.
●
Gebruik van de [eHELP]
Hartelijk dank voor de aankoop van dit Panasonic-product.
Lees deze instructies aandachtig voordat u het product gebruikt en bewaar ze zodat
u ze later opnieuw kunt raadplegen.
Lees vóór gebruik aandachtig het gedeelte “Veiligheidsmaatregelen” in deze
handleiding.
De afbeeldingen in deze handleiding dienen slechts als voorbeeld.
Zie uw Europese Garantie als u contact wilt opnemen met uw plaatselijke Panasonic-
dealer voor assistentie.
M0115-1015 Nederlands
(p. 15)
Page 22
Inhoudsopgave
Belangrijke informatie
Belangrijke kennisgeving ��������������������������������������� 3
Veiligheidsmaatregelen ����������������������������������������� 3
Quick Start-handleiding
Accessoires �������������������������������������������������������� 6
Verbindingen ������������������������������������������������������� 7
Bedieningsonderdelen ������������������������������������������11
Automatisch instellen bij het eerste gebruik ��������������13
Uw VIERA-tv gebruiken
Bediening ����������������������������������������������������������14
Gebruik eHELP ���������������������������������������������������15
Overige informatie
Veelgestelde vragen ��������������������������������������������17
Onderhoud���������������������������������������������������������18
Specificaties �������������������������������������������������������18
Nederlands
2
●
Raadpleeg de [eHELP] voor informatie over de
handelsmerken (Ondersteuning > Licentie).
Page 23
Belangrijke
Veiligheidsmaatregelen
kennisgeving
Kennisgeving over DVB/datatransmissie/
IPTV-functies
●
Deze tv is ontworpen om te voldoen aan de normen
(vanaf augustus 2014) voor DVB-T/T2 (MPEG2 en
MPEG4-AVC(H.264)) digitale terrestrische services
en DVB-C (MPEG2 en MPEG4-AVC(H.264)) digitale
kabelservices.
Raadpleeg uw lokale dealer voor de beschikbaarheid
van DVB-T-/T2-services in uw gebied.
Raadpleeg uw kabelprovider voor de beschikbaarheid
van DVB-C-services met deze tv.
●
Deze tv werkt mogelijk niet correct met een signaal
dat niet voldoet aan de normen van DVB-T/T2 of
DVB-C.
●
Afhankelijk van het land, het gebied, de zender, de
serviceprovider en de netwerkomgeving zijn mogelijk
niet alle functies beschikbaar.
●
Niet alle CI-modules werken goed met deze tv.
Raadpleeg uw serviceprovider over de beschikbare
CI-module.
●
Deze tv werkt wellicht niet correct met een CI-module
die niet is goedgekeurd door de serviceprovider.
●
Afhankelijk van de serviceprovider kunnen extra
kosten worden aangerekend.
●
Compatibiliteit met toekomstige services is niet
gegarandeerd.
●
U kunt de meest recente informatie over de
beschikbare diensten op de volgende website
bekijken. (alleen Engels)
http://panasonic.net/viera/support
Panasonic garandeert de werking en prestaties van
randapparatuur van derden niet; wij wijzen elke vorm
van aansprakelijkheid of schade af die voortvloeit uit de
werking en/of prestaties bij gebruik van randapparatuur
van dergelijke derde partijen.
Dit product is in licentie gegeven onder de AVCpatentportfoliolicentie voor persoonlijk en nietcommercieel gebruik door een consument voor (i) het
coderen van video in overeenstemming met de AVCnorm (“AVC Video”) en/of (ii) het decoderen van AVCvideo die werd gecodeerd door een consument voor
persoonlijke en niet-commerciële doeleinden en/of werd
verkregen via een videoleverancier die een licentie heeft
om AVC-video te leveren. Er is geen licentie verleend,
ook niet impliciet, voor enig ander gebruik.
Ga voor meer informatie naar MPEG LA, LLC.
Zie http://www.mpegla.com.
Volg onderstaande waarschuwingen en
voorzorgsmaatregelen om het risico op een elektrische
schok, brand, schade of letsel te helpen vermijden.
■ Stekker en netsnoer
Waarschuwing
Verwijder de stekker onmiddellijk
uit het stopcontact als u iets opvalt
dat niet normaal is.
●
Deze TV is ontworpen om te werken op 220-240 V
wisselstroom, 50/60 Hz.
●
Steek de stekker van het netsnoer volledig in het
stopcontact.
●
Zorg voor een makkelijke toegang naar de stekker
van de voedingskabel.
●
Haal de stekker uit het stopcontact als u de tv reinigt.
●
Raak de stekker nooit met natte handen
aan.
●
Zorg ervoor dat het netsnoer niet beschadigd raakt.
Plaats geen zwaar
•
voorwerp op het snoer.
Leg het snoer niet in
•
de buurt van een warm
voorwerp.
Trek nooit aan het snoer.
•
Houd de stekker vast
wanneer u het snoer uit het
stopcontact wilt trekken.
Verplaats de tv niet wanneer de stekker nog in het
•
stopcontact zit.
Draai het netsnoer niet ineen, buig het niet
•
overmatig en rek het niet uit.
Gebruik geen beschadigde stekkers of
•
stopcontacten.
Voorkom dat het netsnoer bekneld raakt door de tv.
•
●
Gebruik geen ander netsnoer dan het netsnoer dat u
bij deze tv hebt ontvangen.
■ Voorzichtig zijn
Waarschuwing
●
Verwijder niet de afdekplaten van de
tv en breng geen wijzigingen aan de tv
aan, anders kunt u in contact komen met
onderdelen die onder spanning staan. Er
zijn geen door de gebruiker repareerbare
onderdelen aan de binnenkant.
Vervoer de TV alleen rechtop.
Nederlands
3
Page 24
●
Stel de tv niet bloot aan regen
of hoge vochtigheid. De tv
mag niet blootgesteld worden
aan druppelend of spattend
water. Plaats geen voorwerpen
gevuld met vloeistof, zoals
vazen, op de tv of erboven.
●
Laat geen vreemde voorwerpen in de tv komen door
de ventilatiegaten.
●
Gebruik geen standaard of montage-uitrusting die
niet is goedgekeurd. Vraag uw Panasonic-dealer om
de instellingen of installatie uit te voeren van een
goedgekeurde muurbevestigingssteun.
●
Oefen geen krachtige druk uit op het beeldscherm en
houd het vrij van schokken.
●
Zorg dat kinderen niet op de tv klimmen.
●
Plaats de tv niet op een
schuin aflopende of onstabiele
ondergrond, en zorg ervoor
dat de tv niet over de rand van
de basis hangt.
●
Deze tv is ontworpen voor gebruik op een tafelblad.
●
Stel de tv niet bloot aan
direct zonlicht of andere
warmtebronnen.
Laat om brand te
voorkomen nooit
kaarsen of een
andere bron van open
vuur in de nabijheid
van de televisie.
■ Gevaar voor verstikking/inslikken
Waarschuwing
●
De verpakking van dit product kan verstikking
veroorzaken, en sommige onderdelen zijn klein en
gevaarlijk als ze door kinderen worden ingeslikt.
Houd deze onderdelen buiten het bereik van jonge
kinderen.
■ Standaard
Waarschuwing
●
De vloerstandaard niet demonteren of er wijzigingen
in aanbrengen.
Let op
●
Gebruik alleen de standaard die u bij deze tv hebt
ontvangen.
●
De vloerstandaard niet gebruiken als deze verbogen,
gebarsten of anderszins beschadigd is. Neem in
dat geval zo spoedig mogelijk contact op met uw
Panasonic dealer.
●
Let er tijdens de montage op dat alle schroeven goed
zijn vastgedraaid.
●
Let op dat de tv geen schokken krijgt tijdens de
installatie van de standaard.
●
Zorg dat kinderen niet op de standaard klimmen.
●
Gebruik minstens twee personen om de tv op de
standaard te installeren en ervan te verwijderen.
●
Installeer en verwijder de tv op de voorgeschreven
wijze.
■ Radiogolven
Waarschuwing
●
Gebruik de tv niet in medische instituten of op locaties
met medische apparatuur. De radiogolven kunnen
interfereren met medische apparatuur en kunnen
storing en ongevallen veroorzaken.
●
Gebruik de tv niet in de buurt van automatische
controleapparatuur, zoals automatische deuren of
brandalarmen. De radiogolven kunnen interfereren
met automatische controleapparatuur en kunnen
storing en ongevallen veroorzaken.
●
Bewaar tenminste 22 cm afstand van de tv als u
een hartpacemaker hebt. De radiogolven kunnen de
werking van de pacemaker verstoren.
●
De tv mag op geen enkele wijze worden
gedemonteerd of gewijzigd.
■ Ingebouwd draadloos LAN
Let op
●
Gebruik de ingebouwde draadloze LAN-functie
niet om toegang de verkrijgen tot een draadloos
netwerk (SSID*) waarvoor u geen toegangsrecht
hebt. Dergelijke netwerken kunnen wel bij de
zoekresultaten staan. Maar het gebruik van zulke
netwerken kan illegaal zijn.
*
De SSID is de naam van een draadloos netwerk
voor gegevensoverdracht.
●
Stel de ingebouwde draadloze LAN-adapter niet bloot
aan hoge temperaturen, direct zonlicht of vocht.
●
Gegevens die via radiogolven worden verzonden en
ontvangen, kunnen worden onderschept en gevolgd.
●
Het ingebouwde draadloze LAN gebruikt de
frequentiebanden 2,4 GHz en 5 GHz. Houd de tv
uit de buurt van andere apparaten die 2,4 GHz en
5 GHz-signalen gebruiken zoals andere draadloze
LAN-apparaten, magnetrons en mobiele telefoons om
storing of vertraging door interferentie te vermijden
wanneer de ingebouwde draadloze LAN-adapter
wordt gebruikt.
●
Wanneer een probleem optreedt door statische
elektriciteit e.d. kan de tv automatisch stoppen door
de zelfbeveiligingsfunctie. Zet de tv in dat geval met
de hoofdschakelaar uit en weer aan.
●
Aanvullende informatie over het draadloze LAN en
het toegangspunt kunt u vinden op de volgende
website.
(alleen Engels)
http://panasonic.net/viera/support
4
Nederlands
Page 25
■ Ventilatie
Let op
Laat voldoende ruimte vrij rond de tv zodat overtollige
warmte kan worden afgevoerd; de levensduur van
sommige elektronische componenten wordt verkort als
ze te heet worden.
Minimale afstand:
10
10
●
Zorg dat de ventilatie niet
wordt belemmerd door
ventilatieopeningen die zijn
afgedekt door voorwerpen
zoals kranten, tafelkleden en
gordijnen.
●
Zorg ervoor dat de ventilatieopeningen onderaan de
tv altijd vrij zijn en dat er voldoende ruimte is voor
goede ventilatie, ongeacht of u wel of geen standaard
gebruikt.
10
10
(cm)
■ De tv verplaatsen
Let op
Verwijder alle kabels voordat u de tv verplaatst.
●
De tv moet door minstens twee personen verplaatst
worden.
■ Wanneer de tv langere tijd niet gebruikt
wordt
Let op
Ook als de tv uitgeschakeld is, verbruikt deze nog
stroom zolang de stekker in het stopcontact zit.
●
Trek de stekker uit het stopcontact wanneer de tv
lange tijd niet wordt gebruikt.
■ Hoog geluidsniveau
Let op
●
Stel uw gehoor niet bloot
aan overmatig hard geluid
via de hoofdtelefoon.
De beschadiging kan
onherstelbaar zijn.
●
Zet het volume lager of stop met luisteren door de
hoofdtelefoon als uw oren suizen.
■ Batterij voor de afstandsbediening
Let op
●
Batterijen kunnen lekken, roesten en exploderen als
ze verkeerd geïnstalleerd worden.
●
Vervang de batterij alleen door hetzelfde of een
vergelijkbaar type.
●
Gebruik geen oude en nieuwe batterijen door elkaar.
●
Gebruik geen verschillende batterijtypen door elkaar,
bijvoorbeeld alkaline- en mangaanbatterijen.
●
Gebruik geen oplaadbare batterijen (Ni-Cd enz.).
●
Houd batterijen niet in het vuur en haal ze niet uit
elkaar.
●
Stel batterijen niet bloot aan extreme warmte, zoals
zonlicht, vuur of dergelijke.
●
Gooi gebruikte batterijen weg volgens de
voorschriften voor afvalverwijdering.
●
Verwijder de batterij uit het apparaat als u het
gedurende langere tijd niet gaat gebruiken om lekken,
corrosie en explosie van de batterij te voorkomen.
LCD-televisie
Conformiteitsverklaring (DoC)
“Panasonic Corporation verklaart hierbij dat deze tv
voldoet aan de essentiële eisen en andere relevante
bepalingen van de Richtlijn 1999/5/EG.”
Bezoek de volgende website als u een kopie wenst van
de oorspronkelijk eenvormigheidsverklaring van deze tv:
http://www.doc.panasonic.de
Bevoegde vertegenwoordiger:
Panasonic Testing Centre
Panasonic Marketing Europe GmbH
Winsbergring 15, D-22525 Hamburg, Germany
Deze tv is bedoeld voor gebruik in de volgende landen.
Albanië, Andorra, België, Bulgarije, Cyprus,
Denemarken, Estland, Finland, Frankrijk, Duitsland,
Griekenland, Hongarije, Italië, IJsland, Kroatië, Letland,
Liechtenstein, Litouwen, Luxemburg, Macedonië,
Malta, Monaco, Montenegro, Nederland, Noorwegen,
Oostenrijk, Polen, Portugal, Roemenië, Slovenië,
Slowakije, Spanje, Tsjechische Republiek, Turkije,
Zweden, Zwitserland
De draadloze LAN-functie van deze tv mag uitsluitend in
gebouwen gebruikt worden.
Nederlands
5
Page 26
Accessoires
Afstandsbediening
(p. 11)
●
N2QAYB001010
Standaard
(p. 6)
Netsnoer
(p. 8)
Batterijen (2)
●
R6
(p. 12)
Gebruiksaanwijzing
Europese Garantie
Steunplaat
■ De standaard monteren
A
1
C
D
●
De accessoires mogen niet allemaal samen worden
geplaatst. Zorg dat u ze niet per ongeluk weggooit.
●
Raadpleeg de [eHELP] voor informatie over de
optionele accessoires (Ondersteuning > Optionele
accessoires).
De standaard monteren/verwijderen
Montageschroef (4)
M5 × 15
Montageschroef (4)
M4 × 12
Steun (2)
Nederlands
6
2
Page 27
3
B
De standaard van de tv verwijderen
Verwijder de standaard op de volgende manier wanneer
u de muurbevestigingssteun gebruikt of de tv opnieuw
inpakt.
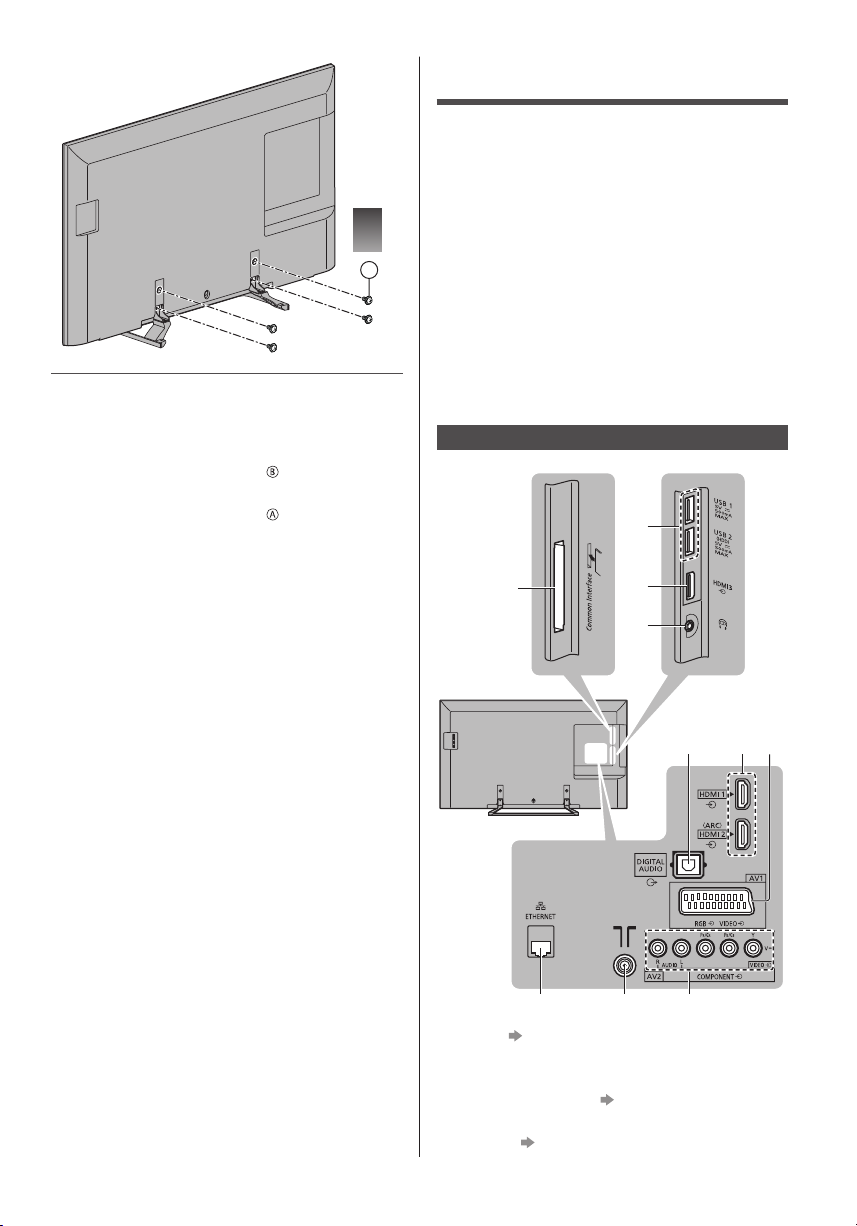
1 Verwijder de montageschroeven
2 Trek de standaard van de tv.
3 Verwijder de montageschroeven
van de tv.
van de steun.
Verbindingen
●
De afgebeelde externe apparatuur en kabels worden
niet bij de tv meegeleverd.
●
Zorg ervoor dat de stekker van de tv niet in het
stopcontact zit als u kabels aansluit of loskoppelt.
●
Controleer of u de juiste aansluitingen en
connectoren gebruikt voor de verbinding.
●
Gebruik een HDMI-kabel met volledige bedrading.
●
Gebruik een SCART-kabel met volledige bedrading.
●
Houd de tv uit de buurt van elektronische apparaten
(videoapparatuur enz.) of apparatuur met een
infrarood sensor om vervormingen van het beeld /
geluid te voorkomen en de bediening van de andere
apparatuur zou ook kunnen worden beïnvloed.
●
Lees ook de handleiding van het apparaat dat moet
worden aangesloten.
Aansluitingen
2
1
8
1 CI-sleuf (p. 10)
2 USB 1 - 2-poort
3 HDMI3
4 Ingang hoofdtelefoon
5 DIGITAL AUDIO
6 HDMI1 - 2
(p. 9)
3
4
(p. 10)
5 6
109
7
Nederlands
7
Page 28
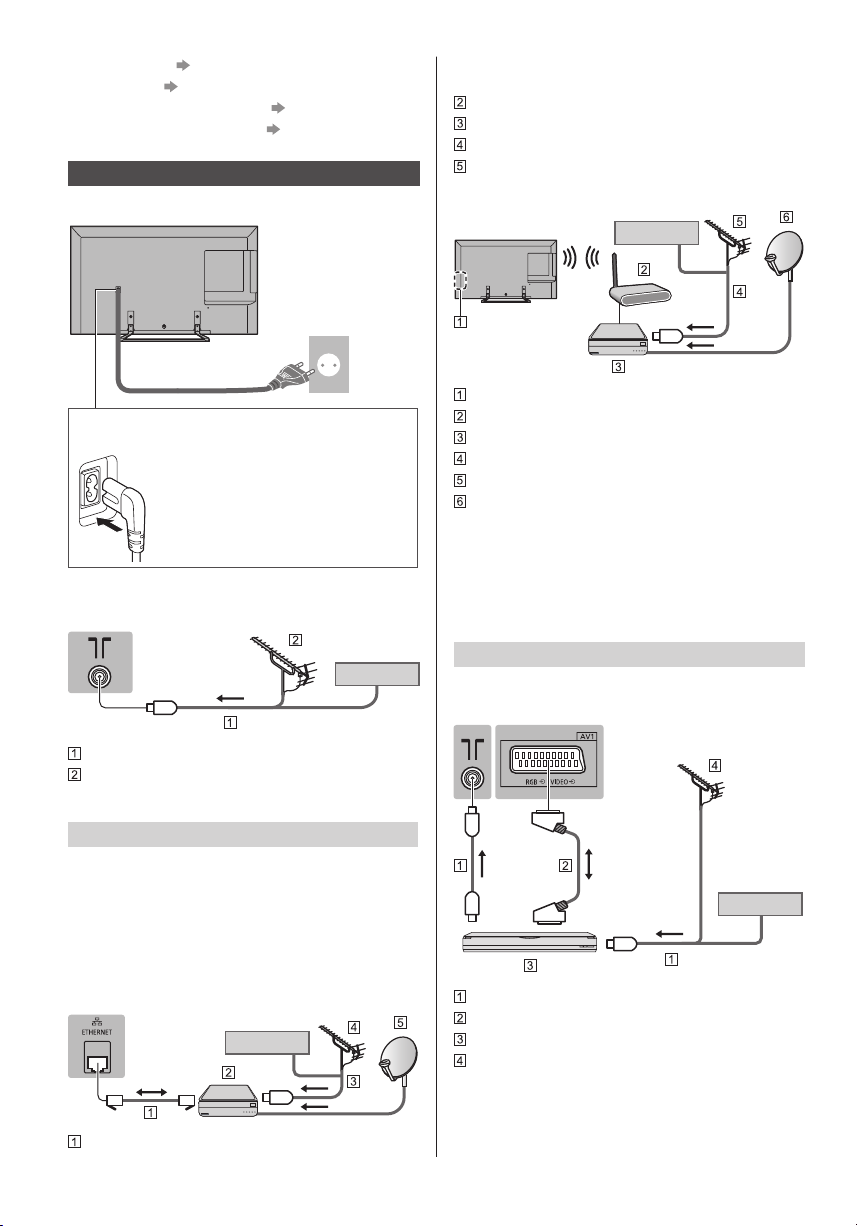
7 AV1 (SCART) (p. 8, 9)
8 ETHERNET
9 Aardse ingang/kabelingang
10
AV2 (COMPONENT/VIDEO) (p. 9)
(p. 9)
Basisaansluitingen
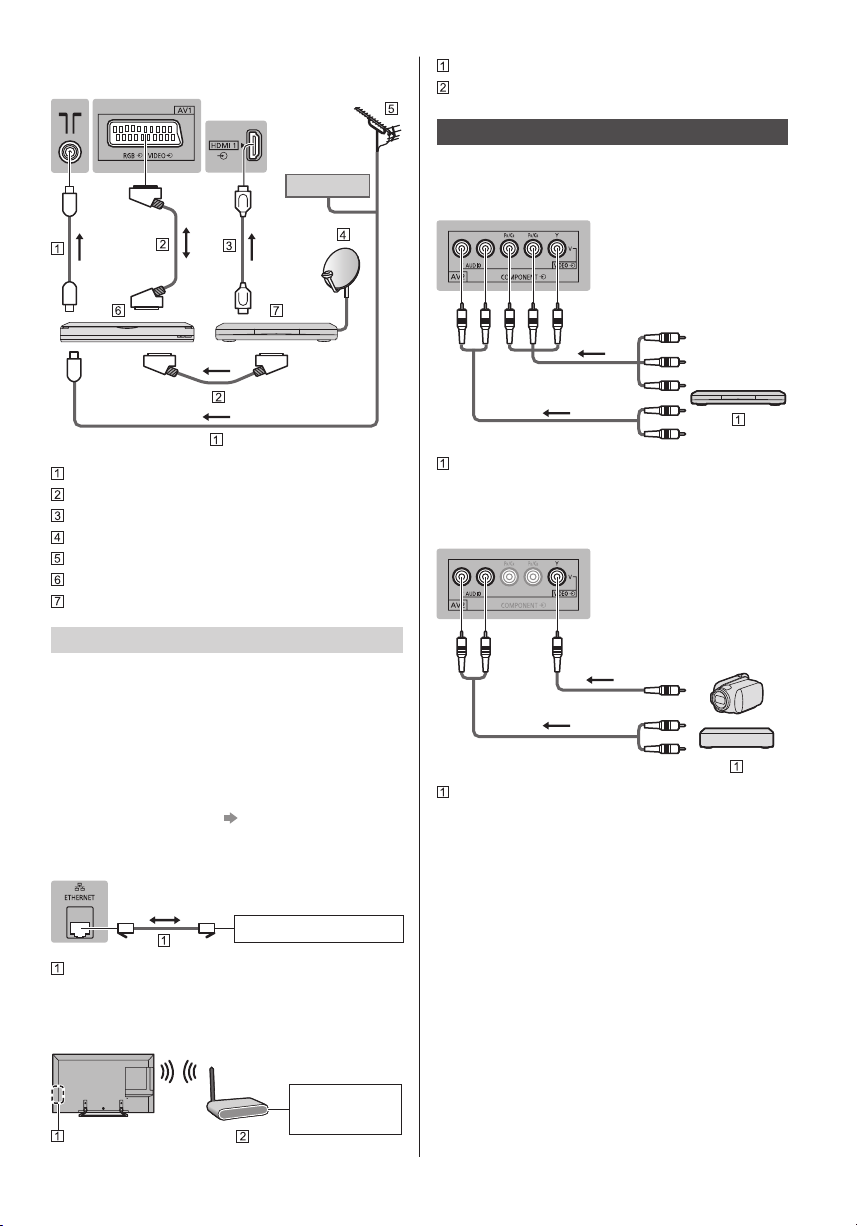
■ Netsnoer
(p. 8)
220-240 V
wisselstroom
50/60 Hz
●
Gebruik een afgeschermde dubbeldraadse (getwist
paar, STP) LAN-kabel.
DVB-via-IP-server
RF-kabel
Aardse antenne
Satellietschotel
■ Draadloze verbinding
Kabel
Netsnoer
Steek de stekker van het netsnoer stevig op zijn
plaats.
●
Haal altijd eerst de stekker uit het
stopcontact voordat u het netsnoer
loskoppelt.
■ Antenne
TV
Kabel
RF-kabel
Aardse antenne
●
Voor DVB-C, DVB-T, analoog
DVB-via-IP-clientverbinding
Deze tv is voorzien van een DVB-via-IP-clientfunctie en
kan verbonden worden met een DVB-via-IP-server om
gestreamde inhoud weer te geven.
●
Het wordt aanbevolen om een LAN-kabel te
gebruiken voor verbinding met een DVB-via-IPserver.
■ Bekabelde verbinding
TV
Kabel
Ingebouwde draadloze LAN-adapter
Toegangspunt
DVB-via-IP-server
RF-kabel
Aardse antenne
Satellietschotel
●
Afhankelijk van de netwerkomstandigheden en
uitzending is deze functie mogelijk niet beschikbaar.
●
Lees de handleiding van de DVB-via-IP-server voor
informatie over de verbindingen.
●
Raadpleeg de [eHELP] voor details (Functies > DVBvia-IP).
AV-apparaten
■ dvd-recorder / VCR
TV
Kabel
RF-kabel
SCART-kabel
dvd-recorder / VCR
Aardse antenne
LAN-kabel (afgeschermd)
Nederlands
8
Page 29
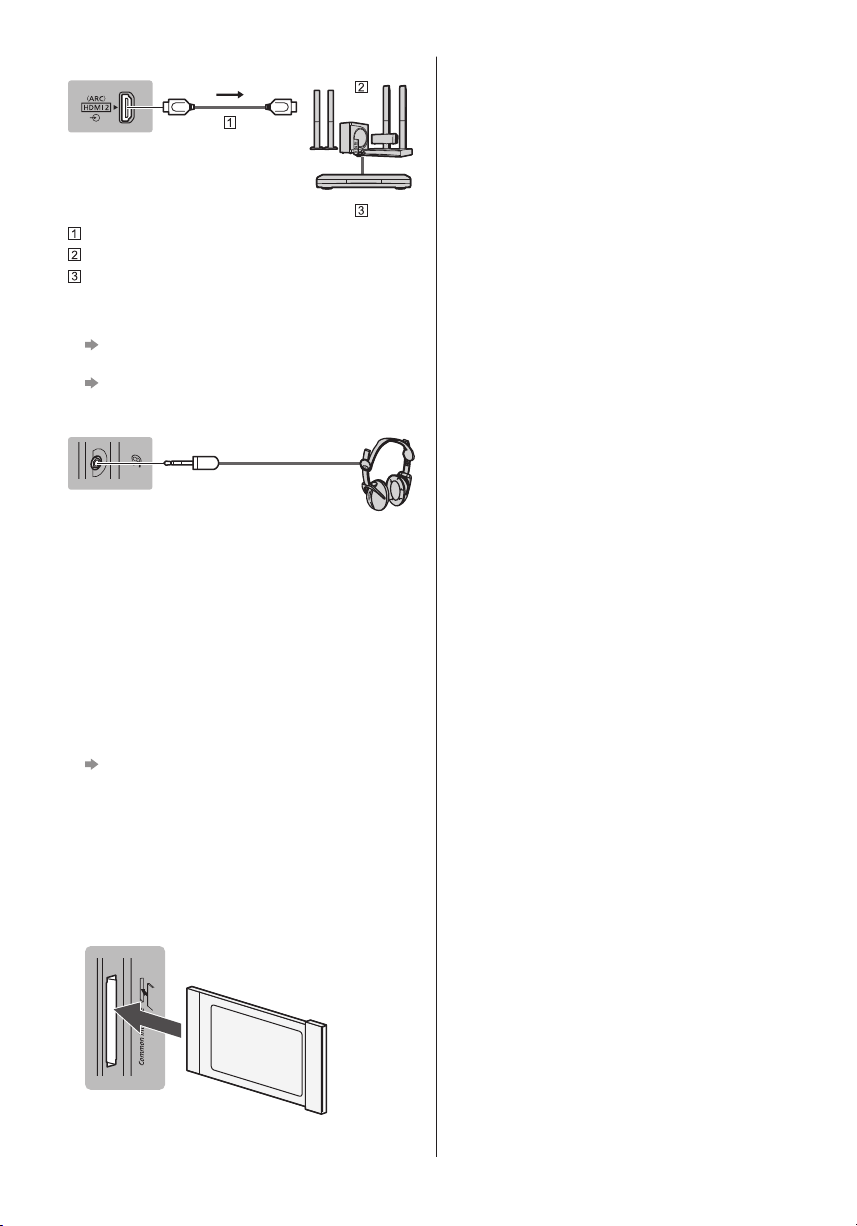
■ dvd-recorder (VCR) / Settopbox
TV
Kabel
RF-kabel
SCART-kabel
HDMI-kabel
Satellietschotel
Aardse antenne
dvd-recorder / VCR
Settopbox
Netwerk
Voor gebruik van internetdiensten is een
breedbandnetwerk vereist.
●
Raadpleeg uw leverancier voor hulp als u geen
breedbandnetwerkservices hebt.
●
Zorg dat de internetomgeving gereed is voor
het aansluiten van een bekabelde of draadloze
verbinding.
●
Het instellen van de netwerkverbinding start bij het
eerste gebruik van de tv.
(p. 13)
■ Bekabelde verbinding
TV
Internetomgeving
LAN-kabel (afgeschermd)
●
Gebruik een afgeschermde dubbeldraadse (getwist
paar, STP) LAN-kabel.
■ Draadloze verbinding
Ingebouwde draadloze LAN-adapter
Toegangspunt
Andere verbindingen
■ dvd-speler
(COMPONENT-apparatuur)
TV
(Kijken)
(Luisteren)
dvd-speler
■ Camcorder / Spelsysteem
(VIDEO-apparatuur)
TV
(Kijken)
(Luisteren)
Camcorder / Spelsysteem
■ Versterker (weergeven via luidsprekers)
●
Gebruik HDMI2 om een versterker aan te sluiten.
Deze aansluiting is van toepassing bij het gebruik van
een versterker met ARC (Audio Return Channel).
Gebruik voor een versterker zonder ARC-functie
DIGITAL AUDIO.
●
Als u wilt genieten van meerkanaals geluid van
een extern apparaat (bijvoorbeeld Dolby Digital
5.1-kanaals), sluit u het apparaat aan op de
versterker. Raadpleeg de handleiding van het
apparaat en de versterker voor informatie over de
aansluitingen.
Internetomgeving
Nederlands
9
Page 30
TV
HDMI-kabel
Versterker met luidsprekersysteem
Externe apparatuur (DVD-speler, enz.)
■ Hoofdtelefoon
●
Het volume
[Hoofdtel. Volume] afstellen in het menu Geluid
●
De geluidsuitgang selecteren om het volume
[Luidsprekerinstelling] af te stellen in het menu
Geluid
TV
(M3-stereoministekker)
■ Algemene interface (CI)
●
Zet de tv altijd met de hoofdschakelaar uit wanneer u
de CI-module plaatst of verwijdert.
●
Als u een gecombineerde smartcard en CI-module
hebt, plaatst u eerst de CI-module en vervolgens
steekt u de smartcard in de CI-module.
●
Plaats of verwijder de CI-module altijd volledig en in
de aangegeven richting.
●
Gewoonlijk worden gecodeerde kanalen
weergegeven. (Beschikbare kanalen en functies zijn
afhankelijk van de CI-module.)
Als de gecodeerde kanalen niet
[Gemeensch. interface] in het menu
Instellingen verschijnt
●
Sommige in de handel verkrijgbare CI-modules met
een oudere firmwareversie werken mogelijk niet
correct met deze nieuwe tv met CI+ v1.3. Neem in dat
geval contact op met uw inhoudsprovider.
●
Raadpleeg de [eHELP] (Functies > Gemeensch.
interface) voor details, lees de handleiding van de CImodule of controleer met de provider van de inhoud.
TV
■ VIERA Link
●
Gebruik HDMI1 - 3 voor VIERA Link-verbinding.
●
Raadpleeg de [eHELP] voor details (Functies >
VIERA Link “HDAVI Control™”).
10
CI-module
Nederlands
Page 31
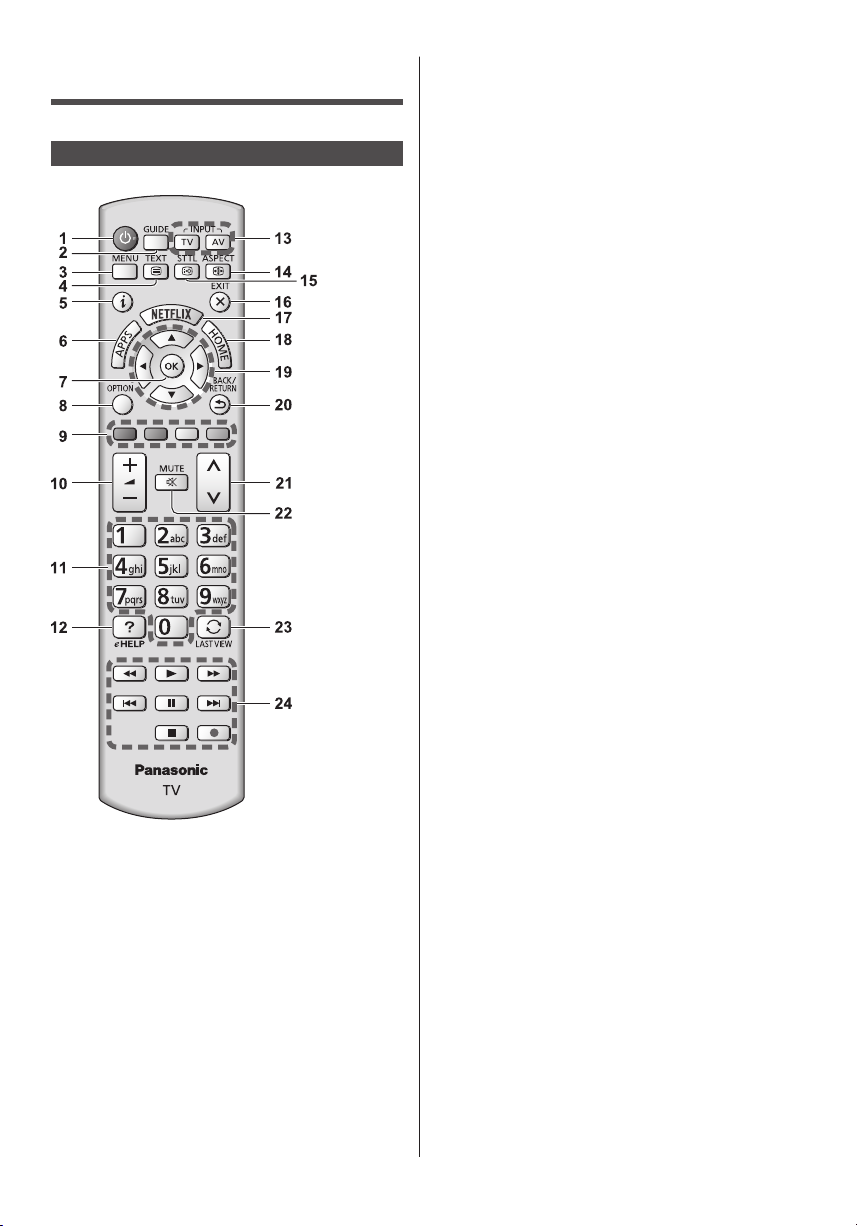
Bedieningsonderdelen
Afstandsbediening
1 Stand-bytoets
2 Tv-programmagids
●
Opent de elektronische programmagids.
3 [Hoofdmenu]
●
Geeft toegang tot de menu’s Beeld, Geluid,
Netwerk, Timer, Instellingen, Help, enz.
4 Teletekst
5 Informatie
●
Geeft kanaal- en programma-informatie weer.
6 APPS
●
Geeft [APPS-lijst] weer (lijst met toepassingen).
7 OK
●
Bevestigt selecties en keuzes.
●
Schakelt over naar de geselecteerde kanaalpositie.
●
Geeft de kanalenlijst weer.
8 [Menu Opties]
●
Eenvoudige optionele instellingen voor weergave,
geluid enz.
9 Gekleurde toetsen
(rood, groen, geel, blauw)
●
Voor selectie, navigatie en de bediening van
verschillende functies.
10
Volume omhoog/omlaag
11
Cijfertoetsen
●
Overschakelen naar een ander kanaal of een
andere teletekstpagina.
●
Tekst invoeren.
●
De tv aanzetten vanuit stand-by.
12
[eHELP]
●
De [eHELP] weergeven (ingebouwde
bedieningsinstructies).
13
Selectie ingangsmodus
●
TV: Overschakelen tussen DVB-C / DVB-T / DVBvia-IP / analoog.
●
AV: Overschakelen naar een AV-ingangsmodus in
de lijst met ingangssignalen.
14
Aspect
●
Wijzigt de beeldverhouding.
15
Ondertitels
●
Geeft ondertitels weer.
16
Afsluiten
●
Terugkeren naar [Beginscherm].
17
Netflix
●
Directe toegang tot de NETFLIX-dienst.
●
U moet beschikken over een breedbandnetwerk
om deze dienst te kunnen gebruiken.
●
Deze dienst kan zonder kennisgeving gestopt of
gewijzigd worden.
18
HOME
●
Opent [Beginscherm].
19
Cursortoetsen
●
Voor selecties en aanpassingen.
20
Terugkeren
●
Terugkeren naar het vorige menu of de vorige
pagina.
21
Kanaal omhoog/omlaag
22
Geluid dempen aan/uit
23
Laatste beeld
●
Schakelt terug naar het vorige kanaal of de vorige
invoermodus.
24
Handelingen voor inhoud, aangesloten
apparatuur, enz.
Nederlands
11
Page 32
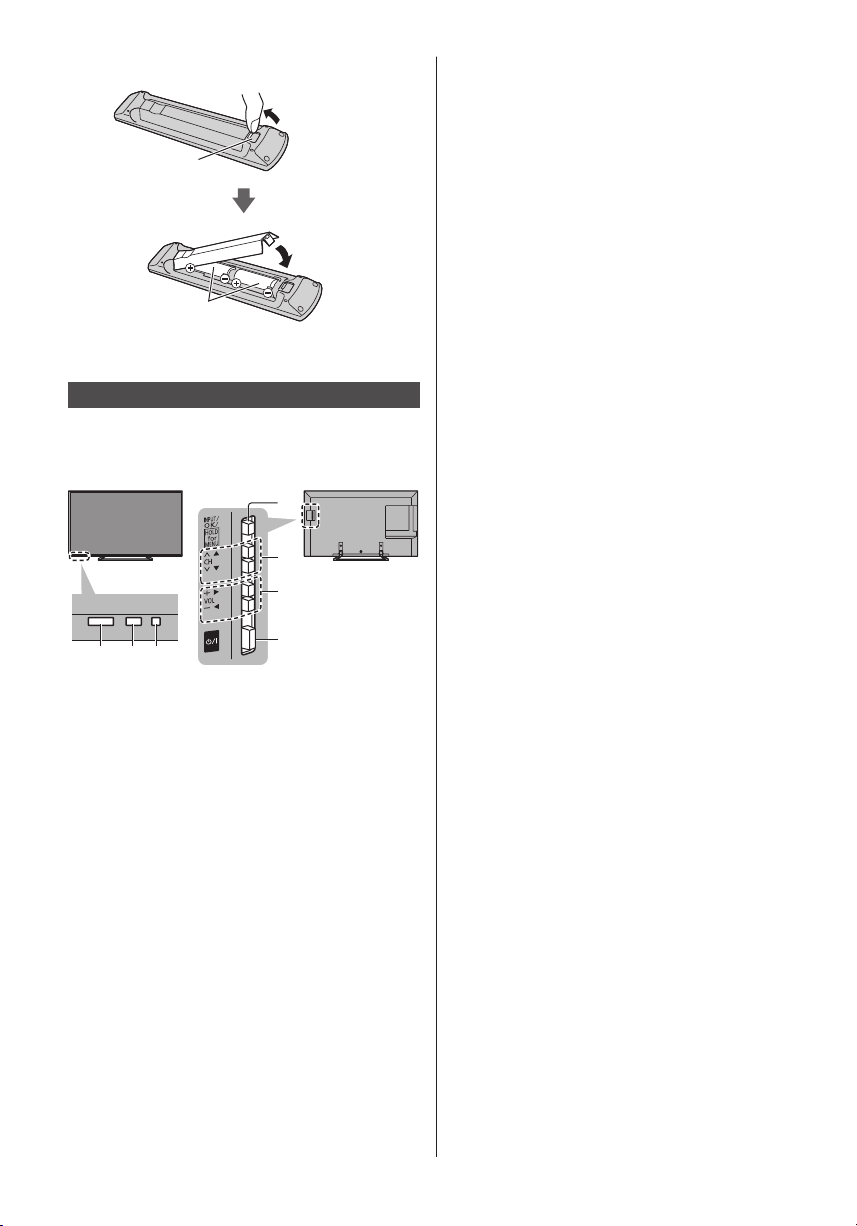
■ De batterijen plaatsen/verwijderen
1 2 3
Opentrekken
Haakje
Sluiten
Plaats de batterijen op
de juiste manier (+ of -)
Indicator/Bedieningspaneel
●
Als u op een van de toetsen 4, 5 of 6 drukt, wordt
gedurende 3 seconden rechts op het scherm een
hulpaanduiding weergegeven die aangeeft welke
toets werd ingedrukt.
4
5
6
7
5 Kanaal omhoog/omlaag
●
Cursor omhoog/omlaag (in menu’s)
6 Volume omhoog/omlaag
●
Cursor naar links/rechts (in menu’s)
7 Hoofdschakelaar
●
Hiermee zet u de tv aan of uit.
Achterzijde van de tv
1 Ontvanger voor afstandsbedieningssignalen
●
Plaats geen voorwerpen tussen de
signaalontvanger van de afstandsbediening op de
tv en de afstandsbediening.
2 Sensor omgevingslicht
●
Detecteert helderheid voor aanpassing van de
beeldkwaliteit als [Omgevings sensor] in het menu
Beeld is ingesteld op [Aan].
3 Voedingslampje
Rood: Stand-by
Groen: Aan
Oranje: Stand-by met sommige functies
(netwerkfunctie, enz.) actief
●
Het lampje knippert wanneer de tv een opdracht
van de afstandsbediening ontvangt.
4 Selecteert de ingangsmodus
●
Druk zo vaak als nodig om de gewenste stand te
selecteren.
[Hoofdmenu]
●
Ongeveer 3 seconden ingedrukt houden om het
hoofdmenu weer te geven.
OK (in menu’s)
Nederlands
12
Page 33
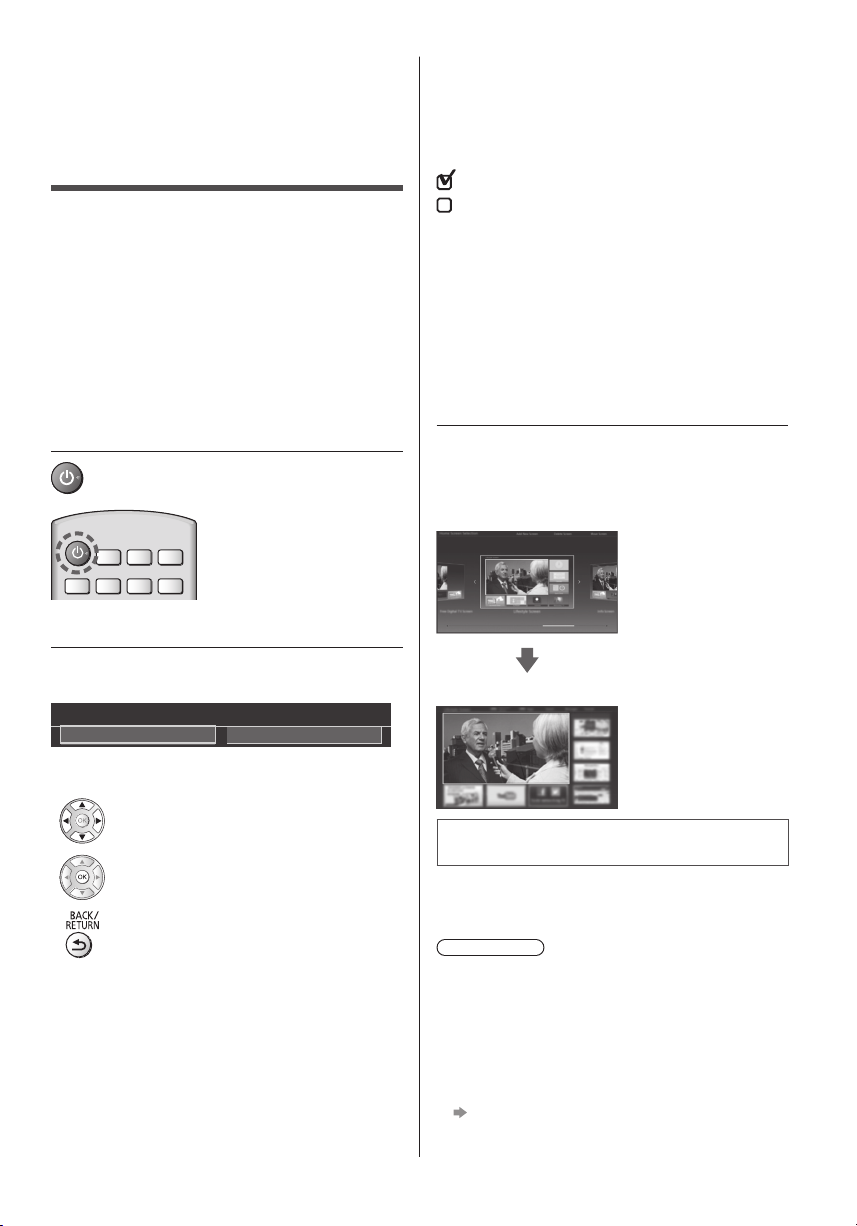
Automatisch
instellen bij het
eerste gebruik
Wanneer de tv voor het eerst wordt aangezet, zoekt hij
automatisch naar beschikbare tv-kanalen en verschijnen
opties om de tv in te stellen.
●
U mag deze stappen overslaan als uw dealer de tv al
heeft ingesteld.
●
Voltooi alle verbindingen (p. 7 - 10) en instellingen
(indien nodig) van de externe apparatuur voordat
u de automatische instelling uitvoert. Raadpleeg
de handleiding van het aangesloten apparaat voor
informatie over de instellingen ervan.
Selecteer uw land
●
Afhankelijk van het land dat u selecteert, stelt u de
regio in of slaat u de pincode voor het kinderslot op
(“0000” kan niet worden opgeslagen).
Vink het tv-signaal aan waarop u wilt afstellen en
selecteer [Start auto set-up]
: afstemmen (beschikbare kanalen zoeken)
: afstemmen overslaan
●
Het instelscherm verschilt afhankelijk van het
geselecteerde land en tv-signaal.
●
[DVB-C Netwerkinstellingen]
Gewoonlijk stelt u [Frequentie] en [Netwerk ID] in op
[Auto].
Als [Auto] niet wordt weergegeven of indien
nodig, stelt u [Frequentie] en [Netwerk ID] met
de cijfertoetsen in met de gegevens van uw
kabelmaatschappij.
1 Steek de stekker van de tv in het
stopcontact en schakel de tv in
●
Het beeld verschijnt na enkele seconden.
2 Selecteer de volgende onderdelen
Volg bij ieder onderdeel de aanwijzingen op het scherm.
Voorbeeld:
Selecteer weergave omgeving.
Thuis Winkel
■ De afstandsbediening gebruiken
Verplaats de cursor
Open het onderdeel/sla de instelling op
Keer terug naar het vorige onderdeel (indien
beschikbaar)
Selecteer uw taal
Selecteer [Thuis]
Voor gebruik thuis selecteert u de weergaveomgeving
[Thuis].
●
[Winkel] is bestemd voor demonstratie in de winkel.
●
Als u de weergaveomgeving later wilt wijzigen, moet
u alle instellingen initialiseren via Fabrieksinstellingen.
Stel de netwerkverbinding in
3 Selecteer het type [Beginscherm]
Er wordt uitleg weergegeven hoe u [Mijn Beginscherm]
kunt gebruiken. Volg tijdens de demonstratie de
aanwijzingen op het scherm en selecteer de gewenste
optie voor [Beginscherm].
Voorbeeld: [Beginscherm selectie]
Voorbeeld: [TV-Beginscherm]
De automatische instelling is voltooid
en de tv is klaar voor gebruik.
Als het afstemmen is mislukt, controleert u de RFkabel en de aansluiting van het netwerk, en volgt u de
aanwijzingen op het scherm.
Opmerking
●
De tv schakelt over naar stand-by wanneer het toestel
niet wordt bediend gedurende 4 uur als [Automatisch
in Stand-by] in het menu Timer is ingesteld op [Aan].
●
De tv schakelt over naar stand-by wanneer geen
signaal wordt ontvangen en het toestel niet wordt
bediend gedurende 10 minuten als [Automatisch
uitschakelen] in het menu Timer is ingesteld op [Aan].
●
Alle kanalen opnieuw afstemmen
[Auto set-up] in [Afstemmenu] (menu
Instellingen)
Nederlands
13
Page 34
●
Een beschikbaar tv-signaal later toevoegen
[Voeg TV-signaal toe] in [Afstemmenu] (menu
Instellingen)
●
Alle instellingen terugzetten naar de beginstand
[Fabrieksinstellingen] in [Systeemmenu] (menu
Instellingen)
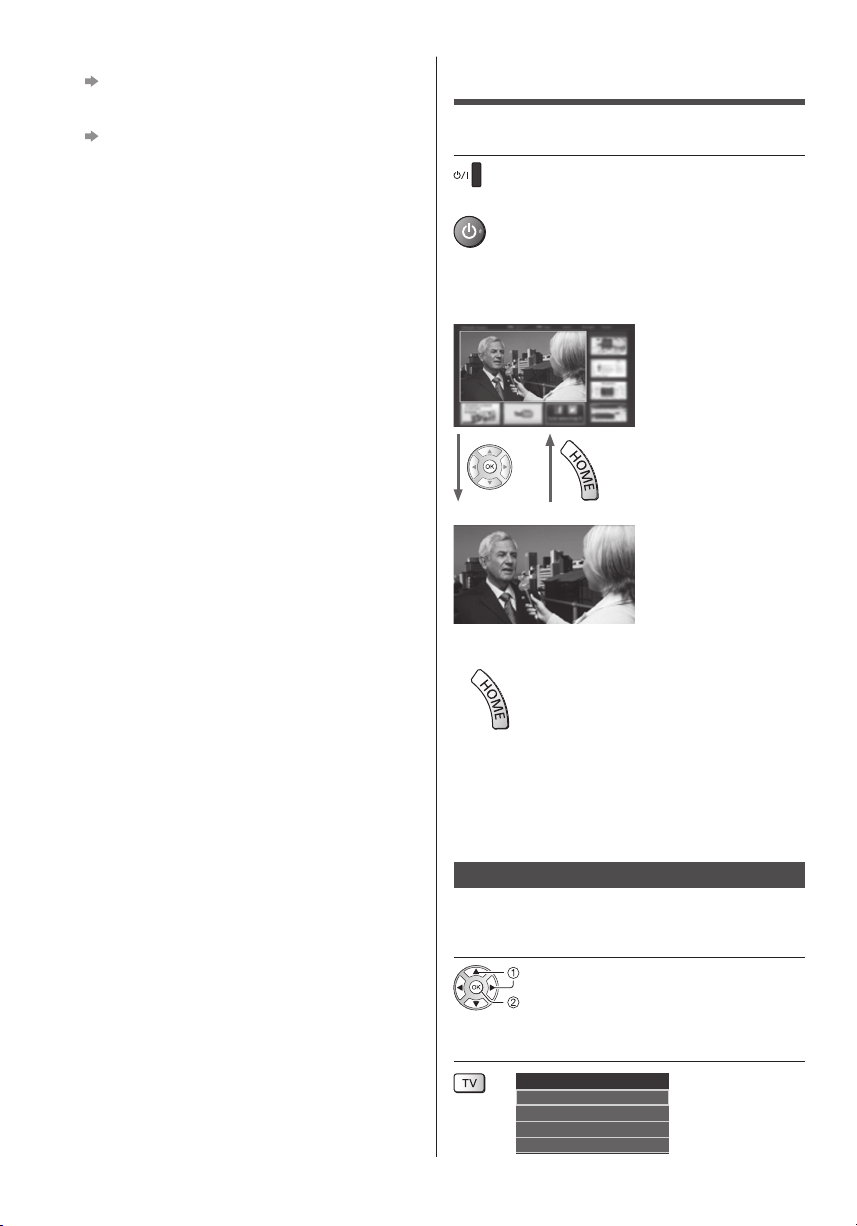
Bediening
Schakel de tv in
(TV)
of
(Afstandsbediening)
●
De hoofdschakelaar moet aan staan. (p. 12)
Het laatst bekeken [Beginscherm] wordt weergegeven.
Voorbeeld: [TV-Beginscherm]
Voorbeeld: Scherm met geselecteerde inhoud
●
Op eender welk moment terugkeren naar
[Beginscherm]
14
Nederlands
●
Het [Beginscherm] kan worden ingesteld om
interessante informatie weer te geven, gemakkelijk
bepaalde functies te openen, het standaard
[Beginscherm] te selecteren, enz. Volg voor details de
aanwijzingen op het scherm of raadpleeg de [eHELP]
(Mijn Beginscherm > Mijn Beginscherm).
Tv kijken
1 Selecteer de tv-weergave in
[Beginscherm]
selecteren
openen
2 Selecteer de stand
TV keuze
DVB-C
DVB-T
DVB-via-IP
Analoog
Page 35
●
De selecteerbare standen zijn afhankelijk van de
opgeslagen kanalen.
Gebruik eHELP
3 Selecteer een kanaal
omhoog
omlaag
of
●
Een kanaal selecteren dat uit twee of meer cijfers
bestaat, bijvoorbeeld 399
Toegang tot de functies
Open [APPS-lijst] en selecteer de gewenste functie
Voorbeeld: [APPS-lijst]
●
APPS staat voor de toepassingen (functies) van de tv.
●
Voor de bediening van de verschillende functies en
de instelling van [APPS-lijst] volgt u de aanwijzingen
op het scherm of raadpleegt u de [eHELP] (Mijn
Beginscherm > APPS-lijst).
[eHELP] is de naam van de gedetailleerde,
ingebouwde bedieningsinstructies van de tv. Hier
vindt u gedetailleerde uitleg over de bediening van de
verschillende functies.
1 Geef [eHELP] weer
of
[Help] [eHELP]
●
Als de [eHELP] eerder is gebruikt sinds de tv werd
aangezet, verschijnt een bevestigingsscherm om te
selecteren of u naar de [Eerste pagina] wilt gaan of
naar de [Laatst bekeken pagina].
2 Selecteer de categorie en het
onderdeel
Categorie
Onderdeel
Subonderdeel
Beschrijving
categorie
selecteren
openen
onderdeel
selecteren
openen
subonderdeel
selecteren
openen
●
Terug naar het vorige niveau
●
De beschrijving scrollen (indien langer dan één
pagina)
Wanneer de beschrijving wordt gemarkeerd
●
Het menu bij de beschrijving weergeven (alleen bij
bepaalde beschrijvingen)
(Rode)
Nederlands
15
Page 36

●
De functies van deze tv bekijken
Lees dit eerst > Functies
16
Nederlands
Page 37
Veelgestelde vragen
Probeer eerst het probleem op te lossen aan de hand
van de volgende eenvoudige richtlijnen voordat u hulp
inroept.
●
Raadpleeg de [eHELP] voor details (Ondersteuning >
Veelgestelde vragen).
De tv gaat niet aan
●
Controleer of de stekker van het netsnoer in de tv en
in het stopcontact zit.
De tv schakelt over naar de stand-bystand
●
De automatische stand-byfunctie is geactiveerd.
De afstandsbediening werkt niet of slechts af en toe
●
Zijn de batterijen op de juiste manier in de
afstandsbediening geplaatst?
●
Is de tv ingeschakeld?
●
De batterijen zijn wellicht leeg. Vervang deze door
nieuwe.
●
Wijs met de afstandsbediening recht naar de
signaalontvanger van de afstandsbediening op de tv
(binnen ongeveer 7 m afstand en een hoek van
30 graden van de ontvanger).
●
Zorg ervoor dat de signaalontvanger van de
afstandsbediening op de tv niet is blootgesteld aan
zonlicht of ander fel licht.
(p. 12)
Onderdelen van de tv worden warm
●
Onderdelen van de tv kunnen heet worden. Deze
temperatuurverhoging vormt geen probleem voor de
prestaties en de kwaliteit.
Als u met uw vinger op het beeldscherm drukt,
beweegt hij een beetje en maakt hij geluid.
●
Er is een beetje ruimte rond het paneel om schade
eraan te voorkomen. Dit is normaal.
Er wordt geen beeld weergegeven
●
Controleer of de tv aan staat.
●
Controleer of de stekker van het netsnoer in de tv en
in het stopcontact zit.
●
Controleer of de juiste ingangsmodus is geselecteerd.
●
Controleer of de instelling van [AV2 ] ([COMPONENT] /
[VIDEO]) in [Ingangssignaal kiezen] overeenkomt met
het signaal van het externe apparaat.
●
Is [Achtergrondlicht], [Kontrast], [Helderheid] of [Kleur]
in het menu Beeld ingesteld op de minimale waarde?
●
Controleer of alle vereiste kabels goed zijn
aangesloten.
Er wordt abnormaal beeld weergegeven
●
De tv heeft een ingebouwde zelftestfunctie. Stelt een
diagnose van beeld- of geluidsproblemen.
[TV Zelfscan Test] (Help-menu)
●
Zet de tv uit en weer aan met de hoofdschakelaar.
●
Als het probleem zich blijft voordoen, initialiseert u
alle instellingen.
[Fabrieksinstellingen] in [Systeemmenu] (menu
Instellingen)
Nederlands
17
Page 38
Onderhoud
Specificaties
Verwijder eerst de stekker van het
netsnoer uit het stopcontact.
Beeldscherm, Behuizing, Standaard
Regelmatig onderhoud:
Veeg de buitenkant van het beeldscherm, de behuizing
of de standaard voorzichtig af met een zachte doek om
vuil of vingerafdrukken te verwijderen.
Voor hardnekkig vuil:
(1) Verwijder eerst het stof van de buitenkant.
(2) Bevochtig een zachte doek met schoon water of
een opgelost neutraal schoonmaakproduct (1 deel
schoonmaakproduct op 100 delen water).
(3) Wring de doek goed uit. (Laat geen vloeistof in de tv
komen omdat hij daardoor defect kan raken.)
(4) Veeg hardnekkig vuil weg met een vochtige doek.
(5) Droog vervolgens al het vocht af.
Let op
●
Gebruik geen harde of ruwe doek en wrijf niet hard op
het oppervlak omdat u daardoor krassen kunt maken.
●
Zorg dat er geen insecticiden, oplosmiddelen,
verdunners of andere vluchtige stoffen met de tv in
aanraking komen. Hierdoor kan de kwaliteit van het
oppervlak afnemen of kan de verf afbladderen.
●
Het scherm is behandeld en voorzien van een
gevoelige oppervlaktelaag. Tik en kras niet op het
oppervlak met uw vingernagel of een hard voorwerp.
●
Zorg dat de behuizing en de standaard niet
gedurende langere tijd in contact zijn met rubber
of pvc. Hierdoor kan de kwaliteit van het oppervlak
afnemen.
Netsnoerstekker
Maak de netsnoerstekker regelmatig schoon met
een droge doek. Vocht en stof kunnen brand of een
elektrische schok veroorzaken.
■ TV
Modelnr.
TX-55CS620E
Afmetingen (B × H × D)
1 242 mm × 761 mm × 292 mm (met standaard)
1 242 mm × 719 mm × 56 mm (alleen TV)
Gewicht
19,0 kg netto (met standaard)
18,0 kg netto (alleen TV)
Stroomvoorziening
220-240 V wisselstroom, 50/60 Hz
Paneel
Led-lcd-paneel
Geluid
Uitgang luidspreker
20 W (10 W + 10 W)
Hoofdtelefoon
3,5-mm M3-stereoministekker × 1
Aansluitingen
AV1-ingang/uitgang
SCART (audio/video in, audio/video out, RGB in)
AV2-ingang (COMPONENT/VIDEO)
VIDEO
RCA PIN-type × 1
1,0 V[p-p] (75 Ω)
AUDIO L - R
RCA PIN-type × 2
0,5 V[rms]
Y
1,0 V[p-p] (inclusief synchronisatie)
B/CB, PR/CR
P
±0,35 V[p-p]
18
Nederlands
HDMI 1 / 2 / 3-ingang
TYPE A-aansluitingen
HDMI1 / 3: Content-type
HDMI2: Content-type, Audio Return Channel
●
De tv ondersteunt “HDAVI Control 5”-functionaliteit.
Kaartsleuf
CI-sleuf (conform CI Plus) × 1
Page 39
ETHERNET
RJ45, IEEE802.3 10BASE-T / 100BASE-TX
USB 1 / 2
DC 5 V, Max. 500 mA [Hi-Speed USB (USB 2.0)]
DIGITAL AUDIO-uitgang
PCM / Dolby Digital, optische vezel
Ontvangstsystemen / Bandnaam
U kunt de meest recente informatie over de beschikbare
diensten op de volgende website bekijken. (alleen
Engels)
http://panasonic.net/viera/support
DVB-C
Digitale kabelservices (MPEG2 en MPEG4AVC(H.264))
DVB-T / T2
Digitale aardse services (MPEG2 en MPEG4AVC(H.264))
PAL B, G, H, I
SECAM B, G
SECAM L, L’
VHF E2 - E12
VHF A - H (ITALIË)
CATV (S01 - S05)
CATV S11 - S20 (U1 - U10)
VHF H1 - H2 (ITALIË)
UHF E21 - E69
CATV S1 - S10 (M1 - M10)
CATV S21 - S41 (Hyperband)
Antenne-ingang
VHF / UHF
Bedrijfscondities
Temperatuur
0 °C - 35 °C
Vochtigheid
20 % - 80 % RV (niet-condenserend)
Ingebouwd draadloos LAN
Standaardcompliantie en frequentiebereik
IEEE802.11a/n
5,180 GHz - 5,320 GHz, 5,500 GHz - 5,580 GHz,
5,660 GHz - 5,700 GHz
IEEE802.11b/g/n
2,412 GHz - 2,472 GHz
Beveiliging
WPA2-PSK (TKIP/AES)
WPA-PSK (TKIP/AES)
WEP (64 bit/128 bit)
*:
Frequenties en kanalen verschillen naargelang het
land.
Opmerking
●
Ontwerp en specificaties kunnen zonder
voorafgaande kennisgeving worden gewijzigd.
Gewicht en afmetingen bij benadering.
●
Raadpleeg de productfiche voor informatie over het
energieverbruik, de schermresolutie, enz.
●
Raadpleeg de [eHELP] voor informatie over de
openbronsoftware (Ondersteuning > Licentie).
●
Dit apparaat voldoet aan de volgende EMC-normen.
EN55032, EN55020, EN55024, EN61000-3-2,
EN61000-3-3
*
PAL D, K
SECAM D, K
VHF R1 - R2
VHF R3 - R5
VHF R6 - R12
UHF E21 - E69
PAL 525/60
NTSC-tapes afspelen via sommige PALvideorecorders (VCR)
M.NTSC
Afspelen via M.NTSC-videorecorders (VCR)
NTSC (alleen AV-ingang)
Afspelen via NTSC-videorecorders (VCR)
Nederlands
19
Page 40
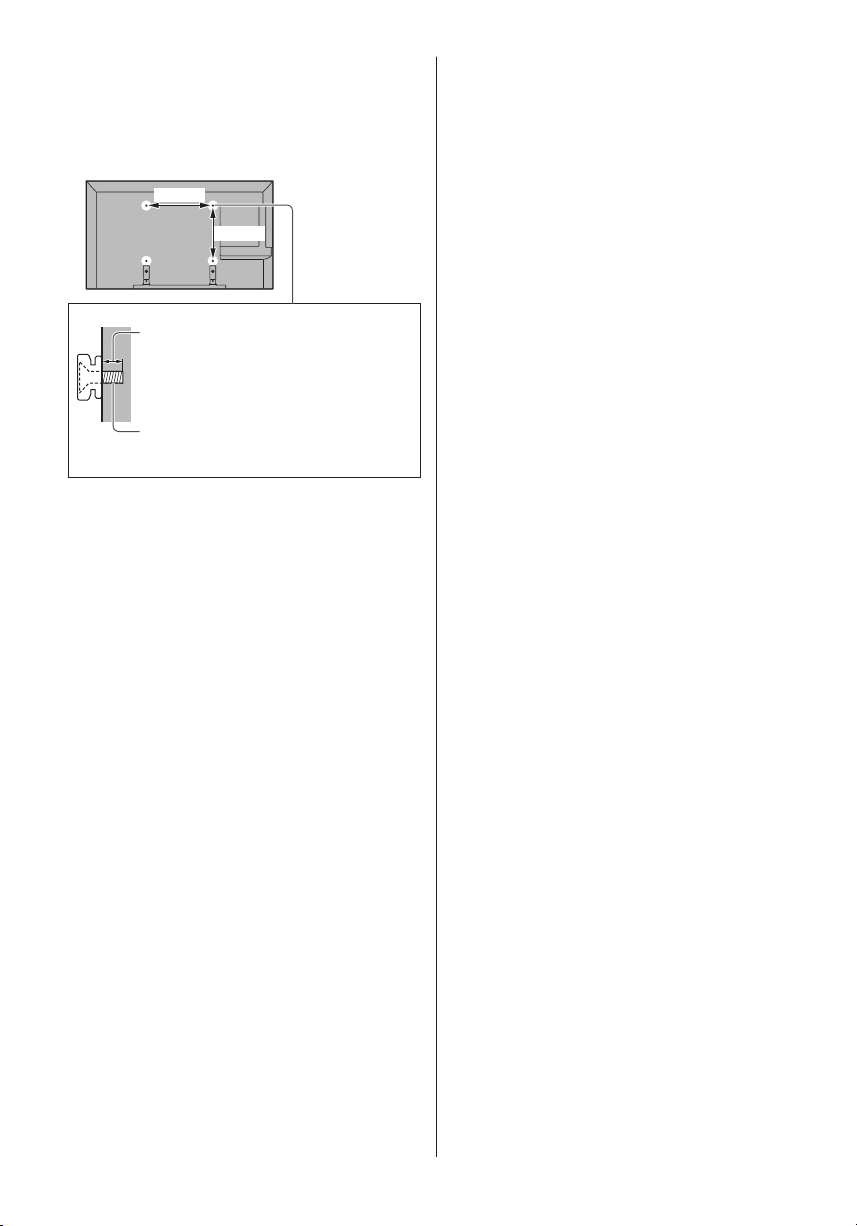
■ Bij gebruik van de muurbevestigingssteun
Neemt contact op met uw plaatselijke Panasonicdealer als u de aanbevolen muurbevestigingssteun wilt
aanschaffen.
●
Gaten voor installatie met de muurbevestigingssteun
Achterzijde van de tv
400 mm
400 mm
(zijaanzicht)
Diepte schroef
minimaal: 10 mm
maximaal: 16 mm
Diameter: M6
Schroef voor het bevestigen van de
tv op de muurbevestigingssteun (niet
meegeleverd met de tv)
20
Nederlands
Page 41

Page 42
Het ontdoen van oude apparatuur en batterijen.
Web Site: http://panasonic.net
© Panasonic Corporation 2015
Enkel voor de Europese Unie en landen met recycle systemen.
Deze symbolen op de producten, verpakkingen en/of begeleidende documenten
betekenen dat gebruikte elektrische en elektronische producten en batterijen niet samen
mogen worden weggegooid met de rest van het huishoudelijk afval.
Voor een juiste verwerking, hergebruik en recycling van oude producten en batterijen,
gelieve deze in te leveren bij de desbetreffende inleverpunten in overeenstemming met
uw nationale wetgeving.
Door ze op de juiste wijze weg te gooien, helpt u mee met het besparen van kostbare
hulpbronnen en voorkomt u potentiële negatieve effecten op de volksgezondheid en het
milieu.
Voor meer informatie over inzameling en recycling kunt u contact opnemen met uw
plaatselijke gemeente.
Afhankelijk van uw nationale wetgeving kunnen er boetes worden opgelegd bij het onjuist
weggooien van dit soort afval.
Let op: het batterij symbool (Onderstaand symbool):
Dit symbool kan in combinatie met een chemisch symbool gebruikt worden. In dit geval
volstaan de eisen, die zijn vastgesteld in de richtlijnen van de desbetreffende chemische
stof.
In te vullen door de eigenaar
Het modelnummer en het serienummer van dit product kunt u vinden op het achterpaneel. Noteer dit serienummer
in de hiervoor bestemde ruimte hieronder en bewaar deze handleiding plus uw bewijs van aankoop als een
permanent bewijs van uw aankoop als hulp bij identificatie in het geval van diefstal of verlies, alsmede bij
aanspraak op de garantie-/serviceverlening.
Modelnummer Serienummer
Nederlands
TQB0E2503B-2
Gedrukt in de Tsjechische Republiek
Page 43
Română
Manual de utilizare
Televizor cu ecran LCD
Model nr.
TX-55CS620E
Pentru instrucţiuni mai detaliate, vă rugăm să
consultaţi [eAJUTOR] (Instrucţiunile de utilizare
integrate).
●
Mod de utilizare a sistemului [eAJUTOR]
Vă mulţumim că aţi cumpărat acest produs Panasonic.
Vă rugăm să citiţi aceste instrucţiuni cu atenţie înainte de a folosi aparatul şi să le
păstraţi pentru consultări ulterioare.
Înainte de utilizare, vă rugăm să citiţi cu atenţie „Măsurile de precauţie” din acest
manual.
Imaginile prezentate în acest manual au doar scop ilustrativ.
Vă rugăm să consultaţi Garanţia Pan-Europeană dacă doriţi să luaţi legătura cu
reprezentantul local Panasonic pentru a solicita asistenţă.
M0115-1015 Română
(p. 15)
Page 44
Cuprins
Citiţi
Notă importantă ��������������������������������������������������� 3
Măsuri de siguranţă ���������������������������������������������� 3
Instalarea rapidă
Accesorii ������������������������������������������������������������ 6
Conexiuni ����������������������������������������������������������� 7
Identificarea elementelor de comandă ���������������������11
Setare automată iniţială ����������������������������������������13
Utilizarea televizorului dvs. VIERA
Operaţii �������������������������������������������������������������14
Modul de utilizare eAJUTOR ����������������������������������15
Altele
Întrebări frecvente �����������������������������������������������17
Întreţinere ����������������������������������������������������������18
Date tehnice �������������������������������������������������������18
Română
2
●
Pentru informaţii privind mărcile comerciale, consultaţi
[eAJUTOR] (Asistenţă > Licenţă).
Page 45
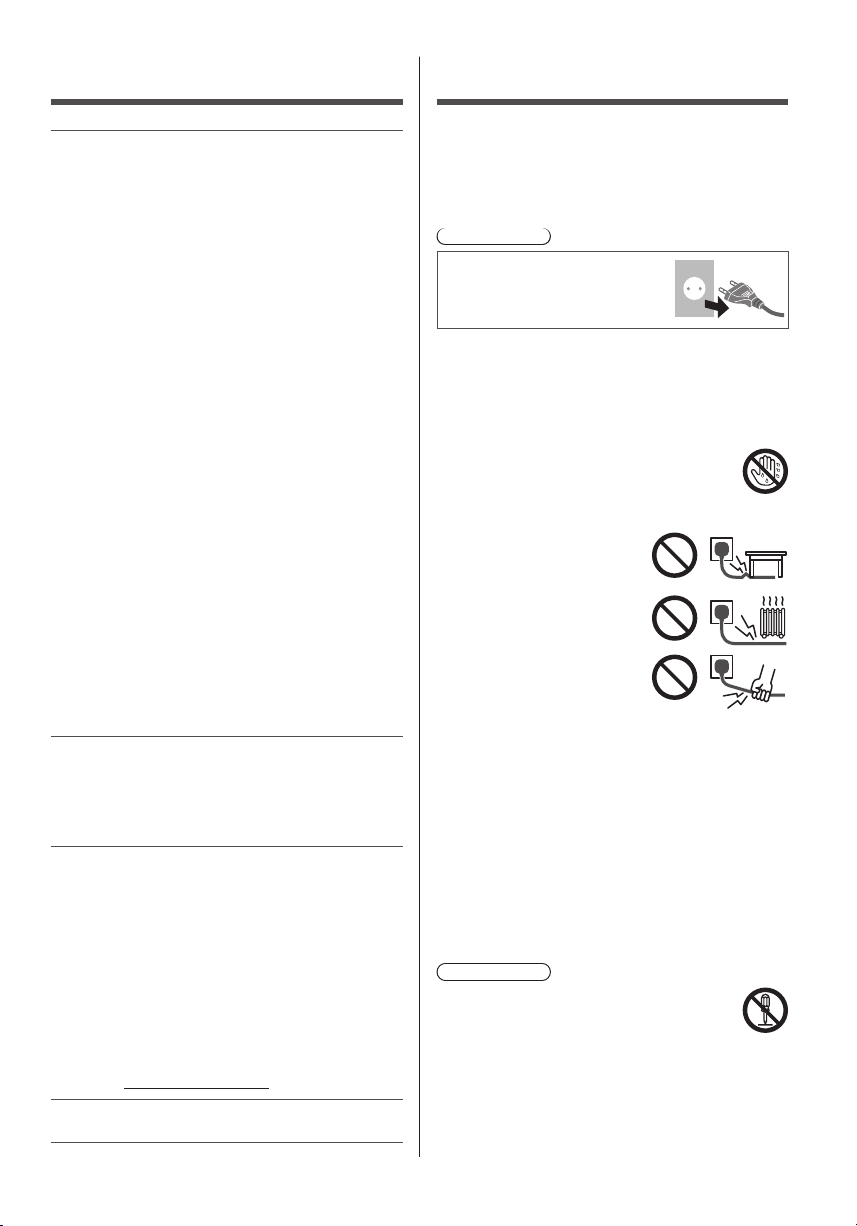
Notă importantă
Referitor la funcţiile DVB/transmisie de
date/IPTV
●
Acest televizor este conceput pentru a corespunde
standardelor (începând cu august 2014) pentru
servicii digitale terestre DVB-T/T2 (MPEG2 şi
MPEG4-AVC(H.264)), servicii digitale prin cablu
DVB-C (MPEG2 şi MPEG4-AVC(H.264)).
Consultaţi distribuitorul local pentru disponibilitatea
serviciilor DVB-T/T2 în zona dumneavoastră.
Consultaţi furnizorul de servicii prin cablu pentru
disponibilitatea serviciilor DVB-C pentru acest
televizor.
●
Este posibil ca acest televizor să nu opereze corect
cu semnal care nu îndeplineşte standardele DVB-T/
T2 sau DVB-C.
●
Nu toate funcţiile sunt disponibile, acest lucru
depinzând de ţară, zonă, emiţător, furnizor de servicii
şi mediul de reţea.
●
Nu toate modulele CI funcţionează corect cu acest
televizor. Consultaţi furnizorul de servicii privind
disponibilitatea modulului CI.
●
Acest televizor nu va funcţiona întotdeauna corect
cu un modul CI care nu este aprobat de furnizorul de
servicii.
●
Taxe suplimentare pot fi impuse în funcţie de
furnizorul de servicii.
●
Nu este garantată compatibilitatea cu servicii viitoare.
●
Consultaţi ultimele informaţii privind serviciile
disponibile pe următorul site web. (Doar în limba
engleză)
http://panasonic.net/viera/support
Panasonic nu garantează operarea şi performanţele
dispozitivelor periferice de la alţi producători; şi ne
derogăm orice responsabilitate pentru daune care apar
din operarea şi/sau performanţele de utilizare a unor
astfel de dispozitive periferice de la alţi producători.
Acest produs este licenţiat sub licenţa portofoliului
de patente AVC pentru uzul personal şi necomercial
al unui consumator (i) pentru a coda fişiere video în
conformitate cu standardul AVC („AVC Video”) şi/sau
(ii) pentru a decoda fişiere video AVC care au fost
codate de către un consumator angajat într-o activitate
personală sau necomercială şi/sau care au fost obţinute
de la un distribuitor video licenţiat pentru a oferi fişiere
video AVC. Niciun fel de licenţă nu este acordată sau
presupusă pentru o altă utilizare.
Informaţii suplimentare pot fi obţinute de la MPEG LA,
LLC.
A se vedea http://www.mpegla.com.
Măsuri de siguranţă
Pentru a contribui la evitarea pericolelor de
electrocutare, incendii, deteriorări sau vătămări
corporale, vă rugăm să urmaţi avertismentele şi
atenţionările de mai jos:
■ Ştecărul şi cablul de alimentare
Avertisment
În cazul în care constataţi orice
aspect neobişnuit, scoateţi imediat
ştecărul din priză.
●
Acest TV este proiectat pentru a opera cu o tensiune
de 220-240 V, 50 / 60 Hz.
●
Introduceţi ştecărul complet în priză.
●
Asiguraţi acces uşor la ştecăr.
●
Deconectaţi ştecărul când curăţaţi televizorul.
●
Nu atingeţi ştecărul dacă aveţi mâinile ude.
●
Nu distrugeţi cablul de alimentare.
Nu amplasaţi un obiect
•
greu pe cablu.
Nu amplasaţi cablul în
•
apropierea unui obiect aflat
la temperaturi ridicate.
Nu trageţi de cablul de
•
alimentare. Când doriţi să
deconectaţi ştecărul de la
reţeaua de curent, apucaţi
de ştecăr, nu de cablu.
Nu mutaţi televizorul cât timp cablul este conectat
•
la o priză.
Nu răsuciţi cablul, nu îl îndoiţi prea tare şi nu îl
•
întindeţi.
Nu folosiţi ştecărul sau priza dacă acestea sunt
•
defecte.
Asiguraţi-vă că televizorul nu apasă pe cablul de
•
alimentare.
●
Nu folosiţi alte cabluri de alimentare decât cele
furnizate cu acest televizor.
■ Aveţi grijă
Avertisment
●
Nu scoateţi capacele şi nu modificaţi
niciodată personal televizorul, deoarece,
la scoaterea capacelor, vor fi accesibile
componente aflate sub tensiune. În interior
nu se află componente reparabile de către
proprietarul televizorului.
Transportaţi aparatul numai în poziţie verticală.
Română
3
Page 46
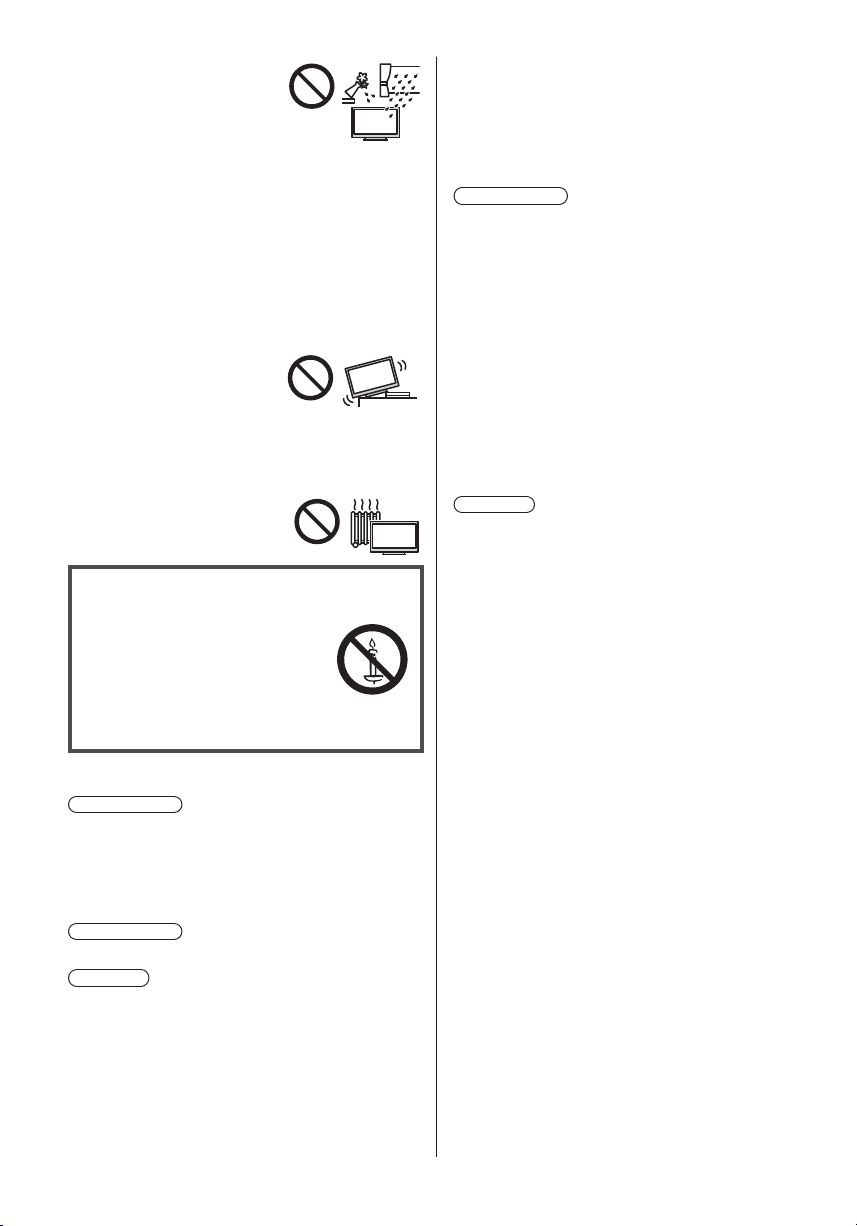
●
Nu expuneţi televizorul la
ploaie sau umiditate excesivă.
Nu amplasaţi deasupra
aparatului vase cu lichid, ca
de ex. vaze şi nu expuneţi
televizorul picăturilor sau
stropirilor cu apă.
●
Nu introduceţi obiecte străine în televizor prin orificiile
de ventilaţie.
●
Nu utilizaţi un piedestal/echipament de montare
neaprobat. Rugaţi distribuitorul Panasonic local
să efectueze setarea sau instalarea suporturilor
aprobate pentru suspendare pe perete.
●
Nu expuneţi panoul de afişare la forţe de apăsare sau
de impact puternice.
●
Nu permiteţi copiilor să se urce pe televizor.
●
Nu aşezaţi televizorul pe
suprafeţe înclinate sau
instabile şi asiguraţi-vă că nicio
parte a televizorului nu este
suspendată peste marginea
bazei.
●
Acest televizor este proiectat pentru utilizarea pe
masă.
●
Nu expuneţi televizorul la
lumina directă a soarelui şi la
alte surse de căldură.
Pentru a preveni
propagarea focului,
păstraţi întotdeauna
la distanţă de acest
produs lumânările sau
alte flăcări deschise
■ Pericol de sufocare / înecare
Avertisment
●
Ambalajul acestui produs poate cauza sufocare, iar
unele componente sunt mici şi pot reprezenta un
pericol de înecare pentru copiii mici. Nu lăsaţi aceste
componente la îndemâna copiilor mici.
■ Piedestal
Avertisment
●
Nu dezasamblaţi şi nu modificaţi piedestalul.
Atenţie
●
Nu folosiţi niciun alt piedestal în afara celui furnizat cu
acest televizor.
●
Nu folosiţi piedestalul dacă se deformează sau
dacă prezintă deteriorări. În acest caz, luaţi legătura
imediat cu cel mai apropiat distribuitor Panasonic.
●
În timpul instalării, asiguraţi-vă că toate şuruburile
sunt bine strânse.
●
Asiguraţi-vă că televizorul nu este supus la impacturi
în timpul instalării piedestalului.
Română
4
●
Nu permiteţi copiilor să escaladeze piedestalul.
●
Instalaţi sau demontaţi televizorul de pe piedestal cu
ajutorul a cel puţin două persoane.
●
Instalaţi sau dezinstalaţi televizorul utilizând
procedura specificată.
■ Unde radio
Avertisment
●
Nu utilizaţi televizorul în instituţii medicale sau în
locaţii cu echipamente medicale. Undele radio pot
interfera cu echipamentele medicale şi pot cauza
accidente din cauza funcţionării defectuoase.
●
Nu utilizaţi televizorul în apropierea echipamentelor
cu comandă automată, precum uşile automate sau
alarmele de incendii. Undele radio pot interfera cu
echipamentele cu comandă automată şi pot cauza
accidente din cauza funcţionării defectuoase.
●
Păstraţi o distanţă de minimum 22 cm faţă de
televizor dacă aveţi un stimulator cardiac. Undele
radio pot afecta funcţionarea stimulatorului cardiac.
●
Nu dezasamblaţi şi nu modificaţi televizorul sub nicio
formă.
■ LAN wireless integrat
Atenţie
●
Nu utilizaţi componenta LAN wireless integrată în
scopul conectării la reţele wireless (SSID*) pentru
care nu aveţi drepturi de utilizare. Astfel de reţele pot
fi listate ca rezultate ale căutărilor. Totuşi, utilizarea
acestora poate fi considerată drept acces ilegal.
*
SSID este o denumire pentru identificarea unei
anumite reţele wireless pentru transmisie.
●
Nu expuneţi componenta LAN wireless integrată la
temperaturi ridicate, lumina directă a soarelui sau
umezeală.
●
Datele transmise şi recepţionate prin unde radio pot fi
interceptate şi monitorizate.
●
Componenta LAN wireless integrată utilizează benzi
de frecvenţă la 2,4 GHz şi 5 GHz. Pentru a evita
funcţionarea defectuoasă sau răspunsul lent cauzate
de interferenţele undelor radio la utilizarea reţelei LAN
wireless integrate, păstraţi distanţa între televizor şi
alte dispozitive care utilizează semnale de 2,4 GHz şi
5 GHz, precum alte dispozitive cu reţea LAN wireless,
cuptoare cu microunde şi telefoane mobile.
●
Când apar probleme din cauza electricităţii statice
etc., acest televizor se poate opri automat pentru
auto-protecţie. În acest caz, opriţi televizorul de la
butonul de pornire/oprire a alimentării, apoi porniţi-l
din nou.
●
Informaţii suplimentare privind reţeaua LAN wireless
şi punctul de acces pot fi găsite pe site-ul Web
următor.
(Doar în limba engleză)
http://panasonic.net/viera/support
Page 47
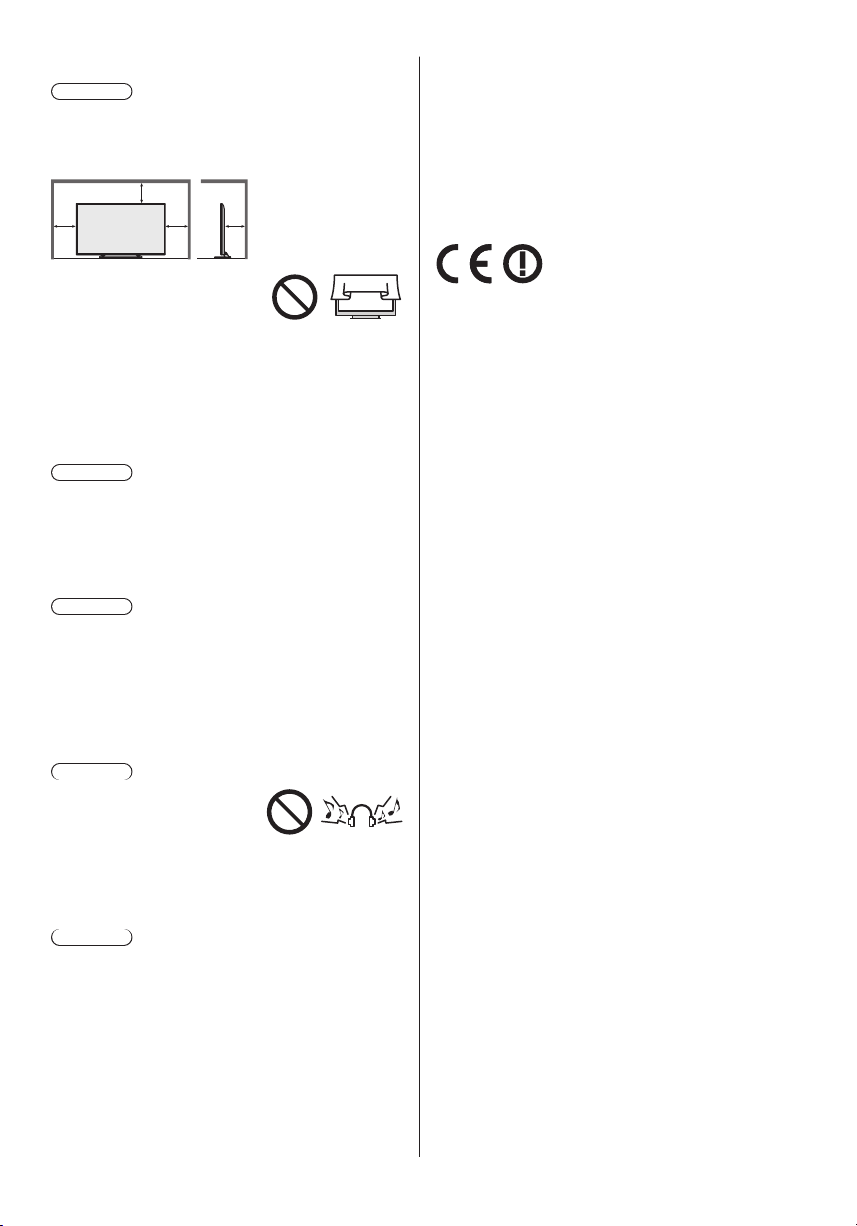
■ Ventilaţie
Atenţie
Lăsaţi un spaţiu suficient în jurul televizorului pentru
a preveni încălzirea excesivă, care poate duce la
defectarea prematură a unor componente electronice.
Distanţă minimă:
10
10
●
Ventilaţia nu trebuie
împiedicată prin acoperirea
fantelor pentru ventilaţie cu
obiecte precum ziare, feţe de
masă sau perdele.
●
Indiferent dacă utilizaţi sau nu un piedestal, asiguraţivă întotdeauna că fantele de la baza televizorului
nu sunt blocate şi că există suficient spaţiu pentru a
permite o ventilaţie adecvată.
10
10
(cm)
■ Mutarea televizorului
Atenţie
Înainte de a muta televizorul, deconectaţi toate cablurile.
●
Mutaţi televizorul cu ajutorul a cel puţin două
persoane.
■ Când televizorul nu este utilizat un timp
îndelungat
Atenţie
Acest televizor consumă puţin curent chiar şi atunci
când este oprit, atâta timp cât ştecărul este conectat la o
priză aflată sub tensiune.
●
Scoateţi fişa cablului de alimentare din priza de
perete când televizorul nu este utilizat pentru o
perioadă îndelungată.
■ Volum excesiv
Atenţie
●
Nu vă expuneţi auzul unui
volum excesiv de la căşti.
Auzul dumneavoastră poate fi
afectat ireversibil.
●
Dacă auziţi un huruit în urechi, reduceţi volumul sau
opriţi-l temporar, cu ajutorul căştilor.
■ Baterie pentru telecomandă
Atenţie
●
Montarea incorectă poate duce la curgerea,
coroziunea şi explozia bateriilor.
●
Înlocuiţi numai cu o baterie de acelaşi tip sau cu un
tip echivalent.
●
Nu amestecaţi baterii vechi cu baterii noi.
●
Nu amestecaţi diferite tipuri de baterii (ca de exemplu
baterii alcaline cu baterii pe bază de mangan).
●
Nu folosiţi baterii reîncărcabile (Ni-Cd etc.).
●
Nu aruncaţi bateriile în foc şi nu le desfaceţi.
●
Nu expuneţi bateriile la căldură excesivă, de exemplu
la soare, flacără sau alte surse similare.
●
Asiguraţi-vă că eliminaţi bateriile la deşeuri în mod
corespunzător.
●
Scoateţi bateria din aparat atunci când nu îl utilizaţi
pentru o perioadă prelungită de timp, pentru a evita
scurgerile de lichid din baterii, corodarea şi exploziile.
Televizor cu ecran LCD
Declaraţie de conformitate (DoC)
„Prin prezenta, societatea Panasonic Corporation
declară că acest televizor este conform cu cerinţele
esenţiale şi cu alte norme corespunzătoare Directivei
1999/5/CE.”
Dacă doriţi să obţineţi o copie a declaraţiei originale
de conformitate a acestui televizor, vă rugăm să vizitaţi
următoarea pagină web:
http://www.doc.panasonic.de
Reprezentant autorizat:
Panasonic Testing Centre
Panasonic Marketing Europe GmbH
Winsbergring 15, D-22525 Hamburg, Germania
Acest televizor a fost proiectat pentru a fi utilizat în
următoarele ţări:
Albania, Andorra, Austria, Belgia, Bulgaria, Croaţia,
Cipru, Republica Cehă, Danemarca, Estonia, Finlanda,
Franţa, Germania, Grecia, Ungaria, Italia, Islanda,
Letonia, Liechtenstein, Lituania, Luxemburg, Malta,
Monaco, Muntenegru, Olanda, Norvegia, Polonia,
Portugalia, România, Slovacia, Slovenia, Spania,
Suedia, Elveţia, Turcia, Macedonia
Funcţia LAN wireless a acestui televizor trebuie să fie
folosită numai în interiorul clădirilor.
Română
5
Page 48
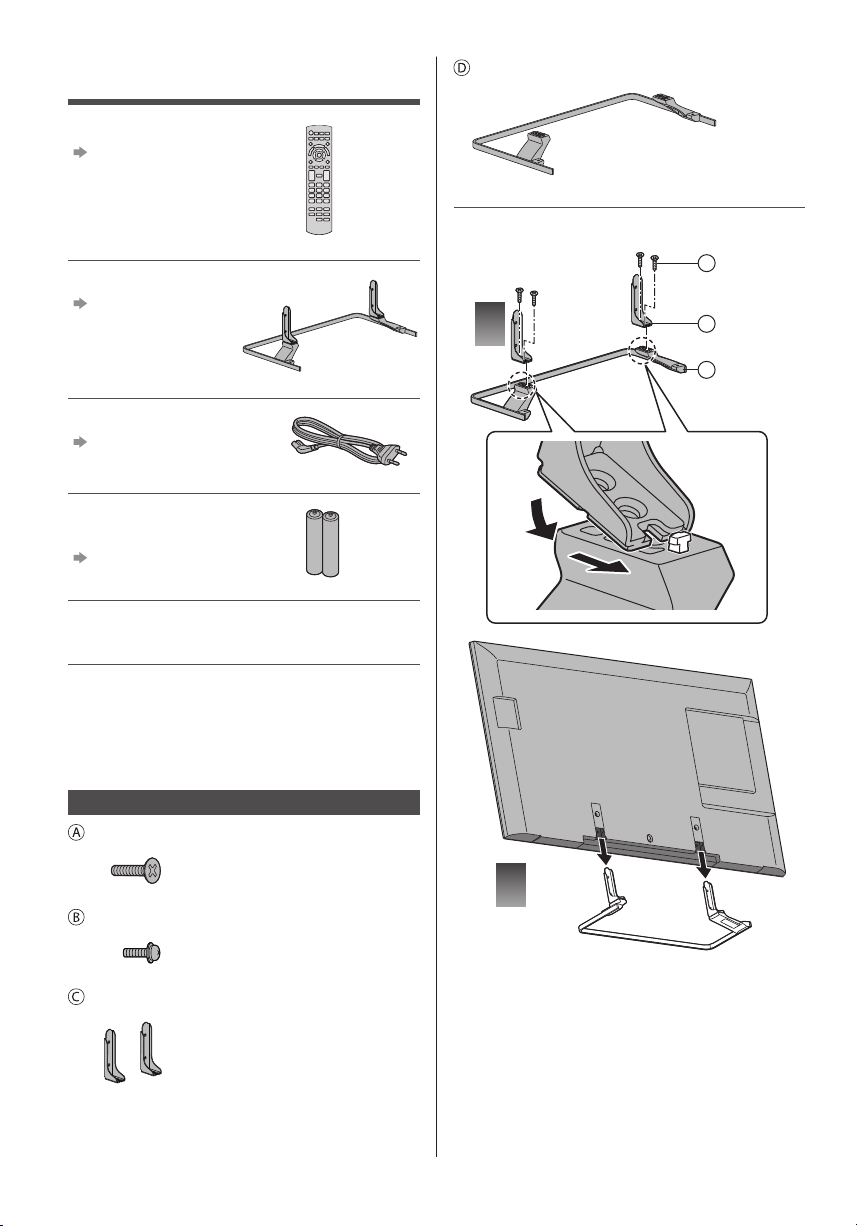
Accesorii
Telecomandă
(p. 11)
●
N2QAYB001010
Piedestal
(p. 6)
Cablu de alimentare
(p. 8)
Baterii (2)
●
R6
(p. 12)
Manual de utilizare
Garanţia Pan-Europeană
Bază
■ Asamblarea piedestalului
A
1
C
D
●
Accesoriile nu vor fi amplasate toate în acelaşi loc.
Asiguraţi-vă că nu le aruncaţi din neatenţie.
●
Pentru informaţii privind accesoriile opţionale,
consultaţi [eAJUTOR] (Asistenţă > Accesorii
opţionale).
Asamblarea/demontarea piedestalului
Şurub de asamblare (4)
M5 × 15
Şurub de asamblare (4)
M4 × 12
Suport (2)
Română
6
2
Page 49
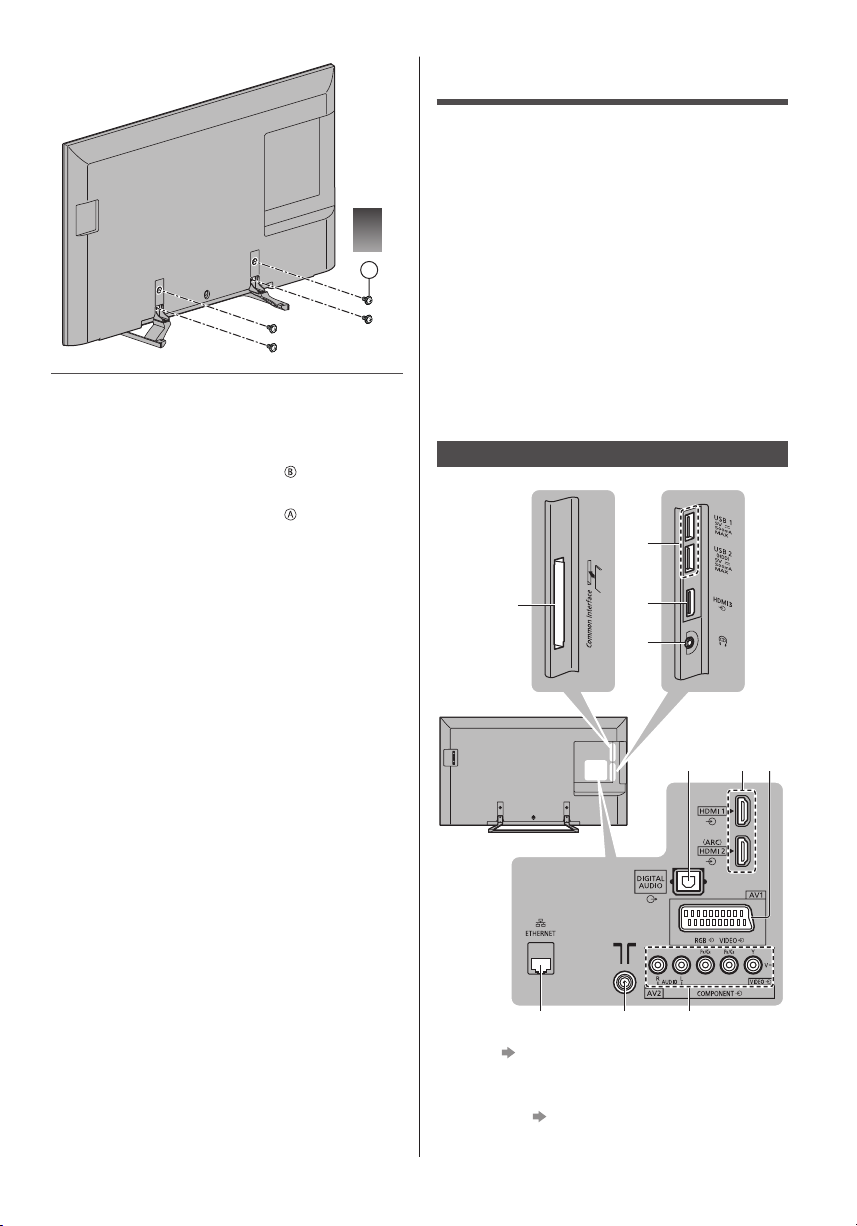
3
B
Demontarea piedestalului de la televizor
Asiguraţi-vă că demontaţi piedestalul în modul următor
atunci când utilizaţi suportul pentru suspendare pe
perete sau la reambalarea televizorului.
1 Demontaţi şuruburile de asamblare
2 Scoateţi piedestalul de la televizor.
3 Demontaţi şuruburile de asamblare
din televizor.
din suport.
Conexiuni
●
Echipamentele externe şi cablurile ilustrate în imagini
nu se livrează împreună cu televizorul.
●
Asiguraţi-vă că aparatul este deconectat de la priză
înainte de a lega sau deconecta orice fel de cabluri.
●
Pentru conectare, verificaţi dacă tipul de terminale şi
ştecăre este corect.
●
Folosiţi un fir complet cablat compatibil HDMI.
●
Folosiţi un cablu SCART complet cablat.
●
Ţineţi televizorul la distanţă de echipamentele
electronice (echipamente video etc.) sau
echipamentele cu senzori în infraroşu, deoarece
în caz contrar pot apărea distorsiuni de imagine/
sunet, iar funcţionarea celorlalte echipamente poate
fi afectată.
●
Vă rugăm citiţi, de asemenea, manualul
echipamentului conectat.
Terminale
2
1
8
1 Slot CI (p. 10)
2 Port USB 1 - 2
3 HDMI3
4 Mufă cască
5 DIGITAL AUDIO
(p. 10)
3
4
5 6
7
109
Română
7
Page 50
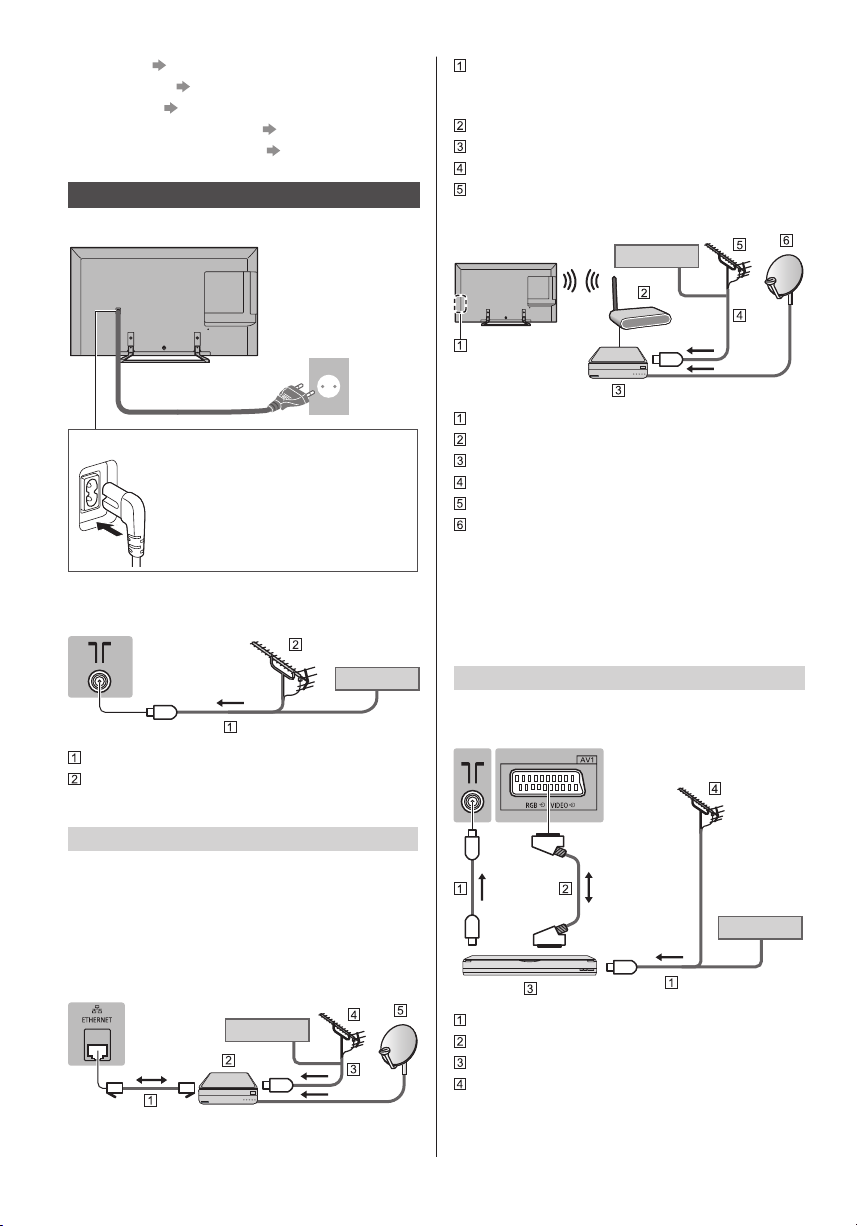
6 HDMI1 - 2 (p. 9, 10)
7 AV1 (SCART)
8 ETHERNET
9 Terminal terestru/de cablu
10
AV2 (COMPONENT/VIDEO) (p. 9)
(p. 8, 9)
(p. 9)
Conexiuni de bază
■ Cablu de alimentare
(p. 8)
CA 220-240 V
50 / 60 Hz
Cablu LAN (Ecranat)
●
Folosiţi cablul LAN torsadat în pereche, ecranat
(STP).
Server DVB via IP
Cablu RF
Antenă terestră
Antenă parabolică
■ Conexiune wireless
Cablu
Cablu de alimentare
Introduceţi ştecărul bine în poziţie.
●
Atunci când deconectaţi cablul de
alimentare, asiguraţi-vă că mai întâi
scoateţi ştecărul din priză.
■ Antenă
Televizor
Cablu
Cablu RF
Antenă terestră
●
Pentru DVB-C, DVB-T, Analogic
Conexiune client DVB via IP
Acest TV are funcţia client DVB via IP şi se poate
conecta la serverul DVB via IP pentru a urmări
transmisiuni în flux continuu.
●
Se recomandă conectarea serverului DVB via IP cu
un cablu LAN.
■ Conexiune prin cablu
Televizor
Cablu
LAN wireless integrat
Punct de acces
Server DVB via IP
Cablu RF
Antenă terestră
Antenă parabolică
●
În funcţie de starea reţelei şi de transmisie, este
posibil ca această funcţie să nu fie disponibilă.
●
Pentru informaţii despre conexiuni, citiţi manualul
serverului DVB via IP.
●
Pentru detalii, consultaţi [eAJUTOR] (Funcţii > DVB
prin IP).
Dispozitive AV
■ Recorder DVD / VCR
Televizor
Cablu
Cablu RF
Cablu SCART
Recorder DVD / VCR
Antenă terestră
8
Română
Page 51
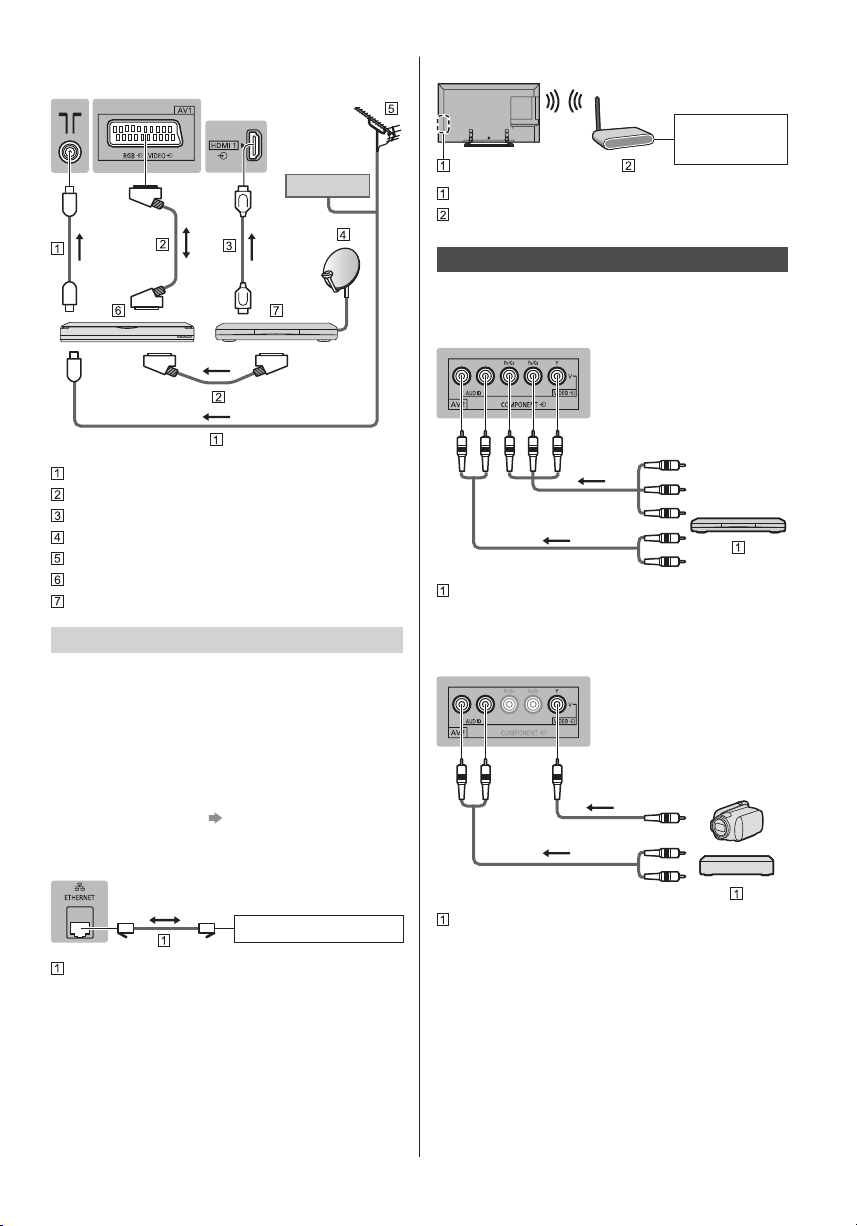
■ Recorder DVD (VCR) / Decodor
Televizor
■ Conexiune wireless
Mediu Internet
Cablu
Cablu RF
Cablu SCART
Cablu HDMI
Antenă parabolică
Antenă terestră
Recorder DVD / VCR
Decodor
Reţea
Pentru a utiliza servicii de internet este nevoie de un
mediu de reţea de bandă largă.
●
Dacă nu aveţi servicii de reţea în bandă largă, vă
rugăm să consultaţi furnizorul dumneavoastră pentru
asistenţă.
●
Pregătiţi mediul Internet pentru conexiunea prin cablu
sau wireless.
●
Setarea conectării la reţea va porni când utilizaţi
prima dată televizorul.
(p. 13)
■ Conexiune prin cablu
Televizor
LAN wireless integrat
Punct de acces
Alte conexiuni
■ Player DVD
(echipament COMPONENT)
Televizor
(Vizionare)
(Ascultare)
Player DVD
■ Cameră video / Echipamente pentru jocuri
(echipament VIDEO)
Televizor
(Vizionare)
(Ascultare)
Mediu Internet
Cablu LAN (Ecranat)
●
Folosiţi cablul LAN torsadat în pereche, ecranat
(STP).
Cameră video / Echipamente pentru jocuri
Română
9
Page 52
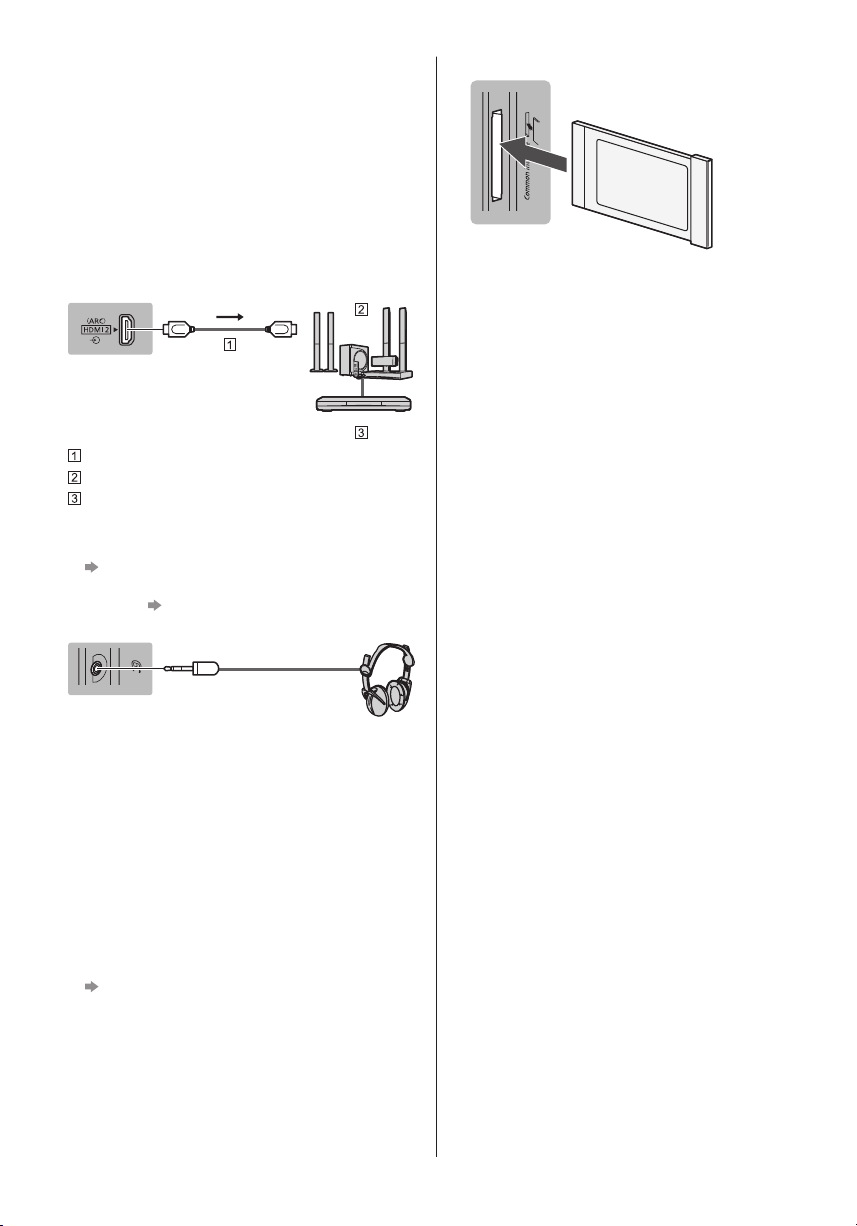
■ Amplificator (pentru a asculta cu difuzoare)
●
Utilizaţi HDMI2 pentru conectarea unui amplificator.
Această conexiune este aplicabilă când utilizaţi un
amplificator care are funcţia ARC (Canal Revenire
Audio).
În ceea ce priveşte un amplificator fără funcţia ARC,
utilizaţi DIGITAL AUDIO.
●
Pentru a vă delecta cu sunetul transmis prin mai
multe canale al echipamentului extern (ex. Dolby
Digital 5.1 canale), conectaţi echipamentul la
amplificator. Pentru informaţii despre conexiuni, citiţi
manualele echipamentului şi amplificatorului.
Televizor
Cablu HDMI
Amplificator cu sistem de difuzoare
Echipament extern (DVD player etc.)
■ Căşti
●
Pentru a regla volumul
[Volum căşti] în meniul Sunet
●
Pentru a selecta ieşirea audio în vederea reglării
volumului
Televizor
[Setare difuzoare] din meniul Sunet
Televizor
Modul CI
■ VIERA Link
●
Utilizaţi HDMI1 - 3 pentru conexiunea VIERA Link.
●
Pentru detalii, consultaţi [eAJUTOR] (Funcţii > VIERA
Link „HDAVI Control™”).
(mufă mini stereo M3)
■ Interfaţă comună
●
Opriţi televizorul cu butonul de pornire/oprire a
alimentării atunci când introduceţi sau scoateţi
modulul CI.
●
Dacă o cartelă inteligentă şi un modul CI sunt
livrate ca set, introduceţi mai întâi modulul CI şi apoi
introduceţi cartela inteligentă în modulul CI.
●
Introduceţi sau scoateţi complet modulul CI în direcţia
corectă, aşa cum este prezentat.
●
Vor fi afişate canalele codificate în mod normal.
(Canalele care pot fi vizionate şi caracteristicile
aferente acestora depind de modulul CI.)
Dacă nu apare canalele criptate
[Interfaţă obişnuită] în meniul Setare
●
Este posibil ca pe piaţă să existe unele module CI
cu versiuni firmware mai vechi, care nu sunt complet
interoperabile cu acest nou televizor CI+ v.1.3. În
acest caz, vă rugăm să vă contactaţi furnizorul de
conţinut.
●
Pentru detalii, consultaţi [eAJUTOR] (Funcţii >
Interfaţă obişnuită), citiţi manualul modulului CI sau
luaţi legătura cu furnizorul de conţinut.
Română
10
Page 53
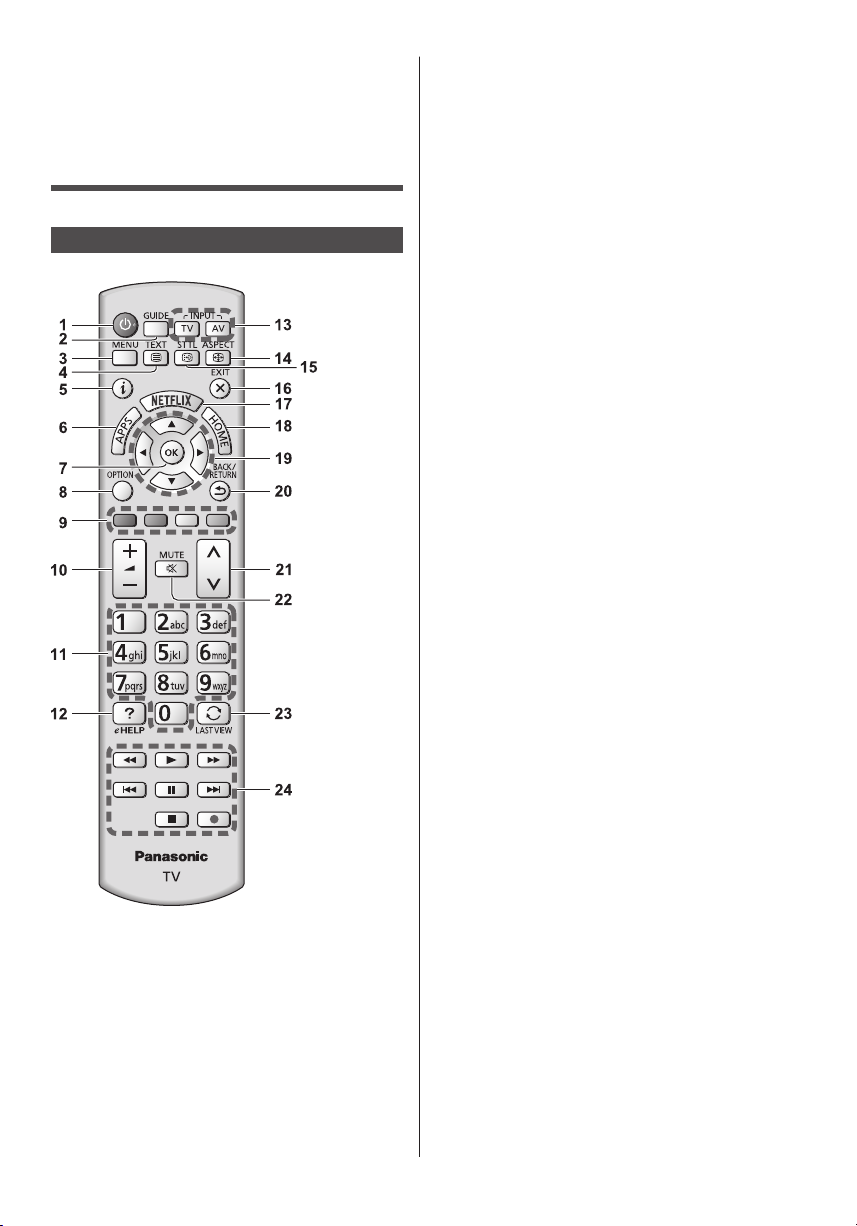
Identificarea
elementelor de
comandă
Telecomandă
1 Buton activare/dezactivare mod de aşteptare
2 Ghid TV
●
Afişează ghidul electronic de programe.
3 [Meniu principal]
●
Apăsaţi pentru a accesa meniurile Imagine, Sunet,
Reţea, Temporizator, Setare şi Ajutor etc.
4 Buton Teletext
5 Informaţii
●
Afişează informaţii despre canale şi programe.
6 APPS
●
Afişează [Lista APPS] (lista de aplicaţii).
7 OK
●
Confirmă selectările şi opţiunile.
●
Pentru o modificare rapidă a canalului, apăsaţi
după selectarea poziţiilor canalelor.
●
Afişează lista de canale.
8 [Meniu opţiuni]
●
Setare opţională simplă pentru vizionare, sunet
etc.
9 Butoane colorate
(roşu-verde-galben-albastru)
●
Folosite pentru selectare, navigare şi utilizarea
diverselor funcţii.
10
Creşterea/reducerea volumului
11
Butoane numerice
●
Schimbă canalele şi paginile teletext.
●
Setează caracterele.
●
În timpul modului de aşteptare, porneşte
televizorul.
12
[eAJUTOR]
●
Afişează sistemul [eAJUTOR] (instrucţiunile de
utilizare integrate).
13
Selectează modul de intrare
●
TV - comută la DVB-C/DVB-T/DVB via IP/Analogic.
●
AV - comută în modul de intrare AV din lista
Selectare intrare.
14
Aspect
●
Modifică formatul imaginii.
15
Subtitrare
●
Afişează subtitrările.
16
Ieşire
●
Revine la [Ecran de pornire].
17
Netflix
●
Accesează direct serviciul NETFLIX.
●
Aveţi nevoie de un mediu de reţea de bandă largă
pentru a utiliza acest serviciu.
●
Acest serviciu poate fi întrerupt sau modificat fără
notificare prealabilă.
18
HOME
●
Afişează [Ecran de pornire].
19
Butoane cursor
●
Efectuează selecţii şi reglaje.
20
Revenire
●
Revenire la meniul/pagina precedentă.
21
Canalul următor/anterior
22
Activare/dezactivare sunet
23
Ultima vizualizare
●
Trece la canalul vizionat anterior sau la modul de
introducere date.
24
Operaţii pentru conţinut, echipamente conectate
etc.
Română
11
Page 54
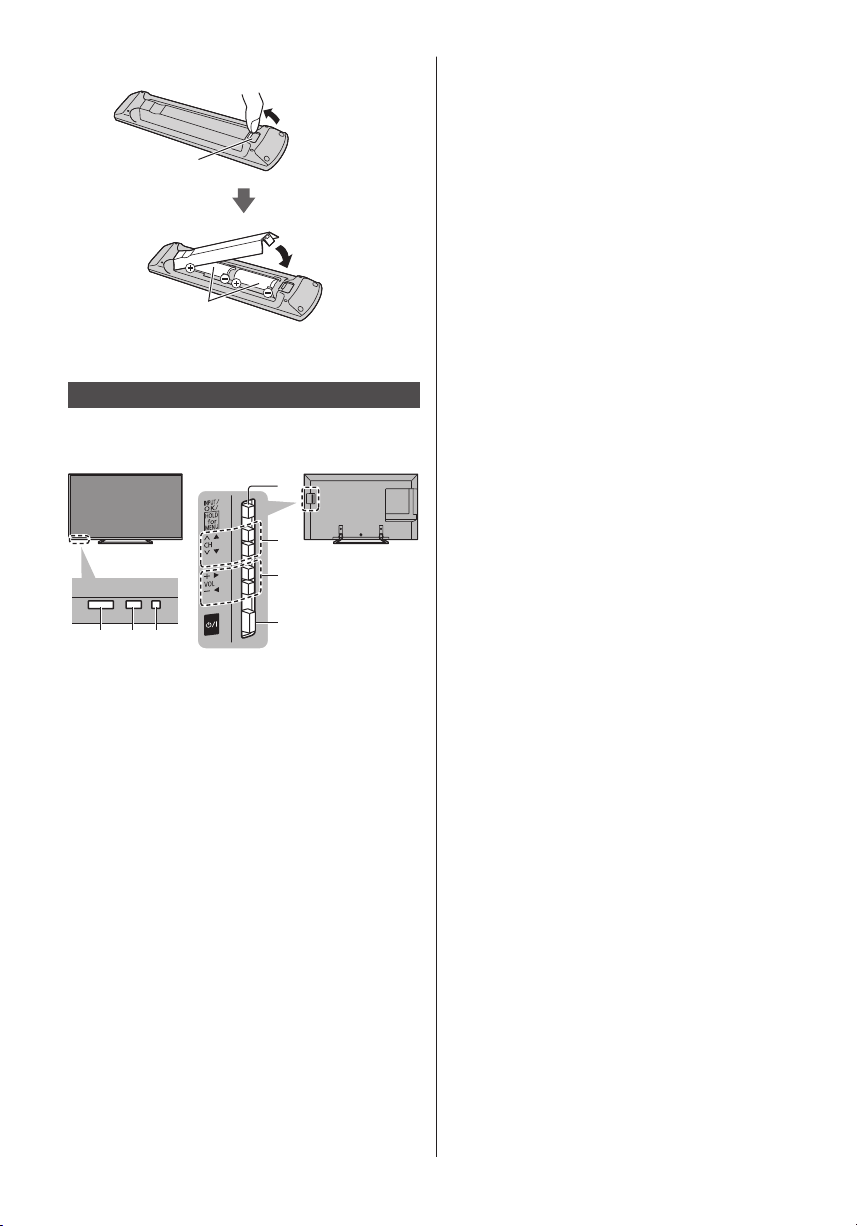
■ Instalarea/demontarea bateriilor
1 2 3
Trageţi pentru a
deschide
Cârlig
Închideţi
Atenţie la polaritatea
corectă (+ sau -)
Indicator/Panou de comandă
●
Când apăsaţi pe butoanele 4, 5, 6, ghidul panoului de
control apare în partea dreaptă a ecranului timp de
3 secunde pentru a evidenţia butonul apăsat.
4
5
6
7
5 Canalul următor/anterior
●
Cursor sus/jos (când vă aflaţi în sistemul de
meniuri)
6 Creşterea/reducerea volumului
●
Cursor stânga/dreapta (când vă aflaţi în sistemul
de meniuri)
7 Buton pornire/oprire alimentare
●
Utilizaţi pentru a porni sau opri alimentarea.
Partea din spate a televizorului
1 Receptor de semnal pentru telecomandă
●
Nu amplasaţi niciun fel de obiecte între
telecomandă şi receptorul de semnal pentru
telecomandă de pe televizor.
2 Senzor de ambianţă
●
Detectează luminozitatea pentru reglarea calităţii
imaginii atunci când [Senzor lumină ambientală]
din Meniul imagine este setat la [Activat].
3 LED de alimentare
Roşu: Mod de aşteptare
Verde: Activat
Portocaliu: Mod de aşteptare cu anumite funcţii
●
LED-ul clipeşte când televizorul primeşte o
comandă de la telecomandă.
4 Selectează modul de intrare
●
Apăsaţi de mai multe ori până ajungeţi la modul
dorit.
[Meniu principal]
●
Ţineţi apăsat pentru circa 3 secunde, pentru a se
afişa meniul principal.
OK (când vă aflaţi în sistemul de meniuri)
Română
12
(funcţia de reţea etc.) active
Page 55
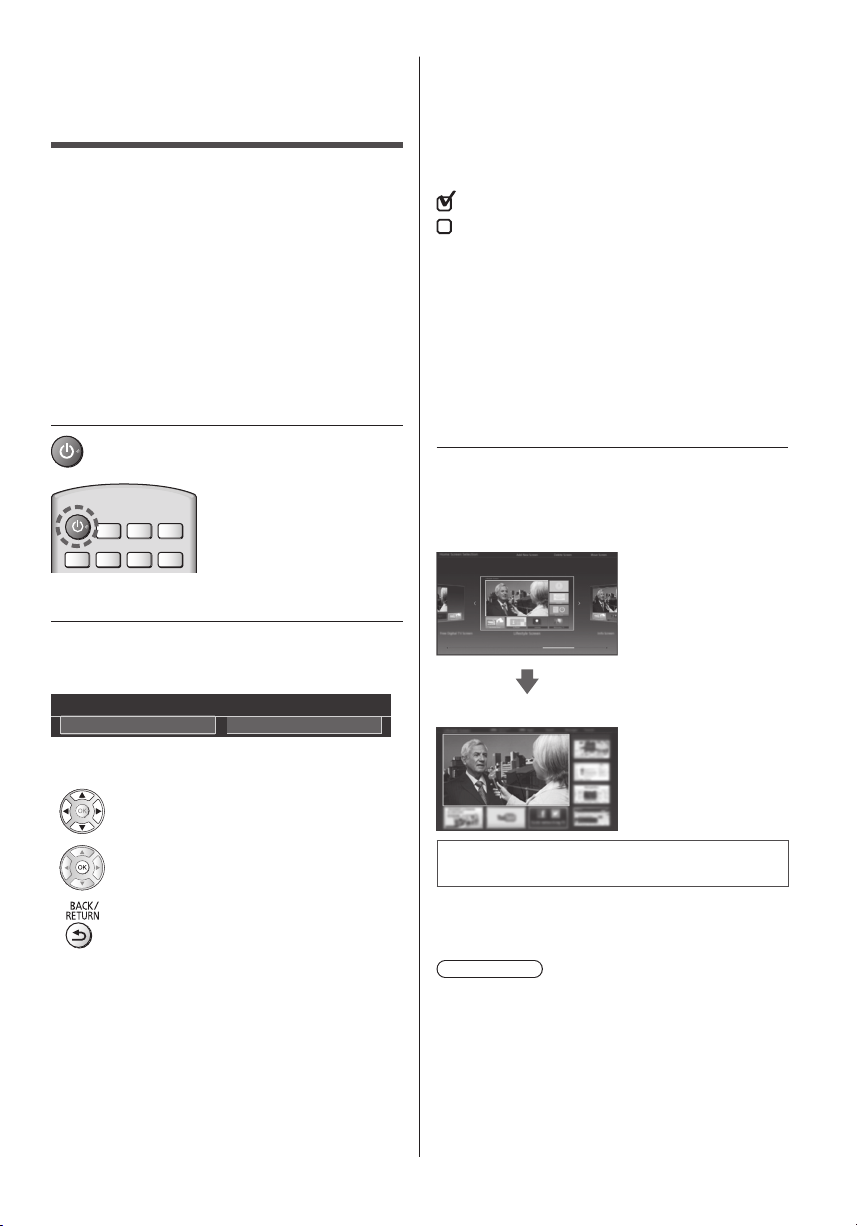
Setare automată
iniţială
La pornirea pentru prima dată a televizorului, acesta
va căuta automat canalele TV disponibile şi va furniza
opţiuni de configurare a televizorului.
●
Aceşti paşi nu trebuie parcurşi în cazul în care
configurarea a fost făcută de reprezentantul local al
firmei Panasonic.
●
Vă rugăm să finalizaţi conexiunile (p. 7 - 10) şi
setările echipamentului conectat (dacă este necesar)
înainte de a începe Setarea automată. Pentru
informaţii despre setările echipamentului conectat,
citiţi manualul echipamentului.
1 Conectaţi televizorul la priză şi cuplaţi
alimentarea acestuia
●
Durează câteva secunde până apare
imaginea.
2 Selectaţi următoarele elemente
Setaţi fiecare element respectând instrucţiunile de pe
ecran.
Exemplu:
Vă rugăm selectaţi mediul de vizionare
Acasă Magazin
Setarea conexiunii la reţea
Selectaţi ţara
●
În funcţie de ţara selectată, selectaţi regiunea
dumneavoastră sau salvaţi codul PIN pentru Blocare
copii („0000” nu poate fi salvat).
Bifaţi modul de semnal TV pentru acord, apoi
selectaţi [Pornire setare auto.]
: acord (căutare a canalelor disponibile)
: omitere acord
●
Ecranul Setare automată variază în funcţie de ţară şi
de modul de semnal selectat.
●
[Setări reţea DVB-C]
În mod normal, setaţi [Frecvenţă] şi [ID reţea] pe
[Auto].
Dacă [Auto] nu este afişat sau dacă este necesar,
introduceţi parametrii [Frecvenţă] şi [ID reţea]
specificaţi de furnizorul dumneavoastră de servicii
prin cablu, utilizând butoanele numerice.
3 Selectaţi tipul de [Ecran de pornire]
Se afişează demonstraţia modului de utilizare a [Ecr.
meu de pornire]. Confirmaţi demonstraţia respectând
instrucţiunile de pe ecran, apoi selectaţi valoarea dorită
pentru [Ecran de pornire].
Exemplu: [Sel. Ecran pornire]
Exemplu: [Ecran de pornire TV]
■ Folosirea telecomenzii
Deplasaţi cursorul
Accesaţi elementul/memoraţi setarea
Reveniţi la elementul precedent (dacă este
disponibil)
Selectaţi limba
Selectaţi [Acasă]
Selectaţi mediul de vizualizare [Acasă] pentru utilizare în
mediul dumneavoastră de acasă.
●
[Magazin] este pentru expunerea în magazin.
●
Pentru a modifica ulterior mediul de vizualizare, va
trebui să iniţializaţi toate setările prin accesarea
Condiţii presetate.
Setarea automată este încheiată şi
televizorul este gata de funcţionare.
Dacă acordarea a eşuat, verificaţi cablul RF şi
conexiunea de reţea, apoi urmaţi instrucţiunile de pe
ecran.
Observaţie
●
Televizorul intră în modul Standby când nu se
execută nicio operaţie timp de 4 ore dacă [Standby
automat] din meniul Temporizator este setată la
[Activat].
●
Televizorul intră în modul Standby când nu se
recepţionează niciun semnal şi nu se execută nicio
operaţie timp de 10 minute dacă [Oprire în absenţa
semnalului] din meniul Temporizator este setată la
[Activat].
Română
13
Page 56
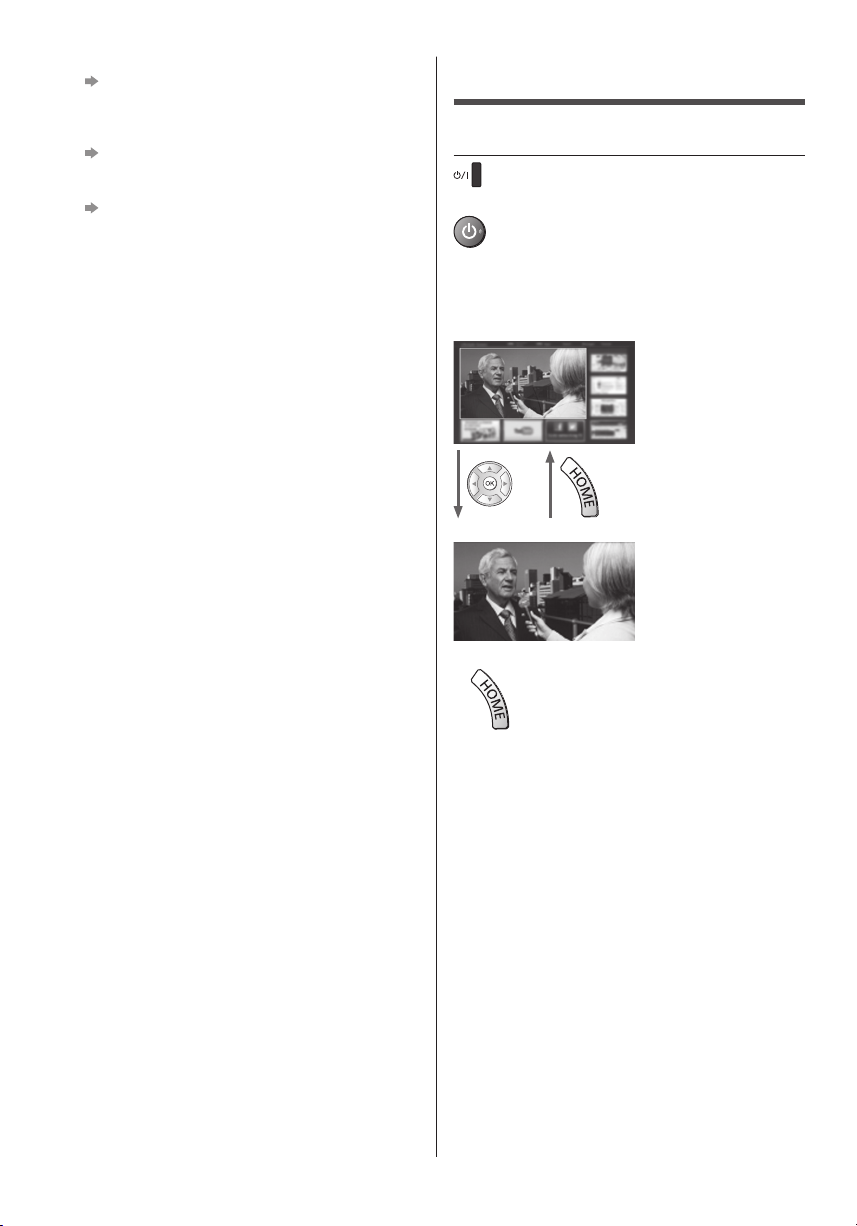
●
Pentru a reacorda toate canalele
[ Setare automată] în [Meniu acord] (Meniul
Setare)
●
Pentru a adăuga modul semnalului TV disponibil mai
târziu
[ Adaugă semnal TV] în [Meniu acord] (Meniul
Setare)
●
Pentru a iniţializa toate setările
[ Condiţii presetate] în [Meniu sistem] (Meniul
Setare)
Operaţii
Porniţi televizorul
(TV)
sau
(Telecomandă)
●
Butonul de pornire/oprire a alimentării trebuie să fie în
poziţia de pornire. (p. 12)
Se afişează ultimul [Ecran de pornire] vizualizat.
Exemplu: [Ecran de pornire TV]
Exemplu: Ecran de conţinut selectat
14
Română
●
Pentru a reveni oricând la [Ecran de pornire]
●
[Ecran de pornire] se poate configura pentru a afişa
informaţiile dorite, pentru a accesa uşor anumite
funcţii, pentru a selecta [Ecran de pornire] implicit
etc. Pentru detalii, urmaţi instrucţiunile de pe ecran
sau consultaţi [eAJUTOR] (Ecr. meu de pornire > Ecr.
meu de pornire).
Page 57
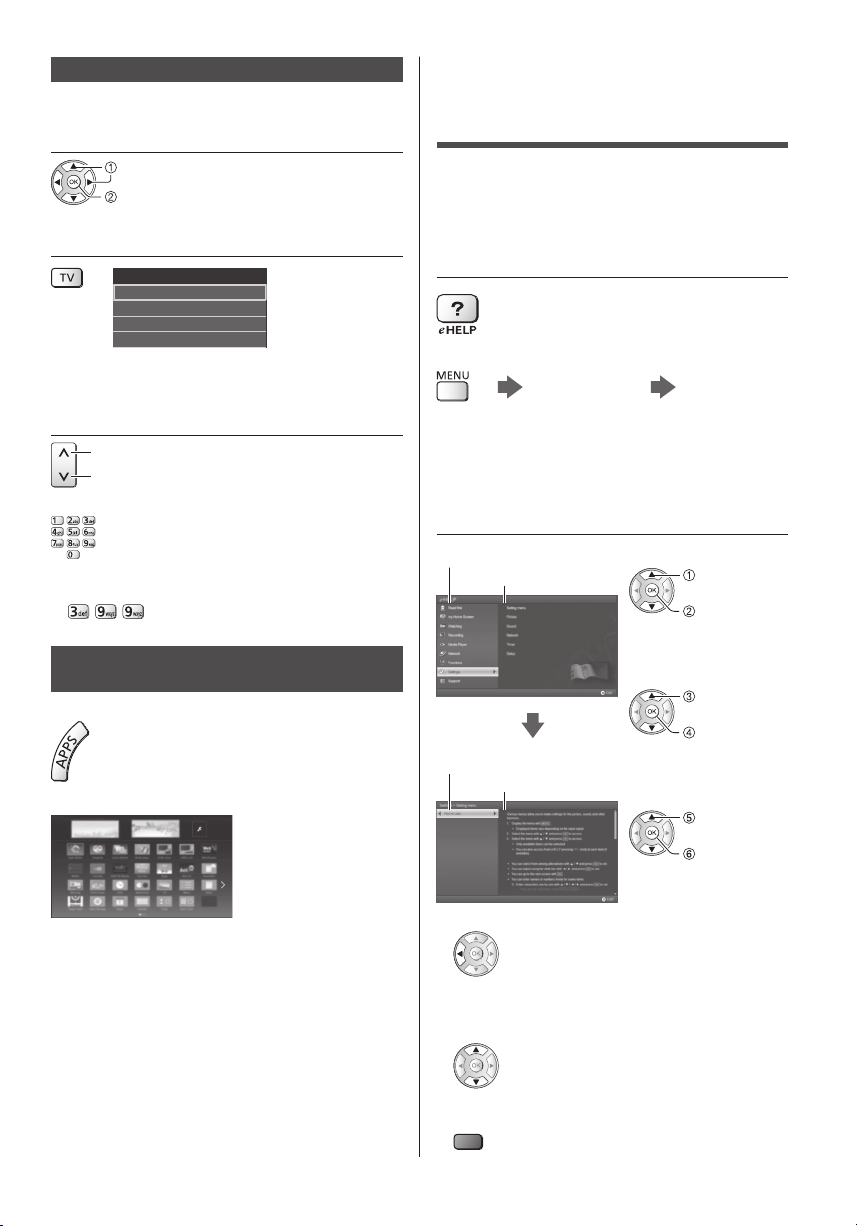
Vizionarea programelor TV
Modul de utilizare
1 Selectaţi vizualizatorul TV din [Ecran
de pornire]
selectare
accesare
2 Selectaţi modul
Selectare TV
DVB-C
DVB-T
DVB prin IP
Analogic
●
Modurile selectabile variază în funcţie de canalele
stocate.
3 Selectaţi un canal
sus
jos
sau
●
Pentru selectarea unui număr de program format din
2 sau mai multe cifre, de ex. 399
Pentru accesarea fiecărei
caracteristici
Accesaţi [Lista APPS] şi selectaţi o caracteristică
Exemplu: [Lista APPS]
eAJUTOR
[eAJUTOR] reprezintă instrucţiunile de utilizare detaliate
integrate în softul televizorului şi furnizează o explicaţie
mai detaliată, pentru o mai bună înţelegere a operării
fiecărei .
1 Afişaj [eAJUTOR]
sau
[Ajutor] [eAJUTOR]
●
Dacă s-a accesat anterior [eAJUTOR] după pornirea
televizorului, va fi afişat ecranul de confirmare, pentru
a selecta dacă se trece la [Prima pagină] sau la
[Ultima pagină vizualizată].
2 Selectaţi categoria şi elementul
Câmp categorie
Câmp element
Câmp element secundar
Descriere
selectare
categorie
accesare
selectare
element
accesare
selectare element
secundar
accesare
●
APPS reprezintă lista de aplicaţii (caracteristici) ale
televizorului.
●
Pentru utilizarea fiecărei caracteristici şi setarea
[Lista APPS], urmaţi instrucţiunile de pe ecran sau
consultaţi sistemul [eAJUTOR] (Ecr. meu de pornire
> Lista APPS).
●
Pentru a reveni la câmpul precedent
●
Pentru a derula descrierea (dacă are mai mult de
1 pagină)
În timp ce descrierea este evidenţiată
●
Pentru a afişa meniul aferent descrierii (numai pentru
unele descrieri)
(Roşu)
Română
15
Page 58

●
Pentru verificarea funcţiilor acestui televizor
A se citi înainte > Funcţii
16
Română
Page 59
Întrebări frecvente
Înainte de a solicita service sau asistenţă, urmaţi aceste
indicaţii simple pentru a rezolva problema.
●
Pentru detalii, consultaţi [eAJUTOR] (Asistenţă >
Întrebări frecvente).
Televizorul nu porneşte
●
Verificaţi dacă aţi conectat cablul de alimentare la
televizor şi la priză.
Televizorul trece în modul aşteptare
●
Funcţia automată de aşteptare este activată.
Telecomanda nu funcţionează sau funcţionează
intermitent
●
Bateriile sunt introduse corect?
●
Televizorul a fost pornit?
●
Se poate ca bateriile să fie consumate. Înlocuiţi-le cu
unele noi.
●
Îndreptaţi telecomanda direct către receptorul
de semnal al telecomenzii televizorului (până
la aproximativ 7 m şi un unghi de 30 de faţă de
receptorul de semnal).
●
Amplasaţi televizorul departe de lumina soarelui
sau de alte surse de lumină puternică, pentru a nu
se reflecta în receptorul de semnal al telecomenzii
televizorului.
(p. 12)
Părţi ale televizorului devin fierbinţi
●
Părţi ale televizorului pot deveni fierbinţi. Aceste
creşteri de temperatură nu prezintă vreo problemă în
ceea ce priveşte performanţele şi calitatea.
La atingerea cu un deget, panoul de afişare se mişcă
încet şi emite un sunet.
●
În jurul panoului există un mic spaţiu liber pentru a
preveni deteriorarea panoului. Aceasta nu este o
defecţiune.
Nu se afişează nicio imagine
●
Verificaţi dacă televizorul este pornit.
●
Verificaţi dacă aţi conectat cablul de alimentare la
televizor şi la priză.
●
Verificaţi selectarea corectă a modului de intrare.
●
Verificaţi ca setarea [AV2] ([COMPONENT] / [VIDEO])
în [Selectare intrare] să corespundă cu semnalul emis
de echipamentul extern.
●
Sunt [Iluminare], [Contrast], [Luminozitate] sau
[Culoare] din meniul Imagine setate la valoarea
minimă?
●
Verificaţi dacă toate cablurile necesare şi conexiunile
sunt bine fixate.
Se afişează o imagine neobişnuită
●
Televizorul are o funcţie de auto-testare integrată.
Realizează o diagnoză a problemelor de imagine sau
de sunet.
[Autotest TV] (Help Menu)
●
Opriţi televizorul de la butonul de pornire/oprire a
alimentării şi apoi reporniţi-l.
●
Dacă problema persistă, iniţializaţi toate setările.
[Condiţii presetate] în [Meniu sistem] (Meniul
Setare)
Română
17
Page 60
Întreţinere
Date tehnice
Mai întâi, scoateţi ştecărul din priză.
Ecranul de afişare, carcasa,
piedestalul
Îngrijirea periodică:
Ştergeţi cu atenţie suprafaţa ecranului de afişare,
carcasa sau piedestalul prin utilizarea unei cârpe moi
pentru a curăţa urmele de murdărie sau amprentele.
Pentru urme persistente de murdărie:
(1) Mai întâi, ştergeţi praful de pe suprafaţă.
(2) Umeziţi o cârpă moale cu apă curată sau cu apă
care conţine o cantitate mică de detergent neutru
(1 parte detergent la 100 părţi apă).
(3) Stoarceţi cârpa temeinic. (Atenţie, nu lăsaţi să
pătrundă lichid în interiorul televizorului, deoarece
poate duce la defectarea produsului.)
(4) Umeziţi cu atenţie cu o cârpă şi apoi îndepărtaţi
murdăria persistentă.
(5) La final, ştergeţi toată umezeala de pe suprafaţă cu
o cârpă uscată.
Atenţie
●
Nu utilizaţi o cârpă din material dur şi nu frecaţi
suprafaţa prea insistent, deoarece pot apărea
zgârieturi pe suprafaţă.
●
Aveţi grijă ca suprafeţele să nu ajungă în contact
cu insecticide, solvenţi, diluanţi sau alte substanţe
volatile. Acestea ar putea distruge calitatea suprafeţei
prin desprinderea stratului de vopsea.
●
Suprafaţa panoului de afişare are un strat de
acoperire special care se deteriorează foarte uşor.
Evitaţi lovirea sau zgârierea suprafeţei cu unghiile sau
cu alte obiecte dure.
●
Nu lăsaţi carcasa şi piedestalul să ajungă în contact o
perioadă mai lungă cu obiecte din cauciuc sau PVC.
Acest lucru ar putea afecta calitatea suprafeţei.
Ştecărul
Ştergeţi ştecărul cu o cârpă uscată la intervale
regulate. Umezeala şi praful pot provoca incendii sau
electrocutare.
■ Televizor
Model nr.
TX-55CS620E
Dimensiuni (lăţime × înălţime × adâncime)
1 242 mm × 761 mm × 292 mm (Cu piedestal)
1 242 mm × 719 mm × 56 mm (Numai televizorul)
Masa
19,0 kg net (Cu piedestal)
18,0 kg net (Numai televizorul)
Sursa de alimentare
CA 220-240 V, 50 / 60 Hz
Panou
Panou LCD cu leduri
Sunet
Ieşire difuzor
20 W (10 W + 10 W)
Căşti
Mufă M3 (3,5 mm) stereo × 1
Conectori
Intrare/ieşire AV1
SCART (intrare audio/video, ieşire audio/video,
intrare RGB)
Intrare AV2 (COMPONENT/VIDEO)
VIDEO
PIN tip RCA × 1
1,0 V[p-p] (75 Ω)
AUDIO L - R
PIN tip RCA × 2
0,5 V[rms]
Y
1,0 V[p-p] (incluzând sincronizarea)
B/CB, PR/CR
P
± 0,35 V[p-p]
18
Română
Intrare HDMI 1/2/3
Conectori TIP A
HDMI1/3: Tip conţinut
HDMI2: Tip conţinut, Canal Revenire Audio
●
Acest televizor acceptă funcţia „HDAVI Control 5”.
Page 61
Slot card
Slot Interfaţă obişnuită (în conformitate cu CI Plus)
× 1
ETHERNET
RJ45, IEEE802.3 10BASE-T/100BASE-TX
USB 1/2
5 V c.c., Max. 500 mA [Hi-Speed USB (USB 2.0)]
Ieşire DIGITAL AUDIO
PCM/Dolby Digital, Fibră optică
Sisteme de recepţie / Denumire bandă
Consultaţi ultimele informaţii privind serviciile disponibile
pe următorul site web. (Doar în limba engleză)
http://panasonic.net/viera/support
DVB-C
Servicii digitale prin cablu (MPEG2 şi MPEG4AVC(H.264))
DVB-T/T2
Servicii digitale terestre (MPEG2 şi MPEG4AVC(H.264))
PAL B, G, H, I
SECAM B, G
SECAM L, L’
VHF E2 - E12
VHF A - H (ITALIA)
CATV (S01 - S05)
CATV S11 - S20 (U1 - U10)
VHF H1 - H2 (ITALIA)
UHF E21 - E69
CATV S1 - S10 (M1 - M10)
CATV S21 - S41 (Hiperbandă)
PAL D, K
SECAM D, K
VHF R1 - R2
VHF R3 - R5
VHF R6 - R12
UHF E21 - E69
NTSC (numai intrare AV)
Redare de pe videocasetofoane NTSC
(videorecorder)
Intrare antenă
VHF/UHF
Condiţii de utilizare
Temperatură
0 °C - 35 °C
Umiditate
20 % - 80 % UR (fără condens)
LAN wireless integrat
Conformitate cu standardele şi gamă de
frecvenţe
Securitate
*:
Frecvenţa şi canalul diferă în funcţie de ţară.
Observaţie
●
Designul şi caracteristicile pot fi modificate fără aviz
prealabil. Dimensiunile şi greutatea indicate sunt doar
valori aproximative.
●
Pentru informaţii privind consumul de energie,
rezoluţia de afişare etc., consultaţi Fişa produsului.
●
Pentru informaţii privind software-ul open source,
consultaţi [eAJUTOR] (Asistenţă > Licenţă).
●
Acest echipament respectă standardele EMC
enumerate mai jos.
EN55032, EN55020, EN55024, EN61000-3-2,
EN61000-3-3
*
IEEE802.11a/n
5,180 GHz - 5,320 GHz, 5,500 GHz - 5,580 GHz,
5,660 GHz - 5,700 GHz
IEEE802.11b/g/n
2,412 GHz - 2,472 GHz
WPA2-PSK (TKIP/AES)
WPA-PSK (TKIP/AES)
WEP (64 biţi/128 biţi)
PAL 525/60
Redare bandă NTSC de pe unele echipamente de
înregistrare video PAL (videorecorder)
M.NTSC
Redare de pe videocasetofoane M.NTSC
(videorecorder)
Română
19
Page 62
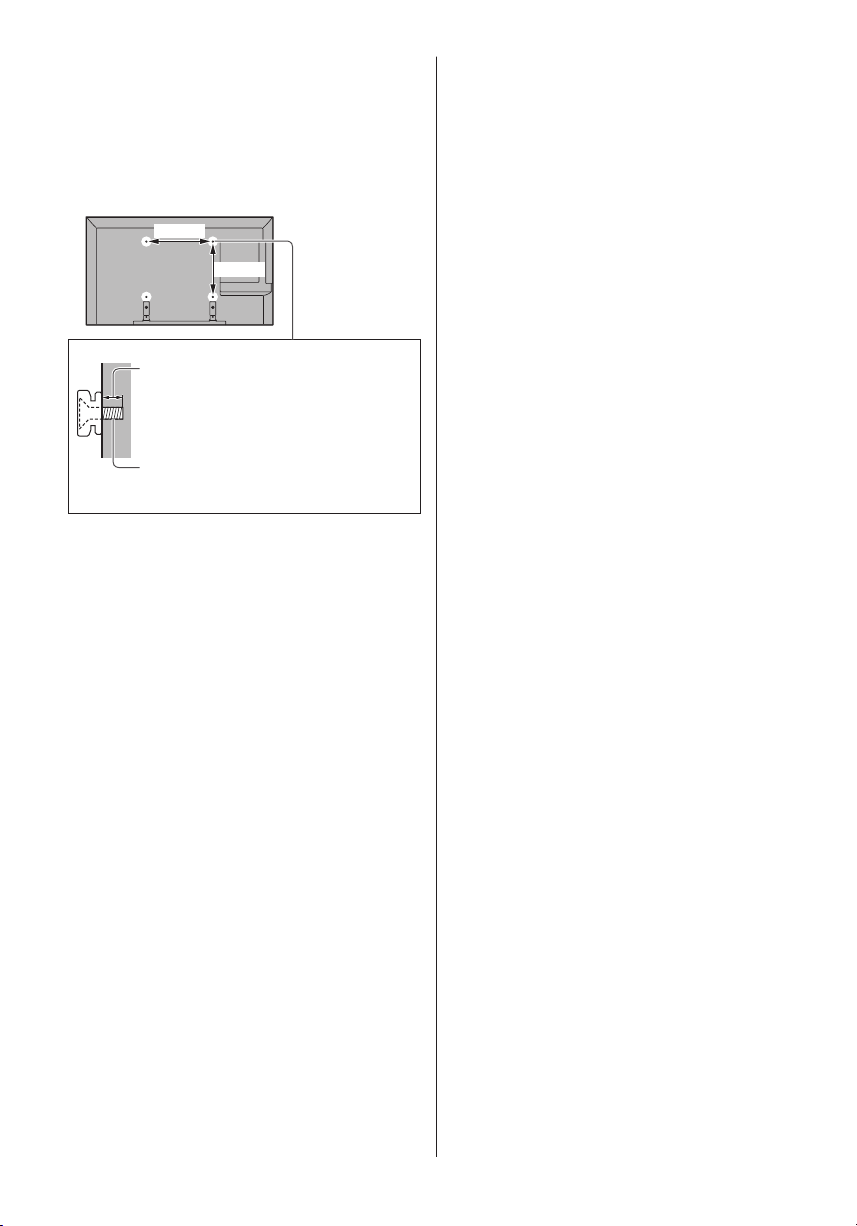
■ Când utilizaţi suportul pentru suspendare
pe perete
Vă rugăm să vă contactaţi distribuitorul local Panasonic
pentru a achiziţiona suportul pentru suspendare pe
perete.
●
Găuri pentru montarea suportului pentru suspendare
de perete
Partea din spate a televizorului
400 mm
400 mm
(Vedere din lateral)
Adâncime şurub
minimum: 10 mm
maximum: 16 mm
Diametru: M6
Şurub pentru fixarea televizorului pe
suportul pentru suspendare pe perete (nu
este furnizat împreună cu televizorul)
20
Română
Page 63

Page 64
Depunerea la deşeuri a echipamentelor şi a bateriilor vechi
Web Site: http://panasonic.net
© Panasonic Corporation 2015
Doar pentru Uniunea Europeană şi pentru ţările cu sisteme de reciclare
Aceste simboluri de pe produse, ambalaje şi/sau documentele însoţitoare indică faptul că
produsele electrice şi electronice, precum şi bateriile uzate nu trebuie să fie amestecate
cu deşeurile menajere obişnuite.
Pentru un tratament corespunzător, pentru recuperarea şi reciclarea produselor vechi şi
a bateriilor uzate, vă rugăm să le depuneţi la punctele de colectare special amenajate, în
conformitate cu legislaţia naţională.
Prin depunerea corespunzătoare a acestora la deşeuri, veţi ajuta la economisirea unor
resurse valoroase şi veţi preveni potenţiale efecte negative asupra sănătăţii umane şi
asupra mediului înconjurător.
Pentru mai multe informaţii despre colectare şi reciclare, vă rugăm să contactaţi
autorităţile locale.
Este posibil ca depunerea incorectă la deşeuri să fie pedepsită în conformitate cu legile
naţionale.
Notă pentru simbolul de baterie (ultimele două exemple de simboluri):
Acest simbol poate fi utilizat în combinaţie cu un simbol chimic. În acest caz, acesta este
conform cu cerinţele stabilite de Directivă pentru elementul chimic în cauză.
Fişa clientului
Numărul modelului şi numărul de serie al acestui produs se găsesc pe panoul din spate al televizorului. Este
recomandat să notaţi acest număr de serie în spaţiul de mai jos şi să păstraţi acest manual, precum şi chitanţa
cu care aţi cumpărat televizorul, pentru a putea fi folosite la identificarea produsului în cazul unui furt sau al unei
pierderi, respectiv pentru lucrările de service prevăzute de garanţie.
Număr model Număr de serie
Română
TQB0E2503N-2
Tipărit în Republica Cehă
 Loading...