

Page 1

OPERATING INSTRUCTIONS
TX-55C320B
COLOUR TELEVISION WITH REMOTE CONTROL
Page 2

Contents
Safety Information ..................................................3
Markings on the Product.........................................3
Maintenance ...........................................................4
Assembling / Removing the pedestal ..................... 5
When using the wall-hanging bracket.....................5
Environmental Information......................................5
Features .................................................................6
Accessories Included..............................................6
Standby Notications .............................................. 6
TV Control Buttons & Operation ............................. 6
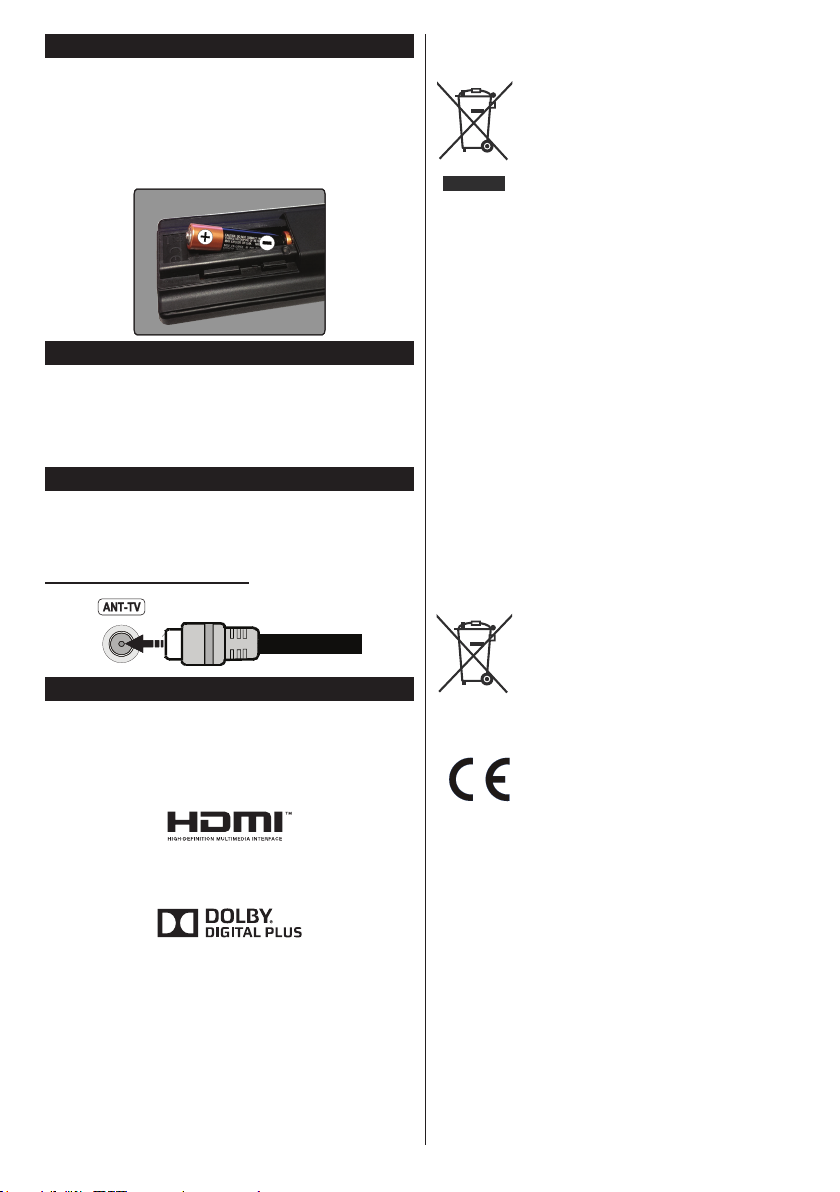
Inserting the Batteries into the Remote .................. 7
Connect Power ...................................................... 7
Antenna Connection ............................................... 7
Notication ..............................................................7
Specication ...........................................................8
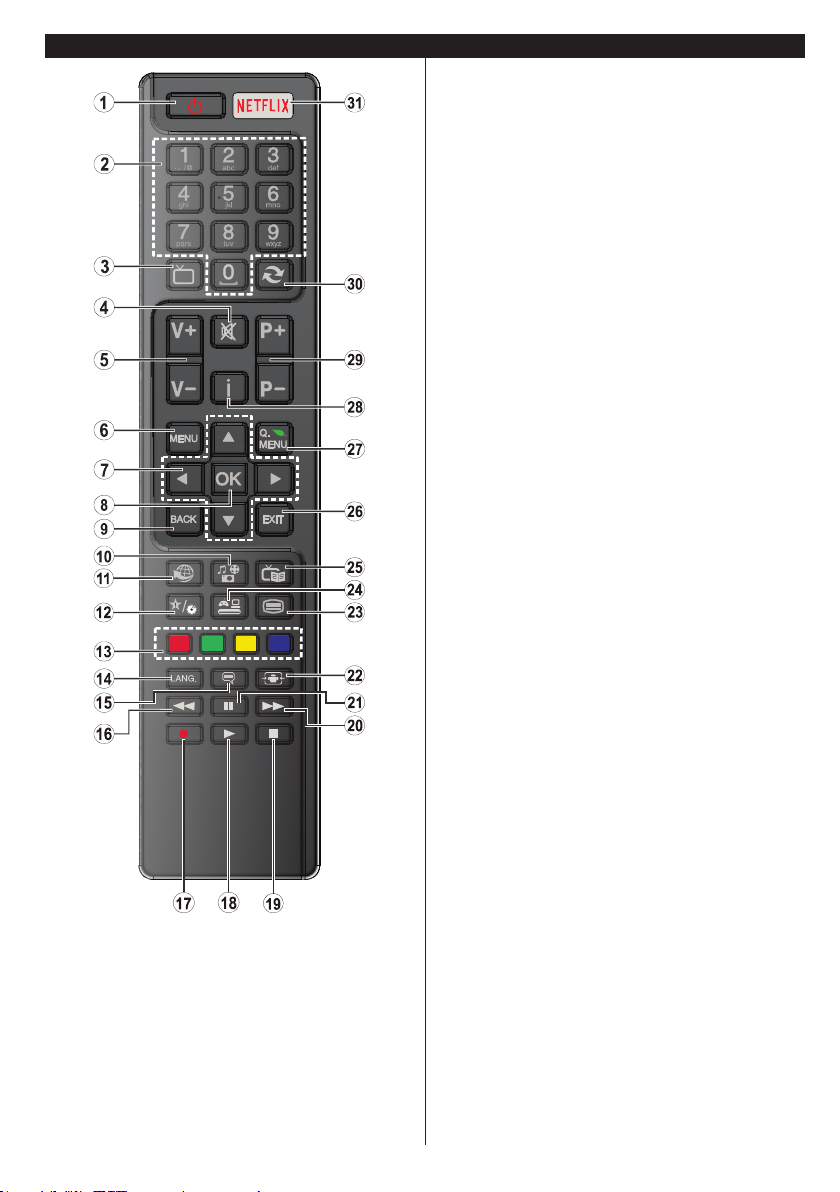
Remote Control ......................................................9
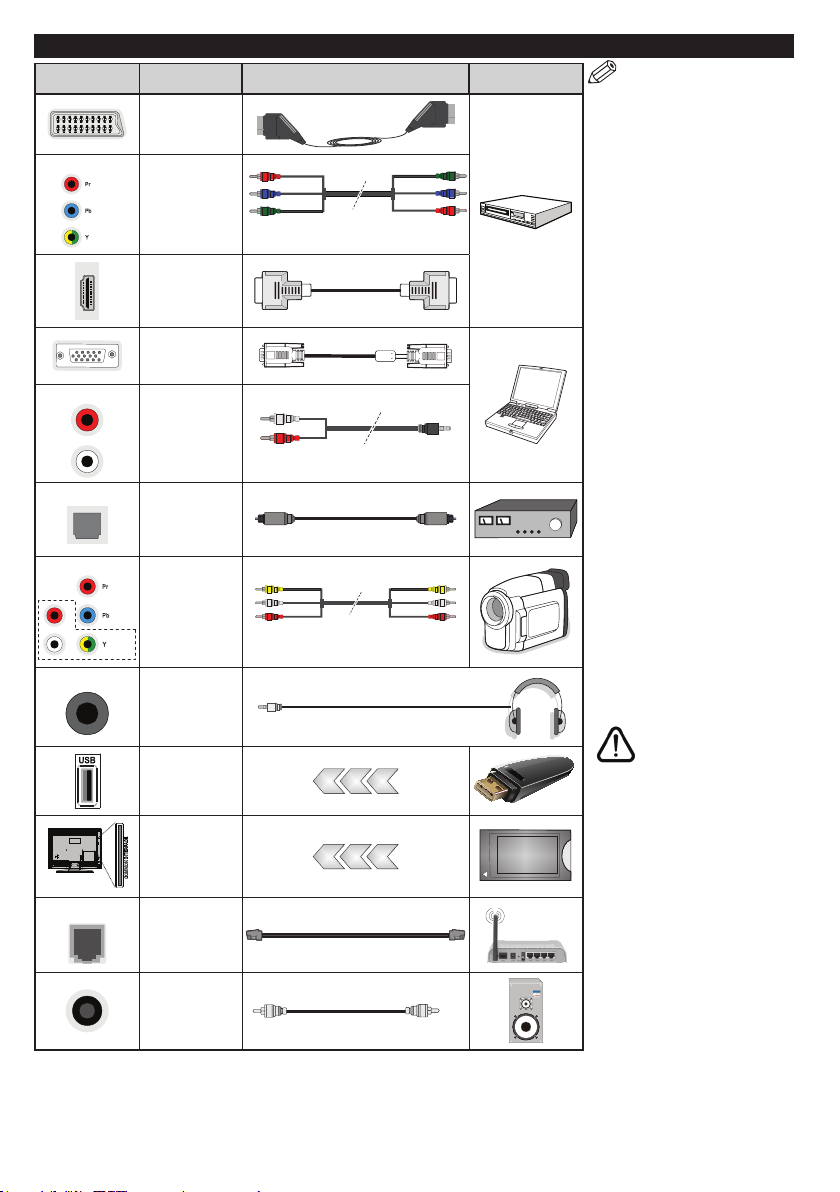
Connections..........................................................10
Switching On/Off ................................................... 11
First Time Installation............................................ 11
Media Playback via USB Input ............................. 11
Media Browser Menu............................................12
CEC and CEC RC Passthrough ........................... 12
TV Menu Contents................................................13
General TV Operation ..........................................17
Using the Channel List .........................................17
Conguring Parental Settings ............................... 17
Electronic Programme Guide (EPG) ....................17
Teletext Services .................................................. 18
Software Upgrade.................................................18
Troubleshooting & Tips .........................................19
PC Input Typical Display Modes ...........................19
AV and HDMI Signal Compatibility .......................20
Supported Video File Formats for USB Mode ......21
Supported Picture File Formats for USB Mode .... 21
Supported Audio File Formats for USB Mode ......22
Supported Subtitle File Formats for USB Mode ...23
Supported DVI Resolutions .................................. 24
Connectivity ..........................................................25
Audio Video Sharing .............................................27
Nero MediaHome Installation ............................... 27
Internet Portal .......................................................28
Internet Browser ................................................... 29
Important Instruction ............................................. 30
English - 2 -
Page 3
Safety Information
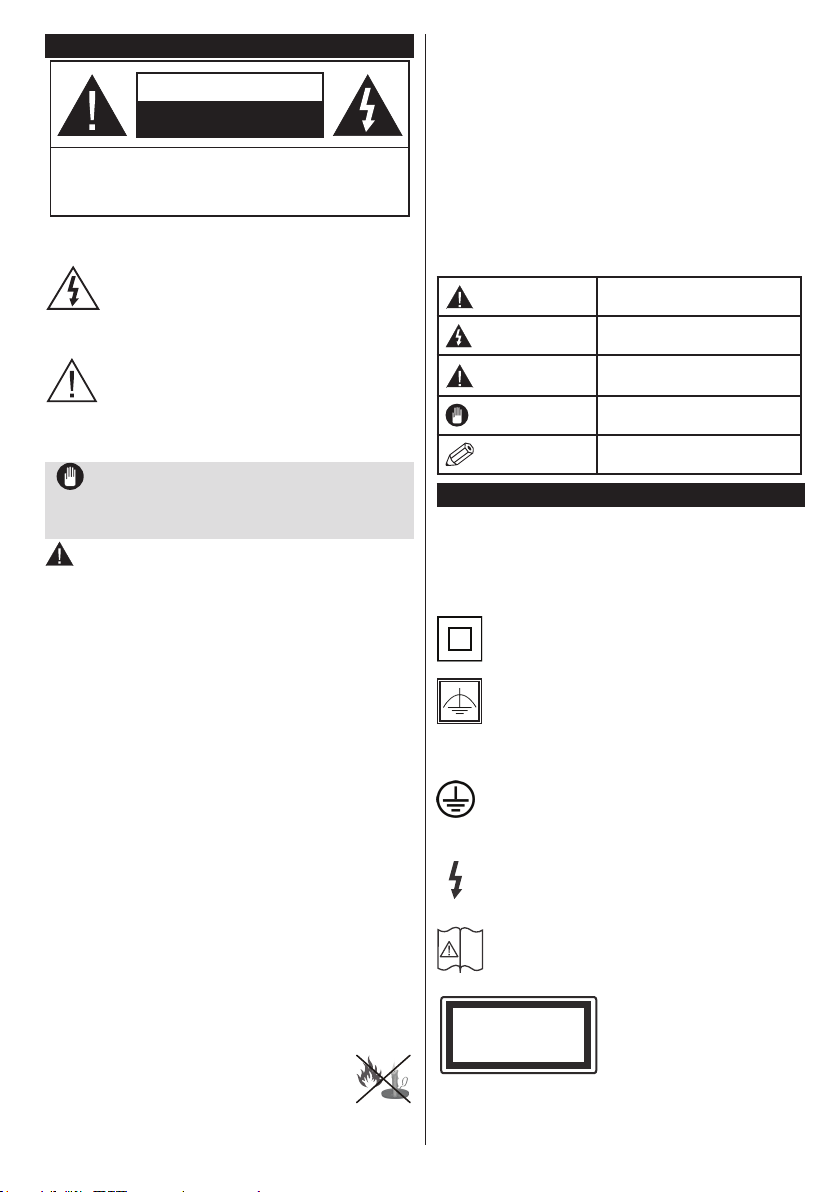
i
CAUTION
RISK OF ELECTRIC SHOCK
DO NOT OPEN
CAUTION: TO REDUCE THE RISK OF ELECTRIC SHOCK DO
NOT REMOVE COVER (OR BACK).
NO USER-SERVICEABLE PARTS INSIDE. REFER
SERVICING TO QUALIFIED SERVICE PERSONNEL.
Don’t operate your TV in extreme ambient
conditions as this may cause damage to your TV.
In extreme weather (storms, lightning) and long
inactivity periods (going on holiday) disconnect
the TV set from the mains. The mains plug is
used to disconnect TV set from the mains and
therefore it must remain readily operable.
This sign is present wherever there is very
important information on operation and
maintenance of the appliance in the literature
Note: Follow the on screen instructions for operating the
related features.
accompanying it.
IMPORTANT - Please read these
instructions fully before installing or
operating
WARNING: Never let people (including
children) with reduced physical, sensory or
mental capabilities or lack of experience and / or
knowledge use electrical devices unsupervised.
• For ventilation purposes, leave a free space of at
least 10 cm all around the set.
•Do not block ventilation holes.
•Do not place the TV on sloping or unstable surfaces,
the TV may tip over.
• Use this device in moderate climates.
• The power cord plug should be easily accessible. Do
not place the TV, furniture, etc. on the power cord.
A damaged power cord/plug can cause re or give
you an electric shock. Handle the power cord by the
plug, do not unplug the TV by pulling the power cord.
Never touch the power cord/plug with wet hands
as this could cause a short circuit or electric shock.
Never make a knot in the power cord or tie it with
other cords. When damaged it must be replaced,
this should only be done by qualied personnel.
•Do not use this TV in a humid or damp environment.
Do not expose the TV to liquids. In case the cabinet
contacts any liquids unplug the TV immediately
and have it checked by qualied personnel before
operating it any further.
•Do not expose the TV to direct sunlight,
open ames or place it near intense heat
sources such as electric heaters.
• Listening in excessive volumes from earphones and
headphones may cause hearing loss.
• Ensure that no open ame sources, such as lit
candles, are placed on top of the TV.
• To prevent injuries, this TV must be securely
attached to a wall by carefully following the
instructions (if the option is available).
• Occasionally, a few non-active pixels may appear
on the screen as a xed blue, green or red point.
Please note that this does not affect the performance
of your product. Take care not to scratch the screen
with ngernails or other hard objects.
• Before cleaning, unplug the TV from the wall socket.
Only use a soft, dry cloth while cleaning.
Markings on the Product
The following symbols are used on the product as
a marker for restrictions and precautions and safety
instructions. Each explanation shall be considered
where the product bears related marking only. Note
such information for security reasons.
connection to electrical earth, the earth connection is
used for functional purposes.
the supply wiring.
English - 3 -
Warning
Risk of electric shock
Caution
Important
Notice
Serious injury or death risk
Dangerous voltage risk
Injury or property damage risk
Operating the system correctly
Additional notes marked
Class II Equipment: This appliance is
designed in such a way that it does not require
a safety connection to electrical earth.
Class II Equipment With Functional
Earthing: This appliance is designed in such
a way that it does not require a safety
Protective Earth Connection: The marked
terminal is intended for connection of the
protective earthing conductor associated with
Hazardous Live Terminal: The marked
terminal(s) is/are hazardous live under normal
operating conditions.
Caution, See Operating Instructions: The
marked area(s) contain(s) user replaceable
coin or button cell batteries.
Class 1 Laser Product:
CLASS 1
LASER PRODUCT
This product contains Class
1 laser source that is safe
under reasonably foreseeable
conditions of operation.
Page 4
WARNING
Do not ingest the battery, Chemical Burn
Hazard
(The accessories supplied with or) This pro-
duct may contain a coin/button cell battery.
If the coin/button cell battery is swallowed,
it can cause severe internal burns in just 2
hours and can lead to death.
Keep new and used batteries away from
children.
If the battery compartment does not close
securely, stop using the product and keep it
away from children.
If you think batteries might have been swal-
lowed or placed inside any part of the body,
seek immediate medical attention.
WARNING
Never place a television set in an unstable
location. A television set may fall, causing
serious personal injury or death. Many inju-
ries, particularly to children, can be avoided
by taking simple precautions such as;
• Using cabinets or stands recommended by
the manufacturer of the television set.
• Only using furniture that can safely support
the television set.
• Ensuring the television set is not overhanging
the edge of the supporting furniture.
• Not placing the television set on all furniture
(for example, cupboards or bookcases)
without acnhoring both the furniture and the
television set to a suitable support.
• Educating children about the dangers of
climbing on furniture to reach the television
set or its controls.
If your existing television set is being retained and
relocated, the same considerations as above should
be applied.
Maintenance
First, remove the mains plug from the mains
socket.
Display panel, Cabinet, Pedestal
Regular care:
Gently wipe the surface of the display panel, cabinet,
or pedestal by using a soft cloth to remove dirt or
ngerprints.
For stubborn dirt:
1. First clean the dust from the surface.
2. Dampen a soft cloth with clean water or diluted
neutral detergent (1 part detergent to 100 parts
water).
3. Wring out the cloth rmly. (Please note, do not
let liquid enter the TV inside as it may lead to
product failure.)
4. Carefully wipe moisten and wipe away the
stubborn dirt.
5. Finally, wipe away all the moisture.
Caution
Do not use a hard cloth or rub the surface too hard,
otherwise this may cause scratches on the surface.
• Take care not to subject the surfaces to insect
repellent, solvent, thinner or other volatile
substances. This may degrade surface quality or
cause peeling of the paint.
• The surface of the display panel is specially treated
and may be easily damaged. Take care not to tap
or scratch the surface with your ngernail or other
hard objects.
• Do not allow the cabinet and pedestal to make
contact with a rubber or PVC substance for a long
time. This may degrade surface quality.
Mains plug
Wipe the mains plug with a dry cloth at regular
intervals.
Moisture and dust may cause re or electrical shock.
English - 4 -
Page 5
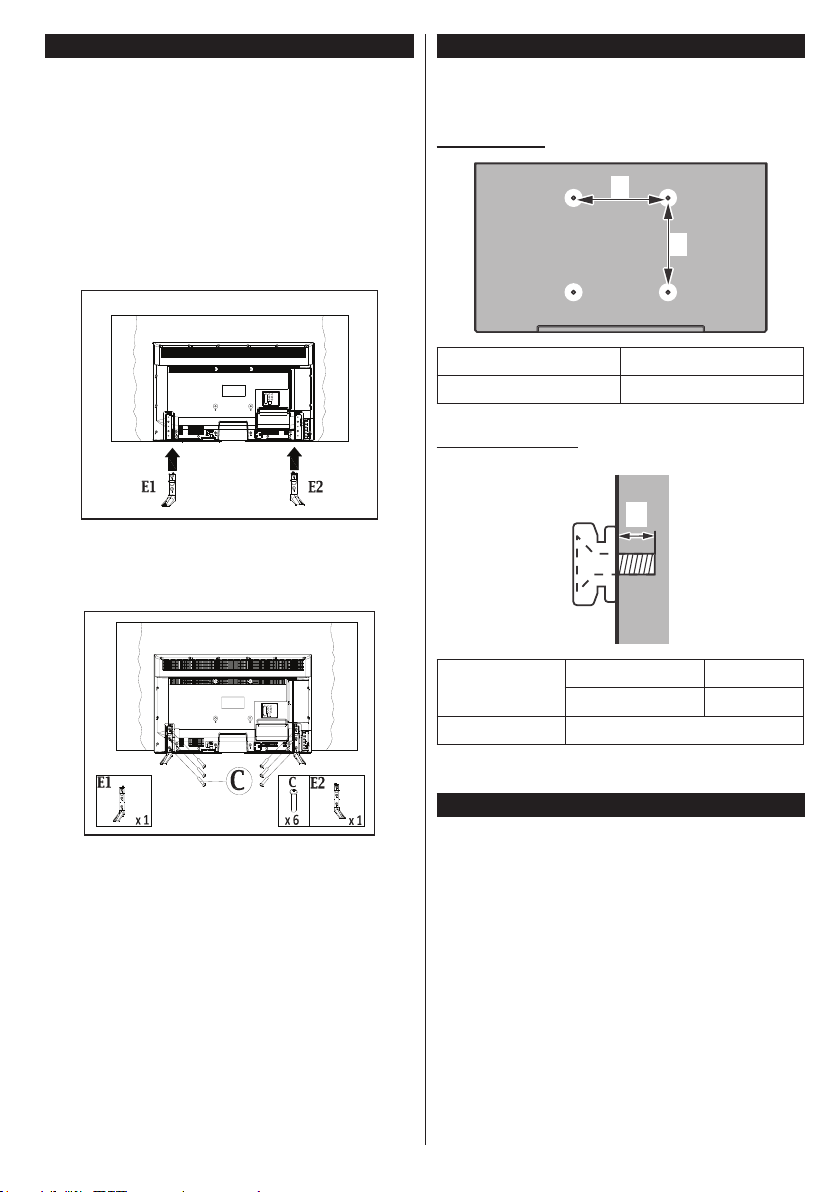
Assembling / Removing the pedestal
Preparations
Take out the pedestal(s) and the TV from the packing
case and put the TV onto a work table with the screen
panel down on the clean and soft cloth (blanket, etc.)
• Use a at and rm table bigger than the TV.
• Do not hold the screen panel part.
• Make sure not to scratch or break the TV.
Assembling the pedestal
1. Place the stand(s) on the stand mounting
pattern(s) on the rear side of the TV.
2. Insert the screws (M4 x 12) provided and
tighten them gently until the stand is properly
tted.
When using the wall-hanging bracket
Please contact your local Panasonic dealer to
purchase the recommended wall-hanging bracket.
Holes for wall-hanging bracket installation;
Rear of the TV
a
b
a (mm) 400
b (mm) 400
View from the side
a
Removing the pedestal from the TV
Be sure to remove the pedestal in the following way
when using the wall-hanging bracket or repacking
the TV.
• Put the TV onto a work table with the screen panel
down on the clean and soft cloth. Leave the stand(s)
protruding over the edge of the surface.
• Unsrew the screws that xing the stand(s).
• Remove the stand(s).
English - 5 -
Depth of
screw (a)
min. (mm) 5
max. (mm) 10
Diameter M6
Note: The screws for xing the TV onto the wall-hanging
bracket are not supplied with the TV.
Environmental Information
This television is designed to be environment friendly.
To reduce energy consumption, you can follow these
steps:
If you set the Energy Saving to Minimum, Medium,
Maximum or Auto the TV will reduce the energy
consumption accordingly. If you like to set the
Backlight to a xed value set as Custom and adjust
the Backlight (located under the Energy Saving
setting) manually using Left or Right buttons on the
remote. Set as Off to turn this setting off.
Note: Available Energy Saving options may differ depending
on the selected Mode in the Picture menu.
The Energy Saving settings can be found in the
Picture menu. Note that some picture settings will
be unavailable to be changed.
Page 6
If pressed Right button while Auto option is selected or
Left button while Custom option is selected, “Screen
will be off in 15 seconds.” message will be displayed
on the screen. Select Proceed and press OK to turn
the screen off immediately. If you don’t press any
button, the screen will be off in 15 seconds. Press
any button on the remote or on the TV to turn the
screen on again.
Note: Screen Off option is not available if the Mode is set
to Game.
When the TV is not in use, please switch off or
disconnect the TV from the mains plug. This will also
reduce energy consumption.
Features
• Remote controlled colour TV
• Fully integrated digital terrestrial/cable TV (DVB-T2/C)
• HDMI inputs to connect other devices with HDMI
sockets
• USB input
• OSD menu system
• Scart socket for external devices (such as DVD
Players, PVR, video games, etc.)
• Stereo sound system
• Teletext
• Headphone connection
• Automatic programming system
• Manual tuning
• Automatic power down after up to eight hours.
• Sleep timer
• Child lock
• Automatic sound mute when no transmission.
• NTSC playback
• AVL (Automatic Volume Limiting)
• PLL (Frequency Search)
• PC input
• Game Mode (Optional)
• Picture off function
• Ethernet (LAN) for Internet connectivity and service
• 802.11n built in WIFI Support
• Audio Video Sharing
Accessories Included
• Remote Control
• Batteries: 2 x AAA
• Instruction Book
• Detachable stand
• Stand mounting screws (M4 x 12)
StandbyNotications
If the TV does not receive any input signal (e.g. from
an aerial or HDMI source) for 5 minutes, it will go
into standby. When you next switch-on, the following
message will be displayed: “TV switched to stand-by
mode automatically because there was no signal
for a long time.” Press OK to continue.
If the TV is on and it isn’t being operated for a while
it will go into standby. When you next switch-on, the
following message will be displayed. “TV switched to
stand-by mode automatically because no operation
was made for a long time.” Press OK to continue.
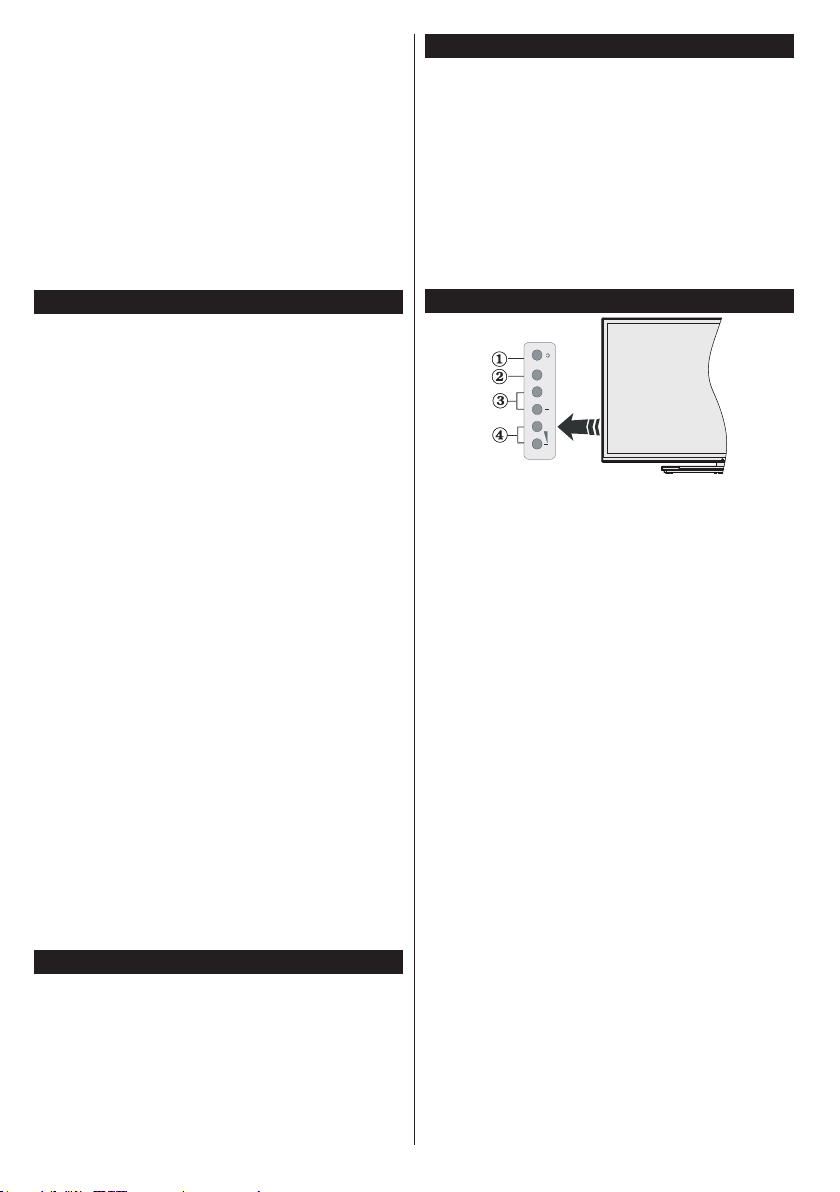
TV Control Buttons & Operation
TV/AV
+
P/CH
+
1. Standby/On button
2. Source button
3. Programme +/- buttons
4. Volume +/- buttons
Press the Volume +/- buttons simultaneously to
view main menu and use Programme +/- buttons to
navigate and Volume +/- buttons to change value.
Note:
The position of the control buttons may differ
depending on the model.
Operation with the Remote Control
Press the Menu button on your remote control to
display main menu screen. Use the directional buttons
to select a menu tab and press OK to enter. Use the
directional buttons again to select or set an item. Press
Return/Back or Menu button to quit a menu screen.
Input Selection
Once you have connected external systems to your
TV, you can switch to different input sources. Press the
Source button on your remote control consecutively
to select the different sources.
Changing Channels and Volume
You can change the channel and adjust the volume
by using the Volume +/- and Programme +/- buttons
on the remote.
English - 6 -
Page 7
Inserting the Batteries into the Remote
Remove the back cover to reveal the battery
compartment. Insert two size AAA batteries. Make
sure the (+) and (-) signs match (observe correct
polarity). Do not mix old and new batteries. Replace
only with same or equivalent type. Place the cover
back on.
Connect Power
IMPORTANT: The TV set is designed to operate on
220-240V AC, 50 Hz socket. After unpacking, allow
the TV set to reach the ambient room temperature
before you connect the set to the mains. Plug the
power cable to the mains socket outlet.
Antenna Connection
Connect the aerial or cable TV plug to the AERIAL
INPUT (ANT-TV) socket located on the rear bottom
side of the TV.
Rear bottom side of the TV
Notication
TRADEMARK ACKNOWLEDGMENT
The terms HDMI and High-Definition Multimedia
Interface, and the HDMI Logo are trademarks or
registered trademarks of HDMI Licensing LLC in the
United States and other countries.
Disposal of Old Equipment and Batteries
Only for European Union
and countries with recycling
systems
These symbols on the products,
packaging, and/or accompanying
documents mean that used electrical and
electronic products and batteries must
not be mixed with general household
waste.
For proper treatment, recovery and
recycling of old products and batteries,
please take them to applicable collection
points in accordance with your national
legislation.
By disposing of them correctly, you will
help to save valuable resouces and
prevent any potential negative effects
on human health and the environment.
For more information about collection
and recycling, please contact your local
municipality.
Penalties may be applicable for incorrect
disposal of this waste, in accordance with
national legislation.
Note for the battery symbol
(bottom symbol):
This symbol might be used in
combination with a chemical symbol.
In this case it complies with the
requirement set by the Directive for the
chemical involved.
Manufactured under license from Dolby Laboratories.
Dolby and the double-D symbol are trademarks of
Dolby Laboratories.
YouTube and the YouTube logo are trademarks of
Google Inc.
English - 7 -
Authorized Representative:
Panasonic Testing Centre
Panasonic Marketing Europe GmbH
Winsbergring 15, 22525 Hamburg, Germany
Web Site: http://www.panasonic.com
Page 8
Sales and Support Information
Customer Communication Centre
• For customers within the UK: 0344 844 3899
• For customers within Ireland: 01289 8333
• Monday - Friday 9:00am - 5:00pm, (Excluding public
holidays).
• For further support on your product, please visit our
website: www.panasonic.co.uk
Direct Sales at Panasonic UK
• Order accessory and consumable items for your
product with ease and condence by phoning our
Customer Comminications Centre Monday - Friday
9:00am - 5:00pm, (Excluding public holidays).
• Or go on line through our Internet Accessory
ordering application at www.pas-europe.com.
• Most major credit and debit cards accepted.
• All enquiries transactions and distribution facilities
are provided directly by Panasonic UK.
• It couldn’t be simpler!
• Also available through our Internet is direct shopping
for a wide range of nished products. Take a browse
on our website for further details.
Specication
TV Broadcasting
Receiving Channels
Digital Reception
Number of Preset
Channels
Channel Indicator On Screen Display
RF Aerial Input 75 Ohm (unbalanced)
Operating Voltage 220-240V AC, 50Hz.
Audio A2 Stereo+Nicam Stereo
Headphone 3.5 mm mini stereo jack
Audio Output Power
(WRMS.) (10% THD)
Power Consumption (W) 140 W
Weight (Kg) 22 Kg
TV Dimensions DxLxH
(with foot) (mm)
TV Dimensions DxLxH
(without foot) (mm)
Display 16/9 55”
Operation temperature
and operation humidity
PAL BG/DK/II’
SECAM BG/DK
VHF (BAND I/III) - UHF
(BAND U) - HYPERBAND
Fully integrated digital
terrestrial-cable TV
(DVB-T-C)
(DVB-T2 compliant)
1.000
2 x 10 W
292 x 1240 x 789
38/47 x 1240 x 716
0ºC up to 40ºC, 85%
humidity max
WirelessLANSpecications
Frequency Range
USA: 2.400 ~ 2.483GHz, 5.15 ~ 5.35GHz, 5.47 ~
5.725GHz, 5.725 ~ 5.85GHz
Europe: 2.400 ~ 2.483GHz, 5.15 ~ 5.35GHz, 5.47
~ 5.725GHz
Japan: 2.400 ~ 2.497GHz, 5.15 ~ 5.35GHz, 5.47 ~
5.725GHz
China: 2.400 ~ 2.483GHz, 5.725 ~5.85GHz
Standard
IEEE 802.11.a/b/g/n
Host Interface
USB 2.0
Security
WEP 64/128, WPA, WPA2, TKIP, AES, WAPI
English - 8 -
Page 9
Remote Control
TV
(*) MY BUTTON:
This button may have a default function depending on the
model. However you can set a special function to this button
by pressing on it for ve seconds when on a desired source
or channel. A conrmation message will be displayed on the
screen. Now MY BUTTON is associated with the selected
function.
Note that if you perform First Time Installation, MY BUTTON
will return to its default function.
1. Standby: Switches On / Off the TV
2. Numeric buttons: Switches the channel, enters a
number or a letter in the text box on the screen.
3. TV: Displays channel list / Switches to TV Source
4. Mute: Completely turns off the volume of the TV
5. Volume +/-
6. Menu: Displays TV menu
7. Directional buttons: Helps navigate menus, content
etc. and displays the subpages in TXT mode when
pressed Right or Left
8. OK: Conrms user selections, holds the page (in TXT
mode), views channel list (DTV mode)
9. Back/Return: Returns to previous screen, opens
index page (in TXT mode)
10. Media player: Opens the media player screen
11. Internet: Opens the portal page, where you can reach
many web based applications
12. My button (*)
13. Coloured Buttons: Follow the on-screen instructions
for coloured button functions
14. Language: Switches between sound modes
(analogue TV), displays and changes audio/subtitle
language (digital TV, where available)
15. Subtitles: Turns subtitles on and off (where available)
16. Rapid reverse: Moves frames backwards in media
such as movies
17. No function
18. Play: Starts to play selected media
19. Stop: Stops the media being played
20. Rapid advance: Moves frames forward in media such
as movies
21. Pause: Pauses the media being played
22. Screen: Changes the aspect ratio of the screen
23. Text: Displays teletext (where available), press again
to superimpose the teletext over a normal broadcast
picture (mix)
24. Source: Shows all available broadcast and content
sources
25. EPG (Electronic programme guide): Displays the
electronic programme guide
26. Exit: Closes and exits from displayed menus or
returns to previous screen
27. Quick Menu: Displays a list of menus for quick access
28. Info: Displays information about on-screen content,
shows hidden information (reveal - in TXT mode)
29. Programme +/-
30. Swap: Quickly cycles between previous and current
channels or sources
31. Netix: Launches the Netix application, if this feature
is supported by your TV
English - 9 -
Page 10
Connections
ideo
Connector Type Cables Device
Scart
Connection
(back)
YPBPR
YPbPr Video
Connection
/ V
AUDIO IN
SPDIF
BACK AV
R
/ Video
L
HEADPHONE
(back)
HDMI
Connection
(bottom&side)
VGA
Connection
(bottom)
PC/YPbPr/
Back AV
Audio
Connection
(back)
SPDIF
(Optical Out)
Connection
(bottom)
Back AV
(Audio/Video)
Connection
(back)
Headphone
Connection
(side)
USB
Connection
(back&side)
CI
Connection
(side)
YPbPr Connection Cable
YPbPr/PC Audio Cable
Audio Video Cable
CAM
module
NOTE: When connecting a
device via the YPbPr or Back
AV inputs, you must use the
connection cables to enable
connection. See the illustrations
on the left side. | To enable
PC/YPbPr audio, you will need
to use the Back Audio inputs
with a YPbPr/PC audio cable
for audio connection. | If an
external device is connected via
the SCART socket, the TV will
automatically switch to AV mode.|
When receiving DTV channels
(Mpeg4 H.264) or while in Media
Player mode, output will not be
available via the scart socket. |
When using the wall mounting
kit (available from third party
in the market, if not supplied),
we recommend that you plug all
your cables into the back of the
TV before mounting on the wall.
| Insert or remove the CI module
only when the TV is SWITCHED
OFF. You should refer to the
module instruction manual for
details of the settings. | The/Each
USB input of your TV supports
devices up to 500mA. Connecting
devices that have current value
above 500mA may damage your
TV. | By connecting an HDMI cable
to your TV, you have to use only a
shielded HDMI cable to guarantee
a sufficient immunity against
parasitic frequency radiation.
If you want to connect a
device to the TV, make
sure that both the TV
and the device are turned off
before making any connection.
After the connection is done, you
can turn on the units and use
them.
LAN
Ethernet
Connection
(bottom)
LAN / Ethernet Cable
Subwoofer
Connection
(back)
English - 10 -
Page 11
Switching On/Off
To Switch the TV On
Connect the power cord to a power source such as a
wall socket (220-240V AC, 50 Hz).
To switch on the TV from standby mode either:
• Press the Standby button, Programme +/- or a
numeric button on the remote control.
• Press the Standby button or Programme +/- on
the TV.
The TV will then switch on.
To Switch the TV Off
Press the Standby button on the remote control or
press the Standby button on the TV, then the TV
switches into standby mode.
To power down the TV completely, unplug the
power cord from the mains socket.
Note: When the TV is switched into standby mode, the
standby LED can blink to indicate that features such as
Standby Search, Over Air Download or Timer is active. The
LED can also blink when you switch on the TV from standby
mode.
First Time Installation
When turned on for the first time, the language
selection screen is displayed. Select the desired
language and press OK.
On the next screen, set your preferences using the
directional buttons.
Note: Depending on the Country selection you may be asked
to set and conrm a PIN at this point. The selected PIN cannot
be 0000. You have to enter it if you are asked to enter a PIN
for any menu operation later.
About Selecting Broadcast Type
Aerial: If Aerial broadcast search option is turned on,
the TV will search for digital terrestrial broadcasts after
other initial settings are completed.
Cable: If Cable broadcast search option is turned on,
the TV will search for digital cable broadcasts after
other initial settings are completed. According to your
other preferences a conrmation message may be
displayed before starting to search. Select YES and
press OK to proceed. To cancel operation, select NO
and press OK. You can select Network or set values
such as Frequency, Network ID and Search Step.
When nished, press OK button.
Note: Searching duration will change depending on the
selected Search Step.
Analogue: If Analogue broadcast search option is
turned on, the TV will search for analogue broadcasts
after other initial settings are completed.
Additionally you can set a broadcast type as your
favourite one. Priority will be given to the selected
broadcast type during the search process and the
channels of it will be listed on the top of the Channel
List. When nished, press OK to continue.
You can activate Store Mode option at this point.
This option will congure your TV’s settings for store
environment. This option is intended only for store use.
It is recommended to select Home Mode for home
use. This option will be available in Setup>More menu
and can be turned off/on later.
Press OK button on the remote control to continue
and the Network Settings menu will be displayed.
Please refer to Connectivity section to congure a
wired or a wireless connection. After the settings are
completed press OK button to continue. To skip to
the next step without doing anything press the Rapid
advance button on the remote.
After the initial settings are completed TV will start
to search for available broadcasts of the selected
broadcast types.
After all the available stations are stored, scan results
will be displayed. Press OK to continue. The Edit
Channel List menu will be displayed next. You can
edit the channel list according to your preferences or
press the Menu button to quit and watch TV.
While the search continues a message may appear,
asking whether you want to sort channels according
to the LCN(*). Select Yes and press OK to conrm.
(*) LCN is the Logical Channel Number system that organizes
available broadcasts in accordance with a recognizable
channel number sequence (if available).
Note: Do not turn off the TV while initializing first time
installation. Note that, some options may not be available
depending on the country selection.
Media Playback via USB Input
You can connect 2.5” and 3.5” inch (hdd with external power
supply) external hard disk drives or USB memory stick to your
TV by using the USB inputs of the TV.
IMPORTANT! Back up the les on your storage devices
before connecting them to the TV. Manufacturer will
not be responsible for any le damage or data loss.
Certain types of USB devices (e.g. MP3 Players)
or USB hard disk drives/memory sticks may not be
compatible with this TV. The TV supports FAT32 and
NTFS disk formatting.
While formatting USB hard drives which have
more than 1TB (Tera Byte) storage space you may
experience some problems in the formatting process.
Wait a little while before each plugging and unplugging
as the player may still be reading les. Failure to do
so may cause physical damage to the USB player
and the USB device itself. Do not pull out your drive
while playing a le.
You can use USB hubs with your TV’s USB inputs.
External power supplied USB hubs are recommended
in such a case.
English - 11 -
Page 12
It is recommended to use the TV’s USB input(s)
directly, if you are going to connect a USB hard disk.
Note: When viewing image les the Media Player menu
can only display 1000 image les stored on the connected
USB device.
Media Browser Menu
You can play photo, music and movie les stored
on a USB disk by connecting it to your TV. Connect
a USB disk to one of the USB inputs located on the
side of the TV. Pressing the Menu button while in the
Media Player mode will access the Picture, Sound
and Setup menu options. Pressing the Menu button
again will exit from this screen.
You can set your
Media Player preferences by using the Setup menu.
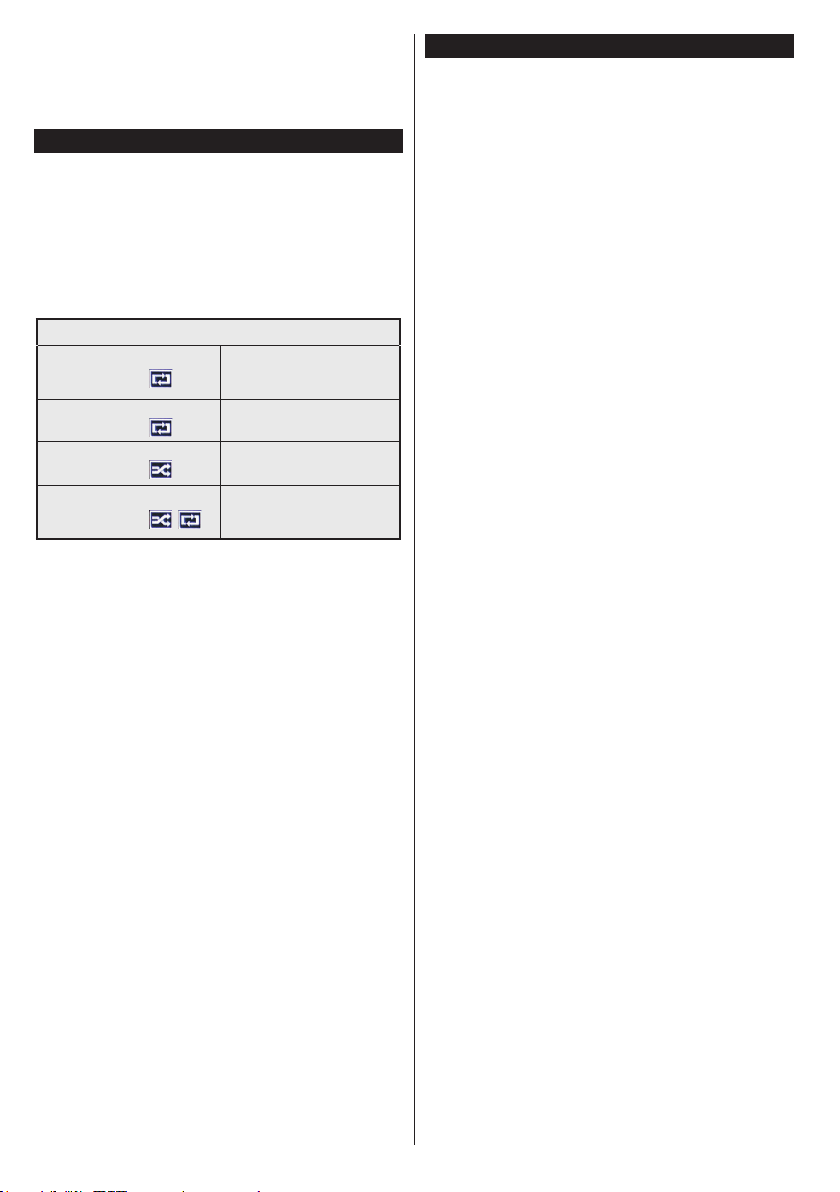
Loop/Shufe Mode Operation
Start playback with the Play
button and activate
Start playback with the OK
button and activate
Start playback with the Play
button and activate
Start playback with the Play
button and activate
All les in the list will be
continuously played in original
order
The same le will be played
continuously (repeat)
All les in the list will be
played once in random order
All les in the list will be
continuously played in the
,
same random order.
CEC and CEC RC Passthrough
This function allows to control the CEC-enabled
devices, that are connected through HDMI ports by
using the remote control of the TV.
The CEC option in the Setup>More menu should be
set as Enabled at rst. Press the Source button and
select the HDMI input of the connected CEC device
from the Sources List menu. When new CEC source
device is connected, it will be listed in source menu
with its own name instead of the connected HDMI
ports name(such as DVD Player, Recorder 1 etc.).
The TV remote is automatically able to perform the
main functions after the connected HDMI source has
been selected.
To terminate this operation and control the TV via
the remote again, press Quick Menu button on the
remote, highlight the CEC RC Passthrough and
set as Off by pressing Left or Right button. This
feature can also be enabled or disabled under the
Setup>More menu.
The TV supports also ARC(Audio Return Channel)
feature. This feature is an audio link meant to replace
other cables between the TV and the audio system
(A/V receiver or speaker system).
When ARC is active, TV does not mute its other audio
outputs automatically. So you need to decrease TV
volume to zero manually, if you want to hear audio
from connected audio device only (same as other
optical or co-axial digital audio outputs). If you want
to change connected device’s volume level, you
should select that device from the source list. In that
case volume control keys are directed to connected
audio device.
Note: ARC is supported only via the HDMI3 input.
System Audio Control
Allows an Audio Amplier/Receiver to be used with
the TV. The volume can be controlled using the
remote control of the TV. To activate this feature set
the Speakers option in the Setup>More menu as
Amplier. The TV speakers will be muted and the
sound of the watched source will be provided from
the connected sound system.
Note: The audio device should support System Audio Control
feature and CEC option should be set as Enabled.
English - 12 -
Page 13
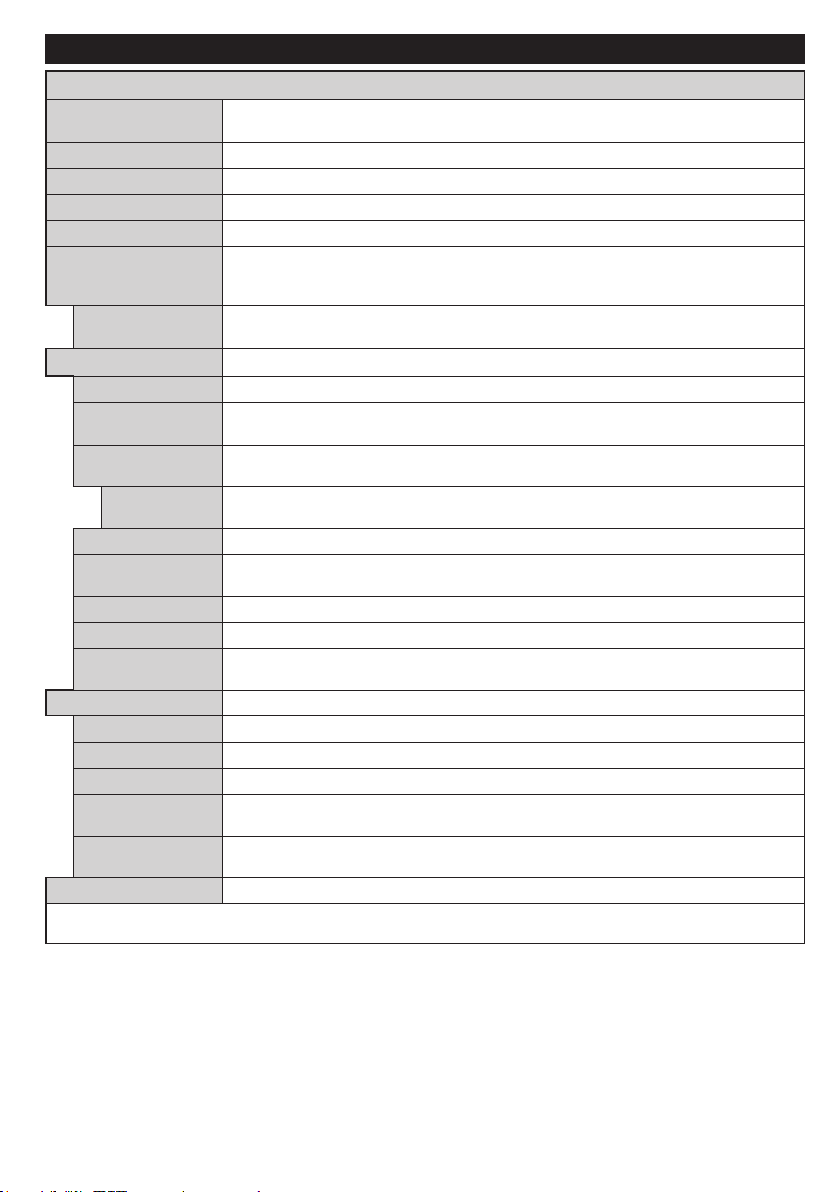
TV Menu Contents
Colour
Picture Zoom
Skin Tone
Colour Shift
Picture Menu Contents
Mode
Contrast
Brightness
Sharpness
Energy Saving
Backlight
Advanced Settings
Dynamic Contrast
Noise Reduction
Colour Temp
White Point
Film Mode
HDMI Full Range
PC Position
Autoposition
H Position
V Position
Dot Clock
Phase
Reset
While in VGA (PC) mode, some items in Picture menu will be unavailable. Instead, VGA mode settings will be added to the Picture
Settings while in PC mode.
You can change the picture mode to suit your preference or requirements. Picture mode
can be set to one of these options: Cinema, Game, Sports, Dynamic and Natural.
Adjusts the light and dark values on the screen.
Adjusts the brightness values on the screen.
Sets the sharpness value for the objects displayed on the screen.
Sets the colour value, adjusting the colours.
For setting the Energy Saving to Custom, Minimum, Medium, Maximum, Auto,
Picture Off or Off.
Note: Available options may differ depending on the selected Mode.
This setting controls the backlight level. The backlight function will be inactive if the
Energy Saving is set to an option other then Custom.
You can change the dynamic contrast ratio to desired value.
If the signal is weak and the picture is noisy, use the Noise Reduction setting to reduce
the amount of noise.
Sets the desired colour temperature value. Cool, Normal, Warm and Custom options are
available.
If the Colour Temp option is set as Custom, this setting will be available. Increase the
‘warmth’ or ‘coolness’ of the picture by pressing Left or Right buttons.
Sets the desired image size format.
Films are recorded at a different number of frames per second to normal television programmes.
Turn this feature on when you are watching lms to see the fast motion scenes clearly.
Skin tone can be changed between -5 and 5.
Adjust the desired colour tone.
While watching from a HDMI source, this feature will be visible. You can use this feature to
enhance blackness in the picture.
Appears only when the input source is set to VGA/PC.
Automatically optimizes the display. Press OK to optimize.
This item shifts the image horizontally to the right hand side or left hand side of the screen.
This item shifts the image vertically towards the top or bottom of the screen.
Dot Clock adjustments correct the interference that appear as vertical banding in dot
intensive presentations like spreadsheets or paragraphs or text in smaller fonts.
Depending on the input source(computer etc.) you may see a hazy or noisy picture on the
screen. You can use phase to get a clearer picture by trial and error.
Resets the picture settings to factory default settings (except Game mode).
English - 13 -
Page 14
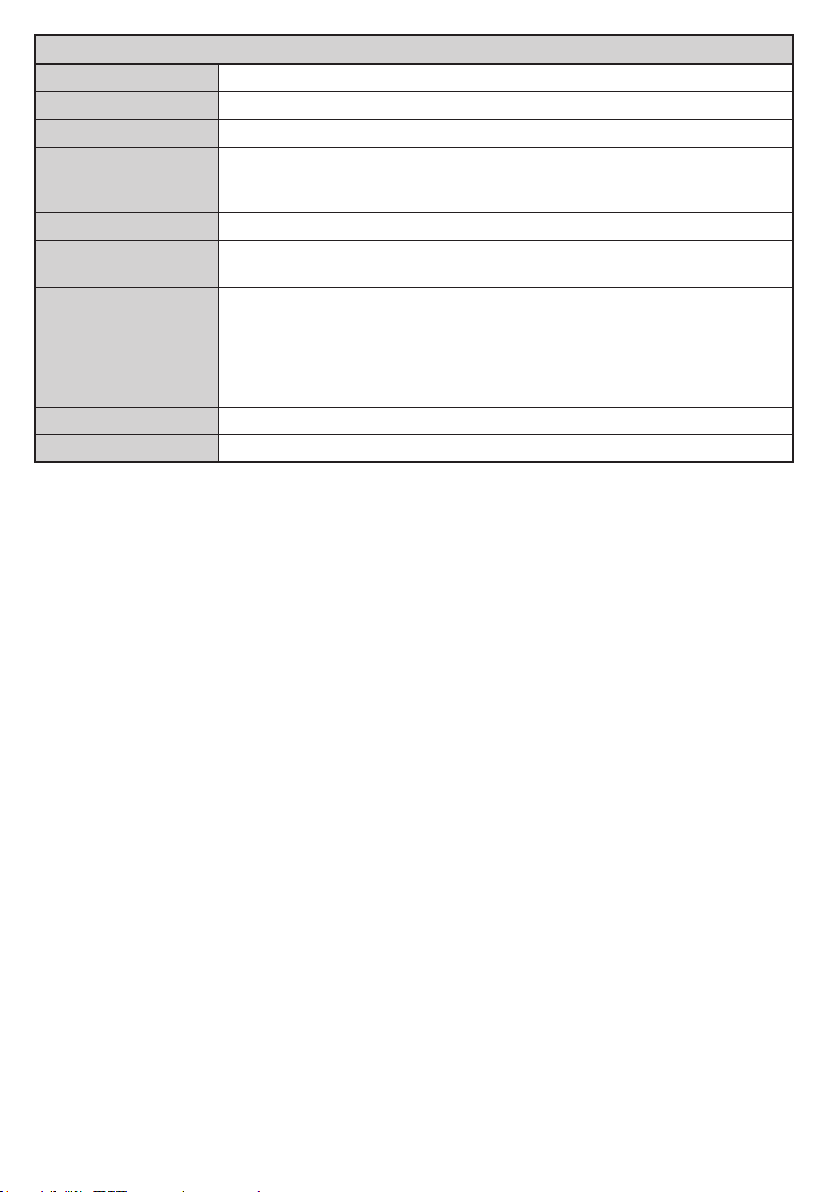
Sound Menu Contents
Volume
Equalizer
Balance
Headphone
Sound Mode
AVL (Automatic
Volume Limiting)
Headphone/Lineout
Dynamic Bass
Digital Out
Adjusts the volume level.
Selects the equalizer mode. Custom settings can be made only when in User mode.
Adjusts whether the sound comes from the left or right speaker.
Sets headphone volume.
Please ensure before using headphones that the headphone volume is set to a low
level, to prevent damage to your hearing.
You can select a sound mode (If the viewed channel supports).
Sets the sound to obtain xed output level between programmes.
When you connect an external amplier to your TV using the headphone jack, you
can select this option as Lineout. If you have connected headphones to the TV, set
this option as Headphone.
Please ensure before using headphones that this menu item is set to Headphone.
If it is set to Lineout, the output from the headphone socket will be set to maximum
which could damage your hearing.
Enables or disables the Dynamic Bass.
Sets digital out audio type.
English - 14 -
Page 15
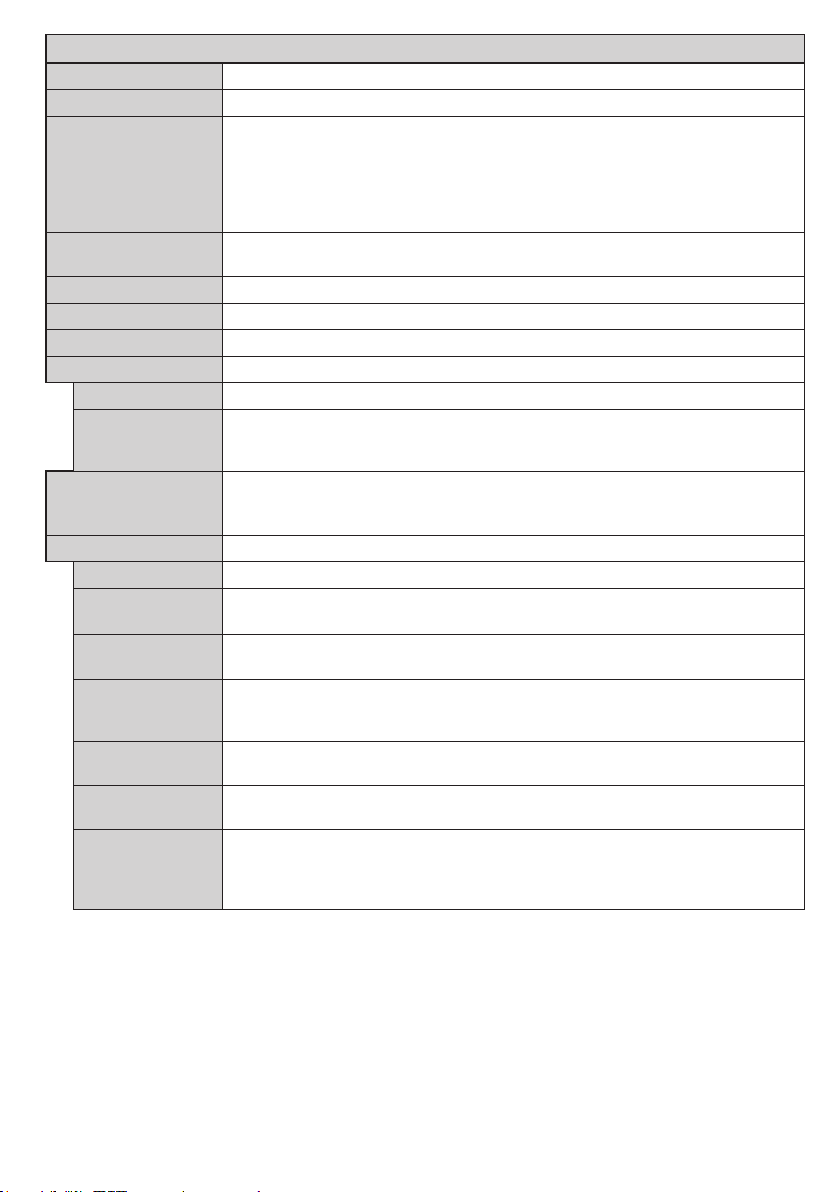
Setup Menu Contents
Conditional Access
Network Settings
Accessibility
Menu Timeout
Language
Parental
Timers
Date/Time
Sources
Hard of Hearing
Audio
Description
Netix
More
Software
Upgrade
Application
Version
Subtitle Mode
Auto TV OFF
Store Mode
Audio Video
Sharing
Controls conditional access modules when available.
You may set a different language depending on the broadcaster and the country.
Enter correct password to change parental settings. You can easily adjust Menu
Lock, Maturity Lock(may not be available depending on the country selection in
the First Time Installation) and Child Lock in this menu. You can also set a new
PIN or change the Default CICAM PIN using the related options.
Note: Default PIN can be set to 0000 or 1234. If you have dened the PIN(is requested depending on the
country selection) during the First Time Installation use the PIN that you have dened.
Sets sleep timer to turn off the TV after a certain time. Sets timers for selected
programmes.
Sets date and time.
Enables or disables selected source options.
Displays network settings.
Displays accessibility options of the TV.
Enables any special feature sent from the broadcaster.
A narration track will be played for the blind or visually impaired audience. Press OK
to see all available Audio Description menu options. This feature is available only if
the broadcaster supports it.
If this feature is supported by your TV, you can view your ESN(*) number and deactivate
Netix.
(*) ESN number is an unique ID number for Netix, created especially to identify your TV.
Displays other setting options of the TV.
Changes timeout duration for menu screens.
Ensures that your TV has the latest rmware. Press OK to see the menu options.
Displays current software version.
This option is used to select which subtitle mode will be on the screen (DVB subtitle /
Teletext subtitle) if both is available. Default value is DVB subtitle. This feature is available
only for the country option of Norway.
Sets the desired time for the TV to automatically go into standby mode when not
being operated.
Select this mode for store display purposes. Whilst Store Mode is enabled, some
items in the TV menu may not be available.
Audio Video Sharing feature allows you to share les stored on your smartphone or tablet
pc. If you have a compatible smartphone or tablet pc and the appropriate software is installed,
you can share/play photos on your TV. See instructions of your sharing software for more
information. Audio Video Sharing mode will not be available with internet portal feature.
English - 15 -
Page 16

Power Up Mode
Virtual Remote
Install and Retune Menu Contents
channel scan
CEC
CEC Auto Power
On
Speakers
This setting congures the power up mode preference. Last State and Standby
options are available.
Enable or disable the virtual remote feature.
With this setting you can enable and disable CEC functionality completely. Press Left
or Right button to enable or disable the feature.
This function allows the connected HDMI-CEC compatible device to turn on the TV
and switch to its input source automatically. Press Left or Right button to enable or
disable the feature.
To hear the TV audio from the connected compatible audio device set as Amplier.
You can use the remote control of the TV to control the volume of the audio device.
Automatic
channel scan
(Retune)
Manual
Network
channel scan
Analoguene
tune
Installation
Settings
Clear Service
List
Select Active
Network
First time
installation
Displays automatic tuning options. Digital Aerial: Searches and stores aerial DVB stations.
Digital Cable: Searches and stores cable DVB stations. Analogue: Searches and stores
analogue stations.
This feature can be used for direct broadcast entry.
Searches for the linked channels in the broadcast system. Digital Aerial: Searches for aerial
network channels. Digital Cable: Searches for cable network channels.
You can use this setting for ne tuning analogue channels. This feature is not available if no
analogue channels are stored.
Displays installation settings menu. Standby Search (Optional): Your TV will search for new
or missing channels while in standby. Any new found broadcasts will be shown.
Use this setting to clear channels stored. This setting is visible only when the Country option
is set to Denmark, Sweden, Norway or Finland.
This setting allows you to select only the broadcasts within the selected network to be listed
in the channel list. This feature is available only for the country option of Norway.
Deletes all stored channels and settings, resets TV to factory settings.
English - 16 -
Page 17

General TV Operation
Using the Channel List
The TV sorts all stored stations in the Channel List.
You can edit this channel list, set favourites or set
active stations to be listed by using the Channel List
options. Press the OK/TV button to open the Channel
List. You can lter the listed channels by pressing the
Blue button or open the Edit Channel List menu by
pressing the Green button in order to make advanced
changes in the current list.
Managing the Favourite Lists
You can create four different lists of your favourite
channels. Enter the Channel List in the main menu
or press the Green button while the Channel List
is displayed on the screen in order to open the Edit
Channel List menu. Select the desired channel on
the list. You can make multiple choices by pressing
the Yellow button. Then press the OK button to open
the Channel Edit Options menu and select Add/
Remove Favourites option. Press the OK button
again. Set the desired list option to On. The selected
channel/s will be added to the list. In order to remove
a channel or channels from a favourite list follow the
same steps and set the desired list option to Off.
You can use the Filter function in the Edit Channel
List menu to lter the channels in the Channel list
permanently according to your preferences. Using this
Filter option, you can set one of your four favourite
lists to be displayed everytime the Channel list is
opened. The ltering function in the Channel list
menu will only lter the currently displayed Channel
list in order to nd a channel and tune in to it. This
changes will not remain the next time the Channel
list is opened.
ConguringParentalSettings
The Parental Settings menu options can be used to
prohibit users from viewing of certain programmes,
channels and using of menus. These settings are
located in the Setup>Parental menu.
To display parental lock menu options, a PIN number
should be entered. After coding the correct PIN
number, Parental Settings menu will be displayed.
Menu Lock: This setting enables or disables access
to all menus or installation menus of the TV.
Guidance: This setting enables or disables access
some of the MHEG applications. Disabled applications
can be released by entering the right PIN.
Internet Lock: If this option is set to OFF, the open
browser application in the portal will be disabled. Set
to ON to release the application again.
Set PIN: Denes a new PIN number.
Default CICAM PIN: This option will appear as greyed
out if no CI module is inserted into the CI slot of the
TV. You can change the default PIN of the CI CAM
using this option.
Note: Default PIN can be set to 0000 or 1234. If you have
defined the PIN(is requested depending on the country
selection) during the First Time Installation use the PIN that
you have dened.
Some options may not be available depending on the country
selection in the First Time Installation.
Electronic Programme Guide (EPG)
Some channels send information about their
broadcast schedules. Press the Epg button to view
the Programme Guide menu.
There are 3 different types of schedule layouts
available, Timeline Schedule, List Schedule and
Now/Next Schedule. To switch between them follow
the instructions on the bottom of the screen.
Timeline Schedule
Zoom (Yellow button): Press the Yellow button to
see events in a wider time interval.
Filter (Blue button): Views ltering options.
Select Genre (Subtitles button): Displays Select
Genre menu. Using this feature, you can search the
programme guide database in accordance with the
genre. Info available in the programme guide will be
searched and results matching your criteria will be
highlighted.
Options (OK button): Displays event options.
Event Details (Info button): Displays detailed
information about selected events.
Next/Prev Day (Programme +/- buttons): Displays
the events of previous or next day.
Search (Text button): Displays Guide Search menu.
Now (Swap button): Displays current event of the
highlighted channel.
List Schedule(*)
(*) In this layout option, only the events of the highlighted
channel will be listed.
Prev. Time Slice (Red button): Displays the events
of previous time slice.
Next/Prev Day (Programme +/- buttons): Displays
the events of previous or next day.
Event Details (Info button): Displays detailed
information about selected events.
Filter (Text button): Views ltering options.
Next Time Slice (Green button): Displays the events
of next time slice.
Options (OK button): Displays event options.
Now/Next Schedule
Navigate (Directional buttons): Press the
Directional buttons to navigate through the channels
and events.
Options (OK button): Displays event options.
Event Details (Info button): Displays detailed
information about selected events.
Filter (Blue button): Views ltering options.
English - 17 -
Page 18

Event Options
Use the directional buttons to highlight an event and
press OK button to display Event Options menu. The
following options are available.
Select Channel: Using this option, you can switch to
the selected channel.
Set Timer on Event / Delete Timer on Event: After
you have selected an event in the EPG menu, press the
OK button. Select Set Timer on Event option and press
the OK button. You can set a timer for future events.
To cancel an already set timer, highlight that event and
press the OK button. Then select Delete Timer on
Event option. The timer will be cancelled.
Notes: You cannot switch to any other channel or source while
there is an active timer on the current channel.
It is not possible to set timer for two or more individual events
at the same time interval.
Teletext Services
Press the Text button to enter. Press again to activate
mix mode, which allows you to see the teletext page
and the TV broadcast at the same time. Press once
more to exit. If available, sections in the teletext pages
will become colour-coded and can be selected by
pressing the coloured buttons. Follow the instructions
displayed on the screen.
Digital Teletext
Press the Text button to view digital teletext
information. Operate it with the coloured buttons,
cursor buttons and the OK button. The operation
method may differ depending on the contents of the
digital teletext. Follow the instructions displayed on
the digital teletext screen. When the Text button is
pressed again, the TV returns to television broadcast.
BBC Connected Red Button (CRB)
While watching BBC channels, press the Red button
to access digital TV services provided by the BBC.
Under the tab ‘Featured’ highlight Connected Red
Button and press OK to start the service. On the
opening page you can access to BBC’s main services
such as BBC iPlayer, BBC News, BBC Sport and
many others. There are also links to the home pages of
the related applications available. Use the navigation
buttons on the TV’s remote control to move through
the application. Press Exit button to close and exit.
Software Upgrade
Your TV is capable of nding and updating the rmware
automatically via the broadcast signal or via Internet.
Software upgrade search via user interface
On the main menu select Setup and press the OK
button. Setup Menu will be displayed. Then select
More and press the OK button. Navigate to Software
upgrade and press the OK button. In Upgrade
options menu select Scan for upgrade and press
OK button to check for a new software upgrade.
If a new upgrade is found, it starts to download
the upgrade. After the download is completed
confirm the question asking about rebooting the
TV by pressing the OK to continue with the reboot
operation.
3 AM search and upgrade mode
Your TV will search for new upgrades at 3:00 o’clock if
Automatic scanning option in the Upgrade options
menu is set to Enabled and if the TV is connected
to an aerial signal or to Internet. If a new software is
found and downloaded successfully, it will be installed
at the next power on.
Note: Do not unplug the power cord while led is blinking
during the reboot process. If the TV fails to come on after the
upgrade, unplug, wait for two minutes then plug it back in.
English - 18 -
Page 19
Troubleshooting & Tips
Tv will not turn on
Make sure the power cord is plugged in securely to
wall outlet. Check if batteries are exhausted. Press
the Power button on the TV.
Poor picture
• Check if you have selected the correct TV system.
• Low signal level can cause picture distortion. Please
check antenna access.
• Check if you have entered the correct channel
frequency if you have done manual tuning.
• The picture quality may degrade when two devices
are connected to the TV at the same time. In such
a case, disconnect one of the devices.
No picture
• This means your TV is not receiving any transmission.
Make sure the correct source has been selected.
• Is the antenna connected properly?
• Is the antenna cable damaged?
• Are suitable plugs used to connect the antenna?
• If you are in doubt, consult your dealer.
No sound
• Check if the TV is muted. Press the Mute button or
increase the volume to check.
• Sound may be coming from only one speaker. Check
the balance settings from Sound menu.
Remote control - no operation
• The batteries may be exhausted. Replace the
batteries.
Input sources - can not be selected
• If you cannot select an input source, it is possible
that no device is connected. If not;
• Check the AV cables and connections if you are
trying to switch to the input source dedicated to the
connected device.
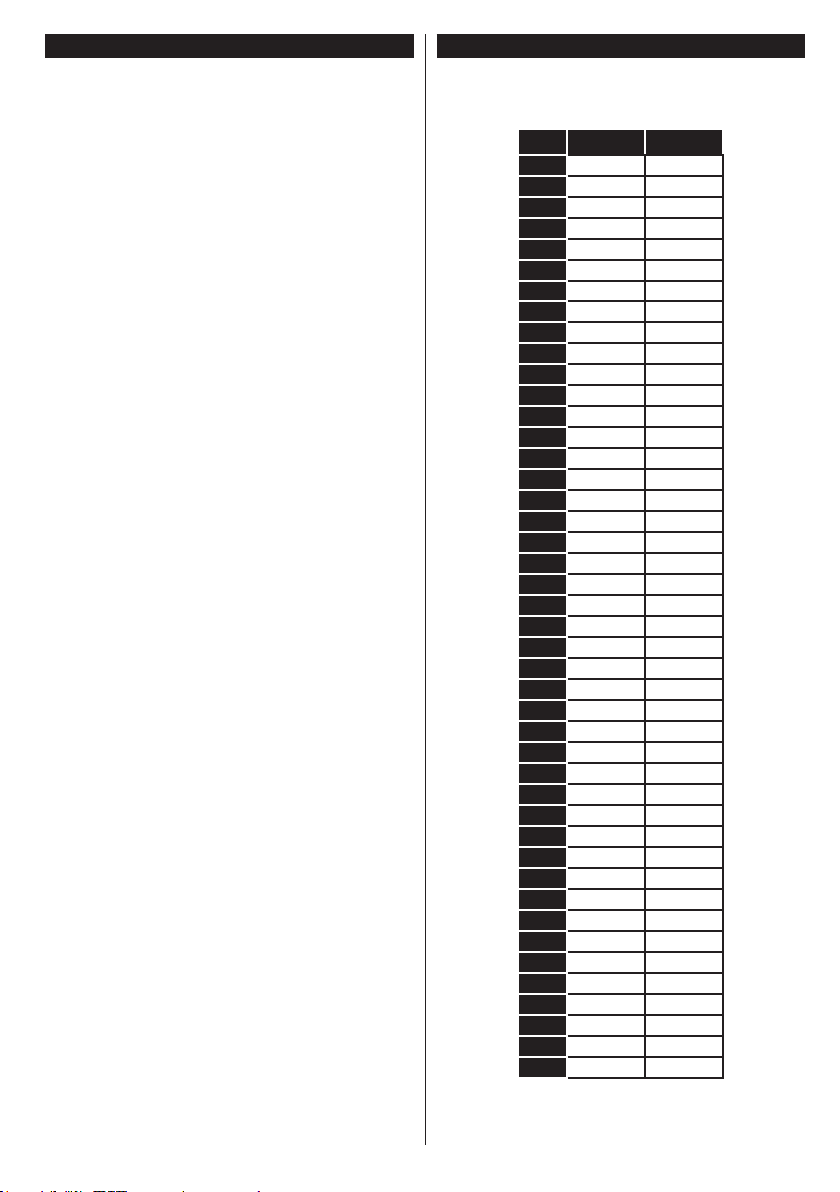
PC Input Typical Display Modes
The following table is an illustration of some of the
typical video display modes. Your TV may not support
all resolutions.
Index Resolution Frequency
1 640x350 85Hz
2 640x400 70Hz
3 640x480 60Hz
4 640x480 66Hz
5 640x480 72Hz
6 640x480 75Hz
7 640x480 85Hz
8 800x600 56Hz
9 800x600 60Hz
10 800x600 70Hz
11 800x600 72Hz
12 800x600 75Hz
13 800x600 85Hz
14 832x624 75Hz
15 1024x768 60Hz
16 1024x768 66Hz
17 1024x768 70Hz
18 1024x768 72Hz
19 1024x768 75Hz
20 1024x768 85Hz
21 1152x864 60Hz
22 1152x864 70Hz
23 1152x864 75Hz
24 1152x864 85Hz
25 1152x870 75Hz
26 1280x768 60Hz
27 1360x768 60Hz
28 1280x768 75Hz
29 1280x768 85Hz
30 1280x960 60Hz
31 1280x960 75Hz
32 1280x960 85Hz
33 1280x1024 60Hz
34 1280x1024 75Hz
35 1280x1024 85Hz
36 1400x1050 60Hz
37 1400x1050 75Hz
38 1400x1050 85Hz
39 1440x900 60Hz
40 1440x900 75Hz
41 1600x1200 60Hz
42 1680x1050 60Hz
43 1920x1080 60Hz
44 1920x1200 60Hz
English - 19 -
Page 20
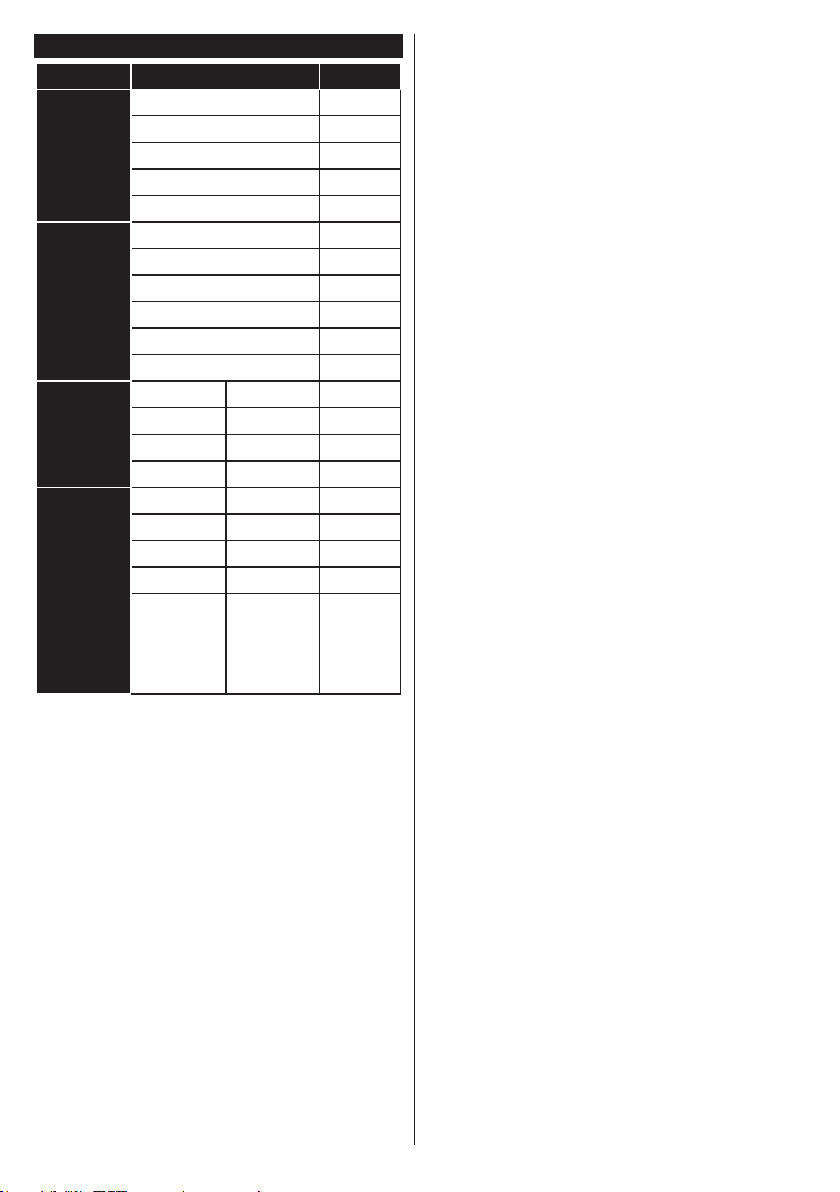
AV and HDMI Signal Compatibility
Source
Supported Signals
Available
PAL O
EXT
(SCART)
Side AV
YPbPr
HDMI
(X: Not Available, O: Available)
SECAM O
NTSC4.43 O
NTSC3.58 O
RGB 50/60
PAL O
SECAM O
NTSC4.43 O
NTSC3.58
S-VIDEO 50Hz (PAL)
S-VIDEO 60Hz (NTSC)
480i, 480p 60Hz O
576i, 576p 50Hz O
720p 50Hz,60Hz O
1080i 50Hz,60Hz O
480i, 480p 60Hz O
576i, 576p 50Hz O
720p 50Hz,60Hz O
1080i 50Hz,60Hz O
24Hz,
1080p
25Hz,
30Hz,
50Hz,
60Hz
O
In some cases a signal on the TV may not be displayed
properly. The problem may be an inconsistency with
standards from the source equipment (DVD, Set-top
box, etc. ). If you do experience such a problem please
contact your dealer and also the manufacturer of the
source equipment.
English - 20 -
Page 21
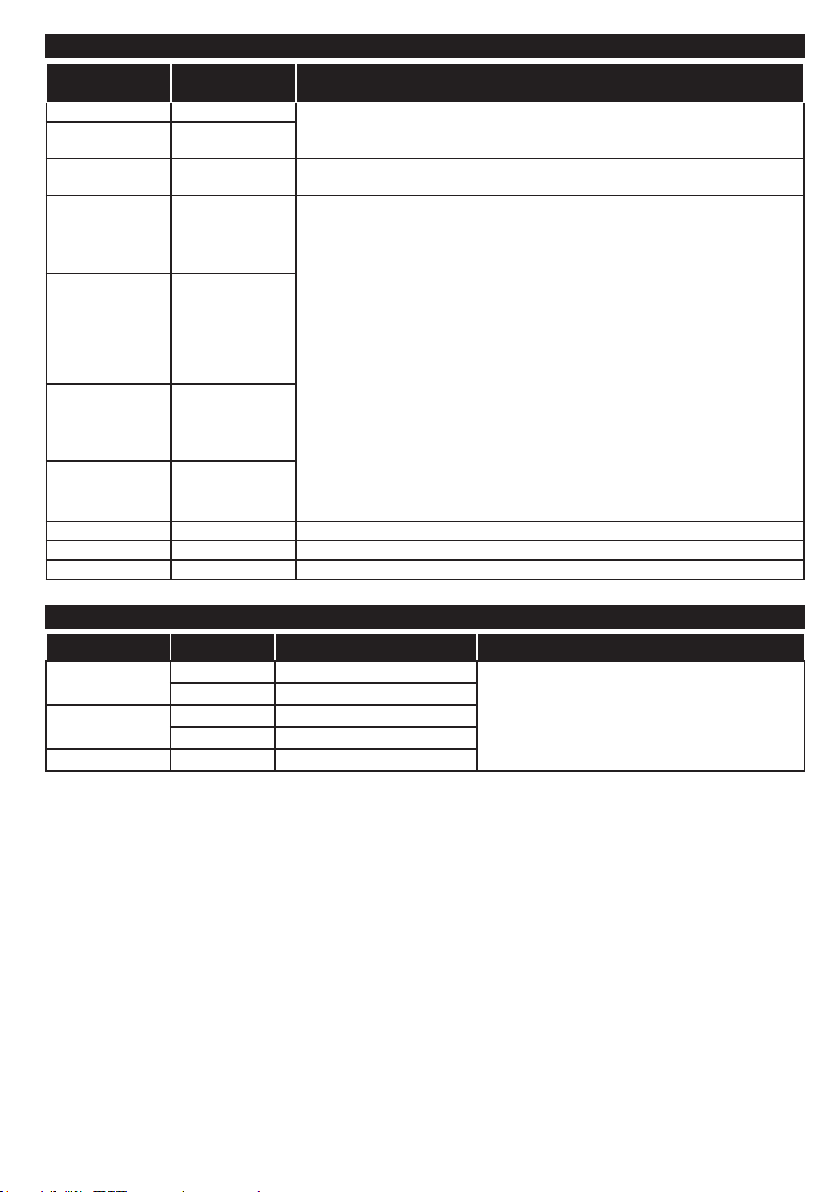
Supported Video File Formats for USB Mode
Extension Video Codec SPEC (Resolution) & Bit Rate
.dat, vob MPEG1/2
.mpg, .mpeg
.ts, .trp, .tp
.mp4, .mov,
.3gpp, .3gp
.avi MPEG1/2,
.mkv MPEG1/2,
.asf Sorenson H.263,
.v WMV3 1080P@30fps - 40 Mbps
.swf RV30/RV40 1080P@30fps - 40 Mbps
.wmv
MPEG1/2,
MPEG4
MPEG1/2, H.264,
AVS, MVC
MPEG1/2,
MPEG4, H.263,
H.264, Motion
JPEG
MPEG4,
Sorenson H.263,
H.263, H.264,
WMV3, Motion
JPEG
MPEG4, H.263,
H.264, WMV3,
Motion JPEG
H.264, WMV3,
Motion JPEG
1080P@30fps - 40 Mbps
H.264: 1080Px2@30fps - 62.5 Mbps, 1080P@60fps - 62.5 Mbps MVC:
1080P@30fps - 62.5 Mbps Other: 1080P@30fps - 40Mbps
H.264: 1080Px2@30fps - 62.5 Mbps, 1080P@60fps - 62.5 Mbps Motion JPEG:
640x480@30fps - 10 Mbps Other: 1080P@30fps - 40 Mbps
Supported Picture File Formats for USB Mode
Image Photo Resolution (width x height) Remark
JPEG
PNG
BMP 9600x6400
Base-line 15360x8640
Progressive 1024x768
non-interlace 9600x6400
interlace 1200x800
The limitation of max resolution depends on DRAM
size
English - 21 -
Page 22
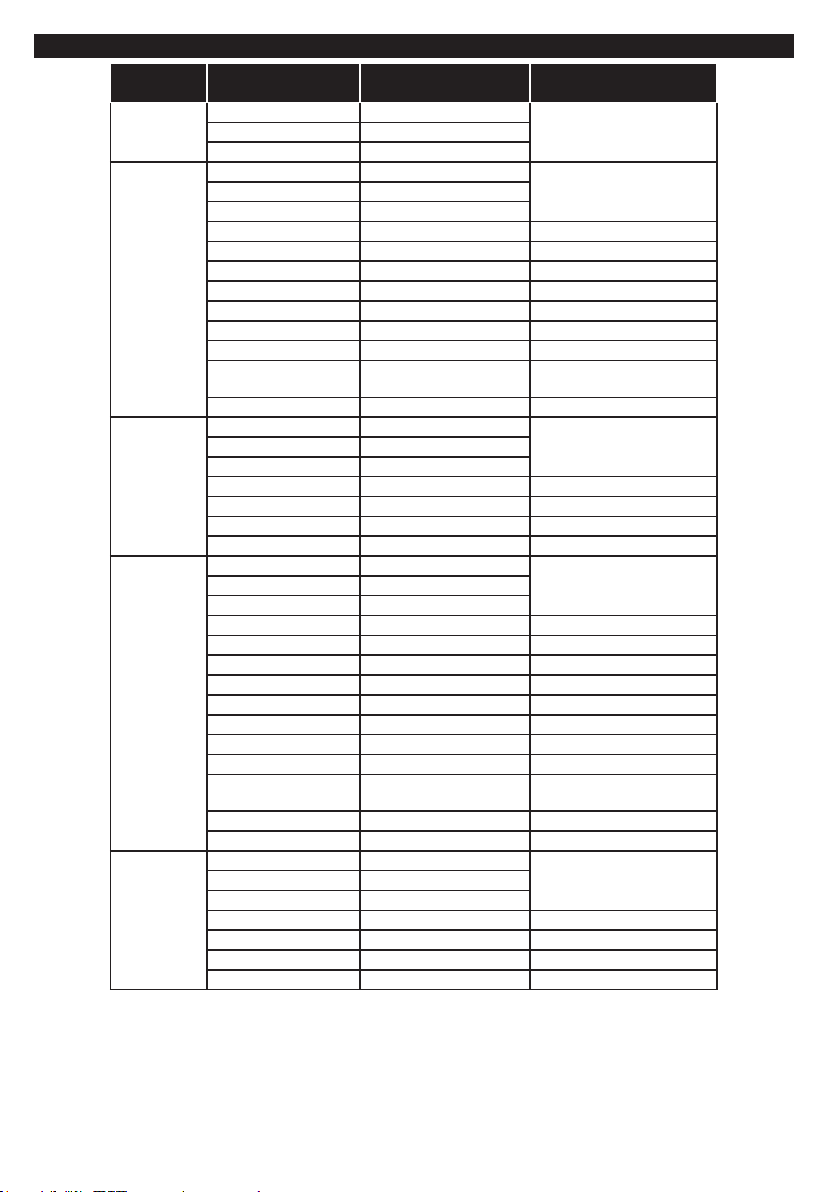
Supported Audio File Formats for USB Mode
Extension
Audio Codec Bit Rate Sample rate
.mp3,
.avi
.asf
.mkv, .mka
.ts, .trp, .tp,
.dat, .vob,
.mpg, .mpeg
MPEG1/2 Layer1 32Kbps ~ 448Kbps
MPEG1/2 Layer3 8Kbps ~ 320Kbps
MPEG1/2 Layer1 32Kbps ~ 448Kbps
MPEG1/2 Layer3 8Kbps ~ 320Kbps
AC3 32Kbps ~ 640Kbps 32KHz, 44.1KHz, 48KHz
AAC, HEAAC 8KHz ~ 48KHz
WMA 128bps ~ 320Kbps 8KHz ~ 48KHz
WMA 10 Pro M0 < 192kbps 48KHz
WMA 10 Pro M1 < 384kbps 48KHz
WMA 10 Pro M2 < 768kbps 96KHz
LPCM 64Kbps ~ 1.5Mbps 8KHz ~ 48KHz
IMA-ADPCM, MS-
ADPCM
G711 A/mu-law 64Kbps ~ 128Kbps 8KHz
MPEG1/2 Layer1 32Kbps ~ 448Kbps
MPEG1/2 Layer3 8Kbps ~ 320Kbps
WMA 128bps ~ 320Kbps 8KHz ~ 48KHz
WMA 10 Pro M0 < 192kbps 48KHz
WMA 10 Pro M1 < 384kbps 48KHz
WMA 10 Pro M2 < 768kbps 96KHz
MPEG1/2 Layer1 32Kbps ~ 448Kbps
MPEG1/2 Layer3 8Kbps ~ 320Kbps
AC3 32Kbps ~ 640Kbps 32KHz, 44.1KHz, 48KHz
AAC, HEAAC 8KHz ~ 48KHz
WMA 128bps ~ 320Kbps 8KHz ~ 48KHz
WMA 10 Pro M0 < 192kbps 48KHz
WMA 10 Pro M1 < 384kbps 48KHz
WMA 10 Pro M2 < 768kbps 96KHz
VORBIS Up to 48KHz
LPCM 64Kbps ~ 1.5Mbps 8KHz ~ 48KHz
IMA-ADPCM,
MS-ADPCM
G711 A/mu-law 64Kbps ~ 128Kbps 8KHz
FLAC < 1.6Mbps 8KHz ~ 96KHz
MPEG1/2 Layer1 32Kbps ~ 448Kbps
MPEG1/2 Layer3 8Kbps ~ 320Kbps
AC3 32Kbps ~ 640Kbps 32KHz, 44.1KHz, 48KHz
EAC3 32Kbps ~ 6Mbps 32KHz, 44.1KHz, 48KHz
AAC, HEAAC 8KHz ~ 48KHz
LPCM 64Kbps ~ 1.5Mbps 8KHz ~ 48KHz
384Kbps 8KHz ~ 48KHz
384Kbps 8KHz ~ 48KHz
16KHz ~ 48KHzMPEG1/2 Layer2 8Kbps ~ 384Kbps
16KHz ~ 48KHzMPEG1/2 Layer2 8Kbps ~ 384Kbps
16KHz ~ 48KHzMPEG1/2 Layer2 8Kbps ~ 384Kbps
16KHz ~ 48KHzMPEG1/2 Layer2 8Kbps ~ 384Kbps
16KHz ~ 48KHzMPEG1/2 Layer2 8Kbps ~ 384Kbps
English - 22 -
Page 23
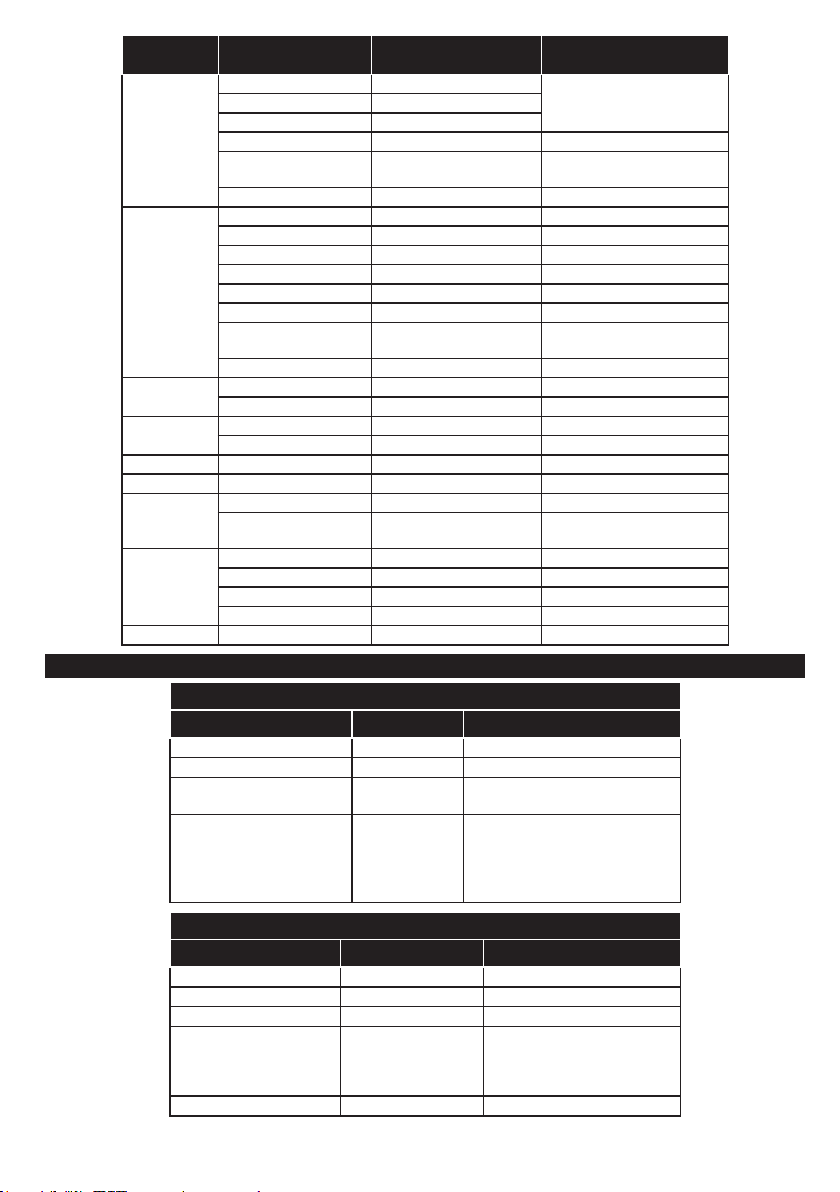
Extension
Audio Codec Bit Rate Sample rate
MPEG1/2 Layer1 32Kbps ~ 448Kbps
.wav
.3gpp, .3gp,
.mp4, .mov,
.m4a
.v
.ac3
.swf MPEG1/2 Layer3 8Kbps ~ 320Kbps 16KHz ~ 48KHz
.ec3 EAC3 32Kbps ~ 6Mbps 32KHz, 44.1KHz, 48KHz
.rm, .rmvb, .ra
.wma, .wmv
.webm VORBIS Up to 48KHz
MPEG1/2 Layer3 8Kbps ~ 320Kbps
LPCM 64Kbps ~ 1.5Mbps 8KHz ~ 48KHz
IMA-ADPCM,
MS-ADPCM
G711 A/mu-law 64Kbps ~ 128Kbps 8KHz
MPEG1/2 Layer3 8Kbps ~ 320Kbps 16KHz ~ 48KHz
AC3 32Kbps ~ 640Kbps 32KHz, 44.1KHz, 48KHz
EAC3 32Kbps ~ 6Mbps 32KHz, 44.1KHz, 48KHz
AAC, HEAAC 8KHz ~ 48KHz
VORBIS Up to 48KHz
LPCM 64Kbps ~ 1.5Mbps 8KHz ~ 48KHz
IMA-ADPCM,
MS-ADPCM
G711 A/mu-law 64Kbps ~ 128Kbps 8KHz
MPEG1/2 Layer3 8Kbps ~ 320Kbps 16KHz ~ 48KHz
AAC, HEAAC 8KHz ~ 48KHz
AC3 32Kbps ~ 640Kbps 32KHz, 44.1KHz, 48KHz
AAC, HEAAC 8KHz ~ 48KHz
AAC, HEAAC 8KHz ~ 48KHz
LBR (cook) 6Kbps ~ 128Kbps
WMA 128bps ~ 320Kbps 8KHz ~ 48KHz
WMA 10 Pro M0 < 192kbps 48KHz
WMA 10 Pro M1 < 384kbps 48KHz
WMA 10 Pro M2 < 768kbps 96KHz
384Kbps 8KHz ~ 48KHz
384Kbps 8KHz ~ 48KHz
Supported Subtitle File Formats for USB Mode
Internal Subtitles
Extension Container Subtitle Code
dat, mpg, mpeg, vob MPG, MPEG DVD Subtitle
ts, trp, tp TS DVB Subtitle
mp4 MP4
mkv MKV
External Subtitles
Extension Subtitle Parser Remark
.srt Subrip
.ssa/ .ass SubStation Alpha
.smi SAMI
.sub
.txt TMPlayer
SubViewer
MicroDVD
DVDSusbtitleSystem
SubIdx (VobSub)
16KHz ~ 48KHzMPEG1/2 Layer2 8Kbps ~ 384Kbps
8KHz, 11.025KHz,
22.05KHz, 44.1KHz
DVD Subtitle
UTF-8 Plain Text
ASS
SSA
UTF-8 Plain Text
VobSub
DVD Subtitle
SubViewer 1.0 & 2.0 Only
English - 23 -
Page 24
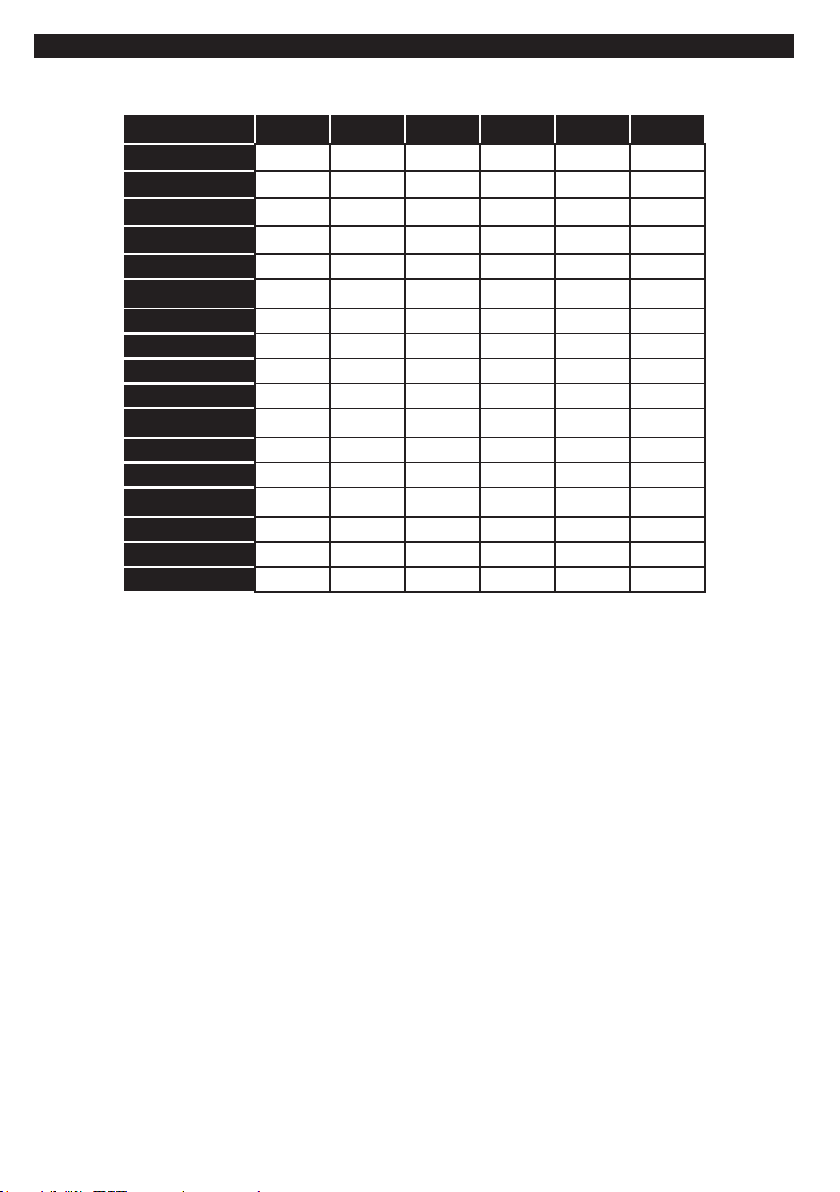
Supported DVI Resolutions
When connecting devices to your TV’s connectors by using DVI converter cable(DVI to HDMI cable - not
supplied), you can refer to the following resolution information.
56Hz 60Hz 66Hz 70Hz 72Hz 75Hz
640x400
640x480
800x600
832x624
1024x768
1152x864
1152x870
1280x768
1360x768
1280x960
1280x1024
1400x1050
1440x900
1600x1200
1680x1050
1920x1080
1920x1200
þ þ þ þ
þ þ þ þ þ
þ þ þ þ þ
þ þ þ
þ þ
þ
þ þ
þ þ
þ þ
þ þ
þ
þ
þ
þ
þ
þ
þ
English - 24 -
Page 25
Connectivity
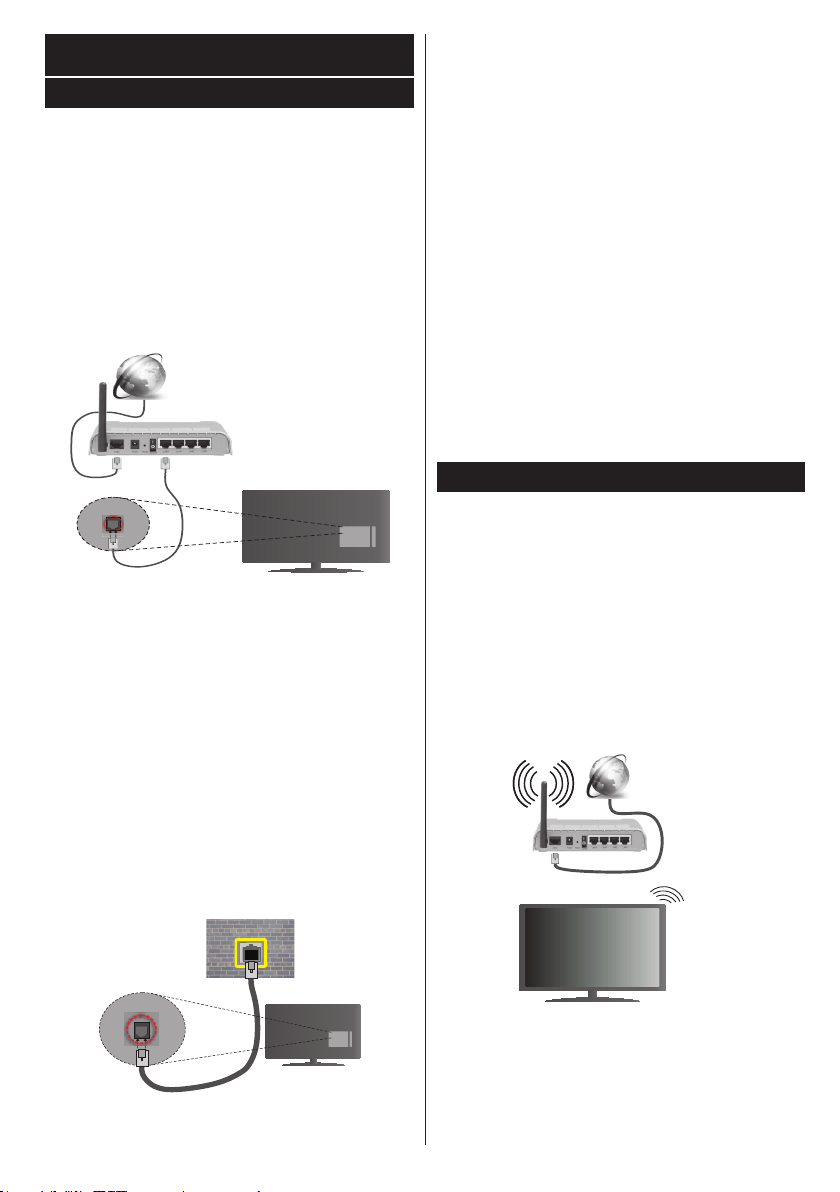
Wired Connectivity
To Connect to a Wired Network
• You must have a modem/router connected to an
active broadband connection.
• Ensure that Nero Media Home software is installed
to your PC (for Audio Video Sharing function). See
“Nero Media Home Installation” section.
• Connect your PC to your modem/router. This can
be a wired or wireless connection.
• Connect your TV to your modem/router via an
ethernet cable. There is a LAN port at the rear
(back) of your TV.
Broadband ISP connection
LAN (ethernet) cable
LAN input on the rear
side of the TV
• To access and play shared les, you must select the
Media Player. Press the Menu button and select
Media Player. Press OK to continue. Select the
desired le type and press OK. You must always
use the Media Player screen to access and play
shared network les.
• PC/HDD/Media Player or any other devices that are
compatible should be used with a wired connection
for higher playback quality.
Tocongure wired settings please refer to the
Network Settings section in the Setup Menu.
• You might be able to connect your TV to your LAN
depending on your network’s conguration. In such
a case, use an ethernet cable to connect your TV
directly to the network wall outlet.
ConguringWiredDeviceSettings
Network Type
The Network Type can be selected as Wired Device,
Wireless Device or Disabled, in accordance with the
active connection to the TV set. Select this as Wired
Device if you are connecting via an ethernet.
Internet Speed Test
Highlight Internet Speed Test and press the OK but-
ton. TV will check the internet connection bandwidth
and display the result when complete.
Advanced Settings
Highlight Advanced Settings and press the OK
button. On the next screen you can change the IP
and DNS settings of the TV. Highlight the desired one
and press Left or Right button to change the setting
from Automatic to Manual. Now you can enter the
Manual IP and / or Manual DNS values. Select the
related item in the drop down menu and enter the
new values using the numeric buttons of the remote.
Press the OK button to save settings when complete.
Wireless Connectivity
To Connect to a Wireless Network
The TV cannot connect to the networks with a hidden
SSID. To make your modem’s SSID visible, you should
change your SSID settings via the modem’s software.
To Connect to a wireless LAN, you should perform
the following steps:
1. Ensure that Nero Media Home software is
installed to your PC (for Audio Video Sharing
function).
2. To congure your wireless settings please refer to
the Network Settings section in the Setup Menu.
Broadband
ISP
connection
network
wall socket
LAN input on the rear
side of the TV
A Wireless-N router (IEEE 802.11a/b/g/n) with
simultaneous 2.4 and 5 GHz bands is designed to
increase bandwidth. These are optimized for smoother
and faster HD video streaming, le transfers and
wireless gaming.
English - 25 -
Page 26
• Use a LAN connection for quicker file sharing
between other devices like computers.
• The frequency and channel differ depending on the area.
• The transmission speed differs depending on the
distance and number of obstructions between the
transmission products, the conguration of these
products, the radio wave conditions, the line trafc
and the products that you use. The transmission may
also be cut off or may get disconnected depending
on the radio wave conditions, DECT phones or any
other WiFi 11b appliances. The standard values of
the transmission speed are the theoretical maximum
values for the wireless standards. They are not the
actual speeds of data transmission.
• The location where the transmission is most effective
differs depending on the usage environment.
• The Wireless feature of the TV supports 802.11 a,b,g
& n type modems. It is highly recommended that you
should use the IEEE 802.11n communication protocol
in order to avoid any possible problems while watching
videos.
• You must change your modem’s SSID when there are
any other modems around with the same SSID. You
can encounter connection problems otherwise. Use
a wired connection if you experience problems with a
wireless connection.
ConguringWirelessDeviceSettings
Open the Network Settings menu and select Network
Type as Wireless Device to start connection process.
The TV will scan the wireless networks automatically.
A list of available networks will be displayed. Please
select your desired network from the list.
Note: If the modem supports N mode, you should set N
mode settings.
If the selected network is protected with a password,
please enter the correct key by using the virtual
keyboard. You can use this keyboard via the directional
buttons and the OK button on the remote control.
Wait until the IP address is shown on the screen.
This means that the connection is now established.
To disconnect from a wireless network, highlight
Network Type and press Left or Right buttons to set
as Disabled.
Highlight Internet Speed Test and press the OK button
to check your internet connection speed. Highlight
Advanced Settings and press the OK button to open
the advanced setting menu. Use directional and numeric
buttons to set. Press the OK button to save settings
when complete.
Other Information
The status of the connection will be displayed as
Connected or Not Connected and the current IP
address, if a connection is established.
English - 26 -
Connecting to your mobile device via WiFi
• If your mobile device has WiFi feature, you can connect
it to your TV via a router, in order to access the content
in your device. For this, your mobile device must have
an appropriate sharing software.
• Connect to your router following the steps stated above
in the Wireless Connectivity section.
• Afterwards, engage your mobile device with the router
and then activate the sharing software on your mobile
device. Then, select les that you want to share with
your TV.
• If the connection is established correctly, you will be
able to access the shared les from your mobile device
via the Media Player of your TV.
• Enter the Media Player menu and the playback device
selection OSD will be displayed. Select your mobile
device and press the OK button to continue.
• If available, you can download a virtual remote
controller application from the server of your mobile
device application provider.
Note: This feature may not be supported on all mobile
devices.
Connectivity Troubleshooting
Wireless Network Not Available
• Ensure that any rewalls of your network allow the
TV wireless connection.
• Try searching for wireless networks again, using the
Network Settings menu screen.
If the wireless network does not function properly, try
using the wired network in your home. Refer to the
Wired Connectivity section for more information on
the process.
If the TV does not function using the wired connection,
check the modem (router). If the router does not
have a problem, check the internet connection of
your modem.
Connection is Slow
See the instruction book of your wireless modem to
get information on the internal service area, connection
speed, signal quality and other settings. You need to
have a high speed connection for your modem.
Distruption during playback or slow
reactions
You could try the following in such a case:
Keep at least three meters distance from microwave
ovens, mobile telephones, bluetooth devices or any
other Wi-Fi compatible devices. Try changing the active
channel on the WLAN router.
Page 27

Internet Connection Not Available / Audio Vi deo
Sh aring Not Working
If the MAC address (a unique identier number) of
your PC or modem has been permanently registered,
it is possible that your TV might not connect to
the internet. In such a case, the MAC address is
authenticated each time when you connect to the
internet. This is a precaution against unauthorized
access. Since your TV has its own MAC address,
your internet service provider cannot validate the MAC
address of your TV. For this reason, your TV cannot
connect to the internet. Contact your internet service
provider and request information on how to connect
a different device, such as your TV, to the internet.
It is also possible that the connection may not be
available due to a firewall problem. If you think
this causes your problem, contact your internet
service provider. A rewall might be the reason of a
connectivity and discovery problem while using the
TV in Audio Video Sharing mode or while browsing
via Audio Video Sharing feature.
Invalid Domain
Ensure that you have already logged on to your PC
with an authorized username/password and also
ensure that your domain is active, prior to sharing
any les in your media server program on your PC. If
the domain is invalid, this might cause problems while
browsing les in Audio Video Sharing mode.
Using Audio Video Sharing Network Service
Audio Video Sharing feature uses a standard that eases
the viewing process of digital electronics and makes
them more convenient to use on a home network.
This standard allows you to view and play photos, music
and videos stored in the media server connected to your
home network.
1. Nero Media Home Installation
The Audio Video Sharing feature cannot be used
if the server programme is not installed onto your
PC. Please prepare your PC with the Nero Media
Home programme. For more information about the
installation, please refer to the “Nero Media Home
Installation” section.
2. Connect to a Wired or Wireless Network
See the Wired/Wireless Connectivity chapters for
detailed conguration information.
3. Play Shared Files via Media Player
Select Media Player by using the Left or Right buttons
from the main menu and press OK. The media browser
will then be displayed.
English - 27 -
Audio Video Sharing
Audio Video Sharing support is only available in the
Media Player Folder mode. To enable folder mode,
go to the Setup tab in the main media browser screen
and press OK. Highlight View Style and set to Folder
using the Left or Right butt ons. Select the desired media
type and press OK.
If sharing congurations are set properly, Device
Selection screen will be displayed after selecting the
desired media type. If available networks are found,
they will be listed on this screen. Select media server
or network that you want to connect to using the Up
or Down buttons and press OK. If you want to refresh
the device list, press the Green button. You can press
Menu to exit.
If you select the media type as Videos and choose
a device from the selection menu. Then select the
folder with video les in it on the next screen and all
the available video les will be listed.
To play other media types from this screen, you must
go back to main Media Player screen and select the
media type as desired and then perform the network
selection again. Refer to the Media Player menu section
for further information on le playback.
Subtitle les do not work if you watch videos from
your network through Audio Video Sharing feature.
You can connect only one television to the same
network. If a problem occurs with the network, please
switch your television off at the wall socket and back
on again. Trick mode and jump are not supported with
the Audio Video Sharing feature.
Note: There may be some PC’s which may not be able to
utilize the Audio Video Sharing feature due to administrator
and security settings (such as business PC’s).
For best home network streaming with this TV, the Nero
software should be installed.
Nero MediaHome Installation
To install Nero MediaHome, please proceed as
follows:
Note: To use Audio Video Sharing feature, this software
should be installed to your PC.
1. Enter the link below completely in the adress-
bar of your web browser.
http://www.nero.com/mediahome-tv
2. Click the Download button on the opening
page. The installation le will be downloaded
onto your PC.
3. After the download is completed, double click
on the installation le to start the installation.
The installation wizard will guide you through
the installation process.
4. The prerequisites screen will be displayed rst.
The installation wizard checks the availability
of required third-party software on your PC.
Page 28

If applications are missing they are listed and
must be installed before continuing installation.
5. Click the Install button. The integrated serial
will be displayed. Please do not change the
displayed serial.
6. Click the Next button. The License Conditions
(EULA) screen will be displayed.
Please read
the license agreement carefully and select the
appropriate check box if you agree to the terms
of the agreement. Installation is not possible
without this agreement.
7. Click the Next button. On the next screen you
can set your installation preferences.
8. Click the Install button. The installation begins
and nishes automatically. A progress bar will
indicate the state of the installation process.
9. Click the Finish button. The installation is
completed. You will be directed to the web site
of the nero software.
10. A shortcut is now placed on your desktop.
Congratulations! You successfully installed Nero
MediaHome on your PC.
Run Nero MediaHome by double clicking on the
shortcut icon.
Internet Portal
Portal feature adds your TV a feature that allows you to
connect a server on the Internet and view the content
provided by this server over your Internet connection.
Portal feature allows you to view the music, video, clip
or web content with dened short-cuts. Whether you
can view this content without interruption depends
on the connection speed provided by your internet
service provider.
Press the Internet button on your remote control
to open internet portal page. You will see icons of
the available applications and services on the portal
screen. Use the directional buttons on your remote
to select the desired one. You may view the desired
content by pressing OK after selecting. Press Back/
Return button to return back to the previous screen.
Moreover, you can access some features using the
short-cut feature dened for the coloured or numeric
buttons of your remote.
Press the Exit button to quit the Internet portal mode.
PIP Window
Current source content will be displayed in the PIP
window, if you switch to portal mode while on any
active source.
If you switch to portal mode while watching TV
channels, current programme will be displayed in
the PIP window.
Notes:
Possible application dependent problems may be caused by
the content service provider.
Portal service content and the interface may be changed at
any time without prior notice.
Third party internet services may change, be discontinued or
restricted at any time.
iPlayer Application
You can access BBC iPlayer using your TV. Select
BBC iPlayer application among the portal options.
Press the OK button on your remote control to start
the BBC iPlayer application.
Note: Broadband internet connection (minumum 2mbps) is
required for high quality viewing.
Playing a Programme via iPlayer
Select a programme and press OK button. The
programme playback will begin.
You can press the Pause button to pause playback.
Press the Play button to resume the playback.
Use the Stop button to stop the playback.
Press the Exit button to exit iPlayer. Press the Return
/Back button for going back to the previous screen.
Note: “Episode is unavailable” message may be displayed
on the screen if a problem occurs during the playback.
Searching a Programme
Highlight the Search tab using the navigation buttons
and press the OK button. Use the virtual keyboard
to type the letters. Select letters and press the OK
button. When nished, highlight Search option and
press the OK button.
English - 28 -
Page 29

Internet Browser
To use the internet browser, please select the internet browser logo from the portal section.
Refresh Home Page Address Bar Add History Bookmarks Zoom
Previous
Next
App App
App
App
Remote control shortcuts
(Zoom in-out/Back/Home)
• To navigate the web browser, use the arrow buttons
on the remote control. Press OK to continue.
• Predened web sites and logos will be displayed on
the browser’s access page (see image above). To
add a desired website to the quick access links,
whilst you are on the site you wish to add, hover the
cursor over the Add icon and click (or press the OK
button). Then click on the Quick Access icon.
• If you want to add bookmarks,
hover the cursor over the
Bookmarks icon and click
whilst the desired website is
on the screen.
• There are various ways to search or visit websites
using the web browser.
Add
Bookmarks Quick
Access
(*)The appearance of the browser logo may change
Settings
App
App
App
App
App
Quick Access
• When you hover the cursor down to the middle of the
screen, the shortcuts assigned to the coloured buttons
of the remote control will appear.You can zoom in/out,
go back to previous page or go to home page using
these shurtcuts by clicking on them or pressing the
related coloured button on the remote.
• You can clear cookies or clear all browser data from
the settings menu.
• Your TV is compatible with USB mice. Plug your
mouse or wireless mouse adaptor into the USB
input of your TV.
• To view your browsing history, click on the history
icon. You can also clear your browsing history from
here.
Enter the address of a website(URL) into the address
bar and click on the button to visit.
Enter keyword/s into the address bar and click on
the
button to search for the related websites.
Click on the links to visit the related websites.
English - 29 -
• The browser does not support multiple tabs.
• Some web pages include ash content. These are
not supported by the browser.
• Your TV does not support any download processes
from the internet via the browser.
Page 30
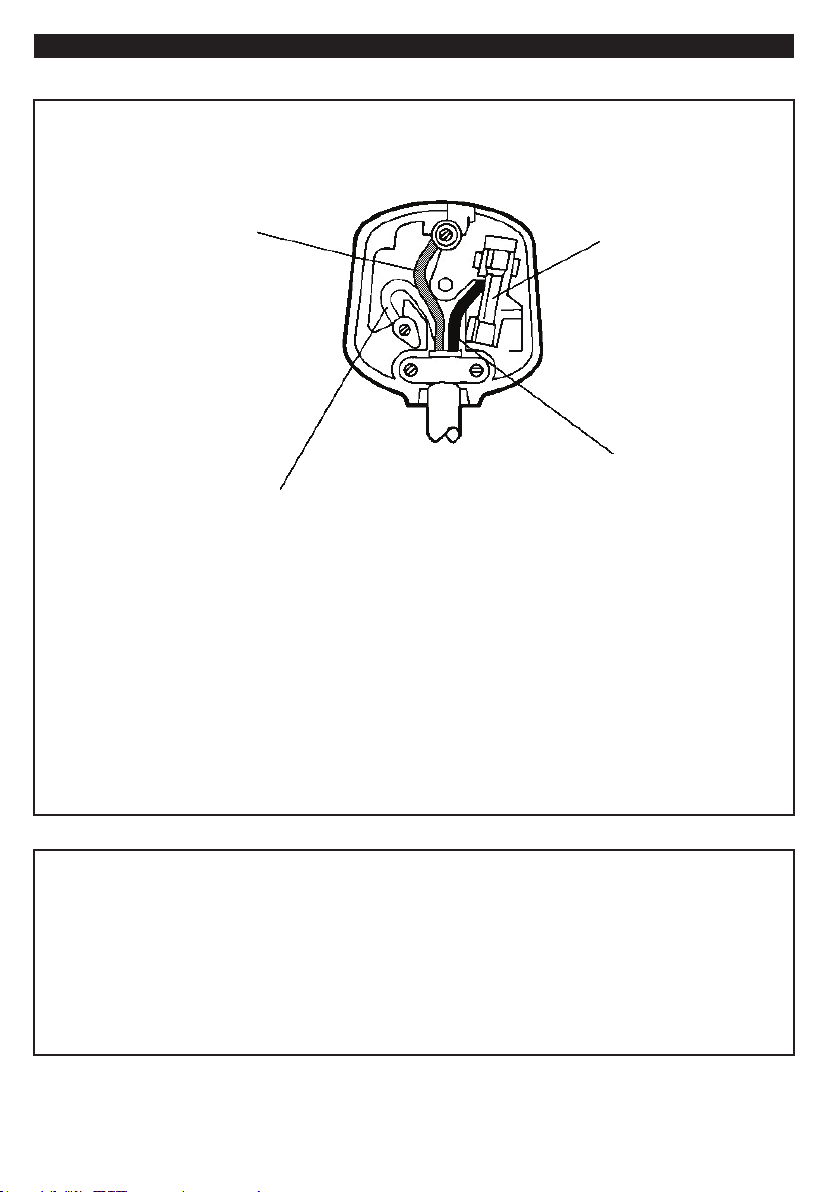
Important Instruction
For your own safety read following instruction carefully before attempting to connect this unit to the mains supply.
MAINS (AC) OPERATION
The wires in the mains lead are coloured in accordance with the following code :
GREEN
&
YELLOW
(Earth)
(if there is earth cable)
BLUE
(Neutral)
FUSE
BROWN
(Live)
IMPORTANT
As the colours of the wires in the mains lead of this appliance may not correspond with the coloured
markings identifying the terminals in your plug, proceed as follows:
The wire which is coloured green and yellow must be connected to the terminal which is marked with
the letter E, or by the earth symbol, or coloured green or green and yellow.
The wire which is coloured blue or black must be connected to the terminal which is marked with the
letter N or coloured Black.
The wire which is coloured brown or red must be connected to the terminal which is marked with the
letter L or coloured Red.
For continued protection against risk of re, replace only with same type and rating of fuse (ASTA
approved 5A 250VAC fuse).
CAUTION
TO PREVENT ELECTRIC SHOCK DISCONNECT FROM THE MAINS BEFORE REMOVING
COVER. NO USER SERVICEABLE PARTS INSIDE. REFER SERVICING TO QUALIFIED SERVICE
PERSONNEL.
SAFETY PRECAUTION
THIS EQUIPMENT MUST BE DISCONNECTED FROM THE MAINS WHEN NOT IN USE. DO NOT
ALLOW THIS UNIT TO BE EXPOSED TO RAIN OR MOISTURE.
English - 30 -
Page 31
Product che
Supplier
Model ID
Energy eciency class
Visible screen size (diagonal)
On mode average power consumption
Annual energy consumption *1
Standby power consumption *2
O mode power consumption
Screen resolution
*1: Energy consumption XYZ kWh per year, based on the power consumption of the television
operating 4 hours per day for 365 days.
The actual energy consumption will depend on how the television is used.
*2: when the TV is turned o with the remote control and no function is active.
For the information of rated power consumption, refer to the label on the TV back cover.
Panasonic Corporation
TX-55C320B
A+
139 cm / 55 inches
86 W
125 kWh
0,50 W
0,01
1920 x 1080
English - 31 -
Page 32
Deutsch
A
Produktdatenblatt
C
Modellkennung
G
Jährlicher Energieverbrauch
B
Lieferanten
D
Energieeffizienzklasse
H
Leistungsaufnahme im Bereitschafts-Zustand
E
Sichtbare Bildschirmdiagonale
I
Leistungsaufnahme im Aus-Zustand
F
Leistungsaufnahme im Ein-Zustand
J
Bildschirmauflösung
K
Energieverbrauch XYZ kWh/Jahr, auf der Grundlage eines täglich vierstündigen Betriebs des Fernsehgerätes
an 365 Tagen. Der tatsächliche Energieverbrauch hängt von der Art der Nutzung des Fernsehgerätes ab.
L
wenn der Fernseher mit der Fernbedienung ausgeschaltet wird und keine Funktion aktiviert ist
M
Weitere Informationen zur Nennleistungsaufnahme siehe Aufkleber auf der hinteren Abdeckung des Fernsehers.
Nederlands
A
Productkaart
C
Typeaanduiding
G
Jaarlijks energieverbruik
B
Leverancier
D
Energie-efficiëntieklasse
H
Elektriciteitsverbruik in de slaapstand
E
Zichtbare schermdiagonaal
I
Elektriciteitsverbruik in de uitstand
F
Elektriciteitsverbruik in de gebruiksstand
J
Schermresolutie
K
Energieverbruik XYZ kWh per jaar, gebaseerd op het elektriciteitsverbruik van de televisie wanneer deze
gedurende 365 dagen 4 uur per dag aanstaat. Het feitelijke energieverbruik is afhankelijk van de manier
waarop de televisie wordt gebruikt.
L
Als de tv is uitgeschakeld met de afstandsbediening en er geen functies actief zijn
M
Raadpleeg het etiket aan de achterkant van de tv voor informatie over het nominale elektriciteitsverbruik.
Italiano
A
Scheda prodotto
C
Identificatore del modello
G
Consumo annuo di energia
B
Fornitore
D
Classe di efficienza energetica
H
Consumo di energia in modo stand-by
E
Diagonale dello schermo visibile
I
Consumo di energia in modo spento
F
Consumo di energia in modo acceso
J
Risoluzione dello schermo
K
Consumo di energia XYZ kWh/anno calcolato sulla base del consumo di un televisore in funzione per 4
ore al giorno per 365 giorni. Il consumo effettivo di energia dipende dall’utilizzo reale del televisore.Lquando il televisore viene spento con il telecomando e non sono attive funzioni
M
Per le informazioni sul consumo di energia nominale, fare riferimento all’etichetta sul coperchio posteriore del televisore.
Français
A
Fiche produit
C
Référence du modèle
G
Consommation d’énergie annuelle
B
Fournisseur
D
Classe d’efficacité énergétique
H
Consommation électrique en mode veille
E
Diagonale d’écran visible
I
Consommation électrique en mode arrêt
F
Consommation électrique en mode marche
J
Résolution de l’écran
K
Consommation d’énergie de “XYZ” kWh par an, sur la base de la consommation électrique
d’un téléviseur fonctionnant quatre heures par jour pendant trois cent soixante-cinq jours. La
consommation réelle dépend des conditions d’utilisation du téléviseur.
L
lorsque le téléviseur est éteint à l’aide de la télécommande et qu’aucune fonction n’est active.MLa consommation nominale est indiquée sur l’étiquette apposée sur la partie arrière du téléviseur.
Español
A
Ficha de producto
C
Identificador del modelo
G
Consumo de energía anual
B
Proveedor
D
Clase de eficiencia energética
H
Consumo de electricidad en espera
E
Diagonal visible de la pantalla
I
Consumo de electricidad en modo apagado
F
Consumo de electricidad en modo encendido
J
Resolución de la pantalla
K
Consumo de energía: XYZ kWh al año, suponiendo cuatro horas de funcionamiento diario durante
365 días. El consumo efectivo dependerá de las condiciones reales de uso de la televisión.Lcuando el TV se apaga con el mando a distancia y no existe ninguna función activa
M
Para información sobre el consumo de potencia nominal consulte la etiqueta en la cubierta trasera del televisor.
Svenska
A
Informationsblad
C
Modellbeteckning
G
Årlig energiförbrukning
B
Leverantör
D
Energieffektivitetsklass
H
Effektförbrukning i standbyläge
E
Synlig skärmdiagonal
I
Effektförbrukning i frånläge
F
Effektförbrukning i påläge
J
Skärmupplösning
K
Energiförbrukning ’XYZ’ kWh per år, beräk nad utifrån effektförbrukningen för en tv-mottagare som
används fyra timmar per dygn under 365 dygn. Den faktiska energiförbrukningen kommer att bero
på hur tv-mottagaren används.Lnär TV:n är avslagen via fjärrkontrollen och ingen funktion är aktiv
M
För information om nominell effektförbrukning, se etiketten på TV:ns baksida.
Norsk
A
Produktinfo
C
Modell-ID
G
Årlig energiforbruk
B
Leverandør
D
Energieffektivitetsklasse
H
Strømforbruk i standby
E
Synlig skjerm-diagonal
I
Strømforbruk i off-modus
F
Strømforbruk i på-modus
J
Skjermoppløsning
K
Energiforbruk XYZ kWh per år, strømforbruket er basert på bruk av TV-en for 4 timer per dag for 365
dager. Det faktiske energiforbruket vil være avhengig av hvordan TV-en brukes.Lnår TV-en er skrudd av med fjernkontrollen og ingen funksjon er aktiv
M
For informasjon om nominell effekt, se etiketten på TV-bakdekselet.
Suomi
A
Tuoteseloste
C
Mallitunniste
G
Vuotuinen energiankulutus
B
Tavarantoimittaja
D
Energiatehokkuusluokka
H
Valmiustilan energiankulutus
E
Näkyvissä olevan kuvapinnan lävistäjä
I
Tehonkulutus pois päältä -tilassa
F
Tehonkulutus päälle kytkettynä -tilassa
J
Kuvaruudun resoluutio
K
Energiankulutus XYZ kWh:a vuodessa, kun oletetaan, että televisiota
käytetään 4 tuntia päivässä 365 päivän ajan. Todellinen energiankulutus
riippuu television käyttötavasta.
L
Kun TV on sammutettu kaukosäätimestä ja mikään toiminto ei ole käytössäMTietoja nimellisestä virrankulutuksesta on kyltissä television takakannessa.
TQB0E2387
G
Jährlicher EnergieverbrauchHLeistungsaufnahme im Bereitschafts-ZustandILeistungsaufnahme im Aus-ZustandJBildschirmauflösungGJaarlijks energieverbruikHElektriciteitsverbruik in de slaapstand
I
Elektriciteitsverbruik in de uitstand
J
Schermresolutie
G
Consumo annuo di energia
H
Consumo di energia in modo stand-by IConsumo di energia in modo spentoJRisoluzione dello schermo
G
Consommation d’énergie annuelle
H
Consommation électrique en mode veilleIConsommation électrique en mode arrêtJRésolution de l’écran
Español
A
Ficha de producto
C
Identificador del modelo
G
Consumo de energía anual
B
Proveedor
D
Clase de eficiencia energética
H
Consumo de electricidad en espera
E
Diagonal visible de la pantalla
I
Consumo de electricidad en modo apagado
F
Consumo de electricidad en modo encendido
J
Resolución de la pantalla
K
Consumo de energía: XYZ kWh al año, suponiendo cuatro horas de funcionamiento diario durante
365 días. El consumo efectivo dependerá de las condiciones reales de uso de la televisión.Lcuando el TV se apaga con el mando a distancia y no existe ninguna función activa
M
Para información sobre el consumo de potencia nominal consulte la etiqueta en la cubierta trasera del televisor.
Svenska
A
Informationsblad
C
Modellbeteckning
G
Årlig energiförbrukning
B
Leverantör
D
Energieffektivitetsklass
H
Effektförbrukning i standbyläge
E
Synlig skärmdiagonal
I
Effektförbrukning i frånläge
F
Effektförbrukning i påläge
J
Skärmupplösning
K
Energiförbrukning ’XYZ’ kWh per år, beräk nad utifrån effektförbrukningen för en tv-mottagare som
används fyra timmar per dygn under 365 dygn. Den faktiska energiförbrukningen kommer att bero
på hur tv-mottagaren används.Lnär TV:n är avslagen via fjärrkontrollen och ingen funktion är aktiv
M
För information om nominell effektförbrukning, se etiketten på TV:ns baksida.
Norsk
A
Produktinfo
C
Modell-ID
G
Årlig energiforbruk
B
Leverandør
D
Energieffektivitetsklasse
H
Strømforbruk i standby
E
Synlig skjerm-diagonal
I
Strømforbruk i off-modus
F
Strømforbruk i på-modus
J
Skjermoppløsning
K
Energiforbruk XYZ kWh per år, strømforbruket er basert på bruk av TV-en for 4 timer per dag for 365
dager. Det faktiske energiforbruket vil være avhengig av hvordan TV-en brukes.Lnår TV-en er skrudd av med fjernkontrollen og ingen funksjon er aktiv
M
For informasjon om nominell effekt, se etiketten på TV-bakdekselet.
Suomi
A
Tuoteseloste
C
Mallitunniste
G
Vuotuinen energiankulutus
B
Tavarantoimittaja
D
Energiatehokkuusluokka
H
Valmiustilan energiankulutus
E
Näkyvissä olevan kuvapinnan lävistäjä
I
Tehonkulutus pois päältä -tilassa
F
Tehonkulutus päälle kytkettynä -tilassa
J
Kuvaruudun resoluutio
K
Energiankulutus XYZ kWh:a vuodessa, kun oletetaan, että televisiota
käytetään 4 tuntia päivässä 365 päivän ajan. Todellinen energiankulutus
riippuu television käyttötavasta.LKun TV on sammutettu kaukosäätimestä ja mikään toiminto ei ole käytössäMTietoja nimellisestä virrankulutuksesta on kyltissä television takakannessa.
TQB0E2387
Ficha de producto
C
Identificador del modelo
G
Consumo de energía anual
Proveedor
D
Clase de eficiencia energética
H
Consumo de electricidad en espera
Diagonal visible de la pantalla
I
Consumo de electricidad en modo apagado
Consumo de electricidad en modo encendido
J
Resolución de la pantalla
Consumo de energía: XYZ kWh al año, suponiendo cuatro horas de funcionamiento diario durante
365 días. El consumo efectivo dependerá de las condiciones reales de uso de la televisión.
cuando el TV se apaga con el mando a distancia y no existe ninguna función activa
Para información sobre el consumo de potencia nominal consulte la etiqueta en la cubierta trasera del televisor.
Informationsblad
C
Modellbeteckning
G
Årlig energiförbrukning
Leverantör
D
Energieffektivitetsklass
H
Effektförbrukning i standbyläge
Synlig skärmdiagonal
I
Effektförbrukning i frånläge
Effektförbrukning i påläge
J
Skärmupplösning
Energiförbrukning ’XYZ’ kWh per år, beräk nad utifrån effektförbrukningen för en tv-mottagare som
används fyra timmar per dygn under 365 dygn. Den faktiska energiförbrukningen kommer att bero
på hur tv-mottagaren används.
när TV:n är avslagen via fjärrkontrollen och ingen funktion är aktiv
För information om nominell effektförbrukning, se etiketten på TV:ns baksida.
Produktinfo
C
Modell-ID
G
Årlig energiforbruk
Leverandør
D
Energieffektivitetsklasse
H
Strømforbruk i standby
Synlig skjerm-diagonal
I
Strømforbruk i off-modus
Strømforbruk i på-modus
J
Skjermoppløsning
Energiforbruk XYZ kWh per år, strømforbruket er basert på bruk av TV-en for 4 timer per dag for 365
dager. Det faktiske energiforbruket vil være avhengig av hvordan TV-en brukes.
når TV-en er skrudd av med fjernkontrollen og ingen funksjon er aktiv
For informasjon om nominell effekt, se etiketten på TV-bakdekselet.
Tuoteseloste
C
Mallitunniste
G
Vuotuinen energiankulutus
Tavarantoimittaja
D
Energiatehokkuusluokka
H
Valmiustilan energiankulutus
Näkyvissä olevan kuvapinnan lävistäjä
I
Tehonkulutus pois päältä -tilassa
Tehonkulutus päälle kytkettynä -tilassa
J
Kuvaruudun resoluutio
Energiankulutus XYZ kWh:a vuodessa, kun oletetaan, että televisiota
käytetään 4 tuntia päivässä 365 päivän ajan. Todellinen energiankulutus
riippuu television käyttötavasta.
Kun TV on sammutettu kaukosäätimestä ja mikään toiminto ei ole käytössä
Tietoja nimellisestä virrankulutuksesta on kyltissä television takakannessa.
TQB0E2387
Deutsch
A
Produktdatenblatt
C
Modellkennung
G
Jährlicher Energieverbrauch
B
Lieferanten
D
Energieeffizienzklasse
H
Leistungsaufnahme im Bereitschafts-Zustand
E
Sichtbare Bildschirmdiagonale
I
Leistungsaufnahme im Aus-Zustand
F
Leistungsaufnahme im Ein-Zustand
J
Bildschirmauflösung
K
Energieverbrauch XYZ kWh/Jahr, auf der Grundlage eines täglich vierstündigen Betriebs des Fernsehgerätes
an 365 Tagen. Der tatsächliche Energieverbrauch hängt von der Art der Nutzung des Fernsehgerätes ab.
L
wenn der Fernseher mit der Fernbedienung ausgeschaltet wird und keine Funktion aktiviert ist
M
Weitere Informationen zur Nennleistungsaufnahme siehe Aufkleber auf der hinteren Abdeckung des Fernsehers.
Nederlands
A
Productkaart
C
Typeaanduiding
G
Jaarlijks energieverbruik
B
Leverancier
D
Energie-efficiëntieklasse
H
Elektriciteitsverbruik in de slaapstand
E
Zichtbare schermdiagonaal
I
Elektriciteitsverbruik in de uitstand
F
Elektriciteitsverbruik in de gebruiksstand
J
Schermresolutie
K
Energieverbruik XYZ kWh per jaar, gebaseerd op het elektriciteitsverbruik van de televisie wanneer deze
gedurende 365 dagen 4 uur per dag aanstaat. Het feitelijke energieverbruik is afhankelijk van de manier
waarop de televisie wordt gebruikt.
L
Als de tv is uitgeschakeld met de afstandsbediening en er geen functies actief zijn
M
Raadpleeg het etiket aan de achterkant van de tv voor informatie over het nominale elektriciteitsverbruik.
Italiano
A
Scheda prodotto
C
Identificatore del modello
G
Consumo annuo di energia
B
Fornitore
D
Classe di efficienza energetica
H
Consumo di energia in modo stand-by
E
Diagonale dello schermo visibile
I
Consumo di energia in modo spento
F
Consumo di energia in modo acceso
J
Risoluzione dello schermo
K
Consumo di energia XYZ kWh/anno calcolato sulla base del consumo di un televisore in funzione per 4
ore al giorno per 365 giorni. Il consumo effettivo di energia dipende dall’utilizzo reale del televisore.
L
quando il televisore viene spento con il telecomando e non sono attive funzioni
M
Per le informazioni sul consumo di energia nominale, fare riferimento all’etichetta sul coperchio posteriore del televisore.
Français
A
Fiche produit
C
Référence du modèle
G
Consommation d’énergie annuelle
B
Fournisseur
D
Classe d’efficacité énergétique
H
Consommation électrique en mode veille
E
Diagonale d’écran visible
I
Consommation électrique en mode arrêt
F
Consommation électrique en mode marche
J
Résolution de l’écran
K
Consommation d’énergie de “XYZ” kWh par an, sur la base de la consommation électrique
d’un téléviseur fonctionnant quatre heures par jour pendant trois cent soixante-cinq jours. La
consommation réelle dépend des conditions d’utilisation du téléviseur.
L
lorsque le téléviseur est éteint à l’aide de la télécommande et qu’aucune fonction n’est active.
M
La consommation nominale est indiquée sur l’étiquette apposée sur la partie arrière du téléviseur.
Español
A
Ficha de producto
C
Identificador del modelo
G
Consumo de energía anual
B
Proveedor
D
Clase de eficiencia energética
H
Consumo de electricidad en espera
E
Diagonal visible de la pantalla
I
Consumo de electricidad en modo apagado
F
Consumo de electricidad en modo encendido
J
Resolución de la pantalla
K
Consumo de energía: XYZ kWh al año, suponiendo cuatro horas de funcionamiento diario durante
365 días. El consumo efectivo dependerá de las condiciones reales de uso de la televisión.
L
cuando el TV se apaga con el mando a distancia y no existe ninguna función activa
M
Para información sobre el consumo de potencia nominal consulte la etiqueta en la cubierta trasera del televisor.
Svenska
A
Informationsblad
C
Modellbeteckning
G
Årlig energiförbrukning
B
Leverantör
D
Energieffektivitetsklass
H
Effektförbrukning i standbyläge
E
Synlig skärmdiagonal
I
Effektförbrukning i frånläge
F
Effektförbrukning i påläge
J
Skärmupplösning
K
Energiförbrukning ’XYZ’ kWh per år, beräk nad utifrån effektförbrukningen för en tv-mottagare som
används fyra timmar per dygn under 365 dygn. Den faktiska energiförbrukningen kommer att bero
på hur tv-mottagaren används.
L
när TV:n är avslagen via fjärrkontrollen och ingen funktion är aktiv
M
För information om nominell effektförbrukning, se etiketten på TV:ns baksida.
Norsk
A
Produktinfo
C
Modell-ID
G
Årlig energiforbruk
B
Leverandør
D
Energieffektivitetsklasse
H
Strømforbruk i standby
E
Synlig skjerm-diagonal
I
Strømforbruk i off-modus
F
Strømforbruk i på-modus
J
Skjermoppløsning
K
Energiforbruk XYZ kWh per år, strømforbruket er basert på bruk av TV-en for 4 timer per dag for 365
dager. Det faktiske energiforbruket vil være avhengig av hvordan TV-en brukes.
L
når TV-en er skrudd av med fjernkontrollen og ingen funksjon er aktiv
M
For informasjon om nominell effekt, se etiketten på TV-bakdekselet.
Suomi
A
Tuoteseloste
C
Mallitunniste
G
Vuotuinen energiankulutus
B
Tavarantoimittaja
D
Energiatehokkuusluokka
H
Valmiustilan energiankulutus
E
Näkyvissä olevan kuvapinnan lävistäjä
I
Tehonkulutus pois päältä -tilassa
F
Tehonkulutus päälle kytkettynä -tilassa
J
Kuvaruudun resoluutio
K
Energiankulutus XYZ kWh:a vuodessa, kun oletetaan, että televisiota
käytetään 4 tuntia päivässä 365 päivän ajan. Todellinen energiankulutus
riippuu television käyttötavasta.
L
Kun TV on sammutettu kaukosäätimestä ja mikään toiminto ei ole käytössä
M
Tietoja nimellisestä virrankulutuksesta on kyltissä television takakannessa.
TQB0E2387
Lietuvių k.
A
Gaminio kortelė
C
Modelio identifikatorius
G
Metinis energijos sunaudojimas
B
Tiekėjas
D
Energijos efektyvumo klasė
H
Energijos sunaudojimas budėjimo režimu
E
Matoma ekrano įstrižainė
I
Energijos sunaudojimas išjungus gaminį
F
Energijos sunaudojimas įjungus gaminį
J
Ekrano skiriamoji geba
K
XYZ kWh energijos sunaudojimas per metus nurodomas atsižvelgus į tai, kiek energijos sunaudojama televizoriui veikiant
4 valandas per dieną 365 dienas iš eilės. Faktinį energijos sunaudojimą lems tai, kiek laiko bus naudojamas televizorius.
L
išjungus televizorių nuotolinio valdymo įrenginiu, kai neveikia jokia funkcija
M
Informaciją apie vardinį energijos suvartojimą žr. etiketėje ant televizoriaus galinio gaubto.
Português
A
Ficha de produto
C
Identificador de modelo
G
Consumo de energia anual
B
Fornecedor
D
Classe de eficiência energética
H
Consumo, em termos de potência, em estado de vigília
E
Diagonal visível do ecrã
I
Consumo, em termos de potência, em estado de desactivação
F
Consumo, em termos de potência, no estado activo
J
Resolução do ecrã
K
Consumo de energia de XYZ kWh por ano, baseado no consumo, em termos de potência, do televisor a funcionar
4 horas por dia durante 365 dias. O consumo de energia real dependerá do modo como o televisor é utilizado.
L
Quando o televisor é desligado com o telecomando e quando não está activada qualquer função
M
Para obter informações sobre o consumo de potência nominal, consulte a etiqueta na tampa traseira do televisor.
Dansk
A
Datablad
C
Modelidentifikation
G
Årligt energiforbrug
B
Leverandør
D
Energieffektivitetsklasse
H
Effektforbruget i standbytilstand
E
Synlig skærmdiagonal
I
Effektforbruget i slukket tilstand
F
Effektforbruget i tændt tilstand
J
Skærmopløsning
K
Energiforbrug: XYZ kWh om året, beregnet som fjernsynets effektforbrug, hvis det er tændt 4 timer
om dagen i 365 dage. Det faktiske energiforbrug vil bero på, hvordan fjernsynet bruges.
L
når fjernsynet er slukket med fjernbetjeningen og ingen funktioner er aktive
M
For oplysninger om nominelt strømforbrug henvises til mærkaten på fjernsynets bagbeklædning.
Български
A
Продуктов фиш
C
Идентификатор на модела
G
Годишна консумация на енергия
B
Доставчик
D
Клас на енергийна ефективност
H
Консумация на енергия в режим „в готовност“
E
Видим диагонал на екрана
I
Консумация на енергия в режим „изключен“
F
Консумация на енергия в режим „включен“
J
Разделителна способност на екрана
K
Консумация на енергия XYZ kWh годишно, изчислена на базата на 4 работни часа дневно при
365 дни. Действително консумираната енергия ще зависи от начина на употреба на телевизора.
L
когато телевизорът е изключен от дистанционното управление и няма активна функция
M
За информация за номиналната консумация на енергия вижте етикета върху задния капак на телевизора.
Română
A
Fişa produsului
C
Referinţă model
G
Consumul anual de energie
B
Furnizor
D
Clasa de eficienţă energetică
H
Puterea consumată în modul standby
E
Diagonala vizibilă a ecranului
I
Puterea consumată în modul oprit
F
Puterea consumată în modul activ
J
Rezoluţie ecran
K
Consumul de energie de XYZ kWh pe an, pe baza puterii consumate de aparatul TV atunci când este în funcţiune
4 ore pe zi timp de 365 de zile; consumul real de energie depinde de condiţiile de utilizare a aparatului TV.
L
când televizorul este oprit cu telecomanda şi nu este activă nicio funcţie
M
Pentru informaţii privind consumul nominal de energie, consultaţi eticheta de pe capacul posterior al televizorului.
Latviešu valodā
A
Produkta speciālā zīme
C
Modeļa identifikators
G
Ikgadējais enerģijas patēriņš
B
Piegādātājs
D
Energoefektivitātes klase
H
Gatavības režīma elektroenerģijas patēriņš
E
Ekrāna redzamās daļas izmērs pa diagonāli
I
Izslēgtā režīma elektroenerģijas patēriņš
F
Aktīvā režīma elektroenerģijas patēriņš
J
Ekrāna izšķirtspēja
K
Enerģijas patēriņš XYZ kWh gadā, ņemot vērā televizora elektroenerģijas patēriņu, darbojoties 365
dienas, četras stundas dienā. Faktiskais enerģijas patēriņš būs atkarīgs no tā, kā televizors tiks izmantots.
L
kad televizors ir izslēgts ar tālvadības pulti un nedarbojas neviena funkcija
M
Nominālais strāvas patēriņš norādīts etiķetē televizora korpusa aizmugurē.
Polski
A
Karta produktu
C
Identyfikator modelu
G
Roczne zużycie energii
B
Dostawca
D
Klasa efektywności energetycznej
H
Zużycie energii w trybie czuwania
E
Przekątna widzialna ekranu
I
Zużycie energii w trybie wyłączenia
F
Zużycie energii w trybie włączenia
J
Rozdzielczość ekranu
K
Zużycie energii XYZ kWh/rok na podstawie zużycia energii przez telewizor działający 4 godziny
dziennie przez 365 dni. Rzeczywiste zużycie energii zależy od sposobu użytkowania telewizora.
L
Wyłączenie telewizora za pomocą pilota i brak aktywnych funkcji.
M
Informacje na temat znamionowego poboru mocy znajdują się na etykiecie na tylnej obudowie telewizora.
Magyar
A
Termékismertető adatlap
C
Típusazonosító
G
Éves energiafogyasztás
B
Beszállító
D
Energiahatékonysági osztály
H
Készenléti üzemmódbeli energiafogyasztás
E
Látható képátló nagysága
I
Kikapcsolt üzemmódbeli energiafogyasztás
F
Bekapcsolt üzemmódbeli energiafogyasztás
J
Képernyőfelbontás
K
A televíziókészülék napi 4 órás üzem mellett az év 365 napjára vetítve évente XYZ kWh mennyiségű
energiát fogyaszt. A tényleges energiafogyasztás a készülék üzemeltetési módjától függ.
L
Amikor a TV-t a távirányítóval kapcsolják ki, és nincs aktív funkció
M
További információért a névleges energiafogyasztással kapcsolatban olvassa el a TV hátulsó burkolatán található címkét.
Česky
A
Informační list výrobku
C
Identifikační značka modelu
G
Roční spotřeba elektrické energie
B
Dodavatel
D
Třída energetické účinnosti
H
Spotřeba elektrické energie v pohotovostním režimu
E
Viditelná úhlopříčka obrazovky
I
Spotřeba elektrické energie ve vypnutém stavu
F
Spotřeba elektrické energie v zapnutém stavu
J
Rozlišení obrazovky
K
Spotřeba elektrické energie XYZ kWh za rok vycházející ze spotřeby elektrické energie televizního přijímače, který je v provozu
4 hodiny denně po dobu 365 dní. Skutečná spotřeba elektrické energie závisí na způsobu použití televizního přijímače.
L
Když je televizor vypnutý dálkovým ovladačem a není aktivní žádná funkce.
M
Informace o jmenovitém příkonu najdete na štítku na zadním krytu televizoru.
Ελληνικά
A
Δελτίο προϊόντος
C
Αναγνωριστικό μοντέλου
G
Ετήσια κατανάλωση ενέργειας
B
Προμηθευτής
D
Τάξη ενεργειακής απόδοσης
H
Κατανάλωση ισχύος σε κατάσταση αναμονής
E
Ορατή διαγώνιος οθόνης
I
Κατανάλωση ισχύος σε κατάσταση εκτός λειτουργίας
F
Κατανάλωση ισχύος σε κατάσταση λειτουργίας
J
Ανάλυση οθόνης
K
Κατανάλωση ενέργειας XYZ kWh ανά έτος, με βάση την κατανάλωση ισχύος από την τηλεόραση για τετράωρη λειτουργία
ανά ημέρα επί 365 ημέρες. Η πραγματική κατανάλωση ενέργειας εξαρτάται από τον τρόπο χρήσης της συσκευής.Lόταν η τηλεόραση είναι απενεργοποιημένη από το τηλεχειριστήριο και δεν υπάρχουν ενεργές λειτουργίεςMΓια τις πληροφορίες ονομαστικής κατανάλωσης ισχύος, ανατρέξτε στην ετικέτα στο πίσω κάλυμμα της τηλεόρασης.
Türk çe
A
Ürün fişi
C
Model No
G
Yıllık enerji tüketimi
B
Tedarikçi
D
Enerji verimlilik sınıfı
H
Beklemede güç tüketimi
E
Görülebilir ekran köşegeni
I
Kapalı modda güç tüketimi
F
Açık modda güç tüketimi
J
Ekran çözünürlüğü
K
365 gün boyunca günde 4 saat çalışan televizyonun tükettiği güç referans alınarak yılda XYZ kWh
enerji tüketimi. Güncel enerji tüketimi televizyonun nasıl kullanıldığına bağlı olacaktır.
L
Televizyon uzaktan kumanda ile kapatıldığında ve aktif fonksiyon yokken
M
Nominal güç tüketim bilgisi için televizyonun arka kapağındaki etikete bakın.
Hrvatski
A
Podatkovni list proizvoda
C
ID modela
G
Godišnji utrošak energije
B
Dobavljač
D
Razred energetske učinkovitosti
H
Utrošak energije u pripravnosti
E
Dijagonala vidljivog zaslona
I
Utrošak energije pri isključenosti
F
Utrošak energije pri uključenosti
J
Razlučivost zaslona
K
Utrošak energije iznosi XYZ kWh godišnje na temelju utroška energije televizora koji radi četiri sata
dnevno 365 dana u godini. Stvarni utrošak energije ovisit će o tome kako se upotrebljava televizor.
L
kada se televizor isključi daljinskim upravljačem i nijedna funkcija nije aktivna
M
Za informacije o nazivnoj snazi pogledajte naljepnicu na stražnjem pokrovu televizora.
Slovensky
A
Opis výrobku
C
Identifikačný znak modelu
G
Ročná spotreba elektrickej energie
B
Dodávateľ
D
Trieda energetickej efektívnosti
H
Spotreba elektrickej energie v pohotovostnom režime
E
Uhlopriečka viditeľnej časti obrazovky
I
Spotreba elektrickej energie v režime vypnutia
F
Spotreba elektrickej energie v režime zapnutia
J
Rozlíšenie obrazovky
K
Spotreba energie XYZ kWh za rok na základe spotreby elektrickej energie televízora, ktorý je v činnosti
4 hodiny denne počas 365 dní. Skutočná spotreba energie závisí od toho, ako sa televízor používa.
L
keď je televízor vypnutý diaľkovým ovládačom a nie je aktívna žiadna funkcia
M
Údaje o menovitom príkone sú uvedené na štítku na zadnom kryte televízora.
Eesti
A
Tootekirjeldus
C
Mudelitähis
G
Aastane energiatarbimine
B
Tarnija
D
Energiatõhususe klass
H
Ooteseisundi elektritarbimine
E
Ekraani nähtava osa diagonaal
I
Väljalülitatud seisundi elektritarbimine
F
Sisselülitatud seisundi elektritarbimine
J
Ekraani resolutsioon
K
Energiatarbimine XYZ kWh aastas, eeldusel et televiisor töötab neli tundi päevas ja 365 päeva aastas.
Tegelik energiatarbimine oleneb televiisori kasutusviisist.
L
kui teler on kaugjuhtimispuldiga välja lülitatud ning ükski funktsioon ei tööta.
M
Nimivõimsustarbe alase teabe leiate teleri tagakattel olevalt sildilt.
English - 32 -
Page 33
Dansk
A
Datablad
C
Modelidentifikation
G
Årligt energiforbrug
B
Leverandør
D
Energieffektivitetsklasse
H
Effektforbruget i standbytilstand
E
Synlig skærmdiagonal
I
Effektforbruget i slukket tilstand
F
Effektforbruget i tændt tilstand
J
Skærmopløsning
K
Energiforbrug: XYZ kWh om året, beregnet som fjernsynets effektforbrug, hvis det er tændt 4 timer
om dagen i 365 dage. Det faktiske energiforbrug vil bero på, hvordan fjernsynet bruges.
L
når fjernsynet er slukket med fjernbetjeningen og ingen funktioner er aktive
M
For oplysninger om nominelt strømforbrug henvises til mærkaten på fjernsynets bagbeklædning.
Български
A
Продуктов фиш
C
Идентификатор на модела
G
Годишна консумация на енергия
B
Доставчик
D
Клас на енергийна ефективност
H
Консумация на енергия в режим „в готовност“
E
Видим диагонал на екрана
I
Консумация на енергия в режим „изключен“
F
Консумация на енергия в режим „включен“
J
Разделителна способност на екрана
K
Консумация на енергия XYZ kWh годишно, изчислена на базата на 4 работни часа дневно при
365 дни. Действително консумираната енергия ще зависи от начина на употреба на телевизора.
L
когато телевизорът е изключен от дистанционното управление и няма активна функция
M
За информация за номиналната консумация на енергия вижте етикета върху задния капак на телевизора.
Română
A
Fişa produsului
C
Referinţă model
G
Consumul anual de energie
B
Furnizor
D
Clasa de eficienţă energetică
H
Puterea consumată în modul standby
E
Diagonala vizibilă a ecranului
I
Puterea consumată în modul oprit
F
Puterea consumată în modul activ
J
Rezoluţie ecran
K
Consumul de energie de XYZ kWh pe an, pe baza puterii consumate de aparatul TV atunci când este în funcţiune
4 ore pe zi timp de 365 de zile; consumul real de energie depinde de condiţiile de utilizare a aparatului TV.
L
când televizorul este oprit cu telecomanda şi nu este activă nicio funcţie
M
Pentru informaţii privind consumul nominal de energie, consultaţi eticheta de pe capacul posterior al televizorului.
Latviešu valodā
A
Produkta speciālā zīme
C
Modeļa identifikators
G
Ikgadējais enerģijas patēriņš
B
Piegādātājs
D
Energoefektivitātes klase
H
Gatavības režīma elektroenerģijas patēriņš
E
Ekrāna redzamās daļas izmērs pa diagonāli
I
Izslēgtā režīma elektroenerģijas patēriņš
F
Aktīvā režīma elektroenerģijas patēriņš
J
Ekrāna izšķirtspēja
K
Enerģijas patēriņš XYZ kWh gadā, ņemot vērā televizora elektroenerģijas patēriņu, darbojoties 365
dienas, četras stundas dienā. Faktiskais enerģijas patēriņš būs atkarīgs no tā, kā televizors tiks izmantots.
L
kad televizors ir izslēgts ar tālvadības pulti un nedarbojas neviena funkcija
M
Nominālais strāvas patēriņš norādīts etiķetē televizora korpusa aizmugurē.
Polski
A
Karta produktu
C
Identyfikator modelu
G
Roczne zużycie energii
B
Dostawca
D
Klasa efektywności energetycznej
H
Zużycie energii w trybie czuwania
E
Przekątna widzialna ekranu
I
Zużycie energii w trybie wyłączenia
F
Zużycie energii w trybie włączenia
J
Rozdzielczość ekranu
K
Zużycie energii XYZ kWh/rok na podstawie zużycia energii przez telewizor działający 4 godziny
dziennie przez 365 dni. Rzeczywiste zużycie energii zależy od sposobu użytkowania telewizora.
L
Wyłączenie telewizora za pomocą pilota i brak aktywnych funkcji.
M
Informacje na temat znamionowego poboru mocy znajdują się na etykiecie na tylnej obudowie telewizora.
Ελληνικά
A
Δελτίο προϊόντος
C
Αναγνωριστικό μοντέλου
G
Ετήσια κατανάλωση ενέργειας
B
Προμηθευτής
D
Τάξη ενεργειακής απόδοσης
H
Κατανάλωση ισχύος σε κατάσταση αναμονής
E
Ορατή διαγώνιος οθόνης
I
Κατανάλωση ισχύος σε κατάσταση εκτός λειτουργίας
F
Κατανάλωση ισχύος σε κατάσταση λειτουργίας
J
Ανάλυση οθόνης
K
Κατανάλωση ενέργειας XYZ kWh ανά έτος, με βάση την κατανάλωση ισχύος από την τηλεόραση για τετράωρη λειτουργία
ανά ημέρα επί 365 ημέρες. Η πραγματική κατανάλωση ενέργειας εξαρτάται από τον τρόπο χρήσης της συσκευής.Lόταν η τηλεόραση είναι απενεργοποιημένη από το τηλεχειριστήριο και δεν υπάρχουν ενεργές λειτουργίεςMΓια τις πληροφορίες ονομαστικής κατανάλωσης ισχύος, ανατρέξτε στην ετικέτα στο πίσω κάλυμμα της τηλεόρασης.
Türk çe
A
Ürün fişi
C
Model No
G
Yıllık enerji tüketimi
B
Tedarikçi
D
Enerji verimlilik sınıfı
H
Beklemede güç tüketimi
E
Görülebilir ekran köşegeni
I
Kapalı modda güç tüketimi
F
Açık modda güç tüketimi
J
Ekran çözünürlüğü
K
365 gün boyunca günde 4 saat çalışan televizyonun tükettiği güç referans alınarak yılda XYZ kWh
enerji tüketimi. Güncel enerji tüketimi televizyonun nasıl kullanıldığına bağlı olacaktır.
L
Televizyon uzaktan kumanda ile kapatıldığında ve aktif fonksiyon yokken
M
Nominal güç tüketim bilgisi için televizyonun arka kapağındaki etikete bakın.
Hrvatski
A
Podatkovni list proizvoda
C
ID modela
G
Godišnji utrošak energije
B
Dobavljač
D
Razred energetske učinkovitosti
H
Utrošak energije u pripravnosti
E
Dijagonala vidljivog zaslona
I
Utrošak energije pri isključenosti
F
Utrošak energije pri uključenosti
J
Razlučivost zaslona
K
Utrošak energije iznosi XYZ kWh godišnje na temelju utroška energije televizora koji radi četiri sata
dnevno 365 dana u godini. Stvarni utrošak energije ovisit će o tome kako se upotrebljava televizor.
L
kada se televizor isključi daljinskim upravljačem i nijedna funkcija nije aktivna
M
Za informacije o nazivnoj snazi pogledajte naljepnicu na stražnjem pokrovu televizora.
Slovensky
A
Opis výrobku
C
Identifikačný znak modelu
G
Ročná spotreba elektrickej energie
B
Dodávateľ
D
Trieda energetickej efektívnosti
H
Spotreba elektrickej energie v pohotovostnom režime
E
Uhlopriečka viditeľnej časti obrazovky
I
Spotreba elektrickej energie v režime vypnutia
F
Spotreba elektrickej energie v režime zapnutia
J
Rozlíšenie obrazovky
K
Spotreba energie XYZ kWh za rok na základe spotreby elektrickej energie televízora, ktorý je v činnosti
4 hodiny denne počas 365 dní. Skutočná spotreba energie závisí od toho, ako sa televízor používa.
L
keď je televízor vypnutý diaľkovým ovládačom a nie je aktívna žiadna funkcia
M
Údaje o menovitom príkone sú uvedené na štítku na zadnom kryte televízora.
Eesti
A
Tootekirjeldus
C
Mudelitähis
G
Aastane energiatarbimine
B
Tarnija
D
Energiatõhususe klass
H
Ooteseisundi elektritarbimine
E
Ekraani nähtava osa diagonaal
I
Väljalülitatud seisundi elektritarbimine
F
Sisselülitatud seisundi elektritarbimine
J
Ekraani resolutsioon
K
Energiatarbimine XYZ kWh aastas, eeldusel et televiisor töötab neli tundi päevas ja 365 päeva aastas.
Tegelik energiatarbimine oleneb televiisori kasutusviisist.
L
kui teler on kaugjuhtimispuldiga välja lülitatud ning ükski funktsioon ei tööta.
M
Nimivõimsustarbe alase teabe leiate teleri tagakattel olevalt sildilt.
A
Lista sa podacima za proizvod
B
Dobavljač
C
ID modelaDKlasa energetske efikasnostiEVidljiva veličina ekrana (dijagonala)
F
Prosečna potrošnja u režimu uključenog
napajanja
G
Godišnja potrošnja struje
H
Potrošnja struje u stanju pripravnostiIPotrošnja u režimu isključenog napajanja
J
Rezolucija ekrana
K
Potrašnja struje od XYZ kWh na godišnjem
nivou zasnovana je na potrošnji televizora
koji je uključen 4 sata dnevno 365 dana
godišnje. Stvarna potrošnja struje zavisiće o
načina korišćenja televizora.LKada je televizor isključen pomoću daljinskog
upravljača i kada nije aktivna nijedan funkcija
M
Informacije o nazivnoj potrošnji struje
potražite na nalepnici na poleđini televizora.
A
Lista sa podacima za proizvodBDobavljač
C
ID modelaDKlasa energetske efikasnostiEVidljiva veličina ekrana (dijagonala)
F
Prosečna potrošnja u režimu uključenog
napajanja
G
Godišnja potrošnja struje
H
Potrošnja struje u stanju pripravnostiIPotrošnja u režimu isključenog napajanja
J
Rezolucija ekrana
K
Potrašnja struje od XYZ kWh na godišnjem
nivou zasnovana je na potrošnji televizora
koji je uključen 4 sata dnevno 365 dana
godišnje. Stvarna potrošnja struje zavisiće o
načina korišćenja televizora.LKada je televizor isključen pomoću daljinskog
upravljača i kada nije aktivna nijedan funkcija
M
Informacije o nazivnoj potrošnji struje
potražite na nalepnici na poleđini televizora.
A
Lista sa podacima za proizvodBDobavljač
C
ID modelaDKlasa energetske efikasnostiEVidljiva veličina ekrana (dijagonala)
F
Prosečna potrošnja u režimu uključenog
napajanja
G
Godišnja potrošnja struje
H
Potrošnja struje u stanju pripravnostiIPotrošnja u režimu isključenog napajanja
J
Rezolucija ekrana
K
Potrašnja struje od XYZ kWh na godišnjem
nivou zasnovana je na potrošnji televizora
koji je uključen 4 sata dnevno 365 dana
godišnje. Stvarna potrošnja struje zavisiće o
načina korišćenja televizora.LKada je televizor isključen pomoću daljinskog
upravljača i kada nije aktivna nijedan funkcija
M
Informacije o nazivnoj potrošnji struje
potražite na nalepnici na poleđini televizora.
A
Lista sa podacima za proizvodBDobavljač
C
ID modelaDKlasa energetske efikasnostiEVidljiva veličina ekrana (dijagonala)
F
Prosečna potrošnja u režimu uključenog
napajanja
G
Godišnja potrošnja strujeHPotrošnja struje u stanju pripravnostiIPotrošnja u režimu isključenog napajanja
J
Rezolucija ekrana
K
Potrašnja struje od XYZ kWh na godišnjem
nivou zasnovana je na potrošnji televizora
koji je uključen 4 sata dnevno 365 dana
godišnje. Stvarna potrošnja struje zavisiće o
načina korišćenja televizora.LKada je televizor isključen pomoću daljinskog
upravljača i kada nije aktivna nijedan funkcija
M
Informacije o nazivnoj potrošnji struje
potražite na nalepnici na poleđini televizora.
E
Vidljiva veličina ekrana (dijagonala)
F
Prosečna potrošnja u režimu uključenog
napajanja
G
Godišnja potrošnja strujeHPotrošnja struje u stanju pripravnostiIPotrošnja u režimu isključenog napajanja
J
Rezolucija ekrana
K
Potrašnja struje od XYZ kWh na godišnjem
nivou zasnovana je na potrošnji televizora
koji je uključen 4 sata dnevno 365 dana
godišnje. Stvarna potrošnja struje zavisiće o
načina korišćenja televizora.LKada je televizor isključen pomoću daljinskog
upravljača i kada nije aktivna nijedan funkcija
M
Informacije o nazivnoj potrošnji struje
potražite na nalepnici na poleđini televizora.
I
Potrošnja u režimu isključenog napajanja
J
Rezolucija ekrana
K
Potrašnja struje od XYZ kWh na godišnjem
nivou zasnovana je na potrošnji televizora
koji je uključen 4 sata dnevno 365 dana
godišnje. Stvarna potrošnja struje zavisiće o
načina korišćenja televizora.LKada je televizor isključen pomoću daljinskog
upravljača i kada nije aktivna nijedan funkcija
M
Informacije o nazivnoj potrošnji struje
potražite na nalepnici na poleđini televizora.
F
Prosečna potrošnja u režimu uključenog
napajanja
G
Godišnja potrošnja struje
H
Potrošnja struje u stanju pripravnostiIPotrošnja u režimu isključenog napajanja
J
Rezolucija ekrana
K
Potrašnja struje od XYZ kWh na godišnjem
nivou zasnovana je na potrošnji televizora
koji je uključen 4 sata dnevno 365 dana
godišnje. Stvarna potrošnja struje zavisiće o
načina korišćenja televizora.LKada je televizor isključen pomoću daljinskog
upravljača i kada nije aktivna nijedan funkcija
M
Informacije o nazivnoj potrošnji struje
potražite na nalepnici na poleđini televizora.
K
Potrašnja struje od XYZ kWh na godišnjem
nivou zasnovana je na potrošnji televizora
koji je uključen 4 sata dnevno 365 dana
godišnje. Stvarna potrošnja struje zavisiće o
načina korišćenja televizora.LKada je televizor isključen pomoću daljinskog
upravljača i kada nije aktivna nijedan funkcija
M
Informacije o nazivnoj potrošnji struje
potražite na nalepnici na poleđini televizora.
J
Rezolucija ekrana
K
Potrašnja struje od XYZ kWh na godišnjem
nivou zasnovana je na potrošnji televizora
koji je uključen 4 sata dnevno 365 dana
godišnje. Stvarna potrošnja struje zavisiće o
načina korišćenja televizora.LKada je televizor isključen pomoću daljinskog
upravljača i kada nije aktivna nijedan funkcija
M
Informacije o nazivnoj potrošnji struje
potražite na nalepnici na poleđini televizora.
C
ID modelaDKlasa energetske efikasnostiEVidljiva veličina ekrana (dijagonala)
F
Prosečna potrošnja u režimu uključenog
napajanja
G
Godišnja potrošnja struje
H
Potrošnja struje u stanju pripravnostiIPotrošnja u režimu isključenog napajanja
J
Rezolucija ekrana
K
Potrašnja struje od XYZ kWh na godišnjem
nivou zasnovana je na potrošnji televizora
koji je uključen 4 sata dnevno 365 dana
godišnje. Stvarna potrošnja struje zavisiće o
načina korišćenja televizora.LKada je televizor isključen pomoću daljinskog
upravljača i kada nije aktivna nijedan funkcija
M
Informacije o nazivnoj potrošnji struje
potražite na nalepnici na poleđini televizora.
D
Klasa energetske efikasnostiEVidljiva veličina ekrana (dijagonala)
F
Prosečna potrošnja u režimu uključenog
napajanja
G
Godišnja potrošnja strujeHPotrošnja struje u stanju pripravnostiIPotrošnja u režimu isključenog napajanja
J
Rezolucija ekrana
K
Potrašnja struje od XYZ kWh na godišnjem
nivou zasnovana je na potrošnji televizora
koji je uključen 4 sata dnevno 365 dana
godišnje. Stvarna potrošnja struje zavisiće o
načina korišćenja televizora.LKada je televizor isključen pomoću daljinskog
upravljača i kada nije aktivna nijedan funkcija
M
Informacije o nazivnoj potrošnji struje
potražite na nalepnici na poleđini televizora.
H
Potrošnja struje u stanju pripravnostiIPotrošnja u režimu isključenog napajanja
J
Rezolucija ekrana
K
Potrašnja struje od XYZ kWh na godišnjem
nivou zasnovana je na potrošnji televizora
koji je uključen 4 sata dnevno 365 dana
godišnje. Stvarna potrošnja struje zavisiće o
načina korišćenja televizora.LKada je televizor isključen pomoću daljinskog
upravljača i kada nije aktivna nijedan funkcija
M
Informacije o nazivnoj potrošnji struje
potražite na nalepnici na poleđini televizora.
G
Godišnja potrošnja struje
H
Potrošnja struje u stanju pripravnostiIPotrošnja u režimu isključenog napajanja
J
Rezolucija ekrana
K
Potrašnja struje od XYZ kWh na godišnjem
nivou zasnovana je na potrošnji televizora
koji je uključen 4 sata dnevno 365 dana
godišnje. Stvarna potrošnja struje zavisiće o
načina korišćenja televizora.LKada je televizor isključen pomoću daljinskog
upravljača i kada nije aktivna nijedan funkcija
M
Informacije o nazivnoj potrošnji struje
potražite na nalepnici na poleđini televizora.
Srpski
E
Vidljiva veličina ekrana (dijagonala)
F
Prosečna potrošnja u režimu uključenog
napajanja
G
Godišnja potrošnja strujeHPotrošnja struje u stanju pripravnostiIPotrošnja u režimu isključenog napajanja
J
Rezolucija ekrana
K
Potrašnja struje od XYZ kWh na godišnjem
nivou zasnovana je na potrošnji televizora
koji je uključen 4 sata dnevno 365 dana
godišnje. Stvarna potrošnja struje zavisiće o
načina korišćenja televizora.LKada je televizor isključen pomoću daljinskog
upravljača i kada nije aktivna nijedan funkcija
M
Informacije o nazivnoj potrošnji struje
potražite na nalepnici na poleđini televizora.
Srpski
A
Lista sa podacima za proizvodBDobavljač
C
ID modelaDKlasa energetske efikasnostiEVidljiva veličina ekrana (dijagonala)
F
Prosečna potrošnja u režimu uključenog
napajanja
G
Godišnja potrošnja strujeHPotrošnja struje u stanju pripravnostiIPotrošnja u režimu isključenog napajanja
J
Rezolucija ekrana
K
Potrašnja struje od XYZ kWh na godišnjem
nivou zasnovana je na potrošnji televizora
koji je uključen 4 sata dnevno 365 dana
godišnje. Stvarna potrošnja struje zavisiće o
načina korišćenja televizora.LKada je televizor isključen pomoću daljinskog
upravljača i kada nije aktivna nijedan funkcija
M
Informacije o nazivnoj potrošnji struje
potražite na nalepnici na poleđini televizora.
A
Lista sa podacima za proizvod
B
Dobavljač
C
ID modelaDKlasa energetske efikasnostiEVidljiva veličina ekrana (dijagonala)
F
Prosečna potrošnja u režimu uključenog
napajanja
G
Godišnja potrošnja struje
H
Potrošnja struje u stanju pripravnostiIPotrošnja u režimu isključenog napajanja
J
Rezolucija ekrana
K
Potrašnja struje od XYZ kWh na godišnjem
nivou zasnovana je na potrošnji televizora
koji je uključen 4 sata dnevno 365 dana
godišnje. Stvarna potrošnja struje zavisiće o
načina korišćenja televizora.LKada je televizor isključen pomoću daljinskog
upravljača i kada nije aktivna nijedan funkcija
M
Informacije o nazivnoj potrošnji struje
potražite na nalepnici na poleđini televizora.
A
Lista sa podacima za proizvodBDobavljač
C
ID modelaDKlasa energetske efikasnostiEVidljiva veličina ekrana (dijagonala)
F
Prosečna potrošnja u režimu uključenog
napajanja
G
Godišnja potrošnja struje
H
Potrošnja struje u stanju pripravnostiIPotrošnja u režimu isključenog napajanja
J
Rezolucija ekrana
K
Potrašnja struje od XYZ kWh na godišnjem
nivou zasnovana je na potrošnji televizora
koji je uključen 4 sata dnevno 365 dana
godišnje. Stvarna potrošnja struje zavisiće o
načina korišćenja televizora.LKada je televizor isključen pomoću daljinskog
upravljača i kada nije aktivna nijedan funkcija
M
Informacije o nazivnoj potrošnji struje
potražite na nalepnici na poleđini televizora.
A
Lista sa podacima za proizvodBDobavljač
C
ID modelaDKlasa energetske efikasnostiEVidljiva veličina ekrana (dijagonala)
F
Prosečna potrošnja u režimu uključenog
napajanja
G
Godišnja potrošnja struje
H
Potrošnja struje u stanju pripravnostiIPotrošnja u režimu isključenog napajanja
J
Rezolucija ekrana
K
Potrašnja struje od XYZ kWh na godišnjem
nivou zasnovana je na potrošnji televizora
koji je uključen 4 sata dnevno 365 dana
godišnje. Stvarna potrošnja struje zavisiće o
načina korišćenja televizora.LKada je televizor isključen pomoću daljinskog
upravljača i kada nije aktivna nijedan funkcija
M
Informacije o nazivnoj potrošnji struje
potražite na nalepnici na poleđini televizora.
A
Lista sa podacima za proizvodBDobavljač
C
ID modelaDKlasa energetske efikasnostiEVidljiva veličina ekrana (dijagonala)
F
Prosečna potrošnja u režimu uključenog
napajanja
G
Godišnja potrošnja strujeHPotrošnja struje u stanju pripravnostiIPotrošnja u režimu isključenog napajanja
J
Rezolucija ekrana
K
Potrašnja struje od XYZ kWh na godišnjem
nivou zasnovana je na potrošnji televizora
koji je uključen 4 sata dnevno 365 dana
godišnje. Stvarna potrošnja struje zavisiće o
načina korišćenja televizora.LKada je televizor isključen pomoću daljinskog
upravljača i kada nije aktivna nijedan funkcija
M
Informacije o nazivnoj potrošnji struje
potražite na nalepnici na poleđini televizora.
E
Vidljiva veličina ekrana (dijagonala)
F
Prosečna potrošnja u režimu uključenog
napajanja
G
Godišnja potrošnja strujeHPotrošnja struje u stanju pripravnostiIPotrošnja u režimu isključenog napajanja
J
Rezolucija ekrana
K
Potrašnja struje od XYZ kWh na godišnjem
nivou zasnovana je na potrošnji televizora
koji je uključen 4 sata dnevno 365 dana
godišnje. Stvarna potrošnja struje zavisiće o
načina korišćenja televizora.LKada je televizor isključen pomoću daljinskog
upravljača i kada nije aktivna nijedan funkcija
M
Informacije o nazivnoj potrošnji struje
potražite na nalepnici na poleđini televizora.
I
Potrošnja u režimu isključenog napajanja
J
Rezolucija ekrana
K
Potrašnja struje od XYZ kWh na godišnjem
nivou zasnovana je na potrošnji televizora
koji je uključen 4 sata dnevno 365 dana
godišnje. Stvarna potrošnja struje zavisiće o
načina korišćenja televizora.LKada je televizor isključen pomoću daljinskog
upravljača i kada nije aktivna nijedan funkcija
M
Informacije o nazivnoj potrošnji struje
potražite na nalepnici na poleđini televizora.
F
Prosečna potrošnja u režimu uključenog
napajanja
G
Godišnja potrošnja struje
H
Potrošnja struje u stanju pripravnostiIPotrošnja u režimu isključenog napajanja
J
Rezolucija ekrana
K
Potrašnja struje od XYZ kWh na godišnjem
nivou zasnovana je na potrošnji televizora
koji je uključen 4 sata dnevno 365 dana
godišnje. Stvarna potrošnja struje zavisiće o
načina korišćenja televizora.LKada je televizor isključen pomoću daljinskog
upravljača i kada nije aktivna nijedan funkcija
M
Informacije o nazivnoj potrošnji struje
potražite na nalepnici na poleđini televizora.
K
Potrašnja struje od XYZ kWh na godišnjem
nivou zasnovana je na potrošnji televizora
koji je uključen 4 sata dnevno 365 dana
godišnje. Stvarna potrošnja struje zavisiće o
načina korišćenja televizora.
L
Kada je televizor isključen pomoću daljinskog
upravljača i kada nije aktivna nijedan funkcija
M
Informacije o nazivnoj potrošnji struje
potražite na nalepnici na poleđini televizora.
J
Rezolucija ekrana
K
Potrašnja struje od XYZ kWh na godišnjem
nivou zasnovana je na potrošnji televizora
koji je uključen 4 sata dnevno 365 dana
godišnje. Stvarna potrošnja struje zavisiće o
načina korišćenja televizora.LKada je televizor isključen pomoću daljinskog
upravljača i kada nije aktivna nijedan funkcija
M
Informacije o nazivnoj potrošnji struje
potražite na nalepnici na poleđini televizora.
C
ID modela
D
Klasa energetske efikasnostiEVidljiva veličina ekrana (dijagonala)
F
Prosečna potrošnja u režimu uključenog
napajanja
G
Godišnja potrošnja strujeHPotrošnja struje u stanju pripravnostiIPotrošnja u režimu isključenog napajanja
J
Rezolucija ekrana
K
Potrašnja struje od XYZ kWh na godišnjem
nivou zasnovana je na potrošnji televizora
koji je uključen 4 sata dnevno 365 dana
godišnje. Stvarna potrošnja struje zavisiće o
načina korišćenja televizora.LKada je televizor isključen pomoću daljinskog
upravljača i kada nije aktivna nijedan funkcija
M
Informacije o nazivnoj potrošnji struje
potražite na nalepnici na poleđini televizora.
D
Klasa energetske efikasnostiEVidljiva veličina ekrana (dijagonala)
F
Prosečna potrošnja u režimu uključenog
napajanja
G
Godišnja potrošnja strujeHPotrošnja struje u stanju pripravnostiIPotrošnja u režimu isključenog napajanja
J
Rezolucija ekrana
K
Potrašnja struje od XYZ kWh na godišnjem
nivou zasnovana je na potrošnji televizora
koji je uključen 4 sata dnevno 365 dana
godišnje. Stvarna potrošnja struje zavisiće o
načina korišćenja televizora.LKada je televizor isključen pomoću daljinskog
upravljača i kada nije aktivna nijedan funkcija
M
Informacije o nazivnoj potrošnji struje
potražite na nalepnici na poleđini televizora.
H
Potrošnja struje u stanju pripravnostiIPotrošnja u režimu isključenog napajanja
J
Rezolucija ekrana
K
Potrašnja struje od XYZ kWh na godišnjem
nivou zasnovana je na potrošnji televizora
koji je uključen 4 sata dnevno 365 dana
godišnje. Stvarna potrošnja struje zavisiće o
načina korišćenja televizora.LKada je televizor isključen pomoću daljinskog
upravljača i kada nije aktivna nijedan funkcija
M
Informacije o nazivnoj potrošnji struje
potražite na nalepnici na poleđini televizora.
G
Godišnja potrošnja struje
H
Potrošnja struje u stanju pripravnostiIPotrošnja u režimu isključenog napajanja
J
Rezolucija ekrana
K
Potrašnja struje od XYZ kWh na godišnjem
nivou zasnovana je na potrošnji televizora
koji je uključen 4 sata dnevno 365 dana
godišnje. Stvarna potrošnja struje zavisiće o
načina korišćenja televizora.LKada je televizor isključen pomoću daljinskog
upravljača i kada nije aktivna nijedan funkcija
M
Informacije o nazivnoj potrošnji struje
potražite na nalepnici na poleđini televizora.
Srpski
E
Vidljiva veličina ekrana (dijagonala)
F
Prosečna potrošnja u režimu uključenog
napajanja
G
Godišnja potrošnja strujeHPotrošnja struje u stanju pripravnostiIPotrošnja u režimu isključenog napajanja
J
Rezolucija ekrana
K
Potrašnja struje od XYZ kWh na godišnjem
nivou zasnovana je na potrošnji televizora
koji je uključen 4 sata dnevno 365 dana
godišnje. Stvarna potrošnja struje zavisiće o
načina korišćenja televizora.LKada je televizor isključen pomoću daljinskog
upravljača i kada nije aktivna nijedan funkcija
M
Informacije o nazivnoj potrošnji struje
potražite na nalepnici na poleđini televizora.
Srpski
A
Lista sa podacima za proizvodBDobavljač
C
ID modelaDKlasa energetske efikasnostiEVidljiva veličina ekrana (dijagonala)
F
Prosečna potrošnja u režimu uključenog
napajanja
G
Godišnja potrošnja strujeHPotrošnja struje u stanju pripravnostiIPotrošnja u režimu isključenog napajanja
J
Rezolucija ekrana
K
Potrašnja struje od XYZ kWh na godišnjem
nivou zasnovana je na potrošnji televizora
koji je uključen 4 sata dnevno 365 dana
godišnje. Stvarna potrošnja struje zavisiće o
načina korišćenja televizora.LKada je televizor isključen pomoću daljinskog
upravljača i kada nije aktivna nijedan funkcija
M
Informacije o nazivnoj potrošnji struje
potražite na nalepnici na poleđini televizora.
E
Vidljiva veličina ekrana (dijagonala)
F
Prosečna potrošnja u režimu uključenog
napajanja
G
Godišnja potrošnja strujeHPotrošnja struje u stanju pripravnostiIPotrošnja u režimu isključenog napajanja
J
Rezolucija ekrana
K
Potrašnja struje od XYZ kWh na godišnjem
nivou zasnovana je na potrošnji televizora
koji je uključen 4 sata dnevno 365 dana
godišnje. Stvarna potrošnja struje zavisiće o
načina korišćenja televizora.LKada je televizor isključen pomoću daljinskog
upravljača i kada nije aktivna nijedan funkcija
M
Informacije o nazivnoj potrošnji struje
potražite na nalepnici na poleđini televizora.
A
Lista sa podacima za proizvodBDobavljač
C
ID modelaDKlasa energetske efikasnostiEVidljiva veličina ekrana (dijagonala)
F
Prosečna potrošnja u režimu uključenog
napajanja
G
Godišnja potrošnja struje
H
Potrošnja struje u stanju pripravnostiIPotrošnja u režimu isključenog napajanja
J
Rezolucija ekrana
K
Potrašnja struje od XYZ kWh na godišnjem
nivou zasnovana je na potrošnji televizora
koji je uključen 4 sata dnevno 365 dana
godišnje. Stvarna potrošnja struje zavisiće o
načina korišćenja televizora.LKada je televizor isključen pomoću daljinskog
upravljača i kada nije aktivna nijedan funkcija
M
Informacije o nazivnoj potrošnji struje
potražite na nalepnici na poleđini televizora.
A
Lista sa podacima za proizvodBDobavljač
C
ID modelaDKlasa energetske efikasnostiEVidljiva veličina ekrana (dijagonala)
F
Prosečna potrošnja u režimu uključenog
napajanja
G
Godišnja potrošnja struje
H
Potrošnja struje u stanju pripravnostiIPotrošnja u režimu isključenog napajanja
J
Rezolucija ekrana
K
Potrašnja struje od XYZ kWh na godišnjem
nivou zasnovana je na potrošnji televizora
koji je uključen 4 sata dnevno 365 dana
godišnje. Stvarna potrošnja struje zavisiće o
načina korišćenja televizora.LKada je televizor isključen pomoću daljinskog
upravljača i kada nije aktivna nijedan funkcija
M
Informacije o nazivnoj potrošnji struje
potražite na nalepnici na poleđini televizora.
A
Lista sa podacima za proizvodBDobavljač
C
ID modelaDKlasa energetske efikasnostiEVidljiva veličina ekrana (dijagonala)
F
Prosečna potrošnja u režimu uključenog
napajanja
G
Godišnja potrošnja strujeHPotrošnja struje u stanju pripravnostiIPotrošnja u režimu isključenog napajanja
J
Rezolucija ekrana
K
Potrašnja struje od XYZ kWh na godišnjem
nivou zasnovana je na potrošnji televizora
koji je uključen 4 sata dnevno 365 dana
godišnje. Stvarna potrošnja struje zavisiće o
načina korišćenja televizora.LKada je televizor isključen pomoću daljinskog
upravljača i kada nije aktivna nijedan funkcija
M
Informacije o nazivnoj potrošnji struje
potražite na nalepnici na poleđini televizora.
napajanja
G
Godišnja potrošnja struje
H
Potrošnja struje u stanju pripravnostiIPotrošnja u režimu isključenog napajanja
J
Rezolucija ekrana
K
Potrašnja struje od XYZ kWh na godišnjem
nivou zasnovana je na potrošnji televizora
koji je uključen 4 sata dnevno 365 dana
godišnje. Stvarna potrošnja struje zavisiće o
načina korišćenja televizora.LKada je televizor isključen pomoću daljinskog
upravljača i kada nije aktivna nijedan funkcija
M
Informacije o nazivnoj potrošnji struje
potražite na nalepnici na poleđini televizora.
J
Rezolucija ekrana
K
Potrašnja struje od XYZ kWh na godišnjem
nivou zasnovana je na potrošnji televizora
koji je uključen 4 sata dnevno 365 dana
godišnje. Stvarna potrošnja struje zavisiće o
načina korišćenja televizora.LKada je televizor isključen pomoću daljinskog
upravljača i kada nije aktivna nijedan funkcija
M
Informacije o nazivnoj potrošnji struje
potražite na nalepnici na poleđini televizora.
napajanja
G
Godišnja potrošnja struje
H
Potrošnja struje u stanju pripravnostiIPotrošnja u režimu isključenog napajanja
J
Rezolucija ekrana
K
Potrašnja struje od XYZ kWh na godišnjem
nivou zasnovana je na potrošnji televizora
koji je uključen 4 sata dnevno 365 dana
godišnje. Stvarna potrošnja struje zavisiće o
načina korišćenja televizora.LKada je televizor isključen pomoću daljinskog
upravljača i kada nije aktivna nijedan funkcija
M
Informacije o nazivnoj potrošnji struje
potražite na nalepnici na poleđini televizora.
K
Potrašnja struje od XYZ kWh na godišnjem
nivou zasnovana je na potrošnji televizora
koji je uključen 4 sata dnevno 365 dana
godišnje. Stvarna potrošnja struje zavisiće o
načina korišćenja televizora.LKada je televizor isključen pomoću daljinskog
upravljača i kada nije aktivna nijedan funkcija
M
Informacije o nazivnoj potrošnji struje
potražite na nalepnici na poleđini televizora.
K
Potrašnja struje od XYZ kWh na godišnjem
nivou zasnovana je na potrošnji televizora
koji je uključen 4 sata dnevno 365 dana
godišnje. Stvarna potrošnja struje zavisiće o
načina korišćenja televizora.LKada je televizor isključen pomoću daljinskog
upravljača i kada nije aktivna nijedan funkcija
M
Informacije o nazivnoj potrošnji struje
potražite na nalepnici na poleđini televizora.
napajanja
G
Godišnja potrošnja struje
H
Potrošnja struje u stanju pripravnostiIPotrošnja u režimu isključenog napajanja
J
Rezolucija ekrana
K
Potrašnja struje od XYZ kWh na godišnjem
nivou zasnovana je na potrošnji televizora
koji je uključen 4 sata dnevno 365 dana
godišnje. Stvarna potrošnja struje zavisiće o
načina korišćenja televizora.LKada je televizor isključen pomoću daljinskog
upravljača i kada nije aktivna nijedan funkcija
M
Informacije o nazivnoj potrošnji struje
potražite na nalepnici na poleđini televizora.
napajanja
G
Godišnja potrošnja struje
H
Potrošnja struje u stanju pripravnostiIPotrošnja u režimu isključenog napajanja
J
Rezolucija ekrana
K
Potrašnja struje od XYZ kWh na godišnjem
nivou zasnovana je na potrošnji televizora
koji je uključen 4 sata dnevno 365 dana
godišnje. Stvarna potrošnja struje zavisiće o
načina korišćenja televizora.LKada je televizor isključen pomoću daljinskog
upravljača i kada nije aktivna nijedan funkcija
M
Informacije o nazivnoj potrošnji struje
potražite na nalepnici na poleđini televizora.
J
Rezolucija ekrana
K
Potrašnja struje od XYZ kWh na godišnjem
nivou zasnovana je na potrošnji televizora
koji je uključen 4 sata dnevno 365 dana
godišnje. Stvarna potrošnja struje zavisiće o
načina korišćenja televizora.LKada je televizor isključen pomoću daljinskog
upravljača i kada nije aktivna nijedan funkcija
M
Informacije o nazivnoj potrošnji struje
potražite na nalepnici na poleđini televizora.
J
Rezolucija ekrana
K
Potrašnja struje od XYZ kWh na godišnjem
nivou zasnovana je na potrošnji televizora
koji je uključen 4 sata dnevno 365 dana
godišnje. Stvarna potrošnja struje zavisiće o
načina korišćenja televizora.LKada je televizor isključen pomoću daljinskog
upravljača i kada nije aktivna nijedan funkcija
M
Informacije o nazivnoj potrošnji struje
potražite na nalepnici na poleđini televizora.
Srpski
I
Potrošnja u režimu isključenog napajanja
J
Rezolucija ekrana
K
Potrašnja struje od XYZ kWh na godišnjem
nivou zasnovana je na potrošnji televizora
koji je uključen 4 sata dnevno 365 dana
godišnje. Stvarna potrošnja struje zavisiće o
načina korišćenja televizora.LKada je televizor isključen pomoću daljinskog
upravljača i kada nije aktivna nijedan funkcija
M
Informacije o nazivnoj potrošnji struje
potražite na nalepnici na poleđini televizora.
Srpski
A
Lista sa podacima za proizvodBDobavljač
C
ID modelaDKlasa energetske efikasnostiEVidljiva veličina ekrana (dijagonala)
F
Prosečna potrošnja u režimu uključenog
napajanja
G
Godišnja potrošnja struje
H
Potrošnja struje u stanju pripravnostiIPotrošnja u režimu isključenog napajanja
J
Rezolucija ekrana
K
Potrašnja struje od XYZ kWh na godišnjem
nivou zasnovana je na potrošnji televizora
koji je uključen 4 sata dnevno 365 dana
godišnje. Stvarna potrošnja struje zavisiće o
načina korišćenja televizora.LKada je televizor isključen pomoću daljinskog
upravljača i kada nije aktivna nijedan funkcija
M
Informacije o nazivnoj potrošnji struje
potražite na nalepnici na poleđini televizora.
E
Vidljiva veličina ekrana (dijagonala)
F
Prosečna potrošnja u režimu uključenog
napajanja
G
Godišnja potrošnja strujeHPotrošnja struje u stanju pripravnostiIPotrošnja u režimu isključenog napajanja
J
Rezolucija ekrana
K
Potrašnja struje od XYZ kWh na godišnjem
nivou zasnovana je na potrošnji televizora
koji je uključen 4 sata dnevno 365 dana
godišnje. Stvarna potrošnja struje zavisiće o
načina korišćenja televizora.LKada je televizor isključen pomoću daljinskog
upravljača i kada nije aktivna nijedan funkcija
M
Informacije o nazivnoj potrošnji struje
potražite na nalepnici na poleđini televizora.
A
Lista sa podacima za proizvodBDobavljač
C
ID modelaDKlasa energetske efikasnostiEVidljiva veličina ekrana (dijagonala)
F
Prosečna potrošnja u režimu uključenog
napajanja
G
Godišnja potrošnja struje
H
Potrošnja struje u stanju pripravnostiIPotrošnja u režimu isključenog napajanja
J
Rezolucija ekrana
K
Potrašnja struje od XYZ kWh na godišnjem
nivou zasnovana je na potrošnji televizora
koji je uključen 4 sata dnevno 365 dana
godišnje. Stvarna potrošnja struje zavisiće o
načina korišćenja televizora.LKada je televizor isključen pomoću daljinskog
upravljača i kada nije aktivna nijedan funkcija
M
Informacije o nazivnoj potrošnji struje
potražite na nalepnici na poleđini televizora.
A
Lista sa podacima za proizvodBDobavljač
C
ID modelaDKlasa energetske efikasnostiEVidljiva veličina ekrana (dijagonala)
F
Prosečna potrošnja u režimu uključenog
napajanja
G
Godišnja potrošnja struje
H
Potrošnja struje u stanju pripravnostiIPotrošnja u režimu isključenog napajanja
J
Rezolucija ekrana
K
Potrašnja struje od XYZ kWh na godišnjem
nivou zasnovana je na potrošnji televizora
koji je uključen 4 sata dnevno 365 dana
godišnje. Stvarna potrošnja struje zavisiće o
načina korišćenja televizora.LKada je televizor isključen pomoću daljinskog
upravljača i kada nije aktivna nijedan funkcija
M
Informacije o nazivnoj potrošnji struje
potražite na nalepnici na poleđini televizora.
A
Lista sa podacima za proizvodBDobavljač
C
ID modelaDKlasa energetske efikasnostiEVidljiva veličina ekrana (dijagonala)
F
Prosečna potrošnja u režimu uključenog
napajanja
G
Godišnja potrošnja strujeHPotrošnja struje u stanju pripravnostiIPotrošnja u režimu isključenog napajanja
J
Rezolucija ekrana
K
Potrašnja struje od XYZ kWh na godišnjem
nivou zasnovana je na potrošnji televizora
koji je uključen 4 sata dnevno 365 dana
godišnje. Stvarna potrošnja struje zavisiće o
načina korišćenja televizora.LKada je televizor isključen pomoću daljinskog
upravljača i kada nije aktivna nijedan funkcija
M
Informacije o nazivnoj potrošnji struje
potražite na nalepnici na poleđini televizora.
napajanja
G
Godišnja potrošnja struje
H
Potrošnja struje u stanju pripravnostiIPotrošnja u režimu isključenog napajanja
J
Rezolucija ekrana
K
Potrašnja struje od XYZ kWh na godišnjem
nivou zasnovana je na potrošnji televizora
koji je uključen 4 sata dnevno 365 dana
godišnje. Stvarna potrošnja struje zavisiće o
načina korišćenja televizora.LKada je televizor isključen pomoću daljinskog
upravljača i kada nije aktivna nijedan funkcija
M
Informacije o nazivnoj potrošnji struje
potražite na nalepnici na poleđini televizora.
J
Rezolucija ekrana
K
Potrašnja struje od XYZ kWh na godišnjem
nivou zasnovana je na potrošnji televizora
koji je uključen 4 sata dnevno 365 dana
godišnje. Stvarna potrošnja struje zavisiće o
načina korišćenja televizora.LKada je televizor isključen pomoću daljinskog
upravljača i kada nije aktivna nijedan funkcija
M
Informacije o nazivnoj potrošnji struje
potražite na nalepnici na poleđini televizora.
napajanja
G
Godišnja potrošnja struje
H
Potrošnja struje u stanju pripravnostiIPotrošnja u režimu isključenog napajanja
J
Rezolucija ekrana
K
Potrašnja struje od XYZ kWh na godišnjem
nivou zasnovana je na potrošnji televizora
koji je uključen 4 sata dnevno 365 dana
godišnje. Stvarna potrošnja struje zavisiće o
načina korišćenja televizora.LKada je televizor isključen pomoću daljinskog
upravljača i kada nije aktivna nijedan funkcija
M
Informacije o nazivnoj potrošnji struje
potražite na nalepnici na poleđini televizora.
K
Potrašnja struje od XYZ kWh na godišnjem
nivou zasnovana je na potrošnji televizora
koji je uključen 4 sata dnevno 365 dana
godišnje. Stvarna potrošnja struje zavisiće o
načina korišćenja televizora.LKada je televizor isključen pomoću daljinskog
upravljača i kada nije aktivna nijedan funkcija
M
Informacije o nazivnoj potrošnji struje
potražite na nalepnici na poleđini televizora.
K
Potrašnja struje od XYZ kWh na godišnjem
nivou zasnovana je na potrošnji televizora
koji je uključen 4 sata dnevno 365 dana
godišnje. Stvarna potrošnja struje zavisiće o
načina korišćenja televizora.LKada je televizor isključen pomoću daljinskog
upravljača i kada nije aktivna nijedan funkcija
M
Informacije o nazivnoj potrošnji struje
potražite na nalepnici na poleđini televizora.
napajanja
G
Godišnja potrošnja struje
H
Potrošnja struje u stanju pripravnostiIPotrošnja u režimu isključenog napajanja
J
Rezolucija ekrana
K
Potrašnja struje od XYZ kWh na godišnjem
nivou zasnovana je na potrošnji televizora
koji je uključen 4 sata dnevno 365 dana
godišnje. Stvarna potrošnja struje zavisiće o
načina korišćenja televizora.LKada je televizor isključen pomoću daljinskog
upravljača i kada nije aktivna nijedan funkcija
M
Informacije o nazivnoj potrošnji struje
potražite na nalepnici na poleđini televizora.
napajanja
G
Godišnja potrošnja struje
H
Potrošnja struje u stanju pripravnostiIPotrošnja u režimu isključenog napajanja
J
Rezolucija ekrana
K
Potrašnja struje od XYZ kWh na godišnjem
nivou zasnovana je na potrošnji televizora
koji je uključen 4 sata dnevno 365 dana
godišnje. Stvarna potrošnja struje zavisiće o
načina korišćenja televizora.LKada je televizor isključen pomoću daljinskog
upravljača i kada nije aktivna nijedan funkcija
M
Informacije o nazivnoj potrošnji struje
potražite na nalepnici na poleđini televizora.
J
Rezolucija ekrana
K
Potrašnja struje od XYZ kWh na godišnjem
nivou zasnovana je na potrošnji televizora
koji je uključen 4 sata dnevno 365 dana
godišnje. Stvarna potrošnja struje zavisiće o
načina korišćenja televizora.LKada je televizor isključen pomoću daljinskog
upravljača i kada nije aktivna nijedan funkcija
M
Informacije o nazivnoj potrošnji struje
potražite na nalepnici na poleđini televizora.
J
Rezolucija ekrana
K
Potrašnja struje od XYZ kWh na godišnjem
nivou zasnovana je na potrošnji televizora
koji je uključen 4 sata dnevno 365 dana
godišnje. Stvarna potrošnja struje zavisiće o
načina korišćenja televizora.LKada je televizor isključen pomoću daljinskog
upravljača i kada nije aktivna nijedan funkcija
M
Informacije o nazivnoj potrošnji struje
potražite na nalepnici na poleđini televizora.
I
Potrošnja u režimu isključenog napajanja
J
Rezolucija ekrana
K
Potrašnja struje od XYZ kWh na godišnjem
nivou zasnovana je na potrošnji televizora
koji je uključen 4 sata dnevno 365 dana
godišnje. Stvarna potrošnja struje zavisiće o
načina korišćenja televizora.LKada je televizor isključen pomoću daljinskog
upravljača i kada nije aktivna nijedan funkcija
M
Informacije o nazivnoj potrošnji struje
potražite na nalepnici na poleđini televizora.
Srpski
A
Lista sa podacima za proizvodBDobavljač
C
ID modelaDKlasa energetske efikasnostiEVidljiva veličina ekrana (dijagonala)
F
Prosečna potrošnja u režimu uključenog
napajanja
G
Godišnja potrošnja struje
H
Potrošnja struje u stanju pripravnostiIPotrošnja u režimu isključenog napajanja
J
Rezolucija ekrana
K
Potrašnja struje od XYZ kWh na godišnjem
nivou zasnovana je na potrošnji televizora
koji je uključen 4 sata dnevno 365 dana
godišnje. Stvarna potrošnja struje zavisiće o
načina korišćenja televizora.LKada je televizor isključen pomoću daljinskog
upravljača i kada nije aktivna nijedan funkcija
M
Informacije o nazivnoj potrošnji struje
potražite na nalepnici na poleđini televizora.
English - 33 -
Page 34

 Loading...