

Page 1
ACA
V
A
A
A
A
X
A
Colour Television
TX-21FG50AAUSTRALIA
GP31 Chassis
ORDER NO. MTV0501369C3
Specifications
Power Source :
Power Consumption : 83W
Aerial Impedance : 75Ω unbalanced
Receiving System : 17 Systems
Receiving Channels :
VHF 1-11 PALB(Australia & N.Zealand)
UHF 21-69 PALGI/SECAMB,G,K1
CATV S1-S41 (Hyper)
Intermediate Frequency:
Video 38.0 MHz
Sound 31.5 MHz (D, K, K1)
UTO 110-240V, 50/60 Hz
Coaxial type
1-12 PAL/SECAMD
1-12 NTSC M JAPAN
2-12 PAL/SECAMB,G
2-13 NTSC M U.S.A.
28-69 PALG(Australia)
13-56 PALD
13-52 NTSC M JAPAN
14-69 NTSC NTSC M U.S.A.
32 MHz (I)
32.5 MHz (B, G)
33.5 MHz (M)
Colour 33.57 MHz (PAL)
33.6 MHz (SECAM)
33.75 MHz (SECAM)
34.42 MHz (NTSC)
ideo/Terminals :
RAV In VideoIn1Vp-p75Ω
udio InApprox. 400mVrms
Monitor Out Video Out 1 Vp-p 75Ω
udio OutApprox. 400mVrms
HighVoltage : 27.5kV±1.5
at zero beam current
Picture Tube :
51cm (21 inches)
Measured diagonally,
udioOutput: 16.0W
Dimensions : Height : 473 mm
Width : 648 mm
Depth : 488 mm
Mass : 24 kg (Net W t.)
Specifications are subject to change without notice.
Mass and dimensions shown are approximate.
V1, 2
51LXR195
90° deflection
© 2005 Matsushita Electric Industrial Co., Ltd. All
rights reserved. Unauthorized copying and
distribution is a violation of law.
Page 2
TX-21FG50A-AUSTRALIA
CONTENTS
Page Page
1 Safety Precautions 3
1.1. General Guide Lines
1.2. Leakage Current Cold Check
1.3. Leakage Current Hot Check (Fig. 1)
1.4. X-Radiation
1.5. GP31 Chassis Block Diagram
2 Service Hints
2.1. Service Position for E-Board
2.2. Factory Mode Adjustment
2.3. Adjustment for White Balance
2.4. Adjustment for CRT CUT OFF
3
3
3
3
4
5
5
5
6
6
2.5. Adjustment Procedure
2.6. PAL Colour
2.7. Adjustment
3 Conductor Views
4 Schematic Diagram
4.1. A Board
4.2. L Board
5 Parts Locations
6 Replacement Parts List
6.1. Replacement Parts List
7
8
8
12
13
15
20
23
24
25
2
Page 3
TX-21FG50A-AUSTRALIA
1 Safety Precautions
1.1. General Guide Lines
1. It is advisable to insert an isolation transformer in the AC supply before servicing this hot chassis.
2. When servicing, observe the original lead dress, especially the lead dress in the high voltage circuits. If a short circuit is found,
replace all parts which have been overheated or damaged by the short circuit.
3. After servicing, see to it that all the protective devices such as insulation barriers, insulation papers, shields and isolation R-C
combinations, are properly installed.
4. When the receiver is not to be used for a long period of time, unplug the power cord from the AC cord outlet.
5. Potential, as high as 29.0kV is present when this receiver is in operation. Operation of the receiver without the rear cover
involves the danger of a shock hazard from the receiver power supply. Servicing should not be attempted by anyone who is not
thoroughly familiar with the precautions necessary when working on high voltage equipment. Always discharge the anode of the
picture tube to the receiver chassis before handling the tube. After servicing make the following leakage current checks to
prevent the customer from being exposed to shock hazards.
1.2. Leakage Current Cold Check
1. Unplug the AC cord and connect a jumper between the two prongs on the plug.
2. Turn on the receiver’s power switch.
Measure the resistance value, with an ohmmeter, between the jumper AC plug and each exposed metallic cabinet part on the
receiver, such as screw heads, aerials, connectors, control shafts, etc. When the exposed metallic part has a return path to the
chassis, the reading should be between 4 MΩ and 20 MΩ. When the exposed metal does not have a return path to the chassis,
the reading must be infinite.
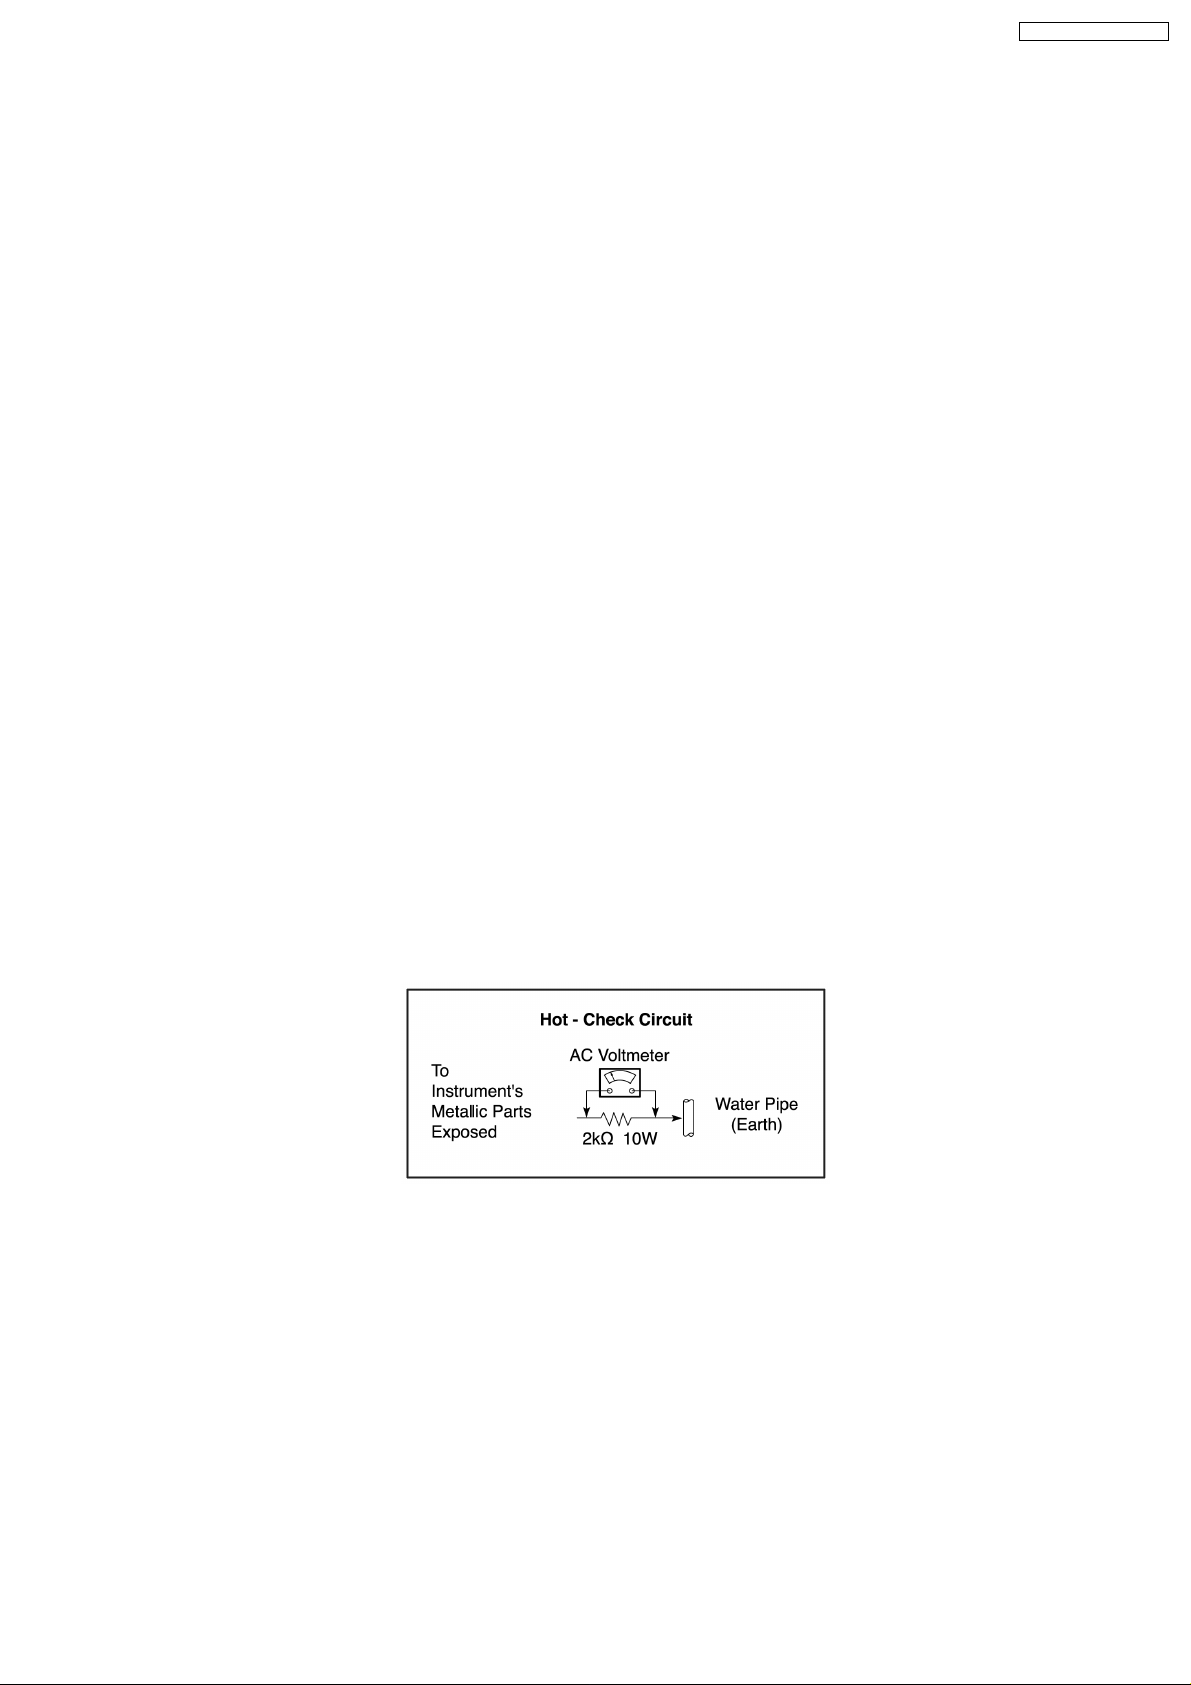
1.3. Leakage Current Hot Check (Fig. 1)
1. Plug the AC cord directly into the AC outlet. Do not use an isolation transformer for this check.
2. Check a 2 kΩ non-inductive resistor and an AC/DC current meter, in series with each exposed metallic part on the receiver in
turn and an earth such as a water pipe.
The current from any point should not exceed 0.7 mA peak AC or 2 mA DC. In the case of a measurement being outside of
these limits specified, there is a possibility of a shock hazard and the receiver should be repaired and rechecked before it is
returned to the customer.
Fig. 1
,
1.4. X-Radiation
Warning:
The potential sources of X-Radiation in TV set are the EHT section and the picture tube. When using a picture tube test jig for
service, ensure that jig is capable of handling 29.0kV without causing X-Radiation.
Note: It is important to use an accurate periodically calibrated high voltage meter.
1. Set the brightness to minimum.
2. Use the remocon to get into Service Mode.
3. Measure the EHT. The meter reading should indicate 27.5±1.5kV. If the meter indication is out of tolerance, immediate service
and correction is required to prevent the possibility of premature component failure.
4. To prevent the possibility X-Radiation, it is essential to use the specified picture tube, if service replacement becomes
necessary.
3
Page 4
I
TX-21FG50A-AUSTRALIA
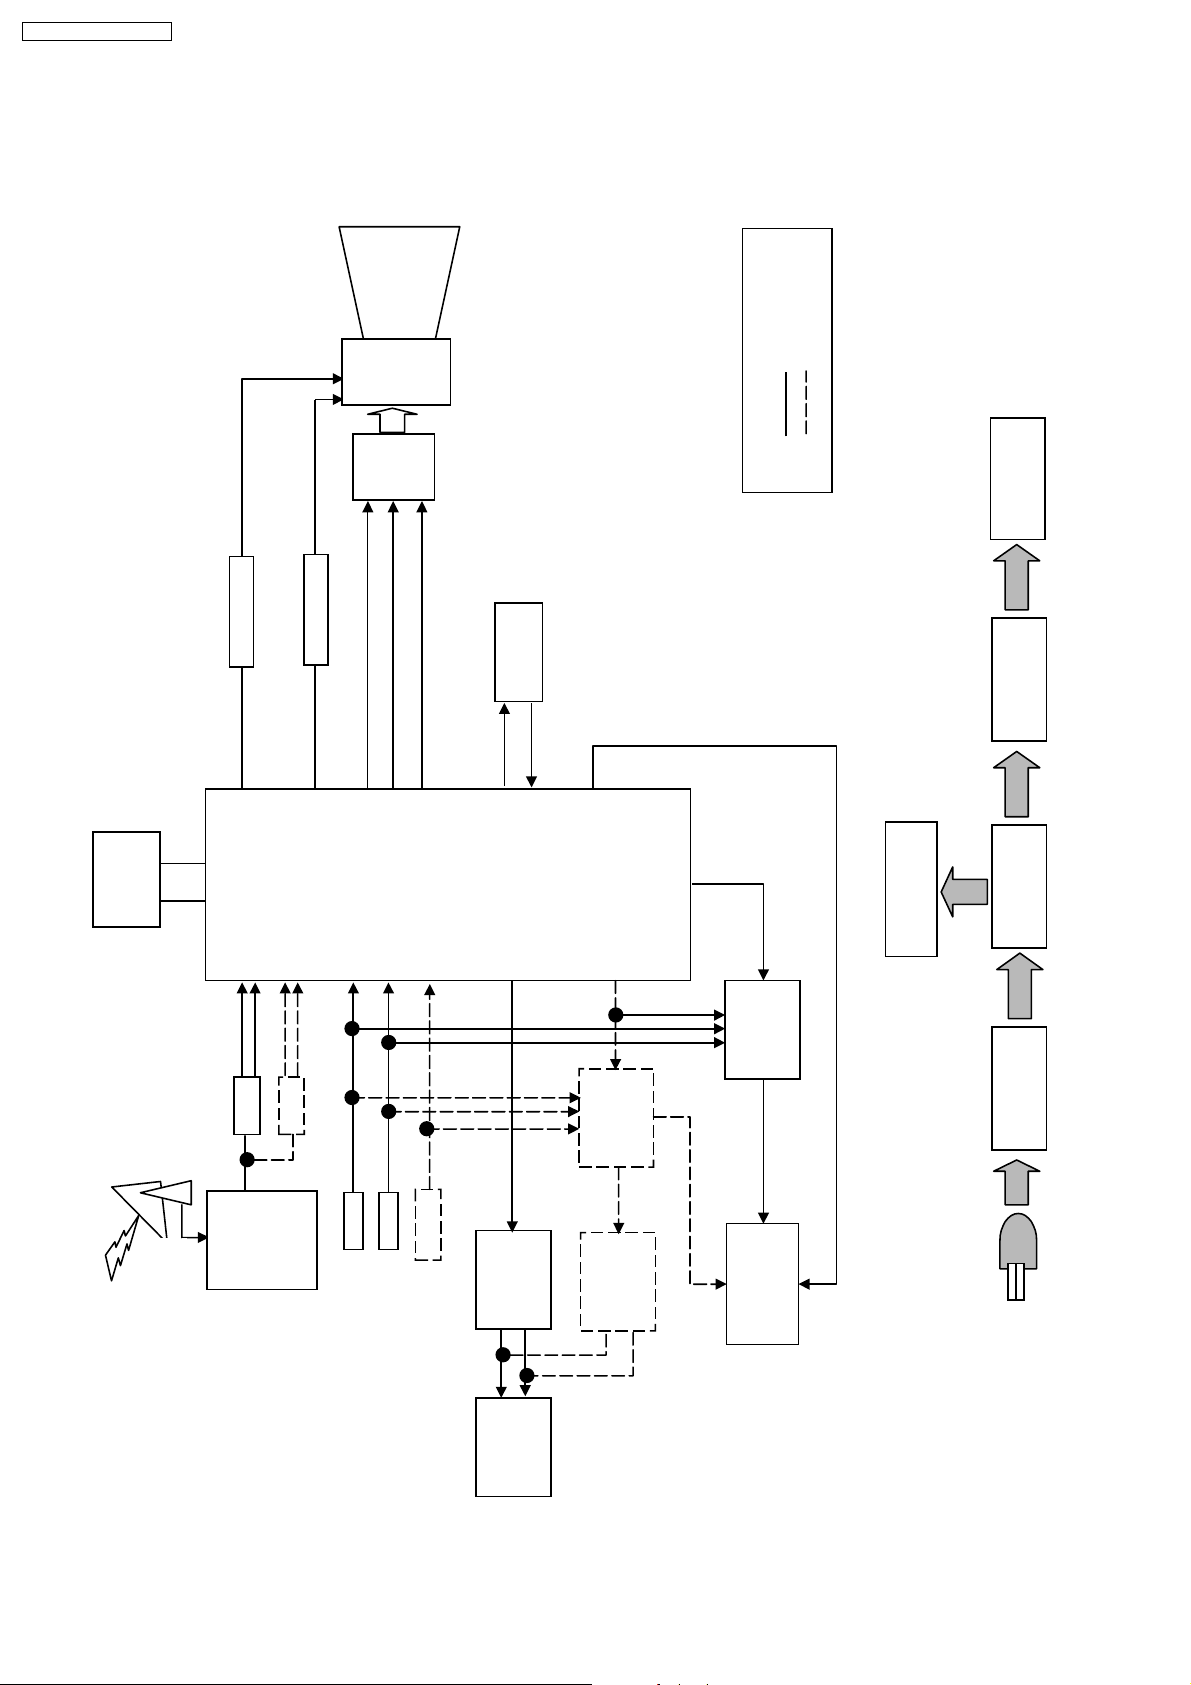
1.5. GP31 Chassis Block Diagram
CRT
coil
defl.
B
R
G
MONO
STEREO
SOUND MODULATION
3.3V
IC1201
IC1103
EEPROM
Antenna
V OUT
V
SDA SCL
IF
SAW
TUNER
SIF
SAW
H OUT
H
CVBS2
AV1
AV1
RGB
CVBS3
AV2
AV2
IC601
YUV
YUV1
UOC
AUDIO
TRAP
SOUND
IFVO
CVBS1
AMOUT
AMP
IC2301A
CVBSO
QIF / AUDIO
DEEMP
MSP
IC2101
AMP
IC2301
AUDIO
SW
IC3151
AUDIO
SWITCH
OUT
MONITOR
IC851
5V & 8V
IC880
STBY 5V
T801
IC801
LIFE CCT
PRIMARY
SPEAKER
4
Page 5
2 Service Hints
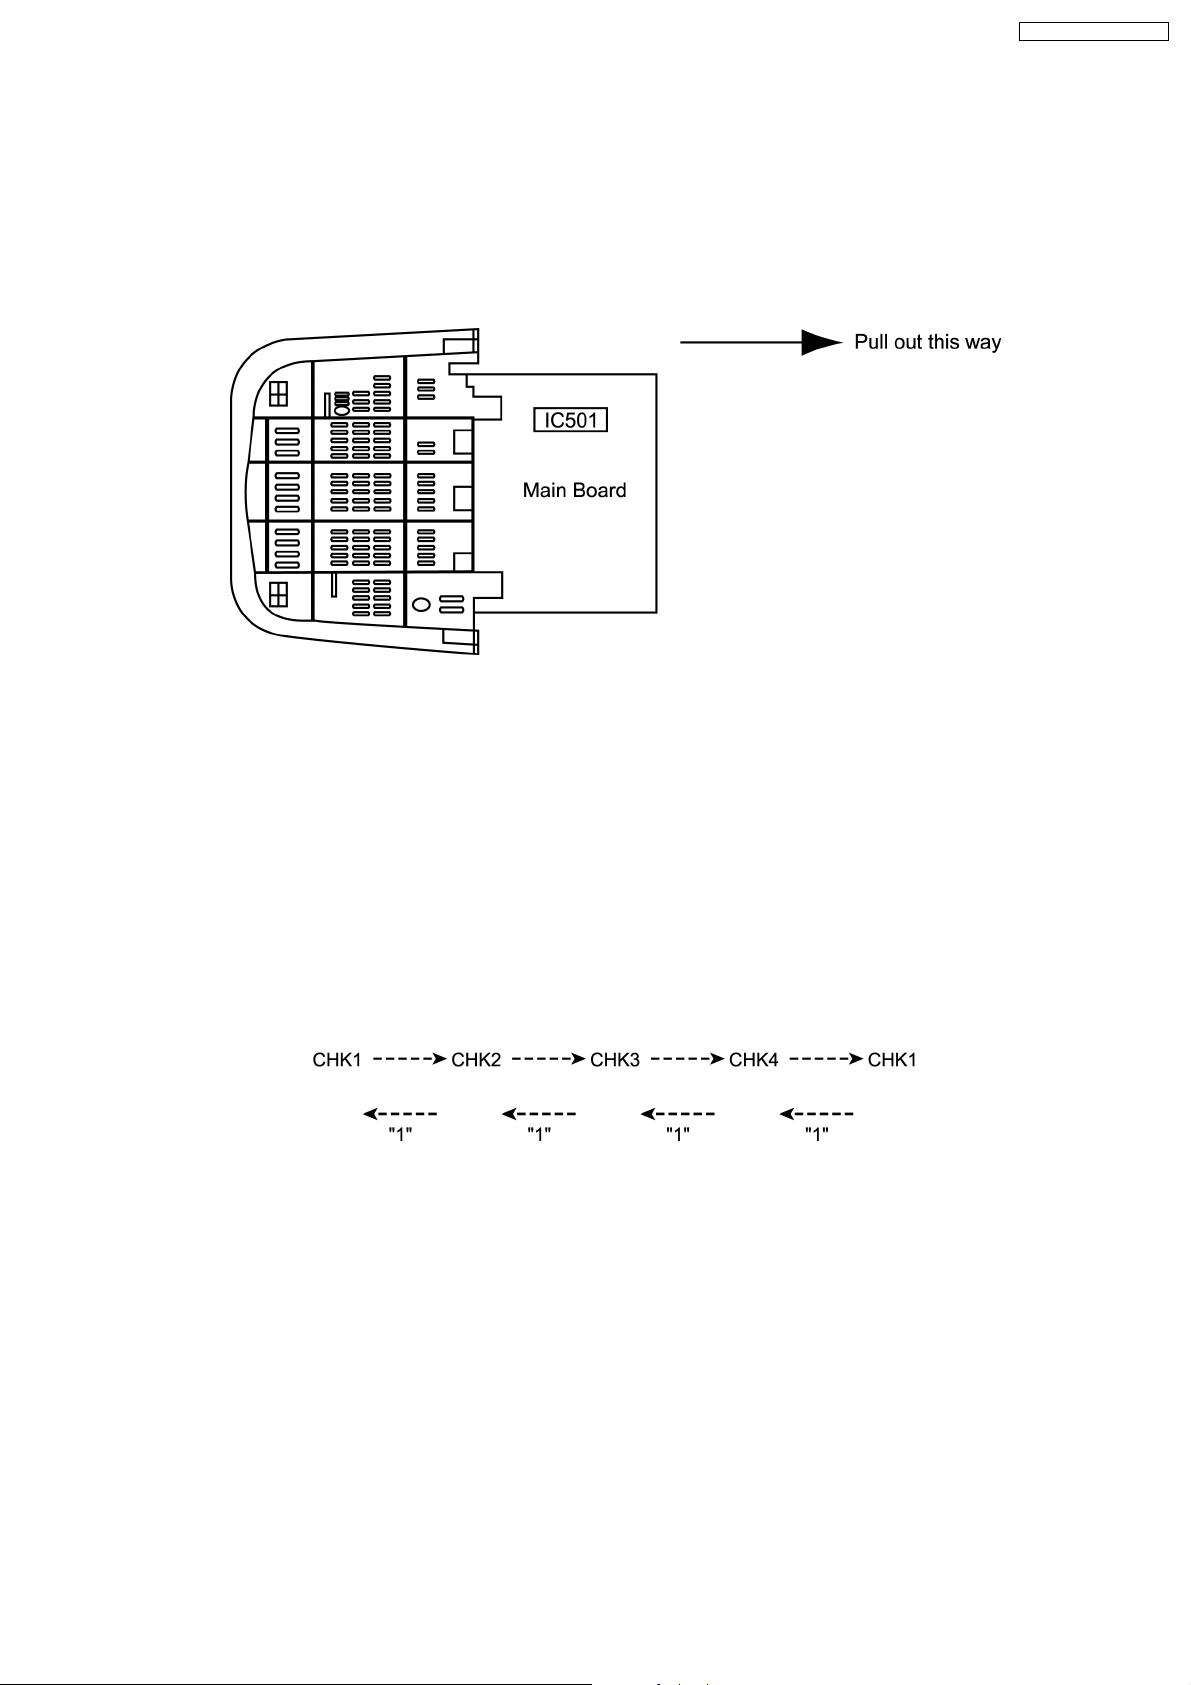
2.1. Service Position for E-Board
1. Remove the back cover.
2. Stand the TV set as shown in Fig. 2.
3. Remove the A-Board from the TV set by pulling the main board out as shown in Figure 2.
TX-21FG50A-AUSTRALIA
Fig. 2
2.2. Factory Mode Adjustment
How to set : To set the Factory mode, press Volume 0 dac on the TV and Timer Setting 30 min. on
the remote control and press Volume (-) Down button on the TV together press recall on
the remote control.
CHK should appear on right of TV screen.
To move from CHK1 to CHK2 mode, etc. please follow below rotation :
To Set Self-Check : Press the Volume Down button on TV then press the Off Timer button on remote
control.
5
Page 6

TX-21FG50A-AUSTRALIA
2.3. Adjustment for White Balance
Preparation:
1. Receive the white balance pattern and aging should have been performed over 30 minutes.
2. Set the picture menu to DYNAMIC NORMAL.
3. Degausse the CRT face.
4. Fix the CRT colour analyzer receiver unit to CRT face.
Adjustment of Low Light.
1. Adjustment Sub Bright, so that Y = 6.3 ± 1.0 nit.
2. Adjustment R-CUT OFF, so that X = 0.235 ± 0.010 nit.
3. Adjustment G-CUT OFF, so that Y = 0.235 ± 0.010 nit.
Adjustment of High Light
1. Adjustment Sub Bright, so that Y = 270 nit.
2. Adjustment R-Drive, so that X = 0.265 ± 0.010 nit.
3. Adjustment B-Drive, so that Y = 0.265 ± 0.010 nit.
2.4. Adjustment for CRT CUT OFF
Preparation:
1. Connect the oscilloscope probe to TPL5.
2. Screen VR min.
3. Set the data Sub Bright, Bright.
4. In service Mode at “Bright” dac press [5] in factory mode to enter vertical line and adjust by volume down or up button.
5. Adjust “Screen VR” until 1-H Line appears.
6
Page 7
2.5. Adjustment Procedure
TX-21FG50A-AUSTRALIA
2.5.1. +B Voltage
Item / preparation
1. Operate the TV set.
2. Set control as follows :
Brightness ........... minimum
Contrast ............... minimum
Adjustment procedure
1. Confirm the DC voltage at the indicated test points, as
follows :
TPA 10 : 141.0 ± 1.5V
TPA 8 : 8 ± 1V
TPA 9 : 5 ± 1V
TPA 21 : 175 ± 15V
2.5.2. RF AGC
Item / preparation
1. Receive a colour bar signal at an RF level of 69 ± 1-2 dBU
with 75Ω loaded.
2. Connect digital multimeter to RF AGC at Tuner.
Adjustment procedure
1. Select “RF AGC” indication in CHK2, on Screen by remote
control at factory mode.
2. Set RF AGC by using remote control Volume (+) or Volume
(-) button until voltage AGC at Tuner reaches 2.3 ± 0.1V at
TPA 15 (Tuner point).
3. Increase RF signal strength by 2dB, confirm AGC at Tuner
voltage drop.
2.5.3. High Voltage
Item / preparation
1. Receive the crosshatch pattern.
2. Set to 0 Beam.
Screen VR .......... minimum
Contrast .............. minimum
Adjustment procedure
1. Connect a DC voltage meter to TPA 10 and confirm the +B
voltage is 141.0 ± 1.5V.
2. Connect a high frequency voltmeter to heater and confirm
that voltage reads 6.3 ± 0.24 (VRMS).
3. Normalize the brightness and contrast.
2.5.4. NTSC TINT COLOUR
Item / preparation
1. Connect oscilloscope probe to TPL1 (R OUT) with 10kΩ
series resistor.
2. Press Main Menu and set system to use AV-NTSC (3.58
MHz).
DYNAMIC ................... Normal
Channel CLR Set ..... STD
Adjustment procedure
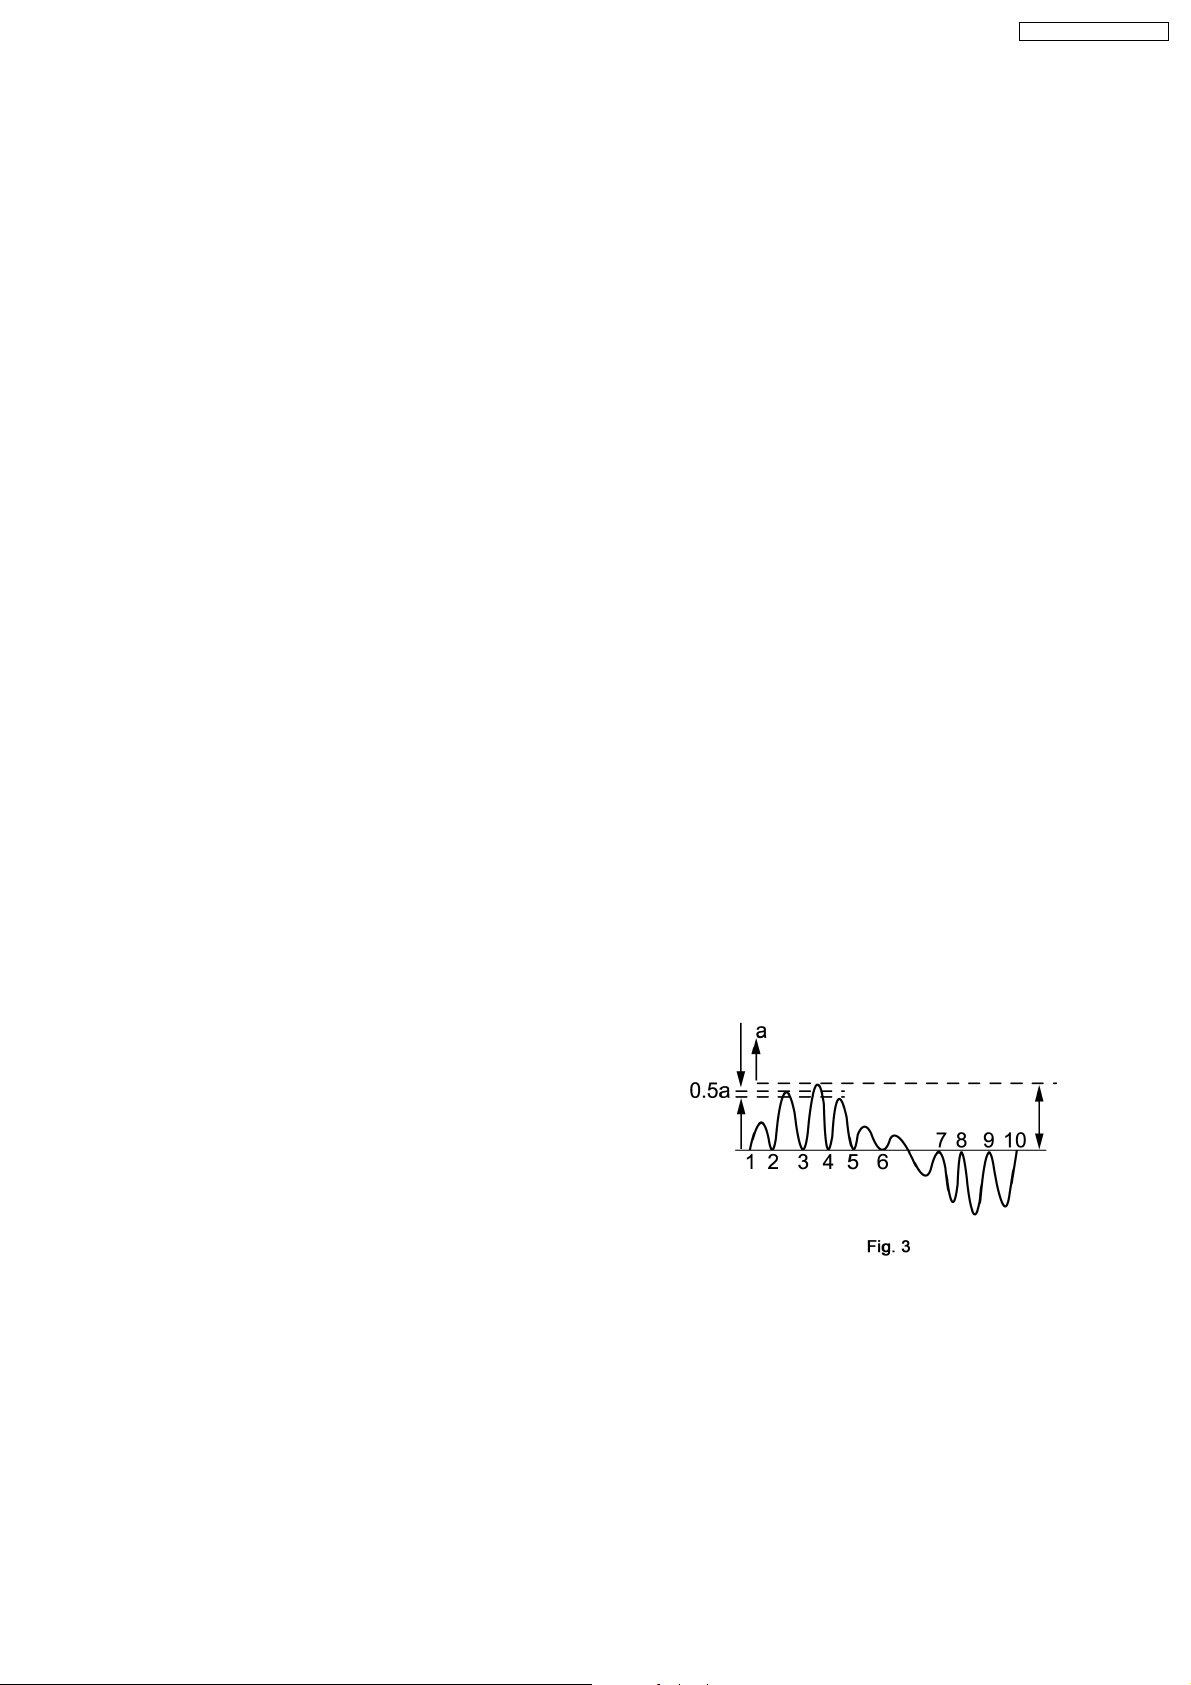
1. Adjust Sub-Tint so that No. 2, 3 and 4 becomes level
waveform is similar to Fig. 3.
2. Confirm phase at Tint is changes more than ± 15 by Tint
control.
3. Confirm that colour level is maximum when colour DAC is
adjusted to maximum position.
Note: Use remote control only when adjusting user mode to
Sub-Tint.
7
Page 8

TX-21FG50A-AUSTRALIA
2.6. PAL Colour
1. Receive the PAL B/G studio colour bar pattern and adjust local frequency at the best tuned position.
2. Pic Menu: Dynamic Normal, Confirm Contrast - 100 DAC, Sub Contrast - 21 dac.
3. Channel colour set --------- STD
4. “CHK2” and press digit key “5” (AKB OFF) also confirm OSD become blue colour.
5. Set (A) to 2.1 ± 0.1V by BRT (CHK2) at measurement point TPL 2 Fig. 4.
2.7. Adjustment
1. Connect oscilloscope probe to TPL 2 (G OUT) with 10kΩ series resistor and adjust Contrast so that (B) as in Fig. 4 is 2.4 ±
0.05V.
2. Adjust “Sub Colour” so that waveform as in Fig. 4 (1) 2.5 ± 0.1V.
3. Connect oscilloscope probe to TPL 1 (R OUT) with 10kΩ series resistor and confirm waveform as in Fig. 5 is (2) 2.7 ± 0.4V.
4. Press digit key “5” (AKB ON) and confirm the OSD become white colour.
8
Page 9

TX-21FG50A-AUSTRALIA
Before Colour Purity, Convergence and White Balance adjustment are attempted,
V. Height, H. Centre and Focus adjustments must be completed.
Colour Purity
1. Set the Brightness and Contrast controls to their maximum
positions.
2. Operate the TV set for 60 minutes.
3. Fully degausse the picture tube by using an external
degaussing coil.
4. Apply a crosshatch pattern signal and adjust the static
convergence magnets to the approximately correct position.
5. Receive a black and white signal.
6. Set the control as follows:
Red................minimum
Green.............minimum
Blue...............minimum
Press the Shipping button on the remote control twice to
select CRT Adjustment Mode to select low light.
7. Loosen the clamp screw forthe Deflection Yoke A in Fig.10
and move the Deflection Yoke as close to the purity magnet
as possible.
8. Adjust the purity magnetic rings sothat avertical green field
is obtained at the centre of the screen.
Convergence
1. Apply a crosshatch pattern signal and Normalize Contrast
control to the maximum positions.
2. Adjust Brightness until the grey position of the crosshatch
pattern just becomes black.
3. Adjust the Red and Blue line at the centre of the screen by
rotating the R-B static.
Fig. 6
9. Slowly push the Deflection Yoke and set it where a uniform
green field is obtained.
Fig. 21
10. Re-adjust the Low Light controls to their correct settings
and make sure that a uniform white field is obtained.
11. Tighten the clamp screw A in Fig. 10.
Fig. 8
4. Adjust Red and Blue with Green line at centre of the screen
by rotating (RB)-G static convergence magnetic rings.
5. Lock convergence magnets with silicone sealer.
6. Remove the DY wedges and slightly tilt the Deflection Yoke
vertically and horizontally to obtain the good overall
convergence.
Fig. 9
7. Fix the Deflection Yoke byreinserting the DYwedges. Refer
to Fig. 10.
8. If purity error is found, repeat “Colour Purity” adjustment.
9
Page 10
TX-21FG50A-AUSTRALIA
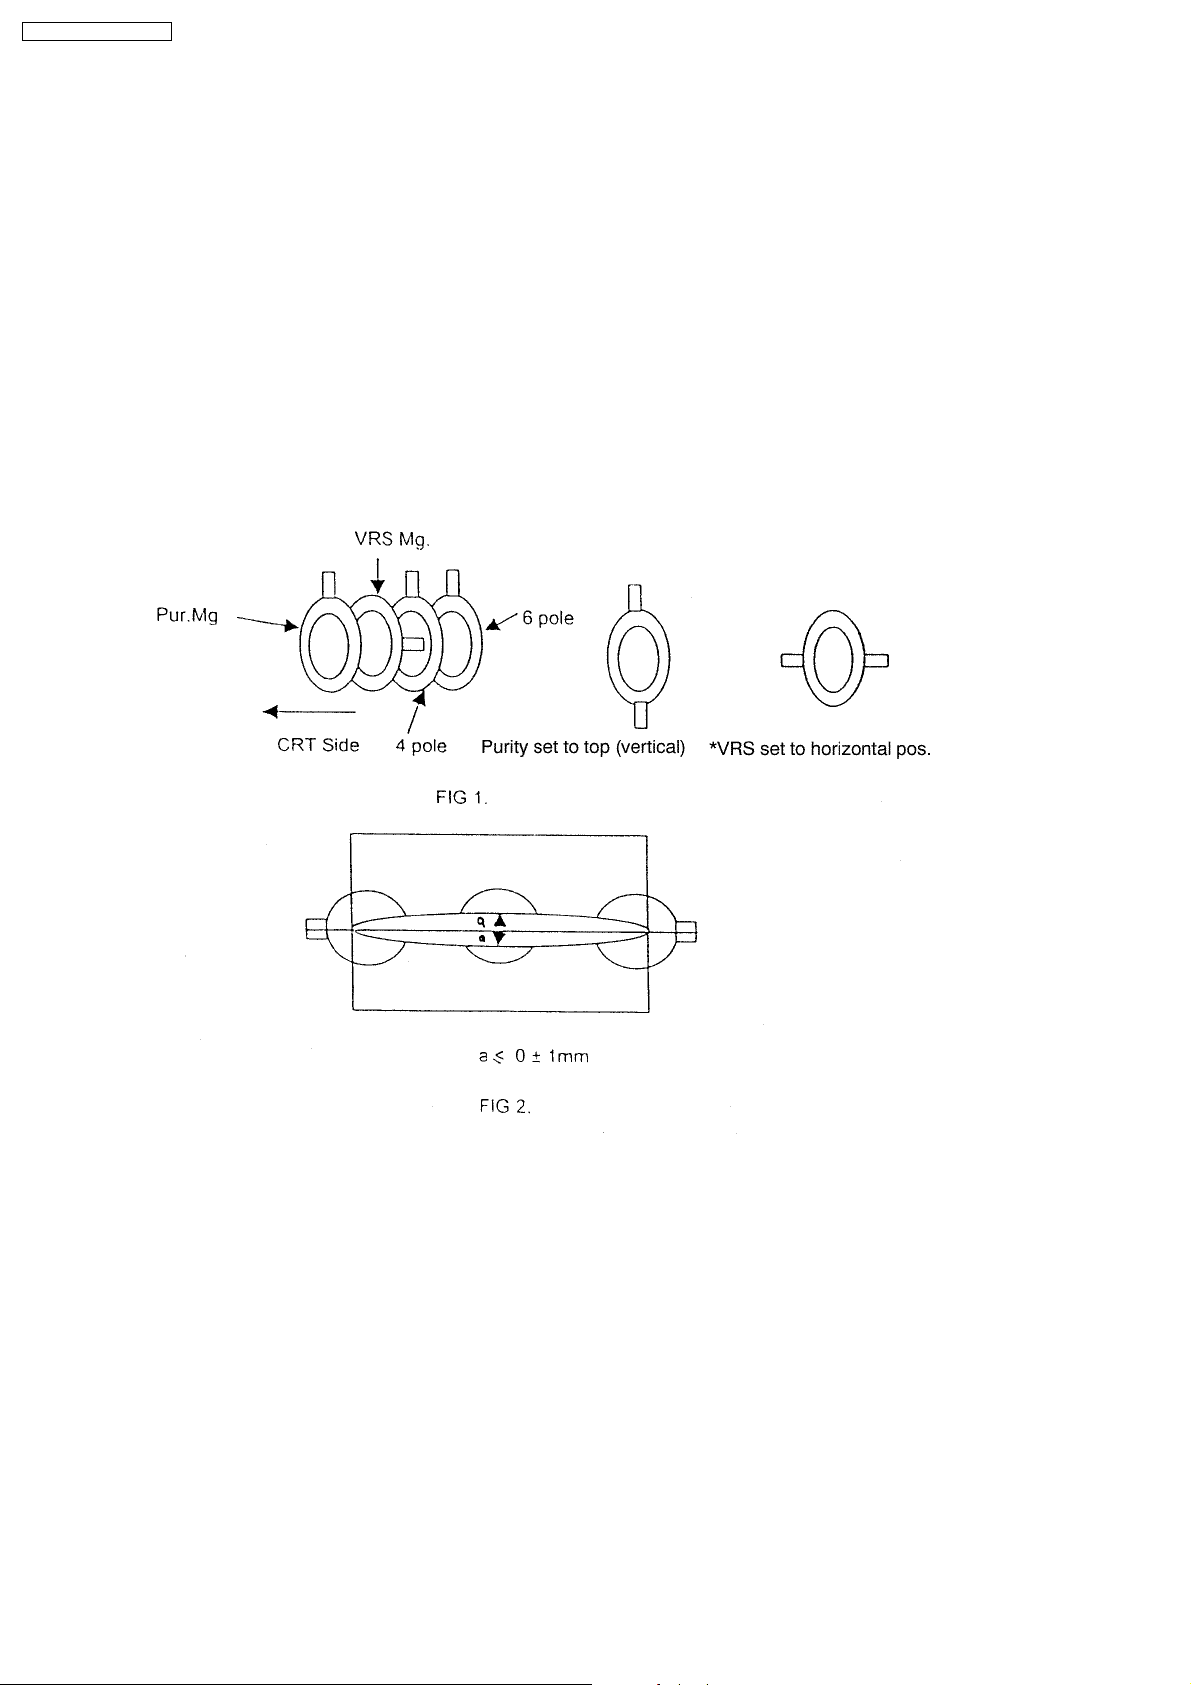
Adjustment of CRT VRS
1. Preparation
a. Set DY to CRT not to tilt up and down left and right deflection.
b. Set CY to CRT and set CY magnet primarily (Fig. 1)
Purity magnet : Set purity magnet that 2 magnets are (TOP POSITION)
VRS magnet : Set purity magnet 2 magnets are (HORIZONTAL POSITION)
2. Adjustment
a. Receive that Cross Hatch pattern.
b. Adjust V-SHIFT -50Hz.
c. Set 2 magnets of horizontal position to up and down equally so that it will be the center part of CRT. (Fig. 2)
10
Page 11
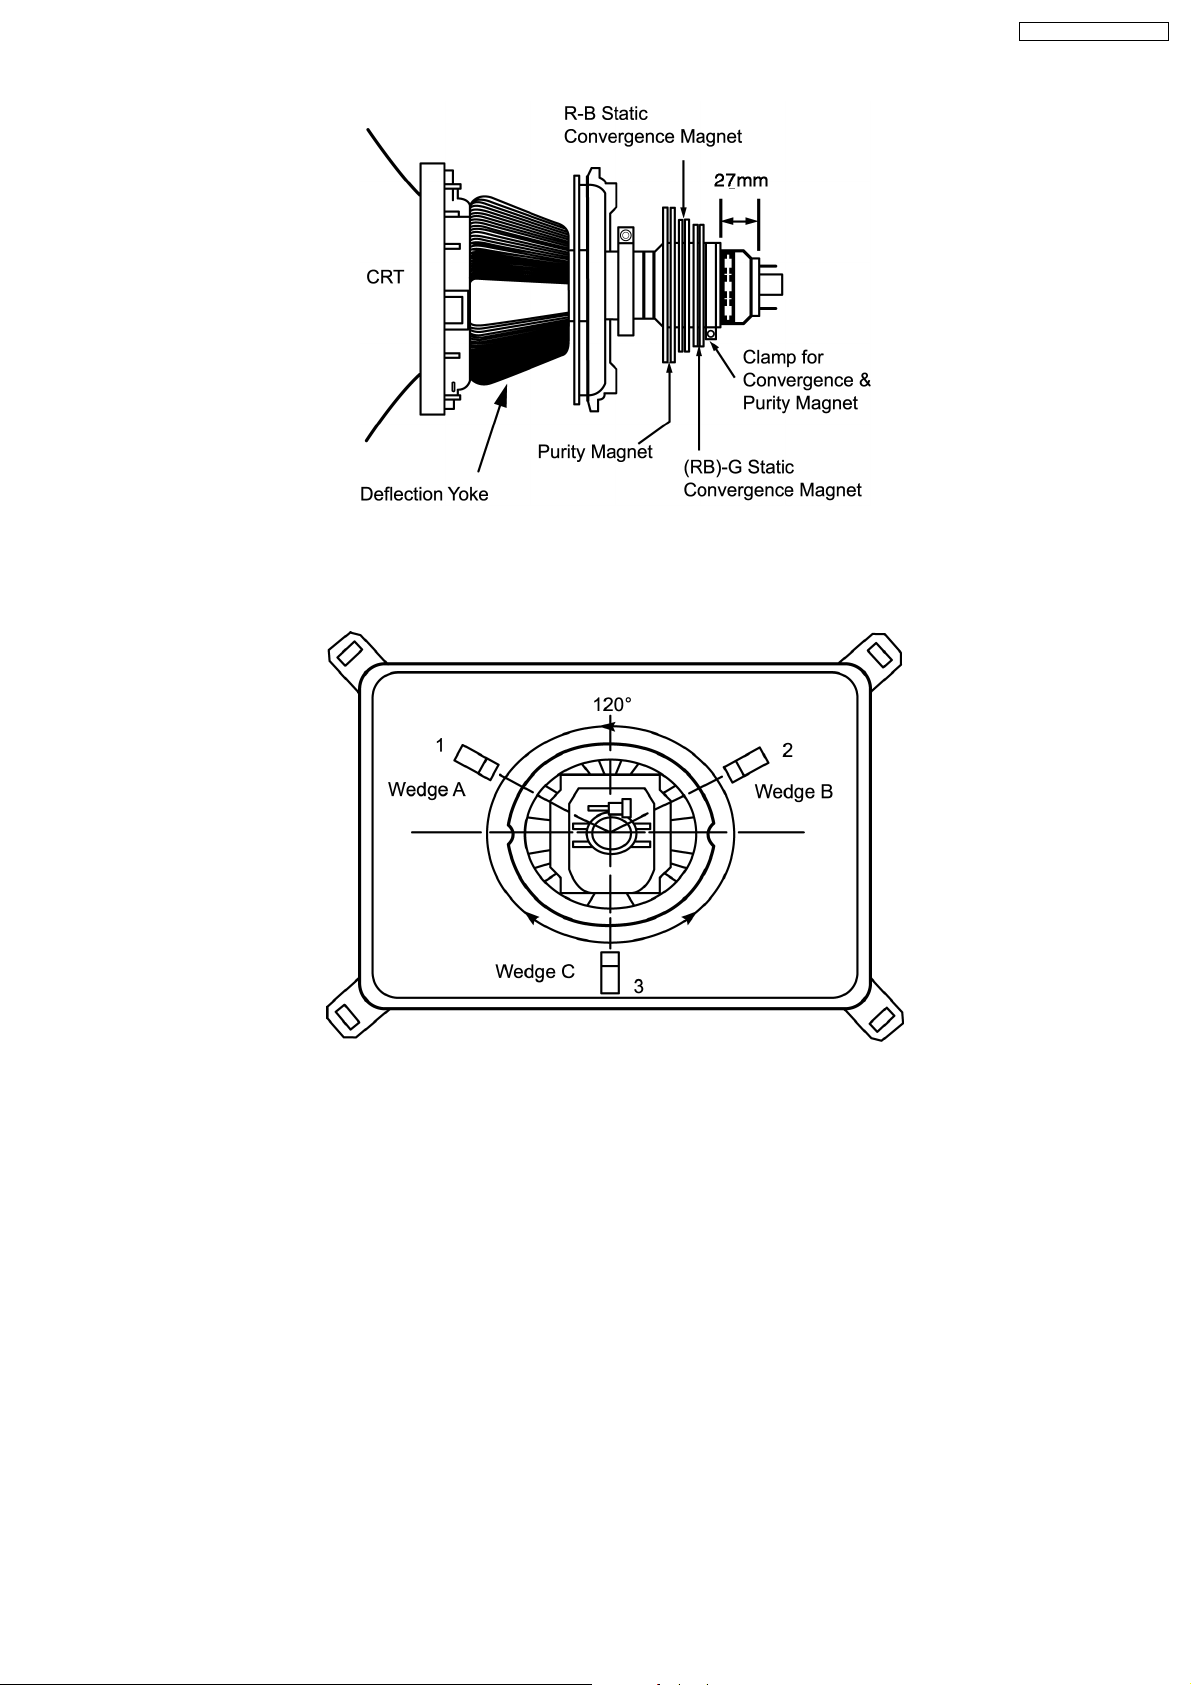
Fig. 10
TX-21FG50A-AUSTRALIA
Fig. 11
Notes:
1. Wedge A, B and C should be inserted following the sequence of 1, 2 and 3 shown in Fig. 11.
2. The wedges should be set 120° apart from each other.
3. Be certain that three wedges are firmly fixed and the Deflection Yoke is tightly clamped in place.
Otherwise the Deflection Yoke may shift its position and cause a loss of convergence and purity.
11
Page 12
TX-21FG50A-AUSTRALIA
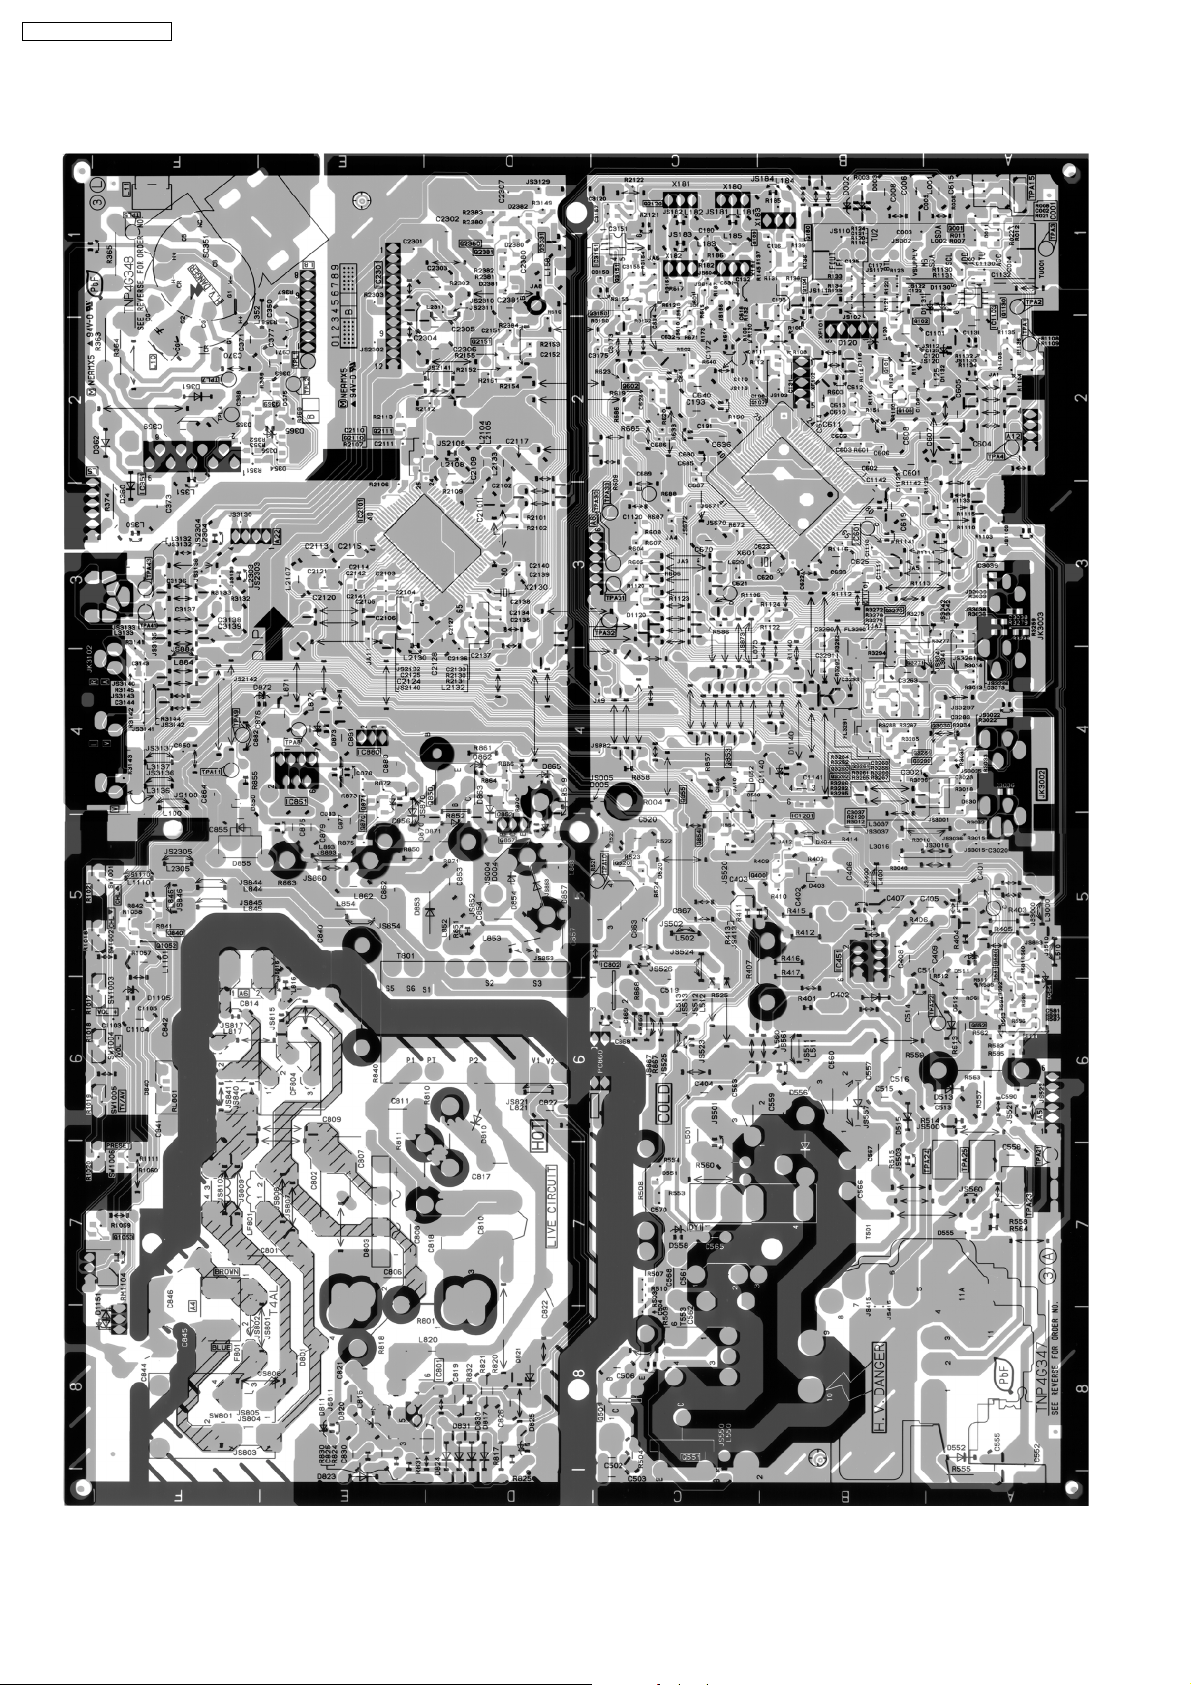
3 Conductor Views
12
Page 13
4 Schematic Diagram
TX-21FG50A-AUSTRALIA
13
Page 14
TX-21FG50A-AUSTRALIA
14
Page 15
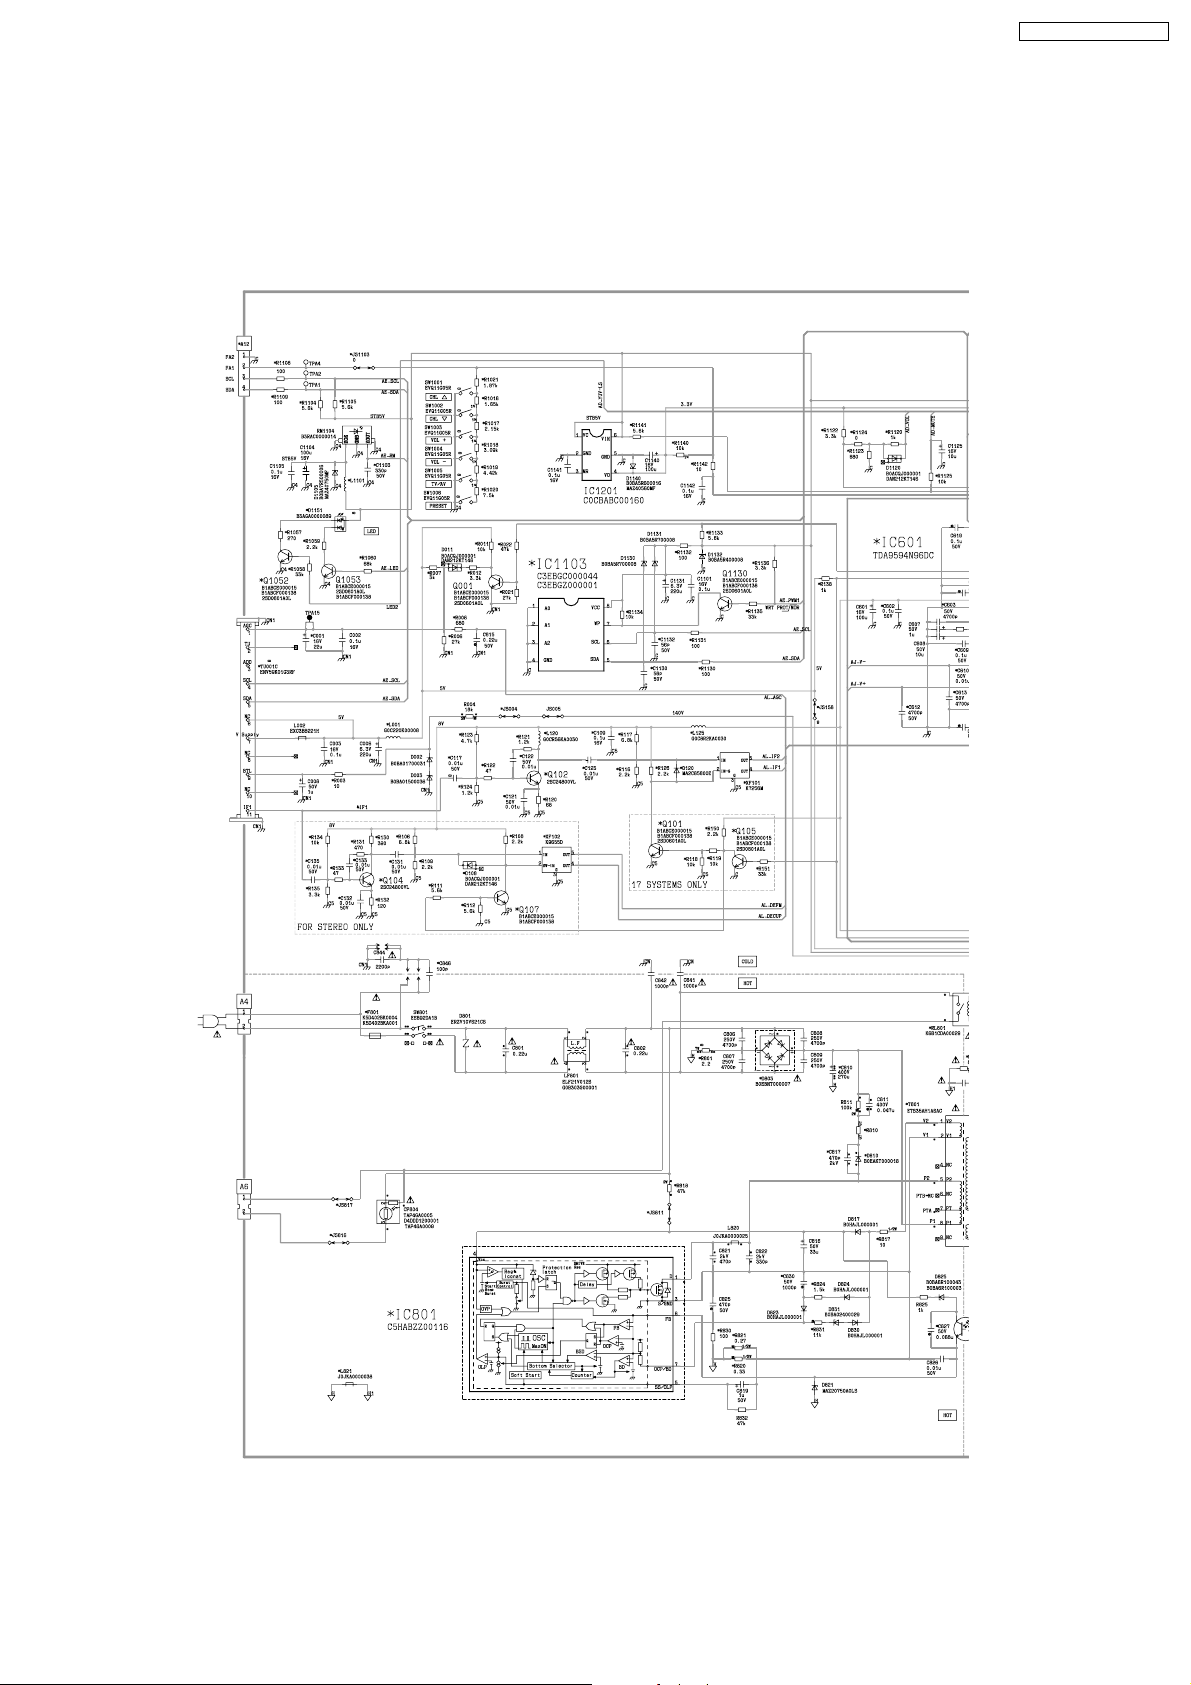
4.1. A Board
4.1.1. A Board (1/5)
TX-21FG50A-AUSTRALIA
<1A>
<2A>
<3A>
<4A>
<5A>
15
<6A>
Page 16
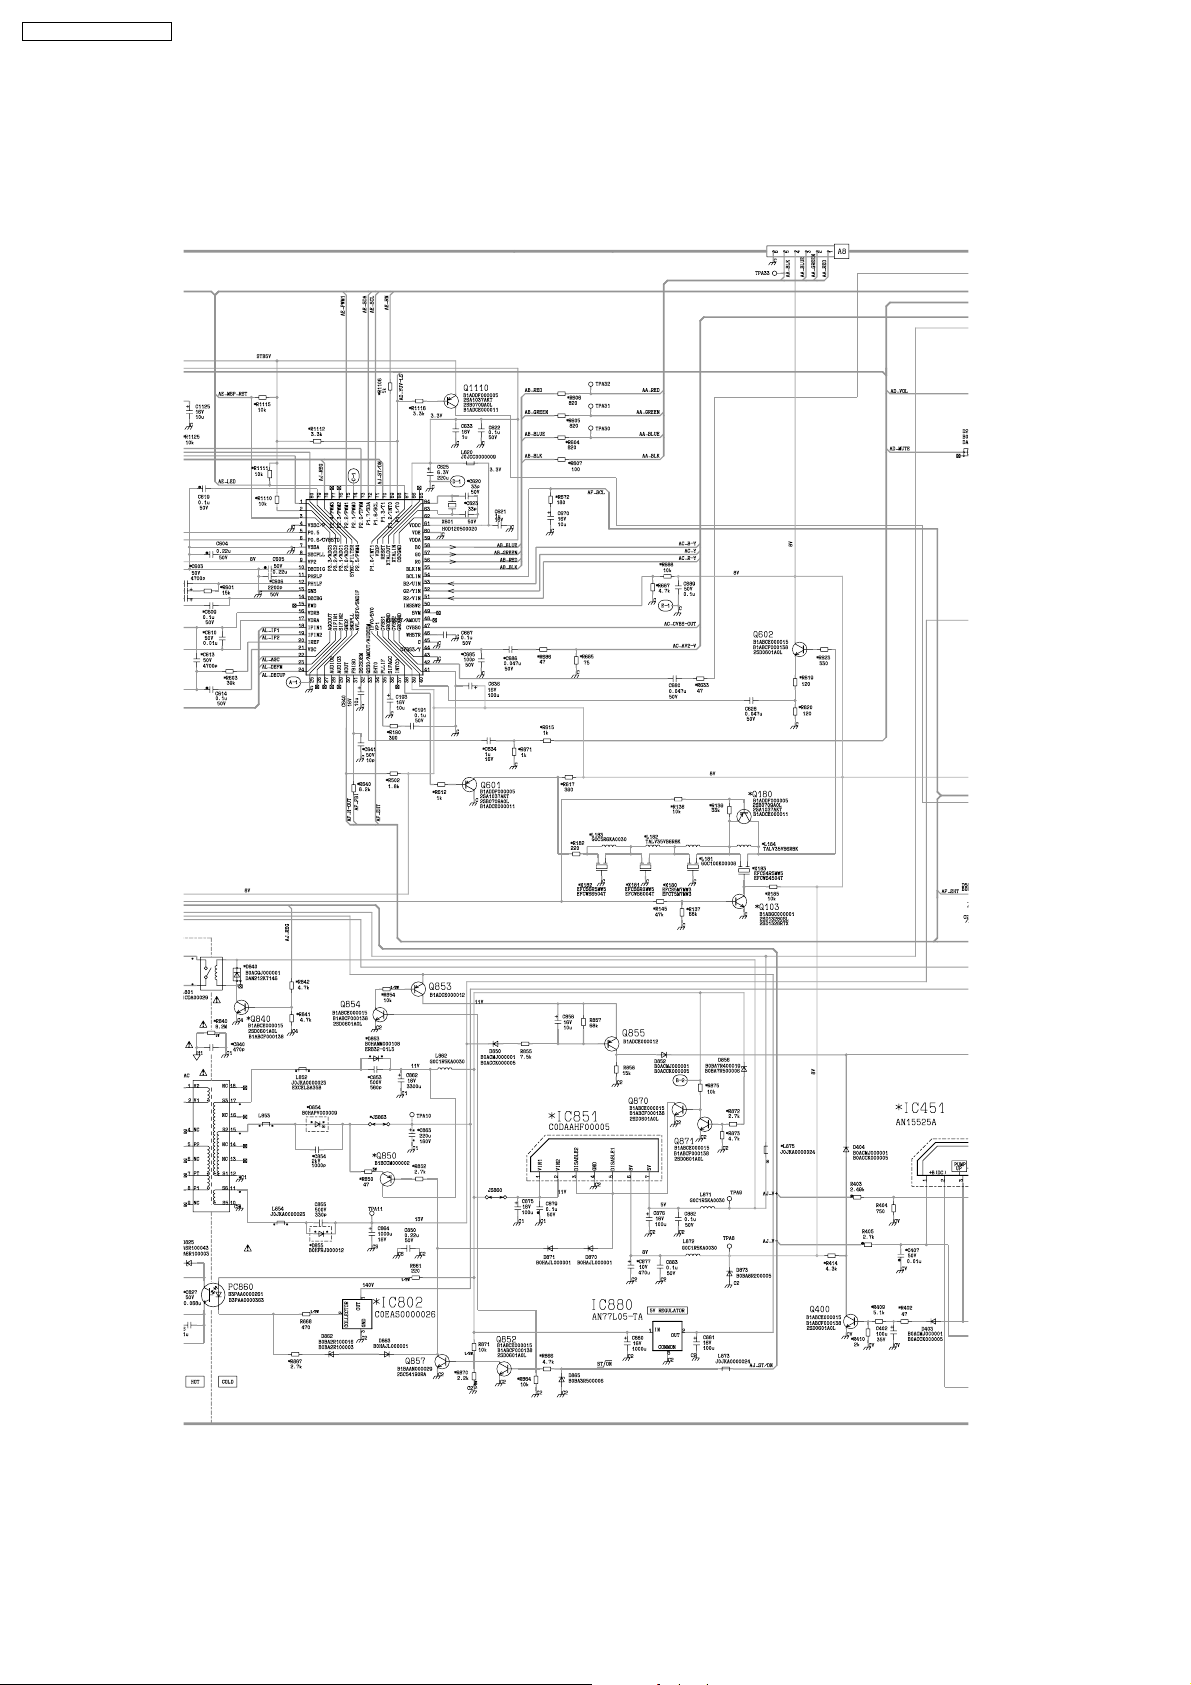
TX-21FG50A-AUSTRALIA
4.1.2. A Board (2/5)
<1A>
<2A>
<3A>
<1B>
<2B>
<3B>
<4A>
<5A>
<6A>
<4B>
<5B>
<6B>
16
Page 17
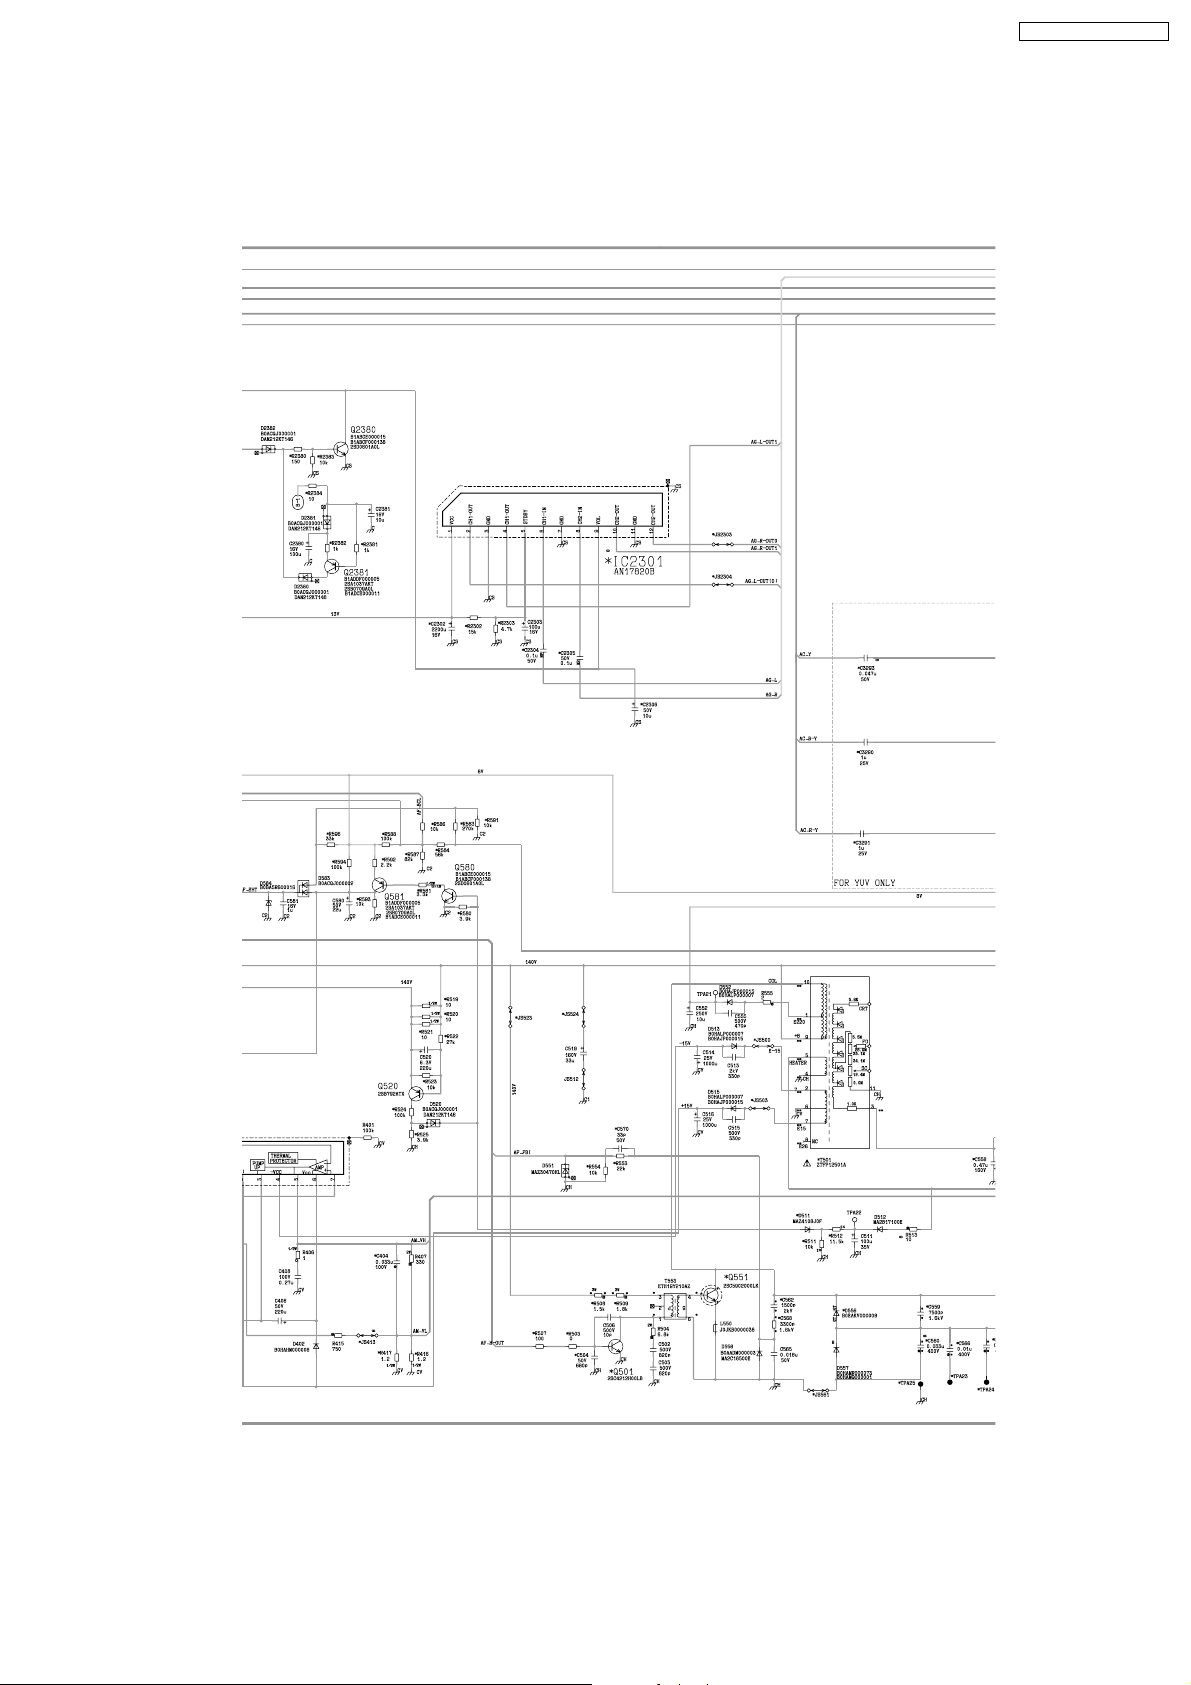
4.1.3. A Board (3/5)
TX-21FG50A-AUSTRALIA
<1B>
<2B>
<3B>
<1C>
<2C>
<3C>
<4B>
<5B>
<6B>
<4C>
<5C>
<6C>
17
Page 18
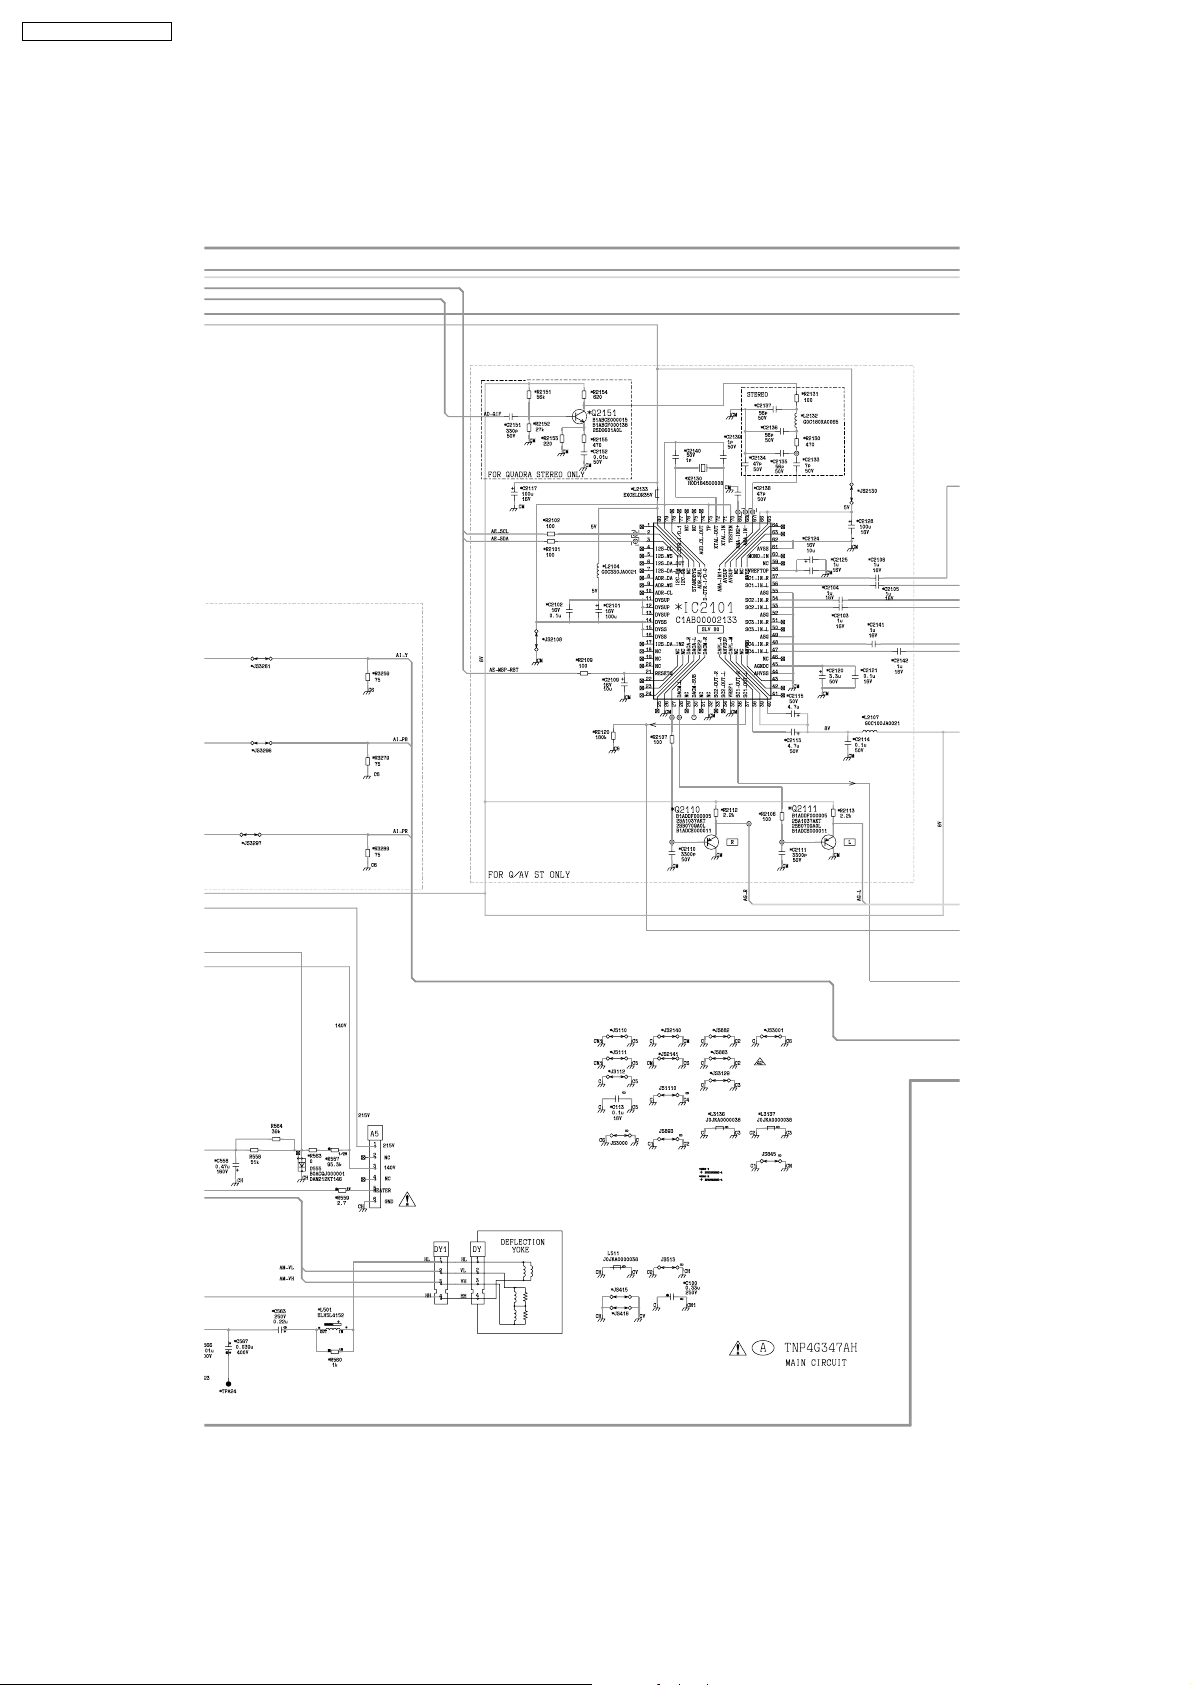
TX-21FG50A-AUSTRALIA
4.1.4. A Board (4/5)
<1C>
<2C>
<3C>
<1D>
<2D>
<3D>
<4C>
<5C>
<6C>
<4D>
<5D>
<6D>
18
Page 19
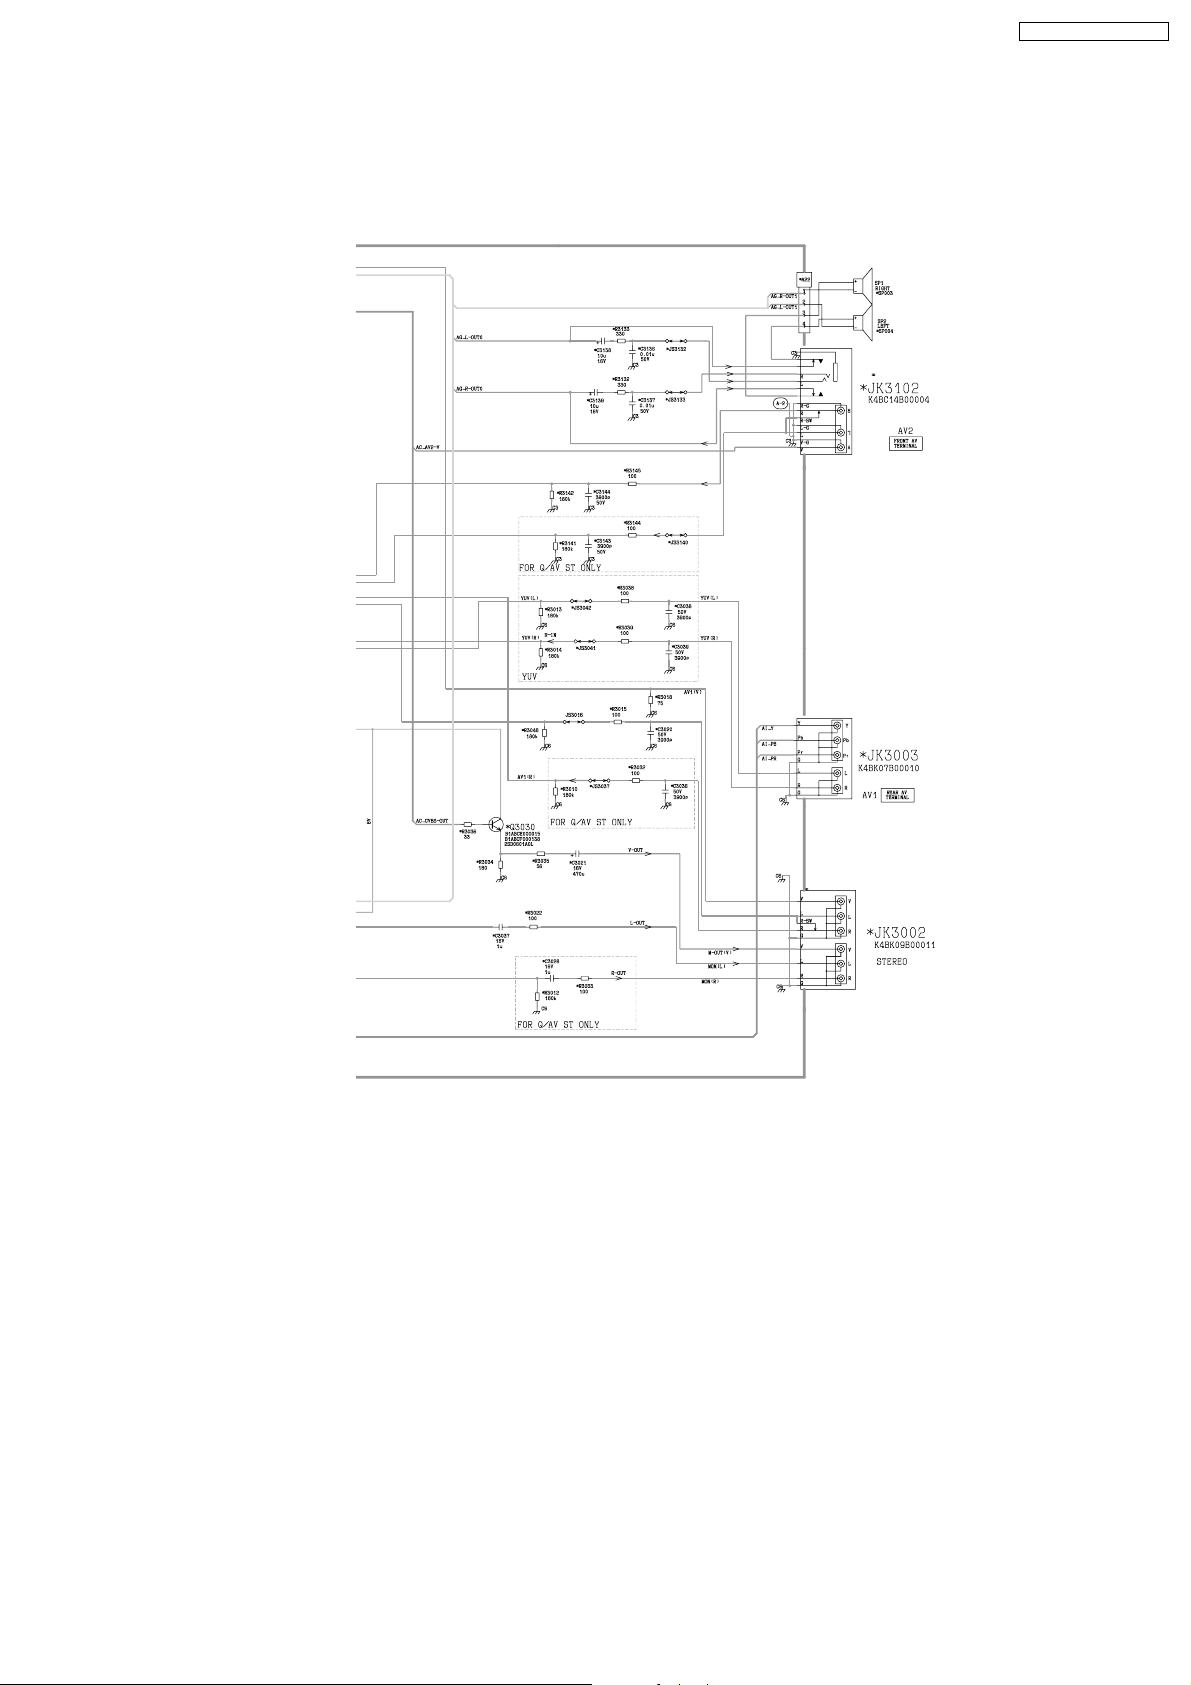
4.1.5. A Board (5/5)
<1D>
<2D>
TX-21FG50A-AUSTRALIA
<3D>
<4D>
<5D>
<6D>
19
Page 20
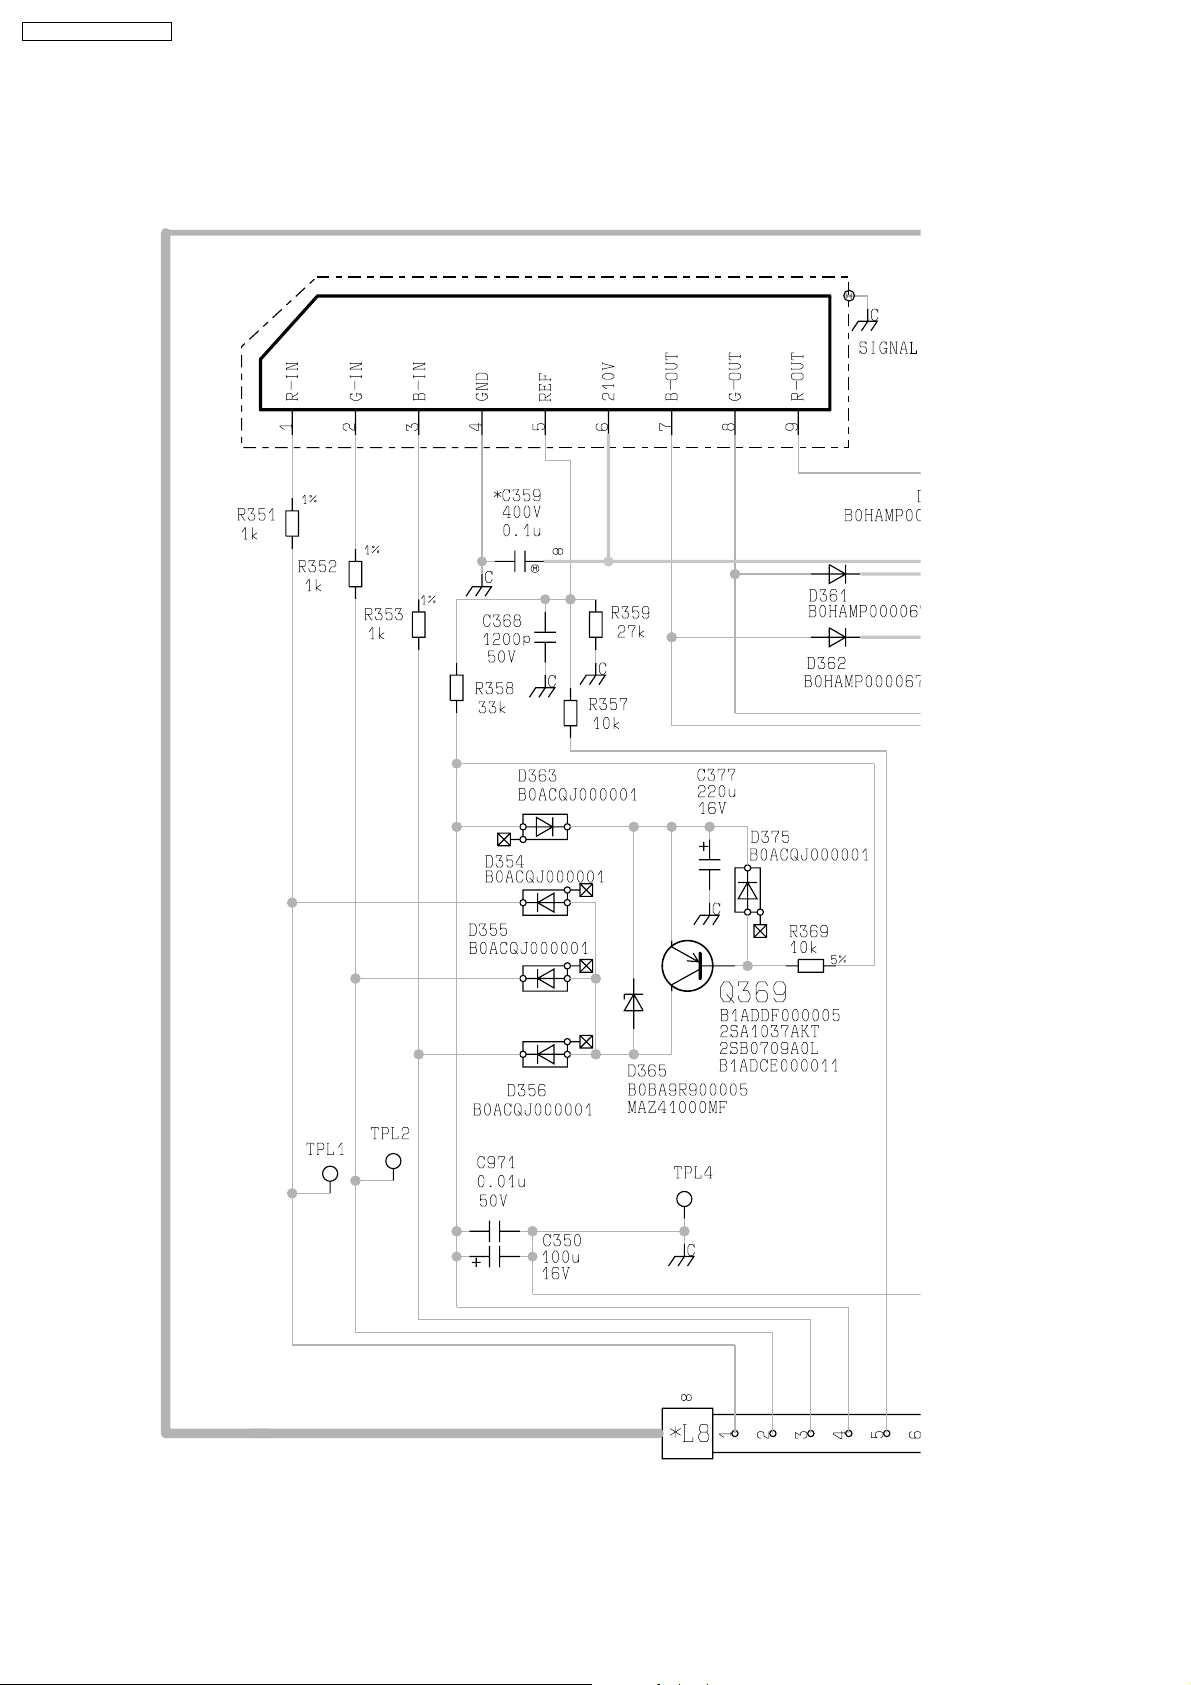
TX-21FG50A-AUSTRALIA
4.2. L Board
4.2.1. L Board (1/3)
<A1>
<A2>
<A3>
20
<A4>
<A5>
Page 21
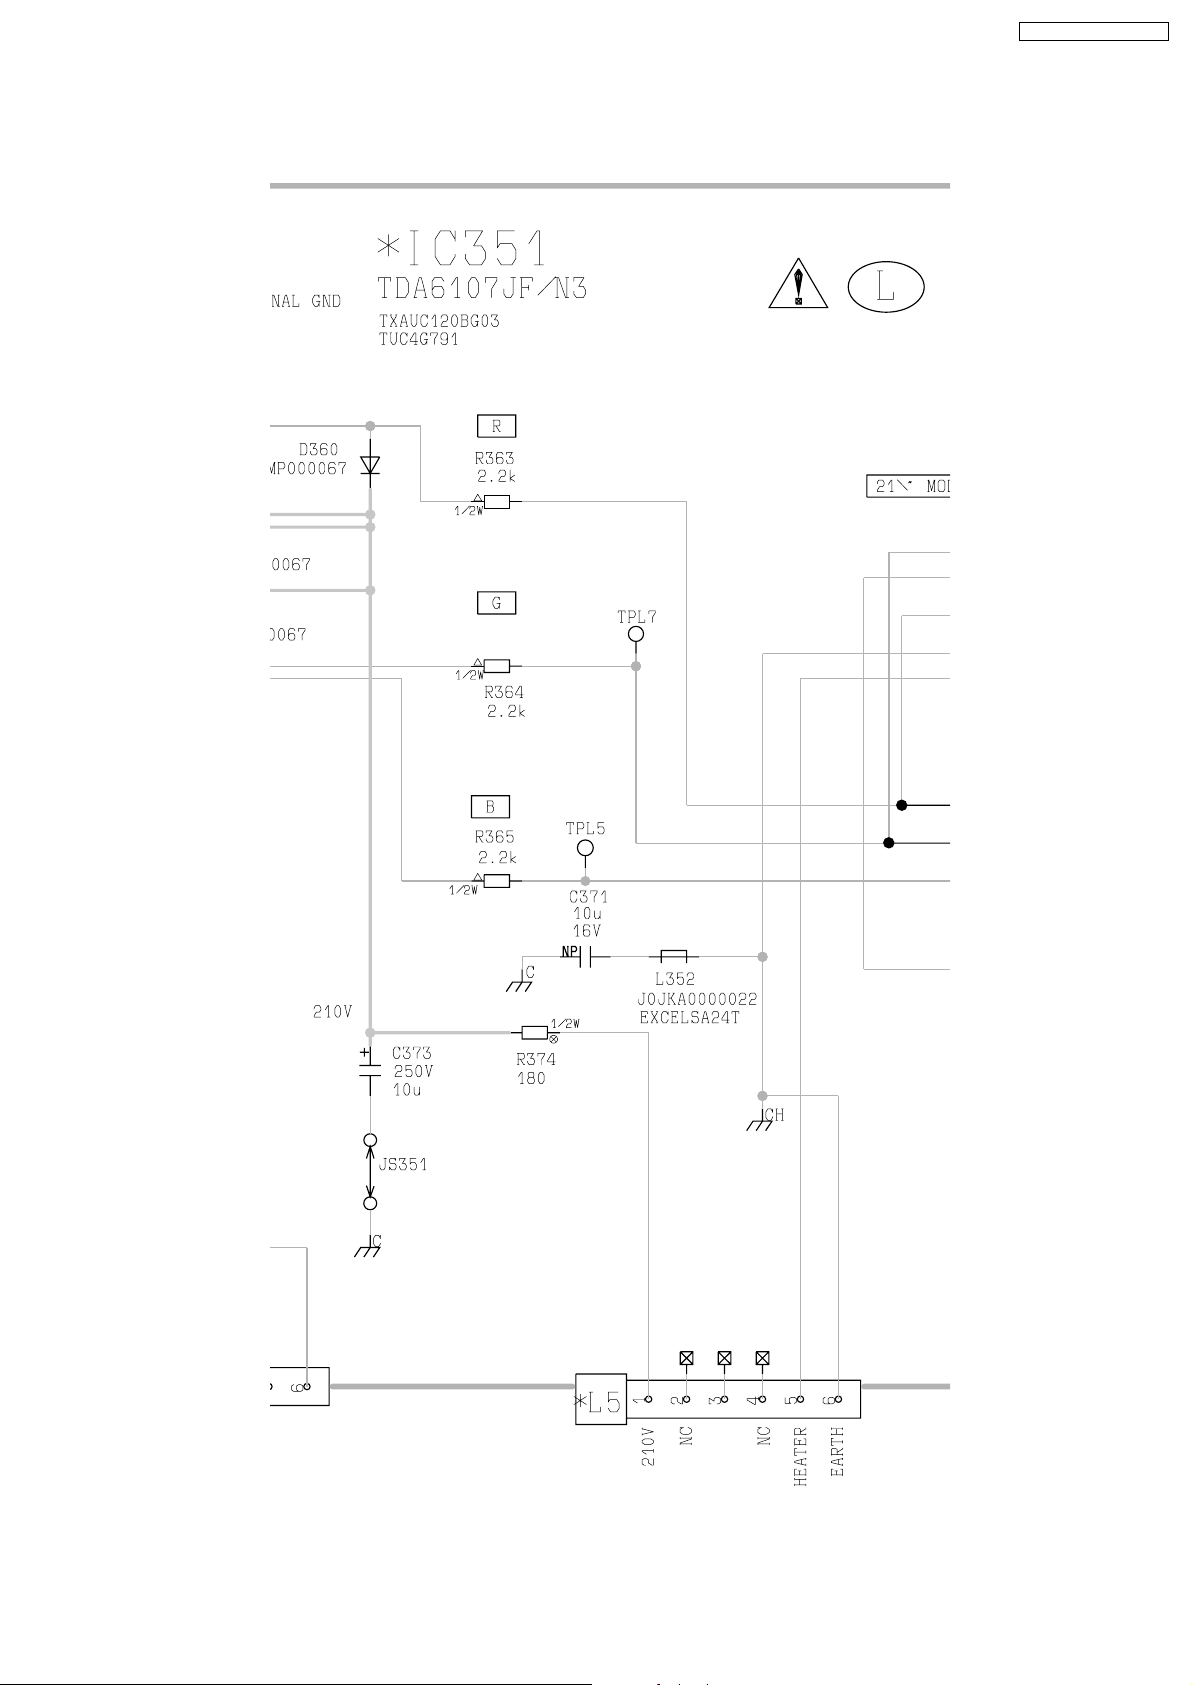
4.2.2. L Board (2/3)
TX-21FG50A-AUSTRALIA
<A1>
<A2>
<A3>
<B1>
<B2>
<B3>
<A4>
<B4>
<B5>
<A5>
<B6>
21
Page 22
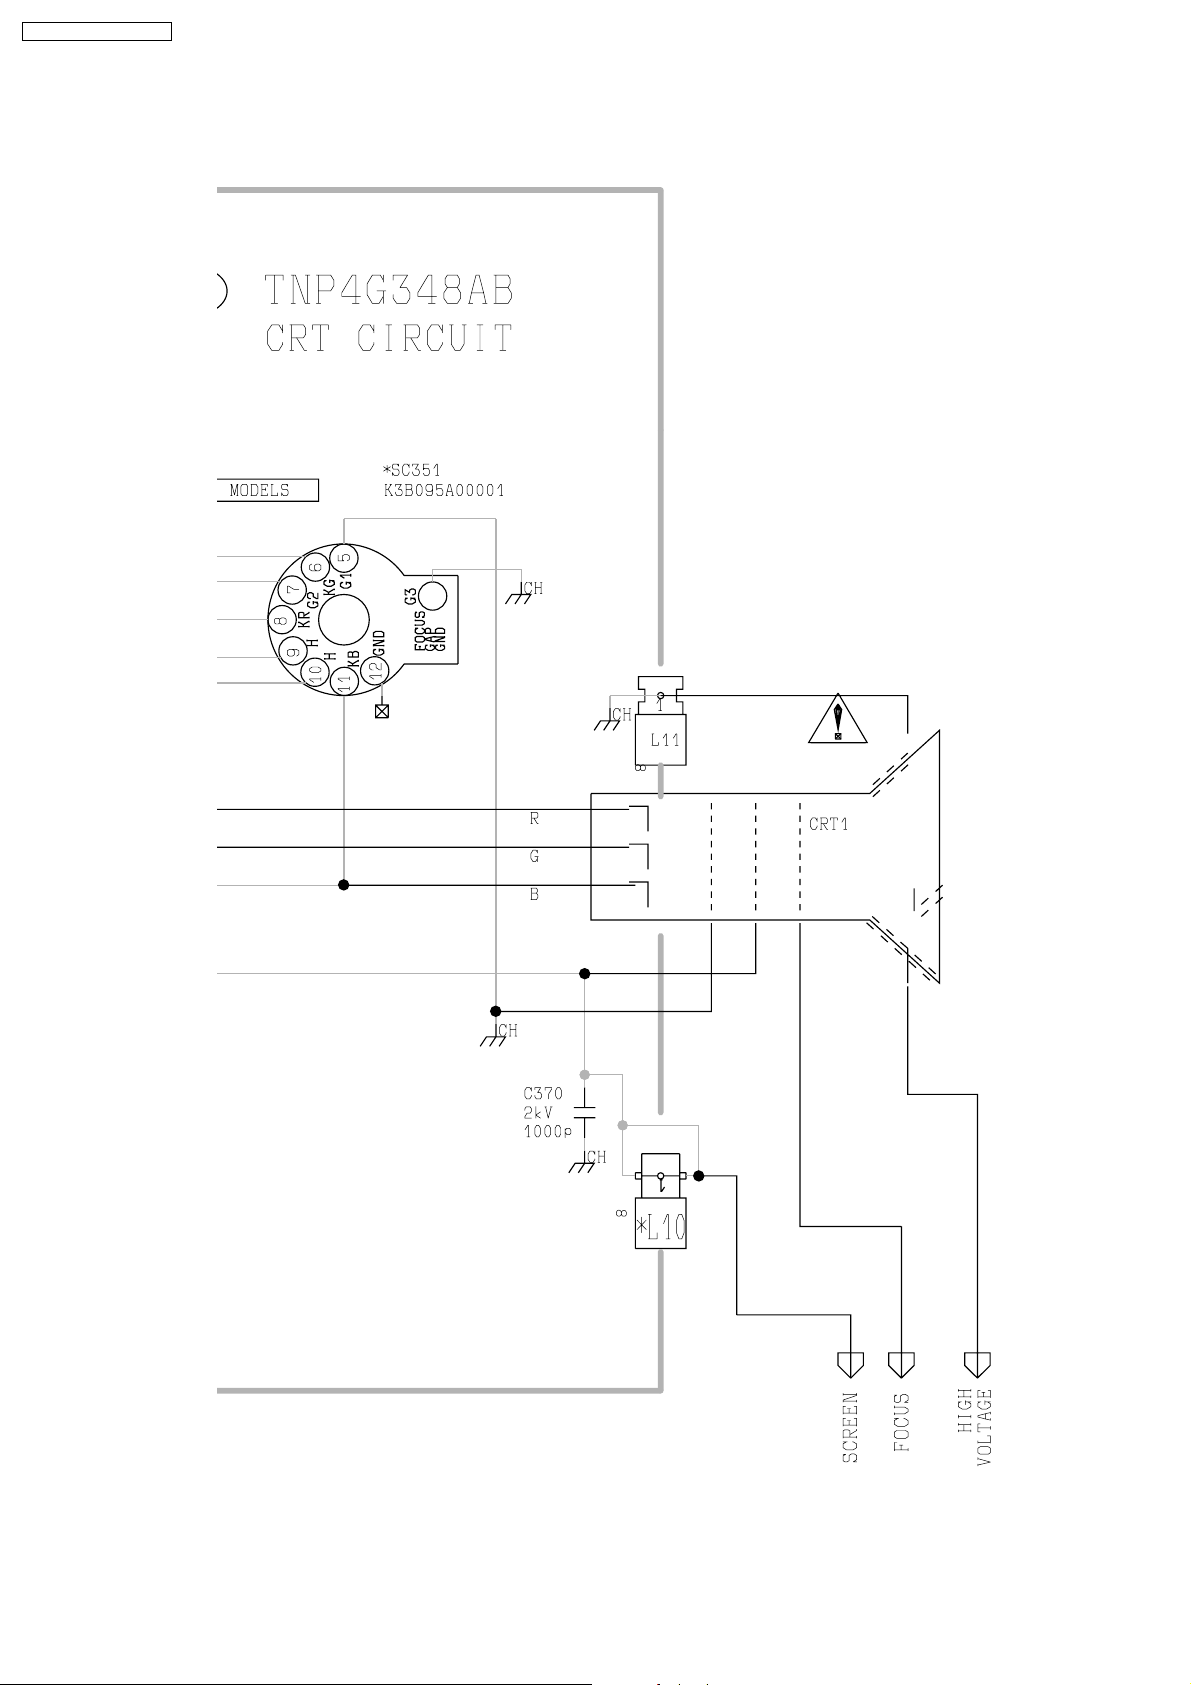
TX-21FG50A-AUSTRALIA
4.2.3. L Board (3/3)
<B1>
<B2>
<B3>
<B4>
<B5>
<B6>
22
Page 23
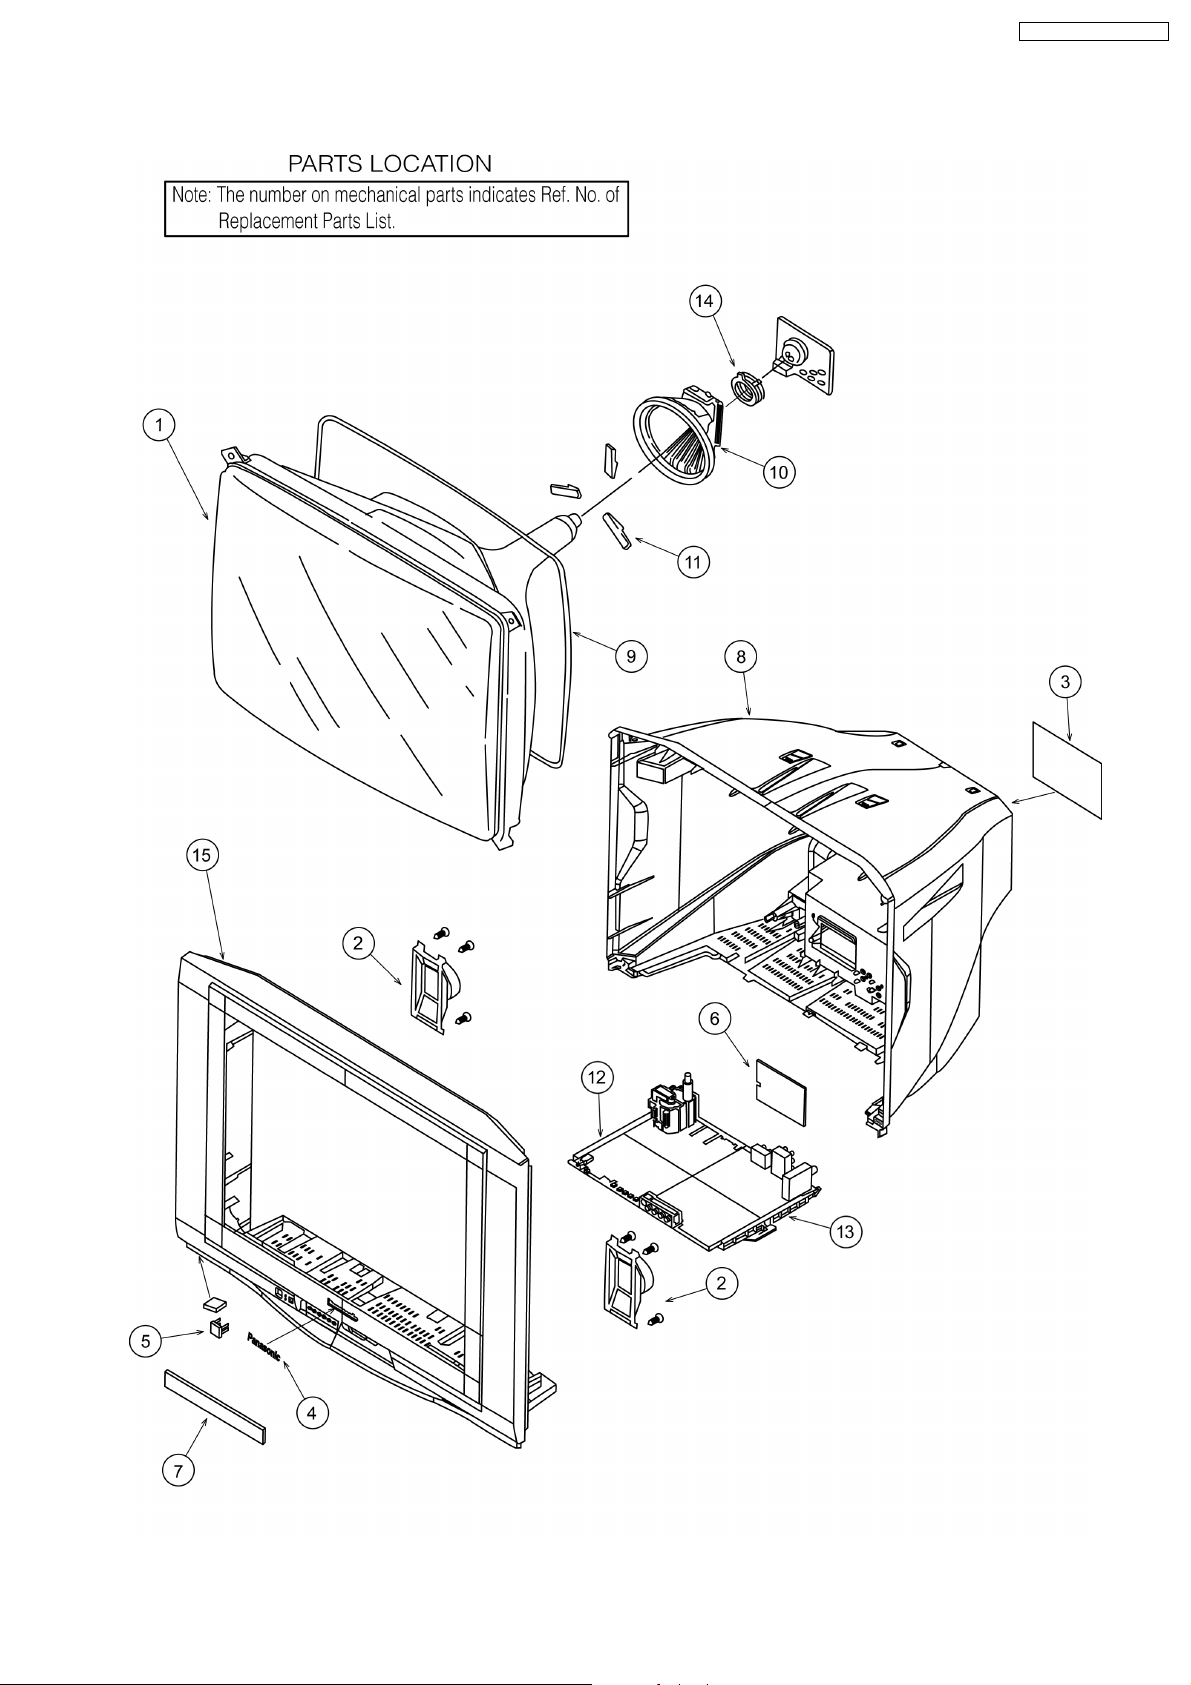
5 Parts Locations
TX-21FG50A-AUSTRALIA
23
Page 24
TX-21FG50A-AUSTRALIA
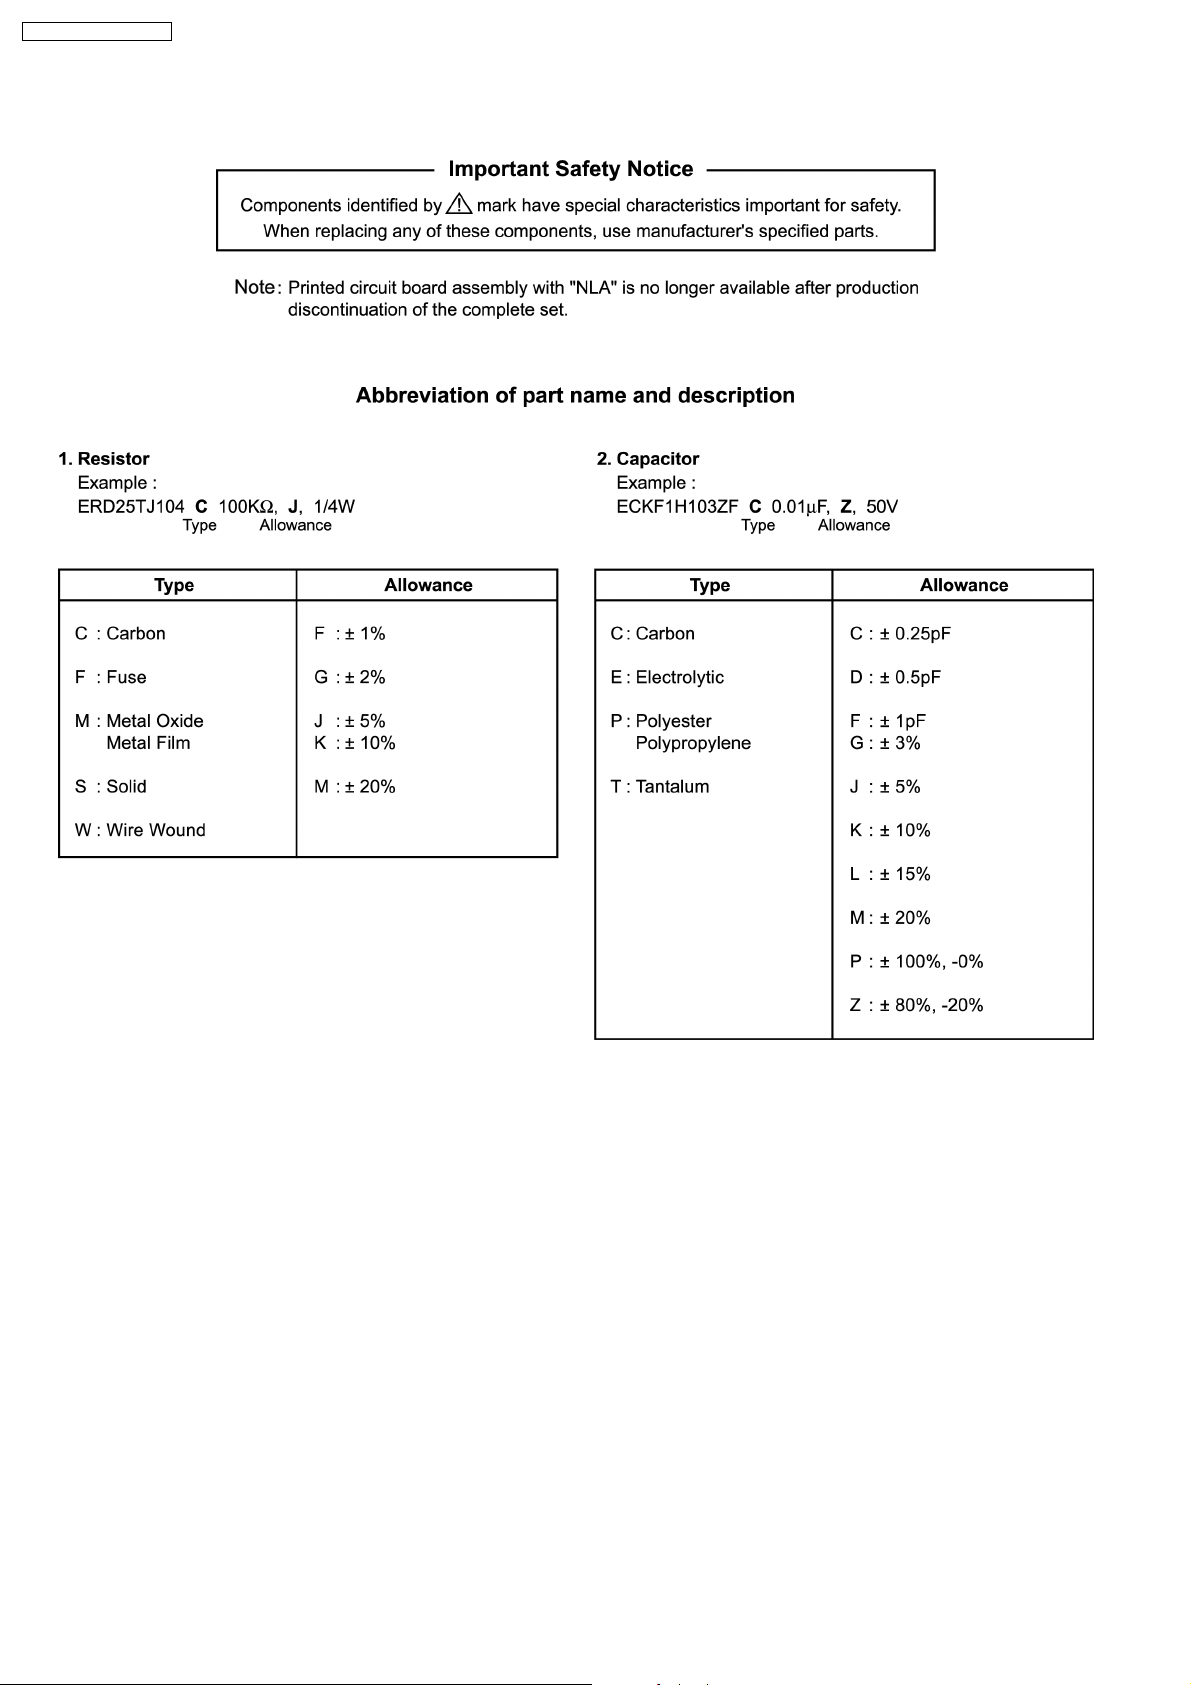
6 Replacement Parts List
24
Page 25
TX-21FG50A-AUSTRALIA
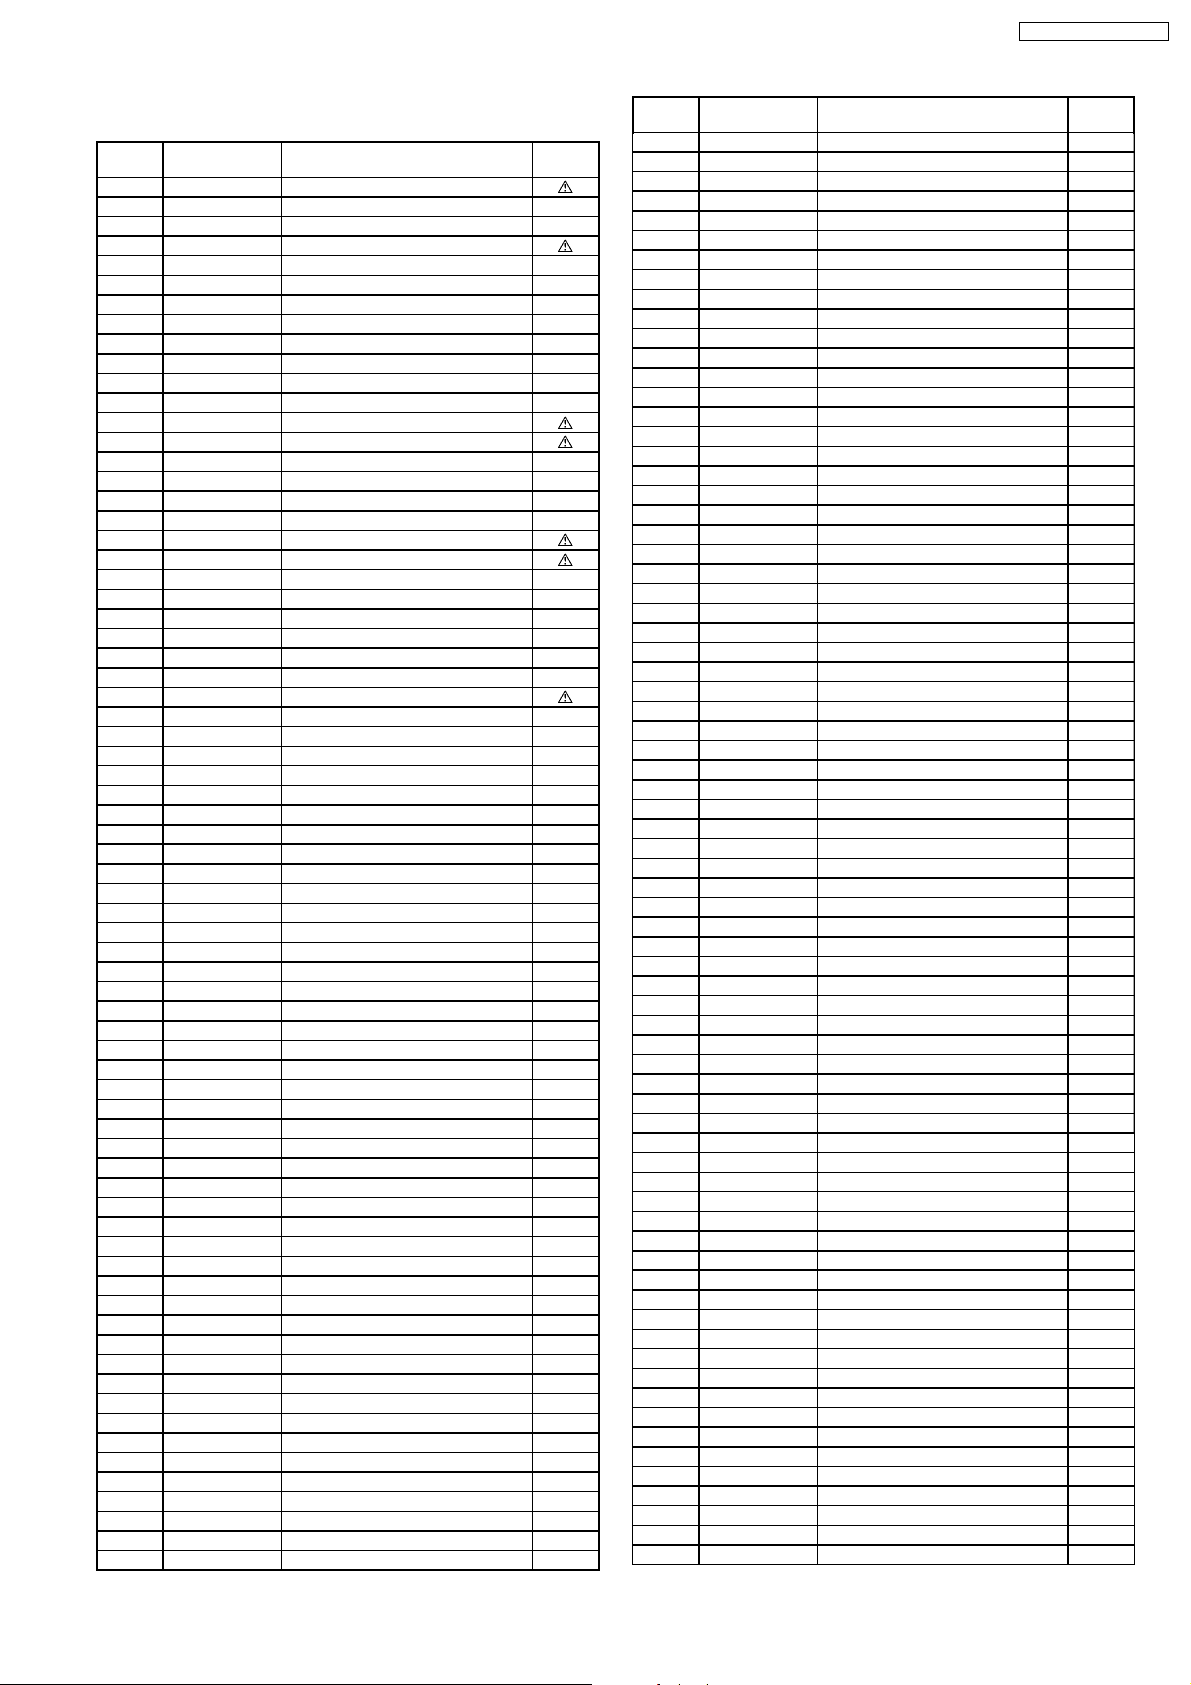
6.1. Replacement Parts List
Ref.
No.
1 A51LXR195X PICTURE TUBE
2 EASG15S02H2 SPEAKER
3 TBM4G1210 MODEL NAME PLATE
4 TBM4G3013 PANASONIC BADGE
5 TBX4G90411 POWER BUTTON
6 TKP4G11744 AC CORD BRACKET
7 TKP4G13291 DOOR
8 TKU4GA1340 BACK COVER
9 TLK4G9037S DEGAUSSING COIL
10 TLY4G343S DEFLECTION YOKE
11 TMM4G503 RUBBER WEDGE
12 TMZ4G9818-1 CHASSIS RAIL (L)
13 TMZ4G9824 CHASSIS RAIL (R)
NLA TNP4G347AH A BOARD
NLA TNP4G348AB L BOARD
14 TP-5400PW CONVERGENCE YOKE
15 TXFKY02CS12 CABINET ASSY
C001 F2A1C220A147 E 22UF, 16V
C002 ECJ2VF1C104Z C 0.1UF, Z, 16V
C003 ECJ2VF1C104Z C 0.1UF, Z, 16V
C006 ECA0JM221B E 220UF, 6.3V
C008 F2A1H1R0A145 E 1UF, 50V
C100 ECQE2334KF P 0.33UF, K,250V
C109 ECJ2VF1C104Z C 0.1UF, Z, 16V
C1101 ECJ2VF1C104Z C 0.1UF, Z, 16V
C1103 ECJ2VC1H331J C 330PF, J, 50V
C1104 ECA1CM101B E 100UF, 16V
C1105 ECJ2VF1C104Z C 0.1UF, Z, 16V
C1125 F2A1C100A147 E 10UF, 16V
C113 ECJ2VF1C104Z C 0.1UF, Z, 16V
C1130 ECJ2VC1H560J C 56PF, J, 50V
C1131 ECA0JM221B E 220UF, 6.3V
C1132 ECJ2VC1H560J C 56PF, J, 50V
C1140 ECA1CM101B E 100UF, 16V
C1141 ECJ2VF1C104Z C 0.1UF, Z, 16V
C1142 ECJ2VF1C104Z C 0.1UF, Z, 16V
C117 ECJ2VB1H103J C 0.01UF, 50V
C121 ECJ2VF1H103Z C 0.01UF, Z, 50V
C122 ECJ2VF1H103Z C 0.01UF, Z, 50V
C123 ECJ2VB1H103J C 0.01UF, 50V
C131 ECJ2VF1H103Z C 0.01UF, Z, 50V
C132 ECJ2VF1H103Z C 0.01UF, Z, 50V
C133 ECJ2VF1H103Z C 0.01UF, Z, 50V
C135 ECJ2VF1H103Z C 0.01UF, Z, 50V
C191 F1J1H104A717 C 0.1UF, 50V
C193 ECA1CM100B E 10UF, 16V
C2101 ECA1CM101B E 100UF, 16V
C2102 ECJ2VF1C104Z C 0.1UF, Z, 16V
C2103 ECJ2VF1C105Z C 1UF, Z, 16V
C2104 ECJ2VF1C105Z C 1UF, Z, 16V
C2105 ECJ2VF1C105Z C 1UF, Z, 16V
C2106 ECJ2VF1C105Z C 1UF, Z, 16V
C2109 ECA1CM100B E 10UF, 16V
C2110 ECJ2VB1H332K C 3300PF, K, 50V
C2111 ECJ2VB1H332K C 3300PF, K, 50V
C2113 ECA1HM4R7B E 4.7UF, 50V
Part No. Part Name & Description Remarks
N2QAJB000080 REMOTE CONTROL
TES4G206 COIL SPRING
TES4G214 SPRING (POWER BUTTON)
TKK4G8603 SPEAKER BRACKET
TMM4G904 RUBBER WASHER
TPE4G14003 LAMI BAG
TPE4G14025 SET COVER
TQB4G3893 FAN BAG
TSMA011 MAGNET
TSN63115-4 PURITY MAGNET
TSX4G113L AC POWER CORD
TXFPC02CA05 CARTON
TXFPD01CG13 CUSHION (TOP)
TXFPD04CG13 CUSHION (BOTTOM)
CAPACITORS
Ref.
No.
C2114 ECJ2VF1H104Z C 0.1UF, Z, 50V
C2115 ECA1HM4R7B E 4.7UF, 50V
C2117 ECA1CM101B E 100UF, 16V
C2120 ECA1HM3R3B E 3.3UF, 50V
C2121 ECJ2VF1C104Z C 0.1UF, Z, 16V
C2124 ECA1CM100B E 10UF, 16V
C2125 ECJ2VF1C105Z C 1UF, Z, 16V
C2128 ECA1CM101B E 100UF, 16V
C2134 ECJ2VC1H470J C47PF,J,50V
C2135 ECJ2VC1H560J C56PF,J,50V
C2136 ECJ2VC1H560J C56PF,J,50V
C2137 ECJ2VC1H560J C56PF,J,50V
C2138 ECJ2VC1H470J C47PF,J,50V
C2139 ECJ2VC1H010C C 1PF, C, 50V
C2140 ECJ2VC1H010C C 1PF, C, 50V
C2141 ECJ2VF1C105Z C 1UF, Z, 16V
C2142 ECJ2VF1C105Z C 1UF, Z, 16V
C2151 ECJ2VC1H331J C 330PF, J, 50V
C2152 ECJ2VF1H103Z C0.01UF,Z,50V
C2302 F2A1C222A117 E 100UF, 16V
C2303 ECA1CM101B E 100UF, 16V
C2304 ECEA1HKN0R1 E 0.1UF, 50V
C2305 ECEA1HKN0R1 E 0.1UF, 50V
C2306 F2A1H100A162 E 10UF, 50V
C2380 ECA1CM101B E 100UF, 16V
C2381 ECA1CM100B E 10UF, 16V
C3020 ECJ2VB1H392K C3900PF,K,50V
C3021 F2A1C4710045 E 470UF, 16V
C3028 ECJ2VF1C105Z C 1UF, Z, 16V
C3036 ECJ2VB1H392K C3900PF,K,50V
C3037 ECJ2VF1C105Z C 1UF, Z, 16V
C3038 ECJ2VB1H392K C3900PF,K,50V
C3039 ECJ2VB1H392K C3900PF,K,50V
C3136 ECJ2VF1H103Z C0.01UF,Z,50V
C3137 ECJ2VF1H103Z C0.01UF,Z,50V
C3138 ECA1CM100B E 10UF, 16V
C3139 ECA1CM100B E 10UF, 16V
C3143 ECJ2VB1H392K C3900PF,K,50V
C3144 ECJ2VB1H392K C3900PF,K,50V
C3290 ECJ2FB1E105K C 1UF, K, 25V
C3291 ECJ2FB1E105K C 1UF, K, 25V
C3293 ECJ2YB1H473K C 0.047UF, K, 50V
C350 ECA1CM101B E 100UF, 16V
C359 ECQM4104KZ P 0.1UF, K,400V
C368 ECJ2VC1H122J C1200PF,J,50V
C370 ECKW3D102KBP C1000PF,K,2KV
C371 ECEA1CN100U E 10UF, 16V
C373 ECA2EM100B E 10UF, 250V
C377 ECA1CM221B E 220UF, 16V
C402 ECA1VM101B E 100UF, 35V
C404 ECQB1333JF P 0.033UF, J,100V
C406 F2A1H221A247 E 220UF, 50V
C407 ECQB1H103JF P 0.01UF, 50V
C408 ECQB1274JF P 0.27UF, J,100V
C502 F1B2H821A025 C 820PF, 500V
C503 F1B2H821A025 C 820PF, 500V
C504 ECJ2VB1H681K C 680PF, K, 50V
C506 F1A2H1000002 C 10PF, 500V
C511 ECA1VM101B E 100UF, 35V
C513 ECKW3D331JBP C 330PF, J, 2KV
C514 F2A1E102A151 E 1000UF, 25V
C515 F1B2H331A025 C 330PF, 500V
C516 F2A1E102A151 E 1000UF, 25V
C519 F2A2C330A096 E 330UF, 160V
C520 ECA0JM221B E 220UF, 6.3V
C552 ECA2EM100B E 10UF, 250V
C555 F1B2H471A025 C 470PF, 500V
C558 ECA2CMR47B E 0.47UF, 160V
C559 ECWH16752JVB P 7500PF,J,1.6KV
C560 ECQM4333JZ P 0.033UF, 400V
C562 ECKW3D152KBR C1500PF,K,2KV
C563 ECWF2224JSR P 0.22UF, J,250V
C565 ECQP1H183JZ P 0.018UF, J, 50V
Part No. Part Name & Description Remarks
25
Page 26
TX-21FG50A-AUSTRALIA
Ref.
No.
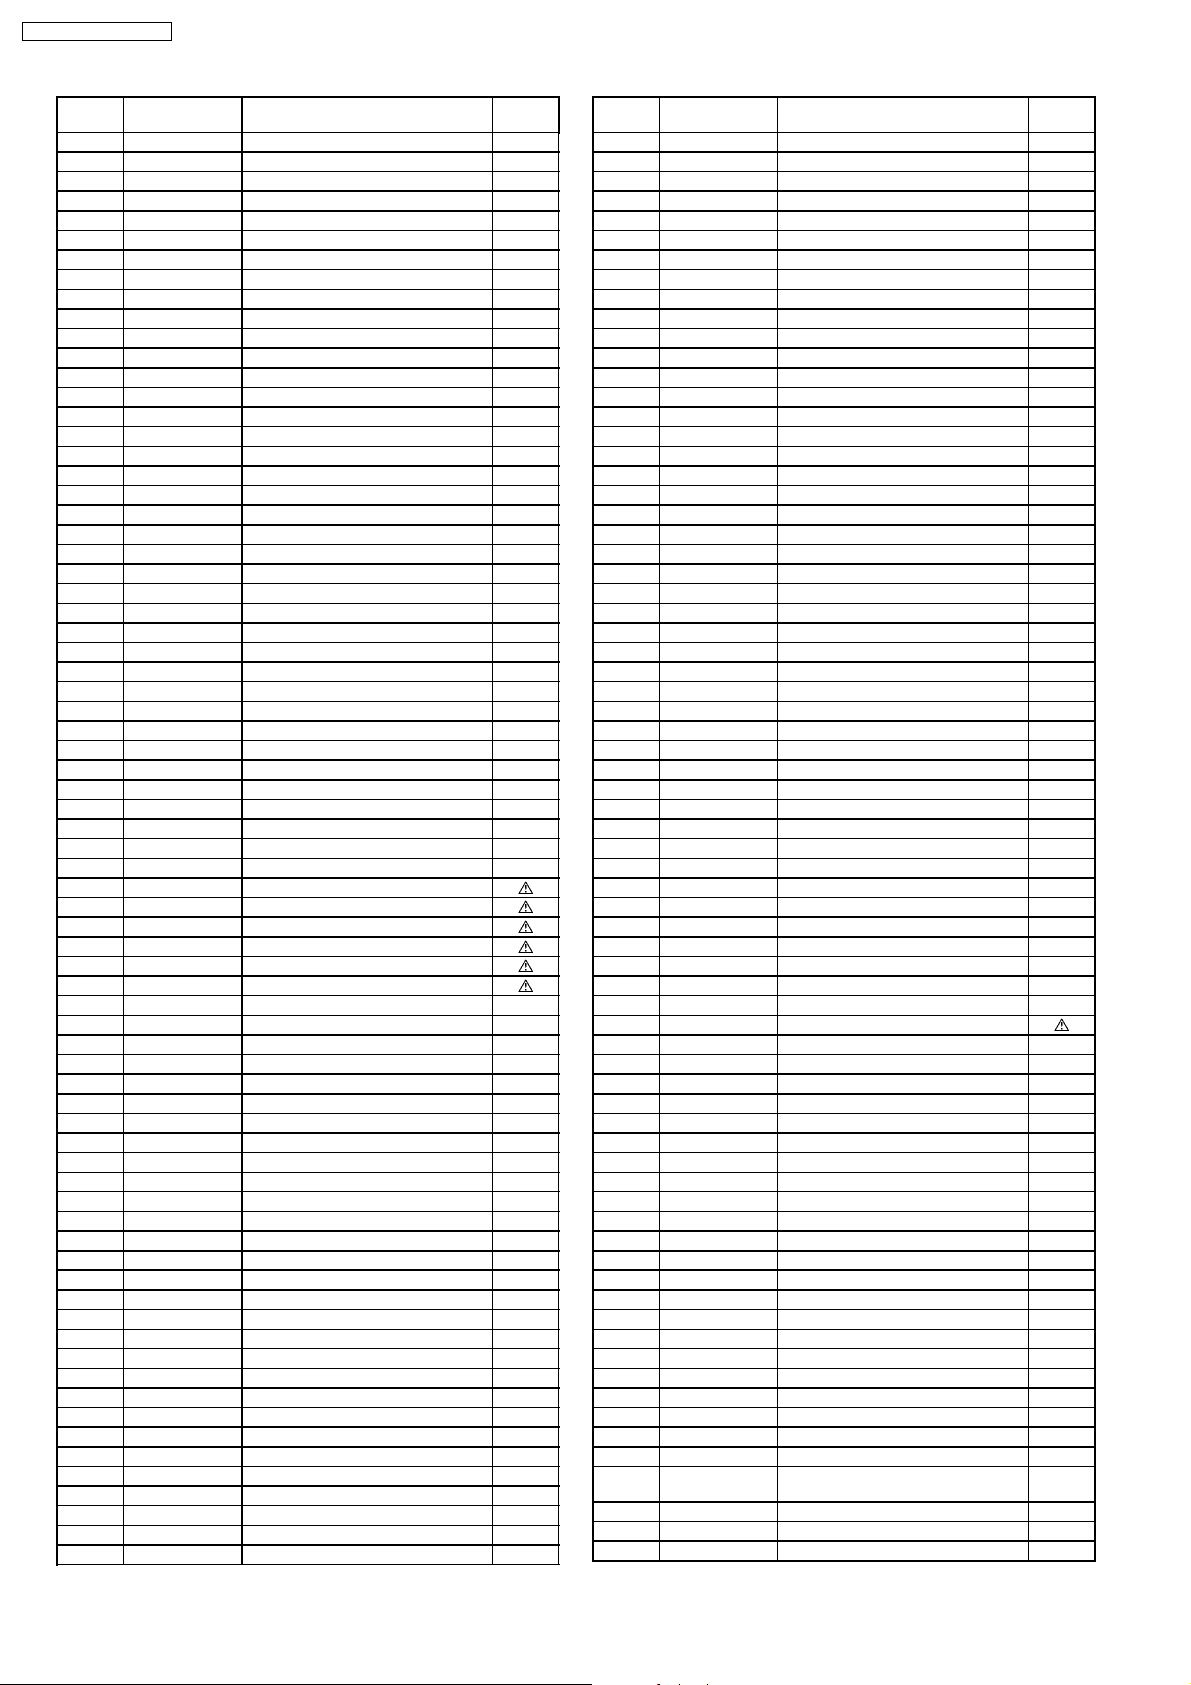
C566 ECQM4103RJZ P 0.01UF, J, 400V
C567 ECQM4393JZ P 0.039UF, J,400V
C568 ECWH16332JVB P 3300PF,J,1.6KV
C570 ECJ2VC1H330J C 33PF, 50V
C580 F2A1H220A162 E 22UF, 50V
C581 ECJ2VF1C105Z C 1UF, Z, 16V
C601 ECA1CM101B E 100UF, 16V
C602 F1J1H104A717 C 0.1UF, 50V
C603 ECJ2VB1H472K C 4700PF, K, 50V
C604 ECQV1H224JL P 0.22UF, J, 50V
C605 ECQV1H224JL P 0.22UF, J, 50V
C606 ECJ2VC1H222J C 2200PF, J, 50V
C607 F2A1H1R0A145 E 1UF, 50V
C608 F2A1H100A145 E 1UF, 50V
C609 F1J1H104A717 C 0.1UF, 50V
C610 ECJ2VB1H103J C 0.01UF, 50V
C612 ECJ2VB1H472K C 4700PF, K, 50V
C613 ECJ2VB1H472K C 4700PF, K, 50V
C614 ECQV1H104JL P 0.1UF, J, 50V
C615 ECQV1H224JL P 0.22UF, J, 50V
C619 ECQV1H104JL P 0.1UF, J, 50V
C620 ECJ2VC1H330J C 33PF, 50V
C621 ECJ2VF1C105Z C 1UF, Z, 16V
C622 ECJ2VF1H104Z C 0.1UF, Z, 50V
C623 ECJ2VC1H330J C 33PF, 50V
C625 ECA0JM221B E 220UF, 6.3V
C628 ECJ2YB1H473K C 0.047UF, K, 50V
C633 ECJ2VF1C105Z C 1UF, Z, 16V
C634 ECJ2VF1C105Z C 1UF, Z, 16V
C636 ECA1CM101B E 100UF, 16V
C640 ECA1CM100B E 10UF, 16V
C641 ECJ2VC1H100C C 10PF, C, 50V
C670 ECA1CM100B E 10UF, 16V
C680 ECJ2YB1H473K C 0.047UF, K, 50V
C685 ECJ2VC1H101K C 100PF, 50V
C686 ECJ2YB1H473K C 0.047UF, K, 50V
C687 ECJ2VF1H104Z C 0.1UF, Z, 50V
C689 ECJ2VF1H104Z C 0.1UF, Z, 50V
C801 ECQU2A224BN9 P 0.22UF, 250V
C802 ECQU2A224BN9 P 0.22UF, 250V
C806 ECKWAE472ZED C 4700PF, Z,500V
C807 ECKWAE472ZED C 4700PF, Z,500V
C808 ECKWAE472ZED C 4700PF, Z,500V
C809 ECKWAE472ZED C 4700PF, Z,500V
C810 EETHC2G271J E 180UF, 400V
C811 ECQM4473JZ P 0.047UF, J,400V
C816 F2A1H3300037 E 680PF, 50V
C817 ECKW3D471KBR C 470PF, K, 2KV
C819 F2A1H1R0A162 E 0.1PF, 50V
C821 ECKW3D471KBR C 470PF, K, 2KV
C822 ECKW3D331JBR C 330PF, J, 2KV
C825 ECQB1H471JF P 470PF, J, 50V
C826 F0A1H103A039 CAPACITOR
C827 ECQB1H683JF P 0.068UF, J, 50V
C830 ECQB1H102JF P 1000PF, 50V
C840 F1A2E471A002 C 470PF, 250V
C841 ECKCNA102MB7 C 1000PF, M,
C842 F1A2E102A001 C 1000PF
C844 ECKCNA222ME7 C 2200PF, M,
C846 F1A2E101A002 C 100PF
C850 ECJ2VF1H224Z C 0.22UF, Z, 50V
C853 F1B2H561A025 C 560PF, 500V
C854 ECKW3D102KBP C 1000PF, K, 2KV
C855 F1B2H331A025 C 330PF, 500V
C856 ECA1CM100B E 10UF, 16V
C862 F2A1C332A232 E 3300UF, 16V
C863 F2A2C2210013 E 220UF, 160V
C864 F2A1C102A252 E 1000UF, 16V
C875 ECA1CM101B E 100UF, 16V
C876 ECA1CM101B E 100UF, 16V
C877 ECA1AM471B E 470UF, 10V
C879 ECQV1H104JL P 0.1UF, J, 50V
C880 ECA1CM102B E 1000UF, 16V
Part No. Part Name & Description Remarks
Ref.
No.
C881 ECA1CM101B E 100UF, 16V
C882 ECJ2VF1H104Z C 0.1UF, Z, 50V
C883 ECJ2VF1H104Z C 0.1UF, Z, 50V
C971 ECJ2VF1H103Z C 0.01UF, Z, 50V
D002 MTZJ18B ZENER DIODE
D003 MTZJ16A ZENER DIODE
D011 B0ACQJ000001 DIODE
D108 B0ACQJ000001 DIODE
D1105 MTZJ7.5C ZENER DIODE
D1120 B0ACQJ000001 DIODE
D1130 MTZJ5.6C ZENER DIODE
D1131 MTZJ5.6C ZENER DIODE
D1132 MTZJ5.6A ZENER DIODE
D1140 MTZJ5.6B ZENER DIODE
D1151 B3AGA0000089 DIODE
D120 MA858 DIODE
D2380 B0ACQJ000001 DIODE
D2381 B0ACQJ000001 DIODE
D2382 B0ACQJ000001 DIODE
D354 B0ACQJ000001 DIODE
D355 B0ACQJ000001 DIODE
D356 B0ACQJ000001 DIODE
D360 B0HAMP000067 DIODE
D361 B0HAMP000067 DIODE
D362 B0HAMP000067 DIODE
D363 B0ACQJ000001 DIODE
D365 MTZJ10C ZENER DIODE
D375 B0ACQJ000001 DIODE
D402 B0HAHM000008 DIODE
D403 B0ACMJ000001 DIODE
D404 B0ACMJ000001 DIODE
D511 MA4108J DIODE
D512 MA171 DIODE
D513 B0HAJP000015 DIODE
D515 B0HAJP000015 DIODE
D520 B0ACQJ000001 DIODE
D551 MA3047HTX DIODE
D552 B0HAJP000015 DIODE
D555 B0ACQJ000001 DIODE
D556 ERB06-15 DIODE
D557 B0HAMQ000001 DIODE
D558 B0AADM000003 DIODE
D583 B0ACQJ000002 DIODE
D584 MTZJ5.6B ZENER DIODE
D801 ERZV10V621CS VARISTOR
D803 B0EBNT000007 DIODE
D810 B0EAKT000018 DIODE
D817 B0HAJL000001 DIODE
D821 MAZ20750A0LS DIODE
D823 B0HAJL000001 DIODE
D824 B0HAJL000001 DIODE
D825 B0BA6R100003 DIODE
D830 B0HAJL000001 DIODE
D831 B0BA02400029 ZENER DIODE
D840 B0ACQJ000001 DIODE
D850 B0ACMJ000001 DIODE
D852 B0ACMJ000001 DIODE
D853 B0HAMM000108 DIODE
D854 FMGG2CSLF665 DIODE
D855 FMLG12S DIODE
D856 MTZJ7.5C ZENER DIODE
D862 MTZJ2.0B ZENER DIODE
D863 B0HAJL000001 DIODE
D865 MTZJ3.6A ZENER DIODE
D870 B0HAJL000001 DIODE
D871 B0HAJL000001 DIODE
D873 MTZJ8.2C ZENER DIODE
IC1103 TVR4GAS388 EEPROM IC
IC1201 C0CBABC00160 IC, POWER SUPPLY
IC2101 C1AB00002133 IC
Part No. Part Name & Description Remarks
DIODES
INTEDGRATED
CIRCUITS
26
Page 27
TX-21FG50A-AUSTRALIA
Ref.
No.
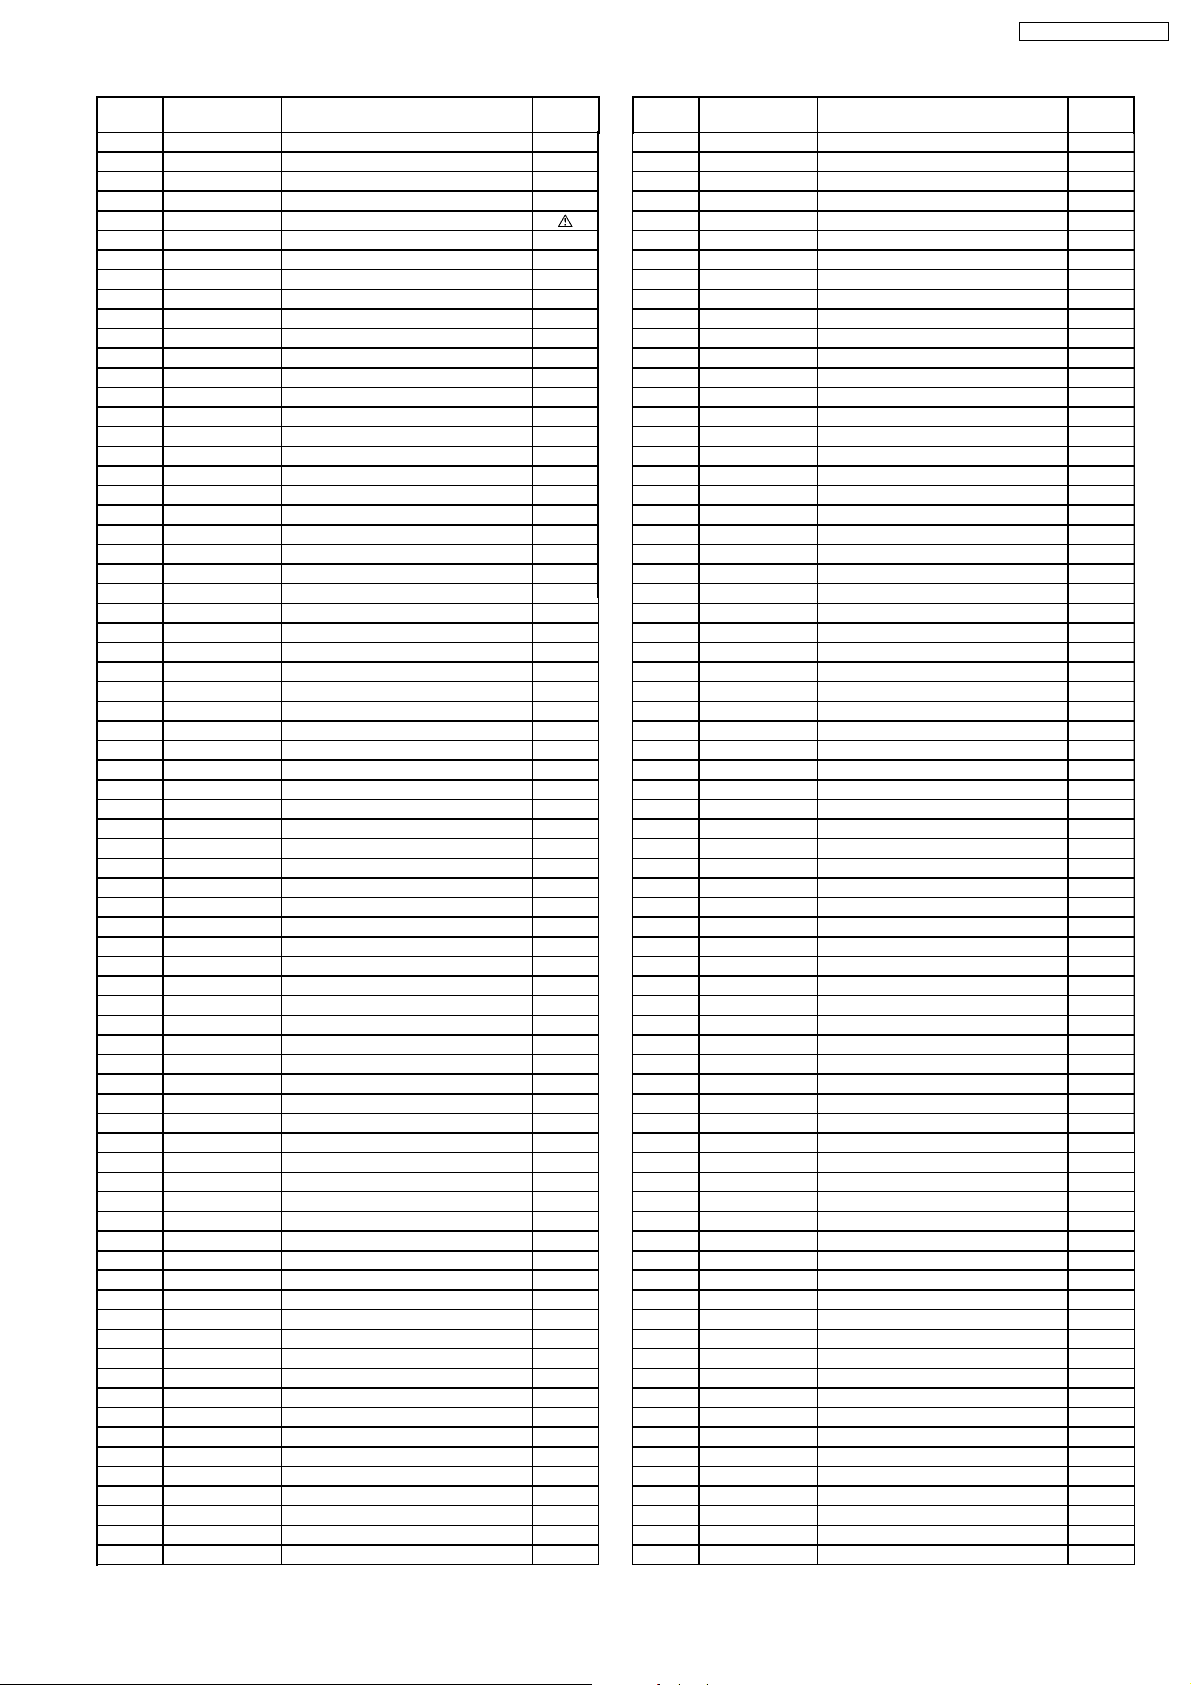
IC2301 AN17820B IC
IC351 TDA6107JF/N3 IC
IC451 AN15525A IC
IC601 TDA9594N96DC IC
IC801 C5HABZZ00116 IC, POWER SUPPLY
IC802 C0EAS0000026 IC
IC851 C0DAAHF00005 IC, POWER SUPPLY
IC880 AN77L05 LINEAR IC
L001 TALV35VB220K PEAKING COIL
L002 EXC3BB221H CHIP BEAD CORE
L1101 TALV35VB331K PEAKING COIL
L120 TLTACTR56K PEAKING COIL
L125 TALV35VB8R2K PEAKING COIL
L181 G0C100K00008 COIL
L182 TALV35VB6R8K PEAKING COIL
L183 TALV35VB5R6K PEAKING COIL
L184 TALV35VB6R8K PEAKING COIL
L2104 TLTACT330J PEAKING COIL
L2107 TALV35VB100J PEAKING COIL
L2132 G0C180KA0065 PEAKING COIL
L2133 EXCELDR35V CORE
L3136 J0JKA0000038 BEAD CORE
L3137 J0JKA0000038 BEAD CORE
L352 J0JKA0000022 BEAD CORE
L501 ELH5L4152 LINEARITY COIL
L511 J0JKA0000038 BEAD CORE
L550 J0JKB0000038 COIL
L620 TSK1045 BEAD CORE
L820 J0JKA0000025 BEAD CORE
L821 J0JKA0000038 BEAD CORE
L852 J0JKA0000023 BEAD CORE
L853 J0JKA0000025 BEAD CORE
L854 J0JKA0000023 BEAD CORE
L862 TLTACT1R5K PEAKING COIL
L871 TLTACT1R5K PEAKING COIL
L872 TLTACT1R5K PEAKING COIL
L873 J0JKA0000024 EMI FILTER
L875 J0JKA0000024 EMI FILTER
Q001 B1ABCE000015 TRANSISTOR
Q101 B1ABCE000015 TRANSISTOR
Q102 2SC2480TX TRANSISTOR
Q103 B1ABGC000001 TRANSISTOR
Q104 2SC2480TX TRANSISTOR
Q105 B1ABCE000015 TRANSISTOR
Q1052 B1ABCE000015 TRANSISTOR
Q1053 B1ABCE000015 TRANSISTOR
Q107 B1ABCE000015 TRANSISTOR
Q1110 B1ADDF000005 TRANSISTOR
Q1130 B1ABCE000015 TRANSISTOR
Q180 B1ADDF000005 TRANSISTOR
Q2110 B1ADDF000005 TRANSISTOR
Q2111 B1ADDF000005 TRANSISTOR
Q2151 B1ABCE000015 TRANSISTOR
Q2380 B1ABCE000015 TRANSISTOR
Q2381 B1ADDF000005 TRANSISTOR
Q3030 B1ABCE000015 TRANSISTOR
Q369 B1ADDF000005 TRANSISTOR
Q400 B1ABCE000015 TRANSISTOR
Q501 2SC4212H TRANSISTOR
Q520 2SB792ATX TRANSISTOR
Q551 2SC5902000LK TRANSISTOR
Q580 B1ABCE000015 TRANSISTOR
Q581 B1ADDF000005 TRANSISTOR
Q601 B1ADDF000005 TRANSISTOR
Q602 B1ABCE000015 TRANSISTOR
Q840 B1ABCE000015 TRANSISTOR
Q850 B1BCCM000002 TRANSISTOR
Q852 B1ABCE000015 TRANSISTOR
Q853 B1ADCE000012 TRANSISTOR
Q854 B1ABCE000015 TRANSISTOR
Q855 B1ADCE000012 TRANSISTOR
Part No. Part Name & Description Remarks
COILS
TRANSISTORS
Ref.
No.
Q857 B1BAAN000029 TRANSISTOR
Q870 B1ABCE000015 TRANSISTOR
Q871 B1ABCE000015 TRANSISTOR
R003 D0GD100JA017 F 10OHM,J, 1/10W
R004 ERG3FJ183H M 18KOHM,J, 3W
R006 D0GD273JA017 F 27OHM,J, 1/10W
R007 D0GD302JA017 F 3KOHM,J, 1/10W
R008 D0GD681JA017 F 680OHM,J, 1/10W
R011 D0GD103JA017 F 10KOHM,J, 1/10W
R012 D0GD332JA017 F 3.3KOHM,J, 1/10W
R021 D0GD273JA017 F 27KOHM,J, 1/10W
R022 D0GD473JA017 F 47KOHM,J, 1/10W
R1016 ERJ6ENF1651 M1.65KOHM, 1/10W
R1017 ERJ6ENF2151 M2.15KOHM, 1/10W
R1018 ERJ6ENF3091 M3.09KOHM, 1/10W
R1019 ERJ6ENF4421 M4.42KOHM, 1/10W
R1020 ERJ6ENF7501 M 7.5KOHM, 1/10W
R1021 ERJ6ENF1871 M1.87KOHM, 1/10W
R1057 D0GD271JA017 F 270OHM,J, 1/10W
R1058 D0GD333JA017 F 33KOHM,J, 1/10W
R1059 D0GD222JA017 F 2.2KOHM,J, 1/10W
R106 D0GD682JA017 F 68KOHM,J, 1/10W
R1060 D0GD683JA017 F 68KOHM,J, 1/10W
R108 D0GD222JA017 F 2.2KOHM,J, 1/10W
R109 D0GD222JA017 F 2.2KOHM,J, 1/10W
R1104 D0GD562JA017 F 5.6KOHM,J, 1/10W
R1105 D0GD562JA017 F 5.6KOHM,J, 1/10W
R1106 D0GD102JA017 F 1KOHM,J, 1/10W
R1108 D0GD101JA017 F 100OHM,J, 1/10W
R1109 D0GD101JA017 F 100OHM,J, 1/10W
R111 D0GD562JA017 F 5.6KOHM,J, 1/10W
R1110 D0GD103JA017 F 10KOHM,J, 1/10W
R1111 D0GD103JA017 F 10KOHM,J, 1/10W
R1112 D0GD332JA017 F 3.3KOHM,J, 1/10W
R1115 D0GD103JA017 F 10KOHM,J, 1/10W
R1116 D0GD332JA017 F 3.3KOHM,J, 1/10W
R112 D0GD562JA017 F 5.6KOHM,J, 1/10W
R1120 D0GD102JA017 F 1KOHM,J, 1/10W
R1122 D0GD332JA017 F 3.3KOHM,J, 1/10W
R1123 D0GD681JA017 F 820OHM,J, 1/10W
R1124 ERJ6GEY0R00 M 0OHM,J,1/10W
R1125 D0GD103JA017 F 10KOHM,J, 1/10W
R1130 D0GD101JA017 F 100OHM,J, 1/10W
R1131 D0GD101JA017 F 100OHM,J, 1/10W
R1132 D0GD101JA017 F 100OHM,J, 1/10W
R1133 D0GD562JA017 F 56KOHM,J, 1/10W
R1134 D0GD103JA017 F 10KOHM,J, 1/10W
R1135 D0GD333JA017 F 33KOHM,J, 1/10W
R1136 D0GD332JA017 F 3.3KOHM,J, 1/10W
R1140 ERJ6ENF1002 M 10KOHM, 1/10W
R1141 D0GD562JA017 F 56KOHM,J, 1/10W
R1142 D0GD100JA017 F 10OHM,J, 1/10W
R116 D0GD222JA017 F 2.2KOHM,J, 1/10W
R117 D0GD682JA017 F 6.8KOHM,J, 1/10W
R118 D0GD103JA017 F 10KOHM,J, 1/10W
R119 D0GD103JA017 F 10KOHM,J, 1/10W
R120 D0GD680JA017 F 68OHM,J, 1/10W
R121 D0GD122JA017 F 1.2KOHM,J, 1/10W
R122 D0GD470JA017 F 47OHM,J, 1/10W
R123 D0GD472JA017 F 4.7KOHM,J, 1/10W
R124 D0GD122JA017 F 1.2KOHM,J, 1/10W
R126 D0GD222JA017 F 2.2KOHM,J, 1/10W
R130 D0GD391JA017 F 390OHM,J, 1/10W
R131 D0GD471JA017 F 470OHM,J, 1/10W
R132 D0GD121JA017 F 120OHM,J, 1/10W
R133 D0GD470JA017 F 47OHM,J, 1/10W
R134 D0GD103JA017 F 10KOHM,J, 1/10W
R135 D0GD332JA017 F 3.3KOHM,J, 1/10W
R136 D0GD103JA017 F 10KOHM,J, 1/10W
R137 D0GD683JA017 F 68KOHM,J, 1/10W
R138 D0GD102JA017 F 1KOHM,J, 1/10W
R139 D0GD333JA017 F 33KOHM,J, 1/10W
Part No. Part Name & Description Remarks
RESISTORS
27
Page 28
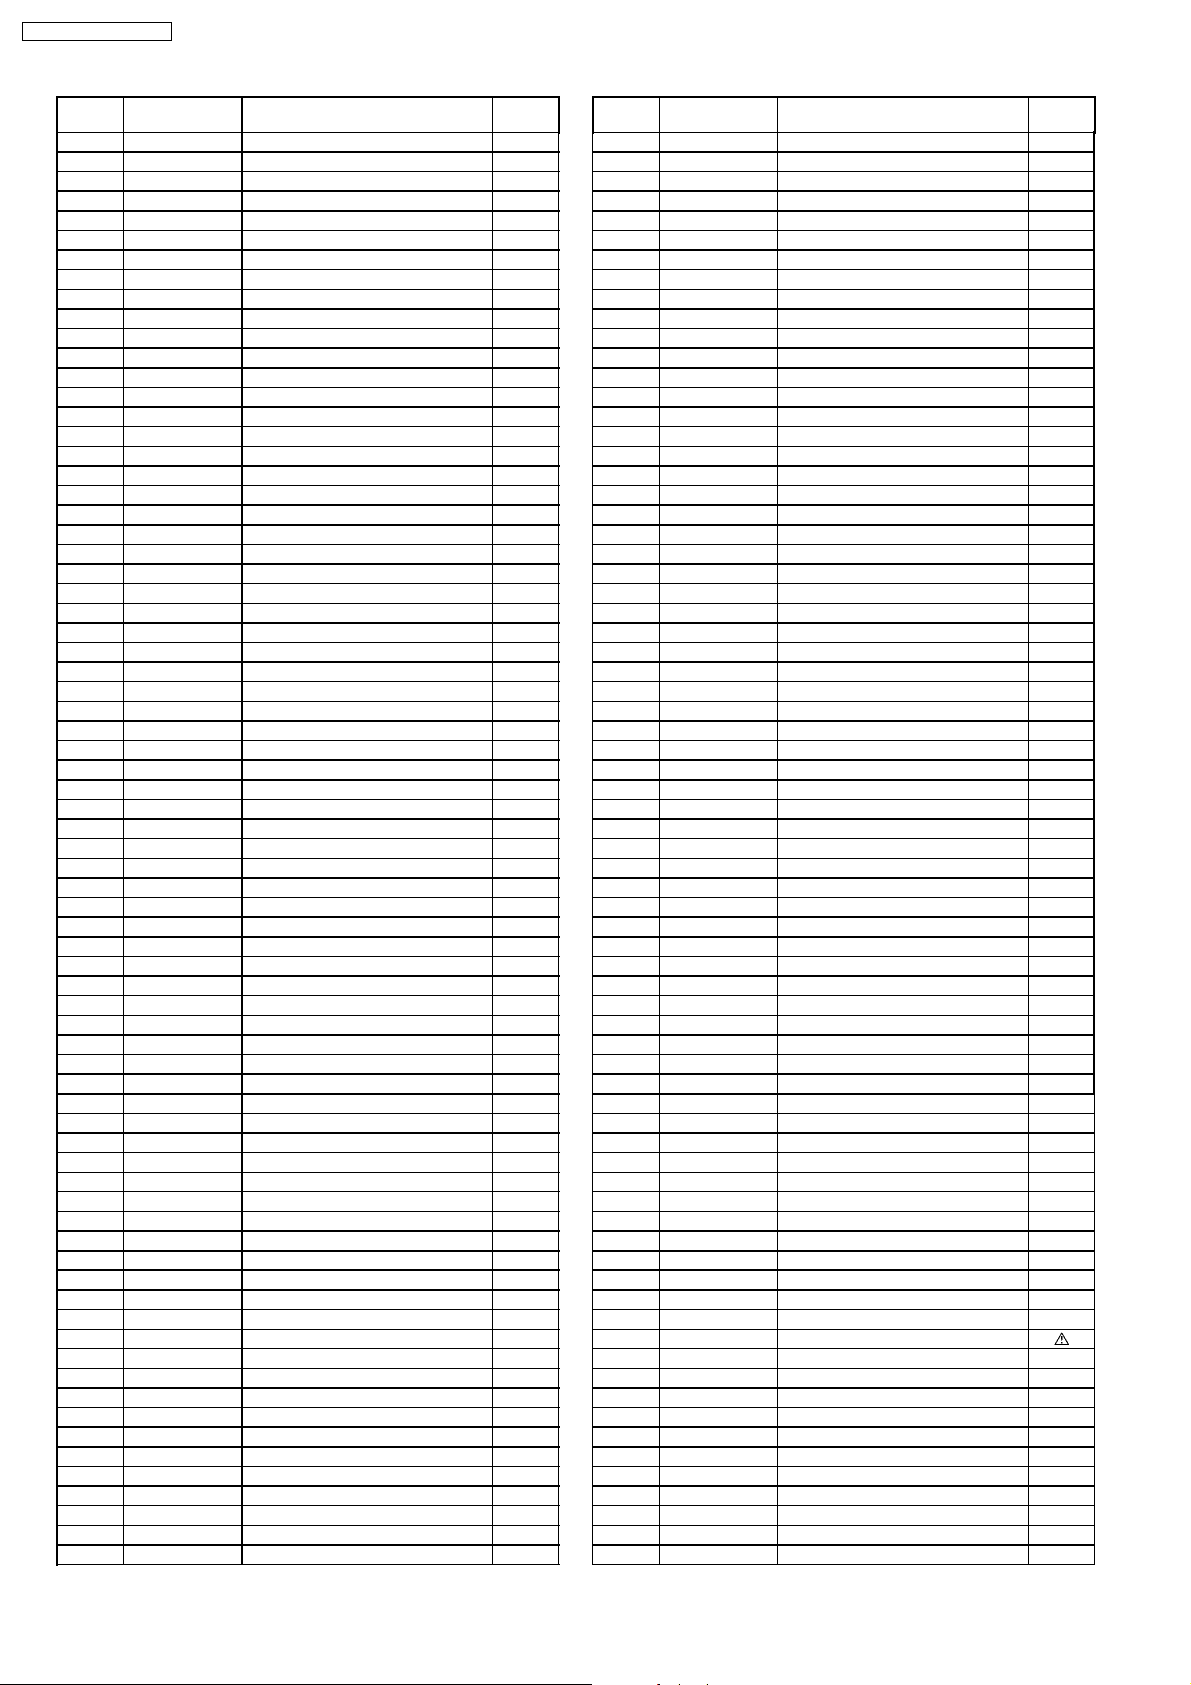
TX-21FG50A-AUSTRALIA
Ref.
No.
R145 D0GD473JA017 F 47KOHM,J, 1/10W
R150 D0GD222JA017 F 2.2KOHM,J, 1/10W
R151 D0GD333JA017 F 33KOHM,J, 1/10W
R182 D0GD221JA017 F 220OHM,J, 1/10W
R185 D0GD103JA017 F 10KOHM,J, 1/10W
R190 D0GD391JA017 F 390OHM,J, 1/10W
R2101 D0GD101JA017 F 100OHM,J, 1/10W
R2102 D0GD101JA017 F 100OHM,J, 1/10W
R2106 D0GD101JA017 F 100OHM,J, 1/10W
R2107 D0GD101JA017 F 100OHM,J, 1/10W
R2109 D0GD101JA017 F 100OHM,J, 1/10W
R2112 D0GD222JA017 F 2.2KOHM,J, 1/10W
R2113 D0GD222JA017 F 2.2KOHM,J, 1/10W
R2120 D0GD184JA017 F 180KOHM,J, 1/10W
R2130 D0GD471JA017 F 470OHM,J, 1/10W
R2131 D0GD101JA017 F 100OHM,J, 1/10W
R2133 ECJ2VC1H070D F 56KOHM,J, 1/10W
R2151 D0GD563JA017 F 27KOHM,J, 1/10W
R2152 D0GD273JA017 F 220OHM,J, 1/10W
R2153 D0GD221JA017 F 620OHM,J, 1/10W
R2154 D0GD621JA017 F 470OHM,J, 1/10W
R2155 D0GD471JA017 F 15KOHM,J, 1/10W
R2302 D0GD153JA017 F 4.7KOHM,J, 1/10W
R2303 D0GD472JA017 F 150OHM,J, 1/10W
R2380 D0GD151JA017 F 1KOHM,J, 1/10W
R2381 D0GD102JA017 F 1KOHM,J, 1/10W
R2382 D0GD102JA017 F 10KOHM,J, 1/10W
R2383 D0GD103JA017 F 10OHM,J, 1/10W
R2384 D0GD100JA017 F 180KOHM,J, 1/10W
R3010 D0GD184JA017 F 180KOHM,J, 1/10W
R3012 D0GD184JA017 F 180KOHM,J, 1/10W
R3013 D0GD184JA017 F 180KOHM,J, 1/10W
R3014 D0GD184JA017 F 100OHM,J, 1/10W
R3015 D0GD101JA017 F 75KOHM,J, 1/10W
R3018 D0GD750JA017 F 100OHM,J, 1/10W
R3022 D0GD101JA017 F 100OHM,J, 1/10W
R3032 D0GD101JA017 F 100OHM,J, 1/10W
R3033 D0GD101JA017 F 180OHM,J, 1/10W
R3034 D0GD181JA017 F 180OHM,J, 1/10W
R3035 D0GD560JA017 F 56OHM,J, 1/10W
R3036 D0GD330JA017 F 33OHM,J, 1/10W
R3038 D0GD101JA017 F 100OHM,J, 1/10W
R3039 D0GD101JA017 F 100OHM,J, 1/10W
R3048 D0GD184JA017 F 180KOHM,J, 1/10W
R3132 D0GD331JA017 F 330OHM,J, 1/10W
R3133 D0GD331JA017 F 330OHM,J, 1/10W
R3141 D0GD184JA017 F 180KOHM,J, 1/10W
R3142 D0GD184JA017 F 180KOHM,J, 1/10W
R3144 D0GD101JA017 F 100OHM,J, 1/10W
R3145 D0GD101JA017 F 100OHM,J, 1/10W
R3259 D0GD750JA017 F 75KOHM,J, 1/10W
R3279 D0GD750JA017 F 75KOHM,J, 1/10W
R3289 D0GD750JA017 F 75KOHM,J, 1/10W
R351 ERJ6ENF1001 M 1KOHM, 1/10W
R352 ERJ6ENF1001 M 1KOHM, 1/10W
R353 ERJ6ENF1001 M 1KOHM, 1/10W
R357 D0GD103JA017 F 10KOHM,J, 1/10W
R358 D0GD333JA017 F 33KOHM,J, 1/10W
R359 D0GD273JA017 F 27KOHM,J, 1/10W
R363 ERC12GK222 S 2.2KOHM,K, 1/2W
R364 ERC12GK222 S 2.2KOHM,K, 1/2W
R365 ERC12GK222 S 2.2KOHM,K, 1/2W
R369 D0GD103JA017 F 10KOHM,J, 1/10W
R374 ERQ12AJ181P F 180OHM,J, 1/2W
R401 ERDS2TJ104 C 100KOHM,J, 1/4W
R402 D0GD470JA017 F 47OHM,J, 1/10W
R403 ER0S2CHF2491 M 2.49KOHM, 1/10W
R404 D0AE751JA046 C 750OHM,J, 1/4W
R405 ER0S2CHF2701 M 2.7KOHM, 1/10W
R406 ERDS1FJ1R0 C 1OHM,J, 1/2W
R407 ERG2FJ331H M 330OHM,J, 2W
R409 D0GD512JA017 F 5.1KOHM,J, 1/10W
R410 D0GD202JA017 F 2KOHM,J, 1/10W
Part No. Part Name & Description Remarks
Ref.
No.
R414 D0GD432JA017 F 4.3KOHM,J, 1/10W
R415 ER0S2CHF7500 M 750OHM,J, 1/4W
R416 ERDS1TJ1R2 C 1.2OHM,J, 1/2W
R417 ERDS1TJ1R2 C 1.2OHM,J, 1/2W
R502 D0GD182JA017 F 1.8KOHM,J, 1/10W
R503 ERJ6GEY0R00 M 0OHM,J,1/10W
R504 ERG2SJ682E M 6.8KOHM,J, 2W
R507 D0GD101JA017 F 100OHM,J, 1/10W
R508 ERG3FJ152H M 1.5KOHM,J, 3W
R509 ERG3FJ182H M 1.8KOHM,J, 3W
R511 ERJ6ENF1002 M 10KOHM, 1/10W
R512 ERJ6ENF1152 M11.5KOHM, 1/10W
R513 ERQ14AJ100E F 10OHM,J, 1/4W
R519 ERQ12AJ100E F 10OHM,J, 1/4W
R520 ERQ12AJ100E F 10OHM,J, 1/2W
R521 ERQ12AJ100E F 10OHM,J, 1/2W
R522 D0GD273JA017 F 10OHM,J, 1/2W
R523 D0GD103JA017 F 27KOHM,J, 1/10W
R524 D0GD104JA017 F 10KOHM,J, 1/10W
R525 D0GD392JA017 F 100KOHM,J, 1/10W
R553 D0GD223JA017 F 3.9KOHM,J, 1/10W
R554 ERJ6GEYJ103 M 10KOHM,J,1/10W
R555 ERQ14AJ2R0P F 2.0OHM, J,1/4W
R557 ER050CKF9532 M95.3KOHM,F, 1/2W
R558 ERDS2TJ513 C 51KOHM,J, 1/4W
R559 ERQ1CJP2R7S FUSE RESISTOR
R560 ERG1SJ102E M 1KOHM,J, 1W
R563 ERJ6GEY0R00 M 0OHM,J,1/10W
R564 ERDS2TJ393 C 39KOHM,J, 1/4W
R580 D0GD392JA017 F 2.7OHM, J,1W
R581 ERJ6GEYJ332 M 3.3KOHM,J,1/10W
R583 D0GD274JA017 F 270KOHM,J, 1/10W
R584 D0GD563JA017 F 56KOHM,J, 1/10W
R586 D0GD103JA017 F 10KOHM,J, 1/10W
R587 D0GD823JA017 F 82KOHM,J, 1/10W
R588 D0GD104JA017 F 100KOHM,J, 1/10W
R591 D0GD103JA017 F 10KOHM,J, 1/10W
R592 D0GD222JA017 F 2.2KOHM,J, 1/10W
R593 D0GD103JA017 F 10KOHM,J, 1/10W
R594 D0GD104JA017 F 100KOHM,J, 1/10W
R596 ERJ6GEYJ333 M 33KOHM,J,1/10W
R601 D0GD153JA017 F 15KOHM,J, 1/10W
R603 D0GD393JA017 F 39KOHM,J, 1/10W
R604 ERJ6GEYJ821 M 820OHM,J,1/10W
R605 ERJ6GEYJ821 M 820OHM,J,1/10W
R606 ERJ6GEYJ821 M 820OHM,J,1/10W
R607 D0GD101JA017 M 100OHM,J,1/10W
R612 D0GD102JA017 F 1KOHM,J, 1/10W
R615 D0GD102JA017 F 1KOHM,J, 1/10W
R617 D0GD391JA017 F 390OHM,J, 1/10W
R619 D0GD121JA017 F 120OHM,J, 1/10W
R620 D0GD121JA017 F 120OHM,J, 1/10W
R623 D0GD331JA017 F 330OHM,J, 1/10W
R633 D0GD470JA017 F 47OHM,J, 1/10W
R640 D0GD822JA017 F 8.2KOHM,J, 1/10W
R671 D0GD102JA017 F 1KOHM,J, 1/10W
R672 D0GD181JA017 F 180OHM,J, 1/10W
R685 D0GD750JA017 F 75OHM,J, 1/10W
R686 D0GD470JA017 F 47OHM,J, 1/10W
R687 D0GD472JA017 F 4.7KOHM,J, 1/10W
R688 D0GD103JA017 F 10KOHM,J, 1/10W
R801 D0D72R2KA002 W 2.2OHM, 7W
R810 ERG2FJ470 M 47OHM,J, 2W
R811 ERG2FJ104H M 100KOHM, J , 2W
R817 ERDS1TJ100 C 10OHM,J, 1/2W
R818 ERG2FJ473H M 47KOHM, J , 2W
R820 ERX12SJR33E M 0.33OHM,J, 1/2W
R821 ERX12SJR27E M 0.27OHM,J, 1/2W
R824 ERDS2TJ152 C 1.5KOHM,J, 1/4W
R825 ERDS2TJ102 C 1KOHM,J, 1/4W
R830 ERDS2TJ101 C 100OHM,J, 1/4W
R831 ER0S2CKF1102 M 11KOHM,F, 1/4W
R832 ERDS2TJ473 C 47KOHM,J, 1/4W
Part No. Part Name & Description Remarks
28
Page 29
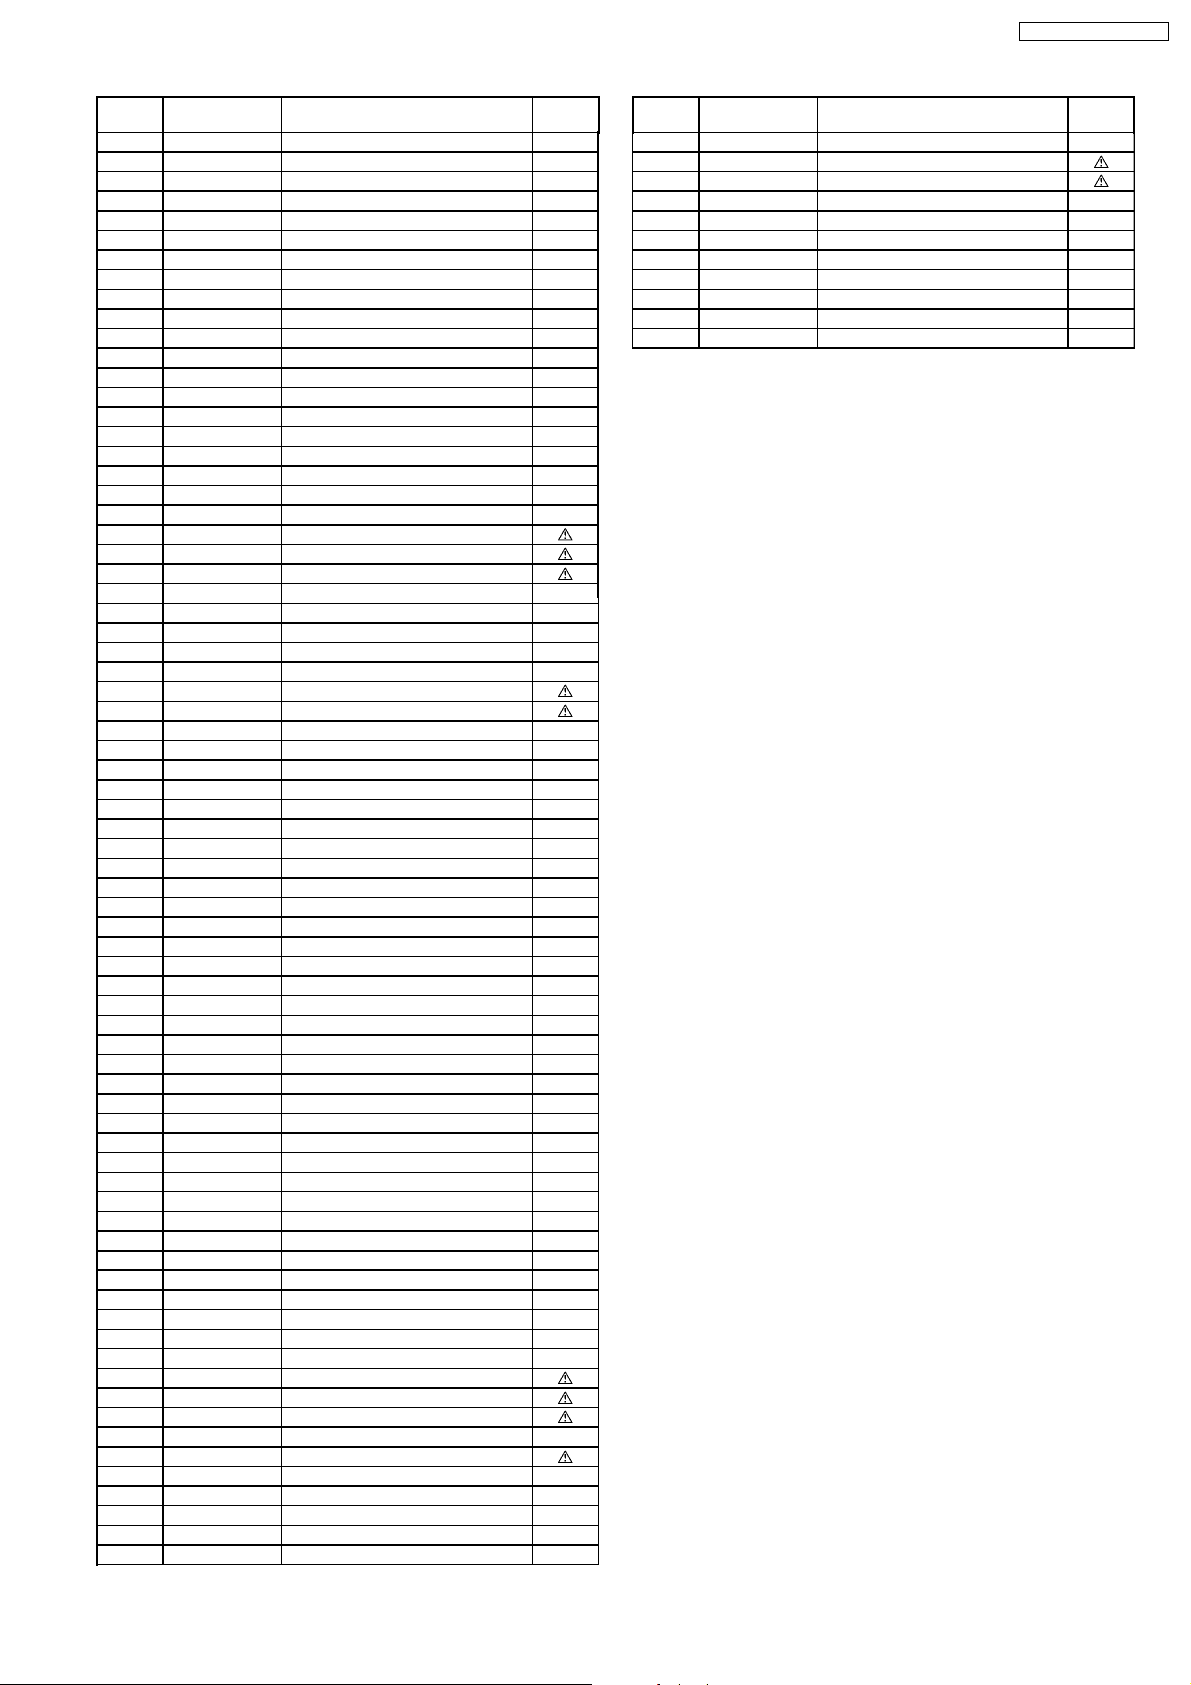
TX-21FG50A-AUSTRALIA
Ref.
No.
R840 ERD75TAJ825 C 8.2MOHM,J, 3/4W
R841 D0GD472JA017 F 4.7KOHM,J, 1/10W
R842 D0GD472JA017 F 4.7KOHM,J, 1/10W
R850 ERG3SJS470H M 47OHM, J , 3W
R852 ERDS2TJ272 C 2.7KOHM,J, 1/4W
R854 ERJ6GEYJ103 M 10KOHM,J,1/10W
R855 ERDS2TJ752 C 7.5KOHM,J, 1/4W
R857 ERDS2TJ683 C 68KOHM,J, 1/4W
R858 ERDS2TJ153 C 15KOHM,J, 1/4W
R861 ERDS1TJ221 C 220OHM,J, 1/2W
R864 D0GD103JA017 F 10KOHM,J, 1/10W
R866 D0GD472JA017 F 4.7KOHM,J, 1/10W
R867 ERDS2TJ272 C 2.7KOHM,J, 1/4W
R868 ERDS1TJ471 C 470OHM,J, 1/2W
R870 ERJ6GEYJ222 M 2.2KOHM,J,1/10W
R871 ERDS1TJ103 C 10KOHM,J, 1/2W
R872 D0GD272JA017 F 2.7KOHM,J, 1/10W
R873 D0GD472JA017 F 4.7KOHM,J, 1/10W
R875 D0GD103JA017 F 10KOHM,J, 1/10W
T501 ZTFP12501A FLYBACK TRANS
T553 ETH19Y210AZ H DRIVE TRANS
T801 ETS35AH1A6AC SWITCHING TRANS
A12 K1KA04AA0093 CONNECTOR
A22 K1KA04AA0190 CONNECTOR
A5 K1KA13A00138 CONNECTOR
A8 K1KA13A00138 CONNECTOR
CF804 TAP4GA0005 POSISTOR
F801 K5D402BK0004 FUSE
JA1 ERJ6GEY0R00 M 0OHM,J,1/10W
JA10 ERJ6GEY0R00 M 0OHM,J,1/10W
JA12 ERJ6GEY0R00 M 0OHM,J,1/10W
JA3 ERJ6GEY0R00 M 0OHM,J,1/10W
JA4 ERJ6GEY0R00 M 0OHM,J,1/10W
JA5 ERJ6GEY0R00 M 0OHM,J,1/10W
JA7 ERJ6GEY0R00 M 0OHM,J,1/10W
JA8 ERJ6GEY0R00 M 0OHM,J,1/10W
JA9 ERJ6GEY0R00 M 0OHM,J,1/10W
JK3002 K4BK09B00011 AV TERMINAL
JK3003 K4BK07B00010 AV TERMINAL
JK3102 K4BC14B00004 FRONT AV TERMINAL
JS110 ERJ6GEY0R00 M 0OHM,J,1/10W
JS1103 ERJ6GEY0R00 M 0OHM,J,1/10W
JS111 ERJ6GEY0R00 M 0OHM,J,1/10W
JS112 ERJ6GEY0R00 M 0OHM,J,1/10W
JS2140 ERJ6GEY0R00 M 0OHM,J,1/10W
JS2141 ERJ6GEY0R00 M 0OHM,J,1/10W
JS3001 ERJ6GEY0R00 M 0OHM,J,1/10W
JS3129 ERJ6GEY0R00 M 0OHM,J,1/10W
JS3132 ERJ6GEY0R00 M 0OHM,J,1/10W
JS3133 ERJ6GEY0R00 M 0OHM,J,1/10W
JS3140 ERJ6GEY0R00 M 0OHM,J,1/10W
JS3261 ERJ6GEY0R00 M 0OHM,J,1/10W
JS3296 ERJ6GEY0R00 M 0OHM,J,1/10W
JS3297 ERJ6GEY0R00 M 0OHM,J,1/10W
JS415 ERJ6GEY0R00 M 0OHM,J,1/10W
JS416 ERJ6GEY0R00 M 0OHM,J,1/10W
JS882 ERJ6GEY0R00 M 0OHM,J,1/10W
JS883 ERJ6GEY0R00 M 0OHM,J,1/10W
L5 K1KA13A00138 CONNECTOR
L8 K1KA13A00138 CONNECTOR
L10 K1ZZ00001301 CONNECTOR
LF801 ELF21V012S LINE FILTER
PC860 B3PAA0000261 PHOTO COUPLER
RL801 K6B1CDA00029 RELAY
RM1104 B3RAC0000014 REMOCON RECEIVER
SC351 K3B095A00001 CRT SOCKET
SW1001 EVQ11G05R SWITCH
SW1002 EVQ11G05R SWITCH
SW1003 EVQ11G05R SWITCH
SW1004 EVQ11G05R SWITCH
SW1005 EVQ11G05R SWITCH
Part No. Part Name & Description Remarks
TRANSFORMERS
OTHERS
Ref.
No.
SW1006 EVQ11G05R SWITCH
SW801 ESB92DA1B SWITCH
TU001 ENV59K01G3RF TUNER
X180 EFCS5M7MW3 CERAMIC FILTER
X181 EFCS6R0MW5 CERAMIC FILTER
X182 EFCS6R5MW5 CERAMIC FILTER
X183 EFCS4R5MW5 CERAMIC FILTER
X2130 TSSA128 CRYSTAL OSC
X601 H0D120500020 CRYSTAL OSC
XF101 K7256M SAW FILTER
XF102 K9655D SAW FILTER
Part No. Part Name & Description Remarks
29
 Loading...