

Page 1
Operating Instructions
LCD Television
Manual de instrucciones
Televisor LCD
Model No. TC-26LX60
Número de modelo TC-26LE60
TC-32LX60
TC-32LE60
English
Español
For assistance, please call : 1-800-211-PANA (7262)
For assistance, please call : 787-750-4300
For assistance, please call : 1-800-561-5505
Para solicitar ayuda, llame al: 1-800-211-PANA (7262)
Para solicitar ayuda, llame al: 787-750-4300
[Resumen]
R
or contact us at www.panasonic.com/contactinfo
or visit us at www.panasonic.com
or visit us at www.panasonic.ca
o visítenos en www.panasonic.com/contactinfo
o visítenos en www.panasonic.com
Please read these instructions before operating your set and retain them for future reference.
Lea estas instrucciones antes de utilizar su televisor y guárdelas para consultarlas en el futuro.
Las imágenes mostradas en este manual tienen solamente fines ilustrativos.
The images shown in this manual are for illustrative purposes only.
(U.S.A.)
(Puerto Rico)
(Canada)
(EE.UU.)
(Puerto Rico)
TQB2AA0661
Page 2
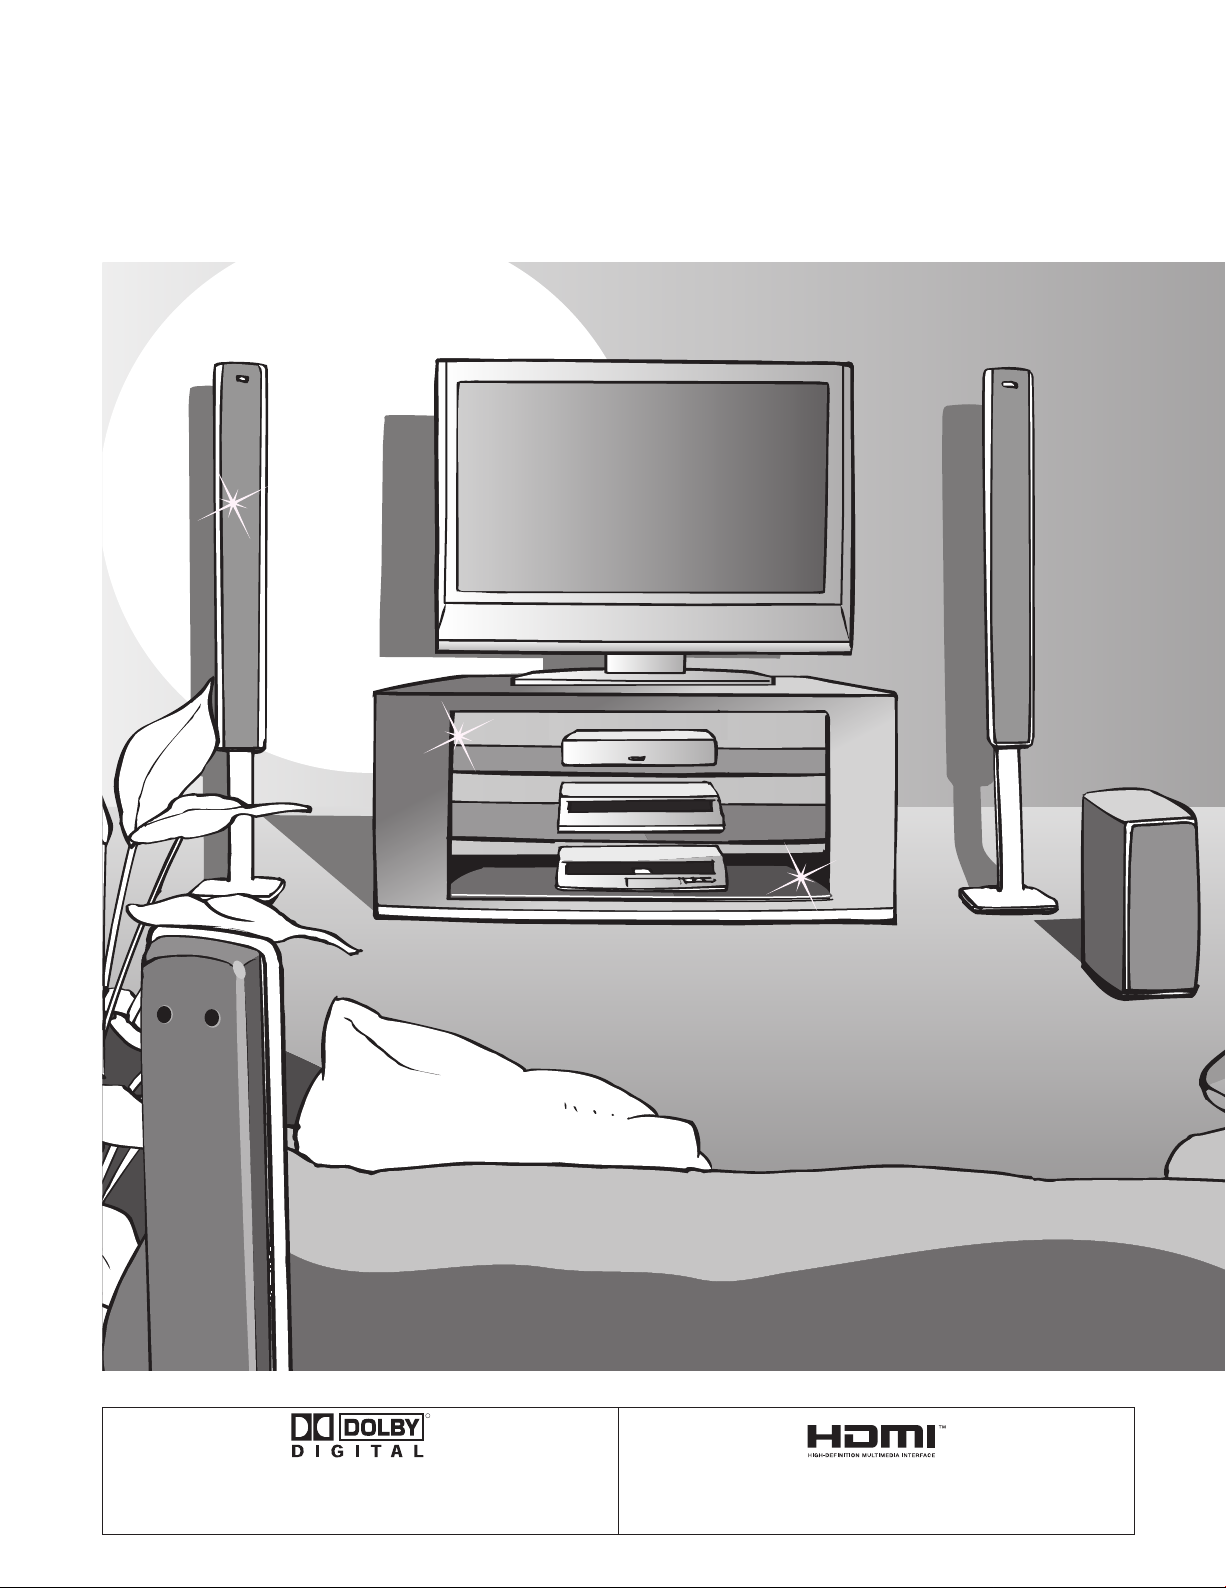
Turn your own living room into a movie theater!
Experience an amazing level of multi-media
excitement
2
R
Manufactured under license from Dolby Laboratories.
“Dolby” and the double-D symbols are trademarks of Dolby
Laboratories.
HDMI, the HDMI logo and High-Definition Multimedia
Interface are trademarks
or registered trademarks of HDMI Licensing LLC.
Page 3
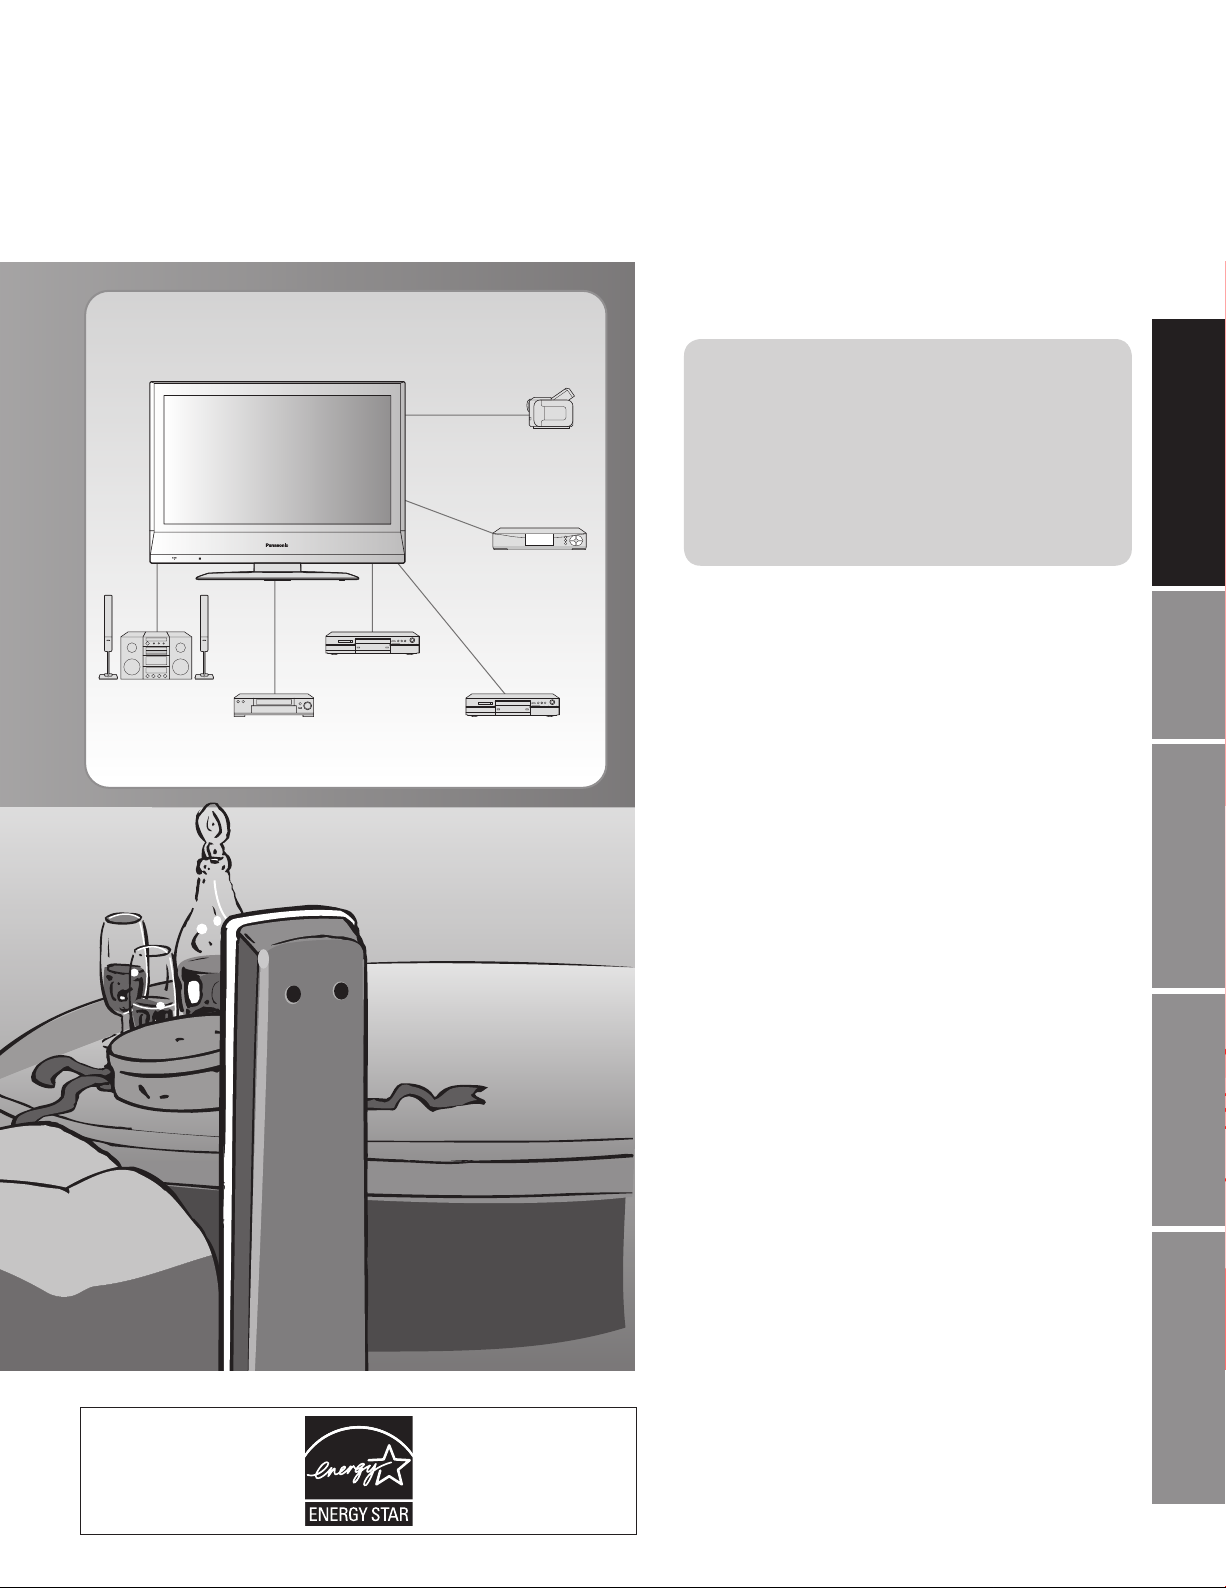
Enjoy rich multi-media
Camcorder
Set Top Box
Contents
Be Sure to Read
Important Safety Instructions ·······················4
•
Accessories/Option ························· 6
•
Identifying Controls ························· 7
•
Connection ····························· 8
•
First Time Setup ··················9
•
Quick Start Guide
Amplifier
Home theater unit
DVD recorder
VCR DVD player
Enjoy your TV !
Basic Features
Watching TV ···············································10
•
Watching Videos and DVDs ·······················12
•
Advanced Features
Input Labels/Closed Caption ·····················13
•
How to Use Menu Functions
•
(picture, sound quality, etc.) ·······················14
Channel Lock ·············································16
•
Editing and Setting Channels ····················18
•
Operating Peripheral Equipment ···············20
•
Control with HDMI “HDAVI Control” ···········21
•
Recommended A V connections ·················22
•
Accesorios/Opción ·····································24
•
Identificación de los controles ····················25
•
Conexiones ················································26
•
Ajuste inicial ···············································27
•
Para ver la televisión ·································28
•
Cómo utilizar las funciones de los menús
•
Para ver vídeos y DVDs ·····························32
•
Control con HDMI “HDAVI Control” ············33
•
Conexiones A V recomendadas ··················34
•
Viewing Advanced FAQs, etc.
[Resumen]
Español
·····30
FAQs, etc.
Remote Control Operation/Code List ·········36
•
Ratings List for Channel Lock ····················39
•
Technical Information ·································40
•
Maintenance ··············································42
•
FAQ ····························································42
•
Specifications ·············································44
•
Limited Warranty (for U.S.A.) ·····················45
•
Customer Services Directory (for U. S. A.)
•
Limited Warranty (for Canada) ···················47
•
Customer Services Directory (for Canada)
•
·······46
·······48
3
Page 4
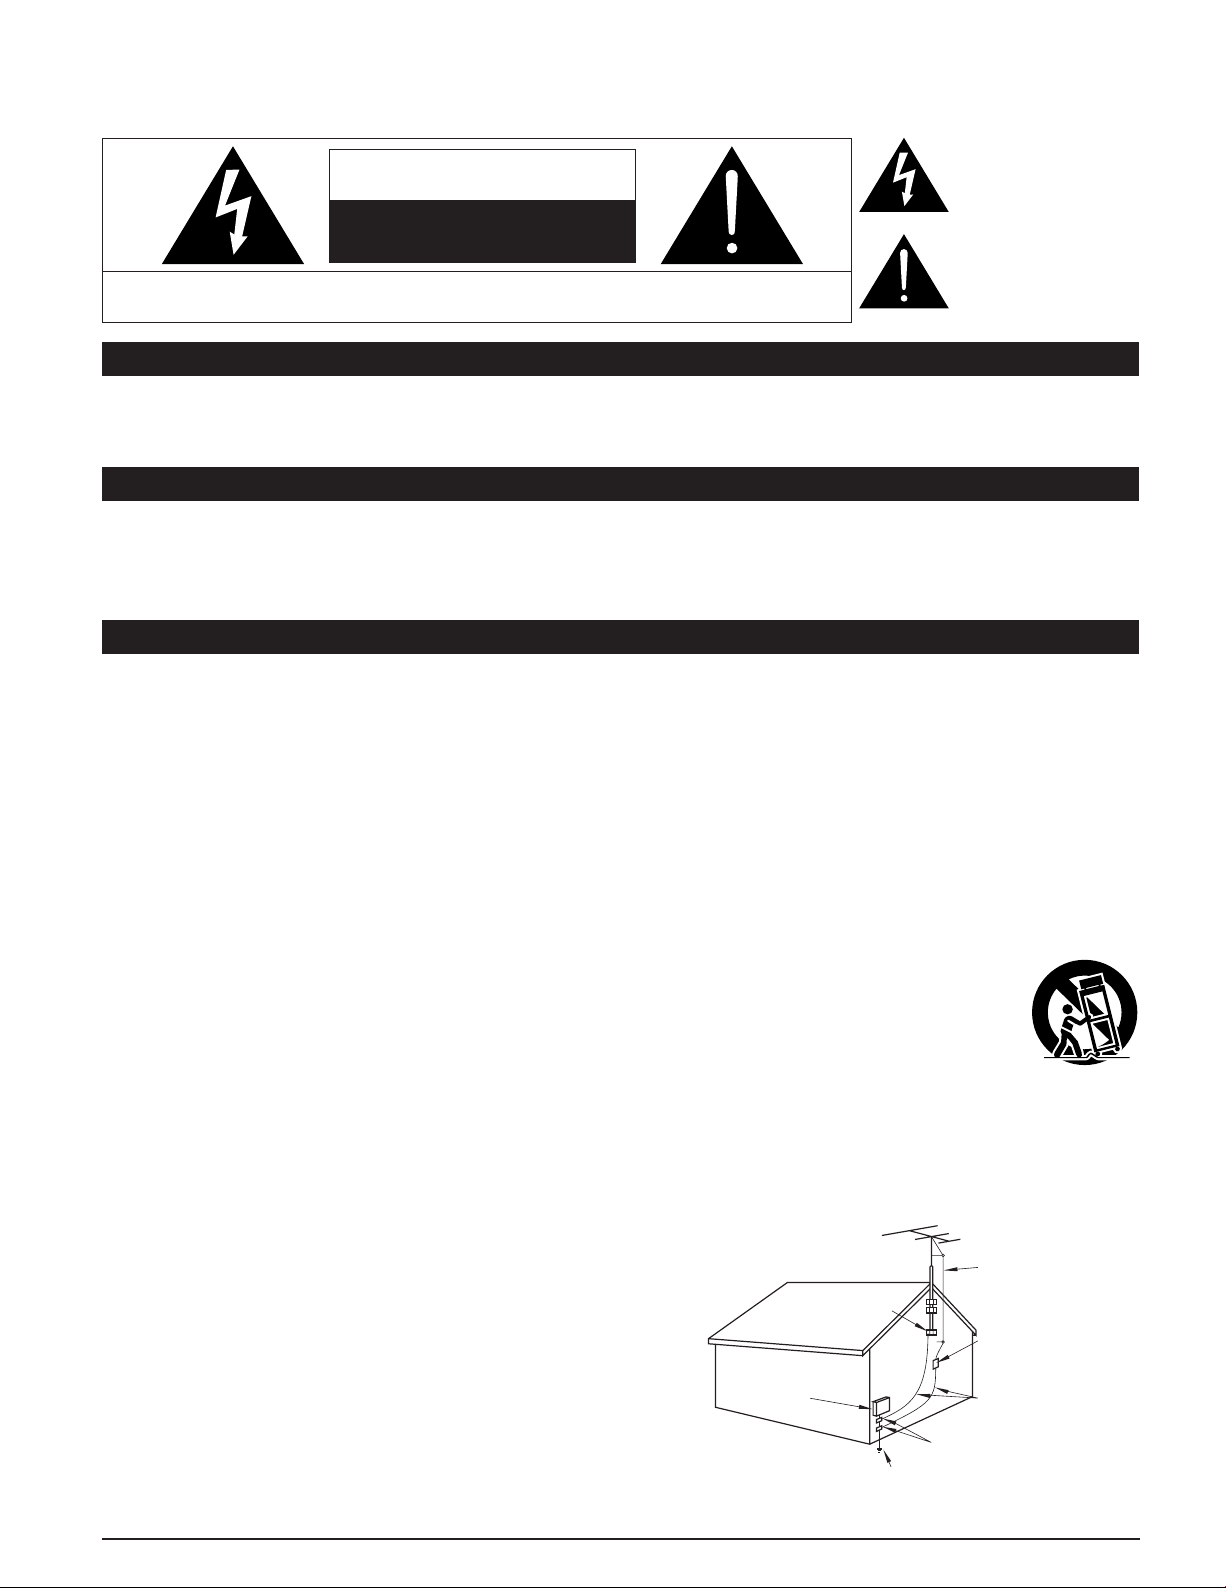
Important Safety Instructions
The lightning flash with
arrow head within a triangle
CAUTION
RISK OF ELECTRIC SHOCK
DO NOT OPEN
WARNING: To reduce the risk of electric shock, do not remove cover or back.
No user-serviceable parts inside. Refer servicing to qualified service personnel.
Note to CATV System Installer
This reminder is provided to direct the CATV system installer’s attention to Article 820-40 of the NEC that provides guidelines for
proper grounding and, in particular, specifies that the cable ground shall be connected to the grounding system of the building, as
close to the point of cable entry as practical.
Secure ventilation
Slots and openings in the cabinet and the back or bottom are provided for ventilation, and to ensure reliable operation of the LCD
TV and to protect it from overheating. These openings must not be blocked or covered. There should be at least 10 cm of space
from these openings. The openings should never be blocked by placing the LCD TV on a bed, sofa, rug or other similar surface.
This LCD TV should not be placed in a built-in installation such as a bookcase unless proper ventilation is provided.
Important Safety Instructions for LCD TV
is intended to tell the user
that parts inside the product
are a risk of electric shock to
persons.
The exclamation point within
a triangle is intended to
tell the user that important
operating and servicing
instructions are in the papers
with the appliance.
1) Read these instructions.
2) Keep these instructions.
3) Heed all warnings.
4) Follow all instructions.
5) Do not use this apparatus near water.
6) Clean only with dry cloth.
7) Do not block any ventilation openings. Install in accordance with the manufacturer’s instructions.
8) Do not install near any heat sources such as radiators, heat registers, stoves, or other apparatus (including amplifiers) that
produce heat.
9) Do not defeat the safety purpose of the polarized or grounding-type plug. A polarized plug has two blades with one wider than
the other. A grounding type plug has two blades and a third grounding prong. The wide blade or the third prong are provided for
your safety. If the provided plug does not fit into your outlet, consult an electrician for replacement of the obsolete outlet.
10) Protect the power cord from being walked on or pinched particularly at plugs, convenience receptacles, and the point where
they exit from the apparatus.
11) Only use attachments / accessories specified by the manufacturer.
12) Use only with the cart, stand, tripod, bracket, or table specified by the manufacturer, or sold with the
apparatus. When a cart is used, use caution when moving the cart / apparatus combination to avoid injury
from tip-over.
13) Unplug this apparatus during lightning storms or when unused for long periods of time.
14) Refer all servicing to qualified service personnel. Servicing is required when the apparatus has been damaged in any way,
such as power-supply cord or plug is damaged, liquid has been spilled or objects have fallen into the apparatus, the apparatus
has been exposed to rain or moisture, does not operate normally, or has been dropped.
15) Operate only from the type of power source indicated on the marking label. If you are not sure of the type of power supplied to
your home consult your television dealer or local power company.
16) Follow all warnings and instructions marked on the LCD TV.
17) Never push objects of any kind into this LCD TV through cabinet
slots as they may touch dangerous voltage points or short out parts
that could result in a fire or electric shock. Never spill liquid of any
kind on the LCD TV.
18) If an outside antenna is connected to the tele vi sion equipment,
be sure the antenna system is grounded so as to provide some
protection against voltage surges and built up static charg es.
In the U.S. Section 810-21 of the National Electrical Code
provides information with respect to proper grounding of the mast
and supporting structure, grounding of the lead-in wire to an
antenna discharge unit, size of grounding conductors, location of
antenna discharge unit, connection to grounding electrodes, and
re quire ments for the grounding electrode.
EXAMPLE OF ANTENNA
GROUNDING AS PER
(NEC) NATIONAL
ELECTRICAL
CODE
GROUND CLAMP
ELECTRIC
SERVICE
EQUIPMENT
POWER SERVICE GROUNDING
ELECTRODE SYSTEM
(NEC ART 250, PART H)
ANTENNA
LEAD-IN WIRE
ANTENNA
DISCHARGE UNIT
(NEC SECTION 810-20)
GROUNDING
CONDUCTORS
(NEC SECTION 810-21)
GROUND CLAMPS
4
Page 5

19) An outside antenna system should not be lo cat ed in the vicinity of overhead power lines or other electric light or power circuits,
or where it can fall into such power lines or circuits. When installing an outside antenna system extreme care should be taken
to keep from touching such power lines or circuits as contact with them might be fatal.
20) Unplug this LCD TV from the wall outlet, and refer servicing to qualified service personnel under the following conditions:
a. When the power cord or plug is damaged or frayed.
b. If liquid has been spilled into the LCD TV.
c. If the LCD TV has been exposed to rain or water.
d. If the LCD TV does not operate normally by following the operating instructions.
Adjust only those controls that are covered by the operating instructions as improper adjustment of other
controls may result in damage and will often require extensive work by a qualified technician to restore the LCD
TV to normal operation.
e. If the LCD TV has been dropped or the cabinet has been damaged.
f. When the LCD TV exhibits a distinct change in performance - this indicates a need for service.
21) When replacement parts are required, be sure the service technician uses replacement parts specified by the manufacturer
that have the same characteristics as the original parts. Unauthorized substitutions may result in fire, electric shock, or other
hazards.
22) WARNING : TO REDUCE THE RISK OF FIRE OR ELECTRIC SHOCK, DO NOT EXPOSE THIS APPARATUS TO RAIN
OR MOISTURE.
DO NOT PLACE LIQUID CONTAINERS (FLOWER VASES, CUPS, COSMETICS, ETC.) ABOVE THE SET.
(INCLUDING ON SHELVES ABOVE, ETC.)
23) WARNING : SMALL PARTS CAN PRESENT CHOKING HAZARD IF ACCIDENTALLY SWALLOWED. KEEP SMALL
PARTS AWAY FROM YOUNG CHILDREN.
DISCARD UNNEEDED SMALL PARTS AND OTHER OBJECTS, INCLUDING PACKAGING MATERIALS
AND PLASTIC BAGS/SHEETS TO PREVENT THEM FROM BEING PLAYED WITH BY YOUNG CHILDREN,
CREATING THE POTENTIAL RISK OF SUFFOCATION.
24) CAUTION : TO PREVENT ELECTRIC SHOCK DO NOT USE THIS PLUG WITH A RECEPTACLE OR OTHER OUTLET
UNLESS THE BLADES CAN BE FULLY INSERTED TO PREVENT BLADE EX PO SURE.
25) CAUTION : USE WITH OTHER STAND MAY RESULT IN INSTABILITY POSSIBLY CAUSING INJURY.
26) CAUTION : DANGER OF EXPLOSION IF BATTERY IS INCORRECTLY REPLACED. REPLACE ONLY WITH THE SAME
OR EQUIVALENT TYPE.
NOTE : This equipment is designed to operate in North America and other countries where the broadcasting system and AC
■
house current are exactly the same as in North America.
This product utilizes tin-lead solder, and has a fluorescent lamp containing a small amount of mercury. Disposal of
these materials may be regulated in your community due to environmental considerations. For disposal or re cy cling
information please contact your local authorities, or the Electronics Industries Alliance: www.eiae.org.
Federal Communication Commission Information
This equipment has been tested and found to comply with the limits for a TV Broadcast Receiver, pursuant to Part 15 of
the FCC Rules. These limits are designed to provide reasonable protection against harmful interference in a residential
installation. This equipment generates, uses and can radiate radio frequency energy and, if not installed and used in
accordance with the instructions, may cause harmful interference to radio communications. However, there is no guarantee
that interference will not occur in a particular installation. If this equipment does cause or receive interference, which can be
determined by turning equipment off and on, the user is encouraged to try to correct the interference by one or more of the
following measures:
Reorient or relocate the TV antenna.
Increase the separation between TV and other equipment.
Connect TV into separate outlet from other equipment.
Consult the dealer or an experienced radio / TV technician for help.
FCC Caution: Any changes or modifications not expressly approved by the party responsible for compliance could void
the user’s authority to operate this equipment.
5
Page 6
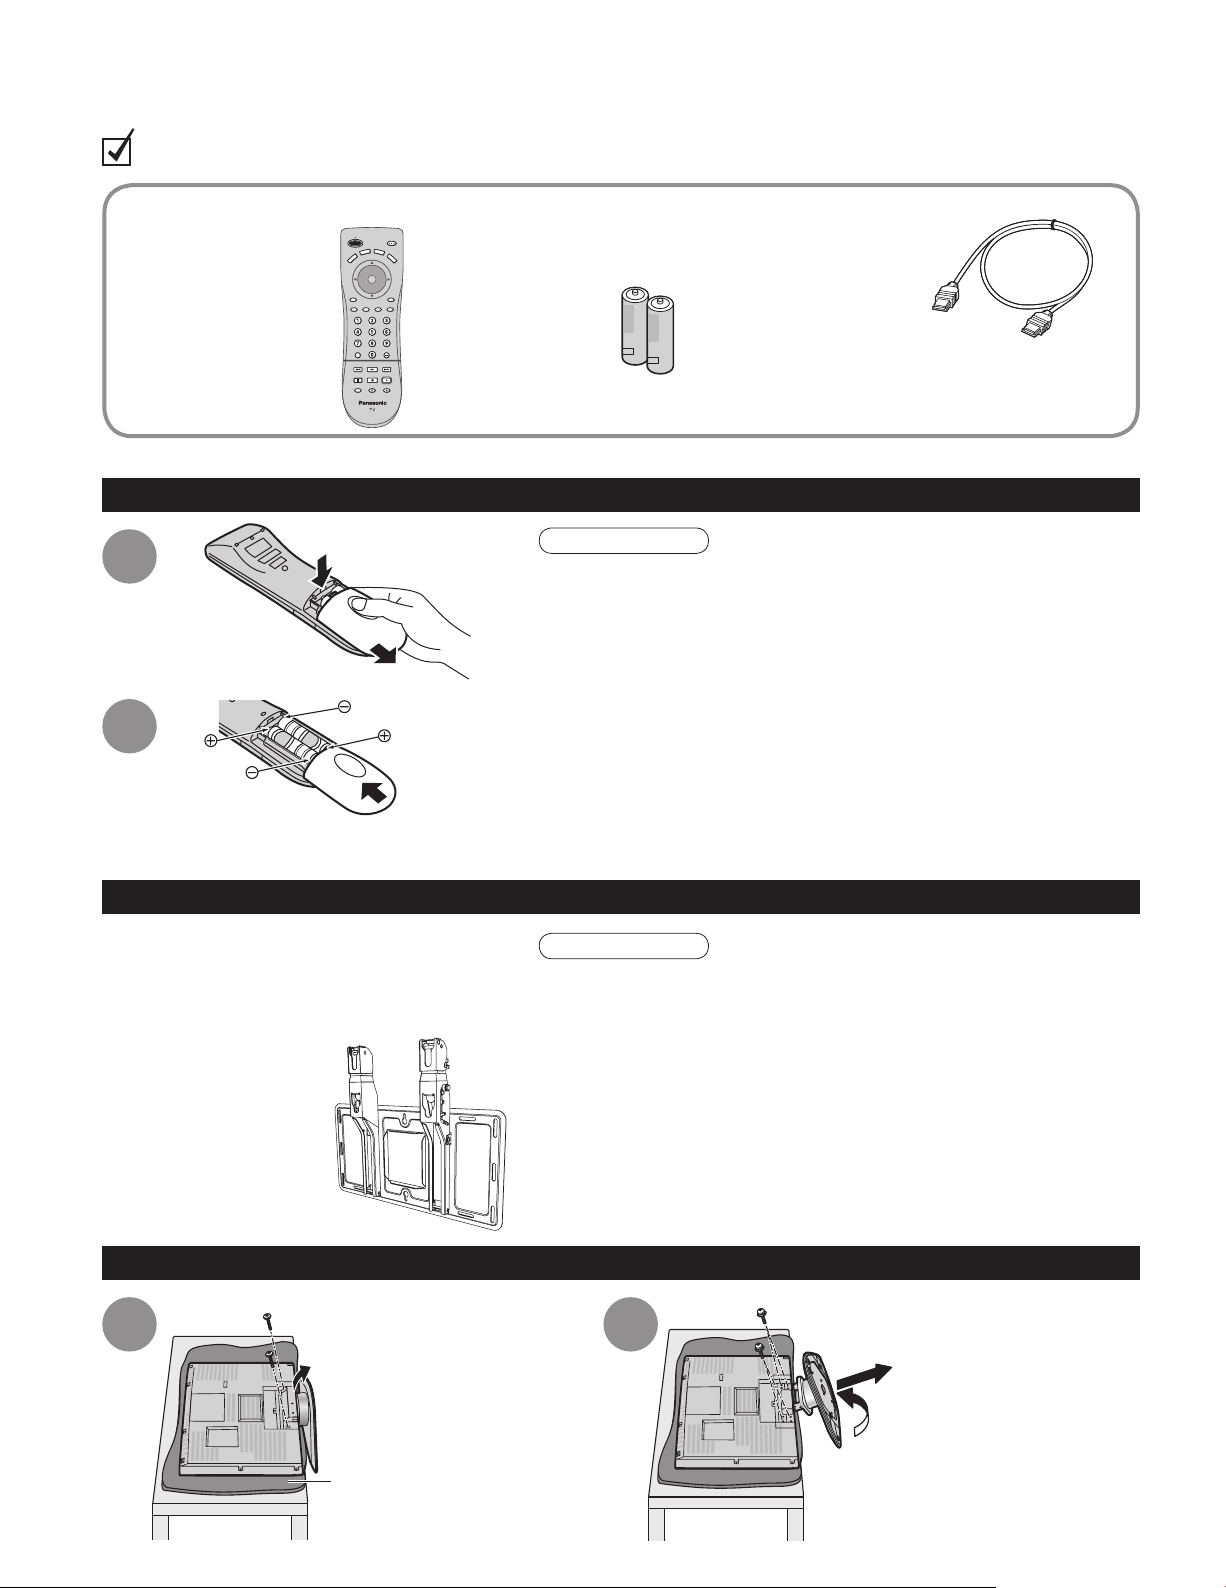
Accessories/Option
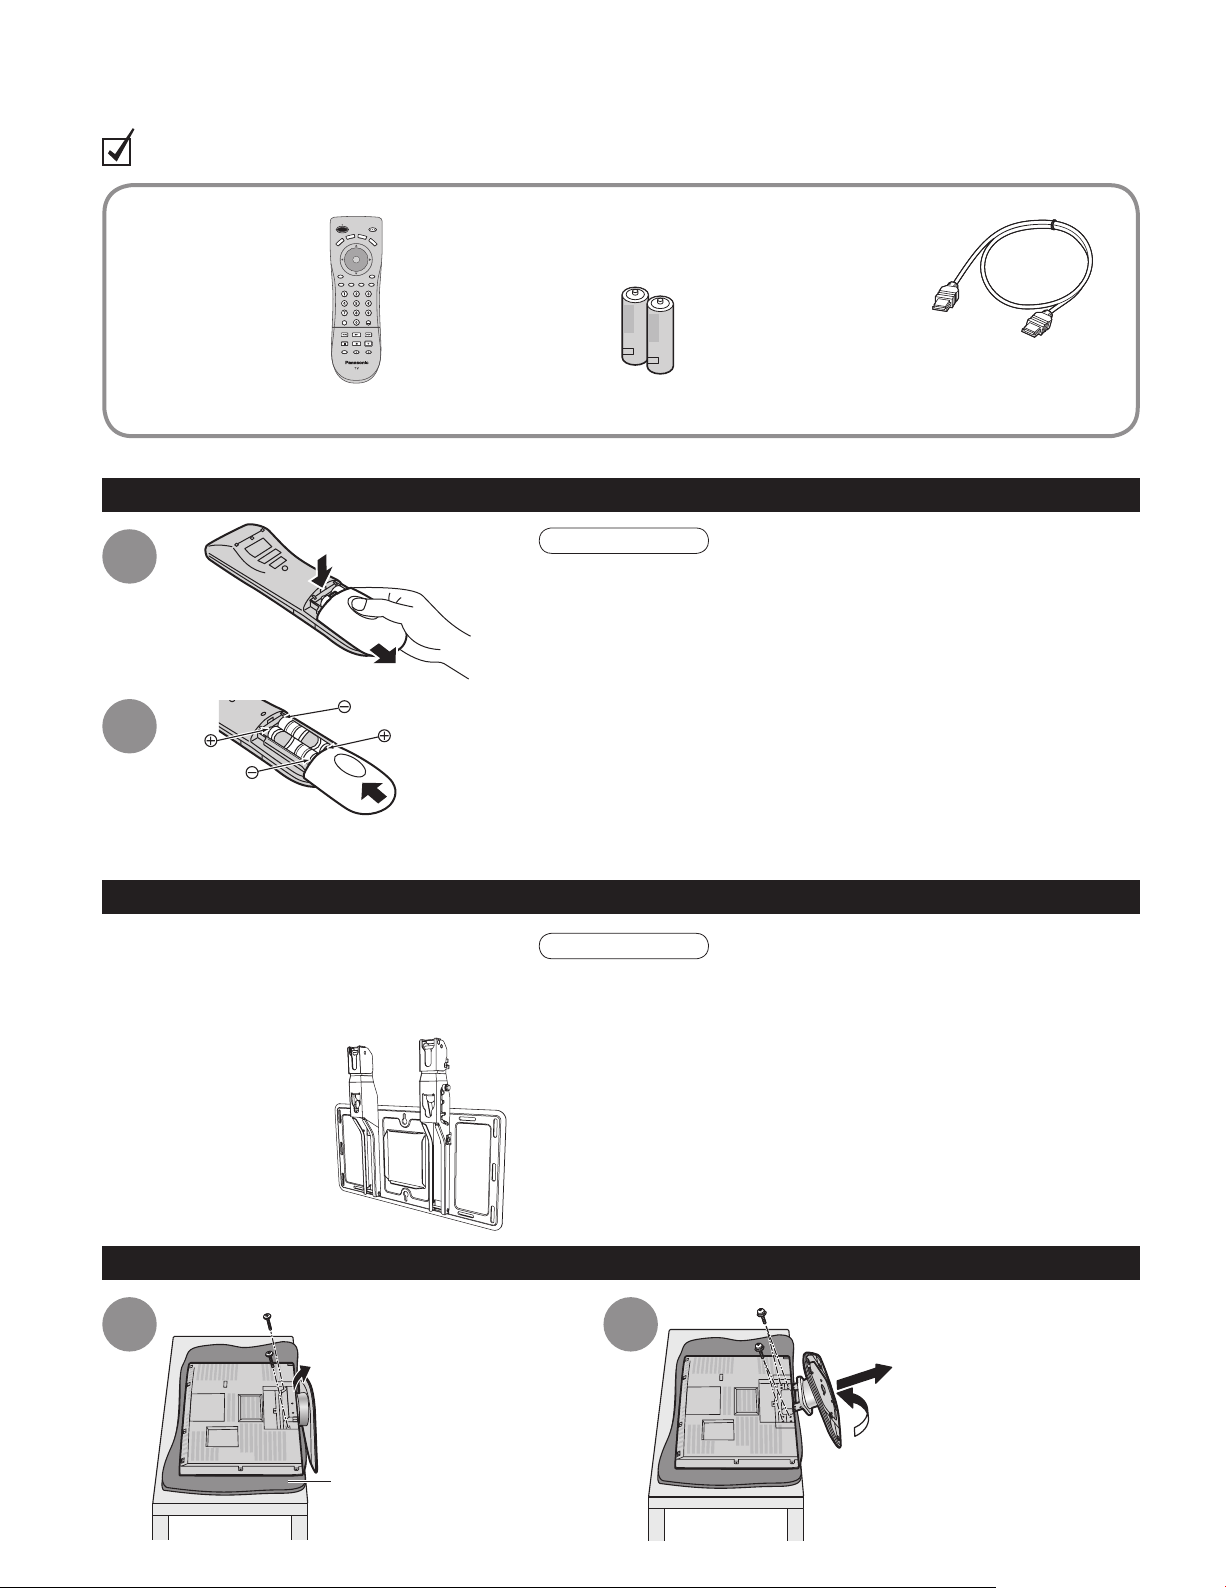
Check you have all the items shown.
Accessories
Remote Control
□
Transmitter
EUR7613ZG0
•
Batteries for the Remote
□
Control Transmitter
AA Battery
•
(2)
HDMI Cable
□
(for TC-26LE60 and TC-32LE60)
Operating
□
Instructions
push
Product Registration Card
□
(U.S.A.)
Installing remote’s batteries
1
slide open
2
close
Note the correct
polarity (+ or -).
Please contact your nearest Panasonic dealer
to purchase the recommended wall-hanging
bracket. For additional details, please refer to the
wall-hanging bracket installation manual.
Wall-hanging bracket
(vertical)
TY-WK32LR2W
•
Customer Care Plan Card
□
(U.S.A.)
Caution
Incorrect installation may cause battery leakage and corrosion,
•
resulting in damage to the remote control unit.
Do not mix old and new batteries.
•
Do not mix different battery types (such as alkaline and
•
manganese batteries).
Do not use rechargeable (Ni-Cd) batteries.
•
Do not burn or break batteries.
•
Make a note of the remote control codes before changing
•
batteries in case the codes are reset. (p. 37-38)
Optional accessory
WARNING
Failure to use a Panasonic bracket or choosing to mount the unit
•
yourself will be done at the risk of the consumer.
Any damage resulting from not having a professional installer
mount your unit will void your warranty.
Always be sure to ask a qualified technician to carry out set-up.
•
Incorrect fitting may cause equipment to fall, resulting in injury
and product damage.
Do not mount this LCD Television directly below ceiling lights
•
(such as spotlights, floodlights or halogen lights) which typically
give off high heat. Doing so may warp or damage plastic cabinet
parts.
6
How to remove the TV-Stand
1 2
Remove two screws
Pull out the plastic portion
Foam mat or thick soft cloth
Remove four screws
Pull out the metallic portion
Page 7
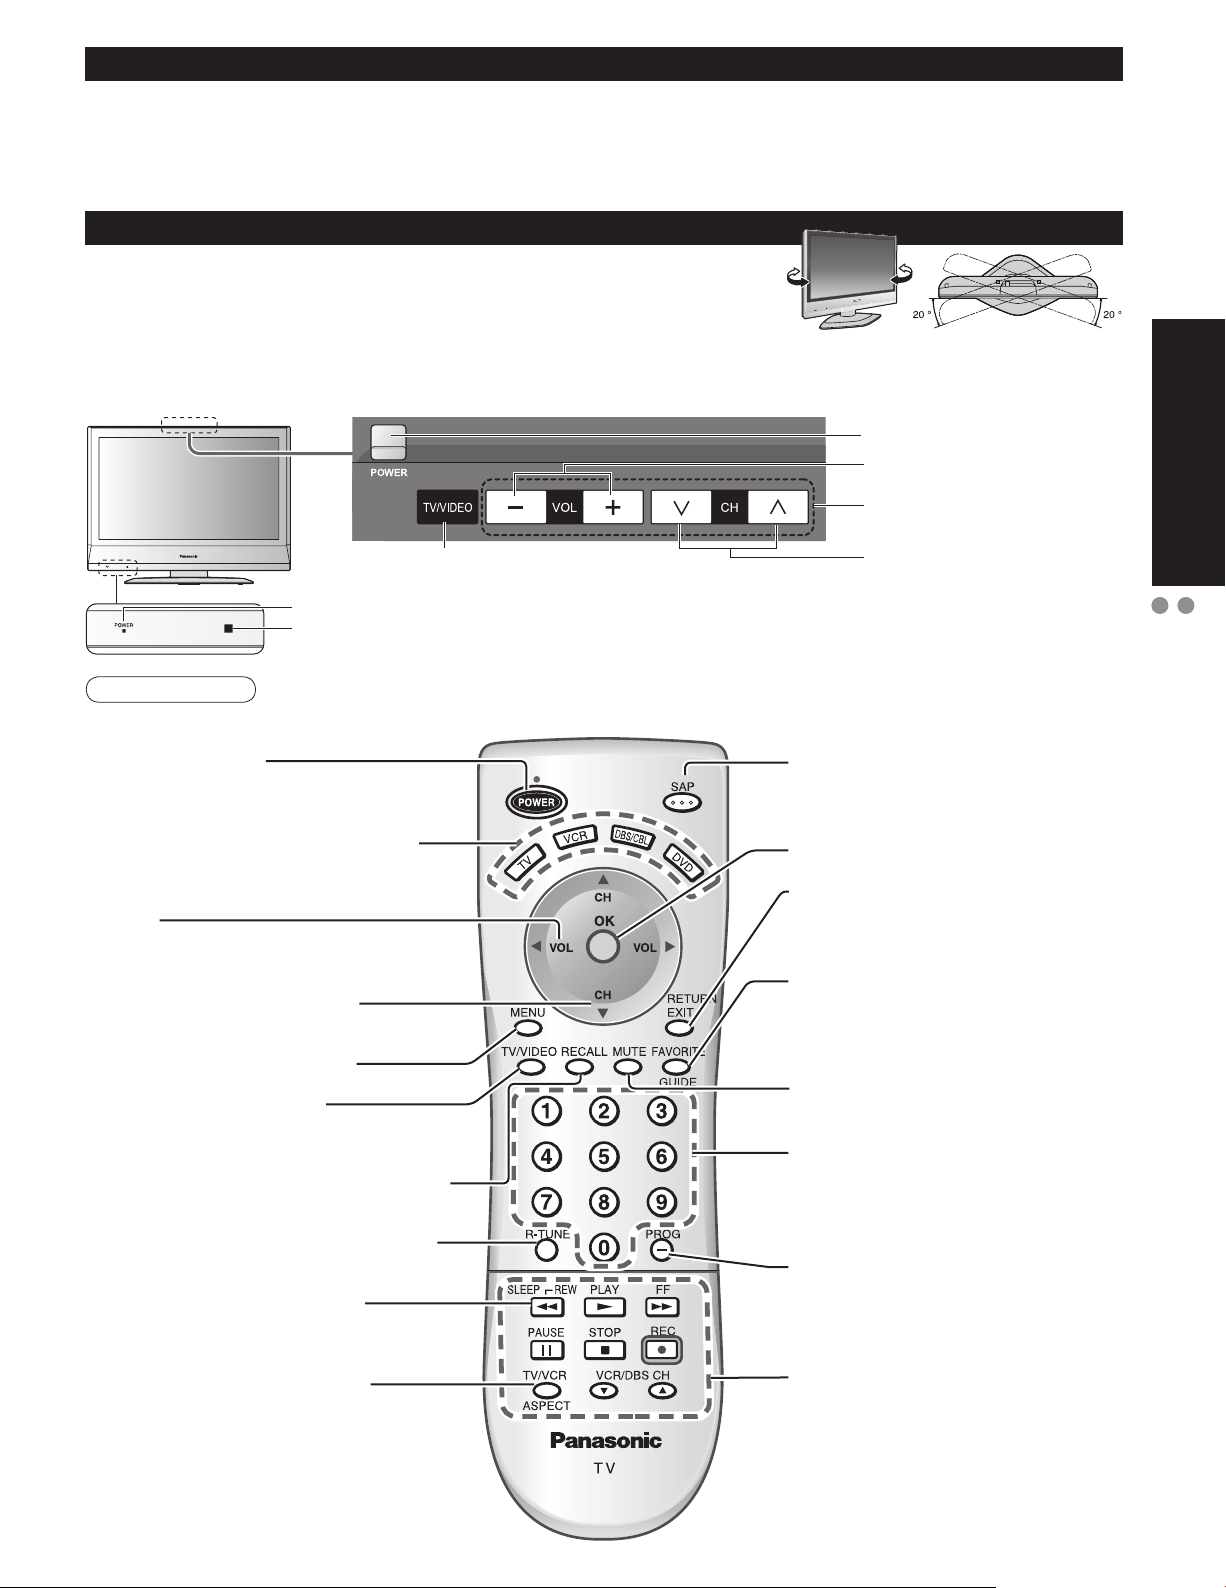
Receiver Location
Locate at a comfortable distance for viewing. Avoid placing where sunlight or other bright light (including reflections)
will fall on the screen.
Use of some types of fluorescent lighting can reduce remote control transmitter range.
Adequate ventilation is essential to prevent internal component failure. Keep away from areas of excessive heat or
moisture.
How to use the LCD stand
Adjust the stand to your desired angle.
The stand angle can be rotated 20 ° to the right / left.
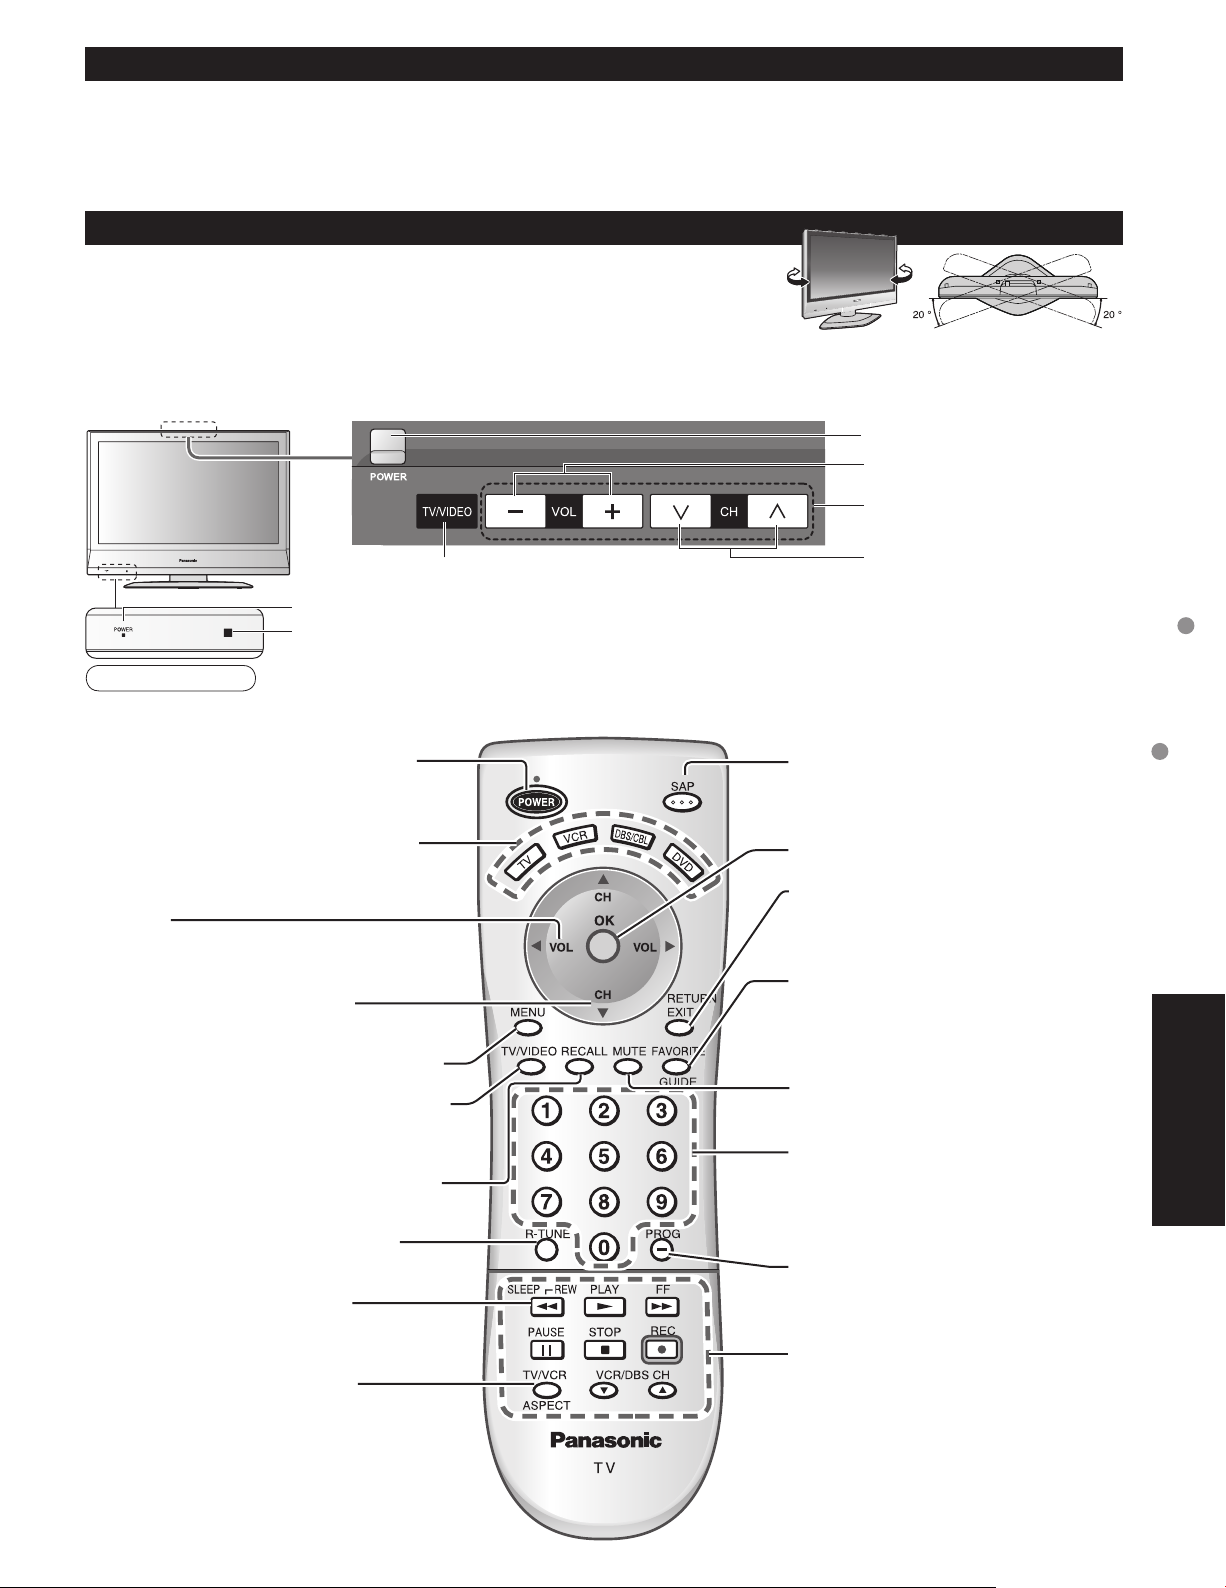
Identifying Controls
POWER button
Volume
Menu navigations
Quick Start Guide
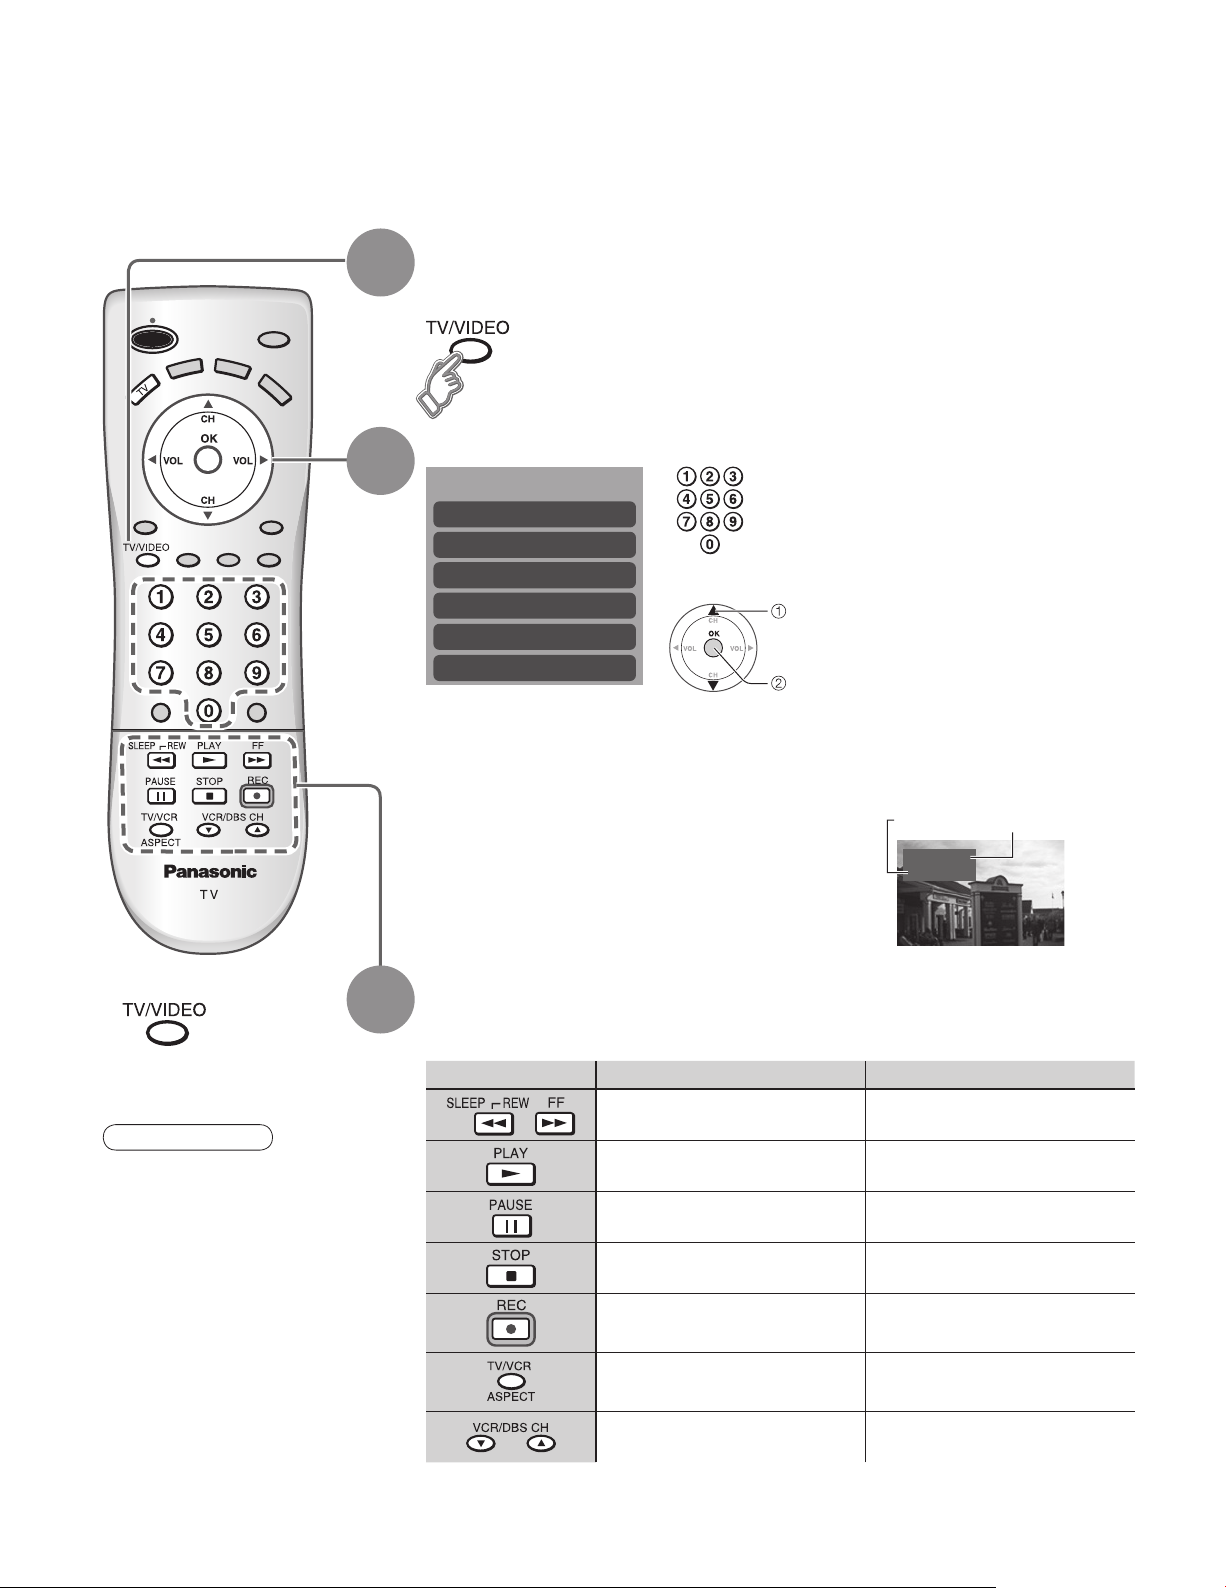
Switches TV/VIDEO
Power indicator (on : red, off : no light)
Remote control sensor
Within about 23 feet (7 meters) in front of the TV set.
Note
The TV consumes some power as long as the power cord is inserted into the wall outlet.
•
Turns power On/Off
(used when the unit Power button is on)
Sets the remote to communicate with
other equipments (p. 20)
Volume
Menu navigations
Selects channels in sequence
Menu navigations
Displays Main Menu (p. 14-15)
Selects input mode (p. 12)
Selects Audio Mode for TV Viewing
(p. 10)
Selects/OK/Change
RETURN (to previous menu)
Exit (from the menu)
Operates the Favorite channel list
function. (p. 11)
GUIDE for DBS
Sound mute On/Off
Selects channels
in sequence
Identifying Controls
Accessories/Options
Displays or removes the channel banner
(p. 10)
Switches to previously viewed channel
and input mode.
Sleep timer (MINUTES) (p. 10)
Changes aspect ratio (p. 11, 40)
Numeric keypad to select
any channel or press to enter
alphanumeric input in menus. (p. 10)
Direct channel access for DTV and
DBS (p. 10)
External equipment operations
(p. 12, 36) (VCRs, DVDs, etc.)
7
Page 8

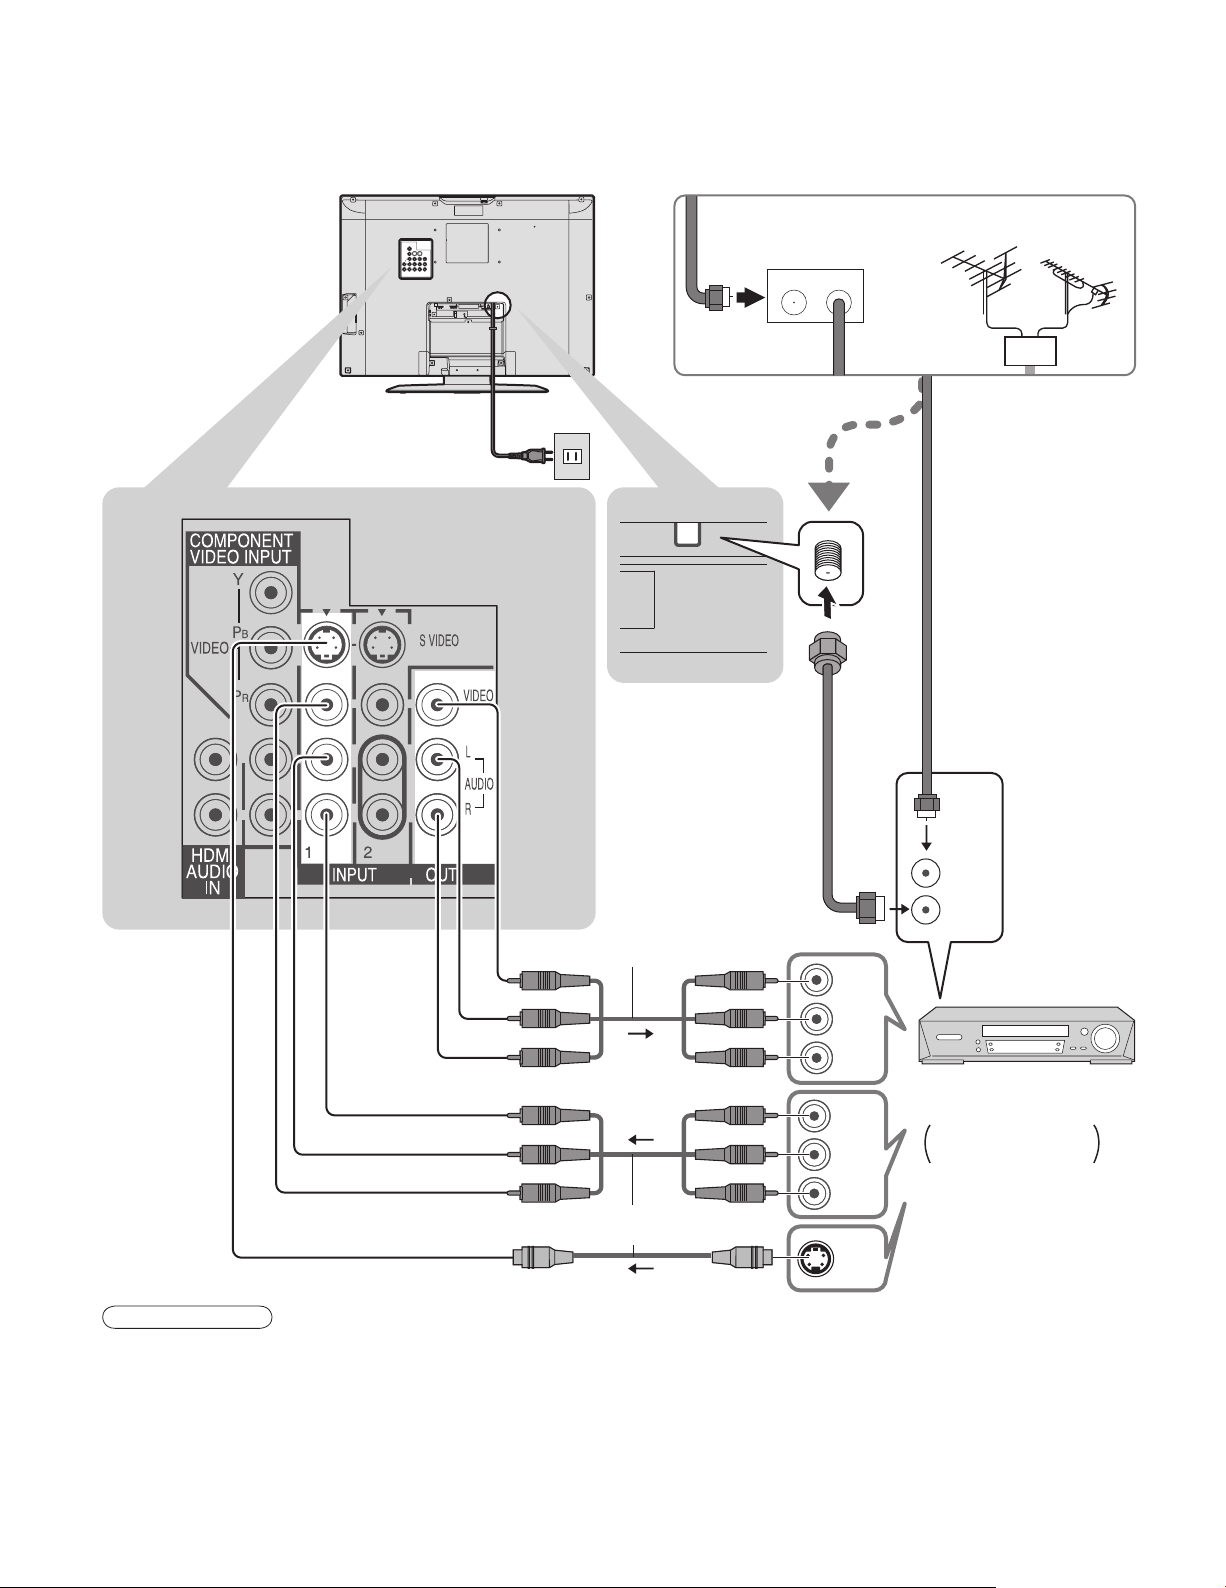
Connection
Watching TV
■
Back of the unit
Power Cord
(Connect after all the
other connections.)
ANT
Cable BOX
IN OUT
VHF/UHF aerial
or
or
ANT IN
ANT OUT
To record TV shows
Video
IN
L
Audio
OUT
R
Video
OUT
L
Audio
IN
R
S-Video signals have
priority.
Note
All cables and external equipments shown in this book are not supplied with the TV.
•
For additional assistance, visit us at www.panasonic.com
•
When connecting video cables, priority is given to the S-Video cable when both the S-VIDEO input terminal and
•
the VIDEO input terminal are connected.
When receiving digital channel signals, all digital formats are down-converted to composite NTSC video to be
•
output through “OUTPUT” terminals.
Some programs contain a copyright protection signal to prevent VCR recording.
•
S-Video
OUT
Video recorder
with TV Tuner
DVD Recorder /
VCR
8
Page 9
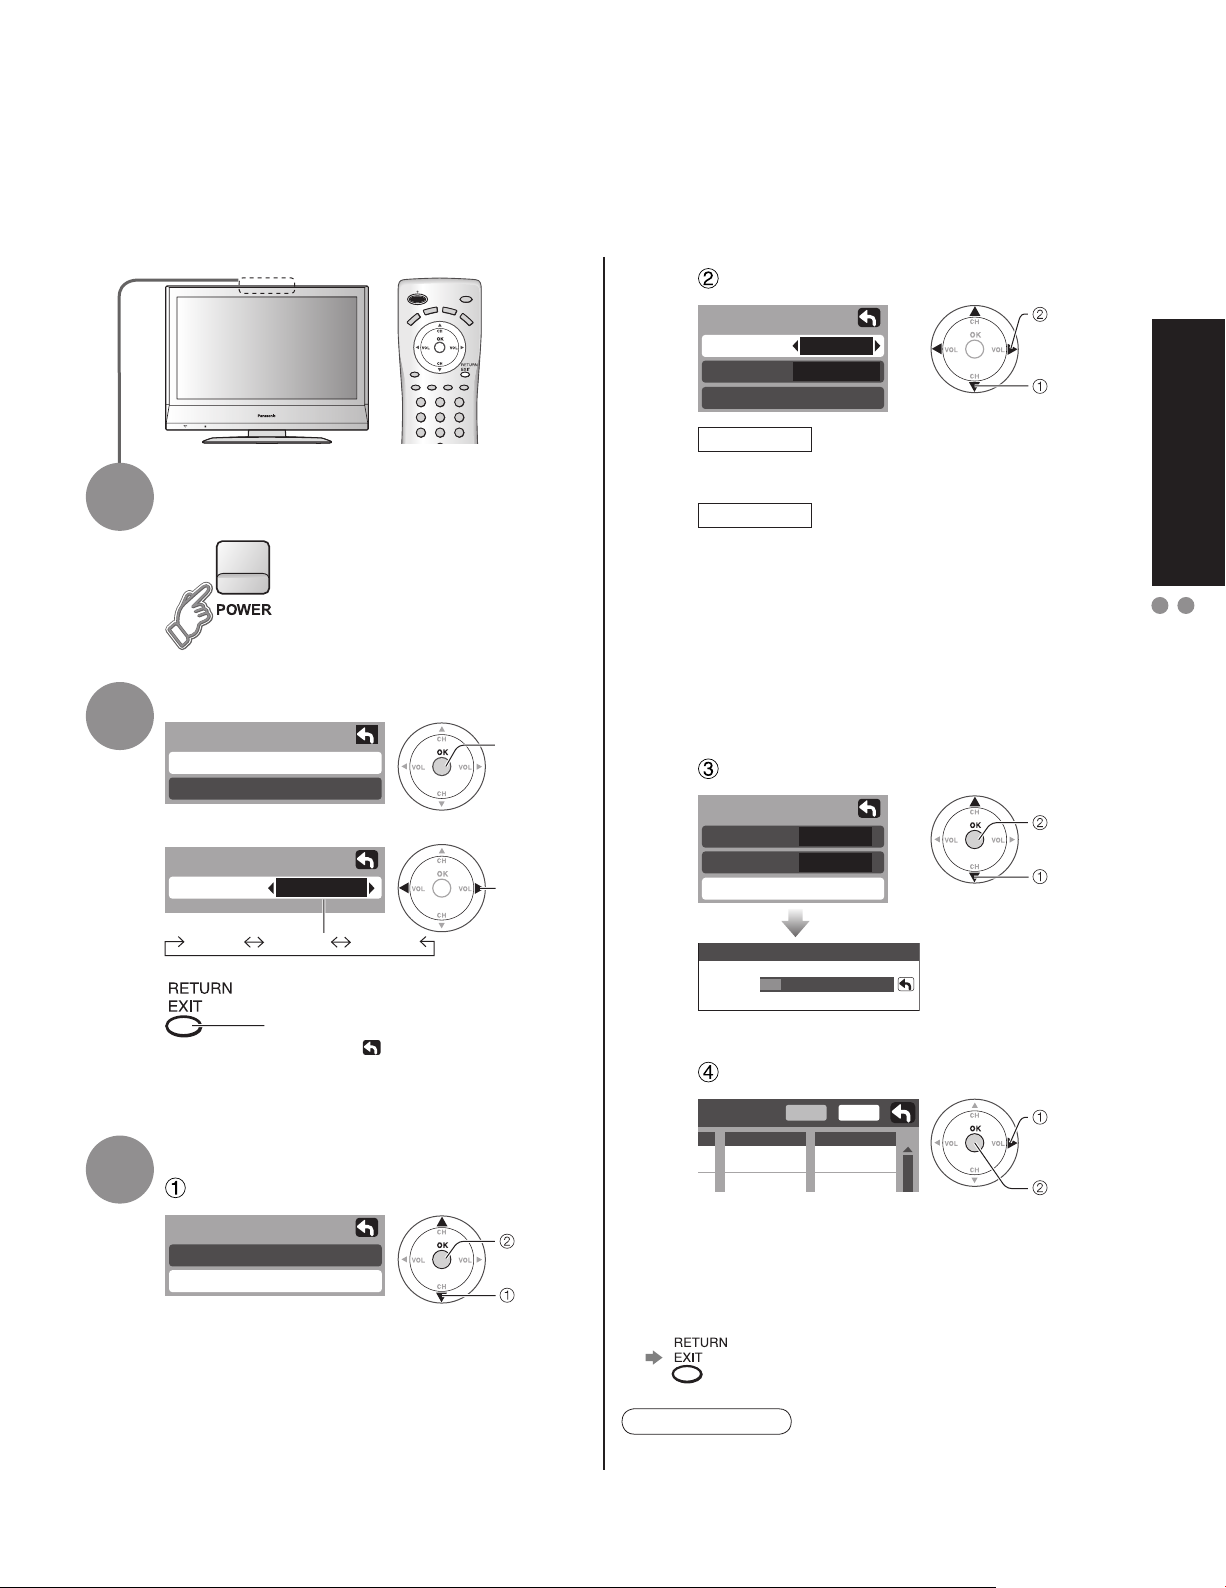
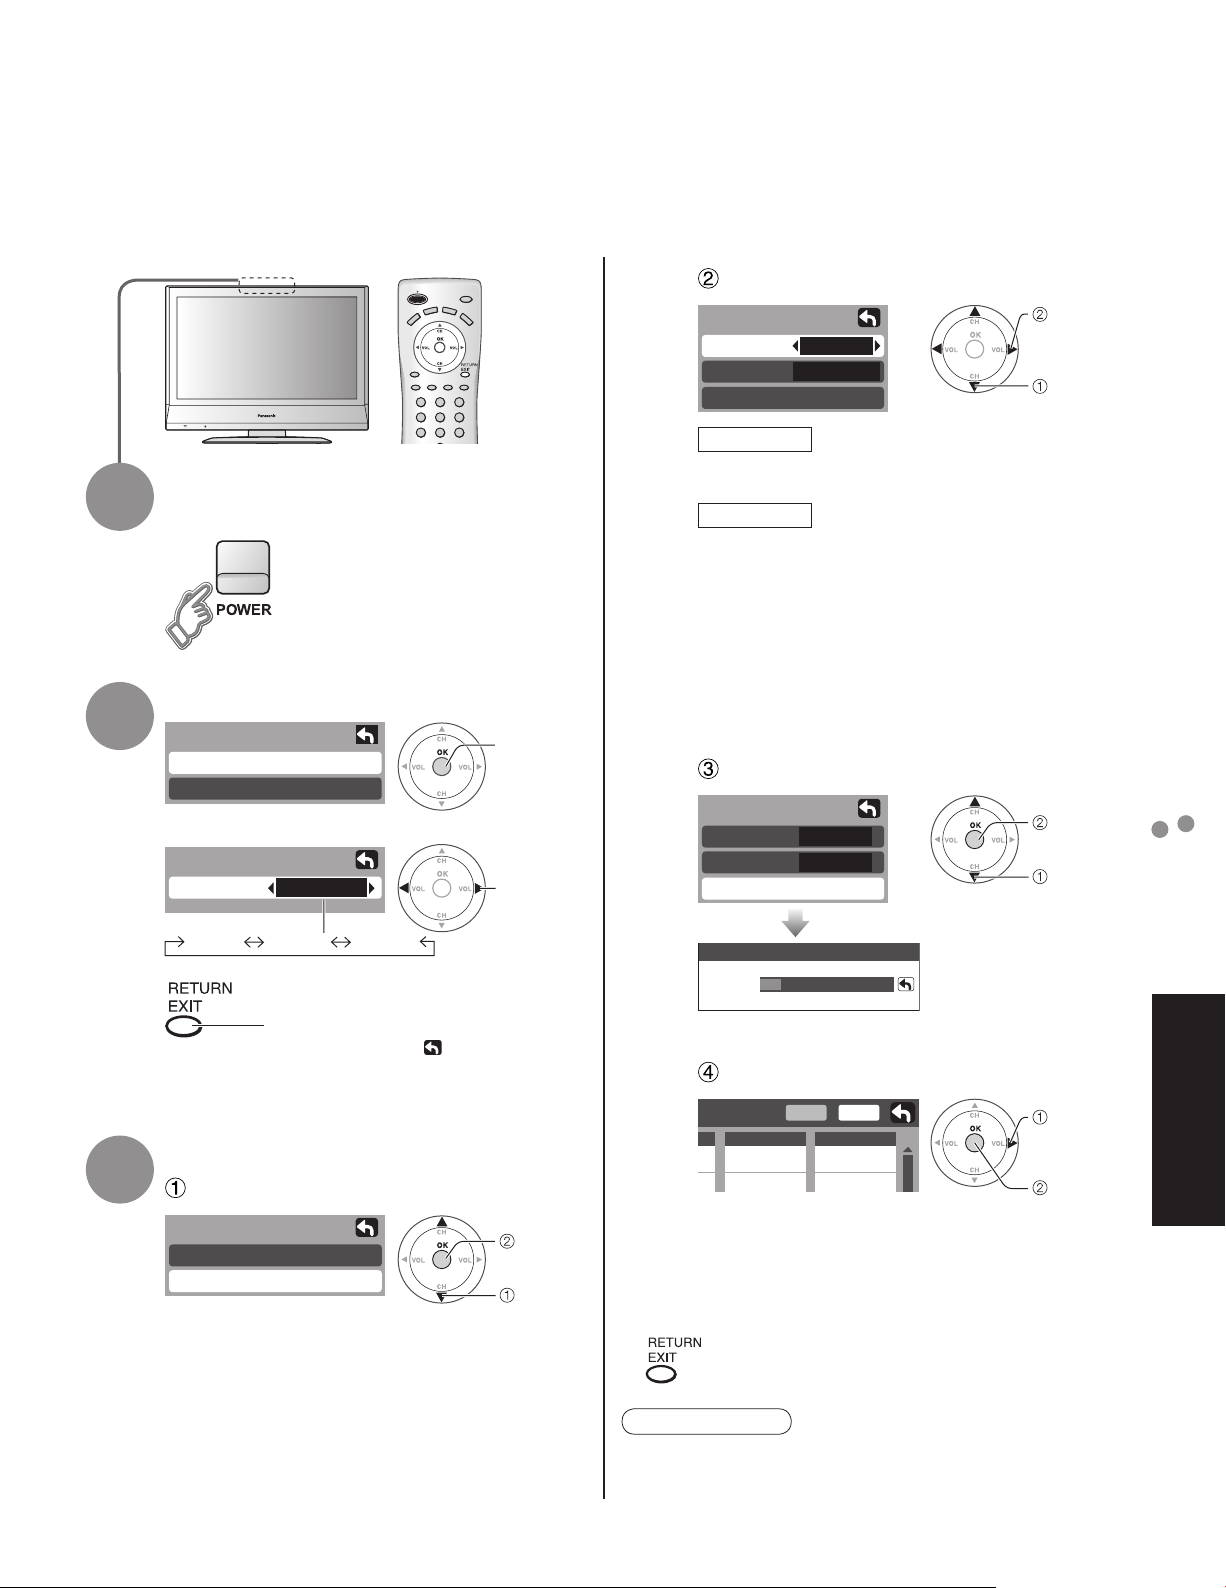
First Time Setup
“First time setup” is displayed only when the TV is turned on for the first time after the power cord is
inserted into a wall outlet.
Available only when “Auto power on” (p. 14-15) is set to “Off”.
Select antenna and input modes
Auto program
Cable
All
scanning)
more channels featuring high-quality
video and sound
Cable
All
Available channels
•
(analog/digital)
are automatically
set.
1
2
Turn the TV On with the POWER
button
Select your language
First time setup
Language
Auto program
Language
Language
English Español Français
English
Press to go to previous screen.
Or, select icon, then press OK
for same results.
next
select
ANT In
Mode
Start scan
ANT In
Cable: Cable TV Antenna: Antenna
Mode
All : digital and analog
Analog : analog only (Reduces time for
About broadcasting systems
•
Analog : traditional TV system
Digital : new system that allows you to view
Start scanning the channels
Auto program
ANT In
Mode
Start scan
Now scanning analog channel ...
Progress
Confirm registered channels
set
select
start
select
“Start
scan”
Quick Start Guide
First Time Setup
Connection
3
Auto channel setup
Select “Auto program”
First time setup
Language
Auto program
next
select
Edit
Apply
Favorite
- - -
2
If OK is not pressed after selecting “Apply”,
•
the channels will not be memorized.
Press to exit or return to previous screen
■
Add
No
Yes
select
“Apply”
ok
Note
To change setting later, go to Menu screen (p. 14-15)
•
9
Page 10

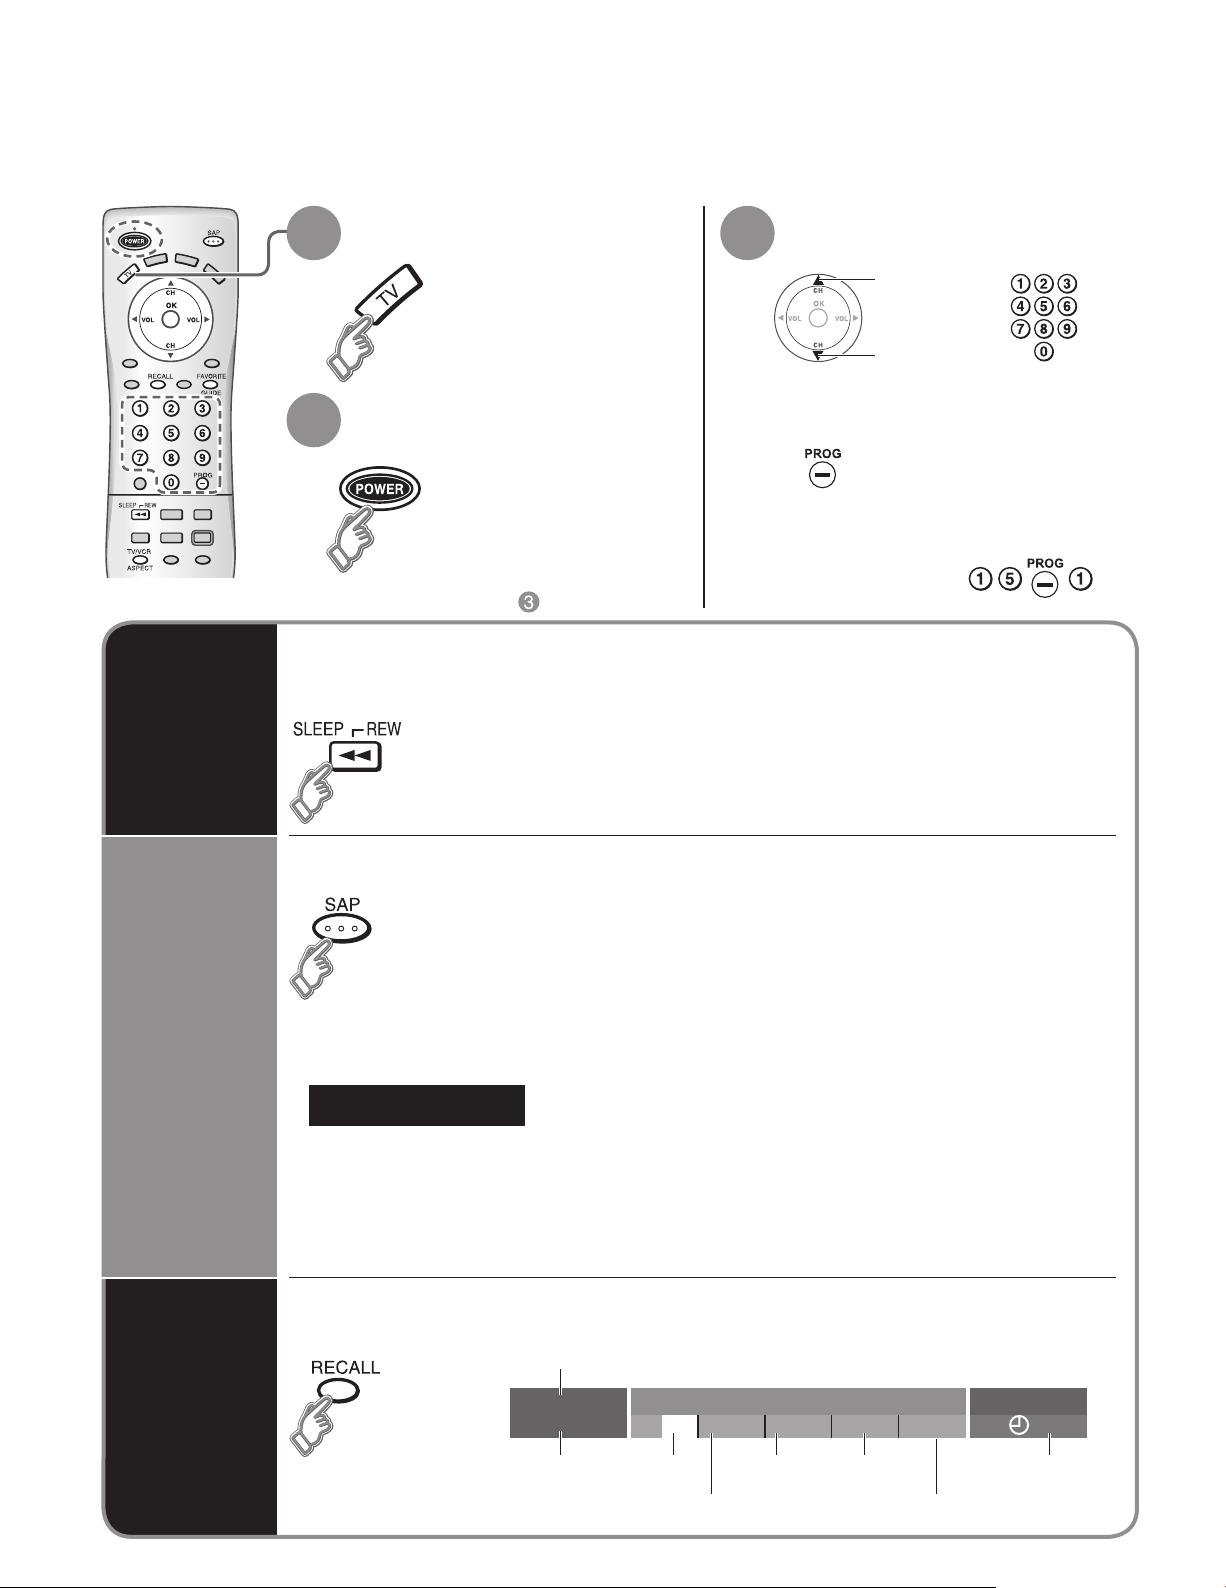
Watching TV
Connect cable Box when watching cable TV. (p. 8)
For receiving digital broadcasting of cable TV, connect Cable TV directly to “ANT” terminal.
•
Switch to TV mode
1 3
Turn power on
2
Other Useful Functions (Operate after )
■
Switches the unit OFF in a preset amount of time from 0 to 90 minutes in 30
minute intervals.
Sleep Timer
0/30/60/90 (minutes)
•
Select a channel number
up
or
down
To directly input the digital channel
■
number
When tuning digital channel,
press the button to enter the
minor number in a compound
channel number.
example: CH15-1:
Listen
with SAP
(Secondary
Audio
Program)
Information
Recall
Selects Audio Mode for TV Viewing
■
Digital mode
•
Press SAP to select the next audio track (if available) when receiving a digital channel.
Audio track 1 of 1
Analog mode
•
Press SAP to select the desired audio mode.
• Each press of SAP will change the audio mode. (Stereo/SAP/Mono)
Displays or removes the channel banner.
(English)
Channel
15-2
ABC - HD
Station
identifier
CC SAP
SAP Signal
Rating Level
T V -G
resolution
1080I
Standard
Picture
mode
4 : 3
Sleep timer
remaining time
Aspect ratio
30
10
Page 11
Setting 1/3
[1]
[2]
[3]
[4]
Setting 1/3
[1] 26-1
[2]
[3]
[4]
Favorite 1/3
[1]
[2]
[3]
[4]
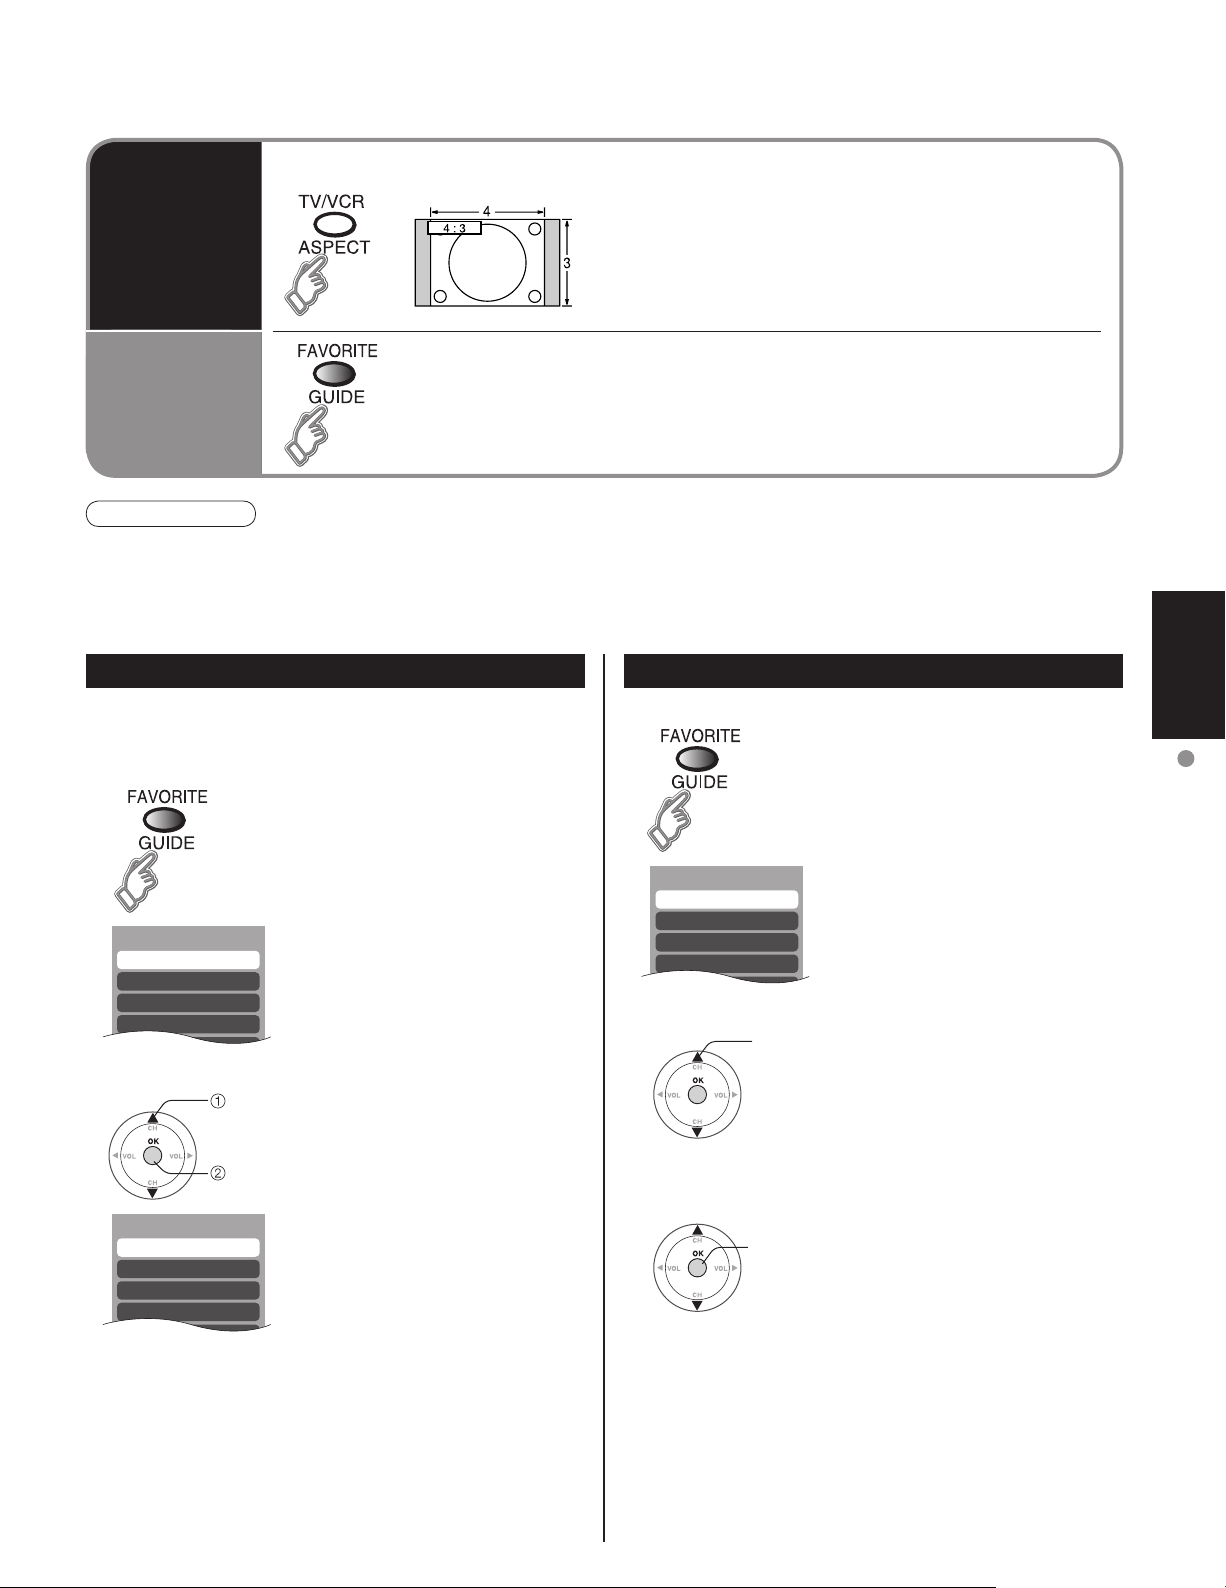
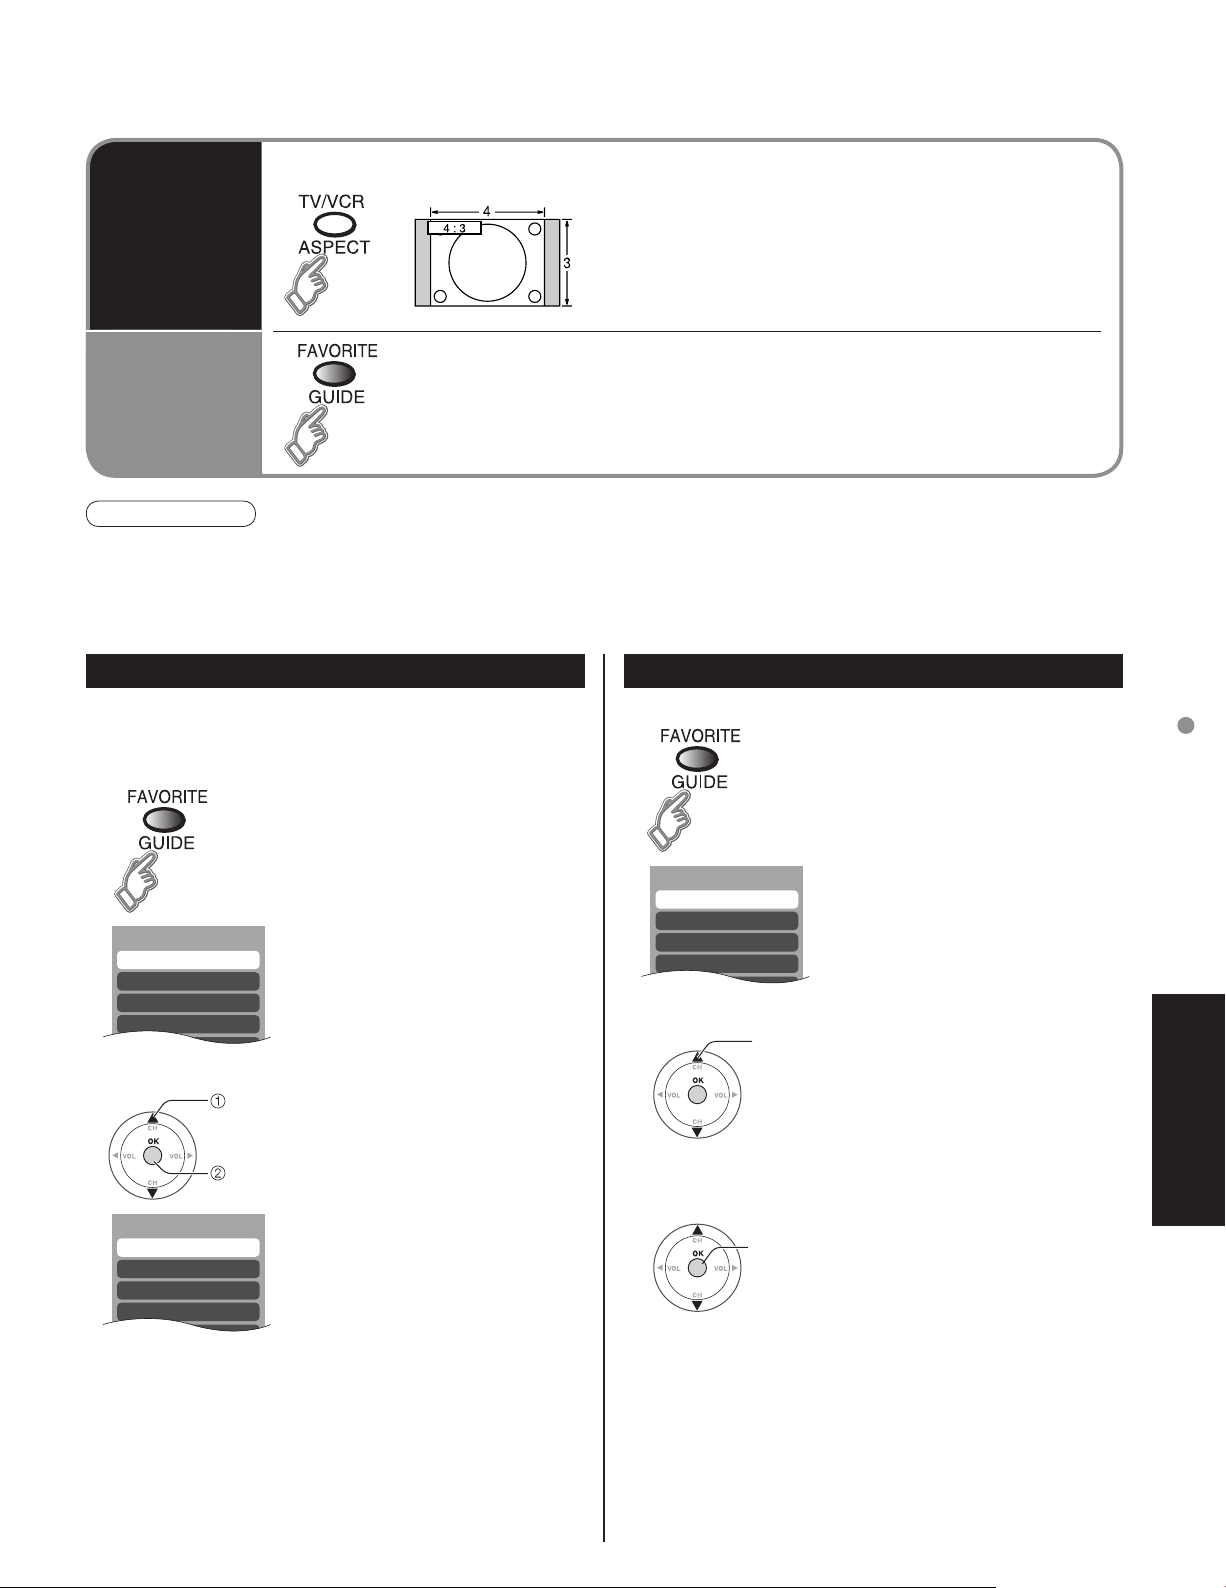
Change the aspect (p. 40)
Change
aspect
ratio
Call up
a favorite
channel
Note
Reselect “Cable” or “Antenna” in “ANT In” of “Auto program” to switch the signal reception between cable TV and
•
antenna. (p. 19)
The channel number and volume level remain the same even after the TV is turned off.
•
FAVORITE
■
Channel numbers registered in Favorite are displayed on the favorite tune
screen. Select the desired broadcast station with the cursor, or using number
keys. (See below)
Each press changes the mode.
•
• 480i, 480p:FULL/JUST/4:3/ZOOM
• 1080i, 720p:FULL/H-FILL/JUST/4:3
Set Favorite Feature Use Favorite Feature
1 Display the channel to be placed on the Favorites list.
2 Hold down FAVORITE for several
seconds.
• Press FAVORITE repeatedly
to change between pages (1/3,
2/3, 3/3, or exit). Pressing ◄ ►
also changes the page.
1 Press FAVORITE.
• Press FAVORITE repeatedly
to change between pages (1/3,
2/3, 3/3, or exit). Pressing ◄ ►
also changes the page.
Viewing
Watching TV
3 Press ▲▼to highlight a position
• You can also use the NUMBER
To delete a favorite channel
•
A memorized channel can be removed from the list by
holding down FAVORITE while it’s position is highlighted.
select
ok
on the list.
Then, press OK to memorize the
displayed CH in that position.
keys (1-9 and 0) to select the
recorded list numbers (1-9 and
0). By doing so, the numbers
will be directly recorded without
having to press the OK key.
2 Press ▲▼ or a Numbered key
select
(1-9 and 0) to highlight a channel
on the list.
• Selecting a channel number
from the list with the Number
keys will display the channel
directly.
3 Press OK to display the
ok
highlighted channel.
11
Page 12
Watching Videos and DVDs
Some Panasonic equipments connected to the TV unit can be operated with the remote control.
Programming the remote control is necessary to operate other manufacturers’ products. (p. 20, 36-38)
With VCR or DVD turned On
1
2
Switch to external input
Press to display the Input select menu.
Select the input mode
Input select
[1] TV
[2] Component
[3] HDMI
[4] Video 1
[5] Video 2
[6] Video 3
(Initial screen)
or
select
enter
Press corresponding NUMBER
key on the Remote Control to
select the input of your choice.
Press to select the input of your
choice, then press “OK”.
If during selection, no action
•
is taken for several seconds,
the Input selection menu is
exited.
Press to return to TV
■
For details, see the
•
manual of the
equipment
or ask your local
dealer.
Note
3
The terminal and label of the connected
•
equipment is indicated.
To label the each connected equipments (p. 13)
Operate
the VCR or DVD with the remote control
VCR DVD
Rewind/Fast Forward Reverse/Forward
Play Play
Pause Pause
Stop Stop
VCR Record
TV/VCR Open/Close
Label
Video 1
[example]
-
Terminal
VCR
(example)
12
Channel Down/UP Slow Reverse/Forward
(For other operations, see p. 36)
Page 13
Input Labels/Closed Caption
Input labels
Display
labels of
external
equipments
CC
Display
Closed
Caption
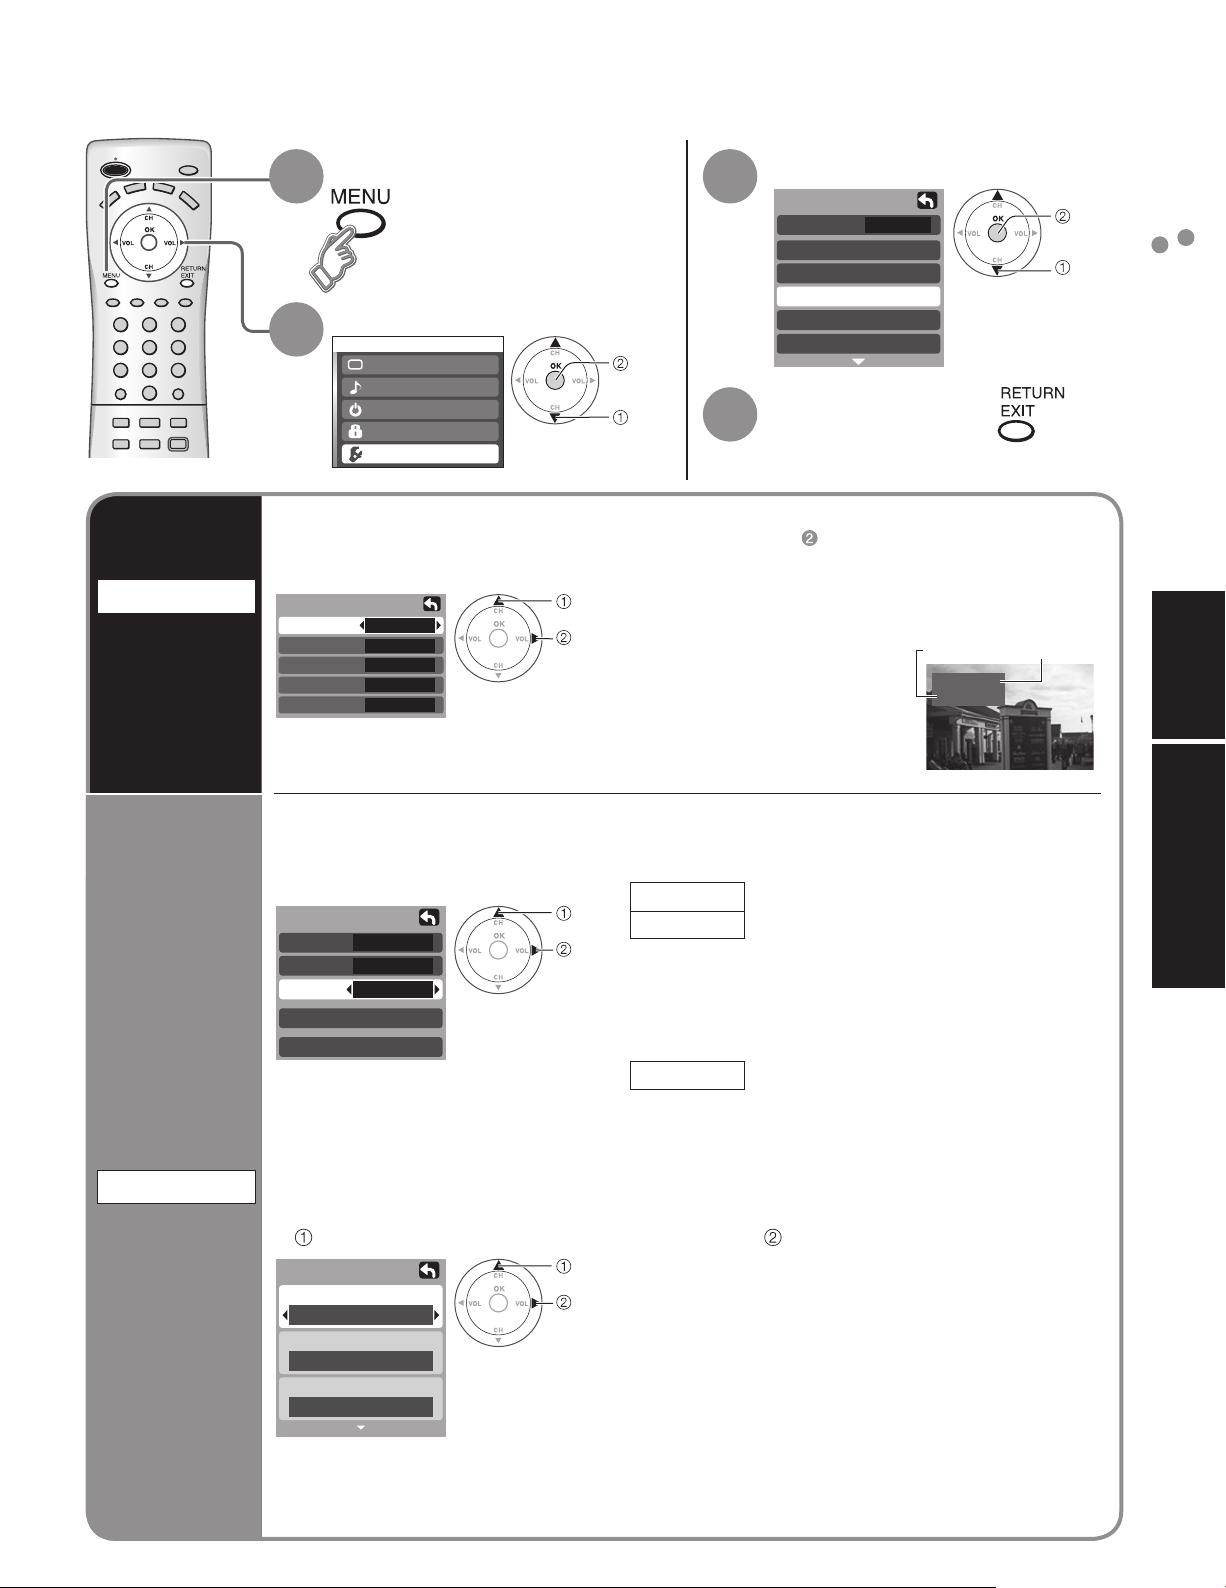
Display menu
1
Select “Setup”
2
Menu
Picture
Audio
Timer
Lock
Setup
The labels of equipments connected to external input terminals can be indicated for easy
recognition on the screen. (In selecting input mode of p. 12 )
Select the terminal and the label of the external equipment
Input labels
Comp.
HDMI
Video 1
Video 2
Video 3
The television includes a built-in decoder that is capable or providing a visual display of the
audio portion. The program viewed must provide Closed Captioning (CC) for the television to
display it. (p. 40)
Select the item and set
■
CC
Mode
Analog
Digital
Digital setting
CC reset
The settings in “Analog” or “Digital”
•
depend on the broadcaster.
To make more in-depth display settings in digital programs
■
Select “Digital setting” and press “OK” button
Digital setting
Size
Automatic
Font
Automatic
Style
Automatic
SKIP
DVD
AUX
SKIP
SKIP
Off
CC1
Primary
(1/3)
next
select
select
set
select
set
select
set
Terminal: Comp./HDMI/Video1-3
•
Label: SKIP*/VCR/DVD/CABLE/DBS/PVR/
•
* If “SKIP” is selected for a
non-connected terminal,
its input is skipped when
switched with TV/VIDEO
button.
Mode
Analog
CC1-4:
T1-4:
Digital
Select the setting.
“Primary”, “Second.”, “Service 3”, “Service 4”,
•
“Service 5”, “Service 6”
Size: Text size
•
Font: Text font
•
Style: Text style (Raised, Depressed, etc.)
•
Foreground: Color of text
•
Fore opacity: Opacity of text
•
Background: Color of text box
•
Back opacity: Opacity of text box
•
Outline: Outline color of text
•
(Identify the setting options on the screen.)
Select “Input labels” or “CC”
3
Setup
CH scan
Language
Program channel
Input labels
CC
Other adjust
Set
■
ALL
Press to exit
4
GAME/AUX/[BLANK]
Select “On” (when not using, select “Off”).
(Choose the closed caption service of
Analog broadcasting.)
Information related to pictures
(Appears at bottom of screen)
Textual information
(Appears over entire screen)
(The Digital Closed Caption menu lets you
configure the way you choose to view the
digital captioning.)
Select the item and set
Label
Video 1
VCR
[example]
next
select
Terminal
Input Labels/Closed Caption
Watching Videos and DVDs
Viewing Advanced
To reset the settings
■
Select “CC reset” and press “OK” button
13
Page 14
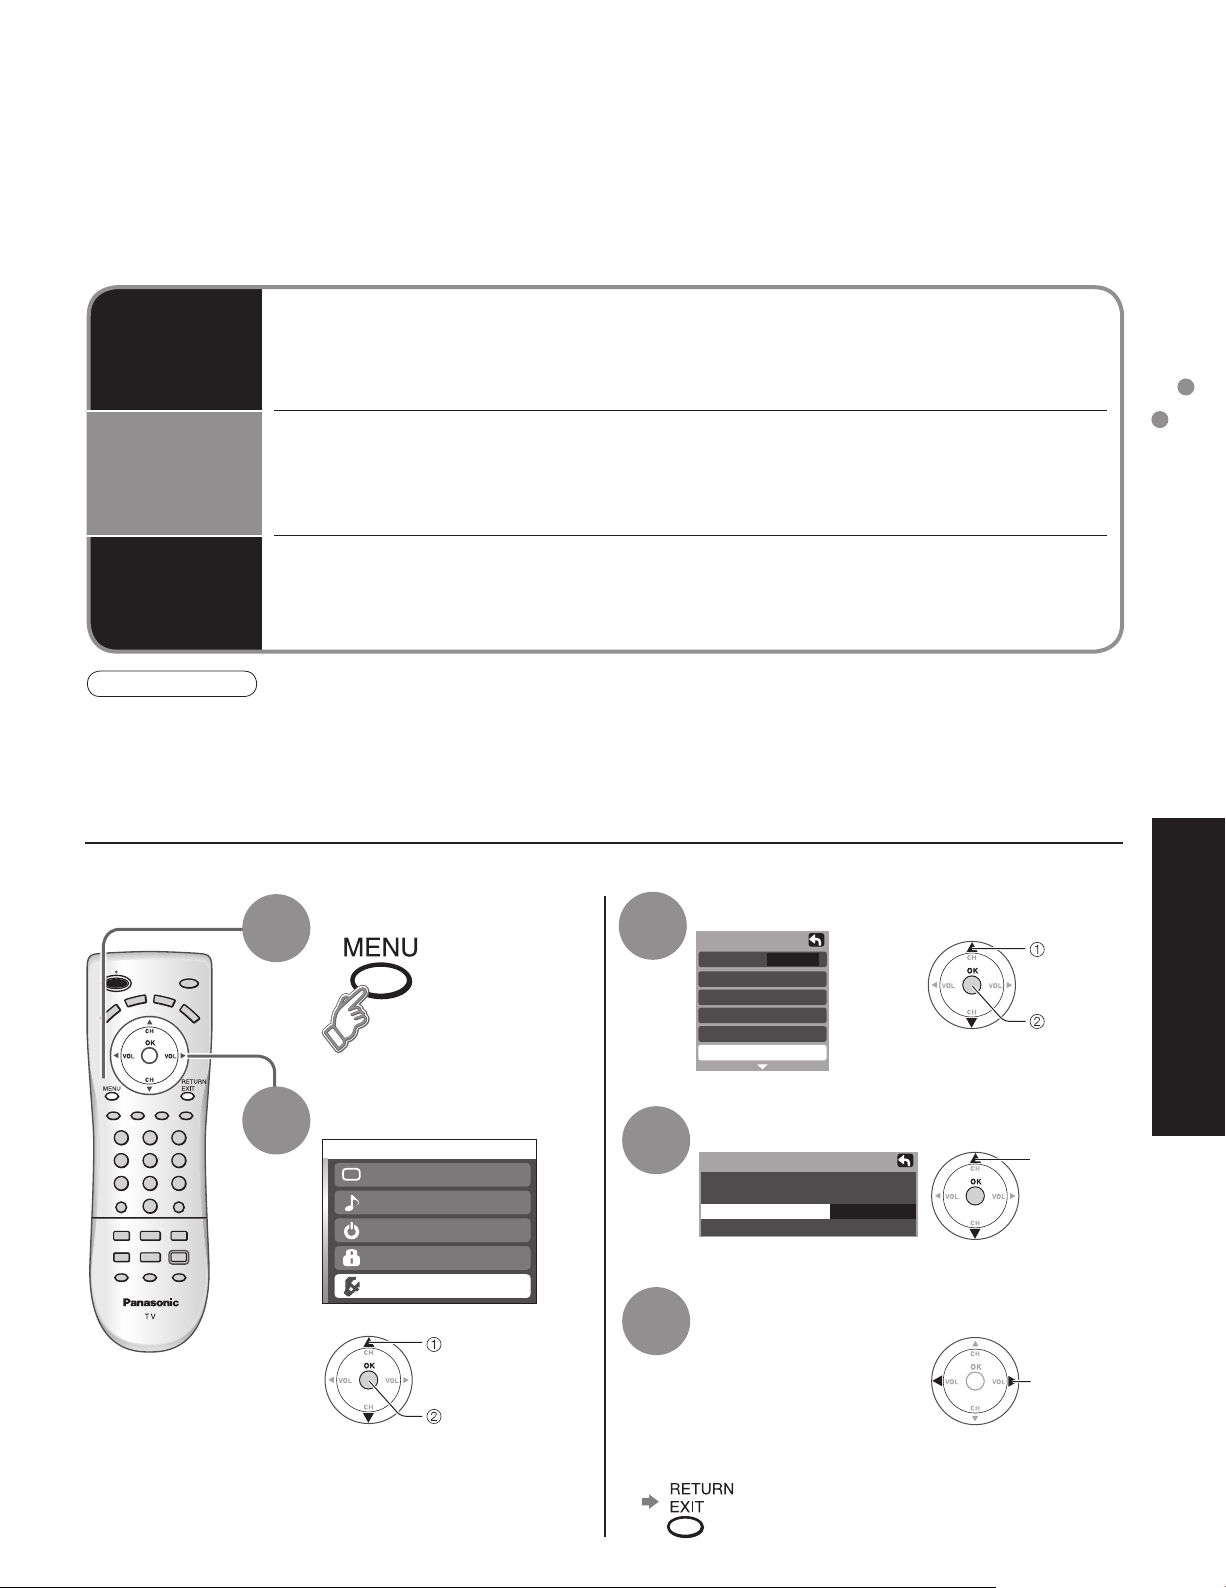
How to Use Menu Functions
Menu list
Various menus allow you to change settings for the picture, sound,
and other functions so that you can enjoy watching TV with your
preferences set.
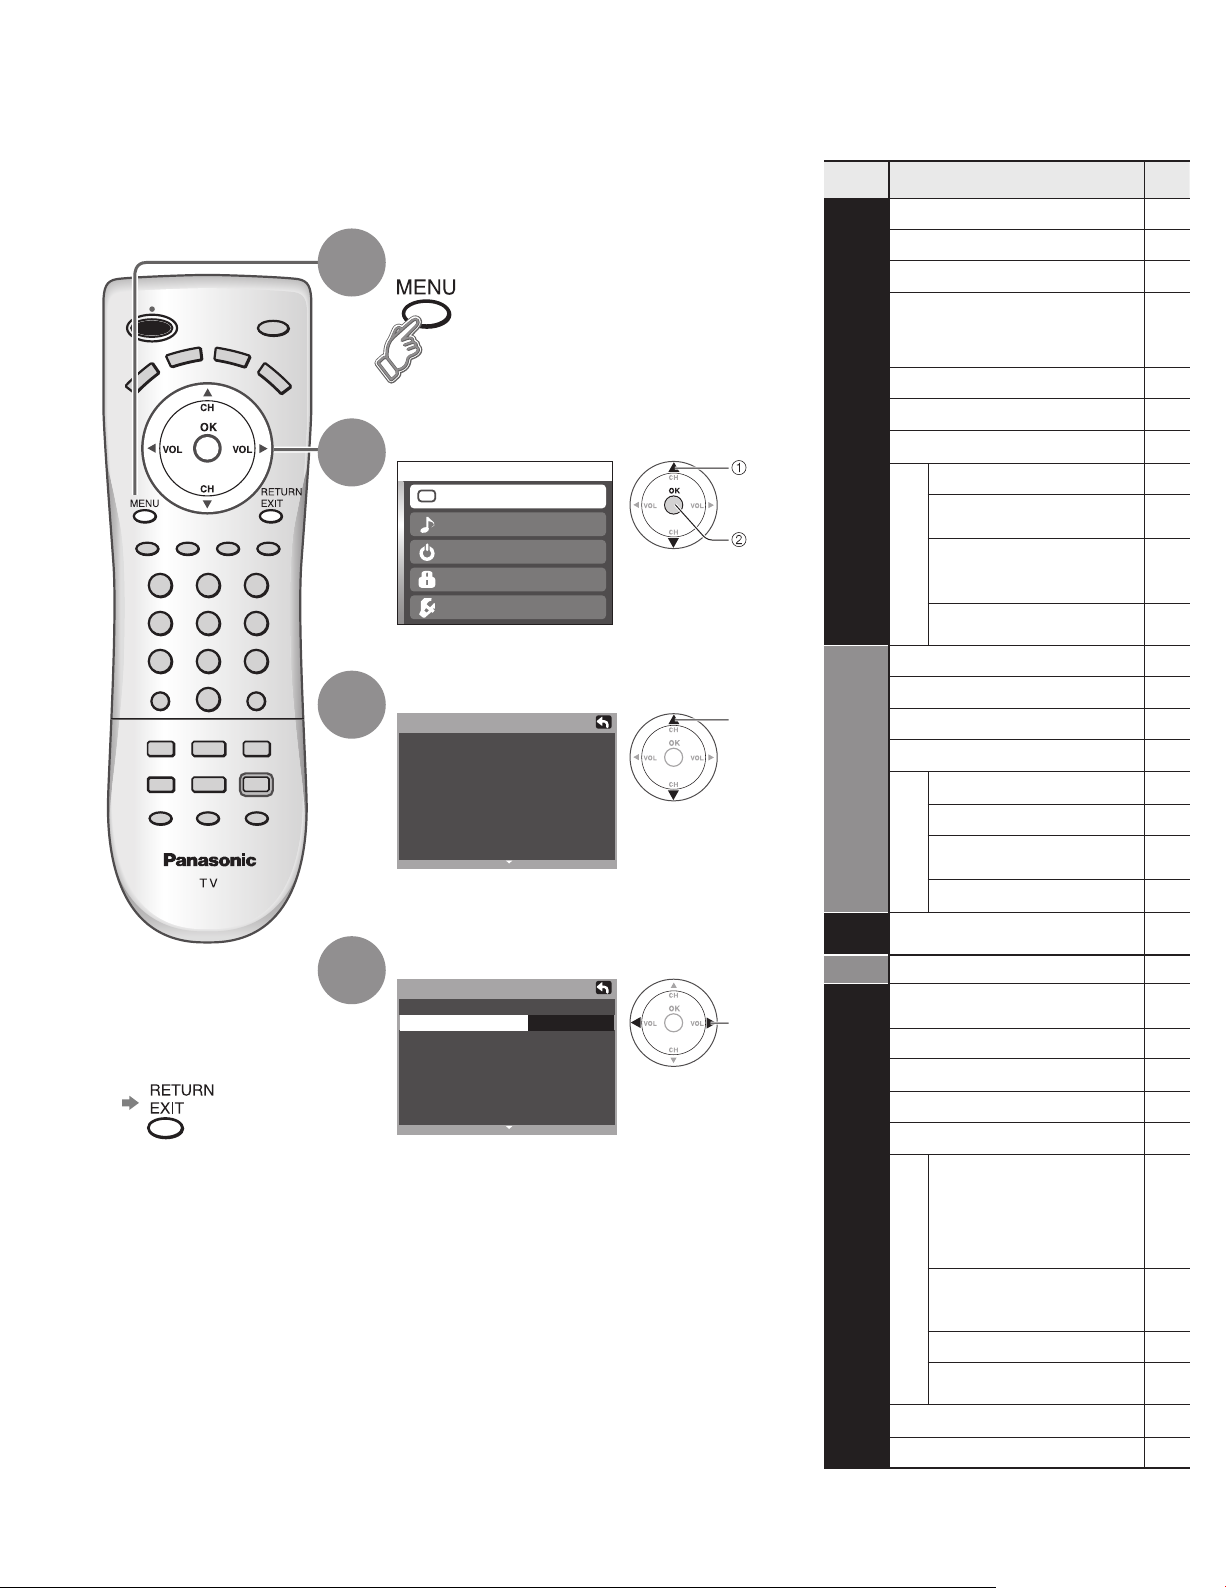
Display menu
1
Displays the functions that
•
can be set (varies according
to the input signal)
Select the menu
2
Menu
Picture
Audio
Timer
Lock
Setup
Select the item
3
Picture 1/2
Normal
Pic. mode
Picture
Brightness
Color
Tint
Sharpness
(example: Picture menu)
Set
Standard
+20Back light
+20
0
0
0
0
select
select
next
■
Menu Item
Normal
Pic. mode
Back light
Picture, Brightness,
Color, Tint,Sharpness
Picture
Color temp
AI picture
Zoom adjust
Video NR
Other adjust
3D Y/C filter
Color matrix
Black level
Normal
Bass
Treble
Audio
Balance
Other adjust
AI sound
Surround
HDMI in
Audio leveler
Press to exit or return
■
to previous screen
4
Adjust or select
Picture 1/2
Normal
Picture
Brightness
Color
Tint
Sharpness
(example: Picture menu)
Standard Pic. mode
Set
+20Back light
+20
Timer
Sleep
Lock
adjust
or
0
0
0
0
select
CH scan
Language
Program channel
Input labels
CC
Setup
Auto power on
Other adjust
Prog-out stop
Ctrl with HDMI
Power save
About
Reset
14
Page 15
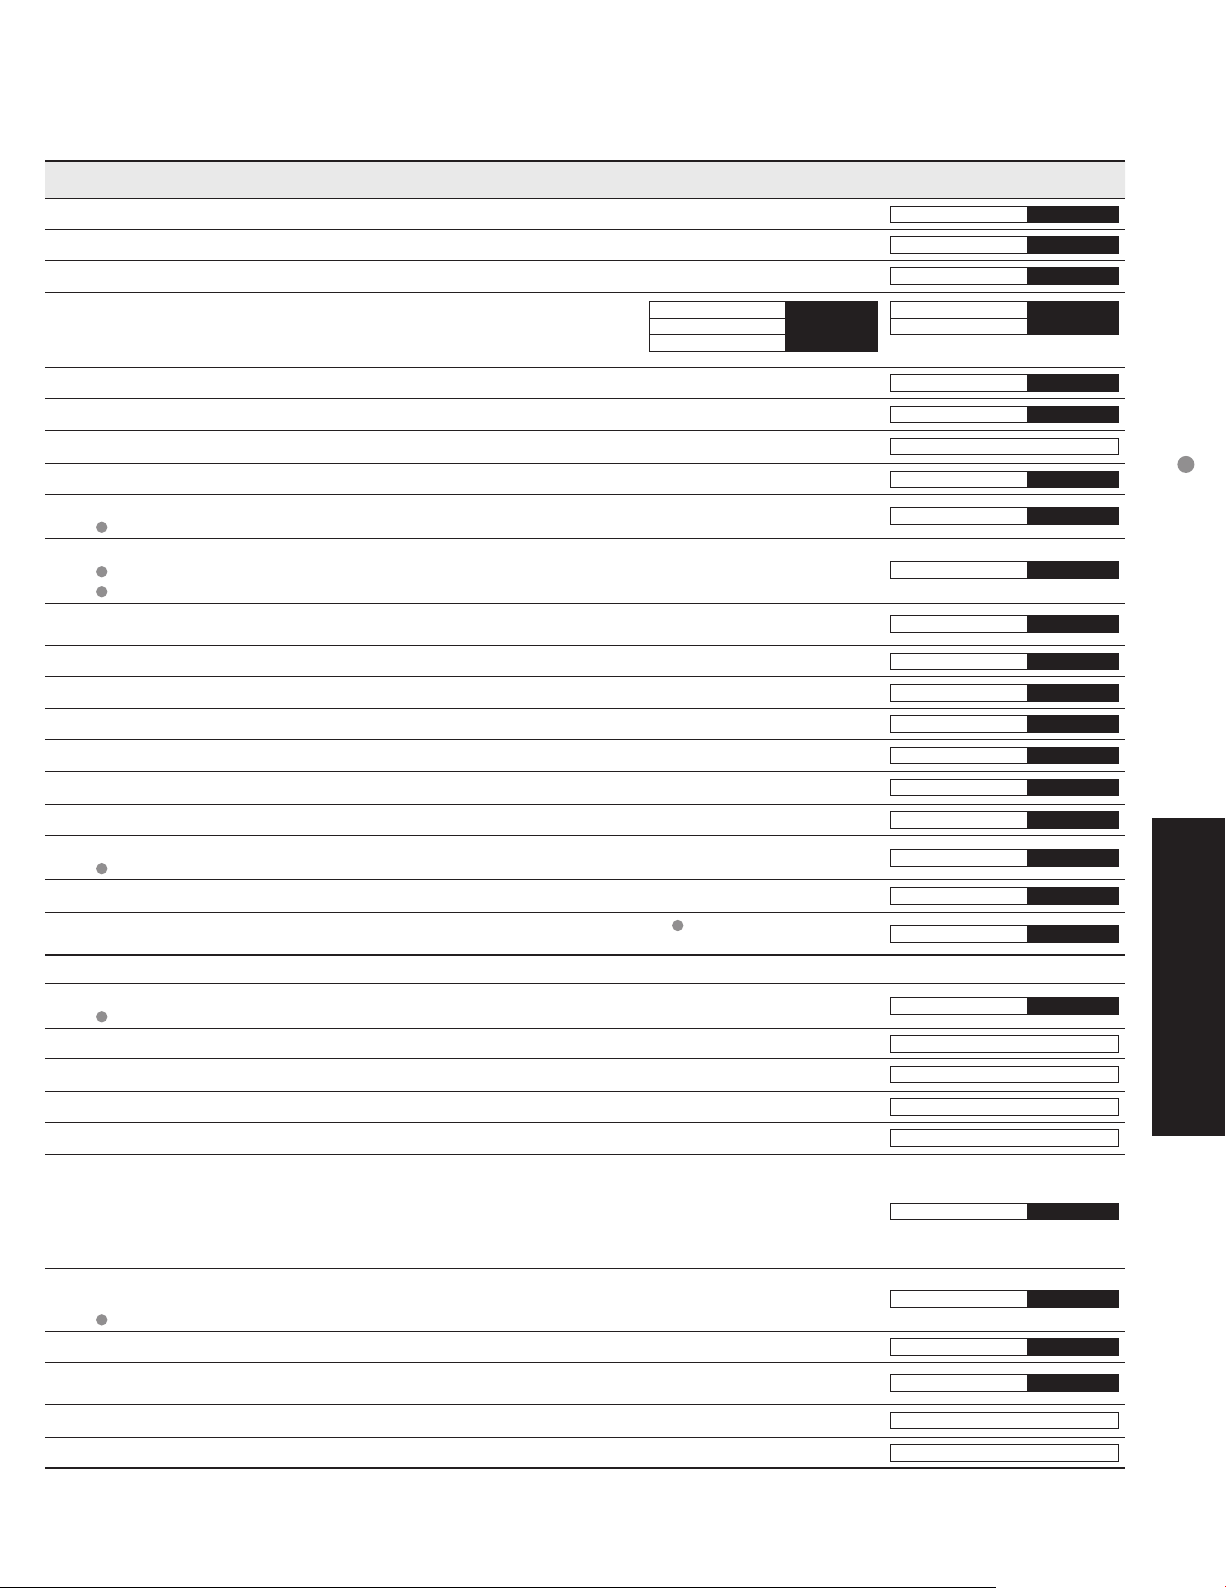
Adjustments/Configurations (alternatives)
Resets all picture adjustments to factory default settings except for “Other adjust”
Basic picture mode (Vivid/Standard/Cinema)
Adjusts luminance of the back light.
Adjusts color, brightness, etc. for each picture mode to suit your
taste
Picture
Brightness
Color
+20
0
0
Normal
Pic. mode
Back light
Tint
Sharpness
Set
Standard
+20
0
0
Selects level of warm colors (red) and cool colors (blue) (Warm/Cool/Normal)
Controls dark areas without affecting the black level or brightness in the overall picture (On/Off)
Adjusts vertical alignment and size when aspect setting is “ZOOM” (p. 40)
Reduces noise, commonly called snow. Leave off when receiving a strong signal. (On/Off)
Minimizes noise and cross-color in the picture. (On/Off)
Not valid on component and HDMI.
Selects image resolution of component-connected devices (SD/HD)
SD: normal vision HD: high-definition vision
Only 480 p signal accepted; regular TV (NTSC) is not available.
Select Dark or Light depending on the picture conditions. (Dark/Light)
The dark scene becomes easy to see. (Valid only for external input signals.)
Reset Bass, Treble and Balance adjustments to factory default settings.
Increase or decrease the bass response.
Increase or decrease the treble response.
Emphasize the left / right speaker volume.
Equalize overall volume levels across all channels and VIDEO inputs. (On/Off)
Enhances audio response when listening to stereo. (On/Off)
Selects according to the signal when HDMI is connected (Auto/Digital/Analog)
Auto: Automatically selects Analog / Digital signal
Minimizes volume disparity after switching to external inputs
Automatically turns off the TV after a pre-selected amount of time.
0/30/60/90 (minutes)
Timer setting is also possible by pressing the “Sleep” button on the remote control. (p. 10)
Locks the channels and programs (p. 16-17)
Selects channels to be displayed when pressing “Channel up/down” buttons. (Fav./All)
Fav.: Only channels registered as Favorite (p. 19)
Selects the screen menu language (p. 9)
Sets receiving channels. (p. 18-19)
Displays labels of external equipments (p. 13)
Displays subtitles (Closed Caption) (p. 13)
Sets how to power on the TV. (Set/Off)
Set : Connect power cord plug to Cable box etc. and control TV’s On/Off on the connected
equipment. (The Sleep Timer will not function if Auto power on is set.)
Off : Supply Power from wall outlet and control TV’s On/Off on TV side.
(“First time setup” menu is displayed when power cord plug is re-inserted after removing it
from the wall outlet.)
Stops output of the pictures specified in this menu.
(Off/Comp./HDMI/Video 1/Video 2/Video 3)
Comp./HDMI cannot output video signals regardless of “Prog-out stop” setting.
Controls equipments connected to HDMI terminals. (p. 21, 22) (On/Off)
Reduces screen brightness to lower power consumption. Eye-friendly for viewing in a dark room
(Standard/Saving)
Displays TV version and software license.
Performing Reset will clear all items set with Setup, such as channel settings.
(p. 18)
Use Reset with care.
Color temp
AI picture
Zoom adjust
Video NR
3D Y/C filter
Color matrix
Black level
Normal
Bass
Treble
Balance
AI sound
Surround
HDMI in
Audio leveler
Sleep
CH scan
Language
Program channel
Input labels
CC
Auto power on
Prog-out stop
Ctrl with HDMI
Power save
About
Reset
Cool
On
On
Off
Off
SD
Light
Set
+ 4
On
Off
Auto
All
Off
Off
On
Standard
On
How to Use Menu Functions
(picture, sound quality, etc.)
0
0
0
60
Advanced
In VIDEO mode, the Audio menu and Setup menu give a smaller number of options.
•
15
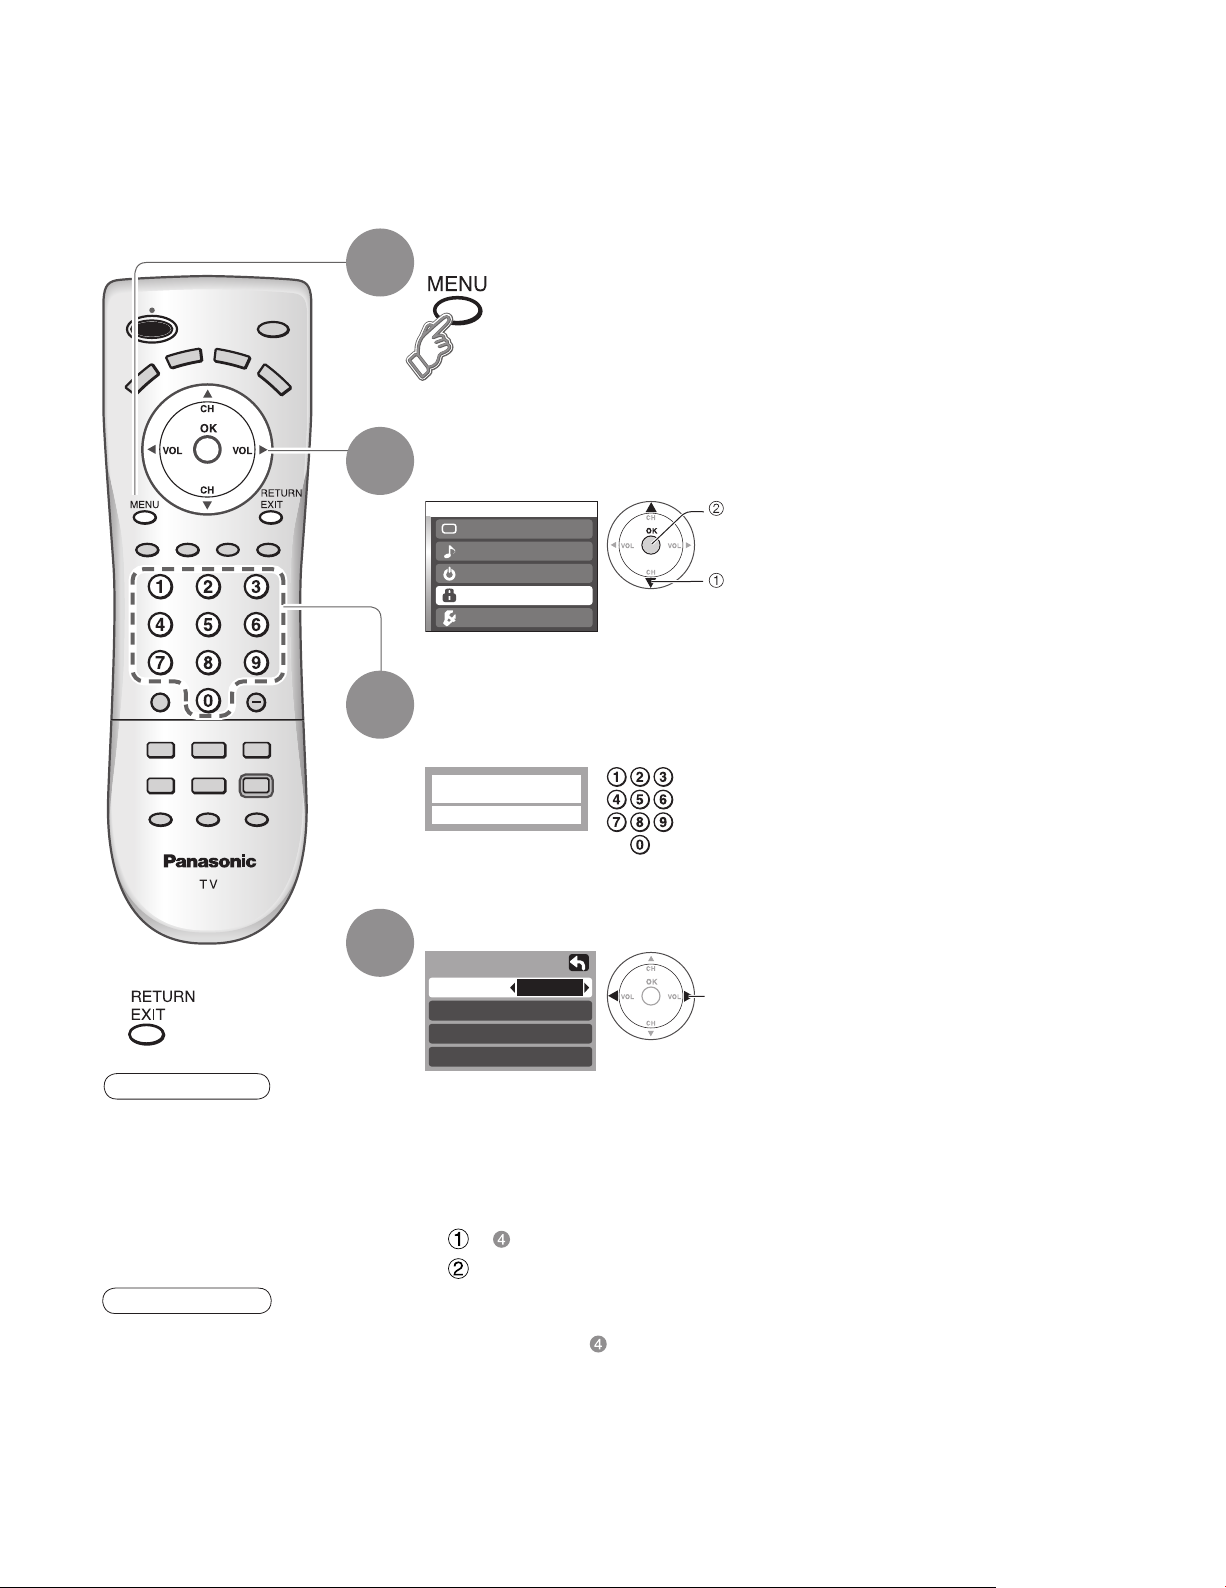
Page 16
Channel Lock
You can lock out specified channels or shows to prevent children from watching objectionable content.
Display menu
1
Select “Lock”
2
You will be asked to enter your password each time you display the Lock menu.
Menu
Picture
Audio
Timer
Lock
Setup
next
select
Press to exit
■
Caution
Make a note of your
•
password in case
you forget it. (If you
have forgotten your
password, consult your
local dealer.)
Note
When you select a
•
locked channel,
a message will be
displayed that allows
you to view the
channel if you input
your password.
3
4
Input your 4-digit password
A 4-digit code must be entered to view a blocked program or change rating
settings.
For the first time, input the
Enter password.
----
Select the Lock mode
Lock
Mode
Channel
Program
Change password
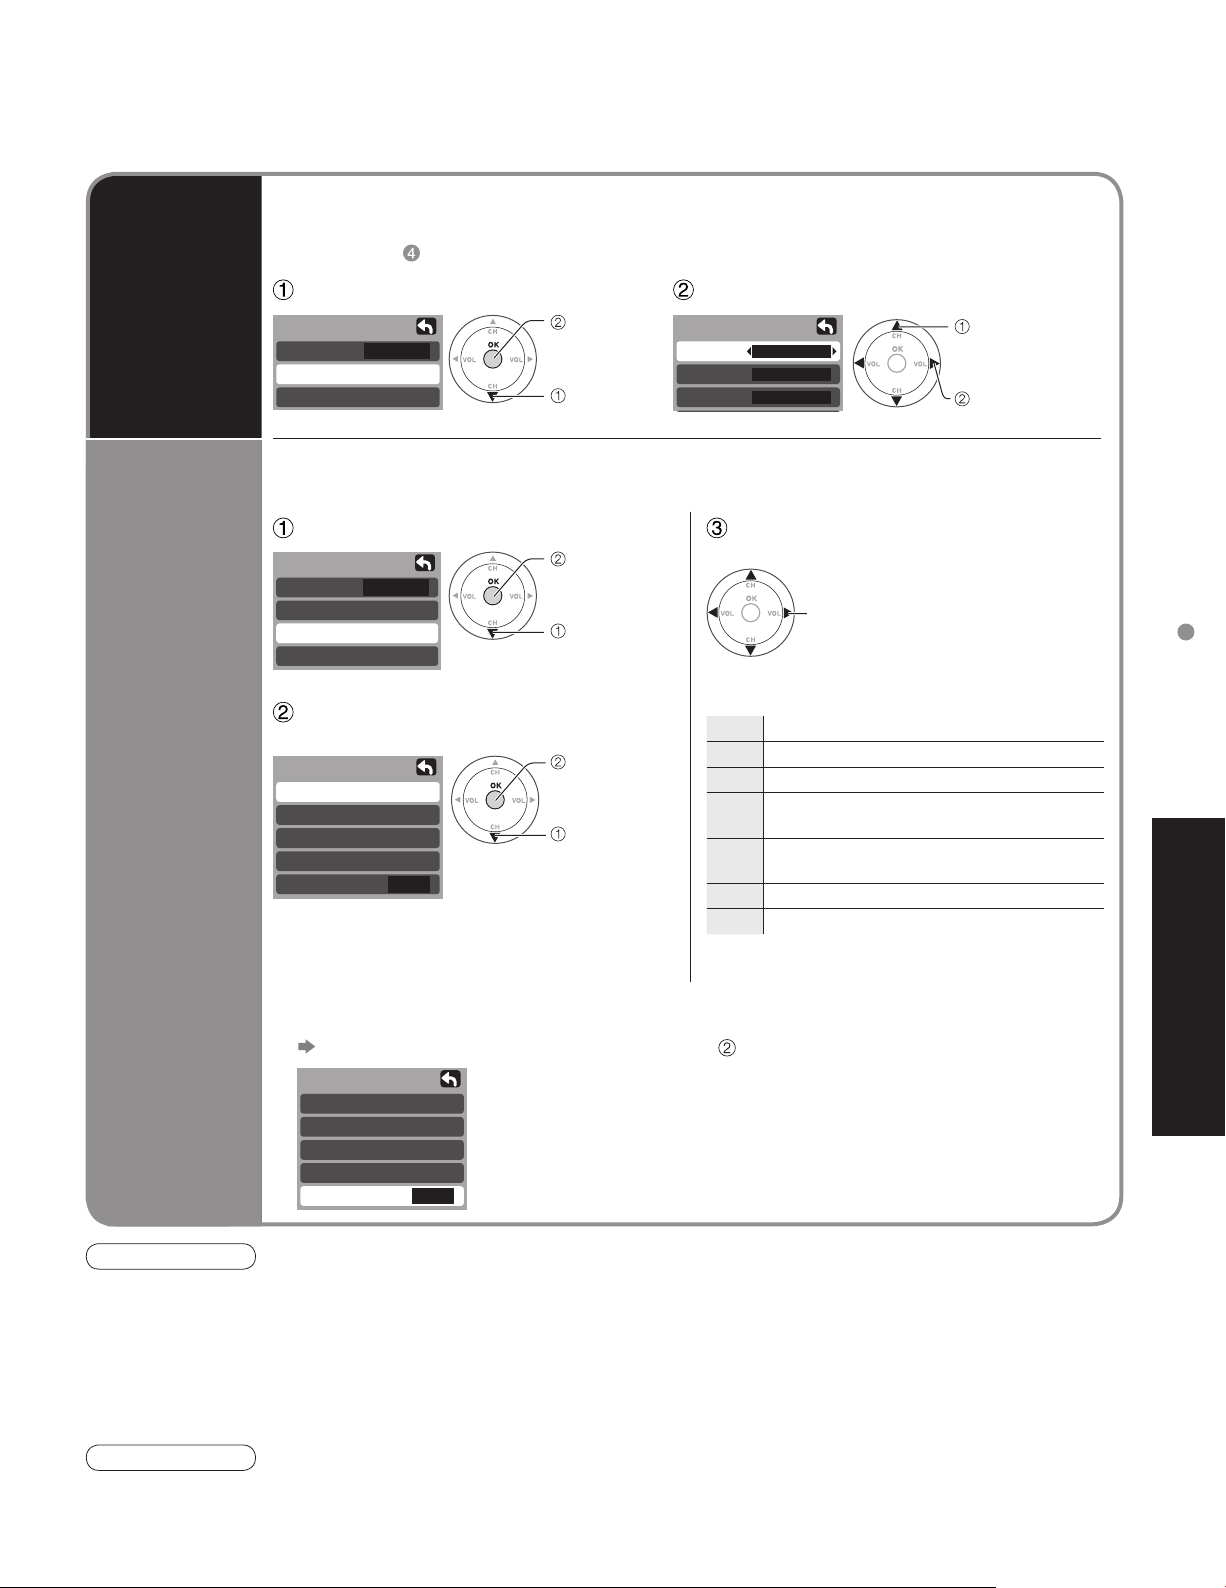
Off: “Channel lock” not activated
•
All: Locks all channels and Video inputs
•
Game: Locks CH3, CH4, and Video inputs
•
CH: Locks specified channels (analog/digital)
•
To change the password
■
In , select “Change password” and press “OK” button
Input the new 4-digit password twice
To cancel the “Channel lock”
■
Select “Off” in
Off
•
number twice to register it.
change
16
Page 17
To select the channel or the rating of the program to be locked
■
Select up to 7 (1-7) channels to be blocked out. These channels will be blocked out regardless
of the program rating.
Select “CH” in
Channel
Lock
Block
program
Select “Channel”
Lock
Mode
Channel
Program
To set rating level
■
“V-chip” technology enables restricted shows to be locked according to TV ratings.
CH
next
select
Select “Program”
Lock
Mode
Channel
Program
Change password
CH
next
select
Select the rating category you wish
to follow
Program lock
MPAA
U.S.TV
C.E.L.R.
C.F.L.R.
Monitor out
MPAA:U.S movie ratings
•
U.S.TV:U.S TV program ratings
•
C.E.L.R:Canadian English ratings
•
C.F.L.R:Canadian French ratings
•
To disable recording of the locked program
■
Select “Monitor out” in “Program lock” menu ( )
Program lock
MPAA
U.S.TV
C.E.L.R.
C.F.L.R.
Monitor out
On
On : Turns on the monitor terminal output for programs that have
Off : Turns off the monitor terminal output for programs that have
Off
set
select
been set to “Blocked.”
been set to “Blocked.”
Select channel to lock
Channel lock
CH 1
CH 2
CH 3
3 - 0
Select the rating to be locked
select
Example of “MPAA” (U.S movie ratings)
Off No rating
G General Audience: All ages admitted
PG Parental Guidance Suggested
PG-13
NC-17 No one 17 and under admitted
•
Parents Strongly Cautioned: Inappropriate for
children under 13
Restricted: Under 17 requires accompanying
R
parent or adult guardian
X Adults only
To get other information (p. 39)
select “CH1-7”
select channel
Channel Lock
Advanced
Caution
The V-Chip system that is used in this set is capable of blocking “NR” programs (non rated, not applicable and
•
none) as per FCC Rules Section15.120(e)(2). If the option of blocking “NR” programs is chosen “unexpected and
possibly confusing results may occur, and you may not receive emergency bulletins or any of the following types of
programming:”
• Emergency Bulletins (Such as EAS messages, weather warnings and others)
• Locally originated programming • News • Political • Public Service Announcements • Religious • Sports
• Weather
Note
The Off rating is independent of other ratings.
•
When placing a block on a specific age based rating level, the Off rating and any other more restrictive ratings will
•
also be blocked.
17
Page 18
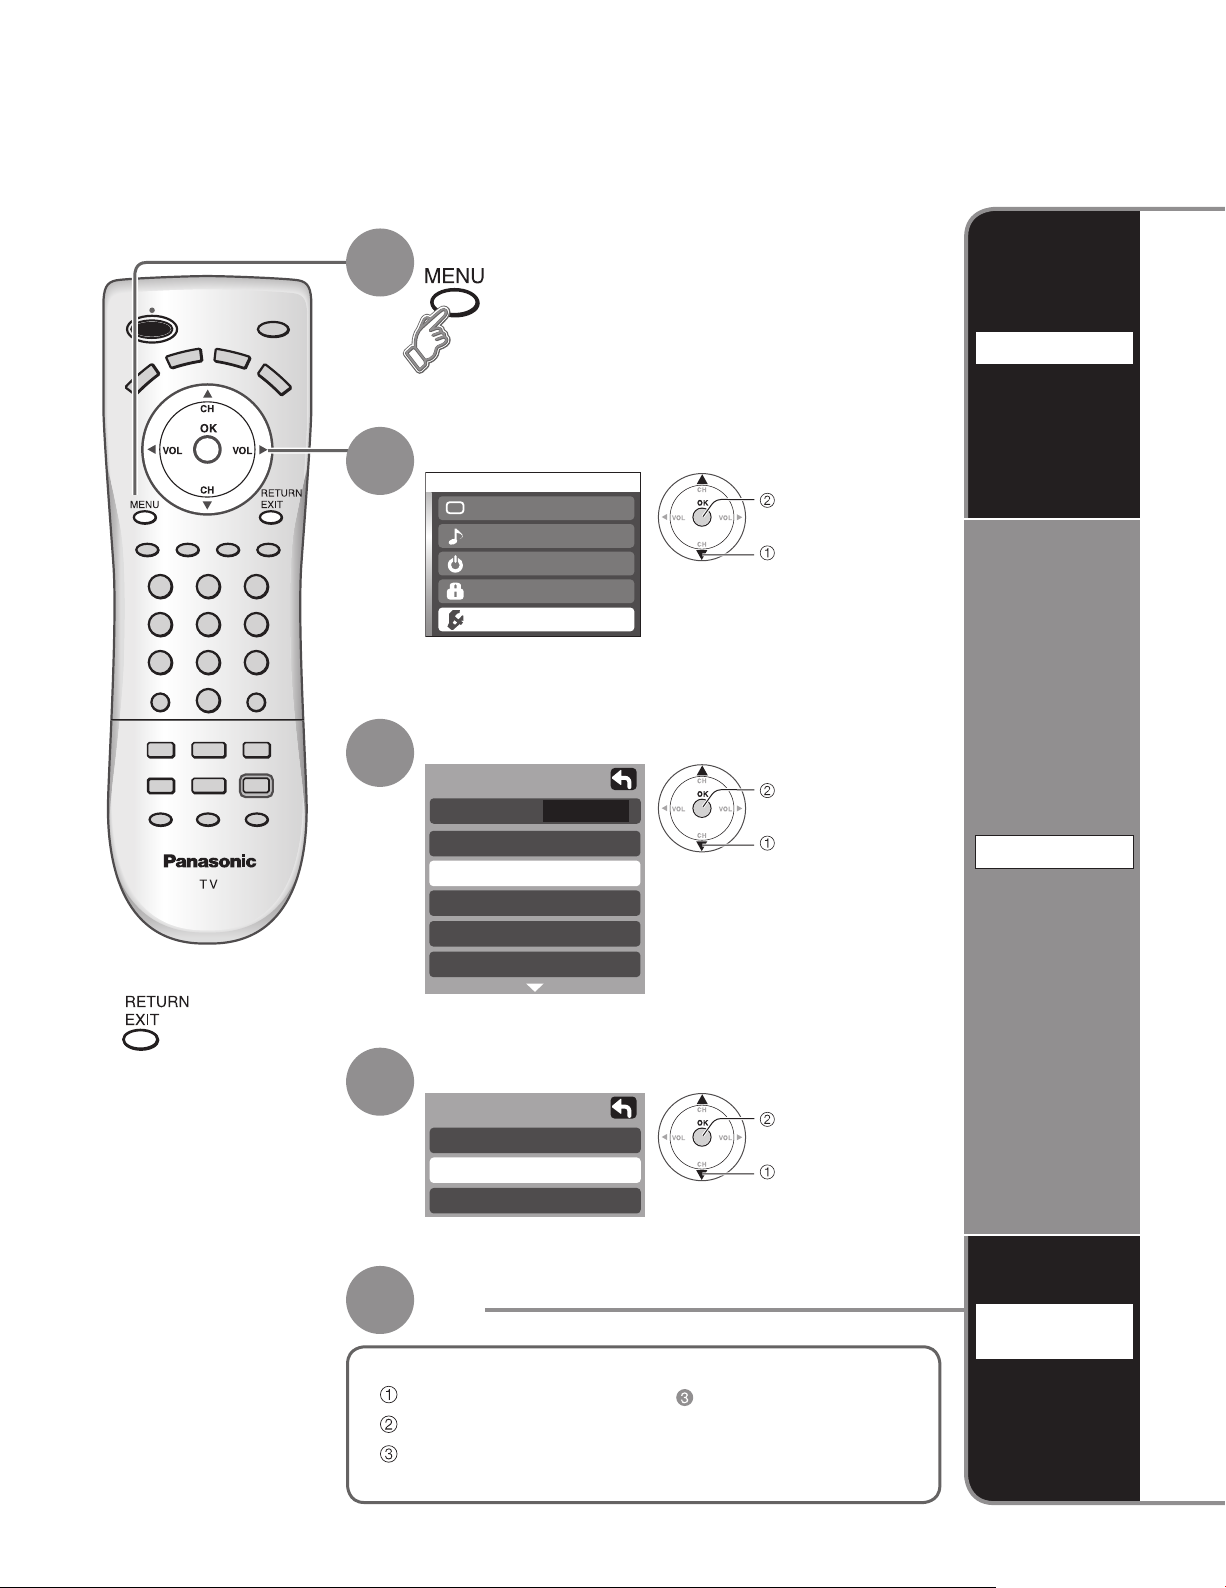
Editing and Setting Channels
The current channel settings can be changed according to your needs and reception conditions.
Display menu
1
Auto
Set
automaticallty
Select “Setup”
2
Menu
Picture
Audio
Timer
Lock
Setup
next
select
Press to exit
■
Select “Program channel”
3
Setup
CH scan
Language
Program channel
Input labels
CC
Other adjust
ALL
next
select
Select the function
4
5
■
Program channel
Auto
Manual
Signal meter
next
select
Set
To reset the settings of setup menu
Select “Reset” in Setup menu ( ) and press “OK” button
Input your 4-digit password with number buttons
Select “YES” on the confirmation screen and press “OK”
button
Manual
Set
manually
Signal
meter
Check
signal
strength
18
Page 19
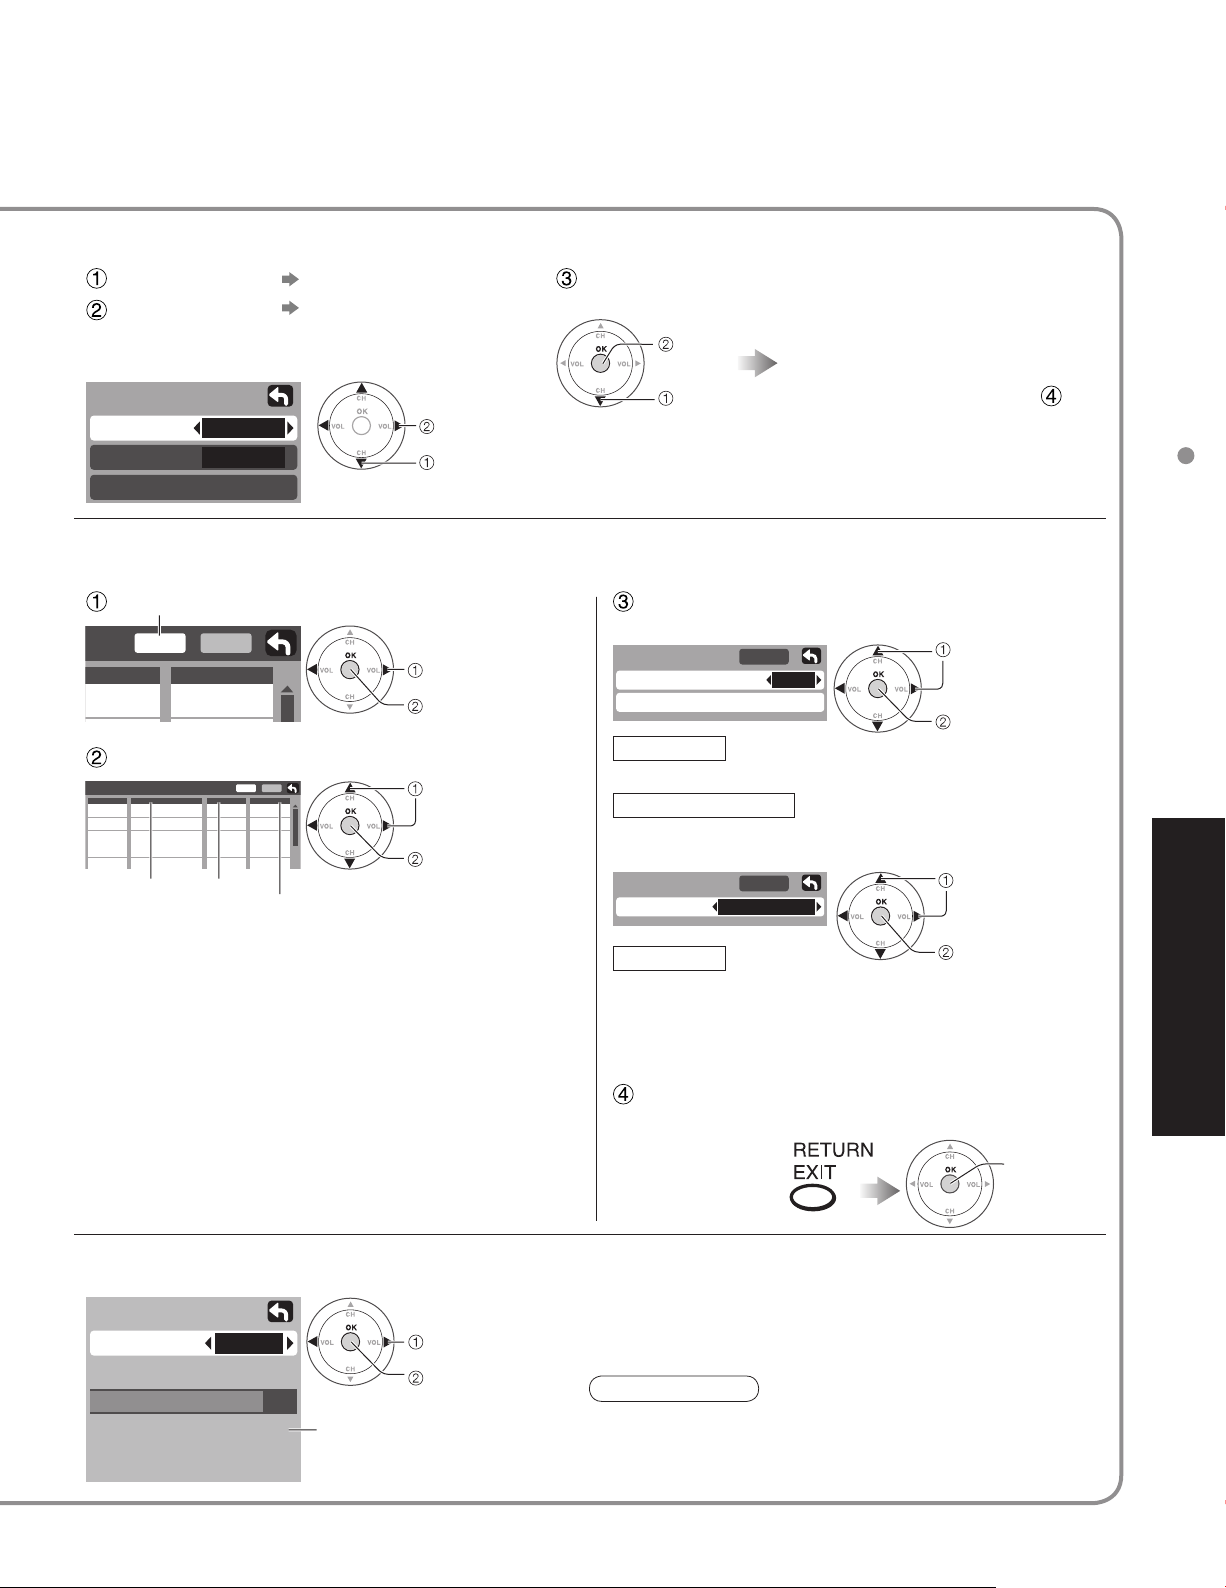
Automatically searches and adds receivable channels to memory.
Select “ANT In”
Select “Mode”
Auto program
ANT In
Mode
Cable
All
(Select Cable or Antenna)
Select All or Analog
All: Analog and digital
Analog: Analog only
set
select
Select “Start scan”
start
select
Settings are made automatically
After completing the setting,
•
select “Apply”. (see below ).
All previously memorized
•
channels are erased.
Start scan
Use this procedure when changing setting of receiving channels or changing the channel display.
Also, use to add or delete channels from channel list manually.
Select “Edit” Edit
Edit
avorite
- - -
Apply
Add
No
Select the item to be edited
Edit
CH
Caption
1
- - -
2
3
- - -
4
- - -
5
- - -
Caption Favorite
Favorite
Apply
Add
- - -
No
2
Yes
- - -
No
- - -
No
- - -
No
Add
select
next
select item to edit
(Caption/Favorite/Add)
next
Caption
•
Caption select
Preset
Caption detail
Apply
---
Preset
Select the station identifier
Caption detail
Rename (maximum 7 characters available)
Favorite
•
Favorite
Favorite
Apply
12
Editing and Setting Channels
select
set/next
select
Advanced
Caption:
•
Changes the station identifier
Favorite:
•
Registers channel to Favorites List
Add:
•
Adds or deletes channels
Favorite
Select the number
Add
•
Press “OK” button to select “Yes (add)” or “No
(delete)”
Select “Apply”
Press to move cursor to “Apply”
Check the signal strength if interference is found or freezing occurs on a digital image.
Signal meter
CH
Signal strength
Current
Peak level
2 - 1
85 %
85 %
change channel
ok
Signal intensity
If the signal is weak, check the antenna.
•
If no problem is found, consult your
local dealer.
Note
Not available if “Cable” is selected in “ANT In”
•
(see above).
Effective only for digital antenna channels.
•
next
ok
(to enter your
program)
If “Channel lock” (p. 16) is activated and “Auto”, “Manual” or “Signal meter” is selected, “Enter password.” will be displayed.
•
19
Page 20
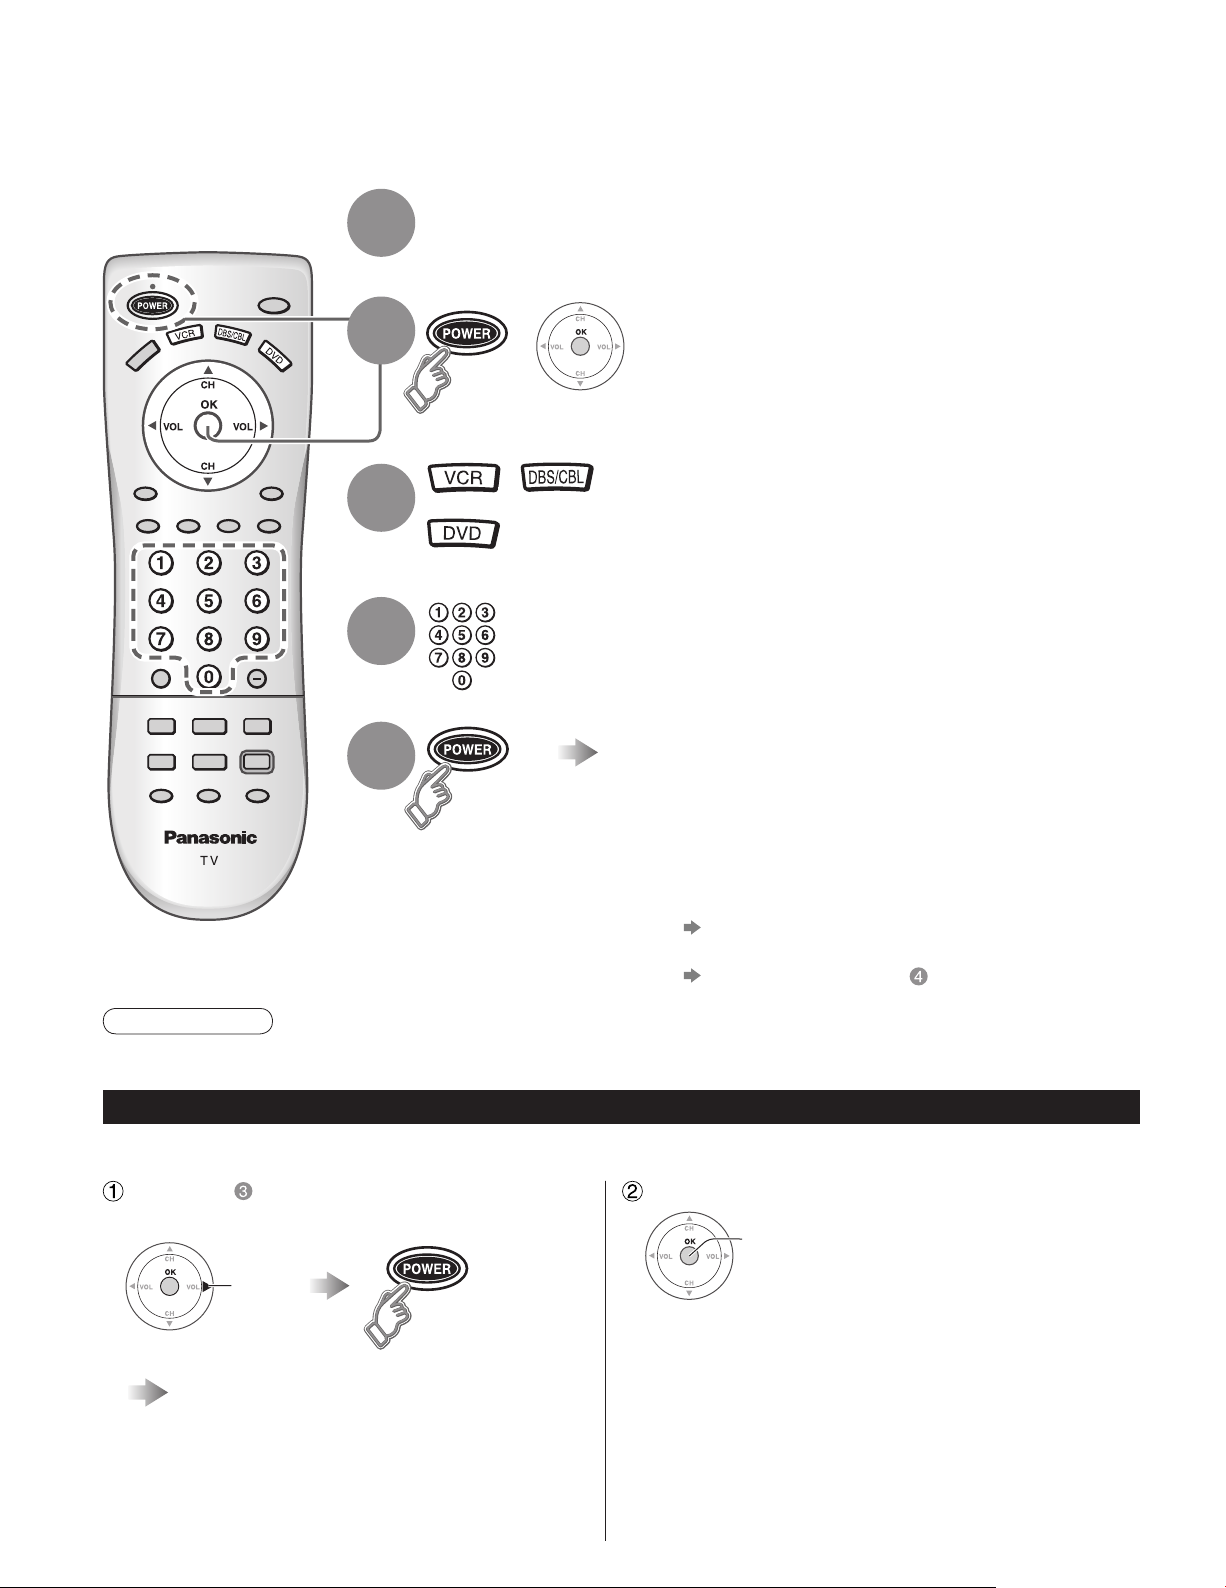
Operating Peripheral Equipment
You can operate other manufacturers’ equipments using this TV’s remote control.
Connect the external equipments to the TV and
1
2
3
4
Power Off the external equipments
Press both buttons simultaneously
+
for more than 3 seconds.
Release the buttons when the equipment selection
•
buttons start flashing.
Select the equipment
with the equipment selection button
The selected button remains lit (other buttons are not
•
lit).
Input the equipment’s 4-digit remote
control code
(p. 37-38)
Operate the equipment with the
5
Caution
Registration will fail if the wrong code is input or it takes more than 30 seconds to register.
•
To find a code not listed in the code list
This procedure searches all codes and is called the “sequence method.”
After step above, change the code and
test
change
remote control
The external equipment turns On.
•
If the equipment does not operate with
■
remote control
When your equipment has a single code
•
Input the remote control code again
When your equipment has multiple codes
•
Change the code with above and test again
When the correct code is found
store
(p. 36)
20
Operate the equipment with the
remote control (p. 36)
Repeat until the code is found
•
It may take many attempts before the correct
•
code is found
Page 21
Control with HDMI “HDAVI Control”
Newer Panasonic audio-video products with HDMI output connections can be controlled using the TV’s
remote. Limited features such as automatic switching to the TV’s HDMI input are available.
This feature is limited to models incorporating Panasonic’s “Control with HDMI”. Refer to the models listed on page
•
22 or the individual instruction manuals for compatibility information.
Depending on the cable used, this function may not be possible.
•
Automatic
input
switching
Power on
link
Power off
link
Note
Before using HDMI control functions, the connected equipment (DIGA) must also be set. For details, see the
•
operation manual for each equipment.
For equipment connection details, see p. 22.
•
Default setting is “On”. If no HDMI equipments are connected or standard HDMI (non- “Control with HDMI”) are
•
used, set to “Off”. (see below)
When “Ctrl with HDMI” is set to “On”, at the start of DIGA playback, TV input automatically
switches to the input compatible with playback equipment.
If using DIGA operation and the DIGA menu is displayed, the TV input automatically
•
switches to DIGA. If TV power is Off, it switches On.
When “Ctrl with HDMI” is set to “On”, the TV is automatically turned on and switched to the
appropriate HDMI input whenever a “Control with HDMI” compatible DIGA (Panasonic DVD
Recorder) is initially turned on and Play mode is selected.
When “Ctrl with HDMI” is set to “On” and the TV is turned off, the connected DIGA (Panasonic
DVD Recorder) is also automatically turned off.
DIGA (Panasonic DVD Recorder) will not turn off if it is still in rec mode.
•
Select “Other adjust”
Setup
CH scan
Language
Program channel
Input labels
CC
Other adjust
ALL
1
Display menu
3
Control with HDMI “HDAVI Control”
Operating Peripheral Equipment
Advanced
select
next
2
Select “Setup”
Menu
Picture
Audio
Timer
Lock
Setup
select
next
Select “Ctrl with HDMI”
4
Other adjust
Auto power on
Prog-out stop
Ctrl with HDMI
Power save
Off
Off
On
Standard
Select “On” or “Off”
5
Press to exit or return to previous screen
■
select
change
21
Page 22
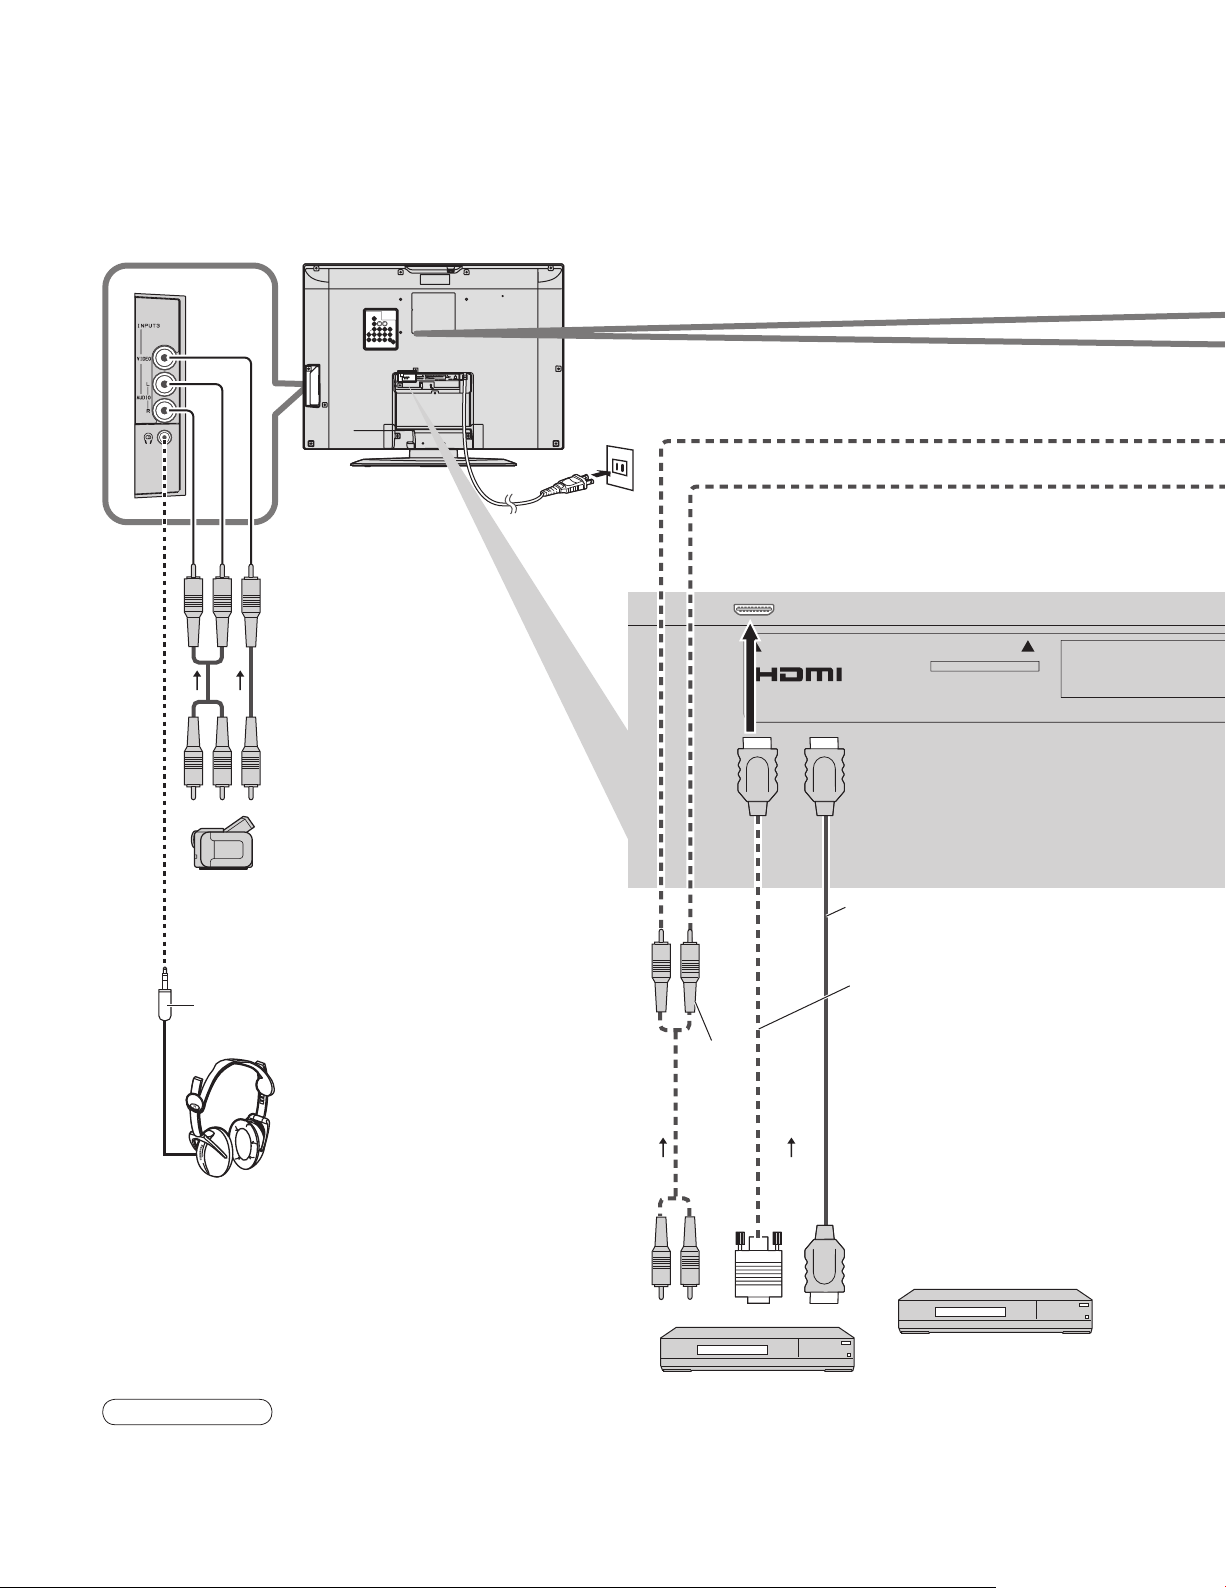
Recommended AV connections
These diagrams show our recommendations for how to connect the TV unit to your various equipments.
For other connections, consult the instructions of each equipment and the specifications (p. 44).
For additional assistance, please visit our website at www.panasonic.com
Power Cord
(Connect after all the other
connections.)
Back of the unit
M3 plug
Headphones/
Earphones
(not supplied)
To watch camcorder
■
images
Camcorder
VCR
DVD Player
To watch digital
■
video image
DVD Player or
Set Top Box
(HDMI compatible
machine only)
Audio
cable
AV IN
or
SERVICE ONLY
HDMI cable
HDMI-DVI
conversion cable
Control with HDMI
■
(p. 21)
Connect with HDMI cable
DIGA
(Panasonic DVD Recorder)
22
Note
Individual HDMI equipments may require additional menu settings specific to each model. Please refer to their
•
respective operating instruction manuals.
As of March 2006, models with “Control with HDMI” are: DMR-ES25, DMR-ES45V, DMR-EH55, DMR-EH75V
•
and DMR-ES46V (USA only)
See www.panasonic.com for future models with “Control with HDMI”
Page 23

ANT
DIGITAL AUDIO OUT
Digital Audio Out
To watch DVDs
■
DVD Player
Set Top Box
Recommended AV connections
Advanced
Cable TV
or
Cable Box
or
DVD Recorder / VCR
■
Optical digital
audio cable
OPTICAL IN
Amplifier
Note
Set the TV channel to CH3 or CH4 for using Cable Box
•
Connection.
For further information on Cable Box Connection, consult to
•
your local cable company.
The picture and audio input signals connected to a terminal
•
specified in “Prog-out stop” (p. 14-15) cannot be output from
“OUTPUT” terminals.
However, audio output can be obtained from “Digital Audio
Out” terminal.
When an equipment (STB, DVD, etc.) is connected to HDMI
•
or COMPONENT terminals, only audio signals can be
obtained. No video signals can be out put.
To listen to the TV through
■
speakers
Turn Off the
•
TV speakers.
23
Page 24
Accesorios/Opción
Compruebe que ha recibido todos los elementos que se indican.
Accesorios
Transmisor de
□
mando a distancia
EUR7613ZG0
•
Pilas para el transmisor
□
de mando a distancia
Pila AA
•
(2)
Cable HDMI
□
(para TC-26LE60 y TC-32LE60)
Manual de
□
instrucciones
Instalación de las pilas del mando a distancia
Empuje
Tarjeta del cliente
□
(para EE. UU.)
1
Deslice para abrir
2
Cierre
Ponga las polaridades (+ ó -)
en las posiciones correctas
Póngase en contacto con su concesionario
Panasonic más cercano para adquirir la ménsula
de montaje en pared recomendada. Para conocer
más detalles, consulte el manual de instalación
de la ménsula de montaje en pared.
Soporte para colgar
en pared (vertical)
TY-WK32LR2W
•
Tarjeta para el plan de asistencia
□
al cliente (para EE. UU.)
Precaución
La instalación mal hecha puede causar fugas de electrolito y
•
corrosión, lo que podría dañar el mando a distancia.
No mezcle pilas viejas y nuevas.
•
No mezcle pilas de tipos diferentes (pilas alcalinas y de
•
manganeso, por ejemplo).
No utilice baterías (Ni-Cd).
•
No queme ni rompa las pilas.
•
Anote los códigos de mando a distancia antes de cambiar las
•
pilas en el caso de que tenga que restablecer los códigos.
(págs. 37-38)
Accesorio opcional
ADVERTENCIA
No utilizar una ménsula de Panasonic ó montar la unidad usted
•
mismo puede ser la causa de que el consumidor corra riesgos.
Cualquier daño que resulte de no haber sido un instalador
profesional quien montó su unidad anulará su garantía.
Asegúrese de pedir siempre a un técnico calificado que lleve a
•
cabo la instalación. Una instalación incorrecta podría ser la causa
de que el equipo cayera, causando lesiones a personas y daños
en el producto.
No monte el televisor LCD directamente debajo de las luces
•
del techo (luces direccionales, reflectores ó luces halógenas)
que producen típicamente mucho calor. De lo contrario podrían
deformarse ó dañarse las piezas de plástico de la caja.
24
Cómo retirar la base del televisor
1 2
Retire dos tornillos.
Saque la parte de plástico.
Estera de espuma ó paño
blando y grueso
Retire cuatro tornillos.
Saque la parte metálica.
Page 25
Colocación del receptor
Coloque el receptor a una distancia confortable para ver. Evite colocarlo donde la luz solar directa u otra luz brillante
(incluidos reflejos) caiga sobre la pantalla.
La utilización de algún tipo de iluminación fluorescente puede reducir el alcance del transmisor del mando a distancia.
La ventilación adecuada es esencial para impedir el fallo de los componentes internos. Manténgase alejado de las
áreas donde el calor o la humedad sea excesivo.
Cómo utilizar la base del LCD
Ajuste el soporte con el ángulo deseado
El ángulo del soporte se puede girar 20° hacia la derecha/izquierda.
Identificación de los controles
El botón POWER
Volúmen
Navegaciones del
menú
Cambia TV/VIDEO
Indicador de alimentación (conectada: rojo, desconectada: apagado)
Sensor del control remoto
Dentro de unos 7 metros enfrente del televisor.
Nota
El televisor consumirá algo de corriente siempre que el enchufe del cable de alimentación esté introducido en la
•
toma de corriente.
Conecta/desconecta la alimentación.
(Se utiliza cuando está activado el botón de la
alimentación.)
Seleccione el modo de audio para
ver la televisión. (pág. 28)
Selecciona canales
en orden.
Identificación de los controles
Accesorios/Opción
Configura el mando a distancia para
hacer la comunicación con otros
dispositivos.
Volúmen
Navegaciones del menú
Selecciona canales en orden.
Navegaciones del menú
Visualiza el menú principal. (págs. 30-31)
Selecciona el modo de entrada. (pág. 32)
Visualiza ó elimina la bandera de canal.
(pág. 28)
Cambia al canal visto previamente.
Temporizador para acostarse
(MINUTOS) (pág. 28)
Cambia la relación de aspecto
(pág. 29)
Selección/OK/Cambio
RETURN (para volver al menú anterior)
Salir (del menú)
Controla la función de la lista de
canales favoritos.
GUÍA para DBS
Encendido / Apagado del
silenciamiento del sonido
Teclado numérico para seleccionar
cualquier canal ó para hacer
introducciones alfanuméricas en los
menús. (pág. 28)
Acceso directo a canales para DTV
y DBS (pág. 28)
Operaciones de equipos externos
(pág. 32) (Videograbadoras, DVDs, etc.)
(pág. 29)
[Resumen]
Español
25
Page 26
Conexiones
Para ver la televisión
■
Parte posterior de la unidad
Cable de alimentación de
CA (Conéctelo después de
terminar todas las demás
conexiones.)
ANT
Receptor de televisión
por cable
IN OUT
ó
Antena de VHF / UHF
ó
ANT IN
ANT OUT
Para reproducir vídeo
Video
IN
L
Audio
OUT
R
Video
OUT
L
Audio
IN
Las señales de S-Vídeo
tienen prioridad.
Notas
Con este televisor no se suministran todos los cables ni equipos externos mostrados en este manual.
•
Para obtener más ayuda, visítenos en www.panasonic.com
•
Al conectar cables de vídeo se da prioridad al cable de S-vídeo cuando están conectados el terminal de entrada
•
S-VIDEO y el terminal de entrada VIDEO.
Cuando reciba señales de canales digitales, todos los formatos digitales serán convertidos en sentido
•
descendente en vídeo NTSC compuesto que saldrá a través de los terminales de salida de programas.
Algunos programas contienen una señal de protección de derechos de autor para impedir la grabación con una
•
videograbadora.
R
S-Video
OUT
Videograbadora con
sintonizador de TV
Grabadora DVD /
Videograbadora
26
Page 27
Ajuste inicial
“Ajuste inicial” sólo se visualiza cuando el televisor se enciende por primera vez después de conectar el
cable de alimentación de CA en una toma de corriente.
Sólo disponible cuando “Autoencendido” (págs. 30-31) está en “Sí”.
Seleccione la antena y los modos de entrada
Establezca
Seleccione
Inicie.
Seleccione
“Iniciar
escaneo”.
Seleccione
“Aceptar”.
Aceptar
1
2
3
Encienda el televisor con el
interruptor POWER.
Seleccione su idioma.
Ajuste inicial
Idioma
Programa auto
Idioma
Idioma
English Español Français
Español
Pulse para ir a la pantalla anterior
ó seleccionar un icono, y luego
pulse OK para obtener el mismo
resultado.
Siguiente
Seleccione
Configuración automática de canales
Seleccione “Programa auto”.
Programa auto
Ent. ANT
Modo
Iniciar escaneo
Ent. ANT
Cable: Televisión por cable
Modo
Todos : Digital y analógico
Análogo: Analógico solamente (Reduce el
Acerca de los sistemas de emisión
•
Analógico : Sistema de televisión tradicional
Digital : Un sistema nuevo que le permite
Cable
Todos
Antena: Antena
tiempo para la recepción)
ver más canales con imagen y
sonido de alta calidad.
Inicie la exploración de los canales.
Programa auto
Ent. ANT
Modo
Iniciar escaneo
Escaneando canales análogos ...
Progreso
Cable
Todos
Los canales disponibles
•
(analógicos/digitales)
se establecen
automáticamente.
Confirme los canales registrados.
Editar
Aceptar
Favoritos
- - -
2
Agregar
No
Si
Ajuste inicial
Conexiones
[Resumen]
Español
Ajuste inicial
Idioma
Programa auto
Siguiente
Seleccione
Para poner en la memoria los canales que
•
fueron localizados mediante la exploración
automática, mueva el cursor a “Aceptar” y
pulse OK.
Pulse para salir ó volver a la pantalla anterior.
■
Nota
Para cambiar la configuración posteriormente, vaya a
•
la pantalla Menu (Págs. 30-31)
27
Page 28
Para ver la televisión
Conecte el receptor de televisión por cable cuando vaya a ver televisión por cable. (Pág. 26)
Cambie al modo de
1
televisión.
Conecte la
2
alimentación
Otras funciones útiles (Utilícelas después de )
■
Apaga la unidad después de pasar un periodo de tiempo de 0 a 90 minutos que
Temporizador
para
acostarse
puede ajustarse a intervalos de 30 minutos.
0/30/60/90 (minutos)
•
Seleccione un número de
3
canal.
Arriba
ó
Abajo
Para introducir directamente el
■
número de un canal digital
Cuando se sintonicen canales
digitales, presione el botón
para introducir el número
menor en un número de canal
complejo.
Ejemplo: CH15-1:
Escucha
con SAP
(Programa
de audio
secundario)
Recuperación
de
información
Seleccione el modo de audio para ver la televisión.
■
Modo digital
•
Pulse SAP para seleccionar la siguiente pista de audio (si está disponible) cuando se recibe
un canal digital.
Pista de audio 1 de 1
Modo analógico
•
Pulse SAP para seleccionar el modo de audio como se describe a continuación.
(La flecha muestra la selección.)
•
Cada vez que se pulsa el botón SAP, el modo de audio cambiará como se muestra a continuación.
(Estereo/SPA/Mono)
Visualice ó elimine la bandera de canales.
(Ingles)
Canal
15-2
ABC - HD
Identificador
de emisora
CC SPA
SPA
Nivel de clasificación
T V -G
Resolución
de señales
1080I
Estándar
Modo de
imagen
Relación de aspecto
4 : 3
30
Tiempo restante del
temporizador para acostarse
28
Page 29
Ajustes 1/3
[1]
[2]
[3]
[4]
Ajustes 1/3
[1] 26-1
[2]
[3]
[4]
Favoritos 1/3
[1]
[2]
[3]
[4]
Cambie la relación de aspecto
Cambio de
la relación
de aspecto
Llamada
a un canal
favorito
Nota
Vuelva a seleccionar “Cable” ó “Antena” en “ANT In” de “Programa auto” para cambiar la recepción de la señal
•
entre televisión por cable y antena.
El número del canal y el nivel del volúmen se fijan incluso después de apagar el televisor.
•
FAVORITOS
■
Los números de canales de Favoritos se visualizan en la pantalla de
sintonización de favoritos. Seleccione la emisora deseada con el cursor ó
usando las teclas de números. (vea debajo)
El modo cambia con cada pulsación.
•
• 480i, 480p:COMP/JUSTO/4:3/ACERC
• 1080i, 720p:COMP/H-LLENO/JUSTO/4:3
Configuración de la función de favoritos Utilización de la función de favoritos
1 Visualice el canal que va a colocar en la lista de favoritos.
2 Mantenga pulsado FAVORITE
durante varios segundos.
• Pulse repetidamente FAVORITE
para cambiar entre las páginas
(1/3, 2/3, 3/3 ó salir). Al pulsar
◄ ► también cambia la página.
1 Pulse FAVORITE.
• Pulse repetidamente FAVORITE
para cambiar entre las páginas
(1/3, 2/3, 3/3 ó salir). Al pulsar
◄ ► también cambia la página.
Para ver la televisión
3 Pulse ▲▼ para resaltar una
• También puede utilizar las
•
Un canal memorizado se podrá eliminar de la lista
Seleccione
posición en la lista. Y luego pulse
OK para memorizar el canal
Aceptar
Para eliminar un canal favorito
manteniendo pulsado FAVORITE mientras su posición está
resaltada.
visualizado en esa posición.
teclas numéricas (1-9 y 0) para
seleccionar los números de lista
grabados (1-9 y 0). Al hacer
esto, los números se grabarán
directamente sin tener que
pulsar la tecla OK.
2 Pulse ▲▼ ó una tecla numerada
3 Pulse OK para visualizar el canal
Seleccione
(1-9 y 0 ) para resaltar un canal
de la lista.
• Al seleccionar un número de
canal de la lista con las teclas
numeradas se visualizará
directamente el canal.
Aceptar
resaltado.
[Resumen]
Español
29
Page 30

Cómo utilizar las funciones de los menús
Lista de menús
Varios menús le permiten cambiar ajustes para la imagen, el sonido
y otras funciones, para poder disfrutar viendo la televisión con sus
preferencias establecidas.
Visualice el menú
1
Visualiza las funciones que
•
pueden establecerse (cambia
según la señal de entrada).
Seleccione el menú
2
Menú
Imagen
Audio
Cronόmetro
Bloqueo
Ajuste
Seleccione
Siguiente
Seleccione el elemento
3
Imagen 1/2
Normal
Modo
Contraste
Brillo
Color
Tinte
Nitidez
(Ejemplo: Menú Picture)
Estándar
+20Luz de atrás
+20
Sí
0
0
0
0
Seleccione
■
Menú Elemento
Normal
Modo
Luz de atrás
Contraste, Brillo,
Color, Tinte, Nitidez
Imagen
Temp color
Imagen IA
Ajuste acerc.
Reduc de ruido
Otros ajustes
3D Y/C filtro
Matriz color
Nivel obscuro
Normal
Bajos
Altos
Audio
Balance
Otros ajustes
Sonido IA
Envolvente
Ent. HDMI
Norm. de audio
Pulse para salir ó volver
■
a la pantalla anterior.
4
Ajuste ó seleccione
Imagen 1/2
Normal
Modo
Contraste
Brillo
Color
Tinte
Nitidez
(Ejemplo: Menú Picture)
Estándar
+20Luz de atrás
+20
Sí
0
0
0
0
Ajuste
ó
Seleccione
Cronómetro
Apagado
Bloqueo
Búsqueda
Idioma
Programa canal
Títulos de entradas
CC
Ajuste
Autoencendido
Otros ajustes
Para prog-out
Ctrl con HDMI
Econ. energía
Acerca de
Restaurar
30
Page 31

Ajustes / Configuraciones (alternativas)
Restablece la configuración del menú de imagen (excepto para “Otros ajustes”).
Modo de imagen básico (Vívido/Estándar/Cinema)
Ajusta la luminancia de la luz de fondo.
Ajusta el color, el brillo, etc. para que cada modo de imagen se
ajuste a sus gustos.
Contraste
Brillo
Color
+20
0
0
Normal
Modo
Luz de atrás
Tinte
Nitidez
Sí
Estándar
+20
0
0
Selecciona el nivel de los colores cálidos (rojo) y de los colores fríos (azul). (Rojo/Azul/Normal)
Controla las áreas oscuras sin afectar al nivel del negro ni al brillo de la imagen en general.
(Sí/No)
Ajusta la alineación vertical y el tamaño cuando el ajuste del aspecto es “ACERC”
Reduce el ruido en el canal, comúnmente llamado efecto de nieve. Permanece en No cuando se recibe una señal intensa.
(Sí/No)
Minimiza el ruido y la diafotía cromática en la imagen. (Sí/No)
No es válido en componente y HDMI.
Temp color
Imagen IA
Ajuste acerc.
Reduc de ruido
3D Y/C filtro
Selecciona la resolución de la imagen de los dispositivos conectados a componentes. (SD/HD)
SD: Visión normal HD: Visión de alta definición
Matriz color
Sólo se acepta la señal 480 p, la televisión convencional (NTSC) no se está disponible.
Selecciona Oscuro ó Claro dependiendo de las condiciones de la imagen. (Obscuro/Claro)
Las escenas oscuras se pueden ver fácilmente. (Sólo es válido para señales de entrada externas.)
Repone los ajustes de Bajos, Altos y Balance los ajustes predeterminados en la fábrica.
Aumenta ó disminuye la respuesta de los graves.
Aumenta ó disminuye la respuesta de los agudos.
Repone los ajustes de Bajos, Altos y Balance los ajustes predeterminados en la fábrica.
Iguale los niveles del sonido en todos los canales y entradas VIDEO. (Sí/No)
Mejora la respuesta de audio cuando se escucha sonido estéreo. (Sí/No)
Selecciona según la señal cuando está conectado HDMI. (Auto/Digital/Análogo)
Auto: Selecciona automáticamente la señal analógica/digital.
Minimiza la diferencia de volúmen después de cambiar a entradas externas.
Apaga automáticamente el televisor después de transcurrido el periodo de tiempo preestablecido.
0/30/60/90 (minutos)
También es posible hacer el ajuste del temporizador pulsando el botón “Sleep” del mando a distancia. (pág. 28)
Nivel obscuro
Normal
Bajos
Altos
Balance
Sonido IA
Envolvente
Ent. HDMI
Norm. de audio
Apagado
Bloquea canales y programas.
Selecciona los canales que van a visualizarse cuando se pulsan los botones “canal arriba/abajo”. (Fav./Todos)
Fav.: Sólo cuando se registran canales como Favoritos
Selecciona el idioma para los menús de la pantalla. (pág. 27)
Establece los canales de recepción.
Etiquetas de visualización de dispositivos externos
Visualiza subtítulos (subtítulos)
Búsqueda
Idioma
Programa canal
Títulos de entradas
CC
Establece cómo se va a conectar la alimentación del televisor. (Sí/No)
Sí : Conecte la clavija del cable de alimentación al receptor de televisión por cable, etc., y
controle el encendido/apagado del televisor en el equipo conectado. (El temporizador para
acostarse no funcionará si está activado “Autoencendido”.)
No : Suministre alimentación desde una toma de corriente y controle el encendido/apagado del
Autoencendido
televisor en el propio televisor.
(El menú “Ajuste inicial” se visualiza cuando la clavija del cable de alimentación vuelve a
conectarse después de desconectarla de la toma de corriente.)
Detiene la salida de las imágenes especificadas en este menú.
(No/Comp./HDMI/Video 1/Video 2/Video 3)
Comp./HDMI 1/HDMI 2 no puede dar salida a señales de vídeo independientemente del ajuste de “Para prog-out”.
Controla los equipos conectados a los terminales HDMI (pág. 33, 34) (Sí/No)
Reduce el brillo de la pantalla para disminuir el consumo de energía. Para ver programas en
habitaciones oscuras sin que se canse la vista. (Estándar/Ahorro)
Visualiza la versión del televisor y la licencia del software.
Al realizar la reposición se cancelarán todos los elementos establecidos con Ajuste como, por
ejemplo, los ajustes de canales. Utilice la reposición con cuidado.
En el modo Video, el menú Audio y el menú Ajuste ofrecen un número inferior de opciones.
•
Para prog-out
Ctrl con HDMI
Econ. energía
Acerca de
Restaurar
Estándar
Azul
Sí
On
No
Cómo utilizar las funciones de los menús
No
SD
Claro
Sí
+ 4
0
0
Sí
No
Auto
0
60
Todos
[Resumen]
Español
No
No
Sí
On
31
Page 32

Para ver vídeos y DVDs
Algunos dispositivos de Panasonic conectados al televisor pueden ser controlados con el mando a
distancia.
Para controlar los productos de otros fabricantes se necesita programar el mando a distancia.
Con la videograbadora ó DVD encendido
1
2
Cambie a entrada externa.
Pulse para visualizar el menú de selección de entrada.
Seleccione el modo de entrada.
Seleccionar entrada
[1] TV
[2] Componente
[3] HDMI
[4] Video 1
[5] Video 2
[6] Video 3
(Pantalla inicial)
ó
Seleccione.
Introducir.
Pulse la tecla de número
correspondiente en el mando
a distancia para seleccionar la
entrada de su elección.
Pulse para seleccionar la
entrada de su elección y luego
pulse “OK”.
Si, durante la selección, no
•
se realiza ninguna acción
durante varios segundos, se
saldrá del menú de selección
de entrada.
Para volver
■
al televisor
Nota
Para conocer detalles,
•
vea el manual del
equipo ó pregunte a su
concesionario local.
3
El terminal y la etiqueta del dispositivo
•
conectado se indican.
Para etiquetar cada dispositivo conectado (pág. 13)
Etiqueta
[ejemplo]
Utilice
la videograbadora ó DVD con el mando a distancia
Videograbadora DVD
Retroceso/Avance rápido Retroceso/Avance
Reproducción Reproducción
Pausa Pausa
Parada Parada
Grabación de
videograbadora
Televisor/Videograbadora Abertura/Cierre
-
Terminal
Video 1
VCR
(ejemplo)
32
Canal abajo/arriba Retroceso/avance lento
Page 33

Control con HDMI “HDAVI Control”
Los productos de audio-vídeo de Panasonic más recientes equipados con conexiones de salida HDMI
pueden ser controlados utilizando el mando a distancia del televisor. Se encuentran disponibles funciones
limitadas como, por ejemplo, el cambio automático a la entrada HDMI del televisor.
Esta función se limita a los modelos que incorporan “Control con HDMI” de Panasonic.
•
Consulte los modelos listados en la página 34 ó los manuales de instrucciones individuales para obtener
información relacionada con la compatibilidad.
Dependiendo del cable utilizado, puede que resulte imposible emplear esta función.
•
Cambio
de entrada
automático
Prende
control
Apaga
control
Nota
Antes de utilizar las funciones de control HDMI, el equipo conectado (DIGA) deberá configurarse. Para conocer
•
detalles, vea el manual de funcionamiento de cada equipo.
Para conocer detalles de la conexión del equipo, vea la pág. 34.
•
El ajuste predeterminado es “Sí”. Si no están conectados equipos HDMI ó se utilizan equipos HDMI estándar (que
•
no sean “Control con HDMI”), ajuste en “No”. (vea debajo)
Cuando “Ctrl con HDMI” se ponga en “Sí”, al empezar la reproducción de DIGA la entrada del
televisor cambia automáticamente a la entrada compatible con el equipo de reproducción.
Si se utiliza la operación DIGA y se visualiza el menú DIGA, la entrada del televisor cambia
•
automáticamente a DIGA. Si el televisor está apagado, éste se encenderá.
Cuando “Ctrl con HDMI” se ponga en “Sí”, al empezar la reproducción de DIGA la entrada del
HDMI apropiada, automáticamente, siempre que un DIGA (Grabadora DVD de Panasonic)
compatible con “Control con HDMI” se encuentre inicialmente encendido y el modo de
reproducción esté seleccionado.
Cuando “Ctrl con HDMI” se ponga en “Sí” y se apague el televisor, el DIGA (Grabadora DVD
de Panasonic) conectado también se apagará automáticamente.
DIGA (grabadora DVD de Panasonic) no se apagará si aún está en el modo de grabación.
•
1
Visualice el menú.
3
Seleccione “Otros ajustes”.
Ajuste
Búsqueda
Idioma
Programa canal
Títulos de entradas
CC
Otros ajustes
Todos
Seleccione
Siguiente
Control con HDMI “HDAVI Control”
Para ver vídeos y DVDs
[Resumen]
Español
2
Seleccione “Ajuste”.
Menú
Imagen
Audio
Cronόmetro
Bloqueo
Ajuste
Seleccione
Siguiente
Seleccione “Ctrl con HDMI”.
4
Otros ajustes
Autoencendido
Para prog-out
Ctrl con HDMI
Econ. energía
No
No
Estándar
Sí
Seleccione “Sí” ó “No”.
5
Pulse para salir ó volver a la pantalla anterior.
■
Seleccione.
Cambie
33
Page 34

Conexiones AV recomendadas
Estos diagramas muestran nuestras recomendaciones sobre cómo conectar el televisor a varios equipos.
Para hacer otras conexiones, consulte las instrucciones de cada equipo y las especificaciones (pág. 44).
Para obtener ayuda adicional, visite nuestro sitio Web www.panasonic.com.
Cable de alimentación de CA
(Conéctelo después de terminar
todas las demás conexiones.)
Parte posterior de la
unidad
Para ver imágenes de
■
cámara de vídeo
Cámara de vídeo
Videograbadora
Reproductor DVD
Clavija M3
Los cascos auriculares/
auriculares (no suministrados)
Para ver imágenes
■
de vídeo digital
Reproductor DVD
ó receptor digital
multimedia (Máquinas
compatibles con HDMI
solamente)
Cable
de audio
AV IN
ó
SERVICE ONLY
Cable HDMI
Cable de
conversión
HDMI-DVI
Control con HDMI
■
(pág. 33)
Conecte con cable HDMI
DIGA
(Grabadora DVD de Panasonic)
34
Notas
Los equipos HDMI individuales tal vez requieran configuraciones de menús específicas adicionales para cada
•
modelo. Consulte sus manuales de instrucciones respectivos.
A partir de marzo de 2006, los modelos con “Control con HDMI” son: DMR-ES25, DMR-ES45V, DMR-EH55,
•
DMR-EH75V y DMR-ES46V (EE.UU. solamente)
Visite www.panasonic.com para conocer los futuros modelos con “Control con HDMI”.
Page 35

ANT
DIGITAL AUDIO OUT
Salida de audio digital
Cable óptica
digital de audio
Para ver DVDs
■
Reproductor DVD
Receptor digital
multimedia
Para escuchar la
■
televisión por altavoces
Apague los
•
altavoces del televisor.
Conexiones AV recomendadas
[Resumen]
Español
Cable TV
Cable Box
ó
Grabadora DVD /
■
Videograbadora
OPTICAL IN
ó
Amplificador
Notas
Ponga el canal de televisión en CH3 ó CH4 para utilizar la
•
conexión del receptor de televisión por cable.
Para tener más información acerca de la conexión del
•
receptor de televisión por cable, consulte a su compañía de
televisión por cable local.
Las señales de entrada de vídeo y audio conectadas a un
•
terminal especificado en “Para-prog-out” (págs. 30-31) no
pueden salir por los terminales “OUTPUT”.
Sin embargo, sí se obtendrá salida de audio por el terminal
“Digital Audio Out”.
Cuando se conecte un equipo (STB, DVD, etc.) a los
•
terminales HDMI ó COMPONENT sólo se podrán obtener
señales de audio. No se pueden reproducir señales de vídeo.
35
Page 36

Remote Control Operation/Code List
The following explains how to operate external equipments with the remote control.
Register the remote control codes (p. 20) if you want to operate an external equipment of another manufacturer. (p. 37-38)
•
Note
Operation may not be possible depending on the available memory size of the remote control.
•
This remote control is not designed to cover operation of all functions of all models.
Remote Control Operation List
■
This chart defines which keys are operational after programming (if needed),
while in the selected remote control mode, DTV, CABLE, DBS, VCR, DVD.
KEY NAME VCR MODE
Power Power Power Power
-
-
Vol Down DBS Cursor Left CBL Cursor Left Vol Down
Vol Up DBS Cursor Right CBL Cursor Right Vol Up
-
-
TV Input Switch TV Input Switch TV Input Switch TV Input Switch
Onscreen Display Onscreen Display Recall Onscreen Display
TV Mute TV Mute TV Mute TV Mute
-
(DBS) (CBL)
CH Up, Cursor Up CH Up, Cursor Up Skip Up
CH Down, Cursor Down CH Down, Cursor Down Skip Down
DBS Menu CBL Menu
Exit Exit
Guide Guide
DBS/CBL MODE
-
-
-
DVD MODE
36
-
-
Rewind
Play
Fast Forward
Pause
Stop
VCR Record
TV/VCR Aspect Aspect Open/Close
Channel Down Page Down Page Down Slow Reverse
Channel Up Page Up Page Up Slow Forward
0-9 0-9
--
--
--
--
--
-
PVR Record *
-
Reverse
Play
Forward
Pause
Stop
1
-
*1: Combination type
Page 37

Remote Control Code List
■
Cable Converter ( )
Brand Code Brand Code Brand Code Brand Code
ABC 0003, 0008
Americast 0899
Bell South 0899
Digeo 1187
Director 0476
General Instrument
GoldStar 0144
0003, 0276, 0476, 0810
Hamlin 0009, 0273
Jerrold
Memorex 0000
Motorola
Pace 0008, 0237, 1877
Panasonic 0000, 0107
Paragon 0000
0003, 0276, 0476, 0810
1376, 0276, 0476, 0810, 1187
Philips 0317, 1305
Pioneer
Pulsar 0000
Quasar 0000
Regal 0273, 0279
Runco 0000
Samsung 0144
0144, 0533, 0877, 1877
Scientific Atlanta
Sony 1006
Starcom 0003
Supercable 0276
Torx 0003
Toshiba 0000
Zenith 0000, 0525, 0899
0008, 0477, 0877, 1877
Satellite Receiver ( )
AlphaStar 0772
Chaparral 0216
Crossdigital 1109
DirecTV
Dish Network
System
Dishpro
Echostar
Expressvu 0775, 1775
GE 0392, 0566
0099, 0247, 0392, 0566,
0639, 0724, 0749, 0819,
1076, 1108, 1109, 1142,
1377, 1392, 1414, 1442,
1443, 1444, 1609, 1639,
1640, 1749, 1856
0775, 1005, 1170,
1505, 1775
0775, 1005, 1505, 1775
0775, 1005, 1170, 1505, 1775
General
Instrument
GOI 0775, 1775
Goodmans 1246
Hisense 1535
Hitachi 0819, 1250
HTS 0775, 1775
Hughes 0749, 1442, 1749
Hughes Network
Systems
iLo 1535
Janeil 0152
Jerrold 0869
JVC 0775, 1170, 1775
LG 1226, 1414
0869
0749, 1142, 1442,
1443, 1444, 1749
Magnavox 0722, 0724
Memorex 0724
Mitsubishi 0749
Motorola 0856, 0869
NEC 1270
Next Level 0869
Panasonic
Paysat 0724
Philips
Pioneer 1442
Proscan 0392, 0566
Proton 1535
RadioShack 0869
RCA
0152, 0247, 0701, 1786
0099, 0722, 0724, 0749,
0819, 1076, 1142, 1442, 1749
0143, 0392, 0566, 0855, 1392
Samsung
Sanyo 1219
Sony 0639, 1639, 1640
Star Choice 0869
Tivo 1142, 1442, 1443, 1444
Toshiba
UltimateTV 1392, 1640
Uniden 0722, 0724
US Digital 1535
USDTV 1535
Voom 0869
Zenith 1856
1108, 1109, 1142, 1276,
1377, 1442, 1609
0749, 0790, 0819, 1285, 1749
Cable/PVR Combination ( )
Americast 0899
Digeo 1187
General Instrument
0476, 0810
Jerrold 0476, 0810
Motorola 0476, 0810, 1187, 1376
Pace 0237, 1877
Pioneer 0877, 1877
Scientific Atlanta
Sony 1006
0877, 1877
Supercable 0276
Zenith 0899
DBS/PVR Combination ( )
DirecTV
Dish Network
System
0099, 0392, 0639, 1076,
1142, 1377, 1392, 1442,
1443, 1444, 1640
0775, 1505
Dishpro 0775, 1505
Echostar 0775, 1170, 1505
Expressvu 0775
Hughes Network
Systems
1142, 1442, 1443, 1444
JVC 1170
Motorola 0869
Philips 1142, 1442
Proscan 0392
RCA 1392
Samsung 1442
Sony 0639, 1640
Star Choice 0869
VCR ( )
ABS 1972
Adventura 0000
Aiwa 0000, 0037, 0124
Akai 0175
Alienware 1972
American High
Audiovox 0037
Broksonic 1479
Calix 0037
Canon 0035
Citizen 0037, 1278
Craig 0037
Curtis Mathes 0035, 0060, 1035
CyberPower 1972
Daewoo 0045, 1278
Dell 1972
Denon 0042
DirecTV 0739
Durabrand 0039
Dynatech 0000
Electrohome 0037, 0043
Electrophonic 0037
Emerex 0032
Emerson
Fuji 0033, 0035
Funai 0000
Garrard 0000
Gateway 1972
GE
GoldStar 0037, 1237
Gradiente 0000
Harley Davidson
0035
0000, 0037, 0043, 1278, 1479
0035, 0060, 0807, 1035, 1060
0000
Hewlett Packard
Hitachi 0000, 0042, 0089
Howard Computers
HP 1972
Hughes
Network Systems
Humax 0739
Hush 1972
iBUYPOWER 1972
JVC 0067
KEC 0037
Kenwood 0067
Kodak 0035, 0037
Linksys 1972
Lloyd’s 0000
LXI 0037
Magnasonic 1278
Magnavox
Marantz 0035
Marta 0037
Matsushita 0035
Media Center PC
MEI 0035
Memorex
MGA 0043
Microsoft 1972
Mind 1972
Minolta 0042
Mitsubishi 0043, 0067, 0807
Motorola 0035
MTC 0000
Multitech 0000
1972
1972
0042, 0739
0000, 0035, 0039, 1781
1972
0000, 0035, 0037, 0039, 1237
NEC 0067
Nikko 0037
Niveus Media 1972
Northgate 1972
Olympus 0035, 0226
Onkyo 0222
Optimus 0037
Orion 1479
Panasonic
Penney
Pentax 0042
Philco 0035
Philips
Pilot 0037
Pioneer 0067
Proscan 0060, 1060
Pulsar 0039
Quasar 0035, 0077, 1035
RadioShack 0000
Radix 0037
Randex 0037
RCA
Realistic 0000, 0035, 0037
ReplayTV 0614, 0616
Ricavision 1972
Runco 0039
Samsung 0045, 0739, 1014
Sanky 0039
Sansui 0000, 0067, 1479
Sanyo 0159
0035, 0077, 0225, 0226,
0227, 0378, 0616, 1035, 1244
0035, 0037, 0042, 1035, 1237
0035, 0618, 0739, 1081, 1181
0042, 0060, 0077, 0807,
0880, 1035, 1060
Scott 0043, 0045
Sears
Sharp 0807, 0848
Sonic Blue 0614, 0616
Sony
Stack 9 1972
STS 0042
Sylvania
Symphonic 0000
Systemax 1972
Tagar Systems
Teac 0000
Technics 0035
Teknika 0000, 0035, 0037
Thomas 0000
Tivo 0618, 0636, 0739
Toshiba
Totevision 0037
Touch 1972
Vector 0045
Video Concepts
Videomagic 0037
Viewsonic 1972
Villain 0000
Voodoo 1972
Wards
XR-1000 0000, 0035
Zenith
ZT Group 1972
0000, 0035, 0037, 0042, 1237
0000, 0032, 0033, 0035,
0636, 1032, 1232, 1972
0000, 0035, 0043, 1781
1972
0043, 0045, 0845,
1008, 1145, 1972
0045
0000, 0035, 0042, 0060
0000, 0033, 0039, 1479
Remote Control Operation/Code List
FAQs, etc.
37
Page 38

Remote Control Operation/Code List
Remote Control Code List
■
DBS/PVR Combination ( )
Brand Code Brand Code Brand Code Brand Code
Hughes Network
Systems
0739
PVR( )
ABS 1972
Alienware 1972
CyberPower 1972
Dell 1972
DirecTV 0739
Gateway 1972
Hewlett Packard
Howard
Computers
HP 1972
1972
1972
DVD ( )
Adcom 1094
Allegro 0869
Apex Digital
Aspire Digital 1168
Blue Parade 0571
Broksonic 0695
California
Audio Labs
CineVision 0833, 0869
Coby 1086
CyberHome 0816, 1023, 1024, 1129
Daewoo 0833, 0869
Denon 0490
Disney 0675
DVD2000 0521
Emerson 0591, 0675
Enterprise 0591
Funai 0675
Gateway 1158
GE 0522
Go Video
0672, 0794, 0796,
0797, 1004, 1056,
1061, 1100
0490
0741, 0833, 0869,
1075, 1158, 1304, 1730
DVD Recorder ( )
Apex Digital 1056
Aspire Digital 1168
Coby 1086
CyberHome 1129
Funai 0675
Gateway 1158
Philips 0739
Samsung 0739
Hughes Network
Systems
Humax 0739
Hush 1972
iBUYPOWER 1972
Linksys 1972
Media Center
PC
Microsoft 1972
Mind 1972
GoldStar 0741
Gradiente 0490
Grundig 0539
Hitachi 0573, 0664
Hiteker 0672
Integra 0571
JVC
Kenwood 0490, 0534
Lecson 1533
LG
LiteOn 1158, 1440
Loewe 0511
Magnavox
Marantz 0539
McIntosh 1533
Memorex 0695
Microsoft 0522
Mitsubishi 0521, 1521
NAD 0591, 0741
NEC 0785
Go Video 0741, 1158, 1304, 1730
JVC 1164, 1275
LG 0741
LiteOn 1158, 1440
Magnavox 0646
Panasonic 0490, 1010, 1011
0739
1972
0558, 0623, 0867, 1164,
1275
0591, 0741, 0801,
0869
0503, 0539, 0646,
0675
Niveus Media 1972
Northgate 1972
Panasonic 0616
Philips 0618, 0739
RCA 0880
ReplayTV 0614, 0616
Sonic Blue 0614, 0616
Sony 0636, 1972
Stack 9 1972
Onkyo 0503, 0792
0490, 0503, 0632,
Panasonic
Philips
PianoDisc 1024
Pioneer
Polaroid 1061, 1086
Polk Audio 0539
Proceed 0672
Proscan 0522
RCA 0522, 0571, 0822
Rio 0869
Rotel 0623
Sampo 0752
Samsung
Sansui 0695
Sanyo 0695, 0873, 1967
Philips 0646
Pioneer 0631
Polaroid 1086
RCA 0522
Samsung 0490
0703, 1010, 1011,
1362, 1462, 1490,
1762, 1967
0503, 0539, 0646,
0675, 1267, 1354
0525, 0571, 0631,
0632
0490, 0573, 0820,
1075
Systemax 1972
Tagar
Systems
Tivo 0618, 0636, 0739
Toshiba 1008, 1972
Touch 1972
Viewsonic 1972
Voodoo 1972
ZT Group 1972
Sensory
Science
Sharp
Shinsonic 0533
Sonic Blue 0869
Sony
Sylvania 0675
Symphonic 0675
Teac 0809
Technics 0490, 0703
Theta Digital 0571
Toshiba 0503, 0695, 1045, 1154
Urban
Concepts
Xbox 0522
Yamaha 0490, 0539, 0545
Zenith 0503, 0591, 0741,0869
Sensory
Science
Sharp 0675
Sony 1033, 1431
Sylvania 0675
Zenith 0741
1972
1158
0630, 0675, 0752,
1256
0533, 0864, 1033, 1431,
1533
0503
1158
38
Page 39

Ratings List for Channel Lock
“V-chip” technology enables you to lock out channels or shows according to
standard ratings set by the entertainment industry. (p. 17)
U.S. MOVIE RATINGS (MPAA)
■
Off
G
PG
PG-13
R
NC-17
X
U.S. TV PROGRAMS RATINGS (U. S. T. V)
■
Age-based
Group
NR
(Not Rated)
Youth
Guidance
FV: Fantasy/Cartoon Violence. V: Violence S: Sex L: Offensive Language D: Dialogue with sexual content.
NO RATING (NOT RATED) AND NA (NOT APPLICABLE) PROGRAMS. Movie has not been rated or
rating does not apply.
GENERAL AUDIENCES. All ages admitted.
PARENTAL GUIDANCE SUGGESTED. Some material may not be suitable for children.
PARENTS STRONGLY CAUTIONED. Some material may be inappropriate for children under 13.
RESTRICTED. Under 17 requires accompanying parent or adult guardian.
NO ONE 17 AND UNDER ADMITTED.
ADULTS ONLY.
Age-based
Ratings
TV-NR
TV-Y
TV-Y7
TV-G
TV-PG
TV-14
TV-MA
Possible Content
Selections
Viewable
Blocked
Viewable
Blocked
FV Blocked
Viewable
Blocked
Viewable
Blocked
D,L,S,V (all selected)
Any combination of D,
L, S, V
D,L,S,V (all selected)
Any combination of D,
L, S, V
D,L,S,V (all selected)
Any combination of L,
S, V
Description
Not Rated.
All children. The themes and elements in this program are specifically
designed for a very young audience, including children from ages 2-6.
Directed to older children. Themes and elements in this program may
include mild physical or comedic violence, or may frighten children under
the age of 7.
General audience. It contains little or no violence, no strong language,
and little or no sexual dialogue or situations.
Parental guidance suggested. The program may contain infrequent
coarse language, limited violence, some suggestive sexual dialogue and
situations.
Parents strongly cautioned. This program may contain sophisticated
themes, sexual content, strong language and more intense violence.
Mature audiences only. This program may contain mature themes,
profane language, graphic violence, and explicit sexual content.
Remote Control Operation/Code List
Ratings List for Channel Lock
CANADIAN ENGLISH RATINGS (C. E. L. R)
■
E
C
C8+
G
PG
14+
18+
CANADIAN FRENCH RATINGS (C. F. L. R)
■
E
G
8 ans+
13 ans+
16 ans+
18 ans+
Exempt - Exempt programming includes: news, sports, documentaries and other information programming,
talk shows, music videos, and variety programming.
Programming intended for children under age 8. No offensive language, nudity or sexual content.
Programming generally considered acceptable for children 8 years and over. No profanity, nudity or sexual content.
General programming, suitable for all audiences.
Parental Guidance suggested. Some material may not be suitable for children.
Programming contains themes or content which may not be suitable for viewers under the age of 14. Parents are
strongly cautioned to exercise discretion in permitting viewing by pre-teens and early teens.
18+ years old. Programming restricted to adults. Contains constant violence or scenes of extreme violence.
Exempt - Exempt programming.
General - Programming intended for audience of all ages. Contains no violence, or the violence content is minimal
or is depicted appropriately.
8+ General - Not recommended for young children. Programming intended for a broad audience but contains light
or occasional violence. Adult supervision recommended.
Programming may not be suitable for children under the age of 13 - Contains either a few violent scenes or one or
more sufficiently violent scenes to affect them. Adult supervision strongly suggested.
Programming may not be suitable for children under the age of 16 - Contains frequent scenes of violence or intense
violence.
Programming restricted to adults. Contains constant violence or scenes of extreme violence.
FAQs, etc.
39
Page 40

Technical Information
Closed Caption (CC)
For viewing Closed Caption of digital broadcasting, set the aspect ratio to FULL.
•
(If viewing with H-FILL, JUST, ZOOM or 4:3, characters will be cut off.)
The closed caption is not displayed when you use HDMI connection.
•
If analog connected equipment is used for displaying or recording, closed caption (CC) should be set On/Off on the
•
connected equipment.
The CC mode setting of the TV will not affect the analog input.
If a digital program is being output in analog format, the CC data will also be output in analog format.
If digital connected equipment is used for input, CC should be set On on either the connected equipment or the TV.
If CC is set On on both the connected equipment and the TV, captions from each unit will overlap.
Aspect Ratio
Let you choose the aspect depending on the format of the received signal and your preference. (p. 11) (e.g.: in case
of 4:3 image)
•
FULL
FULL
•
JUST
JUST
Enlarges the 4:3 image horizontally to the screen’s side edges.
(Recommended for anamorphic picture)
H-FILL
•
H-FILL
Enlarges the 4:3 image horizontally to the screen’s side edges.
The side edges of the image are cut off.
ZOOM
•
ZOOM
Enlarges the 4:3 image to the entire screen.
(Recommended for Letter Box)
Zoom adjust
•
Vertical image position and size can be adjusted in “ZOOM.”
Select “Zoom adjust” on the “Picture” menu. (p. 14-15)
V-Position: Vertical position adjustment Size: Vertical size adjustment
Stretches to justify the 4:3 image to the four corners of the
screen.
(Recommended for normal TV broadcast)
4:3
•
Standard
(Note that “after image” of the side bar may occur from
displaying it for a long time.)
Note
480i (4:3), 480i (16:9), 480p (4:3), 480p (16:9) : FULL, JUST,
•
4:3 or ZOOM
1080i / 720p : FULL, H-FILL, JUST or 4:3
•
Side bar
40
To reset the aspect ratio (OK)
■
Page 41

DIGITAL AUDIO OUT terminals
You can enjoy your home theater by connecting a Dolby Digital (5.1 channel) decoder and “Multi Channel” amplifier
to the DIGITAL AUDIO OUT terminals.
Caution
Depending on your DVD player and DVD-Audio software the copyright protection function may operate and disable
•
optical output.
External speakers cannot be connected directly to OUTPUT terminals.
•
When ATSC channel is selected, the output from the DIGITAL AUDIO OUT jack will be Dolby Digital. When NTSC
•
channel is selected, the output will be PCM.
HDMI connections to some Panasonic equipments allow you to enjoy easy playback.
Setup the equipment to enable this function. Read the manual of the equipment.
•
Switch the TV unit on again with the equipment on when connection or setup is changed.
•
This function may not work normally depending on the equipment condition.
•
The equipment can be operated by TV’s remote control with this function on even if TV is in Standby mode.
•
Image or sound may not be available for the first few seconds when the playback starts.
•
Image or sound may not be available for the first few seconds when Input mode is switched.
•
Volume function will be displayed when adjusting the volume of the equipment.
•
Easy playback is also available by using the remote control for Amplifier. Read the manuals of Amplifier.
•
HDMI (high-definition multimedia interface) allows you to enjoy high-definition digital images and high-quality sound by connecting
the TV unit and the equipments.
HDMI-compatible equipment (*1) with an HDMI or DVI output terminal, such as a set-top box or a DVD player, can be connected
to the HDMI connector using an HDMI compliant (fully wired) cable.
HDMI is the world’s first complete digital consumer AV interface complying with a non-compression standard.
•
If the external equipment has only a DVI output, connect to the HDMI terminal via a DVI to HDMI adapter cable (*2).
•
When the DVI to HDMI adapter cable is used, connect the audio cable to the audio input terminal.
•
Audio settings can be made on the “HDMI in” menu screen. (p. 14-15)
•
Applicable audio signal sampling frequencies (L.PCM):
48 kHz, 44.1 kHz, 32 kHz
(*1): The HDMI logo is displayed on an HDMI-compliant equipment.
(*2): Enquire at your local digital equipment retailer shop.
Control with HDMI “HDAVI Control”
HDMI connection
Technical Information
Caution
Use with a PC is not assumed.
•
All signal is reformatted before being displayed on the screen.
•
If the connected equipment has an aspect adjustment function, set the aspect ratio to “16:9”.
•
This HDMI connector is “type A”.
•
An equipment having no digital output terminal may be connected to the input terminal of either “COMPONENT”, “S-VIDEO”, or
•
“VIDEO” to receive analog signals.
The HDMI input terminal can be used with only the following image signals: 480i, 480p, 720p and 1080i
•
Match the output setting of the digital equipment.
For details of the applicable HDMI signals, see below.
•
Input signals that can be displayed
* Mark: Applicable input signal for Component (Y, PB, PR) and HDMI
horizontal
525 (480) / 60i 15.73 59.94
525 (480) /60p 31.47 59.94
750 (720) /60p 45.00 59.94
1,125 (1,080) /60i 33.75 59.94
Note
Signals other than above may not be displayed properly.
•
The above signals are reformatted for optimal viewing on your display.
•
frequency (kHz)
vertical
frequency (Hz)
COMPONENT HDMI
**
**
**
**
FAQs, etc.
41
Page 42

Maintenance
First, unplug the Power cord plug from the wall outlet.
Display panel
The front of the display panel has been specially treated. Wipe the panel surface gently using only a cleaning cloth or
a soft, lint-free cloth.
If the surface is particularly dirty, soak a soft, lint-free cloth in a weak detergent solution and then wring the cloth to
•
remove excess liquid. Use this cloth to wipe the surface of the display panel, then wipe it evenly with a dry cloth, of
the same type, until the surface is dry.
Do not scratch or hit the surface of the panel with fingernails or other hard objects. Furthermore, avoid contact
•
with volatile substances such as insect sprays, solvents and thinner; otherwise, the quality of the surface may be
adversely affected.
Cabinet
If the cabinet becomes dirty, wipe it with a soft, dry cloth.
If the cabinet is particularly dirty, soak the cloth in a weak detergent solution and then wring the cloth dry.
•
Use this cloth to wipe the cabinet, and then wipe it dry with a dry cloth.
Do not allow any detergent to come into direct contact with the surface of the LCD TV.
•
If water droplets get inside the unit, operating problems may result.
Avoid contact with volatile substances such as insect sprays, solvents and thinner; otherwise, the quality of the
•
cabinet surface may be adversely affected or the coating may peel off. Furthermore, do not leave it for long periods
in contact with articles made from rubber or PVC.
Power cord plug
Wipe the plug with a dry cloth at regular intervals. (Moisture and dust can lead to fire or electrical shock.)
FAQ
Before requesting service or assistance, please follow these simple guides to resolve the problem.
If problem still persists, please contact your local Panasonic dealer or Panasonic Servicenter for assistance. For
details (p. 46, 48)
For additional assistance, please contact us via the website at:
www.panasonic.com/contactinfo
White spots or
shadow images
(noise)
Check the position, direction,
•
and connection of the aerial.
Interference or
frozen digital channels
(intermittent sound)
Pictures from a equipment are
unusual when the equipment is
connected via HDMI
Is the HDMI cable connected properly?
•
(p. 22-23, 41)
Turn Off the TV unit and equipment, then turn
•
them On again.
Check an input signal from the equipment.
•
(p. 41)
Use a equipment compliant with
•
EIA/CEA-861/861B.
42
Change the direction of antenna
•
for digital channels.
Check “Signal meter” (p. 19).
•
If the signal is weak, check the
antenna and consult your local
dealer.
The remote control does not work
Are the batteries installed correctly? (p. 6)
•
Has the battery run down?
•
To operate external equipment of other
•
manufacturers, register the
remote control codes. (p. 20, 37-38)
Page 43

If there is a problem with your TV please refer to the table below to determine the symptoms, then carry out the
suggested check. If this does not solve the problem, please contact your local Panasonic dealer, quoting the model
number and serial number (both found on the rear of the TV).
Symptoms
Checks
Picture
Multiple Images
Interference
Normal Picture
Sound
Noisy SoundSnowy Picture
Normal Sound
Noisy Sound
No Sound
Antenna location, direction or connection.
•
Antenna location, direction or connection.
•
Electrical appliances.
•
Cars / Motorcycles.
Fluorescent lights.
Volume level.
•
Sound mute switched on.
STEREO/SAP/MONO
No Picture
No color
Poor or Distorted Picture
Normal Picture
Cannot operate with the remote control.
The main unit is hot.
No Sound
Normal Sound
Weak or No Sound
Weak,Wrong or No Sound
TV set to AV mode.
•
Not plugged into wall outlet.
Not switched on.
Picture / Sound controls set at minimum levels.
Color controls set at minimum levels.
•
Weak signal.
Retune Channel (s).
•
Sound reception may have deteriorated.
•
Set STEREO/SAP/MONO setting to SAP or MONO until reception improved.
The battery/ies is/are exhausted.
•
The batteries’ polarity is wrong.
The remote control sensor is exposed to strong light from a fluorescent
lamp, etc.
The main unit radiates heat and some of the parts may become hot. This is
•
not a problem for performance or quality.
Set up in a location with good ventilation.
Do not cover the ventilation holes of the TV with a tablecloth, etc., and do
not place on top of other equipment.
Frequently Asked Questions
Maintenance
FAQs, etc.
There may be red spots, blue spots,
green spots and black spots on the
screen.
This is a characteristic of liquid crystal panels and is not a problem. The
•
liquid crystal panel is built with very high precision technology giving you
fine picture details. Occasionally, a few non-active pixels may appear on the
screen as fixed points of red, blue, green, or black.
Please note this does not affect the performance of your LCD.
43
Page 44

Specifications
TC-26LX60 / TC-26LE60 TC-32LX60 / TC-32LE60
Power Source AC 120 V, 60 Hz
Power Consumption
Average use
Maximum Current
Standby condition
Aspect Ratio 16:9
Visible screen size
(W × H × Diagonal)
(No. of pixels)
Sound
Speaker 2.36 ” × 4.7 ” (60 mm × 120 mm) Full-range × 2 pcs
Audio Output 20 W [ 10 W + 10 W ] ( 10 % THD )
Headphones M3 (3.5mm) Jack × 1
Channel CapabilityDigital/Analog
Operating Conditions
INPUT 1-2
Connection Terminals
INPUT 3
COMPONENT
VIDEO INPUT
HDMI
AUDIO IN
OUTPUT
DIGIT AL AUDIO OUT PCM / Dolby Digital, Fiber Optic
FEATURES
Dimensions
(W × H × D)
Including TV stand
113 W
2.2 A
0.6 W
26.0 ” DIAGONAL (66.1 cm DIAGONAL) 31.5 ” DIAGONAL (80.0 cm DIAGONAL)
22.7 ” × 12.8 ” × 26.0 ”
(576 mm × 324 mm × 661 mm)
1,049,088 (1,366 (W) × 768(H))
VHF/ UHF : 2-69, CATV:1-135
Temperature : 41 °F -95 °F (5 °C – 35°C)
Humidity : 5 % - 90 % RH (non-condensing)
VIDEO : RCA PIN Type × 1 1.0 V[p-p] (75 Ω)
S-VIDEO : Mini DIN 4-pin Y:1.0 V[p-p] (75 Ω) C:0.286 V [p-p] (75 Ω)
AUDIO L - R : RCA PIN Type × 2 0.5 V [rms]
VIDEO : RCA PIN Type × 1
AUDIO L - R : RCA PIN Type × 2 0.5 V [rms]
Y : 1.0 V [p-p] (including synchronization)
B, PR : ±0.35 V [p-p]
P
AUDIO L-R : RCA PIN Type × 2 0.5 V [rms]
TYPE A Connector × 1
AUDIO L - R : RCA PIN Type × 2
VIDEO : RCA PIN Type × 1 1.0 V [p-p] (75 Ω)
AUDIO L - R : RCA PIN Type × 2 0.5 V [rms]
3D Y/C Digital Comb Filter, CLOSED CAPTION, V-Chip
HDMI
Vesa compatible
25.9 ” × 20.7 ” × 11.8 ”
(657 mm × 525 mm × 300 mm)
[4,098 × 768 dots]
1.0 V [p-p] (75 Ω)
0.5 V [rms]
126 W
2.4 A
0.6 W
27.5 ” × 15.4 ” × 31.5 ”
(698 mm × 392 mm × 800 mm)
31.1 ” × 24.2 ” × 11.8 ”
(791 mm × 615 mm × 300 mm)
44
TV Set only
Weight
[TC-26LX60 / TC-26LE60] [TC-32LX60 / TC-32LE60]
25.9 ” (657 mm)
18.6 ” (473 mm)
20.7 ” (525 mm)
19.8 ” (504 mm) 19.8 ” (504 mm)
25.9 ” × 18.6 ” × 4.6 ”
(657 mm × 473 mm × 117 mm)
36.4 lb. (16.5
4.6 ” (117 mm)
11.8 ” (300 mm)
) NET 43.0 lb. (19.5 ) NET
24.2 ” (615 mm)
31.1 ” × 22.2 ” × 4.6 ”
(791 mm × 563 mm × 117 mm)
31.1 ” (791 mm)
22.2 ” (563 mm)
4.6 ” (117 mm)
11.8 ” (300 mm)
Note
Design and Specifications are subject to change without notice. Weight and Dimensions shown are approximate.
•
Page 45

Limited Warranty (for U.S.A.)
PANASONIC CONSUMER ELECTRONICS COMPANY,
DIVISION OF:
PANASONIC CORPORATION OF NORTH AMERICA
One Panasonic Way
Secaucus, New Jersey 07094
PANASONIC SALES COMPANY,
DIVISION OF:
PANASONIC PUERTO RICO, INC.
Ave. 65 de Infanteria, Km. 9.5
San Gabriel Industrial Park
Carolina, Puerto Rico 00985
Panasonic LCD Televisions
Limited Warranty
Limited Warranty Coverage
If your product does not work properly because of a defect in materials or workmanship, Panasonic Consumer
Electronics Company or Panasonic Sales Company (collectively referred to as “the warrantor”) will, for the length
of the period indicated on the chart below, which starts with the date of original purchase (“warranty period”), at
its option either (a) repair your product with new or refurbished parts, or (b) replace it with a new or a refurbished
product. The decision to repair or replace will be made by the warrantor.
LCD TV CATEGORIES PARTS LABOR SERVICE
Up to 20’ (diagonal)
21” (diagonal) and larger In Home or Carry-in / Mail in
During the “Labor” warranty period there will be no charge for labor. During the “Parts” warranty period, there will
be no charge for parts. You must carry-in or mail-in your product during the warranty period. If non-rechargeable
batteries are included, they are not warranted. This warranty only applies to products purchased and serviced in the
United States or Puerto Rico. This warranty is extended only to the original purchaser of a new product which was
not sold “as is”. A purchase receipt or other proof of the original purchase date is required for warranty service.
In-Home or Carry-in Service
For In-Home or Carry-In Service in the United States call 1-800-211-PANA(7262) or visit the Panasonic web Site:
http://www.panasonic.com.
For assistance in Puerto Rico call Panasonic Sales Company (787)-750-4300 or fax (787)-768- 2910.
In-Home service requires clear, complete and easy access to the product by the authorized servicer and does
not include removal or re-installation of an installed product. It is possible that certain in-home repairs will not be
completed in-home, but will require that the product, or parts of the product, be removed for shop diagnosis and/or
repair and then returned.
Limited Warranty Limits And Exclusions
This warranty ONLY COVERS failures due to defects in materials or workmanship, and DOES NOT COVER normal
wear and tear or cosmetic damage, nor does it cover markings or retained images on the LCD panel resulting
from viewing fixed images (including, among other things, letterbox pictures on standard 4:3 screen TV’s, or nonexpanded standard 4:3 pictures on wide screen TV’s, or onscreen data in a stationary and fixed location). The
warranty ALSO DOES NOT COVER damages which occurred in shipment, or failures which are caused by products
not supplied by the warrantor, or failures which result from accidents, misuse, abuse, neglect, bug infestation,
mishandling, misapplication, alteration, faulty installation, set-up adjustments, misadjustment of consumer controls,
improper maintenance, power line surge, lightning damage, modification, or commercial use (such as in a hotel,
office, restaurant, or other business), rental use of the product, service by anyone other than a Factory Servicenter or
other Authorized Servicer, or damage that is attributable to acts of God.
1 (ONE) YEAR 1 (ONE) YEAR
Carry-In or Mail-in
Limited Warranty (for U.S.A.)
Specifications
THERE ARE NO EXPRESS WARRANTIES EXCEPT AS LISTED UNDER “LIMITED WARRANTY COVERAGE”.
THE WARRANTOR IS NOT LIABLE FOR INCIDENTAL OR CONSEQUENTIAL DAMAGES RESULTING FROM
THE USE OF THIS PRODUCT, OR ARISING OUT OF ANY BREACH OF THIS WARRANTY. (As examples, this
excludes damages for lost time, cost of having someone remove or re-install an installed unit if applicable, or travel to
and from the servicer. The items listed are not exclusive, but are for illustration only.) ALL EXPRESS AND IMPLIED
WARRANTIES, INCLUDING THE WARRANTY OF MERCHANTABILITY, ARE LIMITED TO THE PERIOD OF THE
LIMITED WARRANTY.
Some states do not allow the exclusion or limitation of incidental or consequential damages, or limitations on how
long an implied warranty lasts, so the exclusions may not apply to you.
This warranty gives you specific legal rights and you may also have others rights which vary from state to state. If a
problem with this product develops during or after the warranty period, you may contact your dealer or Servicenter.
If the problem is not handled to your satisfaction, then write to the warrantor’s Consumer Affairs Department at the
addresses listed for the warrantor.
PARTS AND SERVICE (INCLUDING COST OF AN IN-HOME SERVICE CALL, WHERE APPLICABLE) WHICH
ARE NOT COVERED BY THIS LIMITED WARRANTY ARE YOUR RESPONSIBILITY.
FAQs, etc.
45
Page 46

Customer Services Directory
Customer Services Directory
Obtain Product Information and Operating Assistance; locate your nearest Dealer or Servicenter; purchase
Parts and Accessories; or make Customer Service and Literature requests by visiting our Web Site at:
http://www.panasonic.com/consumersupport
or, contact us via the web at:
http://www.panasonic.com/contactinfo
You may also contact us directly at:
1-800-211-PANA (7262)
Monday-Friday 9 am-9 pm; Saturday-Sunday 10 am-7 pm, EST.
For hearing or speech impaired TTY users, TTY : 1-877-833-8855
■
Accessory Purchases
Purchase Parts, Accessories and Instruction Books on line for all Panasonic Products by visiting our Web
Site at:
http://www.pasc.panasonic.com
or, send your request by E-mail to:
npcparts@us.panasonic.com
You may also contact us directly at:
1-800-332-5368 (Phone) 1-800-237-9080 (Fax Only) (Monday - Friday 9 am to 8 pm, EST.)
Panasonic Services Company
20421 84th Avenue South,
Kent, WA 98032
(We Accept Visa, MasterCard, Discover Card, American Express, and Personal Checks)
(for U.S.A.)
For hearing or speech impaired TTY users, TTY : 1-866-605-1277
■
Service in Puerto Rico
Panasonic Puerto Rico, Inc.
Ave. 65 de Infantería, Km. 9.5, San Gabriel Industrial Park,
Carolina, Puerto Rico 00985
Phone (787)750-4300, Fax (787)768-2910
46
Page 47

Limited Warranty (for Canada)
Panasonic Canada Inc.
PANASONIC PRODUCT - LIMITED WARRANTY
Panasonic Canada Inc. warrants this product to be free from defects in material and workmanship and agrees to
remedy any such defect for a period as stated below from the date of original purchase.
Plasma TV / Monitor In-home service One (1) year, parts (including Plasma Panel) and labour.
LCD TV (26 in & over) In-home service One (1) year, parts (including LCD Panel) and labour.
LCD TV (25 in & under) Carry-in service only One (1) year, parts (including LCD Panel) and labour.
LCD Projector Carry-in service only One (1) year, parts (lamp ninety (90) days) and labour.
Accessories Ninety (90) days (parts only)
In-home Service will be carried out only to locations accessible by roads and within 50 km of an authorized
Panasonic service facility.
LIMIT ATIONS AND EXCLUSIONS
This warranty does not apply to products purchased outside Canada or to any product which has been improperly
installed, subjected to usage for which the product was not designed, misused or abused, damaged during shipping,
or which has been altered or repaired in any way that affects the reliability or detracts from the performance, nor
does it cover any product which is used commercially. Dry cell batteries are also excluded from coverage under this
warranty.
This warranty is extended to the original end user purchaser only. A purchase receipt or other proof of date of original
purchase is required before warranty service is performed.
THIS EXPRESS, LIMITED WARRANTY IS IN LIEU OF ALL OTHER WARRANTIES, EXPRESS OR IMPLIED,
INCLUDING ANY IMPLIED WARRANTIES OF MERCHANTABILITY AND FITNESS FOR A PARTICULAR
PURPOSE. IN NO EVENT WILL PANASONIC CANADA INC. BE LIABLE FOR ANY SPECIAL, INDIRECT OR
CONSEQUENTIAL DAMAGES.
In certain instances, some jurisdictions do not allow the exclusion or limitation of incidental or consequential
damages, or the exclusion of implied warranties, so the above limitations and exclusions may not be applicable.
Customer Services Directory (for U.S.A.)
WARRANTY SERVICE
For product operation and information assistance, please contact:
Our Customer Care Centre: Telephone #: (905) 624-5505
1-800 #: 1-800-561-5505
Fax #: (905) 238-2360
Email link: “Contact Us” on www.panasonic.ca
FOR PRODUCT REPAIRS, please locate your nearest Authorized Servicentre at www.panasonic.ca :
Link: “Servicentres™ locator” under “Customer support”
Panasonic Factory Service:
Vancouver, British Columbia
Panasonic Canada Inc.
12111 Riverside Way
Richmond, BC V6W 1K8
Tel: (604) 278-4211
Fax: (604) 278-5627
IF YOU SHIP THE PRODUCT TO A SERVICENTRE
Carefully pack and send prepaid, adequately insured and preferably in the original carton.
Include details of the defect claimed, and proof of date of original purchase.
Mississauga, Ontario
Panasonic Canada Inc.
5770 Ambler Dr.
Mississauga, ON L4W 2T3
Tel: (905) 624-8447
Fax: (905) 238-2418
Limited Warranty (for Canada)
FAQs, etc.
47
Page 48

Customer Services Directory (for Canada)
48
British Columbia
a
Audio Video Electronics
4450 Juneau Street
Burnaby, BC V5C 4C8
Canada
Bus: (604) 299-6969
Bus Fax: (604) 299-8464
E-mail:
audio_video_electronics@yahoo.com
A-Z Tech Electronics
3356 T ennyson Avenue
Victoria, BC V8Z 3P6
Canada
Bus: (250) 475-3341
Bus Fax: (250) 475-3315
E-mail: a-ztech@islandnet.com
g
GS Audio Services Ltd.
10511 King George Hwy
Surrey, BC V3T 2X1
Canada
Bus: (604) 582-4833
Bus Fax: (604) 951-9183
E-mail: gs-audioservices@shaw.ca
G TV Electronics Ltd.
1590 Commercial Drive
Vancouver, BC V5L 3Y2
Canada
Bus: (604) 253-0033
Bus Fax: (604) 253-0007
E-mail: nwms@telus.net
Giddens Services Ltd.
1613 Valleyview Drive
Kamloops, BC V2C 4B4
Canada
Bus: (250) 372-8842
Bus Fax: (250) 372-0603
E-mail: giddensservices@shaw.ca
i
IT Electronics
5690 Imperial Street
Burnaby, BC V5J 1G2
Canada
Bus: (604) 430-4228
Bus Fax: (604) 433-3619
E-mail: parts@itelectronics.com
k
Kelowna Teltronics TV & Audio
1695 Burtch Road
Kelowna, BC V1Y 4A9
Canada
Bus: (250) 860-9888
Bus Fax: (250) 860-0766
E-mail: teltronics@telus.net
n
NESA
102 1636 West 2nd Avenue
Vancouver, BC V6J 1H4
Canada
Bus: (604) 734-7606
Bus Fax: (604) 734-9783
E-mail: nesa@telus.net
Nippon Video & Sound
180 3771 Jacombs Road
Richmond, BC V6V 2L9
Canada
Bus: (604) 270-2820
Bus Fax: (604) 270-3359
E-mail:
nippon@nipponvideoandsound.ca
v
Vernon Electronics Service
2705 45th Avenue
Vernon, BC V1T 3N5
Canada
Bus: (250) 545-2266
Bus Fax: (250) 545-4065
E-mail: ves@shaw.ca
a
Autek Lab Ltd.
488 A St Annes Road
Winnipeg, MB R2M 3E1
Canada
Bus: (204) 256-4048
Bus Fax: (204) 257-6556
E-mail: all81@escape.ca
c
Consumer Electronics Servicentre
2305 7th Avenue
Regina, SK S4R 1C6
Canada
Bus: (306) 781-8033
Bus Fax: (306) 569-2177
E-mail: ces@accesscomm.ca
e
Electronic Analyst (51st Ave only)
9006 51st Avenue
Edmonton, AB T6E 5X4
Canada
Bus: (780) 468-2575
Bus Fax: (780) 466-1337
E-mail: service@elan.ab.ca
Image Electronics (1992) Inc.
643 Park Street
Regina, SK S4N 5N1
Canada
Bus: (306) 522-6655
Bus Fax: (306) 569-9660
E-mail: image@accesscomm.ca
Japan Audio Video
1037 Erin Street
Winnipeg, MB R3G 2X1
Canada
Bus: (204) 775-0494
Bus Fax: (204) 774-2747
E-mail: kanomax@pcs.mb.ca
m
MSJ Electronic Services Ltd.
10558 114th Street
Edmonton, AB T5H 3J7
Canada
Bus: (780) 426-1560
Bus Fax: (780) 425-9595
E-mail: msj@telusplanet.net
s
S & R Electronics
805 West Frederica Street
Thunder Bay, ON P7E 3X4
Canada
Bus: (807) 475-4956
Bus Fax: (807) 475-7252
E-mail: srelect@shaw.ca
Sonnx Service Inc.
Unit L 675 Berry Street
Winnipeg, MB R3H 1A7
Canada
Bus: (204) 953-0110
Bus Fax: (204) 953-0119
E-mail: rfrechette@sonnx.mb.ca
Southland Crossing TV Ltd.
Bay 5-7, 5708-1st Street SE
Calgary, AB T2H 2W9
Canada
Bus: (403) 255-9647
Bus Fax: (403) 259-4034
E-mail: southtv@shaw.ca
Sylvan Electronic Services Inc.
Bay #12 7619 50th Avenue
Red Deer, AB T4P 1M6
Alberta
i
j
Canada
Bus: (403) 358-3540
Bus Fax: (403) 358-3540
E-mail: marinof@telusplanet.net
t
T.H.E Service Department
Bay 6 1247 36 Ave NE
Calgary, AB T2E 6N6
Canada
Bus: (403) 291-3717
Bus Fax: (403) 250-1322
E-mail: theservice@shaw.ca
Tricom Electronics Ltd.
#4-1622 Ontario Avenue
Saskatoon, SK S7K 1S8
Canada
Bus: (306) 653-3913
Bus Fax: (306) 665-1445
E-mail:
rlanglands.tricom@sasktel.net
E-mail 2:
kschneider.tricom@sasktel.net
Nouveau-Brunswick
b
BJW Electronics Ltd.
90 Millennium Drive
Moncton, NB E1E 2G7
Canada
Bus: (506) 857-2118
Bus Fax: (506) 857-8763
E-mail: gil@bjwe.net
o
Ohmega Electronics Ltd.
165 Whitting Rd, Unit2, Industr.
Park
Fredericton, NB E3B 5Y5
Canada
Bus: (506) 450-6020
Bus Fax: (506) 452-7053
E-mail: mobile@ohmega.ca
E-mail 2: accounting@ohmega.ca
s
Servicetek Electronics
164 Albert Street
Moncton, NB E1C 1B2
Canada
Bus: (506) 387-4373
Bus Fax: (506) 387-4332
E-mail: servicetek@nb.aibn.com
Ontario
a
A & N Electronics
196 Joseph Zatzman Drive, Unit 8
Dartmouth, NS B3B 1N4
Canada
Bus: (902) 468-7205
Bus Fax: (902) 468-1047
E-mail:
anelectronics@ns.sympatico.ca
Advanced Audio & Video
60 Meg Drive (Unit 14)
London, ON N6E 3T6
Canada
Bus: (519) 686-4334
Bus Fax: (519) 686-9515
E-mail: advaud@ody.ca
b
Beaver Creek Electronics
155 East Beaver Creek Road, 17
Richmond Hill, ON L4B 2N1
Canada
Bus: (905) 731-1872
Bus Fax: (905) 731-8034
E-mail: bce@accessv.com
c
C Agusta TV Sales & Service
25 Fisherman Drive 13
Brampton, ON L7A 1C9
Canada
Bus: (905) 846-4739
Bus Fax: (905) 846-9289
E-mail: agustatv@on.aibn.com
Coltech Electronics
306 Kenora Avenue N
Hamilton, ON L8E 2W2
Canada
Bus: (905) 561-5506
Bus Fax: (905) 578-1001
E-mail: coltech@cogeco.net
Crescent TV
3033 Marentette Avenue
Windsor, ON N8X 4G1
Canada
Bus: (519) 969-1622
Bus Fax: (519) 969-6772
E-mail:
ctv@crescentelectronics.com
d
Downtown Dupont Electronics
1137 Dupont Street
Toronto, ON M6H 2A3
Canada
Bus: (416) 532-2888
Bus Fax: (416) 535-5720
E-mail:
downtowndupont@sympatico.ca
h
Hagopian Television Centre Ltd.
864 Merivale Road
Ottawa, ON K1Z 5Z6
Canada
Bus: (613) 728-2894
Bus Fax: (613) 728-2926
E-mail: hagopian@hagopian.ca
Hextech Consumer Electronics
110 Pony Drive, Unit 16
Newmarket, ON L3Y 7B6
Canada
Bus: (905) 830-6797
Bus Fax: (905) 830-6799
E-mail: hextech@rogers.com
n
Northern Electronic Services
660 Bayview Drive, Unit 10 & 11
Barrie, ON L4N 9P5
Canada
Bus: (705) 733-2195
Bus Fax: (705) 725-7686
E-mail: northern@mcw.net
r
Regional Factory Parts & Service
22 Antares Drive, Unit “J”
Ottawa, ON K2E 7Z6
Canada
Bus: (613) 820-8606
Bus Fax: (613) 820-3145
E-mail: j.tunnell@sysu.com
E-mail 2: j.long@bellnet.ca
s
Service Depot
252 Lasalle Blvd
Sudbury, ON P3A 1W6
Canada
Bus: (705) 566-3557
Bus Fax: (705) 566-3455
E-mail: service.depot@on.aibn.com
a
Acadien Electronique
5215 De La Savane
Montreal, QC H4P 1V4
Canada
Bus: (514) 270-1105
Bus Fax: (514) 738-4229
E-mail: support@amtservice.com
Audio Beaudoin TV Inc.
945 Rte de L‘Eglise
Ste.Foy, QC G1V 3V2
Canada
Bus: (418) 653-8951
Bus Fax: (418) 653-8964
E-mail:
beaudoinelectro@biz.videotron.ca
c
Capri Electronique
7903 20E Avenue St Michel
Montreal, QC H1Z 3S6
Canada
Bus: (514) 376-4990
Bus Fax: (514) 376-4305
E-mail:
capri.electronique@videotron.ca
Clinic Electronique Enr.
4230 King Ouset
Sherbrooke, QC J1L 1W6
Canada
Bus: (819) 823-1097
Bus Fax: (819) 821-3701
E-mail: clinic@videotron.ca
h
Hecotron International Inc.
1370 rue Poncet (coin Hamon)
Montreal, QC H3M 3A4
Canada
Bus: (514) 736-1313
Bus Fax: (514) 736-1254
E-mail: service@hecotron.net
l
Labtronic
5115 Boul Jean XXIII
Trois Riveres, QC G8Z 4A5
Canada
Bus: (819) 373-0066
Bus Fax: (819) 373-4317
E-mail: labtronic@cgocable.ca
Leblond Electronique
162 rue Fraser
Riviere-du-Loop, QC G5R 1C8
Canada
Bus: (418) 862-9062
Bus Fax: (418) 862-6392
E-mail: lebelec@hotmail.com
v
V. G. S. Electronique Inc.
25 Rue Neron Suite #3
Chicoutimi, QC G7H 8B7
Canada
Bus: (418) 696-3292
Bus Fax: (418) 696-2457
E-mail:
vgs.electronique@qc.aira.com
Quebec
Page 49

NOTE
Page 50

NOTE
Page 51

NOTE
Page 52

NOTE
Page 53

NOTE
Page 54

NOTE
Page 55

NOTE
Page 56

Customer’s Record
The model number and serial number of this product can be found on its back cover. You should note this serial
number in the space provided below and retain this book, plus your purchase receipt, as a permanent record of your
purchase to aid in identification in the event of theft or loss, and for Warranty Service purposes.
Model Number Serial Number
Anotación del cliente
El modelo y el número de serie de este producto se encuentran en su panel posterior. Deberá anotarlos en el
espacio provisto a continuación y guardar este manual, más el recibo de su compra, como prueba permanente de
su adquisición, para que le sirva de ayuda al identificarlo en el caso de que le sea sustraído o lo pierda, y también
para disponer de los servicios que le ofrece la garantía.
Modelo Número de serie
Panasonic Consumer Electronics
Company,
Division of Panasonic Corporation
of North America
One Panasonic Way, Secaucus
Panasonic Puerto Rico Inc.
(“PSC”)
Ave. 65 de Infanteria, Km 9.5
San Gabriel Industrial Park,
Carolina, Puerto Rico 00985
New Jersey 07094 U.S.A.
©
2006 Panasonic Corporation of North America. All Rights Reserved.
©
2006 Panasonic Corporation of North America. Todos los Derechos Reservados.
Panasonic Canada Inc.
5770 Ambler Drive
Mississauga, Ontario
L4W 2T3 CANADA
Printed in U.S.A.
Impreso en EE.UU.
Page 57

Manuel d’utilisation
Téléviseur à cristaux liquides
Modèles TC-26LE60
TC-32LE60
Français
R
Pour bénéficier d’une assistance, appelez le : 1-800-211-PANA (7262)
ou bien consultez notre site www.panasonic.com/contactinfo
Pour bénéficier d’une assistance, appelez le : 787-750-4300
ou bien consultez notre site www.panasonic.com
Pour bénéficier d’une assistance, appelez le : 1-800-561-5505
ou bien consultez notre site www.panasonic.ca
Avant d’utiliser l’appareil, lire attentivement le présent manuel et le conserver pour référence ultérieure.
Les images montrées dans le présent manuel n’y sont qu’à des fins d’illustration.
(États-Unis)
(Porto Rico)
(Canada)
TQB2AA0661
Page 58

Transformez votre salon en salle de cinéma !
Le multimédia à son meilleur !
2
R
Fabriqué sous licence de Dolby Laboratories.
Le terme “Dolby” et le sigle double D sont des marques
commerciales de Dolby Laboratories.
HDMl, le logo HDMI et High-Definition Multimedia Interface
sont des marques de commerce ou des marques déposées
de HDMI Licensing LLC.
Page 59

Une grande polyvalence multimédia
Table des matières
À lire attentivement
Mesures de sécurité ·····································4
•
Guide de mise
Amplificateur
Chaîne cinéma
maison
Caméscope
Décodeur
Enregistreur DVD
Magnétoscope Lecteur DVD
Accessoires/Équipement en option
•
Emplacement des commandes ······· 7
······ 6
•
Connexion ······························· 8
•
Réglage initial ·······················9
•
Pour un grand plaisir télévisuel
Fonctions de base
Visionnement de la télévision ····················10
•
Visionnement de bandes vidéo et de DVD
•
Fonctions avancées
Ident. prises/Sous-titres ·····························13
•
Utilisation des fonctions des menus
•
(image, son, etc.) ·······································14
Blocage de canaux ····································16
•
Programmation et édition des canaux ·······18
•
Utilisation des appareils périphériques ······20
•
Contrôle avec HDMI “HDAVI Control” ········21
•
Connexions A V recommandées ·················22
•
···12
en route
Fonctions
de base
Fonctions avancées FAQ, etc.
Foire aux questions et généralités
Télécommande et liste des codes de
•
commande ·················································24
Liste des classifications aux fins de
•
blocage des canaux ···································27
Informations techniques ·····························28
•
Entretien ·····················································30
•
Foire aux questions ···································30
•
Spécifications
•
Garantie limitée
•
Liste des centres de service à la clientèle
•
(pour le Canada) ········································34
··················································
··············································
32
33
3
Page 60

Mesures de sécurité
L’éclair avec la flèche dessiné
à l’intérieur d’un triangle
ATTENTION
Risque de secousse
électrique Ne pas ouvrir
AVERTISSEMENT: Pour réduire les risques de secousse électrique, ne pas retirer
le couvercle ni le panneau arrière. Cet appareil ne contient aucune pièce qui puisse
être réparée par l’utilisateur; l’entretien doit être effectué par du personnel qualifié.
Conseils pour l’installateur du système de câblodistribution:
Il est recommandé de consulter le Code canadien de l’électricité en ce qui a trait à la mise à la terre du fil de câblodistribution. Ce
code spécifie que le fil doit être relié au système de mise à la terre de l’édifice, le plus près possible du point d’entrée.
Ventilation sûre
Les fentes et les ouvertures situées à l’arrière ou en dessous du téléviseur sont prévues pour assurer sa ventilation, et garantir
ainsi son bon fonctionnement en évitant toute surchauffe. Ces ouvertures ne doivent pas être recouvertes ou obstruées. Ménagez
au moins un espace de 10 cm autour de ces ouvertures. Ainsi, ne posez jamais l’appareil sur un lit, un canapé, un tapis ou toute
autre surface qui risquerait de gêner la ventilation. Ce téléviseur ACL ne doit pas être encastré dans un meuble, à moins de
prévoir une ventilation adéquate.
Précautions de sécurité importantes
avertit l’utilisateur que les
éléments internes au produit
présentent un risque de choc
électrique.
Le point d’exclamation
dessiné à l’intérieur d’un
triangle avertit l’utilisateur que
d’importantes instructions de
fonctionnement et d’entretien
sont fournies avec l’appareil.
1) Lisez ces instructions.
2) Conservez ces instructions en lieu sûr.
3) Respectez toutes les consignes de sécurité.
4) Suivez toutes les instructions fournies.
5) N’utilisez pas ce téléviseur à proximité d’une source d’eau.
6) Ne nettoyez cet appareil qu’avec un chiffon sec.
7) N’obstruez pas les évents de ventilation de l’appareil. Installez-le en respectant les instructions du fabricant.
8) N’installez pas le téléviseur ACL près d’une source de chaleur, par exemple un radiateur, un réchaud ou tout autre appareil (y
compris des amplificateurs) produisant de la chaleur.
9) N’invalidez pas les caractéristiques de sécurité de la fiche polarisée ou avec mise à la terre. Une fiche polarisée possède deux
lames dont une est plus large que l’autre. Une fiche avec mise à la terre possède deux lames plus une troisième lame pour la
mise à la terre. La lame large ou la lame de mise à la terre sont conçues pour des raisons de sécurité. Si la fiche fournie ne
peut pas être branchée dans votre prise secteur, consultez un électricien pour faire remplacer la prise.
10) Faites en sorte que personne ne puisse marcher sur le cordon d’alimentation ou le plier, tout particulièrement
à ses deux extrémités.
11) Utilisez uniquement les accessoires prévus par le fabricant.
12) Ne placez l’appareil que sur la table, le trépied ou le support spécifié par le fabricant ou fourni avec l’appareil.
Si vous utilisez une table roulante, veillez, lorsque vous déplacez l’ensemble, à éviter tout basculement qui
pourrait entraîner des blessures corporelles.
13) Débranchez l’appareil pendant les orages ou lorsque vous ne comptez pas vous en servir pendant une période prolongée.
14) Pour toute intervention, adressez-vous à un technicien qualifié. Une intervention est nécessaire lorsque l’appareil a été
endommagé, par exemple en cas de rupture du cordon secteur ou de sa fiche, lorsque du liquide s’est répandu sur le
téléviseur ou qu’un objet est tombé à l’intérieur, lorsque l’appareil a été exposé à la pluie ou à l’humidité, quand il ne fonctionne
pas normalement ou quand il est tombé.
15) N’alimentez l’appareil que par une source électrique conforme aux
indications apposées sur l’étiquette de l’appareil. Si vous avez
des doutes sur les caractéristiques de votre courant domestique,
consultez votre installateur de télévision ou votre fournisseur
d’électricité.
16) Respectez toutes les instructions et consignes de sécurité figurant
sur le téléviseur ACL.
17) N’introduisez aucun objet par les ouvertures du téléviseur ACL ;
ils pourraient entrer en contact avec des composants sous tension
élevée ou provoquer un court-circuit susceptible d’entraîner un
incendie ou une décharge électrique. Ne répandez jamais de
liquide sur le téléviseur ACL.
Exemple de mise à la terre
de l’antenne recommandé
par le code canadien de
l’électricité
Collier de mise à la
terre
Service d’entrée
électrique
Système de mise à la terre du réseau
électrique (code canadien de l’électricité)
Fil de descente
Parafoudre (partie 1
du code canadien de
l’électricité)
Fils de terre (partie 1
du code canadien de
l’électricité)
Sangles de mise à la terre
4
Page 61

18) Si une antenne extérieure est reliée à ce téléviseur, assurez-vous que celle-ci a été mise à la terre afin de protéger l’appareil
contre les surtensions et l’accumulation d’électricité statique. La partie 1 du Code canadien de l’électricité contient des
informations concernant la mise à la terre des mâts d’antenne et de leurs structures, celle du fil de descente, le calibre du fil de
descente requis et les exigences concernant la tige de la mise à la terre.
19) Un système d’antenne extérieur ne doit jamais se situer à proximité de lignes électriques aériennes ou de tout autre circuit
d’éclairage ou circuit électrique, ni à un endroit où il risque d’en être trop près. Lors de l’installation d’un système d’antenne
extérieur, prenez bien soin de ne pas toucher ces lignes ou ces circuits électriques, car le moindre contact peut être fatal.
20) Débranchez le téléviseur ACL de la prise murale et demandez les services d’un technicien qualifié dans les cas suivants:
a . Quand le cordon d’alimentation ou sa fiche sont endommagés ou usés.
b . Si du liquide s’est renversé sur le téléviseur ACL.
c . Si le téléviseur ACL a été en contact avec la pluie ou l’eau.
d . Si le téléviseur ACL ne fonctionne pas normalement alors que vous respectez son mode d’emploi. Réglez uniquement les
paramètres décrits dans le mode d’emploi, car des réglages incorrects d’autres paramètres risquent de provoquer des
dommages et de demander davantage de travail à un technicien qualifié pour une remise en état du téléviseur ACL.
e . Si le téléviseur ACL est tombé ou si son coffret a été endommagé.
f . Lorsque le téléviseur ACL subit un changement notable au niveau des performances (cela indique qu’il faut le réparer).
21) Lorsqu’il faut remplacer des pièces, assurez-vous que le technicien utilise les pièces préconisées par le fabricant, avec les
mêmes caractéristiques que celles d’origine. Un remplacement non conforme risque de causer un incendie, un choc électrique
ou tout autre dommage.
22) AVERTISSEMENT: POUR RÉDUIRE LES RISQUES D’INCENDIE ET DE DÉCHARGE ÉLECTRIQUE, N’EXPOSEZ PAS
CET APPAREIL À L’HUMIDITÉ OU À LA PLUIE.
NE PLACEZ AUCUN RÉCIPIENT CONTENANT DE L’EAU (VASE DE FLEUR, TASSE, BOUTEILLE
DE PRODUIT DE BEAUTÉ, ETC.) SUR L’ APPAREIL (OU SUR UNE ÉTAGÈRE LE DOMINANT).
23) AVERTISSEMENT: LES PETITES PIÈCES PEUVENT PRÉSENTER DES DANGERS D’ÉTOUFFEMENTS SI ELLES
SONT AVALÉES PAR ACCIDENT. GARDEZ LES PETITES PIÈCES HORS DE LA PORTÉE DES
ENFANTS.
JETEZ LES PETITES PIÈCES INUTILES, AINSI QUE LES AUTRES OBJETS INUTILES, Y
COMPRIS LES MATÉRIAUX D’EMBALLAGE ET LES SACS/FEUILLES EN PLASTIQUE,
AFIN D’ÉVITER QUE DES ENFANTS JOUENT AVEC, CRÉANT UN RISQUE POTENTIEL DE
SUFFOCATION.
24) ATTENTION: POUR ÉVITER LES CHOCS ÉLECTRIQUES, N’UTILISEZ PAS CETTE FICHE POLARISÉE DANS
UNE PRISE OÙ ELLE NE PEUT ÊTRE INSÉRÉE COMPLÈTEMENT.
25) ATTENTION: UTILISATION AVEC UN AUTRE SUPPORT QUE CELUI FOURNI OU RECOMMANDÉ PEUT
RENDRE L’ENSEMBLE INSTABLE ET ÊTRE CAUSE DE BLESSURES CORPORELLES.
26) ATTENTION: IL EXISTE UN RISQUE D’EXPLOSION EN CAS D’UTILISATION DE PILES NON CONFORMES. NE
REMPLACEZ LES PILES QUE PAR DES PILES IDENTIQUES OU DE TYPE ÉQUIVALENT.
REMARQUE : Cet équipement est conçu pour être utilisé en Amérique du Nord et dans tout pays où le système de télévision
Ce produit utilise des soudures à l’étain-plomb et une lampe fluorescente contenant une petite quantité de
■
mercure. Le rejet de ces matières peut être soumis à restrictions dans votre région en raison de considérations
environnementales. Pour plus d’informations sur le rejet ou le recyclage, contactez votre administration publique
locale.
et le courant alternatif domestique sont exactement les mêmes qu’en Amérique du Nord.
5
Page 62

Accessoires/Équipement en option
Vérifiez que les accessoires et les éléments ci-dessous sont bien inclus en cochant leur case.
Accessories
Télécommande
□
EUR7613ZG0
•
Manuel d’utilisation
□
Piles pour la télécommande
□
Format AA
•
Mise en place des piles de la télécommande
(2)
Câble HDMI
□
Poussez.
1
Glissez pour ouvrir.
2
Refermez.
Respectez la polarité
(+ ou -).
Communiquez avec un détaillant Panasonic
pour vous procurer l’adaptateur de montage
mural recommandé. Pour de plus amples
renseignements, reportez-vous à la notice
d’installation de l’adaptateur de montage mural.
Adaptateur de montage
mural (vertical)
TY-WK32LR2W
•
Mise en garde
L’installation incorrecte des piles peut entraîner une fuite de
•
l’électrolyte provoquant la corrosion de la télécommande.
N’utilisez pas à la fois une pile neuve et une pile usagée.
•
N’utilisez pas en même temps deux types de piles (par
•
exemple, une pile au carbone zinc et une pile alcaline).
N’utilisez pas de piles rechargeables (Ni-Cd).
•
Ne démontez pas et ne chauffez pas les piles usagées.
•
Notez les codes de commande avant de remplacer les piles dans
•
le cas où il serait nécessaire d’en refaire la programmation.
(p. 25-26)
Accessoire en option
AVERTISSEMENT
L’utilisateur qui choisirait de ne pas utiliser l’adaptateur de
•
montage mural Panasonic ou d’installer le téléviseur lui-même
le fait à ses propres risques. Tout dommage résultant d’une
installation qui n’aurait pas été effectuée par un technicien
qualifié entraînera la résiliation de la garantie.
Confiez l’installation du téléviseur à un technicien qualifié.
•
Une installation inadéquate peut causer la chute de l’appareil
susceptible de l’endommager ou de causer des blessures.
N’installez jamais ce téléviseur ACL directement sous un
•
éclairage au plafond (tel un projecteur, un réflecteur ou une
lampe à halogène) générant de la chaleur. Les pièces en
plastique du boîter pourrraient être endommagées par la chaleur.
6
Retrait du socle du téléviseur
1 2
Retirez les deux vis.
Tirez sur la partie en plastique
pour l’enlever.
Tapis de mousse ou linge
doux épais
Retirez les quatre vis.
Tirez sur la partie métallique
pour l’enlever.
Page 63

Choix de l’emplacement du téléviseur
Placez l’appareil de façon optimale pour le confort des spectateurs. Placez le téléviseur de telle sorte que la
lumière du soleil ou une autre lumière forte (y compris la lumière réfléchie) ne frappe pas l’écran.
La présence de certains éclairages de type fluorescent peut réduire la portée de la télécommande.
Il est important que le lieu soit correctement ventilé pour prévenir toute surchauffe des composants internes
de l’appareil. Ne placez pas l’appareil dans un local trop chaud ou trop humide.
Comment utiliser le socle pour le téléviseur à cristaux liquides
Ajustez le socle sur l’angle souhaité.
L’angle d’inclinaison du socle de l’écran peut être pivoté latéralement
sur une plage de 0° à 20°.
Emplacement des commandes
Touche POWER
Volume
Navigations par
menu
Sélecteur TV/VIDEO
Voyant d’alimentation (en marche : rouge ; hors marche : éteint)
Capteur de réception de télécommande
Tenez-vous à moins de 7 m (25 pi) de l’avant du téléviseur.
Remarque
Tant que le cordon d’alimentation est branché, le téléviseur consomme un peu d’énergie.
•
Met l’appareil sous/hors tension.
(S’utilise lorsque le bouton d’alimentation de
l’appareil est allumé.)
Règle la télécommande pour qu’elle
communique avec d’autres appareils.
(p. 20)
Volume
Navigations par menu
Sélectionner le mode audio pour
l’écoute de la télévision (p. 10)
Sélectionner/OK/Changer
RETURN (au menu précédent)
Quitter (le menu)
Sélectionne les
canaux en séquence.
Guide de mise
en route
Emplacement des commandes
Accessoires/Équipement en option
Sélectionne les canaux en séquence.
Navigations par menu
Afficher le menu principal
Sélectionne le mode d’entrée. (p. 12)
Afficher ou retirer la bannière de canal
(p. 10)
Commuter sur le canal affiché
précédemment
Minuterie-sommeil (MINUTES) (p. 10)
Sélectionne le format d’image. (p. 11, 28)
(p. 14-15)
Utiliser la fonction de liste de canaux
favoris
GUIDE pour DBS
Active/désactive la fonction sourdine.
Pavé numérique pour sélectionner
un canal, ou appuyer pour saisir une
entrée alphanumérique dans les
menus (p. 10)
Accès de canal direct pour DIV et
DBS (p. 10)
Fonctions des appareils externes
(p. 12, 24)
(
(p. 11)
magnétoscopes, DVD, etc.)
7
Page 64

Connexion
Visionnement de la télévision
■
Panneau arrière du téléviseur
Cordon d’alimentation
(Ne le brancher qu’après
avoir fait tous les autres
raccordements.)
ANT
Câblosélecteur
IN OUT
Antenne VHF/UHF
ou
ou
ANT IN
ANT OUT
Enregistrement
d’émissions de télévision
Video
IN
L
Audio
OUT
R
Video
OUT
L
Audio
IN
R
Les signaux S-Vidéo ont
la priorité.
Remarques
Tous les câbles et les appareils externes montrés dans le présent manuel sont vendus séparément.
•
Pour de plus amples renseignements, allez sur www.panasonic.ca
•
En ce qui concerne le magnétoscope, la priorité est donnée à la connexion S-Vidéo lorsque les deux types de
•
connexion vidéo (Vidéo et S-Vidéo) sont établies en parallèle.
Lors de la réception de signaux d’un canal numérique, tous les formats numériques sont convertis en signaux
•
composites NTSC afin d’être sortis par les prises de sortie d’émission.
Certaines émissions contiennent un signal de protection des droits d’auteur afin d’interdire leur enregistrement sur
•
magnétoscope.
S-Video
OUT
Enregistreur vidéo
avec syntonisateur TV
Lecteur DVD /
Magnétoscope
8
Page 65

Réglage initial
Le menu “Réglage initial” ne s’affiche que lorsque le téléviseur est mis en marche pour la première fois
après sa mise sous tension.
Disponible seulement lorsque “Contact auto” est en fonction (EF). (p. 14-15)
Sélectionnez l’entrée d’antenne et le
mode d’entrée.
1
2
Appuyez sur la touche POWER
pour mettre le téléviseur en
marche.
Sélectionnez la langue d’affichage.
Réglage initial
Langue
Program. auto
Langue
Langue
Français
suivant
sélection
Program. auto
Entr. ANT
Mode
Balayage
Entr. ANT
Cable: Câble Antenna: Antenne
Mode
Tous : numérique et analogique
Analog : analogique seulement (abrège le délai
À propos des systèmes de télédiffusion
•
Analogique : télévision traditionnelle
Numérique :
Câble
Tous
de syntonisation)
nouveau système qui permet le
visionnement d’un plus grand
nombre de canaux offrant une
image et un son de haute qualité.
réglage
sélection
Démarrez le balayage des canaux.
Program. auto
Entr. ANT
Mode
Balayage
Câble
Tous
démarrage
sélection
“Balayage”
Guide de mise
en route
Réglage initial
Connexion
3
English Español Français
Appuyez pour aller à l’écran
précédent, ou sélectionnez
l’icône puis appuyez sur OK pour
obtenir les mêmes résultats.
Balayage automatique
Sélectionnez “Program. auto”
Réglage initial
Langue
Program. auto
suivant
sélection
Balayage canaux analogique ...
Progrés
Les canaux pouvant
•
être reçus (analogique
et numérique) sont
automatiquement
sélectionnés.
Vérifiez les canaux sélectionnés.
Modifier
Appliquer
Favori
- - -
2
Les canaux ne seront pas mis en mémoire
•
si vous ne cliquez pas sur “Appliquer” après
l’avoir sélectionné.
Appuyez pour quitter ou revenir à l’écran précédent.
■
Remarque
Pour modifier la configuration ultérieurement, allez à
•
l’écran Menu. (p. 14-15)
Ajout
Non
Oui
sélection
“Appliquer”
ok
9
Page 66

Visionnement de la télévision
Pour capter les canaux câblodistribués, le raccordement d’un câblosélecteur est requis. (p. 8)
Pour capter les émissions de câblodistribution numérique, raccordez le décodeur de câblodistribution à la borne “ANT”.
•
Sélectionnez le mode TV.
1
Mettez l’appareil en
2
marche
Autres fonctions utiles (Exécutez après )
■
Met l’appareil hors tension au bout d’une période de temps prédéfinie (de 0 à
90 minutes, par intervalle de 30 minutes).
Minuteriesommeil
•
0/30/60/90 (minutes)
Syntonisez un canal.
3
haut
bas
Pour entrer directement le numéro du
■
canal numérique
Lors de l’accord d’un canal
numérique, appuyez sur la
touche pour entrer le nombre
secondaire pour un numéro de
canal composé.
Exemple: canal 15-1:
ou
Écoute de la
voie SAP
(Programme
audio
secondaire)
Rappel des
informations
Sélectionner le mode audio pour l’écoute de la télévision
■
Mode numérique
•
Appuyez sur SAP pour sélectionner la plage audio suivante (si disponible) lors de la
réception d’un canal numérique.
Voie audio 1 de 1
Mode analogique
•
Appuyez sur la touche SAP pour sélectionner le mode audio désiré tel que décrit ci-
dessous. (La flèche indique la sélection.)
•
Chaque pression sur la touche SAP change le mode audio tel indiqué ci-dessous. (Stereo/SAP/Mono)
Afficher ou retirer la bannière de canal.
(Anglais)
Canal
15-2
ABC - HD
CC SAP
T V -G
1080I
Standard
4 : 3
30
10
Indicatif du
canal
SAP
Classification
Résolution
du signal
Mode
d’image
Temps restant de la
minuterie-sommeil
Format d’image
Page 67

Réglages 1/3
[1]
[2]
[3]
[4]
Réglages 1/3
[1] 26-1
[2]
[3]
[4]
Favori 1/3
[1]
[2]
[3]
[4]
Changement du format de l’image (p. 28)
Changement
du format
Sur chaque pression de la touche, le mode est
•
commuté.
d’image
• 480i, 480p:PLEIN/CADRAGE/4:3/ZOOM
• 1080i, 720p:PLEIN/H-LARGE/CADRAGE/4:3
Syntonisation
d’un canal
préféré
Remarques
Resélectionnez “Câble” ou “Antenne” sous “Entr. ANT” de “Program. auto” pour basculer entre la réception par
•
câble et par antenne. (p. 19)
Le numéro de canal et le niveau de volume restent les mêmes, même après avoir mis le téléviseur hors tension.
•
Spécifier la fonction de favoris Utiliser la fonction de favoris
1 Affichez le canal à placer sur la liste des favoris.
2 Appuyez de manière continue
sur FAVORITE pendant quelques
secondes.
• Appuyez plusieurs fois sur
FAVORITE pour changer de
page (1/3, 2/3, 3/3, ou quitter).
La pression sur ◄ ► permet
aussi de changer de page.
Favoris
■
Les numéros de canal enregistrés dans Favoris s’affichent sur l’écran
d’accords favoris. Sélectionnez la station de diffusion désirée avec le
curseur ou au moyen des touches numériques. (voir ci-dessous)
1 Appuyez sur FAVORITE.
• Appuyez plusieurs fois sur
FAVORITE pour changer de
page (1/3, 2/3, 3/3, ou quitter).
La pression sur ◄ ► permet
aussi de changer de page.
Fonctions
de base
Visionnement de la télévision
3 Appuyez sur ▲▼pour mettre
• Vous pouvez également utiliser
•
Il est possible de retirer de la liste un canal mis en mémoire,
sélection
en surbrillance une position sur
la liste, puis appuyez sur OK
ok
Pour effacer un canal favori
en appuyant de manière continue sur FAVORITE pendant
que sa position est en surbrillance.
pour mettre en mémoire le canal
affiché dans cette position.
les touches numériques (1 à
9 et 0) pour sélectionner les
numéros de liste enregistrés
(1 à 9 et 0). Ce faisant, les
numéros seront directement
enregistrés sans qu’il ne soit
nécessaire d’appuyer sur la
touche OK.
2 Appuyez sur ▲▼ ou sur une
sélection
touche numérique (1 à 9 et
0) pour mettre un canal en
surbrillance sur la liste.
• Le canal s’affichera directement
si vous sélectionnez son numéro
dans la liste avec les touches
numériques.
3 Appuyez sur OK pour afficher le
ok
canal mis en surbrillance.
11
Page 68

Visionnement de bandes vidéo et de DVD
La télécommande peut piloter les fonctions de certains appareils Panasonic raccordés au téléviseur.
La programmation de la télécommande est nécessaire pour utiliser les appareils d’autres fabricants.
(p. 20, 24-26)
Avec un magnétoscope ou un lecteur DVD en marche
1
2
Passez à l’entrée externe.
Appuyez pour afficher le menu de sélection d’entrée.
Sélectionnez le mode d’entrée.
Sélection d’entrée
[1] TV
[2] Composant
[3] HDMI
[4] Vidéo 1
[5] Vidéo 2
[6] Vidéo 3
(écran initial)
ou
sélection
entrée
Appuyez sur la touche
numérique correspondante
de la télécommande pour
sélectionner l’entrée désirée.
Appuyez pour sélectionner
l’entrée de votre choix, puis
appuyez sur “OK”.
Si, pendant la sélection,
•
aucune commande n’est
exécutée pendant quelques
secondes, le menu de
sélection d’entrée est quitté.
Pour revenir à l’image
■
de la télévision
Remarque
Pour plus de détails,
•
reportez-vous au
manuel de l’appareil ou
informez-vous auprès
du revendeur local.
3
La borne et l’identification de l’appareil connecté
•
sont affichées.
Pour donner une identification à chacun des
appareils connectés. (p. 13)
Identification
Vidéo 1
VCR
[exemple]
Prise
Effectuez les opérations requises
sur le magnétoscope ou le lecteur DVD à partir de la télécommande.
(exemple)
Magnétoscope DVD
Rebobinage arrière/
Avance rapide
Lecture Lecture
Pause Pause
Arrêt Arrêt
Enregistrement sur
magnétoscope
TV/Magnétoscope Ouverture/Fermeture
Recul/Avance
-
12
Canal Bas/Haut Recul/Avance au ralenti
(Pour d’autres opérations, voir à la page 24.)
Page 69

Ident. prises/Sous-titres
Affichez le menu. Sélectionnez “Ident. prises”
Ident. prises
Afficher
l’identification
des appareils
externes
CC
Afficher les
sous-titres
1
Sélectionnez “Réglage”
2
Menu
Image
Audio
Minuterie
Blocage
Réglage
Il est possible de faire afficher l’identification des appareils connectés aux prises d’entrée du
téléviseur. (En sélectionnant le mode d’entrée de la p. 12 )
Sélectionnez la borne et l’étiquette de l’appareil externe.
Ident. prises
Comp.
HDMI
Vidéo 1
Vidéo 2
Vidéo 3
Ce téléviseur comprend un décodeur intégré capable de faire apparaître une contre-partie
visuelle de la partie audio. Le programme regardé doit intégrer des sous-titres codés (CC) afin
que le téléviseur puisse les afficher. (p. 28)
Sélectionnez une rubrique et effectuez le réglage.
■
CC
Mode
Analog.
Numéri.
Réglage numéri.
Réinitialisation
Les réglages dans “Analog.” ou
•
“Numéri.” sont déterminés par le
télédiffuseur.
Réglages plus poussés de l’affichage pour les émissions numériques
■
Réglage numéri.
Format
Automatique
Police
Automatique
Style
Automatique
OMETTRE
DVD
AUX
OMETTRE
OMETTRE
HF
CC1
Primaire
Sélectionnez “Réglage numéri.” , puis appuyez sur la touche “OK”.
Sélectionnez la rubrique, puis effectuez le réglage
(1/3)
suivant
sélection
sélection
réglage
sélection
réglage
Prises: Comp./HDMI/Vidéo1-3
•
Identification:
•
*
Analog.
CC1-4:
T1-4:
Numéri. (Le menu des sous-titres codés numériques
Choisir le réglage.
•
sélection
réglage
Format: Taille des caractères
•
Police: Police de caractères
•
Style: Style (En relief, Effet gravé, etc.)
•
Avant-plan: Couleur
•
Opacité avant: Densité
•
Arrière-plan: Couleur de la zone de texte
•
Opacité arr.: Densité de la zone de texte
•
Contour: Couleur du pourtour des caractères
•
(Sélectionnez parmi les options à l’écran.)
3
ou “CC”
Réglage
Bal. CA
Langue
Program. canaux
Ident. prises
CC
Autres réglages
Tous
Réglez.
4
OMETTRE*/MAGNÉT/DVD/CÂBLE/
SRD/MAGN. NUM/JEU/AUX/
[ESPACE]
Si “OMETTRE” est sélectionné
pour une prise laissée libre, le
signal de cette prise est sauté
lors de la commutation au moyen
de la touche TV/VIDEO.
Mode
“Primaire”, “Second.”, “Service 3”, “Service 4”,
“Service 5”, “Service 6”
Sélectionnez “EF” (lorsque “HF” n’est pas utilisé).
(Permet de choisir le service de sous-titres
de l’émission analogique.)
Informations concernant les images
(Affichage au bas de l’écran)
Informations textuelles
(Affichage plein écran)
vous permet de configurer la façon
d’afficher les sous-titres codés numériques.)
Pour quitter
■
Identification
Vidéo 1
VCR
[exemple]
suivant
sélection
Prise
Visionnement de bandes vidéo et de DVD
Ident. prises/Sous-titres
Fonctions
de base
Fonctions avancées
Réinitialisation des réglages
■
Sélectionnez “Réinitialisation”, puis appuyez sur la touche “OK”.
13
Page 70

Utilisation des fonctions des menus
Divers menus vous permettent de changer les réglages pour l’image, le
son et d’autres fonctions afin que vous puissiez regarder la télévision
en spécifiant vos préférences.
Affichez le menu
1
Affiche les fonctions pouvant être
•
paramétrées (varient selon le
signal d’entrée).
Sélectionnez un menu
2
Menu
Image
Audio
Minuterie
Blocage
Réglage
sélection
suivant
Sélectionnez une rubrique
3
Image 1/2
Norm.
Mode
Rétroéclairage
Image
Brillance
Couleur
Nuances
Netteté
(Exemple : menu Image)
Valider
Standard
+20
+20
0
0
0
0
sélection
Liste de menus
■
Menu Option
Norm.
Mode
Rétroéclairage
Image, Brillance,
Couleur, Nuances,Netteté
Image
Temp. coul.
Image IA
Réglage zoom
Autres réglages
Réducteur
Filtre 3D Y/C
Codeur coul.
Niveau du noir
Norm.
Graves
Aigus
Audio
Équilibre
Autres réglages
Son IA
Son ambio
Entr. HDMI
Égalis. audio
Appuyez pour quitter
■
ou revenir à l’écran
précédent.
4
Faites le réglage ou la
sélection.
Image 1/2
Norm.
Mode
Rétroéclairage
Image
Brillance
Couleur
Nuances
Netteté
(Exemple : menu Image)
Valider
Standard
+20
+20
0
0
0
0
Réglage
ou
sélection
Minuterie
Sommeil
Blocage
Bal. CA
Langue
Program. canaux
Ident. prises
CC
Réglage
Autres réglages
À propos
Réinitialiser
Contact auto
Coup. s. ext.
Ctrl avec HDMI
Éco-énergie
14
Page 71

Réglages/Paramètres (choix)
Rétablit tous les réglages par défaut pour les réglages d’image, sauf pour le réglage “Autres réglages”
Mode de base de l’image (Éclatant/Standard/Cinéma)
Réglage de luminosité du rétroéclairage.
Ajuste la couleur, la brillance, etc. pour chaque mode image selon
vos préférences.
Image
Brillance
Couleur
+20
0
0
Norm.
Mode
Rétroéclairage
Nuances
Netteté
valider
Standard
+20
0
0
Sélectionne le niveau des couleurs chaudes (rouge) et des couleurs froides (bleu) (Rouge/Bleu/Norm.)
Réglage des sections sombres sans affecter le niveau du noir ni la luminosité de l’ensemble de l’image.
(EF/HF)
Ajuste l’alignement vertical et la taille en hauteur lorsque le format est réglé sur “ZOOM”. (p. 28)
Réduit le bruit des canaux, appelé habituellement “neige”. Mettez hors service lors de la réception d’un signal fort. (EF/HF)
Réduit le bruit et le décalage des couleurs. (EF/HF)
Ne fonctionne pas pour les signaux suivants : vidéo composante et HDMI.
Temp. coul.
Image IA
Réglage zoom
Réducteur
Filtre 3D Y/C
Sélectionne la résolution d’image des composants ou appareils connectés. (DS/HD)
DS: standard HD: haute définition
Seulement le signal 480p est pris en charge; le signal de télévision ordinaire (NTSC) n’est pas disponible.
Sélectionnez FONCÉ ou CLAIR selon les conditions de l’image. (Foncé/Clair)
Le visionnement de scènes sombres est amélioré. (Valide uniquement pour les signaux d’entrée externes.)
Réinitialise les réglages des Graves, Aigus et Équilibre aux réglages par défaut.
Augmente ou diminue la réponse des graves.
Augmente ou diminue la réponse des aigus.
Accentue le volume des enceintes gauche/droite.
Égalise le niveau de volume général sur tous les canaux et les entrées VIDEO. (EF/HF)
Améliore la réponse sonore lors de l’écoute d’un programme stéréo. (EF/HF)
Sélectionne en fonction du signal lorsqu’un appareil HDMI est connecté. (Auto/Numéri./Analog.)
Auto: Sélectionne automatiquement le signal analogique/numérique.
Réduit l’écart entre les niveaux de volume après mise en circuit d’une source externe.
Codeur coul.
Niveau du noir
Norm.
Graves
Aigus
Équilibre
Son IA
Son ambio
Entr. HDMI
Égalis. audio
Met automatiquement le téléviseur hors tension une fois écoulée la durée présélectionnée.
0/30/60/90 (minutes)
Sommeil
Il est aussi possible de régler la minuterie en appuyant sur la touche “Sommeil” de la télécommande. (p. 10)
Verrouiller les canaux et programmes (p. 16-17)
Sélectionne les canaux à afficher lors de la pression sur les touches “Canal haut/bas”.
Fav.: Seulement les canaux programmés comme étant des canaux préférés. (p. 19)
Sélectionne la langue du menu à l’écran. (p. 9)
Spécifie les canaux de réception. (p. 18-19)
Affiche l’identification de la source externe. (p. 13)
Affiche les sous-titres. (p. 13)
(Fav./Tous)
Bal. CA
Langue
Program. canaux
Ident. prises
CC
Règle le contact avec le téléviseur (Valider/HF)
Valider : Raccorder le cordon d’alimentation au câblosélecteur, etc. et régler la mise en marche/
hors marche du téléviseur sur l’appareil connecté. (La minuterie-sommeil ne fonctionnera
pas si “Contact auto” est activé.)
Contact auto
HF : Mettre le téléviseur en marche et régler la mise en marche/hors marche du téléviseur sur
le téléviseur même. Le menu “Réglage initial” s’affiche lorsque le cordon d’alimentation
est raccordé de nouveau après avoir été débranché.
Interrompt l’acheminement du signal sélectionné dans le menu.
(HF/Comp./HDMI/Vidéo 1/Vidéo 2/Vidéo 3)
Coup. s. ext.
Comp./HDMI ne peuvent sortir les signaux vidéo quel que soit le réglage Coup s. ext.
Pilote les fonctions de l’équipement connecté aux prises HDMI. (p. 21, 22) (EF/HF)
Réduit la luminosité de l’écran pour réduire la consommation et convient pour une utilisation nocturne. (Standard/Économie)
Affiche les informations sur le téléviseur et le contrat de licence du logiciel.
Réinitialiser les réglages annule toutes les options de l’écran “Réglage”, telles que le réglage des
canaux. (p. 18) Utilisez cette commande avec précaution.
Ctrl avec HDMI
Éco-énergie
À propos
Réinitialiser
Bleu
EF
On
HF
HF
DS
Clair
Valider
+ 4
EF
HF
Auto
Tous
HF
HF
EF
Standard
On
Utilisation des fonctions des menus
(image, son, etc.)
0
0
Fonctions avancées
0
60
Dans le mode Vidéo, les menus Audio et Réglage comportent un plus petit nombre d’options.
•
15
Page 72

Blocage de canaux
Il est possible de bloquer la réception de certains canaux afin de prévenir que les enfants ne soient
exposés à un contenu inapproprié.
Affichez le menu.
1
Sélectionnez “Blocage”.
2
Vous serez invité à saisir votre mot de passe chaque fois que vous afficherez le
menu “Blocage”.
Menu
Image
Audio
Minuterie
Blocage
Réglage
suivant
sélection
Pour quitter
■
Mise en garde
Notez votre mot de
•
passe dans le cas
où vous l’oublieriez.
(Si vous avez oublié
votre mot de passe,
communiquez avec
votre détaillant
Panasonic.)
Remarque
Lorsqu’un canal
•
bloqué est syntonisé,
un message s’affiche
permettant de recevoir
le canal après avoir
entré votre mot de
passe.
3
4
Entrez votre mot de passe à 4 chiffres.
Un code à 4 chiffres doit être saisi pour voir un programme bloqué ou pour
changer les paramètres de classement.
La première fois, entrez le code à deux
Entrer mot de passe.
----
Sélectionnez le mode de blocage.
Blocage
Mode
Canal
Émission
Modifier mot de passe
Non activé : Le blocage de canaux est désactivé.
•
Tout : Verrouille tous les canaux et toutes les entrées vidéo.
•
Jeu : Verrouille CH3, CH4 et l’entrée vidéo.
•
CA : Verrouille les canaux spécifiés (analogiques/numériques).
•
Pour changer le mot de passe
■
Pour annuler le blocage de canaux
■
À l’étape , sélectionnez “HF”.
Non activé
À l’étape , sélectionnez “Modifier mot de passe” puis appuyez sur la
touche “OK”.
Saisissez deux fois le nouveau mot de passe à 4 chiffres.
•
reprises pour l’enregistrer.
sélection
16
Page 73

Pour sélectionner le canal ou la classification du programme à verrouiller
■
Sélectionnez jusqu’à 7 (1 à 7) canaux à bloquer. Ces canaux seront bloqués quel que soit le
classement du programme.
Sélectionnez “CA” à l’étape .
Verrouillage
de canal
Sélectionnez “Canal”
Blocage
Mode
Canal
Émission
Pour spécifier le niveau de classement
■
La technologie “V-chip” permet de verrouiller les émissions à auditoire limité en fonction des
classifications de télévision.
CA
suivant
sélection
Sélectionnez le canal à bloquer.
Bloquer canaux
CA 1
CA 2
CA 3
3 - 0
Sélection de
“CH1-7”
Sélection du canal
Bloquer le
programme
Sélectionnez “Émission”
Blocage
Mode
Canal
Émission
Modifier mot de passe.
CA
suivant
sélection
Sélectionnez la catégorie de
classification que vous désirez adopter.
Bloquer émis.
MPAA
U.S.TV
C.E.L.R.
C.F.L.R.
Sortie moniteur
MPAA : Classification des films (USA)
•
U.S.TV : Classification des émissions de
•
C.E.L.R : Classification (Canada)
•
C.F.L.R : Classification (Québec)
•
Pour désactiver l’enregistrement du programme verrouillé
■
Sélectionnez “Sortie moniteur” dans le menu de “Bloquer émis”. ( )
Bloquer émis.
MPAA
U.S.TV
C.E.L.R.
C.F.L.R.
Sortie moniteur
EF
télévision (USA)
EF : Active la sortie de borne de moniteur pour les programmes
HF : Désactive la sortie de borne de moniteur pour les
HF
réglage
sélection
qui ont été réglés sur “Bloqué”.
programmes qui ont été réglés sur “Bloqué”.
Sélectionnez la classification.
sélection
Exemple : classification MPAA (films USA)
HF Sans classification
G Général : aucune limite d’âge
PG Supervision parentale suggérée
PG-13Prudence des parents conseillée : pour des
spectateurs de 13 ans et plus
Accès limité : les personnes de moins de 17
R
ans doivent être accompagnées par un adulte
NC-17Accès interdit aux personnes de moins de 17
ans
X Adultes seulement
Pour de plus amples renseignements. (p. 27)
•
Blocage de canaux
Fonctions avancées
Mise en garde
La puce antiviolence utilisée dans ce téléviseur est capable de bloquer les programmes sans “visa” (non classés, auquel aucun
•
classement ne s’applique et avec aucun classement) tels que définis par la section 15.120(e) (2) du Règlement FCC. Si l’option
de blocage des programmes sans “visa” est choisie, “des résultats inattendus et éventuellement confus peuvent être obtenus, il
se peut même que vous ne puissiez pas recevoir les bulletins d’urgence ni les types de programmes suivants:”
•
Bulletins d’urgence (tels que des messages du réseau de radiodiffusion d’urgence, des avertissements météorologiques, etc.)
• Programme d’origine locale • Informations • Programmes politiques • Annonces des services publiques
• Programmes religieux • Programmes sportifs • Programmes météorologiques
Remarques
Le classement HF est indépendant des autres classements
•
Si vous bloquez un niveau de classement basé sur un âge spécifique, le classement HF et tout autre classement
•
plus restrictif seront aussi bloqués.
17
Page 74

Programmation et édition des canaux
Les paramètres de canal actuels peuvent être modifiés en fonction de vos besoins et des conditions de
réception.
Affichez le menu.
1
Auto
Programmation
automatique
Sélectionnez “Réglage”
2
Menu
Image
Audio
Minuterie
Blocage
Réglage
suivant
sélection
Pour quitter
■
3
4
5
Sélectionnez “Program. canaux”
Réglage
Bal. CA
Langue
Program. canaux
Ident. prises
CC
Autres réglages
Tous
suivant
sélection
Sélectionnez la fonction.
Program. canaux
Auto
Manuelle
Fréquencemètre
suivant
sélection
Réglez.
Manuelle
Programmation
manuelle
Fréquencemètre
18
Pour réinitialiser les paramétrages du menu Réglage
■
Sélectionnez “Réinitialiser” dans le menu Réglage ( ), puis
appuyez sur “OK”.
Entrez votre code à 4 chiffres au moyen des touches numériques.
Sélectionnez “Oui” dans l’écran de confirmation, puis
appuyez sur la touche “OK”.
Vérification
de la
puissance
du signal
Page 75

Cherche automatiquement les canaux captables et les ajoute dans la mémoire.
Sélectionnez “Entr. ANT”
Sélectionnez “Balayage”
(Sélectionnez Câble ou Antenne)
Sélectionnez “Mode”
Sélectionnez Tous ou Analog.
Tous: Analogique et numérique
Analog.: Analogique seulement
Program. auto
Entr. ANT
Mode
Balayage
Câble
Tous
démarrage
sélection
réglage
sélection
La programmation s’effectue
automatiquement.
La programmation terminée,
•
sélectionnez “Appliquer”.(voir cidessous )
Tous les canaux présents en
•
mémoire sont effacés.
Utilisez cette procédure pour changer le réglage des canaux captés ou pour changer l’affichage de canal.
Utilisez-la aussi pour ajouter ou effacer manuellement des canaux dans la liste de canaux.
Sélectionnez “Modifier”
Favori
- - -
Modifier
Appliquer
Ajout
Non
sélection
suivant
Sélectionnez la rubrique à modifier.
Modifier
Appliquer
CA
Sigle
1
2
3
4
5
- - -
- - -
- - -
- - -
Sigle Favori
Favori
Ajout
- - -
Non
2
Oui
- - -
Non
- - -
Non
- - -
Non
Ajout
Sélectionnez l’élément
à éditer (Sigle/Favori/
Ajout)
suivant
Effectuez les modifications.
Sigle
•
Sélection de sigle
Sigle préréglé
Sigle manuel
Appliquer
---
Sigle préréglé
Sélectionnez l’indicatif du canal.
Sigle manuel
Renommez (maximum de 7 caractères).
Favori
•
Favori
Favori
Appliquer
12
sélection
réglage/suivant
sélection
Programmation et édition des canaux
Fonctions avancées
Sigle:
•
Modifie de l’indicatif du canal.
Favori:
•
Inscrit le canal sur la liste des canaux préférés.
Ajout:
•
Ajoute ou supprime des canaux.
Favori
Sélectionnez le numéro.
Ajout
•
Appuyez sur la touche “OK” pour sélectionner
“Oui” (ajouter) ou “Non” (effacer)
Sélectionnez “Appliquer”
suivant
Appuyez pour déplacer le curseur sur “Appliquer”.
ok
(pour
entrer votre
programme)
Vérifiez la puissance du signal si l’image numérique est brouillée ou figée.
Fréquencemètre
CA
2 - 1
Puissance signal
Actuel
Niveau maximal
Si le blocage des canaux (p. 16) est activé et que le réglage “Auto”, “Manuelle” ou “Fréquence mètre” est sélectionné, le
•
message “Entrer mot de passe” s’affiche.
85 %
85 %
Puissance du
signal
sélection du canal
ok
Si le signal est faible, vérifiez l’antenne. Si aucun
•
problème n’est détecté, communiquez avec votre
détaillant Panasonic.
Remarques
N’est pas disponible si “Câble” est sélectionné dans
•
“Entr. ANT” (voir ci-dessus).
Ne s’applique qu’aux canaux numériques.
•
19
Page 76

Utilisation des appareils périphériques
Vous pouvez commander des appareils d’autres fabricants en utilisant la télécommande de ce téléviseur.
Raccordez les appareils externes au téléviseur et
1
2
3
4
METTEZ-LES hors tension.
Maintenez les deux touches
+
enfoncées plus de 3 secondes.
Relâchez les touches lorsque les touches de sélection
•
d’appareil se mettent à clignoter.
Sélectionnez l’appareil
avec la touche de sélection d’appareil.
La touche pressée demeure allumée (les autres
•
s’éteignent).
Saisissez le code de télécommande à
4 chiffres de l’appareil.
(p. 25-26)
Commandez l’appareil avec la
5
Mise en garde
L’enregistrement échouera si un mauvais code est entré ou si l’opération prend plus de 30 secondes.
•
Pour trouver un code qui ne figure pas dans la liste de codes
Cette procédure cherche tous les codes et est appelée “méthode séquentielle”.
Après l’étape ci-dessus, modifiez le code
et faites un essai.
modification
télécommande.
L’appareil est mis en marche.
•
Si l’appareil ne fonctionne pas avec la
■
télécommande
Appareil à un seul code
•
Entrez le code de nouveau.
Appareil à plusieurs codes
•
Changez le code entré à l’étape , puis
ressayez.
Lorsque le bon code est trouvé.
mise en
mémoire
(p. 24)
20
Commandez l’appareil avec la
télécommande. (p. 24)
Recommencez jusqu’à ce que le bon code ait été
•
trouvé.
Plusieurs tentatives pourraient être nécessaires.
•
Page 77

Contrôle avec HDMI “HDAVI Control”
Les plus récents appareils audio-vidéo Panasonic équipés de connexions de sortie HDMI peuvent
être commandés avec la télécommande du téléviseur. Des fonctions limitées sont disponibles, dont la
commutation automatique sur l’entrée HDMI du téléviseur.
Cette fonction est limitée aux modèles à fonction “Contrôle avec HDMI” intégrée de Panasonic. Pour les
•
informations de compatibilité, consultez la liste des modèles aux page 22, ou les modes d’emploi respectifs.
Dépendant du câble utilisé, cette fonction pourrait ne pas être possible.
•
Commutation
d’entrée
automatique
Lien-En
marche
Lien-Hors
mar.
Remarques
Avant d’utiliser les fonctions de commande HDMI, l’appareil DIGA (l’enregistreur DVD) raccordé doit aussi être réglé. Pour
•
plus d’informations, voir le mode d’emploi de chaque appareil.
Pour plus de détails sur le raccordement de l’appareil, voir p. 22.
•
Le réglage par défaut est “EF”. Si aucun appareil HDMI n’est raccordé ou si un appareil HDMI classique (sans
•
“Contrôle avec HDMI”) est utilisé, réglez sur “HF”. (voir ci-dessous)
Lorsque “Ctrl avec HDMI” est activé et au début de la lecture de l’enregistreur DVD, l’entrée
de la télé se commute automatiquement sur celle compatible avec l’appareil de lecture.
Si l’appareil est en mode DVD et que le menu de l’enregistreur DVD s’affiche, l’entrée télé
•
commute automatiquement sur l’enregistreur DVD. Si le téléviseur était éteint, il s’allume.
Lorsque “Ctrl avec HDMI” est réglé sur “EF”, le téléviseur est automatiquement mis sous
tension et commuté sur l’entrée HDMI adéquate chaque fois qu’un enregistreur DVD
Panasonic (DIGA) compatible “Contrôle avec HDMI” est mis initialement sous tension et que
le mode lecture est sélectionné.
Lorsque “Ctrl avec HDMI” est réglé sur “EF” et que le téléviseur est mis hors tension, le
l’enregistreur DVD Panasonic (DIGA) connecté se met aussi hors tension automatiquement.
L’enregistreur DVD Panasonic (DIGA) ne se mettra pas hors tension s’il est toujours en
•
mode d’enregistrement.
1
Affichez le menu
3
Sélectionnez “Autres réglages”
Réglage
Bal. CA
Langue
Program. canaux
Ident. prises
CC
Autres réglages
Tous
sélection
suivant
Utilisation des appareils périphériques
Contrôle avec HDMI “HDAVI Control”
Fonctions avancées
2
Sélectionnez
“Réglage”
Menu
Image
Audio
Minuterie
Blocage
Réglage
sélection
suivant
Sélectionnez “Ctrl avec HDMI”
4
Autres réglages
Contact auto
Coup. s. ext.
Ctrl avec HDMI
Éco-énergie
HF
HF
EF
Standard
Sélectionnez “EF” ou “HF”
5
Appuyez pour quitter ou revenir à l’écran précédent.
■
sélection
modification
21
Page 78

Connexions AV recommandées
Ces schémas montrent nos recommandations quant à la façon de raccorder le téléviseur à divers
appareils. Pour les autres raccordements, reportez-vous aux instructions de chaque appareil, au tableau
ci-dessous et aux spécifications (p. 32). Pour obtenir de l’aide supplémentaire, visitez notre site Web à
l’adresse www.panasonic.ca
Cordon d’alimentation
(Ne le brancher qu’après
avoir fait tous les autres
raccordements.)
Panneau arrière du
téléviseur
■
Magnétoscope
Lecteur DVD
Connecteur M3
Casque d’écoute /
écouteurs (en option)
Caméscope
Caméscope
Vidéo numérique
■
Lecteur DVD ou
décodeur de télévision
numérique
(appareils HDMI
compatibles seulement)
Câble
audio
AV IN
ou
SERVICE ONLY
Câble HDMI
Câble convertisseur
HDMI-DVI
Contrôle avec HDMI
■
(p. 21)
Raccordez avec un câble
HDMI
Enregistreur DVD Panasonic
(DIGA)
22
Remarques
Les appareils HDMI individuels peuvent nécessiter des réglages de menu supplémentaires spécifiques à chaque
•
modèle. Veuillez consulter les modes d’emploi respectifs.
En mars 2006, les modèles avec “Contrôle avec HDMI” sont : DMR-ES25, DMR-ES45V, DMR-EH55, DMR-EH75V
•
Voir www.panasonic.ca pour les prochains modèles avec “Contrôle avec HDMI”.
Page 79

ANT
DIGITAL AUDIO OUT
Sortie audio numérique
Câble audio
numérique
optique
DVD
■
Lecteur DVD
Décodeur de télévision
numérique
Écoute sur des enceintes
■
externes
Réglez les haut-parleurs
•
du téléviseur hors circuit
Connexions AV recommandées
Fonctions avancées
Câble
ou
Câblosélecteur
ou
Enregistreur DVD /
■
magnétoscope
OPTICAL IN
Amplificateur
Remarques
Syntoniser le canal 3 ou 4 pour le raccordement à un
•
câblosélecteur.
Contactez votre câblodistributeur pour de plus amples
•
renseignements au sujet du raccordement à un câblosélecteur.
Les signaux d’entrée de l’image et du son de la connexion à
•
la borne spécifiée dans “Coup. s. ext.” (p. 14-15) ne peuvent
pas être émis par les bornes “OUTPUT”.
La sortie audio est toutefois disponible par la borne “Digital
Audio Out”.
Lorsqu’un appareil (STB, DVD, etc.) est raccordé aux bornes
•
HDMI ou COMPONENT, seuls les signaux audio sont
disponibles. Aucun signal vidéo ne peut être émis.
23
Page 80

Télécommande et liste des codes de commande
La présente section explique comment piloter les fonctions d’autres appareils au moyen de la télécommande.
Enregistrez les codes de télécommande (p. 20) pour piloter les fonctions d’un appareil d’une marque autre que Panasonic (p. 25-26).
•
Remarque
La capacité mémoire restante de la télécommande pourrait ne pas permettre le pilotage de tous les appareils ni de
•
toutes leurs fonctions. Cette télécommande n’a pas été conçue comme télécommande universelle.
Liste des codes de commande
■
Cette table indique quelles touches sont fonctionnelles à la suite de la programmation (si besoin est), dans le mode
de commande sélectionné.
TOUCHE MODE MAGNÉTOSCOPE
Alimentation Alimentation Alimentation Alimentation
-
-
Volume bas
Volume haut
-
-
Commutation de l’entrée télé Commutation de l’entrée télé Commutation de l’entrée télé Commutation de l’entrée télé
Affichage à l’écran Affichage à l’écran Rappel Affichage à l’écran
Sourdine télé Sourdine télé Sourdine télé Sourdine télé
-
MODE CÂBLE / SRD
(SRD*) (CÂBLE)
Canal haut, Curseur haut Canal haut, Curseur haut Saut vers le haut
Canal bas, Curseur bas Canal bas, Curseur bas Saut vers le bas
Curseur SRD gauche Curseur câble gauche Volume bas
Curseur SRD droit Curseur câble droit Volume haut
Menu SRD Menu câble
Sortie Sortie
Guide Guide
-
-
-
MODE DVD
24
-
SRD – satellite de radiodiffusion directe
-
Rebobinage arrière
Lecture
Avance rapide
Pause
Arrêt
Enregistrement magnétoscope
Télé/Magnétoscope Format d’image Format d’image Ouverture/Fermeture
Canal de magnétoscope bas Bas de page Bas de page Recul au ralenti
Canal de magnétoscope haut Haut de page Haut de page Avance au ralenti
0-9 0-9
--
--
--
--
--
-
Enregistrement – récepteur
vidéo personnel *
-
Recul
Lecture
Avance
Pause
Arrêt
1
-
*1: Type combiné
Page 81

Liste des codes de commande
■
Câbloconvertisseur ( )
Marque Code Marque Code Marque Code Marque Code
ABC 0003, 0008
Americast 0899
Bell South 0899
Digeo 1187
Director 0476
General Instrument
GoldStar 0144
0003, 0276, 0476, 0810
Hamlin 0009, 0273
Jerrold
Memorex 0000
Motorola
Pace 0008, 0237, 1877
Panasonic 0000, 0107
Paragon 0000
0003, 0276, 0476, 0810
1376, 0276, 0476, 0810, 1187
Philips 0317, 1305
Pioneer
Pulsar 0000
Quasar 0000
Regal 0273, 0279
Runco 0000
Samsung 0144
0144, 0533, 0877, 1877
Scientific Atlanta
Sony 1006
Starcom 0003
Supercable 0276
Torx 0003
Toshiba 0000
Zenith 0000, 0525, 0899
0008, 0477, 0877, 1877
Récepteur de télévision par satellite ( )
AlphaStar 0772
Chaparral 0216
Crossdigital 1109
DirecTV
Dish Network
System
Dishpro
Echostar
Expressvu 0775, 1775
GE 0392, 0566
0099, 0247, 0392, 0566,
0639, 0724, 0749, 0819,
1076, 1108, 1109, 1142,
1377, 1392, 1414, 1442,
1443, 1444, 1609, 1639,
1640, 1749, 1856
0775, 1005, 1170,
1505, 1775
0775, 1005, 1505, 1775
0775, 1005, 1170, 1505, 1775
General
Instrument
GOI 0775, 1775
Goodmans 1246
Hisense 1535
Hitachi 0819, 1250
HTS 0775, 1775
Hughes 0749, 1442, 1749
Hughes Network
Systems
iLo 1535
Janeil 0152
Jerrold 0869
JVC 0775, 1170, 1775
LG 1226, 1414
0869
0749, 1142, 1442,
1443, 1444, 1749
Magnavox 0722, 0724
Memorex 0724
Mitsubishi 0749
Motorola 0856, 0869
NEC 1270
Next Level 0869
Panasonic
Paysat 0724
Philips
Pioneer 1442
Proscan 0392, 0566
Proton 1535
RadioShack 0869
RCA
0152, 0247, 0701, 1786
0099, 0722, 0724, 0749,
0819, 1076, 1142, 1442, 1749
0143, 0392, 0566, 0855, 1392
Samsung
Sanyo 1219
Sony 0639, 1639, 1640
Star Choice 0869
Tivo 1142, 1442, 1443, 1444
Toshiba
UltimateTV 1392, 1640
Uniden 0722, 0724
US Digital 1535
USDTV 1535
Voom 0869
Zenith 1856
1108, 1109, 1142, 1276,
1377, 1442, 1609
0749, 0790, 0819, 1285, 1749
Combinaison câble/enregistreur vidéo personnel ( )
Americast 0899
Digeo 1187
General Instrument
0476, 0810
Jerrold 0476, 0810
Motorola 0476, 0810, 1187, 1376
Pace 0237, 1877
Pioneer 0877, 1877
Scientific Atlanta
Sony 1006
0877, 1877
Supercable 0276
Zenith 0899
Combinaison SRD/enregistreur vidéo personnel ( )
DirecTV
Dish Network
System
0099, 0392, 0639, 1076,
1142, 1377, 1392, 1442,
1443, 1444, 1640
0775, 1505
Dishpro 0775, 1505
Echostar 0775, 1170, 1505
Expressvu 0775
Hughes Network
Systems
1142, 1442, 1443, 1444
JVC 1170
Motorola 0869
Philips 1142, 1442
Proscan 0392
RCA 1392
Samsung 1442
Sony 0639, 1640
Star Choice 0869
Magnétoscope ( )
ABS 1972
Adventura 0000
Aiwa 0000, 0037, 0124
Akai 0175
Alienware 1972
American High
Audiovox 0037
Broksonic 1479
Calix 0037
Canon 0035
Citizen 0037, 1278
Craig 0037
Curtis Mathes 0035, 0060, 1035
CyberPower 1972
Daewoo 0045, 1278
Dell 1972
Denon 0042
DirecTV 0739
Durabrand 0039
Dynatech 0000
Electrohome 0037, 0043
Electrophonic 0037
Emerex 0032
Emerson
Fuji 0033, 0035
Funai 0000
Garrard 0000
Gateway 1972
GE
GoldStar 0037, 1237
Gradiente 0000
Harley Davidson
0035
0000, 0037, 0043, 1278, 1479
0035, 0060, 0807, 1035, 1060
0000
Hewlett Packard
Hitachi 0000, 0042, 0089
Howard Computers
HP 1972
Hughes
Network Systems
Humax 0739
Hush 1972
iBUYPOWER 1972
JVC 0067
KEC 0037
Kenwood 0067
Kodak 0035, 0037
Linksys 1972
Lloyd’s 0000
LXI 0037
Magnasonic 1278
Magnavox
Marantz 0035
Marta 0037
Matsushita 0035
Media Center PC
MEI 0035
Memorex
MGA 0043
Microsoft 1972
Mind 1972
Minolta 0042
Mitsubishi 0043, 0067, 0807
Motorola 0035
MTC 0000
Multitech 0000
1972
1972
0042, 0739
0000, 0035, 0039, 1781
1972
0000, 0035, 0037, 0039, 1237
NEC 0067
Nikko 0037
Niveus Media 1972
Northgate 1972
Olympus 0035, 0226
Onkyo 0222
Optimus 0037
Orion 1479
Panasonic
Penney
Pentax 0042
Philco 0035
Philips
Pilot 0037
Pioneer 0067
Proscan 0060, 1060
Pulsar 0039
Quasar 0035, 0077, 1035
RadioShack 0000
Radix 0037
Randex 0037
RCA
Realistic 0000, 0035, 0037
ReplayTV 0614, 0616
Ricavision 1972
Runco 0039
Samsung 0045, 0739, 1014
Sanky 0039
Sansui 0000, 0067, 1479
Sanyo 0159
0035, 0077, 0225, 0226,
0227, 0378, 0616, 1035, 1244
0035, 0037, 0042, 1035, 1237
0035, 0618, 0739, 1081, 1181
0042, 0060, 0077, 0807,
0880, 1035, 1060
Scott 0043, 0045
Sears
Sharp 0807, 0848
Sonic Blue 0614, 0616
Sony
Stack 9 1972
STS 0042
Sylvania
Symphonic 0000
Systemax 1972
Tagar Systems
Teac 0000
Technics 0035
Teknika 0000, 0035, 0037
Thomas 0000
Tivo 0618, 0636, 0739
Toshiba
Totevision 0037
Touch 1972
Vector 0045
Video Concepts
Videomagic 0037
Viewsonic 1972
Villain 0000
Voodoo 1972
Wards
XR-1000 0000, 0035
Zenith
ZT Group 1972
0000, 0035, 0037, 0042, 1237
0000, 0032, 0033, 0035,
0636, 1032, 1232, 1972
0000, 0035, 0043, 1781
1972
0043, 0045, 0845,
1008, 1145, 1972
0045
0000, 0035, 0042, 0060
0000, 0033, 0039, 1479
Télécommande et liste des codes de commande
FAQs, etc.
25
Page 82

Télécommande et liste des codes de commande
Liste des codes de commande
■
Combinaison SRD/enregistreur vidéo personnel ( )
Marque Code Marque Code Marque Code Marque Code
Hughes Network
Systems
0739
Enregistreur vidéo personnel ( )
ABS 1972
Alienware 1972
CyberPower 1972
Dell 1972
DirecTV 0739
Gateway 1972
Hewlett Packard
Howard
Computers
HP 1972
1972
1972
Lecteur DVD ( )
Adcom 1094
Allegro 0869
Apex Digital
Aspire Digital 1168
Blue Parade 0571
Broksonic 0695
California
Audio Labs
CineVision 0833, 0869
Coby 1086
CyberHome 0816, 1023, 1024, 1129
Daewoo 0833, 0869
Denon 0490
Disney 0675
DVD2000 0521
Emerson 0591, 0675
Enterprise 0591
Funai 0675
Gateway 1158
GE 0522
Go Video
0672, 0794, 0796,
0797, 1004, 1056,
1061, 1100
0490
0741, 0833, 0869,
1075, 1158, 1304, 1730
Enregistreur DVD ( )
Apex Digital 1056
Aspire Digital 1168
Coby 1086
CyberHome 1129
Funai 0675
Gateway 1158
Philips 0739
Samsung 0739
Hughes Network
Systems
Humax 0739
Hush 1972
iBUYPOWER 1972
Linksys 1972
Media Center
PC
Microsoft 1972
Mind 1972
GoldStar 0741
Gradiente 0490
Grundig 0539
Hitachi 0573, 0664
Hiteker 0672
Integra 0571
JVC
Kenwood 0490, 0534
Lecson 1533
LG
LiteOn 1158, 1440
Loewe 0511
Magnavox
Marantz 0539
McIntosh 1533
Memorex 0695
Microsoft 0522
Mitsubishi 0521, 1521
NAD 0591, 0741
NEC 0785
Go Video 0741, 1158, 1304, 1730
JVC 1164, 1275
LG 0741
LiteOn 1158, 1440
Magnavox 0646
Panasonic 0490, 1010, 1011
0739
1972
0558, 0623, 0867, 1164,
1275
0591, 0741, 0801,
0869
0503, 0539, 0646,
0675
Niveus Media 1972
Northgate 1972
Panasonic 0616
Philips 0618, 0739
RCA 0880
ReplayTV 0614, 0616
Sonic Blue 0614, 0616
Sony 0636, 1972
Stack 9 1972
Onkyo 0503, 0792
0490, 0503, 0632,
Panasonic
Philips
PianoDisc 1024
Pioneer
Polaroid 1061, 1086
Polk Audio 0539
Proceed 0672
Proscan 0522
RCA 0522, 0571, 0822
Rio 0869
Rotel 0623
Sampo 0752
Samsung
Sansui 0695
Sanyo 0695, 0873, 1967
Philips 0646
Pioneer 0631
Polaroid 1086
RCA 0522
Samsung 0490
0703, 1010, 1011,
1362, 1462, 1490,
1762, 1967
0503, 0539, 0646,
0675, 1267, 1354
0525, 0571, 0631,
0632
0490, 0573, 0820,
1075
Systemax 1972
Tagar
Systems
Tivo 0618, 0636, 0739
Toshiba 1008, 1972
Touch 1972
Viewsonic 1972
Voodoo 1972
ZT Group 1972
Sensory
Science
Sharp
Shinsonic 0533
Sonic Blue 0869
Sony
Sylvania 0675
Symphonic 0675
Teac 0809
Technics 0490, 0703
Theta Digital 0571
Toshiba 0503, 0695, 1045, 1154
Urban
Concepts
Xbox 0522
Yamaha 0490, 0539, 0545
Zenith 0503, 0591, 0741,0869
Sensory
Science
Sharp 0675
Sony 1033, 1431
Sylvania 0675
Zenith 0741
1972
1158
0630, 0675, 0752,
1256
0533, 0864, 1033, 1431,
1533
0503
1158
26
Page 83

Liste des classifications
aux fins de blocage des canaux
La puce antiviolence permet de bloquer la réception de canaux ou d’émissions en fonction de leur
classification établie par l’industrie du divertissement. (p. 17)
Tableau de classement FILMS USA
■
HF
G
PG
PG-13
R
NC-17
X
NE CONTIENT PAS DE CLASSEMENT (NON CLASSÉ) ET PROGRAMMES NA (NON APPLICABLES).
Films qui n’ont pas été classés ou dont le classement n’est pas applicable
PUBLIC GÉNÉRAL. Autorisé à tous les âges.
CONTRÔLE PARENTAL CONSEILLÉ. Certains programmes ne conviennent pas aux enfants.
MISE EN GARDE IMPORTANTE DES PARENTS. Certaines scènes ne conviennent pas aux enfants de moins de 13 ans.
CONTRÔLÉ. Les enfants de moins de 17 ans doivent être accompagnés par un parent ou un gardien adulte.
INTERDIT AUX MOINS DE 17 ANS.
POUR ADULTE UNIQUEMENT .
Tableau de classement ÉMIS.TÉLÉ USA
■
Groupe basé
sur l’âge
Sans visa
(aucune classification)
Jeunesse
Surveillance
FV: VIOLENCE FANTASTIQUE/DESSIN ANIMÉ V: VIOLENCE S: SEX L: LANGUAGE AGRESSIF D:
Tableau de classement CANADA
■
E
C
C8+
G
PG
14+
18+
Classement
basé sur l’âge
TV-NR
TV-Y
TV-Y7
TV-G
TV-PG
TV-14
TV-MA
Exempt - Les programmes exemptés comprennent: informations, programmes sportifs, documentaires, autres programmes
d’information, causeries, vidéo musicales et programmes de variété.
Programmes pour les enfants de moins de 8 ans. Pas de langage offensif, de nudité, ni de contenu sexuel.
Programme généralement considéré acceptable pour les enfants de plus de 8 ans. Pas de blasphème, de nudité ni de contenu
sexuel.
Programmes généraux, pour tout public.
Contrôle parental conseillé. Certains programmes ne conviennent pas aux enfants.
Programmes contenant des thèmes ou un contenu qui peut ne pas convenir aux enfants de moins de 14 ans. Les parents sont
fortement mis en garde d’interdire leur accès aux jeunes adolescents et aux enfants plus jeunes.
Programme réservé aux adultes. Contient des scènes constantes de violence ou des scènes d’extrême violence.
Sélections possibles Description
Non bloqué
Bloqué
Non bloqué
Bloqué
Bloqué FV
Non bloqué
Bloqué
Non bloqué
Bloqué
D,L,S,V (T out)
N’importe quelle
combinaison de D, L, S, V
D, L,S,V (Tout)
N’importe quelle
combinaison de D, L, S, V
L,S,V (T out)
N’importe quelle
combinaison de L, S, V
Non classé.
Tous les enfants. Le thème et le contenu de ce programme sont spécialement
conçus pour un public jeune, y compris les enfants de 2 à 6 ans.
Destiné aux enfants âgés. Le thème et le contenu de ce programme peuvent
contenir des éléments de violence légère ou comique, ou peuvent effrayer les
enfants de moins de 7 ans.
Public général. Programme contenant peu ou pas du tout de violence, pas de mots
grossiers et peu ou aucun dialogue ou situation d’ordre sexuel.
Contrôle parental conseillé. Ce programme peut contenir de façon rare des mots
grossiers, des scènes de violence limitée, certains dialogues et situations sexuelles
suggestives.
Mise en garde importante des parents. Ce programme peut contenir des thèmes
sophistiqués, des scènes sexuelles, un langage grossier et des scènes d’intense
violence.
Public adulte uniquement. Ce programme peut contenir des thèmes pour adulte,
un langage blasphématoire, de la violence et des scènes sexuelles explicites.
Liste des classifications aux fins de blocage des canaux
Télécommande et liste des codes de commande
DIALOGUE À CONTENU SEXUEL
FAQs, etc.
Tableau de classement CANADA-QUÉBEC
■
E
G
8 ans+
13 ans+
16 ans+
18 ans+
Exempt - Les programmes exemptés.
Général - Programmes pour tout public et tous les âges. Ne contient pas de violence ou le contenu violent est faible ou
représenté de façon appropriée.
8+ Général - N’est pas recommandé pour les jeunes enfants. Programme destiné à un public jeune mais contenant
occasionnellement des scènes de violence légère. Supervision par un adulte recommandée.
Programmes qui peuvent ne pas convenir aux enfants de moins de 13 ans - Contient quelques scènes de violence ou une ou
plusieurs scènes violentes pouvant les affecter. Supervision par un adulte fortement conseillée.
Programme pouvant ne pas convenir aux enfants de moins de 16 ans - Contient des scènes fréquentes de violence ou de
violence intense.
Programme réservé aux adultes. Contient des scènes constantes de violence ou des scènes d’extrême violence.
27
Page 84

Informations techniques
Sous-titres (CC)
Pour afficher les sous-titres d’une émission numérique, régler le format de l’image sur PLEIN.
•
(Des caractères seront coupés si le format est réglé sur H-LARGE, CADRAGE, ZOOM ou 4:3.)
Les sous-titres ne s’affichent pas lorsque vous utilisez une connexion HDMI.
•
Si un équipement analogique est utilisé pour l’affichage ou l’enregistrement, l’affichage des sous-titres doit être
•
activé/désactivé directement sur l’équipement en question.
Le réglage du mode d’affichage des sous-titres sur le téléviseur n’a aucun effet sur le signal d’entrée analogique.
Si une émission numérique est acheminée au format analogique, les données relatives aux sous-titres seront également au format analogique.
Si un appareil connecté numériquement est utilisé pour l’entrée, les sous-titres doivent être mis en service soit sur
l’appareil connecté ou soit sur le téléviseur.
Si les sous-titres sont en service à la fois sur l’appareil connecté et le téléviseur, les sous-titres de chaque appareil se chevaucheront.
Format de l’image
Cette fonction vous permet de choisir le format de l’image en fonction du signal reçu et de vos préférences. (par exemple, dans le
cas d’une image 4:3)
PLEIN
•
PLEIN
CADRAGE
•
CADRAGE
Étire horizontalement l’image 4:3 de manière à l’étendre sur les
deux côtés de l’écran.
(Recommandé pour une image anamorphique.)
H-LARGE
•
H-LARGE
Étire horizontalement l’image 4:3 de manière à l’étendre sur les
deux côtés de l’écran. Les côtés de l’image sont rognés.
ZOOM
•
ZOOM
Agrandit l’image 4:3 de manière qu’elle occupe tout l’écran.
(Recommandé pour une image au format “boîte aux lettres”.)
Réglage zoom
•
La position verticale et la taille de l’image peuvent être ajustées dans “ZOOM.”
Dans le menu Image, sélectionnez “Réglage zoom”. (p. 14-15)
Réglage de la position verticale Réglage de la taille verticale
Étire l’image 4:3 horizontalement et verticalement de manière à
remplir l’écran.
(Recommandé pour l’image de télévision ordinaire.)
4:3
•
Ordinaire
(Il est à noter que l’affichage prolongé de la barre latérale peut
provoquer un phénomène de rémanence.)
Remarques
480i (4:3), 480i (16:9), 480p (4:3), 480p (16:9) : PLEIN,
•
CADRAGE, 4:3 ou ZOOM
1080i / 720p : PLEIN, H-LARGE, CADRAGE ou 4:3
•
Barre latérale d’affichage
28
Pour réinitialiser le format d’image (OK)
•
Page 85

Prises de sortie DIGITAL AUDIO OUT
Il est possible de profiter des atouts d’une chaîne cinéma maison en connectant un décodeur Doly Digital (5.1
canaux) et un amplificateur multicanal aux prises “Multi Channel”.
Mise en garde
Selon le lecteur DVD et le type de logiciel DVD-Audio, la fonction de protection contre la copie peut se mettre en
•
marche et désactiver la sortie optique.
Aucune enceinte externe ne peut être raccordée directement aux prises OUTPUT.
•
Quand un canal ATSC est choisi, la sortie de la prise DIGITAL AUDIO OUT est Dolby Digital. Quand un canal
•
NTSC est choisi, la sortie est PCM.
Contrôle avec HDMI “HDAVI Control”
Les connexions HDMI à certains appareils Panasonic permettent de profiter des avantages de la lecture sans tracas
ou du cinéma maison.
Configurez l’appareil de manière à activer cette fonction. Consultez le manuel d’utilisation de l’appareil en question.
•
Remettez le téléviseur en marche avec l’appareil externe en marche lors d’un changement de connexion ou de configuration.
•
Cette fonction pourrait ne pas fonctionner adéquatement selon l’état de l’appareil externe.
•
L’appareil externe peut être piloté au moyen de la télécommande du téléviseur avec cette fonction activée même si
•
le téléviseur est dans le mode attente.
Il est possible que l’image et le son ne soient pas reproduits pendant quelques secondes après le lancement de la lecture.
•
Il est possible que l’image et le son ne soient pas reproduits pendant quelques secondes à la suite d’un
•
changement du mode d’entrée.
Le niveau de volume est affiché lorsque le volume est ajusté sur l’appareil externe.
•
Le visionnement facile est également disponible en utilisant la télécommande pour piloter l’amplificateur. Consultez
•
le manuel d’utilisation de l’amplificateur en question.
Connexion HDMI
L’interface multimédia haute définition (HDMI) vous permet de tirer profit d’images numériques haute définition et
d’un son de haute qualité en connectant le téléviseur à des appareils externes compatibles.
Appareil HDMI (*1) doté d’une prise de sortie HDMI ou DVI, tel un décodeur de télévision numérique ou un lecteur
DVD, peut être raccordé au connecteur HDMI à l’aide d’un câble HDMI.
HDMI est la toute première interface AV numérique intégrale grand public conforme à une norme sans compression.
•
Si l’appareil externe ne possède qu’une sortie DVI, connectez-le à la prise HDMI via un câble adaptateur DVI-HDMI (*2).
•
Lorsqu’un câble adaptateur DVI-HDMI est utilisé, connectez le câble à la prise d’entrée audio.
•
Les réglages audio peuvent être faits dans l’écran du menu “Entr. HDMI”. (p. 14-15)
•
Fréquences d’échantillonnage du signal audio pouvant être prises en charge (L.PCM) : 48 kHz, 44,1 kHz, 32 kHz
Mise en garde
Le fonctionnement adéquat avec un PC ne peut être assuré.
•
Tout signal est reformaté avant d’être affiché à l’écran.
•
SI l’appareil externe possède une fonction de réglage du format d’image, sélectionnez le format “16:9”.
•
Ce connecteur HDMI est de “type A”.
•
Un appareil ne possédant pas de prise de sortie numérique peut être connecté à la prise d’entrée “COMPONENT”,
•
“S VIDEO” ou “VIDEO” pour recevoir des signaux analogiques.
La prise d’entrée HDMI ne peut être utilisée qu’avec les signaux vidéo aux formats suivants : 480i, 480p, 720p et
•
1080i. Il est nécessaire que le réglage du signal de sortie de l’appareil numérique externe y corresponde.
Pour plus de détails sur les signaux HDMI applicables, voir ci-dessous.
•
Signaux d’entrée pouvant être affichés
Le symbole* : identifie le signal d’entrée pour vidéo composante (Y, PB, PR) et HDMI.
Fréquence
horizontale (kHz)
525 (480) / 60i 15,73 59,94
525 (480) /60p 31,47 59,94
750 (720) /60p 45,00 59,94
1 125 (1 080) /60i 33,75 59,94
Fréquence
verticale (Hz)
(*1): Le logo HDMI est apposé sur tout appareil HDMI compatible.
(*2): Disponible auprès d’un détaillant Panasonic.
Composantes HDMI
**
**
**
**
Informations techniques
FAQs, etc.
Remarques
Les signaux autres que ceux indiqués ci-dessus pourraient ne pas être affichés convenablement.
•
Les signaux identifiés ci-dessus sont reformatés de manière à assurer leur affichage optimal à l’écran.
•
29
Page 86

Entretien
Débranchez d’abord le cordon d’alimentation de la prise de courant.
Panneau d’affichage
L’avant du panneau d’affichage a reçu un traitement spécial. Essuyez soigneusement la surface du panneau en
utilisant seulement un chiffon doux sans peluche.
Si la surface est très sale, essuyez avec un chiffon doux sans peluche humecté d’eau additionnée d’un peu de
•
détergent neutre et bien essoré, puis essuyez-la uniformément avec un chiffon sec du même type jusqu’à ce que
la surface soit bien sèche.
Ne rayez pas ou ne cognez pas la surface du panneau avec les ongles ou un objet rigide, sinon vous abîmeriez la
•
surface. En outre, évitez tout contact avec des produits volatils tels que des insecticides à vaporiser, des solvants
ou des diluants, sinon le fini de la surface serait abîmé.
Coffret
Si le coffret est sale, essuyez-le avec un chiffon doux et sec.
Si le coffret est très sale, plongez le chiffon dans de l’eau additionnée d’un peu de détergent neutre, puis essorez
•
le chiffon bien à fond. Utilisez ce chiffon pour essuyer le coffret, puis essuyez-le avec un chiffon sec.
Veillez à ce que du détergent n’entre pas en contact direct avec la surface du téléviseur à cristaux liquides. Si des
•
gouttes d’eau pénètrent dans l’appareil, des anomalies de fonctionnement se produiront.
Évitez tout contact avec des produits volatils tels que des insecticides à vaporiser, des solvants ou des diluants,
•
sinon la surface du coffret pourra être abîmée ou le revêtement s’écaillera. En outre, ne laissez pas l’appareil trop
longtemps en contact avec des articles en caoutchouc ou en PVC.
Fiche du cordon d’alimentation
Nettoyez régulièrement la fiche du cordon d’alimentation. (L’accumulation de poussière et d’humidité peut entraîner
un risque d’incendie ou de choc électrique.)
Foire aux questions
Avant de faire appel à un technicien, vérifiez les problèmes et apportez les corrections simples décrites ci-dessous.
Si le problème devait persister, communiquez avec votre détaillant ou un centre de service Panasonic agréé. (p. 33, 34)
Pour un service d’assistance supplémentaire, contactez-nous via le site Web à l’adresse:
www.panasonic.ca
Points blancs ou images
fantômes (bruit)
L’image d’un appareil est anormale
Vérifiez l’emplacement,
•
l’orientation et la connexion de
l’antenne.
Interférence ou image de
canaux numériques figée
(son intermittent)
lorsque l’appareil est raccordé via
HDMI
Le câble HDMI est-il correctement raccordé?
•
(p. 22-23, 29)
Éteignez le téléviseur et l’appareil, puis
•
rallumez-les.
Vérifier un signal d’entrée de l’appareil.
•
(p. 29)
Utilisez un appareil conforme à EIA/CEA-
•
861/861B.
30
Réorientez l’antenne pour les
•
canaux numériques.
Vérifiez le “Fréquencemètre”
•
(p. 19). Si le signal est
faible, vérifiez l’antenne et
communiquez avec votre
détaillant Panasonic.
La télécommande ne fonctionne pas.
Les piles ont-elles été mises en place
•
correctement? (p. 6)
La pile est-elle épuisée ?
•
Pour utiliser les appareils externes d’autres
•
fabricants, enregistrez les codes de
télécommande. (p. 20, 25-26)
Page 87

S’il y a des problèmes de fonctionnement avec le téléviseur, veuillez vous reporter au tableau ci-dessous afin de
déterminer les symptômes, puis exécuter les remèdes suggérés. Si cela ne résout pas le problème, veuillez noter les
numéros de modèle et de série et contacter un détaillant Panasonic local (les deux numéros se trouvent sur la face
arrière du téléviseur).
Symptômes
Solutions
Vidéo
Image dédoublée
Interférence
Image normale
Audio
Présence de bruitPrésence de neige
Son normal
Présence de bruit
Absence de son
Emplacement, orientation ou branchement de l’antenne.
•
Emplacement, orientation ou branchement de l’antenne.
•
Appareils électroménagers.
•
Voitures/motocyclettes.
Lumières fluorescentes.
Niveau du volume.
•
La fonction de coupure du son est activée.
Paramètre STÉRÉO/SAP/MONO
Absence
d’image
Absence de couleur
Image déformée ou
de piètre qualité
Image normale
Fonctionnement impossible avec la
télécommande.
L’appareil principal est chaud.
Absence de son
Son normal
Son faible ou absent
Son faible,
incorrect ou absent
Le téléviseur est réglé au mode AV.
•
Le téléviseur n’est pas branché à la prise secteur.
Le téléviseur n’est pas en fonction.
Les paramètres de l’image/du son sont réglés au niveau minimum.
Les paramètres de couleur sont réglés au niveau minimum.
•
Signal faible.
Syntonisez de nouveau les canaux.
•
La réception du signal sonore s’est peut-être dégradée.
•
Dans le menu AUDIO, réglez le paramètre STÉRÉO/SAP/MONO sur SAP
ou MONO jusqu’à ce que la réception du signal sonore s’améliore.
Les piles sont épuisées.
•
Les piles sont installées avec la mauvaise polarité.
Le capteur de réception de télécommande sur le téléviseur est éclairé par
une lumière assez forte provenant d’une lampe fluorescente ou autre.
L’appareil génère de la chaleur et certaines de ses parties peuvent atteindre en
•
effet une température élevée. Cela ne pose pas de problème de performance
ou de qualité.
Installez l’appareil dans un lieu correctement ventilé.
Ne recouvrez pas les évents de ventilation avec quoi que ce soit (napperon,
etc.), et ne placez pas l’appareil sur un autre (par exemple le magnétoscope).
Foire aux questions
Entretien
FAQs, etc.
Des points rouges, bleus, verts et noirs
apparaissent à l’écran.
Ceci est une caractéristique des écrans à cristaux liquides. Il ne s’agit pas
•
d’un défaut.
Le panneau à cristaux liquides incorpore des technologies de haute précision pour
produire une image d’une grande netteté. Il arrive parfois que des pixels inactifs
apparaissent à l’écran sous la forme d’un point fixe de couleur bleu, rouge, vert ou
noir. Cela ne pose pas de problème de performance ou de qualité.
31
Page 88

Spécifications
TC-26LE60 TC-32LE60
Alimentation 120 V c.a., 50/60 Hz
Consommation de courant
Consommation moyenne
Intensité maximale
En veille
Format d’image 16:9
Surface d’affichage
(L × H × diagonale)
(Nombre de pixels)
Haut-parleur 60 mm × 120 mm (2,36 po × 4,7 po) À gamme étendue x 2 pcs
Son
Sortie audio 20 W [ 10 W + 10 W ] ( D.H.T de 10 % )
Casque d’écoute Prise M3 de 3,5 mm × 1
Nombre de canaux
(numérique/analogique)
Conditions de fonctionnement
Entrée 1-2
Prises disponibles
Entrée 3
Entrée vidéo
composante
HDMI
AUDIO IN
OUTPUT
DIGIT AL AUDIO OUT PCM / Dolby Digital, Fibre optique
Particularités
Dimensions
(L × H × P)
Avec socle
113 W
2,2 A
0,6 W
66,1 cm diagonale (26,0 po diagonale) 80,0 cm diagonale (31,5 po diagonale)
576 mm × 324 mm × 661 mm
(22,7 po × 12,8 po × 26,0 po)
1 049 088 (1 366 (L) × 768(H))
VHF/ UHF : 2-69, Câblodistribution:1-135
Température : 41 °F à 95 °F (5 °C à 35°C)
Humidité : 5 % à 90 % RH (sans condensation)
VIDEO : Type RCA PIN × 1 1,0 V [p-p] (75 Ω)
S-VIDEO : Mini DIN 4 broches Y : 1,0 V [p-p] (75 Ω), C: 0,286 V [p-p] (75 Ω)
AUDIO L - R : Type RCA PIN × 2 0,5 V [rms]
VIDEO : Type RCA PIN × 1 1,0 V [p-p] (75 Ω)
AUDIO L - R : Type RCA PIN × 2 0,5 V [rms]
Y : 1,0 V [p-p] (y compris la synchronisation)
B, PR: ± 0,35 V [p-p]
P
AUDIO L-R : Type RCA PIN × 2 0,5 V eff.
Connecteur HDMI de type A × 1
AUDIO L - R : Type RCA PIN × 2 0,5 V eff.
VIDEO : Type RCA PIN × 1 1,0 V [p-p] (75 Ω)
AUDIO L - R : Type RCA PIN × 2 0,5 V [rms]
Filtre peigne numérique Y/C 3D, sous-titres, puce antiviolence
HDMI
Conforme à la norme VESA
657 mm × 525 mm × 300 mm
(25,9 po × 20,7 po × 11,8 po)
[4 098 × 768 dots]
126 W
2,4 A
0,6 W
698 mm × 392 mm × 800 mm
(27,5 po × 15,4 po × 31,5 po)
791 mm × 615 mm × 300 mm
(31,1 po × 24,2 po × 11,8 po)
32
Sans socle
Poids
[TC-26LE60] [TC-32LE60]
657 mm (25,9 po)
473 mm (18,6 po)
525 mm (20,7 po)
504 mm (19,8 po) 504 mm (19,8 po)
657 mm × 473 mm × 117 mm
(25,9 po × 18,6 po × 4,6 po)
(36,4 lb) NET 19,5 (43,0 lb) NET
16,5
117 mm (4,6 po)
615 mm (24,2 po)
300 mm (11,8 po)
791 mm × 563 mm × 117 mm
(31,1 po × 22,2 po × 4,6 po)
791 mm (31,1 po)
563 mm (22,2 po)
117 mm (4,6 po)
300 mm (11,8 po)
Remarque
Les caractéristiques et la présentation peuvent être modifiées sans avis préalable. Les poids et les dimensions
•
sont approximatifs.
Page 89

Garantie limitée
Panasonic Canada Inc.
Certificat de garantie limitée Panasonic
Panasonic Canada Inc. garantit cet appareil contre tout vice de fabrication et accepte, le cas échéant, de remédier à
toute défectuosité pendant la période indiquée ci-dessous et commençant à partir de la date d’achat original.
Écrans/téléviseurs à
plasma
Téléviseurs à cristaux
liquides (26 po et plus)
Téléviseurs à cristaux
liquides (25 po ou moins)
Projecteurs à cristaux
liquides
Accessoires Quatre-vingt-dix (90) jours (pièces seulement)
Le service à domicile ne sera offert que dans les régions accessibles par routes et situées dans un rayon de 50 km
d’un centre de service agréé Panasonic.
LIMITATIONS ET EXCLUSIONS
Cette garantie n’est valide que pour les appareils achetés au Canada et ne couvre pas les dommages résultant
d’une installation incorrecte, d’un usage abusif ou impropre ainsi que ceux découlant d’un accident en transit ou de
manipulation. De plus, si l’appareil a été altéré ou transformé de façon à modifier l’usage pour lequel il a été conçu
ou utilisé à des fins commerciales, cette garantie devient nulle et sans effet. Les piles sèches ne sont pas couvertes
sous cette garantie.
Cette garantie est octroyée à l’utilisateur original seulement. La facture ou autre preuve de la date d’achat original
sera exigée pour toute réparation sous le couvert de cette garantie.
CETTE GARANTIE LIMITÉE ET EXPRESSE REMPLACE TOUTE AUTRE GARANTIE, EXPRESSE
OU IMPLICITE, INCLUANT LES GARANTIES IMPLICITES DU CARACTÈRE ADÉQUAT POUR LA
COMMERCIALISATION ET UN USAGE PARTICULIER. PANASONIC N’AURA D’OBLIGATION EN AUCUNE
CIRCONSTANCE POUR TOUT DOMMAGE DIRECT, INDIRECT OU CONSÉCUTIF.
Certaines juridictions ne reconnaissent pas les exclusions ou limitations de dommages indirects ou consécutifs,
ou les exclusions de garanties implicites. Dans de tels cas, les limitations stipulées ci-dessus peuvent ne pas être
applicables.
Service à domicile
Service à domicile
Service en atelier
seulement
Service en atelier
seulement
RÉPARATION SOUS GARANTIE
Pour de l’aide sur le fonctionnement de l’appareil, veuillez contacter notre service à la clientèle au :
N° de téléphone : (905) 624-5505
Ligne sans frais : 1-800-561-5505
N° de télécopieur : (905) 238-2360
Lien courriel : “Contactez-nous” à www.panasonic.ca
Un (1) an, pièces (panneau d’affichage compris) et maind’oeuvre
Un (1) an, pièces (écran à cristaux liquides compris) et
main-d’oeuvre
Un (1) an, pièces (écran à cristaux liquides compris) et
main-d’oeuvre
Un (1) an, pièces (90 jours sur la lampe) et maind’oeuvre
Garantie limitée
Spécifications
Pour la réparation des appareils, veuillez, consulter notre site www.panasonic.ca pour connaître le centre de
service agréé le plus près de votre domicile :
Lien : “Centres de service” sous “support à la clientèle”
Centres de service Panasonic :
Vancouver, Colombie-Britannique
Panasonic Canada Inc.
12111 Riverside Way
Richmond, BC V6W 1K8
Tel: (604) 278-4211
Fax: (604) 278-5627
Expédition de l’appareil à un centre de service
Emballer soigneusement l’appareil, de préférence dans le carton d’origine, et l’expédier port payé et assuré au centre de service.
Inclure la description détaillée de la panne et la preuve de la date d’achat original.
Mississauga, Ontario
Panasonic Canada Inc.
5770 Ambler Dr.
Mississauga, ON L4W 2T3
Tel: (905) 624-8447
Fax: (905) 238-2418
FAQs, etc.
33
Page 90

Liste des centres de service à la clientèle (pour le Canada)
34
Colombie-Britannique
a
Audio Video Electronics
4450 Juneau Street
Burnaby, BC V5C 4C8
Canada
Tél.: (604) 299-6969
Téléc.: (604) 299-8464
Courriel:
audio_video_electronics@yahoo.com
A-Z Tech Electronics
3356 T ennyson Avenue
Victoria, BC V8Z 3P6
Canada
Tél.: (250) 475-3341
Téléc.: (250) 475-3315
Courriel: a-ztech@islandnet.com
g
GS Audio Services Ltd.
10511 King George Hwy
Surrey, BC V3T 2X1
Canada
Tél.: (604) 582-4833
Téléc.: (604) 951-9183
Courriel: gs-audioservices@shaw.ca
G TV Electronics Ltd.
1590 Commercial Drive
Vancouver, BC V5L 3Y2
Canada
Tél.: (604) 253-0033
Téléc.: (604) 253-0007
Courriel: nwms@telus.net
Giddens Services Ltd.
1613 Valleyview Drive
Kamloops, BC V2C 4B4
Canada
Tél.: (250) 372-8842
Téléc.: (250) 372-0603
Courriel: giddensservices@shaw.ca
i
IT Electronics
5690 Imperial Street
Burnaby, BC V5J 1G2
Canada
Tél.: (604) 430-4228
Téléc.: (604) 433-3619
Courriel: parts@itelectronics.com
k
Kelowna Teltronics TV & Audio
1695 Burtch Road
Kelowna, BC V1Y 4A9
Canada
Tél.: (250) 860-9888
Téléc.: (250) 860-0766
Courriel: teltronics@telus.net
n
NESA
102 1636 West 2nd Avenue
Vancouver, BC V6J 1H4
Canada
Tél.: (604) 734-7606
Téléc.: (604) 734-9783
Courriel: nesa@telus.net
Nippon Video & Sound
180 3771 Jacombs Road
Richmond, BC V6V 2L9
Canada
Tél.: (604) 270-2820
Téléc.: (604) 270-3359
Courriel:
nippon@nipponvideoandsound.ca
v
Vernon Electronics Service
2705 45th Avenue
Vernon, BC V1T 3N5
Canada
Tél.: (250) 545-2266
Téléc.: (250) 545-4065
Courriel: ves@shaw.ca
a
Autek Lab Ltd.
488 A St Annes Road
Winnipeg, MB R2M 3E1
Canada
Tél.: (204) 256-4048
Téléc.: (204) 257-6556
Courriel: all81@escape.ca
c
Consumer Electronics Servicentre
2305 7th Avenue
Regina, SK S4R 1C6
Canada
Tél.: (306) 781-8033
Téléc.: (306) 569-2177
Courriel: ces@accesscomm.ca
e
Electronic Analyst (51st Ave only)
9006 51st Avenue
Edmonton, AB T6E 5X4
Canada
Tél.: (780) 468-2575
Téléc.: (780) 466-1337
Courriel: service@elan.ab.ca
Image Electronics (1992) Inc.
643 Park Street
Regina, SK S4N 5N1
Canada
Tél.: (306) 522-6655
Téléc.: (306) 569-9660
Courriel: image@accesscomm.ca
Japan Audio Video
1037 Erin Street
Winnipeg, MB R3G 2X1
Canada
Tél.: (204) 775-0494
Téléc.: (204) 774-2747
Courriel: kanomax@pcs.mb.ca
m
MSJ Electronic Services Ltd.
10558 114th Street
Edmonton, AB T5H 3J7
Canada
Tél.: (780) 426-1560
Téléc.: (780) 425-9595
Courriel: msj@telusplanet.net
s
S & R Electronics
805 West Frederica Street
Thunder Bay, ON P7E 3X4
Canada
Tél.: (807) 475-4956
Téléc.: (807) 475-7252
Courriel: srelect@shaw.ca
Sonnx Service Inc.
Unit L 675 Berry Street
Winnipeg, MB R3H 1A7
Canada
Tél.: (204) 953-0110
Téléc.: (204) 953-0119
Courriel: rfrechette@sonnx.mb.ca
Southland Crossing TV Ltd.
Bay 5-7, 5708-1st Street SE
Calgary, AB T2H 2W9
Canada
Tél.: (403) 255-9647
Téléc.: (403) 259-4034
Courriel: southtv@shaw.ca
Sylvan Electronic Services Inc.
Bay #12 7619 50th Avenue
Red Deer, AB T4P 1M6
Alberta
i
j
Canada
Tél.: (403) 358-3540
Téléc.: (403) 358-3540
Courriel: marinof@telusplanet.net
t
T.H.E Service Department
Bay 6 1247 36 Ave NE
Calgary, AB T2E 6N6
Canada
Tél.: (403) 291-3717
Téléc.: (403) 250-1322
Courriel: theservice@shaw.ca
Tricom Electronics Ltd.
#4-1622 Ontario Avenue
Saskatoon, SK S7K 1S8
Canada
Tél.: (306) 653-3913
Téléc.: (306) 665-1445
Courriel:
rlanglands.tricom@sasktel.net
Courriel 2:
kschneider.tricom@sasktel.net
Nouveau-Brunswick
b
BJW Electronics Ltd.
90 Millennium Drive
Moncton, NB E1E 2G7
Canada
Tél.: (506) 857-2118
Téléc.: (506) 857-8763
Courriel: gil@bjwe.net
o
Ohmega Electronics Ltd.
165 Whitting Rd, Unit2, Industr.
Park
Fredericton, NB E3B 5Y5
Canada
Tél.: (506) 450-6020
Téléc.: (506) 452-7053
Courriel: mobile@ohmega.ca
Courriel 2: accounting@ohmega.ca
s
Servicetek Electronics
164 Albert Street
Moncton, NB E1C 1B2
Canada
Tél.: (506) 387-4373
Téléc.: (506) 387-4332
Courriel: servicetek@nb.aibn.com
Ontario
a
A & N Electronics
196 Joseph Zatzman Drive, Unit 8
Dartmouth, NS B3B 1N4
Canada
Tél.: (902) 468-7205
Téléc.: (902) 468-1047
Courriel:
anelectronics@ns.sympatico.ca
Advanced Audio & Video
60 Meg Drive (Unit 14)
London, ON N6E 3T6
Canada
Tél.: (519) 686-4334
Téléc.: (519) 686-9515
Courriel: advaud@ody.ca
b
Beaver Creek Electronics
155 East Beaver Creek Road, 17
Richmond Hill, ON L4B 2N1
Canada
Tél.: (905) 731-1872
Téléc.: (905) 731-8034
Courriel: bce@accessv.com
c
C Agusta TV Sales & Service
25 Fisherman Drive 13
Brampton, ON L7A 1C9
Canada
Tél.: (905) 846-4739
Téléc.: (905) 846-9289
Courriel: agustatv@on.aibn.com
Coltech Electronics
306 Kenora Avenue N
Hamilton, ON L8E 2W2
Canada
Tél.: (905) 561-5506
Téléc.: (905) 578-1001
Courriel: coltech@cogeco.net
Crescent TV
3033 Marentette Avenue
Windsor, ON N8X 4G1
Canada
Tél.: (519) 969-1622
Téléc.: (519) 969-6772
Courriel:
ctv@crescentelectronics.com
d
Downtown Dupont Electronics
1137 Dupont Street
Toronto, ON M6H 2A3
Canada
Tél.: (416) 532-2888
Téléc.: (416) 535-5720
Courriel:
downtowndupont@sympatico.ca
h
Hagopian Television Centre Ltd.
864 Merivale Road
Ottawa, ON K1Z 5Z6
Canada
Tél.: (613) 728-2894
Téléc.: (613) 728-2926
Courriel: hagopian@hagopian.ca
Hextech Consumer Electronics
110 Pony Drive, Unit 16
Newmarket, ON L3Y 7B6
Canada
Tél.: (905) 830-6797
Téléc.: (905) 830-6799
Courriel: hextech@rogers.com
n
Northern Electronic Services
660 Bayview Drive, Unit 10 & 11
Barrie, ON L4N 9P5
Canada
Tél.: (705) 733-2195
Téléc.: (705) 725-7686
Courriel: northern@mcw.net
r
Regional Factory Parts & Service
22 Antares Drive, Unit “J”
Ottawa, ON K2E 7Z6
Canada
Tél.: (613) 820-8606
Téléc.: (613) 820-3145
Courriel: j.tunnell@sysu.com
Courriel 2: j.long@bellnet.ca
s
Service Depot
252 Lasalle Blvd
Sudbury, ON P3A 1W6
Canada
Tél.: (705) 566-3557
Téléc.: (705) 566-3455
Courriel: service.depot@on.aibn.com
Acadien Electronique
5215 de La Savane
Montréal, QC H4P 1V4
Canada
Tél.: (514) 270-1105
Téléc.: (514) 738-4229
Courriel: support@amtservice.com
Audio Beaudoin TV Inc.
945 rte de l’église
Ste-Foy, QC G1V 3V2
Canada
Tél.: (418) 653-8951
Téléc.: (418) 653-8964
Courriel:
beaudoinelectro@biz.videotron.ca
Capri Electronique
7903 20e Avenue, St-Michel,
Montréal, QC H1Z 3S6
Canada
Tél.: (514) 376-4990
Téléc.: (514) 376-4305
Courriel:
capri.electronique@videotron.ca
Clinic Electronique Enr.
4230 rue King Ouest
Sherbrooke, QC J1L 1W6
Canada
Tél.: (819) 823-1097
Téléc.: (819) 821-3701
Courriel: clinic@videotron.ca
Hecotron International Inc.
1370 rue Poncet (coin Hamon)
Montréal, QC H3M 3A4
Canada
Tél.: (514) 736-1313
Téléc.: (514) 736-1254
Courriel: service@hecotron.net
Labtronic
5115 boul. Jean XXIII
Trois-Rivières, QC G8Z 4A5
Canada
Tél.: (819) 373-0066
Téléc.: (819) 373-4317
Courriel: labtronic@cgocable.ca
Leblond Electronique
162 rue Fraser
Rivière-du-Loup, QC G5R 1C8
Canada
Tél.: (418) 862-9062
Téléc.: (418) 862-6392
Courriel: lebelec@hotmail.com
V. G. S. Electronique Inc.
25 rue Néron, suite #3
Chicoutimi, QC G7H 8B7
Canada
Tél.: (418) 696-3292
Téléc.: (418) 696-2457
Courriel:
vgs.electronique@qc.aira.com
a
c
h
l
v
Quebec
Page 91

NOTA
Page 92

NOTA
Page 93

NOTA
Page 94

NOTA
Page 95

NOTA
Page 96

Consignation du numéro de série
La référence de modèle et le numéro de série de ce produit se trouvent sur sa face arrière. Notez ce numéro de
série dans l’espace réservé à cet effet ci-dessous et conservez ce manuel et votre facture comme preuve de votre
achat, pour aider à identifier l’appareil en cas de perte ou de vol et pour recours à la garantie.
Modèle Numéro de série
Panasonic Consumer Electronics
Company,
Division of Panasonic Corporation
of North America
One Panasonic Way, Secaucus
Panasonic Puerto Rico Inc.
(“PSC”)
Ave. 65 de Infanteria, Km 9.5
San Gabriel Industrial Park,
Carolina, Puerto Rico 00985
New Jersey 07094 U.S.A.
©
2006 Panasonic Corporation of North America. Tous droits resérvés.
Panasonic Canada Inc.
5770 Ambler Drive
Mississauga, Ontario
L4W 2T3 CANADA
Imprimé aux ÉTATS-UNIS
 Loading...