

Page 1
1
PRIMUSBUSINESS.CA
PRIMUS BUSINESS SERVICES | HOSTED PBX | PANASONIC TGP550/TPA50 QUICK SETUP GUIDE
Online instructional videos and manufacturer user guides are also available.
Visit www.primus.ca/hpbxguide for more information.
Panasonic base unit (model KX-
TGP550) from Primus Business
Services
An Internet connection with a
modem or router
Your device may vary
Hosted PBX service from Primus
Business Services
PANASONIC TGP550/TPA50
QUICK SETUP GUIDE
What You Need
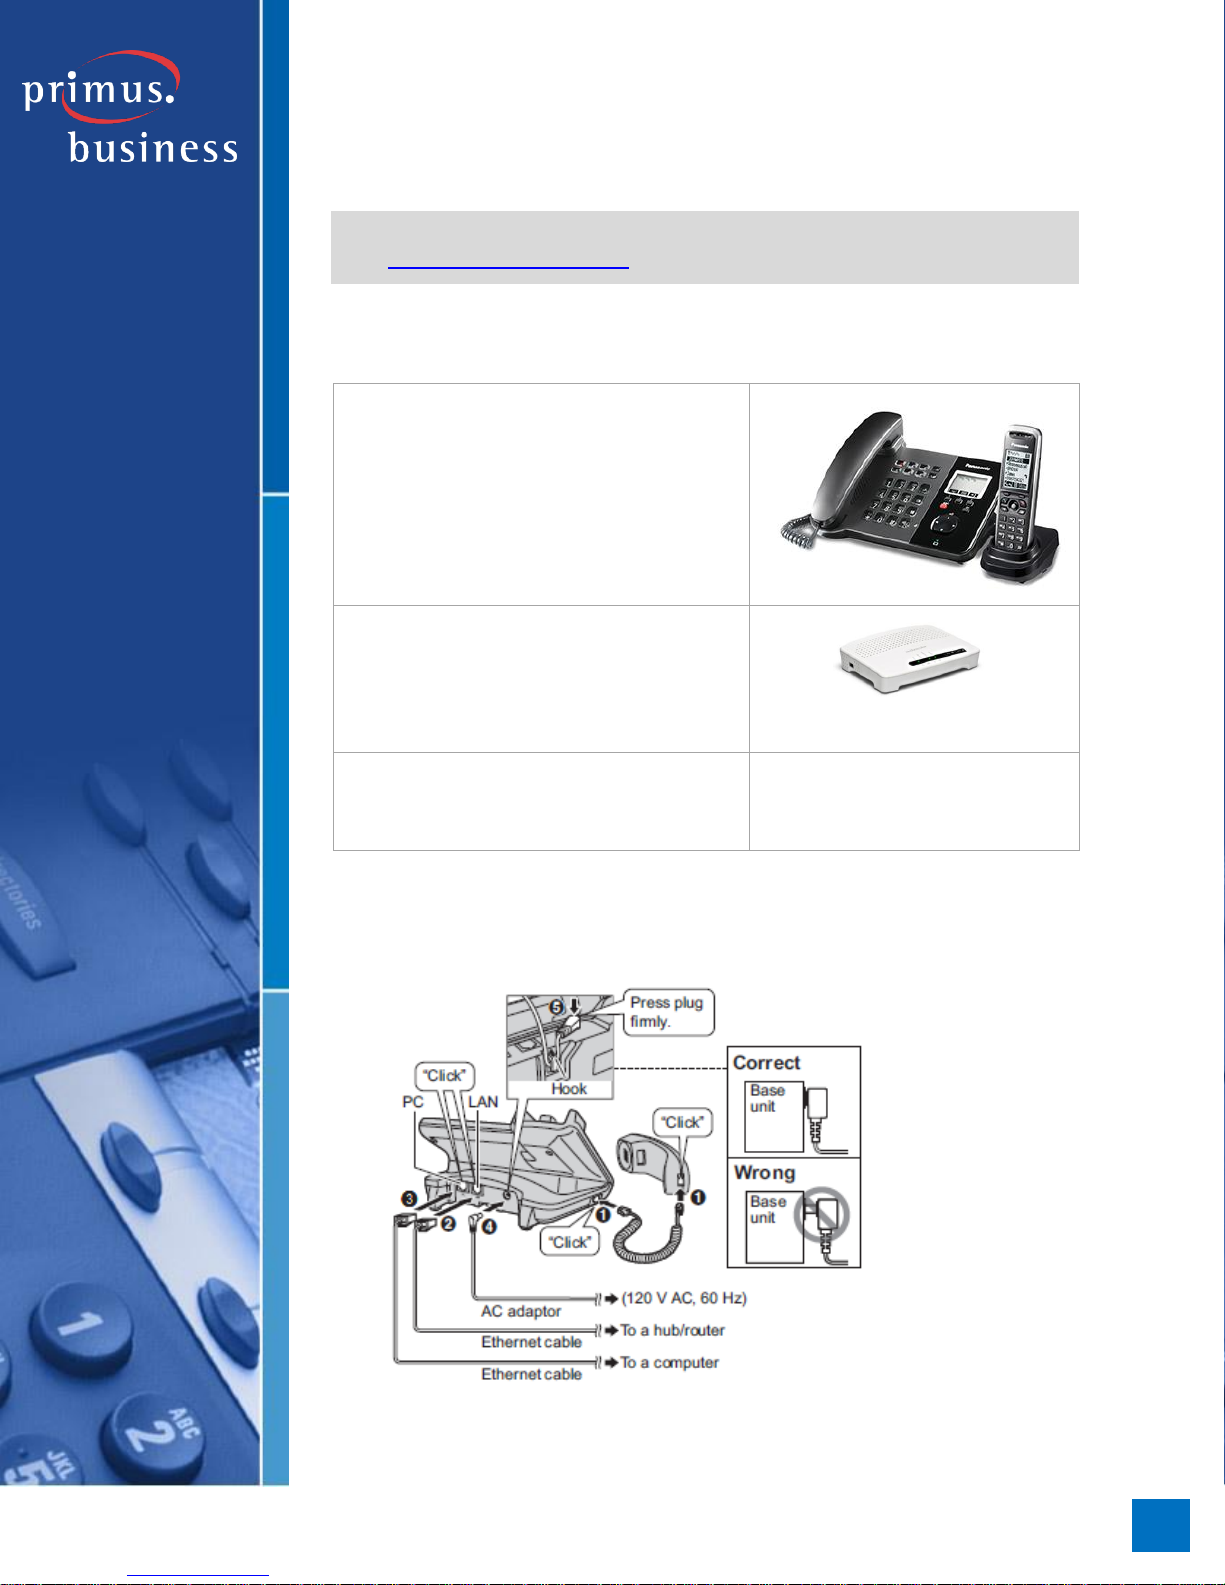
Setting Up the Base Unit
Page 2

2
PRIMUSBUSINESS.CA
PRIMUS BUSINESS SERVICES | HOSTED PBX | PANASONIC TGP550/TPA50 QUICK SETUP GUIDE
1. Plug one end of the coiled handset cord to the base unit and plug the other
end to the corded handset.
2. Take the Ethernet cable (included with your phone) and plug one end to the
port on the base unit labelled “LAN.” Plug the other end of the cable to your
Internet modem or router.
3. If you have a computer that requires network or Internet access and you do
not have enough Ethernet ports on your modem or router, you can connect
the computer to your network through the base unit. Take the Ethernet cable
connected to your computer, and plug it into the port labeled “PC.” The base
unit will pass all of your computer’s network traffic straight through to your
computer, with no impact on your phone calls.
4. Plug the AC adapter into the base unit. Press the plug firmly to make sure it
is in place. There is a hook at the bottom of the unit to secure the cable in
place to prevent it from being accidentally pulled out. Plug the AC adapter
into an electrical outlet.
Once everything is connected, the phone will go through an auto-configuration
process, which may take up to 10 minutes. You are ready to make and receive calls
when the STATUS light indicator turns from a flashing green to a solid green.
NOTE:
The configuration may take up to 10 minutes, and may reboot several times.
Leave the phone plugged in for at least 10 minutes before making any
changes.
When the Panasonic base unit is first connected to power, the status
indicator will be solid red. If you see the message “connect the Ethernet
cable,” make sure the Ethernet cable is properly in place from the LAN port
on the base unit to your modem/router/firewall.
If the status indicator remains red or amber after 10 minutes, try plugging
the base unit directly to your Internet modem instead of through your
routers, switches, or firewalls.
For additional troubleshooting tips, please review the Hosted PBX Small
Office Basic Troubleshooting Guide, available at
http://primus.ca/business/hpbxguide.
If the configuration process was interrupted or if you need assistance, please
contact Primus HPBX Technical Support at 1-888-222-8577.
Page 3
3
PRIMUSBUSINESS.CA
PRIMUS BUSINESS SERVICES | HOSTED PBX | PANASONIC TGP550/TPA50 QUICK SETUP GUIDE
STATUS Indicator
Solid Green
The base unit is connected to the Internet and connected to
the HPBX Small Office system.
Flashing Green
The base unit is downloading data. Do not disconnect the
Ethernet cable or AC power adaptor from the base unit until
the light becomes solid green.
Solid Red
The base unit is booting up.
Flashing Red
The base unit is registering a handset.
Solid Yellow
The base unit’s IP address may conflict with another IP
address on your network.
Flashing Yellow
(slow)
The base unit is attempting to connect to the Internet or to
the HPBX Small Office system. If it flashes indefinitely,
check your network settings, ensure your Internet
connection is working, or try restarting all your devices.
Flashing Yellow
(fast)
The device may be defective. Unplug and reconnect the AC
power adapter to reset the unit. If it flashes indefinitely,
contact Primus Technical Support.
Off
The base unit is off and not powered, or the Ethernet cable
is not connected properly, or it is not getting an active
network connection. Ensure your Internet connection and
network devices are turned on.
Status Light Indicators
Setting up the Cordless Handset
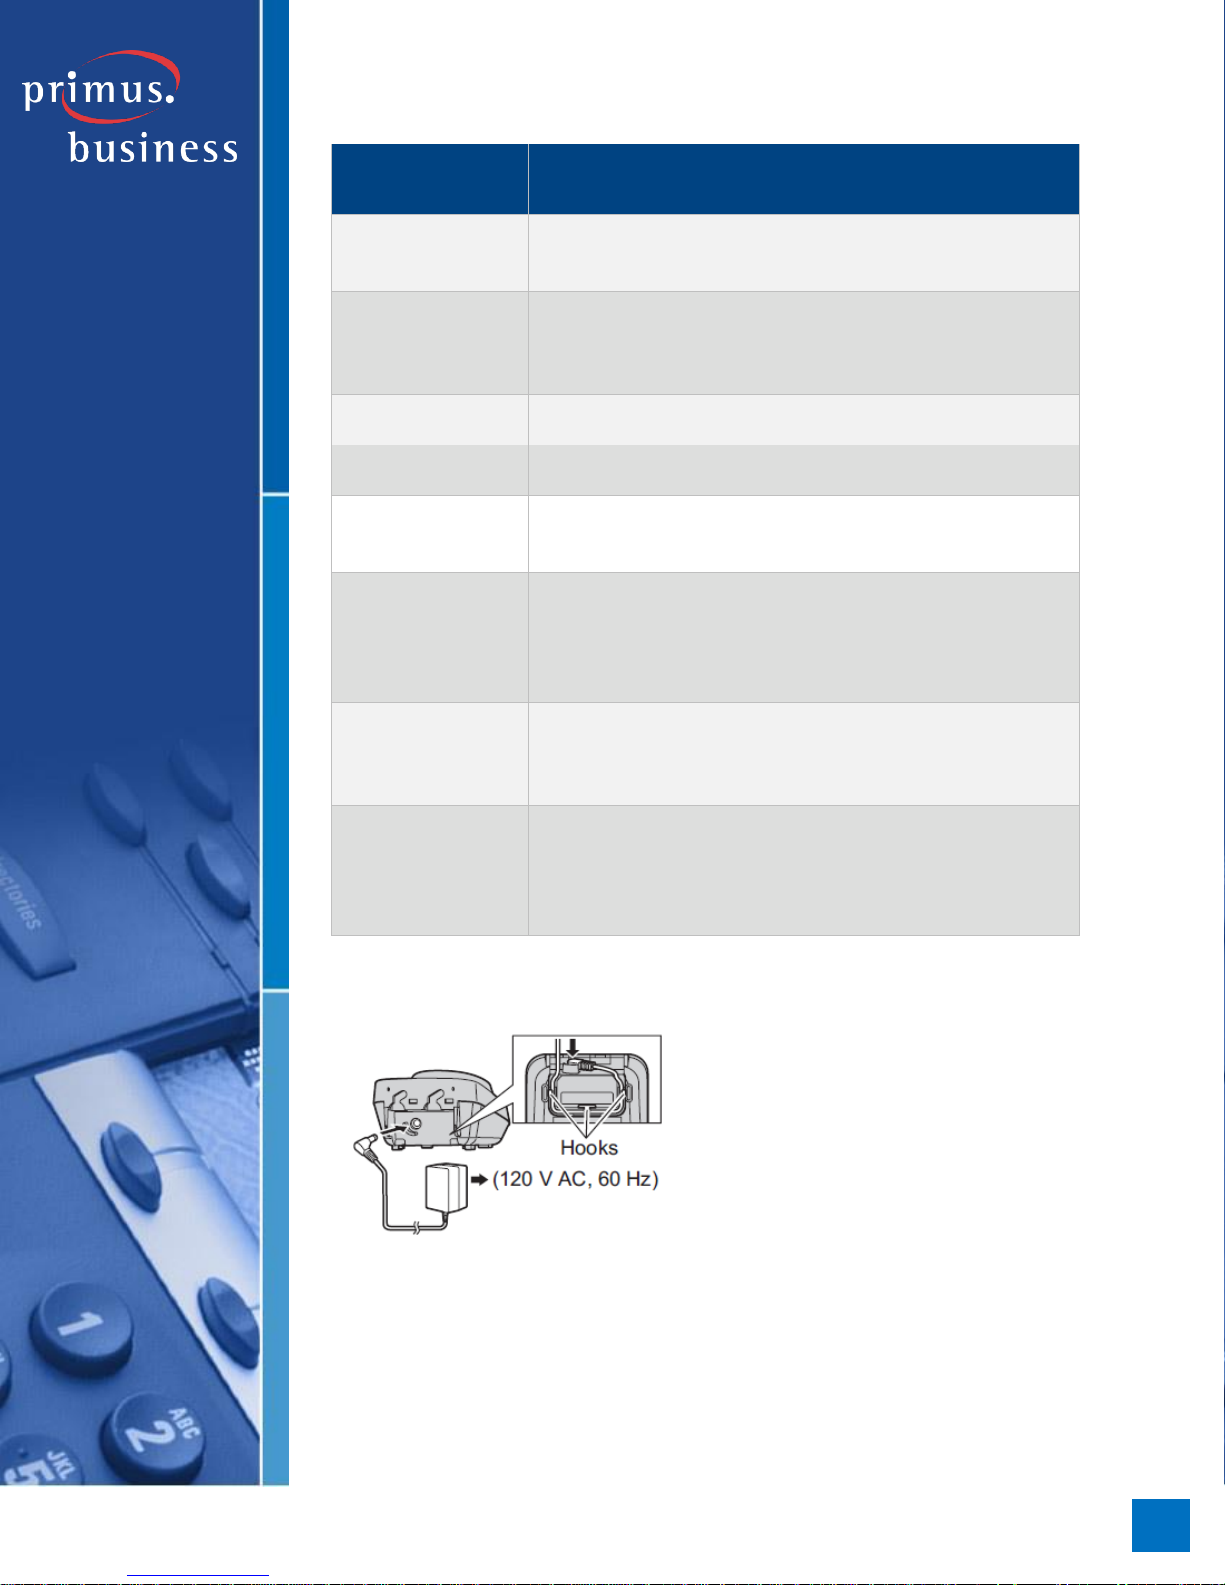
1. Plug the AC adapter into the charger. Press the plug firmly to make sure it is
in place. There are hooks at the bottom of the unit to secure the cable in
place to prevent it from being accidentally pulled out. Plug the AC adapter
into an electrical outlet.
Page 4
4
PRIMUSBUSINESS.CA
PRIMUS BUSINESS SERVICES | HOSTED PBX | PANASONIC TGP550/TPA50 QUICK SETUP GUIDE
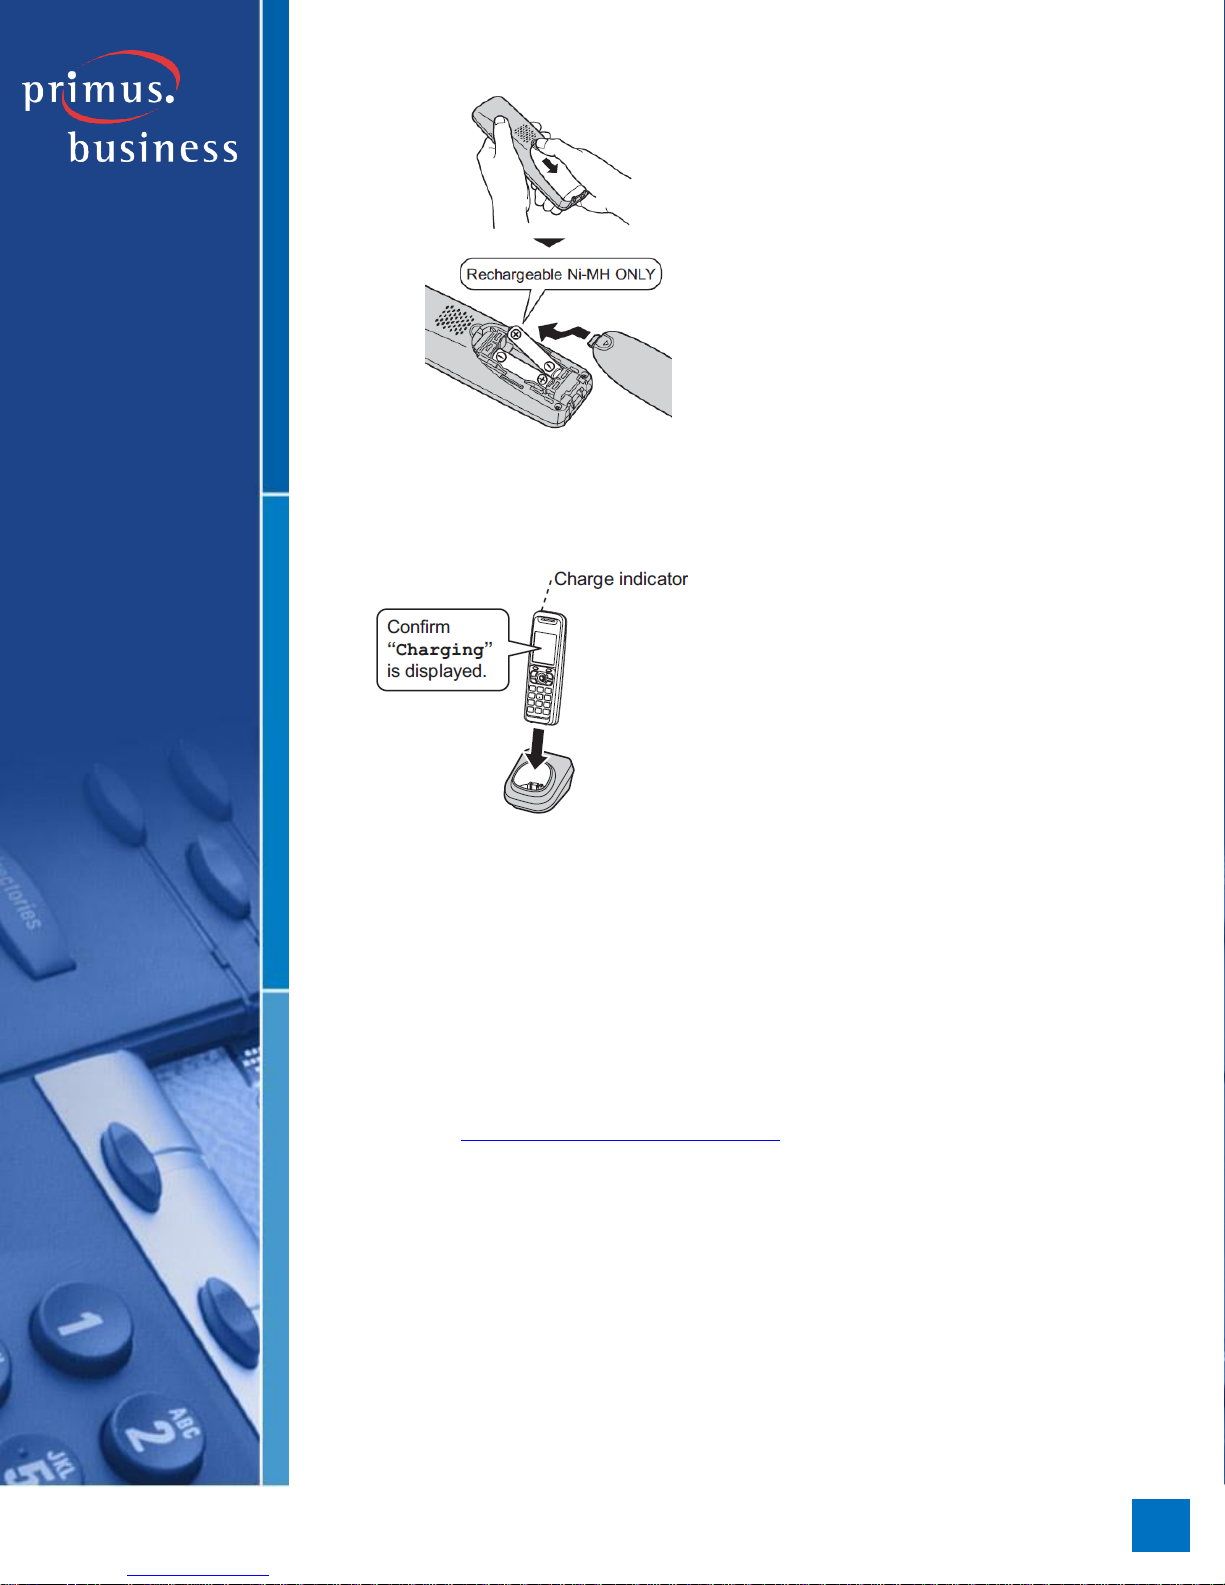
2. Remove the plastic wrapper from the rechargeable batteries included in the
box, and place them into the handset.
3. Place the handset into the charger and confirm that “Charging” is displayed.
Charging the unit takes about 6 hours. When the batteries are fully charged,
the charge indicator goes off and “Fully charged” is displayed. You are now
ready to make and receive calls from the cordless handset.
NOTE:
By default, the base unit and cordless handset are assigned the same
HPBX user. If you have multiple Hosted PBX users, you may want to
assign a separate user to the cordless handset. Please review the
Panasonic TGP550/TPA50 Handset User Assignment Guide, available
at http://primus.ca/business/hpbxguide, for instructions.
If you ordered additional cordless handsets (Panasonic KX-TPA50), you
must register them with the base unit before using it. See the next
section.
Page 5
5
PRIMUSBUSINESS.CA
PRIMUS BUSINESS SERVICES | HOSTED PBX | PANASONIC TGP550/TPA50 QUICK SETUP GUIDE
Registering Additional Cordless Handsets
(Panasonic KX-TPA50)
The Panasonic KX-TGP550 can support up to 6 cordless handsets. If you ordered
additional cordless handsets for your phones, you must register the handset with
your base unit before using it.
1. Follow the steps in the previous section to set up the cordless handset.
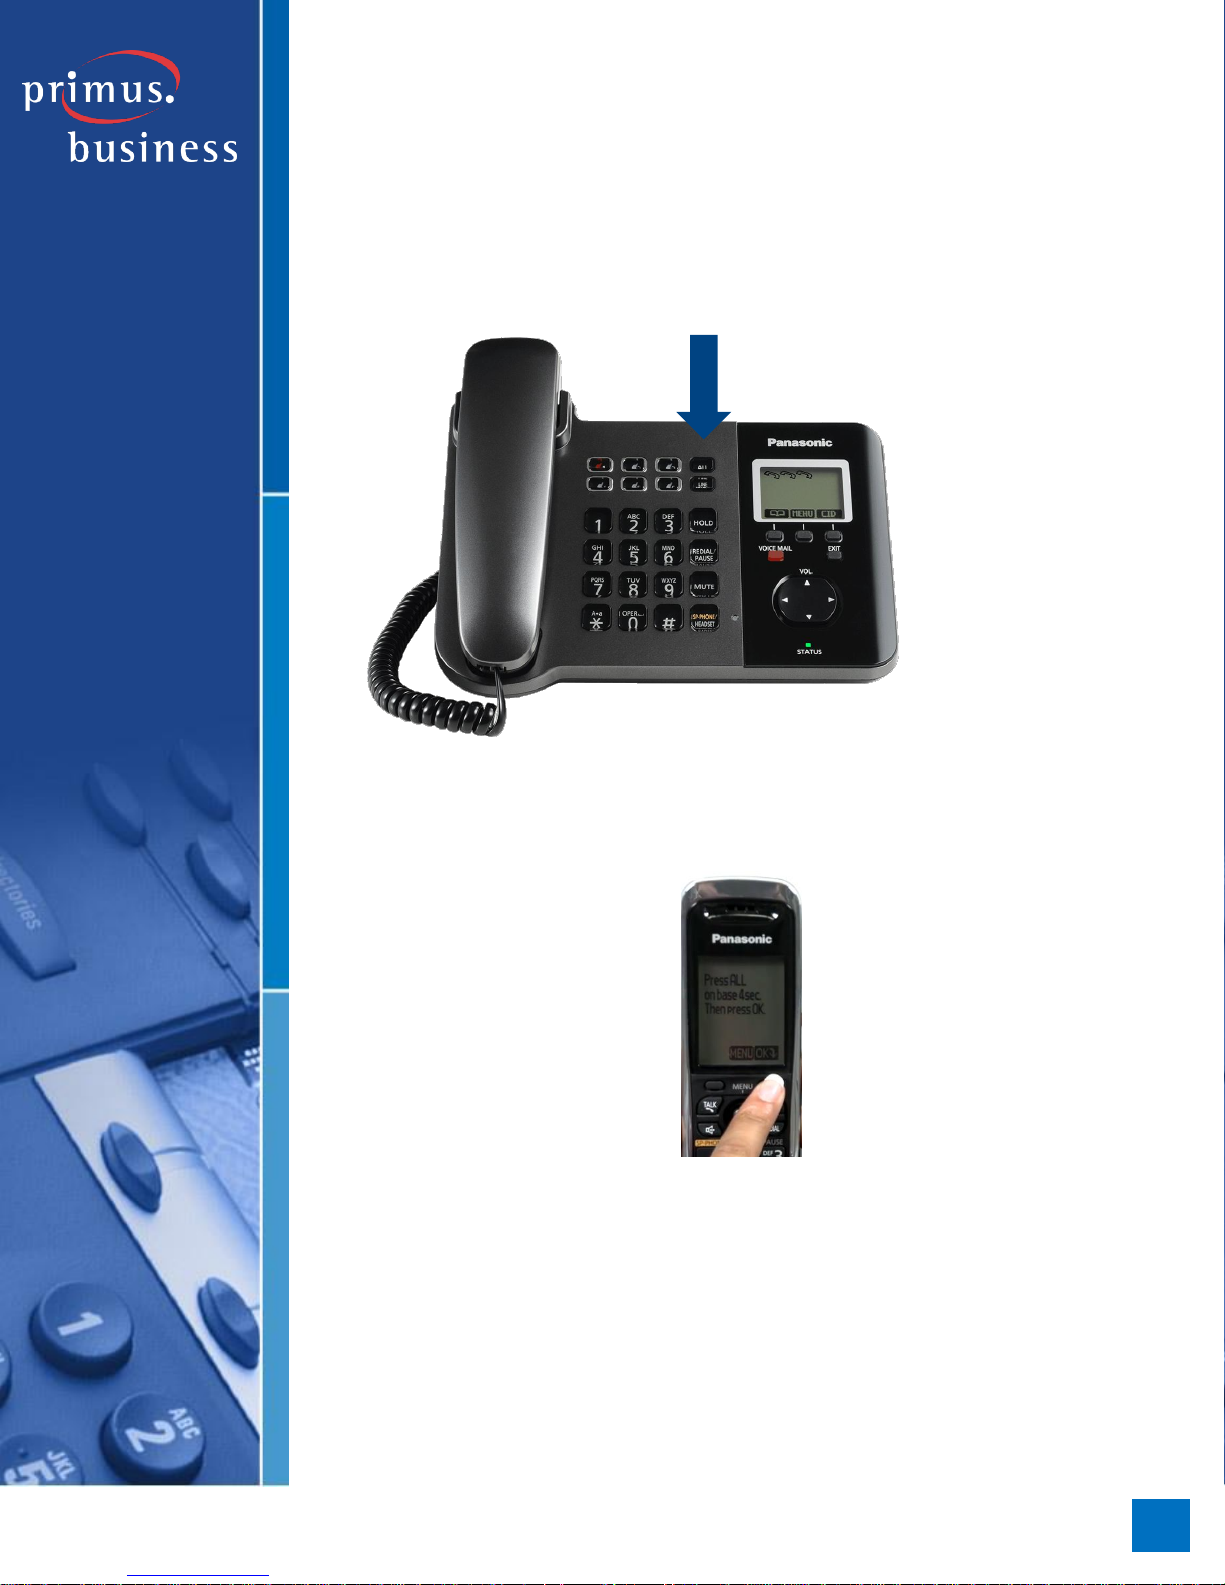
2. Press and hold the ALL button on the base unit for about 4 seconds until the
status indicator flashes red. The base unit will emit a beeping sound.
3. Press OK on the cordless handset then wait until a long beep sounds. If the
handset happens to ring while you are doing this, press the ALL button again on
the base unit to stop, and repeat the process from the beginning.
4. With more than one cordless handset, it is easy to get them mixed up. You can
name each handset to avoid confusion. To name the handset, press MENU by
pressing the centre joystick, then select Initial Settings, then Handset Name.
Enter a name for the handset, and press OK. Choose On for standby display,
and press SAVE.
 Loading...