

Page 1
English
Operating Instructions
Plasma Television
Contents
Be Sure to Read
Important Notice ·················································2
Safety Precautions ·············································2
Quick Start Guide
Accessories ························································5
Connections························································7
Identifying Controls ···········································11
First time Auto Tuning ·······································15
Using your VIERA
Operations ························································16
How to Use eHELP ···········································17
Viewing 3D images ···········································18
Others
FAQs·································································19
Maintenance ·····················································20
Specifications ···················································20
Australia
New Zealand
Model No.
TH-P55VT60A TH-P55VT60Z
TH-P65VT60A TH-P65VT60Z
For more detailed instructions, refer to [eHELP]
(Built-in Operating Instructions).
●
How to use [eHELP] (p. 17)
Thank you for purchasing this Panasonic product.
Please read these instructions carefully before operating this product and
retain them for future reference.
The images shown in this manual are for illustrative purposes only.
TQB4TC0335-1
Page 2
Important Notice
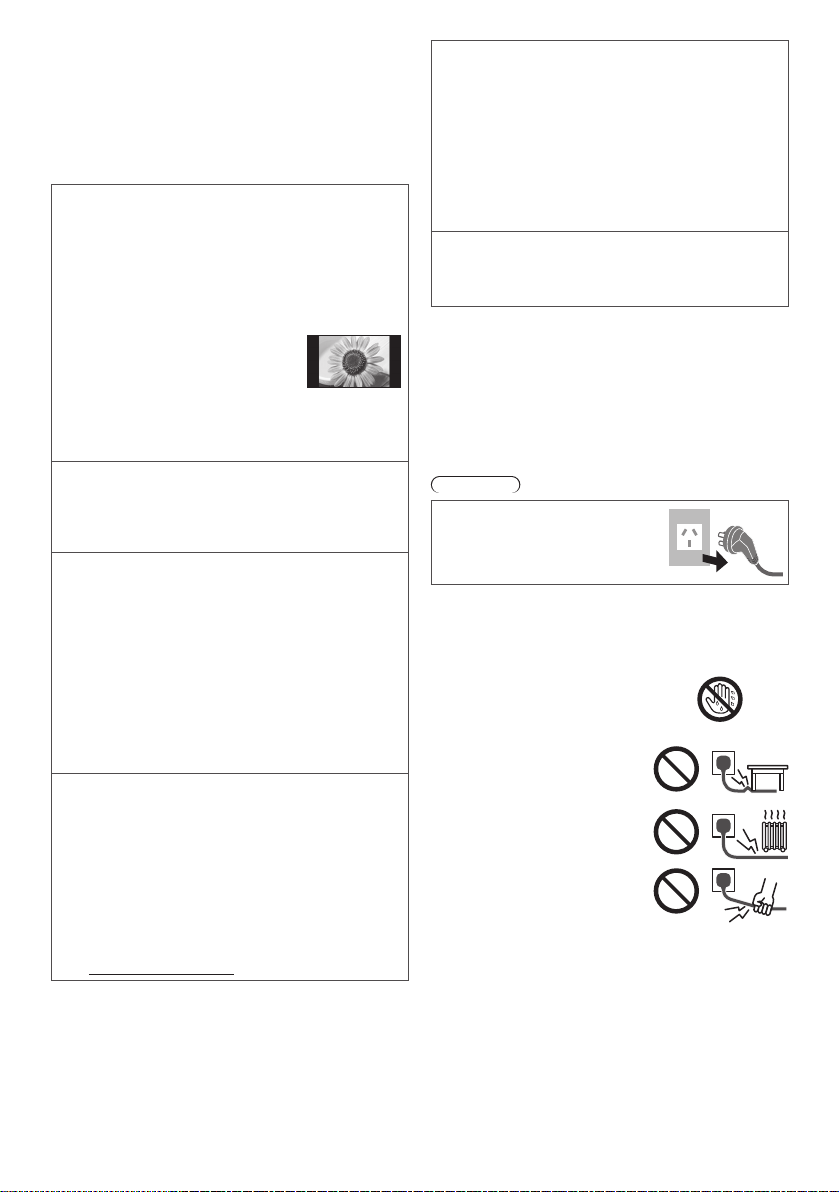
Do not display any still part of the
image for a long period
In such cases the still part of the image remains dimly
on the plasma screen (“image retention”). This is not
considered a malfunction and is not covered by the
warranty.
Typical still image parts:
●
Channel number, channel logo and other logos
●
Still or moving pictures viewed in
4:3 or 14:9 aspect ratio
●
Video games
To avoid image retention, the screen saver may
be activated (VIERA logo moves) or the on-screen
message may move after a few minutes if no signals
are sent or no operations are performed.
Panasonic does not guarantee operation and
performance of peripheral devices made by other
manufacturers; and we disclaim any liability or damage
arising from operation and/or performance from usage
of such other maker’s peripheral devices.
The recording and playback of content on this or any
other device may require permission from the owner
of the copyright or other such rights in that content.
Panasonic has no authority to and does not grant
you that permission and explicitly disclaims any right,
ability or intention to obtain such permission on your
behalf. It is your responsibility to ensure that your use
of this or any other device complies with applicable
copyright legislation in your country. Please refer to
that legislation for more information on the relevant
laws and regulations involved or contact the owner
of the rights in the content you wish to record or
playback.
This product is licensed under the AVC patent portfolio
license for the personal and non-commercial use of a
consumer to (i) encode video in compliance with the
AVC Standard (“AVC Video”) and/or (ii) decode AVC
Video that was encoded by a consumer engaged in
a personal and non-commercial activity and/or was
obtained from a video provider licensed to provide
AVC Video. No license is granted or shall be implied
for any other use.
Additional information may be obtained from MPEG
LA, LLC.
See http://www.mpegla.com.
Panasonic and its affiliates make no representations or
warranties of any kind with respect to the USB devices
and the performance of communication between the
USB devices and the USB port of Panasonic products,
and expressly disclaims any and all warranties,
whether express or implied or otherwise, including
without limitation any implied warranty of fitness for a
particular purpose, any loss of data, and any implied
warranties arising from course of dealing or course of
performance of data communication between the USB
devices and the USB port of Panasonic products.
“Full HD 3D Glasses™” Logo indicates compatibility
between TV products and 3D Eyewear which are
compliant with the “Full HD 3D Glasses™” format, and
does not indicate picture quality of TV products.
Safety Precautions
To help avoid risk of electrical shock, fire, damage or
injury, please follow the warnings and cautions below:
■ Mains plug and lead
Warning
If you detect anything unusual,
immediately remove the mains
plug.
●
This TV is designed to operate on AC 220-240 V, 50 /
60 Hz.
●
Insert the mains plug fully into the socket outlet.
●
Ensure that the mains plug is easily accessible.
●
Disconnect the mains plug when cleaning the TV.
●
Do not touch the mains plug with wet
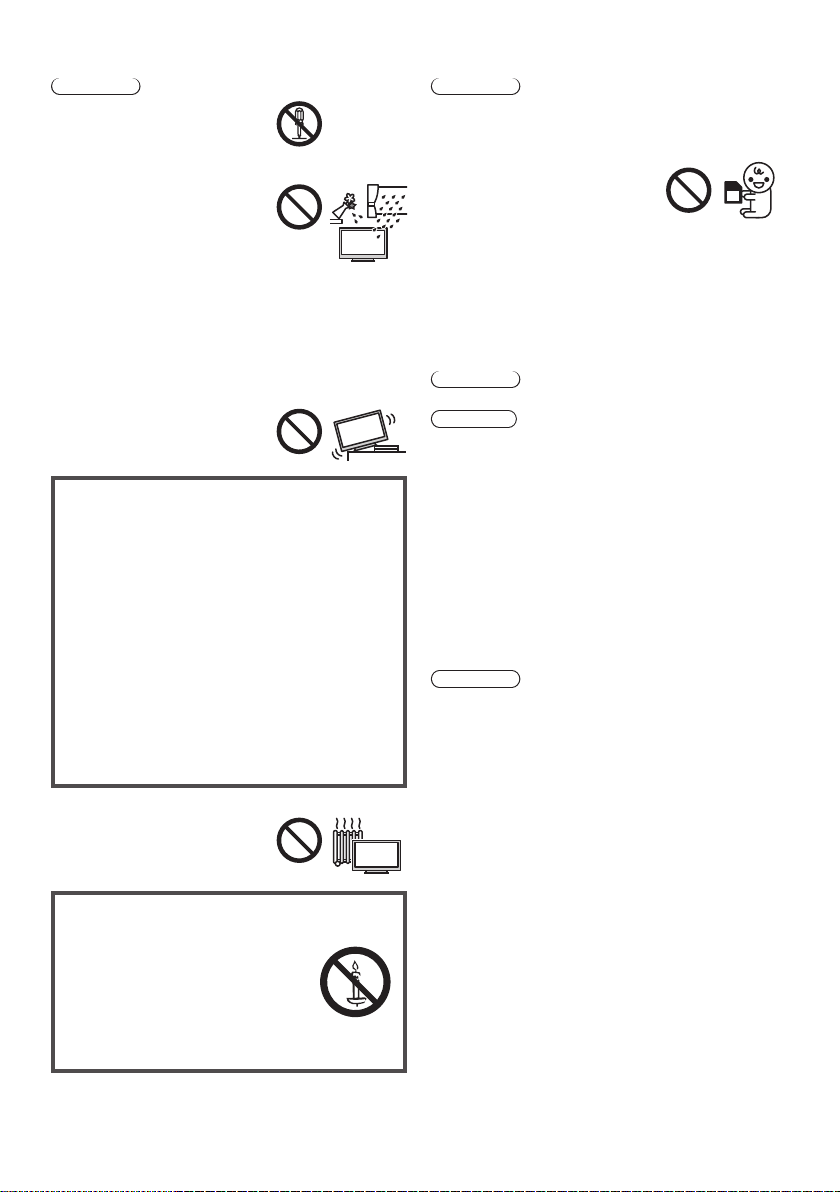
hands.
●
Do not damage the mains lead.
Do not place a heavy object
•
on the lead.
Do not place the lead near a
•
high temperature object.
Do not pull on the lead. Hold
•
onto the mains plug body
when disconnecting the plug.
Do not move the TV with the lead plugged into a
•
socket outlet.
Do not twist the lead, bend it excessively or stretch it.
•
Do not use a damaged mains plug or socket outlet.
•
Ensure the TV does not crush the mains lead.
•
●
Do not use any mains lead other than that provided with
this TV.
●
Ensure the earth pin on the mains plug is securely
connected to prevent electrical shock.
An apparatus with CLASS I construction shall be
•
connected to a mains socket outlet with a protective
earth connection.
2
Page 3
■ Take care
Warning
●
Do not remove covers and never
modify the TV yourself as live
parts are accessible when they
are removed. There are no user
serviceable parts inside.
●
Do not expose the TV to rain
or excessive moisture. This TV
must not be exposed to dripping
or splashing water and objects
filled with liquid, such as vases,
must not be placed on top of or
above the TV.
●
Do not insert foreign objects into the TV through the air
vents.
●
Do not use an unapproved pedestal / mounting
equipment. Be sure to ask your local Panasonic dealer
to perform the setup or installation of approved wallhanging brackets.
●
Do not apply strong force or impact to the display panel.
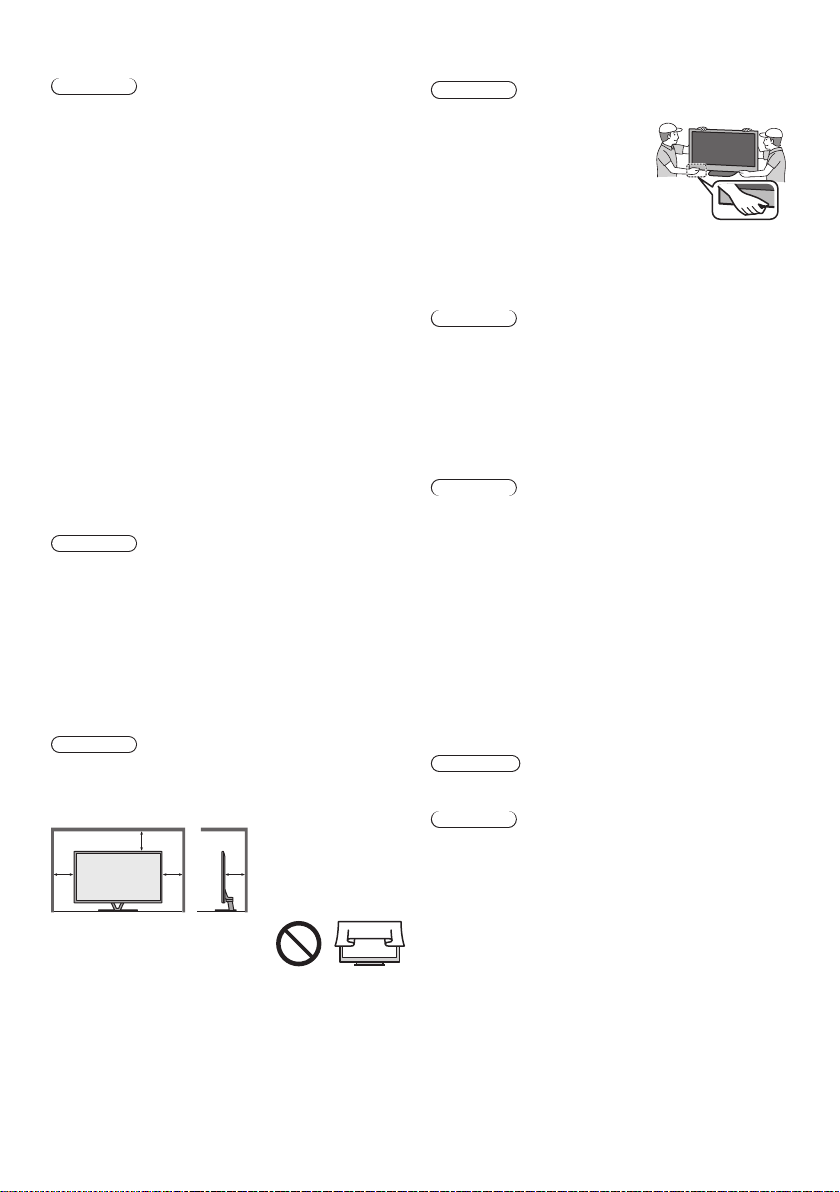
●
Do not place the TV on sloped
or unstable surfaces, and ensure
that the TV does not hang over
the edge of the base.
Important information
If the TV is not positioned in a sufficiently stable
location, it can be potentially hazardous due to
falling. Many injuries, particularly to children, can be
avoided by taking simple precautions such as:
Using cabinets or stands recommended by the
•
manufacturer of the TV.
Only using furniture that can safely support the
•
TV.
Ensuring the TV is not overhanging the edge of
•
the supporting furniture.
Not placing the TV on tall furniture (for example,
•
cupboards or bookcases) without anchoring both
the furniture and the TV to a suitable support.
Not standing the TV on cloth or other materials
•
placed between the TV and supporting furniture.
Educating children about the dangers of climbing
•
on furniture to reach the TV or its controls.
●
This TV is designed for indoor use.
●
Do not expose the TV to direct
sunlight and other sources of
heat.
To prevent the
spread of fire, keep
candles or other
open flames away
from this product at
all times
■ Dangerous part / Small object
Warning
●
This product contains possibly dangerous parts such
as plastic bags, that can be breathed in or swallowed
by young children accidentally. Keep these parts out of
reach of young children.
●
Do not allow children to handle
any small objects such as SD
Card. The small object could be
swallowed by young children.
Remove SD Card immediately
after use and store out of reach of
young children.
●
3D Eyewear and Electronic Touch Pen contain
small parts that can be swallowed by young children
accidentally. Keep these parts out of reach of young
children.
■ Pedestal
Warning
●
Do not disassemble or modify the pedestal.
Caution
●
Do not use any pedestal other than the one provided
with this TV.
●
Do not use the pedestal if it becomes warped or
physically damaged. If this occurs, contact your nearest
Panasonic dealer immediately.
●
During setup, make sure that all screws are securely
tightened.
●
Ensure that the TV does not suffer any impact during
installation of the pedestal.
●
Ensure that children do not climb onto the pedestal.
●
Install or remove the TV from the pedestal with at least
two people.
●
Install or remove the TV by the specified procedure.
■ Radio wave
Warning
●
Do not use the TV, 3D Eyewear, Electronic Touch
Pen and VIERA Touch Pad Controller in any medical
institutions or locations with medical equipment. Radio
waves may interfere with the medical equipment and
cause accidents due to the malfunction.
●
Do not use the TV, 3D Eyewear, Electronic Touch Pen
and VIERA Touch Pad Controller near any automatic
control equipment such as automatic doors or fire
alarms. Radio waves may interfere with the automatic
control equipment and cause accidents due to the
malfunction.
●
Keep the distance at least 22 cm from the TV, 3D
Eyewear, Electronic Touch Pen and VIERA Touch
Pad Controller when you have a cardiac pacemaker.
Radio waves may interfere with the operation of the
pacemaker.
●
Do not disassemble or alter the TV, 3D Eyewear,
Electronic Touch Pen and VIERA Touch Pad Controller
in any way.
3
Page 4
■ Built-in wireless LAN
Caution
●
Do not use the built-in wireless LAN to connect to any
wireless network (SSID*) for which you do not have
usage rights. Such networks may be listed as a result
of searches. However, using them may be regarded as
illegal access.
*
SSID is a name for identifying a particular wireless
network for transmission.
●
Do not subject the built-in wireless LAN to high
temperatures, direct sunlight or moisture.
●
Data transmitted and received over radio waves may be
intercepted and monitored.
●
The built-in wireless LAN uses 2.4 GHz and 5 GHz
frequency bands. To avoid malfunctions or slow
response caused by radio wave interference, keep the
TV away from the devices such as other wireless LAN
devices, microwaves, mobile phones and the devices
that use 2.4 GHz and 5 GHz signals when using the
built-in wireless LAN.
●
When noises occur due to the static electricity, etc.,
the TV might stop operating for the protection of the
devices. In this case, turn the TV off with Mains power
On / Off switch, then turn it on again.
●
Additional information for the wireless LAN and access
point may be on the following website.
http://panasonic.net/viera/support
■ Bluetooth
Caution
●
The TV, 3D Eyewear, Electronic Touch Pen and VIERA
Touch Pad Controller use the 2.4 GHz radio frequency
ISM band (Bluetooth®). To avoid malfunctions or slow
response caused by radio wave interference, keep
the TV, 3D Eyewear, Electronic Touch Pen and VIERA
Touch Pad Controller away from the devices such as
other wireless LAN devices, other Bluetooth devices,
microwaves, mobile phones and the devices that use
2.4 GHz signal.
®
wireless technology
■ Ventilation
Caution
Allow sufficient space around the TV in order to help
prevent excessive heat, which could lead to early failure
of some electronic components.
Minimum distance:
10
10
●
Ventilation should not be
impeded by covering the
ventilation openings with items
such as newspapers, tablecloths
and curtains.
●
Whether you are using a pedestal or not, always ensure
the vents at the bottom of the TV are not blocked and
there is sufficient space to enable adequate ventilation.
10
7
(cm)
■ Moving the TV
Caution
Before moving the TV, disconnect all cables.
●
The TV is heavy. Move the
TV with at least two people.
Support as shown to avoid
injury by the TV tipping or
falling.
●
Transport only in upright position. Transporting the TV
with its display panel facing upwards or downwards
may cause damage to the internal circuitry.
■ When not in use for a long time
Caution
This TV will still consume some power even in the Off
mode, as long as the mains plug is still connected to a
live socket outlet.
●
Remove the mains plug from the wall socket when the
TV is not in use for a prolonged period of time.
■ Battery for the Remote Control /
3D Eyewear / Electronic Touch Pen /
VIERA Touch Pad Controller
Caution
●
Incorrect installation may cause battery leakage,
corrosion and explosion.
●
Replace only with the same or equivalent type.
●
Do not mix old and new batteries.
●
Do not mix different battery types (such as alkaline and
manganese batteries).
●
Do not use rechargeable batteries (Ni-Cd, etc.).
●
Do not burn or break up batteries.
●
Do not expose batteries to excessive heat such as
sunshine, fire or the like.
●
Make sure you dispose of batteries correctly.
●
Remove the battery from the unit when not using for
a prolonged period of time to prevent battery leakage,
corrosion and explosion.
■ Electronic Touch Pen Use
Warning
●
The TV may be hot. Do not touch it continuously to
prevent low temperature burn.
Caution
●
Do not forcibly hit or pick the TV screen with the
Electronic Touch Pen to prevent the TV from falling
over.
●
Touch the TV screen only with the tip of the Electronic
Touch Pen, do not move the tip with exerting pressure
on, or do not move the tip fast to prevent the scratch of
the screen.
●
Stop using the Electronic Touch Pen immediately if you
experience any redness, pain or skin irritation. In rare
cases, the materials used in the Electronic Touch Pen
may cause an allergic reaction.
●
Use the Electronic Touch Pen taking a break
sometimes. Guideline for continuous use is around
1 hour to protect against eyestrain or physical
deconditioning.
●
Do not use the Electronic Touch Pen at high
temperatures. Always keep the Electronic Touch Pen in
a cool and dry place.
4
Page 5
■ 3D Eyewear Use
Caution
●
Use the 3D Eyewear only for the intended purpose and
nothing else.
●
Do not move around while wearing the 3D Eyewear to
avoid falling or accidental injury.
●
Do not drop, bend, exert pressure on, or step on the 3D
Eyewear.
●
Be careful of the tips of the frame when putting on the
3D Eyewear.
●
Be careful not to trap your fingers in the hinge section
of the 3D Eyewear.
●
Do not use the 3D Eyewear if it is physically damaged.
●
If you suffer from any eyesight problems (short / farsighted, astigmatism, eyesight differences in left and
right), ensure that you correct your vision before using
the 3D Eyewear. The supplied 3D Eyewear can be worn
over vision correction glasses.
●
Stop using the 3D Eyewear immediately if you
experience any redness, pain or skin irritation around
the nose or temples. In rare cases, the materials used
in the 3D Eyewear may cause an allergic reaction.
●
Do not use the 3D Eyewear at high temperatures.
Always keep the 3D Eyewear in a cool and dry place.
●
Stop using the 3D Eyewear immediately if a malfunction
or fault occurs.
■ Viewing 3D Images
Caution
●
Pay special attention when children are viewing 3D
images. 3D images should not be viewed by children
younger than about 6 years old, as a guideline.
All children must be fully supervised by parents or
guardians who must ensure their safety and health
while they are viewing 3D images.
●
Stop viewing 3D images immediately if you feel tired,
feel unwell, experience any other uncomfortable
sensation or clearly see double images. Take an
appropriate break before continuing to view. When you
set the 3D effect by using [3D Adjustment], take into
account that the vision of 3D images varies among
different individuals.
●
Do not view 3D images if you have a history of
oversensitivity to light, heart problems or any other
medical conditions.
●
When viewing 3D images, your sense of distance may
be tricked or go wrong. Be careful not to hit the TV
screen or other people unintentionally. Ensure there
are no breakable objects around you to avoid any
accidental damage or injury.
●
Do not view 3D images from a distance shorter than
recommended. The recommended viewing distance is
at least 3 times of the image height.
55-inch model
65-inch model
When black bands at the top and bottom of the screen
are displayed, such as movies, view the screen from
a distance at least 3 times the height of the actual
image. (That makes the distance shorter than the
recommended values above.)
: 2.1 m or more
: 2.4 m or more
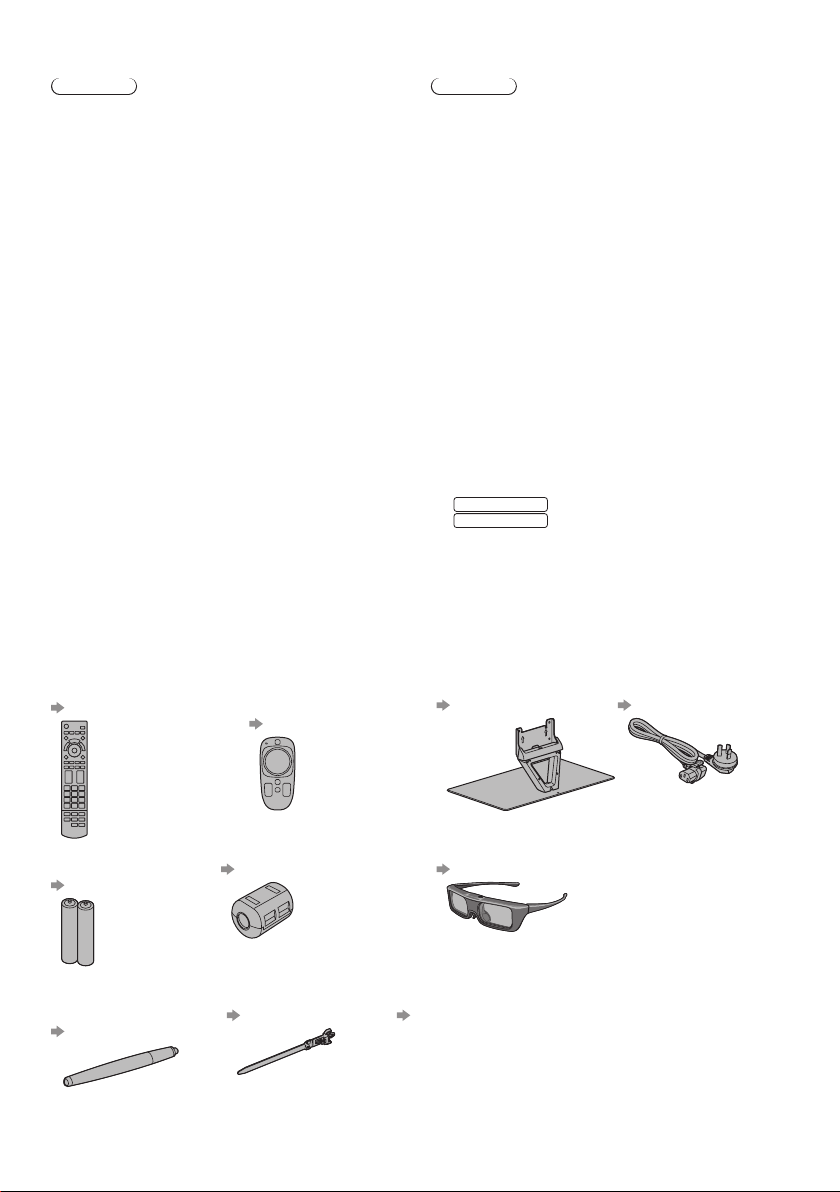
Accessories
Remote Control
(p. 11)
●
N2QAYB000854
Batteries (4)
●
R6
(p. 11, 12)
Electronic Touch Pen
(with R03 battery)
(p. 13)
●
Accessories may not be placed all together. Take care not to throw them away unintentionally.
●
For the information of optional accessories, refer to [eHELP] (Support > Optional accessories).
VIERA Touch Pad
Controller
(p. 12)
●
N2QBYB000028
Ferrite core for LAN cable (2)
(p. 8)
Use the Ferrite cores to comply
with the EMC standard.
Cable tie
(p. 10)
Pedestal
(p. 6)
3D Eyewear (2)
(p. 18)
Fall-prevention parts
(p. 6)
Operating Instructions
with Warranty statement
Mains lead
(p. 7)
5
Page 6
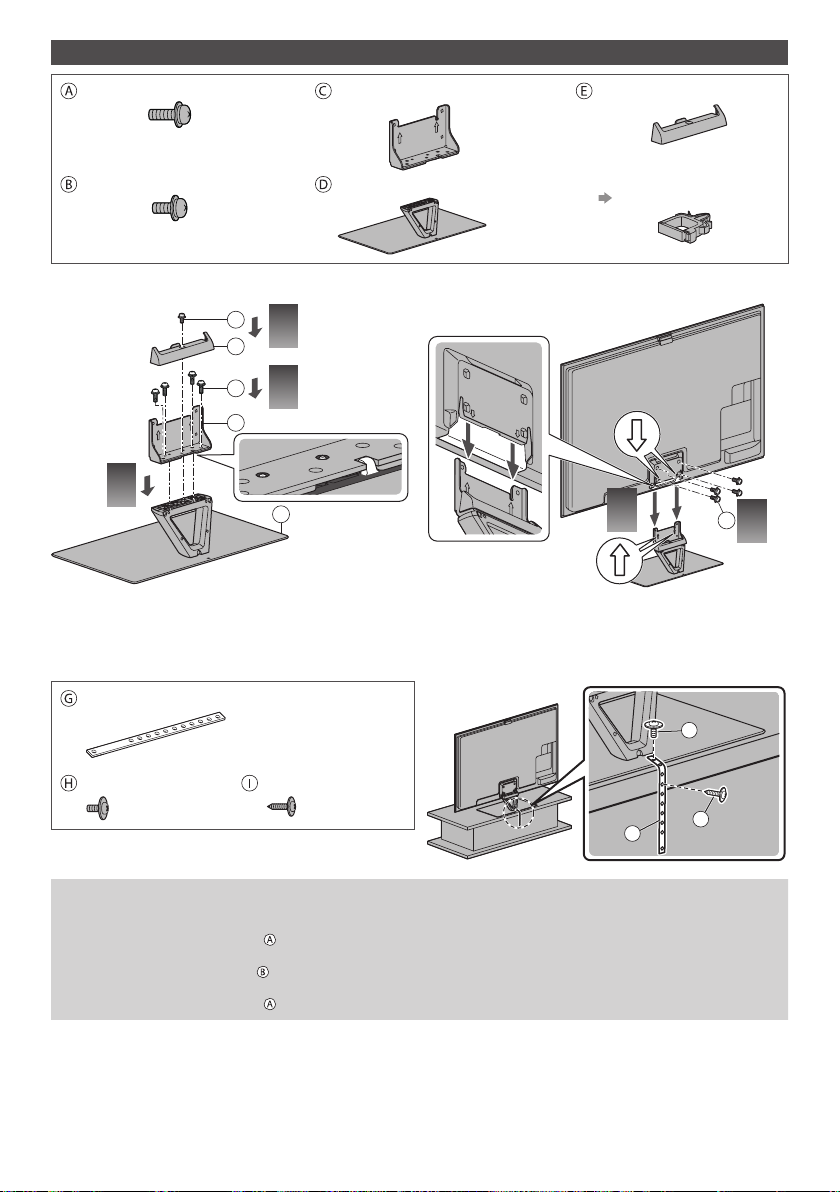
Assembling / Removing the pedestal
Assembly screw (8)
M5 × 16
Assembly screw
M4 × 10
Bracket
Base
Cover
Cable clamp (4)
(p. 10)
■ Assembling the pedestal
B
3
E
A
2
C
1
D
■ Preventing the TV from falling over
It is recommended to secure the pedestal to a furniture as shown to prevent the TV from falling over.
●
This information is designed to reduce the risk of injuries caused by the TV falling over. However, no measure can
guarantee protection in all cases.
Band
Screw
Wood screw
4
G
A
H
I
5
Removing the pedestal from the TV
Be sure to remove the pedestal in the following way when using the wall-hanging bracket or repacking the TV.
1 Remove the assembly screws
2 Pull out the pedestal from the TV.
3 Remove the assembly screw
4 Pull out the cover.
5 Remove the assembly screws from the bracket.
from the TV.
from the cover.
6
Page 7
Connections
●
External equipment and cables shown are not supplied with this TV.
●
Ensure that the unit is disconnected from the mains socket before attaching or disconnecting any leads.
●
Check the type of terminals and cable plugs are correct when connecting.
●
Always use a fully wired HDMI cable.
●
Keep the TV away from electronic equipment (video equipment, etc.) or equipment with an infrared sensor.
Otherwise, distortion of image / sound may occur or operation of other equipment may be interfered.
●
Also read the manual of the equipment being connected.
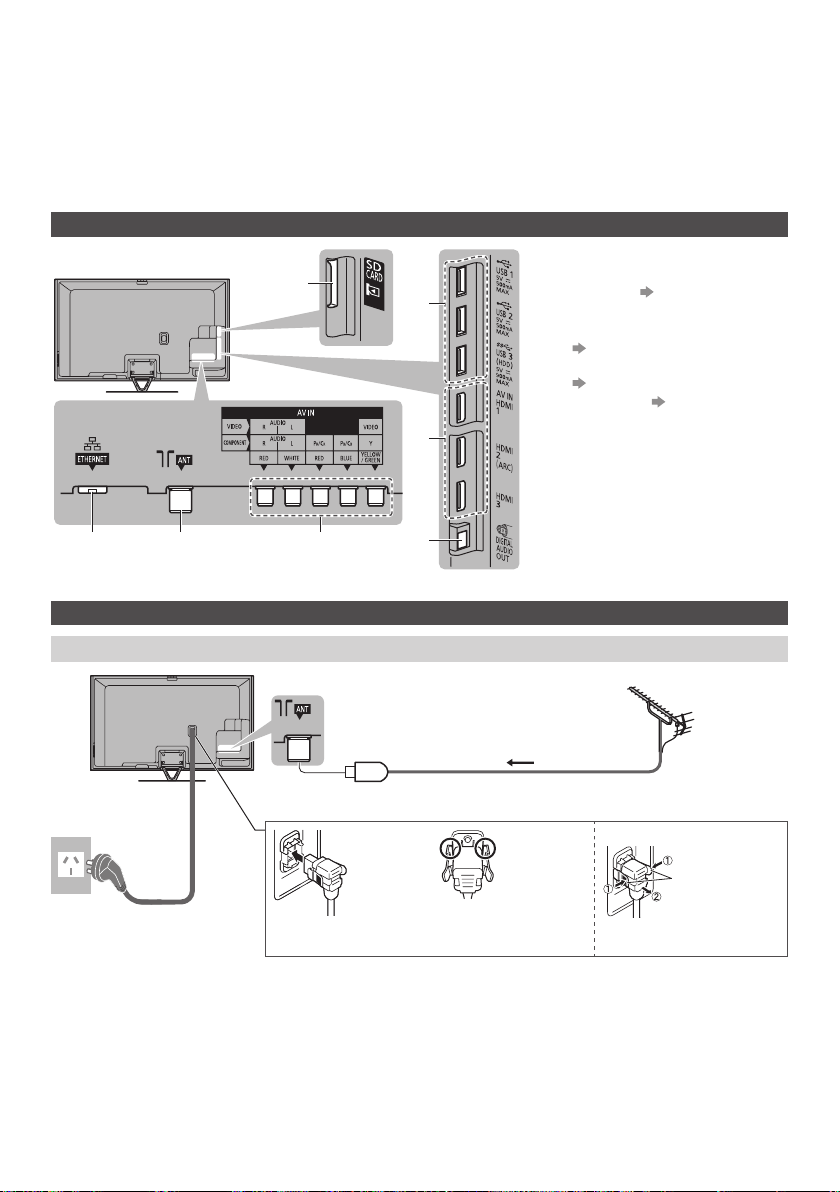
Terminals
SD Card slot
1
USB 1 - 3 port
1
2
3
2
HDMI1 - 3 (p. 8, 9)
3
DIGITAL AUDIO OUT
4
AV (COMPONENT / VIDEO)
5
(p. 9)
Aerial terminal
6
(see below)
ETHERNET (p. 8)
7
6 7
5
4
Basic connections
Mains lead and aerial
■ Digital TV, Analogue TV
Mains lead
(supplied)
AC 220-240 V
50 / 60 Hz
●
Keep RF (aerial) cable away from the mains lead to avoid and minimise mains interference pickup.
●
Do not place the RF cable under the TV.
●
An aerial, correct cable (75 Ω coaxial) and correct terminating plug are required to obtain optimum quality picture and
sound.
●
If a communal aerial system is used, you may require the correct connection cable and plug between the wall aerial
socket and the TV.
●
Your local Television Service Centre or dealer may be able to assist you in obtaining the correct aerial system for your
particular area and the accessories required.
●
Any matters regarding aerial installation, upgrading of existing systems or accessories required, and the costs
incurred, are the responsibility of you, the customer.
■ Mains lead
Push until both side
tabs click
RF cable
Make sure that
the mains lead is
securely fixed
Aerial
To remove from the TV:
tabs
Press both tabs and pull on
mains connector to release
7
Page 8
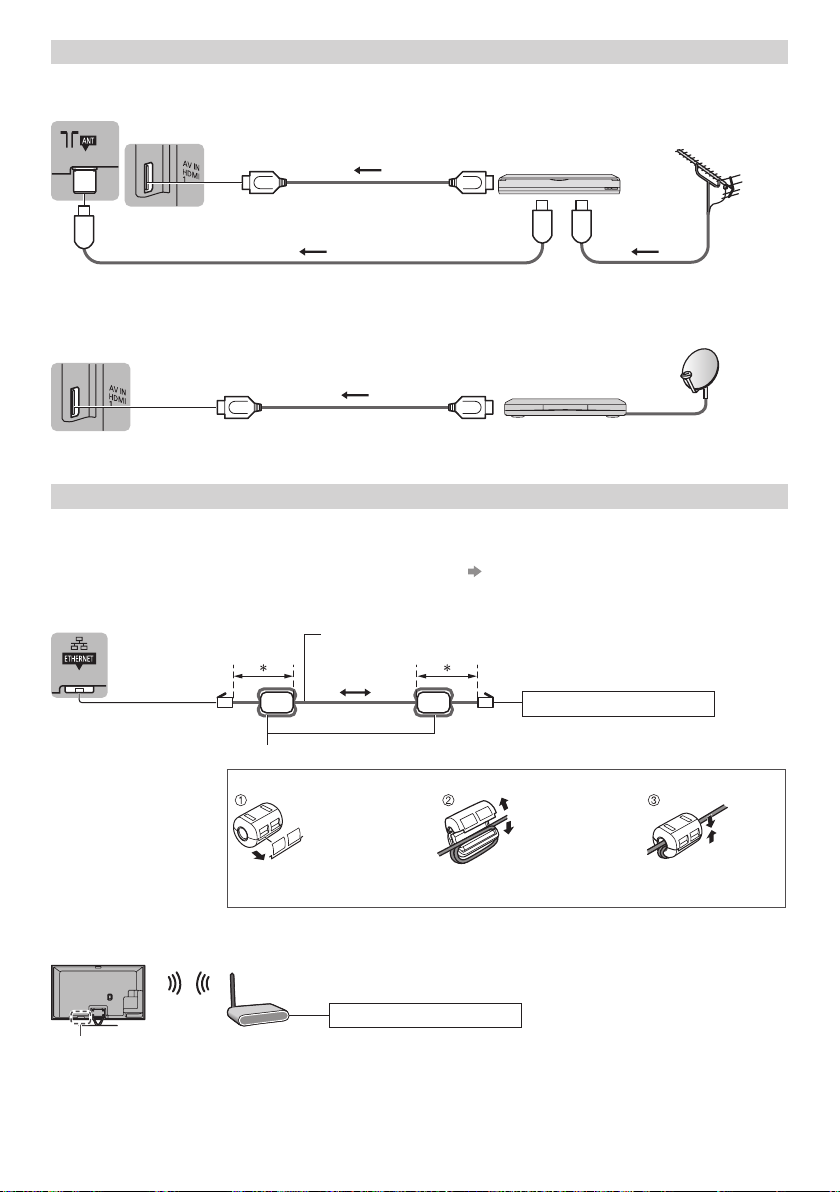
AV devices
■ DVD Recorder / VCR
TV
DVD Recorder / VCR
Aerial
HDMI cable
RF cable
RF cable
■ Set top box
TV
HDMI cable
Set top box
Network
●
To enable the network service functions (VIERA Connect, etc.), you need to connect the TV to a broadband network
environment. If you do not have any broadband network services, please consult your retailer for assistance.
●
Prepare the internet environment for wired connection or wireless connection.
●
Setup of the network connection will start when first using the TV. (p. 15)
■ Wired connection
TV
Ferrite core (supplied)
Installing the Ferrite core
LAN cable (Unshielded)
●
Use the Unshielded Twist Pair (UTP) LAN cable.
*Less than 10 cm
Internet environment
■ Wireless connection
Built-in wireless LAN
8
Pull back the tabs
(in two places)
Access point
Wind the cable twice Close
Internet environment
Page 9
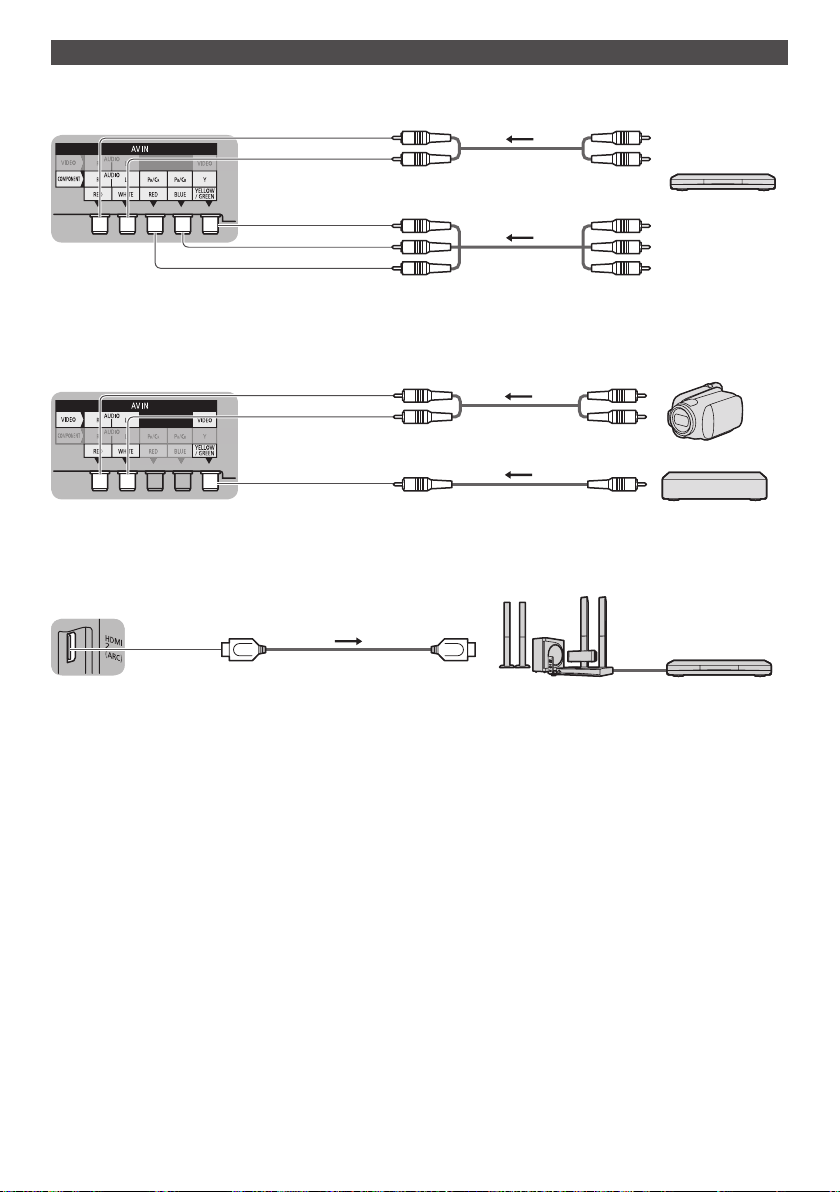
Other connections
■ DVD player
(COMPONENT equipment)
TV
■ Camcorder / Game equipment
(VIDEO equipment)
TV
(Listening)
DVD Player
(Viewing)
(Listening)
Camcorder
(Viewing)
Game equipment
■ Amplifier (to listen with speakers)
TV
HDMI cable
Amplifier with
speaker system
●
Use HDMI2 for connecting an amplifier. This connection is applicable when using an amplifier that has ARC (Audio
Return Channel) function.
As for an amplifier without ARC function, use DIGITAL AUDIO OUT.
●
To enjoy the sound from the external equipment in multi-channel sound (e.g. Dolby Digital 5.1ch), connect the
equipment to the amplifier. For the connections, read the manuals of the equipment and amplifier.
External equipment
(DVD Player, etc.)
9
Page 10

Types of connectable equipment to each terminal
AV
Terminal
AUDIO OUT
DIGITAL
ETHERNET
HDMI 1 - 3
USB 1 - 3
Features
To play back videocassettes / DVDs
(VCR / DVD Player)
To watch 3D contents (Blu-ray Disc Player)
To watch satellite broadcasts (Set top box)
To watch camcorder images (Video camera)
To play games (Game equipment)
To use amplifier with speaker system
To use network services
USB HDD Recording
VIERA Link
: Recommended Connection
*
1: Use HDMI2 for connecting an amplifier. This connection is applicable when using an amplifier that has ARC (Audio
Return Channel) function.
*
2: Use USB 3 port for connecting the USB HDD.
COMPONENT VIDEO
1
*
Using the cable tie and cable clamp (supplied)
●
Do not bundle the RF cable and mains lead together (could cause distorted image).
●
Fix cables with the cable tie and cable clamp as necessary.
●
When using the optional accessory, follow the option’s assembly manual to fix cables.
Attach the cable tie Bundle the cables
hole
2
*
Attach the cable clamp
Insert the cable clamp in
a hole
10
hole
Bundle the cables
Set
Insert the cable tie
in a hole
hooks
To remove from the TV: To loosen:
snaps
Keep pushing
both side snaps
knob
To release:
To remove from the TV:
Keep pushing
Ta b
the tab
Set the tip in
the hooks
Keep pushing
the knob
snaps
Keep
pushing both
side snaps
Page 11
Identifying Controls
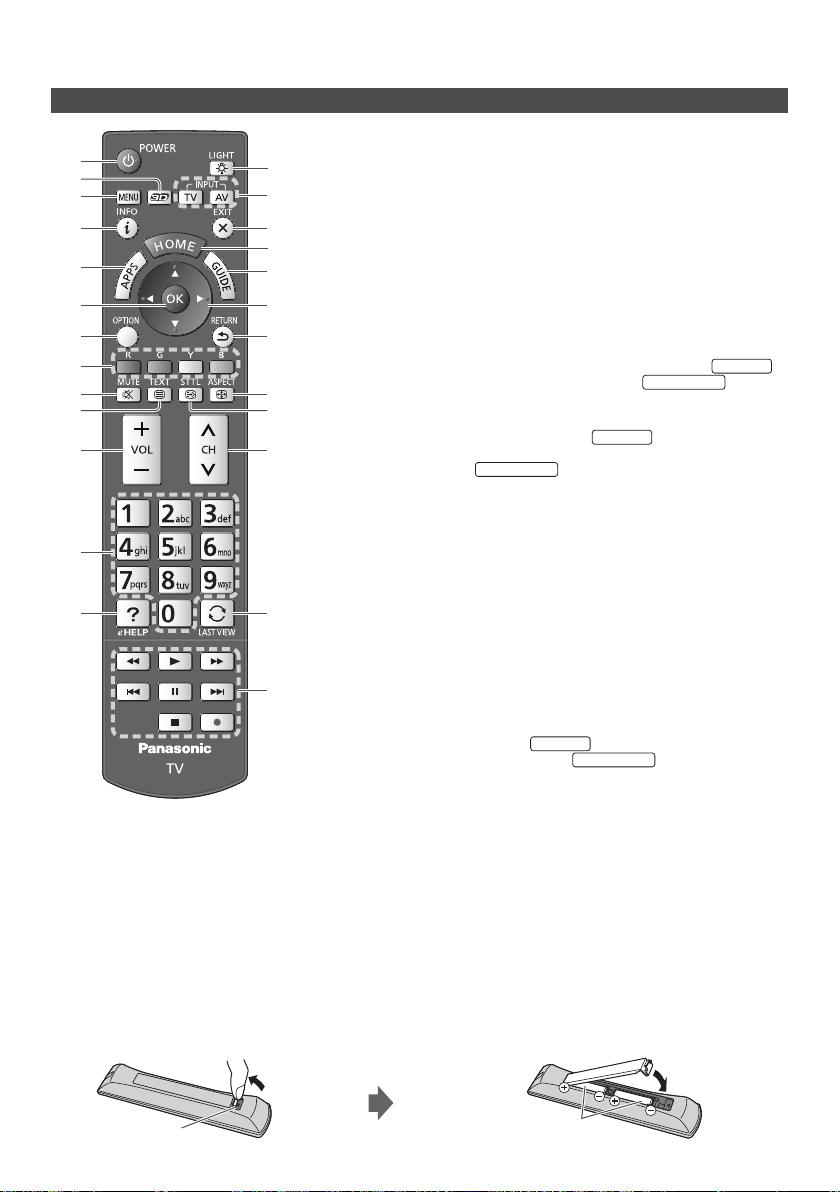
Remote Control
1
2
3
4
5
6
7
8
9
10
11
12
13
Standby On / Off switch
1
3D button
2
●
Switches the view between 2D and 3D.
[Main Menu]
3
●
Press to access Picture, Sound, Network, Timer,
Setup and Help Menus.
Information
4
●
Displays channel and programme information.
APPS
5
●
Displays [APPS List] (applications list).
■ Installing / Removing batteries
14
15
16
17
18
19
20
21
22
23
24
25
OK
6
●
Confirms selections and choices.
●
Press after selecting channel positions to quickly
change channel.
●
Displays the Channel List.
[Option Menu]
7
●
Easy optional setting for viewing, sound, etc.
Coloured buttons
8
(red-green-yellow-blue)
●
Used for the selection, navigation and operation of
various functions.
Sound Mute On / Off
9
Teletext button
10
●
This button is not used for this model.
●
Switches to teletext mode.
Volume Up / Down
11
Numeric buttons
12
●
Changes channel.
●
Changes channel and teletext pages.
New Zealand
●
Sets characters.
●
When in Standby mode, switches TV on.
[eHELP]
13
●
Displays [eHELP] (Built-in Operating Instructions).
Light
14
●
Lights the buttons for about 5 seconds (except the
buttons “25”).
Input mode selection
15
●
TV - switches to Digital TV / Analogue TV.
●
AV - switches to AV input mode from Input
Selection list.
Exit
16
●
Returns to [Home Screen].
HOME
17
●
Displays [Home Screen].
TV Guide
18
Freeview Guide
Cursor buttons
19
●
Makes selections and adjustments.
Return
20
●
Returns to the previous menu / page.
Aspect
21
●
Changes aspect ratio.
Subtitles
22
●
Displays subtitles.
Channel Up / Down
23
Last view
24
●
Switches to previously viewed channel or input
mode.
Operations for contents, connected equipment,
25
etc.
Australia
New Zealand
New Zealand
Australia
Australia
Pull open
Hook
Note the correct polarity
(+ or -)
Close
11
Page 12
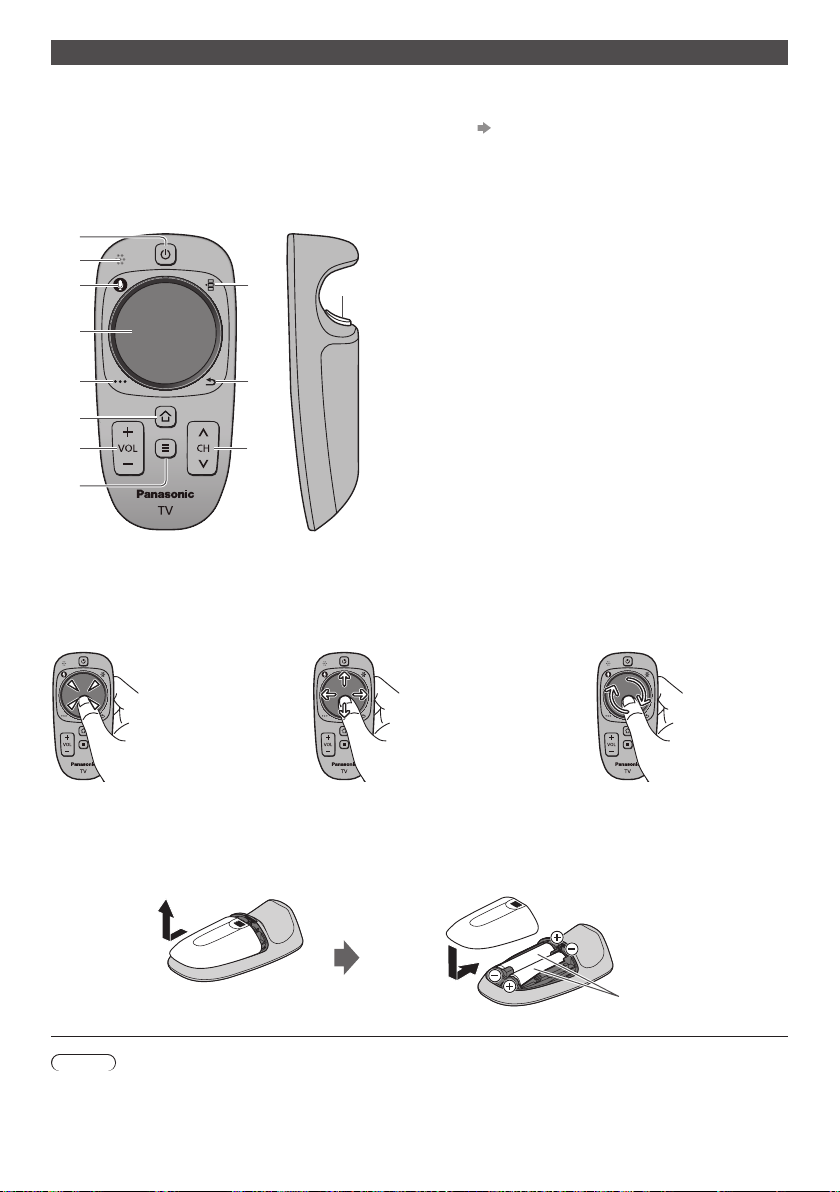
VIERA Touch Pad Controller
This touch pad controller is designed for the convenient operations, especially, on Home Screen or internet contents.
You can operate the TV intuitively with this controller.
●
The touch pad controller can be used by registering to this TV with Bluetooth wireless technology. Setup screen to
register will appear in “First time Auto Tuning” for first using the TV. (p. 15)
●
After registering, you can operate the TV without pointing this controller at the TV (except Standby On / Off switch).
●
To use Standby On / Off switch, point the controller directly at the TV's remote control signal receiver because it
works with the infrared. (You can operate the switch without registration.)
●
It is recommended to speak within about 15 cm from microphone of VIERA Touch Pad Controller when using Voice
Control function.
1
2
3
9
12
4
5
10
6
7
11
8
Standby On / Off switch
1
●
Same function of the remote control button 1 (p. 11).
Microphone
2
Microphone button
3
Touch pad (see below)
4
[Option Menu]
5
HOME
6
●
Same function of the remote control button 17 (p. 11).
Volume Up / Down
7
●
Same function of the remote control button 11 (p. 11).
APPS
8
●
Same function of the remote control button 5 (p. 11).
On-screen remote control
9
●
Press to display the remote control GUI (Graphical User
Interface). Press again to move the position of GUI. (To
change the page of GUI, slide your finger to the left / right
on the touch pad.)
Return
10
●
Same function of the remote control button 20 (p. 11).
Channel Up / Down
11
●
Same function of the remote control button 23 (p. 11).
OK
12
■ Touch Pad
●
Tap the centre of the pad for “OK”.
●
Slide your finger to move the cursor (on
internet contents or [Cursor Settings] in
[VIERA Touch Pad Controller] (Setup
Menu)), select the item, adjust levels, etc.
●
Trace the fringe to scroll.
■ Installing / Removing batteries
Slide open
Note
●
It is recommended to hold the touch pad controller with your hand when using.
●
The battery power will be used whenever you use the touch pad controller (including the touch of the touch pad) even
if not operating the TV. It may decrease the battery life.
●
Some operations differ depending on the application.
12
Close
Note the correct polarity
(+ or -)
Page 13
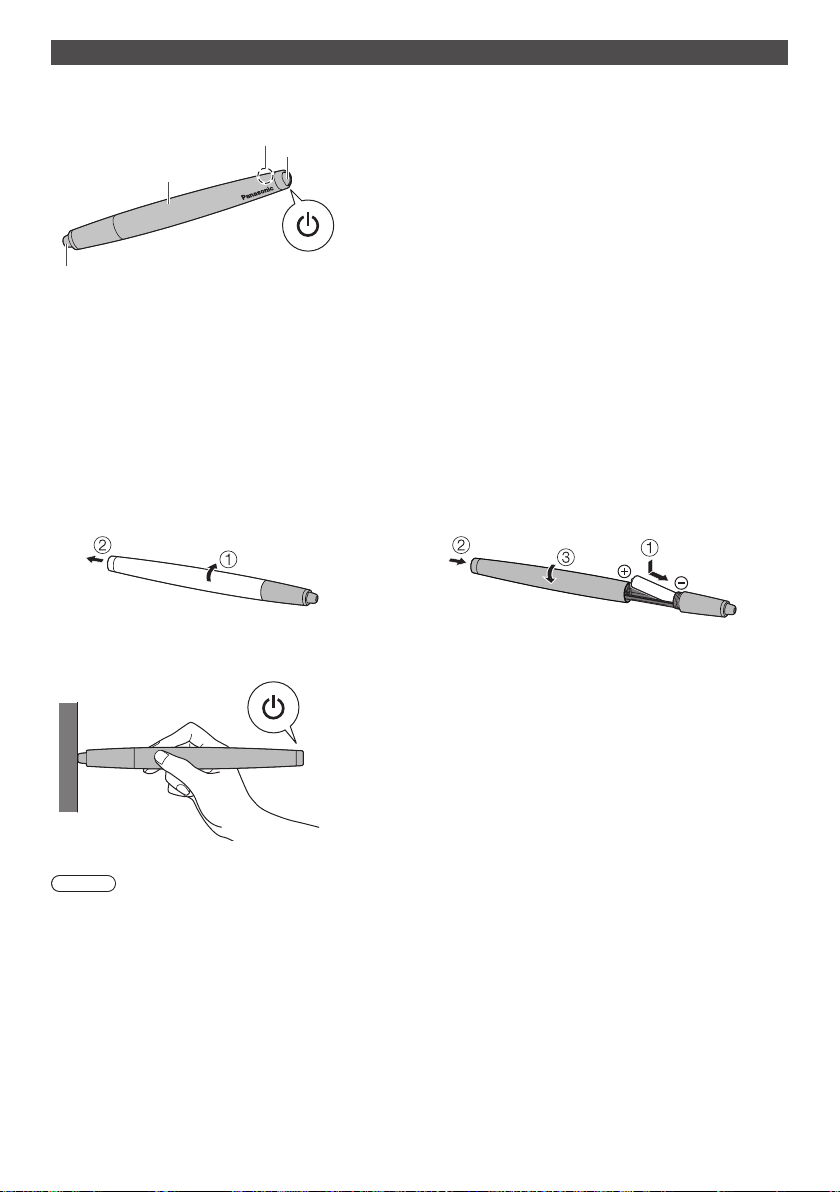
Electronic Touch Pen
You can paint or play games on the TV screen with the Electronic Touch Pen.
●
The Electronic Touch Pen can be used by pairing to the TV in [Auto Tuning] (p. 15) or [Touch Pen Setup].
For more information, refer to [eHELP] (Functions > Electronic Touch Pen > Touch Pen Setup).
2
1
3
4
Power button
1
To turn on: Press once
To turn off: Press and hold 2 seconds or longer
●
Automatically turned off if unused for 5 minutes.
Indicator lamp
2
●
Lights for approx. 2 seconds when turned on, and
then blinks at approx. 2-second intervals.
●
Up to 2 pieces of the Electronic Touch Pen (Pen1 /
Pen2) can be used simultaneously.
Indicator blinks:
Pen1: Red
Pen2: Green
●
Also lights or blinks when pairing the Electronic
Touch Pen to the TV.
●
Blinks 5 times consecutively at power-on when the
battery level is low.
Unit cover
3
Pen tip
4
Press the pen tip on this side of the Electronic Touch
Pen against the TV screen for use.
■ Inserting the battery
Turn and slide the unit cover until the entire
1
shape of the battery is visible.
Insert the R03 battery, and then slide and turn the
2
unit cover to close until it clicks.
■ How to hold the Electronic Touch Pen
●
Touch the tip of the Electronic Touch Pen vertically onto
the TV screen and press it lightly.
Note
●
Do not use devices such as mobile phones or personal transceivers that emit strong electromagnetic waves near the
Electronic Touch Pen as this may cause the Electronic Touch Pen to malfunction.
●
Use the Electronic Touch Pen where there is no interference from other Bluetooth devices.
●
For more information, refer to [eHELP] (Functions > Electronic Touch Pen).
13
Page 14
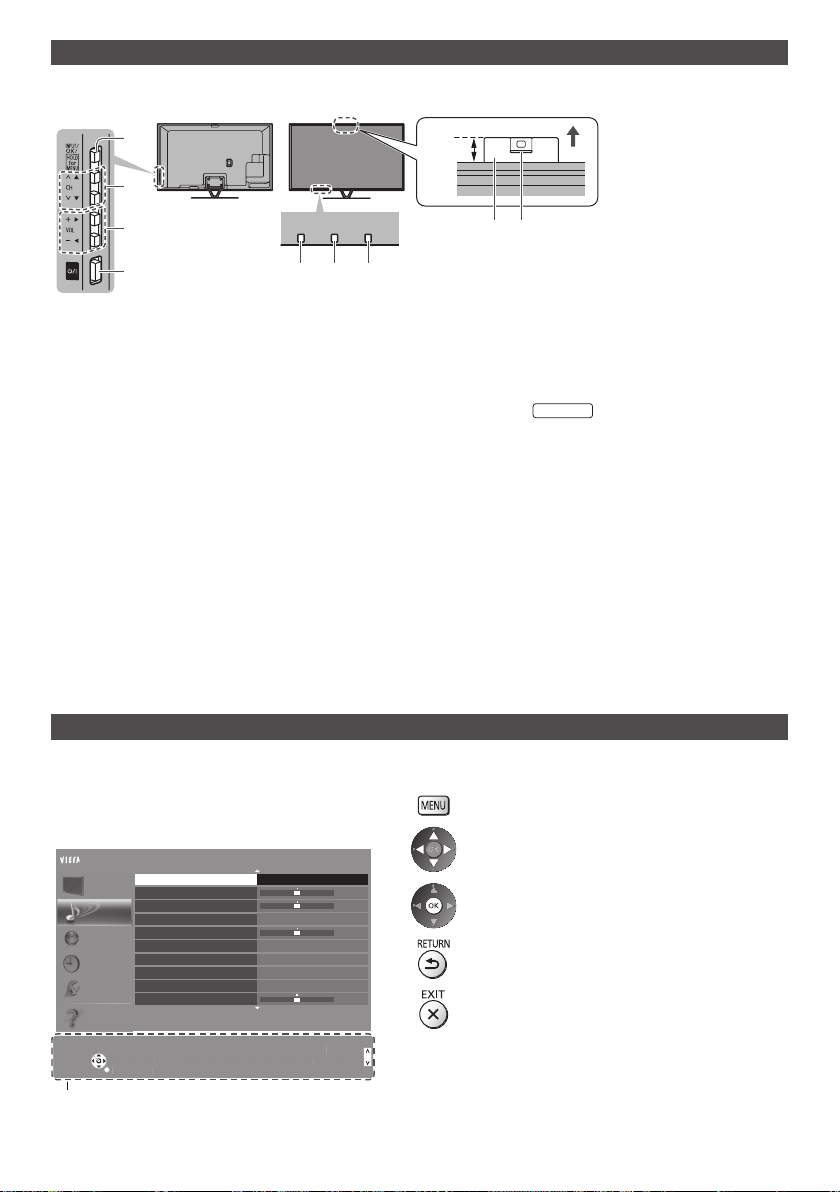
Indicator / Control panel
S
t
S
mode
p
C
ge
RETURN
n
●
When pressing 1, 2, 3 buttons, the control panel guide appears on the side of the screen for 3 seconds to highlight
the pressed button.
1
2
3
4
Rear side of the TV
Input mode selection
1
●
Press repeatedly until you reach the desired
mode.
[Main Menu]
●
Press and hold for about 3 seconds to display
main menu.
OK (when in the menu system)
Channel Up / Down
2
Cursor Up / Down (when in the menu system)
Volume Up / Down
3
Cursor Left / Right (when in the menu system)
Mains power On / Off switch
4
●
Use to switch the mains power.
Remote control signal receiver
5
●
Do not place any objects between the TV remote
control signal receiver and remote control.
Ambient sensor
6
●
Senses brightness to adjust picture quality when
[Ambient Sensor] in the Picture Menu is set to
[On].
5 6 7
23 mm
8 9
Power LED
7
Red: Standby
Green: On
Orange: Standby with Timer Programming On
●
The LED blinks when the TV receives a command
from the remote control.
Built-in Camera
8
●
Automatically pops up when the camera operation
is activated.
Close manually by pushing top of the camera.
●
For the information of the camera operation, refer
to [eHELP] (Functions > Built-in Camera).
Lens part
9
●
Tilt: -17° to +17°
Australia
Standby with Recording
Using the On Screen Displays - Operation guide
Many features available on this TV can be accessed via the On Screen Display menu.
■ Operation guide
Operation guide will help your operation by using the
remote control.
■ How to use remote control
Example: [Sound Menu]
Main Menu
Picture
Sound
Network
Timer
Setup
Help
Select
elec
han
Change
RETURN
Operation guide
Mode
Bass
Treble
Equaliser
Balance
Surround
Bass Boost
Digital Remaster
Auto Gain Control
Volume Correction
elects your favourite sound
Selects your favourite sound
.
mode.
Standard
Off
Off
Off
Off
Pageu
Page up
Page dow
Page down
1/2
0
0
0
0
14
Open the main menu
Move the cursor / select from a range of options /
select the menu item (up and down only) / adjust
levels (left and right only)
Access the menu / store settings after adjustments
have been made or options have been set
Return to the previous menu
Exit the menu system and return to [Home Screen]
Page 15
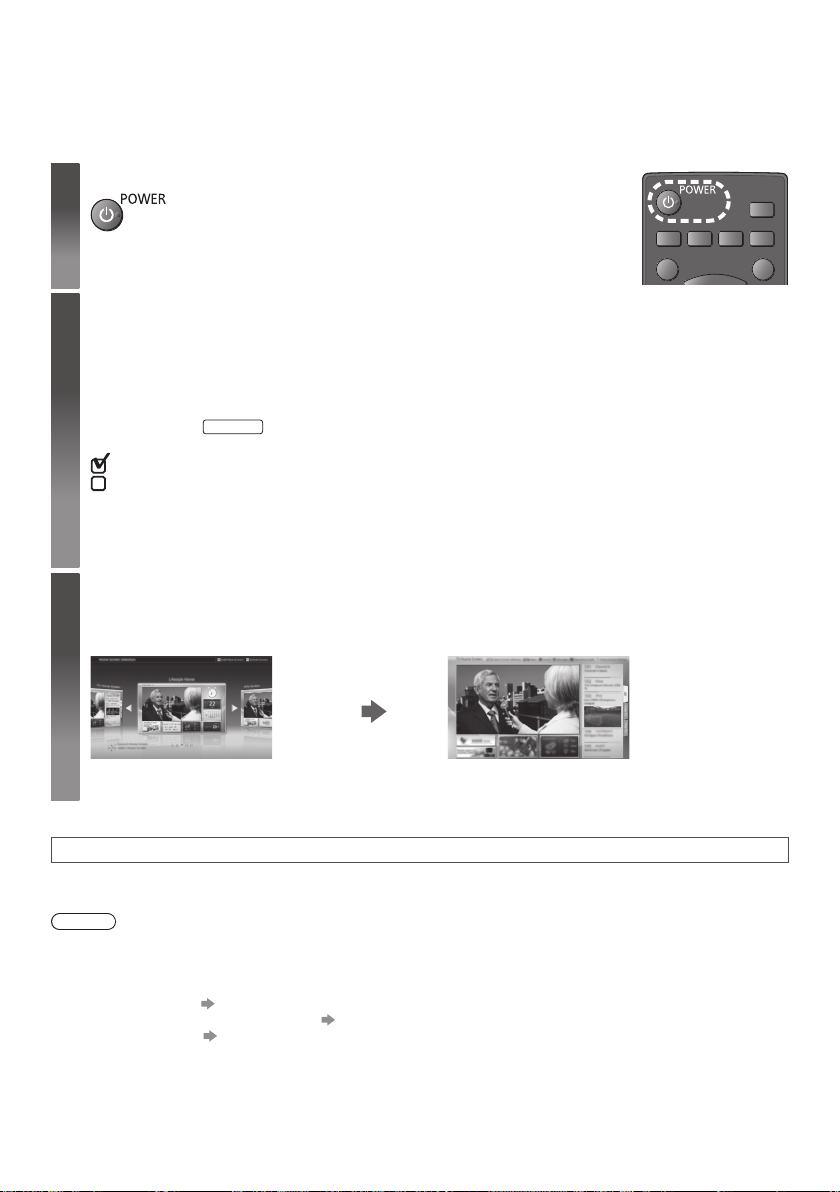
First time Auto Tuning
Automatically sets up the TV and searches for available TV channels when the TV is turned on for the first time.
●
These steps are not necessary if the setup has been completed by your local dealer.
●
Please complete connections (p. 7 - 10) and settings (if necessary) of the connected equipment before starting Auto
Tuning. For details of settings for the connected equipment, read the manual of the equipment.
Plug the TV into mains socket and turn power on
1
Select the following items
2
Set up each item by following the on-screen instructions.
Select [Home]
Select [Home] viewing environment to use in your home environment.
●
[Shop] is for shop display.
●
To change viewing environment later on, you will need to initialise all settings by accessing Shipping Condition.
Set up the network connection
Select your area
Tick the TV signal mode to tune, and then select [Start Auto Tuning]
: tune (search for the available channels)
: skip tuning
Register the VIERA Touch Pad Controller to this TV
Select [Pairing] and follow the on-screen instructions to use the touch pad controller (supplied).
Register the Electronic Touch Pen to this TV
Select [Pairing] and follow the on-screen instructions to use the Electronic Touch Pen (supplied).
Select the type of [Home Screen]
3
The demonstration to explain how to use [my Home Screen] is displayed. Confirm the demonstration by
following the on-screen instructions, and then select the desired [Home Screen].
Example: [Home Screen Selection] Example: [TV Home Screen]
●
Takes a few seconds to be displayed.
Australia
●
[my Home Screen] is the start-up screen when the TV is turned on or the HOME button is pressed.
Auto Tuning is now complete and your TV is ready for viewing.
If tuning has failed, check the connection of the network, RF cable, and then follow the on-screen instructions.
Note
●
The TV will automatically go into Standby mode when no operation is performed for 4 hours if [Auto Standby] in the
Timer Menu is set to [On].
●
The TV will automatically go into Standby mode when no signal is received and no operation is performed for
10 minutes if [No signal Power off] in the Timer Menu is set to [On].
●
To retune all channels [Auto Tuning] in [Tuning Menu] (Setup Menu)
●
To add the available TV signal mode later [Add TV Signal] in [Tuning Menu] (Setup Menu)
●
To initialise all settings [Shipping Condition] in [System Menu] (Setup Menu)
15
Page 16
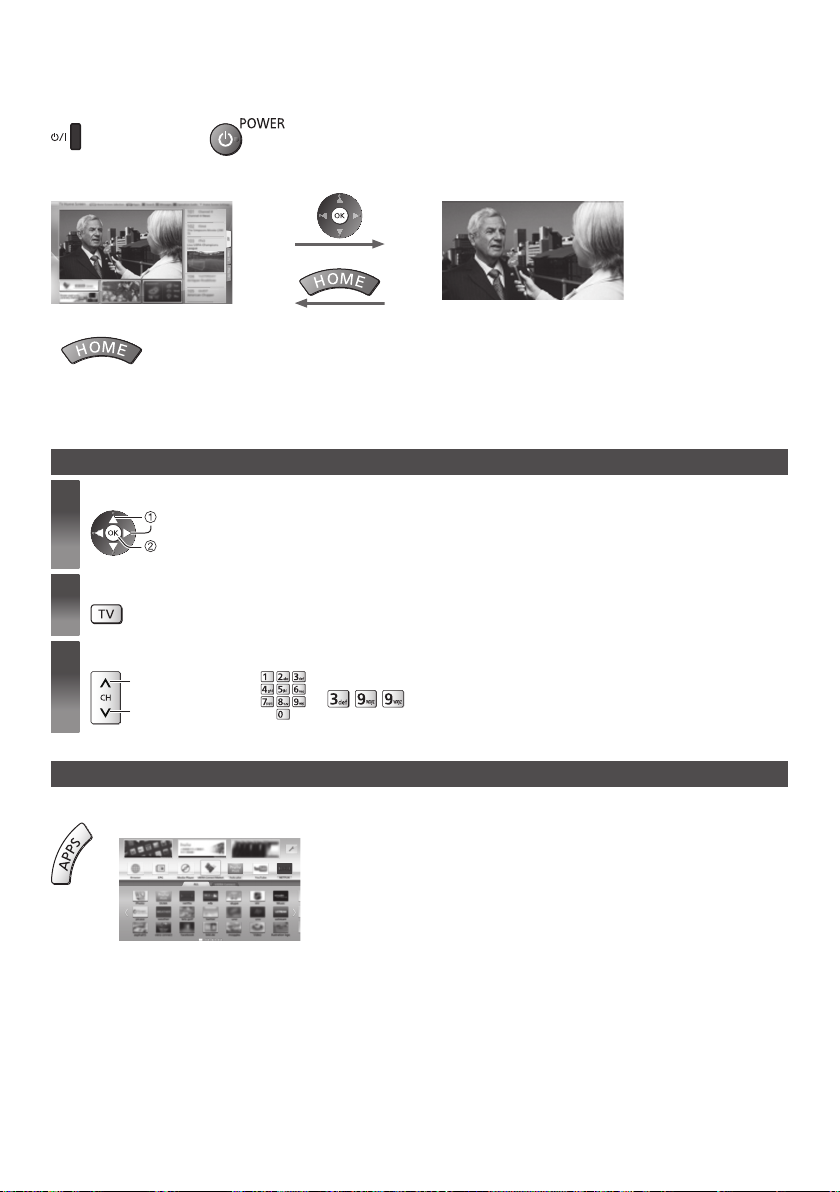
Operations
Turn power on
●
(TV)
The last viewed [Home Screen] is displayed.
Example: [TV Home Screen] Example: Selected content screen
●
To return to [Home Screen] at any time
●
You can set up or make [Home Screen] to display desired information, to access specific features easily, to select the
default [Home Screen], etc. For details, follow the on-screen instructions or refer to [eHELP] (Watching > my Home
Screen).
or
(Remote Control)
Watching TV
Select the TV viewer from [Home Screen]
1
2
3
select
access
Select Digital TV or Analogue TV
Select a channel
●
up
down
or
To select 2 or more-digit channel position number, e.g. 399
Mains power On / Off switch should be on. (p. 14)
To access each feature
Access [APPS List] and select a feature
Example: [APPS List]
16
●
APPS is the applications (features) of the TV.
●
For operations of each feature and the setup of [APPS List], follow
the on-screen instructions or refer to [eHELP] (Functions > APPS
List).
Page 17

How to Use eHELP
[eHELP] is the detailed operating instructions built into the TV, and helps you to get more understanding of the
operations for each feature.
Display [eHELP]
1
or
●
[Read first] will be displayed on the top page. Please read these instructions fully to get more understanding of
the operation in [eHELP].
●
If this is not the first time to view [eHELP] from when the TV is turned on, the confirmation screen is displayed
to select whether [First Page] or [Last Page].
Select the category and item
2
Category field
[eHELP]
Item field
[Help]
Sub item field
Description
select category
access
●
To return to the previous field
●
To scroll the description (if more than 1 page)
While the description is highlighted
●
To display the menu related to the description (only for some descriptions)
(red)
select item
access
select sub item
access
17
Page 18
Viewing 3D images
You can enjoy viewing 3D images with contents or programmes corresponding to the 3D effect by wearing the 3D
Eyewear.
●
The 3D Eyewear must be worn to view 3D images.
●
This TV supports [Frame Sequential]*, [Side by Side] and [Top and Bottom] 3D formats.
*
: The 3D format that the images for the left and right eyes are recorded with the high definition quality and alternately
played back.
3D Eyewear
Use the supplied 3D Eyewear or Panasonic 3D Eyewear that has this logo and supports Bluetooth® wireless
technology.
●
Do not exert pressure on or scratch the lens of the 3D Eyewear.
●
Do not use devices such as mobile phones or personal transceivers that emit strong electromagnetic waves near the
3D Eyewear as this may cause the 3D Eyewear to malfunction.
●
Do not wear the 3D Eyewear when watching anything other than 3D images. Liquid crystal displays (such as
computer screens, digital clocks or calculators, etc.) may be difficult to see while wearing the 3D Eyewear.
First registration
Perform the first registration when first using the 3D Eyewear with this TV.
1 Turn the TV on
2 Press Power button for about 1 second to turn the 3D Eyewear on
●
●
●
3 After the registration is successfully completed, the 3D Eyewear will reconnect with TV automatically when
the 3D Eyewear is turned on near the TV in 3D mode
Registration again
When connection with the registered TV fails, or when using with another TV, re-register the 3D Eyewear.
1 Turn the TV on
2 Within 50 cm from the TV, press Power button until lamp lights, then release it to start registration
3 After the registration is successfully completed, the 3D Eyewear will reconnect with TV automatically when the 3D
“Accessories” (p. 5)
●
“Full HD 3D Glasses™” logo indicates products that are compatible with the active shutter 3D
glasses technology standards licensed by the Full HD 3D Glasses Initiative. The RF mark on
the logo means the wireless system (Bluetooth® wireless technology), and you can use the 3D
Eyewear and the TV that have the same mark together.
Note
The lamp lights for about 2 seconds and then flashes.
The 3D Eyewear will be turned on and start registration.
Place the 3D Eyewear within 50 cm from the TV while registration in progress.
Eyewear is turned on near the TV in 3D mode
To view the 3D images
■ Playing back 3D-compatible Blu-ray disc (Frame Sequential format)
●
Connect the 3D-compatible player via a fully wired HDMI compliant cable. (If you use the non 3D-compatible player,
the images will be displayed in 2D mode.)
●
If the input mode is not switched automatically, select the input mode connected to the player using the AV button.
■ 3D-supported broadcast
●
Please consult the suppliers of contents or programmes for availability of this service.
■ 3D photos and 3D videos taken by 3D-compatible Panasonic products
●
Available in Media Player and Network services.
■ 2D images converted to 3D
●
Press the 3D button and set to [2D 3D] mode in [3D Mode Selection].
Preparations
Ensure that the registration of the 3D Eyewear has been completed.
18
Page 19
Turn the 3D Eyewear on and put it on
1
Connection status and battery status are displayed on the bottom right of the screen.
View the 3D images
2
Safety precautions will be displayed when you first watch the 3D image. Select [Yes] or [No] to continue to view
3D images.
Note
●
Turn off the 3D Eyewear after using it.
●
Use the 3D Eyewear within approximately 3.2 m from the TV. You cannot view the 3D images with the 3D Eyewear
too far from the TV, because of the difficulty of receiving radio waves from the TV.
●
The range may be shortened depending on the obstacles between the TV and the 3D Eyewear, or the surrounding
environment.
●
Use the 3D Eyewear where there is no interference from other Bluetooth devices.
●
3D content will not be correctly visible if the 3D Eyewear is worn upside down or back-to-front.
●
When viewing 3D images, make sure your eyes are at an approximately horizontal level and keep a position where
you do not see double images.
●
If light appears to flicker under fluorescents or dimmers when using the 3D Eyewear, change the setting of [3D
Refresh Rate] in [3D Settings] (Picture Menu).
●
There are differences in the viewing range of the 3D Eyewear among individuals.
FAQs
Before requesting service or assistance, please follow these simple guides to solve the problem.
●
For more information, refer to [eHELP] (Support > FAQs).
The TV does not switch on
●
Check the mains lead is plugged into the TV and the socket outlet.
The TV goes into Standby mode
●
Auto power standby function is activated.
The remote control does not work or is intermittent
●
Are the batteries installed correctly? (p. 11)
●
Has the TV been switched on?
●
The batteries may be running low. Replace them with new ones.
●
Point the remote control directly at the TV’s remote control signal receiver (within about 7 m and a 30 degree
angle of the signal receiver).
●
Situate the TV away from sunshine or other sources of bright light not to shine on the TV’s remote control signal
receiver.
Electronic Touch Pen does not work
●
Check that the batteries are fresh, are of the same type and are installed with the correct polarity (+ & -).
●
Check if the pairing range is within 50 cm.
●
The Electronic Touch Pen automatically turns off if pairing cannot be performed within 2 minutes. In this case, pair
again.
●
The Electronic Touch Pen automatically turns off if unused for 5 minutes.
(When the Electronic Touch Pen is turned on, the indicator lamp blinks but turns off in several minutes.) Turn the
power on again.
No image can be displayed
●
Check the TV is turned on.
●
Check the mains lead is plugged into the TV and the socket outlet.
●
Check the correct input mode is selected.
●
Check the setting of [AV] ([COMPONENT] / [VIDEO]) in [Input Selection] to match the output of the external
equipment.
●
Is [Contrast], [Brightness] or [Colour] in the Picture Menu set to the minimum?
●
Check all required cables and connections are firmly in place.
Unusual image is displayed
●
Turn the TV off with Mains power On / Off switch, then turn it on again.
●
If the problem persists, initialise all settings. [Shipping Condition] in [System Menu] (Setup Menu)
●
Image retention images may be reduced / removed by [Scrolling Bar] in [Screen Settings] (Picture Menu).
19
Page 20
Unusual sound from the TV
●
When the power is on, whirring sound of cooling fan or drive noise may be heard from inside the TV (not a sign of
faulty operation).
Parts of the TV become hot
●
Even if the temperature of parts of the front, top and rear panels has risen, these temperature rises do not cause
any problems in terms of performance or quality.
Maintenance
First, remove the mains plug from the socket outlet.
Display panel, Cabinet, Pedestal
Regular care:
Gently wipe the surface of the display panel, cabinet, or pedestal by using a soft cloth to clean the dirt or fingerprints.
For stubborn dirt:
First clean the dust on the surface. Dampen a soft cloth with clean water or diluted neutral detergent (1 part detergent
to 100 parts water). Wring the cloth and wipe the surface. Finally, wipe away all the moisture.
Caution
●
Do not use a hard cloth or rub the surface too hard, otherwise this may cause scratches on the surface.
●
Take care not to subject the TV’s surfaces to water or detergent. Liquid inside the TV could lead to product failure.
●
Take care not to subject the surfaces to insect repellent, solvent, thinner or other volatile substances. This may
degrade surface quality or cause peeling of the paint.
●
The surface of the display panel is specially treated and may be easily damaged. Take care not to tap or scratch the
surface with your fingernail or other hard objects.
●
Do not allow the cabinet and pedestal to make contact with a rubber or PVC substance for a long time. This may
degrade surface quality.
Mains plug
Wipe the mains plug with a dry cloth at regular intervals. Moisture and dust may cause fire or electrical shock.
Specifications
■ TV
Model No.
Rating AC 220-240 V, 50 / 60 Hz 2.4A AC 220-240 V, 50 / 60 Hz 2.6A
Power
Normal (Home)
mode
Standby power
consumption
Visible screen size
(diagonal)
1
Dimensions (W × H
Mass
20
*
× D)
55-inch model
TH-P55VT60A
TH-P55VT60Z
184 W 222 W
0.3 W 0.3 W
140 cm 165 cm
1,318 mm × 855 mm × 296 mm
(With Pedestal)
1,318 mm × 767 mm × 51 mm (TV only)
38.5
Net (With Pedestal)
31.5
Net (TV only)
1,531 mm × 975 mm × 323 mm
(With Pedestal)
1,531 mm × 887 mm × 51 mm (TV only)
50.5
42.0
65-inch model
TH-P65VT60A
TH-P65VT60Z
Net (With Pedestal)
Net (TV only)
Page 21
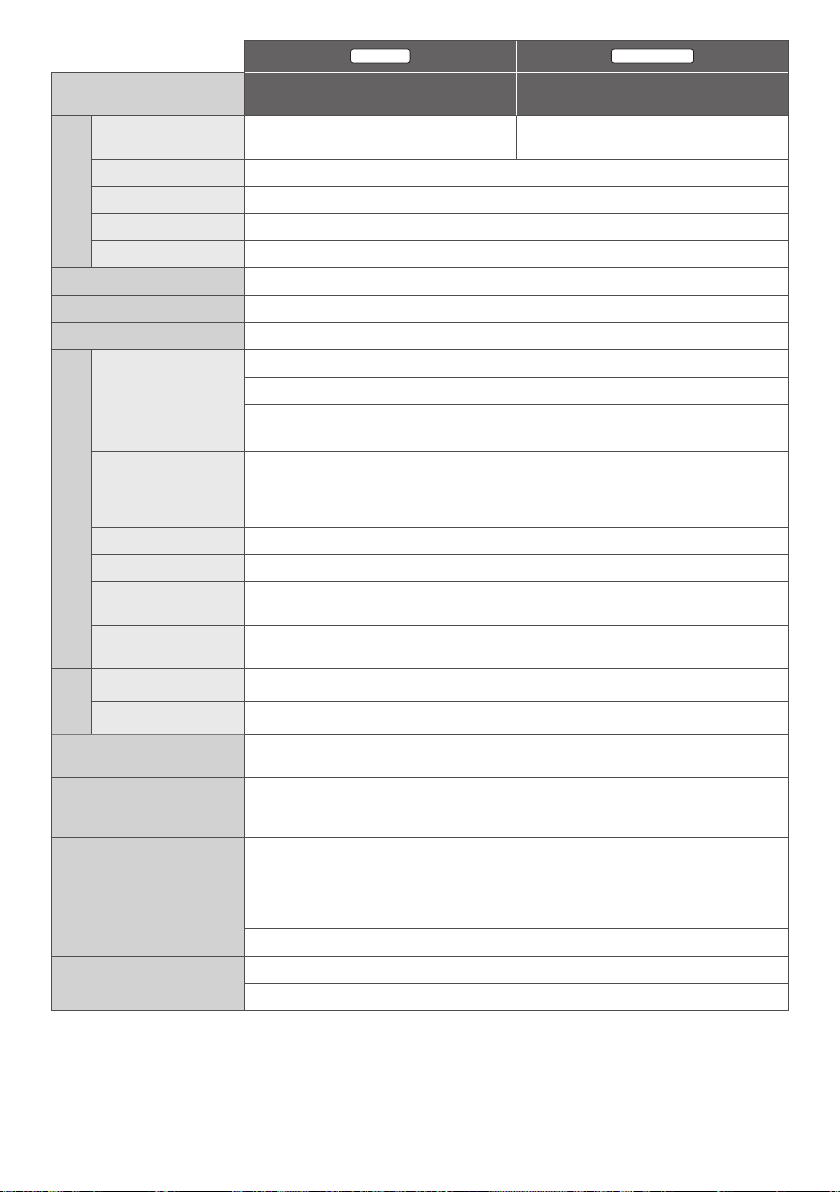
Model No.
Receiving systems /
Digital TV
Band name
Australia
TH-P55VT60A
TH-P65VT60A
7 MHz VHF / UHF (Australia)
free-to-air TV broadcast reception
8 MHz UHF (New Zealand)
free-to-air TV broadcast reception
New Zealand
TH-P55VT60Z
TH-P65VT60Z
PAL B / G Reception of Off air broadcasts
PAL 60 Hz Playback of NTSC tape from some PAL Video recorders (VCR)
M.NTSC Playback from M.NTSC Video recorders (VCR)
NTSC Playback from NTSC Video recorders (VCR)
Aerial input Standard Belling & Lee connector VHF / UHF
Display resolution 1,920 (W) × 1,080 (H)
Panel Plasma Display
VIDEO RCA PIN Type × 1 1.0 V[p-p] (75 Ω)
AV IN (COMPONENT
/ VIDEO)
Connection terminals
AUDIO L - R RCA PIN Type × 2 0.5 V[rms]
Y 1.0 V[p-p] (including synchronisation)
P
B/CB, PR/CR ±0.35 V[p-p]
TYPE A Connectors
HDMI 1 / 2 / 3 input
HDMI1 / 3: 3D, Content Type, Deep Colour, x.v.Colour™
HDMI 2: 3D, Content Type, Audio Return Channel, Deep Colour, x.v.Colour™
●
This TV supports “HDAVI Control 5” function.
Card slot SD Card slot × 1
ETHERNET 10BASE-T / 100BASE-TX
USB 1 / 2 / 3
DIGITAL AUDIO
OUT
Sound
Speaker Front speaker × 2, Woofer (Φ 75 mm) × 1
USB1 / 2: USB2.0 DC 5 V, Max. 500 mA
USB3: USB3.0 DC 5 V, Max. 900 mA
PCM / Dolby Digital / DTS, Fibre optic
Audio output 20 W (5 W + 5 W + 10 W)
Operating conditions
Temperature: 0 °C - 35 °C
Humidity: 20 % - 80 % RH (non-condensing)
Lens: F2.0 Lens; FOV (D) 50.9° (in HD mode)
Built-in Camera
Focus: Fixed focus
Resolution: 1,280 × 720
2
*
Standard compliance and Frequency range
:
IEEE802.11a/n
Built-in wireless LAN
5.15 GHz - 5.35 GHz, 5.47 GHz - 5.85 GHz
IEEE802.11b/g/n
2.40 GHz - 2.4835 GHz
Security: WPA2-PSK (TKIP/AES) WPA-PSK (TKIP/AES) WEP (64 bit/128 bit)
Bluetooth wireless
technology
*
1: With Camera pop-up: +23 mm height
*
2: The frequency and channel differ depending on the country.
*
3: Not all the Bluetooth compatible devices are available with this TV. Up to 5 devices can be used simultaneously
3
*
Standard Compliance: Bluetooth 3.0
Frequency Range: 2.402 GHz - 2.480 GHz
(except the 3D Eyewear and VIERA Touch Pad Controller).
21
Page 22
■ 3D Eyewear
Dimensions (W × H × D) 164.7 mm × 41.0 mm × 170.7 mm
Mass Approx. 34
Lens type Liquid Crystal Shutter
Usage temperature range 0 °C - 40 °C
Battery
Materials
Coin-shaped lithium battery CR2025
Operation time: Approx. 75 hours in continuous use of the battery made by
Panasonic
Main body: Resin
Lens section: Liquid crystal glass
■ Electronic Touch Pen
Dimensions
Mass Approx. 30
Usage temperature range 0 °C - 40 °C
Battery
Materials Main body: Resin
Note
●
3D Eyewear, Electronic Touch Pen and VIERA Touch Pad Controller use Bluetooth wireless technology.
●
Design and Specifications are subject to change without notice. Mass and Dimensions shown are approximate.
●
For the information of the open source software, refer to [eHELP] (Support > Licence).
Length: 186.7 mm
Diameter: 18.2 mm
(excluding battery)
Panasonic R03 battery
Operation time : approx. 8 hours
Panasonic LR03 battery
Operation time: approx. 30 hours
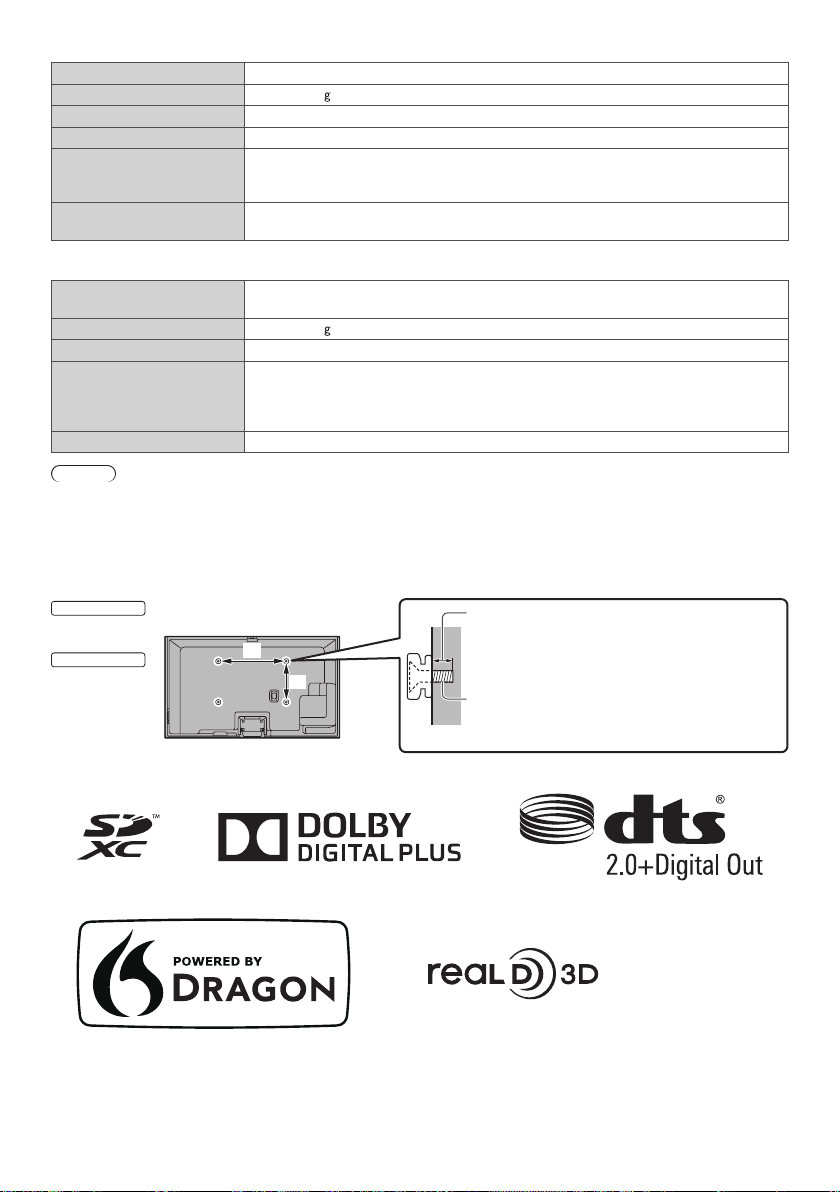
■ When using the wall-hanging bracket
●
For the recommended wall-hanging bracket, refer to [eHELP].
55-inch model
a: 500 mm
b: 300 mm
65-inch model
a: 684 mm
b: 300 mm
●
Holes for wall-hanging bracket
installation
a
b
Rear of the TV
Depth of screw
minimum: 14 mm
maximum: 23 mm
Type of screw: M8
Screw for fixing the TV onto the wall-hanging
bracket (not supplied with the TV)
(View from the side)
●
For the information of the trademarks, refer to [eHELP] (Support > Licence).
22
Page 23
Australia
Panasonic
1. The product is warranted for 12 months from the date of purchase. Subject to the conditions of this warranty Panasonic or its
Authorised Service Centre will perform necessary service on the product without charge for parts or labour, if in the opinion of
Panasonic, the product is found to be faulty within the warranty period.
2.
This warranty only applies to Panasonic products purchased in Australia and sold by Panasonic Australia or its Authorised Distributors or
Dealers and only where the products are used and serviced within Australia or it's territories. Warranty cover only applies to service carried
out by a Panasonic Authorised Service Centre and only if valid proof of purchase is presented when warranty service is requested.
3. This warranty only applies if the product has been installed and used in accordance with the manufacturer’s recommendations (as noted
in the operating instructions) under normal use and reasonable care (in the opinion of Panasonic). The warranty covers normal domestic
use only and does not cover damage, malfunction or failure resulting from use of incorrect voltages, incorrect installation, accident,
misuse, neglect, build-up of dirt or dust, abuse, maladjustment of customer controls, mains supply problems, thunderstorm activity,
infestation by insects or vermin, tampering or repair by unauthorised persons (including unauthorised alterations), introduction of sand,
humidity or liquids, commercial use such as hotel, office, restaurant, or other business or rental use of the product, exposure to abnormally
corrosive conditions or any foreign object or matter having entered the product.
4. This warranty does not cover the following items unless the fault or defect existed at the time of purchase:
(a) Cabinet Part(s) (e) DVD, Blu-ray, or Recordable Discs
(b) Video or Audio Tapes (f) Video / Audio Heads from wear and tear in normal use
(c) SD cards or USB devices (g) Information stored on Hard Disk Drive, USB stick or SD card
(d) User replaceable Batteries (h) DTV reception issues caused by TV Aerial / Cabling / Wall socket(s)
etc
5. Some products may be supplied with Ethernet connection hardware. The warranty is limited on such products and will not cover
(a) Internet and or DLNA connection / setup related problems
(b) Access fees and or charges incurred for internet connection
(c) The use of incompatible software or software not specifically stipulated in the product operations manual; and
(d) Any indirect or consequential costs associated with the incorrect use or misuse of the hardware, its connection to the internet or
any other device.
6. To claim warranty service, when required, you should:
• Telephone Panasonic’s Customer Care Centre on 132600 or visit our website referred to below and use the Service Centre Locator
for the name/address of the nearest Authorised Service Centre.
• Send or take the product to a Panasonic Authorised Service Centre together with your proof of purchase receipt as a proof of purchase
date. Please note that freight and insurance to and / or from your nearest Authorised Service Centre must be arranged by you.
• Note that home or pick-up/delivery service is available for the following products in the major metropolitan areas of Australia or the
normal operating areas of the nearest Authorised Service Centres:
- Plasma/LCD televisions / displays (screen size greater than 103 cm)
7. The warranties hereby conferred do not extend to, and exclude, any costs associated with the installation, de-installation or
re-installation of a product, including costs related to the mounting, de-mounting or remounting of any screen, (and any other ancillary
activities), delivery, handling, freighting, transportation or insurance of the product or any part thereof or replacement of and do not
extend to, and exclude, any damage or loss occurring by reason of, during, associated with, or related to such installation,
de-installation, re-installation or transit.
Panasonic Authorised Service Centres are located in major metropolitan areas and most regional centres of Australia, however, coverage
will vary dependant on product. For advice on exact Authorised Service Centre locations for your product, please telephone our Customer
Care Centre on 132600 or visit our website and use the Service Centre Locator.
In addition to your rights under this warranty, Panasonic products come with consumer guarantees that cannot be excluded under the
Australian Consumer Law. If there is a major failure with the product, you can reject the product and elect to have a refund or to have the
product replaced or if you wish you may elect to keep the goods and be compensated for the drop in value of the goods. You are also entitled
to have the product repaired or replaced if the product fails to be of acceptable quality and the failure does not amount to a major failure.
If there is a major failure in regard to the product which cannot be remedied then you must notify us within a reasonable period by contacting
the Panasonic Customer Care Centre. If the failure in the product is not a major failure then Panasonic may choose to repair or replace the
product and will do so in a reasonable period of time from receiving notice from you.
Warranty
THIS WARRANTY CARD AND THE PURCHASE DOCKET (OR SIMILAR PROOF OF PURCHASE)
SHOULD BE RETAINED BY THE CUSTOMER AT ALL TIMES
If you require assistance regarding warranty conditions or any other enquiries, please visit the
Panasonic Australia website www.panasonic.com.au or contact by phone on 132 600
If phoning in, please ensure you have your operating instructions available.
Panasonic Australia Pty. Limited
ACN 001 592 187 ABN 83 001 592 187
PRO-031-F11 Issue: 4.0 01-01-2011
1 Innovation Road, Macquarie Park NSW 2113
23
Page 24

New Zealand
WARRANTY - New Zealand only
NEW ZEALAND
Distributed in New Zealand by Panasonic New Zealand Limited
350 Te Irirangi Drive East Tamaki, Private Bag 14911, Panmure Auckland
Tel. 09 272 0100
Email: [email protected]
Warranty
Customer Care Center
www.panasonic.co.nz
Information on Disposal in other Countries outside the European Union
This symbol is only valid in the European Union. If you wish to discard this product, please contact
your local authorities or dealer and ask for the correct method of disposal.
Customer’s Record
The model number and serial number of this product may be found on its rear panel. You should note this serial
number in the space provided below and retain this book, plus your purchase receipt, as a permanent record of
your purchase to aid in identification in the event of theft or loss, and for Warranty Service purposes.
Model Number Serial Number
M0313-1043
Web Site: http://panasonic.net
© Panasonic Corporation 2013
Printed in Thailand
 Loading...