

Page 1
Operating Instructions
FULL HD LCD Display
Model No.
TH-42LFE6U
TH-50LFE6U
English
Before connecting, operating or adjusting this product,
please read these instructions completely.
Please keep this manual for future reference.
Page 2
CAUTION
RISK OF ELECTRIC SHOCK
DO NOT OPEN
WARNING: To reduce the risk of electric shock, do not remove cover or back.
No user-serviceable parts inside. Refer servicing to quali ed service personnel.
The lightning flash with
arrow-head within a triangle
is in tend ed to tell the user
that parts inside the product
are a risk of electric shock
to per sons.
The exclamation point within
a triangle is intended to
tell the user that important
operating and servicing
instructions are in the papers
with the ap pli ance.
WARNING : To prevent damage which may result in re or shock hazard, do not expose this apparatus to
rain or mois ture.
Do not place containers with water ( ower vase, cups, cosmetics, etc.) above the set.
(including on shelves above, etc.)
WARNING : 1) To prevent electric shock, do not remove cover. No user serviceable parts inside. Refer servicing
to quali ed service personnel.
2
Page 3
Important Safety Instructions
1) Read these instructions.
2) Keep these instructions.
3) Heed all warnings.
4) Follow all instructions.
5) Do not use this apparatus near water.
6) Clean only with dry cloth.
7) Do not block any ventilation openings. Install in accordance with the manufacturer’s instructions.
8) Do not install near any heat sources such as radiators, heat registers, stoves, or other apparatus (including
ampli ers) that produce heat.
9) If the provided plug does not t into your outlet, consult an electrician for replacement of the obsolete outlet.
10) Protect the power cord from being walked on or pinched particularly at plugs, convenience receptacles, and
the point where they exit from the apparatus.
11) Only use attachments / accessories speci ed by the manufacturer.
12) Use only with the cart, stand, tripod, bracket, or table speci ed by the manufacturer, or sold with
the apparatus. When a cart is used, use caution when moving the cart / apparatus combination
to avoid injury from tip-over.
13) Unplug this apparatus during lightning storms or when unused for long periods of time.
14) Refer all servicing to quali ed service personnel. Servicing is required when the apparatus has been damaged
in any way, such as power-supply cord or plug is damaged, liquid has been spilled or objects have fallen into
the apparatus, the apparatus has been exposed to rain or moisture, does not operate normally, or has been
dropped.
33
Page 4
Dear Panasonic Customer
Welcome to the Panasonic family of customers. We hope that you will have many years of enjoyment
from your new LCD Display.
To obtain maximum benefit from your set, please read these Instructions before making any
adjustments, and retain them for future reference.
Retain your purchase receipt as well, and record the model number and serial number of your set in
the space provided on the rear cover of these instructions.
Visit our Panasonic Web Site http://panasonic.net
Table of Contents
Important Safety Instructions .................................. 3
FCC STATEMENT ...................................................... 5
Safety Precautions ................................................... 6
Maintenance .............................................................. 7
Accessories .............................................................. 8
Accessories Supplied .............................................. 8
Remote Control Batteries ........................................ 8
Connections .............................................................. 9
AC cord connection ................................................. 9
Video equipment connection ................................... 9
AUDIO OUT connection ........................................ 10
HDMI connection ................................................... 10
DVI-D IN connection ...............................................11
PC Input Terminals connection .............................. 12
SERIAL Terminals connection ............................... 13
Power ON / OFF ...................................................... 14
Selecting the input signal ...................................... 16
Basic Controls ........................................................ 17
ASPECT Controls ................................................... 19
Digital Zoom ............................................................ 20
On-Screen Menu Displays ..................................... 21
Adjusting POS. /SIZE ............................................. 22
PICTURE Adjustments ........................................... 24
ADVANCED SETTINGS ........................................ 25
SOUND Adjustment ................................................ 26
PRESENT TIME SETUP / SET UP TIMER .............. 27
PRESENT TIME SETUP ....................................... 27
SET UP TIMER ..................................................... 28
SCREENSAVER
(For preventing image retention) .......................... 29
Setup of SCREENSAVER Time ............................ 30
WOBBLING .............................................................. 30
NO ACTIVITY POWER OFF .................................... 31
ECO MODE SETTINGS ........................................... 32
Customizing the Input labels ................................. 33
Selecting the On-Screen Menu Language ............ 34
Customizing the On-Screen Menu Display .......... 34
SET UP for MULTI DISPLAY ................................... 35
How to setup MULTI DISPLAY .............................. 35
ID Remote Control Function .................................. 36
SET UP for Input Signals ....................................... 37
YUV / RGB-IN SELECT ......................................... 37
SIGNAL menu ....................................................... 38
3:2 PULLDOWN .................................................... 38
XGA MODE ........................................................... 39
SYNC .................................................................... 39
HDMI RANGE ....................................................... 40
Input signal display ................................................ 40
Network Setup ........................................................ 41
Options Adjustments ............................................. 43
Input Search .......................................................... 45
Using Network Function ........................................ 46
Network Connection .............................................. 46
Command Control ................................................. 47
PJLink™ Protocol .................................................. 47
Using Web Browser Control .................................. 48
Before Using Web Browser Control....................... 48
Access from Web Browser .................................... 48
Display Control (BASIC CONTROL/OPTION
CONTROL Screen) ............................................... 49
NETWORK SETTING (NETWORK SETTING
Screen) .................................................................. 50
Password Setting (CHANGE PASSWORD
Screen) .................................................................. 50
Crestron Connected™ page .................................. 51
Troubleshooting ..................................................... 53
Applicable input signals ........................................ 54
Shipping condition ................................................. 55
Speci cations ......................................................... 56
4
Page 5
FCC STATEMENT
This equipment has been tested and found to comply with the limits for a Class B digital device, pursuant to Part
15 of the FCC Rules. These limits are designed to provide reasonable protection against harmful interference
in a residential installation. This equipment generates, uses and can radiate radio frequency energy and, if not
installed and used in accordance with the instructions, may cause harmful interference to radio communications.
However, there is no guarantee that interference will not occur in a particular installation. If this equipment does
cause harmful interference to radio or television reception, which can be determined by turning the equipment
off and on, the user is encouraged to try to correct the interference by one or more of the following measures:
• Reorient or relocate the receiving antenna.
• Increase the separation between the equipment and receiver.
• Connect the equipment into an outlet on a circuit different from that to which the receiver is connected.
• Consult the dealer or an experienced technician for help.
This device complies with Part15 of the FCC Rules. Operation is subject to the following two conditions:(1) This
device may not cause harmful interference, and (2) this device must accept any interference received, including
interference that may cause undesired operation.
FCC CAUTION:
To assure continued compliance, follow the attached installation instructions and use only shielded
interface cables when connecting to computer or peripheral devices. Some recommended user provided
interface cables may require usage of the attached ferrite core kit(s), refer to interface cable connection
instructions for details. Any changes or modi cations not expressly approved by Panasonic Corp. of
North America could void the user’s authority to operate this device.
FCC Declaration of Conformity
Model No. TH-42LFE6U,TH-50LFE6U
Responsible Party: Panasonic Corporation of North America
Two Riverfront Plaza, Newark, New Jersey 07102
Contact Source: Panasonic System Communications Company of North America
1-800-973-4390
CANADIAN NOTICE:
This Class B digital apparatus complies with Canadian ICES-003.
Note:
Image retention may occur. If you display a still picture for an extended period, the image might remain on the
screen. However, it will disappear after a while.
Trademark Credits
• VGA is a trademark of International Business Machines Corporation.
• Microsoft®, Windows®, Windows Vista®, and Internet Explorer® are the registered trademarks or trademarks of
Microsoft Corporation in the United States and/or other countries.
• Macintosh, Mac, Mac OS, OS X and Safari are the trademarks of Apple Inc. registered in the United States and
other countries.
• SVGA, XGA, SXGA and UXGA are registered trademarks of the Video Electronics Standard Association.
Even if no special notation has been made of company or product trademarks, these trademarks have been fully
respected.
• HDMI, the HDMI Logo, and High-De nition Multimedia Interface are trademarks or registered trademarks of HDMI
Licensing LLC in the United States and other countries.
• RoomView, Crestron RoomView and Fusion RV are registered trademarks of Crestron Electronics, Inc, and
Crestron Connected is the trademark of Crestron Electronics, Inc.
55
Page 6
Safety Precautions
CAUTION
This LCD Display is for use only with the following optional accessories. Use with any other type of optional
accessories may cause instability which could result in the possibility of injury.
• Pedestal ................................................... TY-ST42PE6
Always be sure to ask a quali ed technician to carry out set-up.
Small parts can present choking hazard if accidentally swallowed. Keep small parts away from young children. Discard
unneeded small parts and other objects, including packaging materials and plastic bags/sheets to prevent them from
being played with by young children, creating the potential risk of suffocation.
(All of the following accessories are manufactured by Panasonic Corporation.)
When using the LCD Display
Do not bring your hands, face or objects close to the
ventilation holes of the Display.
•
Top of the Display is usually very hot due to the high
temperature of exhaust air being released through the
ventilation holes. Burns or personal injuries can happen if
any body parts are brought too close. Placing any object
near the top of the display could also result in heat damages
to the object as well as to the Display if its ventilation holes
are blocked.
Be sure to disconnect all cables before moving the
Display.
•
Moving the Display with its cables attached might damage
the cables which, in turn, can cause re or electric
shock.
Disconnect the power plug from the wall outlet as a
safety precaution before carrying out any cleaning.
• Electric shocks can result if this is not done.
Clean the power cable regularly to prevent it from
becoming dusty.
• Built-up dust on the power cord plug can increase
humidity which might damage the insulation and cause
re. Unplug the cord from the wall outlet and clean it with
a dry cloth.
Note:
Image retention may occur. If you display a still picture for
an extended period, the image might remain on the screen.
However, it will disappear after a while.
66
Page 7
Safety Precautions
WARNING
Setup
Do not place the Display on sloped or unstable
surfaces, and ensure that the Display does not
hang over the edge of the base.
• The Display may fall off or tip over.
Do not place any objects on top of the Display.
• If water spills onto the Display or foreign objects get
inside it, a short-circuit may occur which could result in
re or electric shock. If any foreign objects get inside
the Display, please consult an Authorized Service
Center.
Do not cover the ventilation holes.
• Doing so may cause the Display to overheat, which
can cause re or damage to the Display.
Transport only in upright position!
• Transporting the unit with its display panel facing
upright or downward may cause damage to the internal
circuitry.
For suf cient ventilation;
Leave a space of 3 15/16” (10 cm) or more at the top,
left and right, and 1 31/32” (5 cm) or more at the rear,
and also keep the space between the bottom of the
display and the oor surface.
Cautions for Wall Installation
• Wall installation should be performed by an
installation professional. Installing the Display
incorrectly may lead to an accident that results in
death or serious injury. Furthermore, when installing
on a wall, a UL standard certi ed wall hanging
bracket (TH-42LFE6U: VESA 400X400,
TH-50LFE6U: VESA 400X200) must be used.
Do not install the product to a place where the
product is exposed to direct sunlight.
• If the screen is exposed to direct sunlight, the liquid
crystal panel may have adverse effect.
AC Power Supply Cord
The Display is designed to operate on 110 - 127 V
AC, 50/60 Hz.
Ensure that the mains plug is easily accessible.
Do not use any power supply cord other than that
provided with this unit.
• Doing so may cause re or electric shocks.
Securely insert the power cord plug as far as it will
go.
• If the plug is not fully inserted, heat may be generated
which could cause re. If the plug is damaged or the
wall socket plate is loose, they should not be used.
Do not handle the power cord plug with wet hands.
• Doing so may cause electric shocks.
Do not do anything that might damage the power cable. When
disconnecting the power cable, hold the plug, not the cable.
• Do not make any modi cations, place heavy objects
on, place near hot objects, heat, bend, twist or
forcefully pull the power cable. Doing so may cause
damage to the power cable which can cause re or
electric shock. If damage to the cable is suspected,
have it repaired at an Authorized Service Center.
If the Display will not be used for a long period of time,
unplug the power cord from the wall outlet.
If problems occur during use
If a problem occurs (such as no picture or no sound),
or if smoke or an abnormal odor is detected from the
Display, unplug the power cord immediately.
•
Continuous use of the Display under these conditions might
cause re or permanent damage to the unit. Have the
Display evaluated at an Authorized Service Center. Services
to the Display by any unauthorized personnel are strongly
discouraged due to its high voltage dangerous nature.
If water or foreign objects get inside the Display, if the
Display is dropped, or if the cabinet becomes damaged,
disconnect the power cord plug immediately.
• A short may occur, which could cause re. Contact an
Authorized Service Center for any repairs that need
to be made.
Maintenance
The front of the display panel has been specially treated. Wipe the panel surface gently using only a cleaning
cloth or a soft, lint-free cloth.
•
If the surface is particularly dirty, wipe with a soft, lint-free cloth which has been soaked in pure water or water in which
neutral detergent has been diluted 100 times, and then wipe it evenly with a dry cloth of the same type until the surface
is dry.
• Do not scratch or hit the surface of the panel with ngernails or other hard objects, otherwise the surface may
become damaged. Furthermore, avoid contact with volatile substances such as insect sprays, solvents and thinner,
otherwise the quality of the surface may be adversely affected.
If the cabinet becomes dirty, wipe it with a soft, dry cloth.
• If the cabinet is particularly dirty, soak the cloth in water to which a small amount of neutral detergent has been
added and then wring the cloth dry. Use this cloth to wipe the cabinet, and then wipe it dry with a dry cloth.
• Do not allow any detergent to come into direct contact with the surface of the Display. If water droplets get inside
the unit, operating problems may result.
• Avoid contact with volatile substances such as insect sprays, solvents and thinner, otherwise the quality of the
cabinet surface may be adversely affected or the coating may peel off. Furthermore, do not leave it for long periods
in contact with articles made from rubber or PVC.
Usage of a chemical cloth
• Do not use a chemical cloth for the panel surface.
• Follow the instructions for the chemical cloth to use it for the cabinet.
7
Page 8
Accessories
Accessories Supplied
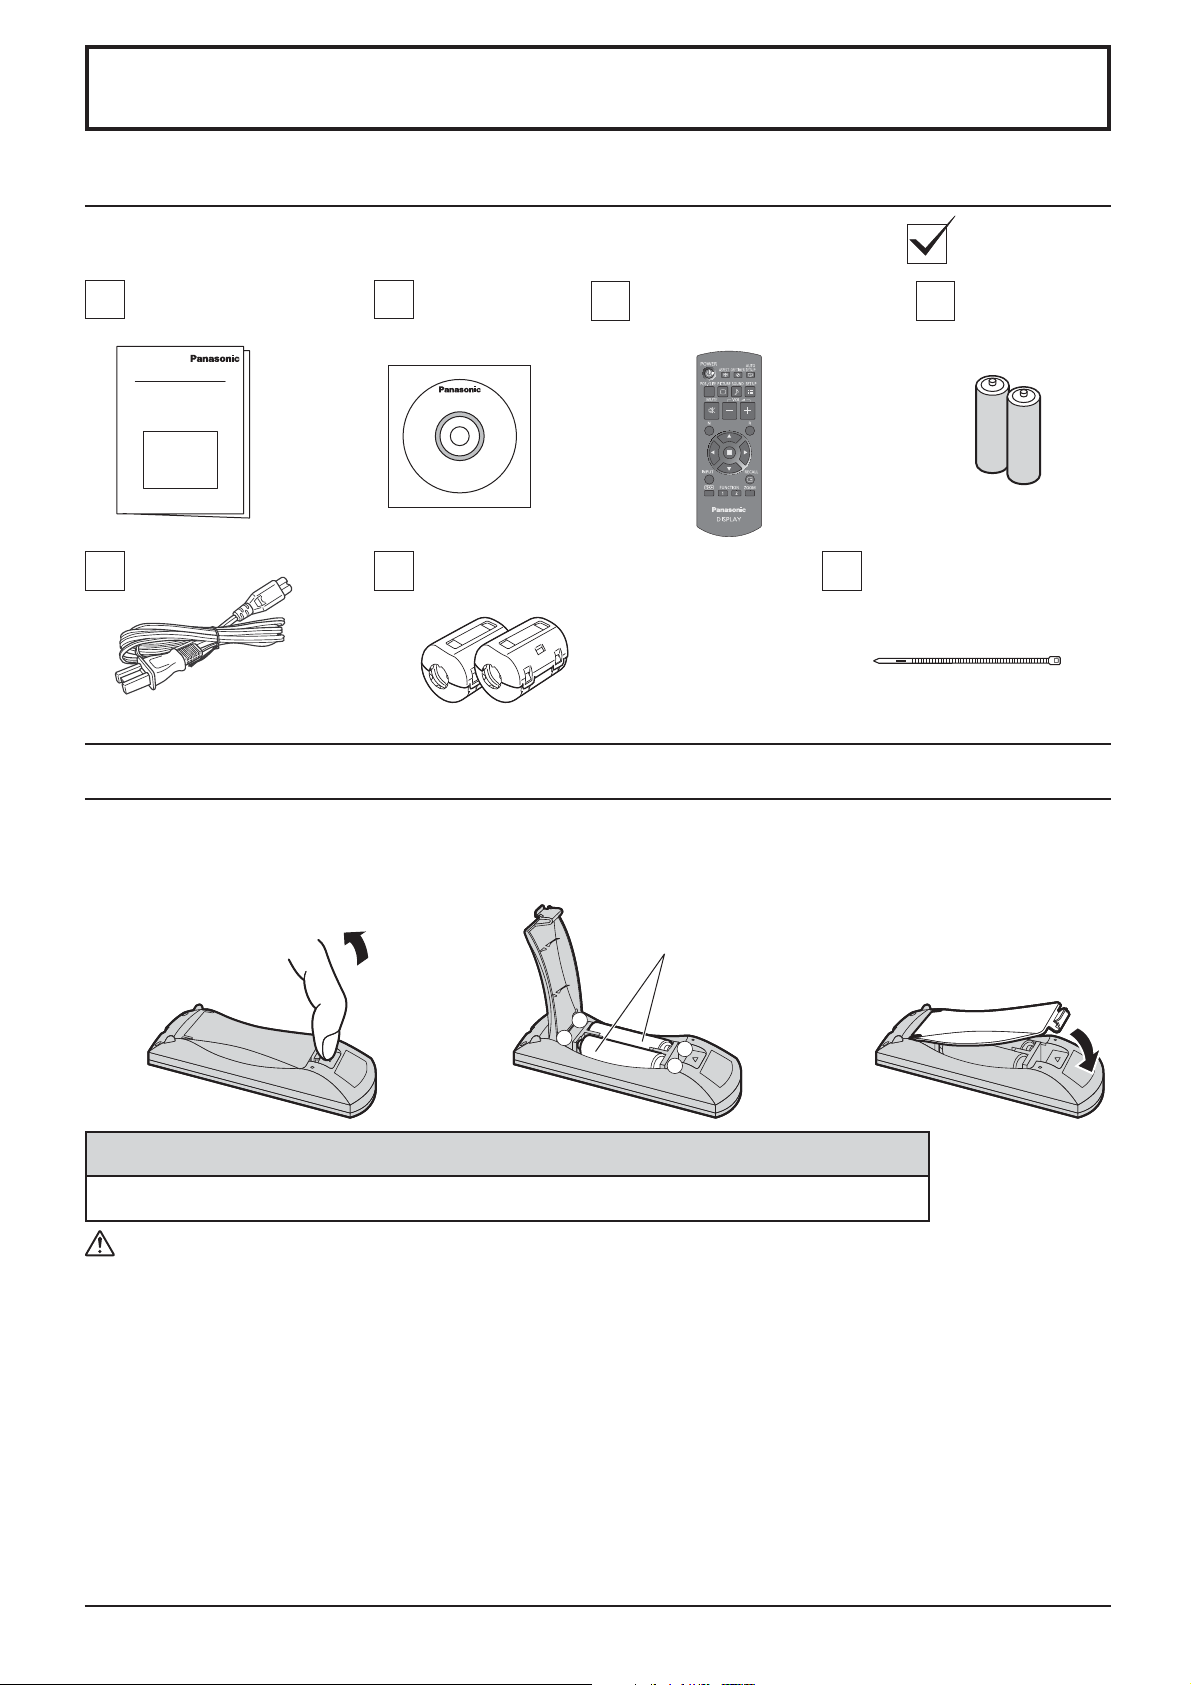
Check that you have the Accessories and items shown
Operating
Instruction book
AC cord
CD-ROM
(Operating
instructions)
Ferrite core × 2
J0KG00000014
Remote Control Batteries
Requires two AA batteries.
1. Pull and hold the hook, then
open the battery cover.
2. Insert batteries - note correct
polarity (+ and -).
Remote Control Transmitter
N2QAYB000691
Use the Ferrite cores
to comply with the
EMC standard.
Batteries for the
Remote Control
Transmitter
(AA Size × 2)
Cable tie × 2
TMM17499
3. Replace the cover.
“AA” size
-
+
+
-
Helpful Hint:
For frequent remote control users, replace old batteries with Alkaline batteries for longer life.
Precaution on battery use
Incorrect installation can cause battery leakage and corrosion that will damage the remote control transmitter.
Disposal of batteries should be in an environment-friendly manner.
Observe the following precautions:
1. Batteries should always be replaced as a pair. Always use new batteries when replacing the old set.
2. Do not combine a used battery with a new one.
3. Do not mix battery types (example: “Zinc Carbon” with “Alkaline”).
4. Do not attempt to charge, short-circuit, disassemble, heat or burn used batteries.
5. Battery replacement is necessary when the remote control acts sporadically or stops operating the Display.
6. Do not burn or breakup batteries.
Batteries must not be exposed to excessive heat such as sunshine, re or the like.
88
Page 9
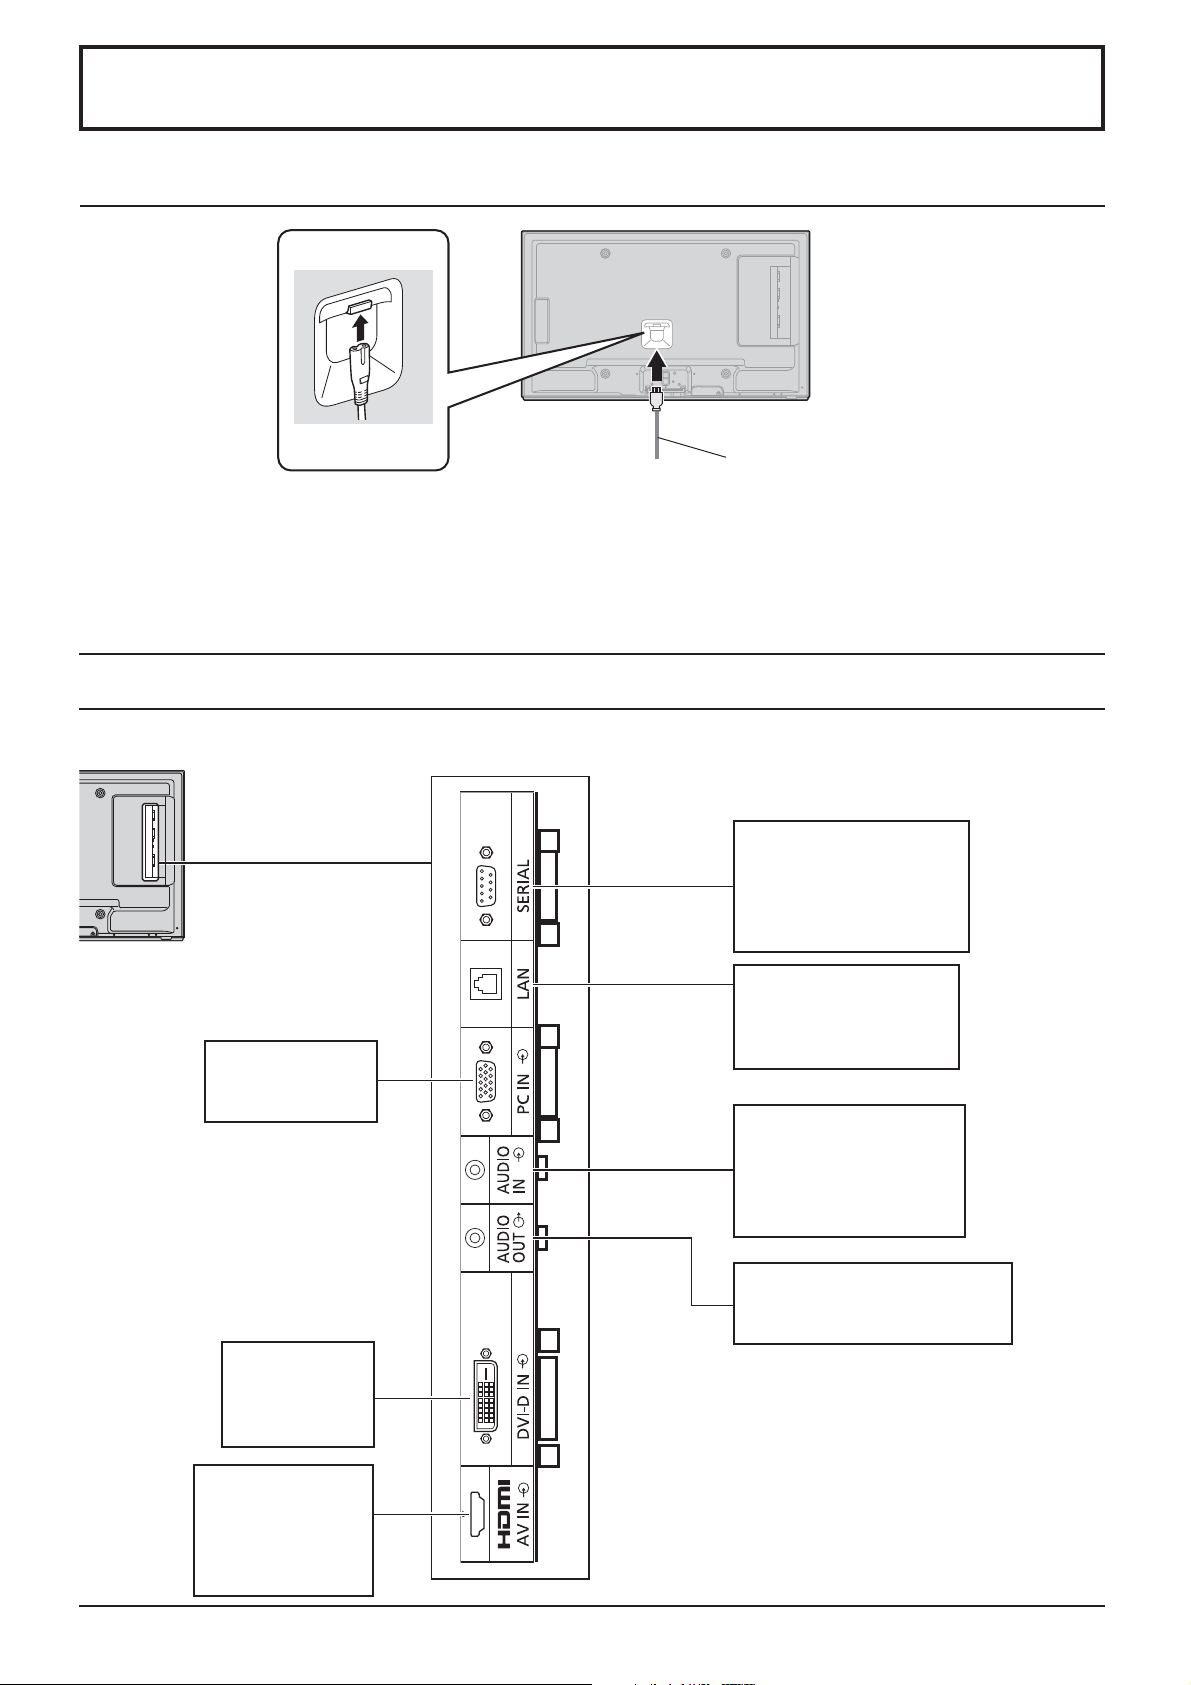
Connections
AC cord connection
AC cord
(accessory)
Notes:
• Insert the AC cord rmly into place.
• When disconnecting the AC cord, be absolutely sure to disconnect the AC cord plug at the socket outlet rst.
• The included AC cord is for use with this unit only.
Video equipment connection
PC IN
PC Input Terminal
(see page 12)
SERIAL IN
SERIAL Input Terminal
Control the Display by
connecting to PC.
(see page 13)
LAN: Connect to a
network to control
the unit.
(see page 41, 46)
AUDIO IN (DVI-D / PC)
Connect the audio
output of a device
connected to DVI-D IN,
PC IN. (see page 11, 12)
DVI-D IN
DVI-D Input
Terminal
(see page 11)
AV IN
HDMI
HDMI Input
Terminal
(see page 10)
AUDIO OUT
Connect to sound equipment
(see page 10)
99
Page 10
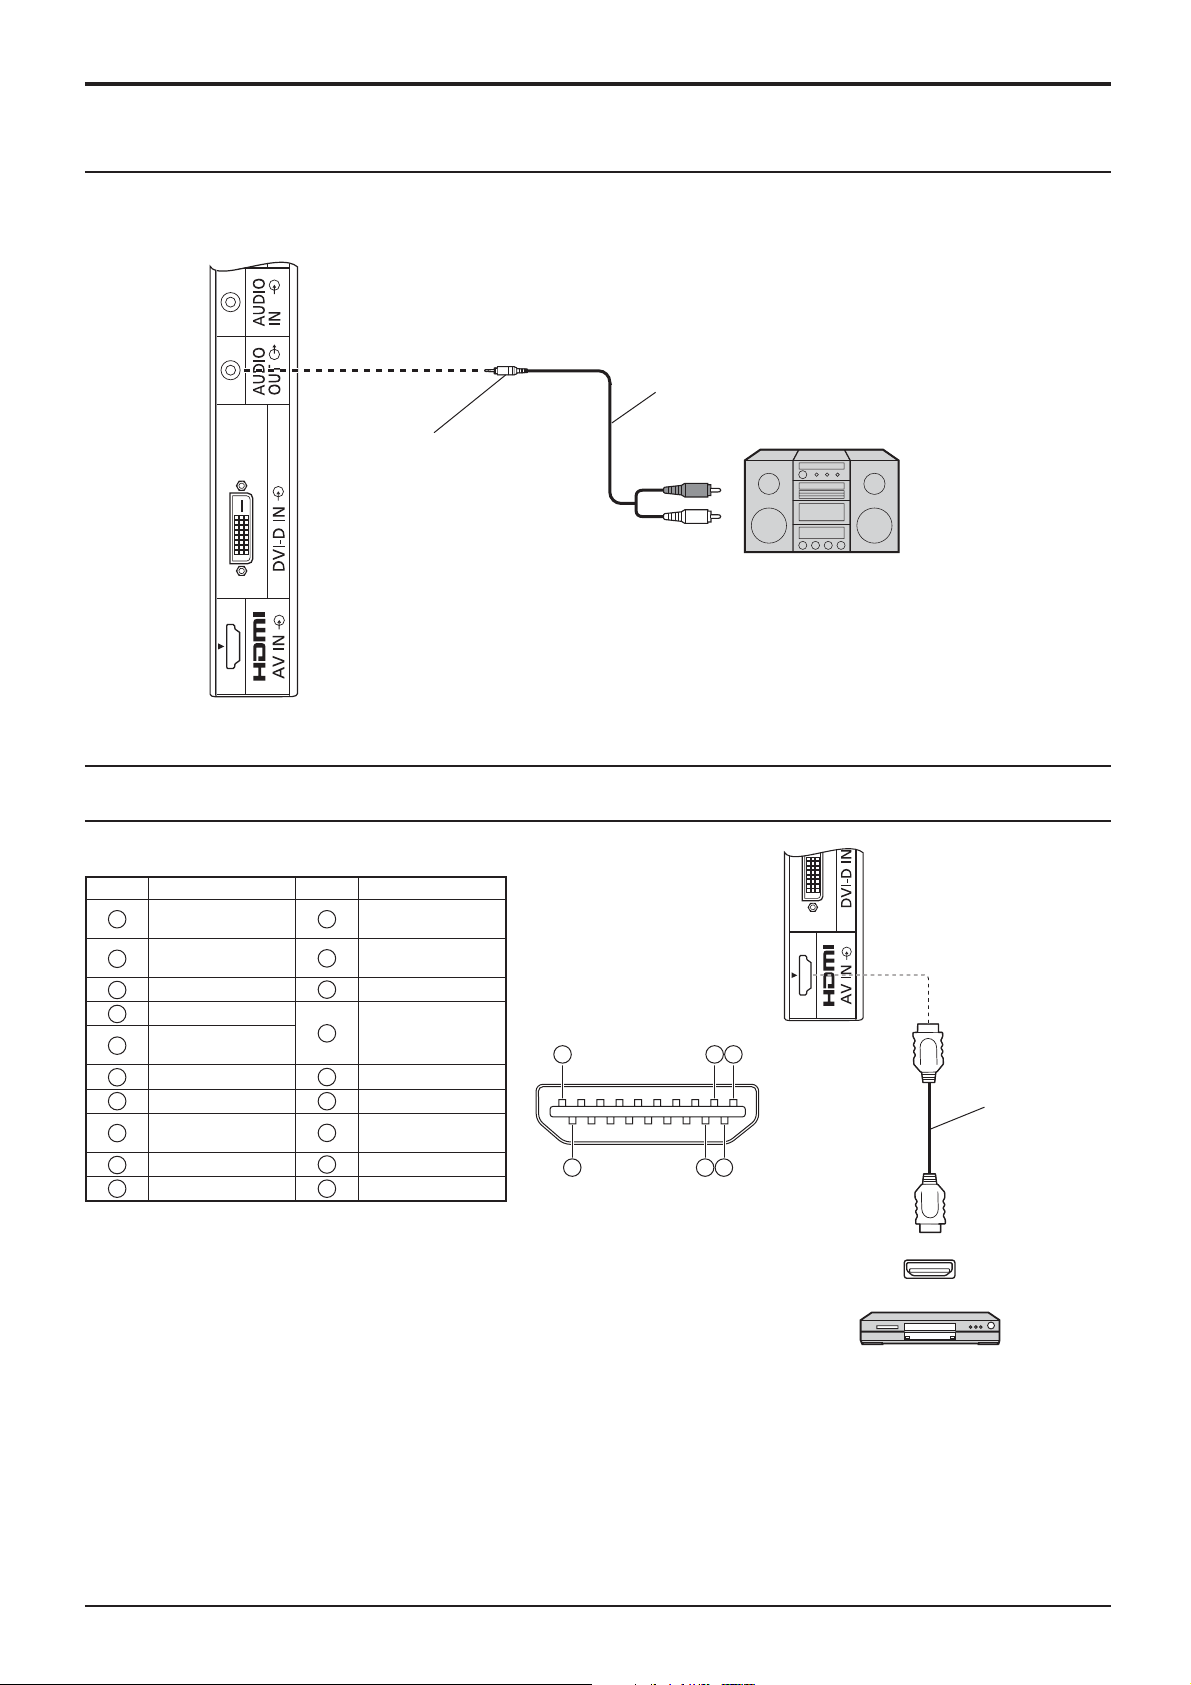
Connections
AUDIO OUT connection
Note:
Additional equipment and cables shown are not supplied with this set.
Stereophonic sound code
Stereo mini plug (M3)
HDMI connection
[Pin assignments and signal names]
Pin No.
Signal Name
1
T.M.D.S Data2+
T.M.D.S Data2
2
Shield
3
T.M.D.S Data2-
4
T.M.D.S Data1+
T.M.D.S Data1
5
Shield
6
T.M.D.S Data1-
7
T.M.D.S Data0+
T.M.D.S Data0
8
Shield
9
T.M.D.S Data0-
10
T.M.D.S Clock+
Pin No.
11
12
13
14
15
16
17
18
19
T.M.D.S Clock
Shield
T.M.D.S Clock-
CEC
Reserved
(N.C. on device)
SCL
SDA
DDC/CEC
Ground
+5V Power
Hot Plug Detect
Signal Name
audio equipment
line-in
19
3 1
HDMI cable
2
18
4
Note:
Additional equipment and HDMI cable shown are not supplied with this set.
10
HDMI
AV OUT
DVD player
Page 11
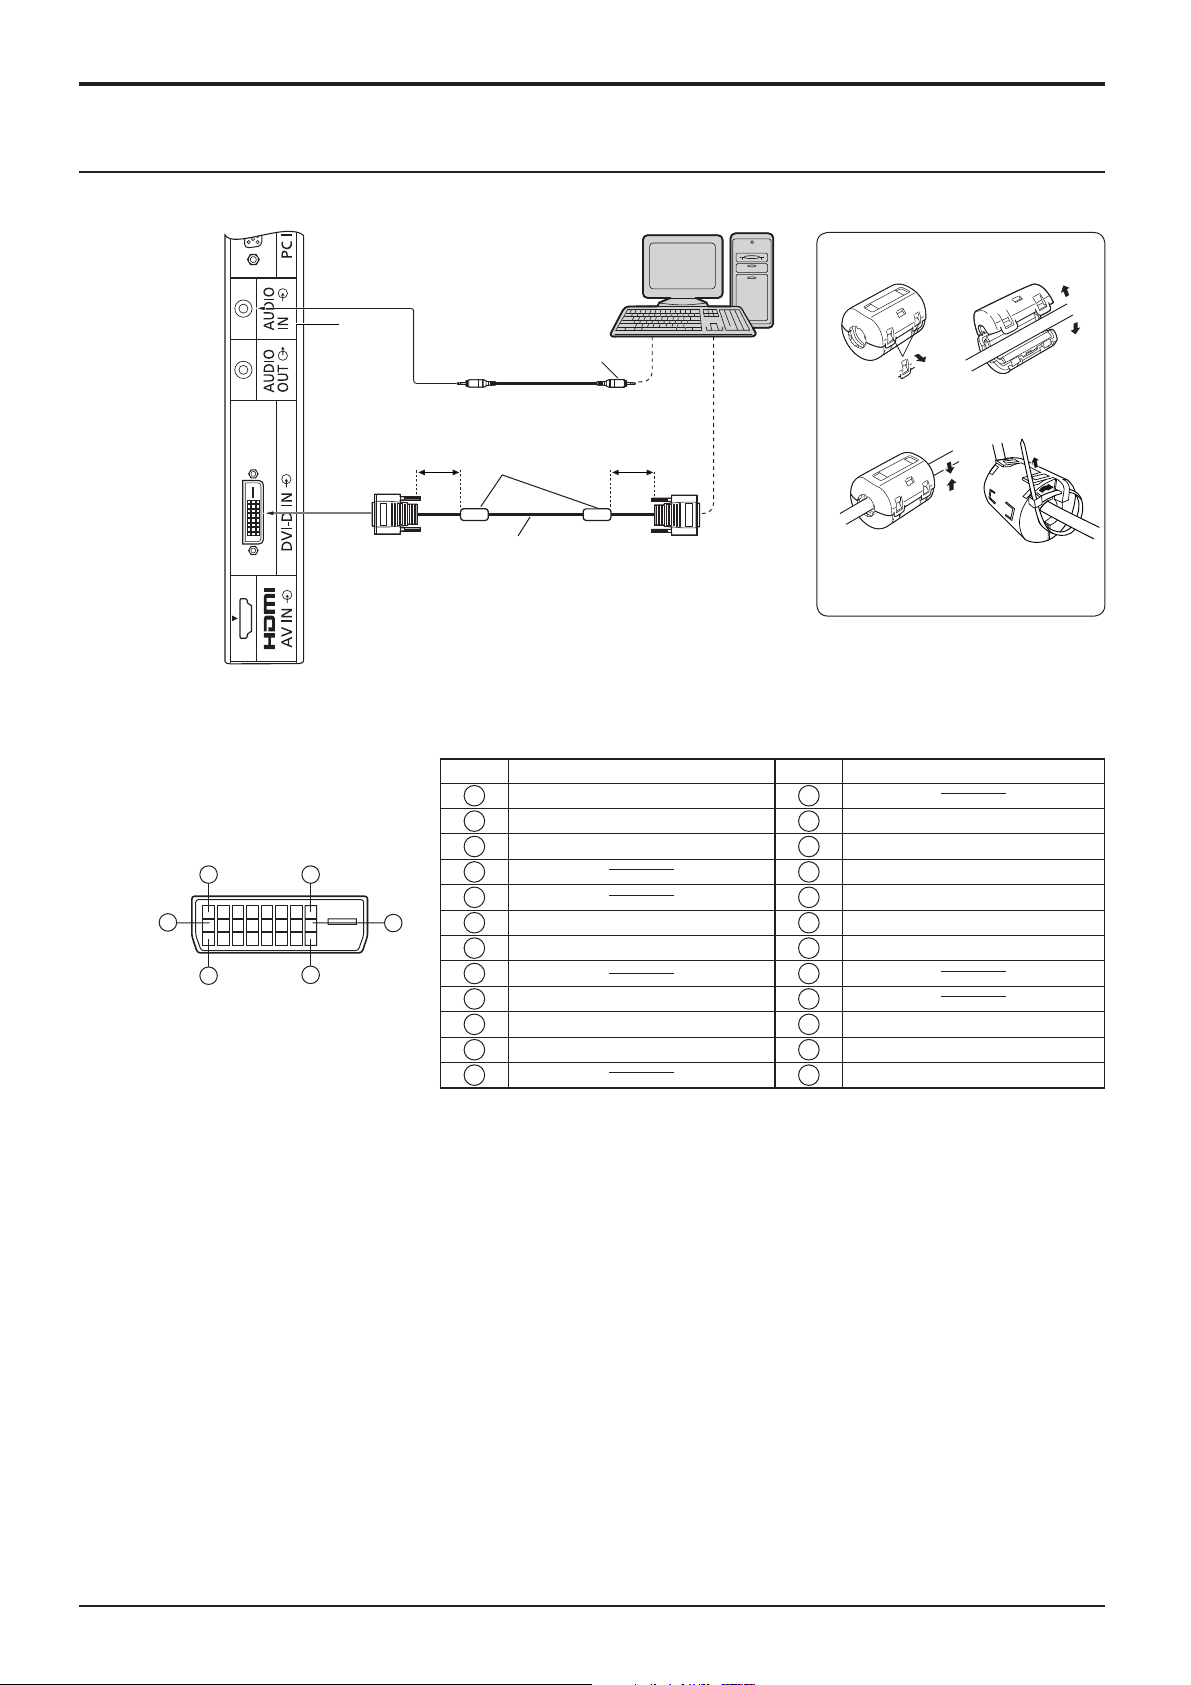
DVI-D IN connection
Shared
with PC
IN.
Stereo mini plug (M3)
Less than
1.97 inch
(5 cm)
Ferrite core
(supplied)
PC with DVI-D
video out
Less than
1.97 inch
(5 cm)
Connections
Installing the Ferrite core
1. 2.
Pull back the tabs
(in two places)
3. 4.
Open the
Ferrite core
DVI-video cable (Within 5 m)
DVI-D Input Connector
Pin Layouts
1
9
17
8
24
Connection port view
16
Pin No.
Signal Name
T.M.D.S. data 2-
1
T.M.D.S. data 2+
2
T.M.D.S. data 2 shield
3
4
5
DDC clock
6
DDC data
7
8
T.M.D.S. data 1-
9
T.M.D.S. data 1+
10
T.M.D.S. data 1 shield
11
12 24
Pin No.
13
14
15
16
17
18
19
20
21
22
23
Notes:
• Additional equipment and cables shown are not supplied with this set.
• Image deterioration may occur depending on the length or the quality of the cable.
Route the
cable through
and close
Fix the Ferrite
core with the
cable tie
Signal Name
+5 V DC
Ground
Hot plug detect
T.M.D.S. data 0T.M.D.S. data 0+
T.M.D.S. data 0 shield
T.M.D.S. clock shield
T.M.D.S. clock+
T.M.D.S. clock-
11
Page 12
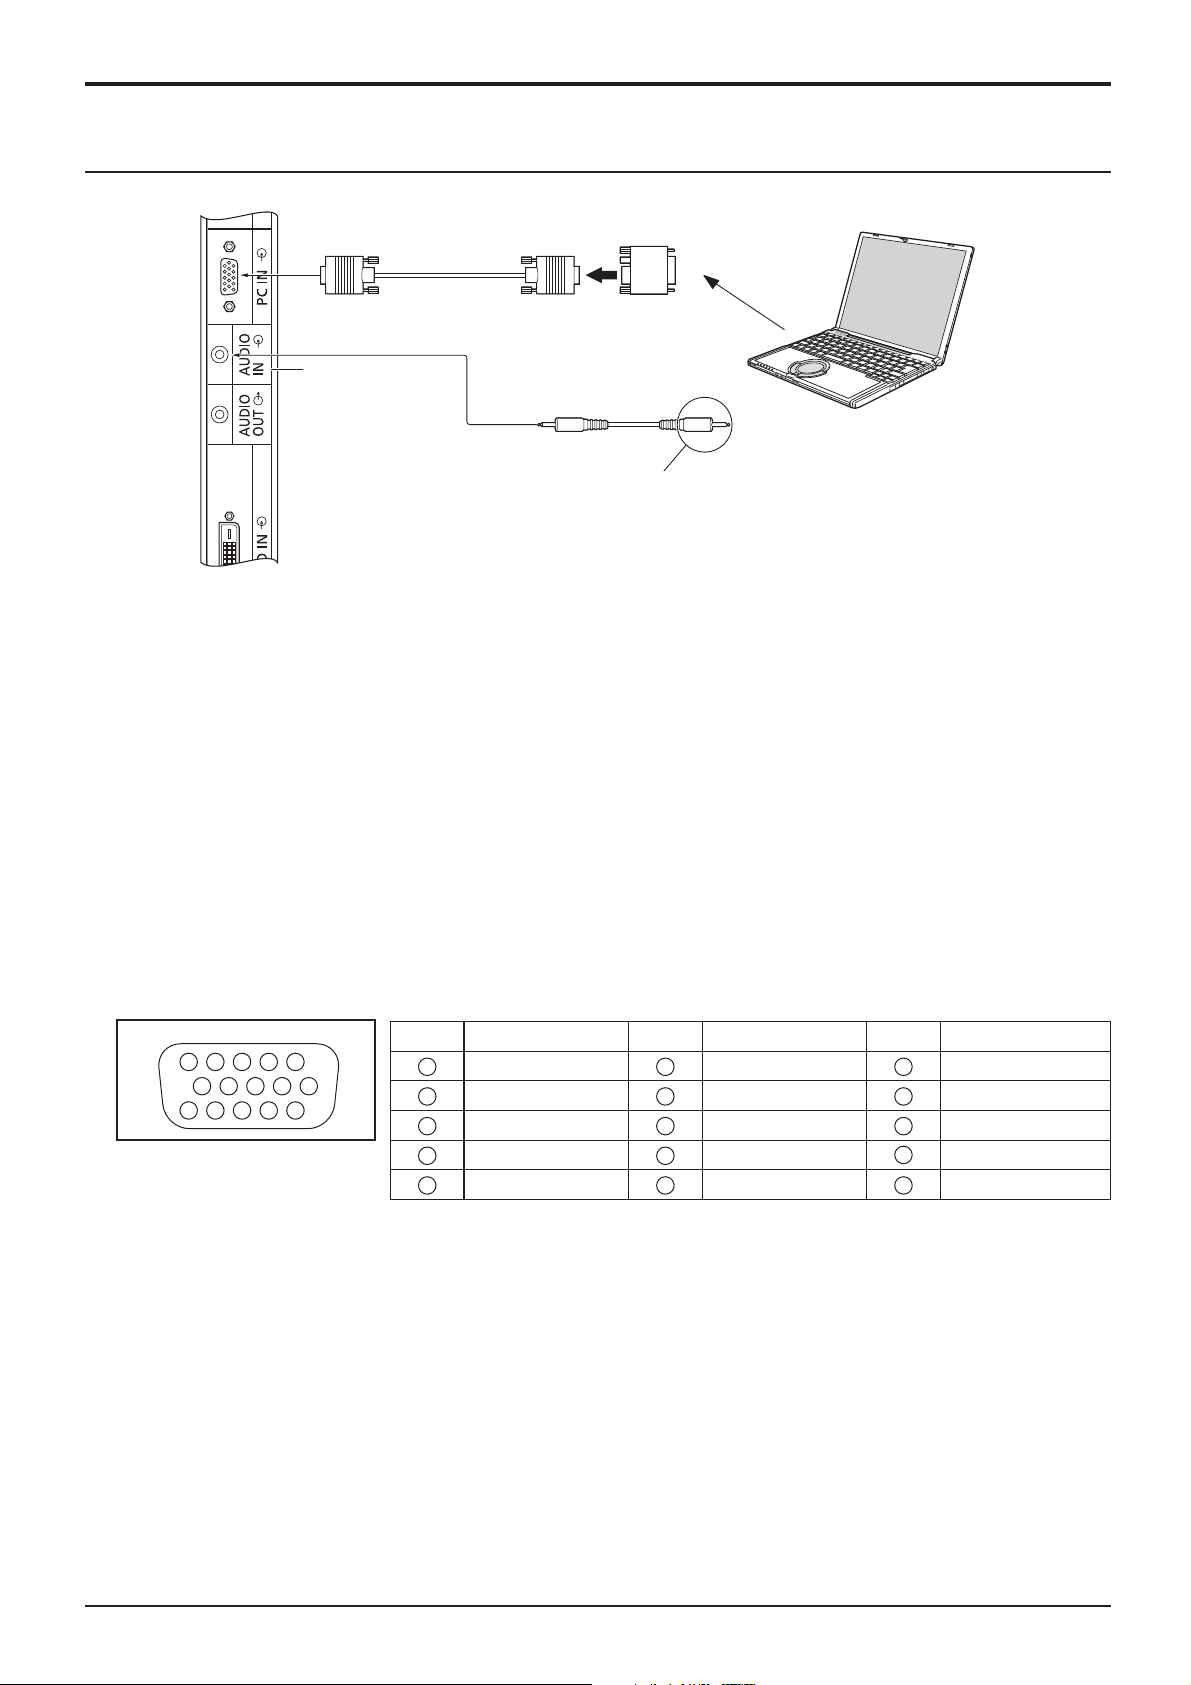
Connections
PC Input Terminals connection
(Female)
Mini D-sub 15p
(Male)
Shared with
DVI-D IN.
Stereo mini plug (M3)
Connect a cable which matches
the audio output terminal on the computer.
Conversion adapter
(if necessary)
Audio
COMPUTER
Notes:
• Computer signals which can be input are those with a horizontal scanning frequency of 30 to 110 kHz and vertical
scanning frequency of 48 to 120 Hz. (However, the image will not be displayed properly if the signals exceed 1,200
lines.)
• The display resolution is a maximum of 1,440 × 1,080 dots when the aspect mode is set to “4:3”, and 1,920 × 1,080
dots when the aspect mode is set to “FULL”. If the display resolution exceeds these maximums, it may not be possible
to show ne detail with suf cient clarity.
• The PC input terminals are DDC2B-compatible. If the computer being connected is not DDC2B-compatible, you will
need to make setting changes to the computer at the time of connection.
• Some PC models cannot be connected to the set.
• There is no need to use an adapter for computers with DOS/V compatible Mini D-sub 15P terminal.
• The computer shown in the illustration is for example purposes only.
• Additional equipment and cables shown are not supplied with this set.
• Do not set the horizontal and vertical scanning frequencies for PC signals which are above or below the speci ed
frequency range.
Signal Names for Mini D-sub 15P Connector
Pin No. Signal Name Pin No. Signal Name Pin No. Signal Name
1
3
4 5
2
9
10
15 14 13 12 11
6 7 8
Pin Layout for PC Input
Terminal
1
2
3
4
NC (not connected)
5
GND (Ground)
R
G
B
6
GND (Ground)
7
GND (Ground)
8
GND (Ground)
9
10
+5 V DC
GND (Ground)
11
NC (not connected)
12
13
14
15
HD/SYNC
SDA
VD
SCL
12
Page 13
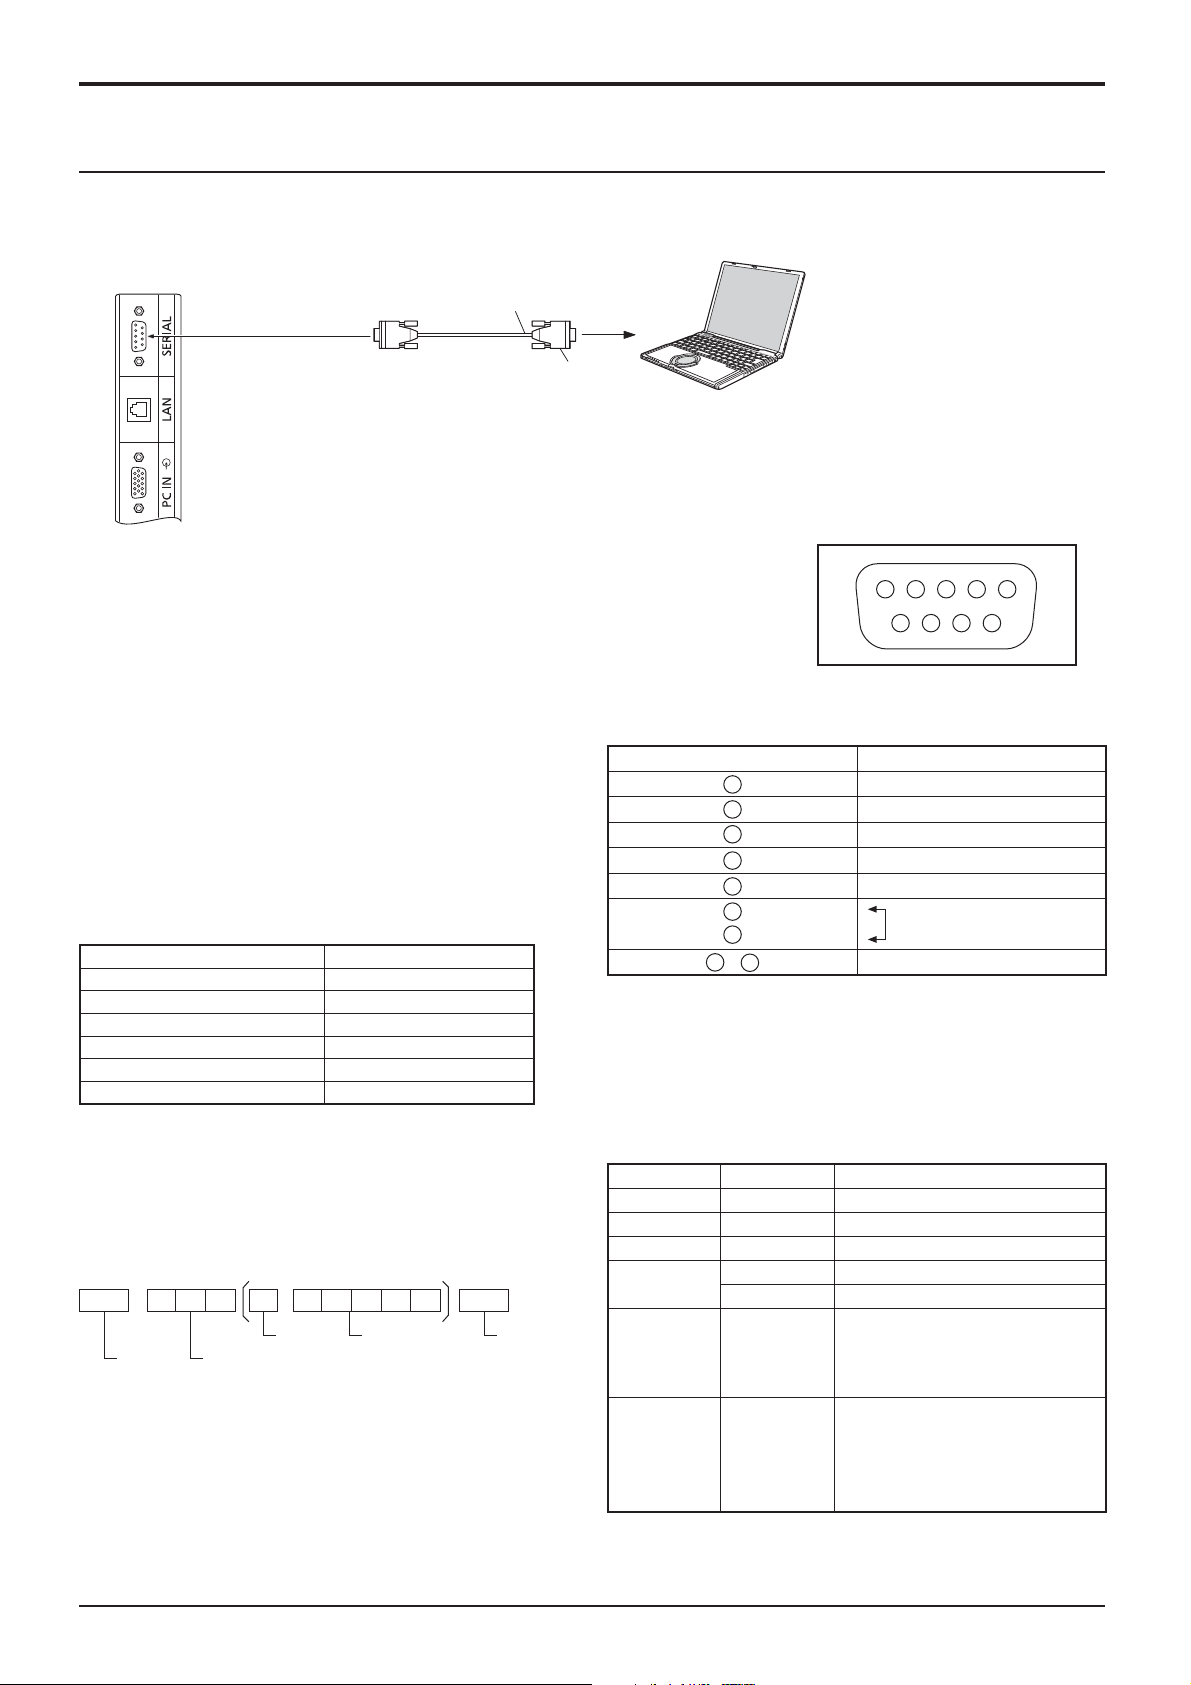
SERIAL Terminals connection
The SERIAL terminal is used when the Display is controlled by a computer.
Connections
COMPUTER
(Male)
RS-232C Straight cable
(Female)
D-sub 9p
Notes:
• Use the RS-232C straight cable to connect the computer
to the Display.
• The computer shown is for example purposes only.
• Additional equipment and cables shown are not supplied
with this set.
The SERIAL terminal conforms to the RS-232C interface
speci cation, so that the Display can be controlled by a
computer which is connected to this terminal.
The computer will require software which allows the
sending and receiving of control data which satis es
the conditions given below. Use a computer application
such as programming language software. Refer to the
documentation for the computer application for details.
Communication parameters
Signal level RS-232C compliant
Synchronization method Asynchronous
Baud rate 9600 bps
Parity None
Character length 8 bits
Stop bit 1 bit
Flow control -
1 3 4 5 2
6 7 8 9
Pin layout for SERIAL Terminal
Signal names for SERIAL IN terminal
Pin No.
2
3
4
5
6
7
8
1
9
•
Details
R X D
T X D
DTR
GND
DSR
(Shorted in this set)
NC
These signal names are those of computer speci cations.
Basic format for control data
The transmission of control data from the computer
starts with a STX signal, followed by the command, the
parameters, and lastly an ETX signal in that order. If
there are no parameters, then the parameter signal does
not need to be sent.
STX C1 C2 C3 P1 P2 P3 P4: P5 ETX
Start
(02h)
Colon Parameter(s)
3-character
command (3 bytes)
(1 - 5 bytes)
End
(03h)
Notes:
• If multiple commands are transmitted, be sure to wait for
the response for the rst command to come from this unit
before sending the next command.
• If an incorrect command is sent by mistake, this unit will
send an “ER401” command back to the computer.
• Consult an Authorized Service Center for detail
instructions on command usage.
Command
Command Parameter Control details
PON None Power ON
POF None Power OFF
AVL *** Volume 000 - 100
AMT 0 Audio MUTE OFF
1 Audio MUTE ON
IMS None
HM1
DV1
PC1
DAM None
ZOOM
FULL
NORM
ZOM2
Input select (toggle)
HDMI input (HDMI)
DVI-D IN input (DVI)
PC IN input (PC)
Screen mode select (toggle)
ZOOM1
FULL
4:3
ZOOM2
With the power off, this display responds to PON command
only.
13
Page 14
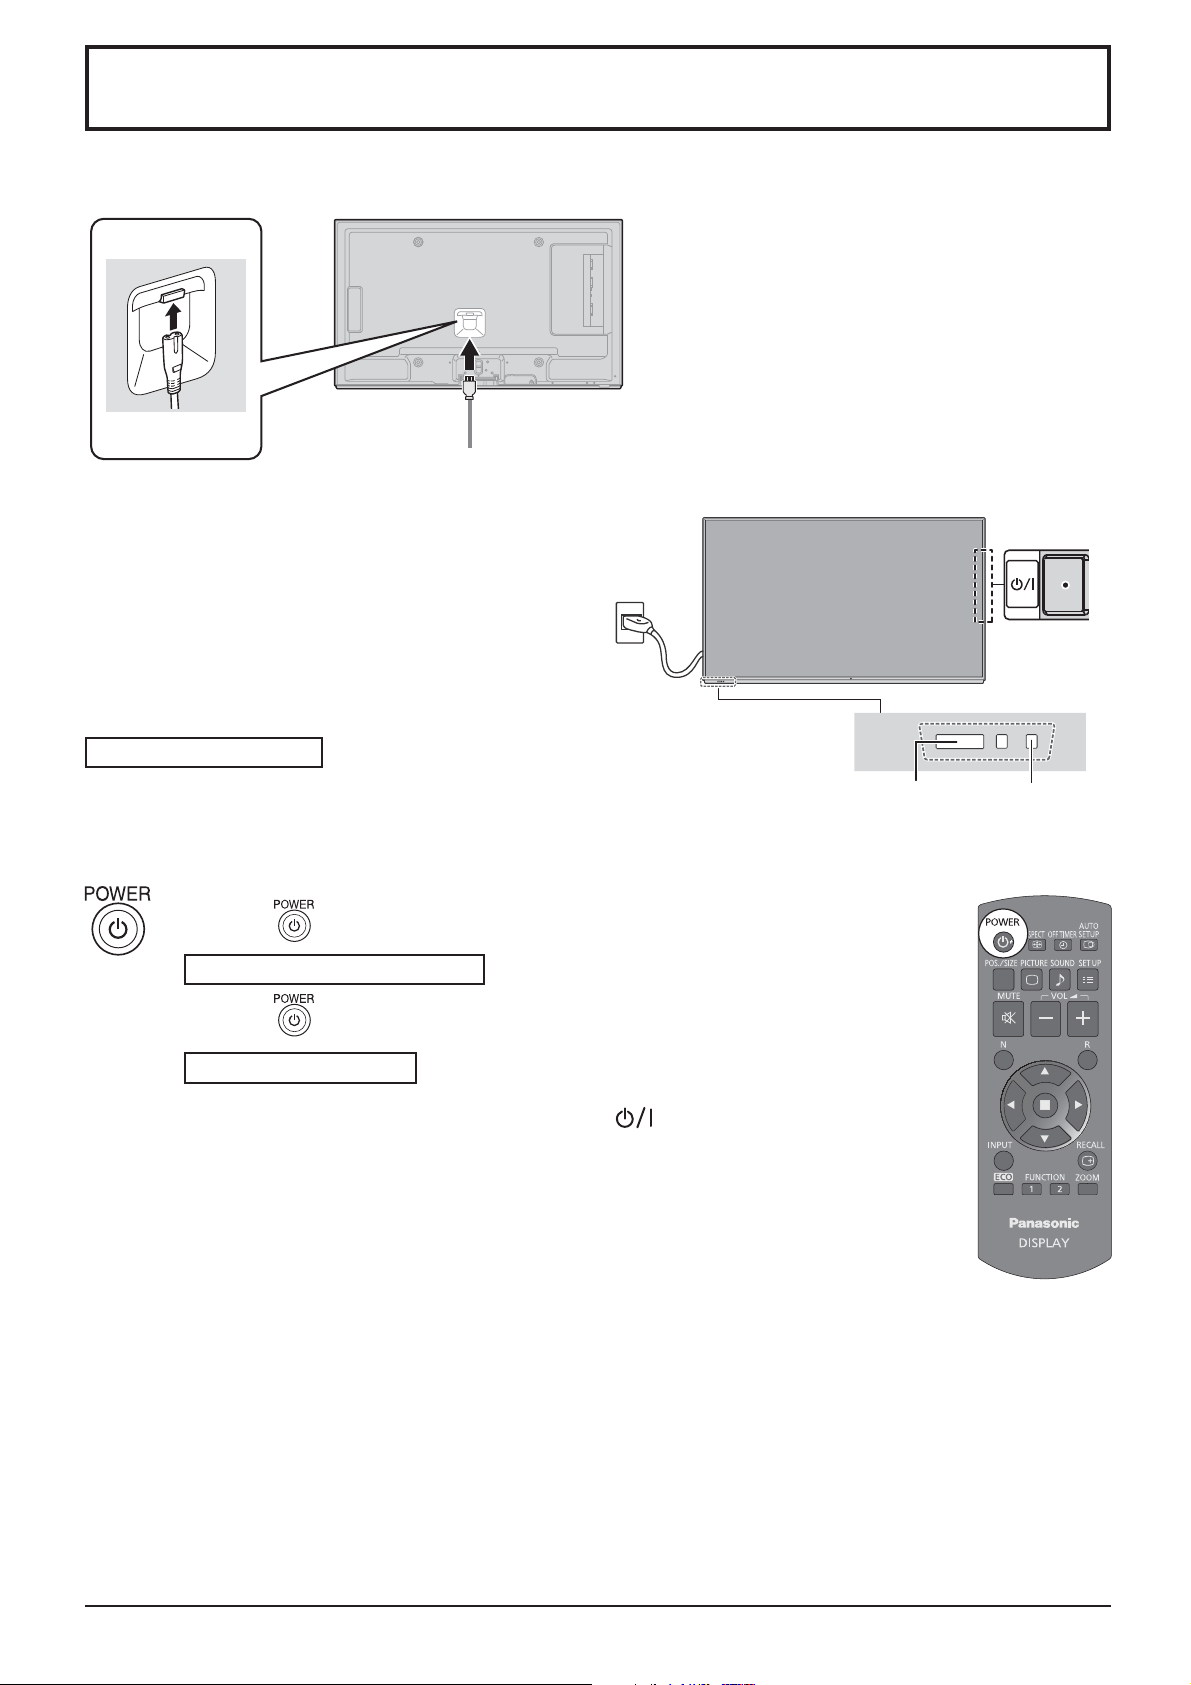
Power ON / OFF
Connecting the AC cord plug to the Display.
Connecting the plug to the Wall Outlet.
Note:
When disconnecting the AC cord, be absolutely sure to
disconnect the AC cord plug at the socket outlet rst.
Power switch
Press the Power switch on the Display to turn the set
on: Power-On.
Power Indicator: Green
Press the button on the remote control to turn the Display off.
Power Indicator: Red (standby)
Press the button on the remote control to turn the Display on.
Power Indicator: Green
Turn the power to the Display off by pressing the switch on the unit, when the
Display is on or in standby mode.
Note:
During operation of the power management function, the power indicator turns
orange in the power off state.
Remote Control Sensor Power Indicator
1414
Page 15
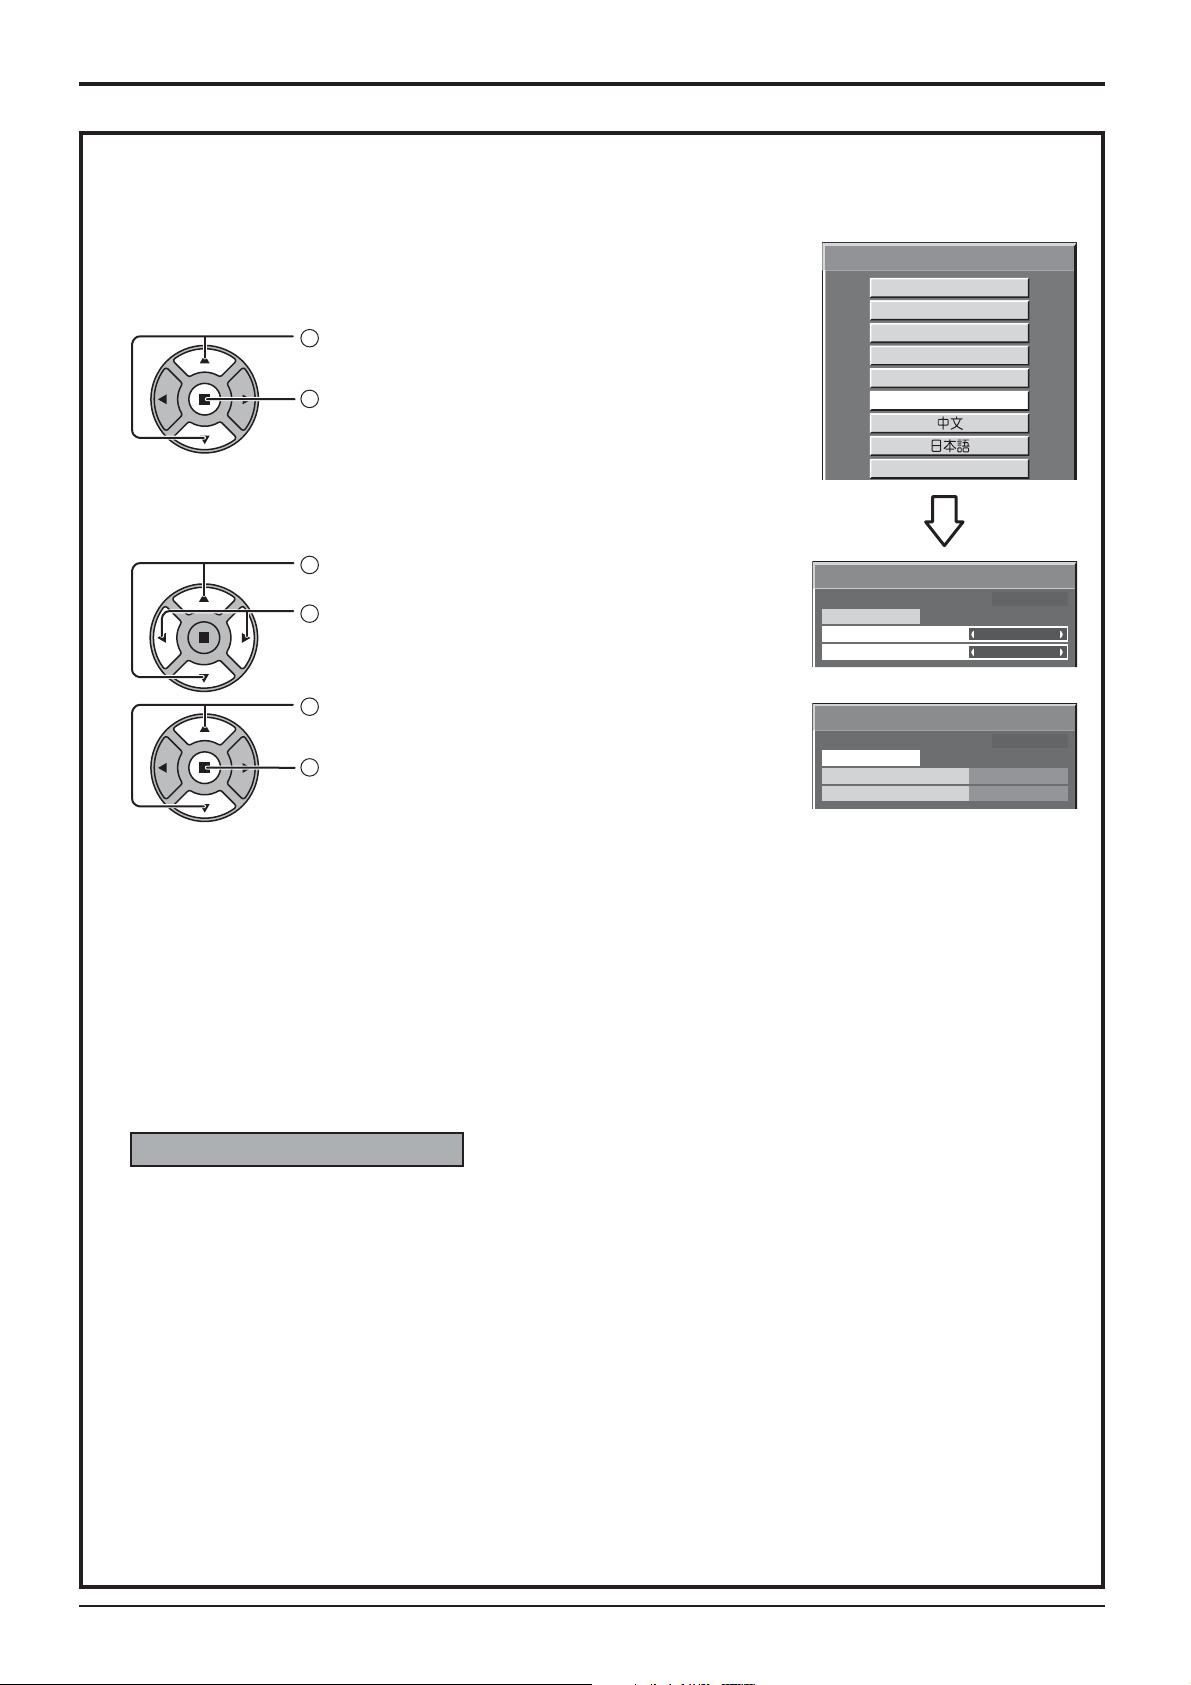
When rst switching on the unit
Following screen will be displayed when the unit is turned on for the rst time.
Select the items with the remote control. Unit buttons are invalid.
OSD LANGUAGE
1
Select the language.
2
Set.
PRESENT TIME SETUP
1
Select “DAY” or “PRESENT TIME OF DAY”.
2
Setup “DAY” or “PRESENT TIME OF DAY”.
Power ON / OFF
OSD LANGUAGE
English (UK)
Deutsch
Français
Italiano
Español
ENGLISH (US)
PRESENT TIME SETUP
PRESENT TIME OF DAY MON 99 : 99
SET
DAY
PRESENT TIME OF DAY
MON
99 : 99
1
Select “SET”.
2
Set.
PRESENT TIME SETUP
PRESENT TIME OF DAY MON 99 : 99
SET
DAY
PRESENT TIME OF DAY
TUE
10 : 00
Notes:
• Once the items are set, the screens won't be displayed when switching on the unit next time.
• After the setting, the items can be changed in the following menus.
OSD LANGUAGE (see page 34)
PRESENT TIME SETUP (see page 27)
Power ON warning message
The following message may be displayed when turning the unit power ON:
No activity power off Precautions
’NO ACTIVITY POWER OFF’ IS ENABLED.
If “NO ACTIVITY POWER OFF” in SET UP menu is set to “ENABLE”, a warning message is displayed
every time the power is turned ON. (see page 31)
This message display can be set with the following menu: Options menu
Power On Message (see page 44)
15
Page 16
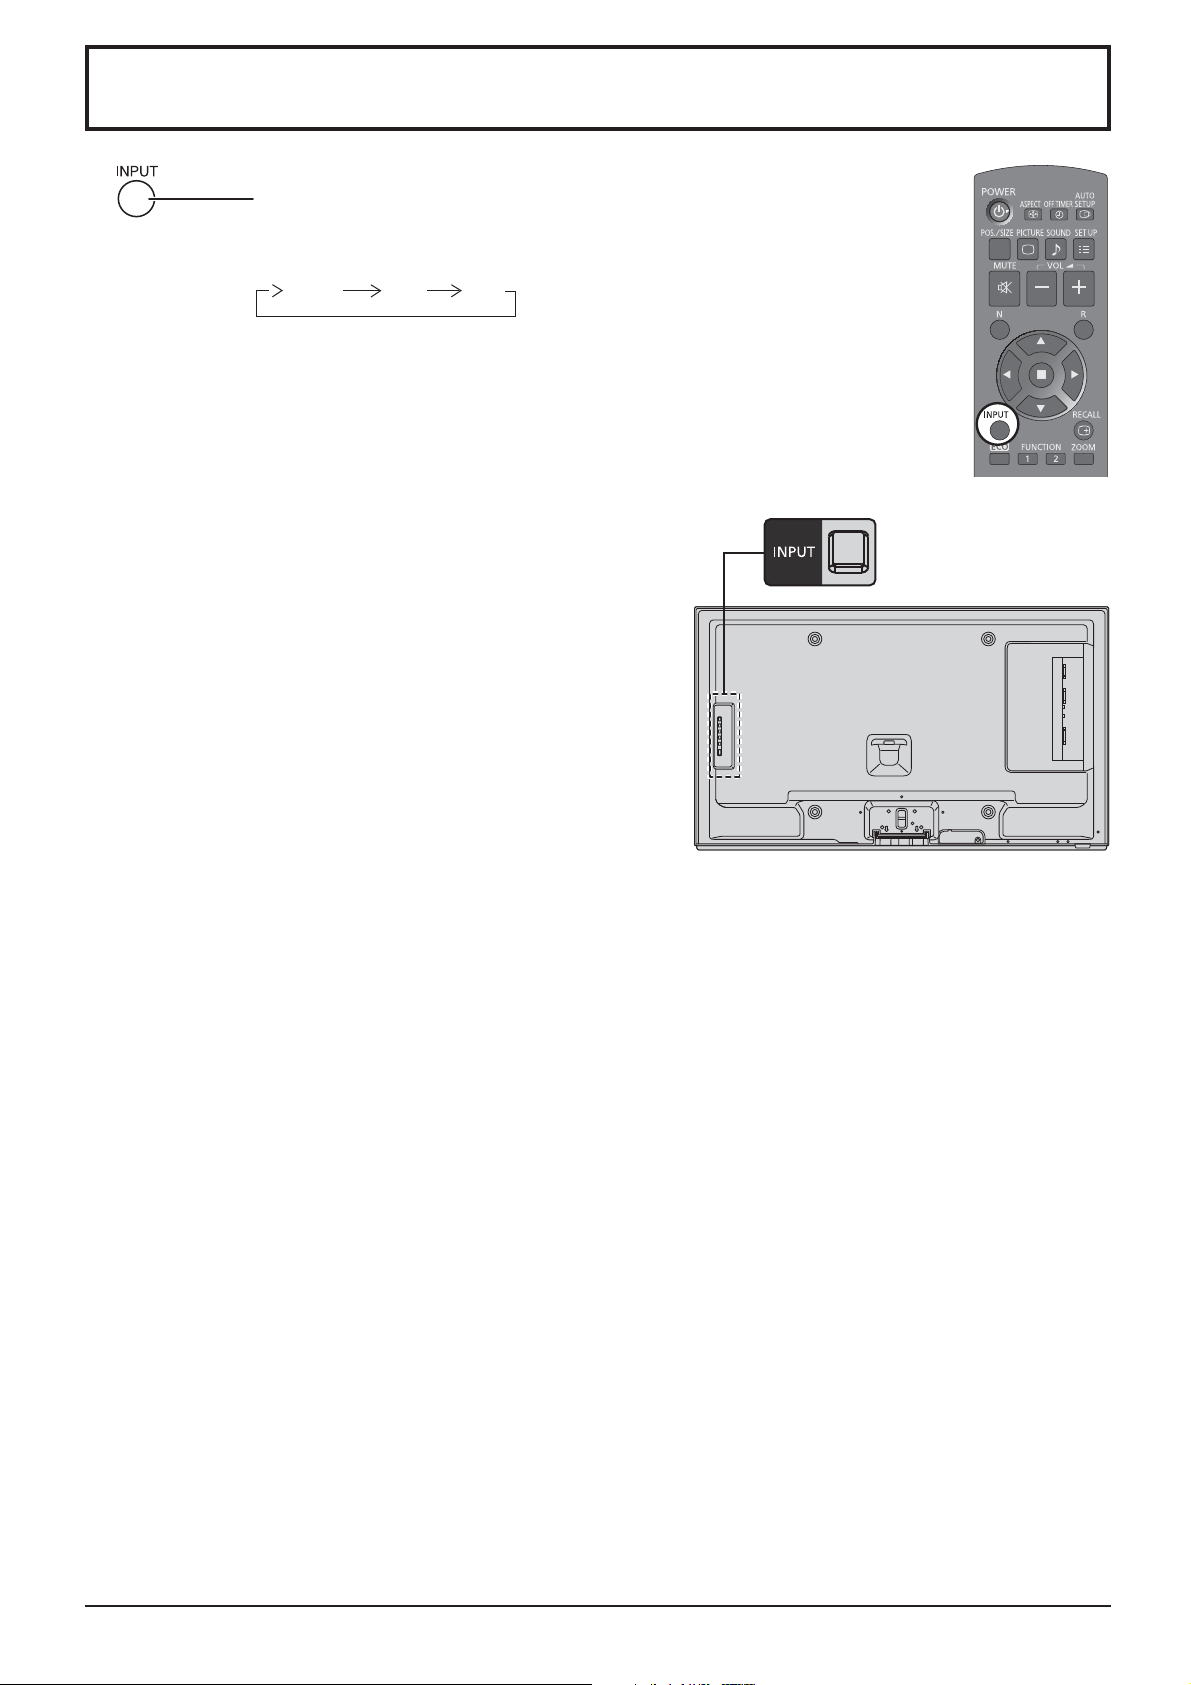
Selecting the input signal
Press to select the input signal to be played back from the equipment which
has been connected to the Display.
Input signals will change as follows:
HDMI
HDMI: HDMI input terminal in AV IN (HDMI).
PC: PC input terminal in PC IN.
DVI: DVI input terminal in DVI-D IN.
Note:
Selecting is also possible by pressing the INPUT button on the
unit.
PC
DVI
1616
Page 17
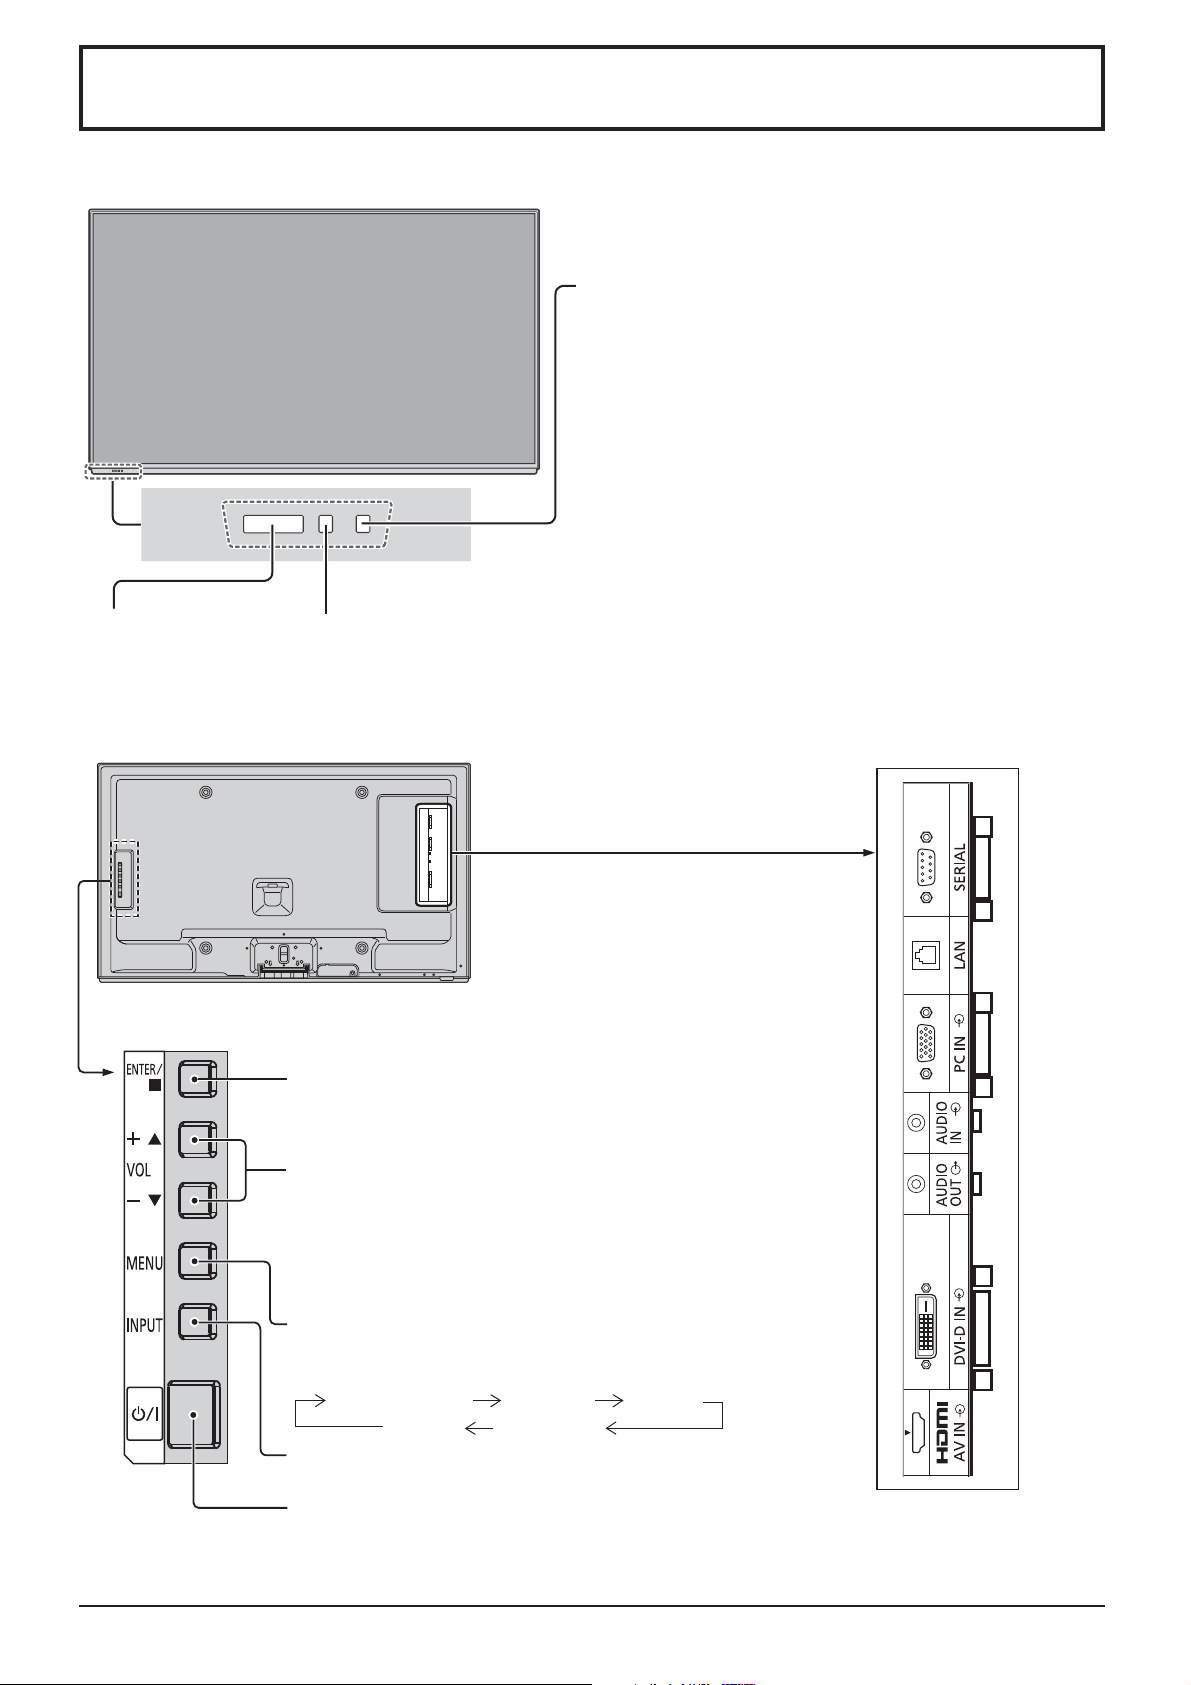
Basic Controls
Main Unit
Remote
control sensor
Brightness Sensor
Detects the brightness in the
viewing environment.
Power Indicator
The Power Indicator will light.
• Power-OFF .... Indicator not illuminated (The unit will
still consume some power as long as the
power cord is still inserted into the wall
outlet.)
• Standby ......... Red
Orange (When the control terminal
selection is “LAN”. See page 41)
• Power-ON ......Green
• PC POWER MANAGEMENT
....................... Orange (With PC input signal.
See page 32)
• DVI-D POWER MANAGEMENT
....................... Orange (With DVI input signal.
See page 32)
Enter / Aspect button
(see page 19, 21)
Volume Adjustment
Volume Up “+” Down “–”
When the menu screen is displayed:
“+” :
press to move the cursor up
“–” :
press to move the cursor down
(see page 21)
MENU Screen ON / OFF
Each time the MENU button is pressed, the menu screen
will switch. (see page 21)
Normal Viewing PICTURE SET UP
SOUND POS. /SIZE
INPUT button (Input signal selection) (see page 16)
Main Power On / Off Switch
1717
Page 18
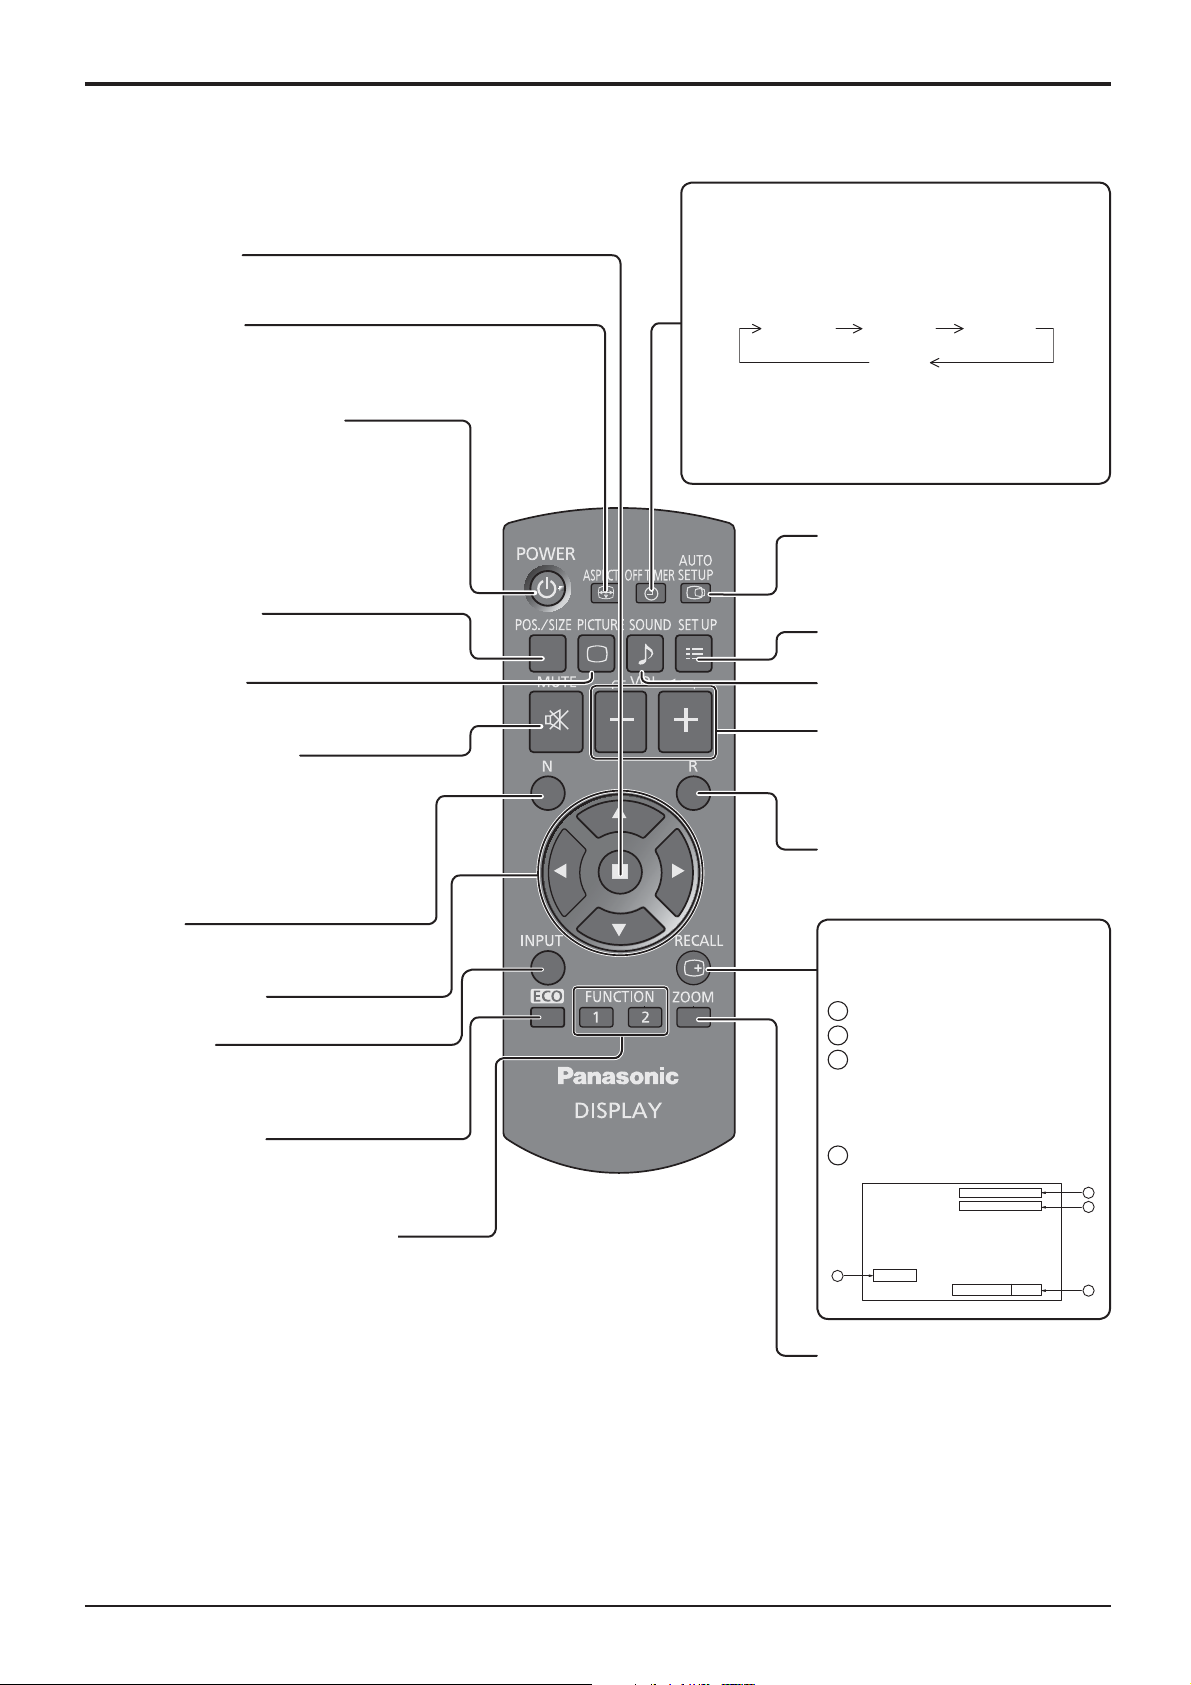
Basic Controls
Remote Control Transmitter
ACTION button
Press to make selections.
ASPECT button
Press to adjust the aspect.
(see page 19)
Standby (ON / OFF) button
The Display must rst be plugged into
the wall outlet and turned on at the power
switch (see page 14).
Press this button to turn the Display On,
from Standby mode. Press it again to turn
the Display Off to Standby mode.
POS. /SIZE button
(see page 22, 23)
OFF TIMER button
The Display can be preset to switch to stand-by
after a xed period. The setting changes to 30
minutes, 60 minutes, 90 minutes and 0 minutes (off
timer cancelled) each time the button is pressed.
30 MIN 60 MIN
90 MIN
0 MIN
When three minutes remain, “OFF TIMER 3 MIN”
will ash.
The off timer is cancelled if a power interruption
occurs.
AUTO SETUP button
Automatically adjusts the position/
size of the screen. (see page 22)
SET UP button (see page 27 - 42)
PICTURE button
(see page 24, 25)
Sound mute On / Off
Press this button to mute the sound.
Press again to reactivate sound.
Sound is also reactivated when power is
turned off or volume level is changed.
N button
(see page 23, 24, 25, 26)
POSITION buttons
INPUT button
Press to select input signal sequentially.
(see page 16)
ECO MODE (ECO)
Press to change the ECO MODE
setup status. (see page 32)
FUNCTION buttons (FUNCTION)
(see page 45)
SOUND button (see page 26)
Volume Adjustment
Press the Volume Up “+” or Down
“–” button to increase or decrease
the sound volume level.
R button (see page 21)
Press the R button to return to
previous menu screen.
RECALL button
Press the “RECALL” button to
display the current system status.
Input label
1
Aspect mode (see page 19)
2
Off timer
3
The off timer indicator is
displayed only when the off
timer has been set.
Clock display (see page 44)
4
PC
4:3
10:00
4
OFF TIMER
90MIN
1
2
3
18
Digital Zoom (see page 20)
Page 19
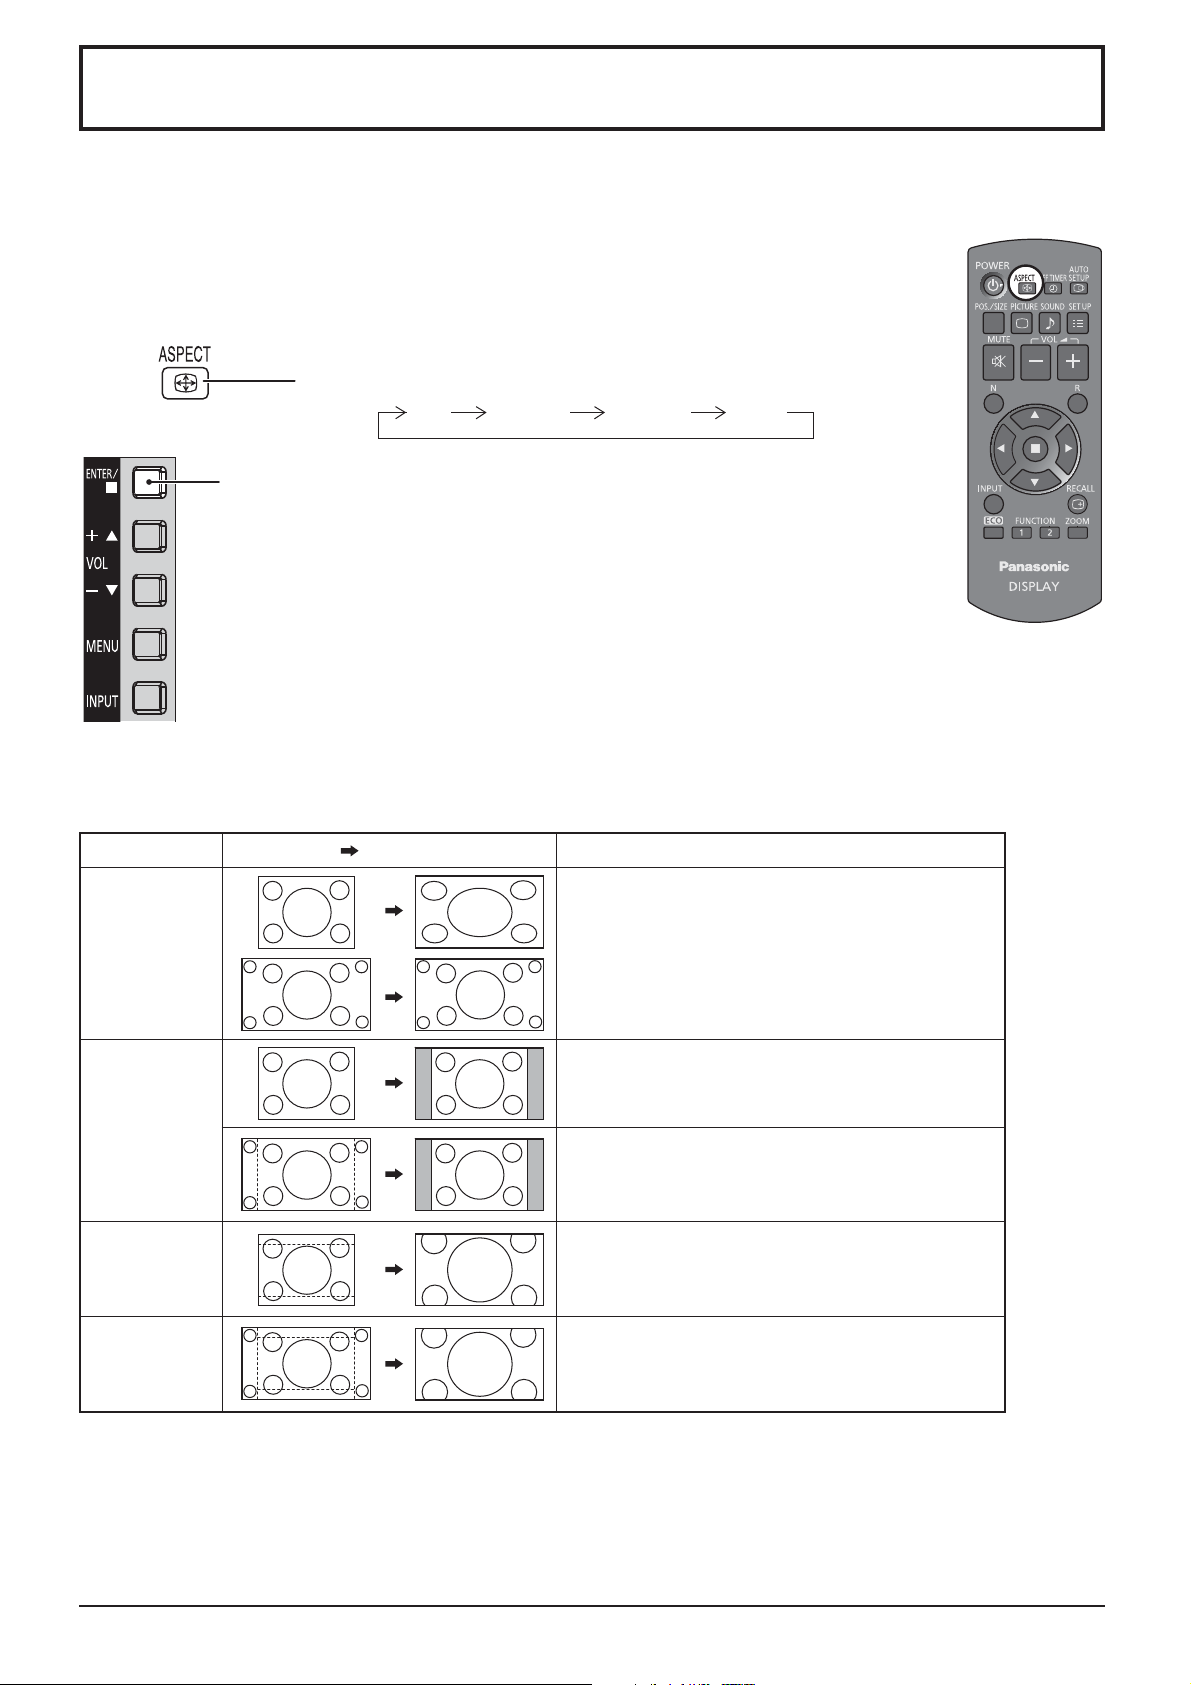
ASPECT Controls
The Display will allow you to enjoy viewing the picture at its maximum size, including wide screen cinema format
picture.
Note:
Be aware that if you put the display in a public place for commercial purposes or a public showing
and then use the aspect mode select function to shrink or expand the picture, you may be violating
the copyright under copyright law. It is prohibited to show or alter the copyrighted materials of other
people for commercial purposes without the prior permission of the copyright holder.
Press repeatedly to move through the aspect options:
[from the unit]
4:3 ZOOM1 FULL
The aspect mode changes each time the ENTER button is
pressed.
ZOOM2
Note:
The aspect mode is memorized separately for each input terminal.
Aspect mode
FULL
4:3
ZOOM1
ZOOM2
Picture
Enlarged screen
The display of the pictures lls the screen.
In the case of SD signals, pictures with a 4:3 aspect
ratio are enlarged horizontally, and displayed. This
mode is suited to displaying anamorphic pictures with
a 16:9 aspect ratio.
Pictures with a 4:3 aspect ratio are displayed with their
original aspect ratio. Side panels are displayed at the
left and right edges of the screen.
Pictures with a 16:9 aspect ratio are displayed with
their original aspect ratio. The left and right edges of
the pictures are masked by side panels.
Letterbox pictures with a 16:9 aspect ratio are enlarged
vertically and horizontally so that their display lls the
screen. The top and bottom edges of the pictures are
cut off.
Letterbox pictures with a 16:9 aspect ratio are enlarged
vertically and horizontally so that their display lls the
screen. The top and bottom edges as well as the left
and right edges of the pictures are cut off.
Description
1919
Page 20
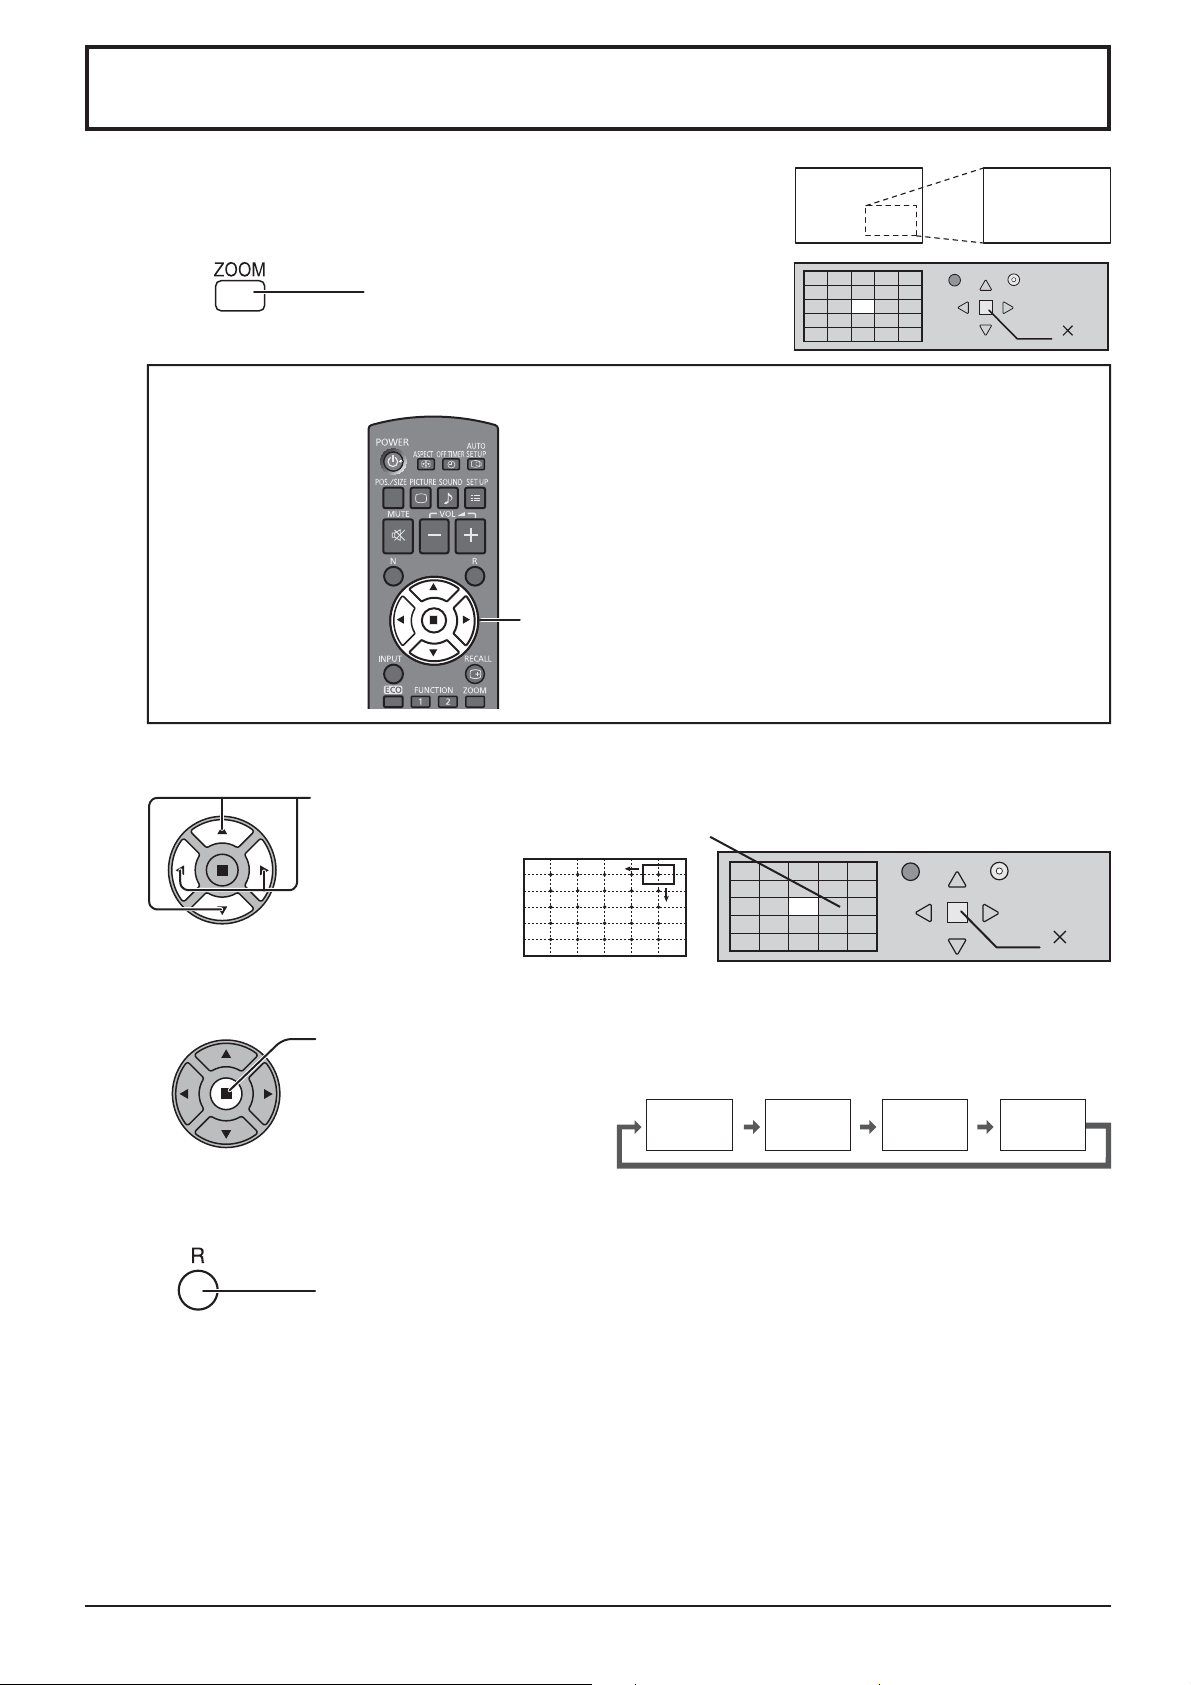
Digital Zoom
This displays an enlargement of the designated part of the displayed image.
1
2
Display the operation guide.
Press to access Digital Zoom.
The operation guide will be displayed.
During Digital Zoom, only the following buttons can be operated.
[Remote control]
POSITION /
ACTION button
Select the area of the image to be enlarged.
Press on the enlargement location to select.
The cursor will move.
EXIT
1
3
4
Notes:
• When power goes OFF (including “Off Timer” operation), Digital Zoom terminates.
• The Digital Zoom function cannot be selected while in the following operation state:
When MULTI DISPLAY SETUP is ON (see page 35).
When SCREENSAVER is running. (see page 29, 30)
• While Digital Zoom is in operation, “Adjusting POS. /SIZE” cannot be used.
Select the magni cation required for the enlarged display.
Each time this is pressed, the magni cation factor changes.
This is shown in the image being displayed.
× 1 × 2 × 3 × 4
Return to normal display (quit Digital Zoom).
Press to exit from the Digital Zoom.
EXIT
2
2
2020
Page 21
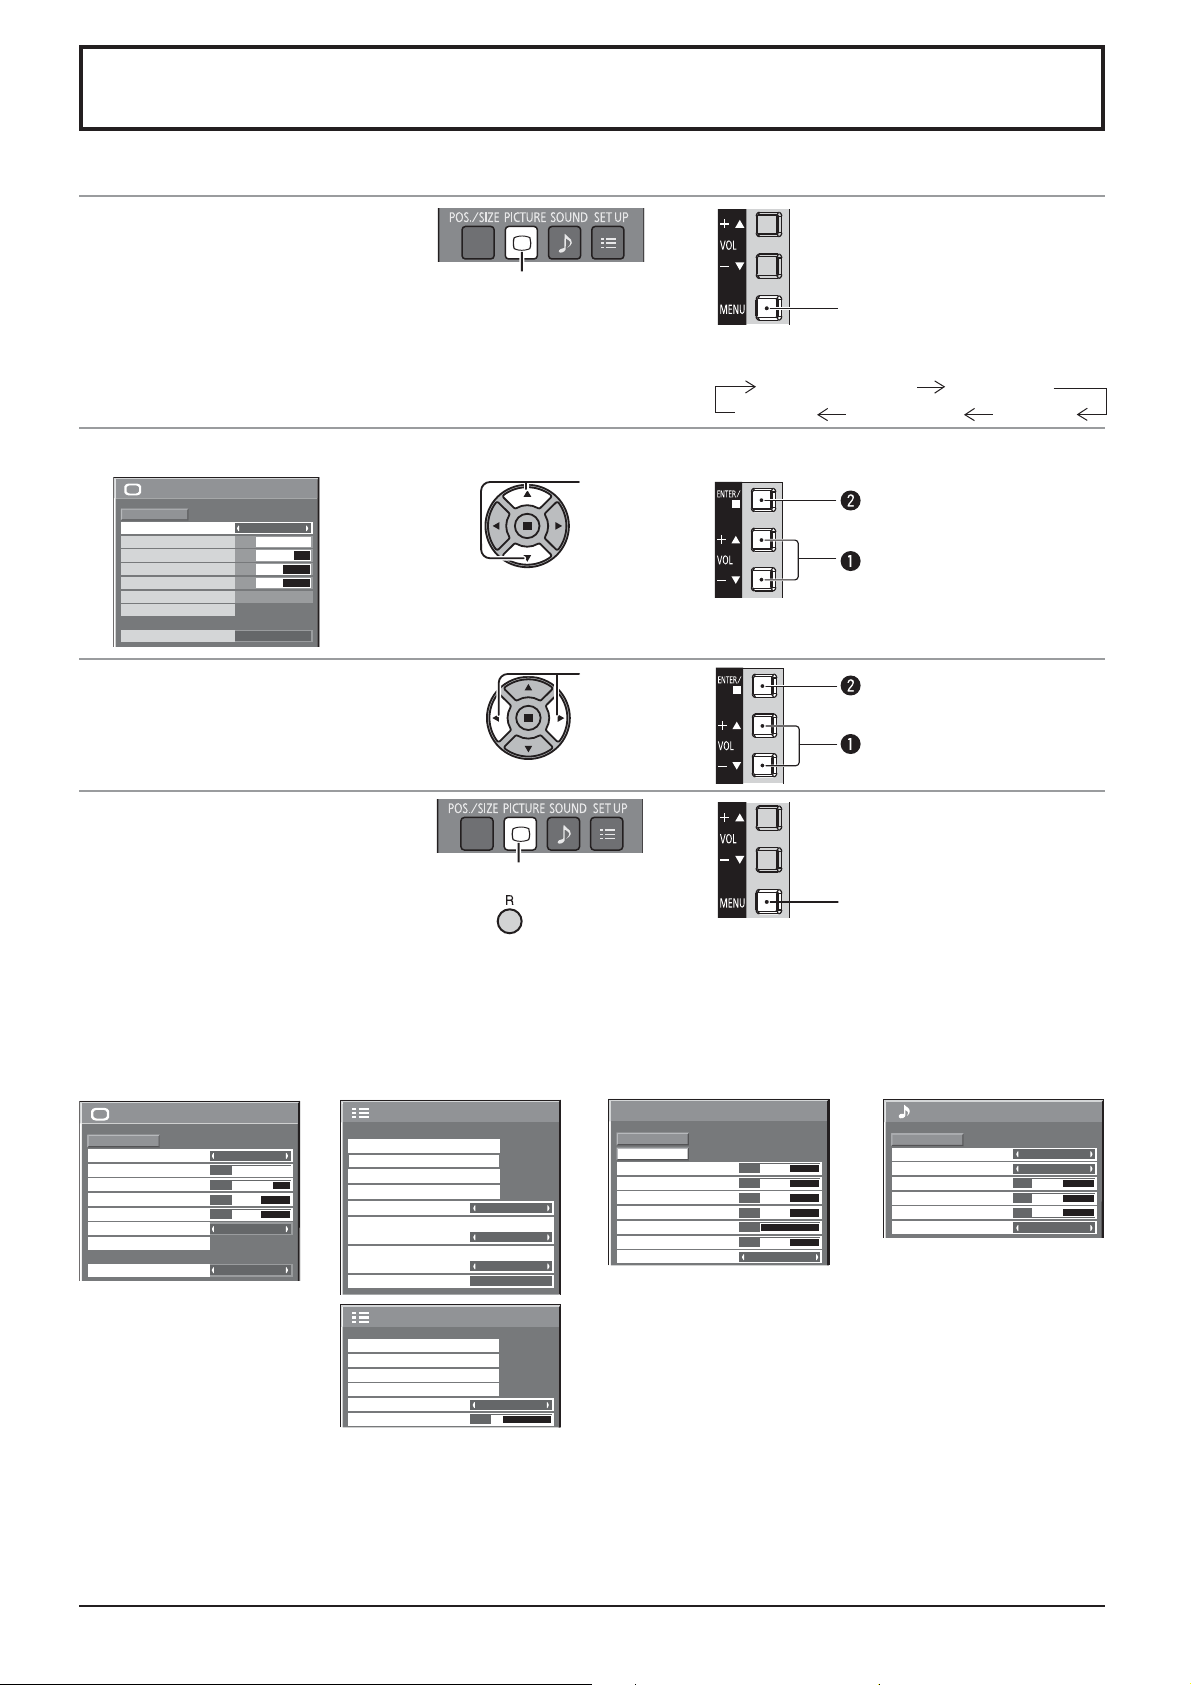
On-Screen Menu Displays
Remote Control Unit
Display the menu screen.
1
Press to select.
(Example: PICTURE menu)
Select the item.
2
PICTURE
NORMAL
NORMALIZE
PICTURE MENU
BACKLIGHT
PICTURE
BRIGHTNESS
SHARPNESS
COLOR TEMP
ADVANCED SETTINGS
FRAME CREATION
STANDARD
100
70
50
50
NORMAL
MAX
( Example:
PICTURE menu)
Select.
Press several times.
Each time the MENU button is pressed, the
menu screen will switch.
Normal Viewing PICTURE
SOUND POS. /SIZE
SET UP
Press.
Select.
3
Set.
Adjust.
Press.
Adjust.
Exit the menu.
4
Press.
Press several times.
Press to return to the
previous menu.
Menu display list
Note: Menu that cannot be adjusted is grayout. Adjustable menu changes depending on signal, input and menu setting.
PICTURE menu SET UP menu POS./SIZE menu SOUND menu
PICTURE
NORMALIZE
PICTURE MENU
BACKLIGHT
PICTURE
BRIGHTNESS
SHARPNESS
COLOR TEMP
ADVANCED SETTINGS
FRAME CREATION
NORMAL
see page 24, 25
STANDARD
100
70
50
50
NORMAL
MAX
SET UP
SIGNAL
SCREENSAVER
INPUT LABEL
ECO MODE SETTINGS
WOBBLING
YUV/RGB-IN SELECT
NO ACTIVITY POWER OFF
OSD LANGUAGE
MULTI DISPLAY SETUP
SET UP TIMER
PRESENT TIME SETUP
NETWORK SETUP
MENU DISPLAY DURATION
MENU TRANSPARENCY
see page 27-42
1/2
OFF
RGB
DISABLE
ENGLISH (US)
2/2SET UP
15 S
20
POS. /SIZE
NORMALIZE
AUTO SETUP
H-POS
H-SIZE
V-POS
V-SIZE
CLOCK PHASE
DOT CLOCK
1:1 PIXEL MODE
NORMAL
see page 22, 23
0
0
0
0
0
0
OFF
SOUND
NORMALIZE
OUTPUT SELECT
AUDIO MENU
BASS
TREBLE
BALANCE
SURROUND
NORMAL
see page 26
SPEAKERS
STANDARD
0
0
0
OFF
2121
Page 22
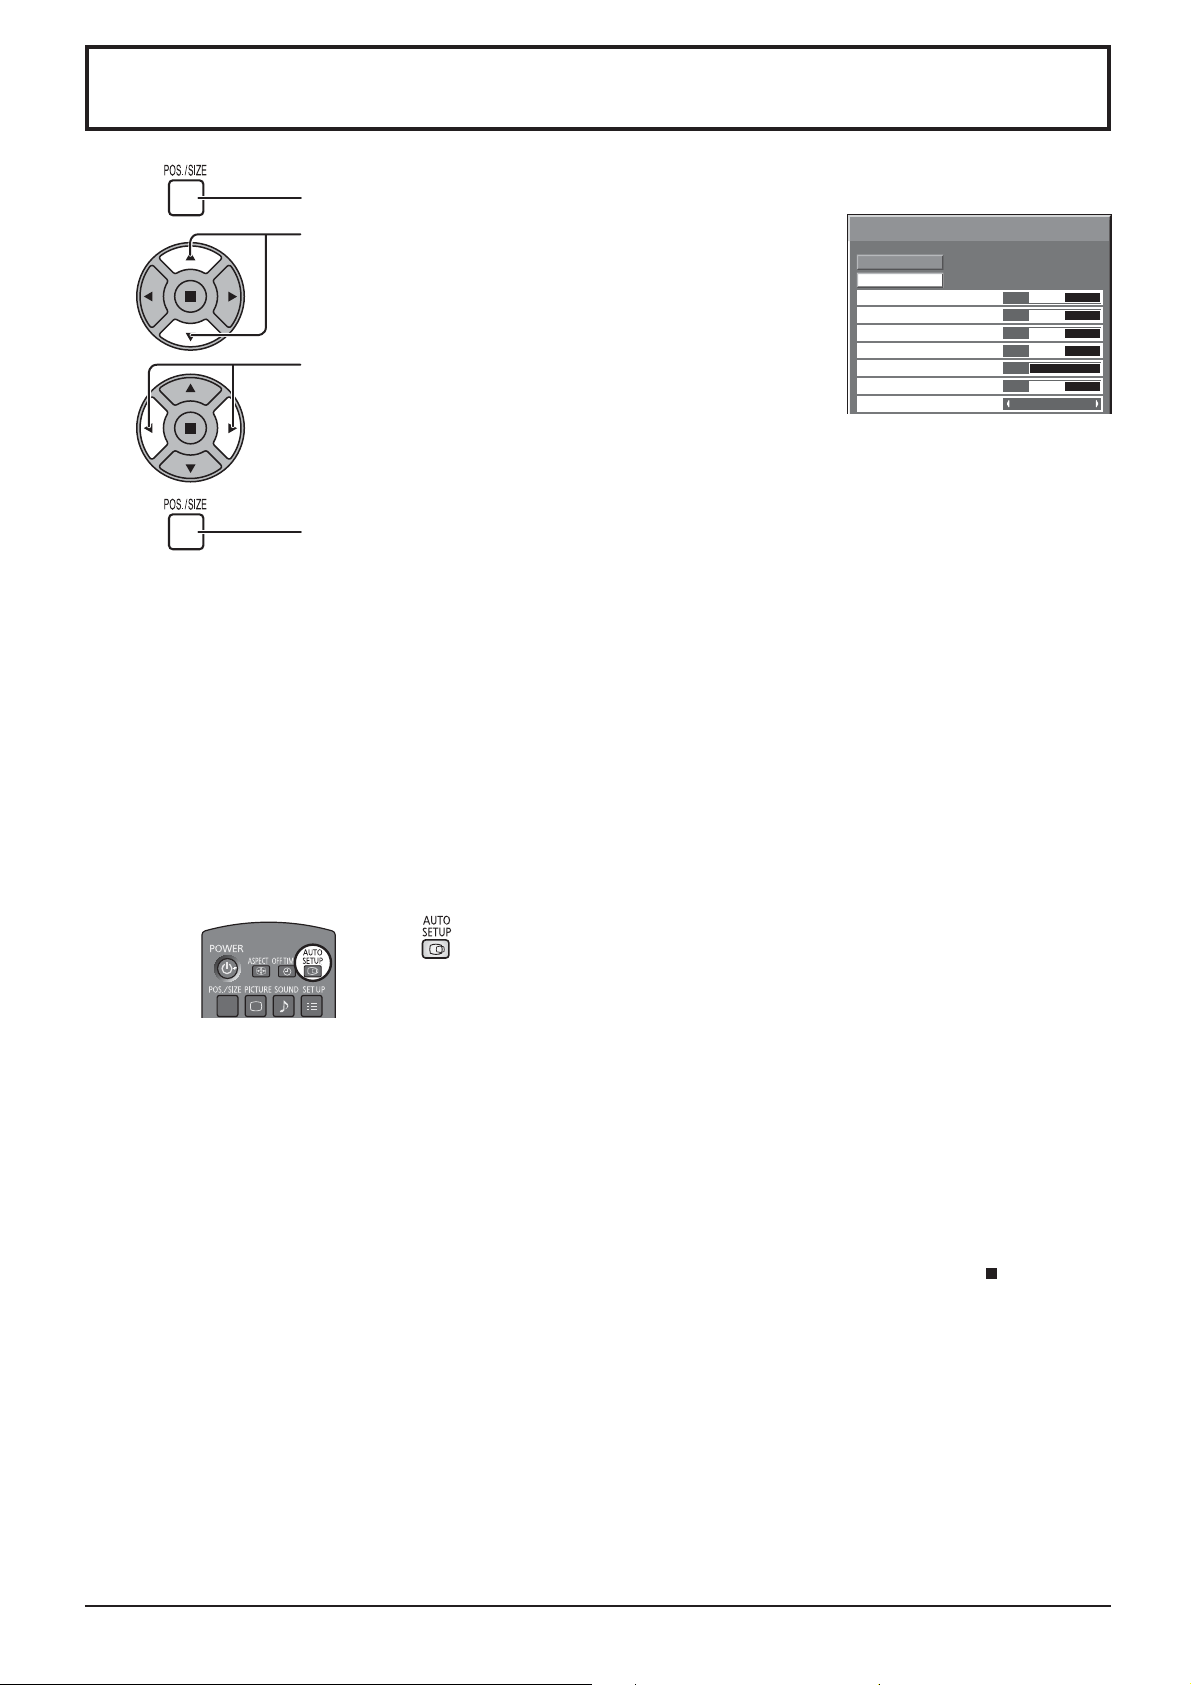
Adjusting POS. /SIZE
1
2
3
Press to display the POS. /SIZE menu.
Press to select the menu to adjust.
Press to adjust the menu.
POS. /SIZE
NORMALIZE
AUTO SETUP
H-POS
H-SIZE
V-POS
V-SIZE
CLOCK PHASE
DOT CLOCK
1:1 PIXEL MODE
NORMAL
0
0
0
0
0
0
OFF
Note:
Unadjustable items are grayed out.
Adjustable items differ
4
Press to exit from adjust mode.
depending on the input signal
and the display mode.
Note:
If a “Cue” or “Rew” signal from a VCR or DVD player is received, the picture position will shift up or down. This picture
position movement cannot be controlled by the POS. /SIZE function.
AUTO
SETUP
H-POS/V-POS, H-SIZE/V-SIZE, DOT CLOCK and CLOCK PHASE are automatically adjusted when the
PC signal is received.
This setting only operates when a PC signal is input, and the aspect is “16:9”.
Using Remote Control
When on the remote control is pressed, “AUTO SETUP” will be executed.
When AUTO SETUP does not work, “INVALID” is displayed.
Notes:
• AUTO SETUP may not work when a cropped or dark image is input. In such case, switch to a bright
image with borders and other objects are clearly shown, and then try auto setup again.
• Depending on the signal, out of alignment may occur after AUTO SETUP. Carry out ne tuning for the
position/size as required.
• If AUTO SETUP cannot set properly for vertical frequency 60Hz XGA signal (1024×768@60Hz and
1366×768@60Hz), pre-selecting the individual signal in “XGA MODE” (see page 39) may results in
correct AUTO SETUP.
• AUTO SETUP does not work well when a signal such as additional information is superimposed out of
valid image period or intervals between synchronizing and image signals are short.
• If AUTO SETUP cannot adjust correctly, select “NORMALIZE” once and press ACTION ( ) then adjust
POS. /SIZE manually.
• If the picture goes off screen in the horizontal direction as a result of performing AUTO SETUP, perform
DOT CLOCK adjustment.
22
Page 23
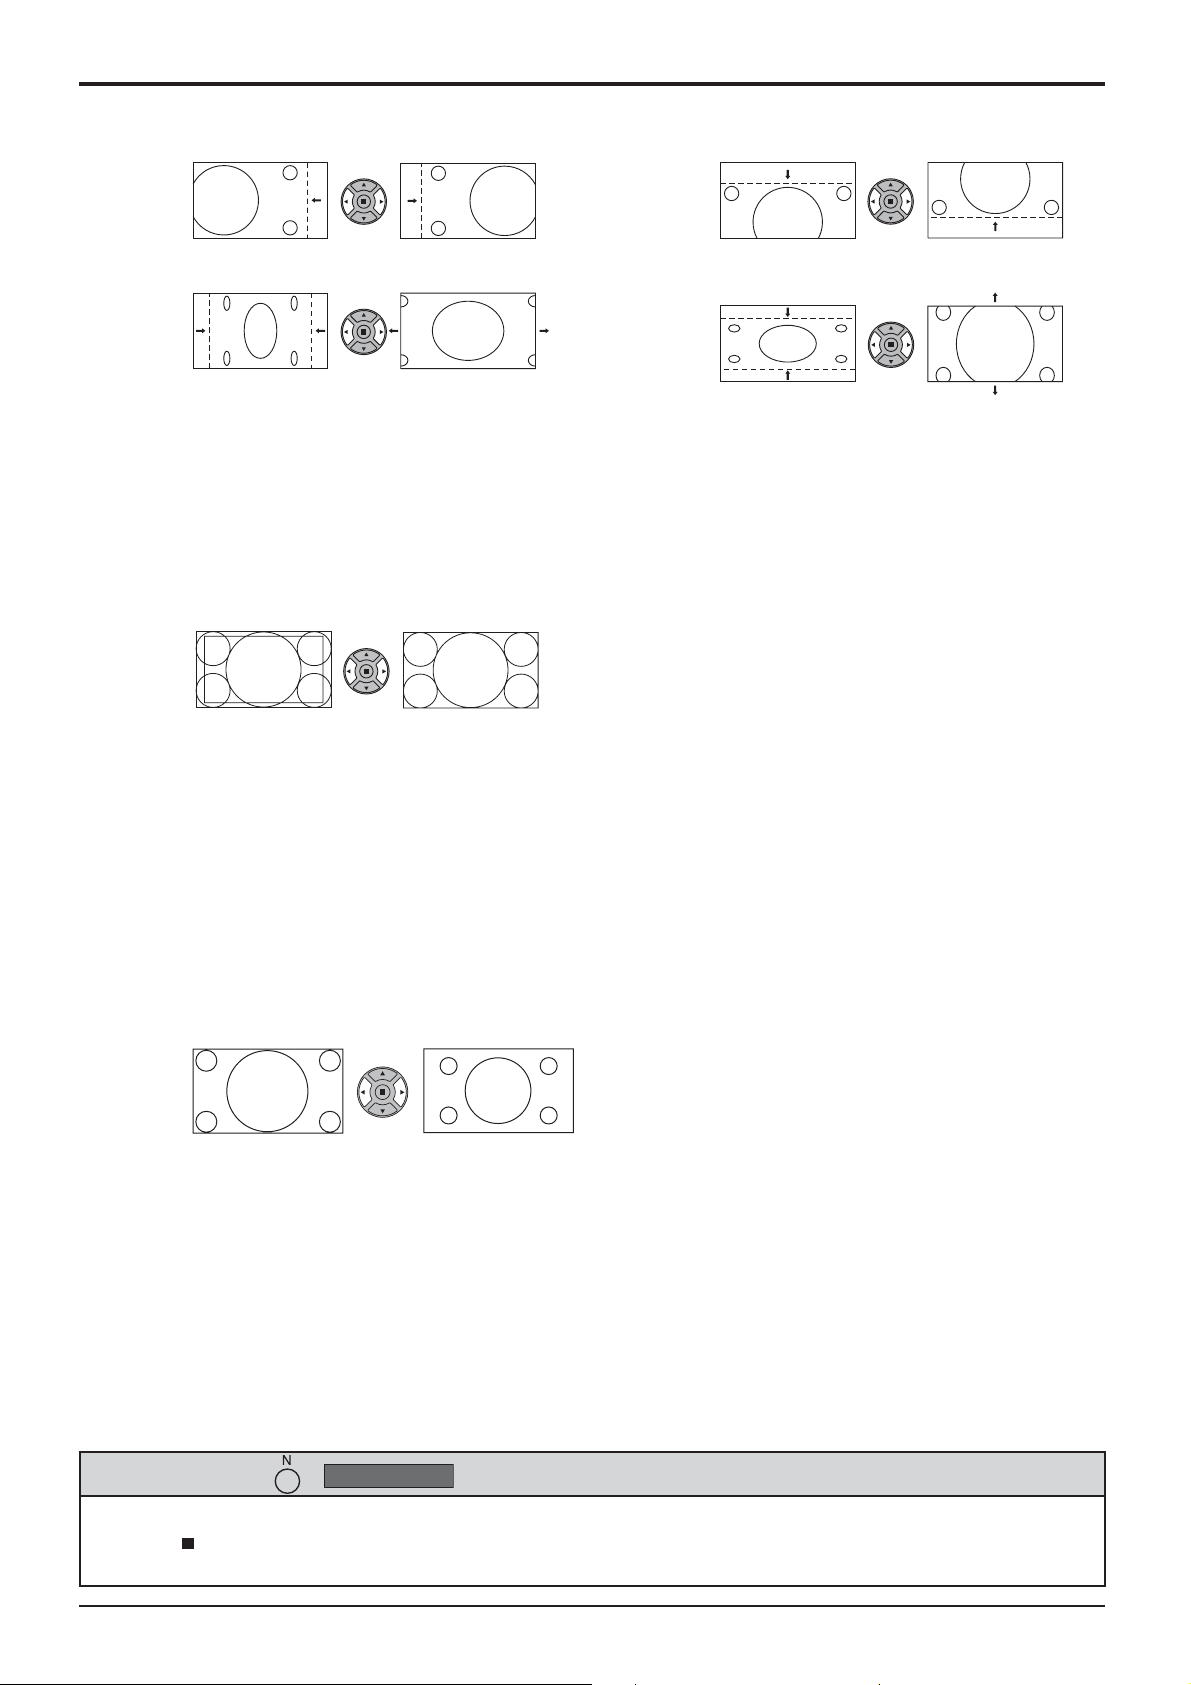
Adjusting POS. /SIZE
H-POS Adjust the horizontal position. V-POS Adjust the vertical position.
H-SIZE Adjust the horizontal size. V-SIZE Adjust the vertical size.
Clock
Phase
Dot Clock (During PC input signal)
Over scan Turn image over scan On/Off.
1:1 PIXEL
MODE
(During PC input signal)
Eliminate the ickering and distortion.
Periodic striped pattern interference (noise) may occur when a striped pattern is displayed. If this happens,
adjust so that any such noise is minimized.
Con gurable signals are as follows:
525i, 525p, 625i, 625p, 750/60p, 750/50p (DVI, HDMI)
ON OFF
Notes:
• “OFF” is effective during only “FULL” aspect mode.
• When “OFF” is set, “H-SIZE” and “V-SIZE” cannot be adjusted.
Adjusts the display size when 1125i or 1125p signal is input.
Notes:
• “ON” is effective during only “FULL” aspect mode.
• Select ON when you would like to replay 1920 × 1080 input signal.
• Applicable input signal;
1125 (1080) / 50i · 60i · 24sF · 24p · 25p · 30p · 50p · 60p
• Select OFF when ickering is shown around the image.
• H-SIZE and V-SIZE cannot be adjusted when ON is selected.
OFF ON
Helpful Hint ( /
While the POS. /SIZE display is active, if either the N button on the remote control is pressed at any time or the
ACTION ( ) button is pressed during “NORMALIZE”, then all adjustment values (except “CLOCK PHASE” and
“DOT CLOCK”) are returned to the factory settings.
NORMALIZE
Normalization)
23
Page 24
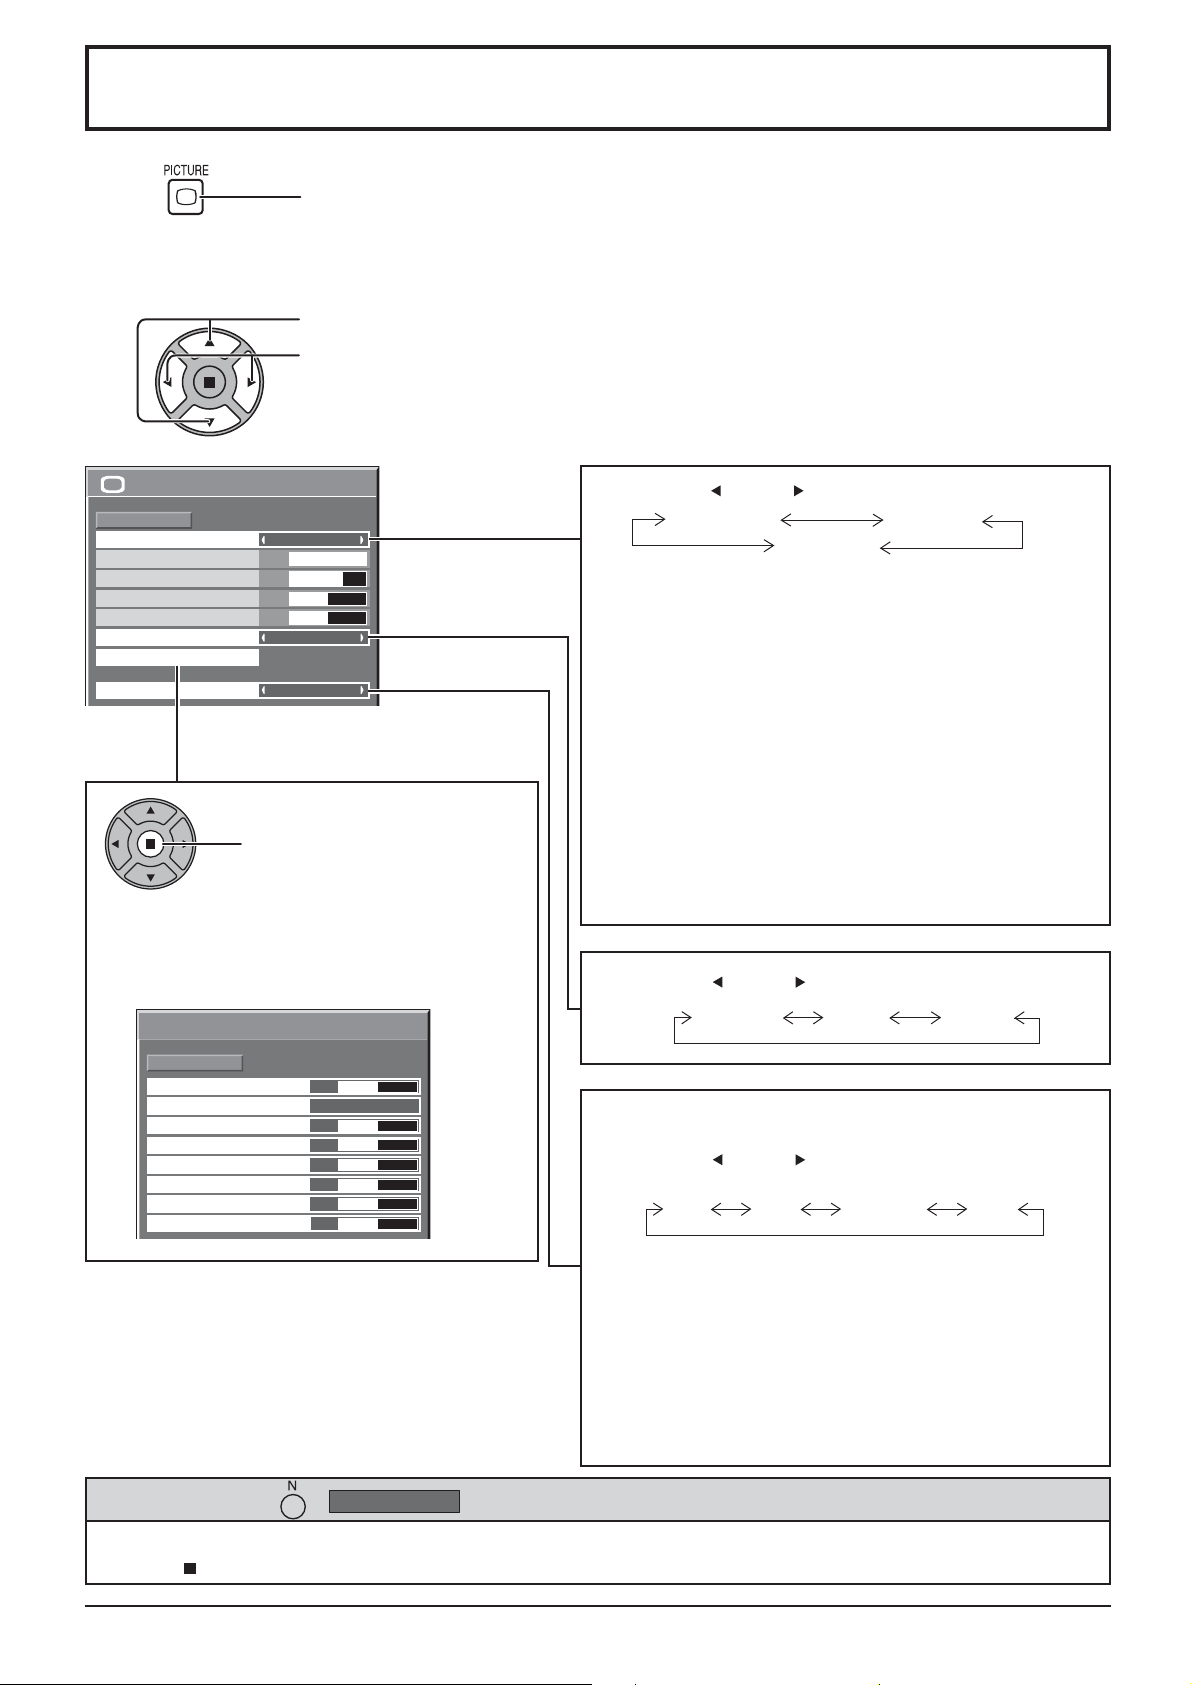
PICTURE Adjustments
1
Select to adjust each item.
2
PICTURE
NORMALIZE
PICTURE MENU
BACKLIGHT
PICTURE
BRIGHTNESS
SHARPNESS
COLOR TEMP
ADVANCED SETTINGS
FRAME CREATION
NORMAL
Press to display the PICTURE menu.
Press to select the menu to adjust.
Select the desired level by looking at the picture behind the menu.
Note:
Menu that cannot be adjusted is grayout. Adjustable menu
changes depending on signal, input and menu setting.
Press the left or right button to switch between modes.
STANDARD
STANDARD
100
70
50
50
NORMAL
STANDARD
For viewing in standard environments.
DYNAMIC
MAX
For viewing in brighter environments.
CINEMA
For use in viewing tone-focused pictures with
brightness reduced.
DYNAMIC
CINEMA
Press to enter Advanced
Settings.
ADVANCED SETTINGS
Enables ne picture adjustment at a professional level
(see next page).
ADVANCED SETTINGS
NORMALIZE
INPUT LEVEL
GAMMA
W/B HIGH R
W/B HIGH G
W/B HIGH B
W/B LOW R
W/B LOW G
W/B LOW B
NORMAL
0
2.2
50
50
50
50
50
50
Note:
If you would like to change the picture and color of the
selected PICTURE menu to something else, adjust
using the items in the PICTURE menu. (see next page)
Press the left or right button to switch between modes.
NORMAL WARM COOL
FRAME CREATION
Improves motion picture quality by reducing motion blur.
Press the left or right button to switch between
modes.
OFF MIN MIDDLE MAX
Notes:
• The mode is memorized per input terminal.
• Even if “NORMALIZE” is selected, the NORMAL setting
will not be restored.
• The picture and menu will disappear for a moment if
you switch the mode to OFF, or switch from OFF to
another mode.
• “FRAME CREATION” is not available for 42-inch
models.
Helpful Hint ( /
NORMALIZE
Normalization)
While the “PICTURE” menu is displayed, if either the N button on the remote control is pressed at any time or the
ACTION ( ) button is pressed during “NORMALIZE”, then all adjustment values are returned to the factory settings.
24
Page 25
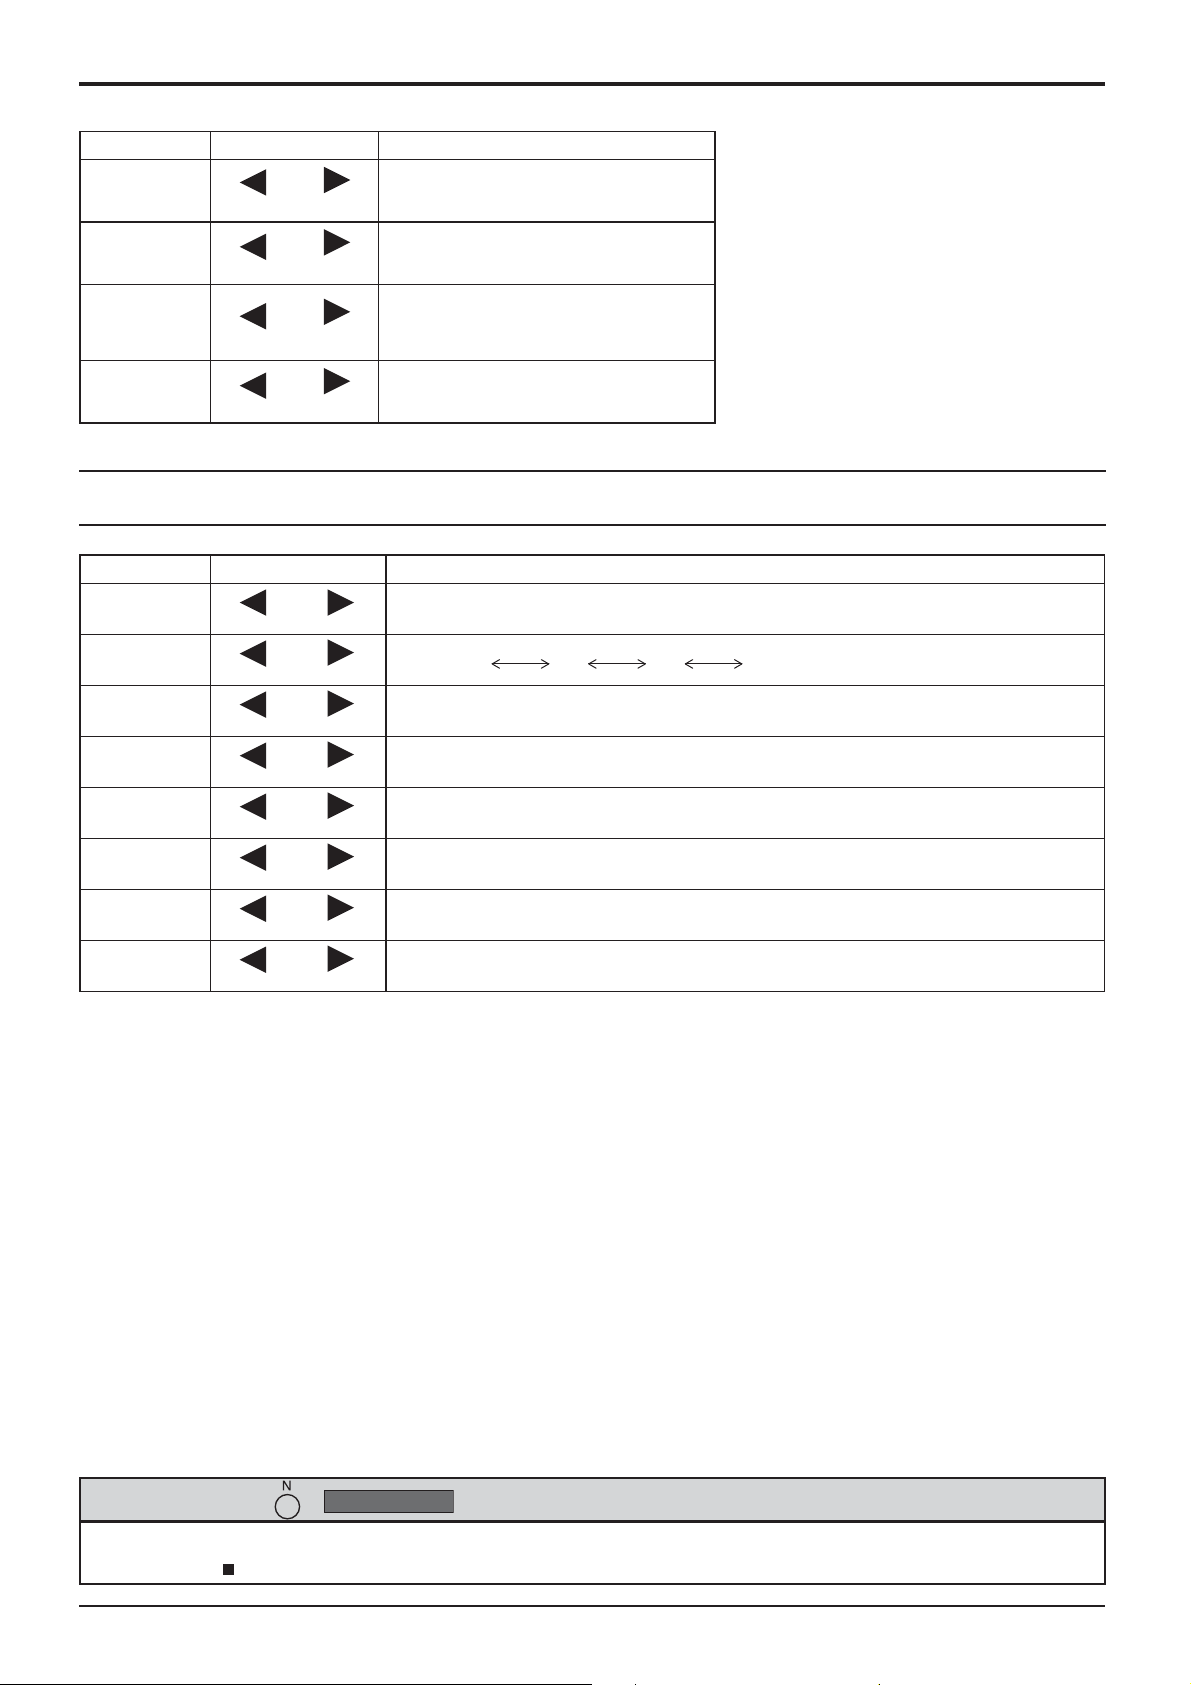
PICTURE Adjustments
Item Effect Adjustments
BACKLIGHT
PICTURE
BRIGHTNESS
SHARPNESS
Darker Brighter
Less More
Darker Brighter
Less More
Adjusts luminance of the back light.
Adjusts the proper picture contrast.
Adjusts for easier viewing of dark
pictures such as night scenes and
black hair.
Adjusts picture sharpness.
ADVANCED SETTINGS
Item Effect Details
INPUT
LEVEL
GAMMA
W/B HIGH R
Less More
Down
Less
Up
More
Adjustment of parts which are extremely bright and hard to see.
S CURVE 2.0 2.2 2.6
Adjusts the white balance for light red areas.
Notes:
• You can change the level of each function
(BACKLIGHT, PICTURE, BRIGHTNESS,
SHARPNESS) for each PICTURE
MENU.
• The setting details for STANDARD,
DYNAMIC and CINEMA respectively
are memorized separately for each input
terminal.
• “BACKLIGHT” can be adjusted when
“ECO MODE” is set to “CUSTOM” and
“POWER SAVE” to “OFF”. (see page
32)
W/B HIGH G
W/B HIGH B
W/B LOW R
W/B LOW G
W/B LOW B
Notes:
• Carry out “W/B” adjustment as follows.
Adjust the white balance of the bright sections using the “W/B HIGH R” , “W/B HIGH G” and “W/B HIGH B”
1.
settings.
2. Adjust the white balance of the dark sections using the “W/B LOW R” , “W/B LOW G” and “W/B LOW B”
settings.
3. Repeat steps 1 and 2 to adjust.
Steps 1 and 2 affect each other’s settings, so repeat each step in turn to make the adjustment.
• The adjustment values are memorized separately for each input terminal.
• The adjustment range values should be used as an adjustment reference.
Less
Less
Less
Less
Less
More
More
More
More
More
Adjusts the white balance for light green areas.
Adjusts the white balance for light blue areas.
Adjusts the white balance for dark red areas.
Adjusts the white balance for dark green areas.
Adjusts the white balance for dark blue areas.
Helpful Hint ( /
On the remote control unit, while the “ADVANCED SETTINGS” menu is displayed, if either the N button is pressed at any time
or the ACTION ( ) button is pressed during “NORMALIZE”, then all adjustment values are returned to the factory settings.
NORMALIZE
Normalization)
25
Page 26
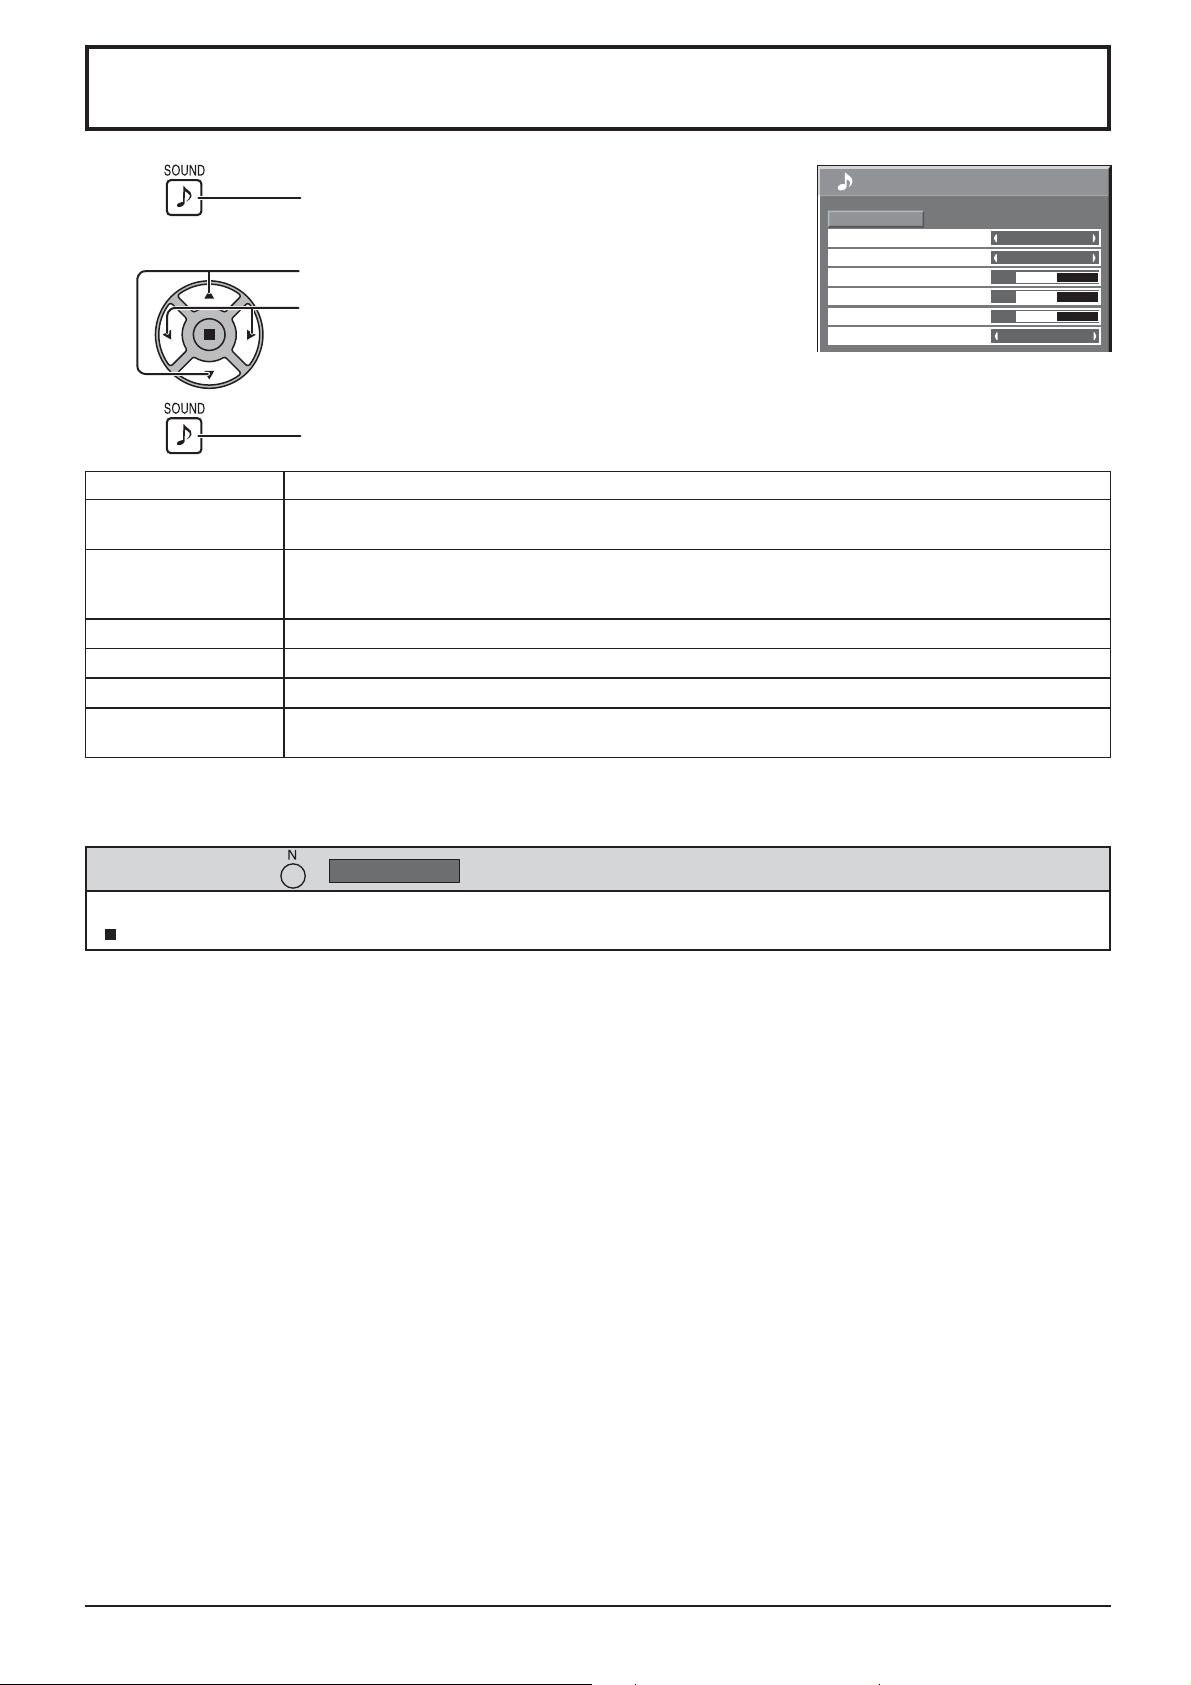
SOUND Adjustment
1
Select to adjust each item.
2
3
Item Details
OUTPUT SELECT
AUDIO MENU
BASS
TREBLE
BALANCE
SURROUND
Notes:
• When “AUDIO OUT” is selected, the items other than “BALANCE” cannot be adjusted.
• BASS, TREBLE and SURROUND settings are memorized separately for each AUDIO MENU.
Press to display the SOUND menu.
Press to select the menu to adjust.
Select the desired level by listening to the sound.
Press to exit from adjust mode.
SPEAKERS: Emits sound from the built-in speakers.
AUDIO OUT: Emits sound through the AUDIO OUT terminal.
STANDARD: Emits the original sound.
DYNAMIC: Accentuates sharp sound.
CLEAR: Attenuates human voice.
Adjusts low pitch sound.
Adjusts high pitch sound.
Adjusts left and right volumes.
ON: Stereo sound reproduction is active.
OFF: Stereo sound reproduction is not active.
SOUND
NORMALIZE
OUTPUT SELECT
AUDIO MENU
BASS
TREBLE
BALANCE
SURROUND
NORMAL
SPEAKERS
STANDARD
0
0
0
OFF
Helpful Hint ( /
While the “SOUND” menu is displayed, if either the N button on the remote control is pressed at any time or the ACTION
( ) button is pressed during “NORMALIZE”, then all adjustment values are returned to the factory settings.
NORMALIZE
Normalization)
26
Page 27
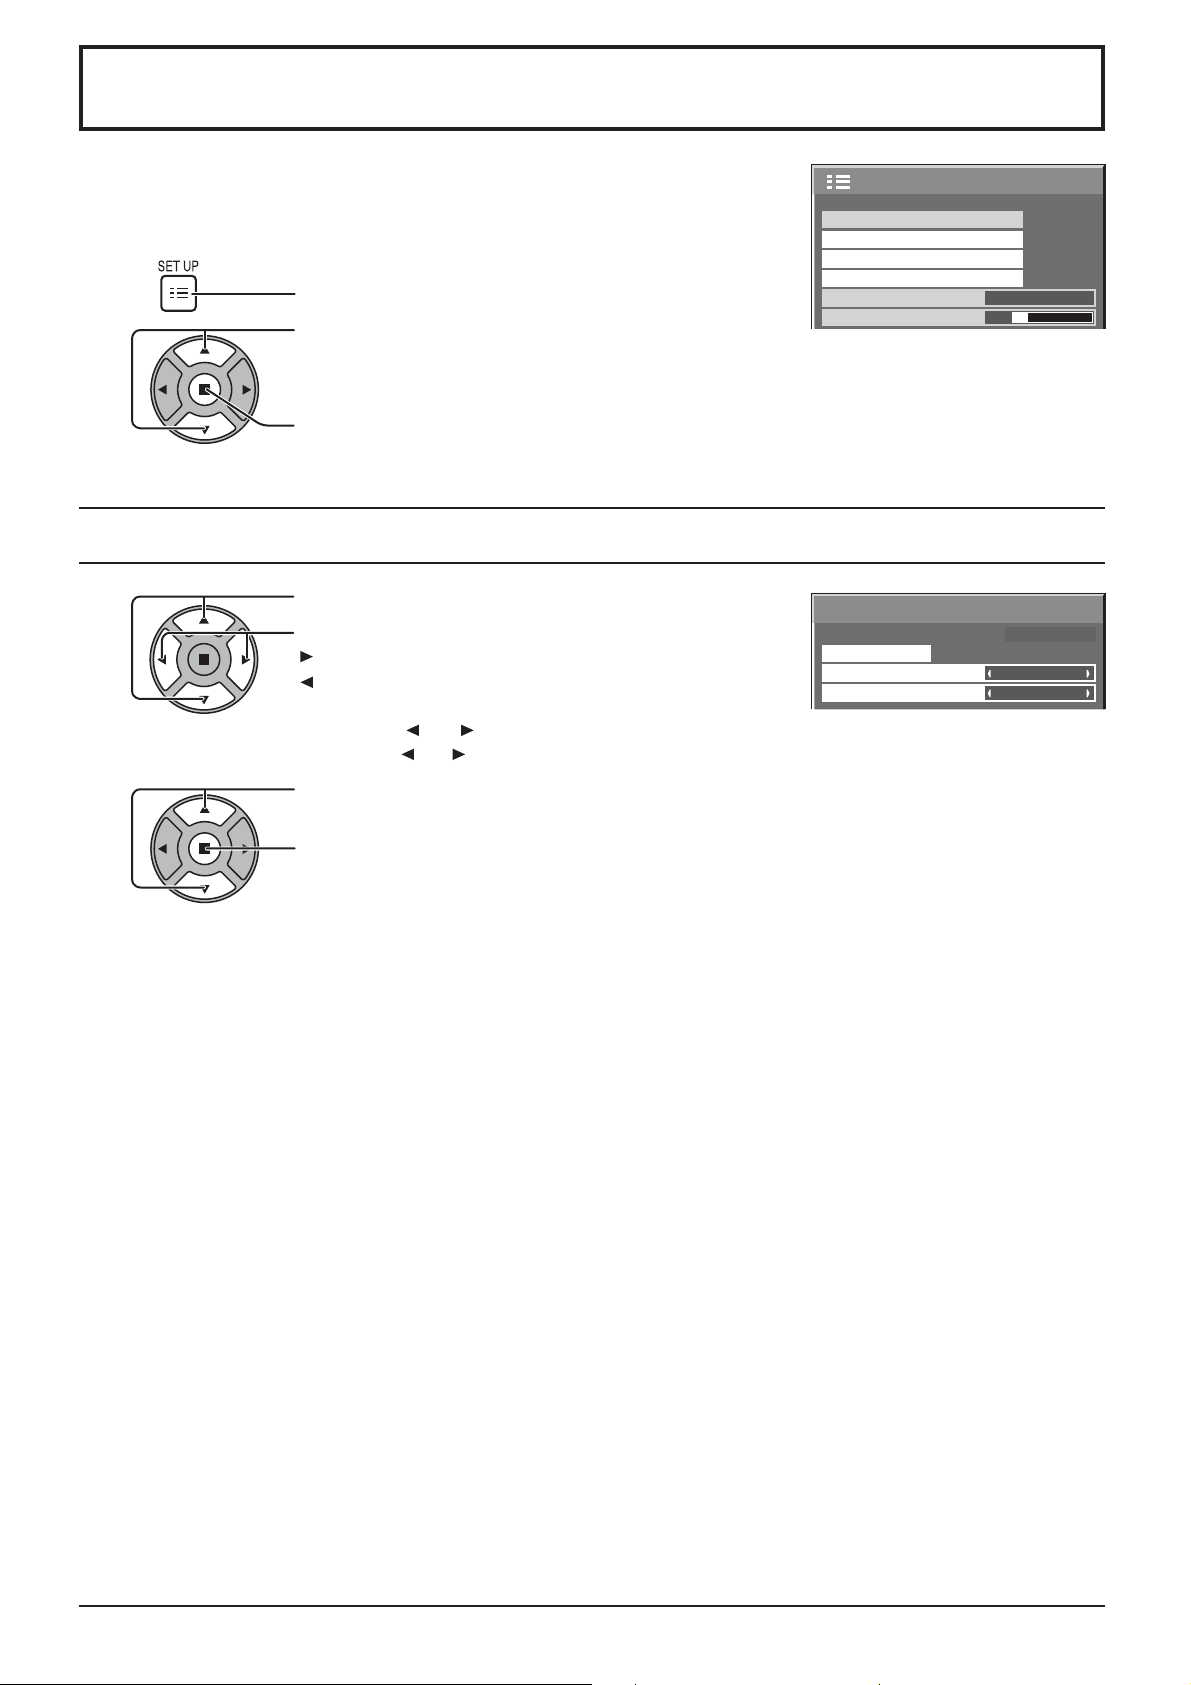
PRESENT TIME SETUP / SET UP TIMER
The timer can switch the Display ON or OFF.
Before attempting Timer Set, con rm the PRESENT TIME OF DAY and adjust if
necessary. Then set POWER ON TIME / POWER OFF TIME.
1
Press to display the SET UP menu.
2
Press to select SET UP TIMER or
PRESENT TIME SETUP.
Press to display the SET UP TIMER screen or PRESENT TIME SETUP screen.
PRESENT TIME SETUP
1
Press to select DAY or PRESENT TIME OF DAY.
Press to set up DAY or PRESENT TIME OF DAY.
button: Forward
button: Back
Notes:
• Pressing “ ” or “ ” button once changes PRESENT TIME OF DAY 1 minute.
• Pressing “ ” or “ ” button continuously changes PRESENT TIME OF DAY by 15 minutes.
MULTI DISPLAY SETUP
SET UP TIMER
PRESENT TIME SETUP
NETWORK SETUP
MENU DISPLAY DURATION
MENU TRANSPARENCY
PRESENT TIME SETUP
PRESENT TIME OF DAY MON 99 : 99
SET
DAY
PRESENT TIME OF DAY
15 S
20
MON
99 : 99
2/2SET UP
2
Press to select SET.
Press to store PRESENT TIME SETUP.
Notes:
• SET cannot be selected unless PRESENT TIME OF DAY is set.
• Unless setting the present time other than “99:99”, “DAY” and “PRESENT TIME OF DAY”
cannot be set.
• The settings of “DAY” and “PRESENT TIME OF DAY” are reset when leaving the display
turned off for about 7 days for the following reasons:
Pressing POWER switch of the unit to turn off the display.
Disconnecting the AC cord.
Interruption of power supply.
27
Page 28
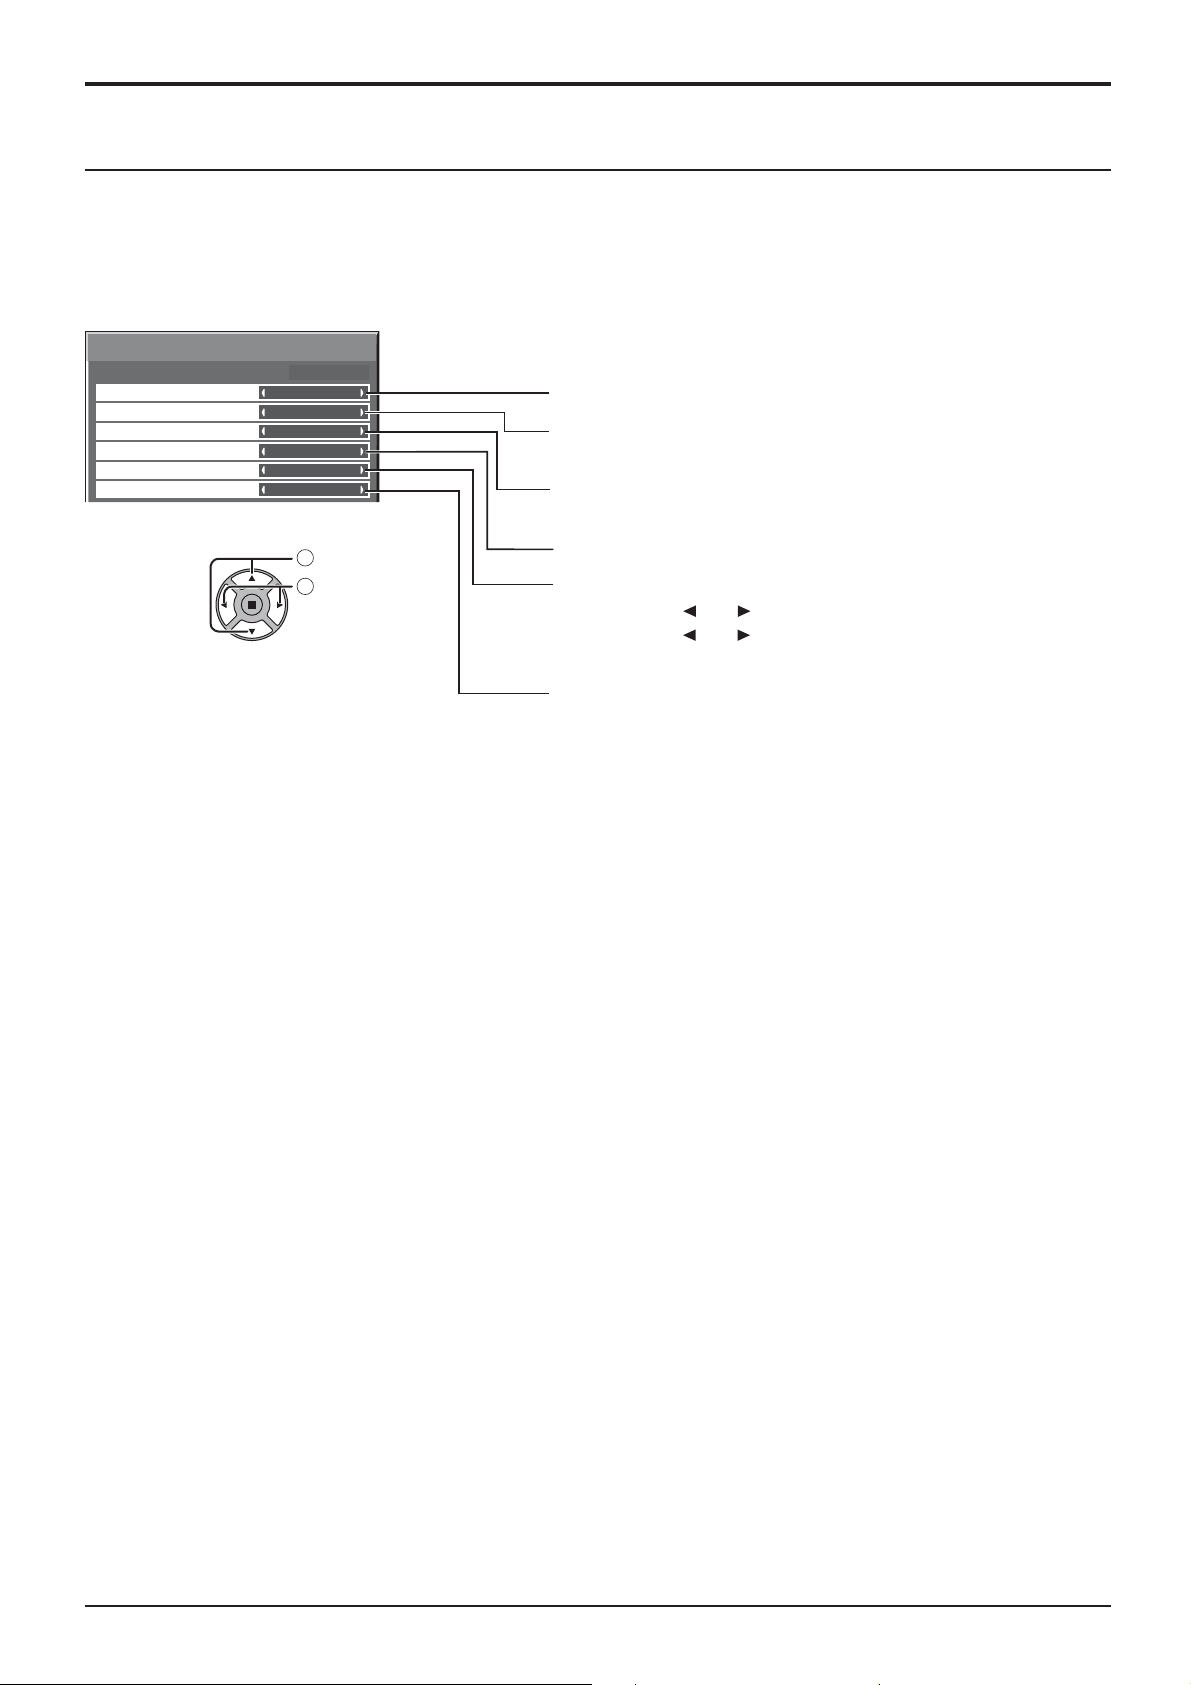
PRESENT TIME SETUP / SET UP TIMER
SET UP TIMER
Set the program for turning the power ON/OFF and select the input signal at the speci ed time. Up to 20 programs
can be set.
[Setting Example]
Program 1, Every Monday, 12:00, Power On, Input: HDMI
SET UP TIMER
PRESENT TIME OF DAY MON 0 : 03
PROGRAM
TIMER FUNCTION
DAY
POWER MODE
TIME
INPUT
1
ON
MON
POWER ON
12 : 00
HDMI
select
1
adjust
2
Set the program number.
1
To execute the program, set to “ON”.
2
The program is disabled when “OFF” is set.
Set the day.
3
The program is executed every day when “EVERYDAY” is set.
Set the power ON/OFF.
4
Set the time.
5
Pressing “ ” or “ ” button once changes “TIME” 1 minute.
Pressing “ ” or “ ” button continuously changes “TIME” by
15 minutes.
Set the input.
6
Notes:
• This function cannot be set unless “PRESENT TIME SETUP” is set.
• If more than one programs are set for the same time, only the program with the smallest program number is
enabled.
28
Page 29
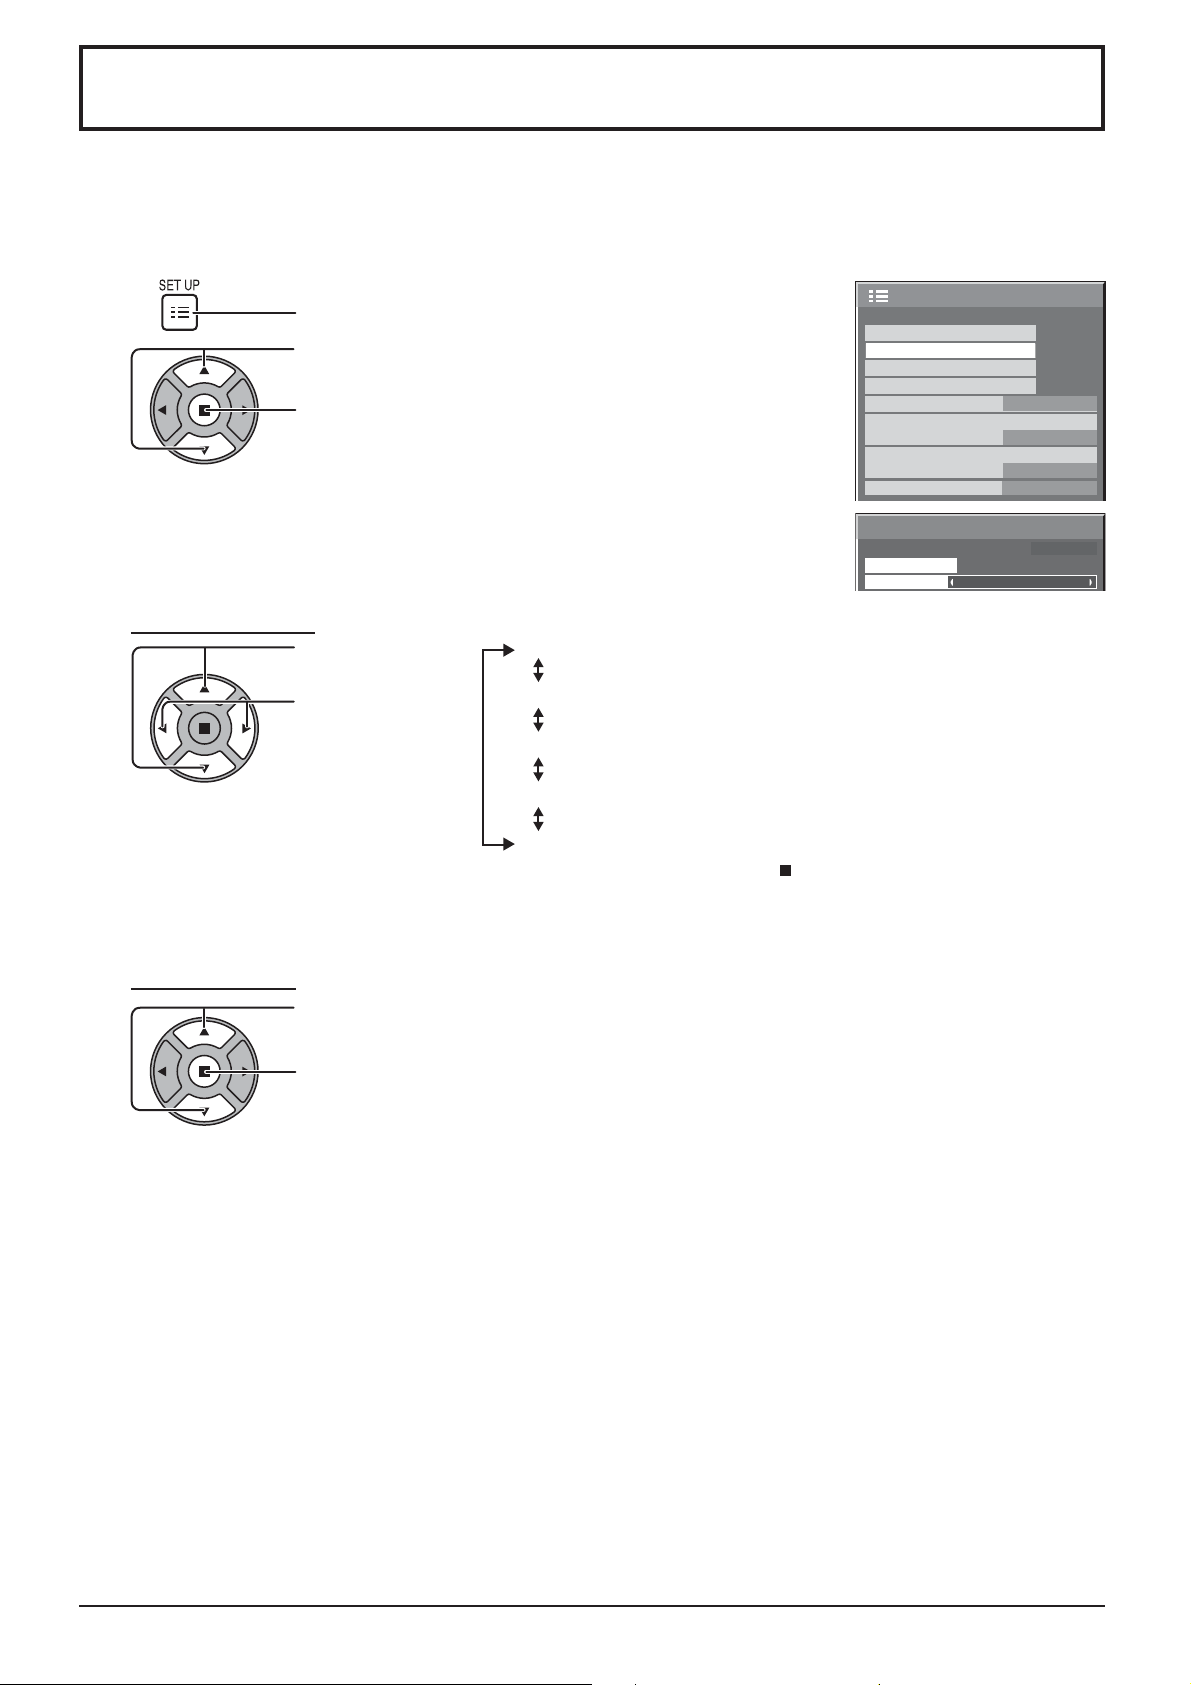
SCREENSAVER (For preventing image retention)
Do not display a still picture, especially in 4:3 mode, for any length of time.
If the display must remain on, a SCREENSAVER should be used.
When the screen saver is operating, the following 5 patterns are displayed full screen for 5 seconds each.
BlackDark GrayGrayLight GrayWhite
1
2
MODE selection
3
Press to display the SET UP menu.
Press to select the SCREENSAVER.
Press to select the SCREENSAVER menu.
Press to select the
MODE.
Press to select
each mode items.
OFF
INTERVAL
TIME OF DAY : Operates when START TIME and FINISH TIME
STANDBY AFTER SCR SAVER : Operates while SCREENSAVER DURATION,
ON : Operates when START is selected and the
OFF
RGB
DISABLE
1/2
)
SET UP
SIGNAL
SCREENSAVER
INPUT LABEL
ECO MODE SETTINGS
WOBBLING
YUV/RGB-IN SELECT
NO ACTIVITY POWER OFF
OSD LANGUAGE ENGLISH (US
SCREENSAVER
PRESENT TIME OF DAY MON 0 : 02
START
MODE
OFF
: Operates when SHOW DURATION and SAVER
DURATION are set up and those times arrive.
are set up and those times arrive.
and display enters standby mode.
ACTION ( ) button is pressed.
START setting
4
When the MODE is set to ON, press to select START.
Press to start SCREENSAVER.
The menu screen will disappear and the SCREENSAVER will be activated. To stop the
SCREENSAVER under ON, press the R button or any buttons on the main unit.
Note: When the display is turned off, the SCREENSAVER will be deactivated.
29
Page 30
SCREENSAVER (For preventing image retention)
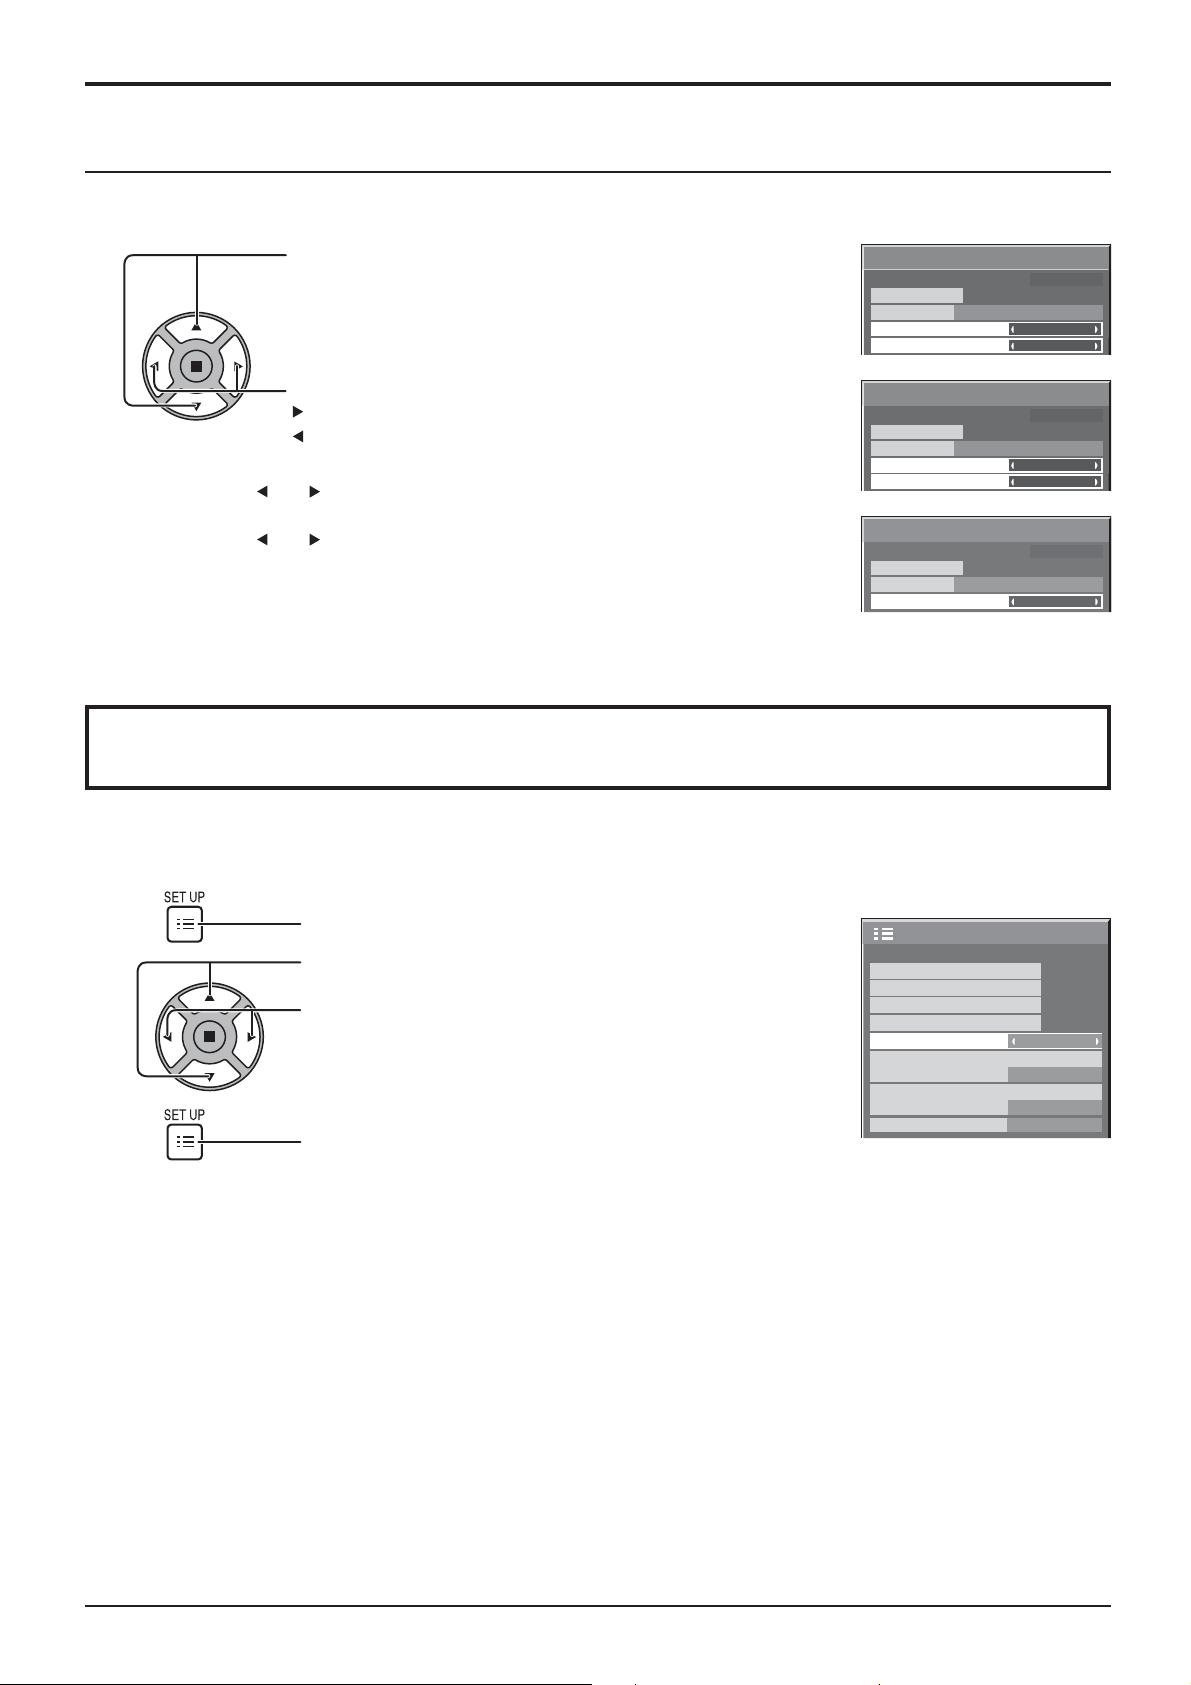
Setup of SCREENSAVER Time
After selecting TIME OF DAY, INTERVAL or STANDBY AFTER SCR SAVER, the relevant Time Setup will become
available for selection and the Operating Time may be set. (Time cannot be set when “MODE” is “ON” or “OFF”.)
Press to select START TIME / FINISH TIME (When TIME OF
DAY is selected).
Press to select SHOW DURATION / SAVER DURATION
(When INTERVAL is selected).
Press to select SCREENSAVER DURATION (When
SCREENSAVER
PRESENT TIME OF DAY MON 15 : 00
START
MODE
START TIME
FINISH TIME
TIME OF DAY
6 : 15
12 : 30
STANDBY AFTER SCR SAVER is selected).
Press to setup.
button: Forward
button: Back
Notes:
• Pressing “ ” or “ ” button once changes the Time 1 minute.
[However, switching occurs every 15 minutes when Periodic Time is selected.]
• Pressing “ ” or “ ” button continuously changes the Time by 15 minutes.
• “SCREENSAVER DURATION” of the “STANDBY AFTER SCR SAVER” can
be set from 0:00 to 23:59. When this is set to “0:00”, “STANDBY AFTER
SCR SAVER” will not be activated.
SCREENSAVER
PRESENT TIME OF DAY MON 15 : 00
START
MODE
SHOW DURATION
SAVER DURATION
SCREENSAVER
PRESENT TIME OF DAY MON 15 : 00
START
MODE
SCREENSAVER DURATION
INTERVAL
12 : 00
3 : 00
STANDBY AFTER SCR SAVER
6 : 15
Note: Timer function will not work unless “PRESENT TIME OF DAY” is set.
WOBBLING
Automatically shifts the display image (therefore unnoticeable to the eye) to prevent image retention of sharper contour
of image.
1
Press to display the SET UP menu.
Press to select “WOBBLING”.
2
Press to select “ON” or “OFF”.
ON: Shifts the position of the display image on a xed time
interval.
3
Notes:
• If “MULTI DISPLAY SETUP” is set to “ON”, this function does not operate.
• When this function is operating, part of the screen may appear to be missing.
Press to exit from adjust mode.
SET UP
SIGNAL
SCREENSAVER
INPUT LABEL
ECO MODE SETTINGS
WOBBLING
YUV/RGB-IN SELECT
NO ACTIVITY POWER OFF
OSD LANGUAGE ENGLISH (US
OFF
RGB
DISABLE
1/2
)
30
Page 31
NO ACTIVITY POWER OFF
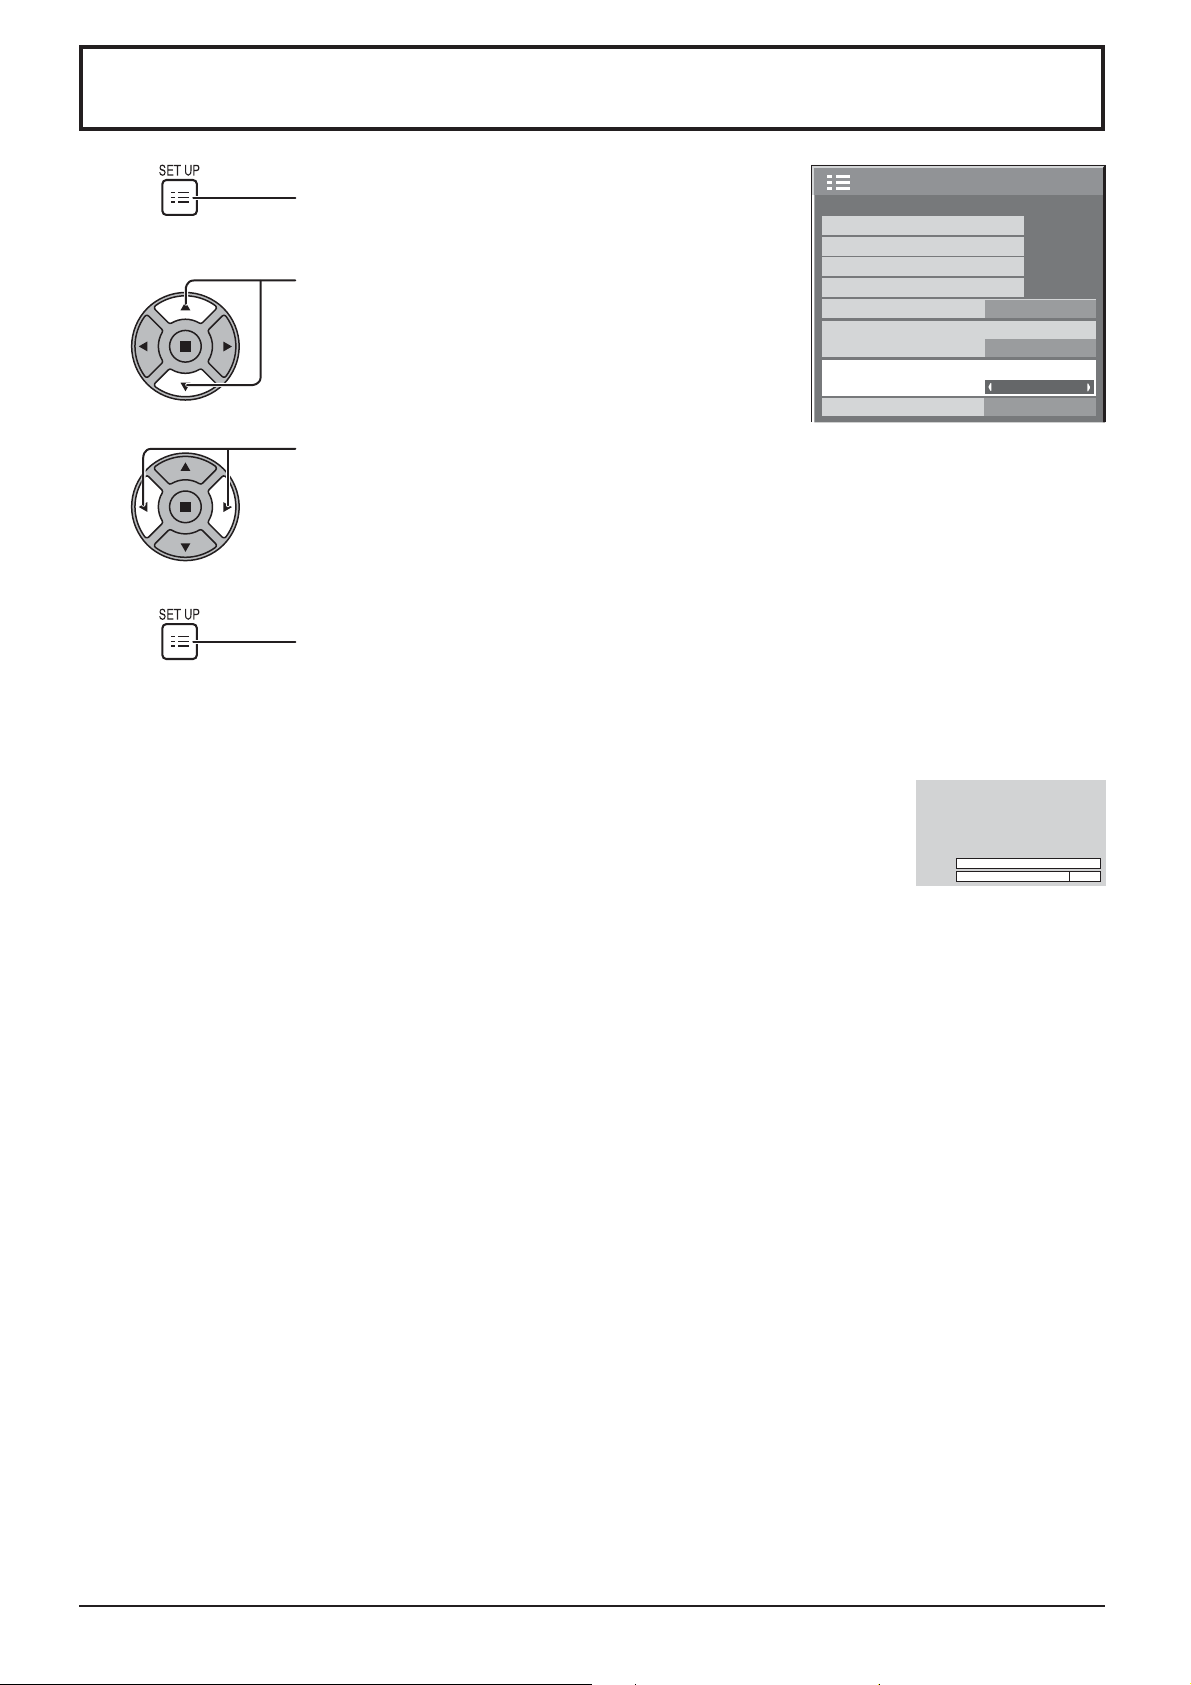
1
2
Press to display the SET UP menu.
Press to select the menu to adjust.
Press to select “ENABLE” or “DISABLE”.
SET UP
SIGNAL
SCREENSAVER
INPUT LABEL
ECO MODE SETTINGS
WOBBLING
YUV/RGB-IN SELECT
NO ACTIVITY POWER OFF
OSD LANGUAGE ENGLISH (US
1/2
OFF
RGB
DISABLE
)
3
4
When this function is set to “ENABLE”, the power is turned off (standby) automatically when there is no operation of
the Display for 4 hours.
Starting from 3 minutes before the turn off, the remaining time will be displayed.
Press to exit from SET UP.
PRESS ANY KEY TO ABORT.
NO ACTIVITY POWER OFF
When the power is turned off due to this function, a message “LAST TURN OFF DUE TO ’NO ACTIVITY POWER
OFF’.” is displayed next time the power is turned on.
Note:
During the screensaver is running, this function is disabled.
3MIN
31
Page 32
ECO MODE SETTINGS
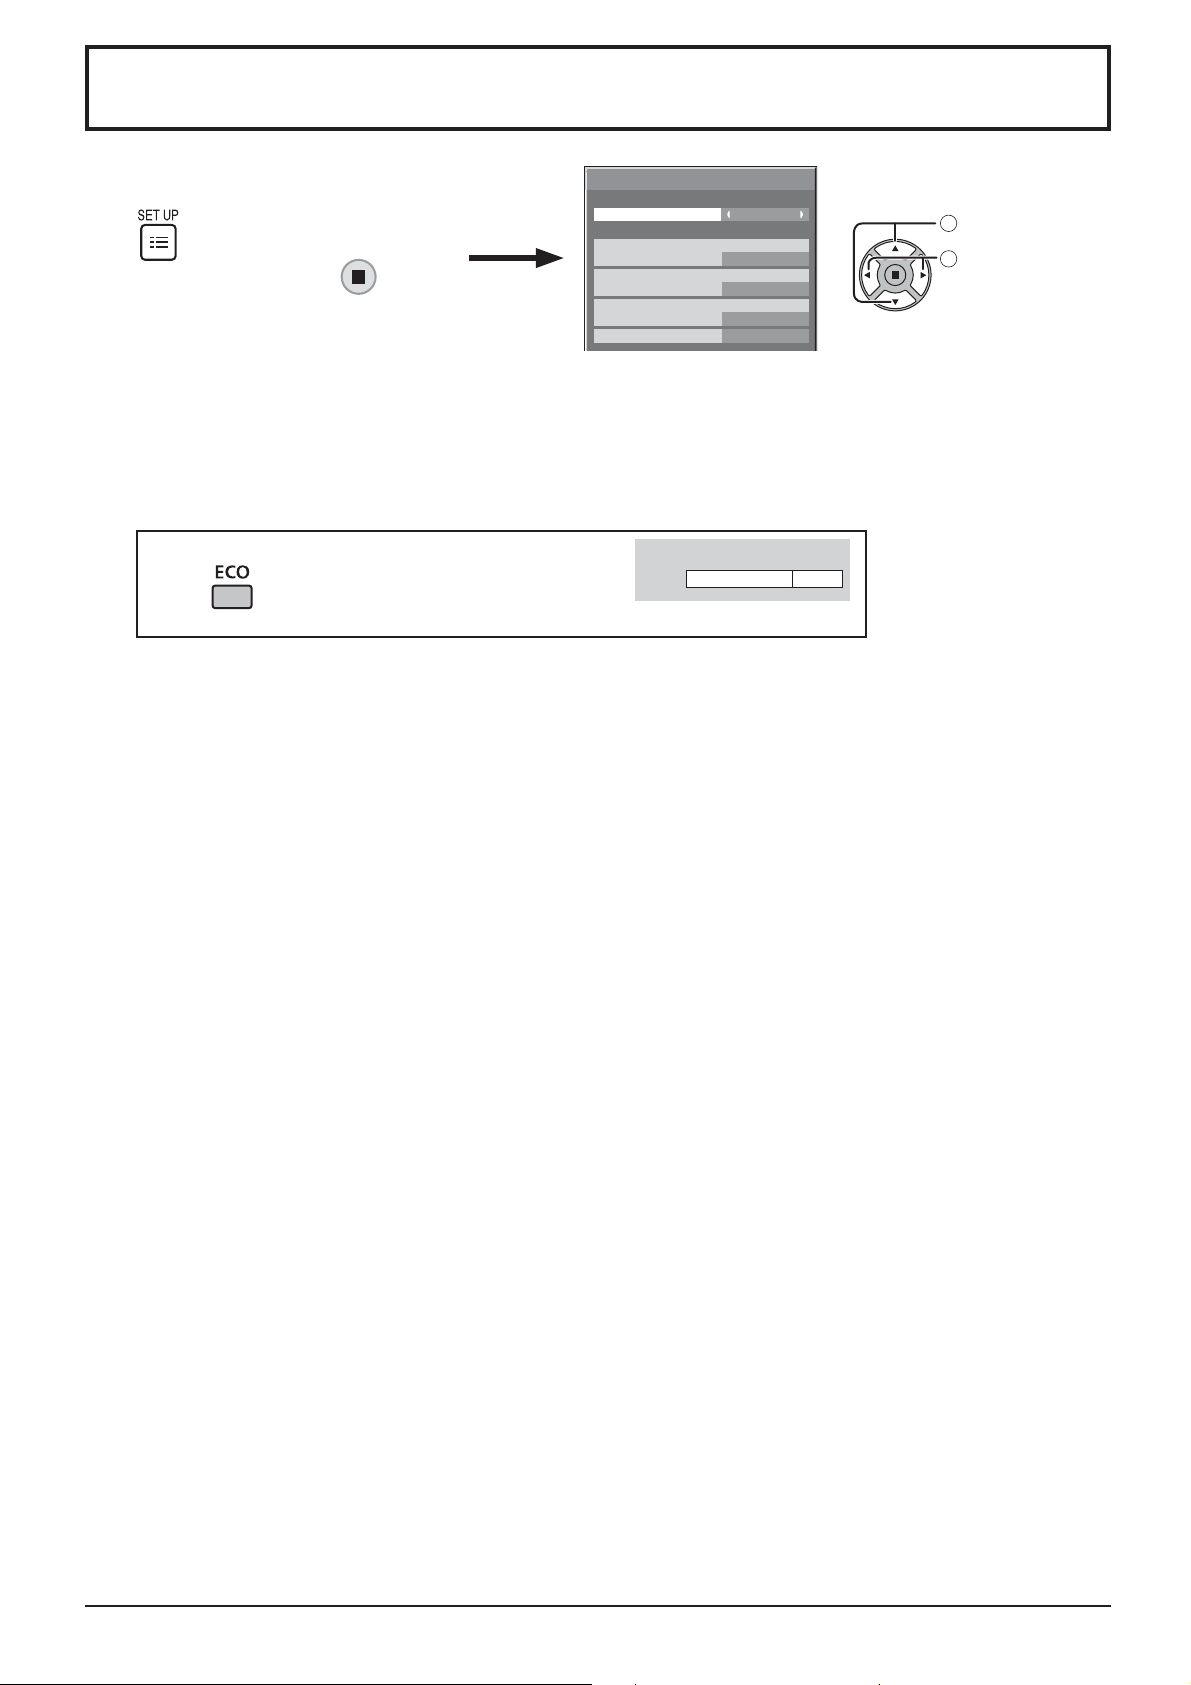
ECO MODE SETTINGS
Press , select “ECO MODE SETTINGS”
in “SETUP” menu and press button.
CUSTOMECO MODE
NO SIGNAL POWER OFF
PC POWER MANAGEMENT
DVI-D POWER MANAGEMENT
POWER SAVE
ENABLE
ON
OFF
OFF
select
1
adjust
2
ECO MODE
CUSTOM: The menu of power consumption reduction is individually set.
ON: The following xed values are set to the menu of power consumption reduction. Individual setting is not available.
NO SIGNAL POWER OFF: ENABLE DVI-D POWER MANAGEMENT: ON
PC POWER MANAGEMENT: ON POWER SAVE: SENSOR
Using Remote Control
When is pressed, the “ECO MODE” setting
changes.
ECO MODE ON
Custom settings
The menu of the power consumption reduction is individually set. This setting is enabled when “ECO MODE” is set
to “CUSTOM”.
NO SIGNAL POWER OFF
Equipment power supply is turned OFF when there is no signal.
When this is set to “ENABLE”, the power supply of the unit goes Off 10 minutes after the input signals stop.
PC POWER MANAGEMENT
When this function is set to ON, it operates under the following conditions to turn the power on or off automatically.
When no pictures (HD/VD sync signals) are detected for 30 or so seconds during PC signal input:
Power is turned off (standby); the power indicator lights up orange.
When pictures (HD/VD sync signals) are subsequently detected:
Power is turned on; the power indicator lights up green.
Notes:
• This function operates only during input from PC IN terminal.
• This function is effective when “Sync” is set to “Auto” and during normal viewing.
DVI-D POWER MANAGEMENT
When this function is set to ON, it operates under the following conditions to turn the power on or off automatically.
When no pictures (sync signal) are detected for 30 or so seconds during DVI signal input:
Power is turned off (standby); the power indicator lights up orange.
When pictures (sync signal) are subsequently detected:
Power is turned on; the power indicator lights up green.
Note:
This function operates only during DVI signal input.
POWER SAVE
This function adjusts the brightness of the backlight to reduce power consumption.
OFF: This function does not operate.
ON: Backlight brightness is reduced.
SENSOR: The backlight brightness is automatically adjusted according to the viewing environment.
Note:
When this function is set to “ON” or “SENSOR”, the “BACKLIGHT” setting in the PICTURE menu is disabled.
32
Page 33
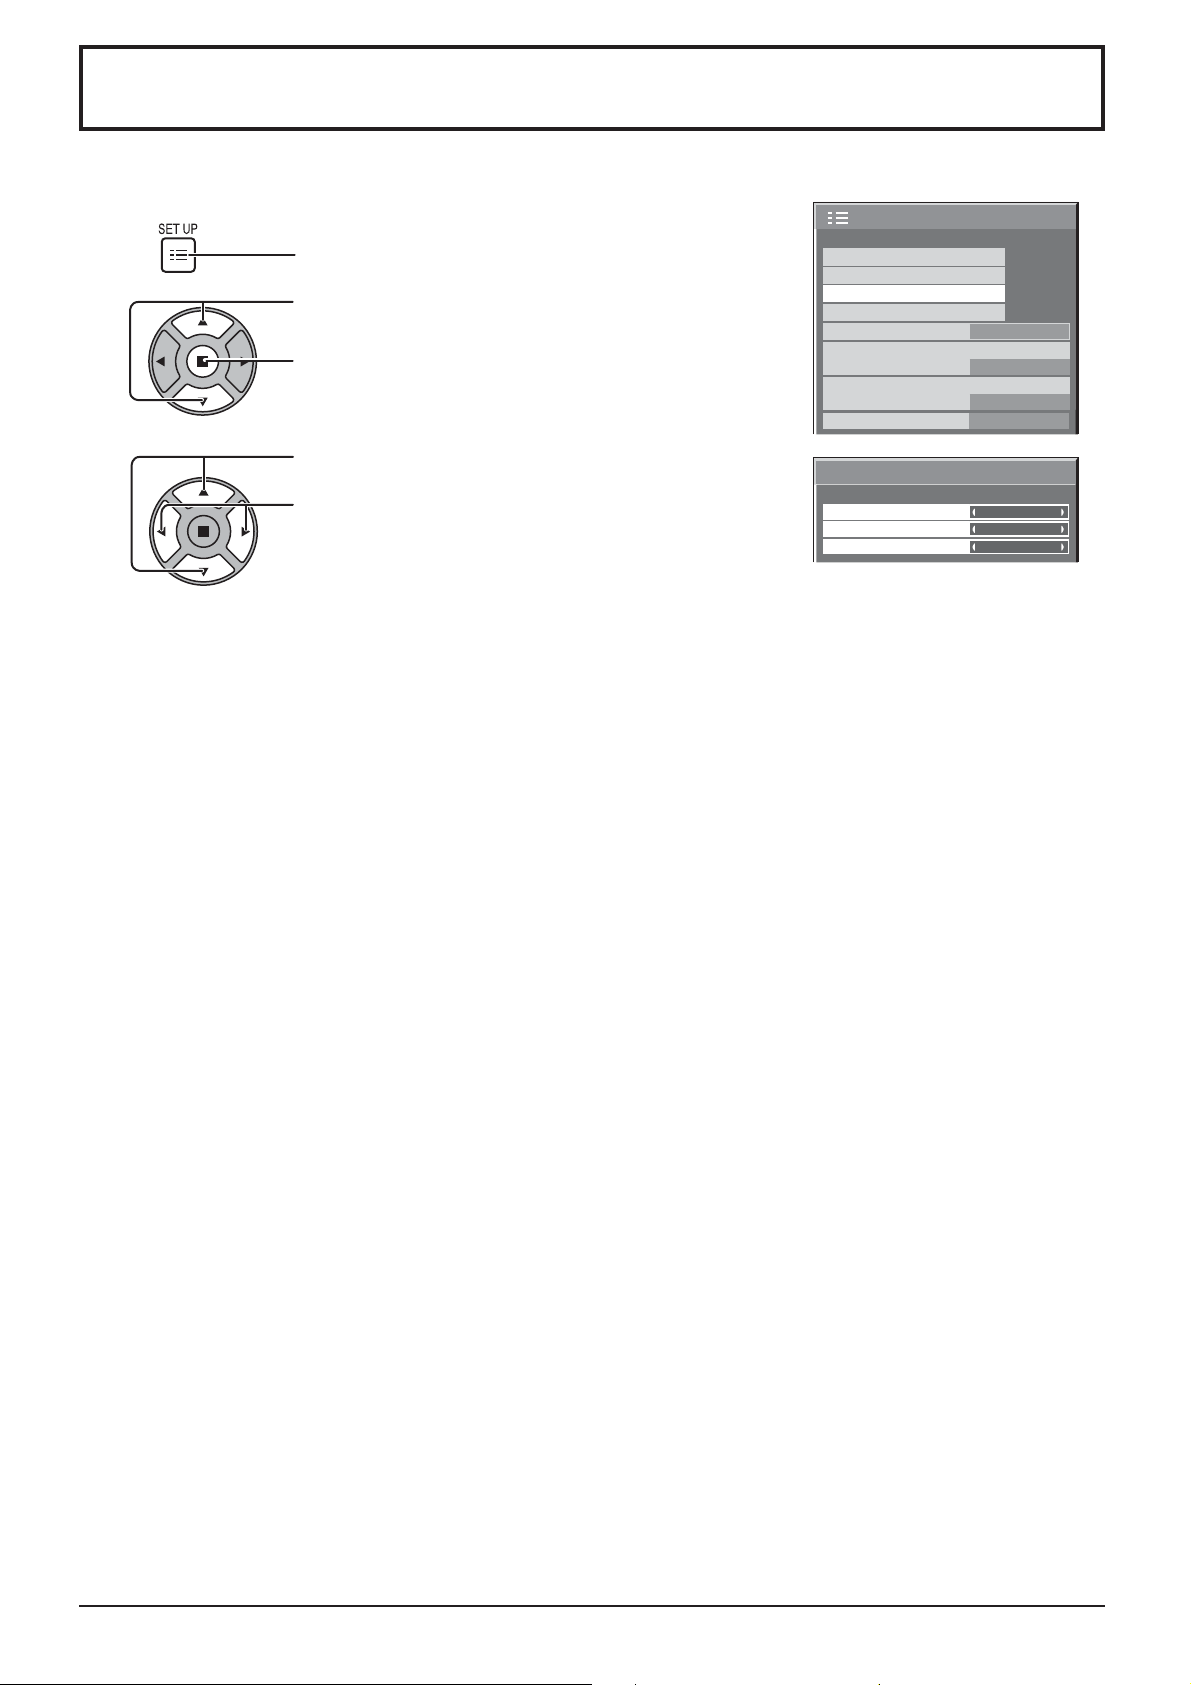
Customizing the Input labels
This function can change the label of the Input signal to be displayed. (see page 16)
SET UP
1
Press to display the SETUP menu.
Press to select INPUT LABEL.
2
Press to display the INPUT LABEL menu.
Press to select image input.
3
Press to change input label.
WOBBLING
YUV/RGB-IN SELECT
NO ACTIVITY POWER OFF
OSD LANGUAGE ENGLISH (US
INPUT LABEL
PC
DVI
HDMI
Image input Input label
[PC] PC / DVD1 / DVD2 / DVD3 / Blu-ray1 / Blu-ray2 / Blu-ray3 / CATV / VCR / STB / (SKIP)
[DVI] DVI / DVD1 / DVD2 / DVD3 / Blu-ray1 / Blu-ray2 / Blu-ray3 / CATV / VCR / STB / (SKIP)
[HDMI] HDMI / DVD1 / DVD2 / DVD3 / Blu-ray1 / Blu-ray2 / Blu-ray3 / CATV / VCR / STB / (SKIP)
(SKIP) : The INPUT button press will skip its input.
SIGNAL
SCREENSAVER
INPUT LABEL
ECO MODE SETTINGS
OFF
RGB
DISABLE
PC
DVI
HDMI
1/2
)
33
Page 34
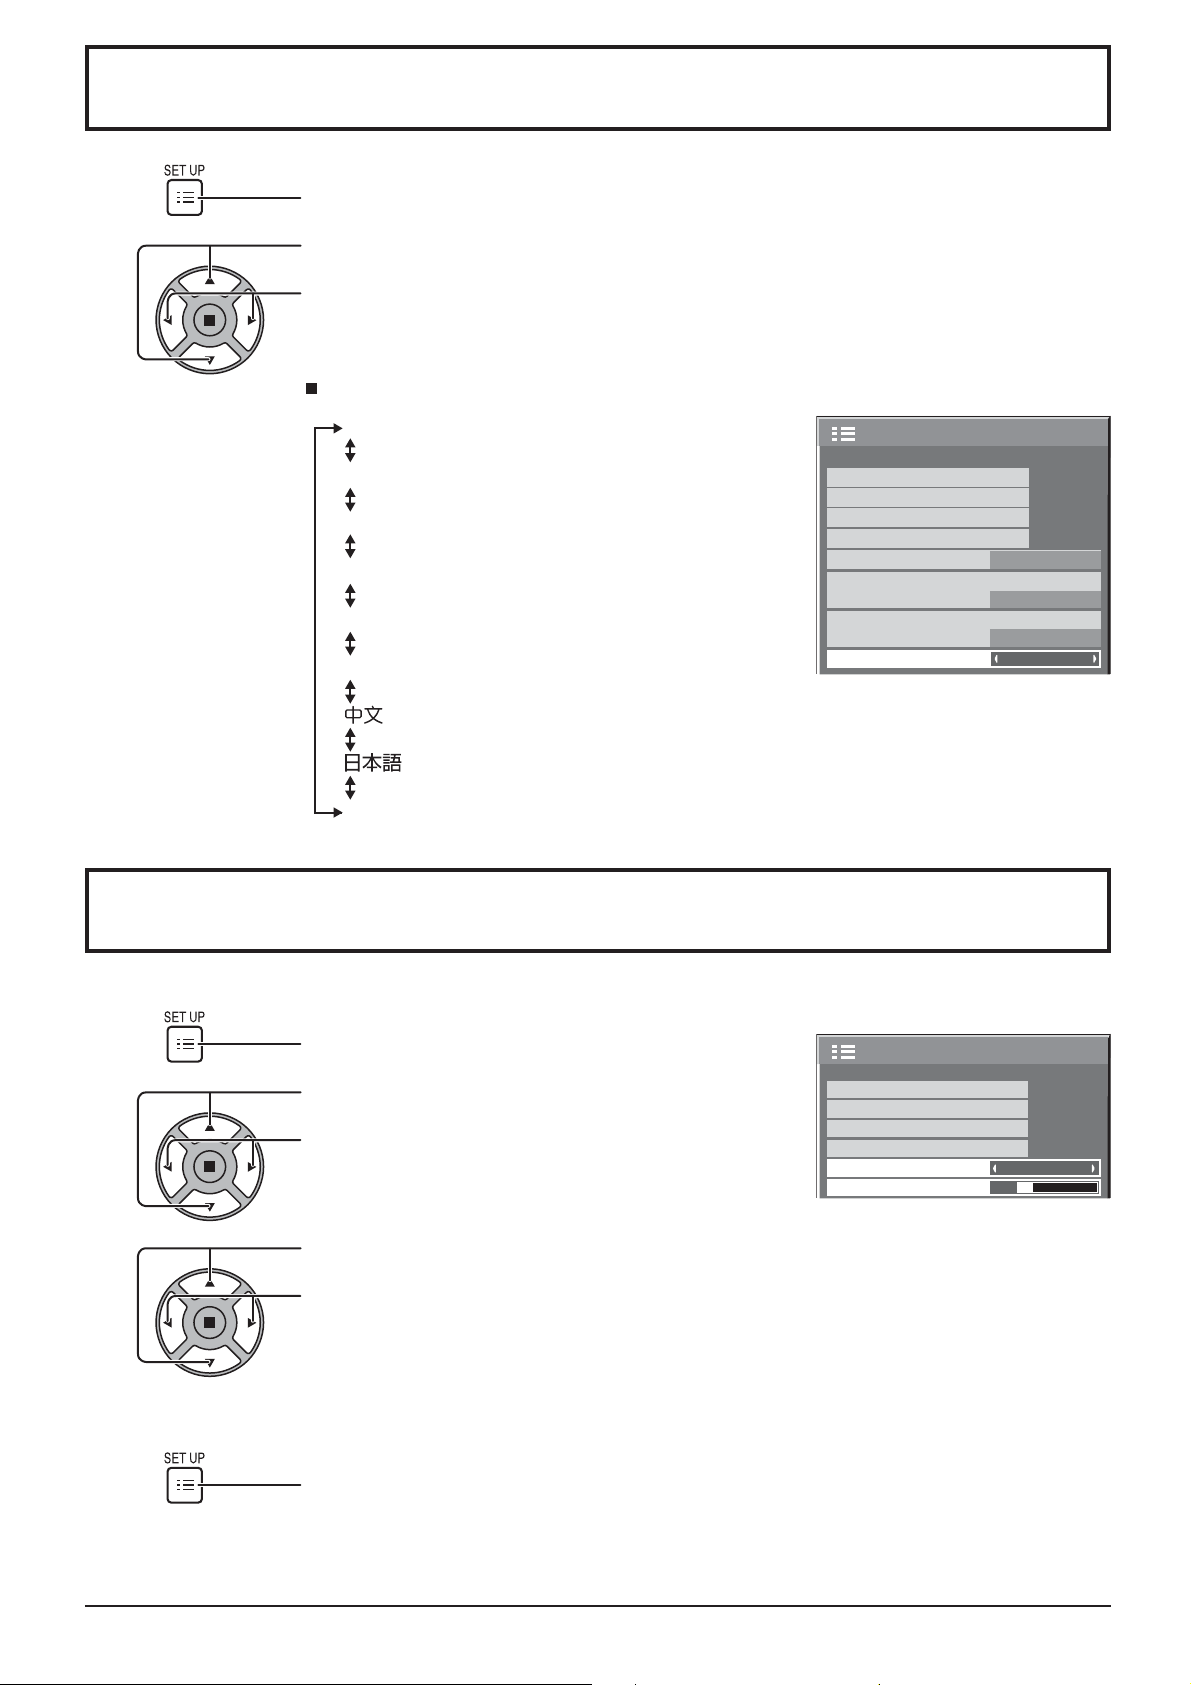
Selecting the On-Screen Menu Language
1
2
Press to display the SET UP menu.
Press to select OSD LANGUAGE.
Press to select your preferred language.
Selectable languages
English (UK)
Deutsch
Français
Italiano
Español
English (US)
......(Chinese)
.......(Japanese)
SET UP
SIGNAL
SCREENSAVER
INPUT LABEL
ECO MODE SETTINGS
WOBBLING
YUV/RGB-IN SELECT
NO ACTIVITY POWER OFF
OSD LANGUAGE ENGLISH (US
1/2
OFF
RGB
DISABLE
)
.......(Russian)
Customizing the On-Screen Menu Display
Set the display time and background transparency of the on-screen menu display.
1
2
3
Press to display the SET UP menu.
Press to select “MENU DISPLAY DURATION”.
Press to adjust the display duration.
Press to select “MENU TRANSPARENCY”.
Press to adjust the transparency.
MULTI DISPLAY SETUP
SET UP TIMER
PRESENT TIME SETUP
NETWORK SETUP
MENU DISPLAY DURATION
MENU TRANSPARENCY
2/2SET UP
15 S
20
4
34
Press to exit from adjust mode.
Page 35
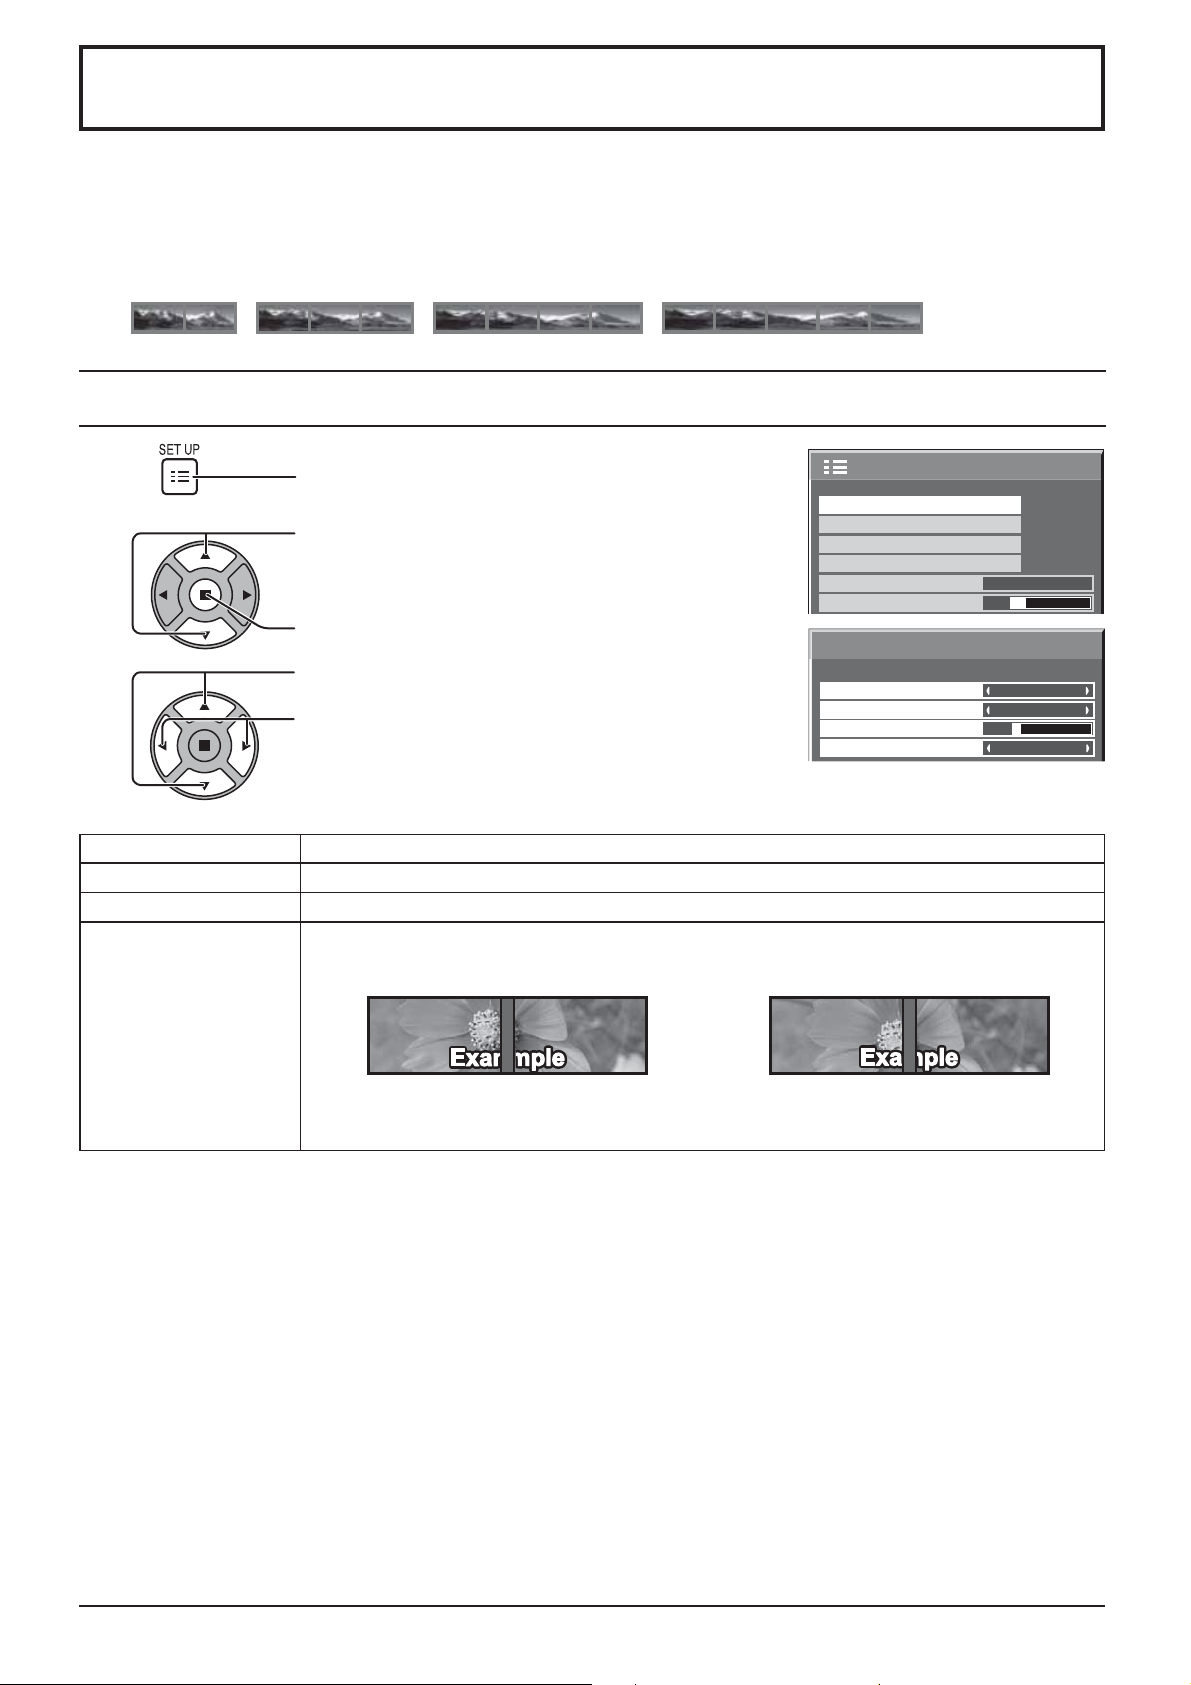
SET UP for MULTI DISPLAY
By lining up the Displays in groups, for example, as illustrated below, an enlarged picture may be displayed across
all screens.
For this mode of operation, each display has to be set up with a Display number to determine its location.
(Example)
group of 4 (4 × 1)group of 2 (2 × 1) group of 3 (3 × 1)
How to setup MULTI DISPLAY
group of 5 (5 × 1)
1
Press to display the SET UP menu.
Press to select the MULTI DISPLAY SETUP.
2
Press to display the MULTI DISPLAY SETUP menu.
Press to select the MULTI DISPLAY SETUP.
3
Press to select “ON” or “OFF”.
Item Details
MULTI DISPLAY SETUP
HORIZONTAL SCALE Select “1”, “2”, “3”, “4”, “5”.
BEZEL H ADJUSTMENT
Select “ON” or “OFF”.
Areas of the image that are hidden by the joint sections are adjusted horizontally (0~100).
To show joints between displays.
MULTI DISPLAY SETUP
SET UP TIMER
PRESENT TIME SETUP
NETWORK SETUP
MENU DISPLAY DURATION
MENU TRANSPARENCY
MULTI DISPLAY SETUP
MULTI DISPLAY SETUP
HORIZONTAL SCALE
BEZEL H ADJUSTMENT
LOCATION
To hide joints between displays.
20
10
2/2SET UP
15 S
OFF
1
A1
Suitable for still image display.
Setting value: 0 Setting value: 100
Suitable for moving image display.
35
Page 36
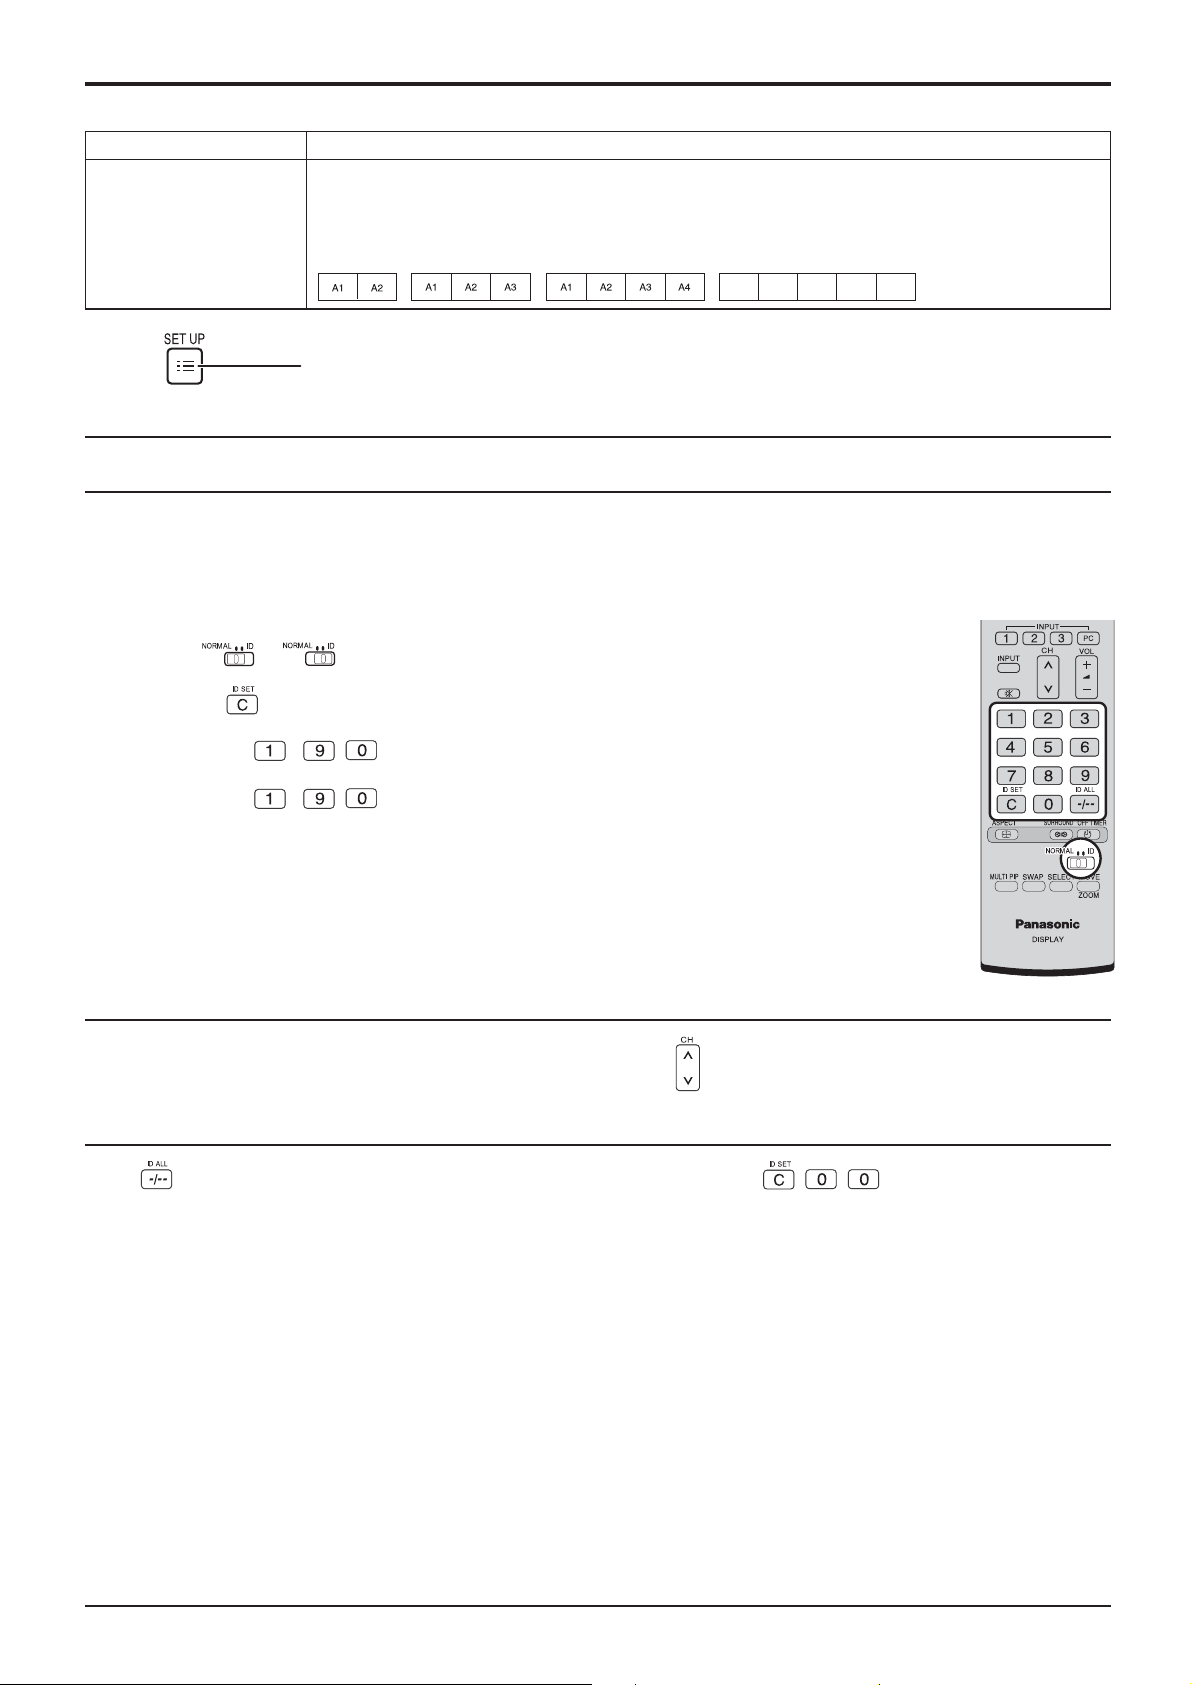
SET UP for MULTI DISPLAY
Item Details
Select the required arrangement number. (A1-A5 : Refer to the following)
Display Number locations for each arrangement.
LOCATION
(Examples)
( 2 × 1) ( 3 × 1 )
( 4 × 1 )
( 5 × 1 )
A1 A2 A3 A4 A5
4
Press to exit from adjust mode.
ID Remote Control Function
You can set the remote control ID when you want to use this remote control on one of several different displays.
Note:
To operate this function, please purchase ID remote controller sold separately.
Object model : EUR7636070R
Switch to on the right side.
1
Press the button on the remote control.
2
Press one of - , for the tens digit setting.
3
Press one of - , for the units digit setting.
4
Notes:
• The numbers in 2, 3 and 4 should be set up quickly.
• Adjustable ID number range is 0 - 99.
• If a number button is pressed more than two times, the rst two numbers become the ID number
for the remote control.
ID remote control button operation
The operation is the same as normal remote control except for the button.
ID Cancellation
Press button on remote control. (This has the same effect as pressing the , , buttons at the same time.)
Notes:
• Set the Remote ID “On” to operate the ID remote control.
If Remote ID is set to “On”, you can use the remote control without identical ID number during option menu display.
(see page 44)
• The ID remote control cannot be used when ID select is set to anything other than 0, and the remote control ID is
not the same as the ID select number (see page 44).
36
Page 37
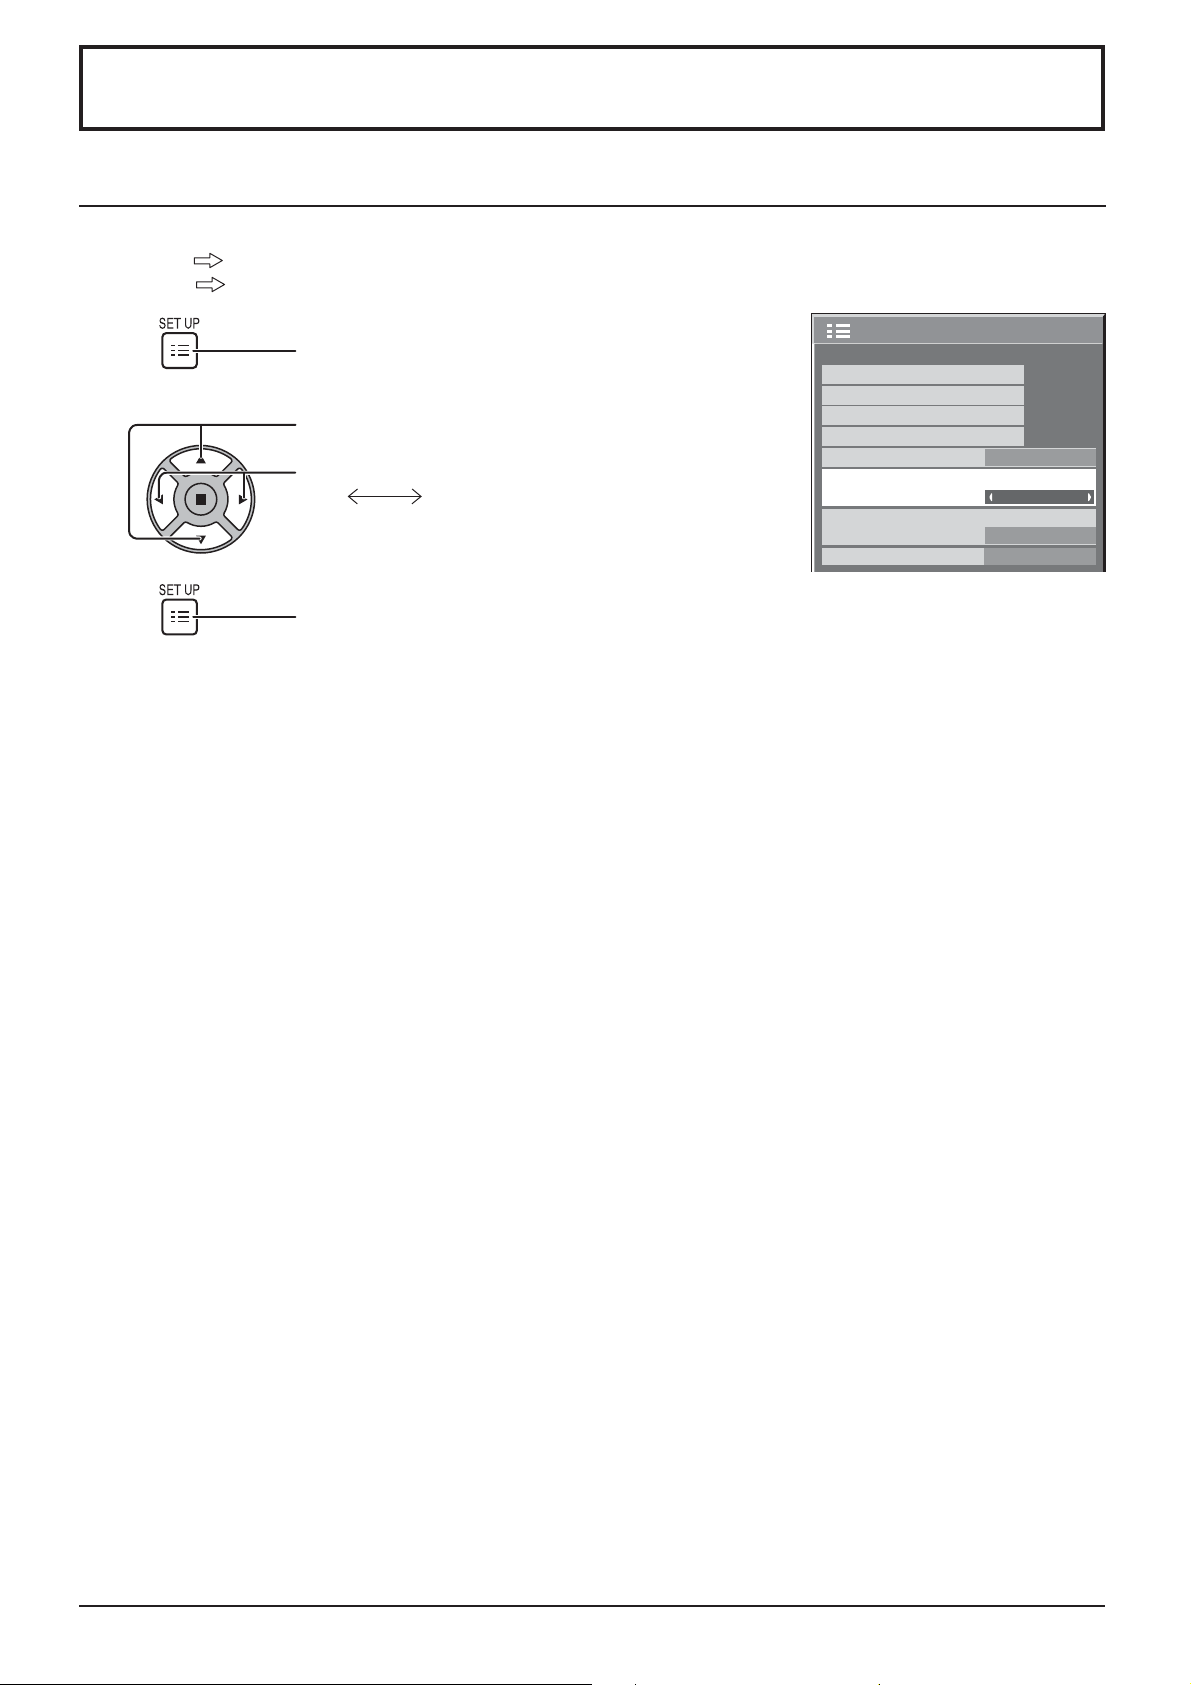
SET UP for Input Signals
YUV / RGB-IN SELECT
Select to match the signals from the source connected to DVI-D IN terminal.
YUV signals “YUV”
RGB signals “RGB”
1
2
3
Press to display the SET UP menu.
Press to select the “YUV / RGB-IN SELECT”.
Press to select the desired mode.
YUV
Press to exit from adjust mode.
RGB
SET UP
SIGNAL
SCREENSAVER
INPUT LABEL
ECO MODE SETTINGS
WOBBLING
YUV/RGB-IN SELECT
NO ACTIVITY POWER OFF
OSD LANGUAGE ENGLISH (US
1/2
OFF
RGB
DISABLE
)
37
Page 38
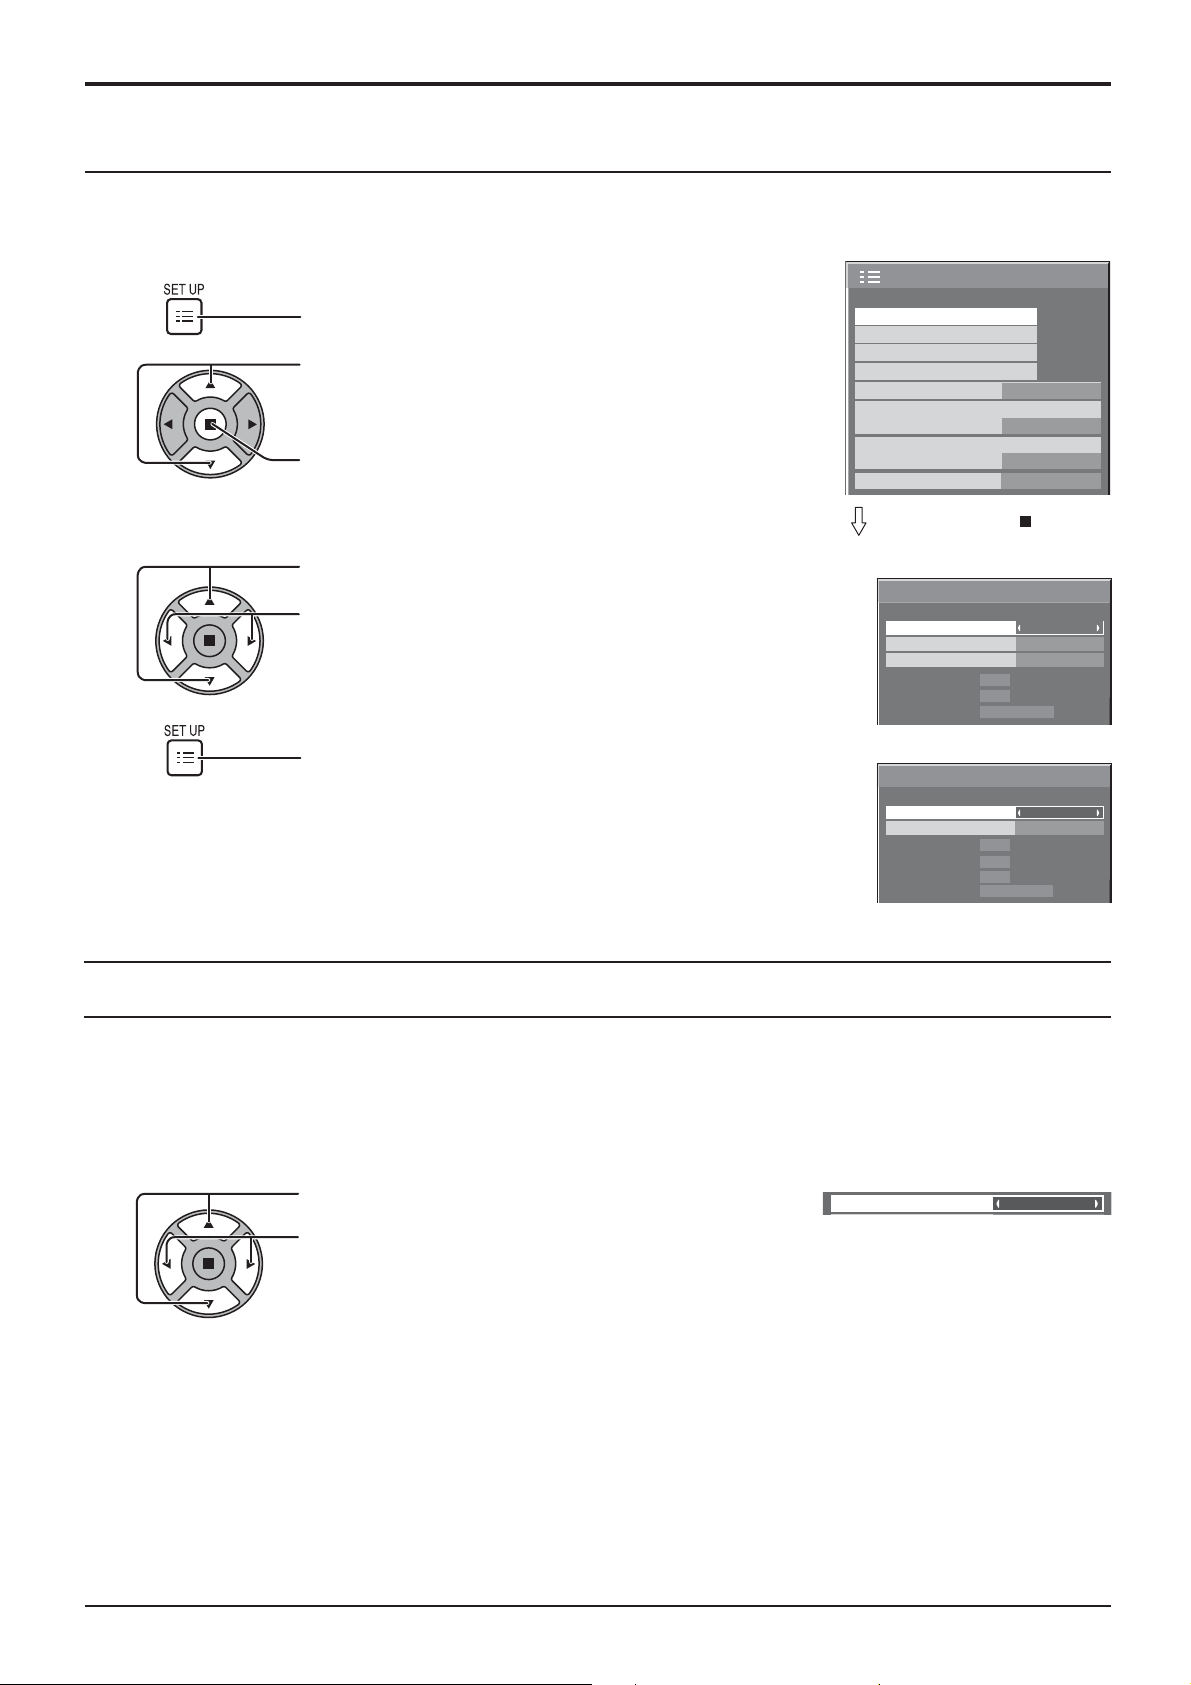
SET UP for Input Signals
SIGNAL menu
Note:
“SIGNAL” setup menu displays a different setting condition for each input signal.
1
2
3
4
Press to display the SET UP menu.
Press to select the “SIGNAL”.
Press to display the SIGNAL menu.
Press to select the menu to adjust.
Press to adjust the menu.
Press to exit from adjust mode.
SET UP
SIGNAL
SCREENSAVER
INPUT LABEL
ECO MODE SETTINGS
WOBBLING
YUV/RGB-IN SELECT
NO ACTIVITY POWER OFF
OSD LANGUAGE ENGLISH (US
OFF
RGB
DISABLE
Press ACTION ( ) button
For RGB
kHz
Hz
AUTO
1024
OFF
×
[
768
RGB
SIGNAL
SYNC
3 : 2 PULLDOWN
XGA MODE
H-FREQ.
63.98
V-FR EQ.
SIGNAL FORMAT 1280×1024/60
60.02
For Digital
kHz
Hz
MHz108.0
[
OFF
AUTO
Digital
SIGNAL
3 : 2 PULLDOWN
HDMI RANGE
H-FREQ.
63.98
V-FR EQ.
DOT CLOCK FREQ.
SIGNAL FORMAT 1280×1024/60
60.02
1/2
)
]
]
3:2 PULLDOWN
3:2 PULLDOWN: When ON, the display attempts to reproduce a more natural interpretation of sources such as movie
pictures, which are recorded at 24 frames per second.
If the picture is not stable, turn the setting to OFF.
Note:
When ON, this setting only affects the following signal input:
• 525i(480i), 625i(575i), 1125(1080)/60i signal input during Component input signal.
Press to select “3:2 PULLDOWN”.
Press to set ON/OFF.
3 : 2 PULLDOWN
OFF
38
Page 39
SET UP for Input Signals
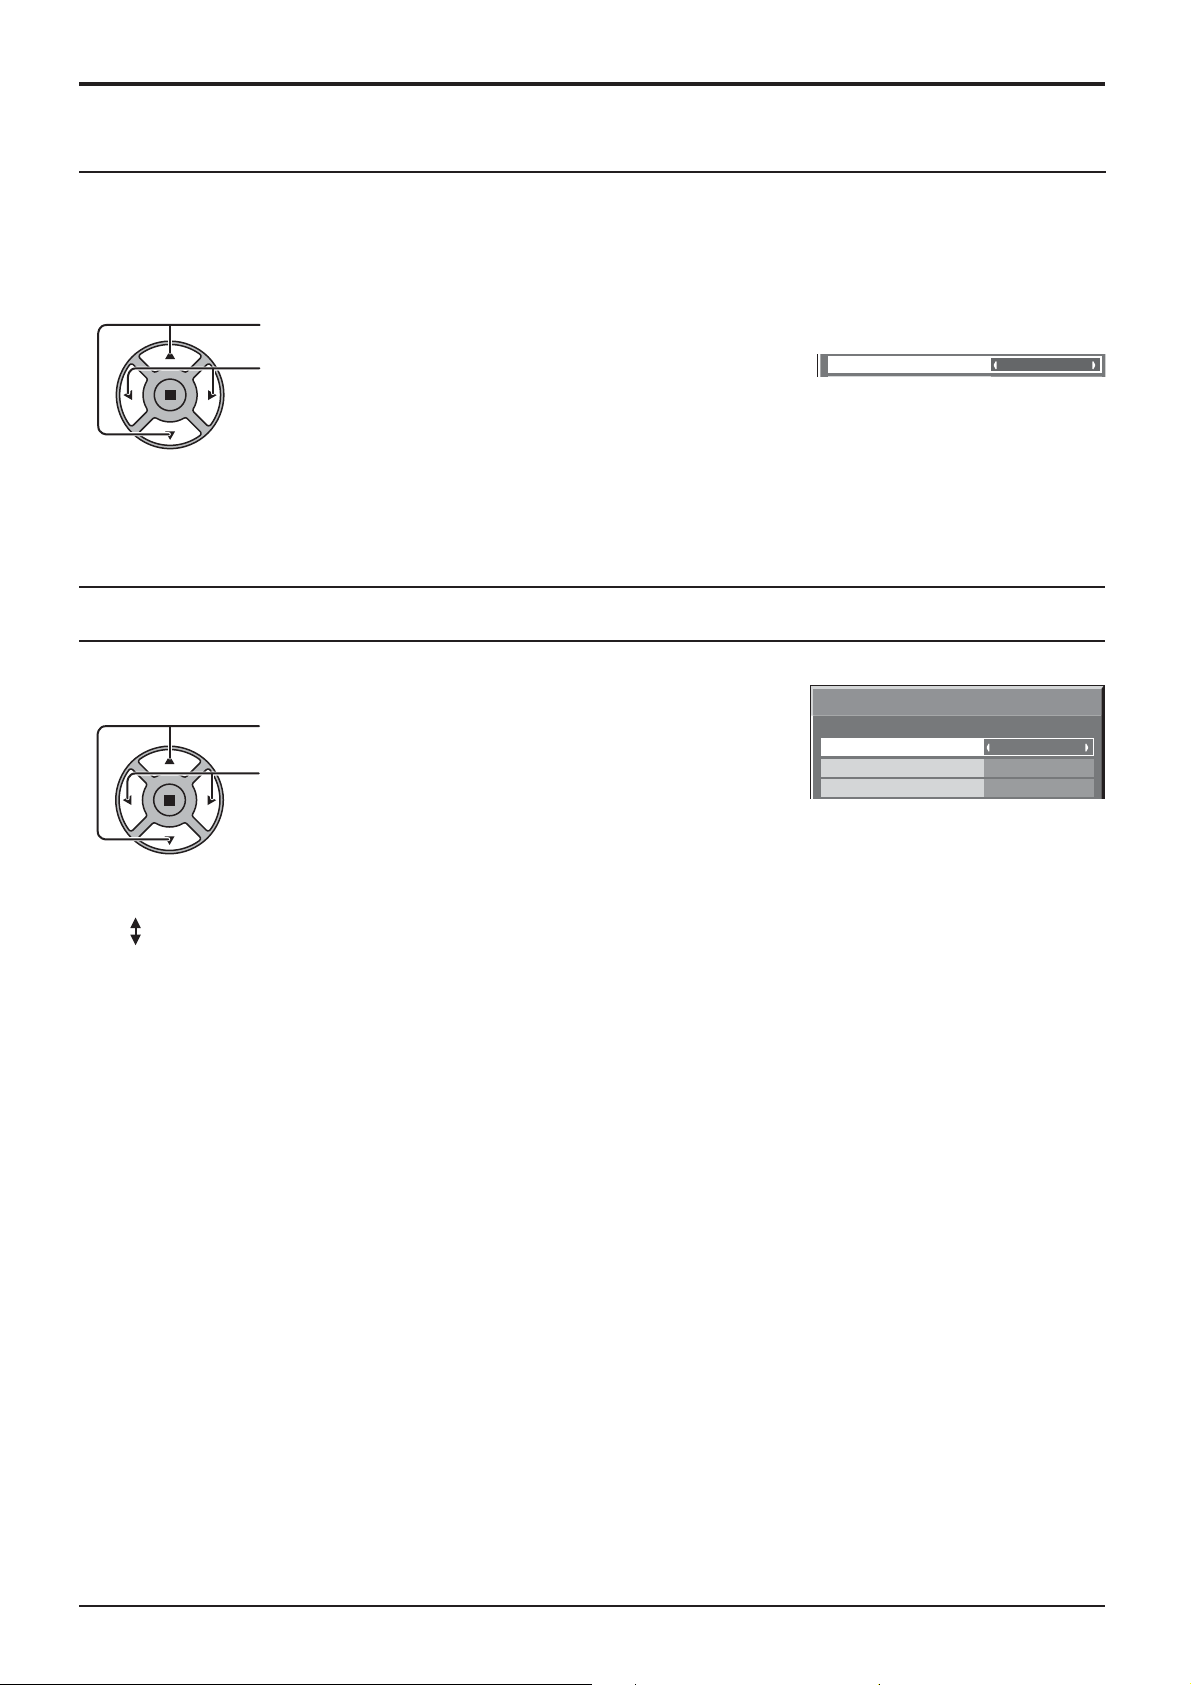
XGA MODE
This menu is displayed when the PC IN input signal is selected.
This menu sets two types of XGA signals with 60Hz vertical frequency having different aspect ratios and sampling
rates (1,024 × 768 @ 60Hz and 1,366 × 768 @ 60Hz).
When a 1,280 x 768 @ 60Hz input signal is automatically detected, the image is processed as a 1,280 x 768 @ 60Hz
XGA input signal irrespective of this setting.
Press to select “XGA MODE”.
Press to select “1024×768”, “1366×768”.
XGA MODE
1024
×768
Note:
After making this setting, be sure to make each adjustment (such as “AUTO SETUP”) on the “POS. /SIZE” menu as
necessary. (see page 22)
SYNC
This function operates only during input from PC IN terminal.
SIGNAL
Press to select the “SYNC”.
SYNC
Press to adjust.
3 : 2 PULLDOWN
XGA MODE
Con rm that the input is set to RGB input (this setting is valid only for RGB input signal).
AUTO:
The H and V sync or synchronized signal is automatically selected. If both input, it is selected the H and V sync.
However, the synchronized signal that is input rst is selected.
AUTO
OFF
1024
[
×768
RGB
]
ON G:
Uses a synchronized signal on the Video G signal, which is input from the G connector.
39
Page 40
SET UP for Input Signals
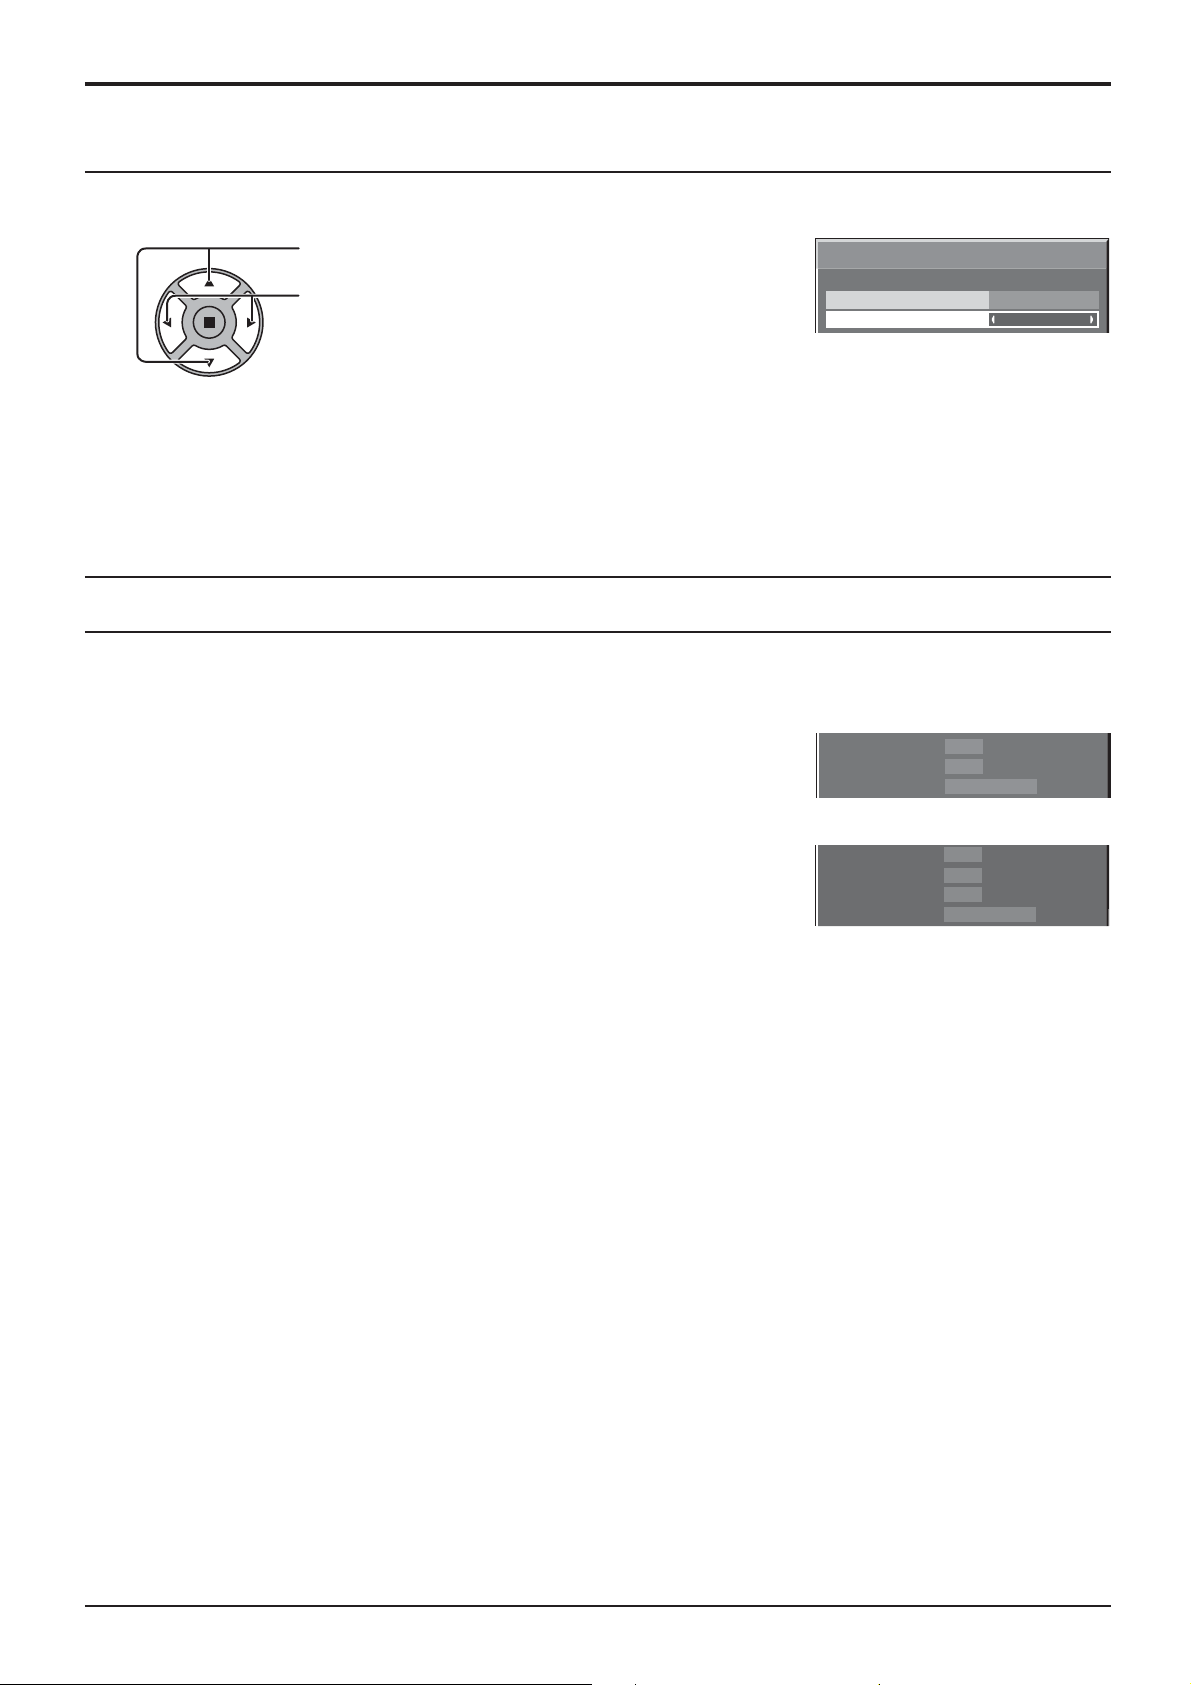
HDMI RANGE
Switches the dynamic range according to the input signal from HDMI terminal.
Press to select “HDMI RANGE”.
SIGNAL
[
Digital
]
Press to select “VIDEO(16-235)”, “FULL(0-255)”,
“AUTO”.
3 : 2 PULLDOWN
HDMI RANGE
VIDEO(16-235): If the input signal is the video range, Example: HDMI terminal output for DVD player
FULL(0-255): If the input signal is full range, Example: HDMI terminal output for personal computer
AUTO:
Switches the dynamic range automatically between “VIDEO(16-235)” and “FULL(0-255)” according to the input signal.
Note:
This function can be set only for HDMI signal input.
Input signal display
Displays the frequency and the type of the current input signal.
Display range:
Horizontal 30 - 110 kHz
Vertical 48 - 120 Hz
The dot clock frequency is displayed during digital signal input.
Note:
The automatically detected signal format may be displayed differently than the
actual input signal.
H-FREQ.
V-FREQ.
SIGNAL FORMAT 1280×1024/60
H-FREQ.
V-FREQ.
DOT CLOCK FREQ.
SIGNAL FORMAT 1280×1024/60
63.98
60.02
63.98
60.02
OFF
AUTO
kHz
Hz
kHz
Hz
MHz108.0
40
Page 41
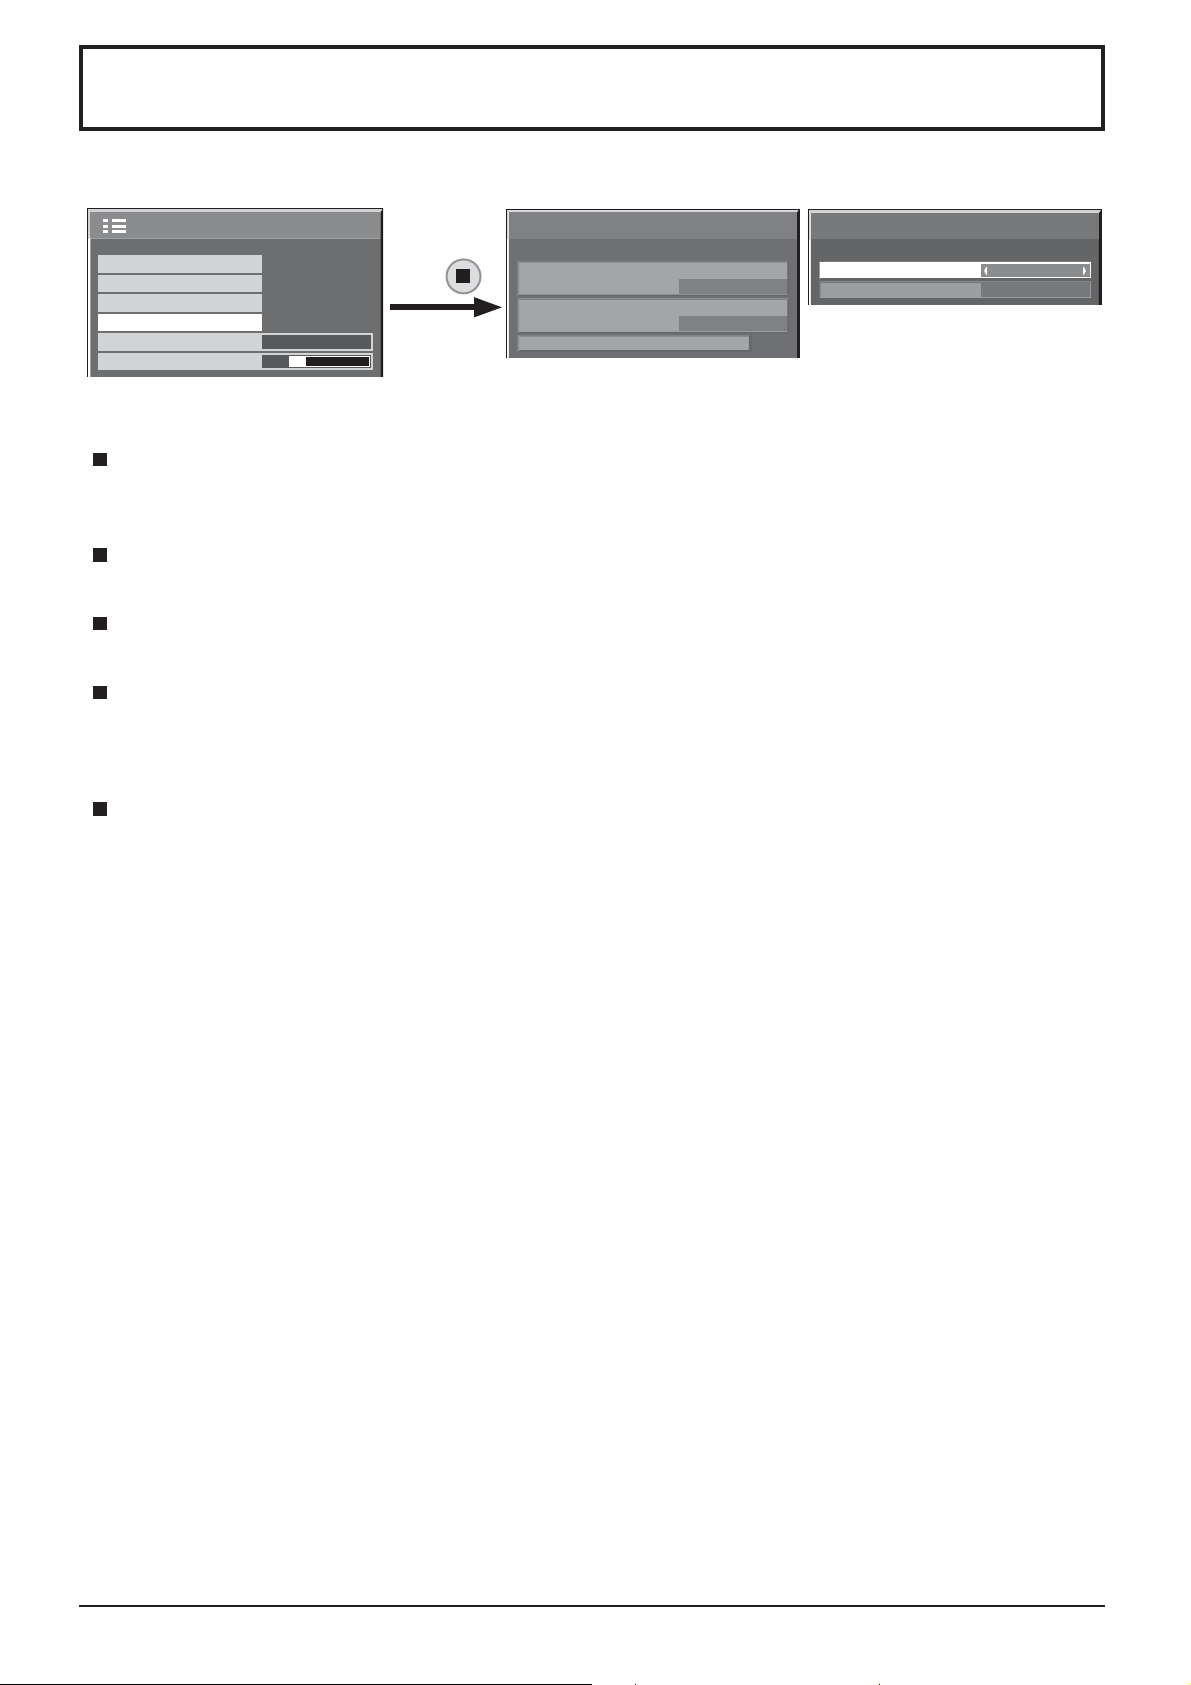
NETWORK SETUP
Con gure the various settings required to use the network function.
LFE6-00
1/2
NETWORK SETUP
AMX D.D.
CRESTRON CONNECTED™
OFF
OFF
MULTI DISPLAY SETUP
SET UP TIMER
PRESENT TIME SETUP
NETWORK SETUP
MENU DISPLAY DURATION
MENU TRANSPARENCY
20
15 S
2/2SETUP
Press
NETWORK SETUP
CONTROL INTERFACE
RS-232C
DISPLAY NAME
LAN SETUP
CONTROL INTERFACE
Set whether to control with RS-232C or LAN. When “LAN” is set, power indicator lights orange under the
condition of power off with remote control (stand-by state).
DISPLAY NAME
The name of the Display that is shown on the network can be changed.
LAN SETUP
See page 42
AMX D.D.
This function allows the Display to be detected by AMX Device Discovery. For more details, visit the following
website.
http://www.amx.com/
2/2
CRESTRON CONNECTED™
When this function is set to on, the Display can be monitored or controlled via the network using equipment and
application software of Crestron Electronics, Inc.
This Display supports the following application software from Crestron Electronics, Inc.
RoomView® Express
Fusion RV
RoomView® Server Edition
[CRESTRON CONNECTED™] is a function to connect to a system developed by Crestron Electronics, Inc.
which manages and controls multiple system devices connected to the network.
• For details of “CRESTRON CONNECTED™”, refer to the Crestron Electronics, Inc. website (Provided only in
English).
http://www.crestron.com/
For the download of “RoomView® Express”, refer to the Crestron Electronics, Inc. website (Provided only in
English).
http://www.crestron.com/getroomview
®
4141
Page 42
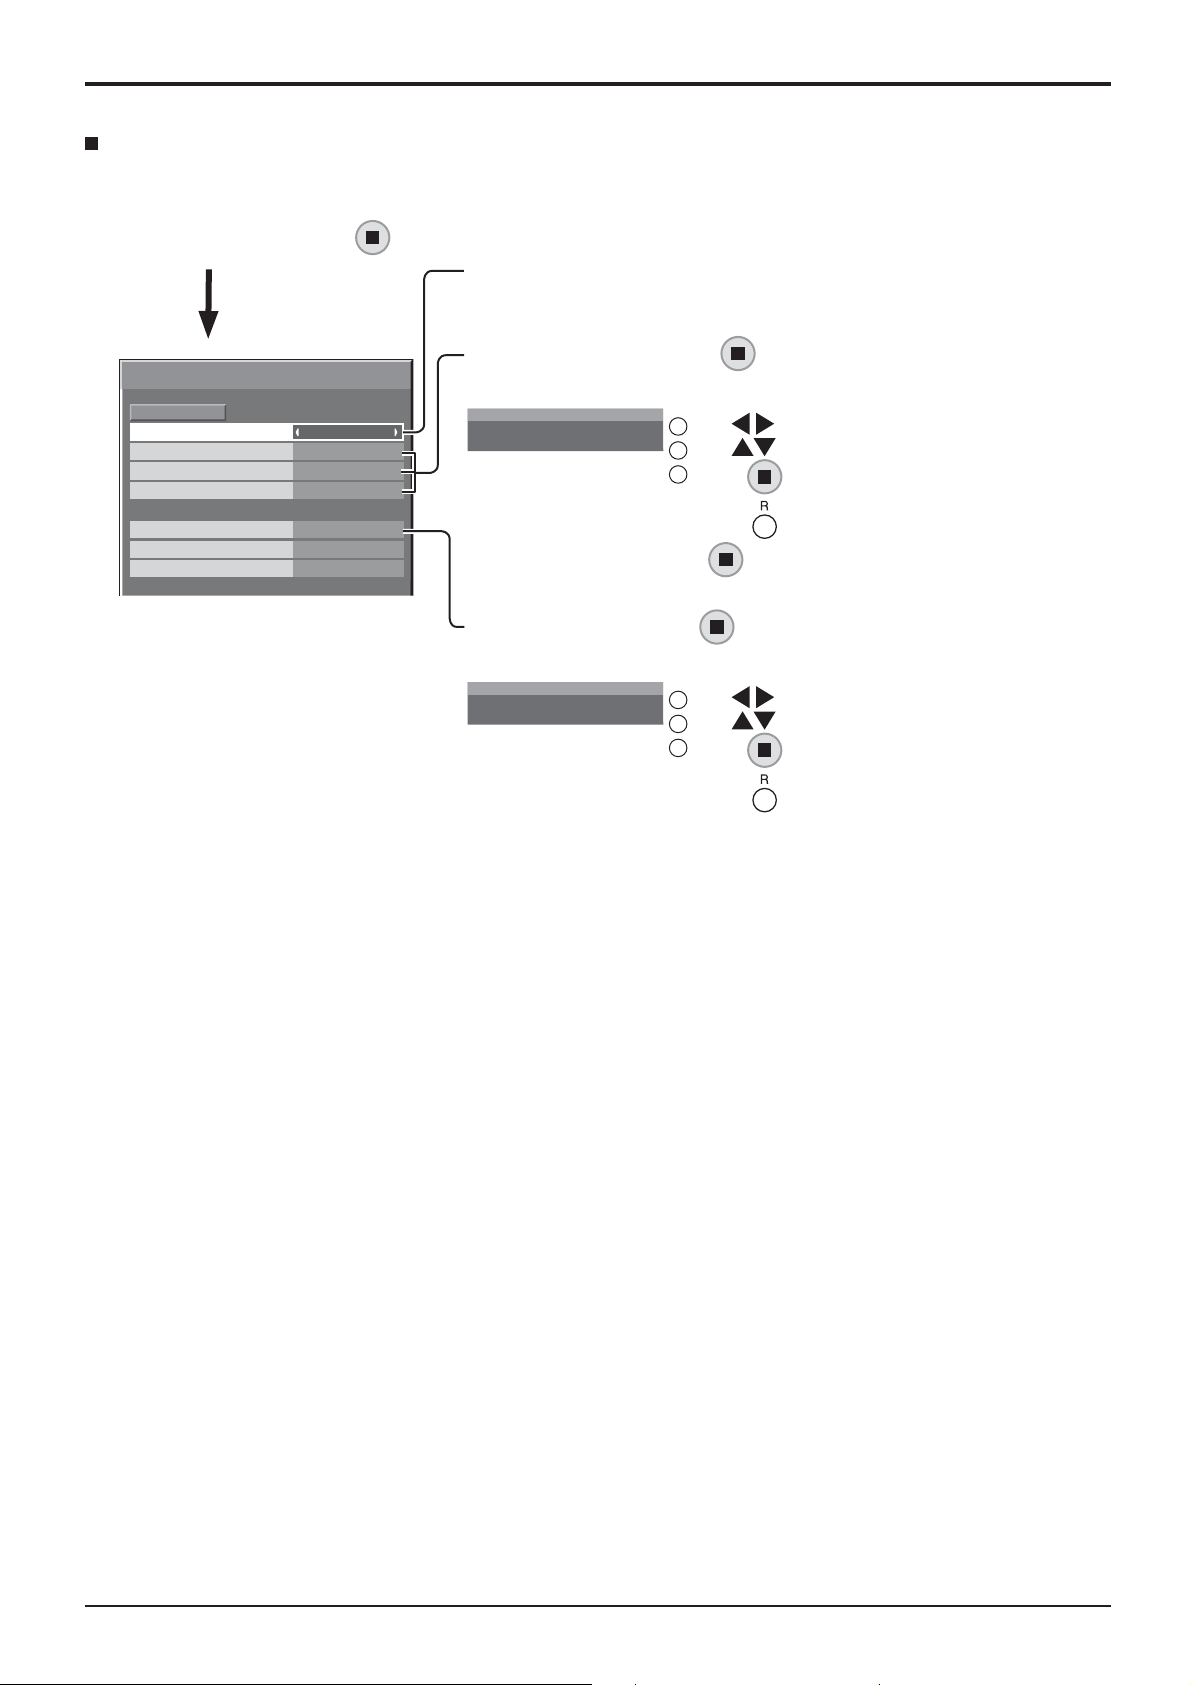
NETWORK SETUP
LAN SETUP
Detailed network settings for the LAN established via the LAN terminal of the Display or twisted pair cable
transmitter can be con gured.
Select “LAN Setup” and press .
LAN SETUP
SAVE
DHCP
IP ADDRESS
SUBNET MASK
GATEWAY
PORT
DUPLEX
NETWORK ID
MAC ADDRESS
OFF
192.168. 0. 8
255.255.255. 0
192.168. 0. 1
1024
AUTO
0
--:--:--:--:--:--
DHCP, IP ADDRESS, SUBNET MASK, and GATEWAY SETTINGS
1 Set DHCP.
When “Off” is selected, IP address and other settings can be set
manually.
2 Select the item and press .
3 Enter an address.
IP ADDRESS
I
192.168. 0. 8
1
Use to select a digit.
2
Use to change a number.
3
Press .
Pressing will cancel the address change.
4 Select “Save” and press .
PORT setting
1 Select “Port” and press .
2 Enter a port number.
PORT
01024
I
1
Use to select a digit.
2
Use to change a number.
3
Press .
Pressing will cancel the port number change.
SAVE
Save the current network Setup. Each value set for
DHCP, IP address, Subnet mask, and Gateway will be
saved. If “NG” is displayed, check the same IP address
is not used within the same network.
DHCP (DHCP client function)
To obtain an IP address automatically using a DHCP
server, set this to “On”. If DHCP server is not used, set
this to “Off”.
IP address (IP address display and setting)
Enter an IP address if DHCP server is not used.
PORT
Set the port number used for command control.
The available setting range is 1024 – 65535.
When the PJLink™ protocol is used, the port setting is
not necessary.
DUPLEX
Set the connection speed of the LAN environment.
Select the value from Auto, 10 HALF, 10 FULL,100 HALF
or 100 FULL.
Network ID
Set the ID to identify this unit.
The available setting range is 0 – 99.
Subnet mask (Subnet mask display and setting)
Enter a subnet mask if DHCP server is not used.
MAC Address
Display the MAC address of this unit. However, the
Gateway (Gateway address display and setting)
Enter a gateway address if DHCP server is not used.
MAC address is not displayed when the “CONTROL
INTERFACE” is set to “RS-232C”.
Notes:
• To use a DHCP server, make sure the DHCP server is started.
• Contact your network administrator for details on settings.
4242
Page 43
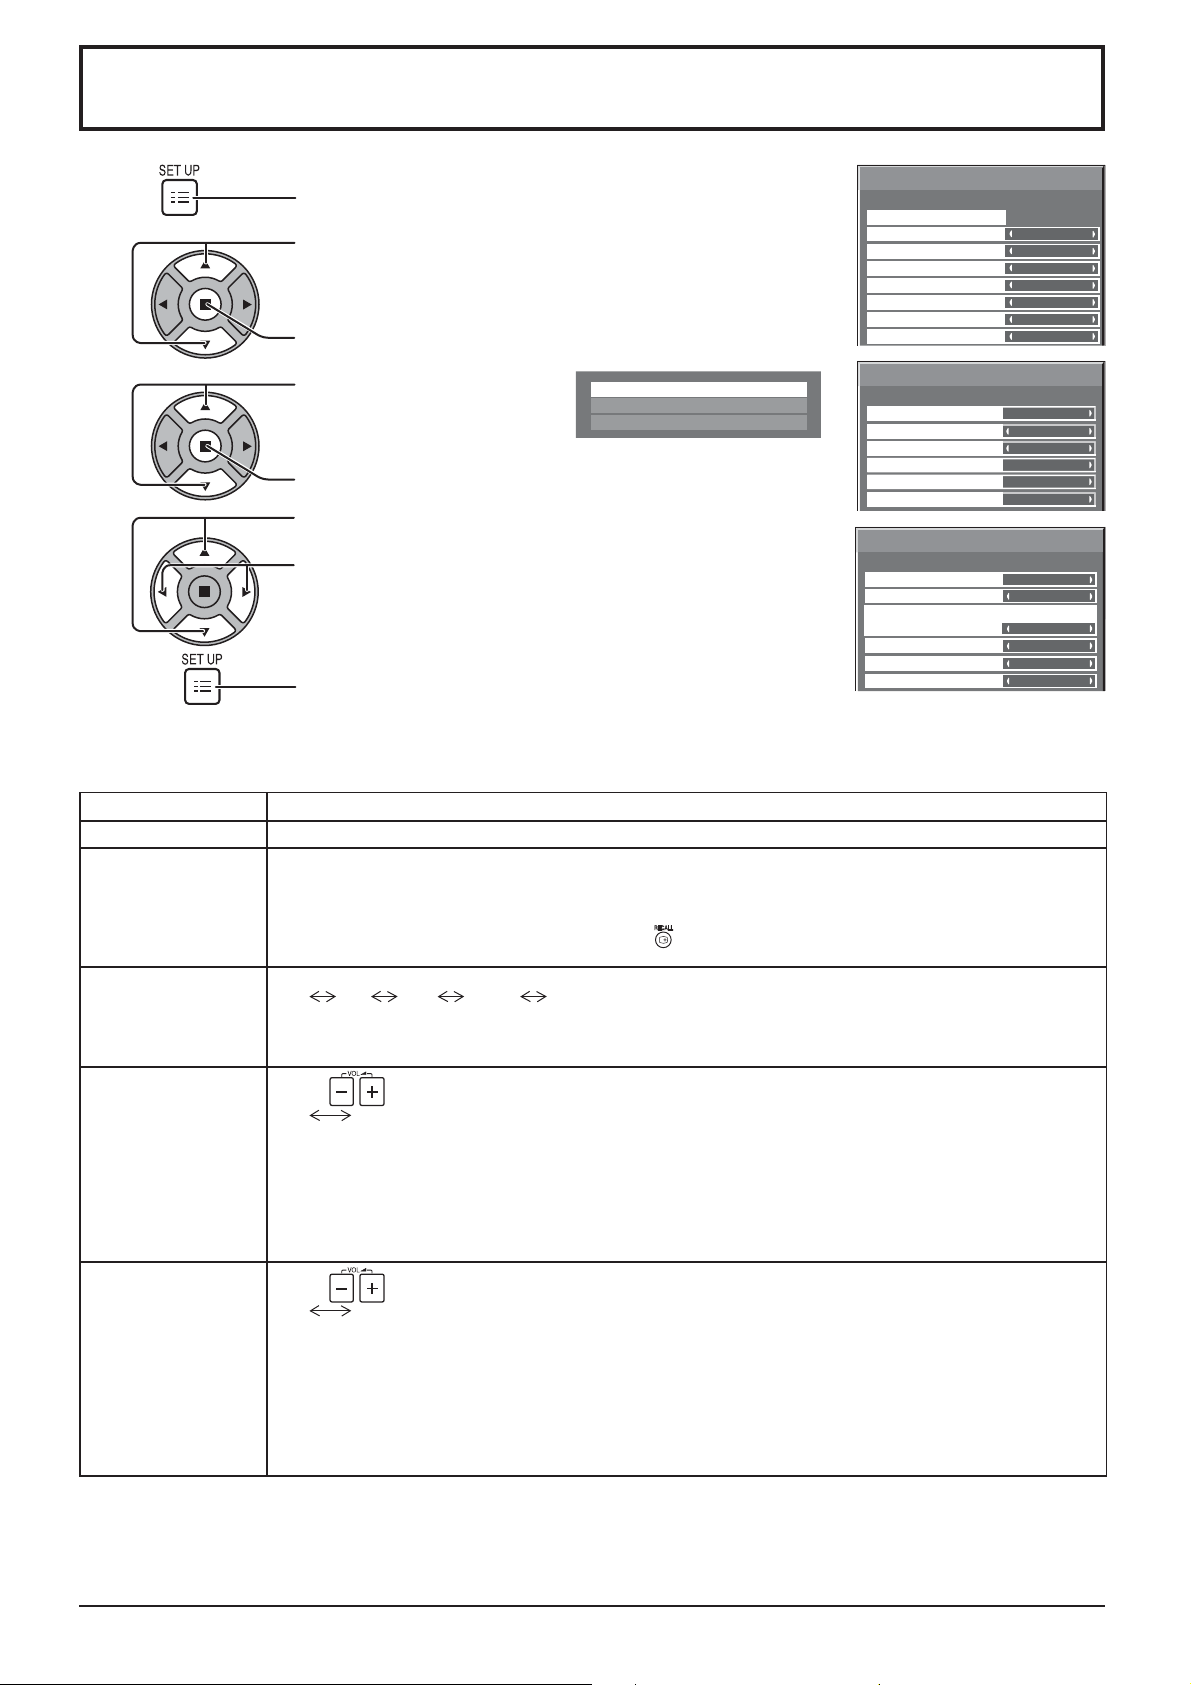
Options Adjustments
1
2
3
Press to display the SET UP menu.
Press to select “OSD LANGUAGE”.
Press for more than 3 seconds.
Press to select “Options”.
Press to display the Options menu.
Options
Display Serial Number
Shipping
Options
Input Search
On screen display
Initial input
Initial VOL level
Maximum VOL level
Input lock
Button lock
Remocon User level
Options
Off-timer function
Initial Power Mode
ID select
Remote ID
Serial ID
Studio W/B
Press to select your preferred menu.
4
5
Press to adjust the menu.
Press to exit from Options menu.
Options
Power ON Screen Delay
Clock Display
Power On Message (No activity power off)
Function button assign 1
Function button assign 2
Power Switch Lock
• The serial number of this device is displayed when “Display Serial Number” is selected in step 3.
1/3
On
Off
Off00
Off
Off
Off
Off
2/3
Enable
Normal
0
Off
Off
Off
3/3
Off
Off
On
Signal
Screensaver
Off
Item Adjustments
Input Search
On screen display
Initial input
Initial VOL level
Maximum VOL level
Set auto input switching for when there is no signal. (see page 45)
On: Displays all the following on screen.
• Power on display
• Input signal switch display
• No signal display
• Mute and the remaining time of off-timer after
was pressed.
Off: Hides all the items above from view.
Adjusts the input signal when the unit is turned on.
PC DVI HDMI Off
Off
Notes:
• Only the adjusted signal is displayed. (see page 16)
• This menu is available only when “Input lock” is “Off”.
Press
Off
button to adjust the volume when the unit is turned on.
On
Off: Sets normal volume.
On: Sets your preferred volume.
Notes:
When “Maximum VOL level” is “On”, the volume can only be adjusted between 0 and your maximum
•
range.
• You can hear the changed volume regardless of your volume setting before opening the options menu
if you adjust the volume when “Initial VOL level” is “On” and cursor is on the menu.
Press
button to adjust the maximum volume.
Off On
Off: Sets auto maximum volume.
On: Sets your preferred maximum volume.
Notes:
• If the “Maximum VOL level” is set lower than the “Initial VOL level”, the “Initial VOL level” automatically
becomes the same as the “Maximum VOL level”.
• The volume display can go up to 100 regardless of the settings.
• You can hear the changed volume regardless of your volume setting before opening the options menu
if you adjust the volume when “Maximum VOL level” is “On” and cursor is on the menu.
4343
Page 44
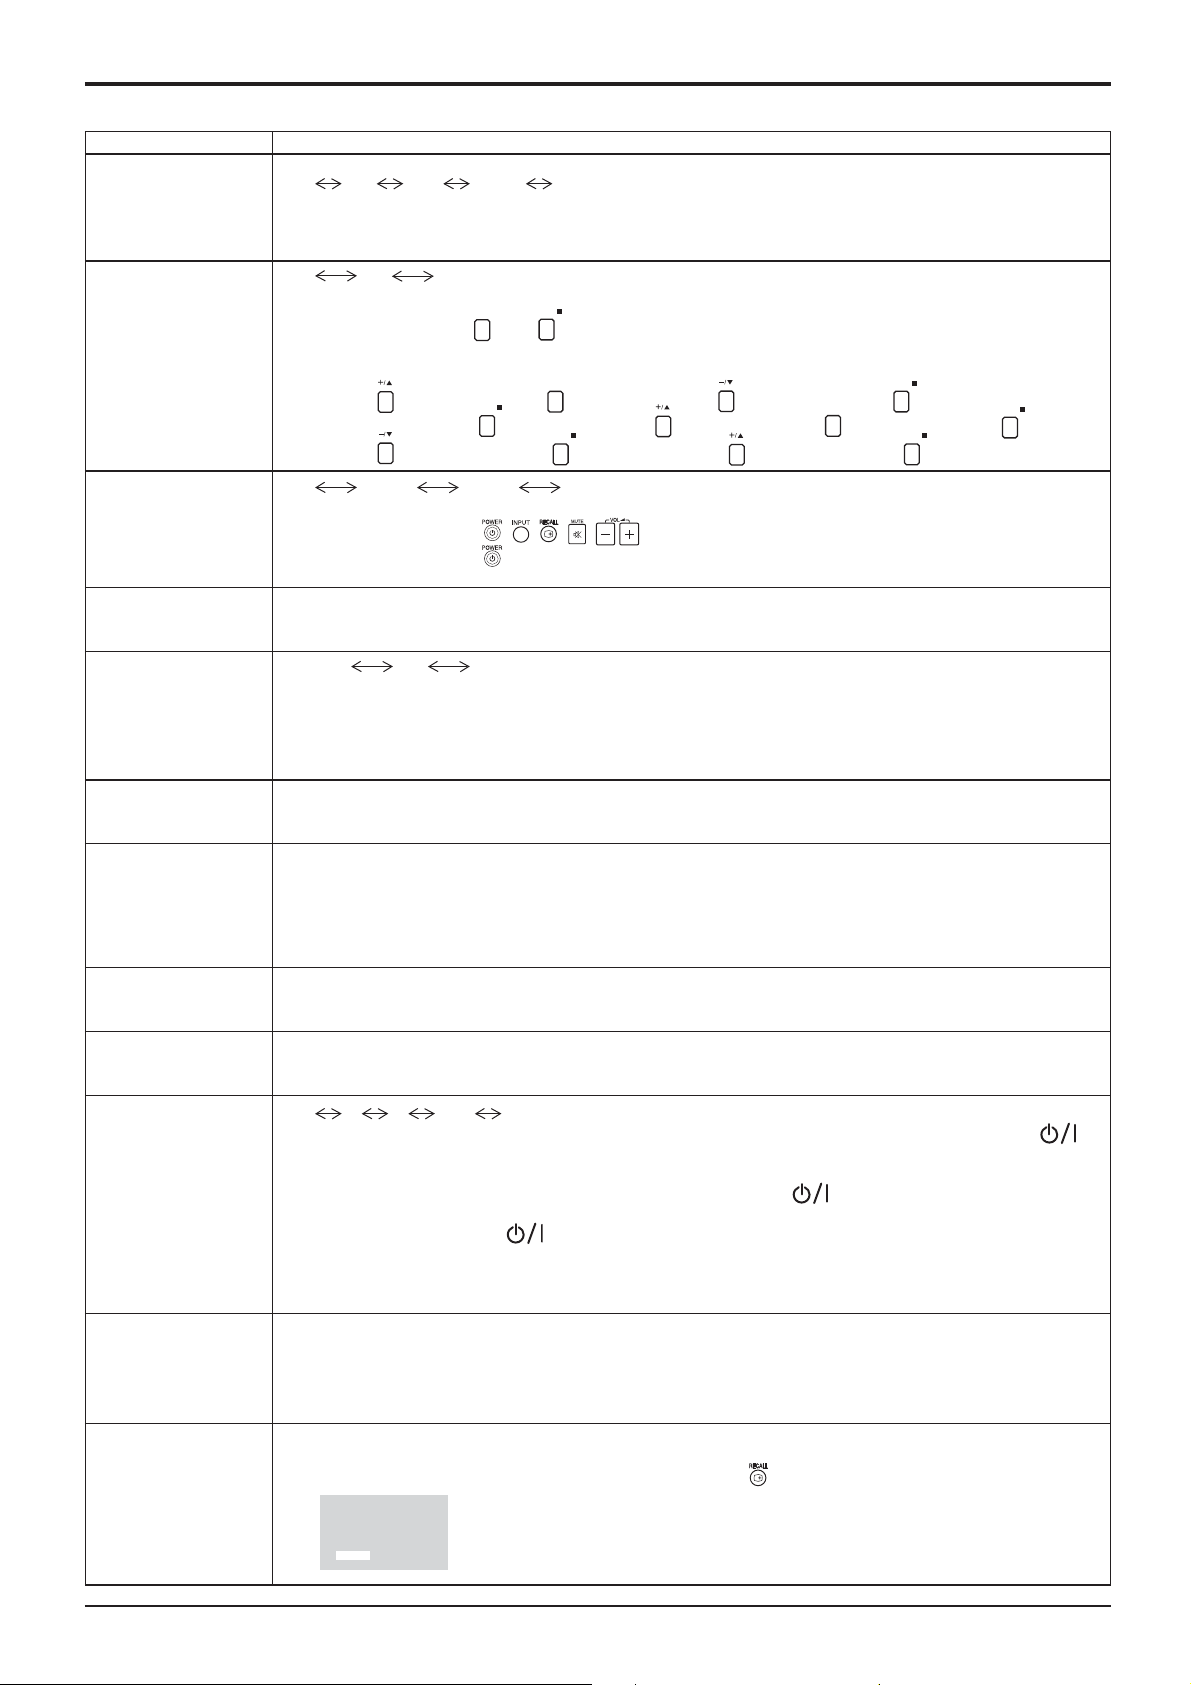
Options Adjustments
Item Adjustments
Locks the input switch operation.
Off
PC DVI HDMI Off
Input lock
Button lock
Notes:
• Only the adjusted signal is displayed (see page 16).
• Input switch can be used when this is set to “Off”.
Off
Off: All the buttons on main unit can be used.
MENU&ENTER: Locks
On MENU&ENTER
ENTER/
MENU
and
buttons on main unit.
On: Locks all the button on main unit except the Power switch.
Sets Button lock with the unit buttons in the following procedure.
Off: Press
four timesPress
ENTER/
MENU&ENTER: Press
On: Press four timesPress
INPUT
four timesPress four timesPress
four timesPress four timesPress
ENTER/
four timesPress four timesPress
ENTER/
INPUT
four timesPress
ENTER/
ENTER/
Remocon User level
Off-timer function
Initial Power Mode
ID select
Remote ID
Serial ID
Studio W/B
Power ON Screen
Delay
Power On Message
(No activity power
off)
Clock Display
Off
User1 User2 User3
Off: You can use all of the buttons on the remote control.
User1:
You can only use , , , , buttons on the remote control.
User2: You can only use
User3:
Locks all the buttons on remote control.
button on the remote control.
Enable: Enables the “Off-timer function”.
Disable: Disables the “Off-timer function”.
Note: When “Disable” is set, the Off-timer is cancelled.
Normal
On Standby
Sets the power mode of the unit for when the power recovers from failure or after plugging off and in again.
Normal: Power returns in as the same state as before the power interruption.
Standby: Power returns in standby mode. (Power Indicator : red/orange)
On: Power returns in power On. (Power Indicator : green)
Note:
When using multiple displays, “Standby” is preferred to be set in order to reduce a power load.
Sets panel ID number when panel is used in “Remote ID” or “Serial ID”.
Set value range: 0 - 100
(Standard value: 0)
The setting of this menu is valid only when using ID remote control.
Off: Disables ID remote control functions. You can use normal remote control operations.
On: Enable ID remote control functions.
Note: To use the ID remote control function, it is necessary to set each ID number of remote control and
display unit. About the setting method, please refer to “ID Remote Control Function” (see page
36) and “ID select” (above-mentioned).
Sets the panel ID Control.
Off: Disables external control by the ID.
On: Enables the external control by the ID.
Off: Nullify all the settings adjusted.
On: Sets the color temperature for TV studio.
Note: Valid only when the “WARM” is set as “COLOR TEMP” in PICTURE menu.
Off
1 2 3.... 30
You can set the power-on delay time of the displays to reduce the power load, when you press
to
turn on the multiple displays that are set together, for example, on MULTI DISPLAY system.
Set each display’s setting individually.
Off: The display will be turned on at the same time as
1 to 30 (sec.)
After pressing
: Set the power-on delay time (second).
, the display will be powered on with time delay depending on this setting.
is pressed.
Notes:
• During this function is working, the power indicator is blinking green.
•
This function also works when the power recovers from failure or after plugging off and in again the power cord.
Whether to show/hide No activity power off Precautions at the time of power ON is set.
On: The warning precautions are shown at the time of power ON.
Off: The warning precautions are not shown at the time of power ON.
Note:
This setting is enabled only if “NO ACTIVITY POWER OFF” is “ENABLE” (see page 31).
Off: Not display the clock.
On: Display the clock.
The clock is displayed at the lower left of the screen when
10:00
Note: When “PRESENT TIME Setup” is not set, the clock is not displayed even
if “Clock Display” is “On”. (see page 27)
button is pressed.
4444
Page 45
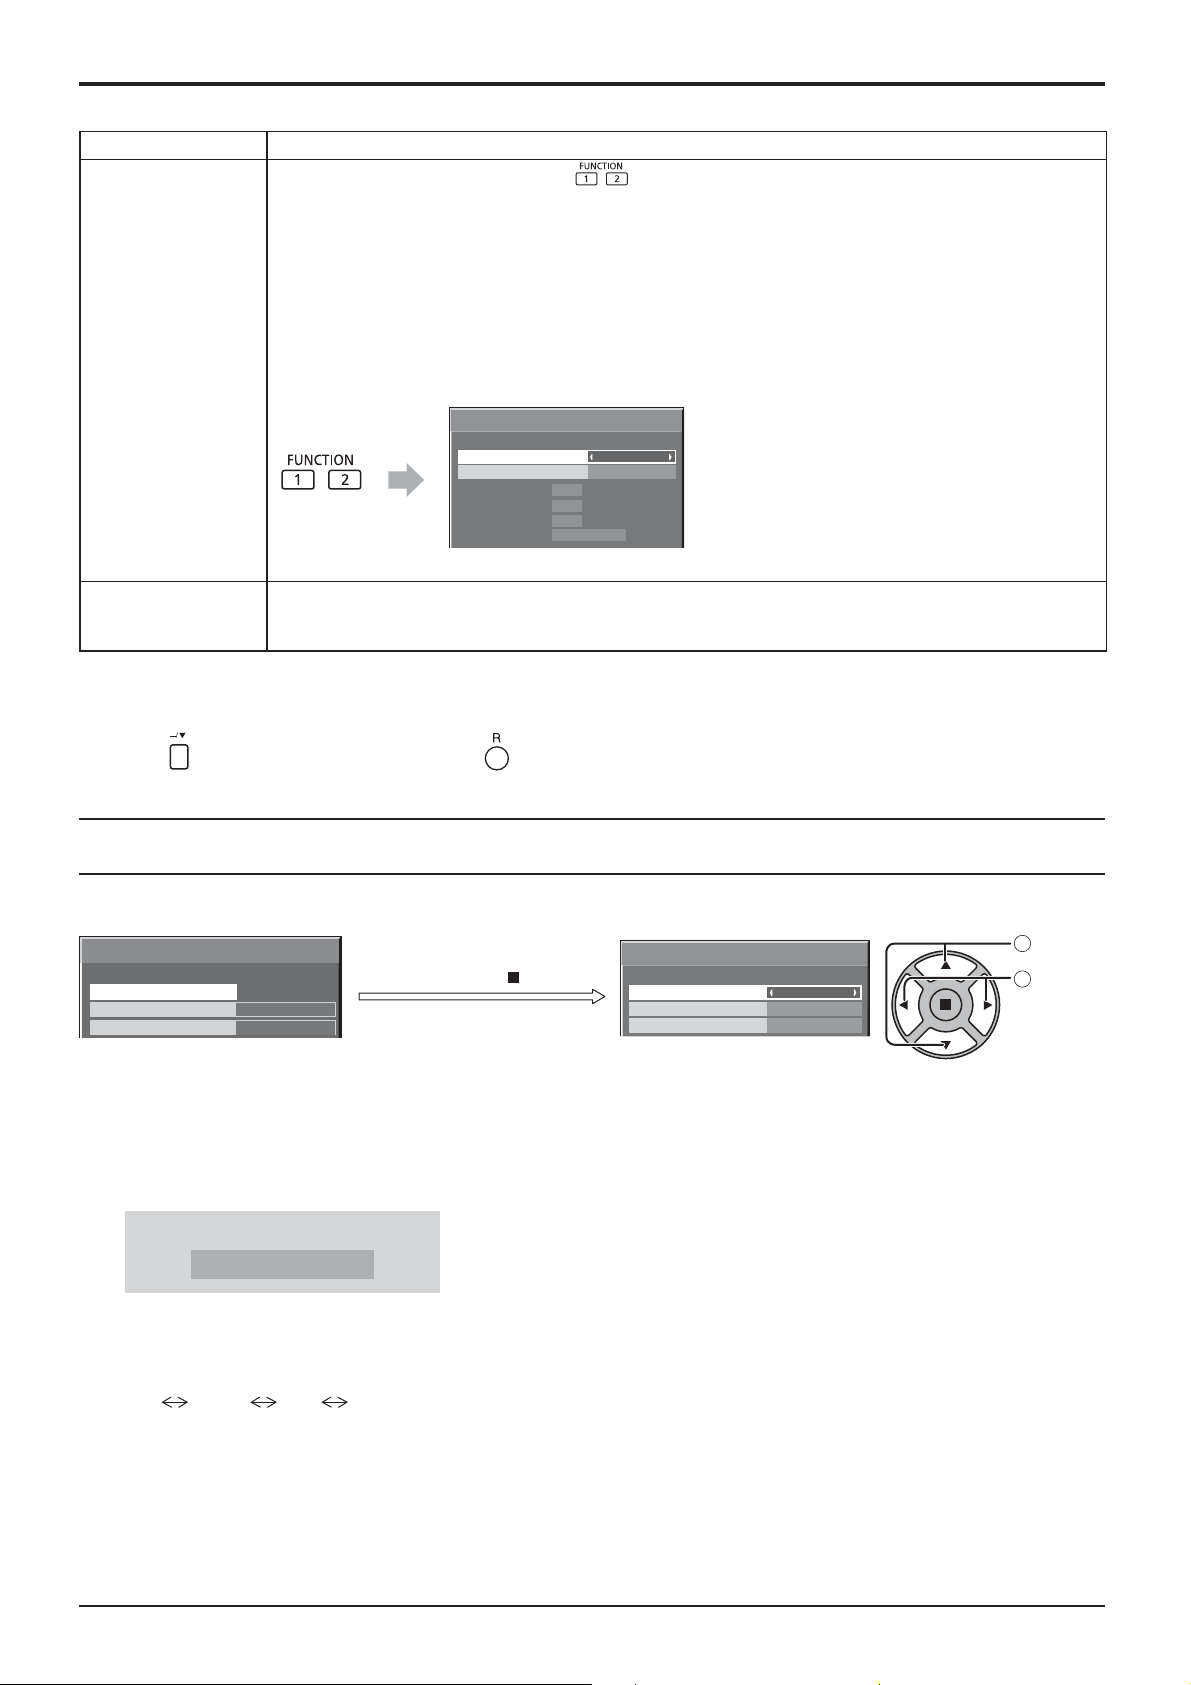
Item Adjustments
Function button assign 1
Function button assign 2
Set the functions that operates when is pressed.
Signal: The “SIGNAL” menu is displayed.
Screensaver: The “SCREENSAVER” menu is displayed.
ECO menu: The “ECO MODE SETTINGS” menu is displayed.
Set up TIMER: The “Set up TIMER” menu is displayed.
Note:
Factory settings are as follows.
FUNCTION1 button: Signal
FUNCTION2 button: Screensaver
Use the FUNCTION button
The menu screen is displayed. (Example: Signal)
[
SIGNAL
Digital
]
Options Adjustments
3 : 2 PULLDOWN
HDMI RANGE
H-FREQ.
63.98
V-FR EQ.
DOT CLOCK FREQ.
SIGNAL FORMAT 1280×1024/60
60.02
kHz
Hz
MHz108.0
OFF
AUTO
Press the FUNCTION button to exit from the menu.
Sets the lock setting for the display Power switch.
Power Switch Lock
On: Power switch operation is disabled.
Off: Power switch operation is enabled.
Normalization
When both main unit buttons and remote control are disabled due to the “Button lock”, “Remocon User level” or
“Remote ID” adjustments, set all the values “Off” so that all the buttons are enabled again.
Press the button on main unit together with button on the remote control and hold for more than 5 seconds. The
“Shipping” menu is displayed and the lock is released when it disappears.
Input Search
When a signal is not detected, another input with a signal is automatically selected.
select
Options
Input Search
On screen display
Initial input
On
Off
1/3
Press ACTION ( ) button
Input Search
Input Search
Primary Input
Secondary Input
Off
1
adjust
2
Input Search
Off: When there is no signal, the input is not switched automatically.
All Inputs: Searches all inputs and switches to an input with a signal.
Priority: Searches “Primary Input” and “Secondary Input” in order and switches to an input with a signal.
SEARCHING...
“SEARCHING...” is displayed during the input search.
Primary Input, Secondary Input
Set the input to search when “Priority” is selected.
(NONE)
HDMI DVI PC
Notes:
• This menu is available only when “Input lock” is “Off”. (see page 44)
4545
Page 46
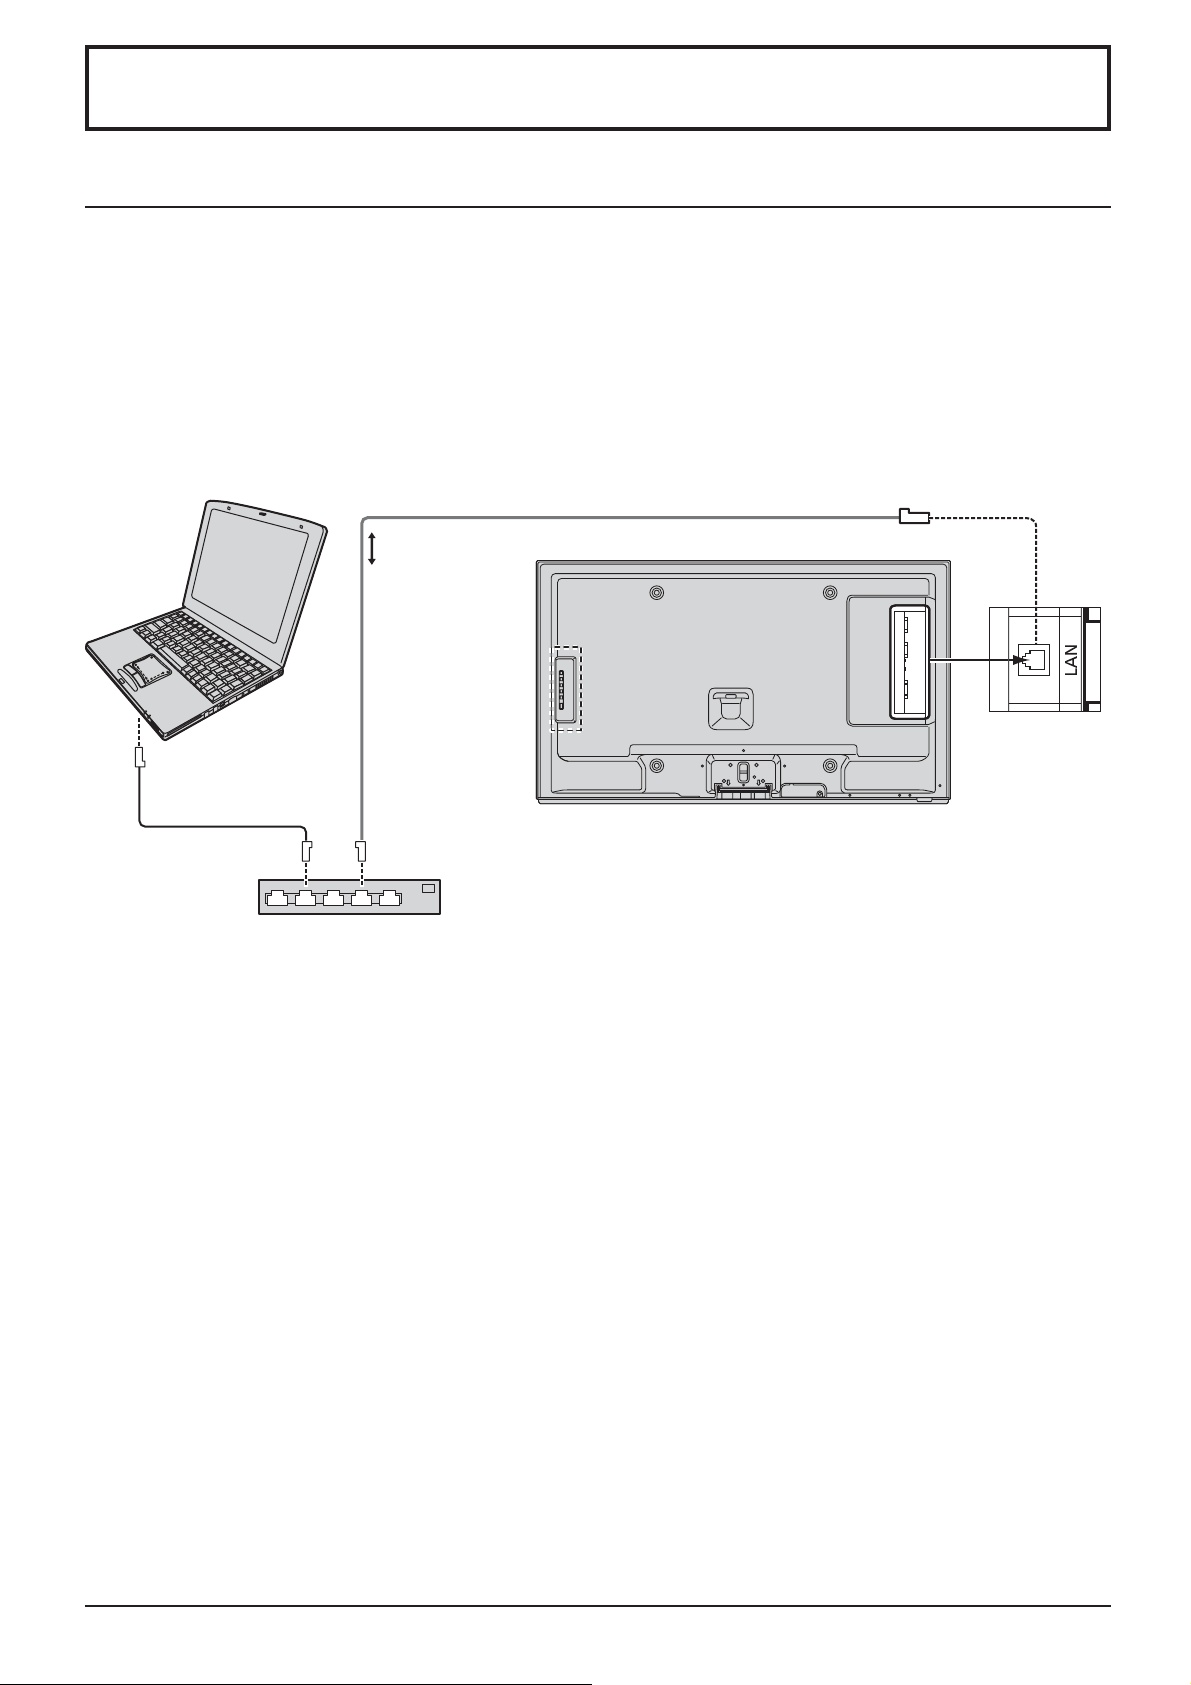
Using Network Function
Network Connection
This unit has a network function to control the network connected display with your computer.
Note:
To use the network function, set each “Network Setup” setting and make sure to set the “CONTROL INTERFACE” to
“LAN”. (see page 41)
When “LAN” is set, power indicator lights orange under the condition of power “Off” with remote control (stand-by
state).
Example of network connection
COMPUTER
LAN cable
(Shielded)
ȵ
Use the
Shielded Twist
Pair (STP) LAN
cable.
Hub or broadband router
Notes:
• Make sure the broadband router or hub supports 10BASE-T/100BASE-TX.
• Use a LAN cable that is compliant with “CAT5” when connecting a device that supports 100BASE-TX.
• For instructions on how to connect, consult your network administrator.
Display (main unit, rear)
4646
Page 47
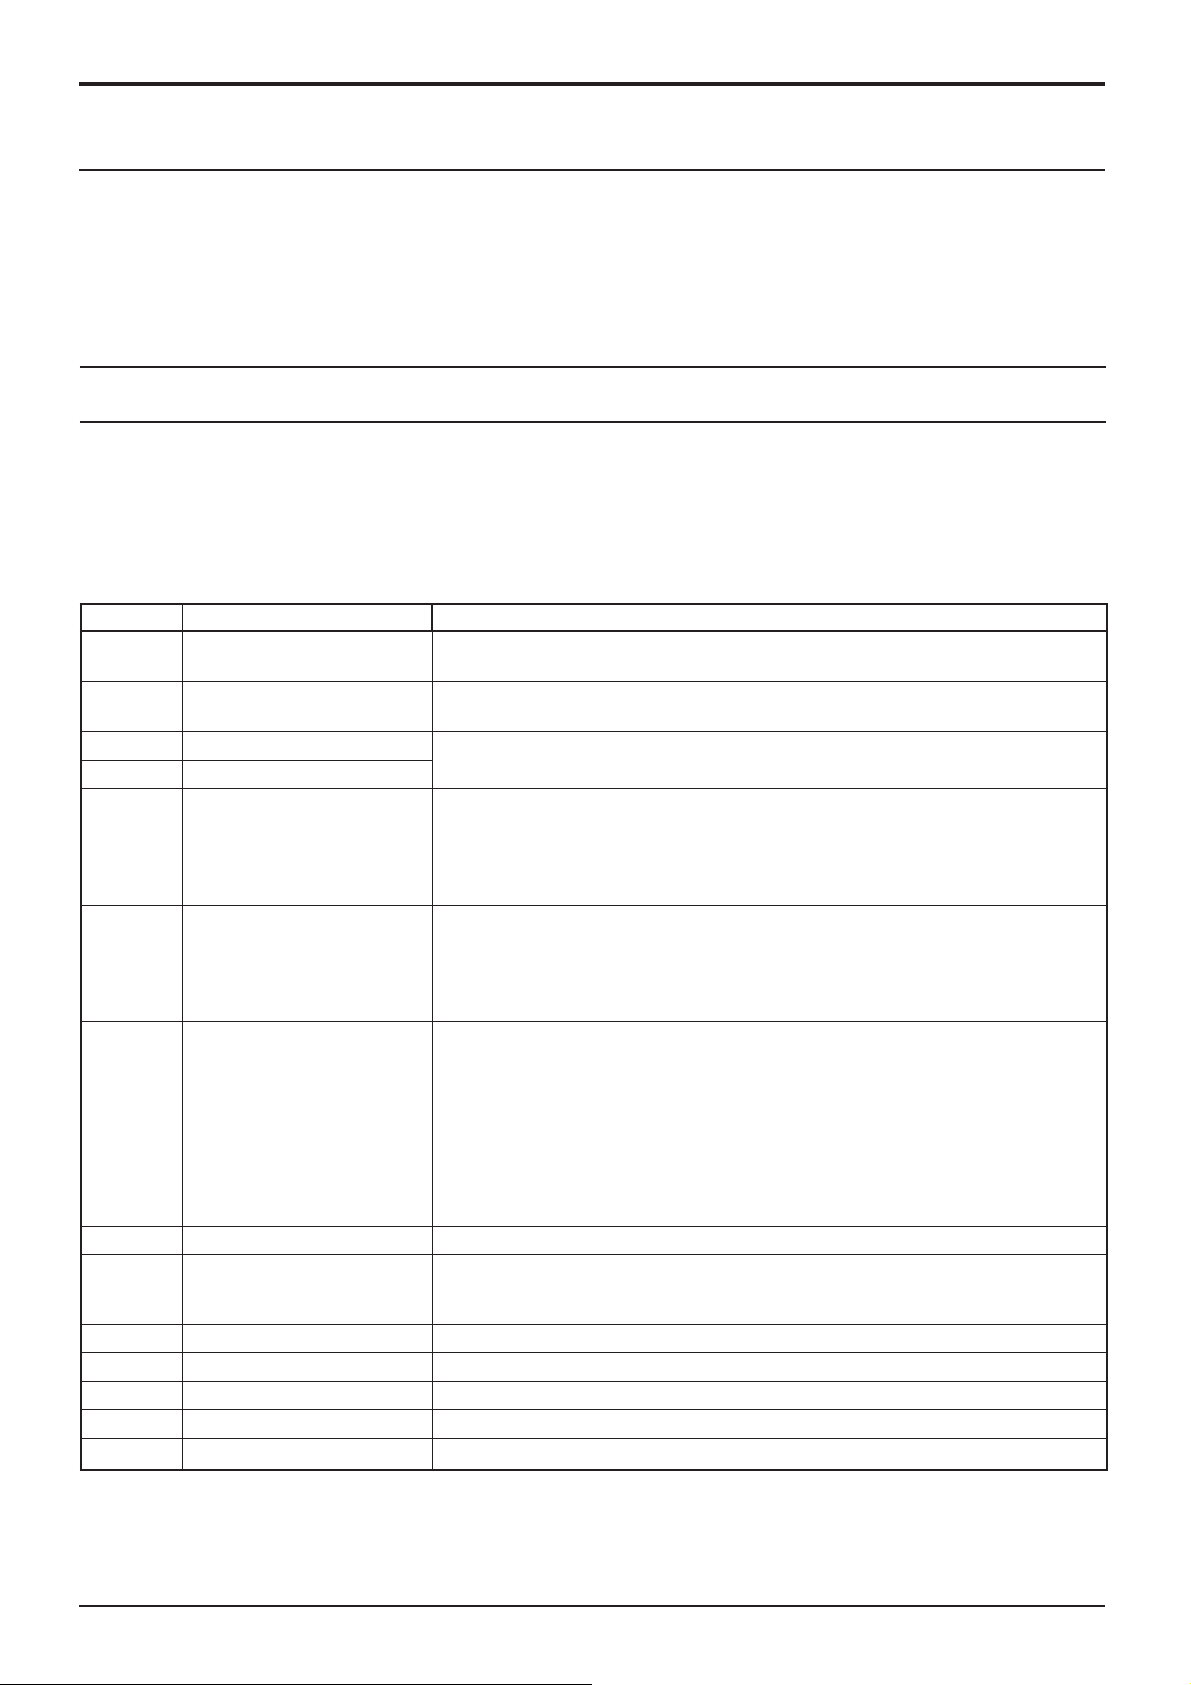
Using Network Function
Command Control
Network function of the unit can control the unit in the same way as serial control from a network.
Supported commands
Commands used in the serial control are supported. (see page 13)
Note:
Consult your local Panasonic dealer for detail instructions on command usage.
PJLink™ Protocol
The network function of the unit conforms with PJLink™ class 1 and you can operate the following actions from your
computer using PJLink™ protocol.
• Display setup
• Display status query
Supported commands
Commands to control the unit with PJLink™ protocol are shown in the table below.
Command Control Remark
POWR Power control
POWR ? Power status query
INPT Input switch
INPT ? Input switch query
AVMT Shutter control Parameter
AVMT ? Shutter control query Parameter
ERST ? Error status query Parameter
LAMP ? Lamp status query Not supported
INST ? Input switch list query
NAME ? Projector name query Return the Display name contents selected in “Network Setup”.
INF1 ? Manufacturer name query Returns “Panasonic”
INF2 ? Model name query Returns “42LFE6U” (for 42-inch model)
INFO ? Other information query Returns version number
CLSS ? Class information query Returns “1”
Parameter
0 = Standby 1 = Power “On”
Parameter
0 = Standby 1 = Power “On”
Parameter
See the parameter for command INST ?
10 = Picture On (picture mute deactivated), 11 = Picture Off (picture on mute)
20 = Audio On (audio mute deactivated), 21 = Audio Off (audio on mute)
30 = Shutter mode Off (picture and audio mute deactivated)
31 = Shutter mode On (picture and audio on mute)
11 = Picture Off (picture on mute)
21 = Audio Off (audio on mute)
30 = Shutter mode Off (picture and audio mute deactivated)
31 = Shutter mode On (picture and audio on mute)
First byte: 0
Second byte: 0
Third byte: 0
Fourth byte: 0
Fifth byte: 0
Sixth byte: Means other error. 0 or 2.
Meaning of the 0 – 2 settings:
0 = Error is not detected, 2 = Error
Parameter
11: PC IN input (PC)
32: DVI-D IN input (DVI)
31: HDMI input (HDMI)
PJLink™ security authentication
Set “panasonic” for the PJLink™ password.
• PJLink™ is a pending trademark in Japan, the United States, and other countries or areas.
4747
Page 48
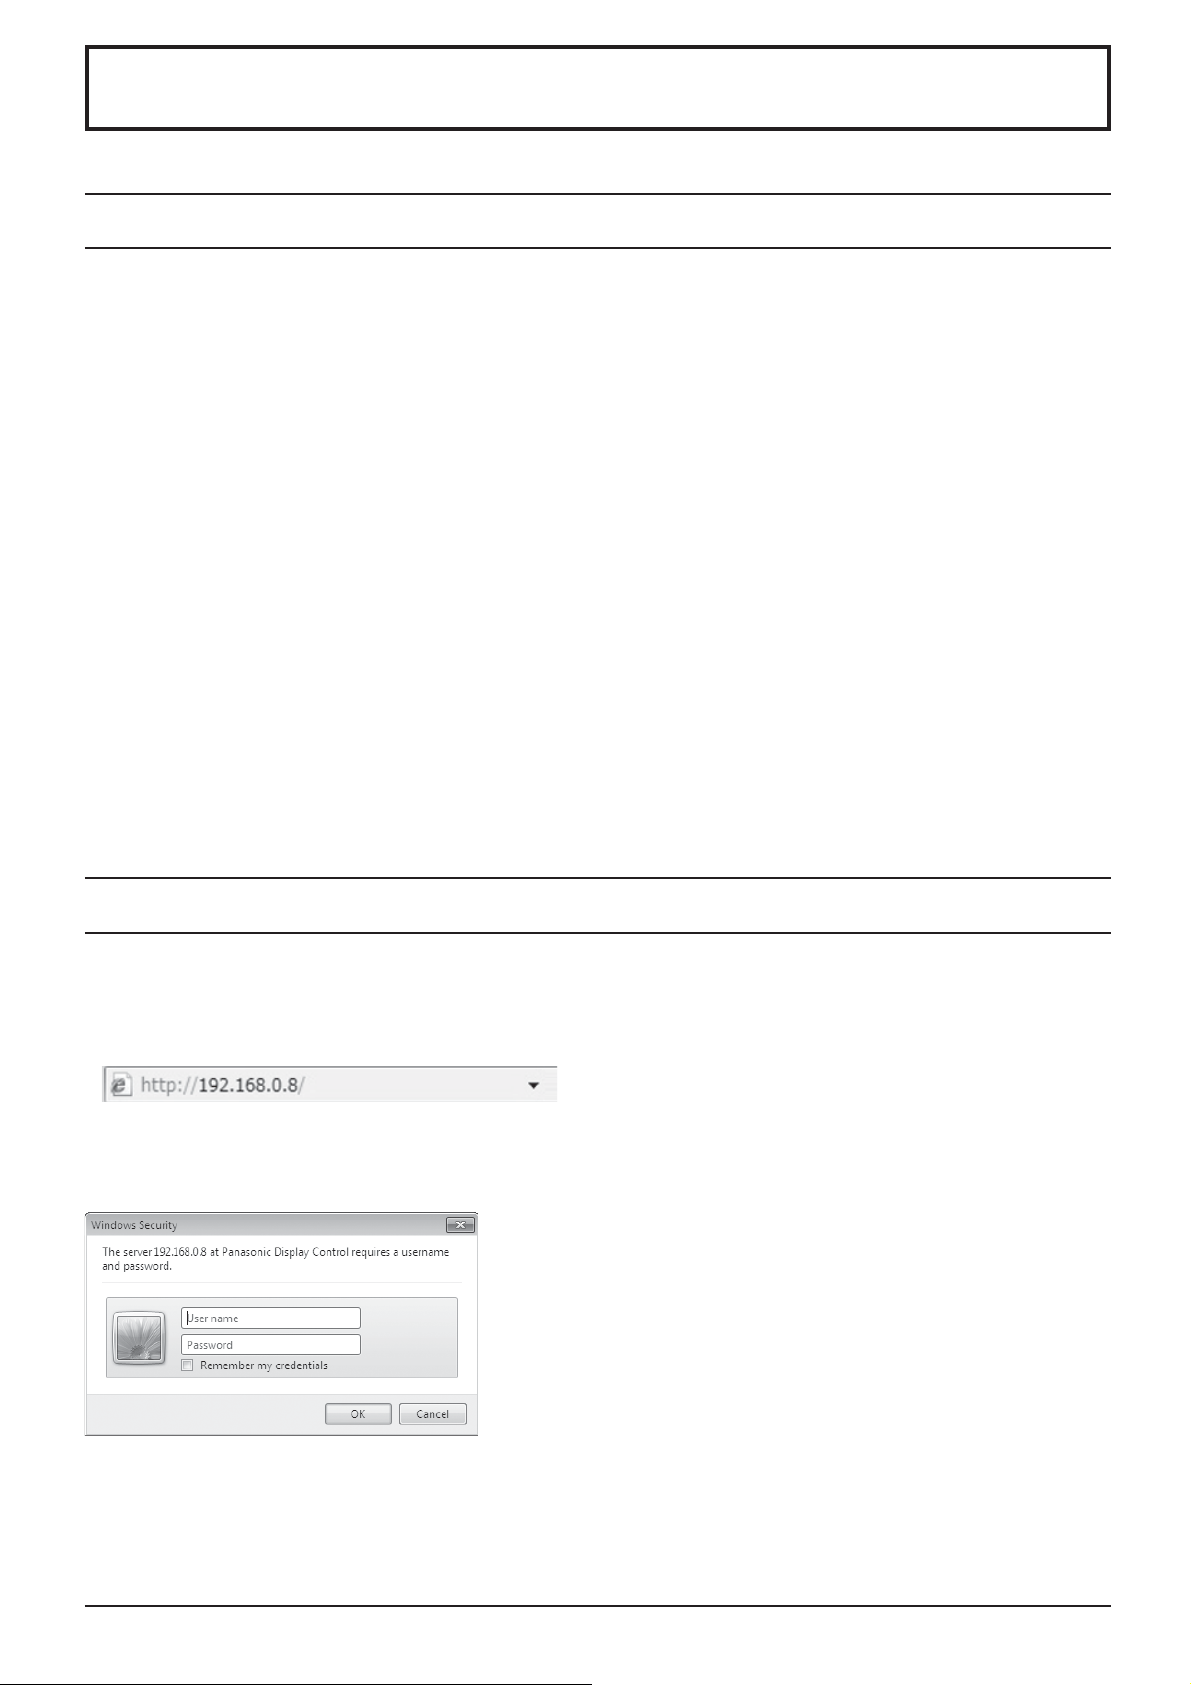
Using Web Browser Control
You can use a Web browser to control the unit and set up a network and password.
Before Using Web Browser Control
To use the Web browser control, the unit and computer setups are required.
Unit Setup
Set each “Network Setup” setting and make sure to set the “CONTROL INTERFACE” to “LAN”. (see page 42)
Computer Setup
Disable the proxy server settings and enable JavaScript.
(Windows) (Macintosh)
Disable proxy server settings
1 Display [Internet Properties] window.
Click [Start] – [Control Panel] – [Network and Internet]
– [Internet Options].
2 Click the [Connections] tab and then [LAN Settings].
3 Deselect the [Use automatic con guration script] and
[Use a proxy server for your LAN] boxes.
4 Click [OK].
Enable JavaScript
1 Display [Internet Properties] window.
Click [Start] – [Control Panel] – [Network and Internet]
– [Internet Options].
2 Set the security level on the [Security] tab to [Default
Level]. Alternatively enable [Active scripting] from the
[Custom Level] button.
Disable proxy server settings
1 From the [Safari] menu, click [Preferences].
General screen is displayed.
2 From the [Advanced] tab, click the [Change
Settings…] button next to [Proxies]. Click [Proxies]
and set up a proxy server.
3 Deselect the [Web Proxy] and [Automatic Proxy
Con guration] boxes.
4 Click [Apply Now].
Enable JavaScript
1 Display [Security] of Safari.
2 Select [Enable JavaScript] under [Web content].
Access from Web Browser
Access to the TOP screen of the Web browser control using a Web browser.
1 Start your Web browser.
2 Enter the IP address set with the “LAN Setup” of the unit.
(see page 42)
3 Enter the user name and password when the
Authentication screen is displayed.
Authentication screen
4
Click [OK].
After logged in, the TOP screen of the Web browser
control is displayed. (see page 49)
Notes:
The password used here is the same password
used for command control and the PJLink™
security authentication.
Default user name and password are as follows:
User name: user1
Password: panasonic
The password can be changed on the Password
Setup screen after logging in (see page 50). The
user name cannot be changed.
Under no circumstances, Panasonic Corporation
or it's associated companies will ask customers
their password directly.
Even if you are asked directly, please do not
reveal your password.
4848
Page 49
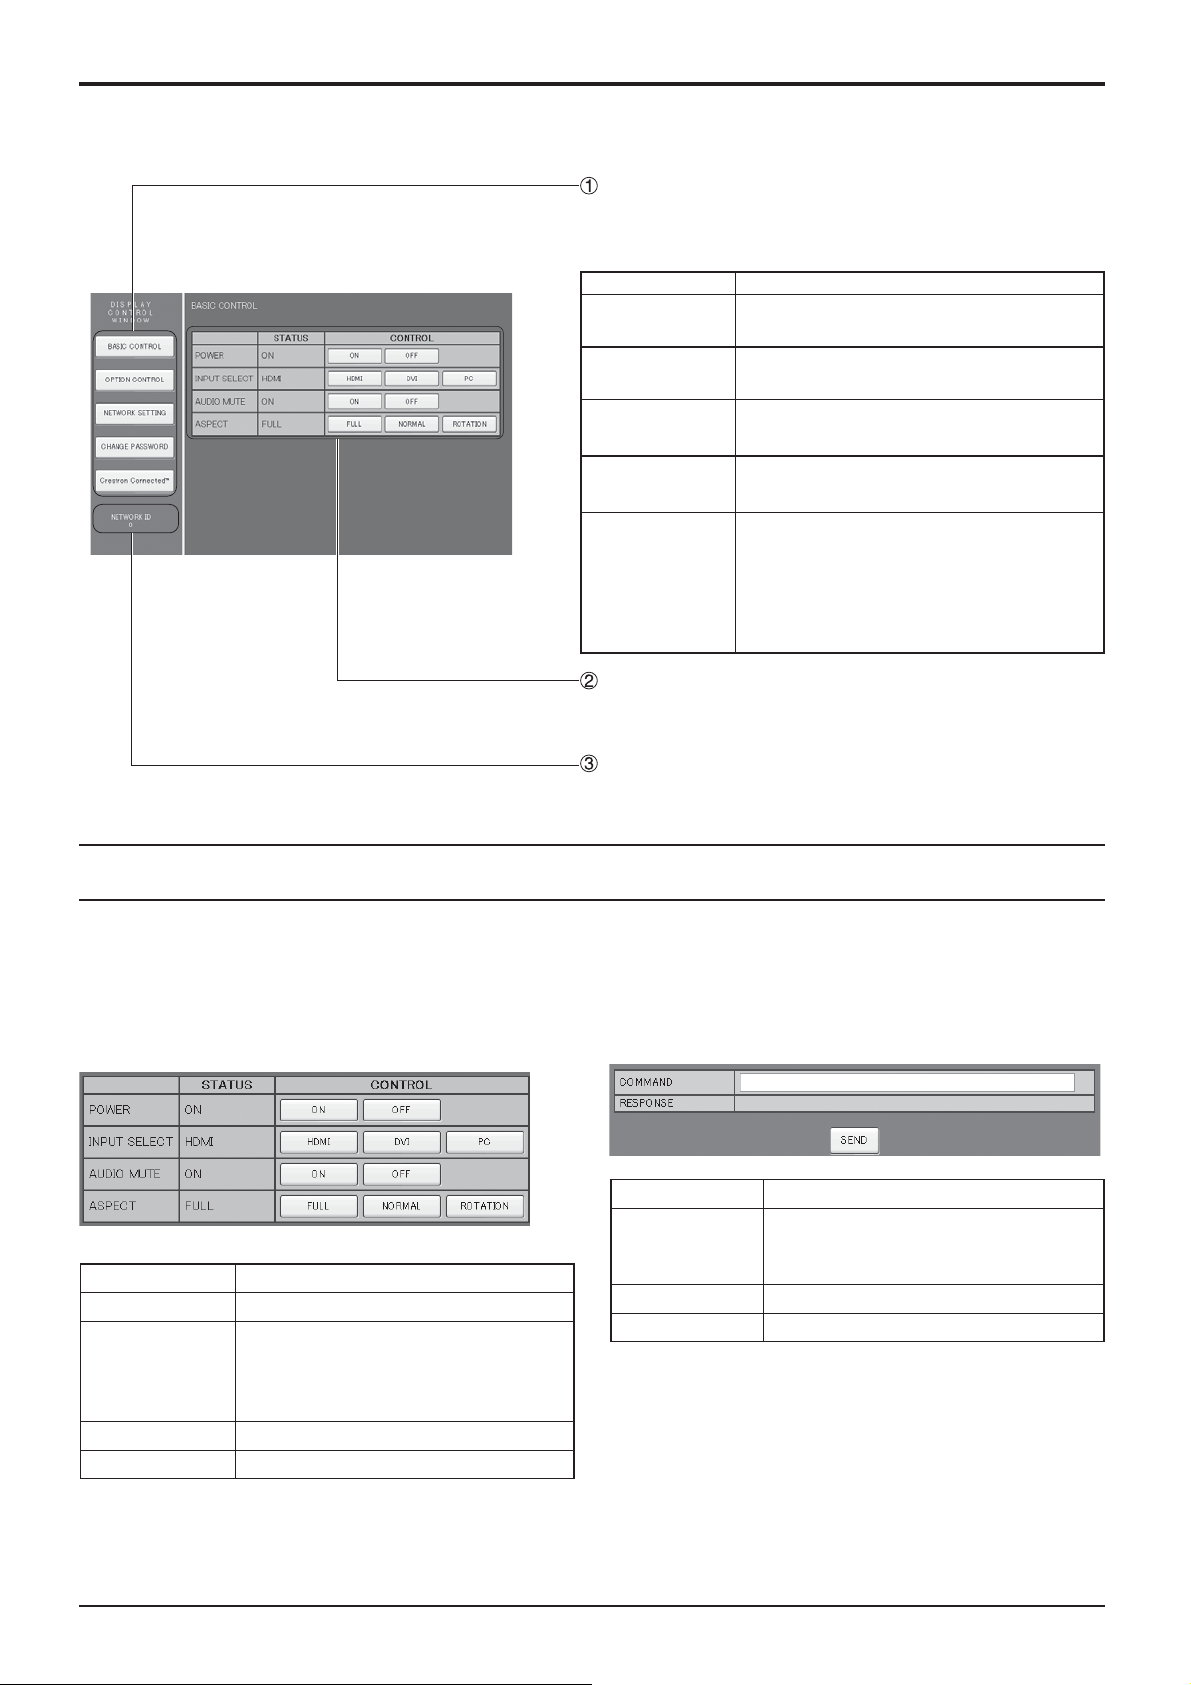
Using Web Browser Control
TOP screen structure of the Web browser control
After logging in, the TOP screen of the Web browser control is displayed.
Menu
Menu items are displayed. When a button is clicked,
setup screen of each item is displayed.
Item Details
BASIC
CONTROL
OPTION
CONTROL
NETWORK
SETTING
CHANGE
PASSWORD
Crestron
Connected™
BASIC CONTROL screen is displayed.
(see below)
OPTION CONTROL screen is
displayed. (see below)
Network Setup screen is displayed.
(see page 50)
Password setup screen is displayed.
(see page 50)
The Crestron Connected™ operations
screen will appear. (see pages 51, 52)
This button does not appear when
“Crestron Connected™” in “Network
Setup” is “OFF”. (see page 41)
According to the selected item from the menu, setup
status or set items are displayed.
Network ID information
ID to identify the unit is displayed.
Display Control (BASIC CONTROL/OPTION CONTROL Screen)
Click BASIC CONTROL or OPTION CONTROL from the menu. Various controls of the unit can be set.
BASIC CONTROL screen OPTION CONTROL screen
Click BASIC CONTROL from the menu. Unit status and
buttons to change settings are displayed.
Item Details
POWER Switch ON/OFF of the unit power.
Switch the input signals. Displayed
INPUT SELECT
AUDIO MUTE Switch ON/OFF of the sound mute.
ASPECT Switch the screen modes
buttons vary according to the
connection status of the video
device.
Click OPTION CONTROL from the menu. Command input
eld for command control of the unit is displayed.
Item Details
Enter a command. Use the same
COMMAND
RESPONSE Response from the unit is displayed.
SEND Command is sent and run.
Note:
After the settings are changed, it may take a while till
the display’s response is displayed.
command used for the serial control.
(see page 13)
4949
Page 50
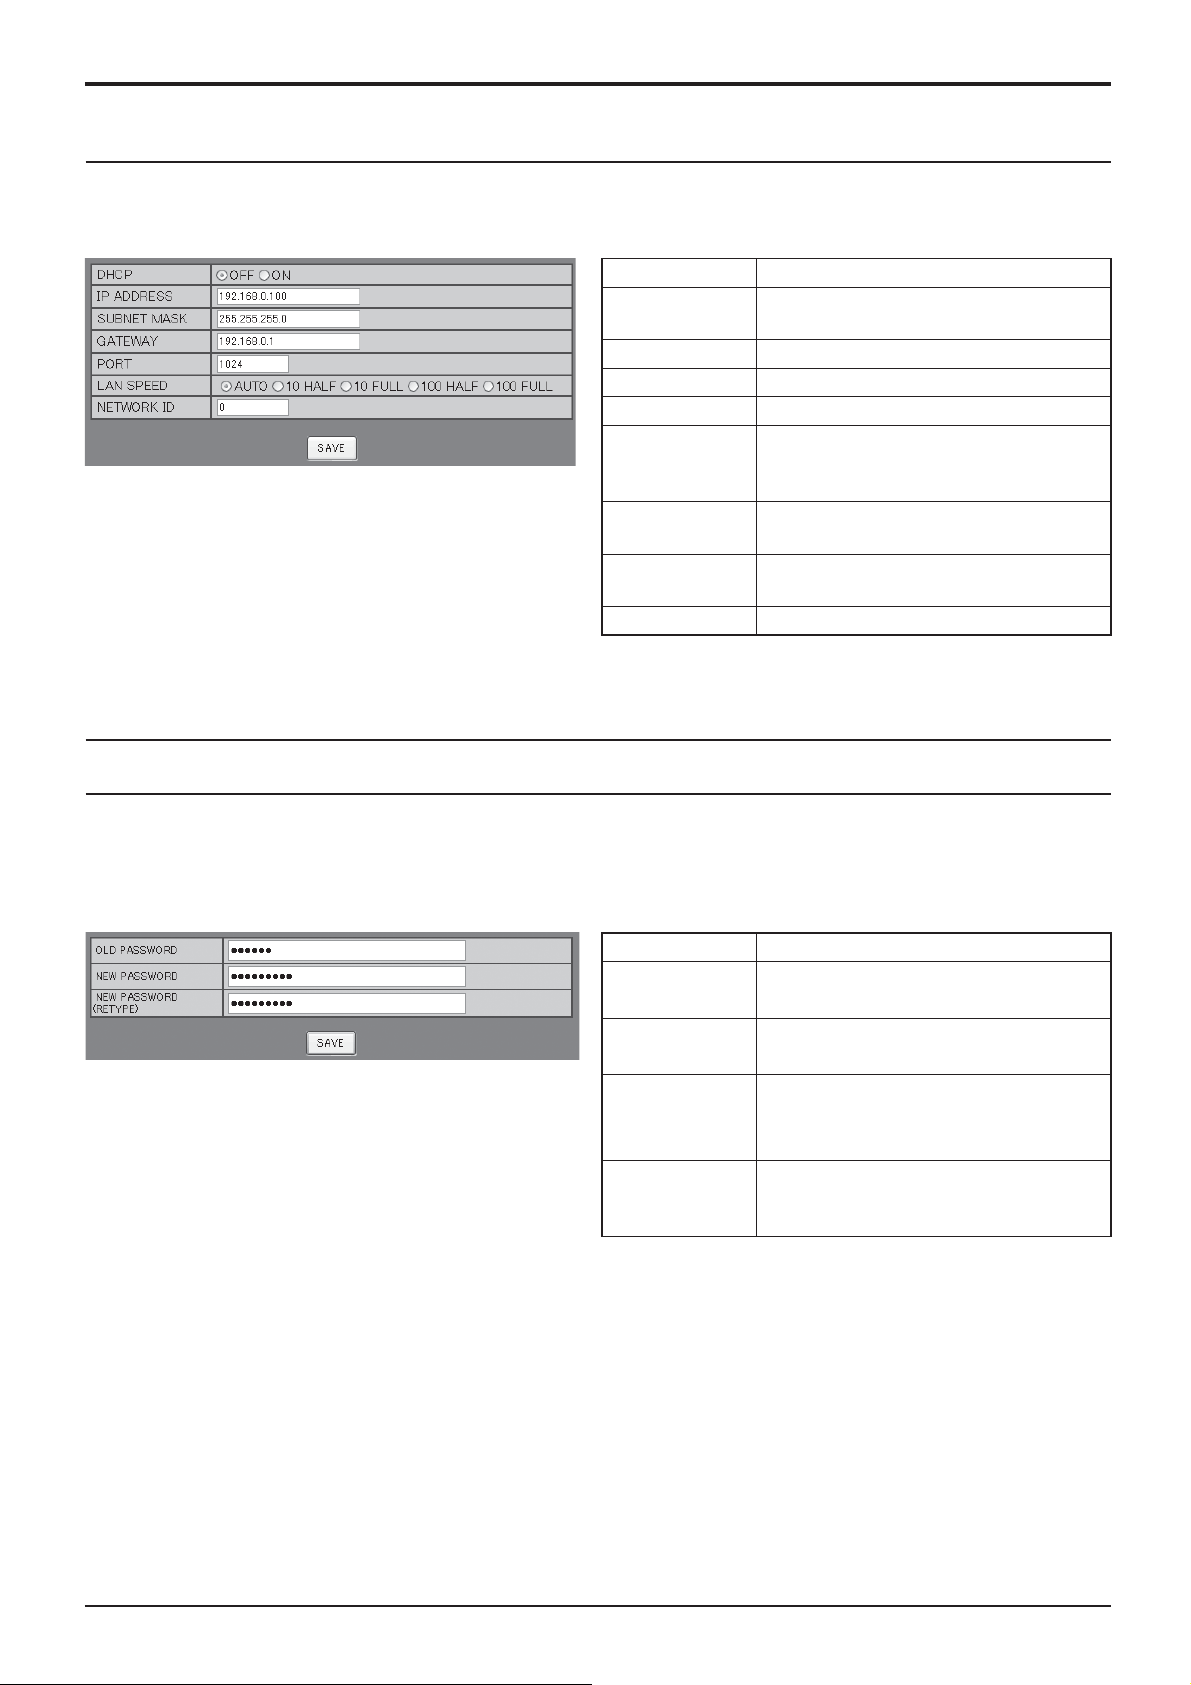
Using Web Browser Control
NETWORK SETTING (NETWORK SETTING Screen)
Click NETWORK SETTING from the menu. Various settings of a network can be set. For the details of the setting
items, please check Network Setup under the Set up of the unit. (see page 42)
Item Details
Set to ON when a DHCP server is
used, or OFF when it is not used.
Enter the port number used for
command control. The available
setting range is 1024 - 65535.
Set the connection speed of the LAN
environment.
Set the ID to identify this unit. The
available setting range is 0 - 99.
Notes:
• To use a DHCP server, make sure the DHCP server
is started.
• During a DHCP server is used, IP ADDRESS,
SUBNET MASK, and GATEWAY values cannot be
entered.
• When the set values are changed properly,
“NETWORK SETTING CHANGED.” message and
the changed set items are displayed.
DHCP
IP ADDRESS Enter an IP address.
SUBNET MASK Enter a subnet mask.
GATEWAY Enter a gateway address.
PORT
LAN SPEED
NETWORK ID
SAVE Save the each set value.
Password Setting (CHANGE PASSWORD Screen)
Click CHANGE PASSWORD from the menu. Password to access the Web browser control can be set. When
the password is changed in this screen, the password used for command control and the PJLink™ security
authentication is also changed.
Item Details
Notes:
• The default password is “panasonic”.
• Up to 32 alphanumeric characters can be used for a
password.
• When the password is changed properly, “Password
has changed.” message is displayed.
OLD
PASSWORD
NEW
PASSWORD
NEW
PASSWORD
(RETYPE)
SAVE
Enter the old password.
Enter the new password.
Enter the password entered in “NEW
PASSWORD” for con rmation.
Save the new password. The
con rmation screen is displayed.
Click OK to change the password.
5050
Page 51
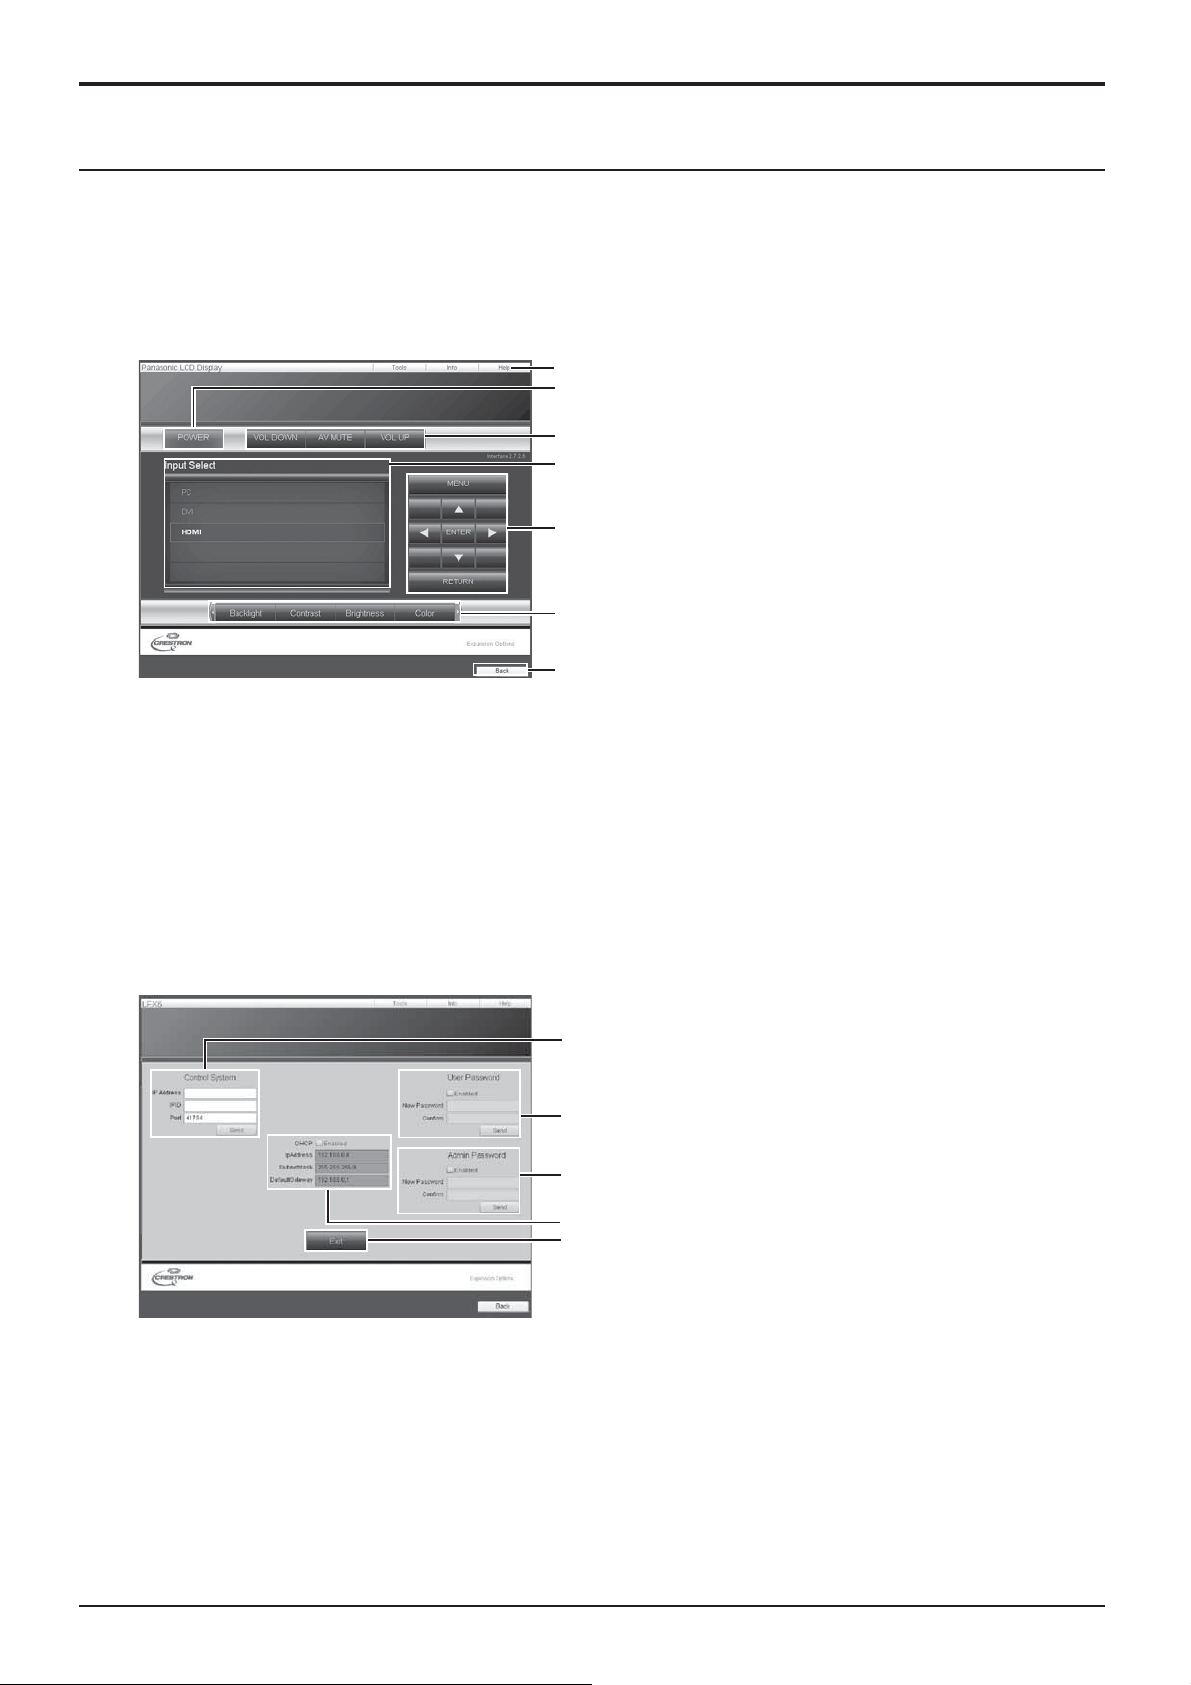
Using Web Browser Control
Crestron Connected™ page
You can monitor or control the Display using Crestron Connected™.
When you click [Crestron Connected™], the Crestron Connected™ operation page is displayed.
If Adobe Flash Player is not installed in your computer, or if the browser does not support Flash, this page does
not appear. In this case, return to the previous page by clicking [Back] in the operation page.
Operation page
1 Tools, Info, Help
1
2
3
4
Switches the pages for tools, information, help
using the tab.
2 POWER
Switches between on and off of the power.
3 VOL DOWN, AV MUTE, VOL UP
Sets the volume, AV mute. When the power of the
5
Display is turned off, VOL DOWN, AV MUTE and
VOL UP are not available.
4 Input Select
6
Sets the input selection. When the power of
the Display is turned off, this operation is not
7
available.
5 Operation buttons on the menu screen
Operates on the menu screen.
6 Image quality adjustments
Operate items related to image quality.
7 Back
Returns to the previous page.
Tools page
Click Tools on the operation page.
1 Control system
Sets the information required for the communication
with the controller that is connected to the Display.
2 User Password
1
Sets the password for the user rights in the operation
page of Crestron Connected™.
3 Admin Password
2
Sets the password for the administrator rights in the
3
operation page of Crestron Connected™.
4 Network status
4
5
Displays the setting of LAN.
DHCP: Displays the value in the current setting.
IpAddres: Displays the value in the current setting.
SubnetMask: Displays the value in the current setting.
DefaultGateway: Displays the value in the current setting.
5 Exit
Return to the operation page.
Note:
When you monitor or control the Display using Crestron Connected™, set “Crestron Connected™” to “On” in the
“Network Setup” menu. (see page 41)
5151
Page 52
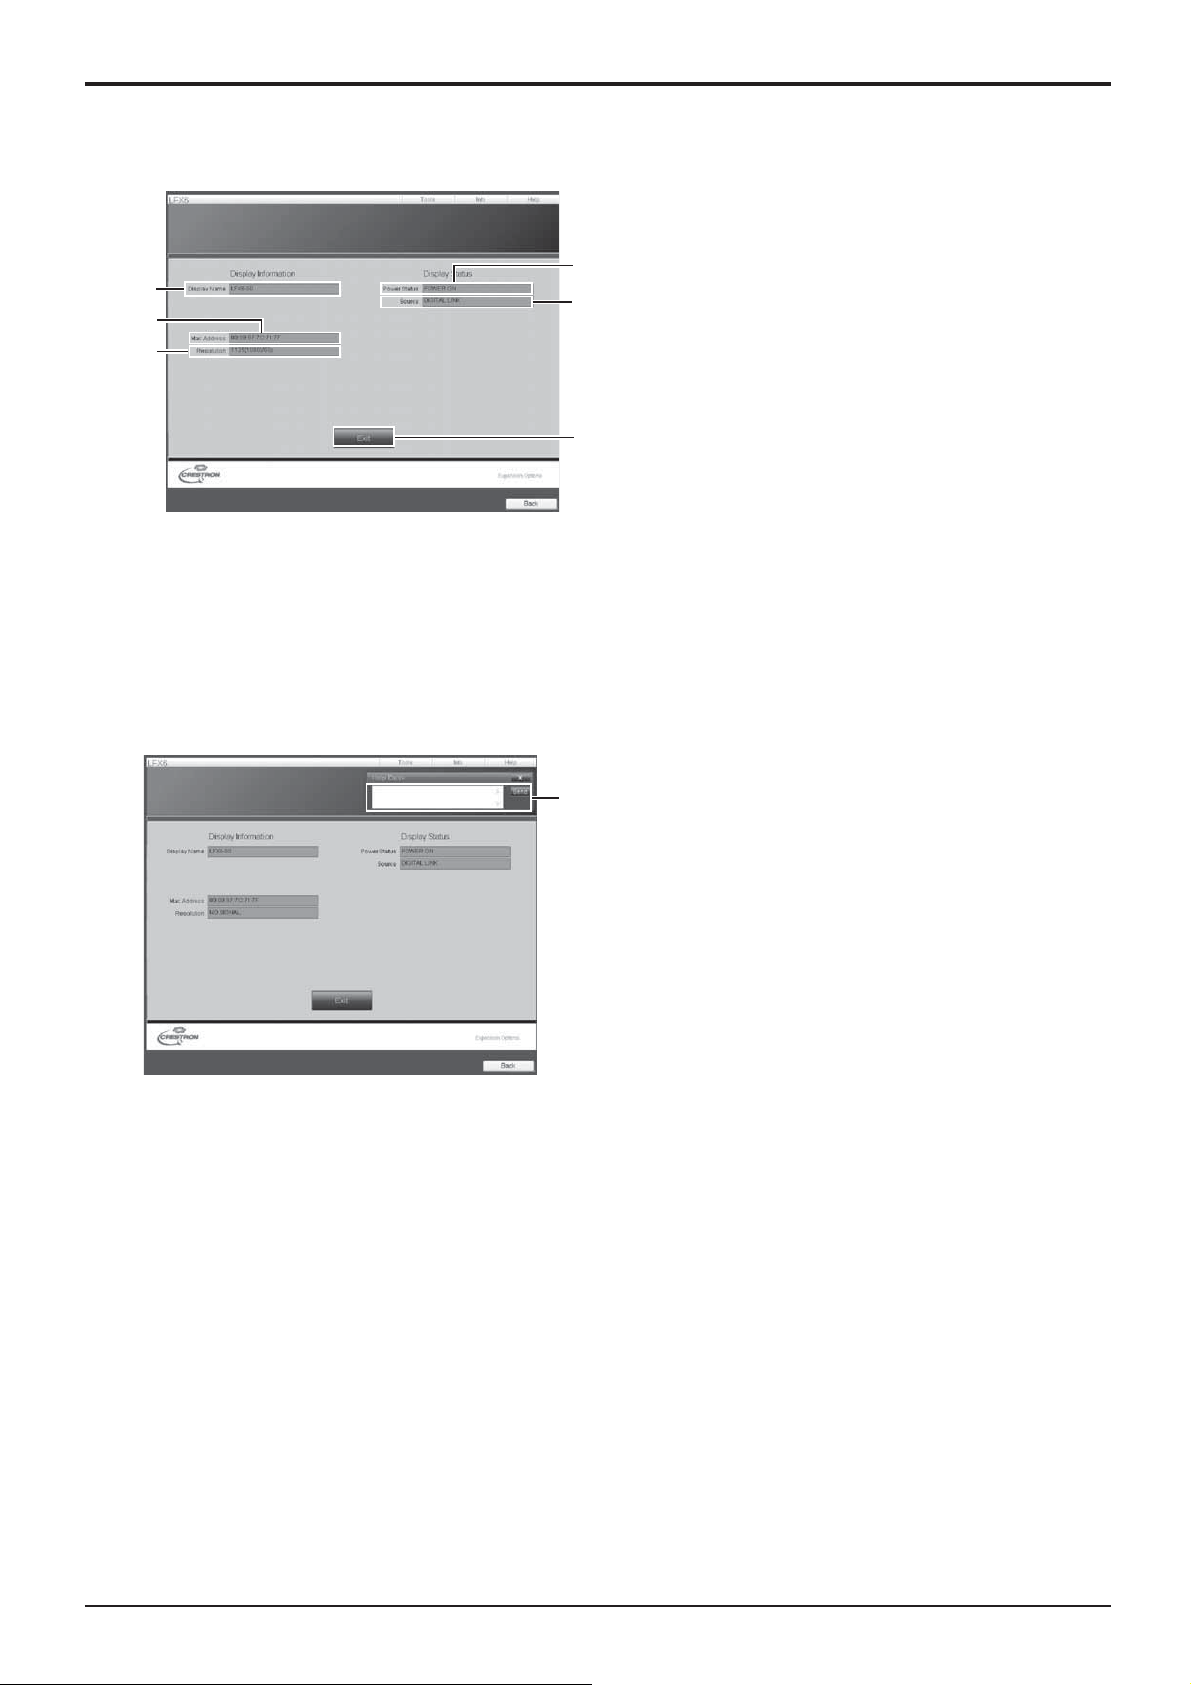
Using Web Browser Control
Info page
Click Info on the operation page.
1
2
3
1 Display name
Displays the name of the Display.
2 Mac Address
4
5
Displays the MAC address.
3 Resolution
Displays the resolution of the Display.
4 Power Status
Displays the status of the power.
5 Source
6
Displays the selected video input.
6 Exit
Return the operation page.
Help page
Click Help on the operation page.
The Help Desk screen is displayed.
1 Help Desk
1
Sends or receive messages to the administrator who
uses Crestron Connected™.
5252
Page 53
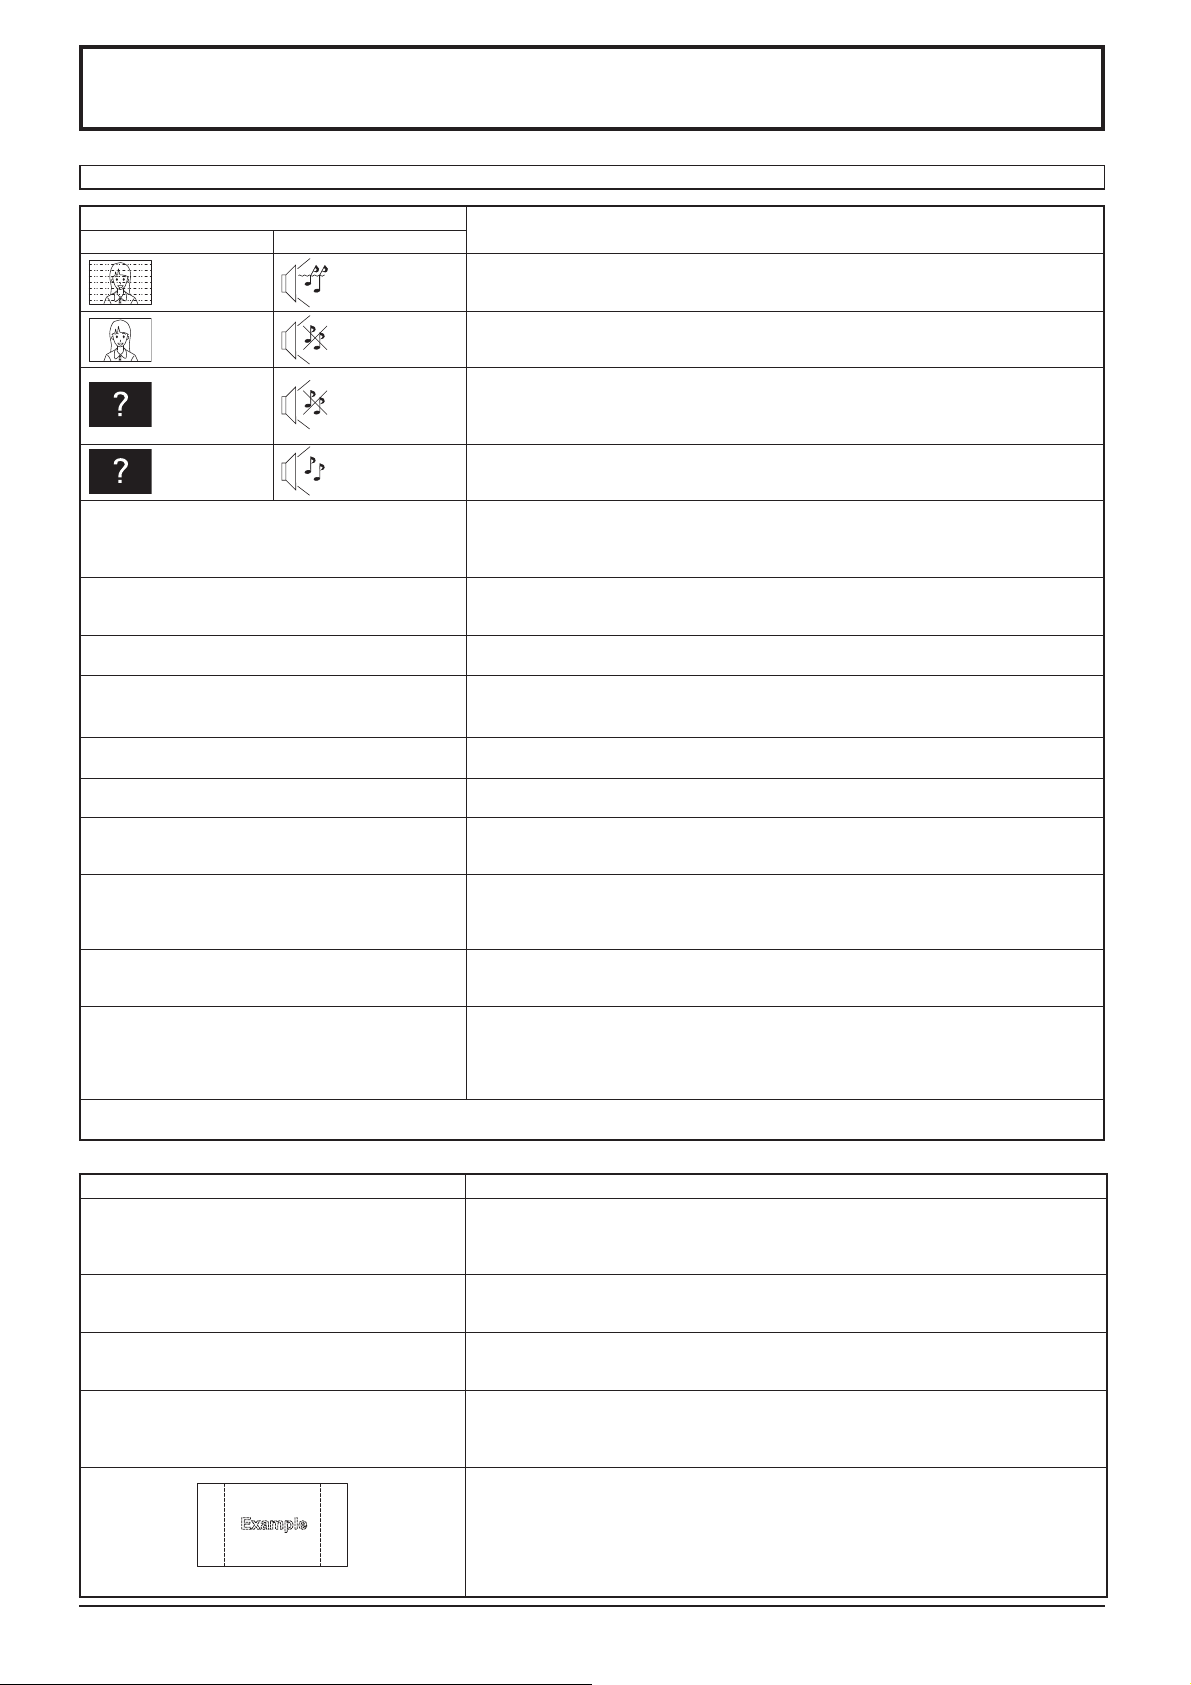
Troubleshooting
Before you call for service, determine the symptoms and make a few simple checks as shown below.
Symptoms
Picture Sound
Interference Noisy Sound
Normal Picture No Sound
No Picture No Sound
No Picture Normal Sound
No remote control operations can be performed.
A cracking sound is sometimes heard from the unit.
The top or bottom of the picture on the screen is cut
off when I use the zoom function.
Areas at the top and bottom of the screen where
the image is missing appear when I use the zoom
function.
I can hear sounds coming from inside the unit. When the power is turned on, a sound of the display panel being driven may be heard:
Parts of the unit become hot.
Power automatically turns off unexpectedly. Check the settings of “NO SIGNAL POWER OFF”, “PC POWER MANAGEMENT”,
There is no picture displayed or sound output
sometimes.
The RS232C is uncontrollable Check whether the connection has been made properly. (see page 13) When controlling
The LAN is uncontrollable
This LCD Display uses special image processing. Hence a slight time lag may occur between image and audio, depending on the type of input
signal. However, this is not a malfunction.
Electrical Appliances
Cars / Motorcycles
Fluorescent light
Volume
(Check whether the mute function has been activated on the remote control.)
Not plugged into AC outlet
Not switched on
PICTURE and BRIGHTNESS/Volume setting
(Check by pressing the power switch or stand-by button on the remote control.)
If a signal with a non-applicable format, or frequency is input, only the input terminal
indication is displayed.
Check whether the batteries have discharged completely and, if they have not, whether they were inserted properly.
Check whether the remote control sensor is exposed to an outdoor light or a strong uorescent light.
Check whether the remote control designed speci cally for use with the unit is being used. (The
unit cannot be operated by any other remote control.)
If there is nothing wrong with the picture or sound, this is the sound of the cabinet undergoing
very slight contractions in response to changes in the room temperature. There are no
adverse effects on the performance or other aspects.
Adjust the position of the picture on the screen.
When using a video software program (such as a cinema size program) with a screen
wider than one in the 16:9 mode, blank areas separate from the images are formed at the
top and bottom of the screen.
This is normal and not indicative of malfunctioning.
Even when the temperature of parts of the front, top and rear panels has risen, these
temperature rises will not pose any problems in terms of performance or quality.
“DVI-D POWER MANAGEMENT” and “NO ACTIVITY POWER OFF”. Any of them may
be set to “ON (ENABLE)”. (see page 31, 32)
When HDMI or DVI signals are input to the Display using a selector or distributor, sound or
images may not be output in the normal fashion depending on the selector or distributor used.
The symptoms may be improved by turning the power off and on again, or by replacing
the selector or distributor.
the RS232C command on page 13 from the RS232C terminal in the display, make sure
that “CONTROL INTERFACE” is “RS-232C”. (see page 41)
Check whether the connection has been made properly. (see page 46) Check whether
“CONTROL INTERFACE” is “LAN” when controlling with the WEB browser control or the
command control on page 47. (see page 41) Check whether “LAN Setup” has been con gured
properly. (see page 42) When connecting to a device of AMX, Crestron Electronics, Inc., set
“AMX D.D.”, “Crestron Connected™”, according to the device to use. (see page 41)
Checks
LCD Display panel
Symptoms
The screen darkens slightly when bright pictures with
minimal movements are shown.
It takes a while for the picture to appear.
The edges of the images icker. Due to the characteristics of the system used to drive the panel, the edges may appear
There may be red spots, blue spots, green spots and
black spots on the screen.
The screen will darken slightly when photos, still images of a computer or other pictures with
minimal movements are shown for an extended period. This is done to reduce image retention
on the screen and the shortening of the screen’s service life: It is normal and not indicative of
malfunctioning.
The unit digitally processes the various signals in order to reproduce esthetically pleasing
images. As such, it sometimes takes a few moments for the picture to appear when the
power has been turned on, when the input has been switched.
to icker in the fast-moving parts of the images: This is normal and not indicative of
malfunctioning.
This is a characteristic of liquid crystal panels and is not a problem. The liquid crystal panel
is built with very high precision technology giving you ne picture details. Occasionally,
a few non-active pixels may appear on the screen as xed points of red, blue, green, or
black. Please note this does not affect the performance of your LCD.
Image retention may occur. If you display a still picture for an extended period, the image
might remain on the screen. However, it will disappear after a while. This is not considered
as malfunction.
Check
Image retention appears
5353
Page 54
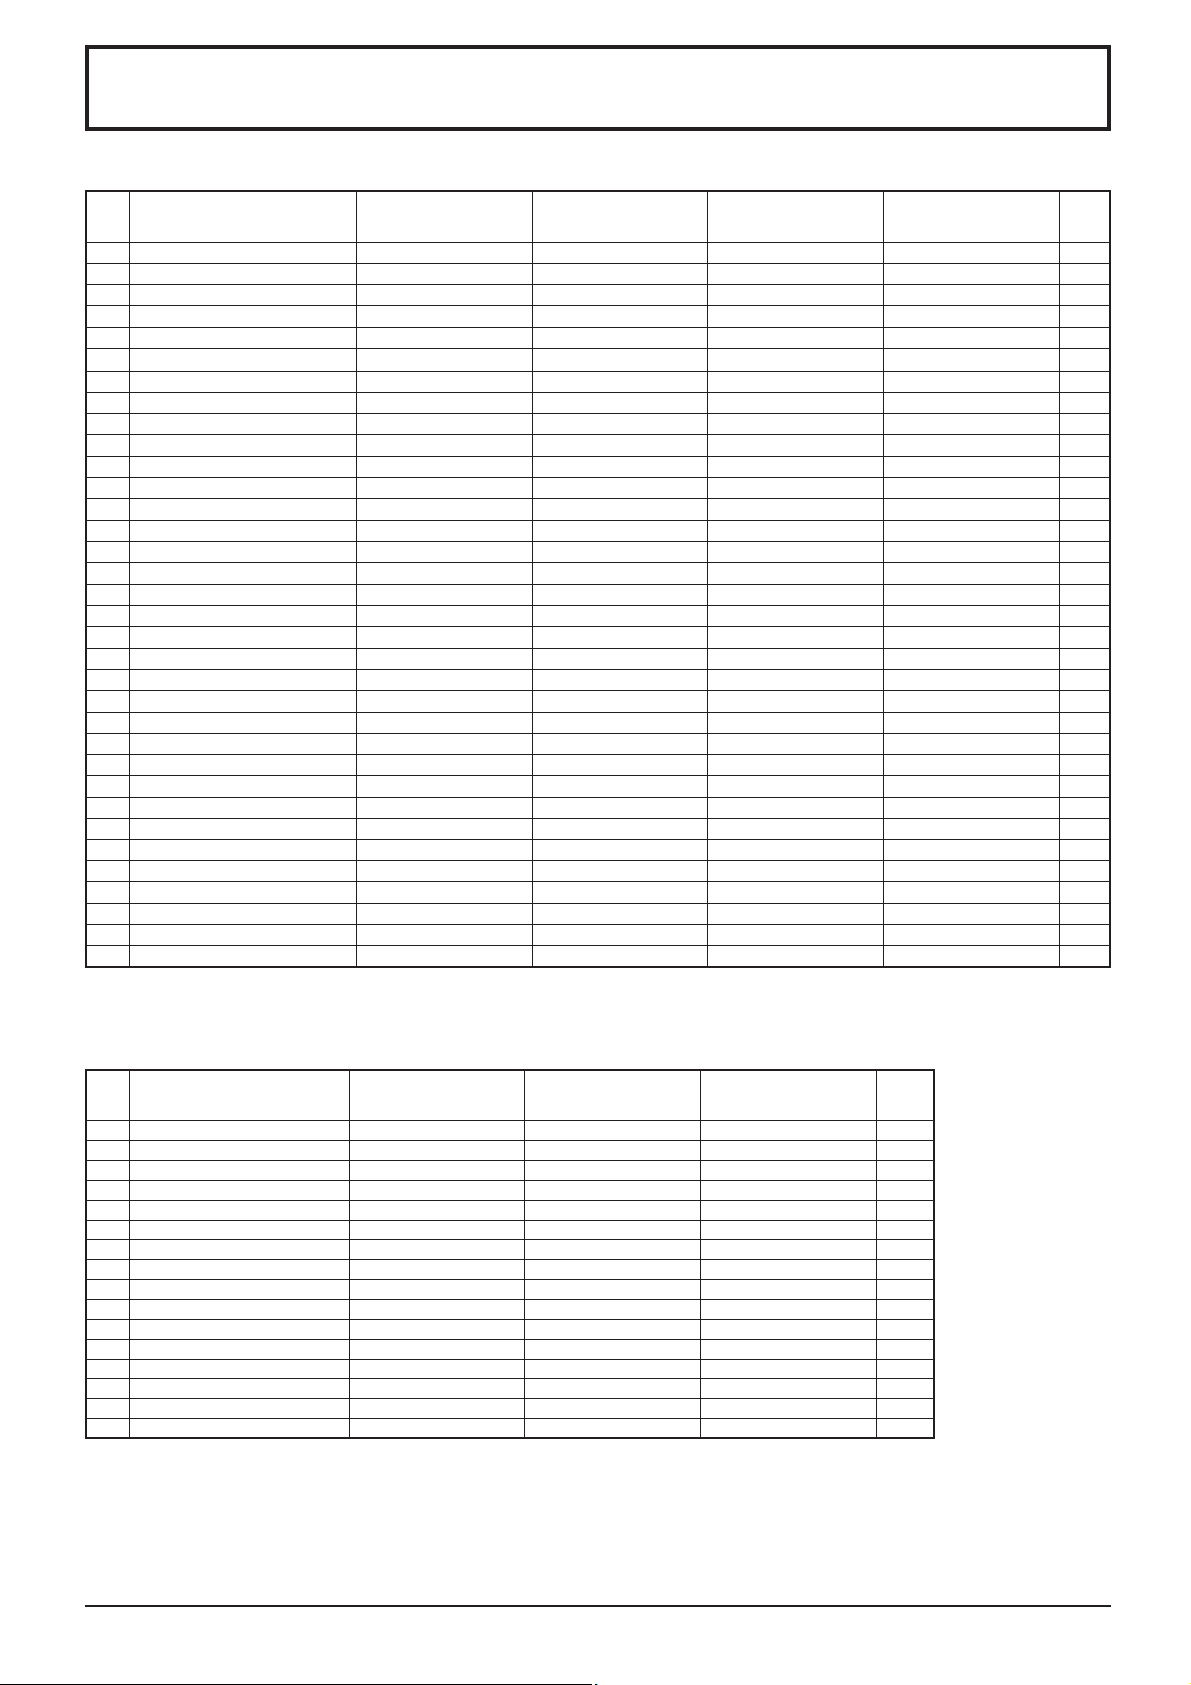
Applicable input signals
PC signals
Signal name
1 640x400@70Hz 31.46 70.07
2 640x480@60Hz 31.47 59.94
3 640x480@72Hz 37.86 72.81
4 640x480@75Hz 37.50 75.00
5 640x480@85Hz 43.27 85.01
6 800x600@56Hz 35.16 56.25
7 800x600@60Hz 37.88 60.32
8 800x600@72Hz 48.08 72.19
9 800x600@75Hz 46.88 75.00
10 800x600@85Hz 53.67 85.06
11 852x480@60Hz 31.47 59.94
12 1024x768@50Hz 39.55 50.00
13 1024x768@60Hz 48.36 60.00
14 1024x768@70Hz 56.48 70.07
15 1024x768@75Hz 60.02 75.03
16 1024x768@85Hz 68.68 85.00
17 1066x600@60Hz 37.64 59.94
18 1152x864@60Hz 53.70 60.00
19 1152x864@75Hz 67.50 75.00
20 1280x768@60Hz 47.70 60.00
21 1280x960@60Hz 60.00 60.00
22 1280x960@85Hz 85.94 85.00
23 1280x1024@60Hz 63.98 60.02
24 1280x1024@75Hz 79.98 75.02
25 1280x1024@85Hz 91.15 85.02
26 1366x768@50Hz 39.55 50.00
27 1366x768@60Hz 48.36 60.00
28 1400x1050@60Hz 65.22 60.00
29 1600x1200@60Hz 75.00 60.00
30 1920x1080@60Hz 67.50 60.00
31 1920x1200@60Hz 74.04 59.95
32 Macintosh13"(640x480) 35.00 66.67
33 Macintosh16"(832x624) 49.72 74.55
34 Macintosh21"(1152x870) 68.68 75.06
1 Not compatible with SYNC ON G.
Horizontal frequency
(kHz)
Vertical frequency
(Hz)
PC IN
(Dot clock (MHz))
(25.17)
*
(25.18)
*
(31.5)
*
(31.5)
*
(36.0)
*
(36.0)
*
(40.0)
*
(50.0)
*
(49.5)
*
(56.25)
*
(65.0)
*
(75.0)
*
(78.75)
*
(94.5)
*
(108.0)
*
(80.14)
*
(108.0)
*
(148.5)
*
(108.0)
*
(135.0)
*
(157.5)
*
(86.71)
*
(162.0)
*
(148.5)
*
(30.24)
*
(57.28)
*
(100.0)
*
*Mark: Applicable input signal
1
• The signal format automatically detected may differ from the actual input signal in display.
DVI-D IN
(Dot clock (MHz))
(25.18)
*
(40.0)
*
(34.24)
*
(51.89)
*
(65.0)
*
(53.0)
*
(81.62)
*
(108.0)
*
(69.92)
*
(87.44)
*
(122.61)
*
(162.0)
*
(148.5)
*
(154.0)
*
HDMI
*
*
*
*
*
*
*
*
*
*
*
*
*
*
Component signals
Signal name
1 525(480)/60i 15.73 59.94 * (27.0)
2 525(480)/60p 31.47 59.94
3 625(575)/50i 15.63 50.00
4 625(576)/50i 15.63 50.00 * (27.0)
5 625(575)/50p 31.25 50.00 *
6 625(576)/50p 31.25 50.00
7 750(720)/60p 45.00 60.00
8 750(720)/50p 37.50 50.00
9 1,125(1,080)/60p 67.50 60.00
10 1,125(1,080)/60i 33.75 60.00
11 1,125(1,080)/50p 56.25 50.00
12 1,125(1,080)/50i 28.13 50.00
13
1,125(1,080)/24sF
14 1,125(1,080)/30p 33.75 30.00
15 1,125(1,080)/25p 28.13 25.00
16 1,125(1,080)/24p 27.00 24.00
Horizontal frequency
(kHz)
27.00 48.00
Vertical frequency
(Hz)
*Mark: Applicable input signal
DVI-D IN
(Dot clock (MHz))
* (27.0) *
* (27.0) *
* (74.25) *
* (74.25) *
* (148.5) *
* (74.25) *
* (148.5) *
* (74.25)
* (74.25) *
* (74.25) *
* (74.25) *
5454
HDMI
*
*
*
Page 55
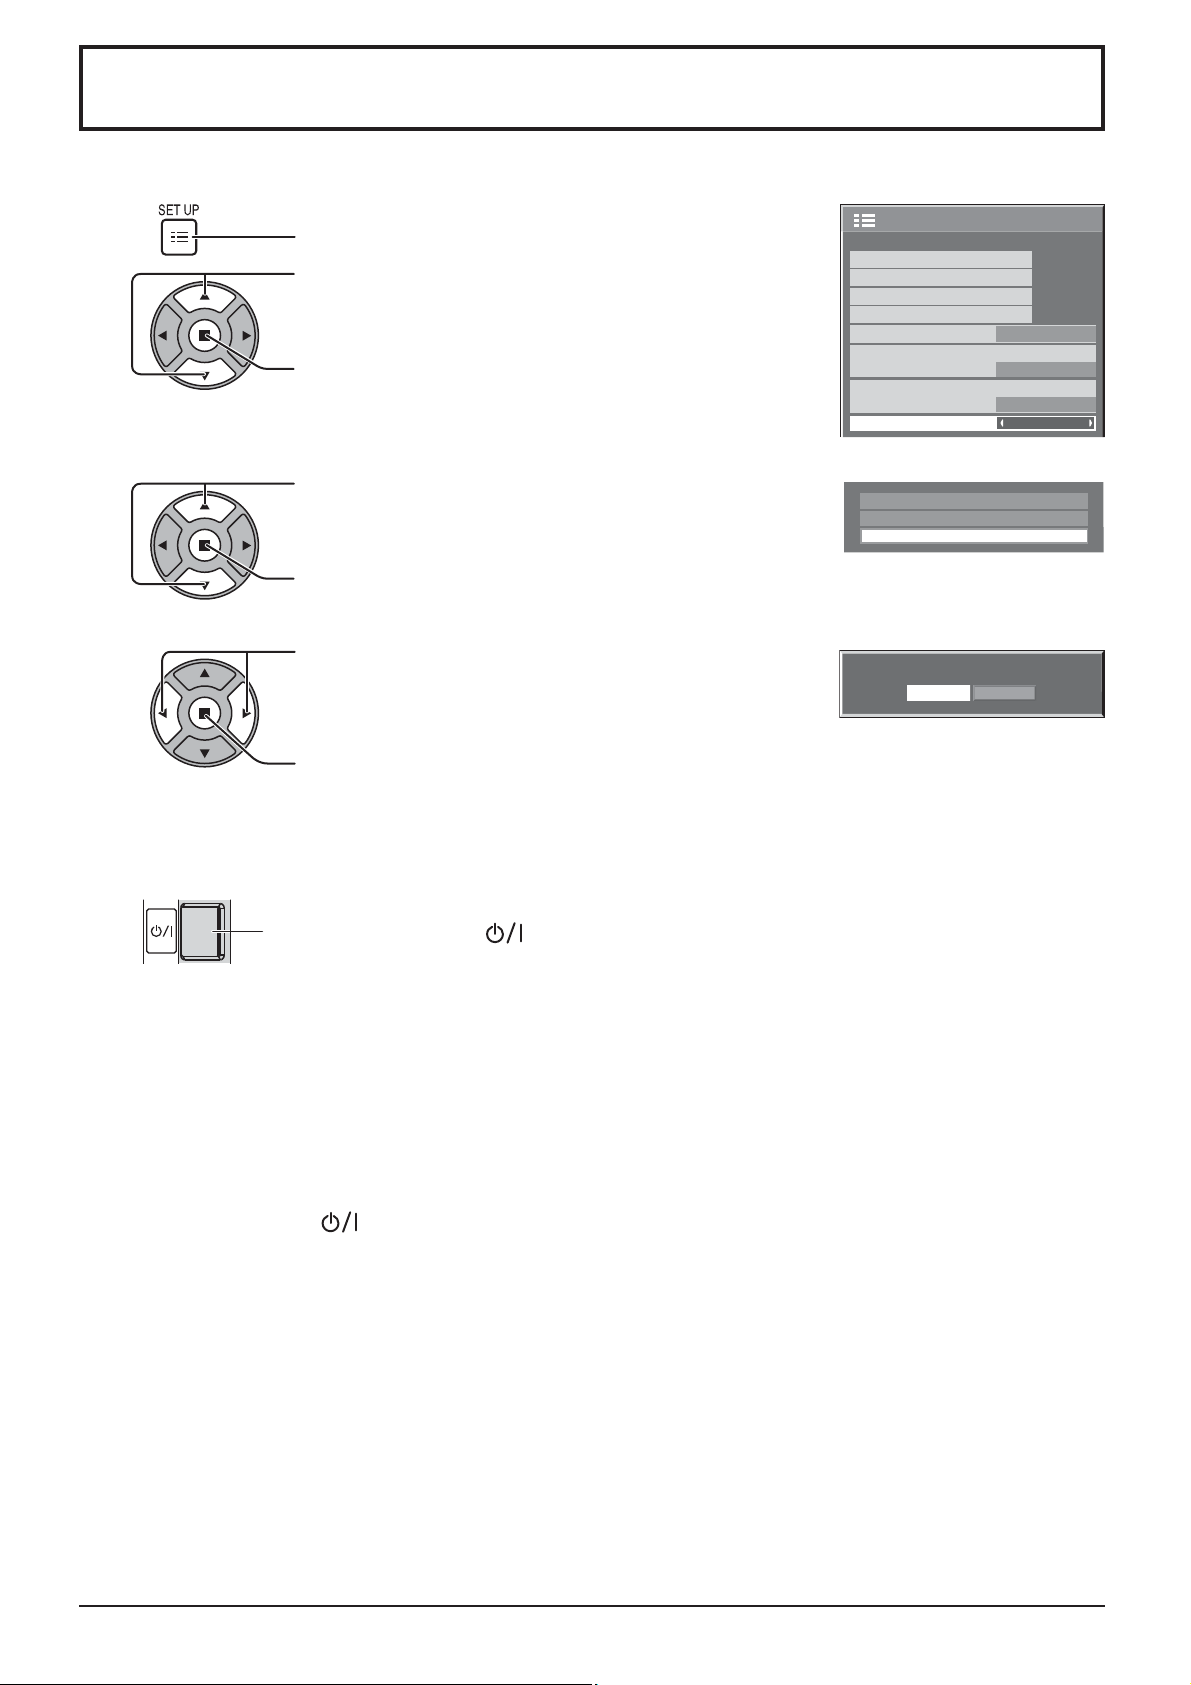
Shipping condition
This function allows you to reset the unit to the factory setting.
1
2
3
4
Press to display the SET UP menu.
Press to select “OSD LANGUAGE”.
Press for more than 3 seconds.
Press to select “Shipping”.
Press to display the Shipping menu.
Press to select “YES”.
Press to con rm.
SET UP
SIGNAL
SCREENSAVER
INPUT LABEL
ECO MODE SETTINGS
WOBBLING
YUV/RGB-IN SELECT
NO ACTIVITY POWER OFF
OSD LANGUAGE ENGLISH (US
Options
Display Serial Number
Shipping
Shipping
YES NO
OFF
RGB
DISABLE
1/2
)
5
6
[from the unit]
1 Press the MENU button till the SET UP menu is displayed.
2 Press the Volume Up “+” or Down “–” button to select “OSD LANGUAGE”.
3 Press and hold the ENTER button till the Shipping menu is displayed.
4 Press the Volume Up “+” or Down “–” button to select “YES”.
5 Press the ENTER button and wait for 10 sec.
6 Press the power switch ( ) on main unit to turn the power off.
Wait for 10 seconds.
Press the power switch ( ) on main unit to turn the power off.
* If the power switch is locked, please disconnect the AC cord plug from the wall outlet.
* If the power switch is locked, please disconnect the AC cord plug from the wall outlet.
5555
Page 56
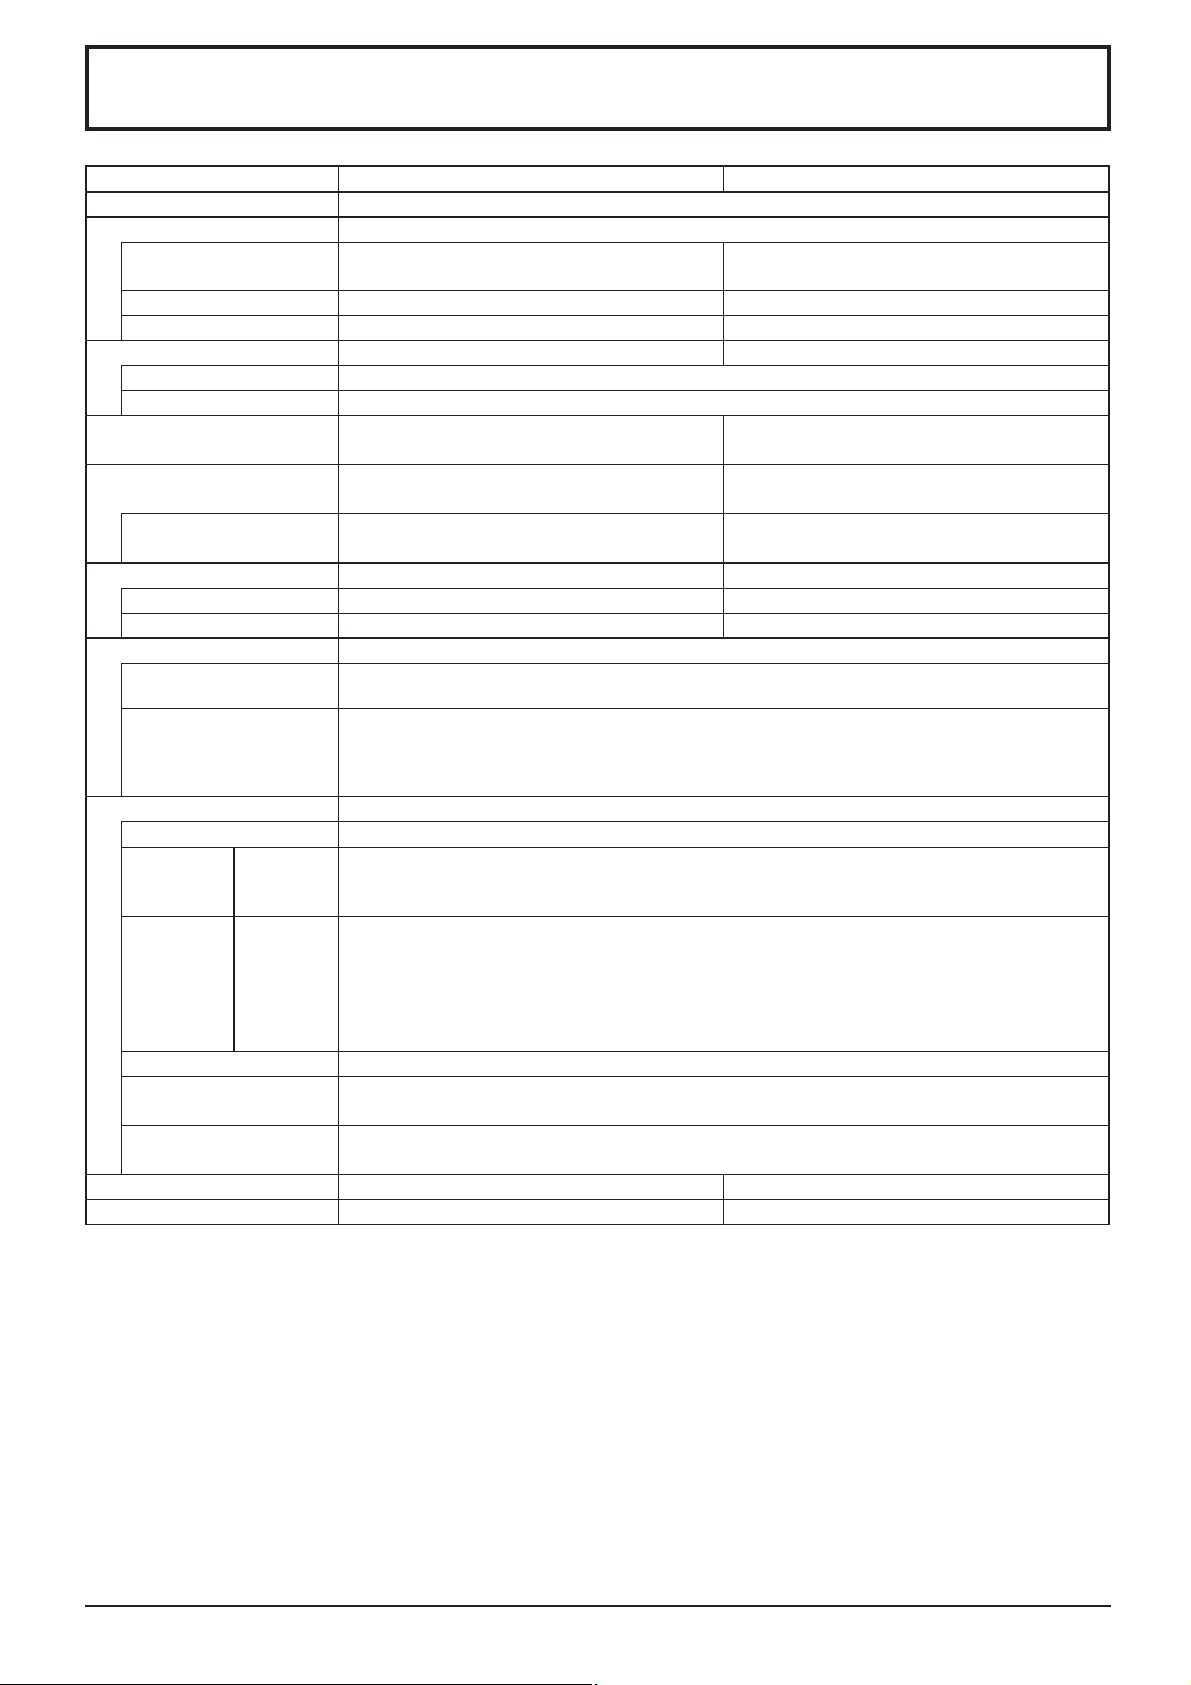
Speci cations
Power Source
Power Consumption
Rated Power
Consumption
Stand-by condition
Power off condition
Sound
Speakers
Audio Output
LCD Display panel
Screen size
(No.of pixels)
Operating condition
Temperature
Humidity
Applicable signals
Scanning format
PC signals
Connection terminals
HDMI
DVI-D IN
AUDIO
PC IN
AUDIO
LAN
SERIAL IN
AUDIO
OUT
Dimensions (W × H × D)
Mass (weight)
36.6” (930 mm) (W) × 20.5” (523 mm) (H) ×
525 (480) / 60i · 60p, 625 (575) / 50i · 50p, 750 (720) / 60p · 50p, 1125 (1080) / 60i · 60p · 50i ·
50p · 24p · 25p · 30p · 24sF
DVI-D 24 Pin
Content Protection
Stereo mini jack (M3) × 1
High-Density Mini D-sub 15 Pin
Stereo mini jack (M3) × 1
RJ45 10BASE-T/100BASE-TX, compatible with PJLink™
External Control Terminal
D-sub 9 Pin RS-232C compatible
Stereo mini jack (M3) × 1
Output level: Variable (- 0 dB)
37.7” (957 mm) × 22.2” (564 mm) × 2.0” (49 mm) 44.2” (1,121 mm) × 25.8” (655 mm) × 2.0” (49 mm)
TH-42LFE6U TH-50LFE6U
110 - 127 V AC, 50/60 Hz
65 W 90 W
0.5 W 0.5 W
0.5 W 0.5 W
0.9” (22 mm) × 3.6” (90 mm) × 2 pcs
10 W [5 W + 5 W] (10 % THD)
42-inch VA panel (LED backlight),
16:9 aspect ratio
42.0” (1,067 mm) (diagonal)
2,073,600 (1,920 (W) × 1,080 (H))
[5,760 × 1,080 dots]
32 °F - 104 °F (0 °C - 40 °C) 32 °F - 104 °F (0 °C - 40 °C)
20 % - 80 % 20 % - 80 %
VGA, SVGA, XGA, SXGA
UXGA ···· (compressed)
Horizontal scanning frequency 30 - 110 kHz
Vertical scanning frequency 48 - 120 Hz
TYPE A Connector
approx. 29.8 lbs approx. 39.7 lbs
50-inch VA panel (LED backlight),
16:9 aspect ratio
43.1” (1,095 mm) (W) × 24.2” (616 mm) (H) ×
49.4” (1,257 mm) (diagonal)
2,073,600 (1,920 (W) × 1,080 (H))
[5,760 × 1,080 dots]
Compliance with DVI Revision 1.0
Compatible with HDCP 1.1
0.5 Vrms, Shared with PC IN
G with sync 1.0 Vp-p (75 )
G without sync 0.7 Vp-p (75 )
B: 0.7 Vp-p (75 )
R: 0.7 Vp-p (75 )
HD/VD: 1.0 - 5.0 Vp-p (high impedance)
0.5 Vrms, Shared with DVI-D IN
0.5 Vrms
[INPUT 1 kHz / 0 dB, 10 k Load]
Note:
Design and speci cations are subject to change without notice. Mass and dimensions shown are approximate.
5656
Page 57

<Software Information for This Product>
This product has software installed partially licensed under the Free BSD LICENSE.
Free BSD LICENSE regulations under the above specifications are as follows:
(These regulations are set by the third party; therefore the original (English) regulations are stated.)
Copyright © 1980, 1986, 1993
The Regents of the University of California. All rights reserved.
Redistribution and use in source and binary forms, with or without modification, are permitted provided that the
following conditions are met:
1. Redistributions of source code must retain the above copyright notice, this list of conditions and the following
disclaimer.
2. Redistributions in binary form must reproduce the above copyright notice, this list of conditions and the following
disclaimer in the documentation and/or other materials provided with the distribution.
3. All advertising materials mentioning features or use of this software must display the following acknowledgement:
This product includes software developed by the University of California, Berkeley and its contributors.
4. Neither the name of the University nor the names of its contributors may be used to endorse or promote products
derived from this software without specific prior written permission.
THIS SOFTWARE IS PROVIDED BY THE REGENTS AND CONTRIBUTORS “AS IS” AND ANY EXPRESS
OR IMPLIED WARRANTIES, INCLUDING, BUT NOT LIMITED TO, THE IMPLIED WARRANTIES OF
MERCHANTABILITY AND FITNESS FOR A PARTICULAR PURPOSE ARE DISCLAIMED. IN NO EVENT SHALL
THE REGENTS OR CONTRIBUTORS BE LIABLE FOR ANY DIRECT, INDIRECT, INCIDENTAL, SPECIAL,
EXEMPLARY, OR CONSEQUENTIAL DAMAGES (INCLUDING, BUT NOT LIMITED TO, PROCUREMENT OF
SUBSTITUTE GOODS OR SERVICES; LOSS OF USE, DATA, OR PROFITS; OR BUSINESS INTERRUPTION)
HOWEVER CAUSED AND ON ANY THEORY OF LIABILITY, WHETHER IN CONTRACT, STRICT LIABILITY,
OR TORT (INCLUDING NEGLIGENCE OR OTHERWISE) ARISING IN ANY WAY OUT OF THE USE OF THIS
SOFTWARE, EVEN IF ADVISED OF THE POSSIBILITY OF SUCH DAMAGE.
57
Page 58
USA only: Disposal may be regulated in your community due to
environmental considerations. For disposal or recycling information,
please visit Panasonic website: http://www.panasonic.com/environmental
or call 1-888-769-0149.
Customer’s Record
The model number and serial number of this product can be found on its back cover. You should note this serial
number in the space provided below and retain this book, plus your purchase receipt, as a permanent record of
your purchase to aid in identi cation in the event of theft or loss, and for Warranty Service purposes.
Model Number Serial Number
Panasonic Corporation 2013
¤
Panasonic System Communications Company of North America
Unit of Panasonic Corporation of North America
Executive Of ce :
Two Riverfront Plaza, Newark, New Jersey 07102
Panasonic Canada Inc.
5770 Ambler Drive
Mississauga, Ontario
L4W 2T3
 Loading...