

Panasonic TH-80BF1U, TH-80BF1E, TH-65BF1E, TH-50BF1E, TH-80BF1W Operating Instructions Manual
...Page 1
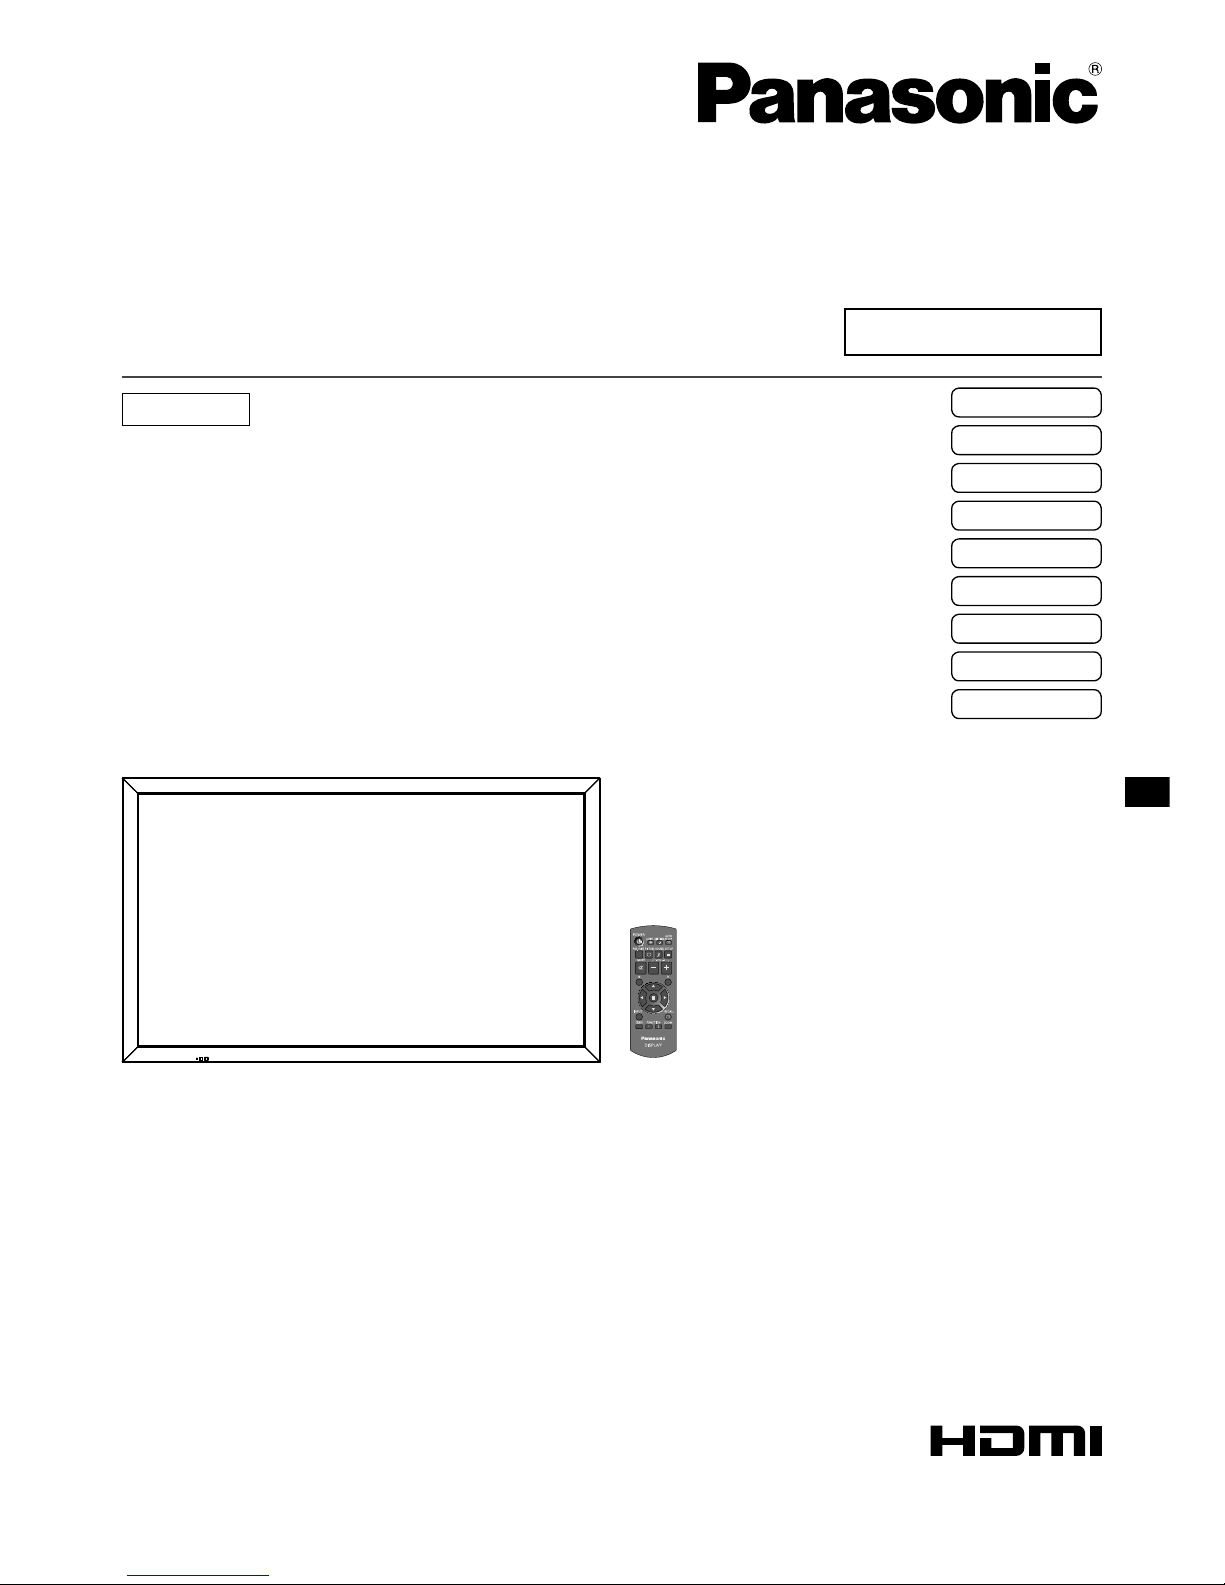
Operating Instructions
Basic Guide
Touch Screen LCD Display For business use
Model No. TH-80BF1U
80-inch model
TH-65BF1U
65-inch model
TH-50BF1U
50-inch model
TH-80BF1E
80-inch model
TH-65BF1E
65-inch model
TH-50BF1E
50-inch model
TH-80BF1W
80-inch model
TH-65BF1W
65-inch model
TH-50BF1W
50-inch model
DPQX1036ZA/X1
English
For more detailed instructions, refer to the
Operating Instructions on the CD-ROM.
•
Please read these instructions before operating your set and
retain them for future reference.
•
Illustrations and screens in this Operating Instructions are
images for illustration purposes, and may be different from
the actual ones.
•
Descriptive illustrations in this Operating Instructions are
created mainly based on the 50-inch model.
Contents
Important Safety Instructions ........... 2
FCC STATEMENT ........................... 3
Important Safety Notice ................... 5
Safety Precautions .......................... 6
Precautions for use........................ 10
Accessories ................................... 15
Connections................................... 19
Power On / Off ............................... 24
Basic Controls ............................... 26
Specifications ................................ 29
Software License ........................... 32
Panasonic Professional Flat Panel
Display Limited Warranty ............... 33
LIMITED WARRANTY STATEMENT
... 34
Customer Service .......................... 35
Page 2
2
1) Read these instructions.
2) Keep these instructions.
3) Heed all warnings.
4) Follow all instructions.
5) Do not use this apparatus near water.
6) Clean only with dry cloth.
7) Do not block any ventilation openings. Install in accordance with the manufacturer’s instructions.
8) Do not install near any heat sources such as radiators, heat registers, stoves, or other apparatus (including
amplifiers) that produce heat.
9) Do not defeat the safety purpose of the polarized or grounding-type plug. A polarized plug has two blades with
one wider than the other. A grounding type plug has two blades and a third grounding prong. The wide blade
or the third prong are provided for your safety. If the provided plug does not fit into your outlet, consult an
electrician for replacement of the obsolete outlet.
10) Protect the power cord from being walked on or pinched particularly at plugs, convenience receptacles, and
the point where they exit from the apparatus.
11) Only use attachments / accessories specified by the manufacturer.
12) Use only with the cart, stand, tripod, bracket, or table specified by the manufacturer, or sold
with the apparatus. When a cart is used, use caution when moving the cart / apparatus
combination to avoid injury from tip-over.
13) Unplug this apparatus during lightning storms or when unused for long periods of time.
14) Refer all servicing to qualified service personnel. Servicing is required when the apparatus has been damaged
in any way, such as power-supply cord or plug is damaged, liquid has been spilled or objects have fallen into
the apparatus, the apparatus has been exposed to rain or moisture, does not operate normally, or has been
dropped.
15) To prevent electric shock, ensure the grounding pin on the AC cord power plug is securely connected.
WARNING : To prevent damage which may result in fire or shock hazard, do not expose this apparatus to
rain or mois ture.
Do not place containers with water (flower vase, cups, cosmetics, etc.) above the set.
(including on shelves above, etc.)
WARNING : 1) To prevent electric shock, do not remove cover. No user serviceable parts inside. Refer servicing
to qualified service personnel.
2) Do not remove the grounding pin on the power plug. This apparatus is equipped with a three pin
grounding-type power plug. This plug will only fit a grounding-type power outlet. This is a safety
fea ture. If you are unable to insert the plug into the outlet, contact an electrician.
Do not defeat the purpose of the grounding plug.
Important Safety Instructions
WARNING
WARNING: To reduce the risk of electric shock, do not remove cover or back.
No user-serviceable parts inside. Refer servicing to qualified service personnel.
The lightning flash with
arrow-head within a triangle
is in tend ed to tell the user
that parts inside the product
are a risk of electric shock
to per sons.
The exclamation point within
a triangle is intended to
tell the user that important
operating and servicing
instructions are in the
papers with the ap pli ance.
Page 3
3
FCC STATEMENT
This equipment has been tested and found to comply with the limits for a class A digital device, pursuant to Part
15 of the FCC Rules. These limits are designed to provide reasonable protection against harmful interference
when the equipment is operated in a commercial environment. This equipment generates, uses and can radiate
radio frequency energy and, if not installed and used in accordance with the instructions manual, may cause
harmful interference to radio communications. Operation of this equipment in a residential area is likely to cause
harmful interference in which case the user will be required to correct the interference at his own expense.
FCC CAUTION:
To assure continued compliance, follow the attached installation instructions and use only the provided
power supply cord. Any changes or modifications not expressly approved by Panasonic Corp. of North
America could void the user’s authority to operate this device.
FCC and Industry Canada (IC) RF Exposure
Warning:
•
This Display is provided with built-in transmitter:
Wireless LAN Adapter with FCC ID:
H8N-WLU5150/IC ID:1353A-WLU5150;
•
This transmitter complies with FCC and IC radiation exposure limits set forth for an uncontrolled
environment for mobile use with minimum 8 inches (20 cm) spacing requirement between transmitter
and all person’s body (excluding extremities of hands, wrist and feet) during wireless modes of
operation.
•
Other third-party wireless transmitters should not be used as they have not been RF exposure
evaluated for use with this Display and may not comply with RF exposure requirements.
<Only for wireless LAN if capable of transmission in the 5.15 ~ 5.25 GHz frequency band>
This product is restricted to indoor use due to its operation in the 5.15 to 5.25 GHz frequency range.
IC requires this product to be used indoors for the frequency range 5.15 to 5.25 GHz to reduce the potential for
harmful interference to co-channel Mobile Satellite systems. High power radars are allocated as primary users
of the 5.25 to 5.35 GHz and 5.65 to 5.85 GHz bands. These radar stations can cause interference with and/or
damage this product.
Declaration of Verification
Model No. TH-80BF1U, TH-65BF1U, TH-65BF1U
Responsible Party: Panasonic Corporation of North America
Two Riverfront Plaza, Newark, New Jersey
07102-5490
Contact Source: Panasonic System Communications Company of North America
1-877-655-2357
General Contact: http://shop.panasonic.com/support
This device complies with Part 15 of the FCC Rules and all applicable IC RSS standards. Operation is subject
to the following two conditions: (1) This device may not cause harmful interference, and (2) this device must
accept any interference received, including interference that may cause undesired operation.
Page 4
4
FCC STATEMENT
CANADIAN NOTICE:
This Class A digital apparatus complies with Canadian ICES-003.
WARNING:
•
Not for use in a computer room as defined in the Standard for the Protection of Electronic Computer/Data
Processing Equipment, ANSI/NFPA 75.
•
For permanently connected equipment, a readily accessible disconnect device shall be incorporated in the
building installation wiring.
•
For pluggable equipment, the socket-outlet shall be installed near the equipment and shall be easily
accessible.
Note:
Image retention may occur. If you display a still picture for an extended period, the image might remain on the
screen. However, it will disappear when a general moving picture is displayed for a while.
Trademark Credits
•
HDMI, the HDMI Logo, and High-Definition Multimedia Interface are trademarks or registered trademarks of
HDMI Licensing LLC in the United States and other countries.
•
RoomView, Crestron RoomView are registered trademarks of Crestron Electronics, Inc.
Crestron Connected™ and Fusion RV are trademarks of Crestron Electronics, Inc.
•
Wi-Fi®, Wi-Fi Direct™ and Miracast™ are registered trademarks or trademarks of Wi-Fi Alliance.
•
Windows, Windows Vista, Internet Explorer, PowerPoint, Microsoft Word and Microsoft Excel are registered
trademarks or trademarks of Microsoft Corporation in the United States and other countries.
•
Mac, Mac OS, OS X, iPad, iPhone, iPod touch and Safari are trademarks of Apple Inc., registered in the
United States and other countries.
•
iOS is a trademark and registered trademark of Cisco in the United States and other countries and is used
under license.
•
Android is a trademark of Google Inc.
•
Adobe, Adobe Flash Player and Adobe Reader are trademarks or registered trademarks of Adobe Systems
Inc. in the United States and/or other countries.
•
Intel and the Intel logo are trademarks of Intel Corporation in the U.S. and/or other countries.
Even if no special notation has been made of company or product trademarks, these trademarks have been
fully respected.
Page 5
5
Important Safety Notice
WARNING
1)
To prevent damage which may result in fire or shock hazard, do not expose this appliance to dripping or splashing.
Do not place containers with water (flower vase, cups, cosmetics, etc.) above the set. (including on
shelves above, etc.)
No naked flame sources, such as lighted candles, should be placed on / above the set.
2) To prevent electric shock, do not remove cover. No user serviceable parts inside. Refer servicing to qualified
service personnel.
3) Do not remove the earthing pin on the power plug. This apparatus is equipped with a three pin earthing-type
power plug. This plug will only fit an earthing-type power outlet. This is a safety feature. If you are unable to
insert the plug into the outlet, contact an electrician.
Do not defeat the purpose of the earthing plug.
4) To prevent electric shock, ensure the earthing pin on the AC cord power plug is securely connected.
CAUTION
This appliance is intended for use in environments which are relatively free of electromagnetic fields.
Using this appliance near sources of strong electromagnetic fields or where electrical noise may overlap with
the input signals could cause the picture and sound to wobble or cause interference such as noise to appear.
To avoid the possibility of harm to this appliance, keep it away from sources of strong electromagnetic fields.
WARNING:
This equipment is compliant with Class A of CISPR32. In a residential environment this equipment may cause radio interference.
IMPORTANT INFORMATION
If a display is not positioned in a sufficiently stable location, it can be potentially hazardous due to falling. Many
injuries, particularly to children, can be avoided by taking simple precautions such as:
•
Using cabinets or stands recommended by the manufacturer of the display.
•
Only using furniture that can safely support the display.
•
Ensuring the display is not overhanging the edge of the supporting furniture.
•
Not placing the display on tall furniture (for example, cupboards or bookcases) without anchoring both the
furniture and the display to a suitable support.
•
Not standing the displays on cloth or other materials placed between the display and supporting furniture.
•
Educating children about the dangers of climbing on furniture to reach the display or its controls.
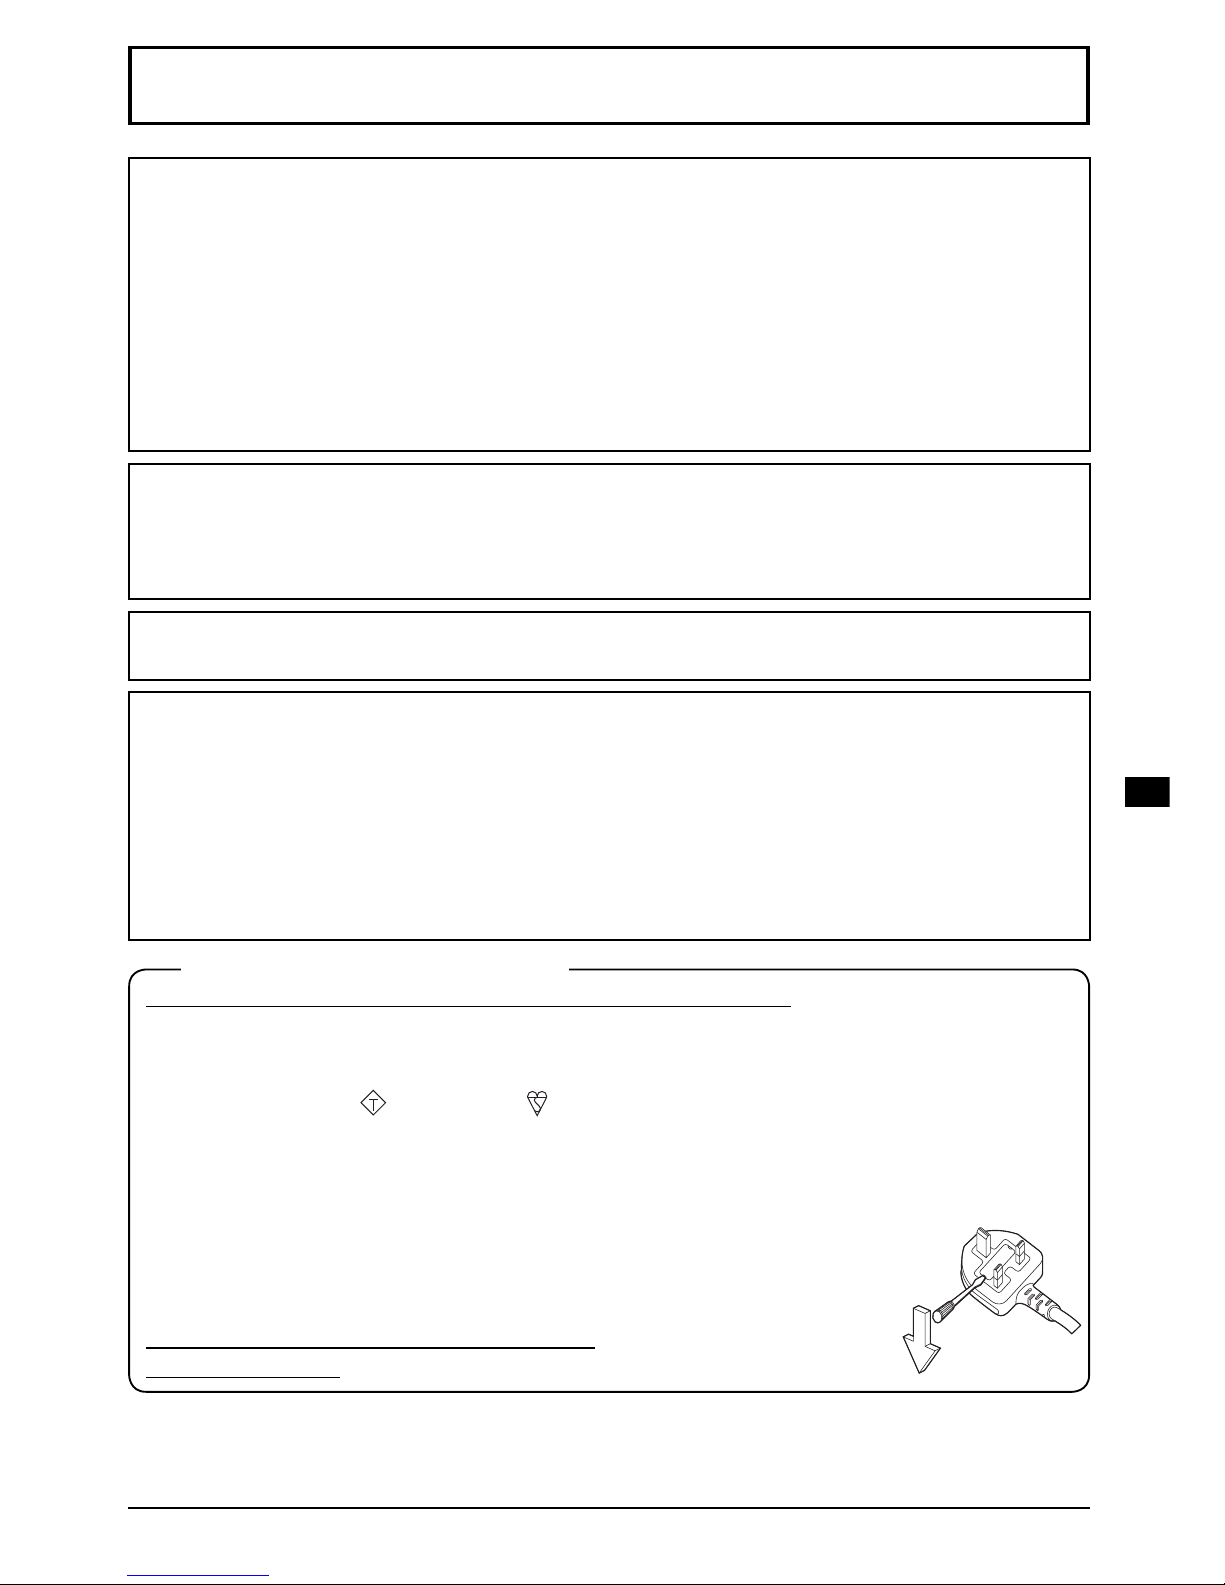
FOR YOUR SAFETY, PLEASE READ THE FOLLOWING TEXT CAREFULLY.
This display is supplied with a moulded three pin mains plug for your safety and convenience. A 10 amp fuse is
fitted in this plug. Shall the fuse need to be replaced, please ensure that the replacement fuse has a rating of
10 amps and that it is approved by ASTA or BSI to BS1362.
Check for the ASTA mark
ASA
or the BSI mark on the body of the fuse.
If the plug contains a removable fuse cover, you must ensure that it is refitted when the fuse is replaced.
If you lose the fuse cover the plug must not be used until a replacement cover is obtained.
A replacement fuse cover can be purchased from your local Panasonic dealer.
Do not cut off the mains plug.
Do not use any other type of mains lead except the one supplied with this display.
The supplied mains lead and moulded plug are designed to be used with this display to
avoid interference and for your safety.
If the socket outlet in your home is not suitable, get it changed by a qualified electrician.
If the plug or mains lead becomes damaged, purchase a replacement from an authorized dealer.
WARNING : — THIS DISPLAY MUST BE EARTHED.
How to replace the fuse. Open the fuse compartment with a screwdriver and replace the fuse.
IMPORTANT: THE MOULDED PLUG
Page 6
6
Safety Precautions
WARNING
■
Setup
This LCD Display is for use only with the following optional accessories. Use with any other type of optional
accessories may cause instability which could result in the possibility of injury.
(All of the following accessories are manufactured by Panasonic Corporation.)
• Pedestal ..................................................................................
50-inch model
TY-ST42P50
1
2
80-inch model 65-inch model
TY-ST65P20
• Mobile stand for Display ..........................................................
50-inch model
TY-ST50PB2
65-inch model
TY-ST65PB2
80-inch model
TY-ST80LF70
• Wall-hanging bracket (vertical) ................................................
50-inch model
TY-WK42PV20
80-inch model
TY-WK70PV50
2
• Wall-hanging bracket (angled) ................................................
50-inch model
TY-WK42PR20
65-inch model
TY-WK65PR20
• Ceiling-hanging bracket ..........................................................
50-inch model
TY-CE42PS20
• BNC Dual Video Terminal Board ............................................. TY-FB9BD
2
• HD-SDI Terminal Board ........................................................... TY-FB9HD
• HD-SDI Terminal Board with audio ......................................... TY-FB10HD
• Dual Link HD-SDI Terminal Board ........................................... TY-FB11DHD
• Dual HDMI Terminal Board ..................................................... TY-FB10HMD
2
• DVI-D Terminal Board ............................................................. TY-FB11DD
• Digital Interface Box ................................................................ ET-YFB100G
• DIGITAL LINK Switcher ........................................................... ET-YFB200G
• This unit does not support long reach communication method of ET-YFB200G.
• Easy wireless stick .................................................................. ET-UW100
3
• Early Warning Software ........................................................... ET-SWA100 series
4
1: Precaution for use of TY-ST42P50
50-inch model
Use a stand pole “for plasma display (long)” (part number: TBLA3679, TBLA3680).
2: Discontinued
3: This product can be purchased in the U.S., Canada, Japan and the European Communities.
4: Suffix of the part number may differ depending on the license type.
Note:
•
The part number of the optional accessories are subject to change without notice.
When installing the pedestal, read the operating instructions supplied with it carefully and install properly. Also,
always use the overturn prevention accessories.
When using a terminal board, read the operating instructions supplied with it carefully and use properly.
Small parts can present choking hazard if accidentally swallowed. Keep small parts away from young children.
Discard unneeded small parts and other objects, including packaging materials and plastic bags/sheets to prevent
them from being played with by young children, creating the potential risk of suffocation.
Do not place the Display on sloped or unstable surfaces, and ensure that the Display does not hang over
the edge of the base.
•
The Display may fall off or tip over.
Install this unit at a location with minimal vibration and which can support the weight of the unit.
•
Dropping or falling of the unit may cause injury or malfunction.
Do not place any objects on top of the Display.
•
If foreign objects or water get inside the Display, a short-circuit may occur which could result in fire or electric
shock. If any foreign objects get inside the Display, please consult your local Panasonic dealer.
Transport only in upright position!
•
Transporting the unit with its liquid crystal panel facing upright or downward may cause damage to the internal
circuitry.
Ventilation should not be impeded by covering the ventilation openings with items such as newspapers,
table cloths and curtains. For sufficient ventilation, see page 10.
Page 7

7
Safety Precautions
When installing the Display vertically, be sure that the Power Indicator
comes to the upper side. Heat is generated and it may cause fire or
damage to the Display.
Power indicator
Cautions for Wall or Pedestal Installation
•
The installation should be performed by an installation professional. Installing the Display incorrectly may lead to
an accident that results in death or serious injury. Use the optional Pedestal. (see page 6)
•
Before installation, be sure to check if the mounting location has enough strength to support the weight of the
LCD display and the wall hanging bracket for anti drop.
•
If you terminate the use of the Display on the Wall or Pedestal, ask a professional to remove the Display as soon
as possible.
•
When mounting the Display on the wall, prevent the mounting screws and power cable from contacting metal
objects inside the wall. An electric shock may occur if they contact metal objects inside the wall.
We are not responsible for any product damage, etc. caused by use of the pedestal, wall-hanging bracket or
ceiling-hanging bracket made by other companies, or by failures in the installation environment for the pedestal,
wall-hanging bracket or ceiling-hanging bracket even during the warranty period.
Do not install the product to a place where the product is exposed to direct sunlight.
•
If the screen is exposed to direct sunlight, the liquid crystal panel may have adverse effect.
■
When using the LCD Display
The Display is designed to operate on 110 - 127 or 220 - 240 V AC, 50/60 Hz.
Do not cover the ventilation holes.
•
Doing so may cause the Display to overheat, which can cause fire or damage to the Display.
Do not stick any foreign objects into the Display.
•
Do not insert any metal or flammable objects into the ventilations holes or drop them onto the Display, as doing
so can cause fire or electric shock.
Do not remove the cover or modify it in any way.
•
High voltages which can cause severe electric shocks are present inside the Display. For any inspection,
adjustment and repair work, please contact your local Panasonic dealer.
Ensure that the mains plug is easily accessible.
The mains plug shall be connected to a mains socket outlet with a protective earthing connection.
Do not use any power supply cord other than that provided with this unit.
•
Doing so may cause short-circuit, generates heat, etc., which could cause electric shock or fire.
Do not use the supplied power supply cord with any other devices.
•
Doing so could cause electric shock or fire.
Securely insert the power supply plug as far as it will go.
•
If the plug is not fully inserted, heat may be generated which could cause fire. If the plug is damaged or the wall
socket is loose, they shall not be used.
Do not handle the power supply plug with wet hands.
•
Doing so may cause electric shocks.
Do not do anything that may damage the power cable. When disconnecting the power cable, pull on the
plug body, not the cable.
•
Do not damage the cable, make any modifications to it, place heavy objects on top of it, heat it, place it near any
hot objects, twist it, bend it excessively or pull it. To do so may cause fire and electric shock. If the power cable is
damaged, have it repaired at your local Panasonic dealer.
Do not touch the power supply cord or the plug directly by hand when they are damaged.
Electric shock could occur.
Page 8
8
Safety Precautions
Do not remove covers and NEVER modify the Display yourself.
•
Do not remove the rear cover as live parts are accessible when it is removed. There are no user serviceable
parts inside. (High-voltage components may cause serious electrical shock.)
•
Have the Display checked, adjusted, or repaired at your local Panasonic dealer.
Keep the pen stand fixing screw and the washer (for 80-inch model only) out of reach of children. If
accidentally swallowed, it will be harmful to the body.
•
Please contact a doctor immediately in case you doubt that the child may have swallowed it.
If the Display is not going to be used for any prolonged length of time, unplug the power supply plug from
the wall outlet.
Picture noise may occur if you connect / disconnect the cables connected to the input terminals you are
currently not watching, or if you turn the power of the video equipment on / off, but it is not a malfunction.
To prevent the spread of fire, keep candles or other open flames away from this product at all times.
CAUTION
If problems or malfunction occur, stop using immediately.
■
If problems occur, unplug the power supply plug.
•
Smoke or an abnormal odour come out from the unit.
•
No picture appears or no sound is heard, occasionally.
•
Liquid such as water or foreign objects got inside the unit.
•
The unit has deformed or broken parts.
If you continue to use the unit in this condition, it could result in fire or electric shock.
•
Turn the power off immediately, unplug the power supply plug from the wall outlet, and then contact the dealer
for repairs.
•
To cut off the power supply to this Display completely, you need to unplug the power supply plug from the wall
outlet.
•
Repairing the unit yourself is dangerous, and shall never be done.
•
To enable to unplug the power supply plug immediately, use the wall outlet which you can reach easily.
■
Do not touch the unit directly by hand when it is damaged.
Electric shock could occur.
■
When using the LCD Display
Do not bring your hands, face or objects close to the ventilation holes of the Display.
•
Heated air comes out from the ventilation holes at the top of Display will be hot. Do not bring your hands or face,
or objects which cannot withstand heat, close to this port, otherwise burns or deformation could result.
Required number of people to carry or unpack this unit:
80-inch model 65-inch model
: 4 or more people
50-inch model
: 2 or more people
•
If this is not observed, the unit may drop, resulting in injury.
Be sure to disconnect all cables before moving the Display.
•
If the Display is moved while some of the cables are still connected, the cables may become damaged, and fire
or electric shock could result.
Disconnect the power supply plug from the wall socket as a safety precaution before carrying out any
cleaning.
•
Electric shocks can result if this is not done.
Clean the power cable regularly to prevent it becoming dusty.
•
If dust built up on the power cord plug, the resultant humidity can damage the insulation, which could result in
fire. Pull the power cord plug out from the wall outlet and wipe the mains lead with a dry cloth.
Do not step on, or hang from the display or the Pedestal.
•
They might tip over, or might be broken and it may result in injury. Pay special attention to the children.
Do not reverse the polarity (+ and -) of the battery when inserting.
•
Mishandling the battery may cause its explosion or leakage, resulting in fire, injury or damage to surrounding
properties.
•
Insert the battery correctly as instructed. (see page 16)
Page 9

9
Safety Precautions
Remove the batteries from the remote control transmitter when not using for a long period of time.
•
The battery may leak, heat, ignite or burst, resulting in fire or damage to surrounding properties.
Do not burn or breakup batteries.
•
Batteries must not be exposed to excessive heat such as sunshine, fire or the like.
Do not turn the Display upside down.
Do not position the unit with its display panel facing upright.
Page 10
10
Precautions for use
Cautions when installing
Do not set up the Display outdoors.
•
The Display is designed for indoor use.
Environmental temperature to use this unit
•
When using the unit where it is below 1 400 m (4 593 ft) above sea level: 0 °C to 40 °C (32 °F to 104 °F)
•
When using the unit at high altitudes (1 400 m (4 593 ft) and higher and below 2 800 m (9 186 ft) above sea
level): 0 °C to 35 °C (32 °F to 95 °F)
Do not install the unit where it is 2 800 m (9 186 ft) and higher above sea level.
•
Failure to do so may shorten the life of the internal parts and result in malfunctions.
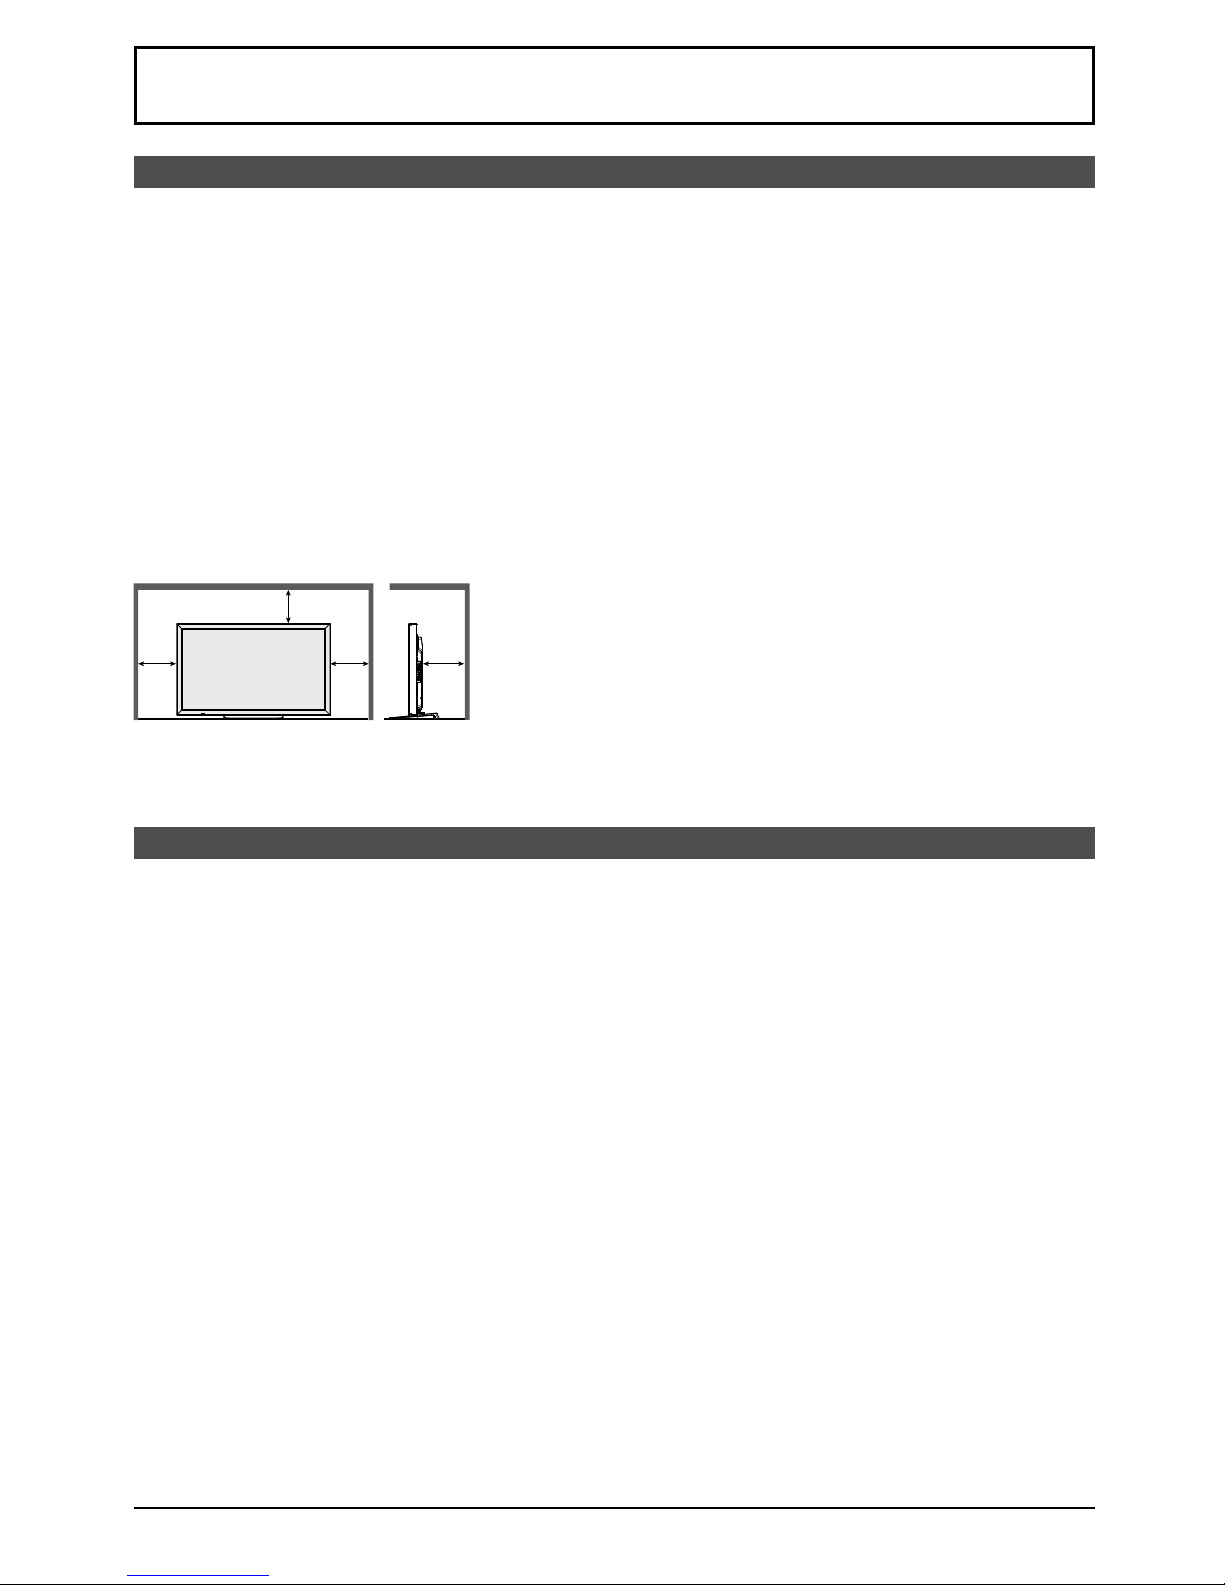
Required space for ventilation
When using the pedestal (optional accessory), leave a space of 10 cm (3
15/16”) or more at the top, left and right,
and 7 cm (2
3/4”) or more at the rear, and also keep the space between the bottom of the display and the floor
surface.
If using some other setting-up method (wall-hanging, etc.), follow the manual of it. (If there is no specific indication
of installation dimension in the installation manual, leave a space of 10 cm (3
15/16”) or more at the top, bottom, left
and right, and 7 cm (2
3/4”) or more at the rear.)
Minimum distance:
a
a
ab
a: 10 cm
(3
15/16”)
b: 7 cm
(2
3/4”)
Depending on the temperature or humidity conditions, uneven brightness may be observed. This is not a
malfunction.
•
This unevenness will disappear while applying current continuously. If not, consult the distributor.
Request Regarding Security
When using this product, take safety measures against the following incidents.
•
Personal information being leaked via this product
•
Unauthorized operation of this product by a malicious third party
•
Interfering or stopping of this product by a malicious third party
Take sufficient security measures.
•
Set a password for the LAN control and restrict the users who can log in.
•
Make your password difficult to guess as much as possible.
•
Change your password periodically.
•
Panasonic Corporation or its affiliate companies will never ask for your password directly. Do not divulge your
password in case you receive such inquiries.
•
The connecting network must be secured by a firewall, etc.
•
When disposing the product, initialize the data before disposing. “Shipping”
About Wireless LANs
●The advantage of a wireless LAN is that information can be exchanged between a PC or other such equipment
and an access point using radio waves as long as you are within range for radio transmissions. On the other
hand, because the radio waves can travel through obstacles (such as walls) and are available everywhere within
a given range, problems of the type listed below may occur if security-related settings are not made.
•
A malicious third-party may intentionally intercept and monitor transmitted data including the content of e-mail
and personal information such as your ID, password, and/or credit card numbers.
•
A malicious third-party may access your personal or corporate network without authorization and engage in the
following types of behaviour. Retrieve personal and/or secret information (information leak)
Spread false information by impersonating a particular person (spoofing)
Overwrite intercepted communications and issue false data (tampering) Spread harmful software such as a
computer virus and crash your data and/or system (system crash)
●Since most wireless LAN adapters or access points are equipped with security features to take care of these
problems, you can reduce the possibility of these problems occurring when using this product by making the
appropriate security settings for the wireless LAN device.
Page 11

11
Precautions for use
●Some wireless LAN devices may not be set for security immediately after purchase. To decrease the possibility of
occurrence of security problems, before using any wireless LAN devices, be absolutely sure to make all securityrelated settings according to the instructions given in the operation manuals supplied with them.
Depending on the specifications of the wireless LAN, a malicious third-party may be able to break security settings
by special means.
Please contact Panasonic if you need help taking care of security settings or other such.
If you cannot perform security settings for your wireless LAN by yourself, please contact the Panasonic Support
Center.
●Panasonic asks customers to thoroughly understand the risk of using this product without making security
settings, and recommends that the customer make security settings at their own discretion and responsibility.
About built-in wireless LAN
CAUTION:
Be aware of the following limits before using the Wireless LAN Module.
•
To use the Wireless LAN Module, an access point needs to be obtained.
•
Do not use the Wireless LAN Module to connect to any wireless network (SSID) for which you do not have
usage rights. Such networks may be listed as a result of searches. However, using them may be regarded as
illegal access.
SSID is a name for identifying a particular wireless network for transmission.
•
Do not subject the Wireless LAN Module to high temperatures, direct sunlight or moisture.
•
Do not bend, or subject the Wireless LAN Module to strong impacts.
•
Do not disassemble or alter the Wireless LAN Module in any way.
•
Do not attempt to install the Wireless LAN Module in any incompatible device.
•
Do not remove the Wireless LAN Module from the host product during operations.
•
Data transmitted and received over radio waves may be intercepted and monitored.
•
To avoid malfunctions caused by radio wave interface, keep the host product away from the devices such as
other wireless LAN devices, microwaves and the devices that use 2.4 GHz and 5 GHz signals when using the
Wireless LAN Module.
•
When noises occur due to the static electricity, etc., the host product might stop operating for the protection of the
devices. In this case, turn the host product Off with Mains power On / Off switch, then turn it On again.
•
Depending on the area, this Wireless LAN Module may not be available.
Notes on Using Wireless Connection
Wireless connection function of the Display uses radio waves in the 2.4 GHz and 5 GHz bands.
A radio station license is not required, but be sure to read and fully understand the following items before use.
Do not use near other wireless equipment.
●The following equipment may use radio waves in the same band as the Display. When the Display is used near
these devices, radio wave interference may make communication impossible, or the communication speed may
become slower.
•
Microwave ovens, etc.
•
Industrial, chemical and medical equipment, etc.
•
In-plant radio stations for identifying moving objects such as those used in factory manufacturing lines, etc.
•
Designated low-power radio stations
If at all possible, avoid the use of cellular phones, TV sets or radios near the Display.
●Cellular phones, TV sets, radios and similar devices use different radio bands from the Display, so there is no
effect on wireless communication or the transmission and reception of these devices. However, radio waves from
the Display may produce audio or video noise.
Wireless communication radio waves cannot penetrate steel reinforcements, metal, concrete, etc.
●Communication is possible through walls and floors made from materials such as wood and glass (except glass
containing wire mesh), but not through walls and floors made from steel reinforcements, metal, concrete, etc.
Avoid using the Display in locations prone to static electricity.
●If the Display is used in a location prone to static electricity, such as on a carpet, the wireless LAN or wired LAN
connection may be lost.
●If this happens, eliminate the source of static electricity or electromagnetic noise and reconnect to the wireless
LAN or wired LAN.
Using the Display outside the country
●It is forbidden to take the Display outside the country or region where you purchased it, so use it only in the said
country or region. Also, note that depending on countries or regions there are restrictions on the channels and
frequencies at which you can use the wireless LAN.
Page 12
12
Precautions for use
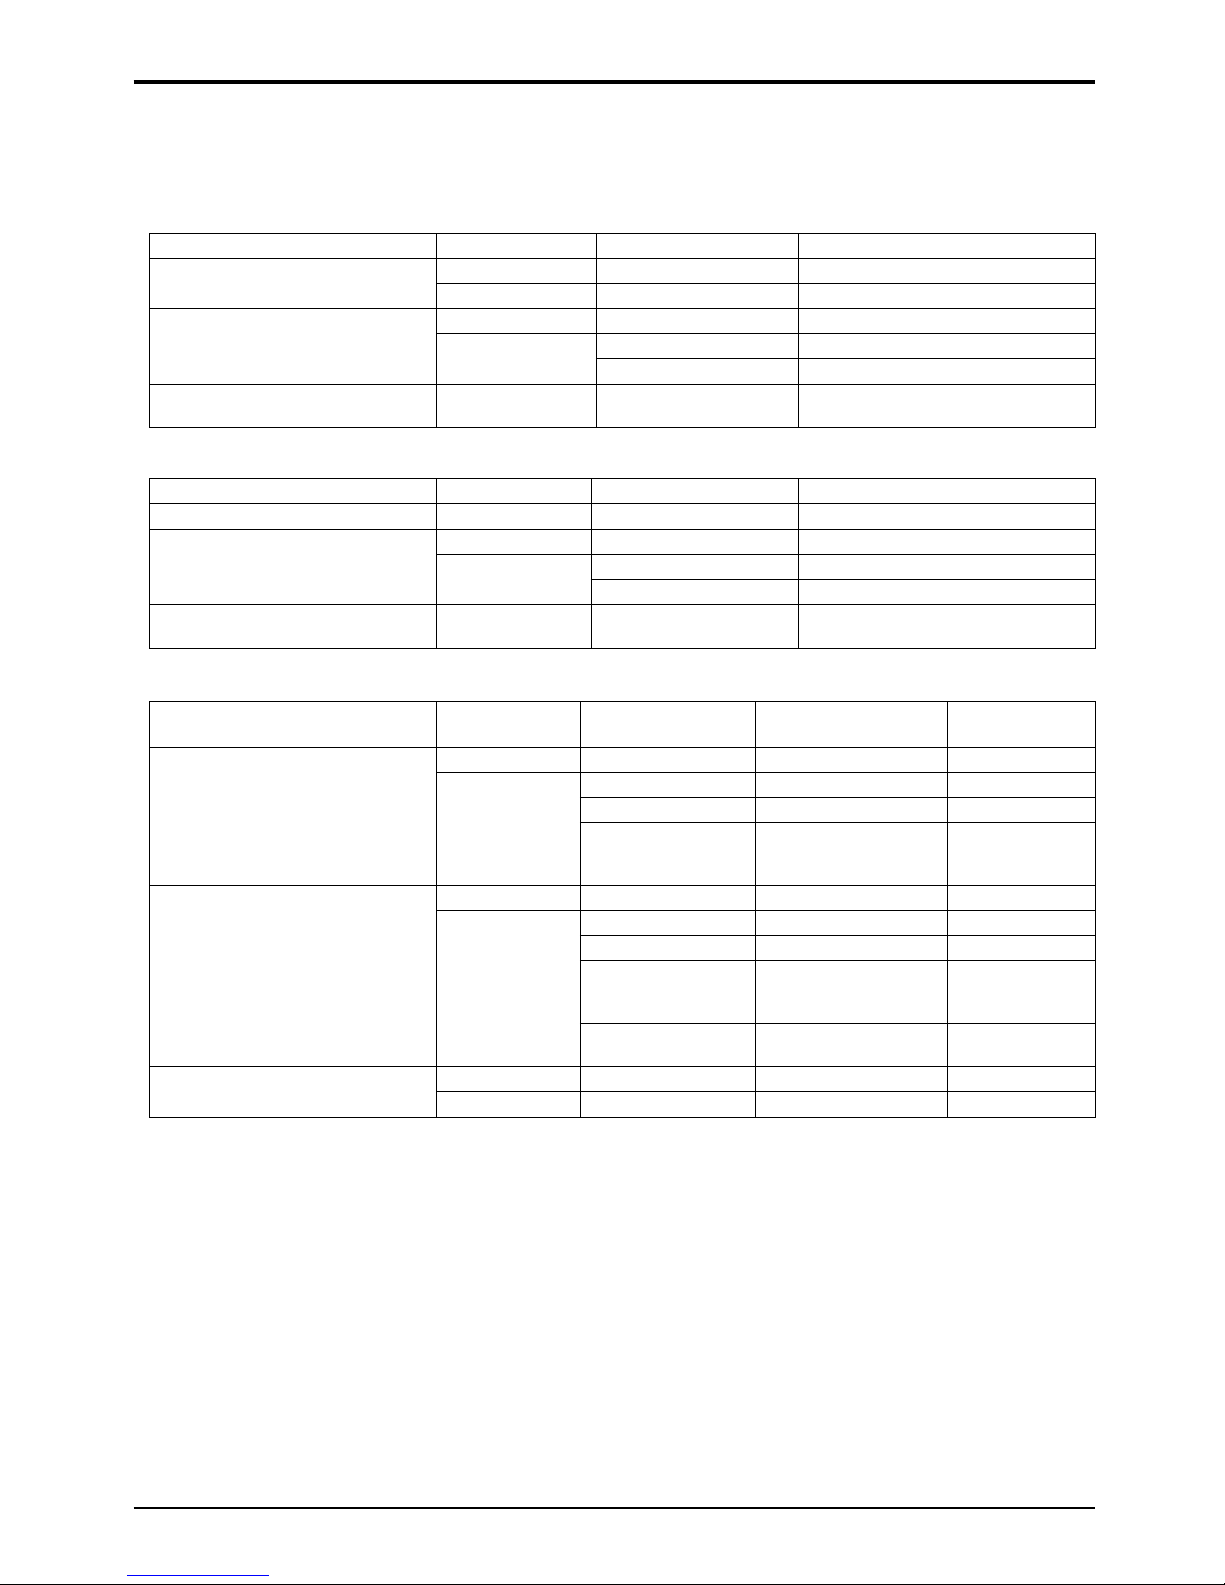
Available wireless LAN channels
The channels (frequency range) that can be used differ according to the country or region and the connecting
method of the wireless LAN. Refer to the table below.
For MIRRORING mode
(When the connecting method is “MIRRORING”)
Country or region Standard Channels used Frequency band (Center frequency)
For Europe and CIS
IEEE802.11b/g/n 1 - 11 2.412 GHz - 2.462 GHz
IEEE802.11a/n 36 / 40 / 44 / 48 5.180 GHz - 5.240 GHz
The power supplies are below 140 V
(Except for Europe and CIS)
IEEE802.11b/g/n 1 - 11 2.412 GHz - 2.462 GHz
IEEE802.11a/n
36 / 40 / 44 / 48 5.180 GHz - 5.240 GHz
149 / 153 / 157 / 161 5.745 GHz - 5.825 GHz
The power supplies are above 190 V
(Except for Europe and CIS)
IEEE802.11b/g/n 1 - 11 2.412 GHz - 2.462 GHz
For M-DIRECT mode
(When the connecting method is “M-DIRECT” of “Panasonic APPLICATION”)
Country or region Standard Channels used Frequency band (Center frequency)
For Europe and CIS IEEE802.11b/g/n 1 - 13 2.412 GHz - 2.472 GHz
The power supplies are below 140 V
(Except for Europe and CIS)
IEEE802.11b/g/n 1 - 11 2.412 GHz - 2.462 GHz
IEEE802.11a/n
36 / 40 / 44 / 48 5.180 GHz - 5.240 GHz
149 / 153 / 157 / 161 / 165 5.745 GHz - 5.825 GHz
The power supplies are above 190 V
(Except for Europe and CIS)
IEEE802.11b/g/n 1 - 13 2.412 GHz - 2.472 GHz
For USER mode
(When the connecting method is “USER1”/“USER2”/“USER3” of “Panasonic APPLICATION”)
Country or region Standard Channels used
Frequency band
(Center frequency)
Scanning type
For Europe and CIS
IEEE802.11b/g/n 1 - 13 2.412 GHz - 2.472 GHz Active scanning
IEEE802.11a/n
36 / 40 / 44 / 48 5.180 GHz - 5.240 GHz Active scanning
52 / 56 / 60 / 64 5.260 GHz - 5.320 GHz Passive scanning
100 / 104 / 108 / 112 /
116 / 120 / 124 / 128 /
132 / 136 / 140
5.500 GHz - 5.700 GHz Passive scanning
The power supplies are below 140 V
(Except for Europe and CIS)
IEEE802.11b/g/n 1 - 11 2.412 GHz - 2.462 GHz Active scanning
IEEE802.11a/n
36 / 40 / 44 / 48 5.180 GHz - 5.240 GHz Active scanning
52 / 56 / 60 / 64 5.260 GHz - 5.320 GHz Passive scanning
100 / 104 / 108 / 112 /
116 / 120 / 124 / 128 /
132 / 136 / 140
5.500 GHz - 5.700 GHz Passive scanning
149 / 153 / 157 / 161 /
165
5.745 GHz - 5.825 GHz Active scanning
The power supplies are above 190 V
(Except for Europe and CIS)
IEEE802.11b/g/n 1 - 13 2.412 GHz - 2.472 GHz Passive scanning
IEEE802.11a/n 149 / 153 / 157 / 161 5.745 GHz - 5.805 GHz Passive scanning
The frequency and channel differ depending on the country.
The passive scanning is performed by changing radio to the channel being scanned in each country.
Please use the wireless LAN feature in compliance with the laws of each country.
■
For North America
This device is restricted to indoor use when operated in the 5.15 to 5.25 GHz frequency range (Channels 36 to 48).
■
For EU
This device is restricted to indoor use when operated in the 5.15 to 5.35 GHz frequency range (Channels 36 to 64).
■
For Mexico
Operation of this equipment is subject to the following two conditions:
(1) this equipment might not have a harmful interference and
(2) this equipment must accept any interference, including one that might cause it to malfunction
■
For Jamaica
•
This product contains Type Approved Modules by Jamaica.
Page 13
13
Precautions for use
LCD Display
Declaration of Conformity (DoC)
“Hereby, Panasonic Corporation declares that this Display is in compliance with the essential requirements and
other relevant provisions of the Directive 1999/5/EC.”
If you want to get a copy of the original DoC of this Display, please visit the following website:
http://www.doc.panasonic.de
Authorized Representative:
Panasonic Testing Centre
Panasonic Service Europe, a division of Panasonic Marketing Europe GmbHn
Winsbergring 15, 22525 Hamburg, Germany
This Display is intended to be used in the following countries.
Albania, Austria, Belgium, Bulgaria, Cyprus, Czech Republic, Denmark, Estonia, Finland, France, Germany, Greece,
Hungary, Italy, Iceland, Latvia, Lithuania, Luxembourg, Malta, Netherlands, Norway, Poland, Portugal, Romania,
Slovakia, Slovenia, Spain, Sweden, Switzerland, Turkey, United Kingdom
The wireless LAN feature of this Display shall exclusively be used inside buildings.
UAE
-
TRA
EGISTERED No
:
ER0081229/1
2
DEALER N
o:
DA
0052708/10
Singapor
e
Complies with
DA Standards
B01017
hailand
“Á¦ºn°Ã¦¤µ¤Â¨³°»¦r¸o¤¸ªµ¤°¨o°µ¤
¤µ¦µµÁ· Á¨¸n . ¤. 1012-2551”
Notes on Using Wired LAN
When setting up the Display at a place, where electric statistic occurs often, take a sufficient antistatic
measure before start using.
•
When the Display is used at a location, where static electricity occurs often, such as on a carpet, a wired LAN
communication is disconnected more often. In that case, remove static electricity and the noise source that may
cause problems with an antistatic mat, and re-connect the wired LAN.
•
In rare cases, the LAN connection is disabled due to static electricity or noise. In that case, turn off the power of
the Display and the connected devices once and then re-turn on the power.
The Display may not work properly due to strong radio wave from the broadcast station or the radio.
•
If there is any facility or equipment, which outputs strong radio wave, near the installation location, set up the
Display at a location sufficiently far from the source of the radio wave. Or, wrap the LAN cable connected to the
DIGITAL LINK/LAN terminal by using a piece of metal foil or a metal pipe, of which is grounded at both ends.
Page 14
14
Precautions for use
Cleaning and maintenance
The front of the liquid crystal panel has been specially treated. Wipe the surface of the liquid crystal panel
gently using only a cleaning cloth or a soft, lint-free cloth.
•
If the surface is particularly dirty, wipe with a soft, lint-free cloth which has been soaked in pure water or water in
which neutral detergent has been diluted 100 times, and then wipe it evenly with a dry cloth of the same type until
the surface is dry.
Wipe off dirt on the IR transmission part with soft cloth.
•
Wipe off dirt on the IR transmission part with soft cloth once a day.
If malfunction is due to dirt on the IR transmission part, simply wiping it off lightly can recover the performance.
If dirt is sticky, wipe it off with cloth wrung out of neutral detergent diluted with water and then wipe the part with
dry cloth.
•
If the substance such as the material of the supplied pen is stuck on the glass surface, wipe it with a wet cloth.
Note that if a deep scratch is caused by using objects other than the supplied pen, it may not be wiped off.
•
Do not scratch or hit the surface of the panel with fingernails or other hard objects, otherwise the surface may
become damaged. Furthermore, avoid contact with volatile substances such as insect sprays, solvents and
thinner, otherwise the quality of the surface may be adversely affected.
If the cabinet becomes dirty, wipe it with a soft, dry cloth.
•
If the cabinet is particularly dirty, soak the cloth in water to which a small amount of neutral detergent has been
added and then wring the cloth dry. Use this cloth to wipe the cabinet, and then wipe it dry with a dry cloth.
•
Do not allow any detergent to come into direct contact with the surface of the Display. If water droplets get inside
the unit, operating problems may result.
•
Avoid contact with volatile substances such as insect sprays, solvents and thinner, otherwise the quality of the
cabinet surface may be adversely affected or the coating may peel off. Furthermore, do not leave it for long
periods in contact with articles made from rubber or PVC.
Usage of a chemical cloth
•
Do not use a chemical cloth for the panel surface.
•
Follow the instructions for the chemical cloth to use it for the cabinet.
Touch panel
Carefully observe the following instructions as the display has an optical touch panel.
Do not expose the display to direct sunlight or strong light source during use.
•
Otherwise malfunction may occur since the optical touch panel of the display uses infrared rays.
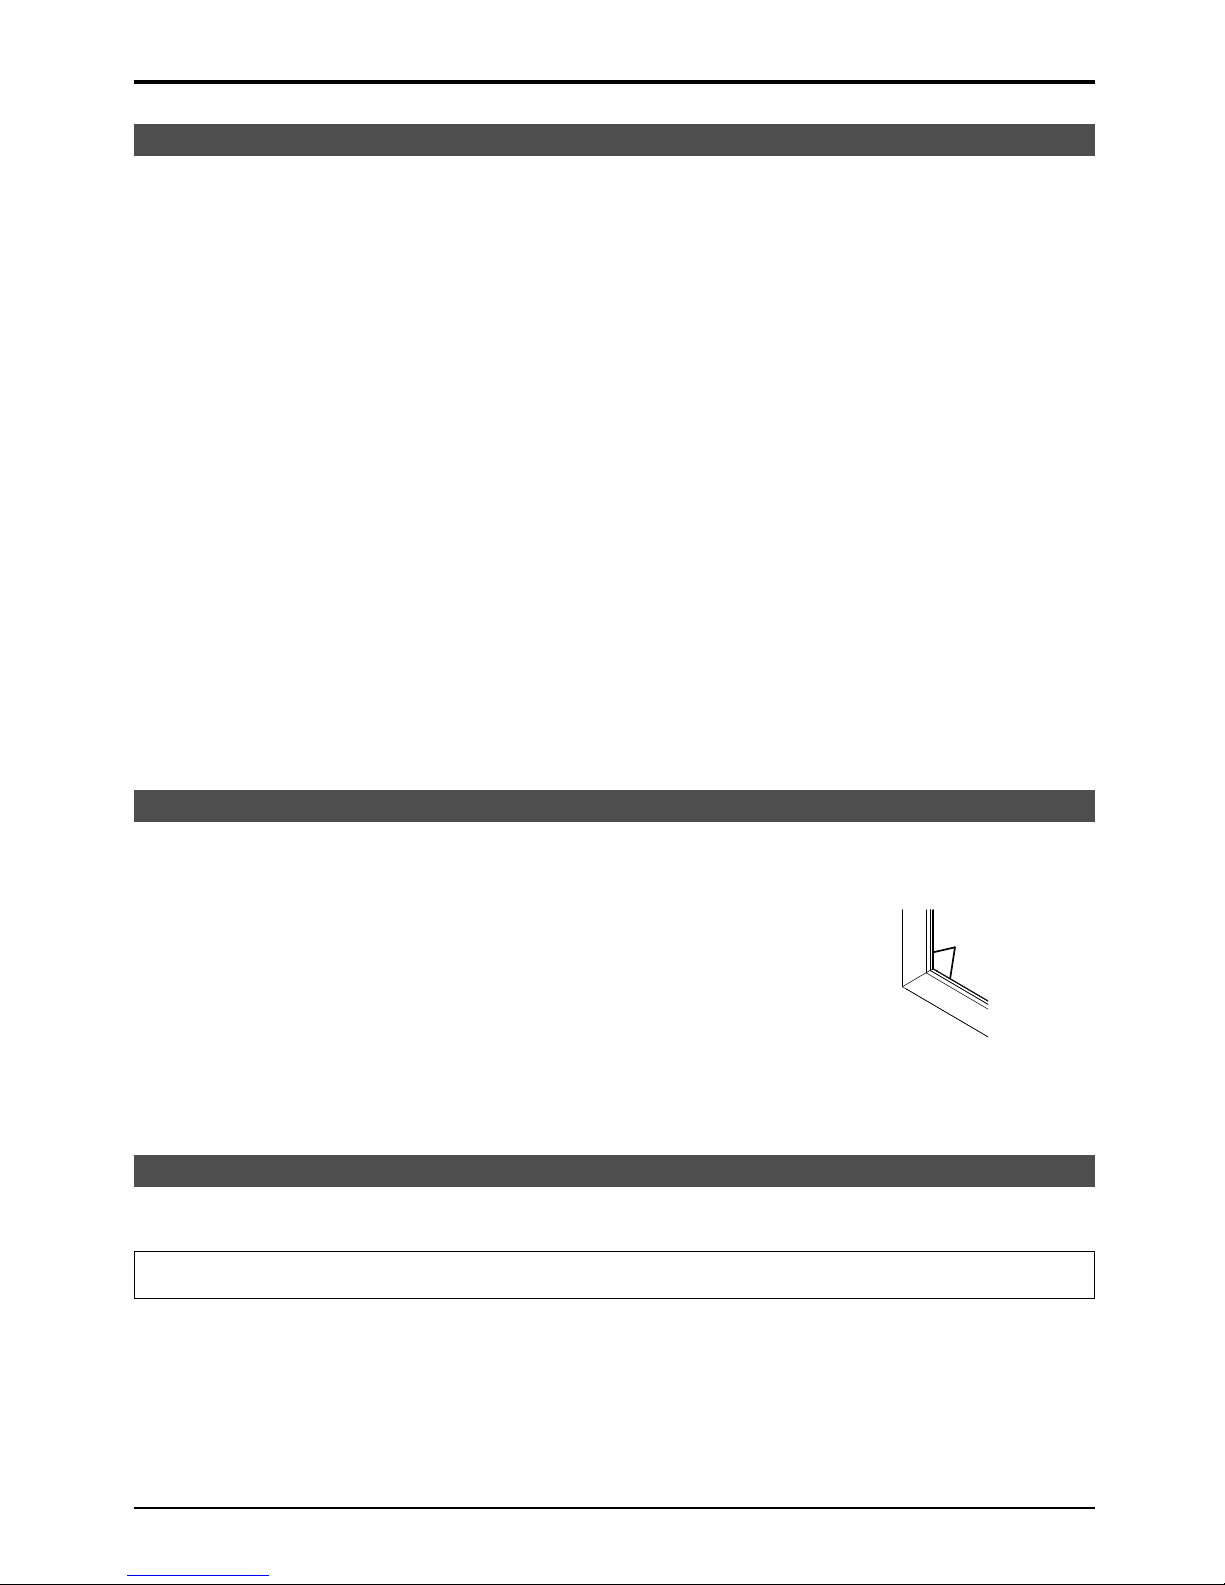
After turning on the power of the display, do not touch the IR transmission part and
the screen until any image is displayed.
•
Otherwise the touched part may be detected as defective elements, resulting in
abnormal operation. If this occurred, turn the display off and then on.
IR transmission part
Always use a finger or the supplied pen to operate the touch panel. Do not use a hard or sharp tip such as
nail, ball-point pen, and pencil.
When using any other infrared device, keep a distance to prevent erroneous operation.
Disposal
When disposing the product, ask your local authority or dealer about the correct methods of disposal.
For USA-California Only
This product contains a CR Coin Cell Lithium Battery which contains Perchlorate Material - special handling may apply.
See www.dtsc.ca.gov/hazardouswaste/perchlorate
Page 15
15
Accessories
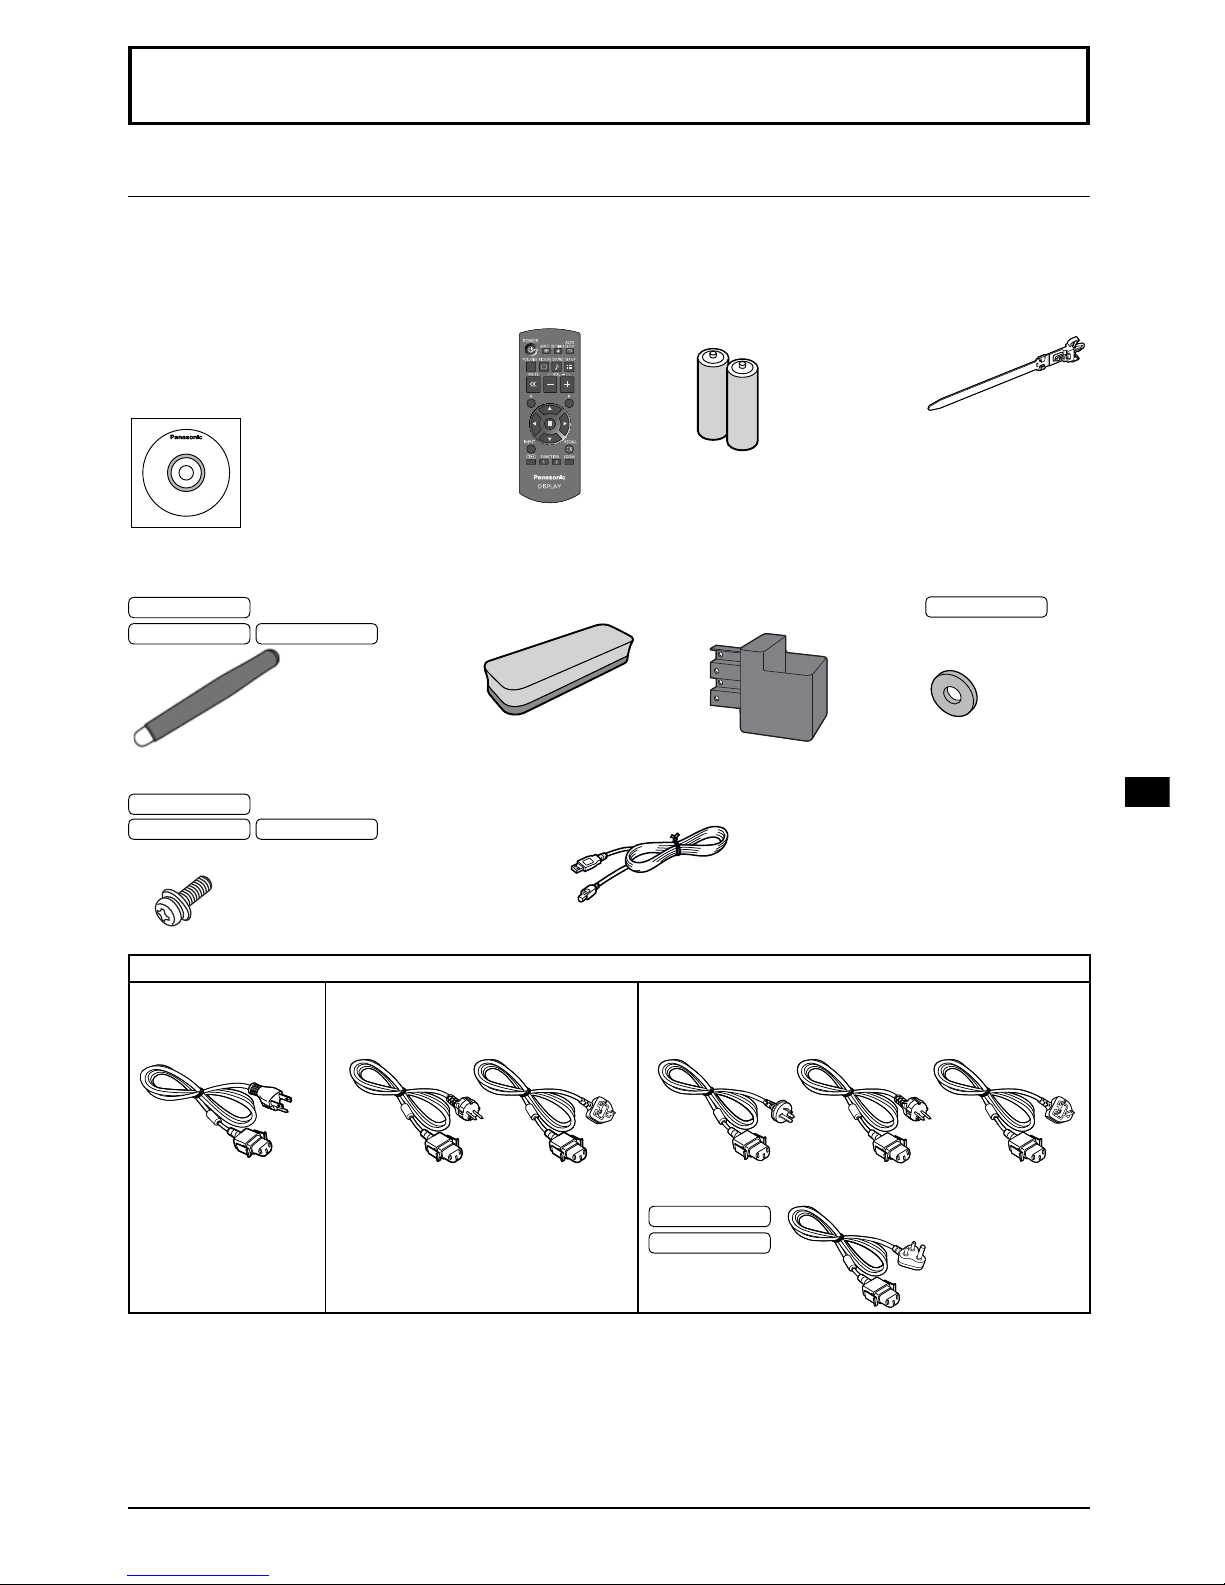
Check that you have the accessories and items shown
Power supply cord
TH-80BF1U
TH-65BF1U
TH-50BF1U
TH-80BF1E
TH-65BF1E
TH-50BF1E
TH-80BF1W
TH-65BF1W
TH-50BF1W
TXFMX011WFU
TXFMX011TFR TXFMX021TFR
TXFMX011NGW TXFMX011TFR TXFMX021TFR
TXFMX01YGFZ
80-inch model
65-inch model
Attention
•
Store small parts in an appropriate manner, and keep them away from young children.
•
The part numbers of accessories are subject to change without notice. (The actual part number may differ from
the ones shown above.)
•
In case you lost accessories, please purchase them from your dealer. (Available from the customer service)
•
Dispose the packaging materials appropriately after taking out the items.
Accessories Supply
Software CD-ROM × 1
TH-80BF1U, TH-65BF1U, TH-50BF1U:
DPQC1006ZA/X1
TH-80BF1E, TH-65BF1E, TH-50BF1E:
DPQC1005ZA/X1
TH-80BF1W, TH-65BF1W, TH-50BF1W:
DPQC1007ZA/X1
Remote Control
Transmitter
N2QAYB000691
Batteries for the Remote
Control Transmitter
(R6 (UM3) Size × 2)
Clamper × 1
TMME289
Screw × 2
80-inch model
XYN4+F12FJK
65-inch model 50-inch model
XYN4+F8FJK
(see page 17)
USB cable × 1
K1HY05YY0189
Pen
TKR5ZA45001
80-inch model
× 4
65-inch model 50-inch model
× 2
Eraser × 1
TKK5ZH50031
Pen Stand × 1
TKK5ZA50021
(see page 17)
Washer × 2
(see page 18)
80-inch model
TMM5ZX010
Page 16
16
Accessories
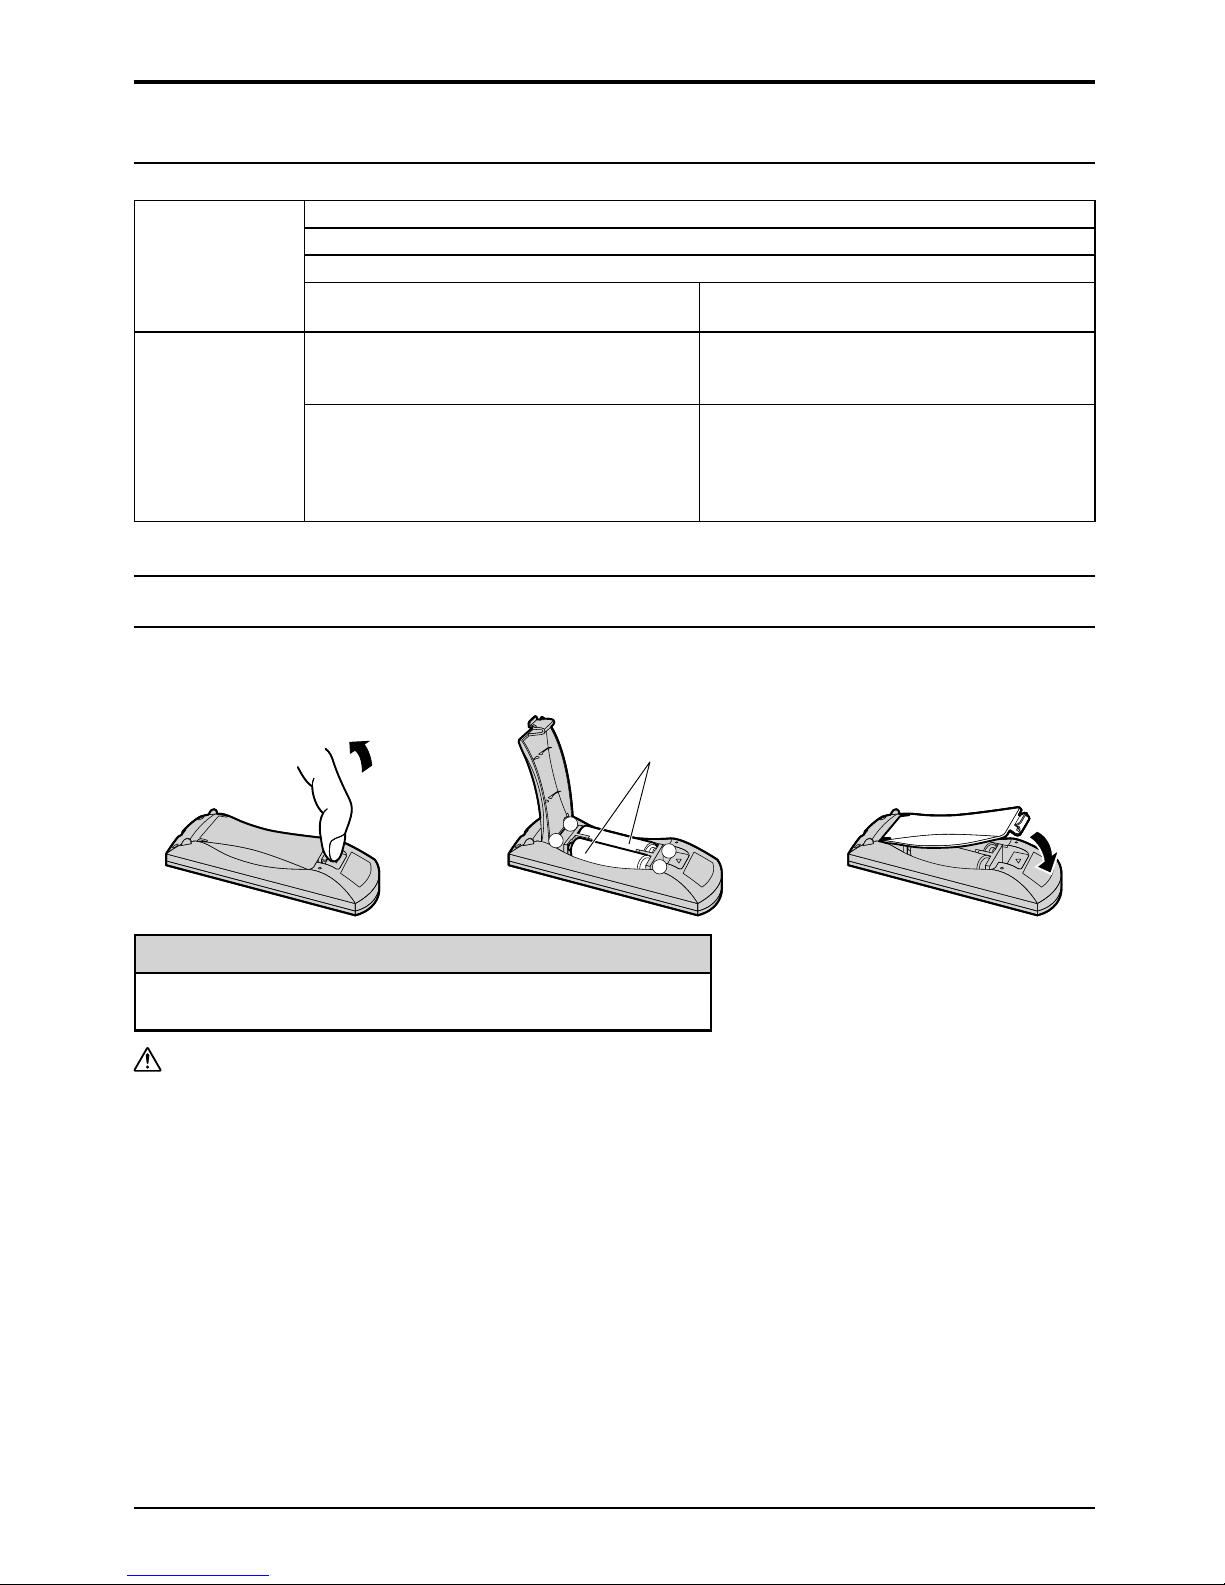
Remote Control Batteries
Helpful Hint:
For frequent remote control users, replace old batteries with
Alkaline batteries for longer life.
Precaution on battery use
Incorrect installation can cause battery leakage and corrosion that will damage the remote control transmitter.
Disposal of batteries should be in an environment-friendly manner.
Observe the following precaution:
1. Batteries shall always be replaced as a pair. Always use new batteries when replacing the old set.
2. Do not combine a used battery with a new one.
3. Do not mix battery types (example: “Zinc Carbon” with “Alkaline”).
4. Do not attempt to charge, short-circuit, disassemble, heat or burn used batteries.
5.
Battery replacement is necessary when remote control acts sporadically or stops operating the Display set.
6. Do not burn or breakup batteries.
7. Batteries must not be exposed to excessive heat such as sunshine, fire or the like.
Contents in the CD-ROM
The contents below are included in the supplied CD-ROM.
Instruction
(PDF)
Operating Instructions - Display Operations
Operating Instructions - Network Operations
Operating Instructions - Wireless Manager ME
Software license GNU GENERAL PUBLIC LICENSE
GNU LESSER GENERAL PUBLIC LICENSE
Software
WhiteBoard Software (Windows)
Allows the display to be used as whiteboard.
You can run the software directly from external
storage without installing it in your computer.
Wireless Manager ME (Windows/Mac) Allows the image on the computer screen to
be sent wirelessly or via wired LAN.
Switch the input to Panasonic APPLICATION
before use. For more details, see the
instruction manual of Wireless Manager ME.
Requires two R6 batteries.
1. Pull and hold the hook, then open
the battery cover.
2. Insert batteries - note correct
polarity (+ and -).
3. Replace the cover.
+
-
+
-
“R6 (UM3)” size
Page 17
17
Accessories
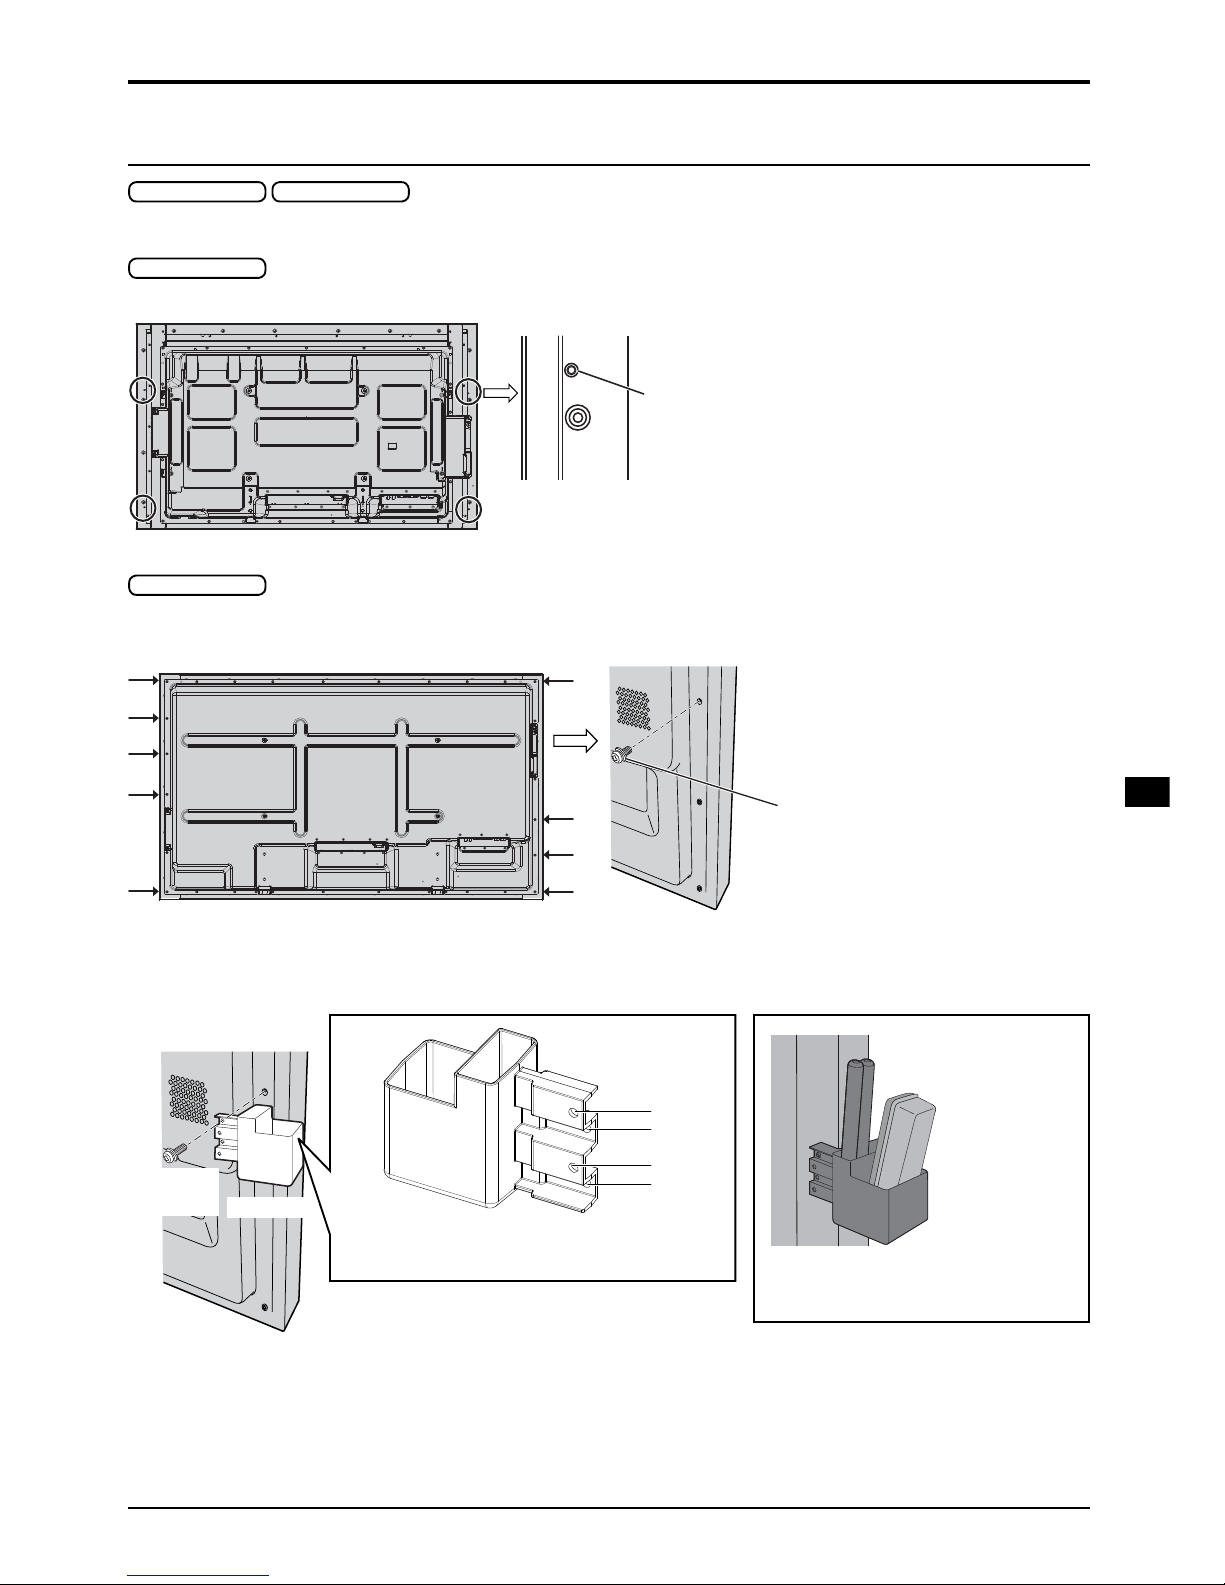
Mounting Pen Stand
50-inch model 65-inch model
Mounting position of the Pen Stand
50-inch model
The supplied Pen Stand can be mounted in one of the four dedicated screw hole positions on the back of the Display.
Each hole is marked with a circle.
65-inch model
The supplied Pen Stand can be mounted in one of the nine positions on the back of the Display.
Remove one screw fixing the back cover and mount the Pen Stand.
Remove one screw from the back
cover.
Mounting
Mount the Pen Stand using one supplied screw.
Screw
(supplied)
Pen Stand
Mounting on the left side: Use either A or C
Mounting on the right side: Use either B or D
A
B
C
D
The Pen Stand can hold 2 pens and
one Eraser.
Page 18
18
Accessories
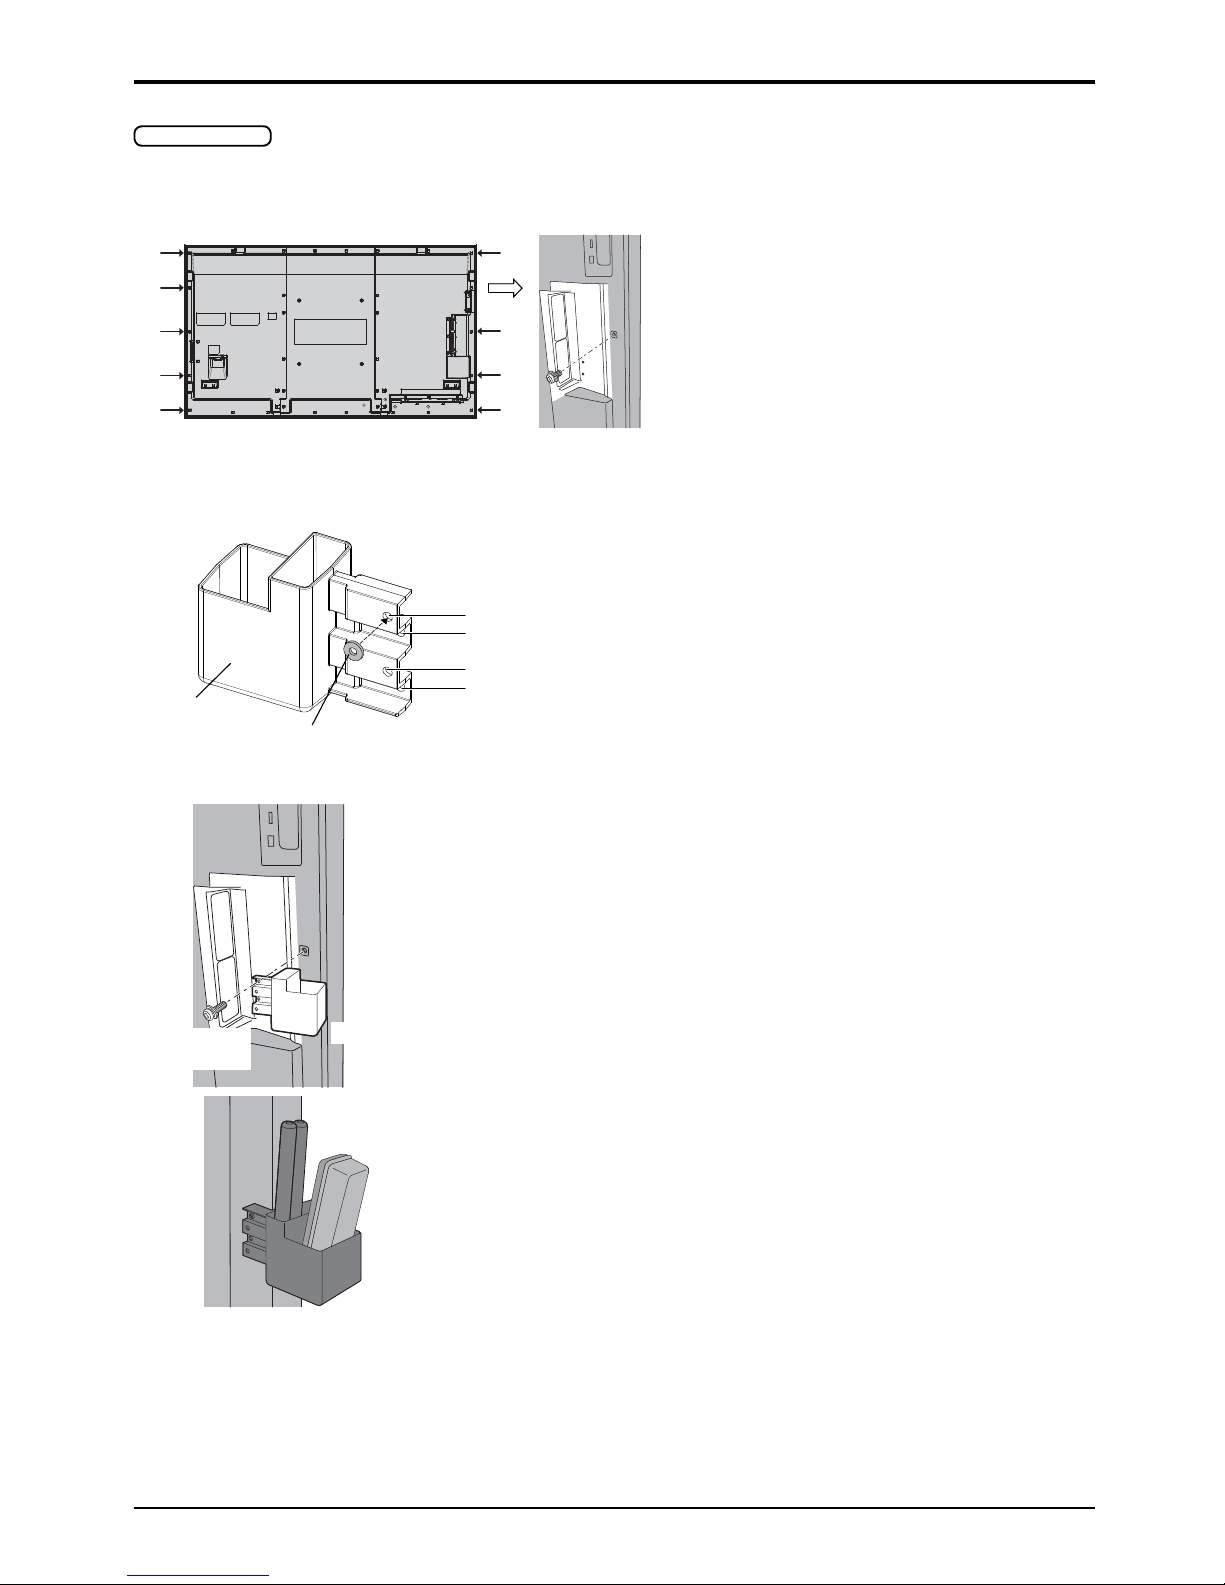
80-inch model
The supplied Pen Stand can be mounted on one of the nine positions on the back of the Display.
1 Remove a screw from the back cover.
2 Peel the paper backing off the supplied washer.
3 Paste the washer to a screw hole for the pen stand.
Any of the hole A to D can be used to fix the pen stand.
A
B
C
D
Washer (supplied)
Pen Stand
(supplied)
4 Mount the Pen Stand with the supplied screw.
Screw
(supplied)
Pen Stand
The Pen Stand can hold 2 pens and one Eraser.
Page 19
19
Connections
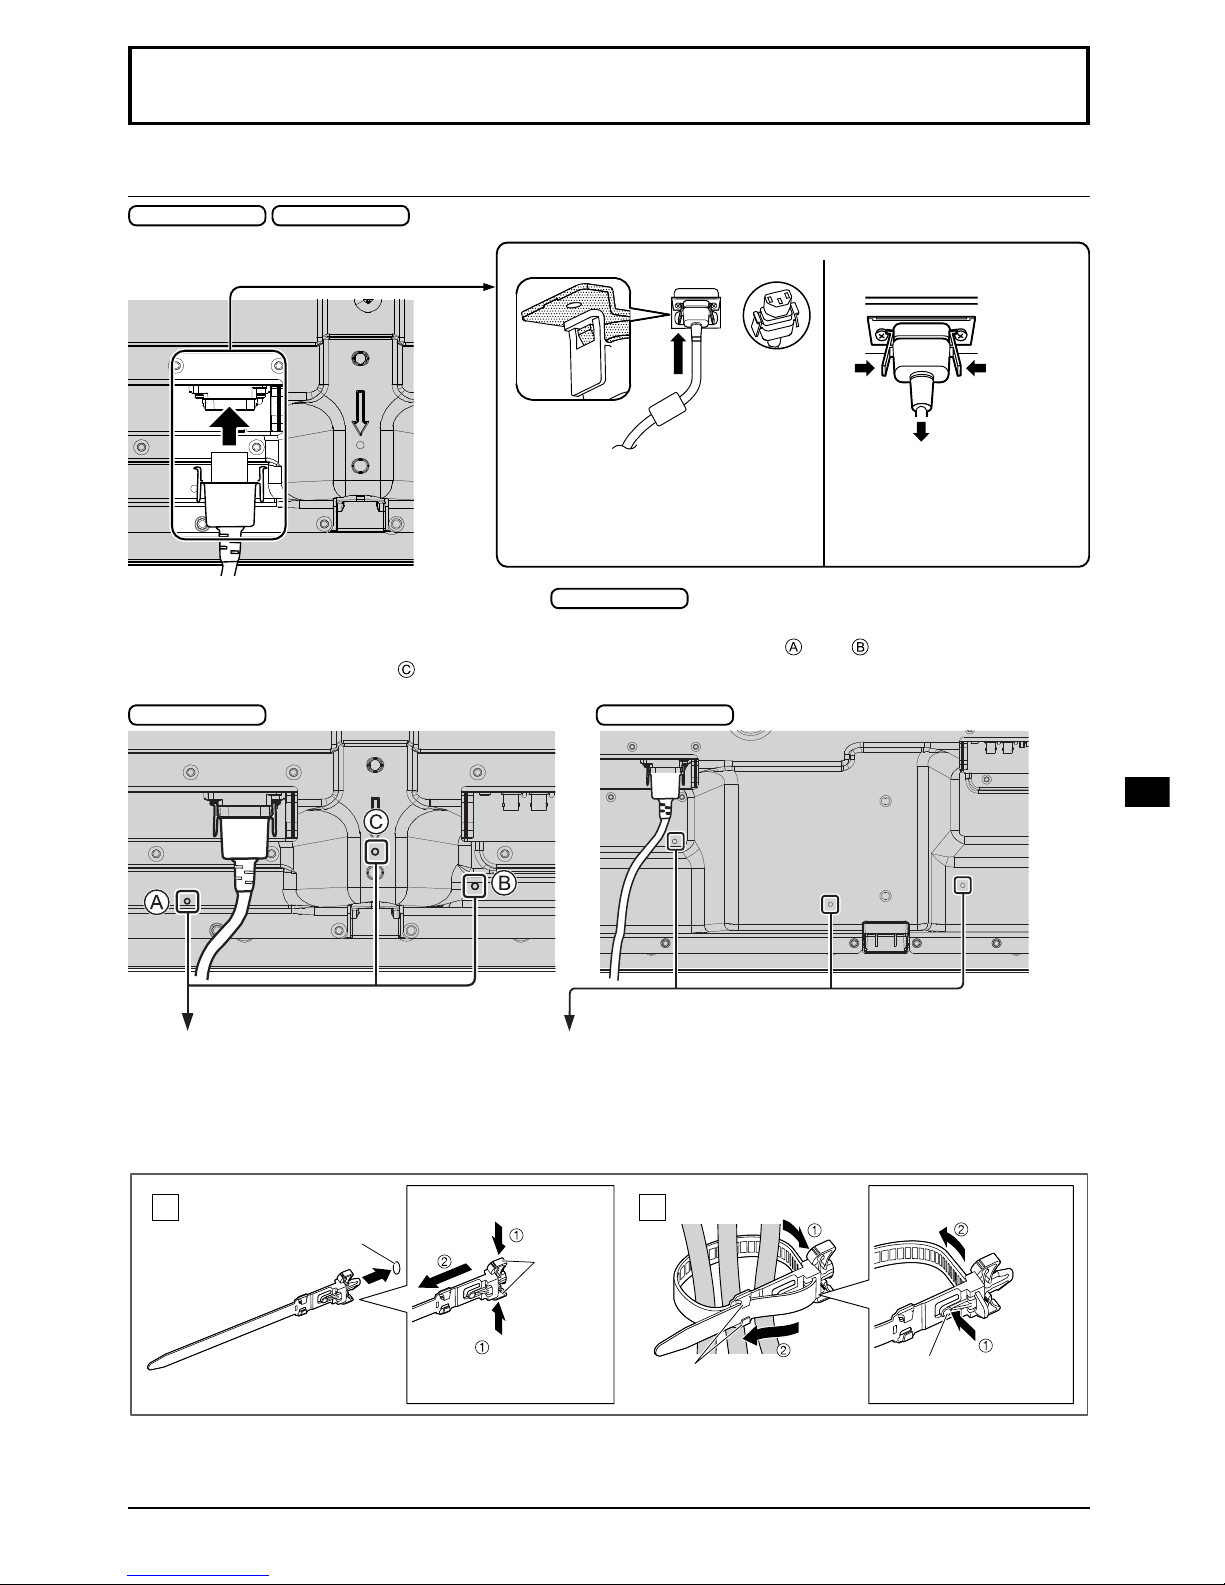
AC cord connection and fixing, cable fixing
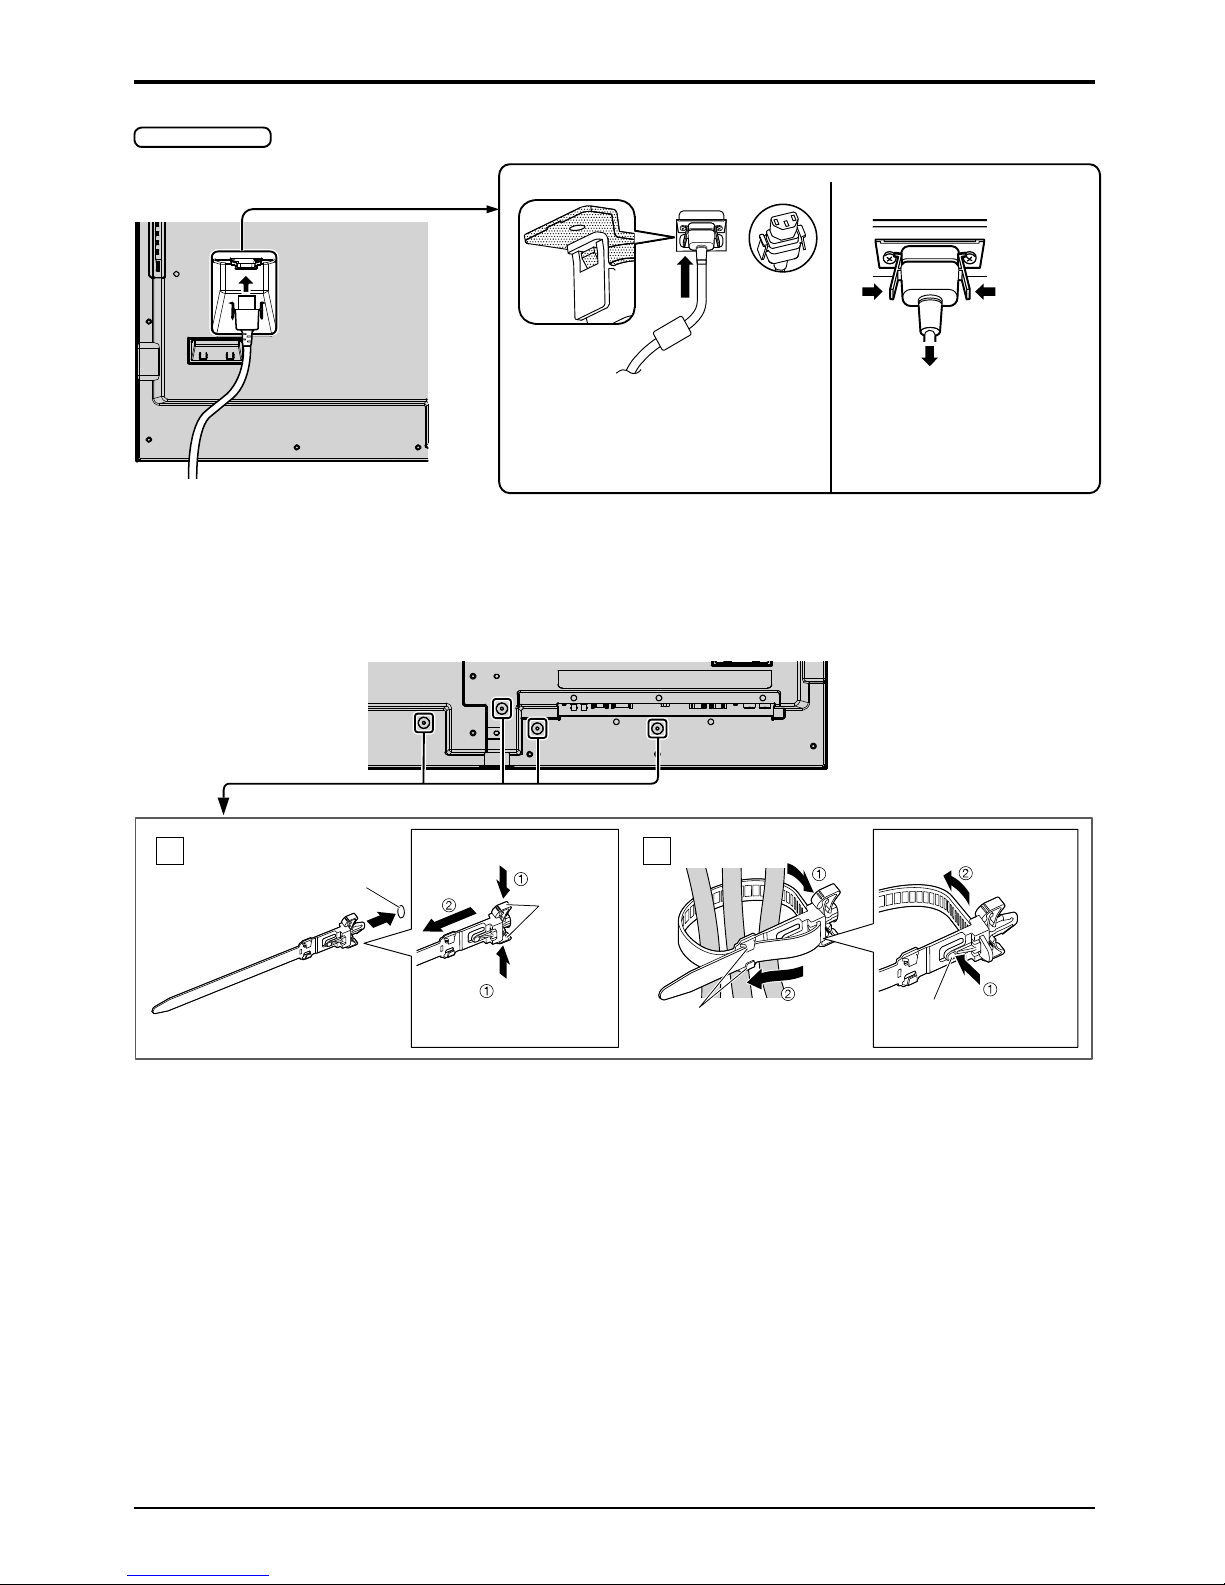
50-inch model 65-inch model
Plug the AC cord into the display unit.
Plug the AC cord until it clicks.
Note:
Make sure that the connector is locked
on both the left and right sides.
Unplug the AC cordAC cord fixing
Unplug the AC cord pressing the
two knobs.
Note:
When disconnecting the AC cord, be
absolutely sure to disconnect the AC
cord plug at the socket outlet first.
When using the Wall-hanging bracket (vertical)
50-inch model
Note:
When using the Wall-hanging bracket (vertical)(TY-WK42PV20), use the holes
and to secure the cables. If
the clamper is used on the hole
, the cables may be caught by the wall-hanging bracket.
50-inch model 65-inch model
Using the clamper
Secure any excess cables with clamper as required.
Note:
One clamper is supplied with this unit. In case of securing cables at three positions, please purchase it separately.
If you need more clampers, purchase them from your dealer. (Available from the customer service)
1
2
Attach the clamper
To remove from the unit:
Keep pushing
both side snaps
hole
Bundle the cables
snaps
hooks
Set the
tip in the
hooks
To loosen:
Keep
pushing
the knob
knob
Insert the clamper
in a hole.
Page 20
20
Connections
80-inch model
Plug the AC cord into the display unit.
Plug the AC cord until it clicks.
Note:
Make sure that the connector is locked
on both the left and right sides.
Unplug the AC cordAC cord fixing
Unplug the AC cord pressing the
two knobs.
Note:
When disconnecting the AC cord, be
absolutely sure to disconnect the AC
cord plug at the socket outlet first.
Using the clamper
Secure any excess cables with clamper as required.
Note:
One clamper is supplied with this unit. In case of securing cables at four positions, please purchase it separately.
If you need more clampers, purchase them from your dealer. (Available from the customer service)
1
2
Attach the clamper
To remove from the unit:
Keep pushing
both side snaps
hole
Bundle the cables
snaps
hooks
Set the
tip in the
hooks
To loosen:
Keep
pushing
the knob
knob
Insert the clamper
in a hole.
Page 21
21
Connections
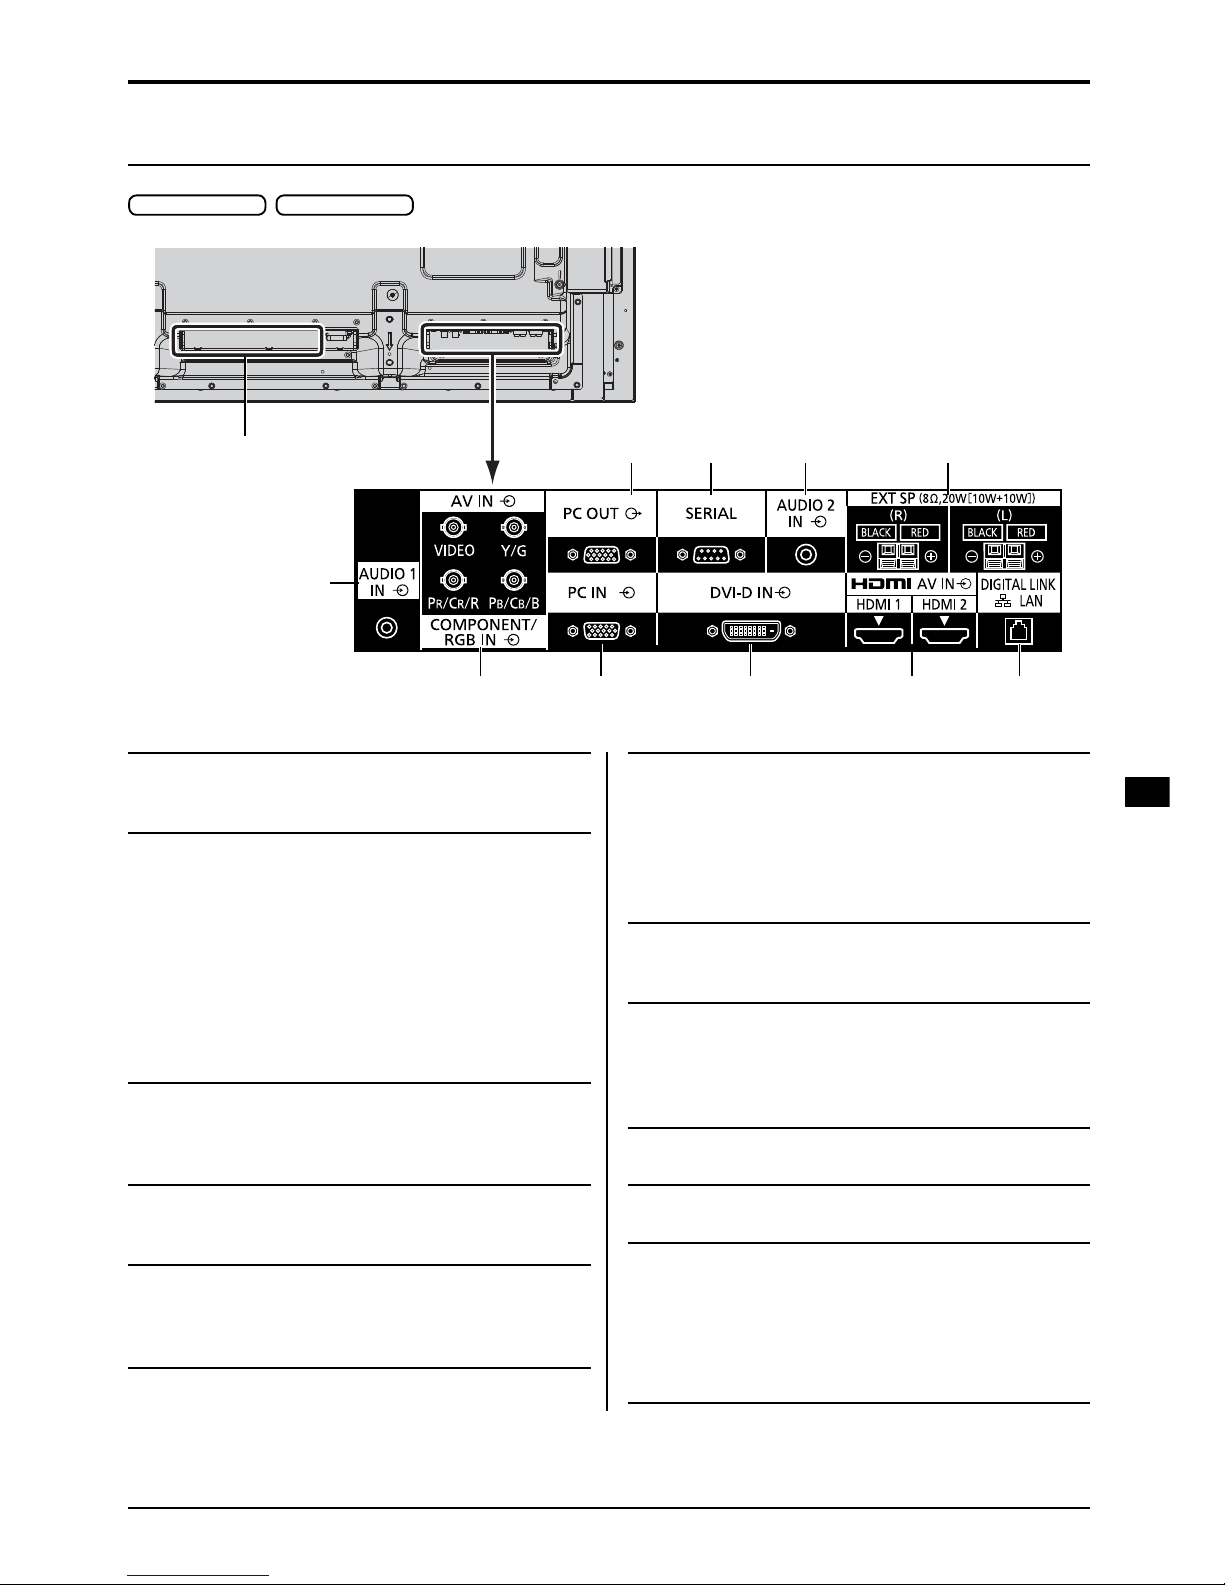
11
1
32 4 5 6
8 7 9 10
1 AUDIO 1 IN : Audio Input Terminal shared
with COMPONENT/RGB IN and
VIDEO IN
2
COMPONENT/
RGB/VIDEO IN :
COMPONENT / RGB Video
Input Terminal (P
R/CR
/R, PB/
C
B
/B, Y/G)
Connect to video equipment
with “YP
BPR
/ YCBCR” or “RGB”
output.
AV IN : Composite Video Input
Terminal (VIDEO)
Connect to video equipment
with Composite signal output.
3 PC IN : PC Input Terminal
Connect to video terminal of PC,
video equipment with “YP
BPR
/
YC
BCR
” or “RGB” output.
4 DVI-D IN : DVI-D Input Terminal
Connect to video equipment
with DVI-D output.
5
AV IN
(HDMI 1, HDMI 2) :
HDMI Input Terminal
Connect to video equipment
such as VCR or DVD player,
etc.
6 DIGITAL LINK /
LAN :
DIGITAL LINK Input Terminal
Control the Display by
connecting to Network.
Alternatively, connect to a
device that sends video and
audio signals via the DIGITAL
LINK terminal.
7 SERIAL : SERIAL Input Terminal
Control the Display by
connecting to PC.
8 PC OUT : Monitor Out Terminal
Video signals being reproduced
on the display are output to
another sub monitor as PC
video signals.
9 AUDIO 2 IN : Audio input terminal shared
with DVI-D IN and PC IN
10 EXT SP : Speaker Terminal
Connect to external speaker.
11 SLOT : Expansion slot
(see page 6)
Note: The right side slot is for terminal board with
2-slot width. The terminal board with 1-slot
width does not function when installed in the
right side slot.
Video equipment connection
50-inch model 65-inch model
Page 22
22
Connections
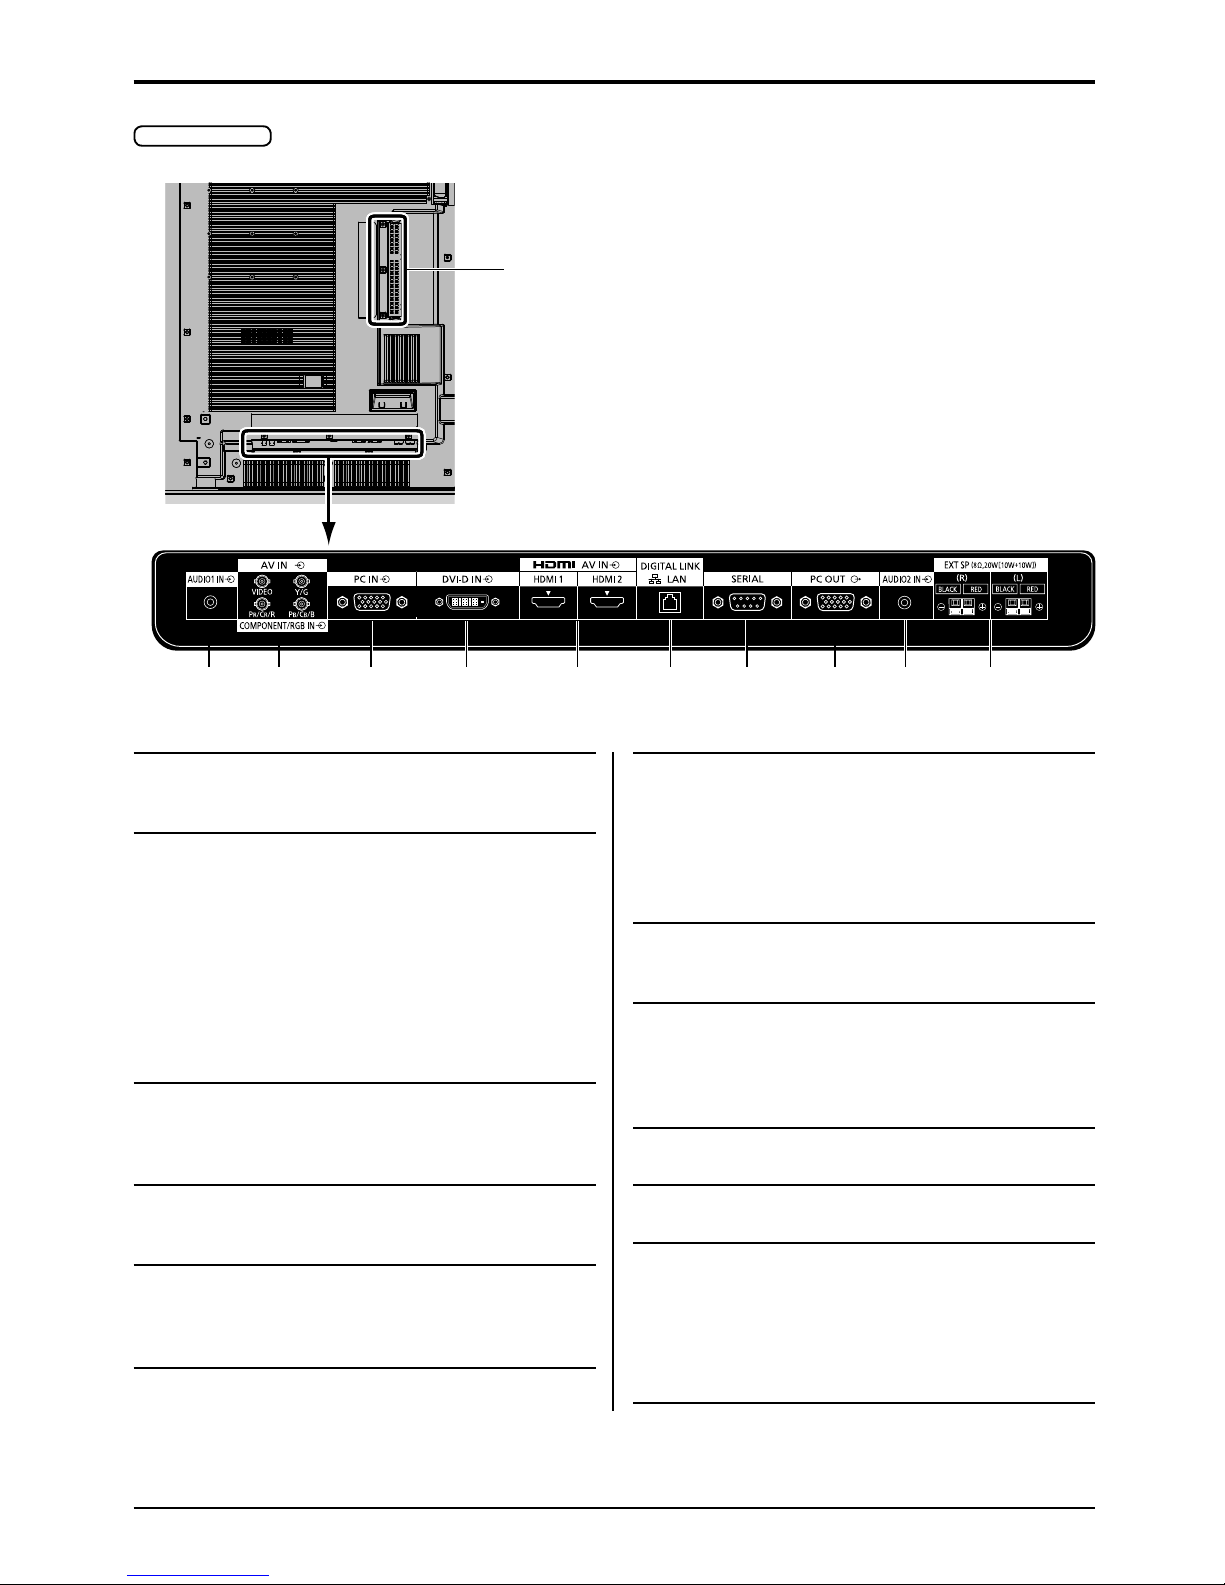
1 AUDIO 1 IN : Audio Input Terminal shared
with COMPONENT/RGB IN and
VIDEO IN
2
COMPONENT/
RGB/VIDEO IN :
COMPONENT / RGB Video
Input Terminal (P
R/CR
/R, PB/
C
B
/B, Y/G)
Connect to video equipment
with “YP
BPR
/ YCBCR” or “RGB”
output.
AV IN : Composite Video Input
Terminal (VIDEO)
Connect to video equipment
with Composite signal output.
3 PC IN : PC Input Terminal
Connect to video terminal of PC,
video equipment with “YP
BPR
/
YC
BCR
” or “RGB” output.
4 DVI-D IN : DVI-D Input Terminal
Connect to video equipment
with DVI-D output.
5
AV IN
(HDMI 1, HDMI 2) :
HDMI Input Terminal
Connect to video equipment
such as VCR or DVD player,
etc.
6 DIGITAL LINK /
LAN :
DIGITAL LINK Input Terminal
Control the Display by
connecting to Network.
Alternatively, connect to a
device that sends video and
audio signals via the DIGITAL
LINK terminal.
7 SERIAL : SERIAL Input Terminal
Control the Display by
connecting to PC.
8 PC OUT : Monitor Out Terminal
Video signals being reproduced
on the display are output to
another sub monitor as PC
video signals.
9 AUDIO 2 IN : Audio input terminal shared
with DVI-D IN and PC IN
10 EXT SP : Speaker Terminal
Connect to external speaker.
11 SLOT : Expansion slot
(see page 6)
Note: The upper side slot is for terminal board
with 2-slot width. The terminal board with
1-slot width does not function when installed
in the upper side slot.
321 4 5 6 7 8 9 10
11
80-inch model
Page 23

23
Connections
Before connecting
●Before connecting cables, carefully read the operating instructions for the external device to be connected.
●Turn off the power of all devices before connecting cables.
●Take note of the following points before connecting the cables. Failure to do so may result in malfunctions.
•
When connecting a cable to the unit or a device connected to the unit itself, touch any nearby metallic objects to
eliminate static electricity from your body before performing work.
•
Do not use unnecessarily long cables to connect a device to the unit or to the unit body. The longer the cable,
the more susceptible to noise it becomes. Since using a cable while it is wound makes it act like an antenna, it is
more susceptible to noise.
•
When connecting cables, connect GND first, then insert the connecting terminal of the connecting device in a
straight manner.
●Acquire any connection cable necessary to connect the external device to the system that is neither supplied with
the device nor available as an option.
●If the outer shape of the plug of a connection cable is large, it may come in contact with the periphery such as a
back cover or the plug of an adjacent connection cable. Use a connection cable with the suitable plug size for the
terminal alignment.
●If video signals from video equipment contain too much jitter, the images on the screen may wobble. In this case,
a time base corrector (TBC) must be connected.
●When the sync signals output form PC or video equipment are disturbed, for example, when changing settings of
video output, the colour of the video may be disturbed temporarily.
●The unit accepts Composite video signals, YCBCR/YPBPR signals, analogue RGB signals and digital signals.
●Some PC models are not compatible with the unit.
●Use cable compensator when you connect devices to the unit using long cables. Otherwise the image may not
display properly.
Page 24
24
Power On / Off
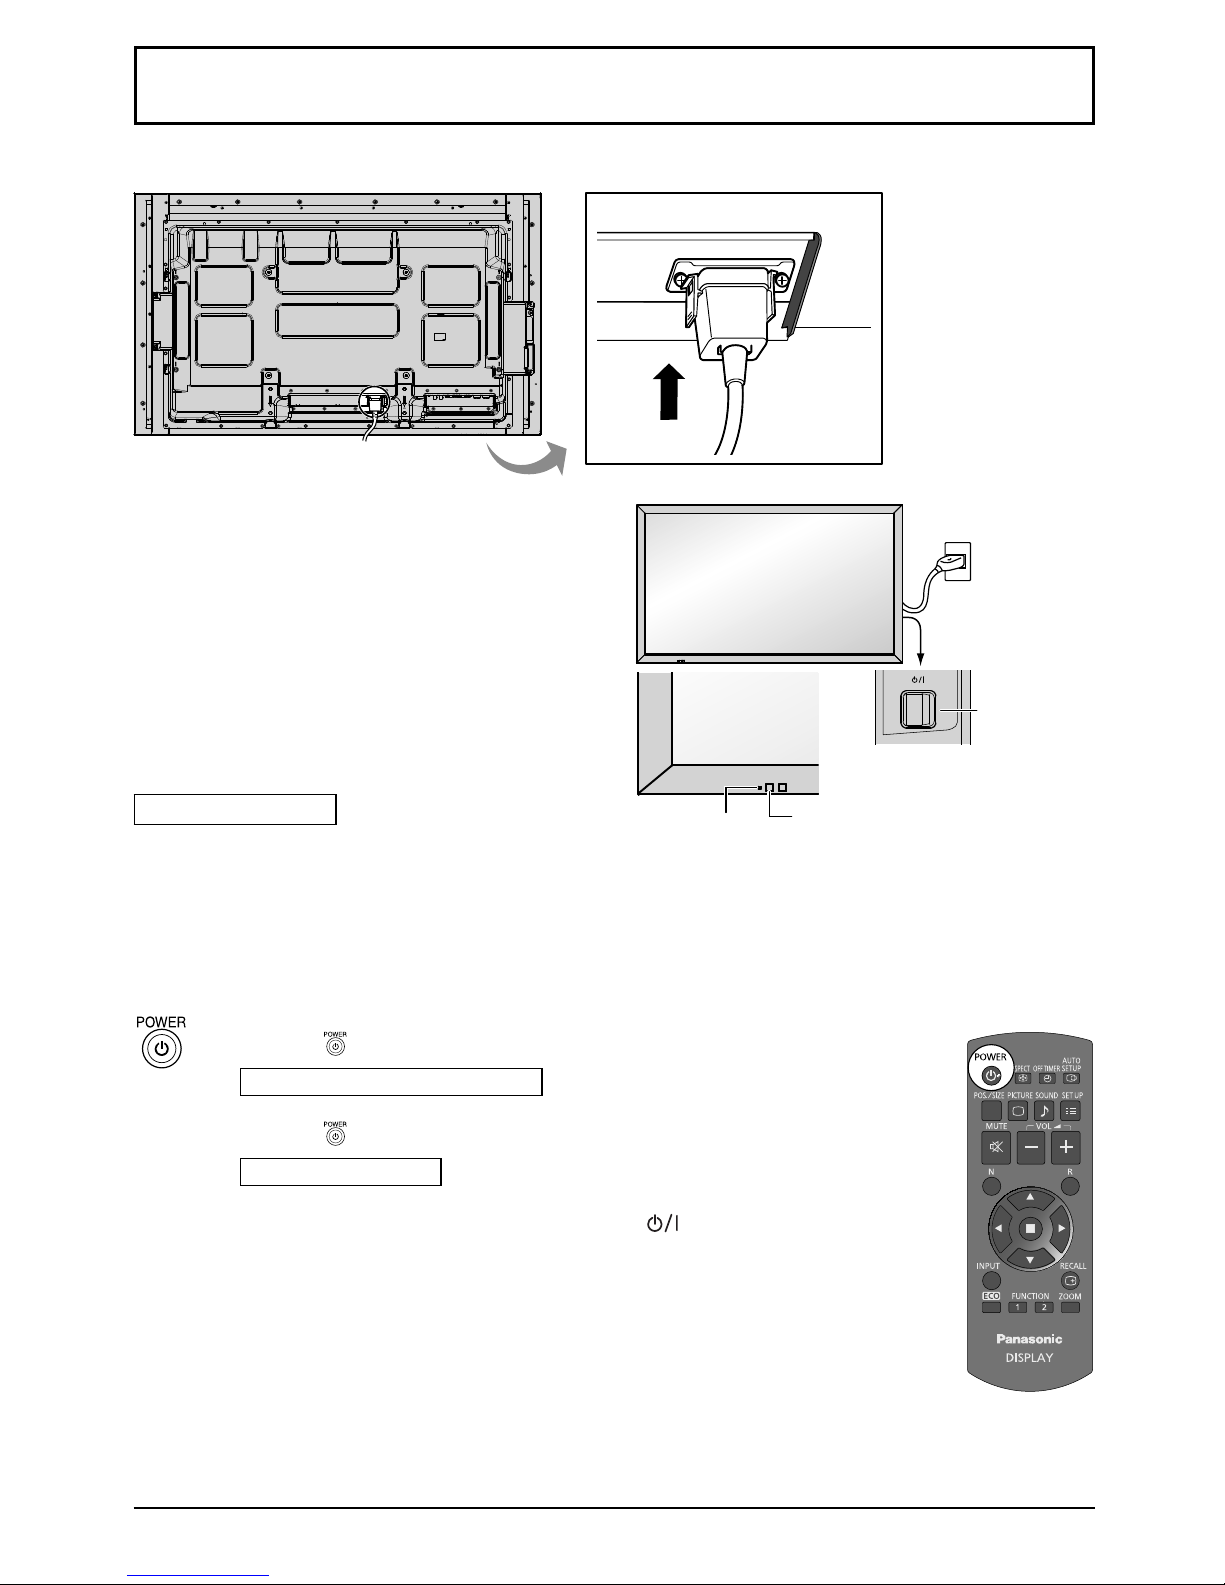
Press the button on the remote control to turn the Display off.
Power Indicator: Orange or purple
Press the button on the remote control to turn the Display on.
Power Indicator: Blue
Turn the power to the Display off by pressing the switch on the unit,
when the Display is on or in standby mode.
Notes:
•
Operate pointing the remote control directly at the unit’s Remote Control
Sensor.
•
During operation of the power management function, the power indicator
turns purple in the power off state.
Connecting the plug to the Wall Outlet
Notes:
•
Main plug types vary between countries. The
power plug shown at right may, therefore, not be
the type fitted to your set.
•
When disconnecting the AC cord, be absolutely
sure to disconnect the AC cord plug at the socket
outlet first.
Press the Power switch on the Display to turn the
set on: Power-On.
Power Indicator: Blue
[Starting up the touch screen and network]
It takes some time for the touch screen and network
to start up just after the power is turned on.
During that time, “Touch screen settings”, “Network
settings” in the “Setup” menu is grayed out and
cannot be set.
Connecting the AC cord plug to the Display.
Power switch
Power Indicator
Remote Control Sensor
Page 25
25
Power On / Off
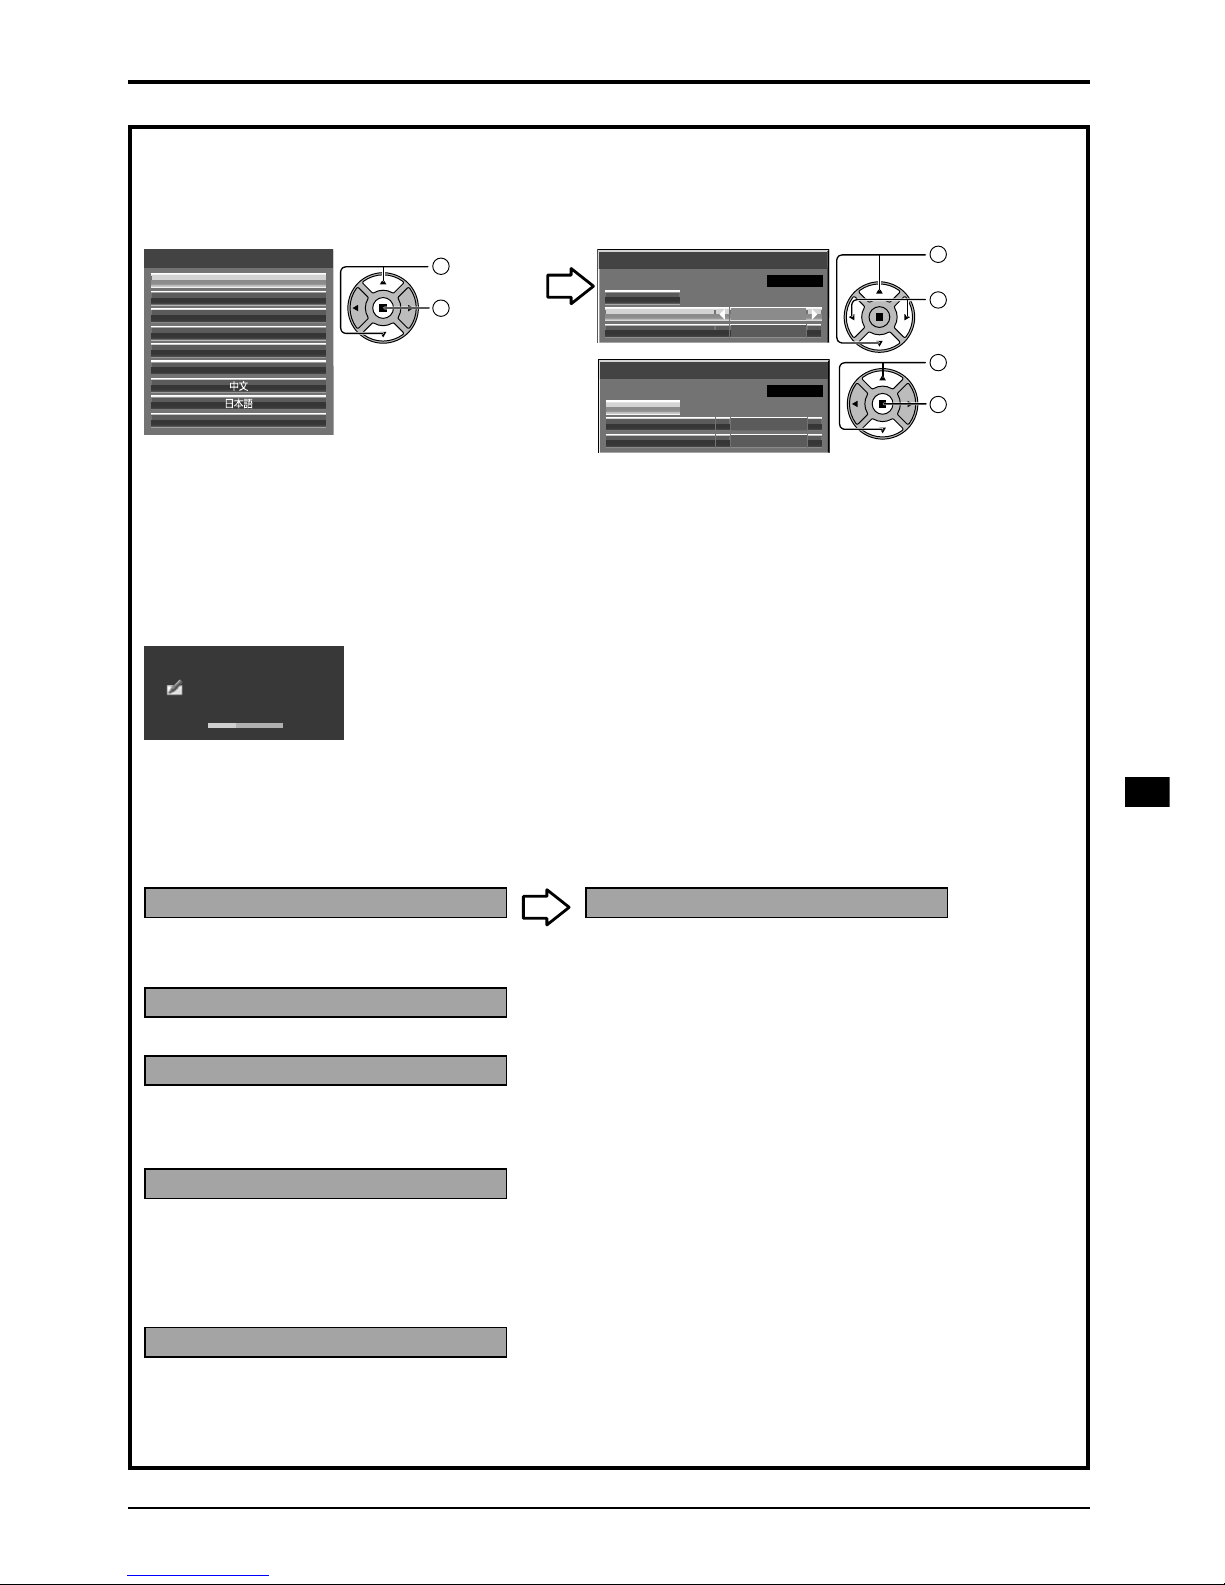
When first switching on the unit
Following screen will be displayed when the unit is turned on for the first time.
Use the remote control to make the settings. Pressing the buttons on the main unit or multi-touch operation will not work.
Set
Day
MON
Day/Time settings
Time MON 99:99
99:99Time
Set
Day
TUE
18:00Time
Day/Time settings
Time TUE 99:99
OSD language
English (UK)
Deutsch
Français
Italiano
Español
ENGLISH (US)
Ɋɭɫɫɤɢɣ
OSD language
Day/Time settings
1
Select the
language.
2
Set.
1
Select “Day”
or “Time”.
2
Setup “Day”
or “Time”.
1
Select “Set”.
2
Set.
Notes:
•
Once the items are set, the screens won’t be displayed when switching on the unit next time.
•
After the setting, the items can be changed in the following menus.
OSD language
Day/Time settings
Power ON message
The following message may be displayed when turning the unit power ON:
WhiteBoard Startup screen
Now Loading...
WhiteBoard
When the power is turned ON with the Input switch of the WHITEBOARD, the built-in WhiteBoard starts up.
Also, the following startup screens are displayed depending on the input.
MIRRORING
MEMORY VIEWER
Touch screen connection status display
When not connected to a computer via USB
Initializing Touch Screen... Touch Screen detected.
Touch operation of the display is possible after this
message appears.
When connected to a computer via USB
Touch Screen connected to external device.
No activity power off Precautions
’No activity power off’ is enabled.
If “No activity power off” in Setup menu is set to “Enable”, a warning message is displayed every time the power
is turned ON.
Power Management Information
Last turn off due to ‘Power management’.
If “Power management” is functioned, an information message is displayed every time the power is turned ON.
These message displays can be set with the following menu: Options menu
Power on message (No activity power off)
Power on message (Power management)
COLOR UNIVERSAL DESIGN Information
’COLOR UNIVERSAL DESIGN’ is enabled.
The information is displayed when “Setup” - “COLOR UNIVERSAL DESIGN” is set to “On”.
About COLOR UNIVERSAL DESIGN (CUD)
Color Universal Design is a design made in consideration of colorations to allow information to be accurately conveyed
to people who see color differently from ordinary people (congenital color weakness, senile cataract, glaucoma, etc.).
Page 26
26
Basic Controls
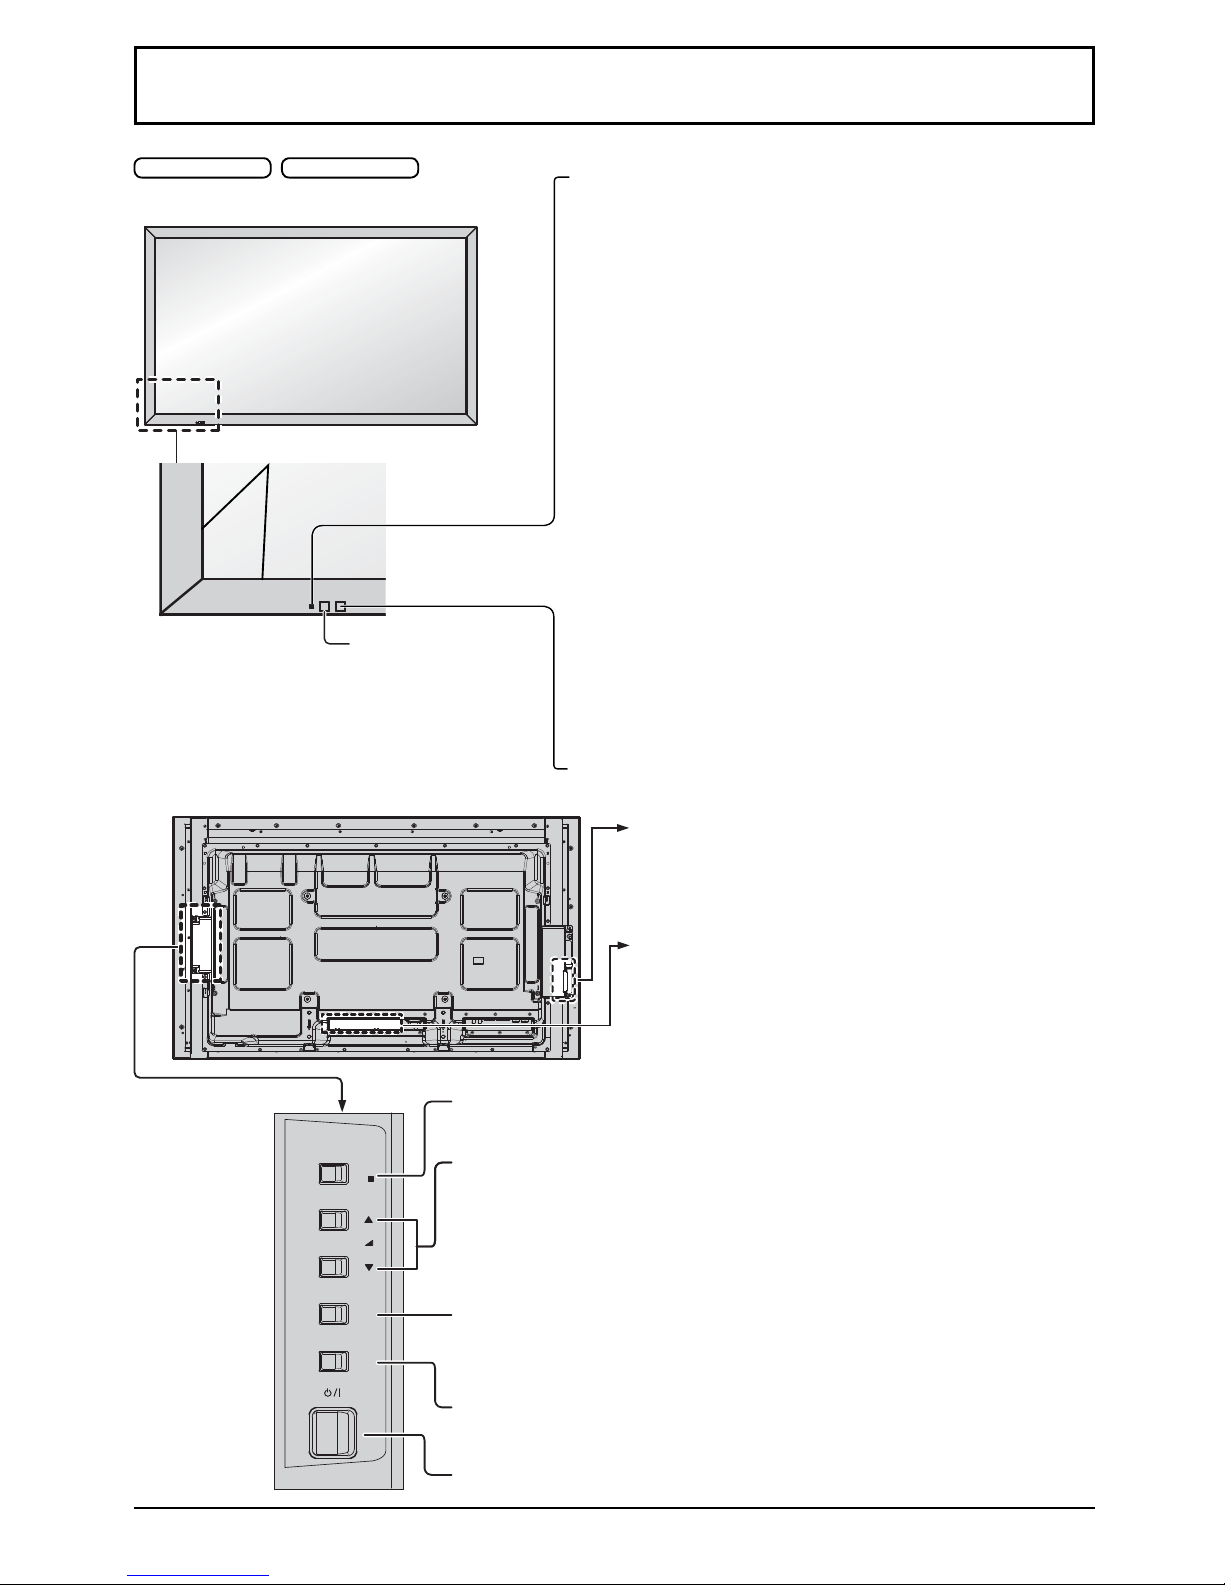
Brightness Sensor
Detects the brightness in the viewing environment.
Main Unit
Power Indicator
The Power Indicator will light.
•
Power-OFF ...
Indicator not illuminated (The unit will still
consume some power as long as the power
cord is still inserted into the wall outlet.)
•
Standby .... Orange
Purple (When “Slot power” is set to “On” and
Terminal Board is installed.
Purple (Depending on the type of the function
board installed, when the power is supplied to
the slot.)
Purple (When “Network control” is set to “On” or
“Wireless network standby” is set to “On”. Refer
to “Operating Instructions, Network Operations”)
Purple (When “Quick launch” is set to “On”.)
•
Power-ON
... Blue
•
HDMI1 power management
HDMI2 power management
.................Purple (With HDMI1 or HDMI2 input signal.)
These functions are not supported by TH-80BF1E, TH-65BF1E, TH-50BF1E.
•
PC power management (DPMS)
.................Purple (With PC input signal.)
•
DVI-D power management
.................Purple (With DVI input signal.)
Notes:
•
If the power indicator is Purple, power consumption during standby
is generally larger than that of when the power indicator is orange.
•
Considering COLOR UNIVERSAL DESIGN, purple lights up
brighter than blue.
About COLOR UNIVERSAL DESIGN (CUD)
INPUT
MENU
VOL
ENTER/
+
/
-
/
MENU Screen ON / OFF
Each time the MENU button is pressed, the menu screen will switch.
Volume Adjustment
Volume Up “+” Down “–”
When the menu screen is displayed:
“+” : press to move the cursor up
“–” :
press to move the cursor down
Main Power On / Off Switch
Enter / Aspect button
INPUT button (INPUT signal selection)
SLOT: Terminal board (optional accessories) insert slot
(see page 6)
Note:
The right side slot is for terminal board with 2-slot width.
The terminal board with 1-slot width does not function
when installed in the right side slot.
USB (VIEWER): Connect to USB memory.
USB (TOUCH): When using the “WhiteBoard Software”
from the supplied CD-ROM, connect the
computer via USB cable.
Remote control
sensor
Touch panel IR transmission part
Installed on the four sides of the liquid crystal panel.
50-inch model 65-inch model
Page 27
27
Basic Controls
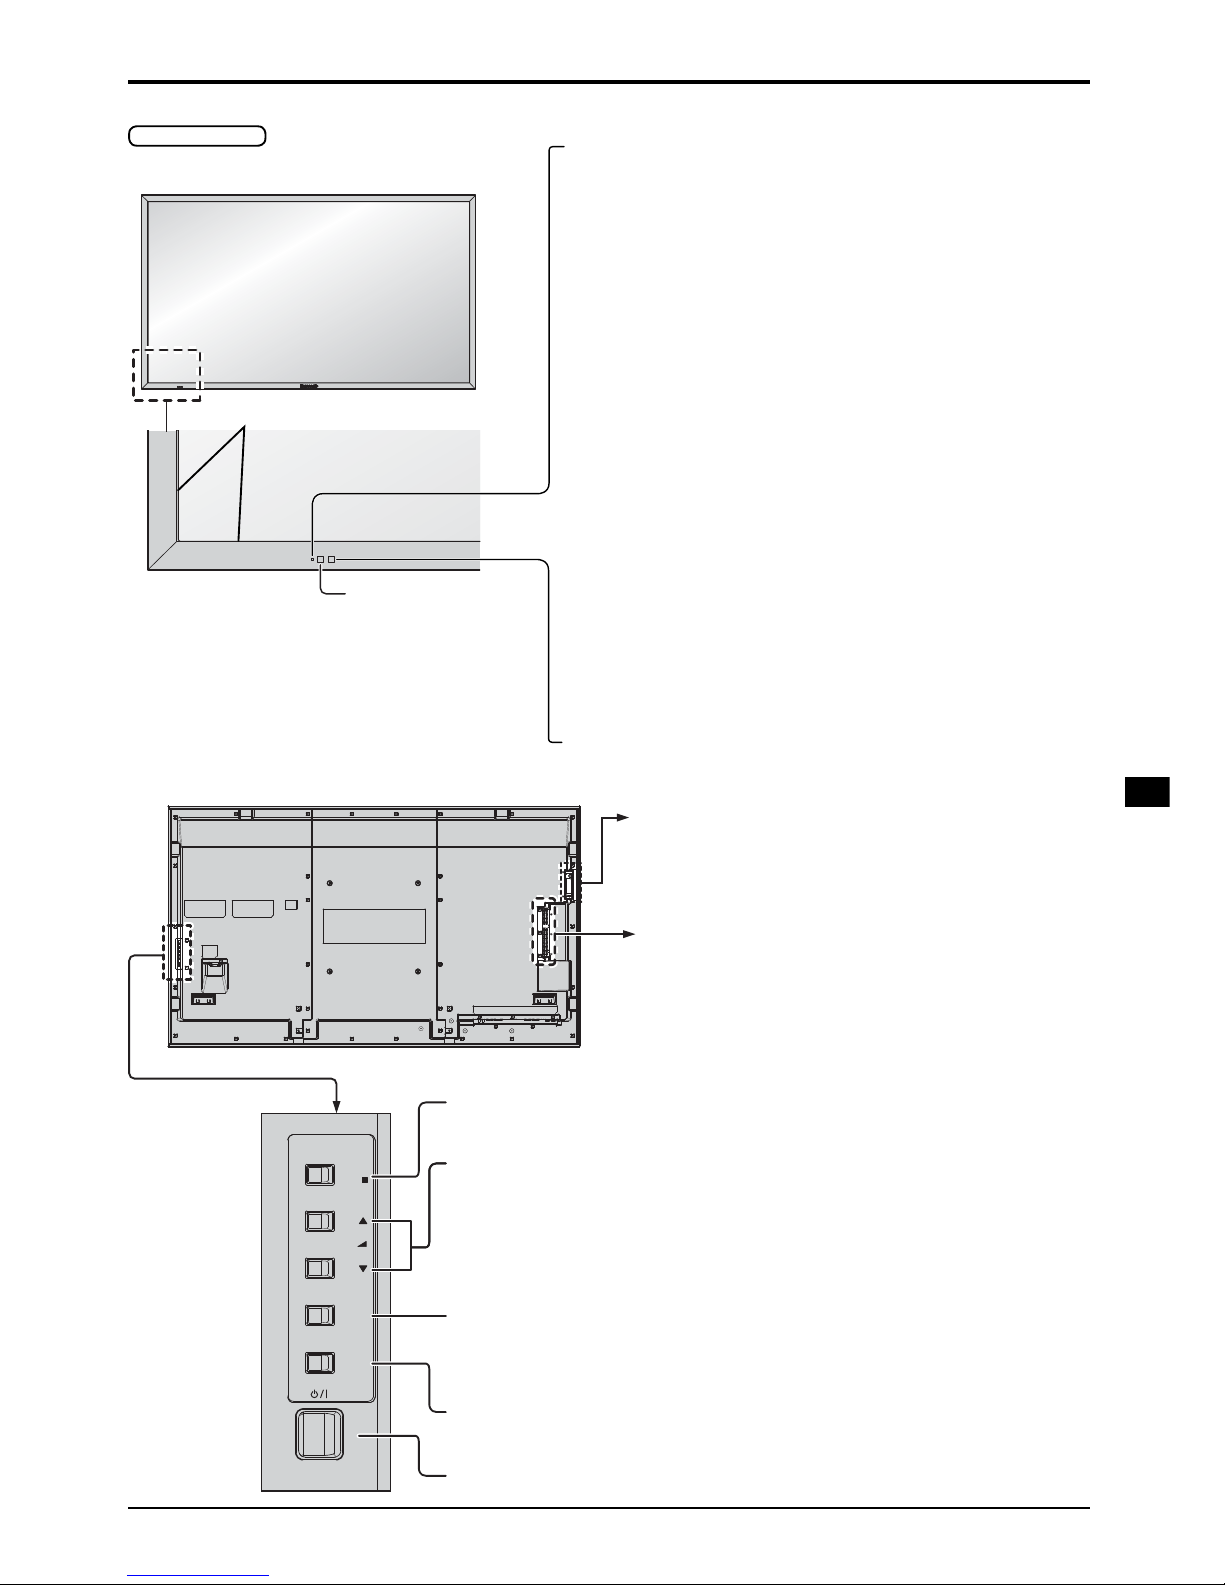
Brightness Sensor
Detects the brightness in the viewing environment.
Main Unit
Power Indicator
The Power Indicator will light.
•
Power-OFF
... Indicator not illuminated (The unit will still
consume some power as long as the power
cord is still inserted into the wall outlet.)
•
Standby .... Orange
Purple (When “Slot power” is set to “On” and
Terminal Board is installed.
Purple (Depending on the type of the function
board installed, when the power is supplied to
the slot.)
Purple (When “Network control” is set to “On” or
“Wireless network standby” is set to “On”. Refer
to “Operating Instructions, Network Operations”)
Purple (When “Quick launch” is set to “On”.)
•
Power-ON
... Blue
•
HDMI1 power management
HDMI2 power management
.................Purple (With HDMI1 or HDMI2 input signal.)
These functions are not supported by TH-80BF1E, TH-65BF1E, TH-50BF1E.
•
PC power management (DPMS)
.................Purple (With PC input signal.)
•
DVI-D power management
.................Purple (With DVI input signal.)
Notes:
•
If the power indicator is purple, power consumption during standby
is generally larger than that of when the power indicator is orange.
•
Considering COLOR UNIVERSAL DESIGN, purple lights up
brighter than blue.
About COLOR UNIVERSAL DESIGN (CUD)
INPUT
MENU
VOL
ENTER/
+
/
-
/
MENU Screen ON / OFF
Each time the MENU button is pressed, the menu screen will switch.
Volume Adjustment
Volume Up “+” Down “–”
When the menu screen is displayed:
“+” : press to move the cursor up
“–” : press to move the cursor down
Main Power On / Off Switch
Enter / Aspect button
INPUT button (INPUT signal selection)
SLOT: Terminal board (optional accessories) insert
slot (see page 6)
Note:
The upper side slot is for terminal board with 2-slot
width. The terminal board with 1-slot width does not
function when installed in the upper side slot.
USB (VIEWER): Connect to USB memory.
USB (TOUCH): When using the “WhiteBoard
Software” from the supplied CD-ROM,
connect the computer via USB cable.
Remote control
sensor
Touch panel IR transmission part
Installed on the four sides of the liquid crystal panel.
80-inch model
Page 28
28
Basic Controls
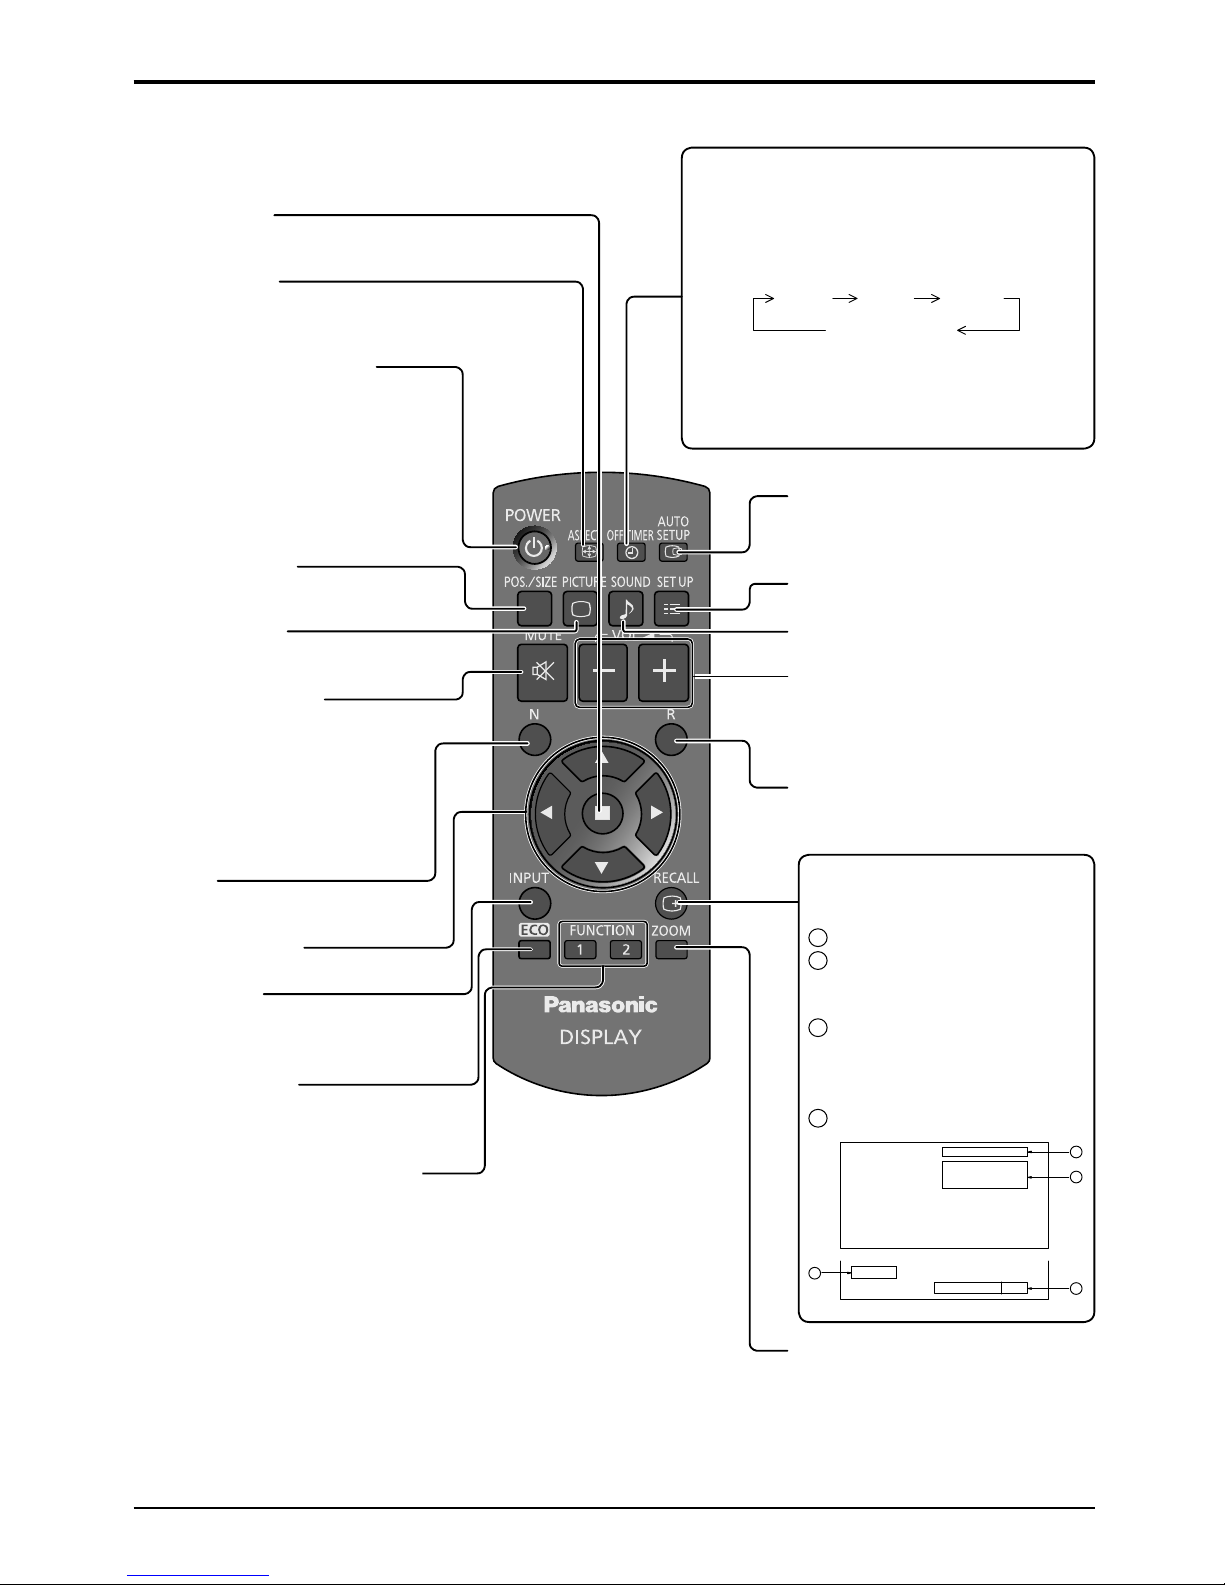
Remote Control Transmitter
Digital Zoom
Standby (ON / OFF) button
The Display must first be plugged
into the wall outlet and turned on at
the power switch (see page 24).
Press this button to turn the Display
On, from Standby mode. Press
it again to turn the Display Off to
Standby mode.
ACTION button
Press to make selections.
ASPECT button
Press to adjust the aspect.
POS./SIZE button
PICTURE button
Sound mute On / Off
Press this button to mute the
sound.
Press again to reactivate sound.
Sound is also reactivated when
power is turned off or volume level
is changed.
N button
POSITION buttons
INPUT button
Press to select Input signal
sequentially.
ECO MODE (ECO)
Press to change the ECO MODE
setup status.
FUNCTION buttons (FUNCTION)
AUTO SETUP button
Automatically adjusts the position/
size of the screen.
SET UP button
SOUND button
Volume Adjustment
Press the Volume Up “+” or Down
“–” button to increase or decrease
the sound volume level.
R button
Press the R button to return to
previous menu screen.
OFF TIMER button
The Display can be preset to switch to
stand-by after a fixed period. The setting
changes to 30 minutes, 60 minutes, 90 minutes
and 0 minutes (off timer cancelled) each time
the button is pressed.
30 min 60 min
0 min (Cancel)
90 min
When three minutes remain, “Off timer 3 min”
will flash.
The off timer is cancelled if a power interruption
occurs.
RECALL button
Press the “RECALL” button to
display the current system status.
1
Input label
2
Aspect mode
Audio input
Profile name
3
Off timer
The off timer indicator is
displayed only when the off
timer has been set.
4
Clock display
1
2
PC
4:3
♪ COMPONENT
Memory name: MEMORY2
Off timer
90min
3
4
10:00
Page 29
29
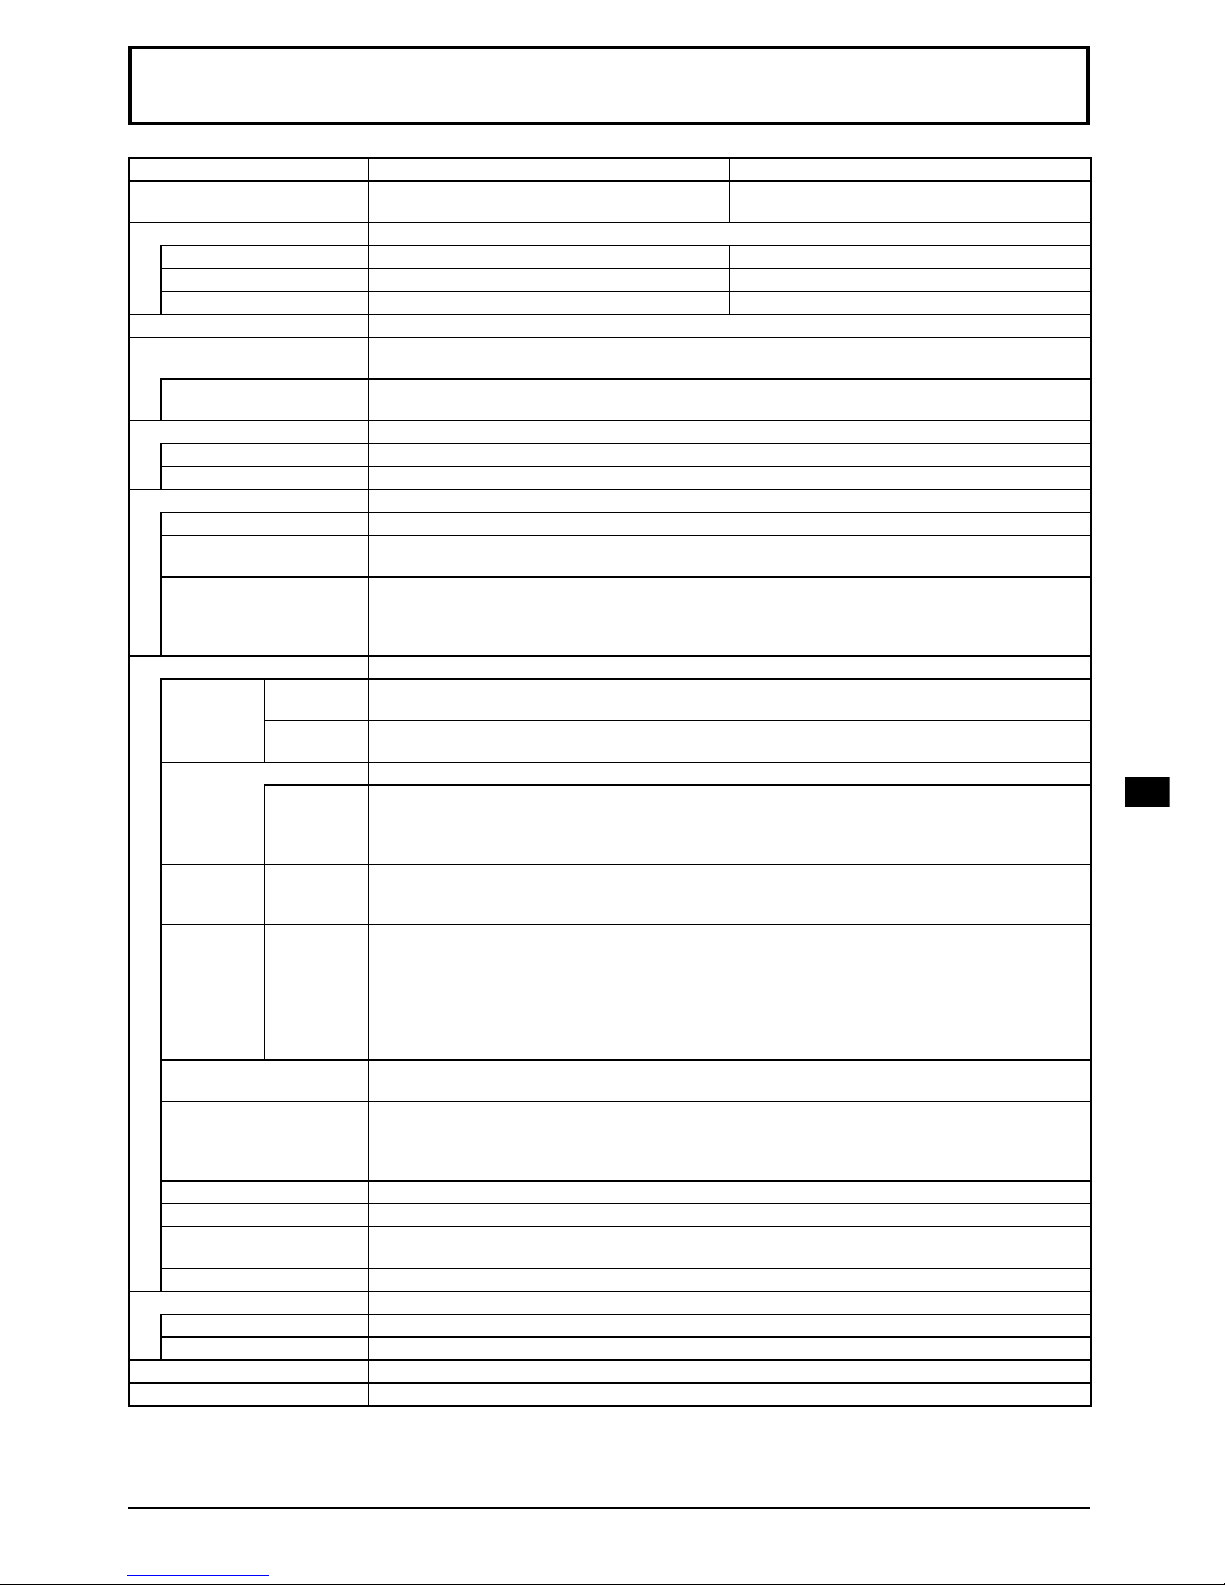
Specifications
TH-80BF1U TH-80BF1E / TH-80BF1W
Power Source 110 - 127 V ~ (110 - 127 V alternating current),
50/60Hz
220 - 240 V ~ (220 - 240 V alternating current),
50/60Hz
Power Consumption
Power on 350 W 350 W
Stand-by condition 0.5 W 0.5 W
Power off condition 0.3 W 0.3 W
LCD Display panel 80-inch VA panel (LED backlight), 16:9 aspect ratio
Screen size 1,771 mm (W) × 996 mm (H) × 2,032 mm (diagonal) /
69.7” (W) × 39.2” (H) × 80.0” (diagonal)
(No.of pixels) 2,073,600 (1,920 (W) ×1,080 (H))
[5,760 × 1,080 dots]
Operating condition
Temperature 32 °F - 104 °F (0 °C - 40 °C)
Humidity 20 % - 80 % (no condensation)
Applicable signals
Colour System NTSC, PAL, PAL60, SECAM, Modified NTSC
Scanning format 525 (480) / 60i · 60p, 625 (575) / 50i · 50p, 750 (720) / 60p · 50p, 1125 (1080) / 60i · 60p · 50i ·
50p · 24p · 25p · 30p · 24psF, 1250 (1080) / 50i
PC signals VGA, SVGA, XGA, SXGA
UXGA ···· (compressed)
Horizontal scanning frequency 15 - 110 kHz
Vertical scanning frequency 48 - 120 Hz
Connection terminals
AV IN VIDEO
AUDIO 1 IN
BNC
Stereo mini jack (M3) × 1
1.0 Vp-p (75 Ω)
0.5 Vrms, Shared with COMPONENT/RGB IN
HDMI 1
HDMI 2
TYPE A Connector × 2
COMPONENT/RGB IN
Y/G
PB/CB/B
PR/CR/R
AUDIO 1 IN
BNC
BNC
BNC
Stereo mini jack (M3) × 1
with sync 1.0 Vp-p (75 Ω)
0.7 Vp-p (75 Ω)
0.7 Vp-p (75 Ω)
0.5 Vrms, Shared with VIDEO
DVI-D IN
AUDIO 2 IN
DVI-D 24 Pin
Content Protection
Stereo mini jack (M3) × 1
Compliance with DVI Revision 1.0
Compatible with HDCP 1.1
0.5 Vrms, Shared with PC IN
PC IN
AUDIO 2 IN
High-Density Mini D-sub 15 Pin
Stereo mini jack (M3) × 1
Y or G with sync 1.0 Vp-p (75 Ω)
Y or G without sync 0.7 Vp-p (75 Ω)
PB/CB/B: 0.7 Vp-p (75 Ω)
PR/CR/R: 0.7 Vp-p (75 Ω)
TTL high impedance, positive polarity /
negative polarity (automatic)
0.5 Vrms, Shared with DVI-D IN
SERIAL External Control Terminal
D-sub 9 Pin RS-232C compatible
PC OUT R: 0.7 Vp-p (75 Ω)
G: 0.7 Vp-p (75 Ω)
B: 0.7 Vp-p (75 Ω)
HD/VD: 1.0 - 5.0 Vp-p
USB (VIEWER) TYPE A USB connector
USB (TOUCH) TYPE B USB connector
DIGITAL LINK / LAN For RJ45 network and DIGITAL LINK connections, compatible with PJLink™
Communication method: RJ45 100BASE-TX
EXT SP 8 Ω, 20 W [10 W + 10 W] (10 % THD)
Sound
Speakers 120 mm × 40 mm × 2 pcs
Audio Output 20 W [10 W + 10 W] (10 % THD)
Dimensions (W × H × D) 1,868 mm × 1,093 mm × 104 mm / 73.6” × 43.1” × 4.1”
Mass (weight) approx. 81.0 kg / 178.6 lbs net
Page 30
30
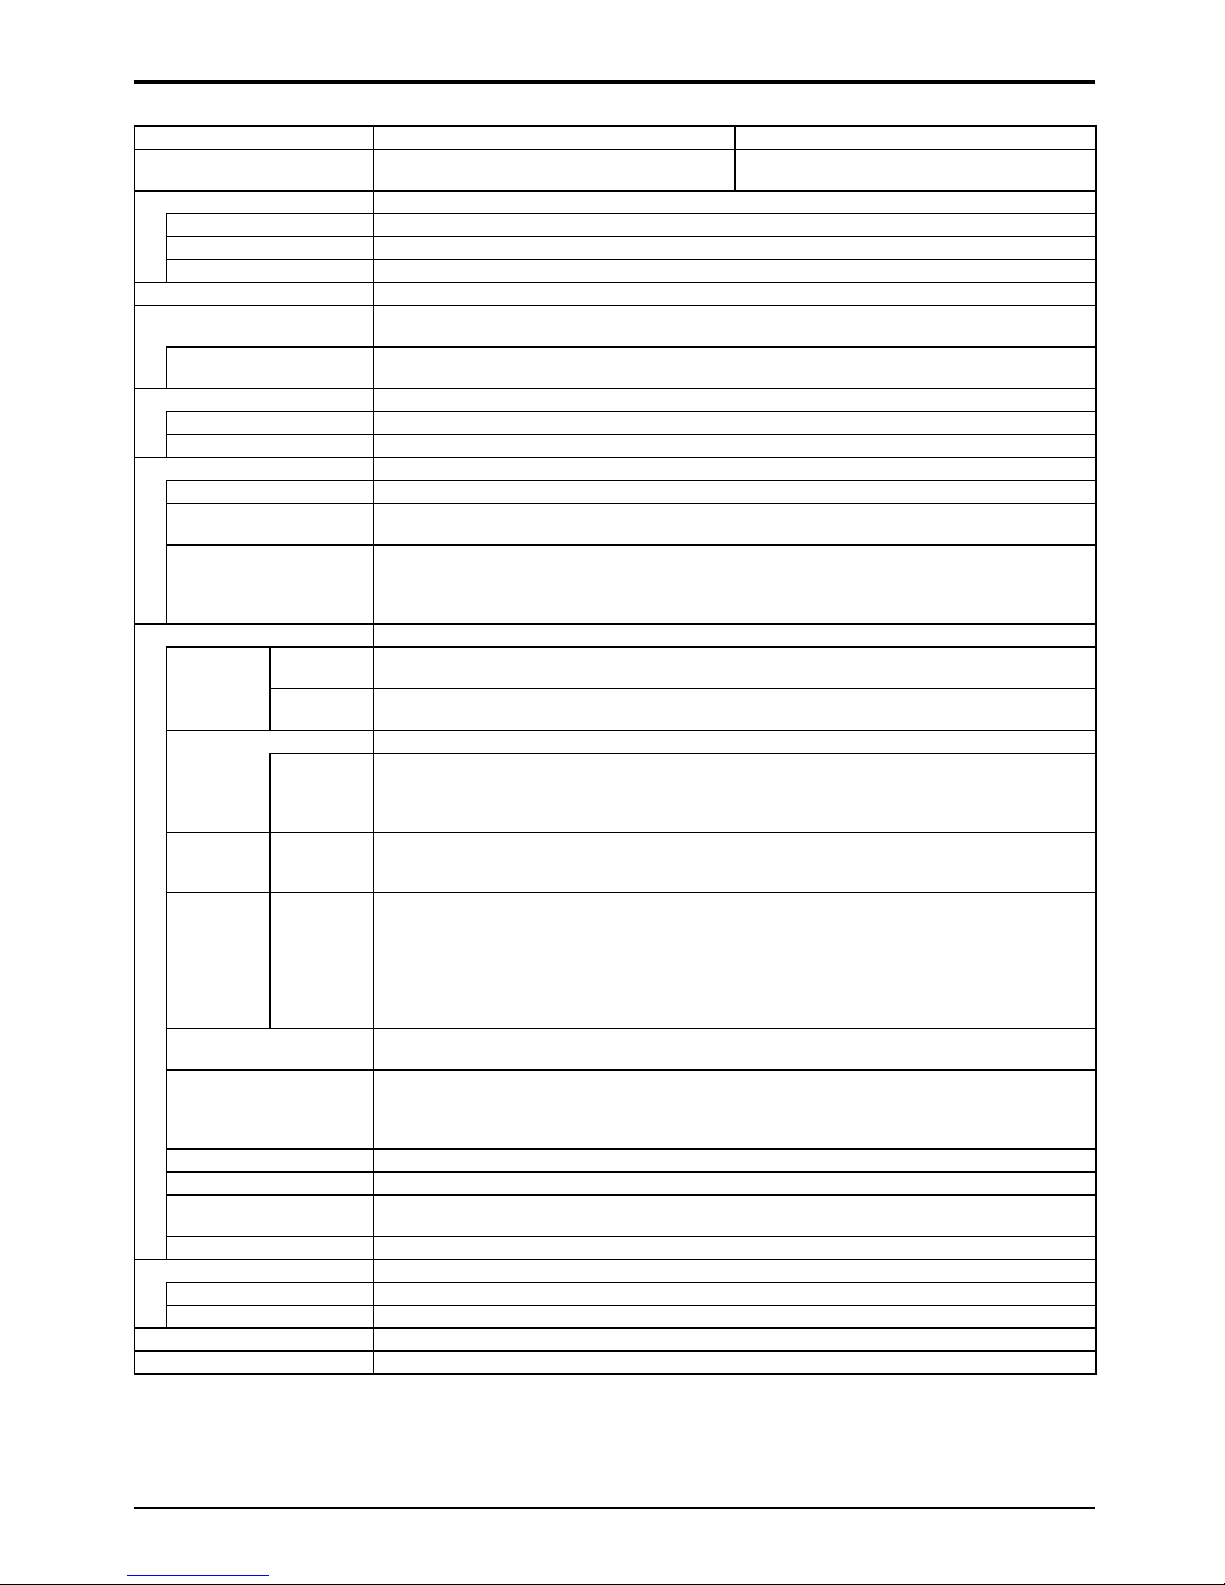
Specifications
TH-65BF1U TH-65BF1E / TH-65BF1W
Power Source 110 - 127 V ~ (110 - 127 V alternating current),
50/60Hz
220 - 240 V ~ (220 - 240 V alternating current),
50/60Hz
Power Consumption
Power on 215 W
Stand-by condition 0.5 W
Power off condition 0.3 W
LCD Display panel 65-inch VA panel (LED backlight), 16:9 aspect ratio
Screen size 1,428 mm (W) × 803 mm (H) × 1,638 mm (diagonal) /
56.2” (W) × 31.6” (H) × 64.5” (diagonal)
(No.of pixels) 2,073,600 (1,920 (W) ×1,080 (H))
[5,760 × 1,080 dots]
Operating condition
Temperature 32 °F - 104 °F (0 °C - 40 °C)
Humidity 20 % - 80 % (no condensation)
Applicable signals
Colour System NTSC, PAL, PAL60, SECAM, Modified NTSC
Scanning format 525 (480) / 60i · 60p, 625 (575) / 50i · 50p, 750 (720) / 60p · 50p, 1125 (1080) / 60i · 60p · 50i ·
50p · 24p · 25p · 30p · 24psF, 1250 (1080) / 50i
PC signals VGA, SVGA, XGA, SXGA
UXGA ···· (compressed)
Horizontal scanning frequency 15 - 110 kHz
Vertical scanning frequency 48 - 120 Hz
Connection terminals
AV IN VIDEO
AUDIO 1 IN
BNC
Stereo mini jack (M3) × 1
1.0 Vp-p (75 Ω)
0.5 Vrms, Shared with COMPONENT/RGB IN
HDMI 1
HDMI 2
TYPE A Connector × 2
COMPONENT/RGB IN
Y/G
PB/CB/B
PR/CR/R
AUDIO 1 IN
BNC
BNC
BNC
Stereo mini jack (M3) × 1
with sync 1.0 Vp-p (75 Ω)
0.7 Vp-p (75 Ω)
0.7 Vp-p (75 Ω)
0.5 Vrms, Shared with VIDEO
DVI-D IN
AUDIO 2 IN
DVI-D 24 Pin
Content Protection
Stereo mini jack (M3) × 1
Compliance with DVI Revision 1.0
Compatible with HDCP 1.1
0.5 Vrms, Shared with PC IN
PC IN
AUDIO 2 IN
High-Density Mini D-sub 15 Pin
Stereo mini jack (M3) × 1
Y or G with sync 1.0 Vp-p (75 Ω)
Y or G without sync 0.7 Vp-p (75 Ω)
PB/CB/B: 0.7 Vp-p (75 Ω)
PR/CR/R: 0.7 Vp-p (75 Ω)
TTL high impedance, positive polarity /
negative polarity (automatic)
0.5 Vrms, Shared with DVI-D IN
SERIAL External Control Terminal
D-sub 9 Pin RS-232C compatible
PC OUT R: 0.7 Vp-p (75 Ω)
G: 0.7 Vp-p (75 Ω)
B: 0.7 Vp-p (75 Ω)
HD/VD: 1.0 - 5.0 Vp-p
USB (VIEWER) TYPE A USB connector
USB (TOUCH) TYPE B USB connector
DIGITAL LINK / LAN For RJ45 network and DIGITAL LINK connections, compatible with PJLink™
Communication method: RJ45 100BASE-TX
EXT SP 8 Ω, 20 W [10 W + 10 W] (10 % THD)
Sound
Speakers 120 mm × 40 mm × 2 pcs
Audio Output 20 W [10 W + 10 W] (10 % THD)
Dimensions (W × H × D) 1,517 mm × 892 mm × 108 mm / 59.8” × 35.2” × 4.3”
Mass (weight) approx. 58.0 kg / 127.9 lbs net
Page 31
31
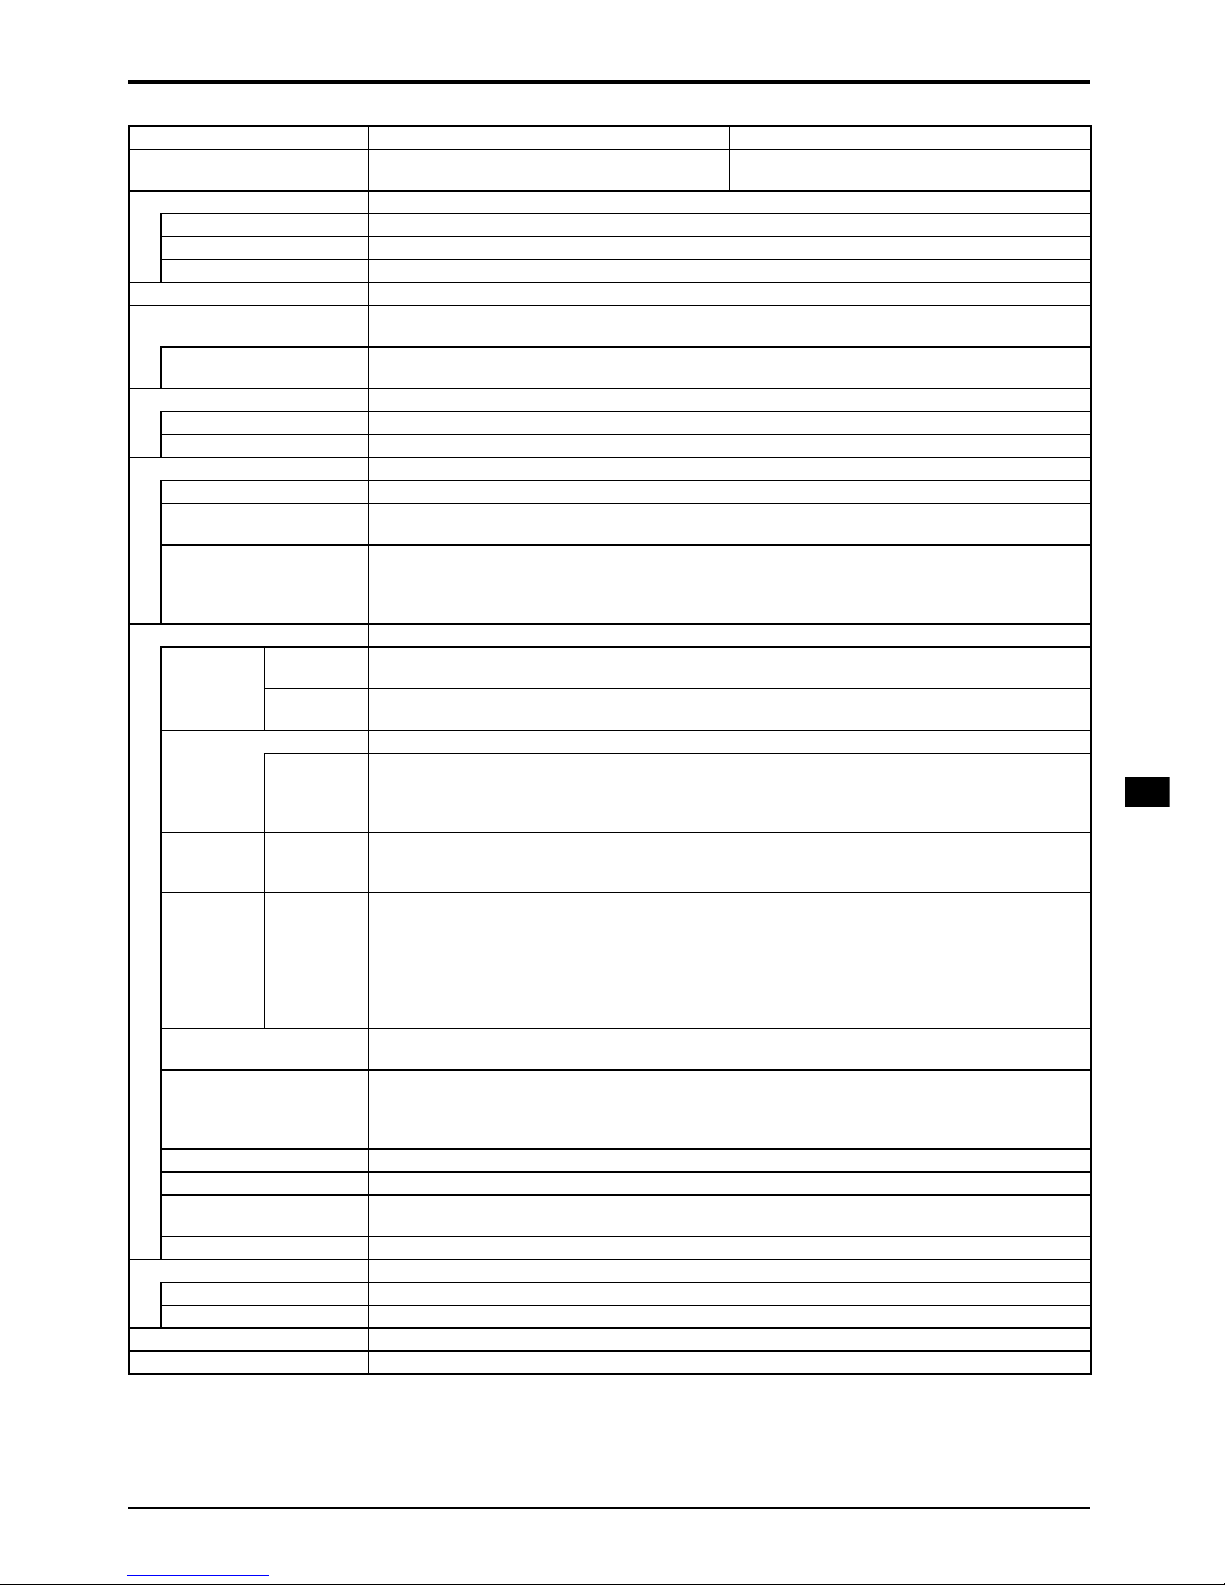
Specifications
TH-50BF1U TH-50BF1E / TH-50BF1W
Power Source 110 - 127 V ~ (110 - 127 V alternating current),
50/60Hz
220 - 240 V ~ (220 - 240 V alternating current),
50/60Hz
Power Consumption
Power on 140 W
Stand-by condition 0.5 W
Power off condition 0.3 W
LCD Display panel 50-inch VA panel (LED backlight), 16:9 aspect ratio
Screen size 1,095 mm (W) × 616 mm (H) × 1,257 mm (diagonal) /
43.1” (W) × 24.2” (H) × 49.5” (diagonal) /
(No.of pixels) 2,073,600 (1,920 (W) ×1,080 (H))
[5,760 × 1,080 dots]
Operating condition
Temperature 32 °F - 104 °F (0 °C - 40 °C)
Humidity 20 % - 80 % (no condensation)
Applicable signals
Colour System NTSC, PAL, PAL60, SECAM, Modified NTSC
Scanning format 525 (480) / 60i · 60p, 625 (575) / 50i · 50p, 750 (720) / 60p · 50p, 1125 (1080) / 60i · 60p · 50i ·
50p · 24p · 25p · 30p · 24psF, 1250 (1080) / 50i
PC signals VGA, SVGA, XGA, SXGA
UXGA ···· (compressed)
Horizontal scanning frequency 15 - 110 kHz
Vertical scanning frequency 48 - 120 Hz
Connection terminals
AV IN VIDEO
AUDIO 1 IN
BNC
Stereo mini jack (M3) × 1
1.0 Vp-p (75 Ω)
0.5 Vrms, Shared with COMPONENT/RGB IN
HDMI 1
HDMI 2
TYPE A Connector × 2
COMPONENT/RGB IN
Y/G
PB/CB/B
PR/CR/R
AUDIO 1 IN
BNC
BNC
BNC
Stereo mini jack (M3) × 1
with sync 1.0 Vp-p (75 Ω)
0.7 Vp-p (75 Ω)
0.7 Vp-p (75 Ω)
0.5 Vrms, Shared with VIDEO
DVI-D IN
AUDIO 2 IN
DVI-D 24 Pin
Content Protection
Stereo mini jack (M3) × 1
Compliance with DVI Revision 1.0
Compatible with HDCP 1.1
0.5 Vrms, Shared with PC IN
PC IN
AUDIO 2 IN
High-Density Mini D-sub 15 Pin
Stereo mini jack (M3) × 1
Y or G with sync 1.0 Vp-p (75 Ω)
Y or G without sync 0.7 Vp-p (75 Ω)
PB/CB/B: 0.7 Vp-p (75 Ω)
PR/CR/R: 0.7 Vp-p (75 Ω)
TTL high impedance, positive polarity /
negative polarity (automatic)
0.5 Vrms, Shared with DVI-D IN
SERIAL External Control Terminal
D-sub 9 Pin RS-232C compatible
PC OUT R: 0.7 Vp-p (75 Ω)
G: 0.7 Vp-p (75 Ω)
B: 0.7 Vp-p (75 Ω)
HD/VD: 1.0 - 5.0 Vp-p
USB (VIEWER) TYPE A USB connector
USB (TOUCH) TYPE B USB connector
DIGITAL LINK / LAN For RJ45 network and DIGITAL LINK connections, compatible with PJLink™
Communication method: RJ45 100BASE-TX
EXT SP 8 Ω, 20 W [10 W + 10 W] (10 % THD)
Sound
Speakers 120 mm × 40 mm × 2 pcs
Audio Output 20 W [10 W + 10 W] (10 % THD)
Dimensions (W × H × D) 1,185 mm × 705 mm × 104 mm / 46.7” × 27.8” × 4.1”
Mass (weight) approx. 34.0 kg / 75.0 lbs
Note:
•
Design and specifications are subject to change without notice. Mass and dimensions shown are approximate.
Page 32
32
Software License
Software information regarding this product
This product incorporates the following software.
(1) The software which is developed independently by or for Panasonic Corporation
(2) The software owned by third party and licensed to Panasonic Corporation
(3) The software which is licensed under the GNU GENERAL PUBLIC LICENSE Version2.0 (GPL V2.0)
(4)
The software which is licensed under the GNU LESSER GENERAL PUBLIC LICENSE Version2.1 (LGPL V2.1)
(5) Open source software which is not licensed under the GPL V2.0 and LGPL V2.1
The software categorized as (3) ~ (5), the license is available in accordance with gnu general public license and
gnu lesser
general public license respectively, it is distributed in the hope that it will be useful, but without any warranty,
without even
the implied warranty of merchantability or fitness for a particular purpose. As for the terms and conditions, please
refer to the
software license of the supplied CD-ROM.
If you wish to ask any questions as to the software, please contact ([email protected]) by email.
Notice about AVC/VC-1/MPEG-4
This product is licensed under the AVC Patent Portfolio License, VC-1 Patent Portfolio License and MPEG-4
Visual Patent Portfolio License for the personal use of a consumer or other uses in which it does not receive
remuneration to (i) encode video in compliance with the AVC Standard, VC-1 Standard and MPEG-4 Visual
Standard (“AVC/VC-1/MPEG-4 Video”) and/or (ii) decode AVC/VC-1/MPEG-4 Video that was encoded by a
consumer engaged in a personal activity and/or was obtained from a video provider licensed to provide AVC/
VC-1/MPEG-4 Video. No license is granted or shall be implied for any other use. Additional information may be
obtained from MPEG LA, LLC. See http://www.mpegla.com
Page 33
33
(for the U.S.A and Puerto Rico)
Panasonic Solutions Company
Unit of Panasonic Corporation of
North America
Two Riverfront Plaza, Newark,
New Jersey 07102-5490
Panasonic Professional Flat Panel Display
Limited Warranty
Models or Parts
Part
Warranty
Labor
Warranty
Professional Flat
Panel Display
LIMITS AND EXCLUSIONS
There are no express warranties except as listed above.
THE WARRANTOR SHALL NOT BE LIABLE FOR
INCIDENTAL OR CONSEQUENTIAL DAMAGES
(INCLUDING, WITHOUT LIMITION, DAMAGE
TO DISCS) RESULTING FROM THE USE OF THIS
PRODUCT, OR ARISING OUT OF ANY BREACH OF
THE WARRANTY. ALL EXPRESS AND IMPLIED
WARRANTIES, INCLUDING THE WARRANTIES
OF MERCHANTABILITY AND FITNESS FOR
PARTICULAR PURPOSE, ARE LIMITED TO THE
APPLICABLE WARRANTY PERIOD SET FORTH
ABOVE.
Some states do not allow the exclusion or limitation
of incidental or consequential damages, or limitations
on how long an implied warranty lasts, so the above
exclusions or limitations may nor apply to you. This
warranty gives you specific legal rights and you may
other rights, which vary from state to state.
If you have a problem with this product that is not
handled to your satisfaction, then
write the Consumer
Affairs Department at the Company address indicated
above.
Panasonic Solutions Company. (referred to as “the
Warrantor”) will repair this product and all included
accessories with new or refurbished parts, free of
charge in the USA or Puerto Rico, of the original
purchase in the event of a defect in materials or workmanship as follows:
In the USA and Puerto Rico
FOR SERVICE
CALL TOLL FREE
1-877-655-2357
2 Years 2 Years
On-site or carry-in service in the USA and Puerto Rico
may be obtained during the warranty period by contacting
Panasonic Solutions Company Service toll free at
1-877-655-2357.
This warranty is extended only to the original purchaser
and is non transferable. A purchase receipt or other
proof of date of original purchase will be required before
warranty service is rendered.
This warranty only covers failures due to defects in
materials or workmanship, which occur during normal
use. The warranty does not cover damage which occur
in shipment, or failures which are caused by products
not supplied by the warrantor, or failures which result
from improper installation, set-up adjustments, improper
antenna, inadequate signal pickup, maladjustment of
consumer controls, improper operation, power line surge,
improper voltage supply, lighting damage, or service by
anyone other than an authorized repair facility, or
damage that is attributable to acts of God.
Page 34
34
(for Canada)
Panasonic Canada Inc.
5770 Ambler Drive, Mississauga, Ontario L4W 2T3
LIMITED WARRANTY STATEMENT
Item
Video Tape
P2/SD Cards
Video Heads
D5 Video heads
Maintenance Items
Colour Camera CCD
Imaging Block
All LCD Monitors
* DLP™ Projectors
* LCD Projectors above
2,500 ANSI Lumens
* LCD Projectors below
2,500 ANSI Lumens
Projector Lamps
103 inch Plasma displays
Hard Drive Disk Unit
Parts
30 days—Replacement only
(content not covered)
(Content not covered)
1 year or 2,000 hrs. (prorated)
Whichever comes first
1 year or
1,0
00 hrs.
Whichever comes first
90 days
2 years
2 years (burn-in not covered)
3 years or 17,000 hrs.
Whichever comes first
3 years or 2,500 hrs.
Whichever comes first
3 years or 1,500 hrs.
Whichever comes first
50% of the rated lamp life or 1 year.
Whichever comes first
3 years (burn-in not covered)
1 year plus balance (if any) of
the original Manufacturer’s
Limited Warranty.
(Content not covered)
Labour
N/A
N/A
1 year or 2,000 hrs.
Whichever comes first
1 year or 1,000 hrs.
Whichever comes first
90 days
2 years
2 years
3 years or 17,000 hrs.
Whichever comes first
3 years or 2,500 hrs.
Whichever comes first.
3 years or 1,500 hrs.
Whichever comes first
50% of the rated lamp life or 1 year.
Whichever comes first.
3 years
All Plasma displays 2 years (burn-in not covered) 2 years
1 year
WARRANTY COVERAGE PERIOD EXCEPTIONS
Panasonic Canada Inc. (also known as PCI) warrants this product to be free of
defects in material and workmanship under normal use during the applicable
warranty coverage period described below. PCI agrees to repair, or at its option,
exchange, any part that becomes defective. However, the product must be
purchased and serviced in Canada. The product or part that shows evidence of
defect must be delivered prepaid or carried in to an authorized Panasonic Broadcast
Service Center. This warranty does not cover shipping costs.
The warranty coverage period is one year for both parts and labour beginning with
the date of original end user purchase, subject to the exceptions as stated below.
Repaired or replacement parts supplied during the warranty coverage period carry
the unexpired portion of the original warranty coverage period. Proof of product
purchase is a condition of warranty service. The owner must produce the product
purchase receipt or other satisfactory evidence of date of original purchase.
This warranty does not apply to external appearance items, such as handles, knobs,
safety windows, etc. This warranty does not apply to any part, or parts, of the
product, installed, altered, repaired or misused in any way that, in the opinion of PCI,
affects the reliability of or detracts from the performance of the product.
For products requiring routine preventive maintenance, that maintenance must be
performed in order to maintain warranty coverage.
Serial numbers that have been altered, defaced or removed void this warranty. This
warranty does not cover replacements or repairs necessitated by loss or damage
resulting from any cause beyond the control of PCI.
Marking or retained images (sometimes called “burn-in”) resulting from the display of
fixed images on video display products are not defects and are not covered under
this warranty.
In certain instances, some jurisdictions do not allow the exclusion or limitation of
incidental or consequential damages, or the exclusion of implied warranties, so the
above limitations and exclusions may not be applicable.
Warranty Service
If the product needs to be shipped for service, carefully pack (preferably in the
original carton) and enclose a letter, detailing the complaint. Send prepaid and
adequately insured to the local authorized Panasonic Service Centre in your
area or to Panasonic Technical Support and Product Services Department, 5770
Ambler Drive, Mississauga, Ontario, L4W 2T3. Shipping to the latter location
requires a return authorization before shipment. No liability is assumed for loss
or damage to the product while in transit.
THIS EXPRESS, LIMITED WARRANTY IS IN LIEU OF ALL OTHER
WARRANTIES, EXPRESS OR IMPLIED, INCLUDING ANY IMPLIED
WARRANTIES OF MERCHANTABILITY AND FITNESS FOR A PARTICULAR
PURPOSE. IN NO EVENT WILL PANASONIC CANADA INC. BE LIABLE FOR
ANY SPECIAL, INDIRECT OR CONSEQUENTIAL DAMAGES.
• Dust, smoke, rental/staging environment and twenty-four/seven operation,
dramatically decreases the interval between performances of routine preventive
maintenance required to maintain this warranty coverage.
Page 35
35
Page 36
Customer’s Record
The model number and serial number of this product can be found on its rear panel. You should note this serial
number in the space provided below and retain this book, plus your purchase receipt, as a permanent record of
your purchase to aid in identification in the event of theft or loss, and for Warranty Service purposes.
Model Number Serial Number
Web Site : http://panasonic.com
Panasonic Corporation 2016
USA only: Disposal may be regulated in your community due to
environmental considerations. For disposal or recycling information,
please visit Panasonic website: http://www.panasonic.com/environmental
or call 1-888-769-0149.
For TH-80BF1U, TH-65BF1U and TH-50BF1U
Panasonic System Communications Company of North America
Unit of Panasonic Corporation of North America
Executive Office :
Two Riverfront Plaza, Newark, New Jersey 07102-5490
Panasonic Canada Inc.
5770 Ambler Drive
Mississauga, Ontario
L4W 2T3
For TH-80BF1E, TH-65BF1E and TH-50BF1E
Panasonic Testing Centre
Panasonic Service Europe, a division of Panasonic Marketing Europe GmbH
Winsbergring 15, 22525 Hamburg, F.R. Germany
Information for Users on Collection and Disposal of Old Equipment and used Batteries
EU
EU
These symbols on the products, packaging, and/or accompanying documents mean that used
electrical and electronic products and batteries should not be mixed with general household waste.
For proper treatment, recovery and recycling of old products and used batteries, please take them to
applicable collection points, in accordance with your national legislation and the Directives
2002/96/EC and 2006/66/EC.
By disposing of these products and batteries correctly, you will help to save valuable resources and
prevent any potential negative effects on human health and the environment which could otherwise
arise from inappropriate waste handling.
For more information about collection and recycling of old products and batteries, please contact your
local municipality, your waste disposal service or the point of sale where you purchased the items.
Penalties may be applicable for incorrect disposal of this waste, in accordance with national
legislation.
For business users in the European Union
If you wish to discard electrical and electronic equipment, please contact your dealer or supplier for
further information.
[Information on Disposal in other Countries outside the European Union]
These symbols are only valid in the European Union. If you wish to discard these items, please
contact your local authorities or dealer and ask for the correct method of disposal.
Note for the battery symbol (bottom two symbol examples):
This symbol might be used in combination with a chemical symbol. In this case it complies with the
requirement set by the Directive for the chemical involved.
TI0416TS0 -PB
Printed in China
 Loading...