

Panasonic TH42LF5E User Manual [en, es]
English
Nederlands
Dansk
Español
Model No.
TH-42LF5E
TH-47LF5E
Operating Instructions
FULL HD LCD Display
For more detailed instructions, refer to the Operating
Instructions on the CD-ROM.
Contents
Important Safety Notice .............................2
•
Safety Precautions .....................................3
•
Accessories ................................................6
•
Connections ...............................................7
•
Power On / Off ...........................................8
•
Basic Controls ............................................9
•
Specifi cations ...........................................11
•
Please read these instructions before operating your set
and retain them for future reference.

Important Safety Notice
IMPORTANT: THE MOULDED PLUG
WARNING
English
1) To prevent damage which may result in fi re or shock hazard, do not expose this appliance to dripping
or splashing.
Do not place containers with water (fl ower vase, cups, cosmetics, etc.) above the set. (including on
shelves above, etc.)
No naked fl ame sources, such as lighted candles, should be placed on / above the set.
2) To prevent electric shock, do not remove cover. No user serviceable parts inside. Refer servicing to qualifi ed
service personnel.
3) Do not remove the earthing pin on the power plug. This apparatus is equipped with a three pin earthing-type
power plug. This plug will only fi t an earthing-type power outlet. This is a safety feature. If you are unable to
insert the plug into the outlet, contact an electrician.
Do not defeat the purpose of the earthing plug.
4) To prevent electric shock, ensure the earthing pin on the AC cord power plug is securely connected.
CAUTION
This appliance is intended for use in environments which are relatively free of electromagnetic fi elds.
Using this appliance near sources of strong electromagnetic fi elds or where electrical noise may overlap with the
input signals could cause the picture and sound to wobble or cause interference such as noise to appear.
To avoid the possibility of harm to this appliance, keep it away from sources of strong electromagnetic fi elds.
Trademark Credits
• VGA is a trademark of International Business Machines Corporation.
• Macintosh is a registered trademark of Apple Inc., USA.
• SVGA, XGA, SXGA and UXGA are registered trademarks of the Video Electronics Standard Association.
Even if no special notation has been made of company or product trademarks, these trademarks have been fully respected.
• HDMI, the HDMI Logo, and High-Defi nition Multimedia Interface are trademarks or registered trademarks of HDMI
Licensing LLC in the United States and other countries.
Note:
Image retention may occur. If you display a still picture for an extended period, the image might remain on the screen.
However, it will disappear after a while.
IMPORTANT: THE MOULDED PLUG
FOR YOUR SAFETY, PLEASE READ THE FOLLOWING TEXT CAREFULLY.
This display is supplied with a moulded three pin mains plug for your safety and convenience. A 10 amp fuse is
fi tted in this plug. Shall the fuse need to be replaced, please ensure that the replacement fuse has a rating of 10
amps and that it is approved by ASTA or BSI to BS1362.
Check for the ASTA mark
If the plug contains a removable fuse cover, you must ensure that it is refi tted when the fuse is replaced.
If you lose the fuse cover the plug must not be used until a replacement cover is obtained.
A replacement fuse cover can be purchased from your local Panasonic dealer.
Do not cut off the mains plug.
Do not use any other type of mains lead except the one supplied with this display.
The supplied mains lead and moulded plug are designed to be used with this display to avoid
interference and for your safety.
If the socket outlet in your home is not suitable, get it changed by a qualifi ed electrician.
If the plug or mains lead becomes damaged, purchase a replacement from an authorized dealer.
WARNING : — THIS DISPLAY MUST BE EARTHED.
How to replace the fuse.
or the BSI mark on the body of the fuse.
ASA
Open the fuse compartment with a screwdriver and replace the fuse.
2
Safety Precautions
WARNING
Setup
This LCD Display is for use only with the following optional accessories. Use with any other type of optional
accessories may cause instability which could result in the possibility of injury.
(All of the following accessories are manufactured by Panasonic Corporation.)
• Pedestal ....................................................... TY-ST42P50
Always be sure to ask a qualifi ed technician to carry out set-up.
Small parts can present choking hazard if accidentally swallowed. Keep small parts away from young children. Discard
unneeded small parts and other objects, including packaging materials and plastic bags/sheets to prevent them from
being played with by young children, creating the potential risk of suffocation.
Do not place the Display on sloped or unstable surfaces, and ensure that the Display does not hang over the
edge of the base.
• The Display may fall off or tip over.
Do not place any objects on top of the Display.
• If water is spills onto the Display or foreign objects get inside it, a short-circuit may occur which could result in fi re
or electric shock. If any foreign objects get inside the Display, please consult your local Panasonic dealer.
Transport only in upright position!
• Transporting the unit with its display panel facing upright or downward may cause damage to the internal
circuitry.
Ventilation should not be impeded by covering the ventilation openings with items such as newspapers, table
cloths and curtains.
For suffi cient ventilation;
Leave a space of 10 cm or more at the top, left and right, and 5 cm or more at the rear, and also keep the space
between the bottom of the display and the fl oor surface.
Cautions for Wall Installation
• Wall installation should be performed by an installation professional. Installing the Display incorrectly may lead to
an accident that results in death or serious injury. Furthermore, when installing on a wall, a wall hanging bracket
that conforms to VESA standards (VESA 400 × 400) must be used.
• When installing the Display vertically, be sure to install the power indicator onto the bottom of the Display.
Do not install the product to a place where the product is exposed to direct sunlight.
• If the screen is exposed to direct sunlight, the liquid crystal panel may have adverse effect.
English
3

Safety Precautions
When using the LCD Display
English
The Display is designed to operate on 220 - 240 V AC, 50/60 Hz.
Do not cover the ventilation holes.
• Doing so may cause the Display to overheat, which can cause fi re or damage to the Display.
Do not stick any foreign objects into the Display.
• Do not insert any metal or fl ammable objects into the ventilations holes or drop them onto the Display, as doing so
can cause fi re or electric shock.
Do not remove the cover or modify it in any way.
• High voltages which can cause severe electric shocks are present inside the Display. For any inspection, adjustment
and repair work, please contact your local Panasonic dealer.
Ensure that the mains plug is easily accessible.
An apparatus with CLASS I construction shall be connected to a mains socket outlet with a protective earthing connection.
Do not use any power supply cord other than that provided with this unit.
• Doing so may cause fi re or electric shocks.
Securely insert the power supply plug as far as it will go.
• If the plug is not fully inserted, heat may be generated which could cause fi re. If the plug is damaged or the wall
socket is loose, they shall not be used.
Do not handle the power supply plug with wet hands.
• Doing so may cause electric shocks.
Do not do anything that may damage the power cable. When disconnecting the power cable, pull on the plug body, not the cable.
• Do not damage the cable, make any modifi cations to it, place heavy objects on top of it, heat it, place it near any
hot objects, twist it, bend it excessively or pull it. To do so may cause fi re and electric shock. If the power cable is
damaged, have it repaired at your local Panasonic dealer.
If the Display is not going to be used for any prolonged length of time, unplug the power supply plug from
the wall outlet.
To prevent the spread of fi re, keep candles or other open fl ames away from this product at all times.
If problems occur during use
If a problem occurs (such as no picture or no sound), or if smoke or an abnormal odour starts to come out
from the Display, immediately unplug the power supply plug from the wall outlet.
• If you continue to use the Display in this condition, fi re or electric shock could result. After checking that the smoke
has stopped, contact your local Panasonic dealer so that the necessary repairs can be made. Repairing the Display
yourself is extremely dangerous, and shall never be done.
If water or foreign objects get inside the Display, if the Display is dropped, or if the cabinet becomes damages,
disconnect the power supply plug immediately.
A short circuit may occur, which could cause fi re. Contact your local Panasonic dealer for any repairs that need to be made.
•
4
CAUTION
Safety Precautions
When using the LCD Display
Do not bring your hands, face or objects close to the ventilation holes of the Display.
• Heated air comes out from the ventilation holes at the top of Display will be hot. Do not bring your hands or face,
or objects which cannot withstand heat, close to this port, otherwise burns or deformation could result.
Be sure to disconnect all cables before moving the Display.
• If the Display is moved while some of the cables are still connected, the cables may become damaged, and fi re or
electric shock could result.
Disconnect the power supply plug from the wall socket as a safety precaution before carrying out any
cleaning.
• Electric shocks can result if this is not done.
Clean the power cable regularly to prevent it becoming dusty.
• If dust built up on the power cord plug, the resultant humidity can damage the insulation, which could result in fi re.
Pull the power cord plug out from the wall outlet and wipe the mains lead with a dry cloth.
Do not burn or breakup batteries.
• Batteries must not be exposed to excessive heat such as sunshine, fi re or the like.
Cleaning and maintenance
The front of the display panel has been specially treated. Wipe the panel surface gently using only a cleaning
cloth or a soft, lint-free cloth.
• If the surface is particularly dirty, wipe with a soft, lint-free cloth which has been soaked in pure water or water in
which neutral detergent has been diluted 100 times, and then wipe it evenly with a dry cloth of the same type until
the surface is dry.
• Do not scratch or hit the surface of the panel with fi ngernails or other hard objects, otherwise the surface may
become damaged. Furthermore, avoid contact with volatile substances such as insect sprays, solvents and thinner,
otherwise the quality of the surface may be adversely affected.
If the cabinet becomes dirty, wipe it with a soft, dry cloth.
• If the cabinet is particularly dirty, soak the cloth in water to which a small amount of neutral detergent has been
added and then wring the cloth dry. Use this cloth to wipe the cabinet, and then wipe it dry with a dry cloth.
• Do not allow any detergent to come into direct contact with the surface of the Display. If water droplets get inside
the unit, operating problems may result.
• Avoid contact with volatile substances such as insect sprays, solvents and thinner, otherwise the quality of the
cabinet surface may be adversely affected or the coating may peel off. Furthermore, do not leave it for long periods
in contact with articles made from rubber or PVC.
Usage of a chemical cloth
• Do not use a chemical cloth for the panel surface.
• Follow the instructions for the chemical cloth to use it for the cabinet.
English
5
Accessories
English
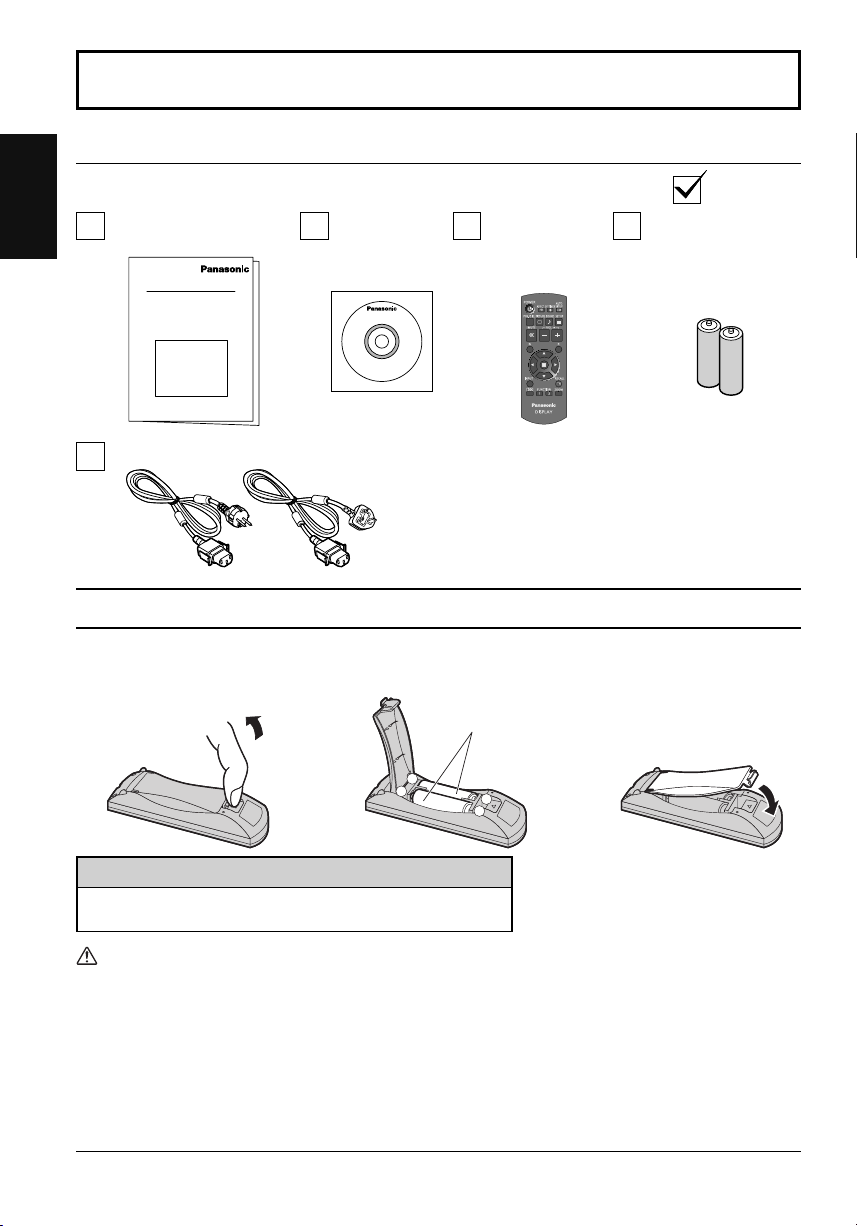
Accessories Supply
Operating Instruction book
Power supply cord
Remote Control Batteries
Requires two R6 batteries.
1. Pull and hold the hook, then open
the battery cover.
Check that you have the accessories and items shown
CD-ROM
(Operating
instructions)
2. Insert batteries - note correct
polarity ( + and -).
Remote Control
Transmitter
N2QAYB000691
3. Replace the cover.
“R6 (UM3)” size
Batteries for the Remote
Control Transmitter
(R6 (UM3) Size × 2)
-
+
+
-
Helpful Hint:
For frequent remote control users, replace old batteries with Alkaline
batteries for longer life.
Precaution on battery use
Incorrect installation can cause battery leakage and corrosion that will damage the remote control transmitter.
Disposal of batteries should be in an environment-friendly manner.
Observe the following precaution:
1. Batteries shall always be replaced as a pair. Always use new batteries when replacing the old set.
2. Do not combine a used battery with a new one.
3. Do not mix battery types (example: “Zinc Carbon” with “Alkaline”).
4. Do not attempt to charge, short-circuit, disassemble, heat or burn used batteries.
Battery replacement is necessary when remote control acts sporadically or stops operating the Display set.
5.
6. Do not burn or breakup batteries.
Batteries must not be exposed to excessive heat such as sunshine, fi re or the like.
6
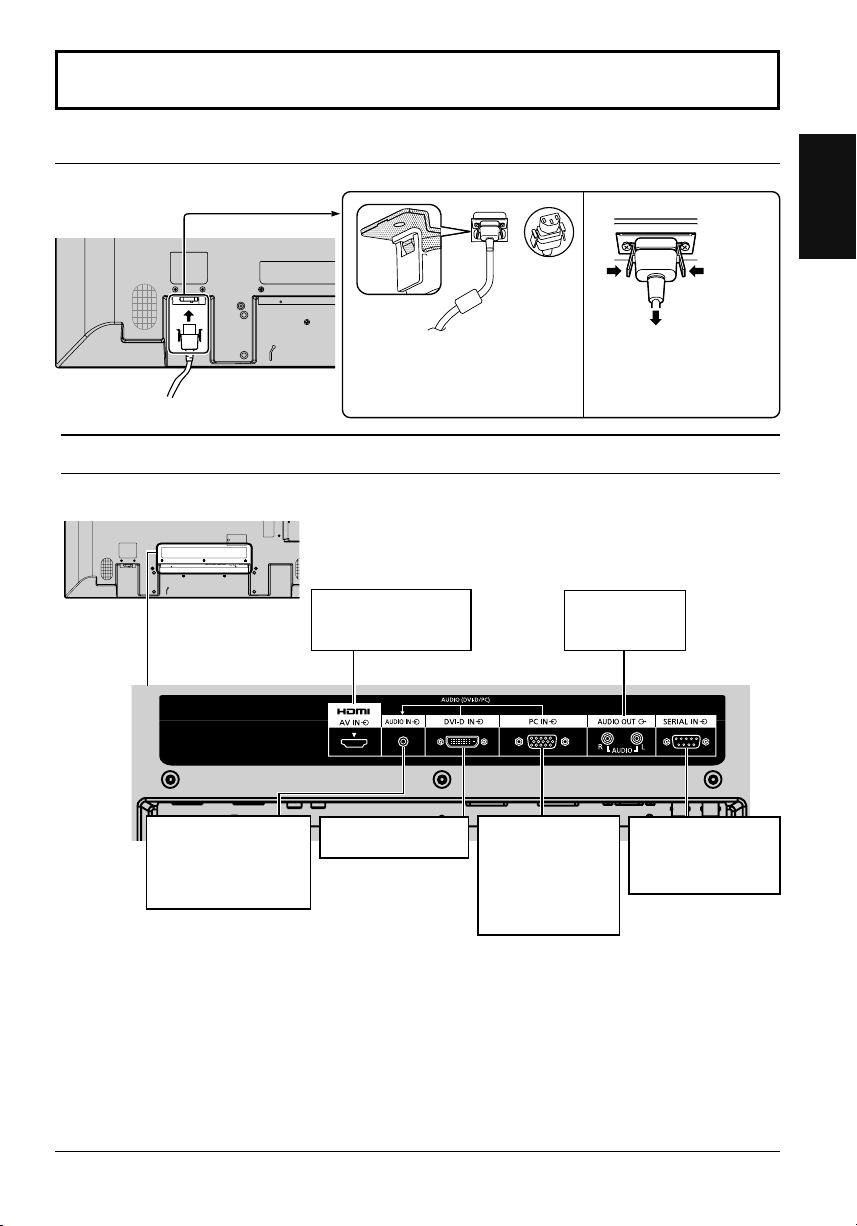
Connections
AC cord connection and fi xing
AC cord fi xing
Plug the AC cord into the display unit.
Plug the AC cord until it clicks.
Note:
Make sure that the AC cord is locked on
both the left and right sides.
Video equipment connection
AV IN
HDMI
HDMI Input Terminal
Unplug the AC cord
Unplug the AC cord pressing the
two knobs.
Note:
When disconnecting the AC cord, be
absolutely sure to disconnect the AC
cord plug at the socket outlet fi rst.
AUDIO OUT
Connect to sound
equipment
English
AUDIO IN (DVI-D / PC)
Connect the audio
output of a device
connected to DVI-D IN,
PC IN.
DVI-D IN
DVI-D Input Terminal
PC IN
PC Input Terminal
Connect to video
terminal of PC or
equipment with Y,
PB(CB) and PR(CR)
output
SERIAL IN
SERIAL Input Terminal
Control the Display by
connecting to PC.
7
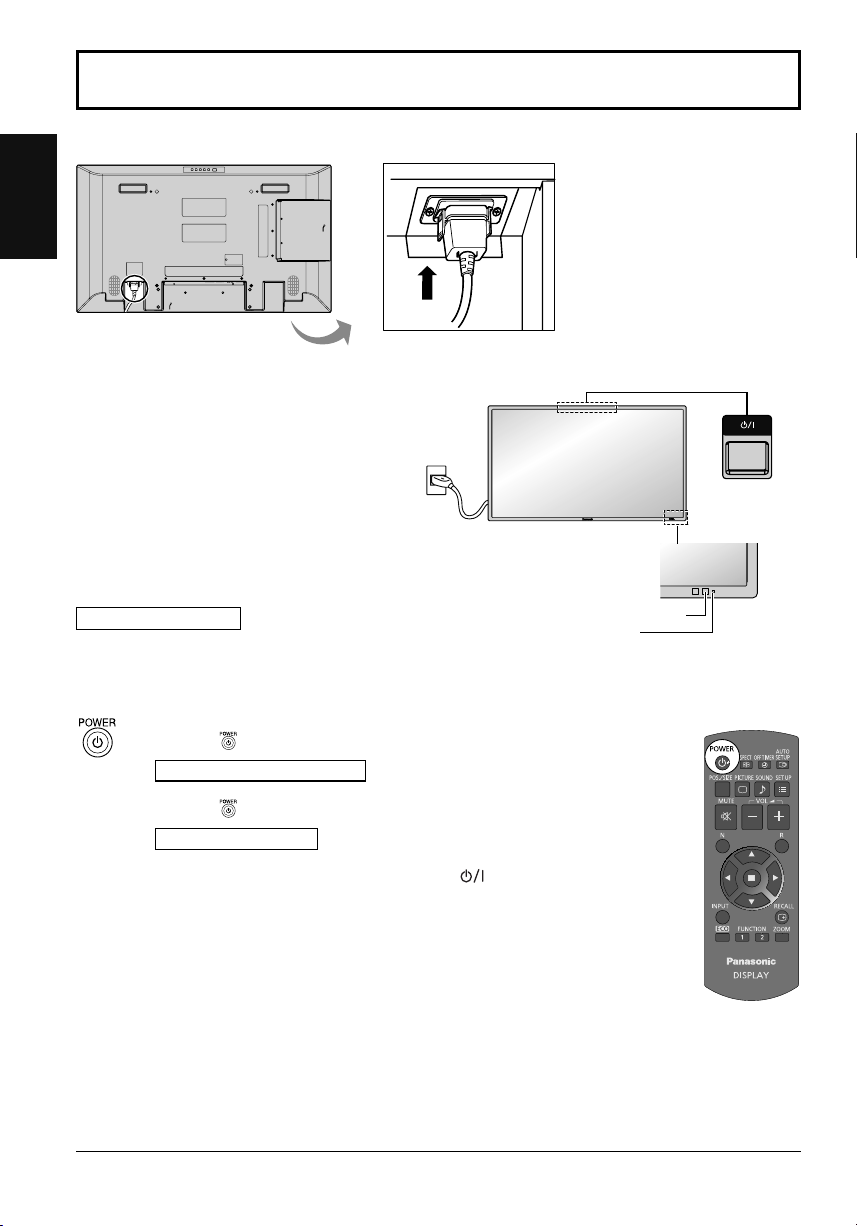
Power On / Off
Connecting the AC cord plug to the Display.
English
Connecting the plug to the Wall Outlet
Notes:
• Main plug types vary between countries. The power
plug shown at right may, therefore, not be the type
fi tted to your set.
• When disconnecting the AC cord, be absolutely
sure to disconnect the AC cord plug at the socket
outlet fi rst.
Press the Power switch on the Display to turn the
set on: Power-On.
Power switch
Power Indicator: Green
Press the button on the remote control to turn the Display off.
Power Indicator: Red (standby)
Press the
Power Indicator: Green
Turn the power to the Display off by pressing the switch on the unit, when
the Display is on or in standby mode.
Note:
During operation of the power management function, the power indicator turns
orange in the power off state.
8
Remote Control Sensor
Power Indicator
button on the remote control to turn the Display on.
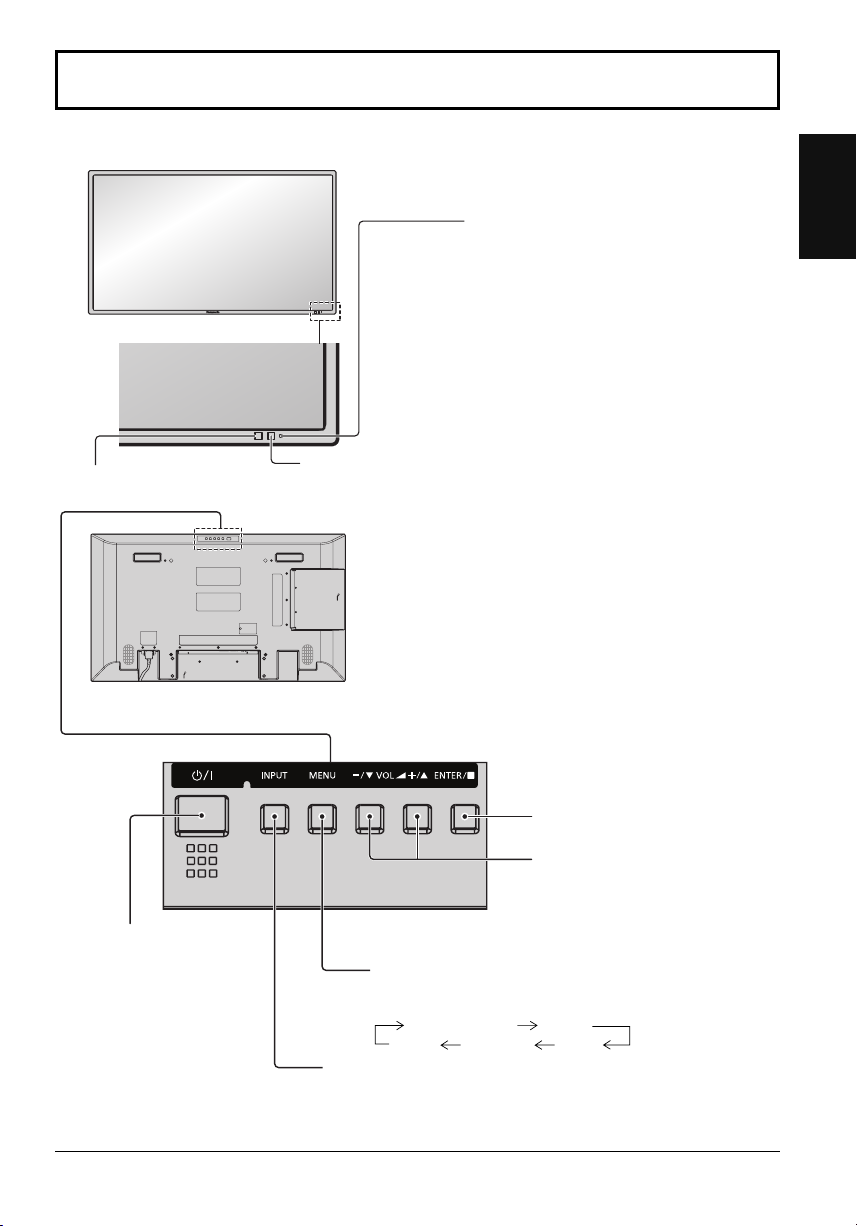
Basic Controls
Main Unit
Brightness Sensor
Detects the brightness in the viewing
environment.
English
Power Indicator
The Power Indicator will light.
• Power-OFF .... Indicator not illuminated (The unit
will still consume some power
as long as the power cord is still
inserted into the wall outlet.)
• Standby ........ Red
• Power-ON ...... Green
• PC Power management
......................... Orange (With PC input signal.)
• DVI-D Power management
....................... Orange (With DVI input signal.)
Remote control
sensor
Main Power On / Off Switch
Enter / Aspect button
Volume Adjustment
Volume Up “+” Down “–”
When the menu screen is displayed:
“+” : press to move the cursor up
“–” :
press to move the cursor down
MENU Screen ON / OFF
Each time the MENU button is pressed, the menu screen
will switch.
Normal Viewing Picture
Sound Pos. /Size
INPUT button
(INPUT signal selection)
Setup
9

Basic Controls
Remote Control Transmitter
English
ACTION button
Press to make selections.
ASPECT button
Press to adjust the aspect.
Standby (ON / OFF) button
The Display must fi rst be plugged into
the wall outlet and turned on at the
power switch (see page 8).
Press this button to turn the Display On,
from Standby mode. Press it again to
turn the Display Off to Standby mode.
POS. /SIZE button
PICTURE button
Sound mute On / Off
Press this button to mute the
sound.
Press again to reactivate sound.
Sound is also reactivated when
power is turned off or volume level
is changed.
N button
POSITION buttons
INPUT button
Press to select Input signal
sequentially.
ECO MODE (ECO)
Press to change the ECO MODE
setup status.
FUNCTION buttons (FUNCTION)
OFF TIMER button
The Display can be preset to switch to stand-by
after a fi xed period. The setting changes to 30
minutes, 60 minutes, 90 minutes and 0 minutes
(off timer cancelled) each time the button is
pressed.
30 min 60 min
90 min
0 min
When three minutes remain, “Off timer 3 min”
will fl ash.
The off timer is cancelled if a power interruption
occurs.
AUTO SETUP button
Automatically adjusts the position/
size of the screen.
SET UP button
SOUND button
Volume Adjustment
Press the Volume Up “+” or Down “–”
button to increase or decrease the
sound volume level.
R button
Press the R button to return to
previous menu screen.
RECALL button
Press the “RECALL” button to display
the current system status.
Input label
1
Aspect mode
2
Off timer
3
The off timer indicator is
displayed only when the off
timer has been set.
90min
1
2
3
Off timer
PC
4:3
10
Digital Zoom
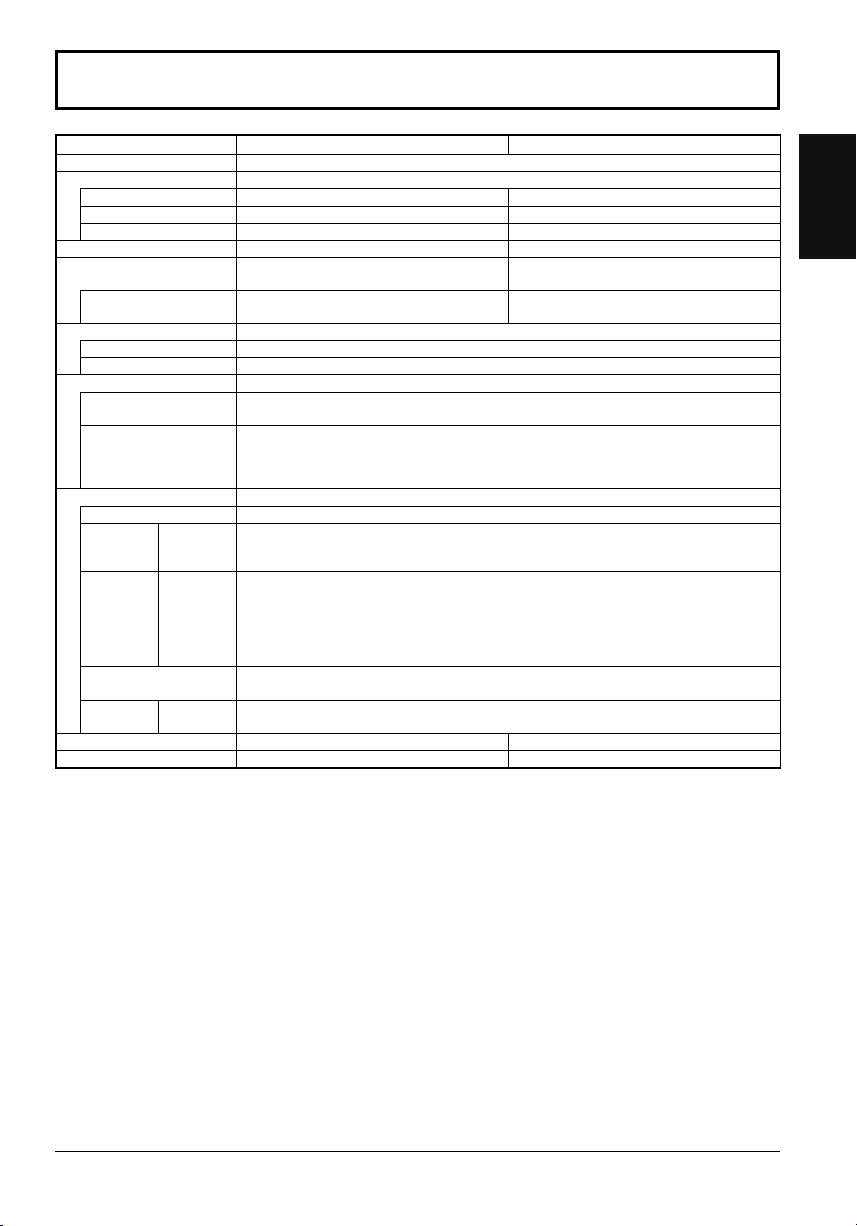
Specifi cations
Power Source 220 - 240 V AC, 50/60Hz
Power Consumption
LCD Display panel 42-inch IPS panel, 16:9 aspect ratio 47-inch IPS panel, 16:9 aspect ratio
Screen size 930 mm (W) × 523 mm (H) × 1,067 mm
Operating condition
Applicable signals
Connection terminals
Dimensions (W × H × D) 968 mm × 561 mm × 116 mm 1,079 mm × 624 mm × 117 mm
Mass (weight) approx. 20.0 kg approx. 24.5 kg
Power on 250 W 290 W
Stand-by condition 0.5 W 0.5 W
Power off condition 0.3 W 0.3 W
(No.of pixels) 2,073,600 (1,920 (W) × 1,080 (H))
Temperature 0 °C - 40 °C
Humidity 20 % - 80 %
Scanning format 525 (480) / 60i · 60p, 625 (575) / 50i · 50p, 750 (720) / 60p · 50p, 1125 (1080) / 60i · 60p · 50i ·
PC signals VGA, SVGA, XGA, SXGA
HDMI TYPE A Connector
DVI-D IN
PC IN
AUDIO
OUT
AUDIO
AUDIO
SERIAL IN External Control Terminal
50p · 24p · 25p · 30p · 24sF
DVI-D 24 Pin
Content Protection
Stereo mini jack (M3) × 1
High-Density Mini D-sub 15 Pin
Stereo mini jack (M3) × 1
D-sub 9 Pin RS-232C compatible
L-R RCA PIN JACK × 2 (L / R)
Output level: Variable (-∞ ― 0 dB)
TH-42LF5E TH-47LF5E
(diagonal)
[5,760 × 1,080 dots]
Horizontal scanning frequency 30 - 110 kHz
Vertical scanning frequency 48 - 120 Hz
UXGA ···· (compressed)
1,039 mm (W) × 584 mm (H) × 1,192 mm
2,073,600 (1,920 (W) × 1,080 (H))
[5,760 × 1,080 dots]
Compliance with DVI Revision 1.0
Compatible with HDCP 1.1
0.5 Vrms, Shared with PC IN
Y or G with sync 1.0 Vp-p (75 Ω)
Y or G without sync 0.7 Vp-p (75 Ω)
P
B/CB/B: 0.7 Vp-p (75 Ω)
P
R/CR/R: 0.7 Vp-p (75 Ω)
HD/VD: 1.0 - 5.0 Vp-p (high impedance)
0.5 Vrms, Shared with DVI-D IN
[INPUT 1 kHz / 0 dB, 10 kΩ Load]
(diagonal)
Notes:
• Design and specifi cations are subject to change without notice. Mass and dimensions shown are approximate.
• This equipment complies with the EMC standards listed below.
EN55022, EN55024, EN61000-3-2, EN61000-3-3.
English
11
Information for Users on Collection and Disposal of Old Equipment and used Batteries
These symbols on the products, packaging, and/or accompanying documents mean that used
electrical and electronic products and batteries should not be mixed with general household waste.
For proper treatment, recovery and recycling of old products and used batteries, please take them to
English
applicable collection points, in accordance with your national legislation and the Directives
2002/96/EC and 2006/66/EC.
By disposing of these products and batteries correctly, you will help to save valuable resources and
prevent any potential negative effects on human health and the environment which could otherwise
arise from inappropriate waste handling.
For more information about collection and recycling of old products and batteries, please contact your
local municipality, your waste disposal service or the point of sale where you purchased the items.
Penalties may be applicable for incorrect disposal of this waste, in accordance with national
legislation.
For business users in the European Union
If you wish to discard electrical and electronic equipment, please contact your dealer or supplier for
further information.
[Information on Disposal in other Countries outside the European Union]
These symbols are only valid in the European Union. If you wish to discard these items, please
contact your local authorities or dealer and ask for the correct method of disposal.
Note for the battery symbol (bottom two symbol examples):
This symbol might be used in combination with a chemical symbol. In this case it complies with the
requirement set by the Directive for the chemical involved.
with the requirements of Technical Regulation on the Restriction Of the use of certain Hazardous
Substances in Electrical and Electronic Equipment
(adopted by Order No.1057 of Cabinet of Ministers of Ukraine)
The Product is in conformity with the requirements of Technical Regulation on the Restriction Of the use of certain
Hazardous Substances in electrical and electronic equipment (TR on RoHS).
The content of hazardous substance with the exemption
of the applications listed in the Annex No.2 of TR on RoHS:
1. Lead (Pb) – not over 0.1wt % or 1000wt ppm;
2. Cadmium (Cd) – not over 0.01wt % or 100wt ppm;
3. Mercury (Hg) – not over 0.1wt % or 1000wt ppm;
4. Hexavalent chromium (Cr6+) – not over 0.1wt % or 1000wt ppm;
5. Polybrominated biphenyls (PBBs) – not over 0.1wt % or 1000wt ppm;
6. Polybrominated diphenyl ethers (PBDEs) – not over 0.1wt % or 1000wt ppm.
Customer’s Record
The model number and serial number of this product can be found on its rear panel. You should note this serial
number in the space provided below and retain this book, plus your purchase receipt, as a permanent record of
your purchase to aid in identifi cation in the event of theft or loss, and for Warranty Service purposes.
Model Number Serial Number
Web Site : http://panasonic.net
© Panasonic Corporation 2012 Printed in Czech Republic
Declaration of Conformity
TQB0E2298U-G
Nederlands
Model No.
TH-42LF5E
TH-47LF5E
Gebruiksaanwijzing
FULL HD LCD-scherm
Raadpleeg de Bedieningsinstructies op de cd-rom voor meer
gedetailleerde instructies.
INHOUD
Belangrijke veiligheidsinformatie ................2
•
Veiligheidsmaatregelen ..............................3
•
Accessoires ................................................6
•
Aansluitingen ..............................................7
•
In / uitschakelen .........................................8
•
Basisbediening ...........................................9
•
Specifi caties....................................... ......11
•
Lees de gebruiksaanwijzing voordat u het toestel in
gebruik neemt.
Bewaar de gebruiksaanwijzing voor eventuele naslag.
Belangrijke veiligheidsinformatie
WAARSCHUWING
1) Stel om beschadiging die kan leiden tot elektrische schokken of brand te voorkomen, dit toestel niet
bloot aan regen of vocht.
Plaats geen voorwerpen met water erin (bloemenvazen, bekers met drank, cosmetica e.d.) boven het
apparaat. (en ook niet op planken e.d. erboven)
Plaats geen voorwerpen met open vuur, zoals brandende kaarsen, op/boven het toestel.
2) Ter voorkoming van elektrische schokken de omkasting niet verwijderen. In het interne gedeelte zijn geen
Nederlands
onderdelen aanwezig die door de gebruiker zelf gerepareerd kunnen worden. Laat een reparatie over aan
deskundige technici.
3) Dit toestel is voorzien van een netsnoer met randaarde stekker. In verband met installatie/veiligheidsvoorschriften,
dient het toestel uitsluitend op een degelijk geaard stopcontact te worden aangesloten.
4) Om een elektrische schok te voorkomen, moet u ervoor zorgen dat de aardingspen van de netstekker stevig
is aangesloten.
OPGELET
Dit apparaat is bestemd voor gebruik in een omgeving die relatief vrij is van elektromagnetische velden.
Gebruik van dit apparaat in de nabijheid van bronnen met sterke elektromagnetische velden of op plaatsen waar
elektrische storingen de ingangssignalen kunnen overlappen, kan instabiliteit van beeld en geluid veroorzaken
of storing zoals ruis doen ontstaan.
Om mogelijke schade aan dit apparaat te voorkomen, dit niet in de buurt van bronnen met sterke elektromagnetische
velden te gebruiken.
Handelsmerken
• VGA is een handelsmerk van International Business Machines Corporation.
• Macintosh is een wettig gedeponeerd handelsmerk van Apple Inc., USA.
• SVGA, XGA, SXGA en UXGA zijn wettig gedeponeerd handelsmerken van de Video Electronics Standard
Association.
Andere ondernemingen en productnamen zijn de handelsmerken of wettig gedeponeerde handelsmerken vande
betreffende ondernemingen.
• HDMI, het HDMI logo en High-Defi nition Multimedia Interface zijn handelsmerken of gedeponeerde handelsmerken
van HDMI Licensing LLC in de Verenigde Staten en andere landen.
Opmerking:
Inbranden van een nabeeld kan optreden. Als u een stilstaand beeld langdurig op het scherm laat staan, kan dat
beeld op het scherm achterblijven. Na verloop van tijd zal het echter verdwijnen.
2
Veiligheidsmaatregelen
WAARSCHUWING
Setup
Dit LCD-scherm is alleen voor gebruik met de volgende optionele accessoires. Gebruik met enige andere
dan als optie verkrijgbare accessoires kan instabiliteit veroorzaken, hetgeen de kans op schade en letsel tot
gevolg kan hebben.
(Alle onderstaande accessoires zijn vervaardigd door Panasonic Corporation.)
• Vloerstandaard ............................................ TY-ST42P50
Vraag altijd een deskundige installateur om het toestel te installeren.
Kleine onderdelen houden het risico op verstikking in wanneer ze per ongeluk worden ingeslikt. Houd kleine onderdelen
uit de buurt van kleine kinderen. Verwijder onnodige kleine onderdelen en andere objecten, met inbegrip van het
verpakkingsmateriaal en plastic zakken/bladen om te vermijden dat kleine kinderen ermee spelen zodat een potentieel
risico op verstikking ontstaat.
Plaats het scherm niet op een schuin afl opende of onstabiele ondergrond. Zorg er ook voor dat het scherm
niet over de rand van de ondergrond hangt of uitsteekt.
• De kans bestaat dat de scherm dan valt of kantelt.
Plaats geen voorwerpen bovenop de scherm.
• Als er water gemorst wordt op de scherm of als er vreemde voorwerpen in het toestel terecht komen, bestaat de
kans dat er zich een elektrische kortsluiting voordoet, het tot brand of elektrische schokken kan leiden. Neem
contact op met uw Panasonic dealer als er vreemde voorwerpen binnen in de scherm zijn gekomen.
Vervoer alleen rechtop!
• Als u het toestel met het scherm omhoog of omlaag vervoert, kunnen de interne circuits beschadigd raken.
Let op dat de ventilatie niet wordt verhinderd door ventilatieopeningen met voorwerpen zoals b.v. kranten,
tafelkleden en/of gordijnen af te dekken.
Voor voldoende ventilatie;
Laat een ruimte van 10 cm of meer open aan de boven-, rechter- en linkerkant en 5 cm of meer aan de achterkant.
Laat deze ruimte ook open tussen de onderkant van het beeld en het vloeroppervlak.
Waarschuwingen voor muurbevestiging
• Bevestiging aan een muur moet door een erkende installateur worden uitgevoerd. Het onjuist monteren van het
scherm kan tot een ongeluk leiden en de dood of ernstig letsel tot gevolg hebben. Verder moet er bij het monteren
aan een muur een VESA-norm gecertifi ceerde muurbeugel (VESA 400 × 400) worden gebruikt.
• Zorg dat bij een verticale installatie van het scherm de netspanningsindicator zich aan de onderzijde van het scherm
bevindt.
Installeer het product niet op een plaats waar het blootstaat aan direct zonlicht.
• Het lcd-scherm kan worden aangetast als het in direct zonlicht staat.
Nederlands
3
 Loading...