

Page 1
Hybrid IP-PBX
User Manual
Model No. KX-TDA50
Thank you for purchasing the Panasonic Hybrid IP-PBX, KX-TDA50.
Please read this manual carefully before using this product and save this manual for future use.
Page 2
2 User Manual
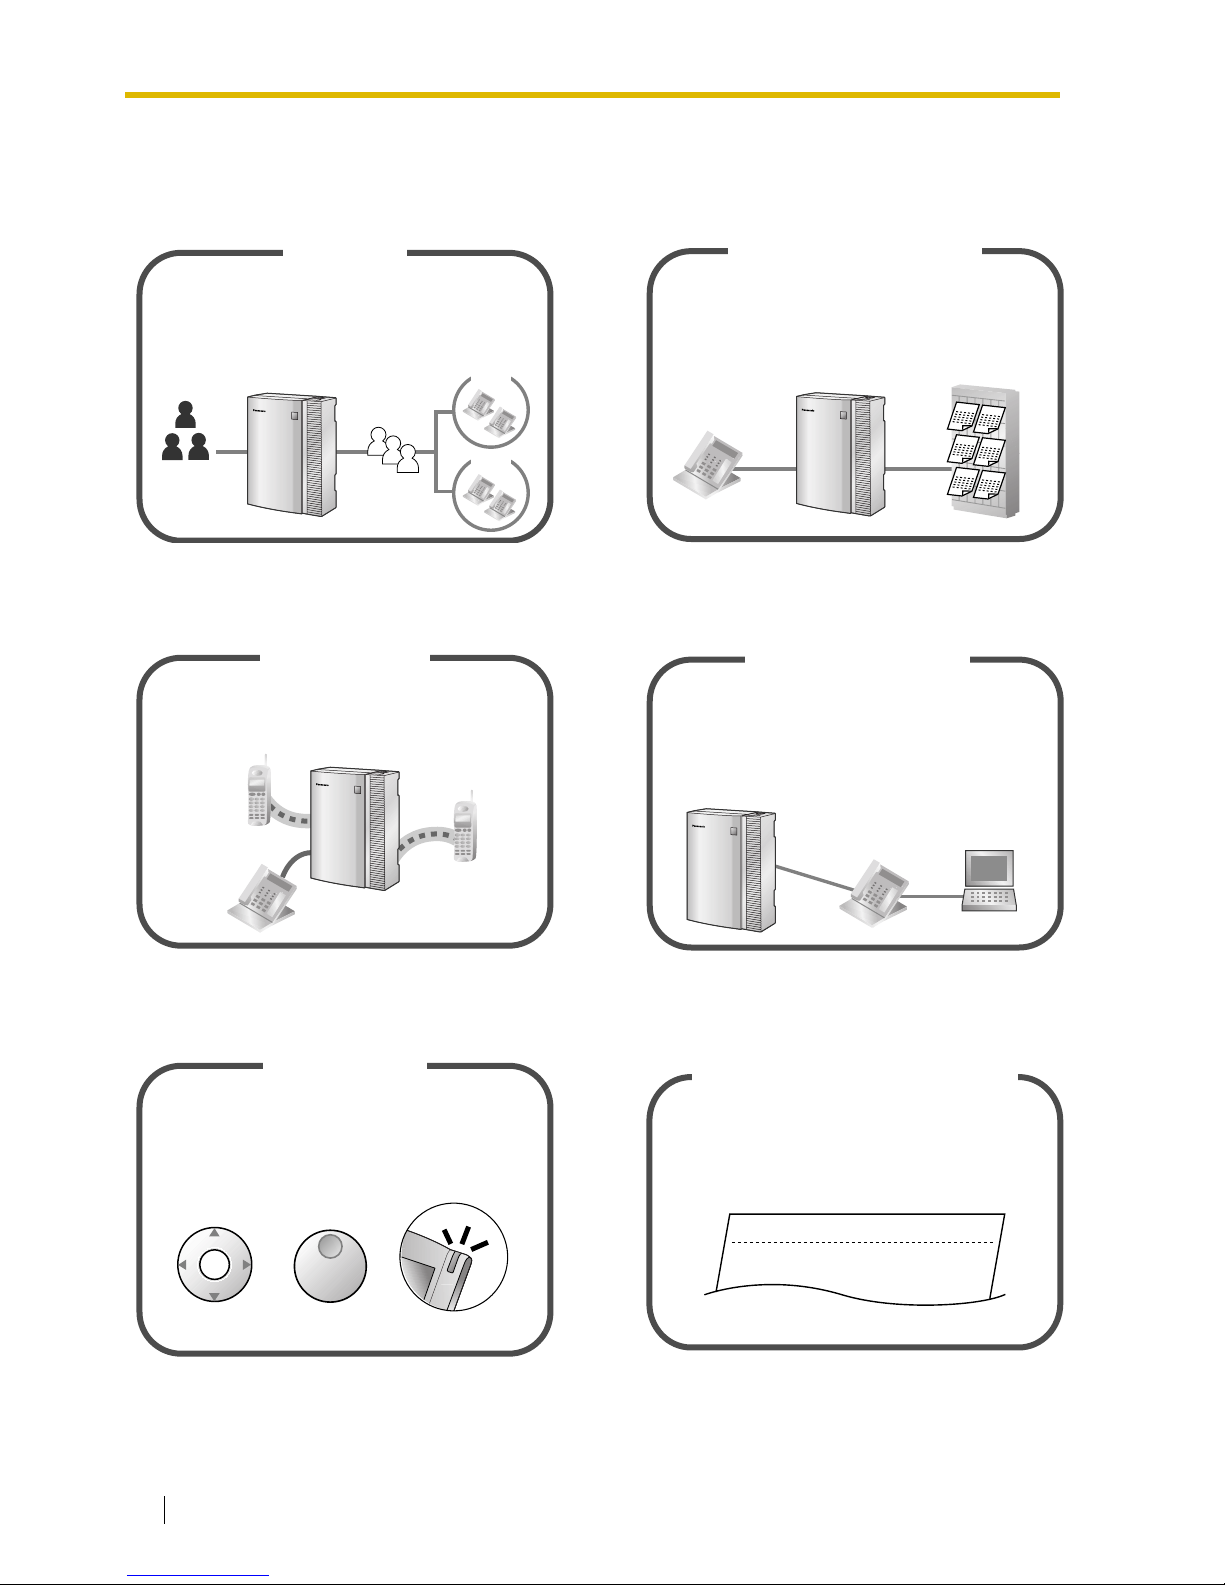
Feature Highlights
1.8 Call Center (Page 85) 1.9.3 Voice Processing System (Page 93)
Appendix (Page 139) Consult your dealer
1.1 Before Operating the Telephones (Page
16)
Consult your dealer
This PBX can establish Incoming Call Distribution
Groups (ICD Group) by which a large volume of
calls from the external customers could be received.
One extension can act as the supervisor, and
monitor other group members.
Call Center
Queuing
Customers
ICD
Group 01
ICD
Group 02
You can forward your calls to a voice
processing system and let calling parties leave
messages in your mailbox when you are unable
to receive calls.
Voice Mail Integration
Message
Message
Message
Message
Message
Message
This PBX optionally supports a Portable Station
(PS) system. PSs can be used on the PBX
with other wired telephones.
Wireless System
PC Phone/PC Console
This PBX supports the PC Phone/PC Console
when your computer is connected to certain
Panasonic telephones via USB interface. The PC
Phone/PC Console provides advanced control and
monitoring of your PBX.
Computer
If you are using a certain Panasonic telephone
that is equipped with a Navigator Key/Jog Dial
and a display, it helps you to access the desired
feature easily. Also, you will be informed of the
arrival of an incoming call or a message waiting
by the lamp if it is equipped.
Easy Operation
ENTER
Navigator Key Jog Dial
Message/Ringer Lamp
This PBX can record or print out call
information: date, time, extension no., dialed
no., duration, etc.
Call Record
(Station Message Detail Recording)
Date
01/02/02
01/02/02
Time
10:03AM
11:07AM
Ext
1230
2230
• • • • • • •
• • • • • • •
• • • • • • •
Page 3

User Manual 3
In This Manual,
• The Proprietary Telephone is abbreviated as "PT".
The Single Line Telephone is abbreviated as "SLT".
The Portable Station is abbreviated as "PS".
The Proprietary Telephone with a Display is abbreviated as "Display PT".
The Digital Proprietary Telephone is abbreviated as "DPT".
• The following icons are used frequently.
ConditionsHints
!!
!!
Page 4

4 User Manual
Important Information
WARNING
• THIS UNIT MAY ONLY BE INSTALLED AND SERVICED BY QUALIFIED
SERVICE PERSONNEL.
• WHEN A FAILURE OCCURS WHICH EXPOSES ANY INTERNAL PARTS,
DISCONNECT THE POWER SUPPLY CORD IMMEDIATELY AND RETURN THIS
UNIT TO YOUR DEALER.
• DISCONNECT THE TELECOM CONNECTION BEFORE DISCONNECTING THE
POWER CONNECTION PRIOR TO RELOCATING THE EQUIPMENT, AND
RECONNECT THE POWER FIRST.
• THIS UNIT IS EQUIPPED WITH A GROUNDING CONTACT PLUG. FOR SAFETY
REASONS, THIS PLUG MUST ONLY BE CONNECTED TO A GROUNDING
CONTACT SOCKET WHICH HAS BEEN INSTALLED ACCORDING TO
REGULATIONS.
• THE POWER SUPPLY CORD IS USED AS THE MAIN DISCONNECT DEVICE.
ENSURE THAT THE SOCKET-OUTLET IS LOCATED/INSTALLED NEAR THE
EQUIPMENT AND IS EASILY ACCESSIBLE.
• TO PREVENT THE RISK OF FIRE OR ELECTRIC SHOCK, DO NOT EXPOSE
THIS PRODUCT TO RAIN OR MOISTURE.
• TO PROTECT THIS UNIT FROM STATIC ELECTRICITY, DO NOT TOUCH ANY
CONNECTORS OF THE UNIT.
Page 5

User Manual 5
When using your telephone equipment, basic safety precautions should always be followed to reduce
the risk of fire, electric shock and injury to persons, including the following:
1. Read and understand all instructions.
2. Follow all warnings and instructions marked on the product.
3. Unplug this product from the wall outlet before cleaning. Do not use liquid cleaners or aerosol
cleaners. Use a damp cloth for cleaning.
4. Do not use this product near water, for example, near a bathtub, wash bowl, kitchen sink, or
laundry tub, in a wet basement, or near a swimming pool.
5. Do not place this product on an unstable cart, stand, or table. The product may fall, causing
serious damage to the product.
6. Slots and openings in the cabinet and the back or bottom are provided for ventilation; to protect
it from overheating, these openings must not be blocked or covered. The openings should never
be blocked by placing the product on a bed, sofa, rug, or other similar surface. This product
should never be placed near or over a radiator or other heat source. This product should not be
placed in a built-in installation unless proper ventilation is provided.
7. This product should be operated only from the type of power source indicated on the product
label. If you are not sure of the type of power supply to your home, consult your dealer or local
power company.
8. This product is equipped with a 3-wire grounding type plug, a plug having a third (grounding) pin.
This plug will only fit into a grounding type power outlet. This is a safety feature. If you are unable
to insert the plug into the outlet, contact your electrician to replace your obsolete outlet. Do not
defeat the safety purpose of the grounding type plug.
9. Do not allow anything to rest on the power cord. Do not locate this product where the cord will
be abused by people walking on it.
10. Do not overload wall outlets and extension cords as this can result in the risk of fire or electric
shock.
11. Never push objects of any kind into this product through cabinet slots as they may touch
dangerous voltage points or short out parts that could result in a risk of fire or electric shock.
Never spill liquid of any kind on the product.
12. To reduce the risk of electric shock, do not disassemble this product, but take it to a qualified
person when some service or repair work is required. Opening or removing covers may expose
you to dangerous voltages or other risks. Incorrect reassembly can cause electric shock when
the appliance is subsequently used.
13. Unplug this product from the wall outlet and refer servicing to qualified service personnel under
the following conditions:
a) When the power supply cord or plug is damaged or frayed.
b) If liquid has been spilled into the product.
c) If the product has been exposed to rain or water.
d) If the product does not operate normally by following the operating instructions. Adjust only
those controls that are covered by the operating instructions because improper adjustment
of other controls may result in damage and will often require extensive work by a qualified
technician to restore the product to normal operation.
e) If the product has been dropped or the cabinet has been damaged.
IMPORTANT SAFETY INSTRUCTIONS
Page 6

6 User Manual
f) If the product exhibits a distinct change in performance.
14. Avoid using a telephone (other than a cordless type) during an electrical storm. There may be a
remote risk of electric shock from lightning.
15. Do not use the telephone to report a gas leak in the vicinity of the leak.
SAVE THESE INSTRUCTIONS
Page 7

User Manual 7
Attention
• If there is any trouble, disconnect the unit from the telephone line. Plug the telephone directly into
the telephone line. If the telephone operates properly, do not reconnect the unit to the line until
the problem has been repaired by an authorized Panasonic Factory Service Center. If the
telephone does not operate properly, chances are that the problem is in the telephone system,
and not in the unit.
• Keep the unit away from heating appliances and electrical noise generating devices such as
fluorescent lamps, motors and televisions. These noise sources can interfere with the
performance of the unit.
• This unit should be kept free of dust, moisture, high temperature (more than 40 °C [104 °F]) and
vibration, and should not be exposed to direct sunlight.
• Never attempt to insert wires, pins, etc., into the vents or holes of this unit.
• Do not use benzene, thinner, or the like, or any abrasive powder to clean the cabinet. Wipe it with
a soft cloth.
• Do not use any handset other than a Panasonic handset for KX-TDA50 use.
When you ship the product
Carefully pack and send it prepaid, adequately insured and preferably in the original carton.
Attach a postage-paid letter, detailing the symptom, to the outside of the carton. DO NOT send
the product to the Executive or Regional Sales offices. They are NOT equipped to make repairs.
Product service
Panasonic Factory Servicenters for this product are listed in the servicenter directory. Consult
your certified Panasonic dealer for detailed instructions.
Page 8

8 User Manual
MODEL NO.:
SERIAL NO.:
The serial number of this product may be found on the label affixed to the side of the
unit. You should note the model number and the serial number of this unit in the
space provided and retain this manual as a permanent record of your purchase to
aid in identification in the event of theft.
DATE OF PURCHASE
NAME OF DEALER
DEALER’S ADDRESS
For your future reference
DEALER’S TELEPHONE NO.
Page 9

User Manual 9
F.C.C. REQUIREMENTS AND RELEVANT
INFORMATION
1. Notification to the Telephone Company
This equipment complies with Part 68 of the FCC rules and the requirements adopted by the
ACTA. On the side of this equipment is a label that contains, among other information, a product
identifier in the format US: ACJMF03AKX-TDA50. If requested, this number must be provided to
the telephone company.
Installation must be performed by a qualified professional installer. If required, provide the
telephone company with the following technical information:
• Telephone numbers to which the system will be connected
• Make: Panasonic
• Model: KX-TDA50
• Certification No.: found on the side of the unit
• Ringer Equivalence No.: 0.3A
• Facility Interface Code: 02LS2
• Service Order Code: 9.0F
• Required Network Interface Jack: RJ11
2. Ringer Equivalence Number (REN)
The REN is used to determine the number of devices that may be connected to a telephone line.
Excessive RENs on a telephone line may result in the devices not ringing in response to an
incoming call. In most, but not all areas, the sum of RENs should not exceed five (5.0). To be
certain of the number of devices that may be connected to a line, as determined by the total
RENs, contact the local telephone company. The REN for this product is part of the product
identifier that has the format US: ACJMF03AKX-TDA50. The digits represented by 03 are the
REN without a decimal point (e.g., 03 is a REN of 0.3). For earlier products, the REN is
separately shown on the label.
3. Incidence of Harm to the Telephone Lines
If this equipment causes harm to the telephone network, the telephone company will notify you
in advance that temporary discontinuance of service may be required. But if advance notice isn't
practical, the telephone company will notify the customer as soon as possible. Also, you will be
advised of your right to file a complaint with the FCC if you believe it is necessary.
4. Changes in Telephone Company Communications Facilities, Equipment, Operations and
Procedures
The telephone company may make changes in its facilities, equipment, operations or procedures
that could affect the operation of the equipment. If this happens the telephone company will
provide advance notice in order for you to make necessary modifications to maintain
uninterrupted service.
5. Trouble with this equipment
If trouble is experienced with this equipment, for repair or warranty information, please see the
attached warranty, which includes the Servicenter Directory. If the equipment is causing harm to
the telephone network, the telephone company may request that you disconnect the equipment
until the problem is resolved.
6. Connection to Party Line
Connection to party line service is subject to state tariffs. Contact the state public utility
commission, public service commission or corporation commission for information.
Page 10

10 User Manual
7. Combined Use with Alarm Equipment
If your home has specially wired alarm equipment connected to the telephone line, ensure the
installation of this equipment does not disable your alarm equipment. If you have questions about
what will disable alarm equipment, consult your telephone company or a qualified installer.
Note
This equipment has been tested and found to comply with the limits for a Class B digital device,
pursuant to Part 15 of the FCC Rules. These limits are designed to provide reasonable protection
against harmful interference in a residential installation. This equipment generates, uses, and
can radiate radio frequency energy and, if not installed and used in accordance with the
instructions, may cause harmful interference to radio communications. However, there is no
guarantee that interference will not occur in a particular installation. If this equipment does cause
harmful interference to radio or television reception, which can be determined by turning the
equipment off and on, the user is encouraged to try to correct the interference by one or more of
the following measures:
• Reorient or relocate the receiving antenna.
• Increase the separation between the equipment and receiver.
• Connect the equipment into an outlet on a circuit different from that to which the receiver is
connected.
• Consult the dealer or an experienced radio/TV technician for help.
CAUTION
Any changes or modifications not expressly approved by the party responsible for compliance
could void the user’s authority to operate this device.
When programming emergency numbers and/or making test calls to emergency numbers:
1. Remain on the line and briefly explain to the dispatcher the reason for the call before
hanging up.
2. Perform such activities in the off-peak hours, such as early morning hours or late evenings.
Page 11

User Manual 11
For Cell Station
CAUTION
Any changes or modifications not expressly approved by the party responsible for compliance
could void user’s authority to operate this device.
Note
This equipment has been tested and found to comply with the limits for a Class B digital device,
pursuant to Part 15 of the FCC Rules. These limits are designed to provide reasonable protection
against harmful interference in a residential installation. This equipment generates, uses, and
can radiate radio frequency energy and, if not installed and used in accordance with the
instructions, may cause harmful interference to radio communications. However, there is no
guarantee that interference will not occur in a particular installation. If this equipment does cause
harmful interference to radio or television reception, which can be determined by turning the
equipment off and on, the user is encouraged to try to correct the interference by one or more of
the following measures:
• Reorient or relocate the receiving antenna.
• Increase the separation between the equipment and receiver.
• Connect the equipment into an outlet on a circuit different from that to which the receiver is
connected.
• Consult the dealer or an experienced radio/TV technician for help.
Some wireless telephones operate at frequencies that may cause interference to nearby TVs and
VCRs. To minimize or prevent such interference, the base of the wireless telephone should not
be placed near or on top of a TV or VCR. If interference is experienced, move the wireless
telephone further away from the TV or VCR. This will often reduce, or eliminate, interference.
Operating near 2.4 GHz electrical appliances may cause interference. Move away from the
electrical appliances.
CAUTION
To comply with FCC RF exposure requirements in uncontrolled environment:
• This equipment must be installed and operated in accordance with provided instructions and
a minimum 20 cm (8 in) spacing must be provided between antenna and all person’s body
(excluding extremities of hands, wrist and feet) during wireless modes of operation.
• This transmitter must not be co-located or operated in conjunction with any other antenna
or transmitter.
Medical—consult the manufacturer of any personal medical devices, such as pacemakers, to
determine if they are adequately shielded from external RF (radio frequency) energy. (The unit
operates in the frequency range of 2401 MHz to 2480 MHz, and the power output level can range
from 0.004 W to 0.4 W.) Do not use the unit in health care facilities if any regulations posted in
the area instruct you not to do so. Hospitals or health care facilities may be using equipment that
could be sensitive to external RF (radio frequency) energy.
Page 12

12 User Manual
Table of Contents
1 Operation........................................................................................15
1.1 Before Operating the Telephones ........................................................................16
1.1.1 Before Operating the Telephones ............................................................................ 16
1.2 Making Calls........................................................................................................... 25
1.2.1 Basic Calling ............................................................................................................ 25
1.2.2 Easy Dialing............................................................................................................. 28
1.2.3 Redial ...................................................................................................................... 32
1.2.4 When the Dialed Line is Busy or There is No Answer ............................................. 32
1.2.5 Alternate Calling—Ring/Voice ................................................................................. 38
1.2.6 Calling without Restrictions ..................................................................................... 38
1.2.7 Direct Inward System Access (DISA) ...................................................................... 40
1.2.8 Remote Setting ........................................................................................................ 42
1.3 Receiving Calls ...................................................................................................... 44
1.3.1 Answering Calls ....................................................................................................... 44
1.3.2 Hands-free Answerback .......................................................................................... 44
1.3.3 Call Pickup............................................................................................................... 45
1.3.4 Trunk Answer From Any Station (TAFAS) ................................................................ 46
1.3.5 ANSWER/RELEASE Button....................................................................................46
1.4 During a Conversation .......................................................................................... 49
1.4.1 Call Transfer............................................................................................................. 49
1.4.2 Call Hold ..................................................................................................................51
1.4.3 Call Splitting.............................................................................................................54
1.4.4 Call Waiting.............................................................................................................. 56
1.4.5 Multiple Party Conversation..................................................................................... 59
1.4.6 Mute......................................................................................................................... 64
1.4.7 Off-hook Monitor...................................................................................................... 65
1.4.8 Headset Operation .................................................................................................. 66
1.5 Absence Settings .................................................................................................. 68
1.5.1 Call Forwarding........................................................................................................ 68
1.5.2 Absent Message...................................................................................................... 71
1.5.3 Extension Lock ........................................................................................................ 72
1.6 Paging..................................................................................................................... 74
1.6.1 Paging...................................................................................................................... 74
1.6.2 Answering/Denying a Paging Announcement.......................................................... 75
1.7 Extension Settings ................................................................................................ 76
1.7.1 Timed Reminder ......................................................................................................76
1.7.2 Do Not Disturb (DND).............................................................................................. 77
1.7.3 Call Waiting/Off-hook Call Announcement (OHCA)/Whisper OHCA ....................... 78
1.7.4 Connected Line Identification Restriction (COLR) ................................................... 79
1.7.5 Calling Line Identification Restriction (CLIR) ........................................................... 80
1.7.6 Executive Busy Override Deny ................................................................................ 80
1.7.7 Background Music (BGM)........................................................................................ 81
1.7.8 Data Line Security ................................................................................................... 81
1.7.9 Time Service ........................................................................................................... 81
1.7.10 Paralleled Telephone ............................................................................................... 82
1.7.11 Wireless XDP Parallel Mode....................................................................................83
1.7.12 Extension Feature Clear .......................................................................................... 83
Page 13

User Manual 13
1.8 Call Center ..............................................................................................................85
1.8.1 Log-in/Log-out, Wrap-up ..........................................................................................85
1.8.2 Incoming Call Distribution Group Monitor ................................................................87
1.8.3 Manual Queue Redirection ......................................................................................89
1.9 User-supplied Equipment......................................................................................91
1.9.1 Doorphone/Door Opener .........................................................................................91
1.9.2 Host PBX..................................................................................................................92
1.9.3 Voice Processing System.........................................................................................93
1.10 Walking Extension .................................................................................................99
1.10.1 Walking Extension....................................................................................................99
1.11 Display Proprietary Telephone ...........................................................................100
1.11.1 Call Log ..................................................................................................................100
1.11.2 Directories..............................................................................................................104
1.11.3 System Feature Access .........................................................................................107
2 Manager Operation......................................................................109
2.1 Control Features ..................................................................................................110
2.1.1 Extension Control...................................................................................................110
2.1.2 Time Service Mode Control ...................................................................................110
2.1.3 Dial Tone Transfer ..................................................................................................111
2.1.4 External Background Music (BGM) ........................................................................112
2.1.5 Outgoing Messages (OGM) ...................................................................................112
3 Customizing Your Phone & System...........................................115
3.1 Personal Programming........................................................................................116
3.1.1 Personal Programming...........................................................................................116
3.1.2 Settings on the Programming Mode.......................................................................117
3.1.3 Customizing the Buttons ........................................................................................126
3.2 Manager Programming ........................................................................................131
3.2.1 Programming Information.......................................................................................131
3.2.2 Manager Programming ..........................................................................................132
3.3 System Programming ..........................................................................................133
3.3.1 Programming Information.......................................................................................133
3.3.2 System Programming.............................................................................................135
4 Appendix ...................................................................................... 139
4.1 Troubleshooting ...................................................................................................140
4.1.1 Troubleshooting......................................................................................................140
4.2 Feature Number Table .........................................................................................143
4.2.1 Feature Number Table............................................................................................143
4.3 Tone.......................................................................................................................150
4.3.1 Tone .......................................................................................................................150
Index ...................................................................................................155
Page 14

14 User Manual
Page 15

User Manual 15
Section 1
Operation
This chapter shows you step by step how to use each
feature. Read this chapter to become familiar with the
many useful features of this PBX.
Page 16
1.1 Before Operating the Telephones
16 User Manual
1.1 Before Operating the Telephones
1.1.1 Before Operating the Telephones
What Kind of Telephone Can Be Used?
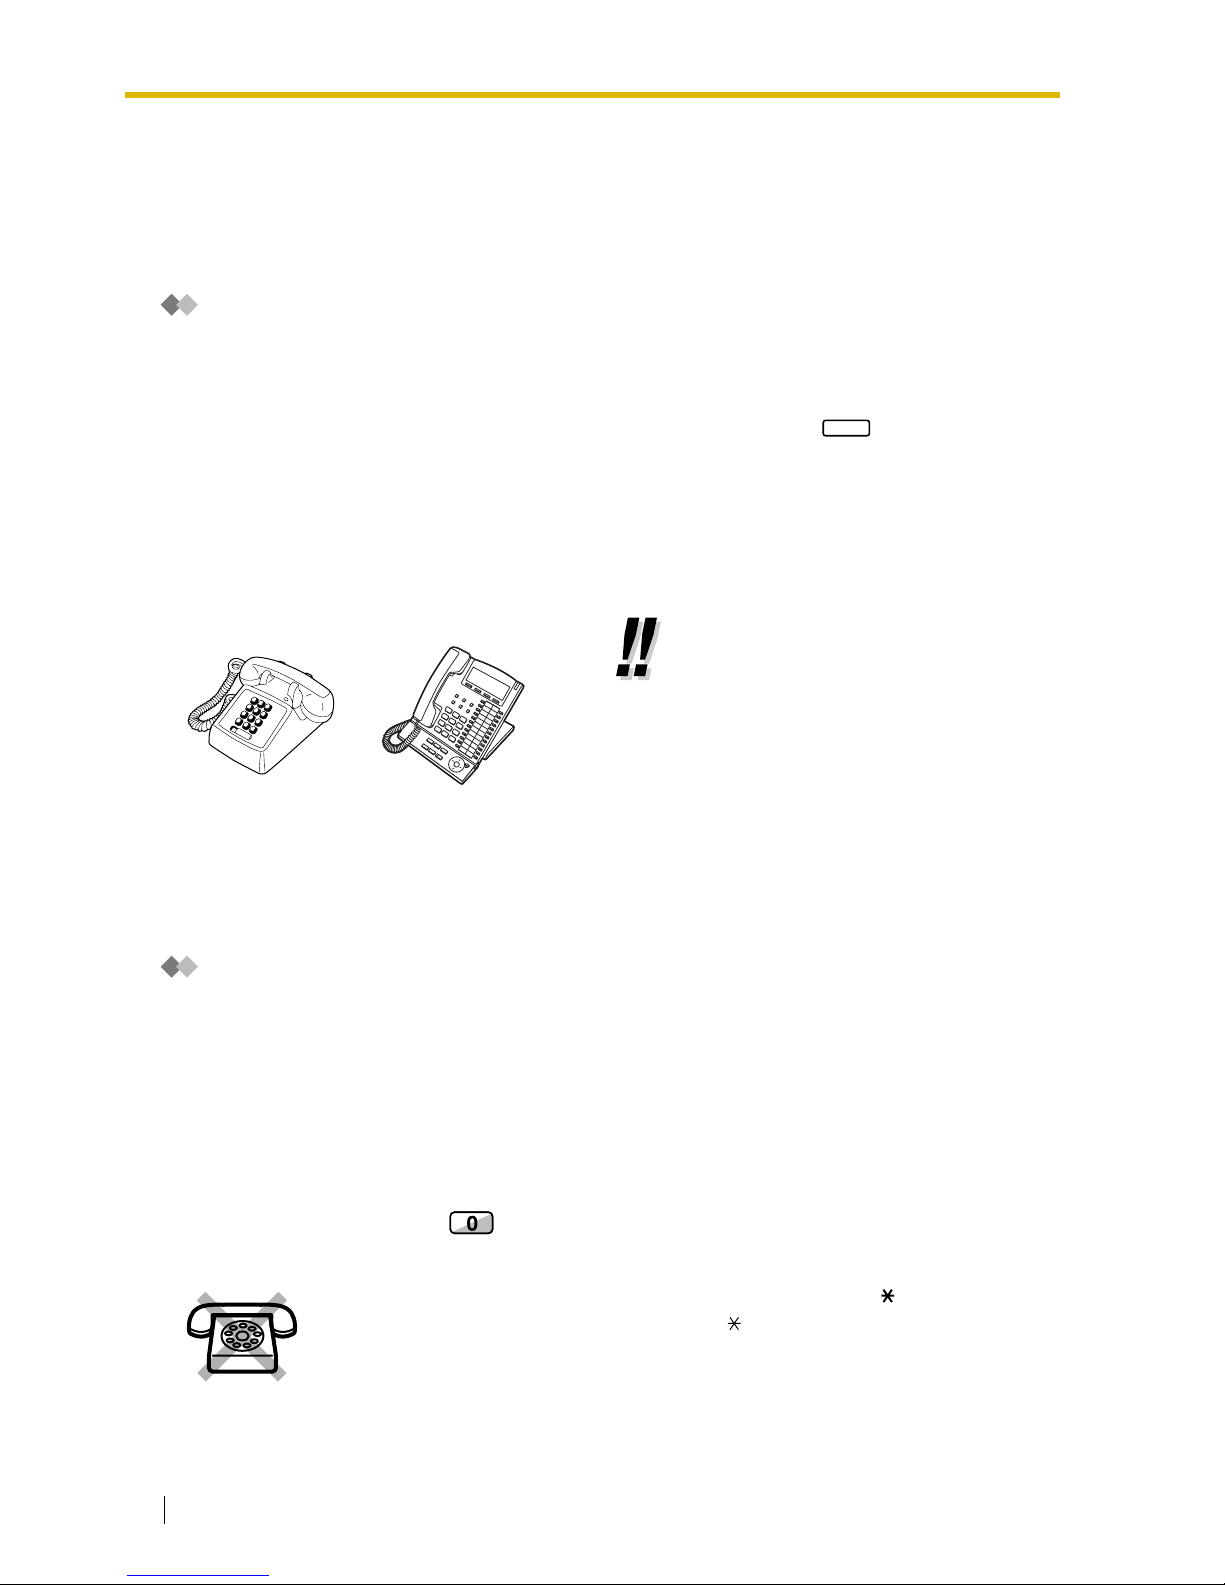
You can use a single line telephone (SLT), such as a rotary pulse telephone or a Panasonic
proprietary telephone (PT) such as the KX-T7636. You can also use a Panasonic Portable Station
(PS), e.g., KX-TD7690. Use the feature depending on the telephone you are using. If you are using
a Panasonic proprietary telephone with a special feature button such as or a display (Display
PT) or both, you can follow the operation with the button or display messages for easy programming.
If you use a large display telephone (e.g., KX-T7636), you can follow the displayed messages to use
the features. If your telephone does not have feature buttons and/or a display, you may operate the
PBX by entering a feature number instead. Follow the operation for your type of telephone.
If you use a Console, you can use the buttons on the Console as the buttons on the connected
proprietary telephone.
Portable Station (PS) Registration
You must register your PS in the PBX and determine its extension number before initial use. For PS
registration, consult your dealer.
Feature Numbers
To use certain features, you need to enter specified feature numbers (and an additional parameter, if
required).
There are two types of feature numbers as follows:
• Flexible feature number
• Fixed feature number
Fixed feature numbers cannot be changed. However, you can change the flexible numbers to other
numbers for easier use. If you want to change the numbers, consult your dealer. In this manual, the
default numbers (factory installed) are used for operations.
A flexible number is shown as (half-shaded key). Use the new programmed number if you have
changed the feature number. Write the new number in the "Feature Number Table" (Appendix).
• If you use a Panasonic proprietary
telephone which does not have
feature buttons, you may change one
of the unused flexible buttons to a
feature button. Refer to "3.1.3
Customizing the Buttons".
If you use a single line telephone which does not have the " " or "#" keys;
it is not possible to access features that have " " or "#" in their feature numbers.
REDIAL
Page 17
1.1 Before Operating the Telephones
User Manual 17
Tone
You will hear various tones, during or after an operation, for confirmation. Refer to "4.3.1 Tone"
(Appendix).
Display
In this manual, you will see "the display ...". This refers to the display of a Panasonic proprietary
telephone. If your telephone is not a Panasonic display proprietary telephone, the message will not
be displayed.
If you use a Panasonic display proprietary telephone, the display helps you confirm the settings.
Some proprietary telephones also give you easy access to features. A message is displayed
depending on the feature. By pressing the corresponding button on the side or at the bottom of the
display, or pressing the Navigator Key, you can access the desired feature.
Furthermore, depending on the display proprietary telephone, you can operate features or make calls
using the display message. Refer to "1.11 Display Proprietary Telephone".
Your Extension Number
If you use a Panasonic display proprietary telephone, you can check your own extension number on
the display. Press the TRANSFER button or Soft (S1) button while on-hook.
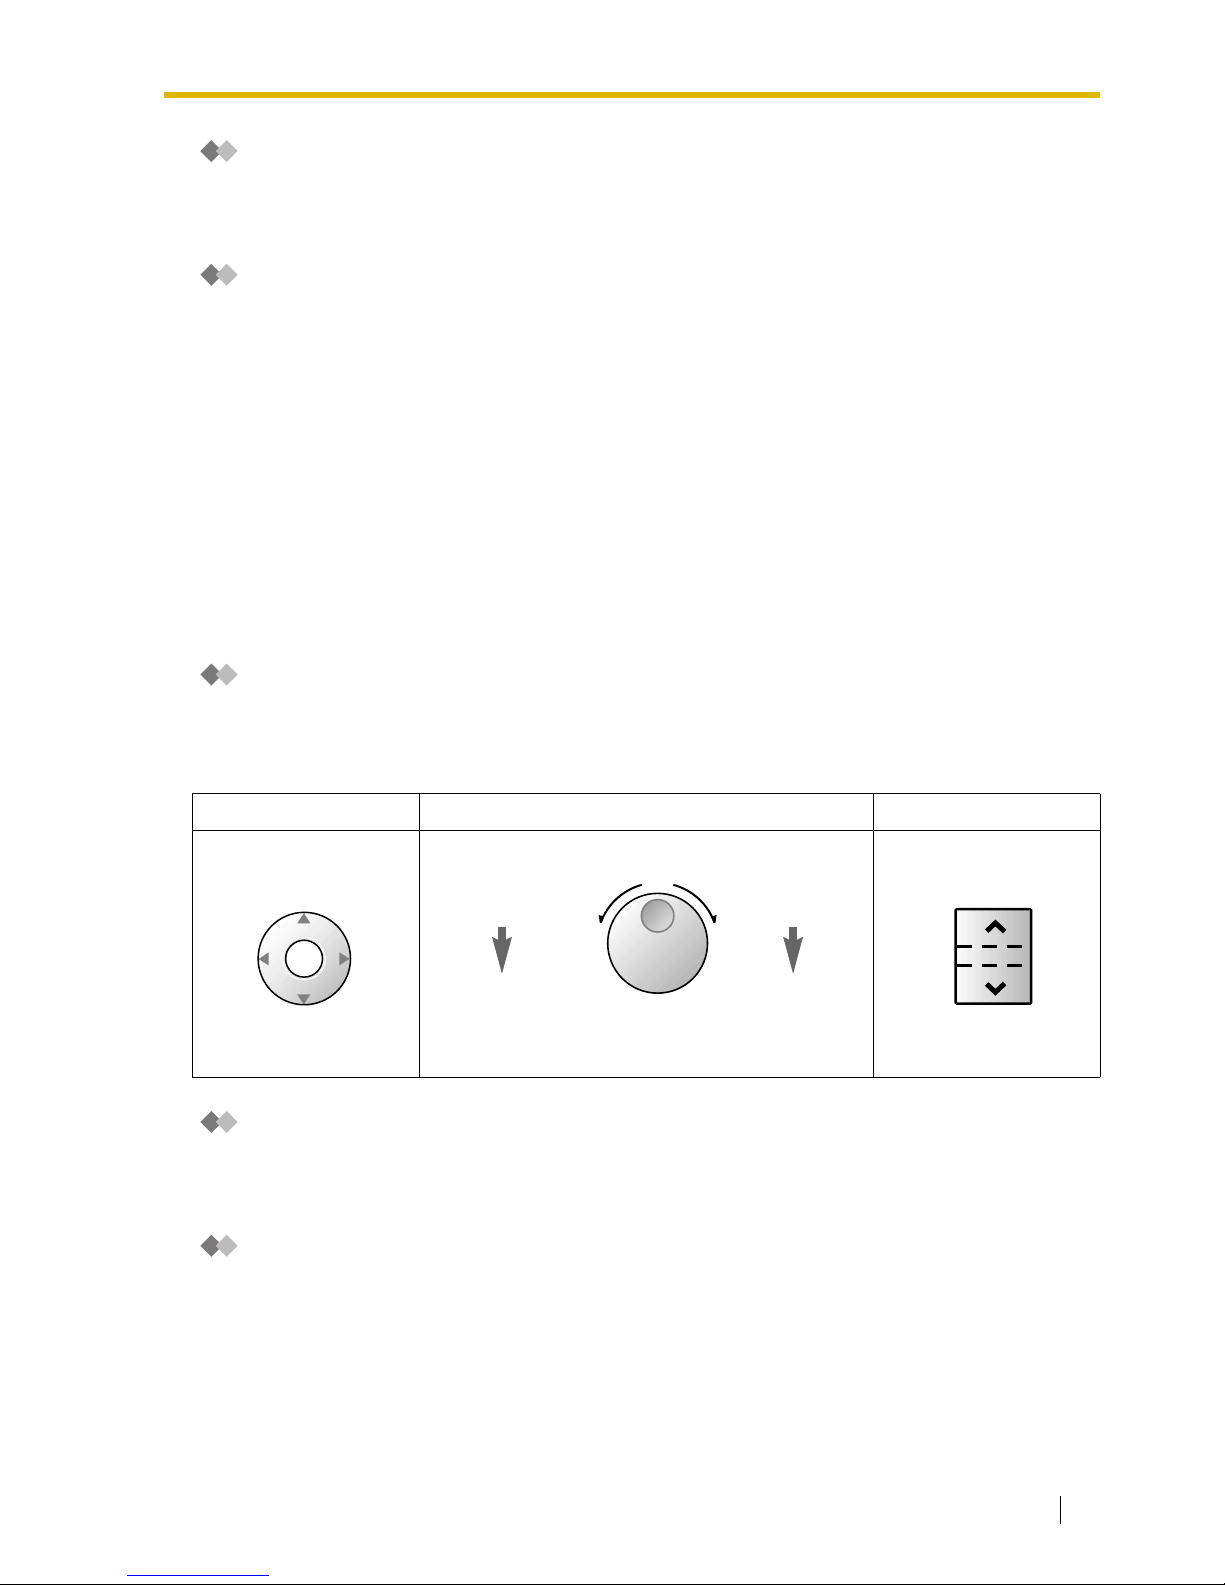
Using a Navigator Key/Jog Dial/Volume Key
The Navigator Key can be used for the display contrast and the volume control or you can search for
desired items on the display. Press the Navigator Key/Volume Key or rotate the Jog Dial in the desired
direction. The contrast or the volume level and the items will change as follows:
Examples
The displays and the illustrations shown as examples are from a telephone connected to the KXTDA50.
Restrictions
Some features may be restricted at your extension under the system programming. Consult your
manager or dealer.
Navigator Key Jog Dial Volume Key
Up
(Level
increases
)
Down
(Level
decreases
)
RightLeft
ENTER
Left
(counter-clockwise)
Level
decreases
Right
(clockwise)
Level
increases
Up
(Level
increases
)
Down
(Level
decreases
)
Page 18
1.1 Before Operating the Telephones
18 User Manual
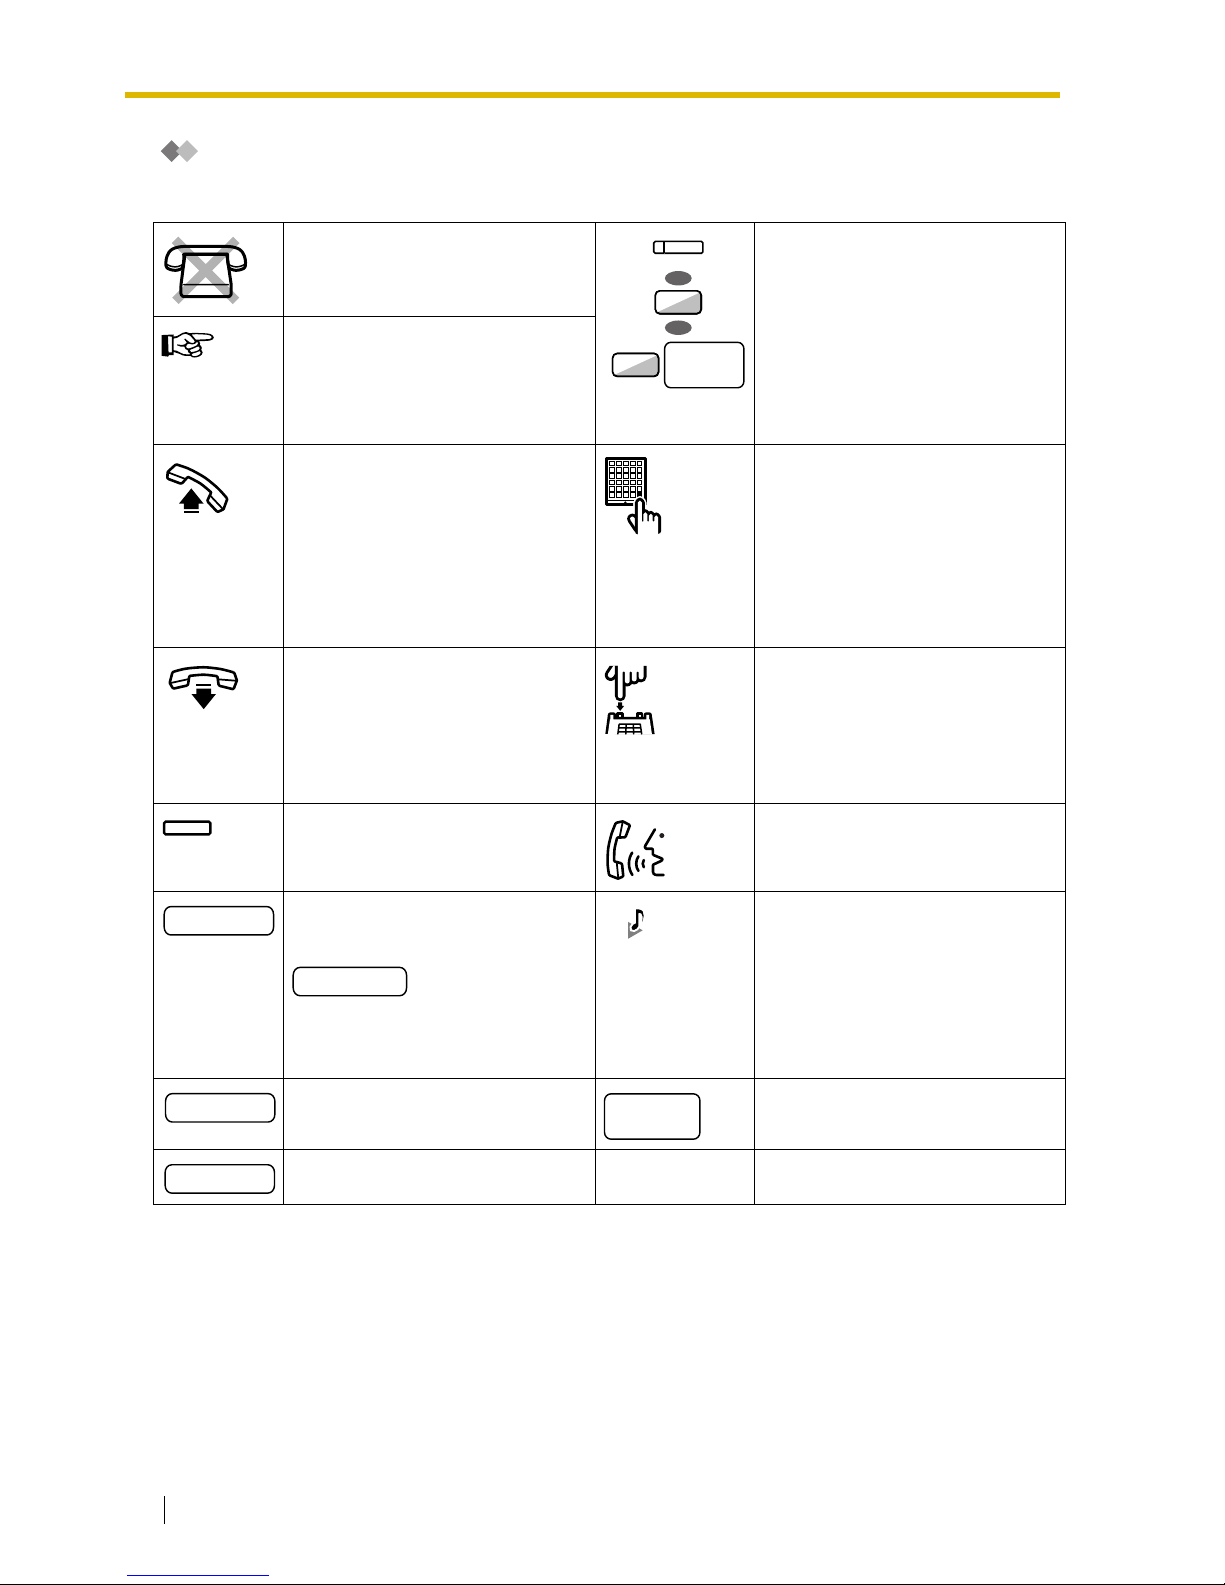
Icon Descriptions
The following icons show you the feature availability, notes and action to use the features.
This feature cannot be used with a
single line telephone.
Seize a CO line (One of the
following).
• Press the CO button.
• Dial automatic line access
number 9.
• Dial CO line group access
number and CO line group
number.
See "Programming" for Related
Programming if necessary.
Off-hook (One of the following).
• Lift the handset.
• Press the SP-PHONE button.
• Press the MONITOR button.
(To start talking, lift the
handset.)
• Press TALK button.
Press the Call button on the
Doorphone.
On-hook (One of the following).
• Hang up.
• Press the SP-PHONE button.
• Press the MONITOR button.
• Press CANCEL button.
Press the hookswitch lightly.
Press the corresponding feature
button on the proprietary
telephone.
Ta lk .
Enter the required number.
<Example>
Enter the account code.
You will hear a busy, confirmation,
dial, ring or ringback tone.
B. Tone: Busy Tone
C. Tone: Confirmation Tone
D. Tone: Dial Tone
R. Tone: Ring Tone
R. B. Tone: Ringback Tone
Dial an extension number. Dial outside phone number.
Dial the telephone number.
CO line
group no.
OR
8
9
OR
(CO)
desired no.
account code
extension no.
outside
phone no.
phone no.
Page 19
1.1 Before Operating the Telephones
User Manual 19
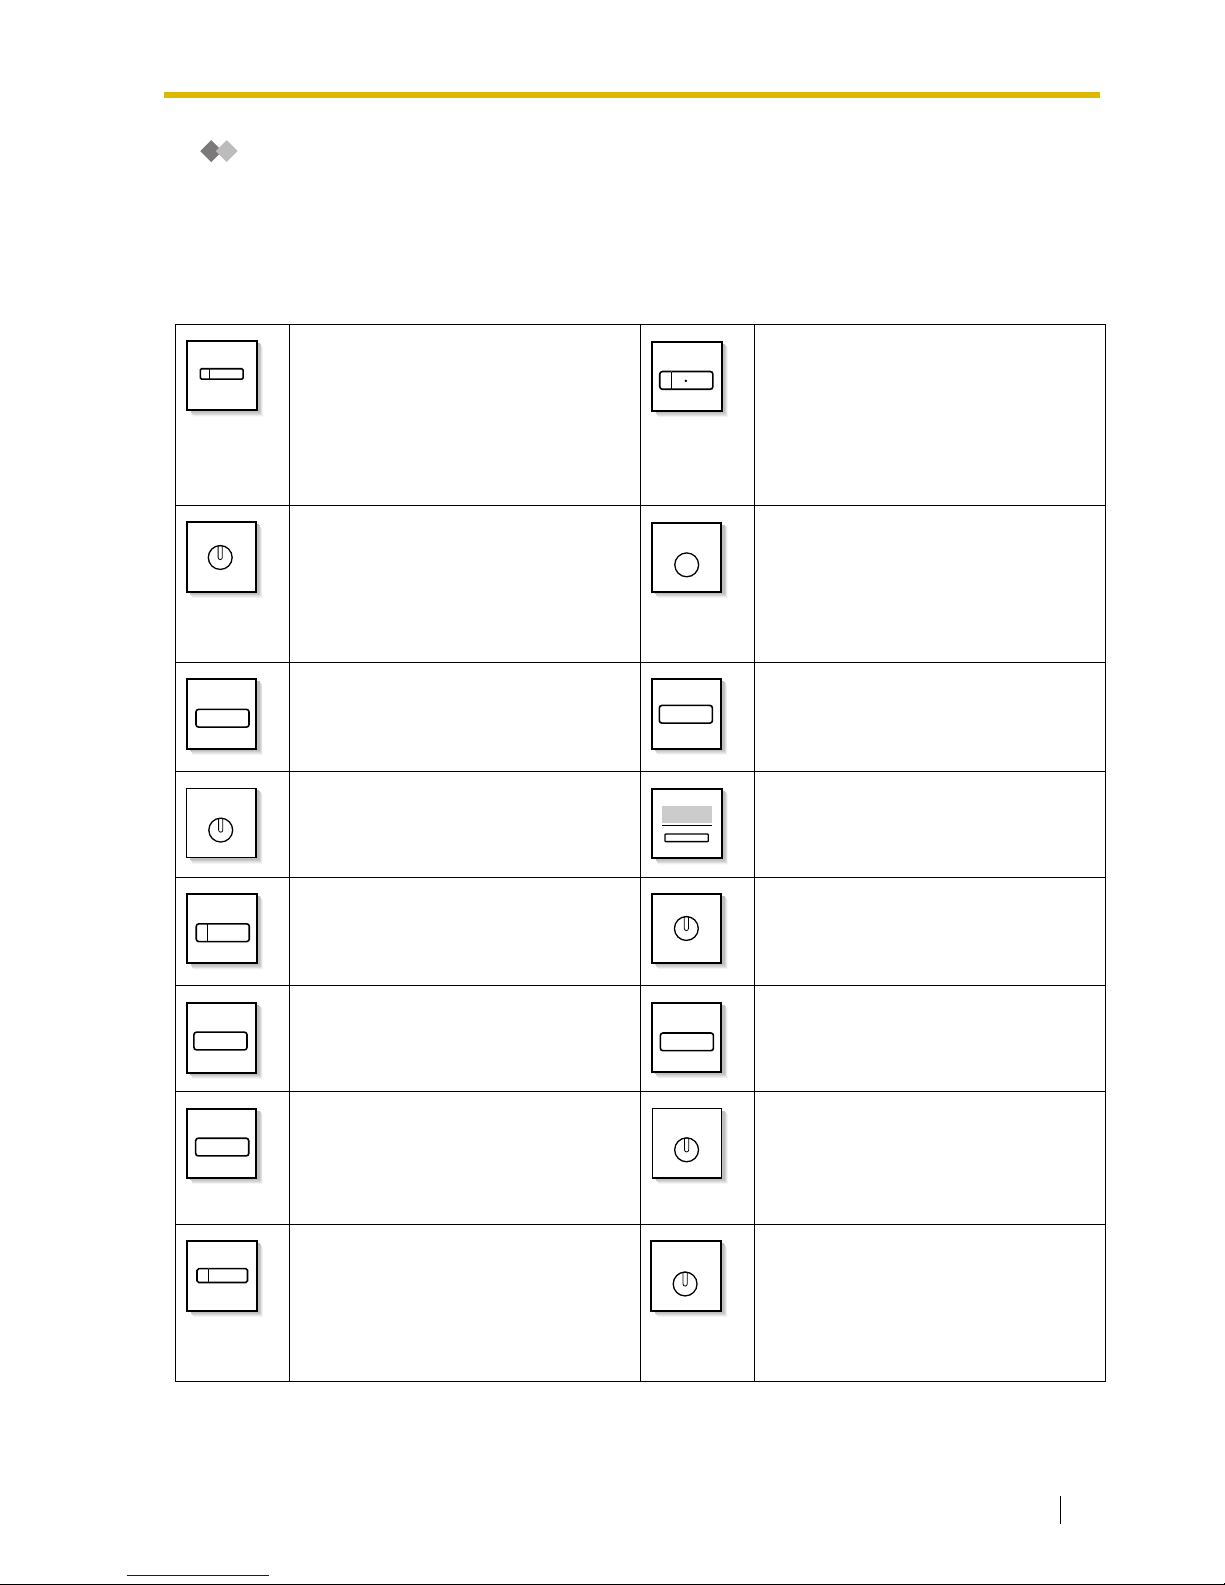
When You Use a Panasonic Proprietary Telephone
If you use a Panasonic proprietary telephone and the Console, they may have some of the useful
feature buttons described below. For a PS user, refer to "Operating Instructions" for PS. These
buttons make operations simple. The illustrations may differ from the buttons on your telephone.
Fixed Buttons
CO:
Used to make or receive an outside
call. (Button assignment is required.)
Also used as feature buttons. (Button
assignment is required.)
(Only the CO line "number" [e.g., 1, 2]
may be shown on some telephones.)
SP-PHONE:
Used for hands-free operation.
AUTO DIAL/STORE:
Used for System/Personal Speed
Dialing or storing program changes.
PAU SE :
Used to insert a pause when storing a
telephone number. This button also
functions as the PROGRAM button
when there is no PROGRAM button on
your telephone.
REDIAL:
Used to redial the last dialed number.
MESSAGE:
Used to leave a message waiting
indication or call back the party who left
the message waiting indication.
INTERCOM:
Used to make or receive intercom
calls.
Soft Buttons:
Used to select the item displayed on
the bottom of the display.
MONITOR:
Used for hands-free dialing. You can
monitor the party’s voice in hands-free
mode.
AUTO ANS (Auto Answer)/MUTE:
Used to receive an incoming call in
hands-free mode or mute the
microphone during a conversation.
TRANSFER:
Used to transfer a call to another party.
HOLD:
Used to place a call on hold.
FLASH/RECALL:
Used to disconnect the current call and
make another call without hanging up.
This button also functions as a
CANCEL button while on-hook.
CONF (Conference):
Used to establish a multiple party
conversation.
VOICE CALL/MUTE:
Used to monitor an intercom call
automatically, but it cannot be used for
hands-free conversations. It also
mutes the handset microphone during
a conversation.
Call Forwarding (FWD)/Do Not
Disturb (DND):
Used to perform Call Forwarding
(FWD) or Do Not Disturb (DND).
(CO)
SP-PHONE
AUTO DIAL
STORE
PAUSE
REDIAL
MESSAGE
INTERCOM
MONITOR
AUTO ANS
MUTE
TRANSFER
HOLD
FLASH/
RECALL
CONF
VOICE CALL
MUTE
FWD/DND
Page 20
1.1 Before Operating the Telephones
20 User Manual
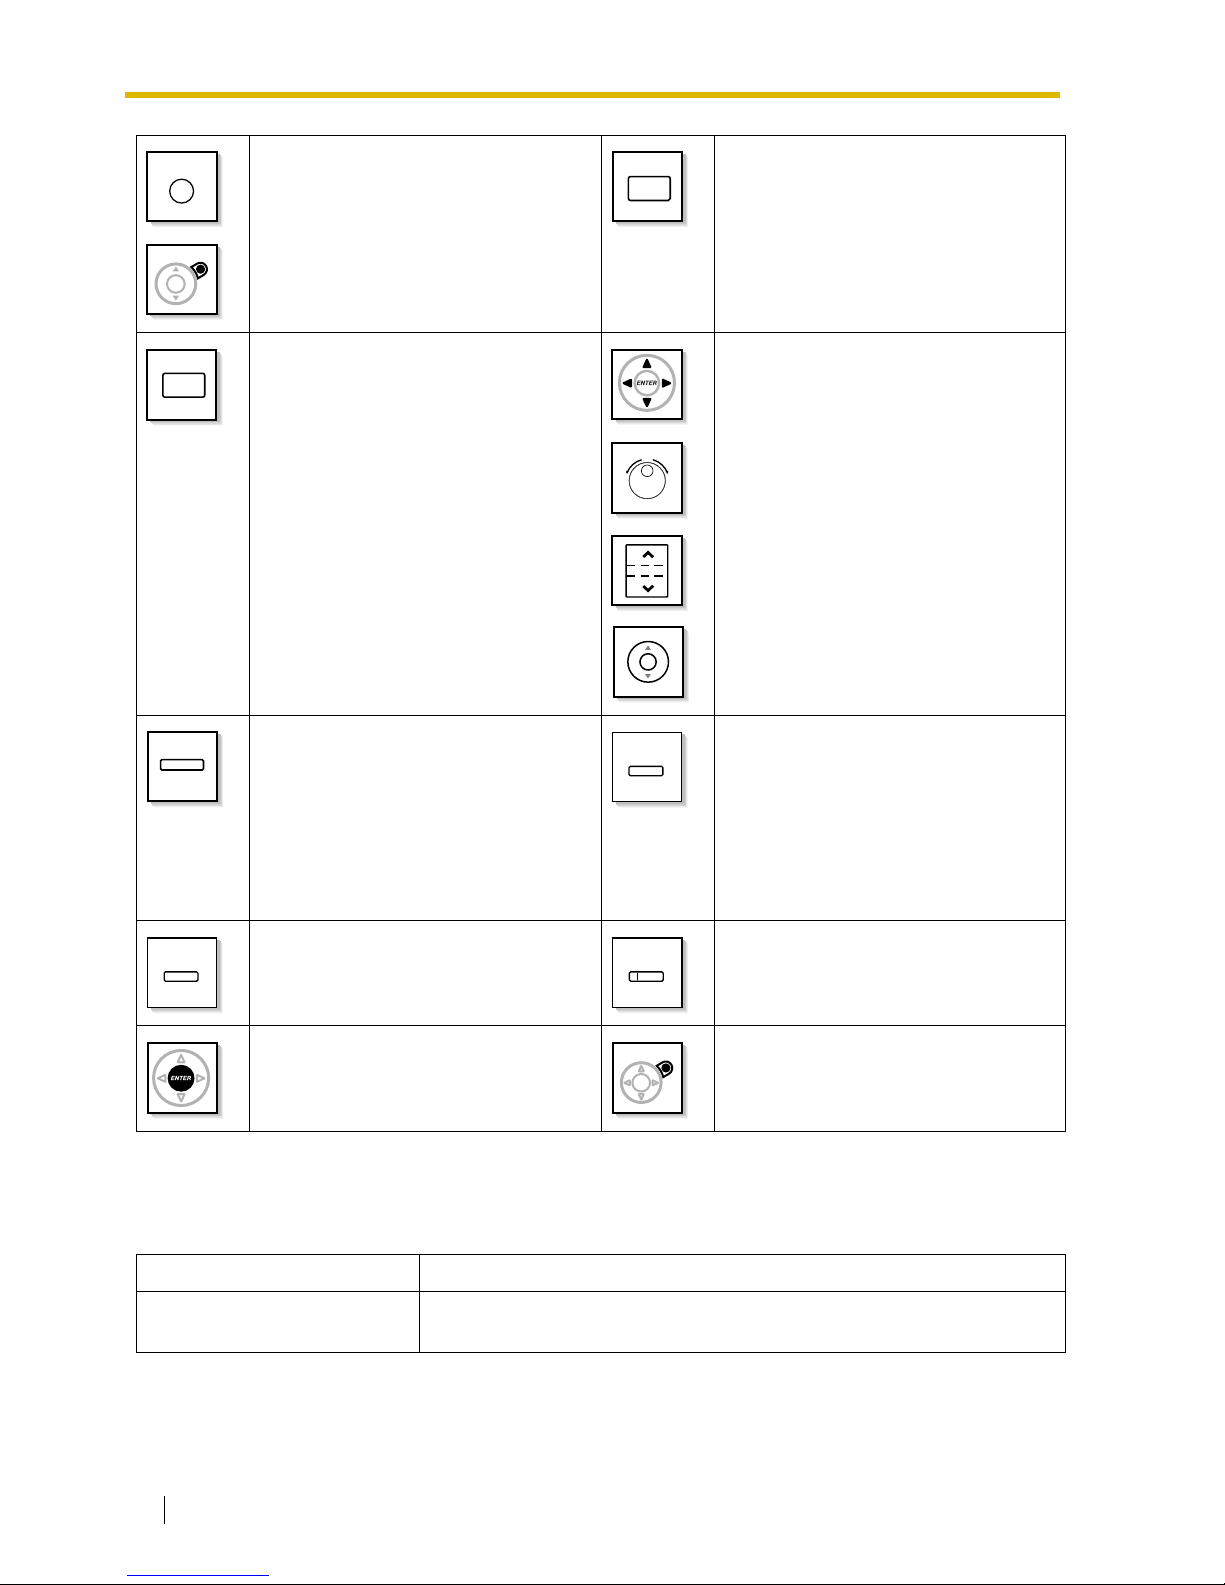
Customized Buttons
If the term is in parentheses like (Account) in this section, it means a flexible button has been made
into an "Account" button. To customize, refer to "3.1.3 Customizing the Buttons".
PROGRAM:
Used to enter and exit the
Programming mode.
ANSWER:
Used to answer an incoming call.
RELEASE:
Used to disconnect the line.
Navigator Key/Jog Dial/Volume Key:
Used to adjust the volume and the
display contrast or select desired
items.
Programmable Feature (PF):
Located on the upper part of the CO
button array or on the DSS Console.
Assigns the desired button and used to
access the stored feature. Mostly used
as a One-touch Dialing button. (Only
the "F and number" may be shown on
some telephones.)
MODE:
Used to shift the display to access
various features.
SELECT:
Used to select the displayed item or to
call the displayed phone number.
SHIFT:
Used to access the second level of Soft
button features.
ENTER:
Used to confirm the selected item.
CANCEL:
Used to cancel the selected item.
Buttons Feature
Loop-CO (L-CO)
Used to access an idle CO line for making outside calls.
Incoming outside calls from any CO line arrive at this button.
PROGRAM
ANSWER
RELEASE
VOL
(PF)
MODE
SELECT
SHIFT
Page 21

1.1 Before Operating the Telephones
User Manual 21
Group-CO (G-CO)
Used to access an idle CO line in a specified CO line group for making
outside calls.
Incoming calls from CO lines in the assigned CO line group arrive at this
button.
Single-CO (S-CO) Used to access a specified CO line for making or receiving outside calls.
Direct Station Selection (DSS)
Used to access an extension with one-touch.
It is also possible to be changed to the other feature button.
One-touch Dialing Used to access a desired party or system feature with one-touch.
Group Directory Number (GDN)
Used to access a specified incoming call distribution group for making or
receiving calls.
Message
Used to leave a message waiting indication or call back the party who left
the message waiting indication.
Message for another extension Used to have a Message button for another extension.
Call Forwarding (FWD)/Do Not
Disturb (DND)—Both calls
Used to forward all calls to a specified destination or refuse.
FWD/DND—Outside calls Used to forward CO line calls to a specified destination or refuse.
FWD/DND—Intercom calls Used to forward intercom calls to a specified destination or refuse.
Group FWD—Both calls Used to forward all the calls to your group to a specified destination.
Group FWD—Outside calls Used to forward the CO line calls to your group to a specified destination.
Group FWD—Intercom calls
Used to forward the intercom calls to your group to a specified
destination.
Account Used to enter an account code.
Conference Used to establish a multiple party conversation.
Terminate
Used to disconnect the current call and make another call without
hanging up.
External Feature Access (EFA)
Used to access special features offered by a host PBX or a telephone
company.
Call Park Used to park or retrieve a call in a preset parking zone.
Call Park (Automatic Park
Zone)
Used to park a call in an idle parking zone automatically.
Call Log Used to show the incoming call information.
Call Log for ICD Group Used to have a Call Log button for incoming call distribution group.
Log-in/Log-out Used to switch between the log-in and log-out mode.
Log-in/Log-out of a specified
group
Used to have a Log-in/Log-out button for another incoming call
distribution group.
Log-in/Log-out for all groups Used to have a Log-in/Log-out button for all groups.
Hurry-up
Used to transfer the longest waiting call in the queue of an incoming call
distribution group to the overflow destination.
Wrap-up Used to switch the wrap-up status, Ready and Not Ready mode.
Buttons Feature
Page 22

1.1 Before Operating the Telephones
22 User Manual
System Alarm Used to confirm a PBX error. For more details, consult your dealer.
Time Service (Day/Night/
Lunch/Break)
Used to switch the time service mode.
Answer Used to answer an incoming call.
Release
Used to disconnect the line during or after a conversation or to complete
a Call Transfer.
Toll Restriction (TRS)
Used to change the toll restriction level of other extension users
temporarily.
Calling Line Identification
Restriction (CLIR)
Used to switch between the CLIP and CLIR services.
Connected Line Identification
Restriction (COLR)
Used to switch between the COLP and COLR services.
Headset Used to talk using the headset.
Time Service Switching Mode
(Automatic/Manual)
Used to switch the time service mode, Automatic or Manual.
Two-way Record Used to record a conversation into your own mailbox.
Two-way Transfer Used to record a conversation into the mailbox of a specific extension.
One-touch Two-way Transfer
Used to record a conversation into the mailbox of a specific extension
with one-touch.
Live Call Screening (LCS)
Used to monitor your own voice mailbox while an incoming caller is
leaving a message and, if desired, intercept the call.
Voice Mail Transfer Used to transfer a call to the mailbox of a specified extension.
Buttons Feature
Page 23
1.1 Before Operating the Telephones
User Manual 23
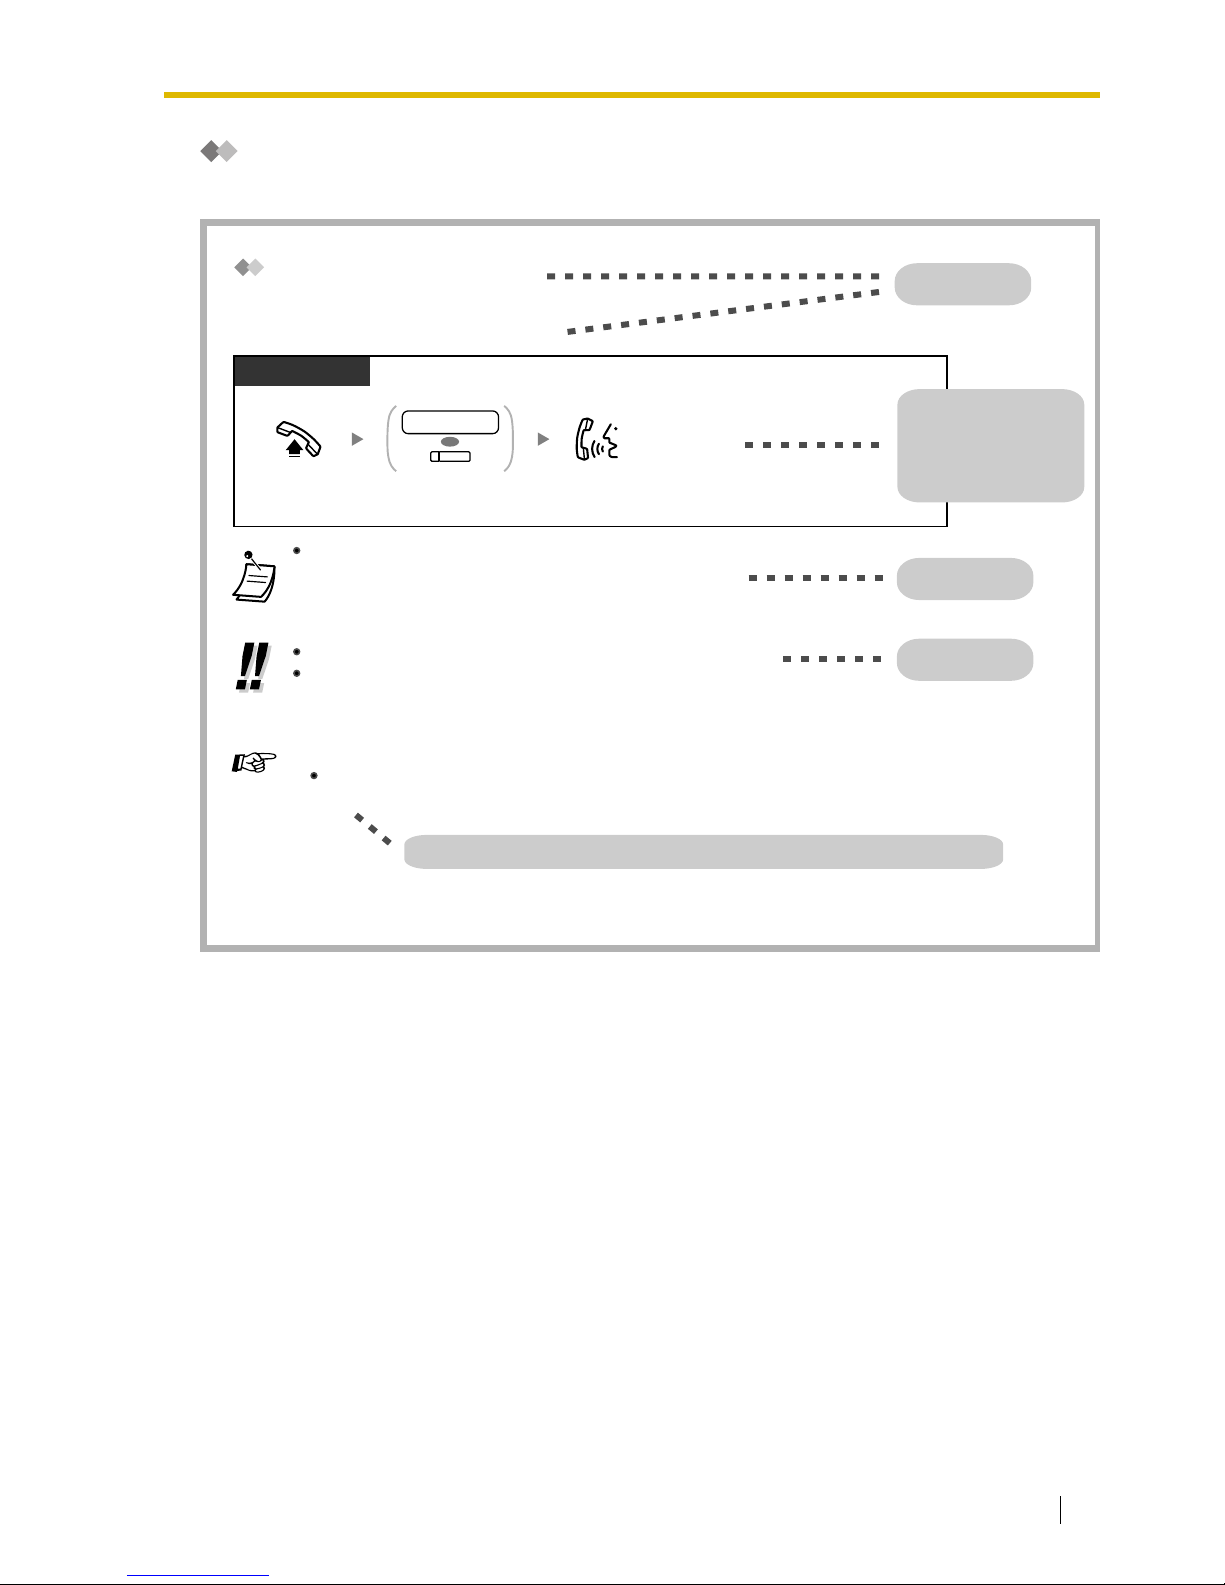
How to Follow the Steps
An example of system operation is shown below.
The DSS button light shows the current status as follows:
Off: The extension is idle.
Red on: Your or another extension is using the line.
For quick operation
If you are an operator or dial some extensions frequently, DSS buttons are useful.
Customizing Your Phone
3.1.3 Customizing the Buttons
Create or edit a Direct Station Selection (DSS) button.
PT and SLT
PT/SLT/PS
Off-hook.
Talk.
Dial extension number
or press DSS.
OR
extension no.
(DSS)
Feature title
Operation steps
The description of the
icons are explained on
"Icon Descriptions".
Conditions
Hints
Programming References: The related or required programming is noted.
Calling Another Extension
To another extension (Intercom Call)
To call using a directory, refer to "1.11.2 Using the Directories".
Page 24
1.1 Before Operating the Telephones
24 User Manual
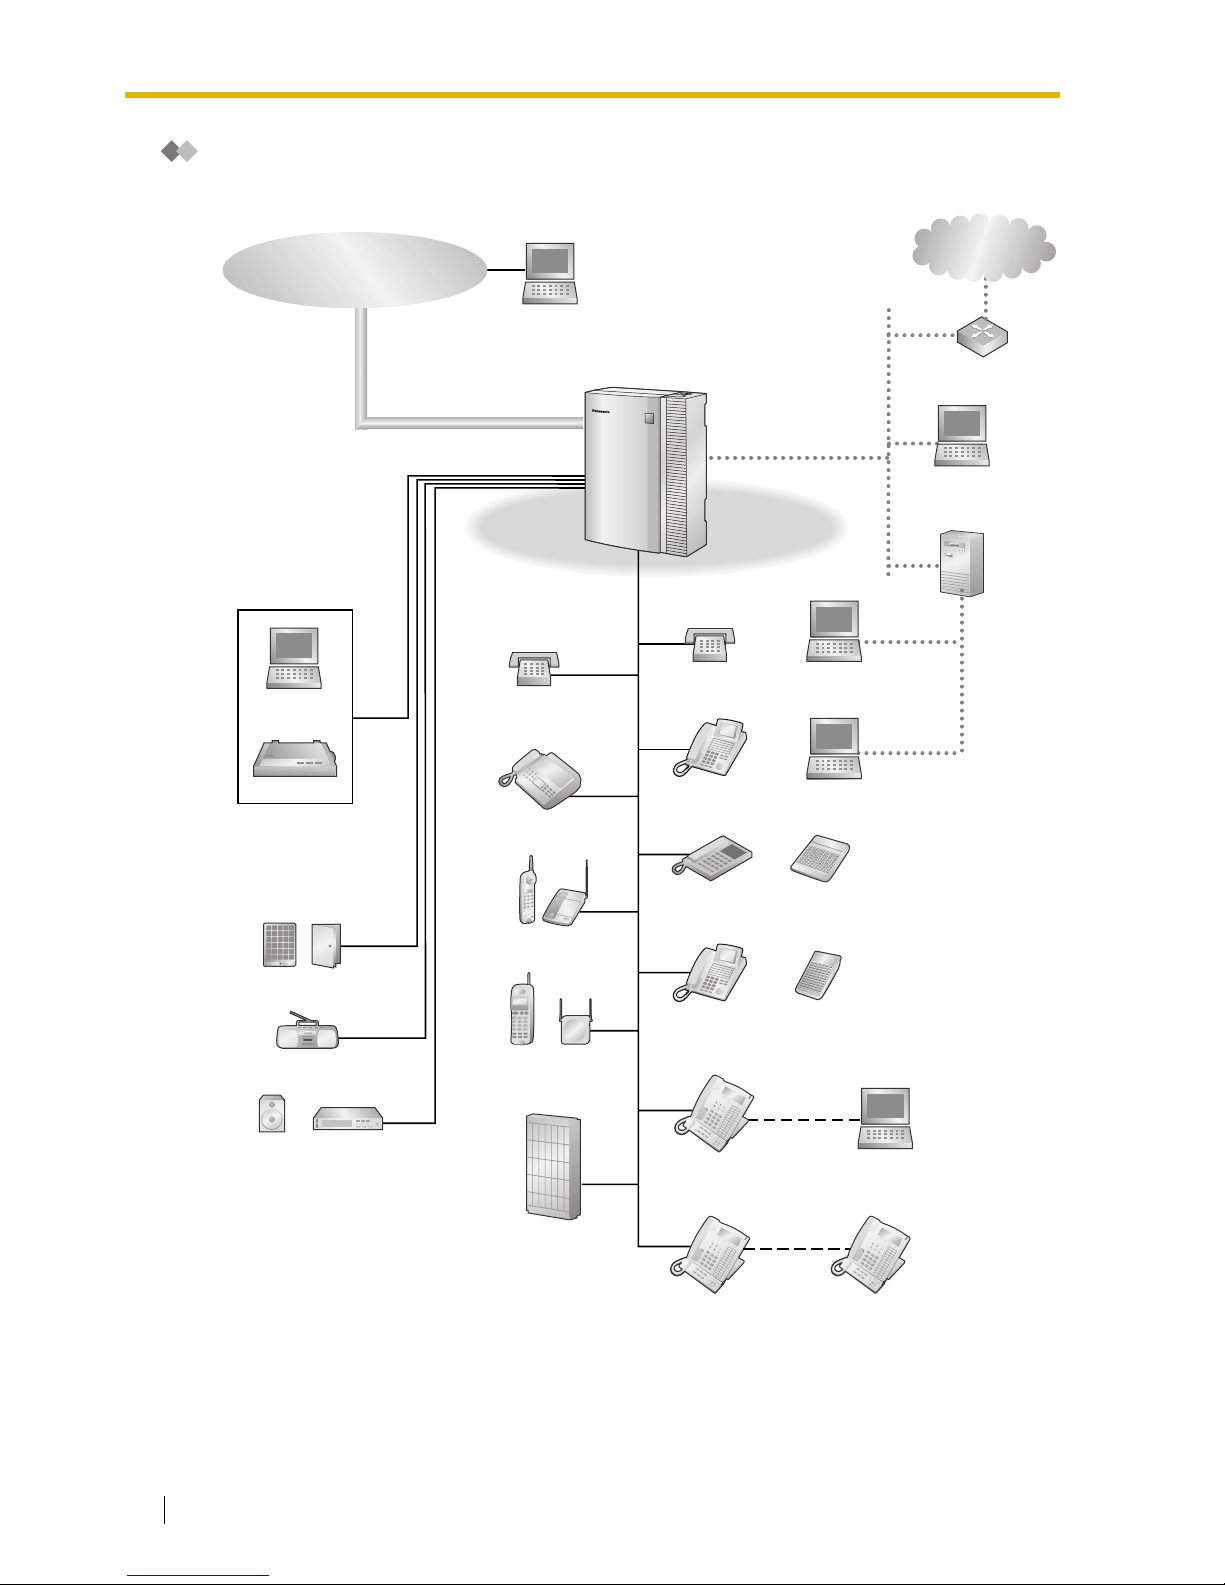
Connection Example
This diagram shows you a connection example.
KX-T7600
Digital
Proprietary
Telephone
KX-T7600
Digital
Proprietary
Telephone
Doorphone & Door Opener
External Music Source
Pager/
Speaker
Voice Processing
System
KX-T7636/
KX-T7633
Computer
Computer
Printer
Router
Telephone Company
Hybrid IP-PBX
Single Line
Telephone
Cell
Station
Portable
Station
Wireless Phone
Fax Machine
Computer
USB
Analog
Proprietary
Telephone
Digital
Proprietary
Telephone
Amplifier
Computer
Computer
(Server)
Computer
Computer
Single Line
Telephone
Digital Proprietary
Telephone
Private IP
Network
DSS Console
DSS Console
Page 25
1.2 Making Calls
User Manual 25
1.2 Making Calls
1.2.1 Basic Calling
— Calling Another Extension
— Calling an Outside Party
— TIE Line Access
— Account Code Entry
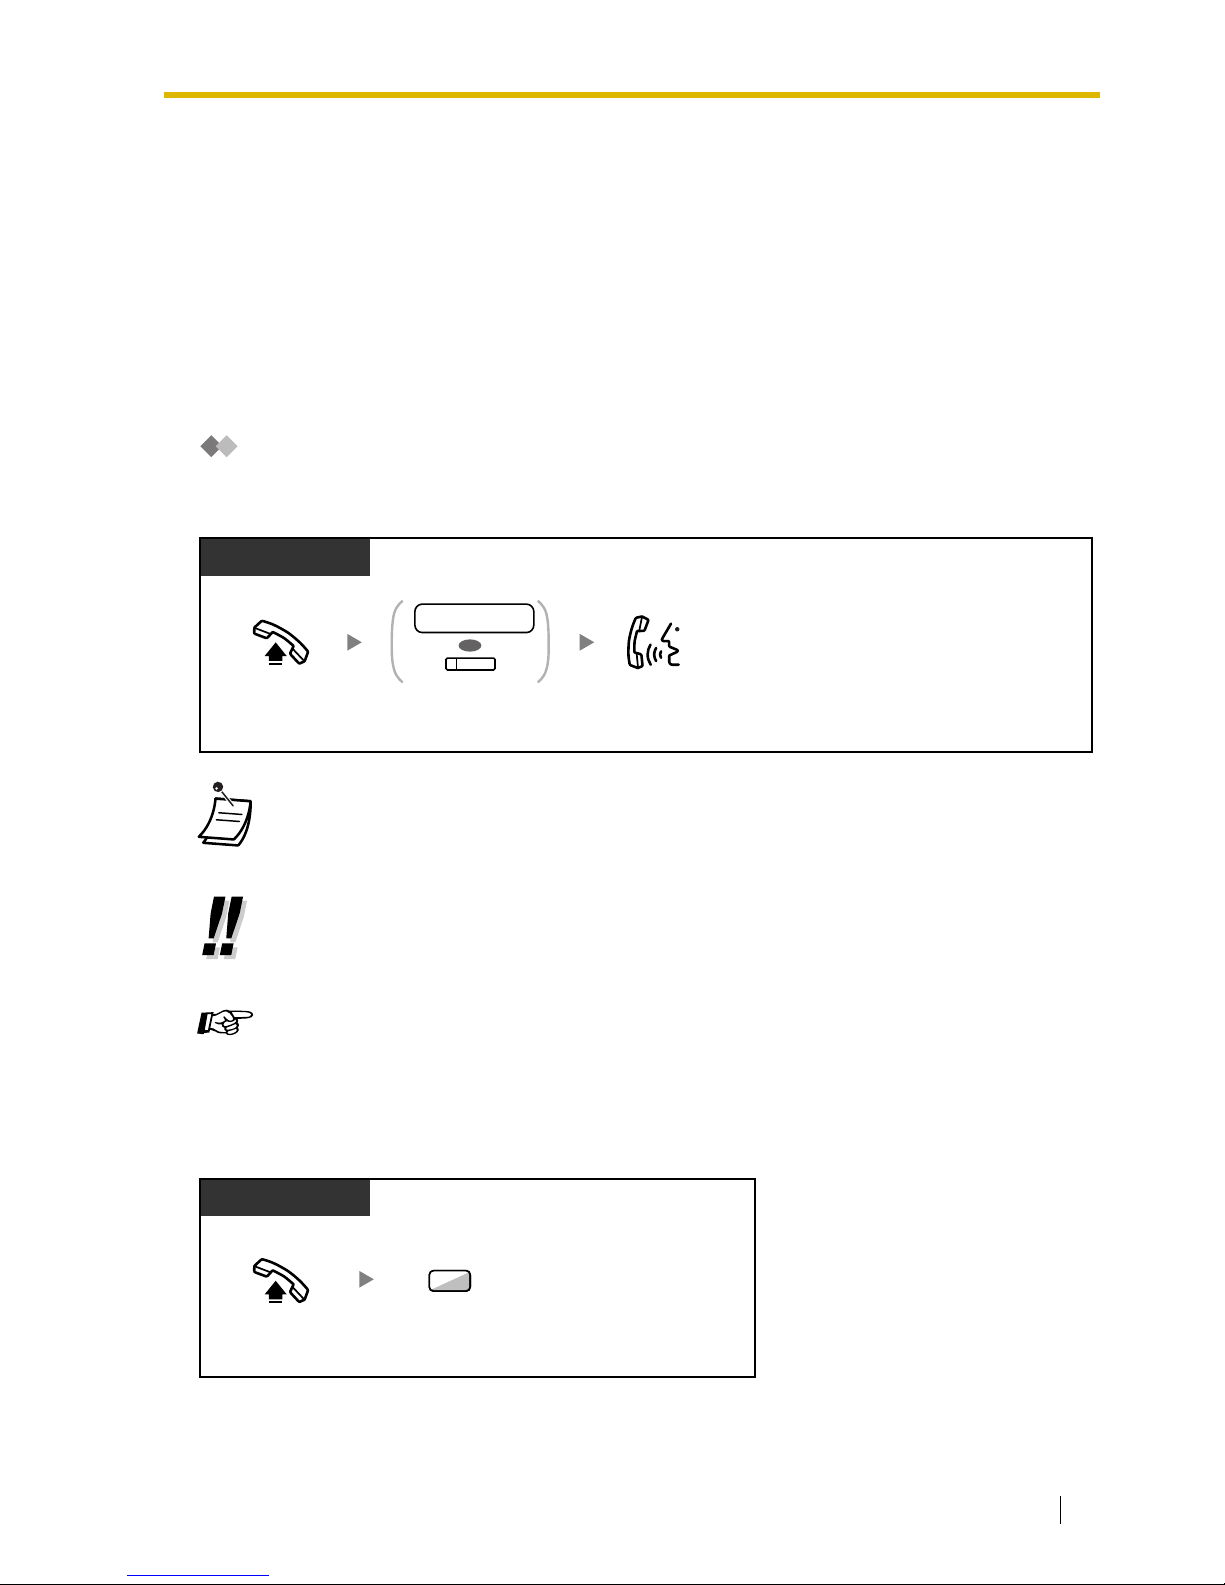
Calling Another Extension
Intercom Call
Operator Call
You can call an extension or a group assigned as the operator.
• The DSS button light shows the current status as follows:
Off: The extension is idle.
Red on: Your or another extension is using the line.
• To call using a directory, refer to "1.11.2 Directories".
• For quick operation
If you are an operator or dial some extensions frequently, DSS buttons are useful.
Customizing Your Phone
• 3.1.3 Customizing the Buttons
Create or edit a Direct Station Selection (DSS) button.
PT and SLT
PT/SLT/PS
Off-hook.
Talk.Dial
extension number
or press
DSS
.
OR
extension no.
(DSS)
PT/SLT/PS
Off-hook.
Enter
0
.
0
Page 26
1.2 Making Calls
26 User Manual
Calling an Outside Party
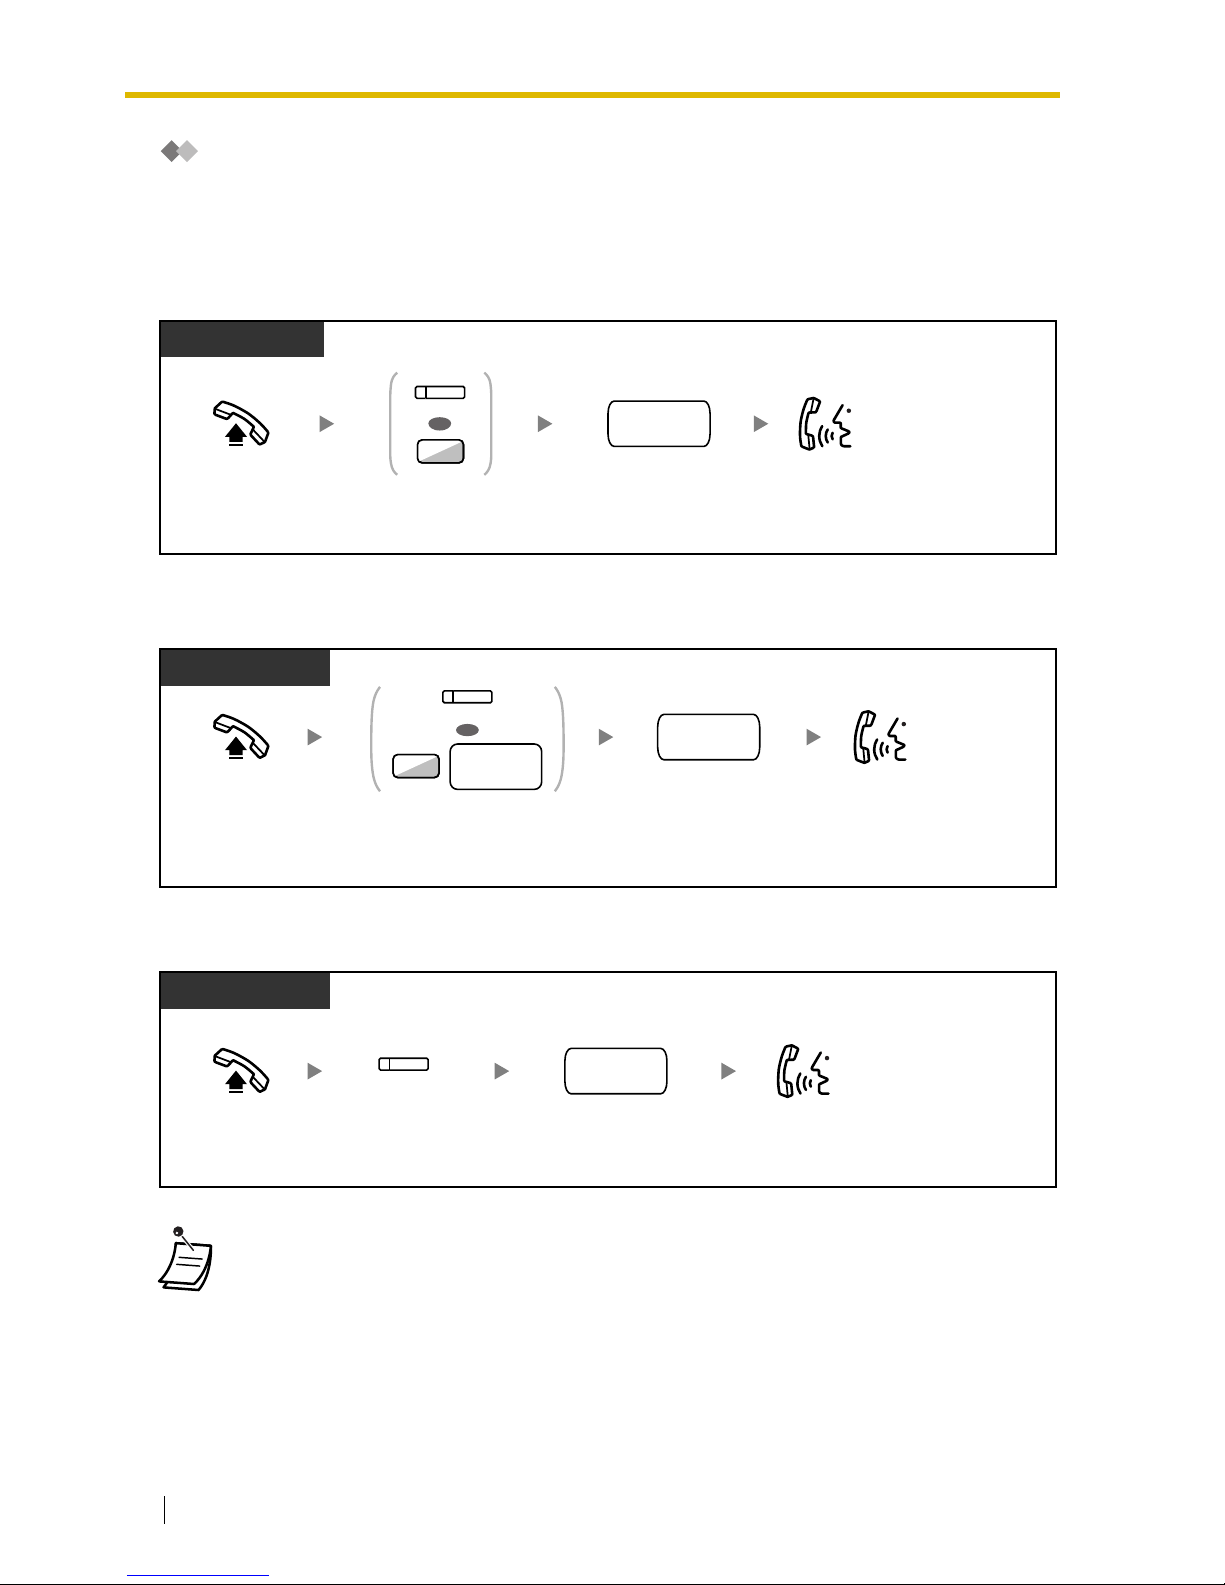
You have to seize a CO line before dialing an outside phone number because external calls are made
via your PBX.
Select one of the following methods:
Automatic Line Access
CO Line Group Access
To select the specified CO line
• Each of the S-CO button or G-CO button light shows the current status as follows:
Off: The line is idle.
Red on: The line is in use.
• You may be restricted from making a call to the specified outside party. To make a call,
refer to "1.2.6 Calling without Restrictions".
PT/SLT/PS
Off-hook. Talk.
Dial outside
phone number.
Press L-CO or
enter automatic
line access number.
OR
9
(L-CO)
outside
phone no.
PT and SLT
PT/SLT/PS
Off-hook. Talk.
Press
G-CO
or enter
CO
line group access number
and then
CO line group
number
(2 digits).
Dial
outside phone
number
.
outside
phone no.
OR
(G-CO)
8
CO line
group no.
PT and SLT
PT/PS
Off-hook. Talk.
Press
S-CO
.
(S-CO)
Dial
outside
phone number
.
outside
phone no.
Page 27
1.2 Making Calls
User Manual 27
TIE Line Access
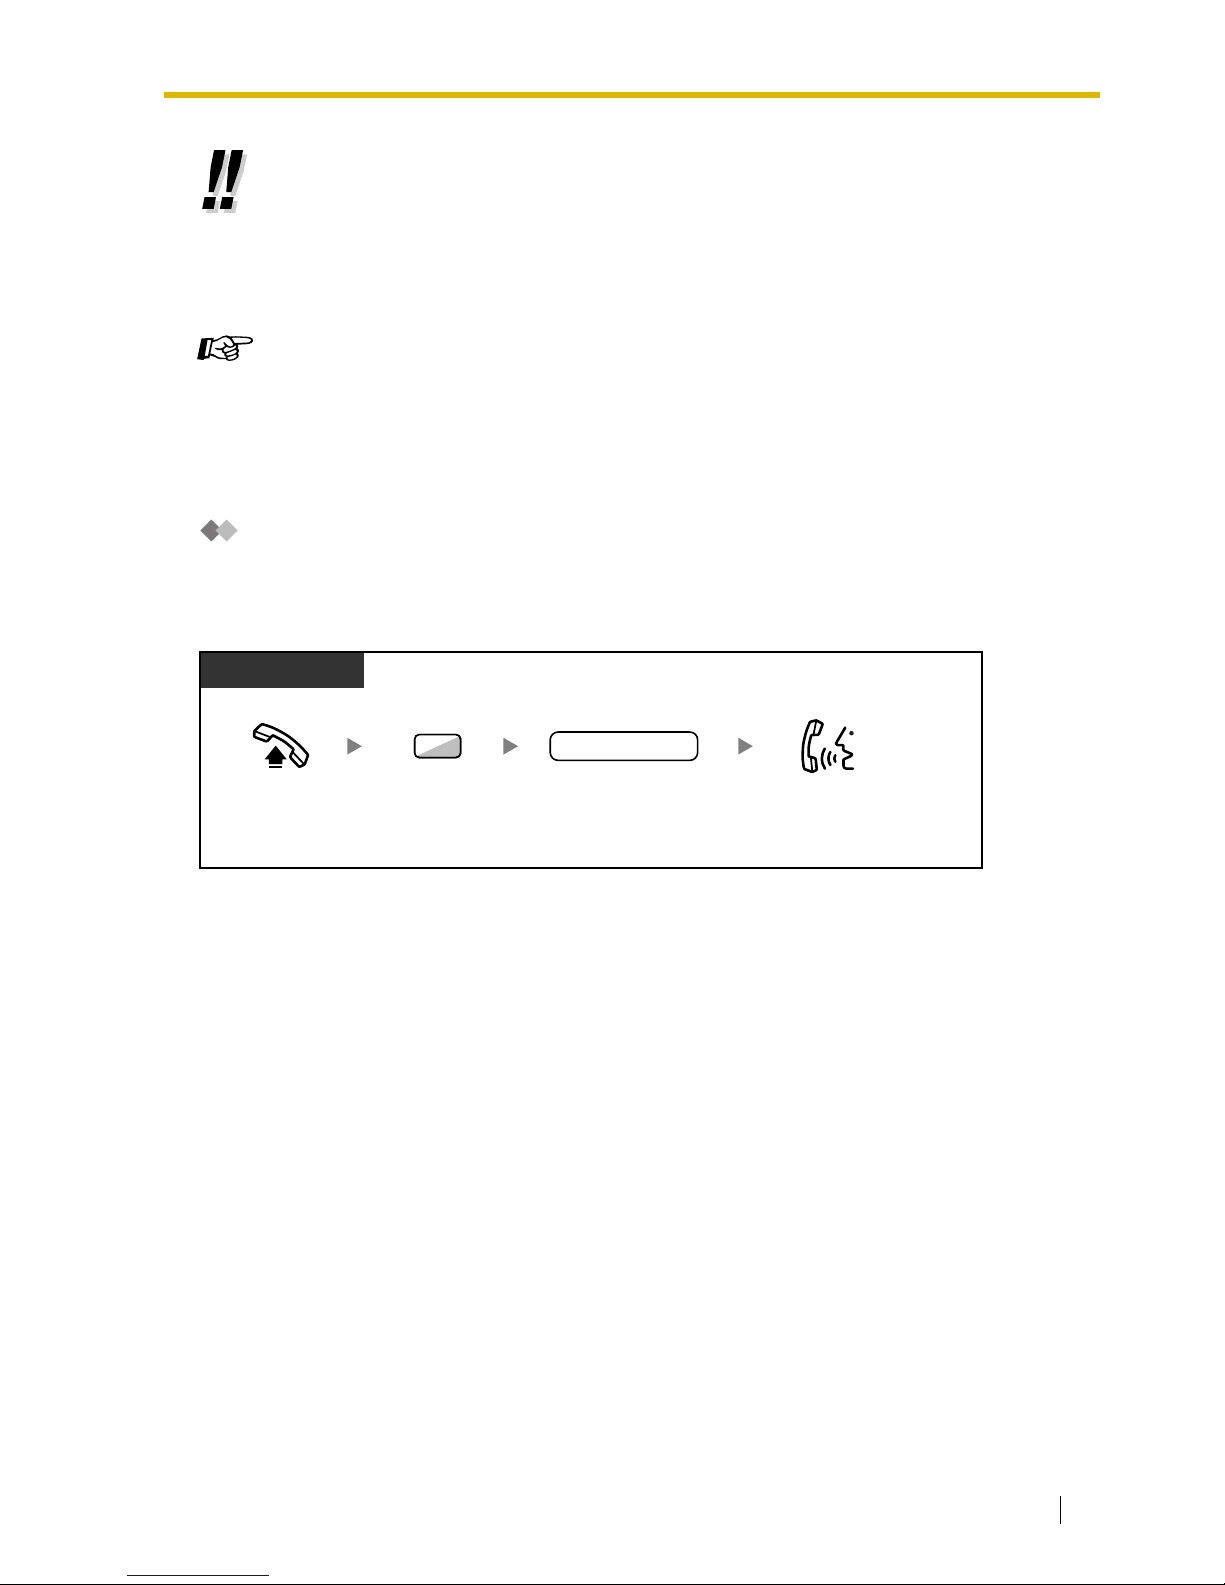
When your PBX is connected to a private network, you can access it.
To call
• To confirm number before dialing, you can enter a phone number and confirm it on the
display and then go off-hook. (Predialing)
• To make a call to another party without going on-hook, press the FLASH/RECALL
button. It will re-access the CO line and provide external dial tone. Pressing the Terminate
button will provide intercom dial tone. You can dial the new phone number without going
on/off-hook.
Customizing Your Phone
• 3.1.2 Settings on the Programming Mode–Preferred Line Assignment—Outgoing
Select the seized line when going off-hook.
• 3.1.3 Customizing the Buttons
Create or edit a Loop-CO (L-CO) button, a Group-CO (G-CO) button, a Single-CO (SCO) button or a Terminate button.
PT/SLT/PS
Off-hook. Talk.
Enter 7. Dial private
phone number.
private phone no.
7
Page 28
1.2 Making Calls
28 User Manual
Account Code Entry
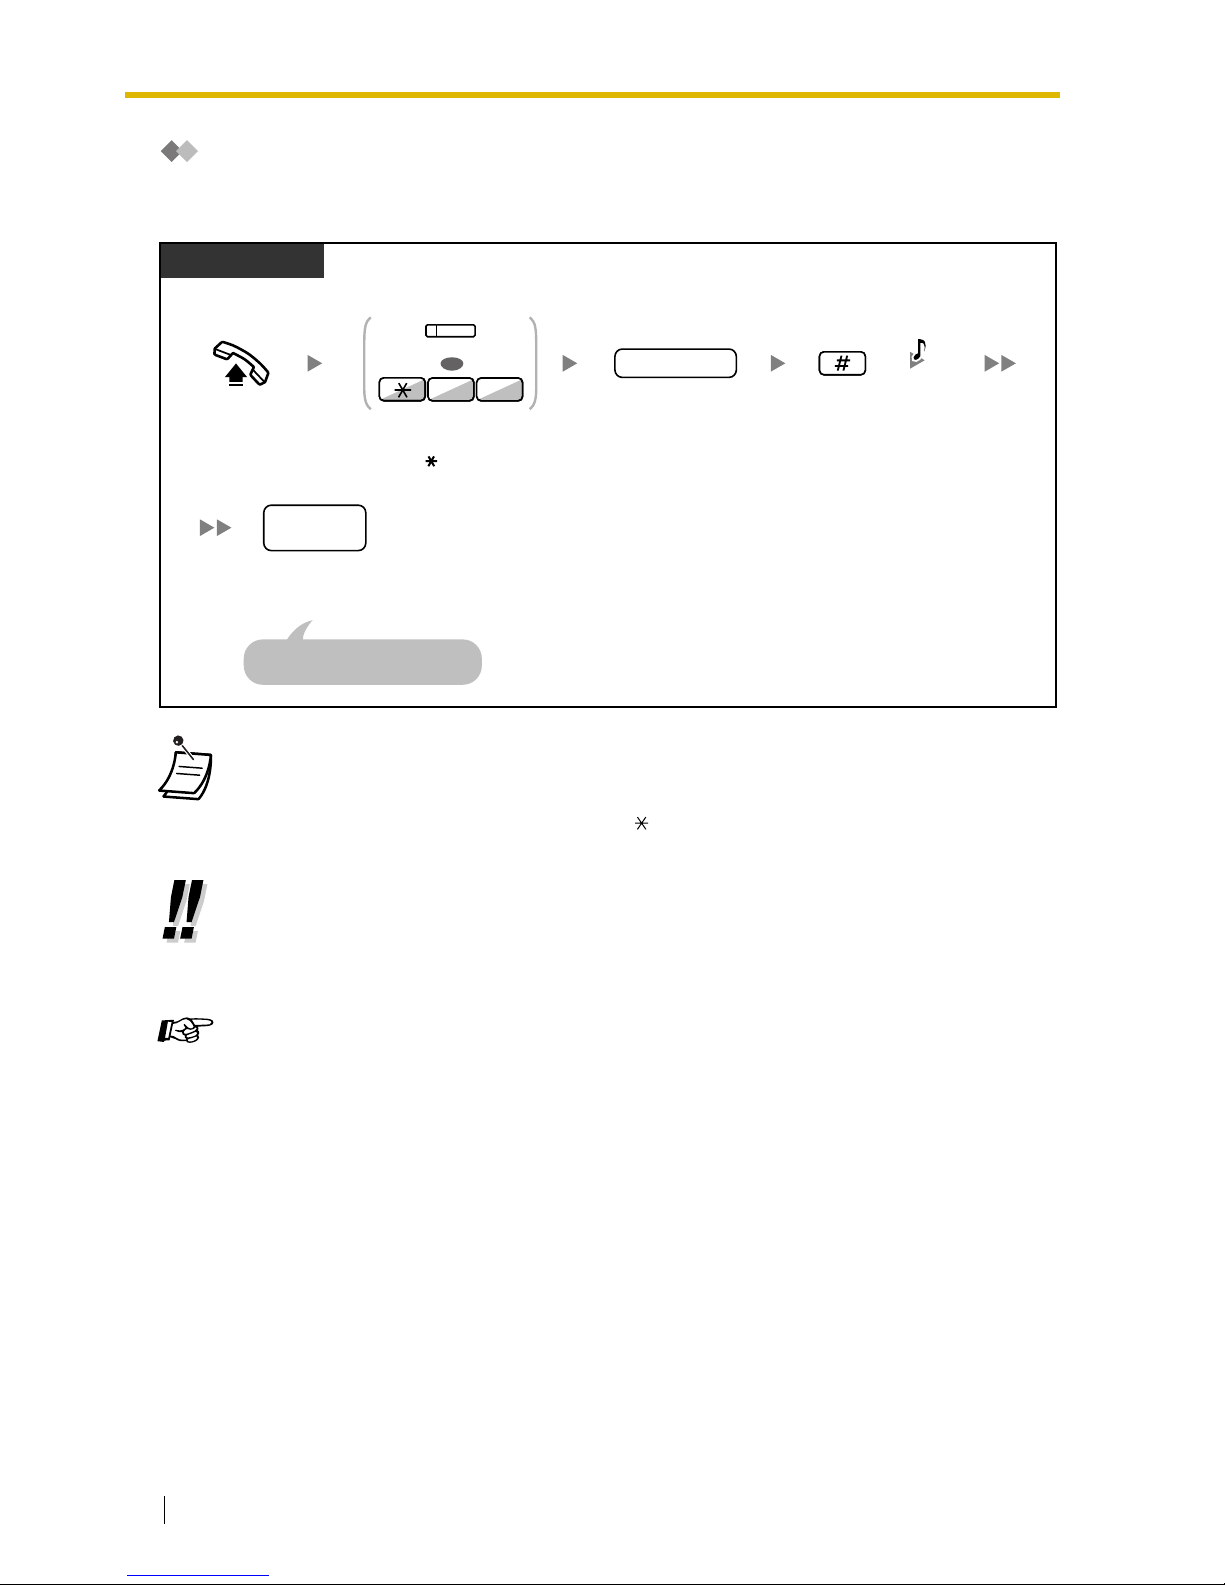
You may give a specified account code to extension users and check their telephone usage. You can
specify an account code for each client and check the call duration.
1.2.2 Easy Dialing
This is convenient for frequently dialed phone numbers.
— One-touch Dialing
— Personal Speed Dialing
— System Speed Dialing
— Hot Line
— Quick Dialing
• A Panasonic proprietary telephone extension user can enter an account code during
a conversation and when hearing reorder tone after the other party hangs up.
• Account codes may use the digits "0" through "9".
• If you enter the wrong code, press the " " key and re-enter the account code.
• You may not be able to make an outside call without an account code. Entry mode is
assigned to each user. Ask your manager for your mode.
• For your convenience, you can store the code with the phone number in the memory
(e.g., Speed Dialing).
Customizing Your Phone
• 3.1.3 Customizing the Buttons
Create or edit an Account button.
PT/SLT/PS
Enter #.
Off-hook.
account code
Enter
account code
(max. 10 digits).
Press
Account
or
enter
49
.
Dial
outside
phone number
.
outside
phone
no.
Seize CO line before entering
outside phone number.
D.Tone
94
(Account)
OR
Page 29
1.2 Making Calls
User Manual 29
One-touch Dialing
Personal Speed Dialing
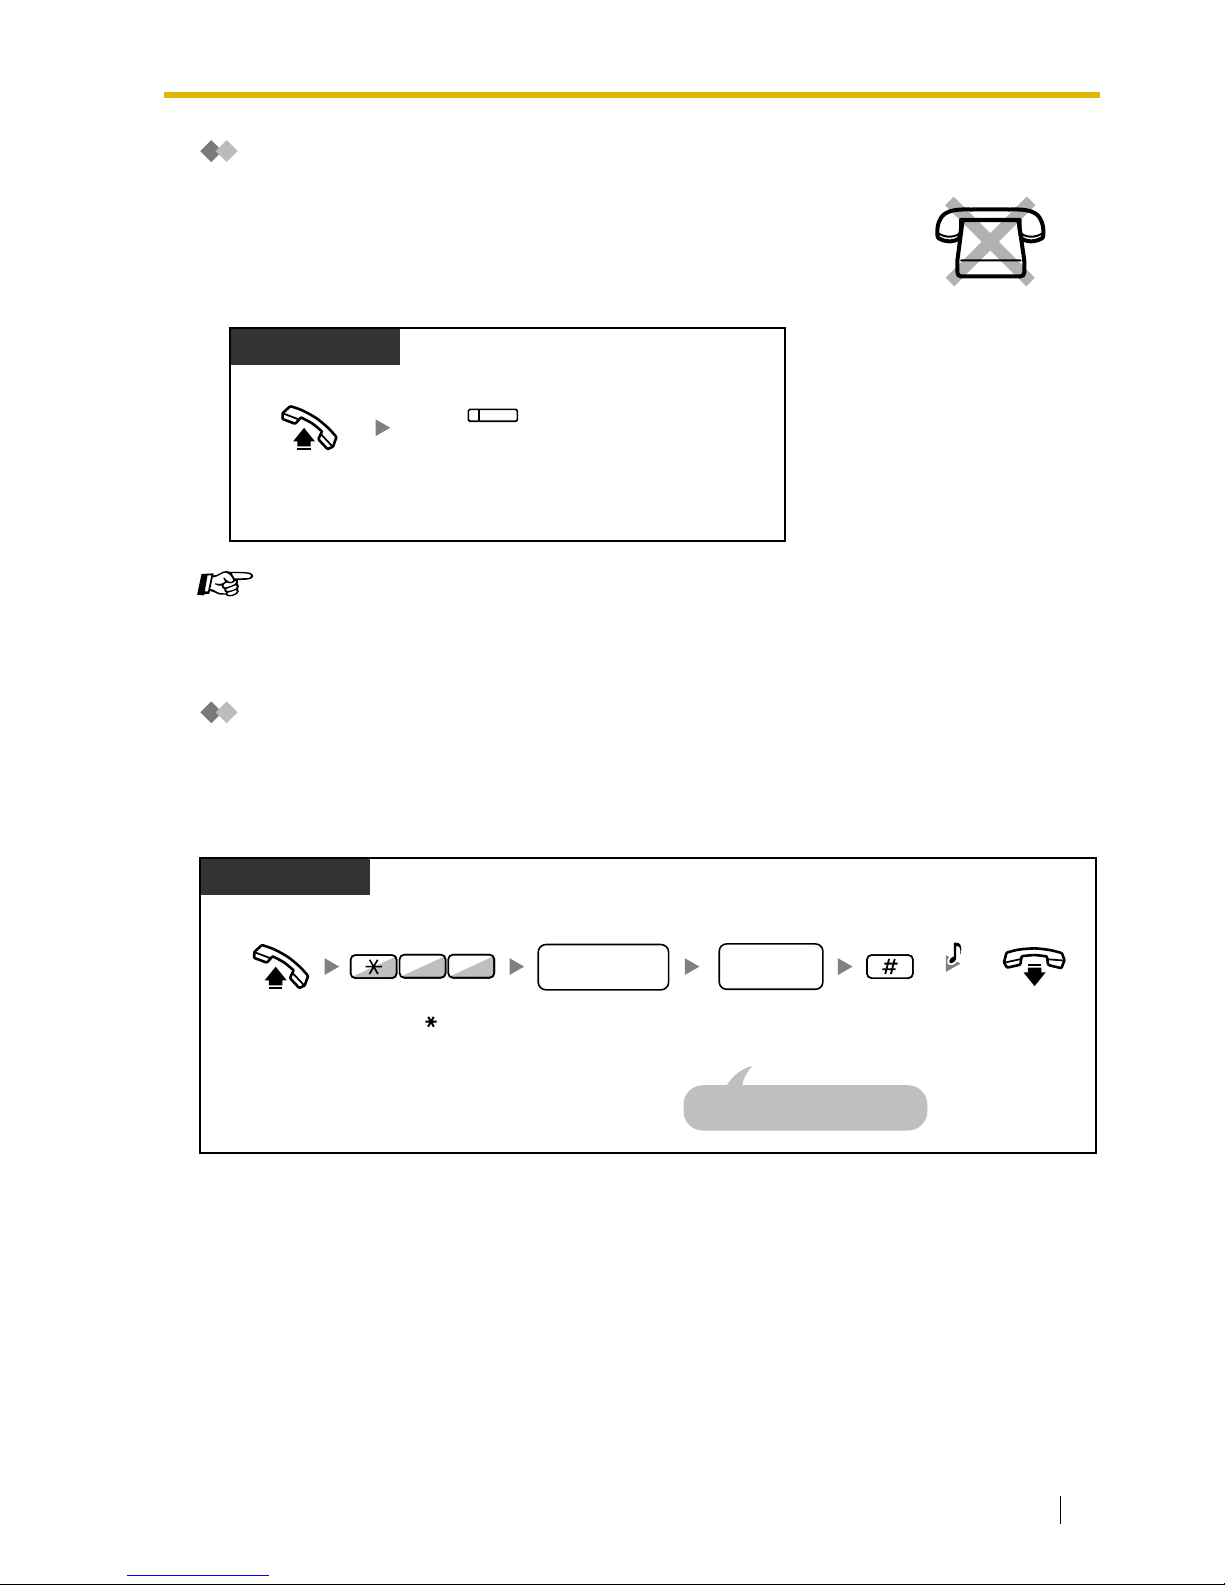
You can store numbers at your extension for your personal use. (Default: 10 numbers, 00-09)
This feature is also known as Station Speed Dialing.
To store a phone number
You can store a phone number into the flexible button for one-touch operation.
Customizing Your Phone
• 3.1.3 Customizing the Buttons
Create or edit a One-touch Dialing button, store the desired phone number or feature
number.
Press
One-touch
Dialing
.
Off-hook.
PT/PS
(One-touch
Dialing)
Off-hook.
Enter
personal speed
dialing number
(2 digits).
Enter
#
.
desired
phone no.
personal speed
dialing no.
Enter
desired
phone number
(max. 32 digits).
PT/SLT
On-hook.
03
Enter 30.
Enter CO line access number
before outside phone number.
C.Tone
Page 30
1.2 Making Calls
30 User Manual
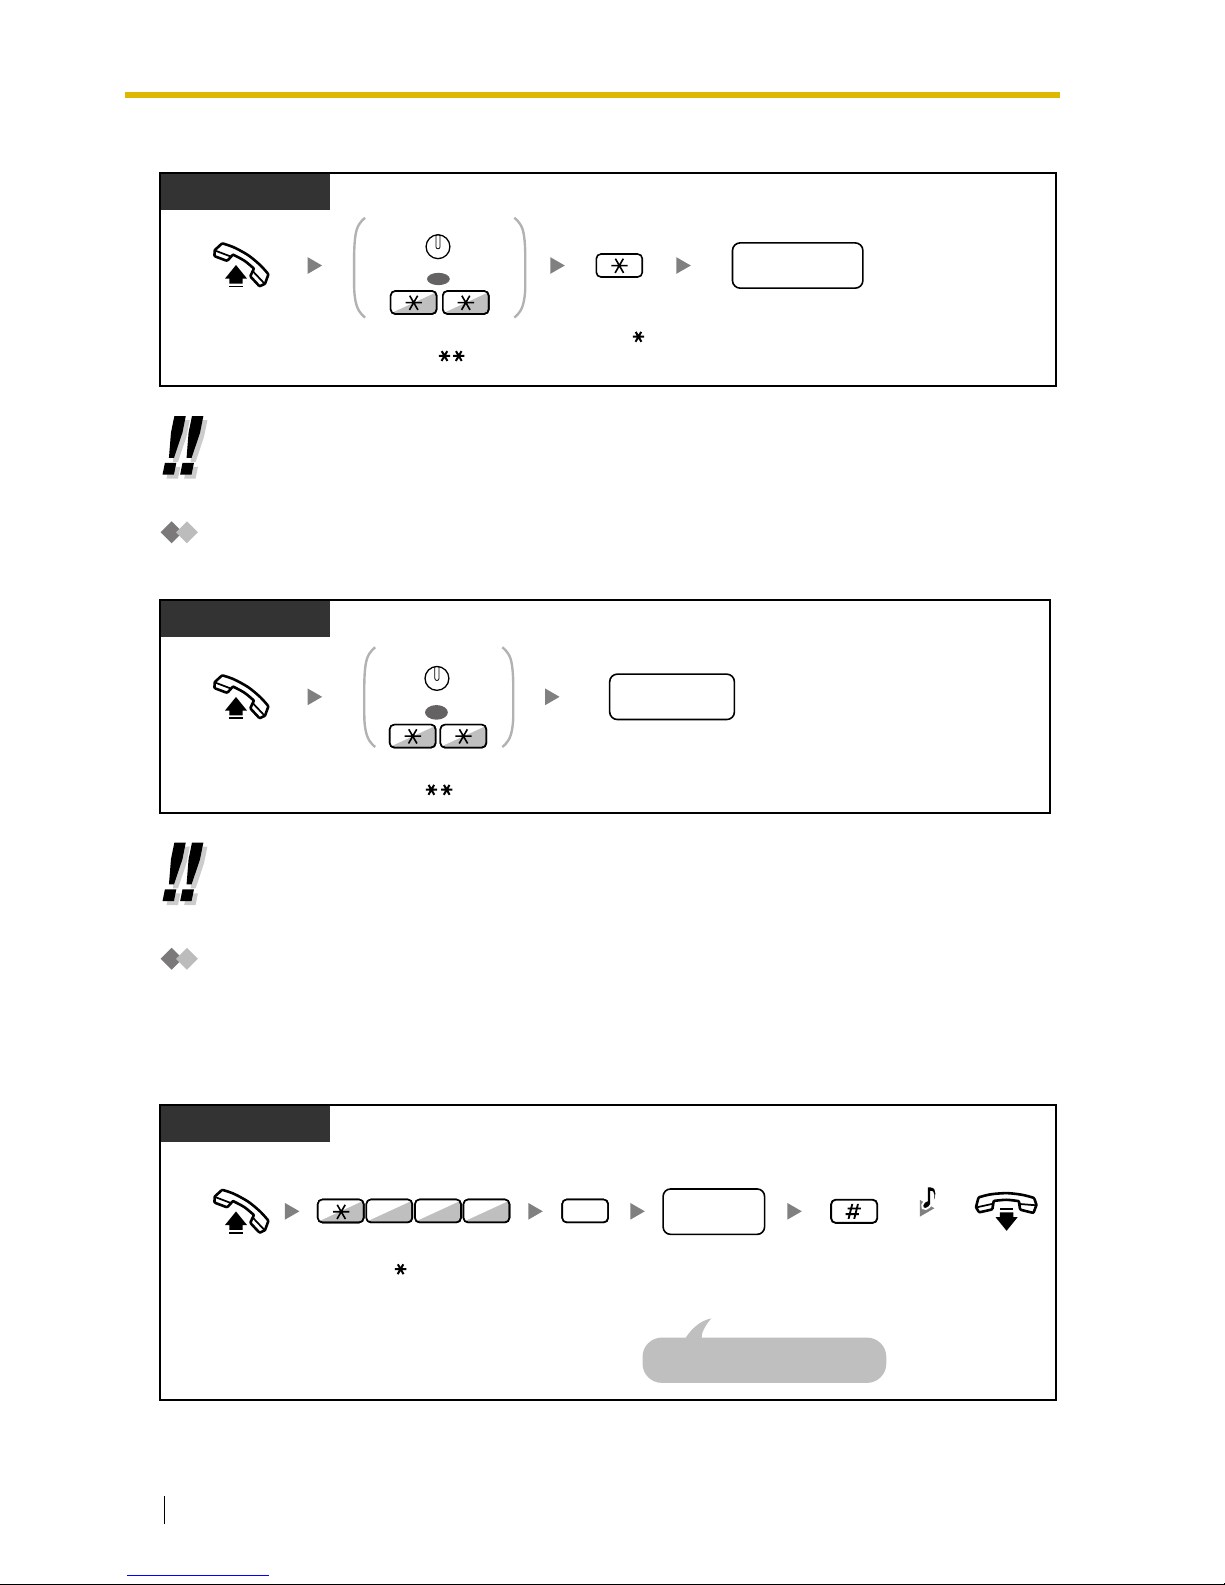
To dial
System Speed Dialing
You can make calls using speed dialing numbers stored in the PBX.
Hot Line
You can make an outside call simply by going off-hook if you have preprogrammed your phone.
This feature is also known as Pickup Dialing.
To store a phone number
• To call using a directory, refer to "1.11.2 Directories".
• To call using a directory, refer to "1.11.2 Directories".
PT/SLT
Enter
. Dial
personal speed
dialing number
(2 digits).
personal speed
dialing no.
Off-hook.
Press
AUTO DIAL
or enter .
OR
AUTO DIAL
STORE
PT/SLT/PS
Off-hook.
Press
AUTO DIAL
or enter .
Dial
system speed
dialing number
(3 digits).
system speed
dialing no.
OR
AUTO DIAL
STORE
PT/SLT/PS
Enter #.
On-hook.
Off-hook.
Enter
desired
phone number
(max. 32 digits).
desired
phone
no.
Enter CO line access number
before outside phone number.
Enter
740
.
2
Enter 2.
4 0
7
C.Tone
Page 31
1.2 Making Calls
User Manual 31
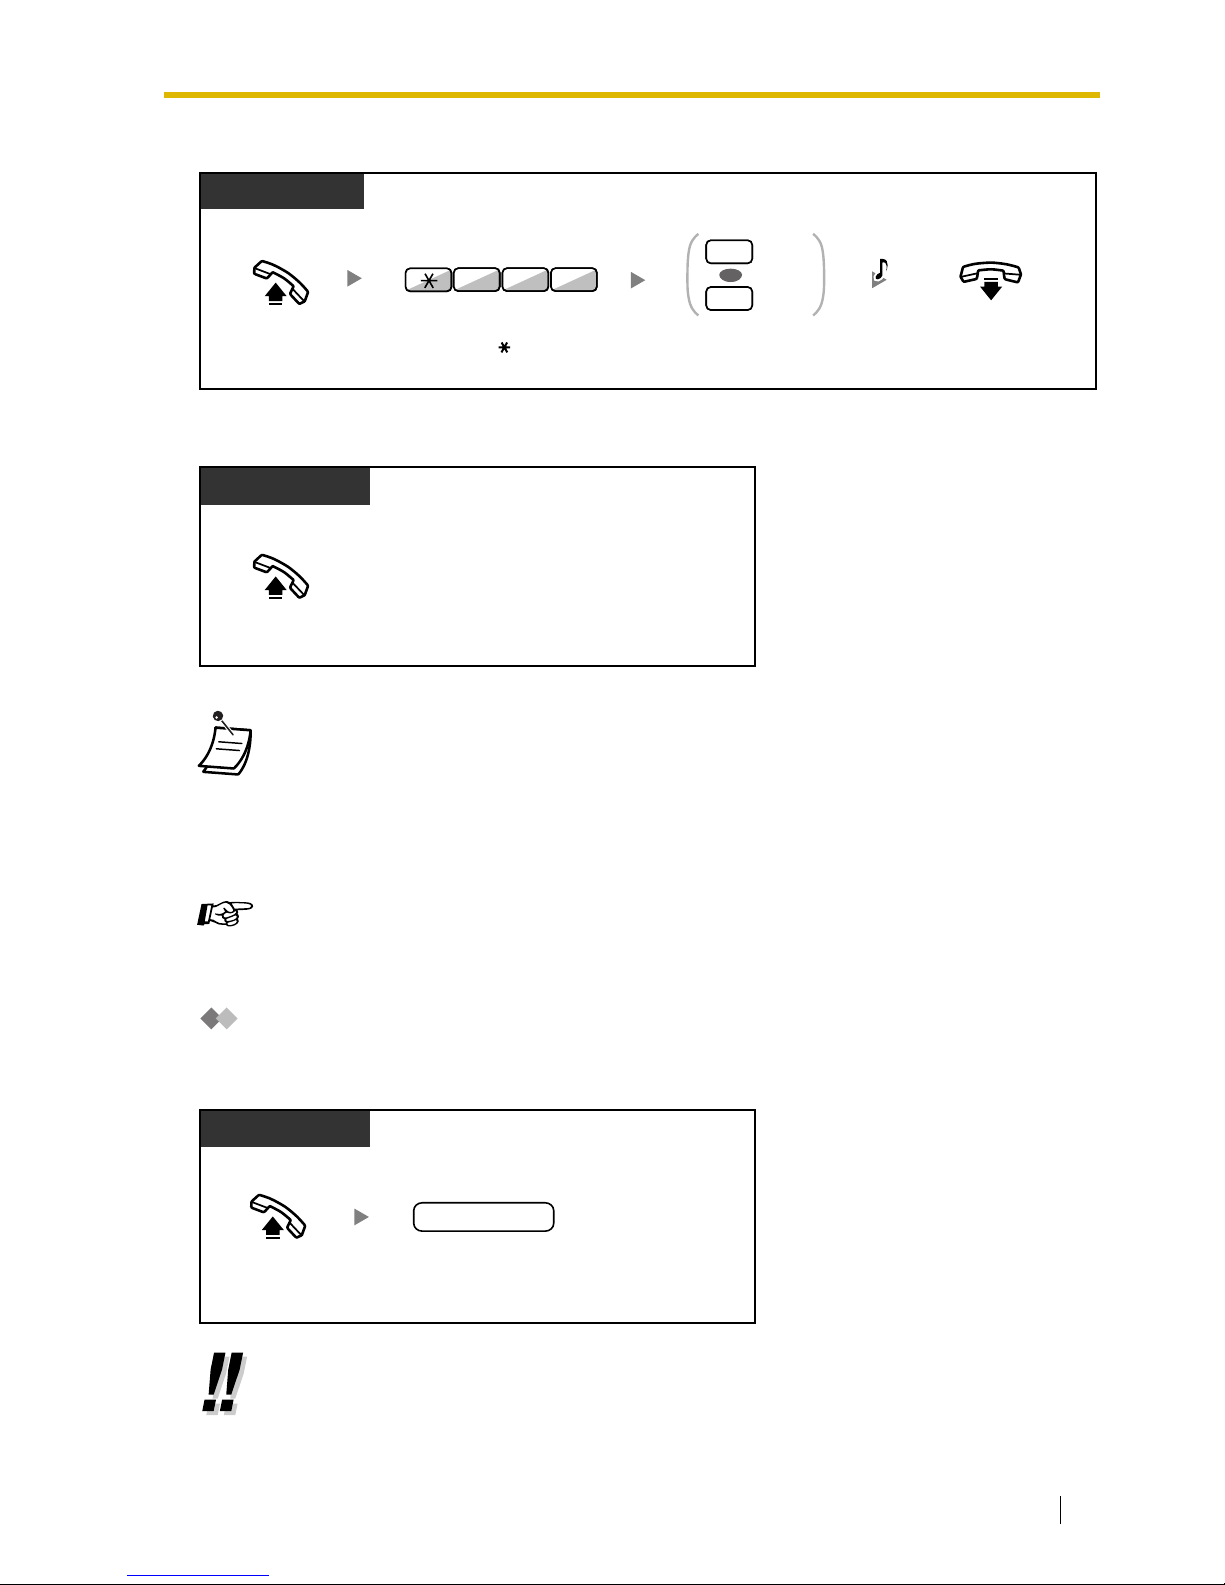
To set/cancel
To dial
Quick Dialing
You can make a call simply by pressing the preprogrammed number for quick dialing. For details,
consult your manager or dealer.
• To call another party, dial the desired party’s phone number before the preprogrammed
number is dialed.
• You should assign the intercom line as the seized line when going off-hook. (Preferred Line
Assignment— Outgoing)
• If canceling Hot Line is difficult because this feature is activated immediately after going
off-hook, consult your dealer.
Customizing Your Phone
• 3.1.2 Settings on the Programming Mode—Preferred Line Assignment—Outgoing
Select the seized line when going off-hook.
• It is a useful feature for Hotel.
For example, to dial the Room Service, dial the digit "3", not the full extension number.
PT/SLT/PS
Off-hook.
On-hook.
Enter 1 to set
or
0
to cancel.
Set
Cancel
1
0
Enter
740
.
4 07
C.Tone
OR
Off-hook.
PT/SLT/PS
Off-hook.
Dial
quick dialing
number
(max. 4 digits).
PT and SLT
quick dialing no.
PT/SLT/PS
Page 32
1.2 Making Calls
32 User Manual
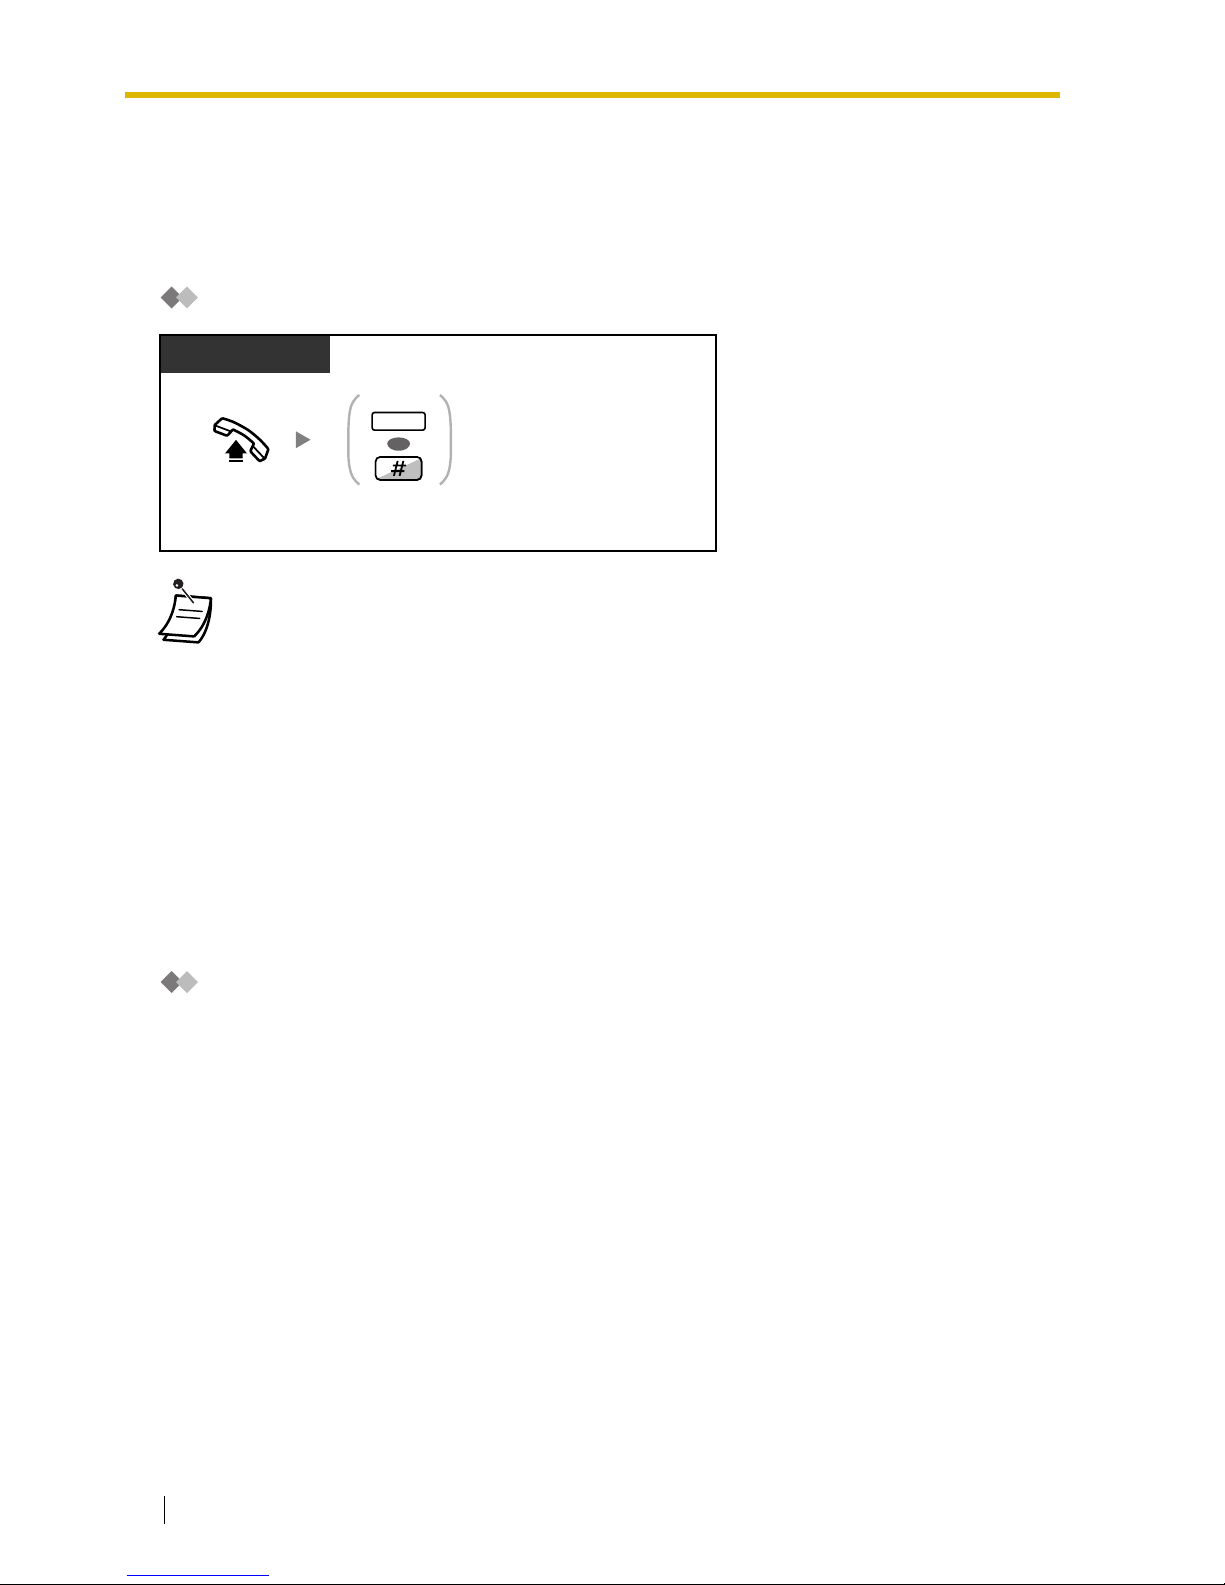
1.2.3 Redial
This is convenient when calling the same outside party again.
— Last Number Redial
Last Number Redial
1.2.4 When the Dialed Line is Busy or There is No Answer
— Automatic Callback Busy
— Call Waiting
— Message Waiting
— Executive Busy Override
— Call Monitor
— DND Override
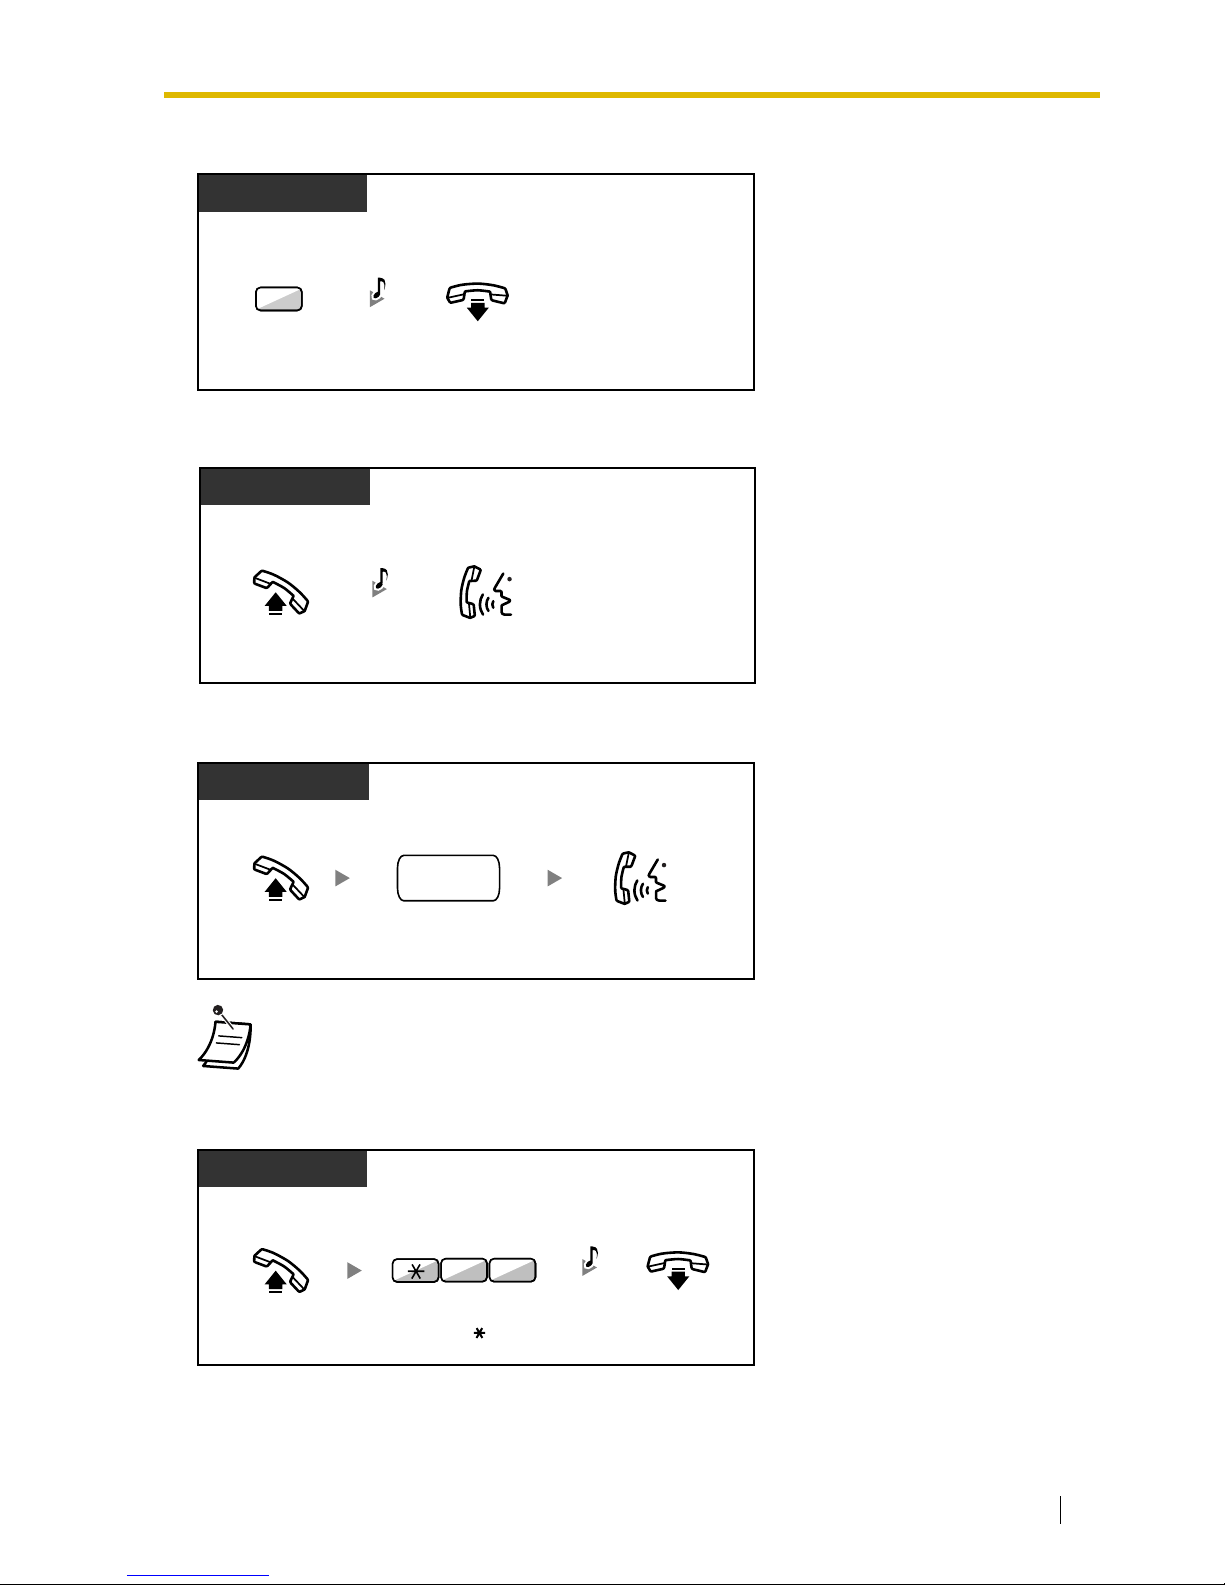
Automatic Callback Busy
You can set the telephone to receive callback ringing:
• when a dialed extension becomes idle.
• when your desired CO line that is in use by another extension becomes idle.
You cannot set Automatic Callback Busy for a busy party outside of the PBX.
When you answer the callback ringing:
• For an outside call: The line is seized.
• For an intercom call: The called extension starts ringing automatically.
• Up to 32 digits can be stored and redialed.
• After pressing REDIAL, if you hear a busy tone again, press REDIAL to retry.
PT/SLT/PS
Off-hook.
Press
REDIAL
or enter #.
REDIAL
OR
Page 33
1.2 Making Calls
User Manual 33
To set (for both extension and CO line)
To answer the callback ringing from an idle extension
To answer the callback ringing from an idle CO line
Automatic Callback Busy Cancel
• If you do not answer the callback ringing within 10 seconds, this feature will be canceled.
PT/SLT/PS
While hearing a busy tone
Enter 6.
6
On-hook.
C.Tone
Off-hook.
PT/SLT/PS
Talk.
While hearing a callback ringing
R.B.Tone
Off-hook.
PT/SLT/PS
Talk.
Dial
outside
phone number
.
outside
phone no.
While hearing a callback ringing
Off-hook.
PT/SLT/PS
On-hook.
4 6
Enter 46.
C.Tone
Page 34
1.2 Making Calls
34 User Manual
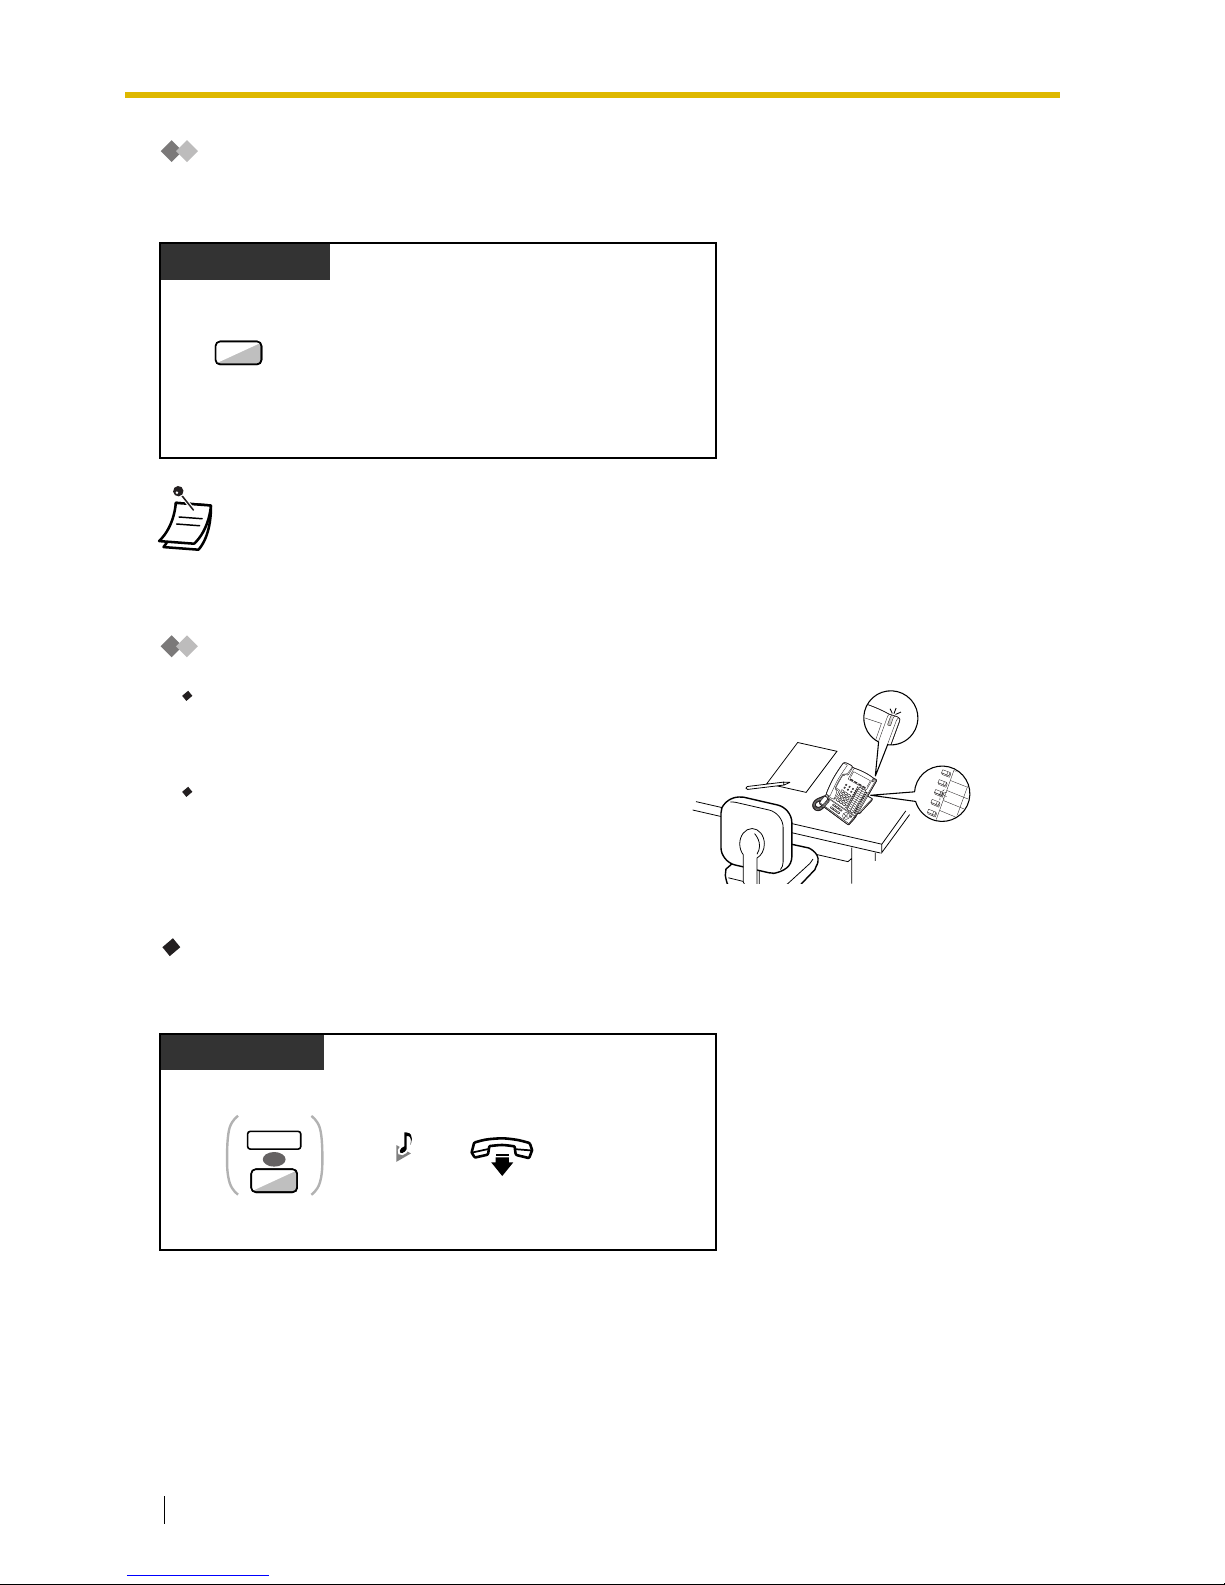
Call Waiting
You can inform the called party that your call is waiting.
This feature is also known as Busy Station Signaling (BSS).
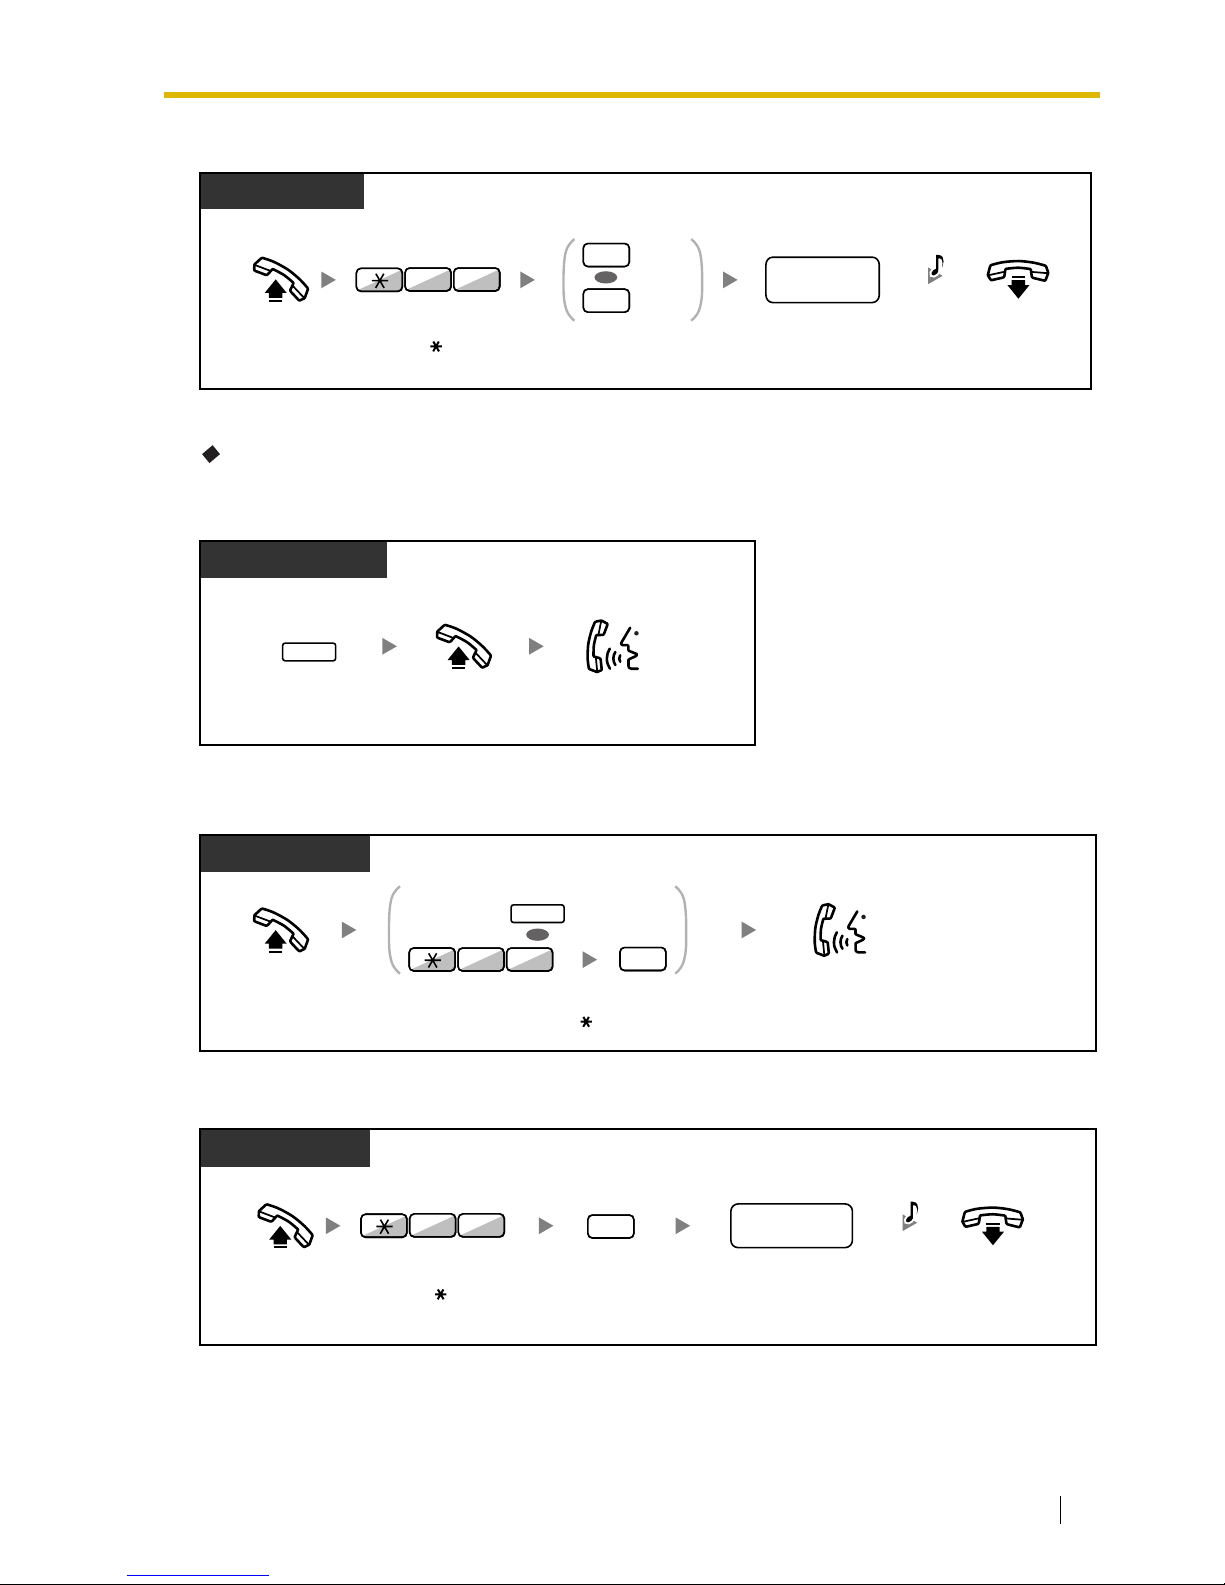
Message Waiting
For a caller
To leave a message waiting indication
• Depending on the other party’s telephone, the "Off-hook Call Announcement (OHCA)"
and the "Whisper OHCA" features can be used. You can talk to the other party through the
speaker and the microphone (OHCA) or you only send a call announcement through the
handset (Whisper OHCA), if they are having another conversation using the handset.
Refer to "1.7.3 Call Waiting/Off-hook Call Announcement (OHCA)/Whisper OHCA".
For a caller
When the called extension is busy or does not answer
your call, you can leave a notification so that the called
party may call you back.
For a called extension
As a message receiver, the Message button light or
Message/Ringer Lamp lets you know that a call has been
received. If you receive notification, you can call back the
caller by a simple operation.
PT/SLT/PS
Enter 1.
1
While hearing a busy tone
PT/SLT/PS
Press MESSAGE
or enter 4.
On-hook.
When the called extension is busy or does not answer
OR
4
MESSAGE
C.Tone
Page 35
1.2 Making Calls
User Manual 35
To leave/cancel a message waiting indication
For a called extension
To check the left message and call back
To call back
To clear message waiting indications left on your extension
PT and SLT
PT/SLT/PS
Off-hook.
Enter 1 to leave
or 0 to cancel.
On-hook.
Enter desired
extension number.
Leave
Cancel
1
0
OR
07
Enter 70.
desired
extension no.
C.Tone
While on-hook
PT/PS
Press
MESSAGE
until the desired
extension appears.
Off-hook.
Talk.
MESSAGE
Off-hook.
Press MESSAGE or enter 70 and then 2.
PT/SLT/PS
Talk.
OR
MESSAGE
0
2
7
PT/SLT/PS
Off-hook.
Enter 0.
On-hook.
Dial your
extension number.
0
07
Enter 70.
your
extension no.
C.Tone
Page 36
1.2 Making Calls
36 User Manual
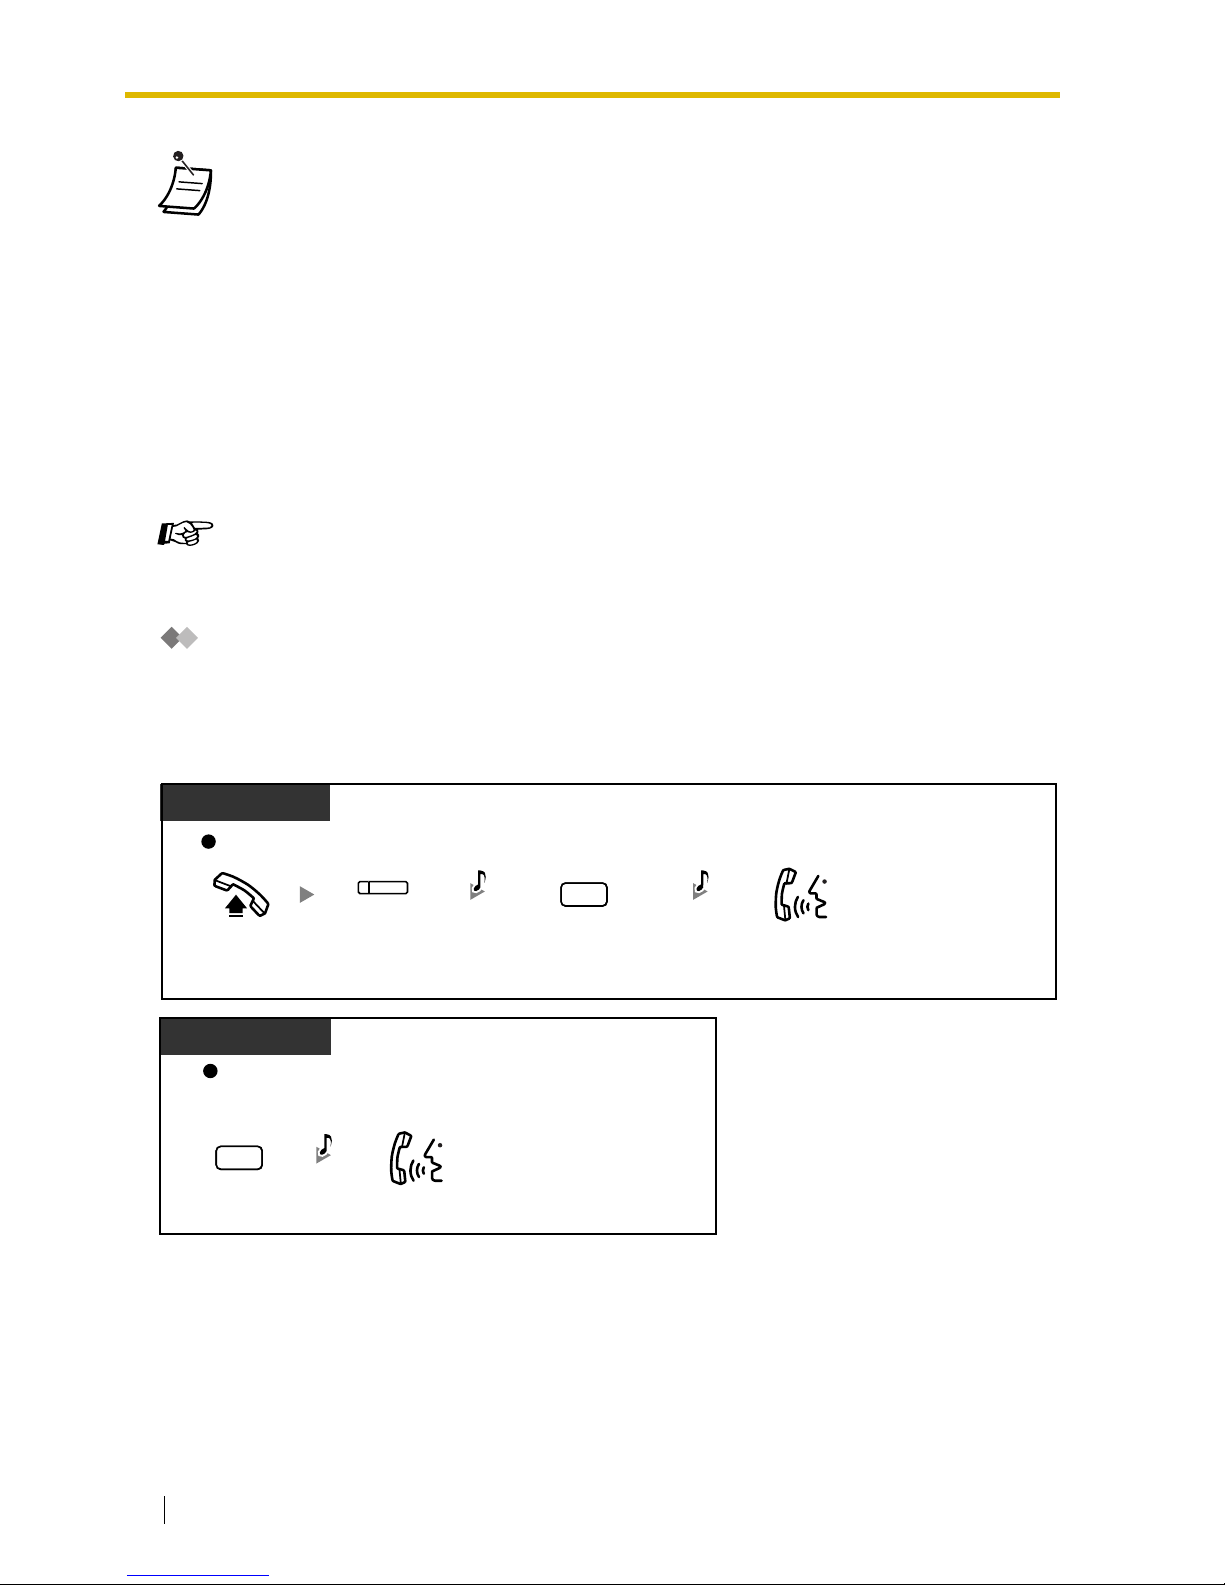
Executive Busy Override
The preprogrammed extension can call someone who is busy on the telephone and establish a threeparty conversation.
To join
• The Message button light or Message/Ringer Lamp shows the current status as follows:
Off: No message
Red on: You have a message.
• The display shows the messages starting with the most recent call.
• At a called extension, the MESSAGE button allows you to clear message waiting
indications if you do not want to call the callers back. To clear, press the MESSAGE button
and then press the soft button.
• On your PT, you can establish one or more "Message for another extension" buttons.
These buttons can accept the message waiting notification of other extensions or various
incoming call distribution groups.
In other words, you can monitor the message waiting notifications of other telephones.
• A single line telephone extension user will hear a special dial tone as the message waiting
notification when going off-hook.
Customizing Your Phone
• 3.1.3 Customizing the Buttons
Create or edit a Message button or Message for another extension button.
Off-hook.
Press
corresponding
CO
.
Enter 3.
Outside call
PT/PS
Talk.
(CO)
3
B. Tone C.Tone
Enter 3.
3
Intercom call
PT/SLT/PS
Talk.
While hearing a busy tone
C.Tone
Page 37
1.2 Making Calls
User Manual 37
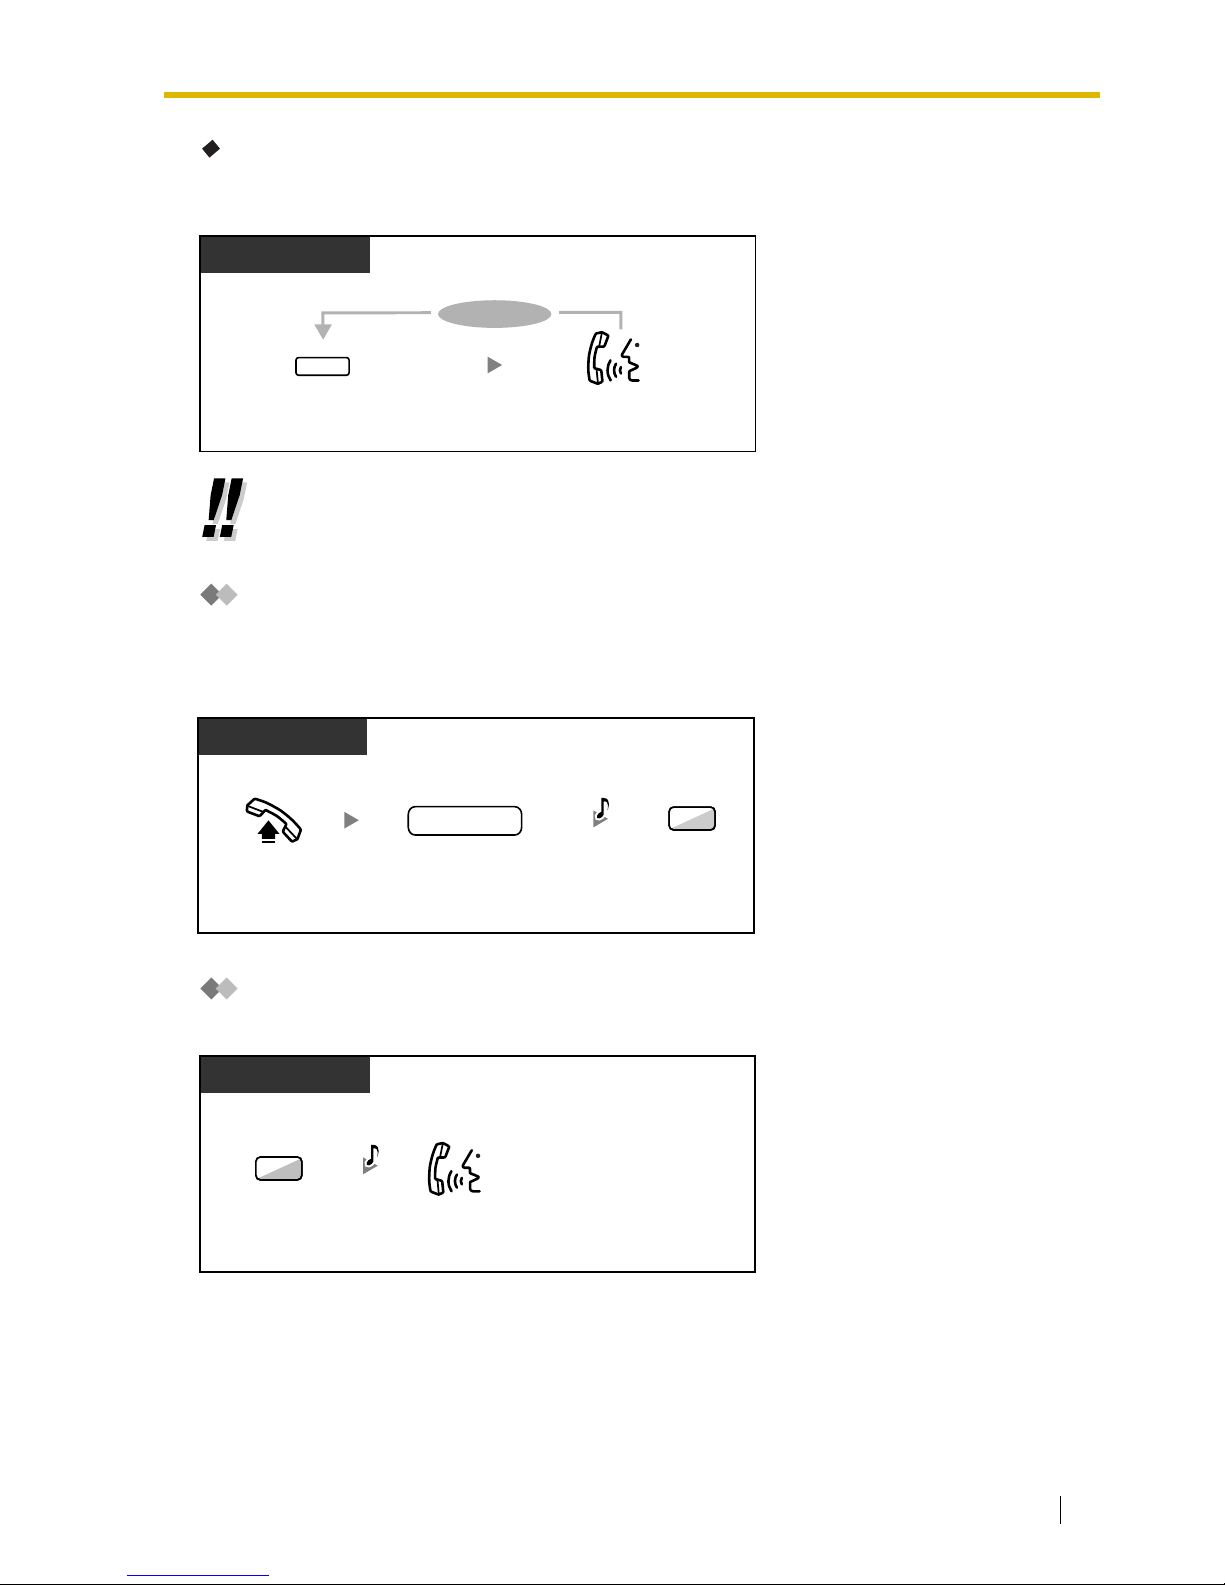
For the joined extension
To talk to each party alternately
Call Monitor
The preprogrammed extension can monitor another extension.
To monitor
DND Override
The preprogrammed extension can call someone who has set the DND feature.
• You can also deny others the possibility of joining your conversation (Default: Allow). Refer
to "1.7 Extension Settings".
Talk to the
other party.
During a conversation
PT/PS
Press
TRANSFER
.
TRANSFER
To continue
PT/SLT/PS
Enter 5.
5
extension no.
Dial
extension
number
.
B.Tone
Off-hook.
Enter 1.
While hearing the DND tone
PT/SLT/PS
Talk.
R.B.Tone
1
Page 38
1.2 Making Calls
38 User Manual
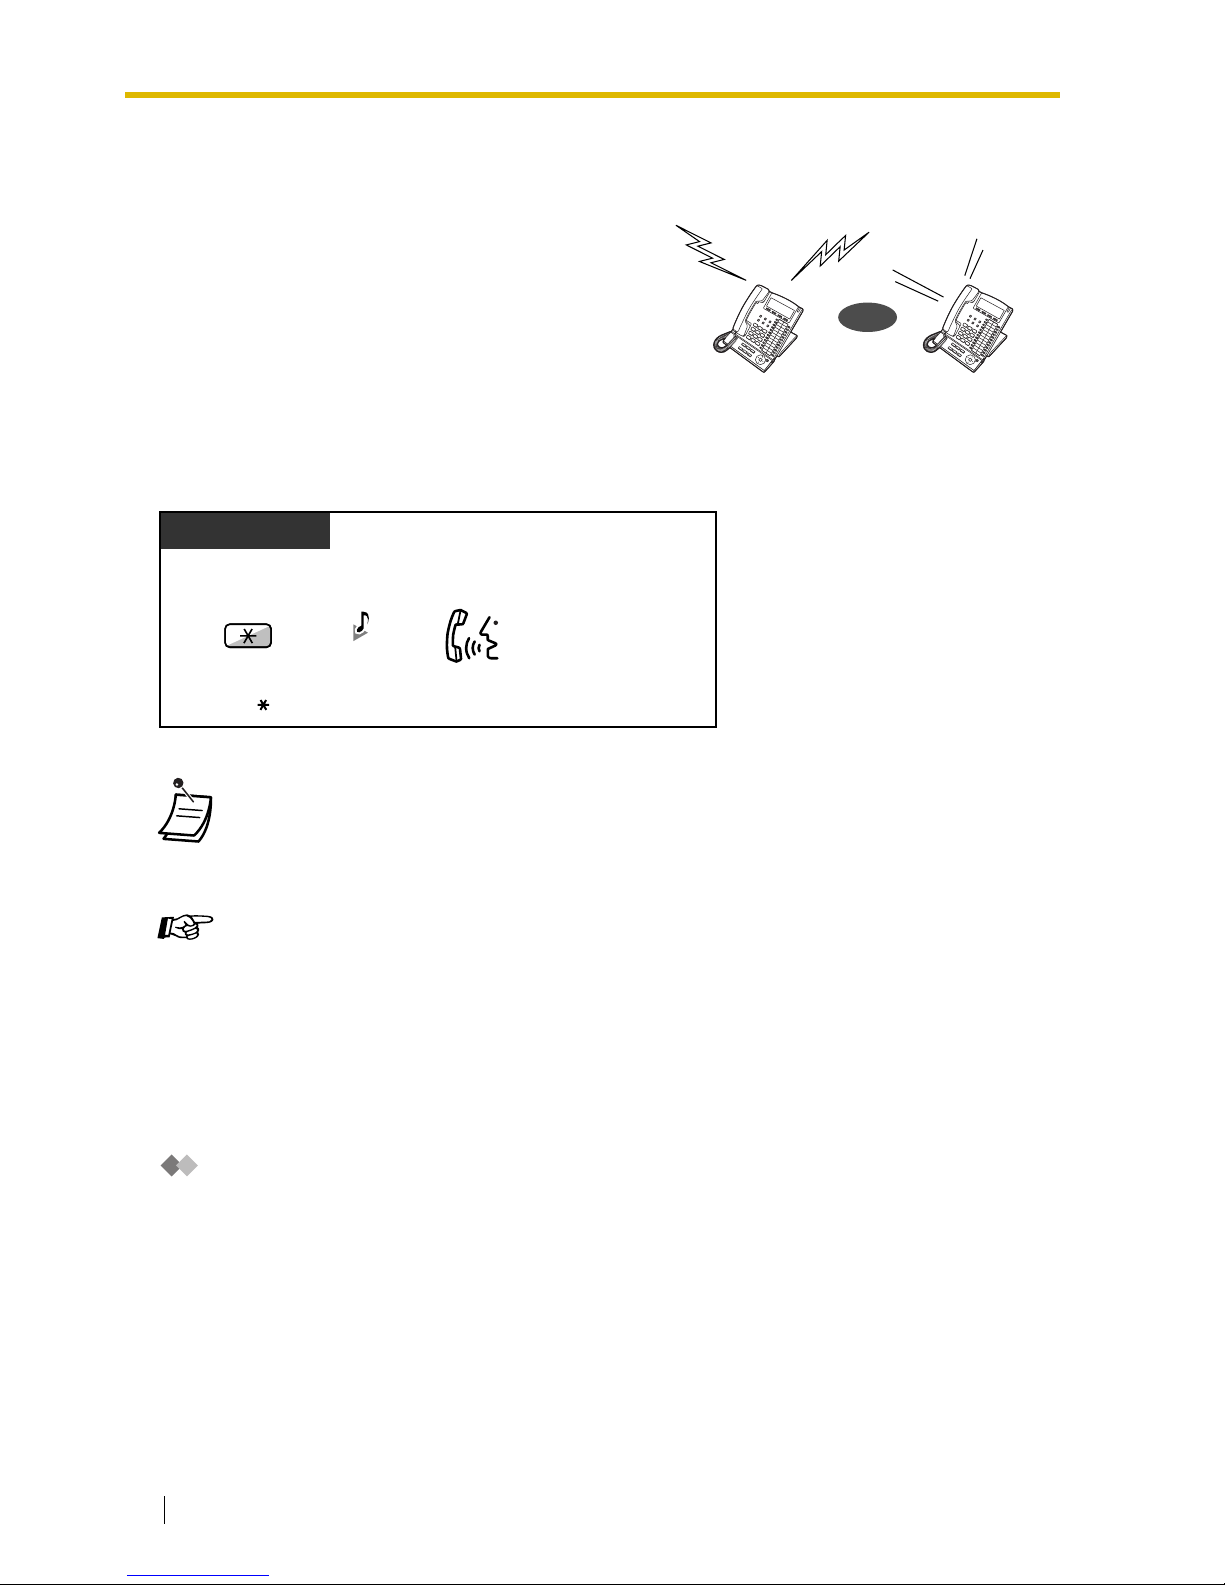
1.2.5 Alternate Calling—Ring/Voice
To change the method
1.2.6 Calling without Restrictions
— Remote COS Access
Remote COS Access
You can use your calling privileges (Class of Service) at another extension. You may override
restrictions which have been set. To use this feature, an original extension number and an extension
PIN (Personal Identification Number) are required. You can make a call by entering a verified code
and verified code PIN. For the available verified code, ask your manager.
The caller can alternate the alerting method, either ring
or voice, when making an intercom call.
On the other hand, any extension can set the alerting
method, either ring or voice, when receiving an
intercom call.
Ringing (Default): You can call the other party
with a ring tone.
Voice-Calling: You can talk to the other party
immediately after confirmation tone.
• If the called party uses a single line telephone or portable station, Voice-Calling is not
available.
• This feature is not available when the called party’s telephone is in the Voice Call Deny
mode.
Customizing Your Phone
• 3.1.2 Settings on the Programming Mode—Alternate Receiving—Ring/Voice
Select the alerting method, either ring or the other party’s voice.
Ring
Ring
Hello
OR
After dialing
Enter .
PT/SLT/PS
Talk.
C.Tone
Page 39
1.2 Making Calls
User Manual 39
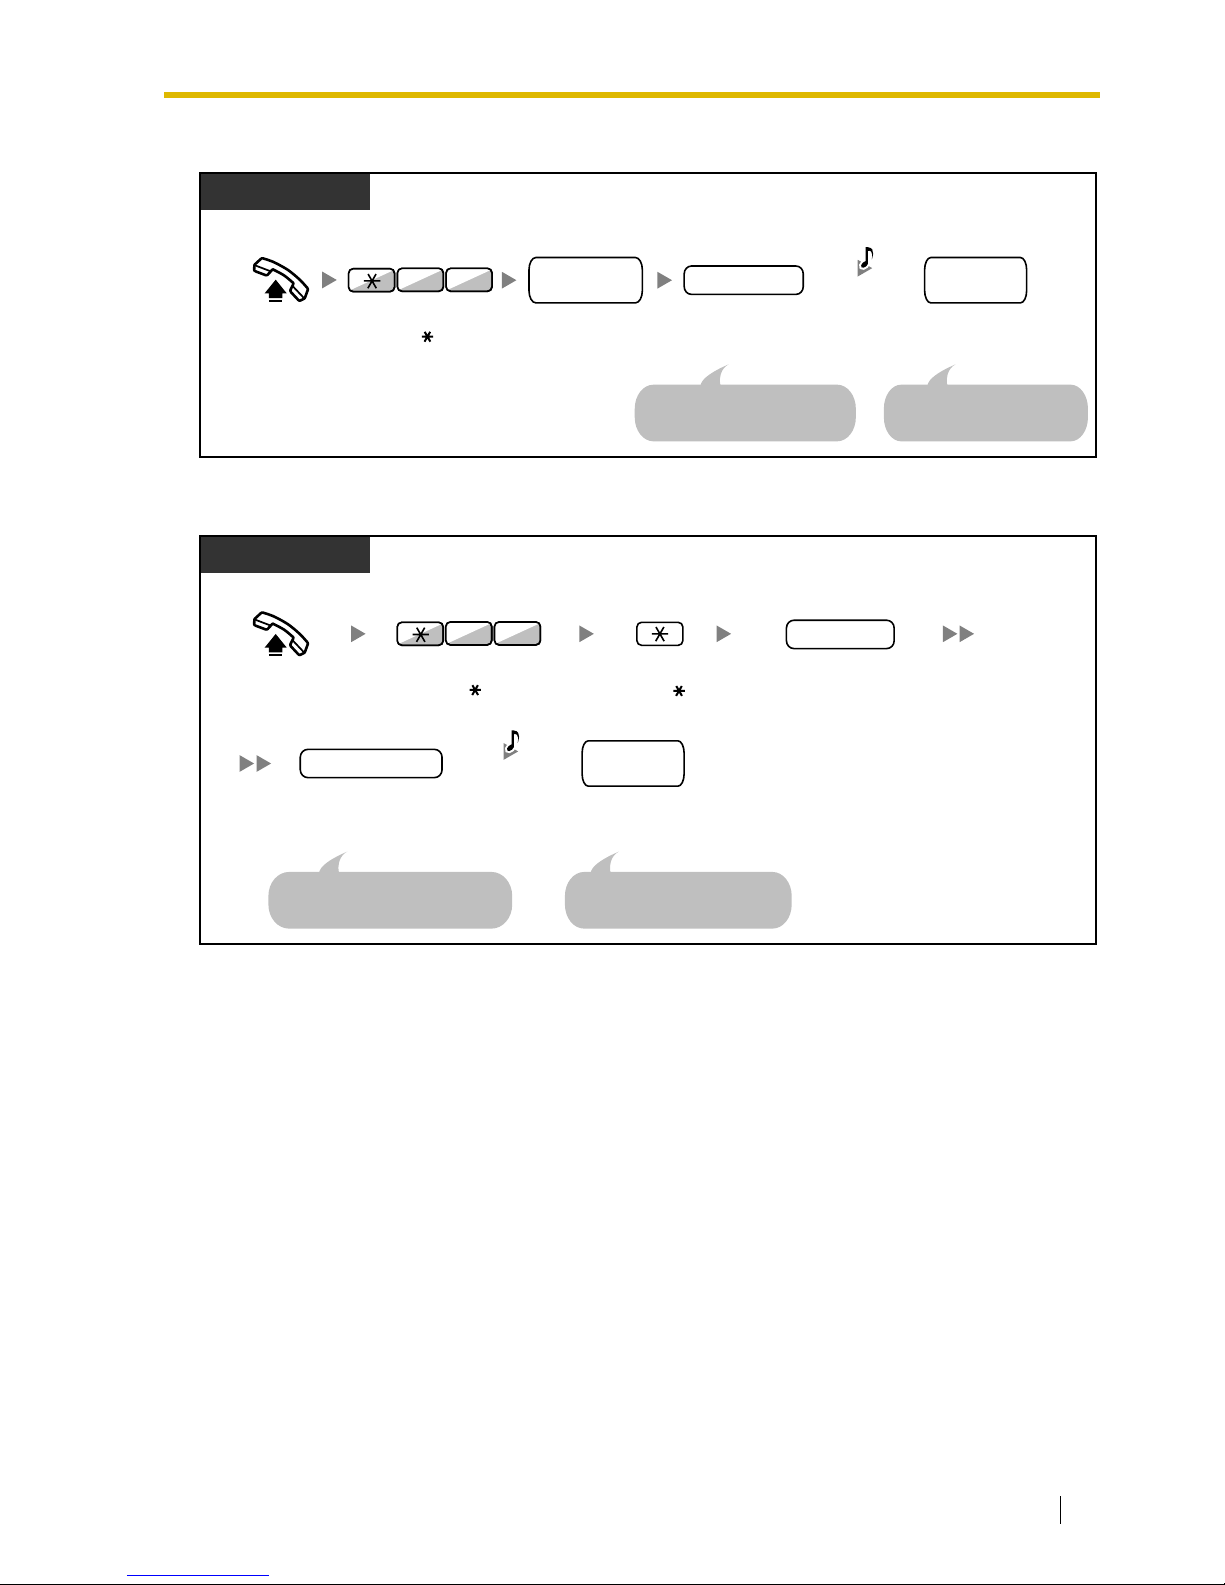
To call (Walking COS)
To call (Verified Code Entry)
Off-hook.
PT/SLT/PS
74
Enter 47.
extension PIN
your
extension no.
desired
phone no.
Dial your
extension number.
Enter extension PIN
(max. 10 digits).
If a wrong extension PIN is
entered, you hear an alarm tone.
Dial desired
phone number.
Seize CO line before entering
outside phone number.
C.Tone &
D.Tone
PIN: Personal Identification Number
Off-hook.
PT/SLT/PS
74
Enter 47. Enter .
verified code PIN
verified code
Enter verified code
(max. 4 digits).
Enter verified code PIN
(max. 10 digits).
If a wrong verified code PIN is
entered, you hear an alarm tone.
desired
phone no.
Dial desired
phone number.
Seize CO line before entering
outside phone number.
C.Tone &
D.Tone
PIN: Personal Identification Number
Page 40
1.2 Making Calls
40 User Manual
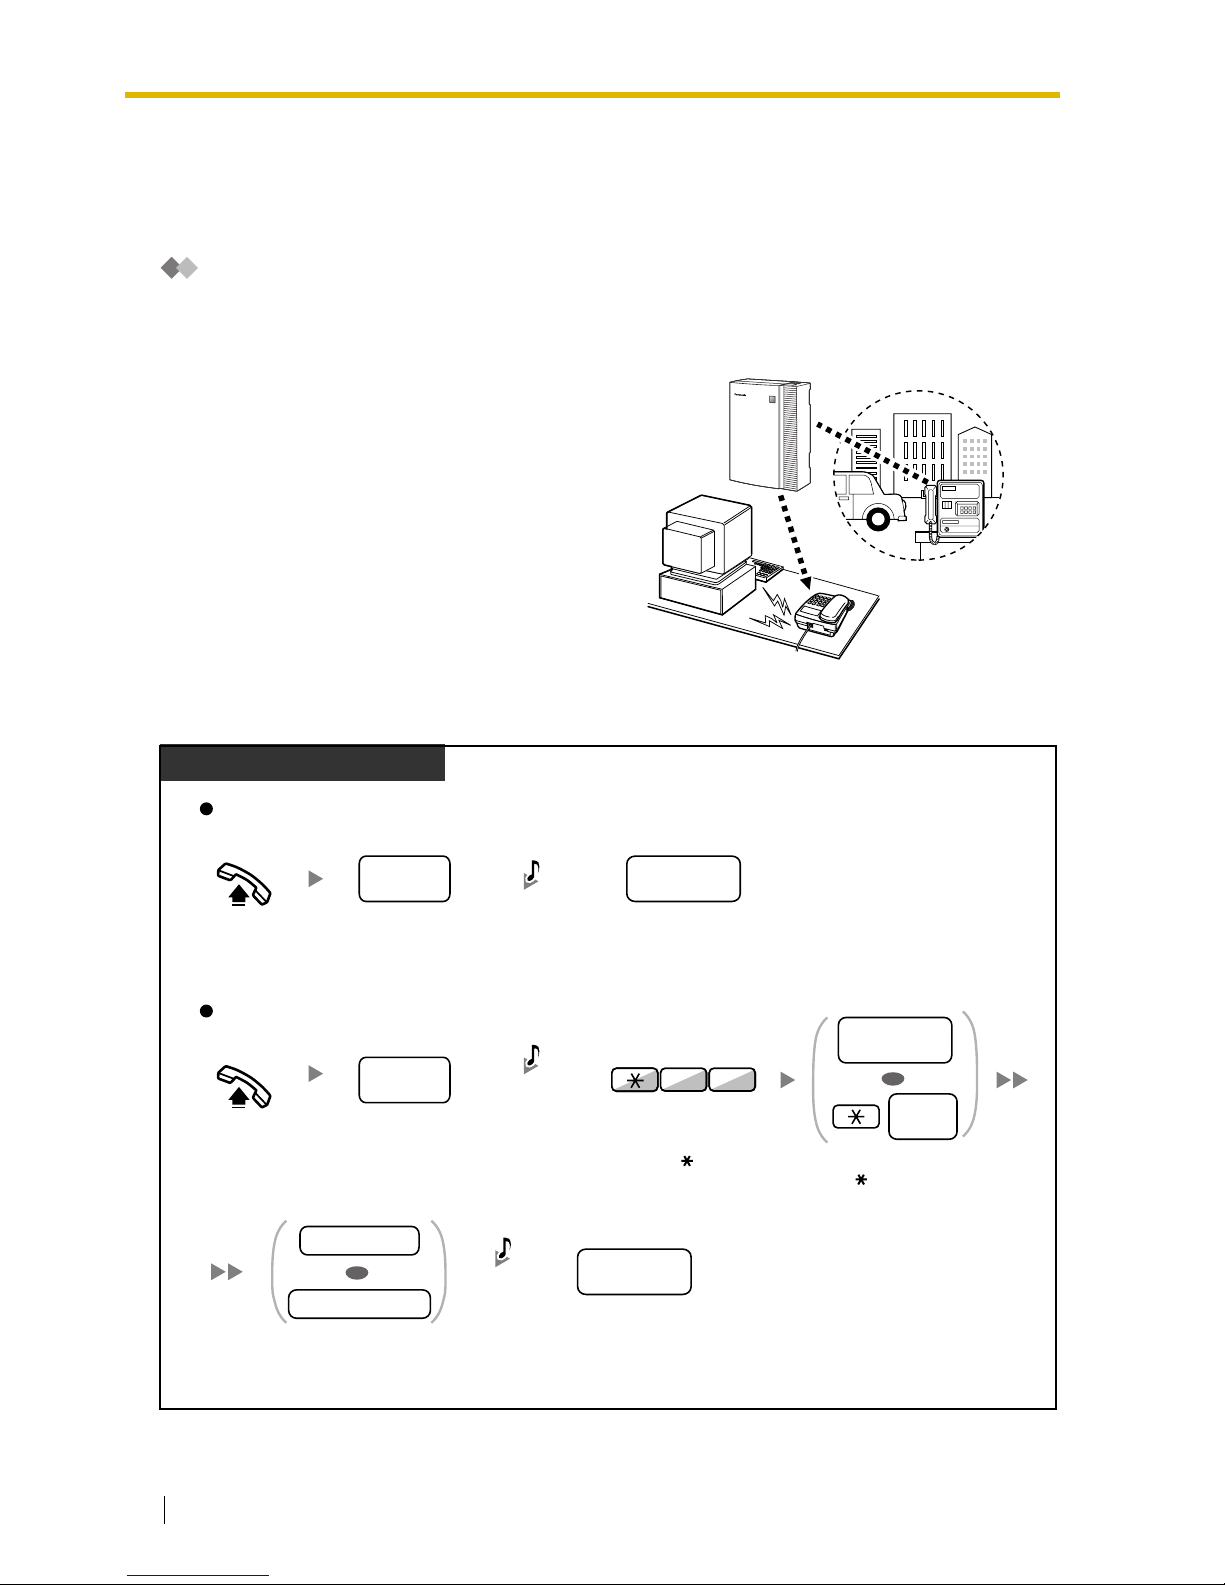
1.2.7 Direct Inward System Access (DISA)
— Calling through DISA
Calling through DISA
To call an extension
When outside callers access extensions in the
PBX, a prerecorded message greets the caller and
gives information about how to access an
extension. You do not need the operator’s
assistance.
You may be able to access system features or call
an outside party with your password depending on
the security mode. Ask your manager for the mode
assigned to your PBX.
Dial
DISA
phone number
.
DISA
phone no.
From Outside Telephone
In No Security Mode/Trunk Security Mode
Off-hook.
Off-hook.
Dial
DISA
phone number
.
Enter
extension PIN
or
verified code PIN
(max.10 digits).
DISA
phone no.
In All Security Mode
Enter 47. Dial
your extension number
.
Or enter and then
verified
code
.
your
extension no.
verified
code
Dial
desired
extension number
.
74
desired
extension no.
Dial
desired
extension number
.
desired
extension no.
extension PIN
verified code PIN
R.B.Tone &
DISA message
R.B.Tone &
DISA message
C.Tone &
D.Tone
OR
OR
PIN: Personal Identification Number
Page 41
1.2 Making Calls
User Manual 41
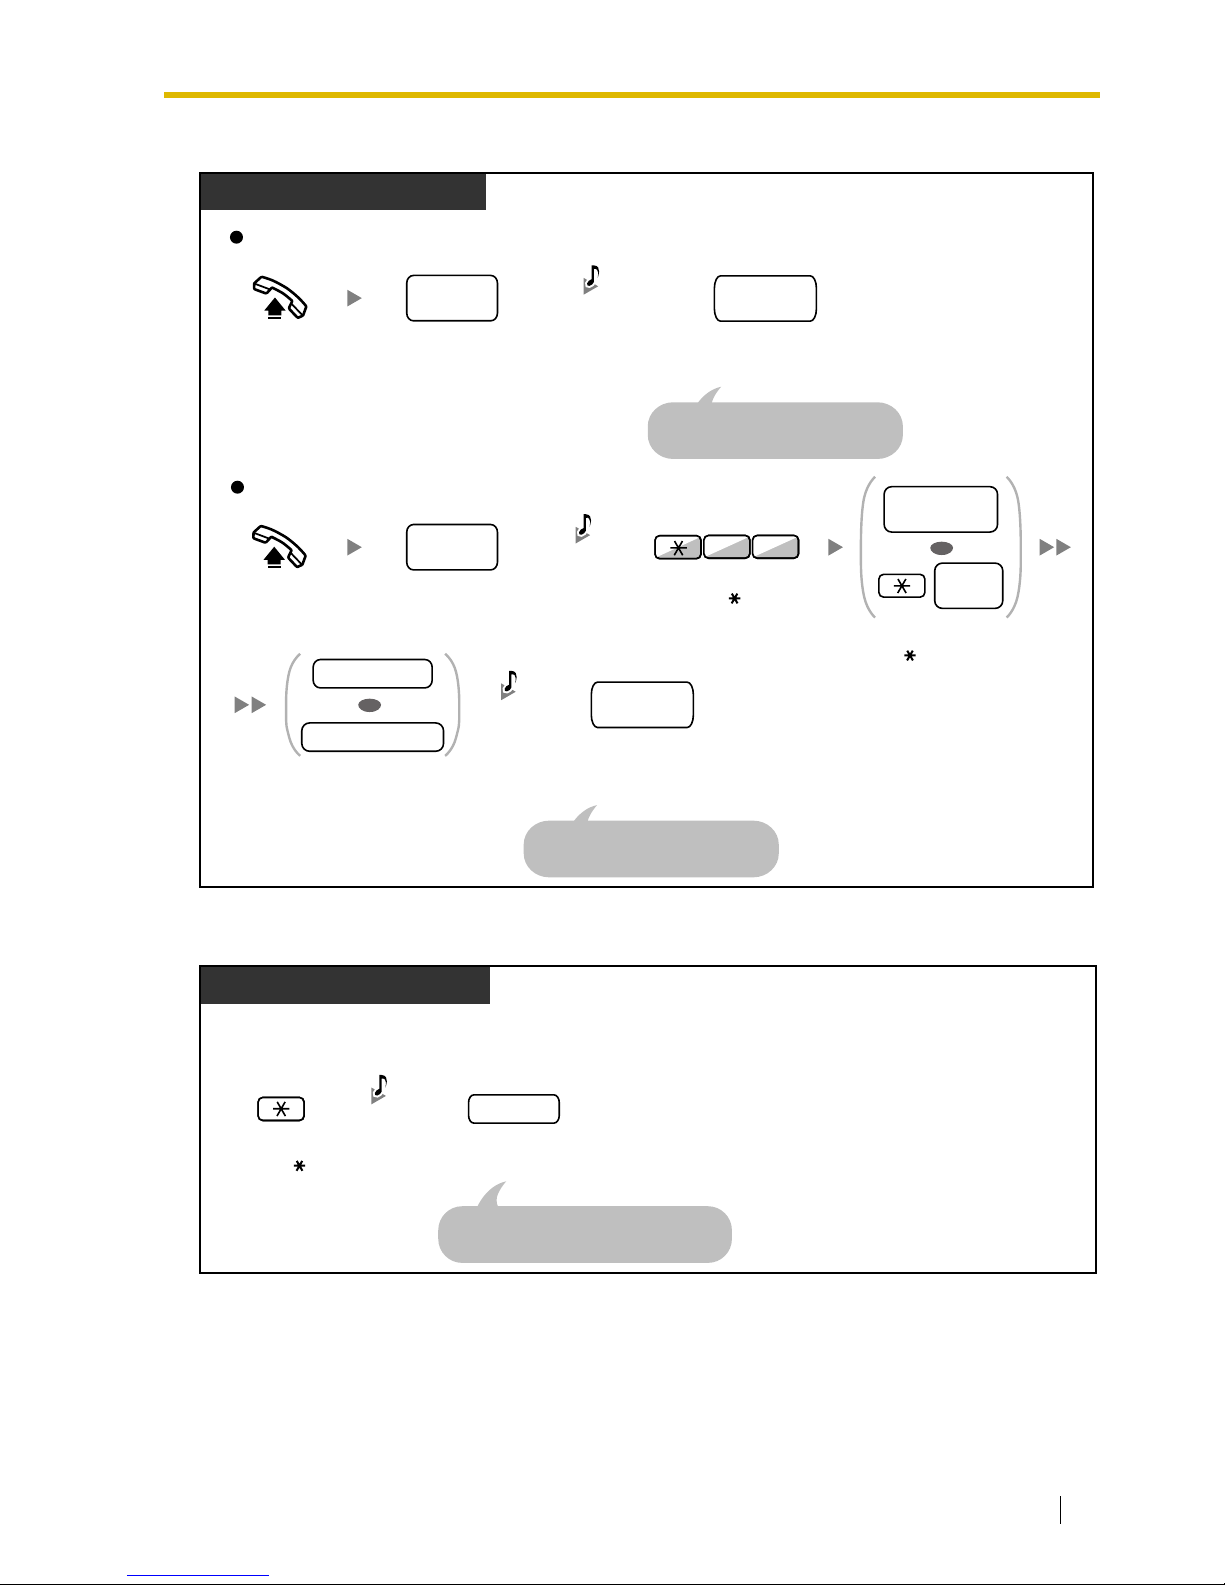
To call an outside party
To retry
In No Security Mode
Dial DISA
phone number.
In Trunk Security Mode/All Security Mode
From Outside Telephone
Off-hook.
Off-hook.
74
Enter 47.
Seize CO line before dialing
outside phone number.
Dial outside
phone number.
outside
phone no.
Seize CO line before dialing
outside phone number.
Dial outside
phone number.
R.B.Tone &
DISA message
R.B.Tone &
DISA message
Dial DISA
phone number.
Dial your extension number.
Or enter and then verified
code.
Enter extension PIN or
verified code PIN
(max.10 digits).
C.Tone &
D.Tone
DISA
phone no.
DISA
phone no.
outside
phone no.
extension PIN
verified code PIN
your
extension no.
verified
code
OR
OR
PIN: Personal Identification Number
Dial
phone number
.
To dial a different number during a conversation with an outside party or
while hearing the ringback, reorder, or busy tone
Enter .
phone no.
Dial a line access number as the first
digit when calling an outside party.
From Outside Telephone
DISA
message
Page 42
1.2 Making Calls
42 User Manual
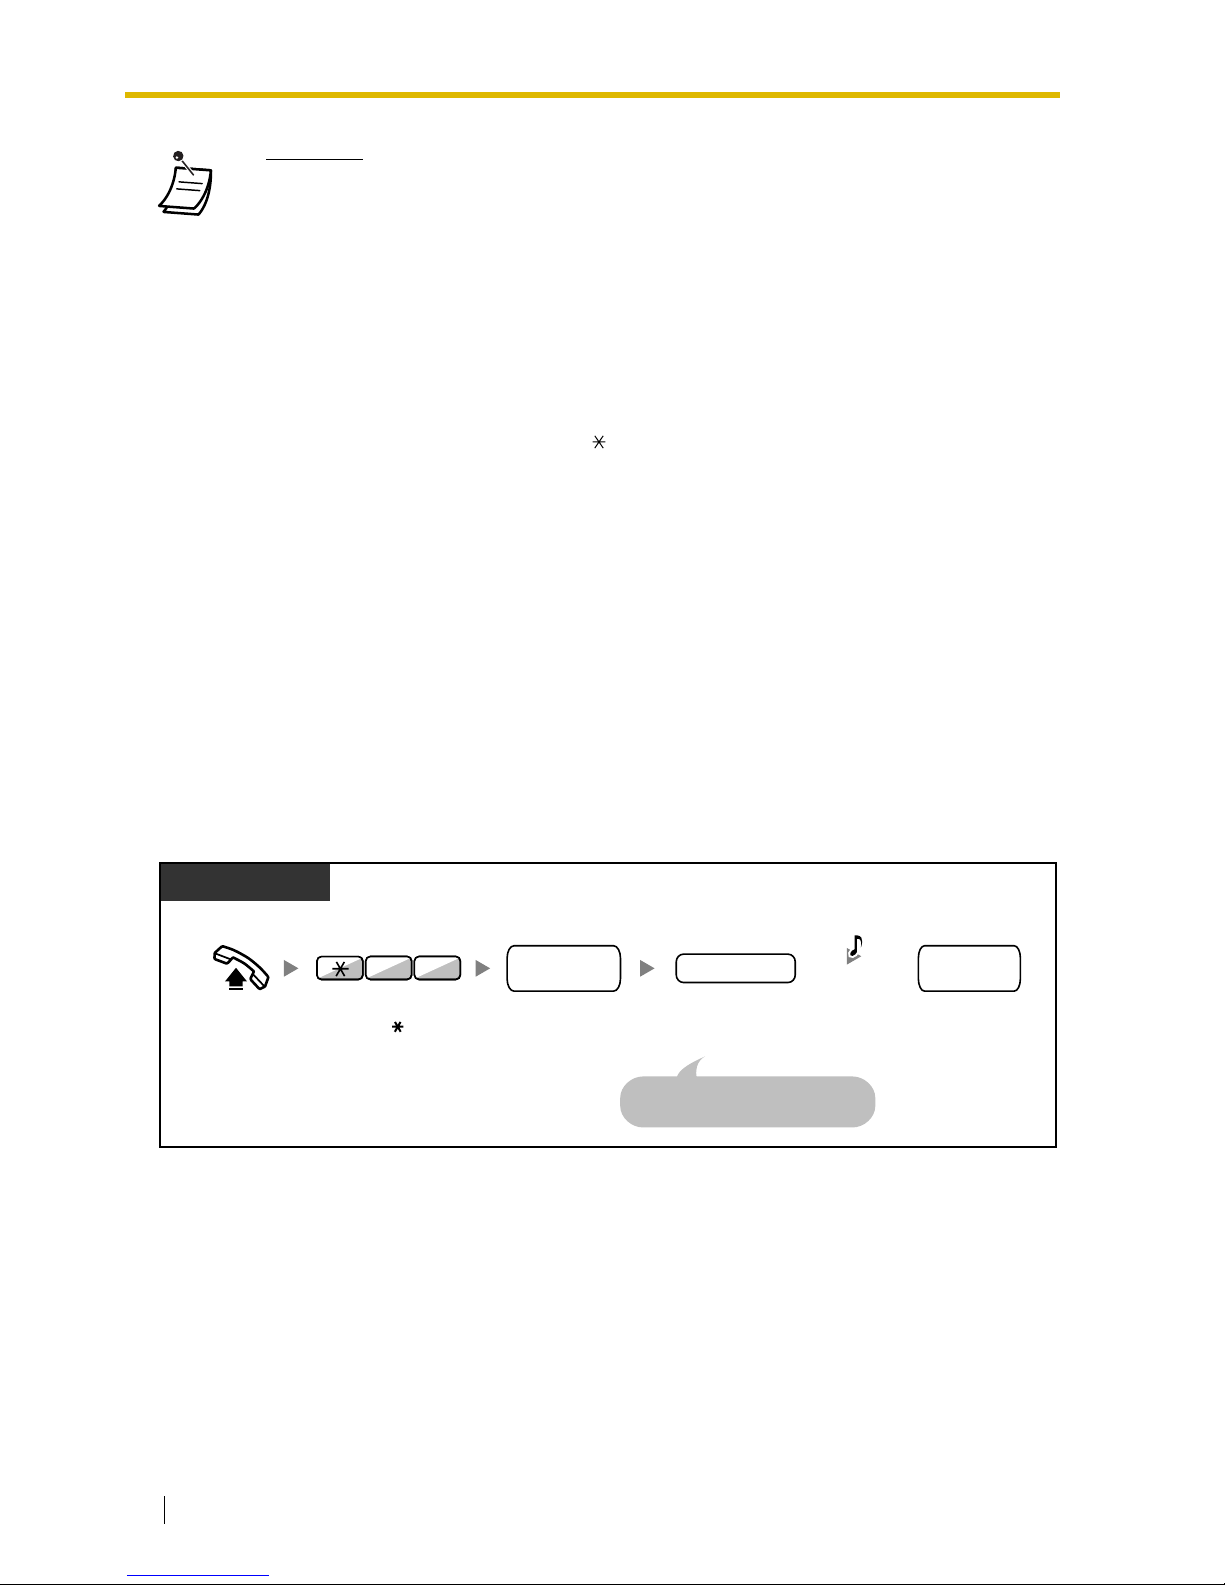
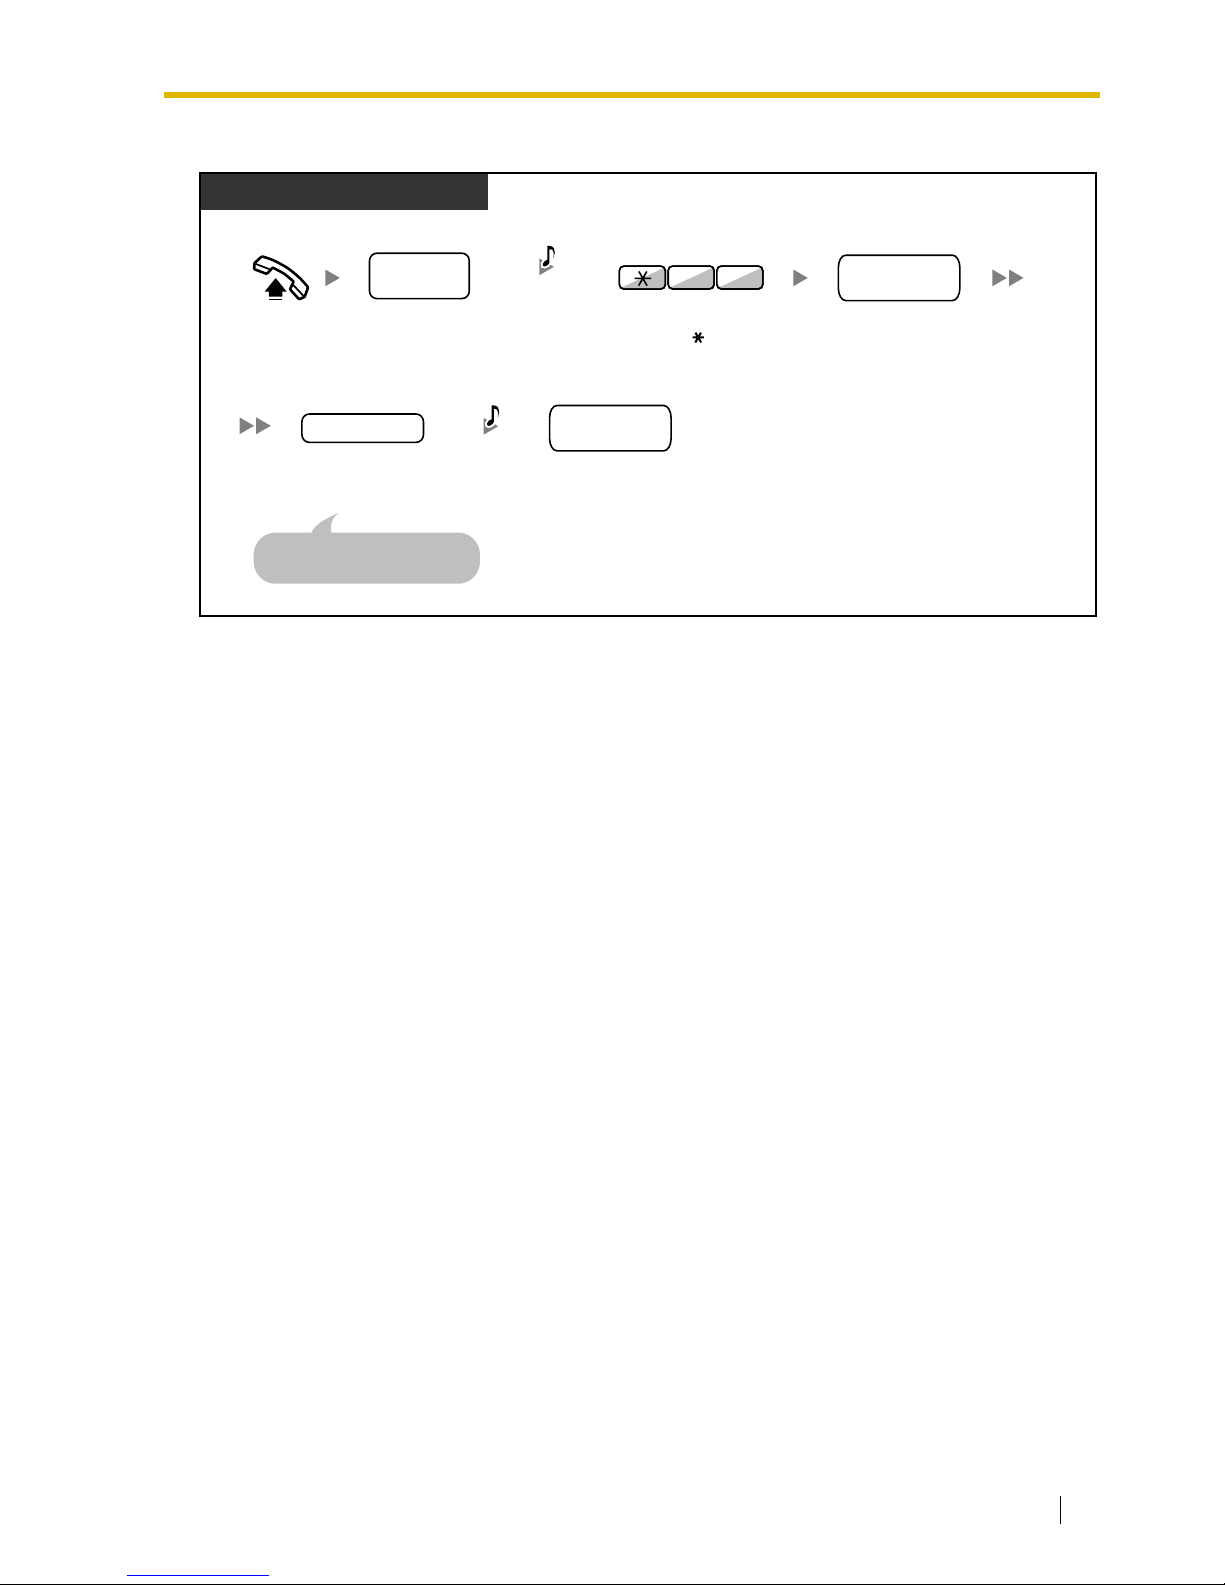
1.2.8 Remote Setting
You can set the following features on your telephone from another extension or through DISA.
• Call Forwarding (FWD)/Do Not Disturb (DND)
• Changing the Log-in/Log-out Status of Extensions
• Absent Message
• Extension Lock
• Time Service—Changing the Time Mode (Day/Night/Lunch/Break)
From another extension
• WARNING
When you enable the Outside-to-Outside Call feature of DISA, and a third party
discovers the password (verified code PIN/extension PIN) of the PBX, there will be
a risk that they will make fraudulent phone calls using the telephone line, and the
cost will be charged to your own account. In order to avoid this problem, we
strongly recommend the following points:
a) Carefully maintain the secrecy of the PIN.
b) Specify a complicated PIN as long and random as you can make it.
c) Change the PIN frequently.
• Time limit
Both parties will hear an alarm tone fifteen seconds before the specified time limit. To
extend, press any dial button except .
• If Built-in Automated Attendant service is set, you can access the desired extension
simply by pressing a single digit (0-9) from the options given the prerecorded message.
Off-hook.
PT/SLT/PS
Enter 47.
extension PIN
your
extension no.
desired
feature no.
Dial your
extension number.
Enter extension PIN
(max. 10 digits).
If a wrong extension PIN is
entered, you hear an alarm tone.
Dial desired
feature number.
74
C.Tone &
D.Tone
PIN: Personal Identification Number
Page 43
1.2 Making Calls
User Manual 43
Through DISA
Off-hook.
Enter 47.
Dial your
extension number.
Enter extension PIN
(max. 10 digits).
If a wrong extension PIN is
entered, you hear an alarm tone.
Dial desired
feature number.
74
Dial
DISA
phone number.
DISA
phone no.
extension no.
your
extension no.
R.B.Tone &
DISA message
extension PIN
extension no.
desired
feature no.
C.Tone &
D.Tone
PIN: Personal Identification Number
From Outside Telephone
Page 44
1.3 Receiving Calls
44 User Manual
1.3 Receiving Calls
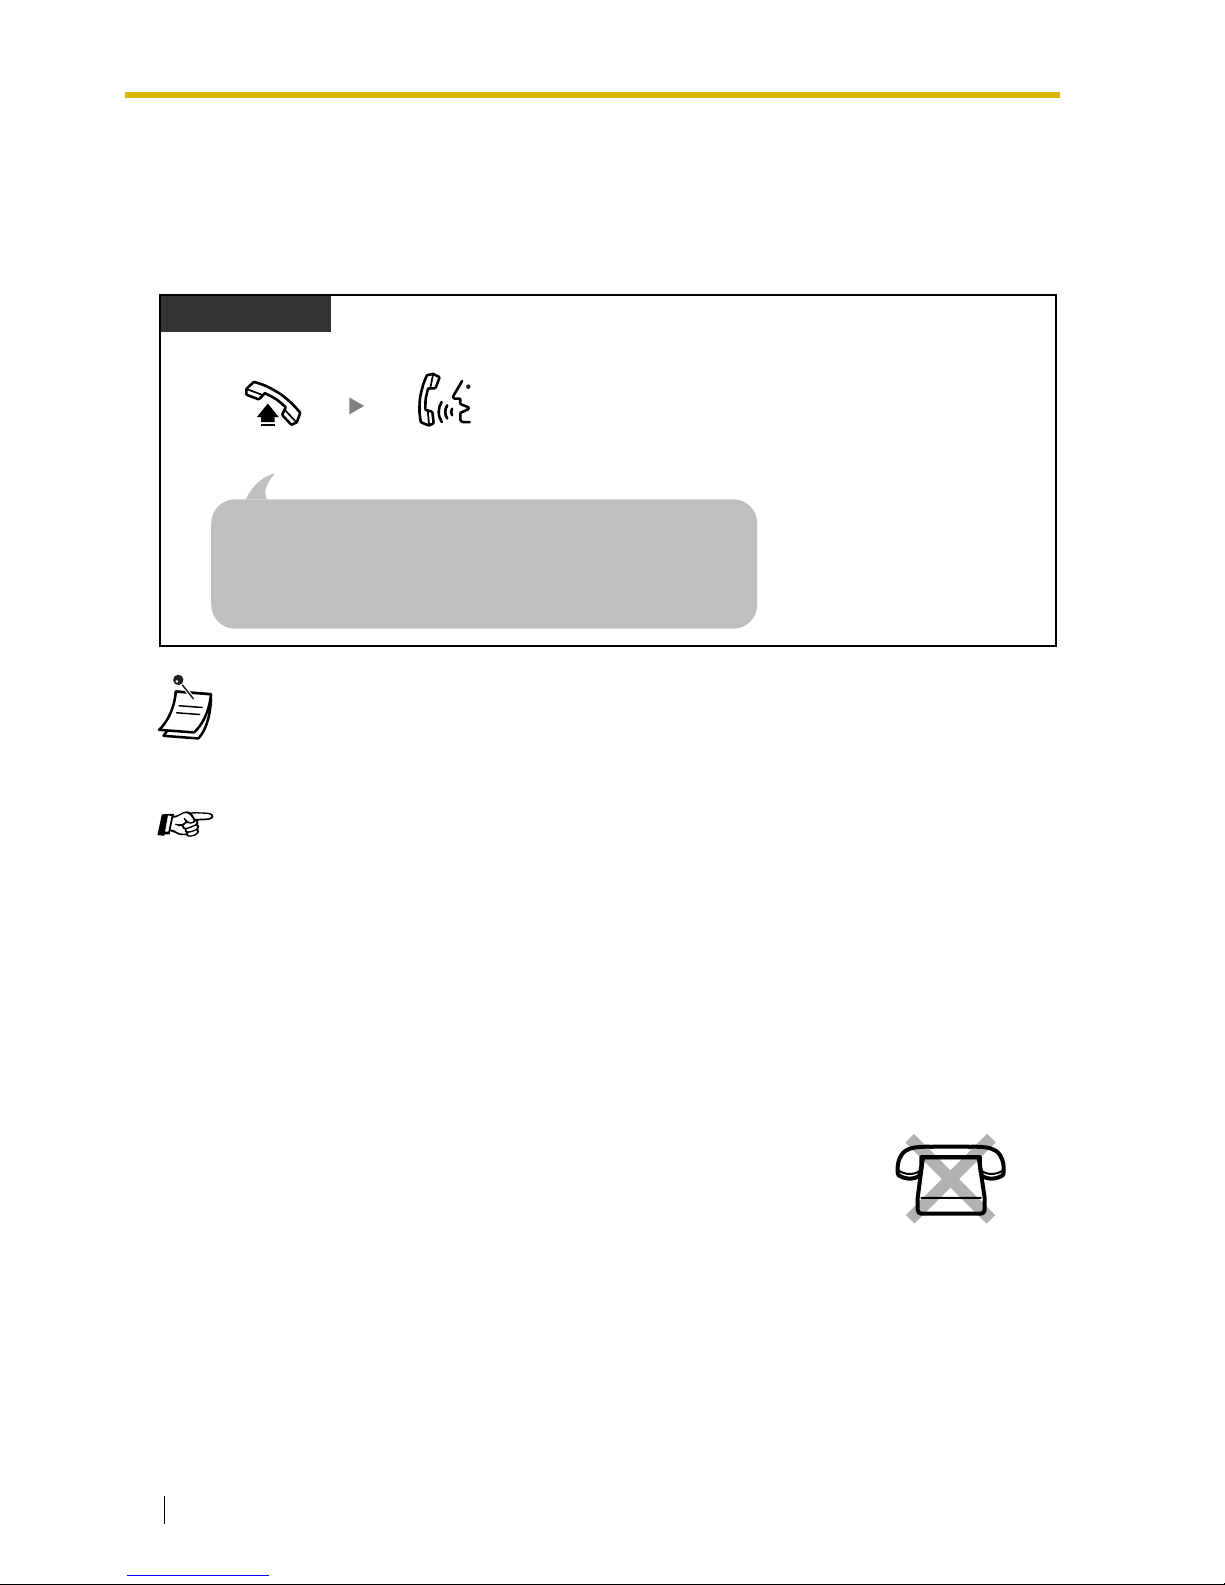
1.3.1 Answering Calls
1.3.2 Hands-free Answerback
• The G-DN button light shows the current status as follows:
Off: Idle
Green on: The line is in use. (You are using the line.)
Red on: Your extension is in Log-out mode from the incoming call distribution group.
Customizing Your Phone
• 3.1.2 Settings on the Programming Mode—
Preferred Line Assignment—Incoming
Select the seized line when going off hook.
Alternate Receiving—Ring/Voice
Select the Calling method, either ring or the other party’s voice.
• 3.1.3 Customizing the Buttons
Create or edit a Group Directory Number (G-DN) button.
You can answer an incoming call without going off-hook as soon as the line is
connected. When an intercom call arrives, you will hear the caller talking without
the phone ringing. When an outside call arrives, you will hear the caller talking
after a preprogrammed number of rings. Hands-free Answerback for outside
calls requires System Programming. Consult your dealer.
Talk.
Off-hook.
Select one of the following methods:
· Lift the handset to receive the preferred line.
(Default: Ringing line is selected.)
· Press the SP-PHONE button.
· Press the flashing CO, INTERCOM or G-DN button directly.
· Press the ANSWER button.
PT/SLT/PS
Page 45
1.3 Receiving Calls
User Manual 45
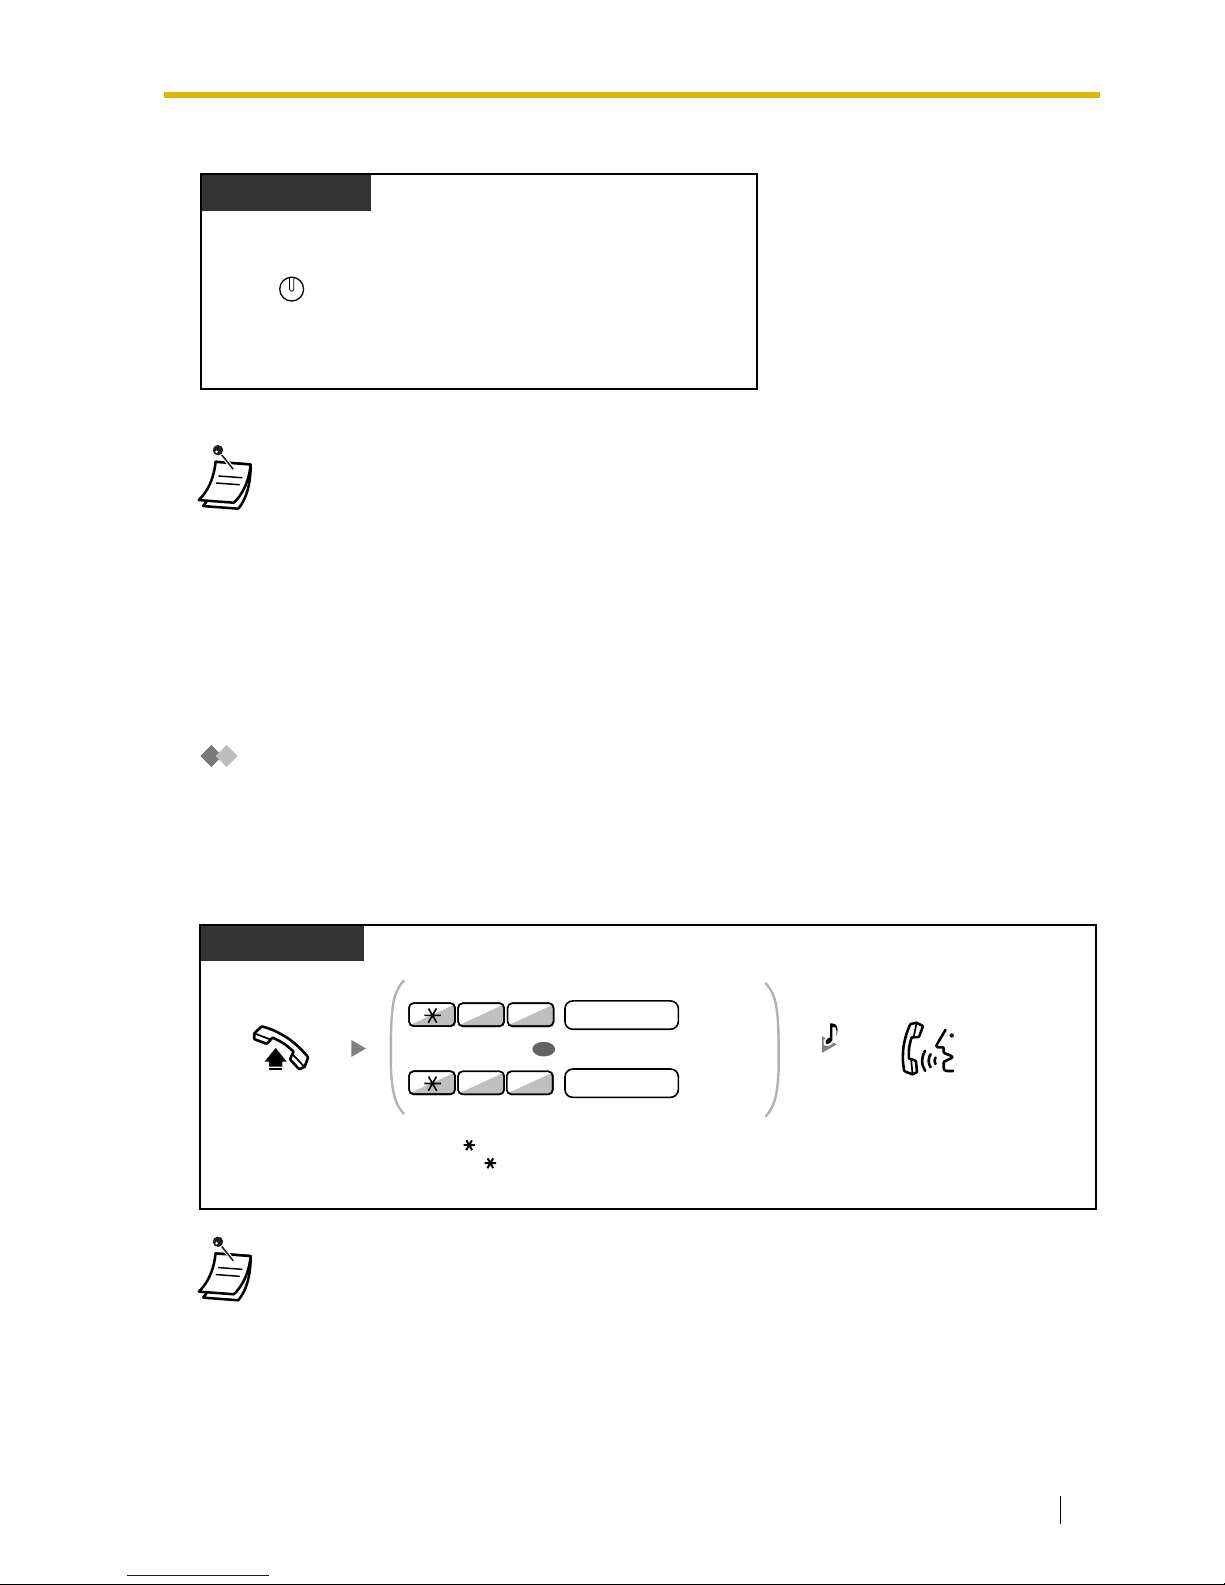
To set/cancel
1.3.3 Call Pickup
— Call Pickup
— Call Pickup Deny
Call Pickup
You can answer an incoming call that is ringing at another extension or group from your phone without
leaving your desk.
The following types of pickup are available:
Group Call Pickup: Picks up a call within your group.
Directed Call Pickup: Picks up a specified extension’s call.
• The AUTO ANS button light shows the current status as follows:
Off: Not set
On: Set
• For a PS user, refer to "Operating Instructions" for PS.
• If you receive a call waiting tone, you can ask a third party to pick up your second call
with Directed Call Pickup.
• If there are multiple incoming calls for the same group, the longest waiting call is received
first.
Press
AUTO ANS
.
While on-hook
PT
AUTO ANS
MUTE
PT/SLT/PS
Off-hook.
Enter 40 and then
group number
(2 digits).
Or enter
41
and then
extension number
.
Talk.
Group
Directed
4 0
OR
14
group no.
extension no.
C.Tone
Page 46
1.3 Receiving Calls
46 User Manual
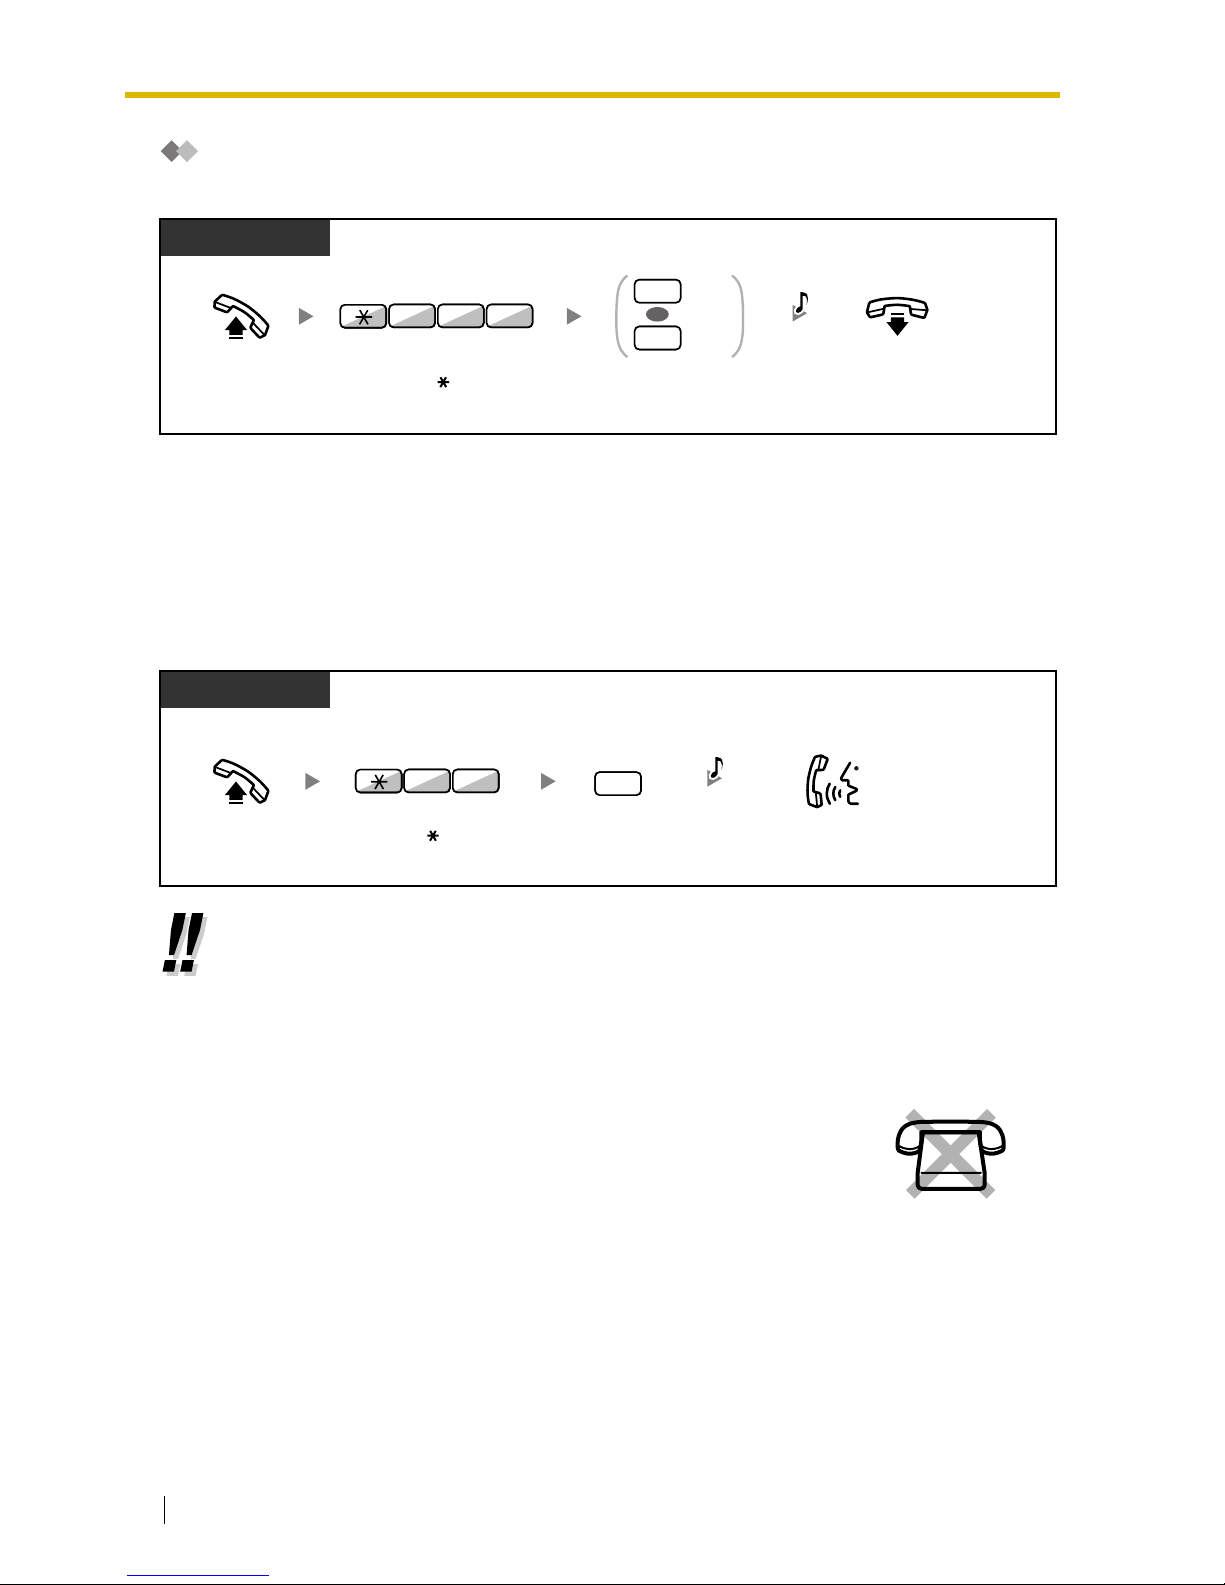
Call Pickup Deny
You can deny or allow other people to pick up your calls.
1.3.4 Trunk Answer From Any Station (TAFAS)
You can be notified of incoming outside calls through an external speaker. These calls can be
answered from any extension.
Through an external speaker
1.3.5 ANSWER/RELEASE Button
• You can also receive a paging announcement via a speaker with this operation.
The ANSWER and RELEASE buttons are convenient for operators using
headsets.
With the ANSWER button, you can answer all incoming calls.
With the RELEASE button, you can disconnect the line during or after a
conversation, or complete transferring a call.
Off-hook. On-hook.
Enter 1 to deny
or
0
to allow.
PT/SLT/PS
Deny
Allow
1
0
OR
Enter
720
.
2 07
C.Tone
Off-hook.
PT/SLT/PS
Talk.
While hearing a tone
Enter 42.
24
C.Tone
Enter 1.
1
Page 47
1.3 Receiving Calls
User Manual 47
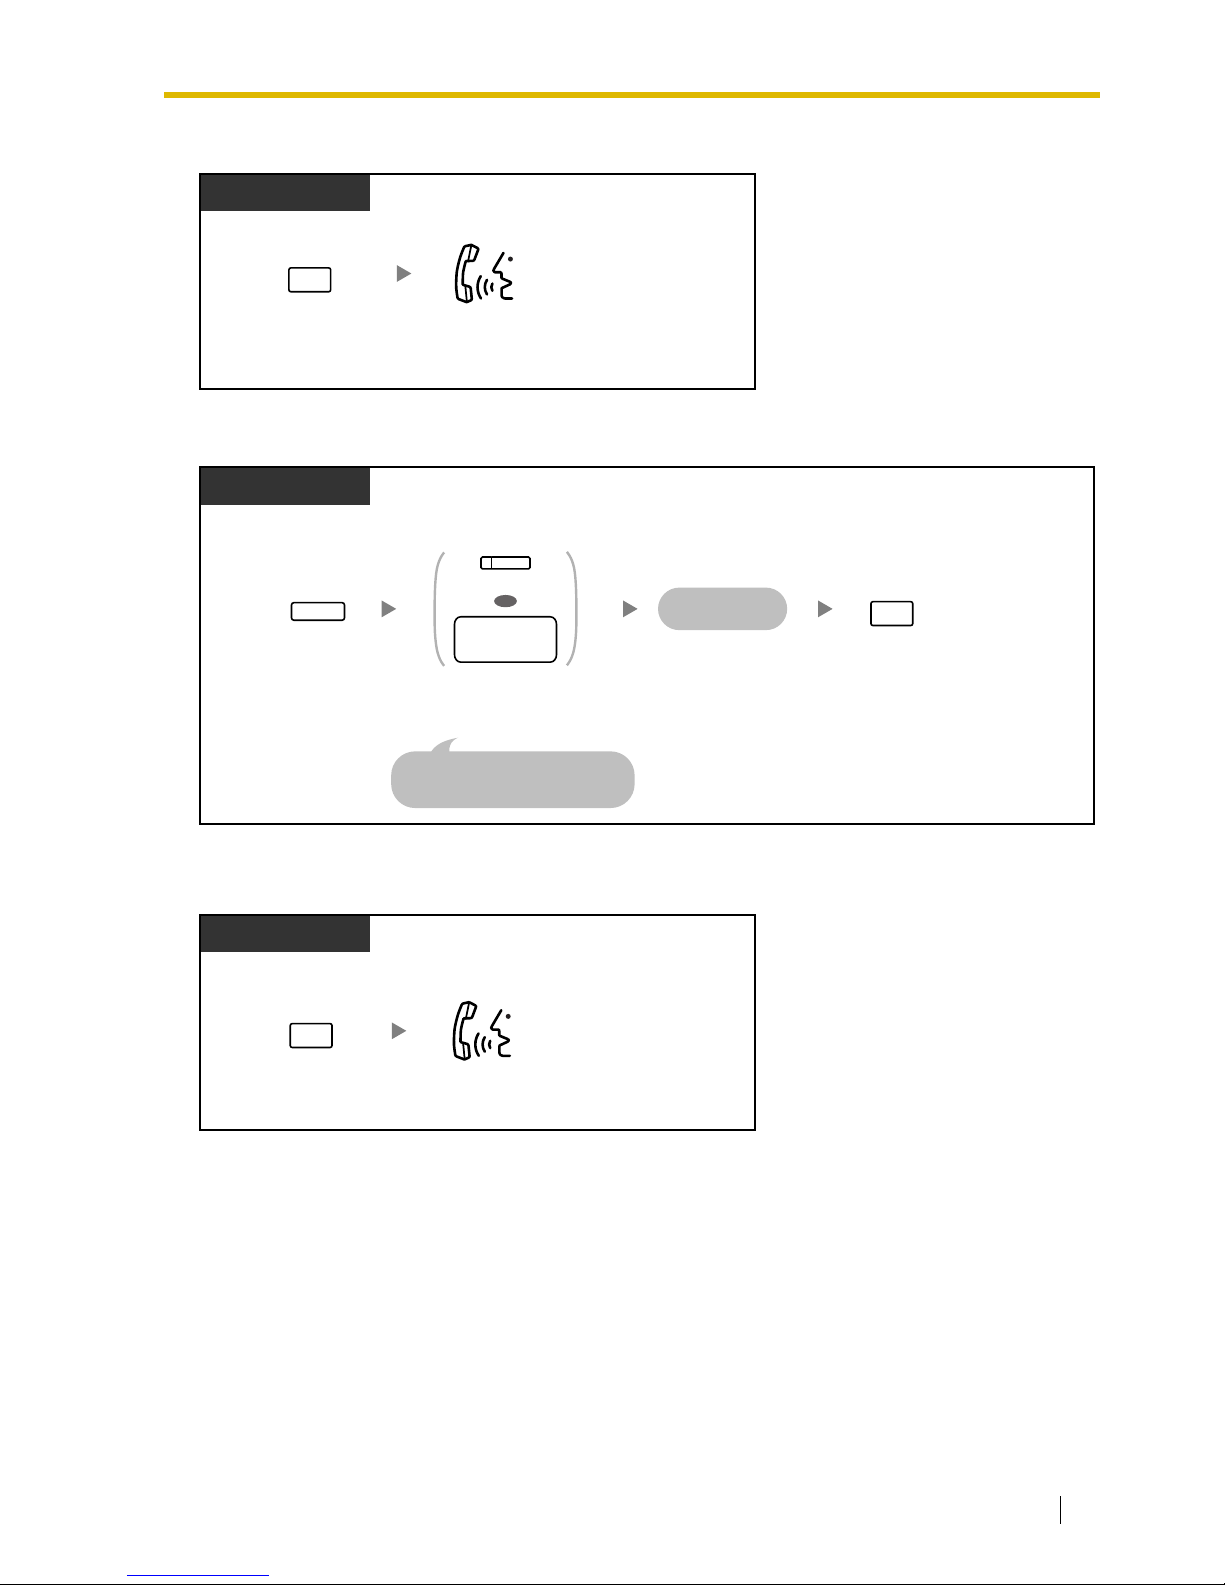
To answer
To transfer a call
To talk to a waiting caller
Press
ANSWER
.
Talk.
PT
ANSWER
PT
During a conversation
Press
DSS
or dial
desired phone number
.
The called
party answers.
Seize CO line before
dialing outside phone number.
OR
(DSS)
desired
phone
no.
Press
TRANSFER
.
TRANSFER
Press
RELEASE.
RELEASE
Press
ANSWER
.
Talk.
PT
While hearing call waiting tone
ANSWER
Page 48
1.3 Receiving Calls
48 User Manual
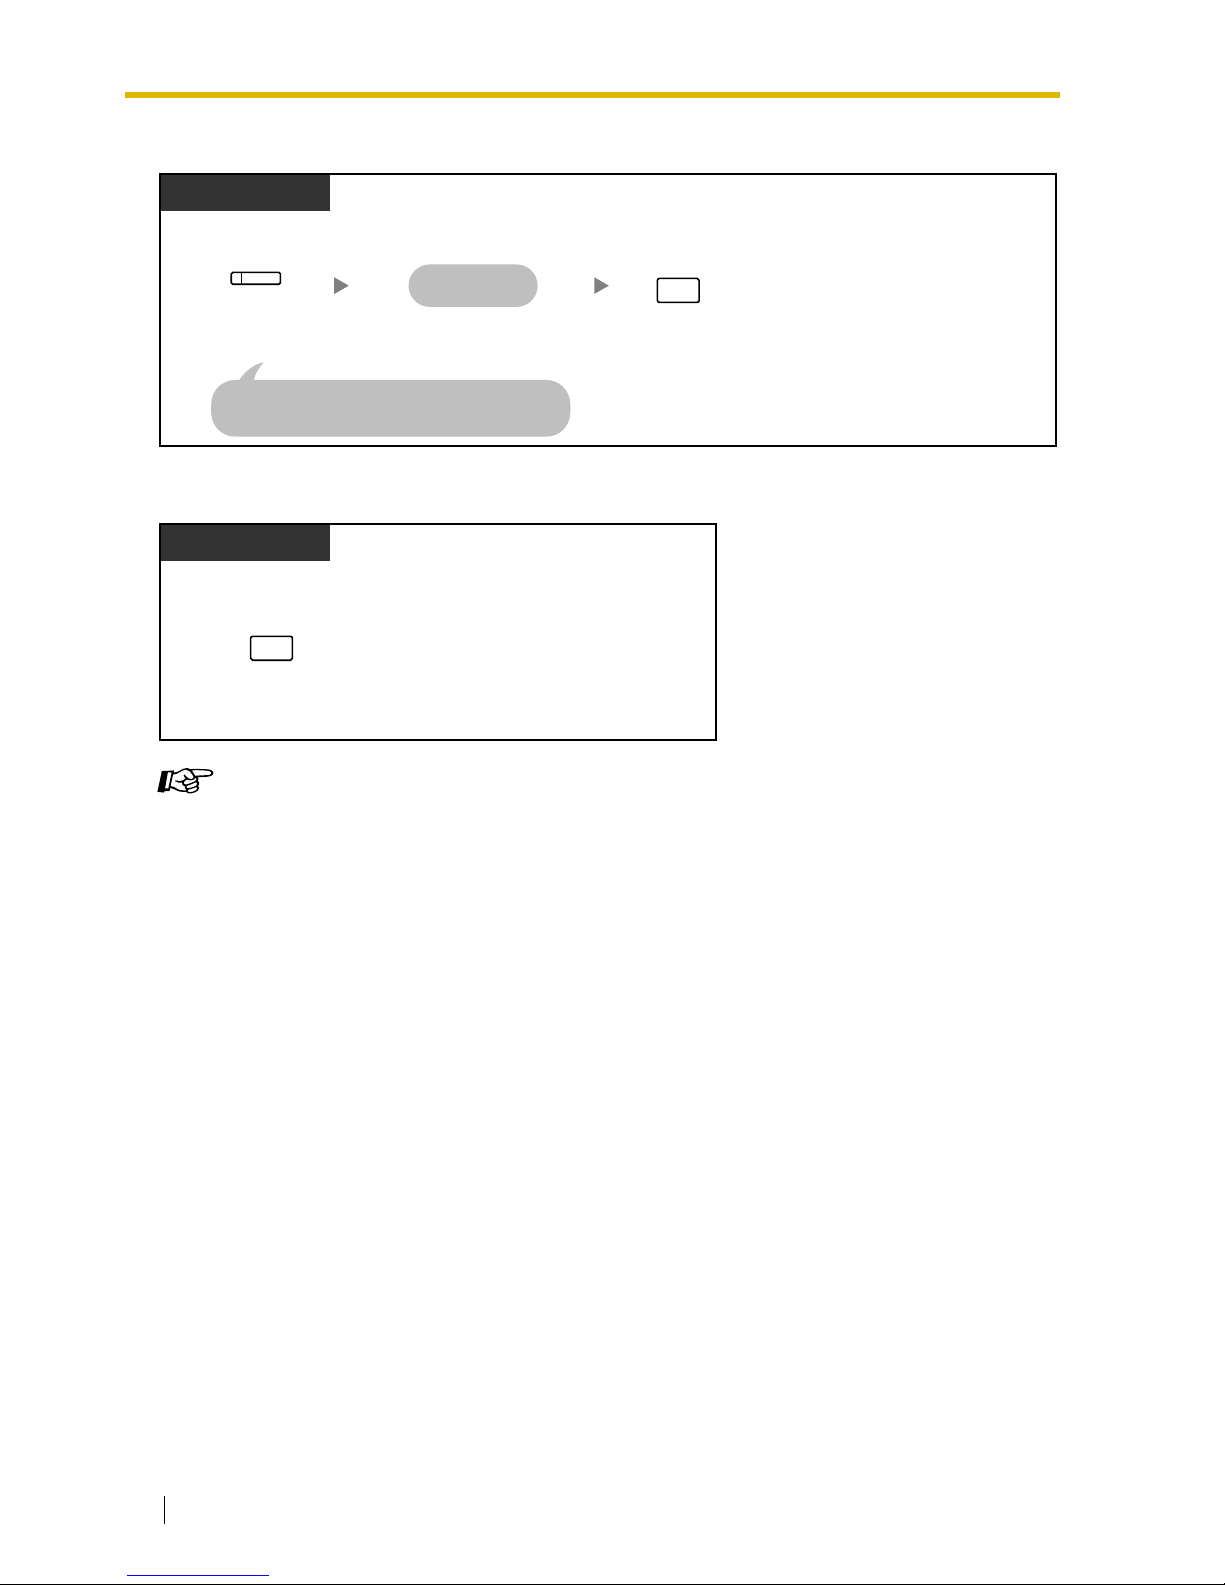
To transfer an outside call to an extension with a one-touch operation
To end a conversation
Customizing Your Phone
• 3.1.3 Customizing the Buttons
Create or edit an Answer button or a Release button.
Press
DSS
.
PT
During a conversation
Press
RELEASE
.
The called
party answers.
The other party is placed on hold and the
destination extension is called immediately.
(DSS)
RELEASE
Press RELEASE.
PT
During a conversation
RELEASE
Page 49
1.4 During a Conversation
User Manual 49
1.4 During a Conversation
1.4.1 Call Transfer
— Transferring to an Extension on the PBX
— Transferring to an Outside Party Using the PBX Service
Transferring to an Extension on the PBX
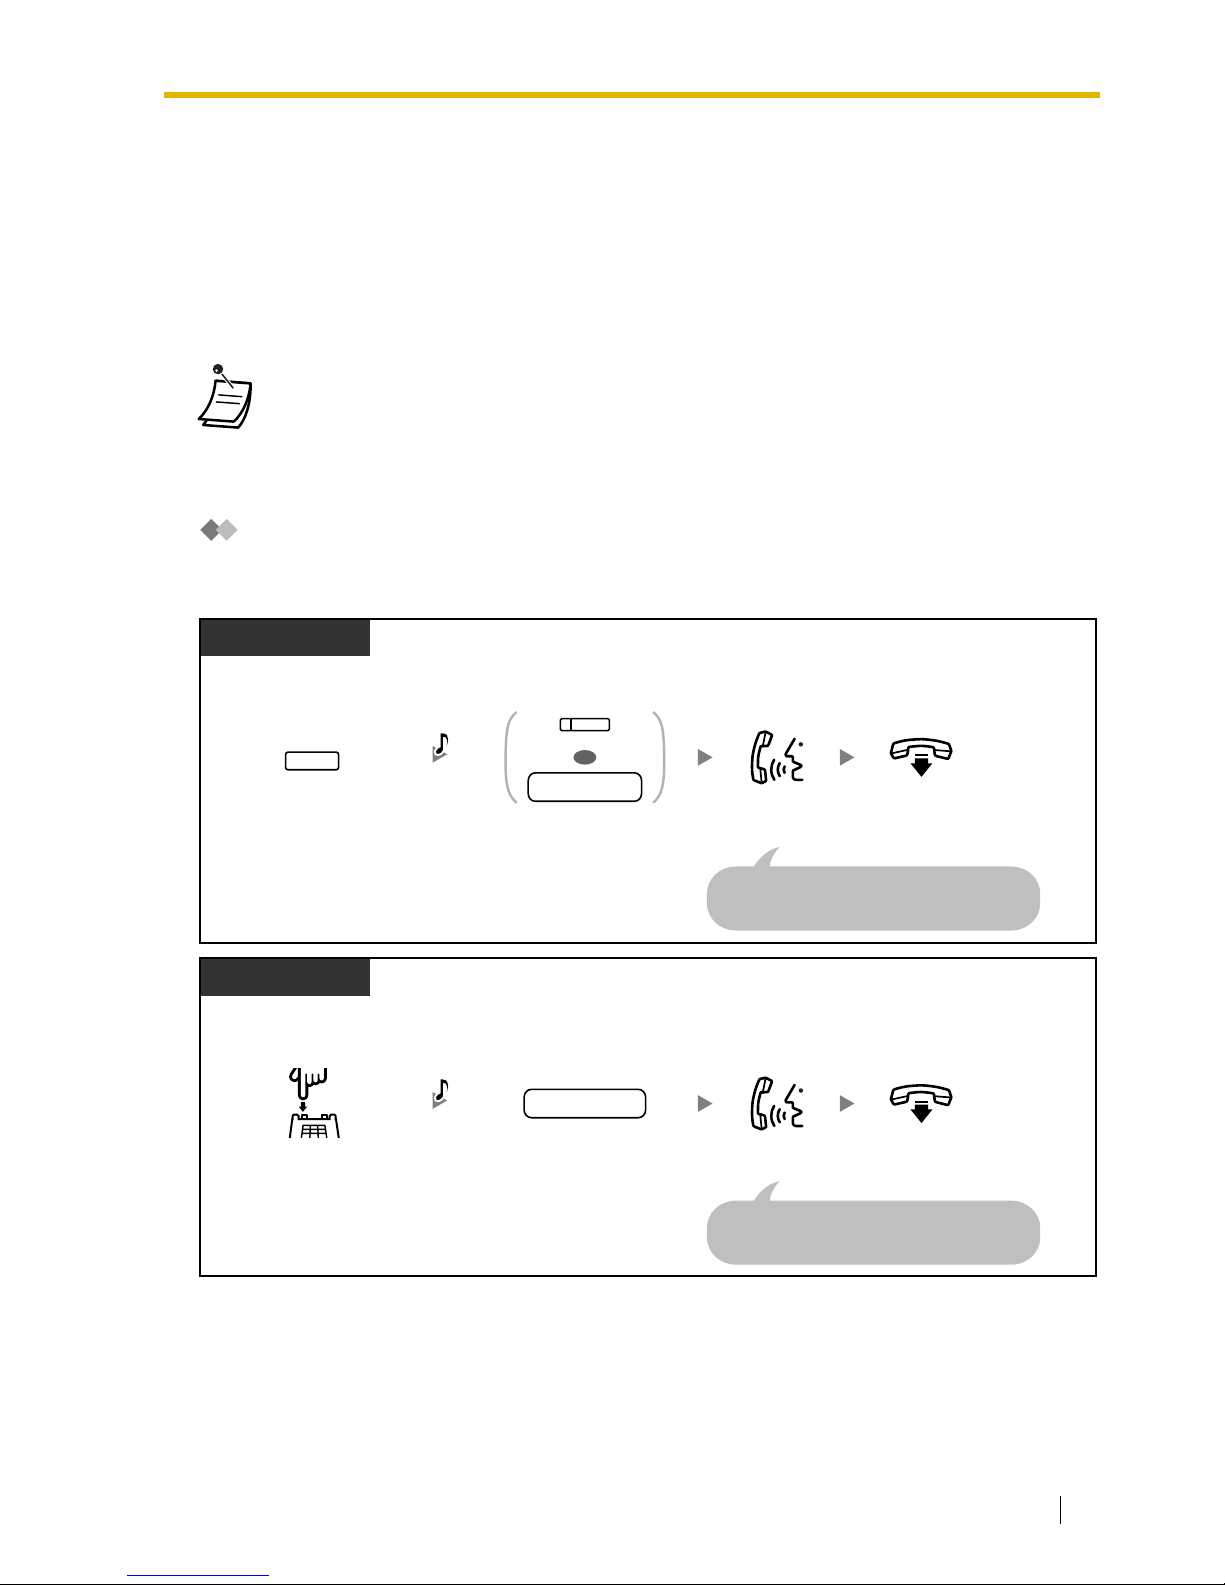
To transfer
• You can transfer a held call without talking by going on-hook.
If a call is not retrieved within a specified time, you will hear an alarm as a reminder. And,
if an outside call is not answered within a specified time, it is automatically disconnected.
• If you hear an alarm tone, the destination extension did not answer the call. Answer the
call.
Press
DSS
or dial
extension number
.
On-hook.
Talk.
During a conversation
You do not have to inform the destination
extension about where the call has been
transferred from. This can be disregarded.
PT/PS
Press
TRANSFER
.
extension no.
OR
(DSS)
TRANSFER
C.Tone
Dial
extension
number
.
On-hook.
Talk.
During a conversation
You do not have to inform the destination
extension about where the call has been
transferred from. This can be disregarded.
SLT
Press
Recall/
hookswitch
.
extension no.
C.Tone
Page 50
1.4 During a Conversation
50 User Manual
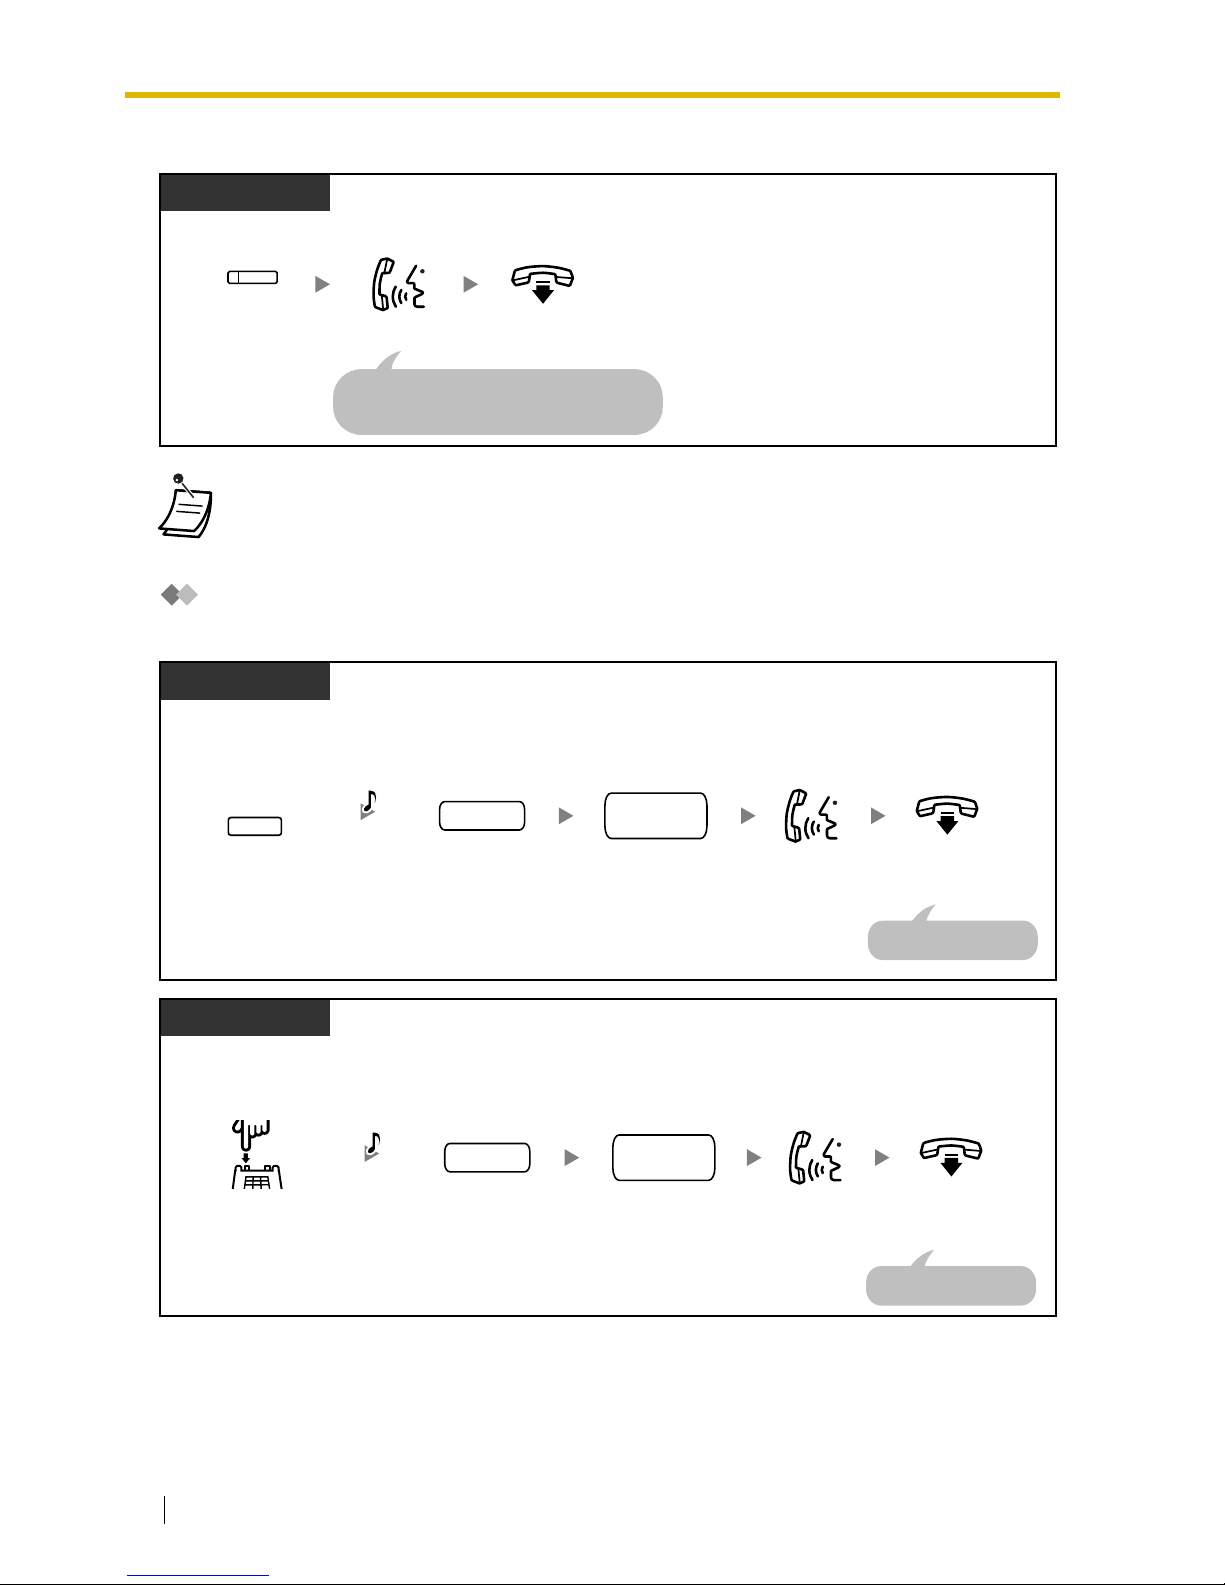
To transfer with one-touch (One-touch Transfer)
Transferring to an Outside Party Using the PBX Service
Some extensions may be restricted from performing this feature.
• Even if the transferred party does not answer, you can go on-hook.
During a conversation
PT/PS
Press
DSS
.
(DSS)
On-hook.
Talk.
You do not have to inform the destination
extension about where the call has been
transferred from. This can be disregarded.
On-hook.Talk.
Seize
CO line
.
During a conversation
PT/PS
The call is transferred.
Press
TRANSFER
. Dial
outside
phone number
.
CO line
outside
phone no.
TRANSFER
C.Tone
On-hook.Talk.
During a conversation
SLT
Press
Recall/
hookswitch
.
Dial
outside
phone number
.
C.Tone
The call is transferred.
Seize
CO line
.
CO line
outside
phone no.
Page 51
1.4 During a Conversation
User Manual 51
1.4.2 Call Hold
— Call Hold
— Call Park
Call Hold
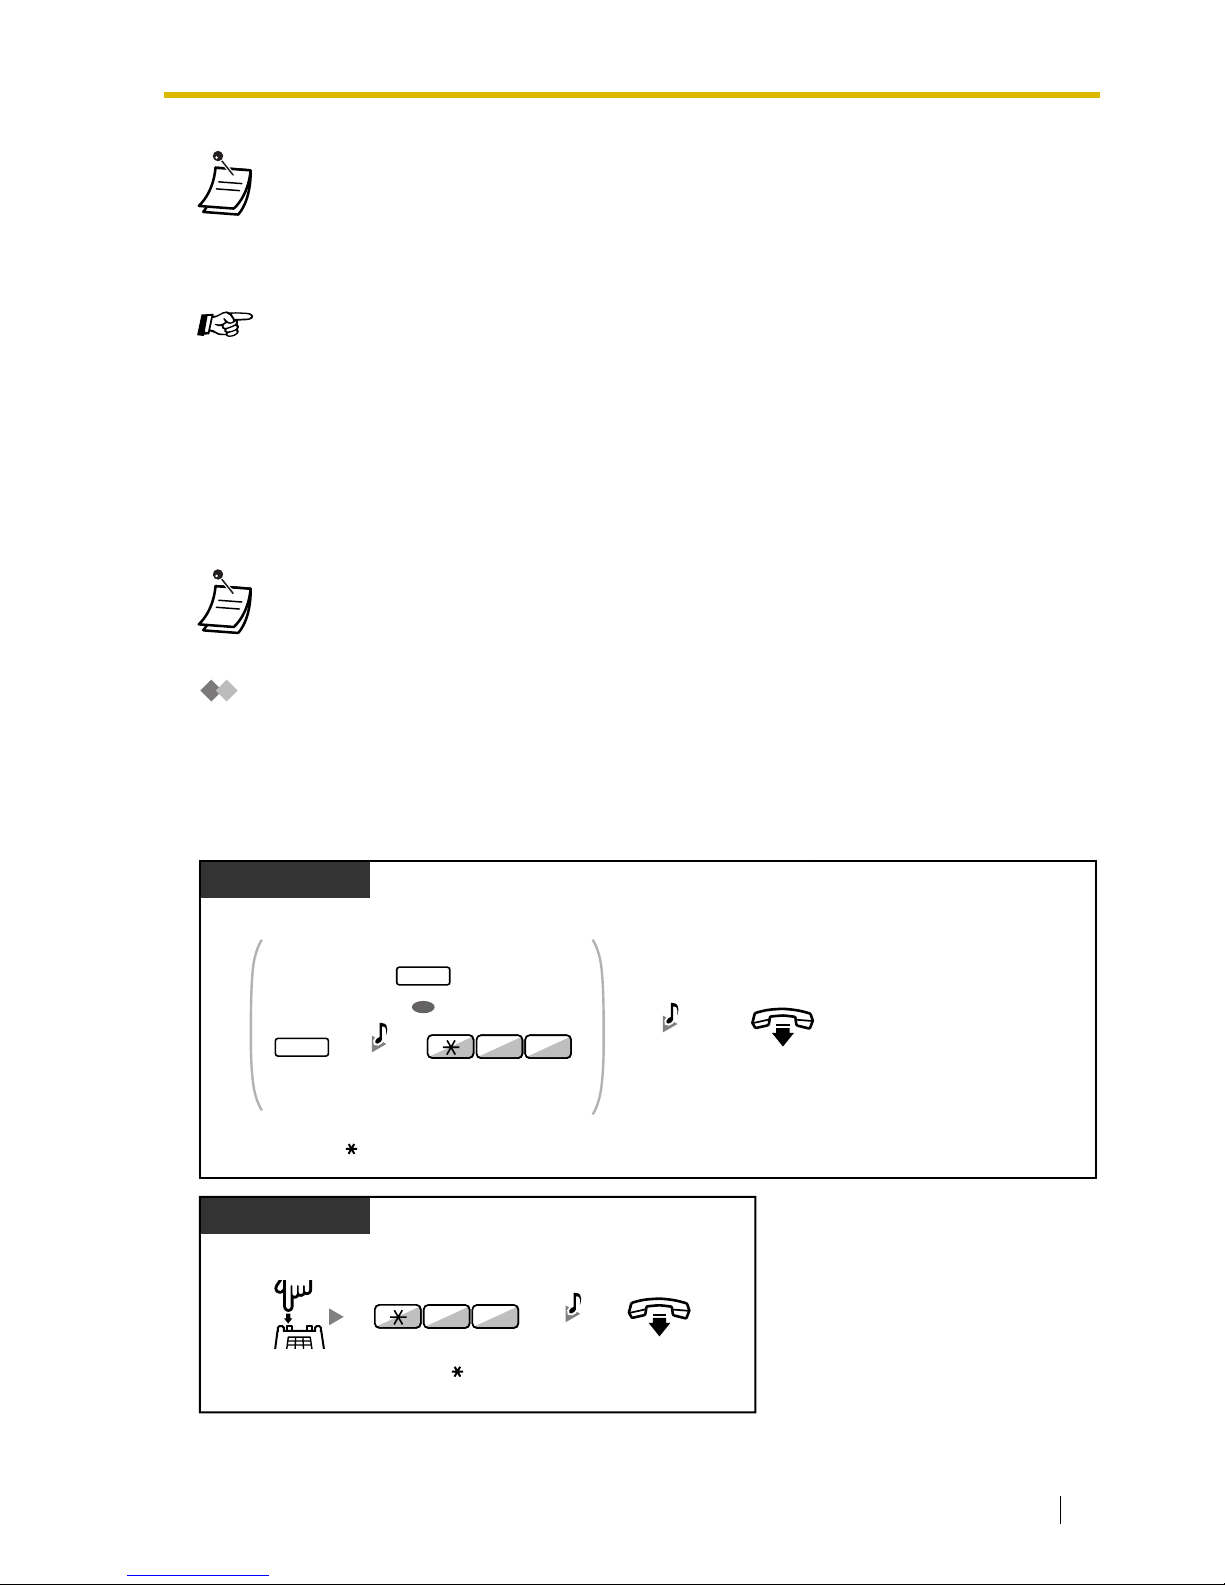
There are two types of hold. The difference between them is that other people can retrieve your held
call (Regular Hold) or not (Exclusive Call Hold). As they can be alternated, ask your manager what
the current mode is.
Call Hold
• Time limit
Both the caller and the transferred party will hear an alarm tone fifteen seconds before a
specified time period.
• To return to the held call before the destination answers, press the TRANSFER
button, corresponding CO, G-DN or INTERCOM button, or the hookswitch.
Customizing Your Phone
• 3.1.3 Customizing the Buttons
Create or edit a Direct Station Selection (DSS) button.
• If a call is not retrieved within a specified time, you will hear an alarm as a reminder.
And, if an outside call is not answered within a specified time, it is automatically
disconnected.
On-hook.
During a conversation
PT/PS
Press
HOLD,
or press
TRANSFER
and
then enter
50
.
C.Tone
OR
05
TRANSFER
HOLD
C.Tone
SLT
During a conversation
On-hook.
Enter
50
.
Press
Recall/
hookswitch
.
05
C.Tone
Page 52
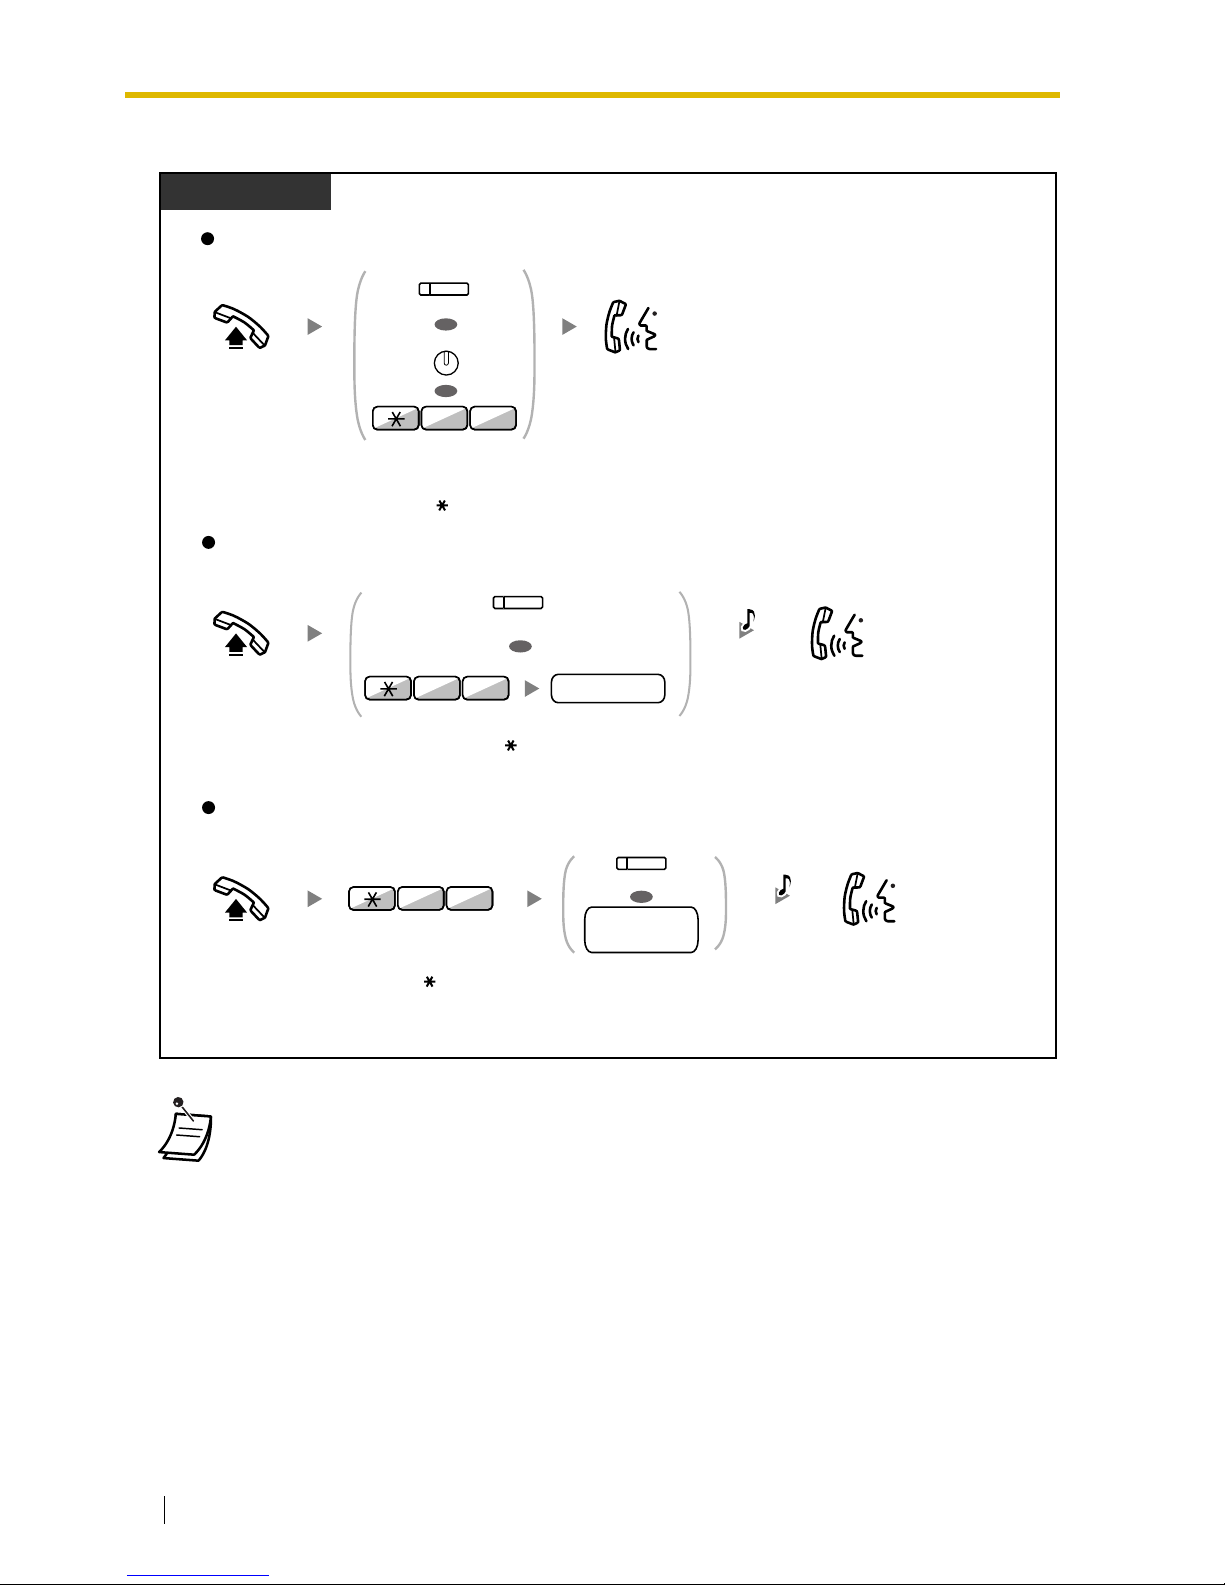
1.4 During a Conversation
52 User Manual
Call Hold Retrieve
• The CO or INTERCOM button light shows the current status as follows:
— Regular Hold mode
Flashing green slowly: Your held call
Flashing red: Another extension’s held call
— Exclusive Call Hold mode
Flashing green rapidly: Your held call
Red on: Another extension’s held call
• Hold Mode Change (PT only)
After pressing the HOLD button, if you press the HOLD button again, the status switches
from the Regular Hold mode to the Exclusive Call Hold mode or from the Exclusive Call
Hold mode to the Regular Hold mode.
Off-hook.
Off-hook.
Press
DSS
or dial
holding extension
number
.
Off-hook.
At the holding extension (Call Hold Retrieve)
To retrieve an outside call from another extension—only Regular Hold
(Call Hold Retrieve–Specified with a held line number)
To retrieve an intercom call or outside call from another extension—only Regular Hold
(Call Hold Retrieve–Specified with a holding extension number)
PT/SLT/PS
Talk.
Talk.
Talk.
Press CO, or enter 53 and then
held line
number
(3 digits).
Enter 51.
holding
extension no.
OR
(DSS)
0
5
15
Press flashing
CO
or
INTERCOM
,
or enter
50
.
C.Tone
C.Tone
(CO)
held line no.
3
5
OR
OR
(CO)
OR
INTERCOM
Page 53
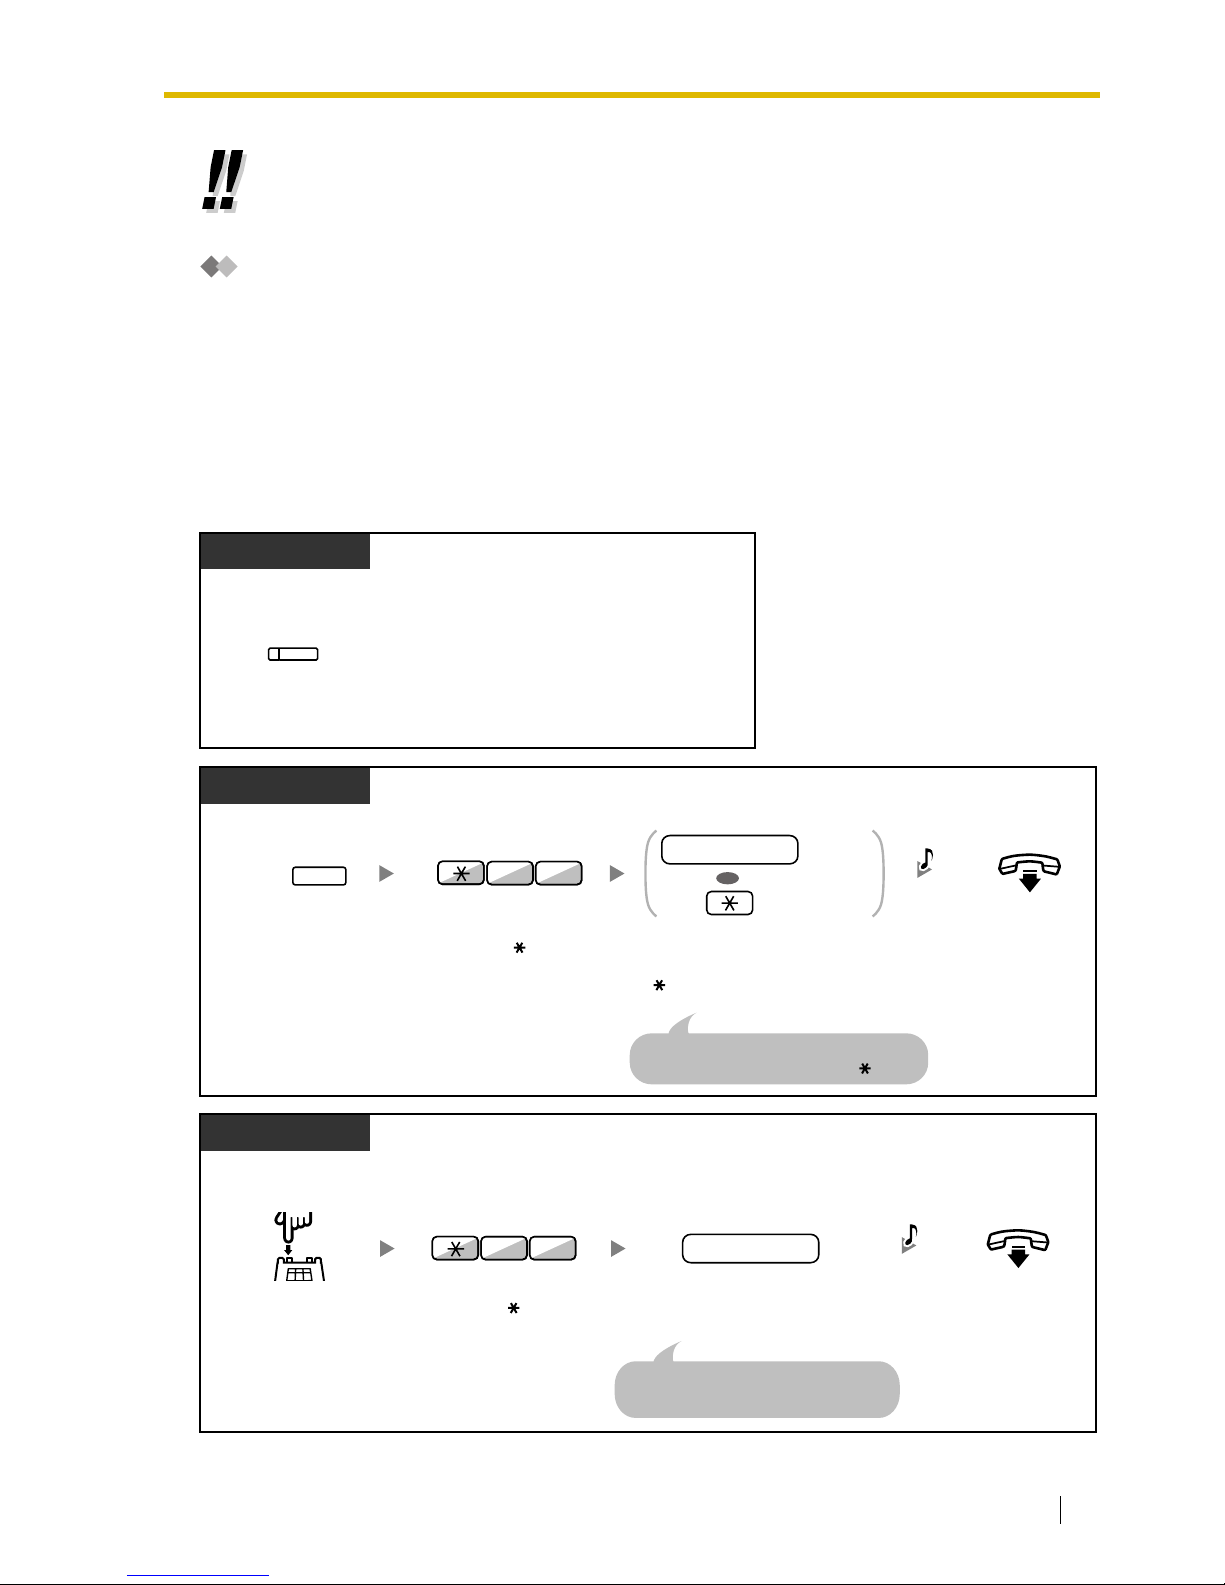
1.4 During a Conversation
User Manual 53
Call Park
You can put a call on hold in a common parking zone of the PBX so that any extension can retrieve
the parked call. You can use this feature as a transferring feature.
A call can be put into either a specified parking zone (Specified) or any idle parking zone (Auto). If a
Call Park button and Call Park (Automatic Park Zone) button have been established, you can select
either way to park by simply pressing the corresponding button.
When a call is parked automatically, or more than one call has been parked at the same time, you
need to specify the parking zone number to retrieve the required call.
To set
• For simple operation, you can automatically hold a call by pressing another CO, G-DN
or INTERCOM button, only if preprogrammed. (Automatic Call Hold) Consult your
dealer.
During a conversation
Press
Call Park
.
PT/PS
(Call Park)
Enter a specified
parking
zone number
(2 digits) or press
to park at an idle parking zone
automatically.
During a conversation
Press
TRANSFER
.
PT/PS
On-hook.
Enter 52.
parking zone no.
OR
Specified
Auto
If you hear a busy tone, enter another
parking zone number or press again.
25
TRANSFER
C.Tone
During a conversation
Press
Recall/
hookswitch
.
SLT
On-hook.
If you hear a busy tone, enter another
parking zone number.
Enter
52
. Enter a specified
parking
zone number
(2 digits).
parking zone no.
25
C.Tone
Page 54
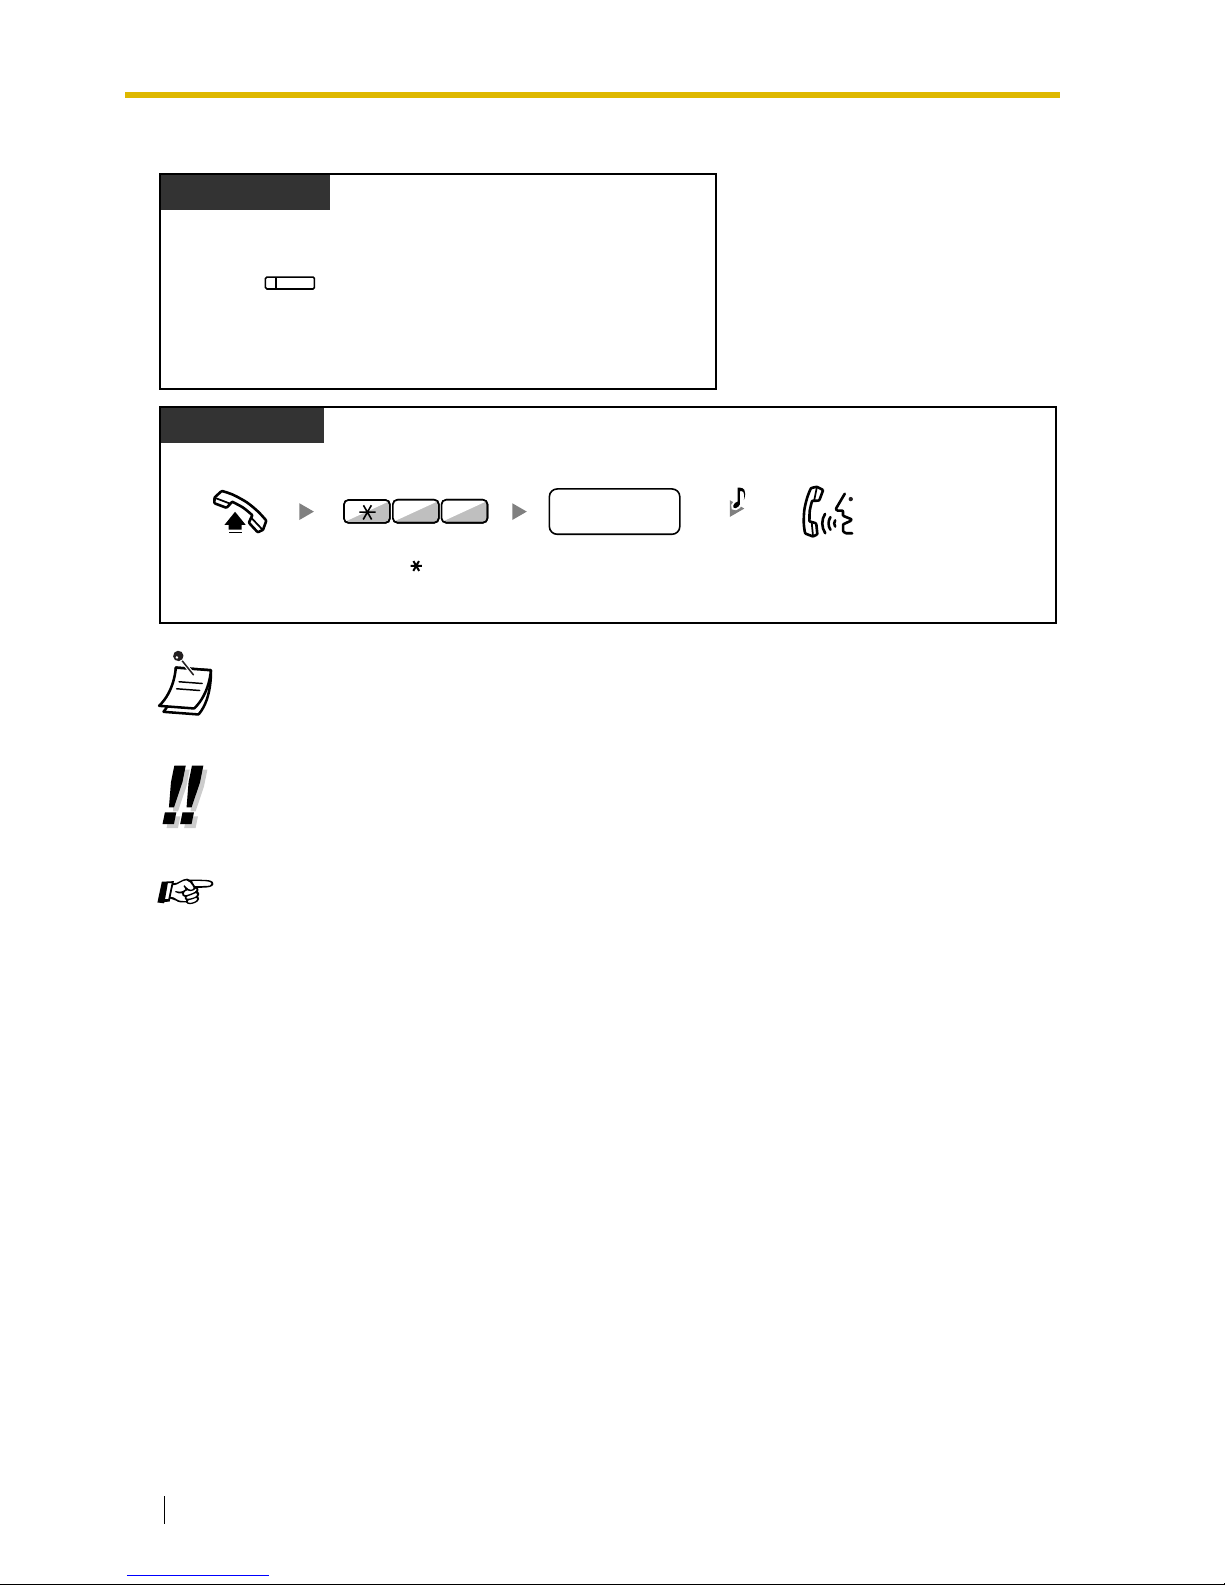
1.4 During a Conversation
54 User Manual
Call Park Retrieve
1.4.3 Call Splitting
When talking to one party while the other party is on hold, you can swap the calls back and forth
(alternately).
• If a call is parked automatically, confirm the parking zone number on the display.
• If you hear a reorder tone when retrieving a parked call, there is no held call. Confirm
the stored parking zone number.
• After you park a call, you can perform other operations.
Customizing Your Phone
• 3.1.3 Customizing the Buttons
Create or edit a Call Park button or Call Park (Automatic Park Zone) button.
Press a flashing
Call Park
.
PT/PS
(Call Park)
Off-hook.
Enter 52. Dial
stored parking
zone number
(2 digits).
stored parking
zone no.
PT/SLT/PS
Talk.
25
C.Tone
Page 55
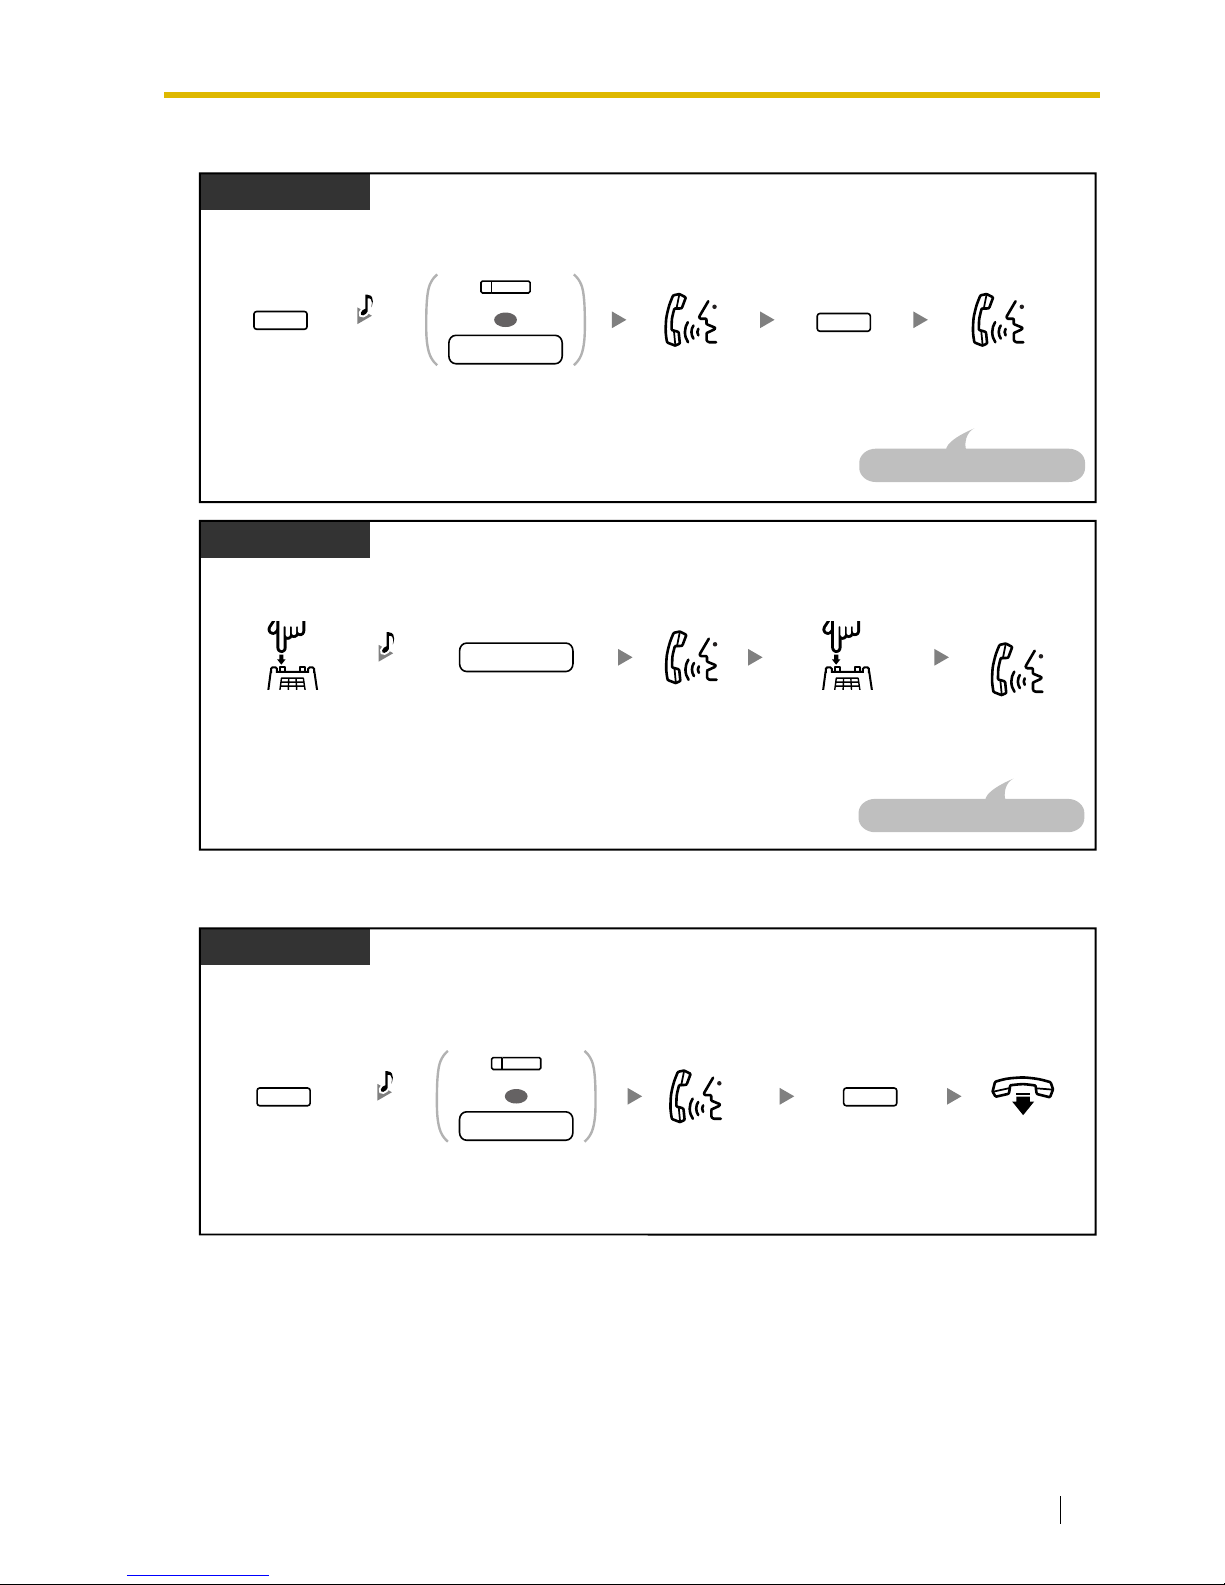
1.4 During a Conversation
User Manual 55
To alternate between the parties leaving one party on hold temporarily
To leave the conversation and then let the two parties talk
PT/PS
During a conversation
Press
TRANSFER
.
Talk to the
other party.
Talk to the
original party.
TRANSFER
Press
DSS
or dial
the other
party's extension number
.
Press
TRANSFER
.
extension no.
OR
(DSS)
OR
TRANSFER
C.Tone
The other party will be on hold.
SLT
During a conversation
Talk to the
other party.
Talk to the
original party.
Dial
the other party's
extension number
.
Press
Recall/
hookswitch
.
extension no.
Press
Recall/
hookswitch
.
C.Tone
The other party will be on hold.
PT/PS
Press
DSS
or dial
the other
party's extension number
.
Talk to the
other party.
During a conversation
Press
TRANSFER
.
extension no.
OR
(DSS)
TRANSFER
Press
TRANSFER
.
TRANSFER
C.Tone
On-hook.
Page 56
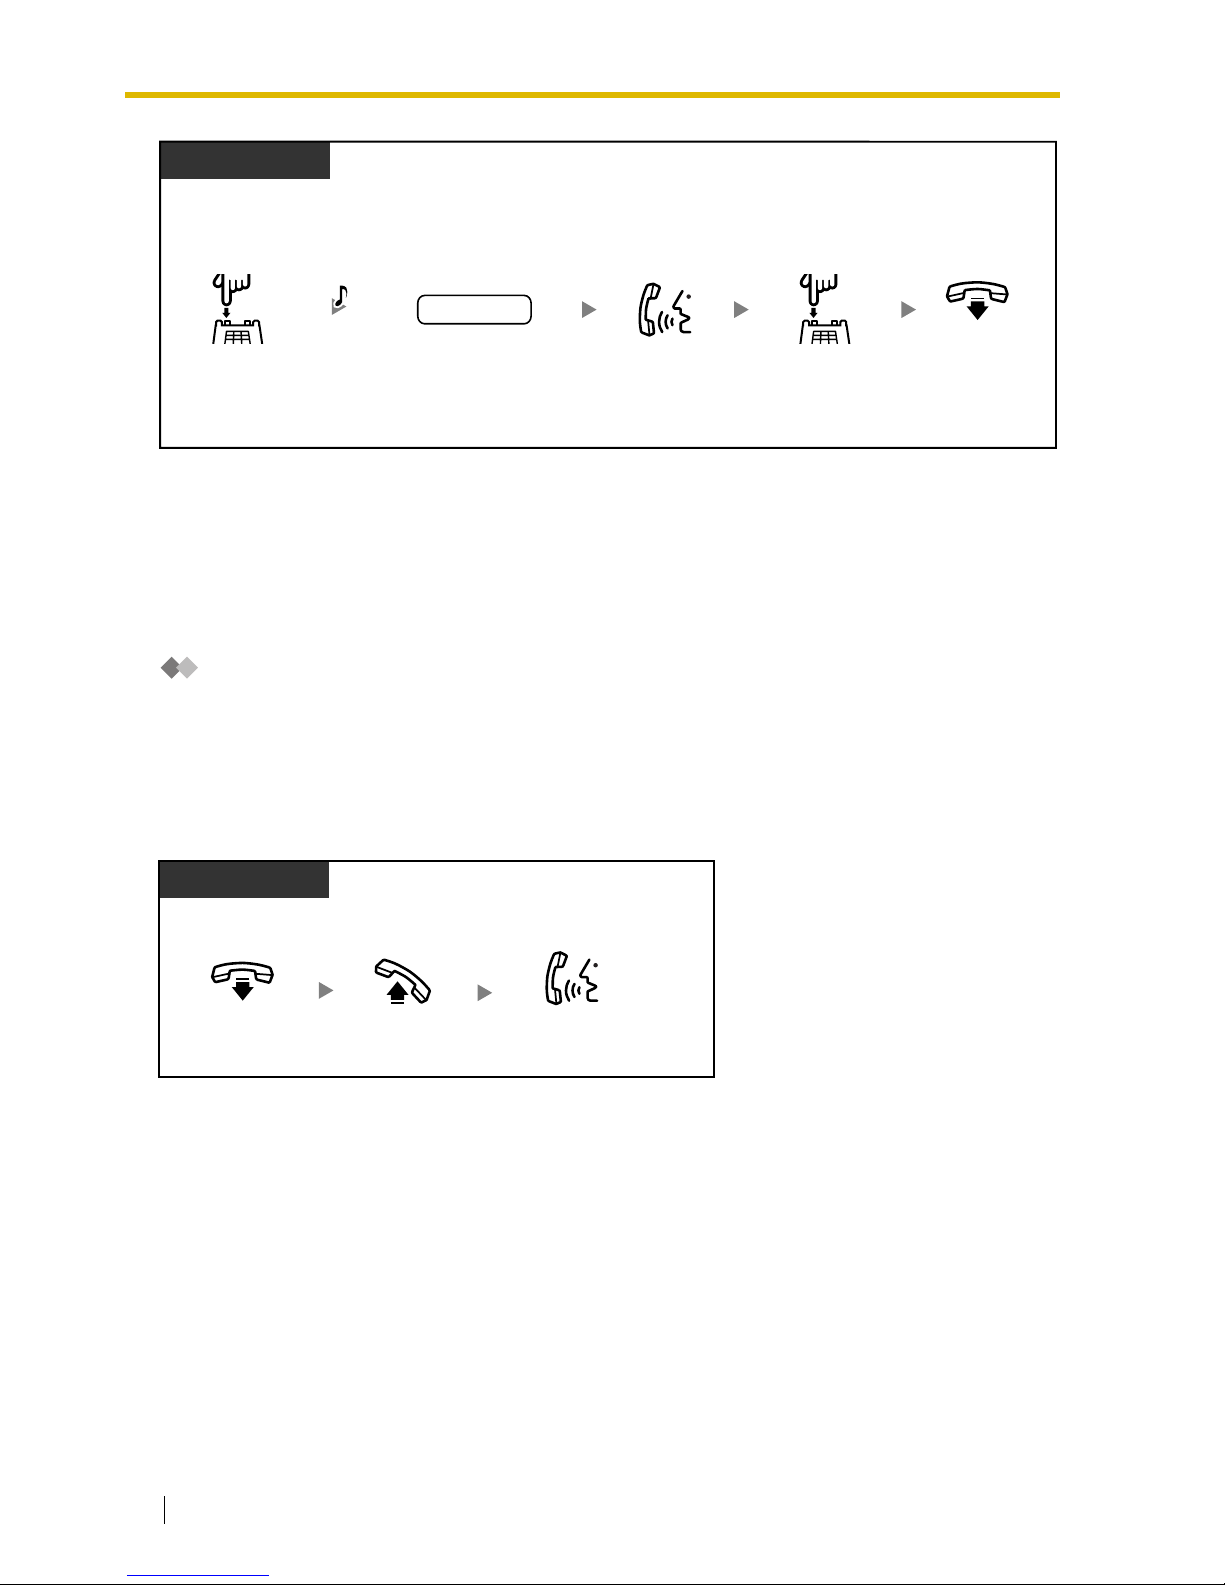
1.4 During a Conversation
56 User Manual
1.4.4 Call Waiting
— Answering Call Waiting in the PBX
— Answering Call Waiting from the Telephone Company
Answering Call Waiting in the PBX
During a conversation, a call waiting tone or voice announcement through the speaker or the handset
occurs when an outside call has been received or another extension is letting you know a call is
waiting. You must activate this feature to use it. (Default: Enable—Tone)
You can answer the second call by disconnecting (1) or holding (2) the current call.
1. To disconnect the current call and then talk to the new party
SLT
Dial
the other party's
extension number
.
Talk to the
other party.
During a conversation
Press
Recall/
hookswitch
.
extension no.
C.Tone
On-hook.
Press
Recall/
hookswitch
.
PT/SLT/PS
While hearing a tone
Off-hook.
On-hook.
Talk to the
new party.
Page 57
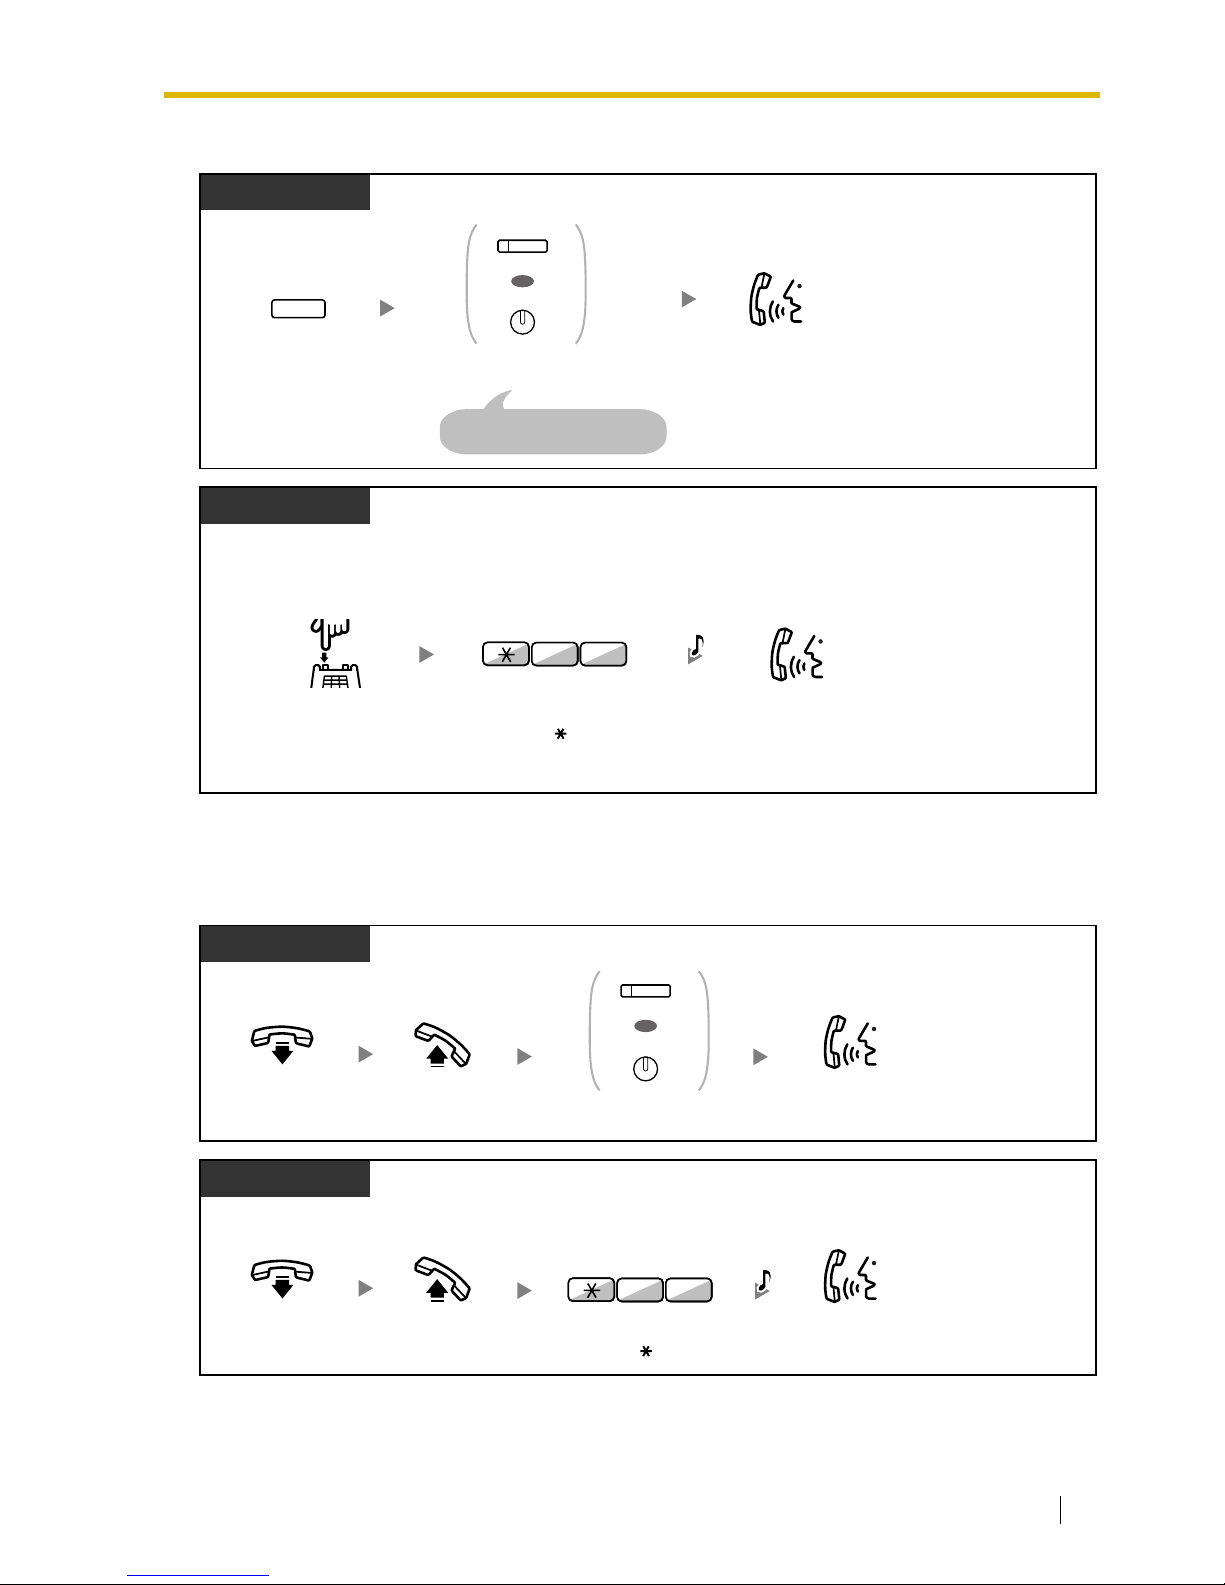
1.4 During a Conversation
User Manual 57
2. To hold the current call and then talk to the new party
After talking to the new party (second call), you can disconnect (2.1) or hold (2.2) it and then
retrieve the first call.
2.1 To disconnect the second call and then talk to the original party
PT/PS
Press
HOLD
.
While hearing a tone
Disregard this step if both
parties are extensions.
Press
CO
or
INTERCOM
.
HOLD
OR
(CO)
INTERCOM
Talk to the
new party.
SLT
While hearing a tone
Enter
50.
0
5
Talk to the
new party.
Press
Recall/hookswitch
.
C.Tone
PT/PS
During a conversation
Off-hook.
On-hook.
Talk to the
original party.
Press
CO
or
INTERCOM
.
OR
(CO)
INTERCOM
PT/SLT/PS
During a conversation
Off-hook.
On-hook.
Talk to the
original party.
Enter
50.
0
5
C.Tone
Page 58
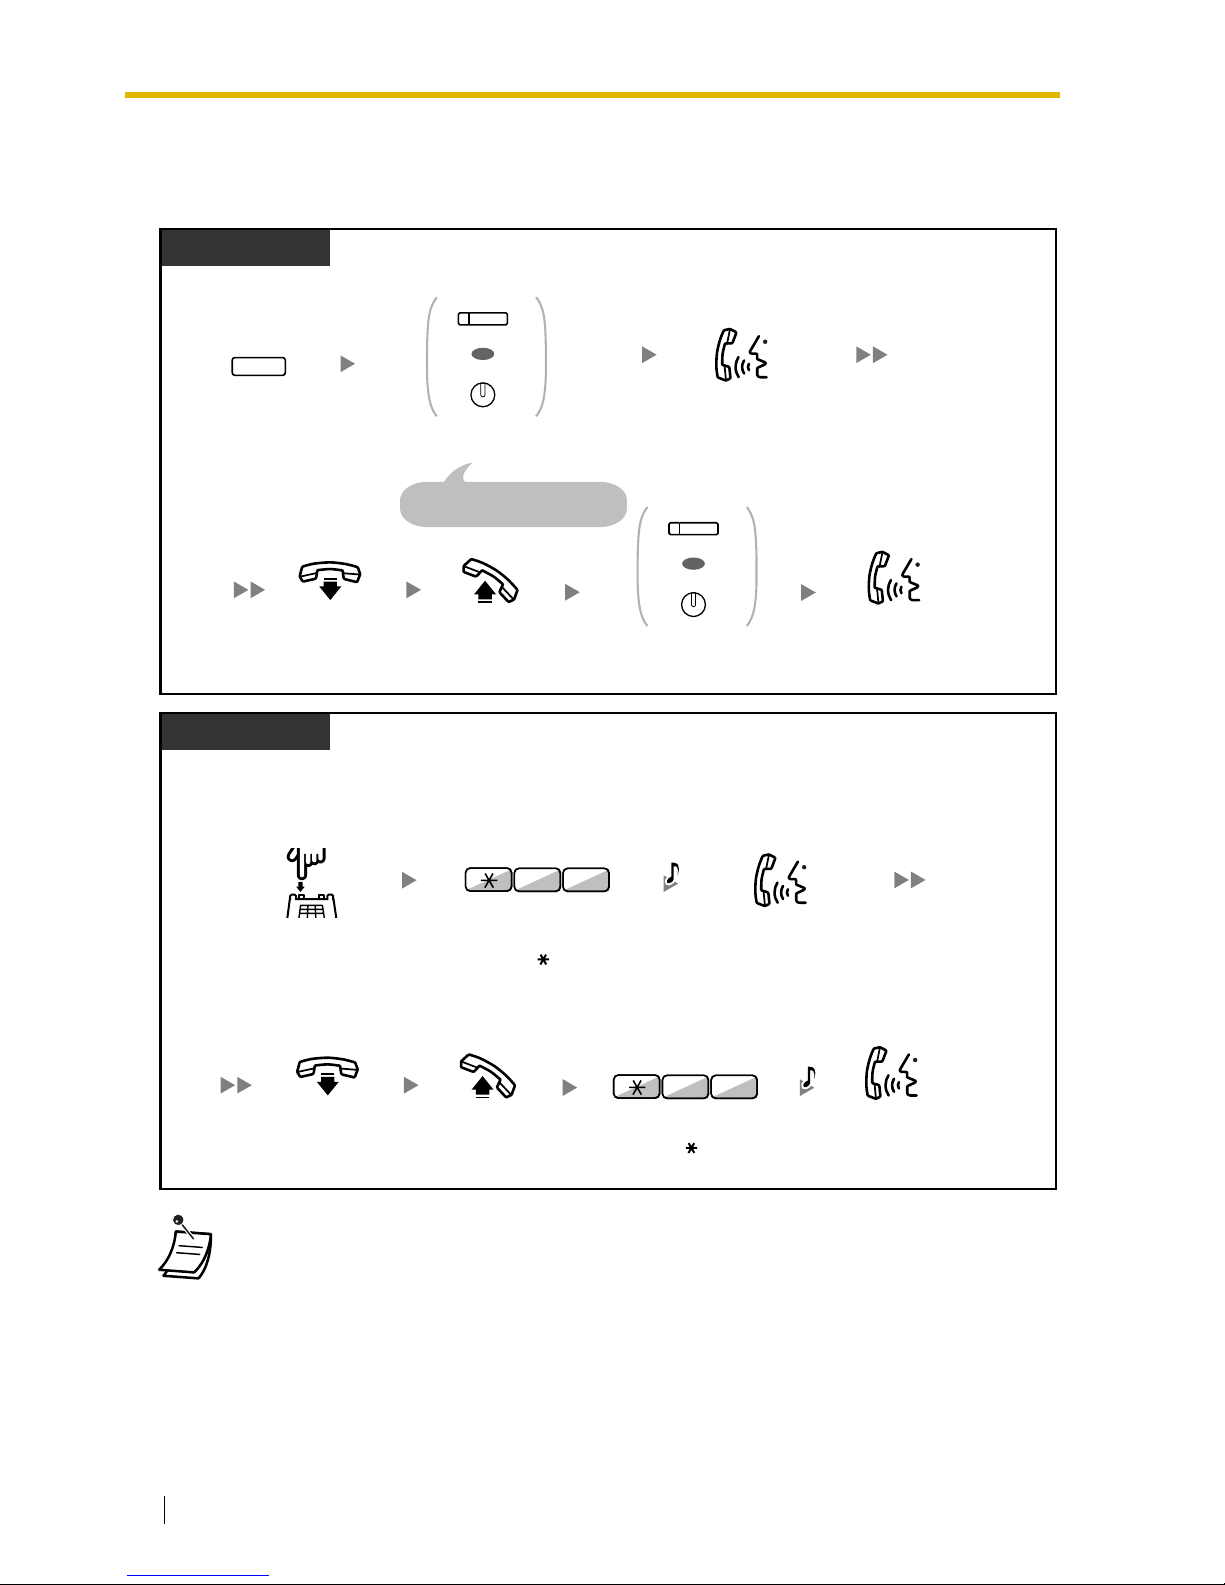
1.4 During a Conversation
58 User Manual
2.2 To hold the second call and then talk to the original party
After holding it, you can talk to the original party. Then, you can disconnect it and then talk to the new
party again.
• Depending on your telephone, the "Off-hook Call Announcement (OHCA)" and the
"Whisper OHCA" features can be used. You can talk to the other party through the speaker
and the microphone (OHCA) or you can receive an announcement through the handset
(Whisper OHCA), if you are having a conversation using the handset.
Refer to "1.7.3 Call Waiting/Off-hook Call Announcement (OHCA)/Whisper OHCA".
• The caller’s name or number is displayed for five seconds in ten second intervals while
waiting to be answered.
PT/PS
Press
HOLD
.
During a conversation
Disregard this step if both
parties are extensions.
Press
CO
or
INTERCOM
.
HOLD
OR
(CO)
INTERCOM
Talk to the
original party.
Off-hook.
On-hook.
Talk to the
new party.
Press
CO
or
INTERCOM
.
OR
(CO)
INTERCOM
SLT
During a conversation
Enter
50.
0
5
Talk to the
original party.
Press
Recall/hookswitch
.
Off-hook.
On-hook.
Talk to the
new party.
Enter
50.
0
5
C.Tone
C.Tone
Page 59
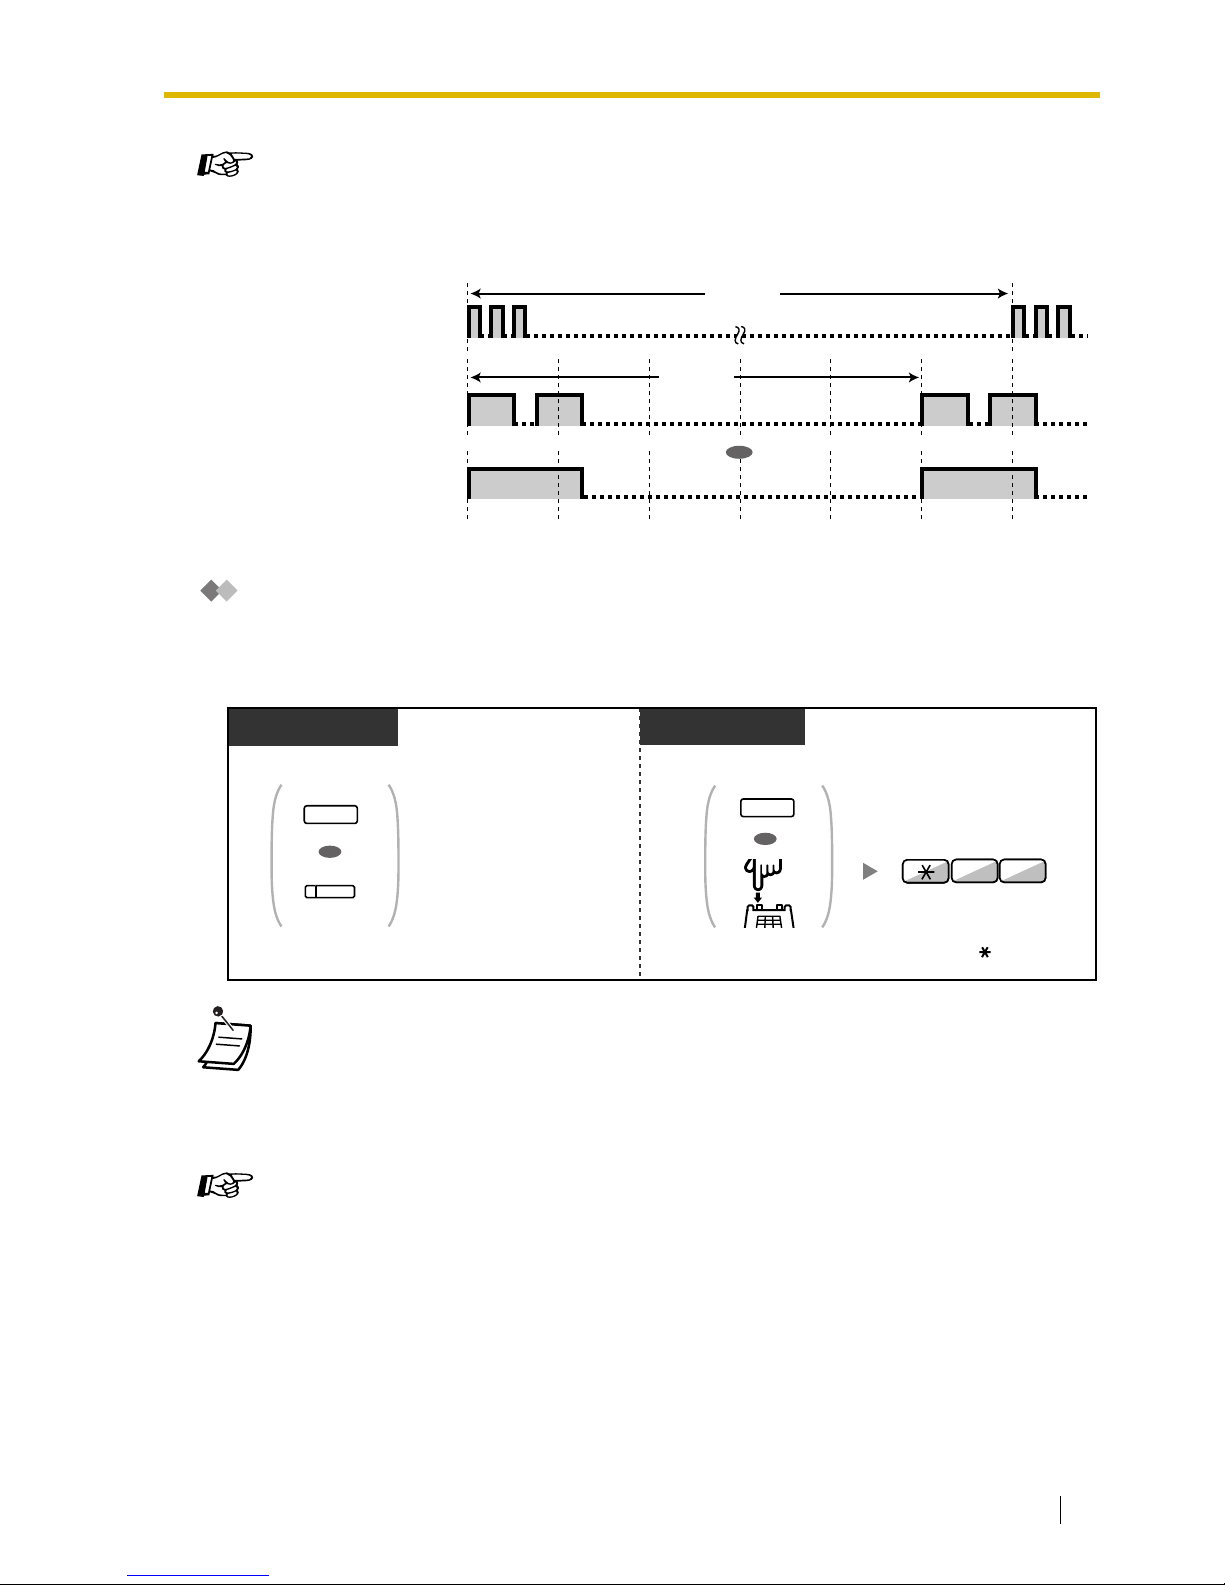
1.4 During a Conversation
User Manual 59
Answering Call Waiting from the Telephone Company
This is an optional telephone company service. You can receive a call waiting tone and the caller’s
telephone number information. (The caller’s name will not be received.) For details, consult your
telephone company.
1.4.5 Multiple Party Conversation
— Conference
— Unattended Conference
— Leaving 3 Parties Conference
Customizing Your Phone
• 3.1.2 Settings on the Programming Mode—Call Waiting Tone Type Selection
If you select "Tone 1", you will hear the same tone for Call Waiting from an outside
party and an extension. If you select "Tone 2", you will hear different tones for Call
Waiting from an outside party and an extension.
• To return to the original party, repeat the operation.
• In this case, FLASH/RECALL button on proprietary telephones is in the External Feature
Access (EFA) mode.
• The caller’s telephone number will not be displayed on telephones or wireless phones
connected to SLT ports.
Customizing Your Phone
• 3.1.3 Customizing the Buttons
Create or edit an External Feature Access (EFA) button.
Default
(Tone 1)
Special Tones
(Tone 2)
15 s
5 s
OR
While hearing a tone
While hearing a tone
PT/SLT/PS
Press
FLASH/RECALL
or
EFA
.
Enter
60
.
6 0
Press
TRANSFER
or
Recall/hookswitch
.
OR
OR
TRANSFER
FLASH/
RECALL
PT/PS
OR
(EFA)
Page 60
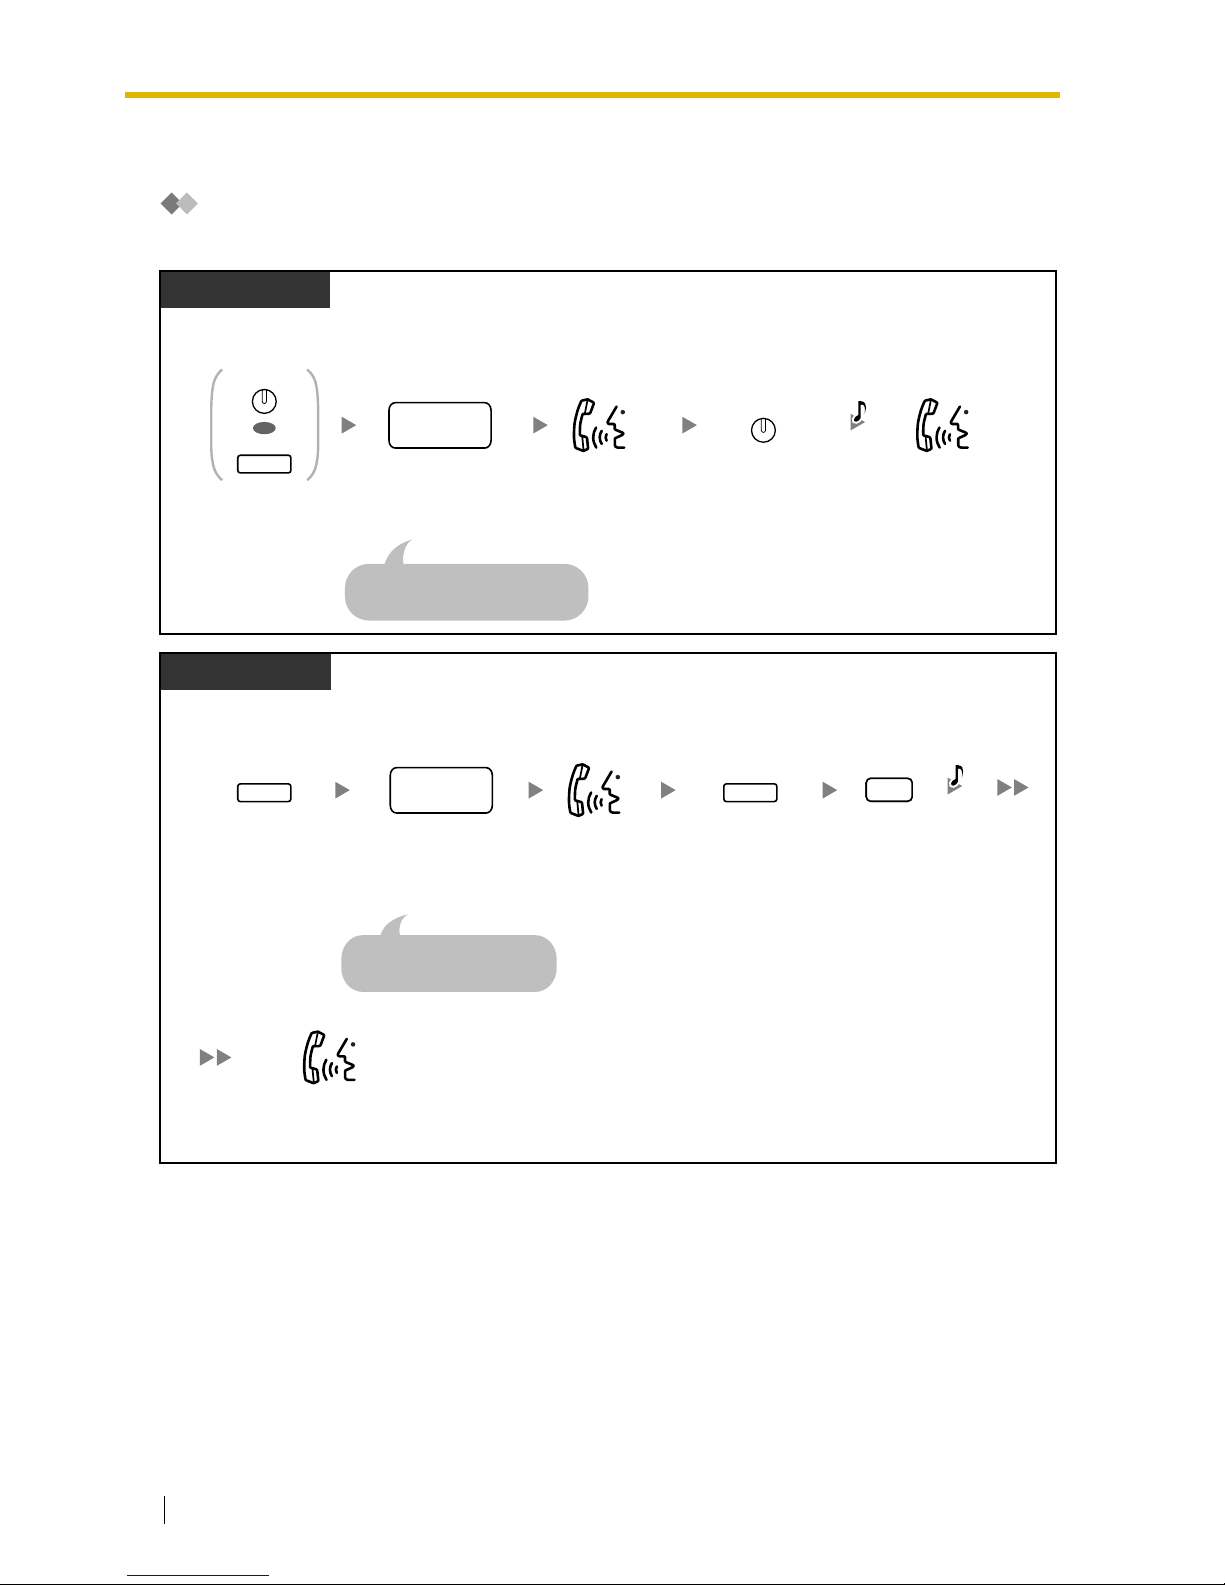
1.4 During a Conversation
60 User Manual
— Privacy Release
Conference
You can add one or more parties to your conversation.
Press
CONF
or
TRANSFER
.
Press
CONF
.Dial
desired
phone number
.
Seize CO line before
dialing outside phone number.
PT/PS
Talk with
multiple parties.
During a conversation
desired
phone
no.
Talk to the
new party.
CONF
OR
CONF
TRANSFER
C.Tone
Dial
desired
phone number
.
desired
phone
no.
PT/PS
Talk with multiple parties.
Enter 3.Press
TRANSFER
.
Talk to the
new party.
3
During a conversation
Seize CO line before
dialing outside phone number.
TRANSFER
Press
TRANSFER
.
TRANSFER
C.Tone
Page 61
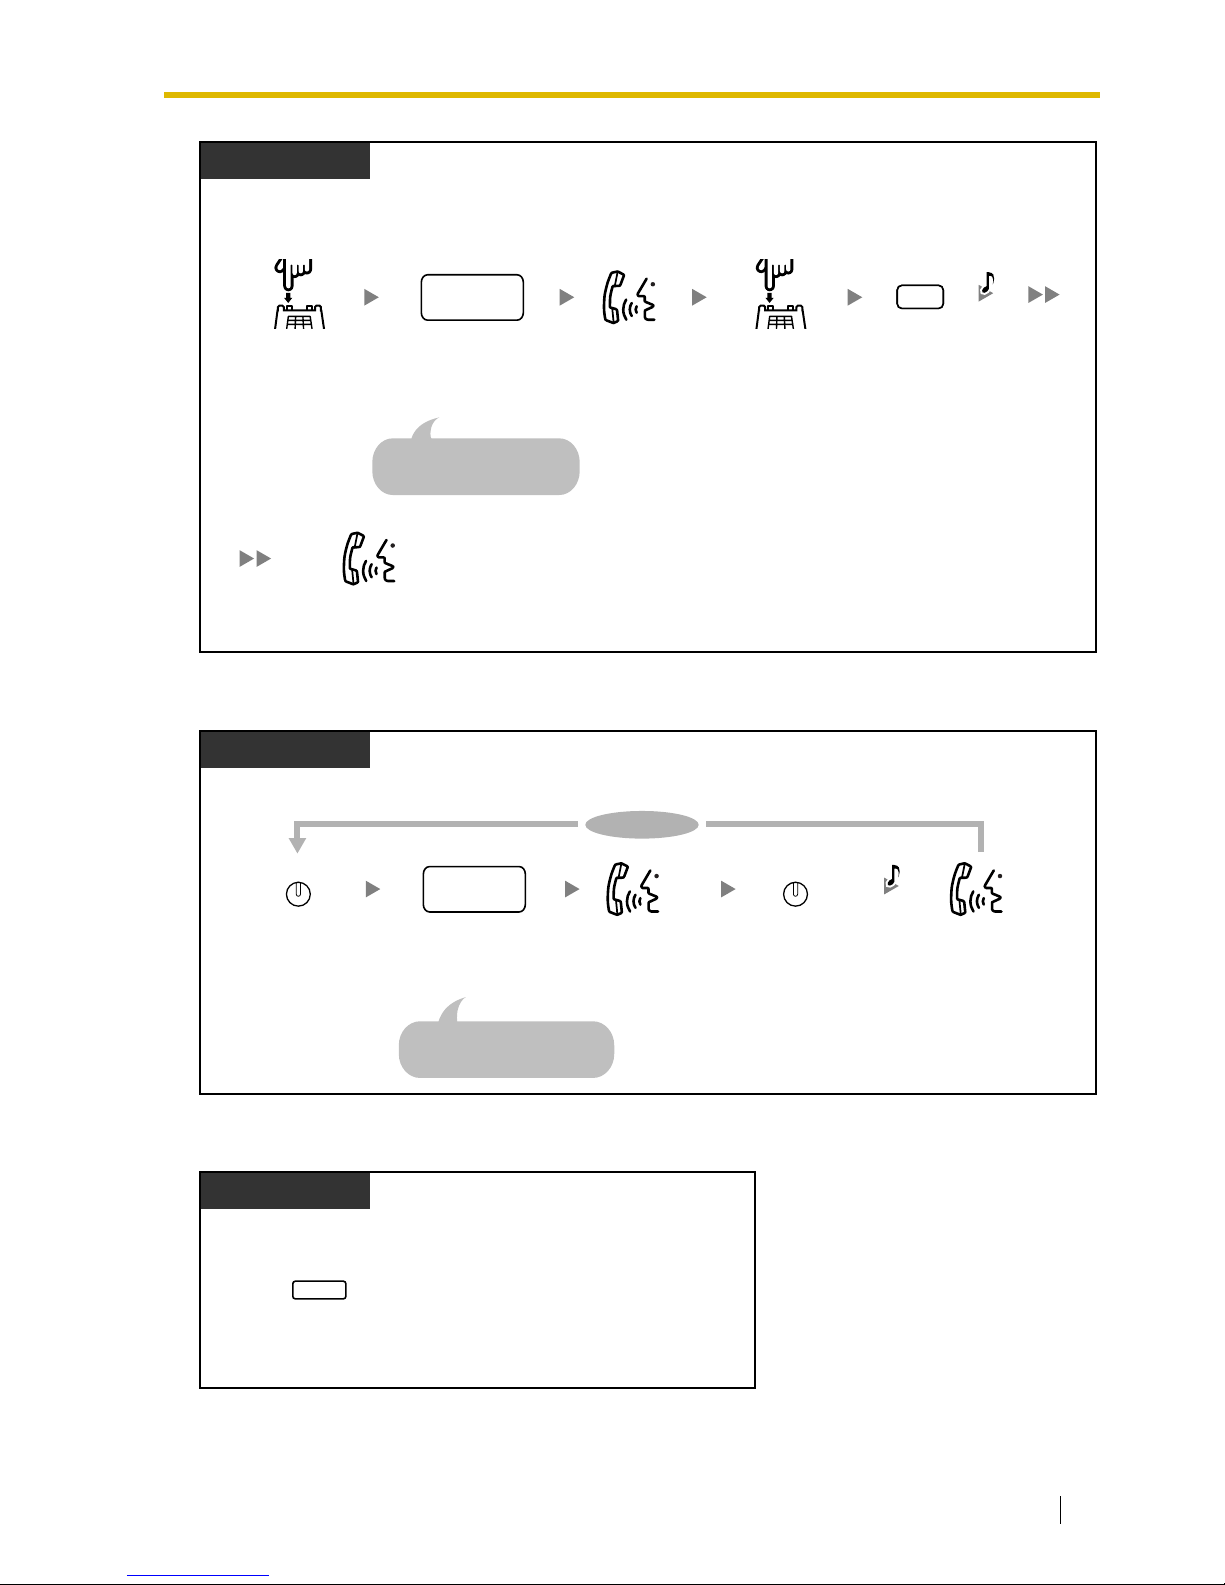
1.4 During a Conversation
User Manual 61
To add four or more parties to a conference
To talk alternately on three-party conversation
Dial
desired
phone number
.
desired
phone
no.
SLT
Talk with multiple parties.
Enter 3.Press
Recall/
hookswitch
.
Talk to the
new party.
3
During a conversation
Seize CO line before
dialing outside phone number.
Press
Recall/
hookswitch
.
C.Tone
Press
CONF
. Press
CONF
.Dial
desired
phone number
.
desired
phone
no.
Seize CO line before
dialing outside phone number.
PT/PS
Talk.
During a conversation
Talk.
To continue
CONF CONF
C.Tone
During a conversation
PT/PS
Press
TRANSFER
.
TRANSFER
Page 62
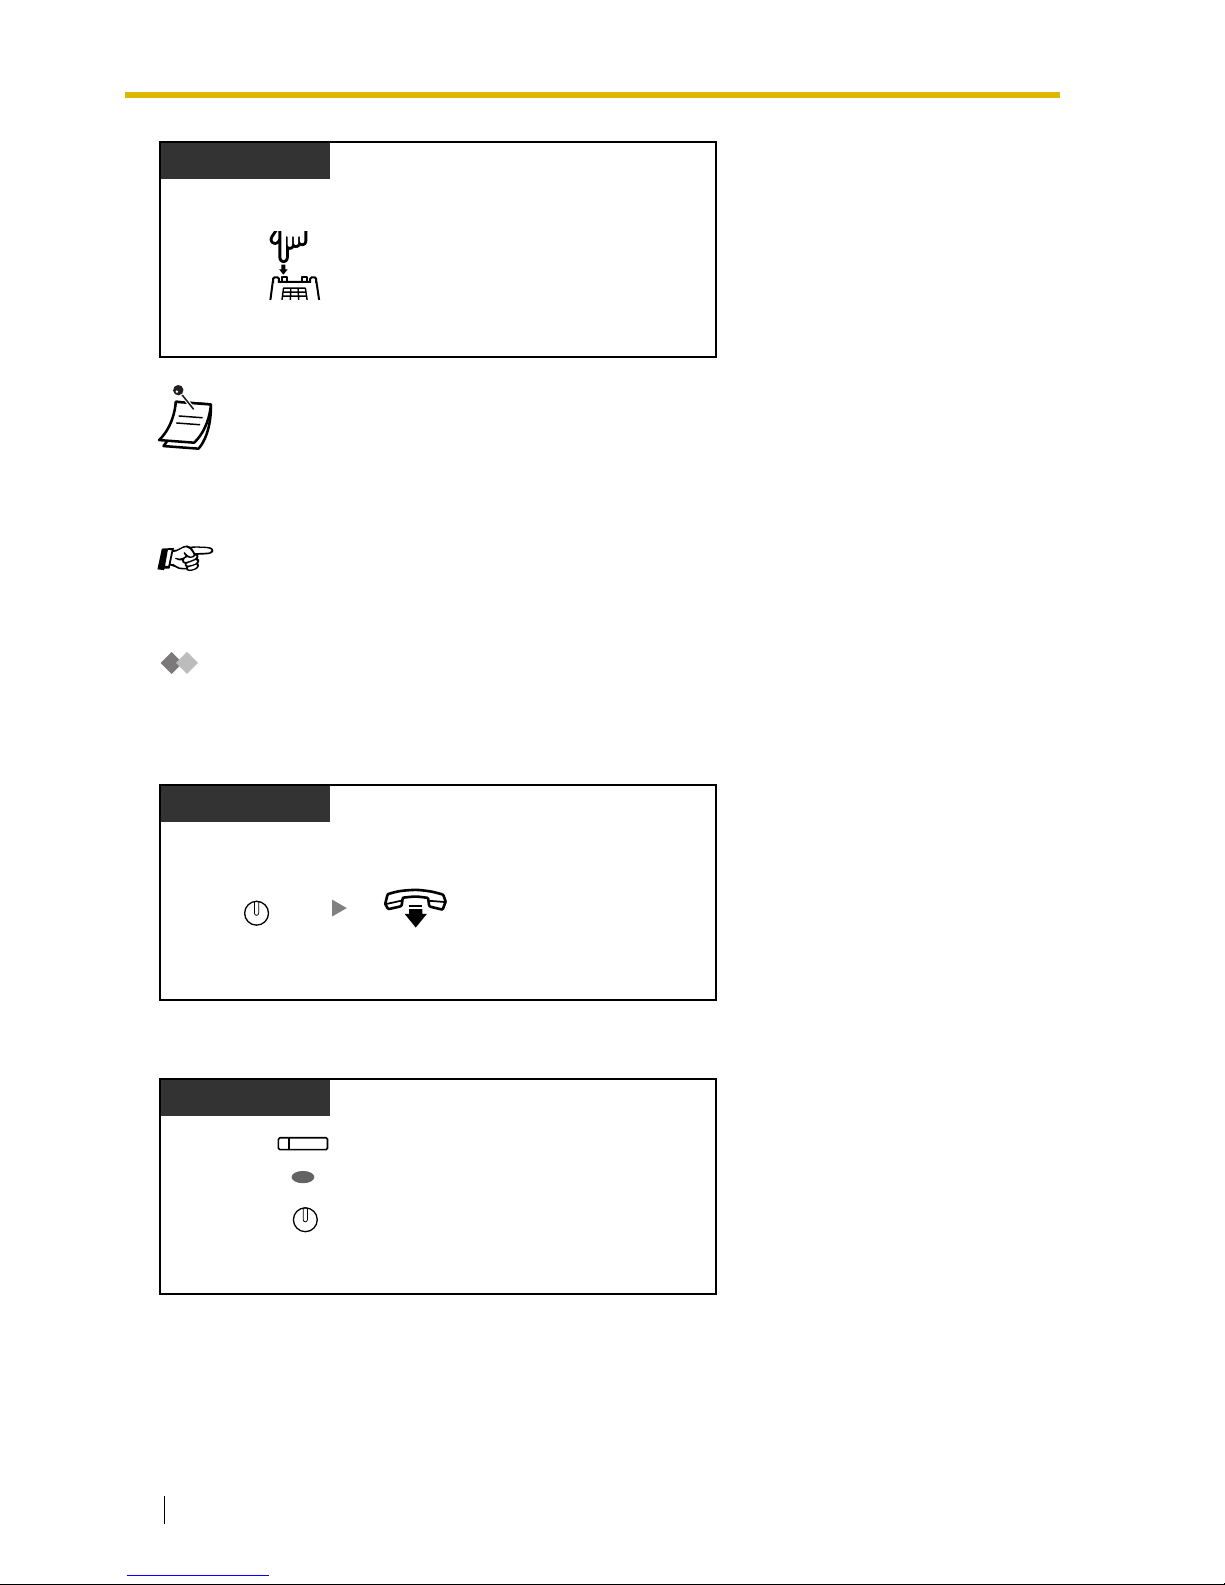
1.4 During a Conversation
62 User Manual
Unattended Conference
The other parties can continue their conversation.
To leave a conference
To return while others are talking
• During a three-party conversation, when you press TRANSFER, Recall/hookswitch, you
can talk to the party who had a conversation previously. If you want to talk to the third party,
press TRANSFER, Recall/hookswitch again.
• You can have a conference with maximum eight parties (comprising intercom or CO lines)
simultaneously.
Customizing Your Phone
• 3.1.3 Customizing the Buttons
Create or edit a Conference button.
During a conversation
SLT
Press
Recall/hookswitch
.
PT/PS
Press
CONF
.
During 3- to 7-party conference
CONF
On-hook.
Press flashing green CO or
INTERCOM
.
PT
OR
(CO)
INTERCOM
Page 63
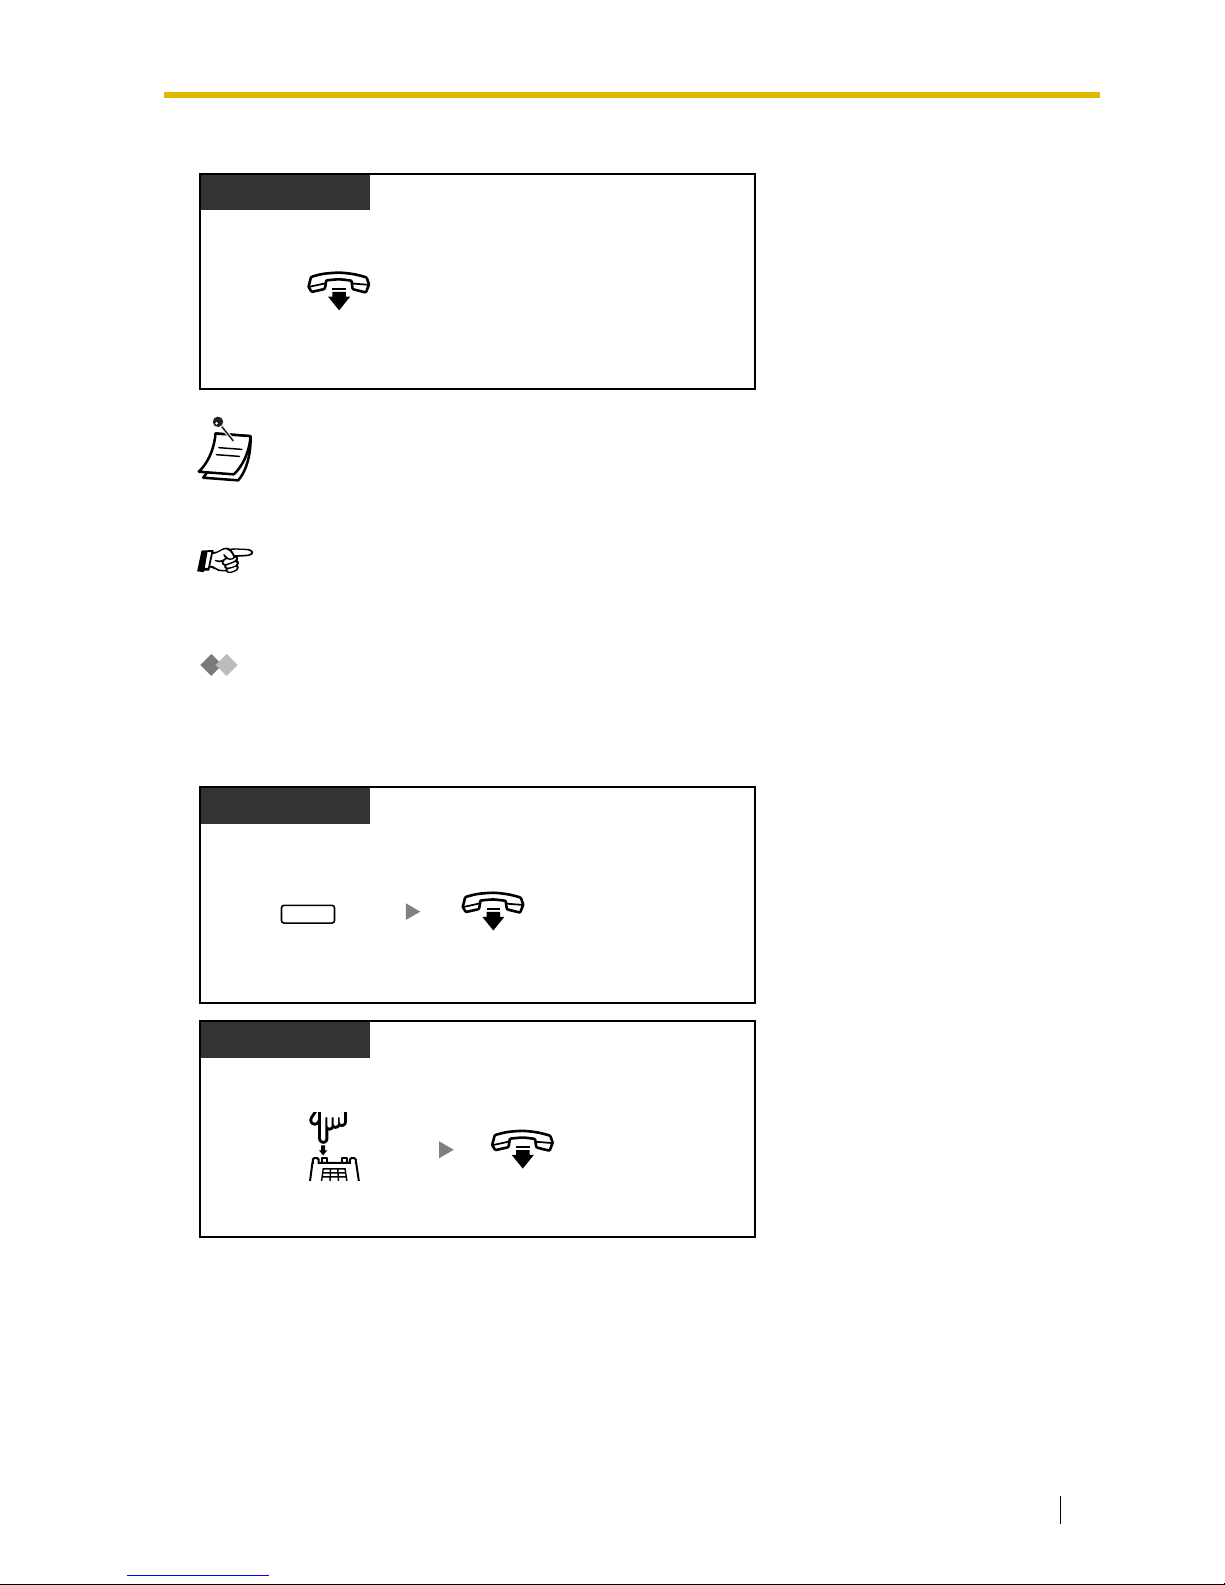
1.4 During a Conversation
User Manual 63
To complete a conversation
Leaving 3 Parties Conference
The other two parties can continue their conversation.
To leave a conference
• Time limit
Both parties will hear an alarm tone before a specified timeout. The originating extension
will hear an alarm tone before timeout. The call is disconnected when the time runs out
unless the originating extension returns to the conference.
Customizing Your Phone
• 3.1.3 Customizing the Buttons
Create or edit a Conference button.
During a conversation
On-hook.
PT/SLT/PS
During 3-party conference
PT/PS
Press
TRANSFER
.
TRANSFER
On-hook.
During 3-party conference
SLT
Press
Recall/hookswitch
.
On-hook.
Page 64
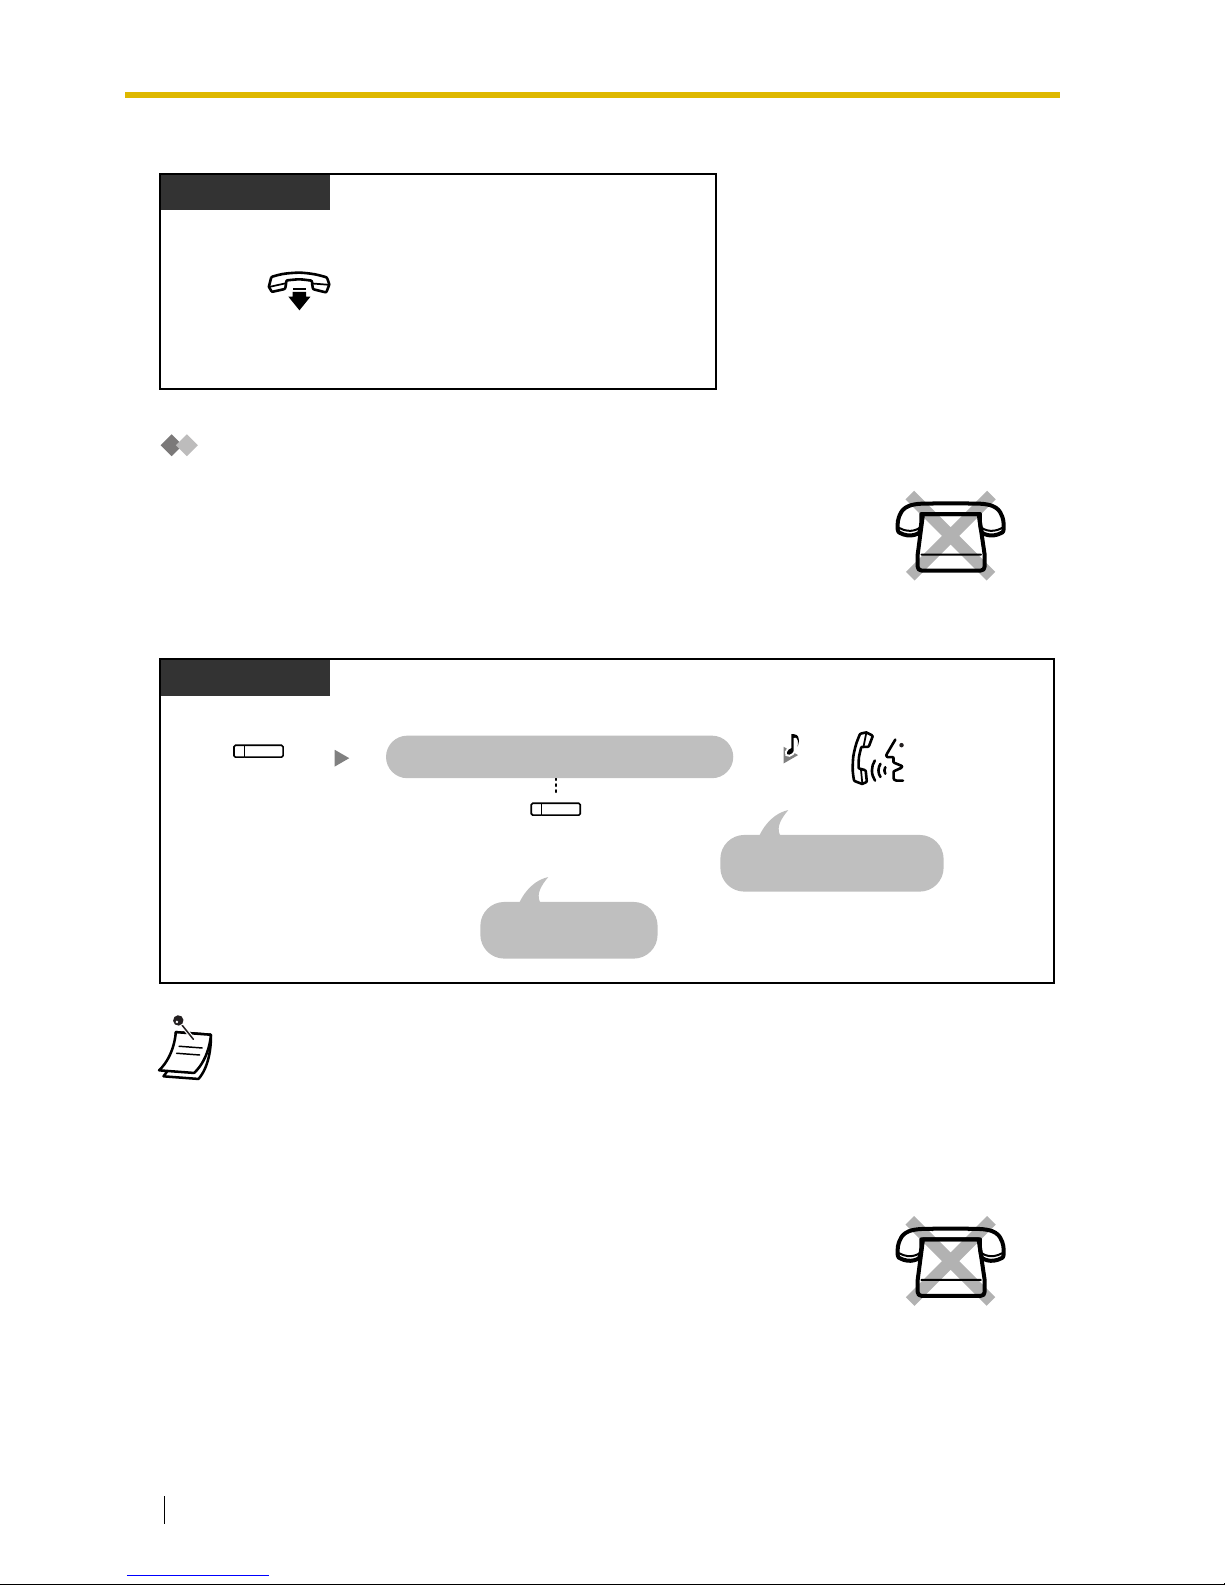
1.4 During a Conversation
64 User Manual
To complete a conversation
Privacy Release
To set
1.4.6 Mute
You can let a third party join your current outside call.
• Only an S-CO button can be used for this operation.
You can disable the microphone or the handset to consult privately with others
in the room while listening to the other party on the phone through the speaker
or the handset.
During a conversation
PT/SLT/PS
On-hook.
Press green
S-CO
.
Ask the third party to perform the step below.
Press flashing green
S-CO
within 5 seconds.
During a conversation
A three-party conversation
is now established.
To prolong,
press
S-CO
again.
PT/PS
Talk.
(S-CO)
(S-CO)
C.Tone
Page 65
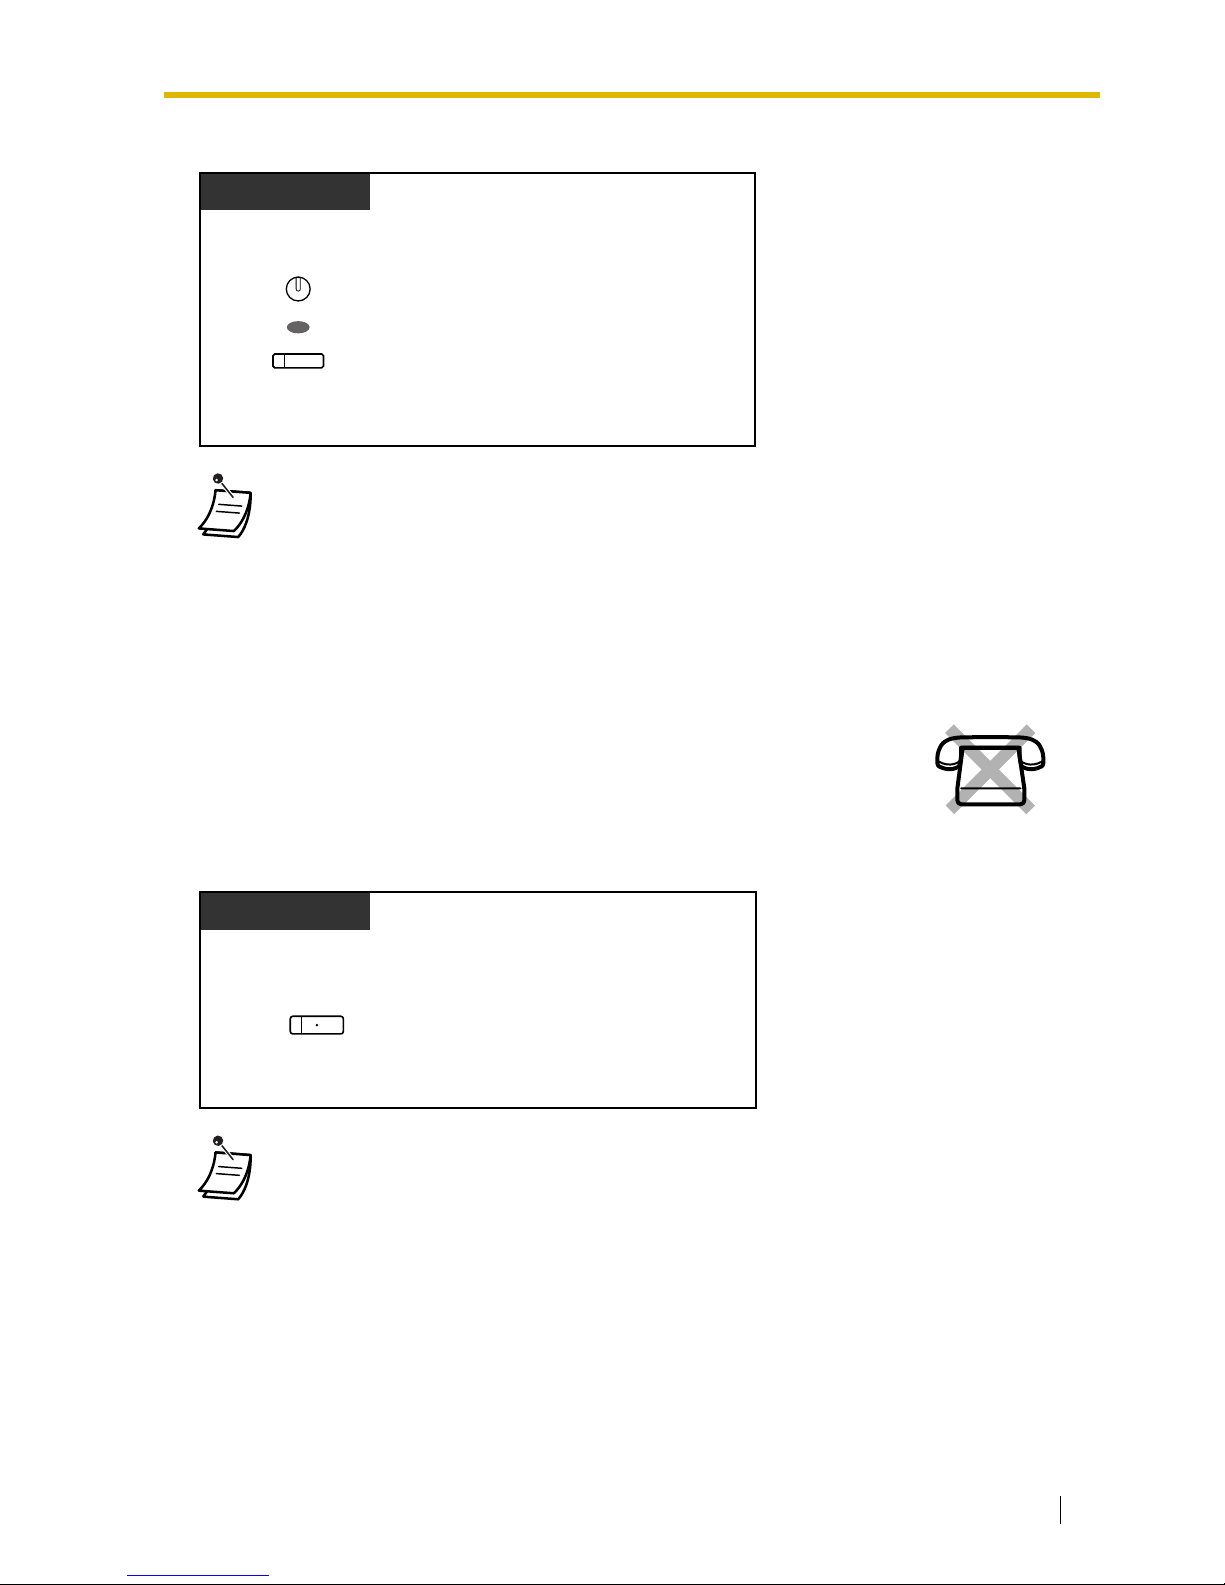
1.4 During a Conversation
User Manual 65
To set/cancel
1.4.7 Off-hook Monitor
To set/cancel
• The AUTO ANS/MUTE or VOICE CALL/MUTE button light shows the current status as
follows:
Off: Normal
Flashing red: Mute
• If mute is used during OHCA, it will become Handset Mute.
You can let other people in the room listen to the conversation through the
speaker while continuing the conversation using the handset.
• The SP-PHONE button light shows the current status as follows:
Off: The voice is heard through the handset.
On: The voice is heard through the speaker and the handset.
• This feature is controlled work by programming. Ask your manager.
• This feature may not be available with certain proprietary telephones. For more details,
consult your dealer.
Press
MUTE
.
PT
OR
During a conversation
AUTO ANS
MUTE
VOICE CALL
MUTE
Press
SP-PHONE
.
PT
During a conversation using the handset
SP-PHONE
Page 66
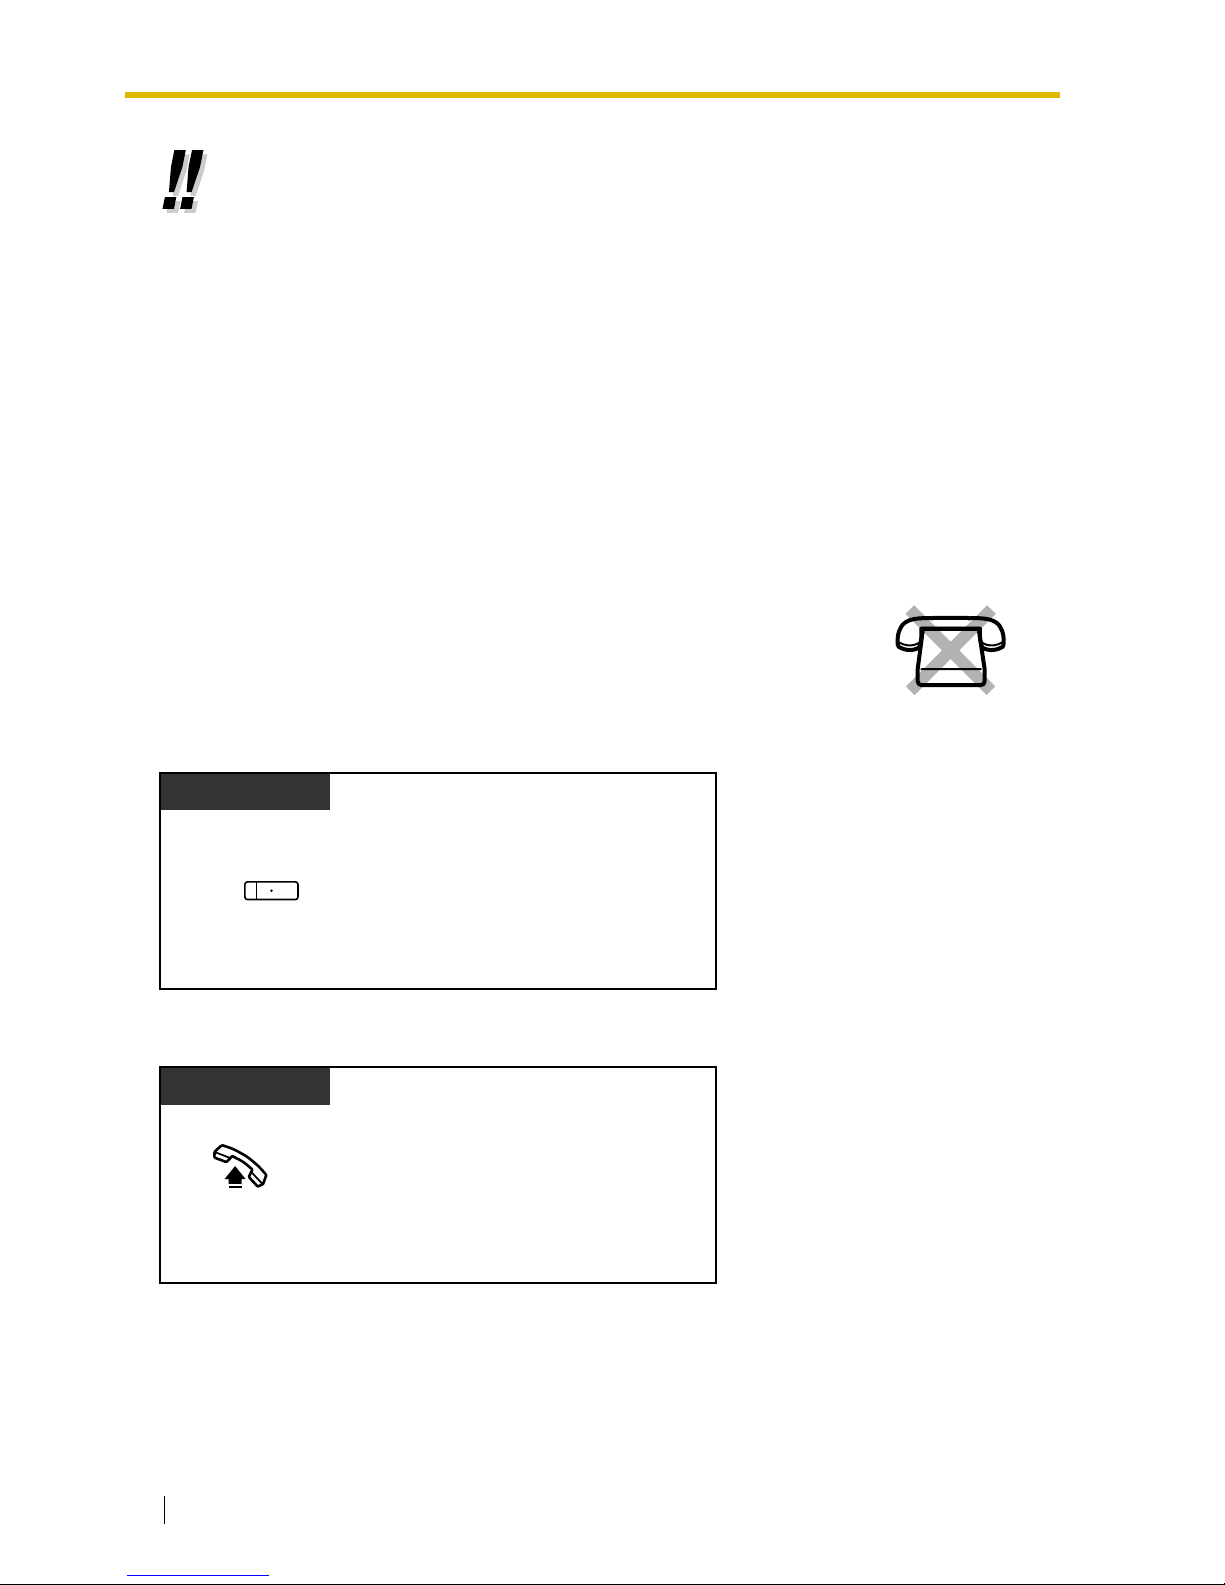
1.4 During a Conversation
66 User Manual
1.4.8 Headset Operation
To talk using the headset
To use the handset during a conversation using the headset
• Hands-free operation
You can have a conversation in hands-free mode using the SP-PHONE button. You can
perform other tasks simultaneously.
Helpful hints for hands-free operation:
• If it is difficult to hear the other party's voice;
Raise the sound level using the Speaker Volume Control.
• If the other party has difficulty hearing you;
Lower the sound level.
• Absorbing echoes;
Using this unit in a room which has curtains or carpeting or both.
• To avoid missing part of the conversations;
If you and the other party speak at the same time, parts of your conversation will be
lost. To avoid this, speak alternately.
You can have a conversation using a headset.
In this case, you must select "Headset on" in programming mode or set the
Headset button on (red) in advance.
This feature is also known as Handset/Headset Selection.
Press
SP-PHONE
.
PT
SP-PHONE
PT
Off-hook.
Page 67
1.4 During a Conversation
User Manual 67
To talk in hands-free mode during a conversation using the headset
• The Headset button light shows the current status as follows:
Off: Headset mode off
Red on: Headset mode on
Customizing Your Phone
• 3.1.2 Settings on the Programming Mode—Headset Operation
Select the equipment to use.
• 3.1.3 Customizing the Buttons
Create or edit a Headset button.
PT
Press red
Headset
.
(Headset)
Page 68
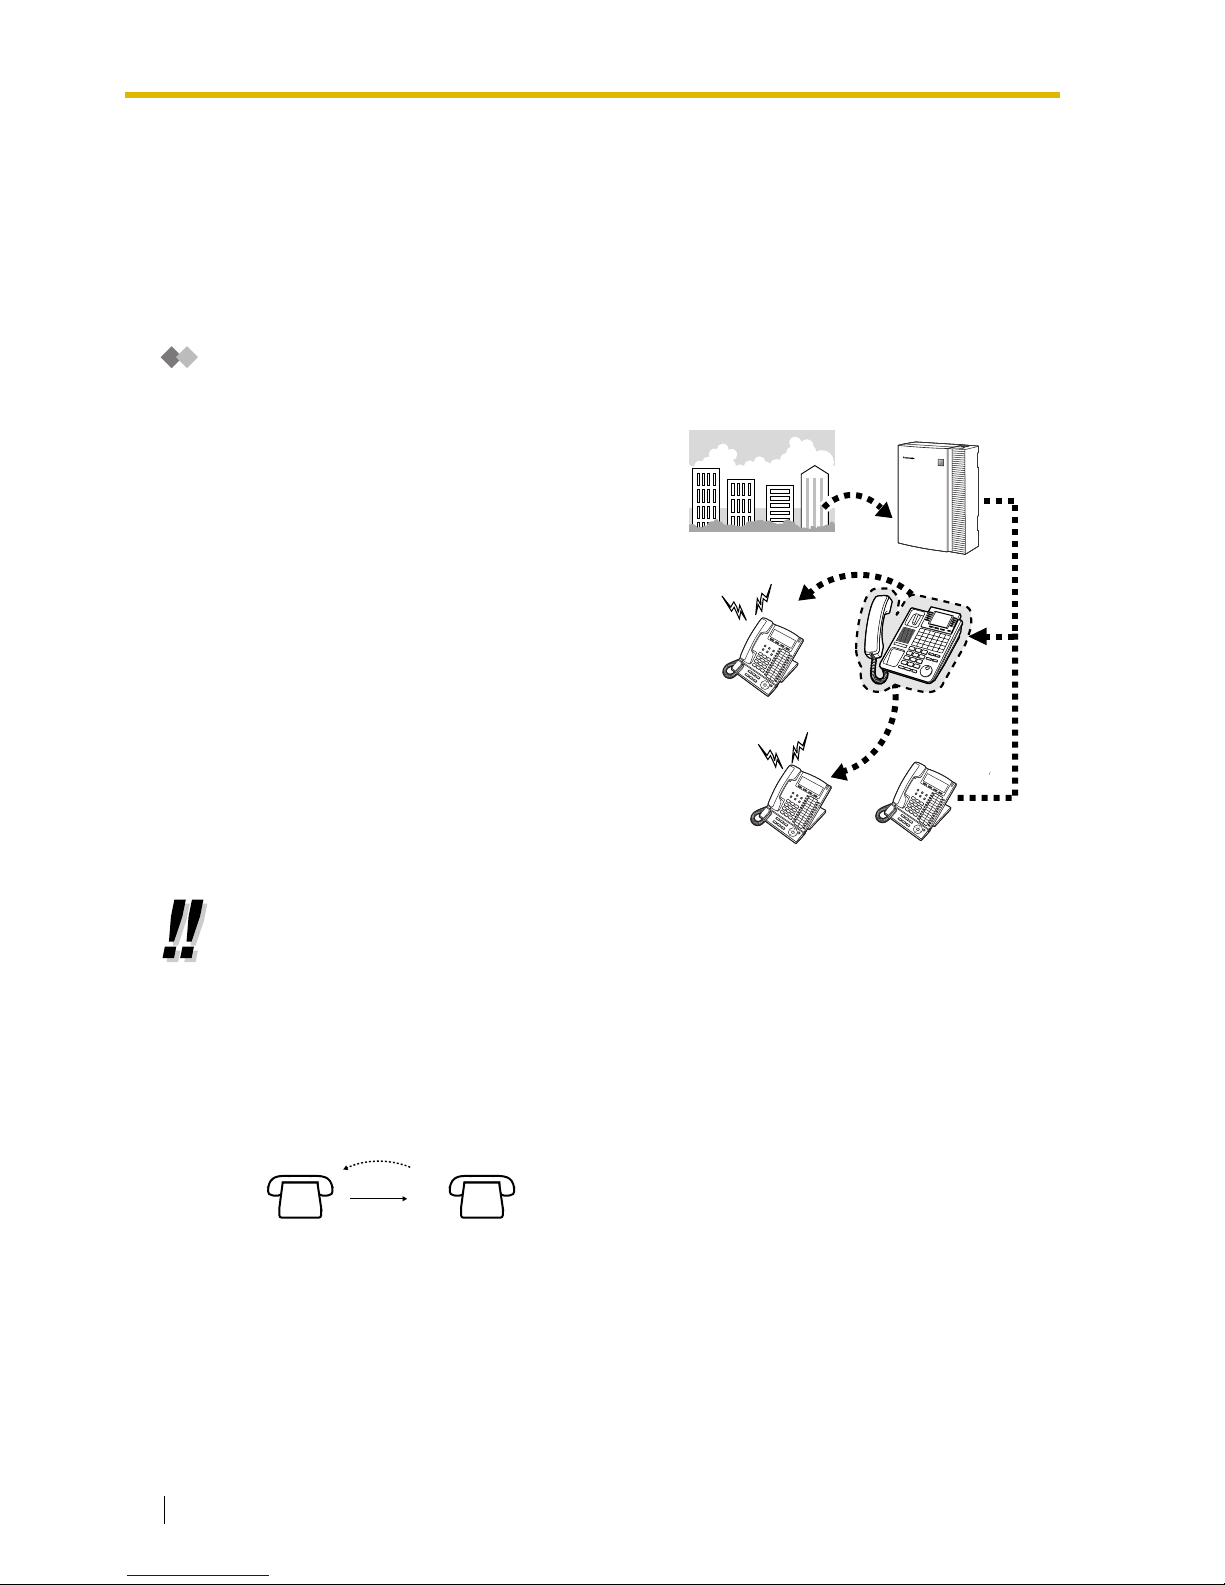
1.5 Absence Settings
68 User Manual
1.5 Absence Settings
1.5.1 Call Forwarding
— Call Forwarding (FWD)
Call Forwarding (FWD)
You can have your incoming calls forwarded to a
specified destination.
All Calls:
All calls are forwarded. Preset extensions may
also forward from their own receiving group.
Busy:
All calls are forwarded when your extension is
busy.
No Answer:
All calls are forwarded when you do not answer
the call within a specified time period.
Busy/No Answer (BSY/NA):
All calls are forwarded when you do not answer
within a specified time period or when your
extension is busy.
Follow Me (From):
If you fail to set the above-mentioned "All Calls" to
forward before you leave your desk, you can set
the same feature from the destination extension.
• You can set the voice mail floating extension number as a forward destination to receive
calls into your mailbox.
• You can set your mobile telephone as the forward destination. The voice mail can be used
to receive calls if you are unable to answer.
• Incoming calls can be forwarded up to four times.
• Boss & Secretary feature
The extension which has been set as the destination can call the forwarding extension.
<Example>
Forward
set
Call
destinationForwarding
extension
Page 69
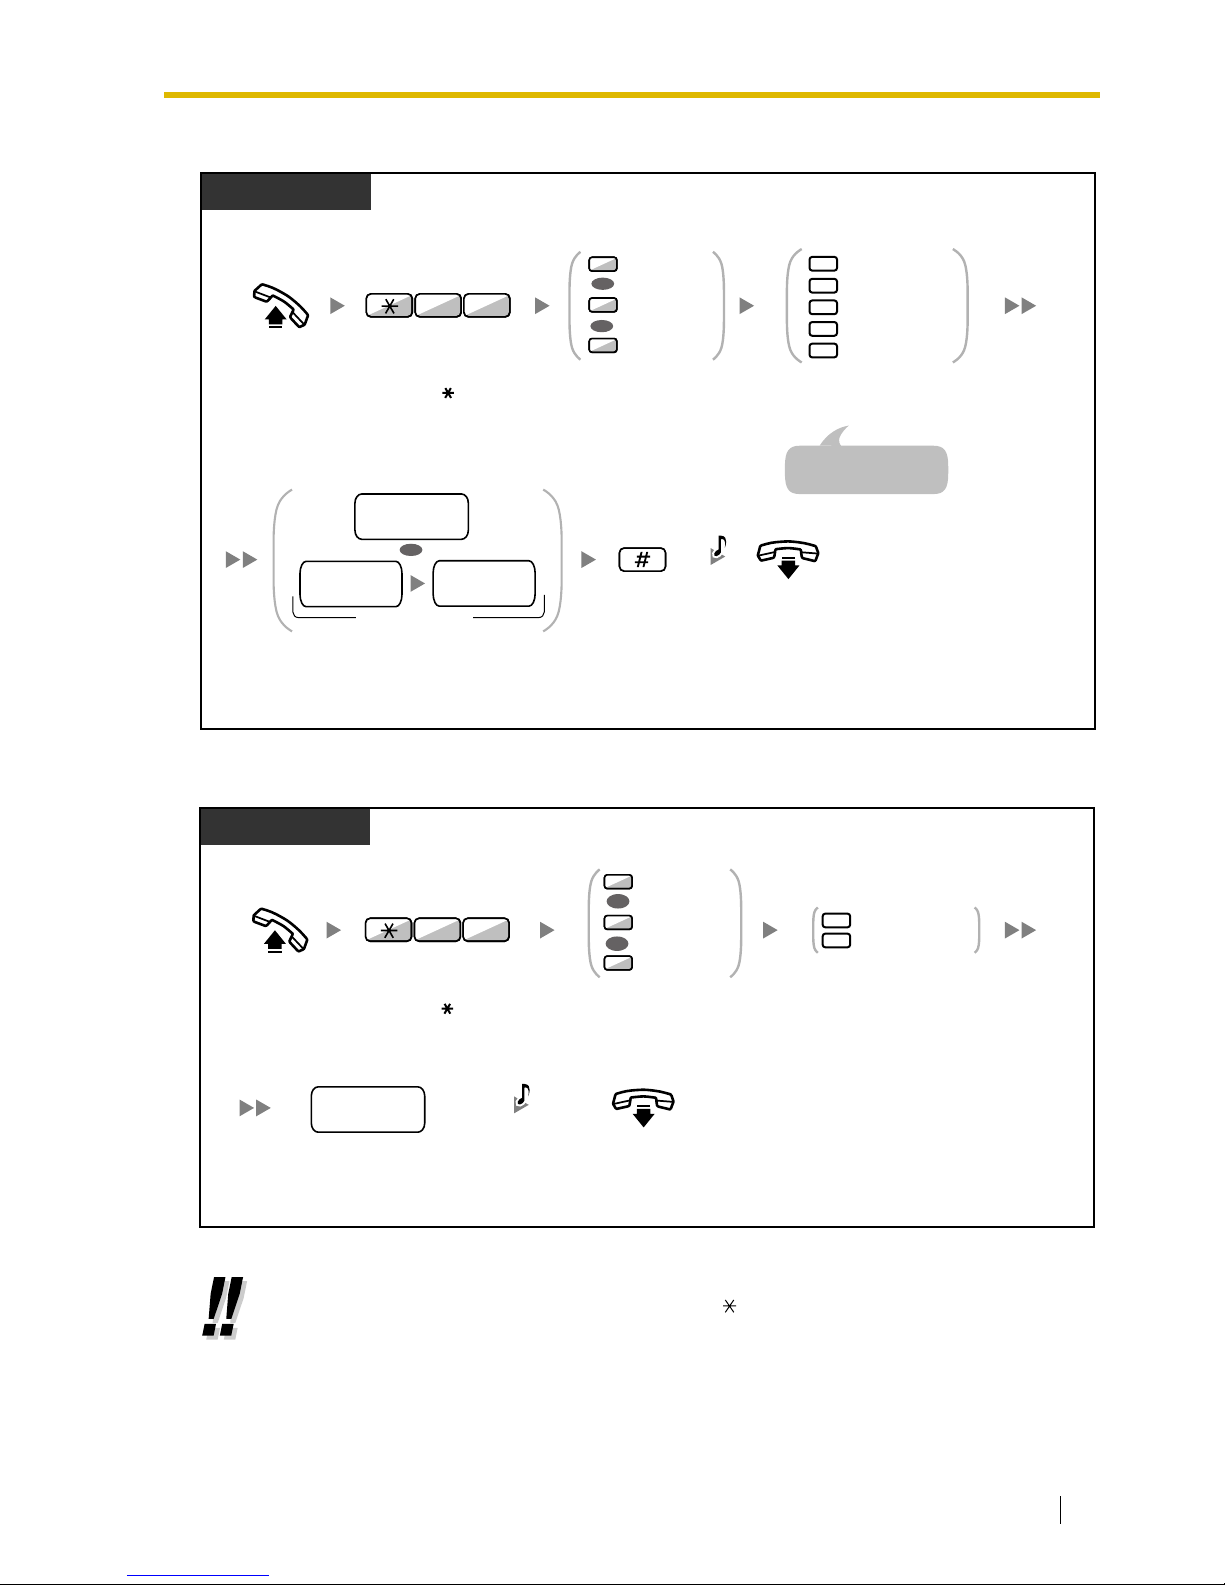
1.5 Absence Settings
User Manual 69
To set/cancel
To set from another extension
• When using a proprietary telephone, you can set or cancel Call Forwarding by pressing
the FWD/DND button (fixed button) instead of " 710".
PT/SLT/PS
Enter #.
On-hook.
Enter
destination extension number
.
Or enter
CO line access number
and then
outside phone number
.
2
0
3
4
5
Cancel
All Calls
Busy
No Answer
Busy/No Answer
Enter
required
number
.
For "Cancel",
go on-hook directly.
Off-hook.
1
2
0
Both Calls
Intercom Calls
Outside Calls
OR
OR
Enter 71.
1
7
Enter 0 to 2 as
you desire.
OR
destination
extension no.
(Max. 32 digits)
outside
phone no.
CO line
access no.
C.Tone
PT/SLT/PS
your
extension no.
On-hook.
Enter
your
extension number
.
Enter
7
or 8.
7
8
Follow Me
Follow Me Cancel
Off-hook.
1
2
0
Both Calls
Intercom Calls
Outside Calls
OR
OR
Enter 71.
1
7
Enter 0 to 2 as
you desire.
C.Tone
Page 70
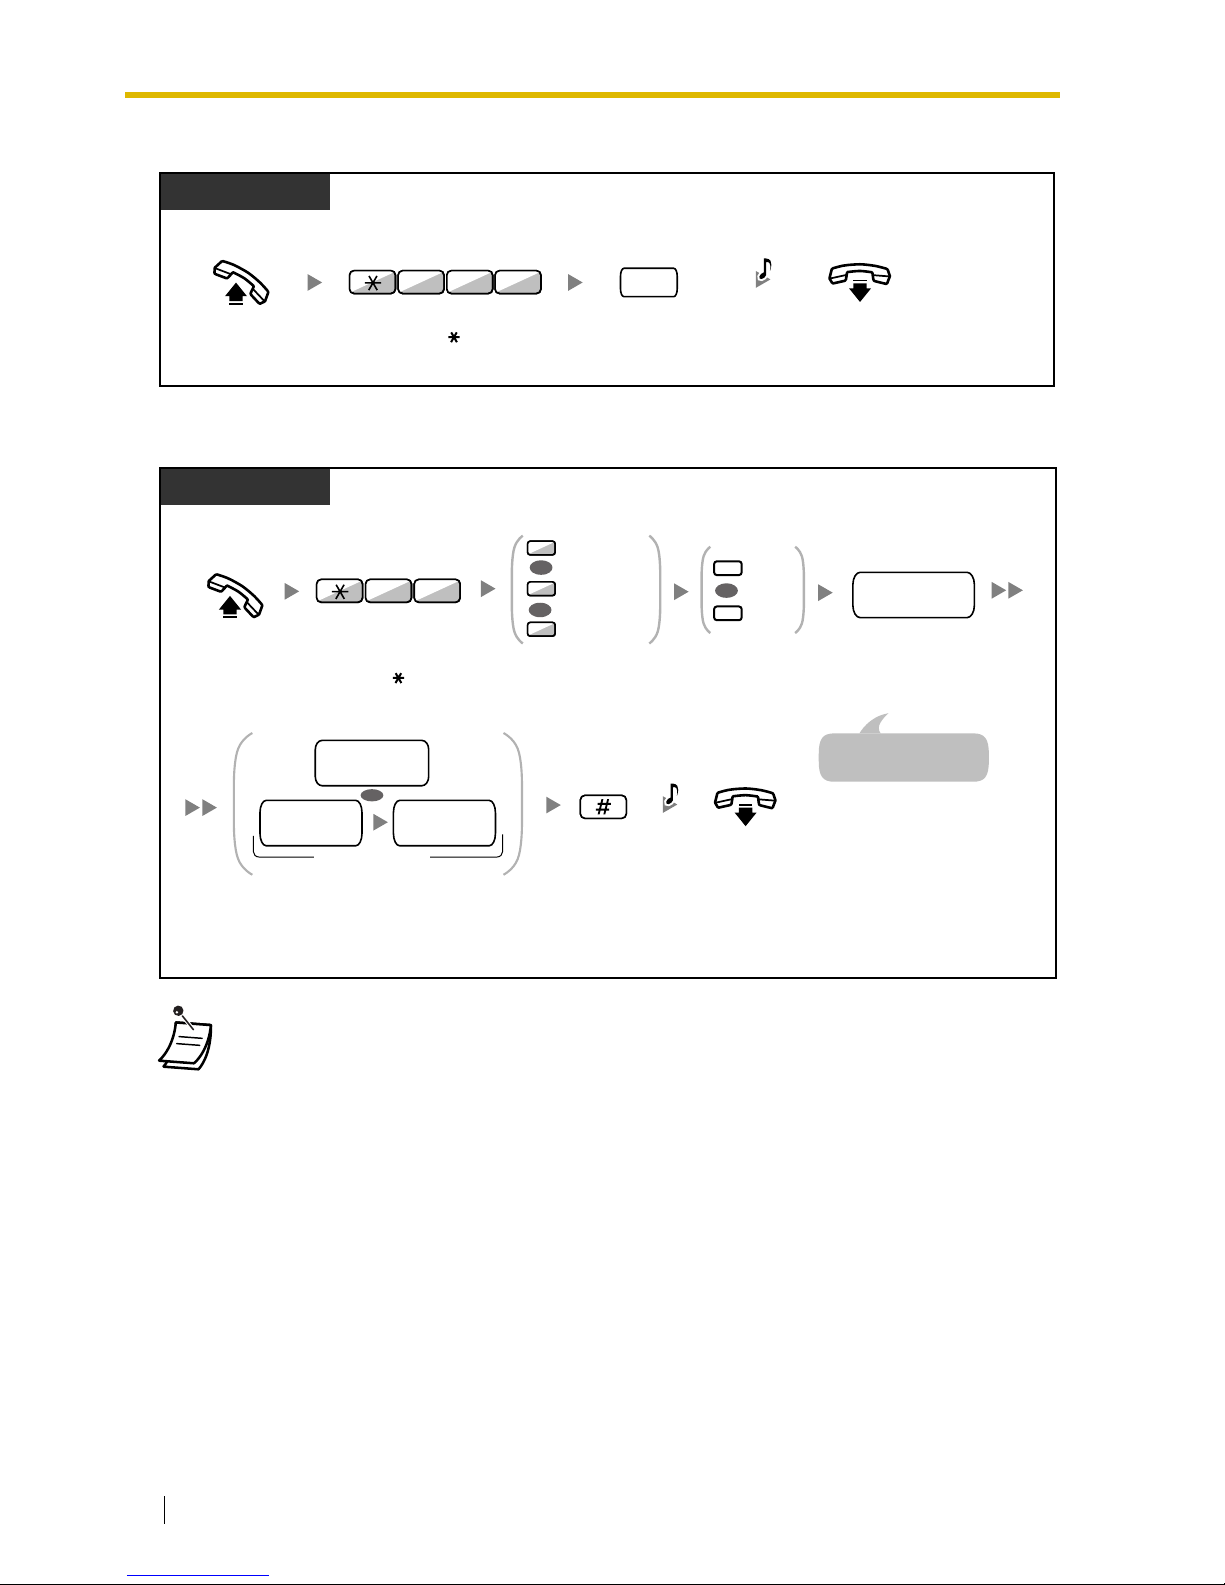
1.5 Absence Settings
70 User Manual
To set the timer for "No Answer" and "Busy/No Answer"
Call Forwarding (FWD) for your Incoming Call Distribution Group
• The FWD/DND button light shows the current status as follows:
Off: Both features are not set.
Flashing red slowly: FWD mode
Red on: DND mode
• The Group FWD button light shows the current status as follows:
Off: No set
Red on: FWD mode
Off-hook.
Enter time
(seconds [2 digits]).
time
PT/SLT/PS
Enter 713.
On-hook.
1 3 7
C.Tone
PT/SLT/PS
0
1
Set
Cancel
OR
Enter 1 to set
or 0 to cancel.
Enter ICD Group
extension number.
ICD Group
extension no.
Off-hook.
5
6
4
Both Calls
Intercom Calls
Outside Calls
OR
OR
Enter 71.
1
7
Enter 4 to 6 as
you desire.
Enter #.
On-hook.
Enter destination extension number.
Or enter CO line access number
and then outside phone number.
OR
destination
extension no.
(Max. 32 digits)
outside
phone no.
CO line
access no.
C.Tone
ICD Group: Incoming Call Distribution Group
For "Cancel",
go on-hook directly.
Page 71

1.5 Absence Settings
User Manual 71
1.5.2 Absent Message
You can show the reason you do not answer, if the caller uses a Panasonic display proprietary
telephone. There are eight preprogrammed messages and one for your personal message (16
characters). The selected message is shown on the display of your telephone.
• The system has two modes: (1) FWD/DND Cycle Switch Mode and (2) FWD/DND Setting
Mode. Ask your manager what mode your system is in if you are not sure.
(1) When in the FWD/DND Cycle Switch Mode:
Pressing the FWD/DND button (fixed button) while in idle status will cycle the setting
as shown below:
(2) When in the FWD/DND Setting Mode:
Pressing the FWD/DND button (fixed button) while in idle status will take you directly
to the programming mode for the FWD/DND setting.
(Refer to "3.1.2 Settings on the Programming Mode".)
Note
A FWD/DND button (customized button) is always in FWD/DND Cycle Switch Mode: the
mode cannot be changed.
• Transferred outside calls are also forwarded to the destination assigned for outside calls.
• When intercom calls are set to be handled differently from outside calls (forwarding type,
forward destination), we recommend establishing buttons for both FWD/DND—Outside
calls and FWD/DND—Intercom calls, and/or Group FWD—Outside calls and Group
FWD—Intercom calls, because:
a) the light patterns of the FWD/DND—Both calls button (including FWD/DND button
[fixed button]) and the Group FWD—Both calls button will indicate the setting for
either outside calls or intercom calls, but not both.
Note
The FWD icon on PS display reflects the setting for outside calls only.
b) pressing the FWD/DND—Both calls button (including FWD/DND button [fixed button])
or the Group FWD—Both calls button will not change the FWD or DND mode for
intercom calls and outside calls separately.
Customizing Your Phone
• 3.1.3 Customizing the Buttons
Create or edit FWD/DND (Both calls, Outside calls, Intercom calls) buttons, or Group
FWD (Both calls, Outside calls, Intercom calls) buttons.
Message no. Message (Example)
1 Will Return Soon
2 Gone Home
3 At Ext %%%% (Extension number)
4 Back at %%:%% (Hour:Minute)
5 Out until %%/%% (Month/Day)
FWD DND Off
Page 72
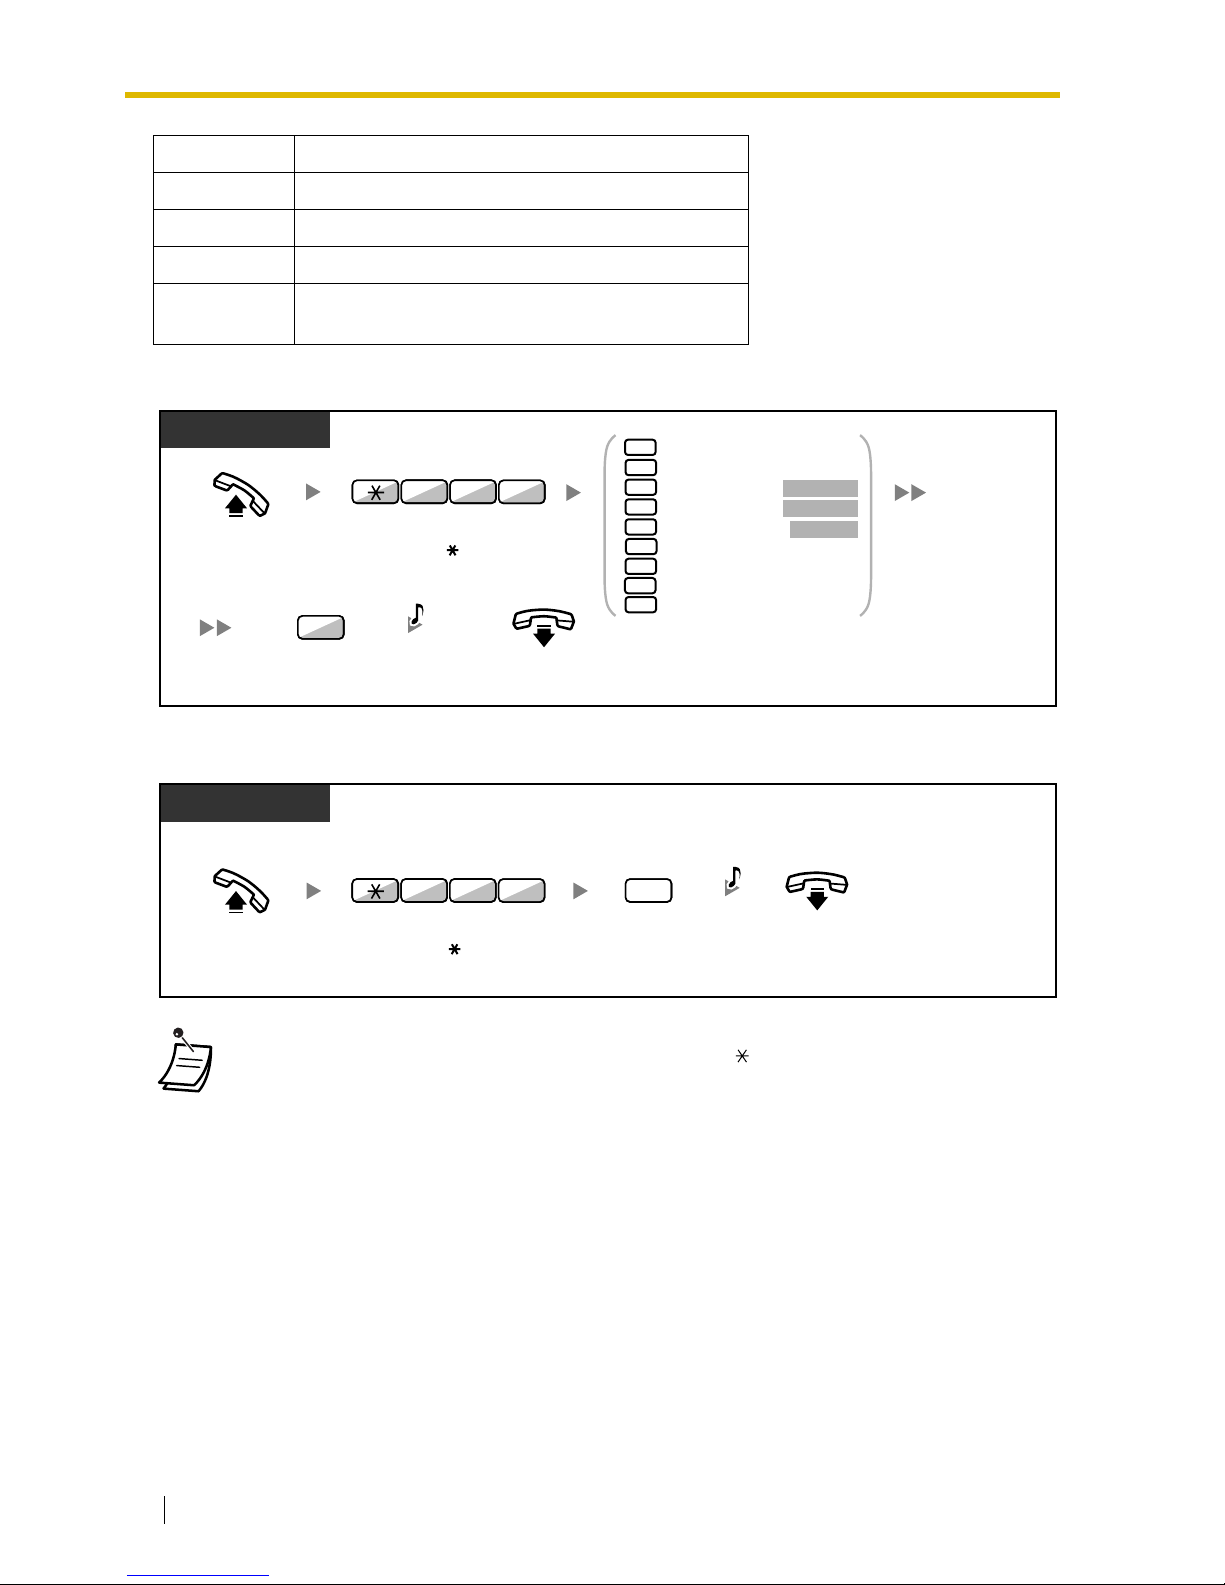
1.5 Absence Settings
72 User Manual
To set
To cancel
1.5.3 Extension Lock
You can lock your extension so that other users cannot make inappropriate outside calls.
This feature is also known as Electronic Station Lockout.
6 In a Meeting
7
8
9
A message assigned for each extension.
(Personal Absent Message)
• Enter the desired value in the "%" positions. You must enter the correct number of
characters as represented by the "%" using 0 to 9 or .
• The default messages can be changed. Consult your dealer.
• To create your personal message (Message no. 9), refer to "3.1.2 Settings on the
Programming Mode".
Message no. Message (Example)
Enter required number.
2
3
4
5
6
Gone Home
At Ext %%%% +
Back at %%:%% +
Out until %%/%% +
1
Will Return Soon
9
7
8
In a Meeting
Extension no.
Hour : Minute
Month / Day
PT/SLT/PS
Off-hook.
Enter 750.
7 5
0
On-hook.
Enter #.
#
C.Tone
Off-hook.
Enter 0.
0
On-hook.
Enter
750
.
7 5
0
C.Tone
PT/SLT/PS
Page 73
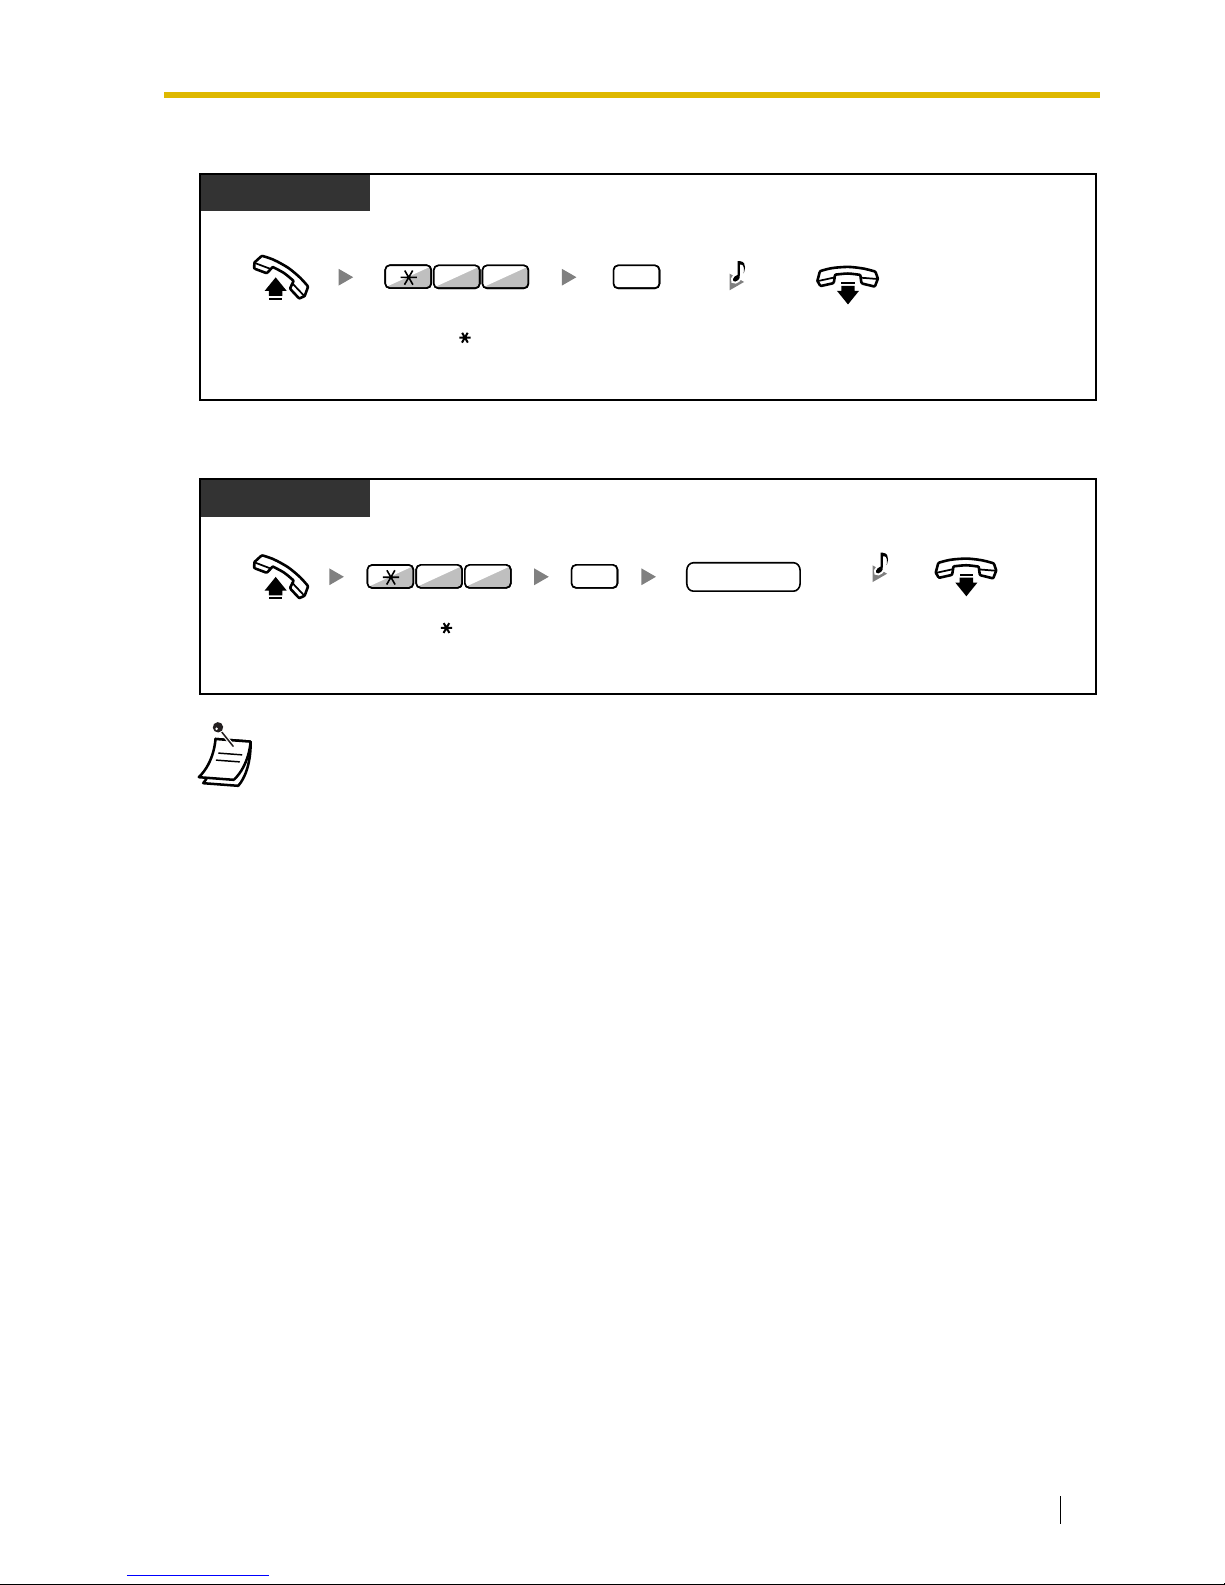
1.5 Absence Settings
User Manual 73
To lock
To unlock
• If you forget the extension PIN or cannot unlock your phone, consult your manager.
He can clear your extension PIN. Then, you can set the new PIN and unlock your
extension by entering it.
• If your extension is locked by this feature, it cannot perform features as follows:
— Making outside calls
— Changing the call forwarding destination
• If you do not set extension PIN, you cannot lock and unlock.
Off-hook.
On-hook.
PT/SLT/PS
Enter 77.
Enter 1.
177
C.Tone
Off-hook. On-hook.
PT/SLT/PS
Enter 77. Enter 0.
077
C.Tone
PIN: Personal Identification Number
extension PIN
Enter
extension PIN
(max. 10 digits).
Page 74
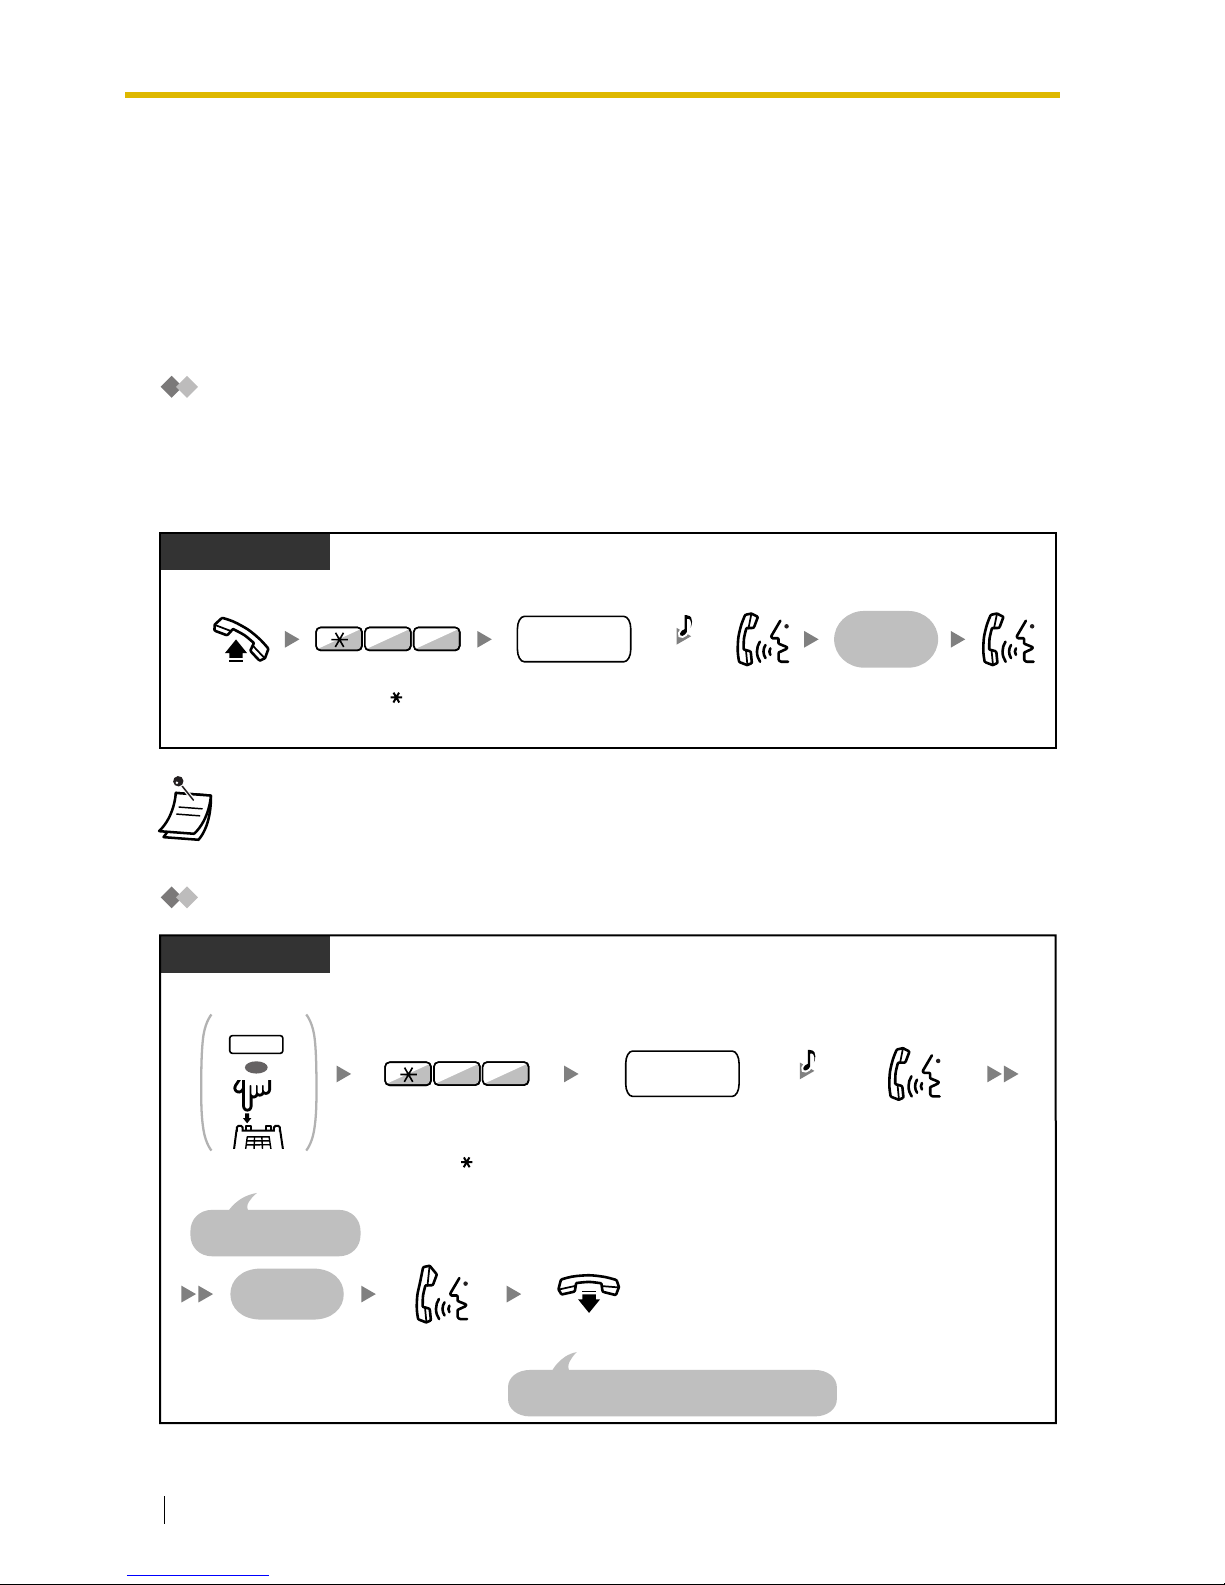
1.6 Paging
74 User Manual
1.6 Paging
1.6.1 Paging
— Group Paging
— Paging and then Transferring a Call
Group Paging
You can make a voice announcement to proprietary telephones or external speakers or both in the
preset group simultaneously.
To page
Paging and then Transferring a Call
• If the group which you paged is already being used for paging, you hear a busy tone.
Off-hook. Talk.Announce.
PT/SLT/PS
Dial paging group
number (2 digits).
Enter 33.
Wait for an
answer
paging group
no.
3 3
C.Tone
Announce.
Talk.
On-hook.
During a conversation
PT/SLT/PS
Enter 33.
Wait for an
answer
The held party and the paged extension are
connected and start a conversation.
The other party is
placed on hold.
Dial paging group
number (2 digits).
paging group
no.
33
C.Tone
Press TRANSFER or
Recall/hookswitch.
OR
OR
TRANSFER
Page 75
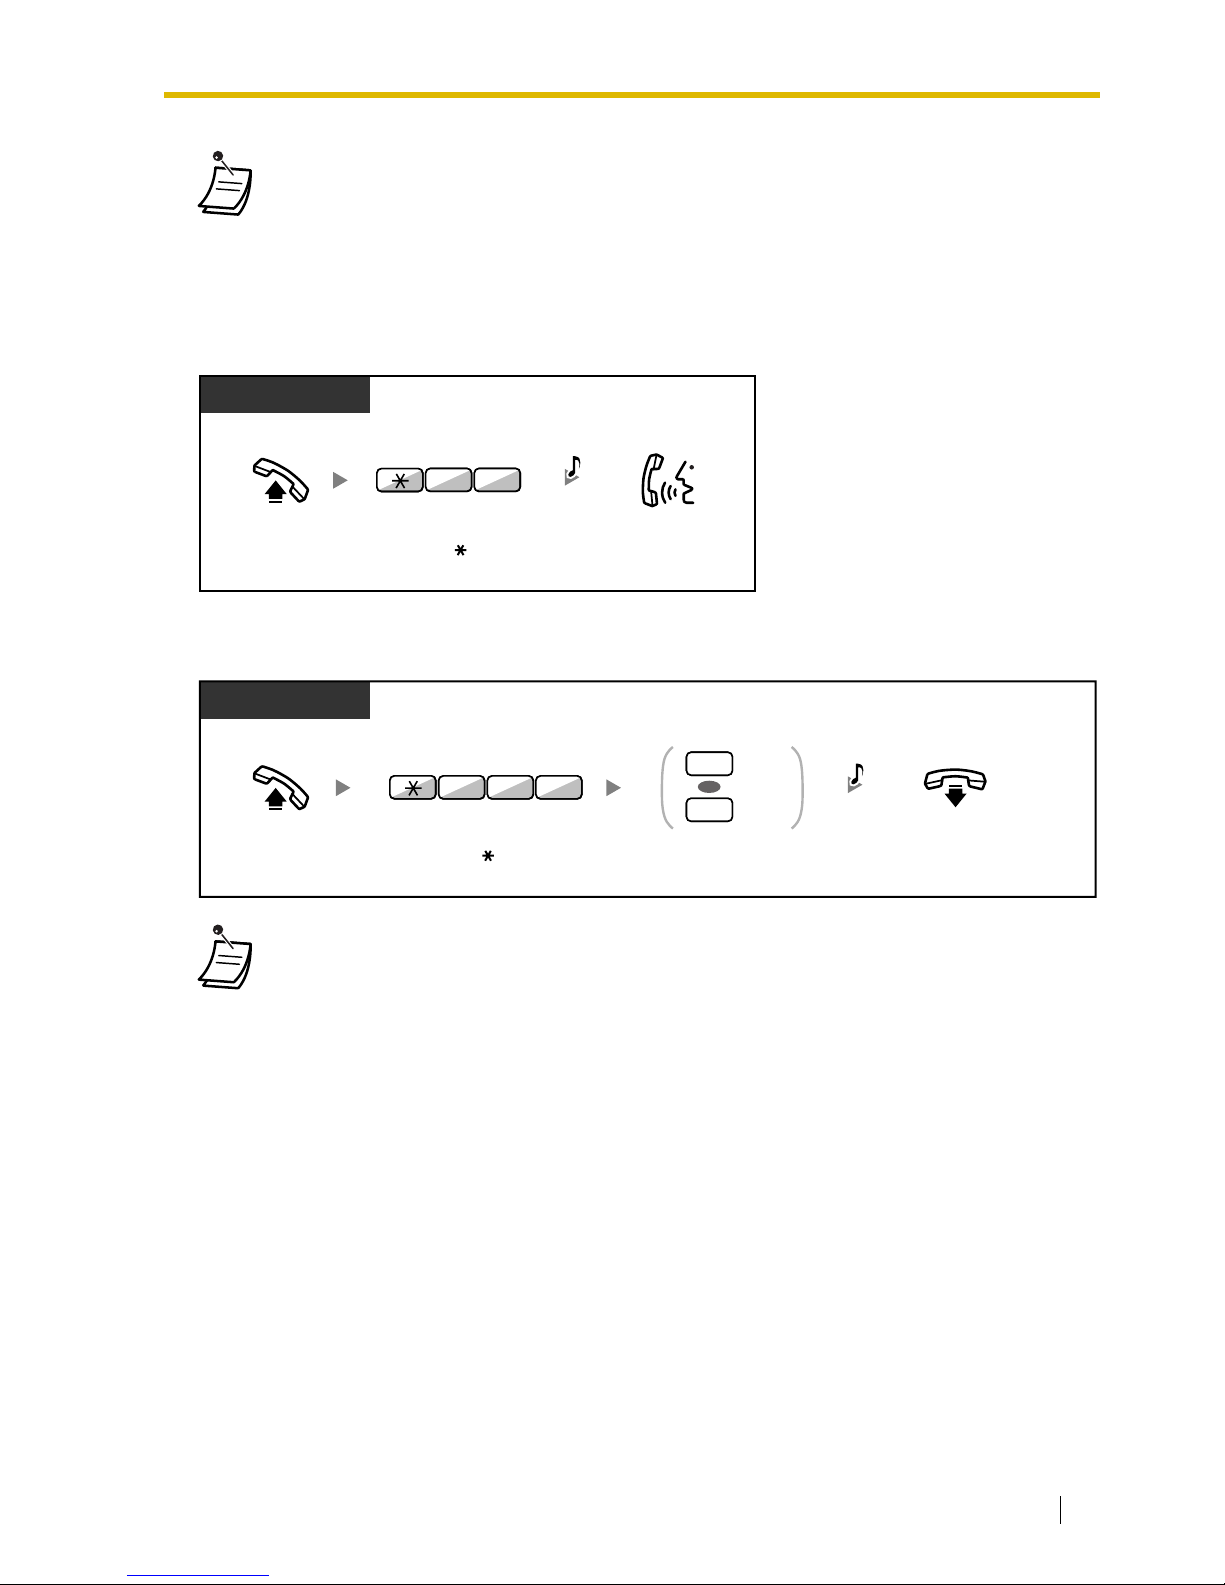
1.6 Paging
User Manual 75
1.6.2 Answering/Denying a Paging Announcement
To answer
Paging Deny
• After you go on-hook, the caller can talk to the person who answers the page.
• The following are extensions that cannot receive a paging announcement:
— Portable station
— Single line telephone
— Proprietary telephone that is ringing or busy
— Proprietary telephone in Paging Deny mode
— Proprietary telephone in DND mode
• Even if the announcement is not paging your extension, you can answer it, if it is paging
your group.
PT
Enter 43.
Talk.
Off-hook.
34
C.Tone
Off-hook. On-hook.
PT
Enter
721
.
Deny
Allow
1
0
OR
Enter 1 or 0.
7 2 1
C.Tone
Page 76
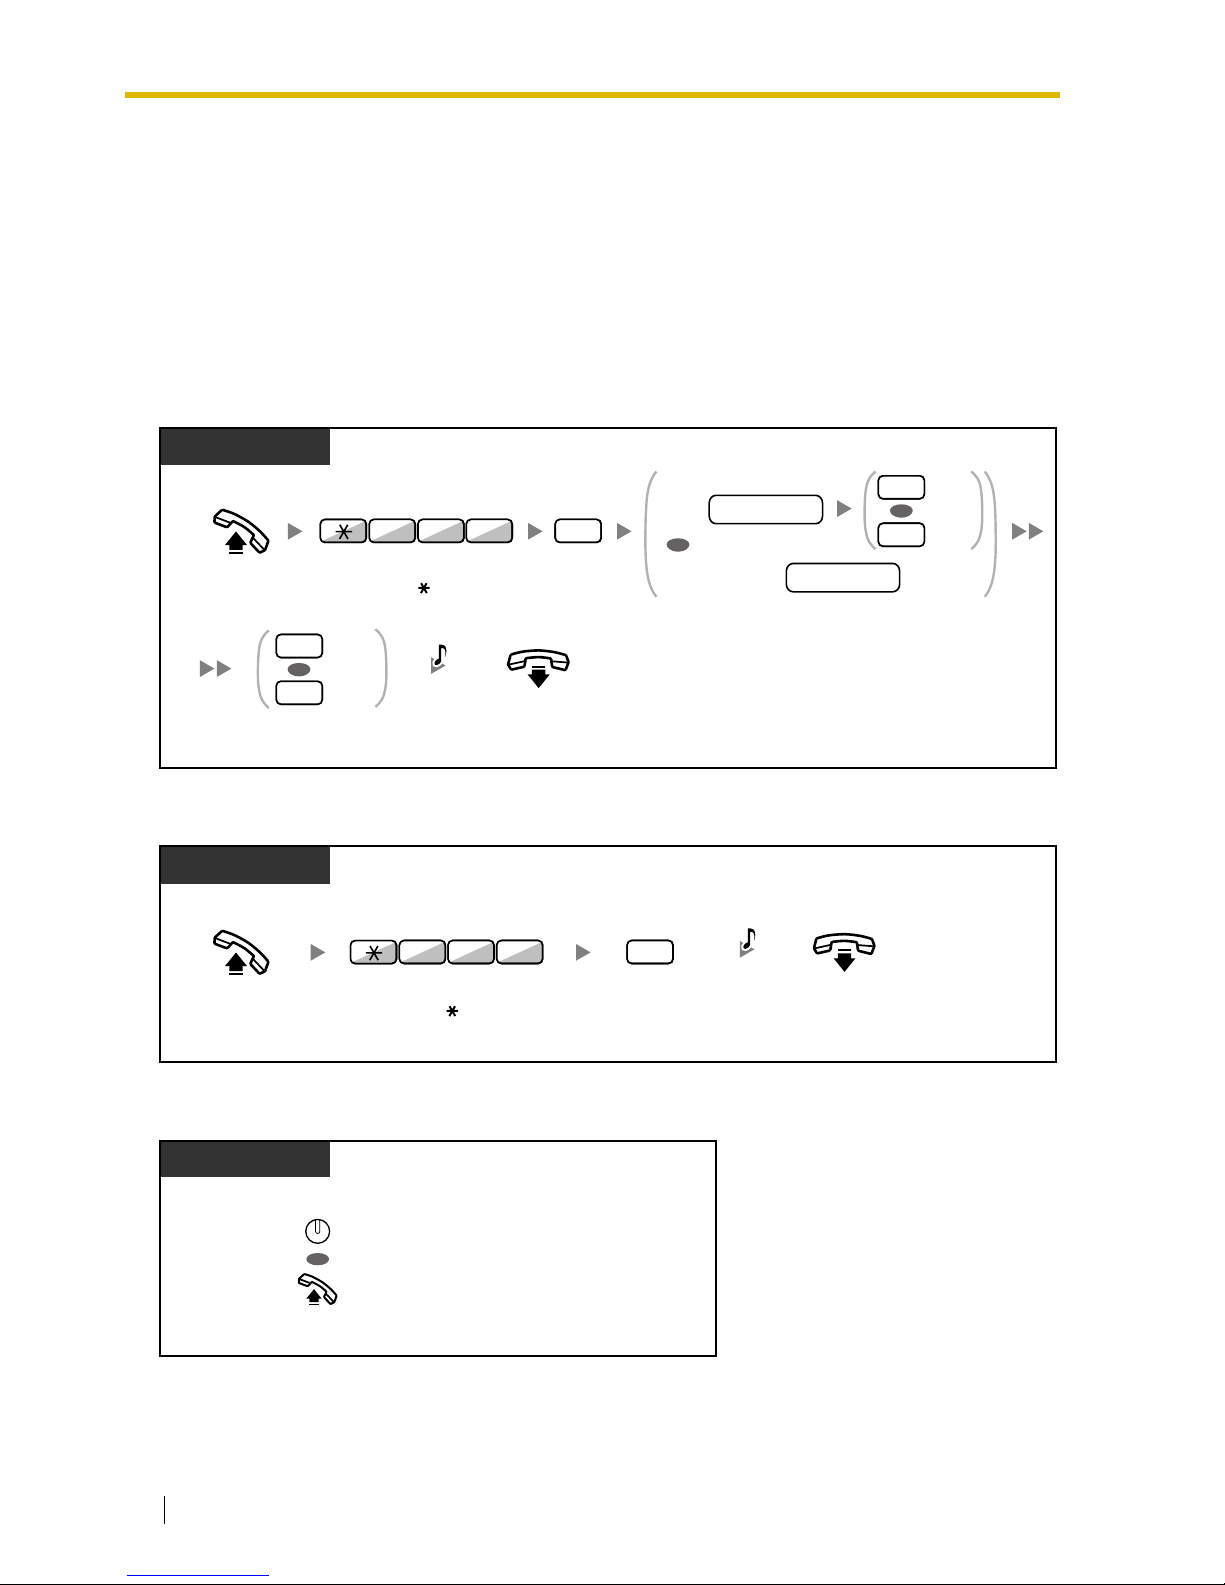
1.7 Extension Settings
76 User Manual
1.7 Extension Settings
1.7.1 Timed Reminder
You can receive an alarm at your telephone to remind you of a meeting, appointment or as a wakeup call. The alarm can occur either once or daily (every day until canceled) at a preset time.
When you go off–hook to answer, you will hear a special dial tone or prerecorded message.
To set
To cancel
To stop or answer the ringback
On-hook.
Enter 0 for once
or
1
for daily.
Off-hook.
PT/SLT
Once
Daily
0
1
OR
1
Enter
760
. Enter 1.
6 07
C.Tone
AM
PM
0
1
Enter
hour
(01-12) and
minute
(00-59) and then
0
for AM or 1 for PM.
Or enter
hour
(00-23) and
minute
(00-59).
hour/minute
OR
OR
12 H:
24 H:
hour/minute
Off-hook.
On-hook.
PT/SLT
0
Enter
760
.
Enter 0.
6 07
C.Tone
Press
INTERCOM
or off-hook.
PT/SLT
OR
INTERCOM
Page 77
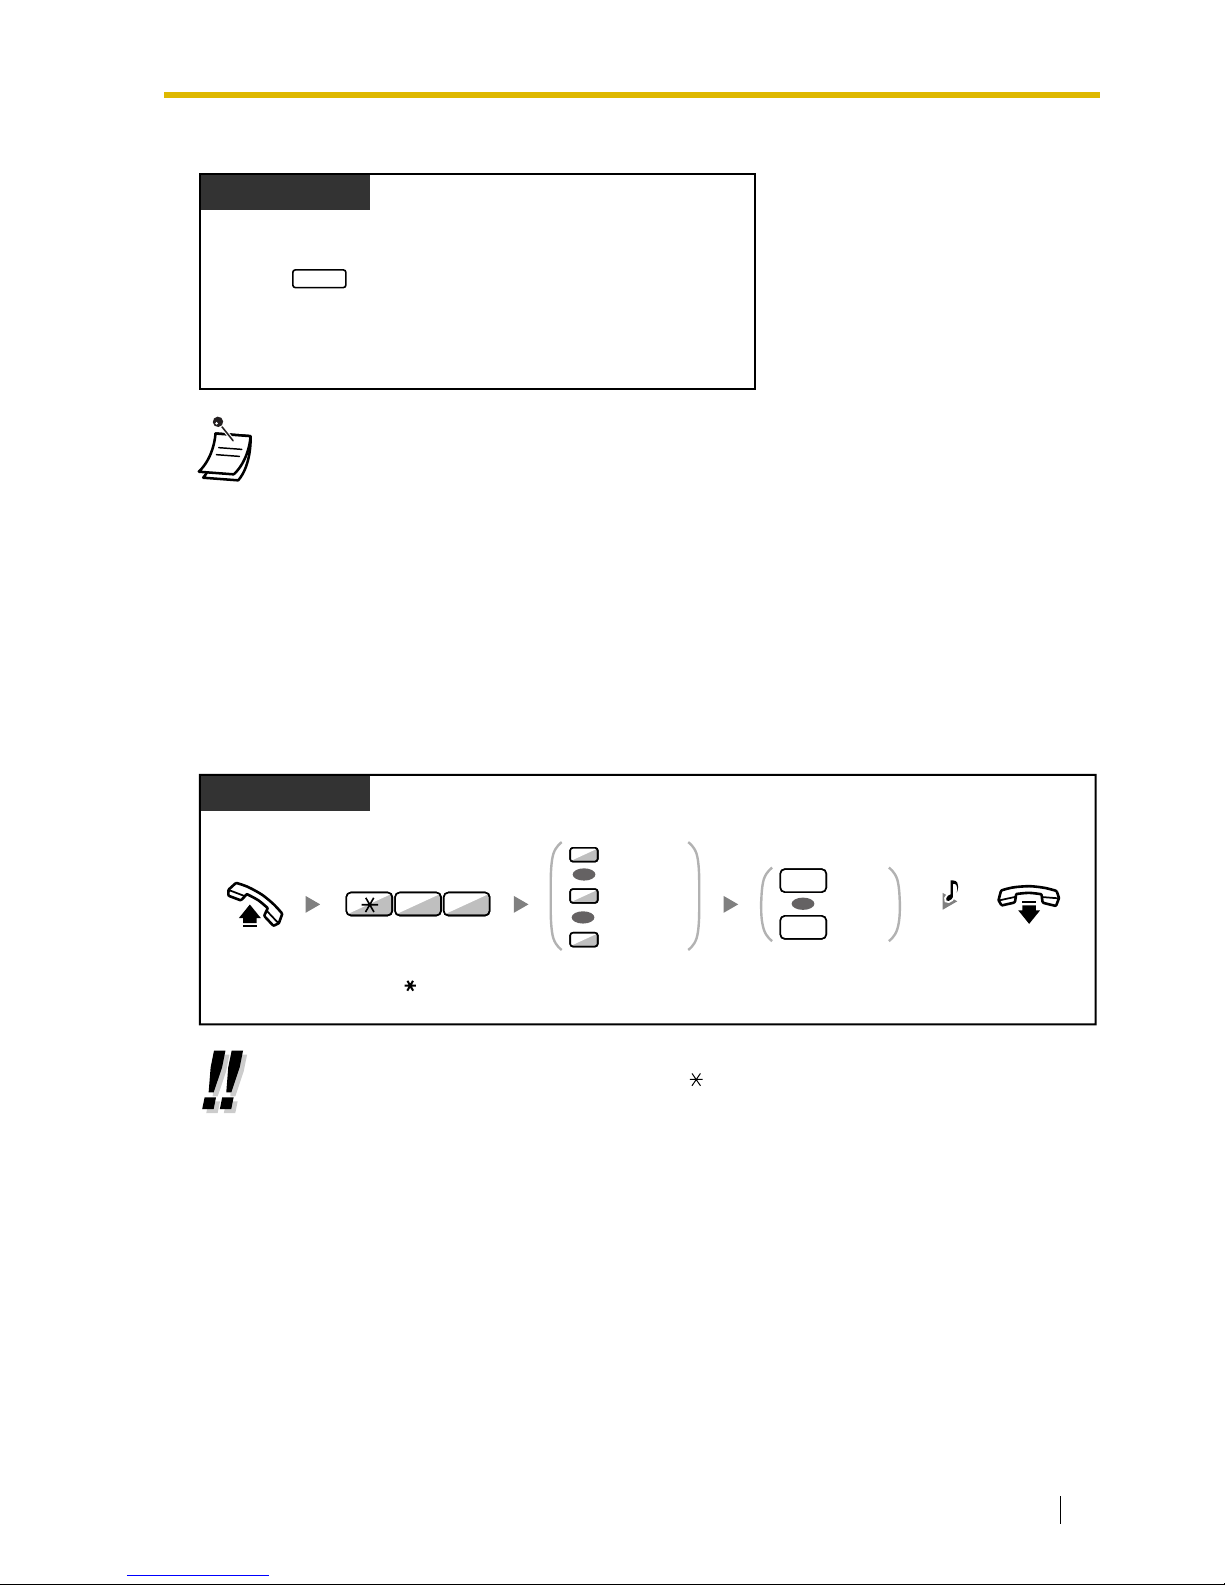
1.7 Extension Settings
User Manual 77
To confirm
1.7.2 Do Not Disturb (DND)
You may set this feature when you are in a meeting or busy.
To set/cancel
• You can also confirm the Timed Reminder by using the soft button.
• The alarm keeps ringing for preprogrammed seconds.
• If you receive an incoming call during ringback, the ringing starts after the ringback
stops.
• If you are having a conversation exceeding alarm ringing period, the ringback will
start after your conversation.
• When using a proprietary telephone, you can set or cancel Do Not Disturb by pressing the
FWD/DND button (fixed button) instead of " 710".
PT
Press
TRANSFER
several times.
TRANSFER
On-hook.
Enter 1 to set
or
0
to cancel.
PT/SLT/PS
Set
Cancel
1
0
OR
Off-hook.
Enter 71.
1
2
0
Both Calls
Intercom Calls
Outside Calls
OR
OR
17
Enter 0 to 2 as you desire.
C.Tone
Page 78

1.7 Extension Settings
78 User Manual
1.7.3 Call Waiting/Off-hook Call Announcement (OHCA)/
Whisper OHCA
During a conversation, you can be informed of a call waiting with a tone or voice announcement
through your built-in speaker or handset. (Default: Enable—Tone)
Call Waiting Tone:
a waiting tone through the built-in speaker of PT/handset of SLT. To change the tone from PT,
refer to "3.1.2 Settings on the Programming Mode".
OHCA:
a voice announcement through the built-in speaker
• The FWD/DND button light shows the current status as follows:
Off: Both features are not set.
Flashing red slowly: FWD mode
Red on: DND mode
• The system has two modes: (1) FWD/DND Cycle Switch Mode and (2) FWD/DND Setting
Mode. Ask your manager what mode your system is in if you are not sure.
(1) When in the FWD/DND Cycle Switch Mode:
Pressing the FWD/DND button (fixed button) while in idle status will cycle the setting
as shown below:
(2) When in the FWD/DND Setting Mode:
Pressing the FWD/DND button (fixed button) while in idle status will take you directly
to the programming mode for the FWD/DND setting.
(Refer to "3.1.2 Settings on the Programming Mode".)
Note
A FWD/DND button (customized button) is always in FWD/DND Cycle Switch Mode: the
mode cannot be changed.
• If your extension has set this feature, a calling extension will hear DND tone.
• If this feature is set, the Call Forwarding (FWD) feature does not work.
• Specified extensions can override this feature and call DND extensions (DND Override).
• When intercom calls are set to be handled differently from outside calls (DND set/cancel),
we recommend establishing buttons for both FWD/DND—Outside calls and FWD/DND—
Intercom calls, because:
a) the light patterns of the FWD/DND—Both calls button (including FWD/DND button
[fixed button]) will indicate the setting for either outside calls or intercoms calls, but not
both.
Note
The DND icon on PS display reflects the setting for outside calls only.
b) pressing the FWD/DND—Both calls button (including FWD/DND button [fixed button])
will not change the FWD or DND mode for intercom calls and outside calls separately.
Customizing Your Phone
• 3.1.3 Customizing the Buttons
Create or edit FWD/DND (Both calls, Outside calls, Intercom calls) buttons.
FWD DND Off
Page 79
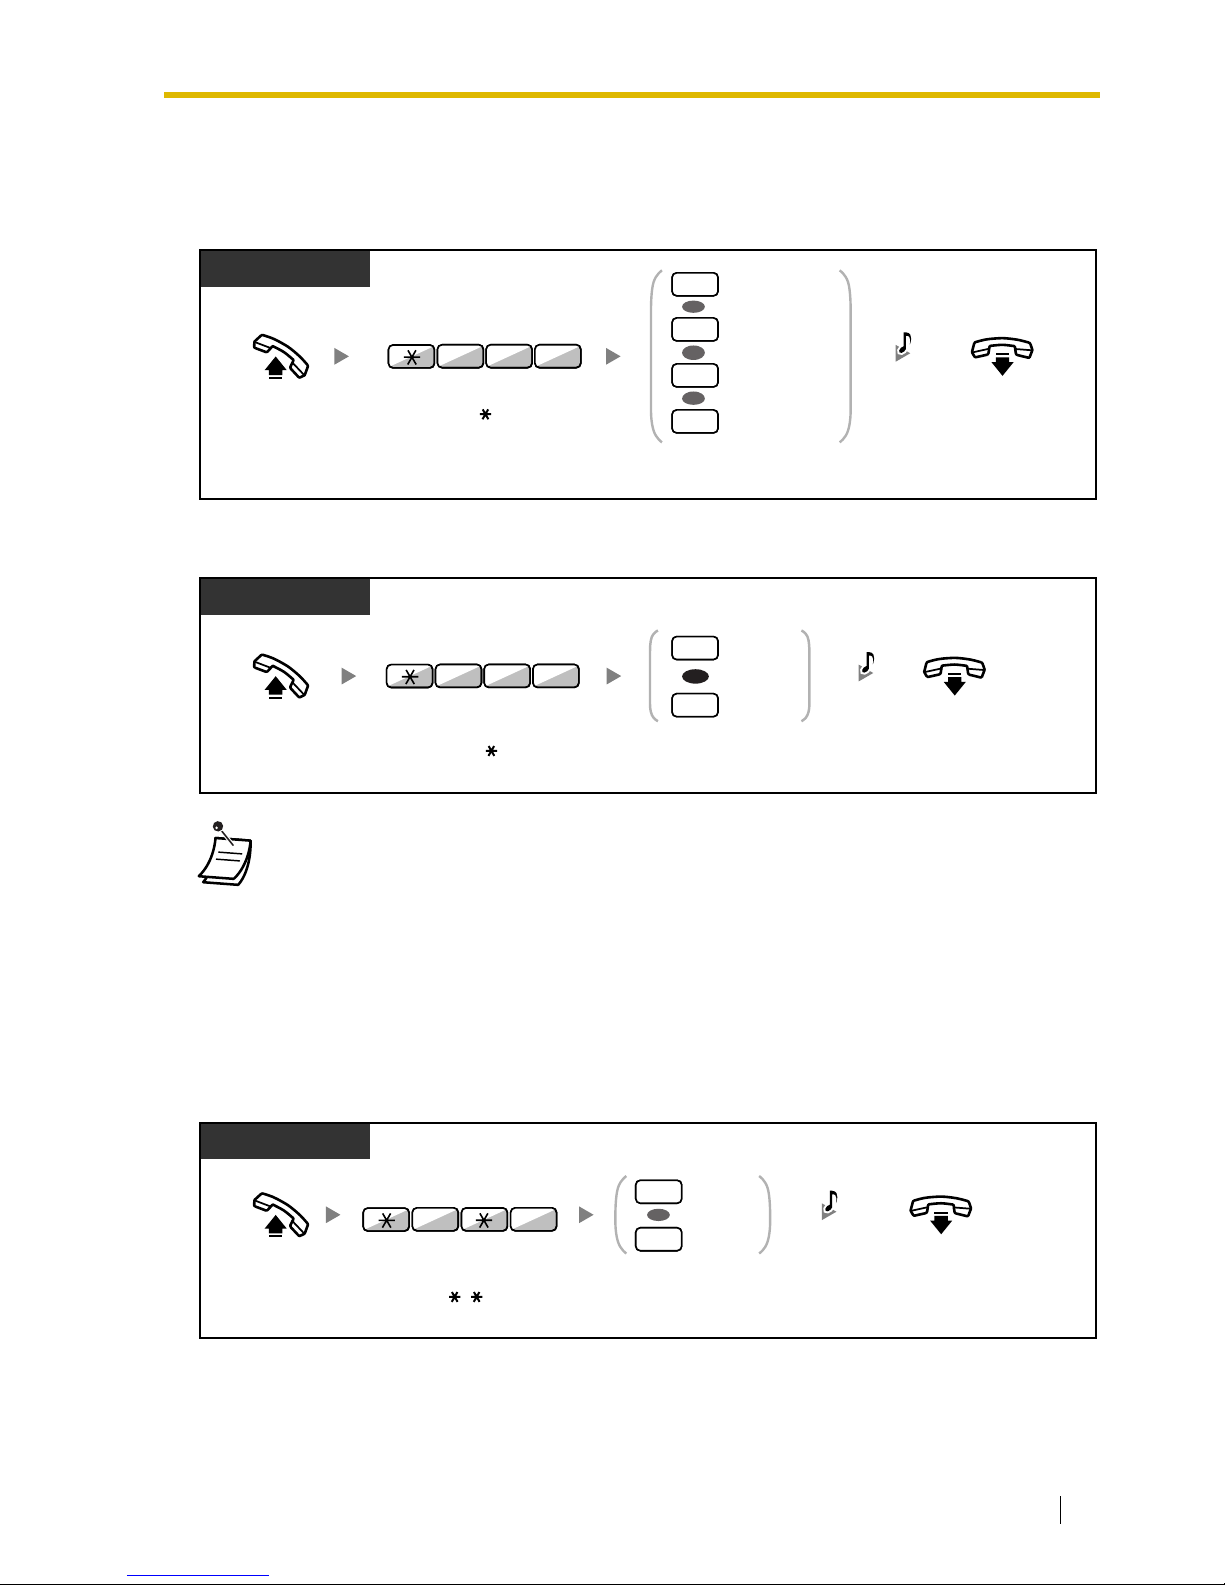
1.7 Extension Settings
User Manual 79
Whisper OHCA:
a voice announcement through the handset
To set/cancel for intercom calls
To set/cancel for outside calls
1.7.4 Connected Line Identification Restriction (COLR)
When receiving a call through a private network, you can select whether the caller can see your
extension number or not.
To show/prevent
• OHCA and Whisper OHCA can be activated only on certain digital proprietary telephones.
In addition, Whisper OHCA requires that both you and the other party are using supported
telephones. For more details, consult your dealer.
Off-hook.
Enter
0
to 3 as you desire.
On-hook.
Enter
731
.
PT/SLT/PS
No call
Tone
OHCA
Whisper OHCA
0
1
OR
2
OR
3
OR
3 17
C.Tone
Off-hook.
Enter
0
or 1.
On-hook.
PT/SLT/PS
No tone
Tone
0
1
OR
Enter
732
.
3 27
C.Tone
On-hook.Off-hook.
PT/SLT/PS
Show
Prevent
0
1
OR
07
Enter
7 0
. Enter 0 to show
or
1
to prevent.
C.Tone
Page 80
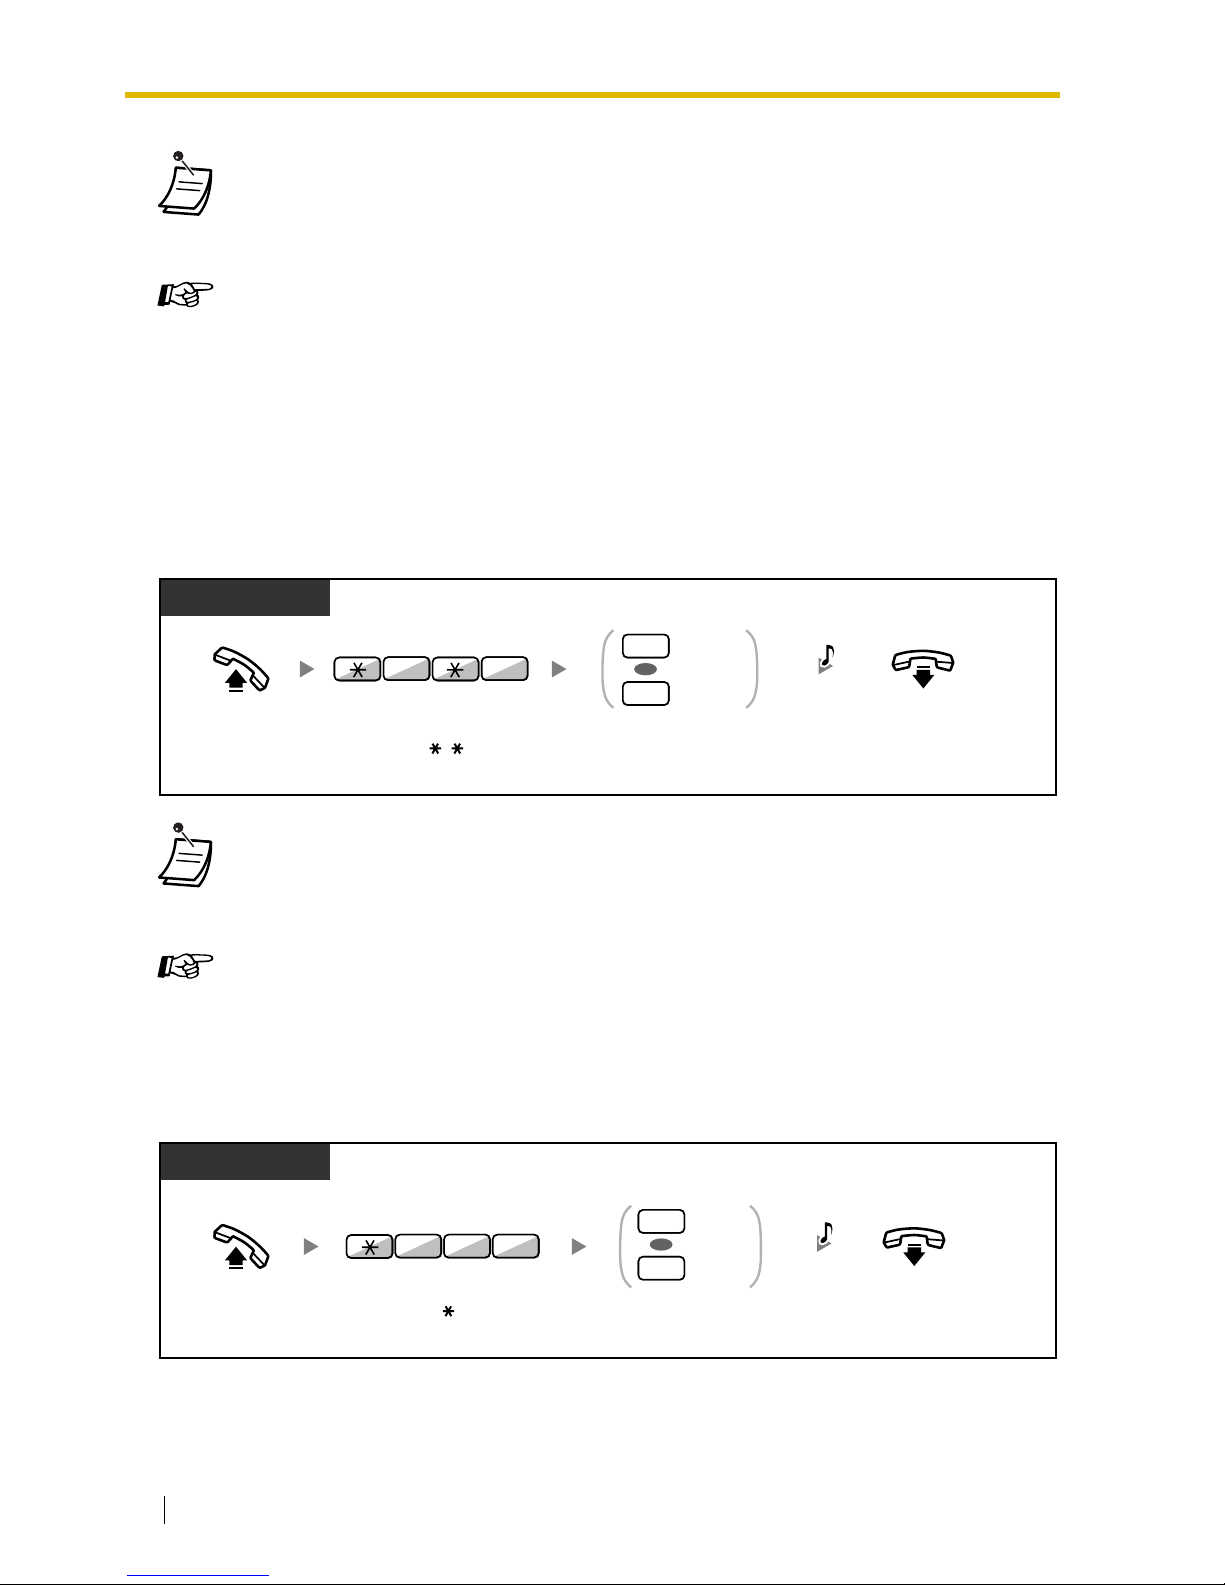
1.7 Extension Settings
80 User Manual
1.7.5 Calling Line Identification Restriction (CLIR)
When making a call through a private network, you can select whether the called party can see your
extension number or not.
To show/prevent
1.7.6 Executive Busy Override Deny
• You can change the mode by pressing a preset COLR button while on-hook.
The COLR button light shows the current status as follows:
Off: shows your extension number.
Red on: prevents your extension number being displayed.
Customizing Your Phone
• 3.1.3 Customizing the Buttons
Create or edit a Connected Line Identification Restriction (COLR) button.
• You can change the mode by pressing a preset CLIR button while on-hook.
The CLIR button light shows the current status as follows:
Off: shows your extension number.
Red on: prevents your extension number being displayed.
Customizing Your Phone
• 3.1.3 Customizing the Buttons
Create or edit a Calling Line Identification Restriction (CLIR) button.
On-hook.Off-hook.
PT/SLT/PS
Enter
7 1
.
Show
Prevent
0
1
OR
17
Enter 0 to show
or
1
to prevent.
C.Tone
Off-hook.
On-hook.
Enter 1 to prevent
or
0
to allow.
PT/SLT/PS
Prevent
Allow
1
0
OR
Enter
733
.
3 37
C.Tone
Page 81
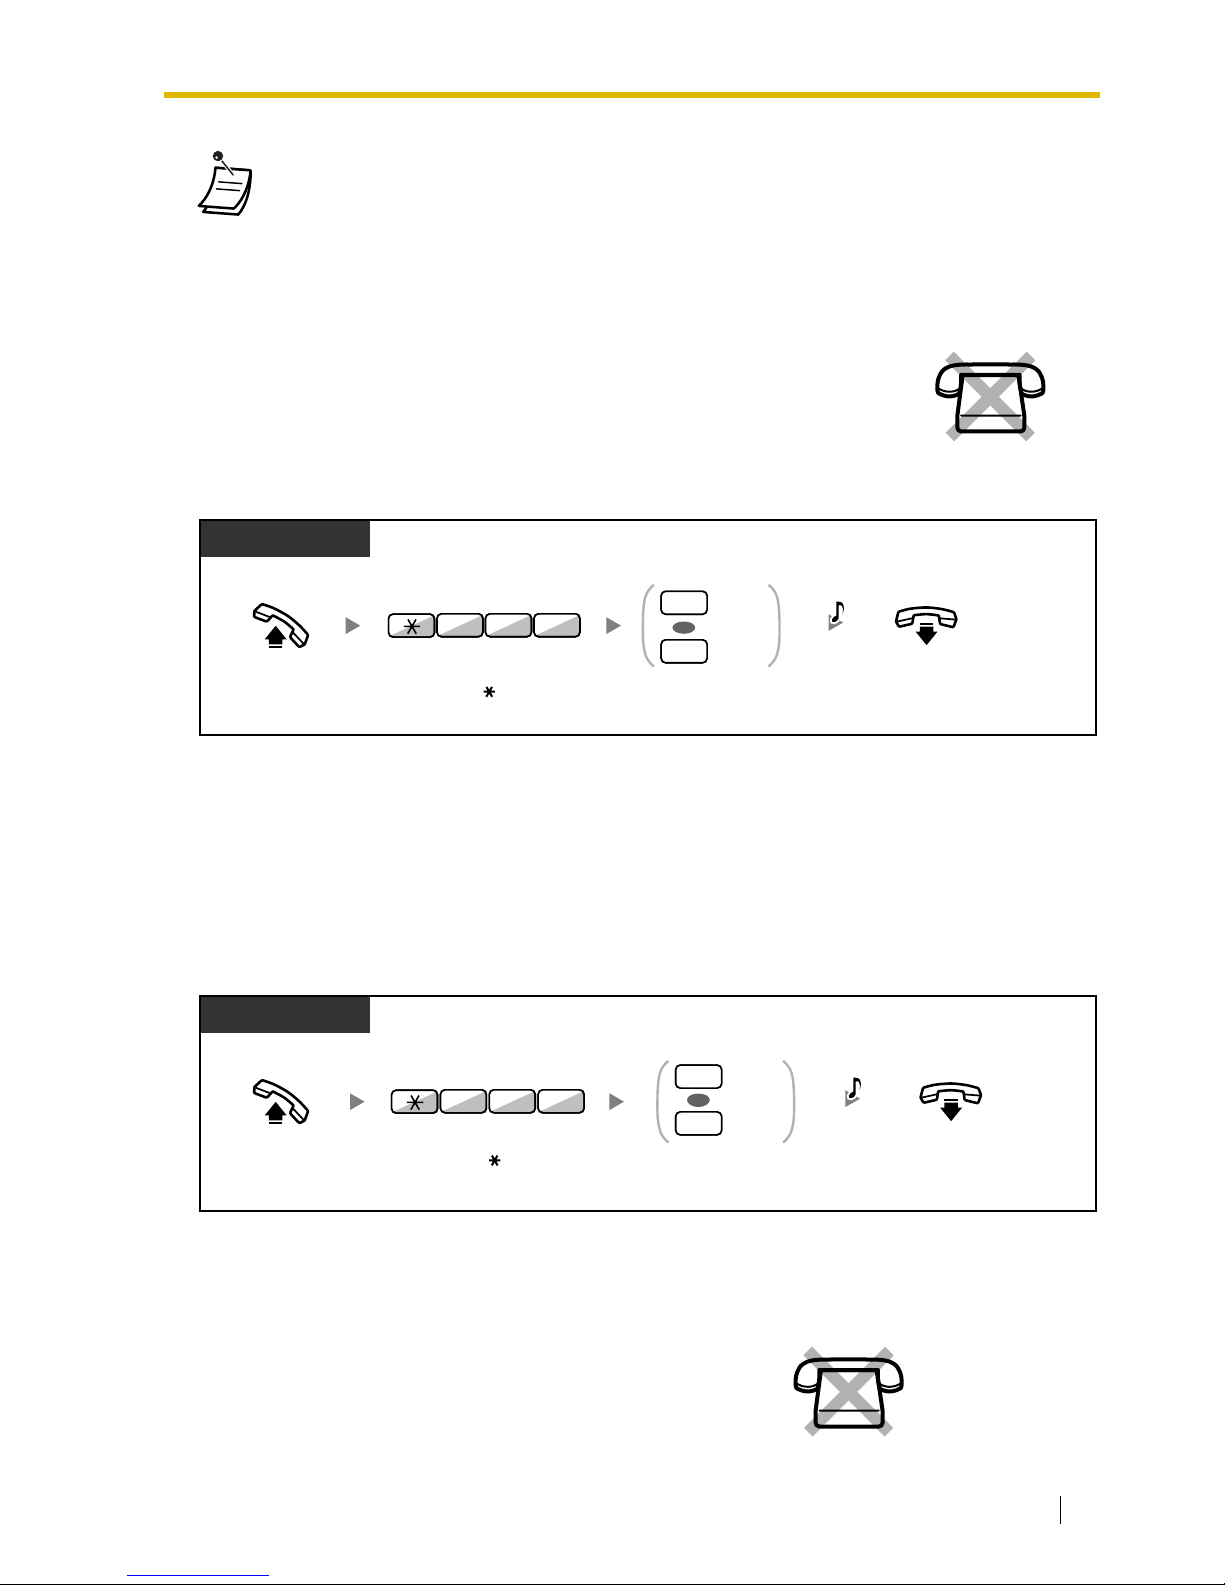
1.7 Extension Settings
User Manual 81
1.7.7 Background Music (BGM)
To select and set/cancel
1.7.8 Data Line Security
You can protect the line against audible notification tones, such as a call waiting tone during a
conversation. Set this feature if your extension has a data communication device, such as a computer
or fax machine connected to ensure secure data transmission.
To set/cancel
1.7.9 Time Service
• Some extensions may be prohibited from performing this feature.
You can listen to the background music through your telephone speaker while
on-hook. An external music source, such as a radio, can be connected.
If your extension becomes busy (off-hook, making or receiving a call etc.), the
music stops temporarily. When you go back on-hook, the music starts again.
You can check the current status of the Time Service on the
display.
Off-hook. On-hook.
Enter 1 to set
or
0
to cancel.
PT
Enter
751
.
Cancel
0
Set
OR
5 17
C.Tone
1
Off-hook.
On-hook.
Enter 1 to set
or
0
to cancel.
PT/SLT/PS
Set
Cancel
1
0
OR
Enter
730
.
3 07
C.Tone
Page 82
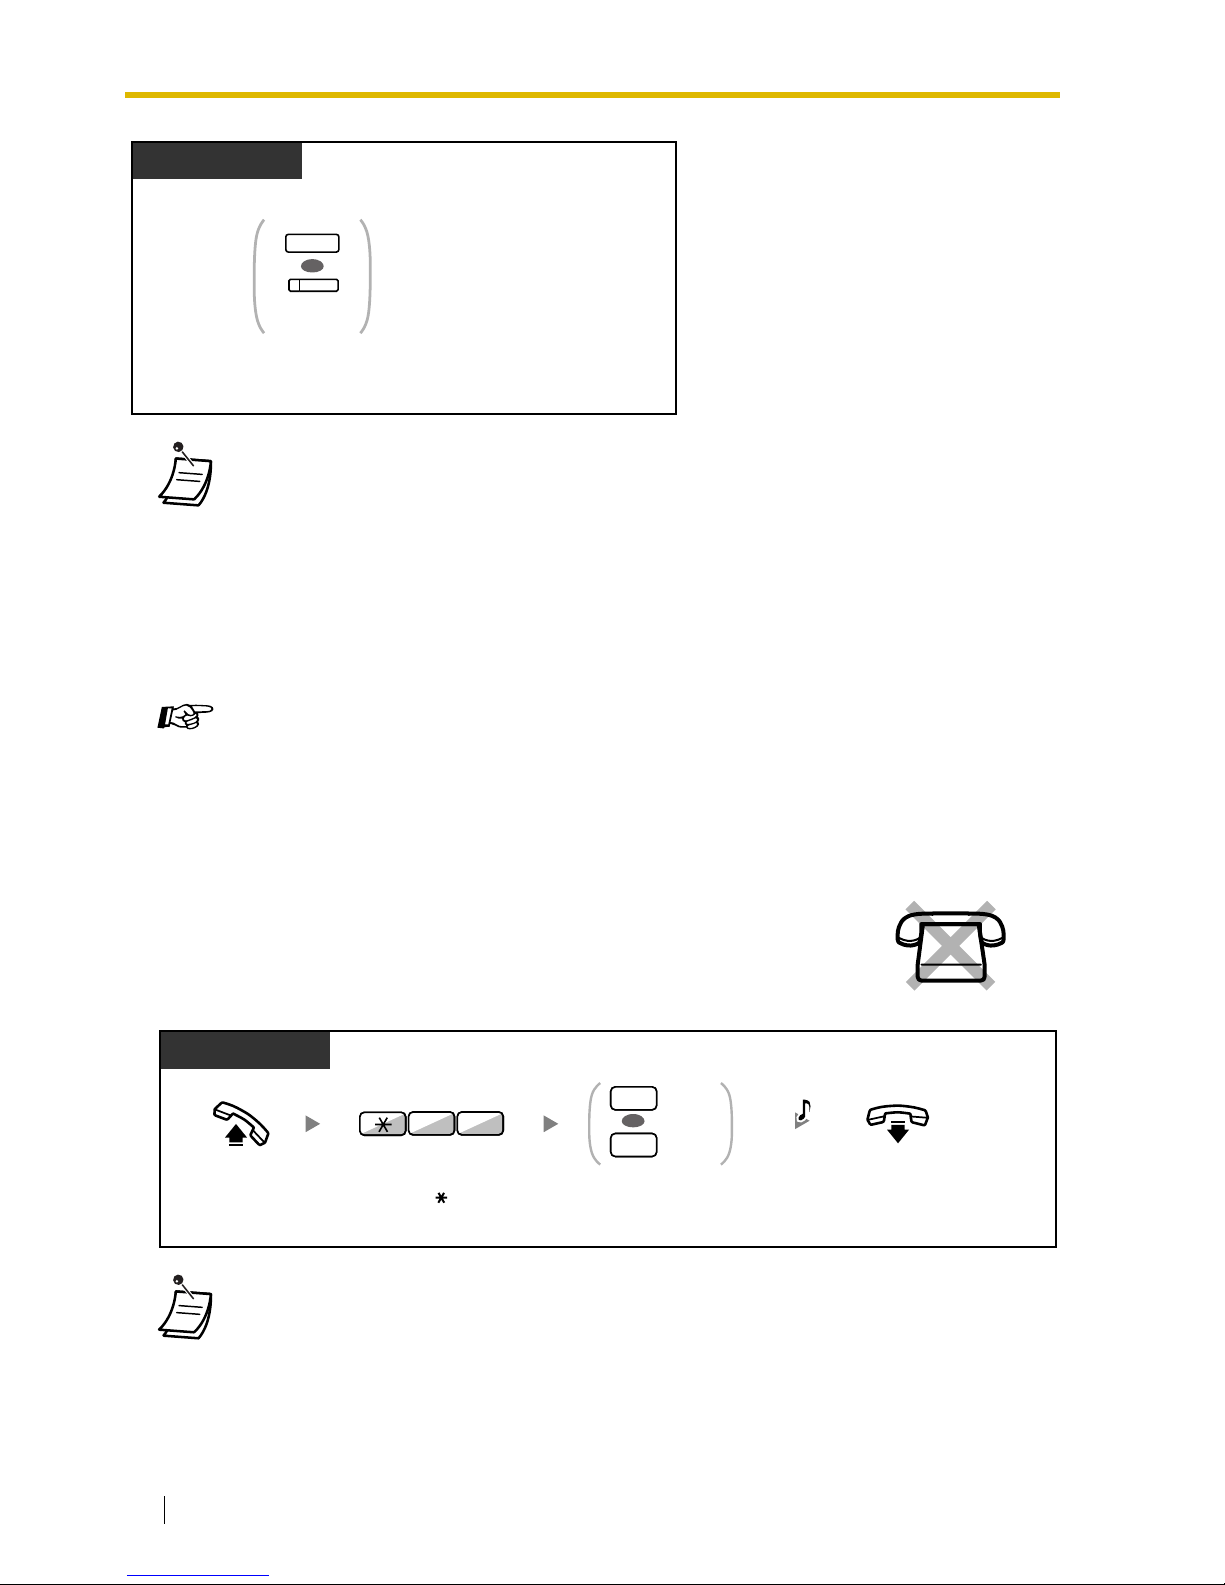
1.7 Extension Settings
82 User Manual
1.7.10 Paralleled Telephone
• The Time Service (Day/Night/Lunch/Break) button light always shows the current status
as follows:
Off: Day mode
Green on: Lunch mode
Flashing Green: Break mode
Red on: Night mode
Flashing Red: Holiday mode
• Any extension user except the managers can check the current status by pressing the
Time Service (Day/Night/Lunch/Break) button.
Customizing Your Phone
• 3.1.3 Customizing the Buttons
Create or edit a Time Service (Day/Night/Lunch/Break) button.
A digital proprietary telephone extension user can choose whether the single
line telephone connected in parallel will ring or not, when an incoming call is
received.
(Default: Ring)
• Even if "No ring" is selected, calls can be made and answered on the single line
telephone by lifting the handset.
• If you go off-hook while your paralleled telephone is in use, the call will switch over to
you.
Press TRANSFER or Time Service
(Day/Night/Lunch/Break).
While on-hook
PT
(Time Service
(Day/Night/
Lunch/Break))
OR
TRANSFER
Off-hook.
On-hook.
DPT
Enter 1 to ring
or
0
not to ring.
Ring
No ring
1
0
OR
Enter 39.
3 9
C.Tone
Page 83
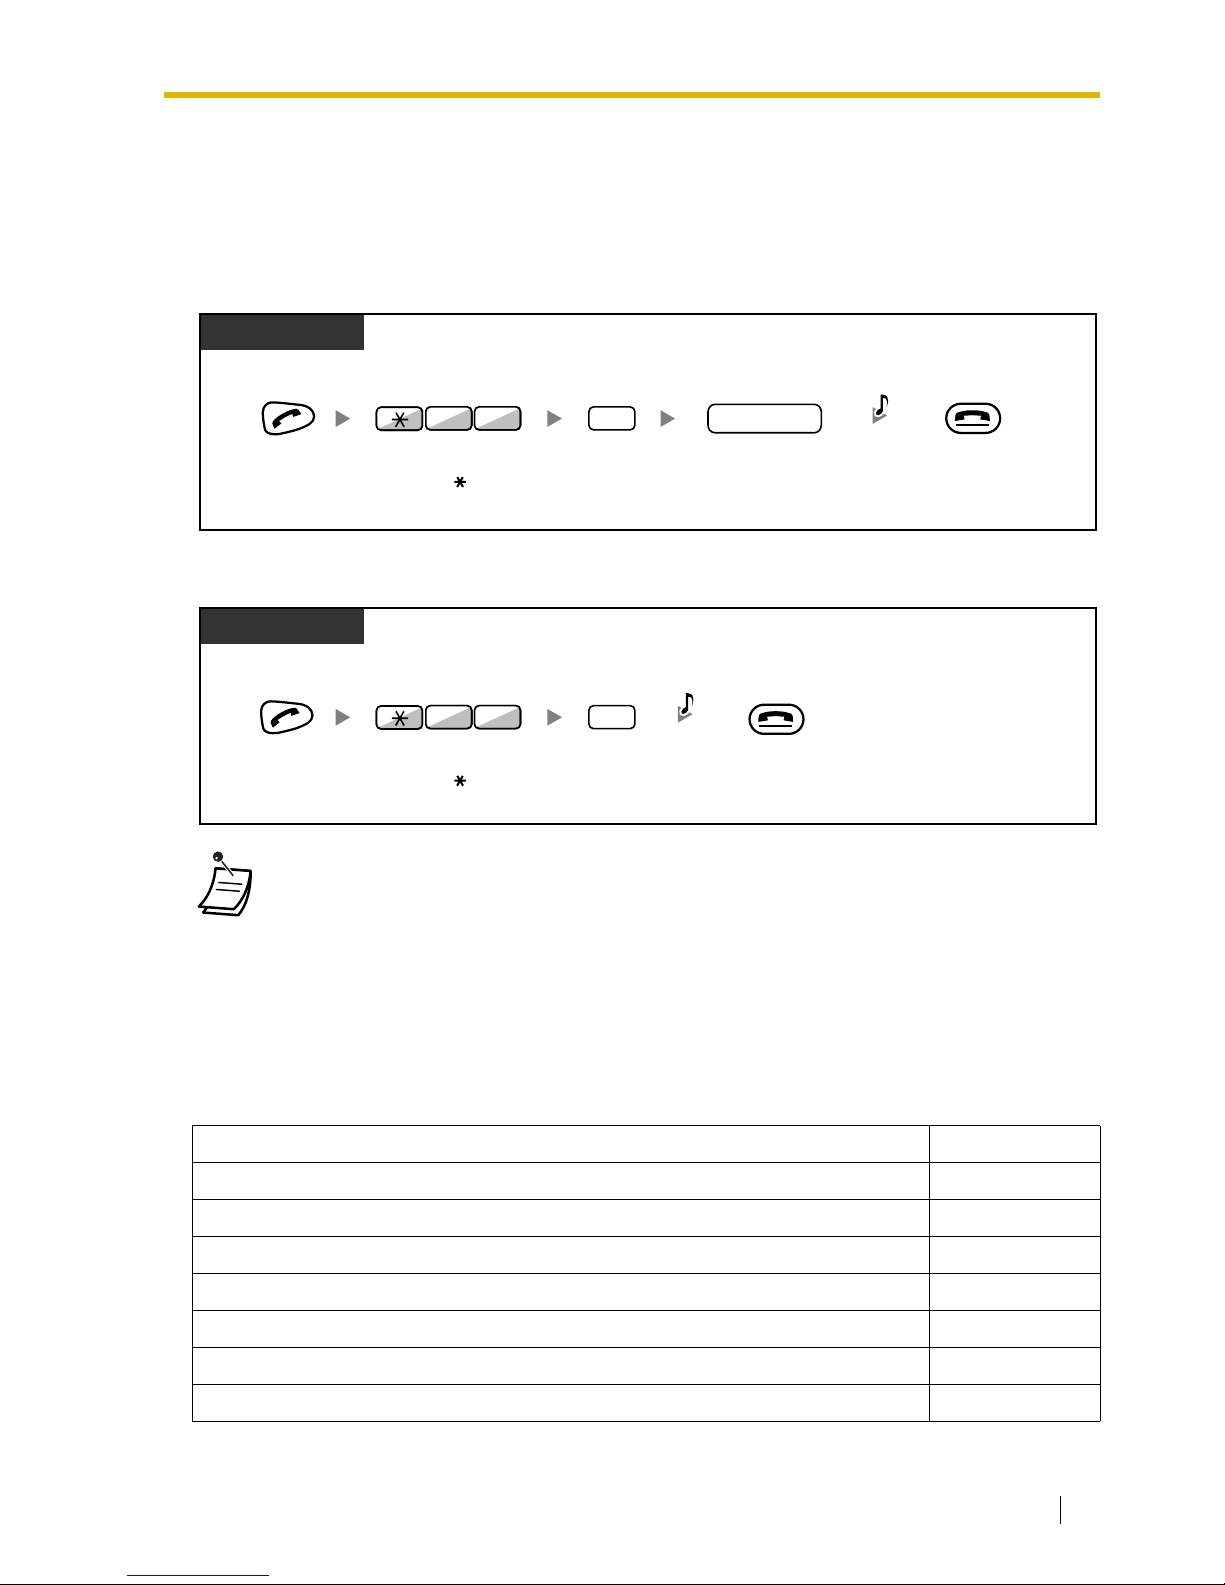
1.7 Extension Settings
User Manual 83
1.7.11 Wireless XDP Parallel Mode
Your PS can be used in parallel with a PT or SLT.
When in this mode, incoming calls to a wired telephone also ring the paired PS.
To set
To cancel
1.7.12 Extension Feature Clear
You can reset the settings of the following features on your extension to the default settings with one
operation.
This feature is also known as Station Program Clear.
• Some wired telephones are prohibited from using this feature.
• If you go off-hook while your paralleled telephone is in use, the call will switch over to
you.
Features Default Setting
Hot Line* Off
Message Waiting—(All the messages that have been left by other extension users) Off
Call Pickup Deny Allow
Call Forwarding (FWD)* Off
Absent Message Off
Paging Deny Allow
Timed Reminder Cleared
PS
Enter
extension number
of the paired telephone.
Press
CANCEL
.
PS
extension no.
Press
TALK
. Enter 48.
4 8 1
C.Tone
Enter 1.
PS
PS
Press
CANCEL
.
Press
TALK
.
Enter
48
.
4 8 0
C.Tone
Enter 0.
Page 84
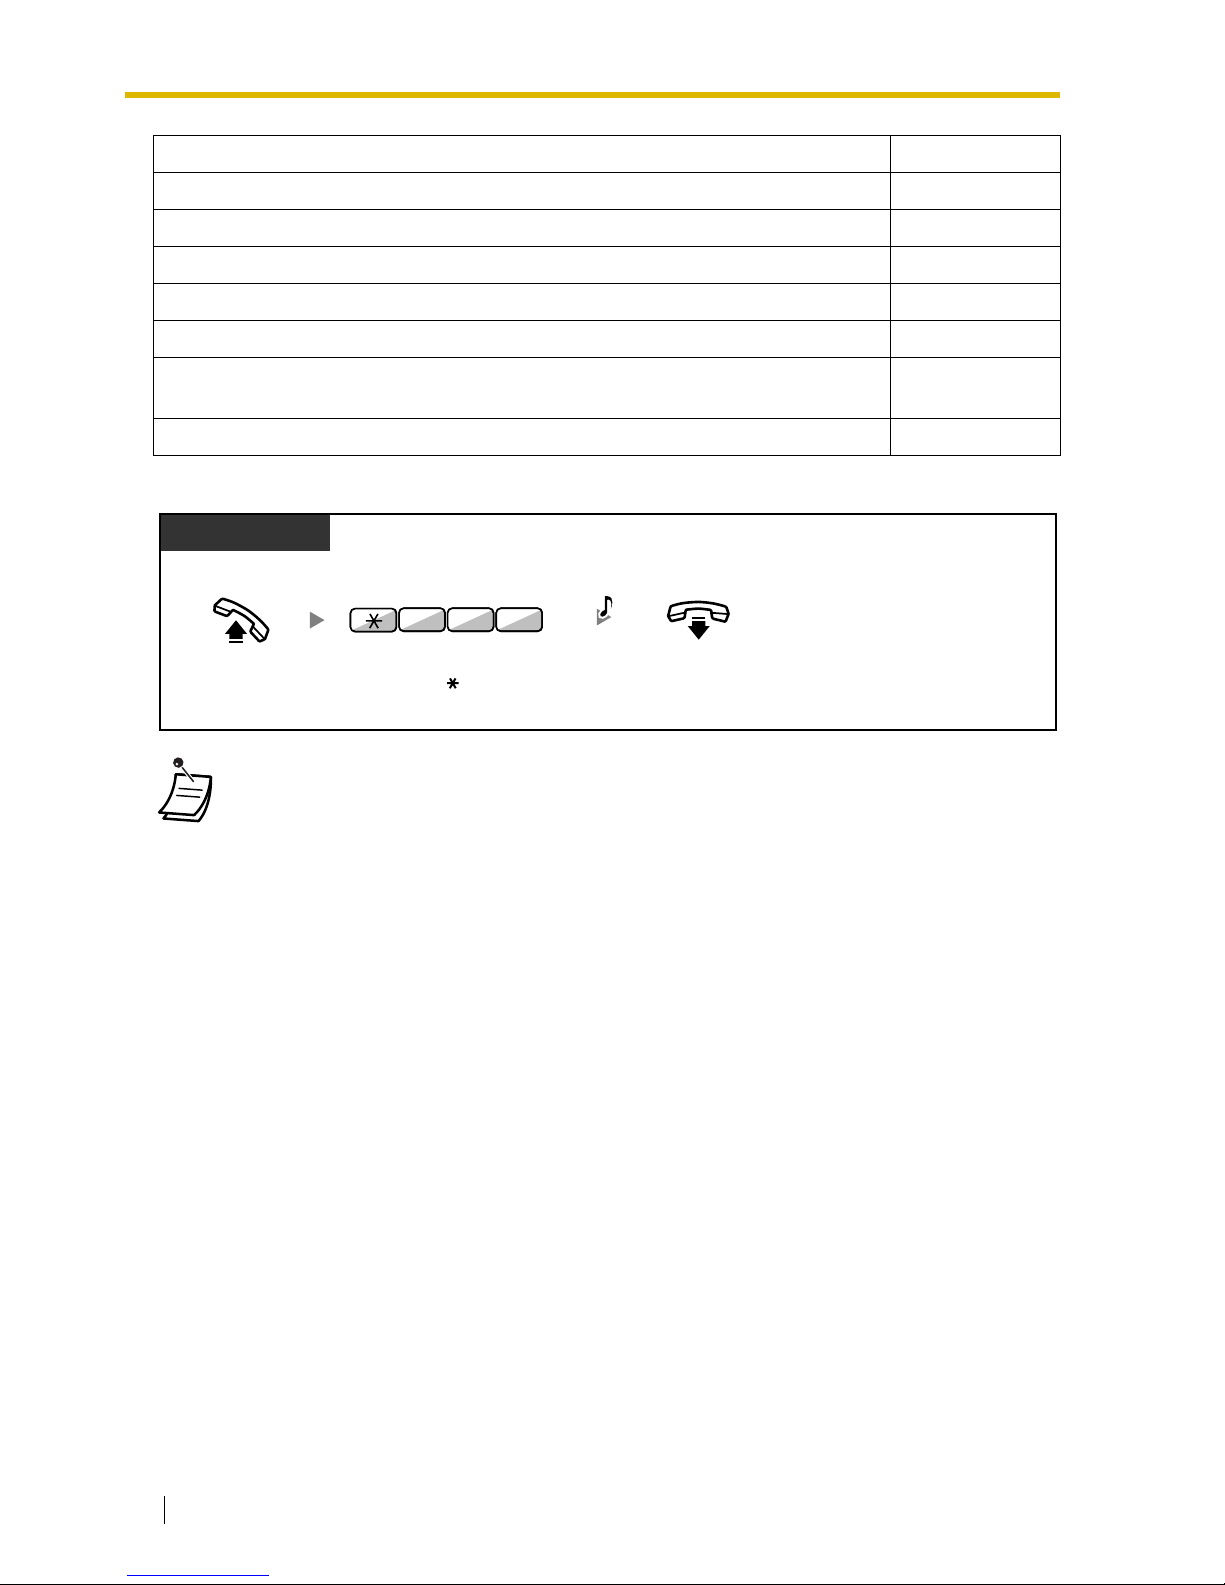
1.7 Extension Settings
84 User Manual
* These features may not be reset depending on the system programming.
Do Not Disturb (DND)* Off
Call Waiting* Enable—Tone
Executive Busy Override Deny Allow
BGM Off
Data Line Security Off
Paralleled Telephone The telephone in
parallel rings.
Log-in/Log-out Log-in
• After performing Extension Feature Clear, the setting of Call Waiting becomes "Enable—
Tone". In this case, dial tone 2 will be heard when you go off-hook.
Features Default Setting
Off-hook.
On-hook.
PT/SLT/PS
Enter
790
.
9 07
C.Tone
Page 85
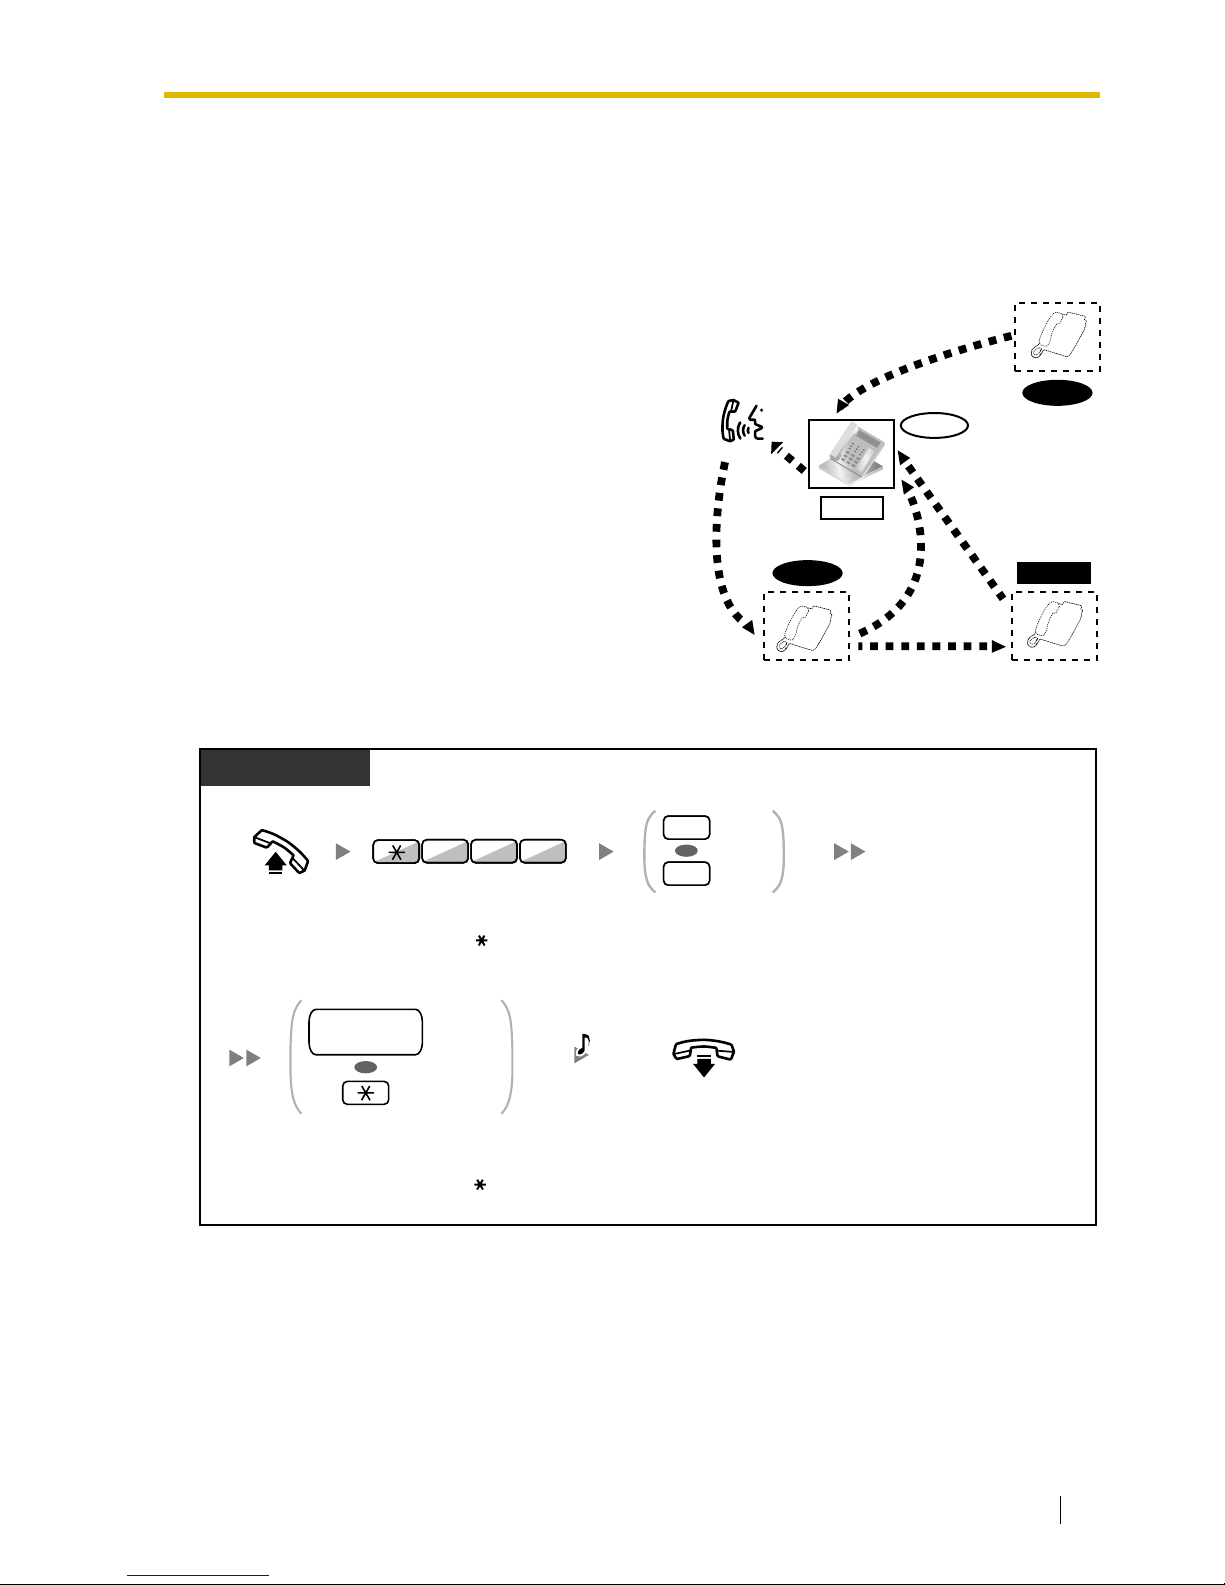
1.8 Call Center
User Manual 85
1.8 Call Center
1.8.1 Log-in/Log-out, Wrap-up
To set Log-in/Log-out
You can control your status in an incoming call
distribution group. When in the Log-out mode,
incoming calls to the group will not ring at your
extension. When you return, calls will again ring at
your extension. (Default: Log-in)
Even if your extension is logged-in, you can have a
specified time period (wrap-up time) when you will not
receive calls after completing a previous call. This
time can be used for you to write a report and so on.
You can also manually select "Not Ready" mode to
temporarily leave a distribution group.
Log-in
Log-out
Wrap-up
Talk.
Not Ready
Ready
Off-hook.
On-hook.
PT/SLT/PS
Enter
736
.
Log-out
Log-in
0
1
OR
Enter
ICD Group
extension number
or .
Specified
OR
ICD Group
extension no.
All
3 67
Enter 0 or 1.
C.Tone
ICD Group: Incoming Call Distribution Group
Page 86
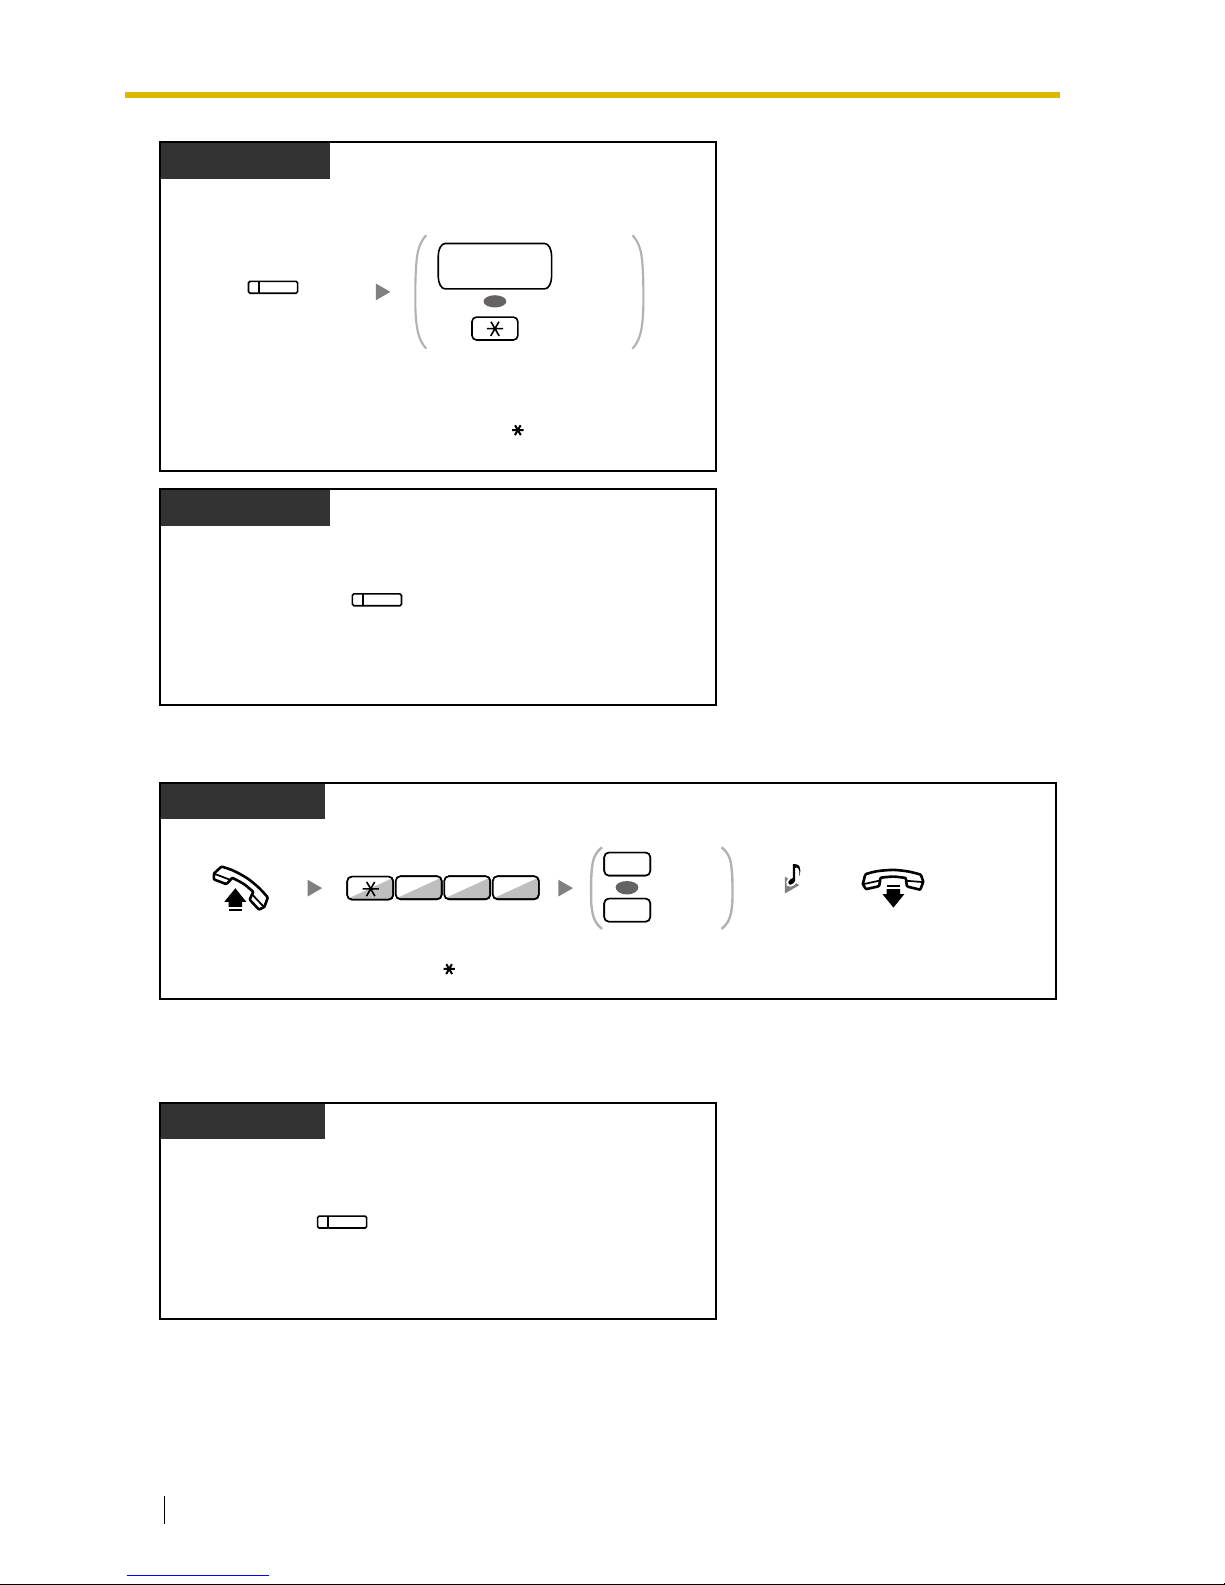
1.8 Call Center
86 User Manual
To enter/leave the Not Ready mode
To set/cancel the Not Ready mode or to leave the Wrap-up mode (To enter the Ready
mode)
While on-hook
PT/PS
Press
Log-in/Log-out
.
(Log-in/Log-out)
Specified
OR
All
ICD Group
extension no.
Enter
ICD Group extension
number
or
.
ICD Group: Incoming Call Distribution Group
While on-hook
PT/PS
Press
Log-in/Log-out of a Specified Group
.
(Log-in/Log-out
of a Specified Group)
PT/SLT/PS
On-hook.Off-hook.
537
Not Ready
Ready
1
0
OR
Enter
735
.
Enter 1 or 0.
C.Tone
PT/PS
(Wrap-up)
While on-hook
Press red or flashing red
Wrap-up.*
Page 87
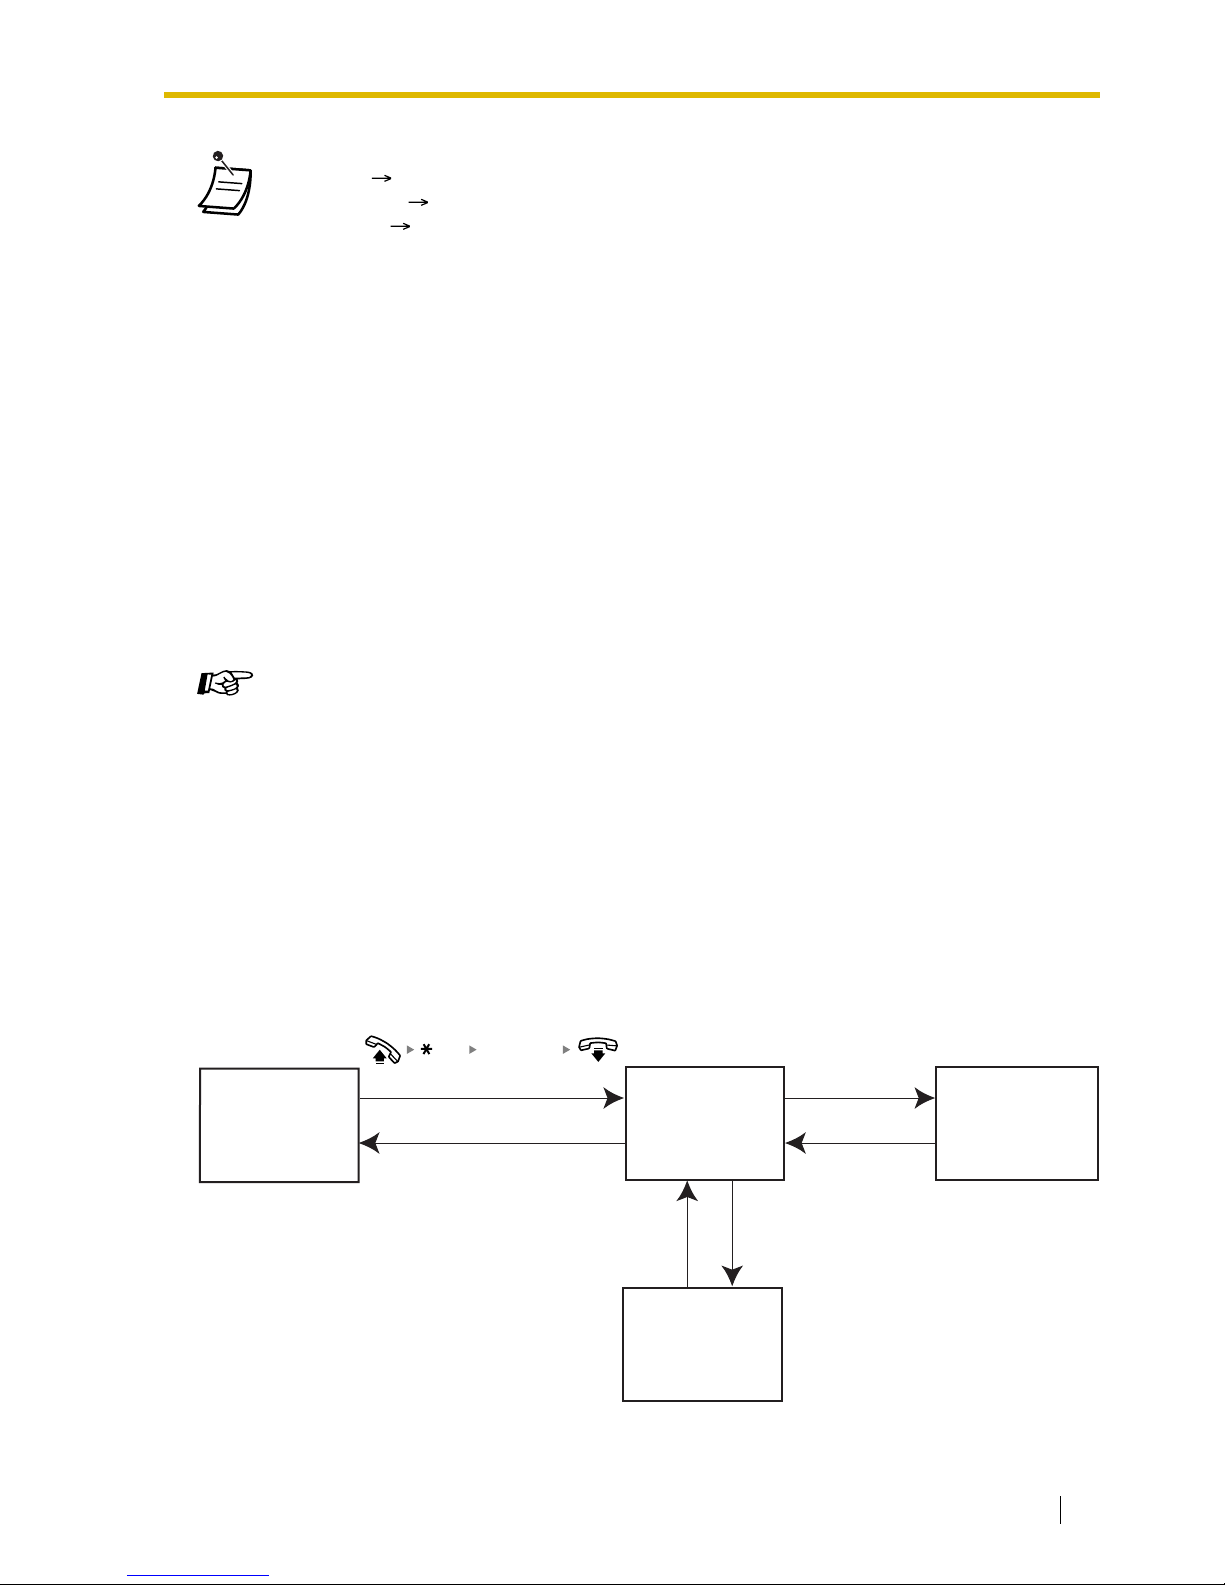
1.8 Call Center
User Manual 87
1.8.2 Incoming Call Distribution Group Monitor
— Monitoring the Status of Waiting Calls
— Monitoring and Changing the Log-in/Log-out Status of Extensions
The extension assigned as a Supervisor extension can monitor and control the status of other
extensions in an incoming call distribution group. It should have a PT with 6-line display. The display
and DSS buttons show as follows:
• * The status will be as follows:
Ready Not Ready
Not Ready Ready
Wrap-up Not Ready
• The Log-in/Log-out of a specified group button light shows the current status as follows:
Off: Log-in mode
Red on: Log-out mode
• The Wrap-up button alternates the setting of Wrap-up mode, Not Ready mode or Ready
mode.
The Wrap-up button light shows the current status as follows:
Off: Ready mode
Red on: Not Ready mode
Flashing red: Wrap-up mode
• In Wrap-up mode/Not Ready mode, your extension does not receive calls through any
group, even if it belongs to multiple groups.
• There may be at least one extension in the incoming call distribution group that is in the
Log-in mode.
• The Supervisor extension can control the Log-in/Log-out status of other extensions.
For more information, refer to "1.8.2 Incoming Call Distribution Group Monitor".
Customizing Your Phone
• 3.1.3 Customizing the Buttons
Create or edit a Log-in/Log-out button, a Log-in/Log-out of a specified group button or
a Wrap-up button.
<Display>
Date/Time &
extension no.
<DSS>
Busy Status Monitor
Initial Display
<Display>
Queuing Monitor
<DSS>
Busy Status Monitor
Monitoring the
Call Status
<Display>
Call Log History
<DSS>
Busy Status Monitor
<Display>
Queuing Monitor
<DSS>
Log-in/Log-out Monitor
Monitoring the Call Status
and Log-in/Log-out Statu
s
"SPRVS"
"EXIT""EXIT"
"LOG""EXIT"
739
ICD Group: Incoming Call Distribution Group
ICD Group
extension
no.
Page 88
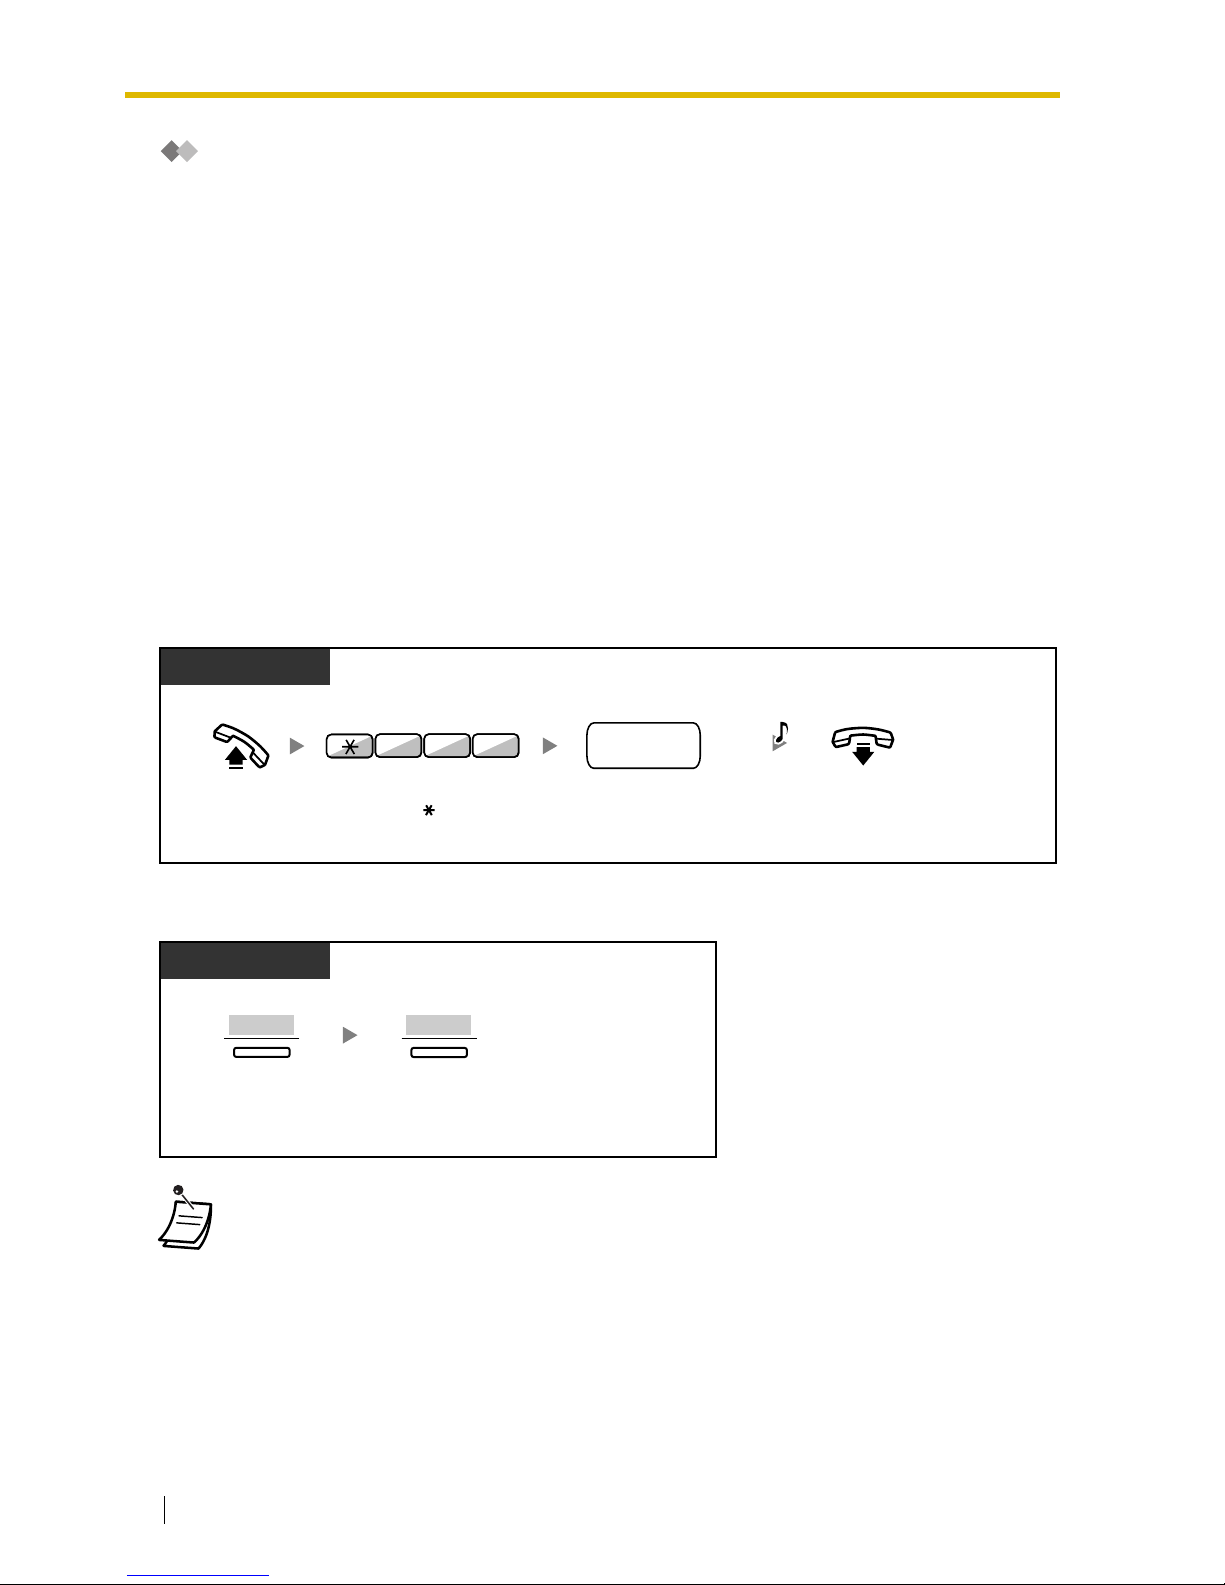
1.8 Call Center
88 User Manual
Monitoring the Status of Waiting Calls
The Supervisor extension can monitor the status of calls waiting to be answered in the queue. If an
incoming call distribution group has an overflowed call, the display shows the status automatically.
The following information is displayed.
<Queuing Monitor>
• The current date/time
• The ICD Group extension number/name
• The number of waiting calls
• The longest waiting time
<Call Log History>
• The date/time when cleared at last time
• The total number of received calls
• The number of overflowed calls
• The number of unanswered calls
• The average waiting time of queuing calls
To monitor
To clear Call Log History
• The accumulated data is cleared.
"****" shows if the number to be displayed exceeds the maximum displayable digits.
On-hook.
Enter
ICD Group
extension number
.
Off-hook.
Display PT
Enter
739
.
3 97
C.Tone
ICD Group
extension no.
ICD Group: Incoming Call Distribution Group
Display PT
Press "
LOG
".
LOG
Press "
CLEAR
".
CLEAR
Page 89
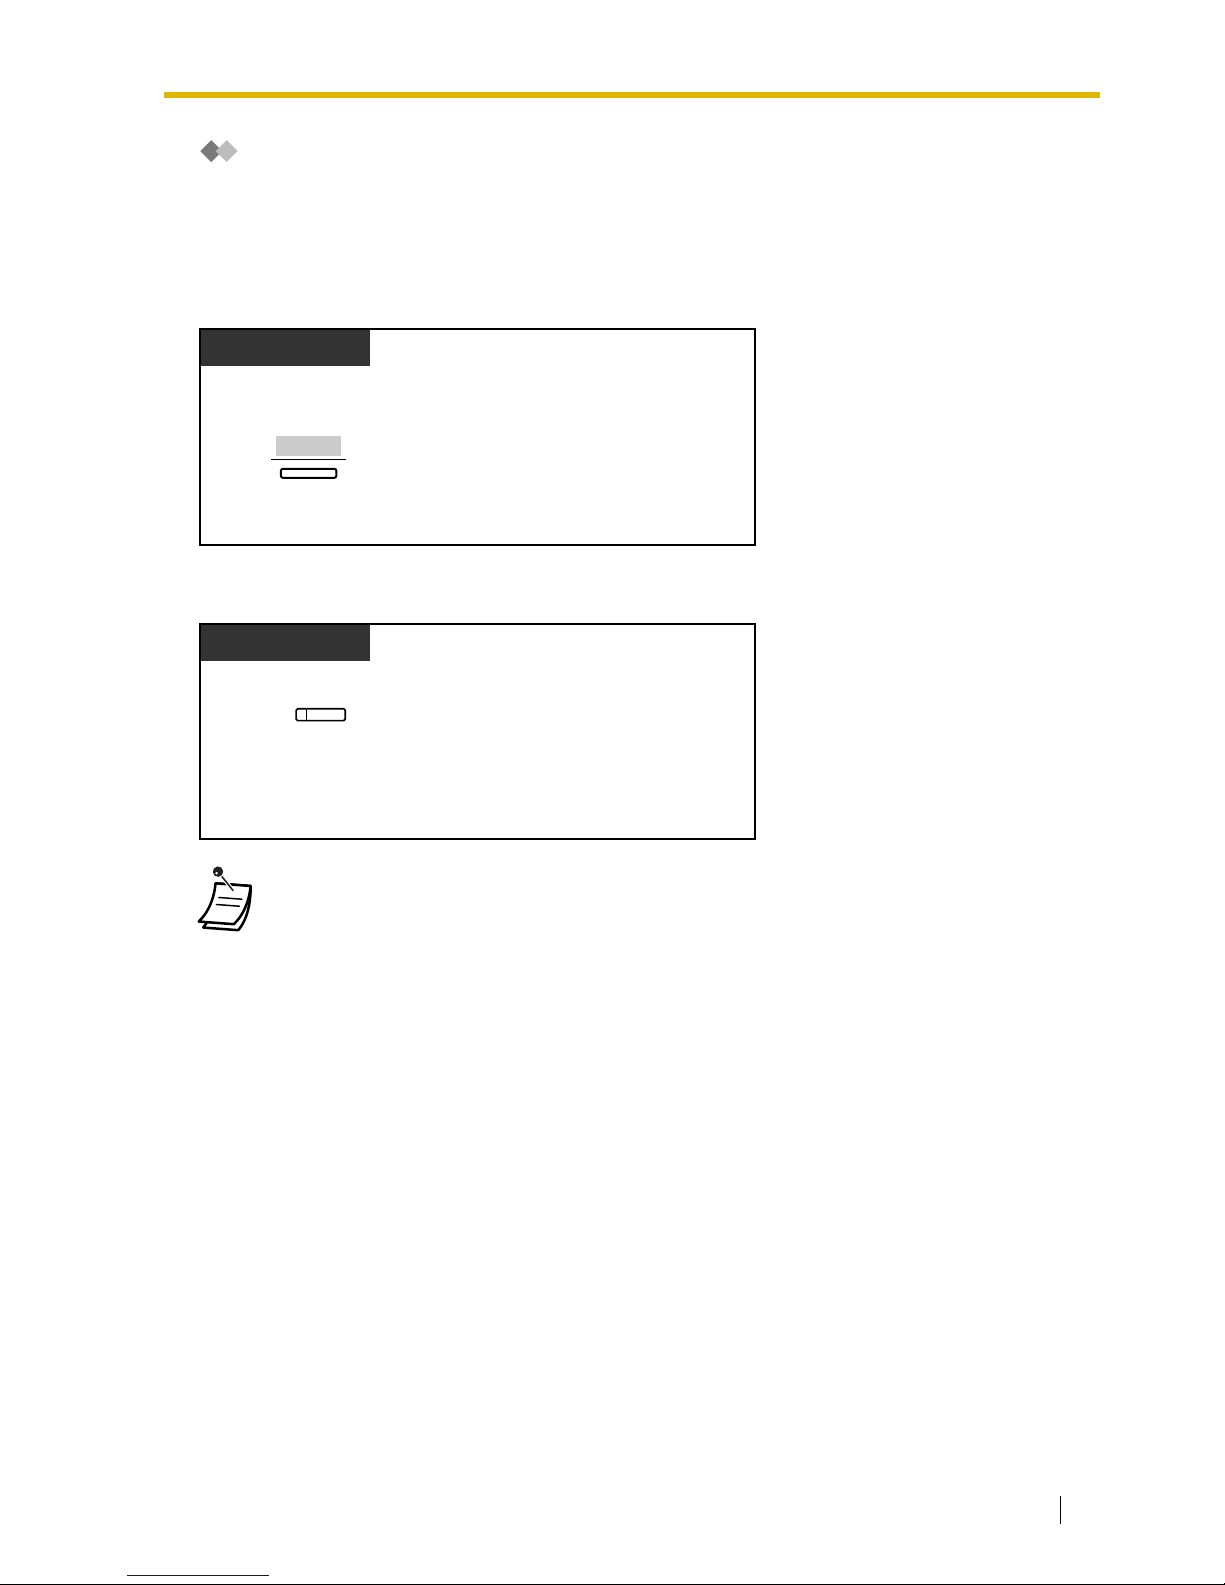
1.8 Call Center
User Manual 89
Monitoring and Changing the Log-in/Log-out Status of
Extensions
The Supervisor extension can monitor the Log-in/Log-out status of the incoming call distribution
group members by the DSS button light. It can also change their Log-in/Log-out status if needed.
To monitor
To change the Log-in /Log-out mode
1.8.3 Manual Queue Redirection
When your incoming call distribution group is busy and other outside calls arrive, the arriving calls are
put in a waiting queue.
Extensions can check the status of the queue with the Hurry-up button light, and forward the longest
waiting call in the queue to a preset destination manually.
This feature is also known as Hurry-up Transfer.
• The DSS button light shows the current status as follows:
Off: The extension is not in the group.
Green on: Log-in (Ready) mode
Flashing green: Log-in (Not Ready) mode
Red on: Log-out mode
Press "SPRVS".
Display PT
SPRVS
After viewing the status of waiting calls
Press desired
DSS
.
Display PT
(DSS)
Page 90

1.8 Call Center
90 User Manual
To forward the waiting call
• The Hurry-up button light shows the current status as follows:
Off: No waiting call.
Red on: Some calls are waiting.
Flashing red: The number of calls exceeds the manual queue redirection level.
Customizing Your Phone
• 3.1.3 Customizing the Buttons
Create or edit a Hurry-up button.
PT/PS
Press red or flashing red
Hurry-up
.
(Hurry-up)
Page 91
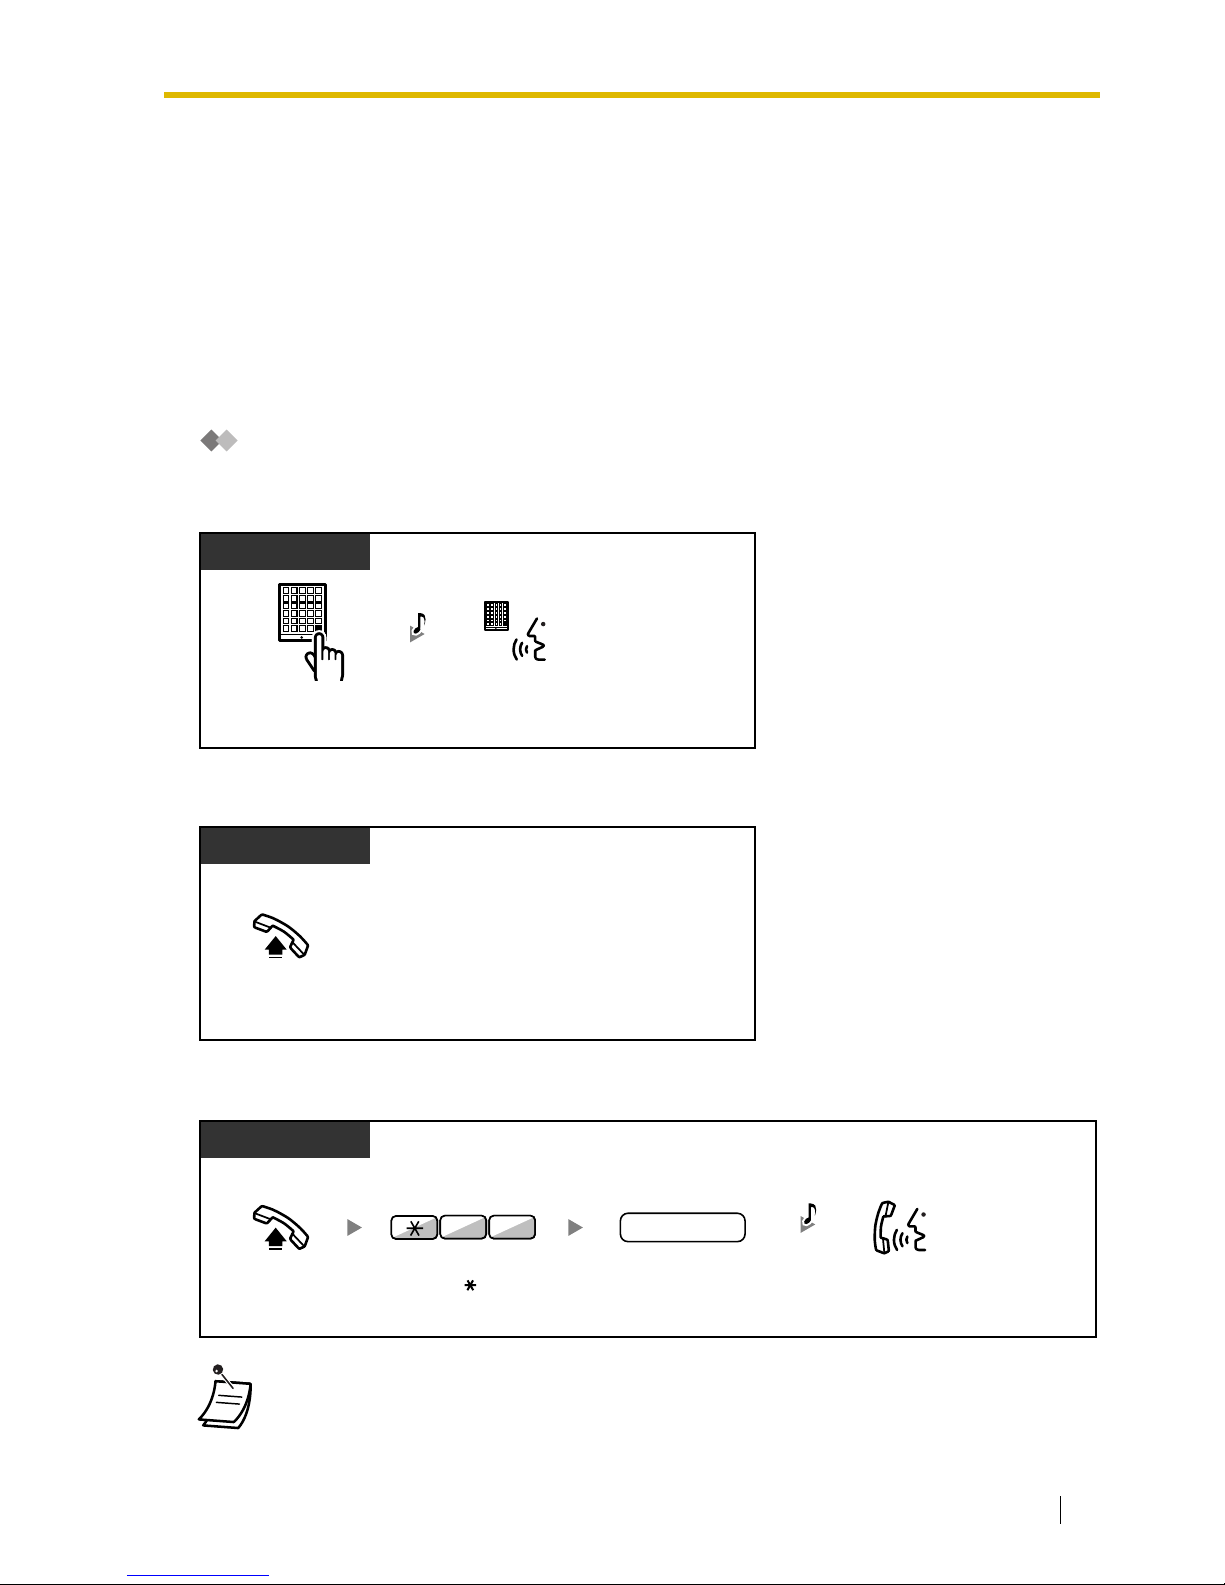
1.9 User-supplied Equipment
User Manual 91
1.9 User-supplied Equipment
1.9.1 Doorphone/Door Opener
You can talk to a person at the door through the doorphone. Preprogrammed extensions or an outside
party can receive the calls from the doorphone. You can open the door.
— Doorphone Call
— Door Open
Doorphone Call
To call from the doorphone
To answer a call from the doorphone
To call the doorphone
• If no one answers a doorphone call within a specified time period, the call is canceled.
Press
doorphone
button.
Doorphone
Talk.
C.Tone
Off-hook.
PT/SLT/PS
Talk.Off-hook.
Enter
doorphone
number
(2 digits).
doorphone no.
PT/SLT/PS
Enter 31.
3 1
C.Tone
Page 92
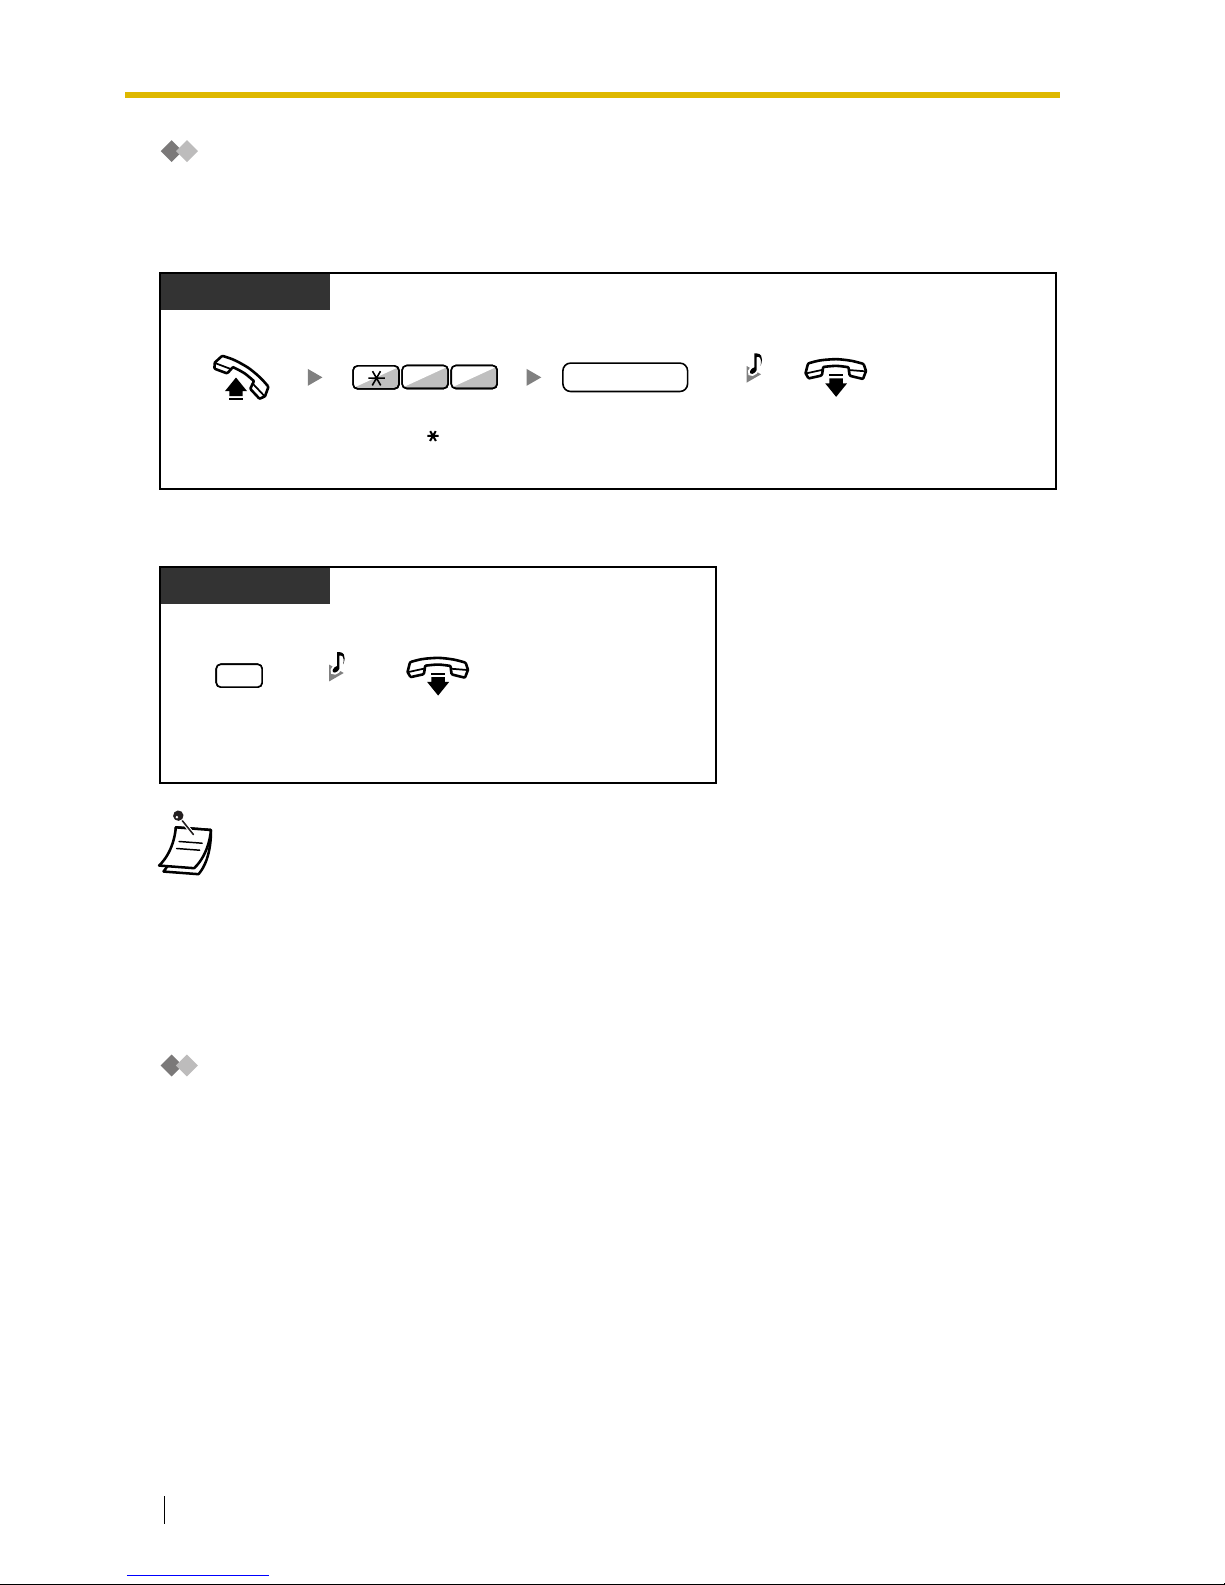
1.9 User-supplied Equipment
92 User Manual
Door Open
Some extensions may be prohibited from using this feature.
From a specified extension
From any extension while talking to the doorphone
1.9.2 Host PBX
— External Feature Access (EFA)
External Feature Access (EFA)
You can access special features (e.g., Call Waiting) offered by a host PBX or telephone company.
This feature is only effective for an outside call.
• The door open will be triggered for a specified time period.
Off-hook. On-hook.
Enter
doorphone
number
(2 digits).
PT/SLT/PS
Enter 55.
5 5
C.Tone
doorphone no.
PT/SLT/PS
On-hook.
Enter
5
.
5
C.Tone
Page 93
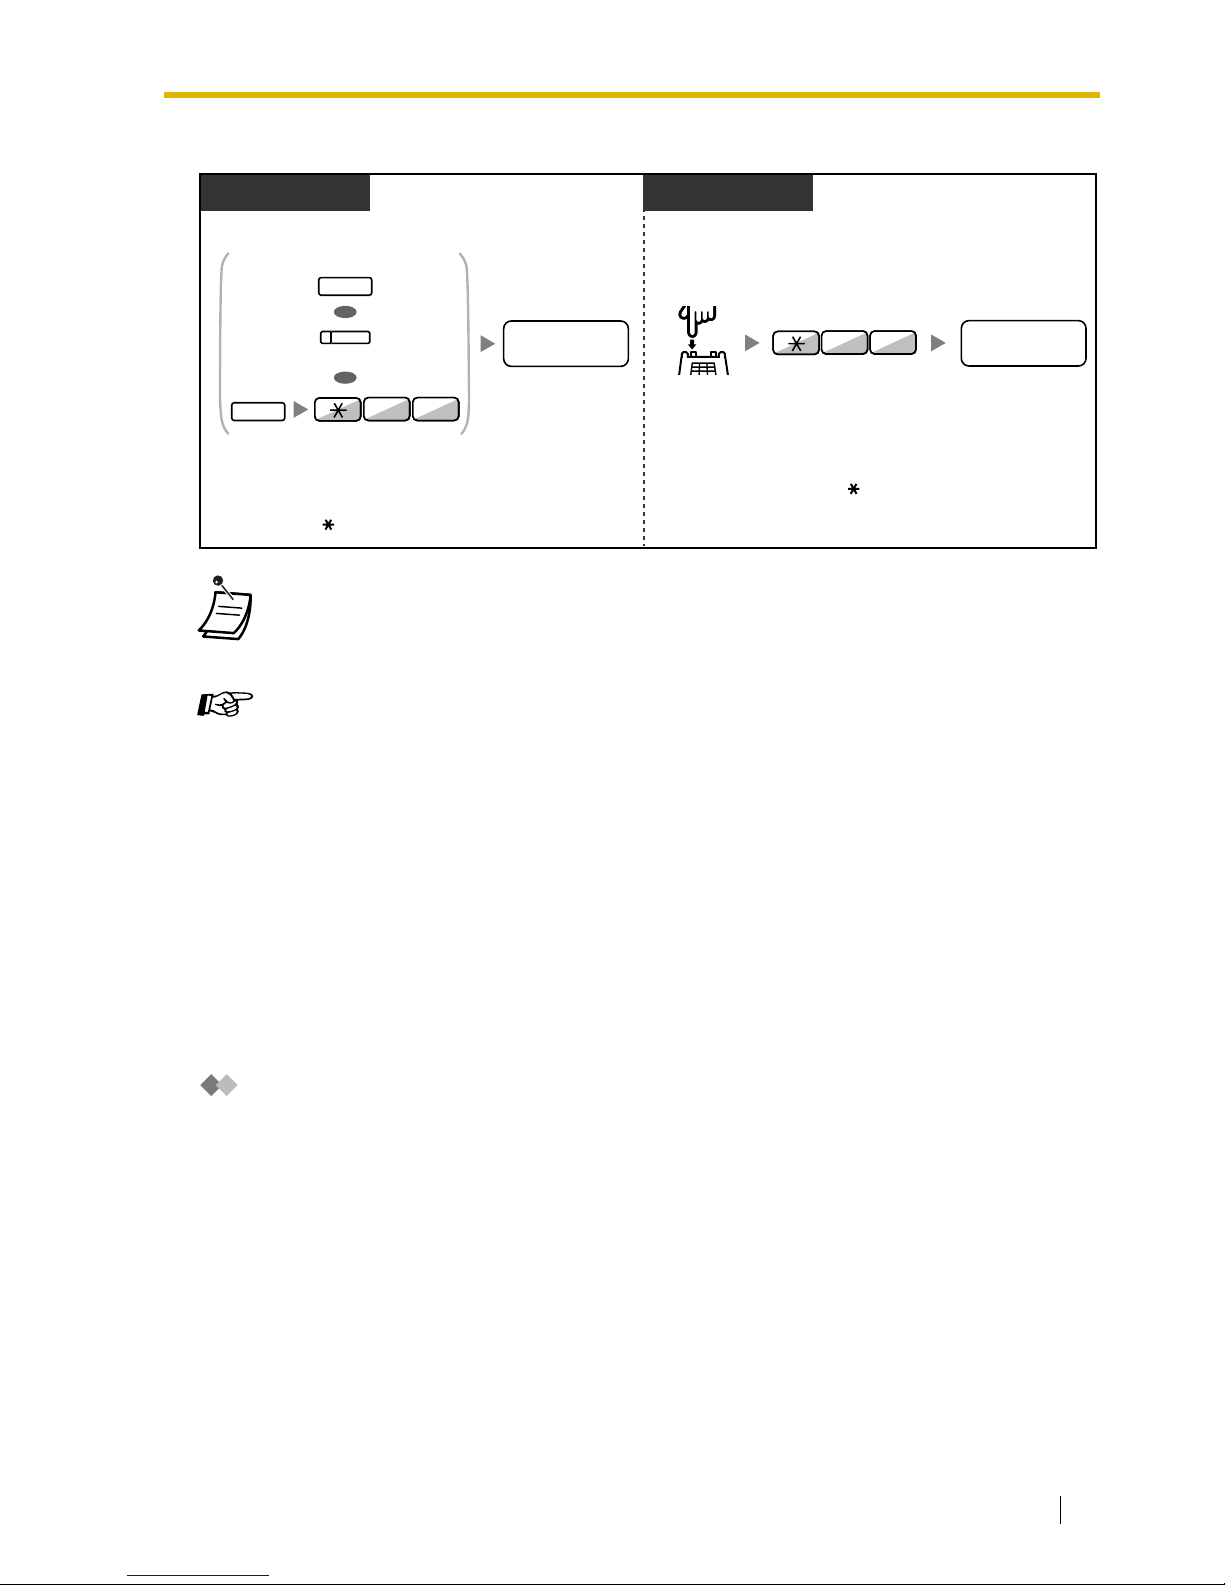
1.9 User-supplied Equipment
User Manual 93
<Example> To hold the current call and then talk to the new party
1.9.3 Voice Processing System
You or an outside party can access the Voice Processing System from a telephone.
— Call Forwarding to Voice Mail (Voice Mail Integration)
If your PBX has a Panasonic Voice Processing System connected (e.g., KX-TVS series) using digital
integration, the following features are also available:
— Live Call Screening (LCS)
— Two -way Re co rd
Call Forwarding to Voice Mail (Voice Mail Integration)
— To forward your calls to your mailbox
— To transfer a call to a mailbox
— To listen to messages
If you cannot answer calls, you can forward them to your mailbox. You can select the type of incoming
calls (Intercom Calls/Outside Calls/Both Calls). If your telephone has a Message button, the Message
light turns on and lets you know you have messages. Even if a Message button is not provided, you
will hear an indication tone* when going off-hook.
You can also transfer received outside calls to a mailbox so that calling parties can leave messages.
If you create a Voice Mail Transfer button on your phone, the transfer is done without knowing the
mailbox number (Voice Mail Transfer).
The duration for recording depends on the voice processing system.
• In this case, FLASH/RECALL button on a proprietary telephone is in the External Feature
Access (EFA) mode.
• Regarding the service code, consult your dealer.
Customizing Your Phone
• 3.1.3 Customizing the Buttons
Create or edit an External Feature Access (EFA) button.
PT/PS SLT
Enter
desired
service code
.
desired service
code
Enter
desired
service code
.
Press
Recall/
hookswitch
.
Press
FLASH/RECALL
or
EFA
.
Or press
TRANSFER
and
then enter
60
.
While hearing a tone While hearing a tone
Enter 60.
OR
OR
(EFA)
FLASH/
RECALL
6 0
TRANSFER
desired service
code
6 0
Page 94
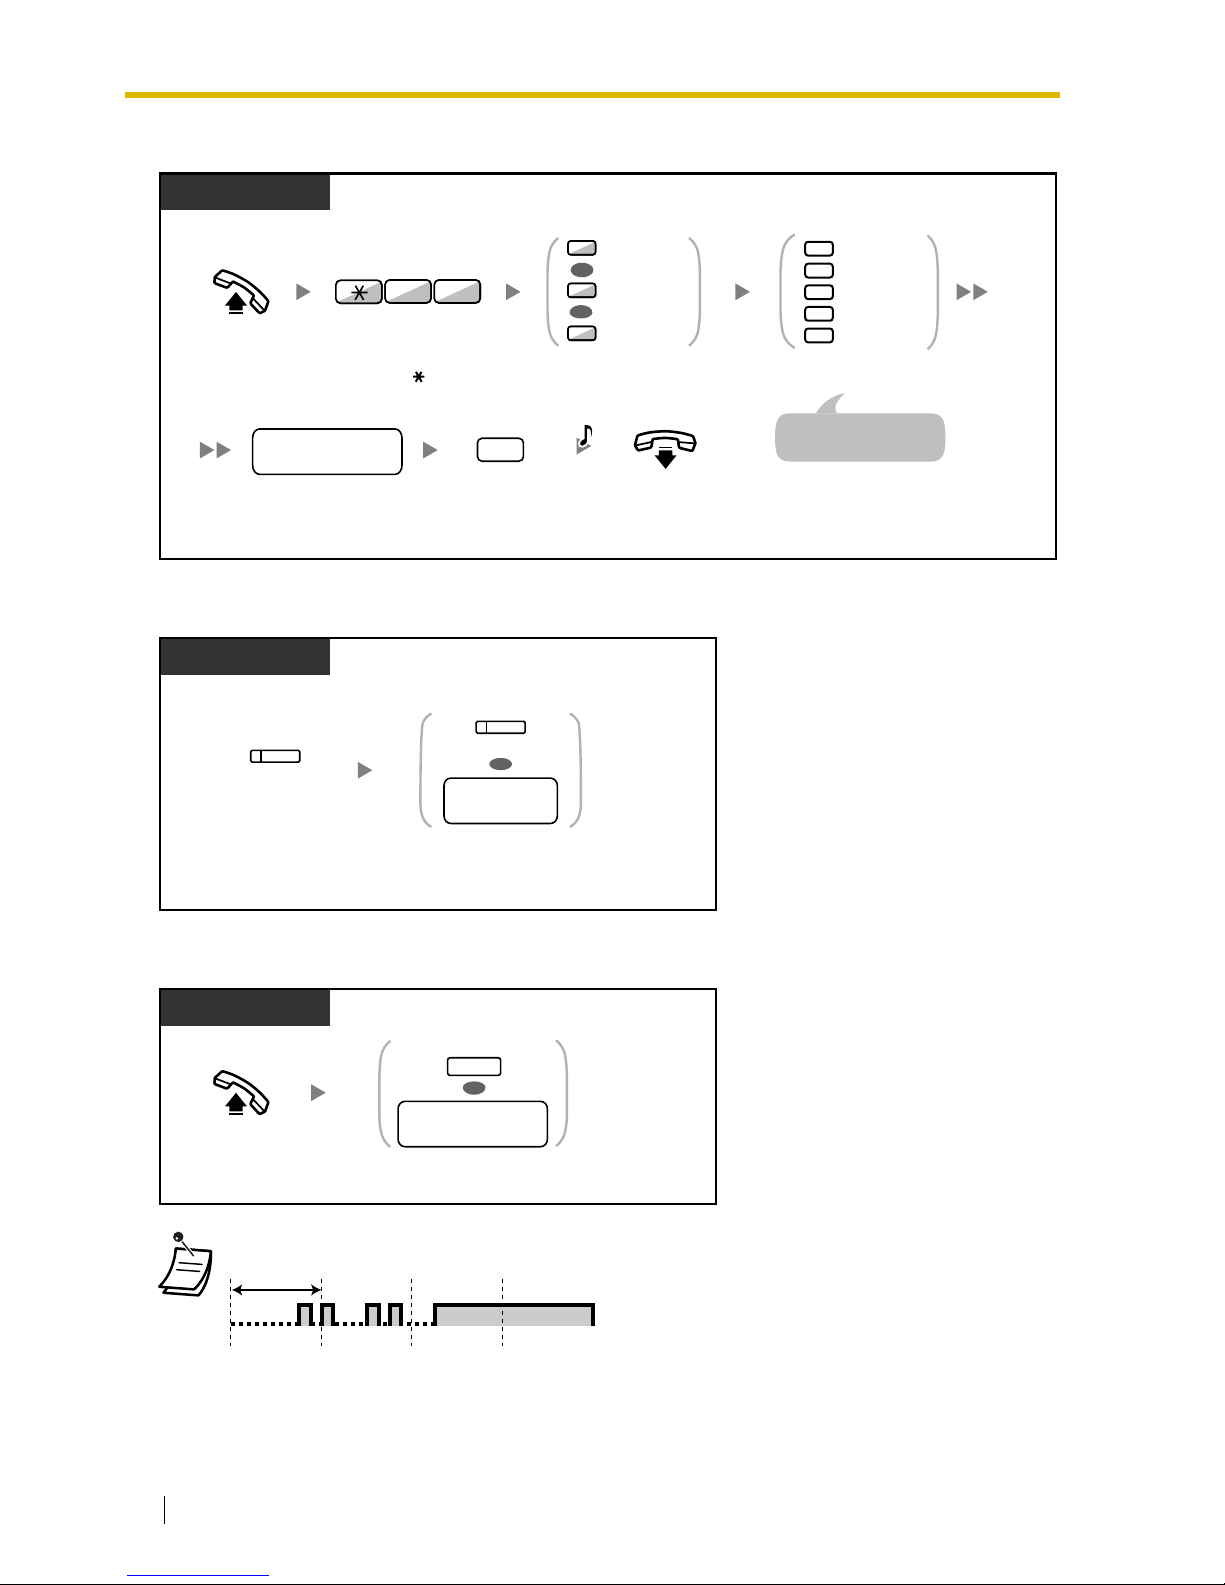
1.9 User-supplied Equipment
94 User Manual
To forward your calls to your mailbox
To transfer a call to a mailbox
To listen to messages
*Indication tone after off-hook
• You can access a voice mail with one-touch.
PT/SLT/PS
voice mail floating
extension no.
On-hook.
Enter
voice mail floating
extension number
.
Enter
required number
.
2
0
3
4
5
Cancel
All Calls
Busy
No Answer
Busy/No Answer
Off-hook.
Enter
71
. Enter 0 to 2 as you desire.
1
2
0
Both Calls
Intercom Calls
Outside Calls
OR
OR
17
C.Tone
Enter #.
#
For "Cancel",
go on-hook directly.
Press
DSS
or enter
desired
extension number
.
Press
Voice Mail
Transfer
.
PT/PS
(Voice Mail
Transfer)
During a conversation
OR
(DSS)
desired
extension no.
Press
MESSAGE
or enter
voice
mail floating extension number
.
Off-hook.
PT/SLT/PS
OR
voice mail floating
extension no.
MESSAGE
1 s
Page 95
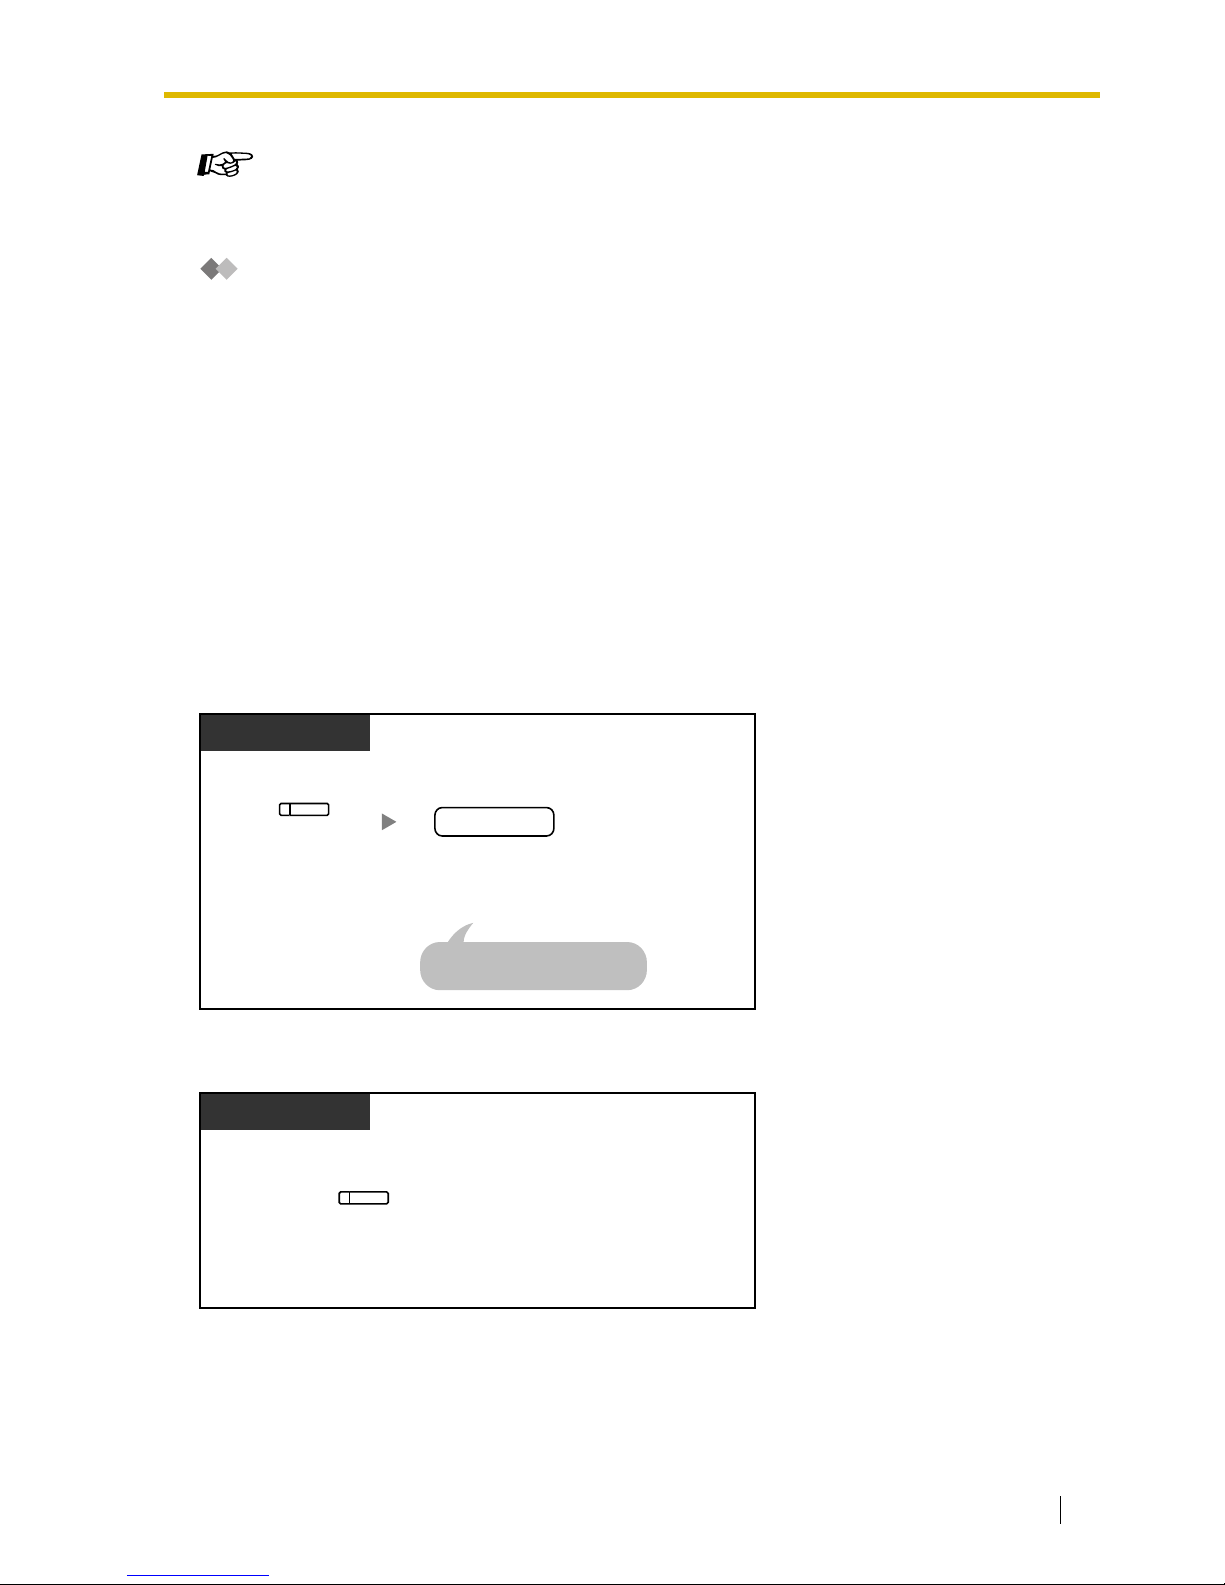
1.9 User-supplied Equipment
User Manual 95
Live Call Screening (LCS)
While a caller is leaving a message in your mailbox, you can monitor the call without answering. If you
so desire, you can answer the call while monitoring. There are two methods available (Default:
Hands-free mode).
Hands-free mode:
You can monitor the message automatically, live through the telephone speaker.
Private mode:
You will hear an alarm tone while the caller is leaving a message.
Before operating
• Create a Live Call Screening (LCS) button (Personal Programming).
• Select the mode, either Hands-free or Private (Personal Programming).
• Set the extension PIN (Personal Identification Number).
• Set the Live Call Screening feature.
To set Live Call Screening
To cancel Live Call Screening
Customizing Your Phone
• 3.1.3 Customizing the Buttons
Create or edit a Voice Mail Transfer button or a Message button.
Press Live Call
Screening.
Enter extension PIN
(max. 10 digits).
extension PIN
PT/PS
(Live Call
Screening)
This is required only when
an extension PIN is stored.
PIN: Personal Identification Number
Press red
Live Call Screening
.
PT/PS
(Live Call
Screening)
Page 96
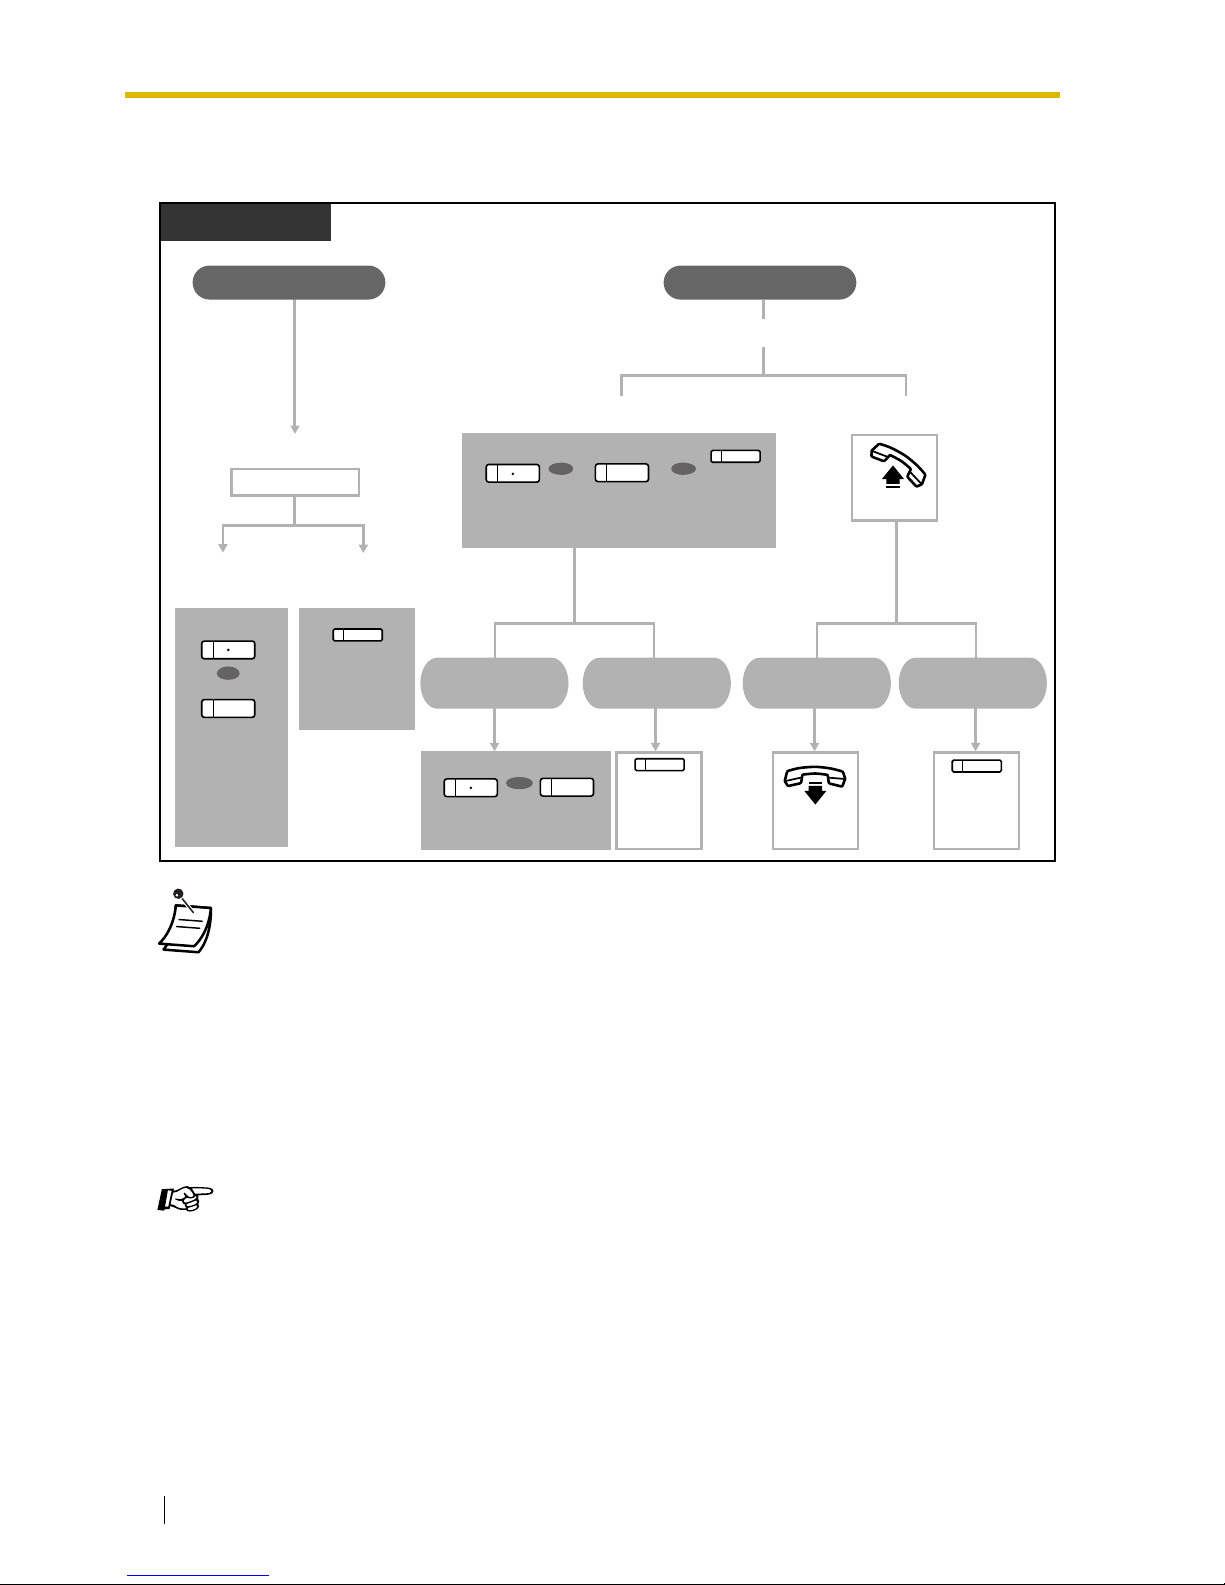
1.9 User-supplied Equipment
96 User Manual
Operation Flowchart
The operations in the shaded areas can be done hands-free.
• The Live Call Screening (LCS) button light shows the feature status as follows:
Off: LCS is off.
Flashing green rapidly: Alerting in the Private mode.
Flashing green slowly: Monitoring.
Red on: LCS is on.
• The manager extension can clear an extension PIN.
• This feature is available for a single line telephone if it is connected to a proprietary
telephone in parallel. (Private mode only)
To answer the call while monitoring, press Recall/hookswitch.
• Only the handset monitoring in the Private mode is available for PS users.
Customizing Your Phone
• 3.1.2 Settings on the Programming Mode—Live Call Screening Mode Set
Select the mode, either monitoring the message through the speaker automatically or
receiving, while the caller leaves a message.
• 3.1.3 Customizing the Buttons
Create or edit a Live Call Screening (LCS) button.
Hands-free Mode Private Mode
Stop
monitoring
Answering
the call
Stop
monitoring
Answering
the call
Monitoring
Monitoring (Hands-free) Monitoring (Handset)
No operation
Stop
monitoring
Answering
On-hook.
(Live Call
Screening)
(Alarm Tone)
Press
SP-PHONE
or
MONITOR
.
OR
Press
Live Call
Screening
.
MONITOR
MONITOR
SP-PHONE
(Live Call
Screening)
Press
Live Call
Screening
.
OR OR
Press
Live Call
Screening
.
Press
SP-PHONE, MONITOR
or
Live Call
Screening
.
PT/PS
(Live Call
Screening)
(Live Call
Screening)
OR
Press
SP-PHONE
or
MONITOR
.
Off-hook.
MONITOR
SP-PHONE
SP-PHONE
Page 97
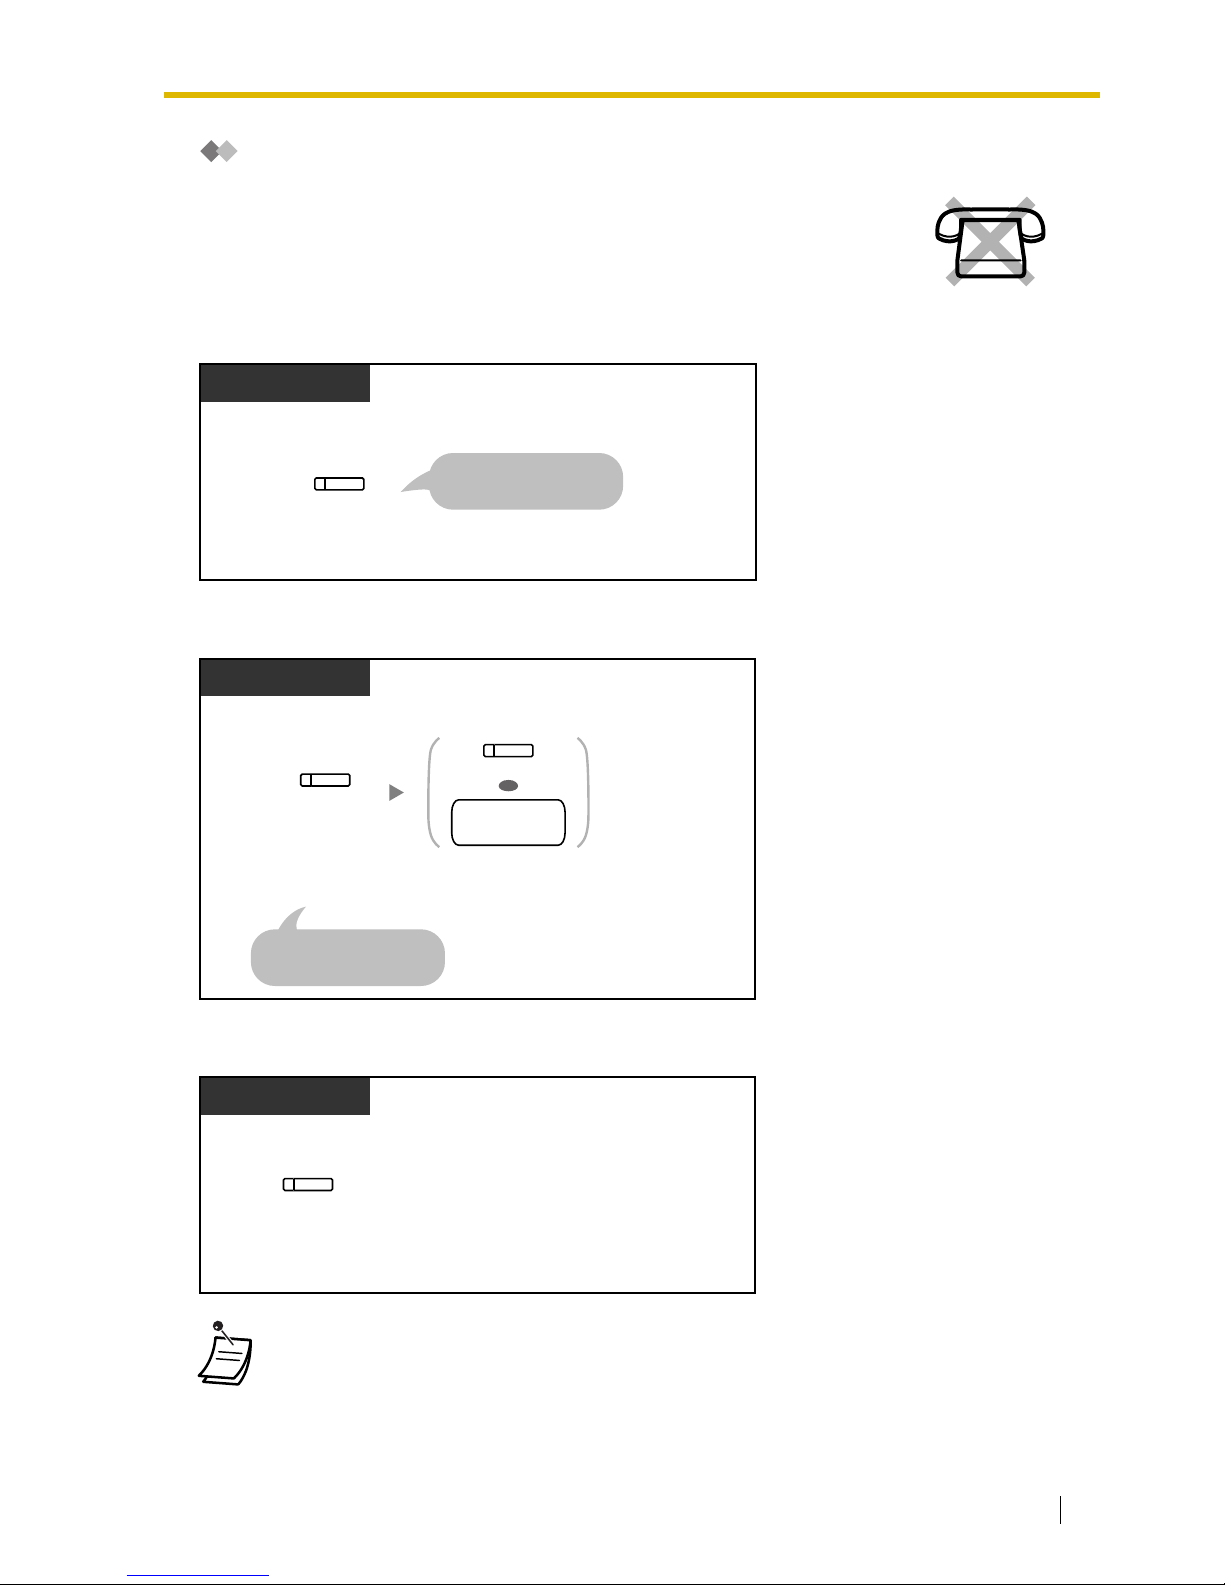
1.9 User-supplied Equipment
User Manual 97
Two-way Record
To record into your mailbox
To record into another mailbox (Two-way Transfer)
To record into another mailbox with one-touch (One-touch Two-way Transfer)
You can record a conversation into a mailbox while talking on the phone.
You can select the mailbox each time you record a conversation.
• The Two-way Record button light, Two-way Transfer button light or One-touch Two-way
Transfer button light shows the current status as follows:
Off: Not recording.
On: Recording the conversation.
Press
Two-way Record
.
During a conversation
To stop recording,
press this button again.
PT/PS
(Two-way
Record)
Press
Two-way
Transfer
.
During a conversation
Press
DSS
or enter
another extension
number
.
To stop recording,
press this button again.
PT/PS
(Two-way
Transfer)
OR
(DSS)
another
extension no.
Press
One-touch
Two-way Transfer
.
During a conversation
PT/PS
(One-touch
Two-way
Transfer)
Page 98

1.9 User-supplied Equipment
98 User Manual
• Note:
Many states have imposed regulations on the manner in which 2-way telephone
conversations may be recorded, so you should inform the other party that the conversation
is being recorded.
Consult your local telephone company for further information.
Customizing Your Phone
• 3.1.3 Customizing the Buttons
Create or edit a Two-way Record button, a Two-way Transfer button and a One-touch
Two-way Transfer button.
Page 99
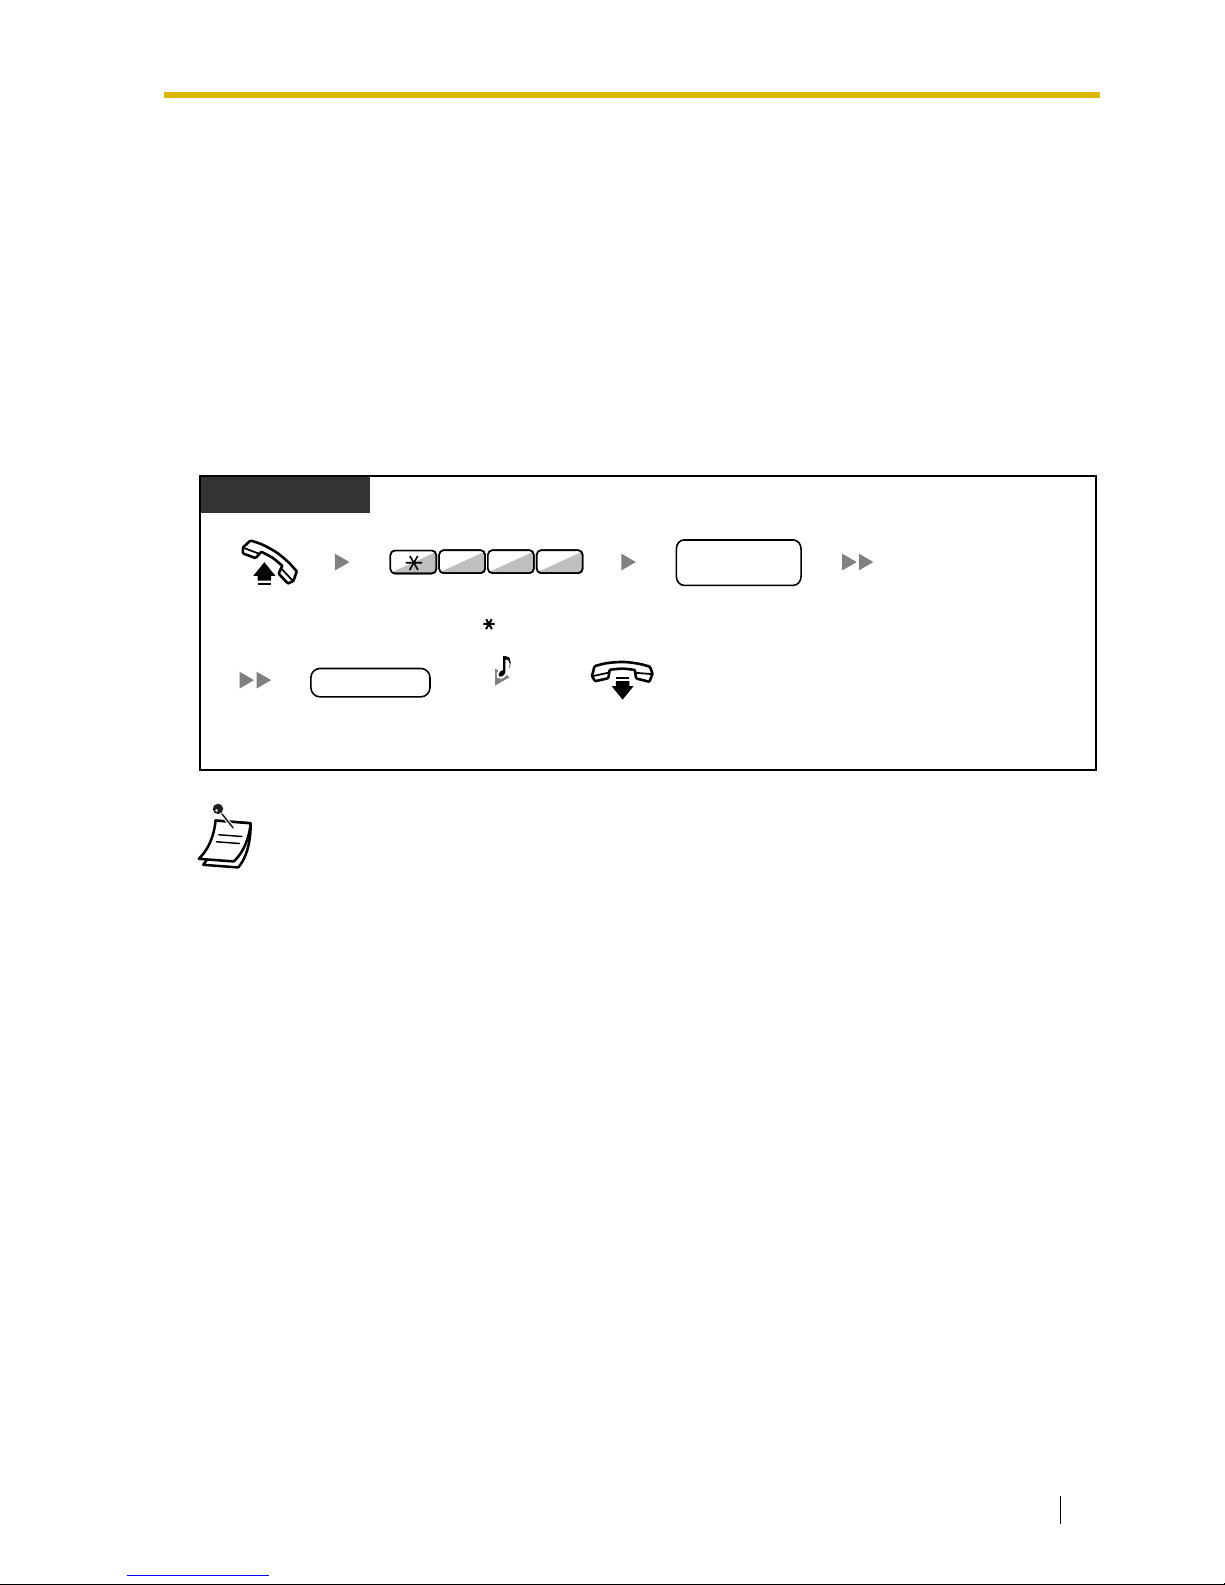
1.10 Walking Extension
User Manual 99
1.10 Walking Extension
1.10.1 Walking Extension
You can use the same functions assigned on your previous extension even if you move to another
extension in the office.
You can retain your settings such as extension number or One-touch Dialing memory etc. on the new
extension.
This feature is also known as Walking Station.
To set
• Your previous extension will get the old settings of your new extension.
• This feature is available for movement between SLT and SLT, PT and PT or SLT and PT.
• For more information, refer to "3.1.1 Personal Programming".
Off-hook.
Enter
727
.
PT/SLT
your previous
extension no.
On-hook.
Enter
your previous
extension number.
extension PIN
Enter
extension PIN
(max. 10 digits).
2 77
D.Tone
PIN: Personal Identification Number
Page 100
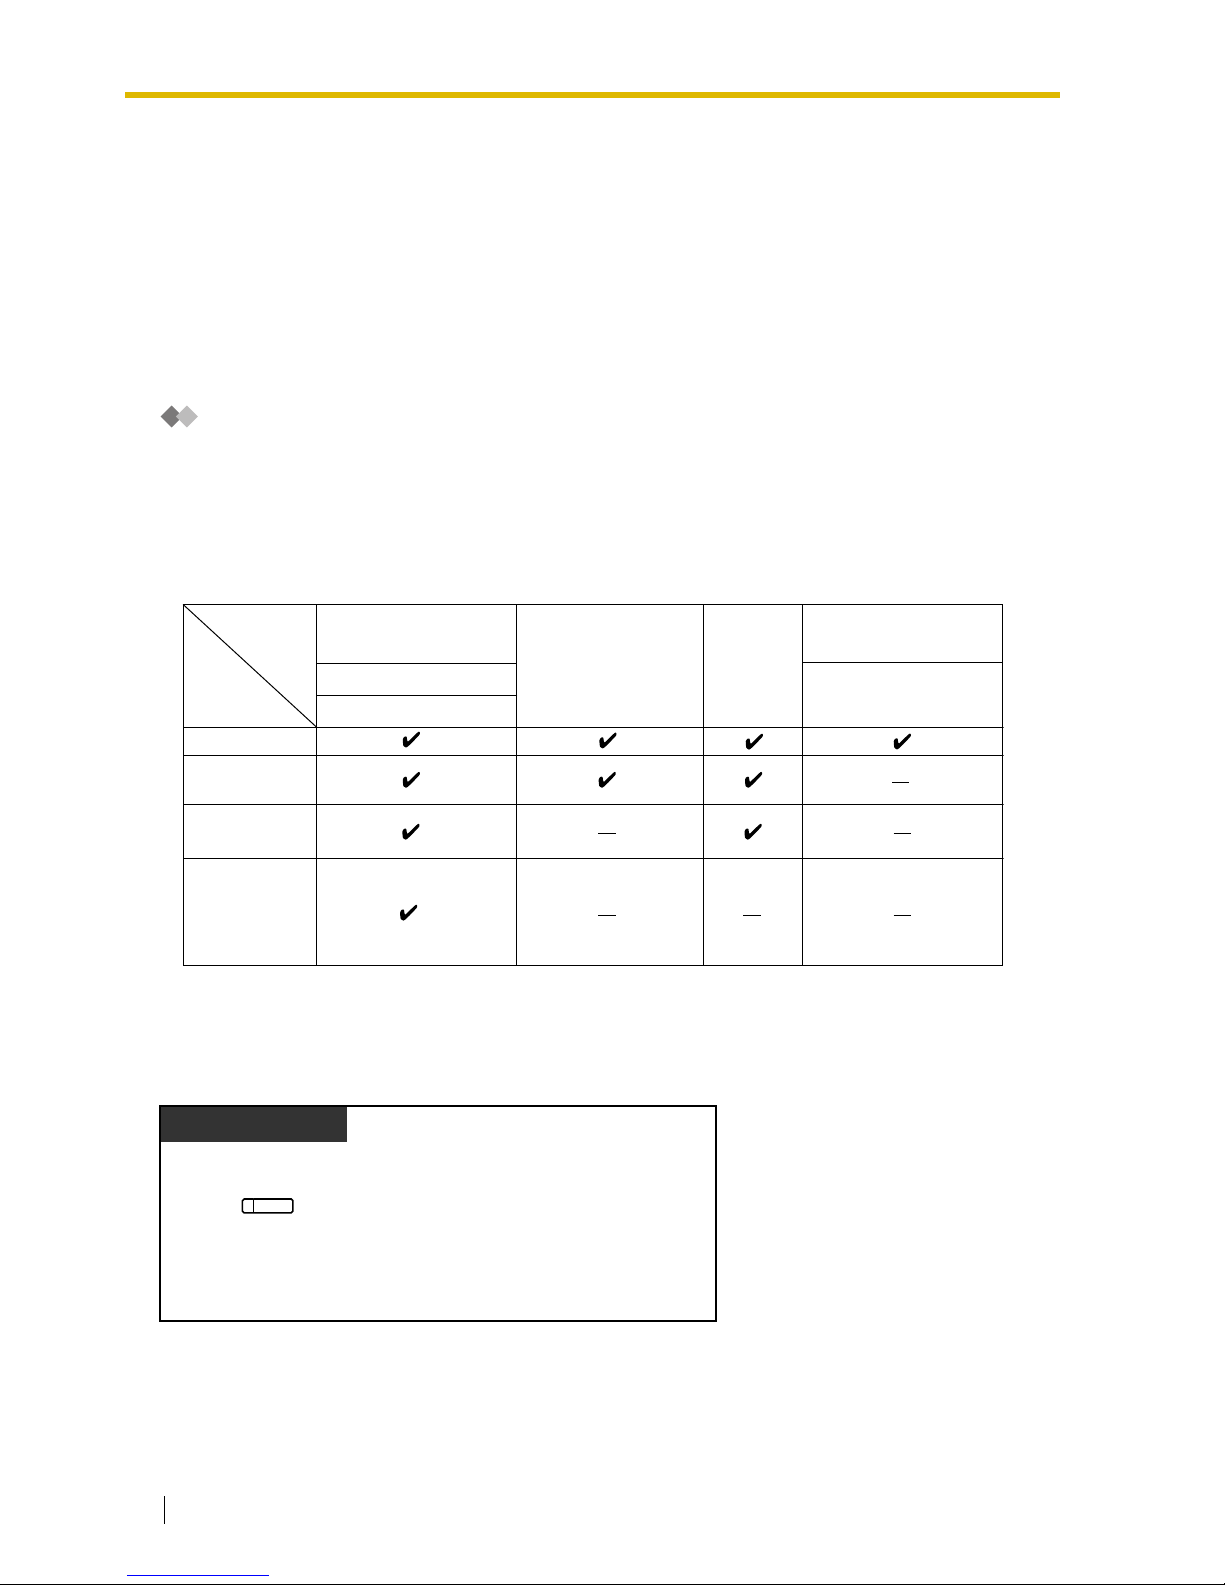
1.11 Display Proprietary Telephone
100 User Manual
1.11 Display Proprietary Telephone
1.11.1 Call Log
This is available for the display proprietary telephone and the portable station.
— Incoming Call Log
— Outgoing Call Log
Incoming Call Log
When you receive an outside call, the caller’s information is recorded automatically in the incoming
call log. A preprogrammed number of calls can be logged per extension.
When the call log is full and other call arrives, the oldest call is deleted.
You can modify the logged telephone number.
When the Call Log button light turns on, there is a call which you did not answer.
The following information is logged.
To confirm the log information with the Call Log button
*: If the caller’s name is not logged, the caller’s phone number is displayed.
If the caller’s name is logged, the caller’s phone number is not displayed.
KX-T7636/KX-T7633/
KX-T7630
Telephone
Caller's Name
Information
Caller's Phone
Number
Date/Time call
received
Answered or
Not Answered
Confirmed or
Not Confirmed
KX-TD7690/KX-TD7680
6-line display PT
3-line display PT
except KX-T7735/
KX-T7633/KX-T7630
KX-T7735
1-line or 2-line
display PT
Wireless phone
(KX-T7885/KX-TD7895)
*
Press
Call Log
until
desired party
appears.
Display PT
(Call Log)
While on-hook
 Loading...