

Page 1
User
TeleData, Inc.
Manual
Business Telephone & Data Solutions
TeleData, Inc.
1402 W. Wilden
Goshen, IN 46528
www.teledata-inc.com
Panasonic
TVA/TDA
Voicemail & System
Phone: 574-533-0699
Fax: 574-533-7588
Email: [email protected]
Page 2

Section 1
Using Your Voice Processing System
(VPS)
Page 3

SSeeccttiioonn 11 -- UUssiinngg YYoouurr VVooiiccee PPrroocceessssiinngg SSyysstteemm
Section 1 – Using Your Voice Processing System (VPS)
The following subjects are covered in this section:
Abbreviations / Symbols .................................................................................................................... 2
Definitions ........................................................................................................................................ 2
First Time Set-Up .............................................................................................................................. 2
Manual Log-In................................................................................................................................... 2
Recording Menus............................................................................................................................... 2
Voice Mail Changes............................................................................................................................ 3
Changing or Deleting Your Personal Greeting Messages ................................................................... 3
Changing Your VM Password .......................................................................................................... 3
Change or Delete Your Subscriber Name ......................................................................................... 4
Message Playback and Related Features ............................................................................................. 4
Playing Messages........................................................................................................................... 4
Message Playback Features Table ................................................................................................... 5
Replying to Messages..................................................................................................................... 6
Calling Back the Message Sender................................................................................................. 6
Leaving a Message for the Sender ............................................................................................... 6
Transferring Messages ................................................................................................................... 7
Specifying the Recipients by Number ........................................................................................... 7
Specifying the Recipients by Name (Dialing by Name)................................................................... 7
Remote Access to Voice Mail........................................................................................................... 8
Remote Automatic Log-In ........................................................................................................... 8
Remote Manual Log-In................................................................................................................ 8
- 1 -
Page 4

SSeeccttiioonn 11 -- UUssiinngg YYoouurr VVooiiccee PPrroocceessssiinngg SSyysstteemm
Abbreviations / Symbols
Following are a list of abbreviations and symbols
used in this instruction manual and their
definitions:
EXT Extension
PBX Telephone System
VPS Voice Processing System
VM Voice Mail
[CO] Outside Line
[#] Pound key on telephone dial pad
[*] Star Key on telephone dial pad
[2] Number Key on telephone dial pad
¿ Arrow Up
À Arrow Down
Definitions
Off-Hook – Lift hand set from cradle
On-Hook – Put hand set on cradle
Subscriber – Names/Users in the voice processing
system
Manual Log-In
1. Go Off-Hook
2. Enter the EXT number of the VPS
165 or ________ ________ _______
3. Enter [#] [6] [*] [9] [9] [8]
4. Enter password _____________________
followed by [#]
Recording Menus
1. Log In
2. Enter [5] to record messages
3. Enter [3] for customer service menus
4. Enter the customer service menu number
________ Day ______ Night
5. Enter [1] to change the message
6. Enter [1] to record message
7. Listen to prompts and record greeting
8. Press [1] to end recording
9. Press [2] to accept changes
Notes:
________________________________________
First Time Set-Up
Dial Voice Mail extension number and follow
tutorial prompts to the end of complete tutorial.
________________________________________
________________________________________
________________________________________
________________________________________
________________________________________
________________________________________
________________________________________
________________________________________
________________________________________
________________________________________
- 2 -
Page 5

Voice Mail Changes
Changing or Deleting Your Personal
Greeting Messages
After callers reach your mailbox, they will hear
your personal greeting message. You can record
several kinds of Personal Greetings; the
appropriate greeting will be played for callers. If
you delete or do not record a greeting message,
a prerecorded greeting message will be used.
No Answer Greeting: Heard by callers when
you do not answer their calls. A common example
might be, “This is [name]. I am unable to take
your call right now …”
Busy Signal Greeting: Heard by callers when
you are on another call. A common example
might be, “This is [name]. I am on another call
right now …”
After Hours Greeting: Message heard by
callers when the VPS is in night mode. A common
example might be, “This is [name]. I have gone
home for the day …”
1. Log into your mailbox.
2. Enter [3] [1].
3. Select the desired greeting.
[1] No Answer Greeting.
[2] Busy Signal Greeting.
[3] After Hours Greeting.
4. Follow the prompts as necessary
[1] to change the greeting.
[3] to delete the selected greeting.
• The greeting will be deleted; go
On-Hook to finish.
5. Record your greeting message after the
tone.
• We recommend stating your name in
your greeting messages so that callers
will know they have reached the
correct mailbox.
• The maximum length of each message
is 1 minute by default.
6. Enter [1] to end recording.
7. Follow the prompts as necessary or go to
Step 8.
SSeeccttiioonn 11 -- UUssiinngg YYoouurr VVooiiccee PPrroocceessssiinngg SSyysstteemm
Enter [1] to review.
Enter [3] to rerecord the greeting
message.
Enter [4] to add to the greeting message
you just recorded.
Enter [*] to delete the greeting message
and exit.
8. Enter [2] to accept.
9. Record or delete other greeting messages
as necessary by following the prompts.
10. Go On-Hook.
Note:
• A Temporary Personal Greeting is played
instead of all your other greetings until it is
deleted. Each time you log in to your mailbox,
the VPS will ask you if you want to turn off
(delete) your Temporary Personal Greeting.
• Make sure you go On-Hook only after you
have accepted your new greeting in step 8. If
you go On-Hook without accepting your new
greeting, it will not be saved.
Changing Your VM Password
You can password protect your mailbox to
prevent unauthorized access to your voicemail. If
your mailbox has a password, you must enter it
using the dial keys [0-9] whenever you log in to
your mailbox. Your password can contain up to
16 digits. You can change your password at any
time. When choosing a password, avoid using
obvious number combinations. If you forget your
password, have your System Administrator or
System Manager clear or reset your password.
You may then set a new one.
1. Log in to your mailbox
2. Enter [3] [2] [1]
3. Enter the desired password, then press
[#].
• It is necessary to set a password
equal to or longer than the specified
number of digits by default. For more
information, consult your System
Administrator
4. Enter [2] to accept.
5. Go On-Hook.
- 3 -
Page 6

Change or Delete Your Subscriber
Name
You can record your name in the VPS. The VPS
can then announce your name for callers to let
them know that they have reached the correct
mailbox. If a caller does not know your mailbox
number, the caller can try to reach you by
entering the first few letters of your last name if
the Dialing by Name feature is available. After
entering the first few letters of your name, the
VPS will announce the names of VPS subscribers
whose names share those same letters, and the
caller can select your name.
1. Log in to your mailbox.
2. Enter [3] [3] [1] to change name,
continue to Step 4.
3. Enter [3] [3] [3] to delete name, then go
On-Hook to finish.
4. Enter [1] to end recording.
5. Enter [2] to accept.
6. Go On-Hook.
SSeeccttiioonn 11 -- UUssiinngg YYoouurr VVooiiccee PPrroocceessssiinngg SSyysstteemm
1. Log in to your mailbox.
2. Enter [1]
3. Follow the prompts as necessary
[1] to play new messages
[2] to play old messages
[3] to play deleted messages
4. Listen to the message.
Pressing the [ * ] key during message
playback will return you to the previous
menu. You can then select another
message type to listen to.
Note:
Additional features are available during and/or
after message playback. Refer to the table and
press the appropriate dialing key. Note that
certain features are not available depending on
the message type (new, old, and deleted).
Message Playback and Related
Features
Playing Messages
Callers and other subscribers can leave messages
for you, and you can play them back later after
you have logged in to your mailbox.
Messages in your mailbox are divided into 3
types:
New Messages: Messages in your mailbox
which you have not played back yet.
Old Messages: Messages in your mailbox which
you have played back but have not yet deleted.
Deleted Messages: Messages in your mailbox
which you have deleted. You can “recover” your
deleted messages, after which they will be
treated as old messages. If you do not recover
deleted messages, they will be permanently
deleted at the end of the next day.
When playing back a message, the VPS can also
announce the message’s “envelope” which is the
date and time of the message, and the message
sender’s information.
- 4 -
Page 7

SSeeccttiioonn 11 -- UUssiinngg YYoouurr VVooiiccee PPrroocceessssiinngg SSyysstteemm
Message Playback Features Table
Message Type Key Feature
New Old Deleted
1
1 1
1 2
2
2 3 **
2 4
2 5
2 6
3
(+ 1 )**
3
4
5 *
6 *
7
8
9 *
9 0 *
*These keys also function when using VM Menu.
** These keys only available when the appropriate COS settings are assigned to your mailbox. For more information, consult your
System Administrator.
Note:
• VPS programming determines if the message envelope is played before each message, after each message, or only when you press
[2] [3]. For more information, consult your System Administrator.
• The VPS will automatically delete both new and old messages after a specified number of days have passed. Your System
Administrator controls how many days messages are retained. Each time you play a new or old message, the message retention
counter resets.
• When messages are deleted, they will be retained until the end of the next day.
• A Bookmark allows you to set a point in a message that you can jump to quickly during playback. You can set only one Bookmark in
each message. If you set a second Bookmark in the same message, the previous one is deleted.
• During playback, you can adjust playback volume and speed by pressing [8] [9] respectively. Press the desired key repeatedly to
adjust the volume and speed as necessary. If volume or speed are at the highest setting, pressing the dialing key will select the
lowest setting.
Repeat the message √ √ √
Replay the previous message √ √ √
Play the next message
Pause / restart message playback
(during playback only)
Play the message envelope
Set Bookmark (during playback only)
[2] to restart message playback.
Start playback at the Bookmark
Save this message as new
- After saving the message, the next
message will be played soon.
Delete this message
- If the confirmation message is played,
press [1] to delete the message
Recover this message
Reply to this message
Rewind (during playback only)
Fast-forward, skip envelope
(during playback only
Transfer this message
Adjust playback volume
(during playback only)
Adjust playback speed
(during playback only)
Play back at normal speed
(during playback only)
√ √ √
√ √ √
√ √ √
√ √ --
√ √ --
√ -- --
√ √ --
-- -- √
√ √ --
√ √ √
√ √ √
√ √ --
√ √ √
√ √ √
√ √ √
- 5 -
Page 8

SSeeccttiioonn 11 -- UUssiinngg YYoouurr VVooiiccee PPrroocceessssiinngg SSyysstteemm
Replying to Messages
You can reply to messages left in your mailbox by
either calling back the caller or by leaving a
message in the caller’s mailbox.
Calling back is possible when the person who left
you the message is another subscriber. Calling
back outside callers is possible if their Caller ID
information is received by the PBX and VPS.
However, this feature is not available with certain
PBX models and may be disabled by the System
Administrator for your mailbox.
Replying by leaving a message in the caller’s
mailbox is possible only if the caller is another
subscriber. When replying by leaving a message
in the caller’s mailbox, you can set any of the
following:
Urgent Status: The message will be heard
before other messages by the recipient.
Private Status: The recipient will not be able to
forward the message, ensuring privacy.
Auto Receipt: You will receive notification
(receipt message) once the recipient has played
back the message.
Reply: You can send your reply immediately or
set a message delivery time. However, please
know that you cannot reply to receipt messages.
Calling Back the Message Sender
1. Play back the desired message.
• Only new and old messages can be
replied to. To reply to a deleted
message, recover the message first.
2. [4] during or after message playback.
3. [1] to call the sender.
Calling back outside callers (using Caller ID
Callback) is only available with some PBX models.
For more information, consult your System
Administrator.
Leaving a Message for the Sender
1. Play back the desired message.
2. [4] during or after message playback.
3. [2] to begin recording.
4. Speak after the tone.
You can pause and resume recording by
pressing [2]. If you pause for more than
20 seconds, recording will stop
automatically.
5. [1] to end recording.
6. [2] to accept.
7. [1] [1] to set the delivery time of the
message.
[1] [2] to send the message immediately,
then go to Step 12
[2] to accept, then go to step 15.
8. Enter the desired delivery time, then [#]
9. [1] for AM
[2] for PM
This option may not be available if the
VPS is set for 24-hour time.
10. Enter the day of the month for delivery,
then [#].
11. [2] to accept.
12. [1] to make the message urgent.
[2] to continue.
13. [1] to make the message private.
[2] to continue.
14. [1] to request a receipt.
[2] to continue.
15. Go On-Hook
Note:
• Auto Receipt is not enabled by default.
For more information, consult your system
Administrator.
• New urgent messages are played before
any other messages. However, old urgent
messages are treated like regular
messages: messages are played starting
with the oldest.
- 6 -
Page 9

SSeeccttiioonn 11 -- UUssiinngg YYoouurr VVooiiccee PPrroocceessssiinngg SSyysstteemm
Transferring Messages
You can transfer (forward) messages in your
mailbox to other subscribers. However, please
note that you cannot transfer receipt messages,
or messages that were specified by the sender as
“private”.
When transferring a message, you can:
a. Specify the recipient by entering another
subscriber’s mailbox number.
b. Specify several recipients by entering a
Personal Group Distribution List number
or a Mailbox Group number.
c. Record your own comments and send
them along with the transferred message.
Specifying the Recipients by Number
1. Play back the desired message.
2. [7] during or after message playback.
3. Enter one of the following:
A mailbox number.
A Personal Group Distribution List
number, then [#].
A Mailbox Group number if available.
4. [2] to accept.
5. [1] to transfer the message without
recording your comments, then go to Step
8.
[2] to record your comments.
6. Record your comments after the tone.
7. [1] to end recording.
8. [2] to accept.
9. Go On-Hook.
Specifying the Recipients by Name
(Dialing by Name)
1. Play back the desired message.
2. [7] during or after message playback.
3. [#] [1]
4. Using the dialing keys, enter the first 3 or
4 letters of the desired recipient’s name.
5. [1] to select the announced name
[2] to hear the next name.
[3] to repeat the current name.
6. Enter one of the following:
[1] to transfer the message without
recording your comments, then go to Step
10.
[2] to record your comments.
7. Record your comments after the tone.
8. [1] to end recording.
9. [2] to accept.
10. Go On-Hook.
- 7 -
Page 10

Section – Using Your Voice Processing System
Remote Access to Voice Mail
You can call the VPS while outside and log in to
your mailbox in order to listen to your messages.
There are 2 ways to log in to your mailbox
remotely:
Automatic Log-in:
When logging in to your mailbox remotely from a
preprogrammed outside telephone number
(assigned as a Caller ID number), you do not
need to enter any special commands or your
mailbox number. The VPS can recognize the
telephone number you are calling from and
determine your are the caller. This feature is not
available with some PBX models and may be
disabled by the System Administrator for your
mailbox.
Manual Log-in:
You need to enter the Voice Mail Service
Command followed by [*] and your mailbox
number. Manual Log-in is necessary when
logging in to your mailbox when Automatic Log-in
is not available, when your mailbox is not
programmed for Automatic Log in, or when you
are calling from a telephone number not
programmed for Automatic Log-in.
Remote Manual Log-In
1. Call the VPS from an outside telephone
using the number provided by your
System Administrator.
Remote Number ____________________
2. [#] [6]
3. [*] Mailbox number
4. [Password] [#]
5. [1] to play back new messages.
6. Follow the prompts or select one of the
following as necessary:
7. [#] [8] to call an extension.
8. [#] [8] [0] to call the operator
9. [#] [9] when finished
10. Go On-Hook.
Remote Automatic Log-in
1. Call the VPS from the preprogrammed
outside telephone number (assigned as a
Caller ID number) using the telephone
number you should dial in order to access
the VPS remotely.
Remote Number ___________________
2. [Password] [#]
3. [1] to play back messages.
4. Follow the prompts or select one of the
following:
5. [#] [8] to call an extension
6. [#] [8] [0] to call the operator
7. [#] [9] when finished.
8. Go On-Hook.
- 8 -
Page 11

Section 2
Using Your Telephone System
(PBX)
Page 12

SSeeccttiioonn 22 -- UUssiinngg YYoouurr TTeelleepphhoonnee SSyysstteemm
Section 2 – Using Your Telephone system (PBX)
The following subjects are covered in this section:
During a Conversation..................................................................................................1.4
Call Transfer........................................................................................................ 1.4.1
Call Hold .............................................................................................................1.4.2
Call Park
Call Splitting........................................................................................................ 1.4.3
Call Waiting.........................................................................................................1.4.4
Multiple Party Conversation.................................................................................. 1.4.5
Unattended Conference
Leaving Three-Party Conference
Privacy Release
Mute................................................................................................................... 1.4.6
Off-Hook Monitor................................................................................................. 1.4.7
Absence Settings.......................................................................................................... 1.5
Call Forwarding ................................................................................................... 1.5.1
Absent Message .................................................................................................. 1.5.2
Extension Lock .................................................................................................... 1.5.3
Personal Programming .................................................................................................3.1
Extension PIN...................................................................................................... 3.1.1
Settings on the Programming Mode ...................................................................... 3.1.2
Clearing Features
Customizing the Buttons ...................................................................................... 3.1.3
Personal Phone Settings
Page 13
1.4 During a Conversation
1.4 During a Conversation
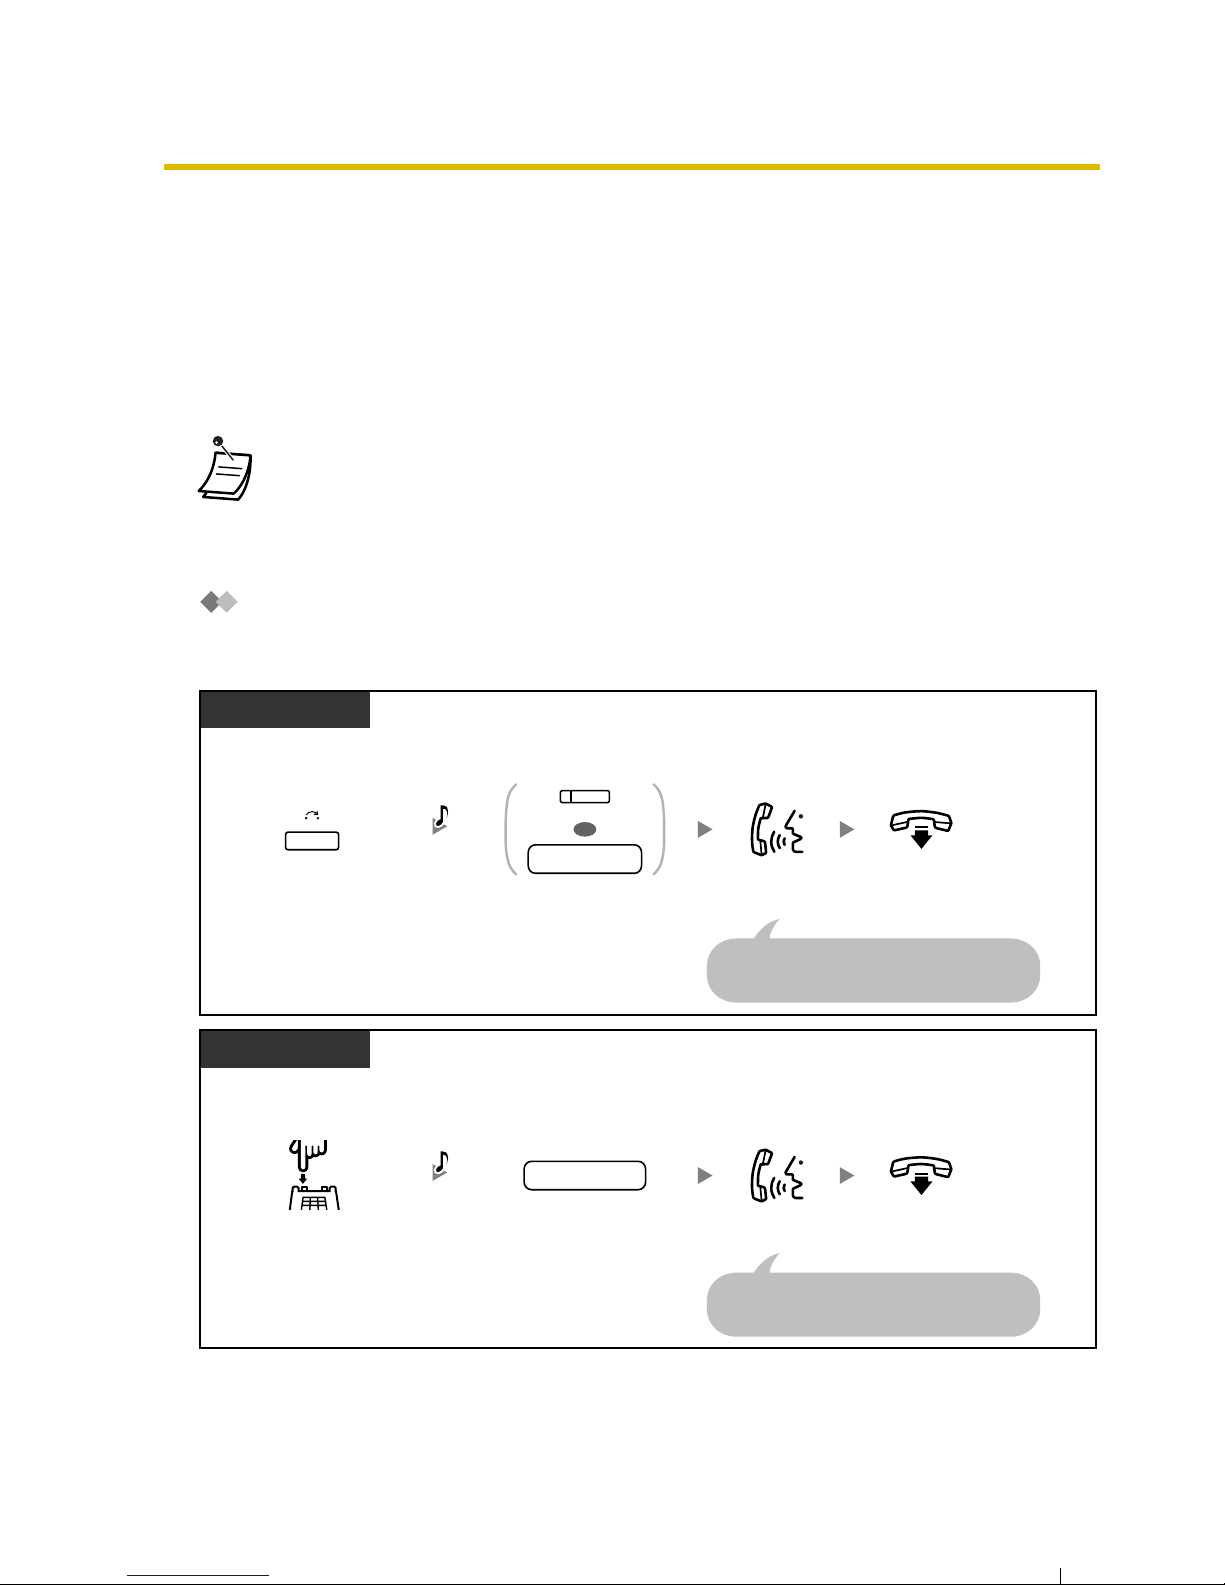
1.4.1 Call Transfer
— Transferring to an Extension on the PBX
— Transferring to an Outside Party Using the PBX Service
Transferring to an Extension on the PBX
To transfer
• You can transfer a held call without talking by going on-hook.
If a call is not retrieved within a specified time, you will hear an alarm as a reminder. And,
if an outside call is not answered within a specified time, it is automatically disconnected.
•
If you hear an alarm tone,
the destination extension did not answer the call. Answer the
call.
Press
DSS
or dial
extension number
.
On-hook.
Talk.
During a conversation
You do not have to inform the destination
extension about where the call has been
transferred from. This can be disregarded.
PT/PS
Press
TRANSFER
.
extension no.
OR
(DSS)
TRANSFER
C.Tone
Dial
extension
number
.
On-hook.
Talk.
During a conversation
You do not have to inform the destination
extension about where the call has been
transferred from. This can be disregarded.
SLT
Press
Recall/
hookswitch
.
extension no.
C.Tone
Page 14
1.4 During a Conversation
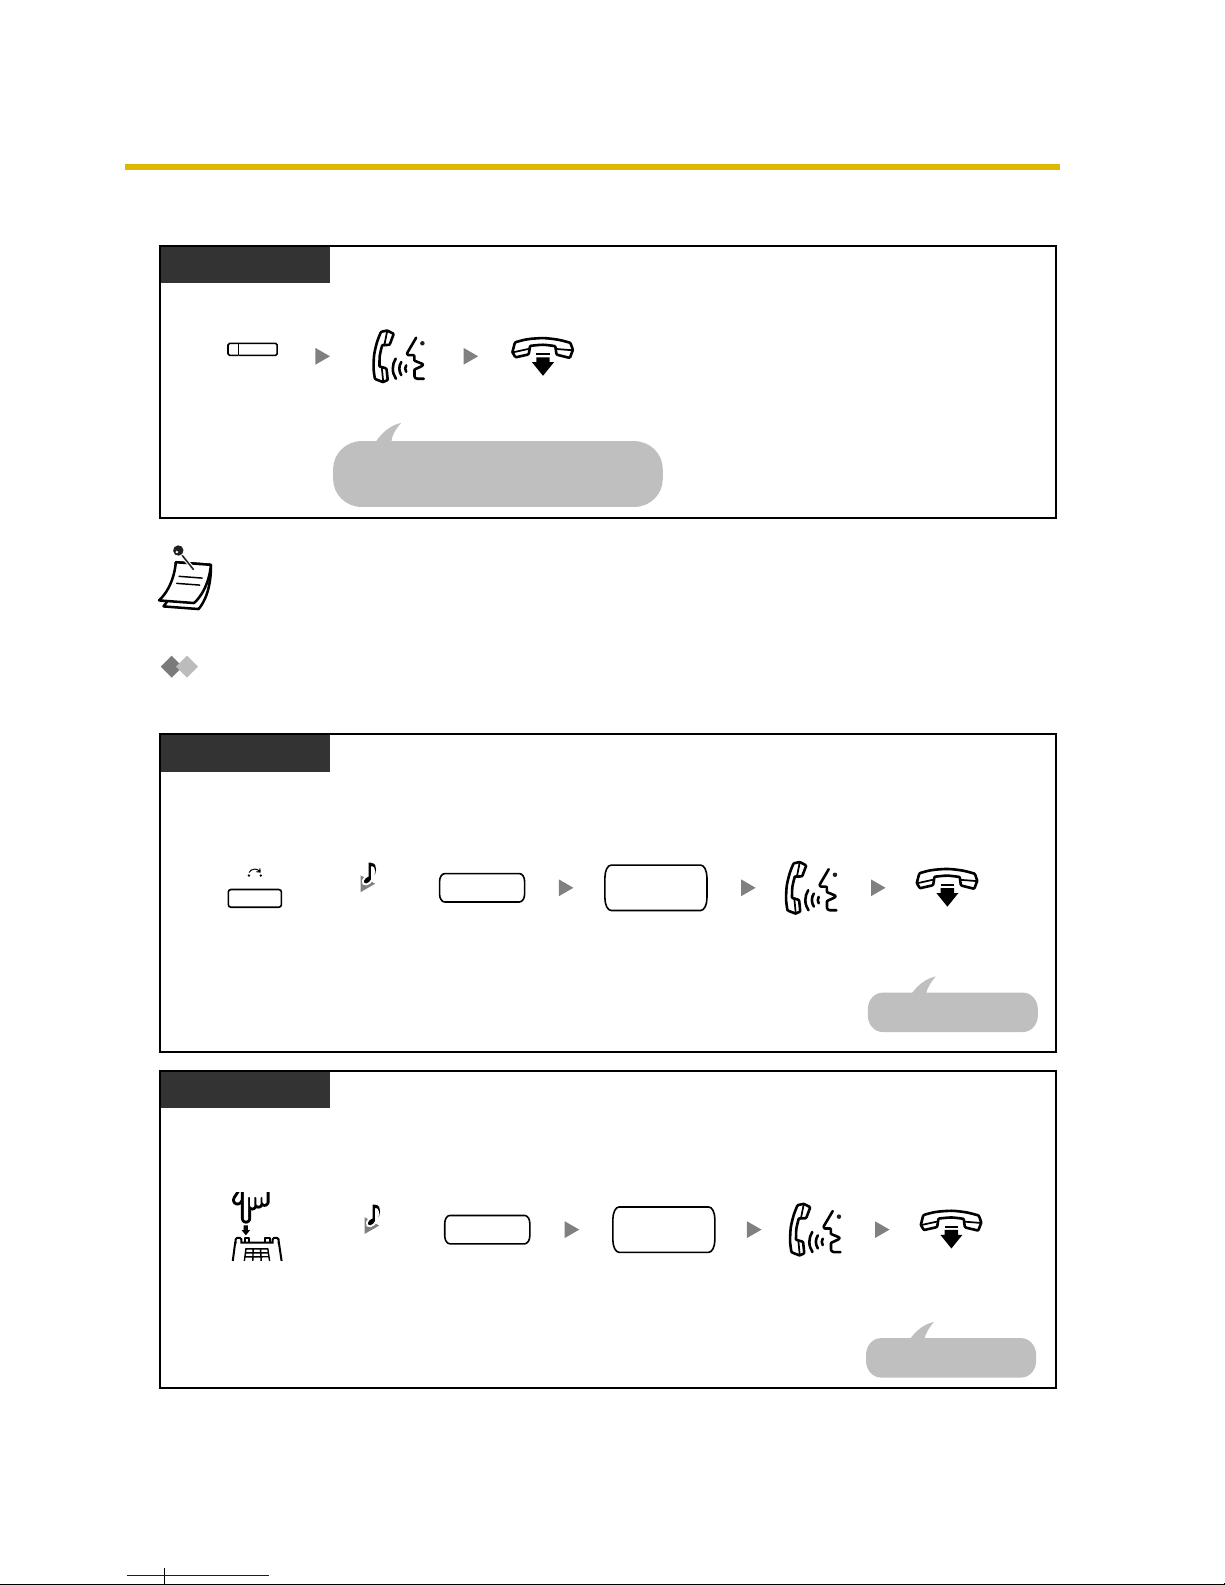
To transfer with one-touch (One-touch Transfer)
Transferring to an Outside Party Using the PBX Service
Some extensions may be restricted from performing this feature.
• Even if the transferred party does not answer, you can go on-hook.
During a conversation
PT/PS
Press
DSS
.
(DSS)
On-hook.
Talk.
You do not have to inform the destination
extension about where the call has been
transferred from. This can be disregarded.
On-hook.Talk.
Seize
CO line
.
During a conversation
PT/PS
The call is transferred.
Press
TRANSFER
. Dial
outside
phone number
.
CO line
outside
phone no.
TRANSFER
C.Tone
On-hook.Talk.
During a conversation
SLT
Press
Recall/
hookswitch
.
Dial
outside
phone number
.
C.Tone
The call is transferred.
Seize
CO line
.
CO line
outside
phone no.
Page 15
1.4 During a Conversation
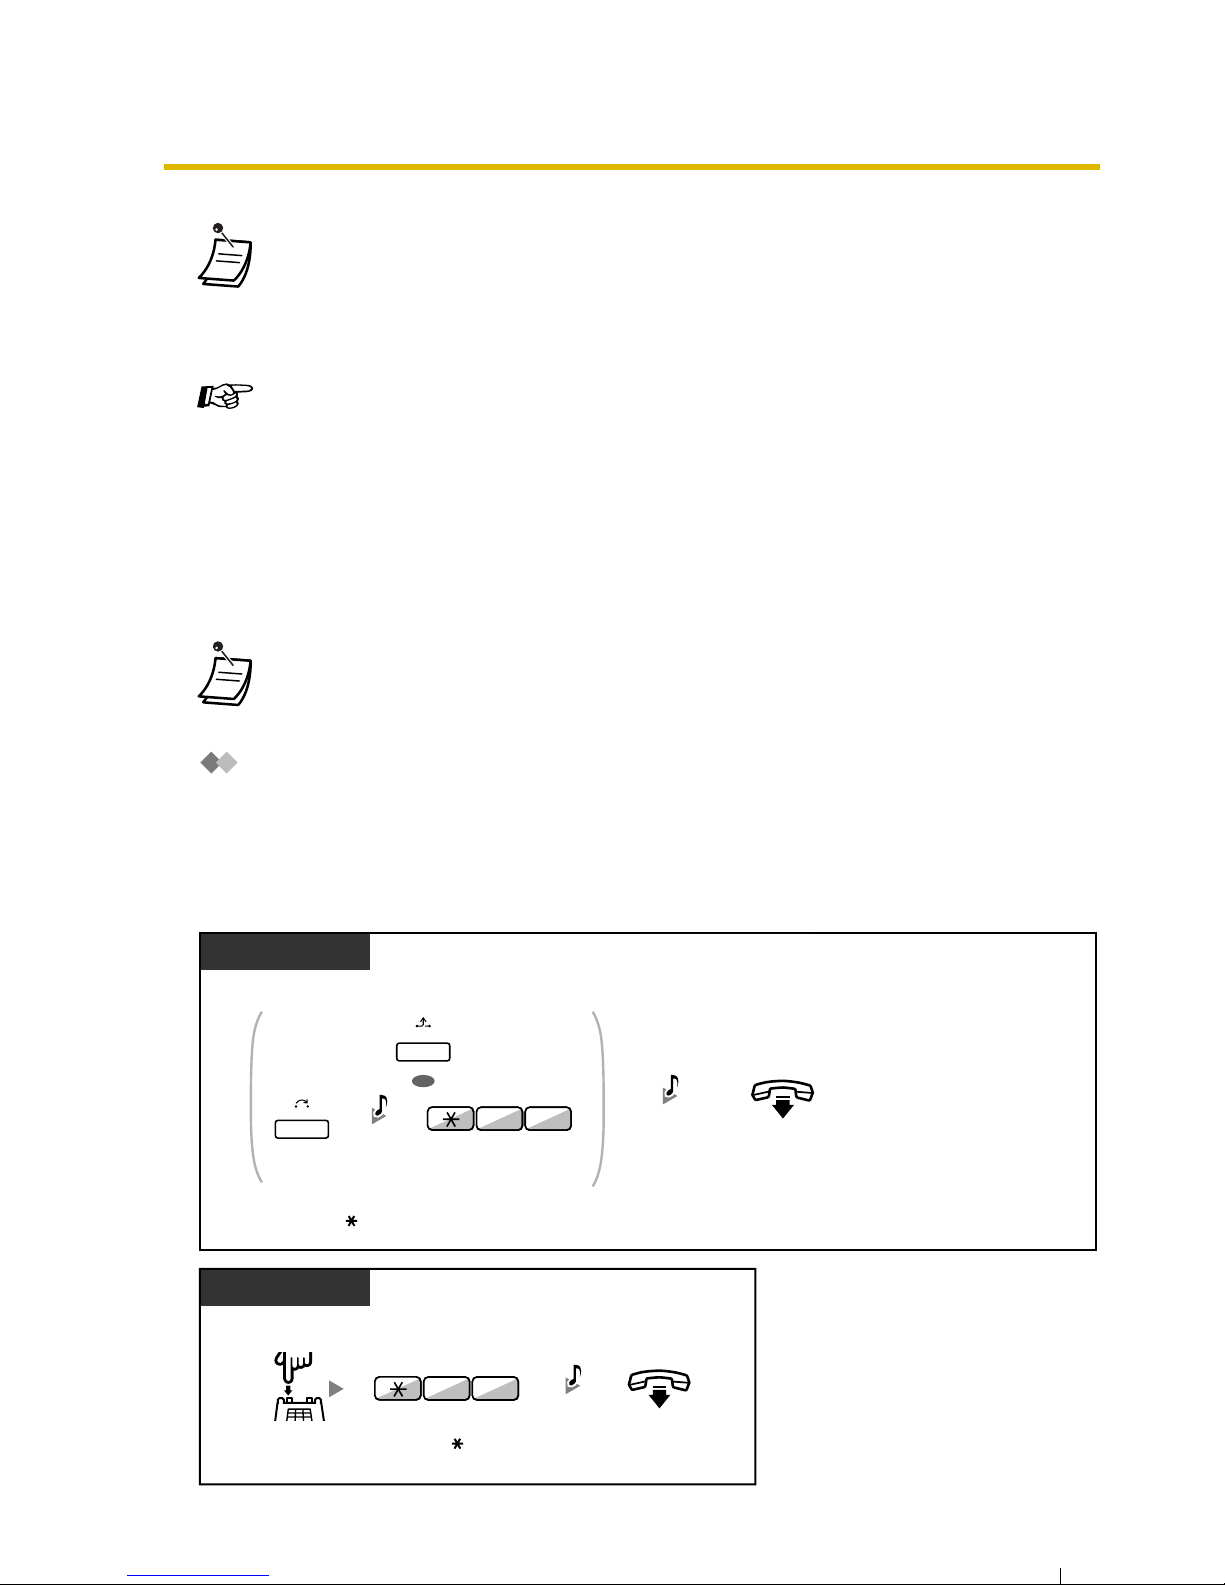
1.4.2 Call Hold
— Call Hold
— Call Park
Call Hold
There are two types of hold. The difference between them is that other people can retrieve your held
call (Regular Hold) or not (Exclusive Call Hold). As they can be alternated, ask your manager what
the current mode is.
Call Hold
•
Time limit
Both the caller and the transferred party will hear an alarm tone fifteen seconds before a
specified time period.
•
To return to the held call before the destination answers,
press the TRANSFER
button, corresponding CO, G-DN or INTERCOM button, or the hookswitch.
Customizing Your Phone
• 3.1.3 Customizing the Buttons
Create or edit a Direct Station Selection (DSS) button.
•
If a call is not retrieved within a specified time
, you will hear an alarm as a reminder.
And, if an outside call is not answered within a specified time, it is automatically
disconnected.
On-hook.
During a conversation
PT/PS
Press
HOLD,
or press
TRANSFER
and
then enter
50
.
C.Tone
OR
05
TRANSFER
HOLD
C.Tone
SLT
During a conversation
On-hook.
Enter
50
.
Press
Recall/
hookswitch
.
05
C.Tone
Page 16
1.4 During a Conversation
50 User Manual
Call Hold Retrieve
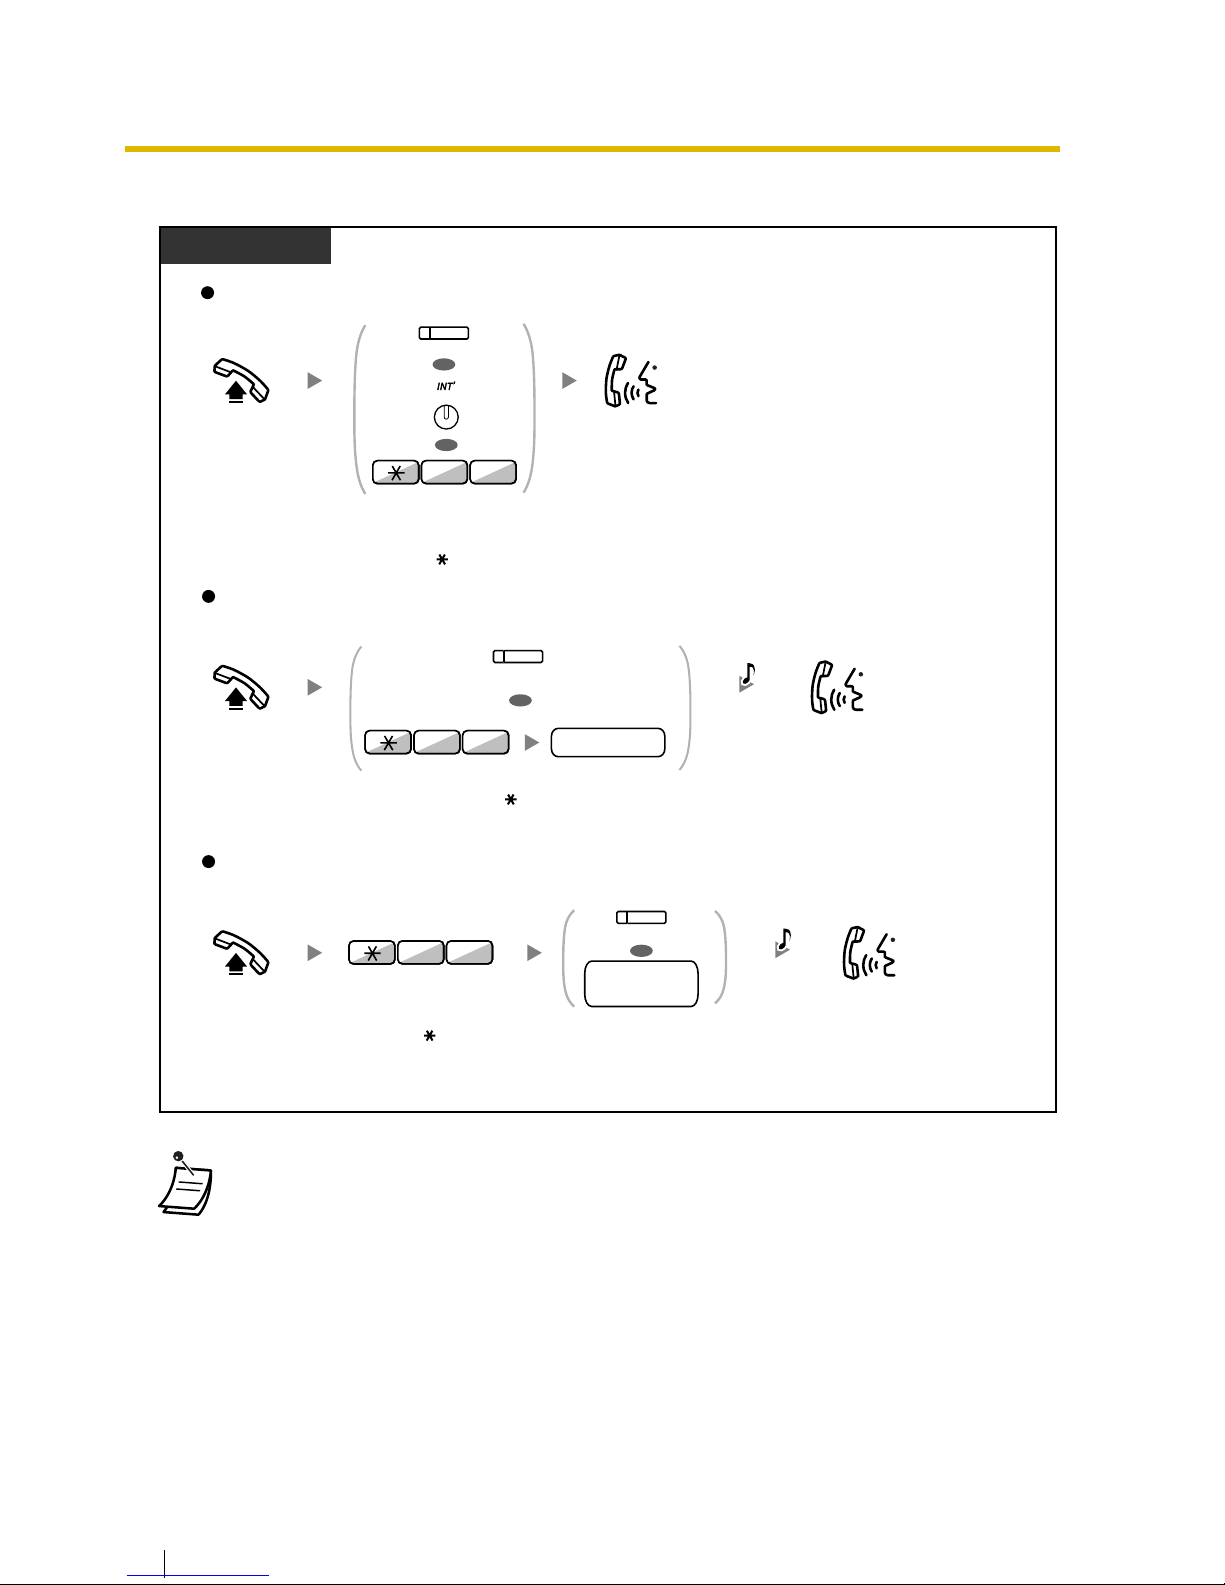
• The CO or INTERCOM button light shows the current status as follows:
— Regular Hold mode
Flashing green slowly
: Your held call
Flashing red
: Another extension’s held call
— Exclusive Call Hold mode
Flashing green rapidly
: Your held call
Red on
: Another extension’s held call
•
Hold Mode Change (PT only)
After pressing the HOLD button, if you press the HOLD button again, the status switches
from the Regular Hold mode to the Exclusive Call Hold mode or from the Exclusive Call
Hold mode to the Regular Hold mode.
Off-hook.
Off-hook.
Press
DSS
or dial
holding extension
number
.
Off-hook.
At the holding extension (Call Hold Retrieve)
To retrieve an outside call from another extension—only Regular Hold
(Call Hold Retrieve–Specified with a held line number)
To retrieve an intercom call or outside call from another extension—only Regular Hold
(Call Hold Retrieve–Specified with a holding extension number)
PT/SLT/PS
Talk.
Talk.
Talk.
Press CO, or enter 53 and then
held line
number
(3 digits).
Enter 51.
holding
extension no.
OR
(DSS)
0
5
15
Press flashing
CO
or
INTERCOM
,
or enter
50
.
C.Tone
C.Tone
(CO)
held line no.
3
5
OR
OR
(CO)
OR
INTERCOM
Page 17
1.4 During a Conversation
User Manual 51
Call Park
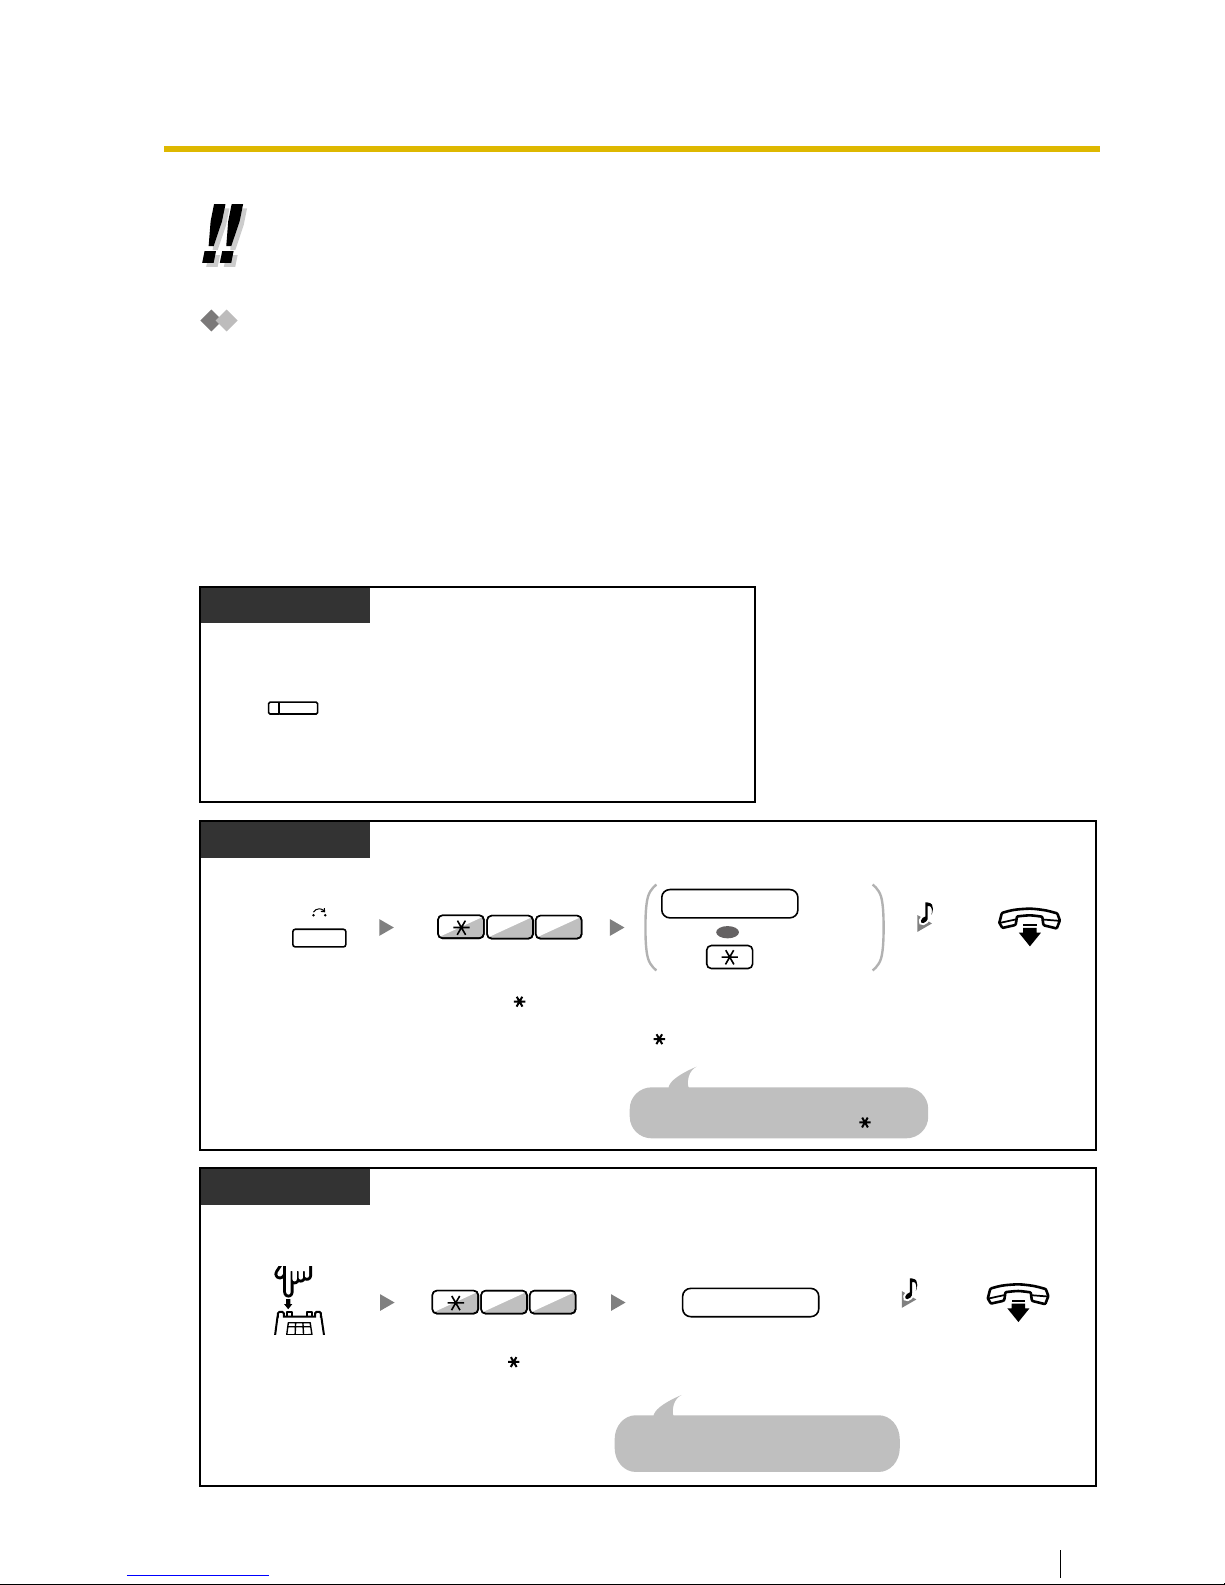
You can put a call on hold in a common parking zone of the PBX so that any extension can retrieve
the parked call. You can use this feature as a transferring feature.
A call can be put into either a specified parking zone (Specified) or any idle parking zone (Auto). If a
Call Park button and Call Park (Automatic Park Zone) button have been established, you can select
either way to park by simply pressing the corresponding button.
When a call is parked automatically, or more than one call has been parked at the same time, you
need to specify the parking zone number to retrieve the required call.
To set
•
For simple operation,
you can automatically hold a call by pressing another CO, G-DN
or INTERCOM button, only if preprogrammed.
(Automatic Call Hold)
Consult your
dealer.
During a conversation
Press
Call Park
.
PT/PS
(Call Park)
Enter a specified
parking
zone number
(2 digits) or press
to park at an idle parking zone
automatically.
During a conversation
Press
TRANSFER
.
PT/PS
On-hook.
Enter 52.
parking zone no.
OR
Specified
Auto
If you hear a busy tone, enter another
parking zone number or press again.
25
TRANSFER
C.Tone
During a conversation
Press
Recall/
hookswitch
.
SLT
On-hook.
If you hear a busy tone, enter another
parking zone number.
Enter
52
. Enter a specified
parking
zone number
(2 digits).
parking zone no.
25
C.Tone
Page 18
1.4 During a Conversation
52 User Manual
Call Park Retrieve
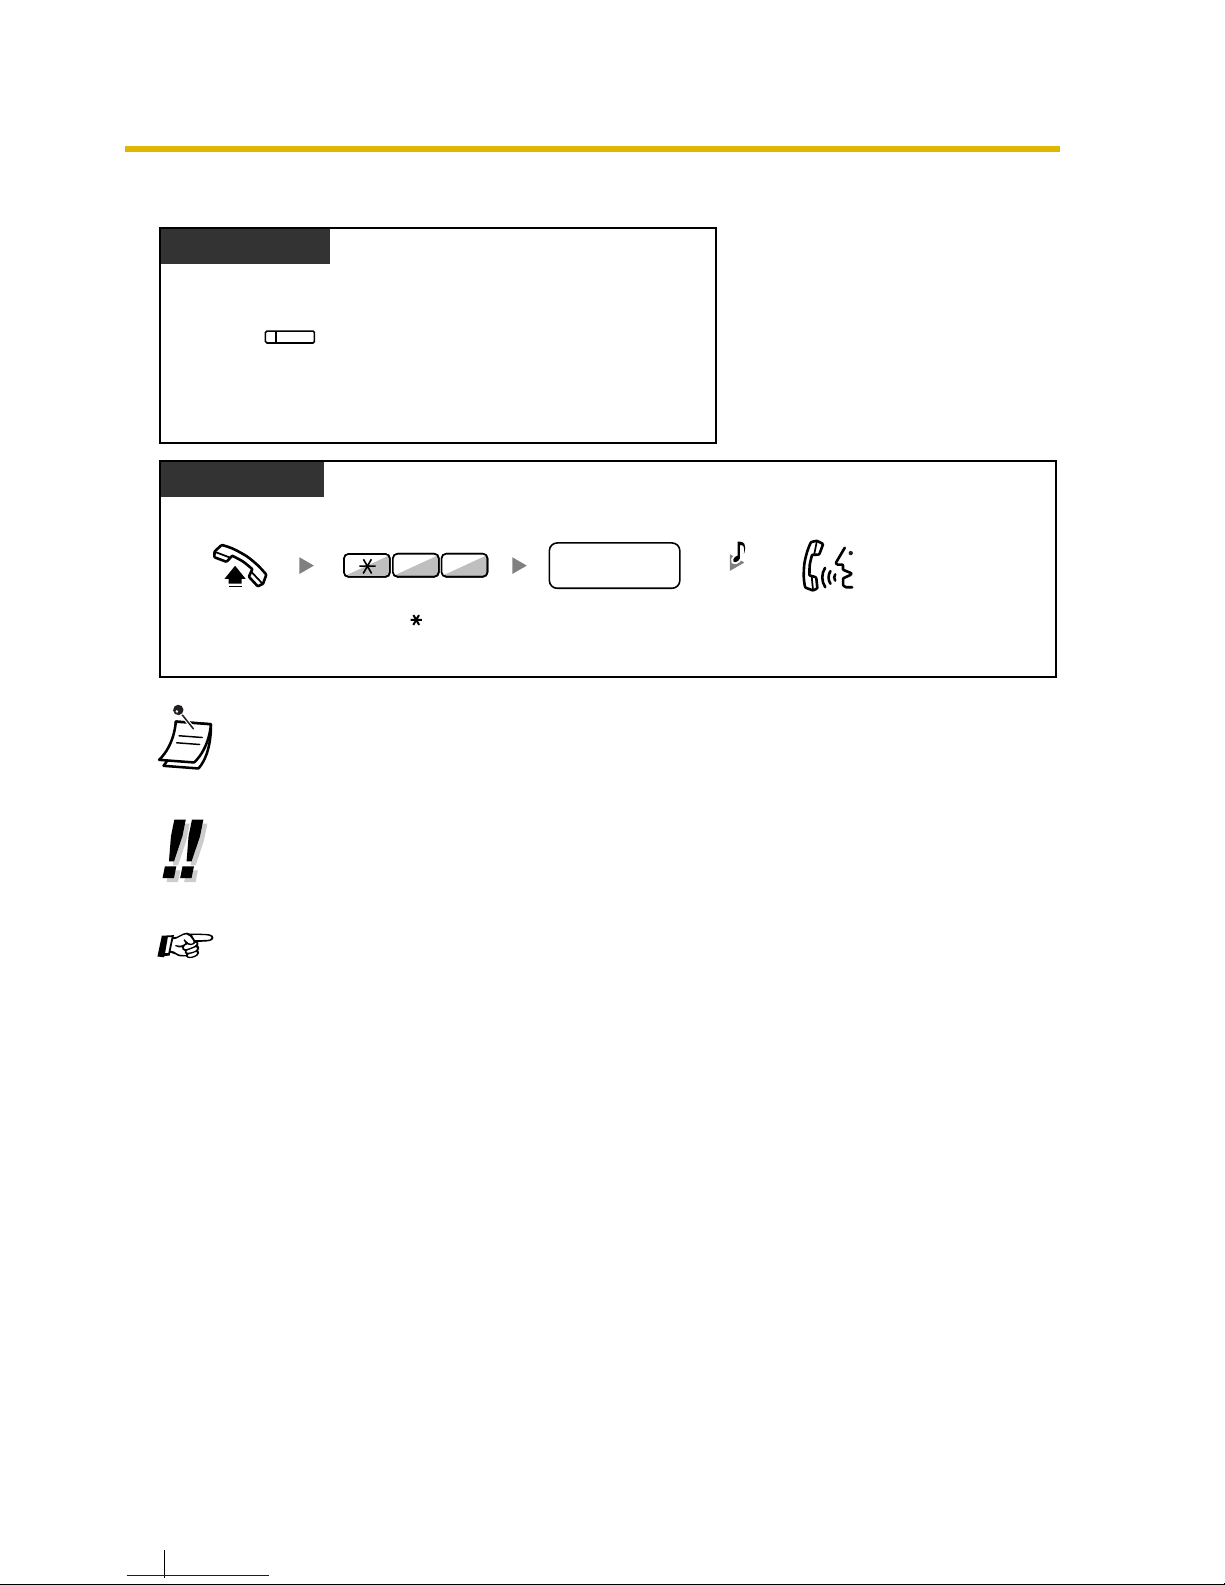
1.4.3 Call Splitting
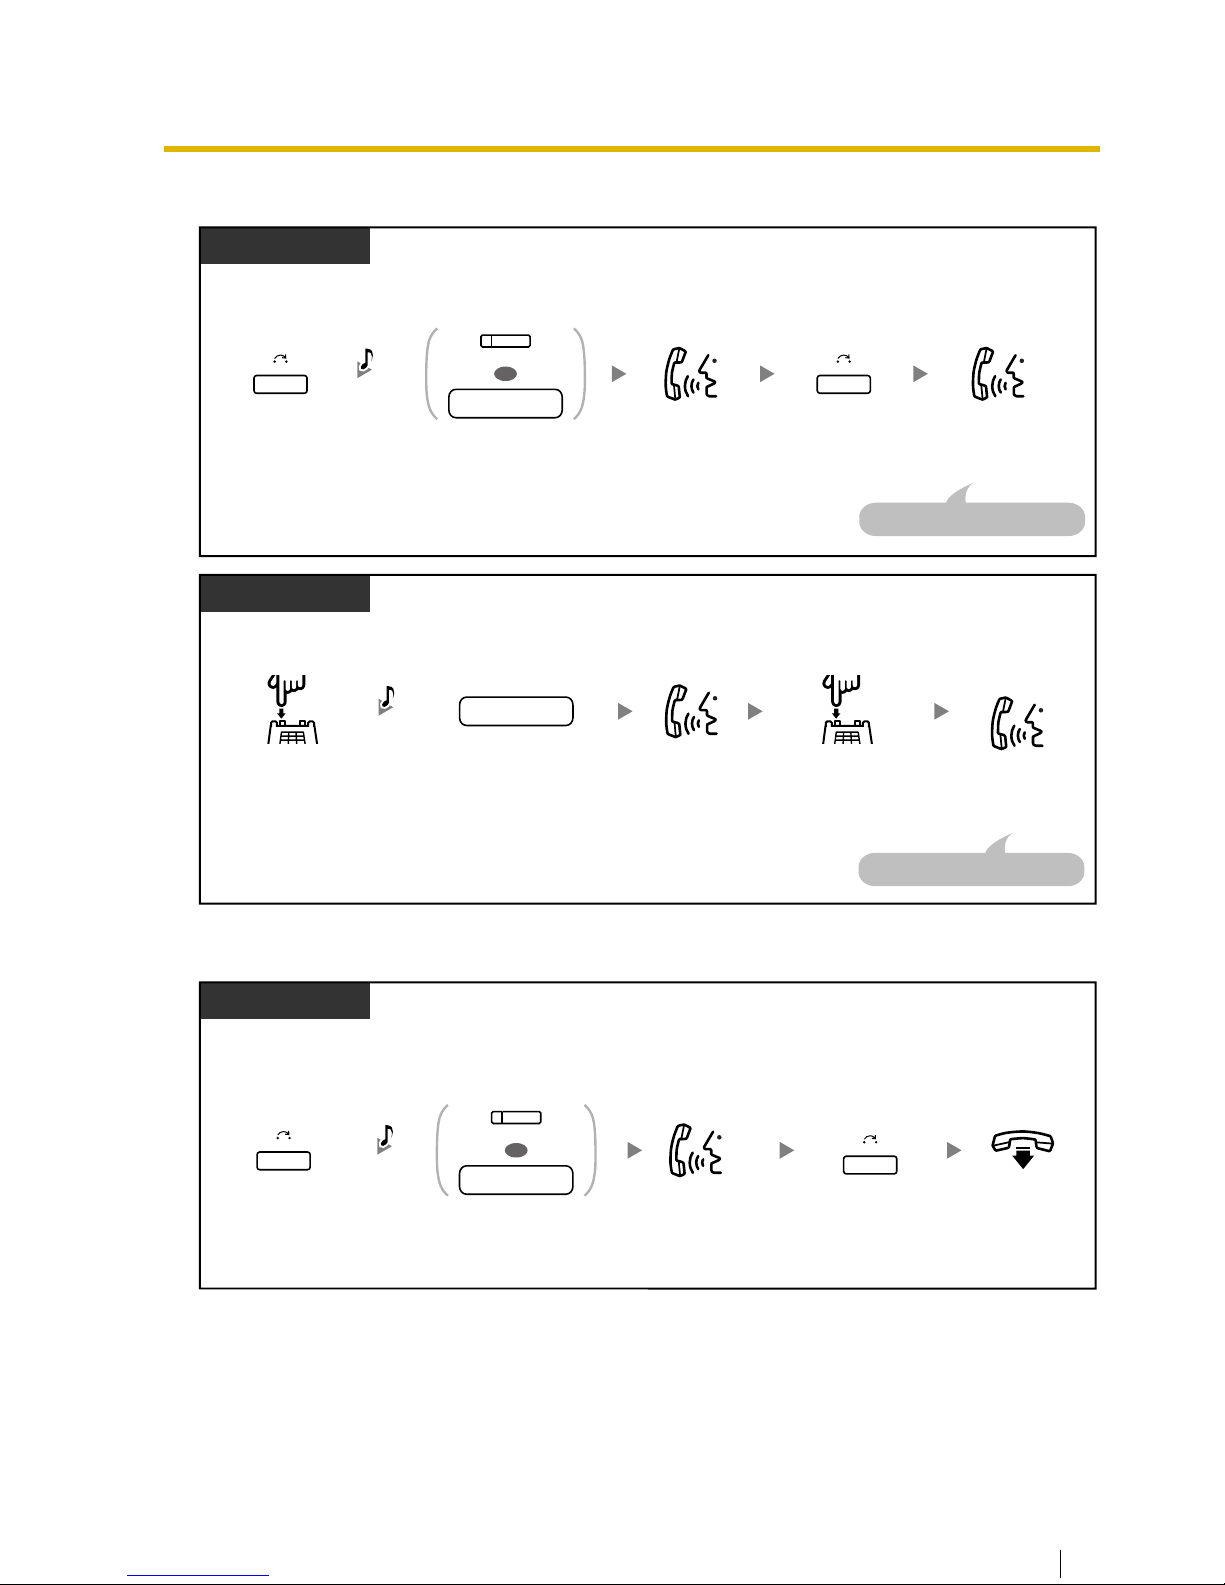
When talking to one party while the other party is on hold, you can swap the calls back and forth
(alternately).
• If a call is parked automatically, confirm the parking zone number on the display.
•
If you hear a reorder tone when retrieving a parked call,
there is no held call. Confirm
the stored parking zone number.
• After you park a call, you can perform other operations.
Customizing Your Phone
• 3.1.3 Customizing the Buttons
Create or edit a Call Park button or Call Park (Automatic Park Zone) button.
Press a flashing
Call Park
.
PT/PS
(Call Park)
Off-hook.
Enter 52. Dial
stored parking
zone number
(2 digits).
stored parking
zone no.
PT/SLT/PS
Talk.
25
C.Tone
Page 19
1.4 During a Conversation
User Manual 53
To alternate between the parties leaving one party on hold temporarily
To leave the conversation and then let the two parties talk
PT/PS
During a conversation
Press
TRANSFER
.
Talk to the
other party.
Talk to the
original party.
TRANSFER
Press
DSS
or dial
the other
party's extension number
.
Press
TRANSFER
.
extension no.
OR
(DSS)
OR
TRANSFER
C.Tone
The other party will be on hold.
SLT
During a conversation
Talk to the
other party.
Talk to the
original party.
Dial
the other party's
extension number
.
Press
Recall/
hookswitch
.
extension no.
Press
Recall/
hookswitch
.
C.Tone
The other party will be on hold.
PT/PS
Press
DSS
or dial
the other
party's extension number
.
Talk to the
other party.
During a conversation
Press
TRANSFER
.
extension no.
OR
(DSS)
OR
TRANSFER
Press
TRANSFER
.
OR
TRANSFER
C.Tone
On-hook.
Page 20
1.4 During a Conversation
54 User Manual
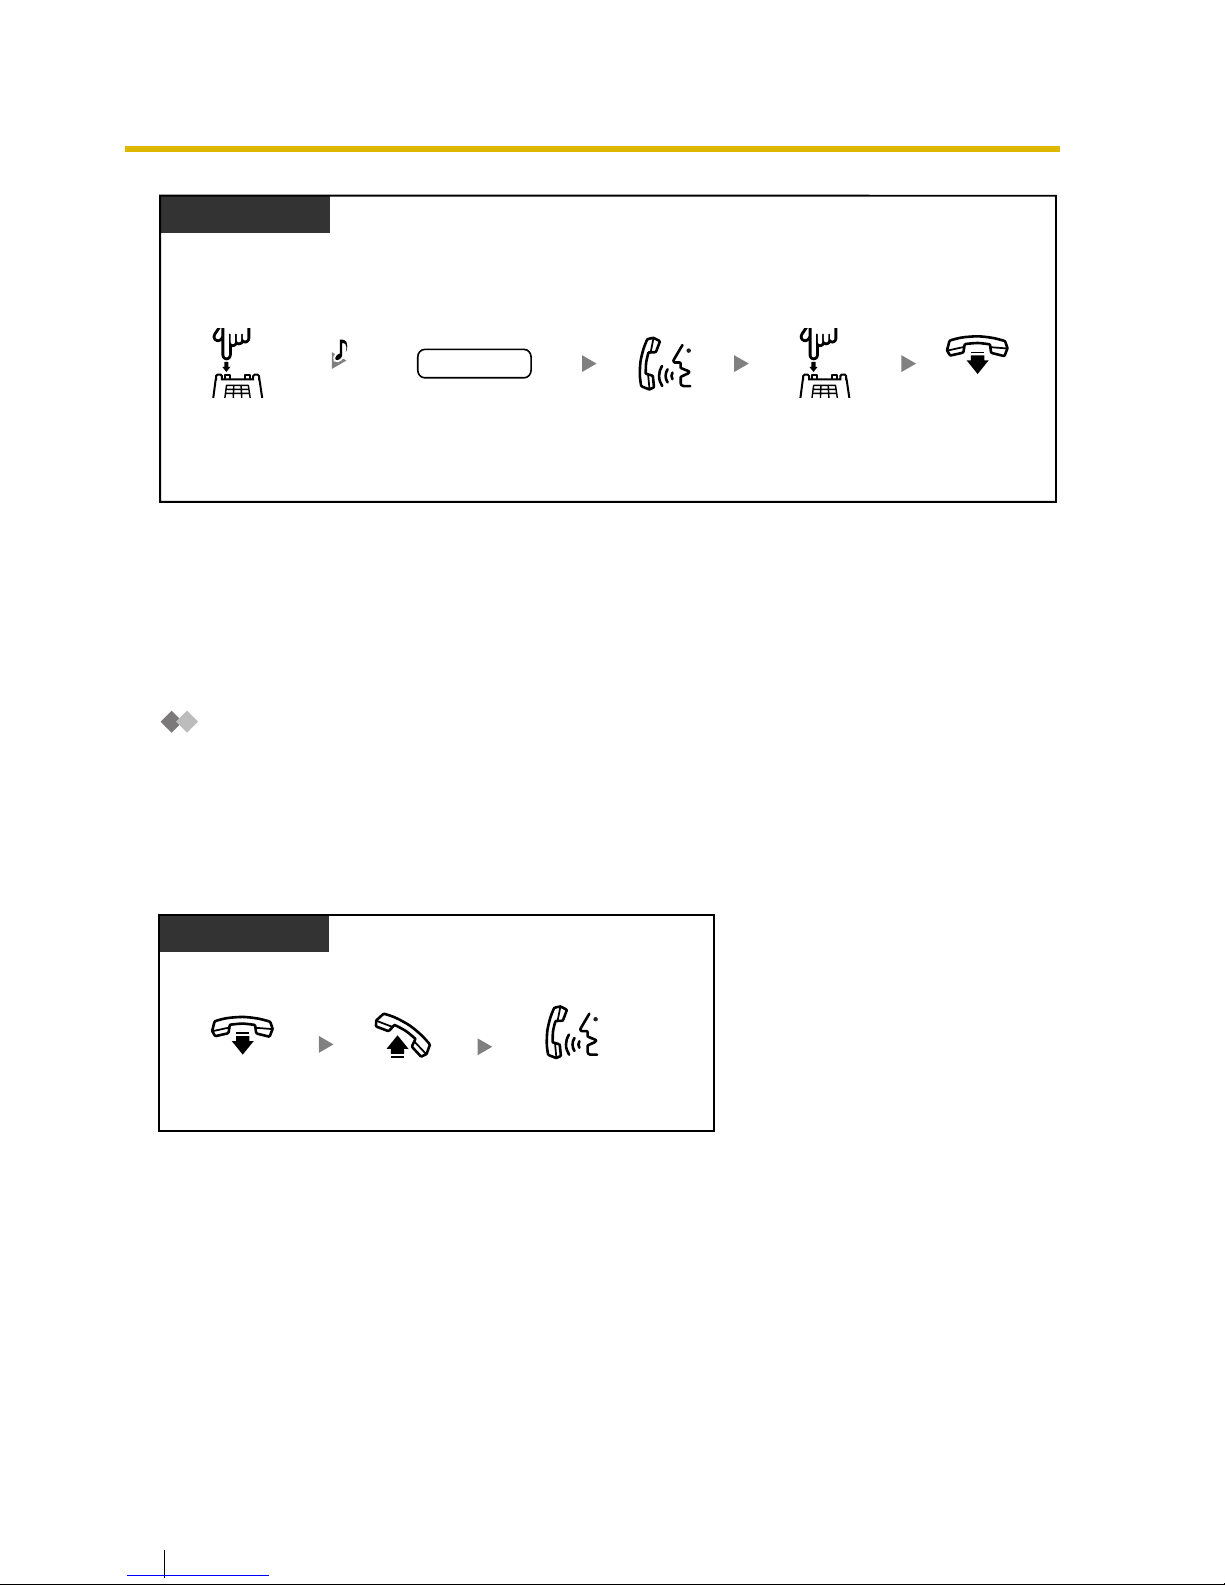
1.4.4 Call Waiting
— Answering Call Waiting in the PBX
— Answering Call Waiting from the Telephone Company
Answering Call Waiting in the PBX
During a conversation, a call waiting tone or voice announcement through the speaker or the handset
occurs, then an outside call has received or another extension is letting you know another call is
waiting. You must activate this feature to use it. (Default: Enable—Tone)
You can answer the second call by disconnecting (1) or holding (2) the current call.
1. To disconnect the current call and then talk to the new party
SLT
Dial
the other party's
extension number
.
Talk to the
other party.
During a conversation
Press
Recall/
hookswitch
.
extension no.
OR
C.Tone
On-hook.
Press
Recall/
hookswitch
.
OR
PT/SLT/PS
While hearing a tone
Off-hook.
On-hook.
Talk to the
new party.
Page 21
1.4 During a Conversation
User Manual 55
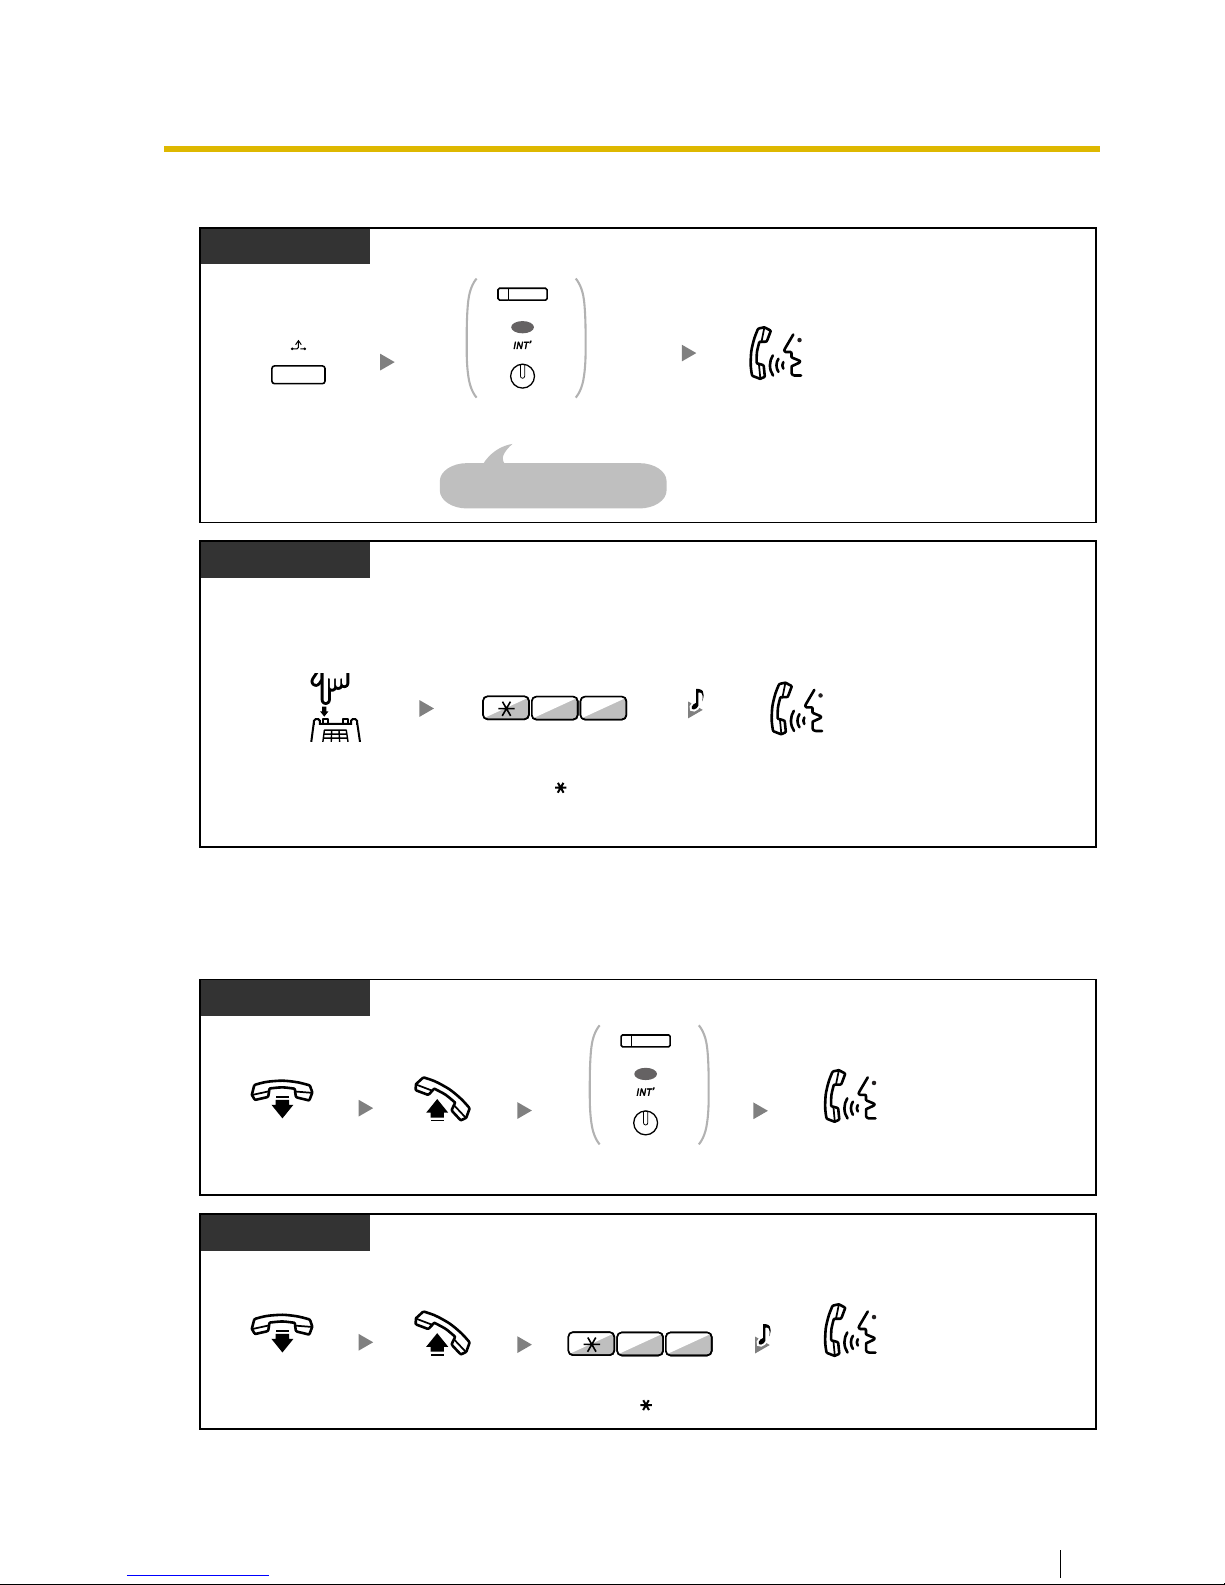
2. To hold the current call and then talk to the new party
After talking to the new party (second call), you can disconnect (2.1) or holding (2.2) it and
then retrieve the first call.
2.1 To disconnect the second call and then talk to the original party
PT/PS
Press
HOLD
.
While hearing a tone
Disregard this step if both
parties are extensions.
Press
CO
or
INTERCOM
.
HOLD
OR
(CO)
INTERCOM
Talk to the
new party.
SLT
While hearing a tone
Enter
50.
0
5
Talk to the
new party.
Press
Recall/hookswitch
.
C.Tone
PT/PS
During a conversation
Off-hook.
On-hook.
Talk to the
original party.
Press
CO
or
INTERCOM
.
OR
(CO)
INTERCOM
PT/SLT/PS
During a conversation
Off-hook.
On-hook.
Talk to the
original party.
Enter
50.
0
5
C.Tone
Page 22
1.4 During a Conversation
56 User Manual
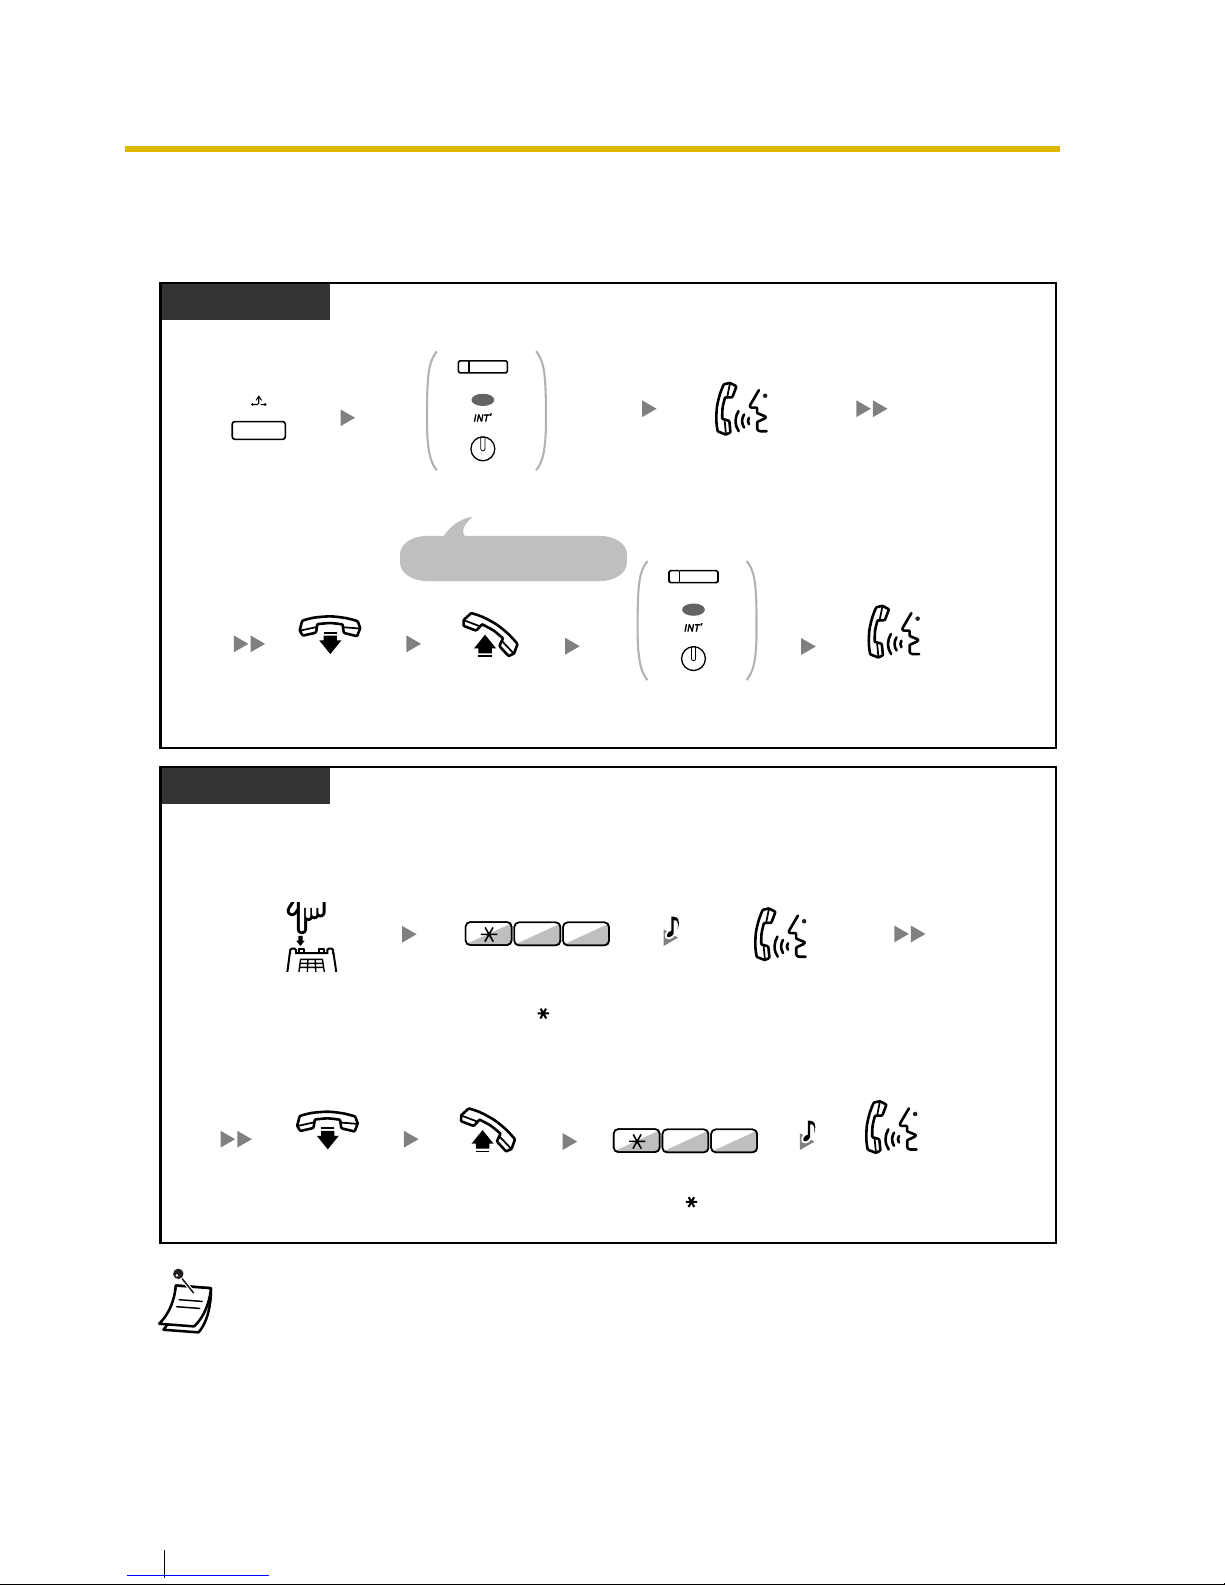
2.2 To hold the second call and then talk to the original party
After holding it, you can talk to the original party. Then, you can disconnect it and then talk to the new
party again.
•
Depending on the other party’s telephone,
the "Off-Hook Call Announcement (OHCA)"
and the "Whisper OHCA" features can be used. You can talk to the other party through the
speaker and the microphone (OHCA) or you can receive an announcement through the
handset (Whisper OHCA), if you are having a conversation using the handset.
• The caller’s name or number is displayed for five seconds in ten second intervals while
waiting to be answered.
PT/PS
Press
HOLD
.
During a conversation
Disregard this step if both
parties are extensions.
Press
CO
or
INTERCOM
.
HOLD
OR
(CO)
INTERCOM
Talk to the
original party.
Off-hook.
On-hook.
Talk to the
new party.
Press
CO
or
INTERCOM
.
OR
(CO)
INTERCOM
SLT
During a conversation
Enter
50.
0
5
Talk to the
original party.
Press
Recall/hookswitch
.
Off-hook.
On-hook.
Talk to the
new party.
Enter
50.
0
5
C.Tone
C.Tone
Page 23
1.4 During a Conversation
60 User Manual
1.4.5 Multiple Party Conversation
— Conference
— Unattended Conference
— Leaving Three-party Conference
— Privacy Release
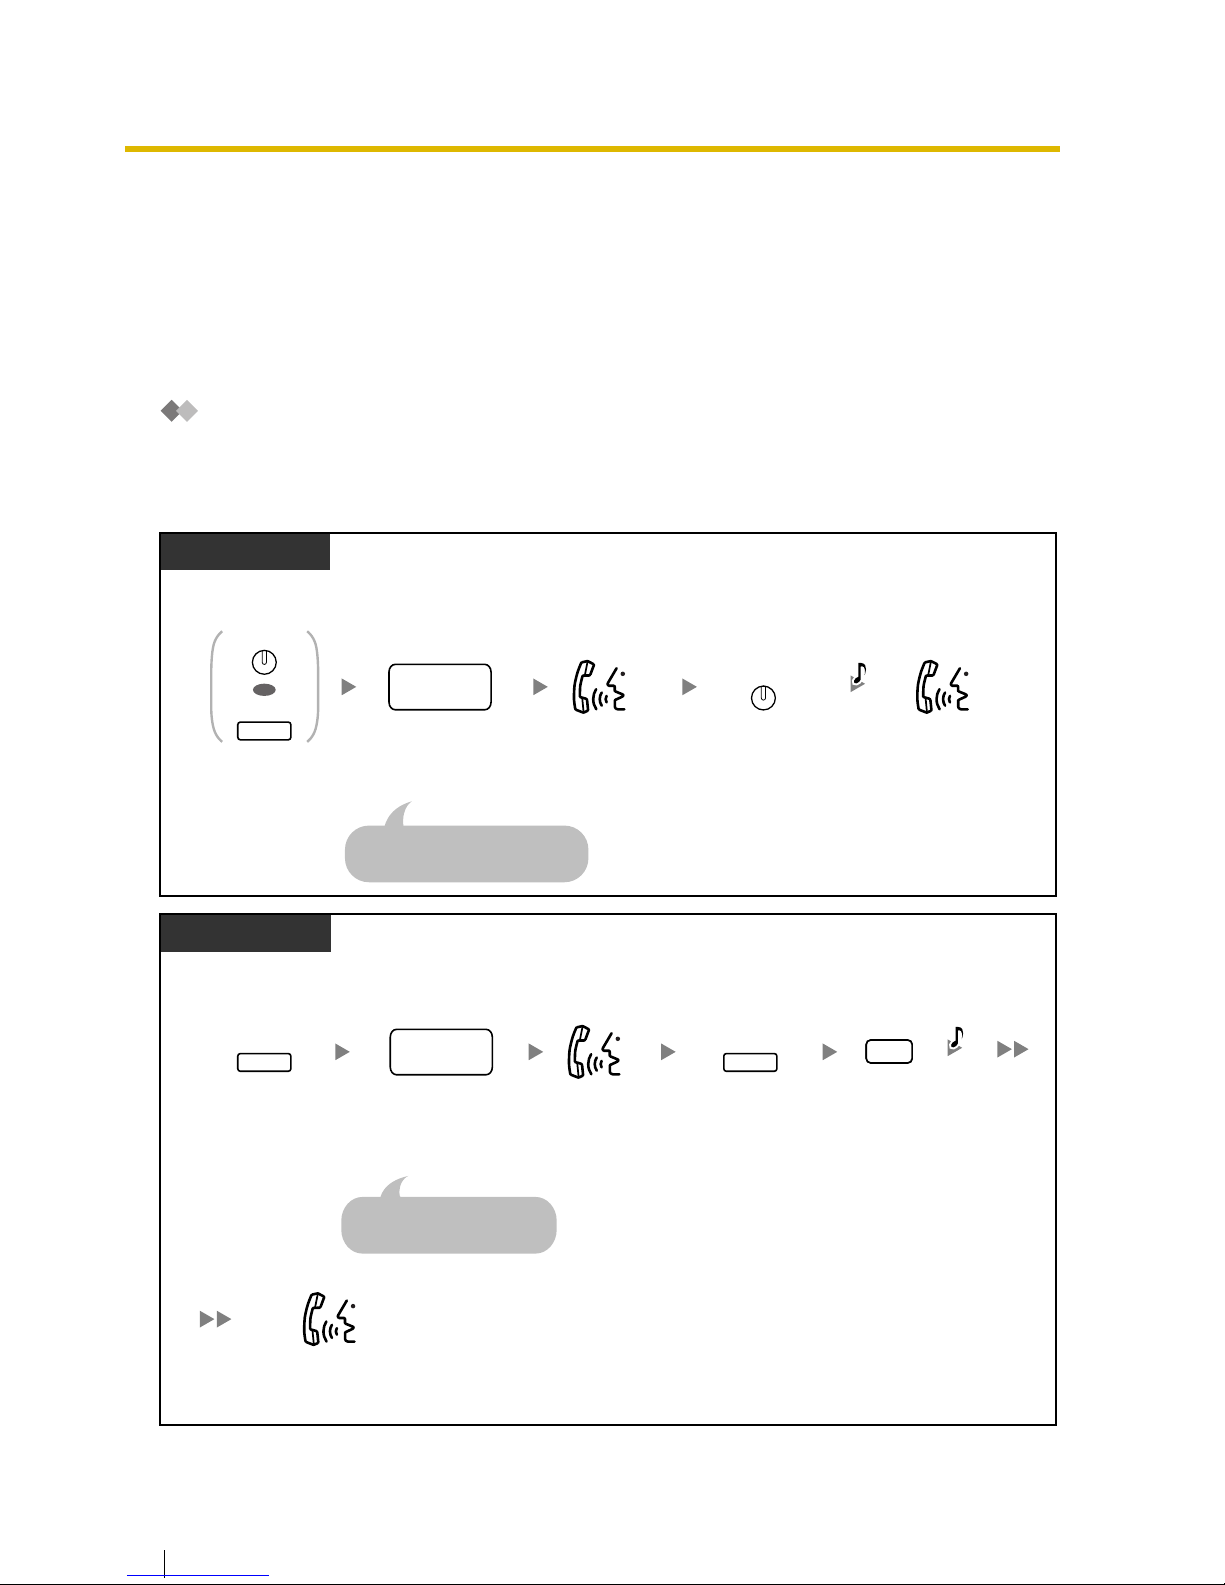
Conference
You can add one or more parties to your conversation.
To establish a conference call
Press
CONF
.Dial
desired
phone number
.
Seize CO line before
dialing outside phone number.
PT/PS
Talk with
multiple parties.
During a conversation
desired
phone
no.
Talk to the
new party.
CONF
Press
CONF
or
TRANSFER
.
OR
CONF
TRANSFER
C.Tone
Dial
desired
phone number
.
desired
phone
no.
PT/PS
Talk with multiple parties.
Enter 3.Press
TRANSFER
.
Talk to the
new party.
3
During a conversation
Seize CO line before
dialing outside phone number.
TRANSFER
Press
TRANSFER
.
TRANSFER
C.Tone
Page 24
1.4 During a Conversation
User Manual 61
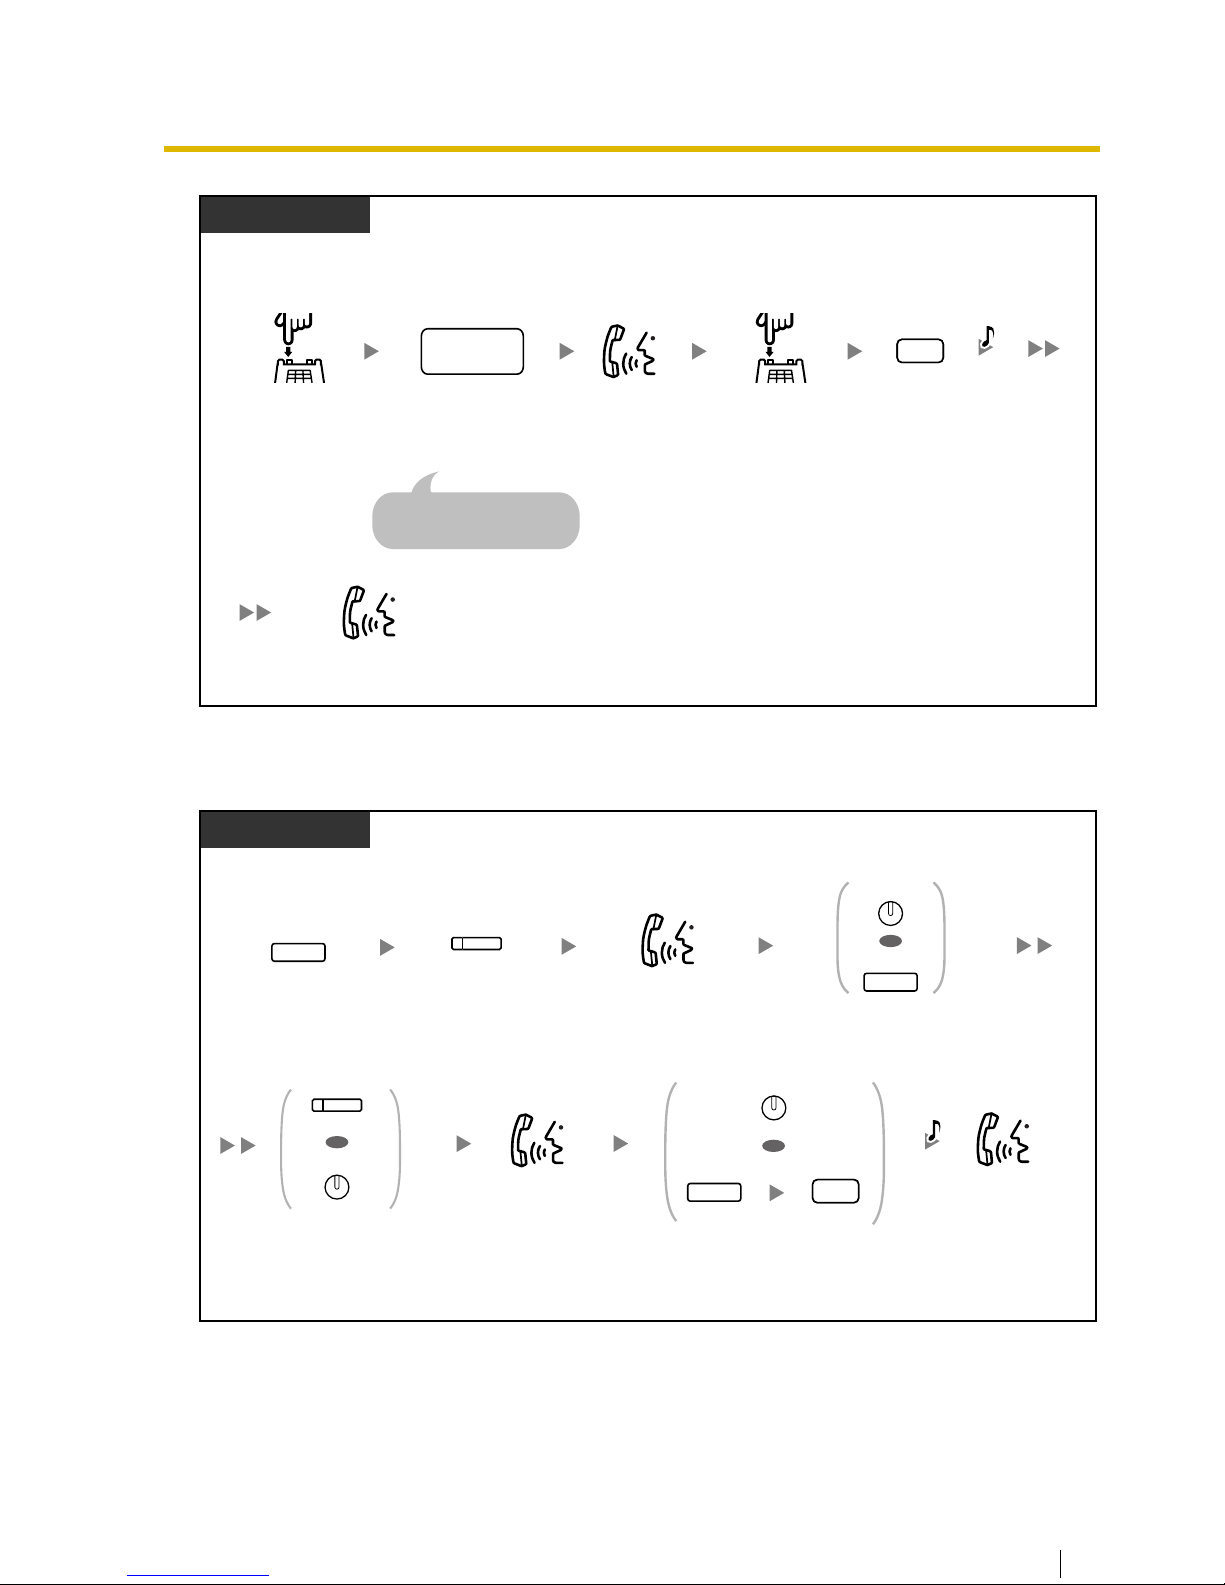
To establish a conference call when receiving a call from an outside party during a twoparty conversation
Dial
desired
phone number
.
desired
phone
no.
SLT
Talk with multiple parties.
Enter 3.Press
Recall/
hookswitch
.
Talk to the
new party.
3
During a conversation
Seize CO line before
dialing outside phone number.
Press
Recall/
hookswitch
.
C.Tone
PT/PS
Press
HOLD
.
While hearing a call waiting tone
HOLD
Press the
flashing
CO
.
(CO)
Talk to the
new party.
Press
CONF
or
TRANSFER
.
OR
CONF
TRANSFER
Talk to the
original party.
Press the flashing
CO
or
INTERCOM
corresponding
to the original party.
OR
(CO)
INTERCOM
Press
CONF,
or press
TRANSFER
and then enter 3.
OR
TRANSFER
3
Talk with
multiple parties.
CONF
C.Tone
Page 25
1.4 During a Conversation
62 User Manual
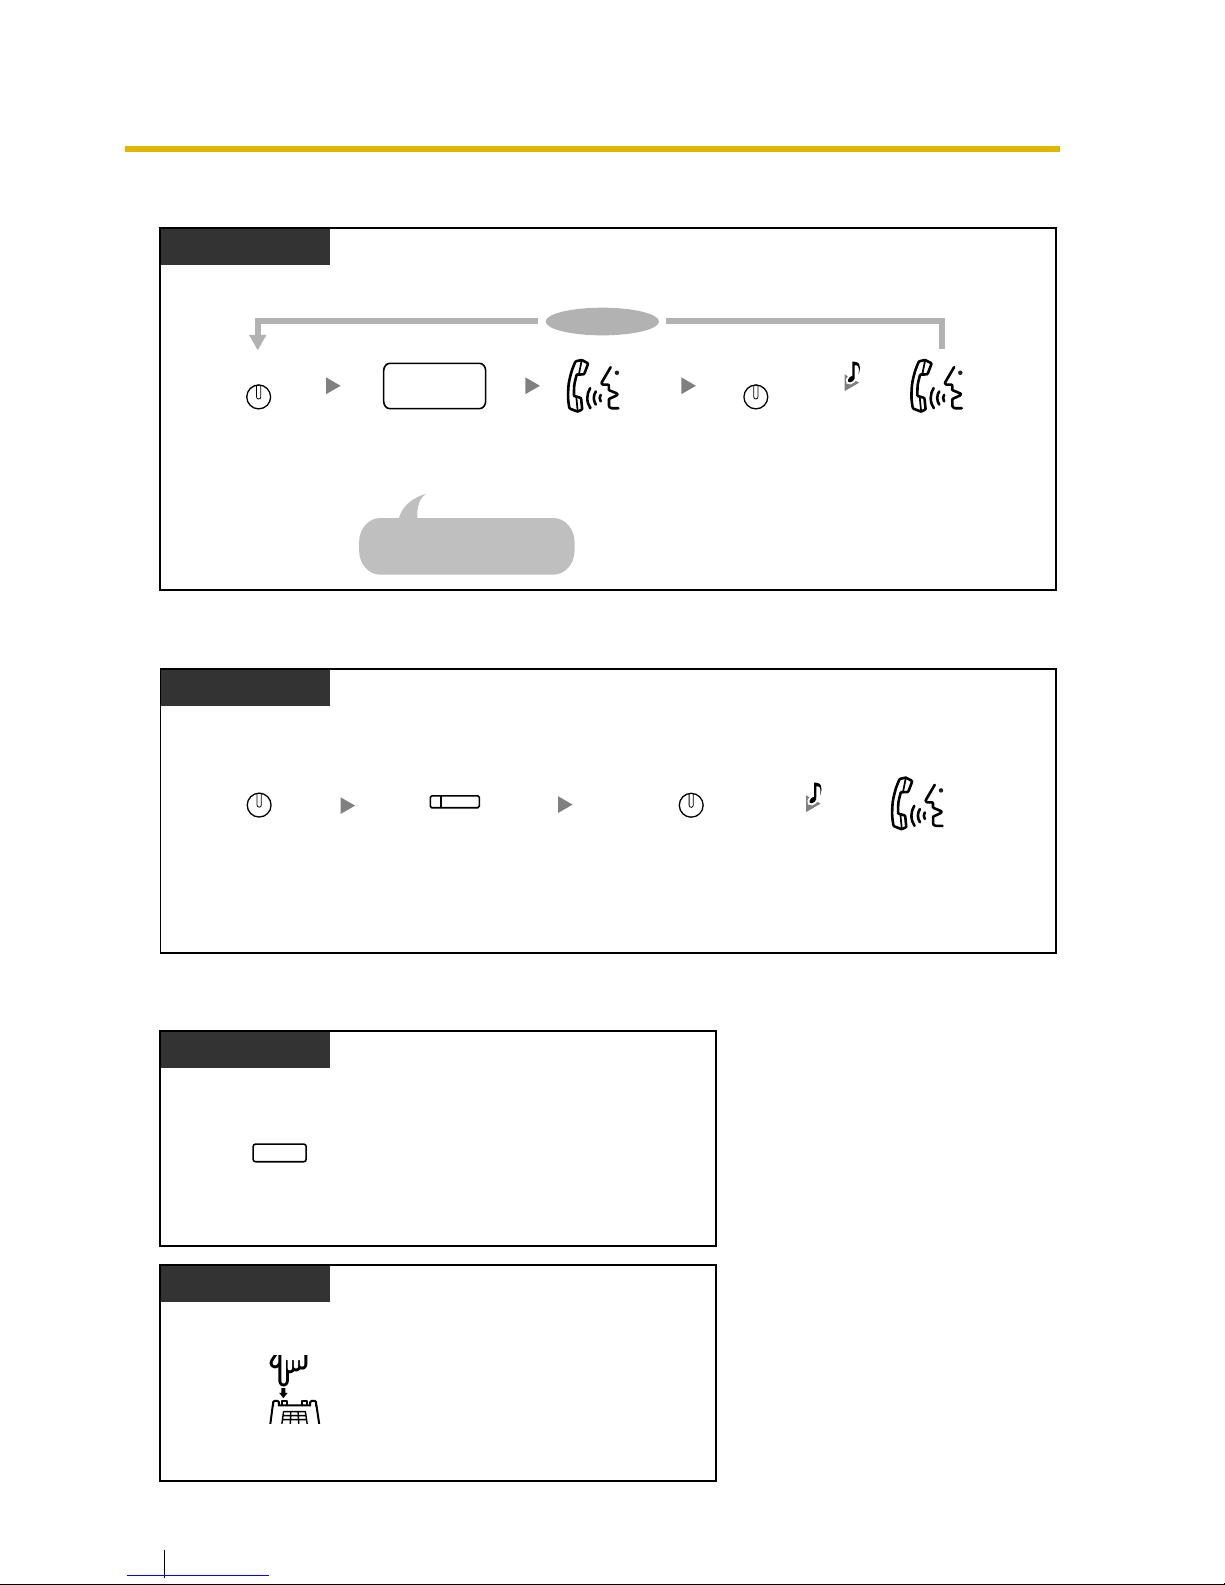
To add four or more parties to a conference
To add an outside party on hold to a conference
To talk to two parties alternately in a three-party conversation
Press
CONF
. Press
CONF
.Dial
desired
phone number
.
desired
phone
no.
Seize CO line before
dialing outside phone number.
PT/PS
Talk.
During a conversation
Talk.
To continue
CONF CONF
C.Tone
PT/PS
During a 3- to 7-party conference
Press the flashing
CO
corresponding to the party
on hold.
(CO)
Talk with
multiple parties.
Press
CONF
.
CONF
Press
CONF
.
CONF
C.Tone
During a conversation
PT/PS
Press
TRANSFER
.
TRANSFER
During a conversation
SLT
Press
Recall/hookswitch
.
Page 26
1.4 During a Conversation
User Manual 63
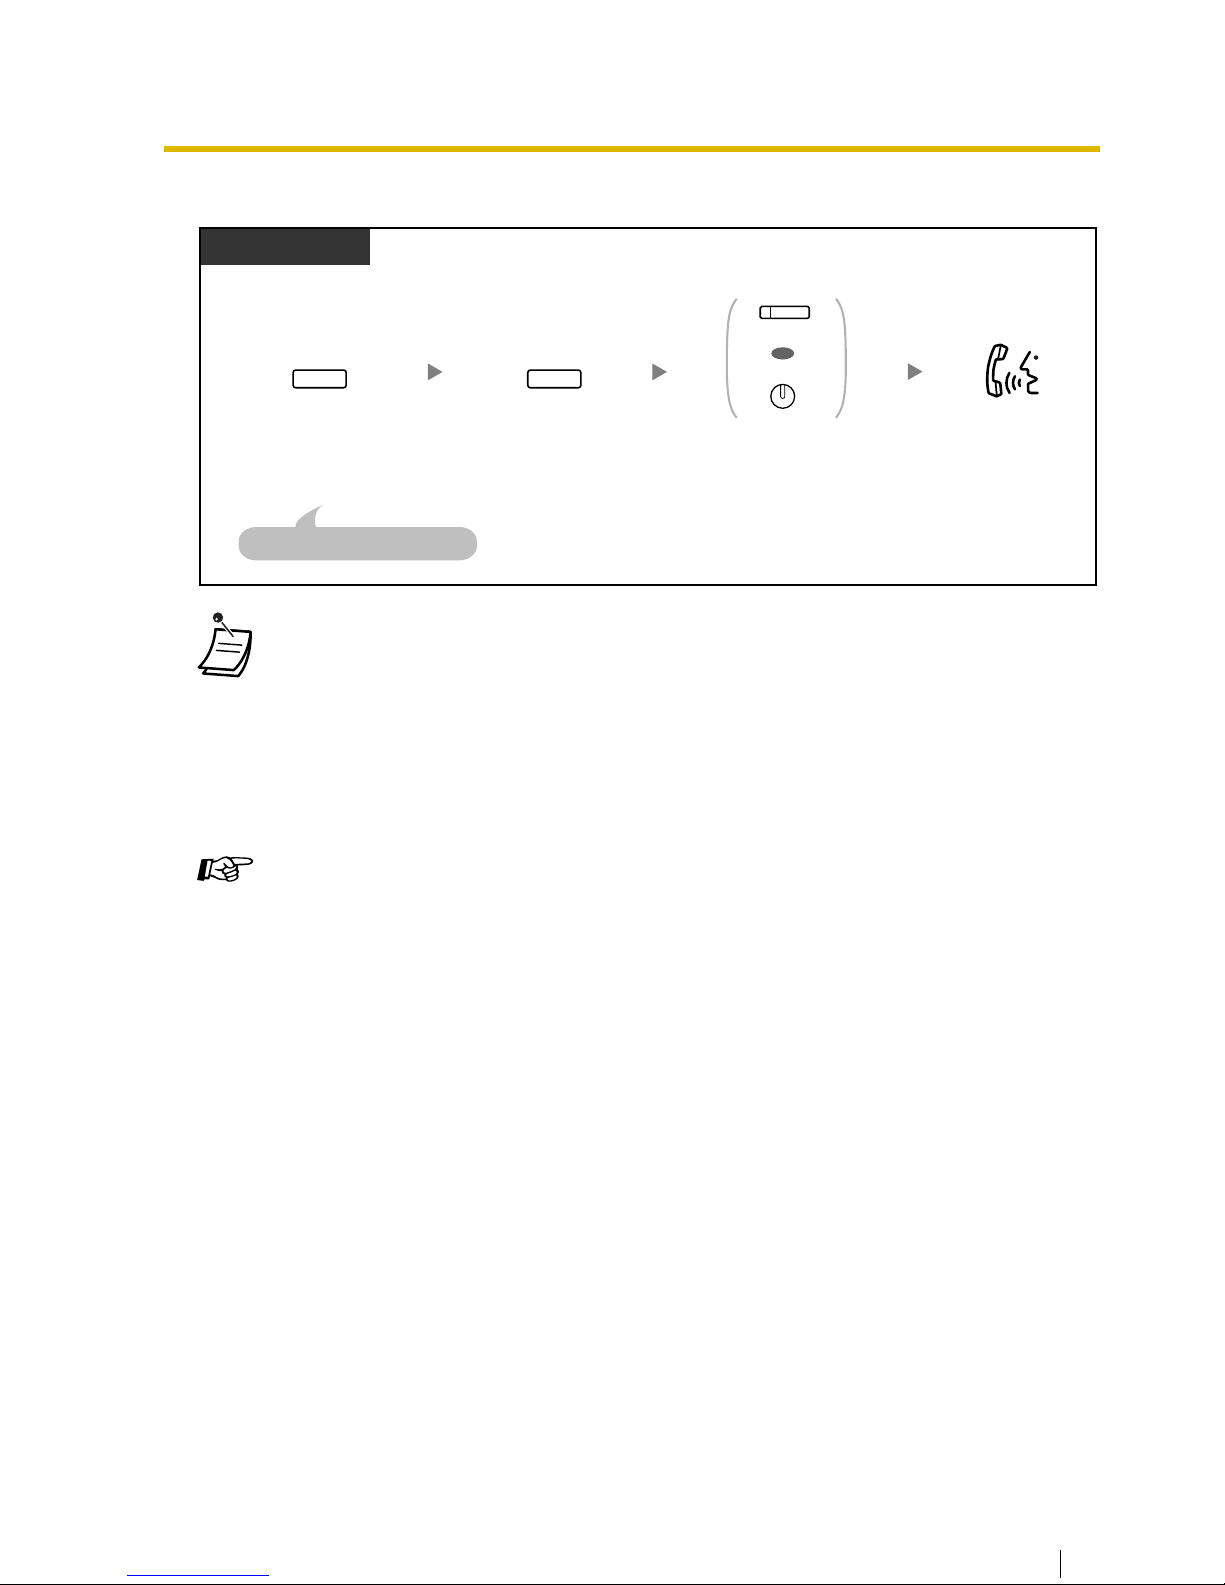
To disconnect one party and then talk to the other in a three-party conversation
• * In this case, the FLASH/RECALL button on a proprietary telephone must be in the Flash/
Recall mode.
• During a three-party conversation, pressing the TRANSFER button or Recall/hookswitch
alternates between the two other parties in the conversation.
• You can have a conference with a maximum of eight parties (comprising intercom or CO
lines) simultaneously.
• During a conversation involving four or more parties, you cannot disconnect one party and
maintain the conversation with the other parties.
Customizing Your Phone
• 3.1.3 Customizing the Buttons
Create or edit a Conference button.
PT/PS
Press
TRANSFER
once
or twice to establish a
conversation with the
party to be disconnected.
TRANSFER
During a conversation
Press
FLASH/RECALL
.*
FLASH/
RECALL
Press the flashing
CO
or
INTERCOM
corresponding
to the party on hold.
OR
(CO)
INTERCOM
Talk.
The other party will be put on hold.
Page 27
1.4 During a Conversation
64 User Manual
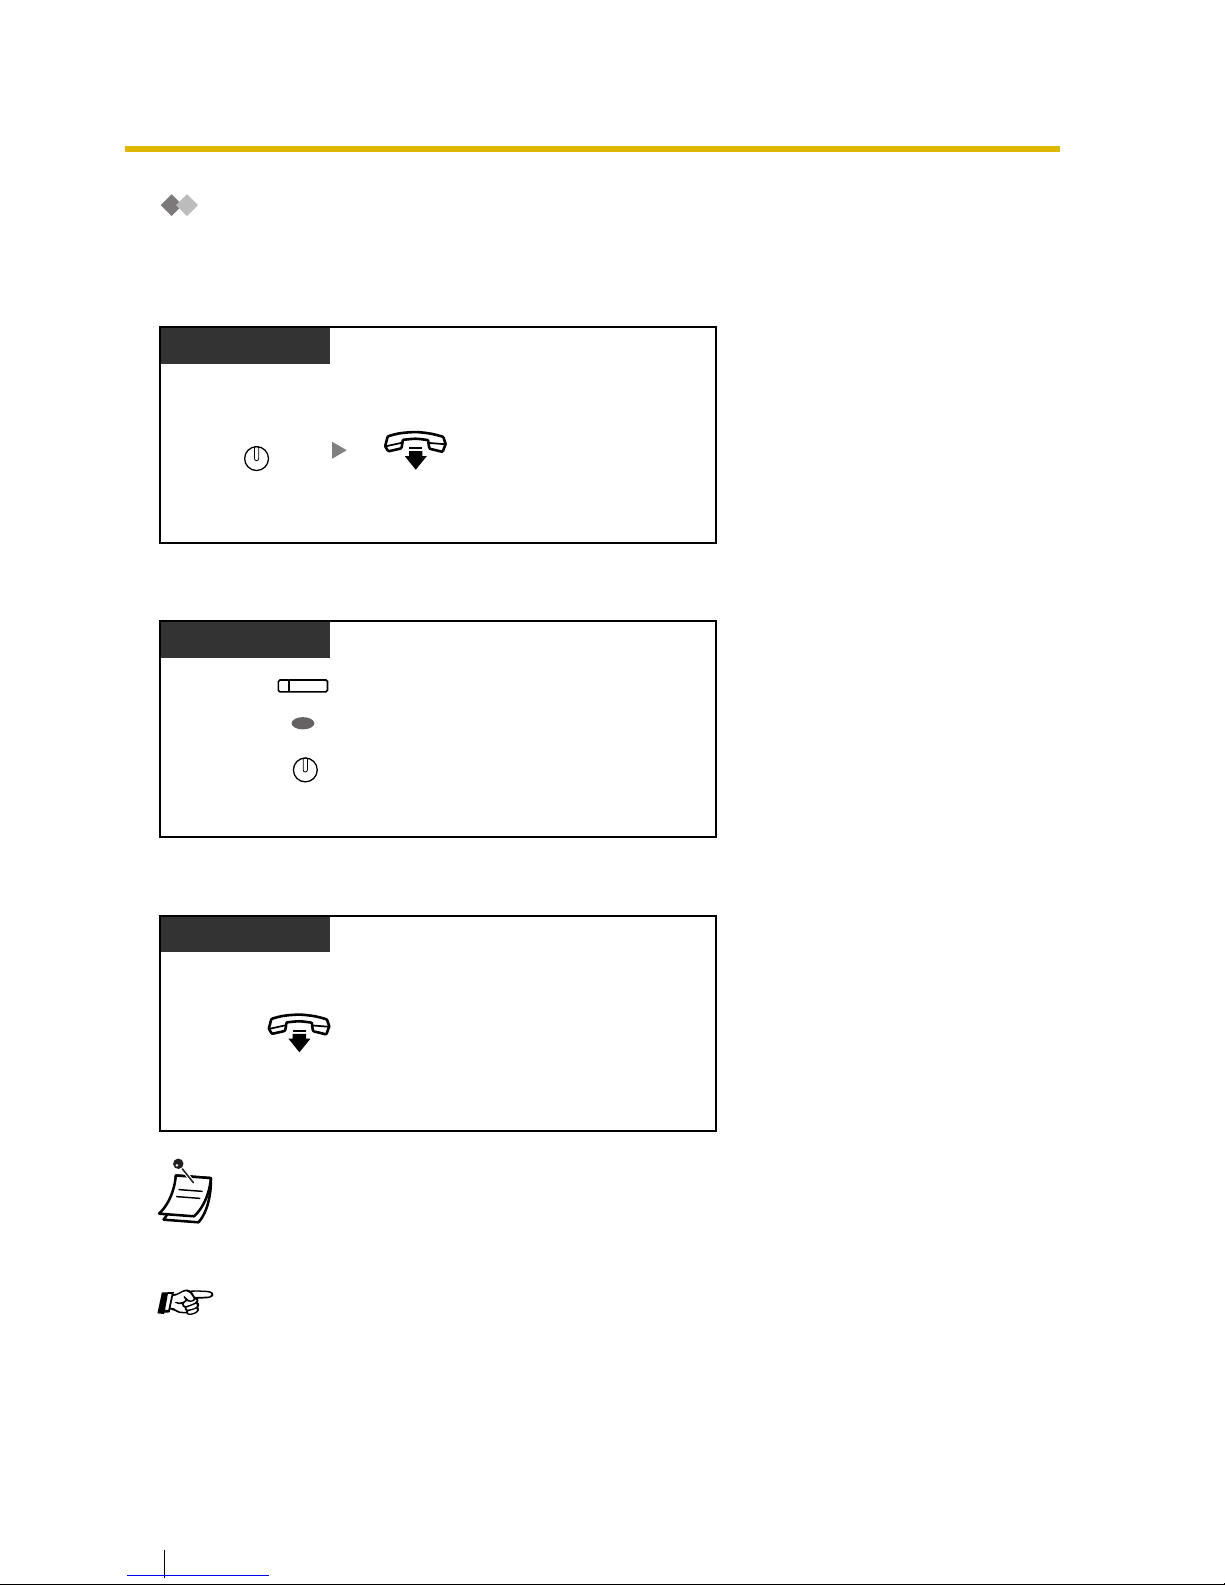
Unattended Conference
The other parties can continue their conversation.
To leave a conference
To return while others are talking
To complete a conversation
• Time limit
Both parties will hear an alarm tone before a specified timeout. The originating extension
will hear an alarm tone before timeout. The call is disconnected when the time runs out
unless the originating extension returns to the conference.
Customizing Your Phone
• 3.1.3 Customizing the Buttons
Create or edit a Conference button.
PT/PS
Press
CONF
.
During a 3- to 7-party conference
CONF
On-hook.
Press flashing green CO or
INTERCOM
.
PT
OR
(CO)
INTERCOM
During a conversation
On-hook.
PT/SLT/PS
Page 28
1.4 During a Conversation
User Manual 65
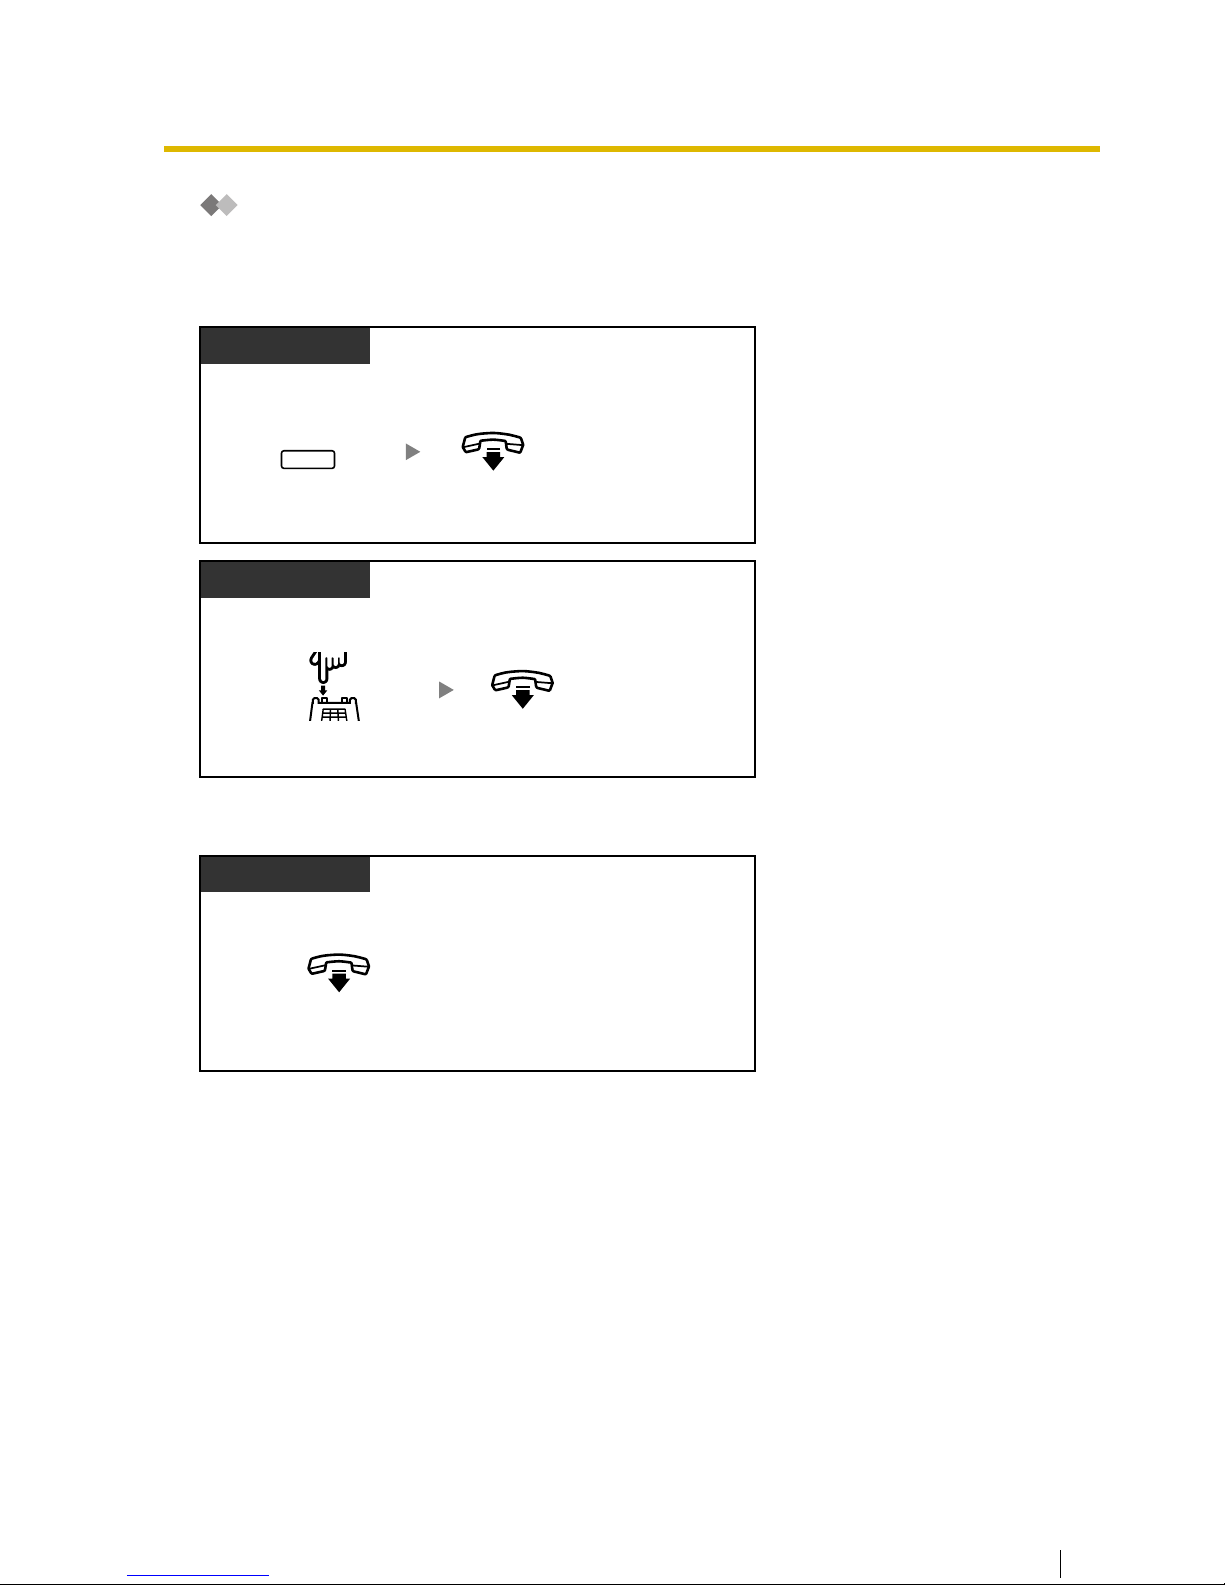
Leaving Three-party Conference
The other two parties can continue their conversation.
To leave a conference
To complete a conversation
During a three-party conference
PT/PS
Press
TRANSFER
.
TRANSFER
On-hook.
During a three-party conference
SLT
Press
Recall/hookswitch
.
On-hook.
During a conversation
PT/SLT/PS
On-hook.
Page 29
1.4 During a Conversation
66 User Manual
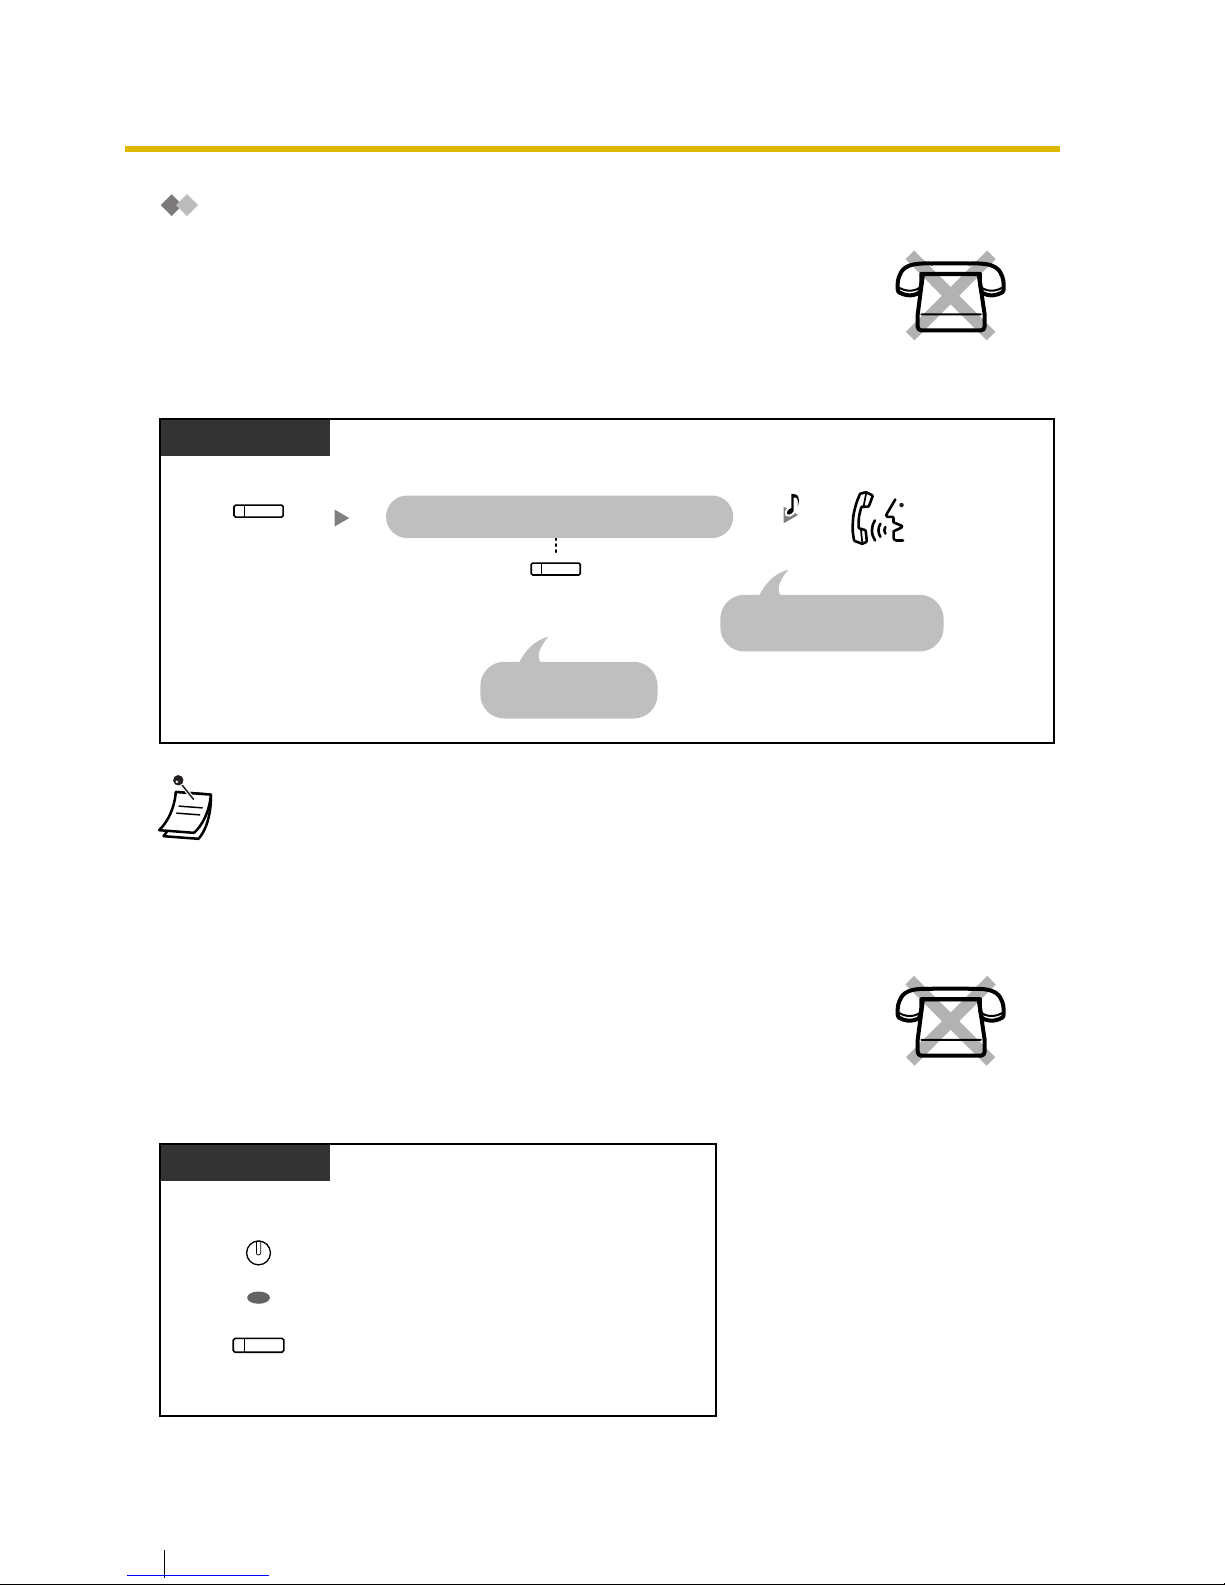
Privacy Release
To set
1.4.6 Mute
To set/cancel
You can let a third party join your current outside call.
• Only an S-CO button can be used for this operation.
You can disable the microphone or the handset to consult privately with others
in the room while listening to the other party on the phone through the speaker
or the handset.
Press green
S-CO
.
Ask the third party to perform the step below.
Press flashing green
S-CO
within 5 seconds.
During a conversation
A three-party conversation
is now established.
To prolong,
press
S-CO
again.
PT/PS
Talk.
(S-CO)
(S-CO)
C.Tone
Press
MUTE
.
PT
OR
During a conversation
AUTO ANS
MUTE
VOICE CALL
MUTE
Page 30
1.4 During a Conversation
User Manual 67
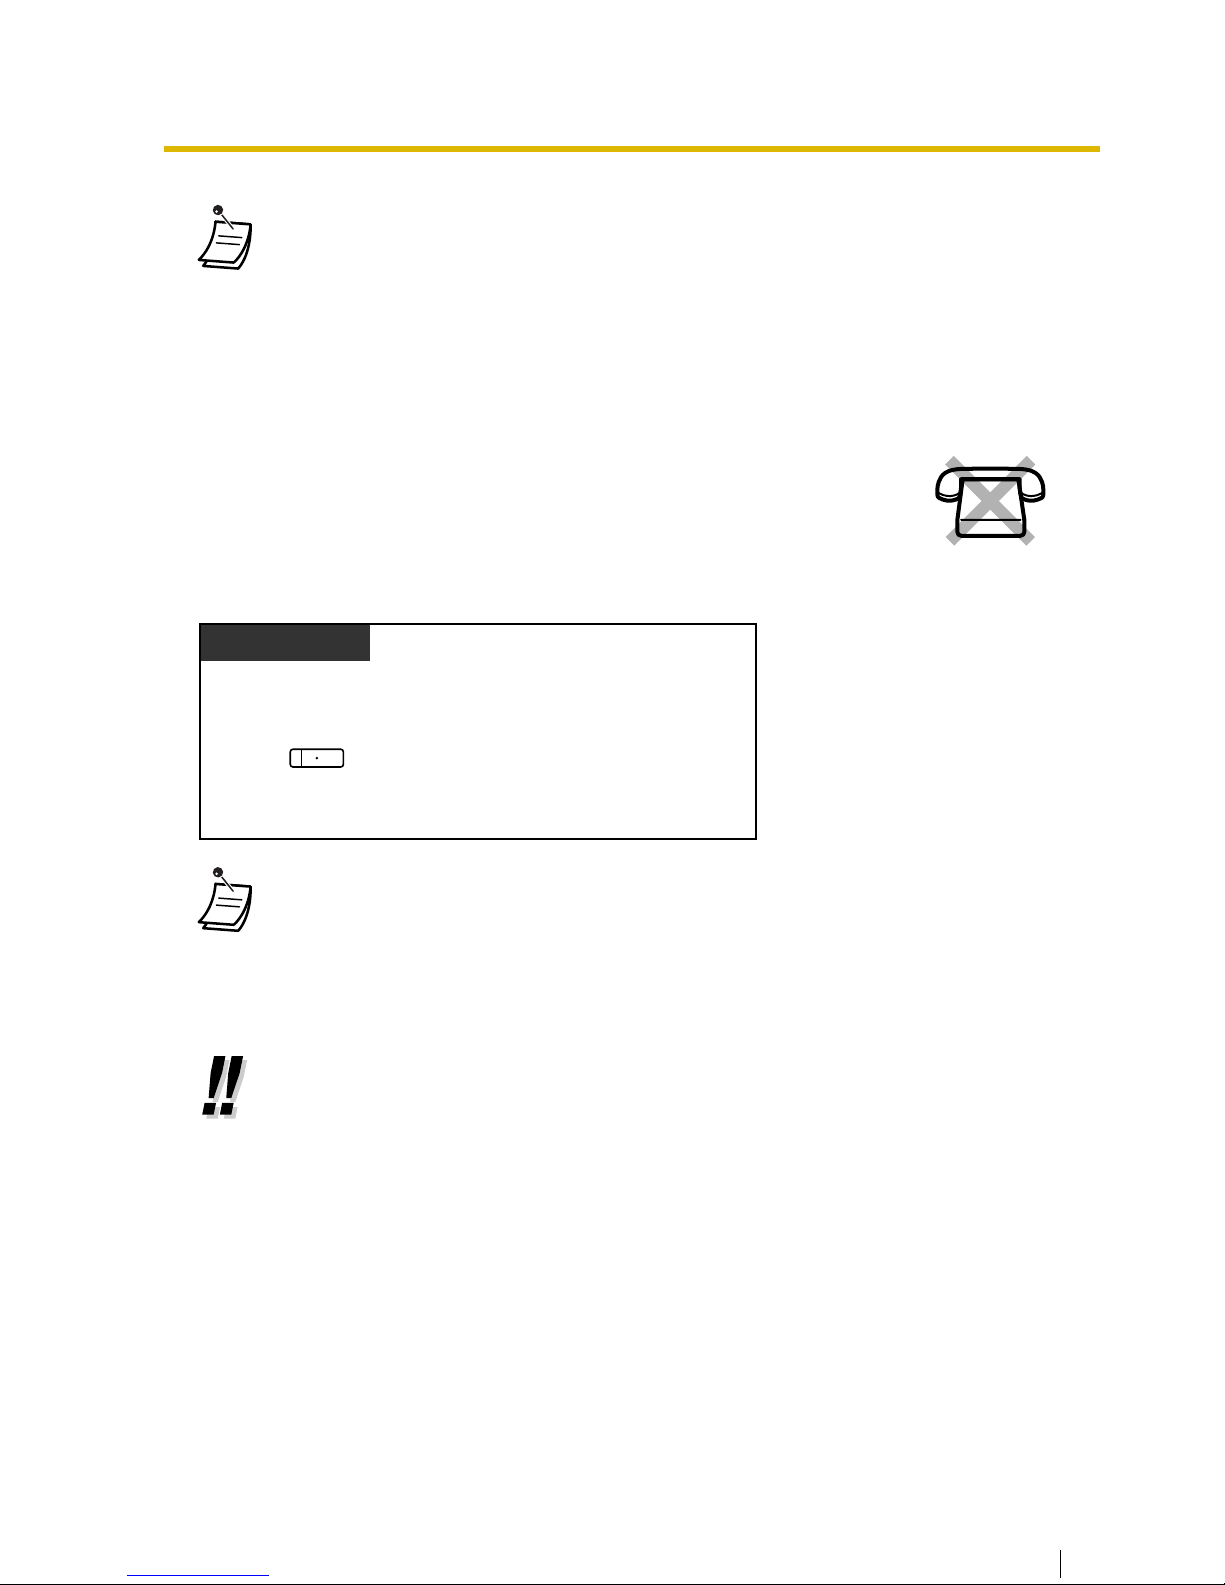
1.4.7 Off-hook Monitor
To set/cancel
• The AUTO ANS/MUTE or VOICE CALL/MUTE button light shows the current status as
follows:
Off: Normal
Flashing red: Mute
• If mute is used during OHCA, it will become Handset Mute.
You can let other people in the room listen to the conversation through the
speaker while continuing the conversation using the handset.
• The SP-PHONE button light shows the current status as follows:
Off: The voice is heard through the handset.
On: The voice is heard through the speaker and the handset.
• This feature is controlled work by programming. Ask your manager.
• This feature may not be available with certain proprietary telephones. For more details,
consult your dealer.
• Hands-free operation
You can have a conversation in hands-free mode using the SP-PHONE button. You can
perform other tasks simultaneously.
Helpful hints for hands-free operation:
• If it is difficult to hear the other party’s voice;
Raise the sound level using the Speaker Volume Control.
• If the other party has difficulty hearing you;
Lower the sound level.
• Absorbing echoes;
Using this unit in a room which has curtains or carpeting or both.
• To avoid missing part of the conversations;
If you and the other party speak at the same time, parts of your conversation will be
lost. To avoid this, speak alternately.
Press
SP-PHONE
.
PT
During a conversation using the handset
SP-PHONE
Page 31
1.5 Absence Settings
66 User Manual
1.5 Absence Settings
1.5.1 Call Forwarding
— Call Forwarding (FWD)
Call Forwarding (FWD)
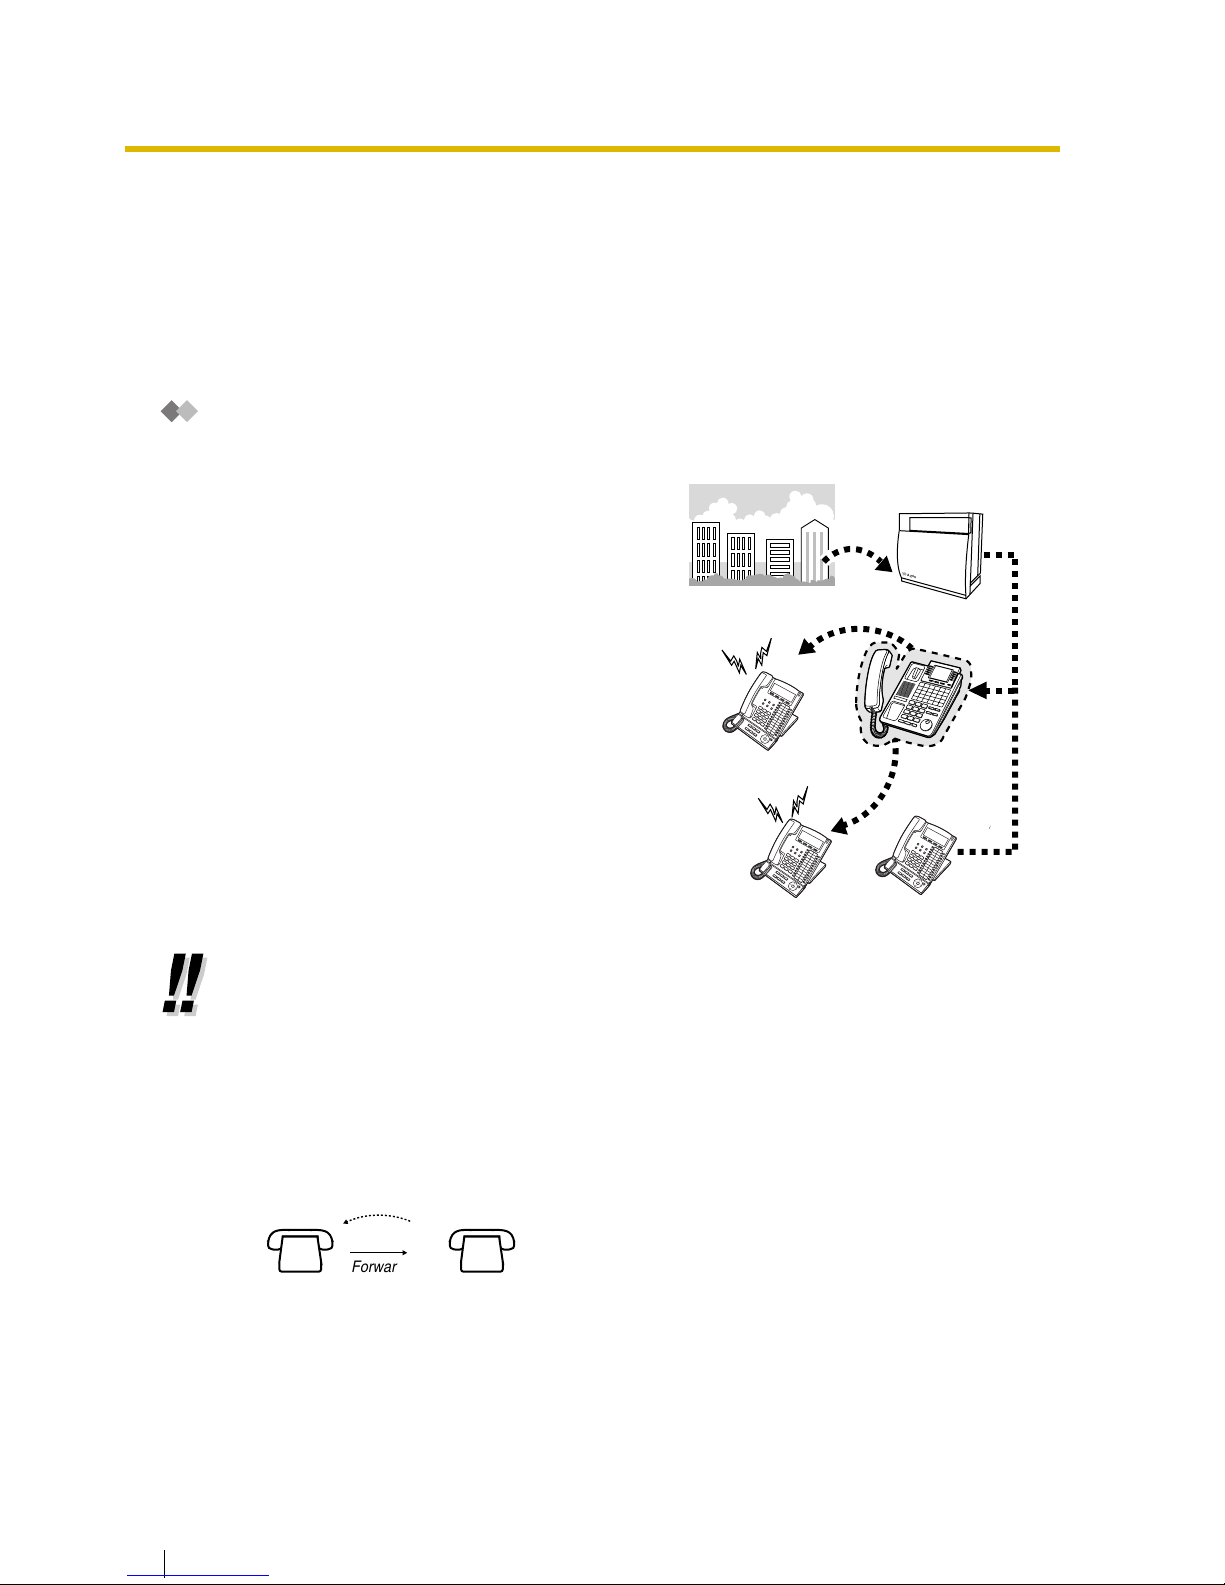
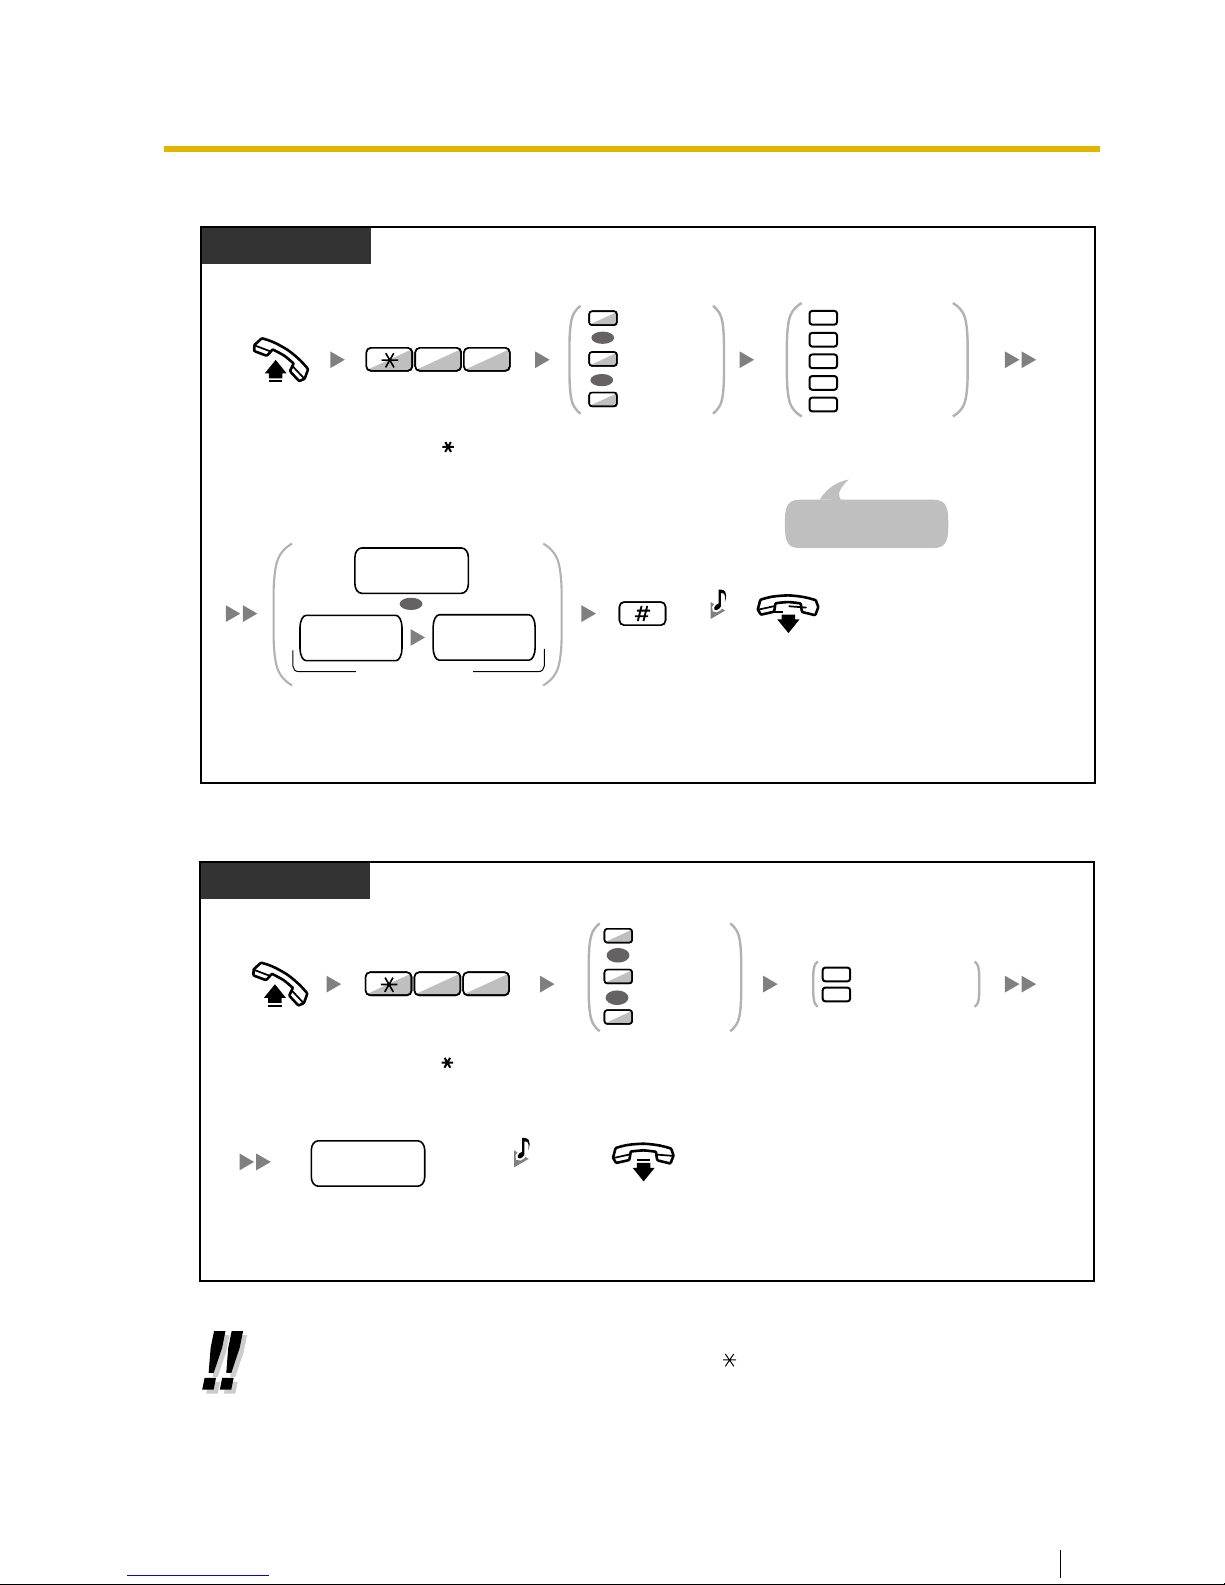
You can have your incoming calls forwarded to a
specified destination.
All Calls:
All calls are forwarded. Preset extensions may
also forward from their own receiving group.
Busy:
All calls are forwarded when your extension is
busy.
No Answer:
All calls are forwarded when you do not answer
the call within a specified time period.
Busy/No Answer (BSY/NA):
All calls are forwarded when you do not answer
within a specified time period or when your
extension is busy.
Follow Me (From):
If you fail to set the above-mentioned "All Calls" to
forward before you leave your desk, you can set
the same feature from the destination extension.
• You can set the voice mail floating extension number as a forward destination to receive
calls into your mailbox.
• You can set your mobile telephone as the forward destination. The voice mail can be used
to receive calls if you are unable to answer.
• Incoming calls can be forwarded up to four times.
•
Boss & Secretary feature
The extension which has been set as the destination can call the forwarding extension.
<Example>
TDA200
Forward
set
Call
destinationForwarding
extension
Page 32
1.5 Absence Settings
User Manual 67
To set/cancel
To set from another extension
• When using a proprietary telephone, you can set or cancel Call Forwarding by pressing
the FWD/DND button (fixed button) instead of " 710".
PT/SLT/PS
Enter #.
On-hook.
Enter
destination extension number
.
Or enter
CO line access number
and then
outside phone number
.
2
0
3
4
5
Cancel
All Calls
Busy
No Answer
Busy/No Answer
Enter
required
number
.
For "Cancel",
go on-hook directly.
Off-hook.
1
2
0
Both Calls
Intercom Calls
Outside Calls
OR
OR
Enter 71.
1
7
Enter 0 to 2 as
you desire.
OR
destination
extension no.
(Max. 32 digits)
outside
phone no.
CO line
access no.
C.Tone
PT/SLT/PS
your
extension no.
On-hook.
Enter
your
extension number
.
Enter
7
or 8.
7
8
Follow Me
Follow Me Cancel
Off-hook.
1
2
0
Both Calls
Intercom Calls
Outside Calls
OR
OR
Enter 71.
1
7
Enter 0 to 2 as
you desire.
C.Tone
Page 33
1.5 Absence Settings
68 User Manual
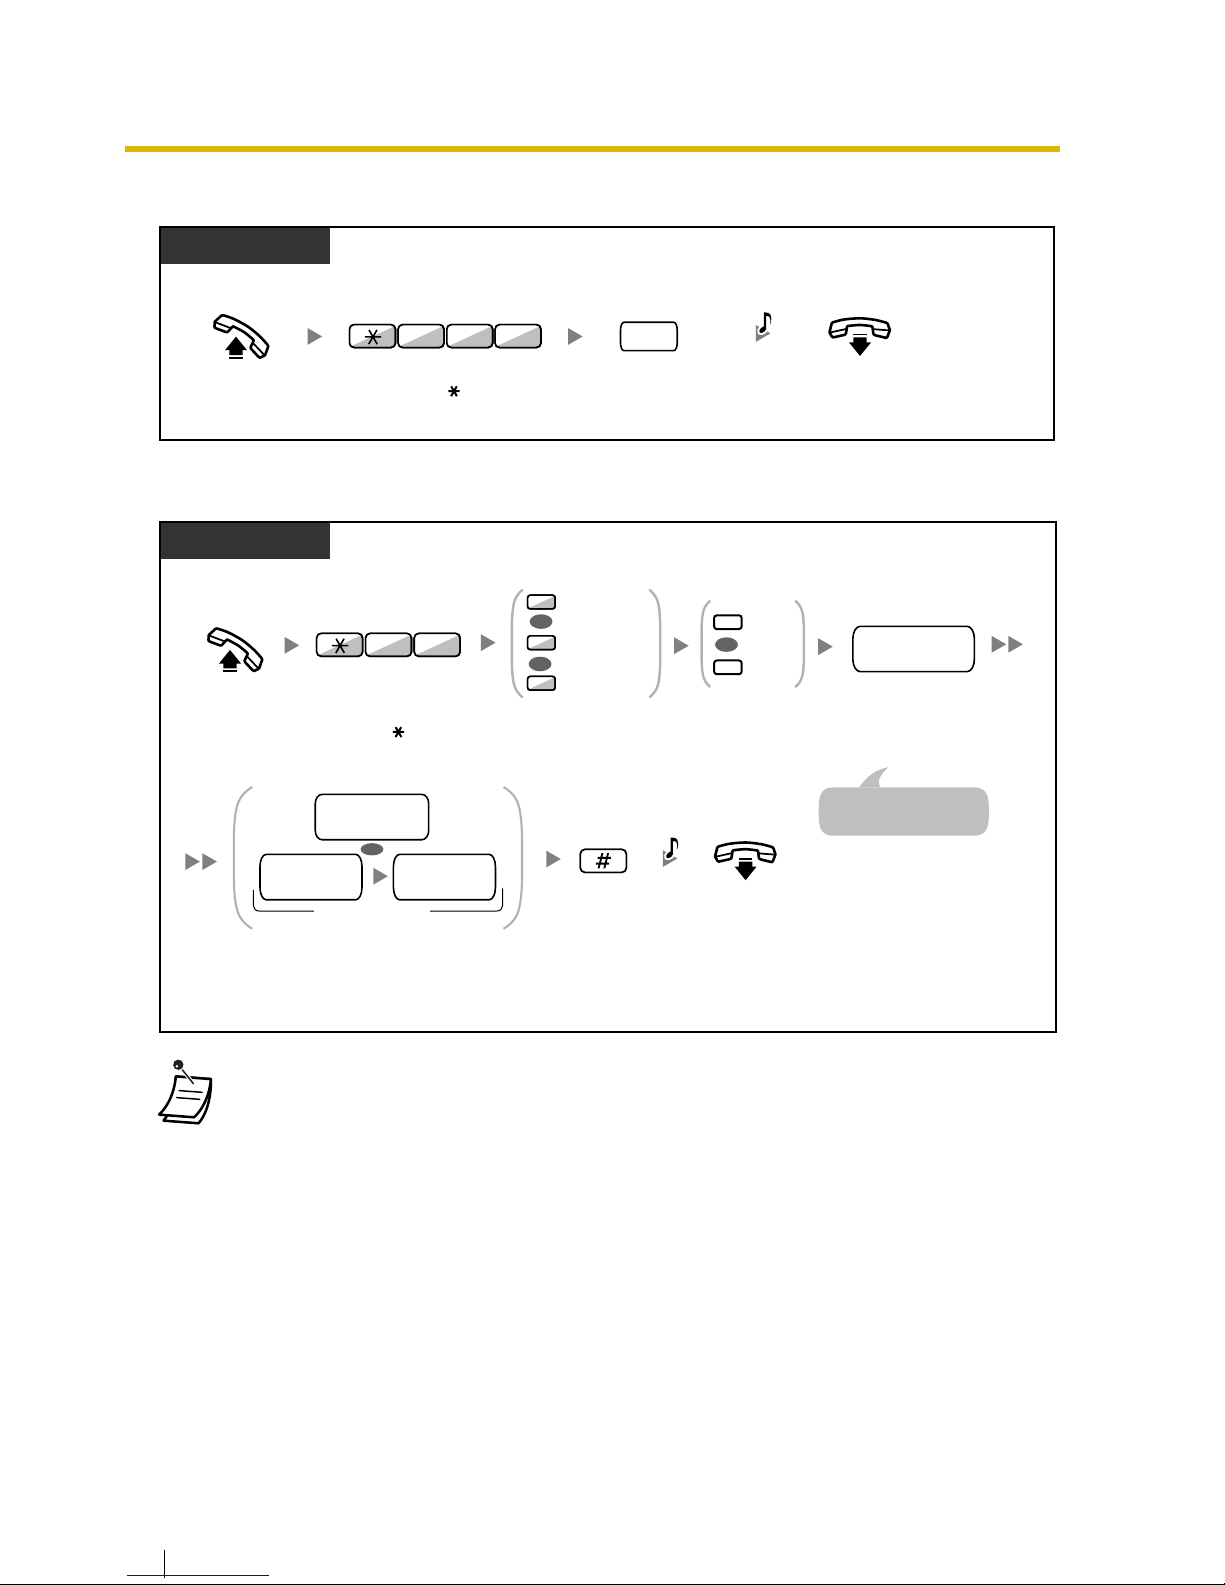
To set the timer for "No Answer" and "Busy/No Answer"
Call Forwarding (FWD) for your Incoming Call Distribution Group
• The FWD/DND button light shows the current status as follows:
Off
: Both features are not set.
Flashing red slowly
: FWD mode
Red on
: DND mode
• The Group FWD button light shows the current status as follows:
Off
: No set
Flashing red slowly
: FWD mode
• You can change the mode alternately by pressing the FWD/DND or Group FWD button
while on-hook.
This only applies to a FWD/DND button or Group FWD button customized on a flexible
button; it cannot be done on the FWD/DND button (fixed button).
(Refer to "Fixed Buttons" in "1.1.1 Before Operating the Telephones".)
• Transferred outside calls are also forwarded to the destination assigned for outside calls.
Off-hook.
Enter time
(seconds [2 digits]).
time
PT/SLT/PS
Enter 713.
On-hook.
1 3 7
C.Tone
PT/SLT/PS
0
1
Set
Cancel
OR
Enter 1 to set
or 0 to cancel.
Enter ICDG
extension number.
ICDG
extension no.
Off-hook.
5
6
4
Both Calls
Intercom Calls
Outside Calls
OR
OR
Enter 71.
1
7
Enter 4 to 6 as
you desire.
Enter #.
On-hook.
Enter destination extension number.
Or enter CO line access number
and then outside phone number.
OR
destination
extension no.
(Max. 32 digits)
outside
phone no.
CO line
access no.
C.Tone
ICDG: Incoming Call Distribution Group
For "Cancel",
go on-hook directly.
Page 34

1.5 Absence Settings
User Manual 69
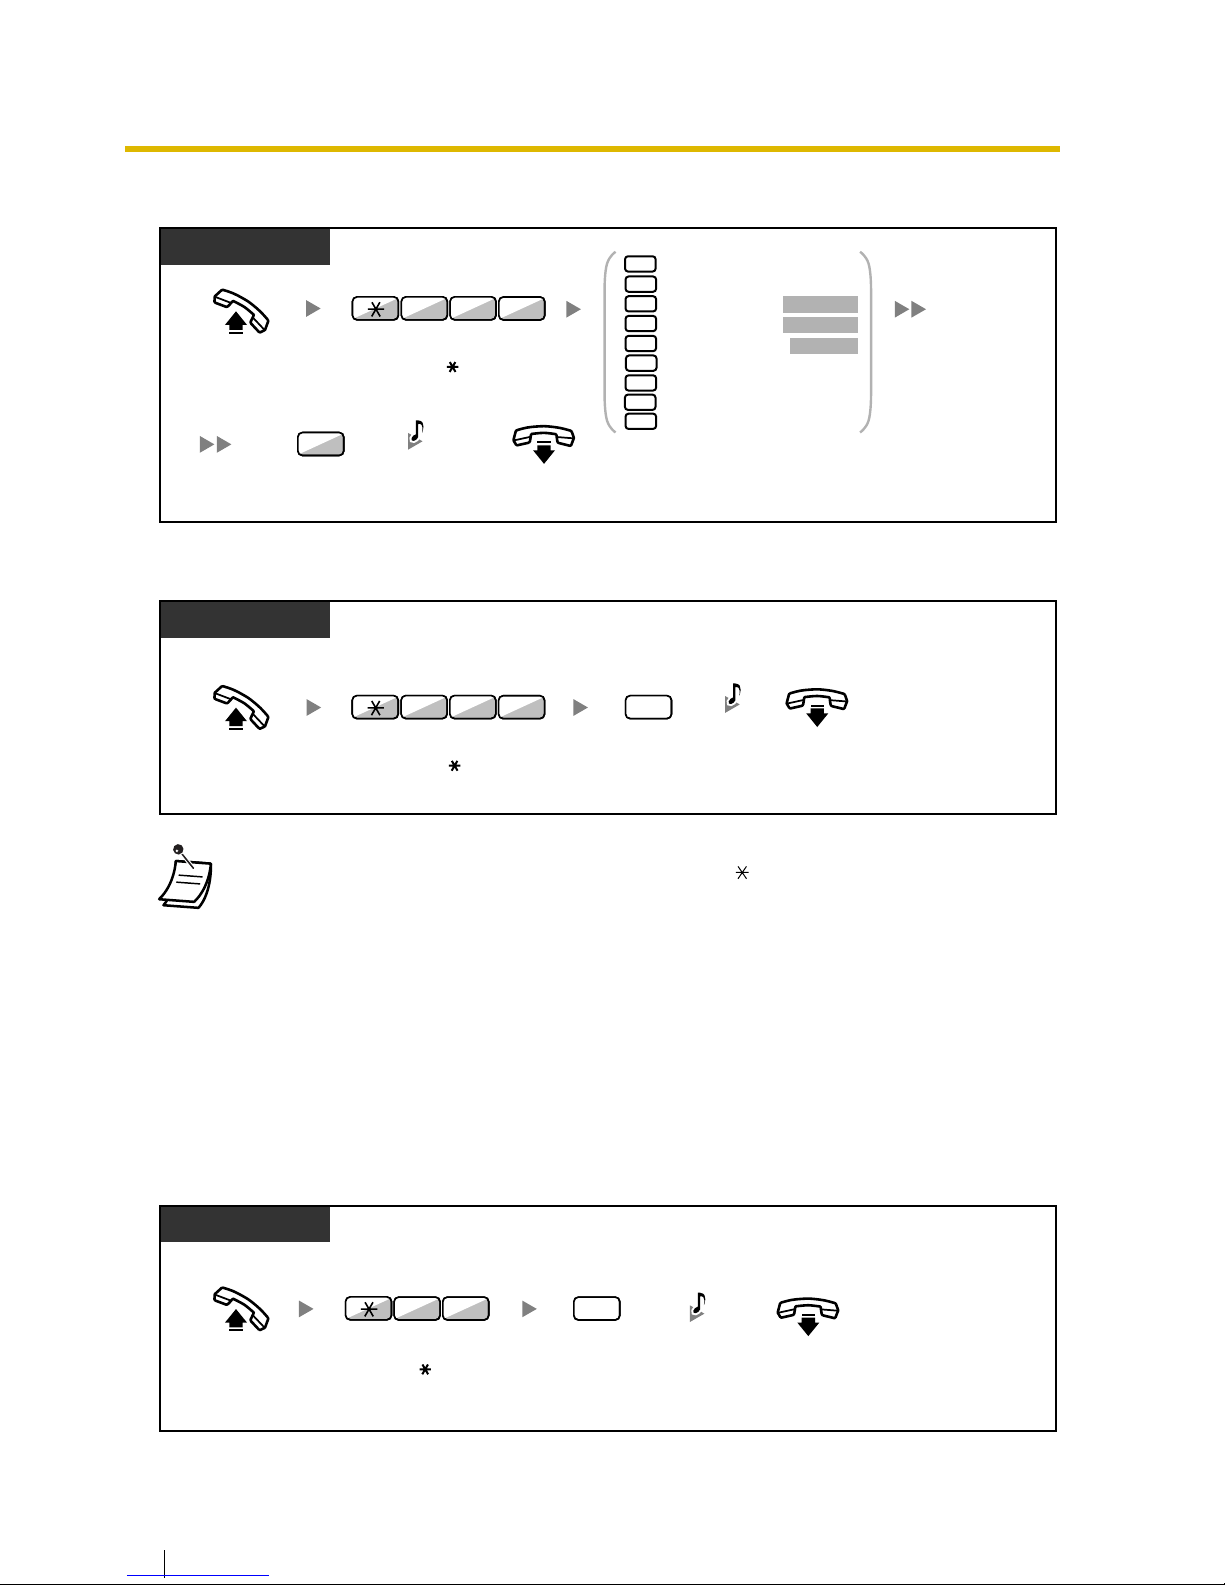
1.5.2 Absent Message
You can show the reason you do not answer, if the caller uses a Panasonic display proprietary
telephone. There are eight preprogrammed messages and one for your personal message (16
characters). The selected message is shown on the display of your telephone.
• When intercom calls are set to be handled differently from outside calls (forwarding type,
forward destination), we recommend establishing buttons for both FWD/DND—Outside
calls and FWD/DND—Intercom calls, and/or Group FWD—Outside calls and Group
FWD—Intercom calls, because:
a)
the light patterns of the FWD/DND—Both calls button (including FWD/DND button
[fixed button]) and the Group FWD—Both calls button will indicate the setting for
either outside calls or intercom calls, but not both.
Note
The FWD icon on PS display reflects the setting for outside calls only.
b)
pressing the FWD/DND—Both calls button or the Group FWD—Both calls button will
not change the FWD or DND mode for intercom calls and outside calls separately.
Customizing Your Phone
• 3.1.3 Customizing the Buttons
Create or edit FWD/DND (Both calls, Outside calls, Intercom calls) buttons, or Group
FWD (Both calls, Outside calls, Intercom calls) buttons.
Message no. Message (Example)
1 Will Return Soon
2 Gone Home
3 At Ext %%%% (Extension number)
4 Back at %%:%% (Hour:Minute)
5 Out until %%/%% (Month/Day)
6 In a Meeting
7
8
9
A message assigned for each extension.
(Personal Absent Message)
Page 35
1.5 Absence Settings
70 User Manual
To set
To cancel
1.5.3 Extension Lock
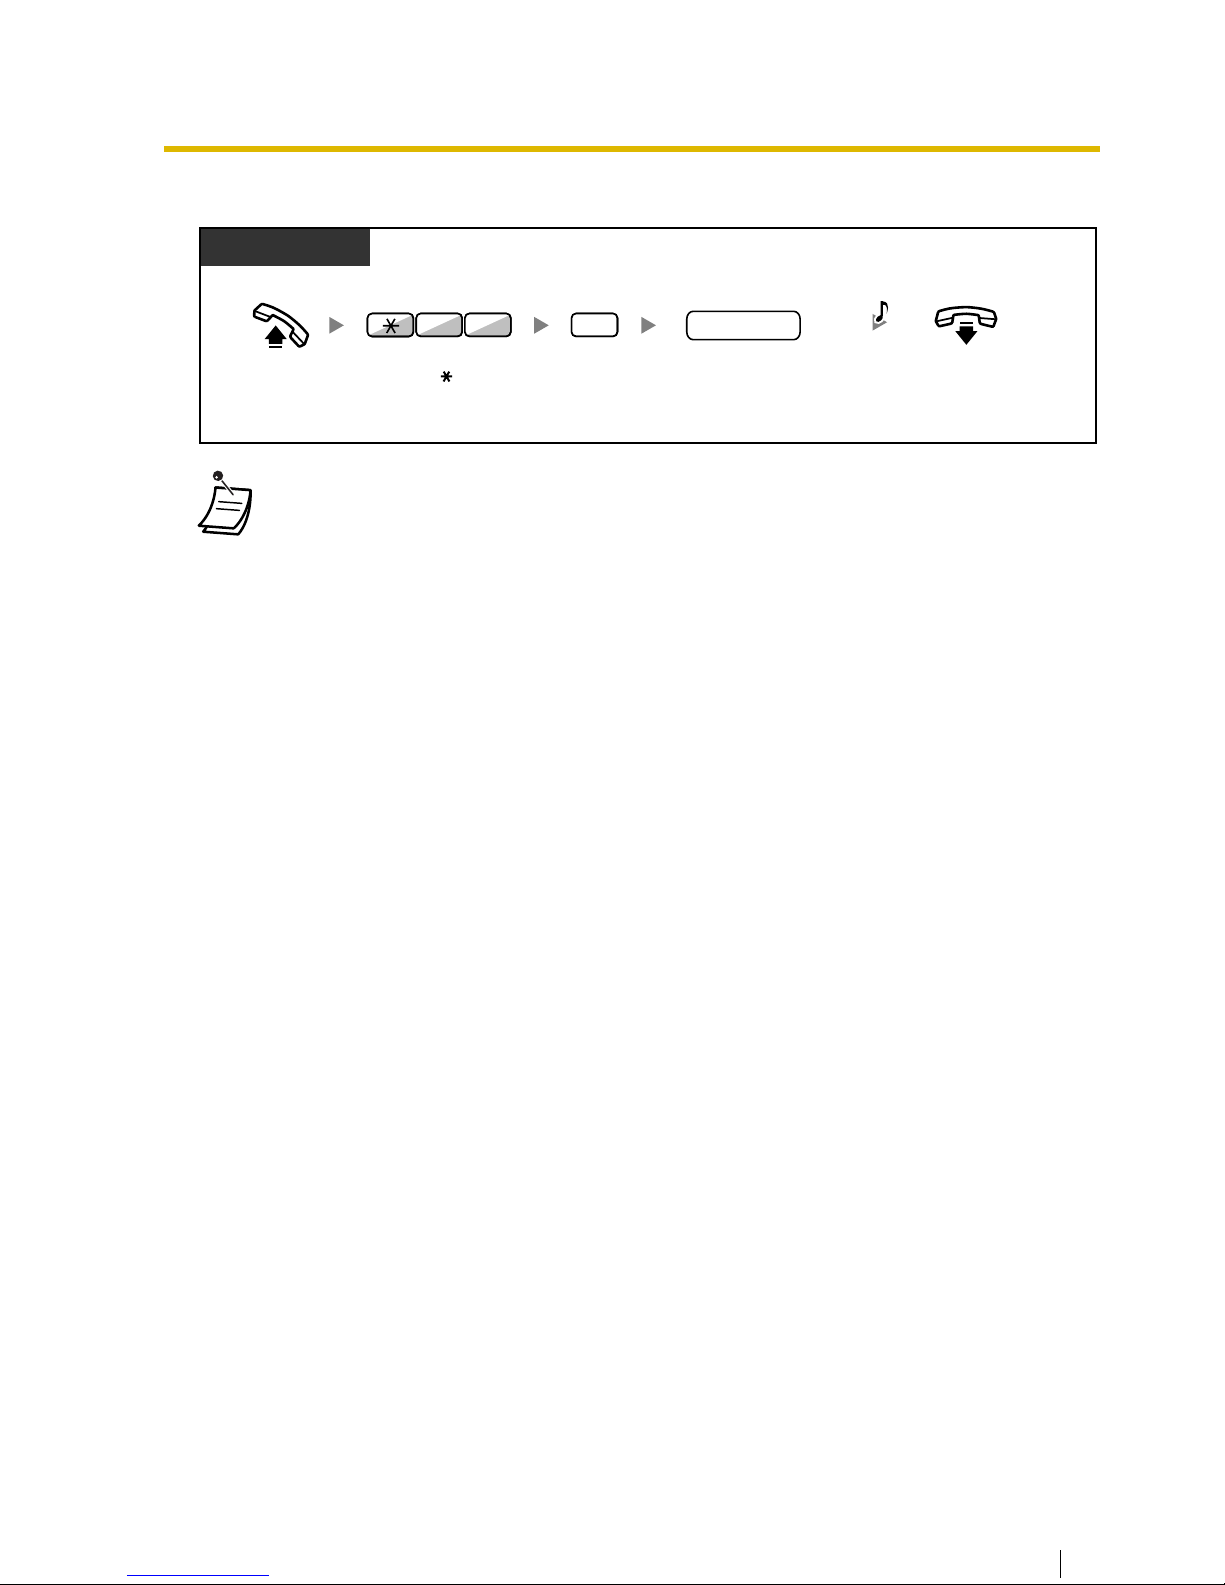
You can lock your extension so that other users cannot make inappropriate outside calls.
This feature is also known as Electronic Station Lockout.
To lock
• Enter the desired value in the "%" positions. You must enter the correct number of
characters as represented by the "%" using 0 to 9 or .
• The default messages can be changed. Consult your dealer.
• To create your personal message (Message no. 9), refer to "3.1.2 Settings on the
Programming Mode".
Enter required number.
2
3
4
5
6
Gone Home
At Ext %%%% +
Back at %%:%% +
Out until %%/%% +
1
Will Return Soon
9
7
8
In a Meeting
Extension no.
Hour : Minute
Month / Day
PT/SLT/PS
Off-hook.
Enter 750.
7 5
0
On-hook.
Enter #.
#
C.Tone
Off-hook.
Enter 0.
0
On-hook.
Enter
750
.
7 5
0
C.Tone
PT/SLT/PS
Off-hook.
On-hook.
PT/SLT/PS
Enter 77.
Enter 1.
177
C.Tone
Page 36
1.5 Absence Settings
User Manual 71
To unlock
•
If you forget the extension PIN or cannot unlock your phone,
consult your manager.
He can clear your extension PIN. Then, you can set the new PIN and unlock your
extension by entering it.
• If your extension is locked by this feature, it cannot perform feature as follows:
— Making outside calls
— Changing the call forwarding destination
• If you do not set extension PIN, you cannot lock and unlock.
Off-hook. On-hook.
PT/SLT/PS
Enter 77. Enter 0.
077
C.Tone
PIN: Personal Identification Number
extension PIN
Enter
extension PIN
(max. 10 digits).
Page 37
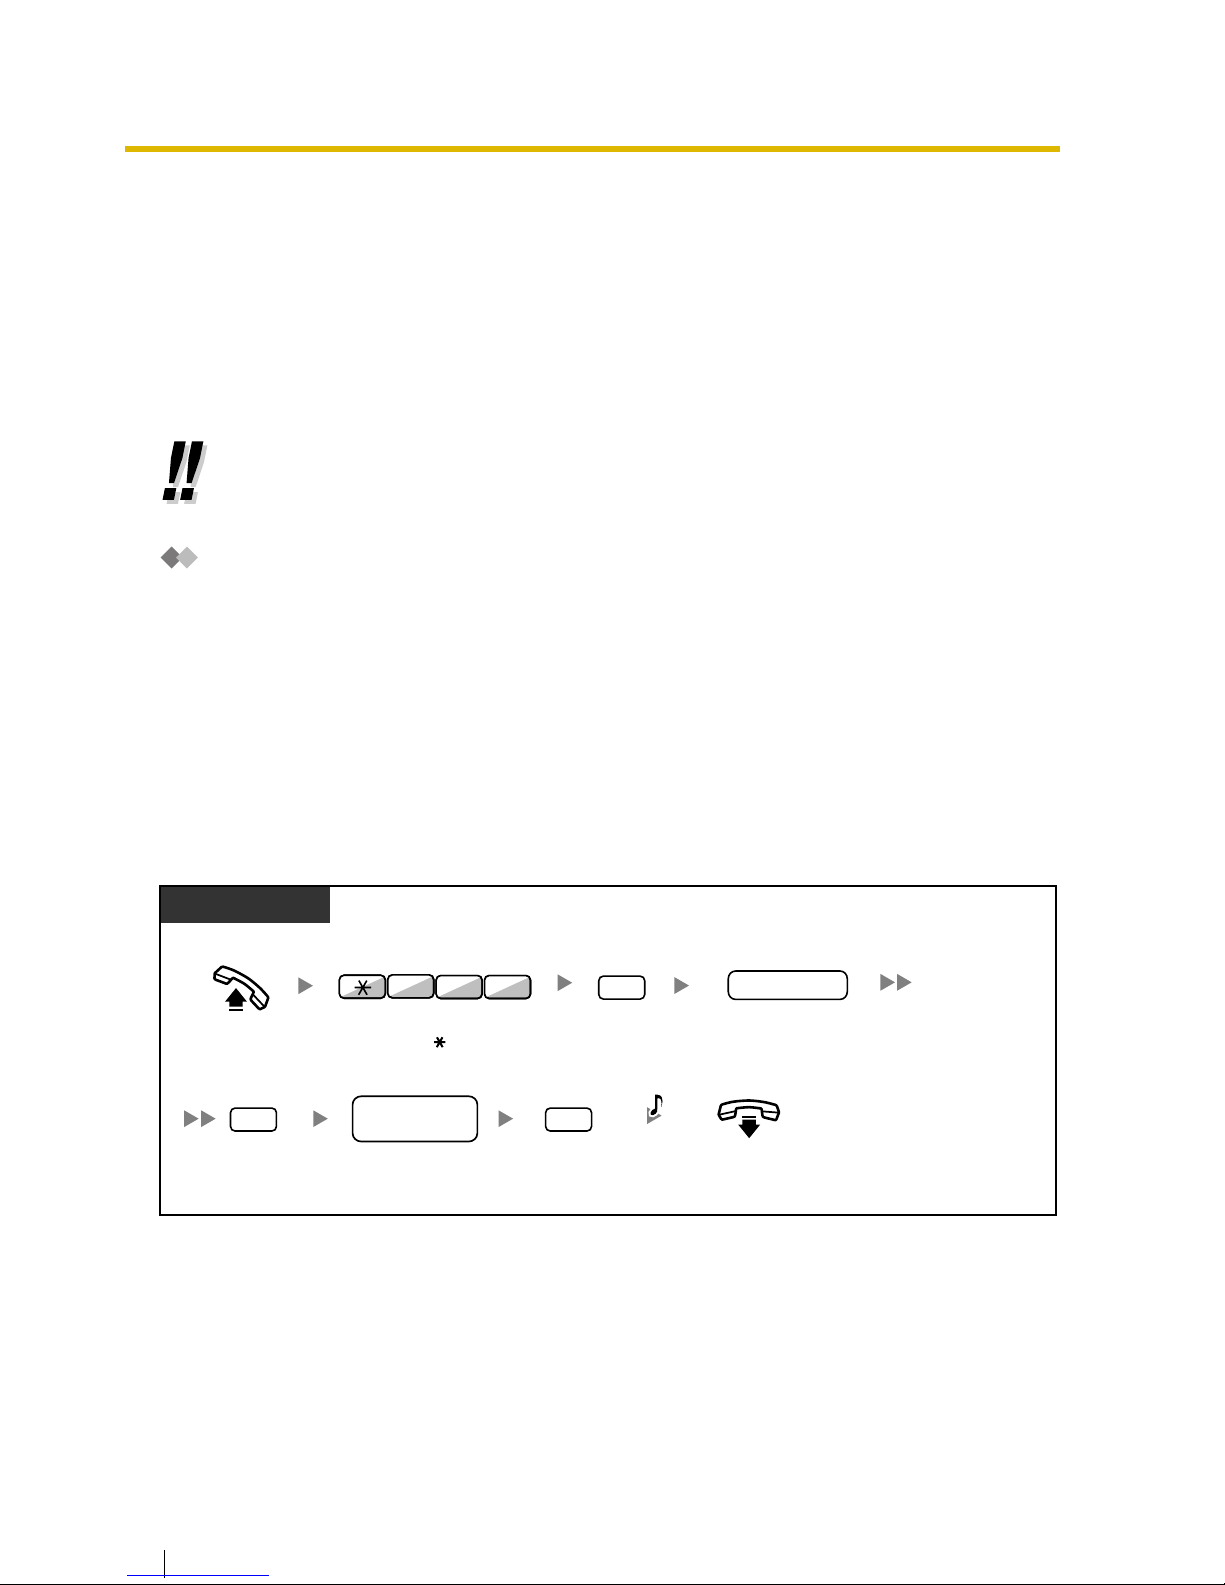
3.1 Personal Programming
112 User Manual
3.1 Personal Programming
3.1.1 Personal Programming
You can customize your telephone features desk and extension. For example, you can change the
initial settings or button features according to your needs.
— Extension PIN (Personal Identification Number)
Extension PIN (Personal Identification Number)
You can assign a password to each extension.
The following features require an extension PIN.
1.
Screening calls (Live Call Screening [LCS])
2.
Prohibiting other people from seeing your personal directory and call log (Directory and Call
Log Lock)
3.
Using the same settings as your extension at other extensions (Walking Extension)
4.
Remote Control Operation (Walking COS)
5.
Extension Lock Clear
To set
• If you change your desk and extension, refer to "1.10.1 Walking Extension".
PT/SLT/PS
Off-hook.
Enter
799
.
1
Enter 1. Enter
extension
PIN
(max. 10 digits).
extension PIN
#
Enter #.
same
extension PIN
#
Enter #.
On-hook.
Enter
same extension
PIN
(max. 10 digits).
7 9 9
C.Tone
PIN: Personal Identification Number
Page 38
3.1 Personal Programming
User Manual 113
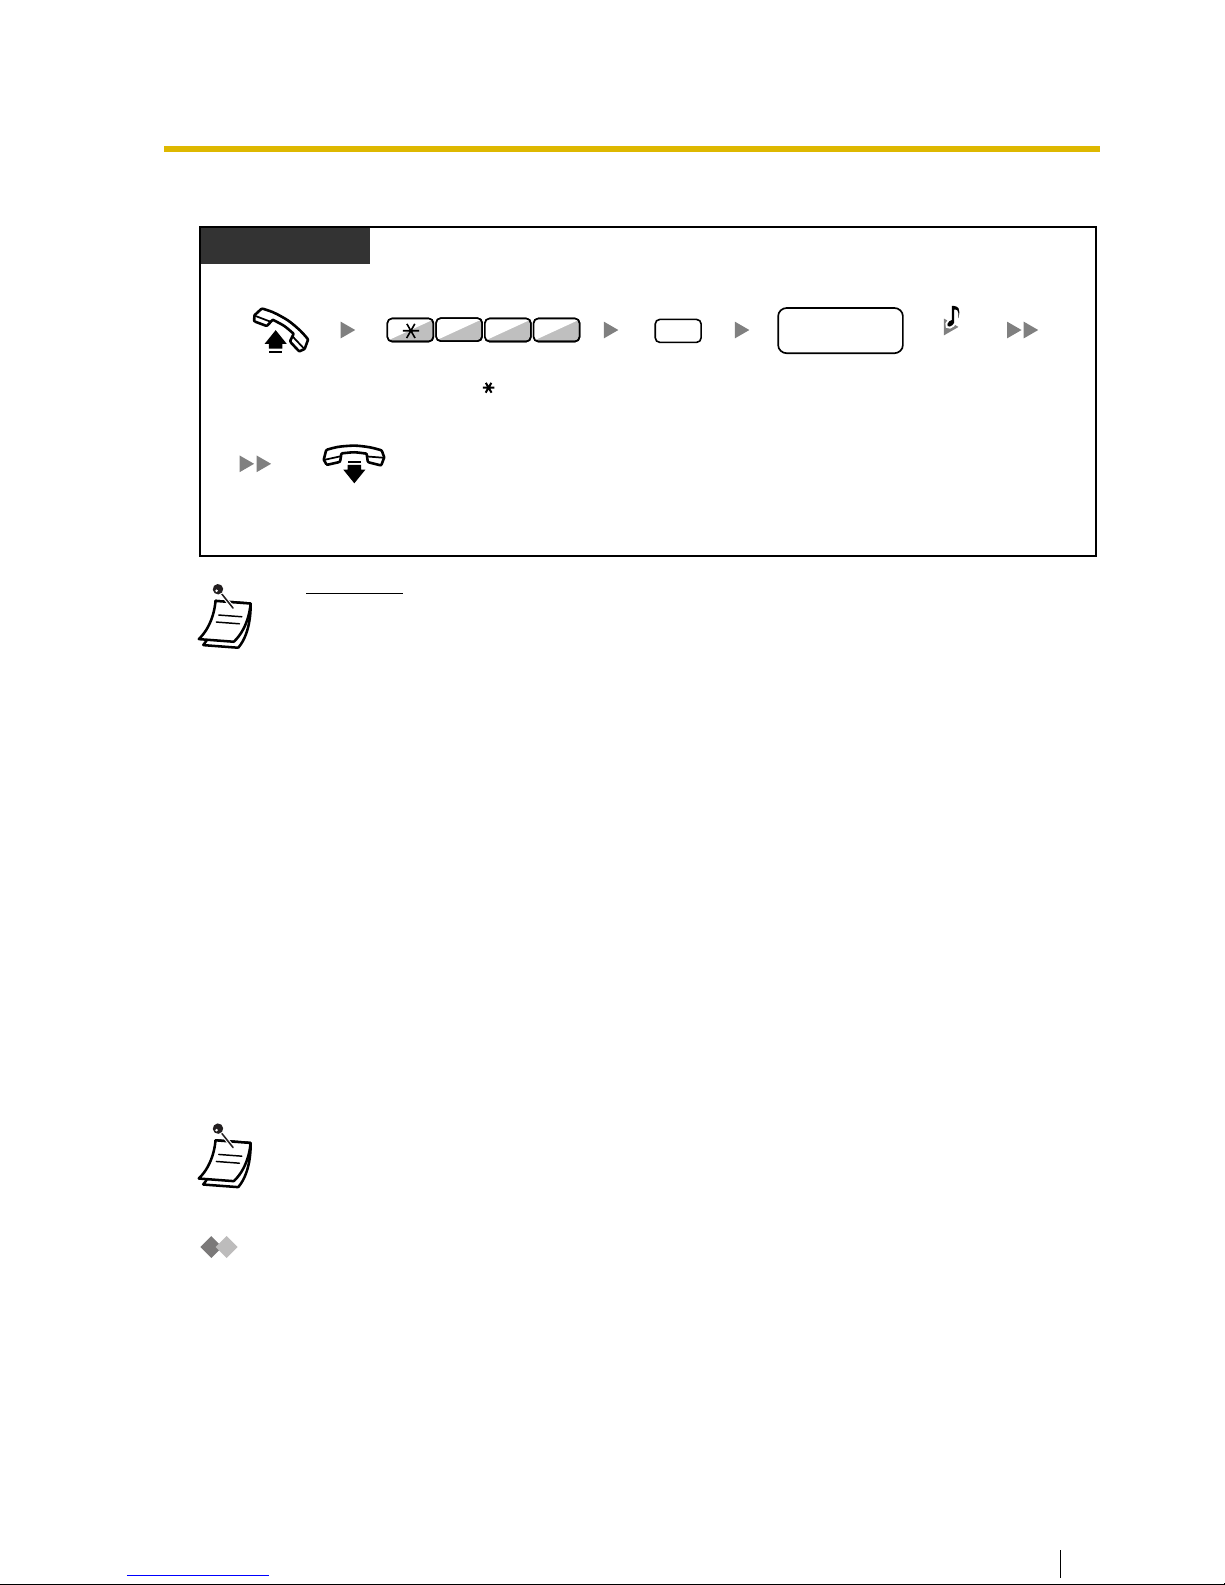
To cancel
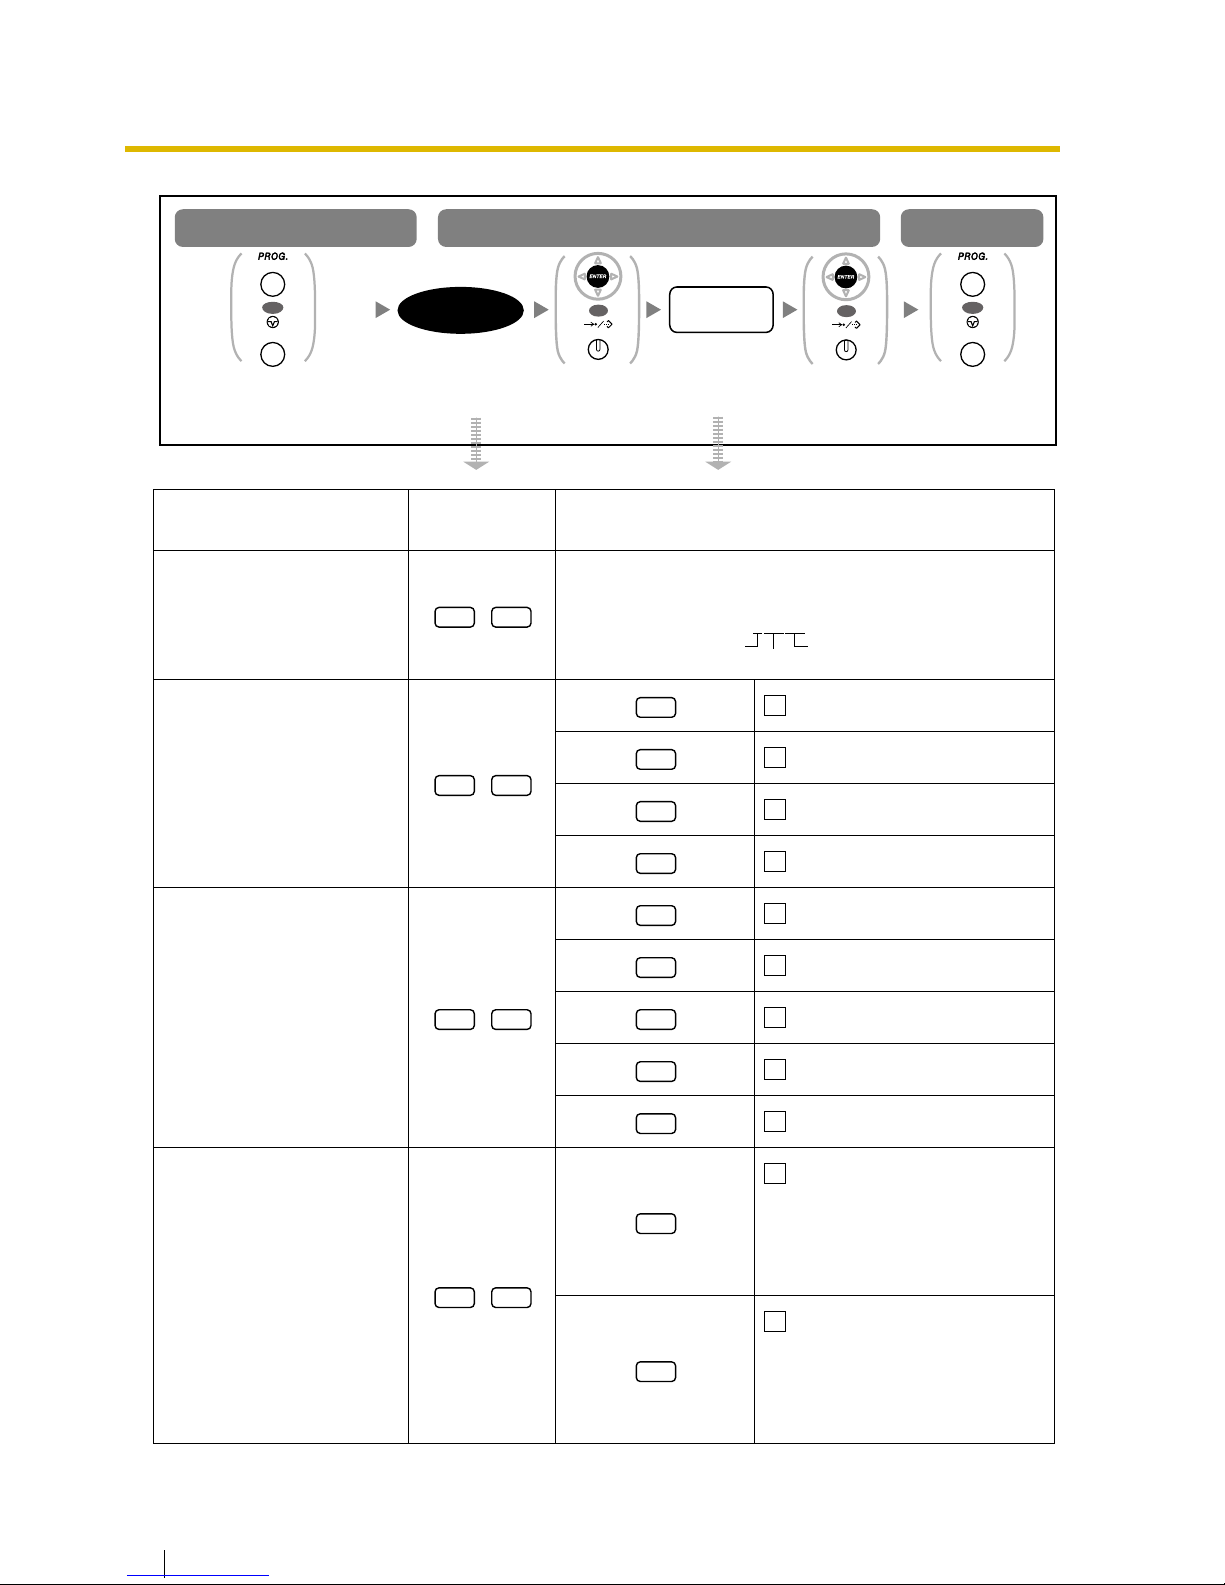
3.1.2 Settings on the Programming Mode
You can program features using the programming mode.
— Setting Features
— Clearing Features
Setting Features
The default settings are shown in bold letters. For later reference, place a check mark in the boxes
below to indicate your customized setting.
•
WARNING
When a third party discovers the password (extension PIN) of the PBX, there will be
a risk that they will make fraudulent phone calls using the telephone line, and the
cost will be charged to your own account. In order to avoid this problem, we
strongly recommend the following points:
a) Carefully maintain the secrecy of the PIN.
b) Specify a complicated PIN as long and random as you can make it.
c) Change the PIN frequently.
• Valid numbers for an extension PIN are "0" through "9".
• If the wrong extension PIN is entered for a preprogrammed number of times, the PIN is
locked.
• If you forget your extension PIN or your extension PIN is locked, your manager can clear
the extension PIN and extension PIN lock.
• To exit at any time, lift the handset.
• To enter the programming mode when using a PS, refer to "Operating Instructions" for PS.
• The following items with "*" (asterisk) are not available for a PS.
PT/SLT/PS
Off-hook.
Enter
799
.
0
Enter 0. Enter
stored
extension PIN
.
On-hook.
stored
extension PIN
7 9 9
C.Tone
PIN: Personal Identification Number
Page 39
3.1 Personal Programming
114 User Manual
Item
Programming
Input
Selection & Parameter
Your extension information
It shows PBX number, slot number and port number
<example>
Preferred display contrast
level from the 4 levels
available.
(Display Contrast
Selection)*
Light
Little Light
Little Dark
Dark
Which display language do
you prefer?
(Display Language
Selection)
English
2nd Language
3rd Language
4th Language
5th Language
Would you like the call
duration to be shown
automatically on the display
when answering an outside
call?
(Display Switching Mode)
No—Manual (The display
keeps showing all of the outside
caller’s information unless you
change it to the call duration
manually.)
Yes—Automatic (The first
line of the display will change
to the call duration
automatically when you
answer an outside call.)
Follow
programming
input
.
To program To exit
To enter the programming mode
Follow
Selection
&
Parameter
.
Press
PROGRAM
or
PAUSE
.
Press
PROGRAM
or
PAUSE
.
selection &
parameter
programming
input
OR
PROGRAM
PAUSE
OR
PROGRAM
PAUSE
Press
ENTER
or
STORE
.
OR
AUTO DIAL
STORE
Press
ENTER
or
STORE
.
OR
AUTO DIAL
STORE
0 0
EXT1050:10308
PBX no. Port no.
Slot no.
0 1
1
2
3
4
0 2
1
2
3
4
5
0 3
0
1
Page 40
3.1 Personal Programming
User Manual 115
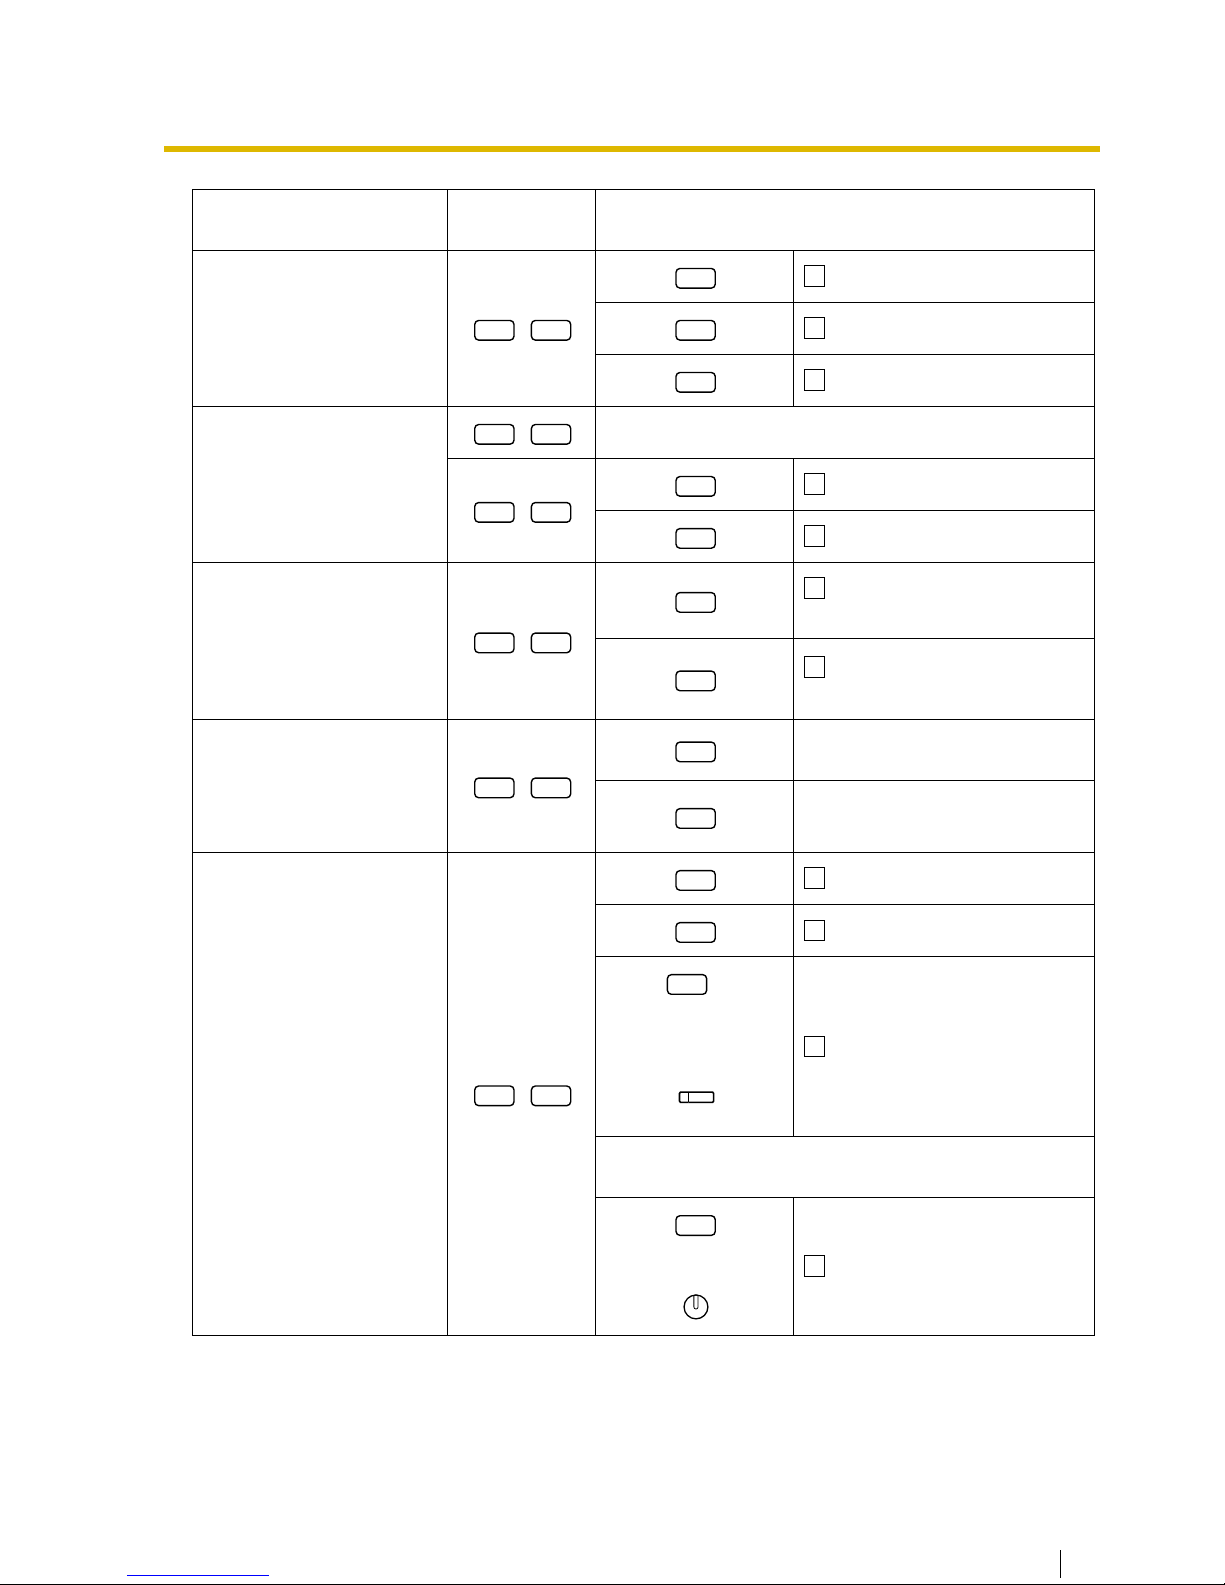
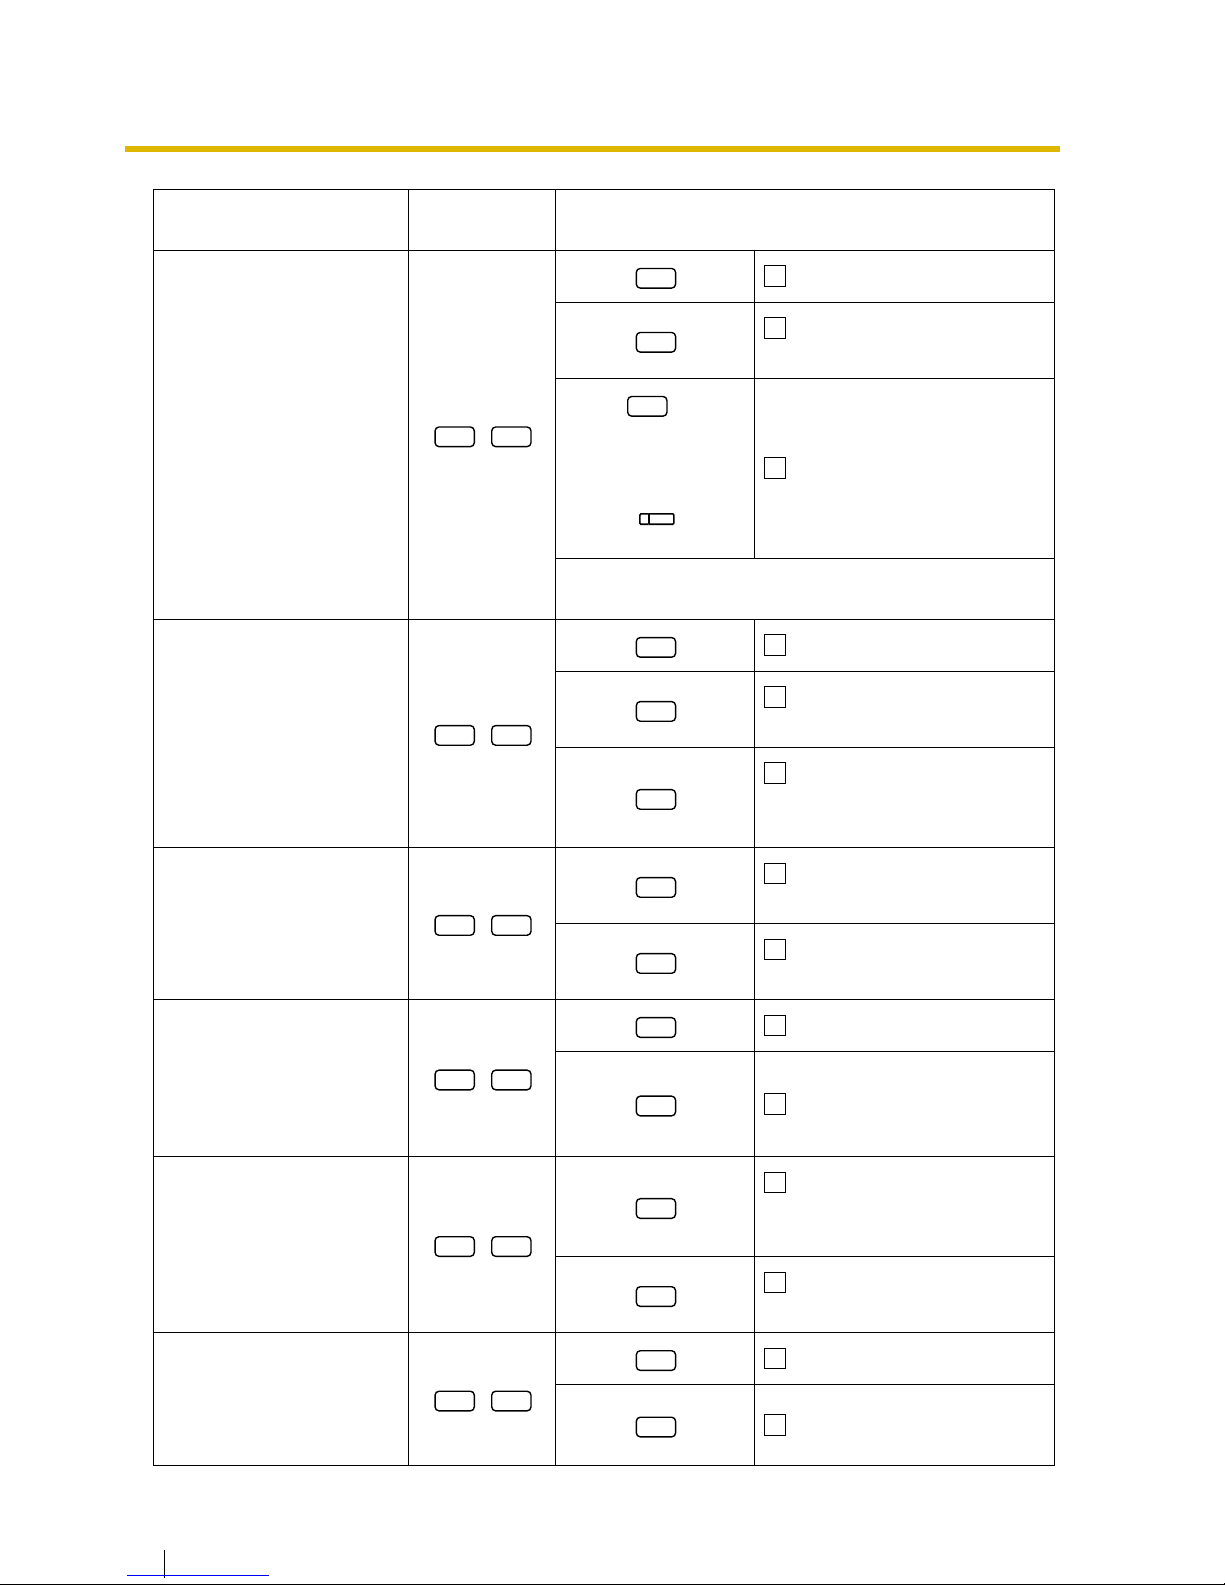
Would you like to turn on
the display backlight of the
KX-T7633/KX-T7636?
(Display Backlight
Selection)*
Ye s —ON in use
Yes—always ON
No—always OFF
Would you like to dial a
preset number simply by
going off-hook?
desired no. (max. 32 digits)
Don’t use
Use
Should you prevent your
number being displayed on
the called party’s
telephone?
(Calling Line Identification
Restriction [CLIR])
No—Allows your number
to be displayed
Ye s —Prevent your number
being displayed
Which number should be
displayed on the called
party’s telephone? (Calling
Line Identification
Presentation [CLIP])
Caller ID assigned to your
extension
Caller ID assigned on the CO line
being used
Which do you prefer to
seize when you go off-hook
to make calls?
(Preferred Line
Assignment—Outgoing)
No line
An idle CO line
+
CO button no.**
(01-36)
or
A CO/G-DN button
** CO button numbers (25-36) are available only when
the Add-on Key Module is set up to your telephone.
or
Intercom
Item
Programming
Input
Selection & Parameter
0 4
0
1
2
1 1
1 2
0
1
1 3
0
1
1 4
0
1
1 9
0
1
2
(CO)
3
INTERCOM
Page 41
3.1 Personal Programming
116 User Manual
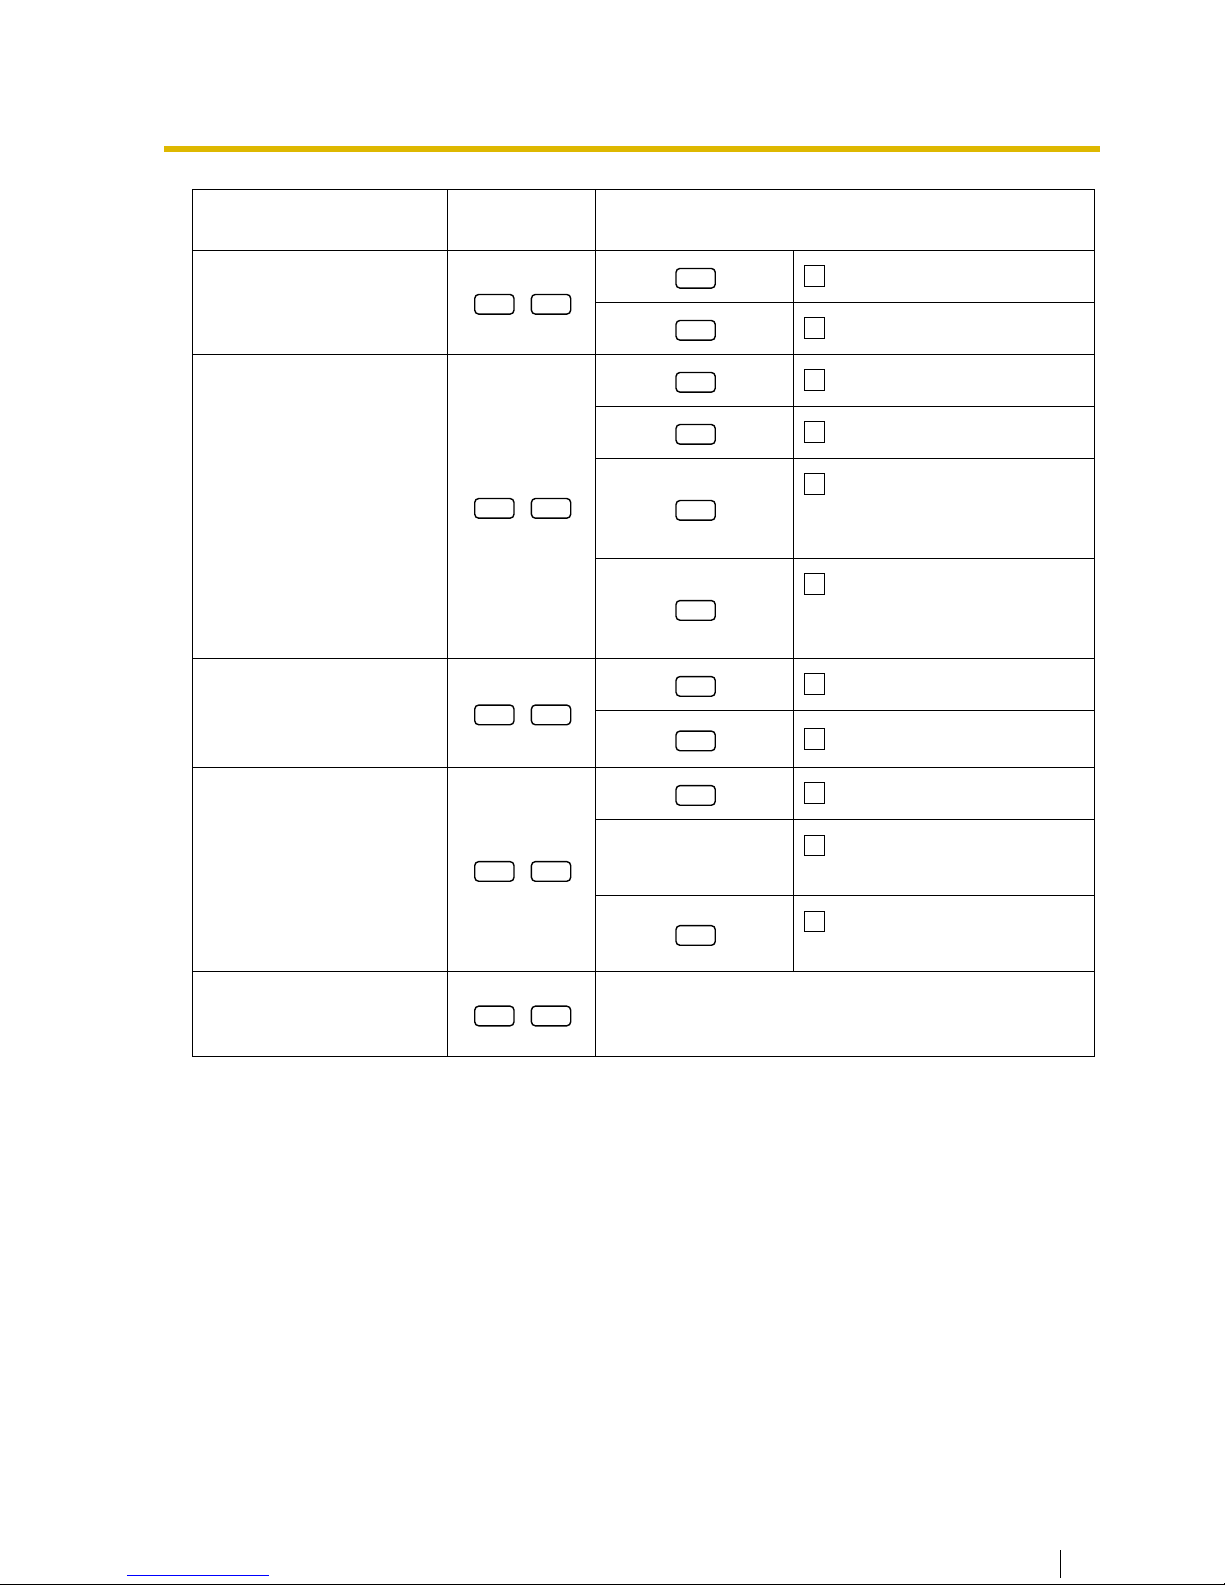
Which line do you prefer to
answer when you go offhook?
(Preferred Line
Assignment—Incoming)
No line
The longest ringing line
(when multiple calls arrive)
+
CO button no.**
(01-36)
or
A assigned outside button
** CO button numbers (25-36) are available only when
the Add-on Key Module is set up to your telephone.
How do you prefer to
receive an intercom call?
(Alternate Receiving—
Ring/Voice)*
Ringing (Tone Call)
Directly—The party’s voice is
heard without ringing.
Ring only—Prohibiting the
caller switching to the voice
mode.
Should the single line
telephone in parallel ring?
(Paralleled Telephone)*
No—The telephone will not
ring.
Yes—The telephone will
ring.
Do you prefer to answer a
call without going off-hook
regardless of the AUTO
ANS button status?
(Forced Answerback
Selection)*
No—Disable
Ye s —Enable
Which service do you prefer
when a calling party is
recording a message in
your mailbox?
(Live Call Screening Mode
Set)*
You can monitor the
message through the telephone
speaker.
(Hands-free mode)
Only an alarm tone is heard.
(Private mode)
Would you like to keep
recording after answering
the call in the LCS mode?
(LCS Mode Set [After
Answering])
No—Stop recording
Ye s —Keep recording
Item
Programming
Input
Selection & Parameter
2 0
0
1
2
(CO)
2 1
0
1
2
2 2
0
1
2 3
0
1
2 5
0
1
2 6
0
1
Page 42
3.1 Personal Programming
User Manual 117
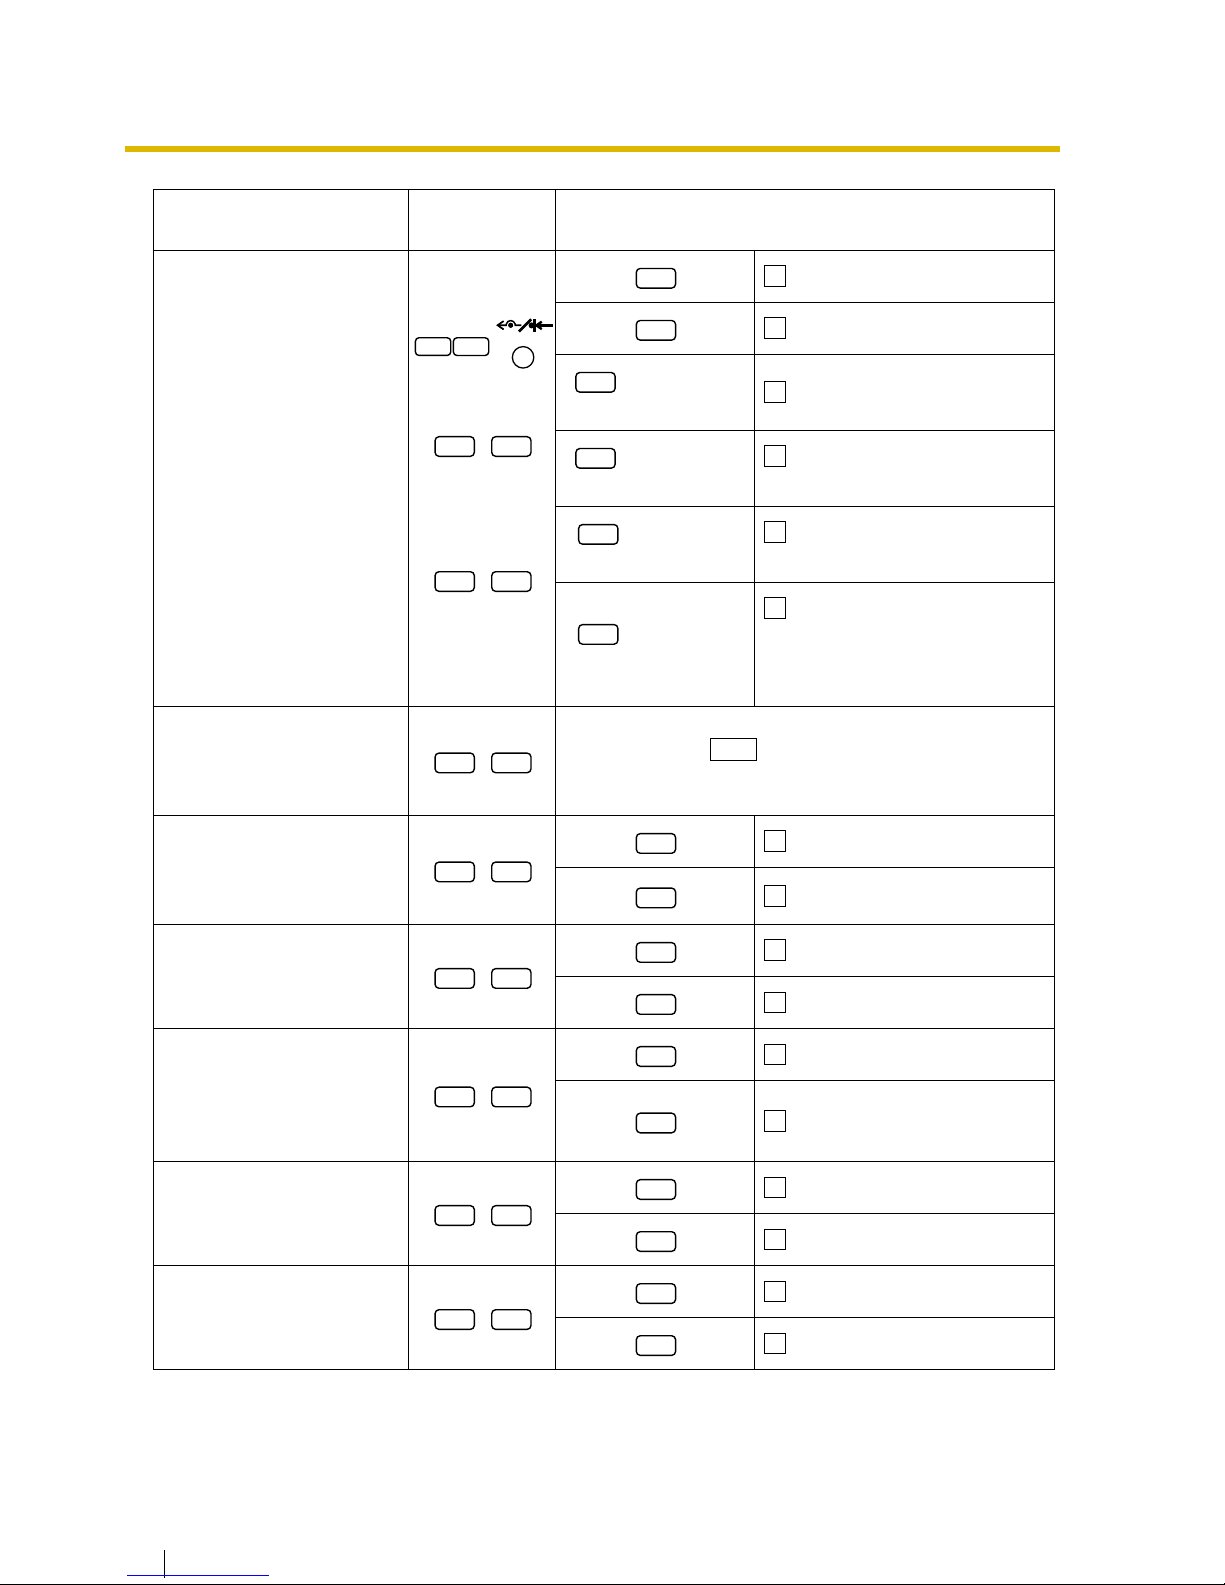
Do you prefer to receive call
waiting for outside calls?
No (No tone)
Yes (Tone)
Which type of call waiting
for intercom calls do you
prefer?
(Call Waiting Selection)
No call
Tone
Voice announcement
through the built-in speaker
(OHCA)
Voice announcement
through the handset (Whisper
OHCA)
Which type of call waiting
tone do you prefer?
(Call Waiting Tone Type
Selection)
Tone 1
Tone 2
Would you like to show a
message on the caller’s
telephone display?
(Absent Message)
No—Off
message no. (1-8)
Ye s —Shows the selected
message.
Ye s —Shows your personal
message.
Creating your personal
message.
(Personal Absent Message)
message (max. 16 characters)
Item
Programming
Input
Selection & Parameter
3 0
0
1
3 1
0
1
2
3
3 2
0
1
4 0
0
9
4 1
Page 43
3.1 Personal Programming
118 User Manual
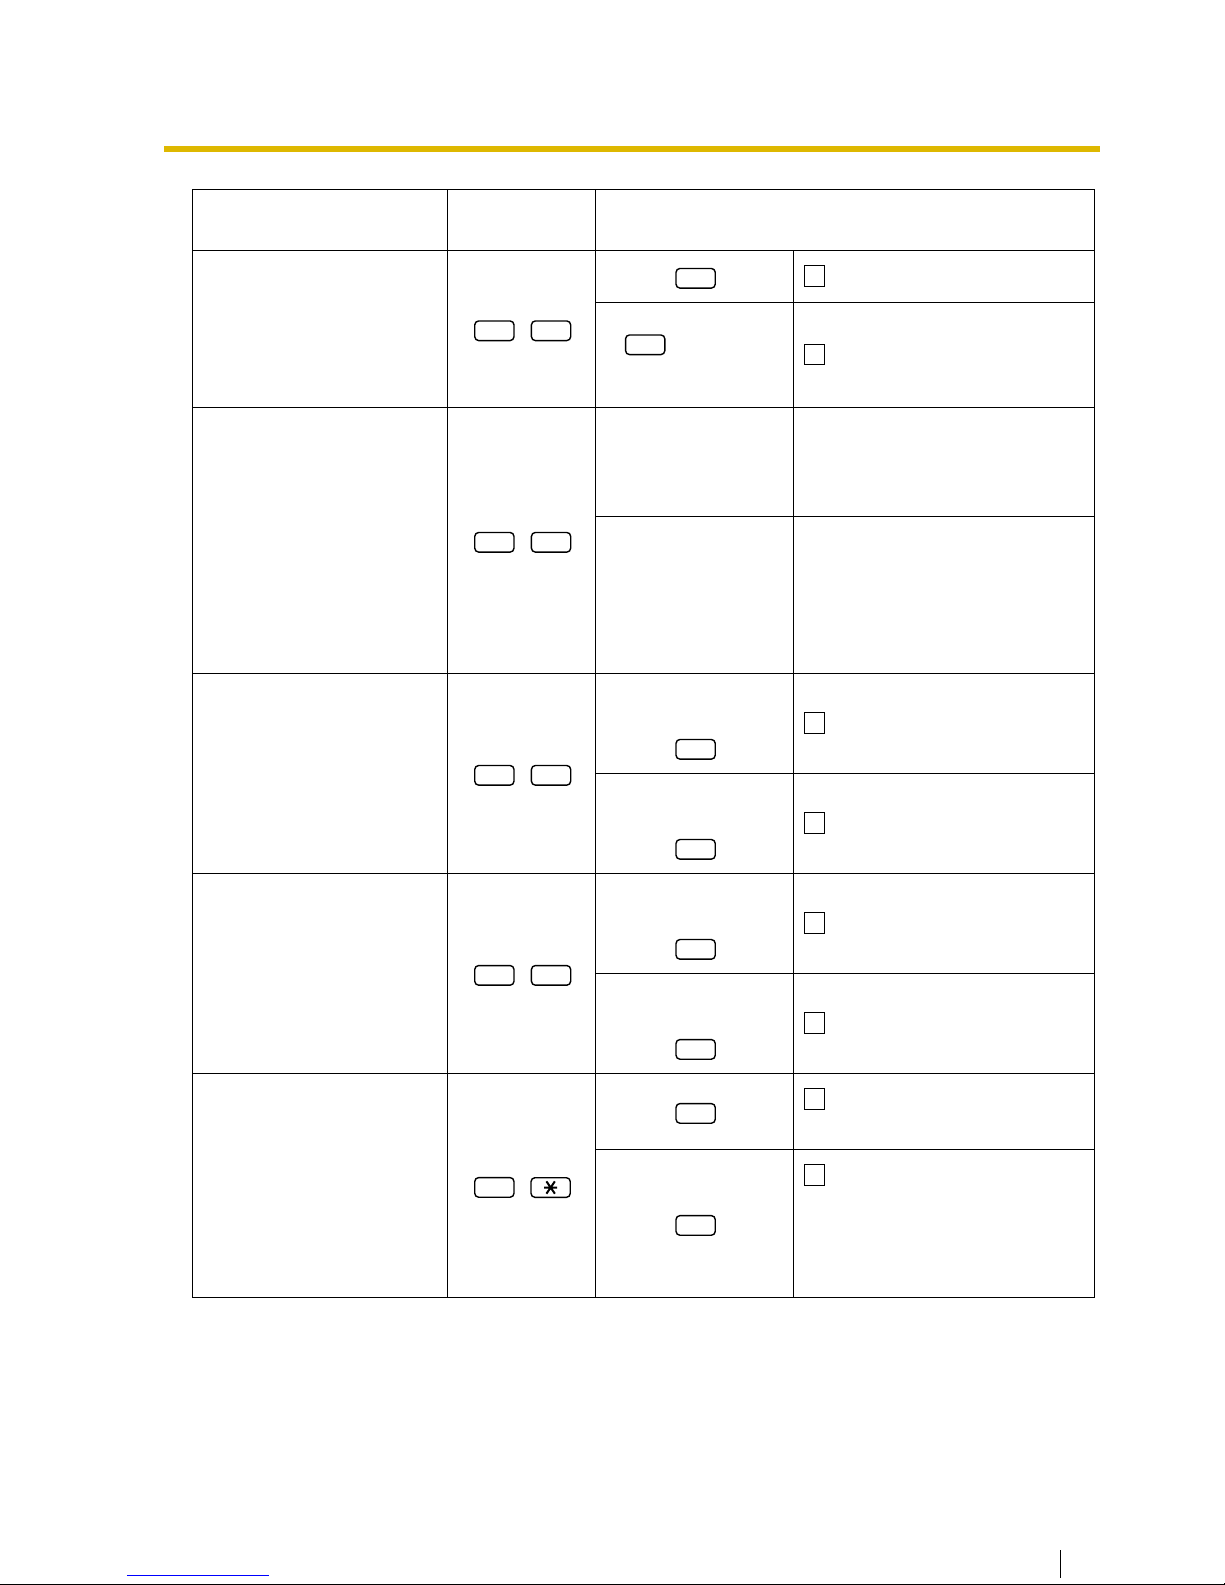
Where are your incoming
calls forwarded or refused?
(Call Forwarding [FWD]/Do
Not Disturb [DND])
(for both calls)
(for outside
calls)
(for intercom
calls)
Off
Do Not Disturb (DND)
+ desired no.
(max. 32 digits)
All—Forward all calls
+ desired no.
(max. 32 digits)
Busy—Forwarded when your
extension is busy.
+ desired no.
(max. 32 digits)
No Answer—Forwarded
when you do not answer.
+ desired no.
(max. 32 digits)
Busy/No Answer—
Forwarded when you do not
answer or when your extension is
busy.
To set the timer for "No
Answer" and "Busy/No
Answer".
(FWD N/A Timer)
(0-120) seconds
(Default: 15 seconds)
Should you prohibit other
people from picking up your
calls?
(Call Pickup Deny)
No—Allow
Ye s —Deny
Do you use the headset?
(Headset Operation)*
No—Headset off
Ye s —Headset on
Do you prohibit other
people from joining your
conversation?
(Executive Busy Override
Deny)
No—Allow
Ye s —Deny
Would you like to prohibit
paging announcements?
(Paging Deny)*
No—Allow
Ye s —Deny
Do you prefer to hear the
key pad tone?
(Key Pad Tone Set)*
No—Off
Yes—On
Item
Programming
Input
Selection & Parameter
5
0
FWD/DND
/
5 1
5 2
0
1
2
3
4
5
5 3
6 0
0
1
6 1
0
1
6 2
0
1
6 3
0
1
6 4
0
1
Page 44
3.1 Personal Programming
User Manual 119
Do you want back ground
music through your
telephone speaker while
on-hook?
(Background Music
[BGM])*
No—Off
+ BGM no.
(1digit)
Ye s —On
Would you like to set your
extension PIN or change a
stored extension PIN to new
one?
(Extension PIN [Personal
Identification Number])
extension PIN
(max. 10 digits) +
ENTER/STORE +
same extension PIN
To set an extension PIN
stored extension PIN
+
new extension PIN
(max. 10 digits) +
ENTER/STORE +
same extension PIN
To change a stored extension
PIN to new one
To prevent other people
from using your telephone.
(Extension Lock)
extension PIN
(max. 10 digits) +
To unlock
extension PIN
(max. 10 digits) +
To l o ck
To prevent other people
from seeing your personal
directory and call log.
(Directory and Call Log
Lock)*
extension PIN
(max. 10 digits) +
To unlock
extension PIN
(max. 10 digits) +
To l o ck
Do you prefer to set the
One-touch dialing only?
(One-touch Dialing
Assignment Mode
Selection)
No—Normal (Any Flexible
CO buttons can be modified.)
Ye s—Only One-touch dialing
buttons can be modified.
However, to modify them, there is
no need to enter "2" before the
number.
Item
Programming
Input
Selection & Parameter
6 5
0
1
9 0
9 1
0
1
9 2
0
1
#
0
1
Page 45
3.1 Personal Programming
120 User Manual
To store the names and numbers for personal speed dialing
•
WARNING
When a third party discovers the password (extension PIN) of the PBX, there will be
a risk that they will make fraudulent phone calls using the telephone line, and the
cost will be charged to your own account. In order to avoid this problem, we
strongly recommend the following points:
a) Carefully maintain the secrecy of the PIN.
b) Specify a complicated PIN as long and random as you can make it.
c) Change the PIN frequently.
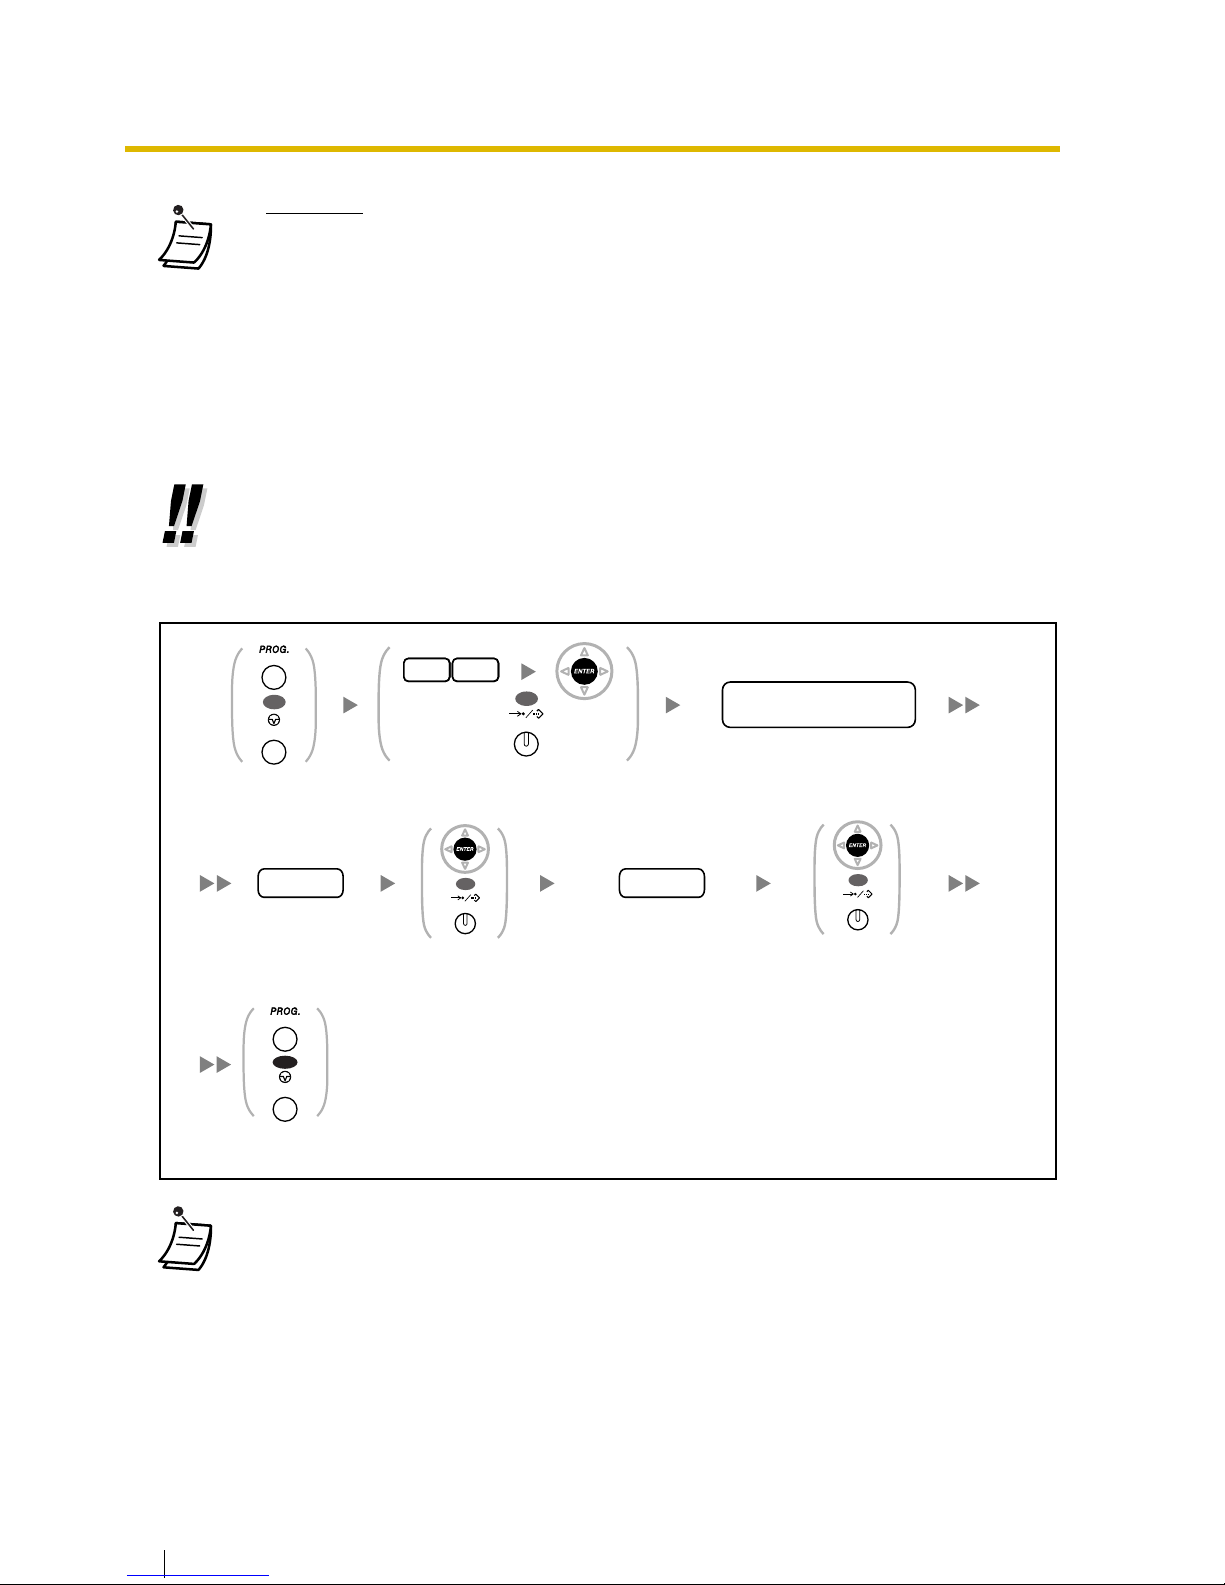
• After the program number is entered, the program title is displayed.
The programming screen can be changed with the Navigator key (Up or Down).
• You can select the parameter with the Navigator Key (Up or Down) instead of entering a
number.
• * To enter characters, refer to "Entering Characters".
Press
PROGRAM
or
PAUSE
.
Enter
10
and then press
ENTER
.
Or press
STORE
.
Enter
personal speed dialing number
(location number)
(2 digits).
personal speed
dialing no. (location no.)
Enter
phone number
(max. 32 digits).
Enter
name
(max. 20 characters).
*
name
Press
PROGRAM
or
PAUSE
.
phone no.
OR
PROGRAM
PAUSE
0
1
OR
AUTO DIAL
STORE
PROGRAM
PAUSE
OR
Press
ENTER
or
STORE
.
OR
AUTO DIAL
STORE
Press
ENTER
or
STORE
.
OR
AUTO DIAL
STORE
Page 46
3.1 Personal Programming
User Manual 121
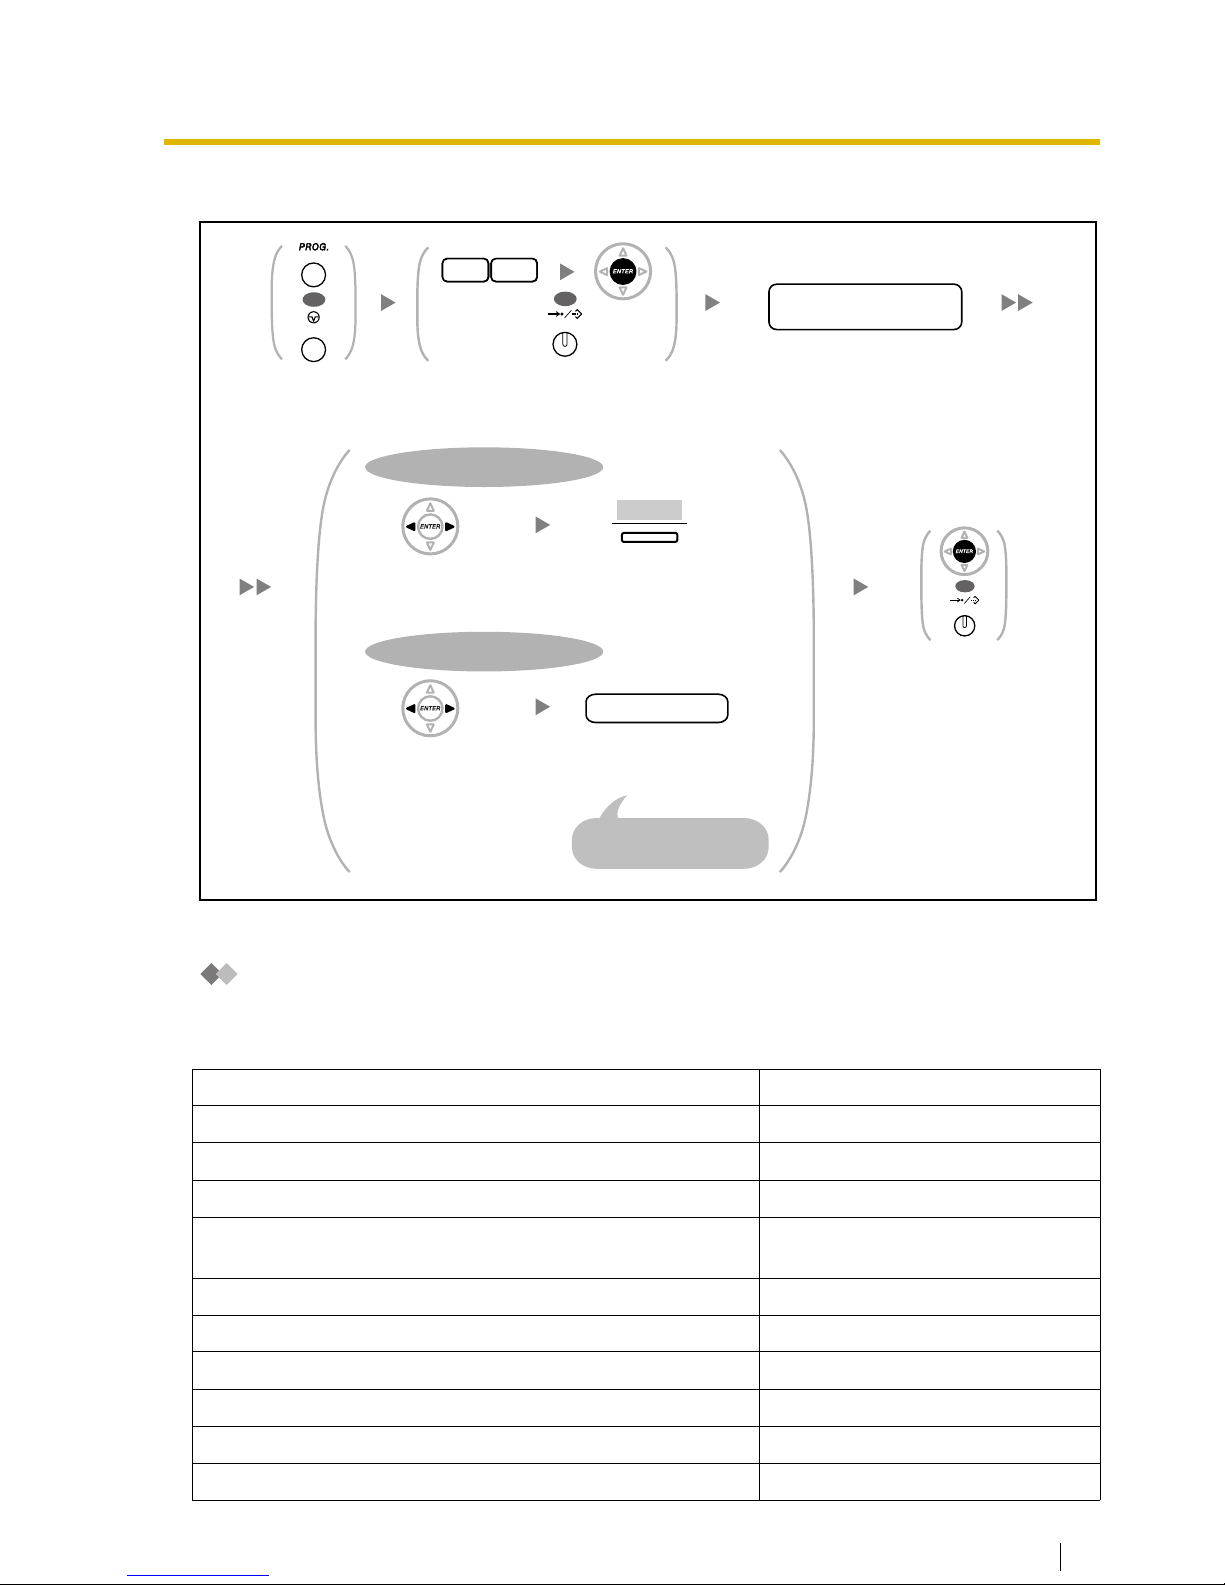
To edit the names and numbers for personal speed dialing
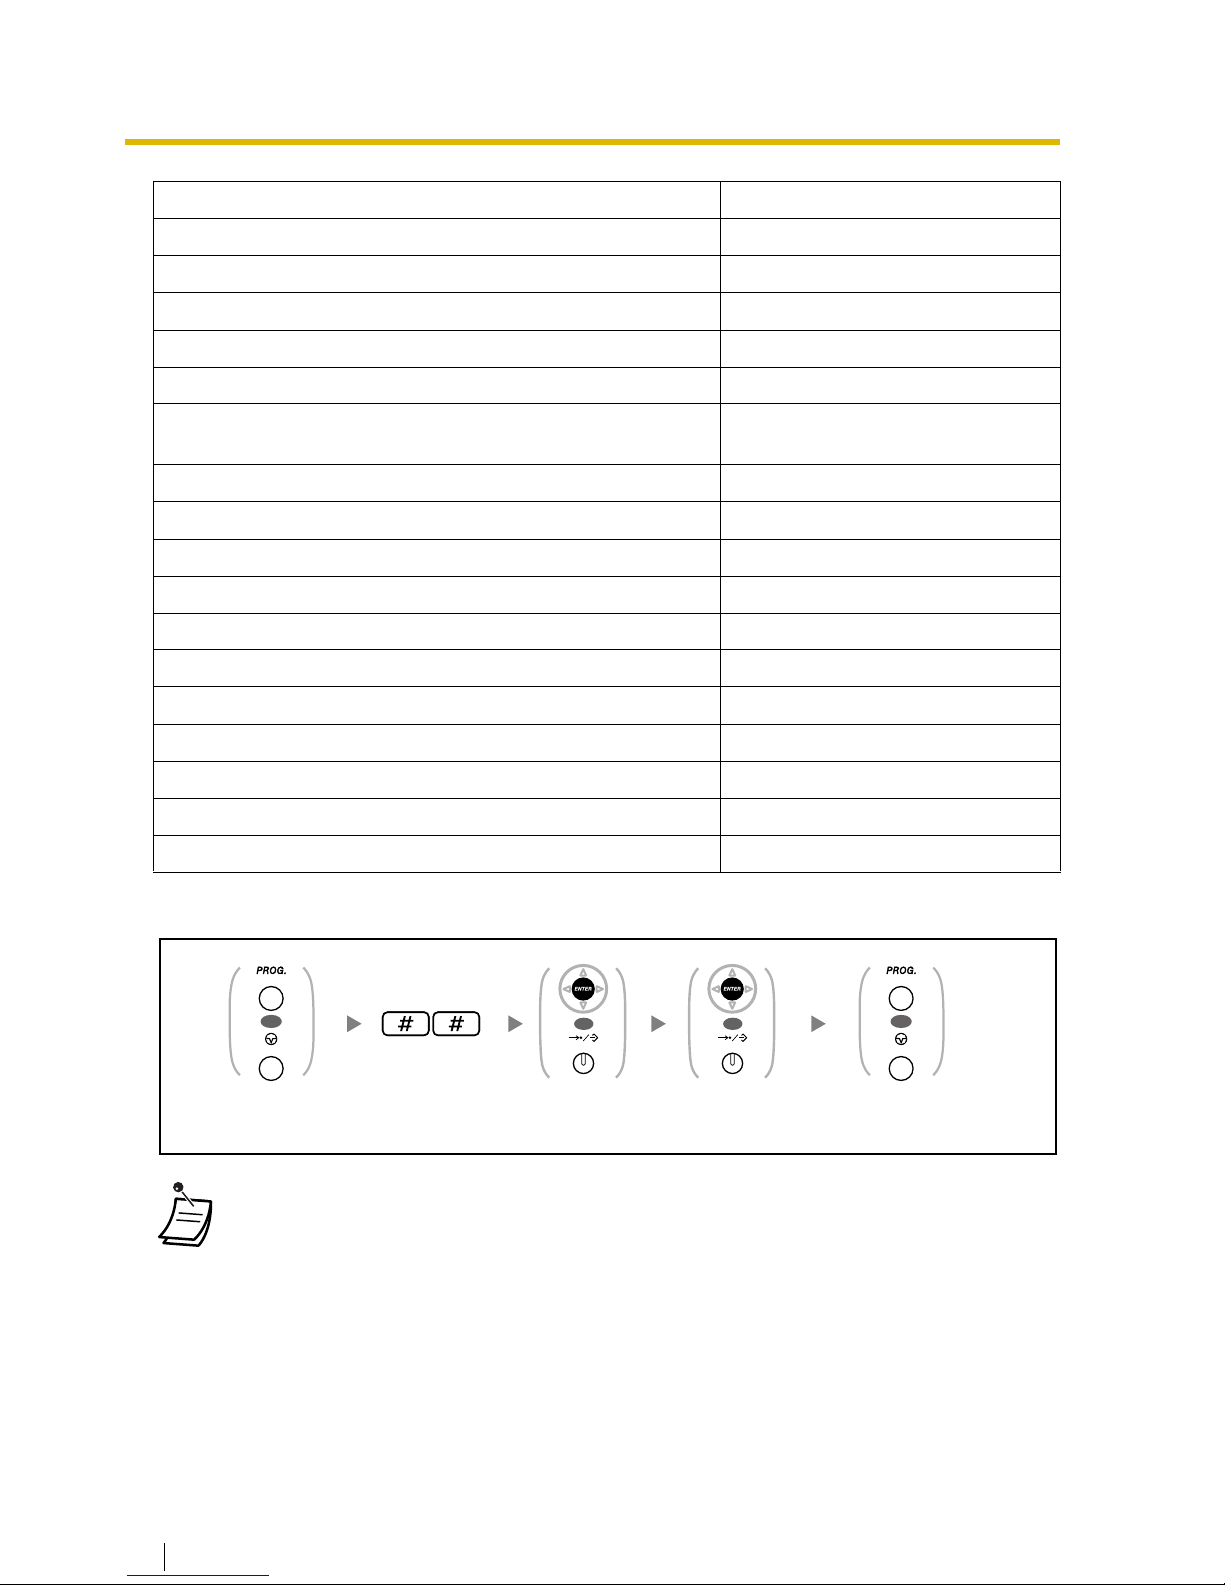
Clearing Features
You can reset the settings of the following features on your extension to the default settings with one
operation.
Features Default Setting
Display Switching Mode
Automatic
Hot Line
Off
Calling Line Identification Restriction [CLIR]
Allow
Calling Line Identification Presentation [CLIP]
Caller ID assigned on your
extension
Preferred Line Assignment—Outgoing
Intercom
Preferred Line Assignment—Incoming
The longest ringing line
Alternate Receiving—Ring/Voice
Ringing (Tone Call)
Paralleled Telephone
Paired SLT will ring
Forced Answerback Selection
Disable
Live Call Screening Mode Set
Hands-free mode
Press
PROGRAM
or
PAUSE
.
PROGRAM
PAUSE
OR
Enter 10 and then press
ENTER
.
Or press
STORE
.
0
1
OR
AUTO DIAL
STORE
Press
ENTER
or
STORE
.
OR
AUTO DIAL
STORE
Press
Left
or
Right
to select a desired part.
Press "
CLEAR
".
CLEAR
To erase a number or character
To insert a number or character
Press
Left
or
Right
to select a desired part.
number/character
Enter a number or
character.
It will be inserted in front
of the selected part.
Enter
personal speed dialing number
(location number)
(2 digits).
personal speed
dialing no. (location no.)
Page 47
3.1 Personal Programming
122 User Manual
To set
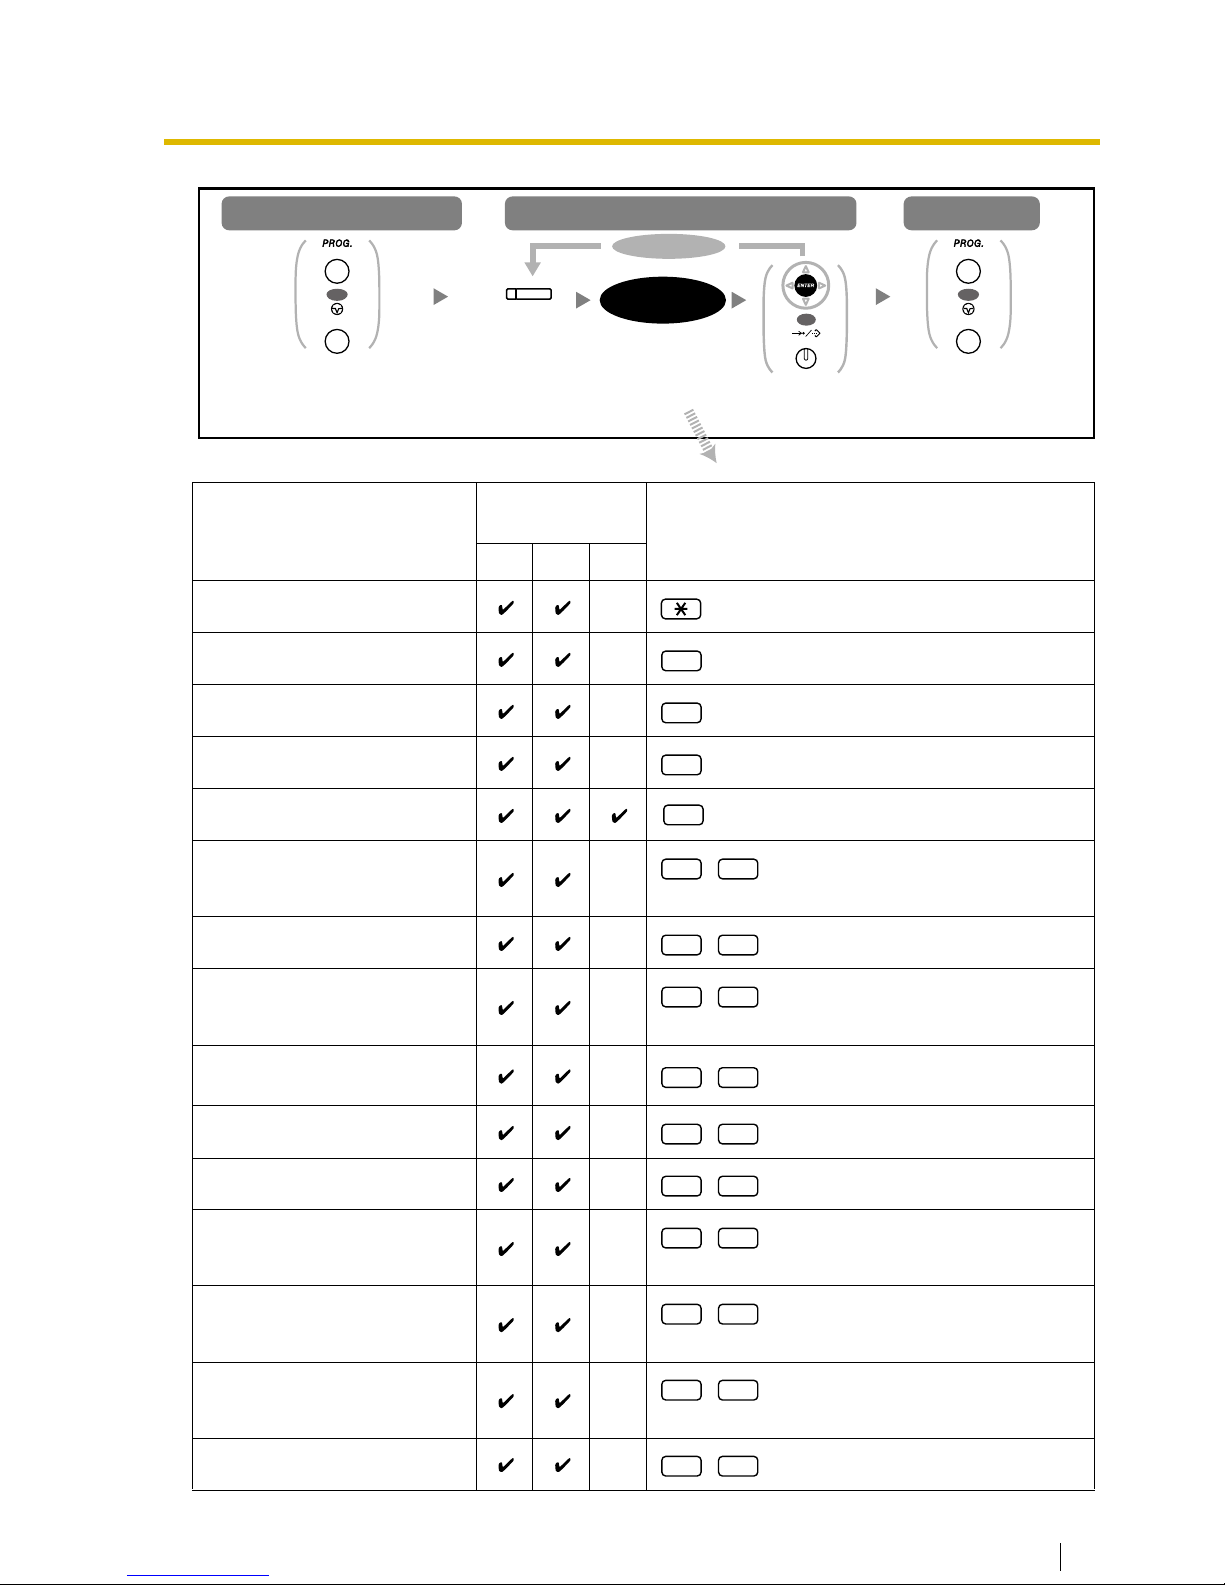
3.1.3 Customizing the Buttons
You can change the flexible CO buttons/DSS buttons, and programmable feature (PF) buttons on
PTs, DSS Consoles, Add-on Key Modules, and PSs to the following function buttons. For example, if
your telephone has more CO buttons than available CO lines, you may change unused CO buttons
to one touch buttons.
LCS Mode Set [After Answering]
Stop recording
Call Waiting Selection—Intercom Calls/Outside Calls
Enable (Tone)
Call Waiting Tone Type Selection
Tone 1
Absent Message
Off
Personal Absent Message
Cleared
Call Forwarding [FWD]/Do Not Disturb [DND]—Intercom Calls/
Outside Calls
Off
FWD N/A Timer
15 seconds
Call Pickup Deny
Allow
Headset Operation
Headset off
Executive Busy Override Deny
Allow
Paging Deny
Allow
Key Pad Tone Set
On
Background Music [BGM]
Off
Data Line Security
Off
Log-in/Log-out
Log-in
Message Waiting
Off
Timed Reminder
Cleared
• If you do not desire that the Call Waiting, FWD/DND or Hot Line to be cleared by this
feature, please ask your dealer.
Features Default Setting
Press
PROGRAM
or
PAUSE
.
Enter
##
. Press
PROGRAM
or
PAUSE
.
OR
PROGRAM
PAUSE
OR
PROGRAM
PAUSE
Press
ENTER
or
STORE
.
OR
AUTO DIAL
STORE
Press
ENTER
or
STORE
.
OR
AUTO DIAL
STORE
Page 48
3.1 Personal Programming
User Manual 123
Buttons
Programmable
Button
Programming Input
CO DSS PF
Loop-CO (L-CO)
Group-CO (G-CO)
+ CO line group no. (2 digits)
Single-CO (S-CO)
+ CO line no. (3 digits)
Direct Station Selection (DSS)
+ Extension no.
One-touch Dialing*
1
+ Desired no. (max. 32 digits)
Group Directory Number (GDN)
+ Incoming call distribution group
extension no.
Message
Message for another extension
+ Extension no./Incoming call
distribution group extension no.
Call Forwarding (FWD)/Do Not
Disturb (DND)—Both calls
FWD/DND—Outside calls
FWD/DND—Intercom calls
Group FWD—Both calls
+ Incoming call distribution group
extension no.
Group FWD—Outside calls
+ Incoming call distribution group
extension no.
Group FWD—Intercom calls
+ Incoming call distribution group
extension no.
Account
Press
PROGRAM
or
PAUSE
.
Press
PROGRAM
or
PAUSE
.
Press
CO
,
DSS or PF
.
To exit
To program
To enter the program mode
Follow
programming
input
.
To continue
(CO, DSS, PF)
programming
input
OR
PROGRAM
PAUSE
OR
PROGRAM
PAUSE
Press
ENTER
or
STORE
.
OR
AUTO DIAL
STORE
#
0
1
2
*
²
3 0
4 0
4 0
4 1
4 2
4 3
4 4
4 5
4 6
4 8
Page 49
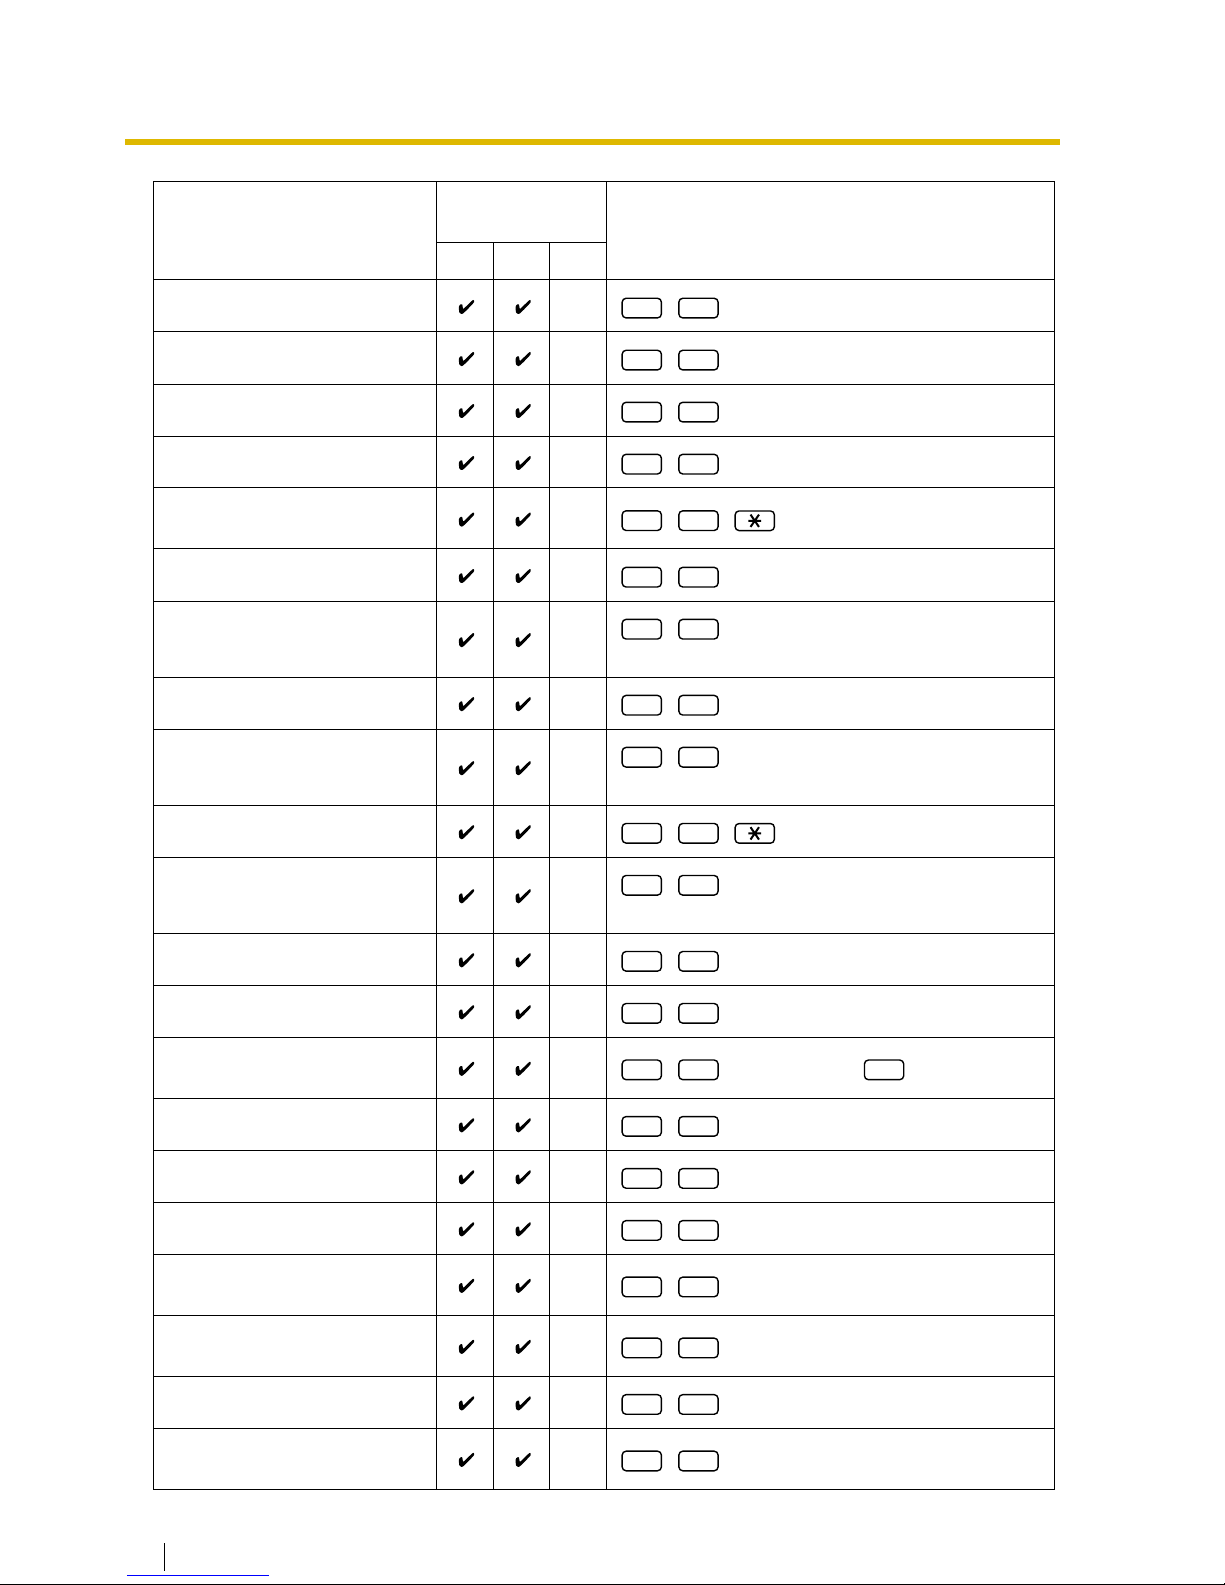
3.1 Personal Programming
124 User Manual
Conference
Te r mi n a te
External Feature Access (EFA)
Call Park
+ Parking zone no. (2 digits)
Call Park (Automatic Park
Zone)
Call Log*
3
Call Log for ICD Group*
3 + Incoming call distribution group
extension no.
Log-in/Log-out
Log-in/Log-out of a specified
group
+ Incoming call distribution group
extension no.
Log-in/Log-out for all groups
Hurry-up
+ Incoming call distribution group
extension no.
Wrap-up
System Alarm*
3
Time Service (Day/Night/
Lunch/Break)
+ 0/1/2/3*
4
(+ + Tenant no.)
Answer*
3
Release*
3
Toll Restriction (TRS)
+ Toll Restriction (TRS) Level (1-7)
Calling Line Identification
Restriction (CLIR)
Connected Line Identification
Restriction (COLR)
Headset*
3
Time Service Switching Mode
(Automatic/Manual)
(+ Tenant no.)
Buttons
Programmable
Button
Programming Input
CO DSS PF
4 9
5 0
5 1
5 3
5 3
5 4
5 4
5 5
5 5
5 5
5 6
5 7
5 8
5 9 #
6 0
6 1
6 2
6 4
6 5
6 7
6 8
Page 50
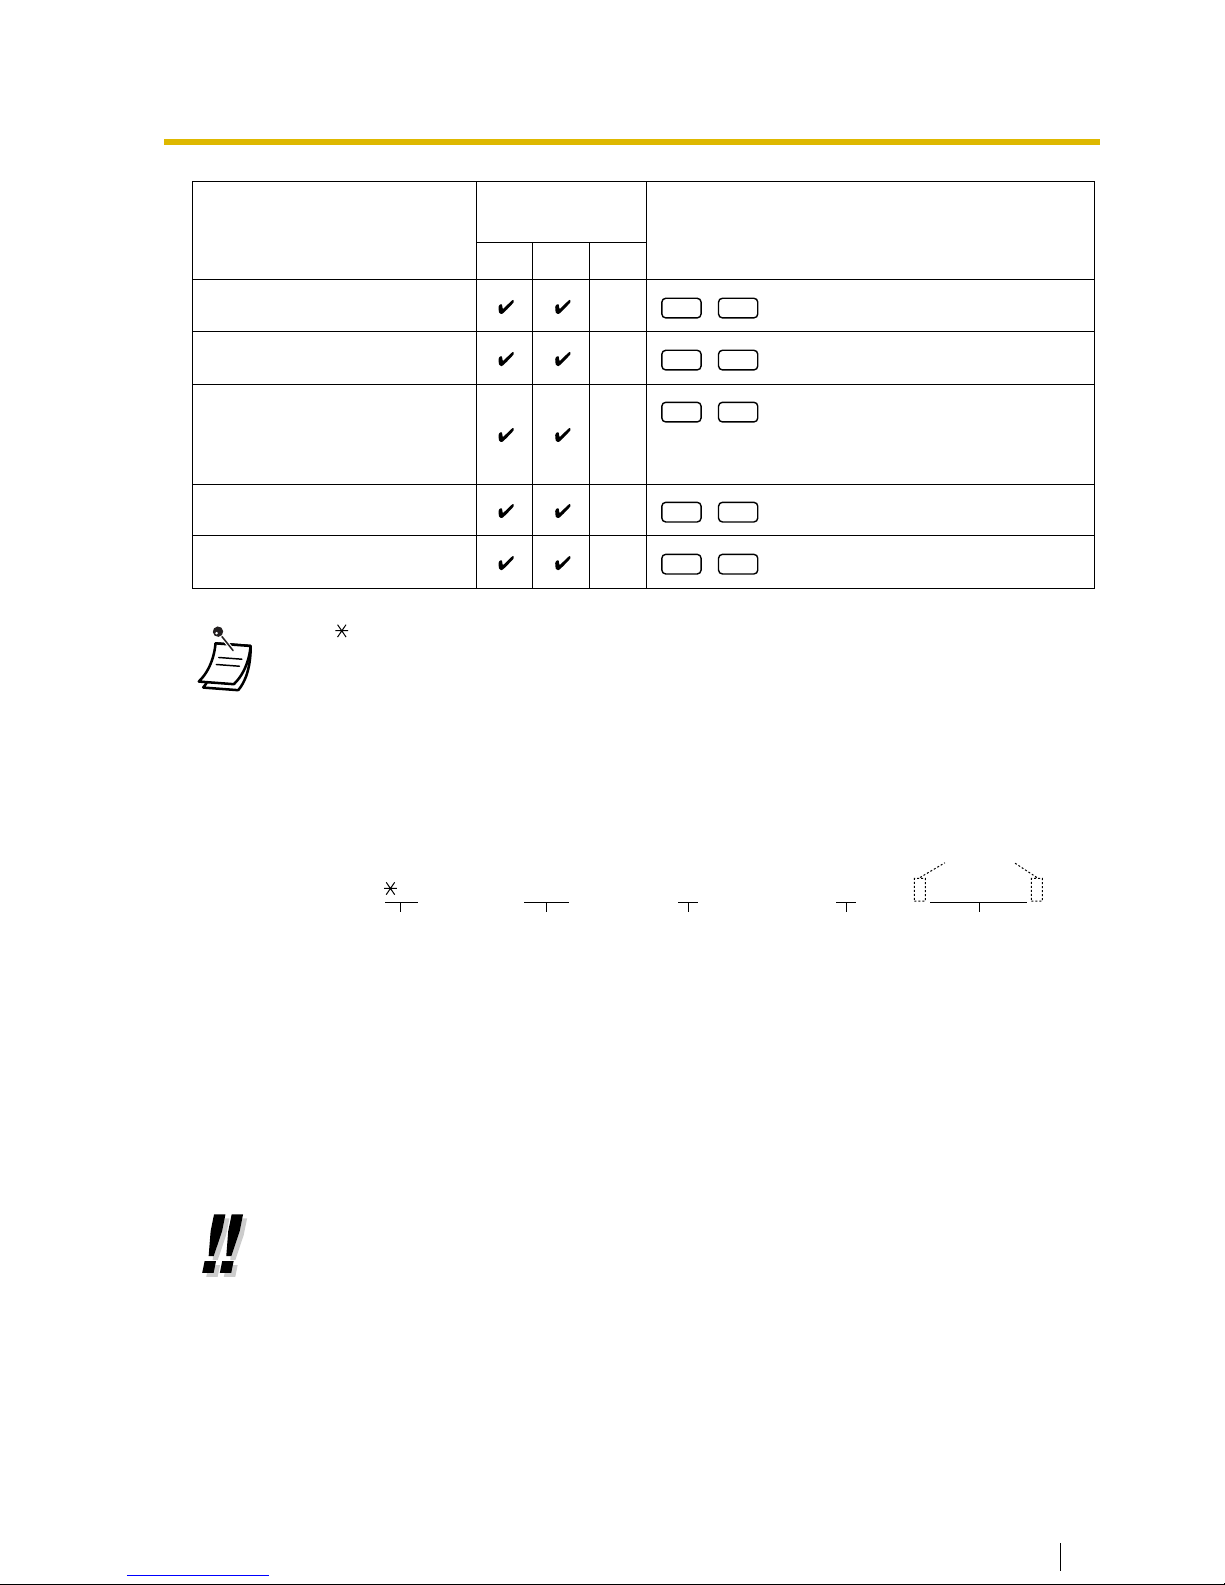
3.1 Personal Programming
User Manual 125
Tw o - w ay R e c o r d *
5
+ Voice mail floating extension no.
Two-way Transfer*
5
+ Voice mail floating extension no.
One-touch Two-way Transfer*
5
+ Voice mail floating extension no. +
#
+ Extension no./Incoming call distribution group
extension no.
Live Call Screening (LCS)*
5
Voice Mail Transfer*
5
+ Voice mail floating extension no.
• *
1
" ," "#," FLASH/RECALL, PAUSE, SECRET (INTERCOM) and T (Transfer) can also be
stored.
If you do not want to display the stored number when making a call, press the SECRET
(INTERCOM) button before and after the numbers you wish to conceal.
If you store an outside party’s number, you should first store a line access number.
If you need to enter an account code, you can enter the specified account code before the
line access number.
<Example>
• *
2
For a PF button, "2" is not required to enter before the desired number.
• *
3
This button is not available for a PS.
• *
4
0: Day/Night/Lunch/Break, 1: Day/Night/Break, 2: Day/Night/Lunch, 3: Day/Night
• *
5
This button is used for the integrated voice mail features.
•
To exit at any time,
lift the handset.
• You can select the parameter with the Navigator key (Up or Down) instead of entering a
number.
Buttons
Programmable
Button
Programming Input
CO DSS PF
9 0
9 1
9 1
9 2
9 4
Account code feature no.49Account code
1234
Account code delimiter#Automatic line
access number
9
Phone number
SECRET
[ 123 4567 ]
Page 51
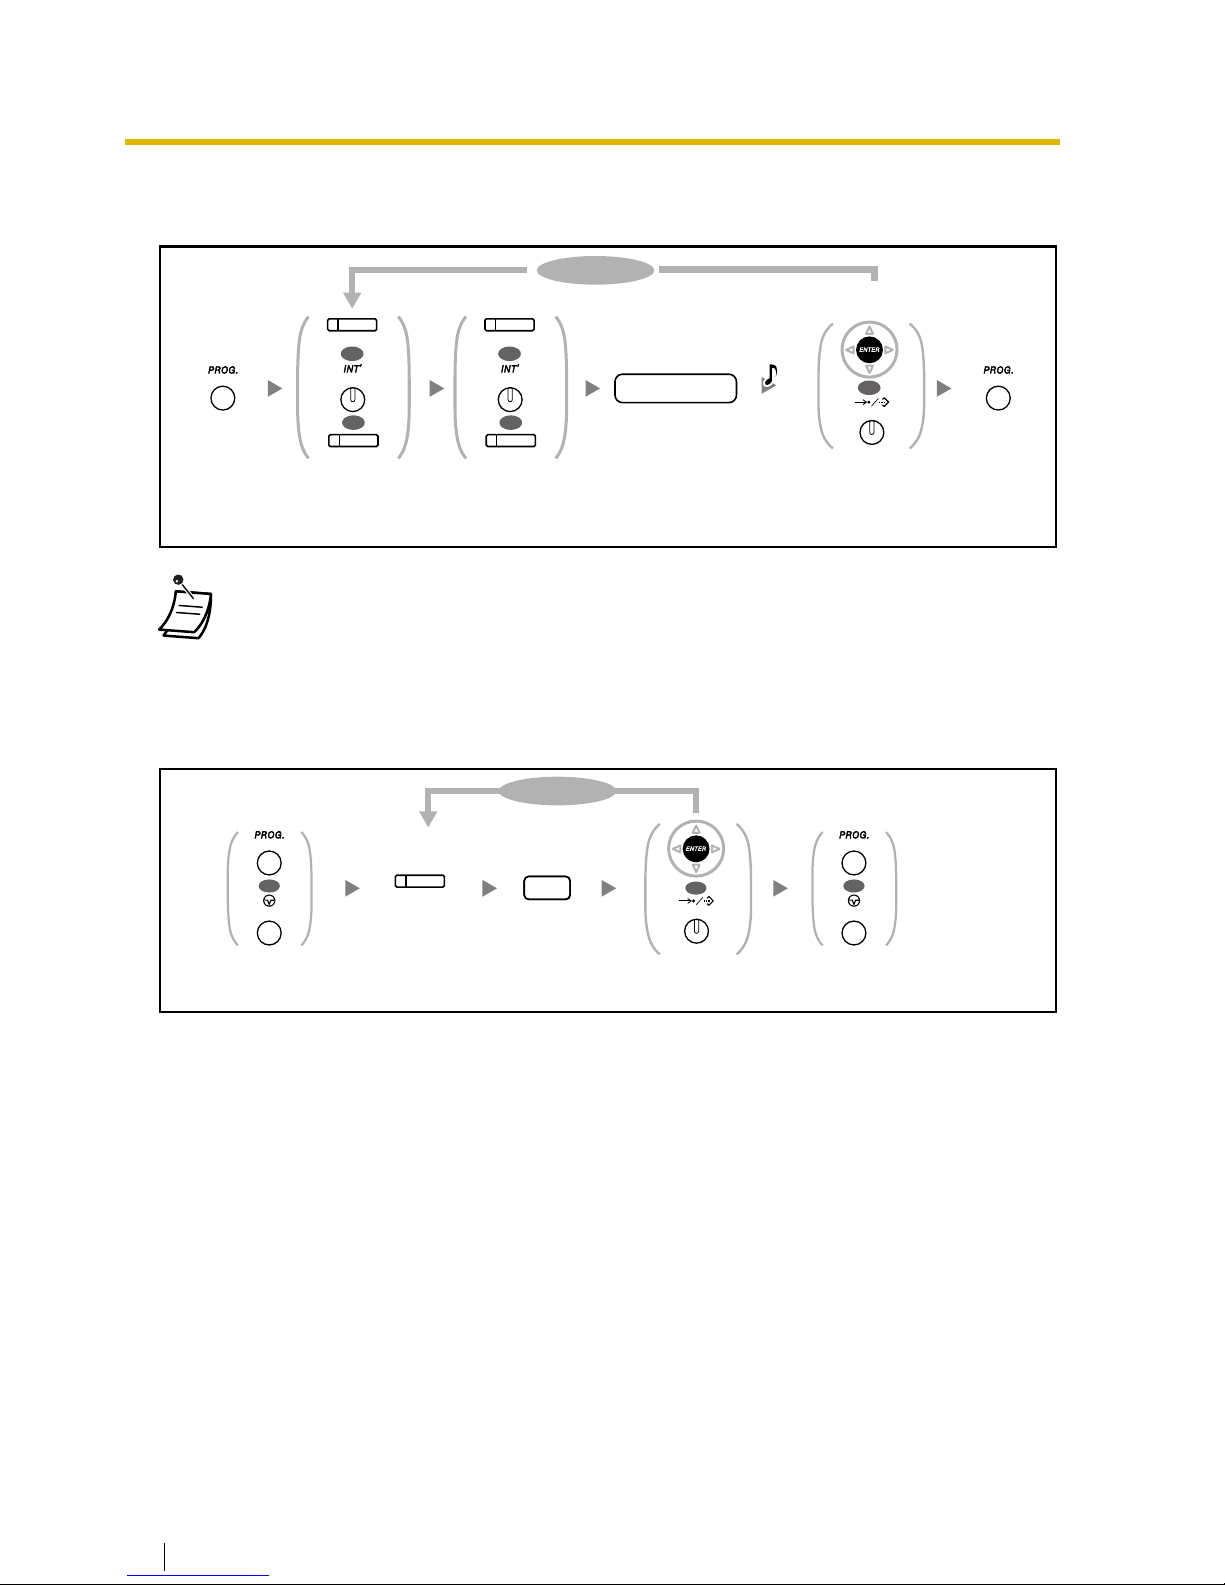
3.1 Personal Programming
126 User Manual
To distinguish the ringing tones for each CO, INTERCOM or G-DN button (Digital
proprietary telephone only)
To clear the button
• * Available tone types vary depending on the telephone you are using:
• KX-T7600 series: Tone types "01" to "30" are available.
• Other telephones: Only tone types "01" to "08" are available.
It is possible to enter a tone type number from "09" to "30", but you will hear tone type
"02".
Press
PROGRAM.
Press
PROGRAM.
Press ENTER or
STORE.
Enter tone type
number.
*
tone type no.
To continue
PROGRAM PROGRAM
OR
AUTO DIAL
STORE
R.Tone
Press CO,
INTERCOM
or G-DN.
OR
(CO)
INTERCOM
OR
(G-DN)
Press CO,
INTERCOM
or G-DN.
OR
(CO)
INTERCOM
OR
(G-DN)
Press
PROGRAM
or
PAUSE
.
Press
ENTER
or
STORE
.
2
Enter 2.Press CO,
DSS or PF
.
To continue
(CO, DSS, PF)
Press
PROGRAM
or
PAUSE
.
OR
AUTO DIAL
STORE
OR
PROGRAM
PAUSE
OR
PROGRAM
PAUSE
Page 52
Personal Phone Settings
Speaker Volume – Handset / Headset Volume
SSeeccttiioonn 22 -- UUssiinngg YYoouurr TTeelleepphhoonnee SSyysstteemm
While in hands-free conversation
While using the handset or headset
** If you hear your own voice through the handset or headset, decrease the volume.
1. Press VOL button Up ¿ or Down À /or/
2. Press arrow Up ¿ or Down À.
Ringer Volume
KX-T7625
While on hook or receiving a call.
KX-T7630/7633/7636
While on hook or receiving a call
1. Slide the lever of the Ringer switch to (OFF/ON).
2. If ON is selected, press VOL Up ¿ or Down À.
1. Press arrow Up ¿ or Down À.
LCD Contrast
1. Press PROG button.
2. [0] [1]
KX-T7630/7633/7636
While on-hook
3. Press ENTER button.
4. Press Up ¿ or Down À arrow to brighten or darken.
5. Press ENTER button.
6. Press EXIT.
Change Ring Tone
Scroll sample of ring tones
1. Press PROG or PROGRAM.
2. Press [CO] or INTERCOM
3. [0] [1] through [3] [0].
4. Press ENTER or AUTO DIAL STORE.
5. Press EXIT or PROGRAM.
twice.
Page 53

Disclaimer and Limitation of Warranty
This Manual uses the initial factory settings (default value) for feature descriptions. Panasonic® strives to design the features in com-
munication systems to be fully interactive with one another. However, this is not always possible as the combinations of accessories
and features are too varied and extensive to insure total feature
compatibility. Accordingly, some features identified in this publication will not operate if some other feature is activated.
Panasonic and TeleData, Inc. disclaim all liability relating to feature
non-compatibility or associated in any way with problems which
may be encountered by incompatible features. TeleData, Inc. makes
no representation as to the compatibility of features.
TeleData, Inc. does not warranty failures which are caused by the
warrantor or failures which result from accident, misuse, abuse, neglect, mishandling, misapplication, set-up adjustments, improper
operation, alteration, modification, power line surge, improper voltage supply, lightning damage, acts of God, signal reception problems or servicing by anyone other than a TeleData, Inc. trained
technician.
Note: If, as a result of using this guide service is required, any
voice or on-site technical service will incur charges.
 Loading...