

Page 1

TC-60AS650U
TC-55AS650U
e
HELP
English
Page 2

Using my Home Screen
my Home Screen
•Features 9
•How to use 10
•Settings 11
Using Apps list
•Features 13
•How to use 14
•Settings 15
Watching TV
Cable / Satellite / Fiber Optic box
•Initial setting 16
Antenna / Cable service without a box
•Initial setting 17
•Select channels 18
•Favorite channels 19
•Closed Caption 20
•SAP 21
•Other 22
Blu-ray, DVD, Game Console, etc.
•Connecting and viewing 23
•Example of AV connections 24
•HDMI connection notice 26
•HDMI connection caution 27
•Input signal 28
For best picture
•Picture mode 29
•Auto brightness (ECO) 30
•Aspect setting 31
•Screen mode 32
•Zoom adjustments 34
•Copy adjustments 35
For best audio
•Sound mode 36
- 2 -
Page 3

•DIGITAL AUDIO OUT terminal 37
Viewing 3D images
•Notice 38
•Viewing 3D 39
•Change 3D↔2D 40
•Adjust 3D images 41
Network services
Connect to network
•Network connections 42
•Network connection types 43
Network settings
•Setting the menu 45
•Network connection/Network status 46
•my Home Cloud settings 47
•VIERA network name 48
•TV remote App settings 49
•Network link 50
•File sharing settings 51
•Software update 52
•New software notice 53
How to use
•Operate 54
Home network “DLNA”
Get started
•Information 55
Photos
•Viewing Photos 56
•Photo view 57
•Options menu 58
•Using slideshow 59
•Slideshow settings 60
Videos
•Viewing Videos 61
- 3 -
Page 4

•Video view 62
•Options menu 63
Music
•Playing Music 64
•Music view 65
•Options menu 66
Media player
Get started
•Information 67
•Media warning messages 68
•SD card handling cautions 69
•File sharing 70
•Notice 71
Photos
•Viewing Photos 72
•Photo View 73
•Sort the photos 74
•Options menu 75
•Multi shot 3D 76
•Thumbnails size 77
•Using slideshow 78
•Slideshow settings 79
•Soundtrack settings 81
Videos
•Viewing Videos 82
•Video view 83
•Options menu 84
Music
•Playing Music 85
•Music view 86
•Options menu 87
Convenience features
Eco navigation
- 4 -
Page 5

•Eco navigation 88
Timer
•Setting the menu 89
Parental control
•Setting the menu 90
•Password setting 91
•Parental control ratings 92
Closed Caption
•Setting the menu 94
•Closed Caption notice 95
VIERA Link ™ “HDAVI Control ™”
•Basic feature 96
•Connecting note 97
•VIERA Link connections 99
•VIERA Link settings 101
•VIERA Link settings feature 102
•VIERA Link 104
•VIERA Link menu 105
User profile
•Setting the menu 107
•my Stream 108
Using Voice guidance
•Voice guidance 109
Using Voice control
•Voice control 110
•How to use the voice control 111
Using Touch Pad Controller
•Features 112
•My button 113
•Setting the menu 114
Using Bluetooth devices
•Settings 115
Control by Smartphone, etc.
•Smartphone remote 116
- 5 -
Page 6

Using USB Keyboard
•Keyboard 117
All settings
How to use
•Setting the menu 118
Picture
•Basic settings 119
•Pro settings 121
•Advanced picture 125
•Screen settings 127
•3D settings 129
•Other settings 131
Sound
•Basic settings 132
•Advanced settings 134
•Voice guidance settings 136
Network
•Network settings 137
Timer
•Sleep (Off timer) 139
•Timer (On/Off timer) 140
•Clock settings 141
•Auto turn off settings 142
Setup
•Eco navigation 143
•Voice control settings 144
•User settings 145
•USB device setup 146
•VIERA Touch Pad settings 147
•Bluetooth settings 148
•Parental control 149
•ANTENNA/Cable setup 151
•Language settings 153
•Display customization 154
- 6 -
Page 7

•Closed Caption 155
•VIERA Link settings 157
•System settings 158
•Other settings 159
Support / FAQ
Help menu
•Using Help menu 160
FAQ
•Picture - Viewing 161
•Picture - Snowy / none 162
•Picture - Distortion 163
•Picture - Continue 164
•Sound - None 165
•Sound - Unusual 166
•Networking 167
•Software update 168
•3D - Viewing 169
•3D - Format 170
•Voice guidance 171
•Voice control 172
•Touch Pad Controller 173
•Eco navigation (Eco-Navi) 174
•Other 175
•Menu - Gray-out or missing items 176
•Reset to factory default 177
Information
•Data information 178
Care and Cleaning
•Display panel 180
•Cabinet 181
•Pedestal / Power cord 182
•3D Eyewear 183
- 7 -
Page 8
Press the Remote control button
INFO Letters in box : Remote control button
Menu Letters in Cyan : Menus on screen display
References in this eHELP
- 8 -
Page 9
Using my Home Screen
my Home Screen
Features
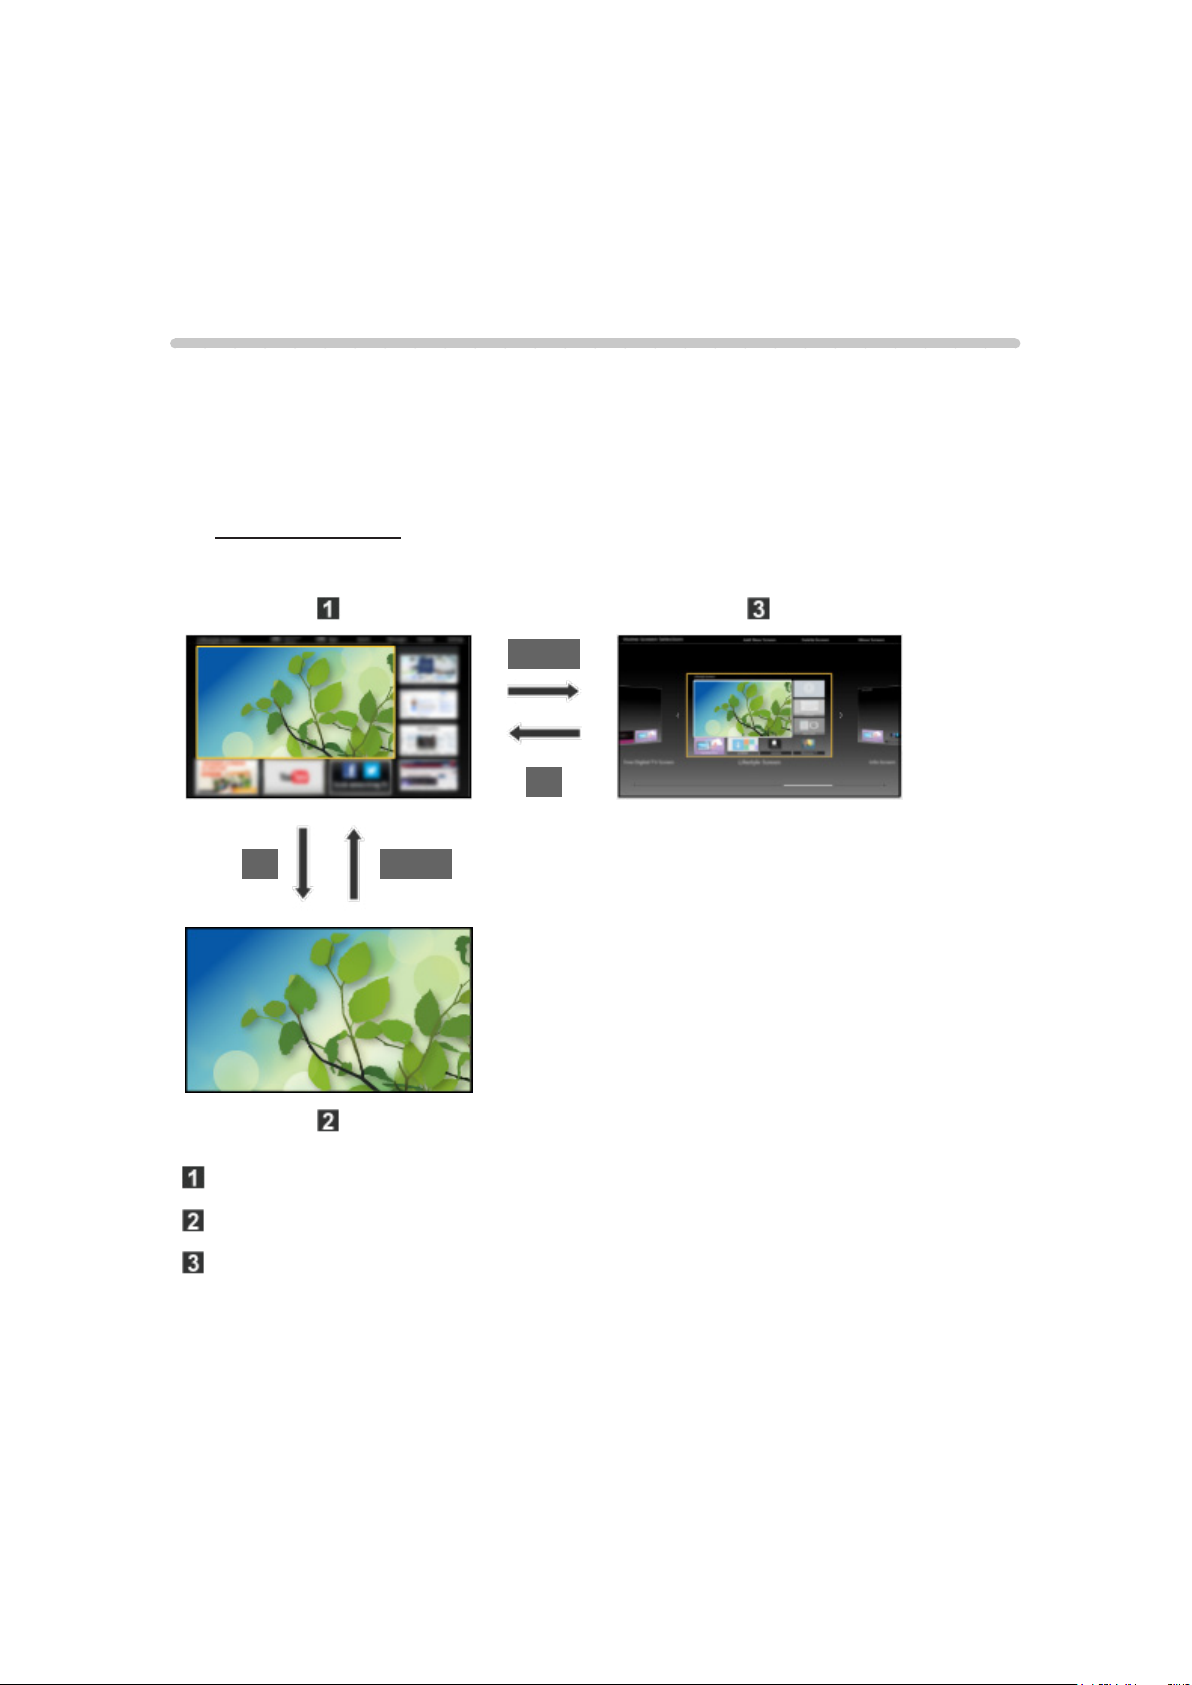
my Home Screen is a gateway to the TV, applications, and more. It provides
easy access to special features such as the Media Player, videos, games,
communication tools, etc.
■ Home Screen
(Example)
HOME
OK
OK HOME
Home Screen (Full Screen TV, Various Home Screen, etc.)
Selected content screen (TV, application, etc.)
Home Screen Selection
– Choose your preferred Home Screen layout.
- 9 -
Page 10
How to use
The Home Screen provides access to special features such as the Media
Player, TV, Internet content, data services, communication tools, etc.
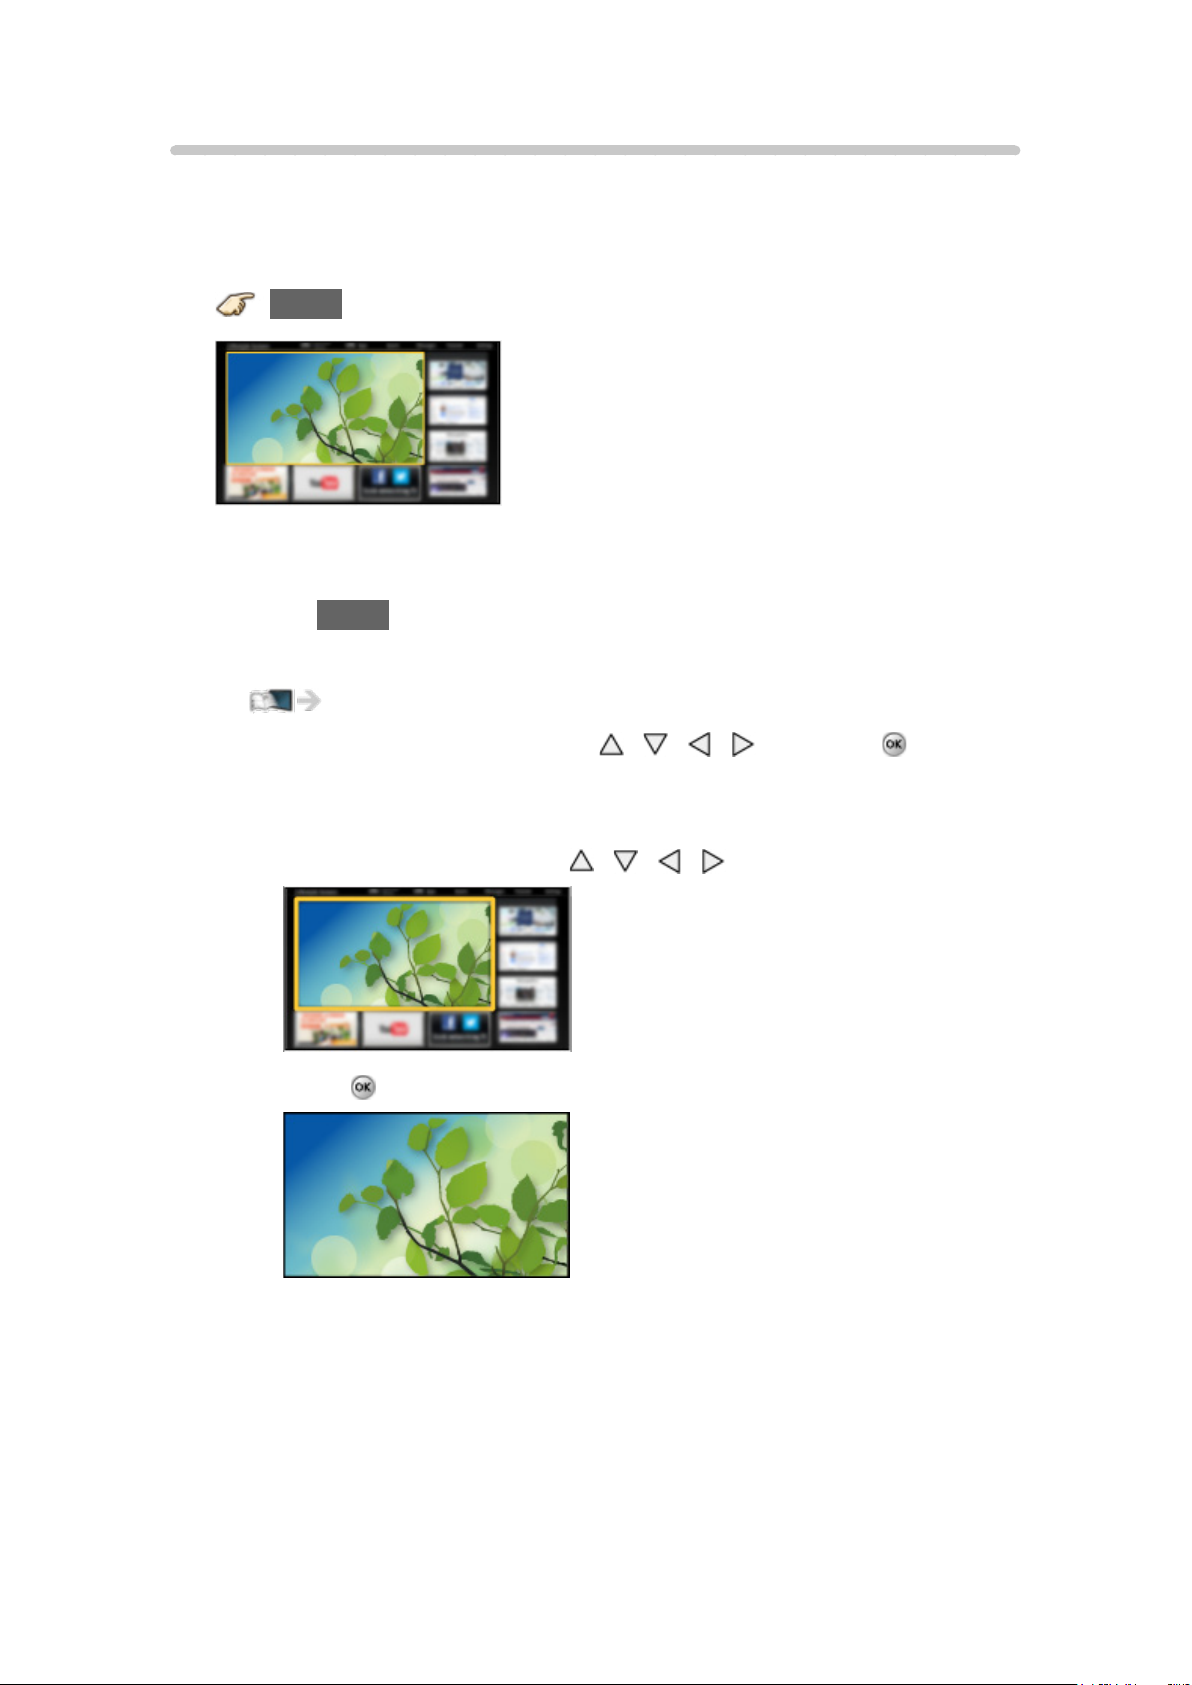
1. Display Home Screen
HOME
●
The last viewed Home Screen is displayed each time the TV is turned
on.
●
Press HOME again to return to Home Screen Selection.
●
You can change the default Home Screen when the TV is turned on.
Using my Home Screen > my Home Screen > Settings
2. Select a Home Screen icon using
access the feature.
●
To watch full-screen TV
1) Select the TV window with
2) Press
●
Also refer to Tutorial from the tool guide.
to watch
/ / / and press to
/ / /
- 10 -
Page 11
Settings
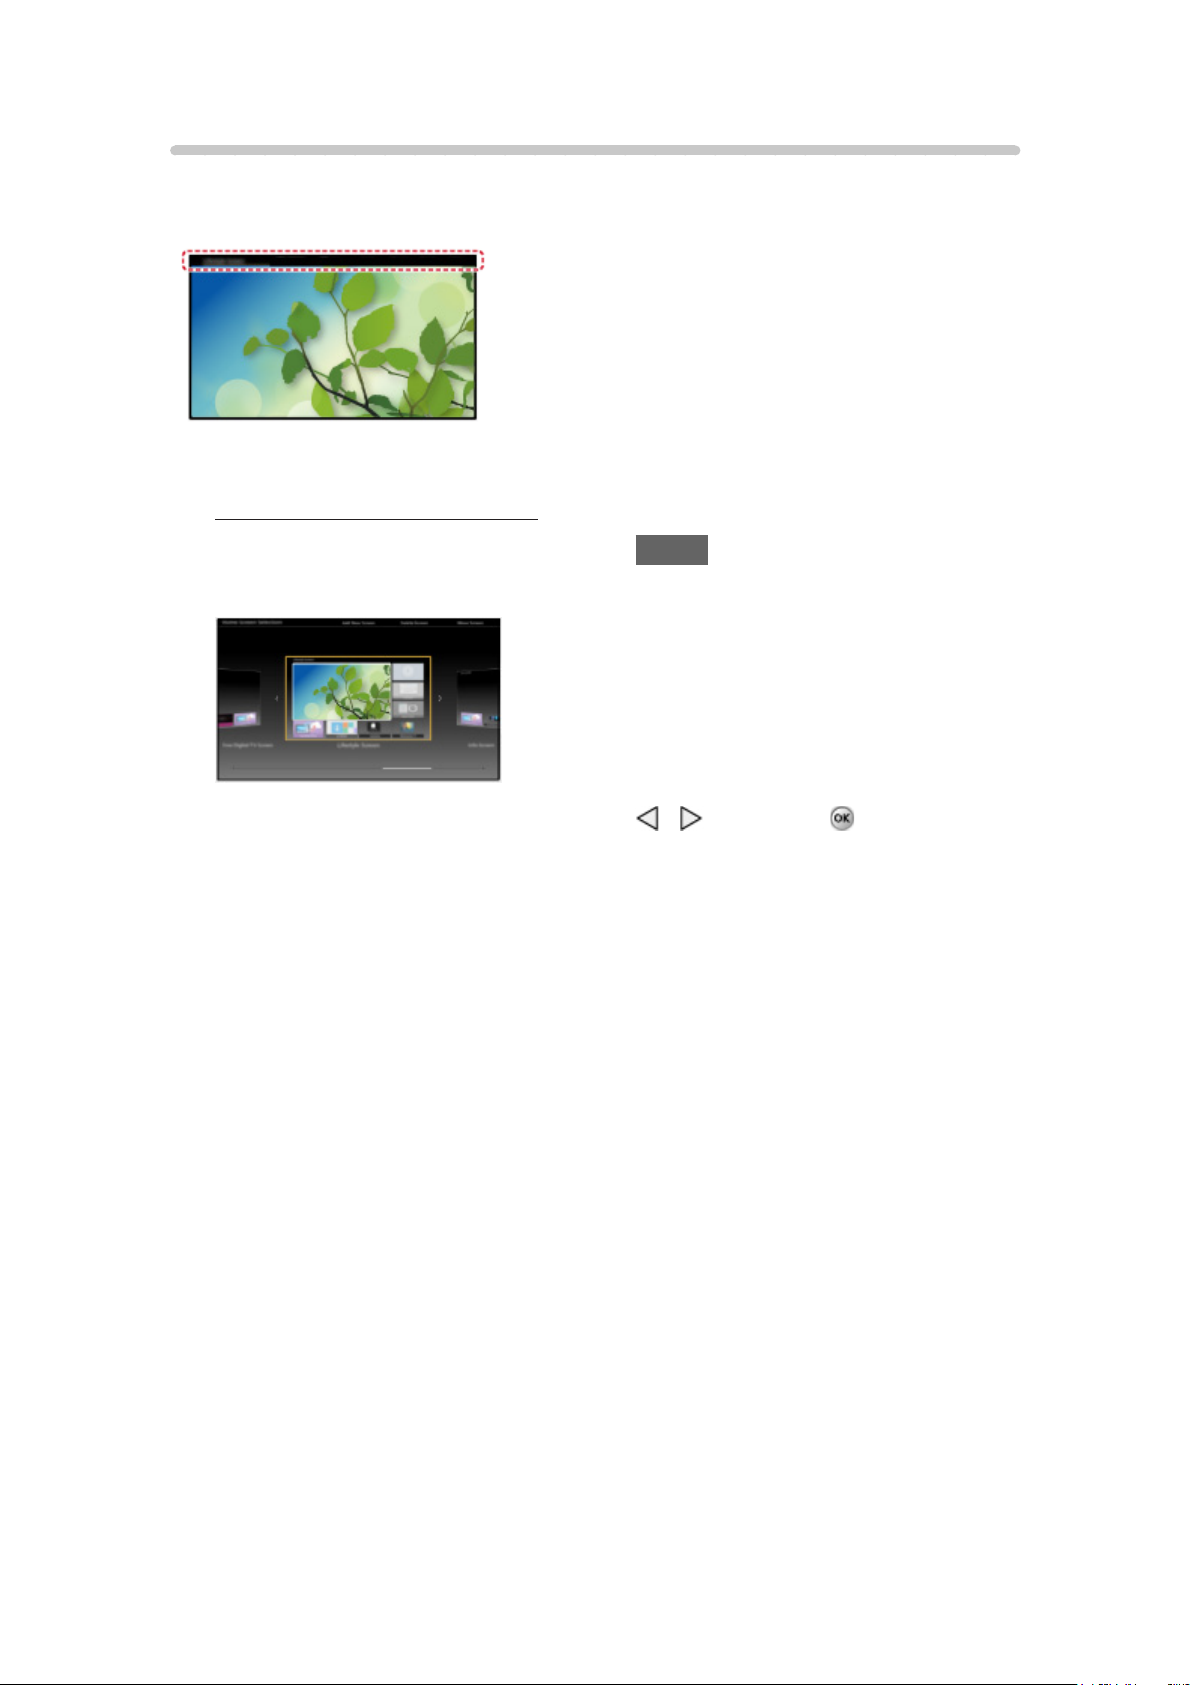
Select the setup menu from the tool guide on the top of the screen.
(Example)
■ Home Screen Selection
1. Display Home Screen Selection with HOME
(Example)
2. Select the type of Home Screen with / and press to set.
●
Full Screen TV
Exits the Home Screen and displays the TV picture in full-screen.
– To Keep Full Screen TV
While watching the TV on this full-screen, select Settings from tool
guide. Then, set the Power ON Option.
●
Various Home Screens
You can change the layout of the Home Screen according to your
lifestyle and personal preferences.
- 11 -
Page 12
■ Face recognition/Voice Print Recognition
By using the communication camera and voice control function, this TV
recognizes your face/voice and displays the registered Home Screen.
●
Say “my Home Screen” into the microphone of the Touch Pad Controller to
use this function.
●
To use this function, you need to set up a user profile and register face/
voice data, preferred Home Screen, etc.
All settings > Setup > User settings
●
For details of voice control function
Convenience features > Using Voice control
●
Communication camera is not included. Please purchase as necessary.
■ Settings
You can customize Home Screen. For example, you can change the
wallpaper, rename the screen, add / delete or set your preferred Home
screen, edit applications, etc.
1. Select Settings from the tool guide
2. Follow the on-screen instructions
■ Search function
You can search the content of various Home screen features.
1. Select Search from the tool guide
2. Follow the on-screen instructions
●
To use this function fully, you need a broadband network environment.
Ensure the network connections and network settings are completed.
●
Be sure to update the software when a software update notice is
displayed on the TV screen. If the software is not updated, you will not
be able to use my Home Screen. You can update the software later
manually.
●
To change the color type of on-screen displays.
All settings > Setup > Display customization
- 12 -
Page 13
Using Apps list
Features
Special features (Internet contents, network contents, Media Player, etc.) can
be accessed easily from Apps (applications) list.
■ APPS list
●
Apps list is subject to change without notice.
- 13 -
Page 14
How to use
You can access special features such as Internet contents, network contents,
Media Player, etc. from Apps list (applications list).
1. Display Apps list
APPS
(Example)
●
To exit Apps list
EXIT
2. Select an icon of the features with
access
/ / / and press to
- 14 -
Page 15

Settings
You can set up Apps list manually. (For example, Screen Settings, Account
Information, restriction, etc.)
1. Display Apps list
APPS
2. Select the setup menu on Apps list with
to access
3. Follow the on-screen instructions
●
Setup items may be changed without notice
/ / / and press
- 15 -
Page 16
Watching TV
Cable / Satellite / Fiber Optic box
Initial setting
1. Connecting
Select the wiring method connecting your box to the TV, AV IN or
Antenna/Cable in.
Note:
●
HDMI will provide the best HD picture
2. Change INPUT
INPUT
Press the INPUT button to select the proper connection. Wait for 2
seconds.
●
The menu choices vary depending on which input is selected.
3. Power on your Cable, Satellite or Fiber Optic box
Use the box’s remote control to change channels.
●
If the box is connected to the TV using a COAX cable (Antenna/Cable
in), then set the TV channel to CH3 or CH4. Note that the picture will
not be in HD.
●
CC/SAP is not available when watching TV with a Cable or Satellite
box connected via HDMI.
●
If you have a High Definition box, ensure that it is outputting 720p or
1080i signal.
Tip: press the TV’s INFO button to verify.
●
Check your box’s “aspect” or “format” settings. It should be set to 16:9,
Widescreen or Full.
●
If the audio volume is too low, check the box’s audio settings.
●
Contact your Cable or Satellite provider for instructions on any box
settings.
- 16 -
Page 17
Antenna / Cable service without a box
Initial setting
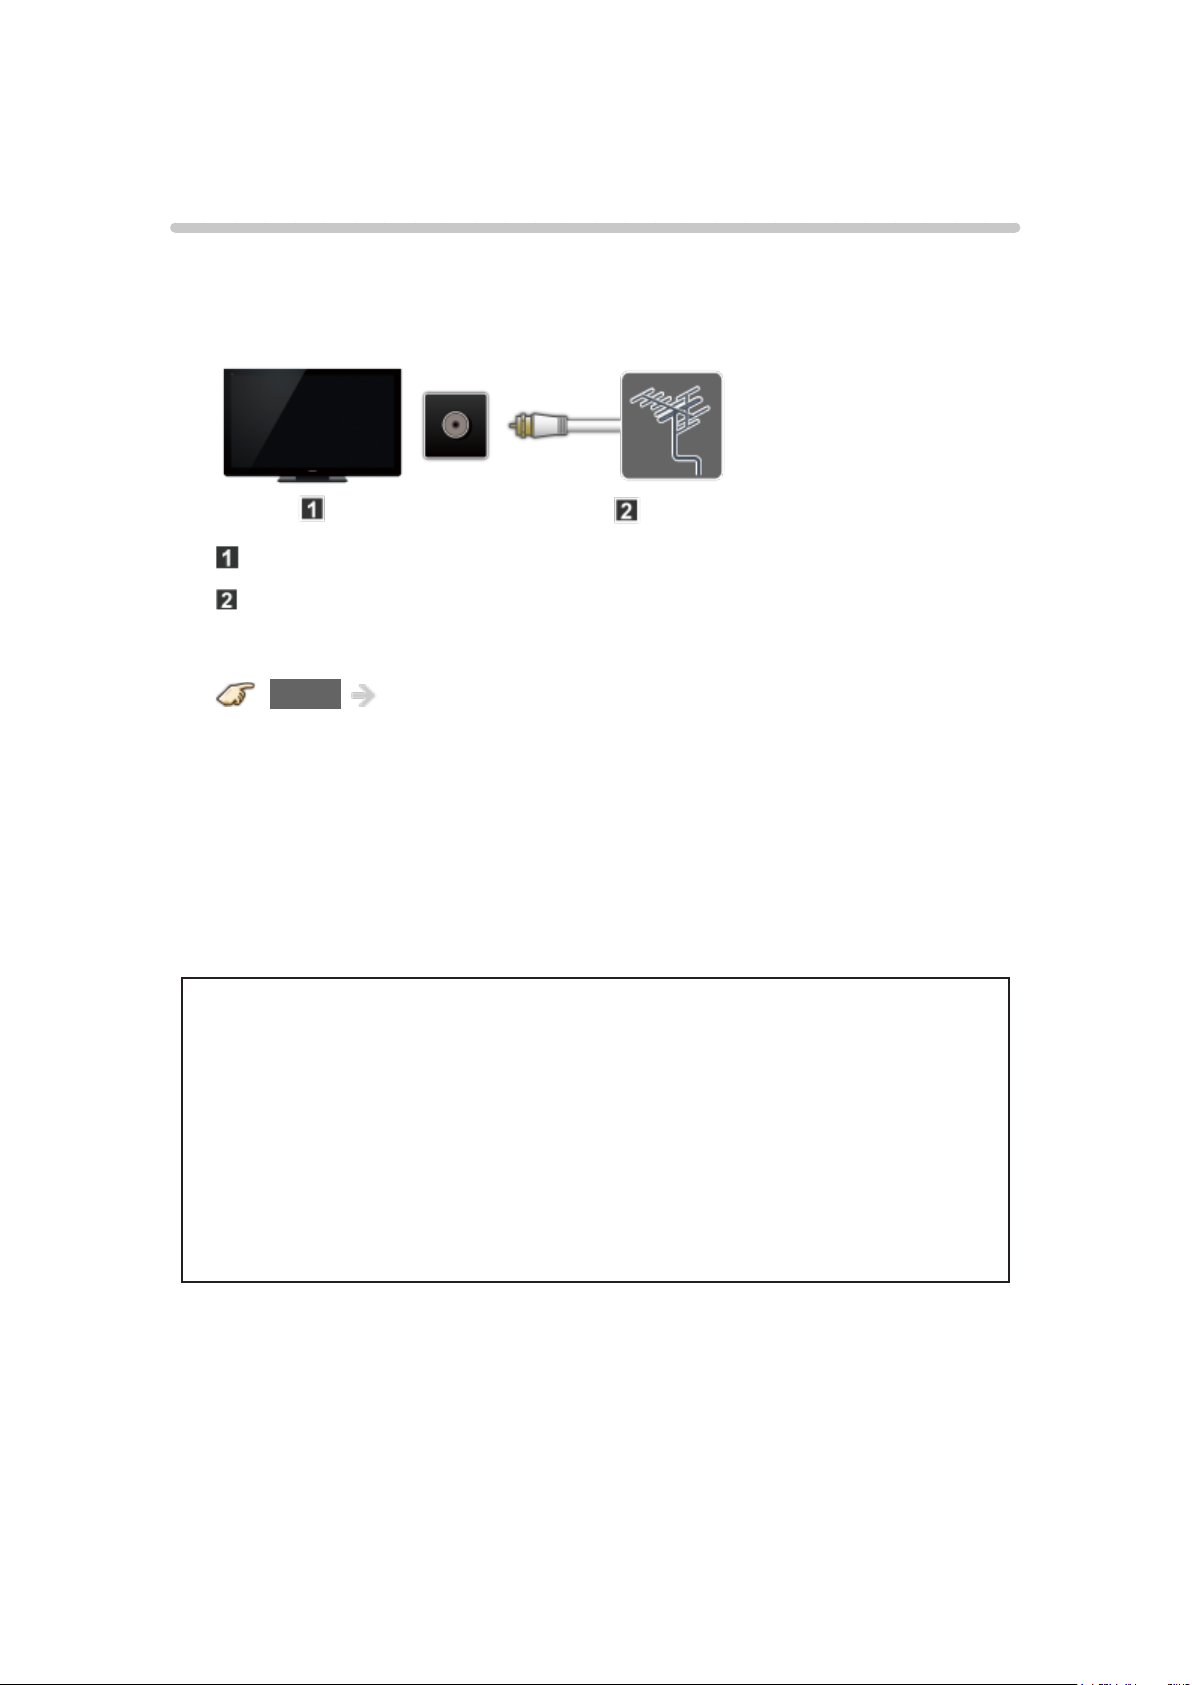
1. Connect coax
Connect a COAX wire from either an antenna or Basic Cable service to
the TV’s “ANTENNA/CABLE IN” screw terminal.
TV (ANTENNA/CABLE IN)
Antenna
2. Scan the channel
MENU Menu > Setup > ANTENNA/Cable setup > ANTENNA/
Cable signal, Auto program
1) Select either Cable or Antenna programming source in ANTENNA/
Cable signal.
2) Select Auto program and then the appropriate scan mode:
(All channels / Analog only / Digital only)
3) Start scanning.
●
The tuner setup menu (auto scan, etc.) is only available when INPUT is
set to TV.
●
If no channels are found by the end of the scan, then check the
following:
– Antenna’s position - or availability of Cable service.
– Cable, Satellite or Fiber Optic services with a box are typically
connected to the TV’s A/V inputs, preferably HDMI, for best HD
picture. In such a case, the channel scanning is not needed.
- 17 -
Page 18
Select channels
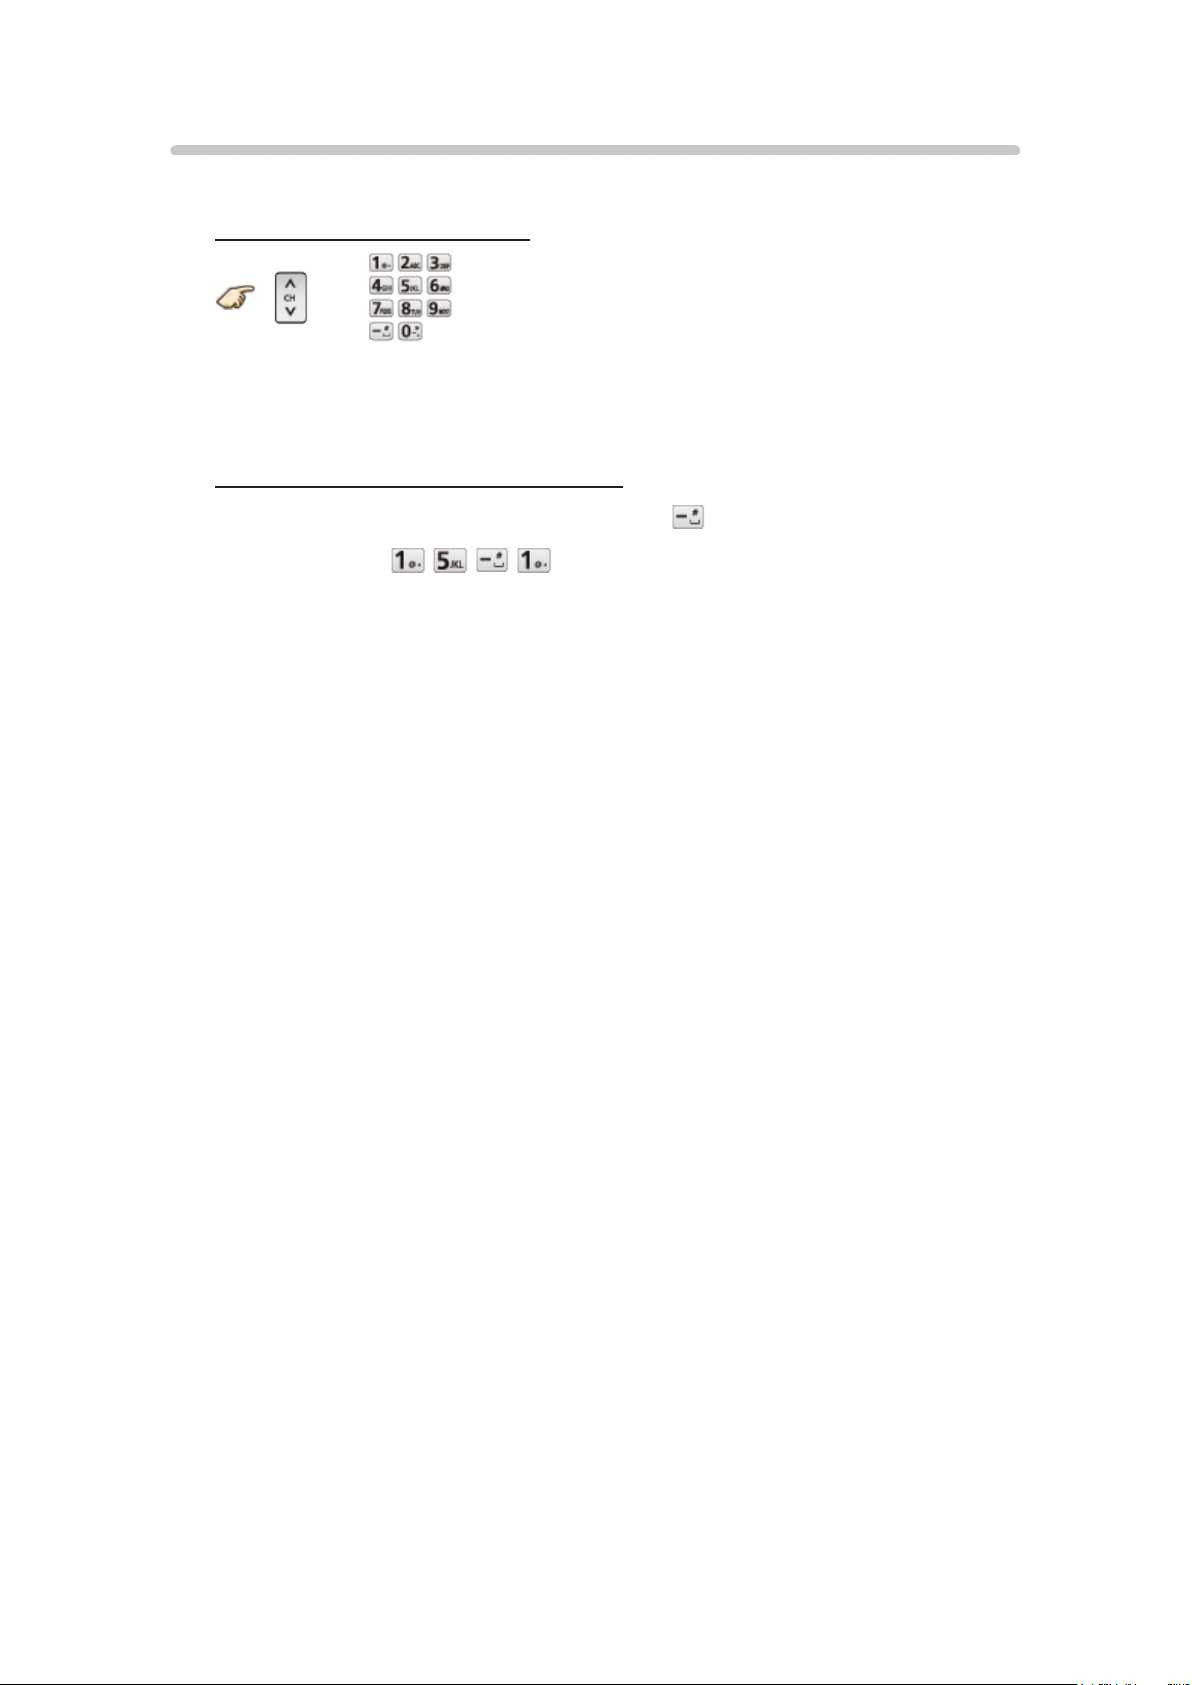
■ Select desired channel
or
●
CH buttons are also available on the TV.
■ Select desired digital channel
To directly enter a digital channel number use button to enter the dash.
(e.g.CH15-1→
)
- 18 -
Page 19
Favorite channels
Channel numbers registered in Favorite are displayed on the favorite tune
screen. Select the desired broadcast station with the cursor or use the
number buttons.
●
Favorite channels cannot be set when using Cable or Satellite box
■ Set the Favorite channel
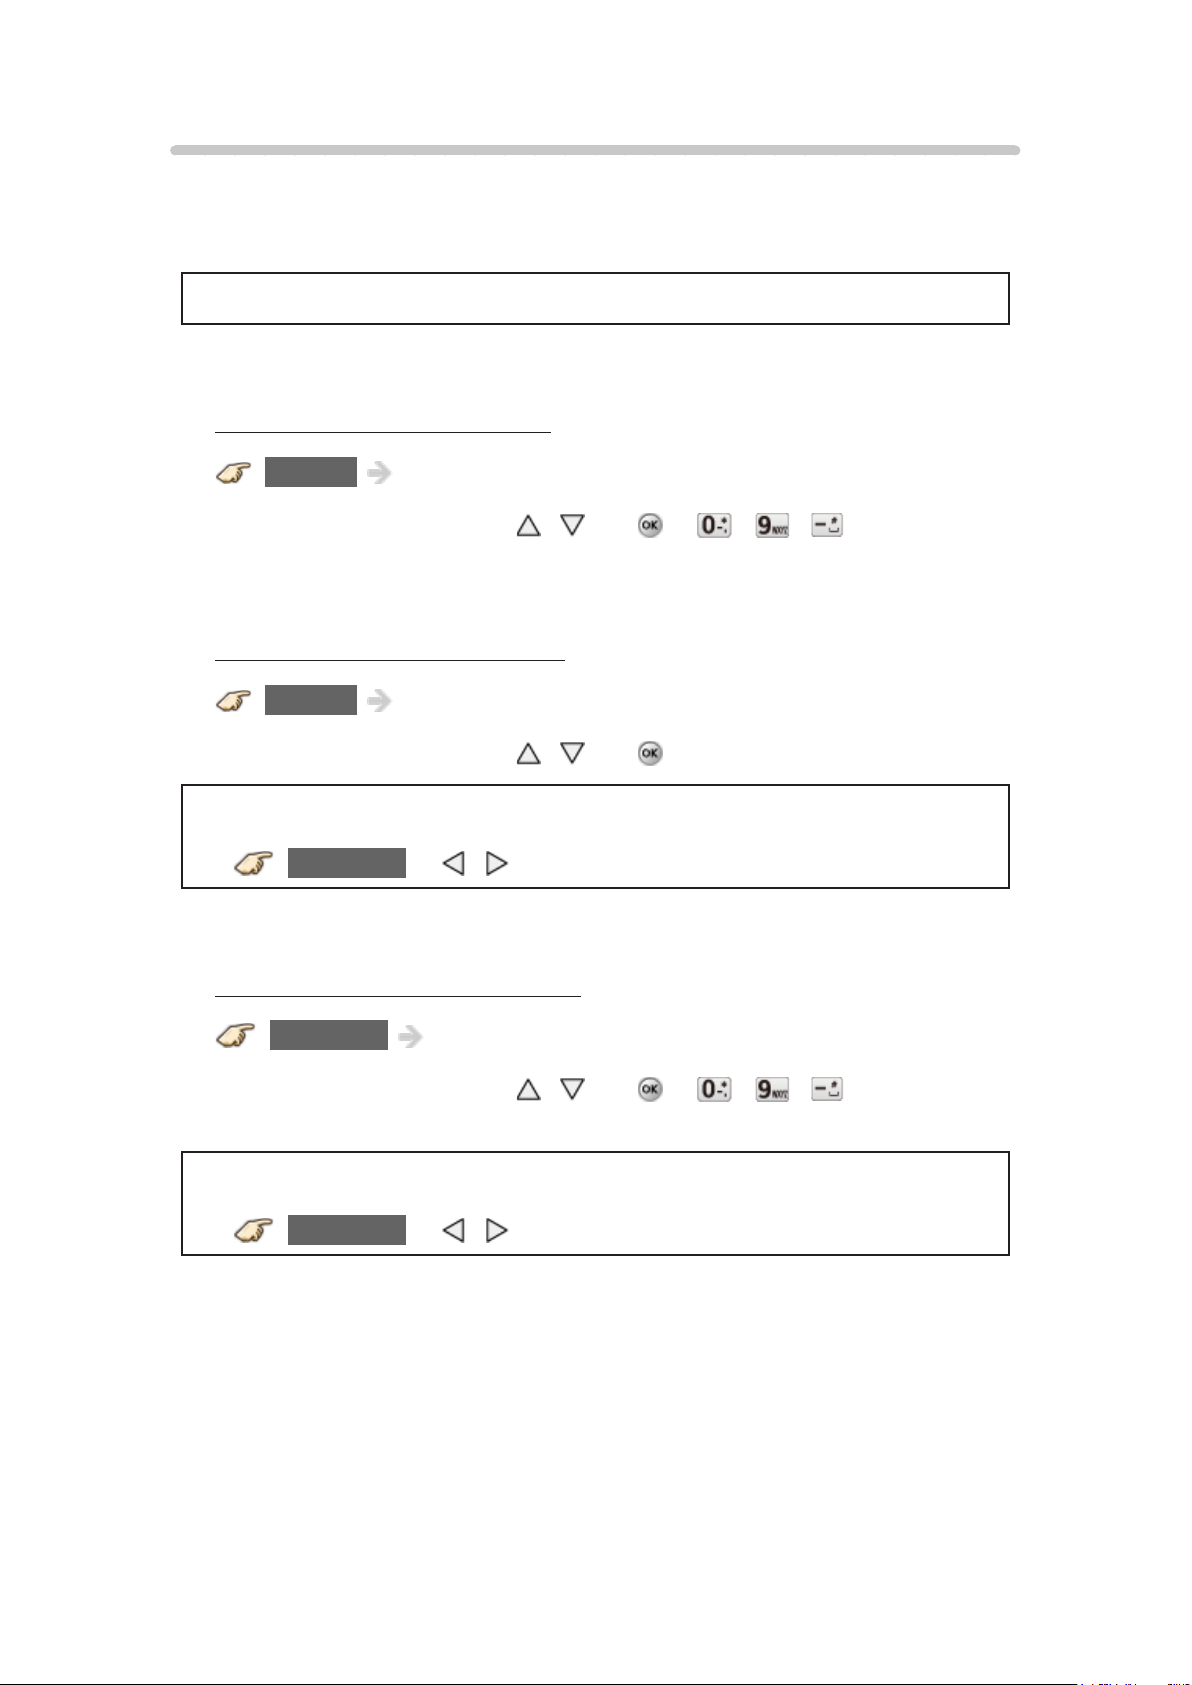
OPTION Options menu > Set favorite
Select the list number using
save the displayed channel.
/ and or - / directly to
■ Delete a Favorite channel
OPTION Options menu > Set favorite
Select the list number using
●
To change the page in Set favorite
FAVORITE or / repeatedly
/ and to delete.
■ Display a Favorite channel
FAVORITE Favorite channels
Select the list number using
save the displayed channel.
/ and or - / directly to
●
To change the page in Favorite channels
FAVORITE or /
repeatedly
- 19 -
Page 20
Closed Caption
■ Viewing with Closed Caption
CC
Switches the Closed Caption mode.
(Off / On / On mute)
●
CC is not available when watching TV with a Cable or Satellite box
connected via HDMI.
●
Contact your Cable or Satellite operator for instructions on enabling CC
with their box.
●
The TV’s CC button does not operate the Satellite or Cable box’s CC
function.
●
For viewing the CC of digital broadcasting, set the aspect to Full (If
viewing with H-FILL, JUST, ZOOM or 4:3; characters might be cut off).
●
If the CC is set to On on both the receiver and TV when the signal is
480i (except for the HDMI connection), the CC may overlap on the TV.
●
If a digital program is being output in analog format, the CC data will
also be output in analog format.
●
If the recorder or output monitor is connected to the TV, the CC needs
to be set up on the recorder or output monitor.
- 20 -
Page 21
SAP
■ Listen with SAP (Secondary Audio Programming)
●
SAP is not available when watching TV with a Cable or Satellite box
connected via HDMI.
●
Contact your Cable or Satellite operator for instructions on enabling
SAP with their box.
●
The TV’s SAP button does not operate the Satellite or Cable box’s
SAP function.
Select the Audio mode for watching TV.
SAP
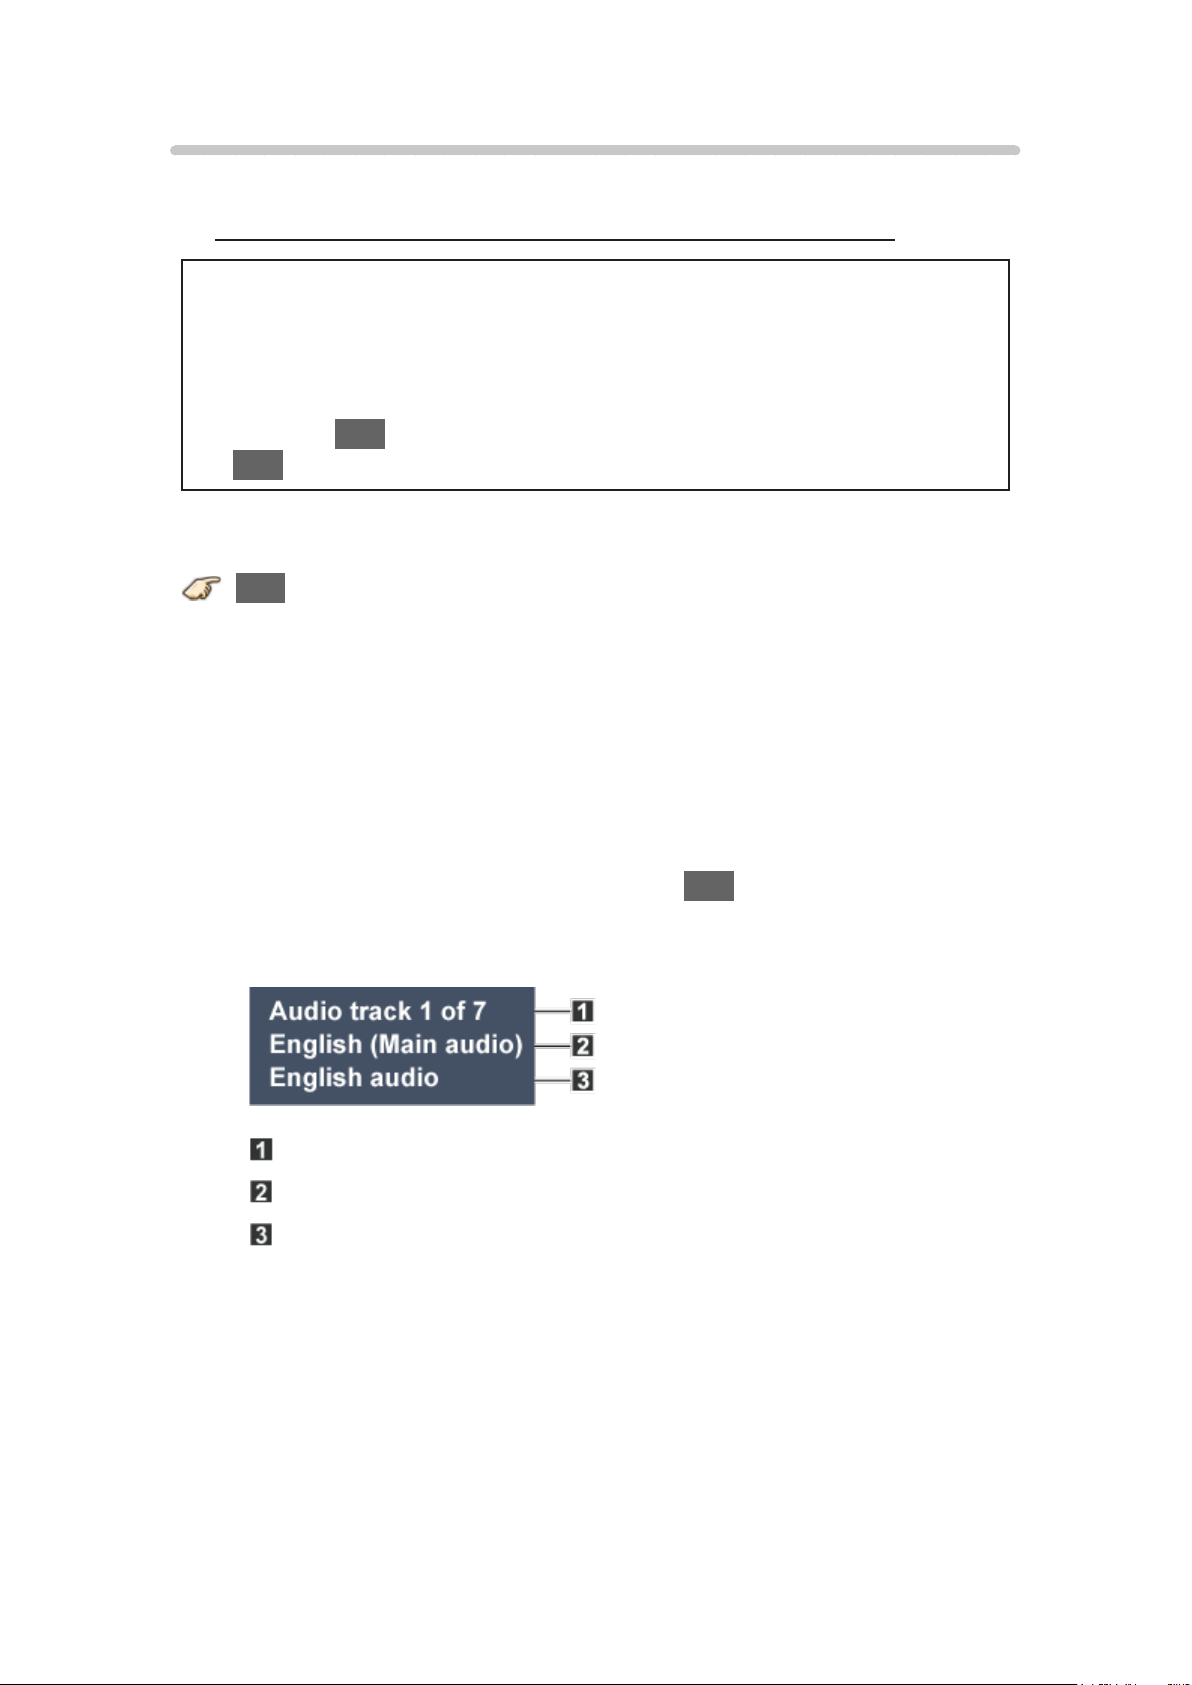
Digital mode:
Select available audio service when receiving a digital channel.
Audio track is automatically selected as Preferred audio type and
Preferred SAP language settings.
(Menu > Sound > Preferred audio type)
(Menu > Setup > Language > Preferred SAP language)
●
If you change the audio settings with the SAP button, Preferred SAP
language and Preferred audio type settings will not change.
(Example)
Track number / Number of tracks
Current audio track information
Audio service information
Analog mode:
Select the desired Audio mode.
(Stereo / SAP / Mono)
- 21 -
Page 22
Other
1. Information banner
Displays TV status information. Also, when watching programs via the
Antenna/Cable input, INFO will include the channel banner.
INFO
Channel / Station identifier / Program title / Closed Caption / SAP /
Rating level / Signal resolution / Picture mode / Aspect ratio / Sleep
timer remaining time / Clock
2. Options menu
This menu consists of shortcuts to convenient functions.
(Options menu is also available in Menu.)
OPTION
Voice guidance settings:
Guidance settings for visually impaired users.
Channel surf mode:
Specify favorites or type of channels to view when pressing the
channel up/down button.
Set favorite:
Set favorite channel
Edit CH caption:
Edit the channel identifier
Signal meter:
Check the antenna’s signal strength
●
Options menu is only available when the TV is using the Antenna/Cable
input, not when using Cable or Satellite box.
- 22 -
Page 23
Blu-ray, DVD, Game Console, etc.
Connecting and viewing
1. Connect device
Verify that the device is connected to the TV properly and connect to
desired terminal. Note which terminal the device is connected to (HDMI 1,
HDMI 2,... Component or Video)
Component and Composite (Video) in terminals are shared.
Please be careful not to confuse the connection when you use Component
or Video.
●
For Example of AV connections
See next section, Example of AV connections.
2. Select Input
1) Display Input select menu (With the connected equipment turned ON)
INPUT
2) Select the input used in step 1
Select correct input source, using
/ and press
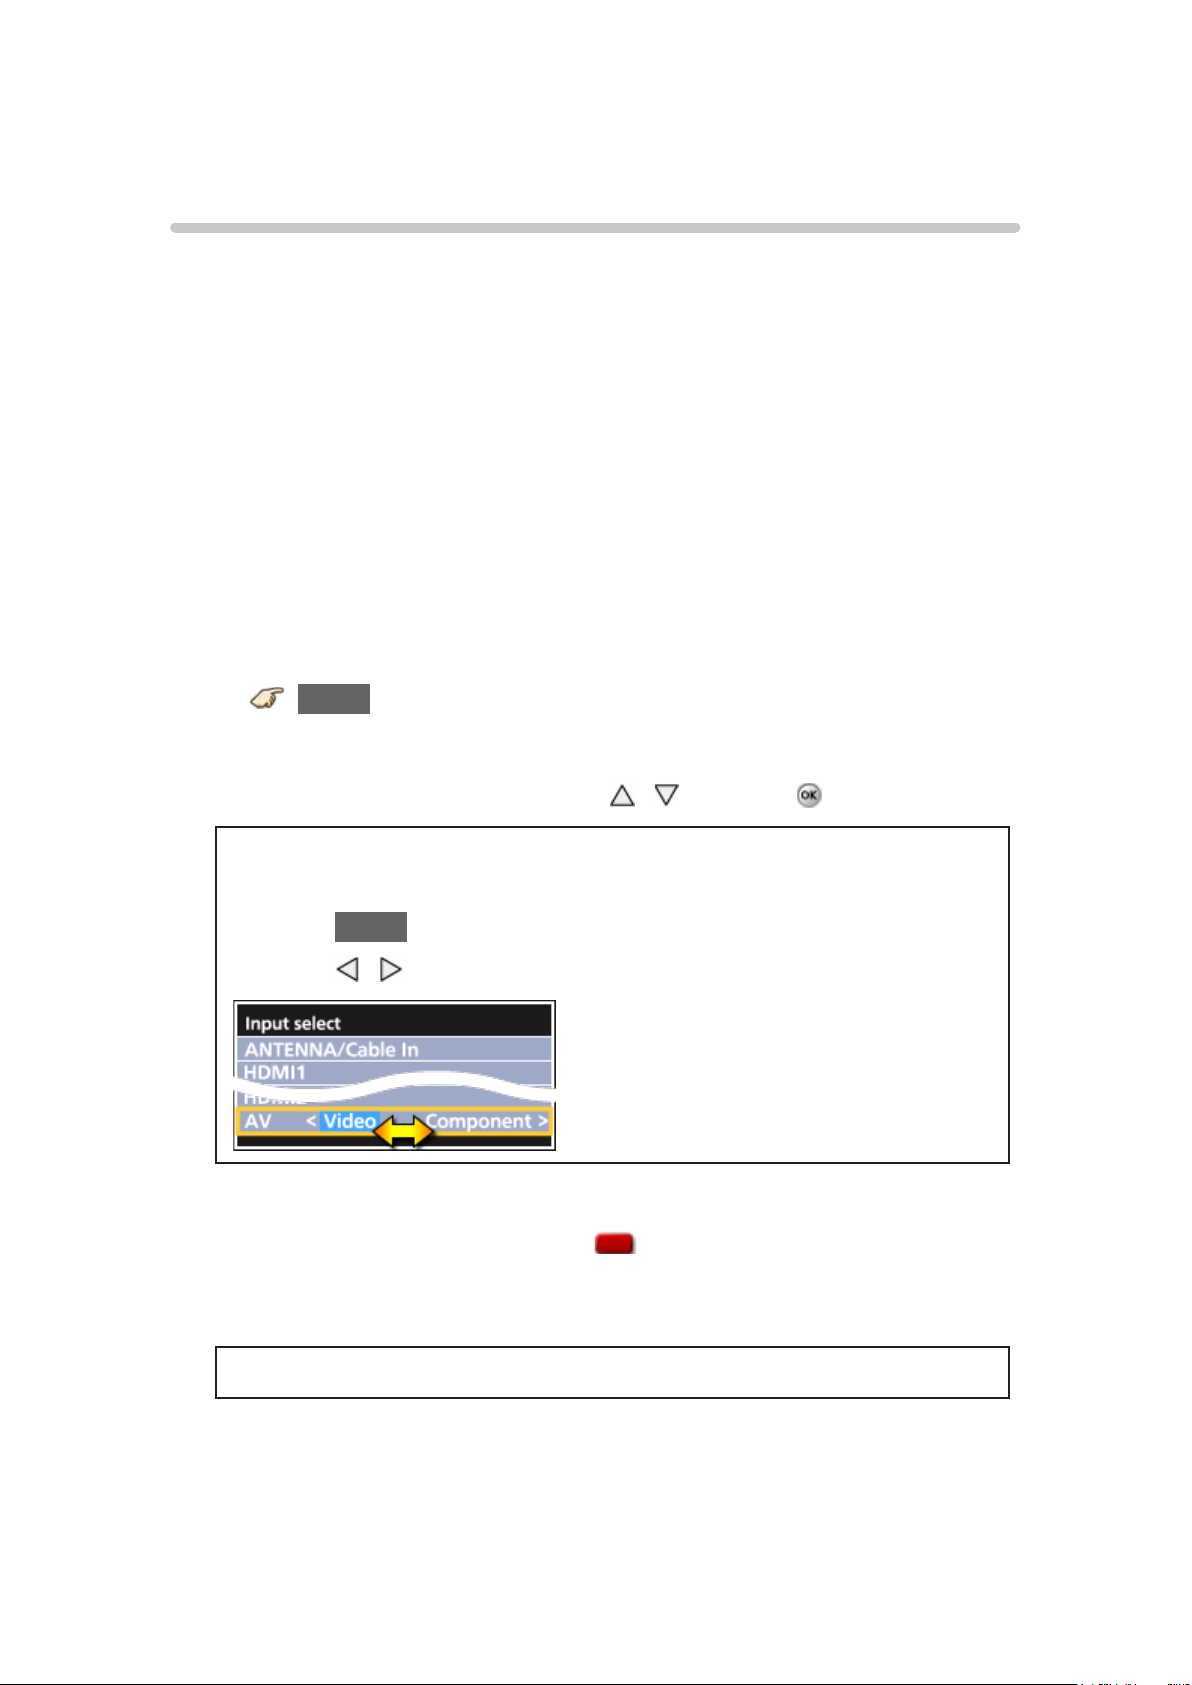
When you connect to Component or Video input, you need to select
Video or Component.
●
Press INPUT and select AV: Video↔Component.
●
Press / to choose Video or Component.
●
You can edit and customize the TV’s Input label for easy
identification by pressing the (Red) button. If you label an input
as Not used, then it will not appear in the Input select menu.
3) Operate using your device’s remote control
●
The menu choices vary depending on which input is selected.
- 23 -
Page 24
Example of AV connections
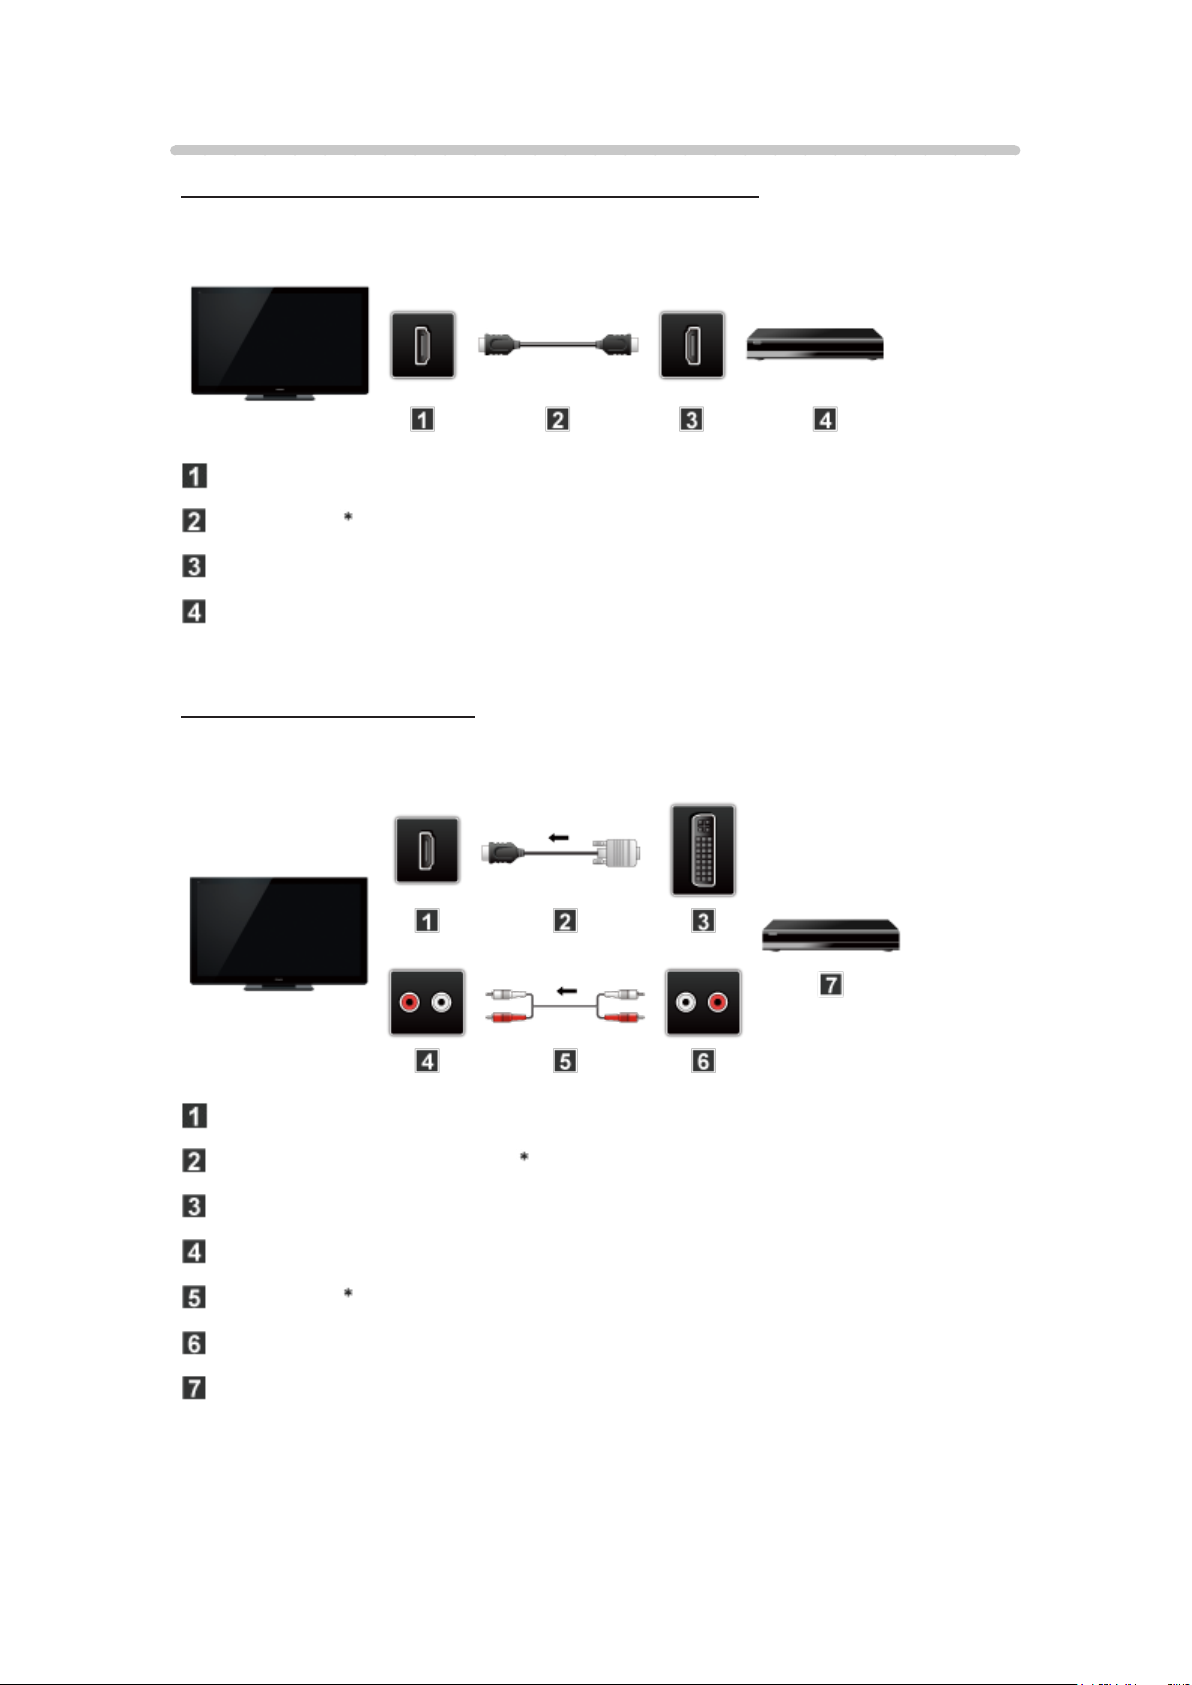
A. Connecting to the HDMI input (Best for HD viewing)
Recommended to use this connection, if the connected equipment has HDMI
terminal.
HDMI IN
HDMI cable
HDMI OUT
AV Equipment (e.g. Blu-ray Disc player)
For devices with DVI output
Recommended to use this connection, if the connected equipment has DVI
terminal only.
HDMI IN
HDMI-DVI Conversion cable
DVI OUT
AUDIO IN
Audio cable
AUDIO OUT
AV Equipment (e.g. Blu-ray Disc player)
- 24 -
Page 25
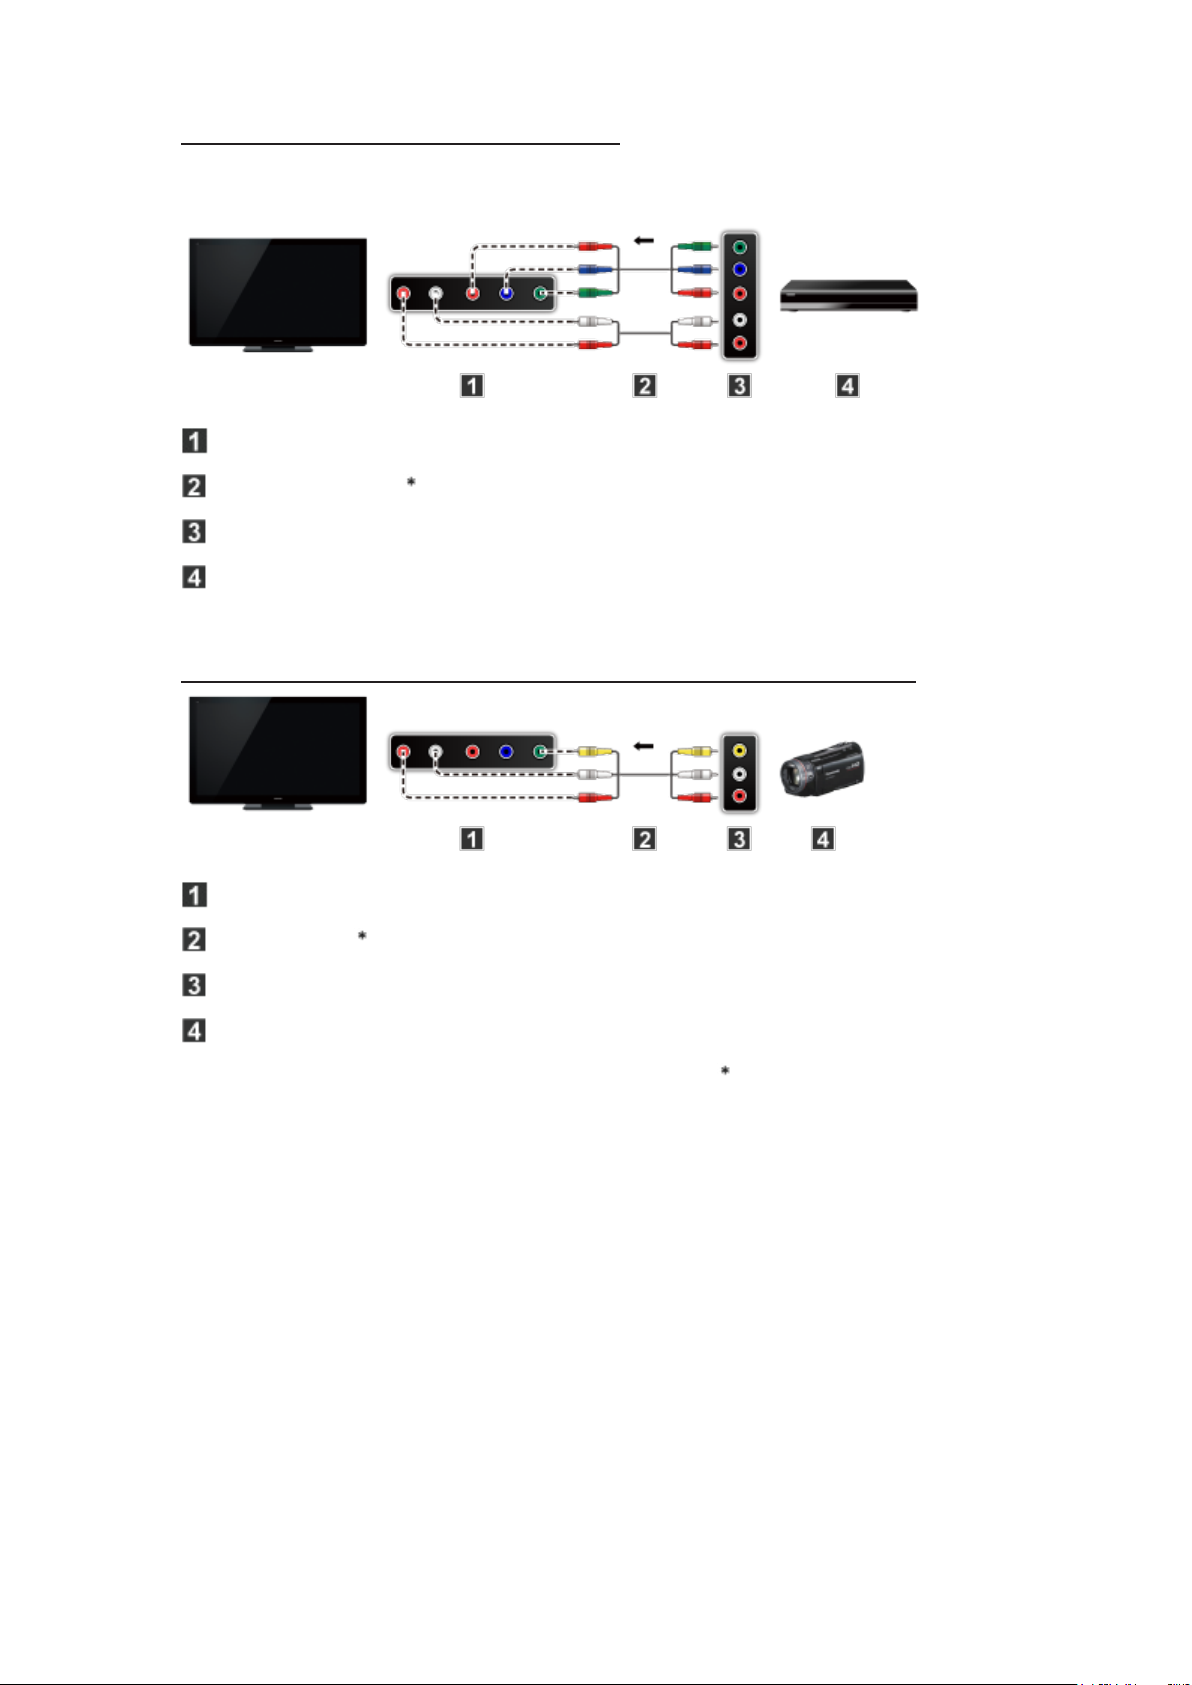
B. Connecting to the COMPONENT input
Recommended to use this connection, if the connected equipment has
Component terminal only.
COMPONENT IN
Component cable
COMPONENT OUT
AV Equipment (e.g. Blu-ray Disc player)
C. Connecting to the VIDEO input (For SD (Standard Definition) only)
COMPOSITE IN
VIDEO cable
COMPOSITE OUT
AV Equipment (e.g. Camcorder)
: Not supplied with this TV
- 25 -
Page 26
HDMI connection notice
HDMI (high-definition multimedia interface) allows you to enjoy high-definition
digital images and high-quality sound by connecting the TV unit and HD
devices.
HDMI-compatible equipment
with an HDMI or DVI output terminal, such
as a Cable or Satellite box or a DVD player, can be connected to the HDMI
connector using an HDMI compliant (fully wired) cable.
●
HDMI is the world’s first complete digital consumer AV interface complying
with a non-compression standard.
●
If the external equipment has only a DVI output, connect to the HDMI
terminal via a DVI to HDMI adapter cable
●
When the DVI to HDMI adapter cable is used, connect the audio cable to
.
the audio input terminal.
●
Audio settings can be made on the HDMI in menu screen. Applicable
audio signal sampling frequencies (L.PCM): 48 kHz, 44.1 kHz, 32 kHz
: The HDMI logo is displayed on an HDMI-compliant device.
: Inquire at your local digital equipment retailer shop.
- 26 -
Page 27

HDMI connection caution
Caution
●
If the connected device has an aspect adjustment function, set the aspect
ratio to “16:9”.
●
The HDMI connectors are “type A”.
●
The HDMI connectors are compatible with HDCP (High-Bandwidth Digital
Content Protection) copyright protection.
●
Devices with no digital output terminal may be connected to the input
terminal of either “COMPONENT IN”, or “VIDEO IN” to receive analog
signals.
●
The HDMI input terminal can be used only with the following video
signals: 480i, 480p, 720p, 1080i and 1080p. Ensure that the device being
connected to the TV can produce one of these video signals.
- 27 -
Page 28
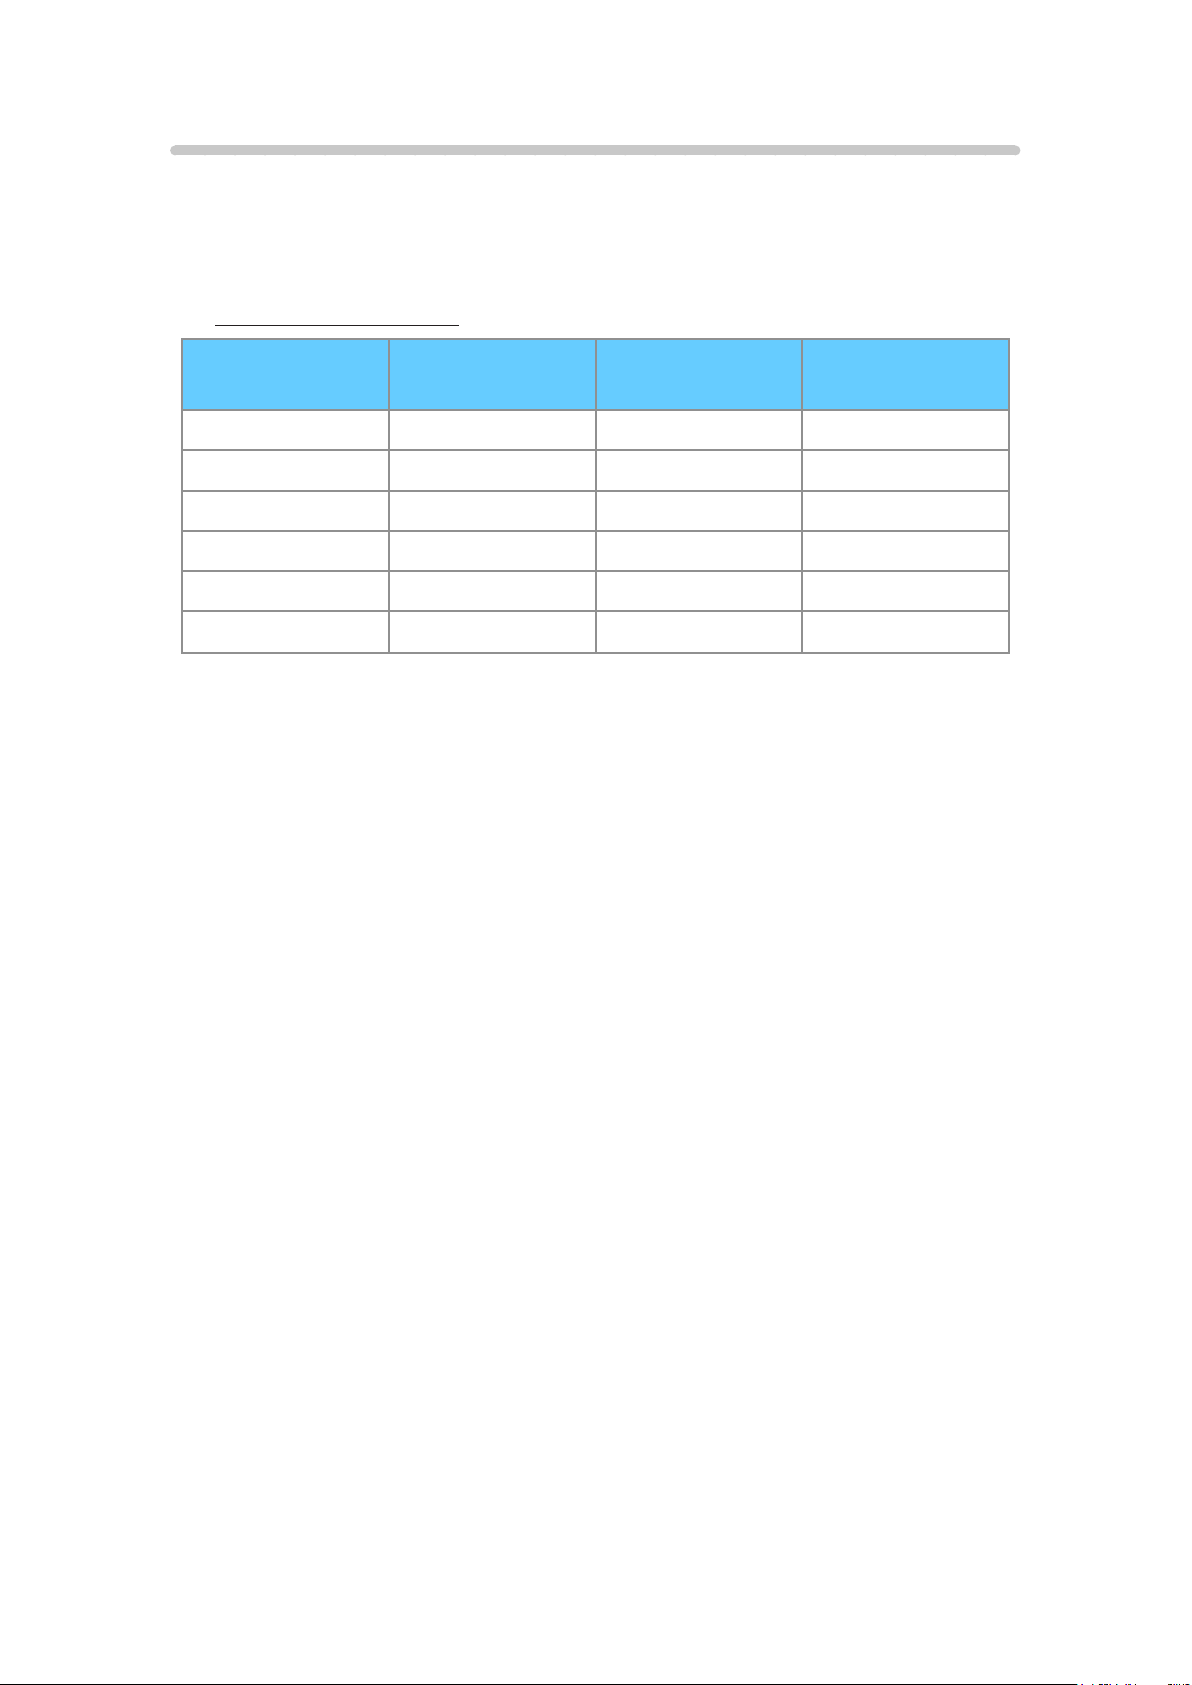
Input signal
●
Signals other than those listed below may not be displayed properly.
●
The signals are reformatted for optimal viewing on your display.
■ Component/HDMI
Input signal
480/60i 59.94/60.00 ○ ○
480/60p 59.94/60.00 ○ ○
720/60p 59.94/60.00 ○ ○
1,080/60i 59.94/60.00 ○ ○
1,080/60p 59.94/60.00 ○ ○
1,080/24p 23.98/24.00 ○
Vertical
frequency (Hz)
Component HDMI
○:Applicableinputsignal
- 28 -
Page 29
For best picture
Picture mode
1. Change picture mode to suit your settings and taste
1) Select Picture mode
MENU Menu > Picture > Picture mode
Select desired menu using
2) Adjust using /
Note:
●
HDMI will provide the best HD picture
2. Picture mode type
Vivid
Provides enhanced picture contrast and sharpness for viewing in a well-lit
room.
Standard
Recommended for normal viewing conditions with subdued room lighting.
Home theater
/ from menu bar and press
For watching movies in a darkened room. It provides a soft, film-like picture.
Cinema
Reproduces the original image quality precisely without any revision.
Allows you to set the professional picture settings in Pro settings and Copy
adjustments.
Use the mode below to adjust the picture mode in more detail.
●
Custom
Customizes each item according to your taste.
Allows you to set the professional picture settings in Pro settings and Copy
adjustments.
●
Adjust the Picture mode in more detail.
All settings > Picture > Pro settings
- 29 -
Page 30

Auto brightness (ECO)
Contrast Automatic Tracking System (C.A.T.S.) adjusts the screen brightness
and contrast according to the room’s ambient light conditions. This ECO
feature automatically dims the brightness of the screen when the room
lighting is lowered.
C.A.T.S. features a built-in delay when the lighting conditions change. The
adjustment happens gradually.
If you prefer a consistent brightness, disable C.A.T.S. by:
●
Menu > Picture > scroll down to C.A.T.S. and turn it off.
Or
●
Menu > Picture > Picture mode then select viewing mode such as
Custom.
- 30 -
Page 31
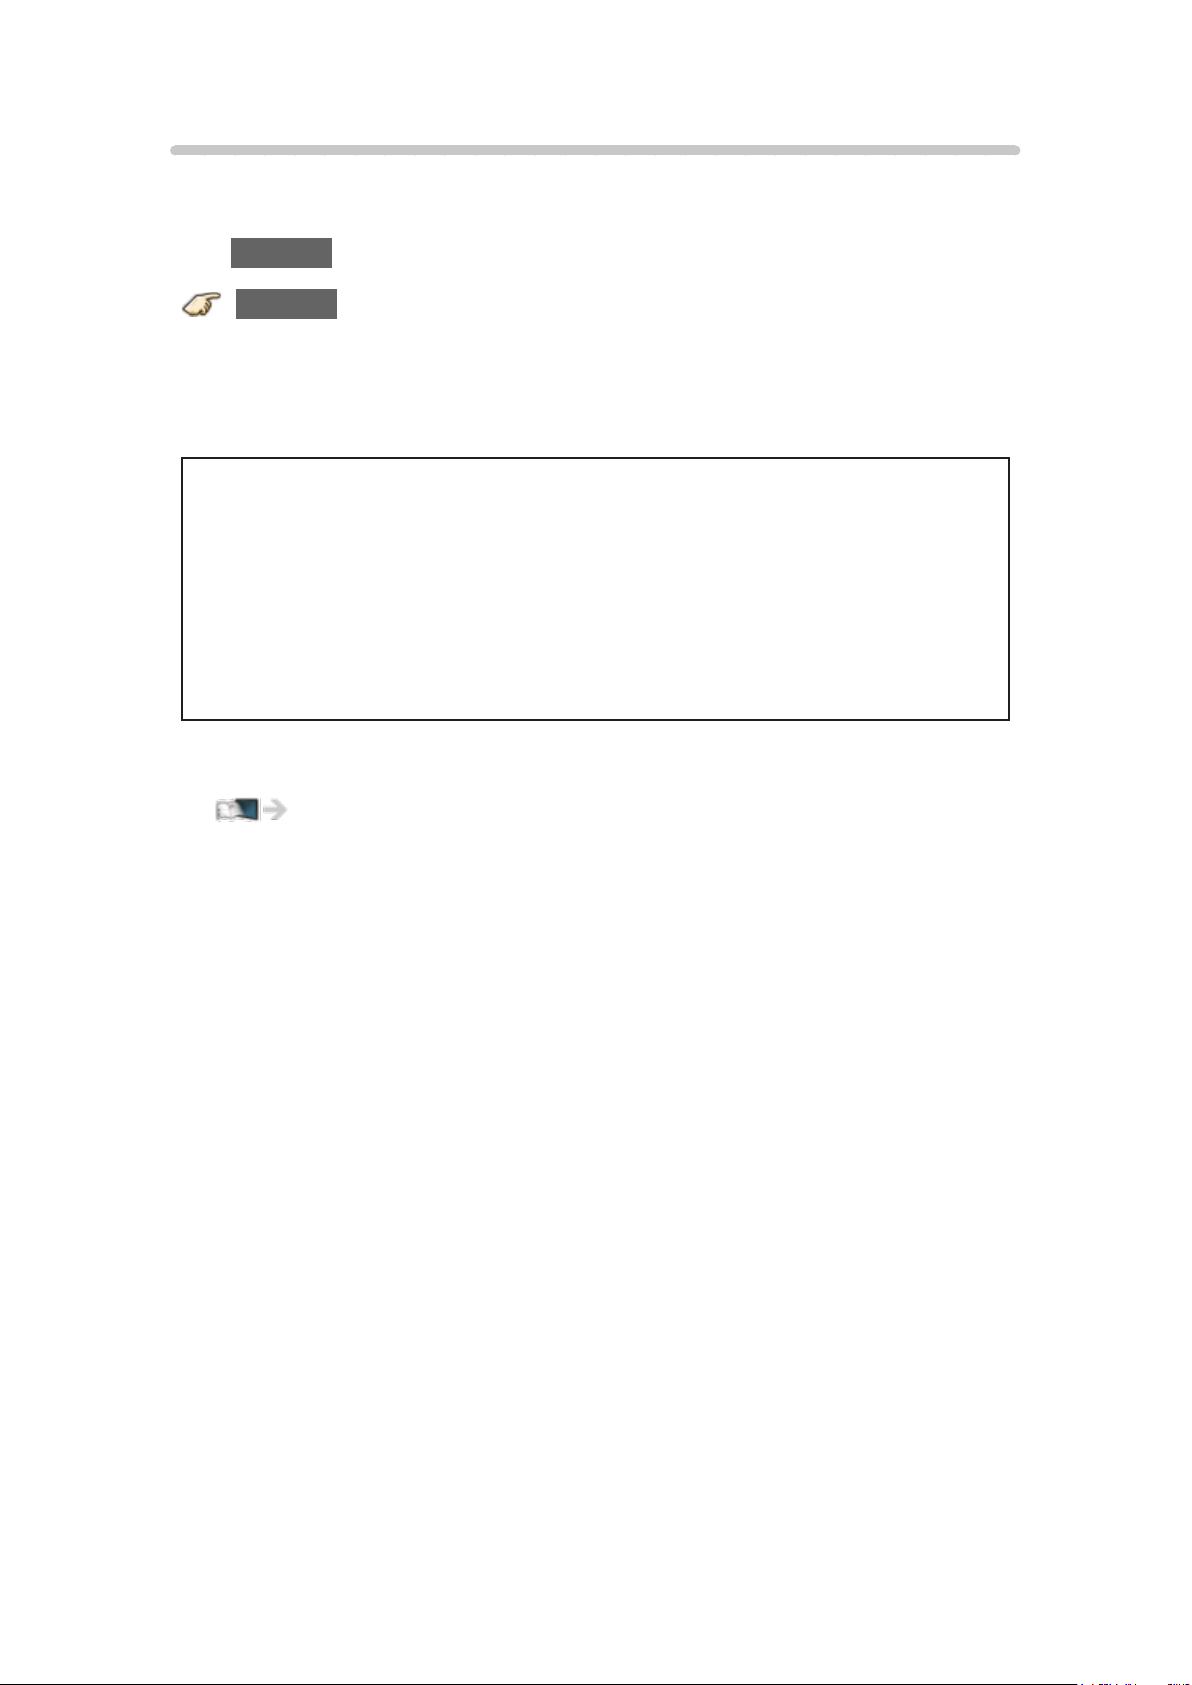
Aspect setting
Use this function when the picture has black bars (sides or top/bottom) or to
zoom the picture.
Use FORMAT button to change the aspect ratio.
FORMAT (to cycle through the aspect modes)
480i, 480p: Full/JUST/4:3/ZOOM
1080p, 1080i, 720p: Full/JUST/4:3/ZOOM/H-FILL/SIDECUT JUST/
SIDECUT ZOOM
●
Use when the picture does not fill the whole screen or portions of the
picture are trimmed.
●
Some content, such as film-based movies, are available in extra-wide
format. Top and bottom bars are unavoidable.
●
Connected devices, such as Cable/Satellite box, DVD/Blu-ray players
and game consoles have their own aspect (format) settings. Adjust the
device’s aspect settings.
●
For screen format settings
All settings > Picture > Screen settings
- 31 -
Page 32
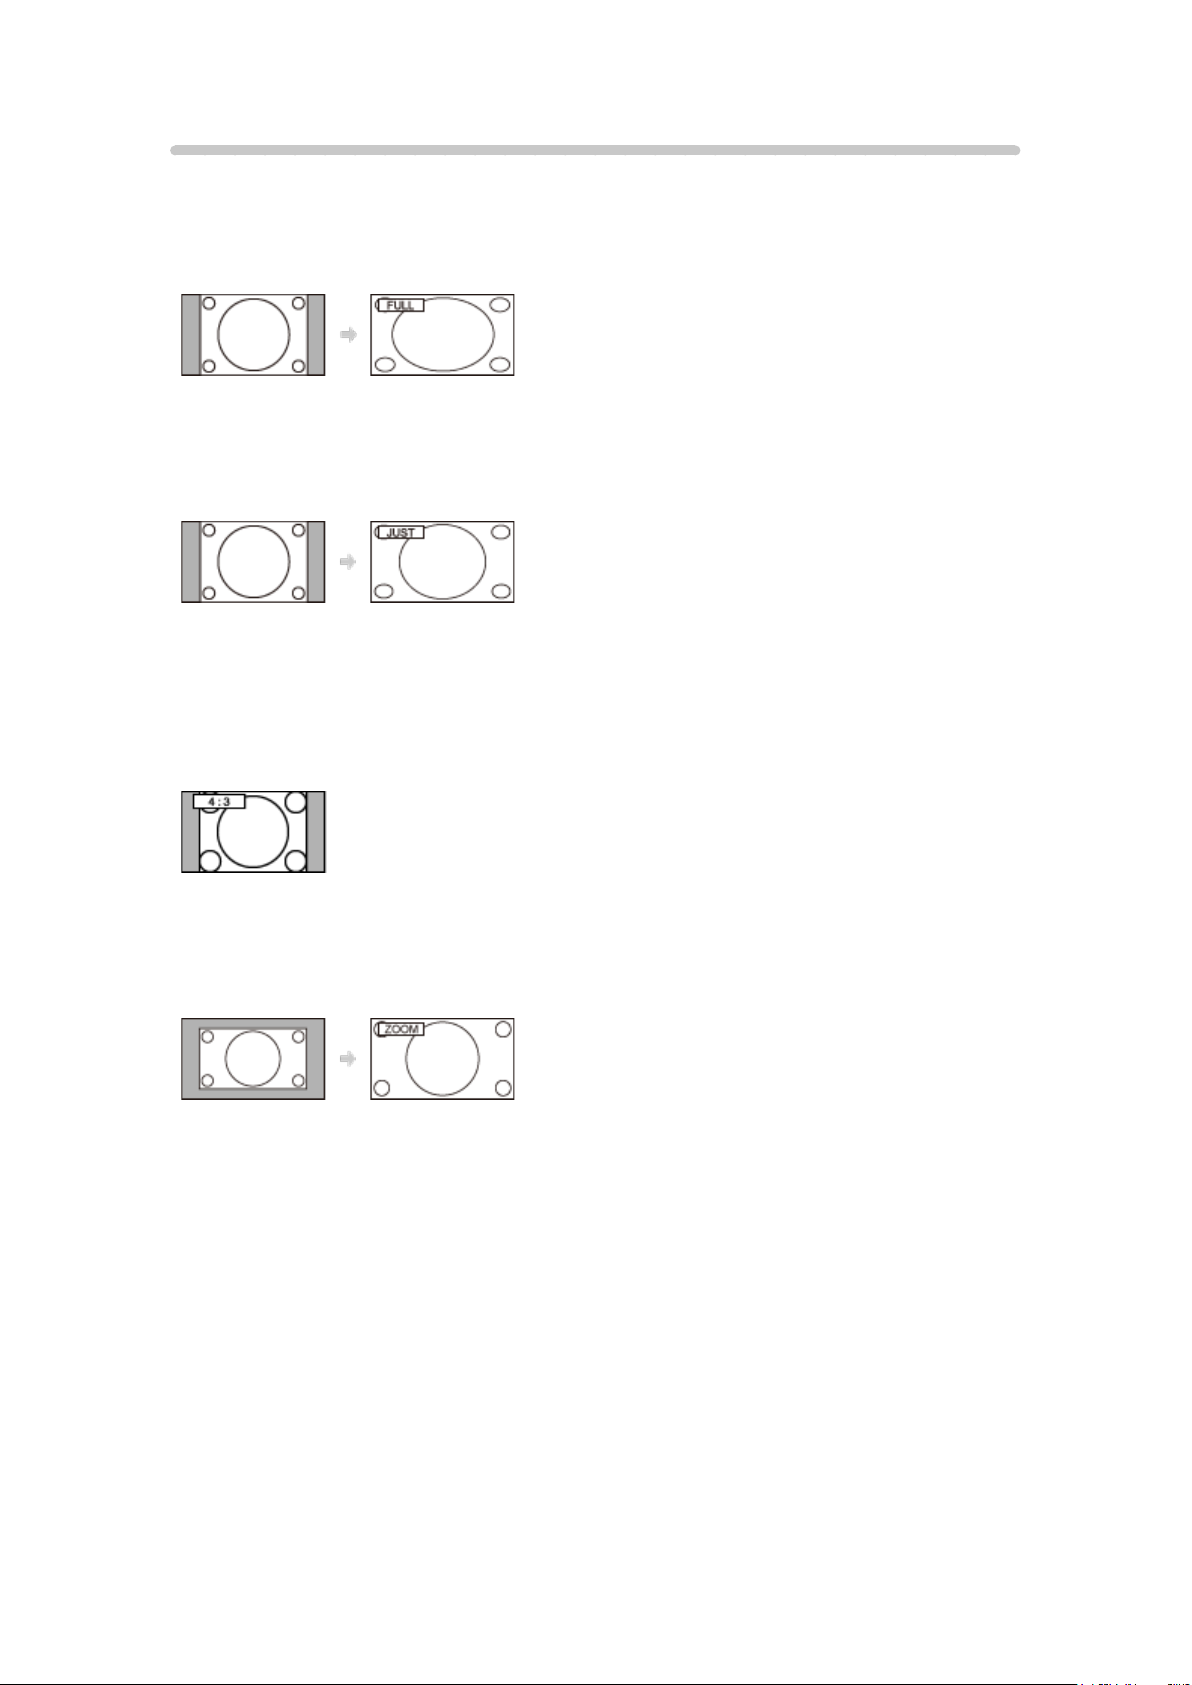
Screen mode
Adjust the screen mode when the picture has black bars (sides or top/bottom)
●
Mainly for Standard Definition (480i, 480p)
Full
Enlarges the image horizontally to the screen’s edges.
JUST
Justifies the image by stretching it to the four corners on the screen.
(Recommended for normal TV broadcast)
4:3
Displays the image as original size.
ZOOM
Enlarges the image to the entire screen.
(Recommended for Letterboxed content)
- 32 -
Page 33
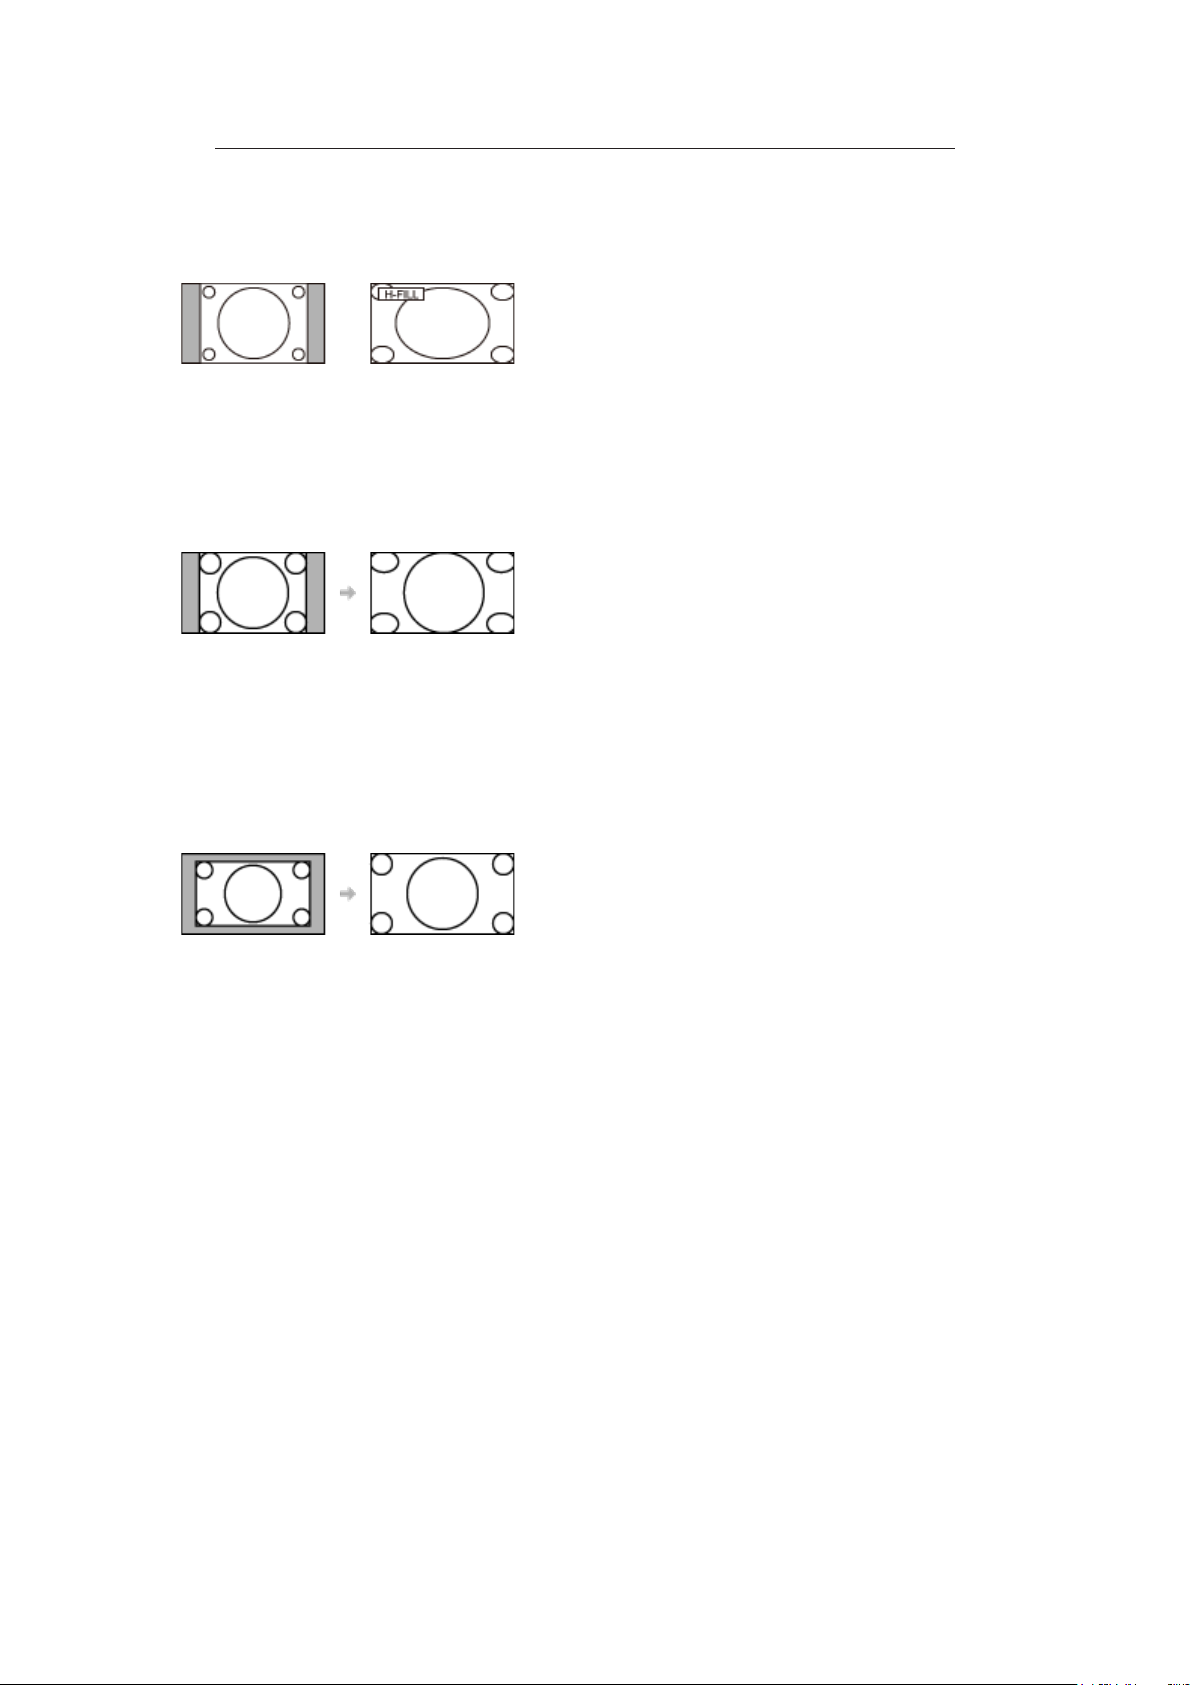
■ Side cut mode for High Definition (1080p, 1080i, 720p)
If the High definition image has the bars on the both side of the screen, side
cut it to enlarge the image to 16:9.
H-FILL
Enlarges the image horizontally to the screen’s side edges.
The side edges of the image are cut off.
SIDECUT JUST
Justifies the image by stretching it to the four corners on the screen.
The aspect ratio remains the same around the center and enlarges the left
and right side of the image.
SIDECUT ZOOM
Enlarges the image to the entire screen.
The side edges of the image are cut off.
- 33 -
Page 34
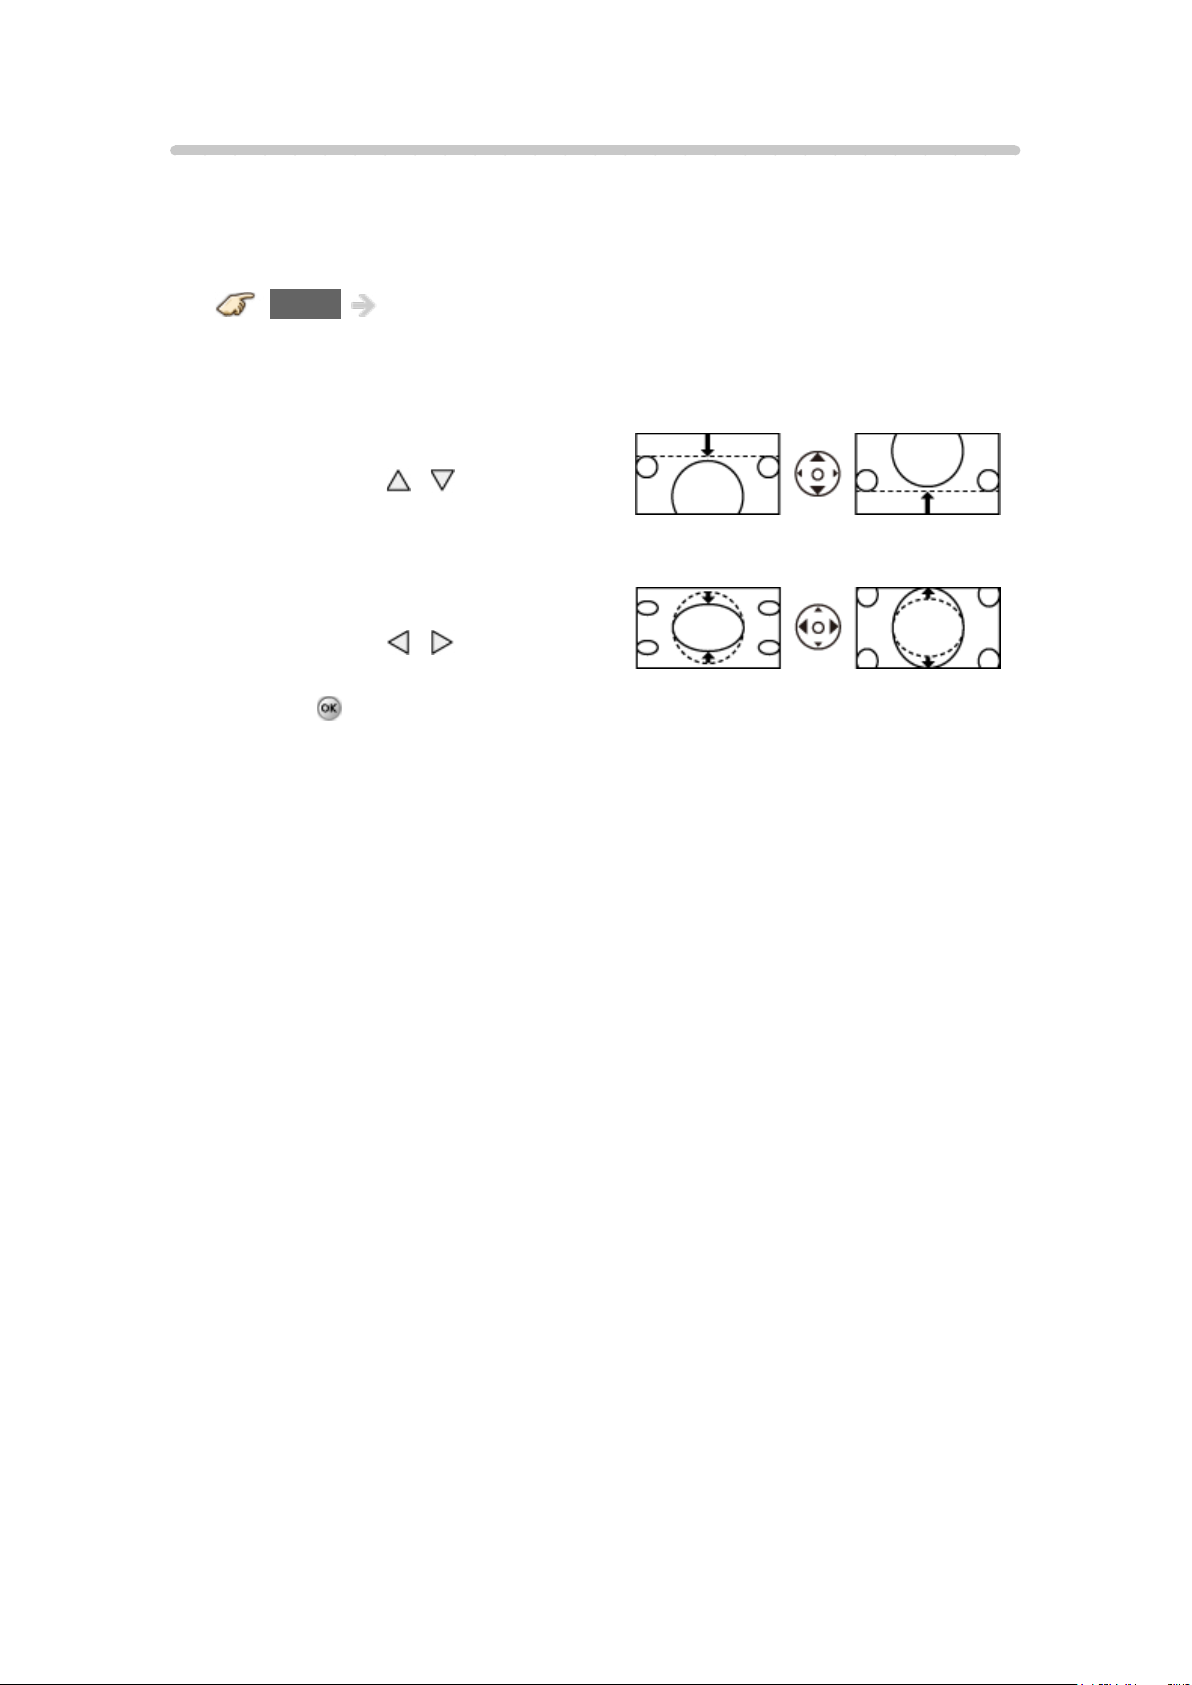
Zoom adjustments
If there is a problem with the image position on the screen, vertical image
position and size can be adjusted in “ZOOM”
1. Select Zoom adjustments in the Picture menu.
MENU Menu > Picture > Screen settings > Zoom adjustments
2. Adjust the V-position or V-size.
V-position:
Vertical position adjustment
Adjust using
position.
V-size:
Vertical size adjustment
Adjust using
●
Press
to reset
/ to desired
/ to desired size.
- 34 -
Page 35
Copy adjustments
You can copy the selected Cinema or Custom settings and apply them to all
or another input.
Settings are basic picture settings and Pro settings.
1. Select Copy adjustments
MENU Menu > Picture > Copy adjustments
Select the desired menu using
2. Select Destination input and set (Default: All)
Select the menu using
Then, select the destination using / and press to set.
3. Select Copy start to copy
Select the menu using
4. Select Yes to set
Select the item using
/ and press
/ and press
/ and press to set
/ and press
- 35 -
Page 36

For best audio
Sound mode
Selects your favorite sound mode.
●
The selected mode affects all input signals.
MENU Menu > Sound > Sound mode
Standard:
Provides the suitable sound quality for all types of scenes.
Music:
Improves sound quality for watching music videos, etc.
Ambience:
Improves spatial effects and provides clear sounds.
User:
Adjusts the sounds manually by using the equalizer to suit your favorite
sound quality.
– For the User mode, Equalizer will appear on the Sound Menu
instead of Bass and Treble. Select Equalizer and adjust the
frequency.
●
Gray-out when using Home Theater.
●
Adjust the Sound mode in more detail.
All settings > Sound
- 36 -
Page 37

DIGITAL AUDIO OUT terminal
You can enjoy your Home Theater by connecting a Dolby Digital (5.1 channel)
decoder and “Multi Channel” amplifier to the DIGITAL AUDIO OUT terminals.
●
Depending on your DVD player and DVD-Audio software the copyright
protection function may operate and disable optical output.
●
When an ATSC channel is selected, the output from the DIGITAL AUDIO
OUT jack will be Dolby Digital. When an NTSC channel is selected, the
output will be PCM.
●
When playing a movie on Movie player, when the sound has been
recorded in Dolby Digital, the output from the DIGITAL AUDIO OUT
terminal will be Dolby Digital. When the sound is recorded in other formats,
the output will be PCM.
- 37 -
Page 38

Viewing 3D images
Notice
The following 3D content can be enjoyed on this TV:
●
A 3D Blu-ray disc, played on 3D capable Blu-ray player/recorder that is
connected via HDMI cable
●
3D TV broadcast (program)
●
3D Photo and 3D Movie taken by LUMIX/Camcorder.
●
3D game played on 3D capable video game console, connected via HDMI
cable.
●
2D→3D
About2D→3D
●
This function converts standard 2D images and displays them in
3D. For this reason, the 3D images appear slightly different from the
originals. Please bear this in mind when using this function.
●
Using this function for profit-making purposes, or publically showing
images converted from 2D to 3D in places such as coffee shops or
hotels, etc. may infringe on the rights of the copyright holder protected
under the Copyright Act.
- 38 -
Page 39

Viewing 3D
1. Put on the 3D Eyewear
2. View
When the TV receives a 3D signal, it also tries to detect the 3D mode
(format). 3D images are automatically displayed according to the signal. If
the 3D images are not displayed correctly or the images cause discomfort,
the images can be adjusted by 3D format select or 3D settings.
●
It may take several seconds to display 3D image properly after you
switch to 3D mode.
- 39 -
Page 40
Change 3D↔2D
■ Simply switches 3D ↔ 2D images (Auto mode)
3D 3D format select
Switch 3D or 2D using
/ and press
■ Change 3D format (Manual mode)
1. Display 3D format select (Manual)
(Red) 3D format select (Manual)
2. Select 3D format
3D Cycle through the 3D format
(Original/Side by Side - 3D/Side by Side - 2D/Top and Bottom - 3D/Top
and Bottom - 2D/2D→3D)
●
When the TV receives a 480i/576i signal from the Component or HDMI
terminal, manual adjustment is not available.
- 40 -
Page 41
Adjust 3D images
1. Select 3D settings
MENU Menu > Picture > 3D settings
2. Select the item and set
Select desired menu using
●
The perceived three dimensional effects of the 3D Eyewear differ from
/ and adjust the settings with /
person-to-person.
●
If a signal received from an external device is different from the 3D
setting of the TV, such as 2D signal when the TV is set to 3D mode, the
images may not be displayed correctly.
●
For 3D settings
All settings > Picture > 3D settings
- 41 -
Page 42

Network services
Connect to network
Network connections
1. Contact your Broadband service provider
Obtain Broadband Internet service:
●
Required speed (effective): at least 1.5 Mbps for SD and 6 Mbps for HD
picture quality, respectively.
●
Dial-up Internet access cannot be used for Home Screen.
2. Select wired or wireless connection
If a wired network connection is available near the TV, then using this LAN
(Ethernet) connection is recommended.
●
Wired LAN connection
Recommended for viewing high quality video at high bit-rates and to
avoid interference with 2.4 GHz devices.
●
Wireless LAN connection
Use when your network router is not close enough to the TV or when a
wired connection is not feasible.
3. Connecting to the network
There are some connection type.
See next section, Network connection types.
- 42 -
Page 43
Network connection types
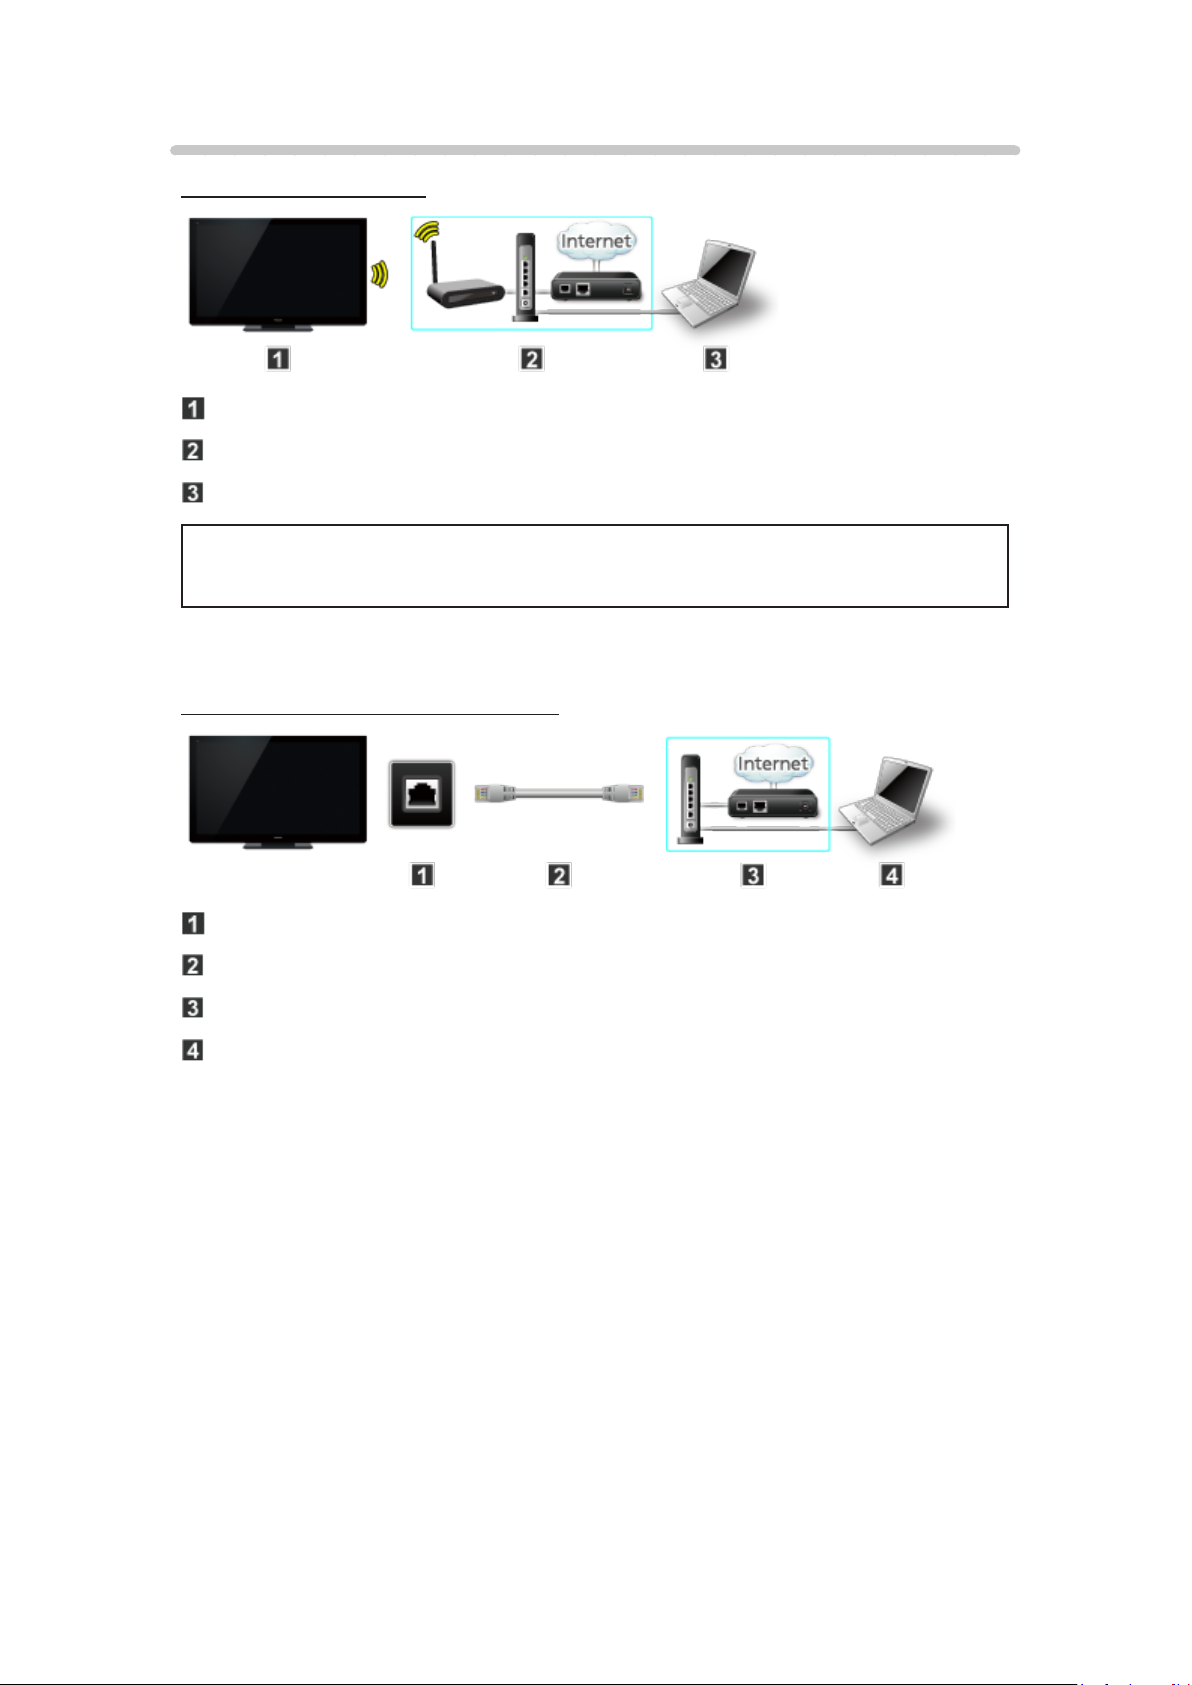
A. Wireless connection
TV (Built-in wireless LAN)
Home network (modem/wireless router)
Computer/DLNA Certified media server
●
To use and operate only DLNA features, a Broadband network service
is not needed.
B. Wired connection (Using Router)
TV (Ethernet port)
LAN (Ethernet) cable
Home network (modem/router)
Computer/DLNA Certified media server
- 43 -
Page 44
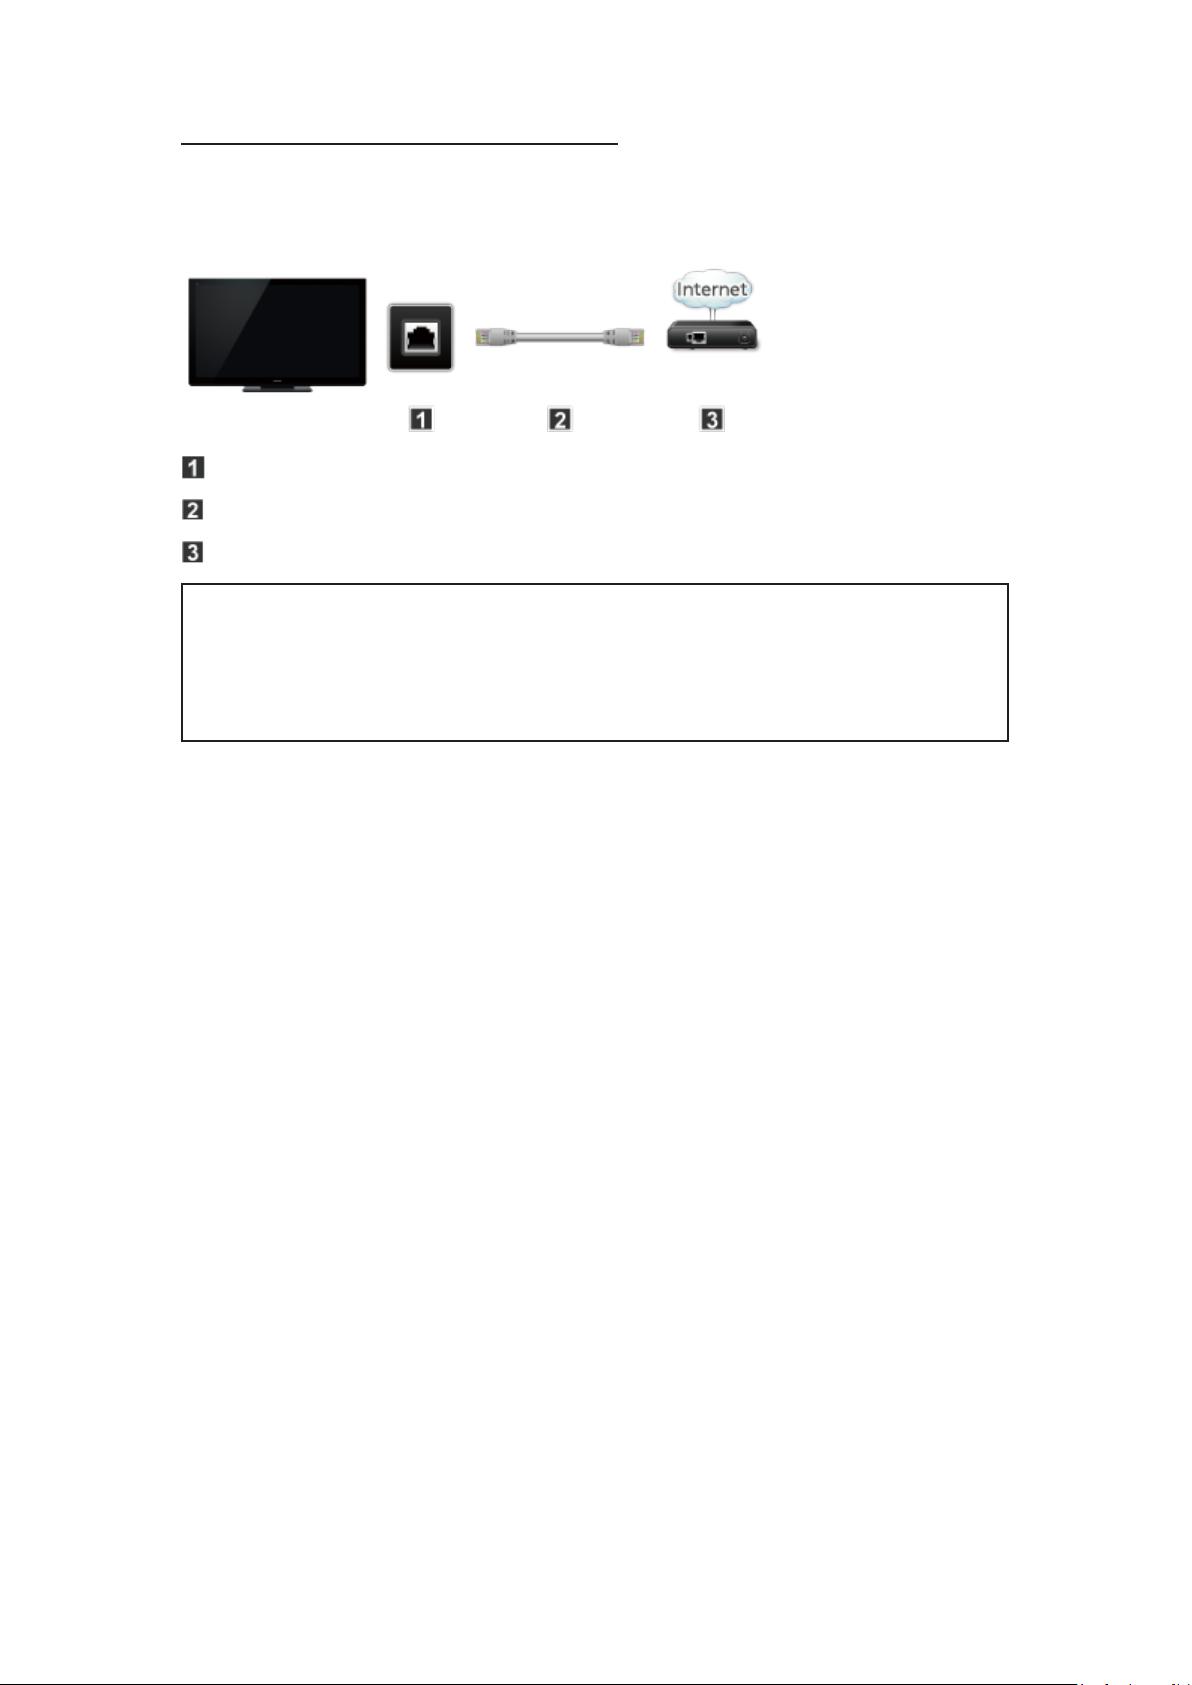
C. Wired connection (Directly connected)
If you are not using the network for connecting anything else but the TV, you
can just connect the TV directly to the Cable/DSL Ethernet modem with LAN
(Ethernet) cable.
TV (Ethernet port)
LAN (Ethernet) cable (crossover cable)
Modem
●
To use and operate only DLNA features, a Broadband network service
is not needed.
You can simply connect the TV directly to the equipment with a LAN
crossover cable.
- 44 -
Page 45

Network settings
Setting the menu
This menu is used for connecting to a Broadband service.
1. Display the Menu and select Network
MENU Menu > Network
Select Network using
2. Select the options and set
(Network connection/Network status/my Home Cloud settings/VIERA
network name/TV Remote App settings/Network link/File sharing
settings/Software update/New software notice)
/ from menu bar and press
- 45 -
Page 46

Network connection/Network status
1. Select Network connection using / and press
2. Select Quick setup to launch Network connection setup wizard.
Follow the directions on the screen to complete the network connection.
●
Manual settings are also available.
Select Custom and select your connection type.
Displays setting menu according to selected connection type.
Set the desired menu and complete the network connection.
3. Displays Network status
Select Try again and press
to start connection test.
Success
Completion message is displayed.
Error
Select Status details/Help and press to display solution of the
connection error.
Follow the directions on the screen to complete the network settings.
●
You can also display Network status from Network menu.
(Network > Network status)
4. Exit the screen
Select Done and press
to exit from this screen.
- 46 -
Page 47
my Home Cloud settings
1. Select my Home Cloud settings using / and press .
2. Select desired menu.
(Notices)
●
To use this function fully, you need a broadband network environment.
Ensure the network connections and network settings are completed.
- 47 -
Page 48

VIERA network name
Set your favorite name for this TV.
1. Select VIERA network name using
2. Enter favorite name with screen keyboard
/ and press
- 48 -
Page 49
TV remote App settings
1. Select TV Remote App settings using / and press
2. Select the item and set
■ TV remote (App)
Enables to control the TV from the network equipment (smartphone, etc.).
●
Set to On to enable the settings below.
1. Select TV Remote using
2. Switch On or Off with /
/ and press
■ Device to upload contents
Selects device to upload contents from the network equipment (smartphone,
etc.).
1. Select Device to upload contents using
2. Select device and press
/ and press
- 49 -
Page 50
Network link
Setting for DLNA server.
■ DLNA server
Enables to use this TV as DMS for network devices (DLNA Certified VIERA).
●
Set to On to enable the settings below.
1. Select DLNA server using
2. Switch On or Off with /
/ and press
■ Registration type
Selects the limitation of access to this TV for each device on the home
network.
1. Select Registration type using
2. Switch Auto or Manual with /
Auto:
All the available device on the home network are accessible. (maximum
16 equipment)
Manual:
Sets the access limitation for each device in the Remote device List.
/ and press
■ Remote device list
Lists the available device on the home network.
1. Select Remote device list using
2. Select the desired device with / and set access limitation.
/ and press
- 50 -
Page 51
File sharing settings
■ Network device list
You can select and play movies, photos and music files on Network Devices
with Media player.
1. Select File sharing settings
2. Select Network device list
Display connected network devices.
3. Select desired network device and press
4. Registration screen is displayed.
Enter the necessary information to register.
●
For registered network device, enter User ID and Password.
5. Press
●
Performance is not guaranteed on all servers. Tested for compatibility
on PCs with Windows 7 / Windows 8 / Windows 8.1 (as of December,
2013). Additional information for the devices may be found on the
following website. (English only)
http://panasonic.net/viera/support
to register
.
- 51 -
Page 52

Software update
1. Select Software update using / and press
2. Press OK to start the Software update screen
Software update
3. Follow directions on the screen
●
Make sure to set this TV’s Clock before the update starts.
- 52 -
Page 53

New software notice
Select On/Off to display new software update information when TV is turned
on.
1. Select New software notice using
2. Switch On or Off with /
/
- 53 -
Page 54
How to use
Operate
Now, you can access and enjoy Network services in various scenes.
●
USB keyboard is available. Set Keyboard type in Setup menu.
MENU Menu > Setup > System > Keyboard type
●
You need a Broadband environment to use this service.
●
Please confirm Network connections and Network settings before using
this function.
●
Depending on the usage conditions, it may take a while to download all
the data.
●
Internet services available in Home Screen are subject to change
without notice.
●
Not all contents are available depending on the country and area.
- 54 -
Page 55
Home network “DLNA”
Get started
Information
You can share the contents (Photo, Video, Music, etc.) stored in DLNA
Certified media server with your home network system.
●
Please confirm Network connection and Network settings before using
this function.
Network services > Connect to network
This TV is a DLNA Certified™ product.
DLNA (Digital Living Network Alliance) is a standard that makes DLNA
Certified digital electronics easier and more convenient to use on a home
network. To learn more, visit www.dlna.org. It allows you to share photos,
videos and music stored in the DLNA Certified media server (for example,
PC with Windows 7/Windows 8 installed, etc.) connected to your home
network, and enjoy the contents on the TV screen.
■ Media server
Store photos, videos or music into the DLNA Certified media server, and
then you can enjoy them on the TV.
To use a PC as a media server
Prepare the PC with Windows 7/Windows 8 or ensure the server software
is installed on the PC. “Windows 7/Windows 8” is the server software that
has been tested for compatibility with this TV (as of December, 2013).
Any other server software have not been tested with this TV, therefore
compatibility and performance cannot be assured.
●
Windows 7/Windows 8
The setup for homegroup settings of Windows 7/Windows 8 is required.
For details, refer to the help functions of Windows 7/Windows 8.
●
For data information
Support / FAQ > Information > Data information
- 55 -
Page 56
Photos
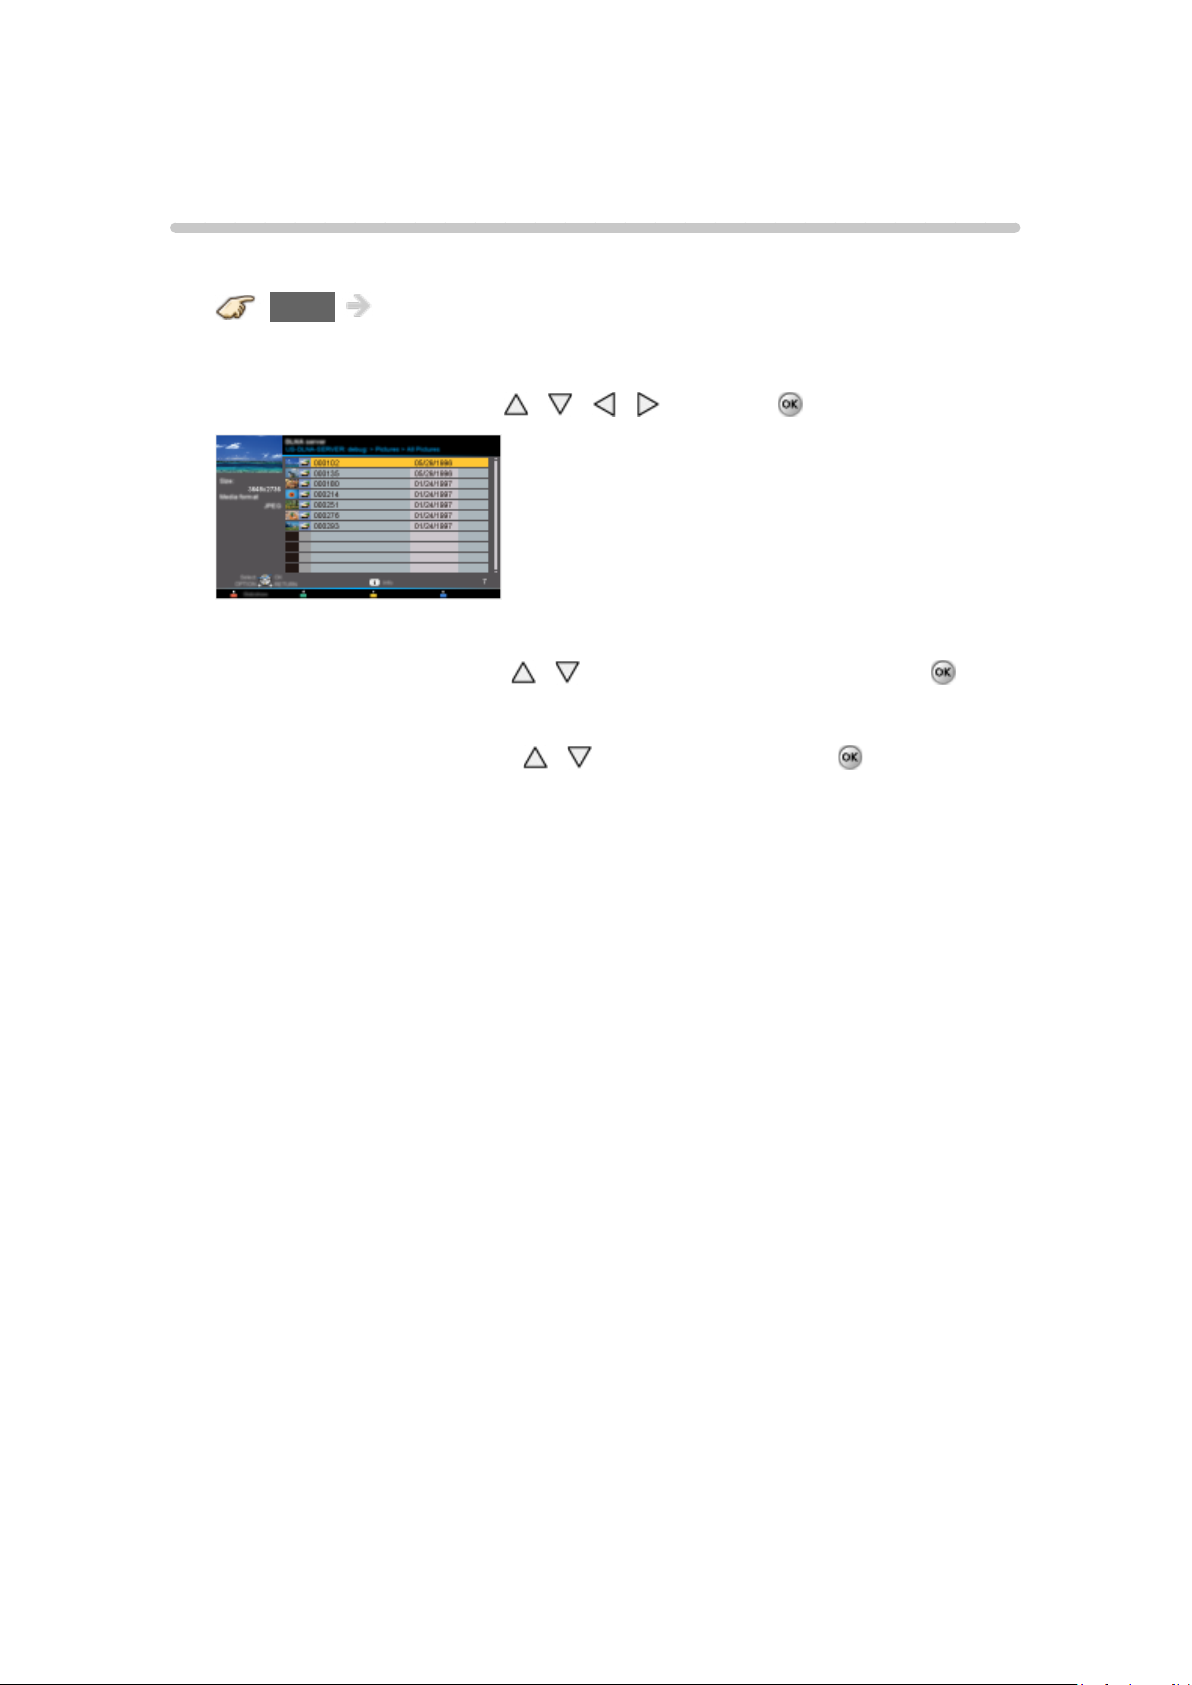
Viewing Photos
1. Display Apps (application) list
APPS APPS list
2. Display DLNA server
Select DLNA server using
3. Select server (Available DLNA servers are displayed)
Select desired server using
4. Select photo (Thumbnails and contents are displayed)
Select desired content using
5. View
Follow the Navigation and guide to operate.
●
Displayed navigation and guide will be different depending on data
type.
/ / / and press
/ from DLNA server list and press
/ from file list and press
- 56 -
Page 57
Photo view
■ Thumbnail view
INFO Information panel (File name, Date, Size, etc.)
■ Playback screen
INFO Display/hide Guide and Banner
Photo status:
Displays current photo status (Slideshow/Single view)
2D/3D status:
Displays current 2D/3D status
Display Slideshow settings
●
Information differs depending on selected data.
Navigation Guide:
Displays available functions.
●
In DMR mode, Slideshow is not available.
●
In DMR mode, OK/Next/Prev. are not available.
- 57 -
Page 58
Options menu
In Photo view, some optional menus are available by pressing the OPTION
button.
1. Display Options menu
(Options menu is also available in Menu.)
OPTION Options menu
2. Select the item
Select the desired menu using
(Slideshow settings)
●
Available menus are displayed on Options menu depending on data
condition and situation.
/ and press
- 58 -
Page 59
Using slideshow
1. Display Slideshow settings
Slideshow settings
2. Adjust items
Select the item by
●
Picture quality may deteriorate depending on the slideshow settings.
●
Picture setting may not work depending on the slideshow settings.
/ and adjust the settings using /
3. Start Slideshow
After adjusting each setting, select Start slideshow with
RETURN Stop in mid-cycle
/ and press
- 59 -
Page 60

Slideshow settings
Transition effect
(Off/Fade in/Dissolve/Motion/Random)
Select the Transition effect shown between photos.
Auto makeup
(On/Off)
Detects a face in the photo, checks the luminance, and then retouches the
enhanced image.
Display interval
(Long/Normal/Short)
Sets the time each image is displayed in the Slideshow mode.
Repeat playback
(On/Off)
Turn the Slideshow Repeat (cycle) function on or off.
Soundtrack settings
(Off/Music 1/Music 2/Music 3/Music 4/Music 5)
Select the music.
- 60 -
Page 61
Videos
Viewing Videos
1. Display Apps list
APPS APPS list
2. Display DLNA server
Select DLNA server using
3. Select server (Available DLNA servers are displayed)
Select desired server using
4. Select video (Thumbnails and contents are displayed)
Select desired content using
5. Play
Follow the Navigation and guide to operate.
●
Displayed navigation and guide will be different depending on data
type.
/ / / and press
/ from DLNA server list and press
/ from file list and press
- 61 -
Page 62
Video view
■ Thumbnail view
INFO Information panel (File name, Date, Size, etc.)
■ Playback screen
INFO Display/hide Guide and Banner
Movie banner:
Displays current Video status
(Drive type, Date and time or File name and Elapsed time.)
2D/3D status:
Displays current 2D/3D status
●
Information differs depending on selected data.
Navigation Guide:
Displays available functions.
●
In DMR mode, Next skip/Prev. skip are not available.
Forward/Reverse:
Five levels of speed 1 to 5 are available.
Slow playback is also available.
●
Press and hold for 5 seconds to turn to slow playback mode.
●
In DMR mode, Resume playback is not available
●
Subtitles are not supported in MKV format.
- 62 -
Page 63
Options menu
In Video view, some optional menus are available by pressing the OPTION
button.
1. Display Options menu
(Options menu is also available in Menu.)
OPTION Options menu
2. Select the item
Select the desired menu using
(Video options)
Repeat playback
●
Set play repeat function (Off/On)
●
Available menus are displayed on Options menu depending on data
condition and situation.
/ and press
- 63 -
Page 64
Music
Playing Music
1. Display Apps list
APPS APPS list
2. Display DLNA server
Select DLNA server using
3. Select server (Available DLNA servers are displayed)
Select desired server using
4. Select music (Thumbnails and contents are displayed)
Select desired content using
5. Play
Follow the Navigation and guide to operate.
●
Displayed navigation and guide will be different depending on data
type.
/ / / and press
/ from DLNA server list and press
/ from file list and press
- 64 -
Page 65

Music view
■ Thumbnail view
INFO Information panel (File name, Date, Size, etc.)
■ Playback screen
INFO Display/hide Guide and Banner
Music Guide:
Displays current Music status
(Artist name/Album name/Song name, Elapsed time)
Navigation Guide:
Displays available functions.
●
Information differs depending on selected data.
Forward/Reverse:
Five levels of speed 1 to 5 are available.
●
In DMR mode, Next skip/Prev. skip/User BGM settings are not
available.
- 65 -
Page 66
Options menu
In Music view, some optional menus are available by pressing the OPTION
button.
1. Display Options menu
(Options menu is also available in Menu.)
OPTION Options menu
2. Select the item
Select the desired menu using
(Music options)
Repeat playback
●
Set play repeat function (Off/Repeat folder/One song)
●
Available menus are displayed on Options menu depending on data
condition and situation.
/ and press
- 66 -
Page 67
Media player
Get started
Information
You can view still and motion images and play music saved on a USB flash
memory and SD card.
■ SD card
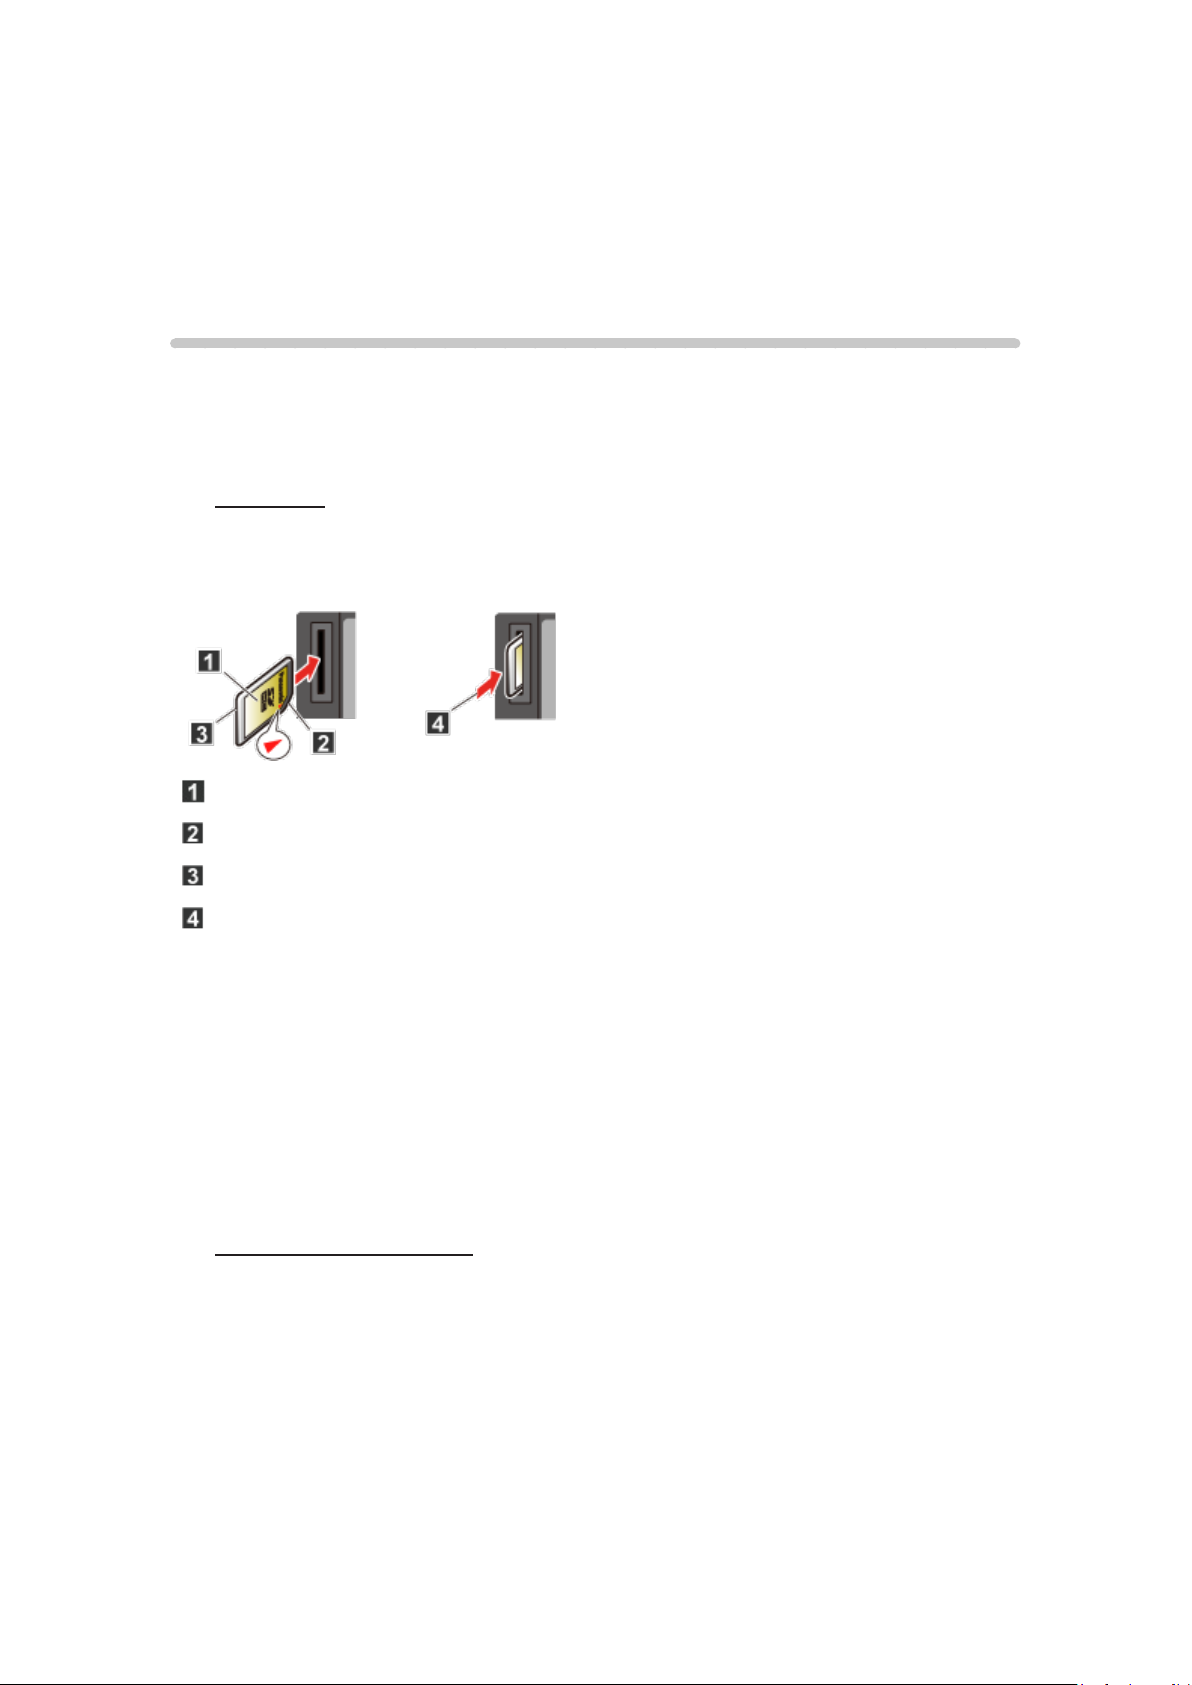
●
When you use an SD card, gently insert with label surface facing front.
●
When you remove the SD card, press in lightly then release.
Label surface
Cutout
Push until a click is heard
Press in lightly on SD Card, then release.
●
Compliant card type (maximum capacity):
SDXC Card (64 GB), SDHC Card (32 GB), microSDHC Card (32 GB),
SD Card (2 GB), miniSD Card (2 GB), microSD Card (2 GB)
(requiring microSDHC Card/miniSD Card/microSD Card/adapter)
●
If a microSDHC Card, miniSD Card or microSD Card is used, insert /
remove it together with the adapter.
■ USB flash memory
●
When you use a USB device, insert straight in and pull straight out.
●
Media player only supports USB Mass storage class devices.
●
Remove USB devise safely with USB device setup.
(Setup > USB device setup)
- 67 -
Page 68
Media warning messages
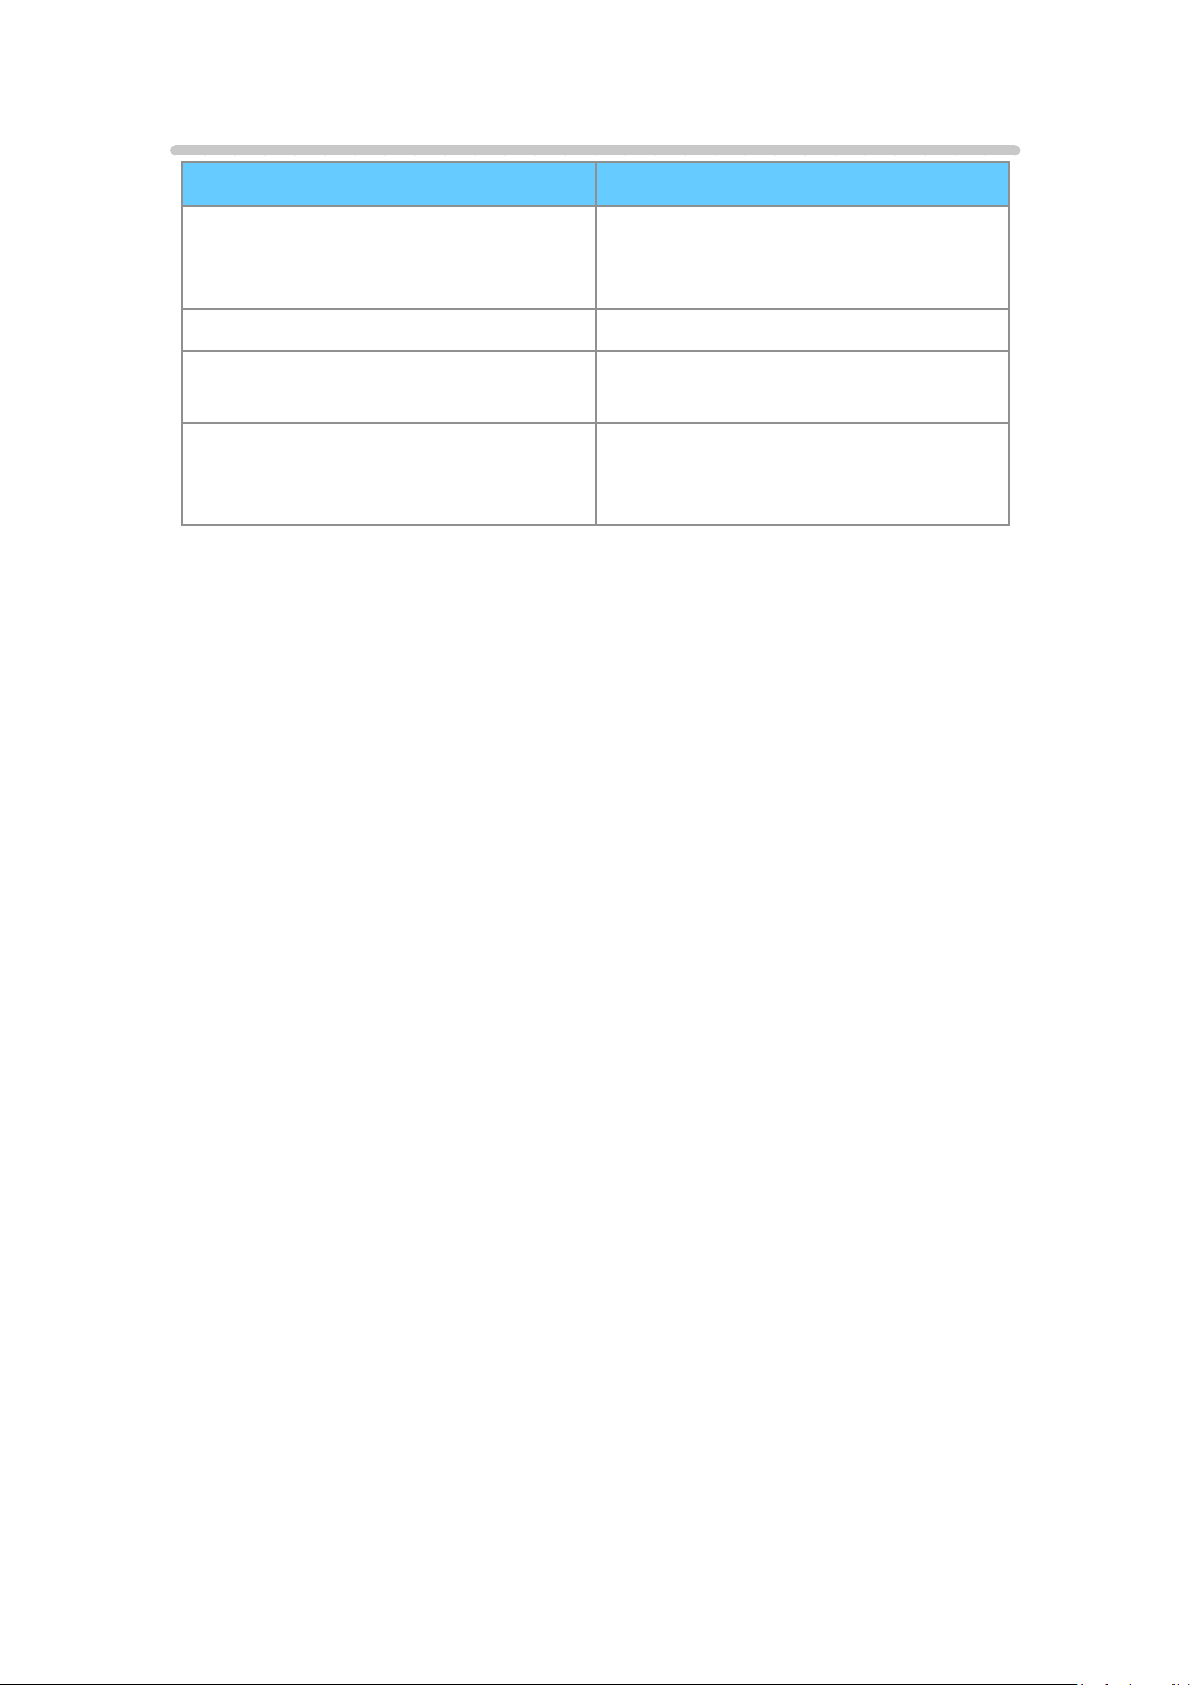
Message Meaning
No media. Please insert an SD
memory card or USB storage
device.
No media. Device removed.
No photos/No movies/No music files
to play/No playable media
Cannot read file
●
The device is not inserted.
●
The device is removed.
●
The device has no data or this
type of data is not supported.
●
The file is broken or unreadable.
The TV does not support the
format.
- 68 -
Page 69
SD card handling cautions
●
Use an SD Card meets SD standards. Otherwise, it may cause the TV to
malfunction.
●
Do not remove the card while the unit is accessing data (this can damage
card or unit).
●
Do not touch the terminals on the back of the card.
●
Do not subject the card to high pressure or impact.
●
Insert the card in the correct direction (otherwise, card or unit may be
damaged).
●
Electrical interference, static electricity or erroneous operation may
damage the data or card.
●
Back up the recorded data at regular intervals in case of deteriorated or
damaged data or erratic operation of the unit. (Panasonic is not liable for
any deterioration or damage of recorded data.)
●
For the suitable SD Memory Cards, please confirm the latest information
on the following website.
http://panasonic.net/viera/support (This site is in English only)
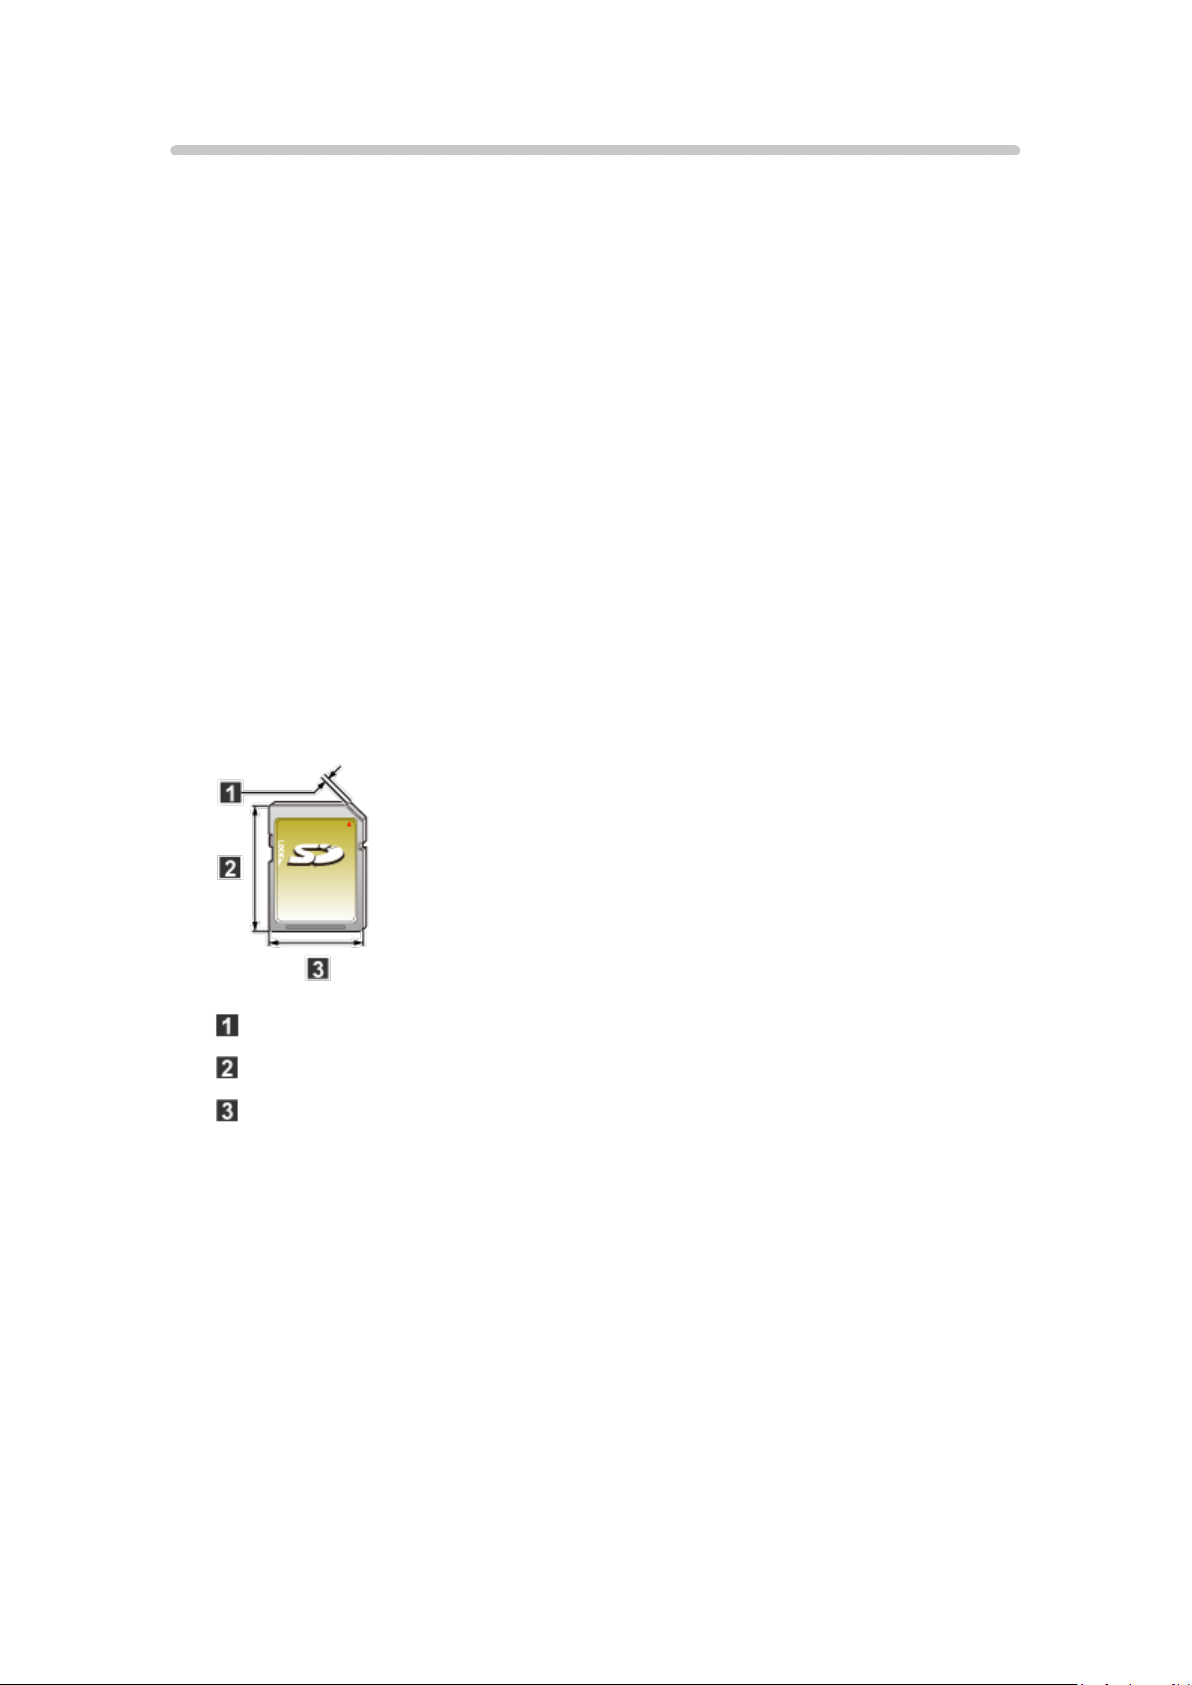
2.1 mm
32 mm
24 mm
- 69 -
Page 70

File sharing
■ Viewing from Network device
You can select and play movies, photos and music files on Network Devices
as SD card or USB Devices connected to the TV with Media player.
●
For more information about settings, refer to the page below.
Network services > Network settings > File sharing settings
- 70 -
Page 71

Notice
●
The picture may not appear correctly on this TV depending on the
recording equipment used.
●
When there are many files and folders, operation may take time to
complete or some files may not be displayed or playable.
●
Depending on how you create the files and the structure of folders, the
files and folders may not be displayed.
●
Partly degraded files might be displayed at a reduced resolution.
●
The folder and file names may be different depending on the digital
camera used.
●
The function cannot display still images that are not DCF formatted (i.e.
TIFF, BMP).
●
Images imported from a PC must be compatible with EXIF 2.0, 2.1 and
2.2.
- 71 -
Page 72
Photos
Viewing Photos
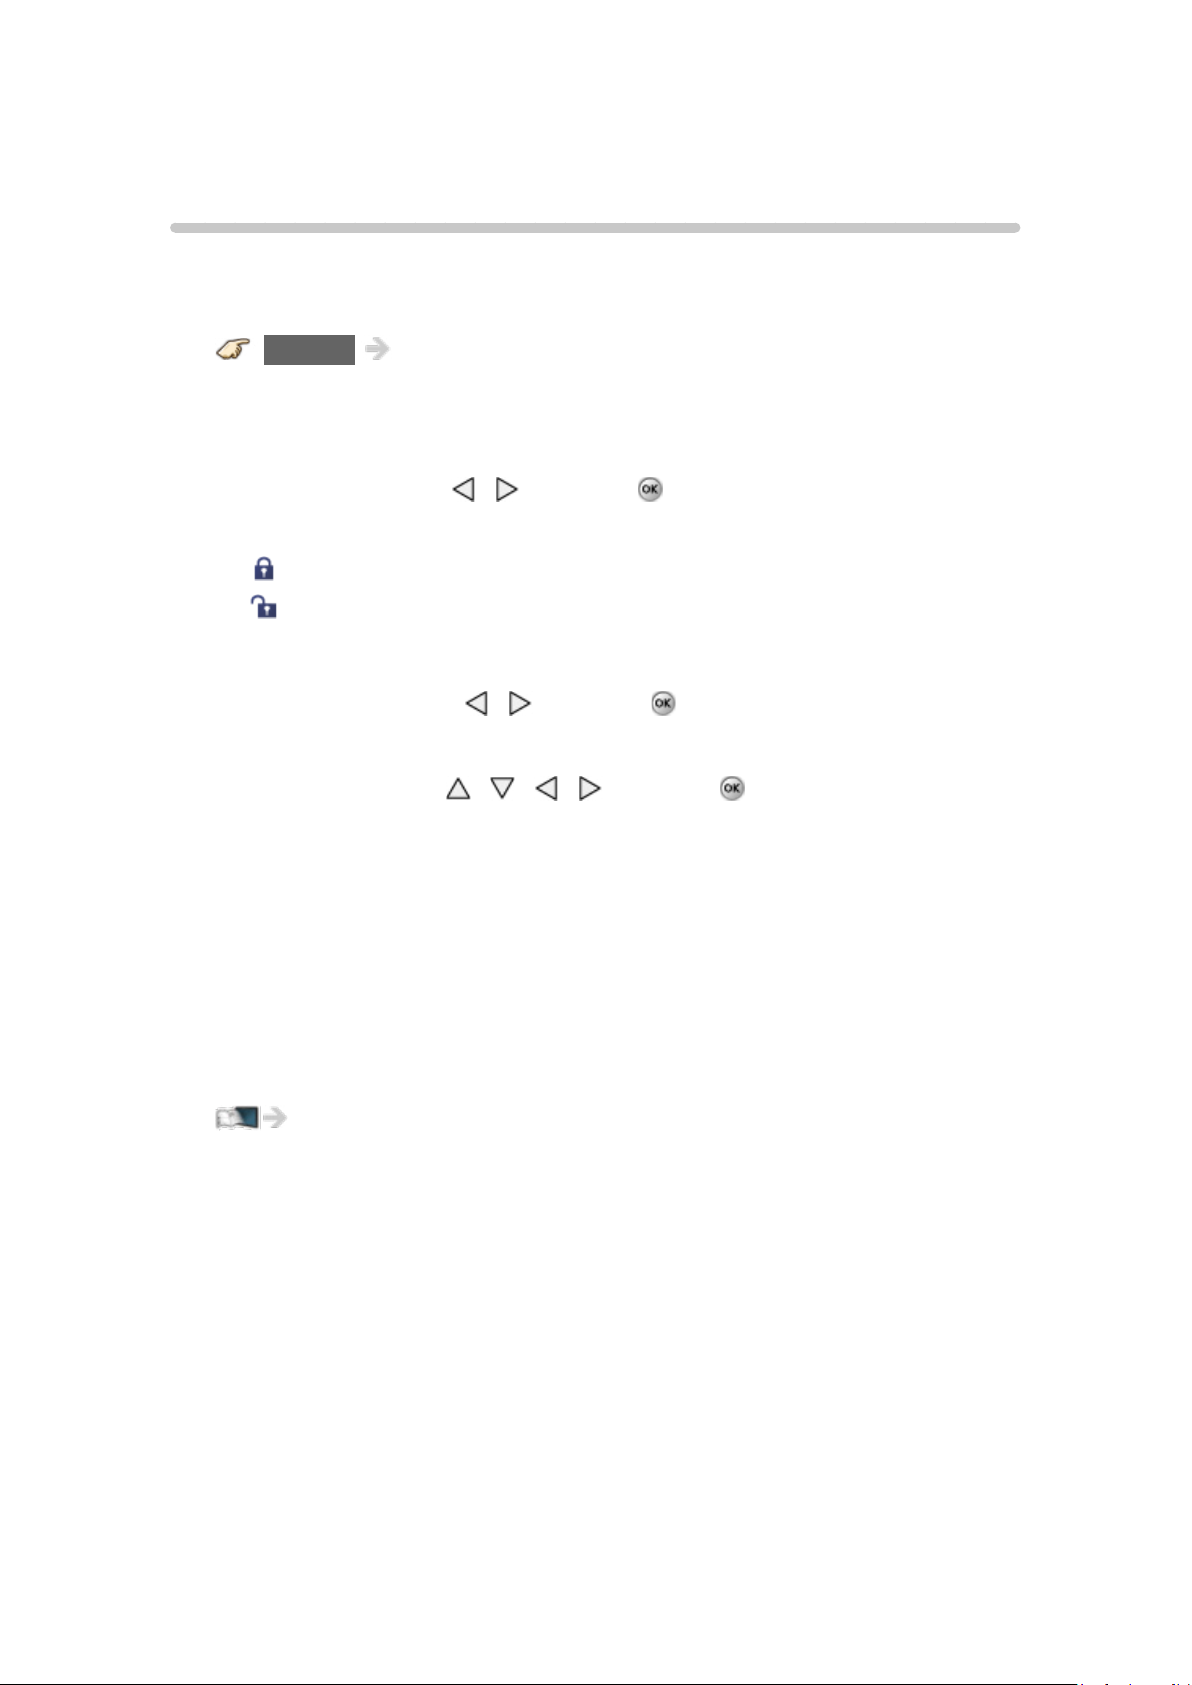
1. Insert Media / Prepare Network devices to share the files
2. Display Media player
SD/USB Media player
You can also access from Apps list.
3. Select the device in Drive select (Displays connected drive)
Select the drive using
●
The network device already connected to the TV is also displayed.
Enter User ID / Password to access.
:
User ID / Password are already entered.
:
4. Select the Photos in Media select
Select the media using
5. Select the photo in thumbnail view
Select the data using
●
How data is displayed differs depending on data storage conditions.
6. View
Follow the Navigation and guide to operate.
●
Displayed navigation and guide may differ depending on data type.
●
For File sharing/How to register the network devices, refer to the page
below.
/ and press
/ and press
/ / / and press
Network services > Network settings > File sharing settings
- 72 -
Page 73
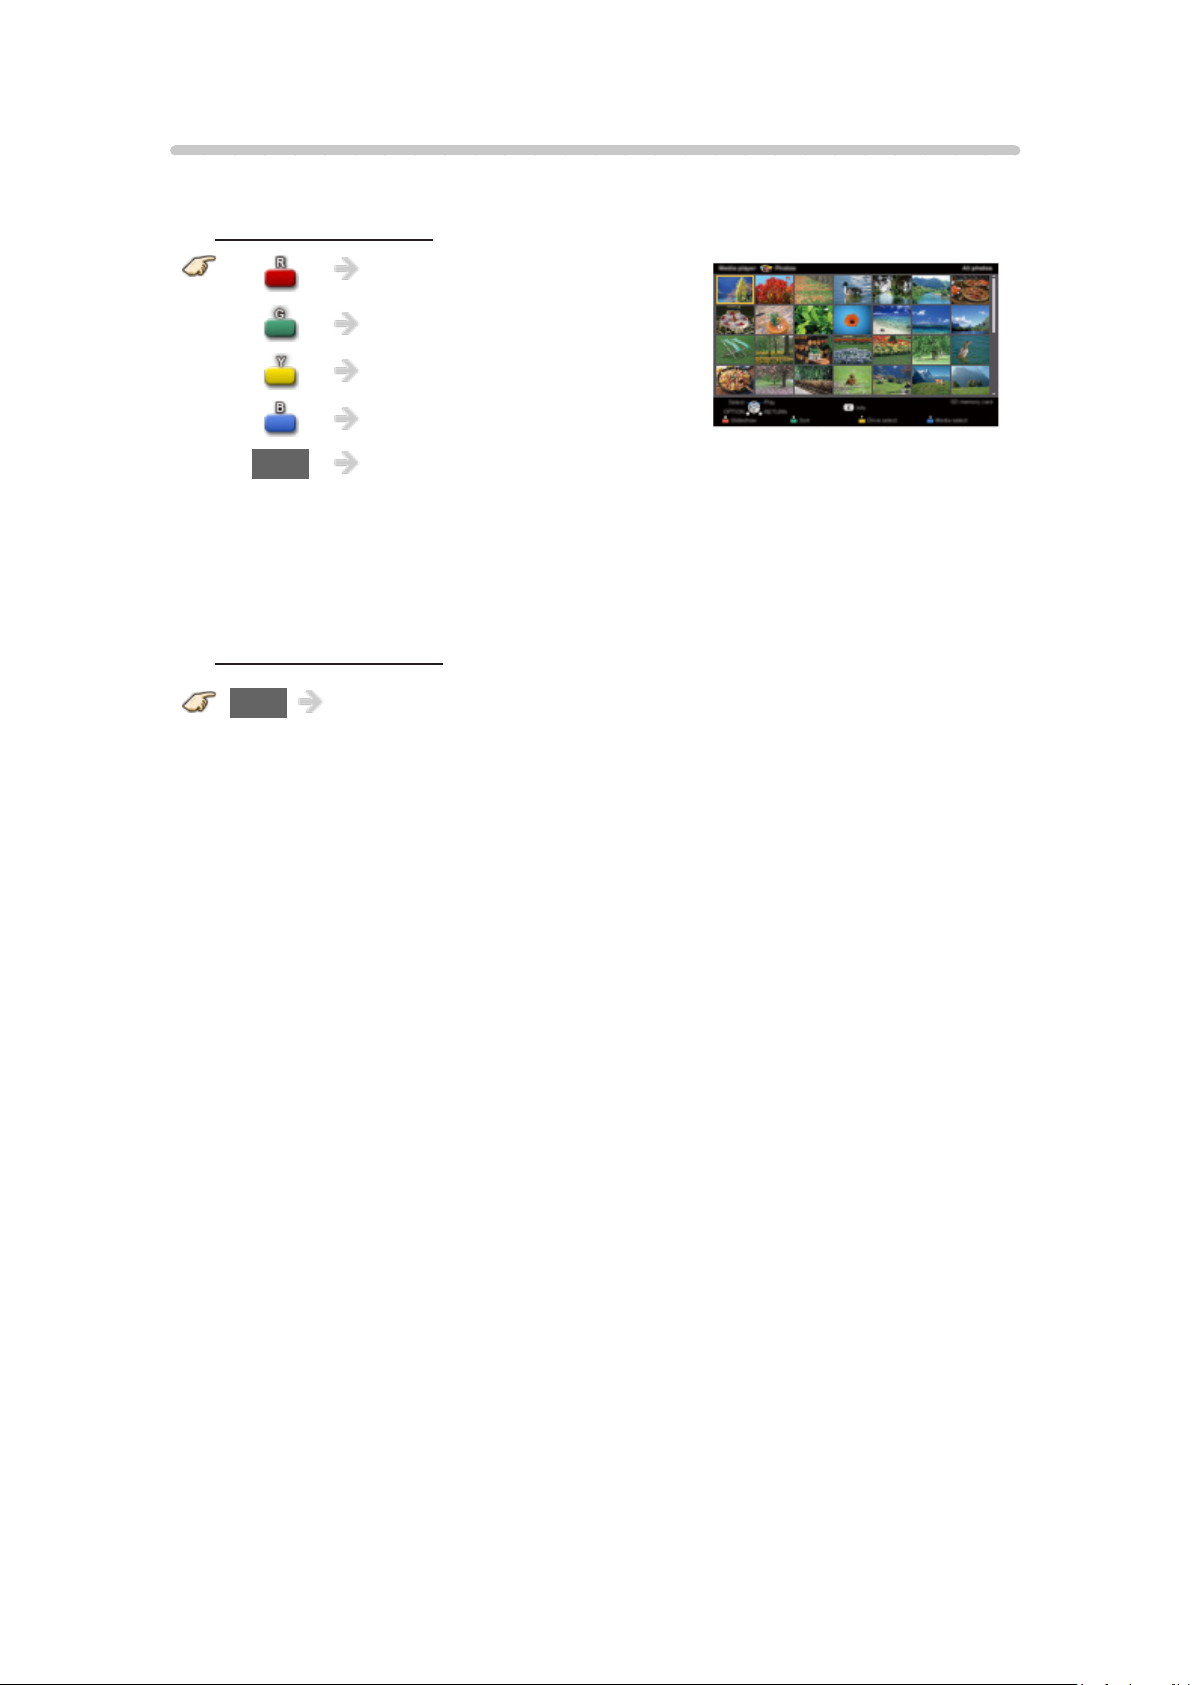
Photo View
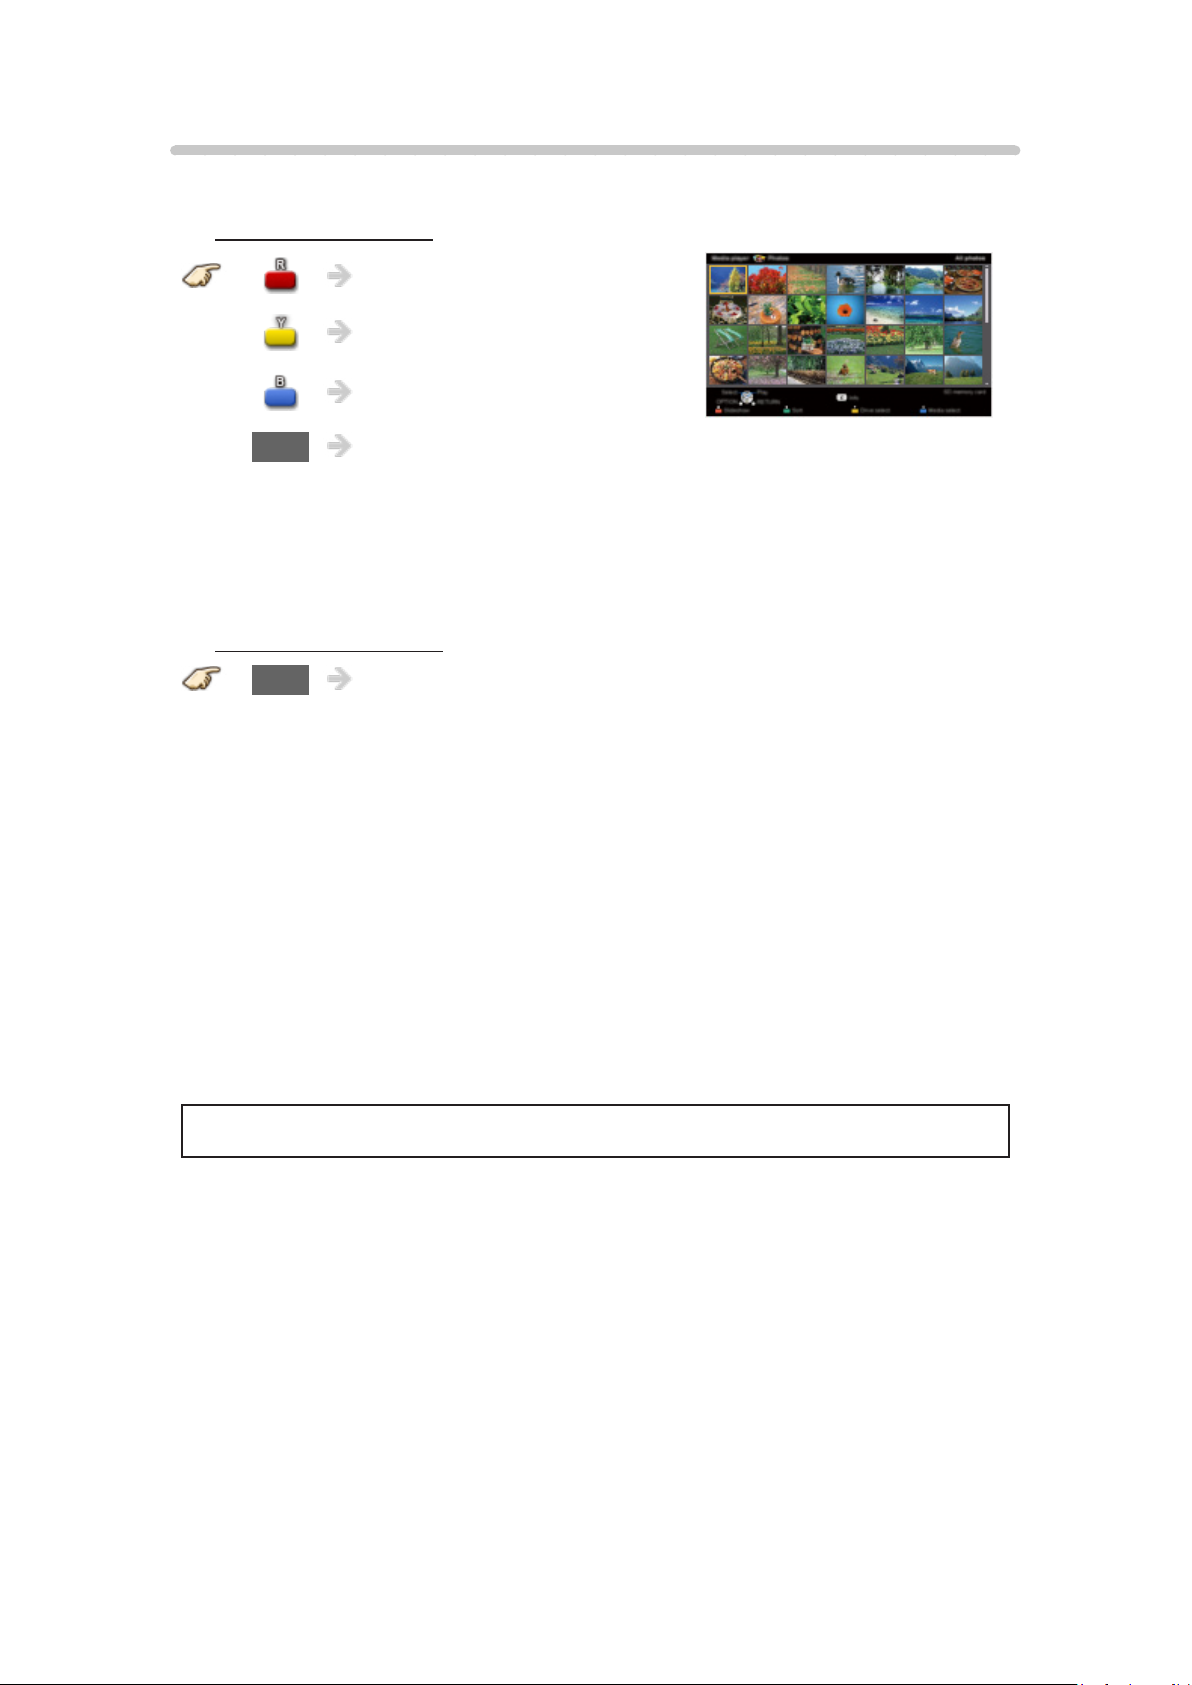
■ Thumbnail view
Display Slideshow settings
Display Sort
Display Drive select
Display Media select
INFO Information panel (File name, Date, Size, etc.)
●
Information differs depending on selected data.
●
Displays function guide for each color button on the bottom of the screen.
■ Playback screen
INFO Display/hide Guide and Banner
Photo status:
Displays current photo status (Slideshow/Single view)
2D/3D status:
Displays current 2D/3D status
Navigation Guide:
Displays available functions.
- 73 -
Page 74

Sort the photos
1. Display Sort select menu
Sort select menu (Folders/Sort by date/Sort by month)
2. Select the sort type
Select the type using
3. Displayed each screen
Folders:
Ascending order of numeric/alphabetical
Sort by month:
Ascending order of the month
Sort by date:
Ascending order of the day
/ and press
- 74 -
Page 75
Options menu
In Photo view, some optional menus are available by pressing the OPTION
button.
1. Display Options menu
(Options menu is also available in Menu.)
OPTION Options menu
2. Select the item
Select the desired menu using
(Slideshow settings/Multi shot 3D/Thumbnails size)
●
Available menus are displayed on Options menu depending on data
condition and situation.
/ and press
- 75 -
Page 76
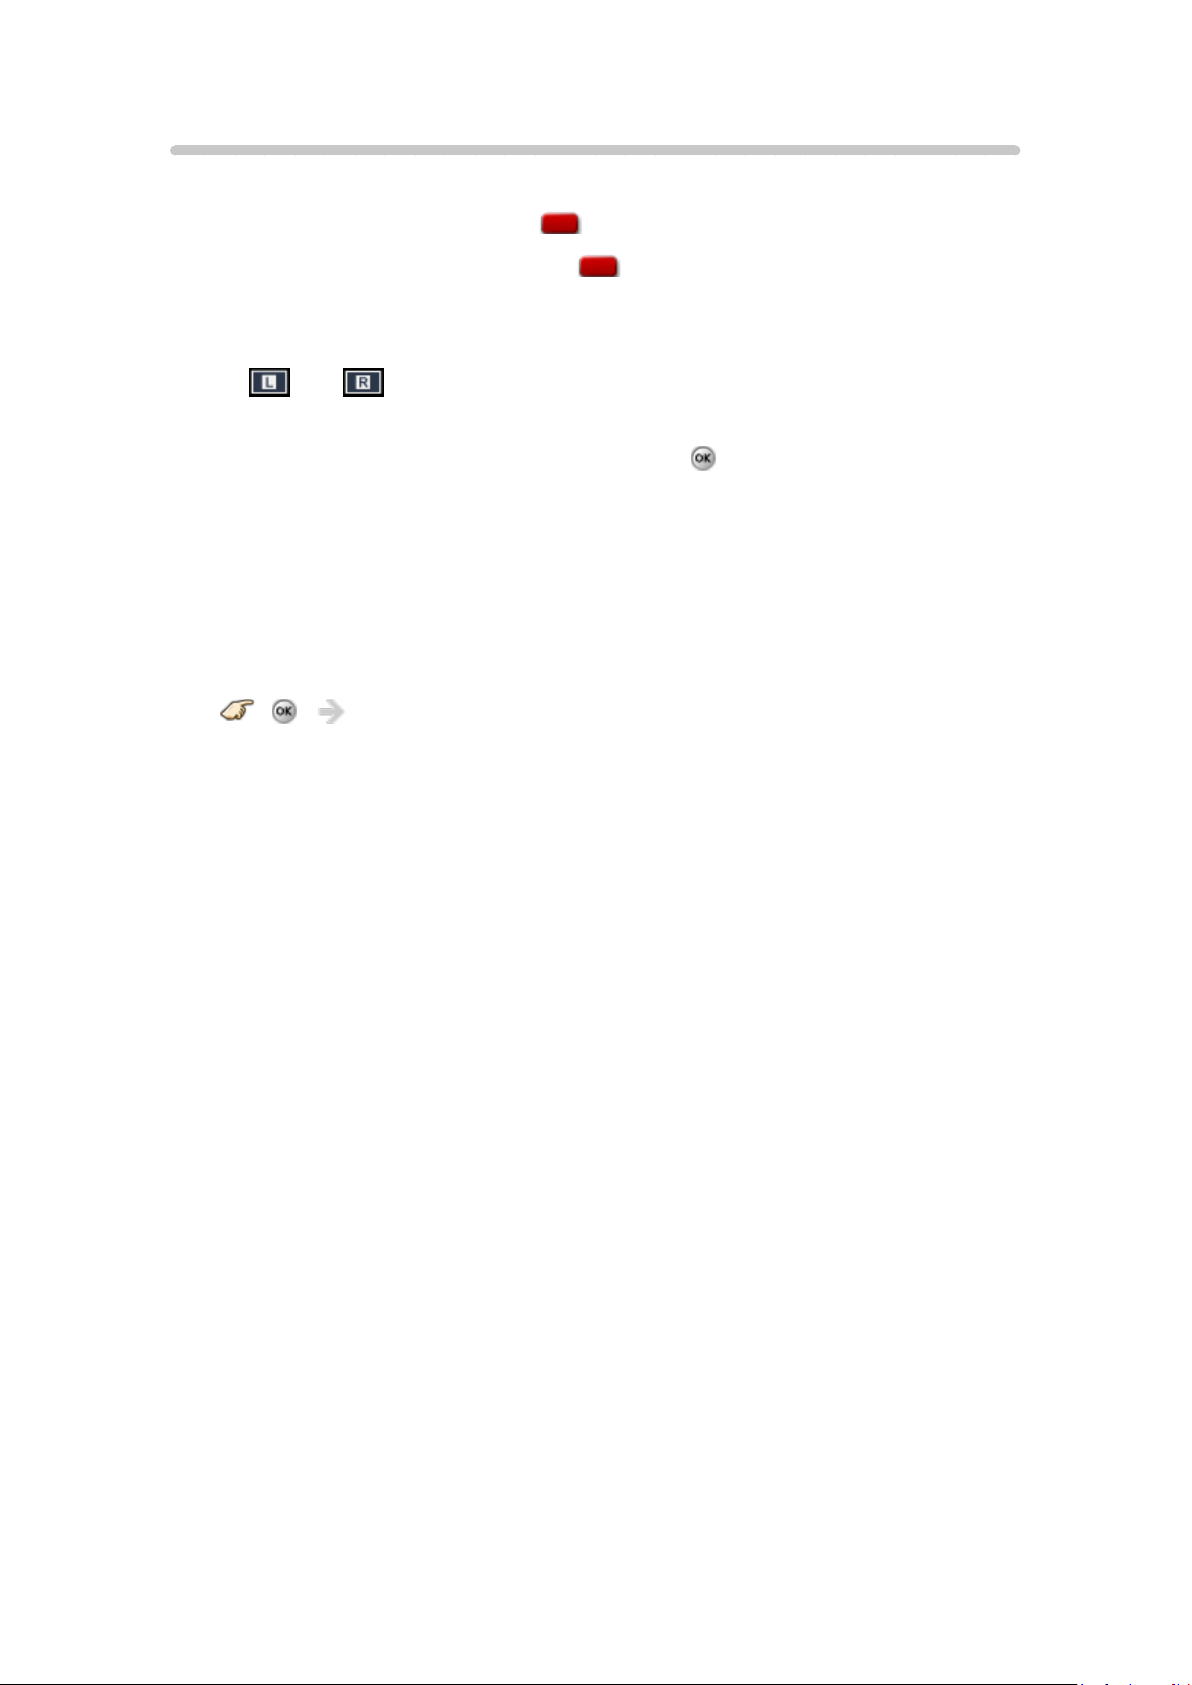
Multi shot 3D
3D images can be created by selecting 2 photos in thumbnail view.
1. Select first photo and press
2. Select second photo and press
●
To select the second image, the size and date must be the same as the
(Red)
(Red)
first image.
●
and are displayed at the top left-hand corner of selected
photos.
3. Start Conversion processing by pressing
Conversion processing message will be displayed.
●
Error message will be displayed if first and second picture have no
relation, or for other reasons. (e.g. size / date is different)
4. 3D photo is created
5. Save the 3D image generated by the above steps to the original drive.
Confirmation message will be displayed and select Yes to
save the data. (SD card only)
- 76 -
Page 77

Thumbnails size
To change the number of photos on a thumbnail screen at a time.
- 77 -
Page 78
Using slideshow
1. Display Slideshow settings
Slideshow settings
2. Adjust items
Select the item by
●
Picture quality may deteriorate depending on the slideshow settings.
●
Picture setting may not work depending on the slideshow settings.
/ and adjust the settings using /
3. Start Slideshow
After adjusting each setting, select Start slideshow with
RETURN Stop in mid-cycle
/ and press
- 78 -
Page 79

Slideshow settings
Frame
(Off/Array/Collage/Drift (with calendar)/Drift/Gallery (with calendar)/
Gallery/Cinema)
Select the Frame.
Photo effect
(Off/Sepia/Gray scale)
Select the display effect.
Transition effect
(Off/Fade in/Dissolve/Motion/Random)
Select the Transition effect shown between photos.
Auto makeup
(On/Off)
Detects a face in the photo, checks the luminance, and then retouches the
enhanced image.
Photo size
(Normal/ZOOM)
Removes the black borders that are added according to the size of the photo
being displayed.
Burst playback
(On/Off)
Continuously plays photos that were shot.
Display interval
(Long/Normal/Short)
Display interval sets the time each image is displayed in the Slideshow
mode.
Repeat playback
(On/Off)
Turn the Slideshow Repeat (cycle) function on or off.
- 79 -
Page 80

Soundtrack settings
(Off/Music 1/Music 2/Music 3/Music 4/Music 5/User selected/Auto)
Select the music.
User selected:
Plays the soundtrack registered in the Soundtrack settings menu.
Auto:
Plays the songs on the SD card or USB flash memory.
- 80 -
Page 81
Soundtrack settings
You can register the favorite songs as soundtracks
1. Select Soundtrack settings in Slideshow settings using
2. Select User selected using /
3. Displays Soundtrack popup menu, then select the desired song with /
and press to register
This song:
Register current music
All songs in folder:
Register the music in a folder
●
Picture setting may not work depending on the slideshow settings.
/
- 81 -
Page 82
Videos
Viewing Videos
1. Insert Media / Prepare Network devices to share the files
2. Display Media player
SD/USB Media player
You can also access from Apps list.
3. Select the device in Drive select (Displays connected drive)
Select the drive using
●
The network device already connected to the TV is also displayed.
Enter User ID / Password to access.
:
User ID / Password are already entered.
:
4. Select the Videos in Media select
Select the media using
5. Select the video in thumbnail view
Select the data using
●
How data is displayed differs depending on data storage conditions.
6. Play
Follow the Navigation and guide to operate.
●
Displayed navigation and guide will be different depending on data
type.
●
For File sharing/How to register the network devices refer to the page
below.
/ and press
/ and press
/ / / and press
Network services > Network settings > File sharing settings
- 82 -
Page 83
Video view
■ Thumbnail view
Play the video
Display Drive select
Display Media select
INFO Information panel (File name, Date, Size, etc.)
●
Information differs depending on selected data.
●
Displays function guide for each color button on the bottom of the screen.
■ Playback screen
INFO Display/hide Guide and Banner
Movie banner:
Displays current Video status
(Drive type, Date and time or File name and Elapsed time.)
2D/3D status:
Displays current 2D/3D status
Navigation Guide:
Displays available functions.
Forward/Reverse:
Five levels of speed 1 to 5 are available.
●
Subtitles are not supported in MKV format.
- 83 -
Page 84
Options menu
In Video view, some optional menus are available by pressing the OPTION
button.
1. Display Options menu
(Options menu is also available in Menu.)
OPTION Options menu
2. Select the item
Select the desired menu using
(Video options)
Repeat playback
●
Set play repeat function (Off/On)
●
Available menus are displayed on Options menu depending on data
condition and situation.
/ and press
- 84 -
Page 85
Music
Playing Music
1. Insert Media / Prepare Network devices to share the files
2. Display Media player
SD/USB Media player
You can also access from Apps list.
3. Select the device in Drive select (Displays connected drive)
Select the drive using
●
The network device already connected to the TV is also displayed.
Enter User ID / Password to access.
:
User ID / Password are already entered.
:
4. Select the Music in Media select
Select the media using
5. Select the music in thumbnail view
Select the data using
●
How data is displayed differs depending on data storage conditions.
6. Play
Follow the Navigation and guide to operate.
●
Displayed navigation and guide will be different depending on data
type.
/ and press
/ and press
/ / / and press
●
For File sharing/How to register the network devices refer to the page
below.
Network services > Network settings > File sharing settings
- 85 -
Page 86
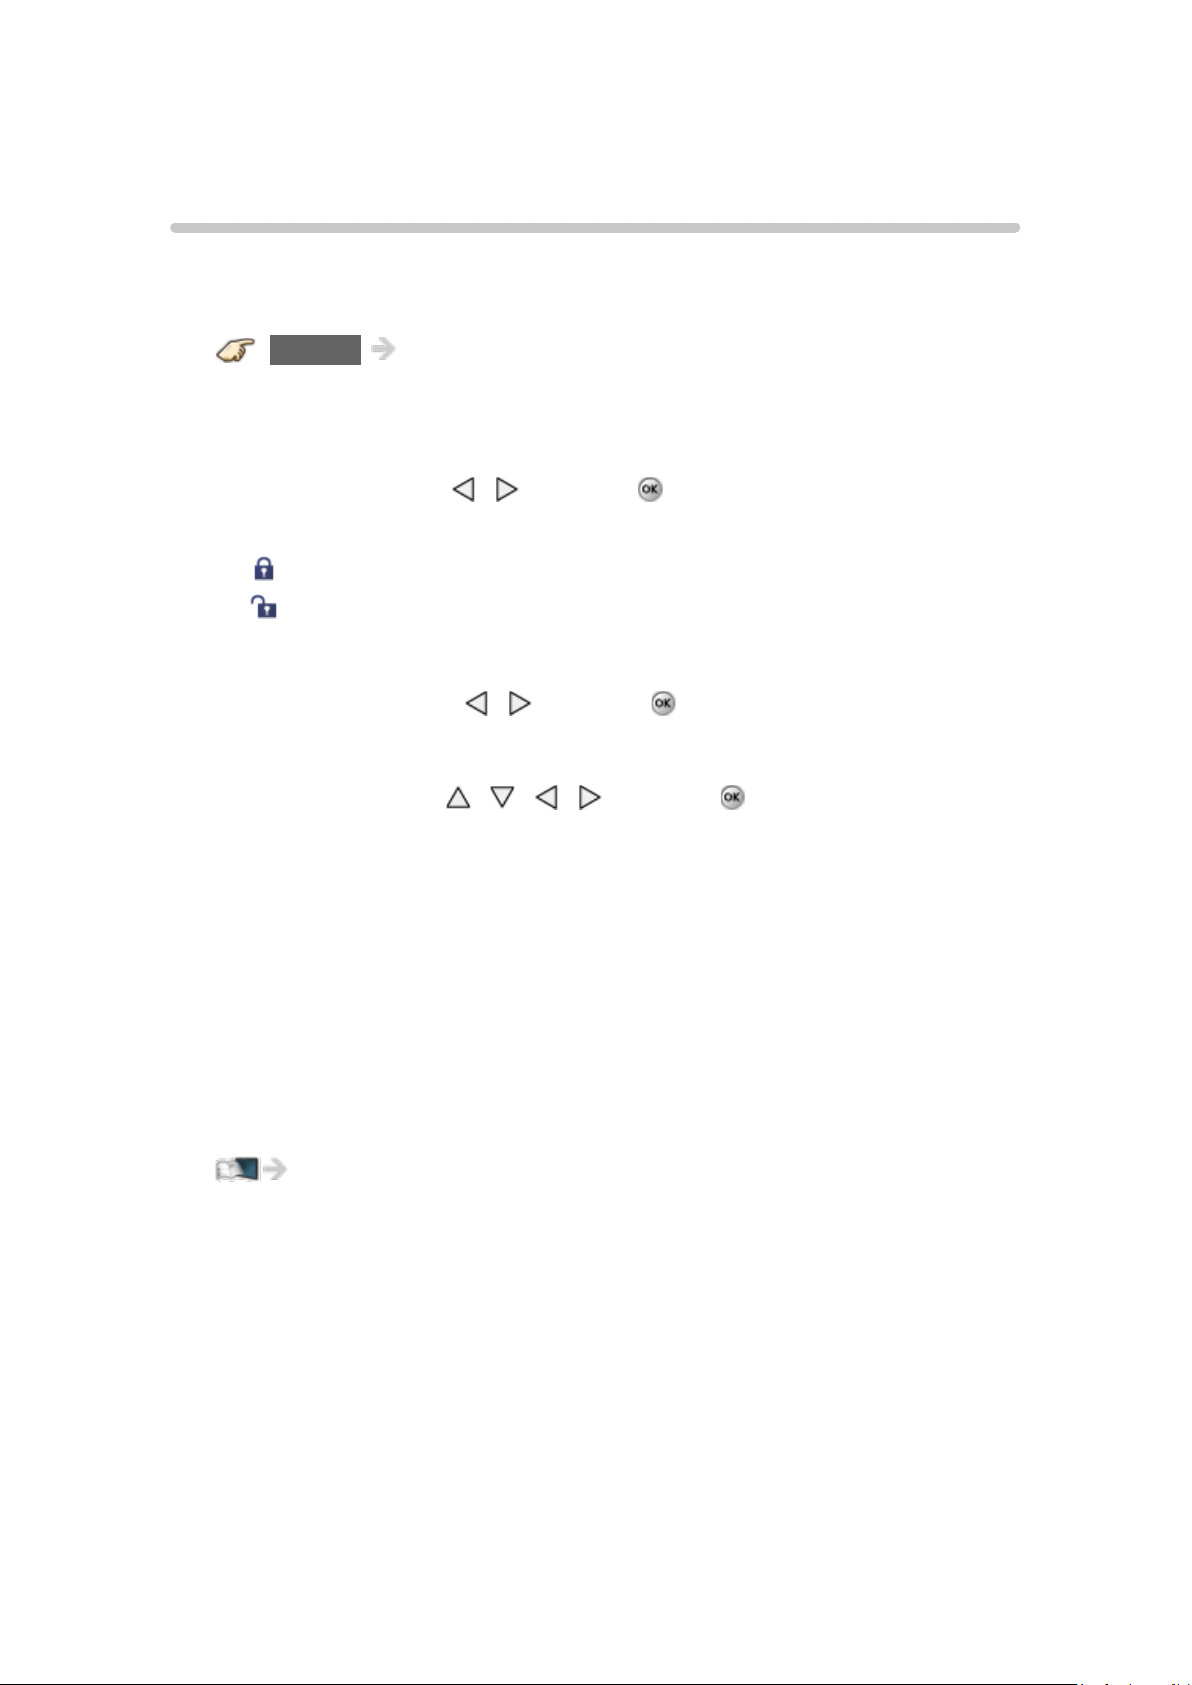
Music view
■ Thumbnail view
Play folder
Display Drive select
Display Media select
INFO Information panel (File name, Date, Size, etc.)
●
Information differs depending on selected data.
●
Displays function guide for each color button on the bottom of the screen.
■ Playback screen
INFO Display/hide Guide
Music Guide:
Displays current Music status
(Artist name/Album name/Song name, Elapsed time)
Navigation Guide:
Displays available functions.
Forward/Reverse:
Five levels of speed 1 to 5 are available.
- 86 -
Page 87
Options menu
In Music view, some optional menus are available by pressing the OPTION
button.
1. Display Options menu
(Options menu is also available in Menu.)
OPTION Options menu
2. Select the item
Select the desired menu using
(Music options)
Repeat playback
●
Set play repeat function (Off/Repeat folder/One song)
●
Available menus are displayed on Options menu depending on data
condition and situation.
/ and press
- 87 -
Page 88

Convenience features
Eco navigation
Eco navigation
This setting allows you to set the TV to the most suitable energy-saving mode
automatically.
1. Select Eco navigation
MENU Menu > Setup > Eco navigation
2. Press Set to ECO
Optimizes the TV’s various modes to save energy.
Note:
●
The TV’s brightness will adjust and adapt as the room lighting changes.
- 88 -
Page 89
Timer
Setting the menu
The TV can automatically turn On/Off at a designated date and time.
1. Display the menu
MENU Menu
2. Select Timer
Select desired menu using
3. Select the item and adjust
Select desired item using
●
Set On/Off timer.
All settings > Timer > Timer (On/Off timer)
●
Set Sleep timer.
All settings > Timer > Sleep (Off timer)
/ from menu bar and press
/ and adjust with /
- 89 -
Page 90
Parental control
Setting the menu
Locks specified channels or shows to prevent children from watching
inappropriate content.
You will be asked to enter your password each time you display the Lock
menu.
Set Custom in Mode to specify Channel, Game and Program settings.
1. Display the menu
MENU Menu
2. Select Setup from menu bar
Select desired menu using
3. Select Parental control
Select the menu using
4. Select the item and adjust
Select desired item using
●
The Off rating is independent of other ratings.
●
When placing a lock on a specific-age-based-rating level, the Off rating
and any other more restrictive ratings will also be blocked.
●
The channels will be blocked regardless of the program rating.
●
For Parental control settings
All settings > Setup > Parental control
/ from menu bar and press
/ and press
/ and adjust with /
- 90 -
Page 91
Password setting
You need to enter the password when you access locked channels or inputs.
(Input your 4-digit password)
●
If it is your first time entering the password, enter the password twice in
order to register it.
●
Make a note of your password. Do not forget it. (If you have forgotten
your password, consult your local dealer.)
●
When you select a locked channel, a message will be displayed that
allows you to view the channel after you input your password.
- 91 -
Page 92
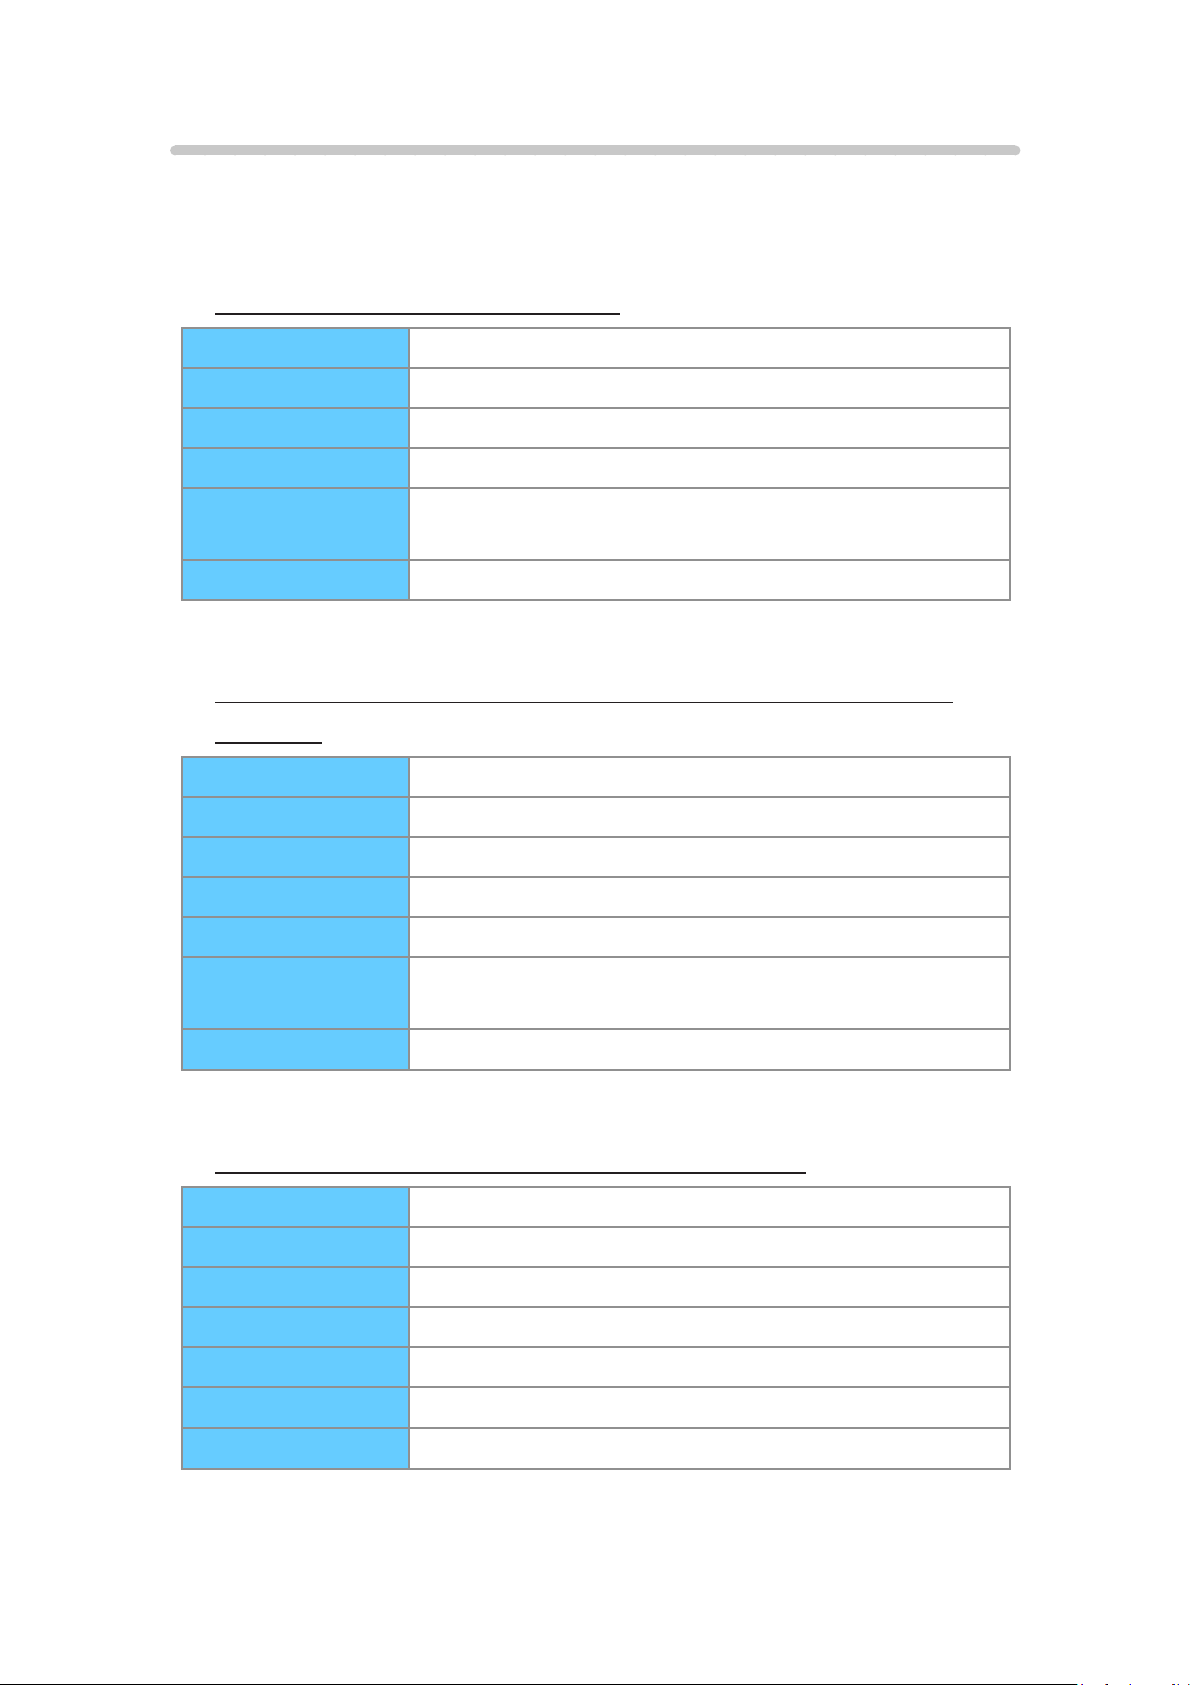
Parental control ratings
“V-chip” technology enables you to lock channels or shows according to
standard ratings set by the entertainment industry.
■ U.S. MOVIE RATINGS (MPAA)
NR Not Rated.
G All children and General Audience.
PG Parental Guidance suggested.
PG-13 Parental Guidance for children under 13.
R
NC-17/X No one 17 or under allowed.
Restricted Viewing, parental guidance is suggested for
children under 17.
■ U.S. TV PROGRAMS RATINGS (U. S. TV) - Age-Based
Ratings
TV-NR Not Rated.
TV-Y All children.
TV-Y7 Directed to children age 7 and older.
TV-G General Audience.
TV-PG Parental Guidance suggested.
TV-14
TV-MA
Parents strongly cautioned, parental guidance is
suggested for children under 14.
Mature Audience only.
■ CANADIAN ENGLISH RATINGS (C. E. L. R.)
E Exempt programming.
C All children.
C8+ Children 8 years and older.
G General programming.
PG Parental Guidance.
14+ Viewers 14 and older.
18+
Adult programming.
- 92 -
Page 93
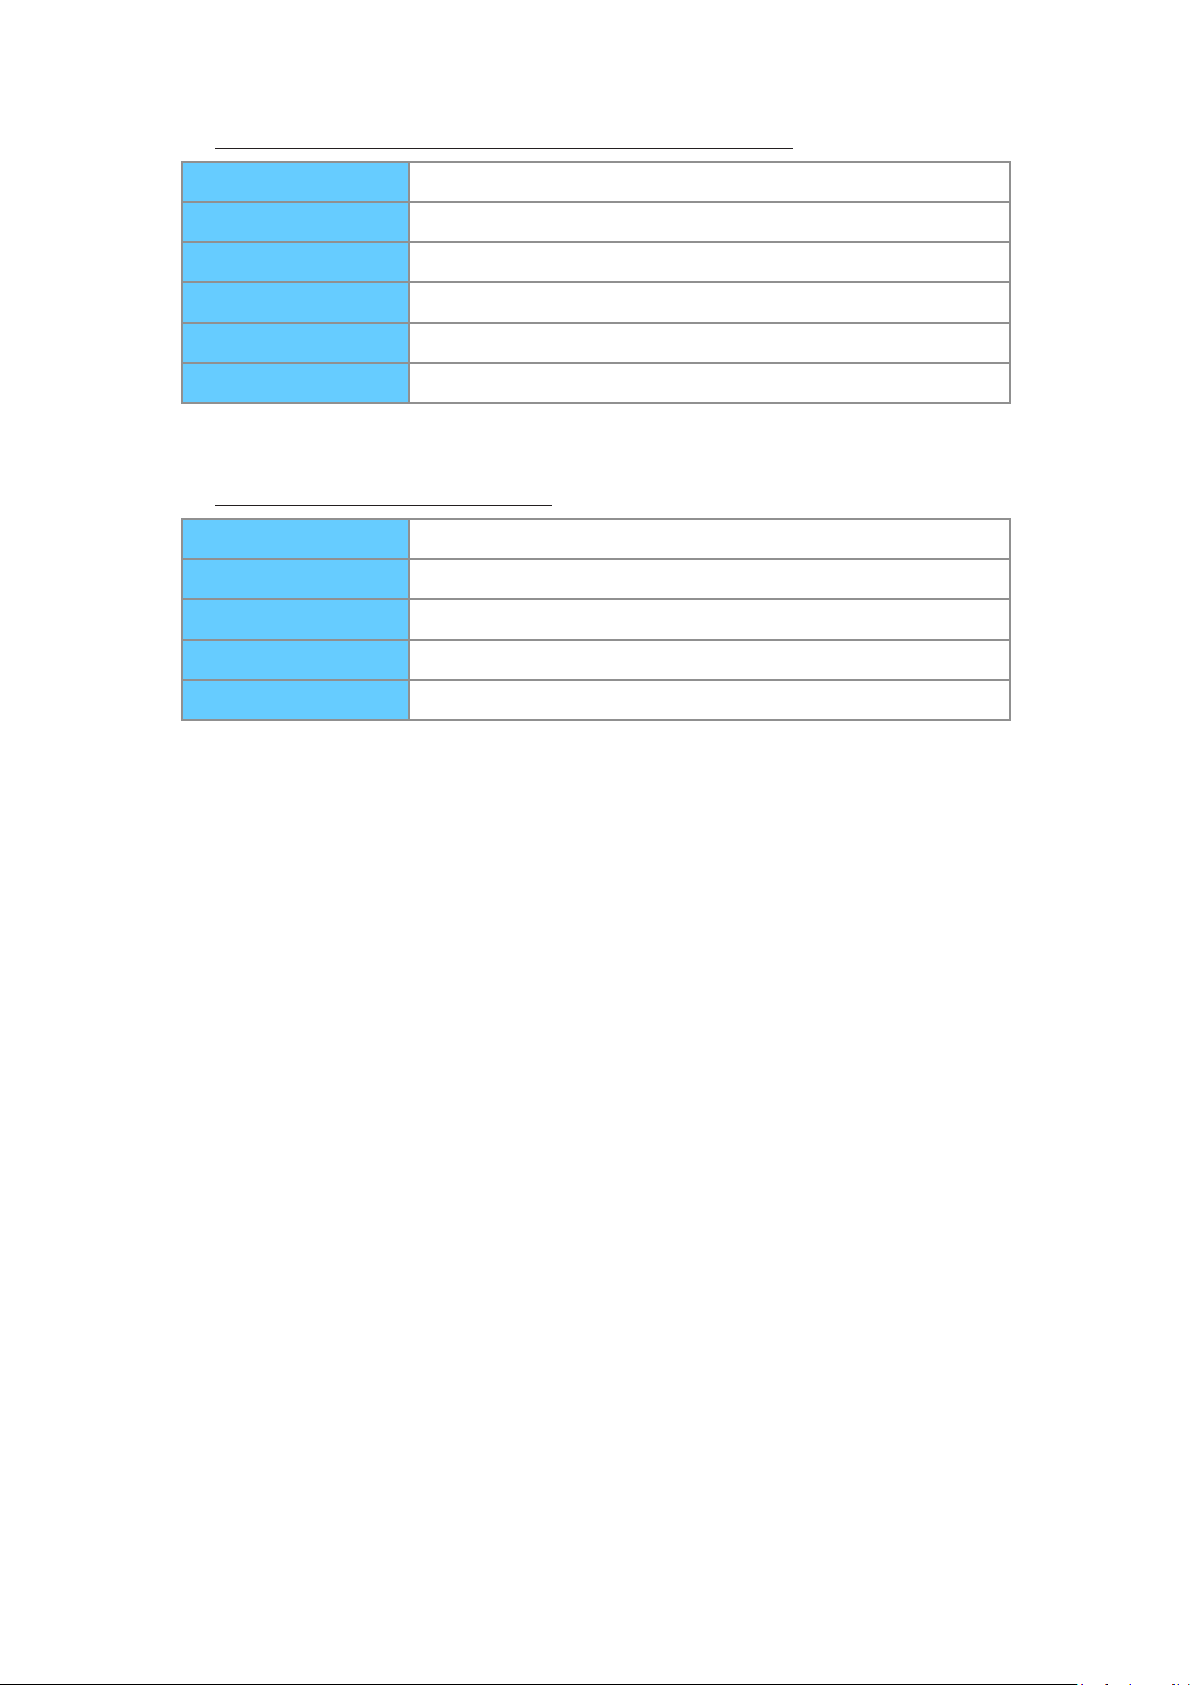
■ CANADIAN FRENCH RATINGS (C. F. L. R.)
E Exempt programming.
G General programming.
8 ans+ Not recommended for young children.
13 ans+ Not recommended for ages under 13.
16 ans+ Not recommended for ages under 16.
18 ans+ Programming restricted to adults.
■ Contents-Based Ratings
FV Fantasy Violence.
D Suggestive Dialogue.
L Strong Language.
S Sexual situations.
V Violence.
Caution
The V-Chip system used in this set is capable of blocking “NR” programs
(non rated, not applicable and none) as per FCC Rules Section15.120(e)(2).
If the option of blocking “NR” programs is chosen “unexpected and possibly
confusing results may occur, and you may not receive emergency bulletins or
any of the following types of programming:”
●
Emergency Bulletins (Such as EAS messages, weather warnings and
others)
●
Locally originated programming
●
News
●
Political
●
Public Service Announcements
●
Religious
●
Sports
●
Weather
- 93 -
Page 94
Closed Caption
Setting the menu
The television includes a built-in decoder that is capable of providing a text
display of the audio. The program being viewed must be transmitting the
Closed Caption (CC) information.
●
The settings are “Analog” or “Digital” depending on the broadcaster.
1. Display the menu
MENU Menu
2. Select Setup from menu bar
Select desired menu using
3. Select Closed Caption in Display customization
Select the menu using
4. Select the item and adjust
Select desired item using
●
Some functions will be disabled depending on the type of input signal.
Reset to defaults will be grayed out if no changes are made.
●
For Closed Caption settings
All settings > Setup > Closed Caption
●
For Smart TV Internet content CC settings (U.S. only)
“IPTV-CC settings” App is available on the Apps list.
– Some Internet services have their own separate CC settings.
/ from menu bar and press
/ and press
/ and adjust with /
- 94 -
Page 95

Closed Caption notice
●
For viewing the CC of digital broadcasting, set the aspect to Full (If viewing
with H-FILL, JUST, ZOOM or 4:3, characters might be cut off).
●
The CC can be displayed on the TV only when the receiver (such as a
Cable box or satellite receiver) has the CC set to ON within the device
itself. Check with your Cable or Satellite provider for instructions. The TV’s
CC button does not operate the Satellite or Cable box’s CC function.
●
If the CC is set to On on both the receiver and TV when the signal is 480i
(except for the HDMI connection), the CC may overlap on the TV.
●
If a digital program is being output in analog format, the CC data will also
be output in analog format.
●
If the recorder or output monitor is connected to the TV, the CC needs to
be set up on the recorder or output monitor.
- 95 -
Page 96
VIERA Link ™ “HDAVI Control ™”
Basic feature
Simultaneously control all Panasonic “HDAVI Control” equipped components
using one button on the TV remote. Enjoy additional HDMI Inter-Operability
with compatible Panasonic products. This TV supports “HDAVI Control 5”
function. Connections to equipment (Blu-ray Disc player, DVD recorder, HD
Camcorder, Home Theater System, Amplifier, etc.) with HDMI cables enables
VIERA Link controls.
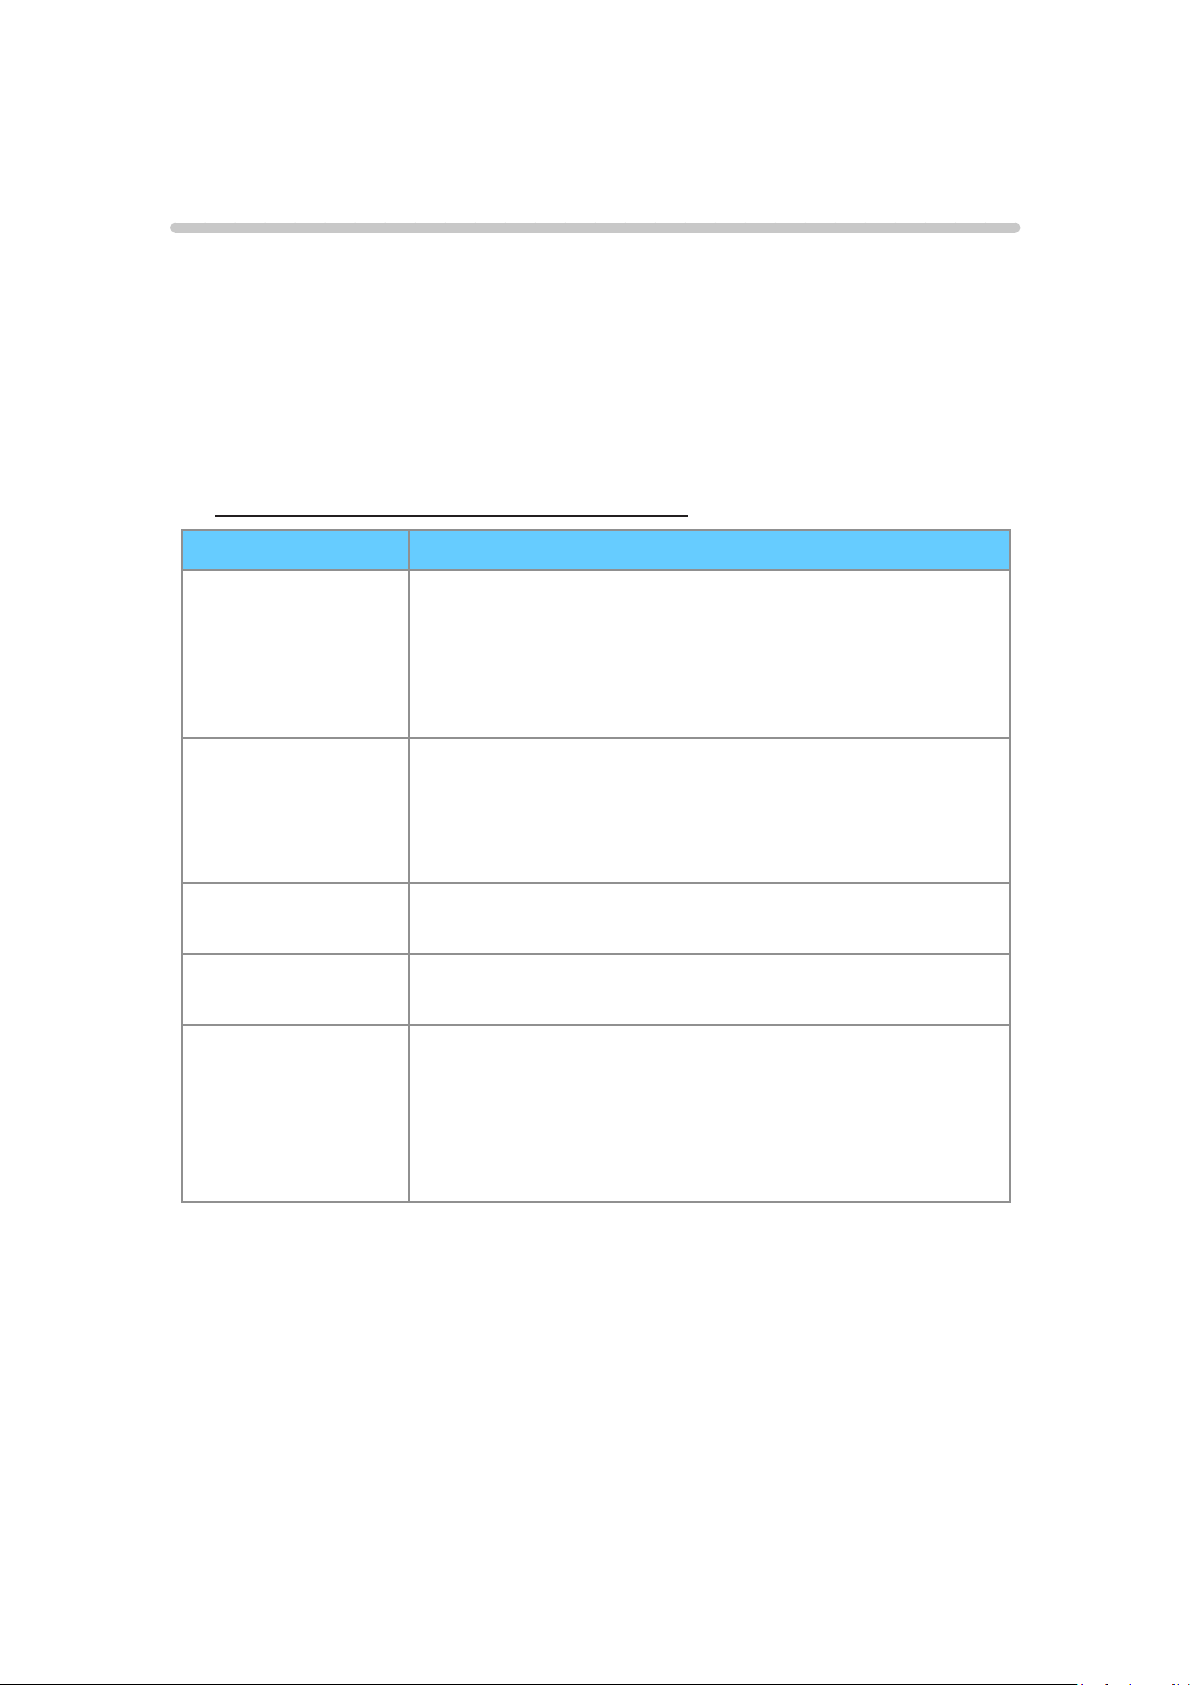
■ Available HDAVI Control functions
Version Operations
●
HDAVI Control or
later
Automatic Input Switching
●
Power on link
●
Power off link
●
Speaker control
HDAVI Control 2 or
later
HDAVI Control 3 or
later
HDAVI Control 4 or
later
HDAVI Control 5
●
VIERA Link control only with the TV’s remote
control
●
Unselected device auto off (for available equipment
only)
●
Automatic lip-sync function
●
Energy saving mode (with Quick Start mode)
●
Audio Return Channel
Audio Return Channel (ARC) is a function that
enables digital sound signals to be sent via an
HDMI cable back from the TV to a connected audio
device.
- 96 -
Page 97

Connecting note
■ When adding new equipment...
When adding new equipment, reconnecting equipment or changing the
setup after the connection, turn the equipment on and then switch the
TV on. Set the input mode to correct HDMI terminal, and make sure that
the image is displayed correctly.
VIERA Link “HDAVI Control”, is based on the control functions provided by
HDMI and industry standard known as HDMI CEC (Consumer Electronics
Control), with unique function that we have developed and added. As such,
its operation with other manufacturers’ equipment that supports HDMI CEC
cannot be guaranteed. Please refer to the individual manuals for other
manufacturers’ equipment supporting the VIERA Link function.
■ HDMI cable
This function needs an HDMI compliant (fully wired) cable. Non-HDMIcompliant cables cannot be utilized.
●
For more details on the external equipment’s connections, please refer to
the operating manual for the equipment.
HDMI connections to some Panasonic equipment allow you to interface
automatically.
●
This function may not work normally depending on the equipment
condition.
●
The equipment can be operated by other remote controls with this function
on, even if the TV is in Standby mode.
●
Image or sound may not be available for the first few seconds when
playback starts.
●
Image or sound may not be available for the first few seconds when input
mode is switched.
●
Volume function will be displayed when adjusting the volume of the
equipment.
●
If you connect equipment that has “HDAVI Control 2” or later function to
the TV with an HDMI cable, the sound from the DIGITAL AUDIO OUT
terminal can be output as multi-channel surround.
●
“HDAVI Control 5” is the newest standard for the HDAVI Control
compatible equipment.
This standard is compatible with the conventional HDAVI equipment.
- 97 -
Page 98

If connection (or setting) of equipment compatible with HDAVI control is
changed, switch the power of this unit Off and On again while the power of
all equipment is On (so that the unit can correctly recognize the connected
equipment) and check that the connected equipment playback operates.
- 98 -
Page 99
VIERA Link connections
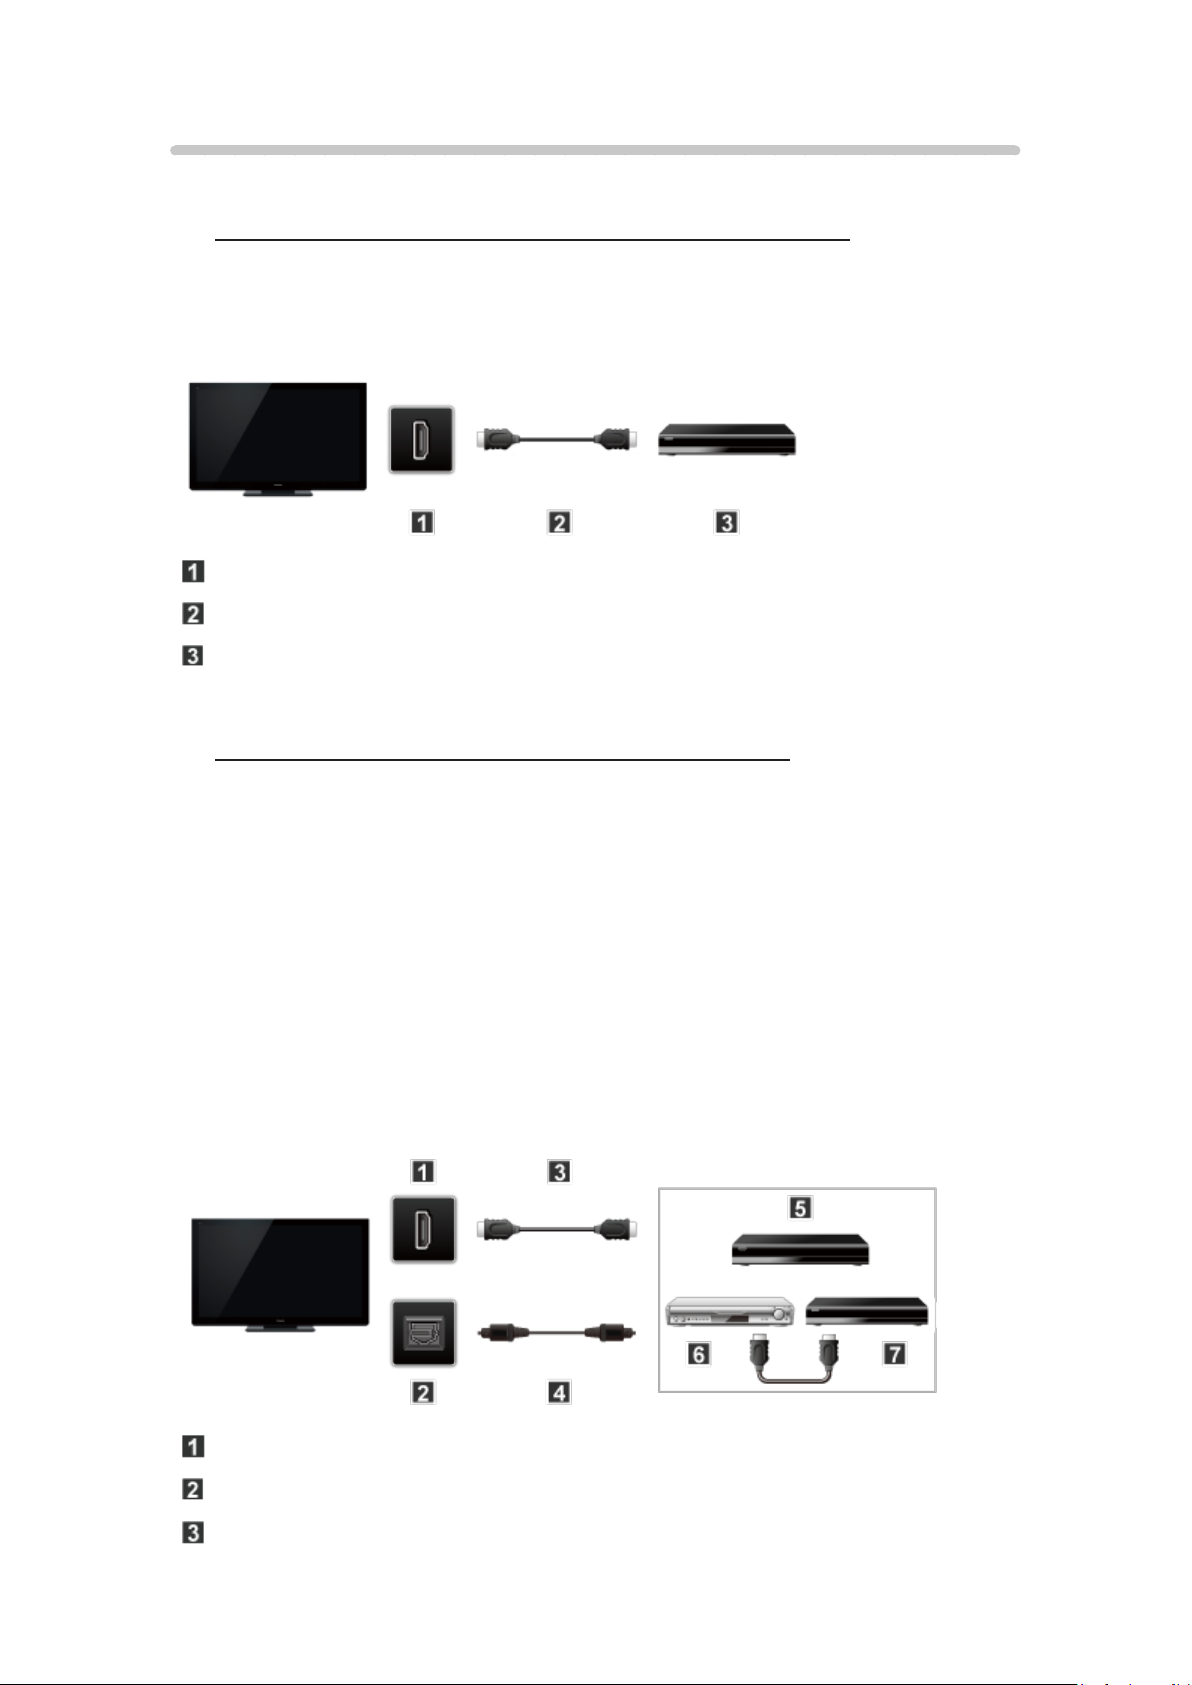
■ Connecting Blu-ray Disc player/DVD Recorder
Connect the HDMI terminal of this TV to the DVD recorder with VIERA Link
function using a fully wired HDMI cable.
●
You can use any HDMI terminal on this TV.
TV (HDMI)
HDMI cable
DVD recorder with VIERA Link function
■ Connecting Home theater system/AV amp
HDMI and Audio connection.
Connect the HDMI terminal and DIGITAL AUDIO OUT to Home Theater
System/AV amp with VIERA Link function using each fully wired HDMI cable
and Optical audio cable.
●
HDMI 2 is recommended.
●
No optical cable is necessary when connecting a Home Theater
supporting “HDAVI control 5” with an HDMI cable.
Audio will be supported via ARC (Audio Return Channel)
●
One AV amp and one Blu-ray Disc player/DVD recorder can be operated
with this unit by connecting with an HDMI cable.
TV (HDMI)
TV (DIGITAL AUDIO OUT)
HDMI cable
- 99 -
Page 100
Optical cable
Home theater system with VIERA Link function
AV amp with VIERA Link function
DVD recorder with VIERA Link function
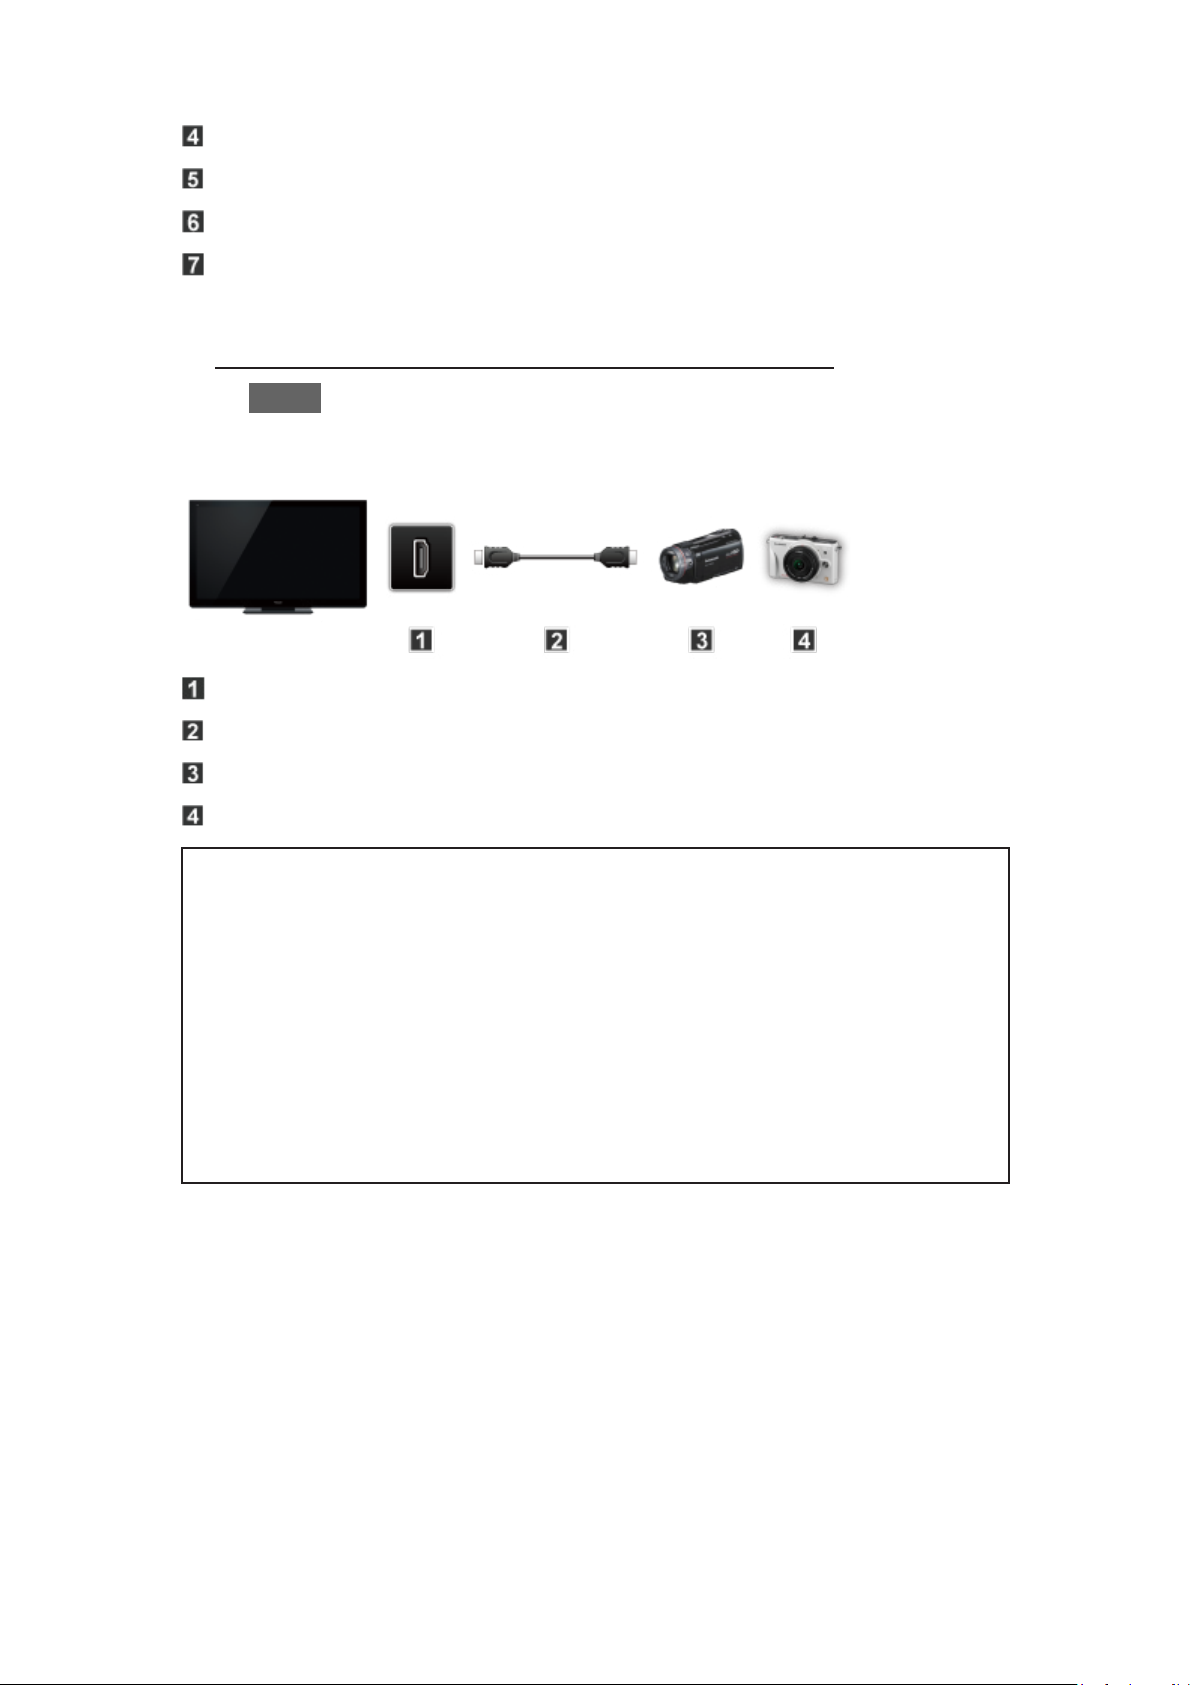
■ Connecting an HD Camcorder/Digital camera
Press INPUT and select an available HDMI terminal, then connect the HD
camcorder/Digital camera with VIERA Link function to this input with fully
wired HDMI/mini HDMI cable.
TV (HDMI)
HDMI / mini HDMI cable
HD Camcorder with VIERA Link function
LUMIX with VIERA Link function
●
Individual HDMI equipment may require additional menu settings
specific to each model. Please refer to their respective manuals.
●
When audio from other equipment connected to this unit via HDMI is
output using “DIGITAL AUDIO OUT” of this unit, the system switches to
2CH audio.
(When connecting to an AV amp via HDMI, you can enjoy higher sound
quality.)
●
Some devices use Mini-HDMI terminal. HDMI (type A) to Mini-HDMI
(type C) cable or adapter should be used.
- 100 -
 Loading...