

Page 1

Panasonic
Colour Television
TC-59R62
TC-25L2Z
Operating Instructions
Please read these operating instructions completely before
operating this set and retain the booklet for future reference.
TQB4A0071
Page 2
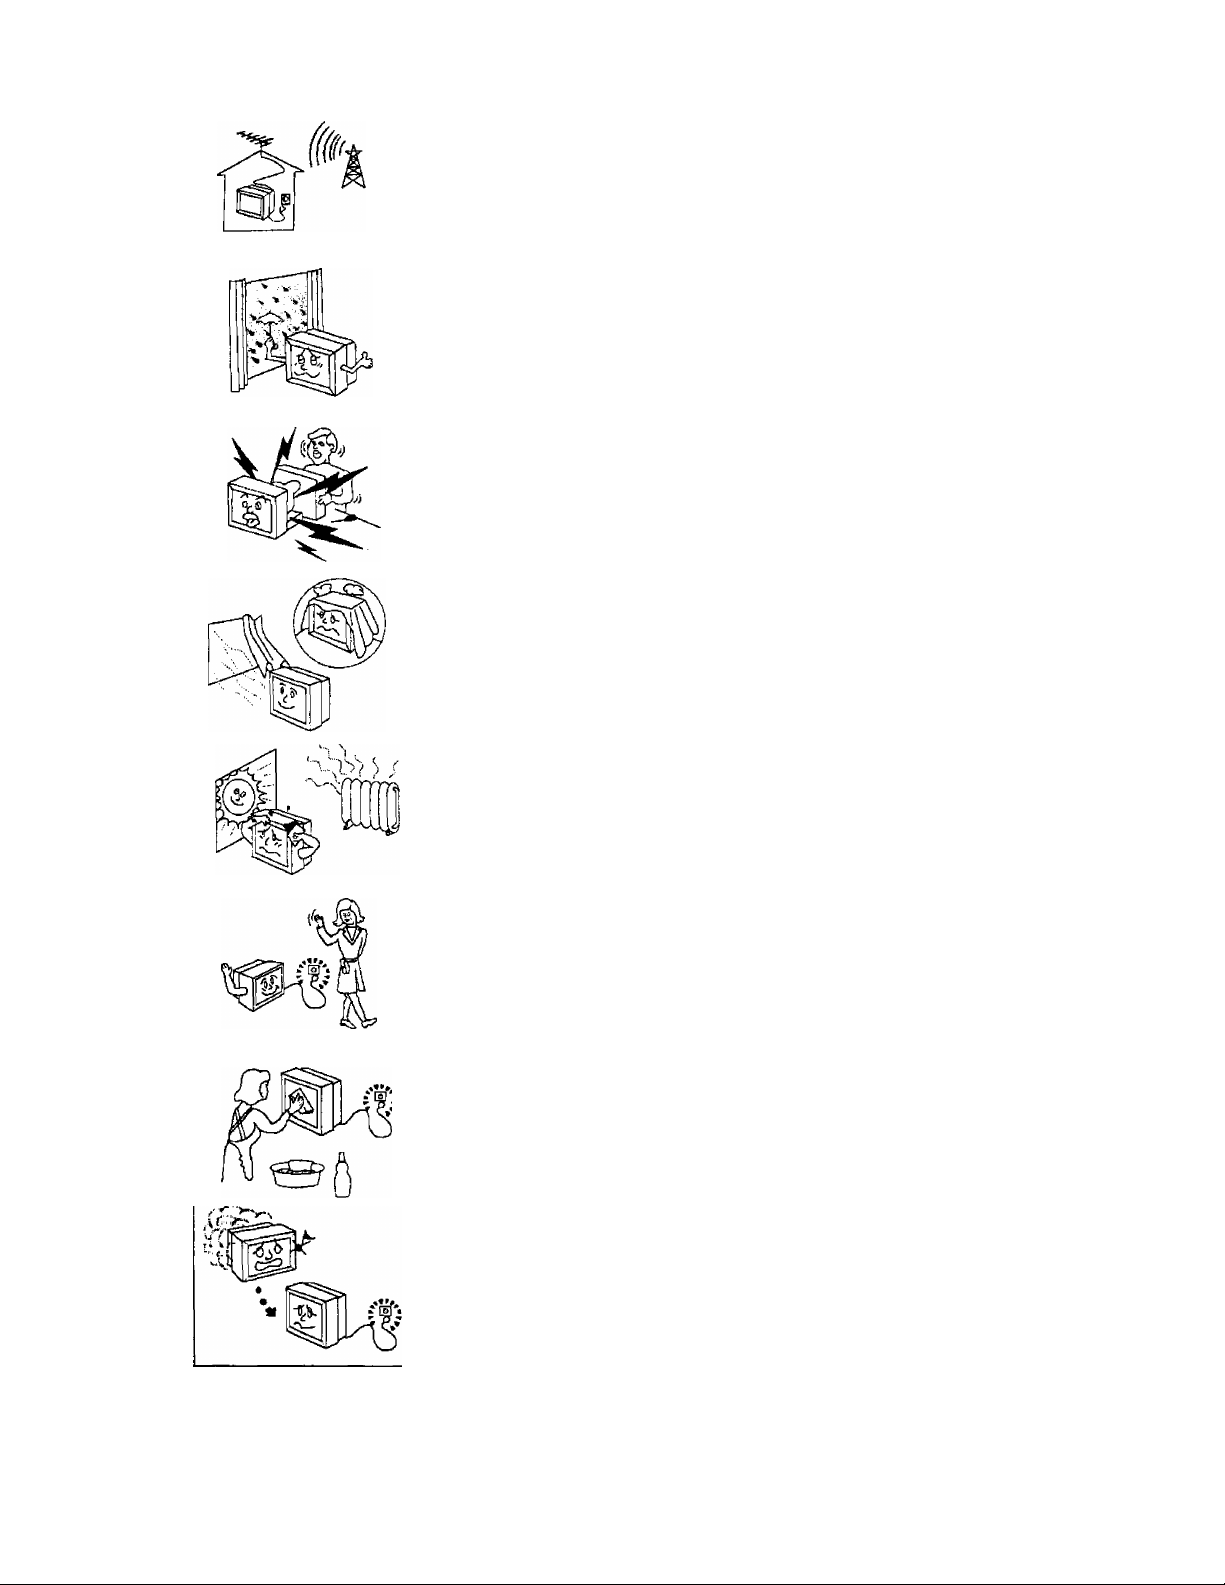
Power Source and Broadcast System
This Television will operate on 240Vi lo% 50Hz A.C.
It is designed exclusively for the PAL B broadcast system.
To prevent damage to the Television which may result in
electric shock, do not expose this television to rain or
excessive moisture. For safety do not place any containers
which contain water on or near this Television.
High Voltage;
Do not remove the rear cover as High Voltage components
will be exposed.
Refer any Service to a Qualified Technician.
Adequate ventilation is essential to prevent premature
failure of any eiectrica! component.
Avoid exposing the Television to direct sunlight or any other
sources of direct heat.
When the Television is not being used for an extended
period of time, remove the Power Plug from the wall socket.
Cabinet and Picture Tube Care
The cabinet and Picture tube can be kept in good condition by
simply wiping with a clean, soft cloth moistened with mild
detergent and water. Do Not use petroleum based solutions.
For safety, remove the plug from the power outletwhen cleaning.
Safety First
In the advent of unusual operation (e.g. odd sounds, smoke or
aromas), turn the Television Off and remove the Power cord
from the wall socket. Then call the Television Service Centre.
Page 3

Connecting your Television.....................4
Battery Installation
..................................
5
Antenna Connectors................................5
Remote Control.......................................6
Remote Control Functions..............12,13
General Operation..............................7 - 9
Tuning............................................10,11
Skip Operation
AFC (Automatic Frequency Control)
Troubleshooting
..................................
............
................................
14
15
16
Page 4
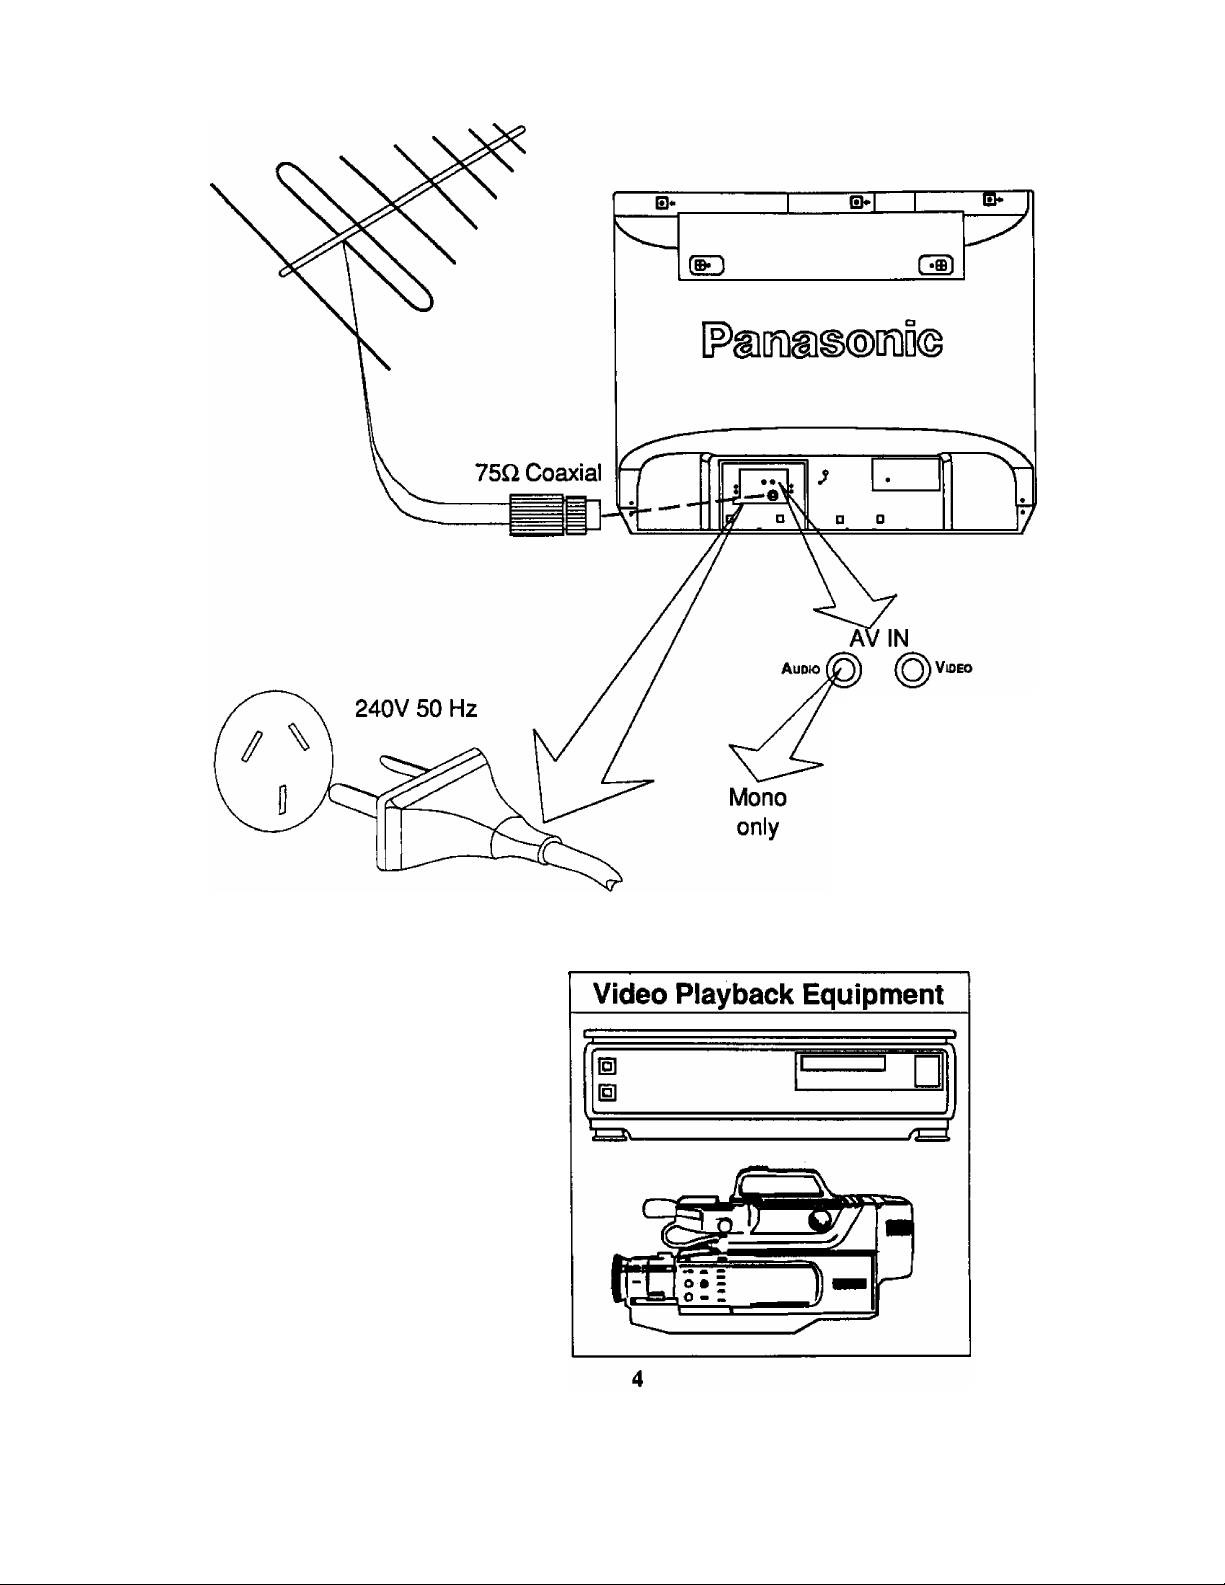
■i0i0VtslOn
Q Q RCA type
^ ^Connectors
g Q
Page 5
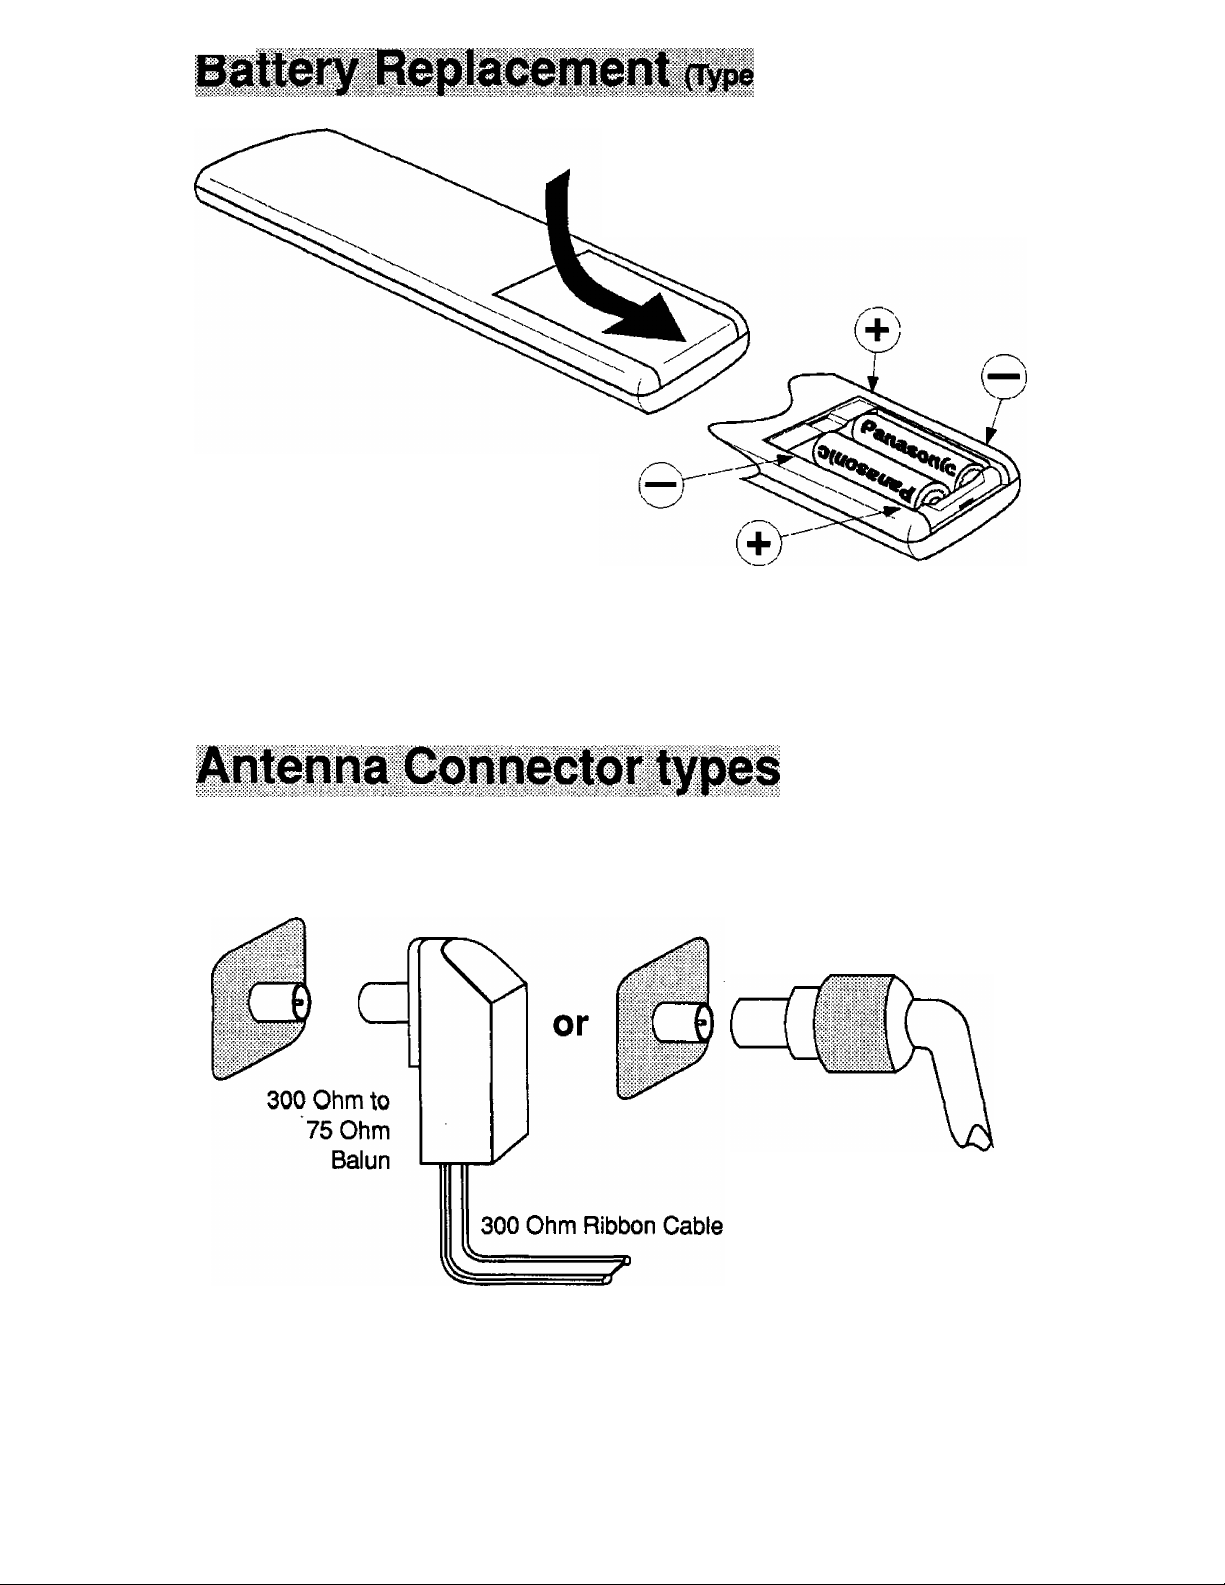
Ensure the correct polarity (+ f -) when
installing batteries into the Remote
Control.
■ŸÏA i*
To Open the Battery
Compartment, first
push down and then in
the direction indicated.
f
* *■, Vi,*:-1 \ À* ■ M*;*:
_ _
I
Caution:
The use of rechargeable batteries is not recommended.
Dispose of old batteries in a responsible manner.
75 Ohm Coaxial Cable
Page 6
Page 7

Front Panel
On / Off Switch
Page 8

...........
FUNCTION
SELECTION
PRE. FUNC. TV/AV —
@ @ @ @-
TUNING
PRESET
TELEVISIO^^
AUDIO
VIDEO
SELECTION
Volume
V A
Sequential
Memory
Access
8
Page 9

General Operation
Colour,
Brightness,
Contrast and
Picture Sharpness
Controls
Press the "FUNC." button.
The On-Screen information will display
either "COLOUR, BRIGHTNESS.
CONTRAST or SHARPNESS". Pressing
either the Volume" 4-" or" button while
this is displayed adjusts the displayed
levels accordingly. The minimum level of
adjustment is 0 while the maximum level of
adjustment = 63.
Note:
The On-Screen information wili remain
displayedforuptoSsecondsafterseiection
and adjustment prior to returning to the
normal viewing mode.
FUNC.
BRIGHTNESS
32
--------------1--------
Press again
Press
-------------
Note:
When the indicator line is YELLOW this represents
“D^
-------------------------
Press again
---------------
Press again
I the Factory Preset Normalised condition. I
----------
SHARPNESS--------------------^-------------------CONTRAST
Press again
------------------
Page 10

Tuning
After pressing the PRE. button and entering the SEARCH mode, (refer
to steps 1 through 6 on the next page) broadcast band selection is
achieved in the foliowing manner;
r
30 SEARCH Vl
While holding the
Button the On-Screen
indicator will move.
On-Screen
Display
Vu
Vh VHF High 5A-11
U UHF
Broadcast
Band
VHF Low 0-5
Continue
pressing
the
button
and the
tuning will continue
onto the next Band
Television
Broadcast
Channel
28-69
10
Page 11

PRE.
TV/AV —
The word preset followed by
Press the "PRE." button.
the characters Vh, Vl or U along
with the memory location
number wiii appear on the
screen.
Select the desired Memory Location number (Channel).
Fast Tune by holding
both buttons together.
TV/AV & Volume "
= Fast tune UP
Hold until the desired
teievision broadcast
becomes visible.
TV/AV & Voiume
= Fast tune DOWN
PRE.
Fine Tune by holding one
« Fine tune UP
tuning button. Ensure the
best picture and sound
information is available
before proceeding further.
Volume "
= Fine tune DOWN
Repeat steps 2, 3 & 4 if more than one Memory
Location requires tuning.
Note:
The PRE. button requires
pressing 3 times from this
Pressthe "PRE." button 3timesto
finalise the tuning process.
position in the presetfunction
to compiete the tuning
memory process and return
to the normai viewing
condition, if this is not done
the teievision wiil remain in a
preset mode untii the
teievision is switched off.
11
Voiume "
__
"
Page 12

Power (Stand-By) Button.
Push this button to turn the receiver off (Stand-by).
Push again to turn On.
Note: Do not leave the Television in Stand-By lor extended periods.
Sound Mute Button.
When activated, this will show the Mute Symbol
in Red as an On-Screen display and reduce the
sound level to minimum. Pressing the Mute
button again, or the Volume -i- or - will return the
volume to the original condition.
Volume Control.
Press the "-i-'' button to increase the volume.
Press the button to decrease the volume.
NORM.
ffl
1
V/
Colour Control.
Brightness Control.
Contrast Control.
Note: Normally Contrast is set at Maximum.
Sharpness Control.
The ”FUNC,'' button on the Remote Control operates in the
same principle as the "FUNC." button on the
front control panel. Refer to page 9.
Normalise Button.
Press this button while the On-Screen display
remains after pressing the "FUNC." button to
reset ALL of the Colour, Brightness, Contrast
and Sharpness levels to the factory preset
condition.
12
Page 13

0~9 & -/--
T
a
Direct Memory Location access. Memory locations 0-9
are accessed by pressing the corresponding
numbered button. For Memory Locations 10-29
First press the button then enter the First digit
followed by the second digit.
A
TV/AV
A
Up
Sequentiai Memory Location access.
V
Down
TV/AV Seiection.
An AV Signal may be connected through the AV
terminals on the rear of the television.
Note: This button is found on both the Remote Control and on the
Television Control Panel. (Refer to page 8)
Recail.
Pressing this button will display the current
Memory Location. Press again to cancel the
display.
\ V
Off Timer.
Press to select a preset time for the television to
automatically turn off (Stand-By). The preset
times are 30, 60 and 90 minutes.
Press (<^30 m- 60 90 0
13
r u
Page 14

Skip Function
This function makes it possible to Skip unused Memory Locations. The Function is
only applicable when the Sequential Memory Access (reference pages 8 & 13) buttons
are pressed.
PRE.
Press the "PRE.” button 2 Times.
Select the Memory Location Number
to insert the Skip Function into.
Press Volume ”+" button until "SKIP ON" appears upon
the screen.
The On-Screen information
wiil display "SKIP OFF"
I I
14
PRE.
If more than one Memory location number is to be
programmed with the Skip Function, Repeat Steps 2 and 3.
(i)
Press the "PRE." Button 2 times to Finalise the Operation.
To Remove the SKIP function please repeat
this process and set to SKIP OFF.
14
Page 15

A C
AFC F
Under normal viewing conditions the AFC remains "ON". However, in areas of poor reception or
constant interference, a slight adjustment to the tuning may improve the picture quality. Once the
AFC OFF function has been selected fine tuning can be performed.
LillOtlOli (
Automatic Trequi
mey Oontroi/
Press the "PRE." button 3 times.
Select the Memory location number
for which you desire to set the AFC
function OFF.
Press Volume "+" button until the word "AFC OFF"
appears upon the screen.
The On-Screen information
will display "AFC ON"
If more than one Memory location number is to be
programmed with the AFC OFF function, repeat Steps 2
and 3.
H
PRE.
Press the "PRE." button 1 time to finalise the operation.
If further tuning is required, refer to page 11,
Time
To Reset the AFC function repeat this
process and set the AFC ON.
15
Page 16

r
Before calling tor Service, determine the symptoms N
and make a few simple chedc as shown below. J
Aerial Location,
Direction or Connections
Snowy Picture
Multiple Picture
Interlerence
No Picture
Noisy Sound
Aerial Location,
Direction or Connections
Normal Sound
Volume (Check the Remote Control
Mute function)
No Sound
Electrical Appliances, Cars, Motorcycles
or Fluorescent Lamps
Noisy Sound
Not Plugged in at the power outlet, Not
switched On at the Television, or
Switchedto Stand-by, orthe Brightness,
Contrast and Volume settings.
No Sound
No Colour
Scrambled
Coloured Patches
Jj)
Normal Sound
Normal Sound
Normal Sound
Colour Control.
Retune the Television.
Magnetic Interference from unshielded
equipment, or the Television moved
while “On”. (Turn the Television Off at
the Main On/Off Switch forTen minutes).
16
Page 17

Model TC-59R62
Power Input
Power Consumption
Antenna Input
Receiving Channels
Picture Tube
Audio Output
Internal Speakers
AV Connections
Dimension
Weight
Remote Control
: AC 240V 50 Hz
130W(Max)
12W Stand-By
: 75il Coaxial Type
VHP Ch. 0 to 11
UHFCh. 28 to 69
Australian Standard
59cm 90° Deflection
4W
2-12x6cmOval 16i2
Video In 1Vp-p, 75i2
Audio In Approx. 400mV~
: Height 51cm
Width 61.8cm
Depth 46.9cm
29Kg
22 Functions
Model TC-25L2Z
Power Input
Power Consumption
Antenna Input
Receiving Channels :
Picture Tube
Audio Output
Internal Speakers :
AV Connections
Dimension
Weight
Remote Control :
AC 230V 50 Hz
130W (Max)
12W Stand-By
75CI Coaxial Type
VHFCh. 1to11
UHFCh. 21 to 69
New Zealand Standard
59cm 90° Deflection
4W
2- 12x6cm Oval 160
Video In 1V p-p, 75£2
Audio In Approx. 400mV~
Height 51cm
Width 61.8cm
Depth 46.9cm
29Kg
22 Functions
Specifications are subject to change without notice.
Dimensions and Weight are approximate.
17
Page 18

Matsushita Electric Co. (Aust) Pty Ltd
P.O. Box 326 Penrith NSW 2751
ACN:000 611 389
Printed in Australia TQB4A0071
18
 Loading...