

Page 1
Projection Television
Operating Instructions
Model No.
TC-43P250H
TX-43P250H
TX-43P250X
TC-51P250H
TX-51P250H
TX-51P250X
This is a combined Operating Instruction
manual for all the above series of models.
Please read these instructions before
operating your set and retain them for
future reference.
TQBC0279-1
Page 2

Dear Panasonic Customer
Welcome to the Panasonic family of customers. We hope that you will have many
years of enjoyment from your new Projection television set.
To obtain maximum benefit from your set, please read these Instructions
before making any adjustments, and retain them for future reference.
Retain your purchase receipt also, and note down the Model Number and
Serial Number of your set in the space provided on the rear cover of these
Instructions.
Visit our Panasonic Web Site http://www.panasonic.co.jp/global/
Important Information
(1) The long time (max. 2 hours) use of TV game on the set is not recommended since the signal from TV
game may be the cause of damage on picture projection tubes on the set.
(2) Do not allow a still picture to be displayed for an extended period, as this can cause a permanent after-
image to remain on the Projection TV screen.
Examples of still pictures include logos, video games, computer images, teletext and images displayed
in 16 : 9 mode.
If still picture cannot be avoided, reduce the brightness and contrast levels of the picture to minimize
any damage that might occur.
(3) In order to minimize any damage to the projection tubes, this set uses the PICTURE SHIFT function
(Refer to page 35) to change (shift) the entire picture approximately 2 mm every 15 minutes.
Page 3

Table of contents
Table of contents
Warnings and Cautions ................................................................. 4
Before Operating This Set ............................................................. 6
How to Use This Manual......................................................................... 6
Quick Reference Guide for your TV Set ................................................. 7
Securing the casters............................................................................... 7
Connecting the Aerial Cable to the RF In Terminal ................................ 8
Safety Precaution ................................................................................... 8
Connecting the Plug to the Wall Outlet................................................... 9
How to Turn the Power On...................................................................... 9
Battery Installation.................................................................................. 9
Battery cautions...................................................................................... 9
Location of Controls .................................................................... 10
Controls and Terminals on the TV ........................................................ 10
Connections ................................................................................. 11
How to connect the “A V1, 2, 3 or 4” Input Terminals............................. 11
How to connect the DVD Input Terminals ............................................. 12
How to connect the AV Monitor Output Terminals to other equipment . 12
Connecting Headphones...................................................................... 13
General Operation........................................................................ 14
On-Screen menu Display from Remote Control.................................... 16
Convergence Adjustment........................................................................ 18
Convergence Adjustment mode ........................................................... 18
Convergence1 Adjustment for RED, BLUE and GREEN...................... 19
Convergence2 Adjustment for RED and BLUE .................................... 20
T uning Channels ...................................................................................... 21
Sound System Selection (Different region use differing systems) ............
Colour System Selection (Different region use differing systems) ............
Channel Selection ................................................................................ 24
Channel Allocation ............................................................................... 25
Automatic Tune
(Channel Select and Regional System must already be set; Refer to pages 21) ......
Manual Tune
(Channel Select and Regional System must already be set; Refer to pages 21) ......
Fine Tuning ........................................................................................... 28
How to Cancel the Fine Tuning............................................................. 28
Programme Number Skip ..................................................................... 29
How to Cancel the Skip Function ......................................................... 29
Picture Adjustment .................................................................................. 30
Sound Adjustment ................................................................................... 32
Setup Adjustment .................................................................................... 34
OFF TIMER .......................................................................................... 34
FLICKER REDUCTION........................................................................ 34
COLOUR SYSTEM .............................................................................. 34
CH COLOUR SET................................................................................ 35
VCR/GAME .......................................................................................... 35
CHILD LOCK........................................................................................ 35
PICTURE SHIFT .................................................................................. 35
LANGUAGE..........................................................................................
Multi Screen.............................................................................................. 36
Multi PIP ............................................................................................... 36
Channel search .................................................................................... 37
Strobe................................................................................................... 37
TELE TEXT (No indication for TC-43P250H & TC-51P250H) ............... 38
Advanced Remoto Control Operation .................................................... 41
Stereo Bilingnal Sound Selection ......................................................... 41
VCR / LD / DVD Control ....................................................................... 41
Troubleshooting ....................................................................................... 42
Specifications........................................................................................... 43
22
23
26
27
35
3
Page 4
Warnings and Cautions
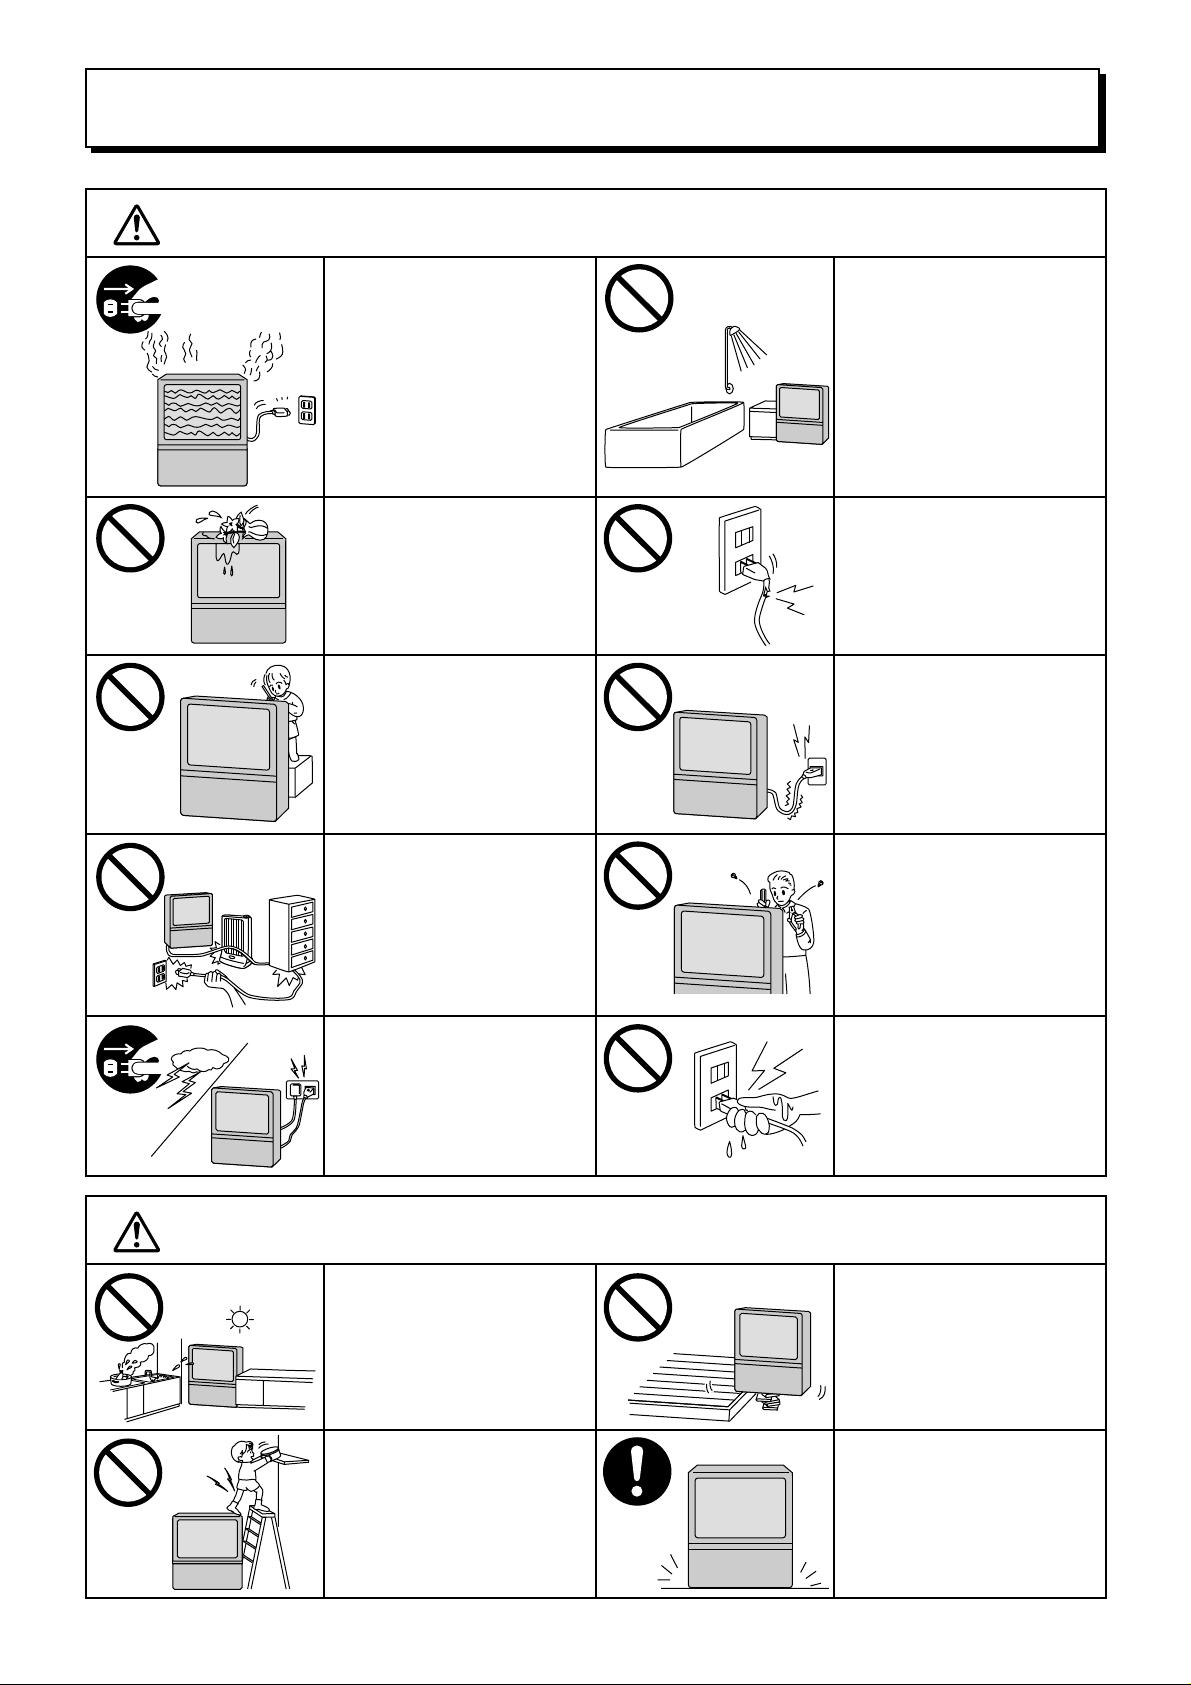
Warnings
Unplug the power cord in the
event of any malfunction
(screen goes blank, no sound,
odd sounds, smoke or unusual
odors coming from the unit).
Unplug the power cord if
foreign matter or water falls
into the unit, or if the unit is
dropped or the cabinet is
damaged.
DO NOT place any of the
following on the unit:
Flower vases, flower pots,
cups, small metal objects, or
cosmetics containers,
chemicals or water.
DO NOT insert foreign objects
(metal or easily flammable
objects).
TAKE CARE NOT to damage
the power cord.
DO NOT use this unit near
water. (Near a bath tub, etc.)
DO NOT use if the power cord
or power plug is damaged, or if
the plug does not fit tightly into
the socket.
DO NOT use at a voltage other
than indicated
DO NOT remove the rear cover
as live parts and High Voltage
components are accessible
when the rear cover is
removed.
Cautions
DO NOT touch the aerial cable
and this unit when there is
lightning.
DO NOT place in humid or
dusty location, or areas
exposed to smoke or steam.
DO NOT place in direct
sunlight and other sources of
direct heat.
DO NOT stand, or place
heavy objects on the unit.
Particular care should be
taken by families with small
children.
DO NOT touch the power plug
if your hands are wet.
DO NOT place in an unstable
location.
Place in a safe location.
Fix the TV to a wall.
(refer to page 8)
4
Page 5
Cautions
Warnings and Cautions
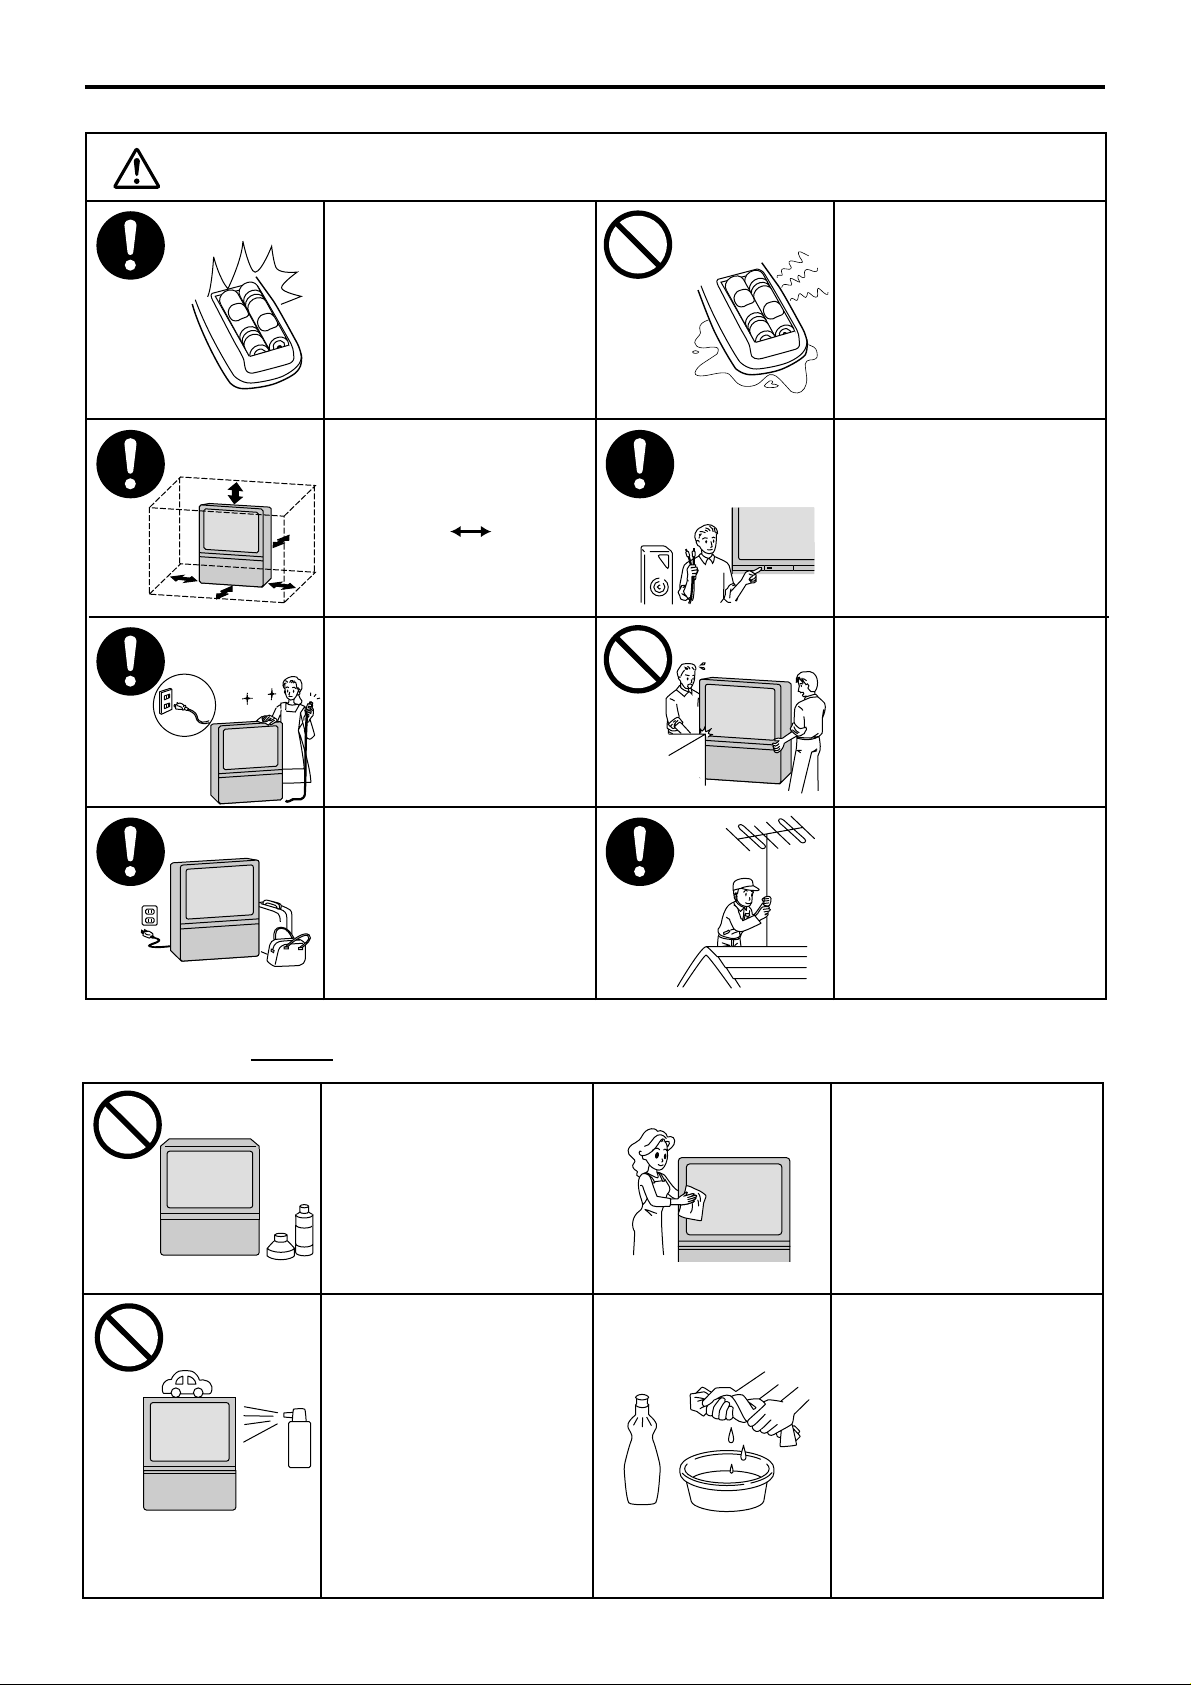
When inserting batteries,
ensure that the polarities
(positive and negative) are
correctly aligned. Insert as
shown on remote control. If
inserted incorrectly, battery
fluid may leak, and fire, injury,
or damage to surrounding
components may result.
Adequate ventilation is
essential to prevent failure of
electrical components, we
recommend that a gap of at
least 10 cm ( ) is left all
around this unit even when it
is placed inside a cabinet or
between shelves.
Before cleaning, unplug the
power plug from the socket.
Do not mix new and old
batteries. Use only the
specified batteries. Failure to
follow this precaution may
result in leakage of battery
fluid. Fire, injur y, or damage to
surrounding components may
also result.
Turn the power “Off ” before
connecting other electrical
equipment.
DO NOT joint the unit.
Cleaning
Unplug the power plug from
the socket if you are not going
to use the unit for an extended
period.
To ensure continued excellent performance by this product, periodic cleaning is recommended.
The unit contains many plastic
parts. For this reason DO NOT
use benzine, thinner or other
chemicals to clean the unit.
DO NOT bring into contact
with insecticide or other
volatile substances.
DO NOT allow the unit to
come into contact for extended
periods with rubber or vinyl
products.
Ask your sales outlet to install
the aerial.
Dust will accumulate on the
picture screen. Please wipe
with the supplied soft cloth
from time to time. If you use a
chemically treated cloth,
please be careful to follow the
instructions that come with the
cloth.
Remove dirt and soiling by
wiping with a light cloth.
Even if the unit is heavily
soiled, do not apply cleaner
directly to the unit. Soak a
cloth in a solution of neutral
cleanser thinned with water.
Then wring out the cloth, wipe
the unit clean, and finish by
wiping with a dry cloth.
Do not use any type of
cleansers on the picture
screen.
5
Page 6
Before Operating This Set
How to Use This Manual
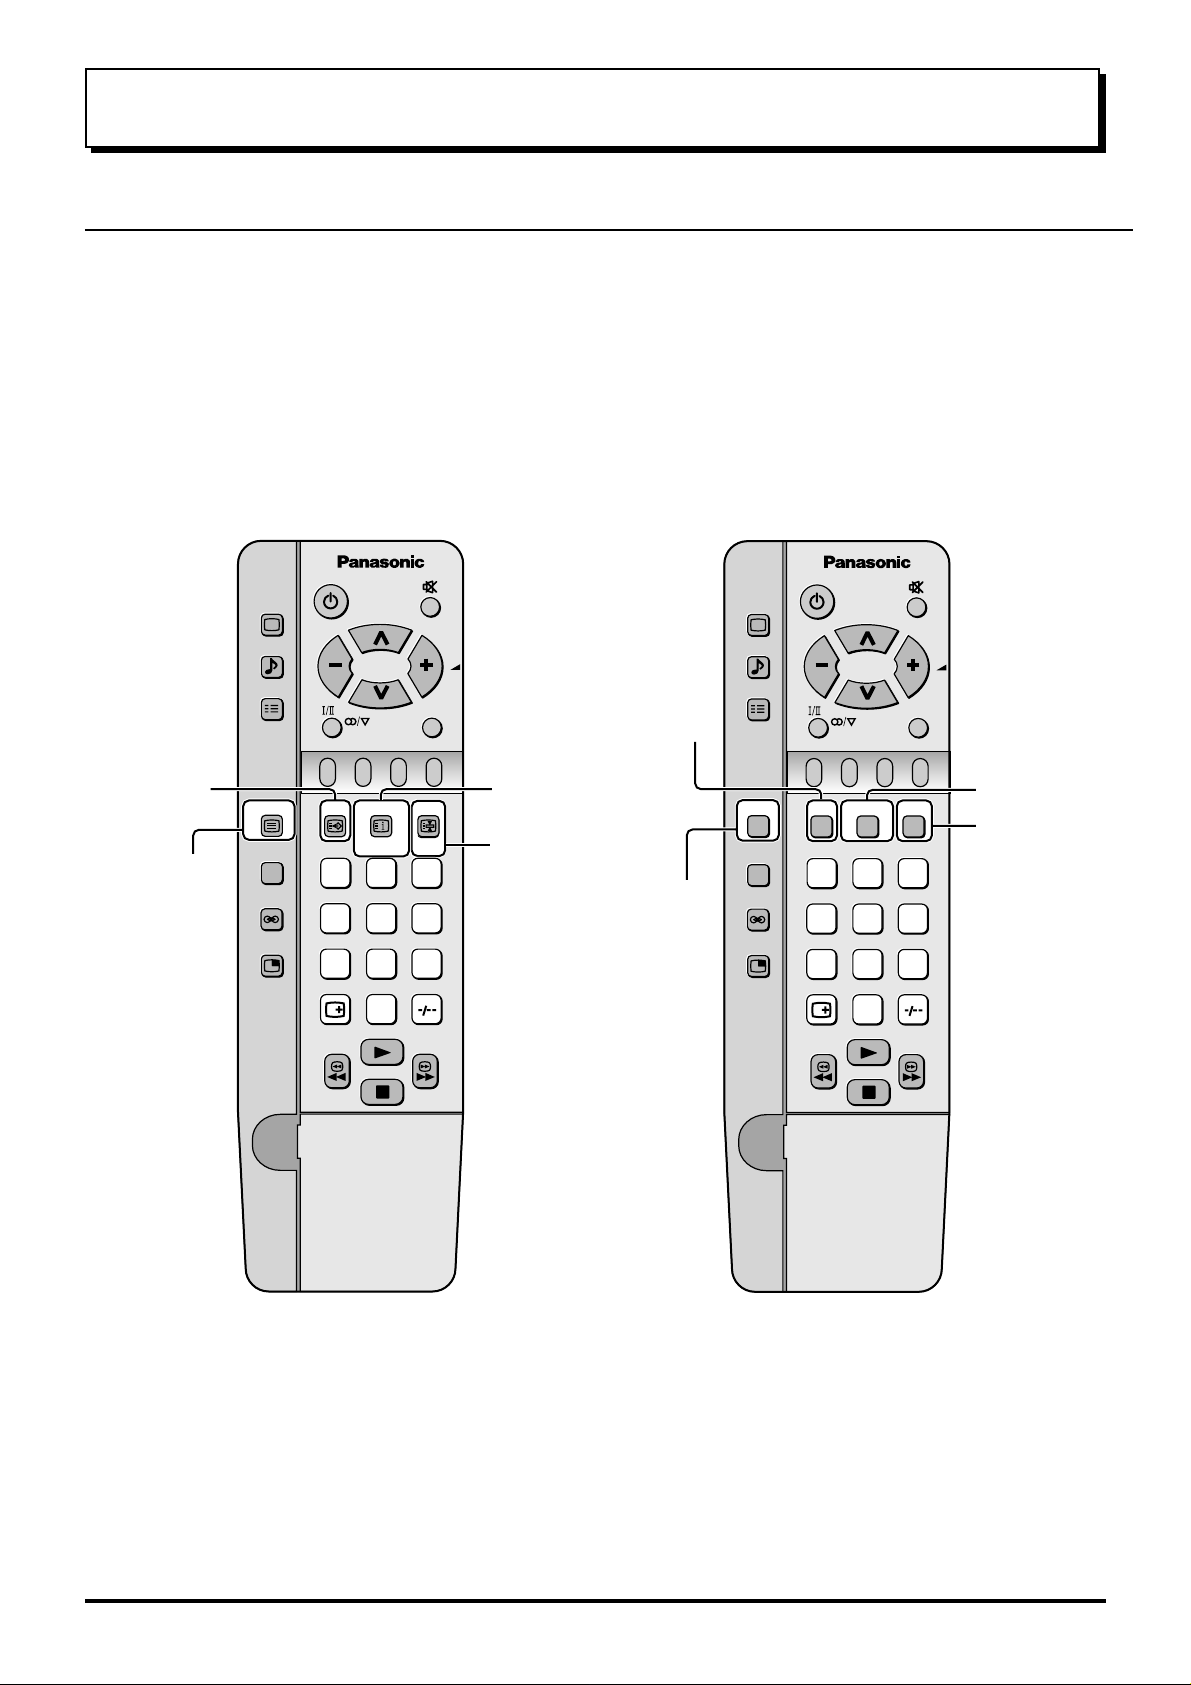
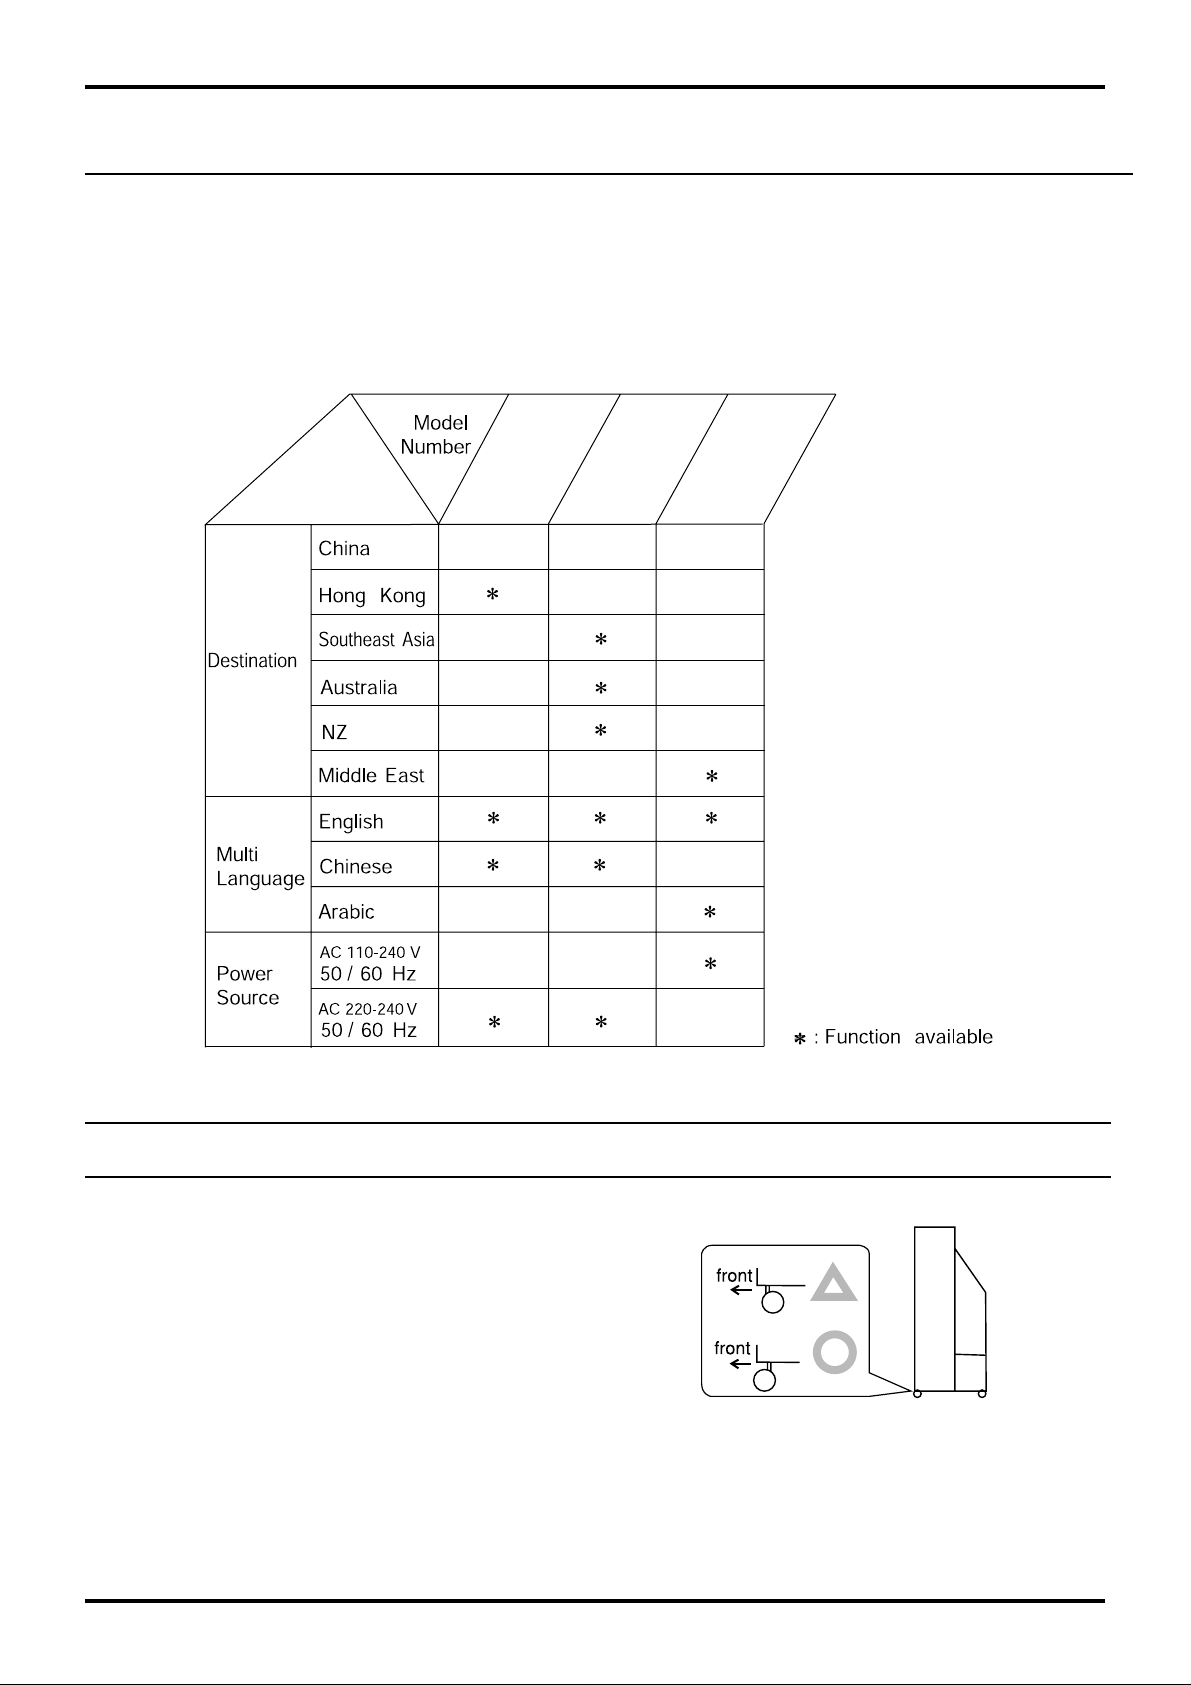
Check the Model Number of your TV set; the Model Number is shown on the rear cover name plate on the set.
Use the table on the opposite page to confirm which features your particular Model is equipped with. This will help you
to know which sections of the manual apply to your set.
TX-43P250H/X
TX-51P250H/X
TEXT Favourite
Page Selection
TV/TEXT
Selection
PICTURE
SOUND
SET UP
TV/TEXT
100Hz/
PROGRE
SURROUND
MULTI
PIP
INDEX
F.P.
CH SEARCH
1 2 3
4 5 6
7 8 9
TV/AV
HOLD
STILL
TC-43P250H
TC-51P250H
Picture AI
TEXT Index
/Channel Search
TEXT hold
/Still
Picture Noise
Reduction
PICTURE
SOUND
SET UP
D.PNR
100Hz/
PROGRE
SURROUND
MULTI
PIP
P. AI
CH SEARCH
1 2 3
4 5 6
7 8 9
TV/AV
Channel Search
STILL
Still
0
0
Note:
• Mainly the remote control for TX-43P250H/X and TX-51P250H/X is used as an example in the Operating
Instructions.
6
Page 7
Before Operating This Set
Quick Reference Guide for your TV Set
Please check the model number of your set.
This Manual applies to several Models and there are slight differences among them.
Please check the table below to see what your TV is equipped with before you begin using these Operating Instructions. Instructions are given for all functions, please disregard these which do not apply to your TV.
TC-51P250H
TC-43P250H
TX-51P250H
TX-43P250H
TX-43P250X
TX-51P250X
Securing the casters
To prevent the set from tipping forward, turn the two
casters on the front of the TV so they face forward, as
shown in the picture.
7
Page 8
Before Operating This Set
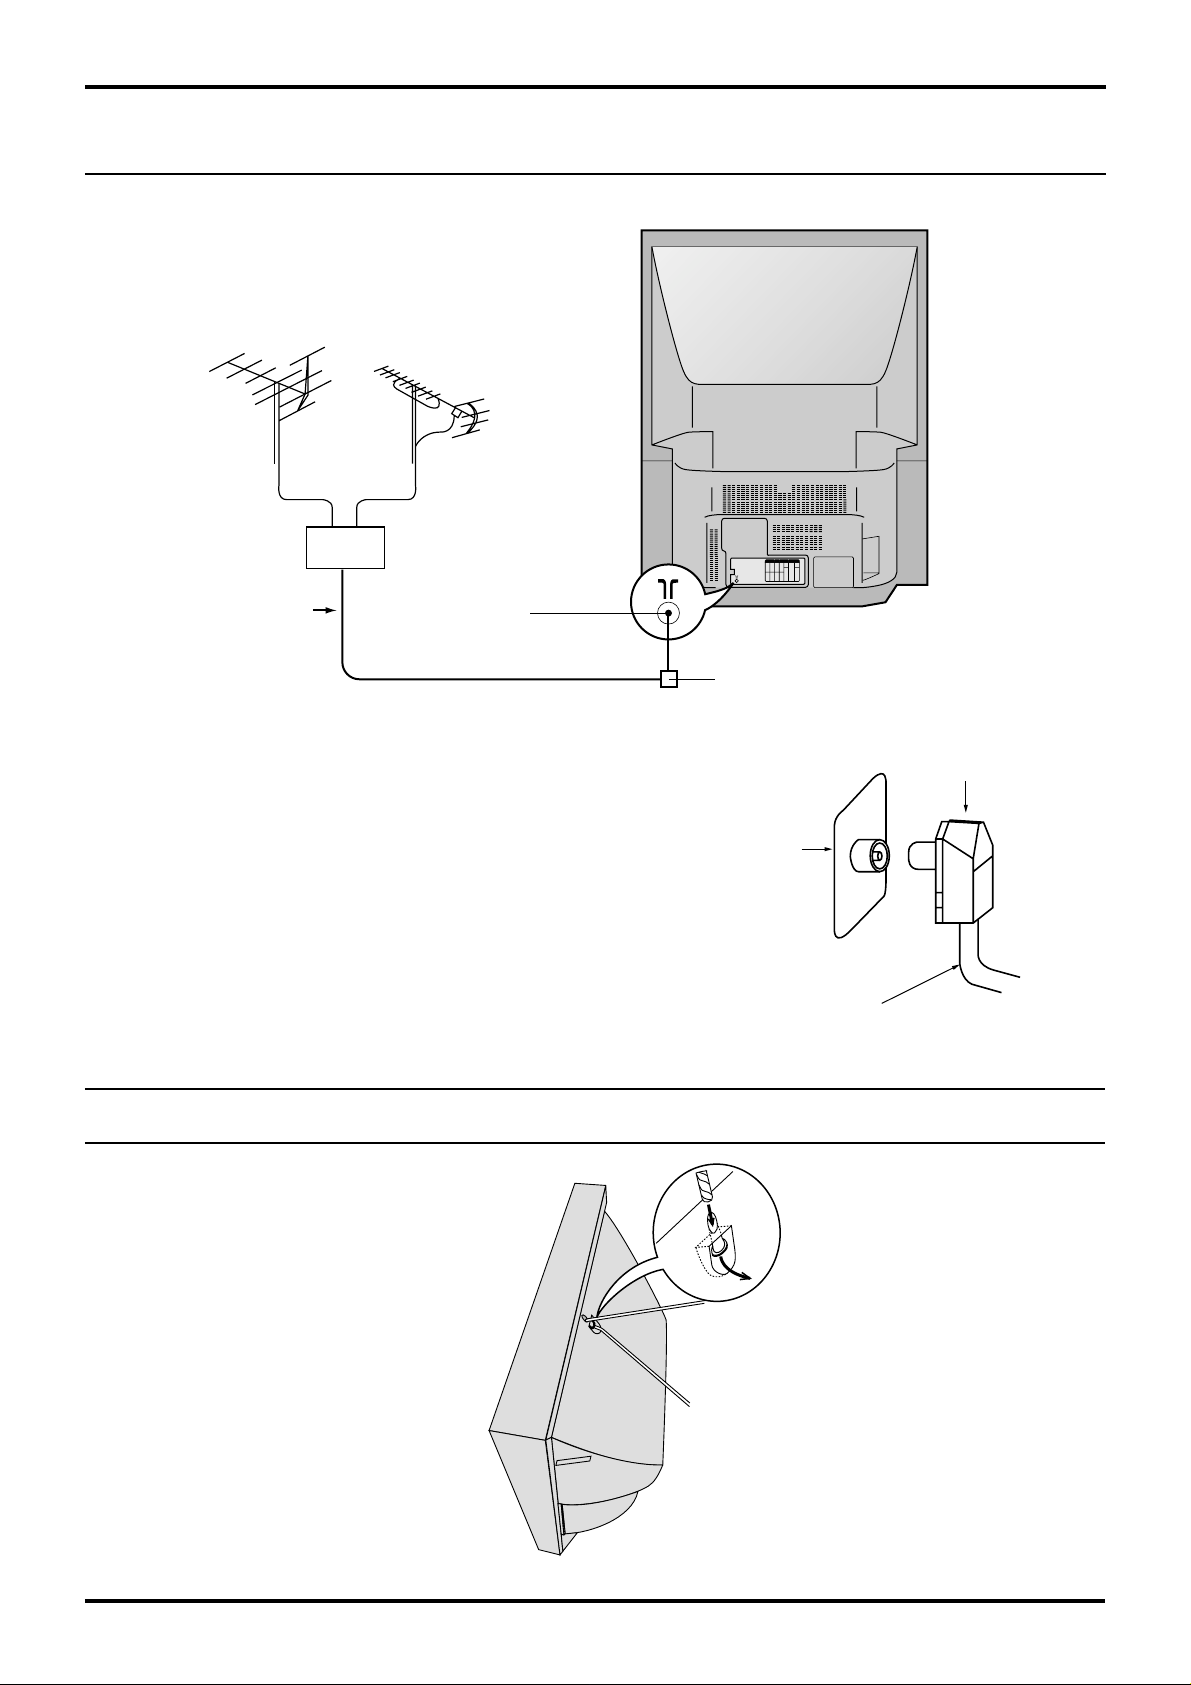
Connecting the Aerial Cable to the RF In Terminal
VHF Aerial
Mixer
75 Ohm
Coaxial Cable
To obtain optimum quality picture and sound, an Aerial,
the correct cable (75 Ohm coaxial) and the correct terminating plug are required.
If a communal Aerial system is used, you may require
the correct connection cable and plug between the wall
Aerial socket and your set.
Your local Television Service Centre or Dealer may be
able to assist you in obtaining the correct Aerial system
for your particular area and accessories required.
Any matters regarding Aerial installation, upgrading of
existing systems or accessories required, and the costs
incurred, are the responsibility of you, the Customer.
UHF Aerial
RF In Terminal
Coaxial Aerial Plug
Coaxial aerial plug
RF in
Terminal
75 Ohm Coaxial Cable
Safety Precaution
Please take safety precautions to prevent the
unit form falling over.
The unit may fall over during earthquakes, or if
someone stands on or shakes the TV.
8
Fixing to a wall
Use a strong rope or a chain to fasten
the TV firmly to a strong support such
as a wall or a pillar.
Page 9
Before Operating This Set
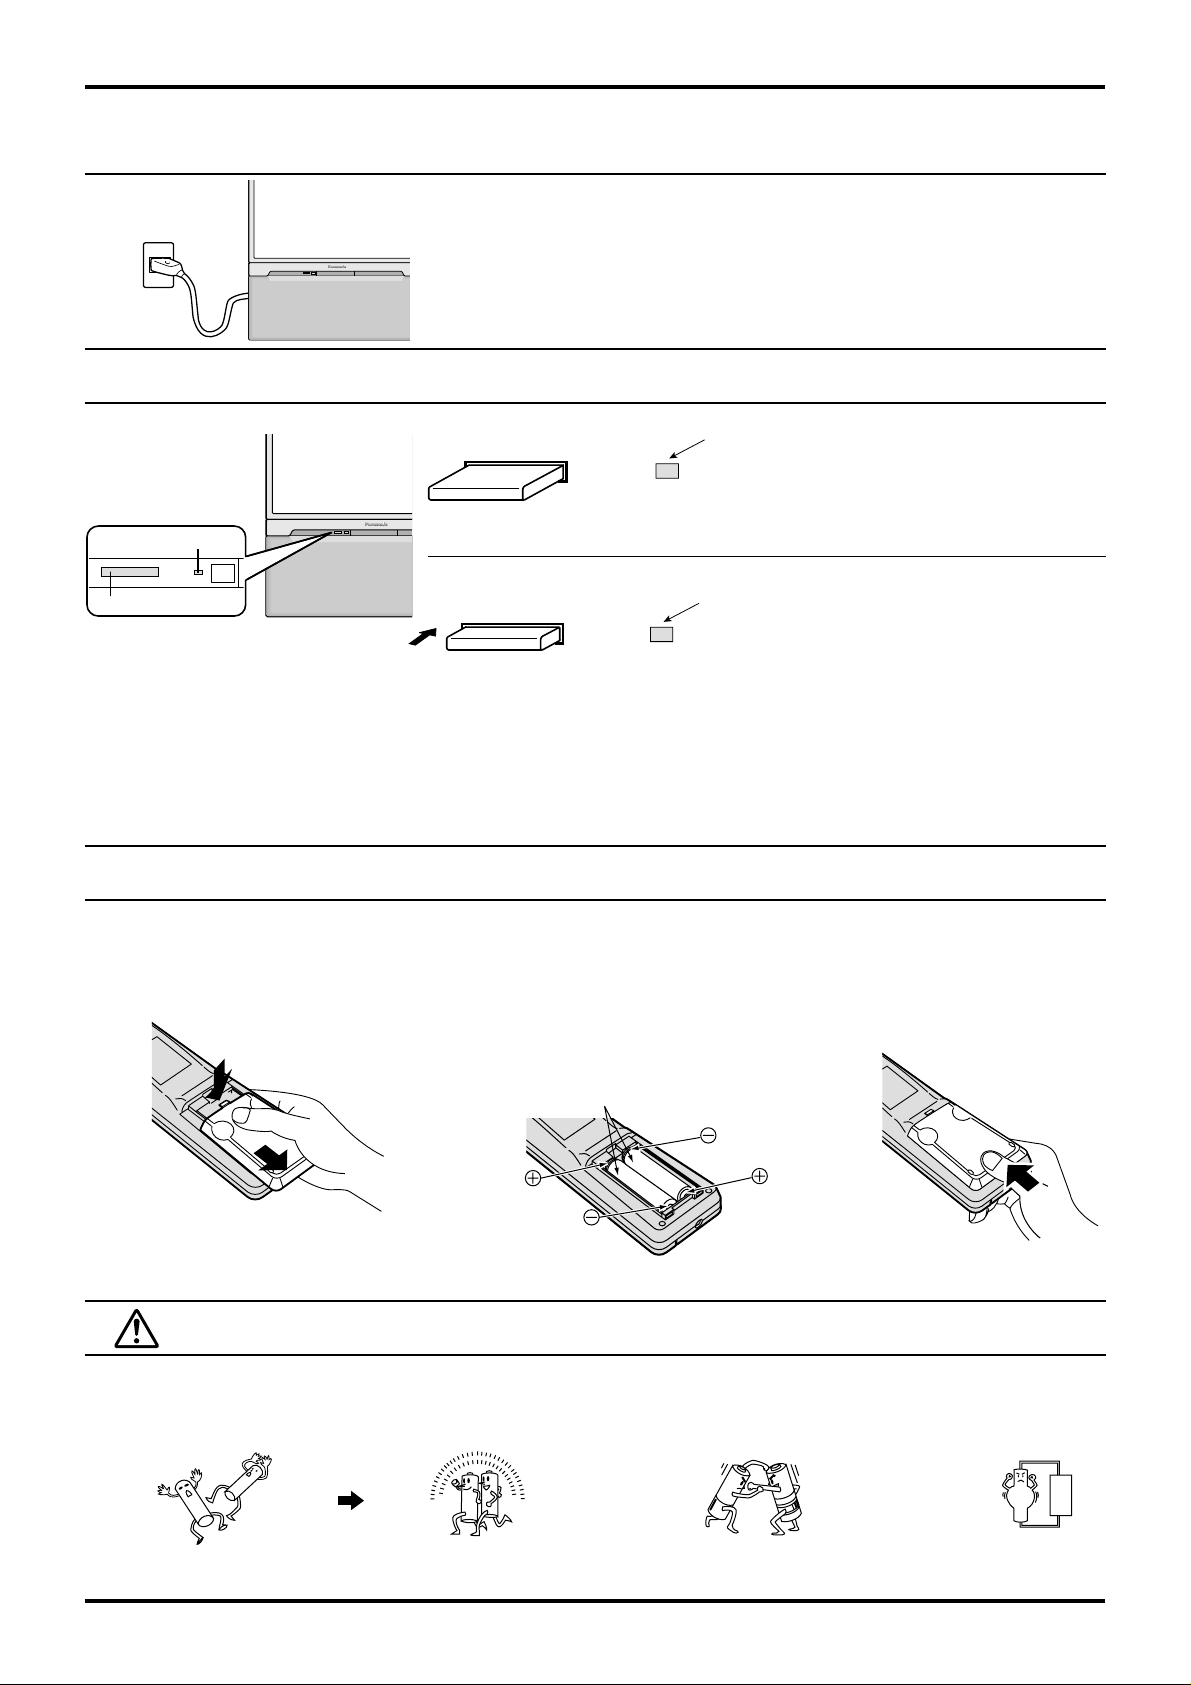
Connecting the Plug to the Wall Outlet
Note:
Main plug types vary between countries. The main plug shown at left may
therefore not be the type fitted to your set.
How to Turn the Power On
Power OFF
Note: Even when the Power Switch is "OFF", the TV set
Power Indicator
Push the Power switch on Television to turn the set on.
Power Switch
Notes:
• When in the Stand-by condition (Refer to page 15), it is also possible to turn the TV set on by pressing any of the
“Direct Programme Number Selection buttons” (0~9) or “Programme Number Up or Down buttons” on the TV set or
on the Remote Control.
• If the Wall Outlet is switched OFF or the Main Plug is unplugged, when the TV set is again turned ON (by either
connecting the Main Plug to the Wall Outlet or switching the W all Outlet ON), it will have returned to the original state.
Power ON
will still consume a small amount of power.
Power Indicator
No light: Power OFF condition
Power Indicator
No light: Normal viewing condition
Red : Stand by
Battery Installation
Open the cover.
1
Apply slight downward pressure
while pulling towards the bottom.
Batteries: Use two “R6 (AA)” size
2
batteries.
Insert the batteries ensuring the correct
polarities.
This is identifiable by the “+” and “−” symbols
on the batteries and inside the battery
compartment.
Two “R6 (AA)” size
3 Replace the cover.
Do not use rechargeable (Ni-Cd) batteries.
They are different in shape and performance and may fail to ensure correct operation.
Battery cautions
The incorrect use of batteries can cause electrolyte leakage which will corrode the Remote Control or cause the
batteries to burst.
Old Batteries New Batteries
Replace both batteries at the same time. Don't mix diffrent battery types
(alkaline with carbon zinc, etc.)
Don't Recharge.
9
Page 10
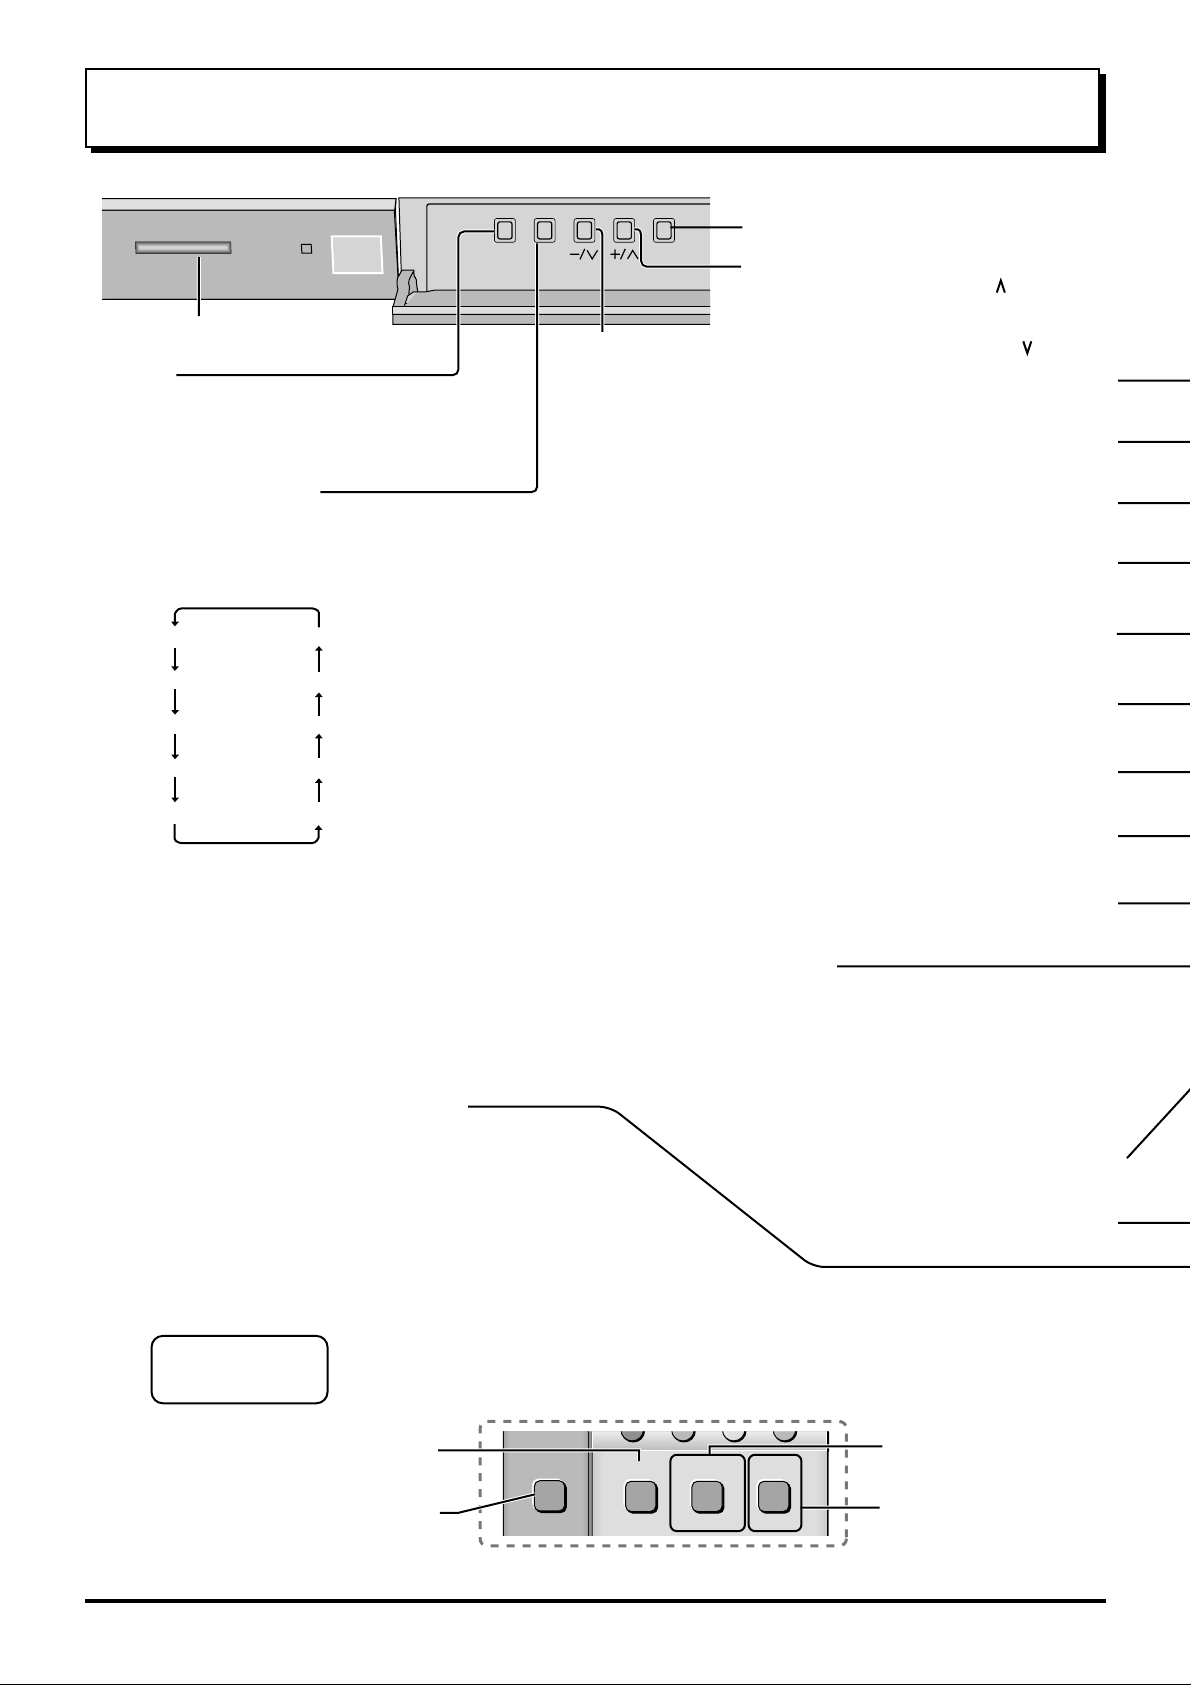
Location of Controls
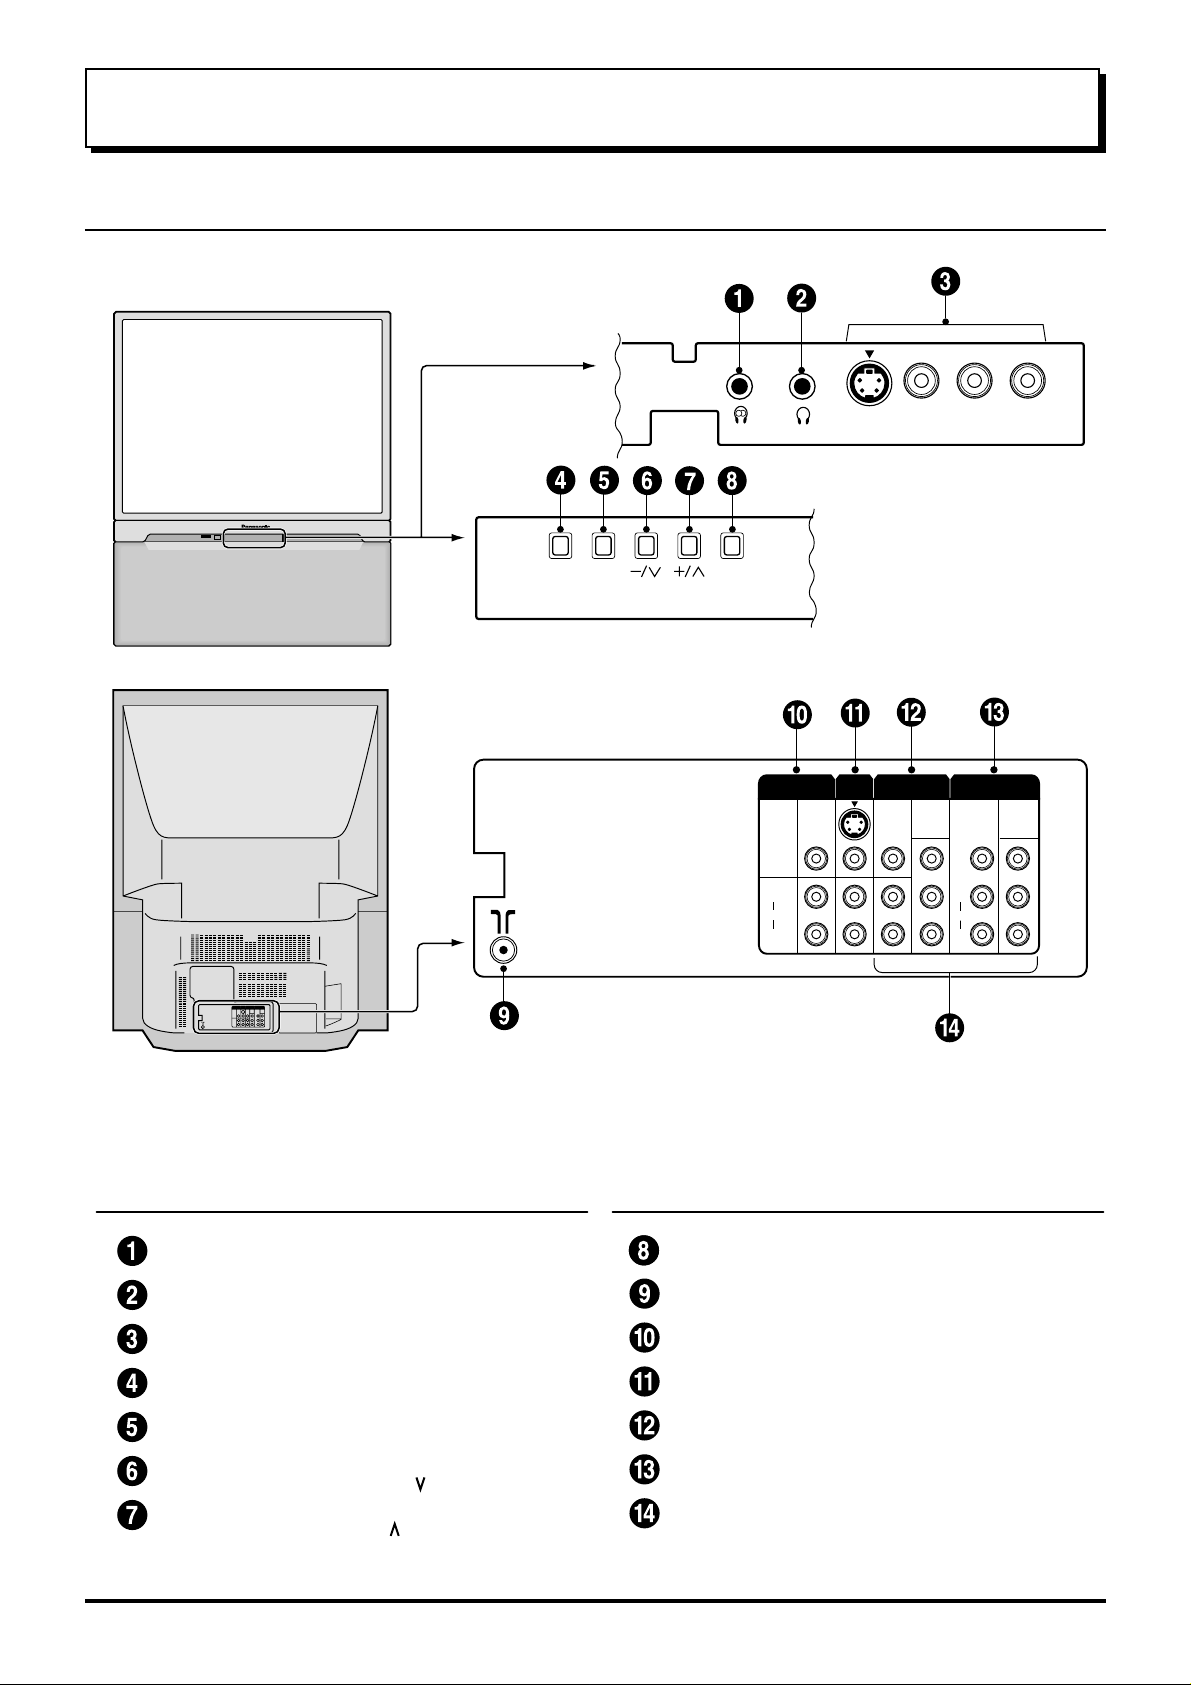
Controls and Terminals on the TV
AV3
IN
S-VIDEO
Sub.Main
VIDEO L/MONO
AUDIO
R
STR F
TV/AV
MONITOR
OUT
S-VIDEO
VIDEO
L
AUDIO
R
AV1INAV2
MONO
MONO
IN
DVD
[
Y-P
Y
PB
PR
AV4
IN
L
AUDIO
R
VIDEO
MONO
DVD
[
]
B-PR
Y-P
Y
PB
PR
]
B-PR
Item
No.
10
Function Refer to
Main Headphones Jack 13
Sub Headphones Jack 13
AV3 Input Terminals 11
STR 14
Function 14
Volume Down (−) /
Programme Number
Volume Up (+) /
Programme Number
Down ( )
Up ( )
Page
14
14
Item
No.
Function Refer to
Page
TV/AV Selection 14
Aerial Terminal (RF In Terminal) 8
Monitor Output Terminals 12
AV1 Input Terminals 11
AV2 Input Terminals 11
AV4 Input Terminals 11
DVD ( Y. P
B
. PR ) Input 12
Page 11
Connections
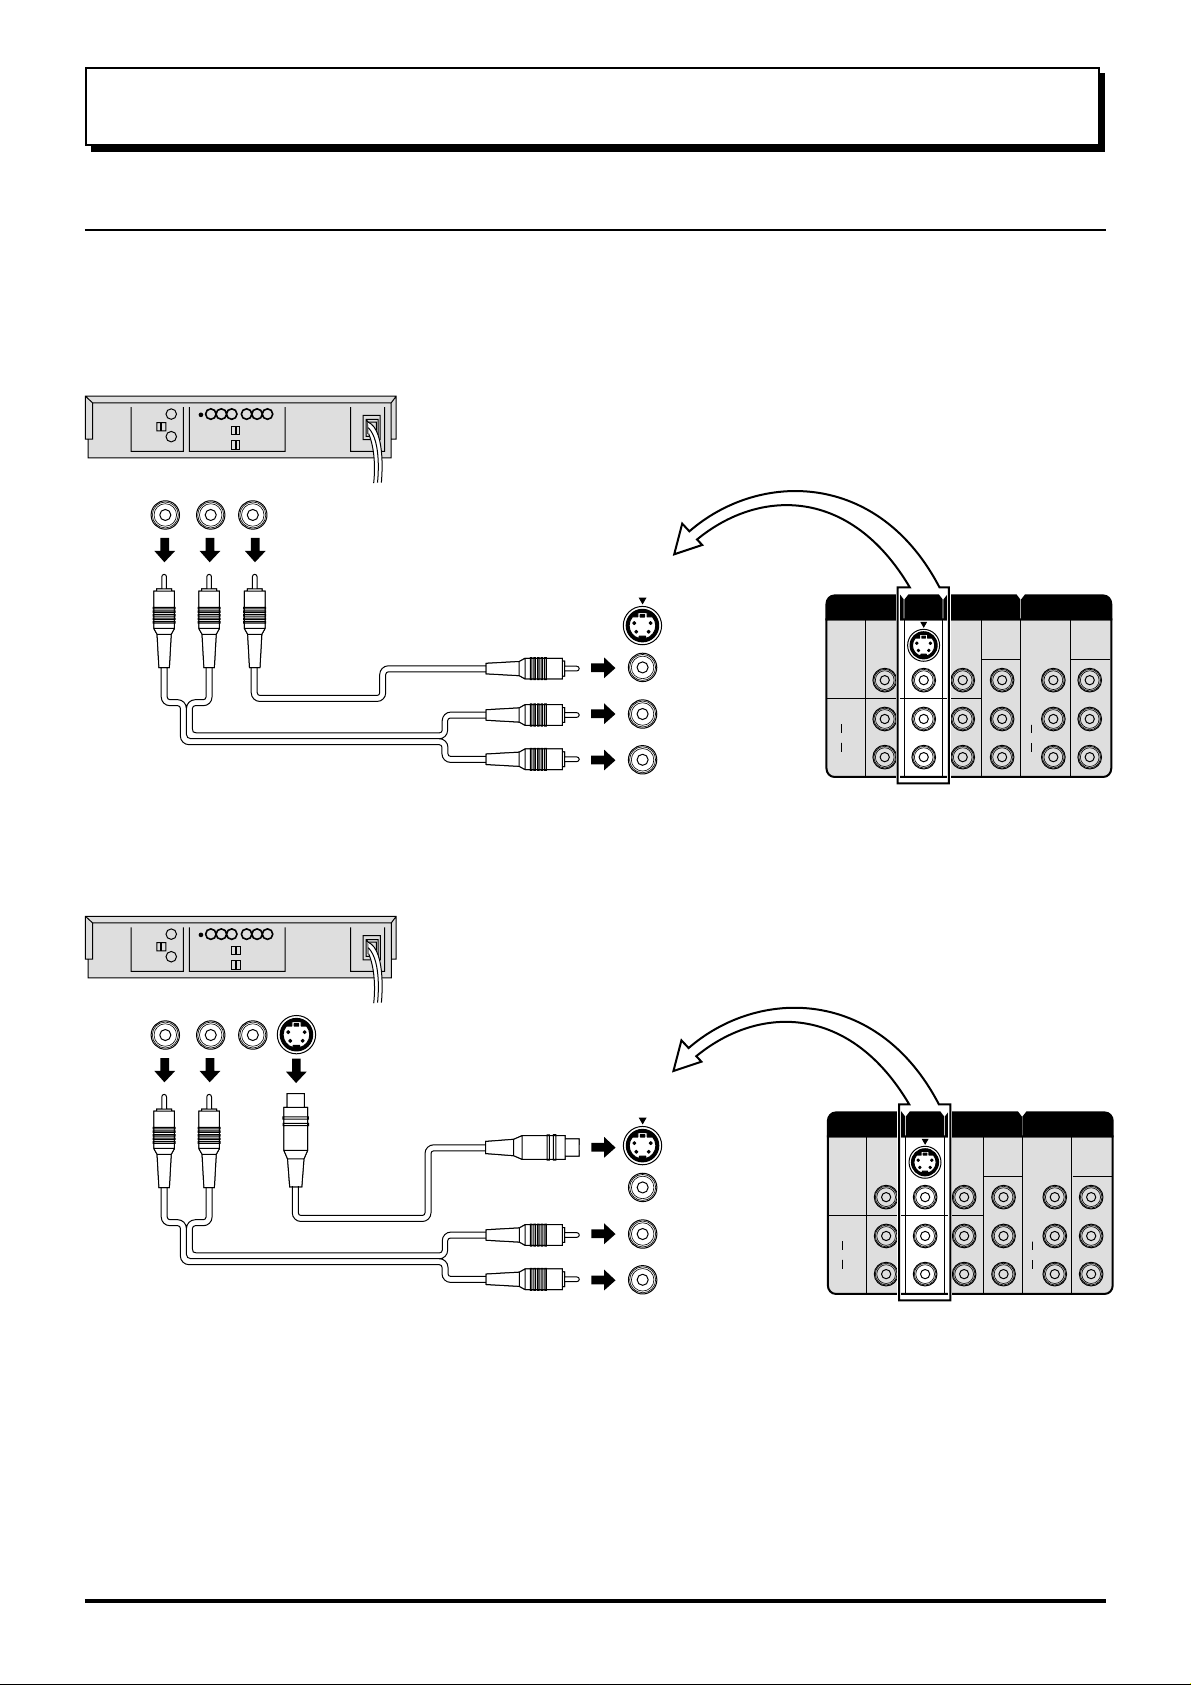
How to connect the “AV1, 2, 3 or 4” Input Terminals
Connect VCRs and other peripheral equipment
(VHS VCR)
Audio
OUT
R
Video
OUT
L
VIDEO
AUDIO
(Super-VHS VCR)
Audio
OUT
R L
Video
OUT
S-Video
OUT
AV1
IN
MONO
MONITOR
OUT
S-VIDEO
VIDEO
L
AUDIO
R
AV1INAV2
MONO
IN
MONO
AV4
IN
DVD
[
]
B-PR
Y-P
Y
PB
PR
L
AUDIO
R
VIDEO
MONO
DVD
[
]
B-PR
Y-P
Y
PB
PR
AV1
AUDIO
VIDEO
IN
MONO
S Video
( )
input
MONITOR
OUT
S-VIDEO
VIDEO
L
AUDIO
R
AV1
IN
MONO
MONO
AV2
IN
AV4
IN
DVD
[
]
B-PR
Y-P
Y
PB
PR
L
AUDIO
R
VIDEO
MONO
DVD
[
B-PR
Y-P
Y
PB
PR
Notes:
• When an S-Video cable is connected to the S-Video terminal, the Video input will be automatically switched off A V
mode.
• When a Monaural VCR is used, connect the Monaural Audio cable to the Audio “L” (Left) terminal.
• Select the desired AV input position by pressing the TV/AV button. (Refer to page 15)
• Input 3 is located on the front of the unit.
• The AV2 and AV4 audio input terminals serve as the audio input terminal for both the V ideo input and the DVD input.
11
]
Page 12
Connections
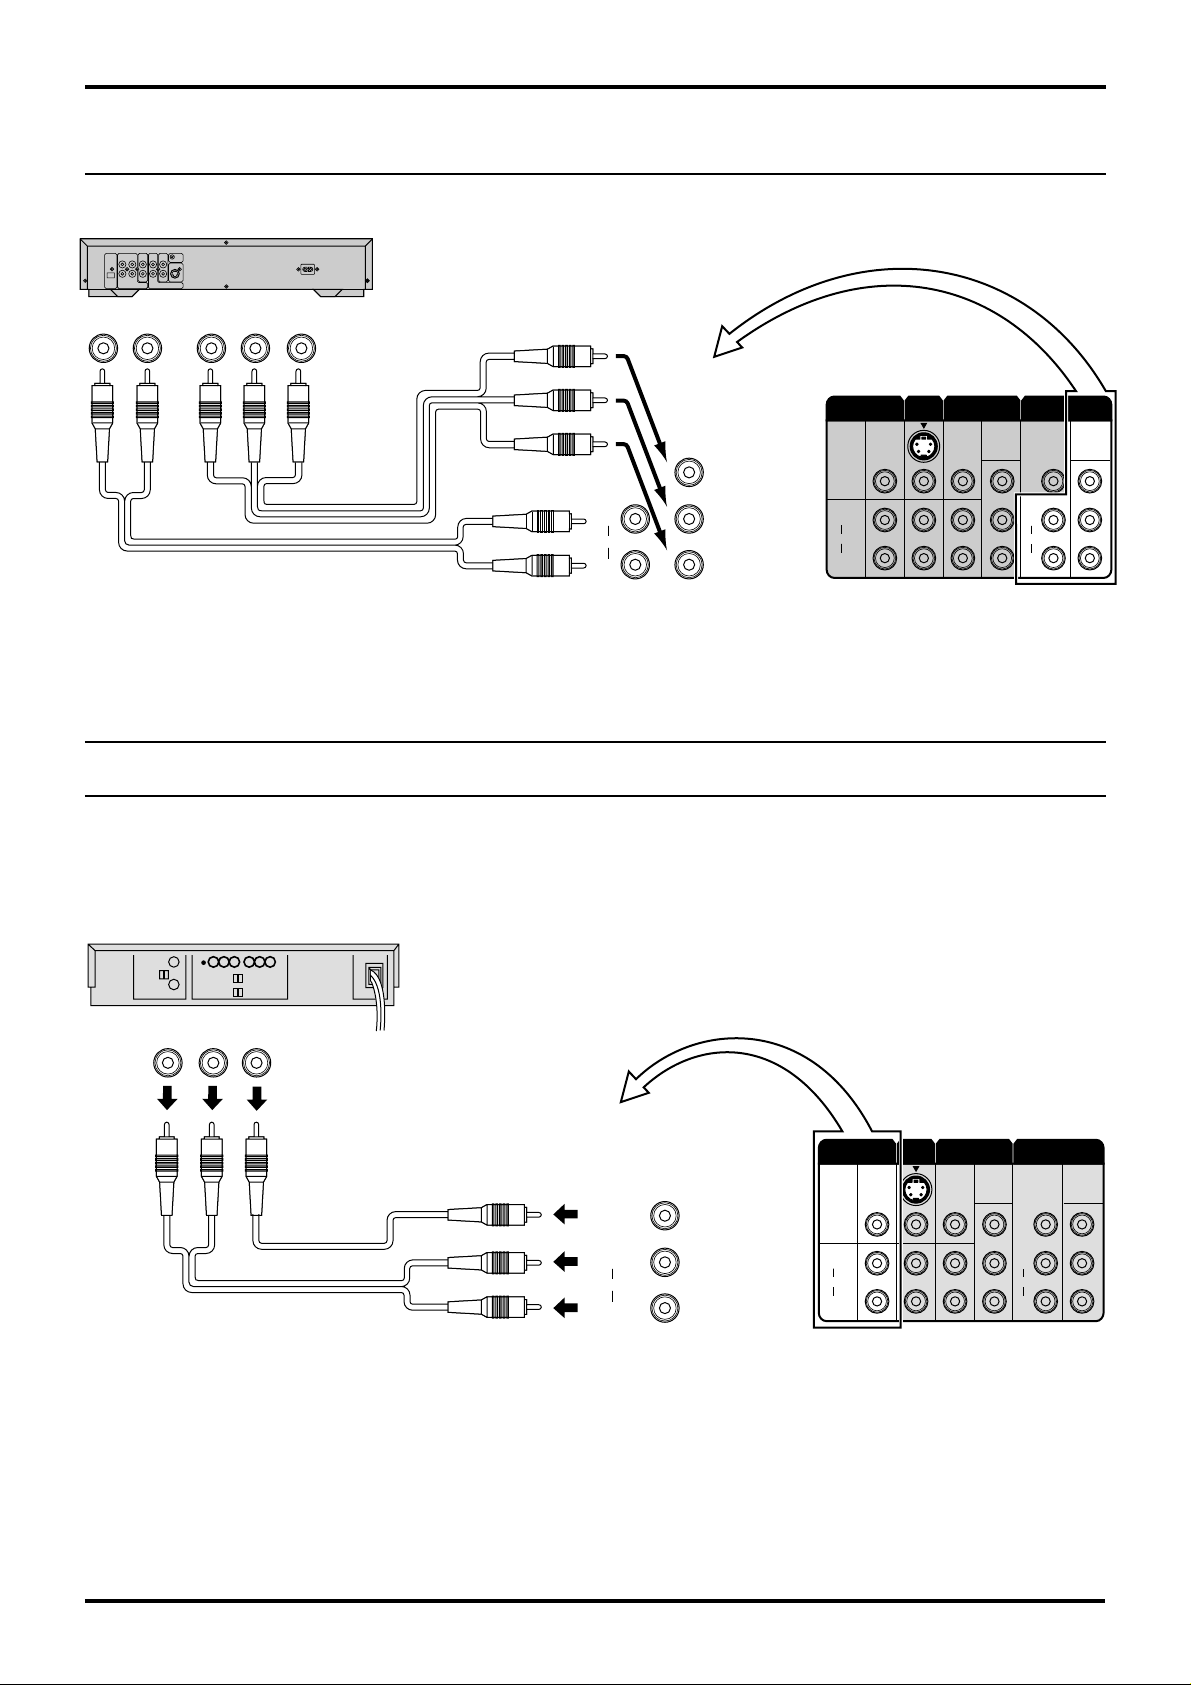
How to connect the DVD Input Terminals
DVD Player
Audio
OUT
LR
DVD(
Y-P B-PR
) OUT
R
P
PBY
MONO
L
AUDIO
R
MONITOR
DVD
[
]
B-PR
Y-P
Y
P
B
P
R
S-VIDEO
VIDEO
L
AUDIO
R
OUT
AV1INAV2
MONO
IN
MONO
AV4
IN
DVD
[
]
B-PR
Y-P
Y
PB
PR
L
AUDIO
R
VIDEO
MONO
DVD
[
B-PR
Y-P
Y
PB
PR
Notes:
• The AV4 audio signal is common for both AV4 and DVD input signal terminals.
• The DVD signal input terminal takes priority over the AV4 video signal input terminal.
• Similar connection are available at the COMPONENT VIDEO input 2 terminal.
How to connect the AV Monitor Output Terminals to other equipment
The “Monitor Out” Terminals output the same signals as main picture on the TV screen and sound from the speaker at
that time, e.g. TV programmes or signals from AV1, AV2, AV3 or AV4 input.
]
Recording Equipment
(VHS VCR)
Audio
R L
Video
IN
IN
VIDEO
AUDIO
MONITOR
OUT
S-VIDEO
VIDEO
L
AUDIO
R
MONITOR
OUT
S-VIDEO
VIDEO
L
AUDIO
R
AV1INAV2
MONO
MONO
IN
DVD
[
Y-P
Y
PB
PR
AV4
IN
L
AUDIO
R
VIDEO
MONO
DVD
[
B-PR
Y-P
Y
PB
PR
]
B-PR
Notes:
• Never connect the same video recorder with both the VIDEO IN and MONITOR OUT terminals on this TV set, as this
could cause incorrect operation.
• The monitor output emits the main picture normal video and audio signals.
• Teletext display on screen will not be output at the MONITOR OUT terminals.
• Even if the television is in picture-in-picture condition, MONITOR OUT terminals output the same signals as main
picture on the screen and sound from speakers. Sub picture including strobe, still, channel search, etc. will not be
output at the MONITOR OUT terminals.
• The DVD signal (Y, PB, PR) is not output at the MONITOR out terminals.
]
12
Page 13
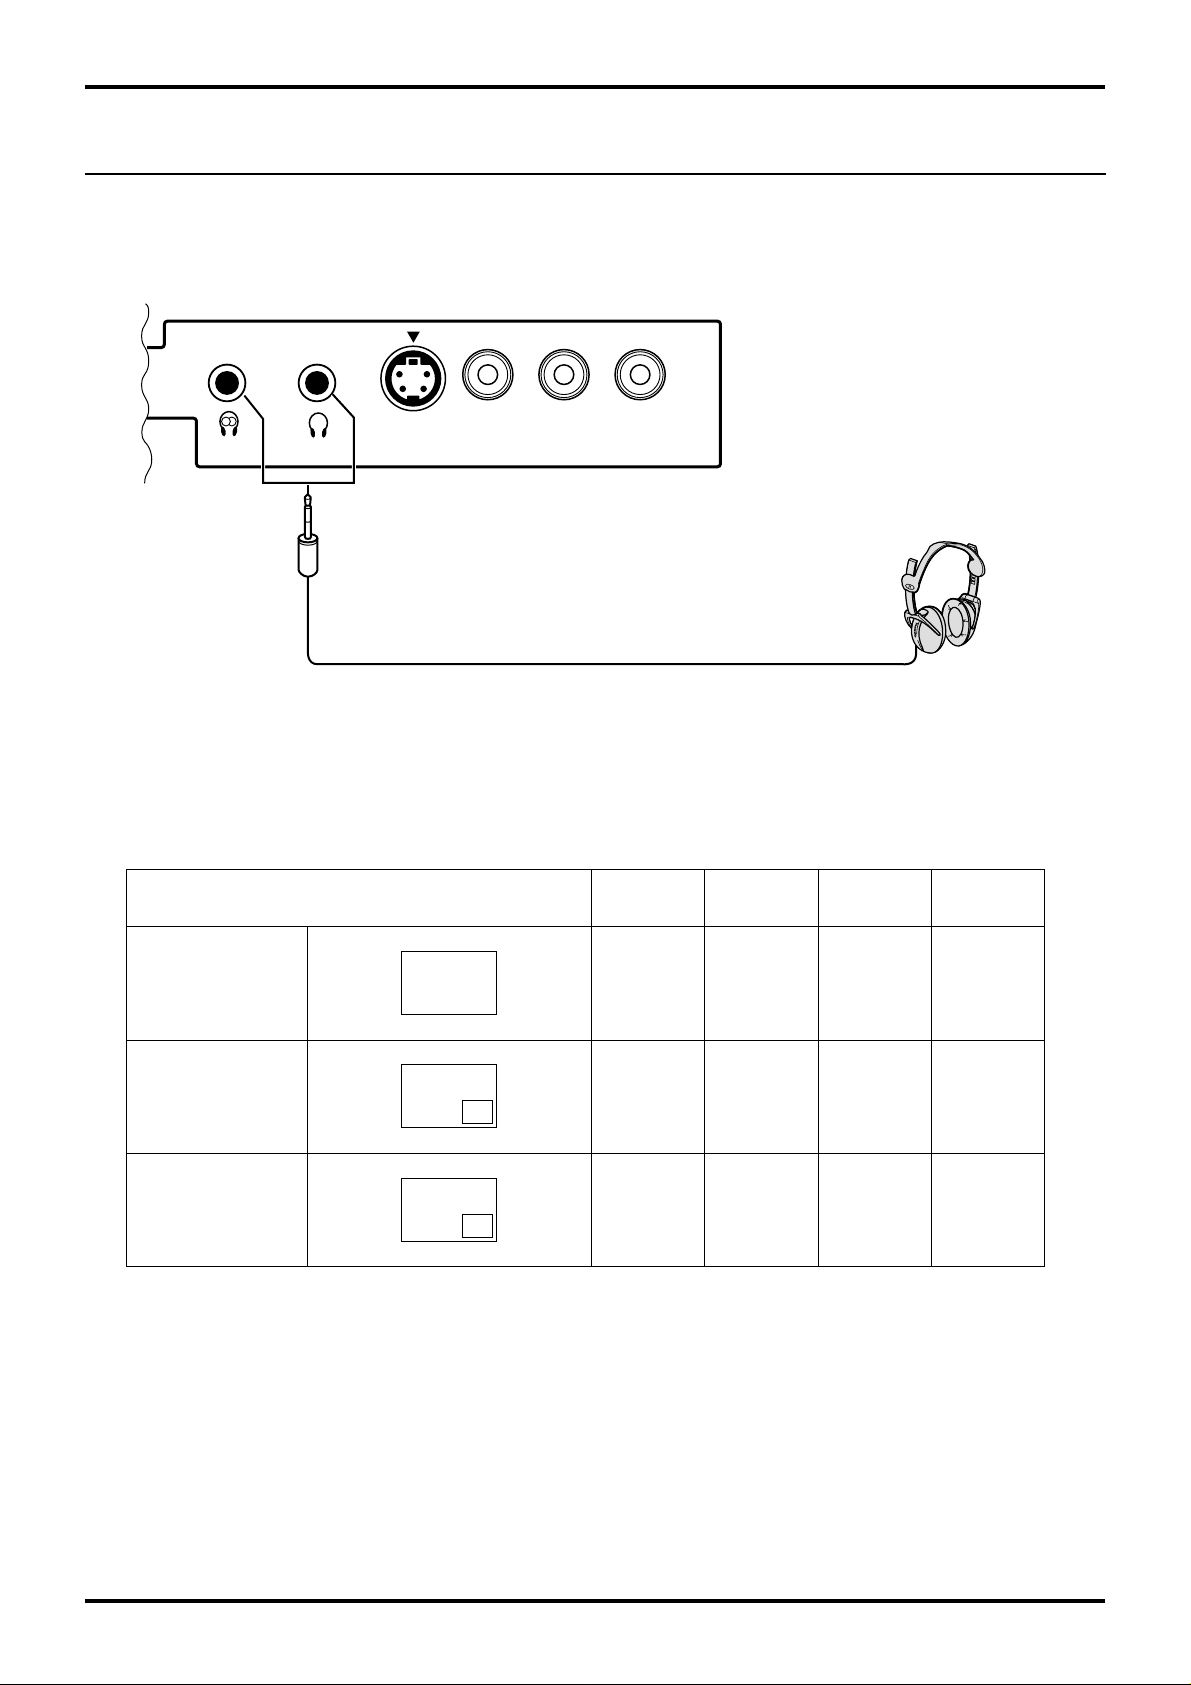
Connecting Headphones
Connect headphones as follows.
Connections
AV3
IN
S-VIDEO
Sub.Main
(3.5mm Plug)
You can listen to sound from each of the headphones plugs as shown below.
Screen condition
Single picture/
Teletext
VIDEO L/MONO
A
AUDIO
Speaker
Sound
(Stereo)
R
Main
Headphones
A
(Stereo)
(Optional)
(not supplied)
Sub
Headphones
A
A
(Mono)
Monitor
Output
A
(Stereo)
Picture in Picture
Picture in Picture/
CHANGE
Main Headphones plug:
When a Main Headphones plug is inserted into the Headphones socket, all speakers will be automatically disconnected; only the Main Headphones will function.
Use Volume Up “+” or Down “-” button to control volume level.
Sub Headphones plug:
For the sub Headphones volume control, refer to page 32.
A
B
B
A
A
(Stereo)
B
(Stereo)
A
(Stereo)
B
(Stereo)
B
(Mono)
A
(Mono)
A
(Stereo)
B
(Stereo)
13
Page 14
P.AI
STILL
CH SEARCH
D.PNR
100Hz/
General Operation
STR F
TV/AV
TV/AV Selection
Volume Up (+) /
Programme Number Up ( )
Power switch
STR
Used to store tuning and other
function settings. Also used to
start the menu demonstration.
Function selection
Displays the on screen display functions, use repeatedly
to select from the available functions.
The following adjustments can be accessed directly.
VOLUME
CONTRAST
BRIGHTNESS
COLOUR
SHARPNESS
TUNING MODE
BALANCE
TREBLE
BASS
NTSC-TINT
Notes:
• NTSC-TINT: Displayed when
receiving NTSC signals.
• TUNING MODE : Not displayed
during AV mode.
Volume Down (-) / Programme Number Down ( )
Picture Menu (see page 16, 30)
Sound Menu (see page 16, 32)
Set up Menu (see page 17, 34)
Stereo/Bilingual Sound Selection
(see page 41)
TEXT Favourite Page Selection
(see page 39)
TV/TEXT Selection (see page 37, 38)
100Hz/PROGRE (see page 31)
Surround (see page 32, 33)
Picture in Picture Selection
(see page 36)
Store
(see page 28, 29, 39)
Stores some settings in TUNING
menus and TELE TEXT.
TC-43P250H
TC-51P250H
Picture AI (see page 31)
Picture Noise Reduction
(see page 31)
Recall
Press to display the current system
status, for example, Programme
number, Channel number, Stereo
mode, Picture menu, Sound menu,
Scan mode, Sound system and colour
system.
VCR/LD/DVD Rewind/Review
Normalization (see page 31, 33)
Channel Search
(see page 37)
Still (see page 37)
14
Page 15

General Operation
Volume Adjustment
PICTURE
SOUND
SET UP
TV/TEXT
100Hz/
PROGRE
SURROUND
MULTI
PIP
Power (Stand-by) (see page 9)
The TV set must first be plugged into the wall
outlet and turned on at the power switch.
Press this button to turn the TV set On from
Standby mode, Press it again to turn the TV
set OFF to Standby mode.
Sound Mute
Press to mute the sound completely the “Mute” symbol will appear.
Press again to restore the previous sound level, and cancel the mute.
Programme Number Selection
Press to select the next higher
or lower Programme number.
Coloured buttons used for
Multi Screen functions
(see page 36)
Teletext functions (see page 38)
AV selection (see page 15)
TEXT Index (see page 40)
/Channel Search (see page 37)
TEXT hold (see page 39)
/Still (see page 37)
F.P.
CH SEARCH
TV/AV
INDEX HOLD
STILL
1 2 3
456
789
0
VCR/LD/DVD Play
VCR/LD/DVD
Fast Forward/cue
LD/DVD
REC-VCR
N
STR HELP
?
A B
DISC SIDE
VCR/LD/DVD Stop
VCR/LD/DVD Control
(see page 41)
Help (see page 16)
Note:
• It is also possible to turn the TV set on from
STANDBY mode by pressing the “Direct
Programme Number Selection” Buttons (0-9) and
Volume Adjustment
the “Programme Number Up or Down” Button,
either on the set or on the Remote Control.
Volume Adjustment
Press to increase or decrease
the sound volume level.
VOLUME 18
TV/AV Mode Selection
Press to select TV, AV1, AV2, AV3
and AV4 input signal modes
sequentially.
Remote control :
AV1 AV2 AV3 AV4
Press to display AV1 - AV4 at the
bottom of the screen. Each
coloured button corresponds to
each input signals. For example,
pressing the Red button selects
AV1.
Direct programme Number
• Direct Programme Number
Selection (CH SELECT = DIRECT)
You can select the number directly by
pressing the corresponding programme
number buttons.
Programme Number 8.......
Programme Number 36..... ,
Programme Number 124... , ,
• Direct Programme Number
Selection (CH SELECT = POSITION)
You can select the numbers directly by
pressing “Number 0-9” buttons or by
pressing “Two Digit” and “Number 0-9”
buttons.
Programme Number 8 .....
Programme Number 12.... , ,
TV/AV
8
3
1
8
6
2
4
1
2
Note:
• When the Skip setting for Programme
Number 100 through 125 is on, the
channel selection time will be
shortened, and thus you can not input
three digits at a time.
15
Page 16

On-Screen menu Display from Remote Control
To PICTURE adjust menu
(see page 30)
PICTURE
MENU
CONTRAST
BRIGHTNESS
COLOUR
SHARPNESS
NTSC-TINT
C. TEMP
PICTURE
P
-
NR
AI
SCAN MODE AUTO
STANDARD
STANDARD
AUTO
ON
PICTURE
SOUND
SET UP
TV/TEXT
F.P.
TV/AV
INDEX HOLD
To SOUND adjust menu
(see page 32)
SOUND
MENU
VOLUME
BASS
TREBLE
BALANCE
HEADPHONE VOL.
SUB HEADPHONE
SURROUND
DYNAMIC
OFF
To HELP MENU
HELP MENU
HOW TO USE THE MENUS
: OPEN OR CLOSE THE MENUS
: GO BACK TO WATCHING
EXT. CONNECTION
MENU DEMO
: MOVE BETWEEN
MENU OPTIONS
: ADJUST OR ACCESS
CHOSEN OPTION/MENU
ACCESS
100Hz/
PROGRE
SURROUND
MULTI
PIP
CH SEARCH
STILL
1 2 3
456
789
0
LD/DVD
REC-VCR
N
?
A B
DISC SIDE
STR HELP
16
The HELP button runs a
demonstration of on screen
display menus available.
Press the HELP button and
select one of the options.
Page 17

To SETUP MENU
(see page 34)
SETUP MENU
TELETEXT
OFF TIMER
FLICKER REDUC.
STROBE
CH COLOUR SET
VCR / GAME
TEXT SELECT ENGLISH
SETUP MENU
CHILD LOCK
PICTURE SHIFT
TUNING MENU
CONVERGENCE
LANGUAGE
FASTEXT
OFF
DYNAMIC
OFF
ENGLISH
OFF
OFF
ACCESS
On-Screen menu Display from Remote Control
Press to access to TUNING MENU
To TUNING MENU
(see page 21)
TUNING MENU
CH SELECT
SYS SELECT
AUTO TUNE
MANUAL TUNE
SOUND SYS 6. 0MHz
COLOUR SYS
FINE TUNE
SKIP
POSITION
E.EUROPE
AUTO
OFF
SETUP MENU
TELETEXT
OFF TIMER
FLICKER REDUC.
STROBE
CH COLOUR SET
VCR / GAME
TEXT SELECT ENGLISH
SETUP MENU
CHILD LOCK
PICTURE SHIFT
TUNING MENU
CONVERGENCE
LANGUAGE
FASTEXT
OFF
DYNAMIC
OFF
OFF
OFF
ACCESS
ENGLISH
Press to access to CONVERGENCE
To CONVERGENCE
(see page 18)
RETURN
CONVERGENCE 1
CONVERGENCE 2
RETURN
CONVERGENCE 1
CONVERGENCE 2
ACCESS
ACCESS
SELECT
ACCESS
TV / AV -
SELECT
ACCESS
TV / AV -
EXIT
EXIT
17
Page 18

Convergence Adjustment
Convergence Adjustment mode
Prior to adjustment, tune the broadcast signal to the video input
signal and operate the set for more than 60 minutes. If the location
or direction of the set is changed or moved, the display may be
out of alignment.
If necessary, carry out the following procedures once with PAL
signal and again with the NTSC signal.
Vertical centre marker
Horizontal centre marker
1
2
3
SET UP
Press to display the Setup Menu.
Press to select the “CONVERGENCE”.
Press to access to the “CONVERGENCE”
menu.
Press to select the “CONVERGENCE1”
or the “CONVERGENCE2”.
Press to access to the function.
Example: CONVERGENCE1 is selected.
SETUP MENU
CHILD LOCK
PICTURE SHIFT
TUNING MENU
CONVERGENCE
LANGUAGE
RETURN
CONVERGENCE 1
CONVERGENCE 2
OFF
OFF
ACCESS
ENGLISH
ACCESS
SELECT
ACCESS
TV / AV -
EXIT
18
Page 19

Convergence Adjustment
Convergence1 Adjustment for RED, BLUE and GREEN
RED
BLUE
Press to align the horizontal red line with
the horizontal blue line.
(Becomes a white line)
Press to align the vertical red line with the
vertical blue line.
(Becomes a white line)
Press N button to adjust the blue mode.
(Stores RED)
Press to align the horizontal blue line with
the horizontal yellow line.
(Becomes a white line)
Press to align the vertical blue line with the
vertical yellow line.
(Becomes a white line)
Press N button to adjust the green mode.
(Stores BLUE)
CONVERGENCE
RED
ADJUST
ADJUST
TV / AV -EXIT
N-BLUE
CONVERGENCE
BLUE
ADJUST
ADJUST
TV / AV -EXIT
N-GREEN
GREEN
Only when cannot adjust with RED and BLUE, proceed to the following GREEN Adjustment.
Vertical centre marker
Press to align the horizontal green line with
the vertical centre maker.
CONVERGENCE
Press to align the vertical green line with
the horizontal centre maker.
GREEN
ADJUST
ADJUST
Press N button to adjust the red mode.
TV / AV -EXIT
N-RED
(Stores GREEN)
Horizontal centre marker
TV/AV
Press at any time to return to the normal viewing.
19
Page 20

Convergence Adjustment
Convergence2 Adjustment for RED and BLUE
This function adjust the convergence of the side part of the screen.
Press to select the CONVERGENCE2.
Press to access to the function.
RETURN
CONVERGENCE 1
CONVERGENCE 2
ACCESS
SELECT
ACCESS
TV / AV -
EXIT
TV/TEXT
100Hz/
PROGRE
SURROUND
MULTI
PIP
Remoto control
RED
INDEX HOLD
F.P.
CH SEARCH
1 2 3
4 5 6
7 8 9
0
STILL
Press the Number button on the Remoe Control to
select the position which you’d like to adjust.
(Example) Position 1 is selectd.
1
4 6
7 89
2 3
RED
TV / AV -EXIT
N-BLUE
Press to align the horizontal red line with
the horizontal blue line.
(Becomes a white line)
Press to align the vertical red line with the
vertical blue line.
(Becomes a white line)
2 3
RED
ADJUST
4 6
7 89
1
4 6
ADJUST
TV / AV -EXIT
N-BLUE
2 3
RED
TV / AV -EXIT
N-BLUE
Press N button to adjust the blue mode.
7 8 9
(Stores RED)
BLUE
Press to align the horizontal blue line with
the horizontal yellow line.
(Becomes a white line)
Press to align the vertical blue line with the
vertical yellow line.
(Becomes a white line)
Repeat above adjustment for each position.
TV/AV
Press to return to the normal viewing. (Stores BLUE)
Note:
If you wish to view a video with a different colour system (PAL / SECAM, NTSC), repeat the steps above
while displaying a picture.
1 2 3
BLUE
4 6
TV / AV -EXIT
N-RED
7 89
20
Page 21

Tuning Channels
Display the TUNING MENU
1
1
SET UP
Press to display the
SETUP MENU.
2
Press to select the
TUNING MENU.
Press to display the TUNING MENU.
2
1 Select the “POSITION” or the “DIRECT”
CH SELECT
Press to select the “CH SELECT (Channel
Select) ” Mode.
Press to select the “POSITION” or the “DIRECT”.
Setting range when the “POS.” (Position) has
been selected: Position 0-99
Setting range when the “DIRECT” has been
selected: Channel 0-125
SETUP MENU
TELETEXT
OFF TIMER
FLICKER REDUC.
STROBE
CH COLOUR SET
VCR / GAME
TEXT SELECT ENGLISH
FASTEXT
OFF
DYNAMIC
OFF
TUNING MENU
CH SELECT
SYS SELECT
AUTO TUNE
MANUAL TUNE
SOUND SYS 6. 0MHz
COLOUR SYS
FINE TUNE
SKIP
SETUP MENU
CHILD LOCK
PICTURE SHIFT
TUNING MENU
CONVERGENCE
LANGUAGE
ENGLISH
POSITION
E.EUROPE
AUTO
OFF
OFF
OFF
ACCESS
The channel select indicator will change as follows. DIRECT POSITOIN
2 Regional System Selection
SYS SELECT (Before AUTO tuning and MANUAL tuning, set the “SYS SELECT” mode, as detailed below.)
CHINA HK/UK M.EAST
JAPAN CATV
System Select by Regional
SYSTEM SELECT
CHINA
HK / UK
ASIA/M.EAST
NZ / INDONES
AUSTRALIA
E.EUROPE
SPECL VER
AMERICA
CATV
JAPAN
China
Hong Kong, United Kingdom
Malaysia, Singapore, Thailand, Asia countries, Kuwait, Saudi Arabia, United Arab Emirates, Middle East countries, etc.
New Zealand, Indonesia, etc.
Australia
CIS, Poland, etc.
South Africa
U.S.A., Chile, Mexico, Panama, Pelu, Philippines, Taiwan, Venezuela, etc.
USA CATV
Japan
Press to select the “SYS SELECT”.
Press to select the appropriate system.
The system select indicator will change as
follows.
AMERICA
NZ/INDONES
SPECL VER
Region
AUSTRALIA
E.EUROPE
TUNING MENU
CH SELECT
SYS SELECT
AUTO TUNE
MANUAL TUNE
SOUND SYS 6. 0MHz
COLOUR SYS
FINE TUNE
SKIP
POSITION
E.EUROPE
AUTO
OFF
21
Page 22

Tuning Channels
Sound System Selection
This function is used only in the TV mode when the sound is not clear or no sound is produced on a Programme
Number, and is not applicable in AV mode .
1
Press to select the “SOUND SYS”.
(Different region use differing systems)
TUNING MENU
CH SELECT
SYS SELECT
AUTO TUNE
MANUAL TUNE
SOUND SYS 6. 0MHz
COLOUR SYS
FINE TUNE
SKIP
Sound System Condition.
POSITION
JAPAN
AUTO
OFF
2
Press until the optimum sound is obtained.
TUNING MENU
The sound system will change as shown.
4.5MHz
6.5MHz
5.5MHz
6.0MHz
CH SELECT
SYS SELECT
AUTO TUNE
MANUAL TUNE
SOUND SYS 6. 0MHz
COLOUR SYS
FINE TUNE
SKIP
POSITION
JAPAN
AUTO
OFF
Note:
These are different sound broadcast transmission systems applicable to differing countries.
3
TV/AV
Press to exit from the “SOUND SYS”.
This returns the set to the normal viewing condition.
The selected Sound System is automatically memorised.
22
Page 23

Tuning Channels
Colour System Selection
If a clear picture with correct colours cannot be obtained when a Broadcast or AV signal is received.
1
Press to select the “COLOUR SYS”.
(Different region use differing systems)
TUNING MENU
CH SELECT
SYS SELECT
AUTO TUNE
MANUAL TUNE
SOUND SYS 6. 0MHz
COLOUR SYS
FINE TUNE
SKIP
Colour System Condition.
2
Press to produce the optimum image.
The colour system will change as shown.
AUTO PAL
NTSC3.58 NTSC4.43
SECAM
TUNING MENU
CH SELECT
SYS SELECT
AUTO TUNE
MANUAL TUNE
SOUND SYS 6. 0MHz
COLOUR SYS
FINE TUNE
SKIP
POSITION
JAPAN
AUTO
OFF
POSITION
JAPAN
AUTO
OFF
Note:
P AL, SECAM and NTSC 3.58 are different colour signal broadcast transmission systems applicable to differing countries.
NTSC 4.43 is a trick playback mode used in special VCR to playback NTSC recorded video tapes through PAL
television equipment.
3
TV/AV
Press to exit from the “COLOUR SYS”.
This returns the set to the normal viewing condition.
The selected Colour System is automatically memorised.
23
Page 24

Tuning Channels
Channel Selection
Select the most easily viewed channel selection method.
2ch
4ch
6ch
8ch
10ch
12ch
14ch
16ch
18ch
20ch
POSITION SELECT
When the Channel Selection is on POS. (Position), and
Auto Tune is performed, the unit memories the channels
tuned in order from programme No.1.
Press the button 1 to view channel 2.
Press the button 2 to view channel 4.
Press the button 3 to view channel 6.
During position mode various reception channels can be
viewed.
DIRECT SELECT
When the Channel Selection is on DIRECT , and Auto Tune
is performed, the unit memories the programme number
which is the same as the channel tuned.
This method allows you to select the desired channel by
pushing the channel display number directly on the remote
control to select the station. The channel display numbers
for the broadcast stations in each region are listed on page
25.
Example
Programme
Number
10
Example
Programme
Number
1
2
3
4
5
6
7
8
9
10
Channel
Display
1
2
3
4
5
6
7
8
9
2
4
6
8
10
12
14
16
18
20
Channel
Display
–
2
–
4
–
6
–
8
–
10
Received
Channel
2
4
6
8
10
12
14
16
18
20
Received
Channel
–
2
–
4
–
6
–
8
–
10
24
20
20
20
Page 25

Tuning Channels
Channel Allocation
• CA TV (USA CATV) channel numbers as recommended by the joint EIA/NCTA Engineering committee and published
as EIA INTERIM STANDARD No.6-CABLE TELEVISION CHANNEL IDENTIFICATION PLAN-MAY 1983.
• The receiving channels are as follows;
SYS SELECT
CH DISPLAY
0
1
2
3
4
5
6
7
11
12
13
14
15
16
19
20
21
22
23
24
28
57
58
59
62
63
69
70
73
74
75
76
77
78
79
80
81
89
90
91
92
93
94
95
96
97
98
99
100
117
118
120
125
CHINA HK/UK
–
1
2
12
13
57
–
–
–
–
–
–
–
–
–
–
–
–
–
–
–
–
–
Z1
Z9
Z10
Z11
Z12
Z13
Z14
Z15
Z16
Z17
Z18
Z19
Z20
Z37
–
–
–
–
–
–
–
–
–
–
–
–
–
–
–
–
–
–
–
–
–
–
–
21
62
63
69
–
–
–
S'1
S'2
S'3
–
–
–
S1
S2
S10
S11
S12
S13
S14
S15
S16
S17
S18
S19
S20
S21
S41
–
–
ASIA/M.EAST
11
12
21
62
63
69
S'1
S'2
S'3
S1
S2
S10
S11
S12
S13
S14
S15
S16
S17
S18
S19
S20
S21
S41
NZ/INDONES
–
–
2
–
–
–
–
–
–
–
–
–
–
–
–
–
–
–
–
1
2
11
–
–
–
–
–
–
–
–
21
62
63
69
–
–
–
S'1
S'2
S'3
–
–
–
S1
S2
S10
S11
S12
S13
S14
S15
S16
S17
S18
S19
S20
S21
S41
–
–
AUSTRALIA
E.EUROPE
RECEIVE CHANNEL
–
0
1
2
3
4
5
S2
S10
6
9
9A
10
11
12
S11
S44
20
21
80
–
–
–
–
–
1
2
11
12
–
–
–
–
–
–
–
21
62
63
69
–
–
–
S'1
–
–
–
–
–
S1
S2
S10
S11
S12
S13
S14
S15
S16
S17
S18
S19
S20
S21
S41
–
–
SPECL VER
11
12
13
21
62
63
69
S'1
S'2
S'3
S1
S2
S10
S14
S15
S16
S17
S18
S19
S20
S21
S41
AMERICA
–
1
2
–
–
–
–
–
–
–
–
–
–
–
–
–
–
–
–
–
13
14
62
63
69
CATV JAPAN
–
–
2
–
–
–
–
–
–
–
–
–
–
–
–
–
–
–
–
–
–
–
–
–
–
–
–
–
–
–
–
–
–
–
–
1
2
62
63
99 C49
100
125
C13
–
1
2
12
13
62
–
–
–
–
–
–
–
–
25
Page 26

Tuning Channels
Automatic Tune
This TV uses automatic tuning to determine whether or not a broadcast signal is being sent which it can receive, and
automatically prepares so that the channel selection can respond to both the position select and direct select modes.
AUTO TUNE
1
SOUND SYS
2
TV/AV
Note:
When sound volume is too small to confirm, tune it up by using the sound volume button on the remote control.
(Channel Select and Regional System must already be set; Refer to pages 21)
Press to select the “AUTO TUNE”.
Press to access to the “AUTO TUNE”.
Search Start.
29
CH 29
AUTO SETUP IN PROGRESS
SEARCHING
SETUP : RETURN TO TUNING MENU
TV/AV : TO EXIT
After all stations are tuned, the on-screen display will automatically change from “AUTO
TUNE” to “SOUND SYS” Position.
Press to improve the Sound quality , if the Sound
is not clear or no sound is produced on a
programme Number Position.
4.5MHz
6.5MHz
Press to exit from the Tuning Menu.
This returns the set to the normal viewing condition.
: PLESE WAIT
STORED CH29
5.5MHz
6.0MHz
When found a station.
The best tuning position is automatically
memorized.
TUNING MENU
CH SELECT
SYS SELECT
AUTO TUNE
MANUAL TUNE
SOUND SYS 6. 0MHz
COLOUR SYS
FINE TUNE
SKIP
TUNING MENU
CH SELECT
SYS SELECT
AUTO TUNE
MANUAL TUNE
SOUND SYS 6. 0MHz
COLOUR SYS
FINE TUNE
SKIP
POSITION
JAPAN
ACCESS
AUTO
OFF
POSITION
JAPAN
AUTO
OFF
3
4
TV/AV
Press to check each station sequentially .
12
Press to exit from the Tuning Menu.
This returns the set to the normal viewing condition.
If necessary, repeat steps 1 to 2 for each Programme Number.
Helpful Hint
(1) If a clear picture with correct colours cannot be obtained when a Broadcast or AV signal is received, refer to the
“Colour System Selection” operation on page 23.
(2)
26
After the Automatic tune is finished, press this button to confirm the tuning condition for each
Programme Number. If some Programme Numbers are unused (no TV stations), it is possible to
skip such Programme Numbers. Please refer to the Programme Number Skip operation on page
29.
Page 27

Tuning Channels
Manual Tune
MANUAL TUNE
1
1
2
(Channel Select and Regional System must already be set; Refer to pages 21)
Press to select the MANUAL TUNE.
Press to access to the MANUAL TUNE.
Press to select the desired Programme
Number.
Press to select the higher or lower channel.
Search Start.
29
CH 12
When found a station.
PROGRAMME - /+
-
RETURN
MANUAL TUNE
TV / AV ‘STR’ BUTTON-STORE
SEARCH
EXIT
/+
The best tuning position is automatically
memorized.
TUNING MENU
CH SELECT
SYS SELECT
AUTO TUNE
MANUAL TUNE
SOUND SYS 6. 0MHz
COLOUR SYS
FINE TUNE
SKIP
POSITION
JAPAN
ACCESS
AUTO
OFF
SOUND SYS
2
Press to confirm the sound condition of each
Programme Number.
Press to improve the Sound quality , if the Sound
is not clear or no sound is produced on a
programme Number Position.
4.5MHz
6.5MHz
Note:
When sound volume is too small to confirm, tune it up by using the sound volume button on the remote control.
3
TV/AV
Press to exit from the Tuning Menu.
This returns the set to the normal viewing condition.
5.5MHz
6.0MHz
TUNING MENU
CH SELECT
SYS SELECT
AUTO TUNE
MANUAL TUNE
SOUND SYS 6. 0MHz
COLOUR SYS
FINE TUNE
SKIP
POSITION
JAPAN
AUTO
OFF
Helpful Hint
(1) If a clear picture with correct colours cannot be obtained when a Broadcast or AV signal is received, refer to the
“Colour System Selection” operation on page 23.
(2)
After the Manual tune is finished, press this button to confirm the tuning condition for each
Programme Number. If some Programme Numbers are unused (no TV stations), it is possible to
skip such Programme Numbers. Please refer to the Programme Number Skip operation on page
29.
(3) When using a VCR without video and audio input/output terminals, it is convenient to connect the aerial cable as
indicated in the instruction manual of VCR and to set the designated channel to programme No. “0”. In that case,
perform manual tune after setting the colour system and sound system in advance. Further, in multi-system VCR,
it is more convenient to set the designated channel to several programme Numbers.
27
Page 28

Tuning Channels
Fine T uning
FINE TUNE
1
2
3
STR
TV/AV
Under normal reception conditions this function is not required or necessary.
However, in areas of poor reception or constant interference, a slight adjustment of
the tuning may improve the picture and sound quality.
Press to select the FINE TUNE.
Press until the clear picture is received.
Press to store the FINE TUNE.
This stores the FINE TUNE to the selected Programme Number.
Press to exit from the FINE TUNE.
This returns the set to the normal viewing condition.
TUNING MENU
CH SELECT
SYS SELECT
AUTO TUNE
MANUAL TUNE
SOUND SYS 6. 0MHz
COLOUR SYS
FINE TUNE
SKIP
POSITION
JAPAN
AUTO
OFF
How to Cancel the Fine Tuning
Cancelling previously adjusted (manually) fine tuning, means re-activating the AFT (Automatic Fine Tuning). Reactivating the Automatic Fine Tuning means albaming the set to automatically tune to the optimum tuning position, for
that programme Number.
1
2
3
4
SET UP
STR
Select the Programme Number which you’d like to return to Automatic Fine Tuning
(cancel the manual fine tuning).
Press to display the SETUP MENU.
Proceed to the TUNING MENU (refer to page 21).
Press to select the MANUAL TUNE.
Press to access to MANUAL TUNE.
Press briefly to tune the best position.
Press to store the AFT.
This stores the re-activated AFT.
TUNING MENU
CH SELECT
SYS SELECT
AUTO TUNE
MANUAL TUNE
SOUND SYS 6. 0MHz
COLOUR SYS
FINE TUNE
SKIP
POSITION
JAPAN
ACCESS
AUTO
OFF
5
TV/AV
Press to exit from the MANUAL TUNE.
This returns the set to the normal viewing condition.
28
Page 29

Tuning Channels
Programme Number Skip
It is possible to skip Programme Number on which no TV stations are tuned appearing on the screen. The function is
only effective when selecting Programme Numbers by pressing the Programme Number Up or Down button either on
the TV set or on the Remote control.
1
2
3
STR
TV/AV
Press to select the Programme Number you’d like to skip.
TUNING MENU
CH SELECT
Press to select the SKIP.
Press to change the mode to “ON.”.
Press to store the Skip function.
Press to exit from the SKIP.
SYS SELECT
AUTO TUNE
MANUAL TUNE
SOUND SYS 6. 0MHz
COLOUR SYS
FINE TUNE
SKIP
POSITION
JAPAN
AUTO
ON
This returns the set to the normal viewing condition.
1
4
3
Repeat Step1 to 3 for each Programme Number for which the Skip function is desired.
2
How to Cancel the Skip Function
1
Press to select the SKIP.
Press to change the mode to “OFF.”.
2
STR
Press to store the Skip function.
TUNING MENU
CH SELECT
SYS SELECT
AUTO TUNE
MANUAL TUNE
SOUND SYS 6. 0MHz
COLOUR SYS
FINE TUNE
SKIP
POSITION
JAPAN
AUTO
OFF
29
Page 30

Picture Adjustment
1
PICTURE
Press to display the Picture Menu.
2
Press to select the desired function.
Press to adjust or change the function.
3
TV/AV
Press to go back to watching TV.
MENU
You can change the level of each Function (CONTRAST, BRIGHTNESS,
COLOUR, SHARPNESS, NTSC-TINT) for each Picture Menu.
Picture menu mode will be memorized for each TV, AV1, AV2, AV3 and AV4
mode.
Picture Menu Function
DYNAMIC
For viewing in brighter environments.
This menu selects a higher than normal
levels of Brightness and Contrast.
PICTURE
MENU
CONTRAST
BRIGHTNESS
COLOUR
SHARPNESS
NTSC-TINT
C. TEMP
PICTURE
MENU
CONTRAST
BRIGHTNESS
COLOUR
SHARPNESS
NTSC-TINT
C. TEMP
STANDARD
STANDARD
PICTURE
P
-
NR
AI
SCAN MODE AUTO
AUTO
ON
STANDARD
STANDARD
STANDARD
SOFT
For viewing in normal (evening lighting)
environments.
This menu selects the normal levels of
Brightness and Contrast.
For viewing in a dark room.
This menu selects reduced levels of
Brightness and Contrast.
CONTRAST, BRIGHTNESS, COLOUR, SHARPNESS, NTSC-TINT
Increase or decrease the levels of CONTRAST, BRIGHTNESS, COLOUR
and SHARPNESS options according to your personal preference.
With an NTSC-TINT signal source connected to the TV, the picture hue can
be adjusted to suit your taste.
Item FunctionEffect
CONTRAST
BRIGHTNESS
COLOUR
SHARPNESS
NTSC-TINT
Less More
Darker Brighter
Less More
Less More
Reddish Greenish
Adjust for contrast.
Adjusts for easier viewing of dark
pictures such as night scenes and hair.
Adjusts slightly to a lighter colour.
Displays a sharp image.
Adjust for proper skin colour.
Notes:
• When set to Multi PIP mode, the main and sub pictures
are both adjusted simultaneously .
• When the TV is receiving NTSC signals, NTSC-TINT
is displayed and level adjustment would be possible.
• Only CONTRAST will be displayed during TEXT mode.
MENU
MENU
MENU
DYNAMIC
STANDARD
SOFT
PICTURE
MENU
STANDARD
CONTRAST
BRIGHTNESS
COLOUR
SHARPNESS
NTSC-TINT
C. TEMP STANDARD
30
Page 31

Picture Adjustment
(Colour Temperature)
P-NR
(Picture Noise
Reduction)
AI
Set the overall colour tone of the picture.C. TEMP
Press to switch between modes
COOLWARMSTANDARD
Automatically reduces undesired picture noise.
Press to switch between modes
OFF
AUTO
TC-43P250H, TC-51P250H: Switching is also
possible using
STRONG
WEAK
D.PNR
on the remote control.
Automatically analyses the incoming picture
and processes it to give improved contrast and
optimum depth of field.
PICTURE
MENU
CONTRAST
BRIGHTNESS
COLOUR
SHARPNESS
NTSC-TINT
C. TEMP
PICTURE
P
-
NR
AI
SCAN MODE AUTO
PICTURE
P
-
NR
AI
SCAN MODE AUTO
STANDARD
STANDARD
AUTO
ON
AUTO
ON
SCAN MODE
TC-43P250H, TC-51P250H: Switching is also
possible using
Choose the screen refresh method:
Press to switch between modes
AUTO
MODE Function
AUTO
100 Hz MODE
PROGRESSIVE
Switching is also possible using
P. AI
on the remote control.
PICTURE
P
-
NR
AI
100 Hz MODE
The TV software will select the best mode for the signal being viewed.
100Hz will give a steady picture for most signal transmission.
Recommended when receiving NTSC signals.
PROGRESSIVE
100Hz/
PROGRE
on the remote control.
SCAN MODE AUTO
AUTO
ON
Note:
We recommend that you set Scan mode to Progressive when viewing a PAL 60 or
NTSC transmission. When viewing a PAL transmission (other than PAL 60) with Scan
mode set to Progressive, the screen will flicker, this is not a fault.
Helpful Hint (NNormalization)
By pressing the Normal “N” Button on the Remote Control while the Picture menu is displayed, the selected menu will
be changed to the Normal Mode.
Normalization will not occur if the menu is not displayed when the “N” Button is pressed.
The Normal mode is the factory preset condition. Returning to this original condition is called “Normalization”.
31
Page 32

Sound Adjustment
1
SOUND
Press to display the Sound Menu.
2
Press to select the desired function.
Press to adjust or change the function.
3
TV/AV
Press to go back to watching TV.
Note:
Some features are only available with the Surround feature switched off. Press
MENU
You can change the level of each Function (VOLUME, BASS, TREBLE,
BALANCE, HEADPHONE VOL, SUB HEADPHONE) for each Sound
Menu. Sound menu mode will be memorized for each TV, AV1, AV2,
AV3 and AV4 mode.
Sound Menu Function
DYNAMIC
STANDARD
SOFT
Amplifies the Low frequencies and outputs
optimum sound.
For music programmes for example.
For Normal use.
Human voices (middle pitch sounds) will
sound more clear.
SOUND
MENU
VOLUME
BASS
TREBLE
BALANCE
HEADPHONE VOL.
SUB HEADPHONE
SURROUND
SURROUND
DYNAMIC
OFF
to switch between On and Off.
SOUND
MENU
VOLUME
BASS
TREBLE
BALANCE
HEADPHONE VOL.
SUB HEADPHONE
SURROUND
MENU
MENU
MENU
DYNAMIC
OFF
DYNAMIC
STANDARD
SOFT
VOLUME, BASS, TREBLE, BALANCE, HEADPHONE VOL., SUB HEADPHONE
Item FunctionEffect
VOLUME
BASS
TREBLE
BALANCE
Less More
Less More
Less More
Left SP. Right SP.
Adjusts output volume.
Adjusts low sounds.
Adjusts high sounds.
Adjust left and right volumes.
Notes:
• When set to Multi PIP mode, the main and sub sound
are both adjusted simultaneously.
HEADPHONE VOL.
SUB HEADPHONE
Less More
Less More
Adjust Headphone volume.
Adjust Sub Headphone volume.
• When using one of the double window features, note
that the headphones will relay the soundtrack for the
programme in the main window, not the smaller
window.
32
BALANCE
SOUND
MENU
VOLUME
BASS
TREBLE
BALANCE
HEADPHONE VOL.
SUB HEADPHONE
SURROUND
DYNAMIC
OFF
Page 33

SURROUND MENU
SURROUND
Sound Adjustment
Press to switch between ON and OFF.
SURROUND
ON
SURROUND
OFF
OR
SOUND
Press to display the Sound Menu.
Press to select the SURROUND function.
Press to switch between ON and OFF.
The benefits of surround sound are enormous. You can be completely enveloped in sound; just as if you were at a
concert hall or cinema.
The surround effect can be obtained without the use of external surround speakers.
SOUND
MENU
VOLUME
BASS
TREBLE
BALANCE
HEADPHONE VOL.
SUB HEADPHONE
SURROUND
DYNAMIC
ON
Helpful Hint (NNormalization)
By pressing the Normal “N” Button on the Remote Control while the Sound menu is displayed, the selected menu will
be changed to the Normal Mode.
Normalization will not occur if the menu is not displayed when the “N” Button is pressed.
The Normal mode is the factory preset condition. Returning to this original condition is called “Normalization”.
33
Page 34

Setup Adjustment
1
2
3
SET UP
TV/AV
Press to display the SETUP MENU.
Press to select the desired function.
Press to adjust or change the function.
SETUP MENU
TELETEXT
OFF TIMER
FLICKER REDUC.
STROBE
CH COLOUR SET
VCR / GAME
TEXT SELECT ENGLISH
Press to go back to watching TV.
OFF TIMER
Switches the TV off within a preset time which you can choose from between 0 to 90
minutes in 15 minute intervals.
OFF
90
3015
45
6075
FASTEXT
OFF
DYNAMIC
OFF
SETUP MENU
CHILD LOCK
PICTURE SHIFT
TUNING MENU
CONVERGENCE
LANGUAGE
SETUP MENU
TELETEXT
OFF TIMER
FLICKER REDUC.
STROBE
CH COLOUR SET
VCR / GAME
TEXT SELECT ENGLISH
OFF
OFF
ACCESS
ENGLISH
FASTEXT
OFF
DYNAMIC
OFF
FLICKER REDUCTION
Lets you control any picture movement. Set to Dynamic to activate motion
compensation, to smooth the image and get rid of picture movement. Set to Normal
to correct minor picture movement, or if slight ghosting of figures occurs when using
the Dynamic setting. Set to Off to have no flicker reduction at aIl, occasional broadcasts
may benefit from using this setting.
DYNAMICNORMALOFF
Note:
In NTSC when set the SCAN MODE to 100Hz MODE, this function is not available.
COLOUR SYSTEM
During AV mode, COLOUR SYSTEM is displayed.
If a clear picture with current colours cannot be obtained when a Broadcast or AV
signal is received. The colour system will change as shown.
AUTO PAL
NTSC3.58 NTSC4.43
PAL, SECAM and NTSC 3.58 are different colour signal broadcast transmission
systems applicable to differing countries. NTSC 4.43 is a trick playback mode used
in special VCR to playback NTSC recorded video tapes through PAL television
equipment.
SECAM
SETUP MENU
TELETEXT
OFF TIMER
FLICKER REDUC.
STROBE
CH COLOUR SET
VCR / GAME
TEXT SELECT ENGLISH
SETUP MENU
TELETEXT
OFF TIMER
FLICKER REDUC.
COLOUR SYS
STROBE
CH COLOUR SET
VCR / GAME
FASTEXT
OFF
DYNAMIC
OFF
FASTEXT
OFF
DYNAMIC
AUTO
OFF
34
Page 35

CH COLOUR SET
Setup Adjustment
Colour density varying between broadcast channels can be adjusted to three levels
for each reception channel.
VCR/GAME
Reproduction of irregular signals, such as certain TV games and rental video tapes,
may be improved.
SETUP MENU
TELETEXT
OFF TIMER
FLICKER REDUC.
STROBE
CH COLOUR SET
VCR / GAME
TEXT SELECT ENGLISH
SETUP MENU
TELETEXT
OFF TIMER
FLICKER REDUC.
STROBE
CH COLOUR SET
VCR / GAME
TEXT SELECT ENGLISH
FASTEXT
OFF
DYNAMIC
OFF
FASTEXT
OFF
DYNAMIC
ON
CHILD LOCK
If the Child-Lock function is set ON, picture and sound of the TV/AV mode being
viewed will disappear and a Black screen will appear.
PICTURE SHIFT
For use as a screen saver, this function changes the entire picture position (shift)
approximately 2 mm every 15 minutes.
LANGUAGE
SETUP MENU
CHILD LOCK
PICTURE SHIFT
TUNING MENU
CONVERGENCE
LANGUAGE
SETUP MENU
CHILD LOCK
PICTURE SHIFT
TUNING MENU
CONVERGENCE
LANGUAGE
ENGLISH
ENGLISH
ON
OFF
OFF
ON
When you first install the TV, the On Screen Display language is set according to
your choice of region. LANGUAGE lets you change the language used for On Screen
Displays.
SETUP MENU
CHILD LOCK
PICTURE SHIFT
TUNING MENU
CONVERGENCE
LANGUAGE
ENGLISH
OFF
OFF
35
Page 36

Multi Screen
Multi PIP
Press
PICTURE
and picture feature.
MULTI
PIP
to select the current programme, the picture in picture feature, or the picture
SOUND
SET UP
TV/TEXT
100Hz/
PROGRE
SURROUND
MULTI
PIP
Red
The on screen selector keys for the features (corresponding to the four coloured buttons
on the remote control) appear and disappear after a few seconds. If you’d like to select an
TV/AV
operation when the keys are not shown, press
Picture in Pcture (PIP)
INDEX HOLD
F.P.
STILL
CH SEARCH
1 2 3
4 5 6
7 8 9
0
Press the Red button:
Sub picture
main picture
MULTI
PIP
Press to view two pictures (sub picture in
main picture) at the same tme.
LOCATE CHANGE EXIT
Red Green Yellow Blue
Press the Y ellow button:
Yellow
Sub picture
main picture
MULTI
PIP
once more and the keys will reappear.
LOCATE CHANGE EXIT
Sub picture
main picture
LOCATE CHANGE EXIT
Each time the location of the sub
picture is changed.
Press the Blue button to exit from the PIP mode.
Blue
Picture and Picture
MULTI
PIP
Press twice to view two pictures (picture and picture) at
the same time.
Press the Yellow button:
Each time the picture in the left and the picture in the
Yellow
right are swapped.
A
BB
LOCATE CHANGE EXIT
AB
BB
A
LOCATE CHANGE EXIT
Each time the main picture and the sub picture are swapped.
ABB
36
Press the Blue button to exit from the PIP mode.
Blue
LOCATE CHANGE EXIT
Page 37

Channel search
INDEX
Press to show freeze-frames of the programmes being broadcast on all of the stored
channels. These images are displayed in series clockwise around the edge of the screen,
starting from the top left.
The current programme is displayed in the centre of the screen, still playing.
Press to pause the search.
CH SEARCH
HOLD
STILL
CH SEARCH
( )
STILL
( )
Multi Screen
1 2 3 4
4
5
INDEX
CH SEARCH
Red Green Yellow Blue
Picture and text (
Note:
The remote control affects the teletext page; so select watching the current programme before making any changes
to the programme.
CH SEARCH
( )
No indication for TC-43P250H and TC-51P250H
TV/TEXT
Press to exit from the feature.
SELECT OK EXIT
Channel search
Press to watch the current programme (displayed centre screen), exiting the feature.
Press to watch the selected channel, exiting the feature.
Press to select each channel's freeze-frame in turn.
)
Press to select watching the
current programme, the teletext or
the picture and text feature.
TELETEXT TELETEXT
TELETEXT mode Picture and text mode
6
Still
HOLD
Press to freeze the picture, press again to return to watching the current programme.
STILL
STILL
( )
Strobe
Lets you take a series of freeze-frame photos of a piece of action (for example:
the finish of a race).
(Access Strobe via the Setup menu, see page 34).
Takes a series of up to twelve freeze-frame images
(one second delay between each image being taken)
from the current programme watched.
HOLD
STILL
STILL
( )
Blue
Press to pause (freeze) the Strobe, press again
to continue taking the freeze-frames.
Press to exit from the Strobe feature and return to watching the current programme.
EXIT
SETUP MENU
TELETEXT
OFF TIMER
FLICKER REDUC.
STROBE
CH COLOUR SET
VCR / GAME
TEXT SELECT ENGLISH
FASTEXT
OFF
DYNAMIC
ACCESS
OFF
37
Page 38

(
TELE TEXT
Teletext features may vary depending on the Broadcasting Companies and are only available when the channel
selected is transmitting Teletext.
No indication for TC-43P250H & TC-51P250H
)
TEXT SELECT
(No indication for
TC-43P250H and
TC-51P250H)
TV / Teletext mode
TV/TEXT
PICTURE
SOUND
Select character set, so that all characters needed
are available for text on teletext pages (eg: cyrillic
characters, etc).
E.EUROPECISENGLISH
Press to select the current programme, the teletext and the picture or the teletext
feature .
Press to display the contrast function with a cyan bar.
Press to display the volume function with a green bar.
Press to alter the s etting as required.
SETUP MENU
TELETEXT
OFF TIMER
FLICKER REDUC.
STROBE
CH COLOUR SET
VCR / GAME
TEXT SELECT ENGLISH
FASTEXT
OFF
DYNAMIC
OFF
SET UP
Red
Green Yellow Blue
LIST / FASTEXT mode
LIST mode:
FASTEXT mode:
CONTRAST
VOLUME
Press to display special function options at the bottom of the screen.
Press to select the desired function.
Choose 2 modes.
LIST FASTEXT
Four differently coloured page numbers are situated
at the bottom of the screen. Each of these numbers
can be altered and stored in the TV's memory.
Four differently coloured subjects are situated at the
bottom of the display. To access more information ,
press the appropriately coloured button. This mode
enables fast access to information on the subjects
shown.
SETUP MENU
TELETEXT
OFF TIMER
FLICKER REDUC.
STROBE
CH COLOUR SET
VCR / GAME
TEXT SELECT ENGLISH
FASTEXT
OFF
DYNAMIC
OFF
Note:
Characters will be illegible unless you select the Text Language which matches the text being received. Select the
correct LANGUAGE (Refer to page 35).
38
Page 39

Page Selection
1 2 3
4 5 6
7 8 9
0
STILL
CH SEARCH
(Two ways)
FulI / Bottom
SET UP
Reveal
SET UP
+
+
Green
TELE TEXT
Press to increase or decrease
the page number by one.
Press to display special functions.
Press the Green button again to expand the BOTTOM half.
Press again to return to normal (FULL) size.
Press to reveal hidden words e.g. quiz page answers. Press again to hide.
Enter the page number
directly using 0-9 on
the remote control.
List Store
STR
Hold
HOLD
STILL
Favourite Page (F.P.)
++
0
Blue
F.P.
STR
9
Red
In LIST mode the four page numbers can be altered (programme positions 1 - 25 only).
Press one of the four coloured buttons and enter the new page number.
Press and hold, the page numbers will change to white indication and the page is stored.
Press to hold the Teletext page when viewing multi-page information.
Press again to return to automatic page update.
Stores a favourite page in memory for instant recall. (programme positions 1 - 25 in List
mode only).
Press the Blue button, select the page number, then press and hold
STR
.
The page number is now stored.
Press to recall the stored page number.
39
Page 40

TELE TEXT
SET UP
Index
+
Yellow
Yellow
TV/AV
INDEX
CH SEARCH
Teletext page
Press to display special
functions to view the TV picture
whilst searching for a Teletext
page .
P100 P100
When found a page.
Press to view the page.
Return to normal TV operation.
Press to return to the main index page.
Depending on the way information is transmitted, this may have to be pressed more than
once to return to the main index page.
News Flash Update
Press to view the TV picture
When a news flash page has
been selected.
TV picture viewing
Press to display the News
Flash.
Press to see the update of
information on certain pages.
When an update is received.
Press to view the page.
Sub Coded Page Access
0
SET UP
9
+
Blue
Yellow
0
9
TV/AV
When Teletext information exceeds more than one page, it may take some time for the
automatic changing of the sub pages to reach the sub page you require.
It is possible to enter your required sub page and continue watching the normal
programme until the correct sub page is found.
Select the required page number using buttons 0 - 9.
If the top of the page indicates that sub pages are being transmitted yet the page does
not change, then the number at the top of the page is there to indicate that the broadcaster
has updated the page's contents, there are no sub pages.
T
****
Enter desired sub page number before the T'''' disappears. To select page 6 enter 0, 0, 0
and 6.
Viewing a normal TV programme. Viewing the Teletext page.
Select a new page number.
Press to return to normal TV operation.
T0006
40
Page 41

Advanced Remoto Control Operation
Stereo Bilingnal Sound Selection
When you receive the stereo/bilingual sound system, sound output modes can be selected
by pressing the stereo/bilingual sound selection button.
Audio Signal
Mode Indicator
STEREO MAIN I SUB II MONO
I
II
NICAM .......used in Australia, Malaysia,Thailand, Indonesia etc.
Type of broadcast
Mode Indicator
Regular broadcast
(Standard Audio)
No Indicator
Regular + NICAM MONO I
(MAIN I )
I
NICAM STEREO
NICAM DUAL MONO
(MAIN I / SUB II )
I
II
A2(German) .......used in New Zealand, Malaysia,Singapore, China.
Type of broadcast
Mode Indicator
Regular broadcast
(Standard Audio)
No Indicator
BILINGUAL or DUAL MONO:
MAIN I / SUB II
I
II
STEREO
Notes:
• If the stereo signal is poor or the receiving conditions are not optimum or if STEREO:MONO automatic switching
occurs, it is recommended you switch from STEREO to MONO.
• Even when the contents of the receiving signal undergo changes, selection mode is kept intact.
• When the receiving conditions deteriorate, listening will be easier if the mode is set to the “MONO” position, using
the stereo/bilingual sound selection button.
• “DUAL”, also known as “DUAL MONO” or as “BILINGUAL” is not currently transmitted in some countries.
VCR / LD / DVD Control
The Remote Control is capable of operating some functions of selected Panasonic VCRs, LD and DVD (Digital Versatile
Disc) equipment. Some VCR, LD and DVD equipment have different functions. So to ensure compatibility please refer
to the equipment's instruction book or consult your dealer for details.
Button
1
1
2
4
6
LD/DVD
REC-VCR
N
STR HELP
?
A B
DISC SIDE
2
3
3
5
4
7
5
A
SIDE
DISC
B
6
7
Power Switch
REC (Record)
VCR/LD, DVD Select button
Pause/Still
Programme Number
Up and Down
Still Advance
VCR
Function
LD/DVD
Programme Skip
DISC SIDE A
Selection
DISC SIDE B
Selection
41
Page 42

Troubleshooting
Before you call for service, determine the symptoms and make a few simple checks as shown below.
Symptoms
Picture Sound
Snowy Picture
Multiple Image
Interference
Normal Picture
No Picture
Noisy Sound
Normal Sound
Noisy Sound
No Sound
No Sound
Checks
Aerial Location, direction or Connections
Aerial Location, direction or Connections
Electrical Appliances
Cars/Motorcycles
Fluorescent Lamps
Volume (Refer to page 15)
(Check whether the mute function has
been activated on the Remote Control.)
Not plugged into AC outlet
Not switched on
Contrast and Brightness/Volume setting
(Check by pressing the Power Switch or
Stand-by Button on the Remote Control.)
42
No Colour
Scrambled
Coloured Patches
No Colour
Normal Sound
Normal or
Weak Sound
Normal Sound
Noisy Sound
Colour Control (Refer to page 30, 31)
Colour System (Refer to page 34)
Retune Channels (Refer to page 21)
Magnetic interference from unshielded
equipment;
TV set moved while “ON”.
Turn the TV set off for 30 minutes, using
the “Power” Switch on the TV set.
Sound Menu (Refer to page 32)
Picture Menu (Refer to page 30)
Page 43

Specifications
Power Source
Power Consumption
Receiving System
21 Systems Function
PAL B, G, H
1
PAL I
2
PAL D, K
3
SECAM B, G
4
SECAM D, K
5
SECAM K1
6
NTSC M (NTSC 3.58/4.5 MHz)
7
NTSC 4.43/5.5 MHz
8
NTSC 4.43/6.0 MHz
9
NTSC 4.43/6.5 MHz
10
NTSC 3.58/5.5 MHz
11
NTSC 3.58/6.0 MHz
12
NTSC 3.58/6.5 MHz
13
SECAM I
14
Receiving Channels
TC-43P250H / TX-43P250H
TC-51P250H / TX-51P250H
AC 220-240 V, 50/60 Hz AC 110-240 V, 50/60 Hz
228 W Stand-by condition 3.0 W
21 Systems Function
15
Reception of broadcast
transmis-sions and
Playback from Video
Cassette Tape
Recorders.
Playback from Special
VCR's
Regular TV
VHF BAND
2-12 (PAL/SECAM B, K1)
0-12 (PAL B AUST.)
1-9 (PAL B N.Z)
1-12 (PAL/SECAM D)
1-12 (NTSC M Japan)
2-13 (NTSC M U.S.A)
UHF BAND
21-69 (PAL G, H, I/SECAM G,
K, K1)
28-69 (PAL B AUST.)
13-57 (PAL D, K)
13-62 (NTSC M Japan)
14-69 (NTSC M U.S.A)
PAL 60 Hz/5.5 MHz
16
PAL 60 Hz/6.0 MHz
17
PAL 60 Hz/6.5 MHz
18
SECAM 60 Hz/5.5 MHz
19
SECAM 60 Hz/6.0 MHz
20
SECAM 60 Hz/6.5 MHz
21
NTSC 50 Hz/4.5 MHz
TX-43P250X / TX-51P250X
238 W Stand-by condition 3.0 W
CATV
S1-S20 (OSCAR)
1-125 (U.S.A CATV)
C13-C49 (JAPAN)
S21-S41 (HYPER)
Z1-Z37 (CHINA)
5A, 9A (AUST.)
Playback from Special
Disc Players and
Special VCR's
Receiving Stereo
System
Tuning System
Audio Output
Headphones
Aerial Impedance
Video/Audio/
Component Terminals
Remote control
Transmitter
NICAM I , NICAM B/G, NICAM D, A2 (German)
Frequency synthesizer Auto Search Tuning
POSITION : 100 Position
DIRECT : 125 Position
24 W [ 2-way, 4-speakers ; 12 W + 12 W ] ( 10 % THD )
3.5 mm Plug
75 Ω Unbalanced coaxial
AV 1, 2, 3, 4
Monitor Out
AV1 IN (Rear) : S-Video, Video, Audio L/R terminals
AV2 IN (Rear) : Video or Y/P
AV3 IN (Front) : S-Video, Video, Audio L/R terminals
AV4 IN (Rear) : Video or Y/P
EUR511250.....TX-43P250H/X, TX-51P250H/X EUR511251.....TC-43P250H, TC-51P250H
R6 (AA) Battery × 2
S-Video In
DVD (Y/P
Video In
Audio In
Video Out
B/PR
B/PR
B/PR
, Audio L/R terminals
, Audio L/R terminals
)
Y:1 Vp-p, 75 Ω
C:0.3 Vp-p, 75 Ω
1 Vp-p, 75 Ω
Approx. 0.4 V 47 KΩ
1 Vp-p, 75 Ω
TC-51P250H, TX-51P250H/XTC-43P250H, TX-43P250H/X
Dimensions
( W × H × D )
Mass (Weight)
932 mm × 1261 mm × 500 mm
54 kg (Net)
1095 mm × 1385 mm × 500 mm
58 kg (Net)
Note: Design and Specifications are subject to change without notice. Weight and Dimensions shown are approximate.
43
Page 44

Customer’s Record
The model number and serial number of this product can be found on its cabinet. You should
note this serial number in the space provided below and retain this book plus your purchase
receipt as a permanent record of your purchase to aid in identification in the event of theft or
loss and for Warranty Service purposes.
Model Number Serial Number
Printed in Japan
MBS091O1111(MS)
Matsushita Electric Industrial Co., Ltd.
Web Site : http://www .panasonic.co.jp/global/
 Loading...