

Page 1
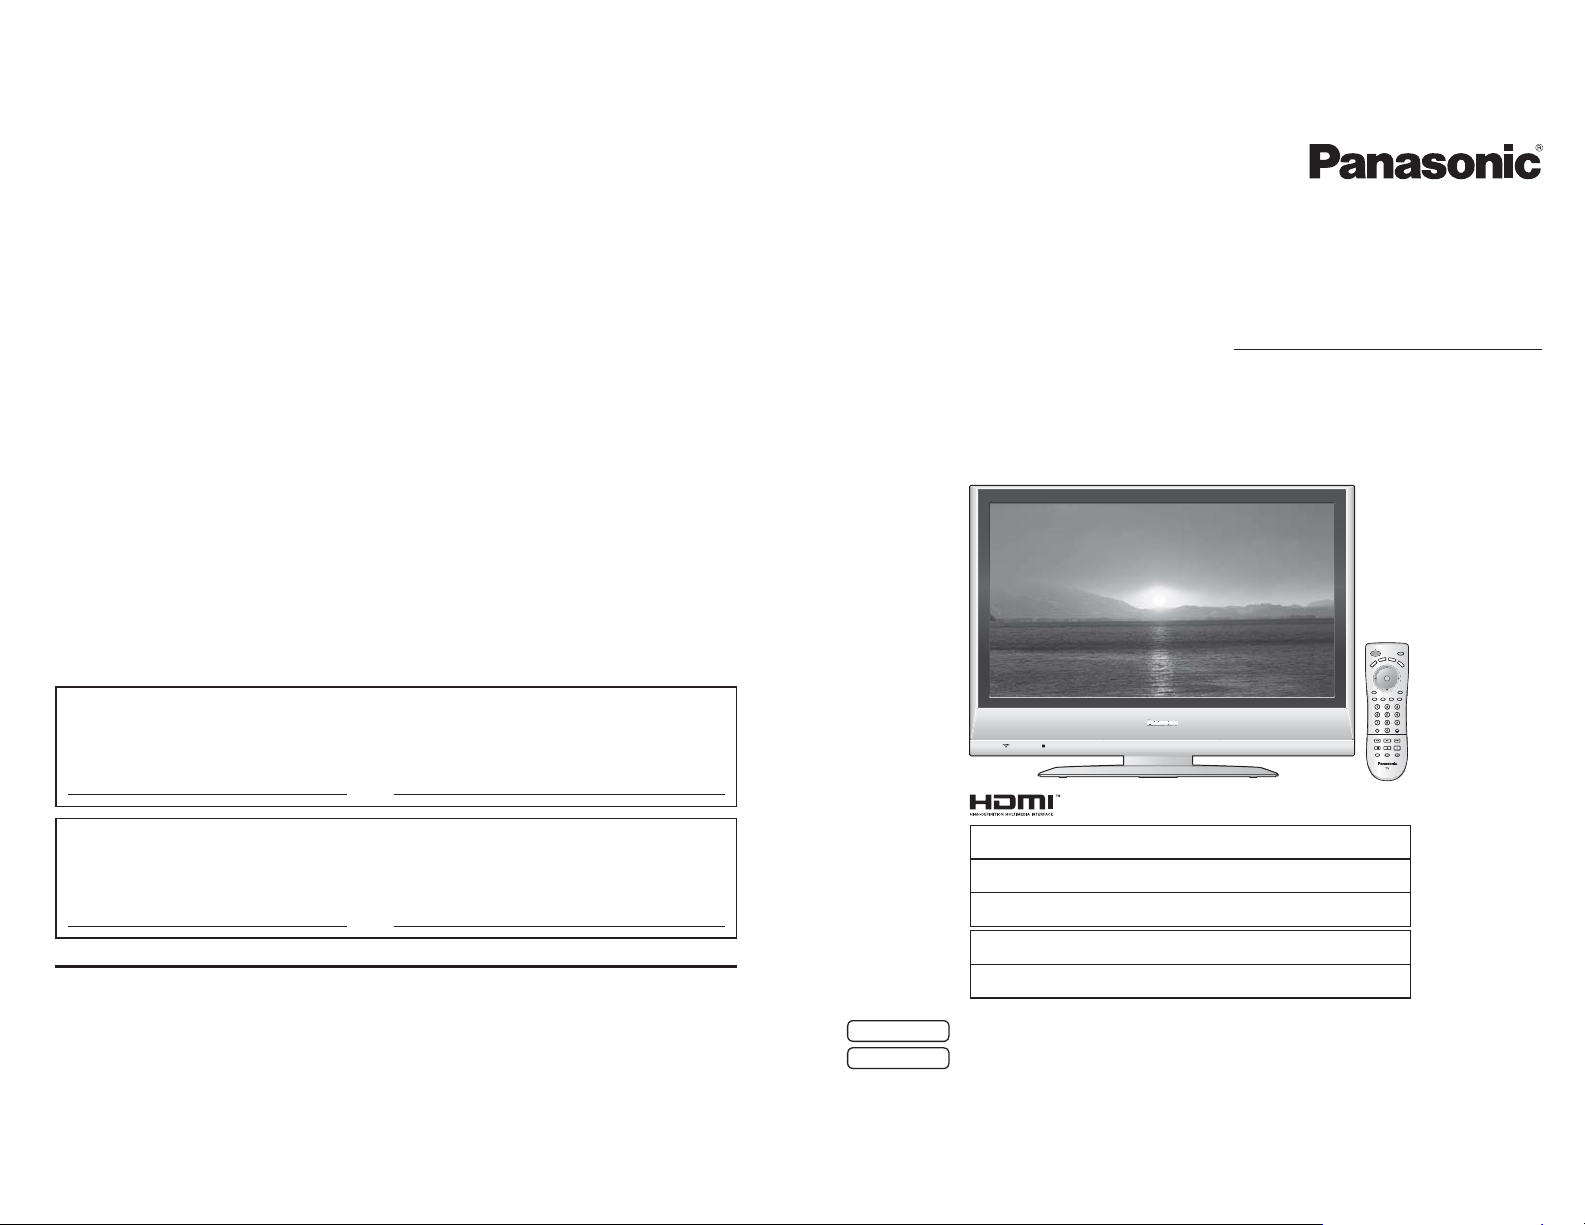
Operating Instructions
LCD Television
Manual de instrucciones
Televisor LCD
Customer’s Record
The model number and serial number of this product can be found on its back cover. You should note this serial
number in the space provided below and retain this book, plus your purchase receipt, as a permanent record of your
purchase to aid in identification in the event of theft or loss, and for Warranty Service purposes.
Model Number Serial Number
Anotación del cliente
El modelo y el número de serie de este producto se encuentran en su panel posterior. Deberá anotarlos en el
espacio provisto a continuación y guardar este manual, más el recibo de su compra, como prueba permanente de
su adquisición, para que le sirva de ayuda al identificarlo en el caso de que le sea sustraído o lo pierda, y también
para disponer de los servicios que le ofrece la garantía.
Modelo Número de serie
Panasonic Consumer Electronics
Company,
Division of Panasonic Corporation
of North America
One Panasonic Way, Secaucus
New Jersey 07094 U.S.A.
¤
2006 Panasonic Corporation of North America. All Rights Reserved.
¤
2006 Panasonic Corporation of North America. Todos los Derechos Reservados.
Panasonic Puerto Rico Inc.
(“PSC”)
Ave. 65 de Infanteria, Km 9.5
San Gabriel Industrial Park,
Carolina, Puerto Rico 00985
Panasonic Canada Inc.
5770 Ambler Drive
Mississauga, Ontario
L4W 2T3 CANADA
Printed in U.S.A.
Impreso en EE.UU.
English
Español
Model No.
Número de modelo
TC-23LX60
TC-26LX60C
TC-26LX60L
TC-32LX60C
TC-32LX60L
For assistance, please call : 1-800-211-PANA (7262)
or contact us at www.panasonic.com/contactinfo (U.S.A.)
For assistance, please call : 787-750-4300
or visit us at www.panasonic.com (Puerto Rico)
For assistance, please call : 1-800-561-5505
or visit us at www.panasonic.ca (Canada)
Para solicitar ayuda, llame al: 1-800-211-PANA (7262)
o visítenos en www.panasonic.com/contactinfo (EE.UU.)
Para solicitar ayuda, llame al: 787-750-4300
o visítenos en www.panasonic.com (Puerto Rico)
Please read these instructions before operating your set and retain them for future reference.
Lea estas instrucciones antes de utilizar su televisor y guárdelas para consultarlas en el futuro.
The images shown in this manual are for illustrative purposes only.
Las imágenes mostradas en este manual tienen solamente fines ilustrativos.
TQB2AA0662-2
Page 2
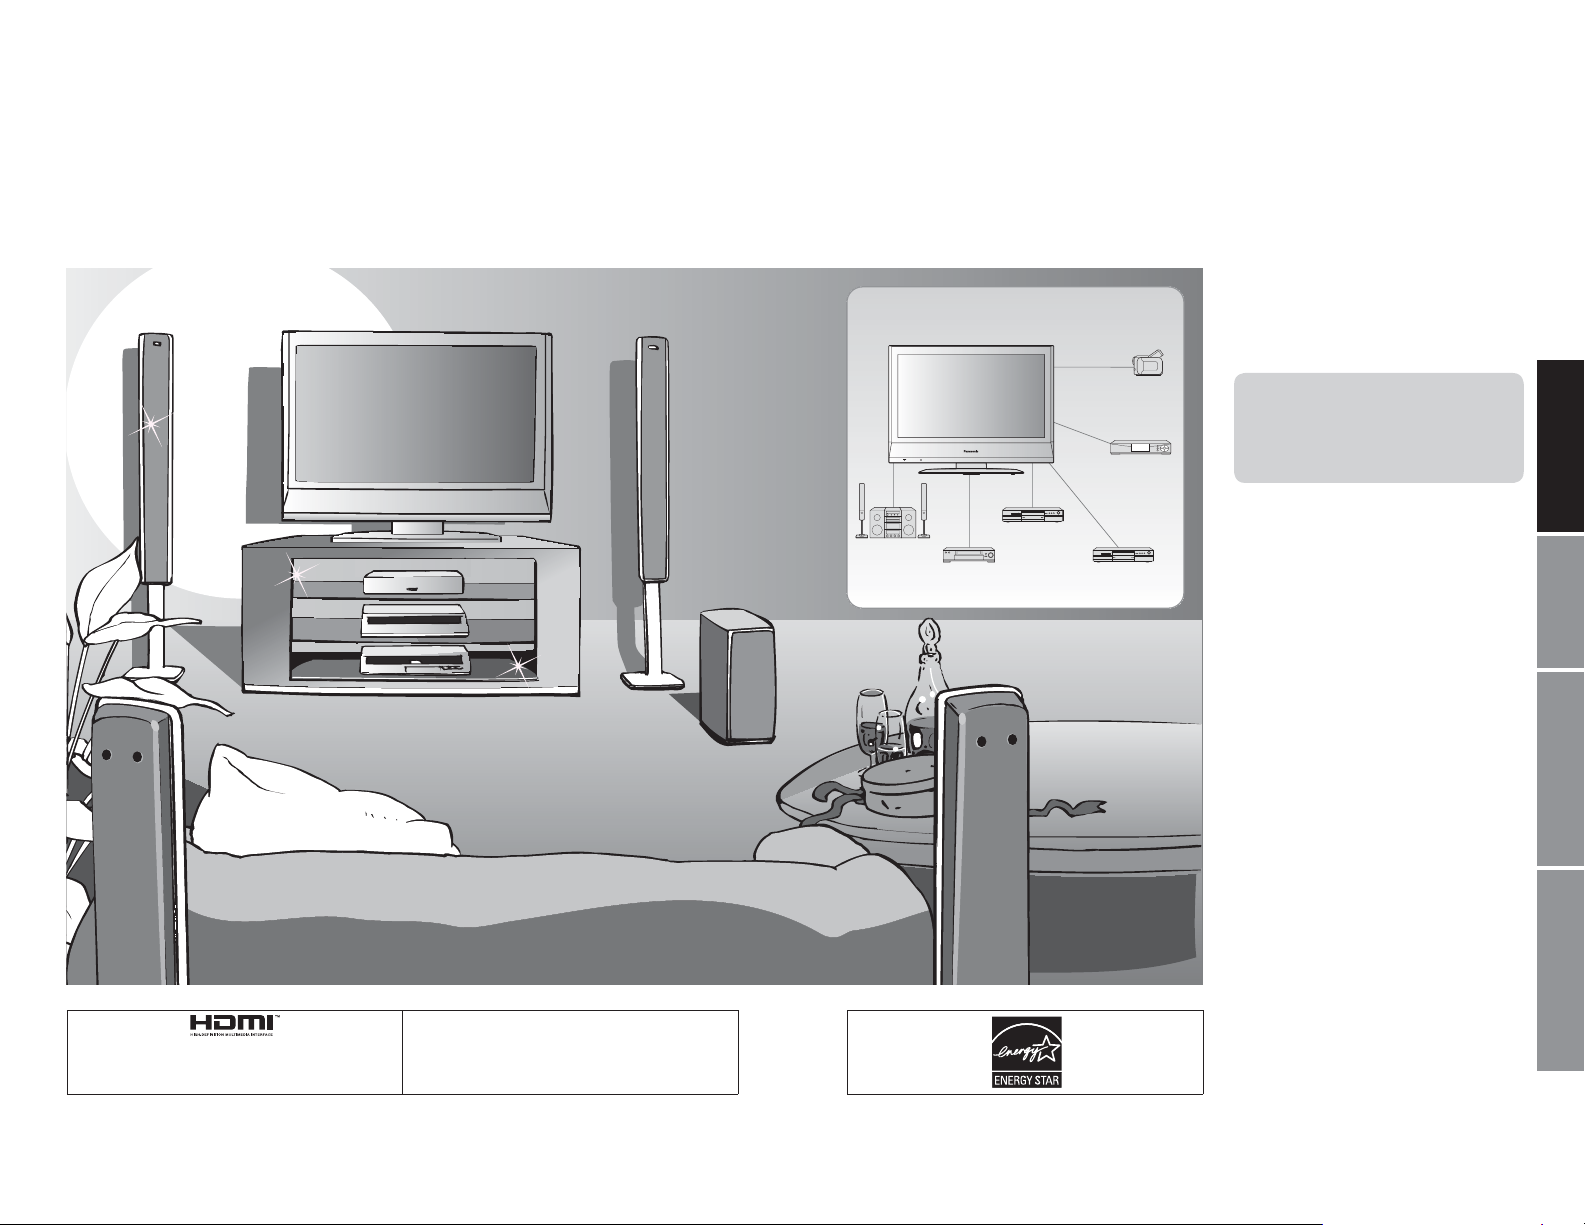
Turn your own living room into a movie theater!
Experience an amazing level of multimedia excitement
Enjoy rich multimedia
Camcorder
Set Top Box
Contents
Please read before using the unit
Important Safety Instructions ······················· 4
•
Accessories/Options ······················· 6
•
Connection ····························· 8
•
Identifying Controls ························· 9
•
Quick Start Guide
Amplifier
Home theater unit
HDAVI Control™
HDMI, the HDMI logo and High-Definition Multimedia Interface
or registered trademarks of HDMI Licensing LLC.
2 3
are trademarks
HDAVI Control™ is a trademark of
Matsushita Electric Industrial Co., Ltd.
DVD recorder
VCR DVD player
Enjoy your TV !
Basic Features
Watching TV ··············································· 10
•
Watching Videos and DVDs ······················· 11
•
Advanced Features
How to Use Menu Functions
•
(picture, sound quality, etc.) ······················· 12
Input Labels/Closed Caption ····················· 14
•
Editing and Setting Channels ···················· 15
•
Lock ··························································· 16
•
Operating Peripheral Equipment ··············· 18
•
Control with HDMI “HDAVI Control™” ······· 19
•
Recommended AV Connections ················20
•
FAQs, etc.
Remote Control Operation/Code List ········· 22
•
Ratings List for Channel Lock ····················25
•
Technical Information ·································26
•
Maintenance ·············································· 28
•
FAQ ····························································28
•
Specifications ············································· 30
•
Limited Warranty (for U.S.A.) ····················· 31
•
Customer Services Directory (for U. S. A.)
•
Limited Warranty (for Canada) ··················· 33
•
······· 32
Viewing Advanced FAQs, etc.
Page 3
Important Safety Instructions
The lightning flash with
arrow head within a triangle
CAUTION
RISK OF ELECTRIC SHOCK
DO NOT OPEN
WARNING: To reduce the risk of electric shock, do not remove cover or back.
No user-serviceable parts inside. Refer servicing to qualified service personnel.
is intended to tell the user
that parts inside the product
are a risk of electric shock to
persons.
The exclamation point within
a triangle is intended to
tell the user that important
operating and servicing
instructions are in the papers
with the appliance.
Note to CATV System Installer
This reminder is provided to direct the CATV system installer’s attention to Article 820-40 of the NEC that provides guidelines for
proper grounding and, in particular, specifies that the cable ground shall be connected to the grounding system of the building, as
close to the point of cable entry as practical.
Secure ventilation
Slots and openings in the cabinet and the back or bottom are provided for ventilation, and to ensure reliable operation of the LCD
TV and to protect it from overheating. These openings must not be blocked or covered. There should be at least 10 cm of space
from these openings. The openings should never be blocked by placing the LCD TV on a bed, sofa, rug or other similar surface.
This LCD TV should not be placed in a built-in installation such as a bookcase unless proper ventilation is provided.
Important Safety Instructions for LCD TV
1) Read these instructions.
2) Keep these instructions.
3) Heed all warnings.
4) Follow all instructions.
5) Do not use this apparatus near water.
6) Clean only with dry cloth.
7) Do not block any ventilation openings. Install in accordance with the manufacturer’s instructions.
8) Do not install near any heat sources such as radiators, heat registers, stoves, or other apparatus (including amplifiers) that
produce heat.
9) Do not defeat the safety purpose of the polarized or grounding-type plug. A polarized plug has two blades with one wider than
the other. A grounding type plug has two blades and a third grounding prong. The wide blade or the third prong are provided for
your safety. If the provided plug does not fit into your outlet, consult an electrician for replacement of the obsolete outlet.
10) Protect the power cord from being walked on or pinched particularly at plugs, convenience receptacles, and the point where
they exit from the apparatus.
11) Only use attachments / accessories specified by the manufacturer.
12) Use only with the cart, stand, tripod, bracket, or table specified by the manufacturer, or sold with the
apparatus. When a cart is used, use caution when moving the cart / apparatus combination to avoid injury
from tip-over.
13) Unplug this apparatus during lightning storms or when unused for long periods of time.
14) Refer all servicing to qualified service personnel. Servicing is required when the apparatus has been damaged in any way,
such as power-supply cord or plug is damaged, liquid has been spilled or objects have fallen into the apparatus, the apparatus
has been exposed to rain or moisture, does not operate normally, or has been dropped.
15) Operate only from the type of power source indicated on the marking label. If you are not sure of the type of power supplied to
your home consult your television dealer or local power company.
16) Follow all warnings and instructions marked on the LCD TV.
17) Never push objects of any kind into this LCD TV through cabinet
slots as they may touch dangerous voltage points or short out parts
that could result in a fire or electric shock. Never spill liquid of any
kind on the LCD TV.
18) If an outside antenna is connected to the tele vision equipment,
be sure the antenna system is grounded so as to provide some
protection against voltage surges and built up static charg es.
In the U.S. Section 810-21 of the National Electrical Code
provides information with respect to proper grounding of the mast
and supporting structure, grounding of the lead-in wire to an
antenna discharge unit, size of grounding conductors, location of
antenna discharge unit, connection to grounding electrodes, and
requirements for the grounding electrode.
EXAMPLE OF ANTENNA
GROUNDING AS PER
(NEC) NATIONAL
ELECTRICAL
CODE
GROUND CLAMP
ELECTRIC
SERVICE
EQUIPMENT
POWER SERVICE GROUNDING
ELECTRODE SYSTEM
(NEC ART 250, PART H)
ANTENNA
LEAD-IN WIRE
ANTENNA
DISCHARGE UNIT
(NEC SECTION 810-20)
GROUNDING
CONDUCTORS
(NEC SECTION 810-21)
GROUND CLAMPS
4 5
19) An outside antenna system should not be lo cated in the vicinity of overhead power lines or other electric light or power circuits,
or where it can fall into such power lines or circuits. When installing an outside antenna system extreme care should be taken
to keep from touching such power lines or circuits as contact with them might be fatal.
20) Unplug this LCD TV from the wall outlet, and refer servicing to qualified service personnel under the following conditions:
a. When the power cord or plug is damaged or frayed.
b. If liquid has been spilled into the LCD TV.
c. If the LCD TV has been exposed to rain or water.
d. If the LCD TV does not operate normally by following the operating instructions.
Adjust only those controls that are covered by the operating instructions as improper adjustment of other
e. If the LCD TV has been dropped or the cabinet has been damaged.
f. When the LCD TV exhibits a distinct change in performance - this indicates a need for service.
21) When replacement parts are required, be sure the service technician uses replacement parts specified by the manufacturer
that have the same characteristics as the original parts. Unauthorized substitutions may result in fire, electric shock, or other
hazards.
22)WARNING : TO REDUCE THE RISK OF FIRE OR ELECTRIC SHOCK, DO NOT EXPOSE THIS APPARATUS TO RAIN,
23)WARNING : SMALL PARTS CAN PRESENT CHOKING HAZARD IF ACCIDENTALLY SWALLOWED. KEEP SMALL
24)CAUTION : TO PREVENT ELECTRIC SHOCK DO NOT USE THIS PLUG WITH A RECEPTACLE OR OTHER OUTLET
25)CAUTION : USE WITH OTHER STAND MAY RESULT IN INSTABILITY POSSIBLY CAUSING INJURY.
26)CAUTION : DANGER OF EXPLOSION IF BATTERY IS INCORRECTLY REPLACED. REPLACE ONLY WITH THE SAME
27)CAUTION : This LCD TV is for use only with the following optional accessories. Use with any other type of optional
NOTE : This equipment is designed to operate in North America and other countries where the broadcasting system and AC
This product utilizes tin-lead solder, and has a fluorescent lamp containing a small amount of mercury. Disposal of
Ŷ
these materials may be regulated in your community due to environmental considerations. For disposal or re cycling
information please contact your local authorities, or the Electronics Industries Alliance: www.eiae.org.
controls may result in damage and will often require extensive work by a qualified technician to restore the LCD
TV to normal operation.
MOISTURE, DRIPPING OR SPLASHING.
DO NOT PLACE LIQUID CONTAINERS (FLOWER VASES, CUPS, COSMETICS, ETC.) ABOVE THE SET.
(INCLUDING ON SHELVES ABOVE, ETC.)
PARTS AWAY FROM YOUNG CHILDREN.
DISCARD UNNEEDED SMALL PARTS AND OTHER OBJECTS, INCLUDING PACKAGING MATERIALS
AND PLASTIC BAGS/SHEETS TO PREVENT THEM FROM BEING PLAYED WITH BY YOUNG CHILDREN,
CREATING THE POTENTIAL RISK OF SUFFOCATION.
UNLESS THE BLADES CAN BE FULLY INSERTED TO PREVENT BLADE EX POSURE.
OR EQUIVALENT TYPE.
accessories may cause instability which could result in the possibility of injury.
(All of the following accessories are manufactured by Matsushita Electric Industrial Co., Ltd.)
• Wall-hanging bracket (Vertical) :
TY-WK23LR2W (TC-23LX60)
TY-WK32LR2W (TC-26LX60C, TC-26LX60L, TC-32LX60C, TC-32LX60L)
Always be sure to ask a qualified technician to carry out set-up.
house current are exactly the same as in North America.
Federal Communication Commission Information
This equipment has been tested and found to comply with the limits for a TV Broadcast Receiver, pursuant to Part 15 of
the FCC Rules. These limits are designed to provide reasonable protection against harmful interference in a residential
installation. This equipment generates, uses and can radiate radio frequency energy and, if not installed and used in
accordance with the instructions, may cause harmful interference to radio communications. However, there is no guarantee
that interference will not occur in a particular installation. If this equipment does cause or receive interference, which can be
determined by turning equipment off and on, the user is encouraged to try to correct the interference by one or more of the
following measures:
Reorient or relocate the TV antenna.
Increase the separation between TV and other equipment.
Connect TV into separate outlet from other equipment.
Consult the dealer or an experienced radio / TV technician for help.
FCC Caution: Any changes or modifications not expressly approved by the party responsible for compliance could void
the user’s authority to operate this equipment.
Page 4

Accessories/Options
Check you have all the items shown.
Accessories
Remote Control
Ƒ
Transmitter
EUR7613Z90R
•
Batteries for the Remote
Ƒ
Control Transmitter
AA Battery
•
(2)
AC Plug Converter
Ƒ
(TC-26LX60L, TC-32LX60L)
How to remove the TV-Stand
1 2
Remove two screws
Pull out the plastic portion
Foam mat or thick soft cloth
Remove four screws
Pull out the metallic portion
Product Registration Card
Ƒ
(U.S.A.)
push
Ƒ
1
slide open
2
Note the correct
polarity (+ or -).
Caution
Please contact your nearest Panasonic
dealer to purchase the recommended wallhanging bracket. For additional details,
please refer to the wall-hanging bracket
installation manual.
Wall-hanging bracket
(vertical)
TY-WK23LR2W
•
(TC-23LX60)
close
Operating Instructions
Customer Care Plan Card
(U.S.A.)
Installing remote’s batteries
Caution
Incorrect installation may cause battery leakage and corrosion,
•
resulting in damage to the remote control unit.
Do not mix old and new batteries.
•
Do not mix different battery types (such as alkaline and
•
manganese batteries).
Do not use rechargeable (Ni-Cd) batteries.
•
Do not burn or break batteries.
•
Make a note of the remote control codes before changing
•
batteries in case the codes are reset. (p. 23-24)
Optional accessory
WARNING
Failure to use a Panasonic bracket or choosing to mount the unit
•
yourself will be done at the risk of the consumer.
Any damage resulting from not having a professional installer
mount your unit will void your warranty.
Always be sure to ask a qualified technician to carry out set-up.
•
Incorrect fitting may cause equipment to fall, resulting in injury
and product damage.
Do not mount this LCD Television directly below ceiling lights
•
(such as spotlights, floodlights or halogen lights) which typically
give off high heat. Doing so may warp or damage plastic cabinet
parts.
Ƒ
Warranty Card
Ƒ
(Mexico)
Receiver Location
Locate at a comfortable distance for viewing. Avoid placing where sunlight or other bright light (including reflections)
will fall on the screen.
Use of some types of fluorescent lighting can reduce remote control transmitter range.
Adequate ventilation is essential to prevent internal component failure. Keep away from areas of excessive heat or
moisture.
How to use the LCD stand
Adjust the stand to your desired angle.
[TC-23LX60]
The stand angle can be adjusted between 5° forward and
10° back, and rotated 20° to the right / left.
[TC-26LX60C / TC-26LX60L / TC-32LX60C / TC-32LX60L]
The stand angle can be rotated 20° to the right / left.
10
5
Quick Start Guide
Accessories/Options
TY-WK32LR2W
•
(TC-26LX60C, TC-26LX60L,
TC-32LX60C, TC-32LX60L)
6 7
Page 5
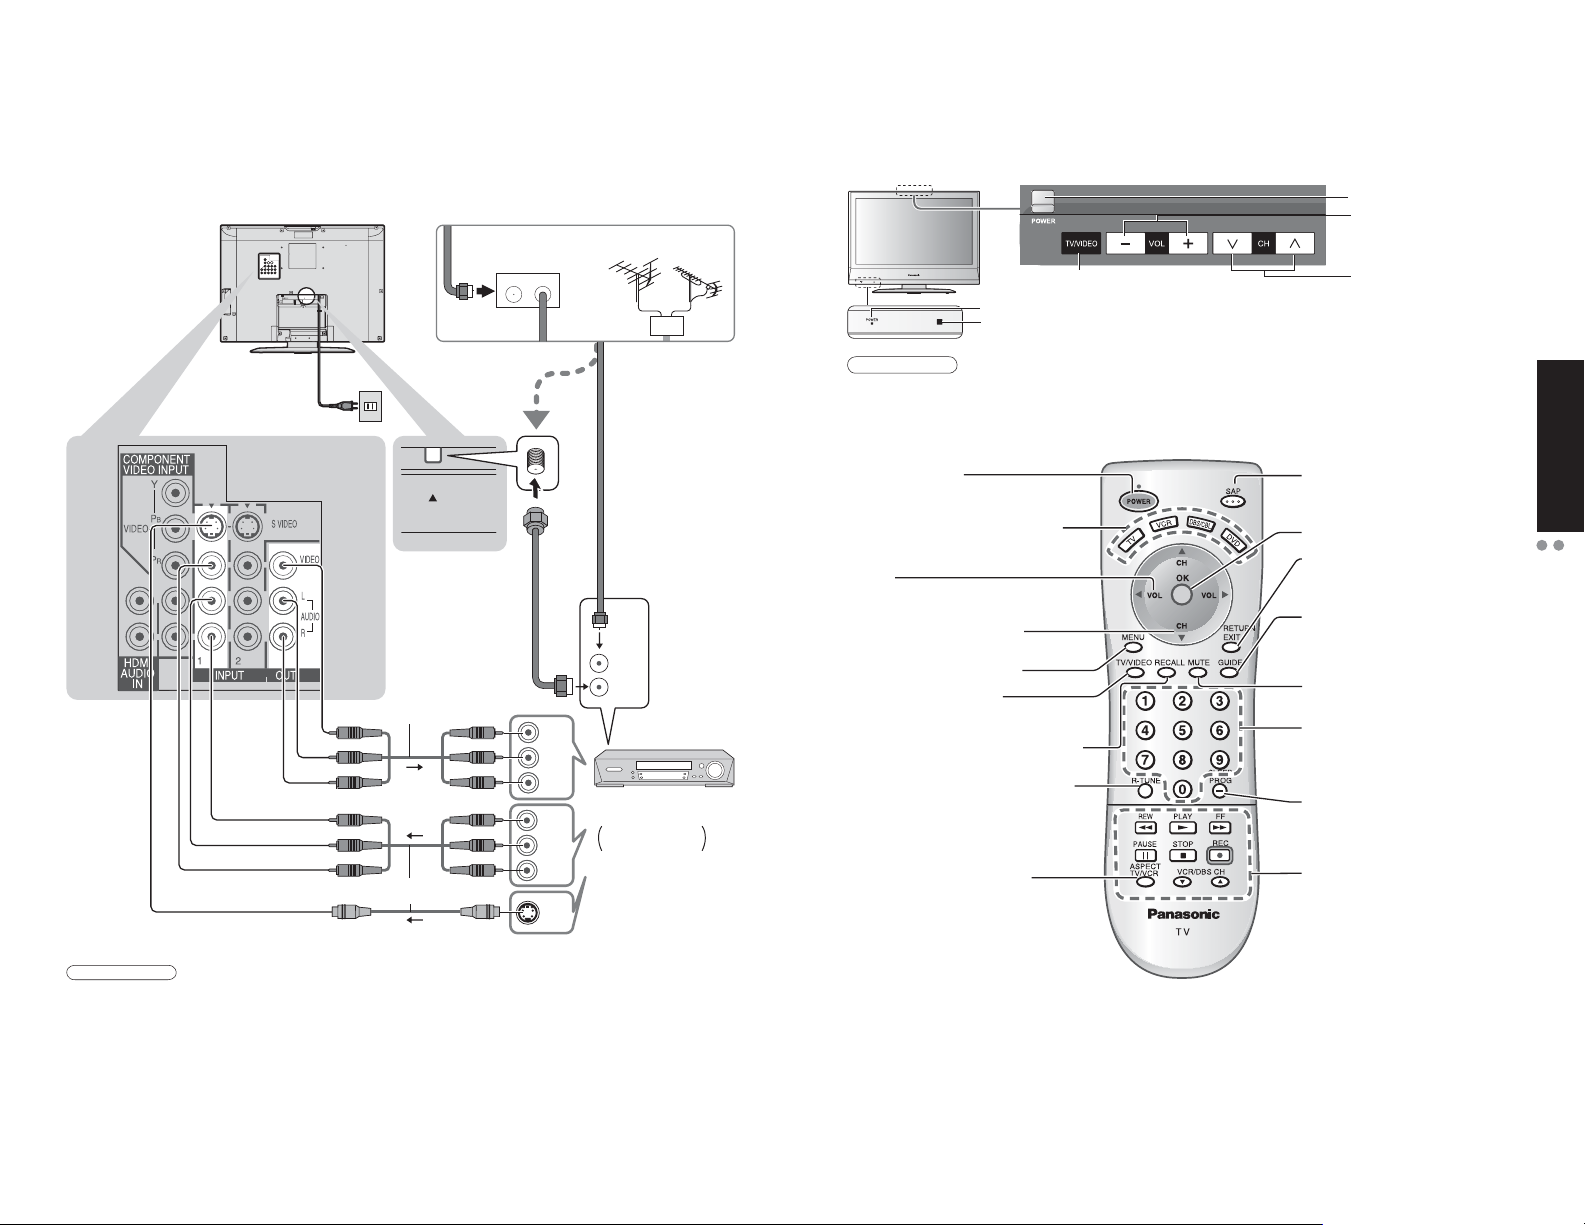
Connection
Identifying Controls
Watching TV
Ŷ
[example: TC-32LX60C]
AV
IN
Back of the unit
Power Cord
(Connect after all the other
connections are complete.)
POWER button
Volume
Cable BOX
ANT
IN OUT
or
ANT
To record TV shows
S Video signals have
priority.
Video
IN
Audio
IN
R
Video
OUT
Audio
OUT
R
S Video
OUT
L
L
VHF/UHF aerial
or
ANT IN
ANT OUT
Video recorder
with TV Tuner
DVD Recorder /
VCR
Switches TV/VIDEO
Power indicator
Remote control sensor
Within about 23 feet (7 meters) in front of the TV set.
Note
The TV consumes some power as long as the power cord is inserted into the wall outlet.
•
Turns power On/Off
(used when the unit’s Power button is on)
Sets the remote to communicate with
other equipment (p. 18)
Volume
Menu navigations
Selects channels in sequence
Menu navigations
Displays Main Menu (p. 12-13)
Selects input mode (p. 11)
Displays or removes the channel banner
(p. 10)
Switches to previously viewed channel
and input mode.
Changes aspect ratio
(p. 10, 26)
(on : red, off : no light)
Selects Audio Mode for TV Viewing
(p. 10)
Selects/OK/Change
RETURN
Exit (from the menu)
GUIDE for DBS
Sound mute On/Off
Numeric keypad to select
any channel or press to enter
alphanumeric input in menus. (p. 10)
Sleep timer (MINUTES) (p. 10)
Direct channel access for DBS
External equipment operations
(p. 11, 22) (VCRs, DVDs, etc.)
Selects channels
in sequence
(to previous menu)
Quick Start Guide
Identifying Controls
Connection
Note
All cables and external equipments shown in this book are not supplied with the TV.
•
For additional assistance, visit us at: www.panasonic.com
•
When connecting video cables, priority is given to the S Video cable when both the S VIDEO input terminal and the
•
VIDEO input terminal are connected.
Some programs contain a copyright protection signal to prevent VCR recording.
•
www.panasonic.ca
8 9
Page 6
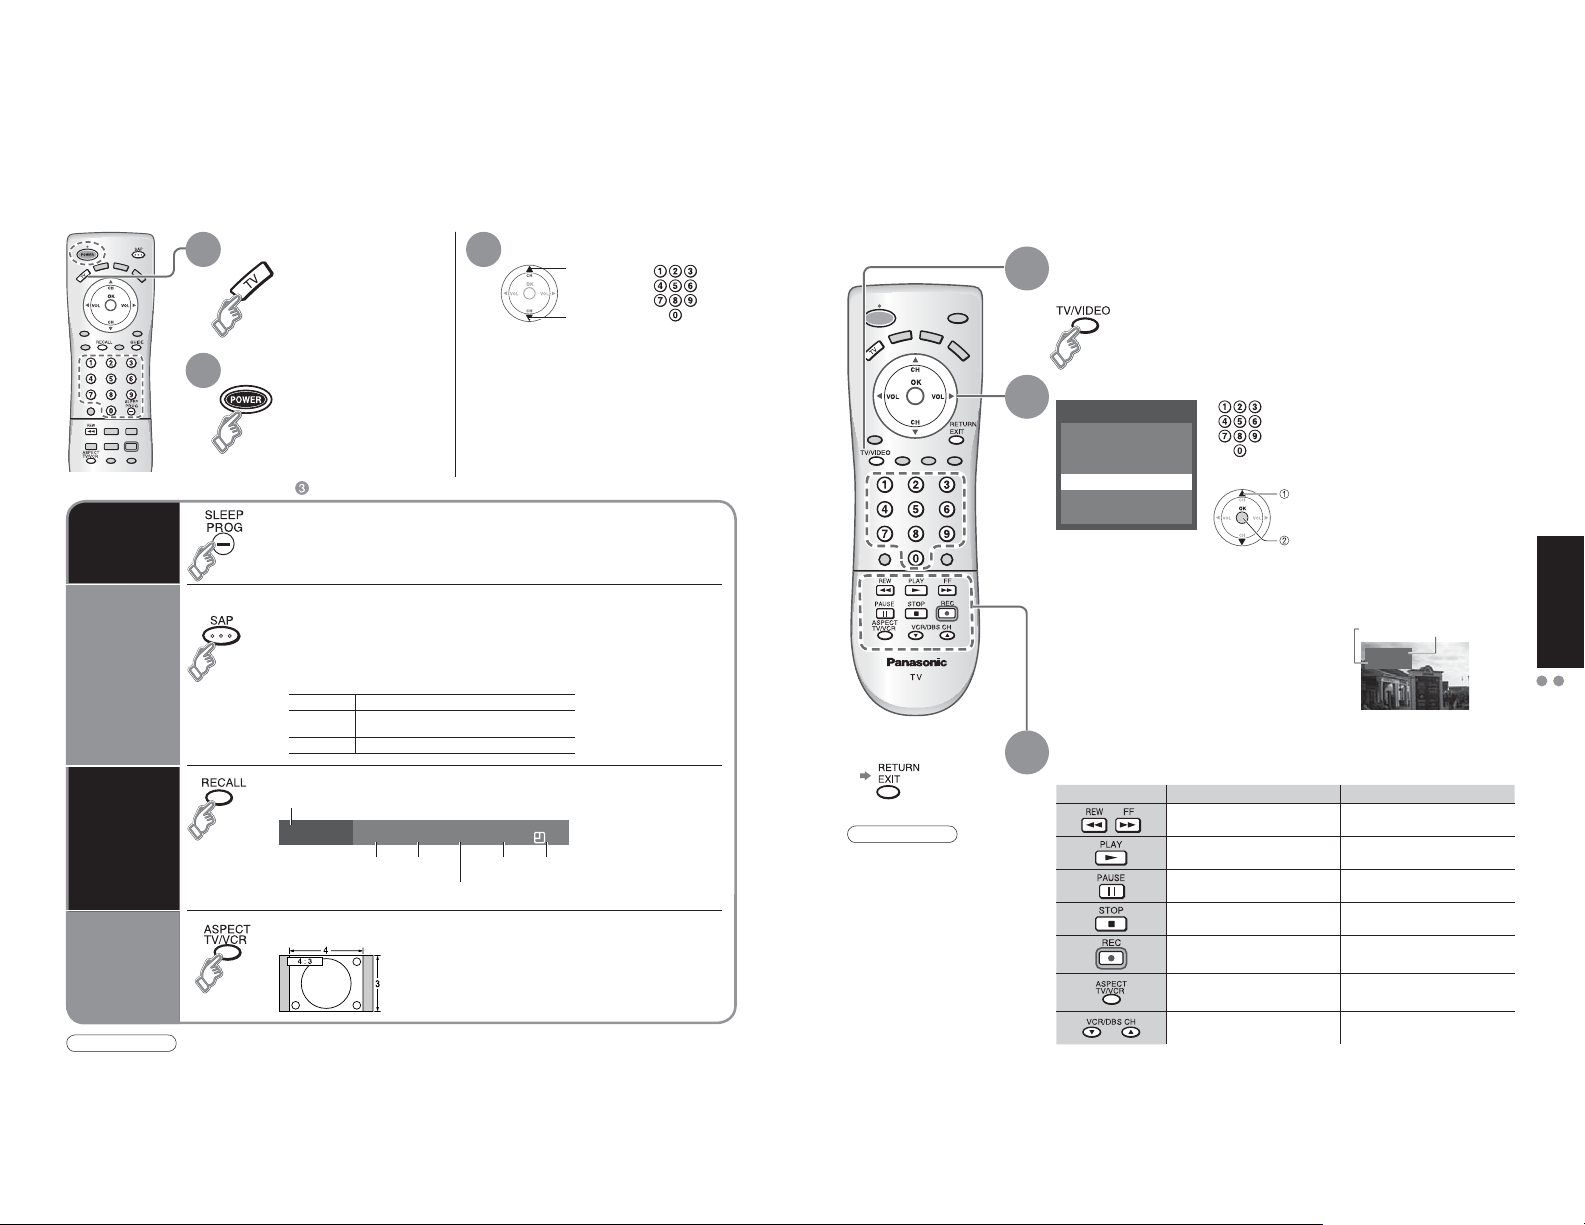
Watching TV
Watching Videos and DVDs
Connect cable Box when watching cable TV. (p. 8)
Switch to TV mode
1 3
Turn power on
2
Other Useful Functions (Operate after )
Ŷ
Switches the unit OFF in a preset amount of time from 0 to 90
Sleep Timer
Selects Audio Mode for TV Viewing
Ŷ
Listen
with SAP
(Secondary
Audio
Program)
Information
Recall
Change
aspect
ratio
Note
Reselect “Cable” or “Antenna” in “ANT in” of “Auto program” to switch the signal reception between cable TV and
•
antenna. (p. 15)
The channel number and volume level remain the same even after the TV is turned off.
•
10 11
minutes in 30 minute intervals.
0/30/60/90 (minutes)
•
Press SAP to select the desired audio mode.
• Each press of SAP will change the audio mode. (Stereo/SAP/Mono)
• Red display : With signal
White display : No signal
White display (All modes) : Mono
Stereo Two channel Audio reception.
Second Audio Programming
SAP
( typically used for bilingual audio ).
Mono Select when stereo signal is weak.
Displays or removes the channel banner.
Ch/input mode
10
Change the aspect (p. 26)
SAP
SAP Signal
resolution
Picture mode
Press button to cycle through the aspect modes.
•
• 480i, 480p:FULL/JUST/4:3/ZOOM
• 1080i, 720p:FULL/H-FILL/JUST/4:3
Select a channel number
up
down
Vivid1080i
Full
30
Sleep timer
Aspect
remaining time
ratio
or
Some Panasonic equipment connected to the TV unit can be operated with the remote control.
Programming the remote control is necessary to operate other manufacturers’ products. (p. 18, 23-24)
With VCR or DVD turned On
Switch to external input
1
Press to display the Input select menu.
Select the input mode
Press to exit or return
Ŷ
to previous screen
Note
For details, see the
•
manual of the other
equipment
or ask your local
dealer.
2
Input select
[1] TV
[2] Component
[3] HDMI
[4] Video1
[5] Video2
[6] Video3
[example]
Video 3 is not available for TC-23LX60.
•
The terminal and label of the connected
•
equipment is indicated.
To label each of the connected equipment
(p. 14)
Operate
3
the VCR or DVD with the remote control
Rewind/Fast Forward Reverse/Forward
Play Play
Pause Pause
Stop Stop
VCR Record
TV/VCR Open/Close
Channel Down/UP Slow Reverse/Forward
(For other operations, see p. 22)
or
VCR DVD
Press the corresponding
NUMBER key on the Remote
Control to select the input of
your choice.
select
Press to select the input of your
choice, then press “OK”.
If during selection, no action
•
is taken for several seconds,
enter
the Input selection menu is
exited.
Label
Video1
VCR
[example]
-
Terminal
(example)
Watching TV
Viewing
Watching Videos and DVDs
Page 7

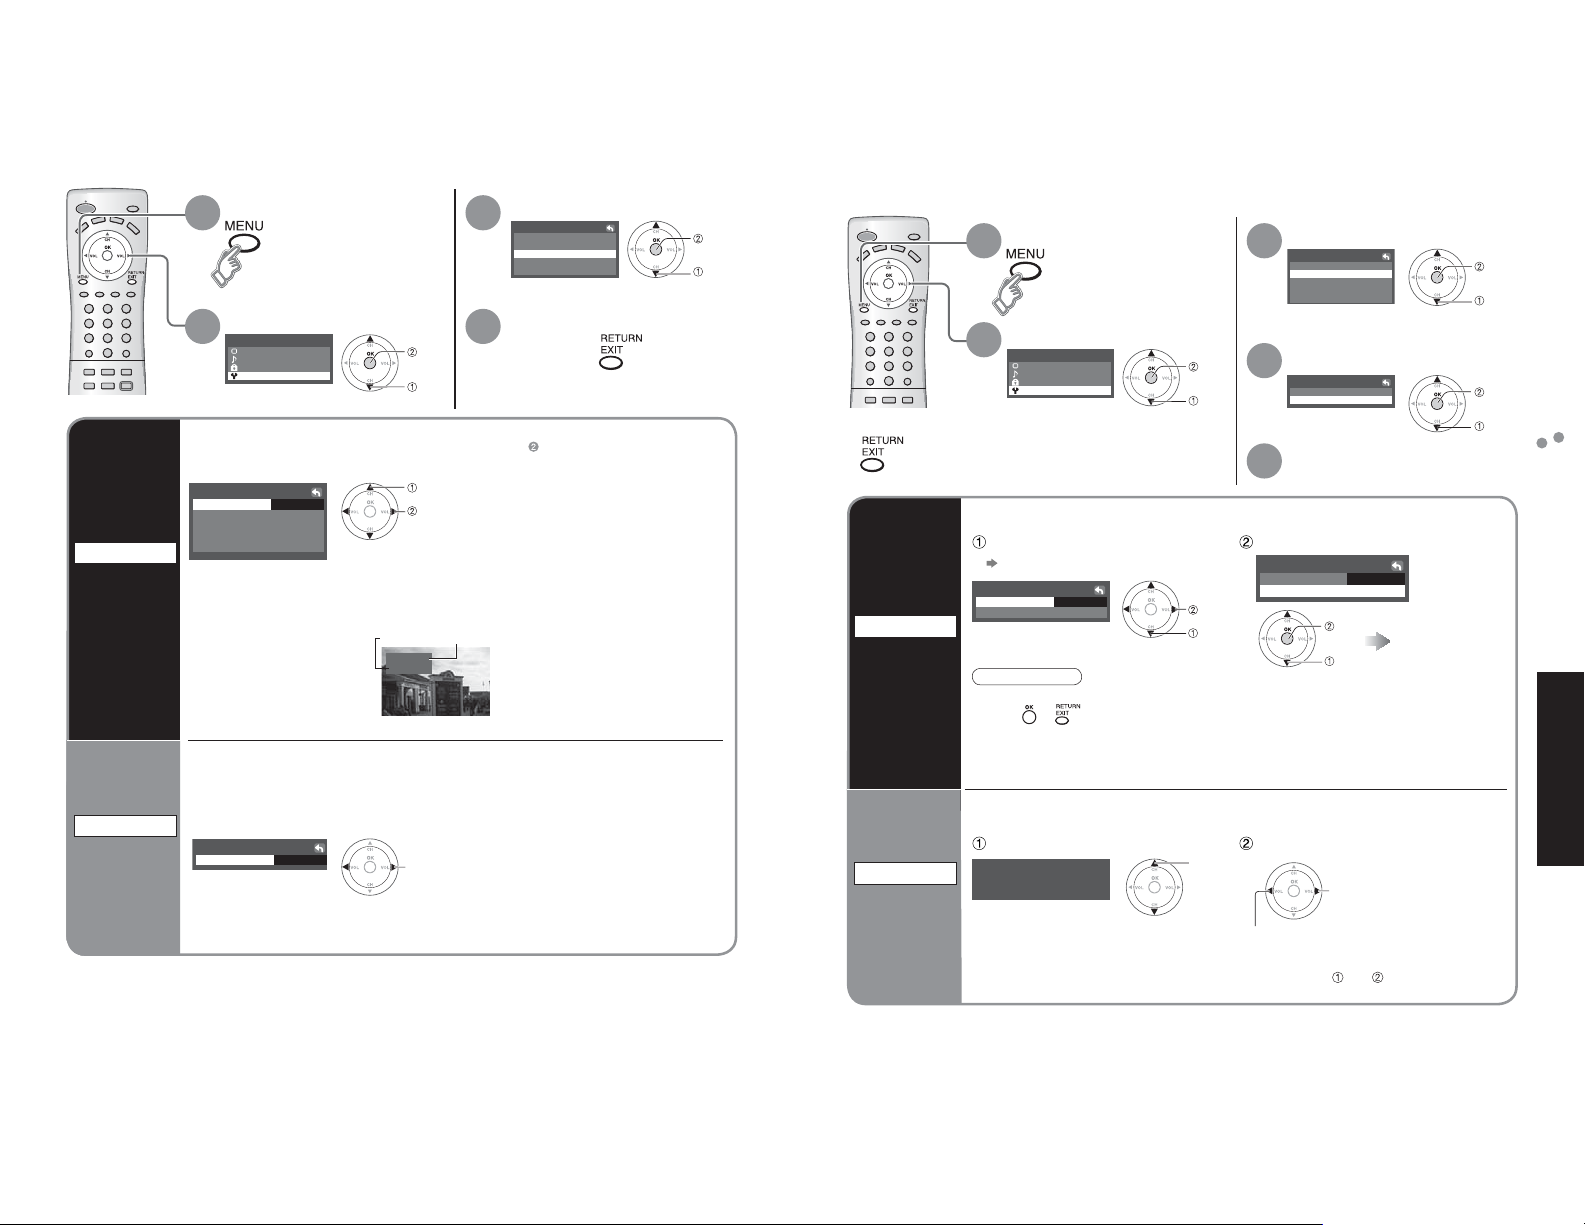
How to Use Menu Functions
Menu list
select
next
select
adjust
or
select
Ŷ
Menu Item Adjustments/Configurations (alternatives)
Normal
Pic. mode
Back light
Picture, Brightness,
Color, Tint, Sharpness
Color temp
AI picture
Picture
Zoom adjust
Video NR
3D Y/C filter
Other adjust
Color matrix
Black level
Normal
Bass
Treble
Balance
Audio
AI sound
Other adjust
Surround
HDMI in
Audio leveler
SAP
Lock
Language
Program channel
Input labels
CC
Setup
Auto power on
Other adjust
Prog-out stop
Ctrl with HDMI
Power save
Resets all picture adjustments to factory default settings except for “Other adjust”
Basic picture mode (Vivid/Standard/Cinema) (p. 27)
Adjusts luminance of the back light.
Adjusts color, brightness, etc. for each picture mode to suit your
taste
Selects level of warm colors (red) and cool colors (blue) (Warm/Cool/Normal)
Controls dark areas without affecting the black level or brightness in the overall picture (On/Off)
Adjusts vertical alignment and size when aspect setting is “ZOOM” (p. 26)
Reduces noise, commonly called snow. Leave off when receiving a strong signal. (On/Off)
Minimizes noise and cross-color in the picture. (On/Off)
Not valid on component and HDMI.
Selects image resolution of component-connected devices (SD/HD)
SD: normal vision HD: high-definition vision
Only 480 p signal accepted; regular TV (NTSC) is not available.
Selects Dark or Light depending on the picture conditions, when selecting the video or component
input.
The dark scene becomes easy to see. (Dark/Light)
Fixed to Dark when selecting TV mode.
Fixed to Light when selecting HDMI mode.
Reset Bass, Treble and Balance adjustments to factory default settings.
Increase or decrease the bass response.
Increase or decrease the treble response.
Emphasize the left / right speaker volume.
Equalize overall volume levels across all channels and VIDEO inputs. (On/Off)
Enhances audio response when listening to stereo. (On/Off)
Selects according to the signal when HDMI is connected (Auto/Digital/Analog)
Auto: Automatically selects Analog / Digital signal
Minimizes volume disparity after switching to external inputs
Selects Audio Mode for TV viewing (Stereo/ SAP/Mono)
To change the mode using SAP button. (p. 10)
Locks the programs (p. 16-17)
Selects the screen menu language
Sets receiving channels. (p. 15)
Displays labels of external equipments (p. 14)
Displays subtitles (Closed Caption) (p. 14)
Sets how to power on the TV. (Set/Off)
Set : Connect power cord plug to Cable box etc. and control TV’s On/Off on the connected
equipment. (The Sleep Timer will not function if Auto power on is set.)
Off : Supply Power from wall outlet and control TV’s On/Off on TV side.
To prevent howling and image oscillation, stops output of the pictures and audio specified in this
menu. (p. 21) (Off/Comp./HDMI/Video 1/Video 2/Video 3)
Video 3 is not available for TC-23LX60.
Comp./HDMI cannot output video signals regardless of “Prog-out stop” setting.
Controls equipments connected to HDMI terminals. (p. 19, 20) (On/Off)
(for TC-23LX60, TC-26LX60C and TC-32LX60C only)
Reduces screen brightness to lower power consumption. Eye-friendly for viewing in a dark room
(Standard/Saving)
In VIDEO mode, the Audio menu and Setup menu give a smaller number of options.
•
Picture
Brightness
Color
+20
0
0
Normal
Pic. mode
Back light
Tint
Sharpness
Color temp
AI picture
Zoom adjust
Video NR
3D Y/C filter
Color matrix
Black level
Normal
Bass
Treble
Balance
AI sound
Surround
HDMI in
Audio leveler
SAP
Language
Program channel
Input labels
CC
Auto power on
Prog-out stop
Ctrl with HDMI
Power save
Standard
Cool
Light
Auto
Stereo
Standard
Set
+20
0
0
On
On
Off
Off
(picture, sound quality, etc.)
SD
Set
+ 4
0
0
On
Off
0
Off
Off
On
Various menus allow you to select settings for the picture, sound,
and other functions so that you can enjoy watching TV with your
preferences set.
Display menu
1
Displays the functions that
•
can be set (varies according
to the input signal)
Select the menu
2
Menu
Picture
Audio
Lock
Setup
Select the item
3
Picture 1/2
Normal
Picture
Brightness
Color
Tint
Sharpness
(example: Picture menu)
Set
StandardPic. mode
+20Back light
+20
0
0
0
0
Adjust or select
4
Picture 1/2
Press to exit or return
Ŷ
to previous screen
Normal
Picture
Brightness
Color
Tint
Sharpness
(example: Picture menu)
Set
StandardPic. mode
+20Back light
+20
0
0
0
0
12 13
How to Use Menu Functions
Advanced
Page 8
CC
Mode off
Setup
Language
CC
Input labels
Other adjust
Program channel
Input Labels/Closed Caption
Editing and Setting Channels
Input labels
Display
labels of
external
equipment
CC
Display
Closed
Caption
Display menu
1
Select “Setup”
2
Menu
Picture
Audio
Lock
Setup
The labels of equipment connected to external input terminals can be indicated for easy
recognition on the screen. (In selecting input mode of p. 11
Select the terminal and the label of the external equipment
Input labels
Video1
Video2
Video3
Terminal: Comp./HDMI/Video1-3
•
Label: SKIP*/VCR/DVD/CABLE/DBS/PVR/GAME/AUX/[BLANK]
•
* If “SKIP” is selected for a
non-connected terminal,
its input is skipped when
switched with TV/VIDEO
button.
The television includes a built-in decoder that is capable of providing a visual display of the
audio portion. The program viewed must provide Closed Captioning (CC) for the television to
display it. (p. 26)
Select the desired mode
Ŷ
SKIPComp.
GAMEHDMI
VCR
AUX
Video 3 is not available for TC-23LX60.
•
Label
Video1
VCR
[example]
select
next
select
select the terminal
set the label
Select “Input labels” or “CC”
3
Setup
Language
Program channel
Input labels
CC
Other adjust
Set
4
Press to exit
Ŷ
)
Terminal
Off:
CC1-4:
T1-4:
When not using, select “Off”.
Information related to pictures
(Appears at bottom of screen)
Textual information
(Appears over entire screen)
next
select
The current channel settings can be changed according to your needs and reception conditions.
Press to exit
Ŷ
Auto program
Set
automatically
Manual program
Set
Display menu
1
Select “Setup”
2
Menu
Picture
Audio
Lock
Setup
Automatically searches and adds active channels to memory.
Select “ANT in” Select “Start scan”
(Select Cable or Antenna)
Auto program
ANT in
Start scan
Note
All previously memorized channels are erased.
•
When or button is pressed during Auto program, the TV will return to normal
•
viewing. (Channels searched up to that point are added.)
After Auto program finishes, the lowest channel number added will be displayed.
•
When there is no receivable channel, channel 69 (forTV) or channel 125 (for cable TV) is
•
displayed.
Use this procedure when changing the setting of receiving channels or changing the channel
display.
Select Channel Add or delete
Manual program
Enter channel
7
Cable
next
select
set
select
select
Select “Program channel”
3
Select the function
4
Program channel
Auto program
Manual program
Set
5
Auto program
ANT in
Start scan
Cable
start
select
add
(the channel number turns blue)
Settings are made
automatically
manually
delete
(the channel number turns yellow)
next
select
next
select
Editing and Setting Channels
Input Labels/Closed Caption
Advanced
Repeat steps and for other channels.
•
If “Channel lock” (p. 16) is activated and “Auto” or “Manual” is selected, “Enter password.” will be displayed.
•
14 15
Page 9
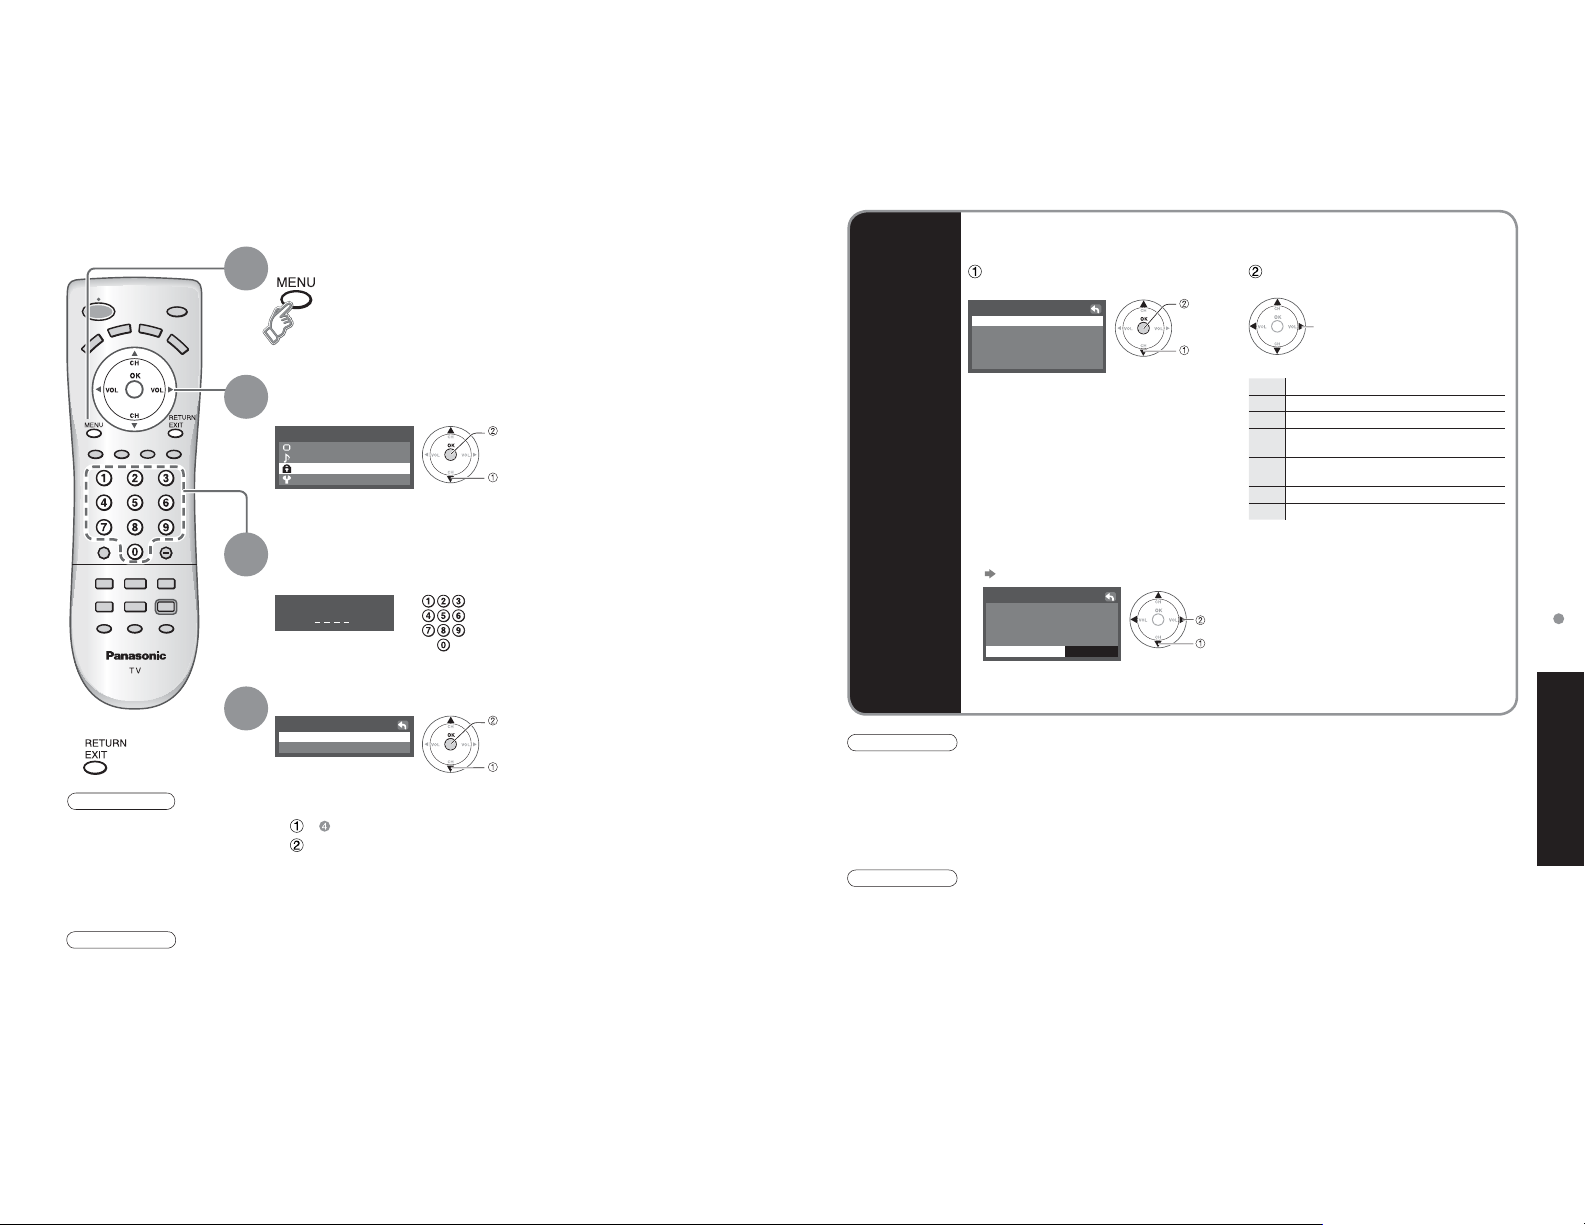
Lock
You can lock out specified channels or shows to prevent children from watching objectionable content.
Display menu
1
Select “Lock”
2
You will be asked to enter your password each time you display the Lock menu.
next
select
If it is the first time to enter the password,
•
enter the number twice in order to
register it.
next
select
Press to exit
Ŷ
Caution
Make a note of your
•
password in case
you forget it. (If you
have forgotten your
password, consult your
local dealer.)
Note
When you select a
•
locked channel,
a message will be
displayed that allows
you to view the
channel if you input
your password.
Menu
Picture
Audio
Lock
Setup
Input your 4-digit password
3
A 4-digit code must be entered to view a blocked program or change rating
settings.
Enter password.
Select “Program lock”
4
Lock
Program lock
Change password
To change the password
Ŷ
In , select “Change password” and press “OK” button
Input the new 4-digit password twice
To select the rating of the program to be locked
Ŷ
To set rating level
Ŷ
“V-chip” technology enables restricted shows to be locked according to TV ratings.
Select the rating category you wish
to follow
Program lock
MPAA
U.S.TV
C.E.L.R.
C.F.L.R.
Monitor out
MPAA:U.S movie ratings
•
U.S.TV:U.S TV program ratings
•
C.E.L.R:Canadian English ratings
•
Block
program
Caution
The V-Chip system that is used in this set is capable of blocking “NR” programs (non rated, not applicable and
•
none) as per FCC Rules Section15.120(e)(2). If the option of blocking “NR” programs is chosen “unexpected and
possibly confusing results may occur, and you may not receive emergency bulletins or any of the following types of
programming:”
• Emergency Bulletins (Such as EAS messages, weather warnings and others)
• Locally originated programming • News • Political • Public Service Announcements • Religious • Sports
• Weather
Note
The Off rating is independent of other ratings.
•
When placing a block on a specific age based rating level, the Off rating and any other more restrictive ratings will
•
also be blocked.
C.F.L.R:Canadian French ratings
•
To disable recording of the locked program
Ŷ
Select “Monitor out” in “Program lock” menu and set to “Off”
Program lock
MPAA
U.S.TV
C.E.L.R.
C.F.L.R.
Monitor out
On : Turns on the monitor terminal output for programs that have been set to “Blocked.”
Off : Turns off the monitor terminal output for programs that have been set to “Blocked.”
Off
Off
set
select
Select the rating to be locked
select
Example of “MPAA” (U.S movie ratings)
Off No rating
G General Audience: All ages admitted
PG Parental Guidance Suggested
Parents Strongly Cautioned: Inappropriate for
PG-13
children under 13
Restricted: Under 17 requires accompanying
R
parent or adult guardian
NC-17 No one 17 and under admitted
X Adults only
To get other information (p. 25)
•
set
select
Lock
Advanced
16 17
Page 10
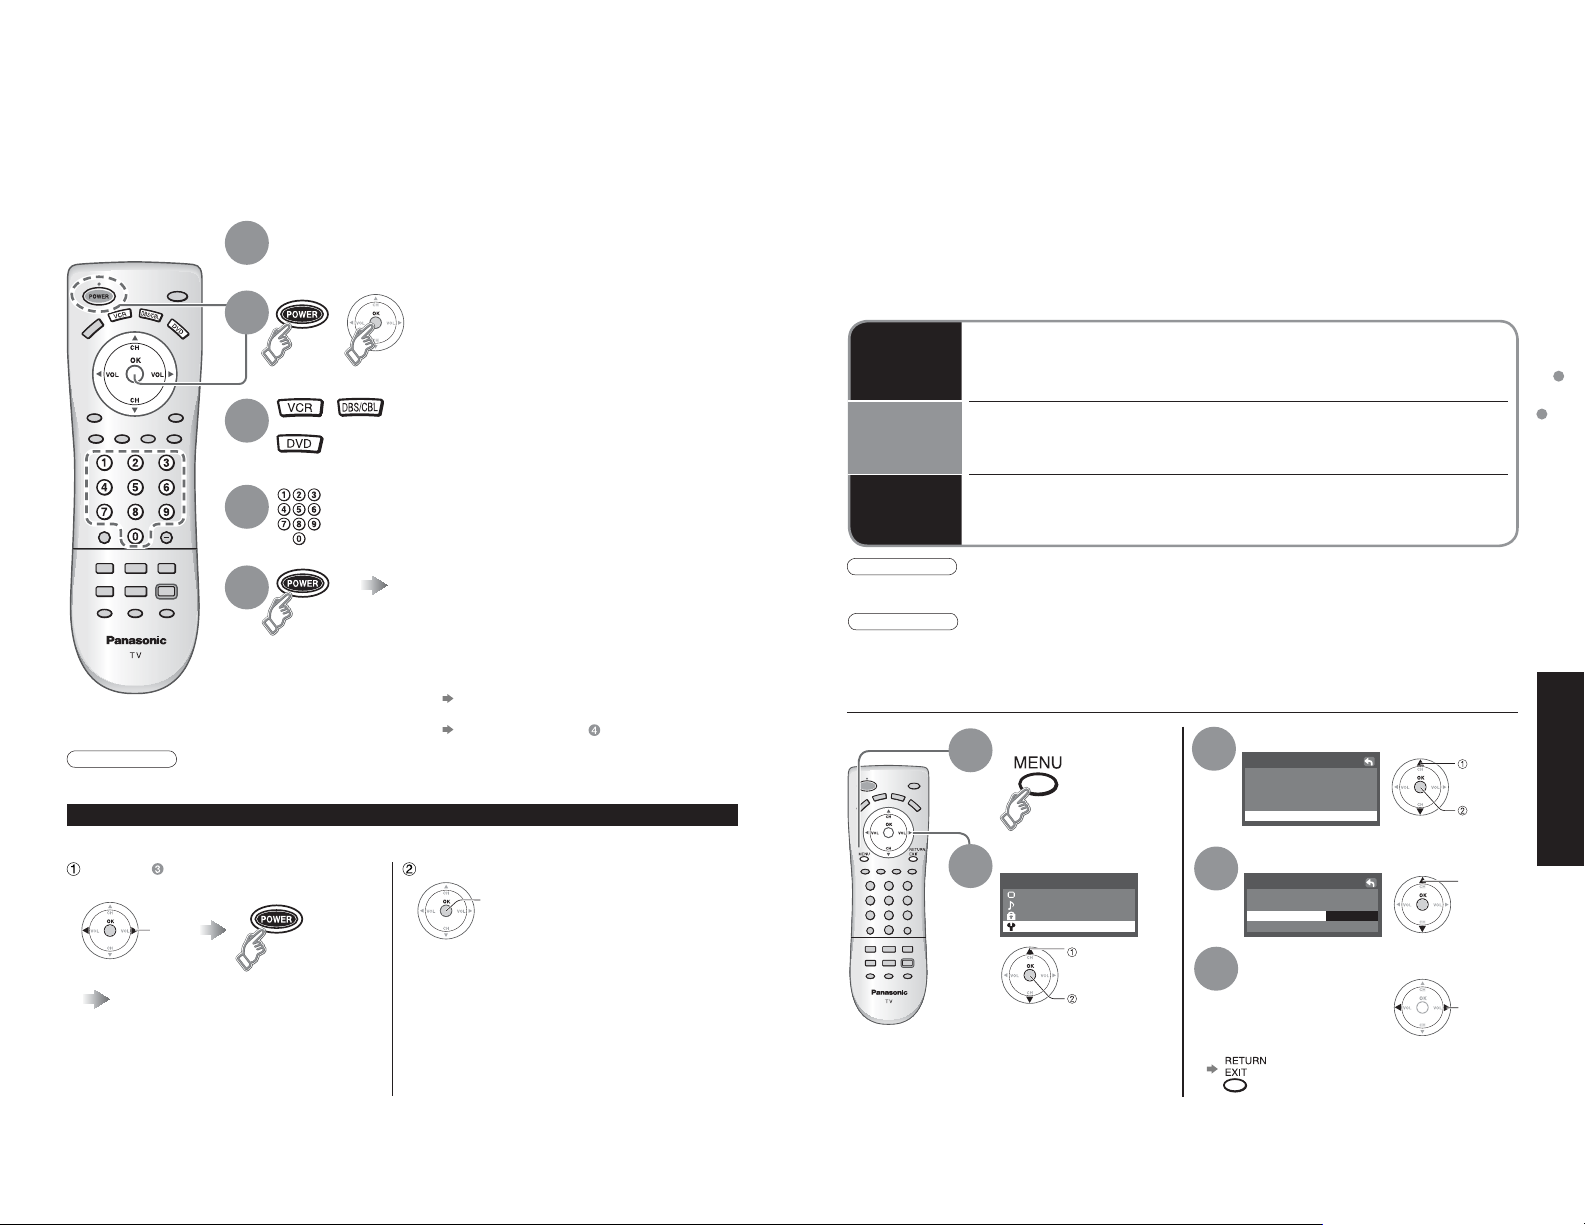
Operating Peripheral Equipment
Control with HDMI “HDAVI Control™”
You can operate other manufacturers’ equipment using this TV’s remote control.
Connect the external equipment to the TV and
1
Power Off the external equipment
2
+
3
4
5
Caution
Registration will fail if the wrong code is input or it takes more than 30 seconds to register.
•
To find a code not listed in the code list
This procedure searches all codes and is called the “sequence method.”
After step above, change the code and
test
change
Operate the equipment with the
remote control (p. 22)
Repeat until the code is found
•
It may take many attempts before the correct
•
code is found
Press both buttons simultaneously
for more than 3 seconds.
Release the buttons when the equipment selection
•
buttons start flashing.
Select the equipment
with the equipment selection button
The selected button remains lit (other buttons are not
•
lit).
Input the equipment’s 4-digit remote
control code
Operate the equipment with the
remote control
The external equipment turns On.
•
If the equipment does not operate with
Ŷ
remote control
When your equipment has a single code
•
Input the remote control code again
When your equipment has multiple codes
•
Change the code with above and test again
When the correct code is found
(p. 23-24)
(p. 22)
store
Newer Panasonic audio-video products with HDMI output connections can be controlled using the TV’s
remote. Limited features such as automatic switching to the TV’s HDMI input are available.
This feature is limited to models incorporating Panasonic’s “Control with HDMI”. Refer to the individual instruction
•
manuals for compatibility information.
Non-HDMI-compliant cables cannot be utilized.
•
It is recommended that you use Panasonic’s HDMI cable.
•
Recommended part number: RP-CDHG15 (1.5 m), RP-CDHG30 (3.0 m), RP-CDHG50 (5.0 m)
[for TC-23LX60, TC-26LX60C and TC-32LX60C only]
Automatic
input
switching
Power on
link
Power off
link
Caution
“Control with HDMI” function does not work in countries other than the USA and Canada.
•
The TV remains on even if the “Control with HDMI” compatible equipment is turned off.
•
Note
Before using HDMI control functions, the connected equipment must also be set. For details, see the operation
•
manual for each piece of equipment.
For equipment connection details, see p. 20.
•
Default setting is “On”. If no HDMI equipment is connected or standard HDMI equipment (non- “Control with
•
HDMI”) is used, set to “Off”. (see below)
When “Ctrl with HDMI” is set to “On”, at the start of HDAVI control compatible equipment’s playback,
the TV’s input automatically switches to the input corresponding to the playback equipment.
If using DIGA operation, the TV’s input automatically switches to DIGA and the DIGA menu
•
is displayed. If the TV’s power is Off, it is automatically switched On.
When “Ctrl with HDMI” is set to “On”, the TV is automatically turned on and switched to the
appropriate HDMI input whenever HDAVI control compatible equipment is initially turned on
and Play mode is selected.
When “Ctrl with HDMI” is set to “On” and the TV is turned off, the connected HDAVI control
compatible equipment is also automatically turned off.
DIGA (Panasonic DVD Recorder) will not turn off if it is still in rec mode.
•
Display menu
1
2
Menu
Picture
Audio
Lock
Setup
select
next
Select “Other adjust”
3
Setup
Language
Program channel
Input labels
CC
Other adjust
Select “Ctrl with HDMI”Select “Setup”
4
Other adjust
Auto power on
Ctrl with HDMI
Power save
Select “On” or “Off”
5
Press to exit or return to previous screen
Ŷ
Standard
Off
OffProg-out stop
On
select
next
select
change
Control with HDMI “HDAVI Control™”
Operating Peripheral Equipment
Advanced
18 19
Page 11

Recommended AV Connections
These diagrams show our recommendations for how to connect the TV unit to your various equipment.
For other connections, consult the instructions of each piece of equipment and the specifications (p. 30).
For additional assistance, please visit our website at: www.panasonic.com
[example: TC-32LX60C][other than TC-23LX60]
www.panasonic.ca
ANT
AV IN
Back of the unit
Power Cord
(Connect after all the other
connections are complete.)
To watch camcorder
Ŷ
images
Camcorder
VCR
DVD Player
M3 plug
To watch digital
Ŷ
Headphones/
Earphones
(not supplied)
Note
Individual HDMI equipment may require additional menu settings specific to each model. Please refer to their
•
20 21
respective operating instruction manuals.
video image
DVD Player or
Set Top Box
(HDMI compatible
machine only)
Control with HDMI
Ŷ
(p. 19)
DIGA
(Panasonic DVD Recorder)
Connect with HDMI cable
•
[TC-23LX60]
Headphones/
Earphones
(not supplied)
HDMI cable HDMI-DVI
conversion
cable
M3 plug
or
AV IN
Audio cable
ANT
Cable TV
or
Cable Box
or
DVD Recorder / VCR
Ŷ
To watch DVDs
Ŷ
DVD Player
Set Top Box
To listen to the TV through
Ŷ
speakers
Amplifier
Note
Set the TV channel to CH3 or CH4 for using Cable Box
•
Connection.
For further information on Cable Box Connection,
•
consult your local cable company.
The picture and audio input signals connected to a
•
terminal specified in “Prog-out stop” (p. 12-13) cannot
be output from “OUTPUT” terminals.
To prevent howling and image oscillation, set the
•
“Prog-out-stop” setting when connecting VCR with
loop-connection. (p. 12)
When equipment (STB, DVD, etc.) is connected to
•
HDMI or COMPONENT terminals, only audio signals
can be obtained. No video signals can be output.
Recommended AV Connections
Advanced
Page 12

Remote Control Operation/Code List
The following explains how to operate external equipment with the remote control.
Register the remote control codes (p. 18) if you want to operate an external equipment of another manufacturer. (p. 23-24)
•
Note
Operation may not be possible depending on the available memory size of the remote control.
•
This remote control is not designed to cover operation of all functions of all models.
Remote Control Operation List
Ŷ
This chart defines which keys are operational after programming (if needed),
while in the selected remote control mode, DTV, CABLE, DBS, VCR, DVD.
KEY NAME VCR MODE
Power Power Power Power
-
-
Vol Down DBS Cursor Left CBL Cursor Left Vol Down
Vol Up DBS Cursor Right CBL Cursor Right Vol Up
-
-
TV Input Switch TV Input Switch TV Input Switch TV Input Switch
Onscreen Display Onscreen Display Recall Onscreen Display
TV Mute TV Mute TV Mute TV Mute
-
-
-
Rewind
Play
Fast Forward
Pause
Stop
VCR Record
TV/VCR Aspect Aspect Open/Close
Channel Down Page Down Page Down Slow Reverse
Channel Up Page Up Page Up Slow Forward
CH Up, Cursor Up CH Up, Cursor Up Skip Up
CH Down, Cursor Down CH Down, Cursor Down Skip Down
DBS Menu CBL Menu
Exit Exit
Guide Guide
0-9 0-9
--
--
--
--
--
-
DBS/CBL MODE
(DBS) (CBL)
PVR Record *
DVD MODE
-
-
-
-
Reverse
Play
Forward
Pause
Stop
1
-
*1: Combination type
Remote Control Code List
Ŷ
Codes for VCR
Brand Code Brand Code
Admiral 335
Aiwa 332
Akai 314, 315, 316, 329
Audio Dynamic 311, 339
Bell & Howell 305, 313
Broksonic 320, 326
Canon 323, 325
Citizen 306
Craig 305, 306, 329
Curtis Mathes 324, 345
Daewoo 301, 324, 343
DBX 310, 311, 339
Dimensia 345
Emerson 303, 319, 320, 325, 326, 343
Fisher 305, 307, 308, 309, 313
Funai 320, 326, 334
GE 324, 333, 345
Goldstar 306
Gradiente 334
Hitachi 300, 323, 345
Instant Replay 323, 324
Jensen 339
JVC 310, 311, 334, 339
Kenwood 306, 310, 311, 339
LXI 300, 305, 306, 307, 308, 309
Magnavox 323, 324, 331
Marantz 310, 311, 339
Marta 306
Memorex 309, 324
MGA 338, 340, 341, 347, 348
Minolta 300, 345
Mitsubishi 338, 340, 341, 347, 348
Multitech 304, 347
NEC 310, 311, 334, 339
Olympic 323, 324
Optimus 306, 321, 328, 335
Orion 320, 326
Codes for Personal Video Recorders
Brand Code
Panasonic Replay
Philips Tivo 101
Sony Tivo 102
100
Panasonic 321, 322, 323, 324
J.C.Penney
Pentax 300, 311, 345
Philco 320, 323, 324, 326, 331, 343
Philips 323, 324, 331
Pioneer 323
Proscan
Quasar 321, 322, 323, 324
Radio Shack 305, 309, 324, 333, 336, 340
RCA
Realistic 305, 309, 324, 336, 340
Samsung 302, 304, 333
Sansui 320, 326, 339, 352
Sanyo 305, 309, 313
Scott
Sears 300, 305, 306, 307, 308
Sharp 335, 336
Shintom 317
Signature 2000 335
Singer 317
Sony 328, 329, 330
Sylvania 323, 324, 331
Tashiro 306
Tatung 310, 311, 339
Teac 310, 311, 339
Technics 321, 322, 323, 324
Teknika 324
Toshiba 301, 346
Vector
Research
Wards 306, 309, 335, 336, 344
Yamaha 305, 310, 311, 339
Zenith 306, 344
300, 305, 310, 311, 324,
339, 345
300, 301, 302, 323, 324,
331, 333, 345, 346
300, 301, 302, 323, 324,
331, 333, 345, 346
301, 302, 304, 309, 320,
326, 338, 340, 347, 348
311
Remote Control Operation/Code List
FAQs, etc.
22 23
Page 13

Remote Control Operation/Code List
Ratings List for Channel Lock
Codes for Cable Box
Brand Code Brand Code
ABC 224
Archer 225, 232
Cableview 205, 232
Citizen 205, 222
Curtis 212, 213
Diamond 224, 225, 232
Eagle 229
Eastern 234
GC Brand 205, 232
Gemini 222
General
Instrument/
Jerrold
Hamlin
Hitachi 203, 224
Macom 203, 204, 205
Magnavox 233
Memorex 230
Movietime 205, 232
Oak 202, 237, 239
Panasonic 209, 210, 214
Philips 206, 207, 228, 229, 230
Pioneer 201, 216
211, 219, 220, 221, 222,
223, 224, 225, 226, 227
212, 218, 240, 241, 242,
245
Pulsar 205, 232
Puser 232
RCA 215
Realistic 232
Regal 212, 218, 240, 241, 242, 245
Regency 234
Rembrandt 205, 232, 237
Samsung 205
Scientific Atlanta 211, 212, 213
Slmark 201, 205
Sprucer 205, 210
Stargate 205, 232
Teleview 201, 205
Texscan 244
Tocom 235
Toshiba 204
Unika 225, 232
Universal 222, 232
Videoway 206
Viewstar 229, 230
Zenith 200, 217
Zenith /Drae
Satellite
200
Codes for DBS
Brand Code Brand Code
Dish Network 105, 115, 116
Echo Star
(Echostar)
Express VU 105, 115
G.E. 106
G.I.
(General Instrument)
Gradiente 114
Hitachi 103, 111, 112
HNS (Hughes) 103
Magnavox 101, 102
105
108
Panasonic 104
Philips 101, 102
Primestar 108
Proscan 106, 109, 110, 113
RCA 106, 109, 110, 113
Sony 107
Star Choice 103, 108
Toshiba 100
Uniden 101, 102
Codes for DVD
Brand Code Brand Code
Denon 100
Ferguson 101
JVC 109
Mitsubishi 105
Nordmende 101
Panasonic 100
Philips 103
Pioneer 102
24 25
RCA 101
Saba 101
Samsung 110
Sharp 108
Sony 104
Technics 100
Thomson 101
Toshiba 103
Yamaha 100
Zenith 107
“V-chip” technology enables you to lock out channels or shows according to
standard ratings set by the entertainment industry. (p. 17)
U.S. MOVIE RATINGS (MPAA)
Ŷ
U.S. TV PROGRAMS RATINGS (U. S. T. V)
Ŷ
Age-based
NR
(Not Rated)
Youth
Guidance
FV: Fantasy/Cartoon Violence. V: Violence S: Sex L: Offensive Language D: Dialogue with sexual content.
CANADIAN ENGLISH RATINGS (C. E. L. R)
Ŷ
CANADIAN FRENCH RATINGS (C. F. L. R)
Ŷ
8 ans+
13 ans+
16 ans+
18 ans+
NO RATING (NOT RATED) AND NA (NOT APPLICABLE) PROGRAMS. Movie has not been rated or
Off
rating does not apply.
GENERAL AUDIENCES. All ages admitted.
G
PARENTAL GUIDANCE SUGGESTED. Some material may not be suitable for children.
PG
PARENTS STRONGLY CAUTIONED. Some material may be inappropriate for children under 13.
PG-13
RESTRICTED. Under 17 requires accompanying parent or adult guardian.
R
NO ONE 17 AND UNDER ADMITTED.
NC-17
ADULTS ONLY.
X
Group
Age-based
Ratings
TV-NR
TV-Y
TV-Y7
TV-G
TV-PG
TV-14
TV-MA
Exempt - Exempt programming includes: news, sports, documentaries and other information programming,
E
talk shows, music videos, and variety programming.
Programming intended for children under age 8. No offensive language, nudity or sexual content.
C
Programming generally considered acceptable for children 8 years and over. No profanity, nudity or sexual content.
C8+
General programming, suitable for all audiences.
G
Parental Guidance suggested. Some material may not be suitable for children.
PG
Programming contains themes or content which may not be suitable for viewers under the age of 14. Parents are
14+
strongly cautioned to exercise discretion in permitting viewing by pre-teens and early teens.
18+ years old. Programming restricted to adults. Contains constant violence or scenes of extreme violence.
18+
Exempt - Exempt programming.
E
General - Programming intended for audience of all ages. Contains no violence, or the violence content is minimal
G
or is depicted appropriately.
8+ General - Not recommended for young children. Programming intended for a broad audience but contains light
or occasional violence. Adult supervision recommended.
Programming may not be suitable for children under the age of 13 - Contains either a few violent scenes or one or
more sufficiently violent scenes to affect them. Adult supervision strongly suggested.
Programming may not be suitable for children under the age of 16 - Contains frequent scenes of violence or intense
violence.
Programming restricted to adults. Contains constant violence or scenes of extreme violence.
Possible Content
Selections
Viewable
Blocked
Viewable
Blocked
FV Blocked
Viewable
Blocked
Viewable
Blocked
D,L,S,V (all selected)
Any combination of D,
L, S, V
D,L,S,V (all selected)
Any combination of D,
L, S, V
D,L,S,V (all selected)
Any combination of L,
S, V
Description
Not Rated.
All children. The themes and elements in this program are specifically
designed for a very young audience, including children from ages 2-6.
Directed to older children. Themes and elements in this program may
include mild physical or comedic violence, or may frighten children under
the age of 7.
General audience. It contains little or no violence, no strong language,
and little or no sexual dialogue or situations.
Parental guidance suggested. The program may contain infrequent
coarse language, limited violence, some suggestive sexual dialogue and
situations.
Parents strongly cautioned. This program may contain sophisticated
themes, sexual content, strong language and more intense violence.
Mature audiences only. This program may contain mature themes,
profane language, graphic violence, and explicit sexual content.
Remote Control Operation/Code List
Ratings List for Channel Lock
FAQs, etc.
Page 14

Technical Information
Closed Caption (CC)
The closed caption is not displayed when you use HDMI connection.
•
If analog connected equipment is used for displaying or recording, closed caption (CC) should be set On/Off on the
•
connected equipment.
The CC mode setting of the TV will not affect the analog input.
If CC is set to On on both the connected equipment and the TV, captions from each unit will overlap.
Aspect Ratio
Let you choose the aspect depending on the format of the received signal and your preference. (p. 10) (e.g.: in case
of 4:3 image)
FULL
•
FULL
Enlarges the 4:3 image horizontally to the screen’s side edges.
(Recommended for anamorphic picture)
H-FILL
•
H-FILL
Enlarges the 4:3 image horizontally to the screen’s side edges.
The side edges of the image are cut off.
ZOOM
•
ZOOM
Enlarges the 4:3 image to the entire screen.
(Recommended for Letter Box)
Zoom adjust
•
Vertical image position and size can be adjusted in “ZOOM.”
Select “Zoom adjust” on the “Picture” menu. (p. 12-13)
V-Position: Vertical position adjustment Size: Vertical size adjustment
To reset the aspect ratio (OK)
•
JUST
•
JUST
Stretches to justify the 4:3 image to the four corners of the
screen.
(Recommended for normal TV broadcast)
4:3
•
Side bar
Standard
(Note that “after image” of the side bar may occur from
displaying it for a long time.)
Note
480i (4:3), 480i (16:9), 480p (4:3), 480p (16:9) : FULL, JUST,
•
4:3 or ZOOM
1080i / 720p : FULL, H-FILL, JUST or 4:3
•
When the signal is 720p/1080i, the aspect mode automatically
•
defaults to Full after turning off the TV, after changing
input mode, or after changed signal resolution other than
720p/1080i.
Control with HDMI “HDAVI Control™”
HDMI connections to some Panasonic equipment allow you to enjoy easy playback.
Set up the equipment to enable this function. Read the manual for the equipment.
•
Switch the TV unit on again with the equipment on when connection or setup is changed.
•
This function may not work normally depending on the equipment condition.
•
The equipment can be operated by TV’s remote control with this function on even if TV is in Standby mode.
•
Image or sound may not be available for the first few seconds when the playback starts.
•
Image or sound may not be available for the first few seconds when Input mode is switched.
•
HDMI connection
HDMI (high-definition multimedia interface) allows you to enjoy high-definition digital images and high-quality sound by connecting
the TV unit and the equipment.
HDMI-compatible equipment (*1) with an HDMI or DVI output terminal, such as a set-top box or a DVD player, can be connected
to the HDMI connector using an HDMI compliant (fully wired) cable.
HDMI is the world’s first complete digital consumer AV interface complying with a non-compression standard.
•
If the external equipment has only a DVI output, connect to the HDMI terminal via a DVI to HDMI adapter cable (*2).
•
When the DVI to HDMI adapter cable is used, connect the audio cable to the audio input terminal.
•
Audio settings can be made on the “HDMI in” menu screen. (p. 12-13)
•
Applicable audio signal sampling frequencies (L.PCM): 48 kHz, 44.1 kHz, 32 kHz
Caution
Use with a PC is not assumed.
•
All signals are reformatted before being displayed on the screen.
•
If the connected equipment has an aspect adjustment function, set the aspect ratio to “16:9”.
•
This HDMI connector is “type A”.
•
Equipment having no digital output terminal may be connected to the input terminal of either “COMPONENT”, “S-VIDEO”, or
•
“VIDEO” to receive analog signals.
The HDMI input terminal can be used with only the following image signals: 480i, 480p, 720p and 1080i
•
Match the output setting of the digital equipment.
For details of the applicable HDMI signals, see below.
•
Input signals that can be displayed
* Mark: Applicable input signal for Component (Y, PB, PR) and HDMI
525 (480) / 60i 15.73 59.94
525 (480) /60p 31.47 59.94
750 (720) /60p 45.00 59.94
1,125 (1,080) /60i 33.75 59.94
Note
Signals other than those shown above may not be displayed properly.
•
The above signals are reformatted for optimal viewing on your display.
•
Vivid (default) : Provides enhanced picture contrast and sharpness for viewing in a well-lit room.
•
Standard : Recommended for normal viewing conditions with subdued room lighting.
•
Cinema : For watching movies in a darkened room. It provides a soft, film-like picture.
•
horizontal
frequency (kHz)
vertical
frequency (Hz)
Pic. mode
(*1): The HDMI logo is displayed on an HDMI-compliant equipment.
(*2): Enquire at your local digital equipment retailer shop.
COMPONENT HDMI
**
**
**
**
Technical Information
FAQs, etc.
26 27
Page 15

Maintenance
First, unplug the Power cord plug from the wall outlet.
Display panel
The front of the display panel has been specially treated. Wipe the panel surface gently using only a cleaning cloth or
a soft, lint-free cloth.
If the surface is particularly dirty, soak a soft, lint-free cloth in a weak detergent solution and then wring the cloth to
•
remove excess liquid. Use this cloth to wipe the surface of the display panel, then wipe it evenly with a dry cloth, of
the same type, until the surface is dry.
Do not scratch or hit the surface of the panel with fingernails or other hard objects. Furthermore, avoid contact
•
with volatile substances such as insect sprays, solvents and thinners; otherwise, the quality of the surface may be
adversely affected.
Cabinet
If the cabinet becomes dirty, wipe it with a soft, dry cloth.
If the cabinet is particularly dirty, soak the cloth in a weak detergent solution and then wring the cloth dry.
•
Use this cloth to wipe the cabinet, and then wipe it dry with a dry cloth.
Do not allow any detergent to come into direct contact with the surface of the LCD TV.
•
If water droplets get inside the unit, operating problems may result.
Avoid contact with volatile substances such as insect sprays, solvents and thinner; otherwise, the quality of the
•
cabinet surface may be adversely affected or the coating may peel off. Furthermore, do not leave it for long periods
in contact with articles made from rubber or PVC.
Power cord plug
Wipe the plug with a dry cloth at regular intervals. (Moisture and dust can lead to fire or electrical shock.)
FAQ
Before requesting service or assistance, please follow these simple guidelines to resolve the problem.
If problem still persists, please contact your local Panasonic dealer or Panasonic
Servicenter for assistance. For details (p. 32, 33)
For additional assistance, please contact us via the website at:
www.panasonic.com/contactinfo
www.panasonic.ca
White spots or
shadow images
(noise)
Check the position, direction,
•
and connection of the aerial.
The LCD panel moves
slightly when it is
pushed with a finger
Clattered sound might
be heard
There are some looseness
•
around the panel to prevent the
damage to the panel.
The panel might move slightly
when it is pushed with a finger,
and clattered sound might be
heard. This is not a malfunction.
28 29
Pictures from external equipment
are distorted when the unit is
connected via HDMI
Is the HDMI cable connected properly?
•
(p. 20-21, 27)
Turn Off the TV unit and equipment, then turn
•
them On again.
Check an input signal from the equipment.
•
(p. 27)
Use equipment compliant with
•
EIA/CEA-861/861B.
The remote control does not work
Are the batteries installed correctly? (p. 6)
•
Has the battery run down?
•
To operate external equipment of other
•
manufacturers, register the
remote control codes. (p. 18, 23-24)
If there is a problem with your TV please refer to the table below to determine the symptoms, then carry out the
suggested check. If this does not solve the problem, please contact your local Panasonic dealer, quoting the model
number and serial number (both found on the rear of the TV).
Symptoms
Picture
Multiple Images
Interference
Normal Picture
No Picture
No color
Poor or Distorted Picture
Normal Picture
Cannot operate with the remote control.
The main unit is hot.
There may be red spots, blue spots,
green spots and black spots on the
screen.
“Control with HDMI” function does not
work
Sound
Noisy SoundSnowy Picture
Normal Sound
Noisy Sound
No Sound
No Sound
Normal Sound
Weak or No Sound
Weak, Wrong or No Sound
Antenna location, direction or connection.
•
Antenna location, direction or connection.
•
Electrical appliances.
•
Cars / Motorcycles.
Fluorescent lights.
Volume level.
•
Sound mute switched on.
STEREO/SAP/MONO
TV set to AV mode.
•
Not plugged into wall outlet.
Not switched on.
Picture / Sound controls set at minimum levels.
Color controls set at minimum levels.
•
Weak signal.
Retune Channel (s).
•
Sound reception may have deteriorated.
•
Set STEREO/SAP/MONO setting to SAP or MONO until reception improved.
The battery/ies is/are exhausted.
•
The batteries’ polarity is wrong.
The remote control sensor is exposed to strong light from a fluorescent lamp, etc.
The main unit radiates heat and some of the parts may become hot. This is
•
not a problem for performance or quality.
Set up in a location with good ventilation.
Do not cover the ventilation holes of the TV with a tablecloth, etc., and do
not place on top of other equipment.
This is a characteristic of liquid crystal panels and is not a problem. The
•
liquid crystal panel is built with very high precision technology giving you
fine picture details. Occasionally, a few non-active pixels may appear on the
screen as fixed points of red, blue, green, or black.
Please note this does not affect the performance of your LCD.
Switch the TV unit on again with the equipment on.
•
Set “Control with HDMI” to “Off”, then set to “On” again. (p. 19)
•
Checks
Maintenance
Frequently Asked Questions
FAQs, etc.
Page 16

Specifications
)
(
)
)
(
)
Limited Warranty (for U.S.A.)
TC-23LX60 TC-26LX60C TC-26LX60L TC-32LX60C TC-32LX60L
Power Source AC 120 V, 60 Hz
Power Consumption
Average use
Maximum Current
Standby condition
Aspect Ratio 16:9
Visible screen size 23.0 ” DIAGONAL
(W × H × Diagonal) 20.0Ǝ ×11.3Ǝ × 23.0 Ǝ
(No. of pixels) 1,049,088 (1,366 (W) × 768(H)) [4,098 × 768 dots]
Sound
Speaker 2.36 ” × 4.7 ” (60 mm × 120 mm) Full-range × 2 pcs
Audio Output 8 W [ 4 W + 4 W ] (10 % THD) 20 W [ 10 W + 10 W ] ( 10 % THD )
Headphones M3 (3.5mm) Jack × 1
Channel Capability VHF/UHF: 2--69, CATV: 1-125
Operating Conditions Temperature : 32 °F -95 °F (0 °C – 35°C)
INPUT 1-2
Connection Terminals
INPUT 3 -
COMPONENT
VIDEO INPUT
HDMI
AUDIO IN
OUTPUT
FEATURES
Dimensions
(W × H × D)
Including TV stand
TV Set only
Weight
[TC-23LX60]
22.2 ” (565 mm)
453 mm
16.2 ” (411 mm)
17.8 ”
15.0 ” (382 mm)
92 W
1.8 A
0.6 W
(58.3 cm DIAGONAL)
(508 mm × 286 mm × 583 mm)
VIDEO : RCA PIN Type × 1 1.0 V [p-p] (75 ȍ)
S VIDEO : Mini DIN 4-pin Y:1.0 V [p-p] (75 ȍ) C:0.286 V [p-p] (75 ȍ)
AUDIO L - R : RCA PIN Type × 2 0.5 V [rms]
Y : 1.0 V [p-p] (including synchronization)
B, PR : ±0.35 V [p-p]
P
AUDIO L-R : RCA PIN Type × 2 0.5 V [rms]
TYPE A Connector × 1
AUDIO L - R : RCA PIN Type × 2 0.5 V [rms]
VIDEO : RCA PIN Type × 1 1.0 V [p-p] (75 ȍ)
AUDIO L - R : RCA PIN Type × 2 0.5 V [rms]
3D Y/C Digital Comb Filter, CLOSED CAPTION, V-Chip
HDMI
Vesa compatible
22.2 Ǝ × 17.8Ǝ × 10.2 Ǝ
(565 mm × 453 mm × 260 mm)
22.2 Ǝ × 16.2 Ǝ × 4.7 Ǝ
(565 mm × 411 mm × 119 mm)
24.2 lb. (11.0
4.7 ” (119 m m
10.2 ” (260 mm)
) NET 34.1 lb. (15.5 ) NET 41.8 lb. (19.0 ) NET
[TC-26LX60C / TC-26LX60L] [TC-32LX60C / TC-32LX60L]
18.6 ” (473 mm)
20.7 ” (525 mm)
AC 120 V - 127 V,
60 Hz
107 W
2.1 A
0.6 W
26.0 ” DIAGONAL
(66.1 cm DIAGONAL)
22.7 ” × 12.8 ” × 26.0 ”
(576 mm × 324 mm × 661 mm)
VIDEO : RCA PIN Type × 1 1.0 V [p-p] (75 ȍ)
AUDIO L - R : RCA PIN Type × 2 0.5 V [rms]
25.9 ” × 20.7 ” × 11.8 ”
(657 mm × 525 mm × 300 mm)
25.9 ” × 18.6 ” × 4.6 ”
(657 mm × 473 mm × 117 mm)
25.9 ” (657 mm)
19.8 ” (504 mm) 19.8 ” (504 mm)
AC 110 V - 220 V,
50/60 Hz
105 W
1.3 A
0.6 W
4.6 ” (117 mm
11.8 ” (300 mm)
AC 120 V - 127 V,
60 Hz
122 W
2.3 A
0.6 W
31.5 ” DIAGONAL
(80.0 cm DIAGONAL)
27.5 ” × 15.4 ” × 31.5 ”
(698 mm × 392 mm × 800 mm)
31.1 ” × 24.2 ” × 11.8 ”
(791 mm × 615 mm × 300 mm)
31.1 ” × 22.2 ” × 4.6 ”
(791 mm × 563 mm × 117 mm)
31.1 ” (791 mm)
22.2 ” (563 mm)
24.2 ” (615 mm)
AC 110 V - 220 V,
50/60 Hz
118 W
1.5 A
0.6 W
117 mm
4.6 ”
11.8 ” (300 mm)
Note
Design and Specifications are subject to change without notice. Weight and Dimensions shown are approximate.
•
30 31
PANASONIC CONSUMER ELECTRONICS COMPANY,
DIVISION OF:
PANASONIC CORPORATION OF NORTH AMERICA
One Panasonic Way
Secaucus, New Jersey 07094
Panasonic LCD Televisions
Limited Warranty
Limited Warranty Coverage
If your product does not work properly because of a defect in materials or workmanship, Panasonic Consumer
Electronics Company or Panasonic Sales Company (collectively referred to as “the warrantor”) will, for the length
of the period indicated on the chart below, which starts with the date of original purchase (“warranty period”), at
its option either (a) repair your product with new or refurbished parts, or (b) replace it with a new or a refurbished
product. The decision to repair or replace will be made by the warrantor.
LCD TV CATEGORIES PARTS LABOR SERVICE
Up to 20’ (diagonal)
21” (diagonal) and larger In Home or Carry-in / Mail in
During the “Labor” warranty period there will be no charge for labor. During the “Parts” warranty period, there will
be no charge for parts. You must carry-in or mail-in your product during the warranty period. If non-rechargeable
batteries are included, they are not warranted. This warranty only applies to products purchased and serviced in the
United States or Puerto Rico. This warranty is extended only to the original purchaser of a new product which was
not sold “as is”. A purchase receipt or other proof of the original purchase date is required for warranty service.
In-Home or Carry-in Service
For In-Home or Carry-In Service in the United States call 1-800-211-PANA(7262) or visit the Panasonic web Site:
http://www.panasonic.com.
For assistance in Puerto Rico call Panasonic Sales Company (787)-750-4300 or fax (787)-768- 2910.
In-Home service requires clear, complete and easy access to the product by the authorized servicer and does
not include removal or re-installation of an installed product. It is possible that certain in-home repairs will not be
completed in-home, but will require that the product, or parts of the product, be removed for shop diagnosis and/or
repair and then returned.
Limited Warranty Limits And Exclusions
This warranty ONLY COVERS failures due to defects in materials or workmanship, and DOES NOT COVER normal
wear and tear or cosmetic damage, nor does it cover markings or retained images on the LCD panel resulting
from viewing fixed images (including, among other things, letterbox pictures on standard 4:3 screen TV’s, or nonexpanded standard 4:3 pictures on wide screen TV’s, or onscreen data in a stationary and fixed location). The
warranty ALSO DOES NOT COVER damages which occurred in shipment, or failures which are caused by products
not supplied by the warrantor, or failures which result from accidents, misuse, abuse, neglect, bug infestation,
mishandling, misapplication, alteration, faulty installation, set-up adjustments, misadjustment of consumer controls,
improper maintenance, power line surge, lightning damage, modification, or commercial use (such as in a hotel,
office, restaurant, or other business), rental use of the product, service by anyone other than a Factory Servicenter or
other Authorized Servicer, or damage that is attributable to acts of God.
THERE ARE NO EXPRESS WARRANTIES EXCEPT AS LISTED UNDER “LIMITED WARRANTY COVERAGE”.
THE WARRANTOR IS NOT LIABLE FOR INCIDENTAL OR CONSEQUENTIAL DAMAGES RESULTING FROM
THE USE OF THIS PRODUCT, OR ARISING OUT OF ANY BREACH OF THIS WARRANTY. (As examples, this
excludes damages for lost time, cost of having someone remove or re-install an installed unit if applicable, or travel to
and from the servicer. The items listed are not exclusive, but are for illustration only.) ALL EXPRESS AND IMPLIED
WARRANTIES, INCLUDING THE WARRANTY OF MERCHANTABILITY, ARE LIMITED TO THE PERIOD OF THE
LIMITED WARRANTY.
Some states do not allow the exclusion or limitation of incidental or consequential damages, or limitations on how
long an implied warranty lasts, so the exclusions may not apply to you.
This warranty gives you specific legal rights and you may also have others rights which vary from state to state. If a
problem with this product develops during or after the warranty period, you may contact your dealer or Servicenter.
If the problem is not handled to your satisfaction, then write to the warrantor’s Consumer Affairs Department at the
addresses listed for the warrantor.
PARTS AND SERVICE (INCLUDING COST OF AN IN-HOME SERVICE CALL, WHERE APPLICABLE) WHICH
ARE NOT COVERED BY THIS LIMITED WARRANTY ARE YOUR RESPONSIBILITY.
1 (ONE) YEAR 1 (ONE) YEAR
PANASONIC SALES COMPANY,
DIVISION OF:
PANASONIC PUERTO RICO, INC.
Ave. 65 de Infanteria, Km. 9.5
San Gabriel Industrial Park
Carolina, Puerto Rico 00985
Carry-In or Mail-in
Limited Warranty (for U.S.A.)
Specifications
FAQs, etc.
Page 17

Customer Services Directory
(for U.S.A.)
Limited Warranty (for Canada)
Customer Services Directory
Obtain Product Information and Operating Assistance; locate your nearest Dealer or Servicenter; purchase
Parts and Accessories; or make Customer Service and Literature requests by visiting our Web Site at:
http://www.panasonic.com/consumersupport
or, contact us via the web at:
http://www.panasonic.com/contactinfo
You may also contact us directly at:
1-800-211-PANA (7262)
Monday-Friday 9 am-9 pm; Saturday-Sunday 10 am-7 pm, EST.
For hearing or speech impaired TTY users, TTY : 1-877-833-8855
Ŷ
Accessory Purchases
Purchase Parts, Accessories and Instruction Books on line for all Panasonic Products by visiting our Web
Site at:
http://www.pasc.panasonic.com
or, send your request by E-mail to:
npcparts@us.panasonic.com
You may also contact us directly at:
1-800-332-5368 (Phone) 1-800-237-9080 (Fax Only) (Monday - Friday 9 am to 8 pm, EST.)
Panasonic Services Company
20421 84th Avenue South,
Kent, WA 98032
(We Accept Visa, MasterCard, Discover Card, American Express, and Personal Checks)
For hearing or speech impaired TTY users, TTY : 1-866-605-1277
Ŷ
Service in Puerto Rico
Panasonic Puerto Rico, Inc.
Ave. 65 de Infantería, Km. 9.5, San Gabriel Industrial Park,
Carolina, Puerto Rico 00985
Phone (787)750-4300, Fax (787)768-2910
Panasonic Canada Inc.
PANASONIC PRODUCT - LIMITED WARRANTY
Panasonic Canada Inc. warrants this product to be free from defects in material and workmanship and agrees to
remedy any such defect for a period as stated below from the date of original purchase.
Plasma TV / Monitor In-home service One (1) year, parts (including Plasma Panel) and labour.
LCD TV (26 in & over) In-home service One (1) year, parts (including LCD Panel) and labour.
LCD TV (25 in & under) Carry-in service only One (1) year, parts (including LCD Panel) and labour.
In-home Service will be carried out only to locations accessible by roads and within 50 km of an authorized
Panasonic service facility.
LIMITATIONS AND EXCLUSIONS
This warranty does not apply to products purchased outside Canada or to any product which has been improperly
installed, subjected to usage for which the product was not designed, misused or abused, damaged during shipping,
or which has been altered or repaired in any way that affects the reliability or detracts from the performance, nor
does it cover any product which is used commercially. Dry cell batteries are also excluded from coverage under this
warranty.
This warranty is extended to the original end user purchaser only. A purchase receipt or other proof of date of original
purchase is required before warranty service is performed.
THIS EXPRESS, LIMITED WARRANTY IS IN LIEU OF ALL OTHER WARRANTIES, EXPRESS OR IMPLIED,
INCLUDING ANY IMPLIED WARRANTIES OF MERCHANTABILITY AND FITNESS FOR A PARTICULAR
PURPOSE. IN NO EVENT WILL PANASONIC CANADA INC. BE LIABLE FOR ANY SPECIAL, INDIRECT OR
CONSEQUENTIAL DAMAGES.
In certain instances, some jurisdictions do not allow the exclusion or limitation of incidental or consequential
damages, or the exclusion of implied warranties, so the above limitations and exclusions may not be applicable.
In-home service requires clear, complete and easy access to the product by the Authorized Servicentre and does not
include removal or re-installation of an installed product. If removal is required to service the product, it will be at the
discretion of the Servicentre and in no event will Panasonic Canada Inc. or the Servicentre be liable for any special,
indirect or consequential damages.
WARRANTY SERVICE
For product operation and information assistance, please contact:
Our Customer Care Centre: Telephone #: (905) 624-5505
1-800 #: 1-800-561-5505
Fax #: (905) 238-2360
Email link: “Customer support” on www.panasonic.ca
FOR PRODUCT REPAIRS, please locate your nearest Authorized Servicentre at www.panasonic.ca :
Link: “Servicentres™ locator” under “Customer support”
Customer Services Directory (for U.S.A.)
Limited Warranty (for Canada)
Carefully pack and send prepaid, adequately insured and preferably in the original carton.
Include details of the defect claimed, and proof of date of original purchase.
IF YOU SHIP THE PRODUCT TO A SERVICENTRE
32 33
FAQs, etc.
Page 18

¡Convierta su propia sala de estar en un cine!
Sienta un nivel increíble de excitación multimedia
Disfrute de multimedia
Cámara de vídeo
Receptor digital
multimedia
Índice
Asegúrese de leer
Importantes medidas de seguridad ············· 4
•
Accesorios/Opciones ······················ 6
•
Conexión ·································· 8
•
Identificación de los controles ········· 9
•
Guía rápida para la
puesta en marcha
Amplificador
Unidad de cine
para casa
HDAVI Control™
HDMI, el símbolo HDMI y la Interface de Multimedios de Alta
Definición son marcas comerciales ó marcas registradas de
2 3
HDMI Licensing LLC.
HDAVI ControlTM es una marca de fábrica de
Matsushita Electric Industrial Co., Ltd.
Videograbadora Reproductor DVD
Grabadora DVD
¡Disfrute de su televisor!
Características básicas
Para ver la televisión ································· 10
•
Para ver vídeo y DVDs ······························ 11
•
Funciones avanzadas
Cómo utilizar las funciones de los menús
•
(imagen, sonido, calidad, etc.) ···················12
Títulos de entradas/Subtítulos ··················· 14
•
Edición y configuración de canales ··········· 15
•
Bloqueo ······················································ 16
•
Operación del equipo periférico ·················18
•
Control con HDMI “HDAVI Control™” ········ 19
•
Conexiones AV recomendadas ··················20
•
Preguntas frecuentes, etc.
Operaciones del mando a distancia/
•
Lista de códigos ·········································22
Lista de calificaciones para el bloqueo de
•
canales······················································· 25
Información técnica ···································· 26
•
Mantenimiento ··········································· 28
•
Preguntas frecuentes ································· 28
•
Especificaciones ········································ 30
•
Guia de Servicios Tecnicos ························ 31
•
avanzadas
frecuentes, etc.
Visión
Funciones
Preguntas
Page 19

Importantes medidas de seguridad
El símbolo de descarga eléctrica en forma
de fl echa, dentro de un triángulo señala
ADVERTENCIA
NO ABRIR, RIESGO
DE CHOQUE ELECTRICO
ADVERTENCIA: Para reducir el riesgo de sufrir una descarga eléctrica, no retire la
cubierta ni el panel posterior. En el interior no hay piezas que deba reparar el usuario.
Solicite las reparaciones al personal de servicio calificado.
aI usuario que existen partes dentro
del aparato que presentan un riesgo de
descargas eIéctricas peligrosas, las cuales
pueden constituir un riesgo de choques
eIéctricos hacia las personas.
EI signo de exclamación dentro
del triángulo señala al usuario que
el manual anexo al aparato tiene
instrucciones importantes, referentes
a su funcionamiento y mantenimiento
(servicio) del mismo.
Nota al lnstalador del Sistema CATV
Este recordatorio es proporcionado para ser dirigido a Ia atención del instalador del sistema CATV al Artículo 820-40 del NEC que
provee las guías para una instalación apropiada a tierra y, en particular, especifi ca que el cable a tierra deberá ser conectado a
un sistema de tierra de la construcción, tan cerca de la entrada del cable como sea más práctico.
Ventilación segura
Las ranuras y aberturas en el gabinete en la parte posterior ó inferior se han colocado para ventilar y asegurar una operación
confi able de Ia TV LCD y para protegerla de un sobre-calentamiento. Estas aberturas no deberán ser bloqueadas ó cubiertas.
Deberá existir un espacio de por lo menos 10 cm entre estas aberturas. Las aberturas nunca deberán ser bloqueadas al poner la
TV LCD sobre una cama, sofá, alfombra ó superfi cie similar.
Esta TV LCD no deberá ser colocada en una instalación pre-fabricada tal como un librero a menos que tenga una ventilación
apropiada.
Importantes Medidas de Seguridad para la TV LCD
1) Leer las instrucciones.
2) Guardar las instrucciones.
3) Atender todas las advertencias.
4) Seguir todas las instrucciones.
5) No hacer uso de este aparato cerca del agua.
6) Limpiar solo con un paño seco.
7) No bloquear ninguna de las aperturas de ventilatión. Instale según las instrucciones del fabricante.
8) No instalar cerca de ninguna fuente de calor como radiadores, reguladores de calefacción, estufas u otros aparatos
(incluyendo amplifi cadores) que generen calor.
9) No desechar el propósito de seguridad del enchufe polarizado o de encalladura. Un enchufe polarizado posee dos cuchillas,
una más ancha que la otra. Un enchufe de encalladura posee dos cuchillas y una tercera punta de encalladura. La cuchilla
ancha o la tercera punta son proporcionadas por su propia seguridad. Si el enchufe proporcionado no cabe en su salida de
corriente, consulte a un eléctrico para reemplazar la salida de corriente obsoleta.
10) Proteger el cable de corriente de ser pisado o pellizcado, especialmente alrededor del enchufe, los
receptáculos y el punto en el que salen del aparato.
11) Usar solo accesorios especifi cados por el fabricante.
12) Usar el aparato solo con el carro, plataforma, tripié, soporte o mesa especifi cado por el fabricante, o vendido
con el aparato. Cuando un carro sea usado, tenga cuidado aI mover dicho carro junto con el aparato para
evitar lesiones por volcaduras.
13) Desconectar este aparato durante tormentas eléctricas o cuando no vaya a ser usado por largos periodos de tiempo.
14) Referir toda necesidad de servicio a personal de servicio califi cado. EI servicio se requiere cuando el aparato ha sido dañado
en cualquier manera, como cuando el cable de corriente o el enchufe ha sido dañado, líquido ha sido derramado, objetos han
caído dentro del aparato, el aparato ha sido expuesto a humedad o
lluvia, no opera normalmente o ha caído.
15)
Operar solamente desde el tipo de fuente de energía indicada en la etiqueta.
Si usted no está seguro del tipo de abastecimiento de energía de su
casa, consultar a su distribuidor ó a la compañía de energia local.
16)
Seguir todas las advertencias e instrucciones marcadas en la TV LCD.
17) Nunca echar objetos de ninguna clase dentro del TV LCD a través
de las ranuras del gabinete ya que pueden tocar puntos de voltaje
peligroso ó cortar partes que pudieran ocasionar un incendio ó choque
eléctrico. Nunca derramar líquido de ningún tipo dentro del TV LCD.
18) Si una antena exterior es conectada aI equipo de la televisión,
asegurar que el sistema de antena sea a tierra para proporcionar
protección contra subidas de voltaje y cargas de estática. En
los E.U.A. la Sección 810 21 de la “National Electrical Code”
proporciona información con respecto a la conexión a tierra
apropiada para el mástil y la estructura de soporte, el cable
EJEMPLO DE ANTENA A
TIERRA DE ACUERDO A
(NEC)
“NATIONAL ELECTRICAL
CODE”
EQUIPO DE SERV I
C I O ELÉCTRICO
EQUIPO DE
SERV I C I O
ELÉCTRICO
SERVICIO DE ENERGIA DEL SlSTEMA DE
ELECTRODOS A TIERRA
(ART. 250 NEC. PARTE H)
CABLE PRINCIPAL
ATIERRA
UNIDAD DE
DESCARGA A TIERRA
(SECCIÓN NEC 810-20)
CONDUCTORES A
TIERRA
(SECCIÓN NEC 810-21)
ABRAZADERAS A TIERRA
4 5
principal a la unidad de descarga de la antena, el tamaño de los conductores a tierra, ubicación de la unidad de descarga de
la antena, la conexión a los electrodos a tierra y requisitos para los electrodos a tierra.
19) Un sistema de antena exterior deberá ser colocado cerca de las líneas de poder ú otros circuitos de energía ó luz ó donde
ésta pueda caer en tales líneas de poder ó circuitos. Cuando se instale un sistema de antena exterior, extremar cuidados para
evitar tocar tales líneas ó circuitos ya que este contacto pudiese tener consecuencias fatales.
20) Desconectar la TV LCD del contacto de pared, y referir a personal de servicio calificado en la condiciones siguientes:
a. Cuando el cable de poder ó contacto esté dañado ó desgastado.
b. Si se ha derramado líquido dentro de la TV LCD
c. Si la TV LCD ha sido expuesta a lluvia ó agua.
d. Si la TV LCD no opera normalmente, siguiendo las instrucciones de operación.
Ajustar solamente aquellos controles que están cubiertos por las instrucciones de operación ya que el ajuste
e. Si la TV LCD se ha caído ó el gabinete se encuentra dañado.
f. Cuando la TV LCD exhibe un cambio distinto en su funcionamiento - esto indica que requiere de servicio.
21) Cuando partes de repuesto sean requeridas, asegurarse que el técnico de servicio utilice partes especifi cadas por el
fabricante que tengan las mismas características de las partes originales. Sustitutos no autorizados pueden ocasionar un
incendio, choque eléctrico ú otros ríesgos.
22)ADVERTENCIA : PARA REDUCIR EL RIESGO DE INCENDIO O DESCARGA ELÉCTRICA, NO EXPONGA ESTE
23)ADVERTENCIA : RETIRAR PIEZAS PEQUEÑAS INNECESARIAS Y OTROS OBJETOS FUERA DEL ALCANCE DE
24)PRECAUCIÓN : PARA EVITAR CHOQUE ELECTRICO NO USAR ESTE ENCHUFE CON UN RECEPTÁCULO Ú
25)PRECAUCIÓN : USAR OTRA BASE PUEDE RESULTAR INESTABLE Y CAUSAR POSIBLEMENTE ALGUN DAÑO.
26)PRECAUCIÓN : PELIGRO DE EXPLOSIÓN SI LA BATERÍA ES COLOCADA INCORRECTAMENTE. REPONER
27)PRECAUCIÓN : Este televisor con pantalla LCD sólo debe utilizarse con los accesorios opcionales siguientes.
NOTA : Este equipo ha sido diseñado para funcionar en Norteamérica y en otros países donde el sistema de emisión y la
Este producto utiliza soldadura de estaño y plomo, y tiene una lámpara fluorescente que contiene una pequeña cantidad
Ŷ
de mercurio. La forma de deshacerse de estos materiales puede estar regulada en su comunidad debido a problemas
relacionados con el medio ambiente. Para obtener información sobre cómo deshacerse o reciclar este aparato, póngase en
contacto con las autoridades de su localidad, o con Electronics Industries Alliance: www.eiae.org.
inapropiado de otros controles puede ocasionar daño y a menudo requerirá de mayor trabajo para un técnico
especializado para restaurar la operación normal del TV LCD.
APARATO A LA LLUVIA, HUMEDAD, GOTEO O SALPICADURA.
NO COLOCAR ENVASES CON LlQUIDO (FLOREROS, COPAS, COSMÉTICOS, ETC.) SOBRE EL
TELEVISOR. (lNCLUYENDO ANAQUELES COLOCADOS ARRIBA DE ESTE, ETC.)
LOS NIÑOS PEQUEÑOS. ESTOS OBJETOS PUEDEN SER TRAGADOS ACCIDENTALMENTE.
TAMBIEN TENER CUIDADO AL EMPACAR MATERIALES Y HOJAS DE PLASTICO.
OTRA SALIDA A MENOS QUE LAS CLAVIJAS PUEDAN SER INSERTADAS FIRMEMENTE PARA
EVITAR QUE LA CLAVIJA QUEDE EXPUESTA.
SOLAMENTE CON EL MISMO TIPO Ó EL EQUIVALENTE.
Utilizarlo con otro tipo de accesorios opcionales podría causar inestabilidad, lo que a su vez podría producir lesiones.
(Todos los accesorios siguientes son fabricados por Matsushita Electric Industrial Co., Ltd.)
• Soporte de montaje en pared (Vertical) :
TY-WK23LR2W (TC-23LX60)
TY-WK32LR2W (TC-26LX60C, TC-26LX60L, TC-32LX60C, TC-32LX60L)
Asegúrese de pedir siempre a un técnico cualificado que realice la instalación.
corriente alterna son exactamente los mismos que en Norteamérica.
Información de la Comisión Federal de Comunicaciones
Este equipo ha sido probado y ha demostrado cumplir con los límites para receptores de emisiones de TV, de conformidad
con el Apartado 15 de las normas de la FCC.
Estos límites han sido designados para proporcionar una protección razonable contra la interferencia perjudicial en una
instalación residencial.
Este equipo genera, utiliza y puede radiar energía radioeléctrica, y, si no se instala y utiliza según las indicaciones del
manual de instrucciones, puede causar interferencias perjudiciales en las comunicaciones por radio.
Sin embargo, no hay garantía de que no se produzcan interferencias en una instalación particular.
Si este equipo causa o recibe interferencias, lo que se puede determinar apagando y encendiendo el equipo, al usuario se
le recomienda eliminar la interferencia tomando una o más de las medidas siguientes:
Cambie la orientación o instalación de la antena de TV.
Aumente la separación entre el TV y el otro equipo.
Conecte el TV en una toma de corriente separada de la del otro equipo.
Consulte a su concesionario o a una técnico experto en radio/TV para solicitar su ayuda.
Aviso de la FCC: Cualquier cambio o modificación que no haya sido aprobado expresamente por la parte responsable del
cumplimiento podría anular la autorización que el usuario tiene para utilizar este equipo.
Page 20

Accesorios/Opciones
Compruebe que ha recibido todos los elementos que se indican.
Accesorios
Transmisor de
Ƒ
mando a distancia
EUR7613Z90R
•
Pilas para el transmisor
Ƒ
de mando a distancia
Pila AA
•
Convertidor de clavija de CA
Ƒ
(2)
(TC-26LX60L, TC-32LX60L)
Cómo retirar la base del televisor
1 2
Retire dos tornillos.
Saque la parte de plástico.
Estera de espuma ó paño
blando y grueso
Retire cuatro tornillos.
Saque la parte metálica.
Tarjeta del cliente
Ƒ
(para EE. UU.)
Empuje
Ƒ
Instalación de las pilas del mando a distancia
1
Deslice para abrir
2
Ponga las polaridades (+ ó -)
en las posiciones correctas
Precaución
Póngase en contacto con su concesionario
Panasonic más cercano para adquirir
la ménsula de montaje en pared
recomendada. Para conocer más detalles,
consulte el manual de instalación de la
ménsula de montaje en pared.
Soporte para colgar en pared
(vertical)
TY-WK32LR2W
•
(TC-23LX60)
Cierre
Manual de instrucciones
Tarjeta para el plan de
asistencia al cliente
(para EE. UU.)
Precaución
La instalación mal hecha puede causar fugas de electrolito y
•
corrosión, lo que podría dañar el mando a distancia.
No mezcle pilas viejas y nuevas.
•
No mezcle pilas de tipos diferentes (pilas alcalinas y de
•
manganeso, por ejemplo).
No utilice baterías (Ni-Cd).
•
No queme ni rompa las pilas.
•
Anote los códigos de mando a distancia antes de cambiar las
•
pilas en el caso de que tenga que restablecer los códigos.
(págs. 23-24)
Accesorio opcional
ADVERTENCIA
No utilizar una ménsula de Panasonic ó montar la unidad usted
•
mismo puede ser la causa de que el consumidor corra riesgos.
Cualquier daño que resulte de no haber sido un instalador
profesional quien montó su unidad anulará su garantía.
Asegúrese de pedir siempre a un técnico calificado que lleve a
•
cabo la instalación. Una instalación incorrecta podría ser la causa
de que el equipo cayera, causando lesiones a personas y daños
en el producto.
No monte el televisor LCD directamente debajo de las luces
•
del techo (luces direccionales, reflectores ó luces halógenas)
que producen típicamente mucho calor. De lo contrario podrían
deformarse ó dañarse las piezas de plástico de la caja.
Ƒ
Tarjeta del garantía
Ƒ
(para México)
Colocación del receptor
Coloque el receptor a una distancia confortable para ver. Evite colocarlo donde la luz solar directa u otra luz brillante
(incluidos reflejos) caiga sobre la pantalla.
La utilización de algún tipo de iluminación fluorescente puede reducir el alcance del transmisor del mando a distancia.
La ventilación adecuada es esencial para impedir el fallo de los componentes internos. Manténgase alejado de las
áreas donde el calor o la humedad sea excesivo.
Cómo utilizar la base del LCD
Ajuste el soporte con el ángulo deseado
[TC-23LX60]
El ángulo del soporte podrá ajustarse entre 5° hacia
delante y 10° hacia atrás, y 20° hacia la derecha/
izquierda.
[TC-26LX60C / TC-26LX60L / TC-32LX60C / TC-32LX60L]
El ángulo del soporte se puede girar 20° hacia la derecha/
izquierda.
10
5
Guía rápida para la
puesta en marcha
Accesorios/Opciones
TY-WK32LR2W
•
(TC-26LX60C, TC-26LX60L,
TC-32LX60C, TC-32LX60L)
6 7
Page 21

Conexiones
Para ver la televisión
Ŷ
[ejemplo: TC-32LX60C]
Identificación de los controles
El botón POWER
Volúmen
ANT
AV
IN
Parte posterior de la unidad
Cable de alimentación de
CA (Conecte después de
haber terminado todas las
demás conexiones.)
Receptor de televisión
ANT
Para reproducir vídeo
Las señales de S Vídeo
tienen prioridad.
por cable
IN OUT
Video
IN
Audio
IN
R
Video
OUT
Audio
OUT
R
S Video
OUT
ó
ó
L
L
Antena de VHF / UHF
ANT IN
ANT OUT
Videograbadora con
sintonizador de TV
Grabadora DVD /
Videograbadora
Cambia TV/VIDEO
Indicador de alimentación (conectada: rojo, desconectada: apagado)
Sensor del control remoto
Dentro de unos 7 metros enfrente del televisor.
Nota
El televisor consumirá algo de corriente siempre que el enchufe del cable de alimentación esté introducido en la
•
toma de corriente.
Conecta/desconecta la alimentación.
(Se utiliza cuando está activado el botón de la
alimentación.)
Configura el mando a distancia para
hacer la comunicación con otros
dispositivos. (pág. 18)
Volúmen
Navegaciones del menú
Selecciona canales en orden.
Navegaciones del menú
Visualiza el menú principal. (págs. 12-13)
Selecciona el modo de entrada. (pág. 11)
Visualiza ó elimina la bandera de canal.
(pág. 10)
Cambia al canal visto previamente.
Cambia la relación de aspecto
(págs. 10, 26)
Selecciona canales
en orden.
Seleccione el modo de audio para
ver la televisión.
Selección/OK/Cambio
RETURN
Salir (del menú)
GUÍA para DBS
Encendido / Apagado del
silenciamiento del sonido
Teclado numérico para seleccionar
cualquier canal ó para hacer
introducciones alfanuméricas en los
menús.
Temporizador para acostarse
(MINUTOS)
Acceso directo a canales para DBS
Operaciones de equipos externos
(págs. 11, 22) (Videograbadoras, DVDs,
etc.)
(pág. 10)
(para volver al menú anterior)
(pág. 10)
(pág. 10)
Guía rápida para la
puesta en marcha
Identificación de los controles
Conexiones
Notas
Con este televisor no se suministran todos los cables ni equipos externos mostrados en este manual.
•
Para obtener más ayuda, visítenos en www.panasonic.com
•
Al conectar cables de vídeo se da prioridad al cable de S vídeo cuando están conectados el terminal de entrada
•
S VIDEO y el terminal de entrada VIDEO.
Algunos programas contienen una señal de protección de derechos de autor para impedir la grabación con una
•
videograbadora.
8 9
Page 22

Para ver la televisión
Para ver vídeos y DVDs
Conecte el receptor de televisión por cable cuando vaya a ver televisión por cable. (pág. 8)
Cambie al modo de
1
televisión.
Conecte la
2
alimentación
Otras funciones útiles (Utilícelas después de )
Ŷ
Temporizador
para
acostarse
Seleccione el modo de audio para ver la televisión.
Ŷ
Escucha
con SAP
(Programa
de audio
secundario)
Recuperación
de
información
Cambio de
la relación
de aspecto
Nota
Vuelva a seleccionar “Cable” ó “Antena” en “ANT In” de “Programa auto” para cambiar la recepción de la señal
•
entre televisión por cable y antena. (
El número del canal y el nivel del volúmen se fijan incluso después de apagar el televisor.
•
10 11
Apaga la unidad después de pasar un periodo de tiempo de 0 a
90 minutos que puede ajustarse a intervalos de 30 minutos.
0/30/60/90 (minutos)
•
Pulse SAP para seleccionar la siguiente pista de audio (si está disponible)
cuando se recibe un canal digital.
• Cada vez que se pulsa el botón SAP, el modo de audio cambiará como se
muestra a continuación. (Estéreo/SPA/Mono)
• Visualización roja: Con señal
Visualización blanca: Sin señal
Visualización blanca (Todos los modos) : Mono
Estéreo Recepción de dos canales de audio.
Programación de audio secundario (se utiliza normalmente para audio bilingüe).
SPA
Mono Seleccione esto cuando la señal estéreo sea débil.
Visualice ó elimine la bandera de canales.
Canal
10
Cambie la relación de aspecto (
pág.
15)
SPA
SPA Resolución
de señales
Modo de imagen
El modo cambia con cada pulsación.
•
• 480i, 480p:COMP/JUSTO/4:3/ACERC
• 1080i, 720p:COMP/H-LLENO/JUSTO/4:3
Seleccione un número de
3
Vivido 1080i
canal.
COMP
Relación
de aspecto
pág.
Arriba
Abajo
30
Tiempo restante del
temporizador para acostarse
26)
ó
Algunos dispositivos de Panasonic conectados al televisor pueden ser controlados con el mando a
distancia.
Para controlar los productos de otros fabricantes se necesita programar el mando a distancia. (pág. 18, 23-24)
Con la videograbadora ó DVD encendido
Cambie a entrada externa.
1
Pulse para visualizar el menú de selección de entrada.
Seleccione el modo de entrada.
Pulse para salir ó volver
Ŷ
a la pantalla anterior.
Nota
Para conocer detalles,
•
vea el manual del
equipo ó pregunte a su
concesionario local.
2
Seleccionar entrada
[1] TV
[2] Componente
[3] HDMI
[4] Video1
[5] Video2
[6] Video3
[ejemplo]
Vídeo 3 no se encuentra disponible para
•
TC-23LX60.
El terminal y la etiqueta del dispositivo
•
conectado se indican.
Para etiquetar cada uno de los dispositivos
conectados (pág. 14)
Utilice
3
la videograbadora ó DVD con el mando a distancia
(Para hacer otras operaciones, vea la pág. 22.)
ó
Videograbadora DVD
Retroceso/Avance rápido Retroceso/Avance
Reproducción Reproducción
Pausa Pausa
Parada Parada
Grabación de
videograbadora
Televisor/Videograbadora Abertura/Cierre
Canal abajo/arriba Retroceso/avance lento
Pulse la tecla de número
correspondiente en el mando
a distancia para seleccionar la
entrada de su elección.
Seleccione.
Pulse para seleccionar la
entrada de su elección y luego
pulse “OK”.
Introducir.
Si, durante la selección, no
•
se realiza ninguna acción
durante varios segundos, se
saldrá del menú de selección
de entrada.
Etiqueta
Video1
VCR
[ejemplo]
-
Terminal
(ejemplo)
Para ver la televisión
Visión
Para ver vídeos y DVDs
Page 23

Cómo utilizar las funciones de los menús
Lista de menús
Seleccione
Siguiente
Seleccione
Ajuste ó
Seleccione
Ŷ
Menú Elemento Ajustes / Configuraciones (alternativas)
Normal
Modo
Luz de atrás
Contraste, Brillo,
Color, Tinte, Nitidez
Temp color
Imagen IA
Imagen
Ajuste acerc.
Otros ajustes
Normal
Bajos
Altos
Balance
Audio
Otros ajustes
Bloqueo
Idioma
Programa canal
Títulos de entradas
CC
Ajuste
Otros ajustes
Reduc de ruido
3D Y/C filtro
Matriz color
Nivel obscuro
Sonido IA
Envolvente
Ent. HDMI
Norm. de audio
SPA
Autoencendido
Para prog-out
Ctrl con HDMI
Econ. energía
Restablece la configuración del menú de imagen (excepto para “Otros ajustes”). (pág. 27)
Modo de imagen básico (Vívido/Estándar/Cinema)
Ajusta la luminancia de la luz de fondo.
Ajusta el color, el brillo, etc. para que cada modo de imagen se
ajuste a sus gustos.
Selecciona el nivel de los colores cálidos (rojo) y de los colores fríos (azul). (Rojo/Azul/Normal)
Controla las áreas oscuras sin afectar al nivel del negro ni al brillo de la imagen en general.
Ajusta la alineación vertical y el tamaño cuando el ajuste del aspecto es “ACERC”. (pág. 26)
Reduce el ruido en el canal, comúnmente llamado efecto de nieve. Permanece en No cuando se
recibe una señal intensa. (Sí/No)
Minimiza el ruido y la diafotía cromática en la imagen. (Sí/No)
No es válido en componente y HDMI.
Selecciona la resolución de la imagen de los dispositivos conectados a componentes. (SD/HD)
SD: Visión normal HD: Visión de alta definición
Sólo se acepta la señal 480 p, la televisión convencional (NTSC) no se está disponible.
Cuando seleccione la entrada de vídeo o componente, elija Obscuro o Claro dependiendo de las
condiciones de la imagen.
Las escenas oscuras pueden verse fácilmente. (Obscuro/Claro)
Fijado en Obscuro cuando se selecciona el modo de TV.
Fijado en Claro cuando se selecciona el modo de HDMI.
Repone los ajustes de Bajos, Altos y Balance los ajustes predeterminados en la fábrica.
Aumenta ó disminuye la respuesta de los graves.
Aumenta ó disminuye la respuesta de los agudos.
Repone los ajustes de Bajos, Altos y Balance los ajustes predeterminados en la fábrica.
Iguale los niveles del sonido en todos los canales y entradas VIDEO. (Sí/No)
Mejora la respuesta de audio cuando se escucha sonido estéreo. (Sí/No)
Selecciona según la señal cuando está conectado HDMI. (Auto/Digital/Análogo)
Auto: Selecciona automáticamente la señal analógica/digital.
Minimiza la diferencia de volúmen después de cambiar a entradas externas.
Seleccione el modo de audio para ver la televisión. (Estéreo/SPA/Mono)
Para cambiar el modo utilizando el botón SAP. (pág. 10)
Bloquea programas. (pág. 16-17)
Selecciona el idioma para los menús de la pantalla.
Establece los canales de recepción. (pág. 15)
Etiquetas de visualización de dispositivos externos (pág. 14)
Visualiza subtítulos (subtítulos) (pág. 14)
Establece cómo se va a conectar la alimentación del televisor. (Sí/No)
Sí : Conecte la clavija del cable de alimentación al receptor de televisión por cable, etc., y
controle el encendido/apagado del televisor en el equipo conectado. (El temporizador para
acostarse no funcionará si está activado “Autoencendido”.)
No : Suministre alimentación desde una toma de corriente y controle el encendido/apagado del
televisor en el propio televisor.
Para impedir el aullido y la oscilación de la imagen, detenga la salida de la imagen y el sonido
especificados en este menú (pág. 21) (No/Comp./HDMI/Video 1/Video 2/Video 3)
Vídeo 3 no se encuentra disponible para TC-23LX60.
Comp./HDMI 1/HDMI 2 no puede dar salida a señales de vídeo independientemente del ajuste
de “Para prog-out”.
Controla los equipos conectados a los terminales HDMI (pág. 19, 20) (Sí/No)
(para TC-23LX60, TC-26LX60C y TC-32LX60C solamente)
Reduce el brillo de la pantalla para disminuir el consumo de energía. Para ver programas en
habitaciones oscuras sin que se canse la vista. (Estándar/Ahorro)
En el modo Video, el menú Audio y el menú Ajuste ofrecen un número inferior de opciones.
•
Contraste
Brillo
Color
(Sí/No)
+20
0
0
Normal
Modo
Luz de atrás
Tinte
Nitidez
Temp color
Imagen IA
Ajuste acerc.
Reduc de ruido
3D Y/C filtro
Matriz color
Nivel obscuro
Normal
Bajos
Altos
Balance
Sonido IA
Envolvente
Ent. HDMI
Norm. de audio
SPA
Idioma
Programa canal
Títulos de entradas
CC
Autoencendido
Para prog-out
Ctrl con HDMI
Econ. energía
Estándar
Azul
Claro
Auto
Estéreo
Estándar
Sí
+20
0
0
Sí
On
No
(imagen, sonido, calidad, etc.)
No
SD
Sí
+ 4
0
0
Sí
No
avanzadas
0
No
No
Sí
Varios menús le permiten seleccionar configuraciones para la imagen,
el sonido y otras funciones, para poder disfrutar viendo la televisión
con sus preferencias establecidas.
Visualice el menú
1
1
Visualiza las funciones que
•
pueden establecerse (cambia
según la señal de entrada).
Seleccione el menú
2
2
Menú
Imagen
Audio
Bloqueo
Ajuste
Seleccione el elemento
3
3
Imagen 1/2
Normal
Contraste
Brillo
Color
Tinte
Nitidez
(Ejemplo: Menú Picture)
Sí
EstándarModo
+20Luz de atrás
+20
0
0
0
0
Ajuste ó seleccione
4
4
Imagen 1/2
Pulse para salir ó volver
Ŷ
a la pantalla anterior.
Normal
Contraste
Brillo
Color
Tinte
Nitidez
(Ejemplo: Menú Picture)
Sí
EstándarModo
+20Luz de atrás
+20
0
0
0
0
12 13
Cómo utilizar las funciones de los menús
Funciones
Page 24

Títulos de entradas/Subtítulos
Edición y configuración de canales
Títulos de
entradas
Etiquetas de
visualización
de
dispositivos
externos
CC
Visualización
de subtítulos
Visualice el menú
1
Seleccione “Ajuste”.
2
Menú
Imagen
Audio
Bloqueo
Ajuste
Las etiquetas de los dispositivos conectados a las terminales de entrada externa se pueden indicar para
reconocerlas fácilmente en la pantalla. (En la selección del modo de entrada de la página 11
Seleccione el terminal y la etiqueta del equipo externo.
Títulos de entradas
Video1
Video2
Video3
Terminales: Comp./HDMI/Video1-3
•
Etiqueta: BRINCAR*/VCR/DVD/CABLE/DBS/PVR/JUEGO/AUX/[BLANCO]
•
* Si se selecciona
“BRINCAR” para una
terminal no conectada, su
entrada se omitirá cuando
se cambie con el botón
TV/VIDEO.
El televisor tiene incorporado un decodificador capaz de proveer información visual
correspondiente al sonido. El programa deberá tener Closed Captioning (Subtítulos) (CC) para
que el televisor pueda mostrarlo. (pág.
Seleccione el modo deseado
Ŷ
CC
Modo No
BRINCARComp.
JUEGOHDMI
VCR
AUX
•
Siguiente
Seleccione
seleccione el terminal
establezca la etiqueta
Vídeo 3 no se encuentra disponible para
TC-23LX60.
Etiqueta
Video1
VCR
[ejemplo]
26)
Seleccione
Seleccione “Títulos de
3
entradas” ó “CC”.
Ajuste
Idioma
Programa canal
Títulos de entradas
CC
Otros ajustes
Establezca
4
Para salir
Ŷ
Terminal
Cuando no se utilice “No”
No:
CC1-4: Información relacionada con
las imágenes
(Aparece en la parte inferior
de la pantalla.)
T1-4: Información textual
(Aparece en toda la pantalla.)
Siguiente
Seleccione
)
Los ajustes del canal actual se pueden cambiar según sus necesidades y las condiciones de la recepción.
Visualice el menú
1
Seleccione “Ajuste”.
2
Menú
Imagen
Audio
Bloqueo
Ajuste
Para salir
Ŷ
Busca y agrega automáticamente los canales que pueden recibirse a la memoria.
Seleccione “Ent. ANT” Seleccione “Iniciar escaneo”
(Seleccione Cable ó Antena)
Programa auto
Ent. ANT
Programa auto
Ajuste
automático
Programa manual
Ajuste
manual
Mientras está activado “Bloqueo de canal” (pág. 16), si se selecciona Auto/Manual/Medidor de señal, se
•
visualizará “Ingresar contraseña”.
Iniciar escaneo
Nota
Todos los canales memorizados previamente se borrarán.
•
Cuando se pulse el botón o durante la programación automática, el TV volverá al
•
modo de visión normal. (Los canales encontrados hasta ese punto se agregan.)
Después de terminar la programación automática se visualizará el número del canal
•
agregado más bajo.
Cuando no haya canal que se pueda recibir, se visualizará el canal 69 (para TV) o el canal
•
125 (para TV por cable).
Utilice este procedimiento cuando cambie la configuración de los canales de recepción ó
cuando cambie la visualización de los canales. Además, utilícelo también para agregar ó
eliminar manualmente canales que se encuentran en la lista de canales.
Seleccione canal Agregue o elimine
Programa manual
Ent. canal
7
Cable
Siguiente
Seleccione
Establezca
Seleccione
Seleccione
Seleccione “Programa canal”.
3
Ajuste
Idioma
Programa canal
Títulos de entradas
CC
Otros ajustes
Seleccione la función
4
Programa canal
Programa auto
Programa manual
Establezca
5
Programa auto
Ent. ANT
Iniciar escaneo
Elimine
(el número del canal se pone amarillo)
Repita los pasos y para otros canales.
•
Cable
Inicie
Seleccione
agregue
(el número del canal se pone azul)
Las configuraciones
se hacen
automáticamente
Siguiente
Seleccione
Siguiente
Seleccione
Edición y configuración de canales
Títulos de entradas/Subtítulos
avanzadas
Funciones
14 15
Page 25

Bloqueo
Puede bloquear canales ó programas especificados para impedir que los niños vean su contenido
censurable.
Visualice el menú
1
Seleccione “Bloqueo”.
2
Cada vez que visualice el menú Bloqueo se le pedirá que introduzca su
contraseña.
Siguiente
Seleccione
Si es la primera vez que introduce una
•
contraseña, introduzca el número dos
veces en orden para registrarlo.
Siguiente
Seleccione
Para salir
Ŷ
Menú
Imagen
Audio
Bloqueo
Ajuste
Introduzca su contraseña de 4 dígitos.
3
Para ver un programa bloqueado ó cambiar los ajustes de calificación deberá
introducir un código de 4 dígitos.
Ingresar contraseña.
Seleccione “Bloquear prog.”
4
Bloqueo
Bloquear prog.
Cambiar código
Para seleccionar la clasificación del programa que se va a bloquear
Ŷ
Para establecer el nivel de calificación
Ŷ
La tecnología “V-chip” permite que los programas restringidos sean bloqueados según las
calificaciones de televisión.
Seleccione la categoría de
Bloqueo
de
programa
calificación que quiera seguir.
Bloquear prog.
MPAA
U.S.TV
C.E.L.R.
C.F.L.R.
Salida a monitor
MPAA : Calificaciones para películas de los
•
EE.UU.
U.S.TV: Calificaciones para programas de
•
televisión de los EE.UU.
C.E.L.R:Calificaciones para el inglés de
•
Canadá
C.F.L.R: Calificaciones para el francés de
•
Canadá
Para desactivar la grabación del programa bloqueado
Ŷ
Seleccione “Salida a monitor” en el menú “Bloquear prog” y póngalo en “No”
Bloquear prog.
MPAA
U.S.TV
C.E.L.R.
C.F.L.R.
Salida a monitor
Sí : Activa la salida del terminal del monitor para los programas que han sido
establecidos en “Bloqueo”.
No: Desactiva la salida del terminal del monitor para los programas que han sido
establecidos en “Bloqueo”.
No
No
Aceptar
Seleccione
Seleccione la calificación que va a
bloquear.
Seleccione
Ejemplo de “MPAA” (Calificaciones para películas de
los EE.UU.)
No Sin calificación
G Público en general: Todos los públicos
Se recomienda el acompañamiento de los
PG
padres
Aviso para los padres: No es apropiado para
PG-13
menores de 13 años
Restringido: Los menores de 17 años
R
necesitan ser acompañados por los padres ó
una persona adulta
No se admite que ningún menor de 17 años
NC-17
vea el programa
X Adultos solamente
Para obtener otra información (pág. 25)
•
Aceptar
select
Bloqueo
avanzadas
Funciones
Precaución
Anote su contraseña
•
por si la olvida.
(Si ha olvidado su
contraseña, consulte
a su concesionario
local.)
Nota
Cuando seleccione un
•
canal bloqueado se
visualizará un mensaje
que le permitirá ver el
canal si usted intro
Para cambiar la contraseña
Ŷ
En , seleccione “Cambiar código” y pulse el botón “OK”
Introduzca dos veces la nueva contraseña de 4 dígitos.
Precaución
El sistema V-Chip que se utiliza en este aparato es capaz de bloquear los programas “NR” (no clasificados, no
•
aplicables y ninguno) de acuerdo con las normas de la FCC indicadas en la Sección 15.120(e)(2). Si se elige la
opción de bloqueo de programas “NR”, “podrán producirse resultados inesperados y posiblemente confusos, y
usted tal vez no pueda recibir anuncios de emergencia ó ninguno de los tipos de programación siguientes”.
• Anuncios de emergencia (mensajes EAS, avisos del tiempo y otros)
• Programas locales • Noticias • Política • Anuncios de servicios públicos • Religión • Deportes • Tiempo
Nota
La calificación No es independiente de otras calificaciones.
•
Cuando bloquee una edad específica basándose en el nivel de calificación, la calificación No y cualquier otra
•
calificación más restrictiva también se bloqueará.
16 17
Page 26

Operación del equipo periférico
Control con HDMI “HDAVI Control™”
Puede controlar los componentes de otros fabricantes utilizando el control remoto de este televisor.
Conecte el equipo externo al televisor y
1
Apague el equipo externo
2
+
3
4
5
Precaución
El registro fallará si se introduce el código equivocado ó si tarda más de 30 segundos en registrarse.
•
Para encontrar un código que no está en la lista de códigos
Este procedimiento busca todos los códigos, y recibe el nombre de “método secuencial”.
Después del paso de más arriba, cambie
el código y pruebe.
Cambie
Opere el equipo con el mando a
distancia. (pág. 22)
Repita hasta encontrar el código.
•
Puede que tengan que hacerse muchos intentos
•
antes de encontrar el código correcto.
Pulse simultáneamente ambos
botones durante más de 3 segundos.
Suelte los botones cuando los botones de selección
•
de equipo empiecen a parpadear.
Seleccione el equipo
con el botón de selección de equipo.
El botón seleccionado permanece encendido (los
•
demás botones no se encienden).
Introduzca el equipo con un código de
mando a distancia de 4 dígitos.
Opere el equipo con el mando a
distancia
El dispositivo externo se enciende.
•
Si el equipo no funciona con mando a
Ŷ
distancia
•
•
Cuando se encuentre el código correcto.
(pág. 22)
Cuando su dispositivo tenga un solo código
Introduzca de nuevo el código de mando a
distancia.
Cuando su dispositivo tenga múltiples códigos
Cambie el código con más arriba y pruebe de
nuevo
Guardar
(pág. 23-24)
Los productos de audio-vídeo de Panasonic más recientes equipados con conexiones de salida HDMI
pueden ser controlados utilizando el mando a distancia del televisor. Se encuentran disponibles funciones
limitadas como, por ejemplo, el cambio automático a la entrada HDMI del televisor.
Esta función se limita a los modelos que incorporan “Control con HDMI” de Panasonic.
•
Consulte los manuales de instrucciones individuales para obtener información relacionada con la compatibilidad.
No se pueden utilizar cables que no cumplan con HDMI.
•
Se le recomienda utilizar un cable HDMI de Panasonic.
•
Numero de pieza recomendado: RP-CDHG15 (1,5 m), RP-CDHG30 (3,0 m), RP-CDHG50 (5,0 m)
[para TC-23LX60, TC-26LX60C y TC-32LX60C solamente]
Cambio
de entrada
automático
Prende
control
Apaga
control
Precaución
La función “Control con HDMI” no se activa en otros países que no sean los EE.UU. y Canadá.
•
El televisor permanecerá encendido aunque se apague el equipo compatible con “ Control con HDMI”.
•
Nota
Antes de utilizar las funciones de control HDMI, el equipo conectado deberá configurarse. Para conocer detalles,
•
vea el manual de funcionamiento de cada equipo.
Para conocer detalles de la conexión del equipo, vea la pág. 20.
•
El ajuste predeterminado es “Sí”. Si no están conectados equipos HDMI ó se utilizan equipos HDMI estándar (que
•
no sean “Control con HDMI”), ajuste en “No”. (vea debajo)
Cuando “Ctrl con HDMI” se ponga en “Sí”, al empezar la reproducción del equipo compatible
con el control HDAVI, la entrada del televisor cambiará automáticamente a la entrada
correspondiente al equipo de reproducción.
Si se utiliza la operación DIGA, la entrada del televisor cambia automáticamente a DIGA y se visualiza
•
el menú DIGA. Si la alimentación del TV está desconectada, ésta se conecta automáticamente.
Cuando “Ctrl con HDMI” se ponga en “Sí”, el televisor se encenderá automáticamente y
cambiará a la entrada HDMI apropiada siempre que el equipo compatible con el control
HDAVI se encuentre inicialmente encendido y el modo de reproducción esté seleccionado.
Cuando “Ctrl con HDMI” se ponga en “Sí” y se apague el televisor, el equipo compatible con
el control HDAVI conectado también se apagará automáticamente.
DIGA (grabadora DVD de Panasonic) no se apagará si aún está en el modo de grabación.
•
Visualice el menú.
1
2
Menú
Imagen
Audio
Bloqueo
Ajuste
Seleccione
Siguiente
Seleccione “Otros ajustes”.
3
Ajuste
Idioma
Programa canal
Títulos de entradas
CC
Otros ajustes
Seleccione “Ctrl con HDMI”.Seleccione “Ajuste”.
4
Otros ajustes
Autoencendido
Ctrl con HDMI
Econ. energía
Seleccione “Sí” ó “No”.
5
Pulse para salir ó volver a la pantalla anterior.
Ŷ
Estándar
No
NoPara prog-out
Sí
Seleccione
Siguiente
Seleccione.
Cambie
Control con HDMI “HDAVI Control™”
Operación del equipo periférico
avanzadas
Funciones
18 19
Page 27

Conexiones AV recomendadas
Estos diagramas muestran nuestras recomendaciones sobre cómo conectar el televisor a varios equipos.
Para hacer otras conexiones, consulte las instrucciones de cada equipo y las especificaciones (pág. 30).
Para obtener ayuda adicional, visite nuestro sitio Web: www.panasonic.com
[modelo que no sea TC-23LX60]
[ejemplo: TC-32LX60C]
ANT
AV IN
Parte posterior de
la unidad
Para ver imágenes de
Ŷ
cámara de vídeo
Cámara de vídeo
Videograbadora
Reproductor DVD
Clavija M3
Los cascos auriculares/
auriculares (no suministrados)
Nota
Los equipos HDMI individuales tal vez requieran configuraciones de menús específicas adicionales para cada
•
modelo. Consulte sus manuales de instrucciones respectivos.
Cable de alimentación de CA (Conecte
después de haber terminado todas las
demás conexiones.)
Para ver imágenes
Ŷ
de vídeo digital
Reproductor DVD ó
receptor digital multimedia
(Máquinas compatibles con
HDMI solamente)
Control con HDMI
Ŷ
(pág. 19)
DIGA
(Grabadora DVD de Panasonic)
Conecte con cable HDMI
•
[TC-23LX60]
Los cascos auriculares/
auriculares (no suministrados)
Cable HDMI Cable de
conversión
HDMI-DVI
Clavija M3
ó
AV IN
Cable de
audio
ANT
Televisión
por cable
Receptor de
televisión
por cable
ó
Grabadora DVD /
Ŷ
Videograbadora
Para ver DVDs
Ŷ
Reproductor DVD
Receptor digital
multimedia
Para escuchar la
Ŷ
televisión por altavoces
Amplificador
ó
Notas
Ponga el canal de televisión en CH3 ó CH4 para
•
utilizar la conexión del receptor de televisión por cable.
Para tener más información acerca de la conexión
•
del receptor de televisión por cable, consulte a su
compañía de televisión por cable local.
Las señales de entrada de vídeo y audio conectadas a
•
un terminal especificado en “Para-prog-out” (págs. 12-
13) no pueden salir por los terminales “OUTPUT”.
Para impedir el aullido y la oscilación de la imagen,
•
establezca la configuración “Para prog-out” cuando
conecte la videograbadora mediante una conexión en
bucle.
(pág. 12)
Cuando se conecte un equipo (STB, DVD, etc.) a los
•
terminales HDMI ó COMPONENT sólo se podrán
obtener señales de audio. No se pueden reproducir
señales de vídeo.
avanzadas
20 21
Conexiones AV recomendadas
Funciones
Page 28

Operaciones del mando a distancia / Lista de códigos
A continuación se explica cómo controlar dispositivos externos con el mando a distancia.
Registre los códigos de mando a distancia (pág. 18) si quiere controlar un dispositivo externo de otro fabricante. (pág. 23-24)
•
Nota
La operación puede resultar imposible dependiendo de la capacidad de memoria disponible del mando a
•
distancia. Este mando a distancia no ha sido diseñado para controlar todas las operaciones de todos los modelos.
Lista de operaciones del mando a distancia
Ŷ
Esta tabla define qué teclas pueden utilizarse después de la programación (si resulta necesario)
estando en el modo de mando a distancia seleccionado, DTV, CABLE, DBS, VCR, DVD.
NOMBRE DE
TECLA
-
MODO DE VIDEOGRABADORA
Alimentación Alimentación Alimentación Alimentación
-
-
Bajar volumen Cursor DBS izquierda Cursor CBL izquierda Bajar volumen
Subir volumen Cursor DBS derecha Cursor CBL derecha Subir volumen
-
-
Conmutador de entrada
de televisión
Visualización en pantalla Visualización en pantalla Recuperación Visualización en pantalla
Silenciamiento de
televisión
-
-
Rebobinado
Reproducción
Avance rápido
Pausa
Parada
Grabación de
videograbadora
TV/VCR Aspecto Aspecto Abertura/Cierre
Canal inferior Página abajo Página abajo Retroceso lento
Canal superior Página arriba Página arriba Avance lento
Canal arriba, cursor
arriba
Canal abajo, cursor
abajo
Menú DBS Menú CBL
Salida Salida
Conmutador de entrada
de televisión
Silenciamiento de
televisión
Guía Guía
0-9 0-9
--
--
--
--
--
-
MODO DBS/CBL
(DBS) (CBL)
Canal arriba, cursor
arriba
Canal abajo, cursor
abajo
Conmutador de entrada
de televisión
Silenciamiento de
televisión
Grabación PVR *
1
MODO DVD
Salto arriba
Salto abajo
-
-
Conmutador de entrada
de televisión
Silenciamiento de
televisión
-
-
Retroceso
Reproducción
atrás
Pausa
Parada
-
*1: Tipo de combinación
Lista de códigos de mando a distancia
Ŷ
Códigos para videograbadora
Marca Código Marca Código
Admiral 335
Aiwa 332
Akai 314, 315, 316, 329
Audio Dynamic 311, 339
Bell & Howell 305, 313
Broksonic 320, 326
Canon 323, 325
Citizen 306
Craig 305, 306, 329
Curtis Mathes 324, 345
Daewoo 301, 324, 343
DBX 310, 311, 339
Dimensia 345
Emerson 303, 319, 320, 325, 326, 343
Fisher 305, 307, 308, 309, 313
Funai 320, 326, 334
GE 324, 333, 345
Goldstar 306
Gradiente 334
Hitachi 300, 323, 345
Instant Replay 323, 324
Jensen 339
JVC 310, 311, 334, 339
Kenwood 306, 310, 311, 339
LXI 300, 305, 306, 307, 308, 309
Magnavox 323, 324, 331
Marantz 310, 311, 339
Marta 306
Memorex 309, 324
MGA 338, 340, 341, 347, 348
Minolta 300, 345
Mitsubishi 338, 340, 341, 347, 348
Multitech 304, 347
NEC 310, 311, 334, 339
Olympic 323, 324
Optimus 306, 321, 328, 335
Orion 320, 326
Códigos para videograbadoras personales
Marca Código
Panasonic Replay
Philips Tivo 101
Sony Tivo 102
100
Panasonic 321, 322, 323, 324
J.C.Penney
Pentax 300, 311, 345
Philco 320, 323, 324, 326, 331, 343
Philips 323, 324, 331
Pioneer 323
Proscan
Quasar 321, 322, 323, 324
Radio Shack 305, 309, 324, 333, 336, 340
RCA
Realistic 305, 309, 324, 336, 340
Samsung 302, 304, 333
Sansui 320, 326, 339, 352
Sanyo 305, 309, 313
Scott
Sears 300, 305, 306, 307, 308
Sharp 335, 336
Shintom 317
Signature 2000 335
Singer 317
Sony 328, 329, 330
Sylvania 323, 324, 331
Tashiro 306
Tatung 310, 311, 339
Teac 310, 311, 339
Technics 321, 322, 323, 324
Teknika 324
Toshiba 301, 346
Vector
Research
Wards 306, 309, 335, 336, 344
Yamaha 305, 310, 311, 339
Zenith 306, 344
300, 305, 310, 311, 324,
339, 345
300, 301, 302, 323, 324,
331, 333, 345, 346
300, 301, 302, 323, 324,
331, 333, 345, 346
301, 302, 304, 309, 320,
326, 338, 340, 347, 348
311
Operaciones del mando a distancia / Lista de códigos
frecuentes, etc.
Preguntas
22 23
Page 29

Operaciones del mando a distancia / Lista de códigos
Lista de clasificaciones para el bloqueo de canales
Códigos para receptores de televisión por cable
Marca Código Marca Código
ABC 224
Archer 225, 232
Cableview 205, 232
Citizen 205, 222
Curtis 212, 213
Diamond 224, 225, 232
Eagle 229
Eastern 234
GC Brand 205, 232
Gemini 222
General
Instrument/
Jerrold
Hamlin
Hitachi 203, 224
Macom 203, 204, 205
Magnavox 233
Memorex 230
Movietime 205, 232
Oak 202, 237, 239
Panasonic 209, 210, 214
Philips 206, 207, 228, 229, 230
Pioneer 201, 216
211, 219, 220, 221, 222,
223, 224, 225, 226, 227
212, 218, 240, 241, 242,
245
Pulsar 205, 232
Puser 232
RCA 215
Realistic 232
Regal 212, 218, 240, 241, 242, 245
Regency 234
Rembrandt 205, 232, 237
Samsung 205
Scientific Atlanta 211, 212, 213
Slmark 201, 205
Sprucer 205, 210
Stargate 205, 232
Teleview 201, 205
Texscan 244
Tocom 235
Toshiba 204
Unika 225, 232
Universal 222, 232
Videoway 206
Viewstar 229, 230
Zenith 200, 217
Zenith /Drae
Satellite
200
Códigos para DBS
Marca Código Marca Código
Dish Network 105, 115, 116
Echo Star
(Echostar)
Express VU 105, 115
G.E. 106
G.I.
(General Instrument)
Gradiente 114
Hitachi 103, 111, 112
HNS (Hughes) 103
Magnavox 101, 102
105
108
Panasonic 104
Philips 101, 102
Primestar 108
Proscan 106, 109, 110, 113
RCA 106, 109, 110, 113
Sony 107
Star Choice 103, 108
Toshiba 100
Uniden 101, 102
Códigos para DVD
Marca Código Marca Código
Denon 100
Ferguson 101
JVC 109
Mitsubishi 105
Nordmende 101
Panasonic 100
Philips 103
Pioneer 102
24 25
RCA 101
Saba 101
Samsung 110
Sharp 108
Sony 104
Technics 100
Thomson 101
Toshiba 103
Yamaha 100
Zenith 107
La tecnología “V-chip” le permite bloquear canales ó programas según clasificaciones estándar
establecidas por la industria del entretenimiento. (pág. 17)
GRÁFICA DE CLASIFICACIONES DE PELÍCULAS PARA LOS EEUU (MPAA)
Ŷ
GRÁFICA DE CLASIFICACIONES DE PROGRAMAS DE TV PARA LOS EEUU (U. S. TV)
Ŷ
Grupo basado
en edad
NR
(Si clasificación)
Youth
Guidance
FV: FANTASIA/ CARICATURAS CON VIOLENCIA V: VIOLENCIA S: SEXO L: LENGUAJE OFENSIVO D: DIALOGO CON CONTENIDO SEXUAL
GRÁFICA DE CLASIFICACIONES PARA INGLÉS DE CANADÁ (C. E. L. R)
Ŷ
GRÁFICA DE CLASIFICACIONES PARA FRANCÉS DE CANADÁ (C. F. L. R)
Ŷ
13 ans+
16 ans+
18 ans+
CONTIENE PROGRAMAS SIN RESTRICCIONES Y PROGRAMAS NA (NO APLICABLES).
No
Las películas no tienen restricciones ó las restricciones no son aplicables.
PÚBLICO EN GENERAL. Se admiten a todos los públicos.
G
SE SUGIERE LA SUPERVISIÓN DE LOS PADRES.
PG
Algún material puede no ser apropiado para los niños.
SE RECOMIENDA ENCARECIDAMENTE LA SUPERVISIÓN DE LOS PADRES. Algún material puede no ser apropiado para los
PG-13
niños menores de 13 años.
RESTRINGIDAS. Los jóvenes menores de 17 años y los niños necesitan estar acompañados de sus padres ó una persona
R
adulta que los supervise.
NO SE ADMITE AL PÚBLICO MENOR DE 17 AÑOS.
NC-17
ADULTOS SOLAMENTE.
X
Clasificación
basada en edad
Exenta - La programación exenta incluye: noticias, deportes, documentales y otros programas de información, entrevistas, vídeos
E
musicales y programas de variedades.
Programación para niños menores de 8 años. Sin lenguaje ofensivo, desnudos ni contenido sexual.
C
Programación considerada generalmente aceptable para niños de 8 años y menos. Sin blasfemias, desnudos ni contenido
C8+
sexual.
Programación general para todos los públicos.
G
Se sugiere la supervisión de los padres. Algún material puede no ser apropiado para los niños.
PG
La programación contiene temas que pueden no ser apropiados para el público menor de 14 años. A los padres se les avisa que
14+
no deben dejar ver estos programas a los niños ni a los jóvenes menores de 14 años.
Mayores de 18 años. Programación limitada a los adultos. Contiene escenas de violencia constante ó de excesiva violencia.
18+
Exenta - La programación exenta.
E
General - Programación para público de todas las edades. No contiene violencia, ó el contenido de la misma es mínimo ó se
G
muestra apropiadamente.
8+ General - No se recomienda para los niños pequeños. La programación es para un público diverso, pero contiene violencia de
8 ans+
vez en cuando. Se recomienda la supervisión de adultos.
La programación tal vez no sea adecuada para niños menores de 13 años. Contiene pocas escenas de violencia ó una ó más
escenas suficientemente violentas como para afectarlos.
Se recomienda encarecidamente la supervisión de personas adultas.
La programación puede que no sea apropiada para menores de 16 años. Contiene frecuentes escenas de violencia ó de mucha
violencia.
Programación limitada a los adultos. Contiene escenas de violencia constante ó de mucha violencia.
TV-NR
TV-Y
TV-Y7
TV-G
TV-PG
TV-14
TV-MA
Posibles selecciones de
contenido
Viewable (Visible)
Blocked (Bloqueado)
Viewable (Visible)
Blocked (Bloqueado)
FV (Bloquear FV)
Viewable (Visible)
Blocked (Bloqueado)
Viewable (Visible)
Blocked (Bloqueado)
D,L,S,V
(Todas seleccionadas)
Cualquier combinación
de D, L, S, V
D,L,S,V
(Todas seleccionadas)
Cualquier combinación
de D, L, S, V
D,L,S,V
(Todas seleccionadas)
Cualquier combinación
de L, S, V
Descripción
No clasificado.
Todos los niños. Los temas y elementos en este programa están especialmente
diseñados para un público infantil, incluyendo niños de 2-6 años.
Dirigido a niños mayores. Los temas y elementos en este programa pueden incluir
ligera violencia física ó cómica, ó puede asustar a niños menores de 7 años.
Audiencia General. Contiene poca ó nada de violencia, nada de lenguaje fuerte, y
poco ó nada de diálogo ó situaciones con contenido sexual.
Guía de los padres sugerida. El programa puede contener lenguaje obsceno
infrecuente, violencia limitada, diálogos ó situaciones sexualmente sugestivas.
Advertencia a los padres. Este programa puede contener temas sofisticados,
contenido sexual, lenguaje inapropiado, y violencia más intensa.
Sólo audiencia Madura. Este programa puede contener temas para adultos, lenguaje
profano, violencia gráfica y contenido sexual explícito.
Operaciones del mando a distancia / Lista de códigos
frecuentes, etc.
Lista de clasificaciones
Preguntas
Page 30

Información técnica
Subtítulos (CC)
Los subtítulos no se visualizan cuando usted utiliza la conexión HDMI.
•
Si se utiliza para visualizar ó grabar un equipo analógico conectado, los subtítulos (CC) deberán encenderse/
•
apagarse en el equipo conectado.
El ajuste del modo CC del televisor no afectará a la entrada analógica.
Si se activan los CC en el equipo conectado y en el televisor, los subtítulos de cada unidad se superpondrán.
Relación de aspecto
LLos controles de aspecto le permiten elegir el aspecto dependiendo del formato de la señal recibida y sus
preferencias. (pág. 10) (ej.: en el caso de imágenes 4:3)
COMP
•
COMP
Amplía horizontalmente la imagen 4:3 hasta los bordes
laterales de la pantalla.
(Recomendada para la imagen anamórfica)
H-LLENO
•
H-LLENO
Amplía horizontalmente la imagen 4:3 hasta los bordes laterales
de la pantalla. Los bordes laterales de la imagen se recortan.
ACERC
•
ACERC
Amplía la imagen 4:3 para que ocupe toda la pantalla.
(Recomendada para Letter Box)
Ajuste acerc.
•
La posición y el tamaño vertical de la imagen se pueden ajustar en “ACERC”.
Seleccione “Autoencendido” en el menú “Imagen”. (pág. 12-13)
posición V: Ajuste de posición vertical Tamaño: Ajuste de tamaño vertical
JUSTO
•
JUSTO
Alarga para justificar la imagen 4:3 a las cuatro esquinas
de la pantalla.
(Recomendada para la emisión de televisión normal)
4:3
•
Barra lateral
Estándar
(Tenga en cuenta que puede quedar una “imagen remanente” de
la barra lateral debido a que se muestra durante mucho tiempo.)
Nota
480i (4:3), 480i (16:9), 480p (4:3), 480p (16:9) : COMP,
•
JUSTO, 4:3 ó ACERC
1080i / 720p : COMP, H-LLENO, JUSTO, 4:3 ó ACERC.
•
Cuando la señal es de 720p/1080i, el modo de aspecto
•
cambia automáticamente a “COMP” después de apagar
el televisor, después de cambiar el modo de entrada o
después de cambiar la resolución de la señal a otra que
no sea de 720p/1080i.
Control con HDMI “HDAVI ControlTM”
Las conexiones HDMI a algunos equipos Panasonic le permiten disfrutar de la reproducción sencilla.
Configure el equipo para permitir utilizar esta función. Lea el manual del equipo.
•
Cuando se cambie la conexión ó la configuración, encienda de nuevo el televisor estando el equipo encendido.
•
Esta función puede no trabajar normalmente dependiendo de la condición del equipo.
•
Con esta función activada, el equipo puede ser controlado mediante el mando a distancia del televisor aunque el
•
televisor esté en el modo de espera.
Cuando empieza la reproducción puede que no se disponga de imagen ni sonido durante los primeros segundos.
•
Cuando se cambia el modo de entrada puede que no se disponga de imagen ni sonido durante los primeros
•
segundos.
Conexión HDMI
HDMI (interfaz multimedia de alta definición) le permite disfrutar de imágenes digitales de alta definición y de sonido
de alta calidad conectando el televisor y los dispositivos.
El equipo compatible con HDMI (*1) que tenga un terminal de salida HDMI o DVI, como, por ejemplo, un receptor
digital multimedia o un reproductor DVD, podrá ser conectado al terminal HDMI utilizando un cable que cumpla con
HDMI (función completa).
HDMI es la primera interfaz AV completamente digital del mundo para el consumidor que cumple con un estándar
•
de no compresión.
Si el dispositivo externo sólo tiene una salida DVI, conecte al terminal HDMI mediante un cable adaptador DVI a
•
HDMI (*2).
Cuando se utiliza el cable adaptador DVI a HDMI, conecte el cable de audio al terminal de entrada de audio.
•
Los ajustes de audio se pueden hacer en la pantalla del menú “Ent. HDMI”. (pág. 12 - 13)
•
Frecuencias de muestreo de la señal de audio aplicable (L.PCM): 48 kHz, 44,1 kHz, 32 kHz
Precaución
No se asume el funcionamiento con un PC.
•
Todas las señales se reformatean antes de visualizarse en la pantalla.
•
Si el equipo conectado tiene una función de ajuste de relación de aspecto, ajuste la relación de aspecto a “16:9”.
•
Este conector HDMI es de “tipo A”.
•
Un dispositivo que no tenga terminal de salida digital podrá conectarse al terminal de entrada de
•
“COMPONENT”, “S VIDEO” ó “VIDEO” para recibir señales analógicas.
El terminal de entrada HDMI sólo puede utilizarse con las señales de imagen siguientes:
•
480i, 480p, 720p y 1080i
Procure que concuerde con el ajuste de salida del dispositivo digital.
Para conocer detalles de las señales HDMI aplicables, vea más abajo
•
Señal de entrada que puede visualizarse
* Marca: Señal de entrada aplicable para componente (Y, PB, PR) y HDMI
525 (480) / 60i 15,73 59,94
525 (480) /60p 31,47 59,94
750 (720) /60p 45,00 59,94
1.125 (1.080) /60i 33,75 59,94
Notas
Las señales que no sean las mostradas arriba pueden no visualizarse correctamente.
•
Las señales de arriba son reformateadas para poder verlas de forma óptima en su pantalla.
•
Frecuencia
horizontal (kHz)
(*1): El logotipo HDMI se visualiza en un equipo compatible con HDMI.
(*2): Pregunte en el establecimiento del vendedor de equipos digitales local.
Frecuencia
vertical(Hz)
Componente HDMI
**
**
**
**
Información técnica
frecuentes, etc.
Preguntas
Para restablecer la relación de aspecto (OK)
•
Vívido (predeterminado)
•
Estándar :
•
Cinema : Para ver películas en una habitación oscura. Proporciona una imagen suave, como la del cine.
26 27
•
: Provee un contraste y una nitidez de imagen realzados para ver programas en una habitación
bien iluminada.
Recomendado para ver bajo condiciones normales en una habitación con iluminación atenuada.
Modo
Page 31

Mantenimiento
Desenchufe primero la clavija del cable de alimentación de CA del toma de corriente.
Panel de la pantalla
El frente del panel de la pantalla ha recibido un tratamiento especial. Limpie suavemente la superficie del panel
utilizando un paño suave.
Si la superficie está especialmente sucia, limpie con un paño suave empapado en agua ó agua mezclada con
•
una pequeña cantidad de detergente neutro, frote uniformemente con un paño seco del mismo tipo hasta que la
superficie quede completamente seca.
No raye ó golpee la superficie del panel con sus uñas u otros objetos duros ya que la superficie puede dañarse.
•
Además, evite el contacto con sustancias volátiles tales como rociadores de insecticida, disolventes y diluyentes
de pintura, de lo contrario puede verse afectada la calidad de la superficie.
Mueble
Si el mueble se ensucia, limpie con un paño suave y seco.
Si el mueble está muy sucio, empape el paño en agua mezclada con una pequeña cantidad de detergente neutro
•
y escurra el paño hasta eliminar el agua. Utilice el paño para limpiar el mueble y seque frotando con un paño seco.
No permita que el detergente entre en contacto directo con la superficie del televisor de plasma.
•
Si las gotas de agua entran en el interior del aparato, pueden surgir problemas en el funcionamiento.
Evite el contacto con sustancias volátiles tales como rociadores de insecticida, disolventes y diluyentes de pintura
•
debido a que puede verse afectada la superficie del mueble y puede desprenderse el revestimiento. Tampoco deje
la superficie por mucho tiempo en contacto con artículos de caucho ó PVC.
Clavija del cable de alimentación
Limpie la clavija con un paño seco a intervalos frecuentes. (La humedad y el polvo pueden causar un incendio o una descarga
eléctrica.)
Preguntas frecuentes
Antes de solicitar reparaciones ó ayuda, siga las indicaciones siguientes para solucionar el problema.
Si el problema persiste, póngase en contacto con su concesionario de Panasonic ó con el centro de servicio
de Panasonic local para solicitar ayuda. Para conocer detalles (pág. 31)
Para obtener ayuda adicional, póngase en contacto con nuestro sitio Web
en www.panasonic.com/contactinfo
Puntos blancos ó
imágenes con sombra
(ruido)
Compruebe la posición, la
•
orientación y la conexión de la
antena.
El panel LCD se mueve
un poco cuando se
empuja con un dedo.
Puede que se oiga ruido
de golpeteo.
Alrededor del panel hay algo de
•
holgura para impedir que éste
se dañe.
El panel puede moverse un
poco cuando se empuja con un
dedo, y puede que se oiga ruido
de golpeteo.
Esto no es un fallo de funcionamiento.
28 29
La imagen se ve distorsionada
cuando el equipo se conecta a
través de HDMI.
Está conectado correctamente el cable HDMI?
•
(pág. 20-21, 27)
Apague el televisor y el equipo y luego vuelva a
•
encenderlos.
Compruebe una señal de entrada procedente
•
del equipo. (pág. 27)
Utilice un dispositivo que cumpla con la norma
•
EIA/CEA-861/861B.
El mando a distancia no funciona.
¿Están instaladas correctamente las pilas?
•
(pág. 6)
¿Se ha agotado la batería?
•
Para controlar equipos externos de otros
•
fabricantes, registro los códigos de mando a
distancia. (pág. 18, 23-24)
Si hay algún problema con su TV consulte la tabla de abajo para determinar los síntomas, y luego realice las
comprobaciones sugeridas. Si esto no resuelve el problema, póngase en contacto con el concesionario Panasonic de su
localidad, mencionándole el número del modelo y el número de serie (ambos se encuentran en el panel posterior del TV).
Síntomas
Imagen
Imagen con efecto de
nieve
Múltiples imágenes
Interferencia
Imagen normal
No hay imagen
No hay color
Imagen normal
No se puede controlar con el mando a
distancia.
La unidad principal está caliente.
Puede haber puntos rojos, azules, verdes
y negros en la pantalla.
La función “Control con HDMI” no se
activa
Sonido
Sonido ruidoso
Sonido normal
Sonido ruidoso
No hay sonido
No hay sonido
Sonido normal
Sonido débil o no hay sonidoImagen mala o distorsionada
Sonido débil o equivocado,
o no hay sonido
Ubicación, sentido o conexión de la antena.
•
Ubicación, sentido o conexión de la antena.
•
Aparatos eléctricos.
•
Automóviles/Motocicletas.
Luces fluorescentes.
Nivel del sonido.
•
Silenciamiento del sonido encendido.
Estéro/SPA/Mono
TV en el modo AV.
•
No está enchufado en una toma de corriente.
No está encendido.
Controles de imagen/sonido ajustados a los niveles mínimos.
Controles de color ajustados a los niveles mínimos.
•
Señal débil.
Vuelva a sintonizar un canal o canales.
•
La recepción de sonido puede haberse deteriorado.
•
Ponga Estéro/SPA/Mono en SPA o Mono hasta que mejore la recepción.
La pila, o pilas, están agotadas.
•
La polaridad de las pilas está mal colocada.
El sensor del mando a distancia está expuesto a la luz intensa de una lámpara
fluorescente, etc.
La unidad principal radía calor y algunas piezas se calientan. Éste no es un
•
problema de rendimiento o calidad.
Haga la instalación en un lugar bien ventilado.
No tape los orificios de ventilación del TV con un mantel, etc., y no lo ponga
encima de ningún otro equipo.
Ésta es una característica de los paneles de cristal líquido y no constituye
•
ningún problema. El panel de cristal líquido está fabricado con tecnología
de muy alta precisión, ofreciéndole imágenes finamente detalladas. De vez
en cuando pueden aparecer en la pantalla unos pocos píxeles no activos en
forma de puntos fijos de color rojo, azul, verde o negro.
Tenga en cuenta que esto no afecta al rendimiento de su LCD.
Vuelva a encender el televisor con el equipo encendido.
•
Ponga “Control con HDMI” en “No” y luego vuelva a ponerlo en “Sí”. (pág. 19)
•
Comprobaciones
Mantenimiento
frecuentes, etc.
Preguntas frecuentes
Preguntas
Page 32

Especificaciones
(10,
)
(11,
)
(11,
)
Guia de Servicios Tecnicos
TC-23LX60 TC-26LX60C TC-26LX60L TC-32LX60C TC-32LX60L
Alimentación AC 120 V, 60 Hz
Uso medio
Corriente máxima
Condición de espera
Consumo
Relación de aspecto 16:9
Tamaño de pantalla
visible
(An. × AI. × Diagonal) 508 mm × 286 mm × 583 mm
(Número de píxeles) 1.049.088 (1.366 (W) × 768(H)) [4.098 × 768 dots]
Altavoces 60 mm × 120 mm (2,36 ” × 4,7 ”) Full-range × 2 piezas
Sonido
Salida de audio
Auriculares M3 (3,5mm) Jack × 1
Capacidad de canalesDigital/Analógico
Condiciones de
funcionamiento
Terminales de conexión
INPUT 1-2
INPUT 3 -
COMPONENT
VIDEO INPUT
HDMI
AUDIO IN
OUTPUT
CARACTERÍSTICAS
(An. × AI. × Prof.)
Dimensiones
Incluyendo pedestal
Televisor solamente
Peso
565 mm (22,2 ”)
411 mm (16,2 ”)
453 mm (17,8 ”)
92 W
1,8 A
0,6 W
58,3 cm DIAGONAL
(23,0 ” DIAGONAL)
(20,0Ǝ ×11,3Ǝ × 23,0 Ǝ)
8 W [ 4 W + 4 W ]
(10% de distorsión armónica
total)
VHF/UHF: 2--69, CATV: 1-125
Temperatura : 32 °F -95 °F (0 °C – 35°C)
VIDEO : Tipo RCA PIN × 1 1,0 V [p-p] (75 ȍ)
S VIDEO : Mini DIN de 4 contactos Y:1,0 V [p-p] (75 ȍ), C:0,286 V [p-p] (75 ȍ)
AUDIO L - R : Tipo RCA PIN × 2 0,5 V [rms]
Y : 1,0 V [p-p] (incluyendo sincronización)
B, PR : ±0,35 V [p-p]
P
AUDIO L-R : Tipo RCA PIN × 2 0,5 V [rms]
Conector tipo A para HDMI × 1
AUDIO L - R : Tipo RCA PIN × 2 0,5 V [rms]
VIDEO : Tipo RCA PIN × 1 1,0 V [p-p] (75 ȍ)
AUDIO L - R : Tipo RCA PIN × 2 0,5 V [rms]
Filtro en peine digital Y/C 3D, SUBTITULOS, V-Chip
HDMI
Compatible con Vesa
565 mm × 453 mm × 260 mm
(22,2 Ǝ × 17,8Ǝ × 10,2 Ǝ)
565 mm × 411 mm × 119 mm
(22,2 Ǝ × 16,2 Ǝ × 4,7 Ǝ)
(24,2 lb.) neto 15,5 (34,1 lb.) neto 19,0 (41,8 lb.) neto
11,0
119 mm (4,7”)
[TC-26LX60C / TC-26LX60L] [TC-32LX60C / TC-32LX60L][TC-23LX60]
525 mm (20,7”)
473 mm (18,6 ”)
AC 120 V - 127 V,
60 Hz
107 W
2,1 A
0,6 W
66,1 cm DIAGONAL
(26,0 ” DIAGONAL )
576 mm × 324 mm × 661 mm
(22,7 ” × 12,8 ” × 26,0 ”)
20 W [ 10 W + 10 W ] (10% de distorsión armónica total)
VIDEO : Tipo RCA PIN × 1 1,0 V [p-p] (75 ȍ)
AUDIO L - R : Tipo RCA PIN × 2 0,5 V [rms]
657 mm × 525 mm × 300 mm
(25,9 ” × 20,7 ” × 11,8 ”)
657 mm × 473 mm × 117 mm
(25,9 ” × 18,6 ” × 4,6 ”)
657 mm (25,9 ”)
AC 110 V - 220 V,
50/60 Hz
105 W
1,3 A
0,6 W
117 mm (4,6”)
AC 120 V - 127 V,
60 Hz
122 W
2,3 A
0,6 W
80,0 cm DIAGONAL
(31,5 ” DIAGONAL)
698 mm × 392 mm × 800 mm
(27,5 ” × 15,4 ” × 31,5 ”)
791 mm × 615 mm × 300 mm
(31,1 ” × 24,2 ” × 11,8 ”)
791 mm × 563 mm × 117 mm
(31,1 ” × 22,2 ” × 4,6 ”)
791 mm (31,1 ”)
563 mm (22,2 ”)
615 mm (24,2 ”)
AC 110 V - 220 V,
50/60 Hz
118 W
1,5 A
0,6 W
117 mm (4,6 ”)
Guia de Servicios Tecnicos
En caso que su unidad deba ser reparada en cualquier otro país que no sea el de compra, se ruega ponerse en
contacto con uno de los centros de servicio mencionados por país en esta Guía. Recuerde que la presente Guía
de Servicios Técnicos no es garantía y que la presentación de la misma no acondiciona en ningún momento a que
el servicio prestado sea gratuito, sino con pagos correspondientes, salvo aquellos que se presten de acuerdo con
las condiciones estipuladas en esta Guía y que se realicen en los paises de su aplicación. En caso que la pieza o
piezas requeridas estén sujetas a restricciones de importación, rogamos tener presente que se podría requerir más
tiempo para la reparación del producto. En algunos casos, el servicio no podrá realizarse, por no disponer de las
piezas necesarias debido a restriciones de importación o porque las técnicas o herramientas para tales reparaciones
no existen en paises donde estos productos no están a la venta en nuestros distribuidores de ventas autorizados.
Casas De Servicio Autorizados (Latino América)
ARGENTINA
BRASIL Panasonic do Brasil Ltda
CHILE
COSTA RICA
EL SALVADOR
GUATEMALA
PANAMA Panasonic Latin America, S.A.
El área de caribe y otros
países Latino americanos
excepto México.
PERU Panasonic Peruana S.A.
VENEZUELA Panasonic de Venezuela, C.A.
MEXICO
Panasonic do Brasil Ltda
Sucursal Argentina
Soc. de Servicios Electrónicos
Ltda.
Panasonic Centroamericana,
S.A.
Panasonic Centroamericana,
S.A.
Sucursal El Salvador
Panasonic Centroamericana,
S.A.
Sucursal Guatemala
Favor de contactar Panasonic
Latin America,
S.A. (PANAMA)
Panasonic de México, S.A. de
C.V.
Manuel Garcia 352 C.P. 1284-Buenos
Aires
Rod. Presidente Dutra, KM155 Zip
12230-971
São José Dos Campos-SP-Brasil
Santa Elena 1722, Casilla 401, Correo 3
Santiago
2 kilómetros al oeste de la Plaza de
Deportes de San Antonio Belén
Final Boulevard Orden de Malta Frente a
Bosques de Santa Elena #700, Antiguo
Cuscatlan, La Libertad
46 Calle 20-56, Zona 12, Guatemala Tel. (502) 2477-5641
Via Simon Bolivar (Transistmica).
Contiguo Colegio la Salle
Av. Alfredo Mendiola 1600-Independencia
(Panamericana Nte. Km 14.5) Casilla
Postal 2544, Lima, Perú
Av. El hatillo, Con Av. Gonzalez Rincones,
Edf. Panasonic, La Trinidad, Caracas P.O.
BOX 4758
Moras No. 313 Esq. Miquel Laurent, Col.
del Valle, Tlacoquemecatl, C.P. 03200
México, D.F.
Tel. (5411) 4308-1610
Tel. (5512) 3935-9000
Tel. (56) 02 -540 1481
Tel. (506) 239-49-11
Servicio al Cliente:
Ext. 160
Tel. (503) 2241-5141
Tel. (507) 229-2955
Fax. (507) 229-2536
Tel. (511) 614-0000
Tel. (02) 945-30-22
Tel. (55) 5488-1000
Guia de Servicios Tecnicos
Especificaciones
frecuentes, etc.
Preguntas
382 mm (15,0 ”)
260 mm
2 ”
504 mm (19,8 ”) 504 mm (19,8 ”)
300 mm
8 ”
300 mm
8 ”
Nota
El diseño y las especificaciones están sujetos a cambios sin previo aviso. La masa y dimensiones son
•
aproximadas.
30 31
 Loading...