

Page 1

□
Operating Instructions
TV/VCR Combination
TC-21SV10S
TC-21SV10M G-code
TC-21SV10H G--CODE
TC-14SV1 OS
TC-14SV10M G-code
TC-14SV10HG
1-CODE
Please read these instructions before operating your set and retain them for future reference.
TQB4G0134
Page 2

Dear Panasonic Customer
Welcome to the Panasonic family of customers.
We hope that you will have many years of enjoyment from your TV/VCR
combination. To obtain the maximum from your set, read these instructions
before making any adjustments and retain them for future reference.
Retain your purchase receipt, and note down the Serial Number of
your set in the space provided on the rear cover of this Instructions book.
Copyright
You may record TV broadcasts and musical programmes for your personal entertainment only.
You are not permitted to use them for any other purpose without the consent of the copyright holder.
G-Code Recording System
Recording is now easier than ever: Simply enter the G-Code number provided in the programme schedule
column carried by newspaper and magazines.
* G~Code is a trademark applied for by Gemstar Development Corp.
G-Code system is manufactured under license from Gemstar Development Corporation.
Note :
Playback and Recording of S-VHS type tape is unavailable on this unit.
Page 3

( Contents )
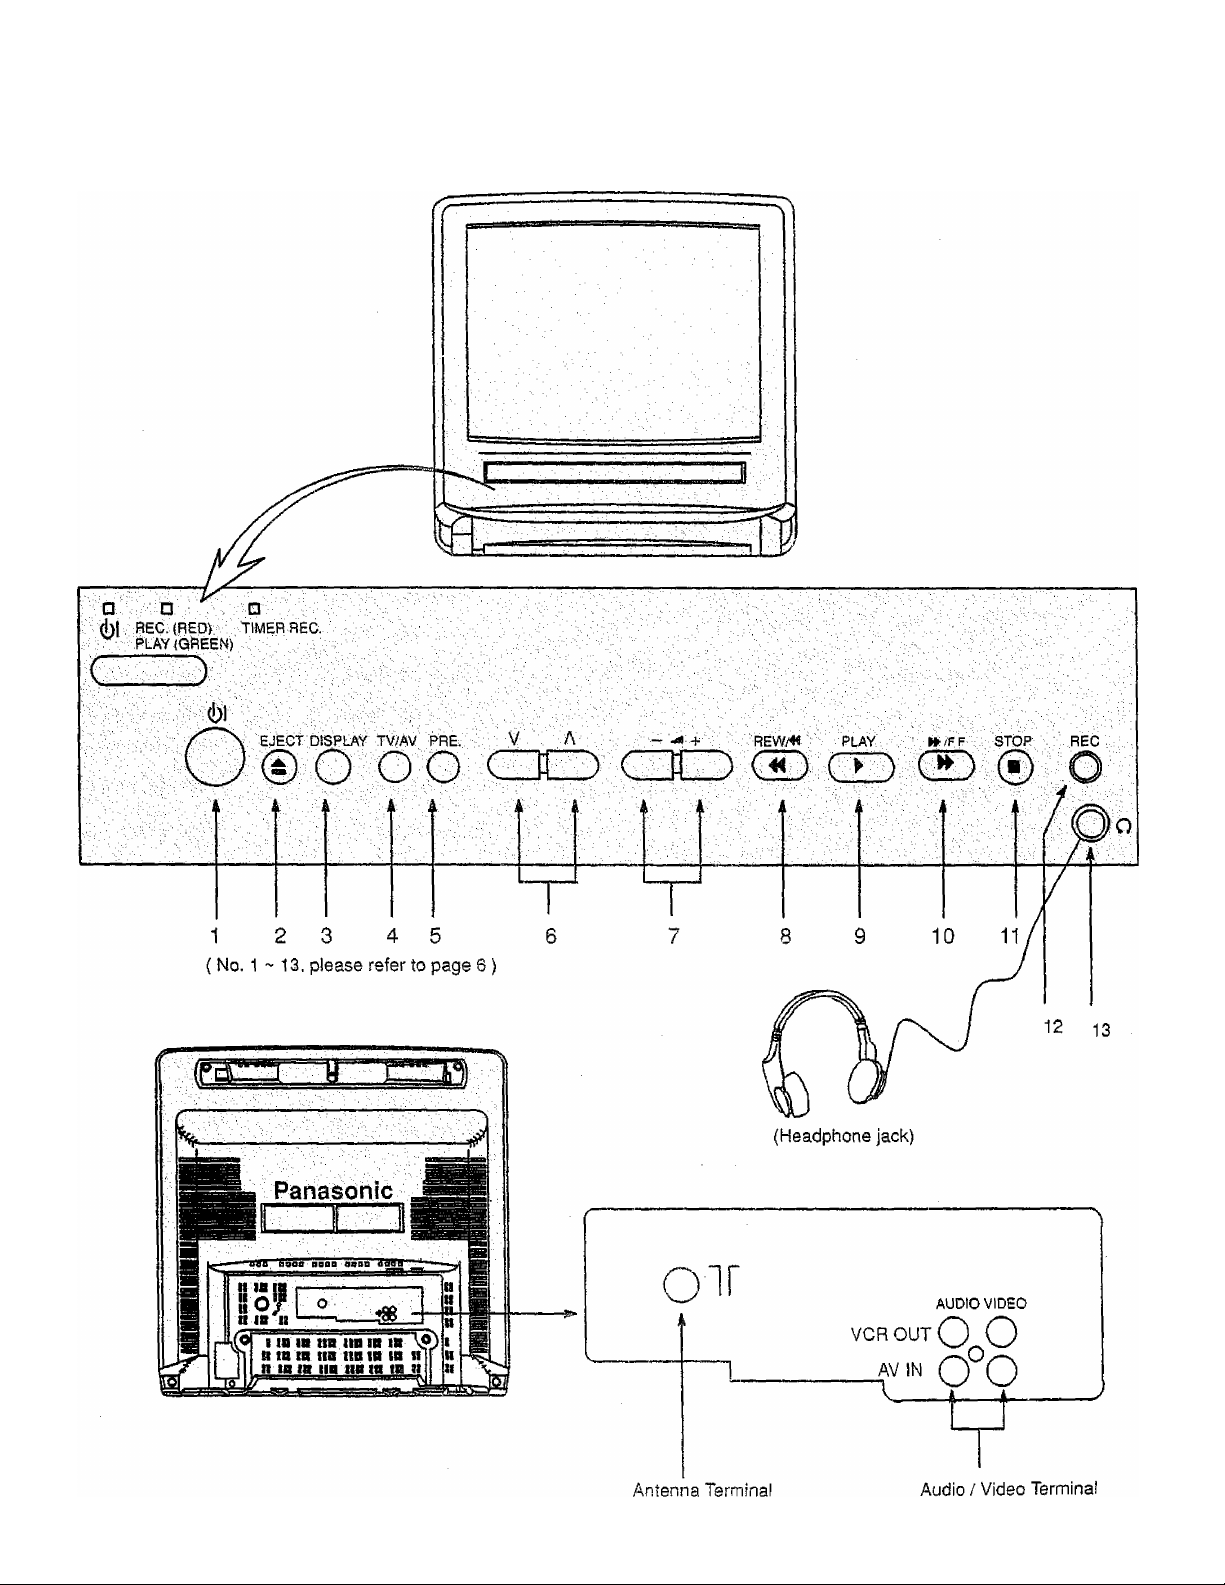
Location of Control (21 inches series)............................................................................................. 1
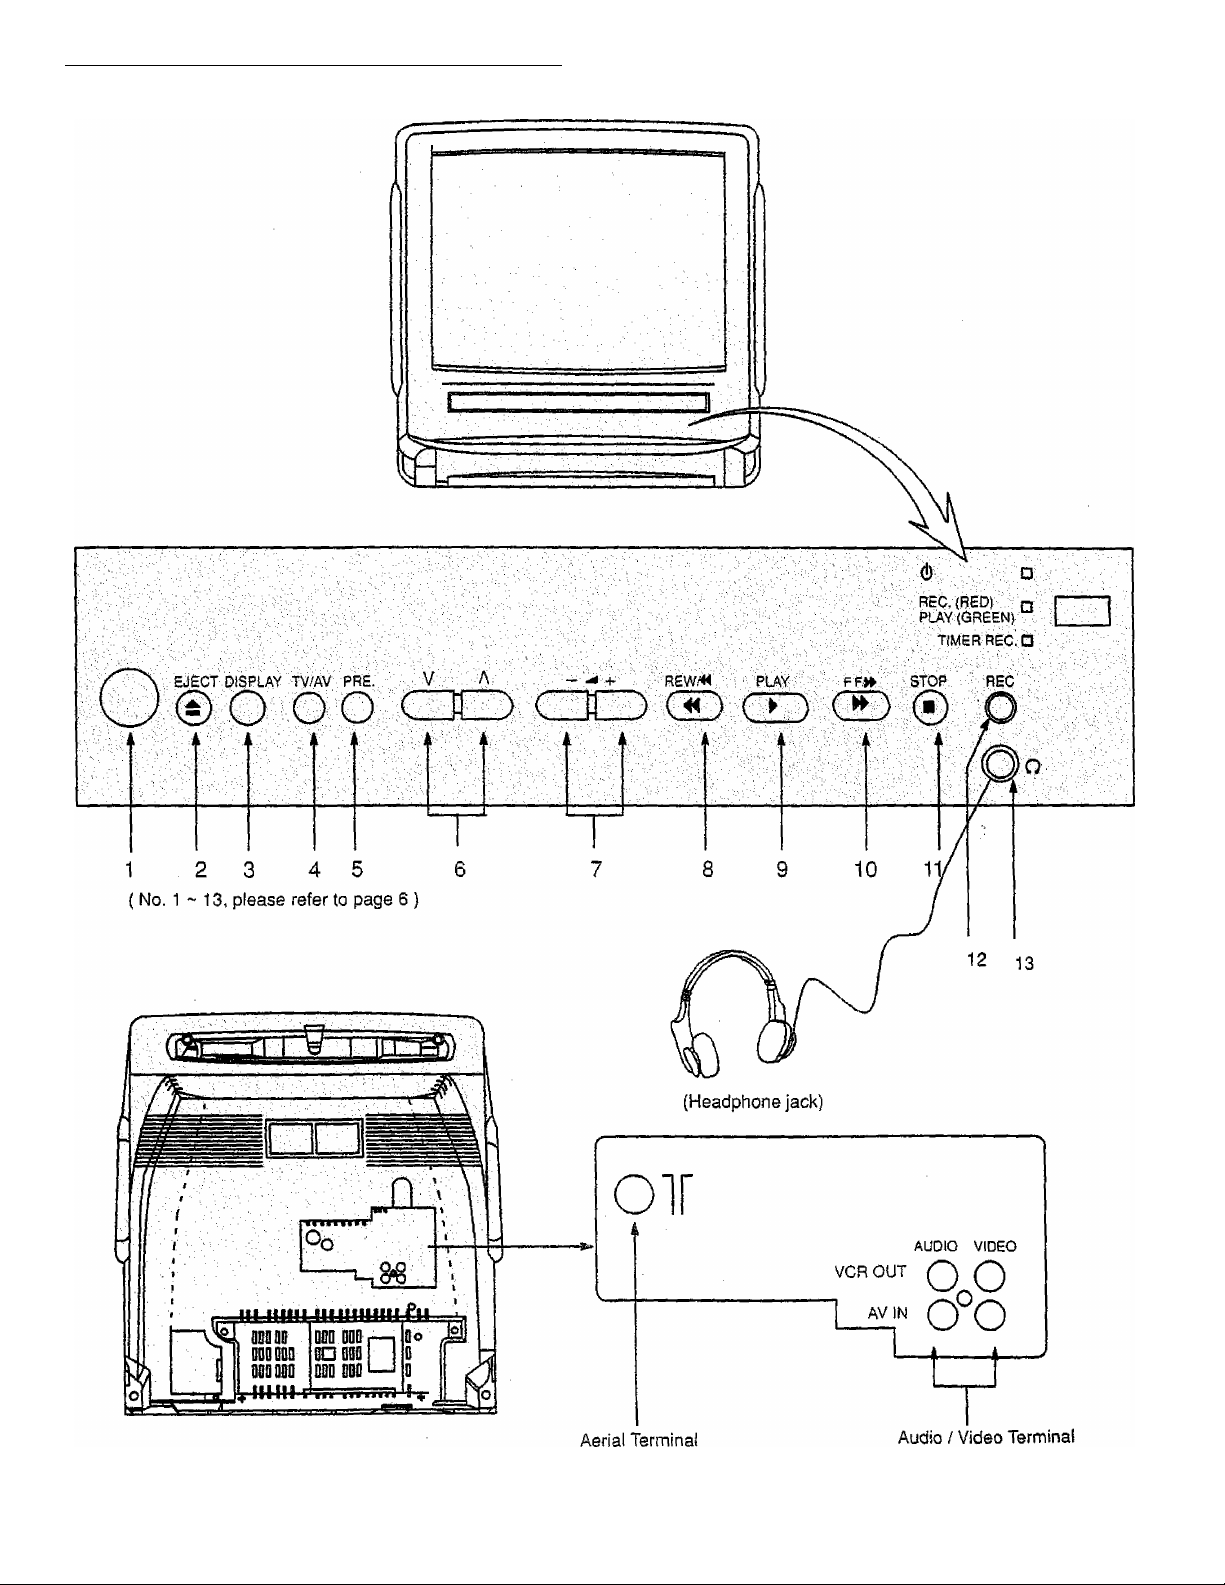
Location of Control (14 inches series)..............................................................................................2
Connections (with Laser Disc Player, Video Camera and Tape Editing)....................................... 3
Antenna Connection .......................................................................................................................... 4
Remote Control Transmitter.............................................................................................................. 5
Location of Control (Remote Control Transmitter and TV) ............................................................ 6
Remote Control Transmitter Operatioa......................................................................................... 7-8
Timer Setting Operation.................................................................................................................... 9
Tuning Procedure (Country System Selection)........................................................................... ,10
Tuning Procedure (Automatic Search and Manual Search)
Fine Tuning Operation...................................................................................................................... 12
Programme Number Skip Operation........................................................................................... 12
Sound System Selection................................................................................................................ 13
Colour System Selection................................................................................................................. 13
VCR Operation (Buttons on the TV set and Remote Control Transmitter)
Remote Control Operation (Main Menu Operation)
Remote Control Operation (Feature Menu and Picture Menu Operation) 16
Operation of the VCR
Recording..................................................................................................................................17
Programme Timer Recording
Presetting Method ...................................................................................................................19
G-Code Programming.................................................................................................... 20-21
G-Code Recording..............................................................................................................- - 22
..................
............................................................................. 18
.....................................................................
..........................................................
...........................
14-15
11
15
Warnings and Cautions.....................................................................................................................23
Before Requesting Service............................................................................................................. 24
Troubleshooting................................................................................................................................ 25
Specifications..............-
...........
-................................................................................................26-27
Page 4
с
Page 5
( Location of Control (14 inches series) )
Page 6
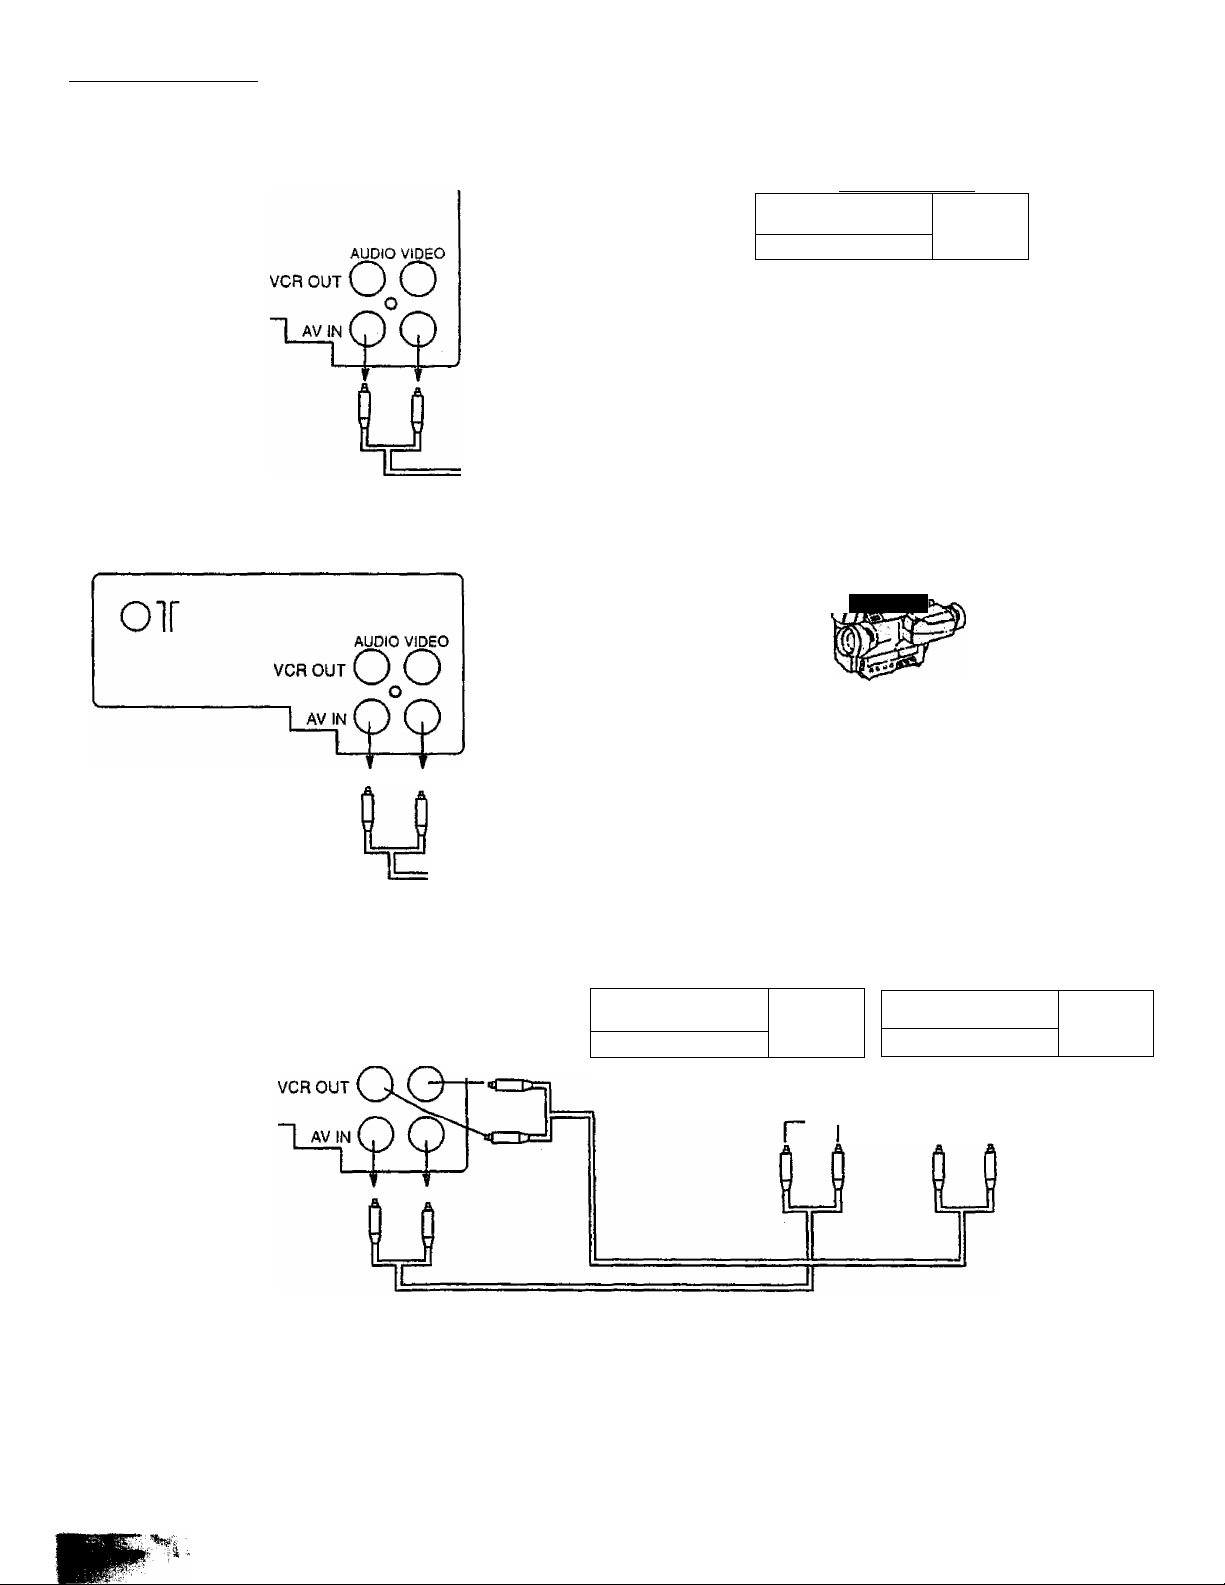
( Connections )
Connection with Laser Oise Player
Laser disc player
OÏ
Connection with Video Camera
_____P.anasfinic
Output Terminal
I
iJ
Output Terminal
rJ-,
“““ O
o«aa
_
U
Tape Editing
a.r”"
Olf
AUDIO VIDEO
Video
Panasonic
ooo
ooo
Output Terminal
a-l
■ Panasonic
Input Terminal
1
Note;
1. When AV mode is selected, and that AV has no input picture signal, the Background Colour of the TV screen will change Blue.
(This only occurs if the Blue-Back function is set to the ON condition)
Video
-------
OOP
Ll
2. At times the picture or sound will be distorted if the input and output terminals from one video tape recorder are connected to
the unit, and the unit is set to AV mode. This is not a mulfunction. Select the input switch on the video tape recorder side to
"Tuner".
Page 7
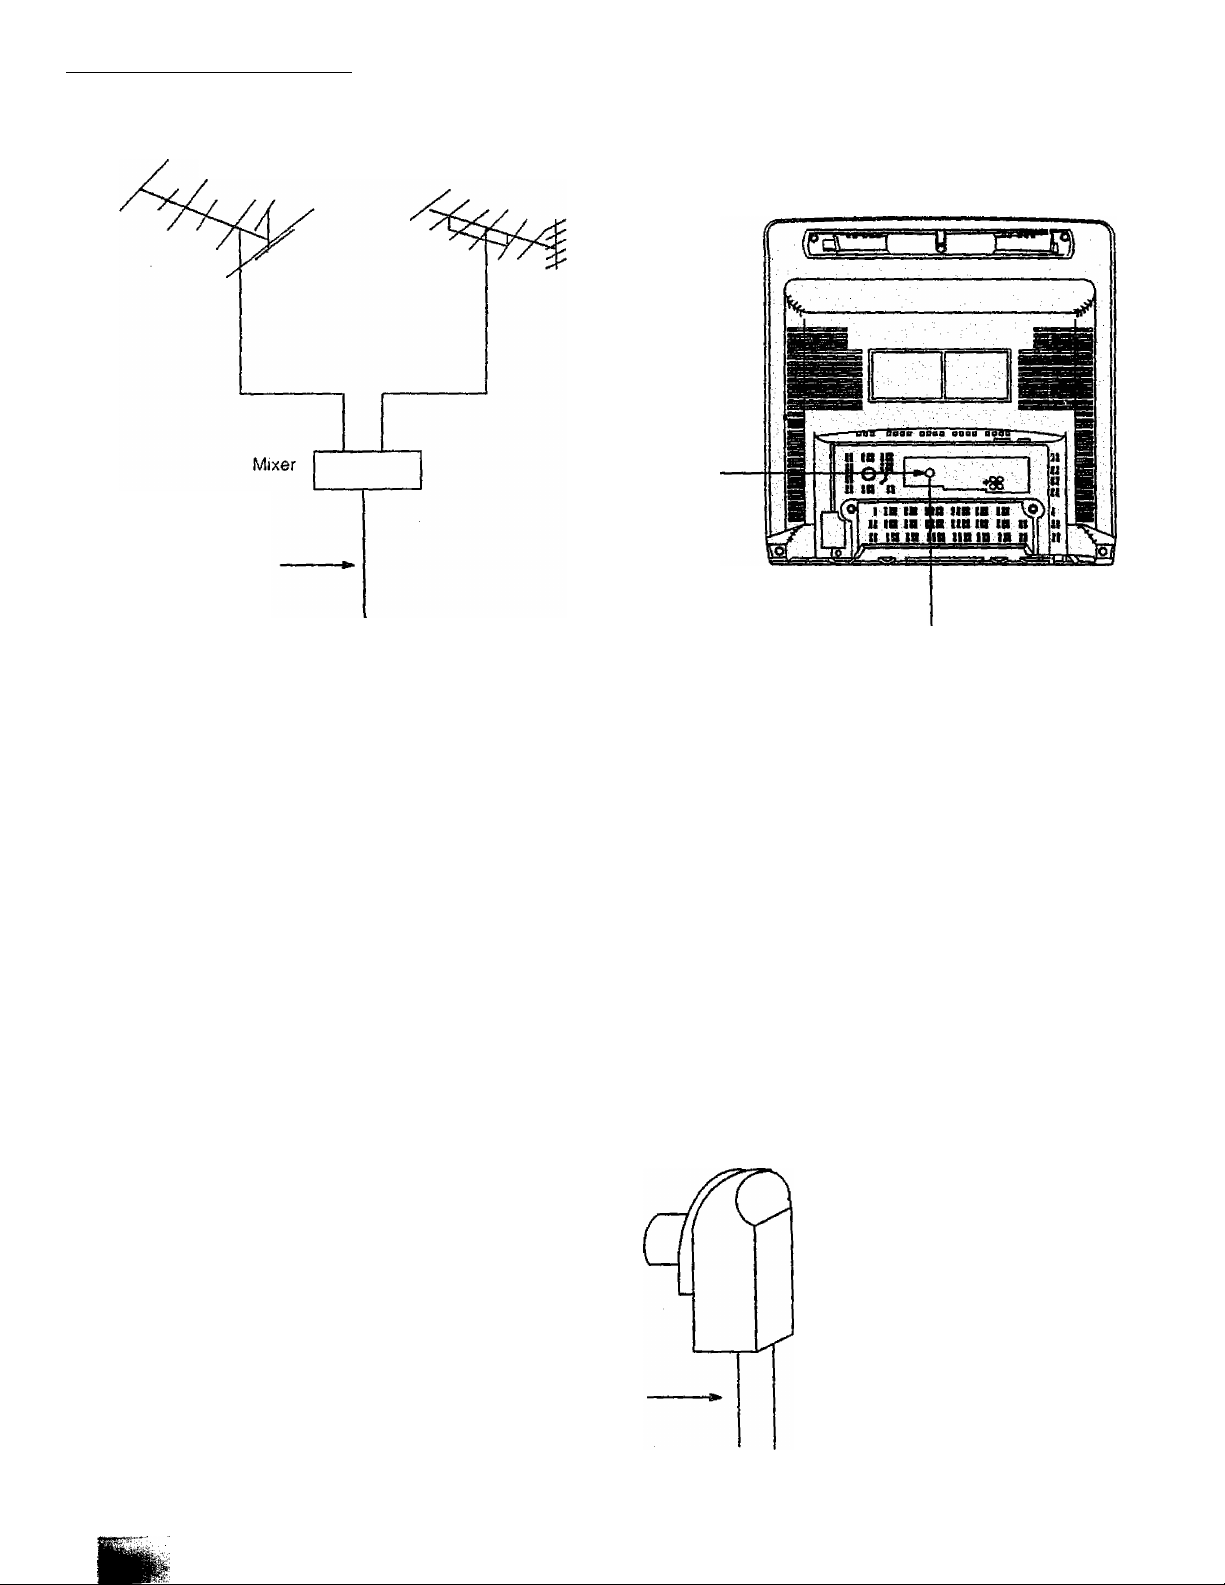
( Antenna Connection )
VHF Aerial
75 Ohm
Coaxial
Cable
UHF Aerial
RF In Terminal
_ Coaxial Aerial Plug
To obtain the best quality picture and sound, an external antenna, the correct cables (75 Ohm coaxial) and the correct terminating
plug will be required.
If a communal antenna system is used, you may require the correct connection cable and plugs between the waif antenna socket
and your television receiver.
Your local Television Service Dealer may be able to assist you in obtaining the correct antenna system for your particular area
and accessories required.
Any matters about antenna installation, upgrading of existing systems or accessories required, and the cost incurred, are the
responsibility of the customer.
Coaxial aerial plug
1
RF In Terminal
75 Ohm Coaxial Cable
Page 8
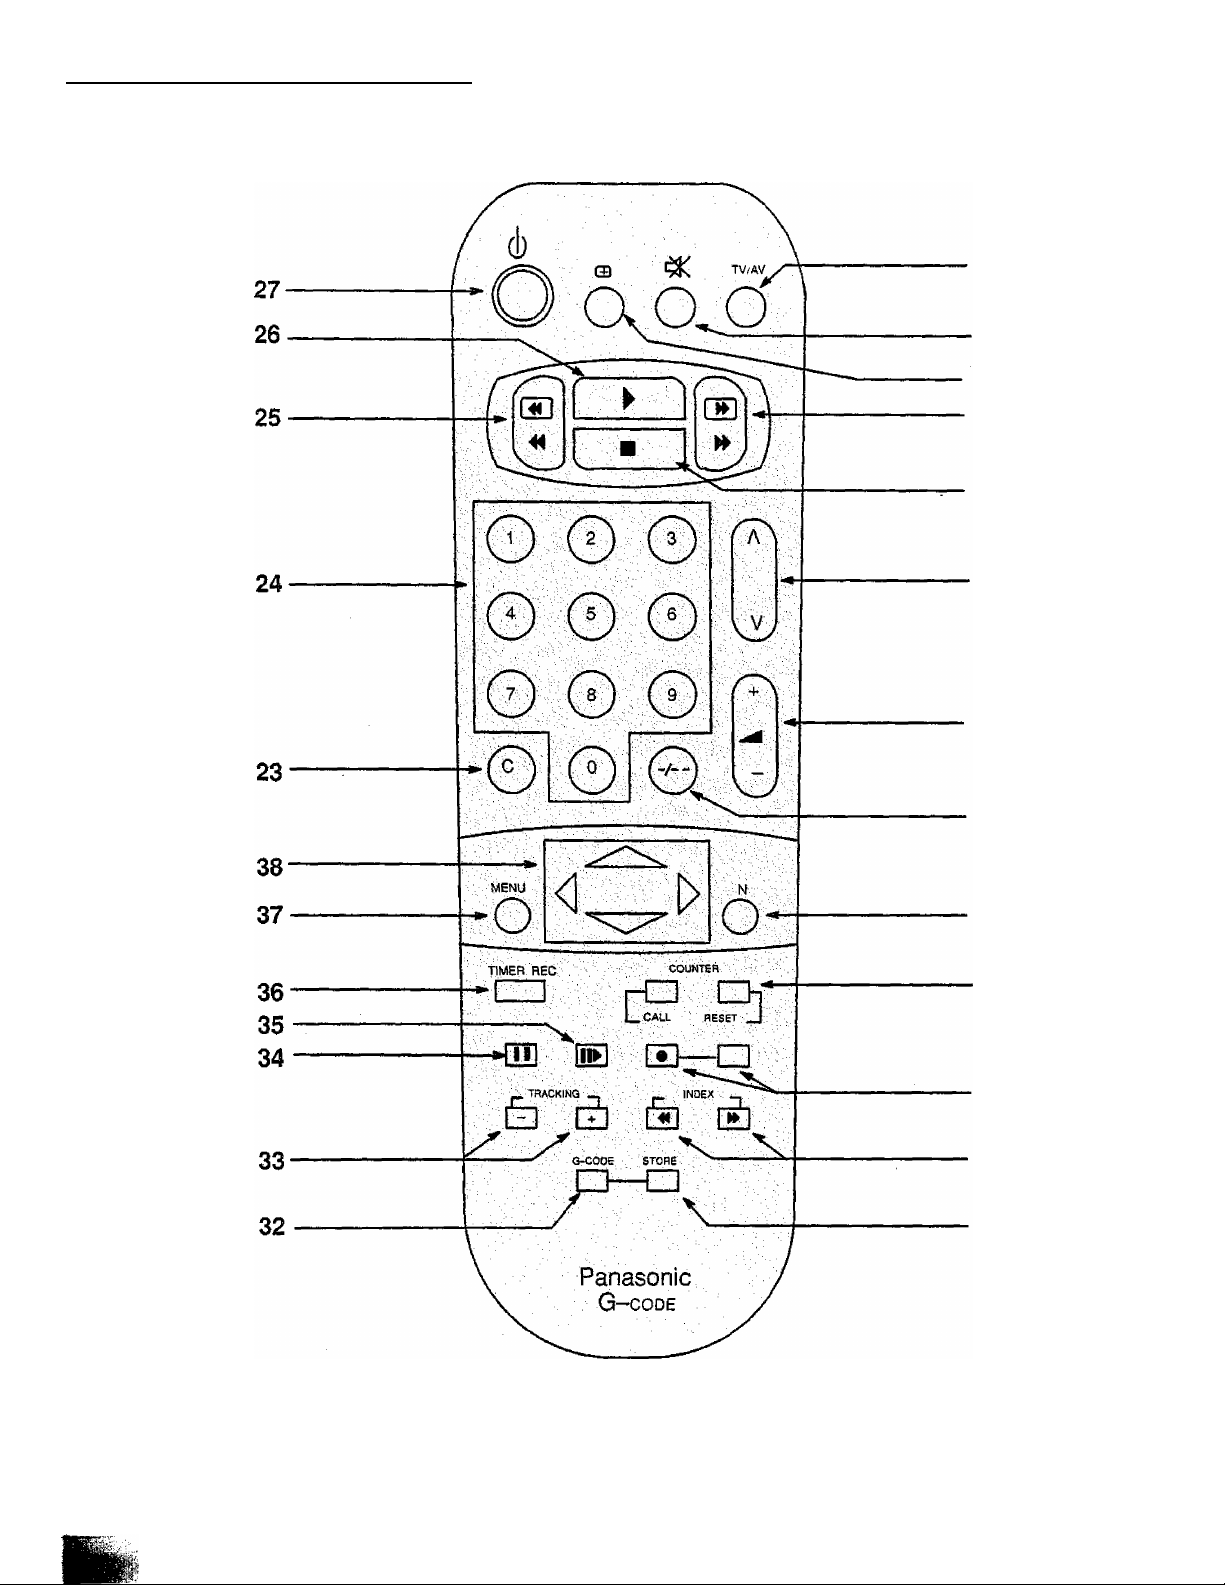
( Remote Control Transmitter^
14
15
16
17
18
19
20
21
22
28
29
30
31
NOTE;
G-CODE button and STORE button forTC-21SV10M, TC-21SV10H, TC-14SV10M and TC-14SV10H only.
Page 9
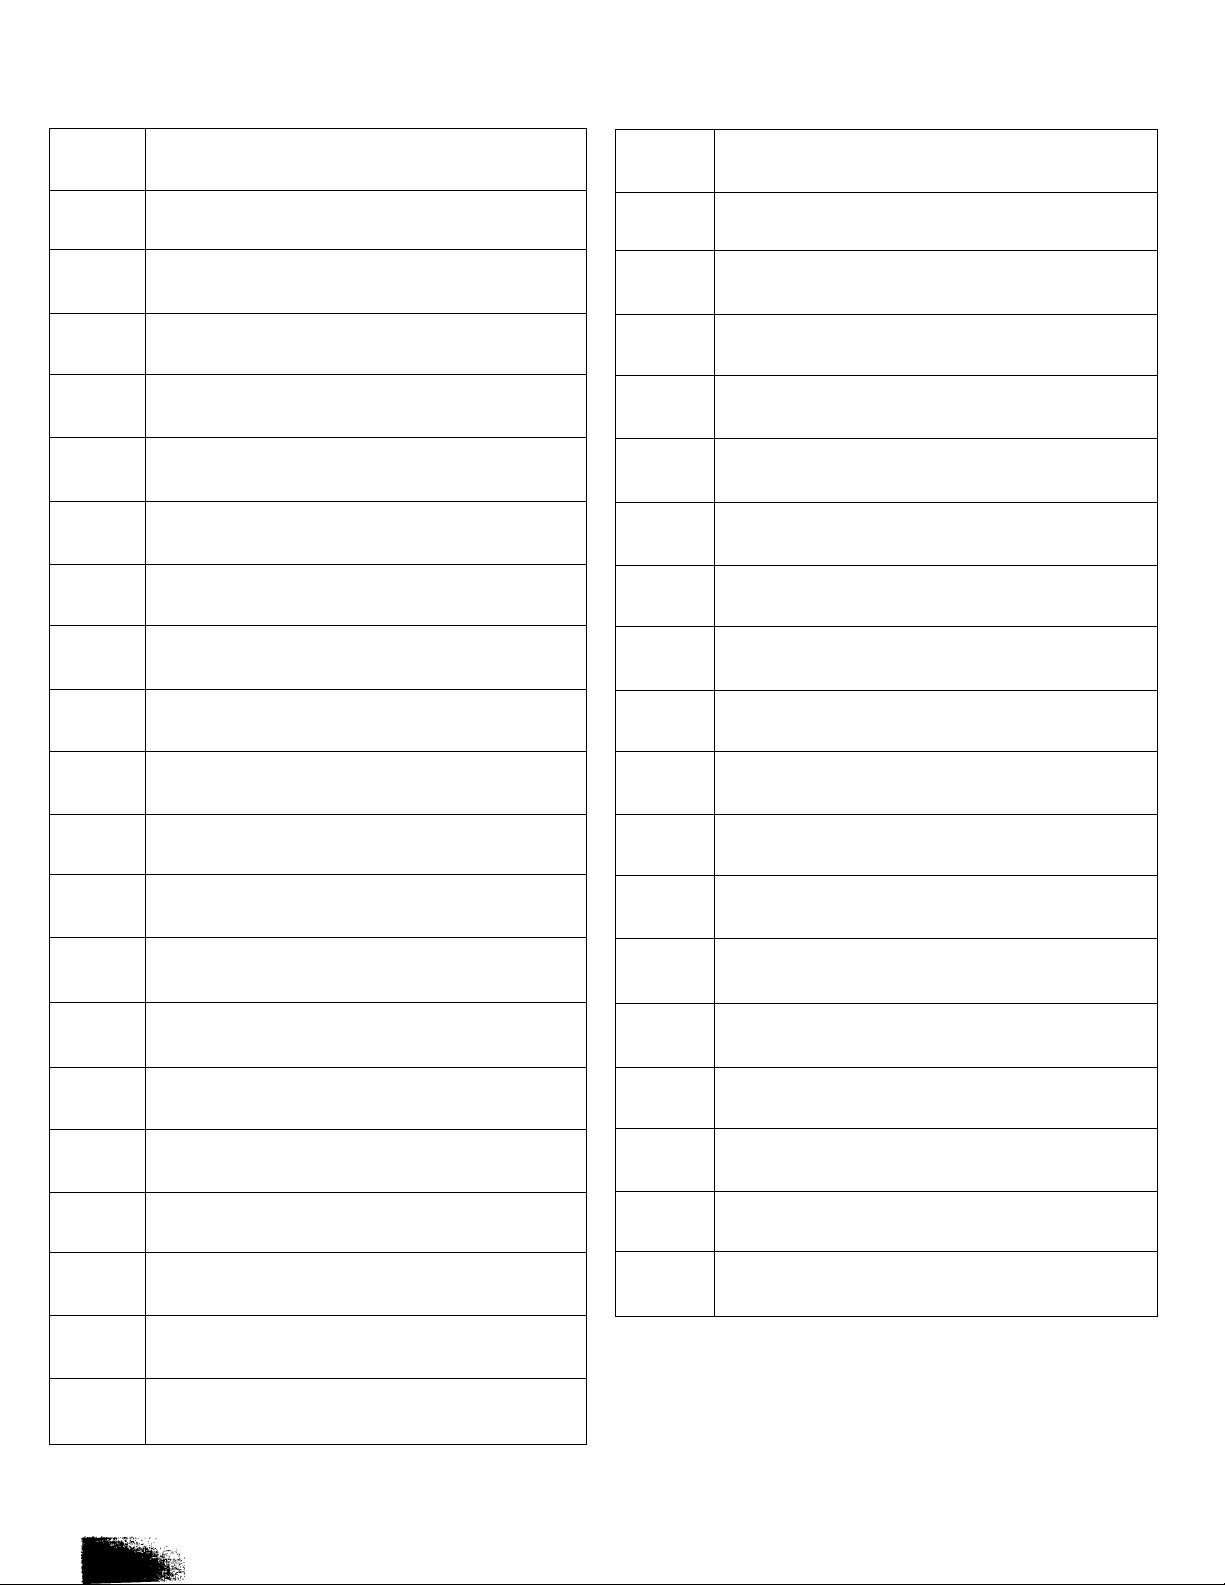
( Location of Control (Remote Control Transmitter and TV) )
No,
1 Power Switch Button
2 Eject Button (VCR)
3 Display Button
4
5 PRE. (PRESET) Button
6
7 Volume Up or Down Button
8 REW (Rewind) Button
9 PLAY Button
Descriptions
TV/AV Selection Button
Programme Number Up or Down Button
No.
21
22
23
24
25
26
27 Stand-by Button
28 Counter Reset
29
Descriptions
Two Digit Programme Number Selection Button
Normalization Button
Channel Selection Button
Direct Programme Number Selection Button
Rewind / Review Button
Play Button
Record Button
10 FF (Fast Forward) Button
11 STOP Button
12 REC. (Record) Button
13
14
15 Sound Mute Button
16
17 Fast Forward Button
18
19
Headphone Terminal
TV/AV Selection Button
Recall Button
Stop Button
Programme Number Up or Down Button
30
31
32 G-Code Button
33
34 Pause Still Button
35 Still Advance Button
36
37
38
INDEX Search Button
G-Code Store Button
Tracking Adjustment Button
Timer Record Button
Menu Selection Button
Position Button
20
Volume Up or Down Button
Page 10
( Remote Control Transmitter : General Operations^
1. TV/AV Selection Button
Press this button to select AV mode or TV mode.
2. Sound Mute Button
Press this button to mute the sound.
To cancel the mute mode ;
1. Press this button again
2. Press the Volume Up or Down button.
3. Recall Button
Press this button to display the current Programme
Number, Channel Number, Colour System, Sound
System, Off-Ttmer and Present Date mode.
In AV mode, a blue colour screen appears if there
is no AV signal (when the recall function is off).
r
2
CH4
AUTO
5.5 MHz
Present date
■►1994 10 1 (SAT)
C_______________________
12 :30
J
4. Fast Forward Button
Press to fast forward the tape. During the playback
mode, press this button to view the picture in
forward rapidly.
—
■
►► FF
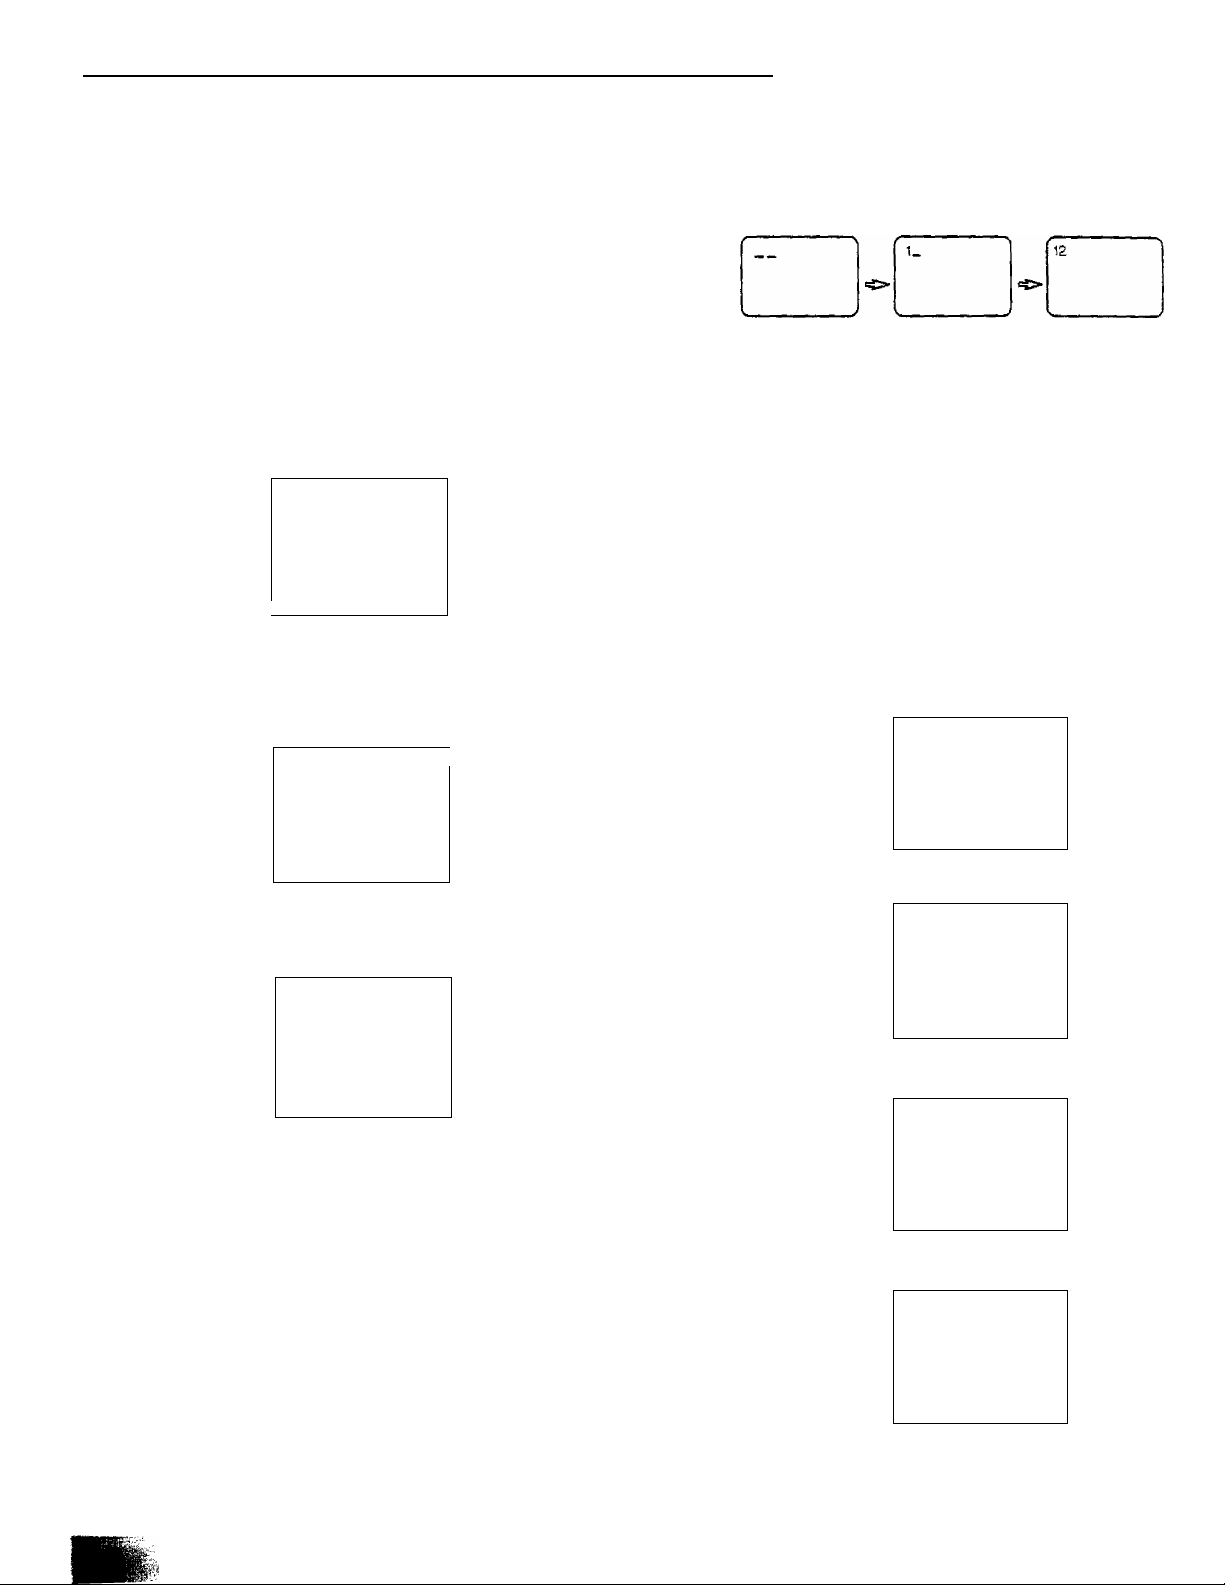
e.g. To select Programme Number 12,
1. Press this button once.
2. Press button number ” 1 ”.
3. Press button number" 2 ".
9. Normalization Button
This button can be used for setting the Colour.
Tint ( NTSC only ), Brightness, Contrast and
Sharpness
When this button is pressed, all functions setting
are reset to the factory preset level.
10. Channel Selection Button
You can select the actual channel number which can be
received in your area directly.
Press the "C" (Channel) button, then select the desired
channel directly.
e.g. To select broadcast transmission Channel Number 9.
r
CH
____
V
_________
.. .. .. .. j
5. Stop Button
Press to stop the tape.
f
■ STOP
6. Programme Number Up and Down Buttons
Press to select the next higher or next lower
Programme Number.
7. Volume Up and Down Buttons
Press to adjust the sound volume level.
8. Two Digit Programme Number Selection Button
Press the button and followed by the required
numbers to select Programme Number from
10 to 59.
Y
_____________
CH
i
__
—
\______________
1
CH_
\
_____________
1
CH9
V
___________
—
______
_
J
.J
y
_
Page 11

( Remote Control Transmitter: General Operations )
11. Programme Number Selection Button
Press one of these buttons to select Programme
Number {0 -- 9).
12. Rewind/Review Button
Press to rewind the tape.
During the playback mode, press this button to view
the picture in reverse rapidly.
13. Play Button
Press to playback the tape.
► P LAY
17. INDEX Search
Please refer to page 22.
18. G-Code Store Button
Please refer to page 22.
19. G-Code Button
Please refer to page 20 and 21.
20. Tracking Adjustment Button
Press these buttons or to adjust for best picture and I
to minimize any vertical jitter during stid-picture playback.
21. VCR Pause Still Button
By pressing in playback mode, the tape will be stopped
temporarily.The picture will pause.
22. Still Advance Button
While PAUSE / STILL mode, press to advance the picture
one frame at a time.
V
_________
14. Power Stand-by Button
Press the button to switch the TV set off.
To switch back on perform one of the following ;
a. Press Stand-by button again.
b. Press one of these Direct Programme Number Selection
buttons on the remote control.
c. Press Programme Number Up or Down buttons on the
TV set or on the remote control.
Note:
Do not leave your TV set in stand-by mode for a long period
of time. It is better to switch your TV off when you are away.
15. Counter Reset
CALL ; Press the button to show the playback time after
inserting tape.
Press once again to cancel.
RESET; Press the button to reset the counter.
23. Timer Record Button
Please refer to page 18.
24. Menu Selection Button
Please refer to page 15 and 16.
25. Position Buttons (Left or Right, Up or Down)
Please refer to page 15 to 22.
16. Record Button.
Press these buttons at the same time to record.
Page 12

( Trm6r Setting Operation )
The timer recording indicator (orange) will flash on and off when the timer has not been set.
1. Press the "MENU” button and select "CLOCK” by using the
Position Up or Down button.
MAIN MENU
PICTURE
FEATUR ES
'6Lo6k 1
'■PTOMmme
GUIDE C H
Display the "CLOCK” screen by using the Position Left or
Right button.
CLO CK
YEA R MO. DATE TIME
► 1993 1 1 00-.00
{FRl)
CLO CK OFF
Example, to set October 1st, 1994.
-Shift the cursor to "YEAR" by using the Position Left or
Right button and set to ”1994" by using the Position Up
or Down button.
-Shift the cursor to "MO."{MONTH) by using the Position
Left or Right button and set to ”10" by using the Position
Up or Down button.
-Shift the cursor to "DATE" by using the Position Left or
Right button and set to "10” by using the Position Up
or Down button.
2. Put the cursor in the place of" ► " by using the Position
Left or Right button.
If you did not move the cursor to the" ► ” location, you
will not be able to move the cursor to the clock.
3. To change "CLOCK OFF" mode to "CLOCK ON" mode,
shift the cursor to "CLOCK OFF" by using the Position Up
or Down button and press the Position Left or Right button.
The dock starts from 14:28:00
—
CLO CK
YEA R MO, DATE TIME
1994
10 1
IK., CLDCK.QEE.I
V
__________
14:28 l> 1994 10 1
(SAT)
. YEAR MO. DATE
r&~abciS]
\______________________________
CLO CK
(SAT)
TIME
14:28
________
4. Press the "MENU" button twice.
Note;
1. If you wish to change the settings, use the Position Up or
Down buttons and using the Position Left or Right buttons,
and move the cursor to the location you wish to change.
Then change the setting time and turn the clock "off" and
back "on".
2. If you attempt to start the video mode in the VCR Menu
without setting the timer, the unit will automatically bring up
the clock screen.
3. The unit will accept dates from 1988 through to December
31,2087.
/
Note:
The selected item is in Red colour.
The on-screen will change as follows ;
Example, to set the time 14:28
- Shift the cursor to "TIME" by using the Position Left or
Right button and set the figure "14” and "28" by using
the Position Up or Down button.
CLO CK
. YEAR MO.
r 1394 10
CLO CK OFF
DATE
(SAT)
TIME
1
rTTai
Page 13

( country System Selection )
Before AUTO SEARCH tuning and MANUAL SEARCH tuning, set the "SYSTEM SELECT" mode as explained below.
1. Press the "PRE." {PRESET) button, setting the Preset Menu to "SYS SELECT".
CH 4 PR ESET
! SYS SELEC T J
AUTO TUNE
MANUAL TUNE
SOUND SYS
COLOUR SYS
FÍNE TUNE
SKIP
CHINA '
6.5MHz
AUTO
OFF
blinking
2. Select the appropriate System by pressing the Volume Up or Down button on the TV set.
The system select indicator will change as follows;
TC-21SV1 OH and TC-14SV10H TC-21SV10S and TC-14SV10S
CHINA
HK/UK
CHINA
ASiA/M.E.
E.EUROPE
TC-14SV10M and TC-21SV10M
► ASIA/M.E
I
NZ/INDONESIA
I
-AUSTRALIA
System Select by Country
SYSTEM SELECT
CHINA
HK/UK
ASIA/M*E Malaysia, Singapore, Thailand, Asia countries, Kuwait, Saudi Arabia,
E* EUROPE
China
Hong Kong, United Kingdom
United Arab Emirates, Middle East Countries, etc.
CIS, Poland, etc.
10
Page 14

( Tuning Procedure^
Automatic Search
(Country System must already be set)
1. Press the ’’PRE. (PRESET)" button twice.
The on-screen display appear as shown*.
1
CH4
SYS SELECT
AUTO TUNg~1
MANUAL TUNE
SOUND SYS
COLOUR SYS
FINE TUNE
SKIP
2. Press the Volume Up or Down button on the TV set.
The best tuning position is automatically memorized.
PRESET
CHINA
6.5MHz
AUTO
OFF
Manual Search
(Country System must already be set)
1. Press the "PRE. (PRESET)" button three times.
The on-screen display appear as shown;
1
PRESET
CH4
SYS SELECT
AUTO TUNE
1 MaNOal
SOUND SyS
COLOUR SYS
FINE TUNE
SKIP
2. Select the desired Programme Number.
3. Press the Volume Up ”+" or Down button, the TV station
broadcasting on the next higher or lower frequency will be
automatically tuned and memorized.
CHINA
6.5MHz
AUTO
OFF
3. After all stations are tuned, the on-screen display will
automatically change from "AUTO TUNE” to "SOUND SYS".
Confirm the sound condition of each Programme Number by
pressing the Programme Number Up button.
4. If the Sound is not clear or no sound is produced on a
Programme Number, press the Volume Up or Down
button to improve the Sound quality.
You can select one of the sound system as below;
, MODEL ■' : ,. ■
TC-14SV10H
TC-21SV10H
TC-14SV10S
TC-21SV10S
TC-14SV10M
TC-21SV10M
SOUND SYSTEM
6.0 MHz 6.5 MHz
5.5 MHz ^ 6.5 MHz
5.5 MHz
1
CH4
SYS SELECT
AUTO TUNE
.MANUAL TU NE
1 .SOUND SYR I
COLOUR SYS
FINE TUNE
SKIP
PRESET
CHINA
6.5MHz<
AUTO
OFF
blinking
If an undesired TV stations is received, press the same
button again until the desired TV station is tuned.
You can also select a specific programme number by
pressing the desired programme number after pressing
the "C" (Channel) button. (Refer to page 7 )
4. Press the "PRE. (PRESET)" button.
5. Select the Sound system by pressing the Programme Number
Up button.
If the Sound is not clear or no sound is produced on a
Programme Number, press the Volume Up 'V" or Down
button to improve the Sound quality.
6. After completed, press the "PRE. (PRESET)" button 4 times
to return the set to the normal viewing condition.
5. Use the Programme Number Up button to sequentially check
each station.
6. After completed, press the "PRE. (PRESET)" button 4 times
to return the set to the normal viewing condition.
11
Page 15

f Finé Tuning operation )
( Prograrntné Number Sl<ip Opefation ^
Under normal reception condition, this function is not used.
However, in areas of poor reception or constant interference,
a slight adjustment on the fine tuning can improve the picture
and sound quality.
How to set the Fine Tuning Operation.
1. Select the desired Programme Number.
2. Press the "PRE." (PRESET) button 6 times.
The on-screen will appear as shown ;
PRE,
3. Press either the Volume Up "+” or Down " - ” buttons
continuously.
When the above fine tuning operation has been performed,
the " symbol appear on the left of Programme Number.
The AFC function is deactivated.
AFC OFF
symbol
—
1
CH 4
SYS SELECT
AUTO TUNE
MANUAL TUNE
SOUND SYS
,-CQi.P0B SY,S,
SKIP
1
CH 4 PR ESET
SYS SELECT CHtNA
AUTO TUNE
MANUAL TUNE
SOUND SYS
COUDUn SYS
■.EiaEJlihET-l
SKIP
PRESET
6.5MHz
AUTO
OFF
CHtNA
6.5MHz
AUTO
OFF
1. Press the TRE." (PRESET) button 7 times.
The on-screen will appear as shown ;
PRE.
1
PRESET
CH 4
SYS SELECT CHtNA
AUTO TUNE
MANUAL TUNE
SOUND SYS
COLOUR SYS
RNETUNE
[ 1k E3
6.5MHz
AUTO
OFF-
blinking
2. Select a Programme Number you want to skip, by pressing
the Programme Number Up or Down button.
3. Press the Volume Up V' or Down button on the TV set.
The displayed "OFF” condition changes to "ON".
1
CH4 PRESET
SYS SELECT CHINA
AUTO TUNE
MANUAL TUNE
SOUND SYS 6.5MHz
COLOUR SYS AUTO
rUNE
JrltlËTt.
ON -4-
blinking
4. !f more Programme Number are to be skipped, repeat
step 2 and 3.
5. Press the "PRE." (PRESET) button once to return the TV
set to normal viewing condition.
4. Press the "PRE." (PRESET) button twice to return the TV set
to the normal operating mode.
How to Cancel the Fine Tuning Operation.
If you want to reset this Programme Number to the
automatically tuned condition with the AFC activated,
perform the following steps :
1. Press the " PRE." (PRESET) button 3 times.
The on-screen will appear as shown :
\
CH4 PRESET
SYS SELECT CHINA
AUTO TUNE
MANUAL TUNE
SOUND SYS
COLOUR SXS
^ FINE TUNE 1
SKIP
2. Press either the Volume Up V or Downbuttons on
the TV set.
3. Press the " PRE." (PRESET) button 5 times to return the
TV set to the normal operating mode.
6.5MHz
AUTO
OFF
How to Cancel the Skip Operation.
1. Press the "PRE. (PRESET)” button 7 times.
The on-screen will appear as shown ;
r
PRE.
2. Select the skipped programme number by pressing the
Programme Number Up or Down button.
3. Press the Volume Up"+" or Down button on the TV set.
The displayed "ON" condition changes to "OFF".
If more Programme Numbers are to be cancelled,
repeat step 2 and 3.
4. After the operation is completed, press the "PRE." (PRESET)
button once to return the TV set to the normal operating mode.
1
CH4
PRESET
SYS SELECT CHINA
AUTO TUNE
MANUAL TUNE
SOUND SYS
COLOUR SYS
FINE TUNE
iSKIPi
6.5MHz
AUTO
ON
blinking
12
Page 16

( SoUrid System Selection )
(TV mode only)
( Colour System Selection )
1. Press the ”PRE.” (PRESET) button 4 times. Setting
the Preset Menu to "SOUND SYS".
PRE.
2. Press the Volume Up V or Down button on the TV set
until the optimum sound is obtained.The selected sound
system is automatically memorized.
3. Press the "PRE." (PRESET) button 4 times to return
to normal operating mode.
Note;
Each model or each country has different Sound System
depending on type of broadcasting transmission.
MODEL
SOUND SYSTEM
1, Press the "PRE." (PRESET) button 5 times. Setting the
Preset Menu to "COLOUR SYS".
(In AV mode, press the "PRE." (PRESET) button once).
PRE.
2. Press the Volume Upor Downbutton until the
optimum image is produced.
(each model has different Colour System)
The colour system will change as shown below;
p AUTO-»* PAL-*" NTSC 3.58-^ NTSC 4.43 -j
3. Press the "PRE." (PRESET) button 3 times to return to
normal operating mode.
The selected Colour System is automatically memorized,
(in AV mode, press the "PRE." button once)
Note;
Each model or each country has different Sound System
depending on type of broadcasting transmission.
TC-14SV10H
TC-21SV10H
TC-14SV10S
TC-21SV10S
TC-14SV10M
j TC-21SV10M
6.0 MHz 6.5 MHz
5.5 MHz 6.5 MHz
5.5 MHz
MODEL
TC-14SV10H
TC-21SV10H
TC-14SV10M
TC-21SV10M
TC-14SV10S
TC-21SV10S
: COLOUR SYSTEM ;
TV
AUTO—►PAL—► NTSC4.43
i . I
AUTO—►PAL—► NTSC4.43
t
--------------
TV
AUTO—►PAL—► NTSC4.43
f _ I
AV
AUTO—►PAL—► NTSC4.43
t
--------------
TV
AUTO—► PAL —► SECAM
t
--------------
NTSC 3.58 ^
NTSC 3.58
NTSC 4.43
--------------
------
---------
---------------
1
1
1
13
AV
AUTO —► PAL—► SECAM
t NTSC 3.58-^ NTSC 4.43*-l
Page 17

( VCR ; General Operation)
1. PLAY Button
Press to playback the tape.
PLAY
r
^ PLAY
______
Note:
- Whenever playing a tape, the mode is automatically
switched over to the "VIDEO" mode even if the TV
is set to the "TV" mode.
- When a cassette tape without erasure prevention
tab is inserted, playback starts automatically.
- When playing starts, VCR indicator lights up.
- When the tape reaches its end, it is rewound to the
beginning automatically.
2. STOP Button
Press STOP button to stop the tape.
During playback mode, holding this button down will allow
you to view the picture in the forward direction rapidly.
>1
Note;
When the tape reaches its end. it is rewound to the
beginning automatically.
5. REW (Rewind) /Review Button
Press the button to rewind the tape.
During playback mode, holding this button down will
allow you to view the picture in reverse rapidly.
Note:
When the power is switched off during rewinding, the
power of the TV is shut off immediately, but the power of
the VCR section is shut off only after completion of rewinding
(REWIND SHUT OFF).
EJECT Button
Press this button to eject the tape.
-
EJECT
-----------------------------
A EJECT
Note:
Ejection is possible in stand-by condition.
4. FF (Fast Forward) I Cue Button
Press this button to fast forward the tape.
V J
N
►► FF
6. PAUSE/STILL Button
Press to stop the tape temporarily during playback and
recording.
During playback ; Still picture
r '
>1
II STILL
Q
______
During recording : To interrupt recording
II PAUSE
Note:
- When Pause and Stilt is continued for more than 5 minutes,
it is automatically cancelled for protection of the tape.
- The VCR indicator (Red) blinks during pause.
- When either FF/Cue playback, REW/Review play back is
continued for more than 10 min., mode returns to the
normal playback mode for protection of the tape.
- If vertical jitter occured during still-picture playback,
refer to TRACKING button explanation.
14
Page 18

( VCR : General Operation)
7. Still/Advance Button
Press this button during Still mode. Each time you press
this button, the still picture is advanced, frame by frame.
( Main Menu Operation )
The menus can be displayed on the screen by pressing the
"MENU" button.
After you press the "MENU" button, on-screen display appear
as below:
When this button is pressed during playback, the mode
turns to slow playback (when you hold slow playback
mode for more than 10 min,, the mode turns to STOP
mode). Press either "PLAY” button to cancel.
8. Displaying the Tape Counter
Make sure that a tape is inserted. The playback time after
insertion of the tape is shown after pressing the CALL button.
Press the button once again to cancel.
■ STO P
0:10.00
J
9. RESETTING the Tape Counter
By pressing this button, the counter reset to 0:00.00.
MENU
MAIN MENU
PICTURE
FEATUR ES
CLO CK
PROGRAMME
GUIDE C H
The PICTURE. FEATURE, CLOCK, PROGRAMME and
GUIDE CH can be selected by using the Position Up or
Down buttons.
These items can be adjusted or set-up by using the Position
Left or Right button.
a) Select the PICTURE menu and press the Position Left or
Right button.
The colour control function (COLOUR. NTSC-TINT. BRIGHT,
CONTRAST and SHARPNESS) will be displayed. It can be
adjusted by pressing these buttons.
Press the Position Up and Down button to shift the cursor to
another items of colour control function.
<1
PICTURE
32 COLOUR
32 NTSC -TIN T
32 BRIGHT
47 CONTRAST
32 SHARPNESS
10. TRACKING Button
pTRACKlNG-|
When the playback picture is not clear, press the
TRACKING buttons 'V and to adjust for best picture.
For vertical locking adjustment. Use the "+" and
buttons to minimize any vertical jitter during still-picture
playback.
Note ;
When this button is pressed, the mode turns to manual
tracking mode.
Mode returns to automatic tracking mode when the tape
is inserted.
b) Select the FEATURES menu and press the Position Left and
Right button.
The on-screen will display the OFF TIMER, BLUE BACK and
REPEAT mode.
Explanations as explained on page 16
c) Select the CLOCK menu and press the Position Left and
Right button.
Explanations are on page 9.
d) Select the PROGRAMME menu and press the Position Left
and Right button.
Explanations are on page 18.
e) Select the GUIDE CH menu and press the Position Left and
Right button.
Explanations are on page 20. 21 and 22.
15
Page 19

Feature Menu Operation)
( Picture Menu AdjustmentOperation)
1 ■ Press the "MENU" button.
2. Select the "FEATURES” by using the Position Left
or Right button.
3. Select the desired item either OFF TIMER mode,
BLUE BACK mode or REPEAT mode by using the
Position Up or Down button.
OFF TIMER
t
I
-------
------
BLUE BACK
REPEAT-
■J
OFF TIMER mode
The TV set can be preset to switch off after a
fixed period of time. By pressing the Position
Left or Right button, you can select the preset
time either 30, 60, 90 or AUTO mode.
30 60 90
In Auto mode, if the TV set is not switched off, it will
automatically go to stand-by condition 5 minutes
after the TV station ends broadcasting.
Note :
{Setting Off-Timer to AUTO mode will not operate
when the Television set is in AV mode.)
AUTO
1. Press the "MENU" button.
MAIN MENU
FEATUR ES
CLO CK
PROGRAMME
GUIDE C H
2. Select the "PICTURE” by using the Position Up or
down button.
3. Select the desired item either COLOUR, NTSC-TINT,
BRIGHT, CONTRAST and SHARPNESS by using the
Position Left or Right button.
PICTURE
i CO LOU RI
NTS C-TINT
BRIGHT
CONTRAST
SHARPNESS
4. The level of selected item can be adjusted by pressing
the Position Left or Right button.
Right button ; to less level
Left button ; to high level
BLUE BACK mode
When no picture signal is input, or the signal is weak,
the screen reverts to a blue background colour.
Disable this Feature to continue watching very weak
signals.
Blue if no input picture signal
or input signal is weak.
Note :
If BLUE BACK Mode is set on while a VCR signal is
being viewed, selecting CUE or REVIEW or when
tracking is deviated, may cause the screen to revert to
the blue background colour. Disable this Feature to
view correctly.
REPEAT Mode
The tape is played back repeatedly from the start to
the end of the recorded content.
PICTURE
COLOURI
NTS C-TINT
BRIGHT
CONTRAST
SHARPNESS
<][>
V _
COLOUR
1
__
-1^
____
1
Helpful Hint ( NORMALIZATION BUTTON )
By pressing the Normalization "N" button on the Remote
Control while the Picture menu is displayed, the selected
menu will be changed to the Normal Mode.
Normalization will not occur if the menu is not displayed when
the "N" button iS'pressed.
The normal mode is the factory preset condition. Returning to
this original condition is called "Normalization".
Л
_ J
16
Page 20

( yeti Ôperatlori )
Recording
1. Press the "REC.” (Record) buttons to record a current programme (TV or AV Input).
2. Recording is started by pressing the "REC." (Record) button.
REC
press at
the
same time
- When recording starts, VCR indicator lights up (Red)
- When a tape without erasure prevention tab is inserted, the tape is automatically ejected. Insert a tape
with the exasure prevention tab still in place.
“ The "ll2d" mark is displayed when there is no recording tape.
3. Recording may be stopped by pushing the STOP button.
Helpful Hint
1. To avoid inadvertent erasure of an important recorded tape, break the erasure prevention tab of the cassette
tape, By doing so, recording becomes impossible and erroneous erasure is prevented.
Use cassette tape (two layers preferably) a cross the broken erasure prevention tab, to make re-recording
possible again.
2. During recording, if another programme is to be recorded, push the "PAUSE" button, switch to another
channel if desired, push the "PAUSE" button again, and recording will re-start.
(The red VCR Indicator blinks during pause)
3. Recording in "S-VHS" format is not possible with this unit.
4. When the "REC." button is pressed at the starting of recording or during recording, an index signal is
recorded. This index signal enables indexing of recorded programmes, for use with indexing function.
Recording tape
index signal ■ - ■■■■
The lime when The time when the The time when the next
recorefing started. "REC." button is recording is started,
To prevent mis operation, leave minimum of approximately 5 min of tape between each recorded index signal.
Note ;
1. The top of the picture may becoma distorted in the Cue, Review mode. This is not an indication of a mulfunction.
2. In the special playback modes, the Blue Back-ground function does not work, even if the screen becomes noisy.
1 st programme
1
pressed again.
2nd programme
1 i
3rd programme ^
1
3. The sound may be muted when playing back a tape with blurred picture.
17
Page 21

; VCR Operationi )
Programme Timer Recording
6 programme Timer Recording is possible.
0
© 0 ©
PFO GRAr IME
POS DATA START STOP
AV 10 14:00 15:00
Position Setting
Cursor
-----------
Present time
1. POS (Position)
Preset the programme number for the programme to be
recorded.
Preset programme number you want to record the
programme from AV input. Skipped programme numbers are
not displayed.
7 11 5:30 7:30
7 11 5:30 7:30
!
1994 10 1 (SAT) 12:30
How to use the arrow Buttons
1. Press the "MENU" button to display the MENU screen.
MENU
2. Set the cursor to PROGRAMME by using the Position Up
and Down buttons.
Select PROGRAMME by using the Position Left and Right
buttons.
3. Shift the position setting Position Up and Down buttons.
Set each items from step 1 to 4 as shown on left side.
The cursor shifts right and left.
4. When a tape is inserted after Programme Timer Recording
mode is set. the Timer Recording indicator lights up (orange).
2. DATE
Preset the date when the programme will be broadcast.
The date can be preset as follows :
- Presetting for one month in advance (from the present
dale).
- Presetting of the same time everyday (DAY)
~ Presetting of the same time from Monday to Saturday
(M-S)
- Presetting of the same time from Monday to Friday
(M-F)
- Presetting of the same time of the same day of every
week (SUN. MON. TUE. WED. THU. FRl, SAT)
3. START
Preset the hour and minute when recording is to start.
4. STOP
Preset the hour and minute when recording is to finish.
18
Page 22

( VCR Operation )
Presetting Method
Press the "MENU" button, set the cursor to PROGRAMME by using the Position Up and Down buttons, and then select
PROGRAMME by using the Position Left and Right buttons.
f
POS DATA
► - -
PROGRAMME
START STOP
MEKU
1994 to
1 (SAT} 12;30^
Note;
When the Timer Setting mode is not set, the Timer setting screen is displayed initially.
Set the Timer Recording mode by shifting the cursor.
For example, when you want to record programme No. 4 on Oct., 5 from 14:30 to 15:30 in the SP mode.
3, Insert a tape and push the 'TIMER REC" button. The "TIMER REG” indicator lights up.
Press again to cancel the timer recording.
TIMER REC
La,
Note: c_:i
- When the tape without erasure prevention lab is inserted, the tape is automatically ejected.
Or when there is no recording tape, the TIMER-REC indicator blinks.
- Unless reservation via the timer is cancelled, it is impossible to operate the VCR and to
eject the tape.
4. Press the "MENU" button twice, to return the set to the normal viewing condition.
Note :
Recording starts from approx. 20 sec. prior to the arrival of preset time.
Helpful Hint
1. When you want to set another programme, shift the cursor to a line not yet set, and set it as described above.
2. To erase contents of the Timer Recording mode, shift the cursor to the line to be erased and push the (N) button.
3. After switching the TIMER REC indicator off by pressing the "TIMER REC" button, you can use the VCR as
usual, except during the time for which Timer Recording mode is set. Insert a tape before recording starts and press
the "TIMER REC" button.
4. When a preset lime has passed, the contents of corresponding preset line is erased.
5. When you want to stop recording during Timer Recording, press the "TIMER REC" button.
6. When the TIMER REC Indicator is light on, Timer Recording is not performed.
19
Page 23

( VCR Operation)
GUIDE CHANNEL (TC-21SV10M, TC-21SV10H, TC-14SV10M and TO-14SV10H only)
G-Code Programming Case 1
When the G-Code are printed on newspaper or magazines.
The Guide channel is a code dedicated to a broadcast station, and enables you to correctly receive broadcast
stations using G-Code scheduling.
The Guide channel may differ from the actual TV channel, so care should be taken.
4. Push the "Direct Programme Number Selection” button and
set the G-Code which is printed on newspaper or magazine.
2,3,6
Note :
If you have entered the wrong number, press the "N" button.
5. Press the "STORE” button.
1,8
MENU
<] -
W
TIMER
■ REC
О
COUNTfiR
L- CALL RESET-
Ш IE IS—□
j^ACKlNG^ . p INDEX -[
О Ы Ш—-Й
G4;ooe ■ STORE ■
a—
(i
GUIDE C H
I GU IDE CH l POS
123 4S6789
GUIDE C H
GUIDE C H I. PQS
194
123 455789
1
1. Press the "MENU" button.
MENU
(
MAIN MENU
i£fCBJ0El
FEATUR ES
CLO CK
PROGRAMME
GUIDE C H
\
/
2. Select the GUIDE CH Menu by using the Position Up or
Down button.
MAIN MENU
PICTURE
FEATUR ES
CLOCK
,,ES.0GBAMME
1ешоЁ.ш
3. Press the Position Left or Right button.
GUIDE C H
I GUIPE^'hJ POS
The Guide channel corresponding to the G-Code will
be displayed.
6. Set to the same Programme Number Position as you have
set for the Guide channel using the Position Up or Down
button.
/
GUIDE C H l ,POS
GUIDE C H
194 Xiir
123 456789
I
Setting range: 0-59 -> AV
7. Repeat Steps 4 to 6 for each Guide channel.
8. After you finish setting all the Guide channels, press the
"Menu” button twice.
MENU
1
\
________
Note;
1. To receive satellite stations, the satellite receiver must
be connected to the AV Input Terminals and programme
position must be set depending on the type of the
connection made, set to programme number AV.
20
2. When the satetlite receiver is connected by means of the
RF coaxial cable, set to a Programme Number 0.
Page 24

( VCR Operation )
GUIDE CHANNEL (TC-21SV10M, TC-21SV10H, TC-14SV10M and TC-14SV10H only)
G-Code Programming Case 2
When channel guide for each broadcasting station is known in advance.
The Guide channel is a code dedicated to a broadcast station, and enable you to correctly receive broadcast stations
using G-Code scheduling.
The Guide channel may differ from the actual TV channel, so care should be taken.
1. Press the ’’MENU” button.
MENU r
MAIN MENU
LpicureI
FEATUR ES
CLO CK
PROGRAMME
GUIDE C H
2. Select the GUIDE CH Menu by using the Position Up or
Down button.
MAIN MENU
PICTURE
FEATUR ES
CLO CK
IME
3. Press the Position Left or Right button.
6. Set to the same Programme Number Position as you have
set for the Guide channel using the Position Up or Down
button.
\
GUIDE C H
GUIDE C H L,POS 1
194 Tin
1 23456739
Setting range : О^бЭ -> AV
Select the ’’GUIDE CH" by using the position Left or
Right button.
7. Repeat Steps 4 to 6 for each Guide channel.
8. After you finish setting all the Guide channels, press the
’’Menu” button twice.
MENU
—
1
1
4. Set the Guide channel by pressing the Position Up or Down
button.
N
GUIDE C H
■GÜlDEljîHi POS
123 456789
и/
Setting range : 001 "• 255.
5. Select the POS by using the Position Left or Right button.
GUIDE C H
GUIDE C H rPOS~
100 L2_______!
1 23456789
1
The Guide channel corresponding to the G-Code will
be displayed.
21
V .
.CALL RESET-
Ш m
f-TRACKING^ INDEX -I
LU Й Ш—Й
G-COOË STORE
J
Page 25

( VCR Operation )
G-Code Recording
You can schedule recording by inputting the G-Codes listed in
the TV programme columns in newspaper and magazines.
Always set to "Guide Channel" when reserving the G-Code.
1. Press the "G-CODE" button.
—
G-CODE
1
_ ___
Note;
Upon pressing the G-Code button after presetting 6
programme timers recordings, programme screen is
displayed.
2. Press the Direct Programme Number Selection button and
set the G-Code.
G-CODE
1 234567S9
A
Playback of Indexed Programme
It is possible to index programme recorded on this unit, to make
locating specific programme start position faster. {The unit
searches for a pre-recorded index signal and the corresponding
programme is played back automatically). Insert a recorded
cassette tape with index signals.
1. By pressing the Index Search buttons to designate many
index signals backward of forward the unit should count off
before stopping.
— INOEX
The diagram below shows a section of tape, with the VCR
stopped between two index signals.
Note from the diagram that nom designate the start of a
selected programme 2 programme back, the unit must count
three index signals so in such a case you would set "3" not "2"
Setting range : 1 -* 20.
/---------
\
_____
►► FF -1
J
3. Press the "STORE" button.
f
G-CODE
123456789
DATA START
POS
10 4 10:00
^1994
121 <THU> 12;00j
STOP
12:00
Note;
- The Input Code will flash on and off if there is a read error
owing to an input miss.
- Press the Position Left or Right button during input to
change each number entry at your option.
- To clear an input code which has already been entered,
press the "N" button.
4. In case of other G-Code recording, Repeat steps 1 to 3 for
each programme,
5. Press the "MENU" button twice.
G-Code is a trademark applied for by Gemstar Development Corp.
G-Code system is manufactured under license from
Gemstar Development Corporation.
►► FF -3
V
____
When a index signal is detected, the numbers displayed will
be reduced.
When the specified index signal is detected, playback of the
corresponding programme starts automatically.
MENU
m m
p.TBACKING-1 f. INDEX
in ui Ca—ra
o-cooe STORE
czh-a
22
Page 26

( Warnings and Cautions )
When a dew condensation phenome
nom occurs, indication of "dew con
densation ” appears and the cassette
tape is ejected. Indication of "dew con
densation" ceases soon. When you
want to operate the VCR, wait for a
while until the said indication ceases.
While "dew condensation" is indicated
the VCR does not work even if you
push any operations buttons, but you
can watch the TV.
indication pf "dew condensation" will
cease within several hours at latest.
Such time may differ according to
circumstances.
As generally dew condensation ad
vances gradually, and indication of
"dew condensation" may appear
10-15 minutes after the begining of
dew condensation.
Do not put the TV/VCR set in a place
where it is exposed to the direct rays
of the sun for a long time.
Conditions which causes dew con
densation are as follows;
It may occur if the TV/VCR and the
cassette tape were moved to anoth
er place where there are great
changes of temperature and
humidity.
- A humid place where the air Is
thick with steam.
- When the TV/VCR was suddenly
moved from an air-conditioned room
to a hot and humid place.
~ The room was heated quickly.
When the rotary cylinder is stained
with condensation droplets, the tape
may adhere to the rotary cylinder. It
may interfere with normal forwarding
of the tape and the tape may be
damaged.
Do not spray insecticide or volatile
solvent upon the TV/VCR. Do not
allow rubber and vinyl products to
contact the TV/VCR for long periods.
The may cause changes in quality
and peeling of the paint.
777"GÎ
Do not put the TV/VCR set in a place
which is dirty or damp or near a
strongly magnetic object.
Always remove connection cable
when moving the TV/VCR. When you
carry the TV/VCR to a distant place,
always wrap it in a blanket or some
thing protective.
Do not give the TV/VCR a physical
shock while carrying it.
Do not put the TV/VCR set in a place
where it is exposed to a spotlight,
heating appliance, smoke, steam etc.
Do not block the ventilating holes.
Always pull out the power plug by
holding the plug itself. Do not pull
the cord.
Do not bring a heating appliance
close to the power cord.
Do not place heavy objects across
the power cord.
Wipe off any dirt on the cabinet and
operation panel with a soft cloth.
- When you use a chemical dus
tcloth, read the manual carefully.
- When the dirt does not comes off,
soak the cloth in a neutral detergent
diluted with water and squeeze it dry
and then wipe off the dirt. Then,
wipe with a dry cloth.
Do not put heavy objects on the
TV/VCR.
Do not put any vessel containing
water on or near the TV set.
23
Page 27

Before Requesting Service)
When you suspect the TV is out of order, check the following points before requesting Service.
Refer to either the shop where the purchase was made or the nearest Authorised Service Centre if the mulfunction
cannot be corrected.
Symptoms
No power supply.
The programme selected is
not displayed clearly.
Spots appear on the screen.
The picture has double or
treble images.
Interference pattern appears
The channel number does not
disappear from the screen.
Inferior tint, light colour.
The TV sometimes produces
a cracking sound.
The Remote Control does not
work.
- Is the power plug disconnected ?
- Is the main power switched ON ?
- is the aerial connected properly ?
- Is received signal weak ?
Is the reception being disrupted by car, train, high tension cable, neon light inteference?
~ Has the direction of the aerial been changed ? It may changed after a severe wind.
- Signal reflection from surrounding mountains or building may effect on the picture.
Such symptoms may occur when the transmitting aerial for a radio station
or a ham ooerator is near the TV.
Is the RECALL button pressed ?
- Push it again.
Have the Colour and Tint been adjusted ? (Check the adjustment values.)
If the picture and sound are normal, it may probably be the sound from
the cabinet which expands and contracts according to change of room
temperature. This is not a malfunction.
- Is the transmitter oriented toward the Remote Control sensor on the TV ?
- Do you operate the Remote Control within 7 m from the receiving
windows ?
- Are there any obstacles between the Remote Control and the RemoteControf sensor ?
- Are the batteries dead ?
- Are the batteries fitted properly ?
- Is the Remote Control sensor being exposed to sunlight or strong fiourescent light ?
Checks
The cassette tape is ejected
immediately after insertion
The TV does not operate
although the power switch is ON
PICTURE RECORDING mode
can not be switched on.
PROGRAMME TIMER
RECORDING mode can not
be switched on.
No colour in picture reproduction
on tape playback.
Snowy picture on tape playback.
Flickering
The digits of the counter do not
change, during tape playback.
The pictured sourced from AV
INPUT shakes or does not work.
Is DEW CONDENSATION displayed on the screen ?
- Wait for a while until the indication disappears.
Is PICTURE RECORDING mode on ?
- When a tape with erasure prevention tab removed has been inserted,
in PROGRAMME TIMER RECORDING mode, the tape is automatically ejected.
Various safety devices have been triggered.
- Switch off the main power supply and switch it on again, after a few
minutes.
- Has the record tab been removed from the tape ?
- Is the PROGRAMME TIMER RECORDING mode on ?
- Is the present time set properly ?
- Has the record tab been removed from the tape ?
- Are the starting time and ending time set properly ?
- Has the TIMER RECORDING button been oushed ?
Has tracking been adjusted ?
- Adjust the tracking.
Are the Video heads dirty ?
- Request professional Service.
Are the video heads worn out ? Replace them.
Is the tape old ?
Is the tape old ?
Is a non-recorded part of the tape being played back ?
- When a non-recorded part of the tape is played back, the screen
becomes blue and the tape counter does not advance.
Such symptoms may occur when the input is set to AV INPUT and no signal
is received at the video input terminals.
When a tape recorded by PAL
systems of 3 times the normal
speed is playback after fast
forwarding or rewinding, the
colour tends to fade out.
This is caused by safety devices triggered by erronous functioning.
24
Page 28

( Troubleshooting )
Before catling for service, determine the symptoms and make a few simple checks as shown below.
25
Page 29

Specifications )
Power Source
Power Consumption
Receiving Systems
TC»14SV10S,TC-21SV10S TC-21SV10M,TC-14SV10M
AC 110-240 V, 50/60 Hz
TC-21SV10S. TC-21SV10M, TC-21SV10H
114 W
Stand-by condition
41 W (VCR REC)
AC22Q-240V, 50 Hz
TC-14SV10S, TC-14SV10M, TC-14SV10H
SOW
Stand-by condition
5 W (VCR STOP)
System
1. PAL B, G, H
TC-14SV10S
TC-21SVIOS
O
TC-14SV10M
TC-21 SVI OM
o
2. PAL!
3.
4.
PAL D. K
SECAM B, G
5. SECAM D, K
SECAM K1
6.
7.
NTSC 4.43 / 5.5 MHz
8.
NTSC 4.43 / 6.0 MHz
9.
NTSC 4.43 / 6.5 MHz
NTSC 3.58 / 5.5 MHz
10.
11.
NTSC 3.58 / 6.0 MHz
12. NTSC 3.58 / 6.5 MHz
13.
PAL 60Hz / 5.5 MHz
14.
PAL 60Hz / 6.0 MHz
15.
PAL 60Hz / 6.5 MHz
o
o
o
o
o
o
o
-
o
o
o
-
—
- -
o
o
—
o
TC-21SV10H, TC-14SV10H
AC 200-220 V, 50 Hz
TC-14SV10H
TC-21SVIOH
-
o
o
-
o
o
-
o
o
Ò
o
41 W (VCR REC)
5 W (VCR STOP)
Function
Reception of broadcast
transmissions and pfay
back from video Cassette Tape Recorders
Playback from Special
VCR’s
Playback from Special
Disc Player's and
Special VCR’s
Receiving Channels
Tuning System
Picture Tube
TC-14SV1 OS, TC-21SV10S
VHP
2-12 (PAL/SECAM B, K1)
1 -12 (PAL/SECAM D)
TC-14SVi OM; TC-21SV1OM;
VHP
2-12 (PAL B)
0-12 (PAL B AUSTRALIA)
1 - 9 (PAL B N. ZEALAND)
UHF
21 - 69 (PAL G. H, I
SECAM G, K, K1)
13-57 (PALD, K)
CATV
SI - S20 (OSCAR)
S21 -S41 (HYPER)
Z1 - Z37 (CHINA)
UHF
21 - 69 (PAL G. H)
28 - 69 (PAL B AUSTRALIA)
CATV
SI -S20 (OSCAR)
S21 -S41 (HYPER)
5A-9A (AUSTRALIA)
Frequency synthesizer
Auto Search Tuning 60 Position
TC-21SV10S, TC-21 SV10M, TC-21 SVI OH
Overall Picture tube measured diagonally
54 cm
Viewable Picture tube measured diagonally
51 cm
CRT deflection : 90 *
TC-21 SV10H,TC-14SV10H
VHP
1 -12 (PAL D)
UHF
21 -69 (PAL I)
13-57 (PALD, K)
CATV
SI - S20 (OSCAR)
S21 - S41 (HYPER)
Z1 - Z37 (CHINA)
TC-14SV10S, TC-14SV10M. TC-14SV1 OH
Overall Picture tube measured diagonally
36 cm
Viewable Picture tube measured diagonally
34 cm
CRT deflection : 90 ®
Audio Output
Headphones
3 W (max)
impedance 8 ii, 3.5 mm Plug
Aerial Impedance 75 n Unbalanced coaxial
26
Page 30

( Specifications)
AudioA/ideo Terminals
(TC-21SV10S, TC-14SV10S)
AudioA/ideo Terminals
(TC-21SV10M, TC-14SV10M'
(TC-21SV10H. TC-14SV10H)
Video Recording System
Record and Playback
Tape Speed
NTSC 3.58 NTSC 4.43 SECAM
AV
VCR OUT
AV
VCR OUT
2 rotary heads, hehcal scanning system.
Record (PAL)
Playback (NTSC and PAL)
3.33 cm/sec (NTSC)
2.339 cm/sec (PAL)
Video In
Audio In
Video Out
Audio Out
Video In
Audio (n
Video Out
Audio Out
TC-21SV10M, TC-14SV10M
TC-21SV1 OH, TC-14SV10H
0 0 0 0
—
0 0
—
PAL
0 0 0
—
—
0
Record (PAL and MESECAM)
Playback (NTSC, PAL and MESECAM) |
0
0
1 Vp -p, 75 a
Approx. 400 mV 47 kii
1 Vp -p, 75 a
Approx. 400 mV 1 kH
1 Vp -p, 75 a
Approx. 400 mV 47 kn
1 Vp -p, 75 a
Approx. 400 mV 1 kii
TC-21 SVI OS. TC-14SV1 OS ;
Record/Piayback Time
Television System
Tape Format
FF/REW Time
Modulation System
Audio Track 1 track (mono only)
Operating Temperature
Operating Humidity
Accessories Supplied Remote Controi Transmitter
Dimension (W x D x H)
180 min. with T~180 tape (NTSC)
240 min. with E-240 tape (PAL)
525 lines. 60 fields (NTSC)
625 lines. 50 fields (PAL)
VHS Tape
Approx. 2 min. 30 sec (with E-180 tape)
Luminance ; FM azimuth recording
Colour Signal: converted subcarrier phase
shift recording
5 => C - 40 * C
35 % - 80 %
TC-21 SV1 OS. TC-21 SV10M, TC-21 SVI OH
R6 (AA) Battery x 2
527 X 479 X 500 mm
TC-14SV10S, TC-14SV10M, TC-14SV10H
Remote Controi Transmitter
R6 (AA) Battery x 2
400 X 383.5 X 371 mm
Weight (Mass) 25.0 kg (Net)
Note :
Design and Specifications are subject to change without notice.
Weight and Dimensions shown are approximate
14.0 kg (Net)
27
Page 31

Customers’s Record
The serial number ofthis product can found on rear cover. You should note this serial number in
the space provided beiow and retain this book plus your purchase receipt as a permanent record
of your purchase to aid in identification in the event of theft or loss, and for Warranty Service purpose.
Model Number
Serial Number.
Matsushita Electric Industrial Co., Ltd
Central P.O. Box 288, Osaka 530-91, Japan
 Loading...