

Page 1

Combination 15.2˝ LCD
OPEN
POWER
/CLOSE
DISPALY
D
ANGLE
V
U
M
D
N
E
E
N
M
U
P
O
T
ENTER
TV
MENU
RETURN
SLOW
/SEARCH
SKIP
STOP
POWER
ASPECT
INPUT VOLUME CHANNEL
TH-15DT1
R-STANDBY
ON
G-POWER
PAUSE PLAY
ASPECT
TV/VIDEO MUTE
CH
SLEEP
SURROUND
REPEAT MODEA-B REPEAT PLAY MODE
R-TUNE
VOL
CANCEL
Operating Instructions
Model No.
L
E
N
N
A
H
C
E
M
U
L
O
V
R
E
W
T
O
U
P
P
N
I
T
C
E
P
S
A
2
T
D
5
1
-
C
T
Y
B
D
N
A
T
S
-
R
N
O
R
E
W
O
P
-
G
TV/DVD Player
TC-15DT2
For assistance, please call : 1-800-211-PANA (7262)
or send e-mail to : consumerproducts@panasonic.com
or visit us at www.panasonic.com (U.S.A)
For assistance, please call : 787-750-4300
This manual is divided into two parts, the “Install and TV Adjusts” and “DVD Operation Guide” :
Install and TV Adjusts: Details on installation of the unit and adjustments to achieve optimum quality of the TV.
DVD Operation Guide: Details on operating instructions for playing disks such as DVDs and CDs.
Before connecting, operating or adjusting this product, please read these instructions completely. Please keep this
manual for future reference.
(Puerto Rico)
TQBC0256
Page 2

Important Safety Instructions
WARNING
RISK OF ELECTRIC SHOCK
DO NOT OPEN
The lightning flash with
arrow-head within a triangle
is intended to tell the user
that parts inside the product
are a risk of electric shock to
persons.
The exclamation point within
a triangle is intended to tell
the user that important
operating and servicing
instructions are in the papers
with the appliance.
Note to CATV System Installer: This reminder is provided to direct the CATV system installer’s attention to Article
820–40 of the NEC that provides guidelines for proper grounding and, in particular , specifies that the cab le ground shall be
connected to the grounding system of the building, as close to the point of cable entry as practical.
Important Safety Instructions for LCD TV
1) Read these instructions and apply them with your LCD TV.
2) Keep these instructions.
3) Heed all warnings.
4) Follow all instructions.
5) Do not use this apparatus near water . For example: A void placing it near a bathtub, washbowl, kitchen sink, or laundry
tub, in a wet basement, or near a swimming pool, etc.
6) Clean only with dry cloth. Unplug this LCD V from the wall outlet before cleaning. Do not use liquid or aerosol cleaners.
7) Do not block any ventilation openings. Install in accordance with the manufacturer's instructions.
Slots and openings in the cabinet and the back or bottom are provided for ventilation, and to insure reliable operation
of the LCD TV and to protect it from o verheating. These openings must not be blocked or covered. There should be at
least 10 cm of space from these openings. The openings should never be blocked by placing the LCD TV on a bed,
sofa, rug or other similar surface. This LCD TV should not be placed in a b uilt-in installation such as a bookcase unless
proper ventilation is provided.
8) Do not install near any heat sources such as radiators, heat registers, sto ves, or other apparatus (including amplifiers)
that produce heat.
9) Protect the power cord from being walked on or pinched particularly at plugs, convenience receptacles, and the point
where they exit from the apparatus.
10) Only use attachments/accessories specified by the manufacturer. Otherwise if may cause hazards.
11) Use only with the cart, stand, tripod, bracket, or table specified by the manufacturer, or sold with the
apparatus. When a cart is used, use caution when moving the cart/apparatus combination to avoid injure
from tip-over.
12) Unplug this apparatus during lightning storms or when unused for long periods of time. This will prev ent damage to the
receiver due to lightning and power-line surges.
13) Refer all servicing to qualified service personnel. Servicing is required when the apparatus has been damaged in any
way, such as power-supply cord or plug is damaged, liquid has been spilled or objects have fallen into the apparatus,
the apparatus has been exposed to rain or moisture, does not operate normally, or has been dropped.
Upon completion of any service or repairs to this LCD TV, ask the service technician to perform routine safety checks
to determine that the television is in safe operating condition.
14) Operate only from the type of power source indicated on the marking label. If you are not sure of the type of power
supplied to your home consult your television dealer or local power company.
15) Follow all warnings and instructions marked on the LCD TV.
16) Never push objects of an y kind into this LCD TV through cabinet slots as they may touch dangerous voltage points or
short out parts that could result in a fire or electric shock. Never spill liquid of any kind on the LCD TV.
2
Page 3

Important Safety Instructions
17) If an outside antenna is connected to the television
equipment, be sure the antenna system is grounded
so as to provide some protection against voltage surges
and built up static charges. In the U.S.
Selection 810-21 of the National Electrical Code
provides information with respect to proper grounding
of the mast and supporting structure, grounding of the
lead-in wire to an antenna discharge unit, size of
grounding conductors, location of antenna discharge
unit, connection to grounding electrodes, and
requirements for the grounding electrode.
18) An outside antenna system should not be located in the
vicinity of overhead pow er lines or other electric light or
power circuits, or where it can f all into such power lines or
circuits. When installing an outside antenna system
extreme care should be taken to keep from touching
such power lines or circuits as contact with them
might be fatal.
19) Unpl u g t h is L CD T V from the w all outlet, and refer servicing to qualified service personnel under the following conditions:
a. When the power cord or plug is damaged or fray ed.
b. If liquid has been spilled into the LCD TV.
c. If the LCD TV ha been exposed to rain or water.
d. If the LCD TV does not operate normally by following the operating instructions.
Adjust only those controls that are covered by the oper ating instructions as improper adjustment of other controls may
result in damage and will often require extensive work by a qualified technician to restore the LCD TV to normal operation.
e. If the LCD TV has been dropped or the cabinet has been damaged.
f. When the LCD TV exhibits a distinct change in performance - this indicates a need for service.
20) When replacement parts are required, be sure the service technician to use replacement parts specified by the manuf acture that
have the same characteristics as the original part. Unauthorized substitutions ma y result in fire, electric shock, or other hazards .
21) WARNING: TO REDUCE THE RISK OF FIRE OR ELECTRIC SHOCK, DO NOT EXPOSE THIS APPARATUS TO
RAIN OR MOISTURE.
22) CAUTION: T O PREVENT ELECTRIC SHOCK DO NO T USE THIS PLUG WITH A RECEPTACLE OR OTHER OUTLET
UNLESS THE BLADES CAN BE FULLY INSERTED TO PREVENT BLADE EXPOSURE.
23) CAUTION: USE WITH O THER STAND IS CABABLE OF RESUL TING IN INSTABILITY CAUSING POSSIBLE INJUR Y.
24) CAUTION: DANGER OF EXPLOSION IF BATTERY IS INCORRECTLY REPLACED. REPLACE ONLY WITH THE
SAME OR EQUIVALENT TYPE.
EXAMPLE OF ANTENNA GROUNDING AS
PER (NEC) NA TIONAL ELECTRICAL CODE
GROUND
CLAMP
ELECTRIC
SERVICE
EQUIPMENT
ANTENNA
LEAD-IN WIRE
ANTENNA
DISCHARGE UNIT
(NEC SECTION 810-20)
GROUNDING CONDUCTORS
(NEC SECTION 810-21)
GROUND CLAMPS
POWER SERVICE GROUNDING
ELECTRODE SYSTEM
(NEC ART 250, PART H)
NOTE:
This equipment is designed to operate in the U.S .A. and other countries where the broadcasting system and
•
AC house current is exactly the same as in the U.S.A.
The marking or retained image on the LCD panel resulting from fixed image use is not an operating defect and as such
•
is not covered by W arranty. This product is not designed to displa y fix ed image patterns for e xtended periods of time.
Important Information Regarding Use of Video Games, Computers, Caption or Other Fixed Image Displays.
The extended use of fixed image program material can cause a permanent "shadow image" on the LCD panel.
This background image is viewable on normal programs in the form of a stationary fixed image. This type of irreversible
LCD panel deterioration can be limited by observing the following steps:
A. Reduce the brightness/contrast setting to a minimum viewing level.
B. Do not display the fixed image for extended periods of time.
C. Turn the power off when not in actual use.
3
Page 4

Dear Panasonic Customer
Welcome to the Panasonic family of customers.
We hope that you will have many years of enjoyment from your new 15.2″ LCD TV
with built in DVD player.
To obtain maximum benefit from your set, please read these Instructions befor e making
any adjustments, and retain them for future reference.
Retain your purc hase receipt also, and note down the model number and serial number
of your set in the space provided on the rear cover of these instructions.
For assistance, please call : 1-800-211-PANA (7262)
or send e-mail to : consumerproducts@panasonic.com
or visit us at www.panasonic.com (U.S.A)
For assistance, please call : 787-750-4300
Federal Communication Commission Information
This equipment has been tested and found to comply with the limits for a TV Broadcast Receiver, pursuant to Part 15
of the FCC Rules. These limits are designed to provide reasonable protection against harmful interference in a
residential installation. This equipment generates, uses and can radiate radio frequency energy and, if not installed
and used in accordance with the instructions, may cause harmful interference to radio communications. If this
equipment does cause or receive interference, which can be determined by turning equipment off and on, the user is
encouraged to try to correct the interference by one of the following measures:
Reorient or relocate the TV antenna.
Increase the separation between TV and other equipment.
Connect TV into separate outlet from other equipment.
Consult the dealer or an experienced radio/TV technician for help.
FCC Caution: Any changes or modifications not expressly approved by the party responsible for compliance could
void the user’s authority to operate this equipment.
CAUTION:
COMBINATION 15.2 ″ LCD TV/DVD PLAYER IS A CLASS 1 LASER
PRODUCT. HOWEVER THIS COMBINATION 15.2 ″ LCD TV/DVD PLAYER
USES A VISIBLE LASER BEAM WHICH COULD CAUSE HAZARDOUS
RADIATION EXPOSURE IF DIRECTED. BE SURE TO OPERATE THE
COMBINATION 15.2 ″ LCD TV/DVD PLAYER CORRECTLY AS INSTRUCTED.
(Puerto Rico)
CLASS 1
LASER PRODUCT
WHEN THIS COMBINATION 15.2 ″ LCD TV/D VD PLAYER IS PLUGGED T O THE W ALL OUTLET, DO NOT PLA CE
YOUR EYES CLOSE TO THE OPENING OF THE DISC TRAY AND OTHER OPENINGS TO LOOK INTO THE
INSIDE OF THIS PLAYER.
USE OF CONTROLS OR ADJUSTMENTS OR PERFORMANCE OF PROCEDURES OTHER THAN THOSE
SPECIFIED HEREIN MAY RESULT IN HAZARDOUS RADIATION EXPOSURE.
DO NOT OPEN COVERS AND DO NOT REPAIR YOURSELF. REFER SERVICING TO QUALIFIED PERSONNEL.
4
Page 5

Table of Contents
Install and TV Adjusts (start from the next page)
Important Safety Instructions ......................................2
Federal Communication Commission Information .......4
Installation .....................................................................6
Disc handling ...............................................................6
Maintenance ................................................................7
SUPPLIED ACCESSORIES ........................................7
Remote control battery installation...............................7
Connecting the Antenna Cable to the RF In Terminal .....
Antenna / Cable Connection ........................................8
How to connect the input terminals............................10
How to connect the AV OUT Terminals ......................10
How to connect the 5.1ch SURROUND AUDIO OUT Terminals ....
Connecting Headphones / Earphones .......................12
Connecting OPTICAL audio cable .............................12
Power ON / OFF...........................................................13
How to Turn the Power On .........................................13
Location of Controls ...................................................14
Flow Chart of TV menu ...............................................16
Tuning channels (Automatic channel programming).......
11
18
DVD Operation Guide
Tuning channels (Manual channel programming).......19
Playing a VCR or other peripheral equipment..........20
Setting condition to be displayed..............................21
Stoppage of the Tray action (Child lock).....................22
ASPECT Controls........................................................23
Adjusting screen position and size...........................24
Picture Adjustments ...................................................25
8
Audio Adjustments .....................................................27
Selecting STEREO/SAP/MONO..................................28
Closed Captions..........................................................29
Lock Feature................................................................30
Customizing the VIDEO INPUT labels .......................33
Adjusting unnatural video images (3D Y/C FIL TER) ....
Automatically changing screen size for VIDEO INPUT modes ....
When the top and bottom of the screen noise (IMAGE ADJ.)
Natural Color ...............................................................36
Noisy Picture ...............................................................36
34
35
....35
Features of DVD on this Product...............................38
Enjoying digital audio output from the digital audio
output connector ........................................................39
Location of Controls for DVD Operation...................40
Basic play ....................................................................42
Recalling/clearing a marker .......................................42
Stopping play .............................................................43
Skipping chapters or tracks.......................................44
Still picture (Pause).....................................................44
Rapid advance (Rapid re verse) ...................................44
Frame advance (Frame reverse) [DVD/Video CD] .......45
Slow-motion play [DVD/Video CD]..............................45
Cancelling playback control [Video CD] ....................45
General information about GUI screens ...................46
Common procedures .................................................46
Detailed descriptions of each GUl icon ....................47
Screen for disc information (For DVD) .......................47
Screen for disc information (For Video CD/CD) .........48
Screen for player information .....................................49
Shuttle screen ............................................................49
Repeat play ..................................................................50
Repeat viewing (Listening).........................................50
Repeating sections between two specific points ( A-B repeat ).....
Storing markers in memory to be viewed (listened to) again
51
...51
Storing a marker in the memory ................................51
Recalling / clearing a marker .....................................51
Program play [ Video CD / CD ]...................................52
Random play [ Video CD / CD ] ...................................53
Changing audio soundtrack language [ DVD ] .........54
Changing subtitle language [ DVD ]...........................55
Viewing from another angle [ DVD ]...........................55
Initial settings ..............................................................56
Common procedures .................................................56
Selecting disc language [DVD]...................................57
Selecting rating level [DVD]........................................57
Selecting On-Screen Display menu language ...........59
Selecting On-Screen Display Messages....................59
Selecting TV screen Aspect.......................................60
Selecting digital output...............................................61
Speaker setting ..........................................................62
Other settings.............................................................66
Language code list .....................................................66
How images appear on your TV (aspect ratios of the screen) .....
Troubleshooting ..........................................................68
Maintenance ................................................................69
Specifications..............................................................70
67
5
Page 6

Installation
Receiver Location
Locate for comfortable viewing. Avoid placing where sunlight or other bright light (including reflections) will fall on the screen.
Use of some types of fluorescent lighting can reduce remote control transmitter range.
Adequate ventilation is essential to prevent internal component failure. Keep away from areas of excessive heat or moisture.
To insure optimum picture do not position magnetic equipment (motors, fans, other speakers, etc.) nearby.
Optional External Equipment
The Video/Audio connection between components can be made with shielded video and audio cables. For best performance,
Antenna cables should utilize 75 ohm coaxial shielded wire. Cables are available from your dealer or electronic supply store.
Before you purchase any cables, be sure you know what type of output and input connectors your various components require.
Also determine the length of cable you’ll need.
For optimum quality picture
When the LCD is exposed to light from outdoors or lighting fixtures, high-contrast pictures may not be displayed clearly. Turn off
florescent lamps near the LCD and place in a location not exposed to outdoor light.
Handling precautions
Hold the disc by the edges so the surface will not be soiled with fingerprints.
•
Fingerprints, dirt and scratches can cause skipping and distortion.
Do not write on the label side.
•
Do not use record cleaning spramire.
•
( ):
6
Page 7
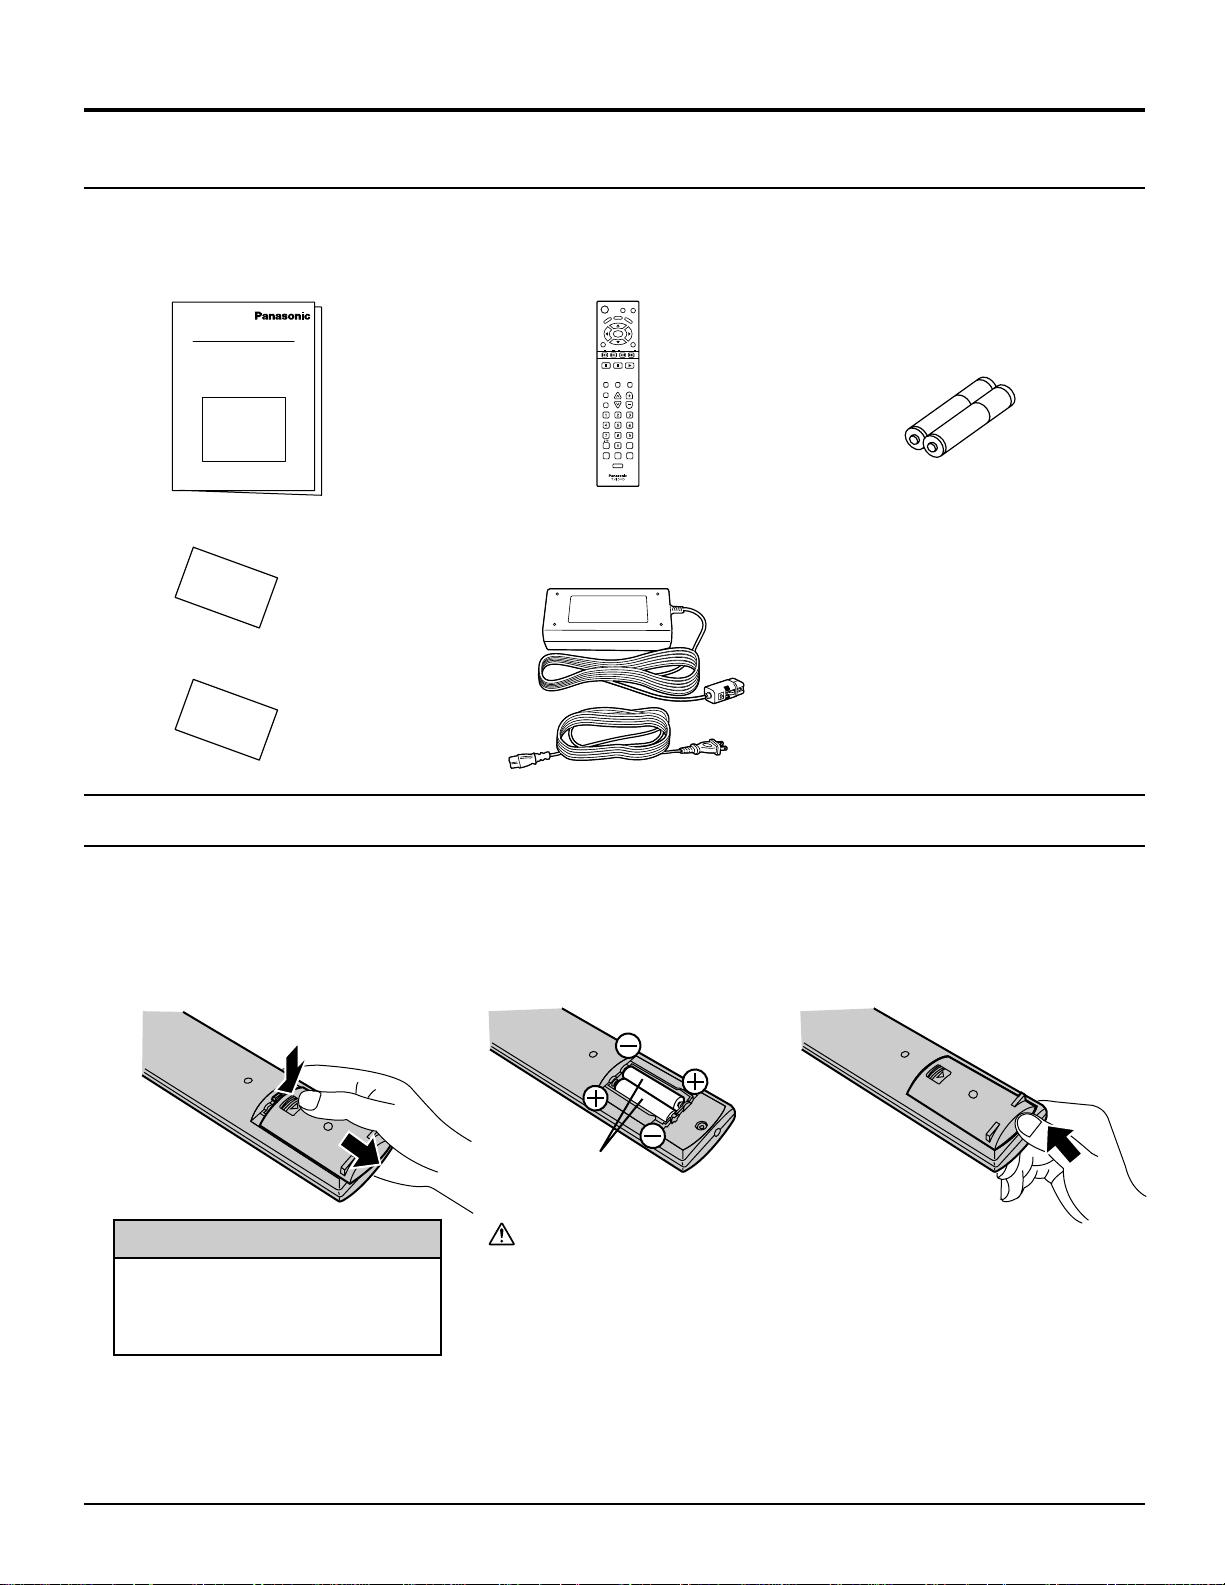
SUPPLIED ACCESSORIES
Check the accessories before installations.
Operating Instruction book
•
(TQBC0256)
Remote Control Transmitter
•
(TNQE262)
OPEN
CLOSE
POWER
ANGLE
U
N
E
M
P
O
T
ENTER
TV
MENU
SLOW/SEARCH
SKIP
STOP
PAUSE PLAY
ASPECT
TV/VIDEO MUTE
CH
SLEEP
SURROUND
REPEAT MODE A-B REPEAT PLAY MODE
R-TUNE
Installation
Battery for the Remote Control
•
Transmitter
DISPALY
D
V
M
D
E
N
U
RETURN
VOL
CANCEL
(2 × AAA size)
Warranty Card
•
AC Adaptor & AC Cord
•
AC Adaptor: (N0JEHK000001)
AC Cord: (K2CA2EA00005)
Service Center List
•
Remote control battery installation
Requires two AAA batteries.
1. Turn the transmitter face down.
Remove top cover by pressing
down on marking and sliding
cover off in the direction indicated.
2. Install the batteries as shown in
the battery compartment. (Polarity
+ or – must match the markings in
the compartment).
3. Replace the cover and slide in
reverse until the lock snaps.
Helpful Hint:
For frequent remote control
users, replace old battery with
Alkaline batteries for longer life.
Two AAA size
Precaution on battery use
Incorrect installation can cause battery leakage and corrosion that will
damage the remote control transmitter.
Observe the following precautions:
1. Batteries should always be replaced as a pair. Always use new
batteries when replacing the old set.
2. Do not combine a used battery with a new one.
3. Do not mix battery types (example: “Zinc Carbon” with “Alkaline”).
4. Do not attempt to charge, short-circuit, disassemble, heat or burn used batteries.
5. Battery replacement is necessary when remote control acts
sporadically or stops operating this unit.
7
Page 8

Installation
Connecting the Antenna Cable to the RF In Terminal
Antenna Connection - For proper reception of VHF/UHF channels, an external
antenna is required. For best reception an outdoor antenna is
recommended. Antenna Mode must be set to TV.
VHF Antenna
UHF Antenna
Mixer
RF In Terminal
75 Ohm
Coaxial Cable
Antenna / Cable Connection
Incoming Cable From Home Antenna (75 Ohm)
DVD
DIGITAL
AUDIO OUT
(PCM
/BITSTREAM)
OPTICAL
DC IN
15V
ANT
Coaxial Antenna Plug
VHF/UHF
on left side of Set
Incoming 75 Ohm Cable (From Cable Company)
Cable Connection - For reception of cable channels (01 - 125) connect the cable supplied by your local cable company. Antenna
Mode must be set to CABLE. (Refer to Antenna Mode section.)
VHF/UHF
on left side of Set
Note:
Certain cable systems offset some channels to reduce interference or have Premium (scrambled) channels. A cable
converter box is required for proper reception. Check with your local Cable company for its compatibility
requirements.
8
Page 9

Antenna Connection (Cable Box, no VCR)
Use this configuration when connecting the TV to a cable TV system using a Cable Box.
CABLE BOX
ANTENNA
TERMINAL ON THE
LEFT SIDE OF THE TV
Installation
ANT
Connect the cable from the
Output terminal on the back of the
Cable Box to the ANT terminal
on the left side of the TV.
OUTPUT INPUT
TERMINAL ON THE BACK
OF THE CABLE BOX
Incoming Cable from Antenna
or Cable TV System
Antenna Connection (Cable Box, and VCR)
Use this configuration when connecting the TV to a cable TV system using a Cable Box and VCR.
CABLE BOX
OUTPUT INPUT
TERMINAL ON THE BACK
OF THE CABLE BOX
Connect the cable from the
antenna or cable system to the
Input terminal on the back of the
CABLE BOX.
Incoming Cable from Antenna
or Cable TV System
TERMINALS ON THE
LEFT SIDE OF THE TV
Connect the cable from the
Output terminal on the back of the
VCR to the Antenna input
terminal on the left side of the TV.
ANTENNA
ANT
Connect the cable from
the Output terminal on
the back of the Cable
Box to the Antenna
input terminal on the
back of the VCR.
TO VCR
VCR
ANT INPUT
S-VIDEO
OUTPUT
VIDEO
L-AUDIO-R
ANT OUTPUT
Note: When the antenna cable is connected to the TV antenna terminal via a cable box or VCR, set the TV channel
to CH3 or CH4, cable. This does not apply when signal is input from VIDEO INPUT.
9
Page 10

Installation
Audio
OUT
Video
OUT
S-Video
OUT
RL
(Super-VHS VCR)
L R
AUDIO
S-VIDEO
VIDEO
FRONT L/R SURROUND L/R
CENTER/SUBWOOFER
5.1
ch
SURROUND
AUDIO OUT
VIDEO IN
MONITOR
OUT
S-VIDEO cable
VIDEO
AUDIO
Audio
INPUT
Video
IN
S-Video
IN
RL
Recording Equipment
(VCR)
L R
AUDIO
S-VIDEO
VIDEO
FRONT L/R SURROUND L/R
CENTER/SUBWOOFER
5.1
ch
SURROUND
AUDIO OUT
VIDEO IN
MONITOR
OUT
How to connect the input terminals
Connects VCRs and other peripheral equipment
Connect the S-VIDEO or
VIDEO Terminal.
How to connect the AV OUT Terminals
Connect the S-VIDEO or
VIDEO Terminal.
Notes:
(1) When a monaural VCR is used, connect the monaural audio cable to the AUDIO-L (Left) terminal.
(2) When connecting video cables, priority is given to the S-Video cable when the S-Video input terminal and the
video input terminal are connected at the same time.
10
Page 11

Installation
How to connect the 5.1ch SURR OUND A UDIO OUT T erminals
5.1
ch
SURROUND
AUDIO OUT
VIDEO IN
FRONT L/R SURROUND L/R
CENTER/SUBWOOFER
MONITOR
S-VIDEO
OUT
VIDEO
Direction of
signal flow
To audio input connectors (FRONT L.R)
AV Amplifier with 5.1ch
input connectors
Front speaker
(left)
L R
AUDIO
FRONT L/R
SURROUND L/R
CENTER/SUBWOOFER
Audio cables
To audio input connectors (SUBWOOFER)
To audio input connectors (CENTER)
To audio input connectors (SURROUND L.R)
Center speaker
Front speaker
(right)
Subwoofer
Surround speaker
(left)
Notes:
After connection is made, set the “7 Speaker Setting”
•
(such as Yes/No and Large/Small) according to your
speaker system. (Refer to “DVD Operating Guide”)
Turn Virtual Surround Sound (VSS) or Headphone
•
VSS off if you are using more than just the two front
speakers (see page 28). Sound will only come from
the front speakers if VSS or Headphone VSS is
turned on.
Surround speaker
(right)
For your reference:
This player can play CDs recorded in dts. When the
•
player is connected to an AV amplifier with 5.1ch
AUDIO OUT connectors, you can enjoy multichannel audio of CDs recorded in dts as well as
DVDs.
11
Page 12

Installation
Connecting Headphones / Earphones
Connect headphones / earphones as follows.
(M3 plug)
5.1
ch
FRONT L/R SURROUND L/R
CENTER/SUBWOOFER
SURROUND
AUDIO OUT
VIDEO IN
MONITOR
OUT
L R
S-VIDEO
AUDIO
VIDEO
(Optional)
Connecting OPTICAL audio cable
DC IN
15V
ANT
DVD
DIGITAL
AUDIO OUT
(PCM
/BITSTREAM)
OPTICAL
DVD
DIGITAL
AUDIO OUT
(PCM
/BITSTREAM)
OPTICAL
Refer to OPTICAL output for details on DVD Operating Guide.
Dust protection cap
Audio system equipped with optical audio connector.
MD player recorder
Note:
When connecting the optical digital audio cable
Remove the dust protection cap from the digital audio output connector and connect the cable firmly so that the
•
configurations of both the cable and the connector match.
Keep the dust protection cap and reattach when not using the connector.
•
12
Page 13

Power ON / OFF
How to Turn the Power On
Connecting the Plug to the Wall Outlet
Push the POWER switch on the TV to turn the set on.
POWER-ON: Green
Example: The screen below is displayed for a while
after the TV is turned on. (setting condition
is an example.)
Press the POWER button on the remote
control to turn the TV off: Red (standby)
Press the POWER button on the remote
control to turn the TV on: Green
Turn the power to the TV set off by
pressing the POWER sw itch on the TV
POWER
ASPECT
TV/VIDEO
TC-15DT2
VOLUME CHANNEL
R-STANDBY
G-POWER ON
when the TV is on or in standby mode.
13
Page 14

Location of Controls
Controls on the TV
Volume up(+) / down(–)
buttons
Program number
selection buttons
14
REPEAT MODE A-B REPEAT PLAY MODE
PLAY MODE button (See page 42)
A-B REPEAT button (See page 51)
Repeating selections between two specific points.
REPEAT button (See page 50)
Page 15

Location of Controls
NORMAL JUST
FULL ZOOM
Stand-by (ON/OFF) button
The television receiver must first be plugged into the wall outlet and turn on at the power switch (see page 20).
Use with DVD operation. (Refer to “DVD Operation Guide”)
OPEN CLOSE button
Press to open or close DVD tray.
DISPLAY button
Press the DISPLAY button to display the current system status.
Refer to “DVD Operation Guide” when using the DVD.
POWER
U
N
E
M
P
O
T
CLOSE
ANGLE
OPEN
DISPLAY
D
V
M
D
E
N
U
ENTER
TV
MENU
SKIP
STOP
ASPECT
SLEEP
SURROUND
REPEAT MODE A-B REPEAT PLAY MODE
PAUSE PLAY
TV/VIDEO MUTE
CH
R-TUNE
RETURN
SLOW/SEARCH
VOL
CANCEL
Moves cursor to the
Moves cursor upward during menu mode.
left during menu
mode.
Moves cursor to the
right during menu
Press the Menu
button to display
the Menu screen.
MENU
ADJUST
PICTURE ADJUST
POSITION / SIZE
AUDIO ADJUST
SET UP
PICTURE
AUDIO
ENTER
TV
MENU
Moves cursor
downward during
mode.
RETURN
Press to return to
before menu
screen.
menu mode.
To disk operation use. (Refer to “DVD Operation Guide”)
ASPECT
TV/VIDEO MUTE
MUTE button
Press to mute the sound.
Press again to reactivate sound. Sound is
also reactivated when power is turned off
or volume level is changed.
TV/VIDEO button
This input mode changes each time this button is pressed
(see page 20).
ASPECT button
Change of screen size
(see page 23).
Direct program number selection buttons
R-TUNE
R-TUNE button
Switches to previously view to channel or video mode.
15
Page 16

Flow Chart of TV menu
If the MENU button is
pressed, the MENU
screen will be displayed.
If the MENU button is
pressed once more while
the menu screen is
displayed, the MENU
screen will be cleared.
POWER
P M
TO
TV
MENU
EN
U
ANGLE
ENTER
OPEN
CLOSE
DISPLAY
D
VD
M
ENU
RETURN
SKIP
STOP
ASPECT
SLEEP
SURROUND
REPEAT MODE A-B REPEAT PLAY MODE
SLOW/SEARCH
PAUSE PLAY
TV/VIDEO MUTE
VOL
CH
CANCEL
MENU
ADJUST
16
R-TUNE
Page 17

Flow Chart of TV menu
Press to select each item.
1
Press to each screen is displayed.
2
ENTER
Notes:
Items displayed in light blue cannot be adjusted.
•
Display color changes according to input settings. (Press the TV/VIDEO button to switch inputs.)
•
TO PICTURE ADJUST
menu
PICTURE ADJUST
NORMAL
PIC MODE
BACK LIGHT
PICTURE
BRIGHTNESS
COLOR
TINT
SHARPNESS
AI PICTURE
STANDARD
+ 5
0
0
0
0
0
OFF ON
(See page 25)
TO PROGRAM CHANNELS
adjust screen
PROGRAM CHANNELS
MODE
AUTO PROGRAM
MANUAL PROGRAM
TV CABLE
(See page 19)
TO POSITION/SIZE
POSITION / SIZE
NORMAL
NORMALIZE
SIZE
1
RETURN
(See page 24)
TO DVD SET UP
1 Disc Languages
2 Ratings Level 8
3 Menu Language English
4 On-Screen Messages
5 TV Aspect 16:9
6 Digital Audio Output
7 Speaker Setting
9 Other Settings
0 Exit
(Refer to “DVD Operation
Guide”)
TO AUDIO ADJUST
menu
AUDIO ADJUST
NORMAL
MODE
BASS
TREBLE
BALANCE
SURROUND
STEREO SAP MONO
AUTO
0
0
0
ON
(See page 27)
TO LOCK
selection screen
LOCK
MOTION PICT.
TV PARENTAL
ENTER CODE FIRST
OFF ON
CHANGE SETTING
OFF ON
CHANGE SETTING
(See page 30)
TO VIDEO INPUT LABEL
selection screen
INPUT LABEL
VIDEO VIDEO
TO CLOSED CAPTION
selection screen
CLOSED CAPTION
MODE
C1
(See page 29)
TO OTHER ADJUST
screen
OTHER ADJUST
NATURL CLR
VIDEO NR
3D Y/C
ID-1
IMAGE ADJ.
CHILD LOCK
OFF ON
OFF ON
OFF ON
OFF ON
1 2
OFF ON
(See page 33)
(See page 34-36)
17
Page 18

Tuning channels (Automatic channel programming)
Automatically searches and adds receivable channels in the installed area and/or CATV
signals to the program.
Press the TV MENU button to display the MENU screen and select SETUP.
1
Press to select PROGRAM CHANNEL.
ENTER
Press to display the PROGRAM CH.
2
ENTER
3
ENTER
Press to select MODE.
Press to select TV or CABLE.
Press to select AUTO PROGRAM.
Press to display the confirmation screen.
MENU
ADJUST SET UP
PROGRAM CH
DVD SET UP
LOCK
CLOSED CAPTION
INPUT LABEL
OTHER ADJUST
PROGRAM CHANNELS
MODE
AUTO PROGRAM
MANUAL PROGRAM
AUTO PROGRAM
Activate
"AUTO PROGRAM?"
TV CABLE
YES NO
4
ENTER
Channels will automatically advance until all channels have been scanned. Channel numbers with a video
signal present will turn light blue. Which indicates it has been stored in the Channel Scan Memory.
Press the TV MENU button to exit the set up menu.
5
Notes:
When buttons are pressed with AUTO PROGRAM running, the TV set will return to normal viewing. (Channel
•
searched up to this point are added.)
After AUTO PROGRAM is finished, the lowest channel number added will be received.
•
When there are no receivable channels, channel 69 is displayed (channel 125 for cable TV).
•
Press to select YES.
Press to run AUTO PROGRAM
AUTO PROGRAM
In "AUTO PROGRAM"
CHANNEL 59
MENU
STOP
18
Page 19

Tuning channels (Manual channel programming)
Use this setting when changing setting of receiving channels or changing the channel displa y .
Turn the TV on and select the broadcast channel. Follow the steps on the previous page to display the PROGRAM
CHANNEL screen.
Selecting the PROGRAM CHANNELS menu.
Press the TV MENU button to display the MENU screen and select SETUP.
1
Press to select PROGRAM CH.
ENTER
Press to display the PROGRAM CH.
2
ENTER
3
ENTER
Press to select MODE.
Press to select TV or CABLE.
Press to select MANUAL PROGRAM.
Press to display the MANUAL PROGRAM screen.
MENU
ADJUST SET UP
PROGRAM CH
DVD SET UP
LOCK
CLOSED CAPTION
INPUT LABEL
OTHER ADJUST
PROGRAM CHANNELS
MODE
AUTO PROGRAM
MANUAL PROGRAM
MANUAL PROGRAM
ENTER CHANNEL
121
TV CABLE
DELETE
CH SELECT
ADD
RETURN
Adding or deleting channels
4
ENTER
5
ENTER
Repeat steps 4 and 5 to continue adding or deleting channels.
6
Press the TV MENU button to exit the set up menu.
7
Press to select channel ( or number keys ).
Press to add channels to memory ( blue ).
Press to select channel.
Press to delete channels from memory ( yellow ).
MANUAL PROGRAM
ENTER CHANNEL
121
DELETE
CH SELECT
ADD
RETURN
19
Page 20

Playing a VCR or other peripheral equipment
Confirming connections
VCR
Video camera
5.1
ch
FRONT L/R SURROUND L/R
CENTER/SUBWOOFER
SURROUND
AUDIO OUT
VIDEO IN
MONITOR
OUT
L R
S-VIDEO
AUDIO
VIDEO
Confirm that the TV is in standby mode.
VIDEO IN
MONITOR
S-VIDEO
POWER
P
O
T
TV
MENU
STOP
M
N
E
SKIP
U
OUT
VIDEO
OPEN
CLOSE
ANGLE
ENTER
SLOW/SEARCH
PAUSE PLAY
DISPLAY
D
V
M
D
E
N
U
RETURN
L R
AUDIO
Laser Disk Player
DVD player
This equipment can also be
connected to the rear
terminals. See Connections
for details.
Turning the power on and switching input modes
2
The input mode changes each time this
button is pressed.
ASPECT
TV/VIDEO
SLEEP
SURROUND
REPEAT MODE A-B REPEAT PLAY MODE
CH
R-TUNE
20
MUTE
VOL
CANCEL
TV
When playing
•
a video
When playing
•
a DVD
VIDEO
DVD/CD
Note:
When the remote control is unavailable, input modes can also be switched
on the TV set using the TV/VIDEO button.
Operate the connected equipment.
3
Page 21

Setting condition to be displayed
DISPLAY (On-screen display)
POWER
TOP MENU
TV
MENU
STOP
ANGLE
ENTER
SKIP
PAUSE PLAY
OPEN
CLOSE
DISPLAY
DVD
M
ENU
RETURN
SLOW/SEARCH
DISPALY
Press this button to display channel number , off-timer remaining
time, screen modes, and other settings. Display fades away
into after about 3 seconds. Press this button again to delete
channel number display.
21
Page 22

Stoppage of the Tray action (Child lock)
POWER
N
E
M
P
O
T
TV
MENU
SKIP
STOP
ASPECT
SLEEP
SURROUND
OPEN
CLOSE
ANGLE
U
ENTER
SLOW/SEARCH
PAUSE PLAY
TV/VIDEO MUTE
CH
DISPLAY
D
V
M
D
E
N
U
RETURN
VOL
The D VD tray on the front can be locked to pre v ent young children slamming
their fingers and to prevent debris from entering.
Press the TV MENU button to display the MENU screen and select
1
SETUP.
2
ENTER
Press to select OTHER ADJUST.
Press to display the OTHER ADJUST
screen.
MENU
ADJUST SET UP
PROGRAM CH
DVD SET UP
LOCK
CLOSED CAPTION
INPUT LABEL
OTHER ADJUST
CANCEL
REPEAT MODE A-B REPEAT PLAY MODE
R-TUNE
3
Press to select CHILD LOCK.
Press to set.
ENTER
TV
MENU
OTHER ADJUST
NATURAL CLR
VIDEO NR
3D Y/C
ID-1
IMAGE ADJ.
CHILD LOCK
OFF ON
OFF ON
OFF ON
OFF ON
1 2
OFF ON
To end adjustment.
When the open close button is pressed when CHILD LOCK is ON, the
below message is displayed and the tray will not open.
OPEN
CLOSE
Note:
The settings are memorized even after
power is turned OFF.
22
Page 23

ASPECT Controls
The LCD TV will allow y ou to enjoy viewing the picture at its maximum size , including wide screen cinema format picture.
ASPECT
23
Page 24

Adjusting screen position and size
ENTER
Adjusting screen
ASPECT
1
Press to select the screen mode to adjust.
STOP
ASPECT
PAUSE PLAY
TV/VIDEO MUTE
2
ENTER
TV
MENU
Press to select
ADJUST menu.
MENU
ADJUST
PICTURE ADJUST
POSITION / SIZE
AUDIO ADJUST
Press to display the MENU screen.
Press to select
POSITION/SIZE and
SET UP
PICTURE
press ACTION.
AUDIO
Switching screen width
During NORMAL mode, if noise appears on the ends of the image in SIZE 1, switch to SIZE 2.
Press to narrow (SIZE 2).
ENTER
NORMAL JUST
(SIZE 1)
SLEEP
SURROUND
POSITION / SIZE
NORMALIZE
SIZE
RETURN
(SIZE 1)
CH
NORMAL
1
VOL
Press to widen (SIZE 1).
Moving Display images cut off from the screen
For ZOOM mode.
Press to move image upwards.
ENTER
Press to move image
downwards.
Notes:
This TV is equipped with various screen modes. If a screen mode with a different aspect from the broadcast program
•
is selected, image will appear differently. Select the proper screen mode with this in mind.
Be careful when using this TV for commercial purposes or for public use, such as in cafes and hotels, for shrinking
•
and enlarging images by using screen mode switching function (zoom, etc.) may violate copyright laws.
Images displayed on a wide screen TV will be cut off or distorted at the edges, when viewing normal aspect images
•
of 4:3 in ZOOM, JUST or FULL mode. Displa y in NORMAL mode to vie w the original image intended by the producer.
The adjusted setting will be kept even when the TV is turned off.
•
The signals output from the monitor output terminal on the right of the TV are not aff ected when the screen size and position are adjusted.
•
(SIZE 2)
To return to standard
•
To end adjustments
•
(SIZE 2)
ENTER
MENU (RETURN)
24
Page 25

Picture Adjustments
Press the TV MENU button to display the MENU screen and select ADJUST.
1
ENTER
2
ENTER
NORMAL is displayed at default.
PICTURE ADJUST
NORMAL
PIC MODE
BACK LIGHT
PICTURE
BRIGHTNESS
COLOR
TINT
SHARPNESS
AI PICTURE
STANDARD
OFF ON
Press to select to PICTURE ADJUST.
Press to display the PICTURE ADJUST screen.
Press to select the menu to adjust.
Select the desired level by looking at the
picture behind the menu.
Press the left
STANDARD CINEMA DYNAMIC
+ 5
0
STANDARD
0
0
See next page
CINEMA
0
0
DYNAMIC
MENU
ADJUST
PICTURE
PICTURE ADJUST
POSITION / SIZE
AUDIO
AUDIO ADJUST
PICTURE ADJUST
PIC MODE
BACK LIGHT
PICTURE
BRIGHTNESS
COLOR
TINT
SHARPNESS
AI PICTURE
or right
button to switch between modes .
STANDARD
Displays unaltered image.
CINEMA
Ideal for movies.
DYNAMIC
Displays a clear screen with contrast of light
and dark.
SET UP
NORMAL
STANDARD
+ 5
0
0
0
0
0
OFF ON
25
Page 26

Picture Adjustments
BACKLIGHT
Illuminance of the back light is adjusted.
PICTURE
Selects proper brightness and density for the room.
BRIGHTNESS
Adjusts for easier viewing of dark pictures such as night
scenes and hair.
COLOR
Adjusts slightly to a lighter color.
TINT
Adjust for nice skin color.
SHARPNESS
Displays a sharp image.
AI PICTURE
Displays blac k and white colors clearer when turned ON.
PICTURE ADJUST
PIC MODE
BACK LIGHT
PICTURE
BRIGHTNESS
COLOR
TINT
SHARPNESS
AI PICTURE
OFF ON
NORMAL
STANDARD
+ 5
0
0
0
0
0
Note:
There is little change when PICTURE is increased with a bright picture or reduced with a dark picture.
26
Page 27

Audio Adjustments
Press the TV MENU button to display the MENU screen and select ADJUST.
1
ENTER
2
ENTER
BASS
Adjusts low sounds
TREBLE
Adjusts high sounds
BALANCE
Adjust left and right
volumes
SURROUND
To enjoy a concer t hall
effect, turn SURROUND
to ON. During stereo
sound or soft playing:
Note:
When VSS* is enabled
during DVD mode,
selections will rotate as
follows:
OFF VSS1 VSS2
Press to select to AUDIO ADJUST.
Press to display the A UDIO ADJUST screen.
Press to select the menu to adjust each item.
Select the desired level by listening to the
sound.
AUDIO ADJUST
NORMAL
MODE
BASS
TREBLE
BALANCE
SURROUND
AUTO
0
0
0
ON
STEREO SAP MONO
Selecting STEREO/
SAP/MONO.
(See next page)
AUTO
STANDARD
DYNAMIC
MUSIC 1
MUSIC 2
MENU
ADJUST
PICTURE ADJUST
POSITION / SIZE
AUDIO ADJUST
Auto
Automatically adjusts quiet
sound and loud sound for
ease of listening.
STANDARD
Emits the original sound.
DYNAMIC
Gives contrast to sound.
MUSIC 1
For programs consisting
mainly of music. Enhances
high sounds (around 4 kHz).
MUSIC 2
Enhances high sounds even
more. (Recommended for
those who have slight
hearing deficiencies.)
SET UP
PICTURE
AUDIO
To reset to standard setting,
select NORMALIZE with the up
ENTER
To end adjustments
•
Note:
* Virtual Surround Sound (VSS) (See page 11, 28)
To adjust settings individually , press the AV up
desired menu and adjust using the left
TV
MENU
and down
Press TV MENU button.
buttons and press ENTER.
and down button to select the
and
right buttons.
27
Page 28

Selecting STEREO/SAP/MONO
Press the TV MENU button to display the MENU screen and select AUDIO ADJUST screen.
ENTER
ENTER
TV
MENU
Press to select STEREO/SAP/MONO.
Press to select STEREO/SAP/MONO.
Red display : With signal
White display : No signal
: MONO
Press to end.
AUDIO ADJUST
NORMAL
MODE
BASS
TREBLE
BALANCE
SURROUND
STEREO SAP MONO
STEREO SAP MONO
Helpful Hints:
STEREO - Two channel Audio reception.
•
SAP - Second Audio Programming (typically
•
used for bilingual audio).
MONO - Use when stereo signal is weak.
•
AUTO
0
0
0
ON
SURROUND Control
ASPECT
TV/VIDEO MUTE
VOL
SLEEP
SURROUND
Notes:
The surround settings are memorized separately for each SOUND mode (AUTO, STANDARD).
•
Even from the MENU screen the surround setting is possible.
•
CH
SURROUND
28
SURROUND Button
The benefits of surround are enormous. You can be completely
enveloped in sound, just as if you were at a concert hall or
cinema.
The surround setting switches on and off each time the
SURROUND button is pressed.
TV/VIDEO mode :
SURROUND OFF
SURROUND ON
SURROUND OFF
Page 29

Closed Captions
This unit has a built in decoder that pro vides a visual depiction of the audio portion of a television
program in the form of written words across the screen (white or colored letters on a black
background). It allows the viewer to read the dialogue of a tele vision program or other information.
Press the TV MENU button to display the MENU screen and select SETUP.
1
Press to select CLOSED CAPTION.
ENTER
Press to display the CLOSED CAPTION screen.
CC Mode
2
Activates the On-Screen Closed Caption feature. When activated this feature will remain on until OFF is selected in this menu.
Press to select CC MODE.
ENTER
CAPTION OFF -
•
CAPTION C1 -
•
CAPTION C2 -
•
To end adjustments
•
Recommended mode when Closed Caption is not being used.
For video related information that can be displayed (up to 4 lines of script strategically placed on
the television screen so that it does not obstruct relevant parts of the picture).
Another mode used for video related information.
Press to select from the following:
OFF C1 C2
TV
MENU
Press TV MENU button.
MENU
ADJUST SET UP
PROGRAM CH
DVD SET UP
LOCK
CLOSED CAPTION
INPUT LABEL
OTHER ADJUST
CLOSED CAPTION
MODE
C1
Surround effects can be turned ON and OFF during TV/VIDEO
mode but also switches as follows when DVDs with VSS signals
are played:
D VD mode :
SURROUND OFF
SURROUND VSS 1
SURROUND VSS 2
When DVDs with VSS signals are played and Headphone VSS
is selected for VSS of the GUI screen (see page 49), SURROUND
display switches as follows:
SURROUND OFF
SURROUND HPVSS 1
SURROUND HPVSS 2
Note:
See pages 46 to 49 for details on GUI.
29
Page 30

Lock Feature
In the United States, the V-CHIP consists of two rating systems, which are MPAA (MOTION
PICTURE) and TV PARENTAL GUIDELINES. Its function is to block programs by the rating
data in the XDS data packets sent from broadcasting stations. The user can select which
rating programs should be blocked by the LOCK MENU options.
Note: The V-CHIP. used in this unit model, is capable of selecting the U.S. ratings that are
indicated in this manual.
Press the TV MENU button to display the MENU screen and select SETUP.
POWER
N
E
M
P
O
T
TV
MENU
SKIP
STOP
ASPECT
SLEEP
SURROUND
OPEN
CLOSE
ANGLE
U
ENTER
SLOW/SEARCH
PAUSE PLAY
TV/VIDEO MUTE
CH
DISPLAY
D
V
M
D
E
N
U
RETURN
VOL
1
ENTER
Press to select LOCK.
Press to display the LOCK screen.
Input code
Enter any 4-digit number as a password.
These numbers will be needed when
deactivating the LOCK function.
MENU
ADJUST SET UP
PROGRAM CH
DVD SET UP
LOCK
CLOSED CAPTION
INPUT LABEL
OTHER ADJUST
LOCK
MOTION PICT.
OFF ON
CHANGE SETTING
TV PARENTAL
OFF ON
CHANGE SETTING
ENTER CODE FIRST
REPEAT MODE A-B REPEAT PLAY MODE
R-TUNE
30
CANCEL
Note:
Use a code that is easy to remember or record it in a safe place.
Page 31

Selecting broadcasts to lock.
2
Lock Feature
3
ENTER
ENTER
ENTER
RETURN
Press to select CHANGE SETTING (the
menu following MOTION PICT. STATUS).
Press to display the MOTION PICTURE
RATING screen.
Press to select rating to lock.
Press to select YES or NO.
Rating (turns red when on)
G : General audience
PG : Parental guidance suggested
PG-13: Parental guidance needed under 13 years old
R : Restricted
NC17 : No one under 17 is admitted
X : Pornography
Press to return to LOCK screen.
LOCK
MOTION PICT.
OFF ON
CHANGE SETTING
TV PARENTAL
OFF ON
CHANGE SETTING
ENTER CODE FIRST
MOTION PICTURE RATING
VIEW NR PROGRAMS?
NO YES
G
PG
PG–13
R
NC–17
X
Setting MOTION PICT..
4
Locking and unlocking the ratings selected above.
Press to select MOTION PICT..
Press to select ON or OFF.
ENTER
ON : The broadcasts selected in the MOTION PICTURE RATING menu cannot
be viewing.
OFF: LOCK is deactivated and any broadcast, regardless of the setting for MOTION
PICTURE RATING, can be viewing.
TV
MENU
Press to set.
LOCK
MOTION PICT.
OFF ON
CHANGE SETTING
TV PARENTAL
OFF ON
CHANGE SETTING
ENTER CODE FIRST
MOTION PICT.
OFF ON
31
Page 32

Lock Feature
TV PARENTAL GUIDE
Press to select TV PARENTAL.
Press to select ON or OFF.
ENTER
Changing setting
Press to select CHANGING SETTING
ENTER
(the menu following TV PARENTAL).
Press to display the TV PARENTAL GUIDE screen.
Setting the TV PARENTAL PROGRAMS screen
VIEW NR PROGRAMS?
NO : Cannot view programs with NR signals.
YES : Can view programs with NR signal.
SETTING
BASIC : The up
and down
DETAILED : The cursor selecting the title can be moved to select options
displayed on the right. The down
to the right if options are available. The up
the cursor to the left and if there are no options to the left, the
cursor will move up.
buttons change the selected title.
buttons moves the cursor
buttons moves
LOCK
MOTION PICT.
TV PARENTAL
ENTER CODE FIRST
TV PARENTAL GUIDE
VIEW NR PROGRAMS?
SETTING DETAILED
TV—Y
TV—Y7
TV—G
TV—PG
TV—14
TV—MA
OFF ON
CHANGE SETTING
OFF ON
CHANGE SETTING
NO YES
FV
V
V
V
DDL
S
L
S
L
S
Locking and unlocking
When a title field is selected, all ratings below this rating are selected.
•
When options within an option field are selected, ratings below this rating within the same field are selected.
•
Ratings displayed in green are unlocked and those displayed in red are blocked programs.
•
1. Ratings for children: These ratings are divided into ranks as follows.
TV-Y
TV-YTV-Y7 TV-Y7 TV-Y7-FVFV
2. Ratings for teenagers: These ratings are the same as the matrix system. This system is described in the
below diagram. Ratings for all ages are on top and ratings for adults are on the bottom.
TV-G
TV-PG
TV-14
TV-MA
To end adjustments
•
V
S
L
D
V
S
L
D
V
S
L
TV
MENU
Press TV MENU button.
32
Page 33

Customizing the VIDEO INPUT labels
Display for each VIDEO INPUT can be changed to match with the connected device (VCR,
DVD Player).
Example: When changing VIDEO to LD.
Press the TV MENU b utton to display the MENU screen and select SETUP.
1
2
TER
ENTER
ENTER
Press to select INPUT LABEL.
Press to display the VIDEO INPUT LABEL screen.
Press to change.
By pressing this button, display changes as follows:
MENU
ADJUST SET UP
PROGRAM CH
DVD SET UP
LOCK
CLOSED CAPTION
INPUT LABEL
OTHER ADJUST
INPUT LABEL
VIDEO VIDEO
VIDEO VCR LD
BLANK DTV DVD GAME
ENTE
TV
MENU
Note:
When DVD or DTV is selected for the change, images are adjusted to match each input signal.
This button rotates in reverse.
Press to end.
33
Page 34

Adjusting unnatural video images (3D Y/C FILTER)
Selecting the VIDEO menu
Press the TV MENU button to display the MENU screen and select SETUP.
Press to select OTHER ADJUST.
ENTER
Press to display the O THER ADJUST screen.
Switching to 3D Y/C FILTER
1
ENTER
Press to select 3D Y/C FILTER.
MENU
ADJUST SET UP
PROGRAM CH
DVD SET UP
LOCK
CLOSED CAPTION
INPUT LABEL
OTHER ADJUST
OTHER ADJUST
NATURL CLR
VIDEO NR
3D Y/C
ID-1
IMAGE ADJ.
CHILD LOCK
OTHER ADJUST
NATURL CLR
VIDEO NR
3D Y/C
ID-1
IMAGE ADJ.
CHILD LOCK
OFF ON
OFF ON
OFF ON
OFF ON
1 2
OFF ON
OFF ON
OFF ON
OFF ON
OFF ON
1 2
OFF ON
34
2
ENTER
TV
MENU
Press to turn OFF.
Press to turn ON.
Press to end.
Page 35

Automatically changing screen size for VIDEO INPUT modes
If the received signal contains screen size specifications in VIDEO INPUT the screen size is
automatically changed.
Press the MENU button to display the MENU screen and select SETUP.
1
Press to select OTHER ADJUST.
ENTER
Press to display the OTHER ADJUST screen.
MENU
ADJUST SET UP
PROGRAM CH
DVD SET UP
LOCK
CLOSED CAPTION
INPUT LABEL
OTHER ADJUST
2
ENTER
TV
MENU
Press to set.
ON : When screen size specification signals are
detected, screen size is automatically changed.
OFF : The screen size is not automatically changed. (T urn
OFF if this function does not operate properly .)
Press to end.
OTHER ADJUST
NATURL CLR
VIDEO NR
3D Y/C
ID-1
IMAGE ADJ.
CHILD LOCK
ID-1
OFF ON
OFF ON
OFF ON
OFF ON
1 2
OFF ON
OFF ON
Note:
When ID-1 is detected and screen size is changed, FULL will be display.
When the top and bottom of the screen noise (IMAGE ADJ.)
Press the MENU button to display the MENU screen and select SETUP.
1
Press to select ID-1 (Image Detection).
2
ENTER
ENTER
Press to select OTHER ADJUST.
Press to display the
OTHER ADJUST screen.
Press to select IMAGE ADJ.
Press to select 2
MENU
ADJUST SET UP
PROGRAM CH
DVD SET UP
LOCK
CLOSED CAPTION
INPUT LABEL
OTHER ADJUST
OTHER ADJUST
NATURL CLR
VIDEO NR
3D Y/C
ID-1
IMAGE ADJ.
CHILD LOCK
OFF ON
OFF ON
OFF ON
OFF ON
1 2
OFF ON
TV
MENU
Press to exit menu.
Notes:
IMAGE ADJ. settings are stored for TV, VIDEO and DVD each.
•
This setting will not change during ZOOM.
•
IMAGE ADJ.
1
(Example) 1 (Example) 2
2
35
Page 36

Natural Color
Press the MENU button to display the MENU screen and select SETUP.
1
2
ENTER
3
ENTER
TV
MENU
Note:
Not available for COMPONENT VIDEO.
Press to select OTHER ADJUST.
Press to display the OTHER ADJUST
screen.
Press to select NATURL CLR.
Press to turn NATURL CLR ON.
Press to end.
MENU
ADJUST SET UP
PROGRAM CH
DVD SET UP
LOCK
CLOSED CAPTION
INPUT LABEL
OTHER ADJUST
OTHER ADJUST
NATURL CLR
VIDEO NR
3D Y/C
ID-1
IMAGE ADJ.
CHILD LOCK
OFF ON
OFF ON
OFF ON
OFF ON
1 2
OFF ON
Noisy Picture
Reduces roughness of pictures.
Press the TV MENU button to display the MENU screen and select SETUP. Reduces roughness of pictures.
1
MENU
ADJUST SET UP
PROGRAM CH
DVD SET UP
LOCK
CLOSED CAPTION
INPUT LABEL
OTHER ADJUST
OTHER ADJUST
NATURL CLR
VIDEO NR
3D Y/C
ID-1
IMAGE ADJ.
CHILD LOCK
2
3
Press to select OTHER ADJUST.
ENTER
Press to display the OTHER ADJUST
screen.
Press to select VIDEO NR.
Press to set.
ENTER
TV
MENU
Press to exit menu.
OFF ON
OFF ON
OFF ON
OFF ON
1 2
OFF ON
36
Page 37

DVD Operation Guide
Page 38

Features of DVD on this Product
High picture quality
10 bit video D/A converter
•
Reproduces fine images faithfully.
An array of picture quality modes yielded by digital
•
processing
Signal deterioration is kept to minimum by processing the data
digitally.
This feature can be used to tailor picture quality for DVD
playback.
High sound quality
96 kHz/24 bit audio D/A converter
•
This player enables 96 kHz/24 bit linear PCM signals, the
highest specifications in DVD standards, to be reproduced
faithfully. To support 96 kHz sampling/24 bit sound, the shaping
noise of this multilev el digital sigma type D/A con v erter is kept
flat up to 44 kHz, thus preventing the audio signals from being
affected in any wa y. This means sound is reproduced f aithfully.
Advanced Dolby Digital/dts (digital theater systems) 5.1c h
•
surround decoder (See pages 11 and 62.)
The advanced Dolby Digital /dts 5.1ch surround decoder
incorporated in this player comes with speaker mode settings
which support the low-range reproduction capability of the
speakers, speaker level settings, delay time adjustment*, audio
dynamic range suppression, and other features.
* Delay time adjustment is effectiv e only f or Dolby Digital D VDs
(center and surround channels).
Dolby Digital/dts (digital theater systems) digital output
•
(See page 11.)
By connecting a Dolby Digital/dts decoder or an amplifier
incorporating a Dolby Digital/dts decoder, you can enjoy high
quality digital surround sound from Dolby Digital/dts discs.
Advanced Virtual Surround Sound (VSS) function
(See page 28-29.)
Even when two front speakers are being used, simply press the
VSS (Virtual Surround Sound) button during playback of a Dolby
Digital D VD (2 channel or ov er) to provide a rear surround effect.
This effect also works while listening with headphones. (This
does not work with Karaoke DVDs. The effect depends on the
kind of DVD used.)
Marker function (See page 51.)
This player can store a maximum of 5 positions in memory for
convenient access.
Dialogue Enhancer (See pages 43 and 49.)
During playback of Dolby Digital/dts DVDs (2 channel or over)
with the dialogue contained in the center channel, this function
will boost the sound level of the center channel so that it is easier
to hear the dialogue on movie software.
Versatile DVD features
Multi-audio function (See page 54.)
•
The audio soundtrack can be heard in up to 8 languages.
(The number of languages depends on the software.)
Multi-subtitle function (See page 55.)
•
Subtitles may be displayed in one of 32 languages.
(The number of languages depends on the software.)
Multi-angle function (See page 55.)
•
This function allows you to choose the camera angle of scenes
shot from different angles. (Limited to DVDs recorded with
multiple camera angles.)
Parental lock function (See page 57.)
•
This function can prevent playback of DVD software which may
be unsuitable for some audiences (especially for children).
(Limited to DVDs encoded with specific rating level.)
Disc formats supported by this player
The player can playback discs bearing any of the following marks:
DVD
[8 cm disc/
12 cm disc]
NTSC
Discs which cannot be played with this player
DVD with Region No. other than “4” or “ALL”
•
DVD-ROM
•
DVD-R/DVD-RAM• CD-G
•
CD-ROM
•
VSD
•
Do not try to play Photo CD or CD-R.
•
(Data on the disc may be damaged.)
Region Management Information
This player is designed to respond to the Region Management
Information recorded on D VDs. The region number of this player
is “1”. If the region number described on the DVD does not
correspond to the region number of this player , this pla y er cannot
play this disc. This play er will pla y DVDs made for “ ALL” regions .
This player will play DVDs marked with labels containing the
region number “1” or “ALL”:
Example:
Video CD
[8 cm disc/
12 cm disc]
NTSC
CDV
•
CD-RW
•
DVD + RW etc.
•
ALL
1
or
CD
[8 cm disc/
12 cm disc]
CVD
•
SVCD
•
Divx Video Disc
•
Graphical User Interface (GUl) screen (See page 46.)
By simply pressing the DISPLAY button on the remote control,
information on the DVD/Video CD/CD player and disc can be
displayed on the TV screen for easy identification. The player’s
operations and settings can be easily accessed by operating
the joystick on the remote control while monitoring the TV screen.
The color and position of the GUl screen can be changed.
38
Page 39

Location of Controls for DVD Operation
Enjoying digital audio output from the
digital audio output connector
Note when connecting the optical digital audio cable
Remove the dust protection cap from the optical digital audio
•
output connector and connect the cable firmly so that the
configurations of both the cable and the connector match.
Keep the dust protection cap and reattach when not using the
•
connector.
DC IN
15V
ANT
(PCM
/BITSTREAM)
OPTICAL
Optical/coaxial digital audio output connector
Disc
Sound
recording
format
DVD
Dolby Digital
Linear PCM
(48/96 kHz
16/20/24 bit)
dts
MPEG audio
Video
MPEG 1
CD
CD
Linear PCM
3
dts*
Dust protection cap
Optical/coaxial digital audio
output from connector
Dolby Digital bitstream (1–
5.1ch) or PCM (2ch) (48 kHz/
1 *2
16 bit)*
Linear PCM (2ch) (48 kHz
sampling/16 bit only) or no
1
output*
PCM (2ch) (48 kHz/16 bit)*2 or
dts bitstream (1–5.1ch)*
1
PCM (2ch) (48 kHz/16 bit)*2 or
MPEG audio bitstream (1–
1
7.1ch)*
PCM (44.1 kHz sampling)*
Linear PCM (44.1 kHz
sampling)
PCM (2ch) (44.1 kHz/16 bit)*
or dts bitstream (1–5.1ch)*
2
2
1
Note
• Some dts decoders which do not support DVD-dts interface
may not work properly with the DVD/Video CD/CD player.
For your reference:
• Dolby Digital is a digital sound compression technique
developed by the Dolby Laboratories, Inc. Supporting 5.1channel surround sound, as well as stereo (2-channel) sound,
this technique enables a large quantity of sound data to be
efficiently recorded on a disc.
• The digital theater systems (dts) is a 5.1-channel surround
sound system, which is widely used in movie theatres around
the world. It allows the bit rate to be increased in order to provide
good sound quality without excessively compressing the data.
• Linear PCM is a signal recording format used in a CD. While a
CD is recorded in 44.1 kHz/16 bit, a DVD is recorded in 48
kHz/16 bit up to 96 kHz/24 bit.
• If you have a Dolb y Pro Logic Surround decoder , y ou will obtain
the full benefit of Pro Logic from the same DVD movies that
provide full 5.1-channel Dolby Digital soundtracks, as well as
from titles with the Dolby Surround mark.
• The digital audio output connector (optical) converts electrical
signals into optical signals and transfers them to an amplifier.
These optical signals are immune from electrical interference,
and they also have minimal effect on other equipment.
Caution for the optional/coaxial digital audio
output connector:
• Do not connect to the digital audio input of an amplifier
that does not have Dolby Digital/dts/MPEG audio
decoder.
• If such an amplifier should be connected to the player
with “Bitstream” selected at the “2 Dolby digital”, “3 DTS
Digital Surround” (see page 61), any attempt to pla y D VDs
(or CDs recorded in dts) may cause such a high level of
noise that it may be harmful to your ears and damage
your speakers.
• Video CDs and CDs can be pla yed as they would normally
be played.
Manufactured under license from Dolby Laboratories.
“Dolby”, “Pro Logic” and the double-D symbol are
trademarks of Dolby Laboratories. Confidential
Unpublished W orks . © 1992-1997 Dolb y Laboratories , Inc.
All rights reserved.
Manufactured under license from Digital Theater Systems ,
Inc. “DTS” and “DTS Digital Surround” are trademarks of
Digital Theater Systems, Inc. © 1996 Digital Theater
Systems, Inc. All rights reserved.
1
The type of audio output from the connector can be selected
*
by “7 Digital Audio Output” of the initial settings.
(See page 61.)
2
Compressed sound converted to PCM will be output.
*
*3 The settings and connections necessary to enjoy CDs recorded
in dts are the same as for DVDs recorded in dts.
39
Page 40

Location of Controls for DVD Operation
Switches angles when scenes taken from
several angles are being played back.
Turns the power ON and OFF
when the power on the TV set
is ON.
Displays the menu for disks
with several titles recorded.
Searches the beginning of a
scene or song.
Stops operation of disk.
Pauses movies and music or
forwards frames.
POWER
TOP MENU
TV
MENU
STOP
ASPECT
CLOSE
ANGLE
ENTER
SKIP
PAUSE PLAY
TV/VIDEO MUTE
OPEN
DISPLAY
DVD
MENU
RETURN
SLOW/SEARCH
Opens and closes disk tray on
the set.
Displays disk information and
settings when pressed during
playback.
Displays the menu for DVDs
with several menus.
Used to make selections,
SELECT Key adjustments
and settings.
For fast forwarding or slow
playback.
Plays the disk or turns the
vocals ON and OFF for
Karaoke.
Selects groups.
SLEEP
SURROUND
REPEAT MODE A-B REPEAT PLAY MODE
CH
R-TUNE
VOL
CANCEL
Used to select menus, songs,
set time and input passwords.
Selects still pictures and
playback modes.
40
Page 41

Functions of front operation panel
LCD display
(15 inch wide-screen)
POWER
ASPECT
TH-15DT1
R-STANDBY
G-POWER ON
Turns power ON and OFF.
(The remote control can be
operated when this is ON)
Power OFF with remote control: Red
Power ON with remote control: Green
Rewinds DVD disks and skips
scenes during playback.
TV/VIDEO
VOLUME CHANNEL
Remote control
sensor
POWER
R-STANDBY
G-POWER ON
ASPECT button
TV/VIDEO button
VOLUME up/down button
Selects channels in sequenc
ASPECT
TV/VIDEO
VOLUME CHANNEL
Opens and closes disk tray.
Plays DVD disks.
Pauses or stops playback of DVD disks.
Stops operation of disk.
Fast forwards DVD disks and skips
scenes during playback.
Disk tray
41
Page 42

DISPLAY
ANGLE
PAUSE
ASPECT
TV/VIDEO MUTE
SLEEP
CH
VOL
TV
MENU
ENTER
RETURN
PLAY
D
V
D
M
E
N
U
T
O
P
M
E
N
U
STOP
SKIP
SLOW/SEARCH
OPEN
CLOSE
POWER
Basic play
POWER
POWER
ASPECT
TV/VIDEO
VOLUME CHANNEL
OPEN
CLOSE
PLAY
Before enjoying DVD/Video CD/CD
The On-Screen menu language of your player has been
factory preset to English.
You can change the menu language to French, Spanish.
Refer to “Selecting On-Screen Display menu language” on
page 59.
In the explanations given below it is assumed that English
has been selected as the menu language.
Recalling/clearing a marker
Press POWER to switch on the power.
1
(See page 20.)
2
Press OPEN CLOSE to
open the disc tray.
Place the disc on the disc tray with the
3
label side to be played facing upwards.
(If the disc has a label)
Hold the disc without touching either of its surfaces, position
it with the label side to be played facing upward, align it with
the guides, and place it in position.
a
8 cm disc b 12 cm disc
Open
POWER
R-STANDBY
G-POWER ON
STOP PLAY
OPEN
CLOSE
Press PLAY to displayed as follows.
4
ReadingClose
The disc tray is automatically closed and play begins.
When the disc tra y is closed b y pressing OPEN CLOSE, press
•
PLAY to start play.
When a menu screen appears on the TV monitor
•
In the case of many movie DVDs,
an interactive DVD or Video CD
TITLE MENU
with playback control, a menu
screen appears on the TV monitor .
Perform step 5 to start play.
Dogs Castles
Lovers Birds
(Example of DVD)
42
Page 43

Press SELECT (
5
, , ,
the item and press ENTER.
TITLE MENU
Dogs Castles
Lovers Birds
Play of the selected item now begins.
) button to select
Birds
of the world
(Example )
Stopping play
Press STOP during play.
RESUME function
The player records the point where ST OP was pressed during pla y.
Press PLAY again, and play will resume from this point.
•
When the tray is opened or STOP is pressed again, the
•
RESUME function will be cleared.
This feature remains active if the player is set to the standby
mode and then turned back ON.
While watching movies
Raising dialogue volume
•
The volume for the dialogue can be raised by displaying the
GUl screen (for player information) and setting “Dialogue
Enhancer” to “ON”. (See page 49.)
This setting takes effect only f or discs which are recorded with
Dolby Digital/dts (2 channel or over) and with the
dialogue contained in the center channel.
When the menu continues onto another screen
After step 4 on page 42, press SKIP ( ).
To return to the previous menu screen
•
Press SKIP (
Due to the design of some software titles, SKIP ( ,
•
may not always work. For operation, refer also to the jacket of
the disc concerned.
)
)
Stopping play and returning to the menu screen
Press D VD MENU or TOP MENU.
Play is suspended, and the menu screen is displayed.
The buttons may not work depending on the disc used.
•
After operation
When the player is not in use, remo ve the disc and press PO WER
to set the player to the standby mode.
What is playback control?
If a Video CD has “playback control” written on its disc or
jacket, it means that particular scenes or information can
be selected for viewing interactively with the TV monitor
using the menu screen.
Chapter review function (DVD only)
When PLAY is pressed while
RESUME function the message
shown on the right is briefly displayed.
If PLAY is pressed again while the above message is displayed
on the screen, the first few seconds of each chapter from the
beginning of the title up to the point where operation was stopped
will be played. This mak es it possible to re view pre vious chapters.
Normal playback will commence from the point where operation
was stopped.
Note
Cancelling the RESUME function will also clear the chapter
•
review function.
The chapter review function may not work with some DVDs.
•
Press PLAY to Chapter Review
Note
The disc continues to rotate while the menu is displayed even
•
after the player has finished playing a particular item. When
no further selections are to be played, be sure to press STOP
to clear the menu display.
For your reference:
When appears on the TV monitor when a b utton is pressed,
•
the operation is prohibited by the player or disc.
43
Page 44

TOP MENU
POWER
N
E
M
P
O
T
Skipping chapters or tracks
Press SKIP ( , ) during play.
OPEN
CLOSE
DISPLAY
ANGLE
U
D
V
M
D
E
N
U
DVD MENU
SKIP
Reverse Forward Reverse Forward
With the remote control
On the TV SET
SELECT
SKIP
STOP
PAUSE
SKIP
STOP
SLEEP
ENTER
SLOW/SEARCH
CH
PLAY
VOL
CANCEL
PAUSE
TV/VIDEO MUTE
RETURN
TV
MENU
ASPECT
SURROUND
REPEAT MODE A-B REPEAT PLAY MODE
SLOW/SEARCH
PLAY
Numeric
buttons
For your reference:
A chapter (DVD) or a track (Video CD/CD) is skipped each
•
time the button is pressed.
When SKIP ( ) is pressed once midway through a chapter/
•
track, play returns to the start of that chapter/track. When it is
pressed again, a chapter/track is skipped each time the button
is pressed.
When SKIP ( , ) is pressed during menu play of Video
•
CDs with playback control, a menu screen may sometimes be
recalled.
Still picture (Pause)
Press PAUSE ( ) during play.
DVD/Video CD: The player will be placed in the still picture
•
CD: The player will be placed in the pause mode.
•
Normal play is resumed when PLAY is pressed.
•
mode.
Rapid advance (Rapid reverse)
Press SLOW/SEARCH ( , ) during play.
POWER
R-STANDBY
G-POWER ON
ASPECT
R-TUNE
TV/VIDEO
VOLUME CHANNEL
SLOW/SEARCH
Reverse Forward
(Example)
The speed of adv ance (re v erse) is relativ ely slow at first. When
•
the button is pressed again, the speed increases up to 5 steps.
Normal play is resumed when PLAY is pressed.
•
For your reference:
When SLOW/SEARCH ( , ) is used during menu play of
•
Video CDs with playback control, a menu screen may
sometimes be recalled.
For D VDs and Video CDs, audio will be heard during scanning
•
(forward direction only) at the initial scan speed. (See page
64.) For CDs, audio will be heard during scanning at every
scan speed (1 to 5). (For dts CDs, audio will not be heard at
any speed.)
44
Page 45

Frame advance (Frame reverse)
[
DVD/Video CD
Press SELECT ( , ) in the still picture mode.
(See page 44.)
: Reverse
: Forward
The disc is advanced (reversed) by one frame each time the
•
SELECT ( , ) is pressed.
When the SELECT ( , ) is kept pressed, consecutive
•
frame advance (reverse) works.
Normal play is resumed when PLAY is pressed.
•
Note
For Video CDs, frame reverse is not possible.
•
For your reference:
Pressing PAUSE also activates frame advance.
•
Whether the pictures are advanced by a “Frame” or “Field” is
•
automatic. (See page 64.)
Slow-motion play
]
[
DVD/Video CD
]
Using a TOP MENU
Some movie discs may have two or more titles. If the disc has a
title menu recorded on it, the TITLE b utton can be used to select
the movie title. (The details of operation depend on the disc used.)
Press TOP MENU during
1
[DVD]
TITLE MENU
play.
A list of the titles on the disc is now
displayed.
Pressing TITLE again resumes pla y from the scene when
•
TITLE was first pressed.
Press SELECT (
2
, , ,
Dogs Castles
Lovers Birds
(Example)
) button to select
the item and press ENTER or PLAY.
TITLE MENU
Dogs Castles
Lovers Birds
Birds
of the world
Press SLOW/SEARCH
(
, ) in the still
picture mode. (See page 44.)
SLOW/SEARCH
Reverse Forward
(Example)
The speed of slow-motion is slow at first. When the button is
•
pressed again, the speed increases up to 5 steps.
Normal play is resumed when PLAY is pressed.
•
Note
For Video CDs, slow-motion playback in reverse direction is
•
not possible.
Cancelling playback control
[
Video CD
1. Press STOP after the menu screen appears (after step 4 on
page 42).
2. Press the numeric buttons to select a track.
(Play begins.)
Refer to the jacket etc. of the disc concerned for the track
•
numbers.
Press “1” to start play from the beginning of the disc.
•
To return to menu play
Press STOP to stop pla yback and press DVD MENU.
Perform step 5 on page 43.
]
(Example )
The selected title now starts playing.
Using a DVD menu
Some DVDs have unique menus. These menus can be for
language selection, audio output selection and/or subtitle
language selection, etc. Although the DVD menu’s contents and
operation differ from disc to disc, the following explains basic
operation when this feature is used.
Press DVD MENU during
1
play.
The DVD menu available on the
disc is now displayed.
Pressing MENU again resumes play from the scene when
•
MENU was first pressed.
Press SELECT (
2
, , ,
[DVD]
DVD MENU
1. SUBTITLE
2. AUDIO
3. ANGLE
(Example)
) button and press
ENTER, or press the numeric buttons, to
select the item.
DVD MENU
1. SUBTITLE
2. AUDIO
3. ANGLE
The selected title now starts playing.
(Example)
When the menu continues onto another screen
Repeat step 2.
45
Page 46

ANGLE
SKIP
STOP
PAUSE
ASPECT
TV/VIDEO MUTE
SLEEP
CH
VOL
SURROUND
REPEAT MODE A-B REPEAT PLAY MODE
TV
MENU
ENTER
RETURN
PLAY
D
V
D
M
E
N
U
T
O
P
M
E
N
U
DISPLAY
CANCEL
SELECT
50
+ 50
dB
OFF
PRG
∗ ∗ ∗ ∗ ∗
3:37
40
+ 40
PBC
OFF
dB
OFF
PRG
∗ ∗ ∗ ∗ ∗
3:37
L R
ENG
ON
ENG
LPCM
48k 16b
1:56:37
dB
OFF
OFF
∗ ∗ ∗ ∗ ∗
100
+100
Numeric
buttons
POWER
OPEN
CLOSE
SLOW/SEARCH
DISPLAY
RETURN
PLAY
General information about GUI screens
This player features GUI (Graphical User Interface) screens
providing various functions. A “banner” will be displayed on the
TV when DISPLAY button on the remote control is pressed.
Operating the SELECT/ENTER button on the remote control will
show disc information (title/chapter/track number , elapsed pla ying
time, audio/subtitle language, and angle) and player information
(repeat play, play mode, marker, picture mode, Virtual Surround
Sound, master volume, etc.). Some icons allow the settings to
be changed.
Common procedures
1
Press DISPLAY during play or in the stop
mode.
Each time this button is pressed, the TV monitor changes
as shown below.
GUI screen for selecting disc information
GUI screen for selecting player information
CANCEL
○○○○○○○○○○○○○○○○○○○○○○○○○○○○○○○
DVD
1 1
1:56:37
1
ENG
Disc information
LPCM
48k 16b
1
ON
ENG
Player information
OFF
•
•
OFF
∗ ∗ ∗ ∗ ∗
2
Shuffle screen
–100
(Screen is cleared)
Video CD
PBC
L R
OFF
(Screen is cleared)
(Screen is cleared)
– 40
CD
– 50
1
•
•
1
•
•
OFF
OFF
PRG
PRG
3:37
∗ ∗ ∗ ∗ ∗
3:37
∗ ∗ ∗ ∗ ∗
+100
Shuttle screen
GUI screen is cleared
Some functions cannot be accessed from the stop mode.
•
1
Press the SELECT (
2
,
) button to select
the item.
dB
0
The currently selected item is indicated b y the yellow fr ame
•
on the GUI screen.
3
Press the SELECT (
,
) button to select
the setting.
For some functions, the setting will be registered
•
immediately; f or others, ENTER or PLAY must be pressed.
When numbers are displayed (e.g. title No.), the numeric
•
buttons are also effective f or setting instead of the SELECT
,
) button. When numbers are entered with numeric
(
buttons, press ENTER to register the setting.
dB
0
+ 40
Press RETURN to clear the GUI screen.
Examples of GUI screens
See , and for detailed illustration.
The screens depend on the disc contents.
For your reference:
• The GUI screens may not be displayed when playing some
kinds of DVD software.
• The color (blue, violet or green) of the GUI screen can be
changed. (See page 59.)
dB
0
+ 50
46
Page 47

LPCM
48k 16b
1:56:37
Detailed descriptions of each GUl icon
Screen for disc information (For DVD)
Title No.
Change the title No. with time SELECT (
Chapter No.
Change the chapter No. with the SELECT (
press ENTER.
,
) button or the numeric buttons and press ENTER.
,
) button or the numeric buttons and
1 1
Audio soundtrack
language No.
(See page 54.)
Audio soundtrack
language
LPCM
Digital
Elapsed playing time
(hour: minute: second)
Angle No.
(See page 55.)
1:56:37
Change the No. with the SELECT
,
) button or the numeric buttons.
(
ENG: English POR: Portuguese
FRA: French RUS: Russian
DEU: German JPN: Japanese
ITA: Italian CHI: Chinese
ESP: Spanish KOR: Korean
NLD: Dutch MAL: Malay
SVE: Swedish VIE: Vietnamese
NOR: Norwegian THA: Thai
DAN: Danish
96k
or
48k
1ch–3/2.1ch*
16b
20b
24b
: Other
*
Linear PCM
(“k” stands for kHz
and “d” stands of bit.)
Dolby Digital
Change the time with the numeric buttons and press ENTER.
Example: To specify “1 hour 56 min. 37 sec.”, enter “15637”.
(This function does not work with some discs.)
LPCM
48k 16b
1
ENG
Change the No. with the SELECT (
buttons.
ON
1
ENG
Subtitle language No.
(See page 55,56.)
Sub language
Subtitle on/off
1
,
) button or the numeric
Change the No. with the SELECT
,
(
) button or the numeric buttons.
ENG: English POR: Portuguese
FRA: French RUS: Russian
DEU: German JPN: Japanese
ITA: Italian CHI: Chinese
ESP: Spanish KOR: Korean
NLD: Dutch MAL: Malay
SVE: Swedish VIE: Vietnamese
NOR: Norwegian THA: Thai
DAN: Danish
Select “ON” or “OFF” with the
SELECT (
OFF Subtitles cleared.
ON Subtitles displayed.
,
: Other
*
) button.
DTS
Audio
attribute
For your reference
,
“
•
MPEG
Vocal
Vocal
” around the icon means that the item can be changed with the SELECT (
1ch–3/2.1ch*
1ch–3/2.1ch*
--- (OFF)
ON
--- (OFF)
V1 + V2
V1
V2
dts
MPEG audio
DVD Karaoke
(Solo)
DVD Karaoke
(Duet)
The GUI screen display indicates the number of channels
•
recorded on the disc.
Example:
3/2.1ch
0: No low frequency effect (for subwoofer)
1: Low frequency effect (for subwoofer)
0: No Surround
1: Mono Surround
2: Stereo Surround (left/right)
0: Center
1: Front left + Front right
2: Front left + Front right + Center
,
) button.
2
47
Page 48

PBC
OFF
L R
3:37
Detailed descriptions of each GUl icon
Screen for disc information (For Video CD/CD)
Track No.
Change the Track No. with the SELECT (
or the numeric buttons and press ENTER.
,
) button
1
Audio mode
(Video CD only)
(See page 54.)
Elapsed playing time
(minute: second)
3:37
Change the mode with SELECT (
LR
L
L R
Left channel sound is output from the speaker (L),
and right channel sound from the speaker (R).
Left channel sound only is output.
Display is changed with the SELECT (
Elapsed playing time Remaining time of the track
This function works with the following discs.
CDs
•
Video CDs with playback control when menu play is cancelled
•
(Press STOP while the menu screen is displayed.)
Video CDs which do not support playback control (Ver 1.1)
•
Playback controls
(Video CD only)
(See page 43.)
PBC
OFF
Remaining time of the disc
OFF Menu play is off.
ON Menu play is on.
,
) button.
,
) button.
R
Right channel sound only is output.
Note
Track No. and the elapsed playing time are not displayed during menu play of Video CDs with playback control.
•
It is not possible to turn playback control ON or OFF using the GUI screen.
•
For your reference
,
“
•
” around the icon means that the item can be changed with the SELECT (
,
) button.
48
2
Page 49

∗ ∗ ∗ ∗ ∗
Screen for player information
---
100
+100
A-B repeat play
(See page 51.)
Repeat play
(See page 50.)
Press ENTER during to store location A and press ENTER again to store location B. Repeat play between
the two locations starts. Press ENTER again to return to normal play.
Select the mode during play with the
SELECT (
OFF
C
T
OFF
T
A
• DVD
Dialogue
Enhancer
(See page 43.)
• Video CD/CD
Play mode
(See pages 52
and 53.)
,
) button.
Normal play
Chapter repeat play
Title repeat play
Normal play
Track repeat play
Disc repeat play
Select the mode during play with
the SELECT (
OFF
ON
OFF
PRG
RND
---
---
Normal volume
Louder volume
Program play
Random play
Normal play
,
DVD
Video
CD/
CD
) button.
Press ENTER during pla y and press ENTER
again at the preferred point to store a marker .
Marker
(See page 51.)
Virtual Surround Sound
(Dolby Digital DVD only)
(See page 28.)
(Marker no. replaces “
• To recall a marker, select the marker no. with
the SELECT (
selection with the SELECT button (
T o clear a marker , select the marker no . with the
•
SELECT (
”.)
∗
,
) button and enter the
,
) button and press CANCEL.
Select the mode during play with
the SELECT (
Select the mode during play with
the SELECT (
OFF
VSS Off
1
VSS natural effect
2
VSS emphasized effect
,
) button.
VSS
Headphone VSS
,
) button.
,
).
Adjust the master volume with
dB
• •
Note
Repeat play and marker functions do not work with an interactive DVD or during menu play of a Video CD with playback control.
•
A-B repeat play does not work with an interactive DVD.
•
It is not possible to change the play mode using the GUI screen.
•
The master volume can be set and stored separately for DVD, Video CD and CD.
•
OFF OFF
∗ ∗ ∗ ∗ ∗
2
0
Master volume
the SELECT (
0 to – 127 dB or – ∞
,
Shuttle screen
Slow-motion play
(Backward)
Rapid reverse
Press the SELECT (
button. (DVD only)
–100
Press the SELECT (
) button.
)
Still/Pause
Play
Press the SELECT (
Press the SELECT
( ) button.
) button.
Slow-motion play
(Forward)
Repaid advance
Press the SELECT (
(DVD/Video CD only)
+100
Press the SELECT (
) button.
) button.
) button.
For your reference
Each time the SELECT (
•
The figures appearing at both ends of the shuttle screen stand for the maximum speeds of rapid reverse and rapid advance.
•
(DVD: +100/-100, Video CD: +40/-40, CD: +50/-50)
,
) button is pressed, the speed of rapid rev erse/advance and slow-motion play increases up to 5 steps .
49
Page 50

POWER
OFF
OFF
N
E
M
P
O
T
Repeat play
Repeat viewing (Listening)
Press REPEAT MODE during play.
Each time this button is pressed, the TV monitor changes as
OPEN
CLOSE
DISPLAY
ANGLE
U
D
V
M
D
E
N
U
shown below and the disc will repeat a chapter or title (DVD) or
a track (Video CD/CD)
• DVD
Normal play
SELECT
REPEAT
MODE
SKIP
STOP
TV/VIDEO MUTE
ENTER
PAUSE
CH
R-TUNE
RETURN
SLOW/SEARCH
PLAY
VOL
CANCEL
TV
MENU
ASPECT
SLEEP
SURROUND
REPEAT MODE A-B REPEAT PLAY MODE
CANCEL
A-B
REPEAT
Repeat of chapter being played
Repeat of title being played
Cancel repeat mode
(Normal play)
• Video CD / CD
Normal play
Repeat of track being played
Repeat of entire disc contents
C
T
OFF
T
A
50
Cancel repeat mode
(Normal play)
OFF
To return to normal play
Press REPEAT MODE until “
Note
Repeat play may not work correctly with some DVDs.
•
Repeat play does not work with an interactive DVD or dur ing
•
menu play of a Video CD with playback control.
OFF
” is displayed.
Page 51

OFF
A
A B
∗
Storing markers in memory to be
∗
∗ ∗ ∗ ∗
∗ ∗ ∗ ∗ ∗
To enjoy program repeat play
If REPEAT MODE is pressed during program play (see page
52), the display changes as follo ws:
Program play
Repeat of programmed track
being played
Repeat of all programs
Cancel repeat mode
(Program play)
T PRG
A PRG
OFF
PRG
To return to program play
Press REPEAT MODE until “
OFF
” is displayed.
Repeating sections between two
specific points ( A-B repeat )
viewed (listened to) again
Storing a marker in the memory
1 Press the DISPLAY during play to display
the Disk information.
2
Press SELECT (
The marker screen appears
on the TV monitor.
” indicates no marker has
“
been stored yet.
Press SELECT during play at the starting
3
point to be viewed (listened to) again.
Indicates “MARK 1” is stored in the
memory.
(If ENTER is pressed where any
number is already displayed, the
previous starting point will be
replaced by the new one.)
Press select (
•
Up to 5 markers can be stored in the memory.
•
Press MARKER to clear the display.
•
,
) button to select the marker item.
∗ ∗ ∗ ∗ ∗
1
∗ ∗ ∗ ∗
) key and press ENTER to store the ne xt marker.
1 Press A-B REPEA T during play at the point
where repeat play is to start (A).
A
2
Press A-B REPEAT at the point where
repeat play is to be concluded (B).
A B
Repeat play of the section between points A and B starts.
To return to normal play
Press A-B REPEAT until “
Note
A-B repeat play does not work with an interactive DVD.
•
Some subtitles recorded around point A or B may fail to appear
•
(DVD).
A-B repeat play works only within a title (D VD) or a trac k (Video
•
CD/CD).
For your reference:
The end of a track or title is automatically determined as point B.
•
• •
” is displayed.
Recalling / clearing a marker
1 Press the DISPLAY during play to display
•
the Disk information.
2
Press SELECT (
marker item.
3
Press SELECT (
marker to be recalled/cleared.
4 Press SELECT (
,
) button to select the
1 2 3 4
∗
,
) button to select the
1 2 3 4
∗
) button to recall a marker .
or
Press CANCEL to clear a marker.
Play resumes from the point corresponding to the selected marker .
The selected marker is cleared.
Note
Some subtitles recorded around the marker may f ail to appear. [DVD]
•
These operations do not work with an interactiv e DVD or during
•
menu play of a Video CD with playback control.
For your reference:
All the markers are cleared when the player is set to the standb y
•
mode or turned off, or OPEN CLOSE is pressed.
or
51
Page 52

Program play [ Video CD / CD ]
The player plays the tracks on the disc in an order you specify.
Press PLAY MODE in the stop mode.
1
The program playback screen appears on the TV monitor.
SELECT
STOP
Numeric
buttons
OPEN
CLOSE
POWER
ANGLE
U
N
E
M
P
O
T
SKIP
STOP
SLEEP
ENTER
SLOW/SEARCH
PAUSE
TV/VIDEO MUTE
CH
R-TUNE
TV
MENU
ASPECT
SURROUND
REPEAT MODE A-B REPEAT
DISPLAY
D
V
M
D
E
N
U
RETURN
PLAY
VOL
CANCEL
PLAY MODE
PLAY
CANCEL
PLAY
MODE
Choose a track , then press ENTER.
Track Time
1
2
3
4
5
6
7
8
Press PLAY to start
T o exit the screen
•
Press PLAY MODE twice.
Press ENTER and press SELECT (
2
button to select the track.
Choose a track , then press ENTER.
Track Time
1
1
2
3
4
5
6
7
8
Press PLAY to start
Press ENTER.
3
The selected track is stored in the memory.
Choose a track , then press ENTER.
Track Time
1
2
3
4
5
6
7
8
5:55
1
Press PLAY to start
Clear
Clear all
Total time
,
Clear
Clear all
Total time
Clear
Clear all
Total time
5:55
)
52
Repeat steps 2 and 3 to select another track.
•
Up to 18 tracks can be programmed.
•
Press PLAY .
4
Play now begins in the programmed sequence.
After playback
Play stops after the last programmed track.
Page 53

Random play [ Video CD / CD ]
To return to normal play
1. Press STOP. (Program play is suspended.)
2. Press PLAY MODE twice.
3. Press PLAY.
Normal play begins from the beginning of the disc.
The program is retained in the memory.
•
Clearing the program
When the program playback screen is displayed.
To clear the last program one by one
•
Move to “Clear last” and press SELECT.
(Pressing CANCEL on the remote control also clears the last
program.)
To clear the whole program
•
Move to “Clear all” and press SELECT.
(The program is also cleared when the player is set to the
standby mode or turned off, or OPEN CLOSE is pressed.)
The player plays the tracks on the disc in random order.
Press PLAY MODE twice in the stop mode.
1
The random playback screen appears on the TV monitor.
Random Playback
Press PLAY to start
T o exit the screen
•
Press PLAY MODE once.
Press PLAY .
2
Play now begins in random order.
After playback
Play stops and the random playback screen is displayed.
To return to normal play
1. Press STOP. (Random play is suspended.)
2. Press PLAY MODE once.
3. Press PLAY.
Normal play begins from the beginning of the disc.
53
Page 54

SELECT
ENG
96k 24b
LPCM
Hello
FRA
96k 24b
LPCM
Bonjour
POWER
P
O
T
TV
MENU
STOP
M
N
E
SKIP
U
OPEN
CLOSE
ANGLE
ENTER
SLOW/SEARCH
PAUSE
DISPLAY
D
V
M
E
N
U
RETURN
PLAY
Changing audio soundtrack language [ DVD ]
It is possible to change the audio soundtrack language to a
different language from the one selected at the initial settings if
available. (See page 57.)
This operation works only with discs on which multiple audio
soundtrack languages are recorded.
Press DISPLAY during play to display the
DISPLAY
D
1
disk information.
The program playback screen appears on the TV monitor.
When no audio soundtrack is recorded, “–” will be displayed
•
instead of the language number.
LPCM
96k 24b
1 1 ENG
Number of the audio
soundtrack language
being played back
Hello
Numeric
buttons
ASPECT
TV/VIDEO MUTE
SLEEP
SURROUND
REPEAT MODE A-B REPEAT
CH
R-TUNE
VOL
CANCEL
PLAY MODE
Press SELECT (
2
,
) to select the AUDIO
soundtrack.
Press SELECT (
3
language.
Pressing the numeric buttons
also changes the audio
soundtrack language.
Press DISPLA Y or ENTER to clear
•
the display.
For your reference:
When the preferred language is not selected, even after press the
•
SELECT ( ,
available on the disc.
When the power is turned on, or the disc is removed, the language heard
•
is the one selected at the initial settings. If this language is not recorded
on the disc, only the availab le language on the disc will be heard.
) button sev eral times , it means that language is not
,
) to select the
LPCM
96k 24b
2 2 FRA
Bonjour
54
Page 55

Changing subtitle language [ DVD ]
I love you
1
ENG
ON
Je t’aime
2
FRA
ON
3
Viewing from another angle [ DVD ]
It is possible to change the subtitle language to a different
language from the one selected at the initial settings if availab le.
(See page 57.)
This operation works only with discs on which multiple subtitle
languages are recorded.
1 Press DISPLA Y button to displa y the player
information.
When no subtitles are recorded, “––” will be displayed
•
instead of the language number.
ON
1
Number of the audio
soundtrack language
being played back
Press SELECT (
2
language item.
Press SELECT (
3
Pressing the numeric
buttons also changes the
subtitle language.
Press SUBTITLE or ENTER
•
to clear the display.
,
) to select SUBTITLE
,
) to select the language.
ENG
I love you
ON
2
FRA
Je t’aime
Some DVDs contain scenes which have been shot
simultaneously from a number of different angles . F or these discs,
the same scene can be viewed from these different angles with
the ANGLE button. (The angles depend on the disc used.)
Press ANGLE during play.
1
Number of angle being
played back
Press SELECT (
2
Pressing the numeric buttons
also changes the angle.
Press ENTER to clear the display.
•
Note
This function only works for titles having scenes recorded at
•
different angles.
,
) to select the angle.
1
3
To clear/display the subtitles
Press the SELECT ( ,
For your reference:
When the preferred language is not selected, even after press
•
the SELECT (
not available on the disc.
When the power is turned on, or the disc is removed, the
•
language heard is the one selected at the initial settings. If this
language is not recorded on the disc, only the available
language on the disc will be heard.
,
) to select ON or OFF at step 2.
) several times , it means that language is
55
Page 56

Initial settings
Once the intial settings have been completed, the player can
always be operated under the same conditions (especially D VDs).
The settings will be retained in the memory , until the settings are
changed, even after switching to standby mode.
SELECT
TV MENU
Numeric
buttons
POWER
N
E
M
P
O
T
TV
MENU
SKIP
STOP
ASPECT
SLEEP
SURROUND
OPEN
CLOSE
ANGLE
U
ENTER
SLOW/SEARCH
PAUSE
TV/VIDEO MUTE
CH
DISPLAY
D
V
M
E
N
RETURN
PLAY
VOL
Common procedures
Press TV MENU to display menu screen
1
D
U
RETURN
during stop mode.
Press SELECT
2
Press SELECT
3
MENU
ADJUST SET UP
PROGRAM CH
DVD SET UP
LOCK
CLOSED CAPTION
INPUT LABEL
OTHER ADJUST
,
(
(
) to select SETUP.
,
) to select DVD SETUP,
and press ENTER.
Initial Setting menu
1 Disc Languages
2 Ratings Level 8
3 Menu Language English
4 On-Screen Messages
5 TV Aspect 16:9
6 Digital Audio Output
7 Speaker Setting
see page 57
see page 57
see page 59
see page 59
see page 60
see page 61
see page 62
REPEAT MODE A-B REPEAT
R-TUNE
CANCEL
PLAY MODE
CANCEL
9 Other Settings
0 Exit
,
Press SELECT
4
(
) to select the item
and press ENTER.
Each screen for setting the value is displayed.
1 Disc Languages
2 Ratings
3 Menu Language
4 On-Screen Messages
5 TV Aspect
6 Digital Audio Output
7 Speaker Setting
9 Other Settings
see page 64
56
Page 57

Initial settings
To cancel during setup operation
Press RETURN or select “0”. (The previous screen is displa yed.)
To clear the initial settings screen
Press SELECT (
(Pressing TV MENU or RETURN also clears the initial settings
screen.)
Note
After the player is set to the “Lock All” setting in “2 Ratings”,
•
none of the initial settings, including “2 Ratings”, can be
changed if a DVD is left inside the player . In this case, remove
the disc, and unlock the player.
For your reference:
The numeric buttons can also be used instead of the SELECT
•
,
) button for selecting items or v alues. Pressing SELECT
(
is not necessary.
,
) to select “0” and press ENTER.
Selecting disc language [DVD]
This is to select the audio soundtrack language, subtitle language
and the language used in title menus or the DVD menus which
will always be used for every disc to be played back.
At the initial settings screen (on page 56)
1
Press SELECT (
,
) to select “1 Disc
Languages” and press ENTER.
When “2 Subtitle” is selected
1 Automatic: Subtitle language will automatically be
2 English / 3, French / 4, Spanish:
5 Other
When “3 Menus” is selected
1 English: English is selected. (Factory preset)
2 French /3, Spanish:
4 Other
The screen illustrated in step 1 is displayed. Select “0” with
the SELECT (
the initial settings screen.
Also refer to “Common procedures” on page 56.
∗∗∗∗
∗∗∗∗
selected in accordance with the audio
soundtrack language.
(Factory preset)
If the language selected for the “I
•
Audio” is actually used during
playback, the subtitles will not appear.
If another language is used during
•
playback, the subtitles will appear in the
language selected at the setup “I A udio”.
The language is selected.
: Another language can be selected.
(Refer to the language codes on page
66. Press CANCEL if an incorrect
language code is entered.)
The language is selected.
: Another language of each disc will be
selected.
(Refer to the language codes on page
66. Press CANCEL if an incorrect
language code is entered.)
,
) button and press ENTER to return to
Disc Languages
1 Audio English
2 Subtitle Automatic
3 Menus English
0 Exit
2
Press SELECT (
,
) to Select the item and
press ENTER.
1 Audio:
To select the audio soundtrack language .
2 Subtitle:
To select the subtitle language.
3 Menus:
To select the language used in title menus or the DVD
menus.
3
Press SELECT (
,
) to select the language
and press ENTER.
When “1 Audio” is selected
1 English: English is selected. (Factory preset)
2 French / 3, Spanish:
4 Original: The original language of each disc will
5 Other
∗∗∗∗
The language is selected.
be selected.
: Another language can be selected.
(Refer to the language codes on page
66. Press CANCEL if an incorrect
language code is entered.)
Note
If the language selected is not available on the disc, the
•
language designated by each disc will be selected.
Selecting rating level [DVD]
This is to disable the playing of some DVDs which are unsuitable
for some audiences, f or example, children.
Some DVDs are encoded with a specific rating level. If the
•
rating level of the disc is higher than that preset in the initial
settings operation, playback of the disc will be prohibited.
1
At the initial settings screen (on page 56)
Press the SELECT (
,
) b u tt o n to select
“2 Ratings” and press ENTER.
Please set a rating limit
8 No Limit
7
6
5
4
3
2
1
0 Lock All
Press RETURN to cancel
(Continued on the next page)
57
Page 58

Initial settings
DISPLAY
ANGLE
PAUSE
ASPECT
TV/VIDEO MUTE
SLEEP
CH
VOL
SURROUND
CANCEL
REPEAT MODE A-B REPEAT
PLAY MODE
ENTER
RETURN
PLAY
D
V
D
M
E
N
U
T
O
P
M
E
N
U
STOP
SKIP
TV
MENU
POWER
OPEN
CLOSE
SLOW/SEARCH
SELECT
When level 7 or lower is selected
3
Input a 4-digit password with the n umeric
buttons and press ENTER.
The lock symbol
appears closed to
show the rating is
locked.
Example: “4343”
Do not forget your
password.
Press ENTER.
4
Setting is finished and the initial settings screen is displayed.
The rating is locked. Any discs with a higher rating than the
•
setting cannot be played back unless the password is entered.
When the player is locked
The following screen appears when “2 Ratings” is selected at
the initial settings screen.
Ratings
The player is locked.
Remember the password.
4 3 4 3
Press RETURN to continue
Ratings
Enter your 4-digit password.
then press SELECT.
Numeric
buttons
2
Press the SELECT (
,
) button to select
the level and press ENTER.
Level 8: All DVDs can be played back.
Level 7 to 2: DVDs for general audiences/children
Level 1: DVDs for children can be played back.
Level 0: Playback of all DVDs is prohibited (e.g.
(Factory preset)
can be played back.
(DVDs for adults are prohibited.)
(DVDs for adults/general audiences are
prohibited.)
to prohibit playback of DVDs for adults
which are not encoded with rating level
information).
Ratings
Enter a 4-digit password.
then press SELECT.
Press RETURN to cancel
1 . Input your 4-digit password and press ENTER.
Ratings
1 Unlock Player
2 Change Password
3 Change Level
4 Tempor ary Unlock
0 Exit
2. To unlock the player
Press “1” and then press ENTER.
To change the password
Press “2”, enter a new 4-digit password and press ENTER,
then press ENTER again.
T o change the rating level Press “3”, select a new level
,
with the SELECT (
) button, then press ENTER.
To unlock the player temporarily
Press “4” and then press ENTER.
The rating is unlock ed temporarily only for the current disc.
•
The player is locked again when OPEN / CLOSE is
pressed or the player is set to the standby mode.
To finish setting without changing the rating level
Press “0”.
Setting is finished and the initial settings screen is displayed.
Also refer to “Common procedures” on page 56.
58
Press RETURN to cancel
Note
Some discs may not be encoded with specific rating level
•
information though its disc jacket sa ys that it is f or “adults”. For
those discs, the age restriction will not work.
Page 59

When “2 Color and Position” is selected
The colors and positions are set as follows:
This is to select the language to be used in the On-Screen Display
menus which the player will show on the TV monitor.
At the initial settings screen (on page 56)
1
Press SELECT (
,
) to Select “3 Menu
Language” and press ENTER.
Select the language
for these Menus.
1 English
2 Français
3 Español
Press RETURN to cancel
Also refer to “Common procedures” on page 56.
1 Blue (Factory preset)
2 Violet
3
Green
4 Blue
5
59
Page 60

Initial settings
Selecting TV screen Aspect
Select the TV aspect, conventional size screen (4:3) or widescreen (16:9), when connecting to your TV set.
At the initial settings screen (on page 56)
DISPLAY
ANGLE
U
N
E
M
P
O
T
D
V
M
D
E
N
U
1
Press SELECT (
and press ENTER.
,
) to Select “5 TV Aspect”
Select your TV aspect
ENTER
PAUSE
ASPECT
TV/VIDEO MUTE
SLEEP
SURROUND
REPEAT MODE A-B REPEAT
CH
RETURN
PLAY
VOL
CANCEL
PLAY MODE
1 4 : 3
2 16 : 9
Press RETURN to cancel
2
Press SELECT (
,
) to select the TV aspect
and press ENTER.
1 4:3:
Select when a conventional TV set is connected.
2 16:9:
Select when a wide-screen TV set is connected.
(Factory preset)
Setting is finished and the initial settings screen is displayed.
60
R-TUNE
Page 61

Initial settings
Selecting digital output
Select the digital output to be output from the optical/coaxial digital
audio output connector of the player.
At the initial settings screen (on page 56)
1
Press SELECT (
,
) to select “6 Digital
Audio Output” and press ENTER.
Digital Audio Output
1
2
Press SELECT (
PCM Down Conversion
2 Dolby Digital Bitstream
3
DTS Digital Surround
0 Exit
,
) to select the item
No
PCM
and press ENTER.
1 PCM Down Conversion:
To select whether digital audio conv erted to 48 kHz/16 bit is
output from the optical/coaxial digital audio output connector
or no digital audio is output during playback of D VDs recorded
in 96 kHz Linear PCM.
(If the DVD is recorded in 48 kHz Linear PCM, digital audio
converted to 48 kHz/16 bit is output irrespective of the setting.)
2 Dolby Digital:
T o select the signal format (Bitstream or PCM) to be output
from the optical/coaxial digital audio output connector during
playback of DVDs recorded in Dolby Digital.
When “3 DTS Digital Surround” is selected
1 PCM: Digital audio converted to 48 kHz/16 bit
PCM (2ch) is output during playback of
DVDs recorded in dts. (Factory preset)
1
2 Bitstream *
The screen illustrated in step I is displayed. Select “0” with
press SELECT (
to the initial settings screen.
Also refer to “Common procedures” on page 56.
(Continued on the next page)
: dts bitstream is output during playback
of DVDs recorded in dts. Select this
setting when the player is connected to
a dts decoder.
,
) button and press ENTER to return
Recommended setting of “Digital Audio Output”
Make settings as shown in table belo w depending on the kind of
equipment that is connected to the optical/coaxial digital audio
output connector.
Type of equipment
to be connected
No equipment is
connected
Dolby Digital
decoder
Recommended setting
1
PCM Down
Conversion
No
Yes*
2
2 Dolby
Digital
Bitstream
Bitstream
3
DTS Digital
Surround
PCM
PCM
3 DTS Digital Surround:
T o select the signal f ormat (PCM or Bitstream) to be output
from the optical/coaxial digital audio output connector
during playback of DVDs recorded in dts.
3
Press SELECT (
,
) to select the setting
and press ENTER.
When “1 PCM Down Conversion” is selected
1 N0: Digital audio of 48 kHz/16 bit is output during playback
of DVDs recorded in 48 kHz Linear PCM. No digital
audio is output during playback of DVDs recorded in
96 kHz Linear PCM. However, audio will be output
using the original audio recording system if the DVD
has not been copyright-protected. (Factory preset)
2 Yes: During playback of DVDs recorded in 48 kHz or 96 kHz
Linear PCM, digital audio converted to 48 kHz/16 bit is output.
(Digital output of PCM audio is restricted to 48 kHz/
16 bit or below for copyright protection.)
When “2 Dolby Digital” is selected
1 Bitstream *
2 PCM: Digital audio converted to 48 kHz/16 bit
1
: Dolby Digital bitstream (1ch-2 PCM:
5.1ch) is output during playback of DVDs
recorded in Dolby Digital. (F actory preset)
Select this setting when the player is
connected to a Dolby Digital decoder.
PCM (2ch) is output during playback of
DVDs recorded in Dolby Digital.
Dolby Digital
dts decoder
Dolby Digital
dts audio decoder
Underlined items are factory preset.
•
1
Do not connect to the digital audio input of an amplifier that
*
does not have Dolby Digital/dts audio decoder: if such an
amplifier should be connected to the player with “Bitstream”
selected at the “2 Dolby Digital”, “3 dts” , any attempt to play
DVDs (or CDs recorded in dts) may cause such a high level of
noise that it may be harmful to your ears and damage speakers.
2
96 kHz PCM sound is converted to 48 kHz 16 bit sound when
*
this player is connected with an optical digital audio cab le. Do
the following if you wish to take advantage of high quality 96
kHz sound.
Select “1 No” and connect this play er’s audio output connector
to an amplifier’s audio input connector with the audio/ video
cable (included) or an audio cable (not included). Note that
PCM, Dolby Digital, and dts signals will all be output in 2
channel, analog form.
Yes*
Yes*
2
2
Bitstream
Bitstream
Bitstream
Bitstream
61
Page 62

○○○○○○○○○○○○○○○○○○○○○○○○○○○○○○○
Ideal position of the center
speaker
LR
SL
C
D2
D1
SW
D3
SR
Ideal position of
the surround
speakers
It is recommended to locate all the speakers
inside this circle.
○○○○○○○○○○○○○○○○○○○○○○○○○○○○○○○
62
Page 63

Delay time [only for Dolby Digital discs] ( ):
If the surround speakers or the center speaker can’t be
installed at an equal distance to the front speakers from the
listening position, change the delay time to get better
surround effect.
When D2 or D3 is equal to or larger than D1, no setting is
•
necessary. Otherwise, change the setting according to the
table below.
Speaker setting
Speaker
Centers approx. 50 cm 1.3 ms
speaker approx. 100 cm 2.6 ms
(D2) approx. 150 cm 3.9 ms
Surround approx. 200 cm 5.3 ms
speakers approx. 400 cm 10.6 ms
(D3) approx. 600 cm 15.9 ms
T o adjust the channel balance using the test signal
1. Select “Test” with press SELECT (
then press ENTER.
(Test signals will be output clockwise from each speak er
except the subwoofer consecutively.)
2. While listening to the test signal, press SELECT (
button to adjust the volume of each speaker until the test
signal is heard at a similar level from all speakers.
3. Press ENTER. (The test signals are stopped.)
FRONT (L) FRONT (R)
SURROUND (L)
Note
Test signal is not output from the subwoofer. Subwoofer
•
volume should be adjusted to suit the material being
Difference between D1
and D2 / D3
approx. 200 cm 5.3 ms
,
CENTRE
SURROUND (R)
Delay time
), and
,
,
,
)
Press SELECT (
4
, , ,
) to select
“Exit” and press ENTER.
Setting is finished and the initial settings screen is displayed.
Also refer to “Common procedures” on page 56.
Playing MPEG 2 multi-channel audio ( )
MPEG 2 multi-channel audio is output from the 5.1 channel output
connectors ( ) if you have set the center, surround and
subwoofer speakers to “Yes” in “8 Speak er Setting”, just as with
Dolby Digital and dts.
If you are using 2 channel audio output connectors (
digital audio output connectors (when “1 PCM” is selected in “4
MPEG” in the digital audio output settings on page 61) (
the phones jack, however, then only the signals for the front
speaker channels are output.
If you intend to use one of these types of terminals, go to “8
Speaker Setting” and set the center, surround, and subwoofer
channels to “No”.
), the
), or
63
Page 64

Speaker setting
Other settings
Compression of the sound’s dynamic range and other special
settings can be performed.
At the initial settings screen (on page 56)
1
Press SELECT (
,
) to s elect “9 Other
Settings” and press ENTER.
Other Settings
1
Still Mode Automatic
2
2
Press SELECT (
Audio during Search
3
TV Mode (4:3) Pan&Scan
4
D. Range Compression
5
Still Picture Display
6
Black Level Control Lighter
0 Exit
,
) to select the item and
On
Off
Off
press ENTER.
1 Still Mode:
Select either “Field still” or “Frame still” to prevent
jittering or improve the video quality of small text or fine
patterns in the still picture mode.
2 Audio during Search:
To select whether audio is heard during search (forward
direction) at the initial scan speed or not.
3 TV Mode (4:3):
To select whether wide-screen video material will be
played back in the pan and scan style or in the letterbox
style on a conventional size TV.
4 D. (Dynamic) Range Compression:
To select the dynamic range during playback.
5 Still Picture Display:
To display the picture type, l, P or B in the still picture
mode.
6 Black Level Control:
Adjusts the dark shades of the image in gradation.
When “2 Audio during Search” is selected
1 On: Audio will be heard during search at the initial scan
2 Off: Select this setting when audio during search at the
When “3 TV Mode (4:3)” is selected
1 Pan & Scan: Wide-screen video material will be played
2 Letterbox: Wide-screen video material will be
When “4 D. (Dynamic) Range Compression” is selected
1 Off: Normal audio range is selected. (Factory preset)
2 On: Select this setting to enjo y dynamic sound at low volume.
When “5 Still Picture Display” is selected
1 Off: The picture type ( I / P / B ) will not be displayed
2 On: The picture type ( I / P / B ) will be displayed on the TV
When “6 Black Level Control” is selected
Adjusts the dark shades of the image in gradation
1 Lighter
2 Darker
speed. (Factory preset)
initial scan speed is not desired.
back in the pan and scan style on a
conventional size TV.
(Factory preset)
Video material not f ormatted in the pan
•
and scan style will be played back in
the letterbox style. (See page 67.)
played back in the letterbox style on a
conventional size TV.
Dynamic range is the difference in volume between
the quietest and loudest sounds.
Dynamic Compression limits level f or listening at low
volume. This is useful late at night.
This function only works with Dolby Digital D VD.
on the TV screen in the still picture mode .
(Factory preset)
screen in the still picture mode.
Since I-Picture features the best picture quality, it is
recommended that the screen be frozen with I-Picture
when the picture quality is to be adjusted.
3
Press SELECT (
,
) to select the setting
and press ENTER.
When “I Still Mode” is selected
1 Automatic: “Field still” and “Frame still” are
automatically selected in the still picture
2 Field: “Field still” is always selected. Select this
3 Frame: “Frame still” is always selected. Select
mode. (Factory preset)
setting when jittering occurs when “I
Automatic” is selected.
this setting when small text or fine
patterns cannot be seen clearly when “I
Automatic” is selected.
64
The screen illustrated in step I is displayed. Select “0” with the
SELECT (
initial settings screen.
Also refer to “Common procedures” on page 56.
,
) button and press SELECT to return to the
Page 65

Speaker setting
Note
It is recommended that the “I PAL 60” is selected at the “6
•
NTSC Disc Output” when a PAL TV is connected; however,
the images shown below will appear on the TV screen. Black
bars appear at the top and bottom parts of the TV screen.
(The picture may be compressed vertically.)
For your reference:
When the “2 On” is selected at the “5 Still Picture Display ”, the
•
following screen is displayed in the still picture mode;
Still
Example: P-Picture
Field
•
Half of the video information (video signal) in a frame is called
a field. With conventional TV systems, a signal frame (a single
screen) consists of two fields.
Field still
•
Only one field (half of the video information) is displayed on
the TV screen, so the apparent resolution is low. However,
there is no blurring on the screen.
Frame
•
Individual images in a video or on the TV are called fr ames.
Frame still
•
The two fields are displayed, alternately, on the TV screen, so
the image is blurry. However, the image quality is better than
field images.
(P)
I/P/B
•
The MPEG 2 standard adopted for DVD uses the following 3
picture types for the coding of each picture (frame) on the TV
screen.
I:I-Picture (Intra coded picture)
This is the standard picture type, and each picture is coded
separately.
P:P-Picture (Predictive coded picture)
This picture type is computed on the basis of a past I-Picture
or P-Picture.
B:B-Picture (Bidirectionally-predictive coded picture)
This picture type is computed by comparing the previous and
subsequent I-Picture or P-Picture. It has the lowest volume of
information.
General Picture type
Predict
. . . . . .
I
Predict
BBPBB
65
Page 66

Language code list
Enter the appropriate code number for the initial settings “Audio”, “Subtitle” and/or “Menus” (See page 57)
Code
6565
6566
6570
6577
6582
6583
6588
6590
6665
6669
6671
6672
6678
6679
Language
Afar
Abkhazian
Afrikaan
Ameharic
Arabic
Assamese
Aymara
Azerbaijani
Bashkir
Byelorssian
Bulgarian
Bihari
Bengali; Bangla
Tibetan
Code
7079
7082
7089
7165
7168
7176
7178
7185
7265
7273
7282
7285
7289
7365
Language
Faroese
French
Frisian
lrish
Scots Gaelic
Galician
Galician
G ujarati
Hausa
Hindi
Croatianb
Hungarian
Armenian
Interlingua
Code
7678
7679
7684
7686
7771
7773
7775
7776
7778
7779
7782
7783
7784
7789
Language
Lingala
Laotian
Lithuanian
Latvian, Lettish
Malagasy
Maori
Macedonian
Malayalam
Mongolian
Moldavian
Marathi
Malay
Maltese
Burmese
Code
8375
8376
8377
8378
8379
8381
8382
8385
8386
8387
8465
8469
8471
8472
Language
Slovak
Slovenian
Samoan
Shona
Somali
Albanian
Serbian
Sundanese
Swedish
Swahili
Tamil
Telugu
Taj i k
Thai
6682
6765
6779
6783
6789
6865
6869
6890
6976
6978
6979
6983
6984
6985*
7065
Breton
Catalan
Corsican
Czech
Welsh
Danish
German
Bhutani
Greek
English
Esperanto
Spanish
Estonian
Basque
Persian
7378
7383
7384
7387
7465
7473
7487
7565
7575
7576
7577
7578
7579
7587
7585
Indonesian
lcelandic
Italian
Hebrew
Japanese
Yiddish
Javanese
Georgian
Kazakh
Greenlandic
Cambodian
Kannada
Korean
Kashmiri
Kurdish
7865
7869
7876
7879
7982
8065
8076
8083
8084
8185
8277
8279
8285
8365
8368
Nauru
Nepali
Dutch
Norwegian
Oriya
Punjabi
Polish
Pashto, Pushto
Portuguese
Quechua
Rhaeto-Rmance
Romanian
Russian
Sanskrit
Sindhi
8473
8475
8476
8479
8482
8484
8487
8575
8582
8590
8673
8679
8779
8872
8979
Tigrinya
Turkmen
Tagalog
Tonga
Turkish
Tatar
Tw i
Ukrainian
Urdu
Uzbek
Vietnamese
Volap k
WoIof
Xhosa
Yoruba
7073
7074
66
Finnish
Fiji
7589
7665
Ki rghiz
Latin
8372
8373
Serbo-Croatian
Singhalese
9072
9085
Chinese
Zulu
Page 67

How images appear on your TV (aspect ratios of the screen)
The Images on the TV screen depend on the type of software and the TV set.
The images which appear on the TV screen, and what each screen mode is called, depend on the manufacturer of the TV set and type
•
of TV set. Consult the instruction manual provided with your TV set.
For your reference:
Letterbox
•
Black bands are inserted at the top and bottom of the screen to fill in the gaps where the size of the picture is smaller than the screen.
Pan and scan
•
Part of the wide-screen picture (either at both sides or one side of the screen) is automatically eliminated so that the picture fills the
whole screen.
67
Page 68

Troubleshooting
Before requesting service for this LCD/D VD combo , check the chart below for a possible cause of the problem y ou are experiencing.
Some simple checks or a minor adjustment on your part may eliminate the problem and restore proper operation.
If you are in doubt about some of the check points, or it the remedies indicated in the chart do not solve the problem,
consult your dealer for instructions.
Symptoms (Common)
Power does not turn ON
Remote control does not
function
Image shakes
Image is not clear or no color
Image appears doubled or tripled.
A black stripe appears for a
moment when changing
channels using the VCR.
Images disappear at the top
and bottom of the screen
During ZOOM or JUST modes,
the image is cut off at the top
and bottom.
Channel number remains
displayed.
Checks
Is the power plug plugged in?
•
Is the AC adapter plug securely connected to the unit?
•
If the power does not turn on using the remote, check if the TV set is
•
turned on.
Are the batteries dead or inserted incorrectly?
•
Is the remote control sensor in direct light of florescent lamps or other
•
strong sources of light?
Is the antenna cable connected properly?
•
When using a VCR and selecting channels on the TV, is the TV/VIDEO
•
mode for the VCR set to TV?
Check cable signal, connections or wire.
•
The image distorts when channels are changed.
•
When using 16:9 image software, there is no picture at the top and
•
bottom of the screen (cinema vision size software, etc.).
Has the screen position been changed?
•
If so, adjust screen positioning.
Press the DISPLAY button.
•
During VIDEO input, channel number is displa yed until an image is displayed.
Page
–
13
7
–
8, 9
20
–
–
–
–
21
Play fails to start even when
PLAY is pressed.
Play starts but then stops
immediately.
There may be red spots, blue
spots and green spots on the
screen.
Condensation has formed: wait about 1 to 2 hours for it to evaporate.
•
This player cannot play discs other than D VDs, Video CD and CD.
•
The disc may be dirty and may require cleaning.
•
Ensure that the disc tis installed with the label of the side to be played
•
facing upwards.
This is a characteristic of liquid crystal panels and is not a problem. The
•
liquid crystal panel is built with very high precision technology giving
you fine picture details. Occasionally, a few non-active pixels ma y appear
on the screen as a fixed point of blue, green, or red. Please note the
this does not affect the performance of your LCD TV.
–
–
68
Page 69

Symptoms (DVD)
Checks
Page
No subtitles.
Alternative audio soundtrack
(or subtitle) languages fail to be
selected.
Angle cannot be changed.
Play does not start even when
title is selected.
Audio soundtrack and/or
subtitle language is not the one
selected at the initial settings.
The menu is displayed in
French (example).
No surround sound.
Symptoms (Video CD)
Subtitles appear only with discs which contain them.
•
An alternative language is not selected with discs which do not contain
•
more than one language.
In the case of some discs, the alternative language cannot be selected.
•
Try selecting it from the DVD menu if one is available.
This function is dependent on software availability. Ev en if a disc has a
•
number of angles recorded, these angles may be recorded f or specific
scenes only.
Confirm the “2 Ratings” setting.
•
If the audio soundtrack and/or subtitle language does not exist on the
•
disc, the language selected at the initial settings will not be seen/heard.
The setup “3 Menus” of “1 Disc Languages ” is set to French: select
•
English.
Choose the setting at “8 Speaker Setting” which matches our speaker system.
•
No surround sound is output when the virtual surround effect is activated
•
(“VSS 1”, “VSS 2”, “Headphone VSS 1” or “Headphone VSS 2”). Select
“VSS OFF” or “Headphone VSS OFF”.
Checks
–
–
45
–
57
–
57
62
28-29
Page
No menu play.
This function works only for Video CDs with playback control.
Maintenance
Do not wipe the LCD with water
Clean the L CD using a dry soft cloth such as gauze. If the LCD is heavily soiled,
apply OA cleaner for LCD panels to the cloth and wipe off gently. Do not use keton
chemicals such as acetone, solvents such as xylen or toluene, or water.
Wipe the cabinet with a soft cloth
If the cabinet is heavily soiled, wipe with a well-wrung soft cloth dipped in kitchen
cleanser (neutral) diluted with water.
43
Neutral
detergent
CAUTION :
If water or similar substances get inside the monitor via the liquid crystal panel surface, a malfunction may result.
69
Page 70

Specifications
Power Source
Power Consumption
LCD
Screen Size
Channel Capability-181
Speaker 3 ″ 5/32 (8 cm) × 2
Sound
Audio Output
Headphones
FEAUTURES
Disc Played
AC 120 V, 60 Hz
Average use : 54 W (Maximum Current 3.62 A)
Stand-by condition : 0.45 W
TFT 15.2-inch, 16 : 9 aspect ratio, 854 × 480 dots, 409,920 pixel
13.19 ″ (335 mm) (W) × 7.4 ″ (188 mm) (H) × 15.12 ″ (384 mm) (DIAGONAL)
VHF-12 : UHF-56 : Cable-125
6 W [3 W + 3 W ] (10 % THD) Power Frequency Response 35 Hz ~ 16 kHz
M3 (3.5 mm) Jack (16 Ω ~ 32 Ω)
DVD Player 3D Y/C FILTER
CLOSED CAPTION V-Chip
DVD-VIDEO/DVD-AUDIO disc COMPACT disc (CD-DA, VIDEO CD)
12 cm single-sided, single-layer 12 cm disc
12 cm single-sided, dual-layer 8 cm disc
12 cm double-sided, single-layer
8 cm single-sided, single-layer
8 cm single-sided, dual-layer
8 cm double-sided, single-layer
Accessories Supplied
Remote control Transmitter
AC Adaptor
Operating Conditions
Connection T erminals
VIDEO INPUT
AUDIO OUT
Dimensions
(W × H × D)
Weight (Mass)
TNQE262 Battery : AAA (R03) Battery × 2
AC Adaptor : N0JEHK000001 AC Cord : K2CA2EA00005
Temperature : 42 °F - 95 °F (5 ° – 35 °C)
Humidity : 20 % - 80 % (non-condensing)
S-VIDEO (Mini DIN 4Pin) Y : 1.0 Vp-p (75 Ω)
C : 0.286 Vp-p (75 Ω)
VIDEO (Pin Jack) 1.0 Vp-p (75 Ω)
AUDIO L-R (Pin Jack × 2)
5.1 ch SURROUND AUDIO OUT
FRONT L/R : STEREO M3 JACK
SURROUND L/R : STEREO M3 JACK
CENTER/SUBWOOFER : STEREO M3 JACK
15.24 ″ (387 mm) × 14.69 ″ (373 mm) ×8.9 ″ (226 mm)
approx. 21.19 lb. (approx. 9.6 kg) Net
0.5 Vrms
Note
Design and Specifications are subject to change without notice. Weight and Dimensions shown are approximate.
•
70
Page 71

Page 72

This product incorporates copyright protection technology that is protected by method claims of certain
U.S. patents and other intellectual property rights owned by Macrovision Corporation and other rights
owners. Use of this copyright protection technology must be authorized by Macrovision Corporation,
and is intended for home and other limited viewing uses only unless otherwise authorized by Macro vision
Corporation. Reverse engineering or disassembly is prohibited.
Customer’ Record
The model number and serial number of this product can be found on its rear panel. You should note
this serial number in the space provided below and retain this book, plus your purchase receipt, as a
permanent record of your purchase to aid in identification in the event of theft or loss, and for Warranty
Service purposes.
Model Number TC-15DT2 Serial Number
Panasonic Consumer Electronics
Company, Division of Matsushita
Electric Corporation of America
One Panasonic Way Secaucus
New Jersey 07094
Panasonic Sales Company,
Division of Matsushita Electric of
Puerto Rico Inc. (“PSC”)
Ave. 65 de Infanteria, Km 9.5
San Gabriel Industrial Park,
Carolina, Puerto Rico 00985
Printed in Japan
MBS0011S0(MS)
 Loading...