

Page 1

Panasonic
Operating Instruction
Colour Television
TX-14ST15M
TC-14S15M
TC-14S15A
Please read the operating instructions completely before operating this set.
TQB4G0503®
II
Page 2
( Dear Panasonic customer)
Welcome to the Panasonic family of customers. WO hope that you will have many years of enjoyment from your new colour television.
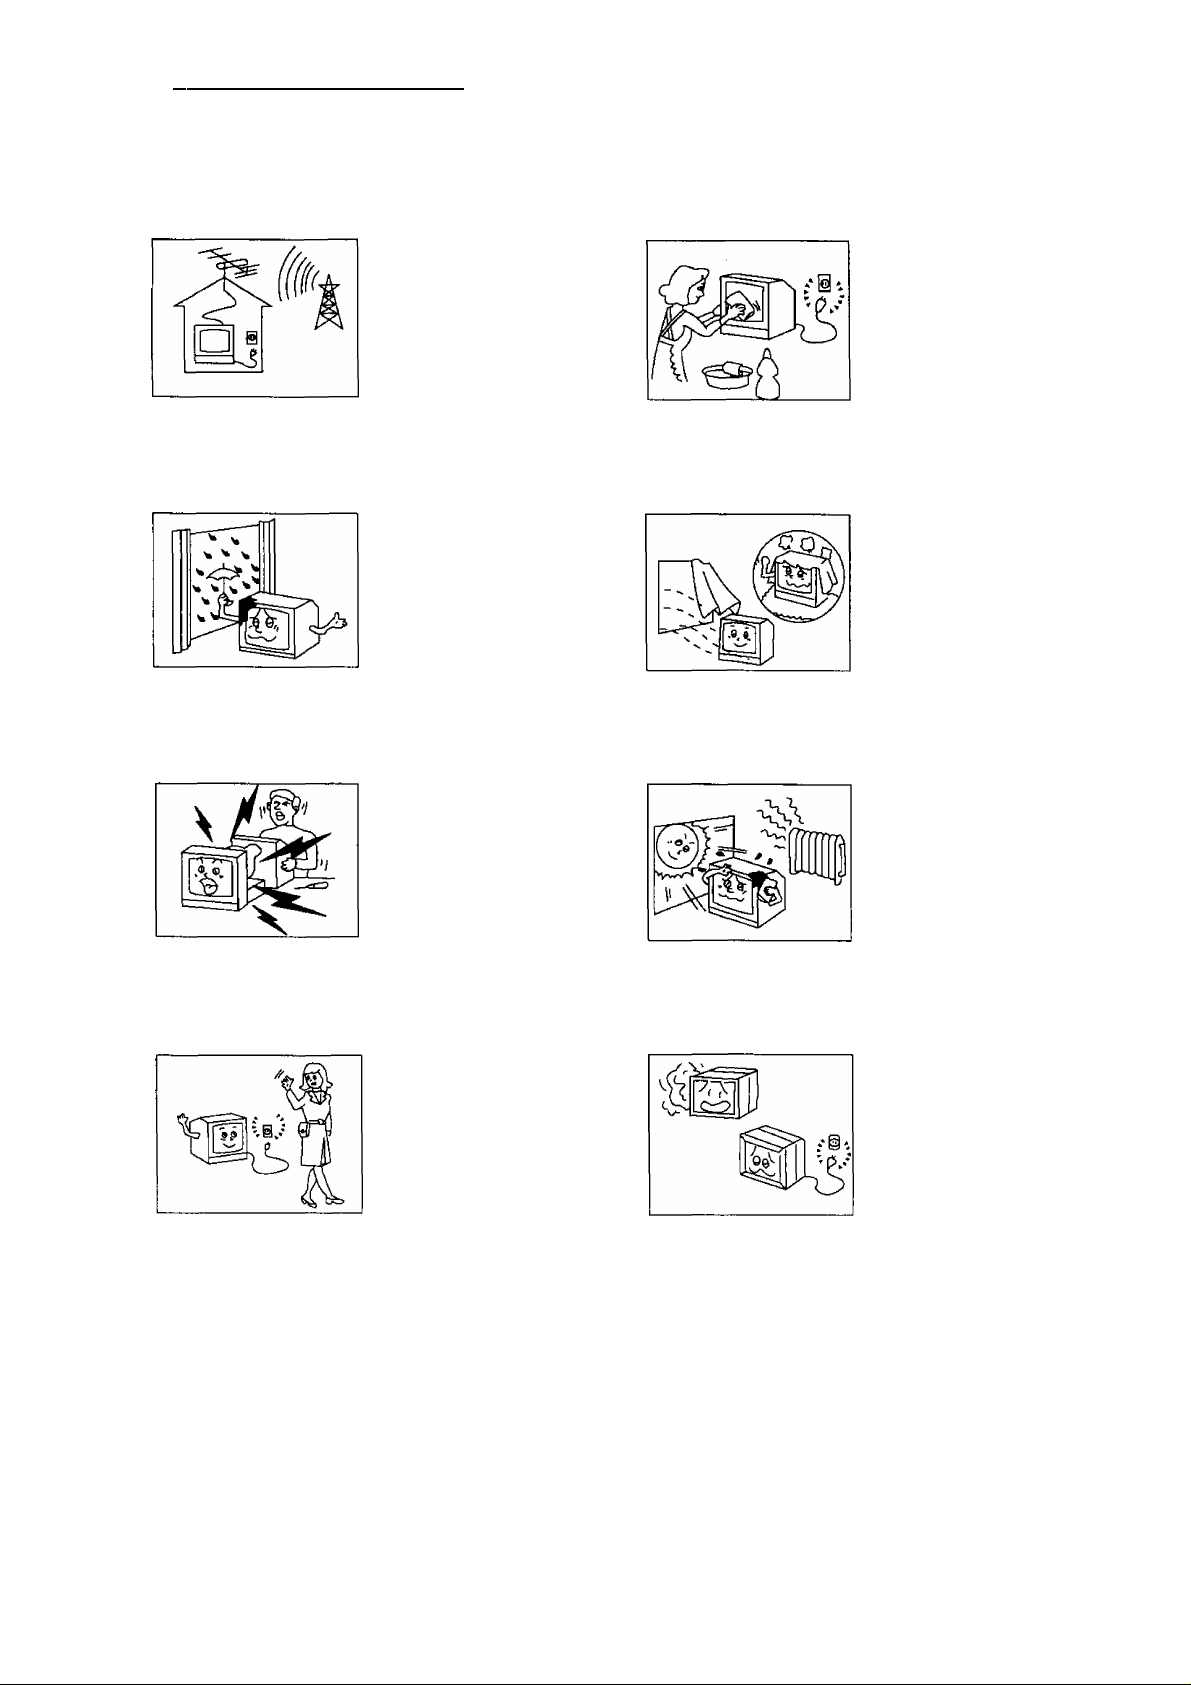
(Safety Instructions)
The TV set can be operated on
AC SINGLE 230V, 50Hz
{TC-14S15M/TX-14ST15M) and
AC SINGLE 240V, 50Hz.
{TC-14S15A)
To prevent damage which may
result in fire or electrical shock,
do not expose the TV set to
rain or excessive moisture.
Do not remove the rear cover,
as live parts are accessible
when it is removed.
The cabinet and picture tube
can be kept in good condition
by simply wiping with a clean,
soft cloth moistened with mild
detergent and water. Do not
use solutions containing
benzol, petroleum or a
chemical cloth. For safety,
remove the plug from the wall
outlet.
Adequate ventilation is
essential to prevent failure of
electrical components.
Avoid exposing the TV set to
direct sunlight and other source
of heat.
Remove the plug from the wall
outlet (Power point) when the
TV set is not used for a
prolonged period of time.
Do not use this set if abnormal
operation occurs.
EX: smoke, odd sounds or
smells, turn the power switch
off and disconnect the AC
power if you notice any unusual
operation.
Page 3
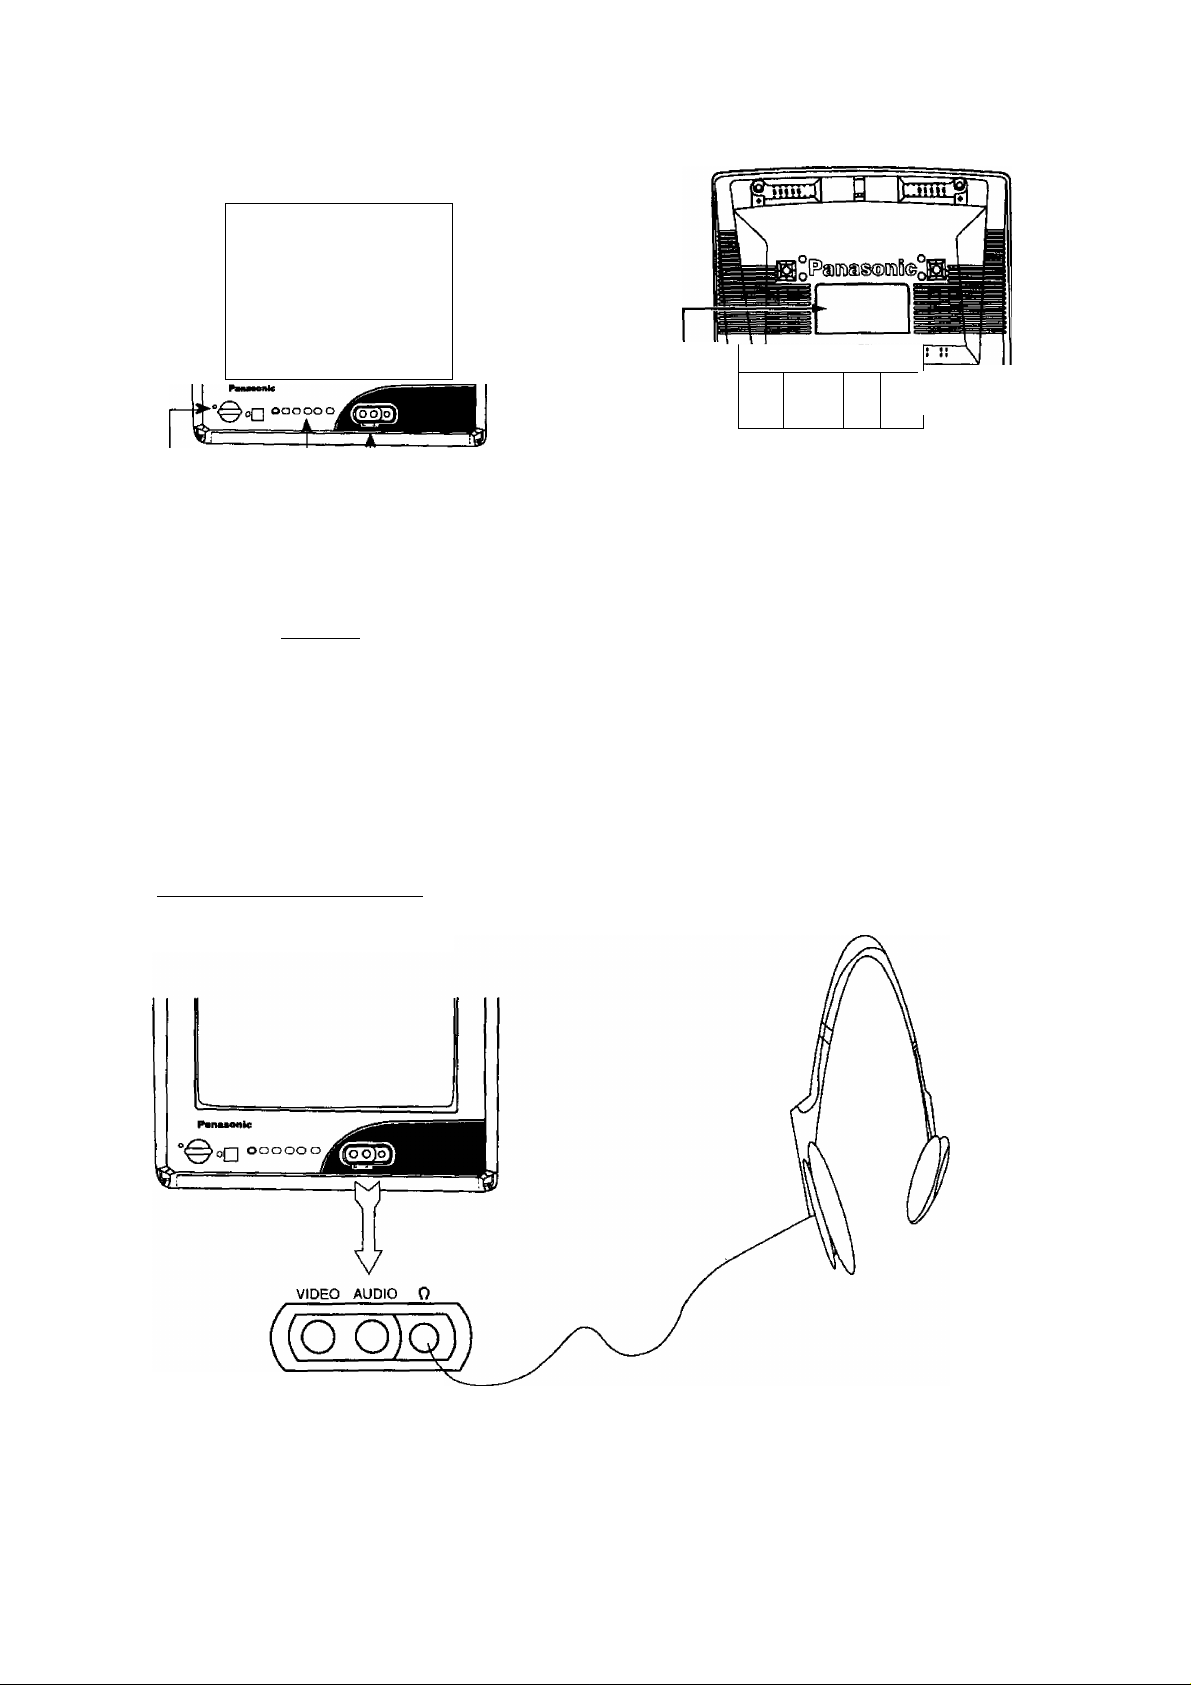
(Location of Control (TV)^
—1
Power Switch
PRE TV^AV
o o o o o
A A A A A
TV/AV button
PRE (PRESET) Button
Volume Up and Down Buttons
(Location of Control (TV))
Plug the earphone jack as shown below;
J
VIDEO AUDIO 0
LaVIN-I
+ V A
Channel Up and Down Buttons
Model Name Plate
ir
(Aerial Terminal)
y ii iil! iiii iiii ii,
•
Serial Number
n
OUTPUT
INPUT
9IIDIID
flODDDIIO
ODDDyO ■‘(□I
^ lODII
OoO
0 oj
BDDIIIIID
«■miiD
-
AUDIO UVIDEO
OoO
o o;
(AudioA/ideo Terminals)
Lavin-I
Page 4
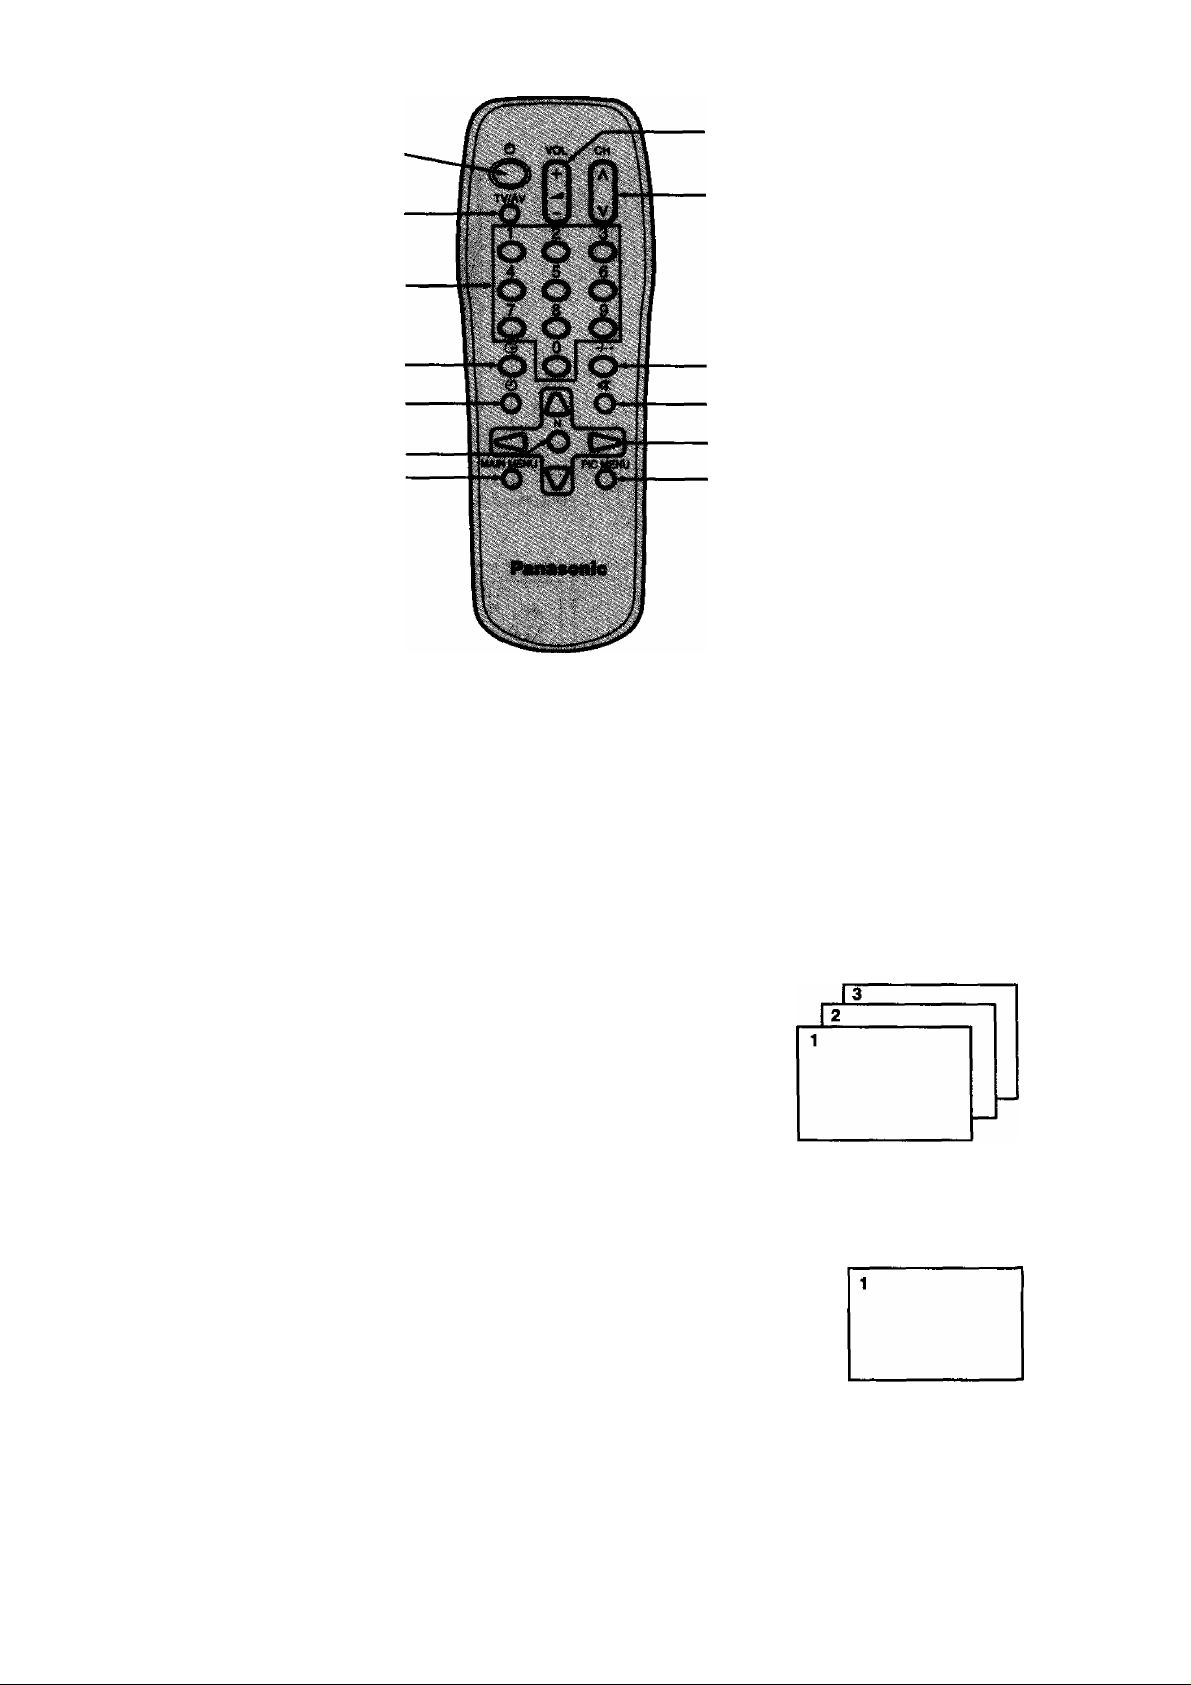
( General Operation )
1. Stand-by Button
6. TV/AV Selection
3. Direct Programme
Number Selection
8. Recall Button
9. Off-Timer Button
11. Normalization Button
Main Menu Selection
1.
(!)
5. Volume Up and Down Buttons
2. Programme Number Up
and Down Buttons
Button
Buttons
4. Two Digit Programme
Number Selection Button
7. Sound Mute Button
Position Buttons
10. Picture Menu Button
Button
Note:
Use two "R6" size dry batteries
for Remote Control Transmitter
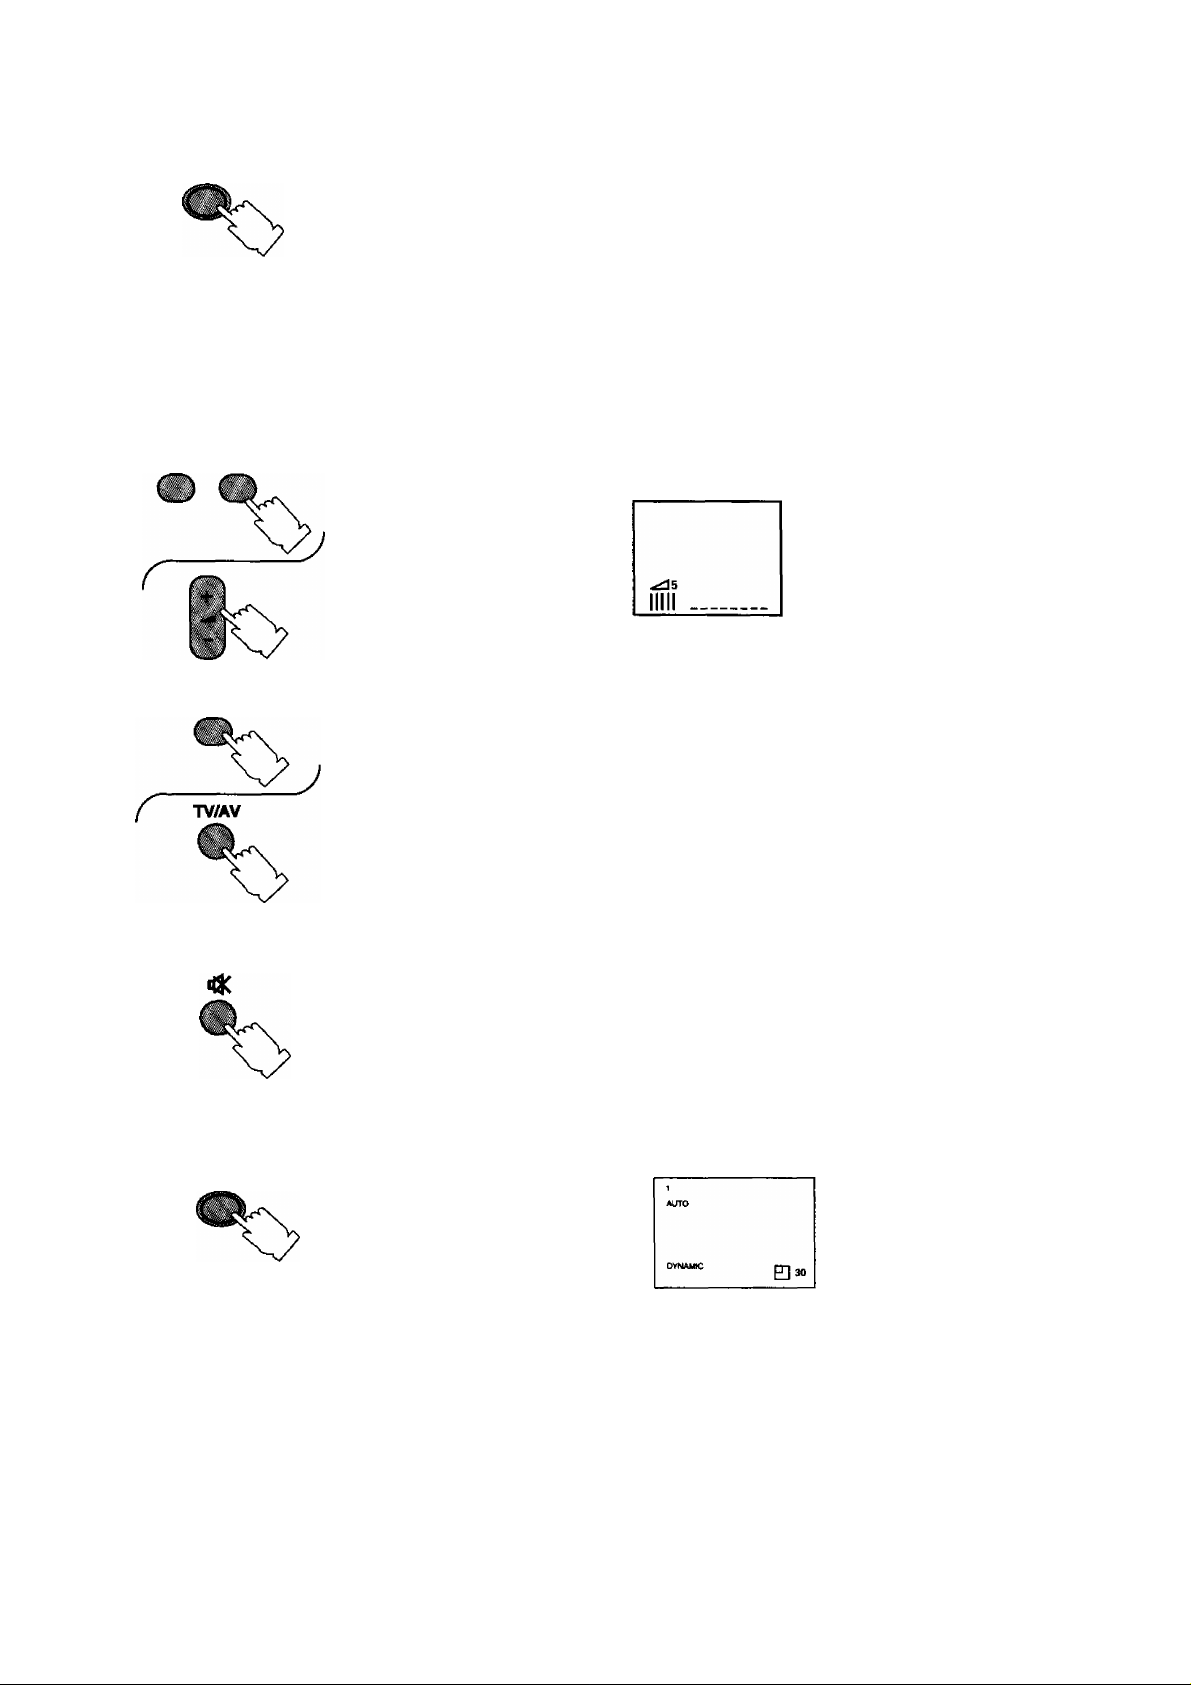
To Switch Power on/off
The TV set must be switched
on at the wali outlet and at the
Main power switch.
Press this button to turn the
TV set ON, from stand-by mode.
Press it again to turn off.
Note:
When in the stand - by condition, it is possibie
to turn the TV set on by pushing the Direct Programme
Number Selection button (0-9) or the Programme Number
Up and Down button.
2. V A
3.
r
%
Programme Number Selection
Press the programme number Up
" A ” or down " V * Button to select
the next higher or lower
programme number.
Direct Programme Number Selection
(0-9)
e. g. To select programme number
"1", press the "r button.
Page 5
(General Operation )
4.
5. - - +
6. TV/AV
Two Digit Programme Number Selection
e.g. To select Programme Number
"24".
Push the button.
2
Push the button.
4
Push the (3) button.
I Setting range | 0 ~ 99
Volume Adjustment
Push the Volume Up or Down
button to increase or decrease
the sound volume level.
TV / AV Selection
Push the" TV/AV" button to
select TV and AV input signal.
You can select a two Digit
Programme Number.
2-
24
Note;
The on screen display will
indicate both numerically and
graphically the volume level.
Numeric levels start at" 0"
for zero or no sound, and will
increase up to 63 which is the
maximum sound level.
AV
8.
Sound Mute Button
Push the this button to mute the Sound
completely.
The" Mute" symbol will appear.
(Colour changes to red)
Push the button once again to restore
the previous sound level, and cancel
the mute.
0
Recall Button
Push the RECALL button to
display the current system status.
Press this button until display is
cancelled.
Page 6
(General Operation )
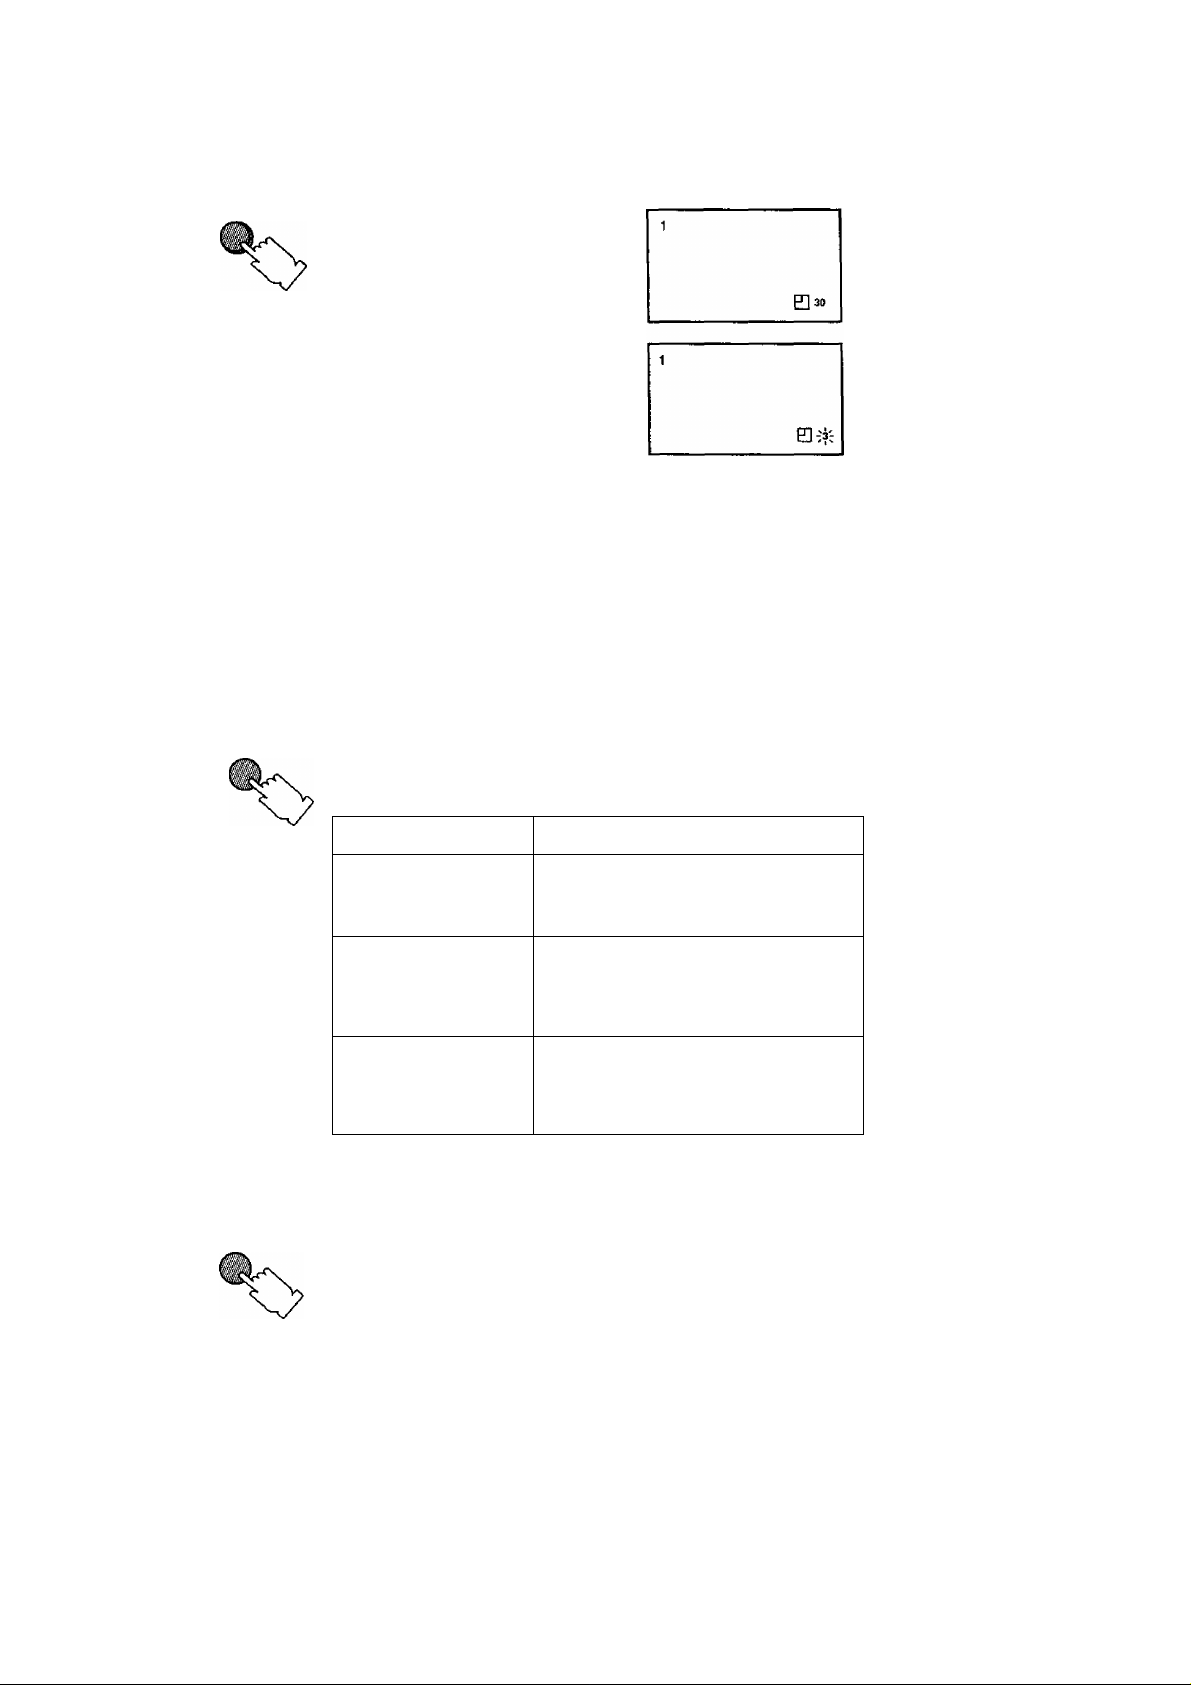
9. Off Timer Button
ó
The TV set may be preset to
switch to stand-by after a fixed
period.
By pressing "Off-Timer" button,
you can select the preset time either
30, 60, or 90 minutes.
□ so—
LQo
E]60 — 090
—0AUTO-J
When the off-timer
reaches its last 3
minutes, it starts blinking
before going to stand-by
condition.
Note:
Setting Off-timer to AUTO mode.
If the set is not switched off, when the TV station ends broadcasting, it will automatically go to the
stand-by condition after 5 minutes. TTiis AUTO mode will not operate when the TV receiver is in AV
mode.
How to cancel the OFF-timer setting:
1. Set the preset time condition to "0“ mode by pressing the Off - timer button.
2. Turning the TV set off.
10. Picture Menu
PIC MENU
By pressing the PICTURE MENU button, you
can sequentially select the Picture menus as
shown below:
On-screen
DYNAMIC
For watching in brighter environments.
This menu selects a higher than normal
level of brightness and contrast.
Function
11. Normal (N) Button
N
For watching in normal (evening)
STANDARD
SOFT
This button can be used for setting the Colour, Brightness, Contrast, Sharpness, Tone
and Colour Temp. When this button is pressed, all functions setting are reset to the
factory preset level.
environments.
This menu selects normal level of
brightness and contrast.
For watching in dark environments.
This menu selects reduced level of
brightness and contrast.
Page 7

( Flow Chart of Main Menu^
When the " MAIN MENU " button is pushed at the main menu screen, the screen display will return to the normal
viewing condition. When the " MAIN MENU " button is pushed at each MENU screen (Picture, Sound, Features,
Language, Preset), the screen display will return to the Main Menu screen.
Push
Select
Symbol
Mark
On-Screen
Indication
Push
On-Screen
Indication
(example)
O
<3 O
I PICTURE I SOUND
DYNAMIC
32 COLOUR
32 NTSC-TINT
o 32 BRIGHT
d 63 CONTRAST
m 32 SHARPNESS
STD COLOUR TEMP
DYNAMIC
C;P 32 COLOUR
I 32 NTSC TINT i
O 32 BRIGHT
d 63 CONTRAST
CD 32 SHARPNESS
STD COLOUR TEMP
A
DYNAMIC
C3;3 32 COLOUR
32 NTSC-TINT
O 32 BRIGHT
d 63 CONTRAST
CD 32 SHARPNESS
STD COLOUR TEMP
9
DYNAMIC
■iP 32 COLOUR
tiid 32 NTSC-TINT
O 32 BRIGHT
) d 63 CONTRAST I
0 32 SHARPNESS
STD COLOUR TEMP
Note :
The menu screen function of Colour, Ntsc-Tint, Sharpness,
Std Colour Temp, Child Lock, Auto Search, Manual Search,
Colour Sys and Skip are not applicable in teletext mode only.
A
DYNAMIC
® 32 COLOUR
32 NTSC-TINT
o 32 BRIGHT
9 63 CONTRAST
0 32 SHARPNESS
STD COLOUR TEMP
I FEATURES I
¡BLUE BACK
CH COLOUR SET
CHILD LOCK OFF
BLUE BACK
[CH COLOUR SET
CHILD LOCK OFF
A
BLUE BACK ON
CH COLOUR SET
ICHILD LOCK offI
ON 1
STD
ON
stdI
STD
to
IlanojageI
[ENGUSH ]
>t»i:
pyCCKHil
ENGUSH
PyCCKltì
|B3biK )
ENGUSH
I pyccKH^n
ENGUSH
pyCCKHñ
I PRESET I
AUTO SEARCH
MANUAL SEARCH
COLOUR SYS AUTO
RNE TUNE
SKIP OFF
AUTO SEARCH
MANUAL SEARCH
COLOUR SYS AUTO
FINE TUNE
SKIP OFF
AUTO SEARCH
MANUAL SEARCH
I COLOUR SYS AUTO
fine tune
SKIP OFF
A
AUTO SEARCH
MANUAL SEARCH
COLOUR SYS AUTO
9
AUTO SEARCH
MANUAL SEARCH
COLOUR SYS AUTO
FINE TUNE
I SKIP
DYNAMIC
iP 32 COLOUR
tiXI 32 NTSC-TINT
O 32 BRIGHT
d 63 CONTRAST
0 32 SHARPNESS
I STD COLOUR TEMP |
Page 8
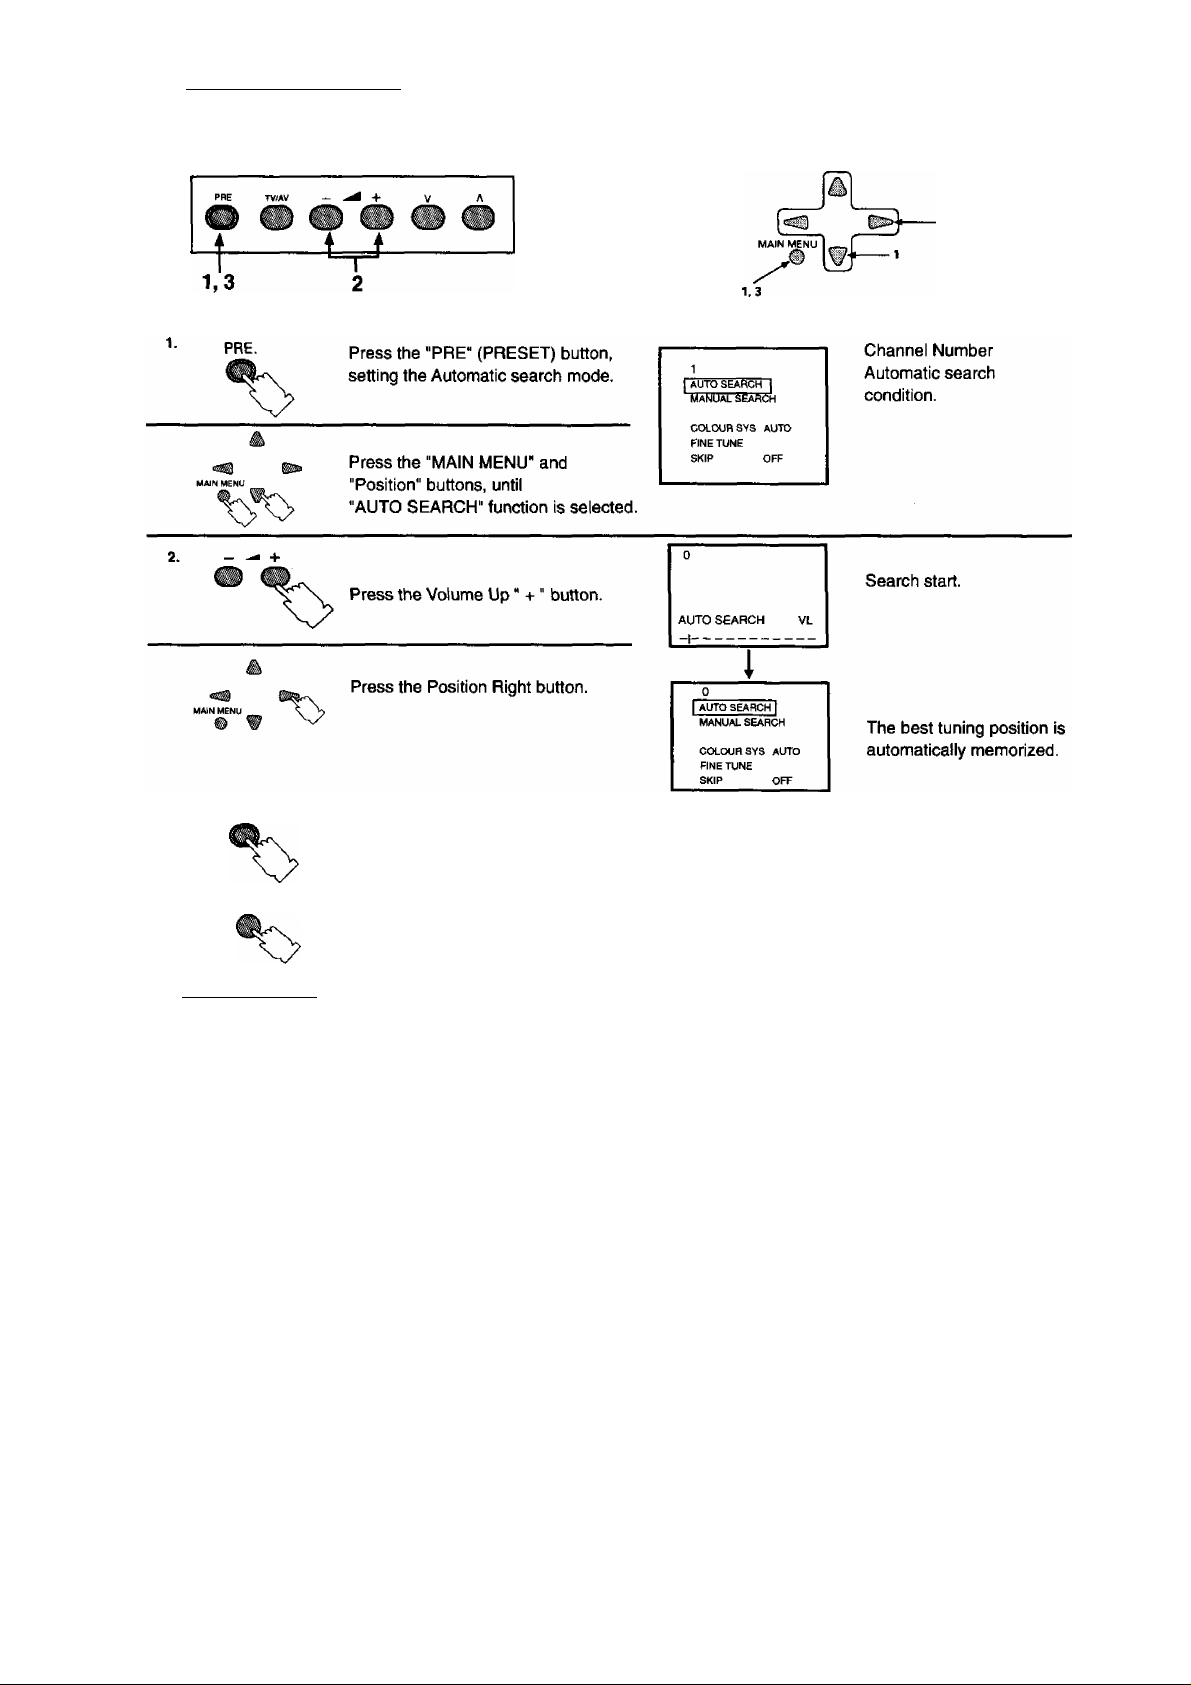
( Tuning Procedure )
Automatic Search
OR
3. PRE.
MAIN MENU
Press the '' PRE " (PRESET) button
5 times.
After all stations are tuned,
press the "MAIN MENU"
button twice.
This returns the set to the
normal viewing condition.
Heipfui Hints
1. If a clear picture with correct colours cannot be obtained when a broadcast or AV signal is received,
refer to the "Colour System Selection" operation on page 13,
2. After the Automatic Search operation is finished, press the Channel Number "Up" button to confirm the tuning
condition for each Channel Number. If some Channel Numbers are unused, it is possible to skip such
Channel Numbers. Please refer to the Channel Number Skip operation on page 11.
3. Repeated pressing of the "PRE." (PRESET) button changes the Preset Menu as follows :
-► AUTO SEARCH
(Page 7)
TV MODE
(Normal viewing condition)
MANUAL SEARCH
(Page 8)
- SKIP ^
(Page 11)
COLOUR SYS-
(Page 13)
FINE TUNE
(Page 9)
Page 9

( Tuning Procedure ^
Manual Search
OR
1. PRE.
2. V A
r
Press the "PRE" (PRESET) button
twice, setting the Manual Search
mode.
Press the "MAIN MENU" and
"Position" buttons, until
"MANUAL SEARCH" is selected.
Press either the Channel Up or
Down button.
0
Press the Volume Up" +" or Down
■ -" button.
Volume" +": Next higher Channel
Volume" -": Next lower Channel
Press the Position Left or Right
button.
Position left: Next lower Channel.
Position right: Next higher Channel.
AUTOSEARCH
I MWUAL SEARCH
COLOUR SYS AUTO
FINE TUNE
SKIP OFF
AUTOSEARCH
I MANUAL SEARCH |
COU3URSYS AUTO
Fit« TUNE
SKIP OFF
2
MANUALSEARCH
-1--------------------------
AUTOSEARCH
I MANUAL SEARCH
COLOUR SYS AUTO
FINE TUNE
SKIP OFF
Channel Number
Mainual search
condition.
Select the desired
Channel Number.
Search Start.
VL
The best tuning position is
automatically memorized.
1. If a clear picture with correct colours cannot be obtained when a broadcast or AV signal is received,
refer to the "Colour System Selection" operation on page 13.
2. After the Manual Search operation is finished, press the Channel Number "Up" button to confirm the tuning
condition for each Channel Number. If some Channel Numbers are unused, it is possible to skip such
Channel Numbers. Please refer to fee Channel Number Skip operation on page 11.
8
Page 10

Tuning Procedure )
Fine Tune
OR
Under normal reception condition, this function is not used. However, in areas of poor reception or constant
interference, a slight adjustment on the fine tuning can improve the picture and sound quality.
Select the channel which you want
to try to improve, using the Channel
Up or Down buttons.
Select the desired
Channel Number.
PRE.
MAIN MENU
Press the "PRE" (PRESET!
button 2 times.
After all stations are tuned,
press the "MAIN MENU"
button twice.
This returns the set to the
normal viewing condition.
Page 11

( Tuning Procedure )
How to cancel the Fine Tuning
OR
Cancelling previously adjusted (manually) fine tuning, means re - activating the AFC (Automatic Frequency Control)
Function, also known as AFT (Automatic Fine Tuning). Re - activating ttie Automatic Fine Tuning means aibaming
the set to automatically tune optimum tuning position, for that Channel Number.
r
PRE.
Select the "AFC OFF" Channel
/J Number which you want to return
to Automatic Frequency Control
(Cancel the manual fine tuning).
Press the " PRE." (PRESET)
buttons 2 times, setting the
Preset Menu to "MANUAL
SEARCH".
Press the "MAIN MENU" and
"Position" buttons, until the
Preset Menu to "MANUAL
SEARCH".
Press the Volume Up" +" or Down
" -" button briefly.
AUTOSEAFICH
[MANUAL SEWCH]
COLOUHSYS AUTO
FINE TUNE
SKIP OFF
"AFC OFF" Channel
Numbers are indicated to
you by the" ■" symboi to
the left of the Channel
Number.
Manual Search condition.
The best tuning position is
automatically memorized.
PRE.
MAIN MENU
Press the Position Left or Right
button briefly.
Press the "PRE" (PRESET)
button 4 times.
Press the "MAIN MENU"
button twice.
10
AUTO SEARCH
[MANUAL SEARCH |
COLOUR SYS AUTO
BNETUNE
SKIP OFF
This returns the set to the
normal viewing condition.
Page 12

HP
i
; i ■
( Tuning Procedure )
Programme Number Skip
PRE.
Press the " PRE." (PRESET)
buttons 5 times, setting the
Preset Menu to "SKIP".
Press the "MAIN MENU" and
"Position* buttons, until "SKIP" is
selected.
OR
AUTO SEARCH
MANUAL SEARCH
COLOUR SYS AUTO
FINE TUNE
Channel Skip condition.
r
- +
Select a Programme Number
'y you want to skip, by pushing the
Channel number Up or Down
buttons.
Press the Volume Up" +" or Down
" -" button.
^ Press the Position Left or Right
^ button.
PRE.
AUTO SEARCH
MANUAL SEARCH
COLOUR SYS AUTO
FINE TUNE
AUTO SEARCH
MANUAL SEARCH
COLOUR SYS AUTO
FINE TUNE
|SWP
The displayed "OFF"
condition changes to "ON"
This returns the set to the
normal viewing
condition.
MAIN MENU
Press the "MAIN MENU"
button twice.
11
Page 13

( Tuning Procedure )
How to Cancel the Skip Function.
OR
PRE.
Press the " PRE." (PRESET)
buttons 5 times, setting the Preset
Menu to "SKIP".
Press the "MAIN MENU" and
"Position" buttons, until the Preset
Menu to "SKIP".
Al/TO SEARCH
MANUALSEARCH
COLOUR SVS AUTO
FINE TUNE
[SKIP OFF I
Channel Skip condition.
4- PRE.
MAIN MENU
to cancel the Skip function on
any other programme number.
After the Skip Cancel operation is
completed, press the" PRE"
button once.
After the Skip Cancel Operation is
completed, press the" MAIN MENU *
button twice.
12
This returns the set to the
normal viewing condition.
Page 14

Tuning Procedure )
Colour System Selection
Use this function if a clear picture with weak colour is obtained when a Broadcast or AV signal is received.
OR
PRE.
Press the" PRE." (PRESET)
Coiour System condition.
button, until "COLOUR
SYS" is SGiected.
AUTO SEAftCH
MANUAL SEARCH
I COLOUR SYS AUTO I
RNE7UNE
SKIP OFF
Press the "MAIN MENU" and
"Position" buttons, until
"COLOUR SYS" is seiected.
2.
Press the Volume Up
" +" or Down button,
" -" repeatedly untii the
optimum image is
produced.
AUTO SEARCH
MANUAL SEARCH
I COLOUR SYS AUTO I
FINE TUNE
SKIP OFF
The Coiour system wiii change
as shown:
AUTO^
---------
—►PAL
t
NTSC 4.43
Press the Position Left or
Right button repeatediy
until the optimum image is
obtained.
-►SEC^
PRE.
MAIN MENU
Press the "PRE" (PRESET)
button 3 times.
Press the "MAiN MENU"
button twice.
This returns the set to the
normai viewing condition.
This selected Coiour System is
automaticaily memorized.
13
Page 15

( Advanced Remote Control Operation)
Picture Menu Operation
________________
Helpful Hint
1. By pushing the Normal "N" button on the Remote control while the Picture menu is displayed, the setting of the
selected function will be return to factory setting level.
14
Page 16

( Advanced Remote Control Operation)
FEATURES Menu Operation
Method
BLUE BACK Mode
When no picture signal is received, or the signal is
weak, the screen reverts to a blue background
colour and the sound is muted.
Disable this features to continue watching very
weak signals.
Blue background
colour if no input
picture signal or
input signal is weak.
Note :
If BLUE BACK Mode is set on while a VCR signal
is being viewed, selecting CUE or REVIEW may
cause the screen to revert to the blue background
colour. Disable this feature to view correctly.
CH (Channel) COLOUR SET mode.
Colour density varying between broadcast
channels can be adjusted to three levels for
each reception channel as follows:
STD'
HIGH
LOW
n
CHILD LOCK mode.
To child lock any channel, press the position left or
right button.
1) When channel is "LOCK", sound is muted and
screen becomes blue colour.
2) If any of the channels is CHILD LOCK, then
preset key at any panel will not woiir. If preset
key (Panel) is pressed, message" CHILD LOCK
ON" will appear.
3) Main power ON in child locked channel will
display "CHILD LOCK ON" on screen to remind
user that the Child lock is On and is in Child
locked channel.
4) Each channel has its own memory for channels
to be child locked.
15
Page 17

( Advanced Remote Control Operation)
Language Menu Operation
Method
Ifl T lo f
m
LANGUAGE 1
EN6USH 1
PyCCKHli
Press the "Position Up or Down" button to select desire language.
Sound Menu Operation
Method
Sound Menu
Push
Item
Effect
Indicator
Select
TONE
<30
Less More
16
j 4 22 1 TONE 1
Page 18

liM
(Advanced Remote Control Operation (For Teletext model only))
Fastext
• Teletext features may vary depending on the Broadcasting companies and is only available if the channel selected is
transmitting teletext.
• When in the teletext mode, the volume may still be altered to the desired listening level.
What is Fastext
In FASTEXT mode, four different coloured subjects are situated at the bottom of the display. To access more information
about one of these subjects, push the appropriately coloured button. This facility enables fast access to information of the
subjects shown.
What are the advantages
• Page selection at the touch of a Coloured-coded button.
• Easy to use step by step selected of the topical subject.
• Reduction of waiting time.
e Page status line at the bottom of screen so you always know which button will take you to the desired
information.
(Teletext Operation^
1- TV/TEXT
2, (2^^
r
3.
4.
F/T/B
HOLD
TVn'etetext mode
By pushing the TV/TEXT button, to change
the TV/Tetetexl mode as follows;
Ctv )
Page Selection
Pages can be selected in two ways:
a) Push the Up/Down Buttons to increase
or decrease the page number by one.
J
b) By entering the page number, using
0 ~ 9 on the remote control.
Full^op/Button
Push to expand the Top of the page.
Push again to expand the Bottom half.
Push again to return to normal (Full) size.
Hold
Push to hold the current page.
Push again to cancel the hold.
(jm)
5.
6.
REVEAL
Green Yellow Blue
Till
DISPLAY
7.
CANCEL
17
Reveal
Push to reveal hidden words,
e.g. quiz page answer.
Push again to hide.
Colour-coded buttons
UQht
In Fastext mode these correspond to the
differently coloured subjects.
Display Cancel
Push the "DISPLAY CANCEL" button to
view the normal TV programme.
When the desired sub-page is received, the
"TEXT" message appears at the top left of
the screen.
Page 19

(Teletext Operation}
8.
INDEX
a - Selected Page Number
Index
a b c d
b - Selected Sub - page Number
c - Sub - page Number Down
d - Sub - page Number Up
e - Sub - page Number
If the selected page number contain sub-page number, the required sub - page number can be select by:
1. Press the Sub - page Number Up (green colour button)
2. Press the Sub - page Number Down (red colour button)
3. Press the Direct Programme Number Buttons, or
4. Programme Number Up or Down Buttons
The Sub - page 2 to sub - page 3 by pressing the Direct Programme Number buttons.
e.g. To change sub - page 2 to sub - page 3 by pressing the Direct Programme Number buttons.
TOO
2/3
P70W0002 S H
—►
700
3/3
P700«X)03 is
e.g. To change sub - page 2 to sub - page 1 by pressing the Sub - page Number Down Button (Red button).
700 700
2/3
P700/0002 H
—►
CANCEL
1 /3
P700/0001 H ®
Press DISPLAY CANCEL to view a normal TV programme.
18
Page 20

■il
( Antenna Connection"^
To obtain the best quality picture and sound, plug the connectors ( 300 Ohm Ribbon or 75 Ohm Coaxial Cable )
to the antenna terminal on the rear of TV set.
( Rear of TV)
III I
(connections (Audio Input and Video InputT)
To watch the VCR picture:
Connect the VCR cable to the AUDIO INPUT and VIDEO INPUT terminals at
the rear of TV.
Press the TV/AV selection button, set the VCR to the playback mode.
To watch or to return to the TV programme, press the TV/AV selection button
again.
Note:
If both AV terminal are connected at the same time, only front AV input terminal
can operate.
VCR
_________
VIDEO AUDIO 0
Lav in-^
(f^PQ* oLTyi.
19
Page 21

( Recording )
Follow the connection shown below when you want to copy a programme from another tape (VCR).
20
Page 22

Troubleshooting
Before calling for service, determine the symptoms and make a few simple checks as shown below.
Symptoms
Checks
Picture
Sound
' ’ 'I V *
Snowy Picture
Multiple Image
Interference
Normal Picture
No Picture
Noisy Sound
Normal Sound
Noisy Sound
No Sound
No Sound
Aerial Location, direction
Connection
Aerial Location, direction
Connection
Electrical Appliances
Cars / Motorcycles
Fluorescent Lamps
Volume
(Check whether the mute function has
been activated on the Remote Control.)
Not plugged into AC outlet
Not switched on
Contrast and Brightness / Volume Setting
(Check by pushing the Power Switch or
Stand-by Button on the Remote Control.)
No Colour
Scrambled
Colour Patches
No Colour Rolling Picture H-Une
A
Normal Sound
Weak Sound
Normal Sound
Noisy Sound
21
Colour Control
Re-tune Channels
Magnetic interference from unshielded
equipment.
Receiver moved while "ON"
System Button
Page 23

Specifications ^
Power Source ; AC SINGLE 230V, 50Hz (TC-US15Mn^-14ST15M)
AC SINGLE 240V, 50Hz (TC-14S15A)
Power Consumption : 72 W
Tuning System : Voltage synthesizer
Auto search tuning 100 position
Picture Tube : 37 cm, measured diagonally, 90* deflection
Audio Output; 3 W
Remote Control Transmitter: EUR 501380 (TC-14S15M/TC-14S15A}
EUR 644666 (TX-14ST15M)
Battery : R6 (AA) x 2
Dimension (W x D x H): 385 x 374 x 358 mm
Weight (Net): 9.5 Kg
Receiving Systems: 4 SYSTEMS
SYSTEMS FUNCTION
1. PAL B,G
Reception of broadcast
transmissions and playback
from video cassette tape
recorders.
2.
3.
4.
Receiving Channels:
2-12 PALB
0-12 PALB(AUS)
NTSC 4.43
NTSC 3.58
PAL 60Hz
VHF BAND
Playback from special VCR only.
Playback from special Disc
player and VCR only.
UHF BAND
21-69 PALG
28-69 PALB(AUS)
CATV
SI -S41 (HYPER)
Note:
Design and Specifications are subject to change without notice.
22
Page 24

Customer's Record:
The serial number of this product can be found on its rear cover. You should note this serial number
in the space provided below and retain this book plus your purchase receipt as a permanent record of
your purchase to aid in identification in the event of theft or loss, and for weirranty Service purposes.
Model Number:
Serial Number:
Matsushita Electric Industrial Co., Ltd
Central RO. Box 288, Osaka 530-91, Japan
 Loading...