

Page 1
OPERATING INSTRUCTIONS
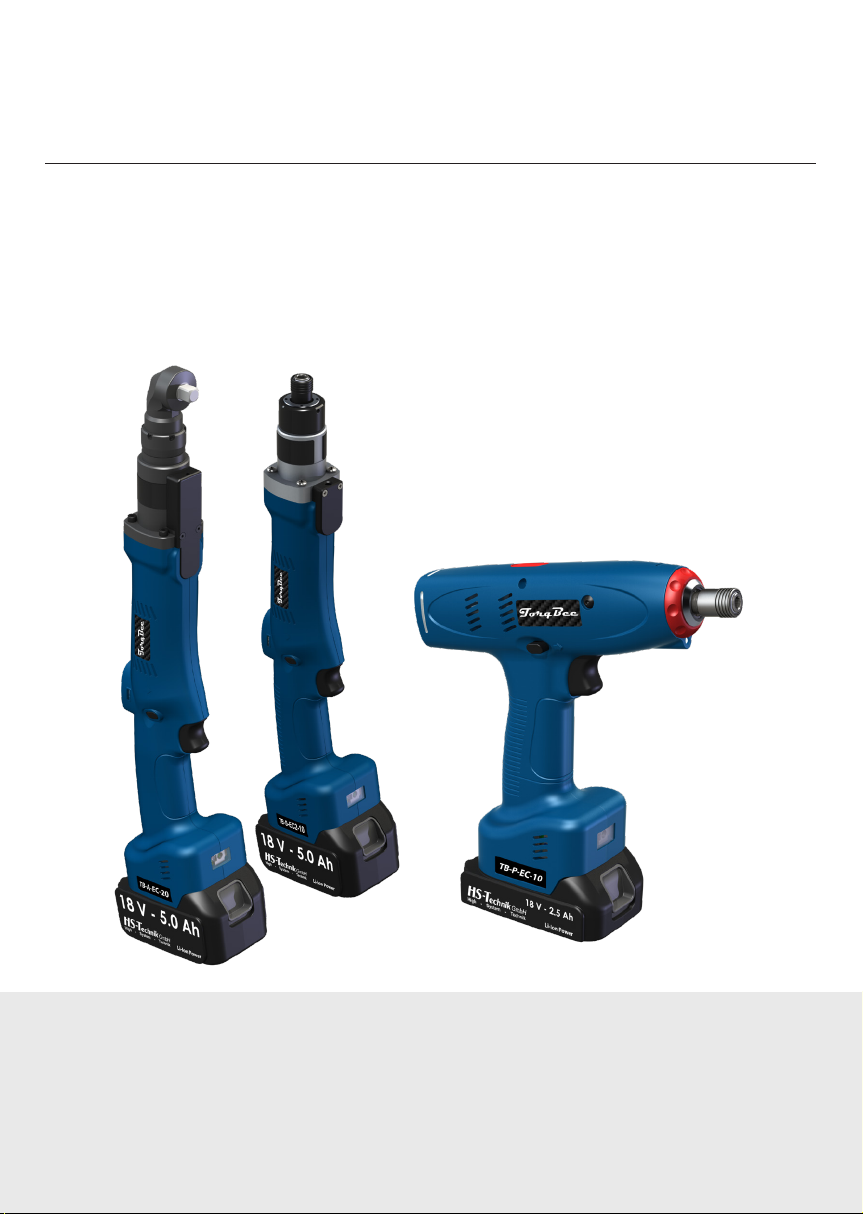
TorqBee®
TB-P-xxx-xx / TB-A-xxx-xx / TB-S-xxx-xx
Release date: January 2018
PC-Software: 2.0.2.25 and higher
Firmware: 2.0.3.4 and higher
Page 2

Table of contents
1. IMPORTANT INFORMATION 8
2. GENERAL INFORMATION 9
2.1.0. Importance of the operating instructions 9
2.2.0. Proper Intended Use 9
2.3.0. Improper use 9
2.4.0. Guarantee and liability 10
2.5.0. Copyright 11
3. BASIC SAFETY INSTRUCTIONS 12
3.1.0. Notices in the operating instructions 12
3.2.0. Operator's responsibility 12
3.2.1. Personnel's responsibility 12
3.2.2. Personnel training 12
3.3.0. Risks when working with the tool 12
3.4.0. Danger from electrical energy 13
3.4.1. Fundamental safety measures 13
3.4.1. Workplace safety 14
3.4.2. Electrical safety 14
3.4.3. Personal safety 15
3.4.4. Using and handling the power tool 15
3.4.5. Service 17
3.5.0. Lithium-ion battery 17
3.8.0. Cleaning and disposing of the tool 20
3.9.0. Risk of injury and damage to the tool 20
4. STARTUP 22
4.1.0. Installing or removing the battery 22
4.1.1. Trigger 23
4.1.2. Rotating direction switch 23
4.1.3. LED / Barcode scanner 24
4.1.4. Multi color LED control light 25
4.2.0. Setting the tightening torque 26
4.3.0. Cancel job 28
4.3.0. Back-up strategy 28
4.5.0. Operation 32
- 2 -
Im Martelacker 12 – D-79588 Efringen-Kirchen – Phone 0 76 28 - 91 11- 0 – Fax 0 76 28 - 91 11-90
E-Mail: info@hs-technik.com – Web: www.hs-technik.com
Page 3
5. DISPLAY 32
5.1.0. Displays 34
6. ACCESSORIES 42
7. TECHNICAL DATA 44
7.1.0. Pistol screwdriver 44
7.2.0. Angle screwdriver 46
CE CONFORMITY DECLARATION 48
NOTICE
This warning symbol indicates additional information that will
make your work easier.
WARNING
General warning to prevent operating errors and failures.
DANGER
This indicates a direct hazard for the worker or the tool. This
warning symbol is especially important and must be observed.
- 3 -
Im Martelacker 12 – D-79588 Efringen-Kirchen – Phone 0 76 28 - 91 11- 0 – Fax 0 76 28 - 91 11-90
E-Mail: info@hs-technik.com – Web: www.hs-technik.com
Page 4
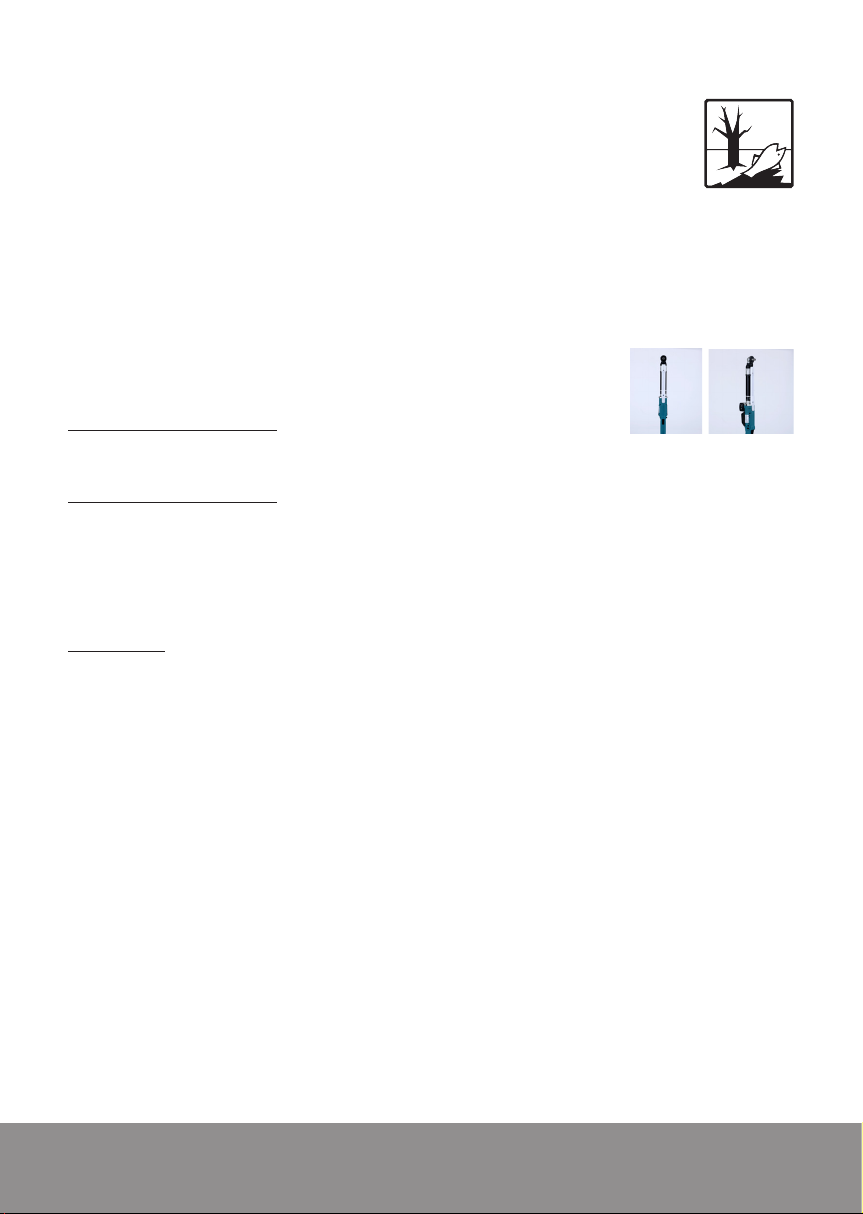
Disposal
Power tools, batteries, accessories and packaging must be
disposed of at an environmentally-compatible recycling facility.
Power tools and batteries do not go into the household trash.
Only for EU countries:
Directive 2002/96/EG:
Defective power tools must be collected separately and disposed of at an
environmentally-compatible recycling facility.
Directive 2006/66/EG:
Defective or drained batteries must be collected separately and disposed
of at an environmentally-compatible recycling facility.
Drained batteries can be disposed of directly:
Germany:
Recyclingzentrum Elektrowerkzeuge
Osteroder Landstraße 3
37589 Kalefeld
Transport
Li-Ion batteries are subject to the specications in the laws pertaining to
hazardous goods. The batteries can be transported on roads by the user
without further constraints.
When shipping with third parties (e.g.: freight forwarders), special
requirements must be observed for packaging and labeling!
Only ship batteries if the casing is not damaged. Cover the contacts with
tape and package the battery so it cannot move around in the packaging.
Please comply with other national and international requirements.
- 4 -
Im Martelacker 12 – D-79588 Efringen-Kirchen – Phone 0 76 28 - 91 11- 0 – Fax 0 76 28 - 91 11-90
E-Mail: info@hs-technik.com – Web: www.hs-technik.com
Page 5
2 4
1
6
8
9
7
3
5
10
11
12
13
1
14
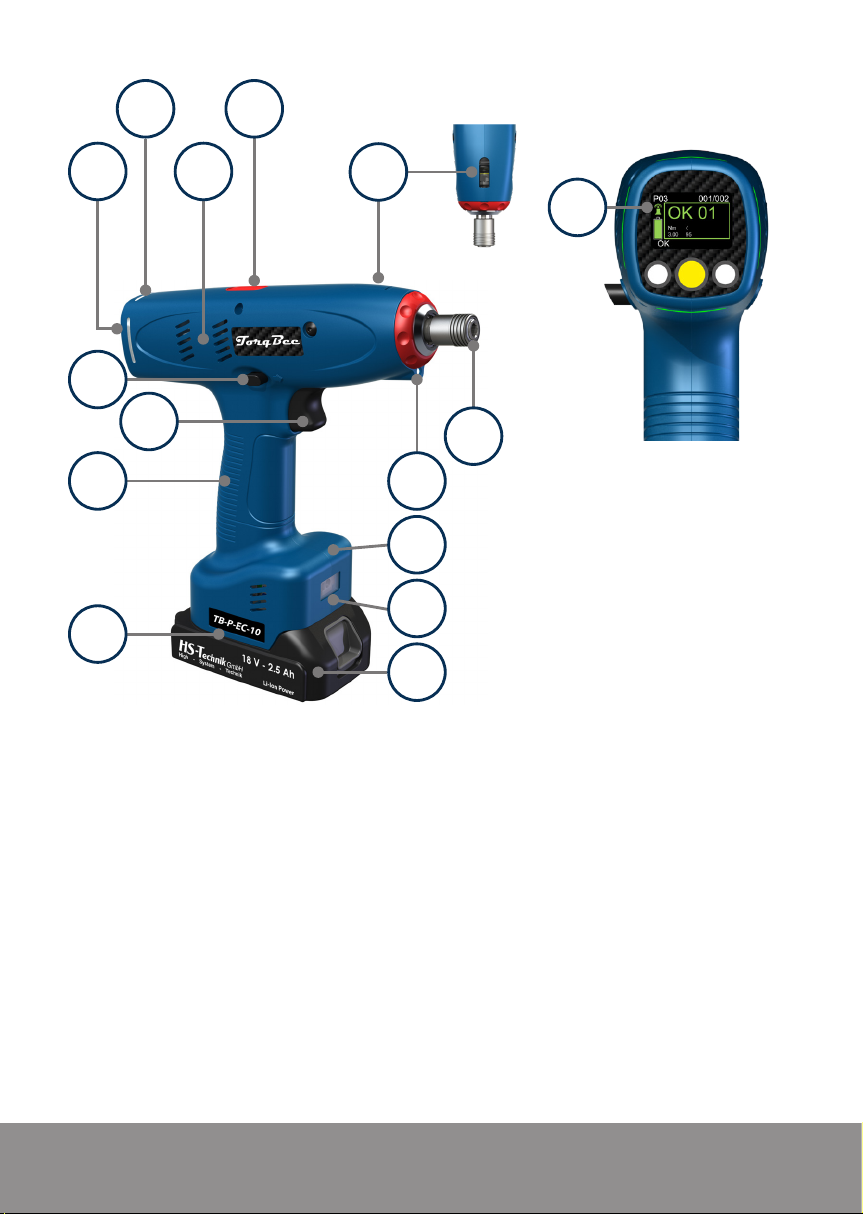
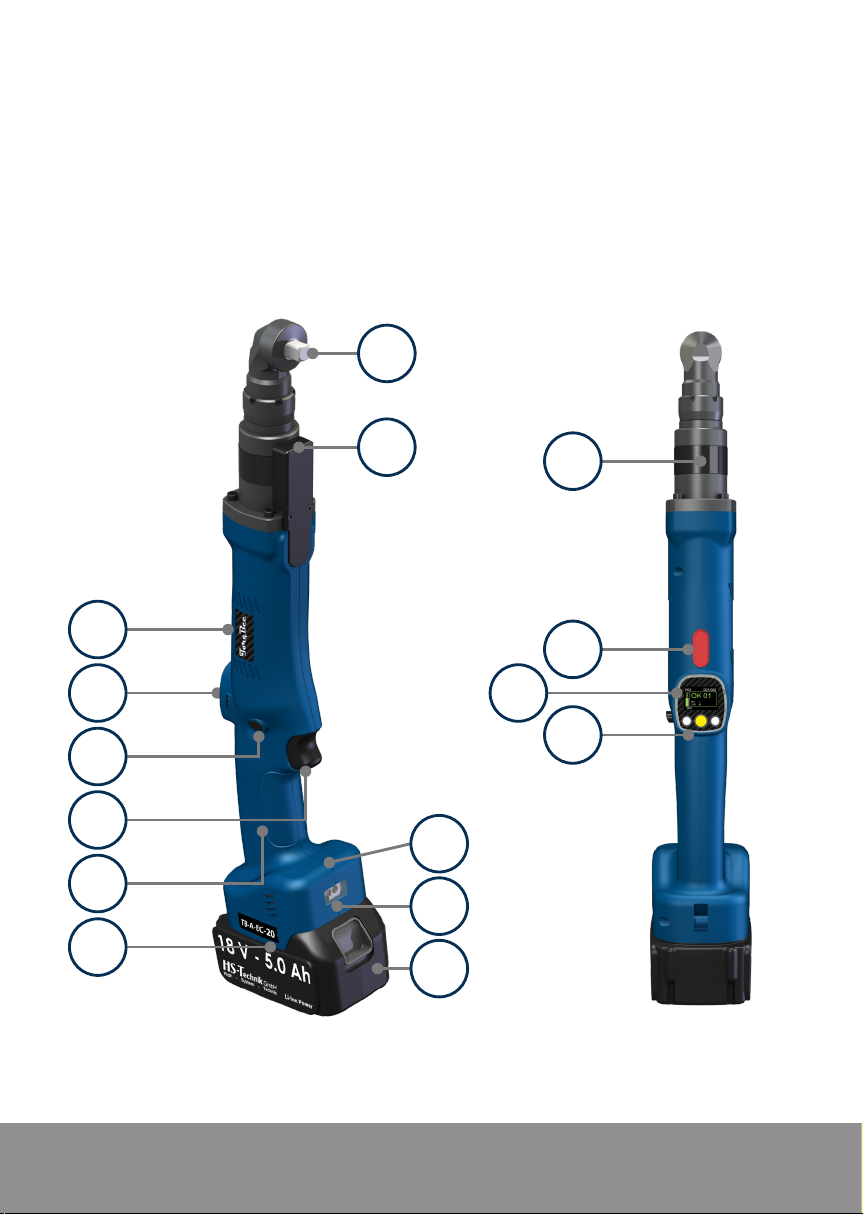
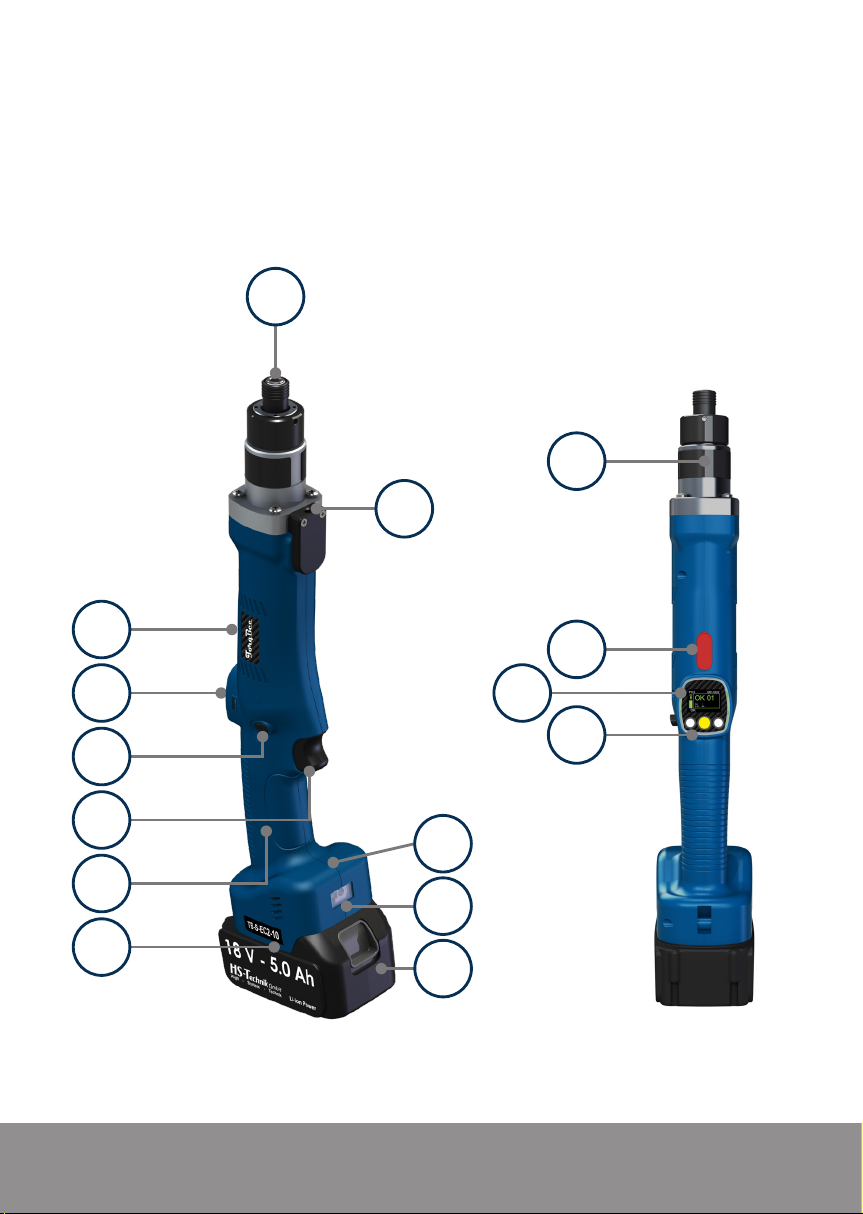
5 Clutch access
not available in the
PRO-M & EC² version
6 CW / CCW
7 Large trigger
8 Ergonomical handle
9 USB interface
10 Powerful LED
11 Optional Wi- module
1 OLED-Display to led the
worker through the process
not available in the
Light version
2 Multi color LED
control light
3 Brushless high-powered
motor
4 Color index
- 5 -
Im Martelacker 12 – D-79588 Efringen-Kirchen – Phone 0 76 28 - 91 11- 0 – Fax 0 76 28 - 91 11-90
E-Mail: info@hs-technik.com – Web: www.hs-technik.com
not available in the
Light version
12 Optional scanner
not available in the
Light version
13 Premium Li-Ion battery
14 1/4“ hex. socket adapter
15 3/8“ square adapter
Page 6
15
3
1
6
7
8
9
10
5
4
1
2
11
12
13
- 6 -
Im Martelacker 12 – D-79588 Efringen-Kirchen – Phone 0 76 28 - 91 11- 0 – Fax 0 76 28 - 91 11-90
E-Mail: info@hs-technik.com – Web: www.hs-technik.com
Page 7
14
5
10
3
4
1
1
2
6
7
11
8
12
9
13
- 7 -
Im Martelacker 12 – D-79588 Efringen-Kirchen – Phone 0 76 28 - 91 11- 0 – Fax 0 76 28 - 91 11-90
E-Mail: info@hs-technik.com – Web: www.hs-technik.com
Page 8
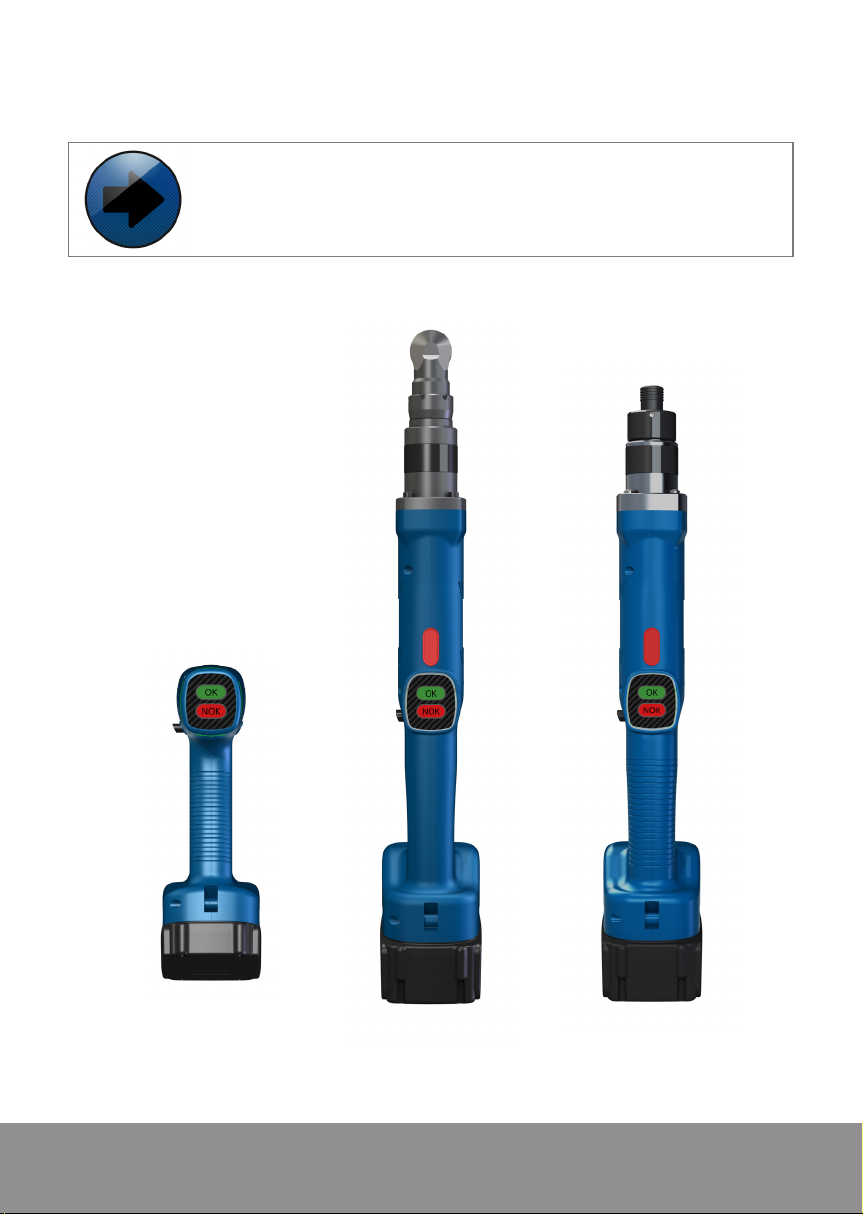
NOTE
The Light version is equipped with a multi color status LED but
do not have a display.
- 8 -
Im Martelacker 12 – D-79588 Efringen-Kirchen – Phone 0 76 28 - 91 11- 0 – Fax 0 76 28 - 91 11-90
E-Mail: info@hs-technik.com – Web: www.hs-technik.com
Page 9
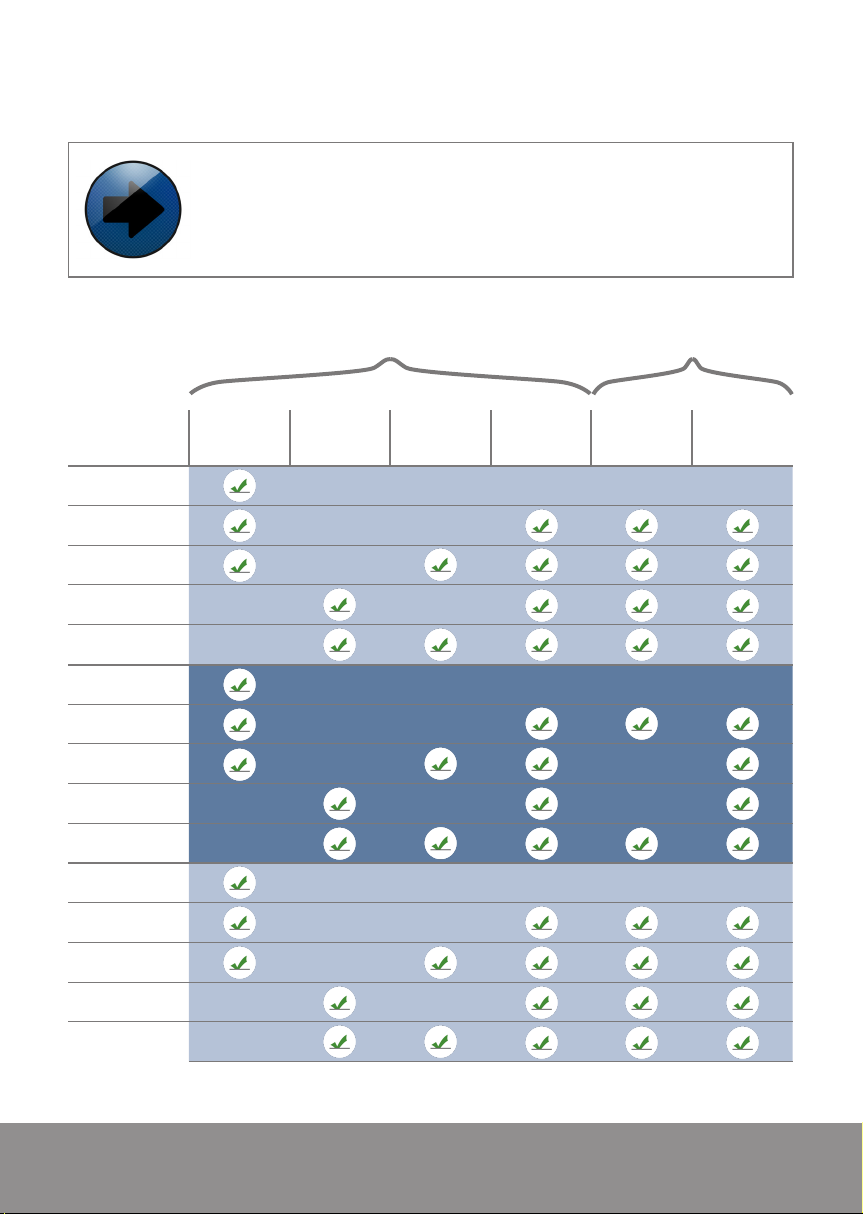
NOTE
Depending on the tool conguration the different functions
described in the manual can be used. Furthermore each
basic function have many subfunctions.
Article Shut-o
TB-P-L-xx
TB-P-SO-xx
TB-P-SOP-xx
TB-P-EC-xx
Pistol screwdriverAngle screwdriverStraight screwdriver
TB-P-EC2-xx
TB-A-L-xx
TB-A-SO-xx
TB-A-SOP-xx
TB-A-EC-xx
TB-A-EC2-xx
TB-S-L-xx
clutch
Included in the
delivery content
Torque
transdurcer
Reaction
sensor
Optional available
Display Scanner Wi-
TB-S-SO-xx
TB-S-SOP-xx
TB-S-EC-xx
TB-S-EC2-xx
- 9 -
Im Martelacker 12 – D-79588 Efringen-Kirchen – Phone 0 76 28 - 91 11- 0 – Fax 0 76 28 - 91 11-90
E-Mail: info@hs-technik.com – Web: www.hs-technik.com
Page 10
1. IMPORTANT INFORMATION
Danger!
Before you put the tool down, wait until it has come to a
complete stop as otherwise, the tool can jam and you may
lose control of the screwdriver.
Danger!
When tightening and unscrewing screws, high reaction
torques may arise. Therefore, always keep a tight grip on the
tool.
Danger!
Switch the electrical device off immediately if the tool used
locks up and be prepared for high reaction torques that can
cause kickback. The tool locks up when it is overladed or
jams in the workpiece.
- 10 -
Im Martelacker 12 – D-79588 Efringen-Kirchen – Phone 0 76 28 - 91 11- 0 – Fax 0 76 28 - 91 11-90
E-Mail: info@hs-technik.com – Web: www.hs-technik.com
Page 11
2. GENERAL INFORMATION
2.1.0. IMPORTANCE OF THE OPERATING INSTRUCTIONS
This information was written with the intention of being read, understood
and complied with in all points by persons responsible for the operation of
the TorqBee® screwdriver (hereinafter referred to as the tool).
Prior to start-up, please read the operating instructions and comply with the
safety instructions. Work station faults can only be prevented if the contents
of these operating instructions are known and fault-free operation can be
ensured.
We are not liable for damages and operational errors that result from non-
compliance with these operating instructions. If difculties arise nonetheless,
please contact us and we will gladly provide assistance.
2.2.0. PROPER INTENDED USE
The tool may only be used, as described in these instructions, to create
screw joints suitable for the type of tool.
NOTICE
Proper intended use also includes:
• complying with all instructions in the operating instructions
• complying with the inspection and maintenance work.
Any other use beyond this is not considered proper intended use.
HS-Technik GmbH is not liable for any damages resulting from noncompliance.
2.3.0. IMPROPER USE
We are not liable for damages and operational errors that result from noncompliance with these operating instructions or improper use.
- 11 -
Im Martelacker 12 – D-79588 Efringen-Kirchen – Phone 0 76 28 - 91 11- 0 – Fax 0 76 28 - 91 11-90
E-Mail: info@hs-technik.com – Web: www.hs-technik.com
Page 12

Danger!
The tool is not a torque wrench. This tool cannot be used
for already tightened connections as otherwise very high
reaction torques arise and the motor control and the motor
can overheat.
2.4.0. GUARANTEE AND LIABILITY
Guarantee and liability claims for personal and material damages are
excluded if they can be traced back to one or more of the following causes:
• improper use
• improper assembly, start-up, operation and maintenance
• operating the tool with defective safety equipment or
improperly installed or non-functioning safety and protective
equipment
• non-compliance with the instruction in the operating instructions
pertaining to transport, storage, assembly, start-up, operation and
maintenance of the tool
• unauthorized structural modications to the tool
• improper repair
• catastrophes caused by foreign bodies and force majeure
- 12 -
Im Martelacker 12 – D-79588 Efringen-Kirchen – Phone 0 76 28 - 91 11- 0 – Fax 0 76 28 - 91 11-90
E-Mail: info@hs-technik.com – Web: www.hs-technik.com
Page 13

High - System - Technik
2.5.0. COPYRIGHT
These operating instructions are only for the operator and its personnel.
They contain the regulations and instructions, which may neither be
completely nor partially
• reproduced
• edited or
• otherwise published.
The copyrights to these operating instructions remain with
HS-Technik GmbH.
Manufacturer address:
Im Martelacker 12
D-79588 Efringen-Kirchen
Telephone: +49 (0) 76 28 - 91 11-0
Telefax: +49 (0) 76 28 - 91 11-90
E-mail: info@hs-technik.com
Internet: www.hs-technik.com
Im Martelacker 12 – D-79588 Efringen-Kirchen – Phone 0 76 28 - 91 11- 0 – Fax 0 76 28 - 91 11-90
E-Mail: info@hs-technik.com – Web: www.hs-technik.com
- 13 -
Page 14

3. BASIC SAFETY INSTRUCTIONS
3.1.0. NOTICES IN THE OPERATING INSTRUCTIONS
• The basic requirement for safe and proper use and fault-free operation
is knowledge of the basic safety instructions and safety regulations.
• In addition, the rules and regulations for the place of use must be
followed.
3.2.0. OPERATOR'S RESPONSIBILITY
The operator is obligated to only allow persons to work with this tool who are
familiar with the basic regulations for work safety and accident prevention
and are trained in how to use the tool. Safety-conscious work of the personnel
must be checked at regular intervals.
3.2.1. PERSONNEL'S RESPONSIBILITY
All persons working with this tool are obligated to comply with the basic
regulations for work safety and accident prevention prior to starting work.
3.2.2. PERSONNEL TRAINING
Only trained and qualied personnel may work with this tool. The responsibilities
of the personnel for the assembly, start-up, operation, maintenance and
servicing must be clearly dened. Personnel-in-training may only operate
the machine in the presence of an experienced person.
3.3.0. RISKS WHEN WORKING WITH THE TOOL
Faults that may hinder safety must be immediately rectied.
- 14 -
Im Martelacker 12 – D-79588 Efringen-Kirchen – Phone 0 76 28 - 91 11- 0 – Fax 0 76 28 - 91 11-90
E-Mail: info@hs-technik.com – Web: www.hs-technik.com
Page 15
WARNING
The tool was built in accordance with the state of the art in
technology and the approved safety regulations. Still, when
using it, risks to life and limb of the user or third parties or other
material assets may arise.
WARNING
Only use the tool
• for the proper intended use
• in working order with regards to safety
3.4.0. DANGER FROM ELECTRICAL ENERGY
DANGER
Only allow a qualied electrician to perform work on this
tool. The electrical equipment of the tool must be regularly
inspected. Loose connections and charred cables must be
immediately repaired. If work must be performed with the
tool, remove the battery prior to opening the device.
WARNING
The tool must be kept closed at all times. Access is only
permitted for authorized persons with a tool.
3.4.1. FUNDAMENTAL SAFETY MEASURES
NOTICE
The terms "tool" and "power tool" used in the safety instructions
pertain to mains-operated power tools (with power cable)
and battery operated power tools (without power cord).
- 15 -
Im Martelacker 12 – D-79588 Efringen-Kirchen – Phone 0 76 28 - 91 11- 0 – Fax 0 76 28 - 91 11-90
E-Mail: info@hs-technik.com – Web: www.hs-technik.com
Page 16

3.4.1. WORKPLACE SAFETY
a) Keep your workspace clean and well lit.
Disorder or poorly lit workspaces can lead to accidents.
Do not use the tool in an explosive environment,
b)
in which
Power tools can generate sparks which can ignite the dust of vapors.
c) Take environmental inuences into account.
Never subject tools to rain.
Do not use tools in moist or wet environments.
d) Keep other persons away from tool while in use.
If you are distracted, you can lose control of the device.
3.4.2. ELECTRICAL SAFETY
a)
Avoid physical contact with grounded surfaces such a pipes, heaters,
etc.
There is an increased risk of electrical shock if your body is grounded.
b) Keep the device away from rain or moisture.
Water penetrating into the tool increases the risk of an electrical shock.
c) Keep the tool away from heat, oil, sharp edges or moving device parts.
ammable liquids, gases or dusts are located.
.
- 16 -
Im Martelacker 12 – D-79588 Efringen-Kirchen – Phone 0 76 28 - 91 11- 0 – Fax 0 76 28 - 91 11-90
E-Mail: info@hs-technik.com – Web: www.hs-technik.com
Page 17

3.4.3. PERSONAL SAFETY
a)
Be careful, pay attention to what you are doing and use
responsibly.
Do not use power tools when you are tired or under the inuence of
drugs,
alcohol or medication.
One moment of carelessness when using the tool can lead to severe
injuries.
b) Wear personal safety equipment and always wear protective eyewear.
Wearing protective safety equipment such as a dust mask, safety
shoes, a protective helmet and hearing protection, depending on the
type and use of of the tool, decreases the
risk of injuries.
c) Avoid unintended start-up.
Ensure that the power tool is shut off before you connect it to the
battery
pick it up, or carry it.
If you have your nger on the trigger while carrying the power tool, or
the device
is connected to the power supply, this can lead to
accidents.
d) Avoid non-ergonomic posture.
Make sure you are standing stably and always maintain your balance.
You can then
control the power tool in unexpected situations.
e) Wear suitable clothing.
Do not wear loose clothing or jewelry.
gloves away from moving parts.
Loose clothing, jewelry or long hair can
Keep your hair, clothing and
get caught in moving parts.
power tools
3.4.4. USING AND HANDLING THE POWER TOOL
a)
Do not overload the tool.
Use the proper tool for your work. You work better
and more safely in the dened output range when using the proper
tool
.
b) Do not use power tools with defective switches.
A tool that cannot be shut off is dangerous and must be repaired.
- 17 -
Im Martelacker 12 – D-79588 Efringen-Kirchen – Phone 0 76 28 - 91 11- 0 – Fax 0 76 28 - 91 11-90
E-Mail: info@hs-technik.com – Web: www.hs-technik.com
Page 18

c)
Remove the battery before you change tool settings, replace
accessories
or lay the tool down.
This safety measure prevents the power tool from starting
unintentionally.
Store unused tools out of reach of children.
d)
Do not allow persons to use the device who are not familiar with it
or
have not read these instructions. Power tools are dangerous if they
are used by inexperienced persons.
Take good care of the power tool.
e)
Check that moving parts
work properly and do not jam, that there are
no broken or damaged parts and that the functionality is not hindered.
Have damaged parts repaired prior to using the device.
Many accidents are caused
by poorly maintained power tools.
f) Keep the tools clean.
Carefully maintained tools jam less often and are easier to use.
g) Use the tool, accessories, etc. in accordance with these instructions.
Take the working conditions and task to be executed into account.
use of power tools for other purposes than the intended use can lead
to
hazardous situations.
h) Use the right tool
Do not use low-output tools for heavy loads. Do not use the tool for
purposes and work for which it is not intended.
i) Check your tool for damage
Prior to further use of the tool, the safety equipment or damaged parts
must be inspected to ensure proper functionality.
Check to ensure the functionality of moving parts, that they don't jam,
that no parts are broken and that all parts are properly and correctly
installed and all conditions
required for the operation of the device
have been fullled.
Damaged safety equipment and parts should be properly repaired or
replaced by a customer service workshop
in the operating instructions
a customer service workshop.
. Damaged switches must be replaced by
Do not use tools on which the trigger
unless otherwise indicated
cannot be easily switched on and off.
The
- 18 -
Im Martelacker 12 – D-79588 Efringen-Kirchen – Phone 0 76 28 - 91 11- 0 – Fax 0 76 28 - 91 11-90
E-Mail: info@hs-technik.com – Web: www.hs-technik.com
Page 19

3.4.5. SERVICE
NOTICE
Only allow your power tool to be repaired by a qualied
technician using only original
HS-Technik GmbH. This ensures that the safety of your device
is maintained.
3.5.0. LITHIUMION BATTERY
NOTICE
Please make sure to follow the following instructions for using
lithium-ion batteries!
spare parts, available from
- 19 -
Im Martelacker 12 – D-79588 Efringen-Kirchen – Phone 0 76 28 - 91 11- 0 – Fax 0 76 28 - 91 11-90
E-Mail: info@hs-technik.com – Web: www.hs-technik.com
Page 20

a) Only charge the batteries in chargers recommended by the
manufacturer.
If the battery is not charged on a suitable charger, it can be
permanently damaged
.
b) Only use the provided battery for power tools.
The use of other batteries can lead to injuries and re hazards.
If the battery is not used for a longer period of time, it must not remain
c)
on the charger or on the tool.
If a work break of more than 3 hours is expected, the battery must be
removed from the tool. Otherwise, the battery may be permanently
damaged.
The lithium-ion battery should not remain on the charger for longer
d)
than 36 hours for safety reasons.
Remove the battery from the charger immediately after the charging
process is completed.
e)
An empty battery should not be in contact with the tool or a
charger that is disconnected from the mains for a longer period of
time.
In both cases, currents are owing that
deep discharge the battery
and can permanently damage it.
Recharge the lithium-ion batteries immediately and
f)
never store them
when empty.
If the battery is stored while disconnected from the tool
and the
charger, it will maintain a constant capacity over a long period of time.
(Loss approx. 5% per year)
Always transport the battery separately from the tool.
g)
You thus prevent accidentally switching on the tool and deep
discharging the battery.
h)
Do not subject the lithium-ion battery to high temperatures
(+ 50°C) or direct
sunlight.
If the battery gets warmer than 50°C during operation (charging or
discharging), it must be removed from the charger or tool immediately.
- 20 -
Im Martelacker 12 – D-79588 Efringen-Kirchen – Phone 0 76 28 - 91 11- 0 – Fax 0 76 28 - 91 11-90
E-Mail: info@hs-technik.com – Web: www.hs-technik.com
Page 21

i)
Keep the unused battery away from paper clips, coins, keys, nails,
screws or other small metal objects which might bridge the contacts.
Do not open the battery and do not short-circuit it.
A short-circuit between the battery contacts can lead to burns, re or
explosions.
Under extreme use or temperature conditions, batteries can leak.
j)
Avoid contact with the skin or eyes if the battery leaks.
The battery
uid is acidic and can cause chemical burns on tissue. If the uid
comes into contact with skin, immediately wash it with soap and water
and then
rinse it with lemon juice or vinegar. If the uid gets into the eyes,
ush with water for at least 10 minutes and immediately go to the
doctor.
Make sure that the Li-Ion battery does not fall down or is subject to
k)
vibrations and
Clean the contacts regularly with a cotton swab soaked in a
l)
impacts.
high-percent alcohol.
NOTICE
Lithium-ion batteries have nearly no self-discharge and
do not have a
reliably supply your tool with power for several years
(approx. 700 - 1000 charge cycles).
In general the following applies:
Avoid deep discharging or overcharging the lithium-ion
battery under any circumstances. It will be permanently
damaged from this.
memory effect. If properly used, they will
- 21 -
Im Martelacker 12 – D-79588 Efringen-Kirchen – Phone 0 76 28 - 91 11- 0 – Fax 0 76 28 - 91 11-90
E-Mail: info@hs-technik.com – Web: www.hs-technik.com
Page 22

3.8.0. CLEANING AND DISPOSING OF THE TOOL
Use and dispose of used materials and substances properly, in particular
cleaning agents and solvents.
Do not throw the used battery in the household trash, a re or in water; have
it properly disposed of by a specialist shop or the manufacturer.
3.9.0. RISK OF INJURY AND DAMAGE TO THE TOOL
1. Make sure that none of the tool parts are damaged.
All damaged parts must be repaired prior to using the
device. If you work with damaged tool parts, you risk
injury.
2. If you work on raised platforms, wear a safety belt and
avoid letting the tool fall down. Non-compliance may
lead to injury and signicant damage.
3. First remove the battery before you clean the device
or perform general maintenance.
4. Never hold your face near the exhaust holes.
5. Avoid skin contact with substances such as lubricating
grease and oil. These substances are ammable on
skin. If you do come into contact with them, thoroughly
wash the area.
6. Avoid unstable working positions. You might fall down
and injure yourself.
7. Maintain your tool carefully. Follow the operating
instructions for maintenance and cleaning.
Keep the handle free of lubrication greases and dirt.
8. Use the tool carefully and pay attention to proper use.
Use the tool carefully. When working, the framework
conditions should be fullled. Always concentrate while
working.
- 22 -
Im Martelacker 12 – D-79588 Efringen-Kirchen – Phone 0 76 28 - 91 11- 0 – Fax 0 76 28 - 91 11-90
E-Mail: info@hs-technik.com – Web: www.hs-technik.com
Page 23

4. STARTUP
Do not let the tool fall or allow other objects to fall on the device. Protect
it from impact damage.
contact with sprayed water or oil.
4.1.0. INSTALLING OR
REMOVING THE BATTERY
•
To remove the battery, set the
rotational direction switch to the
center position,
the front side of the battery back
and pull it forward away from the
machine.
•
To install the battery, align the
tongue of the battery with the
groove in the casing so it can easily
slide
into place.
• Always slide it on completely until
it locks with a click. Check that the
battery is correctly locked in place
before starting to work.
If the battery is not installed properly,
it can
fall out of the tool and lead to
injuries.
Make sure that the device does not come into
slide the clip on
1
2
1 – Clip
2 – Remove battery
•
Never use force when installing
the battery. If the battery cannot
be easily slide in,
correctly installed.
Im Martelacker 12 – D-79588 Efringen-Kirchen – Phone 0 76 28 - 91 11- 0 – Fax 0 76 28 - 91 11-90
E-Mail: info@hs-technik.com – Web: www.hs-technik.com
it has not been
- 23 -
Page 24

4.1.1. TRIGGER
WARNING
Before you remove the battery or install it in the screwdriver,
please check that the rotating direction switch is in the
neutral position.
– Trigger
*
* *
- 24 -
Im Martelacker 12 – D-79588 Efringen-Kirchen – Phone 0 76 28 - 91 11- 0 – Fax 0 76 28 - 91 11-90
E-Mail: info@hs-technik.com – Web: www.hs-technik.com
Page 25

4.1.2. ROTATING DIRECTION SWITCH
WARNING
Always check the rotating direction prior to operation.
*
– Rotating direction switch
*
*
- 25 -
Im Martelacker 12 – D-79588 Efringen-Kirchen – Phone 0 76 28 - 91 11- 0 – Fax 0 76 28 - 91 11-90
E-Mail: info@hs-technik.com – Web: www.hs-technik.com
Page 26

• To change the rotating direction,
the screwdriver is equipped with a
rotating direction switch.
Only use the rotating direction
switch after the screwdriver has come
to a complete stop.
Changing the rotating direction
during operation damages the
device.
*
• If you are not using the screwdriver,
set the rotating direction switch to
the neutral position.
•
To change or set the direction, press
the rotating direction switch
- out to the left
- for
or
- out to the right
- for counter-clockwise
rotation
If the rotating direction switch is set to the
center position, the trigger cannot be
activated.
4.1.3. LED / BARCODE SCANNER
clockwise rotation
WARNING
Never look directly at the LED or barcode scanner!
– Rotating direction switch
*
- 26 -
Im Martelacker 12 – D-79588 Efringen-Kirchen – Phone 0 76 28 - 91 11- 0 – Fax 0 76 28 - 91 11-90
E-Mail: info@hs-technik.com – Web: www.hs-technik.com
Page 27

After pressing the trigger, the LED and the barcode scanner will switch on.
The afterrun illumination of the LED after the trigger has been pressed can
be dened in the HST-Tool-Manager under Settings - General. The released
barcode scanner goes off after a barcode is successfully scanned and/or
the trigger has been released.
NOTICE
Do not clean the LED with aggressive cleaning agents!
NOTICE
The optional barcode scanner need to be activated in the
hardware settings of the HST-Tool-Manager software to be
used.
4.1.4. MULTI COLOR LED CONTROL LIGHT
®
The TorqBee
function which is near the display and
goes arround the tool. The light informs
the worker at all time about the tools
status:
series has a LED control
The light can be programmed as
glowing, ashing or pulsating with
different time periods for each LED
signal and different colors.
More information about the program-
Color:
ming you´ll nd in the HST-Tool-Manager
manual.
- 27 -
Im Martelacker 12 – D-79588 Efringen-Kirchen – Phone 0 76 28 - 91 11- 0 – Fax 0 76 28 - 91 11-90
E-Mail: info@hs-technik.com – Web: www.hs-technik.com
Page 28

4.2.0. SETTING THE TIGHTENING TORQUE
For the TorqBee® / TorqBee® PRO series the tightening torque will be adjusted
with a mechanical clutch.
•
To adjust the clutch the
protection clip has to be
2
1 – Push down the clip
2 – Slide the clip backwards
1 – Clutch adjustment
1
1
removed
•
Push down the clip at the back
carefully. Then the clip can easily
slide backwards. The clutch is visible
now.
•
Now the clutch is adjustable with
an adjustment tool.
anti-clockwise: lower torque
clockwise: higher torque
After the adjustment the clip
needs to be put back in its initial
position. It will close and lock then
automatically.
Now the torque must be checked with
a torque measurement unit.
If the requested value isn´t reached the
clutch needs to be adjusted again.
- 28 -
Im Martelacker 12 – D-79588 Efringen-Kirchen – Phone 0 76 28 - 91 11- 0 – Fax 0 76 28 - 91 11-90
E-Mail: info@hs-technik.com – Web: www.hs-technik.com
Page 29

®
For the TorqBee
PRO-M series the tool will be programmed with the
HST-Tool-Manager software. Check, that the screwdriver is congured and
parameterized correctly.
NOTICE
See HST-Tool-Manager operating instructions
RISK OF INJURY
If a low torque is expected and a very high torque is set
unintentionally.
- 29 -
Im Martelacker 12 – D-79588 Efringen-Kirchen – Phone 0 76 28 - 91 11- 0 – Fax 0 76 28 - 91 11-90
E-Mail: info@hs-technik.com – Web: www.hs-technik.com
Page 30

4.3.0. CANCEL JOB
If you want to execute a job later or you have
scanned the wrong barcode, you can cancel this
after the release.
To do this, hold down the display button for
approx. 3 seconds. The cancel symbol will
appear. Conrm this by pressing the left side
display button.
4.3.0. BACK-UP STRATEGY
If the connection to the controller (process controls) via wireless connection
through an access point is interrupted and a job has already been released
in the screwdriver, it should be further processed if possible. After completing
the job, the screwdriver will try to send the screwing process results. If the
connection to the process controls cannot be restored, the screwing
process results must be manually secured (read out the tool using the
HST-Tool-Manager software and saved).
Then, after removing the battery, the back-up strategy can be used to
continue working.
To do this, hold down the trigger and slide the battery back on. After approx.
3 seconds, the "set-up symbol" will appear on the display. You can now
release the trigger and will be in the set-up menu.
By pressing the menu button, you can go to the next menu point. By pressing
the trigger, you can select a menu point. Using the left button, conrm your
selection; with the right button, cancel the selection.
- 30 -
Im Martelacker 12 – D-79588 Efringen-Kirchen – Phone 0 76 28 - 91 11- 0 – Fax 0 76 28 - 91 11-90
E-Mail: info@hs-technik.com – Web: www.hs-technik.com
Page 31

NOTICE
To activate the back-up strategy, the "Set-up" menu must
be activated in the software under the general settings. Also
activate the "scanner selectable" so the set-up menu point
"Scanner" can be selected. If you also activate "Manual
mode selectable", the set-up menu points "M" and "Scanner
M" will be released. So you can select different programs per
display, the check mark next to "Manual mode active" must
also be selected.
With the left button,
conrm the
entry / selection.
Im Martelacker 12 – D-79588 Efringen-Kirchen – Phone 0 76 28 - 91 11- 0 – Fax 0 76 28 - 91 11-90
E-Mail: info@hs-technik.com – Web: www.hs-technik.com
Using the menu button
on the display, you
can go to the next
menu point.
- 31 -
With the right button,
cancel / decline the
entry / selection.
Page 32

In the "Scanner M" menu point, select the scan mode for scanning barcodes
for program selection. Scan the barcodes for the screwing job as in regular
mode. Then, you will receive the release for the corresponding program
with the number of screws.
The screwing results are not transmitted to the process controls for central
storage. You can, however, read out the screwing process results with the
Tool-Manager software and save them as le.
Go forward with the menu button until the "Scanning M" logo appears. The
tool have to be programmed accordingly with the HST-Tool-Manager.
Press the trigger to select the setting.
To conrm the back-up strategy with scanning function, press the left button
on the display.
- 32 -
Im Martelacker 12 – D-79588 Efringen-Kirchen – Phone 0 76 28 - 91 11- 0 – Fax 0 76 28 - 91 11-90
E-Mail: info@hs-technik.com – Web: www.hs-technik.com
Page 33

In the Info menu point, the most current battery
voltage, network coverage RSSL and the version of the
rmware can be displayed.
In the Scanner menu point, the scanner can be
selected to read in network settings using a barcode.
Scanning for program selection is not possible in this
mode.
In the Program menu point, a program can be selected
from the list of stored programs.
In the M menu point, manual mode can be selected
(M = manual mode).
This activates the "standard program" (yellow star).
In the Scanner M menu point, the scanner can be
selected to scan barcodes for program selection. The
barcodes and their assignment to a program must be
stored in the tool.
By activating the Exit menu point, you will exit the setup
menu. The tool will switch back into normal mode.
- 33 -
Im Martelacker 12 – D-79588 Efringen-Kirchen – Phone 0 76 28 - 91 11- 0 – Fax 0 76 28 - 91 11-90
E-Mail: info@hs-technik.com – Web: www.hs-technik.com
Page 34

4.5.0. OPERATION
WARNING
Hold the screwdriver with its tool insert straight against the
screwing location with the necessary compression force,
otherwise, it may be damaged (cam-out effect).
To ensure the SAFETY and RELIABILITY of the product, repairs, all other potential maintenance or adjustments should be performed by HS-Technik GmbH
or an authorized specialist.
5. DISPLAY
Tool serial number or program
number of the active
program, e.g.: P03
Function display:
green: connected
yellow: searching for
connection
red: no connection
of the battery in 5 different
Counting function:
Counts the processed screws
per screwing instance e.g. 01/03
means 1. screw of 3 successfully
screwed in
Battery display:
Shows the charging status
statuses.
- 34 -
Im Martelacker 12 – D-79588 Efringen-Kirchen – Phone 0 76 28 - 91 11- 0 – Fax 0 76 28 - 91 11-90
E-Mail: info@hs-technik.com – Web: www.hs-technik.com
Page 35

The display elements can be modied in the HST-Tool-Manager so the worker
is shown, for instance, precise values for the screw joints, rotational angle,
only an OK or NOK or the counting process. The display elements can be
presented in German or English. Furthermore, you can set in which unit the
values are output (Nm, lbf.in, lbf.ft).
Main display window:
In the main display window, the worker is shown the results of the
screwing processes, warnings, commands and symbols and texts
to make controlling the tool easier. This way, the worker always
knows directly whether his work was correct, which torque range is
specied for the next screw joint or why the tool is not executing a
screwing process. Furthermore, the worker is notied in time by the
integrated battery management system that the battery needs to
be changed before it can be damaged due to deep discharging.
Display text window:
Shows the text for the current
status or expected action.
- 35 -
Im Martelacker 12 – D-79588 Efringen-Kirchen – Phone 0 76 28 - 91 11- 0 – Fax 0 76 28 - 91 11-90
E-Mail: info@hs-technik.com – Web: www.hs-technik.com
Page 36

5.1.0. DISPLAYS
Status displays
Battery status:
50% - 100%
Battery status:
30% - 50%
Battery status:
10% - 30%
Battery status:
5% - 10%
Battery status:
less than 5%
Screwdriver is released for the selected / scanned
screwing process. When using the barcode scanner,
if there is "NO NUMBER", the corresponding barcode
appears on the blue display element as a release.
- 36 -
Im Martelacker 12 – D-79588 Efringen-Kirchen – Phone 0 76 28 - 91 11- 0 – Fax 0 76 28 - 91 11-90
E-Mail: info@hs-technik.com – Web: www.hs-technik.com
Page 37

Status displays
The device is ready to use.
The rst of two screw joints was successful. Second
screwing process must still be executed. Results of the
rst screw joint are displayed. This notice is also available as an NOK notice.
Both of the screwing processes were successful and
have reached the specied reference (e.g. Nm) or
were in the specied differential range. This notice is
also available as an NOK notice.
Scanning request:
Component 1, 2 or 3, depending on the number in the
component of the display has to be scanned before
the screwdriver is released.
Airplane / product ID must be scanned before the
screwdriver is released. Symbol can also be a car.
Screwdriver is locked and is currently being congured
using the HST-Tool-Manager via Wi-.
Battery must not be removed.
- 37 -
Im Martelacker 12 – D-79588 Efringen-Kirchen – Phone 0 76 28 - 91 11- 0 – Fax 0 76 28 - 91 11-90
E-Mail: info@hs-technik.com – Web: www.hs-technik.com
Page 38

Status displays
The screwing process for one or more screws was not
processed within the specied time.
Specications were not achieved during the screwing
process. Values of the screw joint are displayed.
Maximum battery voltage exceeded
Battery voltage too low
Screwdriver has successfully started up, but cannot
connect to the superordinate controls.
NOK must be separately conrmed by the worker
pressing a button on the display.
- 38 -
Im Martelacker 12 – D-79588 Efringen-Kirchen – Phone 0 76 28 - 91 11- 0 – Fax 0 76 28 - 91 11-90
E-Mail: info@hs-technik.com – Web: www.hs-technik.com
Page 39

Status displays
Screwdriver has received a release for program 3.
This will unscrew the screw with 3.00 Nm.
Screwdriver has received a release for program 3.
This will process the screw with 3.00 Nm.
Screwdriver tries to dial into the network.
Screwdriver has found the network connection and
connects.
Previously lost connections to the network were
restored.
Screwdriver has lost the connection to the network.
- 39 -
Im Martelacker 12 – D-79588 Efringen-Kirchen – Phone 0 76 28 - 91 11- 0 – Fax 0 76 28 - 91 11-90
E-Mail: info@hs-technik.com – Web: www.hs-technik.com
Page 40

Status displays
Releasing the trigger during a screwing process is
permitted. Trigger was released during the screwing
process. The screwing process can continue. When
using the barcode scanner, if there is "NO NUMBER", the
corresponding barcode appears on the blue display
element as a release.
Screwing process is running
When using the barcode scanner, if there is
"NO NUMBER", the corresponding barcode appears on
the blue display element as a release.
Releasing the trigger during an unscrewing
process is permitted. Trigger was released during the
unscrewing process. The unscrewing process can
continue. When using the barcode scanner, if
there is "NO NUMBER", the corresponding barcode
appears on the blue display element as a release.
Unscrewing process is running
When using the barcode scanner, if there is
"NO NUMBER", the corresponding barcode appears on
the blue display element as a release.
After conrming the NOK ("CONFIRM OK" display), the
screw must rst be unscrewed prior to the next release.
The rotating direction switch stands on counter-clockwise
rotation, unscrewing is not allowed. The NOK-scewing in front needs to be acknowledged. This can be
programmed in the settings with the HST-Tool-Manager.
- 40 -
Im Martelacker 12 – D-79588 Efringen-Kirchen – Phone 0 76 28 - 91 11- 0 – Fax 0 76 28 - 91 11-90
E-Mail: info@hs-technik.com – Web: www.hs-technik.com
Page 41

Status displays
Battery was installed, screwdriver starts, but cannot
connect to the network. Press the trigger to start a new
connection.
Current redundancy of the torque was too low.
Current redundancy of the torque was too high.
The worker must inspect the screw after a screwing
process, a time frame for this can be set (e.g. 15
seconds) and conrm it on the display himself.
The timer runs backward to its reference point.
(Graphic stops at 10.9 seconds) If the screw is not
conrmed within the set time, NOK is automatically
selected.
The tool has to be calibrated and will be released after
the calibration.
The tool must be serviced and will not be released until
after the conrmation from the service personnel.
- 41 -
Im Martelacker 12 – D-79588 Efringen-Kirchen – Phone 0 76 28 - 91 11- 0 – Fax 0 76 28 - 91 11-90
E-Mail: info@hs-technik.com – Web: www.hs-technik.com
Page 42

Status displays
Maximum screwing time for the released program was
exceeded.
Released program is deactivated on this screwdriver.
Released program does not exist on this screwdriver.
Released program sequence does not exist on this
screwdriver.
Most common error notications are illustrated for you here. Since there
are several status and error notications in the electronics area, it is not
possible to list them all. If you come across a status or error notication that
doesn't make sense, please feel free to contact us. Many displays can
deviate slightly depending on the software settings. For more information,
look at your settings and the operating instructions from HST-Tool-Manager.
If an error occurs several times, please contact our support team.
The display elements (status notications) were created partially with and
partially without a Wi- connection to a superordinate control system. As
soon as the power tool is connected to a control system, the Wi- symbol
appears over the battery display.
- 42 -
Im Martelacker 12 – D-79588 Efringen-Kirchen – Phone 0 76 28 - 91 11- 0 – Fax 0 76 28 - 91 11-90
E-Mail: info@hs-technik.com – Web: www.hs-technik.com
Page 43

Error displays
Maximum allowable torque exceeded, contact the
manufacturer
Maximum allowable current exceeded, contact the
manufacturer
Temperature of the controls exceeded, contact
manufacturer
Temperature of the motor exceeded, contact
manufacturer
Maximum logic voltage exceeded, tool must be
repaired!
SD card not found in the screwdriver or is defective. If
the problem is not solved by inserting a new SD card,
please contact the manufacturer.
- 43 -
Im Martelacker 12 – D-79588 Efringen-Kirchen – Phone 0 76 28 - 91 11- 0 – Fax 0 76 28 - 91 11-90
E-Mail: info@hs-technik.com – Web: www.hs-technik.com
Page 44

6. ACCESSORIES
• Software
NOTICE
Improper use of potential supplemental devices or
accessories from other manufacturers may pose a
risk (of injury) to persons.
NOTICE
Only use supplemental devices or accessories for
the intended purpose. We will gladly assist you if you have
questions.
You can request exploded drawings and spare parts list with the
article no. at info@hs-technik.com or via telephone +49 (0) 7628 / 9111-0.
NOTICE
All screwdrivers are delivered with software.
- 44 -
Im Martelacker 12 – D-79588 Efringen-Kirchen – Phone 0 76 28 - 91 11- 0 – Fax 0 76 28 - 91 11-90
E-Mail: info@hs-technik.com – Web: www.hs-technik.com
Page 45

HST-3123
Adjustment tool for
TorqBee Light
TorqBee
TorqBee PRO
HST-3580
Suspension (without balancer) for:
TB-A-EC-30 TB-A-EC2-30
TB-A-EC-55 TB-A-EC2-55
TB-A-EC-85 TB-A-EC2-85
HST-3581
Adaption for torque reaction arms:
TB-A-EC-55 TB-A-EC2-55
TB-A-EC-85 TB-A-EC2-85
- 45 -
Im Martelacker 12 – D-79588 Efringen-Kirchen – Phone 0 76 28 - 91 11- 0 – Fax 0 76 28 - 91 11-90
E-Mail: info@hs-technik.com – Web: www.hs-technik.com
Page 46

7. TECHNICAL DATA
7.1.0. PISTOL SCREWDRIVER
TorqBee Light Torque Speed max. Adapter Dimensions
in mm
TB-P-L-4 1.0 - 4.0 Nm 1,050 rpm 1/4“ - Form E 230 x 51 x 206 1.25
TB-P-L-5 1.5 - 5.0 Nm 850 rpm 1/4“ - Form E 230 x 51 x 206 1.25
TB-P-L-6 1.5 - 6.5 Nm 850 rpm 1/4“ - Form E 230 x 51 x 206 1.25
TB-P-L-10 1.5 - 9.0 Nm 570 rpm 1/4“ - Form E 230 x 51 x 206 1.25
TB-P-L-12 3.0 - 13.0 Nm 460 rpm 1/4“ - Form E 230 x 51 x 206 1.25
TB-P-L-24 5.0 - 24.0 Nm 170 rpm 1/4“ - Form E - -
TorqBee Standard Torque Speed max. Adapter Dimensions
in mm
TB-P-SO-4 1.0 - 4.0 Nm 1,050 rpm 1/4“ - Form E 230 x 51 x 206 1.25
TB-P-SO-5 1.5 - 5.0 Nm 850 rpm 1/4“ - Form E 230 x 51 x 206 1.25
TB-P-SO-6 1.5 - 6.5 Nm 850 rpm 1/4“ - Form E 230 x 51 x 206 1.25
TB-P-SO-10 1.5 - 9.0 Nm 570 rpm 1/4“ - Form E 230 x 51 x 206 1.25
TB-P-SO-12 3.0 - 13.0 Nm 460 rpm 1/4“ - Form E 230 x 51 x 206 1.25
TorqBee PRO Torque Speed max. Adapter Dimensions
in mm
TB-P-SOP-4 1.0 - 4.0 Nm 1,050 rpm 1/4“ - Form E 230 x 51 x 206 1.25
TB-P-SOP-5 1.5 - 5.0 Nm 850 rpm 1/4“ - Form E 230 x 51 x 206 1.25
TB-P-SOP-6 1.5 - 6.5 Nm 850 rpm 1/4“ - Form E 230 x 51 x 206 1.25
TB-P-SOP-10 1.5 - 9.0 Nm 570 rpm 1/4“ - Form E 230 x 51 x 206 1.25
TB-P-SOP-12 3.0 - 14.0 Nm 460 rpm 1/4“ - Form E 230 x 51 x 206 1.25
Weight
in kg
Weight
in kg
Weight
in kg
TorqBee PRO-M Torque Speed max. Adapter Dimensions
in mm
TB-P-EC-10 0.8 - 11.0 Nm 570 rpm 1/4“ - Form E 230 x 51 x 206 1.15
TB-P-EC-12 1.0 - 14.0 Nm 460 rpm 1/4“ - Form E 230 x 51 x 206 1.15
- 46 -
Im Martelacker 12 – D-79588 Efringen-Kirchen – Phone 0 76 28 - 91 11- 0 – Fax 0 76 28 - 91 11-90
E-Mail: info@hs-technik.com – Web: www.hs-technik.com
Weight
in kg
Page 47

TorqBee EC² Torque Speed max. Adapter Dimensions
in mm
Weight
in kg
TB-P-EC2-10 0.8 - 11.0 Nm 570 rpm 1/4“ - Form E 230 x 51 x 206 1.15
TB-P-EC2-12 1.0 - 14.0 Nm 460 rpm 1/4“ - Form E 230 x 51 x 206 1.15
18 V batteries without deep discharge protection can be used.
Special types are not considered in this listing.
Data of weight and length are without battery.
51
206
73
230
51
Dimensions in mm
- 47 -
Im Martelacker 12 – D-79588 Efringen-Kirchen – Phone 0 76 28 - 91 11- 0 – Fax 0 76 28 - 91 11-90
E-Mail: info@hs-technik.com – Web: www.hs-technik.com
Page 48

7.2.0. ANGLE SCREWDRIVER
TorqBee Light Torque Speed max. Adapter Dimensions
in mm
TB-A-L-10 1.5 - 9.0 Nm 540 rpm 1/4“ - Form E 411 x 73 x 92 1.35
TB-A-L-12 3.0 - 13.0 Nm 550 rpm 3/8“ square 436 x 73 x 92 1.30
TB-A-L-20 5.0 - 20.0 Nm 360 rpm 3/8“ square 436 x 73 x 92 1.30
TB-A-L-30 8.0 - 30.0 Nm 200 rpm 3/8“ square 483 x 73 x 92 1.50
TB-A-L-50 15.0 - 50.0 Nm 160 rpm 3/8“ square 483 x 73 x 92 1.50
TB-A-L-75 25.0 - 75.0 Nm 90 rpm 1/2“ square 526 x 73 x 92 1.80
TorqBee Standard Torque Speed max. Adapter Dimensions
in mm
TB-A-SO-10 1.5 - 9.0 Nm 540 rpm 1/4“ - Form E 411 x 73 x 92 1.35
TB-A-SO-12 2.5 - 13.0 Nm 550 rpm 3/8“ square 436 x 73 x 92 1.30
TB-A-SO-20 5.0 - 20.0 Nm 360 rpm 3/8“ square 436 x 73 x 92 1.30
TB-A-SO-30 8.0 - 30.0 Nm 200 rpm 3/8“ square 483 x 73 x 92 1.50
TB-A-SO-50 15.0 - 50.0 Nm 160 rpm 3/8“ square 483 x 73 x 92 1.50
TB-A-SO-75 25.0 - 75.0 Nm 90 rpm 1/2“ square 526 x 73 x 92 1.80
TorqBee PRO Torque Speed max. Adapter Dimensions
in mm
TB-A-SOP-10 1.5 - 9.0 Nm 540 rpm 1/4“ - Form E 411 x 73 x 92 1.35
TB-A-SOP-12 2.5 - 13.0 Nm 550 rpm 3/8“ square 436 x 73 x 92 1.30
TB-A-SOP-20 5.0 - 20.0 Nm 360 rpm 3/8“ square 436 x 73 x 92 1.30
TB-A-SOP-30 8.0 - 30.0 Nm 200 rpm 3/8“ square 483 x 73 x 92 1.50
TB-A-SOP-50 15.0 - 50.0 Nm 160 rpm 3/8“ square 483 x 73 x 92 1.50
TB-A-SOP-75 25.0 - 75.0 Nm 90 rpm 1/2“ square 526 x 73 x 92 1.80
Weight
in kg
Weight
in kg
Weight
in kg
- 48 -
Im Martelacker 12 – D-79588 Efringen-Kirchen – Phone 0 76 28 - 91 11- 0 – Fax 0 76 28 - 91 11-90
E-Mail: info@hs-technik.com – Web: www.hs-technik.com
Page 49

TorqBee PRO-M Torque Speed max. Adapter Dimensions
in mm
TB-A-EC-10 1.5 - 10.0 Nm 540 rpm 1/4“ - Form E 411 x 73 x 92 1.35
TB-A-EC-12 2.0 - 13.0 Nm 600 rpm 3/8“ square 451 x 73 x 92 1.40
TB-A-EC-15 1.5 - 15.0 Nm 430 rpm 1/4“ - Form E - -
TB-A-EC-20 5.0 - 20.0 Nm 320 rpm 3/8“ square 441 x 73 x 92 1.20
TB-A-EC-30 8.0 - 32.0 Nm 290 rpm 3/8“ square 541 x 73 x 92 1.20
TB-A-EC-55 15.0 - 55.0 Nm 160 rpm 3/8“ square 600 x 73 x 92 1.40
TB-A-EC-85 25.0 - 85.0 Nm 90 rpm 1/2“ square 644 x 73 x 92 2.90
Weight
in kg
TorqBee EC² Torque Speed max. Adapter Dimensions
in mm
TB-A-EC2-10 1.5 - 10.0 Nm 540 rpm 1/4“ - Form E 411 x 73 x 92 1.35
TB-A-EC2-12 2.0 - 13.0 Nm 600 rpm 3/8“ square 451 x 73 x 92 1.40
TB-A-EC2-15 1.5 - 15.0 Nm 430 rpm 1/4“ - Form E - -
TB-A-EC2-20 5.0 - 20.0 Nm 400 rpm 3/8“ square 441 x 73 x 92 1.20
TB-A-EC2-30 8.0 - 32.0 Nm 290 rpm 3/8“ square 541 x 73 x 92 1.20
TB-A-EC2-55 15.0 - 55.0 Nm 160 rpm 3/8“ square 600 x 73 x 92 1.40
TB-A-EC2-85 30.0 - 85.0 Nm 90 rpm 1/2“ square 644 x 73 x 92 2.90
From 60 Nm on a torque reaction arm is recommended.
18 V batteries without deep discharge protection can be used.
Special types are not considered in this listing.
Data of weight and length are without battery.
Weight
in kg
- 49 -
Im Martelacker 12 – D-79588 Efringen-Kirchen – Phone 0 76 28 - 91 11- 0 – Fax 0 76 28 - 91 11-90
E-Mail: info@hs-technik.com – Web: www.hs-technik.com
Page 50

TorqBee Light / Standard / PRO
440
94
40
44
Außenvierkant DIN 3121-E10
72
28
21
283639
52
TB-A-L-10
TB-A-SO-10
TB-A-SOP-10
TB-A-L-12
TB-A-L-20
TB-A-SO-12
TB-A-SO-20
TB-A-SOP-12
TB-A-SOP-20
223639
22
48
46
Innensechskant DIN 3126-F6,3
52
72
439
94
Dimensions in mm
Not to scale
- 50 -
Im Martelacker 12 – D-79588 Efringen-Kirchen – Phone 0 76 28 - 91 11- 0 – Fax 0 76 28 - 91 11-90
E-Mail: info@hs-technik.com – Web: www.hs-technik.com
Page 51

TorqBee Light / Standard / PRO
73
TB-A-L-30
TB-A-L-50
TB-A-SO-30
TB-A-SO-50
TB-A-SOP-30
TB-A-SOP-50
TB-A-L-75
TB-A-SO-75
TB-A-SOP-75
54
41
39
28
43
40
37
45
11
Außenvierkant DIN 3121-E10
205
35
39
52
72
489
94
311
60
92
R18
52
516
Dimensions in mm
Not to scale
- 51 -
Im Martelacker 12 – D-79588 Efringen-Kirchen – Phone 0 76 28 - 91 11- 0 – Fax 0 76 28 - 91 11-90
E-Mail: info@hs-technik.com – Web: www.hs-technik.com
Page 52

TorqBee PRO-M / EC²
TB-A-EC-10
TB-A-EC2-10
TB-A-EC-20
TB-A-EC2-20
223639
22
48
46
Innensechskant DIN 3126-F6,3
25
31
52
72
439
94
32
39
28
52
72
453
47
41
Außenvierkant DIN 3121-E10
94
Dimensions in mm
Not to scale
- 52 -
Im Martelacker 12 – D-79588 Efringen-Kirchen – Phone 0 76 28 - 91 11- 0 – Fax 0 76 28 - 91 11-90
E-Mail: info@hs-technik.com – Web: www.hs-technik.com
Page 53

TorqBee PRO-M / EC²
TB-A-EC-30
TB-A-EC2-30
TB-A-EC-55
TB-A-EC2-55
42
33
364239
353930
28
35
49
45
Außenvierkant DIN 3121-E10
46
52
46
72
531
94
52
72
577
59
56
Außenvierkant DIN 3121-E12,5
94
Dimensions in mm
Not to scale
- 53 -
Im Martelacker 12 – D-79588 Efringen-Kirchen – Phone 0 76 28 - 91 11- 0 – Fax 0 76 28 - 91 11-90
E-Mail: info@hs-technik.com – Web: www.hs-technik.com
Page 54

TorqBee PRO-M / EC²
TB-A-EC-10
TB-A-EC2-10
36
40
42
39
52
46
50
627
63
60
Außenvierkant DIN 3121-E12,5
72
94
Dimensions in mm
Not to scale
- 54 -
Im Martelacker 12 – D-79588 Efringen-Kirchen – Phone 0 76 28 - 91 11- 0 – Fax 0 76 28 - 91 11-90
E-Mail: info@hs-technik.com – Web: www.hs-technik.com
Page 55

- 55 -
Im Martelacker 12 – D-79588 Efringen-Kirchen – Phone 0 76 28 - 91 11- 0 – Fax 0 76 28 - 91 11-90
E-Mail: info@hs-technik.com – Web: www.hs-technik.com
Page 56

7.2.0. STRAIGHT SCREWDRIVER
TorqBee Light Torque Speed max. Adapter Dimensions
in mm
TB-S-L-3 0.5 - 2.5 Nm 1,600 rpm 1/4“ - Form E 410 x 73 x 92 1.00
TB-S-L-4 1.0 - 4.0 Nm 1,050 rpm 1/4“ - Form E 410 x 73 x 92 1.00
TB-S-L-6 1.75 - 6.5 Nm 850 rpm 1/4“ - Form E 410 x 73 x 92 1.00
TB-S-L-10 2.0 - 10.0 Nm 570 rpm 1/4“ - Form E 410 x 73 x 92 1.00
TB-S-L-12 3.0 - 13.0 Nm 460 rpm 1/4“ - Form E 410 x 73 x 92 1.00
TB-S-L-24 8.0 - 33.0 Nm 170 rpm 3/8“ square 410 x 73 x 92 1.00
TorqBee Standard Torque Speed max. Adapter Dimensions
in mm
TB-S-SO-3 0.5 - 2.5 Nm 1,600 rpm 1/4“ - Form E 410 x 73 x 92 1.00
TB-S-SO-4 1.0 - 4.0 Nm 1,050 rpm 1/4“ - Form E 410 x 73 x 92 1.00
TB-S-SO-6 1.75 - 6.5 Nm 850 rpm 1/4“ - Form E 410 x 73 x 92 1.00
TB-S-SO-10 2.0 - 10.0 Nm 570 rpm 1/4“ - Form E 410 x 73 x 92 1.00
TB-S-SO-12 3.0 - 13.0 Nm 460 rpm 1/4“ - Form E 410 x 73 x 92 1.00
TorqBee PRO Torque Speed max. Adapter Dimensions
in mm
TB-S-SOP-3 0.5 - 2.5 Nm 1,600 rpm 1/4“ - Form E 410 x 73 x 92 1.00
TB-S-SOP-4 1.0 - 4.0 Nm 1,050 rpm 1/4“ - Form E 410 x 73 x 92 1.00
TB-S-SOP-6 1.75 - 6.5 Nm 850 rpm 1/4“ - Form E 410 x 73 x 92 1.00
TB-S-SOP-10 2.0 - 10.0 Nm 570 rpm 1/4“ - Form E 410 x 73 x 92 1.00
TB-S-SOP-12 3.0 - 13.0 Nm 460 rpm 1/4“ - Form E 410 x 73 x 92 1.00
Weight
in kg
Weight
in kg
Weight
in kg
- 56 -
Im Martelacker 12 – D-79588 Efringen-Kirchen – Phone 0 76 28 - 91 11- 0 – Fax 0 76 28 - 91 11-90
E-Mail: info@hs-technik.com – Web: www.hs-technik.com
Page 57

TorqBee PRO-M Torque Speed max. Adapter Dimensions
in mm
TB-S-EC-3 0.35 - 3.5 Nm 1,600 rpm 1/4“ - Form E 410 x 73 x 92 0.95
TB-S-EC-5 0.5 - 5.0 Nm 1,050 rpm 1/4“ - Form E 410 x 73 x 92 0.95
TB-S-EC-6 0.6 - 6.5 Nm 850 rpm 1/4“ - Form E 410 x 73 x 92 0.95
TB-S-EC-10 0.8 - 11.0 Nm 570 rpm 1/4“ - Form E 410 x 73 x 92 0.95
TB-S-EC-12 1.0 - 14.0 Nm 460 rpm 1/4“ - Form E 410 x 73 x 92 0.95
Weight
in kg
TorqBee EC² Torque Speed max. Adapter Dimensions
in mm
TB-S-EC2-3 0.35 - 3.5 Nm 1,600 rpm 1/4“ - Form E 410 x 73 x 92 0.95
TB-S-EC2-5 0.5 - 5.0 Nm 1,050 rpm 1/4“ - Form E 410 x 73 x 92 0.95
TB-S-EC2-6 0.6 - 6.5 Nm 850 rpm 1/4“ - Form E 410 x 73 x 92 0.95
TB-S-EC2-10 0.8 - 11.0 Nm 570 rpm 1/4“ - Form E 410 x 73 x 92 0.95
TB-S-EC2-12 1.0 - 14.0 Nm 460 rpm 1/4“ - Form E 410 x 73 x 92 0.95
18 V batteries without deep discharge protection can be used.
Special types are not considered in this listing.
Data of weight and length are without battery.
Weight
in kg
- 57 -
Im Martelacker 12 – D-79588 Efringen-Kirchen – Phone 0 76 28 - 91 11- 0 – Fax 0 76 28 - 91 11-90
E-Mail: info@hs-technik.com – Web: www.hs-technik.com
Page 58

CE CONFORMITY DECLARATION
We herewith declare that the devices specified below comply with the relevant
CE guidelines with regards to design and construction type.
If the devices are modified without our authorization, this declaration will be
null and void.
The devices specified below comply with the valid EGB / EMV
standards applicable at the time of publication.
Manufacturer:
Company: HS-Technik GmbH
Location: Im Martelacker 12
D-79588 Efringen-Kirchen
Phone: 07628-9111-0
Fax: 07628-9111-90
Description of the device:
Programmable battery-operated screwdriver
Model:
TorqBee® -TB-x-xxx-xx
Applied CE guidelines:
2006/42/EG
2014/30/EU
EN55014
DIN EN 60745-1
HS-Technik GmbH
Im Martelacker 12, D-79588 Efringen-Kirchen
H.-Martin Hanke
Manager Date: 09.03.2018
- 58 -
Im Martelacker 12 – D-79588 Efringen-Kirchen – Phone 0 76 28 - 91 11- 0 – Fax 0 76 28 - 91 11-90
E-Mail: info@hs-technik.com – Web: www.hs-technik.com
Page 59

Notes
- 59 -
Im Martelacker 12 – D-79588 Efringen-Kirchen – Phone 0 76 28 - 91 11- 0 – Fax 0 76 28 - 91 11-90
E-Mail: info@hs-technik.com – Web: www.hs-technik.com
Page 60

High - System - Technik
Im Martelacker 12
D-79588 Efringen-Kirchen
Phone: +49 (0) 76 28 - 91 11- 0
Fax: +49 (0) 76 28 - 91 11- 90
E-Mail: info@hs-technik.com
Internet: www.hs-technik.com
HST20170529POPJSFHHMHHZMRMH
Die technischen Daten in dieser Drucksache geben einen Anhalt, sind aber ohne Gewähr!
Konstruktionsänderungen vorbehalten. Unsere Konstruktionsvorschläge sind unverbindlich!
The technical data in these printed material provide support, but are not guaranteed!
Constructional changes reserved. Our construction recommendations are non-binding!
 Loading...