

Page 1
Operating Instructions
SD-Jukebox ver2.4
for Technics SX-KN7000
For information on the basic operations in
Windows and how to use your computer and
peripheral devices, see the Operating Instructions
included with your system.
To ensure proper use, carefully read these
Operating Instructions and the Operating
Instructions included with your Technics
Electronic keyboard (SX-KN7000).
Before listening to music with
the SD Audio Player (Technics
Electronic keyboard).
Be sure to follow the instructions in
these Operating Instructions to transfer
music to an SD Memory Card.
M0702SF0© Matsushita Electric Industrial Co., Ltd. 2002
For U.S.A.
Panasonic Consumer Electronics Company,
Division of Matsushita Electric Corporation of America
One Panasonic Way Secaucus, New Jersey 07094
E-mail:consumerproducts@Panasonic.com
For other countries.
Matsushita Electric Industrial Co.,Ltd.
Web site:http://www.panasonic.co.jp/global/
Page 2
2
Contents
Important SD-Jukebox usage information
• In compliance with the stipulations of SDMI (Secure Digital Music
Initiative), SD-Jukebox incorporates copyright protection technology
using encryption technology in order to protect copyrights, to ensure the
healthy development of music culture, and to protect the rights of valid
purchasers.
• SD-Jukebox cannot play and record music CDs that does not have a
mark on the disc label.
• SD-Jukebox records music data in encrypted form onto your hard disk drive.
Encrypted music cannot be moved/copied to other folders, drives, and other
computers for use.
• Unique information pertaining to your PC's processor and hard disk drive is used in
the encryption process. Therefore, if either the processor or hard disk drive is
replaced, previously created music data will no longer be available for use.
• Depending on your computer system, you may experience problems such as being
unable to record or use recorded music data. Please note that Matsushita is in no way
liable for any music data you lose, or for any other direct or indirect damages.
Page 3

3
Contents
Preparations
System Requirements......................4
Before you start................................5
• SD-Jukebox Features........................5
• Recorded tracks are stored in
compressed from on your PC............6
• Transferring data between
a PC and SD Memory Card...............6
• Playlists.............................................7
Installation ........................................8
Connecting an SD Memory Card....11
• USB Reader/Writer..........................12
• Protecting data on an
SD Memory Card.............................13
Checking in tracks from
an SD Memory Card to the PC.......24
Editing.............................................25
• Editing a playlist on
the SD Memory Card.......................25
• Editing a playlist on the PC .............26
Listening to music on the PC..........28
Quick start Instructions
Advanced features
Reference information
Names and functions of
the screen elements.......................30
Formatting an SD Memory Card.....38
Uninstalling SD-Jukebox ................39
Troubleshooting..............................40
Limits related to
copyright protection........................43
Limitations related to
Windows Explorer...........................43
End User License Agreement.........44
Index and glossary .........................45
Supported formats..........................47
• Supported formats (stereo only)......47
• Conversion table .............................47
Starting SD-Jukebox.......................14
Main screens..................................15
Converting music data....................16
Recording CDs to your PC.............19
Checking out tracks to
an SD Memory Card ......................22
Page 4

4
Contents
System Requirements
In order to use SD-JukeboxV2.4, you need an IBM PC/AT or compatible
computer satisfying the system requirements shown below.
(SD-Jukebox does not run on Macintosh systems.)
SD-Jukebox does not run on Microsoft Windows 3.1/ Windows 95, or Windows NT.SDJukebox may not run properly if your computer has been upgraded from Windows 3.1/ 95
to Windows 98/98SE, Windows 2000, Windows Me, or Windows XP. SD-Jukebox may not
run properly on computers with dual CPUs or multi-boot systems.
If you are upgrading from Windows 98/ 98SE or Windows Me to Windows XP, select
"Upgrade installation (recommended)". If you select "New installation", music data created
with SD-JukeboxV2.x prior to upgrading to Windows XP will no longer be available for use.
• CPU: Pentium
®
233 MHz MMX or faster (Pentium®II 333 MHz or faster recommended)
For Windows XP: Pentium®II 333 MHz or faster (Pentium®III 500 MHz or faster
recommended)
• RAM: 64MB or more (for Windows XP: 128MB or more)
• Hard disk drive: At least 30MB free disk space (more space may be required for music
data and depending on your version of Windows)
• Display: 800×600 or better resolution
Set to High Color (16-bit) or higher
• Sound device: Creative Labs Sound Blaster 16 or compatible device
• CD-ROM drive (required for installation and for CD recording):
A CD-ROM drive capable of digital recording is required. Four-speed or
higher is recommended. (Recording may not work properly with CDROM drives connected through an IEEE1394 or USB connection.)
• USB port (required for connecting SD Memory Card)
(SD-Jukebox may not run properly if the SD Memory Card is connected through a USB
hub or USB extension cable.)
•
If you are using the CDDB function, then an Internet connection is also required
.
*1 SD-Jukebox may not run properly on all PCs meeting the recommended system
specifications.
*2 SD-Jukebox may not run properly on user-built PCs.
OS (English/German/French/Spanish/Italian version)
: Microsoft®Windows®98/98 SE, Windows®2000(Professional SP2),
Windows®Me, Windows®XP(Home Edition/Professional)
Hardware requirements
Page 5
5
Contents
Before you start
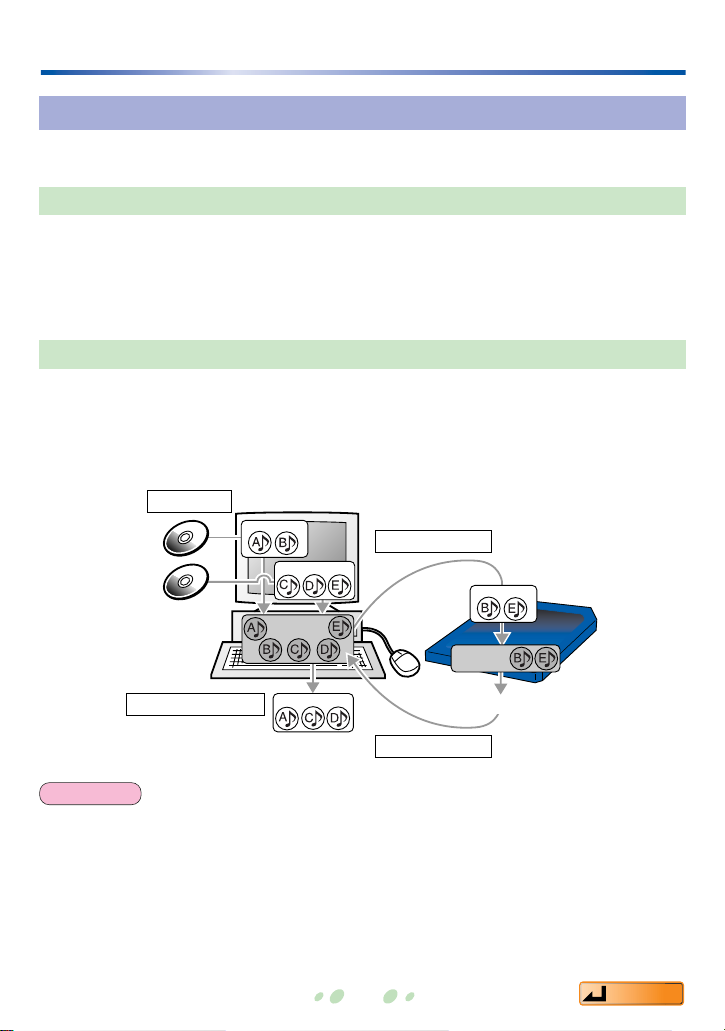
SD-Jukebox Features
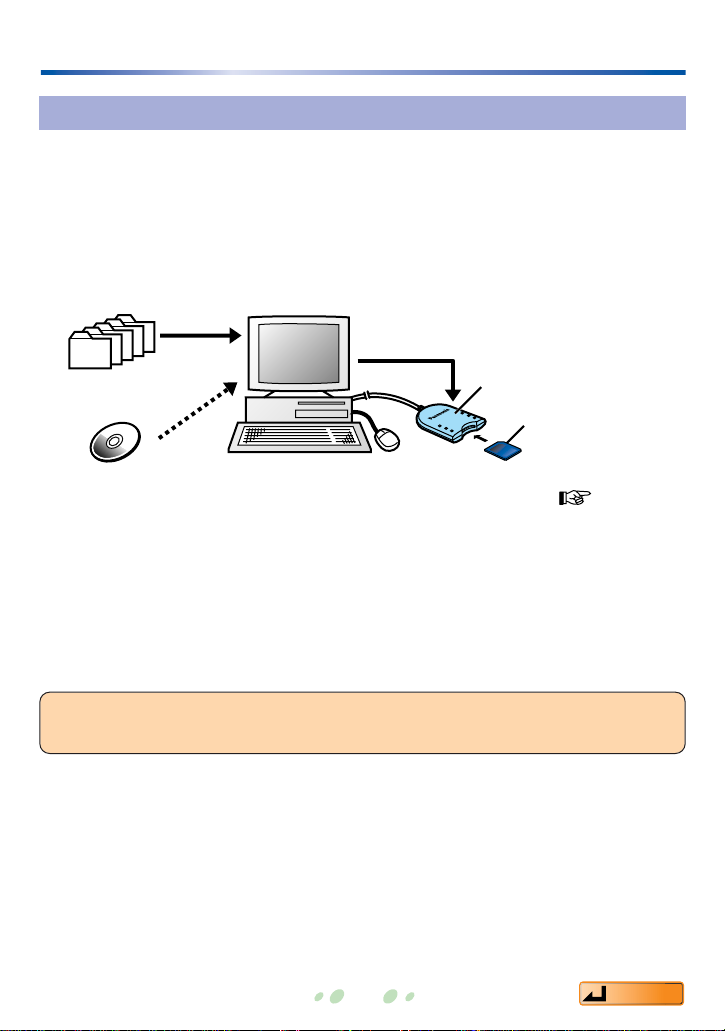
SD-JukeboxV2.4 is a software program that lets you write recorded tracks to an
SD Memory Card. SD-JukeboxV2.4 also lets you record music data from music
CDs to your computer's hard disk drive.
You can play an SD Memory Card by inserting it in the SD Audio Player
(Technics Electronic keyboard). Tracks recorded to an SD Memory Card from a
music CD using the SD Audio Player (Technics Electronic keyboard) can also be
transferred to your PC.
Other features:
• Edit titles, track order, and other information on your PC, and play tracks on
your PC.
• Convert MP3, WAV, and WMA files on your PC's hard disk drive and write
them onto an SD Memory Card.
• In cases where music information is registered at the CDDB site, information
such as album titles can be downloaded just by playing a music CD.
Record
Music CD
MP3/WAV/WMA
Convert
Write
SD Memory Card
(Use a USB
Reader/Writer
to connect to your
PC. Page 11)
USB Reader/Writer
Hard disk
drive
The copyright protection technology used by SD-Jukebox conforms to the
specifications of SDMI (Secure Digital Music Initiative).
Page 6
Before you start
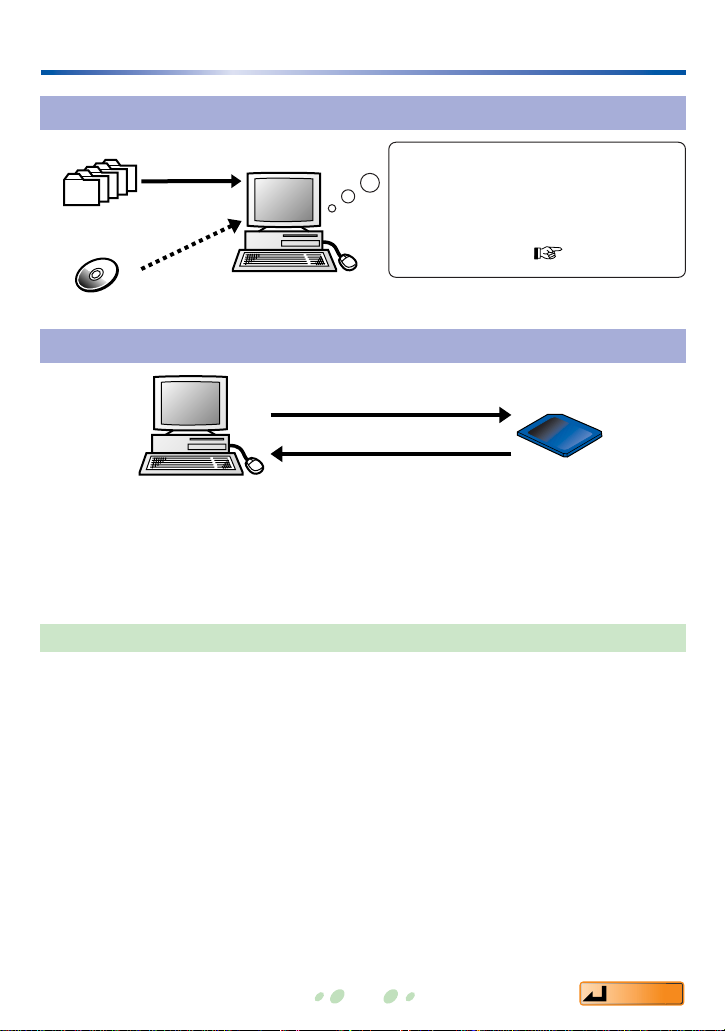
Recorded tracks are stored in compressed form on your PC
Compressed into MPEG-2 AAC format
↓↓
Music data is saved to the hard disk
drive (this collection of music data is
the default playlist
Next page
).
Transferring data between a PC and SD Memory Card
Check out refers to the process of writing tracks recorded on a PC (compressed
music data) to an SD Memory Card. Check in refers to the process of moving
tracks back to the PC from an SD Memory Card.
Check out and check in cannot be done an unlimited number of times.Limits
such as the following apply in order to protect copyrights.
• A track recorded to a PC can be checked out to an SD Memory Card a
maximum of three times.
Therefore, on the <Check out to SD>, only the tracks that have at least one
remaining check out are displayed from the list of all recorded tracks (the PC's
default playlist).
Tracks that have been checked out three times are not displayed.
• When you delete a track from the SD Memory Card's default playlist, the track
is checked in to the PC.
When you check in a track, you increase the check out count for that track on
the PC.
You cannot check in music data that has been deleted from the PC's default
playlist.
Recording
Music CD
MP3/WAV/WMA
Converting
Checkout (write)
Checkin (return)
Check out limit: 3 times
6
Contents
Page 7
7
Contents
Before you start
Playlists
There are two different types of playlists, as described below.
The default playlist is a list of all music data recorded to the PC (or checked out
to an SD Memory Card). When you delete a track from the default playlist, the
music data itself is deleted. (When you delete a track from the default playlist on
an SD Memory Card, the track is checked in to the PC.)
PC Memory card
Checkout
Checkin
Creating a playlist
Recording
Playlist
Playlist
Playlist
Playlist
Default
playlist
Default
playlist
Default playlist (list of all tracks)
When you record music data, a playlist is automatically created on the PC (or on
the SD Memory Card when you check out a track).
After recording or check out, you can select desired tracks from the default
playlist or an existing playlist to create an album (playlist).
Playlists
There are limits on the number of playlists and tracks that can be written to an SD Memory
Card.
• Maximum playlists: 99
• Maximum tracks per playlist: 99
• Maximum tracks per card: 999
NOTE
Page 8
8
Installation
Install the software following the procedures shown below before using SDJukebox.
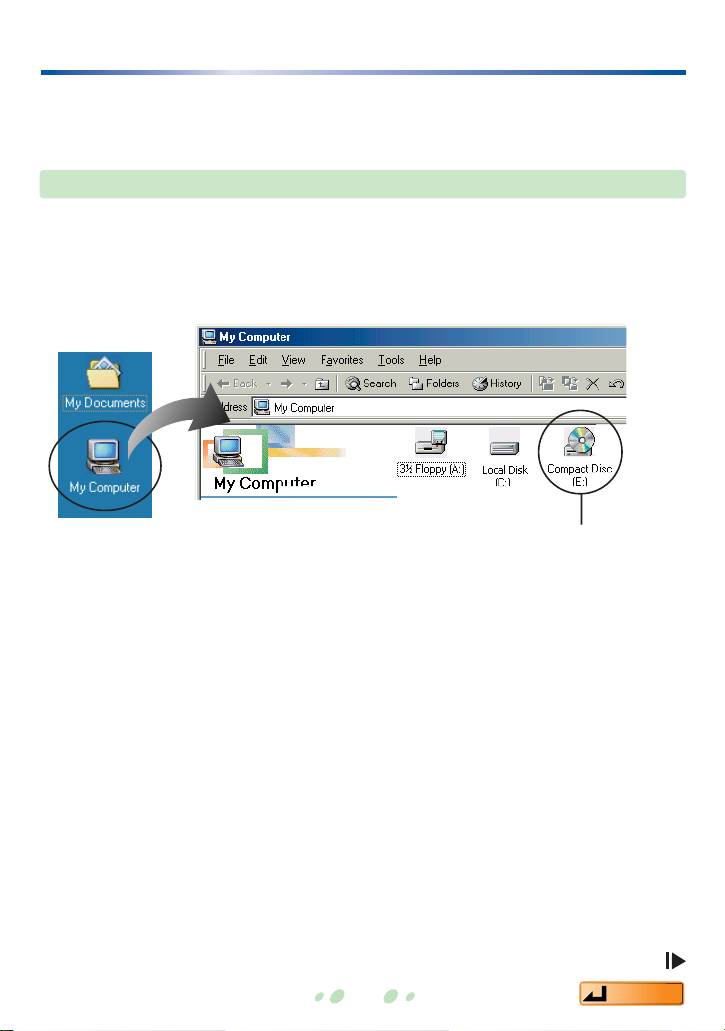
You may need to specify a drive letter during the installation process. Turn on
your PC and start Windows, then check the drive letter before installation as
described below.
If the computer has more than one
CD-ROM drive, select the drive
containing the installation CD-ROM.
Double-click "My
Computer" in the upper
left part of the screen.
*
* <Windows XP>
From the Windows Start menu, click "My computer".
CD-ROM drive
(The drive letter in
this case is "E".)
Checking the drive letter
Continued on next page
Contents
Page 9
9
Contents
Installation
Continued on next page
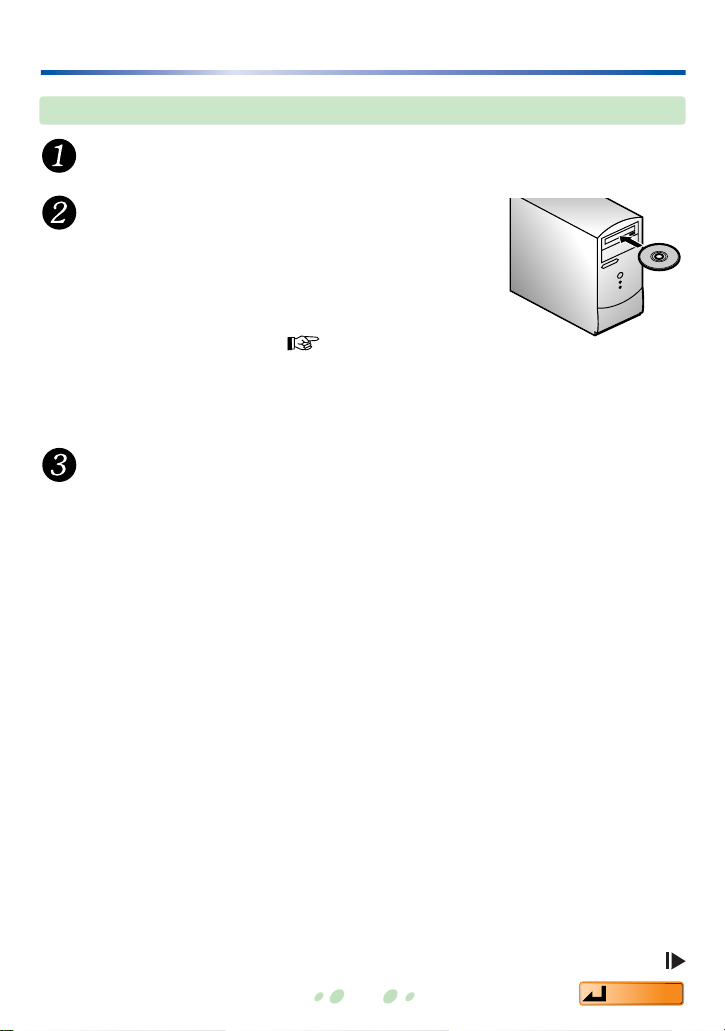
When you insert the CD-ROM, the installer
starts automatically and the <Welcome
Screen> appears.
If the installer does not start, enter the setup file
path to start installation.( page 10)
Installation procedure
Turn on the PC and start Windows.
Insert the installation CD-ROM in
the CD-ROM drive.
Next, follow the on-screen instructions.
Click "Finish" on the <Installation Finished Screen>.
If you select "Yes, restart the computer immediately", the PC will
automatically restart and installation will be completed.
Page 10
10
Contents
Installation
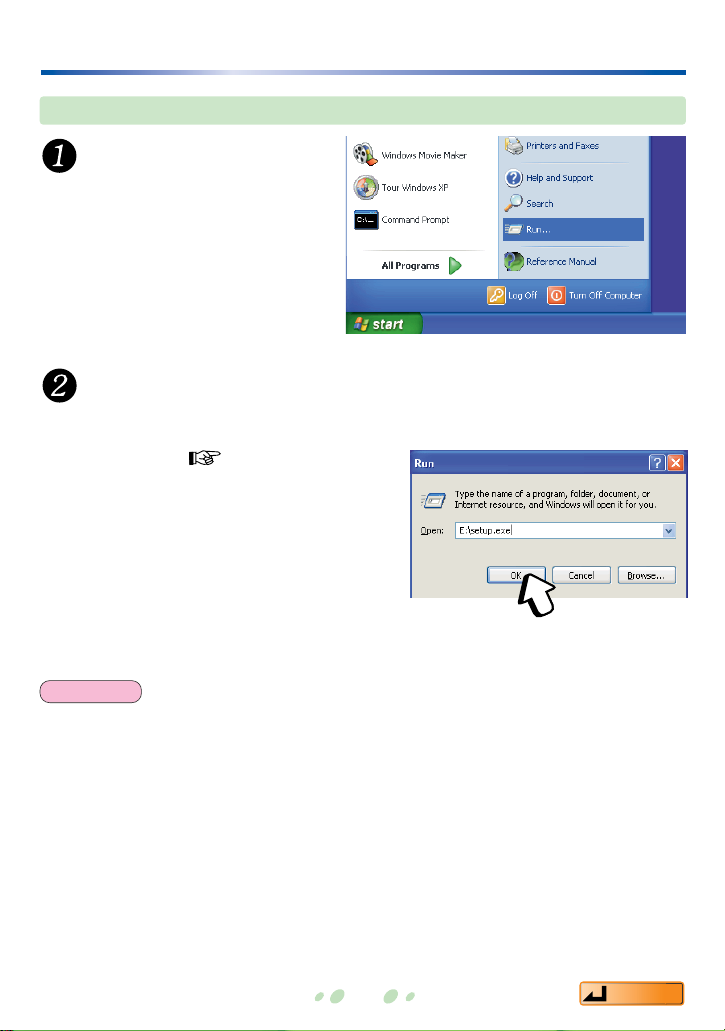
If the installer does not start automatically
From the Windows
Start menu, click
"Run".
Enter [*: setup.exe] and click OK.
/
• The install program starts. Now follow the on-screen instructions.
• Enter the CD-ROM drive letter in place of * above (Drive letter checking
procedure page 8).
• The file path may be entered in
either upper case or lower case.
Be sure to use your computer's administrator account to install SD-Jukebox on a Windows
XP system.
NOTE
Page 11
11
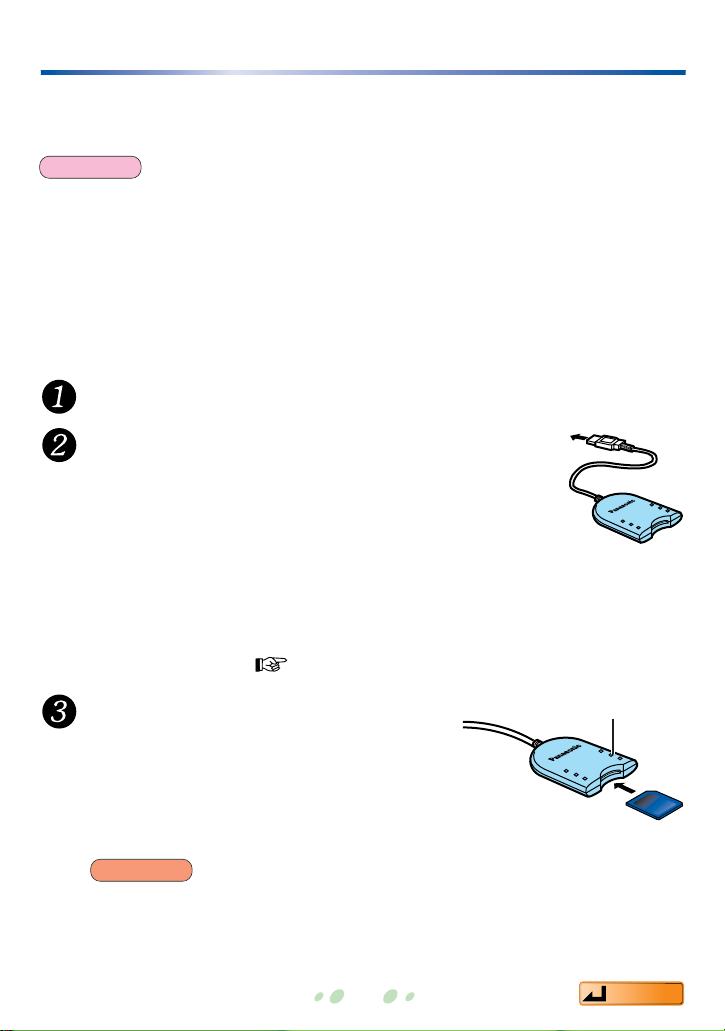
Connecting an SD Memory Card
To check out tracks to an SD Memory Card, you must connect a USB
Reader/Writer (included) to your PC.
Turn on the PC and start Windows.
Insert the USB Reader/Writer
connector into the USB port on
the PC.
The first time you connect the USB Reader/Writer to the PC,
the "Add new hardware" wizard starts. This automatically
changes the computer settings so that it can use the USB
Reader/Writer.
Use Windows Explorer or another file manager to make sure the USB
Reader/Writer drive is displayed as a removable drive.
(If it is not displayed
page
42)
• If you insert the SD Memory Card backwards, you may damage the USB
Reader/Writer slot or damage the card.
• Make sure the USB Reader/Writer ACCESS lamp is off before you remove the
SD Memory Card.
Make sure the SD Memory Card
is facing the correct way, then
insert it in the slot in the USB
Reader/Writer
Insert label-up with
the cut-off corner
facing in
ACCESS lamp
• SD-Jukebox may not run properly in the following cases:
-When two or more USB Reader/Writers or another USB device are connected to a
single PC.
-When the USB Reader/Writer is connected to another SD Memory Card special adapter.
-If you are using a USB hub or USB extension cable.
• Always use an AC adapter when running SD-Jukebox on a notebook computer.
(If the power is cut off while SD-Jukebox is running, data may be lost or the software may
stop working properly.)
To the
computer's
USB port
Contents
NOTE
CAUTION
Page 12

12
Contents
Connecting an SD Memory Card
• Do not allow the USB Reader/Writer to get wet, and do not drop it or
subject it to strong impact.
• Do not place the USB Reader/Writer in a location where it gets hot.
Also do not place it in a location exposed to direct sunlight.
• Do not disassemble or modify the USB Reader/Writer.
• To ensure proper use, carefully read the Operating Instructions
included with your USB Reader/Writer.
USB Reader/Writer
A green question mark may appear next to the [USB large-capacity storage
devices] icon, located under [Universal serial bus controllers] in Device
Manager. However, the USB Reader/Writer will operate properly.
Using the USB Reader/Writer with Windows Me systems
Page 13

13
Connecting an SD Memory Card
Protecting data on an SD Memory Card
If the SD Memory Card is damaged internally or if its data is corrupted, you may
be unable to use the card. Therefore, do not do any of the following before SDJukebox fully starts and while the USB Reader/Writer ACCESS lamp is on:
• Attach or remove the SD Memory Card or USB Reader/Writer
• Intentionally close SD-Jukebox or Windows
• Intentionally turn off the PC (e.g., pull the power cord out of the power
outlet)
After check out, we recommend moving the writeprotect switch on the SD Memory Card to the LOCK
position. Unlock the switch when you want to do a new
check out or check in tracks.
Contents
"LOCK"
Page 14
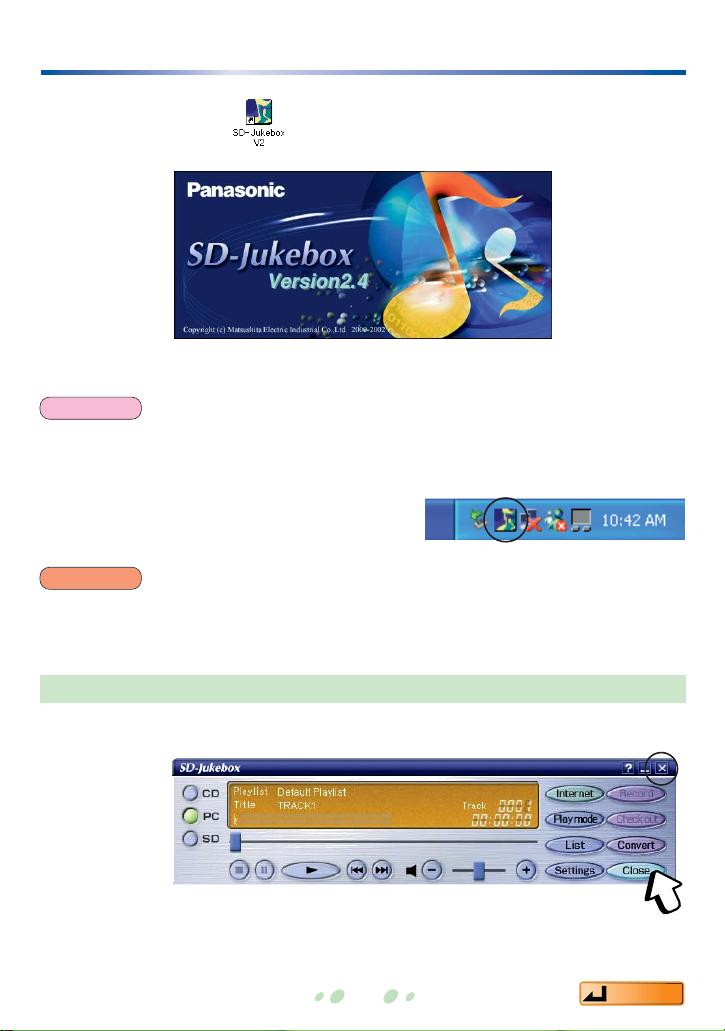
14
Starting SD-Jukebox
• Double-click the icon on the desktop.
The <Main Screen> appears after the <Title Screen>.
You can also exit SD-Jukebox by clicking the "X" button on the screen.
• Click [Close].
<Title Screen>
Exiting SD-Jukebox
• If the icon does not appear on the desktop, then from the Start menu, select [Programs]
→
[Cnc] →[SD-JukeboxV2] →[SD-JukeboxV2.4].
• SD-Jukebox version information
To check which version you have, start SDJukebox and right-click the SD-Jukebox icon on
the task tray. Next, select "About SD-Jukebox".
NOTE
While SD-Jukebox is running, we recommend disabling any power-saving functions
on your equipment (e.g., the PC).
CAUTION
SD-Jukebox icon
Contents
Page 15

15
<Main Screen>
Main screens
<Playlist Screen>
( page 24)
<Convert File Screen>
( page 16)
<Check out to SD Screen>
( page 22)
<CD Recording Screen> ( page 19)
Contents
Page 16

Converting music data
MP3, WMA, and WAV music data files stored on the hard disk drive are
converted to a format that can be written to SD.
Click [Browse].
Click [Convert].
The <Convert File Screen> appears.
The <Browse Folders Screen> appears.
<Main Screen>
<Convert File Screen>
Continued on next page
16
Contents
Page 17

17
Contents
Continued on next page
Converting music data
<Convert File Screen>
Select the checkbox next to the track you want to convert.
• appears next to the selected tracks.
• Click [Select All] to convert all of the tracks.
• To redo the selection, click [Clear All] and then make your selections
again.
Select the folder containing the MP3, WAV, or WMA files
and click [OK].
File names are displayed on the <Convert
File Screen>.
<
Browse for Computer Screen
>
Page 18

• The <Converting File Screen> is
displayed and conversion starts.
• The current track number and the
remaining conversion time are displayed.
• Click [Cancel] to cancel a conversion in
progress. (If you cancel partway through a
track, the track is not converted.)
• When all the tracks have been converted,
the <File Conversion Complete Screen>
is displayed. Click [OK].
Converting music data
Click "Start".
Enter a name in [List to be created].
Input the name directly.
Select the conversion method.
WAV files are automatically converted to AAC.
For MP3 files, normally you should select [MP3 →Secure MP3].
Select [MP3 →Secure AAC] if necessary for the SD Audio Player
(Technics Electronic keyboard) you are using.(
page
47)
Compression format, sampling frequency, and bit rate are not converted
for WMA files.
Copyright-protected WMA files cannot be converted.
NOTE
18
Contents
Page 19

19
Contents
If the CD starts playing automatically as soon as you insert it in the CDROM drive (CD EXTRA or an application with an auto-play function), close
the auto-playing program. You will not be able to use SD-Jukebox until the
auto-playing program is closed.
Click [CD], then [Record].
Recording CDs to your PC
Once recorded, CDs can be automatically checked out to an SD Memory Card.
Insert a CD in your PC's CD-ROM drive.
<Main Screen>
The <CD Recording Screen> appears.
<CD Recording Screen>
To record music to your PC and simultaneously check out the
music to an SD Memory Card, click "Auto check out to SD".
Continued on next page
Page 20

20
Enter names for [List to be created], [Artist], and [Title].
• Enter the names directly in these fields. When the title on the list is
selected, it is overwritten to the title field.
• We recommend changing the name in [List to be created] so that you will
be able to recognize the playlist contents later on the PC.
• If you do not set custom names, then titles will be assigned sequentially
(based on creation sequence and track sequence). Artist names are not
set automatically.
• A maximum of 30 characters can be entered.
Select the checkbox next to the track to be recorded.
• appears next to the selected track.
• To record all tracks, click [Select All].
• To redo the selection, click [Clear All] and then make your selections again.
Recording CDs to your PC
Select the recording quality from the "Record setting" pulldown menu. The
higher the number, the better the quality. However, better quality requires
more memory.
High quality 128 kbps (approximately 64 minutes), standard 96 kbps
(approximately 86 minutes), extended 64 kbps (approximately 129 minutes)
The numbers in parentheses represent the recordable time on a 64MB SD
Memory Card.
Set the recording quality.
Continued on next page
• In cases where music information is registered at the CDDB site, CD data will be
automatically referenced, and the album title (displayed in [List to be created]), together
with the artist name and title information will be downloaded from the site. ( page 45)
(In order to use CDDB function, you must set up an Internet connection for your
computer and establish separate contracts with individual service providers.)
• When you record a CD compatible with the CD TEXT standard, the album title, artist
name, and title information recorded on the CD are acquired automatically. However,
your PC's CD drive must also support CD TEXT in order for this to work.
NOTE
Contents
Page 21

21
Recording CDs to your PC
Click "Start".
• The <Recording Screen> is displayed and
recording starts.
• The current track number and the
remaining recording time are displayed.
• Click [Cancel] to cancel a recording in
progress. (If you cancel partway through a
track, the track is not recorded.)
• When all the tracks have been recorded,
the <Recording complete Screen> is
displayed. Click [OK].
<CD Recording Screen>
After you enter or revise CD track information, you can send the
information to CDDB to register it on their server.
Recordings from CD-R and CD-RW discs may not work properly.
NOTE
During recording, do not remove the CD or remove or insert an SD Memory Card.
CAUTION
Contents
Page 22

Checking out tracks to an SD Memory Card
Select the desired track from the PC's track list and use SD-Jukebox to check
out the track to an SD Memory Card.
Click [PC], then [Check out].
Connect an SD Memory Card.
( page 11)
<Main Screen>
Select the playlist name containing the track you want to
check out.
<Check out to SD Screen>
The <Check out to SD Screen> is displayed.
Continued on next page
22
Contents
Page 23

23
Contents
Checking out tracks to an SD Memory Card
Enter a name in [List to be created].
We recommend changing the name in [List to be created] so that you will
be able to recognize the playlist contents later.
Select the checkbox next to the track being checked out.
• appears next to the selected track..
• To check out all tracks, click [Select All].
• To redo the selection, click [Clear All] and then make your selections
again.
Click "Start".
• The <Checking Out Screen> is displayed,
and the check out process starts.
• The current track number and the
remaining check out time are displayed.
• Click [Cancel] to cancel check out. (If you
cancel partway through a track, the track
is not checked out.)
• When all the tracks have been checked
out, the <Data writing on the SD has been
completed Screen> is displayed. Click
[OK].
Do not remove or insert an SD Memory Card while the <Check out to SD Screen> is
displayed.
CAUTION
Page 24

Checking in tracks from an SD Memory Card to the PC
When you check in a track from the default playlist of an SD Memory Card, the
track is returned to the PC and its check out count is increased.
Click [SD], then [List].
Click a track, then click [Check in].
Select [Default playlist] from the list.
On the <Check in Confirmation Screen>, click [Yes].
The selected track is checked in to the PC.
• Use the same PC as you used for checking out the track.
• If the track has been deleted from the PC's default playlist, you will not be able to check it
in. In this case, the music data itself will be deleted.
• When a track is deleted from the SD Memory Card's playlist, it is simply deleted from the
playlist; it is not checked in.
• If you check in a track which is on multiple playlists, it will be deleted from all of the
playlists on the SD Memory Card.
NOTE
24
Contents
Page 25

25
Contents
Editing
Editing a playlist on the SD Memory Card
• To delete tracks, also click the tracks to be deleted.
• Multiple tracks can be selected.
Click [SD], then [List].
Click the playlist to be deleted.
Click [Delete].
Deleting playlists and tracks (the default playlist cannot be deleted)
Changing the track order (the contents of the default playlist do not change)
Click [SD], then [List].
Select the playlist to be edited.
Drag and drop tracks to change the track order.
• To change a title on the SD Memory Card, first check in the track and change its name
on the PC's default playlist (or playlist), then check the track back out.
• If a track has been deleted from the PC's default playlist, its title cannot be changed.
• After a title has been changed, it can be checked out without checking in to the PC, but
the remaining check out count on the PC will be reduced.
NOTE
Page 26

Editing
1. Right-click "Playlist Name".
3. Enter a name and click [OK].
2. Click "Rename the playlist".
1. Right-click "Playlist Name".
2. Click
"Delete the playlist".
Editing a playlist on the PC
Click [PC], then [List].
Select the playlist to be edited.
Subsequently, follow the appropriate editing procedure.
The <Playlist Edit Screen> is displayed.
Playlists can also be deleted
using [Delete] on the <Playlist
Screen>.
2
Changing the name of a playlist (the default playlist cannot be changed)
Deleting a playlist (the default playlist cannot be deleted)
Continued on next page
26
Contents
Page 27

27
Contents
Editing
• Drag and drop the track you want to move.
1. Right-click the track to be deleted.
2. Click "Delete the track".
1. Right-click the track to
be changed.
2. Click "Edit track Information".
3. Enter a name and click [OK].
The <Advanced Settings Screen> is displayed.
Tracks can also be deleted using [Delete] on the <Playlist Screen>.
1
Changing title and artist names
Deleting a track
Changing the track order (the track order on the default playlist cannot be changed)
When a track is deleted from the default playlist, its music data is deleted and the track
can no longer be checked in.
NOTE
Page 28

Listening to music on the PC
You can use this software to listen to CD tracks, tracks stored on the PC, and
tracks on an SD Memory Card.
Click [CD], [PC], or [SD], then click [List].
Click .
• Playing starts at the first track. When all the tracks on the playlist (or CD)
have been played, playing stops automatically.
• You can start the play session at a particular track by double-clicking the
track.
Select the playlist you want to play.
To listen to all tracks, click [Default Playlist].
<Main Screen>
Continued on next page
28
Contents
Page 29

29
Contents
Button(s) to click
Click while playing (or to start playing)
Click while playing
(after playing stops, the first track is queued)
: Queue previous song : Queue next song
Drag the slider to the right
Drag the slider to the left
: Decrease volume : Increase volume
(Volume can also be adjusted using the volume adjustment
slider)
Play Mode (each time this button is clicked,
the display changes as shown below)
No display (listen to tracks in order starting with the first song)
↓
One-track repeat
↓
All-track repeat
↓
Random
RandomPlaying may stop when you switch modes while
playing. If that happens, click
.
Listening to music on the PC
Function
Pause
Stop
Queue song
Fast forward
Rewind
Volume
adjustment
Change play
modes
You can also use your PC to listen to tracks on an SD Memory Card, if the tracks are in
AAC or MP3 format. You cannot use your PC to listen to tracks stored in WMA format on
an SD Memory Card.
NOTE
While a CD or SD Memory Card is being played, do not remove the CD or SD Memory
Card and do not open the CD-ROM drive tray.
CAUTION
Page 30

2
Names and functions of the screen elements
<Main Screen>
This is the first screen shown when you start SD-Jukebox.
Selects the media type.
Display panel: Displays playlist names, titles, artist names, play modes, track
numbers, and elapsed time.
Changes the play mode.
No display →One-track repeat →All-track repeat →Random.
Displays the <CD Recording Screen>.
Displays the <Check out to SD Screen>.
Displays the MP3/WAV and WMA <Convert File Screen>.
Closes SD-Jukebox.
Displays the <Settings Screen>.
This screen is used for actions such as selecting the playback drive,
entering settings such as the data storage location, and formatting SD
Memory Cards. This cannot be clicked during playback.
Displays the <Playlist Screen>.
Adjusts the volume.
Queues the previous track or the next track.
Starts playback.
Pauses playback.
Stops playback.
Fast-forwards and rewinds.
1
2
3
4
5
6
7
8
9
10
11
12
13
14
15
1
3
4
7
9
5
6
11121415813 10
30
Contents
Page 31

31
Contents
Names and functions of the screen elements
<Playlist Screen>
56
3
1
7
2 2
4
Displays the playlist and the number of tracks on the playlist.When you
double-click a playlist, the tracks on the playlist are displayed in 3.
Click a column to sort the list according to that column.
Displays the title, artist name, and track playing time.
Double-click a track to start playback.
Displays the data format.
Deletes a playlist or track.
Displays the title, creation date, file storage
location, and other details related to the track.
Closes the <Playlist Screen>.
1
2
3
4
5
6
7
Page 32

Names and functions of the screen elements
<CD Recording Screen>
2
1
3
4
10
5
11
6
8
7
9
Used to select the CD-ROM drive containing the CD to be recorded. Initially
the currently selected drive is displayed.
Displays the tracks on the CD in a list. Titles can be entered directly.
Selects all tracks.
Clears all selected tracks.
Displays the track being recorded in red, and displays already-recorded
tracks in black.
Sets the recording quality.
Automatically checks out a track to SD after recording to the PC.
Starts recording.
Closes the screen.
Allows CD track information entered or corrected by the user to be sent to
CDDB and registered on the server.
Sets the base file name which is to be set by default.
1
2
3
4
5
6
7
8
9
10
11
32
Contents
Page 33

33
Contents
Names and functions of the screen elements
<Convert File Screen>
2
1
3
4
7
6
5
8
9
10
Used to select the folder containing the music data (file) to be converted.
Displays just the MP3, WAV, and WMA files that can be converted, along
with their file sizes.
Selects all files.
Deselects currently selected files.
Sets the MP3 conversion method.
Normally, "MP3 →Secure MP3" is selected. Select "MP3 →Secure AAC" if
necessary for the SD Audio Player (Technics Electronic keyboard) you are
using.
Used to enter the name of a new playlist being created.
Displays the track being converted in red, and displays already-converted
tracks in black.
Sets the sound quality of a track which is being converted.
Starts conversion.
Closes the screen.
1
2
3
4
5
6
7
8
9
10
Page 34

Names and functions of the screen elements
<Check out to SD Screen>
2
1
3
4
6
5
7
8
Used to select the PC playlist to be checked out to SD.
Displays the PC playlist tracks and the remaining check out count to SD
Memory Card.
Selects all tracks.
Deselects all currently selected tracks.
A new playlist name to be created on SD is entered here.
Displays the track being checked out in red, and displays already-checkedout tracks in black.
Starts check out.
Closes the screen.
1
2
3
4
5
6
7
8
34
Contents
Page 35

35
Contents
Names and functions of the screen elements
<Check in from SD to PC Screen>
1
2
3
5
6
4
Displays the tracks on the SD.
Selects all tracks.
Deselects all currently selected tracks.
Displays the memory capacity of each.
Starts check in.
Closes the screen.
1
2
3
4
5
6
Page 36

Names and functions of the screen elements
<Settings Screen>
1
2
3
4
6
5
Sets various functions.
Sets the browser and URL to be opened when CDDB is used.
Sets the mute time between tracks.
Formats the SD Memory Card.
Sets the base file name which is to be set by default.
Sets the CDDB function.
1
2
3
4
5
6
36
Contents
Page 37

37
Contents
Names and functions of the screen elements
<CDDB Advanced Settings Screen>
1
2
3
Sets the connection to the Internet.
Sets the CD title database.
Connects to the CDDB site.
1
2
3
Page 38

Formatting an SD Memory Card
When an SD Memory Card is formatted, all data on the card is erased.
Click [Settings] on the <Main Screen> to display the
<Settings Screen>.
Click [Format].
When the <Confirmation Screen> appears, click [Yes].
When the <Formatting Finished Screen> appears, click
[OK].
Formatting starts.
• When an SD Memory Card is formatted tracks checked out using SD-Jukebox as well as
all other data are erased. Before formatting an SD Memory Card, be sure to check its
contents.
• Only use the procedure shown below to format an SD Memory Card. Check out and
playback may not work properly if other formatting procedures are used.
CAUTION
38
Contents
Page 39

39
Contents
Uninstalling SD-Jukebox
Before uninstalling SD-Jukebox, first disconnect the USB Reader/Writer.
From the Windows Start menu, select "Settings"
→→
"Control Panel".
Double-click "Add/Remove Programs".
The <Add/Remove Programs Properties Screen> is displayed.
Click the [Install/Uninstall] tab.
Click [SD-JukeboxV2], then click [Add/Remove].
The <Welcome Screen> appears.
Click [OK].
Click [Finish].
SD-JukeboxV2.4 is deleted, and a <Confirmation Screen> is displayed.
Page 40

Troubleshooting
Problems during installation and startup
Problems during recording to PC
Before requesting service, make the below checks.
(If the steps presented here do not solve your difficulty, check your PC's
operating manual as well.)
If you are in doubt about some of the check points, or if the remedies indicated
in the chart do not solve the problem, contact
North America; the Panasonic Customer Call Center at 1-800-211-7262, or
e-mail consumerproducts@panasonic.com, or web site
(http://www.panasonic.com/sd).
Europe; the Panasonic Europe portal web site http://www.panasonic-europe.com
At these times
Installation does not
work
Unable to start SDJukebox
Check here for problem
• Have you inserted the installation CD-ROM?
• Did you specify the correct CD-ROM drive?
• Under "User Information", did you correctly enter the
number shown on the CD-ROM package?
• Did you install SD-Jukebox onto the hard disk drive?
SD-Jukebox cannot be started directly from the
installation CD-ROM.
•
Does your PC have at least 64MB of RAM? (
page
4)
At these times
Unable to record
Unable to select [CD]
from the <Main Screen>
CD not recognized
Check here for problem
• Is the CD damaged?
• On the <Settings Screen>, check whether the correct
CD-ROM drive (playback drive) has been selected.
• Is there enough free space on the PC's hard disk
drive? (
page
4)
• Check whether a CD has been properly inserted in
the PC.
• Check whether a CD has been properly inserted in
the PC, then click [CD] on the <Main Screen>.
40
Contents
Page 41

41
Troubleshooting
Problems during playback operations
See the SD Audio Player (Technics Electronic keyboard)'s Operating Instructions for
information on playback using the SD Audio Player (Technics Electronic keyboard).
At these times
Unable to play
Unable to start
playback at the first
track
One track (or all
tracks) is played
repeatedly
Unable to play back
from the desired
playlist
There is no sound
or the volume is too
low
Sound quality is
poor
Unable to click a
button
Buzzing sound
CD TEXT information
not displayed
Check here for problem
CD: Has a CD been inserted?
If a CD has been properly inserted, click [CD] on
the <Main Screen>.
PC: Is there music data on the PC?
Is the playback mode set to random?
Check the playback mode in the display panel on the
<Main Screen>. (
page
29)
Is the playback mode set to one-track repeat (or alltrack repeat)?Check the playback mode in the display
panel on the <Main Screen>. (
page
29)
Click [List] on the <Main Screen> to display the
<Playlist Screen>, where you can select the desired
playlist. (
page
28)
• Click to increase the volume.
• Check the volume setting on the PC.Even if the volume
setting in SD-Jukebox is high, if the PC's volume is set
to zero or mute, you won't hear any sound.
The music may have been recorded at a low sound
quality setting. Change the sound quality in "Recording
Settings" and redo the recording. (
page
20)
During playing, you cannot click the [Settings] button
on the <Main Screen>.
Depending on the characteristics of your CD-ROM
drive, you may hear a buzzing type of sound when you
play a CD or recorded music data.
The CD-ROM drive in your PC must support CD
TEXT.
Contents
Page 42

Problem related to SD Memory Card
Check whether the SD Memory Card can be played on the SD Audio Player
(Technics Electronic keyboard).The SD Memory Card may have been damaged
if it cannot be played on the SD Audio Player (Technics Electronic
keyboard).You may be able to use the SD Memory Card if you reformat it, but all
of the data on the card will be erased.
At these times
SD Memory Card not
recognized, or unable to
select [SD] on <Main
Screen>
Unable to select [SD] or [Check
out] on the <Main Screen>, or
[Auto check out to SD] on the
<CD Recording Screen>
USB Reader/Writer drive not
displayed
Unable to check out
Unable to check out even
though there is free space
on the SD Memory Card
Problems after formatting an
SD Memory Card
• The USB Reader/Writer's
ACCESS lamp does not turn off
•
Error messages are displayed,
etc.
Check here for problem
• Check whether the SD Memory Card has been properly
inserted in the USB Reader/Writer (sold separately).
• Check whether the USB Reader/Writer (sold separately)
has been properly connected to the PC.
If the SD Memory Card is still not recognized after the
above procedures, try restarting your PC.
The SD Memory Card may not have been recognized.
Make sure the SD Memory Card has been properly
connected to the PC, then click [SD] on the <Main
Screen> to make the PC recognize the SD Memory Card.
There may be an IRQ (interrupt level) conflict in the PC.
1 From the Windows Start menu, select "Settings" →
"Control Panel". Next, double-click "System".
2
Click the "Device Manager" tab and disable unneeded devices
.
3 Disconnect the USB Reader/Writer and restart the PC.
4 Reconnect the USB Reader/Writer.
• Check out to an SD Memory Card is limited to three
times in order to protect copyrights.(
page
6)
• Is the write-protect switch on the SD Memory Card set to
the LOCK position? (
page
13)
The data may have been altered through Explore or
another program.When an SD Memory Card is formatted
through SD-Jukebox (
page
38), it can be used to
check out tracks.However, formatting an SD Memory Card
erases all of the data on the card, so be sure to check in
the card data you need before formatting.
The card may have been formatted by a program other
than SD-Jukebox. Close SD-Jukebox and remove the
card, then reinsert it.
Troubleshooting
42
Contents
Page 43

43
Contents
Limits related to copyright protection
• In compliance with the stipulations of SDMI (Secure Digital Music Initiative),
SD-Jukebox incorporates software usage limits related to copyright protection.
* Limitations related to SD Memory Cards (
Page
2)
* SD-Jukebox may not work with SD Memory Cards containing copy limitation
information, and music data recorded using DVD audio equipment.
* In cases where the copyright holder or service provider has added music
data use method conditions to the music data, the music data must be used
in accordance with those conditions.
• Pursuant to copyright law, recordings you make may not be used for purposes
other than individual enjoyment without the consent of the copyright holder.
Limitations related to Windows Explorer
• When an SD Memory Card is connected to your PC, it is displayed as an
external drive (e.g., "D drive") in Windows Explorer. Do not use Explore to
move, rename, delete, compress, or otherwise alter music data and folders on
an SD Memory Card. Music data altered through Explorer cannot be played.
Always edit music data through SD-Jukebox.
• Likewise, do not use Windows Explorer to delete, move, rename, or otherwise
alter music data and folders on your PC.
Page 44

End User License Agreement
You ("Licensee") are granted a license for the Software defined in this End User
License Agreement ("Agreement") on condition that you agree to the terms and
conditions of this Agreement. If Licensee does not agree to the terms and
conditions of this Agreement, promptly return the Software to Matsushita Electric
Industrial Co., Ltd. ("Matsushita"), its distributors and agents
Article 1 License
Licensee is granted the right to use the Software, including the information
recorded or described on the CD-ROM, instruction manuals, and any other
media provided to Licensee (collectively "Software"), but all applicable rights
to patents, copyrights, trademarks and trade secrets in the Software are not
transferred to Licensee.
Article 2 Use by a Third Party
Licensee may not transfer or allow any third party, whether free of charge or
not, to use or copy the Software.
Article 3 Restrictions on Copying the Software
Licensee may make a single copy of the Software in whole or a part solely
for back-up purpose.
Article 4 Computer
Licensee may use the Software only on one computer, and may not use it on
more than one computer.
Article 5 Reverse Engineering, Decompiling or Disassembly
Licensee may not reverse engineer, decompile, or disassemble the
Software. Matsushita, or its distributors will not be responsible for any
defects in the Software or damage to Licensee caused by Licensee's reverse
engineering, decompiling, or disassembly of the Software.
Article 6 Indemnification
The Software is provided "AS-IS" without warranty of any kind, either
expressed or implied, including, but not limited to, warranties of noninfringement, merchantability and/or fitness for a particular purpose.
Matsushita or any of its distributors will not be liable for any damage suffered
by Licensee arising from or in connection with Licensee's use of the
Software.
Article 7 Export Control
Licensee agrees not to export or re-export to any country the Software in any
form without the appropriate United States and/or other foreign governmental
export licenses, if necessary.
44
Contents
Page 45

45
Index and glossary
Artist name.......................................20,27
CDDB .....................................................20
A database service provided by Gracenote
(a US company) for finding CDs around
the world. When you play a CD in an
application supporting CDDB, the
application automatically references data
from CDDB and downloads information
such as the artist name and titles.
CD TEXT ................................................20
A standard for recording text information
such as titles onto music CDs. In addition
to voice data, up to 6000 characters of 1byte code (3000 characters of 2-byte
code, for languages, including Japanese)
can be recorded onto a CD. CD TEXT
supports a variety of languages.
CD Recording Screen......................19,32
Check in..............................................6,24
Check in refers to the process of moving
tracks, which have been checked out to
an SD Memory Card, back to the PC.
Check out ...........................................6,22
Check out refers to the process of writing
tracks recorded on a PC to an SD
Memory Card.
Connecting an SD Memory Card.........11
Default playlist...................................7,24
The collection of all recorded or checkedout music data.
Deleting ............................................25,26
Formatting ............................................38
Installing the program............................8
Main screen......................................15,30
MP3 ................................................5,16,47
MP3, which stands for MPEG1 AUDIO
Layer3, is an audio compression system
used with MPEG1. Three layers (Layer1,
Layer2, and Layer3) have been
standardized for MPEG1 AUDIO. Layer3
has the highest compression rate, so
MP3 is used on the Internet and in other
applications.
MPEG-2 AAC...........................................6
MPEG, which stands for Moving Picture
Experts Group, is a standard created by
an organization for compressing
multimedia data. AAC, which stands for
Advanced Audio Coding, is an audio
compression system used with MPEG-2
and MPEG-4. This system enables highquality audio playback with a high
compression rate.
Playing...................................................28
Playlist................................................7,20
A list created by selecting desired tracks.
Playlist Screen ................................24,31
Recording..............................................19
SD Memory Card................................5,11
A memory card containing copyright
protection information. Features include a
fast data transfer rate, and a thinner,
lighter, and more compact form factor
than CompactFlash.
SDMI....................................................2,43
SDMI, which stands for Secure Digital
Music Initiative, is a group of projects
designed to establish a format to enable
safe distribution and sales of music
through music delivery over the Internet
and the like.
Continued on next page
Contents
Page 46

Index and glossary
Song order: how to change............25,27
Starting the program............................14
Title ...................................................20,27
Uninstalling the program.....................39
USB Reader/Writer...........................11,12
Version information .............................14
WMA...............................................5,16,47
WMA, which stands for Windows Media
™
Audio, is a compression format
developed by Microsoft Corporation in the
US. WMA enables sound quality on par
with MP3 while using smaller file sizes.
46
Contents
Page 47

47
Contents
Supported formats
Supported formats (stereo only)
64 kbps
32 kHz
• Music CDs : CD-DA, CD-EXTRA, CD TEXT
• MP3 : MPEG-1 layer3 and MPEG2 layer3 low sampling frequency
variable bit rates supported
• WMA : Windows Media Audio 32 /44.1 /48 kHz, 64~160 kbps
• WAV : PCM 44.1 kHz 16 bits
Sampling frequency and bit rate are not converted during conversion from MP3 to secure
MP3 or conversion from WMA to secure WMA.
Conversion table
Music
CD
MP3
WMA
WAV
Secure
WMA
Secure
MP3
Output format
(2-channel stereo)
CD-DA
CD-EXTRA
16/22.05/24 kHz
32 kbps~192 kbps
32 kHz
32 kbps~192 kbps
44.1 kHz
32 kbps~192 kbps
48 kHz
32 kbps~192 kbps
32 / 44.1/ 48 kHz
64 kbps~160 kbps
44.1 kHz / 172 KB / second
Secure AAC
96 kbps 128kbps
44.1 kHz 48 kHz 44.1 kHz 48 kHz
Input format
(2-channel stereo only)
Page 48

· Panasonic assumes no liability for damaged music data or cases where music cannot
be recorded due to problems with this product or your PC.
·
This product and the contents of this document are subject to change without prior notice
.
· This document presents examples of the operating screens that appear on a system
running Windows XP.
The illustrations and screens in this document may be somewhat different from those
on an actual screen.
· The SD logo is a trademark.
· Portions of this product are protected under copyright law and are provided under license
by ARIS / SOLANA /4C.
· Microsoft and the Microsoft logo, Windows and Windows NT are registered trademarks of
Microsoft Corporation in the US and other countries.
· Windows Media and the Windows logo are registered trademarks
or trademarks of Microsoft Corporation in the US and other
countries.
· Pentium and MMX are registered trademarks of Intel Corporation of the US.
· Sound Blaster 16 is a trademark of Creative Technology, Ltd. of the US.
· IBM and PC/AT are registered trademarks of International Business Machines
Corporation of the US.
·
Macintosh is a trademark of Apple Computer, Inc., registered in the US and other countries
.
· CDDB is a registered trademark of Gracenote.
· Music recognition technology and related data are provided by Gracenote and the
Gracenote CDDB®Music Recognition ServiceSM.
Gracenote is the industry standard in music recognition technology and related content
delivery. For more information go to www.gracenote.com.
Gracenote is CDDB, Inc. d/b/a “Gracenote.” CD and music related data from Gracenote
CDDB®Music Recognition ServiceSM© 2000, 2001 Gracenote. Gracenote CDDB Client
Software © 2000, 2001 Gracenote. U.S. Patents Numbers #5,987,525; #6,061,680;
#6,154,773, and other patents issued or pending.
CDDB is a registered trademark of Gracenote. CDDB-Enabled, the Gracenote logo, the
CDDB Logo, and the “Powered by Gracenote CDDB” logo are trademarks of Gracenote.
Music Recognition Service and MRS are service marks of Gracenote.
· Other system names and product names appearing in this document are in general the
registered trademarks or trademarks of the respective developer companies. Note that
the ™ mark and ® mark do not appear in this document.
M0702SF0
 Loading...