

Page 1

Thank you for purchasing the PX663. The PX663 is operated for the most part in the same way as the PX662,
SX-
PX663
DIGITAL PIANO
therefore read the sections on PX662 in the included instructions. This booklet explains operation and
specifications that differ from the PX662, therefore read it thoroughly.
Wir danken Ihnen für den Kauf des PX663. Das PX663 wird größtenteils so bedient wie das PX662. Lesen Sie
daher die Abschnitte über das PX662 in der beiliegenden Anleitung durch. Dieses Heft erläutert die
Bedienungsvorgänge und Spezifikationen, die von denen des PX662 abweichen. Lesen Sie es daher
aufmerksam durch.
Nous vous remercions d’avoir acheté le PX663. Pour la plus grande partie, le PX663 fonctionne de la même
manière que le PX662. Veuillez donc lire les parties concernant le PX662 dans les instructions incluses. Cette
brochure explique le fonctionnement et les spécifications qui diffèrent du PX662. Veuillez donc la lire
complètement.
Hartelijk dank voor de aanschaf van de PX663. De bediening van de PX663 is bijna hetzelfde als de bediening
van de PX662. Lees daarom de bedieningsaanwijzingen voor de PX662 in de bijgeleverde handleiding. In dit
boekje worden de aanwijzingen en de technische gegevens beschreven die verschillen van de PX662.
Congratulazioni per l’acquisto del PX663. Il PX663 funziona quasi come il PX662, quindi leggete le sezioni
relative al PX662 nelle istruzioni incluse. Questo libretto spiega le operazioni e i dati tecnici diversi dal PX662,
quindi leggetelo tutto attentamente.
Muchas gracias por su compra del PX663. El PX663 funciona casi siempre de la misma forma que el PX662, se
recomienda leer las secciones del PX662 en las instrucciones entregadas. Este manual explica el
funcionamiento y especificaciones que son diferentes del PX662 y debe estudiarse a fondo.
Tak for købet af PX663. Model PX663 anvendes i det store og hele på samme måde som PX662, og det
anbefales derfor, at du læser afsnittene om PX662 i den medfølgende brugervejledning. I dette hæfte forklares
betjeninger og specifikationer, som afviger fra PX662. Læs derfor disse afsnit grundigt.
感謝您購買 PX663。
PX663 的操作絕大部分與 PX662 相同,所以,請閱讀附帶的說明書中有關 PX662 的部分。本手卌對於與 PX662 不
同的操作和規格予以說明,務請一閱。
CAUTION:
TO PREVENT ELECTRIC SHOCK MATCH WIDE
BLADE OF PLUG TO WIDE SLOT, FULLY INSERT.
ATTENTION!
NE PAS INSTALLER CET APPAREIL DANS UNE
BIBLIOTHÈQUE, UNE ARMOIRE OU TOUT AUTRE
ESPACE CONFINÉ. S’ASSURER QUE LA
VENTILATION DE L’APPAREIL EST ADÉQUATE.
AFIN D’ÉVITER TOUT RISQUE DE CHOC
ÉLECTRIQUE OU D’INCENDIE DÛ À UN
SURCHAUFFEMENT, S’ASSURER QUE RIDEAUX
OU TOUT OBJET QUELCONQUE NE BOUCHENT
LES ÉVENTS D’AÉRATION DE L’APPAREIL.
(for U.S.A.).
(Pour le Canada)
警告:
為了減少火災、觸電或產品損壞的危險,請勿讓本機遭
受雨淋、受潮、滴上或濺上水,也不要將諸如花瓶等盛
水之物置於本機上。
注意!
•
為了確保良好的通風條件,請勿將本機安裝或置於書
櫃、內藏式機櫃或其他密閉的空間裡。勿讓窗簾或任
何其他物體堵塞通風孔,以免因過熱而造成觸電或火
災危險。
•
切勿讓報紙、桌布、窗簾等物品堵塞住本機的通風孔。
•
切勿將諸如點燃的蠟燭等明火火源置於本機上。
•
廢棄處理電池時要盡量採取不破壞環境的方式。
只限於台灣
緊急處理方法
為防止使用者及其他人之危害及生命財產的損失,如有
發生異常時,請立即拔出電源㌔插頭並停止使用。
、、、、
仇峽式窮三
序笥斌兆
序笥斌兆各各各各
序笥斌兆序笥斌兆
防和彿儷親室紘芸嗤㍉巷望
防和彿儷親室紘芸嗤㍉巷望
防和彿儷親室紘芸嗤㍉巷望防和彿儷親室紘芸嗤㍉巷望
羅羅羅羅 臼偏佚吶揃5粁2催5~6促
TEL:886-2-2725-9100
TEL:886-2-2725-9100
TEL:886-2-2725-9100TEL:886-2-2725-9100
仇峽式窮三
仇峽式窮三仇峽式窮三
臼偏佚吶揃5粁2催5~6促
臼偏佚吶揃5粁2催5~6促臼偏佚吶揃5粁2催5~6促
Page 2

THE FOLLOWING APPLIES ONLY IN THE U.S.A.
Safety
Installation
Placement
Environment
Maintenance
Service
IMPORTANT SAFETY INSTRUCTIONS
Read these operating instructions carefully before using the unit. Follow the safety instructions on the unit and
the safety precautions listed below. Keep these operating instructions handy for future reference.
Carts and stands—Use the unit
6.
only with carts and stands recom-
Power Source—Connect the unit to a power
1.
source of the type described in these instructions
or as marked on the unit.
Polarization—The unit is equipped with a polar-
2.
ized power plug where one blade is wider than the
other. This safety feature ensures that the plug fits
into your household AC outlet only one way. If the
plug doesn’t fit one way, try reversing it. If the
plug still doesn’t fit, contact an electrician to
replace the obsolete outlet. Do not attempt to
defeat the safety purpose of the plug.
Power Cord protection—Route the AC power
3.
supply cord so that it will not be walked on or
pinched by items placed on or against it. Never
take hold of the plug or cord with wet hands.
Always grasp the plug body firmly when connecting and disconnecting it.
Overloading—When connecting the AC power
4.
supply cord, be careful not to overload the household AC outlet, extension cord, or outlet from any
other device as this can result in fire or electric
shock.
Nonuse periods—Turn the unit off when it is not
5.
in use. Unplug the unit from the household AC
outlet if it is not to be used for a long time. Unplug
the unit during lightning storms.
Attachments and accessories—Use only the
6.
attachments and accessories recommended in
these operating instructions.
mended by the manufacturer.
Move carts with care. Sudden
stops, excessive force, and
uneven surfaces can cause carts
to overturn.
Wall and ceiling mounting—Do not mount the
7.
unit on walls or ceilings unless specified in the
instructions.
Water and moisture—Do not use the unit near
1.
water, such as near a bathtub or swimming pool.
Avoid damp basements.
Heat—Situate the unit away from heat sources,
2.
such as radiators.
Do not situate where temperatures fall below 5°C
(41°F) or rise above 35°C (95°F).
(See page 4 OWNER’S MANUAL for details.)
Unplug the unit from the household AC outlet before
cleaning.
Clean with a damp cloth.
Do not use abrasive pads, scouring powders, or
solvents.
Ventilation—Situate the unit so that it receives
1.
proper ventilation. Do not install in a confined
space such as a bookcase or cabinet. Allow at
least 10 cm (4 inches) clearance from the rear of
the unit. To prevent the risk of electric shock or
fire due to overheating ensure curtains and other
materials do not obstruct the unit’s ventilation.
Foreign material—Ensure objects and liquids do
2.
not get into the unit. Avoid exposing the unit to
excessive smoke, dust, mechanical vibration, and
shock.
Magnetism—Situate the unit away from equip-
3.
ment and devices that generate strong magnetic
fields.
Stacking—Do not place heavy objects on top of
4.
this unit.
Surface—Place the unit on a flat, level surface.
5.
Damage Requiring Service—The unit should be
1.
serviced by qualified service personnel if:
(a)The AC power supply cord or the plug has
been damaged; or
(b)Objects or liquids have gotten into the unit; or
(c) The unit has been exposed to rain; or
(d)The unit does not operate normally or exhibits
a marked change in performance; or
(e)The unit has been dropped or the cabinet dam-
aged.
Servicing—Do not attempt to service the unit
2.
beyond that described in these operating instructions. Refer all other servicing to authorized servicing personnel.
Replacement parts—When parts need replac-
3.
ing ensure the servicer uses parts specified by the
manufacturer or parts that have the same characteristics as the original parts. Unauthorized substitutes may result in fire, electric shock, or other
hazards.
Safety check—After repairs or service, ask the
4.
servicer to perform safety checks to confirm that
the unit is in proper working condition.
2
Page 3

■ DEMO
SOUND
GRAND UPRIGHT E PIANO HARPSI STRINGS ORGAN
VIBES /
VOCAL
VARIATION
123456
PIANO
Sound Name Song Titles Composer
1 Polonaise Heroique Chopin
2 Clair De Lune (Suite bergamasque) Debussy
GRAND
GRAND (VARIATION) Beautiful Dreamer Foster
UPRIGHT My Lady’s-ride (25 Easy Studies Op.100) Burgmüller
UPRIGHT (VARIATION) Maple Leaf Rag Joplin
E PIANO Amazing Grace Traditional
E PIANO (VARIATION) Technics Original
HARPSI Italian Concerto BWV971 Bach
HARPSI (VARIATION) Prelude in C # major No.3 from Book 1 of 48
STRINGS Technics Original
STRINGS (VARIATION) Loch Lomond Traditional
ORGAN Courante from Bach’s Suite No.5 in G major
ORGAN (VARIATION) The House of the Rising Sun Traditional
VIBES La Paloma Traditional
VOCAL (VARIATION) Ave Maria Burgmüller
3 from Sonata A major (K331) Mozart
4 Technics Original
5 Danny Boy Traditional
6 Swannee River Traditional
Bach
Preludes & Fugues (BMV 848)
Bach
(BMV 816)
Press the DEMO button and select a SOUND for the demo. To listen to a demo with tonal variation, press the
VARIATION button so that the lamp lights, before selecting the SOUND.
When the demo is over, press the DEMO button again.
• There are 6 demos in GRAND (VARIATION off). Select one of the flashing buttons.
• Pressing and holding the DEMO button for a few seconds plays a medley of all demo tracks.
Drücken Sie die DEMO-Taste, und wählen Sie einen SOUND für die Demonstration aus. Um eine
Demonstration mit Klangvariationen wiederzugeben, drücken Sie die VARIATION-Taste, so dass die Lampe
aufleuchtet, bevor Sie den SOUND auswählen.
Wenn die Demonstration beendet ist, drücken Sie die DEMO-Taste erneut.
• Im Modus GRAND (VARIATION aus) sind 6 Demonstrationen verfügbar. Wählen Sie eine der blinkenden
Tasten.
• Wenn Sie die DEMO-Taste ein paar Sekunden lang gedrückt halten, wird ein Medley aller Demotracks
abgespielt.
Appuyer sur la touche DEMO et sélectionner une SOUND pour la démonstration. Pour écouter une
démonstration avec les variations de tonalités, appuyer sur la touche VARIATION afin que le témoin s’allume
avant de sélectionner la SOUND.
Lorsque la démonstration est terminée, appuyer de nouveau sur la touche DEMO.
• GRAND contient 6 démonstrations (VARIATION désactivé). Sélectionner l’une des touches clignotantes.
• Presser et maintenir la touche DEMO pendant quelques secondes pour effectuer la lecture d’un pot-pourri de
toutes les plages de démonstration.
3
Page 4

Druk op de DEMO knop en selecteer een SOUND voor de demonstratie. Om naar een demonstratie te luisteren
met een toonvariatie, drukt u op de VARIATION knop zodat het lampje oplicht, voordat u de SOUND selecteert.
Wanneer de demonstratie voorbij is, drukt u nog een keer op de DEMO knop.
• Er zijn 6 demonstraties in GRAND (VARIATION uit). Selecteer een van de knipperende knoppen.
• Wanneer de DEMO knop een paar seconden wordt ingedrukt en vasthouden, wordt een medley van alle
demonstratie-tracks weergegeven.
Premete il pulsante DEMO e selezionate una SOUND per il brano demo. Per ascoltare un brano demo con una
variazione di tonalità, premete il pulsante VARIATION in modo che la lampadina si illumini, prima di selezionare
la SOUND.
Quando l’esecuzione del brano demo è finita, premete di nuovo il pulsante DEMO.
• Ci sono 6 brani demo in GRAND (VARIATION disattivata). Selezionate uno dei pulsanti lampeggianti.
• Premendo e tenendo abbassato il pulsante DEMO per alcuni secondi un insieme di tutti i brani demo sarà
riprodotto.
Pulse el botón DEMO y seleccione un SOUND para la demostración. Para escuchar una demostración con
variaciones de tono, pulse el botón VARIATION para que se encienda la luz antes de seleccionar el SOUND.
Cuando se termina la demostración, vuelva a pulsar el botón DEMO.
• Hay 6 demostraciones en GRAND (VARIATION desactivado). Seleccione uno de los botones que destellan.
• Cuando se mantiene pulsado el botón DEMO durante unos segundos se reproduce un popurrí de todas las
canciones de demostración.
Tryk på DEMO-knappen og vælg en SOUND til demonstrationen. For at høre en demo-tone med tonal variation,
skal du trykke på VARIATION-knappen, så lampen begynder at lyse, inden du vælger SOUND.
Tryk på DEMO-knappen igen, når demonstrationen er færdig.
• Der er 6 demonstrationer i GRAND (VARIATION deaktiveret). Vælg en af de blinkende knapper.
• Hvis DEMO-knappen holdes inde i et par sekunder, vil et potpourri af alle demonstrationssporene blive
afspillet.
按下 DEMO 按鈕,選擇示範曲目的喜愛的 SOUND。如果想聽 VARIATION 音色的示範曲目,請按下 VARIATION 按鈕,
指示燈點亮後,再選擇 SOUND。
再按一次 DEMO 按鈕,試聽結束。
• GRAND 中(VARIATION:關)有 6 種示範曲目。請從閃爍的按鈕中選擇一個。
• 持續按 DEMO 按鈕數秒鐘,全部示範曲目混合演奏。
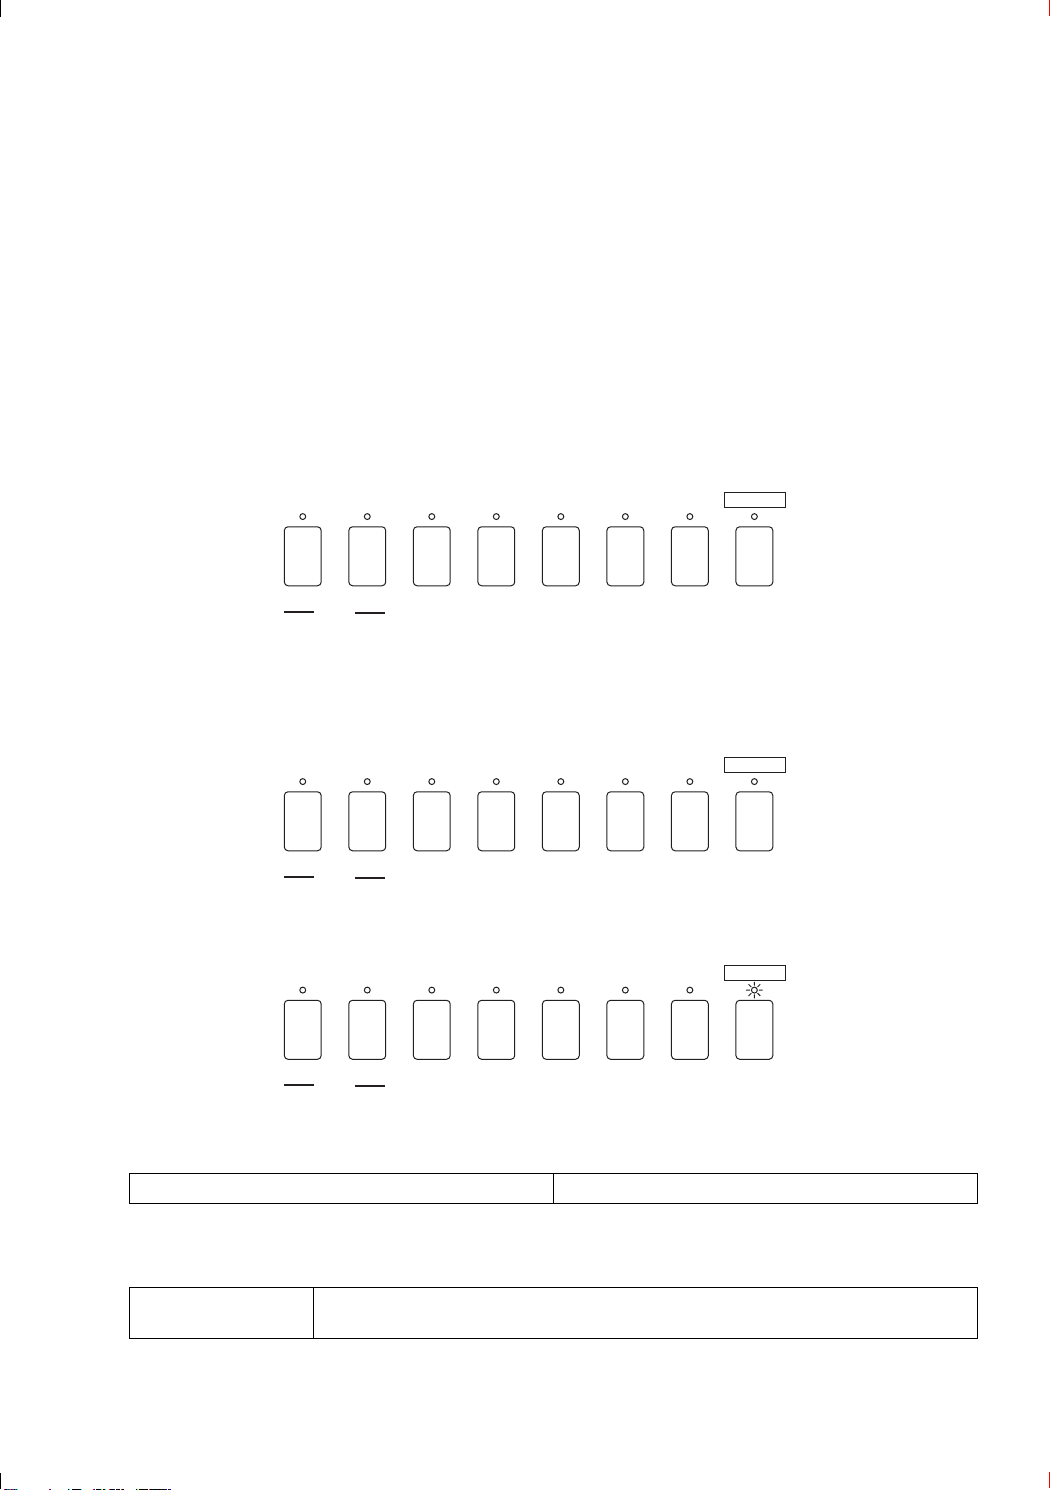
■ SOUND VARIATION
SOUND
GRAND UPRIGHT E PIANO HARPSI STRINGS ORGAN
PIANO
Each SOUND has a number of variation. This tonal variation can be selected by first pressing a tone button and
then pressing the VARIATION button so that it lights up. To mix 2 sounds, set VARIATION on/off ahead of time.
Für jeden SOUND gibt es eine Reihe von Variationen. Sie können diese Klangvariationen wählen, indem Sie
zuerst eine Klangtaste und dann die VARIATION-Taste drücken, so dass sie aufleuchtet. Um 2 Klänge zu
mischen, schalten Sie VARIATION vorher ein/aus.
Chaque SOUND est dotée d’un certain nombre de variations. Ces variations de tonalité peuvent être
sélectionnées en commençant par appuyer sur une touche de tonalité, puis en appuyant sur la touche
VARIATION pour l’allumer. Pour mélanger 2 tonalités, régler au préalable VARIATION sur marche/arrêt.
VIBES /
VOCAL
VARIATION
Elke SOUND heeft een aantal variaties. Deze toonvariatie kan geselecteerd worden door eerst een toonknop in
te drukken en dan op de VARIATION knop te drukken zodat deze oplicht. Om 2 tonen te mengen, zet u
VARIATION vooraf aan/uit.
4
Page 5
Ogni SOUND ha un numero di variazioni. Questa variazione di tonalità può essere selezionata premendo prima
GRAND UPRIGHT E PIANO HARPSI STRINGS ORGAN
VIBES /
VOCAL
VARIATION
PIANO
SOUND
024681012
il pulsante di una tonalità e poi premendo il pulsante VARIATION per farlo illuminare. Per miscelare due tonalità,
impostate anticipatamente VARIATION attivata/disattivata.
Cada SOUND tiene una serie de variaciones. Esta variación de tonos puede seleccionarse pulsando primero un
botón de tono y después pulsando el botón VARIATION para que se encienda. Para mezclar 2 tonos,
seleccione antes la activación/desactivación de la VARIATION.
Hver SOUND har et antal variationer. Denne tonale variation kan vælges ved at man først trykker på en
toneknap og derefter trykker på VARIATION-knappen, så den begynder at lyse. Vælg VARIATION
aktiveret/deaktiveret på forhånd, hvis du vil mixe 2 toner.
各種 SOUND 都可變化,按 VARIATION 按鈕後,可以選擇。如果想將兩種音色混合,請預先將 VARIATION 予以
ON/OFF 設定。
■ MULTI TIMBRE CHANNEL
SOUND
GRAND UPRIGHT E PIANO HARPSI STRINGS ORGAN
1234567
PIANO
VIBES /
VOCAL
VARIATION
■ PROGRAM CHANGE NUMBER
• VARIATION OFF
• VARIATION ON
SOUND
GRAND UPRIGHT E PIANO HARPSI STRINGS ORGAN
VIBES /
VOCAL
135791113
PIANO
■ MIDI Implementation Chart
Prog Change (Recognized) 0 – 13 (PX663)
VARIATION
■ Specification
SOUND
14 SOUNDS (7 SOUNDS x 2 VARIATIONS)
GRAND, UPRIGHT, E PIANO, HARPSI, STRINGS, ORGAN, VIBES/VOCAL
5
Page 6

• This product may receive radio interference caused by mobile telephones during use. If such interference is
apparent, please increase separation between the product and the mobile telephone.
• Dieses Gerät kann beim Betrieb Hochfrequenzstörungen auffangen, die von einem in der Nähe
verwendeten Handy verursacht werden. Falls eine solche Störbeeinflussung festgestellt wird, sollte das
Handy in größerer Entfernung von diesem Gerät betrieben werden.
• Ce produit peut être perturbé par les ondes des téléphones mobiles pendant l’utilisation. Si vous constatez
une telle interférence, éloignez le téléphone mobile du produit.
• Tijdens het gebruik is dit product vatbaar voor radiostoring veroorzaakt door een mobiele telefoon.
Wanneer dergelijke storing optreedt, moet u dit product en de mobiele telefoon verder van elkaar vandaan
gebruiken.
• Durante l’uso, questo prodotto potrebbe essere soggetto all’interferenza radio causata dal cellulare. Se si
dovesse verificare tale interferenza, aumentare la distanza tra questo prodotto e il cellulare.
• Este producto puede tener interferencias causadas por teléfonos móviles durante su utilización. Si tales
interferencias resultan evidentes, aumente la separación entre el producto y el teléfono móvil.
• Dette produkt kan modtage radiointerferens forårsaget af mobiltelefoner under brug. Hvis interferens
forekommer, bedes du venligst øge afstanden mellem produktet og mobiltelefonen.
• Det kan inträffa att den här produkten under användningen tar emot radiostörningar, orsakade av
mobiltelefoner. Öka avståndet mellan produkten och mobiltelefonen om störningarna är uppenbara.
• 本產品在使用過程中,可能會受到移動電話的無㌔電波干擾。如果這種干擾明顯的話,請將本產品遠離移動
電話使用。
• Although the AC power switch is in the “OFF” position, the unit is not completely disconnected from the
mains. Remove the mains plug from the outlet if you will not be using the unit for an extended period of
time. Place the unit so the mains plug can be easily removed.
• Selbst wenn sich der Netzschalter in der Stellung “OFF” befindet, ist das Gerät nicht völlig vom Stromnetz
getrennt. Ziehen Sie den Netzstecker von der Steckdose ab, wenn Sie das Gerät längere Zeit
nicht benutzen werden. Stellen Sie das Gerät so auf, dass sich der Netzstecker leicht abziehen
lässt.
• Même si l’interrupteur d’alimentation secteur est sur la position “OFF”, l’appareil n’est pas complètement
déconnecté du secteur. Débranchez la fiche d’alimentation secteur de la prise de courant si vous ne
prévoyez pas d’utiliser l’appareil pendant une longue période. Placez l’appareil de manière que la fiche
d’alimentation secteur puisse être débranchée facilement.
• Wanneer de netschakelaar in de “OFF” stand staat, is het apparaat niet volledig van het lichtnet
losgekoppeld. Trek de stekker uit het stopcontact wanneer u het apparaat geruime tijd niet denkt te
gebruiken. Plaats het apparaat zodanig dat de stekker gemakkelijk uit het stopcontact kan worden
getrokken.
• Sebbene l’interruttore di alimentazione è sulla posizione “OFF”, l’apparecchio non è completamente
scollegato dalla rete elettrica. Rimuovere la spina del cavo di alimentazione dalla presa a muro se l’unità
non verrà usata per un lungo periodo di tempo. Collocare l’unità in un posto dove la spina del cavo di
alimentazione possa essere facilmente rimossa.
• Aunque el interruptor eléctrico de CA esté en la posición “OFF”, la unidad no está completamente
desconectada del sistema eléctrico. Desenchufe el cable eléctrico del tomacorriente si no va a utilizar la
unidad durante largo tiempo. Instale la unidad de tal forma que pueda desenchufar fácilmente el cable
eléctrico.
• Selv om hovedbryteren er i “OFF”-posisjonen, er apparatet ikke fullstendig koplet fra nettstrømmen. Ta
nettstrømpluggen fra stikkontakten når du ikke vil bruke apparatet i lengre tid. Plasser apparatet der du
med letthet kan ta av pluggen.
•Även medan strömbrytaren står i läget OFF är nätströmmen till instrumentet inte helt frånkopplad. Dra ut
stickkontakten ur nätuttaget, om instrumentet inte ska användas under en längre tid. Placera instrumentet
så att stickkontakten lätt kan dras ut ur nätuttaget.
• Vaikka verkkokytkin on asennossa “OFF”, laite ei ole kytkeytynyt kokonaan irti verkosta. Irrota
verkkopistoke pistorasiasta, jos laitetta ei aiota käyttää pitkähköön aikaan. Sijoita laite niin, että
verkkopistoke voidaan irrottaa helposti.
• Selv om vekselstrømsafbryderen er i stilling “OFF”, betyder dette ikke, at apparatet er taget helt ud af
forbindelse med lysnettet. Tag netledningsstikket ud af stikkontakten i væggen, hvis apparatet ikke skal
anvendes i et længere tidsrum. Anbring apparatet således, at netledningsstikket nemt kan tages ud.
QQTG0709A
Se0503S0
6
 Loading...