

Page 1
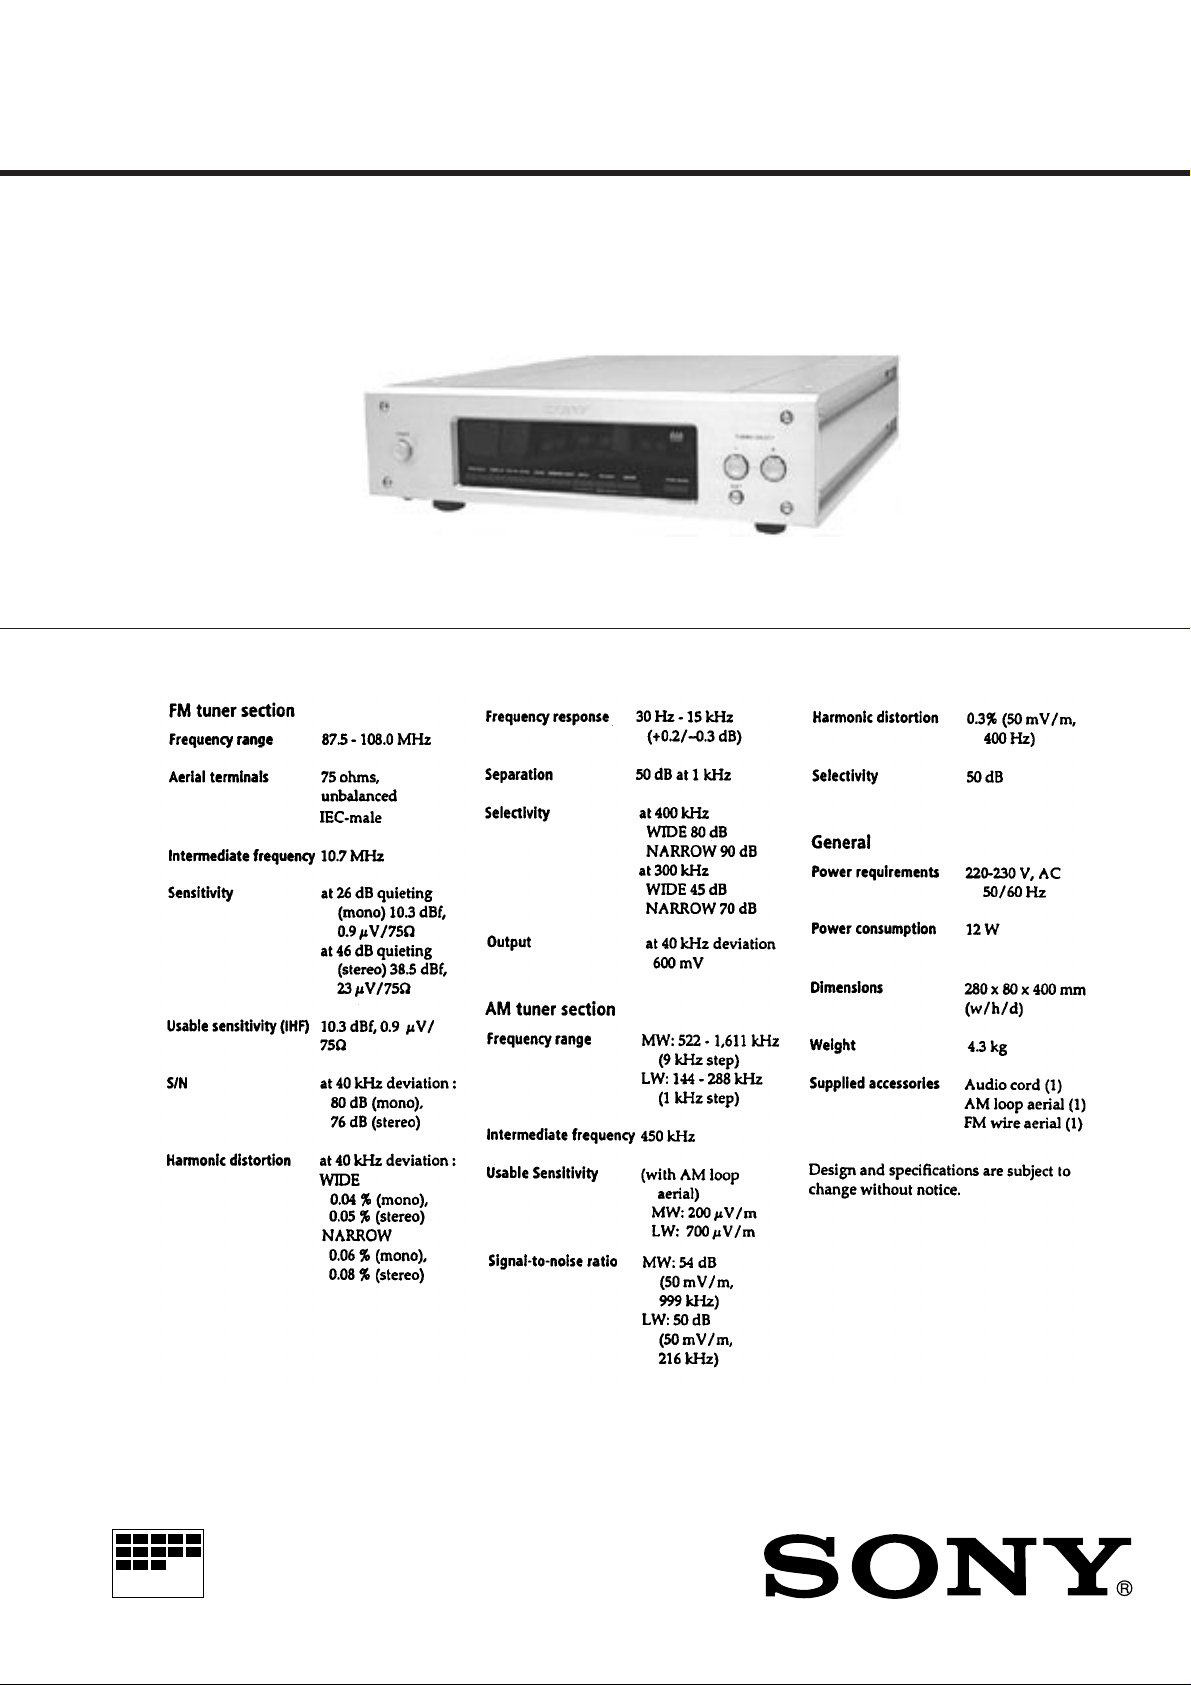
ST-S3000ES
SERVICE MANUAL
SPECIFICATIONS
AEP Model
MICROFILM
FM STEREO FM-AM TUNER
— 1 —
Page 2
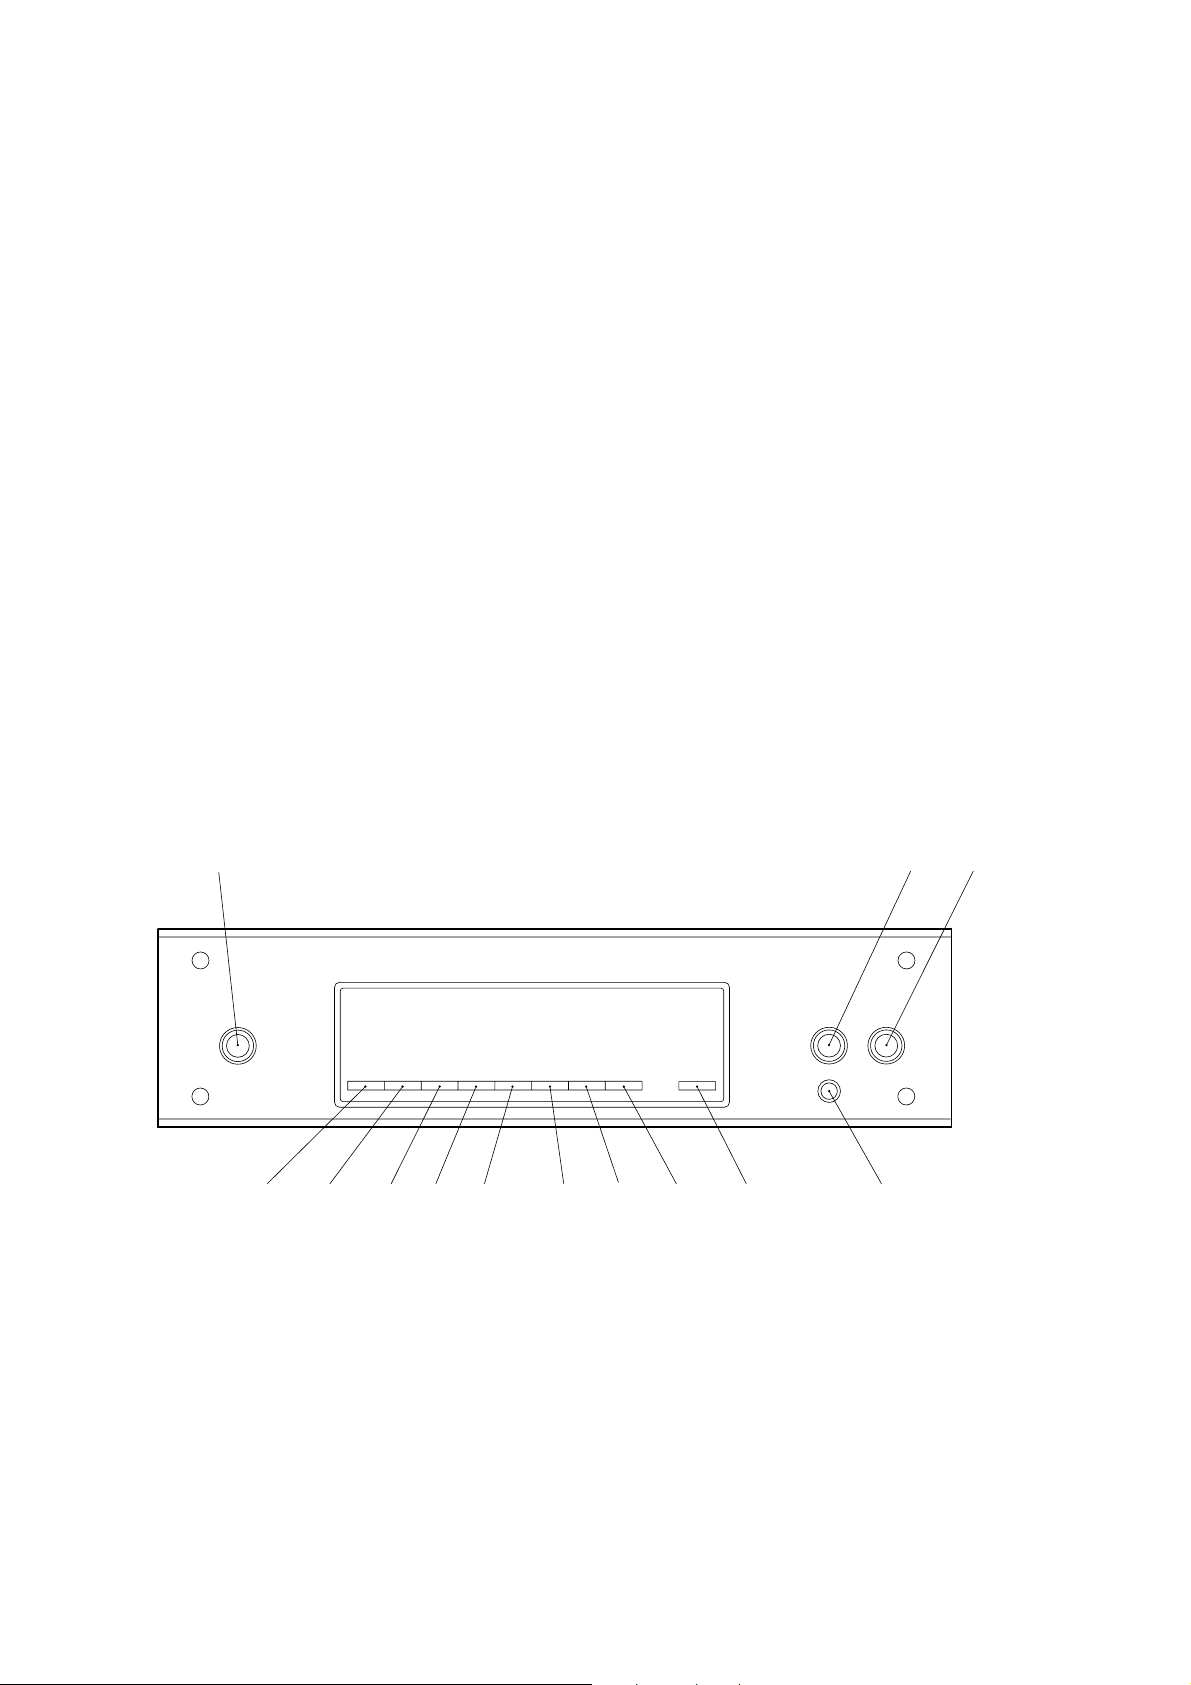
TABLE OF CONTENTS
SAFETY-RELATED COMPONENT WARNING !!
1. GENERAL ...................................................................
2. TEST MODE ................................................................3
3. ELECTRICAL ADJUSTMENT ..................................... 4
4. DIAGRAMS
4-1. Waveforms..........................................................................7
4-2. IC Block Diagrams ............................................................. 8
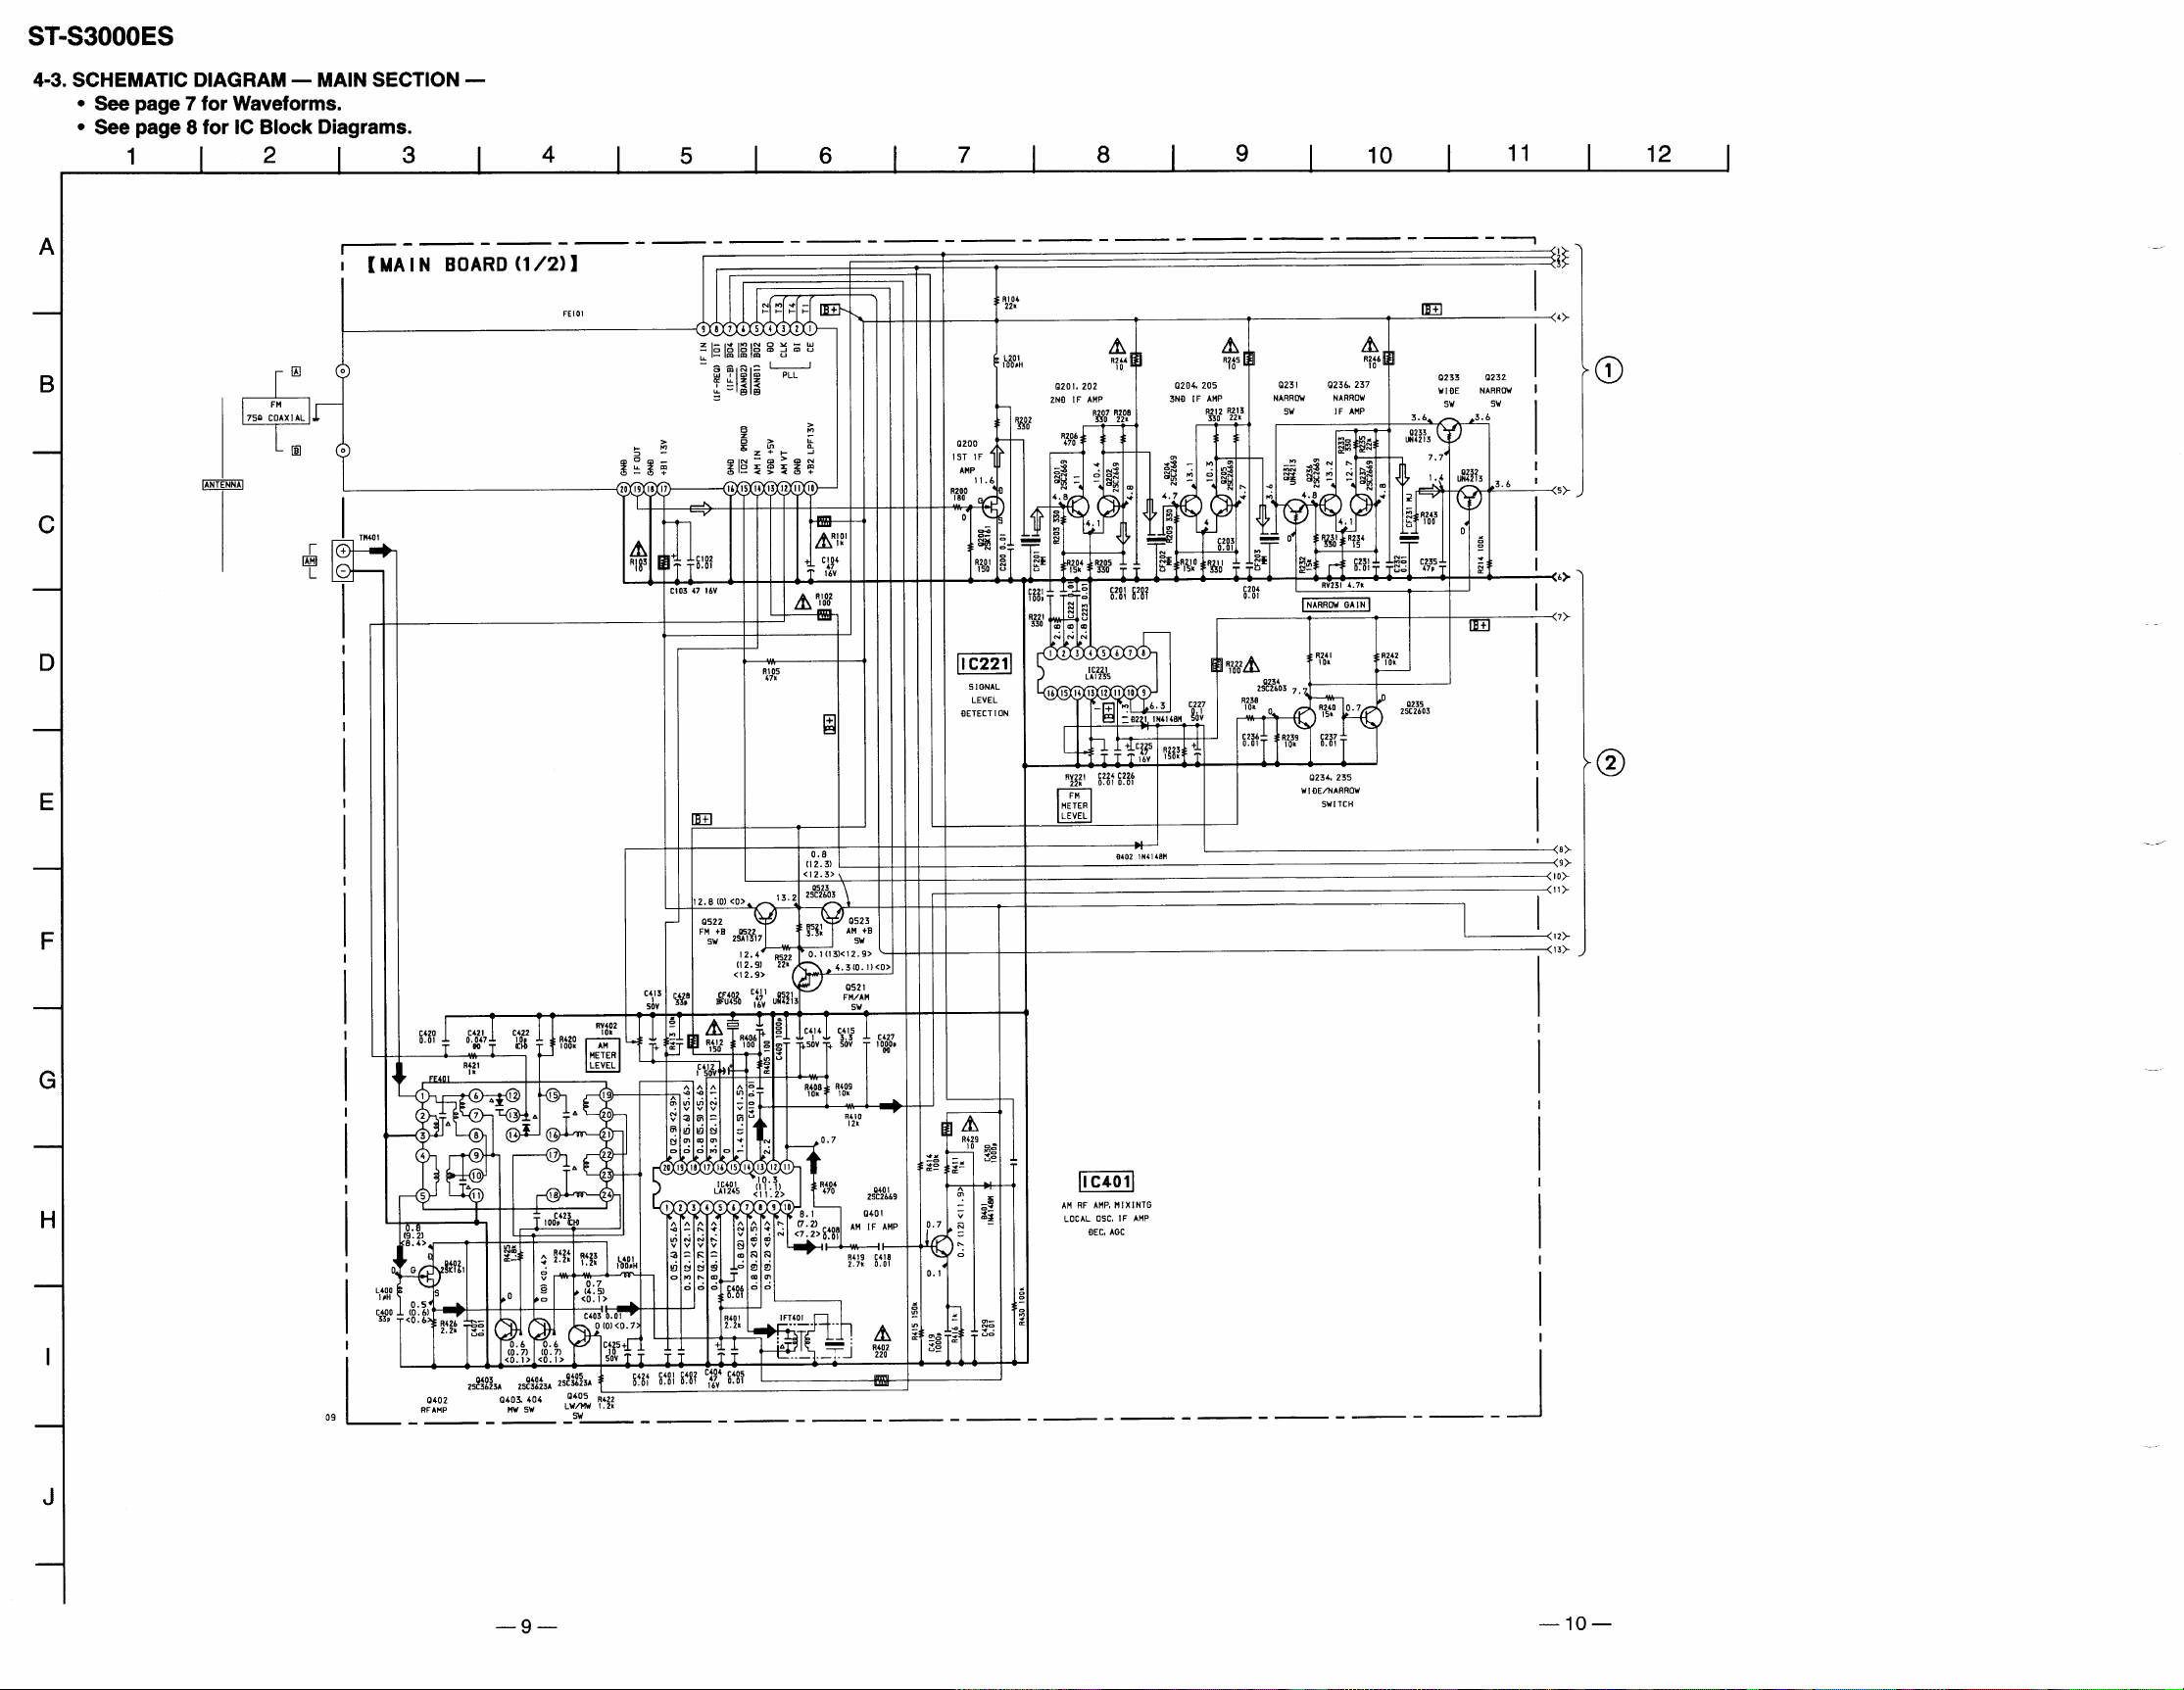
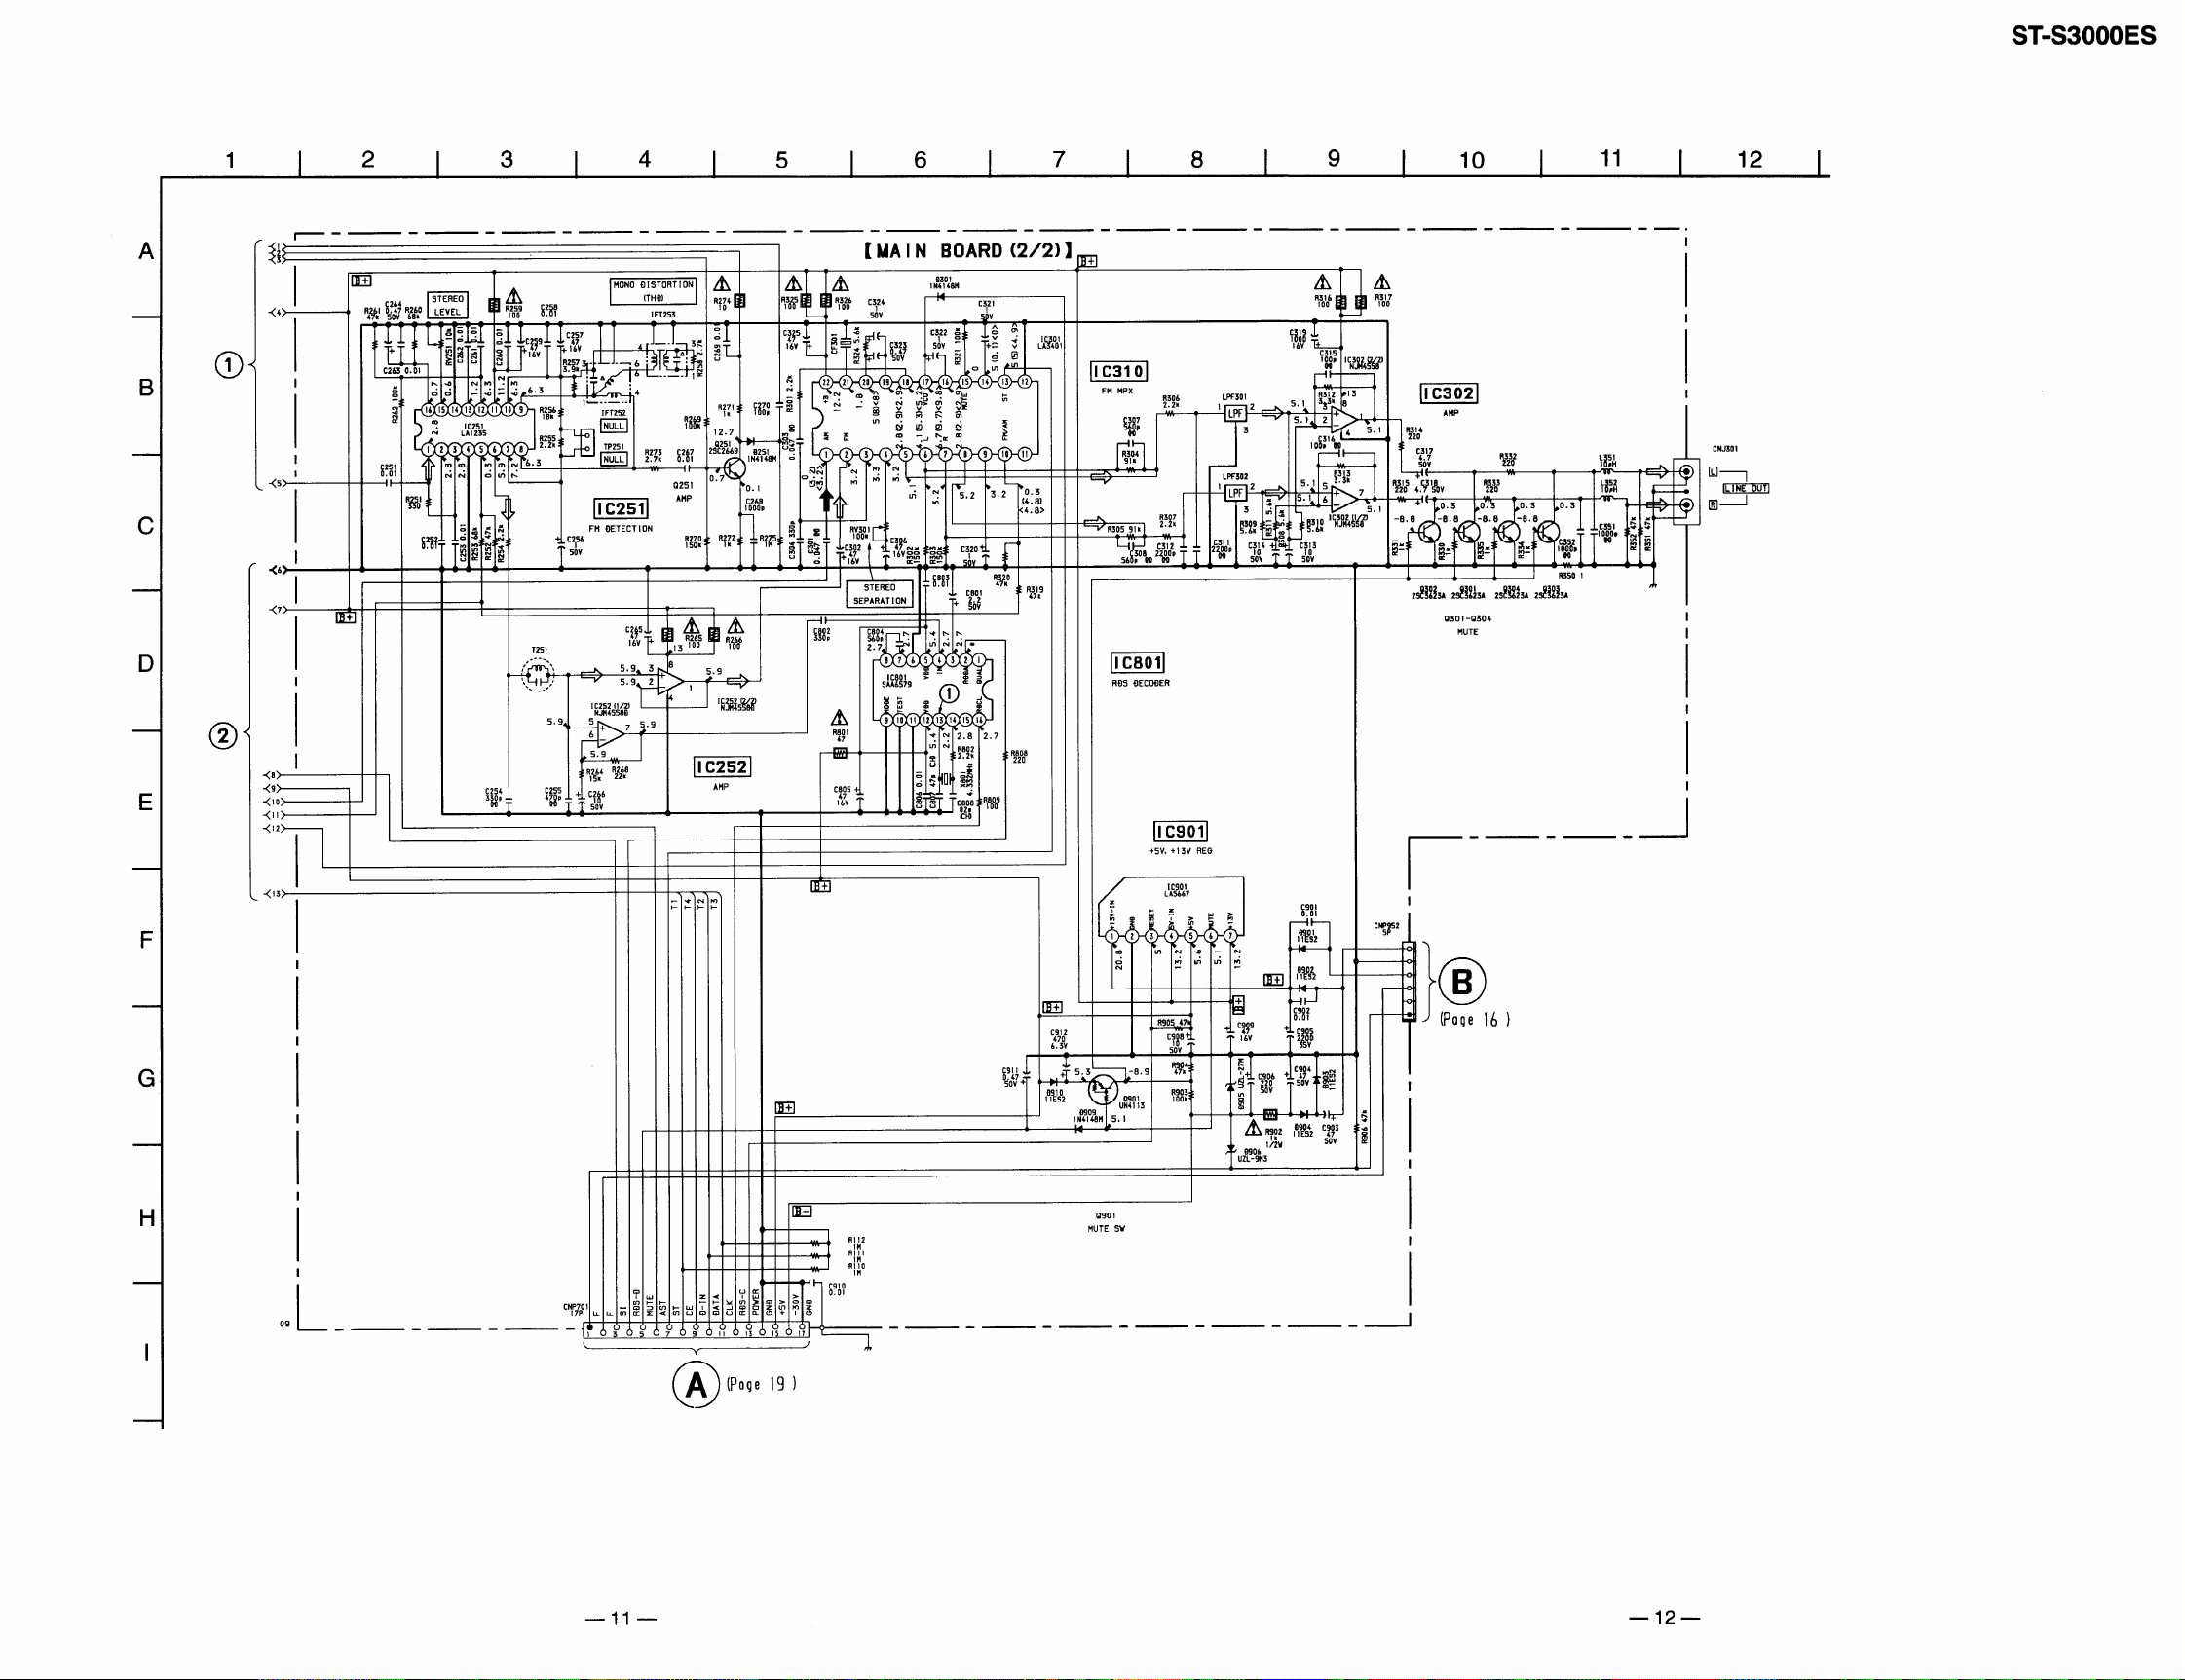
4-3. Schematic Diagram — Main Section — ............................ 9
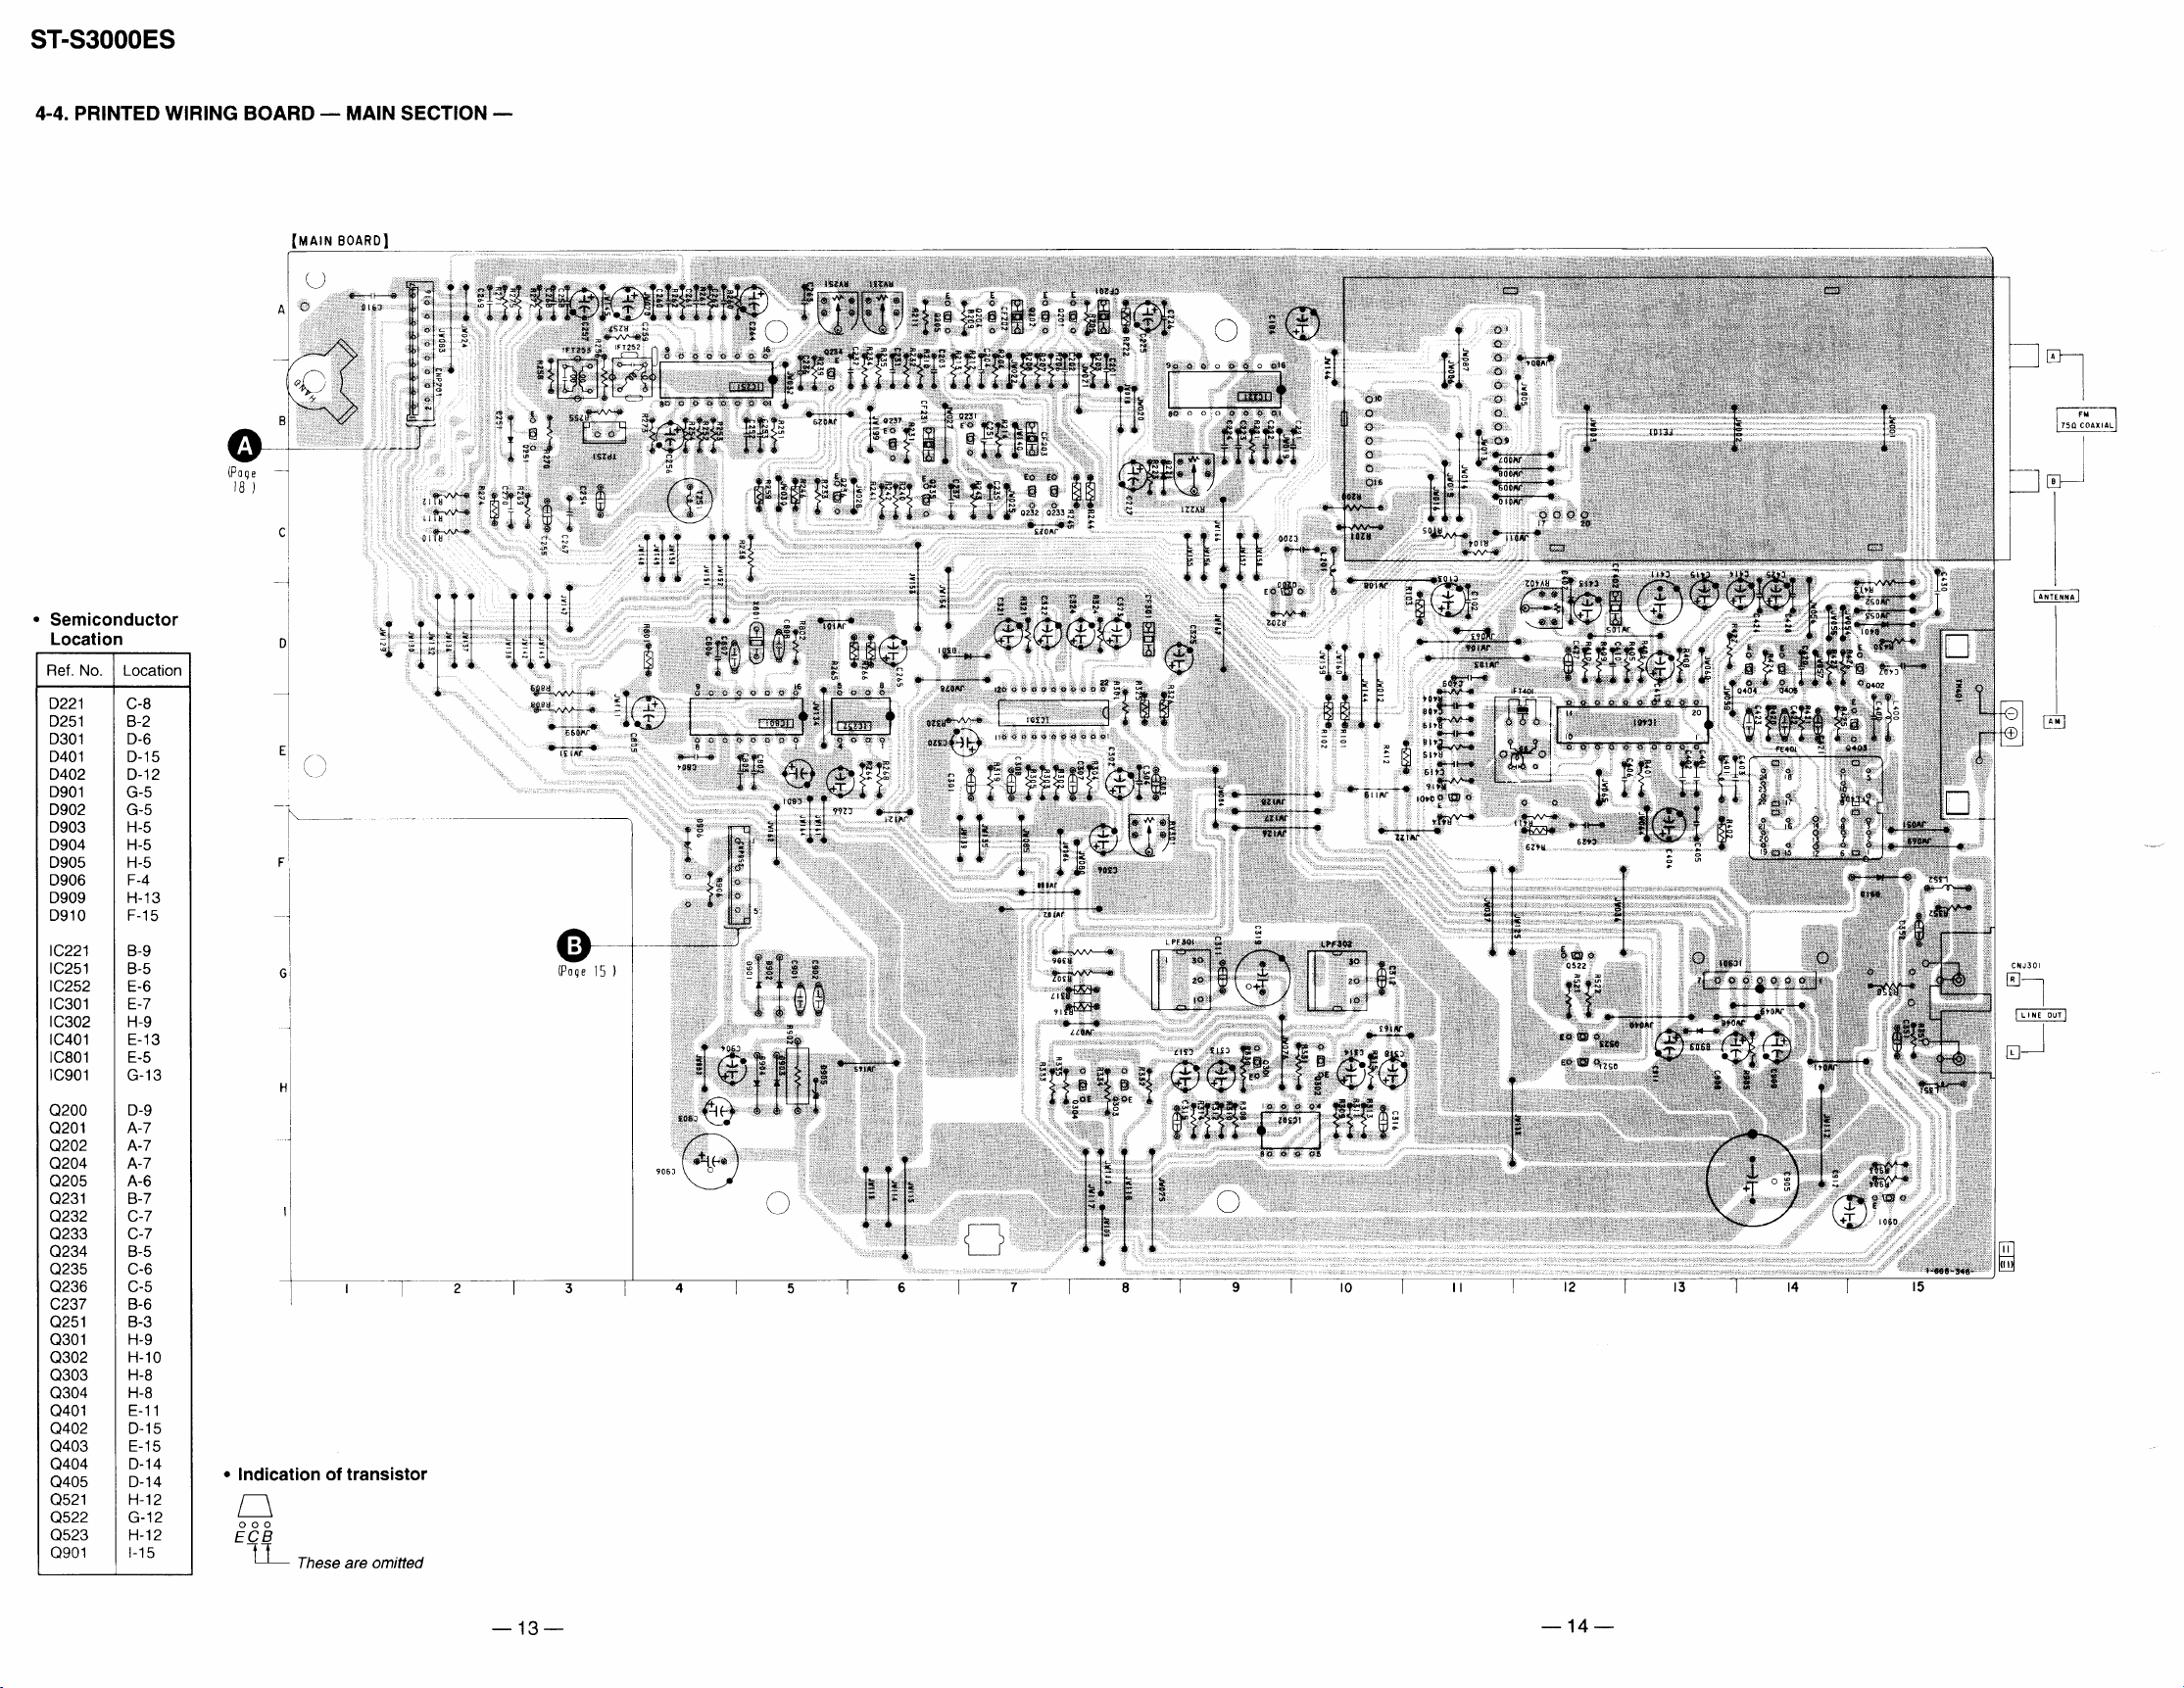
4-4. Printed Wiring Board — Main Section — ....................... 13
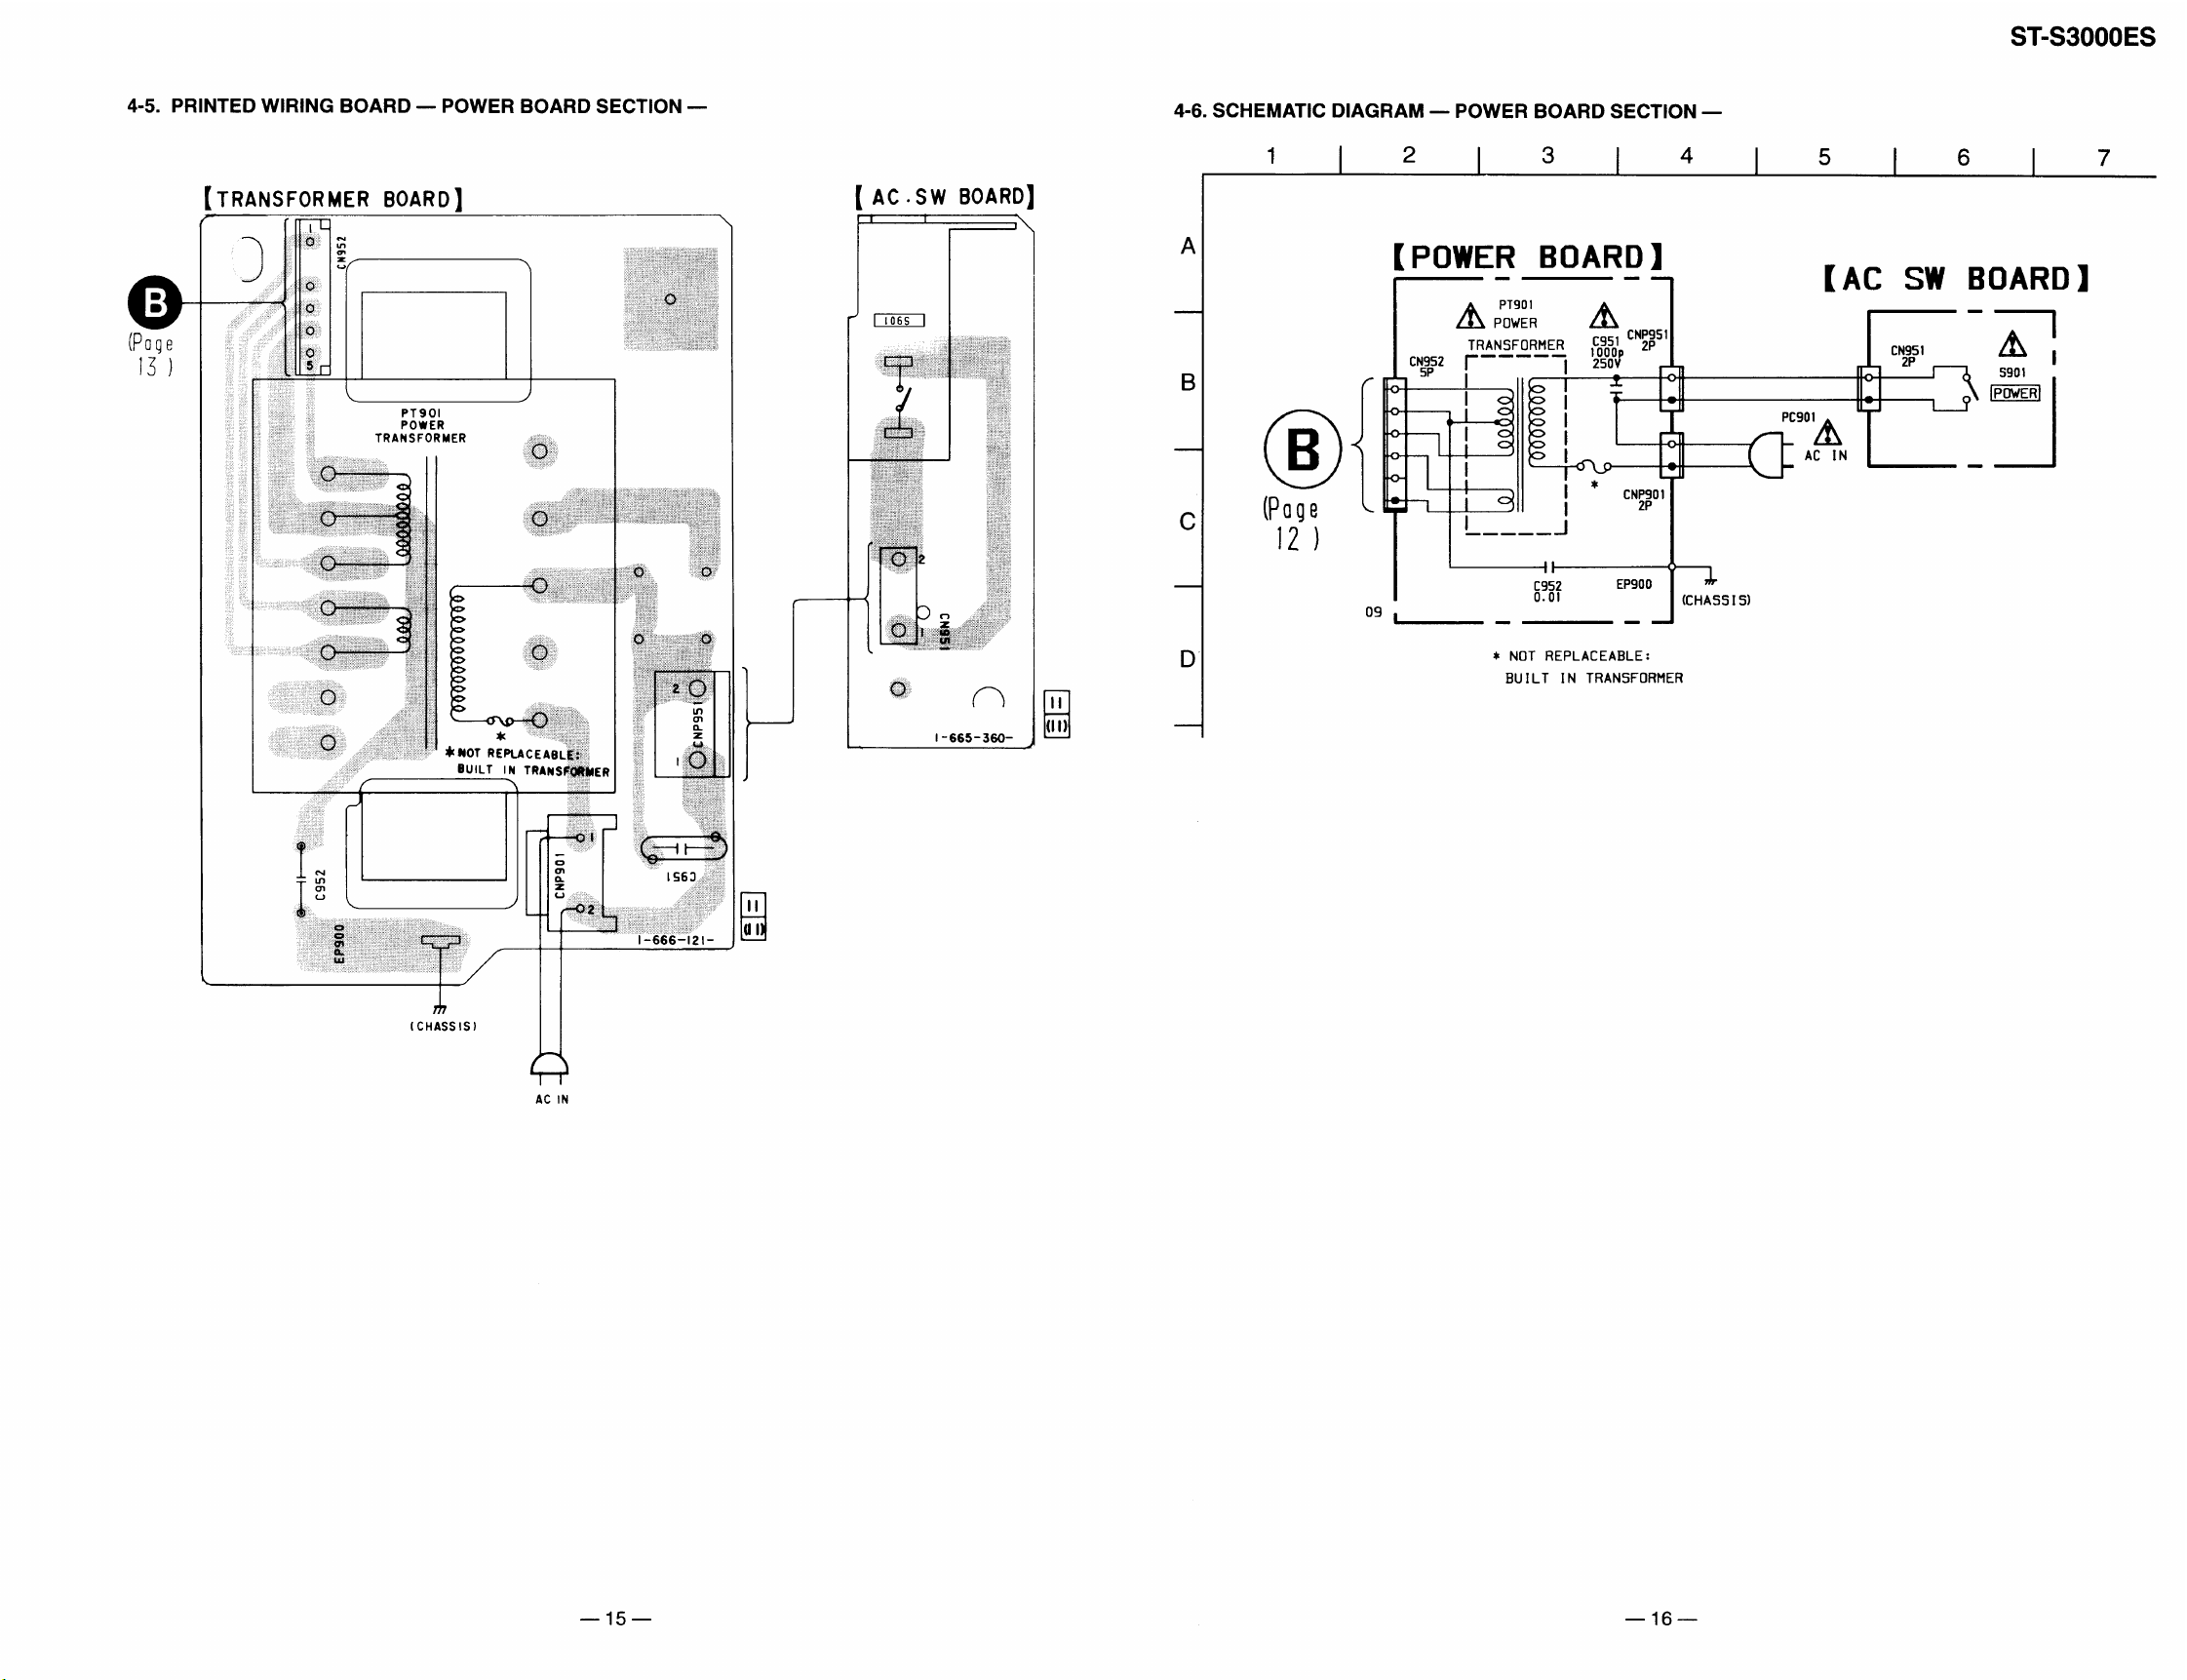
4-5. Printed Wiring Board — Power Board Section —........... 15
4-6. Schematic Diagram — Power Board Section — ............. 16
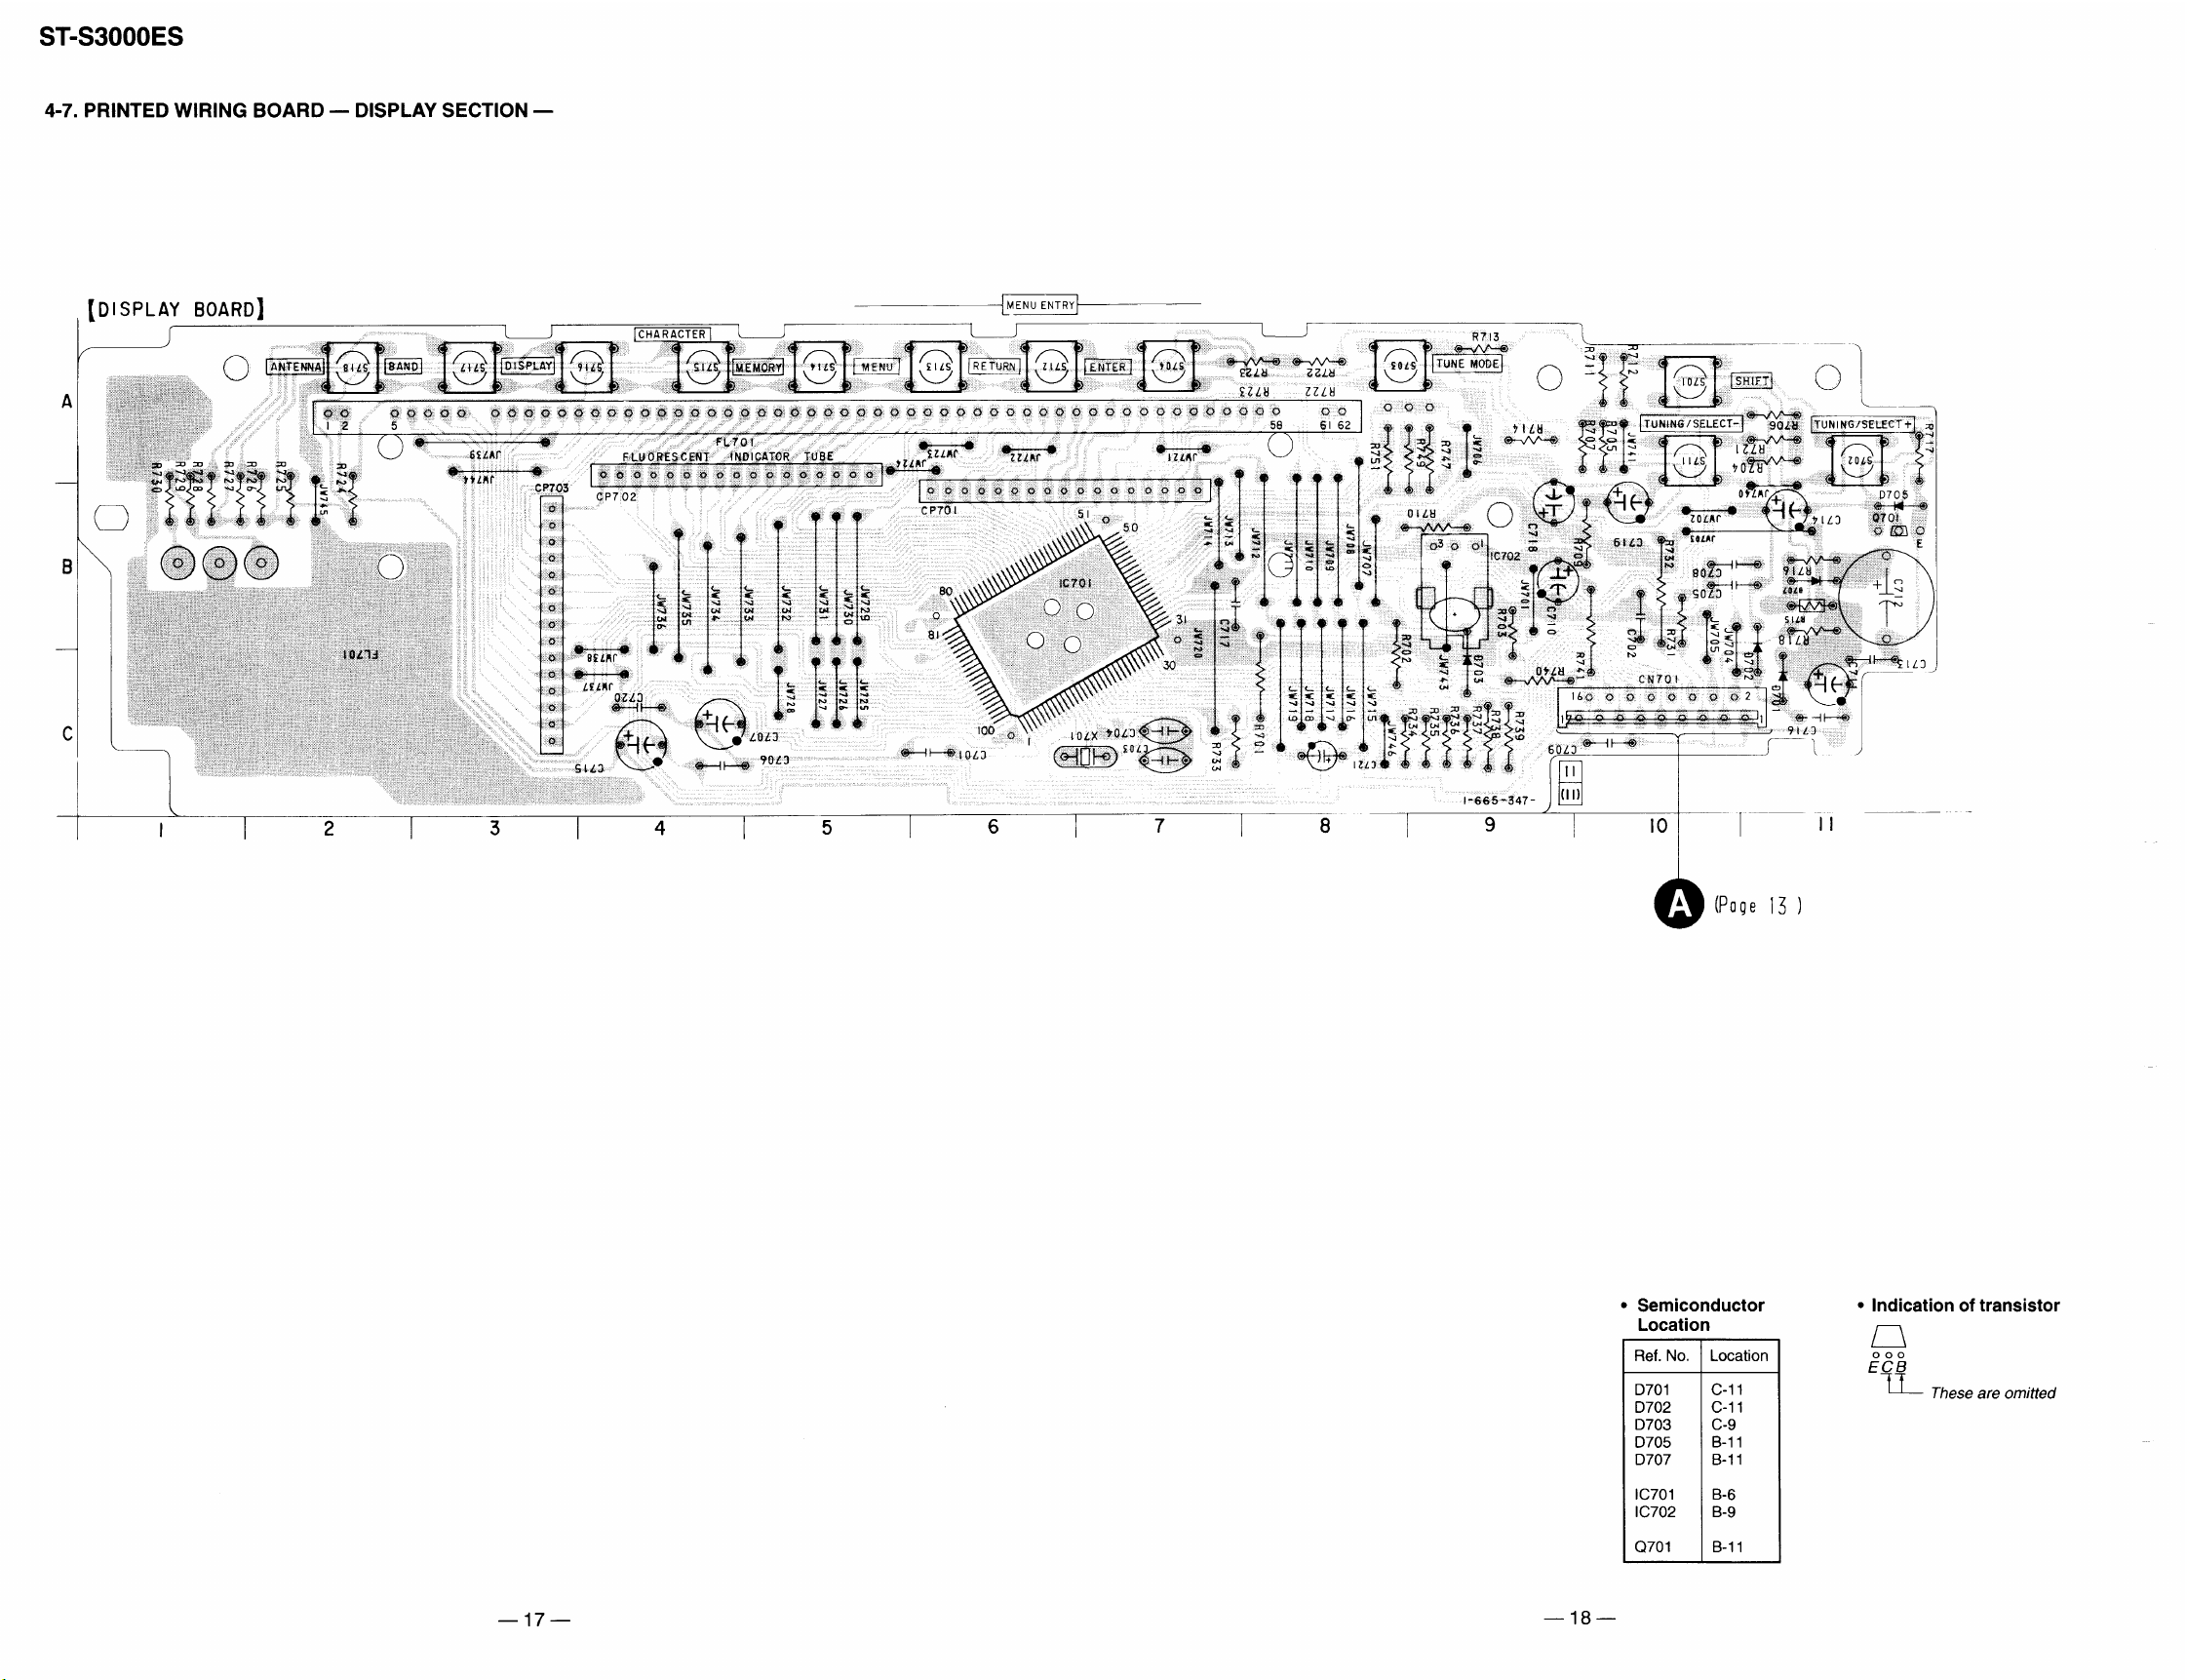
4-7. Printed Wiring Board — Display Section — ...................17
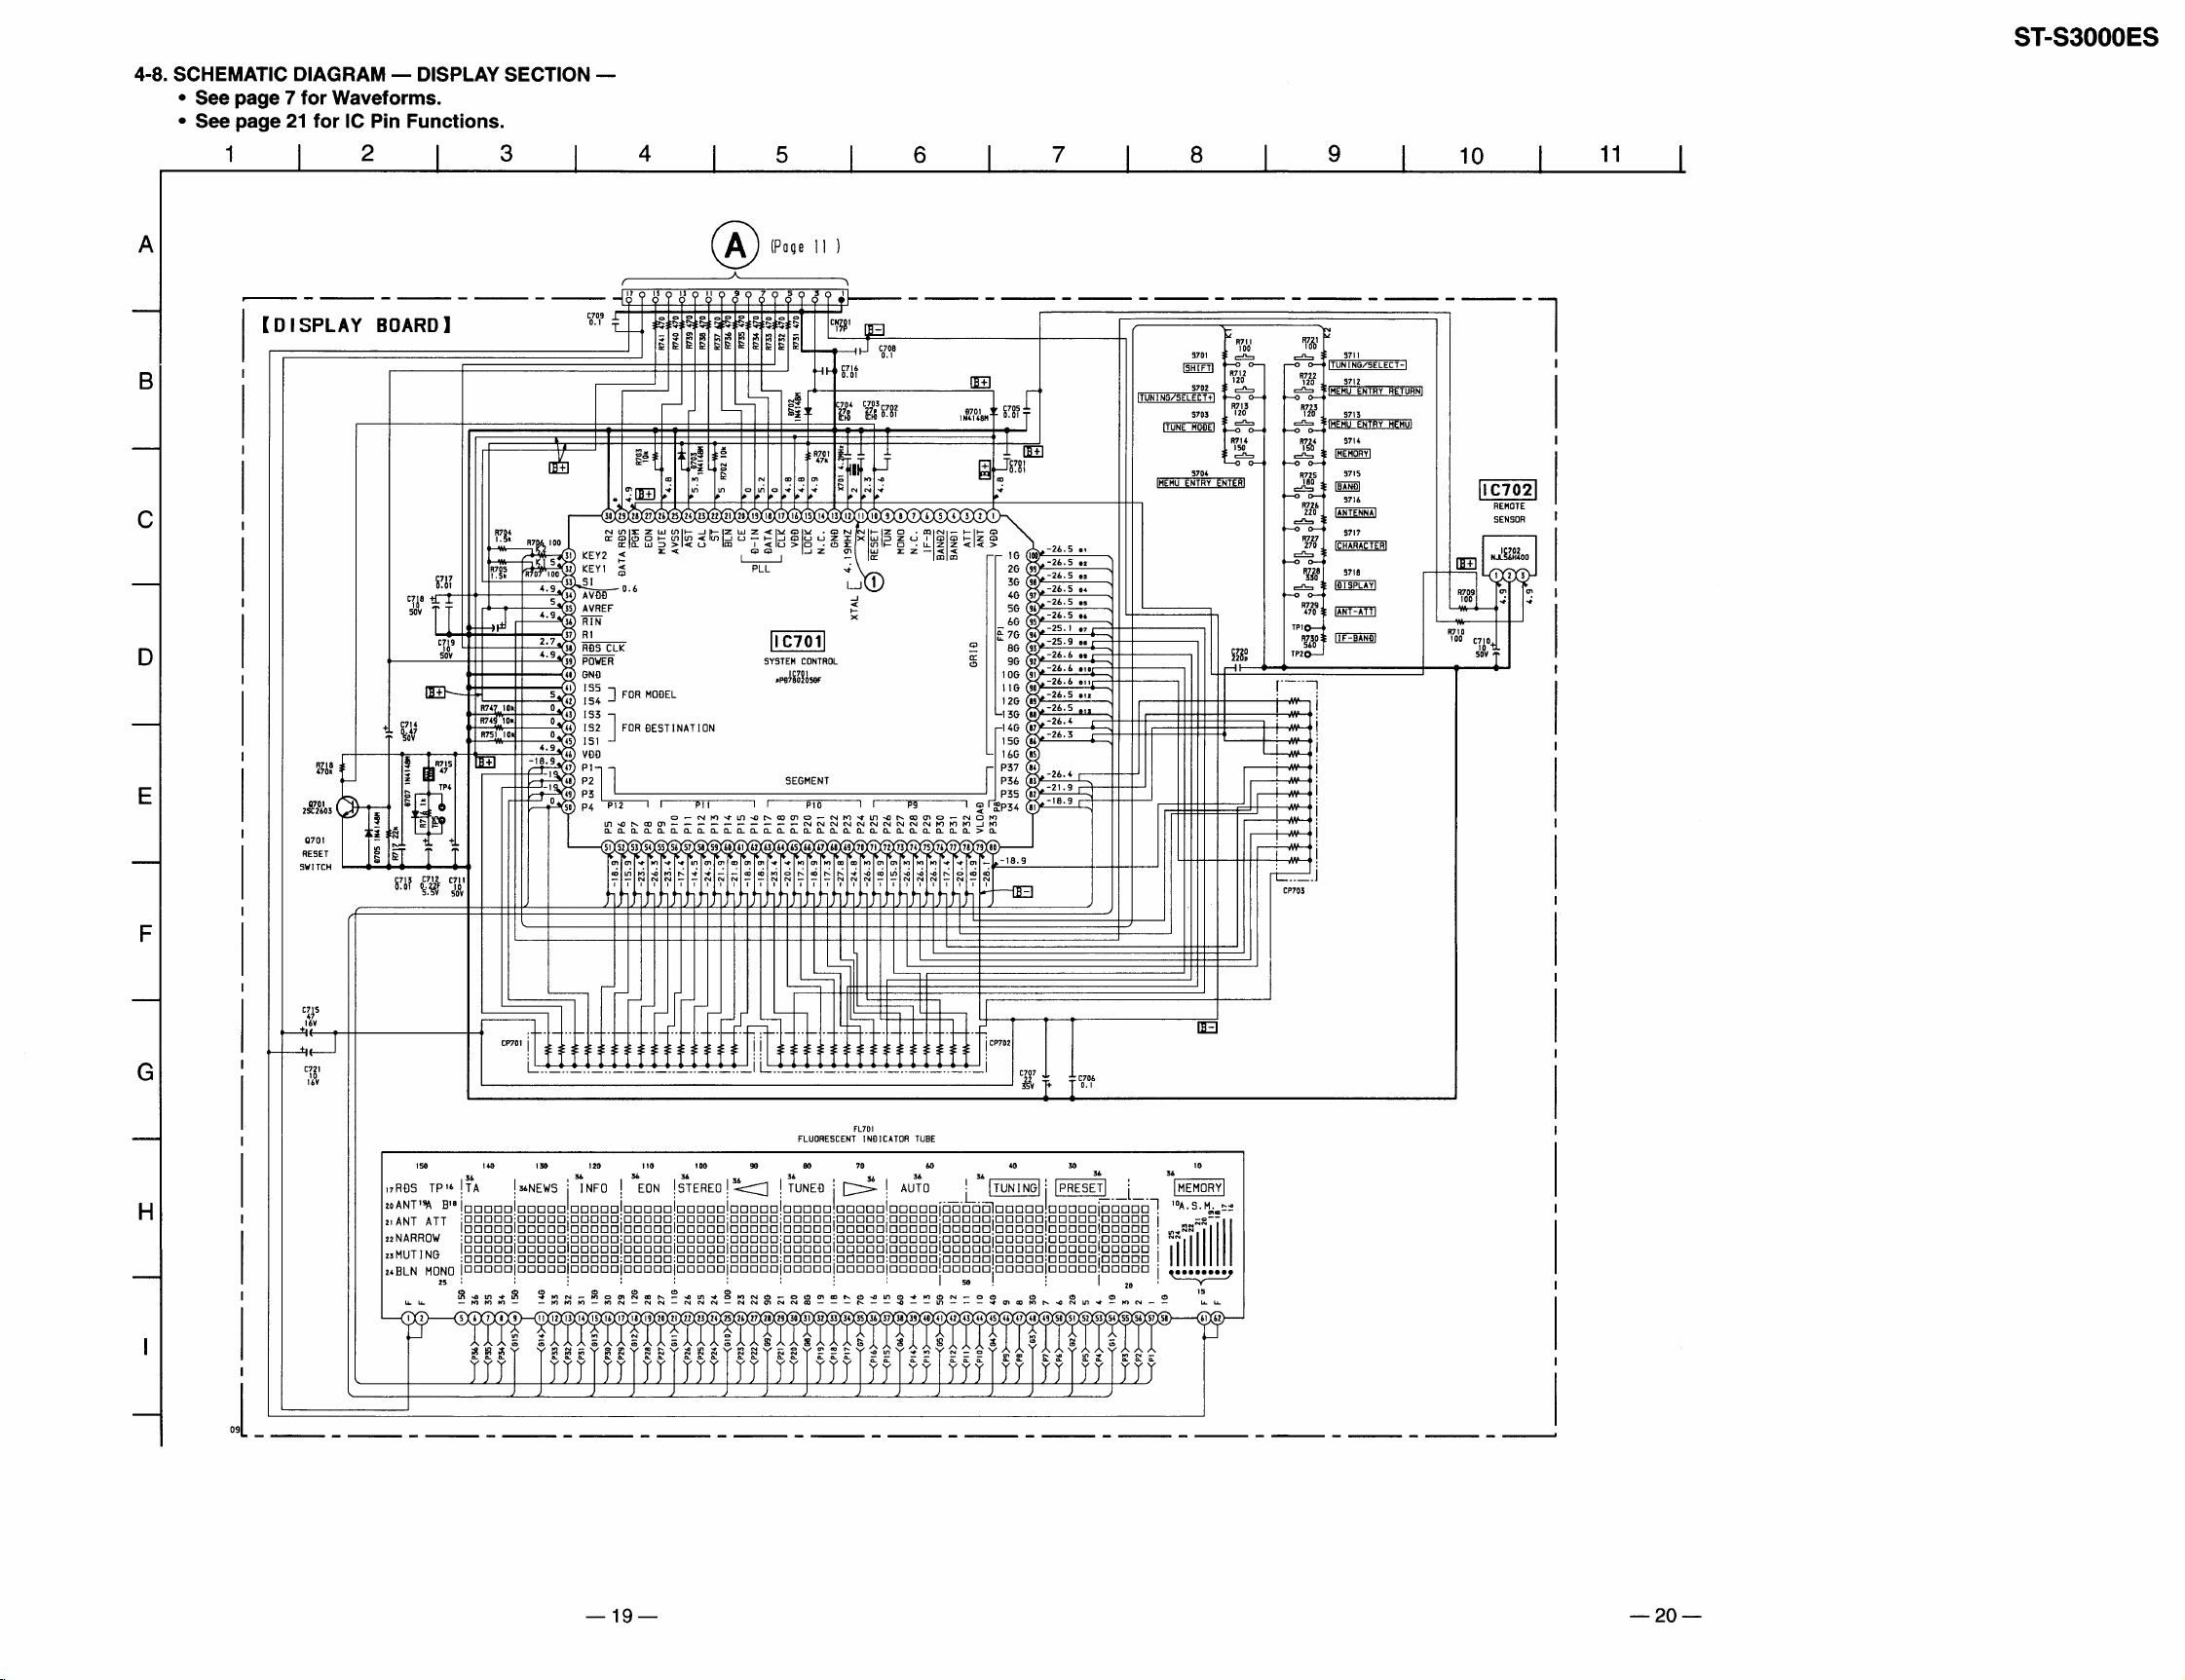
4-8. Schematic Diagram — Display Section — ...................... 19
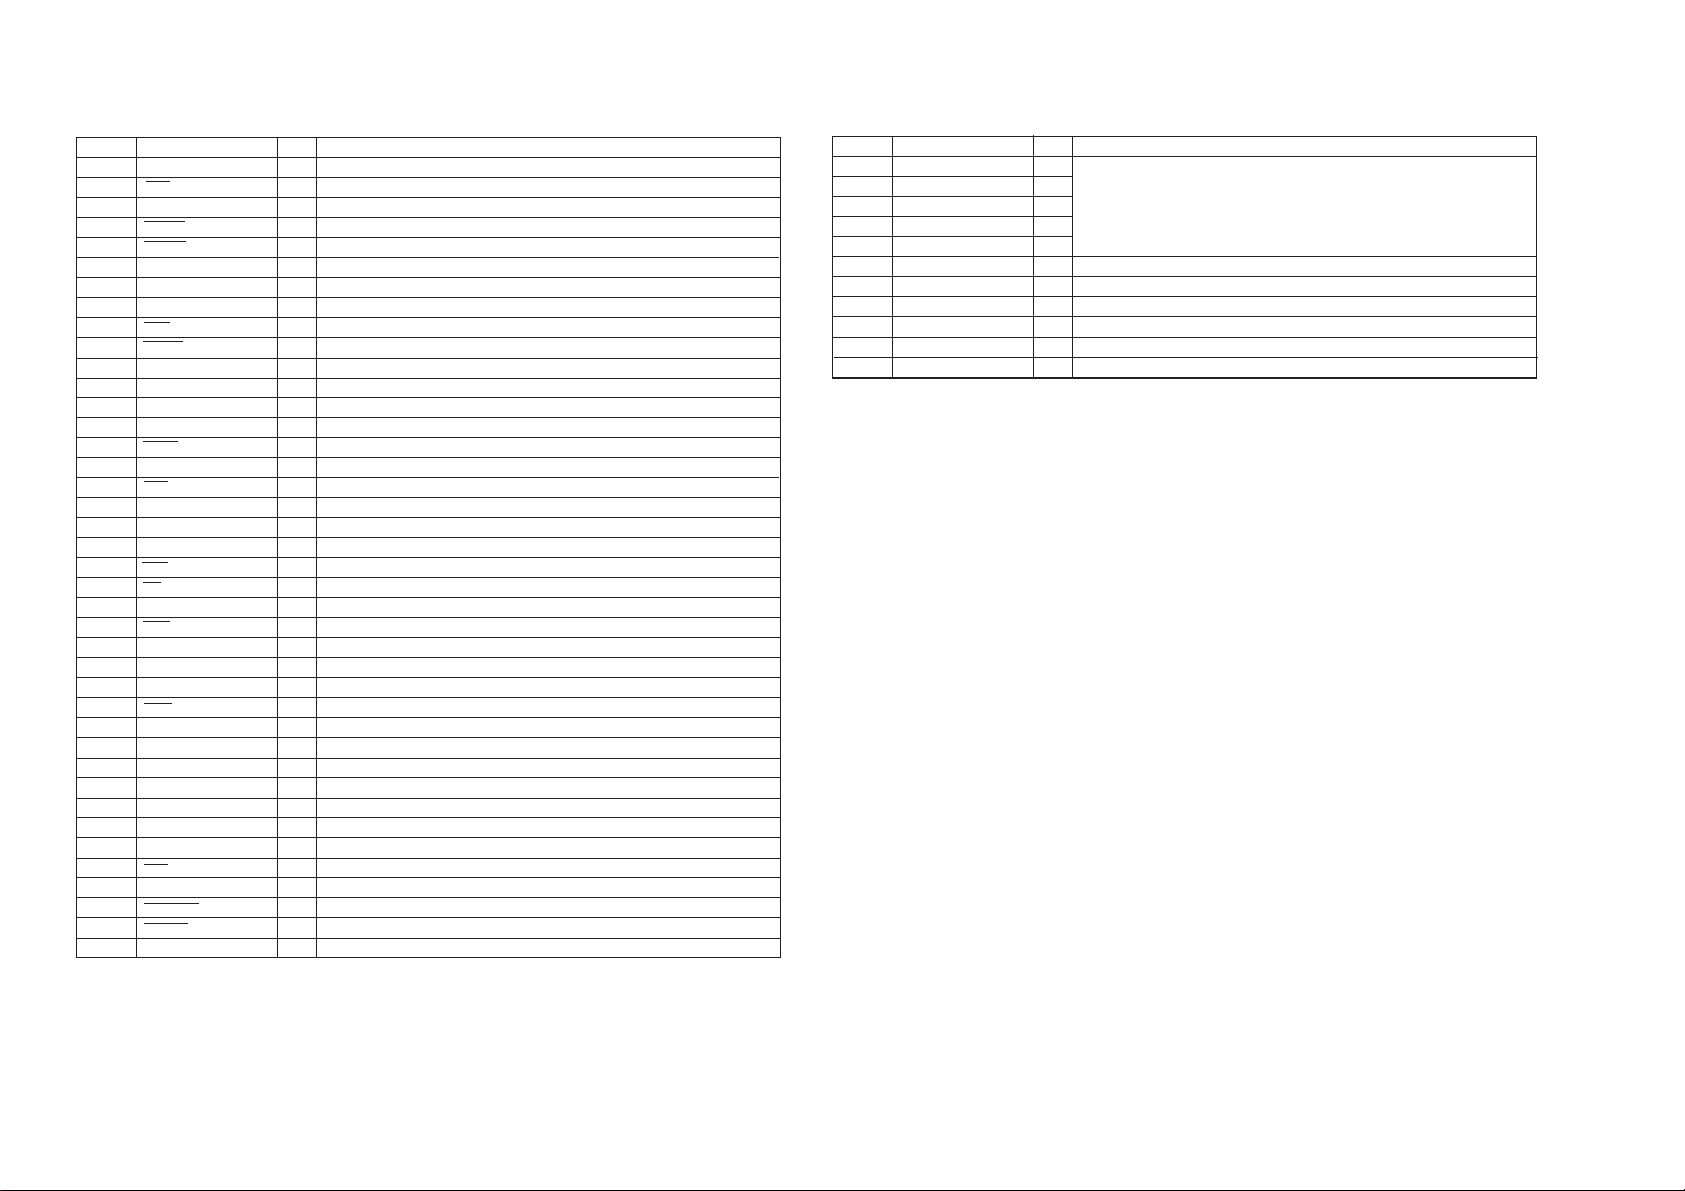
4-9. IC Pin Function
• IC701 System Control (µPD780205GF) ....................... 21
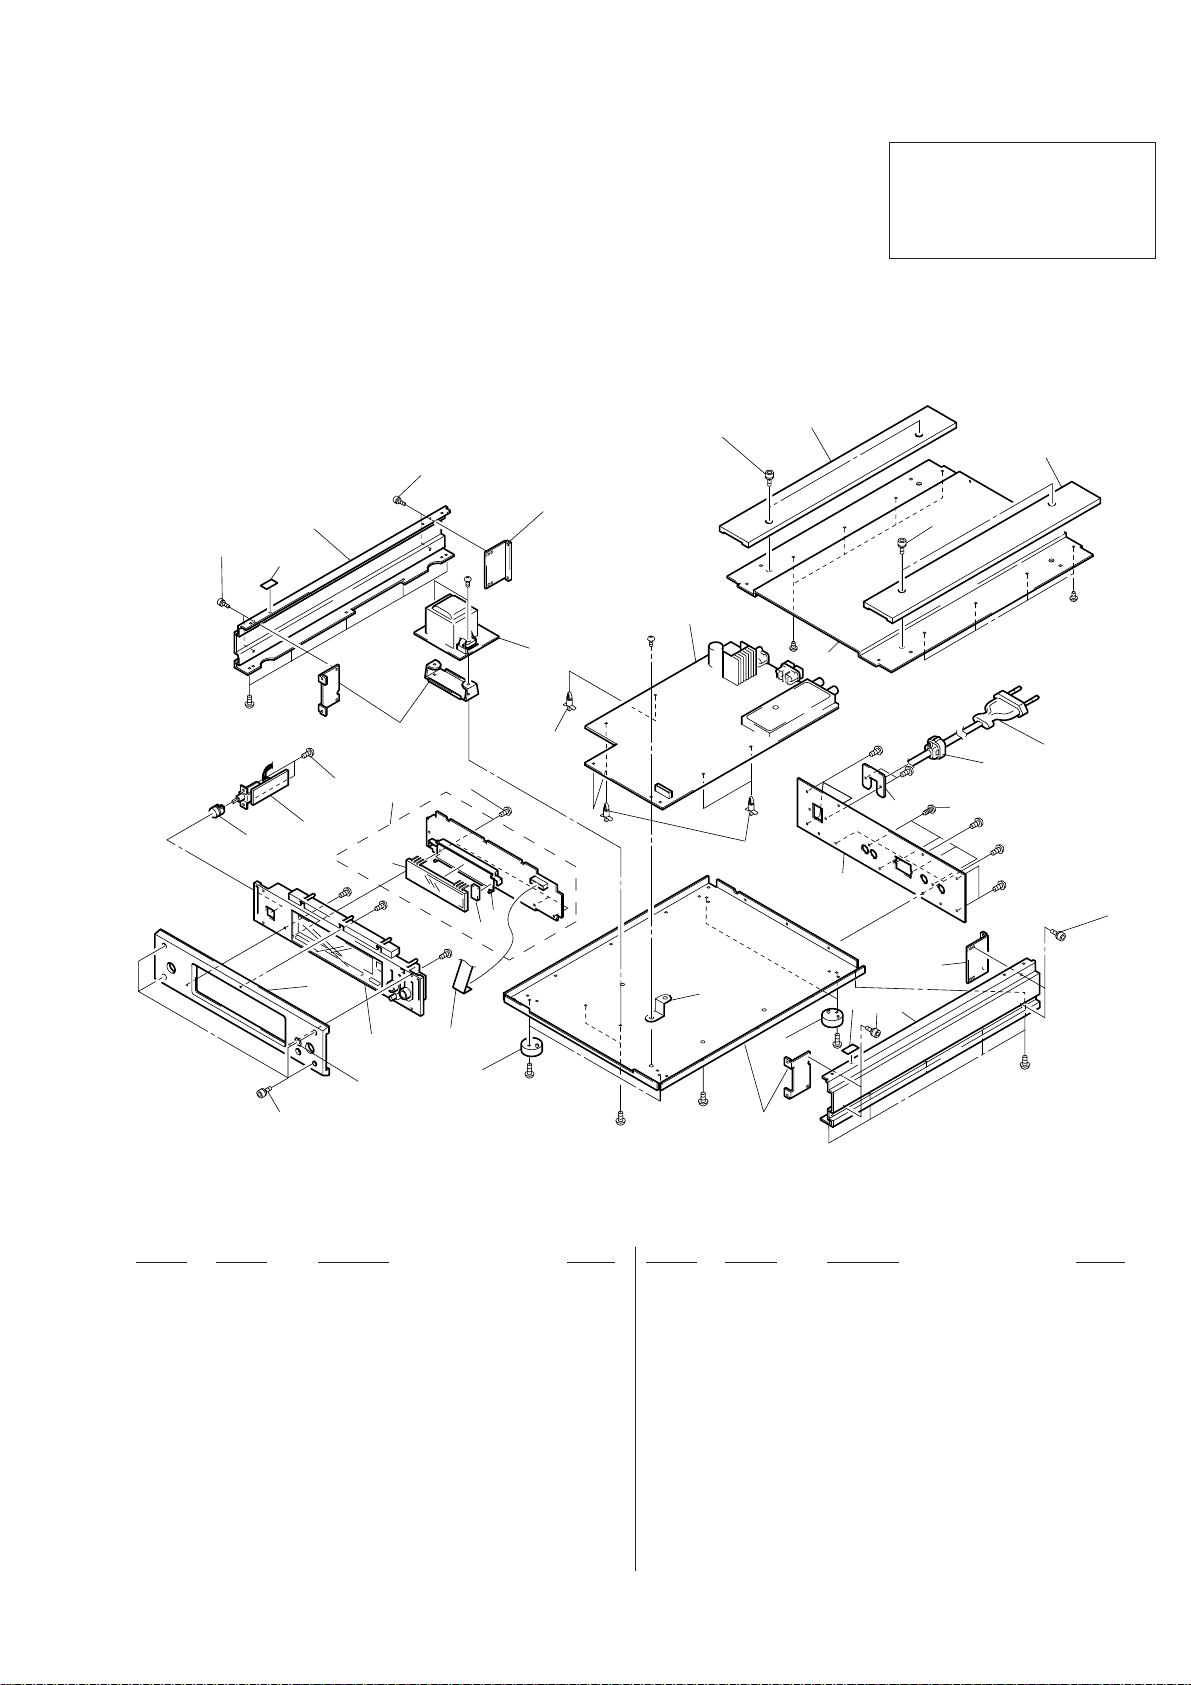
5. EXPLODED VIEW .................................................... 23
6. ELECTRICAL PARTS LIST .................................... 24
SECTION 1
GENERAL
COMPONENTS IDENTIFIED BY MARK ! OR DO TTED LINE
2
WITH MARK ! ON THE SCHEMATIC DIAGRAMS AND IN
THE PARTS LIST ARE CRITICAL TO SAFE OPERATION.
REPLACE THESE COMPONENTS WITH SONY PARTS
WHOSE PART NUMBERS APPEAR AS SHOWN IN THIS
MANUAL OR IN SUPPLEMENTS PUBLISHED BY SONY.
Location of Parts and Controls
1
4
1 POWER button
2 TUNING/SELECT– button
3 TUNING/SELECT+ button
4 DISPLAY button
5 CHARACTER button
6 ANTENNA button
7 BAND button
567
8
10911
8 MEMORY button
9 MENU ENTRY MENU button
10 MENU ENTRY RETURN button
11 MENU ENTRY ENTER button
12 TUNE MODE button
13 SHIFT button
12
13
2
3
— 2 —
Page 3
SECTION 2
TEST MODE
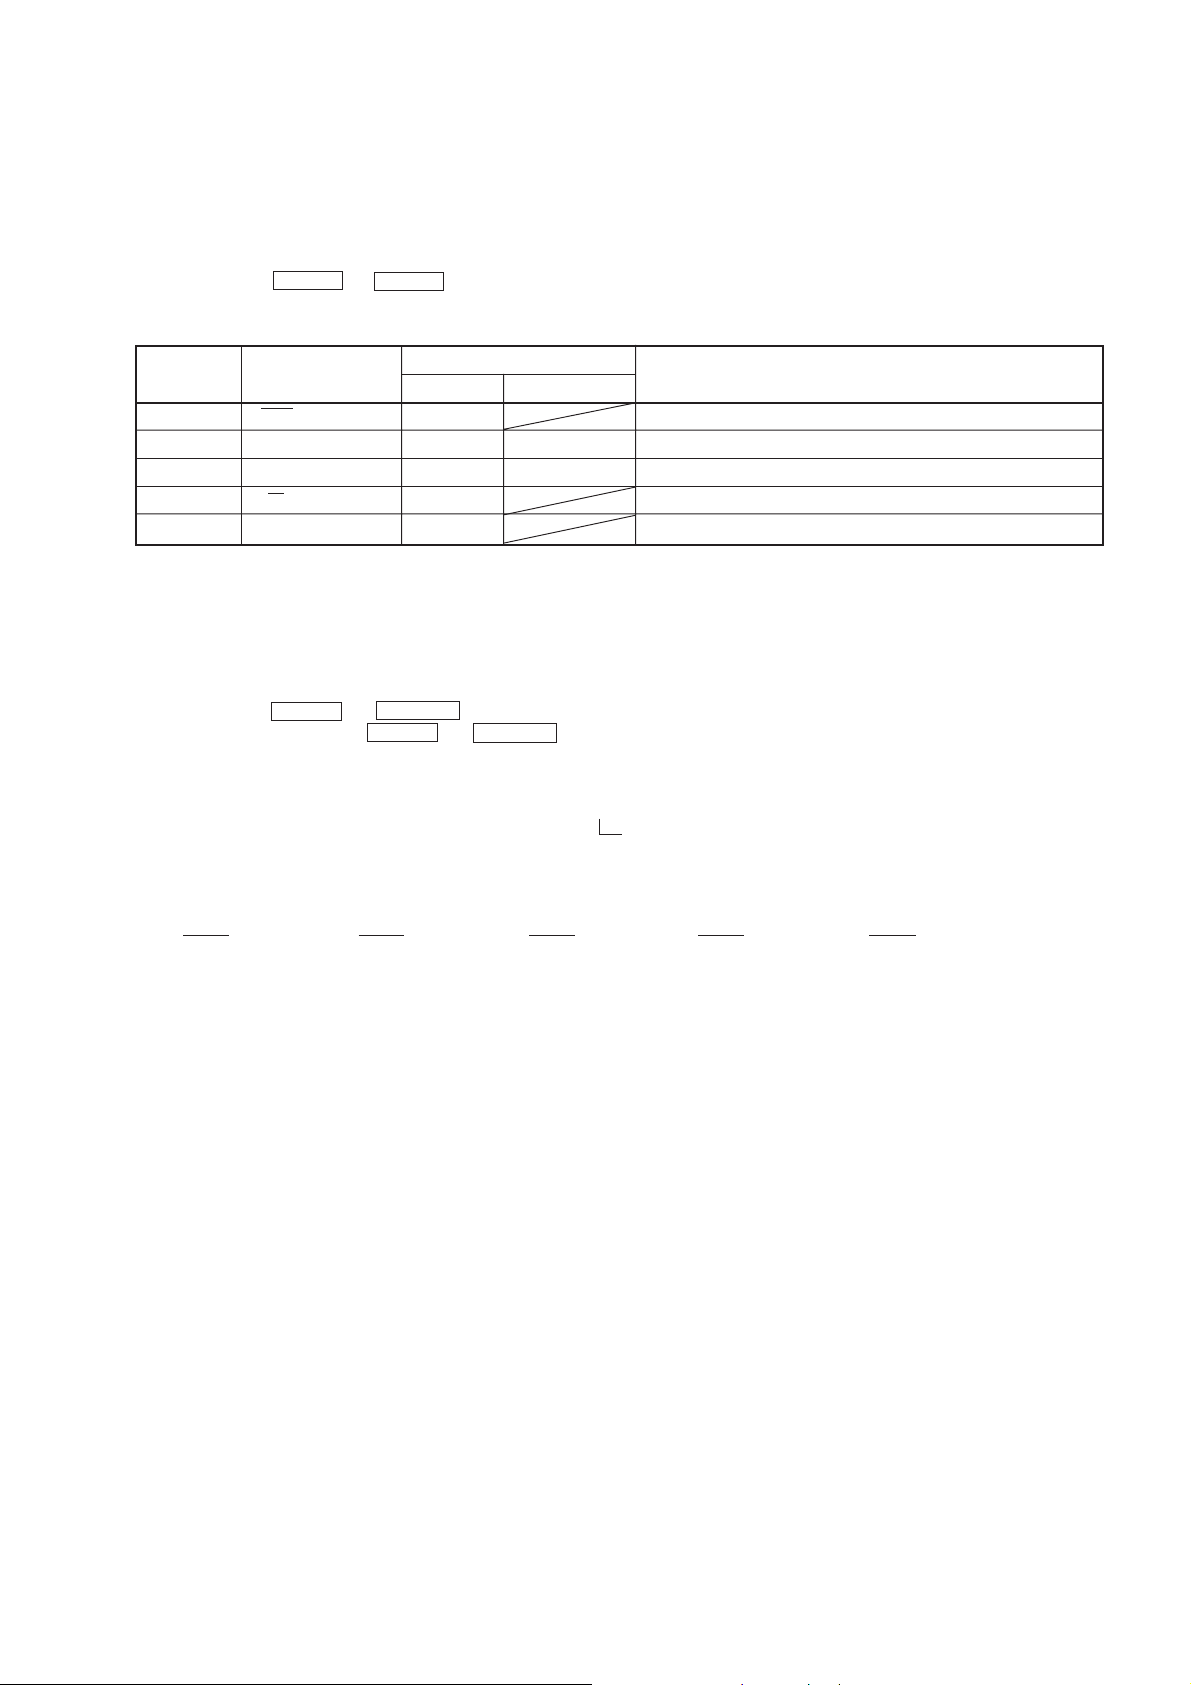
1. Circuit Check Mode
Set to the reception frequency that the circuit can STEREO RDS stations. (Set the input level to above 70 dB.)
This enables circuit check to be performed in any of the reception modes-FM, AM (MW, LW). Set to a desired band before setting the test
mode.
1. Turn OFF the power.
2. While pressing ENTER and BAND together, turn ON the power.
• The items in the following table will be checked automatically in order every 2 seconds.
Display Items
Tuned
IF Frq
Sig Level
Stereo
RDS Signal
AST signal =LOW
IF COUNT OK
SI LEVELh70dB
ST signal=LOW
RDS DATA OK
FM RDS
OK or NG
OK or NG
OK or NG
OK or NG
OK or NG
DISPLAY
AM (MW, LW)
OK or NG
OK or NG
NG
IC251 NG, RV251 adjustments
FE101, IC251 NG, or IF count buffer amp (Q251, Q401) NG
IC221 NG, RV221 adjustments
IC301 NG, RV301 adjustments
IC801 NG
NOTE : The preset data will be erased when this test mode is used. Therefore, take down the data before setting this mode and preset the data
again after completing operations in this mode.
2. FLUORESCENT INDICATOR TUBE Check and KEY Check mode
1. Turn OFF the power.
2. While pressing ENTER and RETURN together, turn ON the power.
3. While continuously pressing ENTER and RETURN together, check the following.
Microcomputer version indication (1 sec) n All light up “7F” n Dot area only “60” n Dot area only “7E”
N
N
Dot area only “5F” N Dot area only “3D”
Indication test pattern
1 7F
p p p p p
p p p p p
p p p p p
p p p p p
p p p p p
p p p p p
p p p p p
2 60
π p π p π
π p π p π
π p π p π
π p π p π
π p π p π
π p π p π
π p π p π
3 7E
p p p p p
π π π π π
π π π π π
π π π π π
π π π π π
π π π π π
π π π π π
4 3D
π π π π π
π π π π π
p p p p p
π π π π π
p p p p p
π π π π π
π π π π π
5 5F
π π π π π
π π π π π
π π π π π
π π π π π
π π π π π
π π π π π
p p p p p
* The indication test patterns from 2 to 5 are indicated on only even grids.
The display changes every 1 sec.
— 3 —
Page 4
4. Release ENTER and RETURN . The KEY CHECK mode will be set.
5. All key numbers will be displayed.
Key Number : 12
6. Each time the key is pressed, the key number will be counted down.
Each key will be counted only once, at the first time.
7. When all keys have been pressed, the process will end.
NOTE : As contents of the Factory Preset will be written into memory after completing this check mode, delete contents of memory
according to 4. Forced RESET.
3. Entering the Factory Preset (In case perform just to write memory of the Factory Preset.)
1. Turn OFF the power.
2. While pressing ENTER and MEMORY together, turn ON the power.
4. Forced RESET (Used to delete the contents of Factory Preset when it is written into the preset memory.)
Clears all the RAMs and sets the initial state
1. Turn OFF the power.
2. While pressing ENTER and ANTENNA together, turn ON the power.
3. When “All clear” is indicated on the display tube.
SECTION 3
ELECTRICAL ADJUSTMENTS
Precautions in Repairing
If the front end unit fails, it is difficult to repair the inner circuits, so
replace the entire front end unit.
Set “IF : WIDE” after the all adjustments.
FM SECTION 0dB = 1µV
FM RF SSG
FM ANTENNA (75
set
Ω
)
1 kHz
highpass
filter
LINE OUT
distortion meter
• Standard Setting of FM Stereo RF Signal Generator.
STEREO STANDARD SIGNAL
Carrier frequency : 98MHz
Modulation : Audio 1kHz
Main channel (L+R) :33.75kHz
deviation
Sub channel (L–R) :33.75kHz
deviation
Pilot :7.5kHz
deviation
MONAURAL
STANDARD SIGNAL
Carrier frequency : 98MHz
Modulation : Audio 1kHz
75kHz deviation
How to switch IF BAND : WIDE/NARROW and ANT ATT :
ON/OFF
Method:
1. Press the power button to turn the power on and set to FM.
2. Press the MENU button and press the TUNING/SELECT –, +
button to indicate “Reception” on the fluorescent display tube,
then press the ENTER button.
3. Press the TUNING/SELECT –, + button to indicate “ATT/IF
Band”, and press the ENTER button.
4. “ANT ATT: OFF” is indicated on the fluorescent display tube
and press the TUNING/SELECT –, + button to indicate “ON”
or “OFF”, then press the ENTER button.
When the ANT ATT is set, “ANT ATT” is indicated on the fluorescent display tube.
5. “IF: Wide” is indicated on the fluorescent display tube, and press
the TUNING/SELECT –, + button to indicate “Wide” or “Narrow”, then press the ENTER button.
When the “IF: Narrow” is set, “NARROW” is indicated on the
fluorescent display tube.
6. Set WIDE after the operation.
— 4 —
Page 5
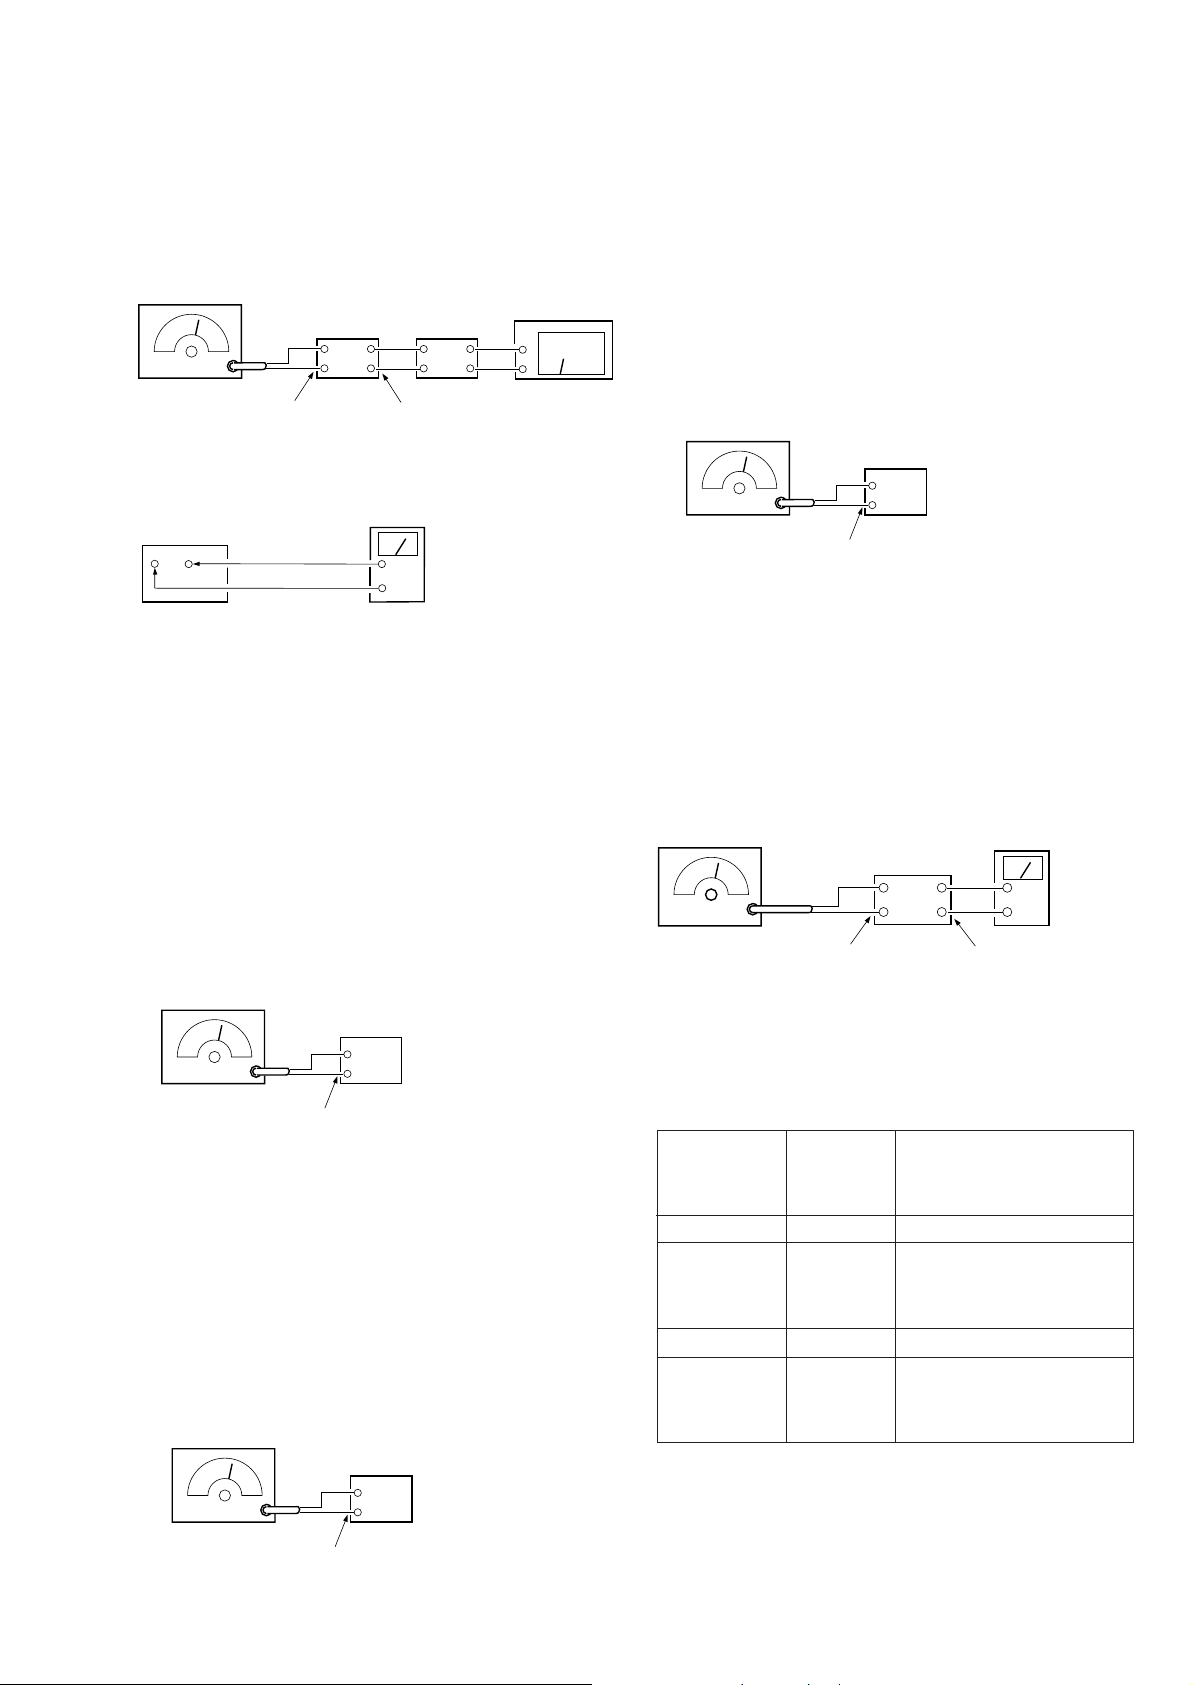
FM Discriminator ADJUSTMENT
(NULL and MONO Distortion Adjustment)
Setting :
IF BAND : WIDE
ANT ATT : OFF
FM RF SSG
set
FM ANTENNA (75
Modulation: Monaural Standard signal
Output level: 6mV (76dB) (at 75
Ω
)
Ω
open)
1 kHz
highpass
filter
LINE OUT
distortion meter
Procedure :
1. Tune the set to 98 MHz.
2. Set “IF BAND : N ARRO W” according to the procedure of “How
to switch IF BAND WIDE/NARROW” on page 6.
3. Adjust RV231 to the point (moment) when the “STEREO” indicator will change from going off to going on.
FM Meter Level Adjustment
Setting :
IF BAND : WIDE
ANT ATT : OFF
FM RF SSG
TP251
NULL terminal
Digital Voltmeter
(DC range)
Procedure :
1. Tune the set to 98 MHz.
2. Adjust IFT252 for 0V reading on the digital voltmeter.
.................. NULL
3. Adjust IFT253 for a minimum reading on the distortion meter.
.................. MONO Distortion (THD)
4. Repeat the adjustments of 2 and 3 several times.
Note : When replacing the ceramic filter, perform this alignment.
Stereo Level Adjustment
Setting :
IF BAND : WIDE
ANT ATT : OFF
FM RF SSG
set
Ω
FM ANTENNA (75
Modulation: Stereo Standard signal
Output level: 18µV (25dB) (at 75
Ω
)
open)
Procedure :
1. Tune the set to 98 MHz.
2. Adjust RV251 to the point (moment) when the “STEREO”
indicator will change from going off to going on.
Narrow Gain Adjustment
Setting :
IF BAND : NARROW
ANT ATT : OFF
FM RF SSG
set
Ω
FM ANTENNA (75
Modulation: Stereo Standard signal
Output level: 3mV (76dB) (at 75
Ω
)
open)
Procedure :
1. Tune the set to 98 MHz.
2. Press DISPLAY button to display the digital signal, then adjust
RV221 to be displayed as “SIG 70dB”.
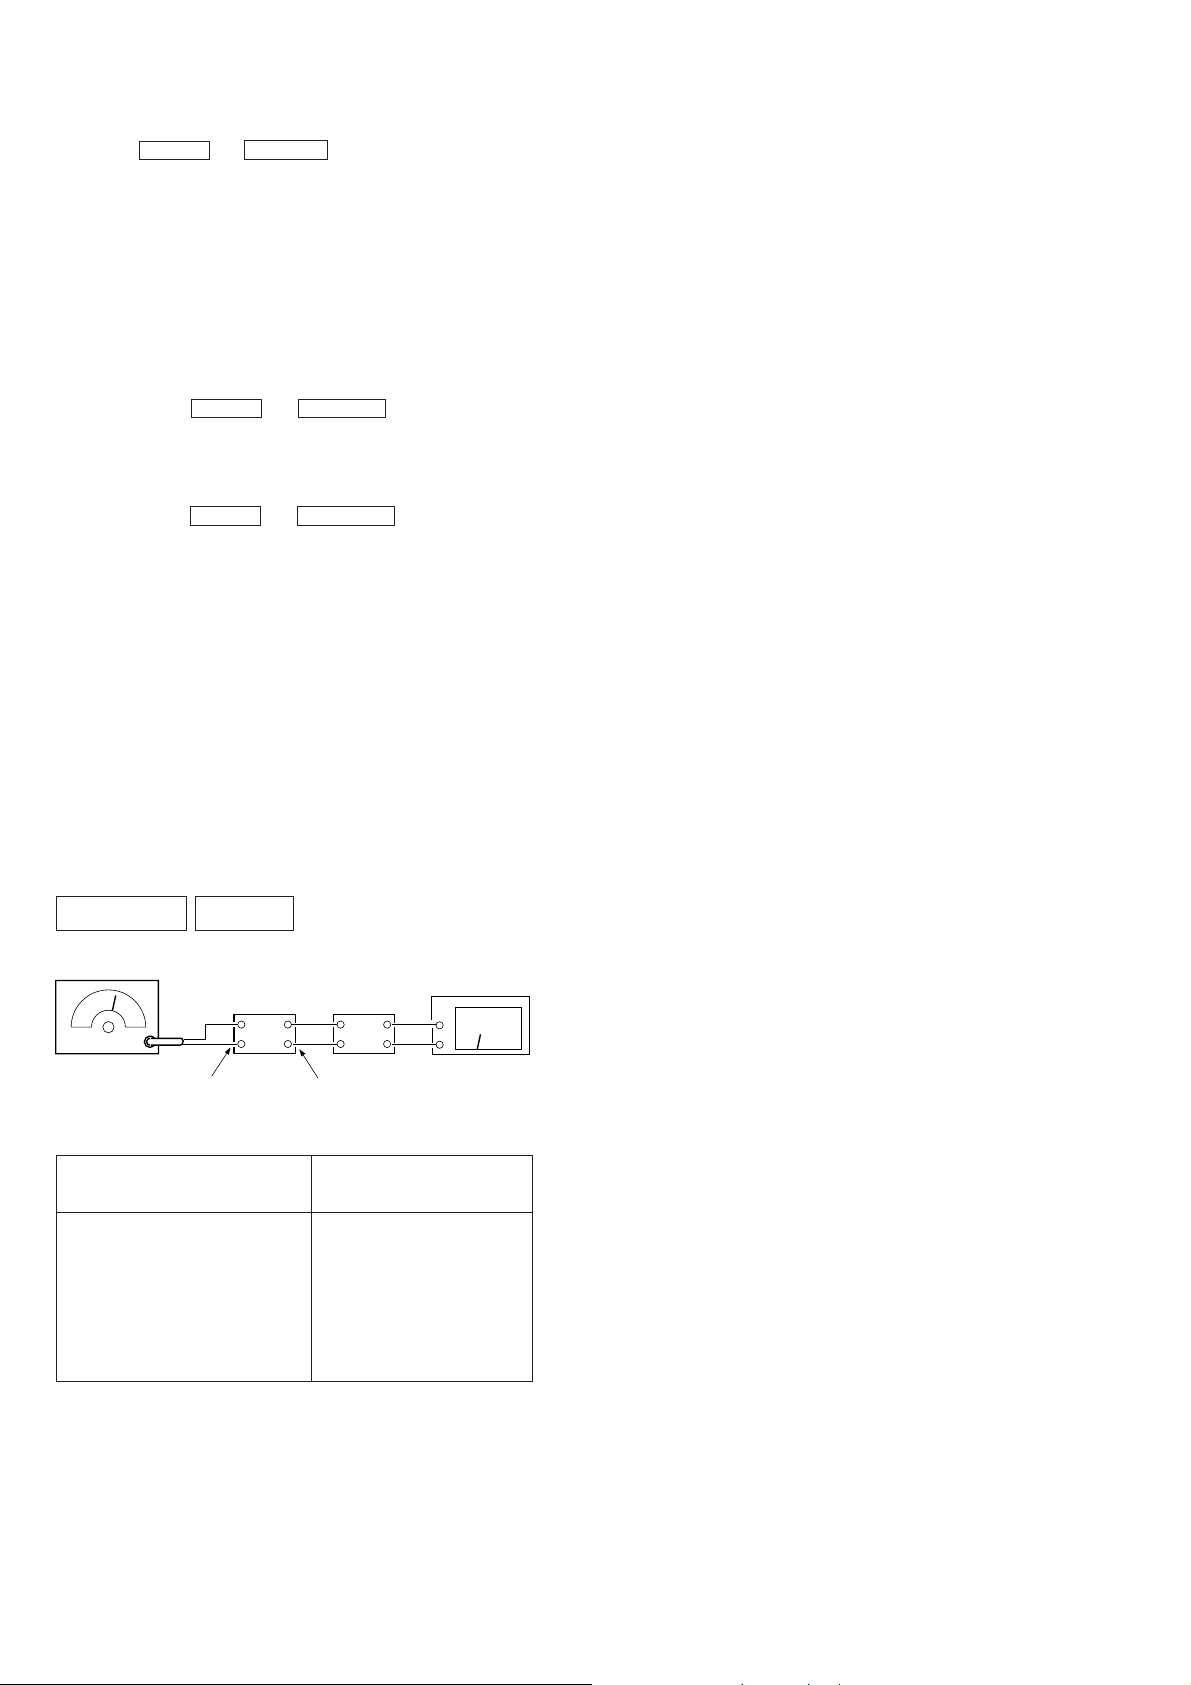
Stereo Separation Adjustment
Setting :
IF BAND : WIDE
FM RF SSG
Ω
FM ANTENNA (75
Modulation: Stereo Standard signal
Output level: 6mV (76dB) (at 75
)
Ω
open)
set
level meter
LINE OUT
Procedure :
1. Refer to “How to switch IF BAND WIDE/NARROW” on page
6.
FM stereo
Signal generator
Output channel
L-CH L-CH A
R-CH L-CH
R-CH R-CH
L-CH R-CH
Level meter
connection
Level meter
reading (dB)
B
Adjust RV301 for minimum
reading on Level meter
C
D
Adjust RV301 for minimum
reading on Level meter
FM ANTENNA (75
Modulation: Stereo Standard signal
Output level: 18µV (25dB) (at 75
Ω
set
open)
L-CH Stereo separation : A - B
R-CH Stereo separation : C - D
Ω
)
The separations of both channels should be equal.
— 5 —
Page 6
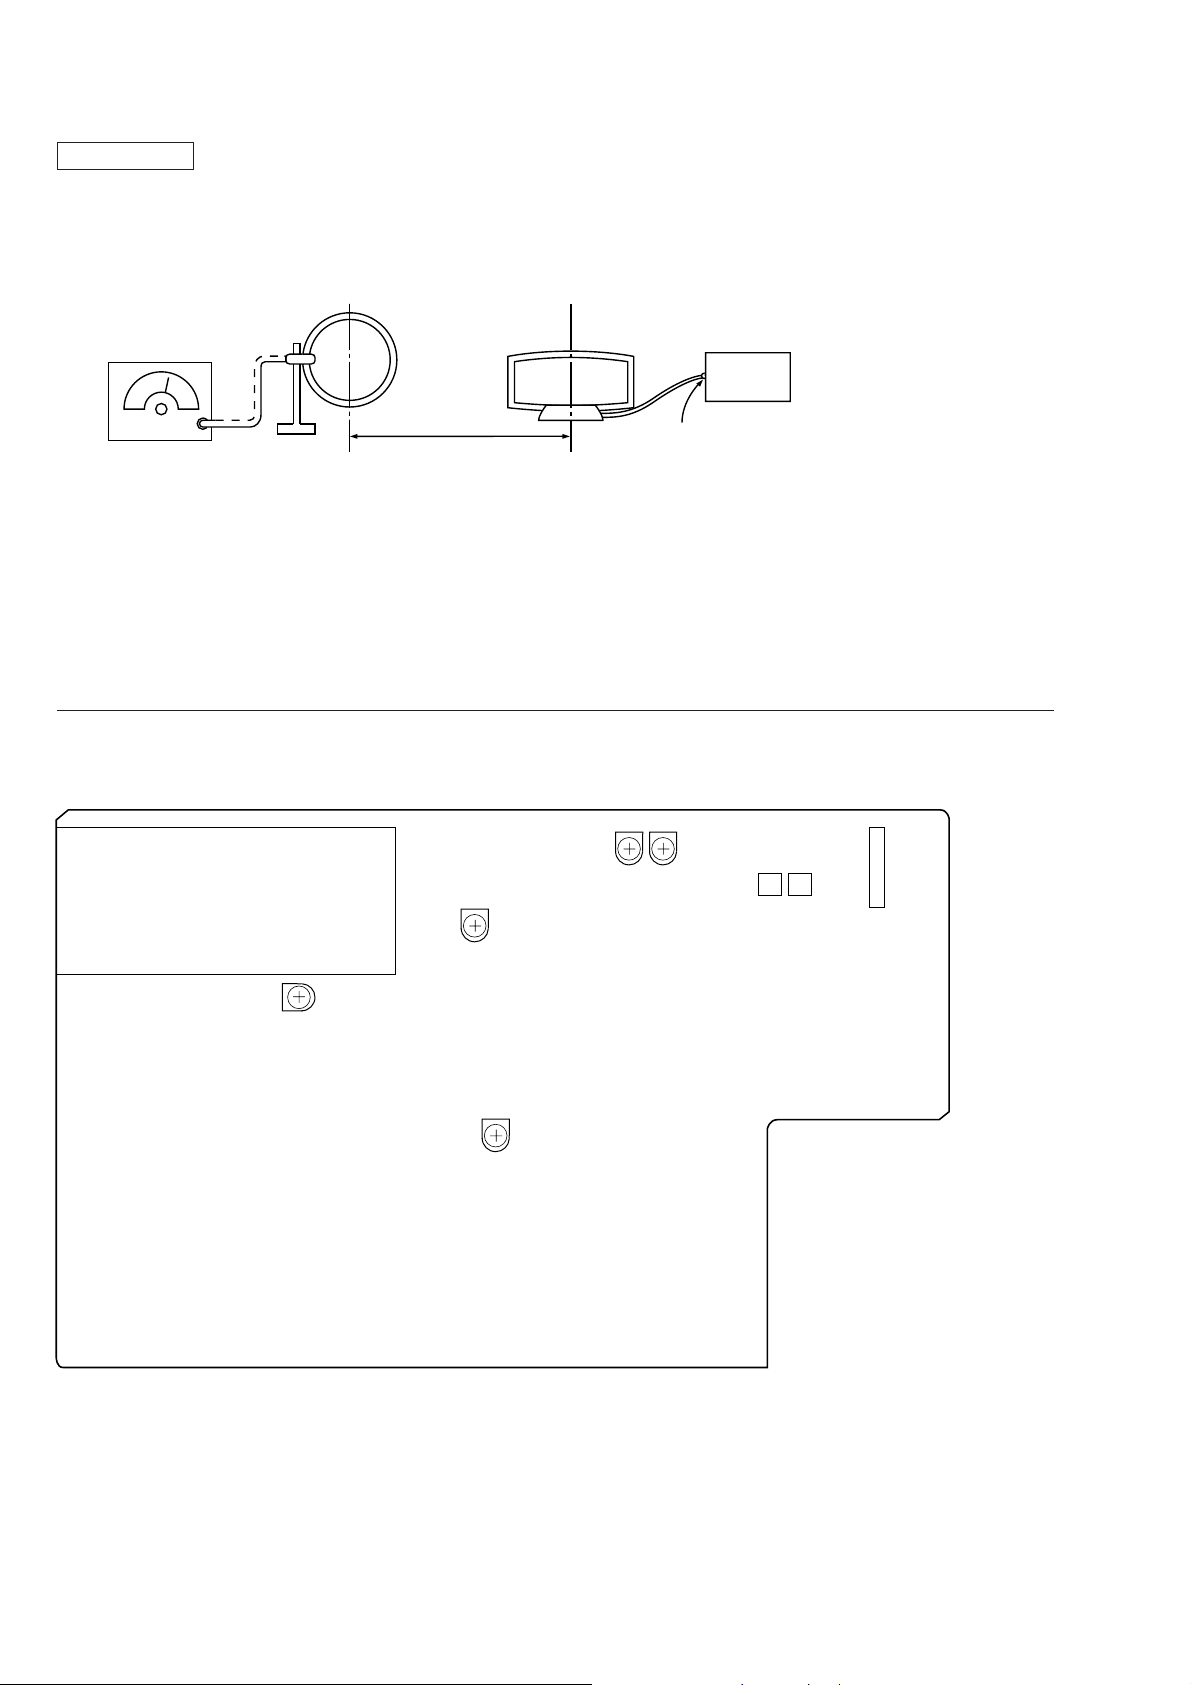
AM SECTION
AM Meter Level Adjustment
Setting :
BAND : LW
AM RF SSG
loop antenna
loop antenna
(Supplied accessories)
set
30% amplitude
modulation by
400Hz signal
Carrier frequency: 216kHz
Modulation: AUDIO 400Hz, 30% modulation
Field strength dB (µV/m) = SSG output level dB (µV/m) –26dB.
60cm
Procedure :
1. Set AM RF signal generator so that the AM antenna input level
becomes 74dBµ/m.
2. Adjust RV402 so that 1 to 10 indication bars light up on the signal
meter.
Adjustment Location
[MAIN BOARD] — Component Side —
FE101
RV221
FM Meter Level
RV231
Narrow
Gain
AM antenna
terminal (TM1)
RV251
Stereo
Level
IFT253
IFT252
(THD)
(NULL)
IFT252, 253
FM Discriminator
CNP701
RV402
AM Meter Level
RV301
Stereo
Separation
— 6 —
Page 7
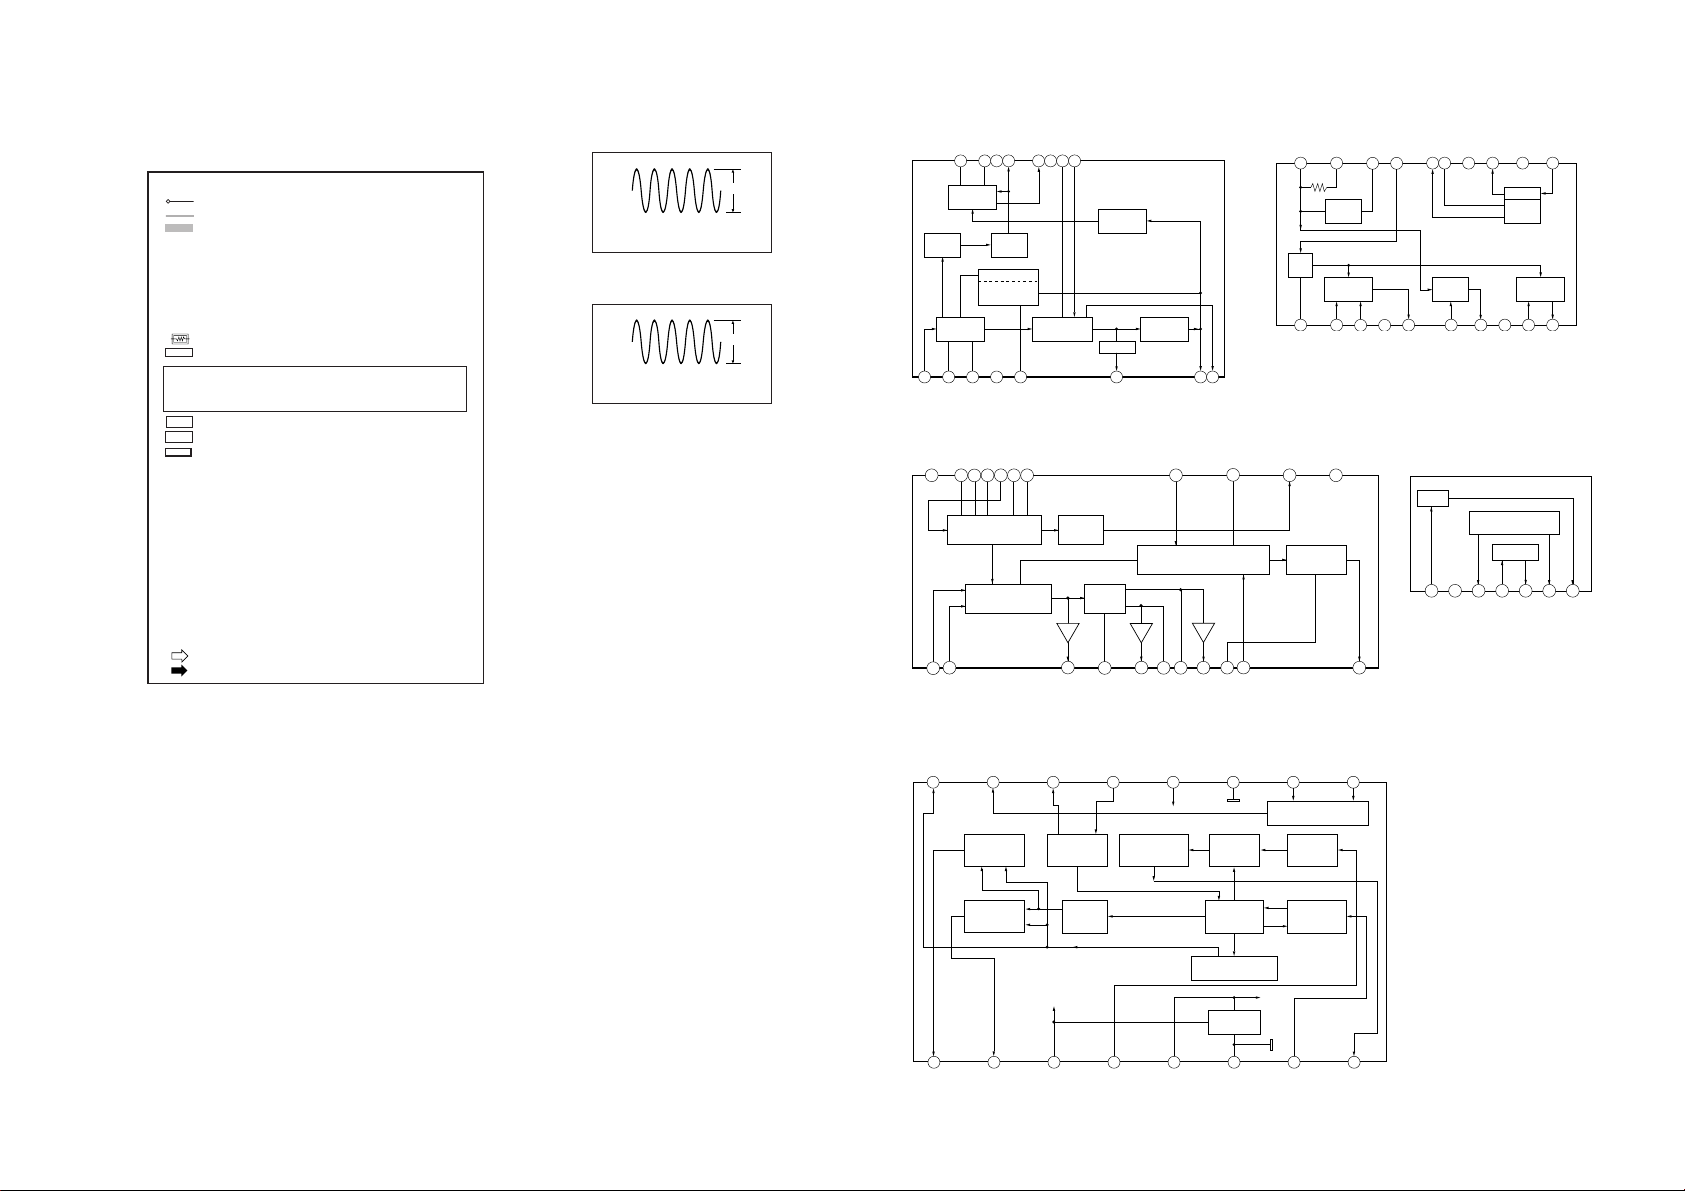
TEST LOGIC AND OUTPUT
SELECTOR SWITCH
QUALITY BIT
GENERATOR
OSCILLATOR
AND
DIVIDER
RECONSTRUCTION
FILTER
57KHz
BANDPASS
(8th ORDER)
ANTI-
ALIASING
FILTER
COSTAS LOOP
VARIABLE AND
FIXED DIVIDER
CLOCKED
COMPARATOR
CLOCK REGENERATION
AND SYNC
16 15 14 13 12 11 10 9
1 2 3 4 5 6 7 8
REFERENCE
VOLTAGE
DIFFERENTIAL
DECODER
BIPHASE
SYMBOL
DECODER
Vp1
QUAL
RDDA
VREF
MUX
VDDA
VSSA
CIN
SCOUT
RDCL
T57
OSCO
OSCI
VDDD
VSSD
TEST
TSTLD
SECTION 4
DIAGRAMS
THIS NOTE IS COMMON FOR PRINTED WIRING BOARDS
AND SCHEMATIC DIAGRAMS.
(In addition to this, the necessary note is printed in each
block.)
NOTE
• : parts extracted from the component side.
• : parts extracted from the conductor side.
• : Pattern from the side which enable seeing.
NOTE
• All capacitors are in µF unless otherwise noted. pF : µµF 50WV
or less are not indicated except for electrolytics and tantalums.
• All resistors are in Ω and 1/4W or less unless otherwise specified.
• ¢ : Internal component.
• : nonflammable resistor.
• : panel designation.
Note: The components identified by mark ! or dotted
line with mark ! are critical for safety.
Replace only with part number specified.
• B+ : B+ Line
B– : B– Line
•
• : adjustment for repalf
• Voltage and wa veforms are dc with respect to ground under nosignal conditions.
no mark : FM
MW : ( )
LW : < >
* : Can not be measu
• Voltages are taken with a VOM (Input impedance 10MΩ).
Voltage variations ma y be noted due to normal production tolerances.
• Waveforms are taken with a oscilloscope.
Voltage variations ma y be noted due to normal production tolerances.
• Circled numbers refer to waveforms.
• Signal path.
: FM
: AM
4-1. W AVEFORMS
MAIN SECTION
1
DISPLAY SECTION
1
4.332MHz
IC801 !£
4.2MHz
IC701 !¡ X2
3.2Vp-p
5.2Vp-p
4-2. IC BLOCK DIAGRAMS
IC221, 251 LA1235
11
1415 12 91016 13
METER
DRIVE
IF OFF
SHORTING
GND
B+
QUADRATURE
DET
DETUNE
AF AMP
DET
AF/NULL
METER
7
MUTING
CIRCUIT
LEVEL
DET
NULL METER
FM IF AMP
LIMITER
3 6
2 5 81 4
IC301 LA3401
22 21 20 19 18 17 16 15 14 13 12
VCC GND
PLL
FM/AM SELECT
MUTING
1
2 3 4 5 6 7 8 9 10 11
LAMP
DRIVE
MPX
FM/AM SELECT CONTROL
LOGIC / MUTE ON/OFF
IC401 LA1245
AGC
MUTING
OUT
AM
OSC
AM RF AMP
18
GND
3
17
4
IC901 LA5667
REG
15 1219 16 1320
14 11
B+
(IF)
AM
MIXING
1 234
6 92 5 81
7 10
GND
B+
(RF)
CONTROL
REG
AM DET
METER
DRIVE
AM IF AMP
567
— 7 —
IC801 SAA6579
— 8 —
Page 8
Page 9
Page 10
Page 11
Page 12
Page 13
Page 14
4-9. IC PIN FUNCTION
• IC701 SYSTEM CONTROL (uPD780205GF)
Pin No.
1
2
3
4
5
6
7
8
9
10
11
12
13
14
15
16
17
18
19
20
21
22
23
24
25
26
27
28
29
30
31
32
33
34
35
36
37
38
39
40
Pin Name I/O
VDD
ANT
ATT
BAND1
BAND2
IF-B
N.C.
MONO
TUN
RESET
X2
4.19MHz
GND
N.C.
LOCK
V
DD
CLK
DAT A
D-IN
CE
BLN
ST
CAL
AST
AV
SS
MUTE
EON
PGM
DATA RDS
R2
KEY 2
KEY 1
SI
DD
AV
AVREF
RIN
R1
RDS CLK
POWER
GND
—
—
—
—
—
—
—
—
—
I
O
I
—
—
I
—
O
O
I
O
—
I
—
I
—
O
—
—
I
—
I
I
I
—
I
I
—
I
I
—
Power supply (+5V).
Not used.
Not used.
Not used.
Not used.
Not used.
Not used.
Not used.
Not used.
System reset input.
Oscillation signal output (4.19MHz).
Oscillation signal input (4.19MHz).
Ground.
Not used.
Lock signal input.
Power supply (+5V).
PLL clock to FE101.
PLL data to FE101.
PLL data from FE101.
PLL latch to FE101.
Not used.
Stereo display detection.
Not used.
Auto stop signal detection.
Ground. (Analog)
Muting signal output.
Not used.
Not used.
RDS data input.
Not used.
Key input.
Key input.
Signal input.
Analog power supply (+5V).
Reference voltage (+5V).
Remote control input.
Not used.
RDS data clock input.
Power supply ON/OFF monitor.
Ground.
Function
Pin No.
41
42
43
44
45
46
47-78
79
80-83
84,85
86-100
IS 5
IS 4
IS 3
IS 2
IS 1
V
DD
P1-P32
V LOAD
P33-P36
P37.16G
15G-1G
Pin Name
I/O Function
I
I
Model detection.
I
I
I
Power supply (+5V).
—
Drives indication tube.
O
Power supply (–30V).
—
Drives indication tube.
O
Not used.
—
Drives indication tube.
O
— 21 —
— 22 —
Page 15
SECTION 5
EXPLODED VIEWS
NOTE:
• Items marked “*” are not stocked since they are
seldom required for routine service. Some delay
should be anticipated when ordering these items.
• The mechanical parts with no reference number in
the exploded views are not supplied.
• Hardware (# mark) list and accessories and packing materials are given in the last of this parts list.
1
5
1
23
#4
11
10
12
#2
not supplied
7
FL701
#2
10
#2
2
#4
9
8
not supplied
18
15
#4
16
1
17
15
#5
22
21
13
23
The components identified by mark !
or dotted line with mark ! are critical
for safety.
Replace only with part number
specified.
22
1
#5
#4
14
not
supplied
1
5
#4
20
PC901
19
#4
#4
#4
1
3
#1
6
4
#3
1
Ref. No. Part No. Description Remark
1 4-960-910-31 SCREW, ORNAMENTAL
2 4-989-920-11 PANEL, FRONT
3 X-4948-552-2 PANEL (BASE) ASSY
4 X-4947-892-1 FOOT ASSY
* 5 4-986-466-01 BRACKET (SIDE)
6 1-773-040-11 WIRE (FLAT TYPE) (17 CORE)
* 7 A-4398-429-A DISPLAY BOARD, COMPLETE
* 8 4-921-941-01 CUSHION (FL)
* 9 4-945-292-01 HOLDER, INDICATION TUBE
10 4-951-620-01 SCREW (2.6X8), +BVTP
11 X-4947-759-1 BUTTON ASSY, POWER
* 12 1-665-360-11 AC.SW BOARD
* 13 4-989-921-12 PANEL, BACK
#3
4
#4
#4
#4
Ref. No. Part No. Description Remark
* 14 4-923-873-01 BRACKET, CORD STOPPER
* 15 3-346-265-11 HOLDER, PC BOARD
* 16 A-4398-428-A MAIN BOARD, COMPLETE
* 17 3-332-563-01 BRACKET (P)
* 18 1-666-121-11 TRANSFORMER BOARD
* 19 3-703-244-00 BUSHING (2104), CORD
20 3-704-515-11 SCREW (BV/RING)
* 21 4-986-255-01 PLATE, TOP
* 22 4-986-468-01 PANEL (TOP)
23 3-703-929-01 SPACER, SWITCH
FL701 1-517-177-21 INDICATOR TUBE, FLUORESCENT
! PC901 1-558-568-21 CORD, POWER
not
supplied
— 23 —
Page 16

AC.SW
Note:
The components identified by mark !
or dotted line with mark ! are critical
for safety.
Replace only with part number specified.
When indicating parts by reference
number, please include the board
name.
Ref. No. Part No. Description Remark Ref. No. Part No. Description Remark
* 1-665-360-11 AC.SW BOARD
DISPLAY
***********
ELECTRICAL PARTS LIST
• Due to standardization, replacements in the parts list
may be different from the parts specified in the
diagrams or the components used on the set.
• -XX, -X mean standardized parts, so they may have
some difference from the original one.
• Items marked “*” are not stocked since they are
seldom required for routine service. Some delay
should be anticipated when ordering these items.
• RESISTORS
All resistors are in ohms
METAL: Metal-film resistor
METAL OXIDE: Metal Oxide-film resistor
F : nonflammable
D705 8-719-987-63 DIODE 1N4148M
D707 8-719-987-63 DIODE 1N4148M
• SEMICONDUCTORS
In each case, u: µ , for example:
uA...: µ A..., uPA...: µPA..., uPB...: µ PB...,
uPC...: µ PC..., uPD...: µ PD...
• CAPACITORS
uF : µ F
• COILS
uH : µ H
SECTION 6
< GROUND PLATE >
EP900 4-957-933-01 PLATE, GROUND
< SWITCH >
! S901 1-762-581-11 SWITCH, AC POWER PUSH (1 KEY)(POWER)
**************************************************************
* A-4398-429-A DISPLAY BOARD, COMPLETE
***********************
* 4-921-941-01 CUSHION (FL)
* 4-945-292-01 HOLDER, INDICATION TUBE
< CAPACITOR >
C701 1-162-306-11 CERAMIC 0.01uF 20% 16V
C702 1-162-306-11 CERAMIC 0.01uF 20% 16V
C703 1-102-516-11 CERAMIC 27PF 5% 50V
C704 1-102-516-11 CERAMIC 27PF 5% 50V
C705 1-162-306-11 CERAMIC 0.01uF 20% 16V
C706 1-164-159-11 CERAMIC 0.1uF 50V
C707 1-124-248-00 ELECT 22uF 20% 35V
C708 1-164-159-11 CERAMIC 0.1uF 50V
C709 1-164-159-11 CERAMIC 0.1uF 50V
C710 1-126-964-11 ELECT 10uF 20% 50V
C711 1-126-964-11 ELECT 10uF 20% 50V
C712 1-104-905-11 CAPACITOR 0.22F 5.5V
C713 1-162-306-11 CERAMIC 0.01uF 20% 16V
C714 1-126-959-11 ELECT 0.47uF 20% 50V
C715 1-124-589-11 ELECT 47uF 20% 16V
C716 1-162-306-11 CERAMIC 0.01uF 20% 16V
C717 1-164-159-11 CERAMIC 0.1uF 50V
C718 1-126-964-11 ELECT 10uF 20% 50V
C719 1-126-964-11 ELECT 10uF 20% 50V
C720 1-162-286-31 CERAMIC 220PF 10% 50V
C721 1-126-157-11 ELECT 10uF 20% 16V
< CONNECTOR >
* CN701 1-568-836-11 SOCKET, CONNECTOR 17P
< DIODE >
D701 8-719-987-63 DIODE 1N4148M
D702 8-719-987-63 DIODE 1N4148M
D703 8-719-987-63 DIODE 1N4148M
< FLUORESCENT INDICATOR >
FL701 1-517-177-21 INDICATOR TUBE, FLUORESCENT
< IC >
IC701 8-759-483-96 IC uPD780205GF-034-3BA
IC702 8-759-459-84 IC NJL56H400
< TRANSISTOR >
Q701 8-729-620-05 TRANSISTOR 2SC2603-EF
< RESISTOR >
R701 1-249-437-11 CARBON 47K 5% 1/4W
R702 1-249-429-11 CARBON 10K 5% 1/4W
R703 1-249-429-11 CARBON 10K 5% 1/4W
R704 1-249-419-11 CARBON 1.5K 5% 1/4W F
R705 1-249-419-11 CARBON 1.5K 5% 1/4W F
R706 1-247-807-31 CARBON 100 5% 1/4W
R707 1-247-807-31 CARBON 100 5% 1/4W
R709 1-247-807-31 CARBON 100 5% 1/4W
R710 1-247-807-31 CARBON 100 5% 1/4W
R711 1-247-807-31 CARBON 100 5% 1/4W
R712 1-249-406-11 CARBON 120 5% 1/4W F
R713 1-249-406-11 CARBON 120 5% 1/4W F
R714 1-249-407-11 CARBON 150 5% 1/4W F
R715 1-249-401-11 CARBON 47 5% 1/4W F
R716 1-249-417-11 CARBON 1K 5% 1/4W F
R717 1-249-433-11 CARBON 22K 5% 1/4W
R718 1-247-895-00 CARBON 470K 5% 1/4W
R721 1-247-807-31 CARBON 100 5% 1/4W
R722 1-249-406-11 CARBON 120 5% 1/4W F
R723 1-249-406-11 CARBON 120 5% 1/4W F
R724 1-249-407-11 CARBON 150 5% 1/4W F
R725 1-249-408-11 CARBON 180 5% 1/4W F
R726 1-249-409-11 CARBON 220 5% 1/4W F
R727 1-249-410-11 CARBON 270 5% 1/4W F
R728 1-249-411-11 CARBON 330 5% 1/4W
R729 1-249-413-11 CARBON 470 5% 1/4W F
R730 1-249-414-11 CARBON 560 5% 1/4W F
R731 1-249-413-11 CARBON 470 5% 1/4W F
R732 1-249-413-11 CARBON 470 5% 1/4W F
R733 1-249-413-11 CARBON 470 5% 1/4W F
R734 1-249-413-11 CARBON 470 5% 1/4W F
R735 1-249-413-11 CARBON 470 5% 1/4W F
— 24 —
Page 17

DISPLAY MAIN
Ref. No. Part No. Description Remark
R736 1-249-413-11 CARBON 470 5% 1/4W F
R737 1-249-413-11 CARBON 470 5% 1/4W F
R738 1-249-413-11 CARBON 470 5% 1/4W F
R739 1-249-413-11 CARBON 470 5% 1/4W F
R740 1-249-413-11 CARBON 470 5% 1/4W F
R741 1-249-413-11 CARBON 470 5% 1/4W F
R747 1-249-429-11 CARBON 10K 5% 1/4W
R749 1-249-429-11 CARBON 10K 5% 1/4W
R751 1-249-429-11 CARBON 10K 5% 1/4W
< SWITCH >
S701 1-554-303-21 SWITCH, TACTILE (SHIFT)
S702 1-554-303-21 SWITCH, TACTILE (TUNING/SELECT +)
S703 1-554-303-21 SWITCH, TACTILE (TUNE MODE)
S704 1-554-303-21 SWITCH, TACTILE (MENU ENTRY ENTER)
S711 1-554-303-21 SWITCH, TACTILE (TUNING/SELECT –)
S712 1-554-303-21 SWITCH, TACTILE (MENU ENTRY RETURN)
S713 1-554-303-21 SWITCH, TACTILE (MENU ENTRY MENU)
S714 1-554-303-21 SWITCH, TACTILE (MEMORY)
S715 1-554-303-21 SWITCH, TACTILE (CHARACTER)
S716 1-554-303-21 SWITCH, TACTILE (DISPLAY)
S717 1-554-303-21 SWITCH, TACTILE (BAND)
S718 1-554-303-21 SWITCH, TACTILE (ANTENNA)
< VIBRATOR >
X701 1-760-422-11 VIBRATOR, CRYSTAL (4.2MHz)
**************************************************************
* A-4398-428-A MAIN BOARD, COMPLETE
********************
7-685-872-09 SCREW +BVTT 3X8 (S)
Ref. No. Part No. Description Remark
C253 1-162-306-11 CERAMIC 0.01uF 20% 16V
C254 1-117-793-11 MYLAR 330PF 5% 50V
C255 1-130-467-00 MYLAR 470PF 5% 50V
C256 1-126-960-11 ELECT 1uF 20% 50V
C257 1-126-967-11 ELECT 47uF 20% 16V
C258 1-162-306-11 CERAMIC 0.01uF 20% 16V
C259 1-126-967-11 ELECT 47uF 20% 16V
C260 1-162-306-11 CERAMIC 0.01uF 20% 16V
C261 1-162-306-11 CERAMIC 0.01uF 20% 16V
C262 1-162-306-11 CERAMIC 0.01uF 20% 16V
C263 1-162-306-11 CERAMIC 0.01uF 20% 16V
C264 1-126-959-11 ELECT 0.47uF 20% 50V
C265 1-126-967-11 ELECT 47uF 20% 16V
C266 1-126-964-11 ELECT 10uF 20% 50V
C267 1-162-306-11 CERAMIC 0.01uF 20% 16V
C268 1-162-294-31 CERAMIC 0.001uF 10% 50V
C269 1-162-306-11 CERAMIC 0.01uF 20% 16V
C270 1-162-282-31 CERAMIC 100PF 10% 50V
C301 1-130-491-00 MYLAR 0.047uF 5% 50V
C302 1-126-967-11 ELECT 47uF 20% 16V
C303 1-130-491-00 MYLAR 0.047uF 5% 50V
C304 1-162-288-31 CERAMIC 330PF 10% 50V
C306 1-126-967-11 ELECT 47uF 20% 16V
C307 1-130-468-00 MYLAR 560PF 5% 50V
C308 1-130-468-00 MYLAR 560PF 5% 50V
C311 1-106-351-00 MYLAR 2200PF 5% 200V
C312 1-106-351-00 MYLAR 2200PF 5% 200V
C313 1-126-964-11 ELECT 10uF 20% 50V
C314 1-126-964-11 ELECT 10uF 20% 50V
C315 1-117-792-11 MYLAR 0.0001uF 5% 50V
C316 1-117-792-11 MYLAR 0.0001uF 5% 50V
C317 1-126-963-11 ELECT 4.7uF 20% 50V
C318 1-126-963-11 ELECT 4.7uF 20% 50V
< CAPACITOR >
C102 1-162-306-11 CERAMIC 0.01uF 20% 16V
C103 1-126-967-11 ELECT 47uF 20% 16V
C104 1-126-967-11 ELECT 47uF 20% 16V
C200 1-162-306-11 CERAMIC 0.01uF 20% 16V
C201 1-162-306-11 CERAMIC 0.01uF 20% 16V
C202 1-162-306-11 CERAMIC 0.01uF 20% 16V
C203 1-162-306-11 CERAMIC 0.01uF 20% 16V
C204 1-162-306-11 CERAMIC 0.01uF 20% 16V
C221 1-162-282-31 CERAMIC 100PF 10% 50V
C222 1-162-306-11 CERAMIC 0.01uF 20% 16V
C223 1-162-306-11 CERAMIC 0.01uF 20% 16V
C224 1-162-306-11 CERAMIC 0.01uF 20% 16V
C225 1-126-967-11 ELECT 47uF 20% 16V
C226 1-162-306-11 CERAMIC 0.01uF 20% 16V
C227 1-126-956-11 ELECT 0.1uF 20% 50V
C231 1-162-306-11 CERAMIC 0.01uF 20% 16V
C232 1-162-306-11 CERAMIC 0.01uF 20% 16V
C235 1-162-215-31 CERAMIC 47PF 5% 50V
C236 1-162-306-11 CERAMIC 0.01uF 20% 16V
C237 1-162-306-11 CERAMIC 0.01uF 20% 16V
C251 1-162-306-11 CERAMIC 0.01uF 20% 16V
C252 1-162-306-11 CERAMIC 0.01uF 20% 16V
C319 1-126-767-11 ELECT 1000uF 20% 16V
C320 1-126-960-11 ELECT 1uF 20% 50V
C321 1-126-960-11 ELECT 1uF 20% 50V
C322 1-126-960-11 ELECT 1uF 20% 50V
C323 1-126-959-11 ELECT 0.47uF 20% 50V
C324 1-126-960-11 ELECT 1uF 20% 50V
C325 1-126-967-11 ELECT 47uF 20% 16V
C351 1-106-343-00 MYLAR 1000PF 5% 200V
C352 1-106-343-00 MYLAR 1000PF 5% 200V
C400 1-162-211-31 CERAMIC 33PF 5% 50V
C401 1-162-306-11 CERAMIC 0.01uF 20% 16V
C402 1-162-306-11 CERAMIC 0.01uF 20% 16V
C403 1-162-306-11 CERAMIC 0.01uF 20% 16V
C404 1-126-967-11 ELECT 47uF 20% 16V
C405 1-162-306-11 CERAMIC 0.01uF 20% 16V
C406 1-162-306-11 CERAMIC 0.01uF 20% 16V
C407 1-162-306-11 CERAMIC 0.01uF 20% 16V
C408 1-162-306-11 CERAMIC 0.01uF 20% 16V
C409 1-162-294-31 CERAMIC 0.001uF 10% 50V
C410 1-162-306-11 CERAMIC 0.01uF 20% 16V
C411 1-126-967-11 ELECT 47uF 20% 16V
C412 1-126-960-11 ELECT 1uF 20% 50V
C413 1-126-960-11 ELECT 1uF 20% 50V
C414 1-126-960-11 ELECT 1uF 20% 50V
— 25 —
Page 18

MAIN
Ref. No. Part No. Description Remark
C415 1-126-962-11 ELECT 3.3uF 20% 50V
C418 1-162-306-11 CERAMIC 0.01uF 20% 16V
C419 1-162-294-31 CERAMIC 0.001uF 10% 50V
C420 1-162-306-11 CERAMIC 0.01uF 20% 16V
C421 1-130-491-00 MYLAR 0.047uF 5% 50V
C422 1-102-508-91 CERAMIC 10PF 0.5PF 50V
C423 1-102-973-00 CERAMIC 100PF 5% 50V
C424 1-162-306-11 CERAMIC 0.01uF 20% 16V
C425 1-126-964-11 ELECT 10uF 20% 50V
C427 1-106-343-00 MYLAR 1000PF 5% 200V
C428 1-162-211-31 CERAMIC 33PF 5% 50V
C429 1-162-306-11 CERAMIC 0.01uF 20% 16V
C430 1-162-294-31 CERAMIC 0.001uF 10% 50V
C801 1-126-961-11 ELECT 2.2uF 20% 50V
C802 1-162-288-31 CERAMIC 330PF 10% 50V
C803 1-162-306-11 CERAMIC 0.01uF 20% 16V
C804 1-162-291-31 CERAMIC 560PF 10% 50V
C805 1-126-967-11 ELECT 47uF 20% 16V
C806 1-162-306-11 CERAMIC 0.01uF 20% 16V
C807 1-102-852-91 CERAMIC 47PF 5% 50V
C808 1-102-527-11 CERAMIC 82PF 5% 50V
C901 1-101-004-00 CERAMIC 0.01uF 50V
C902 1-101-004-00 CERAMIC 0.01uF 50V
C903 1-126-967-11 ELECT 47uF 20% 50V
C904 1-126-967-11 ELECT 47uF 20% 50V
C905 1-126-953-11 ELECT 2200uF 20% 35V
C906 1-126-969-11 ELECT 220uF 20% 50V
C908 1-126-964-11 ELECT 10uF 20% 50V
C909 1-126-967-11 ELECT 47uF 20% 16V
C910 1-162-306-11 CERAMIC 0.01uF 20% 16V
C911 1-126-959-11 ELECT 0.47uF 20% 50V
C912 1-126-935-11 ELECT 470uF 20% 6.3V
< FILTER >
CF201 1-567-389-11 FILTER, CERAMIC
CF202 1-567-389-11 FILTER, CERAMIC
CF203 1-567-389-11 FILTER, CERAMIC
CF231 1-579-554-31 FILTER, CERAMIC
CF301 1-567-250-11 OSCILLA TOR, CERAMIC
Ref. No. Part No. Description Remark
D902 8-719-200-82 DIODE 11ES2
D903 8-719-200-82 DIODE 11ES2
D904 8-719-200-82 DIODE 11ES2
D905 8-719-934-18 DIODE HZS27-2L
D906 8-719-001-18 DIODE UZL-9M3
D909 8-719-987-63 DIODE 1N4148M
D910 8-719-200-82 DIODE 11ES2
< GROUND PLATE >
* EP901 4-942-204-01 PLATE, GROUND
< FRONT END >
FE101 1-233-524-11 ENCAPSULATED COMPONENT
(ANTENNA FM 75Ω COAXIAL)
FE401 1-233-525-11 ENCAPSULATED COMPONENT
< IC >
IC221 8-759-812-35 IC LA1235
IC251 8-759-812-35 IC LA1235
IC252 8-759-634-51 IC M5218AP
IC301 8-759-801-80 IC LA3401
IC302 8-759-634-51 IC M5218AP
IC401 8-759-812-45 IC LA1245
IC801 8-759-169-99 IC SAA6579
IC901 8-759-820-09 IC LA5667
< IFT >
IFT401 1-404-713-11 TRANSFORMER, IF
< COIL >
L201 1-410-521-11 INDUCTOR 100uH
L351 1-410-509-11 INDUCTOR 10uH
L352 1-410-509-11 INDUCTOR 10uH
L400 1-414-142-11 INDUCTOR 1uH
L401 1-410-521-11 INDUCTOR 100uH
< FILTER >
LPF301 1-235-164-00 FILTER, LOW PASS
LPF302 1-235-164-00 FILTER, LOW PASS
CF402 1-527-981-00 FILTER, CERAMIC
< CONNECTOR >
CNJ301 1-568-250-21 JACK, PIN 2P (LINE OUT)
< CONNECTOR >
* CNP701 1-568-836-11 SOCKET, CONNECTOR 17P
CNP952 1-766-267-11 PIN, CONNECTOR (PC BOARD) 5P
< DIODE >
D221 8-719-987-63 DIODE 1N4148M
D251 8-719-987-63 DIODE 1N4148M
D301 8-719-987-63 DIODE 1N4148M
D401 8-719-987-63 DIODE 1N4148M
D402 8-719-987-63 DIODE 1N4148M
D901 8-719-200-82 DIODE 11ES2
< TRANSISTOR >
Q200 8-729-231-20 TRANSISTOR 2SK161-YGR
Q201 8-729-230-99 TRANSISTOR 2SC2669-OY
Q202 8-729-230-99 TRANSISTOR 2SC2669-OY
Q204 8-729-230-99 TRANSISTOR 2SC2669-OY
Q205 8-729-230-99 TRANSISTOR 2SC2669-OY
Q231 8-729-030-03 TRANSISTOR DTC144ESA-TP
Q232 8-729-030-03 TRANSISTOR DTC144ESA-TP
Q233 8-729-030-03 TRANSISTOR DTC144ESA-TP
Q234 8-729-620-05 TRANSISTOR 2SC2603-EF
Q235 8-729-620-05 TRANSISTOR 2SC2603-EF
Q236 8-729-230-99 TRANSISTOR 2SC2669-OY
Q237 8-729-230-99 TRANSISTOR 2SC2669-OY
Q251 8-729-030-03 TRANSISTOR DTC144ESA-TP
Q301 8-729-141-30 TRANSISTOR 2SC3623A-LK
Q302 8-729-141-30 TRANSISTOR 2SC3623A-LK
— 26 —
Page 19
MAIN
Ref. No. Part No. Description Remark Ref. No. Part No. Description Remark
Q303 8-729-141-30 TRANSISTOR 2SC3623A-LK
Q304 8-729-141-30 TRANSISTOR 2SC3623A-LK
Q401 8-729-230-99 TRANSISTOR 2SC2669-OY
Q402 8-729-231-20 TRANSISTOR 2SK161-YGR
Q403 8-729-141-30 TRANSISTOR 2SC3623A-LK
Q404 8-729-141-30 TRANSISTOR 2SC3623A-LK
Q405 8-729-141-30 TRANSISTOR 2SC3623A-LK
Q521 8-729-900-89 TRANSISTOR DTC144ES
Q522 8-729-821-04 TRANSISTOR 2SA1317-STU
Q523 8-729-620-05 TRANSISTOR 2SC2603-EF
Q901 8-729-029-56 TRANSISTOR DTA144ESA
R255 1-249-421-11 CARBON 2.2K 5% 1/4W F
R256 1-249-432-11 CARBON 18K 5% 1/4W
R257 1-249-424-11 CARBON 3.9K 5% 1/4W F
R258 1-249-422-11 CARBON 2.7K 5% 1/4W F
! R259 1-249-405-11 CARBON 100 5% 1/4W F
R260 1-249-439-11 CARBON 68K 5% 1/4W
R261 1-249-437-11 CARBON 47K 5% 1/4W
R262 1-249-441-11 CARBON 100K 5% 1/4W
R264 1-249-431-11 CARBON 15K 5% 1/4W
! R265 1-249-405-11 CARBON 100 5% 1/4W F
! R266 1-249-405-11 CARBON 100 5% 1/4W F
< RESISTOR >
! R101 1-249-417-11 CARBON 1K 5% 1/4W F
! R102 1-249-405-11 CARBON 100 5% 1/4W F
! R103 1-249-393-11 CARBON 10 5% 1/4W F
R104 1-249-433-11 CARBON 22K 5% 1/4W
R105 1-249-437-11 CARBON 47K 5% 1/4W
R110 1-247-903-00 CARBON 1M 5% 1/4W
R111 1-247-903-00 CARBON 1M 5% 1/4W
R112 1-247-903-00 CARBON 1M 5% 1/4W
R200 1-249-408-11 CARBON 180 5% 1/4W F
R201 1-249-407-11 CARBON 150 5% 1/4W F
R202 1-249-411-11 CARBON 330 5% 1/4W
R203 1-249-411-11 CARBON 330 5% 1/4W
R204 1-249-431-11 CARBON 15K 5% 1/4W
R205 1-249-411-11 CARBON 330 5% 1/4W
R206 1-249-413-11 CARBON 470 5% 1/4W F
R207 1-249-411-11 CARBON 330 5% 1/4W
R208 1-249-433-11 CARBON 22K 5% 1/4W
R209 1-249-411-11 CARBON 330 5% 1/4W
R210 1-249-431-11 CARBON 15K 5% 1/4W
R211 1-249-411-11 CARBON 330 5% 1/4W
R212 1-249-411-11 CARBON 330 5% 1/4W
R213 1-249-433-11 CARBON 22K 5% 1/4W
R214 1-249-441-11 CARBON 100K 5% 1/4W
R221 1-249-411-11 CARBON 330 5% 1/4W
! R222 1-249-405-11 CARBON 100 5% 1/4W F
R223 1-247-883-00 CARBON 150K 5% 1/4W
R231 1-249-411-11 CARBON 330 5% 1/4W
R232 1-249-431-11 CARBON 15K 5% 1/4W
R233 1-249-411-11 CARBON 330 5% 1/4W
R234 1-249-395-11 CARBON 15 5% 1/4W F
R235 1-249-433-11 CARBON 22K 5% 1/4W
R238 1-249-429-11 CARBON 10K 5% 1/4W
R239 1-249-429-11 CARBON 10K 5% 1/4W
R240 1-249-431-11 CARBON 15K 5% 1/4W
R241 1-249-429-11 CARBON 10K 5% 1/4W
R242 1-249-429-11 CARBON 10K 5% 1/4W
R243 1-247-807-31 CARBON 100 5% 1/4W
! R244 1-249-393-11 CARBON 10 5% 1/4W F
! R245 1-249-393-11 CARBON 10 5% 1/4W F
! R246 1-249-393-11 CARBON 10 5% 1/4W F
R251 1-249-411-11 CARBON 330 5% 1/4W
R252 1-249-437-11 CARBON 47K 5% 1/4W
R253 1-249-439-11 CARBON 68K 5% 1/4W
R254 1-249-421-11 CARBON 2.2K 5% 1/4W F
R268 1-249-433-11 CARBON 22K 5% 1/4W
R269 1-249-441-11 CARBON 100K 5% 1/4W
R270 1-247-883-00 CARBON 150K 5% 1/4W
R271 1-249-417-11 CARBON 1K 5% 1/4W F
R272 1-249-417-11 CARBON 1K 5% 1/4W F
R273 1-249-422-11 CARBON 2.7K 5% 1/4W F
! R274 1-249-393-11 CARBON 10 5% 1/4W F
R275 1-247-903-00 CARBON 1M 5% 1/4W
R301 1-249-421-11 CARBON 2.2K 5% 1/4W F
R302 1-247-883-00 CARBON 150K 5% 1/4W
R303 1-247-883-00 CARBON 150K 5% 1/4W
R304 1-247-878-00 CARBON 91K 5% 1/4W
R305 1-247-878-00 CARBON 91K 5% 1/4W
R306 1-249-421-11 CARBON 2.2K 5% 1/4W F
R307 1-249-421-11 CARBON 2.2K 5% 1/4W F
R308 1-249-426-11 CARBON 5.6K 5% 1/4W
R309 1-249-426-11 CARBON 5.6K 5% 1/4W
R310 1-249-426-11 CARBON 5.6K 5% 1/4W
R311 1-249-426-11 CARBON 5.6K 5% 1/4W
R312 1-247-843-11 CARBON 3.3K 5% 1/4W
R313 1-247-843-11 CARBON 3.3K 5% 1/4W
R314 1-249-409-11 CARBON 220 5% 1/4W F
R315 1-249-409-11 CARBON 220 5% 1/4W F
! R316 1-249-405-11 CARBON 100 5% 1/4W F
! R317 1-249-405-11 CARBON 100 5% 1/4W F
R319 1-249-437-11 CARBON 47K 5% 1/4W
R320 1-249-437-11 CARBON 47K 5% 1/4W
R321 1-249-441-11 CARBON 100K 5% 1/4W
R324 1-249-426-11 CARBON 5.6K 5% 1/4W
! R325 1-249-405-11 CARBON 100 5% 1/4W F
! R326 1-249-405-11 CARBON 100 5% 1/4W F
R330 1-249-417-11 CARBON 1K 5% 1/4W F
R331 1-249-417-11 CARBON 1K 5% 1/4W F
R332 1-249-409-11 CARBON 220 5% 1/4W F
R333 1-249-409-11 CARBON 220 5% 1/4W F
R334 1-249-417-11 CARBON 1K 5% 1/4W F
R335 1-249-417-11 CARBON 1K 5% 1/4W F
R350 1-249-381-11 CARBON 1 5% 1/4W
R351 1-249-437-11 CARBON 47K 5% 1/4W
R352 1-249-437-11 CARBON 47K 5% 1/4W
R401 1-249-421-11 CARBON 2.2K 5% 1/4W F
! R402 1-249-409-11 CARBON 220 5% 1/4W F
R404 1-249-413-11 CARBON 470 5% 1/4W F
R405 1-247-807-31 CARBON 100 5% 1/4W
R406 1-247-807-31 CARBON 100 5% 1/4W
— 27 —
The components identified by mark !
or dotted line with mark ! are critical
for safety.
Replace only with part number specified.
Page 20
ST-S3000ES
MAIN
Ref. No. Part No. Description Remark
R408 1-249-429-11 CARBON 10K 5% 1/4W
R409 1-249-429-11 CARBON 10K 5% 1/4W
R410 1-249-430-11 CARBON 12K 5% 1/4W
R411 1-249-417-11 CARBON 1K 5% 1/4W F
! R412 1-249-407-11 CARBON 150 5% 1/4W F
R413 1-249-429-11 CARBON 10K 5% 1/4W
R414 1-249-441-11 CARBON 100K 5% 1/4W
R415 1-247-883-00 CARBON 150K 5% 1/4W
R416 1-249-417-11 CARBON 1K 5% 1/4W F
R419 1-249-422-11 CARBON 2.7K 5% 1/4W F
R420 1-249-441-11 CARBON 100K 5% 1/4W
R421 1-249-417-11 CARBON 1K 5% 1/4W F
R422 1-249-418-11 CARBON 1.2K 5% 1/4W F
R423 1-249-418-11 CARBON 1.2K 5% 1/4W F
R424 1-249-421-11 CARBON 2.2K 5% 1/4W F
R425 1-249-420-11 CARBON 1.8K 5% 1/4W F
R426 1-249-421-11 CARBON 2.2K 5% 1/4W F
! R429 1-249-393-11 CARBON 10 5% 1/4W F
R430 1-249-441-11 CARBON 100K 5% 1/4W
R521 1-247-843-11 CARBON 3.3K 5% 1/4W
R522 1-249-433-11 CARBON 22K 5% 1/4W
! R801 1-249-401-11 CARBON 47 5% 1/4W F
R802 1-249-421-11 CARBON 2.2K 5% 1/4W F
R808 1-249-409-11 CARBON 220 5% 1/4W F
R809 1-247-807-31 CARBON 100 5% 1/4W
! R902 1-247-752-11 CARBON 1K 5% 1/2W F
R903 1-249-441-11 CARBON 100K 5% 1/4W
R904 1-249-437-11 CARBON 47K 5% 1/4W
R905 1-249-437-11 CARBON 47K 5% 1/4W
R906 1-249-437-11 CARBON 47K 5% 1/4W
TRANSFORMER
< VARIABLE RESISTOR >
Ref. No. Part No. Description Remark
* 1-666-121-11 TRANSFORMER BOARD
*****************
< CAPACITOR >
! C951 1-113-915-11 CERAMIC 0.001uF 20% 250V
C952 1-162-306-11 CERAMIC 0.01uF 20% 16V
< CONNECTOR >
CNP901 1-580-230-11 PIN, CONNECTOR (PC BOARD) 2P
CNP951 1-564-321-00 PIN, CONNECTOR 2P
< TRANSFORMER >
! PT901 1-423-525-11 TRANSFORMER, POWER
**************************************************************
MISCELLANEOUS
*************
6 1-773-040-11 WIRE (FLAT TYPE) (17 CORE)
FL701 1-517-177-21 INDICATOR TUBE, FLUORESCENT
! PC901 1-558-568-21 CORD, POWER
**************************************************************
ACCESSORIES & PACKING MATERIALS
*******************************
1-501-594-11 ANTENNA (FM)
1-501-721-11 ANTENNA (LOOP)
1-590-925-31 CORD, CONNECTION (AUDIO 100 cm)
3-859-405-11 MANUAL, INSTRUCTION
(ENGLISH,FRENCH,SPANISH,PORTUGUESE,
GERMAN,ITALIAN,DUTCH,SWEDISH)
RV221 1-241-765-11 RES, ADJ, CARBON 22K
RV231 1-241-763-11 RES, ADJ, CARBON 4.7K
RV251 1-241-630-11 RES, ADJ, CARBON 10K
RV301 1-241-767-21 RES, ADJ, CARBON 100K
RV402 1-241-630-11 RES, ADJ, CARBON 10K
< TRANSFORMER >
T251 1-235-126-00 ENCAPSULATED COMPONENT
< IFT >
IFT252 1-404-845-11 COIL, DISCRI (PRIMARY)
IFT253 1-404-846-11 COIL, DISCRI (SECONDARY)
< TERMINAL >
TM401 1-537-897-11 TERMINAL BOARD, PUSH (ANTENNA) 2P
(ANTENNA AM)
< TEST PIN >
TP251 1-766-275-11 PIN, CONNECTOR (PC BOARD) 2P
< VIBRATOR >
X801 1-579-900-21 VIBRATOR, CRYSTAL (4.332MHz)
**************************************************************
**************************************************************
*************
HARDWARE LIST
*************
#1 7-623-308-07 LW 3, TYPE (A)
#2 7-621-775-20 SCREW +B 2.6X5
#3 7-685-874-09 SCREW +BVTT 3X12 (S)
#4 7-685-872-09 SCREW +BVTT 3X8 (S)
#5 7-685-132-19 SCREW +BTP 2.6X5 TYPE2 N-S
The components identified by mark !
or dotted line with mark ! are critical
for safety.
Replace only with part number specified.
9-960-961-11
Sony Corporation
Home A&V Products Company
— 28 —
Printed in Hungary © 1997. 6
97F097547-1
Published by General Engineering Dept.
(Shibaura)
 Loading...