

Page 1
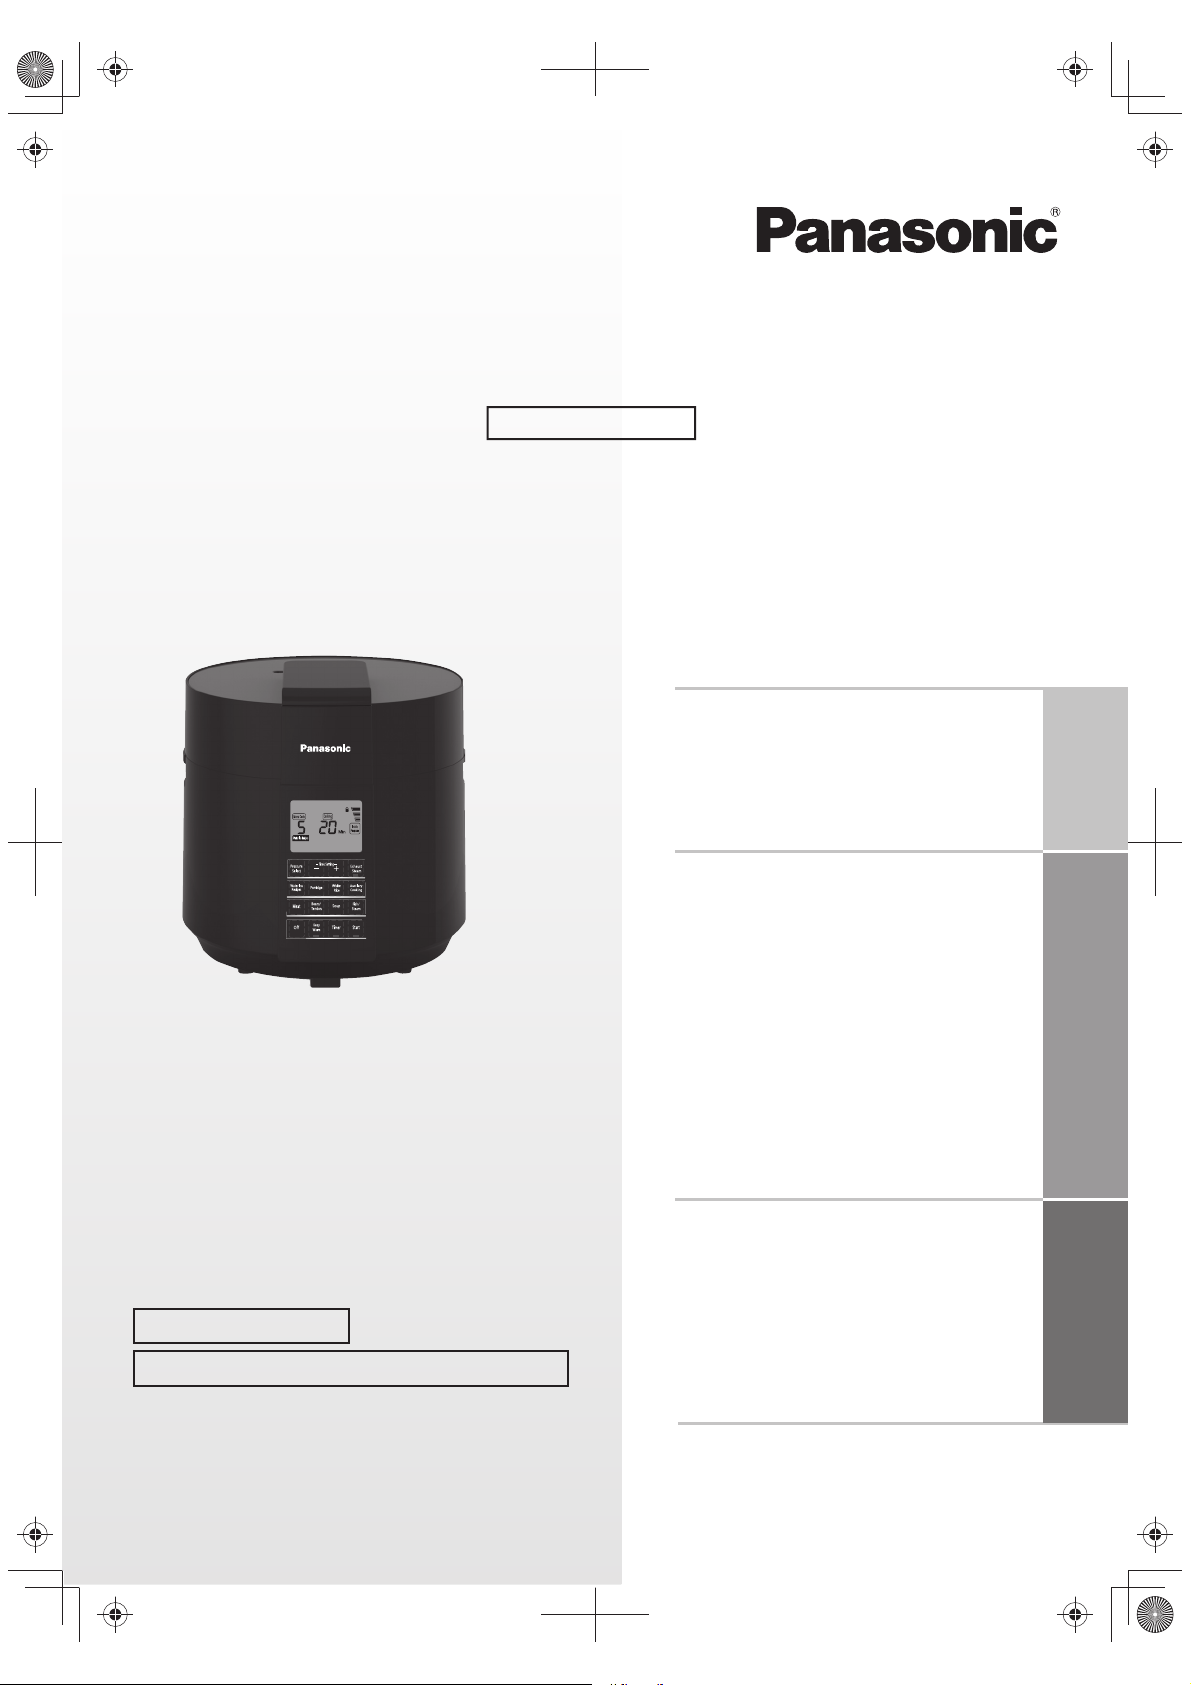
Operating Instructions
Household Use
SR-PS608
The pictures in this instructions take SR-PS608 for example.
Chinese please refer to page 27~ back cover.
(中文請參考P27 ~ 尾頁)
Thank you very much for purchasing the Panasonic product.
●This product is intended for household use only.
●Please read this Operating Instructions carefully for
safe and proper use of this product. Be sure to read the
“Safety Precautions” (page 2 ~ 3) before use.
●Make sure that the information such as date of purchase
and dealer's name is stated on the guarantee certificate.
●Keep the guarantee certificate together with the Operating
Instructions with care.
Reserve it for later use
The guarantee certificate is attached separately
Electronic Pressure Cooker
Model No.
5.0L
6.0L
SR-PS508
SR-PS608
Contents
Before Use
Safety Precautions
Instructions for Use ......................... 4
Parts Identification .................... 5 ~ 6
How to Use
Preparation ................................ 7 ~ 8
How to Choose Course/
Waterless cook time setting ............ 9
Tips on Cooking
Low/Mid/High
Exhaust Steam/
Quickly open the outer lid ........
One Touch Menu .................. 12~14
Timer
/Keep Warm
Recipes ................................. 15~21
When Necessary
Cleaning and Maintenance ... 22 ~ 23
Troubleshooting ............................ 24
If this Code is Displayed ............... 25
Specifications ................................ 25
................. 2 ~ 3
............................
................................
.......................
...
Before Use How to Use
10
11
.. 12
14
When Necessary
Page 2
Safety Precautions
To prevent personal injury, injury to others and property damage, the following instructions must be followed.
Incorrect operation due to failure to follow instructions will cause harm
■
or damage, the seriousness of which is classified below.
Indicate a potential hazard which could
WARNING:
CAUTION:
The instructions to be followed are represented by the following symbols.
■
result in death or serious injury.
Indicate a potential hazard which could
result in injury or damage to property.
Be sure to observe the following precautions
The pressure cooker poses
a safety hazard as the temperature
and pressure inside become
extremely high once it is heated.
Please carefully observe the
following instructions.
This symbol indicates an action that is prohibited.
WARNING
● Do not place the product in a location accessible by
children.
(So as not to cause burn, injury or electric shock.)
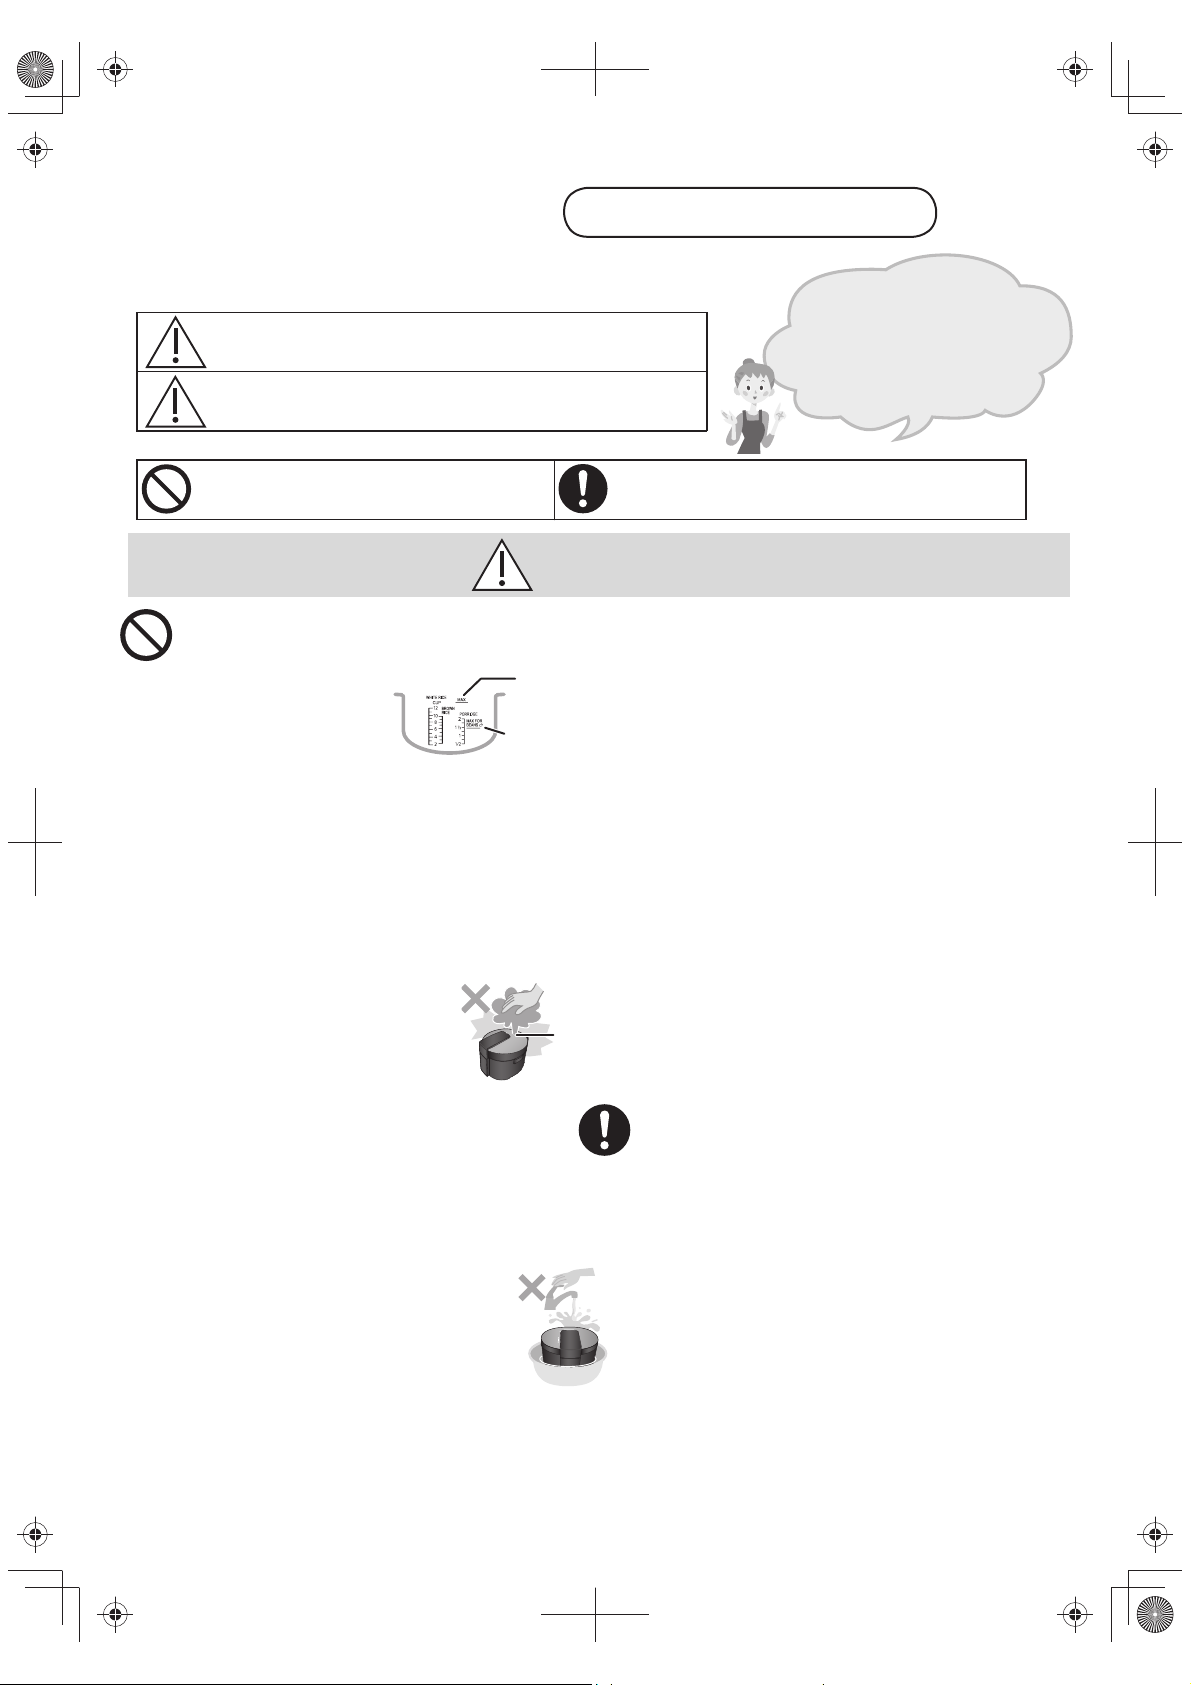
● Maximum cooking volume
must not exceed the up
to MAX scale on the pan.
• Do not use any object that
rapidly reacts to heat and
generates foams such as a
large amount of oil or baking soda.
● Do not use if the main body is in
one of the following states ( page 8).
(So as not to release the pressure safely or steam leak.)
• There are foreign objects such as white rice stick inside
the main body (around the pan packing, nozzle and
pressure valve, etc.).
• The nozzle cap is clogged or not installed.
• The inner lid is deformed or not properly installed.
● When in use or immediately after
cooking, do not put your face or
hands near the steam vent or touch
high temperature parts (including
the pressure indicator pin).
(So as causing burns, or causing vapor burns from the steam.)
• Pay extra attention to children.
● If there is pressure remains in the pan, (when the
pressure indicator pin has not dropped page 6),
please do not force to open the outer lid.
(So as not to bounce the outer lid, leading to food splatter
and causing burns.)
Do not open the outer lid before the pressure is completely
released (the pressure indicator pin is dropped).
● Do not attempt to do the followings.
(So as not to cause fire, electric shock or injury.)
• Immerse the main body in water or splash
water on the main body.
• Spill water or other liquid on the connector
such as the instrument plug.
• Insert foreign objects such as metal pins into the vent or gap.
• Attempt to modify, disassemble or repair the unit.
● Do not use this pressure cooker for any purpose other
than the Operating Instructions.
(So as not to cause fire, burn, injury or electric shock.)
2
Up to the
“MAX” scale
Maximum cooking
volume of food
that swells during
the cooking
process such as
beans and noodles
(including
seasoning).
This symbol indicates an action that is must be followed.
● When cooking is done, be careful that the ingredients
are hot. When stirring, please do not get your face
close to the pan as hot food will be coming out.
(So as not to cause burn.)
● Do not close the outer lid when simmering food with
a thick texture such as curry and stew.
(So as not to cause nozzle cap clogged or burn.)
Open the outer lid, and pull the handle back, otherwise
the pressure cooker will not operate.
● When cooking sticky food, do not use the manual
exhaust steam function.
(So as not to cause food ejection, resulting in burns.)
● Do not attempt to do the followings.
(So as not to cause electric shock, short-circuit or fire.)
• Do not connect or disconnect the power plug with wet hands.
• Do not use damaged power plug or loose power outlet.
• Do not carry out any operation which may damage the power
cord or the power plug. Do not damage the power cord or
the power plug, or forcibly process, bend, twist, pull, or place
Steam vent
them in a hot place, place heavy objects on top of them or
bind the power cord into a bunch.
• Do not let anyone lick the instrument plug. Pay an extra
attention to infants.
● This appliance is not intended for use by persons
(including children) with reduced physical, sensory
or mental capabilities, or lack of experience and
knowledge, unless they have been given supervision
or instruction concerning use of the appliance by a
person responsible for their safety. Children should
be supervised to ensure that they do not play with
the appliance.
(So as not to cause burn, injury or electric shock.)
● Single-phase bipolar grounded power outlet should
be used for this product to ensure reliable grounding!
If grounding device is not installed, it may cause
electrostatic induction of other metal parts such as
housing.
(So as not to cause the risk of electric shock due to failure or
electric leakage.)
● Please use an independent power with the voltage of
AC 220 V/10 A.
(Using the unit together with other equipment on the same
outlet can cause overheating and fire.)
Page 3
WARNING
● Please check regularly the steam vent, nozzle and
nozzle cap used to release steam, and make sure
they are not clogged.
(So as not to cause the abnormal pressure rise.)
● Be sure to mount the pressure valve.
(So as not to cause overflow burns or poor cooking effect
due to abnormal pressure.)
● Remove dust on the power plug regularly.
(Dust accumulated on the power plug may cause insulation
failure due to moisture, which could result in fire.)
Disconnect the power plug and wipe it with a dry cloth.
● Make sure that the power plug and the instrument
plug are fully inserted in place.
(So as not to cause an electric shock or fire due to heat.)
CAUTION
● Do not use a non-dedicated pan or a deformed pan.
(So as not to cause burns or injury due to overheating or
malfunction.)
● Do not let the pressure cooker operate in an empty state.
(So as not to cause burn.)
● Do not use the product in the following places.
• Near heat or in the high humidity environments.
(So as not to cause electric shock, electric leakage
or fire.)
• On uneven surface or a mat which is not heat-resistant.
(So as not to cause injury, burns or fire.)
• In the places close to the wall or furniture, etc.
(So as not to bump into them when opening the lid, or cause
discoloration, deformation and breakage of the furniture.)
● Do not move the main body in use.
(So as not to cause burn.)
● Do not expose the power plug into the steam.
(So as not to cause an electric shock, or a fire due to a short circuit.)
● Do not touch the high temperature area at the end of
cooking, especially the glass panel near the steam vent
on the outer lid and the metal parts such as the inner lid,
the pressure valve , the pan and the cast heater.
(So as not to cause burn.)
To remove and wash it, be sure to take it away with a towel
wrapped. Never pull the pan packing to avoid leaks due
to its distortion.
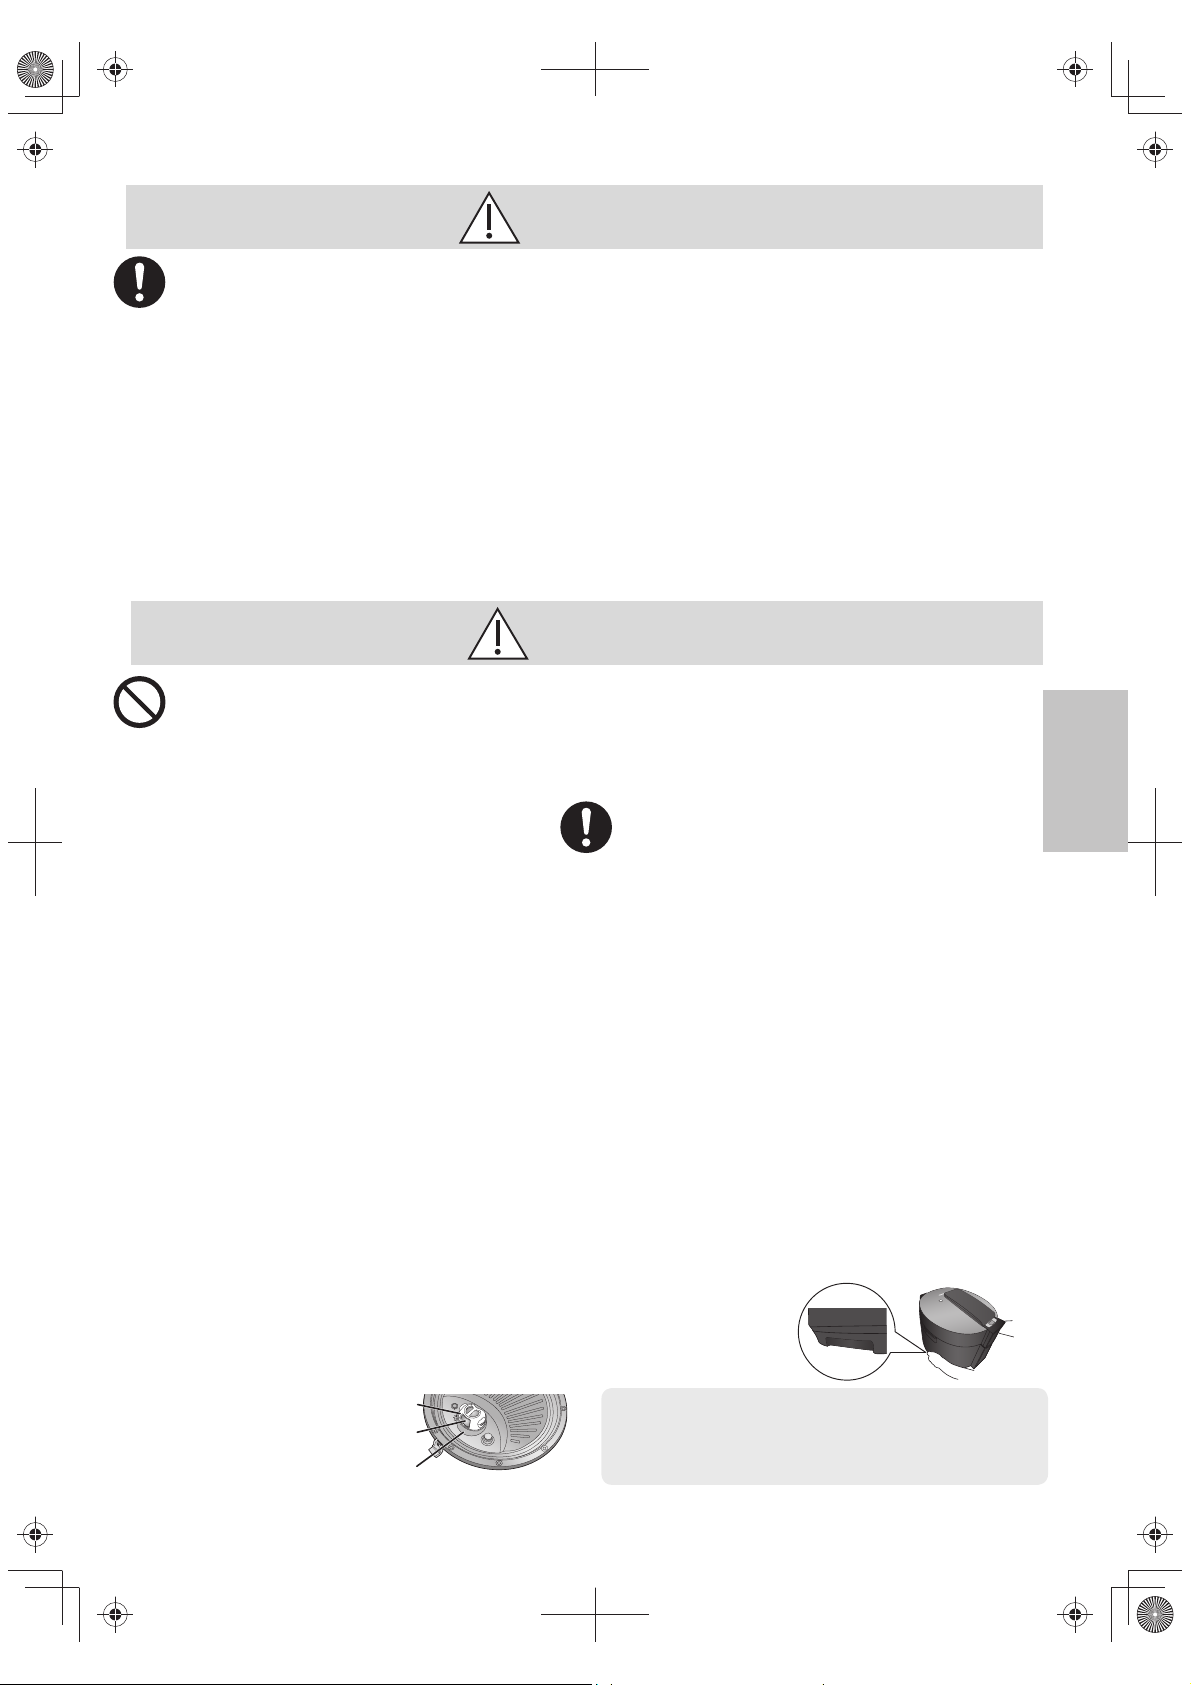
● Do not rotate the pressure valve seat when removing
and cleaning the pressure valve on the back side of
the inner lid.
(So as to avoid the seal ring of the pressure valve from
deformation, resulting in leakage.)
If you want to remove and clean the pressure valve, be
sure to hold the bracket of the pressure valve by hand to
rotate.
Pressure valve seat
Bracket of
pressure valve
Pressure valve
● If an exception or malfunction occurs, stop using the
pressure cooker immediately and unplug the power plug.
(So as not to cause smoke, fire, electric shock, burns or injury.)
Abnormalities • Malfunction Cases
• The power plug and cord become abnormally hot.
• The power cord is damaged or power failure occurs when
being touched.
• The main body is deformed or abnormally hot.
• The main body emits smoke or burning smell.
• The main body is broken, loose or makes abnormal noise.
• A lot of steam is discharged out of the steam vent, but the
pressure indicator pin is not elevated.
• In the non-exhaust steam state, a lot of steam is discharged out
from the steam vent suddenly. (The safety valve may be melted)
Immediately contact service center for inspection or repair.
●
Do not use the power cord not specified for use with
this appliance or using the power cord provided with
this pressure cooker for any other device. If the power
cord damaged, please replace with the original parts
obtained from either the manufacturer or the service
department.
(So as to avoid malfunctions or electric shock, electric
leakage or fire.)
● Be careful when taking out a container containing
food from the pan.
(So as not to cause burn.)
● Wait for the main body to cool before cleaning.
(So as not to cause burns or injury.)
● When taking out the pan or when the pan is not in use,
remember to turn off the power and unplug the power
plug.
(So as not to cause burns, injury, or an electric shock, leakage,
fire due to insulation aging.)
●
When you unplug the power plug or instrument plug, be
sure to hold the plug itself, and never pull the power cord.
(So as not to cause an electric shock, or a fire due to a short circuit.)
● When used within a cupboard or other enclosed spaces,
make sure that the steam can emit outward.
(So as to avoid discoloration or deformation of the cupboard.)
● When moving the product, make sure that both sides
below the main body are held firmly; do not hold the
pan handle.
(So as not to make the outer lid open, causing burns or damage
to the product.)
■
About outage (including unplug of the power plug, trip, etc.)
● If a power failure occurs in use, the product will return to the
state before the power failure (within 1 minute) after powered
again, but cooking results may be affected.
Before Use
3
Page 4
Instructions for Use
About the main body
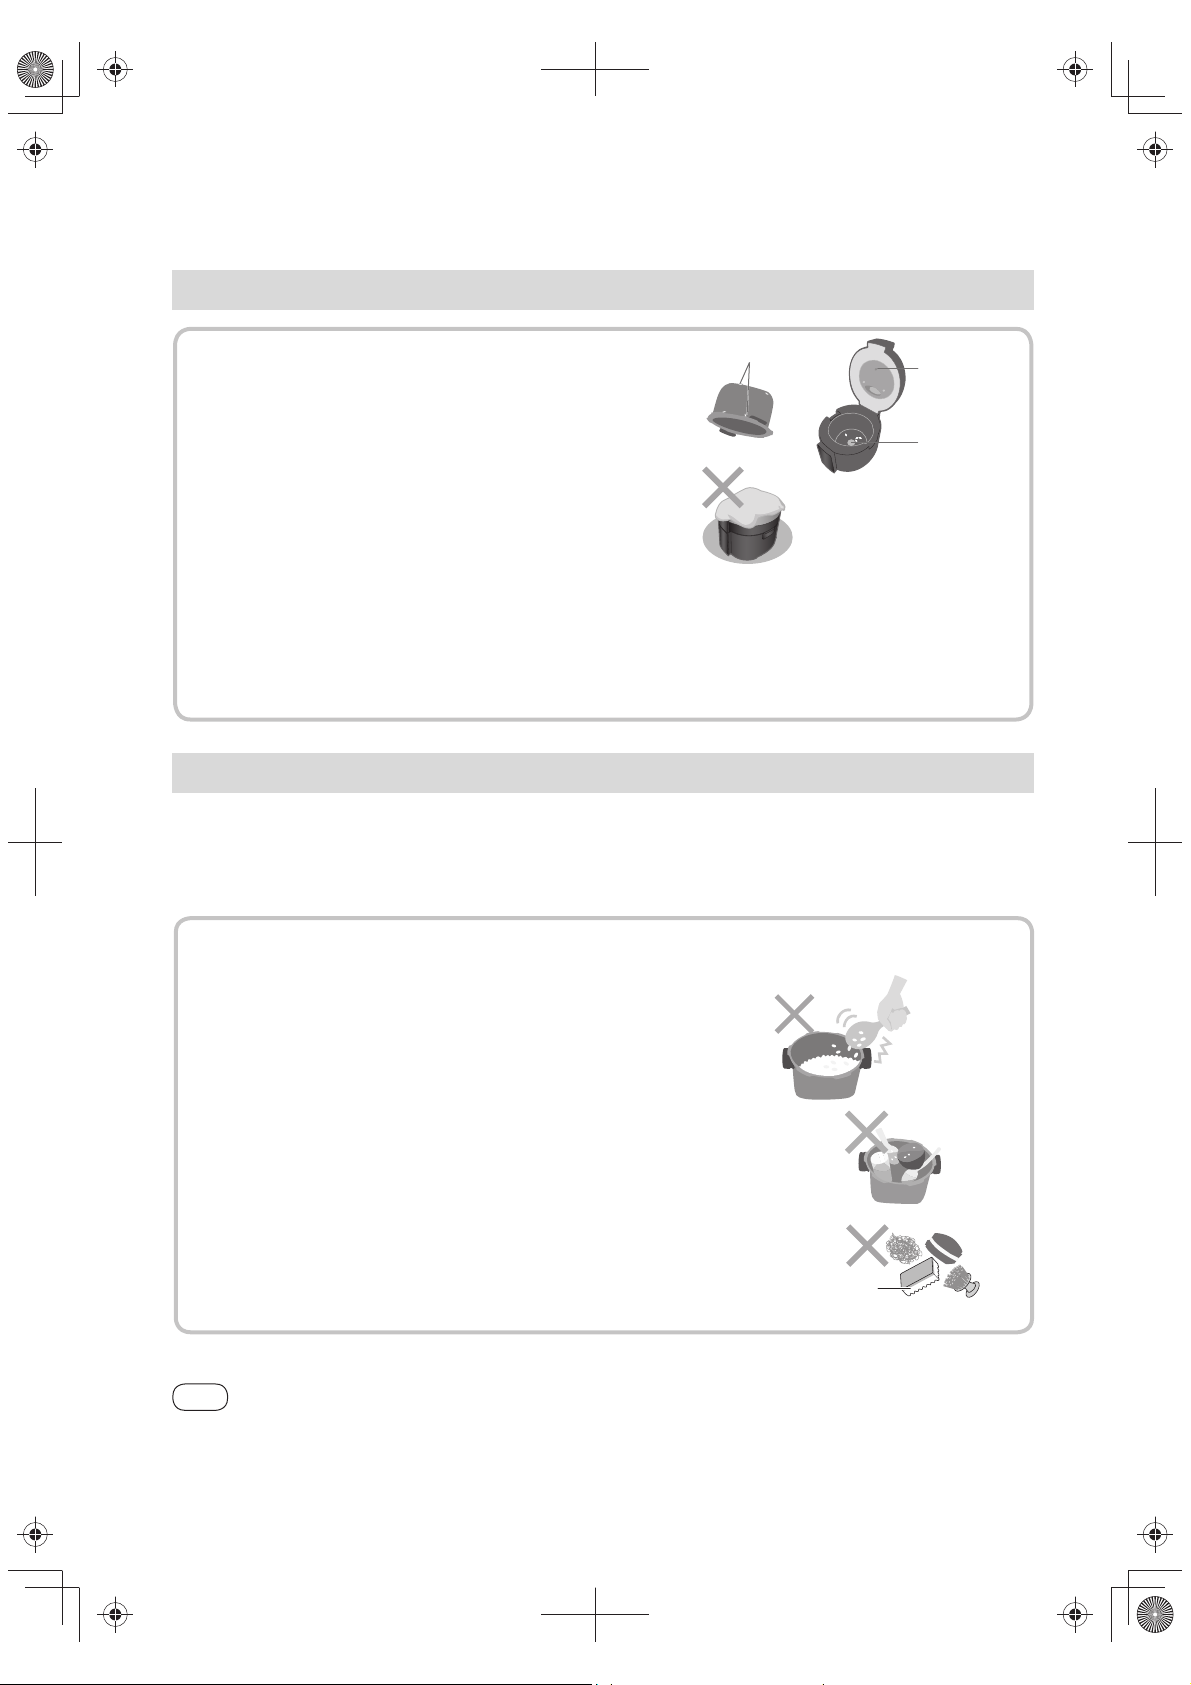
● Please clean rice and other foreign objects stick on the
main body (bottom sensor, or edge or bottom of the pan,
cast heater and pan packing), while cleaning.
• Do not flip or tilt the pressure cooker.
• Before cleaning, turn off the power of the pressure cooker and
unplug the power plug.
● Mix and dissolve the seasoning before adding it.
(So as not to cause unsuccessful cooking such as
uncooked food properly.)
● Do not place a cloth or other items on the outer lid in use.
(So as not to cause the steam from being blocked, resulting in deformation, discoloration or malfunction of the outer lid.)
● Avoid using the pressure cooker in direct sunlight.
(So as not to cause discoloration)
● Do not use on an extension table or other sliding tables.
(So as not to cause the product from driving the extension table to slide when closing or unlocking the lid lock, making the
pressure cooker fail to operate.)
Edge or bottom
(Pan)
Lid sensor
Bottom sensor
About the pan
To prevent peeling or damage of the coating on the surface of the pan
※ The coating peeled has no effect on the performance of the product, and is not
harmful on human body either.
● Do not place the pan over fire or any other heat source.
● Do not press or stir hard or sharp foods in the pan while cooking them (such as pork short ribs).
● Do not use metal cooking utensils (such as a ladle and spatula).
● Do not rinse rice inside the pan.
● Please use the steaming plate provided with this product when cooking.
● Do not allow any hard object to come into contact with the pan or hit the
pan with a hard object.
(Do not place the nozzle cap or power cord in the pan.)
● After use seasoning, until the main body is sufficiently cool, please clean
the pan immediately.
● Do not use the pan as a washing-up bowl. Also do not put spoons or
tableware into the pan.
● Do not wash or scrub the pan with cleanser, wire wool or metal brush,
nylon brush.
To clean the pan, wash it with a soft sponge.
Note
● This appliance is not intended to be operated by means of an external timer or separate remote-control system.
Do not wash the pan using the
surface with abrasive particles.
4
Page 5

Parts Identification
● Before use:
Please remove the rust-proof paper between the pan and the cast heater, also wash the accessories,
inner lid, nozzle cap, pressure valve and pan. ( page 22 ~ 23)
Main body
Front pawl
Inner lid
Pan packing
Rear rib
collector
Bottom sensor
Lower hook snap
Upper hook snap
Outer lid
Dissembling button of the inner lid
Lid sensor
Pan
Before Use
Dew
Control panel
Accessories
(Approx. 180 mL) (1)
Body
Measuring cup
Power plug
Power cord
Instrument plug
Rice scoop (1)Steaming plate (1) Porridge [Soup] scoop (1)
5
Page 6

Parts Identification
Inner lid
Nozzle cap [Anti-Block Cover]
● Prevents clogging of the nozzle with ingredients
Safety valve [Pressure Relief]
● When an exception occurs, the safety valve will
melt and open to release the internal pressure.
Control panel
Pan pressure display
(
Display Lid lock display
P12)
[Inner lid (back side)]
Pressure valve [Pressure Limit]
● Releases steam when the pressure inside the pan
rises.
Lid lock (lid handle)
If you press the [Start] button when the lid lock is not
closed, the sound “beep, beep” will be alarmed four
times,“ ”will flash in the display. Pull back the lid
handle to the direction of the arrow, and the pressure
cooker will normally operate when the display
shows“ ”.
Steam vent
Lid opening button
One Touch Menu
6
Button (
Button (
Button (
Button (
page 11)
Button (Cooking/Timer) (
page 12)
page 14)
page 14)
Pressure indicator pin
● When the pan is under pressure.
Rises
page 11)
● When the pan is not under pressure.
Drops
Page 7
Preparation
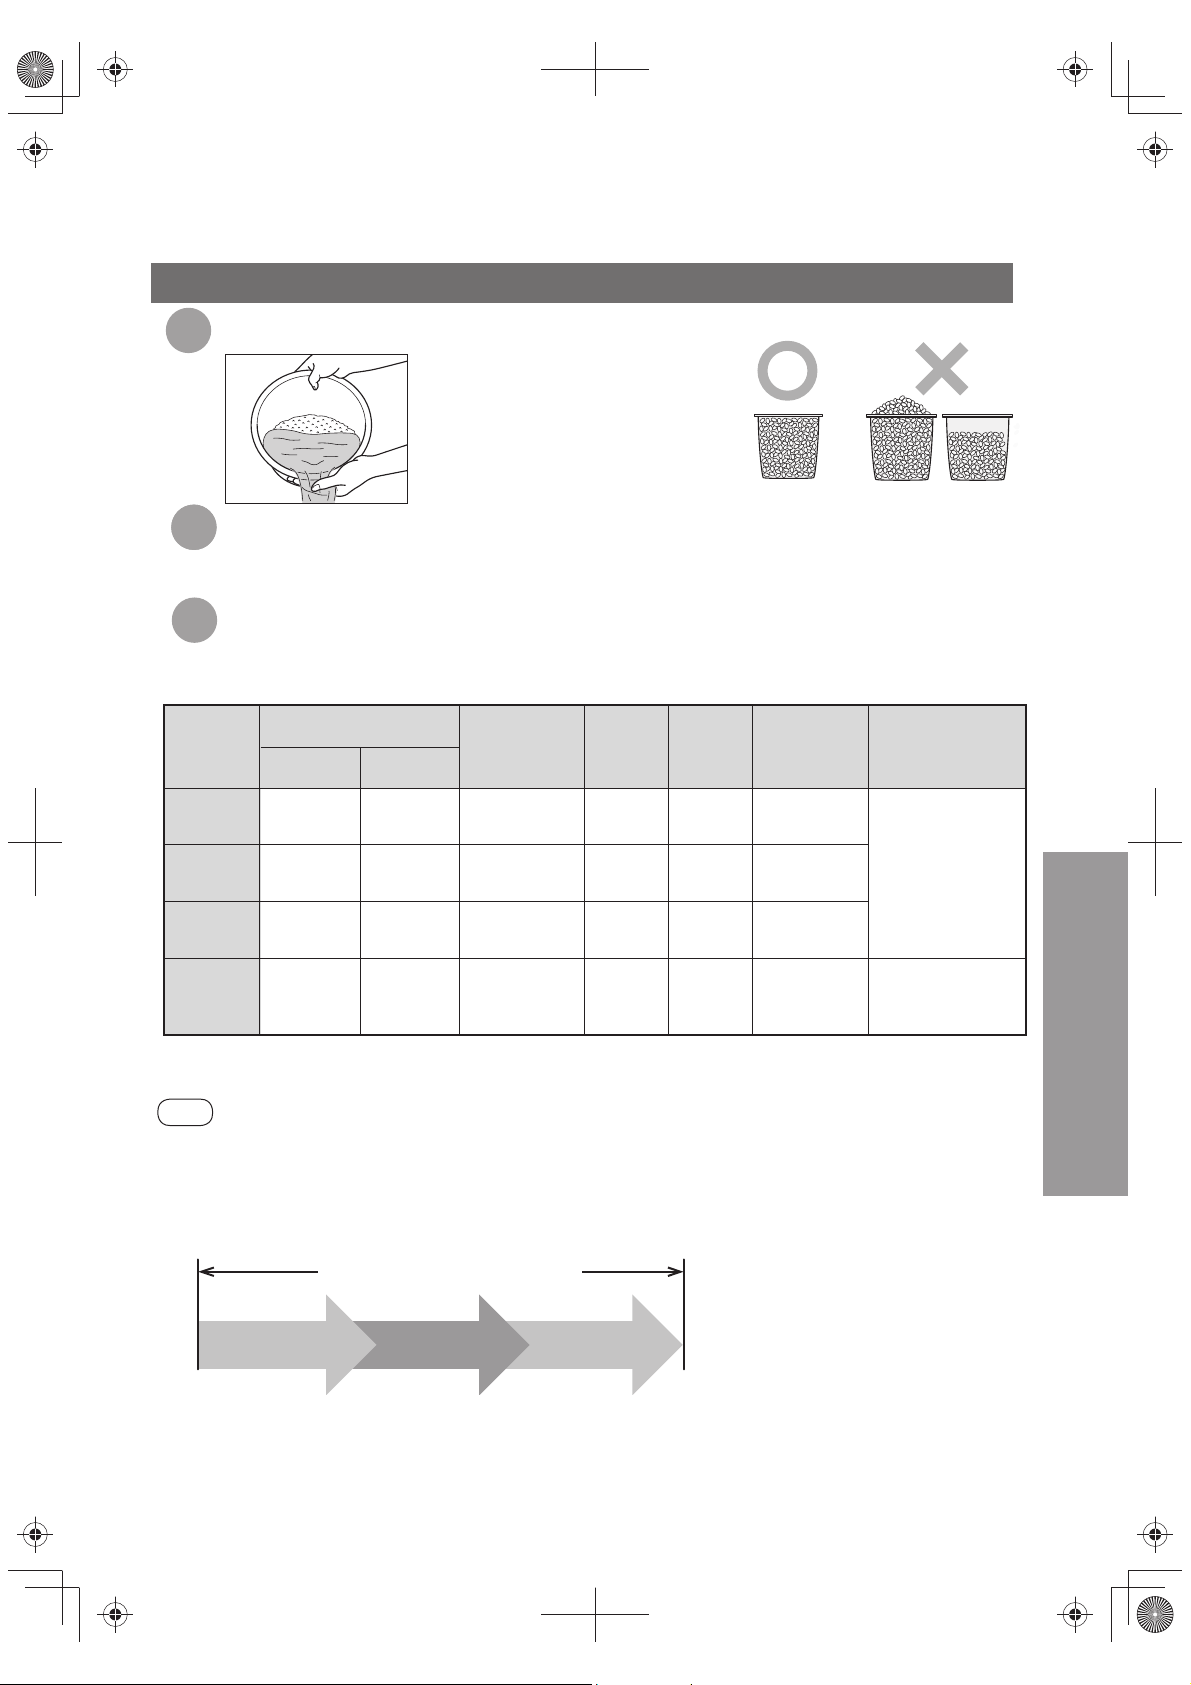
Measure rice, then use another container to wash the rice.
1
Put the rice into the pan and make preparations. (Procedures ~ page 8)
22
● Level the rice.
● Water amount (see table 1): Reduce the water amount a little when you soak the rice for more than
10 minutes or if you feel the white rice is too soft.
Cooking Porridge and White Rice.
3
● When cooking with the One Touch Menu, procedure
● When cooking with “Low / Mid / High”, procedure
steam time
Rice (Measuring cups)
Menu
Model
table1.
5.0 L Model 6.0 L
Measuring and Washing Rice
● Using the measuring cup provided
(Approx. 180 mL), measure the rice
amount on a levelcup basis. When
the rice is full, it should be wiped flat.
● Amount of rice that can be cooked at
a time. (See table 1)
● Soaking of rice is not required.
page 11, Pressure Select, Time Setting and Auto exhaust
Water
(waterline)
Pressure
Select
(Approx. 180 mL / 150 g)
page 12.
Time
Setting
(min)
Auto exhaust
steam time
Approx. (min)
Table 1
Key points of
cooking
Porridge
White rice
Brown rice
Brown rice
porridge
*1: When cooking jasmine rice, increase the amount of water appropriately.
*2: Be sure to use high pressure cooking for brown rice.
Notes
● Do not touch the steam vent until the pressure indicator pin has dropped. (So as not to cause burn)
※ Because of temperature, voltage or other reasons, “Exhausting” may still appear in the display when the pressure
indicator pin is dropped, which is not a malfunction.
● When cooking white rice or brown rice, after opening the outer lid, please stir and loosen the white rice immediately.
(In order to distribute excess water)
● Time required for the cooking is “The set time” + “13 ~ 100 minutes”. (
Start
• The above “The set time” indicates the cooking time only after the pressure inside the pan has risen to the set level.
The displayed time does not change until the pressure has risen to the level, but it is not a failure.
• The more the amount of ingredients, the longer time it takes until the pressure has risen and to let stand the cooked food.
• The food is cooked further during exhausting period by remaining heat.
½~1½ ½~2
*1
2~10 2~12
*2
2~82~10
½
~1½
Time for the whole cooking process
½~2
PORRIDGE Mid
WHITE RICE Mid
BROWN RICE High
PORRIDGE
Exhaust steam timeThe set timePressure rises
(3 ~ 60 minutes)(10 ~ 40 minutes)
High
5~20 30
10~15 1.5
25~30 25
40~50 20
page 9)
Completion
To adjust the
firmness of the rice,
you can shorten or
extend the time
period already set.
To cook softer
porridge, set a
longer cook time.
How to Use
7
Page 8
Preparation
Preparation before Operation
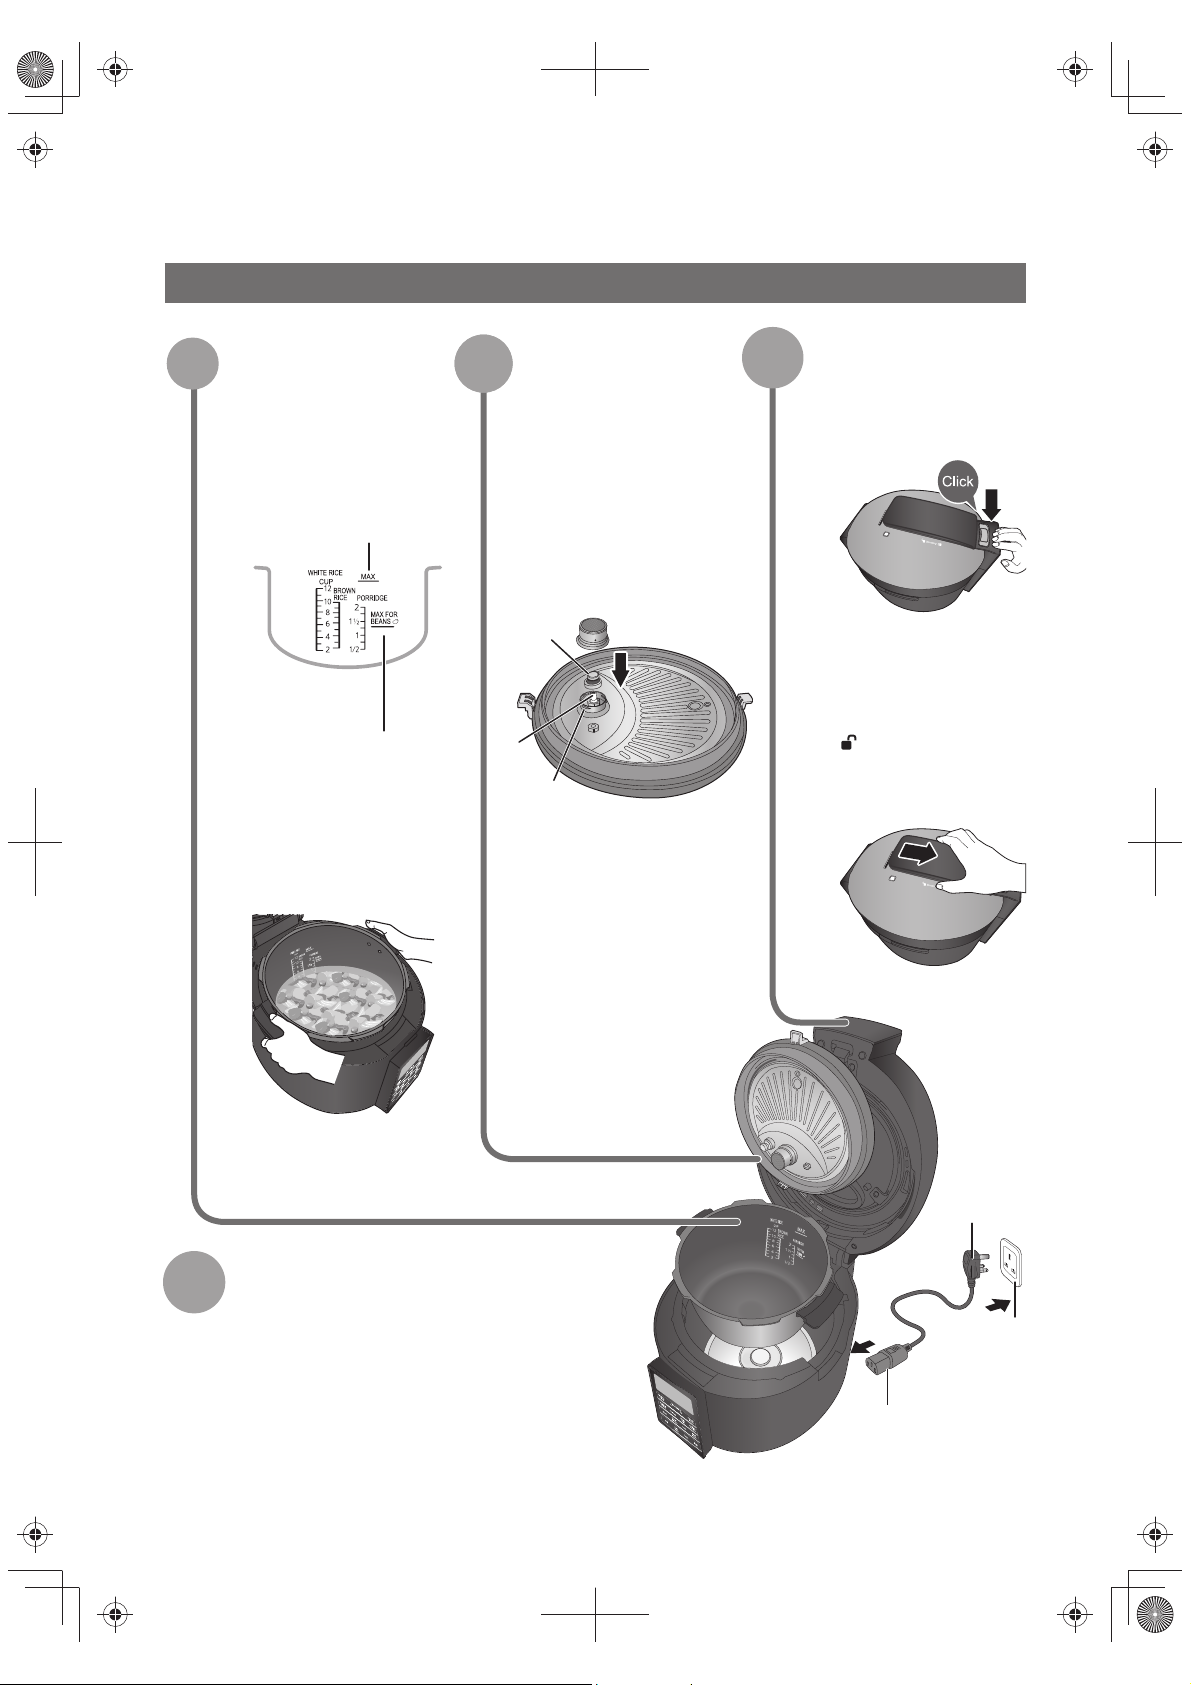
Put the ingredients into
1
the pan and place the
pan in the main body.
● Whenever cooking the
maximum volume (ingredients
+ water), the MAX scale on
the pan must not be exceeded.
Up to the “MAX” scale
Maximum cooking volume of
food that swells during the
cooking process such as beans
and noodles (including seasoning).
● Before place the pan in the main
body, wipe off the water or
foreign object around the pan.
Confirm whether the
22
nozzle cap, the pressure
valve and the inner lid are
installed.
● If the nozzle cap is not installed,
nozzle clogging may be caused,
and exhaust steam can not be
done Do not open the outer
lid until it cools down.
Press down the nozzle cap
properly until the spring
clamp is into place.
Pressure
mandrel
Nozzle
Spring
• Before installing the nozzle cap,
make sure there is no oil or
blocking on the nozzle cap, nozzle
and pressure mandrel.
● Before installing the inner lid,
make sure that the pressure
valve is installed. If the pressure
valve is not installed, the
pressure cooker will have steam
leakage, resulting in the failure
of the pressure to reach the set
value.
page 22 pressure valve)
(
● If the inner lid is not properly
installed, the outer lid can
not be closed.
(
page 22 inner lid)
Close the outer lid and
3
lock the lid lock.
● When closing the outer lid,
make sure that the sound
“click” is heard.
● Confirm that the lid lock
is locked (pull back the lid
handle); if not locked
(“ ” in the display), you
can not cook.
(
page 6 lid lock)
Power plug
Connect the instrument plug and power plug
4
completely.
● Connect the instrument plug to the main body and
then insert the power plug to the power outlet.
● Even if the instrument plug is disconnected (short
beeps sound), plug in immediately and it will
continue the process just before unpluged. If the
instrument plug is disconnected for a long period of
time, the cooking will be stopped.
Instrument plug
Power outlet
8
Page 9
How to Choose Course
According to IngredientsAccording to Cooking Purposes
Press
[Waterless Recipes],
[White Rice], [Meat], [Beans/Tendon], [Soup],
[Fish/Steam] button, then press [Start] button
to begin cooking. Pressure Select and Time
Setting do not need to be selected.
Pressure Select Time Setting Tips
※ Except white rice, the cook time can be
adjusted for the functions mentioned above
according to ingredients or preferences.
● [Auxiliary Cooking] button is used
to flavor or sauce after pressure
cooking, and not for cooking
ingredients difficult to cook.
● [Exhaust Steam] button is used
when you want to open the outer lid.
(During cooking and when cooking
is finished)
● If the aforementioned cooking results are
unsatisfactory, cooking can be conducted
through “Pressure Select” and “Time
Setting”, specifically
[Porridge],
page 11.
Approx.19.6 kPa/105℃
Low
(Approx.1.2 X
atmospheric pressure)
Mid
Approx.59 kPa/113℃
(Approx.1.6 X
atmospheric pressure)
High
Approx.98 kPa/120℃
(Approx.2.0 X
atmospheric pressure)
※ Time Setting
● Time required for the cooking is “The set time” + “13 ~ 100
minutes”.
● Cooking time will differ according to the size of ingredients
even if ingredients are the same. The smaller the ingredients,
the shorter the cooking time.
Table 2
Fruit and easily softened ingredients.
Such as: apples, strawberries, etc.
Making jam at low
pressure will not destroy
nutrients.
Relatively soft or easy to cook
ingredients.
Such as: crucian, jujube, taro, etc.
Vegetables cooked at
medium pressure will not
clump or break apart.
Relatively hard or diffi cult to cook
ingredients.
Such as: meat, soybeans, etc.
Small fish cooked at high
pressure can be consumed
whole and is conducive to
the absorption of calcium.
● When handling ingredients before cooking, it is recommended that the steaming plate attachment be used
for steaming. Steaming preserves nutrition more completely, and retains more vivid colors.
● Similar ingredients should be cut into similar sized pieces.
● When cooking different ingredients at the same time, cut
the easily cooked ingredients into larger pieces and
cut the difficult cooked ingredients into
smaller pieces.
● When seasoning or adding vegetables,
please conduct [Auxiliary Cooking]
after cooking is completed.
● Set cook time
● The pan does not need to be replaced
to conduct auxiliary cooking.
page 14.
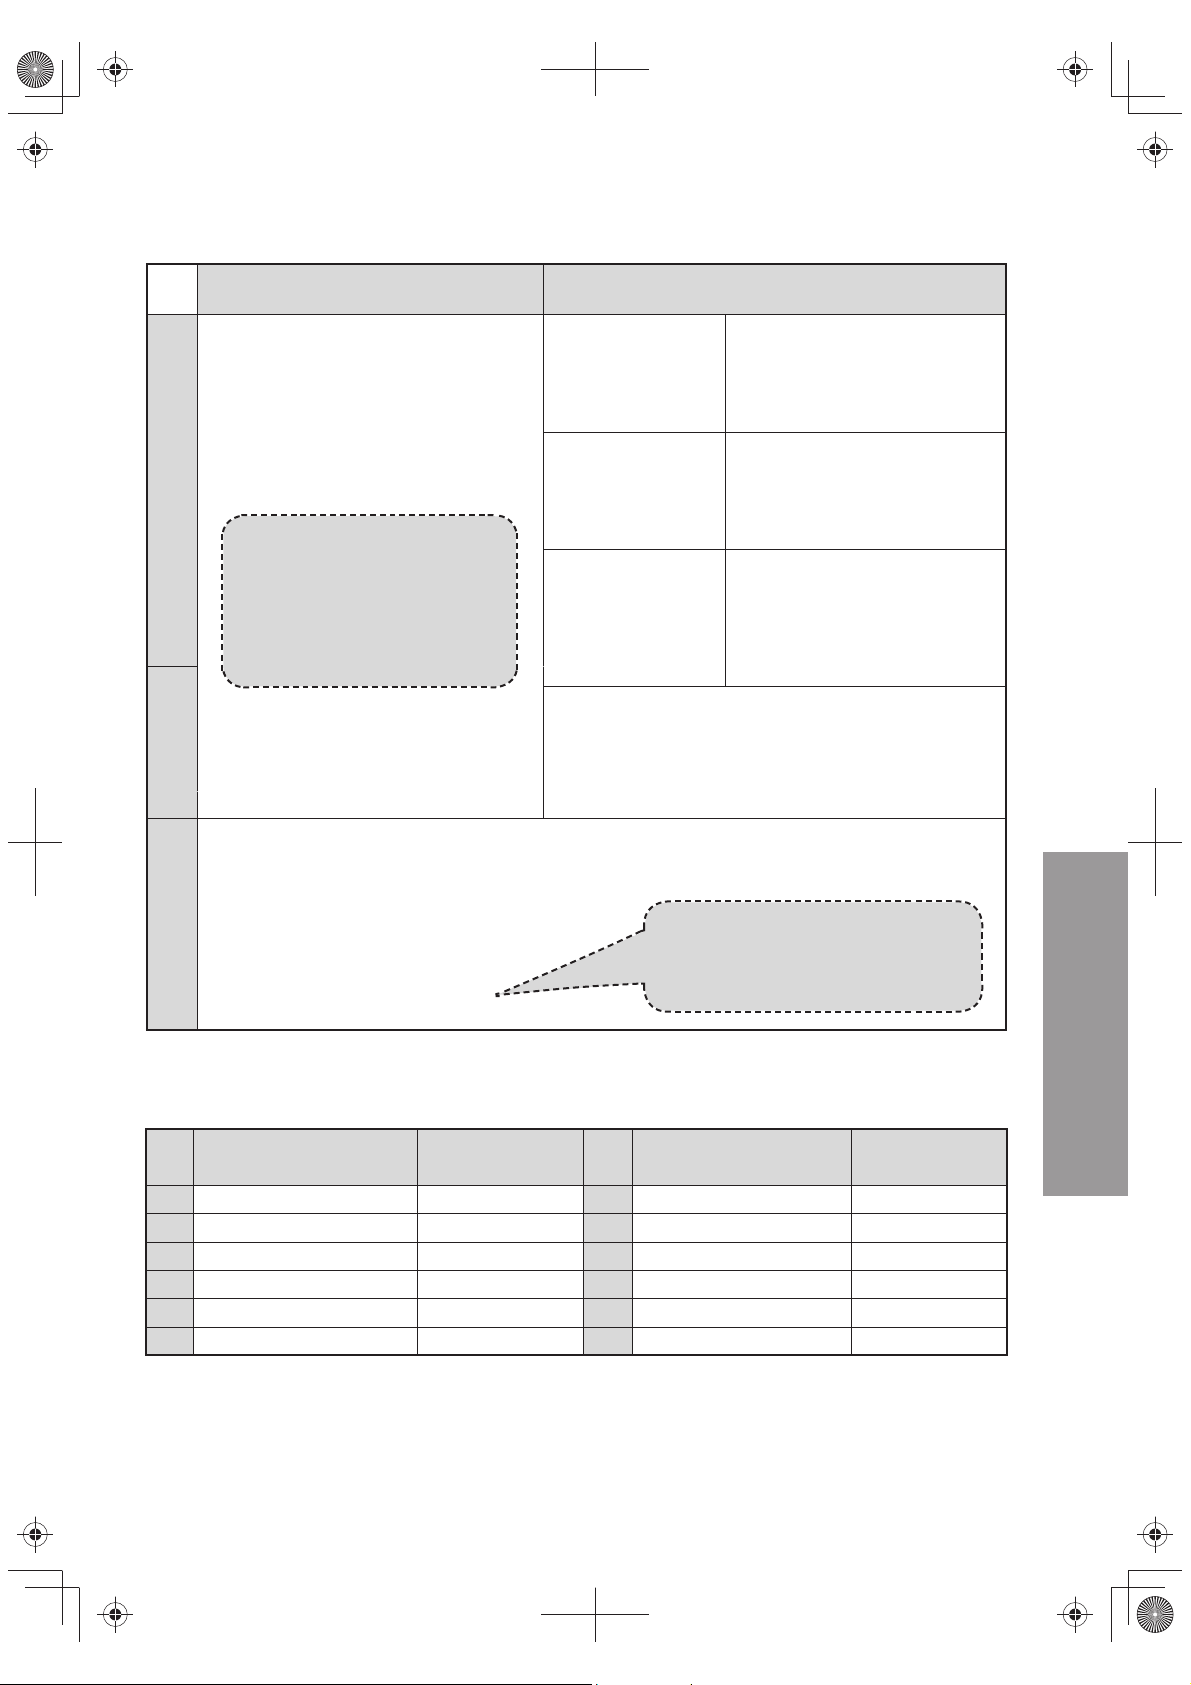
Waterless cook time setting
Menu
Code
1
2
3
4
Braised Chicken with potatoes and pepper
5
6
Menu Menu
Waterless sauced beef
Saliva chicken
Braised chicken wings
Shredded Chicken
Braised pig trotter
Time setting range
(min)
10~40 (default time is 20)
5~20 (default time is 5)
5~20 (default time is 5)
5~20 (default time is 5)
10~40 (default time is 20)
5~20 (default time is 10)
Menu
Code
7
Stewed mushrooms with black pepper
8
Enokitake with minced garlic
9
10
11
12
Ratatouille
Waterless seafood pot
Bass in scallion oil
Fish head with chopped chili
Table 3
Time setting range
(min)
1~10 (default time is 1)
1~10 (default time is 2)
1~10 (default time is 1)
1~10 (default time is 3)
1~10 (default time is 5)
1~10 (default time is 5)
How to Use
How to Use
9
Page 10
Tips on Cooking
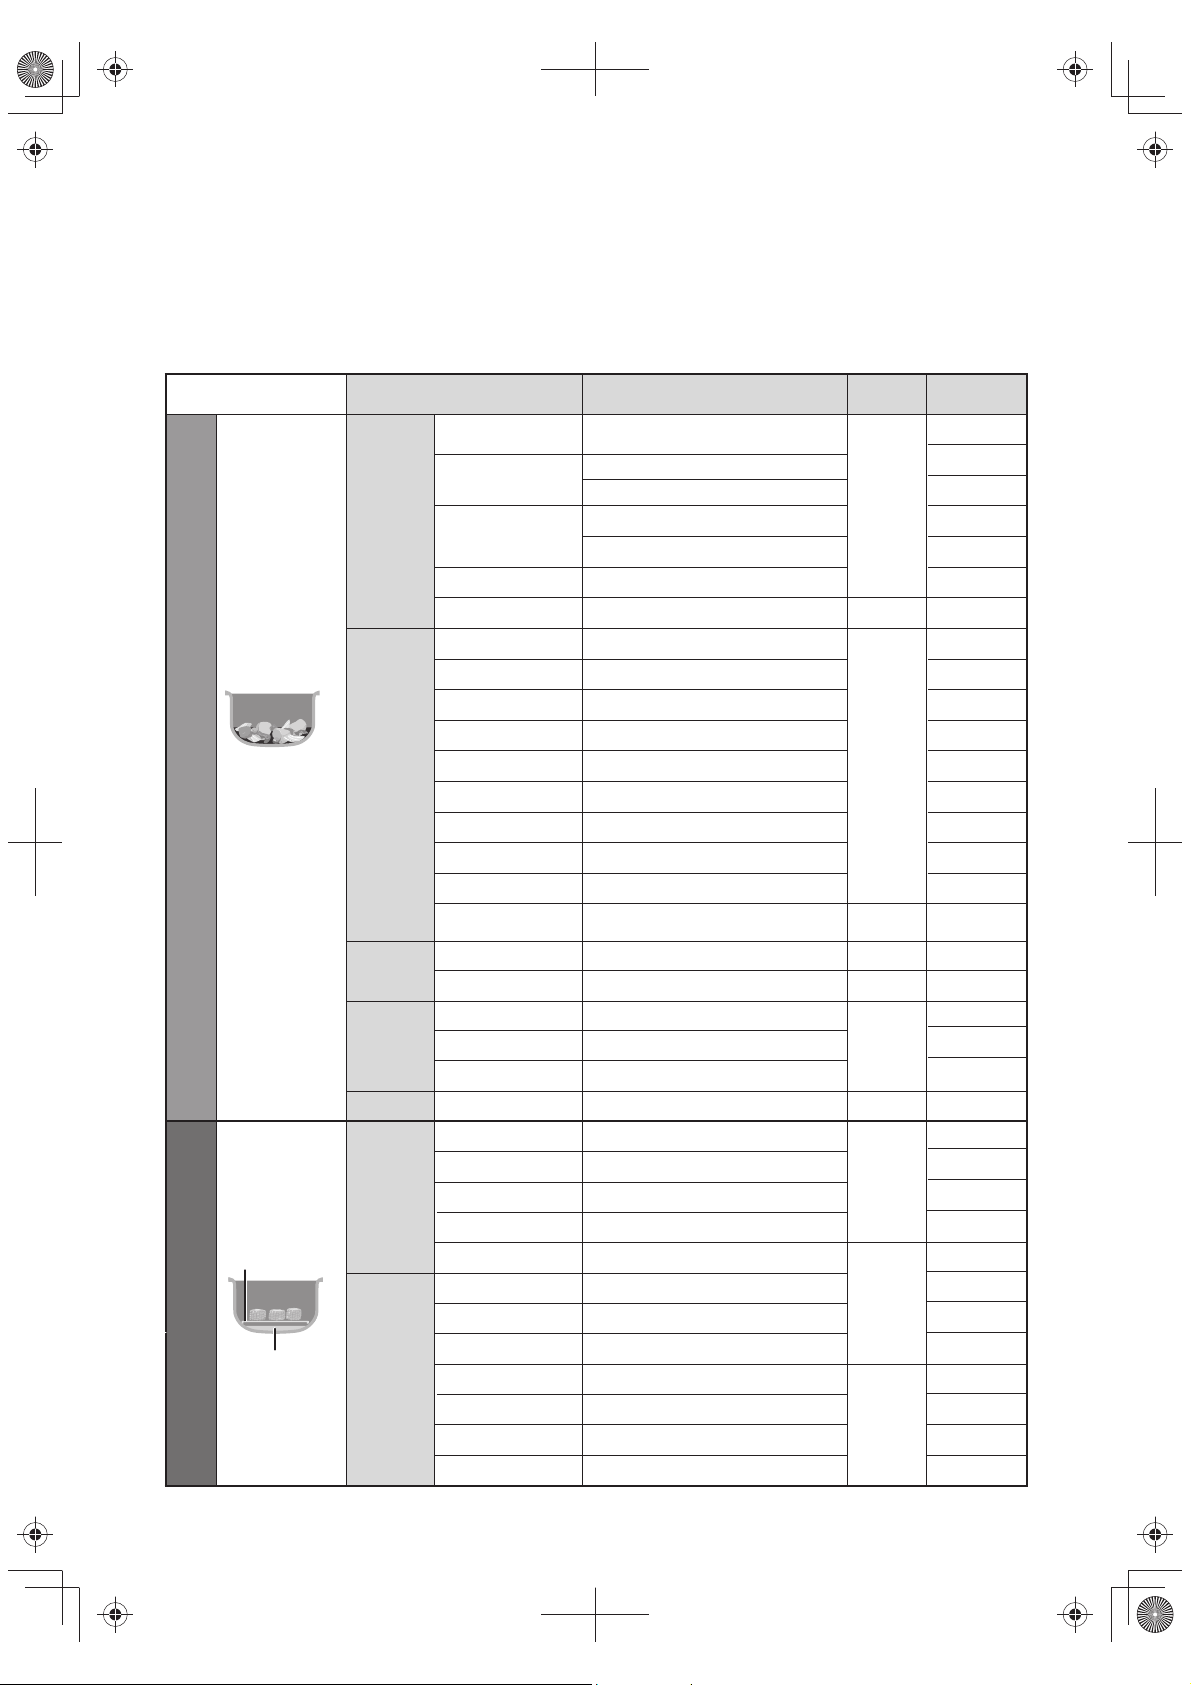
When cooking with “Pressure Select” and “Time Setting”, please refer to the following table for settings.
• Cut the same ingredient into the same size; when cooking different ingredients at the same time, cut the easily cooked
ingredients into larger pieces and cut the difficult cooked ingredients into smaller pieces.
• Cooking time can be freely adjusted according to personal tastes and preferences.
• When using the same ingredients and size for cooking, no matter how much is cooked, the required time setting will
always be the same.
Stew/Boil Steam
The amount of
liquid,
according to your
preferences,
adjust the
amount of liquid.
Steaming plate
(accessory)
1 measuring
cup of water
Meat
Vegetables
Beans
Fruits
Seafood
Fish or
Meat
Vegetables
Ingredients
Beef or Lamb
Pork
Chicken
Duck 30 ~ 35
Chicken
Potato 7 ~ 10
Chestnuts 5 ~ 10
Peanuts 30 ~ 35
Purple Potato 3 ~ 5
Pumpkin 3 ~ 5
Corn 7 ~ 10
Lotus seeds 15 ~ 18
White wood-ear 25 ~ 30
Lotus root
Tomato (paste)
Red beans, Soybeans
Mung beans
Apple (jam)
Strawberry (jam)
Grapefruit (jam)
Trionychidae
Beef
Pork
Pork short ribs
Chicken
Crucian
Taro
Jujube Whole
Potato
Purple Potato
Pumpkin
Chestnuts
Corn 10 ~ 12
Size and amount of ingredients
Cut meat with tendons into pieces
(Approx. 4 cm)
Pork short ribs, Pork bones
Diced pork belly (Approx. 4 cm)
Whole (Approx. 400 g)
Leg with bone (Approx. 200 g)
Half (Approx. 500 g)
Diced (Approx. 4 cm)
Whole (Approx. 150 g)
With shell
With skin, soaked in water for 1 hour
Whole (Approx. 500 g)
Diced with skin
Cut into sections (Approx. 5 cm)
Stewed directly without soaking
Soaked in warm water for 3 ~ 4 hours
1 root (Approx. 240 g)
Whole, Skinned, Seeds Removed,
Chopped
Stewed directly without soaking
Stewed directly without soaking
Skinned, Chopped
Whole without stalk
Skinned, flesh broken into small pieces
Whole (Approx. 700 g)
Diced (Approx. 4 cm)
Sliced or diced (Approx. 1 cm or 4 cm)
Cut into sections (Approx. 5 cm)
Leg with bone (Approx. 200 g)
Whole (Approx. 500 g)
Whole (Approx. 80 g)
Skinned and diced
Whole (Approx. 500 g)
Big diced with skin
With shell
Cut into sections (Approx. 5 cm)
Pressure
Select
High
Mid
High
Low
High
Mid
Low
High
High
Mid
High
Table 4
Time setting
(min)
20 ~ 25
20 ~ 35
12 ~ 15
15 ~ 20
7 ~ 10
15 ~ 20
30 ~ 35
10
25 ~ 30
15 ~ 18
15
6
10
18 ~ 20
35 ~ 40
20 ~ 35
20 ~ 25
15 ~ 20
5
10 ~ 15
3 ~ 5
15 ~ 20
10 ~ 15
10 ~ 15
8 ~ 10
10
Page 11
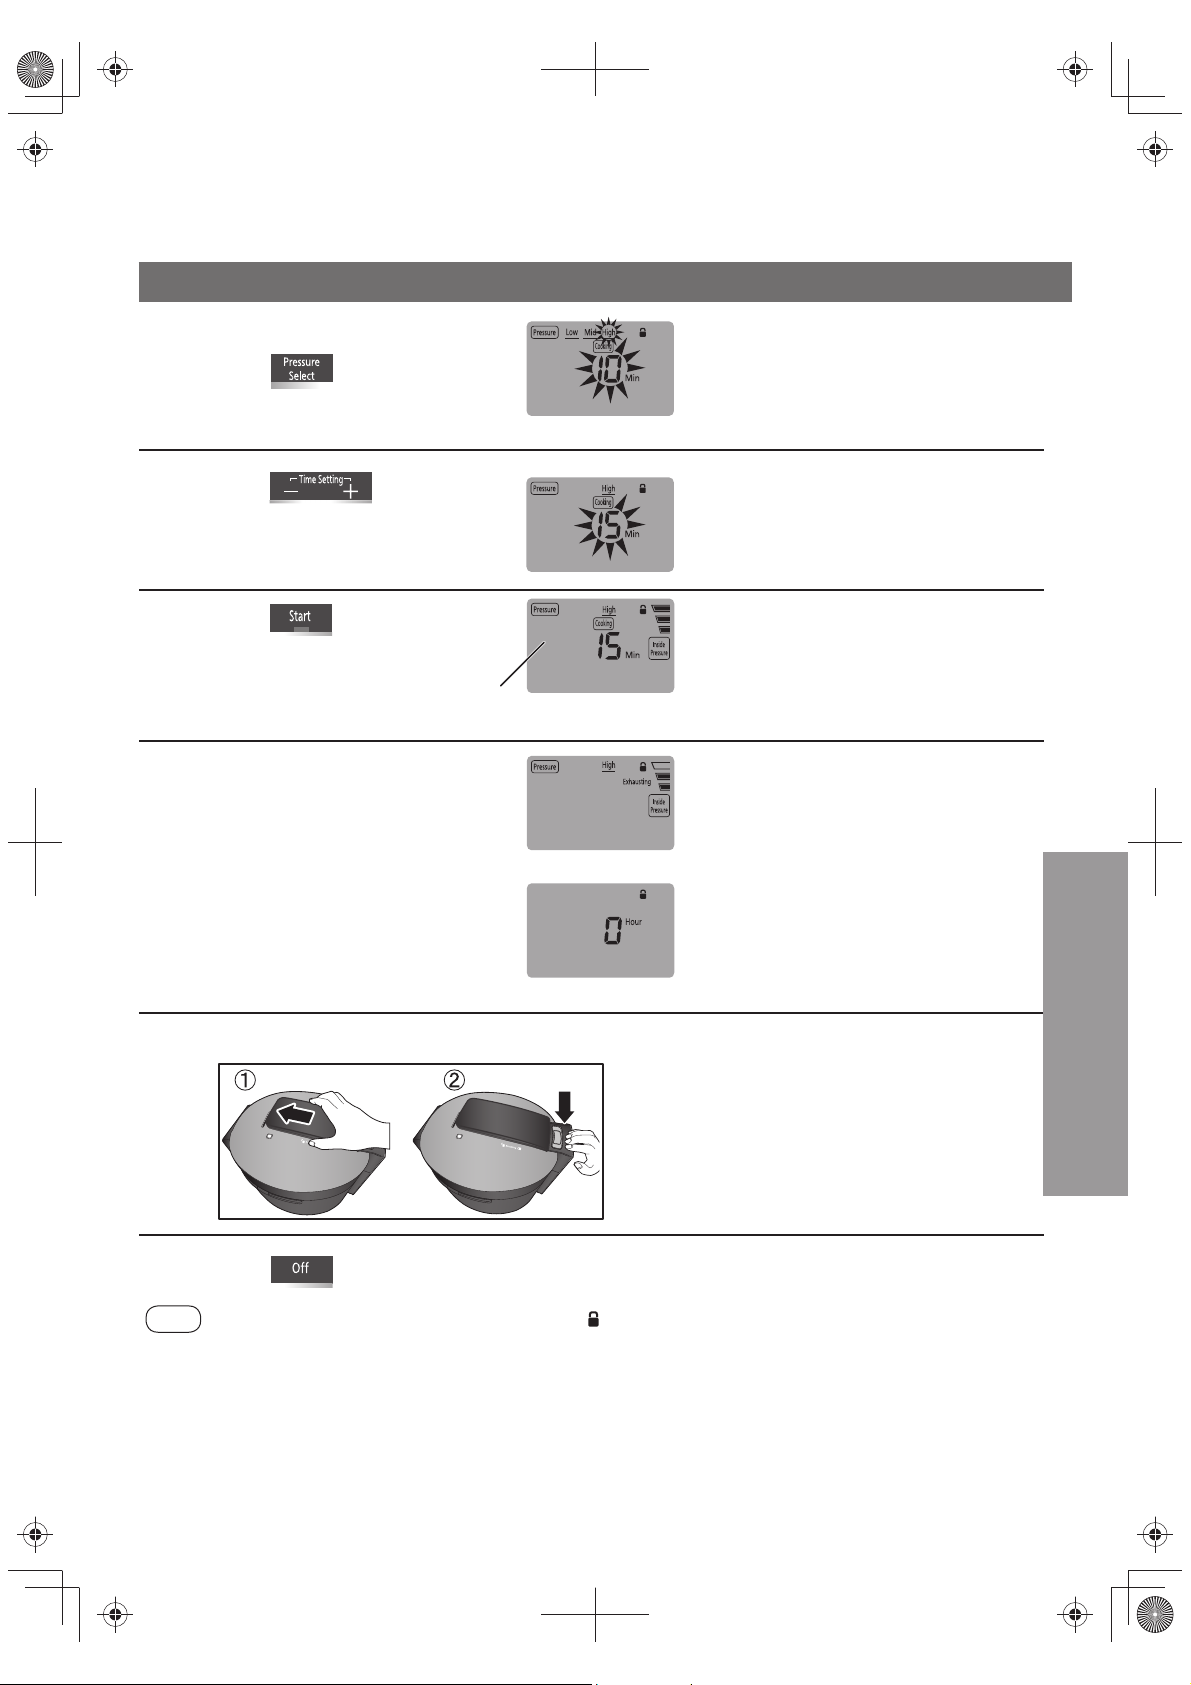
Low / Mid / High
Low / Mid / High
Example: When cooking on High Pressure
Press select “High”.
● The [Start] indicator flashes.
1
Press set the cook time.
(When High pressure is selected)
2
● Time is increased or decreased at
1 minute intervals.
Press .
3
● The [Start] indicator lights up.
Remaining time is
shown in 1 minute
decrements.
After cooking, enter the exhaust
steam state.
4
● The [Exhaust Steam] indicator lights up.
● The pressure shown in the display
varies with the actual pressure in the pan.
● When the exhaust steam is finished
(the pressure indicator pin is dropped),
the buzzer will sound, the display will
be displayed as “0 Hour”, and the
[Keep Warm] indicator will light.
● If you need to open the outer lid when
cooking halfway, page 12
“Exhaust Steam”.
(Once the pressure has
reached the setting level)
(Exhausting)
(Exhaust steam ends)
● Each time this button is pressed, pressure can
be switched according to the order: “Low” →
“Mid” → “High” →“Low” … (When cycling from
“High” back to “Low” two tones will sound to
signal the begining of the cycle.)
● Setting range: 1 ~ 59 minutes
● Press and hold the button to quickly add or
subtract time.
(From 59 minutes back to 1 minute, there will
be two beeps, indicating that the time has been
set from the beginning)
● You can also adjust the time while cooking.
● Remaining time starts to reduce only after the
pressure inside the pan has reached a certain
level.
● The pressure indicator pin will be dropped
within about 10 ~ 60 minutes after the exhaust
steam.
● Before the pressure indicator pin is dropped,
do not approach or touch the keep moisture
cap, so as not to cause burns.
How to Use
Unlock the lid lock (open the lid handle), and press the lid opening button to open the outer lid.
5
Press .
6
Notes
● Please confirm to lock the lid lock before cooking (“ ” is displayed) to avoid cooking failure (except the keep warm).
If the lid lock is unlocked, pressing [Start] will sound “beep, beep” for 4 times.
● You can adjust the time while cooking.
● Do not move the pressure cooker or touch the steam vent and the pressure indicator pin while cooking.
(Steam or food may be ejected.)
● It may take 2 ~ 5 minutes to release the steam until the pressure is stable, which is not unusual.
● Three beeps will be heard when cooking ends, and the pressure cooker will start exhaust steam three seconds later.
Do not get close to the steam vent so as to avoid being burned by the steam.
※The sound is big when the exhaust steam starts, do not panic.
● Before lifting the lid lock, make sure that the
pressure in the pan has been completely
released, and do not forcibly open the lid
handle.
● If it is difficult to open the outer lid, open the
outer lid according to the method in the
“Quickly open the outer lid” on
P12.
11
Page 12

Exhaust Steam / Quickly open the outer lid /
One Touch Menu
Exhaust Steam
You can use the [Exhaust Steam] button under the
following circumstances:
● When you open the outer lid while cooking.
※You need to press [Off] before the [Exhaust Steam] button.
● When you open the outer lid and then immediately close it,
and the pressure indicator pin rises again when you just
finish cooking.
※You need to press [Off] before the [Exhaust Steam] button.
Press .
1
Press .
2
• The pressure shown in the display varies with the
pressure in the pan during exhausting.
High Mid Low
※The “Inside Pressure” in the pan shown in the display
varies with the pressure in the pan. But they are just
vague result of the judgment only as a reference.
Please judge the pressure in the pan according to
the state of the pressure indicator pin (
• Do not open the outer lid until the pressure in the pan is
completely released (the pressure indicator pin is dropped).
page 6).
Quickly open the outer lid
If you want to quickly open the outer lid
Please press and hold the [Exhaust Steam] button to
manually exhaust steam.
When the pressure indicator pin is dropped, and then
you can open the lid handle, and press the lid opening
button to open the outer lid.
• Manual exhaust steam can release the pressure in
the pan faster than Auto exhaust steam, but it is not
recommended to use this function if you cook sticky
foods (such as porridge, beans, white wood-ear and curry).
Food maybe ejected and cause burn.
• When using manual exhaust steam, press and hold the
[Exhaust Steam] button to continuously exhaust steam,
and release the finger to stop exhaust steam.
(※Auto exhaust steam for white rice is continuous
exhaust steam)
Porridge·White Rice
Example: When using the “White Rice” menu to
cook white rice
Press .
1
2
3
● The [Start] indicator flashes.
Press .
Remaining time is
shown in 1 minute
decrements.
● The [Start] indicator lights up.
● White rice have fixed time
so cooking time cannot be set.
● When selecting porridge, set the cooking time
according to
■
Rice and water volume
that can be cooked at one time
Menu
Porridge
White
4
Notes
(Measuring cup)
5.0 L
½~1½ ½~2
2~10 2~12
rice
After cooking, enter the exhaust steam state.
● The [Exhaust Steam] indicator
lights up.
● The pressure shown in the
display varies with the actual
pressure in the pan.
● When the exhaust steam is
finished (the pressure indicator
pin is dropped), the buzzer will
sound, the display will be
displayed as “0 Hour”, and the
[Keep Warm] indicator will light.
● Method for opening the outer
lid
step 4 ~ 5 on page 11.
Press .
● The [Keep Warm] indicator turns off.
● Remaining time starts to reduce only after the pressure
inside the pan has reached the setting pressure.
● If the hardness of white rice or thickness of porridge
is required adjustment, please use “Pressure Select”
and “Time Setting” to cook. (Specifics page 7)
To make it harder: set a shorter time
To make it softer: set a longer time
(
step 2 on page 13.
Rice
6.0 L
(Once the pressure has
reached the setting level)
Water
(waterline)
PORRIDGE
WHITE
RICE
Time setting
range (min)
(default time is 10)
Fixed at 10
(Exhausting)
(Exhaust steam ends)
)
5~20
Table 5
12
Page 13
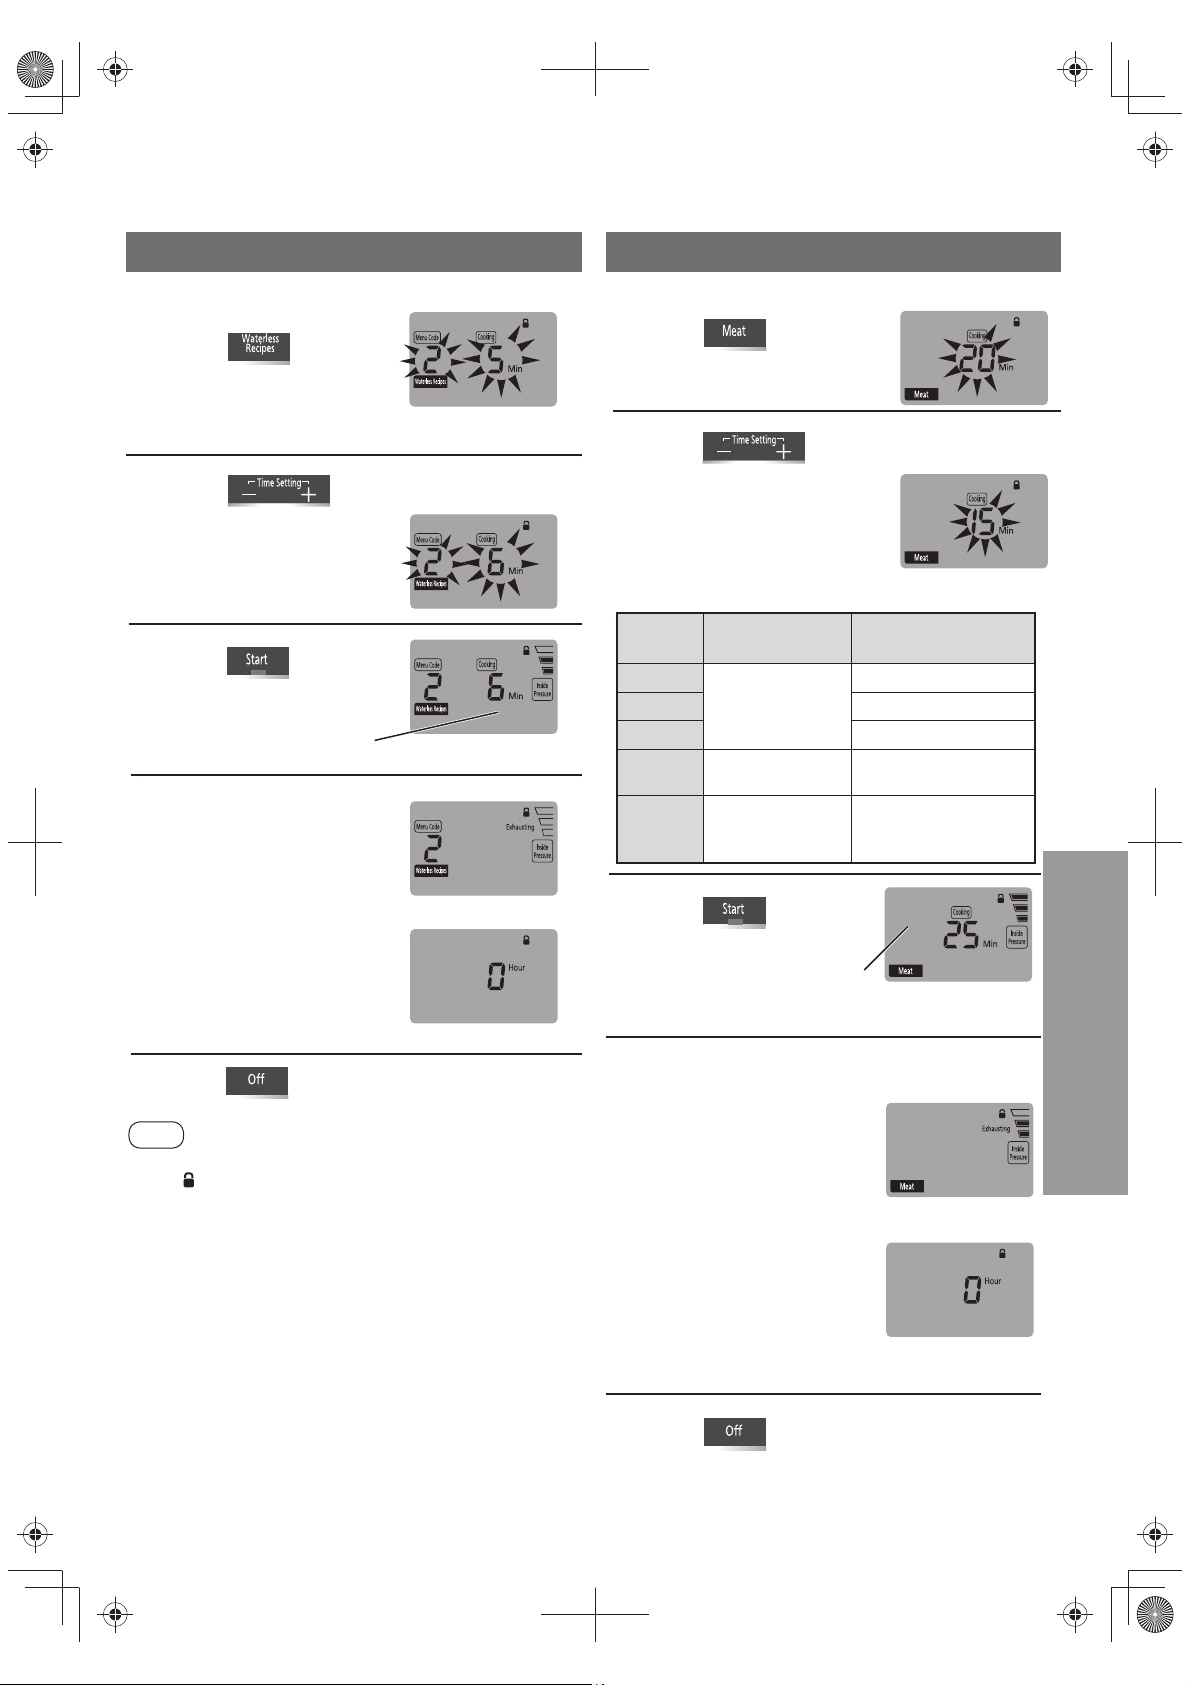
Waterless Recipes
Meat·Beans/Tendon·Soup·Fish/Steam
Example: Cooking saliva chicken with “Waterless
Recipes” function
Press to select
1
Menu Code 2.
● The currently selected menu and menu code are flashing.
● Other Menu Code
Press or to set the cook time.
2
● Time is decreased or increased
at 1 minute intervals.
● Press and hold the [
button to quickly subtract or
add time.
Press .
3
● The [Start] indicator lights up.
Remaining time is
shown in 1 minute
decrements.
After cooking, it will enter
the exhaust steam state.
4
● The [Exhaust Steam] indicator
lights up.
● When the exhaust steam is
finished (the pressure indicator
pin is dropped), the buzzer will
sound, the display will be
displayed as “0 Hour”, and the
“Keep Warm” icon will light.
● If you need to open the outer
lid during cooking, page 12
“Exhaust Steam”.
page 9.
+ ] or [- ]
(Once the pressure has
reached the setting level)
(Exhausting)
(Exhaust steam ends)
Example: When using the “Meat” menu to cook meat
Press .
1
● The [Start] indicator flashes.
Press or to set the cook time.
2
● Time is decreased or increased
at 1 minute intervals.
● Press and hold the [+ ] or [- ]
button to quickly subtract or
add time.
■Maximum cooking volume and
Time setting range
Maximum
Menu
Meat
Tendon
Soup
Fish/Steam
Beans
Press .
3
● The [Start] indicator lights up.
cooking volume
(ingredients + water)
waterline for “MAX”
water:
1 measuring cup
waterline for
“MAX FOR BEANS”
Remaining time is
shown in 1 minute
decrements.
Time setting range (min)
5~35 (default time of 20)
15~35 (default time of 18)
20~59 (default time of 30)
1~59 (default time of 5)
15~35 (default time of 18)
(Once the pressure has
reached the setting level)
Table 6
How to Use
Press .
5
Notes
● Please confirm to lock the lid lock before cooking
(“ ” is displayed) to avoid cooking failure (except
the keep warm).
If the lid lock is unlocked, pressing [Start] will sound
“beep, beep” for 4 times.
● Do not move the pressure cooker or touch the steam
vent and the pressure indicator pin while cooking.
(Steam or food may be ejected.)
● It may take 2 ~ 5 minutes to release the steam until
the pressure is stable, which is not unusual.
● Three beeps will be heard when cooking ends, and
the pressure cooker will start exhaust steam three
seconds later. Do not get close to the steam vent
so as to avoid being burned by the steam.
※ The sound is big when the exhaust steam starts,
do not panic.
● In order to avoid soup spouting, some menus will
enable exhaust in 5 minutes (the “Exhausting” icon
is flashing on the display screen.) after the cooking
countdown is finished.
After cooking, enter the exhaust steam state.
4
● The [Exhaust Steam] indicator
lights up.
● The pressure shown in the
display varies with the actual
pressure in the pan.
● When the exhaust steam is
finished (the pressure indicator
pin is dropped), the buzzer will
sound, the display will be
displayed as “0 Hour”, and the
[Keep Warm] indicator will light.
● Method for opening the outer
lid step 4 ~ 5 on page 11.
Press .
5
● The [Keep Warm] indicator turns off.
(Exhaust steam ends)
(Exhausting)
13
Page 14
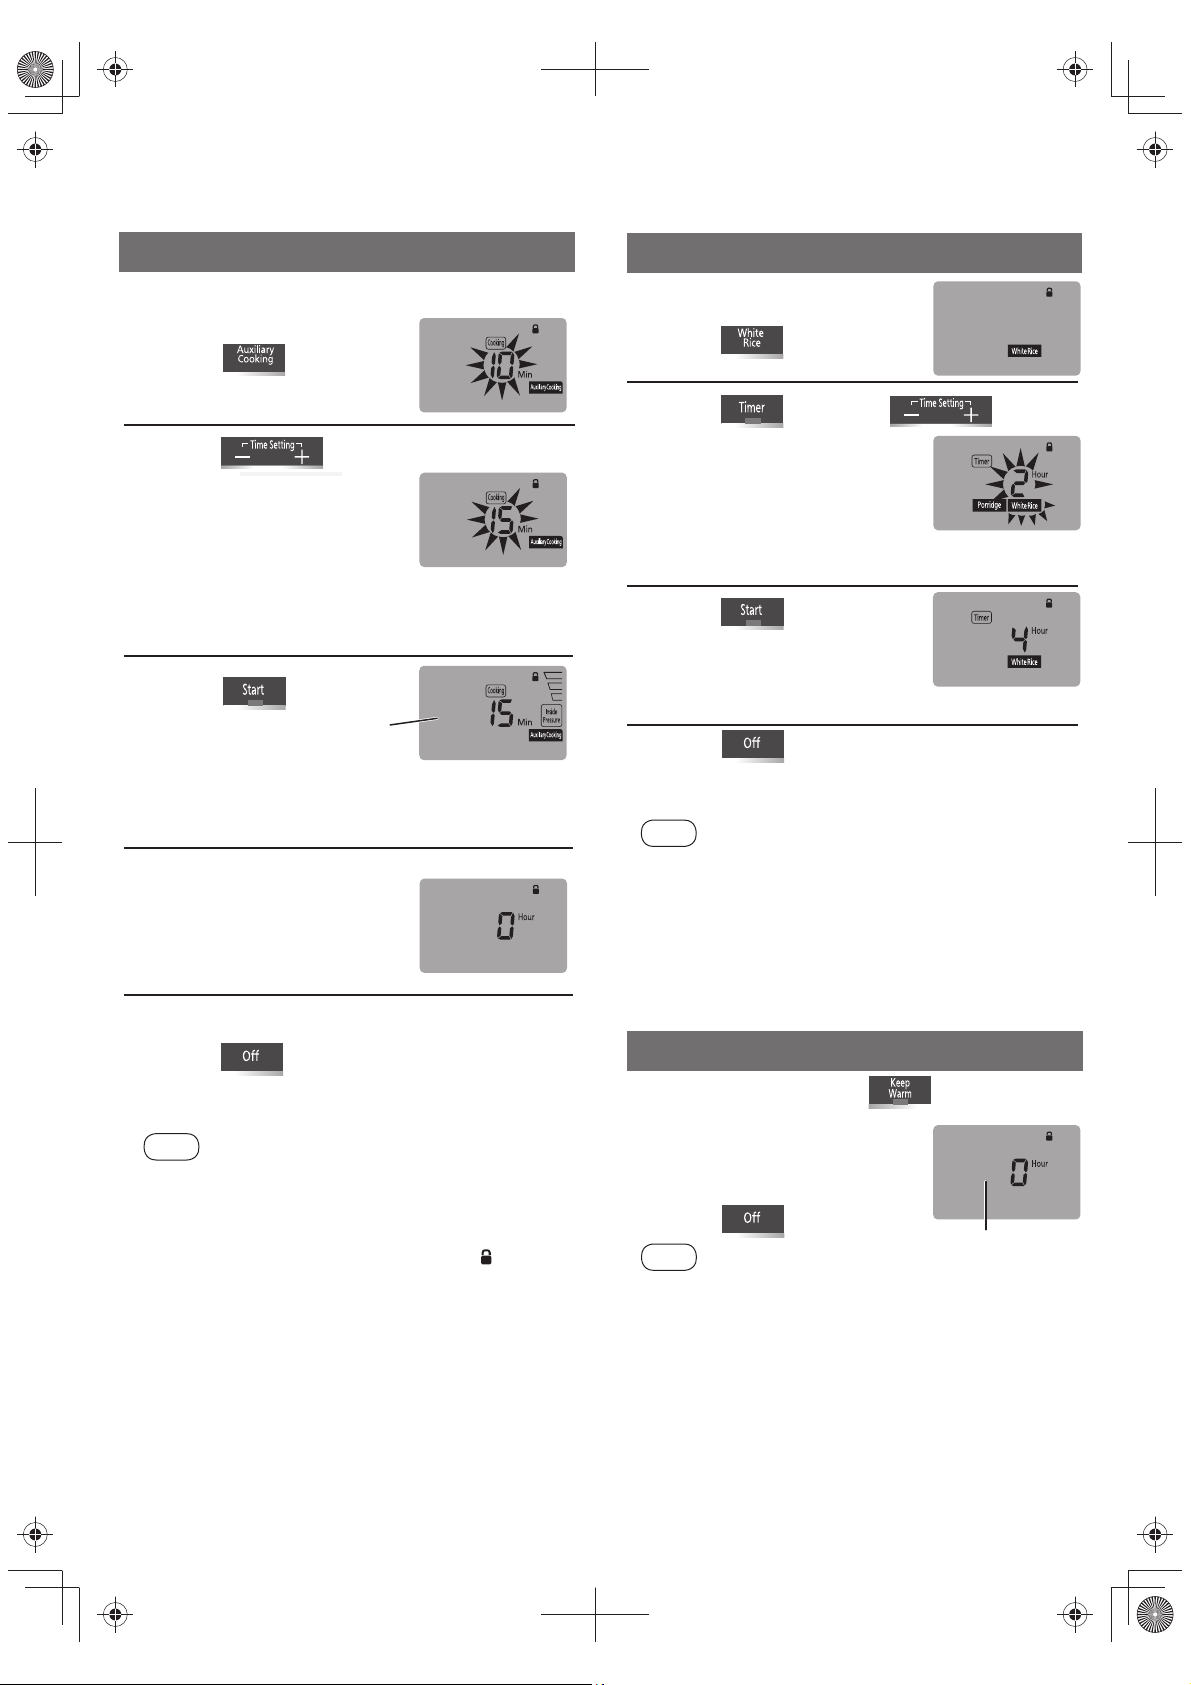
One Touch Menu / Timer / Keep Warm
Auxiliary Cooking
Example: When seasoning with the “Auxiliary
Cooking” menu
Press .
1
● The [Start] indicator flashes.
Press or to set the cook time.
2
● Time is decreased or increased
at 1 minute intervals.
● Press and hold the [+ ] or [- ]
button to quickly subtract or
add time.
● The cooking time setting range is 5 ~ 60 minutes,
and the start time is 10 minutes.
Press .
3
● The [Start] indicator lights up,
the remaining time is decreased at 1 minute intervals.
● To stop the cooking in the middle, press the [Off]
button.
After cooking, the buzzer
sounds, “0 Hour” is shown in
4
the display, and it is
automatically coverterd to
keep warm.
■ To cancel keep warm.
Press .
5
● The [Keep Warm] indicator turns off.
Notes
● When using the auxiliary cooking, be sure to:
•Open the outer lid.
(So as not to affect the cooking effect due
to the pressure in the pan.)
•Lock the lid lock, and the display shows “ ”.
(So as to avoid the failure to cook.)
● Do not cook the food hard to cook using “Auxiliary
Cooking”.
(So as not to affect the cooking effect.)
Remaining time
Timer (Porridge·White Rice)
Example: When cooking white
rice with the timer
Press .
1
● The [Start] indicator flashes.
Press , then press to set
2
preset time.
● Display all menus that can be
timed (porridge, white rice),
selected menu will flash.
● The preset time setting range:
2 ~ 13 hours.
● Timed porridge cooking: press [+] or [-] button
to set the cook time, and press [Timer] and [+] [-]
button to set preset time.
Press .
3
4
Notes
● Other than “Porridge” and “White rice”, other menu can
● Time indicated by the timer is the time cooking finishes.
● The preset time for the last time can be memorized, and
● Time will decrease in 1 hour increments when remaining
● The [Start] indicator turns off.
The [Timer] indicator lights up.
● When the cooking is completed,
the buzzer sounds and “0 Hour” is indicated on
the display, the [Keep Warm] indicator lights up.
Press .
● The [Keep Warm] indicator turns off.
● Steps before pressing the [Off] button, step 4 ~ 5
on page 11.
not be timed.
when cooking with the timer next time, the initial value of
the preset time (2 hours) will be returned to if the power
has been off for more than 1 minute.
time is more than 1 hour,and 1 minute increments when
remainingtime is less than 1 hour.
Keep Warm
Close the outer lid, press .
● The [Keep Warm] indicator lights up.
1
● The temperature inside the pan
can be maintained at around 70
degrees Celsius.
■ To cancel keep warm
Press .
2
Notes
● When using the “Keep Warm” function, you may only close
the outer lid without locking the lid lock.
● Do not use the “Keep Warm” function on white rice and
green vegetables.
● It is recommended that the time for the “Keep Warm”
function shall not exceed 1 hour.
● Once the time for the “Keep Warm” function exceeds 24
hours, the display will disappear, but the “Keep Warm”
function will continue.
(The [Keep Warm] indicator still lights up.)
● If the time for the “Keep Warm” function exceeds 96 hours,
“U14” will appear in the display, and the function will stop.
The keep warm time
(up to 24 hours)
14
Page 15
Recipes
CAUTION: ※Be sure to pull back the lid handle after closing the outer lid so as to avoid failure to cook.
Ingredients:
Steps:
1.Prepare the ingredients. Cut beef into chunks, and cut ginger and garlic into minces. Prick the beef with toothpick,
add all the seasonings and bruised ginger and minced garlic, and pickle for 4 hours.
2.Put all the ingredients and seasonings in the pan, then put the pan into the body and close the outer lid.
3.Press the [Waterless Recipes] button, select the code “1”, set the cook time to 20 minutes, and then press the
[Start] button. After cooking, wait for them to be cool and slice them.
Ingredients:
Steps:
1.Put chicken legs in the pan, sprinkle with minced ginger, pour rice wine, then put the pan into the body, and close the outer lid.
2.Press the [Waterless Recipes] button, select the code “2”, set the cook time to 5 minutes, and then press the [Start] button.
3.Put the pepper oil, vinegar, sugar, and light soy sauce into a bowl (vinegar: light soy sauce: sugar = 3:2:0.5).
Add minced scallion and garlic to mix well.
4.After the cooking is over, press the [Off] button to open the outer lid and take out the chicken legs (pour out the
original soup, otherwise it will dilute the original taste). Wait until they are cold, and slice and pour the sauce.
Ingredients:
Steps:
1.Wash chicken wings, onion, shiitake mushrooms, slice onion and ginger, and cut chicken wings twice in the front
and back to make them tasty.
2.After mixing all the seasonings, put chicken wings in, mix well and preserve for more than one hour.
3.Put a layer of ginger slices on the bottom of the pan, and then lay a layer of onions, and then cover with a layer of
Shiitake mushrooms. Put the chicken wings of 2. on the top, and also evenly spread the marinated seasonings
on the top, put the pan into the body, then close the outer lid.
4.Press the [Waterless Recipes] button, select the code “3”, set the cook time to 5 minutes, and then press the [Start] button.
5.When finished, press the [Off] button to open the outer lid. Press the [Auxiliary Cooking] button, set the cook time
to 10 minutes, and then press the [Start] button.
※When using the “Auxiliary Cooking” function, be sure to open the outer lid, and lock the lid lock.
Ingredients:
Steps:
1.Peel and slice the ginger, and peel and crush the garlic. Wash and drain the dried chilis, wash and cut the shiitake mushrooms.
Wash, peel and roll cut potatoes. Wash red peppers and green peppers separately, and remove stalks and seeds.
2.Wash and drain the chicken legs and cut into pieces. Add ginger slices, cooking wine, five spice powder, salt,
light soy sauce, and oyster sauce to marinate for 25 minutes.
3.Pour the oil into the pan, add the dried chilis and garlic cloves. Press the [Auxiliary Cooking] button, set the cook time
to 5 minutes, and then press the [Start] button.
4.When finished, put marinated chicken legs, shiitake mushroom pieces, potato pieces, star anise, dark soy sauce, and
sugar in the pan. Press the [Waterless Recipes] button and select the code "4". Set cook time to 5 minutes and then
press the [Start] button.
5.When finished, press the [Off] button to open the outer lid, and add the red pepper and green pepper pieces. Press
the [Auxiliary Cooking] button, set the cook time to 10 minutes, Stir until Auxiliary Cooking is finished.
※When using the “Auxiliary Cooking” function, be sure to open the outer lid, and lock the lid lock.
(Do not close the outer lid when simmering food with a thick texture such as curry and stew, but you
need to lock the lid lock.)
※The recipes takes 6.0 L for example, and the cooking amount is 5.0 L
※The amount of ingredients and cook time in the recipe are for reference only. Please adjust them
according to actual needs.
※1 cup (measuring cup): Approx. 150
g
Waterless sauced beef
Seasoning:
Beef 1000 g
Scallion To taste
Ginger To taste
Minced garlic To taste
Sugar 10 g Cooking wine 25 mL
Light soy sauce 50 mL Oyster sauce 20 g
Dark soy sauce 50 mL Thirteen spices 5 g
Saliva chicken
Seasoning:
Peeled chicken leg meat 2
Minced scallion 2 g
Minced Ginger 10 g
Minced garlic 10 g
Rice wine 10 mL Sugar 2.5 g
Pepper oil 40 mL Light soy sauce 10 mL
Vinegar 15 mL
Braised chicken wings
Seasoning:
Chicken wings 8
Onion 1/2
Shiitake mushrooms
Ginger To taste
9
Cooking wine 20 mL
Light soy sauce 20 mL
Dark soy sauce 15 mL Sugar To taste
Sesame oil
10 mL
Braised Chicken with potatoes and pepper
Chicken leg meat 500 g
Shiitake mushrooms
Potatoes 500 g
Green pepper 1
Red pepper 1
Garlic 3
Ginger 10 g
80 g
Seasoning:
Cooking wine 15 mL Star anise 1
Five spice powder 1 g Dark soy sauce 15 mL
Salt 1 g Sugar 3 g
Light soy sauce 15 mL Oil 30 mL
Oyster sauce 15 mL
Dried chili 5
page 25 Specifications.
Waterless Recipes-1
Waterless Recipes-2
Waterless Recipes-3
Pepper oil
Pepper
Waterless Recipes-4
10 mL
To taste
How to Use
15
Page 16
Recipes
Shredded Chicken
Ingredients:
Chicken 1, Approx. 1000 g
Ginger Several pieces
Scallion Several
Steps:
1.Wash and drain the chicken. Put a thin layer of salt on the chicken, and stuff two ginger slices into the chicken’s
stomach; put the chicken aside for 5 minutes.
2.Prepare a container and stir the marinade other than salad oil in the container.
3.Evenly wipe the seasoning of 2. on the chicken, lay the scallions and ginger slice in the bottom of the pan, and place
the chicken and the marinade into the pan for 20 minutes.
4.Spread salad oil on the chicken, put the pan into the body, and close the outer lid.
Press the [Waterless Recipes] button, select the code “5”, and set the cook time to 20 minutes, and then press the [Start] button.
5.
6.After cooking, press the [Off] button to open the outer lid and take out the chicken, tear the chicken into small pieces,
and dip in a little dipping sauce (dipping sauce needs to be mixed thoroughly in advance).
marinade:
Dark soy sauce 10 mL Cooking wine 10 mL
Light soy sauce 10 mL Sugar 15 g
Salt 13 g Salad oil 10 mL
(10 g coated on the chicken,
3 g added to the marinade)
Braised pig trotter
Ingredients:
Pig trotter 500 g
Steps:
1.Boil chopped pig trotter to get rid of the blood. Remove and drain.
2.Put the pig trotter into a small pot, add all seasoning (except crystal sugar and scallion) to preserve for 30 minutes.
3.After preservation, pour the pig trotter with sauce into the pressure cooker, add crystal sugar. Close the outer lid and
lock the lid lock.
4.Press [
5.
6.After the pan boils, press the [Off] button, dish out and put the scallion on the pig trotter.
Waterless Recipes
Wait unti lthe pressure indicator pin is dropped, and press the [Off] button, then push the lid handle, and open the outer lid.
Turn over the pig trotter, press the [Auxiliary Cooking] button, set the cook time to 5 minutes, then press the [Start] button.
※The cooking time for Auxiliary Cooking may be adjusted according to the actual situation.
※When using the “Auxiliary Cooking” function, be sure to open the outer lid, and lock the lid lock.
] button, select the code “6”, set the cook time to 10 minutes, then press the [Start] button.
Seasoning:
Light soy sauce 30 g Shao liquor 40 g
Vinegar 10 g Allspice 1 g
Sugar 10 g Ginger, garlic To taste
Salt To taste Dried red pepper 2 pcs
Scallion 1 pc Crystal sugar 15 g
Waterless Recipes-5
Dipping sauce:
Ginger To taste
Minced garlic To taste
Light soy sauce 15 mL
Sesame oil 5 mL
Sugar 3 g
Waterless Recipes-6
Stewed mushrooms with black pepper
Ingredients:
Shiitake mushroom without stalks
Scallion 2 g
Steps:
1.Wash and drain the shiitake mushrooms, and remove the stalks.
2.Put the pan into the body, put a little oil, then add fresh mushrooms and all seasonings, and close the outer lid.
3.Press the [
4.After cooking, press the [Off] button to open the outer lid. Press the [Auxiliary Cooking] button, set the cook time to
10 minutes, and then press the [Start] button.
5.Place the mushroom in the plate and sprinkle with chopped scallion.
※When using the “Auxiliary Cooking” function, be sure to open the outer lid, and lock the lid lock.
Waterless Recipes
12-15, Approx. 300 g
] button, select the code “7”, set the cook time to 1 minute, and then press the [Start] button.
Seasoning:
Salad oil 10 mL Grind black pepper A small amount
Salt A small Light soy sauce 5 mL
amount Dark soy sauce 5 mL
Enokitake with minced garlic
Ingredients:
Enokitake 300 g
Minced garlic 30 g
green onion 10 g
Steps:
1.Wash enokitake and remove stalks.
2.First lay enokitake in the pan, and then lay minced garlic; add oyster sauce and light soy sauce, and then put the pan into
the body, close the outer lid.
3.Press the [
4.Add oil in another pan and make it hot.
5.After cooking, press the [Off] button to open the outer lid, and put them in a plate, sprinkle with chopped green onion,
and pour the hot oil.
Waterless Recipes
] button, select the code “8”, set the cook time to 2 minutes, and then press the [Start] button.
Seasoning:
Oyster sauce 20 mL
Light soy sauce 10 mL
Salad oil 30 mL
Waterless Recipes-7
Waterless Recipes-8
16
Page 17
Ratatouille
Waterless Recipes-9
Ingredients:
Zucchini 200 g
Tomato 150 g
Onion 100 g
Yellow pepper 100 g
Carrot 50 g
Steps:
1.Wash and dice all ingredients.
2.Pour olive oil into the pan, and add all ingredients and seasonings in order. Stir well with scoop, and close the outer lid.
3.Press the [
Waterless Recipes
] button, select the code “9”, set the cook time to 1 minute, and then press the [Start] button.
Waterless seafood pot
Ingredients:
Clams 200 g
Shrimp 200 g
Mussel 200 g
Minced scallion To taste
Minced garlic To taste
Minced ginger To taste
Steps:
1.Wash all the ingredients, place them in the pan together with the sauce (except minced scallion), and close the outer lid.
Press the [Waterless Recipes] button, select the code “10”, set the cook time to 3 minutes, and then press the [Start] button.
2.
3.After cooking, press the [Off] button to open the outer lid, and put them in a plate, sprinkle with chopped scallion.
Bass in scallion oil
Ingredients:
Bass 1, Approx. 600 g
Ginger To taste
Minced scallion To taste
Garlic cloves 3
Steps:
1.Cut the cleaned bass with a knife on its back several times, and then smear it with salt and pickle for 5 minutes.
2.Crush the garlic cloves and stuff them into the maw of the bass; cut half of the ginger into thin slices and spread
them on the plate, and cut the other half into shreds.
3.Place the pickled bass into the pan, top it with cooking wine, then put the shredded ginger on the bass, and close
the outer lid.
Press the [Waterless Recipes] button, select the code “11”, set the cook time to 5 minutes, and then press the [Start] button.
4.
5.After cooking, press the [Off] button to open the outer lid, and put them in a plate, sprinkle with chopped minced
scallion, top with steam fish soy sauce.
6.Pour salad oil in another pan to make it slightly smoke, and then pour hot salad oil on the fish.
Seasoning:
Oliveoil 15 mL
Grind black pepper A small amount
Salt 2 g
ketchup 40 g
Waterless Recipes-10
Seasoning:
Salad oil 15 mL
Garlic sauce 10 g
Oyster sauce 15 mL
Cooking wine 20 mL
Light soy sauce 15 mL
Waterless Recipes-11
Seasoning:
Salt 3 g
Cooking wine 15 mL
Steam fish soy sauce 30 mL
Salad oil 30 mL
How to Use
Fish head with chopped chili
Ingredients:
Fish head 1, Approx. 600 g
Chopped chili 200 g
Ginger To taste
Scallion To taste
Steps:
1.Remove the scales and gills of the fish head, and then cut it into two pieces connected with their back using a knife.
2.First brush a layer of salad oil in the bottom of the pan, and layer the ginger slice in the bottom of the pan. And then
put the head into the pan, layer the chopped chili on the fish head, and finally sprinkle the cooking wine on the fish head.
3.Put the pan into the body, and close the outer lid. Press the [Waterless Recipes] button, select the code “12”, set
the cook time to 5 minutes, and then press the [Start] button.
4.After cooking, press the [Off] button to open the outer lid, sprinkle with chopped scallion, top with steam fish soy sauce.
5.Pour salad oil in another pan to make it slightly smoke, and then pour hot salad oil on the fish head.
Seasoning:
Steam fish soy sauce 30 mL
Salad oil 30 mL
Cooking wine 20 mL
Waterless Recipes-12
17
Page 18
Recipes
Apple jam
Ingredients:
Apple 2 (Approx. 600 g), skinned and sliced
Lemon Half, juiced
Sugar 150 - 200
Steps:
1.Put apples into the pan and add lemon juice.
2.Close the outer lid,
the [Start] button.
3.Wait until the pressure indicator pin is dropped, and press the [Off] button.
4.Push the lid handle, open the outer lid, and add sugar.
5.Press the [Auxiliary Cooking] button, set the cooking time to 40 minutes, then press the [Start] button, and stir to
the paste while cooking, and press the [Off] button.
※ The amount of sugar depends on personal preference. If you need to preserve the jam, increase sugar.
※ When using the “Auxiliary Cooking” function, be sure to open the outer lid, and lock the lid lock.
※ The cook time for auxiliary cooking may be adjusted according to the actual situation.
g
and press the [
Pressure
] button, select “Low”, set the cook time to 15 minutes, and then press
Vegetable soup with milk
Ingredients: Seasoning:
Onion
½, sliced
Celery
A
½, sliced
Carrot ½, skinned and diced
Potatoes 1, skinned and diced
Soup-stock 300 mL
Salt
5
Pepper
B
To taste
Milk 400 mL
g
Low
Mid
Steps:
1.Put A into the pan and add soup-stock.
2.Close the outer lid,
the [Start] button.
3.Wait until the pressure indicator pin is dropped, and press the [Off] button, then push the lid handle, open the
outer lid and let it cool.
4.Transfer them into a blender then blend until smooth, then put it back into the pressure cooker.
5.Add B, and press the [Auxiliary Cooking] button, set the cooking time to 30 minutes, and then press the [Start]
button, and bring to a boil.
※ When using the “Auxiliary Cooking” function, be sure to open the outer lid, and lock the lid lock.
※ The cook time for auxiliary cooking may be adjusted according to the actual situation.
and press the [
Pressure
] button, select “Mid”, set the cook time to 10 minutes, and then press
Mashed potato
Ingredients: Seasoning:
Potatoes 400 g
Carrot A small amount
Cucumber A small amount
Steps:
1.Place the diced potatoes in a bowl, add 1 cup of water into the pan and place in the steaming plate affiliated,
then put the bowl onto the steaming plate.
2.Close the outer lid,
the [Start] button.
3.Cut the carrot and the cucumber into small grains.
4.Wait until the pressure indicator pin is dropped, and press the [Off] button. Push the lid handle to open the
outer lid and take out the potato.
5.Crush the potato into mashed potato, and add carrot and cucumber grains and condensed milk. Stir into a
spherical shape, and finally top with a little salad dressing.
and press the [
Pressure
] button, select “Mid”, set the cook time to 20 minutes, and then press
Condensed milk 10
Salad dressing Appropriate amount
g
Mid
18
Page 19
Steamed lotus root stuffed with sweet glutinous rice
Ingredients: Seasoning:
Root lotus 1
Glutinous rice 70
Steps:
1.Wash the glutinous rice, and soak it in water for 4 hours; pick up and drain it, and add sugar; stir and set aside.
2.Skin the lotus root, and wash and drain it; cut one end of the lotus root (set aside).
3.Pour the glutinous rice in 1. into the lotus hole, and then put the cut lotus head back in place, and fix it with
toothpicks to avoid rice leakage.
4.Place the lotus root into the pan, add water over the lotus root, and add brown sugar and crystal sugar.
5.Close the outer lid, and press the [Pressure] button, select “High”, set the cooking time to 30 minutes, then
press the [Start] button.
6.Wait until the pressure indicator pin is dropped, and press the [Off] button, then push the lid handle, and open
the outer lid.
7.Take the lotus root out, an remove the toothpicks; cut the root into 1 cm thick wafers, and sprinkle with the
sweetscented osmanthus sugar.
g
Sugar 100
Brown sugar 50
Crystal sugar 50 g
Sweet-scented osmanthus sugar A small amount
g
g
High
Purple potato and white fungus soup
Ingredients: Seasoning:
Purple potatoes 250 g, skinned and diced
White fungus 30 g
Water 11 cups (Approx. 2000 mL)
Steps:
1.Soak the white fungus in water for 3 - 4 hours, and then remove the stalks, and tear the fungus into small pieces.
2.Place the purple potato and the white fungus into the pan and add water.
3.Close the outer lid, and press the [Pressure] button, select “High”, set the cooking time to 25 minutes, then
press the [Start] button.
4.Wait until the pressure indicator pin is dropped, and press the [Off] button, then push the lid handle, and open
the outer lid.
5.Add the crystal sugar,and press the [Auxiliary Cooking] button; set the cooking time to 25 minutes, then press
the [Start] button; press the [Off] button after the crystal sugar melts.
※ When using the “Auxiliary Cooking” function, be sure to open the outer lid, and lock the lid lock.
※ The cook time for auxiliary cooking may be adjusted according to the actual situation.
Oat porridge for blood enrichment and beauty
Ingredients: Seasoning:
White rice ¾ cup
Oat 20 g
Jujube sheet 3 g
Dried olngans 12 pieces
Walnut kernels 30 g
Crystal sugar 120 g
Porridge
Brown sugar 50 g (May increase or decrease)
High
How to Use
Steps:
1.Wash the white rice and the oat, and pour them into the pan; add water to the scale of “PORRIDGE” at “1”.
2.Wash other ingredients and place them into the pan.
3.Close the outer lid, and press the [Porridge] button, set time to 15 minutes, then press the [Start] button.
4.Wait until the pressure indicator pin is dropped, and press the [Off] button, then push the lid handle, and open
the outer lid; add brown sugar and mix well.
19
Page 20
Recipes
White rice with pork short ribs
Ingredients: Seasoning:
White rice 2 cups
Glutinous rice 2 cups
Pork short ribs 350 g, cut into small pieces
Ginger 6 g, sliced
A
Garlic 2 cloves
Carrot 1, diced
Shiitake mushrooms
B
Water 3 measuring cups (Approx. 540 mL)
Steps:
1.Put the pork short ribs into the boil water to get rid of the blood. Take them out and drain.
2.Marinate 1. with A and C for 30 minutes.
3.Put the white rice and the glutinous rice washed and drained into the pan.
4.Put the marinated pork short ribs and B into the pan; add salt, and stir well.
5.Close the outer lid, and press the [White Rice] button, then press the [Start] button.
7.Wait until the pressure indicator pin is dropped, and press the [Off] button, then push the lid handle, and open
the outer lid; mix the ingredients and the white rice well.
Light soy sauce 7 mL
Dark soy sauce 6 mL
Oyster sauce 5 g
1, diced
C
Cornstarch 3 g
Cooking wine 10 mL
Salt 7
g
White Rice
Braised pork with mushrooms in soy sauce
Ingredients: Seasoning:
g
Streaky pork 1000
Mushrooms 150
Scallion 2, washed and cut into long sections
Ginger 1, cut into big pieces after clean
Cinnamon stick 1
g
Salt 8 g
Sugar 20
A
Cooking wine 15 mL
Dark soy sauce 15 mL
g
Meat
Steps:
1.Put all ingredients into the pressure cooker and add A.
2.Close the outer lid, and press the [Meat] button, set time to 15 minutes, then press the [Start] button.
3.Wait until the pressure indicator pin is dropped, and press the [Off] button, then push the lid handle, and open
the outer lid.
Potato beef brisker in clay pot
Ingredients: Seasoning:
Beef brisker 600 g, diced
Potatoes 2, skinned and diced
Carrot 1, skinned and diced
Ginger Several pieces
Water 100 mL
Soup stock 100 mL
Steps:
1.Boil the beef brisker to get rid of the blood. Remove and drain.
2.Put all the ingredients into the pan and add stirred A.
3.Close the outer lid, and press the [Meat] button, set time to 20 minutes, then press the [Start] button.
4.Wait until the pressure indicator pin is dropped, and press the [Off] button, then push the lid handle, and open
the outer lid.
5.Press the [Auxiliary Cooking] button; set the cooking time to 15 minutes, then press the [Start] button; Stir until
Auxiliary Cooking is finished.
Salt 3
Light soy sauce 30 mL
A
Dark soy sauce 15 mL
Rice wine 15 mL
Cornstarch 3
g
g
Meat
20
Page 21
Red bean paste
Ingredients:
Red beans 150 g
Water 900 mL
Slab sugar 50
Tangerine peel Appropriate amount
Steps:
1.Pour the washed red beans and water into the pan, add slab sugar and tangerine peel, then close the outer lid.
2.Press the [Beans/Tendon] button, set time to 35 minutes, then press the [Start] button.
3.Wait until the pressure indicator pin is dropped, and press the [Off] button, then push the lid handle, and open
the outer lid.
4.Press the [Auxiliary Cooking] button; set the cooking time to 15 minutes, then press the [Start] button; Stir until
Auxiliary Cooking is finished.
g
Beans/Tendon
Pork short ribs soup with corn
Ingredients:
Pork short ribs 400
Corn 1, cut into sections
Carrot 1, cut into sections
Water 5.5 cups (Approx. 1000 mL)
Steps:
1.Put the pork short ribs into the boil water to get rid of the blood. Take them out and drain for use.
2.Put the pork short ribs, corn and carrots into the pan, and add water and seasoning.
3.Close the outer lid, and press the [Soup] button, set time to 30 minutes, then press the [Start] button.
5.Wait until the pressure indicator pin is dropped, and press the [Off] button, then push the lid handle, and open
the outer lid.
g
Steamed pork short ribs in soy sauce
Ingredients: Seasoning:
Pork short ribs 300
Shredded ginger 10
Steps:
1.Wash the pork short ribs and cut into small pieces and drain; mix them with cooking wine and pickled ginger
and pickle for 5 minutes.
2.Add black bean chill sauce into 1. and thoroughly mix.
3.Then add oyster sauce into 2. and thoroughly mix.
4.Add the starch into 3. and mix; let the starch wrapped in a thin layer on the surface of the pork short ribs.
5.Place them into a plate or bowl, and add 1 cup of cold water into the pan.
6.Place the steaming plate in, and then put 5. on the steaming plate.
7.Close the outer lid, and press the [Fish/Steam] button, set time to 30 minutes, then press the [Start] button.
9.Wait until the pressure indicator pin is dropped, and press the [Off] button, then push the lid handle, and open
the outer lid.
g
g
Seasoning:
Cooking wine 5 mL
Salt 7
Cooking wine 10 mL
Black bean chill sauce 15 g
Oyster sauce 10
Starch 10
g
Fish/Steam
g
g
Soup
How to Use
21
Page 22
Cleaning and Maintenance
● Please wait until the main body is sufficiently cool before unplugging the power plug cleaning.
● When cleaning, never immerse the main body in water.
● Do not use the dish washer or dish dryer.
Do not use the following items:
• Wire wool or nylon brush • Benzine / Thinner
Tool with abrasive particles
on the surface.
• Cleanser / Alcohol
• Disinfectant / Bleach
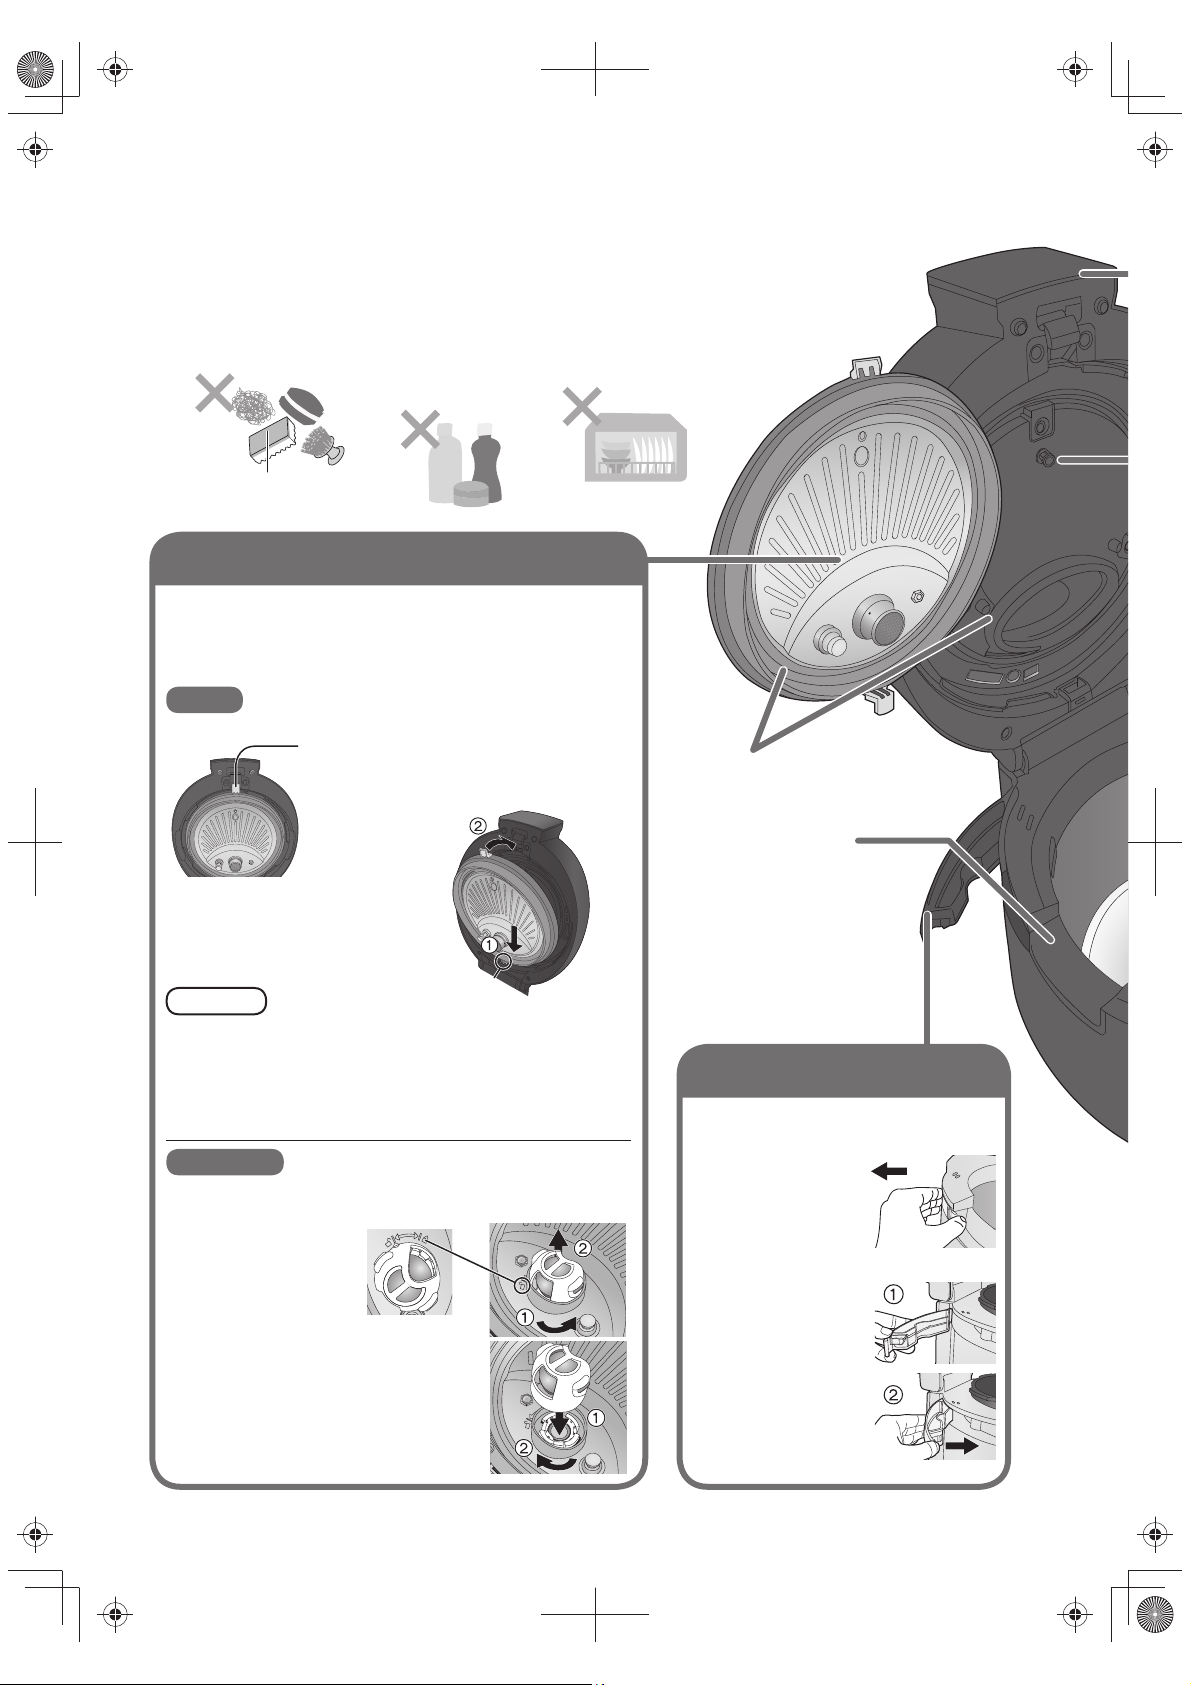
Inner lid · Pressure valve (Inner lid)
Please remove it after every use, and clean it with a kitchen
dedicated neutral detergent.
(Also remove the pressure valve for cleaning.)
● Clean both sides of the inner lid removed, and dry water before
loading it into the outer lid.
Inner lid
■ During disassembly
■ During installation
Insert the lower end of the inner
lid into the slot.
Push the upper end of the inner lid
to the button.
Precautions
● Please wash the pressure cooker immediately after using
seasonings (white rice with pork short ribs, etc.).
(So as to avoid odor, deterioration or rust.)
If the nozzle cap is clogged with foreign objects such as rice
and dirt, clear them using a thin bamboo stick or toothpick.
(So as not to cause steam leak and ejection of cooking food.)
Pressure valve
■ During disassembly
Rotate according to the
direction of the arrow.
Align the triangle on the
pressure valve to the
unlock mark, and you
can remove it.
■ During installation
Place the pressure valve on the inner
lid, making the triangle align to the
unlock mark.
Rotate to the triangle according to
the direction of the arrow till the lock
mark is aligned, and the installation is
complete when hearing a “click” sound.
※ Rinse it with water after removal.
Pull up the dissembling button of the inner lid.
(The inner lid will topple over toward the
front direction.)
Take out.
Slot
• Dish washer and
dish dryer
Seal ring
Support
section of the
pan handle
Dew collector
Remove it after use every time, and wash it
using detergent and then rinse it with water.
■ During disassembly
Take it out from the
support section of the
pan handle.
■ During installation
Insert the rib at the
rear end of the dew
collector into the
positioning groove.
Press it into the main
body in according to
the direction of the
arrow, so that the
jaw at the front end
of the dew collector
may be fitted into the
main body (A “click” is heard).
22
Page 23
Main body · Outer lid (Sealed part)
Wipe with a well-wrung cloth.
● Do not use detergent.
● Do not pull the pan packing.
Pan
Wash with detergent. (
● Do not use the pan as a wash basin.
So as not to cause wear and tear of
the pan.
page 4)
Pressure indicator pin
Wipe with a well-wrung cloth.
Until the indicator pin can
(
move up and down smoothly
)
Lid sensor · Cast heater · Bottom sensor
To remove stubborn foreign objects, gently rub with a little
neutral cleaning agent using a nylon brush, and then wipe
with a well-wrung cloth.
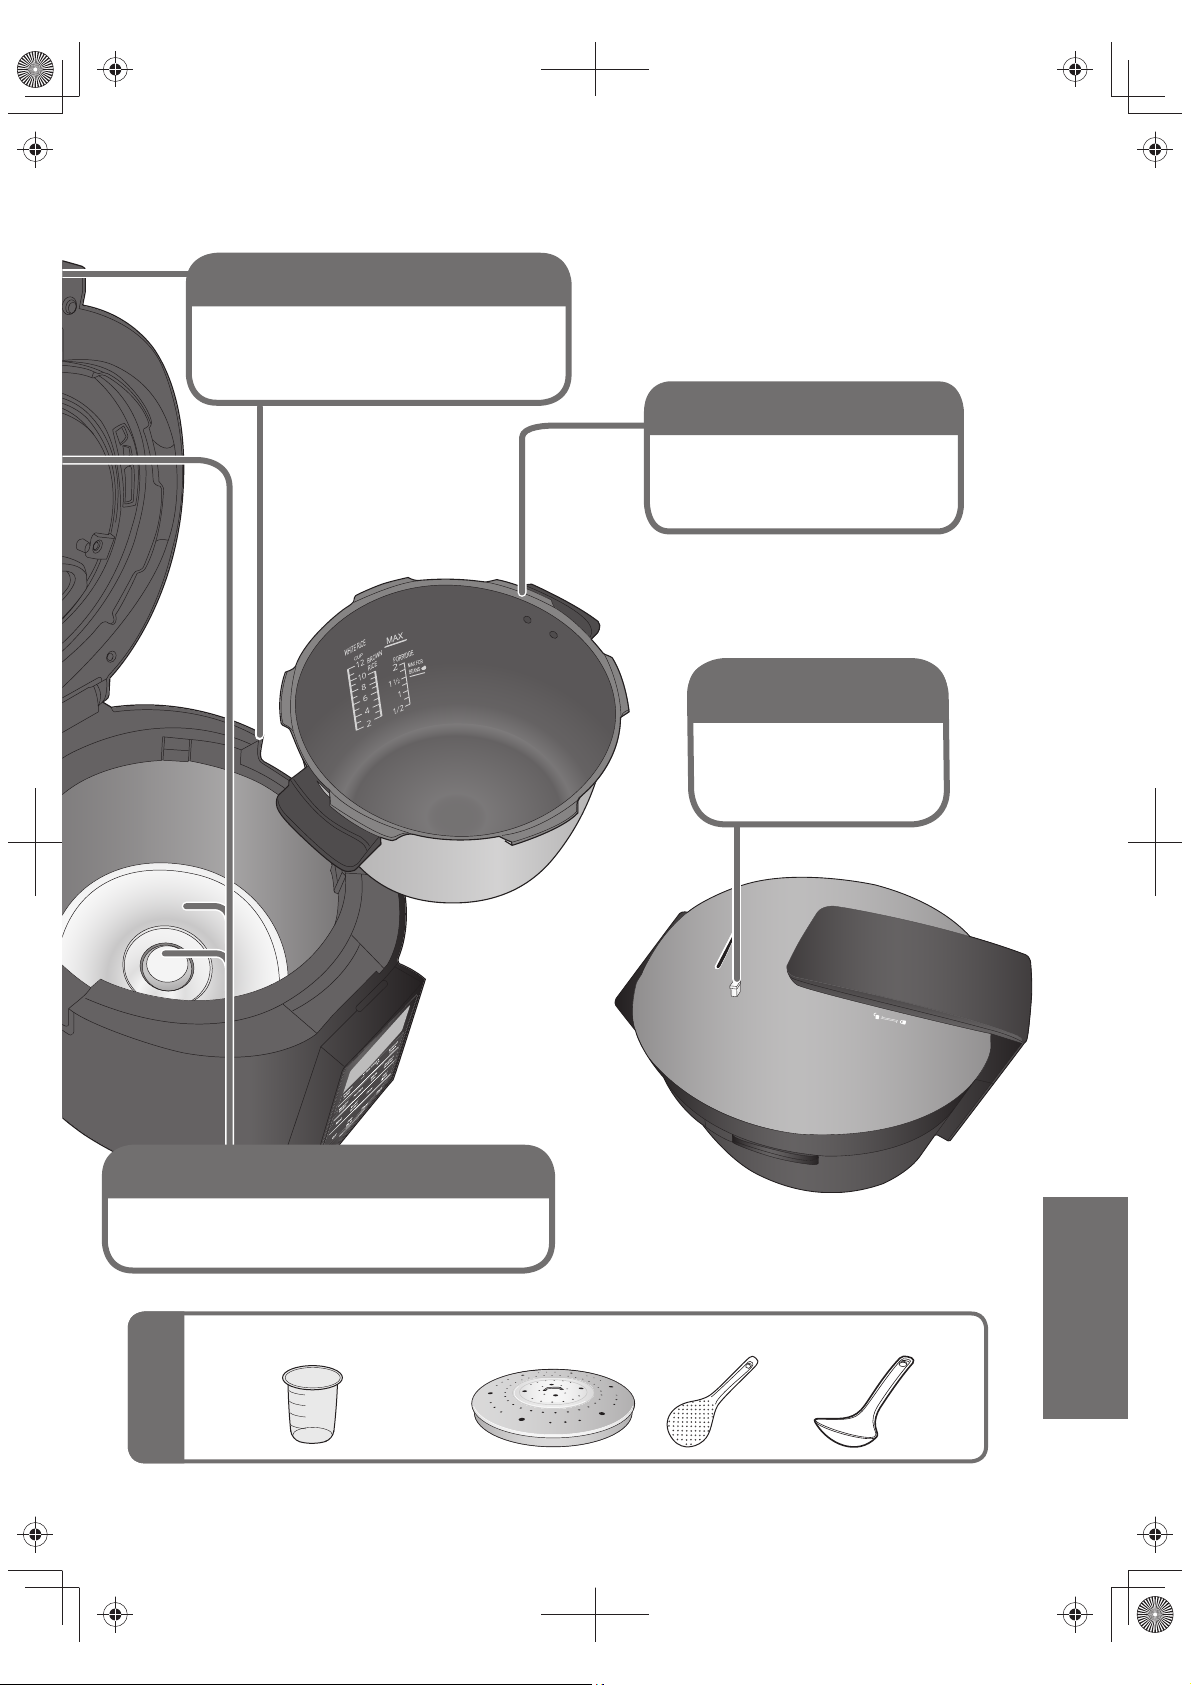
Accessories
Measuring cup (Approx. 180 mL) (1) Steaming plate (1) Rice scoop (1) Porridge [Soup] scoop (1)
When Necessary
23
Page 24
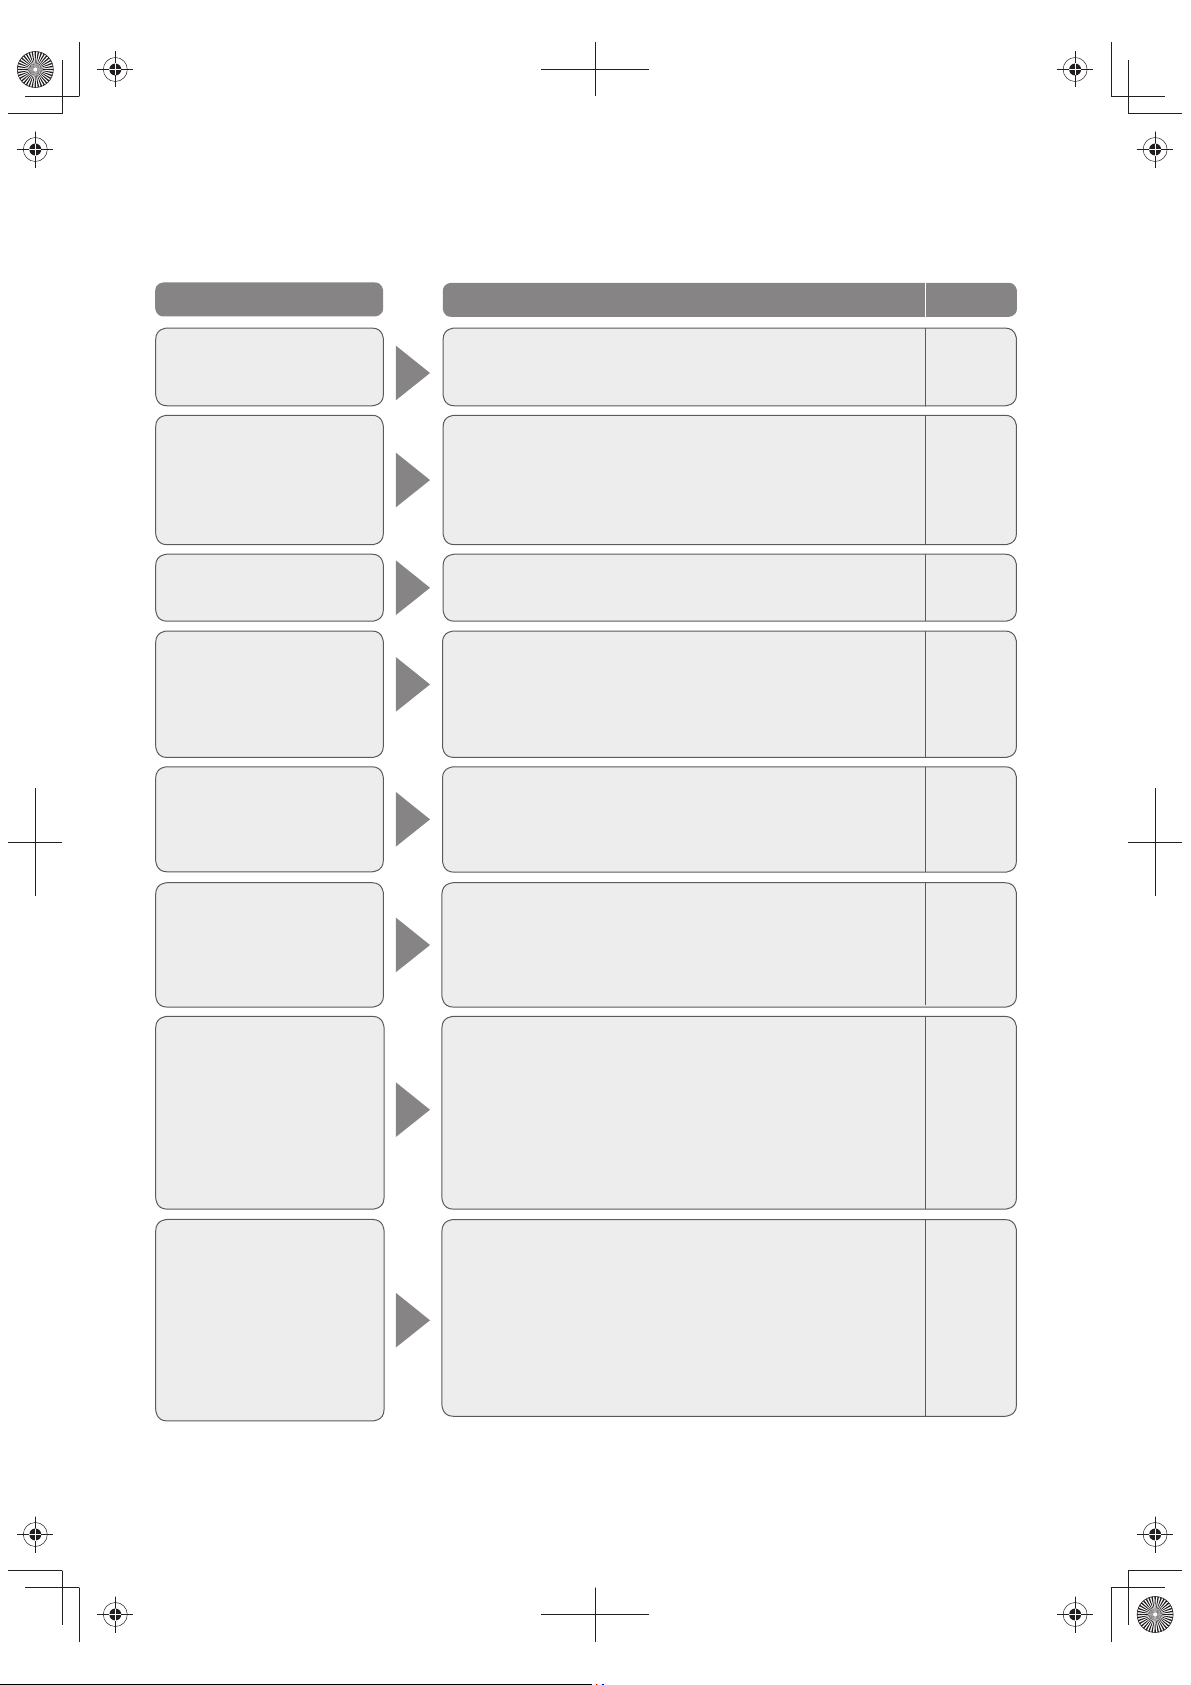
Troubleshooting
Please check the followings before requesting service.
Trouble description Possible causes Ref. page
Unable to cook
(Press the [Start] button, and
“beep, beep ......” is heard)
Time display does not
change
The remaining time displays
when the pressure indicator
pin has not been raised
Steam leak
(From the pan, outer lid,
steam vent or pressure
indicator pin)
Broth and steam spurt out
(Spurt from the steam
vent or the slit of the lid)
Cooking is unsuccessful
(Uncooked / overdone /
watery / burnt /
heat is too low)
● The lid lock is not locked well (the lid handle is not pulled back). 8
● The [Start] button is not pressed after the time is set.
● Steam leak. (See below the “Steam leak” description.)
● Even if the pressure cooking has started, the pressure
inside the pan has not reached the set pressure.
● There are foreign objects at the bottom of the cast heater, lid
sensor or the pan.
● The bottom sensor can not work properly because the
seasoning are not completely dissolved.
● There is a foreign object on the pan, inner lid, pan packing
or pressure indicator pin.
● The pan, inner lid or pan packing is dented or damaged.
● The pressure valve is leaking, the ball inside has a dent, or
the ball fixing seal ring is out of position.
● The safety valve (molten alloy) melts.
● The outer lid is not closed properly.
● Too much ingredients or water is put in the pan.
● During Auxiliary Cooking, the outer lid is closed.
● The pressure valve is not installed.
● The safety valve (molten alloy) melts.
● Pressure Select, Time Setting or water amount is not correct.
● There is a foreign object on the cast heater or inner lid, bottom
sensor.
● The pan placed in the main body is tilted.
● The pressure valve is not installed.
● Seasoning is not completely dissolved.
11~14
11~14
7, 10
—
23
4
—
—
22
—
8
8
14
22
—
23
8
22
5
● Has the pressure in the pan been completely released (the
pressure indicator pin is dropped)?
The outer lid is difficult
to open
The outer lid is difficult
to close
The pressure cooker
sounds
Contact service center for inspection or repair if:
● The bottom of the pan has dents. ● The inner lid or pan packing is dented or damaged.
● Problems are still not solved after the examination according to the above.
● Is the inner lid installed?
● Is the inner lid or the lid handle deformed?
● Because there is pressure in the pan, seal strength is enhanced
for the pressure cooker,so you find it difficult to close. Especially
when loosening the white rice immediately after cooking, you will
find it difficult to close.
● Is there any rice grain at the upper hook snap, lower hook snap
or the upper body?
● The “rip ...” sound indicates that the pressure is released.
● The “grunt” sound heard when closing the inner lid indicates that
the pressure valve is rolling in the outer lid.
● The “pata” sound heard when you release the pressure indicates
that the solenoid valve beats.
● The “beep, beep ...” sound indicates that the lid lock is not locked,
or is mistakenly opened before exhaust steam or during cooking.
● The “buzzing” sound indicates that the solenoid valve is operating.
● The “pop” sound indicates that the water drops at the bottom
(outer) of the pan crack due to thermal expansion.
24
11~14
22
—
—
—
—
—
—
8
—
—
Page 25
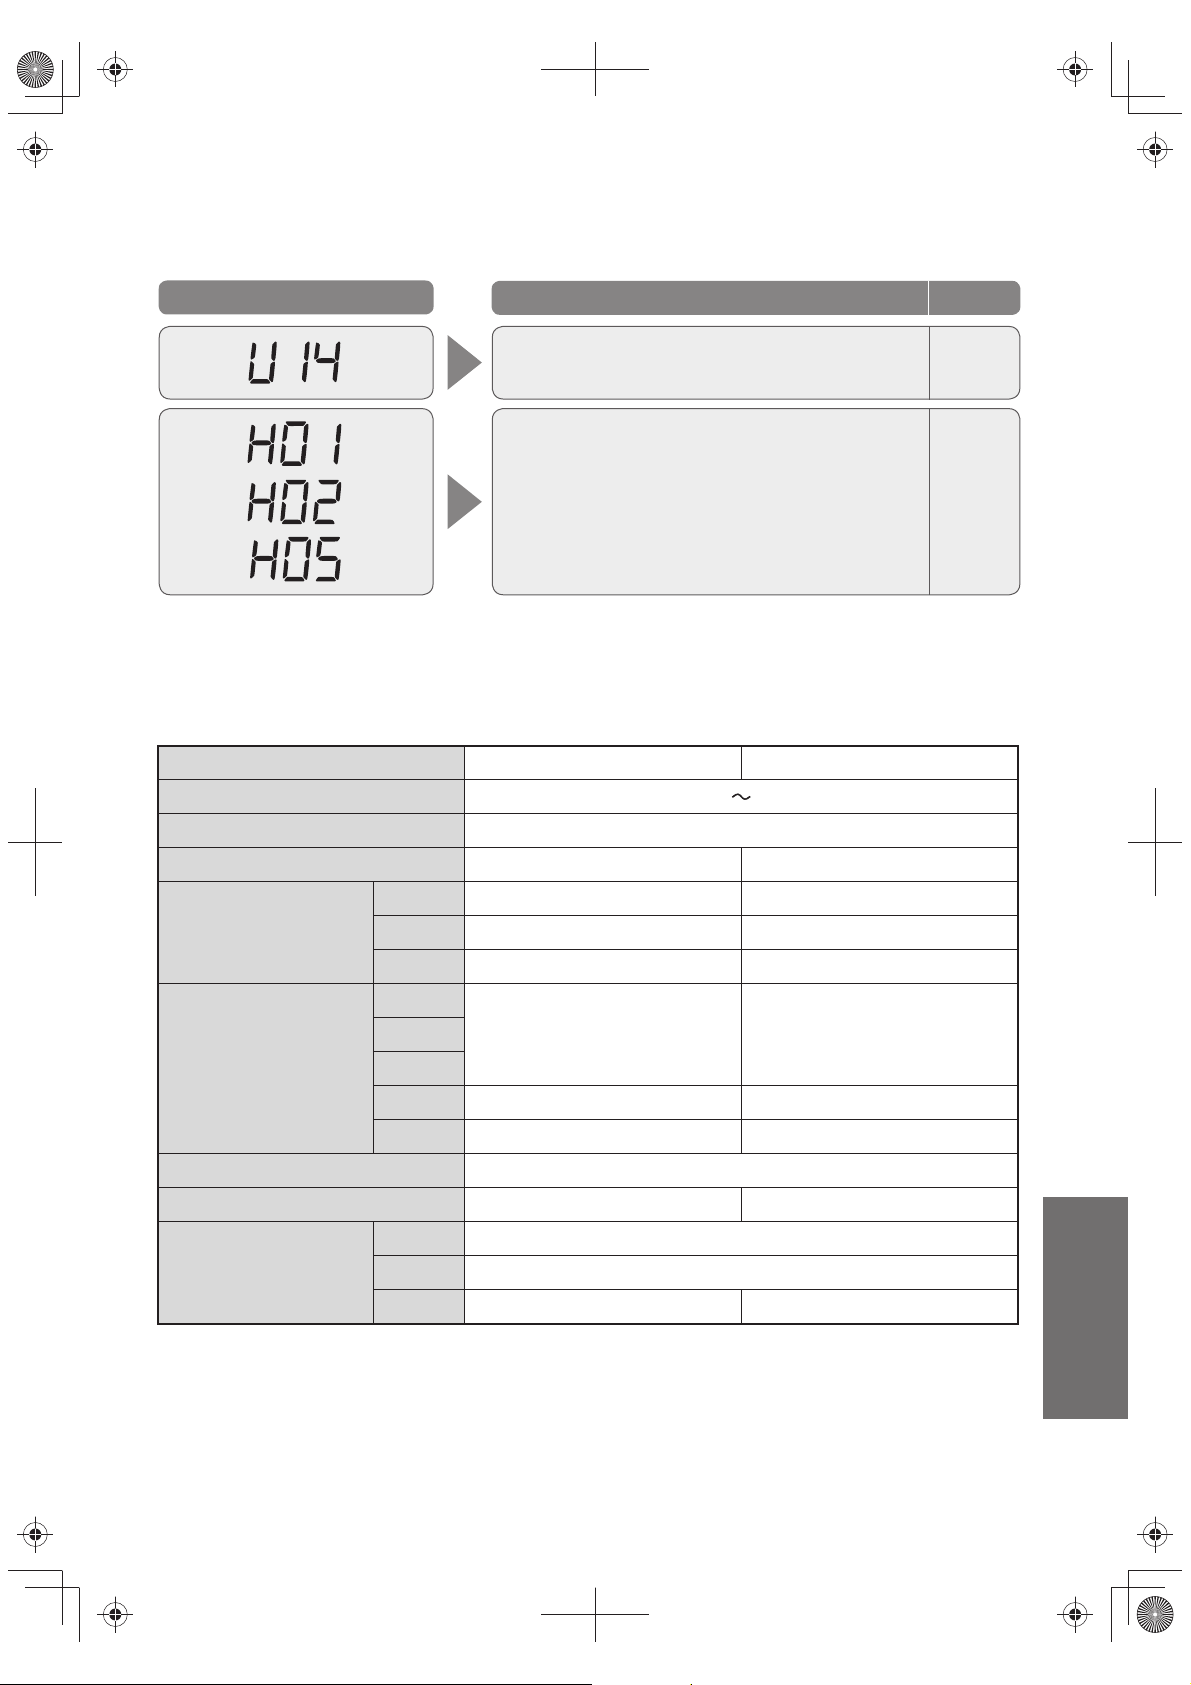
If this Code is Displayed…
Display Possible causes Ref. page
● The “Keep Warm” function is on more than 96 hours.
Press the [Off] button.
Contact service center.
Specifications
Model No.
Power supply / Rated frequency
Rated power (during cooking) 1100 W
Nominal volume of the pan L 5.0 (cooking capacity 3.3) 6.0 (cooking capacity 4.0)
Porridge 0.09 ~0.27(½~ 1½) 0.09 ~ 0.36(½~ 2)
Rice cooking
volume L (cup)
White rice 0.36 ~1.8(2 ~ 10) 0.36 ~ 2.16(2 ~ 12)
Brown rice 0.36 ~ 1.44(2 ~ 8) 0.36 ~ 1.8(2 ~ 10)
220 V 50 Hz
SR-PS608SR-PS508
—
—
Meat
Maximum cooking
volume for menu
(ingredients + water)
(Approx.) L
Power cord length (Approx.) m 0.1
Weight (Approx.) kg 3.72.7
Size (Approx.) cm
● (*1) It indicates the cooking capacity at the “MAX” waterline in the pan.
● (*2) It indicates the cooking capacity at the “MAX FOR BEANS” waterline in the pan.
● (*3) It indicates the product height when opening the outer lid.
● Max working pressure of the pressure regulator is 98 kPa gauge pressure.
● Power consumption at the standby state is approximately 0.4 W (when the power plug is connected).
Tendon
Bone soup
Fish/Steam
Beans 1.5
Width
Depth 36.1
Height
water: 1 measuring cup water: 1 measuring cup
28.1(55.5)
3.3
*1
*2
28.8
*3
29.8(57.2)
4.0
2.0
*1
*2
*3
When Necessary
25
Page 26

26
Page 27
【安全注意事項】(第2828~2929
頁)
安全注意事項
使用說明書
SR-PS608
本使用說明書中的圖片均以 SR-PS608為例
非常感謝您購買 Panasonic 產品。
•此產品僅供家庭使用。
•請仔細閱讀本使用說明書,以確保正確、
安全使用本產品。使用前請務必閱讀
【安全注意事項】(第
•請確保保用證上註明有購買日期和經銷
商號等信息。
•將保用證和使用說明書一同小心收妥。
保留備用 保用證另附
頁)
。
型號
家庭用
5.0L
6.0L
電子高速煲
SR-PS508
SR-PS608
目次
使用前
安全注意事項
使用注意事項................................. 30
零件名稱 ................................ 31~32
使用方法
準備 ..................................... 33 ~ 34
如何選擇功能/
無水料理烹調時間設定 ................. 35
烹調的訣竅
低壓/中壓/高壓
排氣/快速打開外蓋 ...................
一按式食譜選擇 .....................
預約/保溫
食譜........................................ 41~47
必要時
清潔與保養............................. 48~49
故障排除 ........................................ 50
如顯示此代碼 ................................. 51
規格 ............................................... 51
該使用說明書的最終解釋權歸本公司所有
......................... 28~29
....................................
..............................
......................................
36
37
...
.. 38
38~40
40
使用前
使用方法
必要時
Page 28
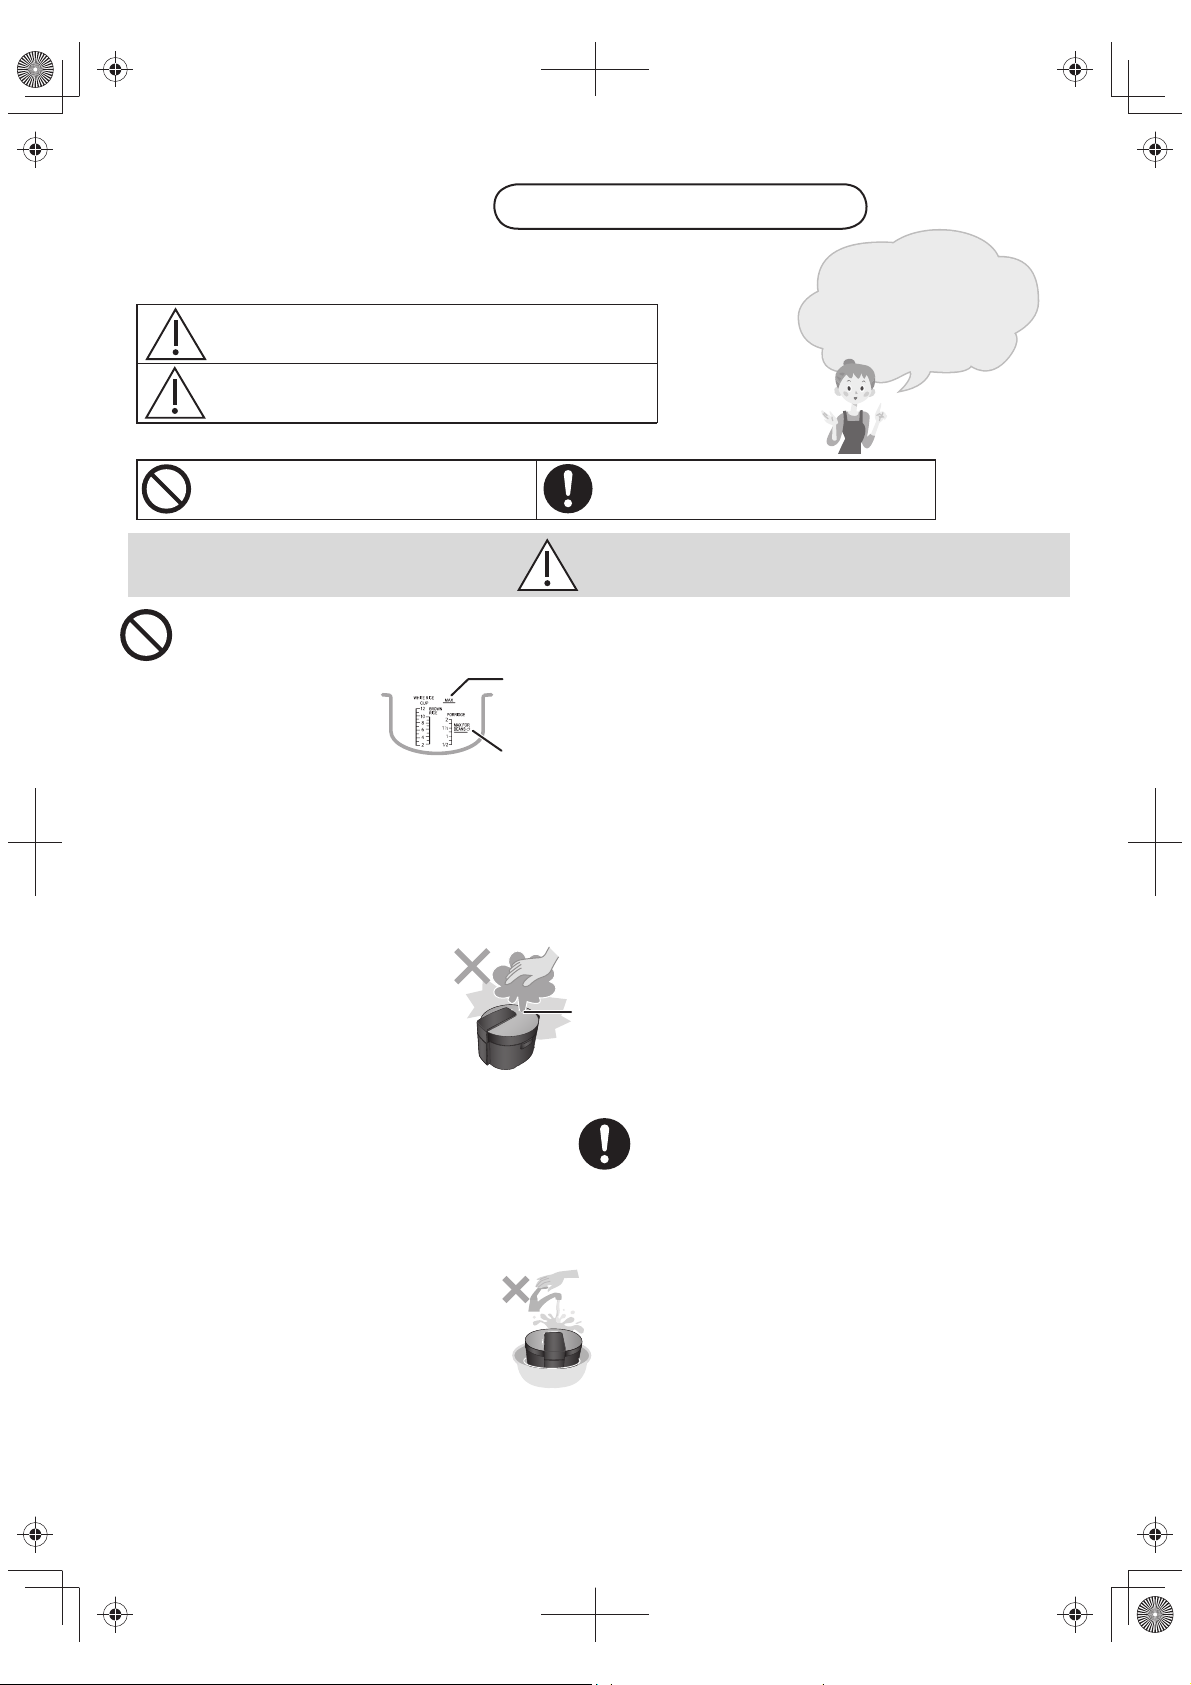
安全注意事項
安全注意事項
由於本體在加熱後
內部會產生極高的
溫度及壓力,
請確保遵循以下注意事項
為防止造成人身傷害、財產損失,請務必遵守以下安全注意事項。
■ 因錯誤操作所產生的危害及損害程度,如下區分說明。
警告
注意
■ 希望遵守的內容分類,用如下圖標來區分說明。
此圖標表示不能進行,“禁止”的內容。
● 請勿將電子高速煲(以下簡稱:高速煲)
放在孩童能觸碰到的地方。
(以免導致燙傷、受傷或觸電。)
● 每次烹調的最大量,
請勿超過內鍋的最大
刻度線。
•請勿使用任何遇熱後
會產生泡沫的食材,
如大量的油或梳打粉。
● 若本體處於以下狀態,請勿使用。
( P34)
(以免壓力無法安全釋放,或導致蒸氣洩漏。)
•產品內部(鍋墊圈、噴嘴及壓力閥周圍等處)
黏有米飯等異物。
•噴嘴帽堵塞或未安裝。
•內蓋變形或未妥善安裝。
● 使用中或烹調剛結束時,請勿
將臉或手靠近蒸氣口或觸摸
高溫部位(包括壓力顯示竿)。
(以免導致燙傷或被排出的蒸氣灼傷。)
•特別要注意小孩。
● 內鍋中仍有壓力時(壓力顯示竿未落下時
P32),請勿強行打開外蓋。
(以免外蓋彈開,導致食物飛濺,從而引起燙傷。)
再打開外蓋。
● 請勿進行以下操作。
(以免導致火災、觸電或受傷。)
•將本體浸入水中或將水濺到本體上。
•將水或液體濺到本體插頭上。
•將金屬針等異物插入散熱孔或間隙中。
•自行改裝、拆解或修理本產品。
● 請勿將本產品用於使用說明書記載以外的
任何用途。
(以免導致火災、燒傷、受傷或觸電。)
請在壓力完全釋放後(壓力顯示竿落下)
表示如不避免,則可能導致死亡
或嚴重傷害的某種潛在危害情況。
表示如不避免,則可能導致輕微
或中度傷害的某種潛在危害情況。
28
警告
最高到“MAX”
(最大)刻度線
在烹調途中會發脹
的食物,如豆子和
麵條(包括調味料)
的最大烹調量
蒸氣口
由於本體在加熱後
內部會產生極高的
溫度及壓力,
因此為了確保安全
請務必遵守以下事項。
此圖標表示務必執行,“強制”的內容。
● 烹調剛完成進行攪拌時,可能會有熱的食物濺
出,請勿將臉靠近內鍋。
(以免導致燙傷。)
● 燉煮咖喱飯菜及燉品等濃稠食物時,請勿閉合
外蓋。
(以免導致噴嘴帽堵塞,引起燙傷。)
打開外蓋,但需拉回把手,否則將無法進行烹調。
● 烹調黏稠狀食物時,請勿使用手動排氣功能。
(以免食物噴出,導致燙傷。)
● 請勿進行以下操作。
(以免導致觸電、短路或引起火災。)
•請勿用濕手插、拔電源插頭。
•請勿使用損壞的電源插頭或鬆脫的插座。
•請勿進行任何可能會損壞電源線或電源插頭的
操作。不要損傷電源線或電源插頭,不要強行
加工、彎曲、扭曲、拉伸或置於高溫處,將
重物放在上面或把電線捆成一束。
•請勿讓任何人舔本體插頭,特別要注意嬰幼兒。
● 本產品不適合供以下人士(包括孩童)使用:
身體感官或心智能力退化者,或是經驗與使用
知識缺乏者,除非有負責他們安全的人在旁監
督或指導,方可使用。請注意避免讓兒童戲玩
本產品。
(以免導致燒傷、受傷或觸電。)
● 本產品應使用單相兩極帶接地的電源插座,
並保證其可靠接地!未安裝接地裝置,可能
會引起箱體等其他金屬部件帶有感應靜電。
(以免發生故障或漏電時有觸電的危險。)
● 請務必單獨使用額定值為 AC 220 V/10 A 的電
源插座。
(以免因與其他電器並用而發熱,從而引起火災。)
Page 29
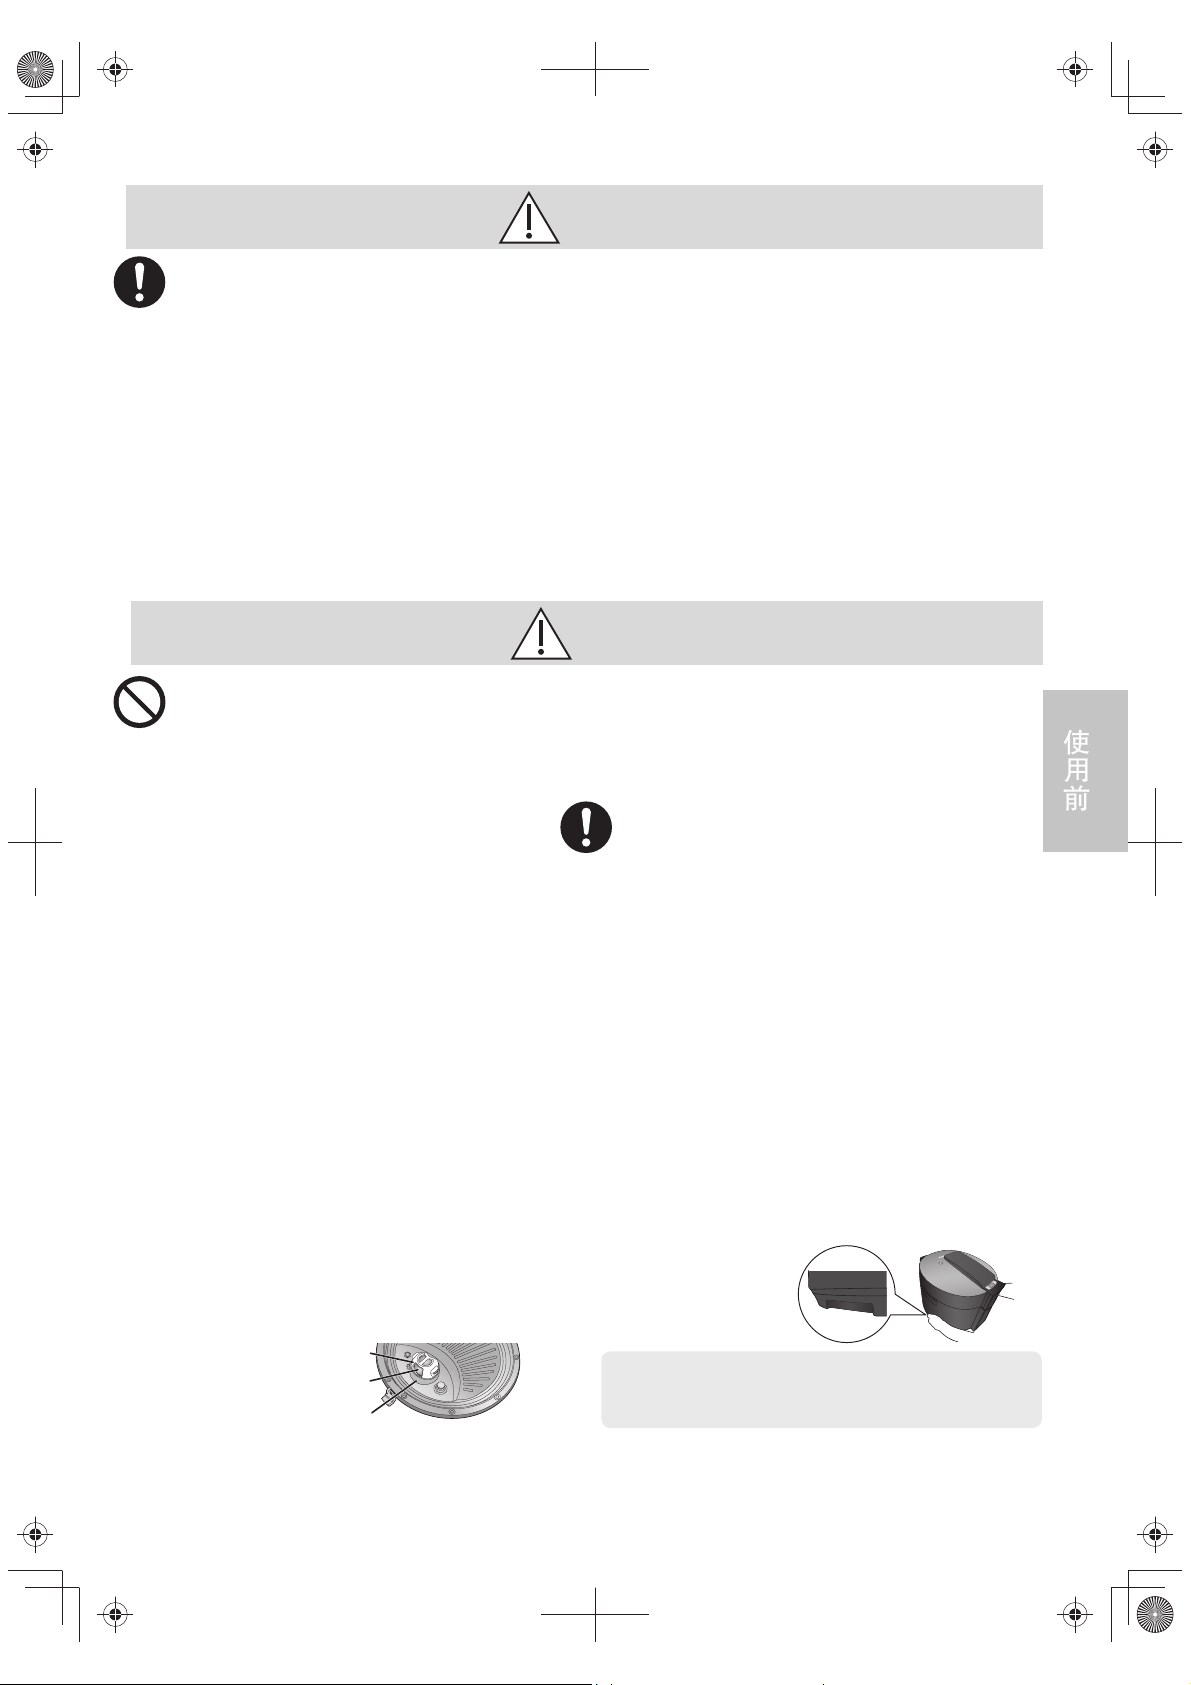
警告
● 請定期檢查用於釋放蒸氣的蒸氣口、噴嘴和
噴嘴帽,確保其沒有堵塞。
(以免壓力異常上升。)
● 請務必裝入壓力閥。
(以免因溢出發生燙傷或因壓力異常影響烹調效果。)
● 請務必定期清除電源插頭上的灰塵。
(以免電源插頭上積聚灰塵,因濕氣導致絕緣故障,
從而引起火災。)
拔下電源插頭,用乾布擦拭。
● 請務必將電源插頭和本體插頭妥善連接。
(以免因發熱導致觸電或火災。)
注意
● 請勿使用非專用內鍋或變形後的內鍋。
( 以免因過熱或故障導致燙傷或受傷。)
● 請勿空燒。
(以免導致燙傷。)
● 請勿在以下地方使用產品。
•靠近熱源或高濕環境中。
(以免導致觸電、漏電或火災。)
•不平穩的檯面或不耐熱的墊子上。
(以免導致受傷、燙傷或火災。)
•靠近牆壁或家具等處。
(以免開蓋時碰到,或導致家具等變色、變形及
破損。)
● 使用中請勿移動本體。
(以免導致燙傷。)
● 請勿將電源插頭暴露在蒸氣中。
(以免導致觸電或因短路導致火災。)
● 烹調剛結束時,請勿觸摸高溫部。特別是外
蓋上蒸氣口附近的玻璃面板及內蓋、壓力閥、
內鍋、電熱板等金屬部。
(以免導致燙傷。)
如要拆洗內蓋,請務必用毛巾等包裹後拿取
內蓋。切勿拉扯鍋墊圈,以免墊圈變形,
導致漏氣。
● 拆洗內蓋背面的壓力閥時,請勿旋轉壓力閥
座拆卸。
(以免壓力閥墊圈變形,導致漏氣。)
如要拆洗壓力閥,請務必手握壓力閥支架
進行旋轉。
壓力閥支架
壓力閥
壓力閥座
● 發生異常或故障時,請立即停止使用,並拔下
電源插頭。
(以免導致冒煙、火災、觸電、燒傷或受傷。)
異常·故障例
•電源插頭及電源線異常發熱。
•電源線已損壞或碰到電源線後發生間歇性斷電。
•本體變形或異常發熱。
•本體冒煙或發出焦味。
•本體破裂、鬆動或發出異響。
•蒸氣口有大量蒸氣冒出,但壓力顯示竿仍未升高。
•在非排氣狀態,蒸氣口突然有大量蒸氣排出。
(可能是安全閥熔化了)
● 禁止使用非本產品隨附的電源線,並禁止把
本電源線轉用到其他地方。如有損壞,必須
用專用電源線或從製造廠或維修部買到的專
用元件來更換。
(以免發生故障或導致觸電、漏電或火災。)
● 從內鍋中取出裝有食物的容器時,請務必
小心。
(以免導致燙傷。)
● 請等到本體冷卻後再進行清洗。
(以免導致燙傷或受傷。)
● 取出內鍋或不使用時,切記關閉電源並拔下
電源插頭。
(以免導致燙傷、受傷,及因絕緣老化而引起觸電、
漏電、火災。)
● 拔下電源插頭或本體插頭時,請確保握住插頭
本身,切勿拉拽電源線。
(以免導致觸電,或因短路引起火災。)
● 在櫥櫃等封閉空間內使用時,請確保蒸氣能
向外散發。
(以免櫥櫃等變色或變形。)
● 搬運產品時,請務必捧住本體下方的兩側,
切勿端鍋把手。
(以免外蓋打開,引起燙傷或產品損壞。)
■關於停電
•使用中如發生停電,再次通電後會回到停電前的狀
請立即與服務中心聯絡,諮詢檢查及修理事宜。
(包括在中途拔掉電源插頭、跳閘等情況)
態(停電1 分鐘以內時),但可能會影響烹調效果。
使用前
29
Page 30
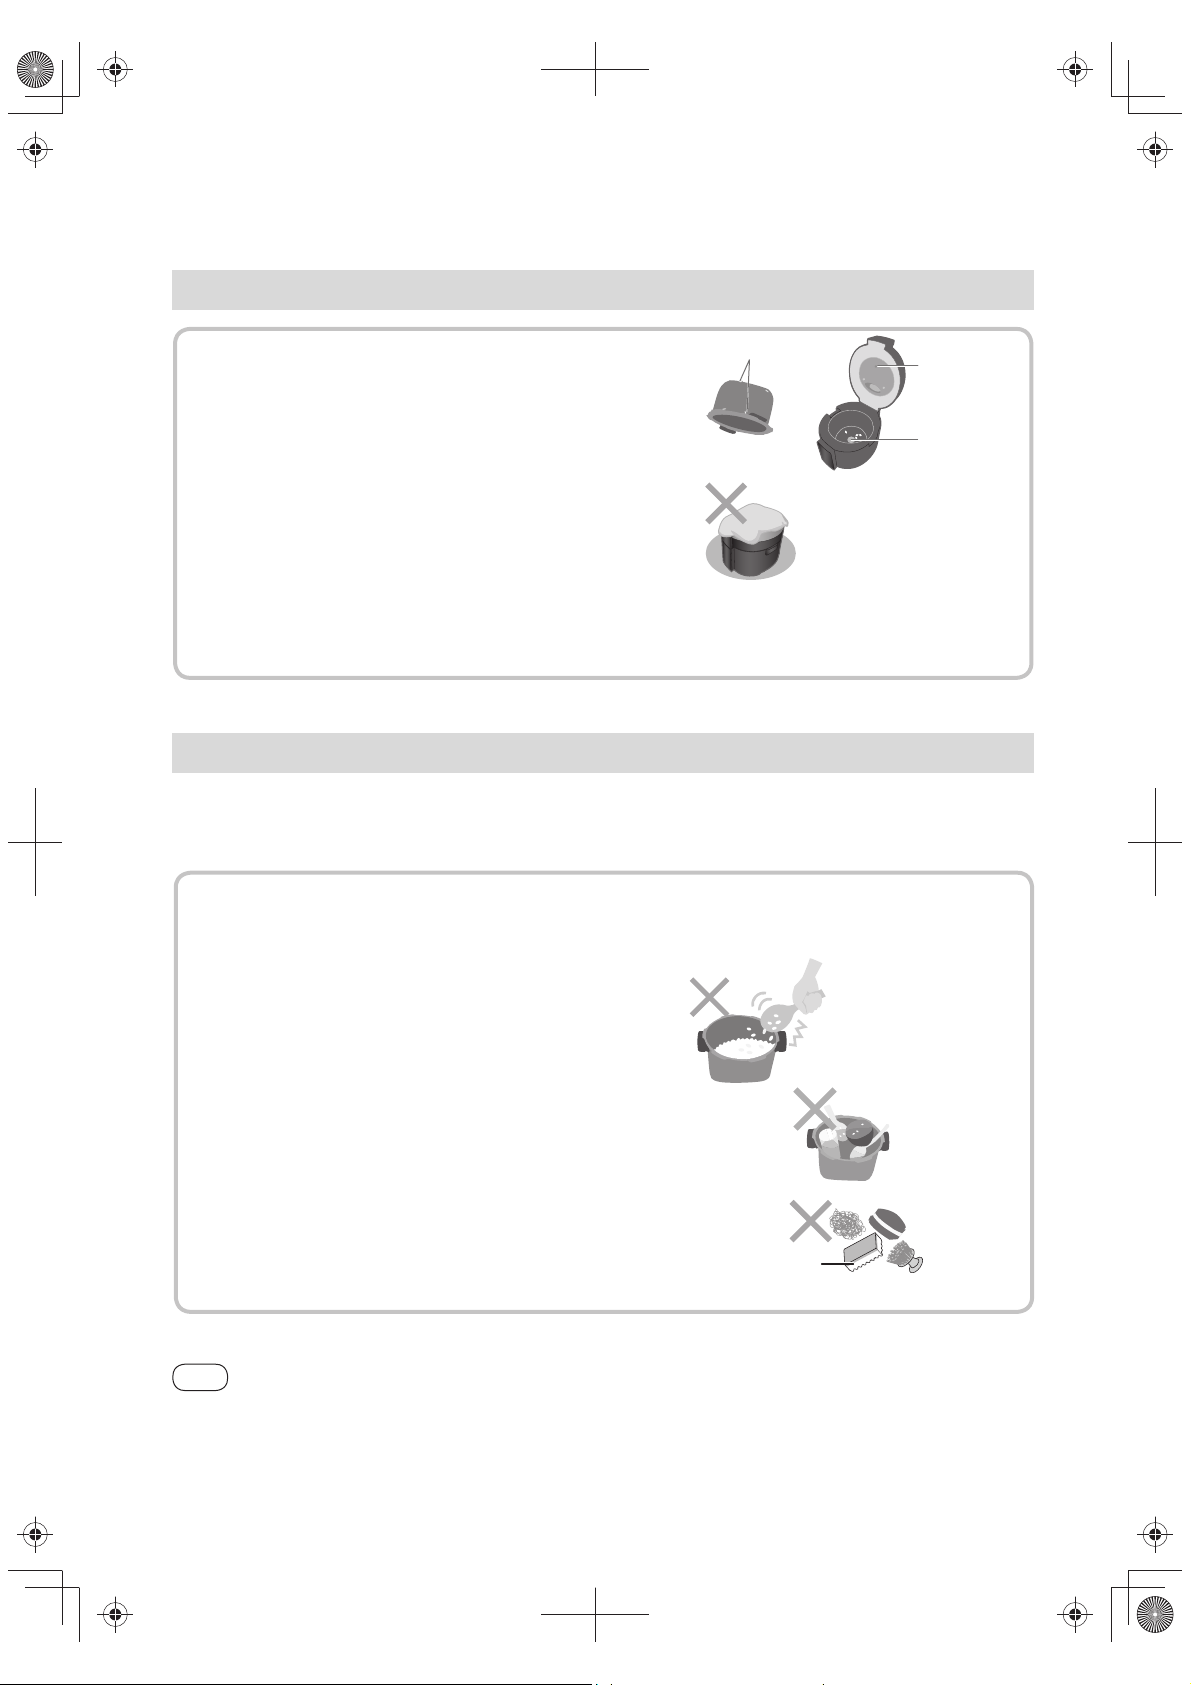
使用注意事項
使用注意事項
●請及時清理黏在本體上(底感應器、內鍋邊緣或底部、
電熱板和鍋墊圈)的飯粒等異物,清理時,
•請勿將電子高速煲傾斜、翻轉。
•進行清潔之前,請關閉電子高速煲的電源,並拔掉插頭。
● 請將調味料混合並溶解後再加入內鍋。
(以免導致烹調失敗,如:不能正常烹調食物。)
● 使用中請勿將布或其他物品蓋在外蓋上。
(以免蒸氣無法釋放,導致外蓋變形、變色或發生故障。)
● 避免在陽光直射下使用。
(以免導致變色。)
● 請勿在拉桌等滑動式檯面上使用。
(以免在合上或解除蓋鎖時,產品帶動拉桌滑動,不能順利操作。)
關於本體
關於內鍋
邊緣或底部
(內鍋)
蓋感應器
底感應器
為防止內鍋表面上的塗層剝離或損傷
※ 剝離的塗層對本產品的性能沒有影響,對人體也無傷害。
●請勿將內鍋置於明火及任何其他加熱源上。
● 烹調較硬或尖銳的食材(如:排骨等)時,請勿在內鍋中按壓、攪拌食物。
● 請勿使用金屬物品(如:勺子或鏟刀)。
● 請勿用內鍋洗米。
● 蒸餸時,請使用本產品隨附的蒸盤。
● 請勿讓任何鋒利物體接近內鍋或用堅硬物體擊打內鍋。
(不要將噴嘴帽或電源線放入內鍋。)
● 使用調味料烹調後,待本體充分冷卻,請立即清洗內鍋。
● 請勿將內鍋當作洗碗盆使用,也不要將湯匙或餐具放入內鍋中。
● 請勿用去污劑、百潔布或金屬刷、尼龍刷等清洗或擦洗內鍋。
用軟海綿清洗內鍋。
請勿使用表面有磨蝕
顆粒的工具清洗內鍋。
提示
● 本產品不可通過外部計時器或獨立遙控系統進行操作。
30
Page 31
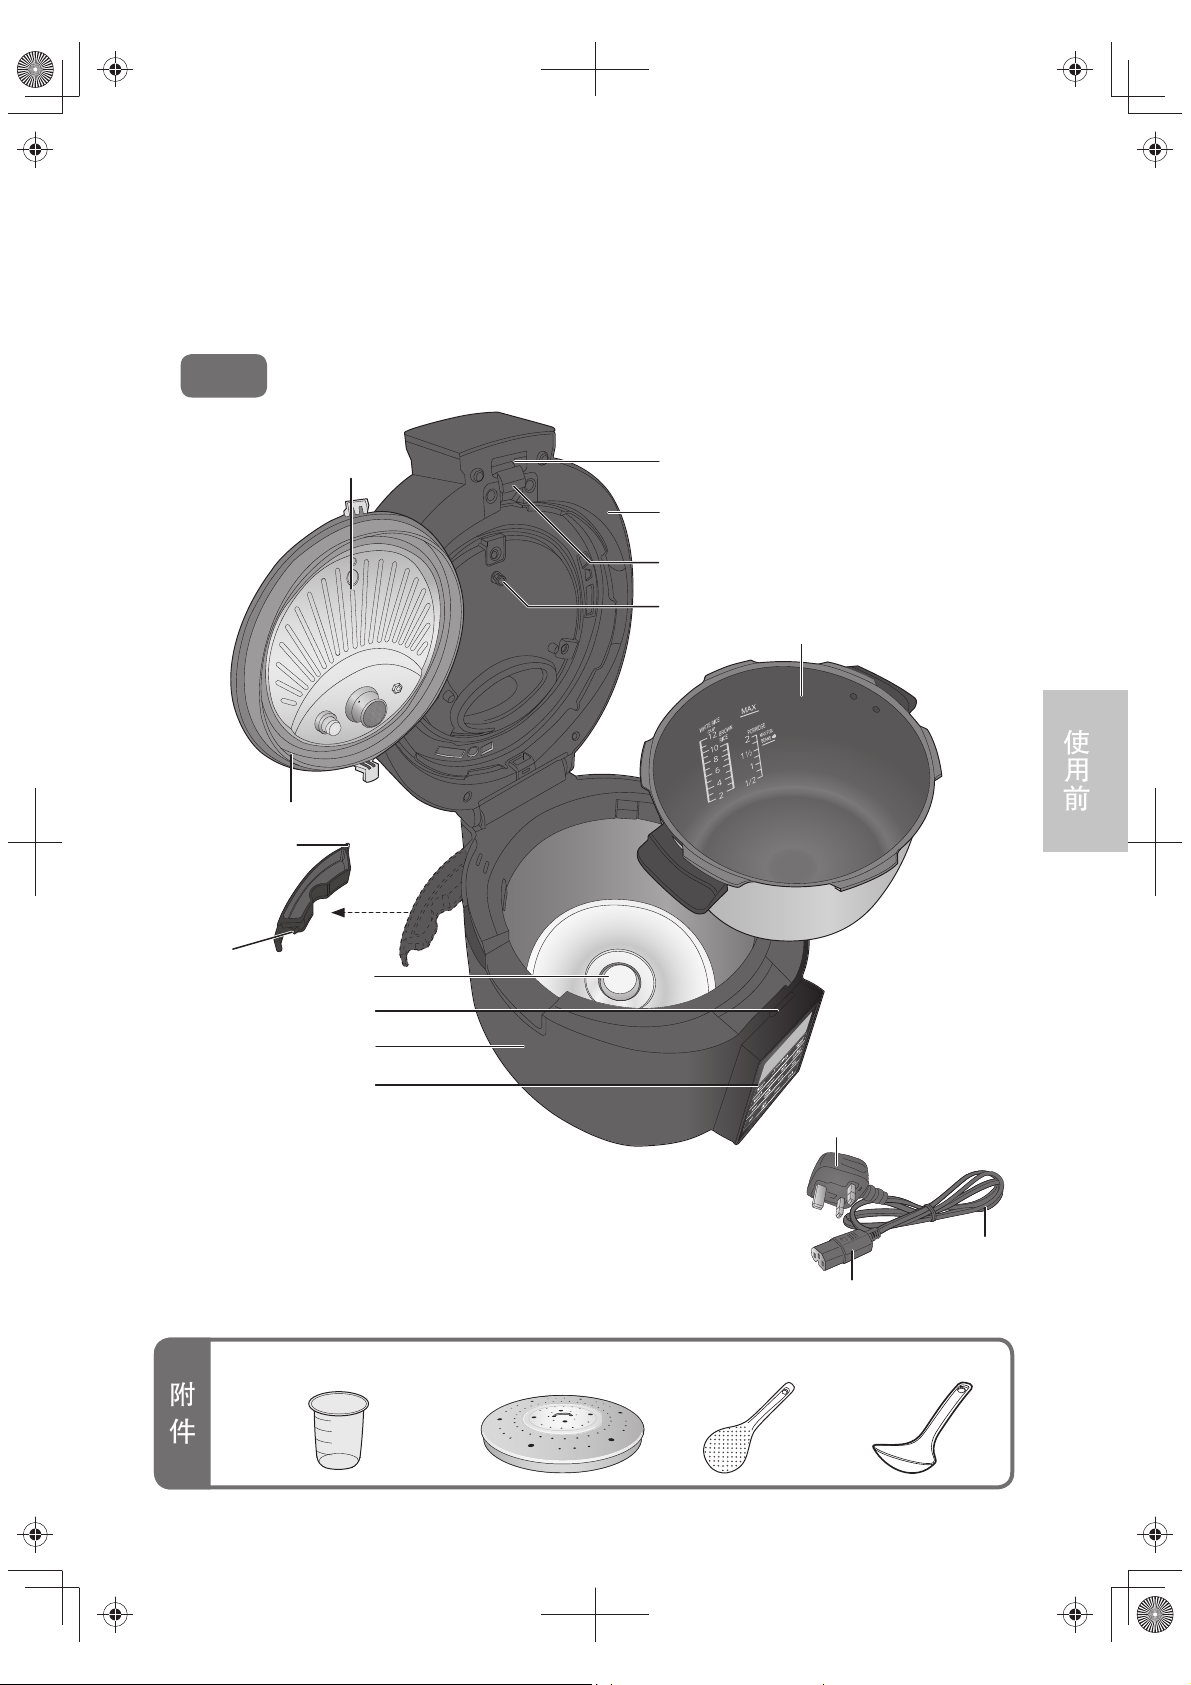
零件名稱
零件名稱
●使用前:
務必取出內鍋與電熱板之間的防鏽紙,並清洗附件、內蓋、噴嘴帽、壓力閥和內鍋。
( P48~49)
本 體
前端卡爪
鍋墊圈
後端的筋
內蓋
接水盒
底感應器
下鉤卡部
上鉤卡部
外蓋
內蓋拆裝按鈕
蓋感應器
內鍋
使用前
機體
操作面板
電源插頭
電源線
本體插頭
附
件
量杯(約180 毫升)(1 個) 飯勺(1 個)蒸盤(1 個) 粥 [湯] 勺(1 個)
31
Page 32
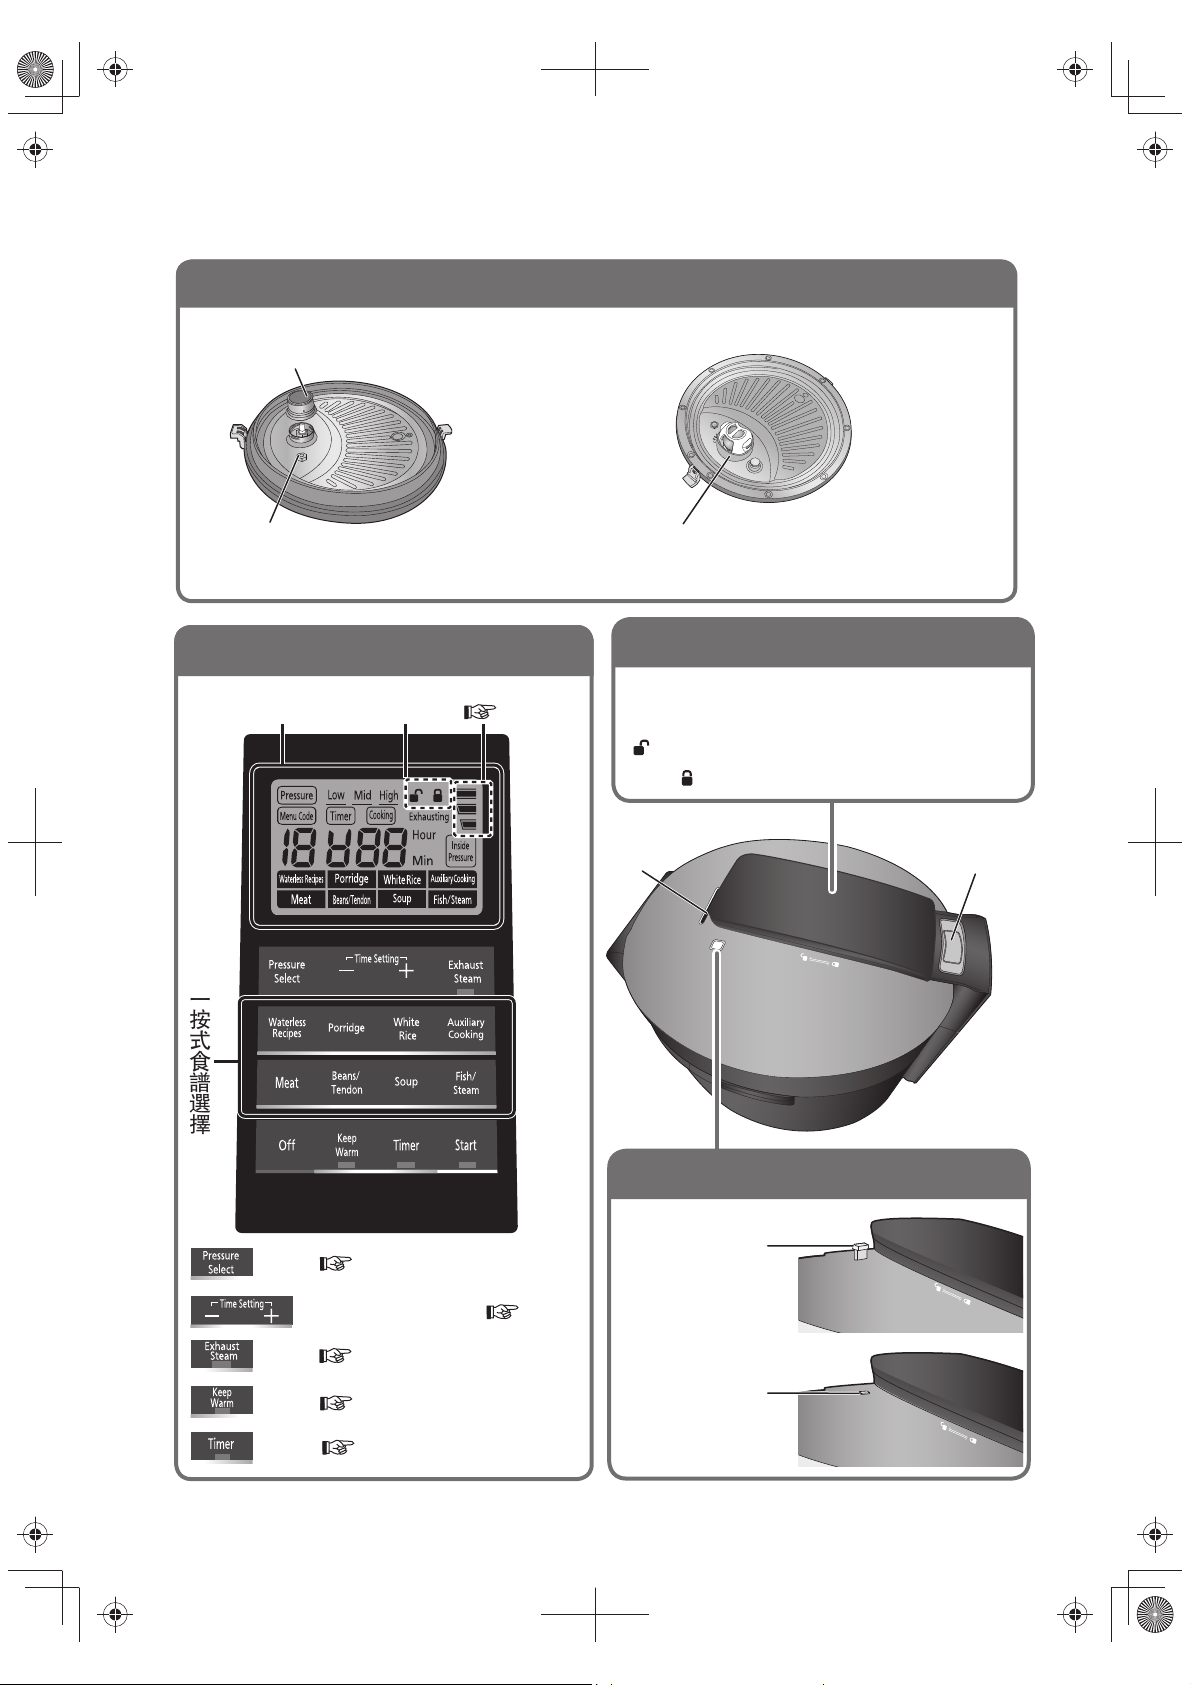
零件名稱
零件名稱
噴嘴帽 [防堵塞設計]
•防止食物堵塞噴嘴
內蓋
(內蓋背面)
安全閥 [泄壓裝置保護]
•出現異常時,安全閥會熔化、開口,
用來釋放內部的壓力。
操作面板
鍋內壓力顯示
顯示屏 蓋鎖顯示
一按式食譜選擇
( P38)
壓力閥 [限壓安全保護]
•內鍋中有壓力時,可用來釋放壓力。
蓋鎖(蓋把手)
在蓋鎖打開的情況下按 [Start] (開) 按鈕,
則會發出4聲“嗶、嗶”的提示音,且顯示屏內
“ ”閃爍。請按箭頭方向拉回蓋把手,顯示屏
顯示“ ”即可正常使用。
蒸氣口
開蓋按鈕
32
按鈕( P37)
按鈕(烹調/預約) ( P37)
按鈕( P38)
按鈕( P40)
按鈕( P40)
壓力顯示竿
● 鍋內有壓力時。
升高
● 鍋內無壓力時。
落下
Page 33
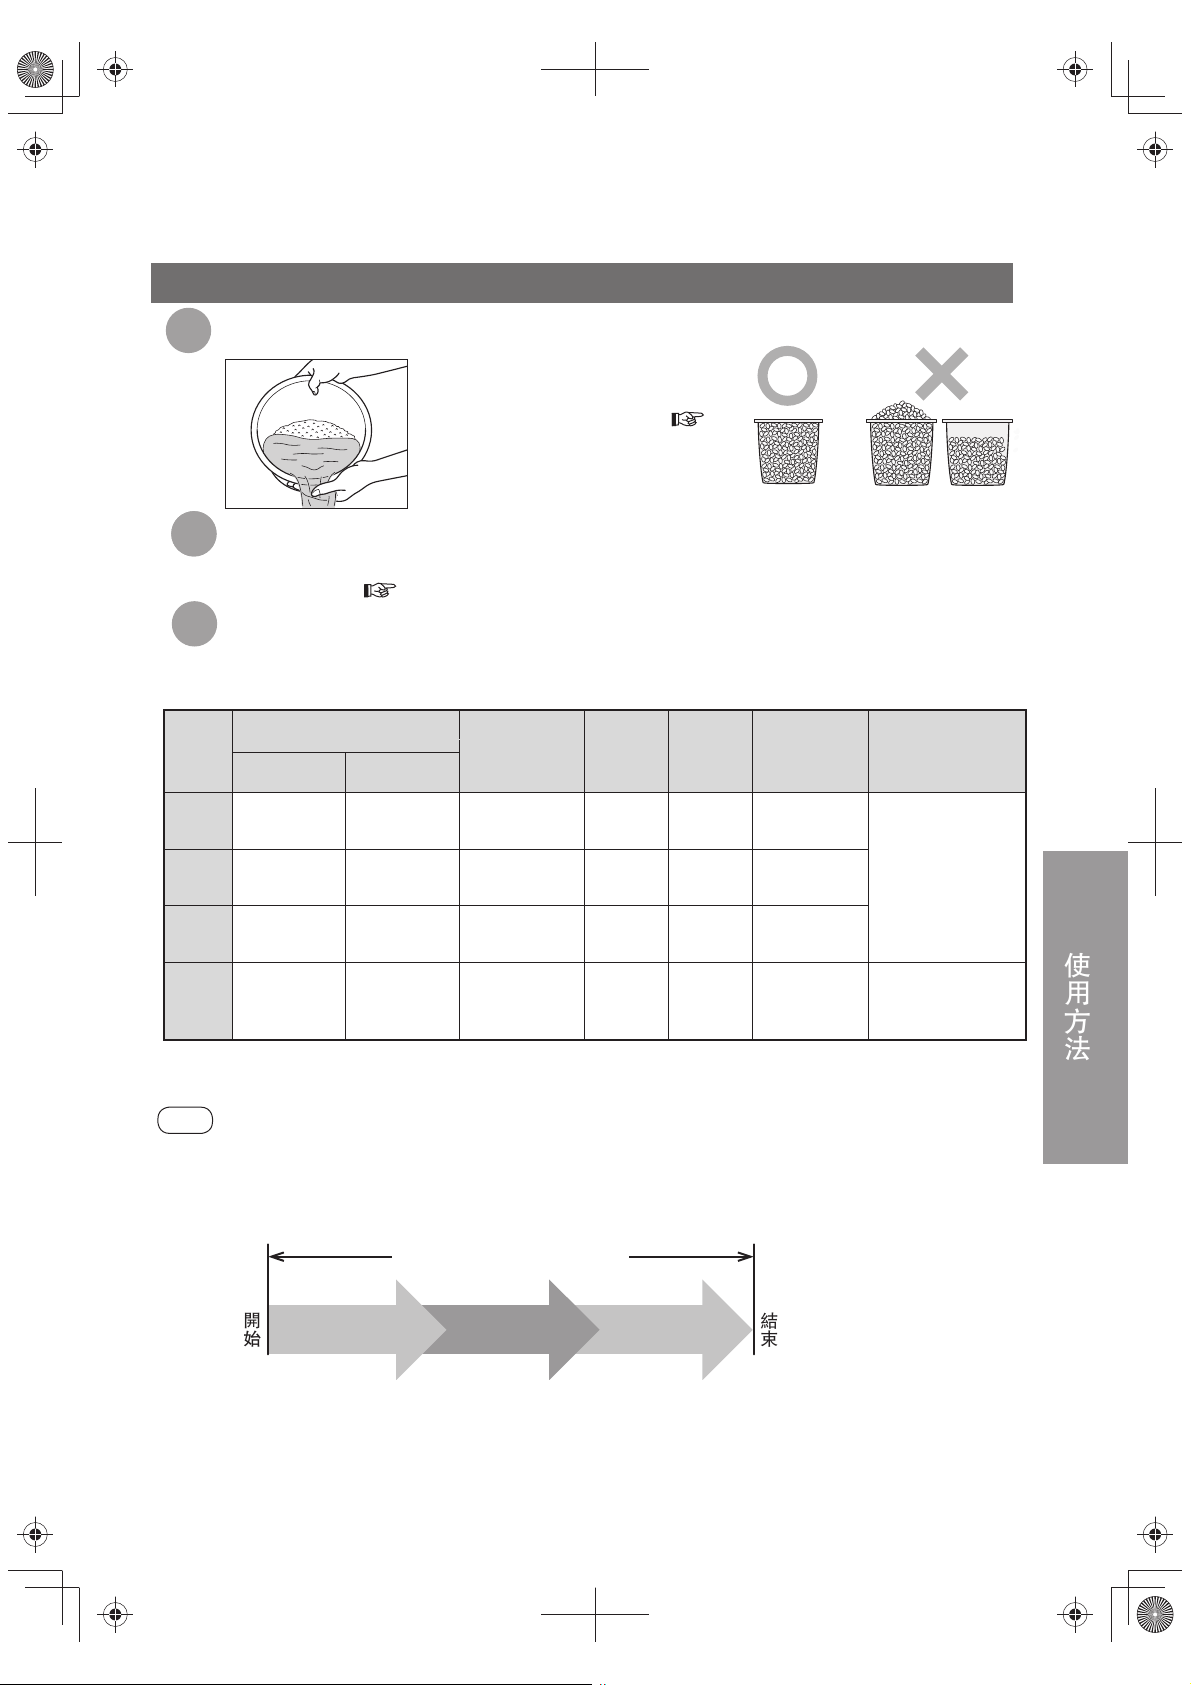
準備
準備
1
22
3
食譜
量米與洗米
量米,然後用另一個容器洗米。
● 用隨附的量杯(約180 毫升)量米,
注意米裝滿時要抹平。
● 1
● 1 次可烹調的米量。(請參閱 表
● 無需浸泡米。
將米放入內鍋中,然後做好準備。
● 把米撫平。
● 水量(請參閱 表1):若已將米浸泡10 分鐘以上,或您覺得米飯太軟,可將水適當減少。
( P34 的步驟 ~)
關於稀飯、米飯的烹調。
● 用一按式食譜選擇進行烹調時,步驟 P38。
● 用“低壓/中壓/高壓”烹調時,步驟
米量(量杯)
5.0 L型 6.0 L型
水量
(水位線)
P37,壓力選擇、時間設定和自動排氣時間
壓力選擇
1)
(約180 毫升/150 克)
時間設定
(分鐘)
自動排氣時間
約(分鐘)
(中間量)
烹調時的注意事項
表1。
表1
稀飯 ½ ~ 1½ ½ ~ 2
*1
米飯
糙米
糙米粥
*1:烹調長身米粒時,請適當增加水量。
*2:糙米請務必使用高壓烹調。
提示
● 在壓力顯示竿落下之前,請勿觸摸蒸氣口。(以免導致燙傷)
※由於室溫、 電壓等原因, 壓力顯示竿落下時,顯示屏可能仍顯示“Exhausting”(排氣中),此種情況並非故障。
● 烹調米飯及糙米時,打開外蓋後,請立即將米飯翻鬆。(以便散發多餘的水分)
● 所需烹調時間約等於“設定時間”+“13 ~ 100 分鐘”。( P35)
2 ~ 10 2 ~ 12
*2
2 ~ 82~ 10
½ ~ 1½ ½ ~ 2
開始
•以上“設定時間”僅指內鍋中的壓力升高到設定壓力後的烹調時間。
在達到設定壓力之前,顯示時間不會變化,這並非本體故障。
•食材的量越多,升至設定壓力值以及排氣所需的時間就越長。
•排氣期間,食材仍在利用餘熱進一步烹調。
PORRIDGE
(稀飯)
WHITE RICE
(白米)
BROWN RICE
(糙米)
PORRIDGE
(稀飯)
整個烹調過程所需的時間
(3~60 分鐘)(10~40 分鐘)
Mid
(中壓)
Mid
(中壓)
High
(高壓)
High
(高壓)
排氣時間設定時間升壓時間
5 ~ 20 30
10 ~ 15 1.5
25 ~ 30 25
40 ~ 50 20
結束
若要調整軟硬度,
可適當縮短或延長
設定的時間。
若要烹調較軟的稀
飯,請設定更長的
烹調時間。
使用方法
33
Page 34
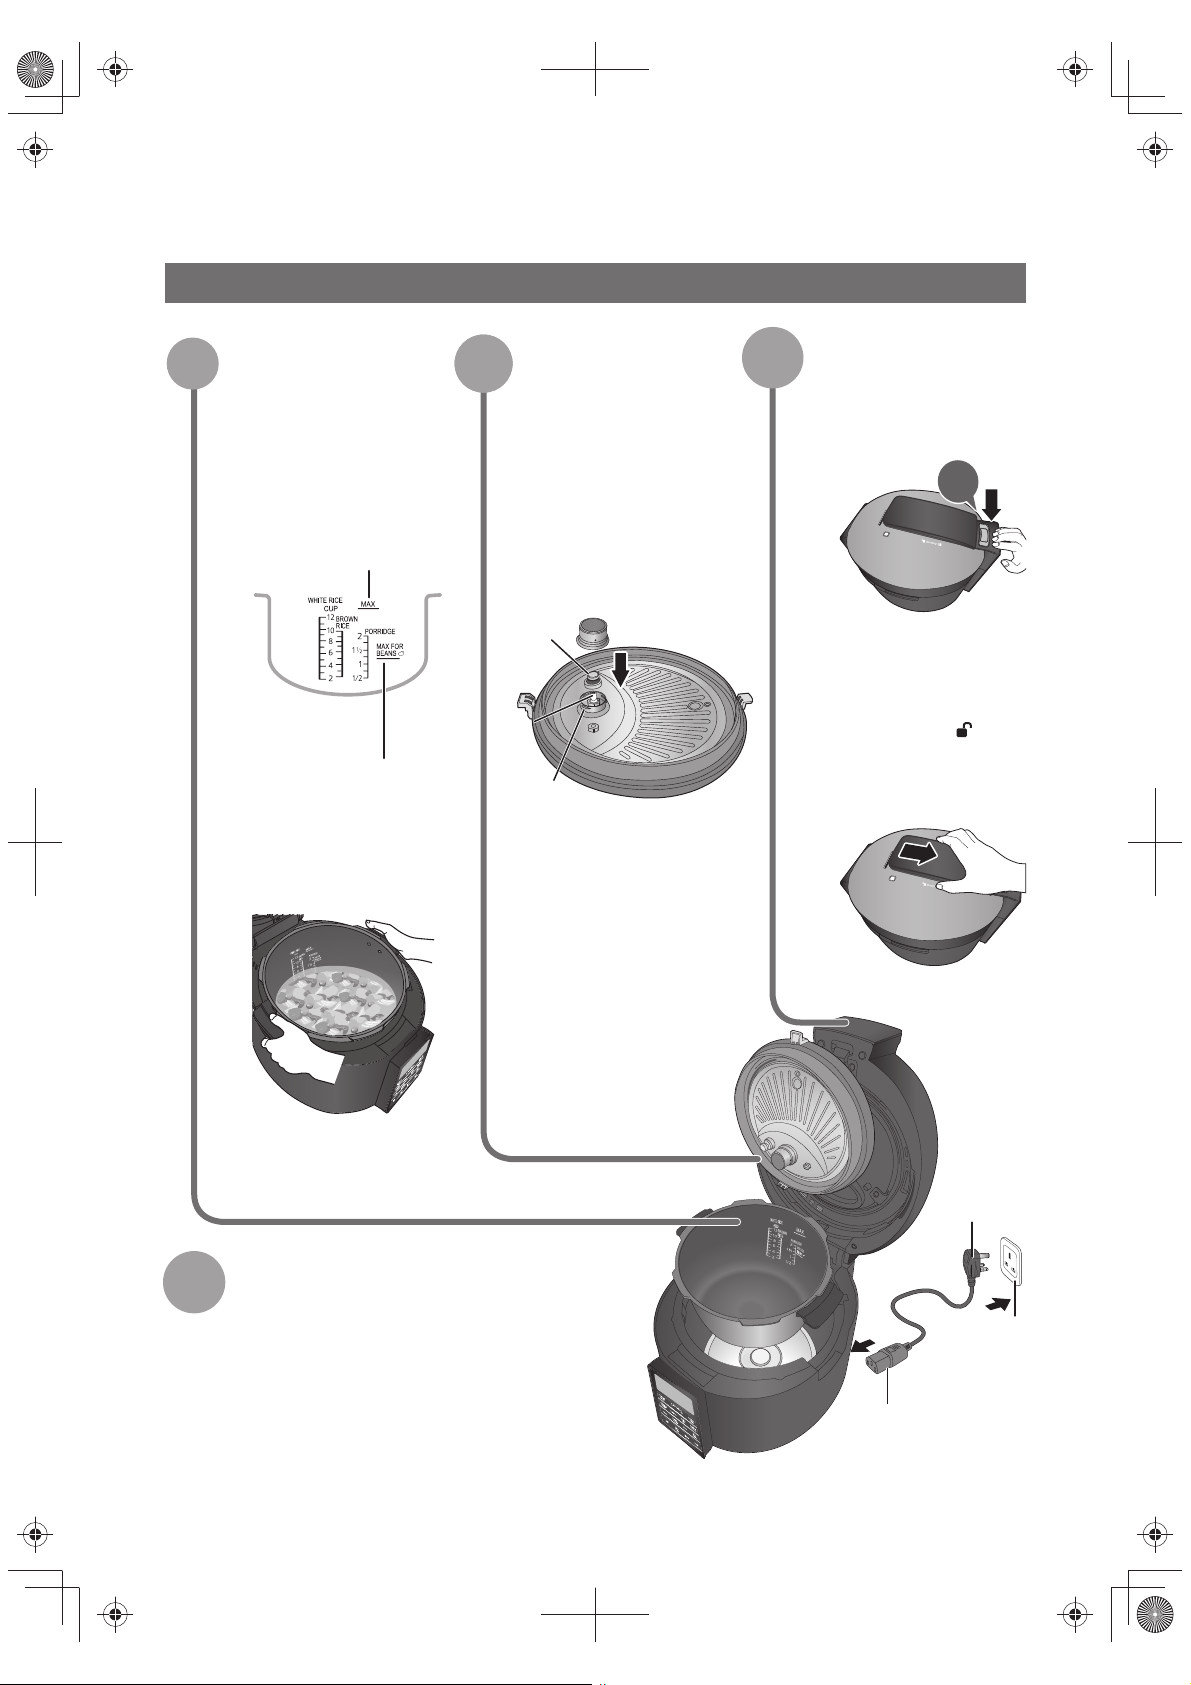
準備
準備
操作前的準備
將食物放入內鍋中,
1
然後將內鍋放入本
體內。
● 每次烹調的最大量
(食材+水),不能超過
內鍋的最大刻度線。
最高到“MAX”(最 大)刻度 線
在烹調途中會發脹的食物,
如:豆子和麵條(包括調味
料)的最大烹調量。
● 放入本體前,擦掉內鍋
外表面的水或異物。
確認噴嘴帽、壓力
22
閥及內蓋是否已安
裝。
● 若未安裝噴嘴帽,可能
會導致噴嘴堵塞,無法
進行排氣 → 需等自然
冷卻後才能打開外蓋。
將噴嘴帽正確向下按,
直至與彈簧卡緊到位。
壓力頂竿
噴嘴
彈簧
•安裝噴嘴帽之前,請先
確認噴嘴帽、噴嘴、壓
力頂竿上沒有油污或出
現堵塞。
● 安裝內蓋之前,請先確
認是否安裝了壓力閥。
若漏裝壓力閥則會漏氣,
從而導致壓力無法到達
設定值。
(
● 若未正確安裝內蓋,
則外蓋無法合上。
(
P48 壓力閥)
P48 內蓋)
合上外蓋,鎖好蓋鎖。
3
● 合上外蓋時,請確認發出
“喀噠”的合上音。
● 確認蓋鎖是否鎖好(拉
回蓋把手),若未拉回
(顯示屏顯示“ ”),
則無法進行烹調。
(
P32 蓋鎖)
喀噠
34
妥善完全連接好本體插頭
4
和電源插頭。
● 將本體插頭連接到本體,然後將
電源插頭插入插座。
● 即使脫離本體插頭(發出短促“嗶
嗶”聲),只要立即插上插頭,則
能繼續進行烹調。若本體插頭長時
間脫離,則會停止烹調。
電源插頭
插座
本體插頭
Page 35
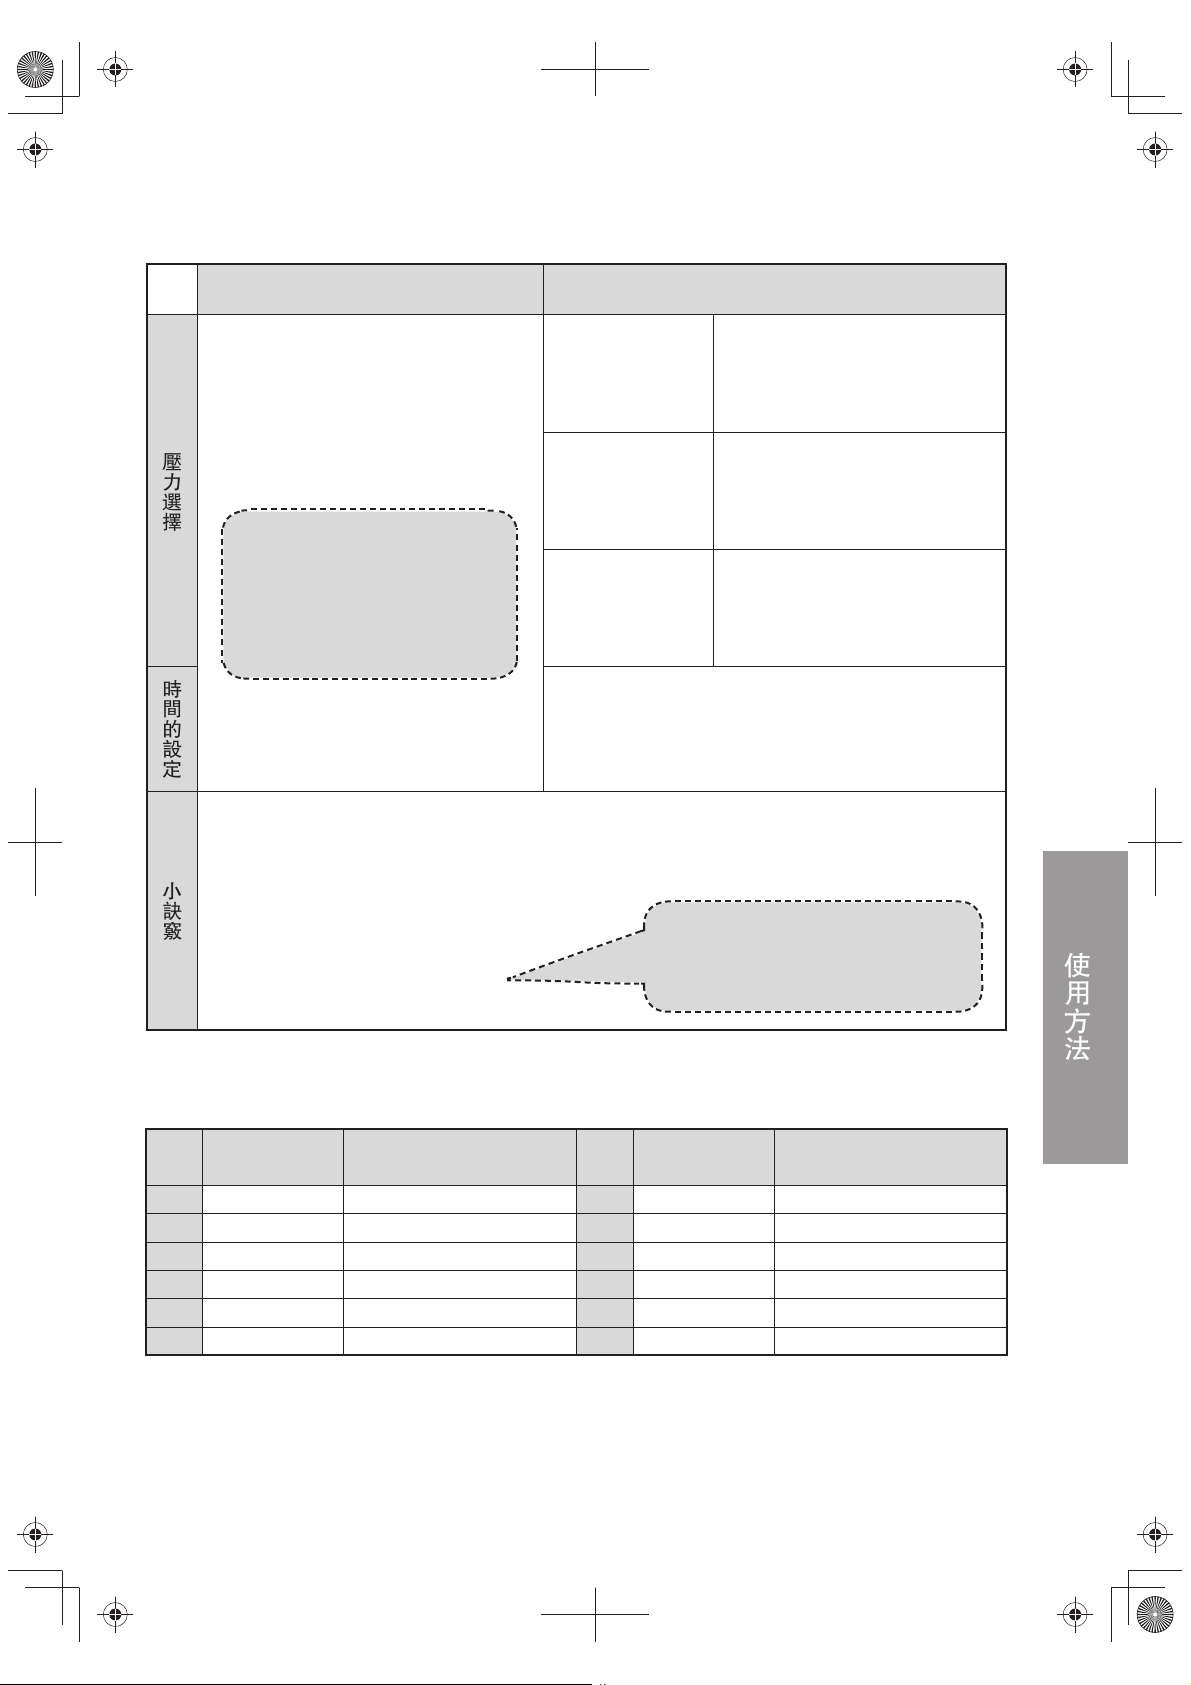
如何選擇功能
如何選擇功能
[Auxiliary Cooking](輔助烹飪))
無水料理烹調時間設定
可直接按
[Porridge](稀飯)、[White Rice](米飯)、
[Meat](肉類)、[Beans/Tendon](豆/蹄筋)、
[Soup](湯)、[Fish/Steam](魚類/蒸餸)
按鈕,再按[Start](開)按鈕進行烹調,
不需要選擇壓力、設定時間。
壓力選擇
※ 除米飯以外,上述其他功能均可根據
食材或喜好調整烹調時間。
時間的設定
• 如果對上述的烹調效果不滿意,可通
過“Pressure Select”(壓力選擇)
和“Time Setting”(時間設定)進行
烹調,具體 P37。
[Waterless Recipes](無水料理)
• [Auxiliary Cooking](輔助烹飪)
按鈕用於壓力烹調後的調味、
收汁,不適用於烹調較難煮熟的
食材。
• [Exhaust Steam](排氣)按鈕
用於想要打開外蓋時。
(烹調途中及烹調結束時)
根據食材根據烹調目的
、
低壓
約19.6 kPa/105 ℃
(約1.2個大氣壓)
中壓
約59 kPa/113 ℃
(約1.6個大氣壓)
高壓
約98 kPa/120 ℃
(約2.0個大氣壓)
※ 時間的設定
• 所需烹調時間等於“設定時間”+“13~100分鐘”。
• 即使是同一種食材,根據食材的大小,烹調時間會不
同。食材塊越小,煮熟時間就越短。
水果等極易軟化的食材。
如:蘋果、草莓等。
用低壓做果醬,不會破壞營養
成分。
較軟或容易煮熟的食材。
如:鯽魚、紅棗、芋頭等。
用中壓烹調蔬菜,不會粘糊或
散碎。
較硬或不容易煮熟的食材。
如:肉類、大豆等。
用高壓烹調小魚,可整條食用,
有利於鈣質的吸收。
表2
• 烹調前要處理食材時,推薦用隨附的蒸盤進行蒸餸。
與燉煮相比,蒸餸的速度更快,營養保持更完整,色澤也更鮮豔。
• 要將相同的食材切成同一大小。
小訣竅
• 同時要烹調不同的食材時,將容易煮熟的食材切成
較大塊,不易煮熟的食材切成較小塊。
• 要調味或加入蔬菜時,請在烹調結束後
再按[Auxiliary Cooking](輔助烹飪
。
無水料理烹調時間設定
食譜
編號
1
2
3
4
5
6
食譜 食譜
無水醬牛肉
口水雞
炆雞翼
薯仔炆雞
手撕雞
紅燒豬手
時間設定範圍
(分鐘)
10~40(預設時間為20)
5~20(預設時間為5)
5~20(預設時間為5)
5~20(預設時間為5)
10~40(預設時間為20)
5~20(預設時間為10)
食譜
編號
10
11
12
7
8
9
• 烹調時間的設定 P40。
• 無需更換內鍋,即可進行輔助烹飪。
時間設定範圍
(分鐘)
黑椒冬菇
蒜蓉金菇
法國燉菜
無水海鮮鍋
煮鱸魚
剁椒魚頭
1~10(預設時間為1)
1~10(預設時間為2)
1~10(預設時間為1)
1~10(預設時間為3)
1~10(預設時間為5)
1~10(預設時間為5)
使用方法
表3
35
Page 36
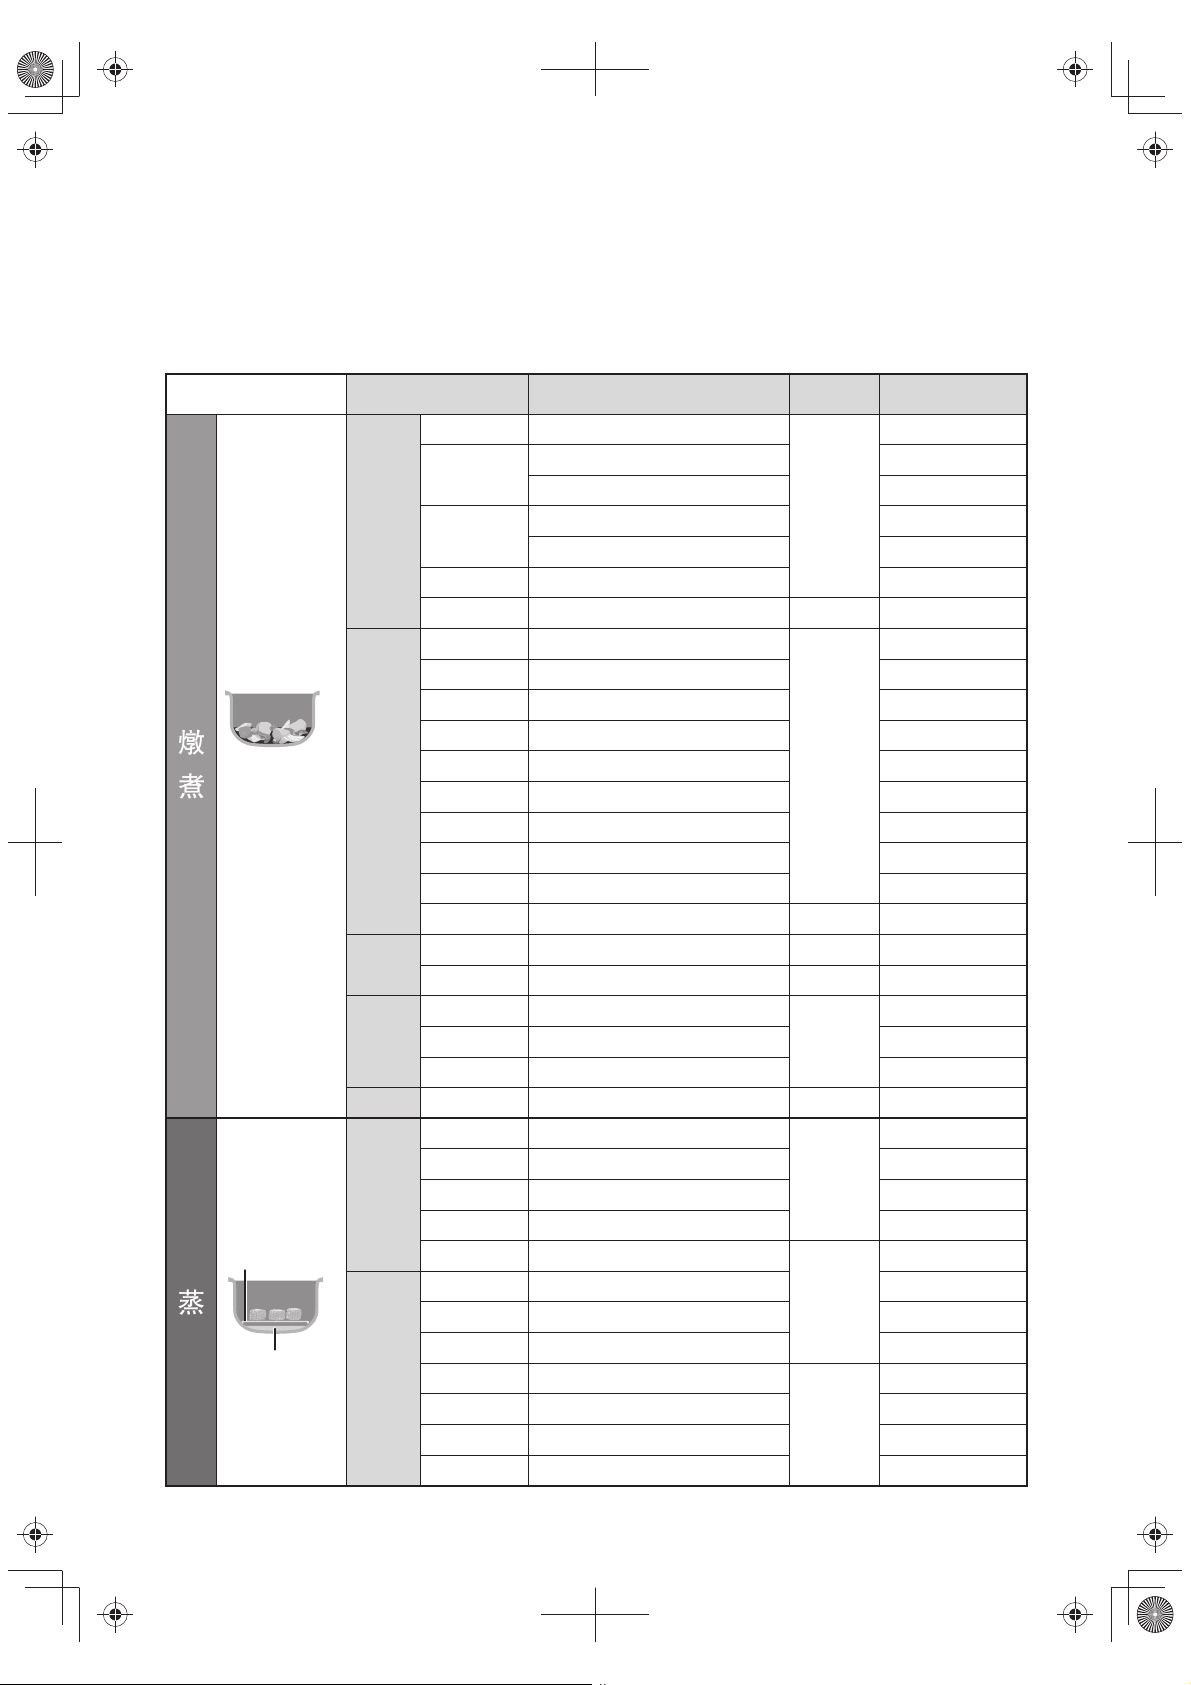
烹調的訣竅
烹調的訣竅
要通過“壓力選擇”和“時間設定”進行烹調時,請參照下表進行設定。
• 將相同食材切成同一大小;不同食材的情況時,將容易煮熟的食材切成較大塊,不易煮熟的食材切成較小塊。
• 烹調時間可根據個人的口味和喜好自由調節。
• 如每次所用的食材及大小都一樣,則不管烹調量有多少,所需的設定時間都相同。
食材 食材大小及份量 壓力選擇
表4
時間設定(分鐘)
燉
煮
湯汁的量,
可根據個人
喜好酌量
增減。
蒸盤(隨附)
蒸
水約1 量杯
牛肉、羊肉
豬肉
肉
雞肉
鴨肉 30 ~ 35
童子雞 切塊(約4 厘米)
薯仔 7 ~ 10
栗子 連殼 5 ~ 10
花生 連皮,在水中浸1 個小時 30 ~ 35
紫薯 整個(約500 克) 3 ~ 5
蔬菜等
豆類
水果
水產 水魚 整隻(約700 克)
魚、肉
蔬菜等
南瓜 連皮切塊 3 ~ 5
粟米 切段(約5 厘米) 7 ~ 10
蓮子 不浸泡,直接燉煮 15 ~ 18
雪耳 用溫水泡3~4 小時 25 ~ 30
蓮藕 30 ~ 35
蕃茄(醬) 去皮、去籽,切小塊 10
紅豆、大豆 不浸泡,直接燉煮 25 ~ 30
綠豆 不浸泡,直接燉煮 15 ~ 18
蘋果(醬) 去皮,切碎
草莓(醬) 去蒂,整個 6
柚子(醬) 去皮,果肉掰成小塊 10
牛肉 35 ~ 40
豬肉
排骨 切段(約
雞肉 雞腿(約200 克/個) 15 ~ 20
鯽魚 整條(約
芋頭 整個(約
紅棗 帶核 3 ~ 5
薯仔 去皮,切塊 15 ~ 20
紫薯 整個(約
南瓜 連皮切大塊 10 ~ 15
栗子 連殼 8 ~ 10
粟米 切段(約
筋肉切塊(約4 厘米)
排骨、豬骨 20 ~ 35
五花肉切塊(約4 厘米) 12 ~ 15
整隻(約400 克) 15 ~ 20
雞腿(約200 克/個) 7 ~ 10
老鴨半隻(約500 克)
整個(約150 克)
1節(約240 克)
切塊(約4 厘米)
切片或切塊(約1 厘米或4 厘米)
5
厘米) 20 ~ 25
500
克) 5
80
克) 10 ~ 15
500
克) 10 ~ 15
5
厘米) 10 ~ 12
High
(高壓)
Mid(中壓)
High
(高壓)
Low(低壓)
High(高壓)
Mid(中壓)
Low
(低壓)
High(高壓)
High
(高壓)
Mid
(中壓)
High
(高壓)
20 ~ 25
15 ~ 20
15
18 ~ 20
20 ~ 35
36
Page 37
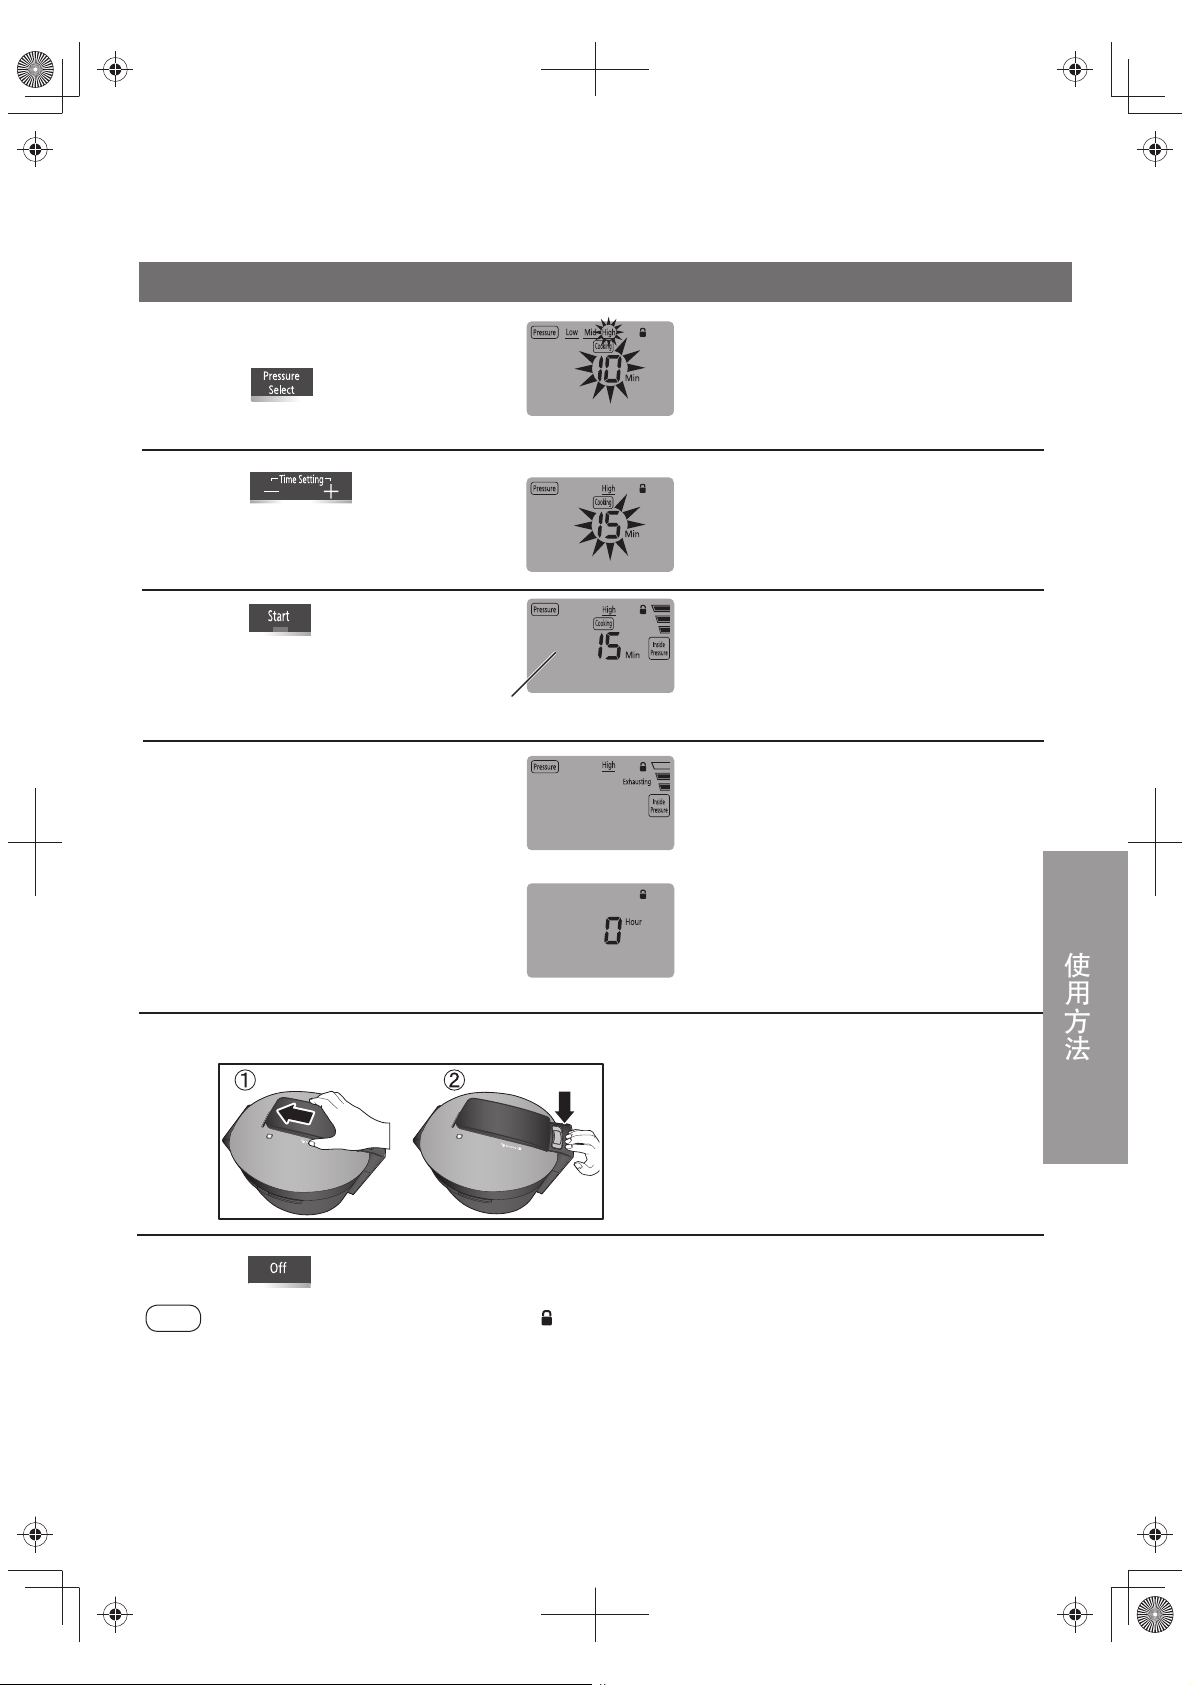
低壓/中壓/高壓
低壓/中壓/高壓
剩
為
Low / Mid / High (低壓/中壓/高壓)
例: 用高壓進行烹調時
按 選擇 “High”。
1
● [Start](開)指示燈閃爍。
(選擇高壓時)
● 每按一次此按鈕即可按以下順序切換壓力:
“Low” (低壓) →“Mid” (中壓) →
“High” (高壓)→“Low” (低壓)…
(從“High”(高壓)再回到“Low”
(低壓)時,會有兩聲“嗶、 嗶”音,
表示又從頭開始選擇了)
按 設定烹調時間。
2
● 時間以1 分鐘為單位遞增或遞減。
按 。
3
● [Start](開)指示燈亮起。
餘時間以1 分鐘
單位遞減
烹調結束後,進入排氣狀態。
4
● [Exhaust Steam](排氣)指示燈
亮起。
● 顯示屏內的壓力顯示會根據鍋內
的實際壓力而變化。
● 等到排氣結束(即壓力顯示竿落
下),蜂鳴器響,顯示屏顯示為
“0 Hour”(零小時),[Keep Warm]
(保溫)指示燈亮起。
● 烹調中途需打開外蓋時,
“排氣”。
解開蓋鎖(推開蓋把手),按下開蓋按鈕,打開外蓋。
(達到設定壓力後)
(排氣中)
P38
(排氣結束)
5
● 設定範圍:1~59 分鐘
● 長按按鈕,時間可快速前進或後退。
(從59 分回到1 分時,會有兩聲“嗶、嗶”
音,表示時間又從頭開始設定了)
● 在烹調過程中也可調整時間。
● 剩餘時間在內鍋中的壓力達到一定程度後
才開始減少。
● 壓力顯示竿會在排氣約10~60 分鐘後落
下。
● 在壓力顯示竿落下之前,請勿靠近或觸
摸蒸氣筒, 以免導致燙傷。
● 解除蓋鎖前,務必確保鍋內壓力已完全
釋放,切勿強行推開蓋把手。
● 如難以打開外蓋,請
開外蓋”中的方法打開外蓋。
P38“快速打
使用方法
按 。
6
● 烹調前請確認鎖好蓋鎖(顯示屏顯示“ ”),以免無法烹調(保溫除外)。如蓋鎖未鎖,按[Start]
提示
(開)則會響4聲“嗶、嗶……”的提示音。
● 烹調過程中可調整時間。
● 烹調途中,請勿移動電子高速煲或觸摸蒸氣口和壓力顯示竿。(蒸氣或食物可能會噴射出來。)
● 釋放蒸氣至壓力穩定,可能需要2 ~ 5 分鐘,這並非異常現象。
● 烹調結束,會發出“嗶嗶、嗶嗶、嗶嗶”的3 聲提示音,再3 秒後開始排氣。此時切勿靠近蒸氣口,
以免被蒸氣燙傷。
※剛開始排氣時,聲音較大,請勿驚慌。
37
Page 38
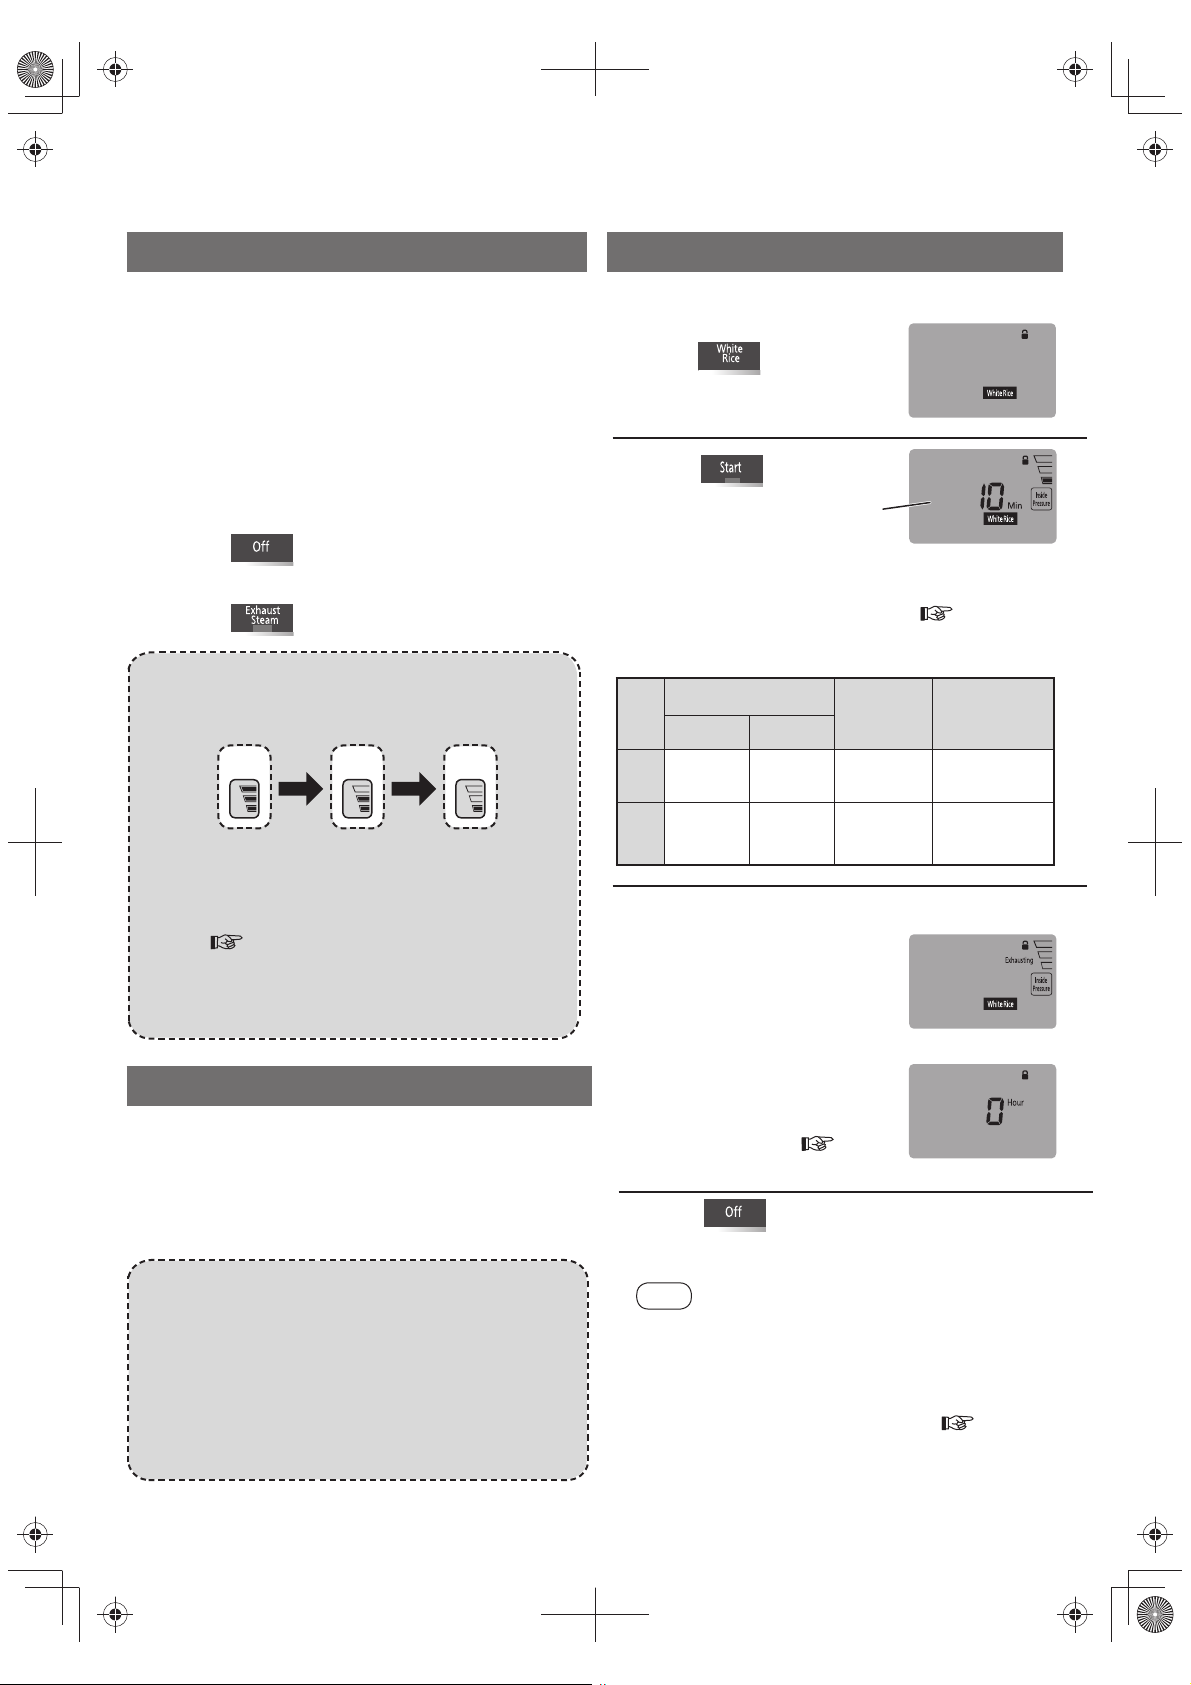
排氣/快速打開外蓋/一按式食譜選擇
排氣/快速打開外蓋/一按式食譜選擇
Exhaust Steam(排氣)
下記情況可使用[Exhaust Steam](排氣)
Porridge·White Rice(稀飯•米飯)
例:用“White Rice”(米飯)功能烹調米飯時
按鈕:
●
烹調途中要打開外蓋時。
※需先按[Off](關),再按[Exhaust Steam](排氣)
按鈕。
●烹調剛結束,打開外蓋後又立即合上外蓋,且壓
力顯示竿再次升高時。
※需先按[Off](關),再按[Exhaust Steam](排氣)
按鈕。
按 。
1
按 。
2
•
排氣過程中,顯示屏內的壓力顯示會根據鍋
內的壓力而變化。
高壓 中壓 低壓
※顯示屏內的“Inside Pressure”(鍋內壓力)
顯示會根據鍋內壓力而變化。但其只是模糊
判斷的結果,僅可作為參考。鍋內壓力的有
無,請根據壓力顯示竿的狀態進行判斷
( P32)。
•
務必等鍋內的壓力完全釋放(壓力顯示竿落下)
後,再打開外蓋。
快速打開外蓋
想要快速打開外蓋時
①
請長按[Exhaust Steam](排氣)按鈕進行手動排氣。
②待壓力顯示竿落下,即可推開蓋把手,按下開
蓋按鈕,打開外蓋。
按 。
1
● [Start](開)指示燈閃爍。
按 。
2
● [Start](開)指示燈亮起。
● 米飯為固定的烹調時間,不可隨意設定。
● 選擇稀飯時, 烹調時間的設定 P39步驟2。
■ 一次可烹調的米量及水量
食譜
½~1½ ½ ~ 2
稀飯
2 ~ 10 2 ~ 12
米飯
剩餘時間以1 分鐘
為單位遞減
米量(量杯)
5.0 L 6.0 L
(水位線)
PORRIDGE
(稀飯)
WHITE RICE
(白米)
烹調結束後,進入排氣狀態。
3
● [Exhaust Steam](排氣)
指示燈亮起。
● 顯示屏內的壓力顯示會根
據鍋內的實際壓力而變化。
● 等到排氣結束(即壓力顯
示竿落下),蜂鳴器響,
顯示屏顯示為“0 Hour”
(零小時),[Keep Warm]
(保溫) 指示燈亮起。
● 如何打開外蓋 P37的
步驟4~5。
按 。
4
● [Keep Warm](保溫) 指示燈熄滅。
(達到設定壓力後)
水量
時間設定範圍
(分鐘)
5 ~20
(預設時間10)
固定為10
(排氣中)
(排氣結束)
表5
• 手動排氣可比自動排氣更快地完成鍋內壓力
的釋放,但烹調粘稠狀食物(如:各類稀飯、
豆類、雪耳、咖喱等)時,不建議使用此功
能。以免食物噴出,造成燙傷等。
• 手動排氣時,長按[Exhaust Steam](排氣)
按鈕,將連續排氣,放開手指則停止排氣。
(※米飯的自動排氣為連續排氣)
38
提示
● 剩餘時間僅會在內鍋中的壓力達到設定壓力後才
開始減少。
● 若要調整米飯的軟硬度或稀飯的濃稠度,請通過
“Pressure Select”(壓力選擇)和“Time Setting”
(時間設定)進行烹調。(具體 P33)
若要使米飯更硬:縮短設定時間
(
若要使米飯更軟:延長設定時間
)
Page 39
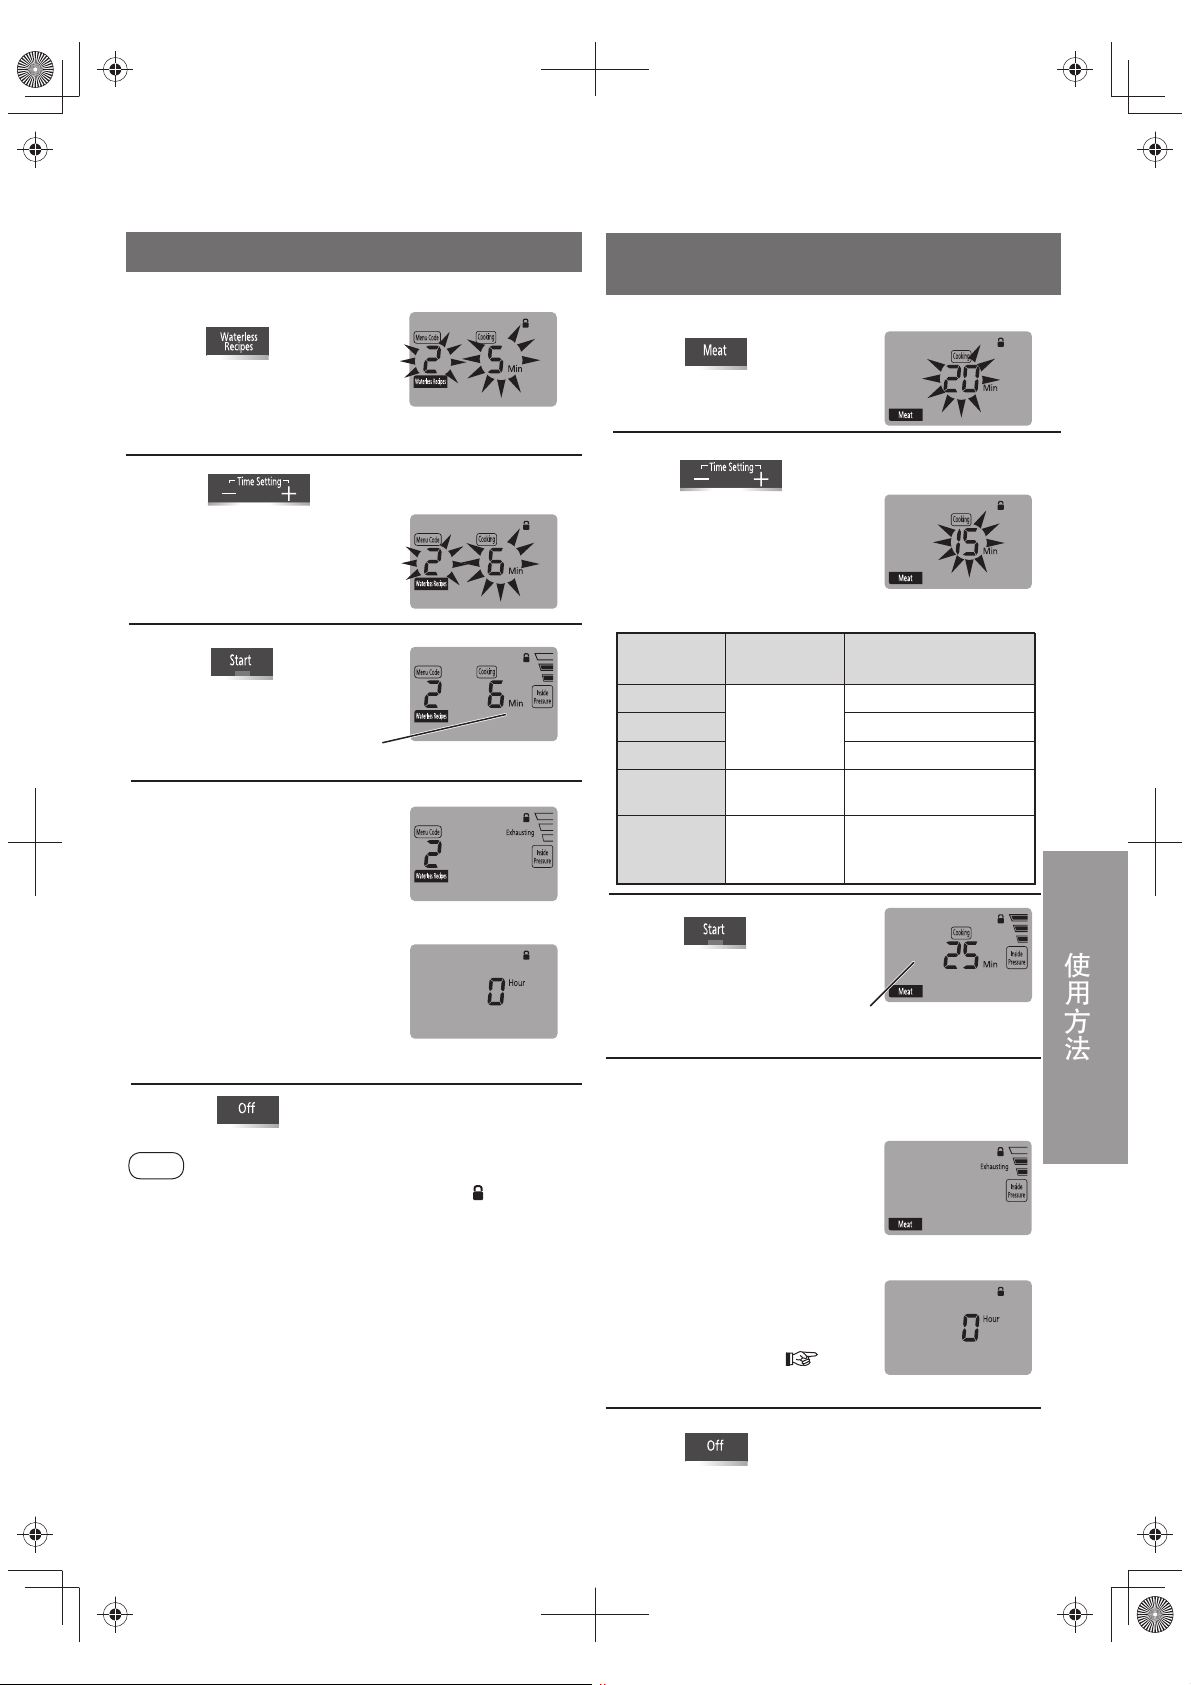
Waterless Recipes(無水料理)
剩
為
例:用“Waterless Recipes”(無水料理)功能
烹調口水雞時
按
1
編號“2”
●選擇的食譜及編號會閃爍。
●其他食譜編號
選擇食譜
。
P35。
Meat·Beans/Tendon·Soup·Fish/Steam
(肉類•豆/蹄筋•湯•魚/蒸餸)
例:用“Meat”(肉類)功能烹調肉時
按 。
1
● [Start](開)指示燈閃爍。
按 或 設定烹調時間。
2
●時間以1 分鐘為單位遞減或
遞增。
●長按 [
時間可快速後退或前進。
3
● [ Start](開)指示燈亮起。
+ ] 或 [- ] 按鈕,
按 。
剩餘時間以1 分鐘
為單位遞減
(達到設定壓力後)
烹調結束後,進入
4
排氣狀態。
●[Exhaust Steam] (排氣)
指示燈亮起。
●等到排氣結束(即壓力顯
示竿落下),蜂鳴器響,
顯示屏顯示為“0 Hour”
(零小時),“Keep Warm”
(保溫)指示燈亮起。
●烹調中途需打開外蓋時
P38“排氣”。
(排氣中)
(排氣結束)
按 。
5
提示
● 烹調前請確認鎖好蓋鎖(顯示屏顯示“ ”),以 免
無法烹調(保溫除外)。
如蓋鎖未鎖,按 [Start] (開)則會響4 聲
“嗶、嗶……”的提示音。
● 烹調途中,請勿移動高速煲或觸摸蒸氣口和
壓力顯示竿。(蒸氣或食物可能會噴射出來。)
● 釋放蒸氣至壓力穩定,可能需要2 ~ 5 分鐘,
這並非異常現象。
● 烹調結束,會發出“嗶嗶、嗶嗶、嗶嗶”的
3 聲提示音,再3 秒後開始排氣。此時切勿
靠近蒸氣口,以免被蒸氣燙傷。
※ 剛開始排氣時,聲音較大,請勿驚慌。
● 為避免湯汁噴出,部分食譜會在烹調倒計時
結束5 分鐘(顯示屏中“Exhausting”(排氣)
閃爍)後,再進行排氣。
按 設定烹調時間。
2
● 時間以1 分鐘為單位遞減
或遞增。
● 長按[+]或[-]按鈕,時間
可快速前進或後退。
■ 最大烹調量及時間設定範圍
食譜
Meat(肉類)
Tendon(蹄筋
Soup(湯)
Fish/Steam
(魚類/蒸餸)
Beans(豆)
按。
3
● [Start](開)指示燈亮起。
烹調結束後,進入排氣狀態。
4
● [Exhaust Steam](排氣)
指示燈亮起。
● 顯示屏內的壓力顯示會根
據鍋內的實際壓力而變化。
● 等到排氣結束 (即壓力
顯示竿落下),蜂鳴器響,
顯示屏顯示為“0 Hour”
(零小時),
[Keep Warm] (保溫)
指示燈亮起。
● 如何打開外蓋 P37
的步驟4~5。
按 。
5
● [Keep Warm] (保溫) 指示燈熄滅。
最大烹調量
(食材+水)
“MAX”
)
(最大)
水位線
水量:1量杯
“MA X FOR BEANS”
(豆類最大)
水位線
餘時間以1分鐘
單位遞減
5~35(預設時間為20)
15~35(預設時間為18)
20~59(預設時間為30)
1~59
15~35(預設時間為18)
表6
時間設定範圍
(分鐘)
(預設時間為5)
使用方法
(達到設定壓力後)
(排氣中)
(排氣結束)
39
Page 40
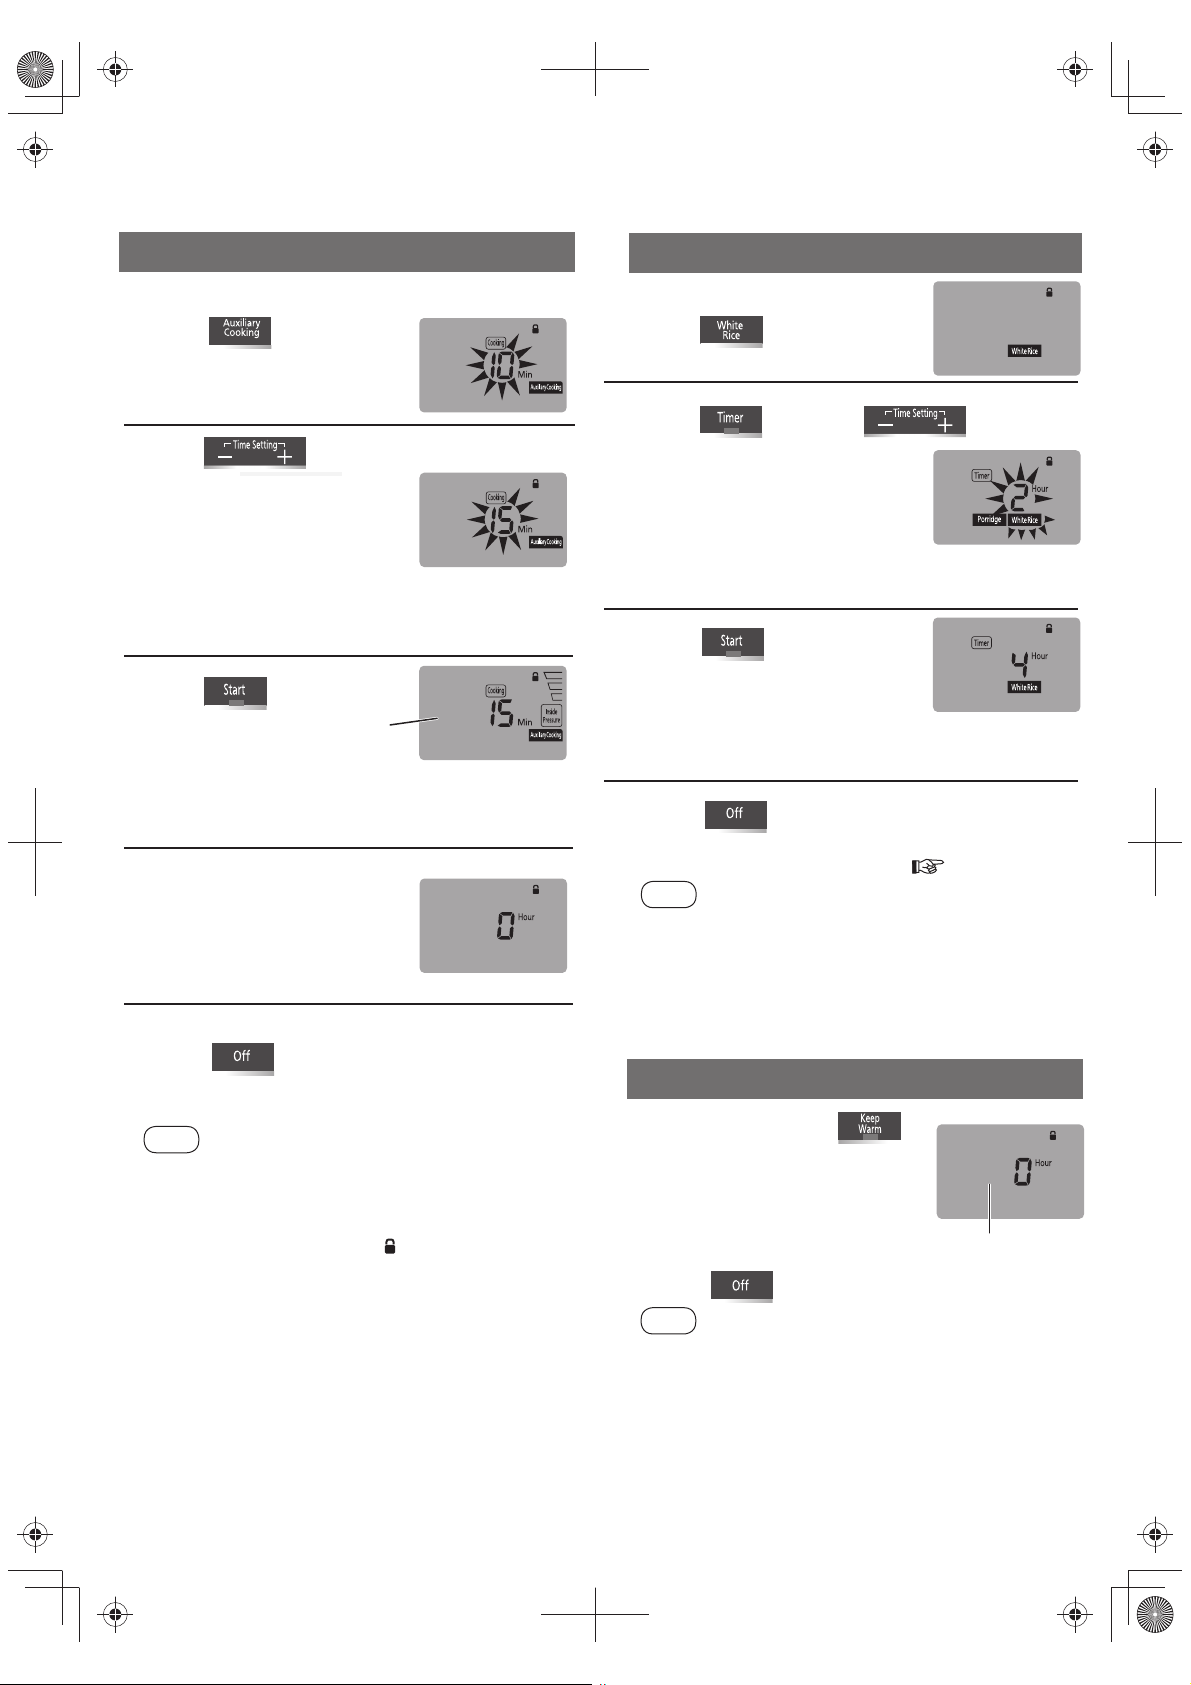
一按式食譜選擇 / 預約 / 保溫
一按式食譜選擇 / 預約 / 保溫
Auxiliary Cooking(輔助烹飪)
例:用“
1
Auxiliary Cooking
按 。
● [Start](開)指示燈閃爍。
按 設定烹調時間。
” (輔助烹飪) 功能調味時
2
● 時間以1 分鐘為單位遞減
或遞增。
● 長按[+]或[-]按鈕,時間
可快速前進或後退。
● 烹調時間設定範圍:
5~60 分鐘,起始時間為10 分。
按 。
3
● [Start](開)指示燈亮起,剩餘時間以1 分鐘
為單位遞減。
● 若要在中途停止烹調,請按[Off](關)按鈕。
烹調結束後,蜂鳴器
4
響起,顯示屏顯示為
“0 Hour”(零小時),
並自動轉為保溫。
■ 若要取消保溫。
按 。
5
● [Keep Warm] (保溫) 指示燈熄滅。
提示
● 進行輔助烹飪時,請務必要:
•打開外蓋。
(以免鍋內有壓力而影響烹調效果。)
•鎖好蓋鎖,顯示屏顯示“ ”。
(以免無法烹調。)
● 請勿用“Auxiliary Cooking”(輔助烹飪)烹調
難以煮熟的食材。
(以免影響烹調效果。)
40
剩餘時間
Timer (Porridge·White Rice)「預約(稀飯·米飯
例 : 預約煮米飯時
按 。
1
● [Start](開)指示燈閃爍。
按 ,然後按 設定
2
預設時間
● 顯示所有可預設食譜(稀 飯•
米飯),所選食譜閃爍。
● 預設時間的可設定範圍:
2 小時~13 小時
● 預約煮稀飯時:先按[+]或[-]按鈕設定烹調
時間,再按[預約]和[+] [-]按鈕設定預約時間。
按 。
3
[Start](開)指示燈熄滅,
●
[Timer](預約)指示燈亮起。
● 烹調結束後,蜂鳴器響起,顯示屏會顯示
“0 Hour”(零小時)字樣,[Keep Warm]
(保溫) 指示燈亮起。
按 。
4
● [Keep Warm] (保溫) 指示燈熄滅。
按[Off](關)按鈕之前的步驟
●
提示
●除了“Porridge”(稀 飯)、“White Rice”(米 飯),
其他功能均不可預設。
● 預設時間指的是烹調結束的時間。
● 能記憶上一次的預設時間。斷電1 分鐘以上再次
預約時,則會回到預設時間的初期值(2 小時)。
● 剩餘時間在1 小時以上時,以1 小時為單位遞減,
1 小時以下時,以1 分鐘為單位遞減。
合上外蓋,按 。
1
指示燈亮起。
● 可使內鍋中的溫度保持在
攝氏70 度左右。
■ 若要取消保溫操作。
按 。
2
提示
●使用保溫功能時,可不鎖蓋鎖,僅合上外蓋即可。
●請勿對米飯和綠色蔬菜等進行保溫。
●建議保溫最長不超過1 小時。
●一旦保溫時間超過24 小時,顯示畫面就會消失,
但保溫工作仍將繼續。([Keep Warm](保溫)
指示燈仍會亮起。)
●如果保溫時間超過96 小時,則顯示屏中會出現
“U14”,並停止保溫工作。
)」
, P37的步驟4~5。
Keep Warm(保温)
●[Keep Warm](保溫)
經過的保溫時間
(最長24 小時)
Page 41
食譜
食譜
注意:※合上外蓋後,請務必拉回蓋把手,以免無法烹調。
(燉煮咖喱飯菜及燉品等濃稠的食物時,請勿合上外蓋,但需鎖好蓋鎖。)
※本食譜以6.0 升為例,5.0 升的烹調量 P51規格。
※食譜中的食材量和烹調時間僅提供參考,請根據實際需求自行調整。
※1杯(量杯):約150 克
食材:
做法:
1.準備食材。牛肉切大塊,薑和蒜切末。牛肉上用竹簽紮小孔,加入所有調味料及薑末、蒜末醃製4 小時。
2.鍋內放入所有食材和調味料,再將內鍋放入本體,合上外蓋。
3.按[Waterless Recipes](無水料理)按鈕,選擇編號“1”,烹調時間設定為20 分鐘,再按
烹調結束後,待涼切片。
食材:
做法:
1.鍋內放入雞腿,撒上薑末,淋上米酒,然後將內鍋放入本體,合上外蓋。
2.按[Waterless Recipes](無水料理)按鈕,選擇編號“2”,烹調時間設定為5 分鐘,再按
3.把辣椒油、醋、白糖、生抽調成一碗(醋:生抽:白糖=3:2:0.5),再將蔥末、蒜末放入拌勻。
4.烹調結束後,按[Off](關)按鈕,打開外蓋,取出雞腿肉(把原湯倒掉,否則會稀釋原有的味道),待稍涼切片,
再淋上醬汁即可。
食材:
做法:
1.將雞翼、洋蔥、冬菇洗淨,洋蔥和薑切片,雞翼的正反面各劃两刀,便於入味。
2.將所有調味料混合後,倒入雞翼,拌勻醃製1 小時以上。
3.在鍋底鋪上一層薑片,再鋪上一層洋蔥,再鋪上一層冬菇,把2.的雞翼平鋪在上面,把醃製的調味料也
均勻的撒在上面,將內鍋放入本體,合上外蓋。
4.按[Waterless Recipes](無水料理)按鈕,選擇編號“3”,烹調時間設定為5 分鐘,再按
5.
食材:
做法:
1.薑去皮切片,蒜去皮拍破。乾辣椒洗淨瀝水,冬菇洗淨切塊。薯仔洗淨,去皮切滾刀塊。紅椒、青椒
分別洗淨,去蒂去籽後切塊。
2.雞腿肉洗淨瀝水後切塊,加薑片、紹酒、五香粉、鹽、生抽、蠔油拌勻醃製25 分鐘。
3.
4.結束後,放入醃製好的雞腿肉、冬菇、薯仔、八 角、老 抽、白糖,按
選擇編號“4”,烹調時間設定為5 分鐘,再 按 [Start](開)按鈕。
5.
設定為10 分鐘,在完成輔助烹調前需攪拌。
無水醬牛肉
調味料:
牛𦟌 1000 克
蔥花 適量
薑末 適量
蒜末 適量
白糖 10 克 紹酒 25 毫升
生抽 50 毫升 蠔油 20 克
老抽 50 毫升 十三香 5 克
口水雞
調味料:
去皮雞腿肉 2 個
蔥末 2 克
薑末 10 克
蒜末 10 克
米酒 10 毫升 白糖 2.5 克
辣椒油 40 毫升 生抽 10 毫升
醋 15 毫升
炆雞翼
調味料:
雞中翼 8 個
洋蔥 1/2 個
冬菇 9 個
薑片 適量
結束後按[Off](關)按鈕,打開外蓋,按[Auxiliary Cooking](輔助烹飪)按鈕,烹調時間設定為10 分 鐘,再 按 [Start](開)按鈕。
※ 使用[Auxiliary Cooking](輔助烹飪)時,務必要打開外蓋,並鎖好蓋鎖。
紹酒 20 毫升 花椒油 10 毫升
生抽 20 毫升 胡椒粉 適量
老抽 15 毫升 白糖 適量
麻油 10 毫升
薯仔炆雞
調味料:
雞腿肉 500 克
冬菇 80 克
薯仔 500 克
青椒 1 個
紅椒 1 個
蒜 3 瓣
薑 10 克
鍋內倒入油,放入乾辣椒、蒜瓣,按[Auxiliary Cooking](輔助烹飪)按鈕,烹調時間設定為5 分 鐘,再 按 [Start](開)按鈕。
結束後按[Off](關)按鈕,打開外蓋,放入紅椒、青椒,按[Auxiliary Cooking](輔助烹飪)按鈕,烹調時間
※ 使用
[Auxiliary Cooking](輔助烹飪)時,務必要打開外蓋,並鎖好蓋鎖。
紹酒 15 毫升 八角 1 個
五香粉 1 克 老抽 15 毫升
鹽 1 克 白糖 3 克
生抽 15 毫升 油 30 毫升
蠔油 15 毫升
乾辣椒 5 個
[Waterless Recipes](無水料理)按鈕
Waterless Recipes(無水料理
[Start](開)按鈕。
Waterless Recipes(無水料理
[Start](開)按鈕。
Waterless Recipes(無水料理
[Start](開)按鈕。
Waterless Recipes(無水料理)- 4
,
)-1
)-
)-
2
3
使用方法
41
Page 42
食譜
食譜
食材:
做法:
1.雞洗淨瀝乾。用鹽薄薄地在雞身上抹一層,雞肚裏塞兩片薑片,靜置5 分鐘。
2.準備一個容器,將除油以外的醃料在容器中攪拌均勻。
3.把 2.均勻抹到雞身上,將蔥和薑片平鋪在鍋底,將雞和醃料放入內鍋靜置20 分鐘。
4.在雞身上淋油,再將內鍋放入本體,合上外蓋。
5.
6.烹調結束後,按[Off](關)按鈕,打開外蓋將雞取出,撕成小塊,蘸少許蘸料即可(蘸料需提前攪拌均勻)。
食材:
做法:
1.先將豬手剁成小塊,放入鍋中焯一下,再清水洗乾淨。
2.將豬手放入小盆中,加入除冰糖和小蔥以外的所有調料醃漬30 分鐘。
3.醃製後,把豬手連醃料一起倒入內鍋中,加入冰糖,合上外蓋。
4.按
5.烹調結束後,按[Off](關)按鈕,打開外蓋,將豬手翻面,按[Auxiliary Cooking](輔助烹飪)按鈕,烹調時間
6.結束后,按[Off](關)按鈕,將豬手盛出擺盤後撒上蔥花即可。
※ 使用[Auxiliary Cooking](輔助烹飪)時,務必要打開外蓋,並鎖好蓋鎖。
手撕雞
醃料:
雞 1隻,約1000 克
生薑 數片
蔥 數根
按[Waterless Recipes](無水料理)按鈕,選擇編號“5”,設定烹調時間為20 分鐘,再按[Start](開)按鈕。
老抽 10 毫升 紹酒 10 毫升
生抽 10 毫升 白糖 15 克
鹽 13 克 油 10 毫升
(10 克塗雞身,
3 克加入醃料中)
紅燒豬手
調味料:
豬手 500 克
[Waterless Recipes](無水料理)
設定為5 分鐘,再按
※ 根據食材的不同,烹調結束後可能出現湯汁沒有完全收乾的情況,請根據自己的口味按輔助烹飪進行開蓋收汁。
[Start](開)
按鈕,選擇編碼“6”,烹調時間
按鈕。
生抽 30 克 紹酒 40 克
醋 10 克 五香粉 1 克
白糖 10 克 薑、蒜 適量
鹽 適量 乾紅辣椒 2 個
蔥 1 根 冰糖 15 克
Waterless Recipes(無水料理
蘸料:
薑末 適量
蒜末 適量
生抽 15 毫升
麻油 5 毫升
白糖 3 克
Waterless Recipes(無水料理
設定為
10 分鐘,再按
[Start](開)
)- 5
)- 6
按鈕。
黑椒冬菇
食材:
去蒂冬菇 12-15 朵,約300 克
蔥花 2 克
做法:
1.將冬菇洗淨瀝乾水分,去蒂備用。
2.內鍋放入本體,放入少許油,然後放入鮮冬菇和所有調味料,合上外蓋。
3.按[Waterless Recipes](無水料理)按鈕,選擇編號“7”,烹調時間設定為1 分鐘,再按
4.烹調結束後,按[Off](關)按鈕,打開外蓋,按
10 分鐘,再按[Start](開)按鈕。
5.完成後裝盤,撒上蔥花即可。
※ 使用[Auxiliary Cooking](輔助烹飪)時,務必要打開外蓋,並鎖好蓋鎖。
調味料:
油 10 毫升 研磨黑胡椒 少許
鹽
老抽 5 毫升
[Auxiliary Cooking](輔助烹飪)按鈕,烹調時間設定為
少許 生抽 5 毫升
蒜蓉金菇
食材:
金菇 300 克
蒜末 30 克
蔥花 10 克
做法:
1.金菇洗淨,去蒂。
2.在內鍋裏鋪上金菇,再鋪上蒜蓉,加入蠔油及生抽,再將內鍋放入本體,合上外蓋。
3.按[Waterless Recipes](無水料理)按鈕,選擇編號“8”,烹調時間設定為2 分鐘,再按
4.另起一鍋燒熱油。
5.烹調結束後,按[Off](關)按鈕,打開外蓋,裝盤,撒上蔥花,澆上熱油。
調味料:
蠔油 20 毫升
生抽 10 毫升
油 30 毫升
Waterless Recipes(無水料理
Waterless Recipes(無水料理
42
)- 7
[Start](開)按鈕。
)- 8
[Start](開)按鈕。
Page 43
法國燉菜
Waterless Recipes(無水料理
)- 9
食材:
翠玉瓜 200 克
蕃茄 150 克
洋蔥 100 克
黄椒 100 克
紅蘿蔔 50 克
做法:
1.將所有食材洗淨,切粒。
2.在鍋內倒入橄欖油,依次放入所有食材和調味料,用飯勺攪拌均勻,合上外蓋。
3.按[Waterless Recipes](無水料理)按鈕,選擇編號“9”,烹調時間設定為1 分鐘,再按
無水海鮮鍋
食材:
蜆 200 克
蝦 200 克
青口肉 200 克
蔥花 適量
蒜末 適量
薑末 適量
做法:
1.將所有食材洗淨,和調味料一起放入鍋中(除蔥花),合上外蓋。
2.按[Waterless Recipes](無水料理)按鈕,選擇編號“10”,烹調時間設定為3 分鐘,再按
3.烹調結束後,按[Off](關)按鈕,打開外蓋,裝盤,撒上蔥花即可。
煮鱸魚
食材:
鱸魚 一條,約600 克
薑 適量
蔥花 適量
蒜頭 3 瓣
做法:
1. 鱸魚清洗乾淨後,用刀在背上切幾刀,然後用鹽塗抹其全身並放置5 分鐘醃漬備用。
2. 蒜頭拍碎塞到魚肚裏,薑一半切薄片鋪在鍋內,另一半切絲。
3. 將醃漬好的鱸魚放入鍋內,淋上紹酒,然後將切絲的薑放在鱸魚上,合上外蓋。
4. 按[Waterless Recipes](無水料理)按鈕,選擇編號“11”,烹調時間設定為5 分鐘,再按[Start](開)按鈕。
5. 烹調結束後,按[Off](關)按鈕,打開外蓋,裝盤,撒上蔥花、淋上蒸魚豉油。
6. 另起一鍋,倒油燒至微微冒煙,然後將熱油潑在魚上即可。
調味料:
橄欖油 15 毫升
研磨黑胡椒 少許
鹽 2 克
茄蓉 40 克
[Start](開)按鈕。
Waterless Recipes(無水料理
調味料:
油 15 毫升
蒜蓉醬 10 克
蠔油 15 毫升
紹酒 20 毫升
生抽 15 毫升
[Start](開)按鈕。
Waterless Recipes(無水料理
調味料:
鹽 3 克
紹酒 15 毫升
蒸魚豉油 30 毫升
油 30 毫升
)- 10
)- 11
使用方法
剁椒魚頭
食材:
魚頭 一個,約600 克
剁椒 200 克
薑片 適量
蔥花 適量
做法:
1. 魚頭去鱗去腮,然後用刀剁成背部相連的兩片。
2.
在鍋底刷一層油,然後將薑片鋪在鍋底。將魚頭放入鍋內,將剁椒鋪在魚頭上面,然後將紹酒淋在魚頭上
3. 將內鍋放入本體,合上外蓋,按[Waterless Recipes](無水料理)按鈕,選擇編號“12”,烹調時間設定
為5 分鐘,再按[Start](開)按鈕。
4. 烹調結束後,按[Off](關)按鈕,打開外蓋,撒上蔥花、淋上蒸魚豉油。
5. 另起一鍋,倒油燒至微微冒煙,然後將熱油潑在魚頭上即可。
調味料:
蒸魚豉油 30 毫升
油 30 毫升
紹酒 20 毫升
Waterless Recipes(無水料理
)- 12
。
43
Page 44
食譜
食譜
食材:
做法 :
食材: 調味料:
A
蘋果醬
蘋果 2 個(約600 克),去皮切薄片
檸檬 半個,榨汁
白糖 150-200 克
1.將蘋果倒入內鍋並加入檸檬汁。
2.合上外蓋,
再按[Start](開)按鈕。
3
.待壓力顯示竿落下,按[Off](關)按 鈕 。
4
.推開蓋把手,打開外蓋,放入白糖。
5.按[Auxiliary Cooking](輔助烹飪)按鈕,烹調時間設定為40 分鐘,再按[Start](開)按鈕,邊煮邊攪動至
糊狀後,再按[Off](關)按鈕。
※ 白糖的分量可根據個人喜好酌量增減。若想短期保存果醬,請增加白糖的分量。
※ 使用[Auxiliary Cooking]
※ 輔助烹飪的烹調時間可根據實際情況適當增減。
按[Pressure](壓力選擇)按鈕,選擇“Low”(低壓),烹調時間設定為15 分鐘,
(輔助烹飪)時,務必要打開外蓋,並鎖好蓋鎖。
蔬菜濃湯
洋蔥 ½個,切片 高湯 300 毫升
西芹 ½個,切片 鹽 5
紅蘿蔔 ½個,去皮後切塊 胡椒粉 適量
薯仔 1個,去皮後切塊 牛奶 400 毫升
B
克
L o w(低 壓)
Mid(中壓)
做法 :
1.將A倒入內鍋並加入高湯。
2.合上外蓋,按[Pressure](壓力選擇)按鈕,選擇“Mid”(中壓),烹調時間設定為10 分鐘,
再按[Start](開)按鈕。
3
.待壓力顯示竿落下,按[Off](關)按鈕,再推開蓋把手,打開外蓋,待其冷卻。
4
.將高速煲中的食材倒入攪拌機,攪拌至細滑,再將其倒回高速煲中。
5
.加入B,按[Auxiliary Cooking](輔助烹飪)按鈕,烹調時間設定為30 分鐘,再按[Start](開)按鈕,
煮至沸騰即可。
※ 使用[Auxiliary Cooking](輔助烹飪)時,務必要打開外蓋,並鎖好蓋鎖。
※ 輔助烹飪的烹調時間可根據實際情況適當增減。
薯蓉球
食材: 調味料:
薯仔 400
紅蘿蔔 少許 沙侓侓醬 適量
青瓜 少許
做法 :
1.薯仔切塊放入碗中,向內鍋中加1 杯水,放入隨附的蒸盤,再把碗置於蒸盤上。
2.合上外蓋,按[Pressure](壓力選擇)按鈕,選擇“Mid”(中壓),烹調時間設定為20 分鐘,
再按[Start](開)按鈕。
3
.紅蘿蔔和青瓜切小粒備用。
4
.待壓力顯示竿落下,按[Off](關)按鈕,再推開蓋把手,打開外蓋,拿出薯仔。
5
.將薯仔碾成泥狀,加入紅蘿蔔粒、青瓜粒和煉乳,充分攪拌,作成球形,最後淋上少許沙侓侓醬。
克
煉乳 10
克
M i d(中 壓)
44
Page 45
桂花糯米藕
食材: 調味料:
蓮藕 1節 白糖 100
糯米 70 克 紅糖 50
冰糖 50
桂花糖 少許
做法 :
1.糯米洗淨,在清水中浸泡4 小時後,撈起瀝乾,並加入白糖攪拌均勻後備用。
2.蓮藕去皮,洗淨瀝乾,將蓮藕的一端切下(保留備用)。
3
.將1.的糯米灌入蓮藕孔中,然後將切下的蓮藕頭放回原位,用牙籤固定,以防漏米。
4.將蓮藕放入內鍋中,加水沒過蓮藕,加入紅糖和冰糖。
5.合上外蓋,按
再按[Start](開)按鈕。
6.待壓力顯示竿落下,按[Off](關)按鈕,再推開蓋把手,打開外蓋。
7.取出蓮藕,去掉牙籤,切成1 厘米厚的圓片,撒上桂花糖即可。
[Pressure](壓力選擇)按鈕,選擇“High”(高 壓),烹調時間設定為30 分鐘,
克
克
克
High(高壓)
紫薯雪耳湯
食材: 調味料:
紫薯 250
雪耳 30 克
水 11 杯(約2000 毫升)
做法 :
1.雪耳用清水泡3 - 4 個小時,泡發後去蒂,撕成小塊。
2.將紫薯和雪耳放入內鍋中,並加入水。
3.合上外蓋,按
按 鈕。
4.待壓力顯示竿落下,按[Off](關)按鈕,再推開蓋把手,打開外蓋。
5.放入冰糖,按[Auxiliary Cooking] (輔助烹飪)按鈕,烹調時間設定為25 分鐘,再按[Start] (開)按鈕,
待冰糖融化後,按[Off](關)按鈕。
※ 使用[Auxiliary Cooking]
※ 輔助烹飪的烹調時間可根據實際情況適當增減。
克,去皮切丁
[Pressure](壓力選擇)按鈕,選擇“High”(高 壓),烹調時間設定為25 分鐘,再按[Start](開)
冰糖 120
(輔助烹飪)時,務必要打開外蓋,並鎖好蓋鎖。
克
補血養顏燕麥粥
食材: 調味料:
白米 ¾杯 紅糖 50
燕麥米 20
紅棗片 3
桂圓肉 12
核桃仁 30
克
克
個
克
克(可適當增減)
High(高壓)
Porridge(稀飯)
使用方法
做法 :
1.白米和燕麥米洗淨、倒入內鍋中,並加水至“PORRIDGE”(稀飯)的刻度線“1”處。
2.其他食材洗淨,放入內鍋中。
3.合上外蓋,按[Porridge](稀飯)按鈕,烹調時間設定為15 分鐘,再按[Start] (開)按鈕。
4.待壓力顯示竿落下,按[Off](關)按鈕,再推開蓋把手,打開外蓋,放入紅糖攪拌均勻即可。
45
Page 46
食譜
食譜
食材: 調味料:
A
B
做法 :
食材: 調味料:
排骨飯
白米 2杯 生抽 7 毫升
糯米 2杯 老抽 6 毫升
排骨 350
生薑 6
蒜瓣 2粒 紹酒 10 毫升
紅蘿蔔 1根,切丁 鹽
冬菇 1個,切丁
水 3量杯(約540 毫升)
1.排骨放入沸水中焯一下,去除血水,撈起瀝乾。
2.將1.用A 及C 醃製30 分鐘。
3.白米和糯米洗淨瀝乾後,放入內鍋中。
4.將醃製後的排骨和B 放入內鍋中,加鹽,並攪拌均勻。
5.合上外蓋,按[White Rice](米飯)按鈕,再按[Start] (開)按鈕。
6.待壓力顯示竿落下,按[Off](關)按鈕,再推開蓋把手,打開外蓋,將食材和米飯攪拌均勻即可。
克,切小段
克,切片
蠔油 5
生粉 3
C
克
克
7
克
蘑菇紅燒肉
五花肉 1000 克 鹽 8
蘑菇 150 克
大蔥 2根,洗淨後切長段 紹酒 15 毫升
薑 1塊,洗淨後切大片 老抽 15 毫升
桂皮 1條
白糖 20
A
克
克
White Rice(米飯)
Meat(肉類)
做法 :
1.把所有的食材放入內鍋中,並加入A。
2.合上外蓋,按[Meat](肉類)按鈕,烹調時間設定為15分鐘,再按[Start] (開)按鈕。
3.待壓力顯示竿落下,按[Off](關)按鈕,再推開蓋把手,打開外蓋。
薯仔牛腩煲
食材: 調味料:
牛腩 600
薯仔 2個,去皮切塊 生抽 30 毫升
紅蘿蔔 1個,去皮切塊 老抽 15 毫升
薑 數片 米酒 15 毫升
水 100 毫升
高湯
:
做法
1.將牛腩放入沸水中焯一下,去除血水,撈起瀝幹。
2.將所有食材倒入內鍋并加入已拌勻的A。
3.合上外蓋,按[Meat](肉類)按鈕,烹調時間設定為20 分鐘,再按[Start](開)按鈕。
4.待壓力顯示竿落下,按[Off](關)按鈕,再推開蓋把手,打開外蓋。
5.按[Auxiliary Cooking] (輔助烹飪)按鈕,烹調時間設定為15 分鐘,再按[Start] (開)按鈕,在完成
輔助烹飪前需攪拌。
克,切塊
100 毫升
鹽 3 克
A
生粉 3 克
Meat(肉類)
46
Page 47
紅豆沙
食材:
紅豆 150
水 900 毫升
片糖 50
陳皮 適量
做法 :
1.將洗淨的紅豆和水倒入內鍋,加入片糖和陳皮,合上外蓋。
2.按[Bean/Tendon](豆/蹄筋)按鈕,烹調時間設定為35 分鐘,再按[Start](開)按鈕。
3.待壓力顯示竿落下,按[Off](關)按鈕,再推開蓋把手,打開外蓋。
4.按[Auxiliary Cooking](輔助烹飪)按鈕,烹調時間設定為15 分鐘,再按[Start](開)按鈕,在完成
輔助烹調前需攪拌。
克
克
Beans/Tendon (豆/蹄筋)
粟米排骨湯
食材: 調味料:
排骨 400 克 紹酒 5 毫升
粟米 1個,切段 鹽 7 克
紅蘿蔔 1根,切段
水 5.5 杯(約1000 毫升)
做法 :
1.排骨放入沸水中焯一下,去除血水,撈起瀝乾備用。
2.將排骨、粟米和紅蘿蔔放入內鍋中,加入水和調味料。
3.合上外蓋,按[Soup](湯)按鈕,烹調時間設定為30 分鐘,再按[Start] (開)按鈕。
4.待壓力顯示竿落下,按[Off](關)按鈕,再推開蓋把手,打開外蓋。
豉汁蒸排骨
食材: 調味料:
排骨 300 克 紹酒 10 毫升
薑絲 10
做法 :
1.排骨洗淨切小塊,瀝乾水份,用紹酒和薑絲拌勻醃製5分鐘。
2.將豆豉醬加入1.中並充分拌勻。
3.再將蠔油加入2.中充分拌勻。
4.在3.中加入生粉,拌勻,讓生粉在排骨表面薄薄的裹上一層即可。
5.裝入盤或碗中,向內鍋加入1 杯涼水。
6.放入隨附的蒸盤,再將5.放在蒸盤上。
7.合上外蓋,按[Fish/Steam](魚類 / 蒸餸)按鈕,烹調時間設定為30 分鐘,再按[Start] (開)按鈕。
8.待壓力顯示竿落下,按[Off](關)按鈕,再推開蓋把手,打開外蓋。
克
豆豉醬 15 克
蠔油 10 克
生粉 10 克
Fish/Steam (魚類/蒸餸)
Soup (湯)
使用方法
47
Page 48
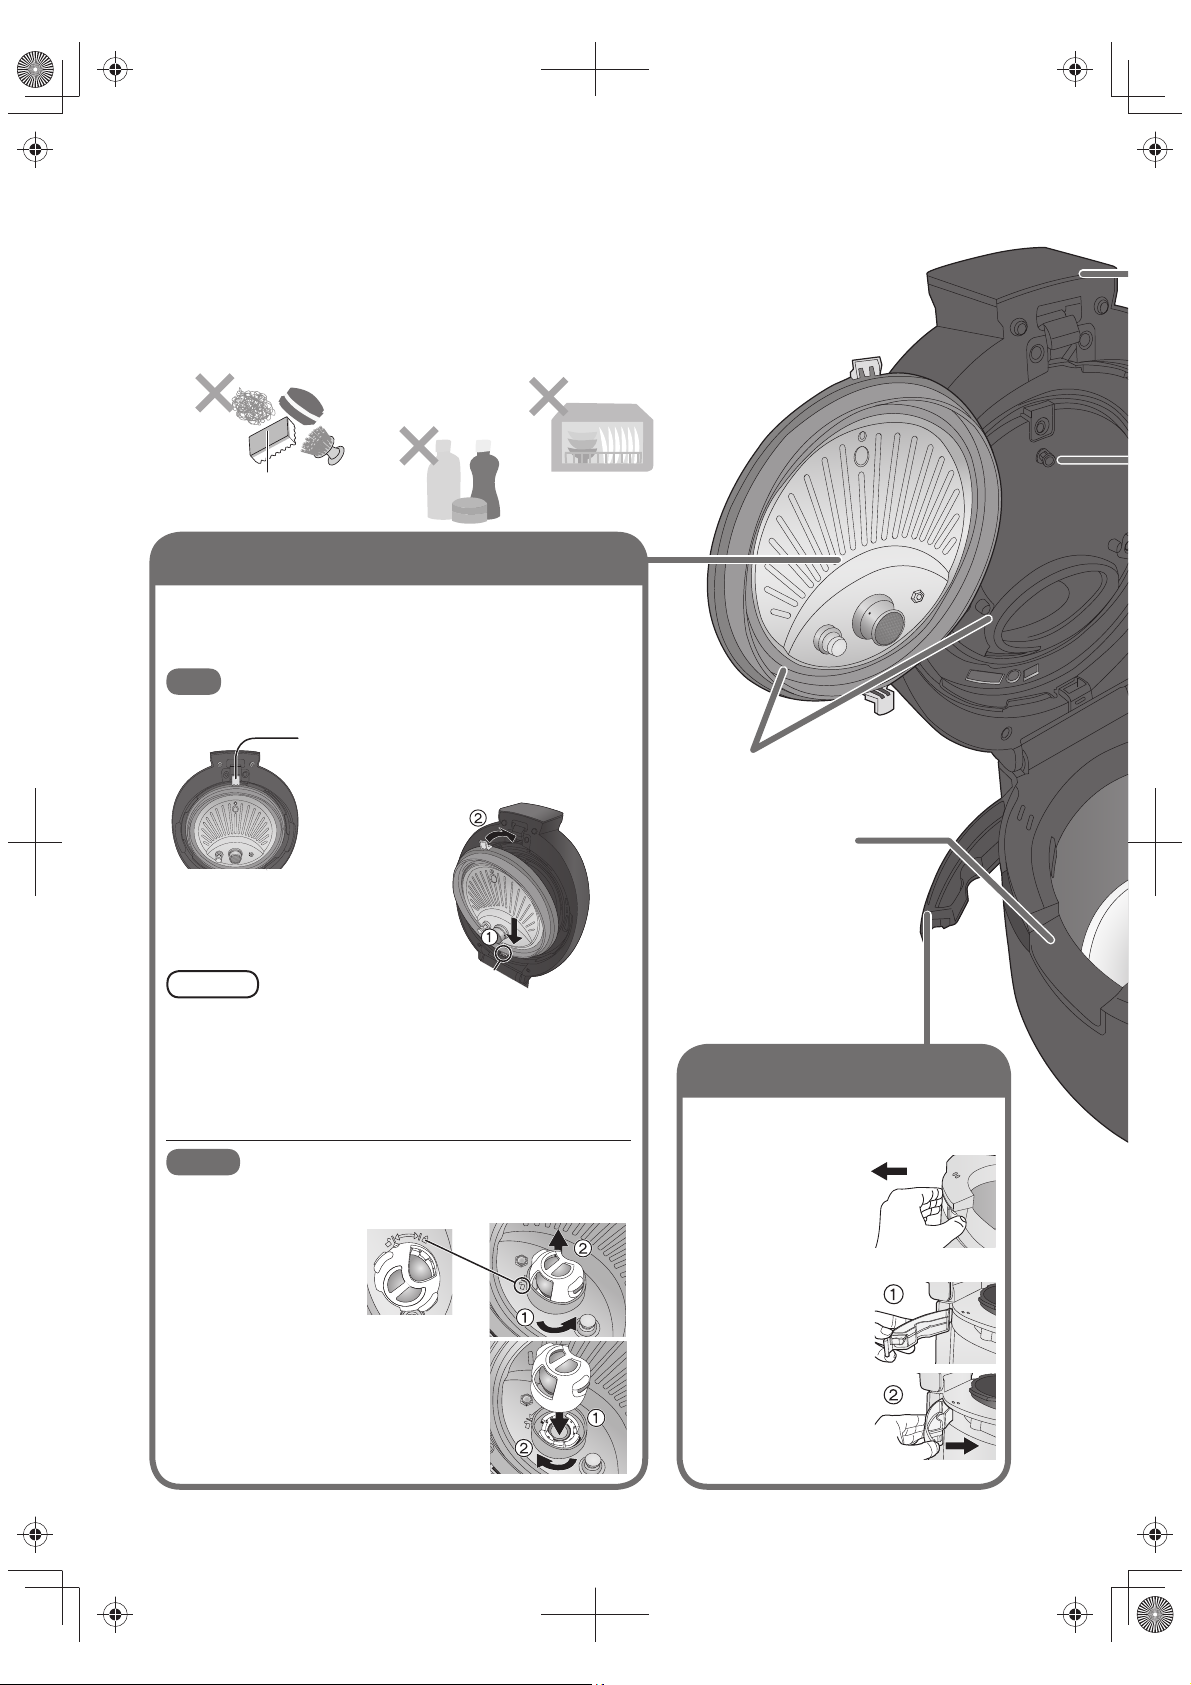
清潔與保養
清潔與保養
● 請等到本體充分冷卻後,再拔下電源插頭進行清潔。
● 清潔時,切勿將本體放入水中。
● 請勿使用洗碗機或烘乾機。
請勿使用以下物品:
• 百潔絲或尼龍刷 • 汽油/稀釋劑
表面有磨蝕顆粒
的工具。
內蓋·壓力閥(內蓋背面)
每次使用後均請拆下,並用廚房專用中性洗滌劑清洗。
(壓力閥也拆下清洗。
● 拆下,清洗內蓋的兩面,並擦乾水分後再裝入外蓋。
內蓋
■ 拆卸時
)
向上撥起內蓋拆裝按鈕。
(內蓋會向面前方向傾倒。)
拿出。
• 洗碗機和烘碗機
• 去污劑/酒精
• 消毒劑/漂白劑
墊圈
■ 安裝時
將內蓋下端插入槽內。
將內蓋上端壓入按鈕處。
預防措施
●使用調味料後(排骨飯等),請立即清洗。
(以免產生異味、變質或生鏽。)
噴嘴帽堵塞了飯粒等異物和污垢時,請用竹籤、牙籤等
清除。
(以免導致蒸氣泄漏,烹調物噴出。)
壓力閥
■ 拆卸時
槽位
按箭頭方向旋轉。
使壓力閥上的三角
對準開鎖標記,
即可取下。
■ 安裝時
將壓力閥放到內蓋上,使三角
對準開鎖標記。
按箭頭方向旋轉至三角對準閉鎖
標記線,並聽到“喀噠”一聲,
即為安裝完成。
※ 拆下後用流水沖洗乾淨。
鍋把手支撐部
接水盒
每次使用後均請拆下,用清潔劑清洗
後再用清水沖洗乾淨。
■ 拆卸時
從鍋把手支撐部處
向外取出。
■ 安裝時
將接水盒的後端
的筋插入定位槽。
再按箭頭方向按
入本體,使接水
盒的前端卡爪與
本體相嵌合(發
出“喀達"聲)。
48
Page 49
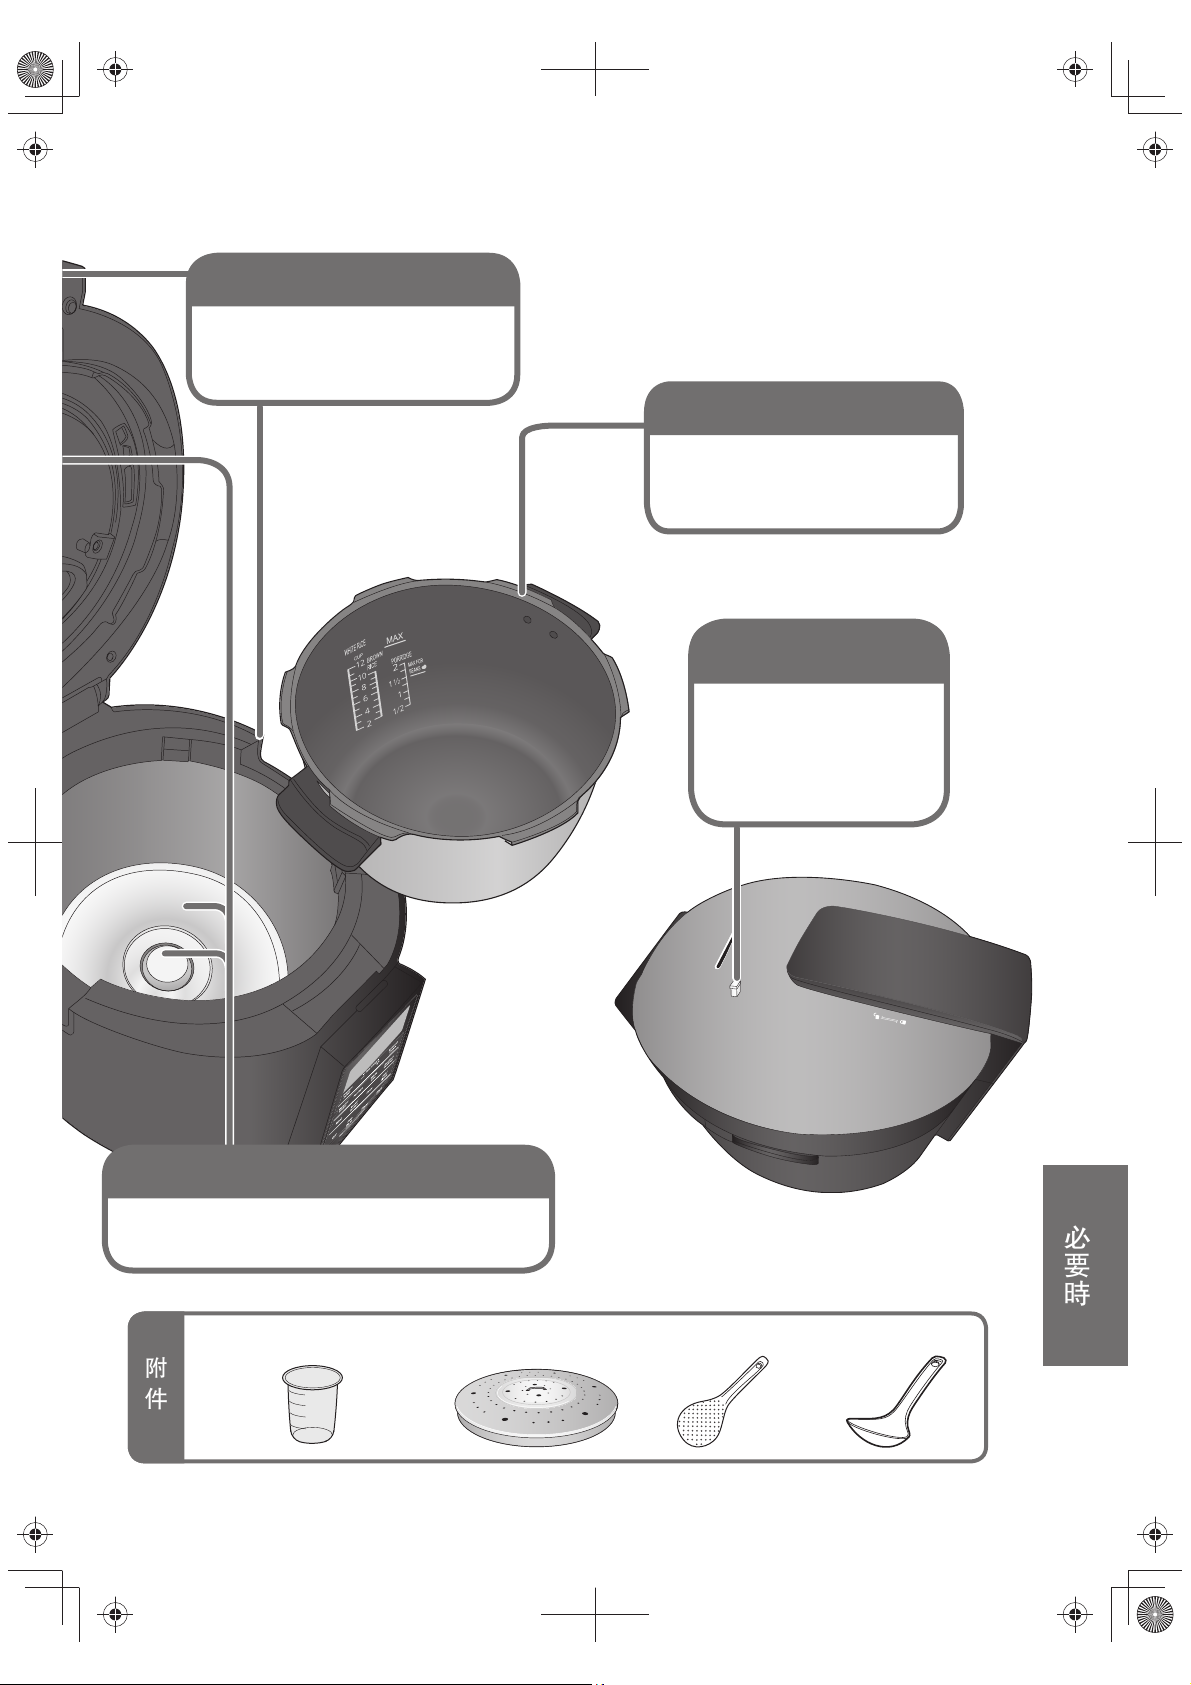
本體·外蓋(密封部)
用完全擰乾的廚房用抹布擦拭。
● 請勿使用清潔劑。
● 請勿拉扯墊圈。
內鍋
用清潔劑清洗。( P30)
● 請勿將內鍋當做洗碗盆使用。
以免導致塗層脫落。
壓力顯示竿
用完全擰乾的廚房用抹布
擦拭。
直至顯示竿可順
暢地上下移動
(
)
蓋感應器·電熱板·底感應器
要去除頑固異物,用尼龍刷蘸點中性廚房用清潔劑
輕輕磨擦,然後用完全擰乾的廚房用抹布擦拭。
量杯(約180 毫升)(1 個) 蒸盤(1 個) 飯勺(1 個) 粥 [湯] 勺(1 個)
附
件
必要時
49
Page 50
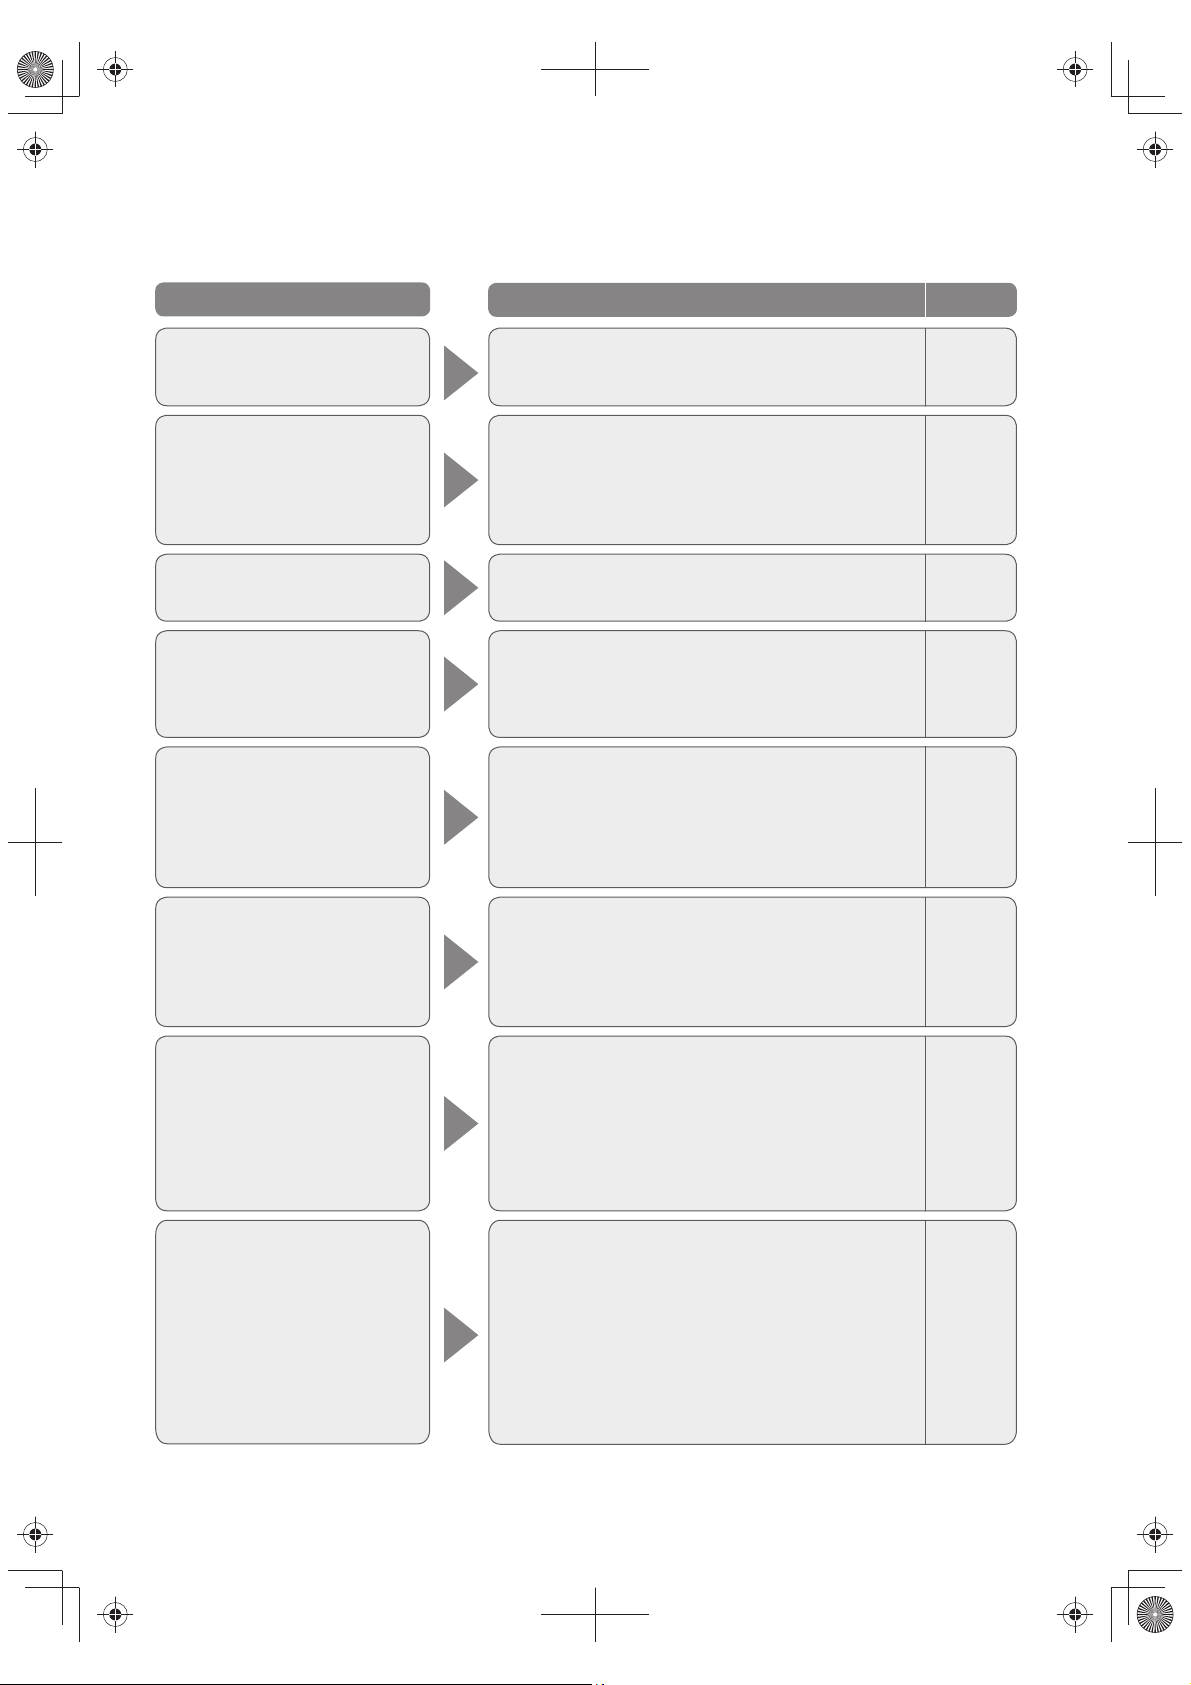
故障排除
故障排除
委託維修服務前,請根據以下各項內容進行檢查。
問題說明 可能的原因 參考頁碼
無法烹調
(按 [Start](開)後,發出
“嗶、嗶……”的提示音)
時間顯示沒有變動
壓力顯示竿尚未升高,
就已顯示剩餘時間
漏氣
(從內鍋、外蓋、蒸氣口或
壓力顯示竿處漏氣)
湯汁和蒸氣噴出
(從蒸氣口或外蓋的縫隙中噴出)
● 蓋鎖未鎖好(蓋把手未拉回)。
● 設定時間後,未按下 [Start](開)按鈕。
● 蒸氣泄漏。(請參閱下述“漏氣”的問題說明。)
● 即使壓力烹調已開始,但內鍋中的壓力仍未達到
設定壓力。
● 電熱板、蓋感應器或內鍋底部有異物。
● 由於調味料沒有完全溶解,因此底感應器無法正確
工作。
● 內鍋、內蓋、鍋墊圈或壓力顯示竿上有異物。
● 內鍋、內蓋或鍋墊圈上有凹痕或已損壞。
● 壓力閥漏裝、內部的球有凹痕,或球固定墊圈偏位。
● 安全閥(熔融合金)熔化了。
● 外蓋未蓋好。
● 內鍋中的食物或水太多。
● 輔助烹飪過程中,合上了外蓋。
● 壓力閥漏裝。
● 安全閥(熔融合金)熔化了。
34
37~40
—
37~40
49
30
—
—
48
—
34
34
40
48
—
● 壓力或時間設定或水量不正確。
烹調失敗
(未煮熟/過熟/水分過多/燒焦/
熱度過低)
外蓋難以打開
外蓋難以合上
電子高速煲發出聲響
若出現以下情況,請聯絡服務中心進行檢查或維修:
● 內鍋底部有凹痕。 ● 內蓋或鍋墊圈有凹痕或已損壞。● 按上述內容檢查後,問題仍未解決。
● 電熱板或內蓋、底感應器上有異物。
● 內鍋未放好。
● 壓力閥漏裝。
● 調味料沒有完全溶解。
● 鍋內的壓力是否已完全釋放(壓力顯示竿落下)?
● 是否安裝了內蓋?
● 內蓋或蓋把手是否變形?
● 因為鍋內有壓力,所以增強了密封強度,令人感到
難以合上。特別是在煮飯後立即翻鬆米飯等時,會
感到難以合上。
● 上鉤卡部,下鉤卡部,機體上部等處是否有米粒等?
● “哧…”聲…釋放壓力的聲音。
● 開閉外蓋時,“咕嚕”聲…內蓋中的壓力閥滾動的
聲音。
● 釋放壓力時,“啪嗒”聲…電磁閥跳動的聲音。
● “嗶、嗶…”的提示音…蓋鎖未鎖好、排氣前或
烹調中誤開蓋鎖等。
● “嗡嗡”聲…電磁閥動作音。
● “噗”聲…內鍋底部(外側)的水滴受熱膨脹後
產生的破裂聲。
33, 36
49
34
48
31
37~40
48
—
—
—
—
—
—
34
—
—
50
Page 51
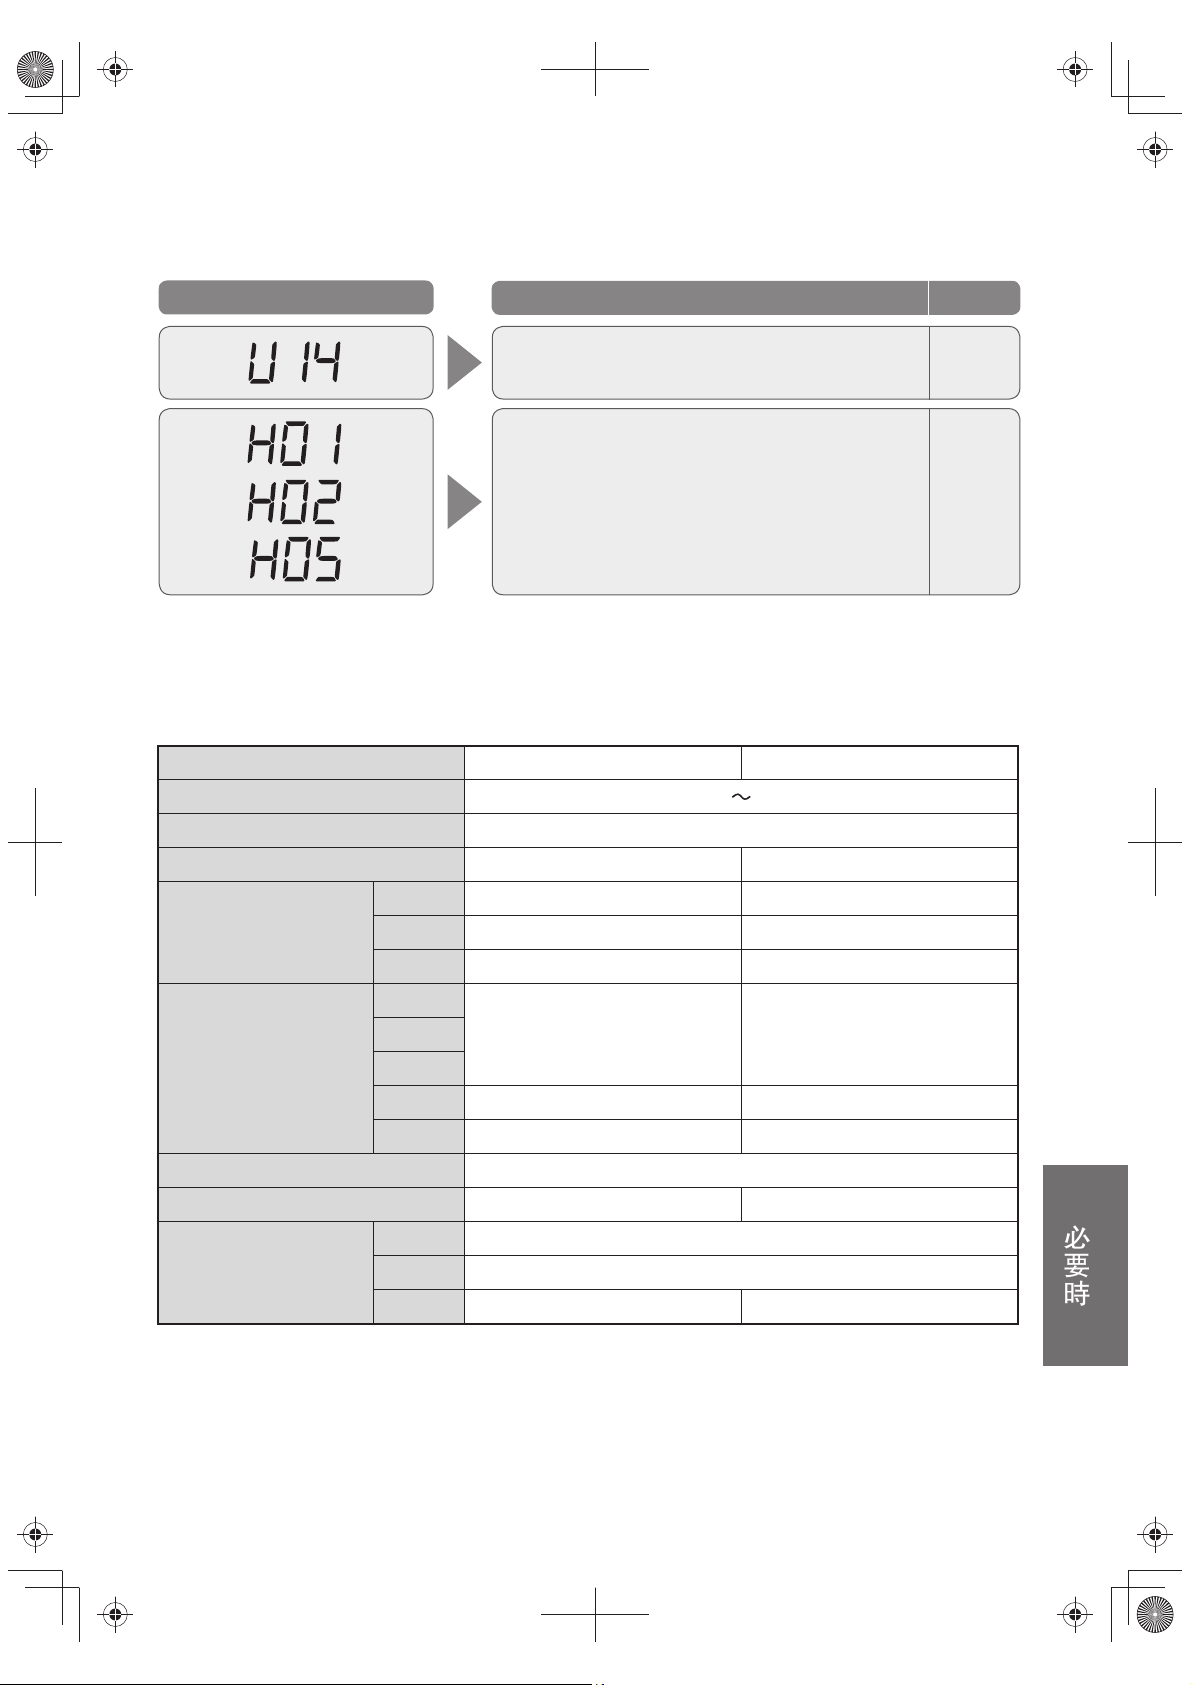
如顯示此代碼…
如顯示此代碼…
規格
顯示屏 可能的原因 參考頁碼
規格
型號
電源/額定頻率
額定功率(烹調時) 1100 W
內鍋的額定容積 升 5.0(烹調容量3.3) 6.0(烹調容量4.0)
● 保溫模式已超過96 小時。
→按 [Off](關)按鈕。
→請聯絡服務中心。
220 V 50 Hz
—
—
SR-PS608SR-PS508
稀飯 0.09 ~ 0.27(½~ 1½) 0.09 ~ 0.36(½~ 2)
米類的烹調量
升(杯)
食譜類的最大烹調量
(食材+水)(約)升
電源線長度(約)米 0.1
產品重量(約)公斤 3.72.7
產品尺寸(約)厘米
●(*1)表示內鍋“MAX”(最大)水位線的烹調容量。
●(*2)表示內鍋“MAX FOR BEANS”(豆類最大)水位線的烹調容量。
●(*3)表示打開外蓋時的產品高度。
● 最大工作壓力約為98 kPa 標準壓。
● 待機時的消耗功率約為0.4 瓦(連接上電源插頭時)。
米飯 0.36 ~ 1.8(2 ~ 10) 0.36 ~ 2.16(2 ~ 12)
糙米 0.36 ~ 1.44(2 ~ 8) 0.36 ~ 1.8(2 ~ 10)
肉類
蹄筋
骨頭湯
水量:1 量杯 水量:1 量杯魚/蒸餸
豆 1.5
寬度
深度 36.1
高度
28.1(55.5)
3.3
*1
*2
28.8
*3
*1
4.0
*2
2.0
29.8(57.2)
必要時
*3
51
Page 52

Panasonic Appliances Rice Cooker (Hangzhou) Co.,Ltd.
Web site: http://panasonic.net/
© Panasonic Corporation 2018
QZ19EL53
S0718-0
Printed in China
 Loading...