

Page 1
HK
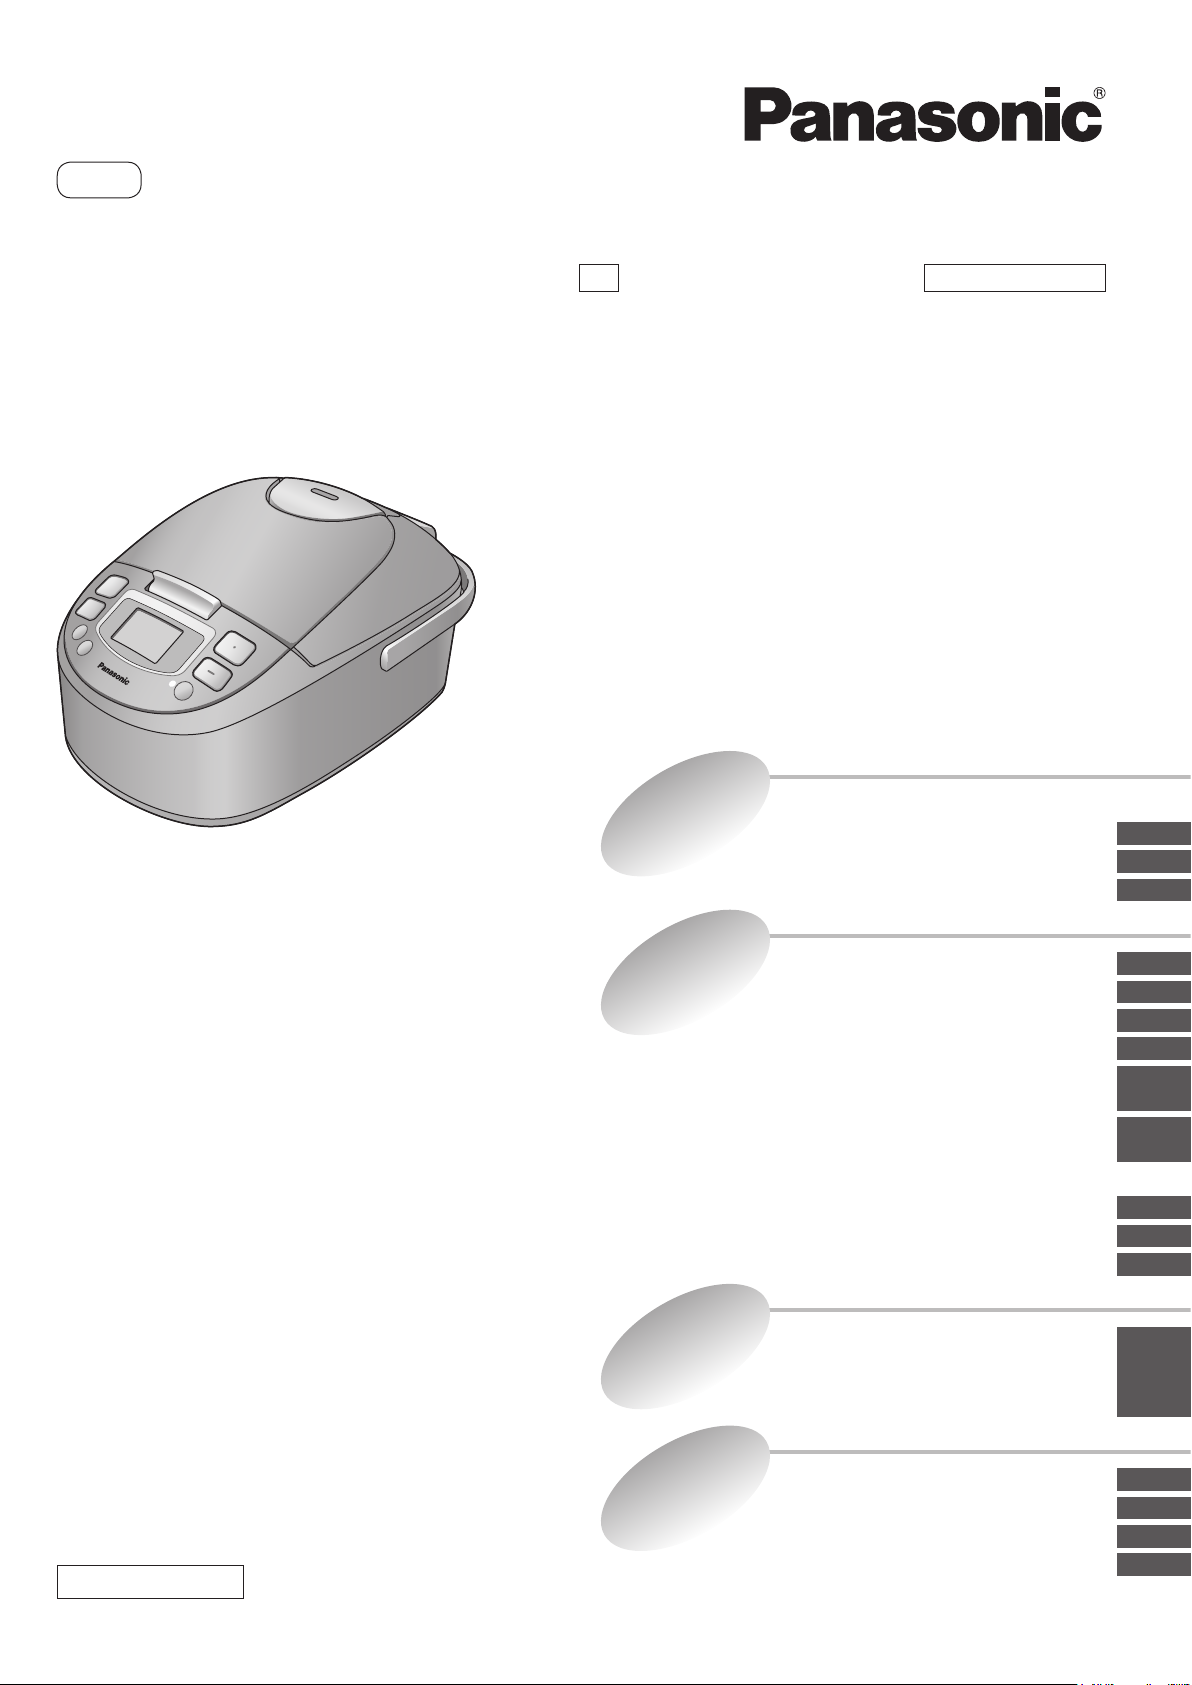
Operating Instructions
Illustrations of the SR-FC108 are used
throughout this Operating Instructions.
IH
Electronic Warm Jar
1.0 L model
Model No.
1.8 L model
Model No.
Contents
Checks and
Precautions
Household Use
SR-FC108
SR-FC188
Safety Precautions
Notes on Use
Part Names/Accessories
page
2
6
7
Thank you for purchasing this Panasonic product.
OOThis product is intended for household use only.
OOPlease read the operating instructions carefully to ensure
safe and correct operation before use.
OOBefore use, be sure to read “Safety Precautions”
(Pages 2–5).
OOKeep the operating instructions and the warranty for
future use.
Warranty appended
Everyday
Use
Cleaning
Further
Information
Cooking Rice
Using the Programs Correctly
Using Different Programs
Cooking
Keeping Warm
OOKeep Warm/Reheat
Using the Timer
OOWhen the current time is incorrect
Recipes
OOCongee/Casserole
OOBrown Rice/Grains
OOCake/Steam
Cleaning
OO
When using for the rst time & on every use
OO
Regular checks
OO
When the cleanliness of the Warm Jar is a concern
Does my Warm Jar have a fault?
What does this mean?
What to do when...
Specications
8
10
11
12
13
14
15
16
17
18
20
21
22
26
Page 2
Please make sure to follow
Safety Precautions
these instructions
In order to prevent accidents or injuries to the user, other people, and
damage to property, please follow the instructions below.
WARNING
OQ The following charts indicate the degree of damage caused by
wrong operation.
WARNING:
CAUTION:
Indicates serious injury or death.
Indicates risk of injury or property damage.
OQ The symbols are classified and explained as follows:
This symbol indicates prohibition.
This symbol indicates requirement that must be followed.
WARNING
O Do not use the appliance if the power cord or power plug is damaged or the power
plug is loosely connected to the power outlet.
(It may cause an electric shock, or fire caused by short circuit.)
O« If the supply cord is damaged, it must be replaced by a special cord or assembly available from the
manufacturer or its service agent.
O Do not damage the power cord or power plug.
•OThe following actions are strictly prohibited.
Damaging, modifying, touching on or placing near heating elements, forcefully bending, twisting, pulling,
pulled over sharp edges, putting heavy objects on top, bundling, pinching the power cord and carrying the
appliance by the power cord.
(It may cause a fire or electric shock due to damage to the power cord or power plug.)
O Do not plug or unplug the power plug with wet hands.
•OAlways ensure that hands are dry before handling the power plug or switching on the appliance.
(It may cause an electric shock or injury.)
O Do not use the appliance for any purpose other than those described in these
instructions.
(It may cause a fire, burn, injury or electric shock.)
•OPanasonic will not accept any liability if the appliance is subject to improper use, or failure to comply with
these instructions.
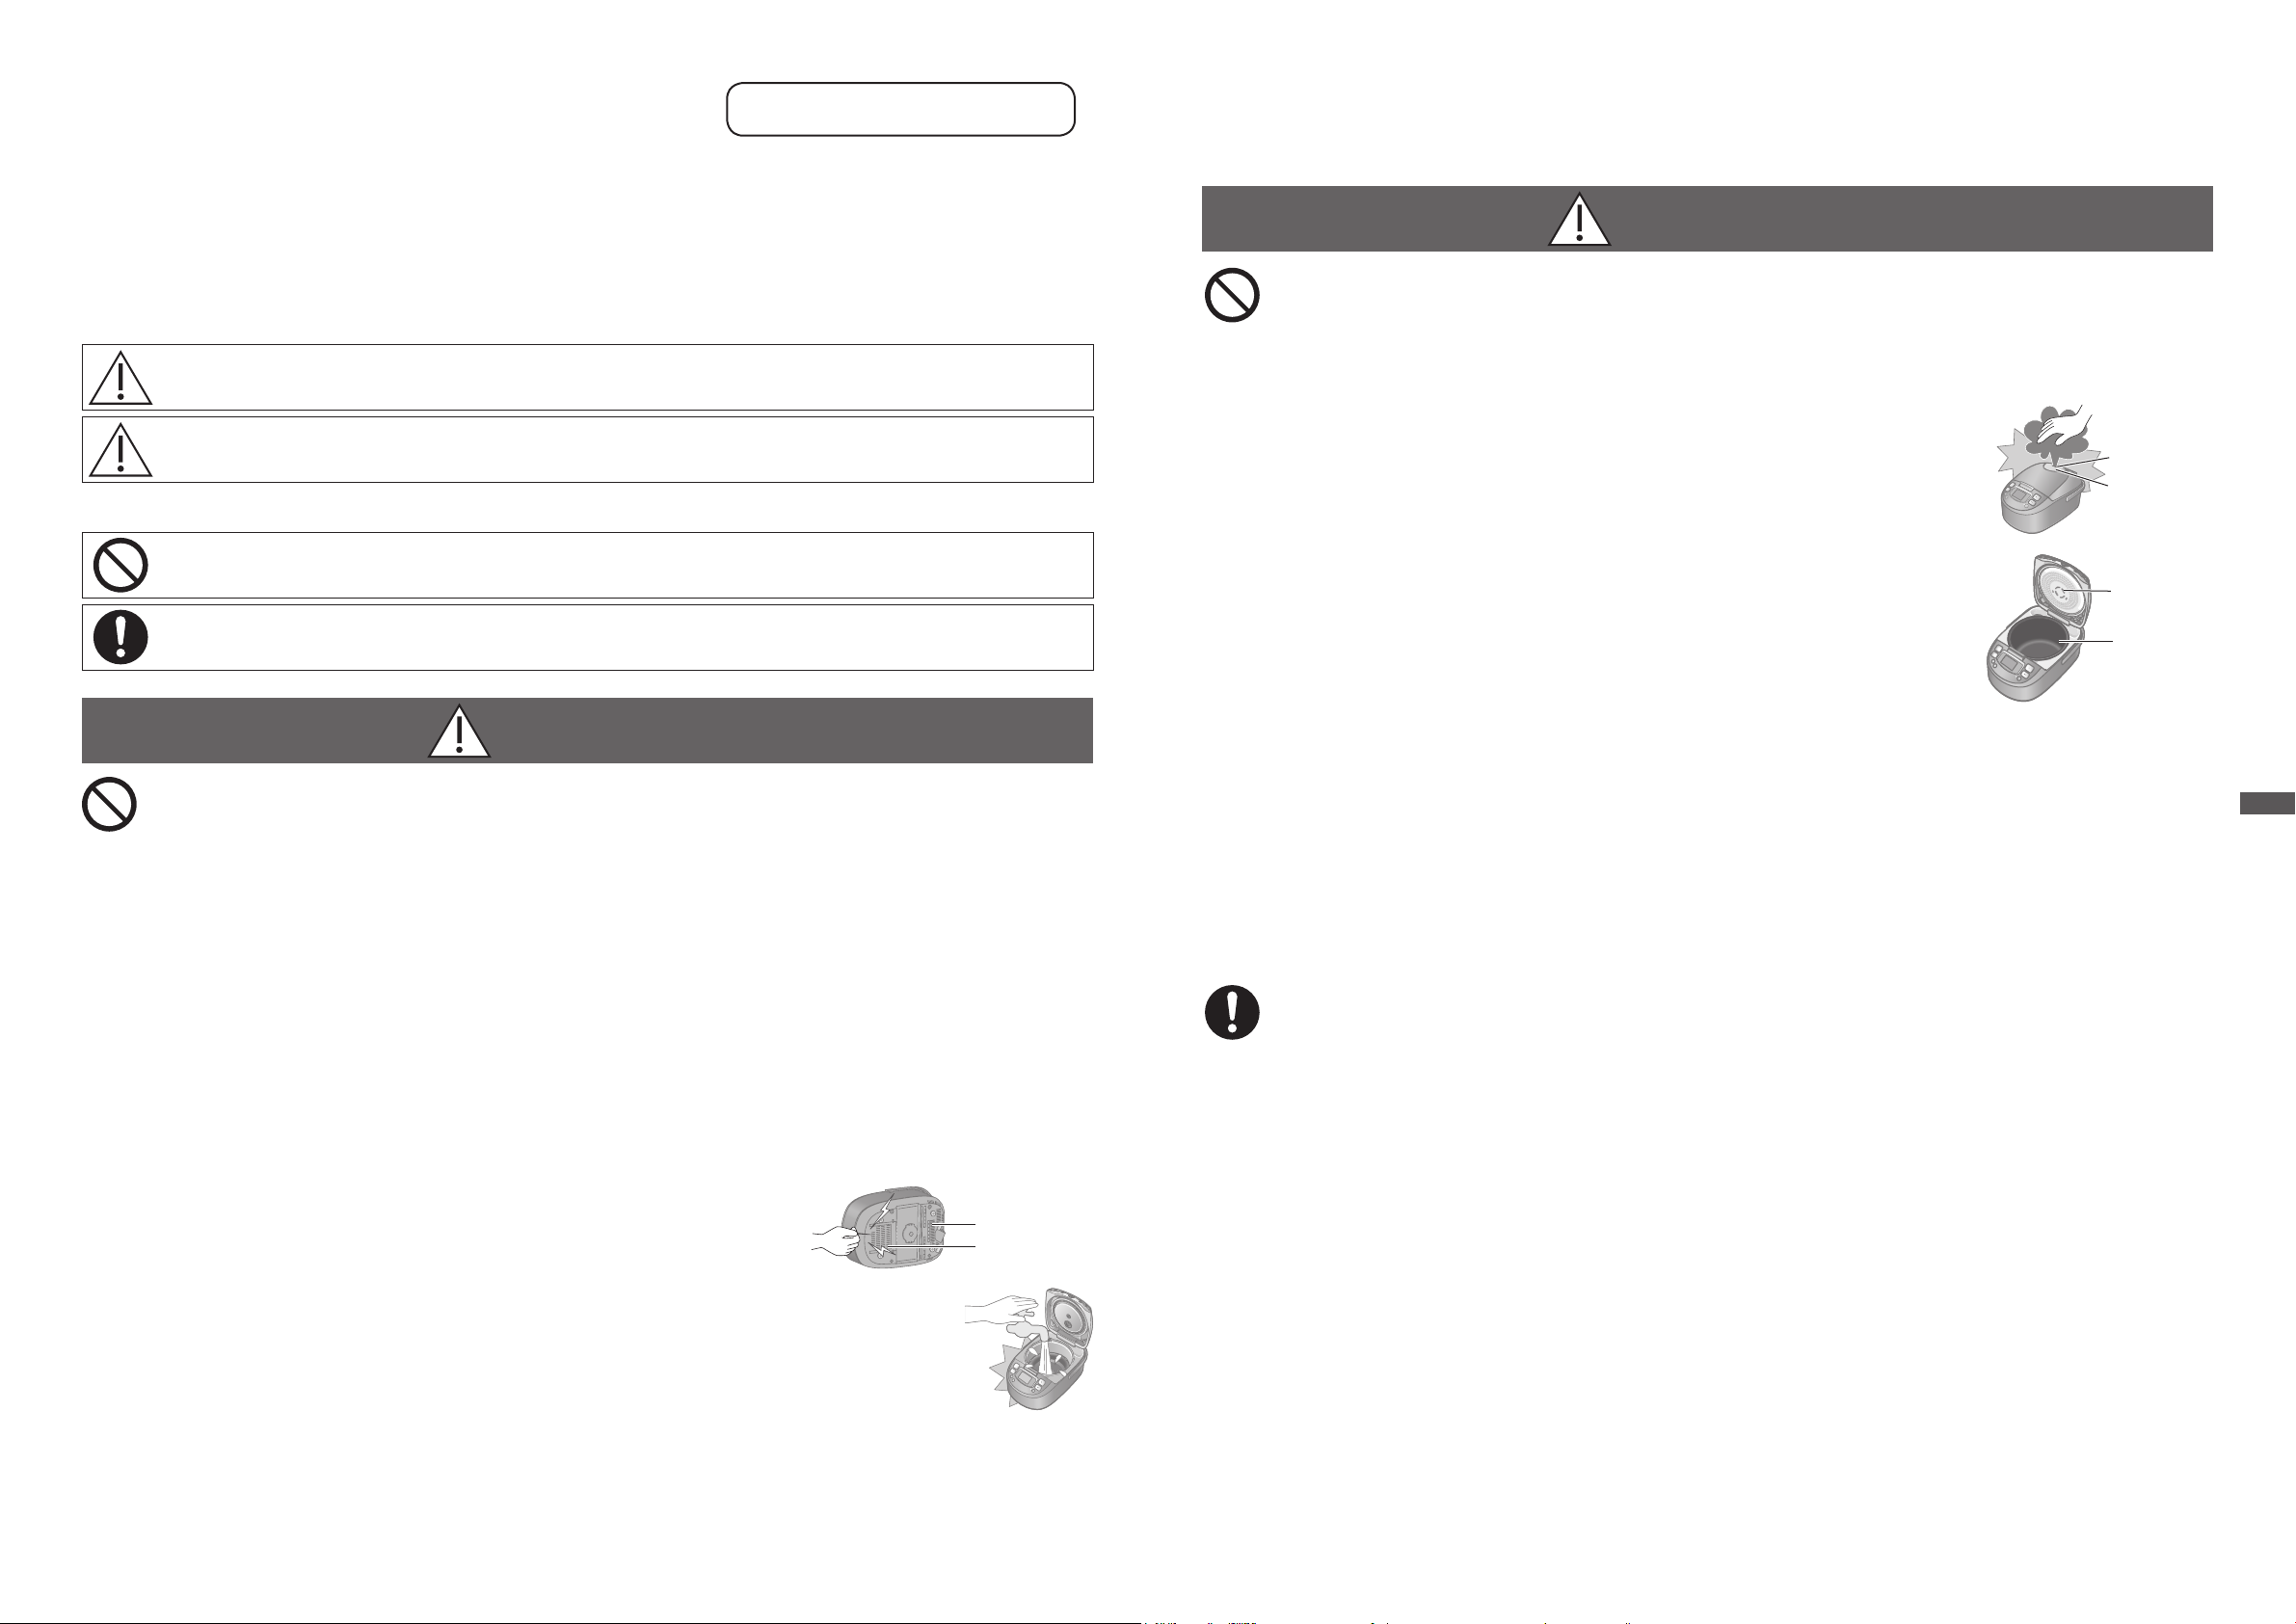
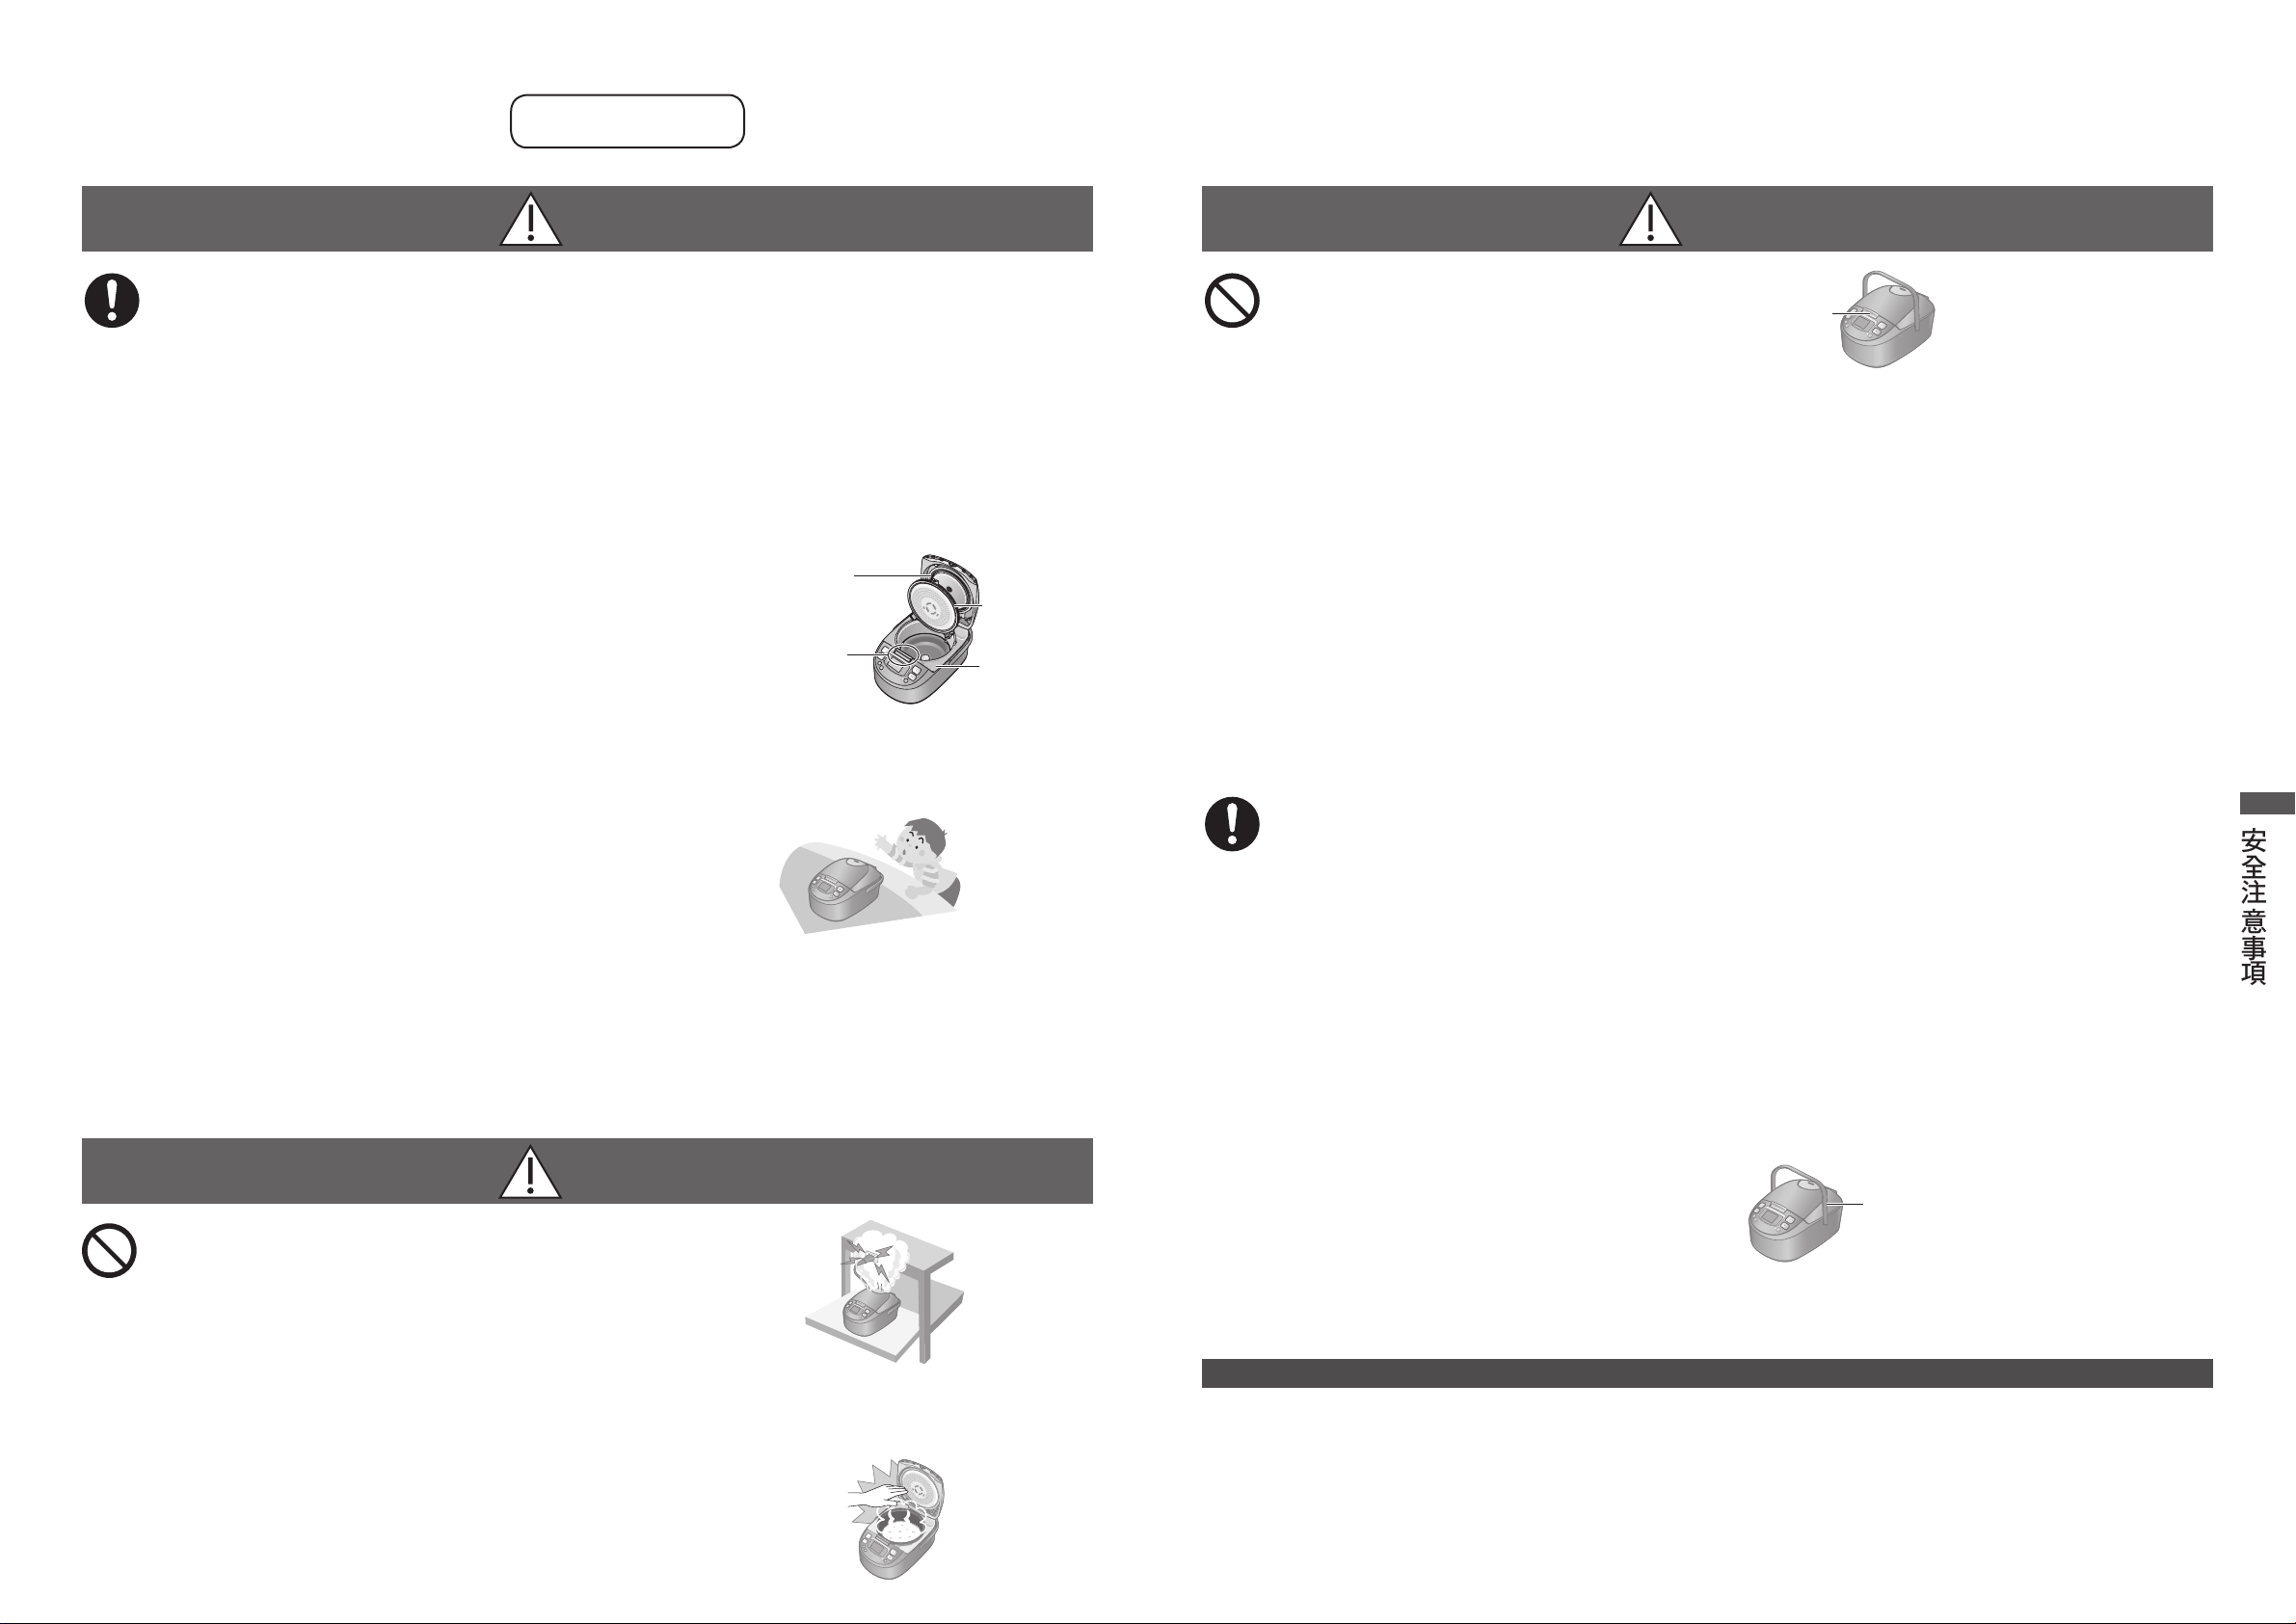
O Do not expose your face close to the Steam Vent or the Steam
Cap or touch them with your hand while cooking or
immediately after cooking.
•OPay extra attention to infants.
(It may cause a burn.)
O Do not put anything in the Inner Pan to block the hole in the
Inner Lid.
(Steam may leak or cooking contents may jet out, causing a burn or injury.)
<Examples of prohibited cooking methods>
•OCooking with the ingredients or seasoning in a plastic bag.
•OCooking by using aluminium foil etc. to cover the ingredients directly.
O Do not open the Outer Lid or carry the appliance while cooking.
(Steam may leak or cooking contents may jet out, causing a burn or injury.)
O Do not spill water or other liquid on the connector such as the instrument plug.
(It may cause an electric shock, or fire caused by short circuit.)
O Do not let anyone lick the instrument plug.
•OPay extra attention to infants.
(It may cause an electric shock or injury.)
O This appliance is not intended for use by persons (including children) with reduced
physical, sensory or mental capabilities, or lack of experience and knowledge,
unless they have been given supervision or instruction concerning use of the
appliance by a person responsible for their safety. Children should be supervised
to ensure that they do not play with the appliance.
(It may cause a burn, injury or electric shock.)
Steam Vent
Steam Cap
Hole in the
Inner Lid
Inner Pan
Safety Precautions
O Do not insert any object in the Intake Vent, Exhaust Vent or gaps.
•OEspecially metal objects such as pins or wires.
(It may cause an electric shock, or injury caused by malfunction.)
O Do not wash the main body with water, immerse the appliance in water
or splash it with water.
(It may cause an electric shock, or fire caused by short circuit.)
O« Please contact an authorised dealer if water gets inside the appliance.
O Do not modify, disassemble, or repair the appliance.
(It may cause a fire, electric shock or injury.)
O« Please contact an authorised dealer for a repair.
Exhaust Vent
Intake Vent
O Use only a power outlet rated at 10 Amperes and alternating electric current at
220 Volts.
(Plugging other devices into the same outlet may cause electric overheating, which may cause a fire.)
•OUse only an extended cord rated at 10 amperes at least.
O Insert the instrument plug and the power plug completely.
(It may cause smoking, a fire or electric shock.)
O Clean the power plug regularly.
A soiled power plug may cause insufficient insulation due to the moisture, and lint build-up, which may
(
cause a fire.
O« Unplug the power plug, and wipe with the dry cloth.
)
2 3
Page 3
Safety Precautions
Please make sure to follow
these instructions
WARNING
O Stop using the appliance immediately and unplug when abnormality or breaking
down occurs.
(It may cause smoking, a fire or electric shock.)
e.g. for abnormality or breaking down:
•OThe power plug and the power cord become abnormally hot.
•OThe power cord is damaged or power failure happens when the power cord is touched.
•OThe main body is deformed or is abnormally hot.
•OSmoke emanates from the main body or a burning odour is detected.
•OThe main body is cracked, is loose or rattles.
•OThe fan in the bottom does not rotate while cooking.
O« Please contact an authorised dealer for inspection or repair immediately.
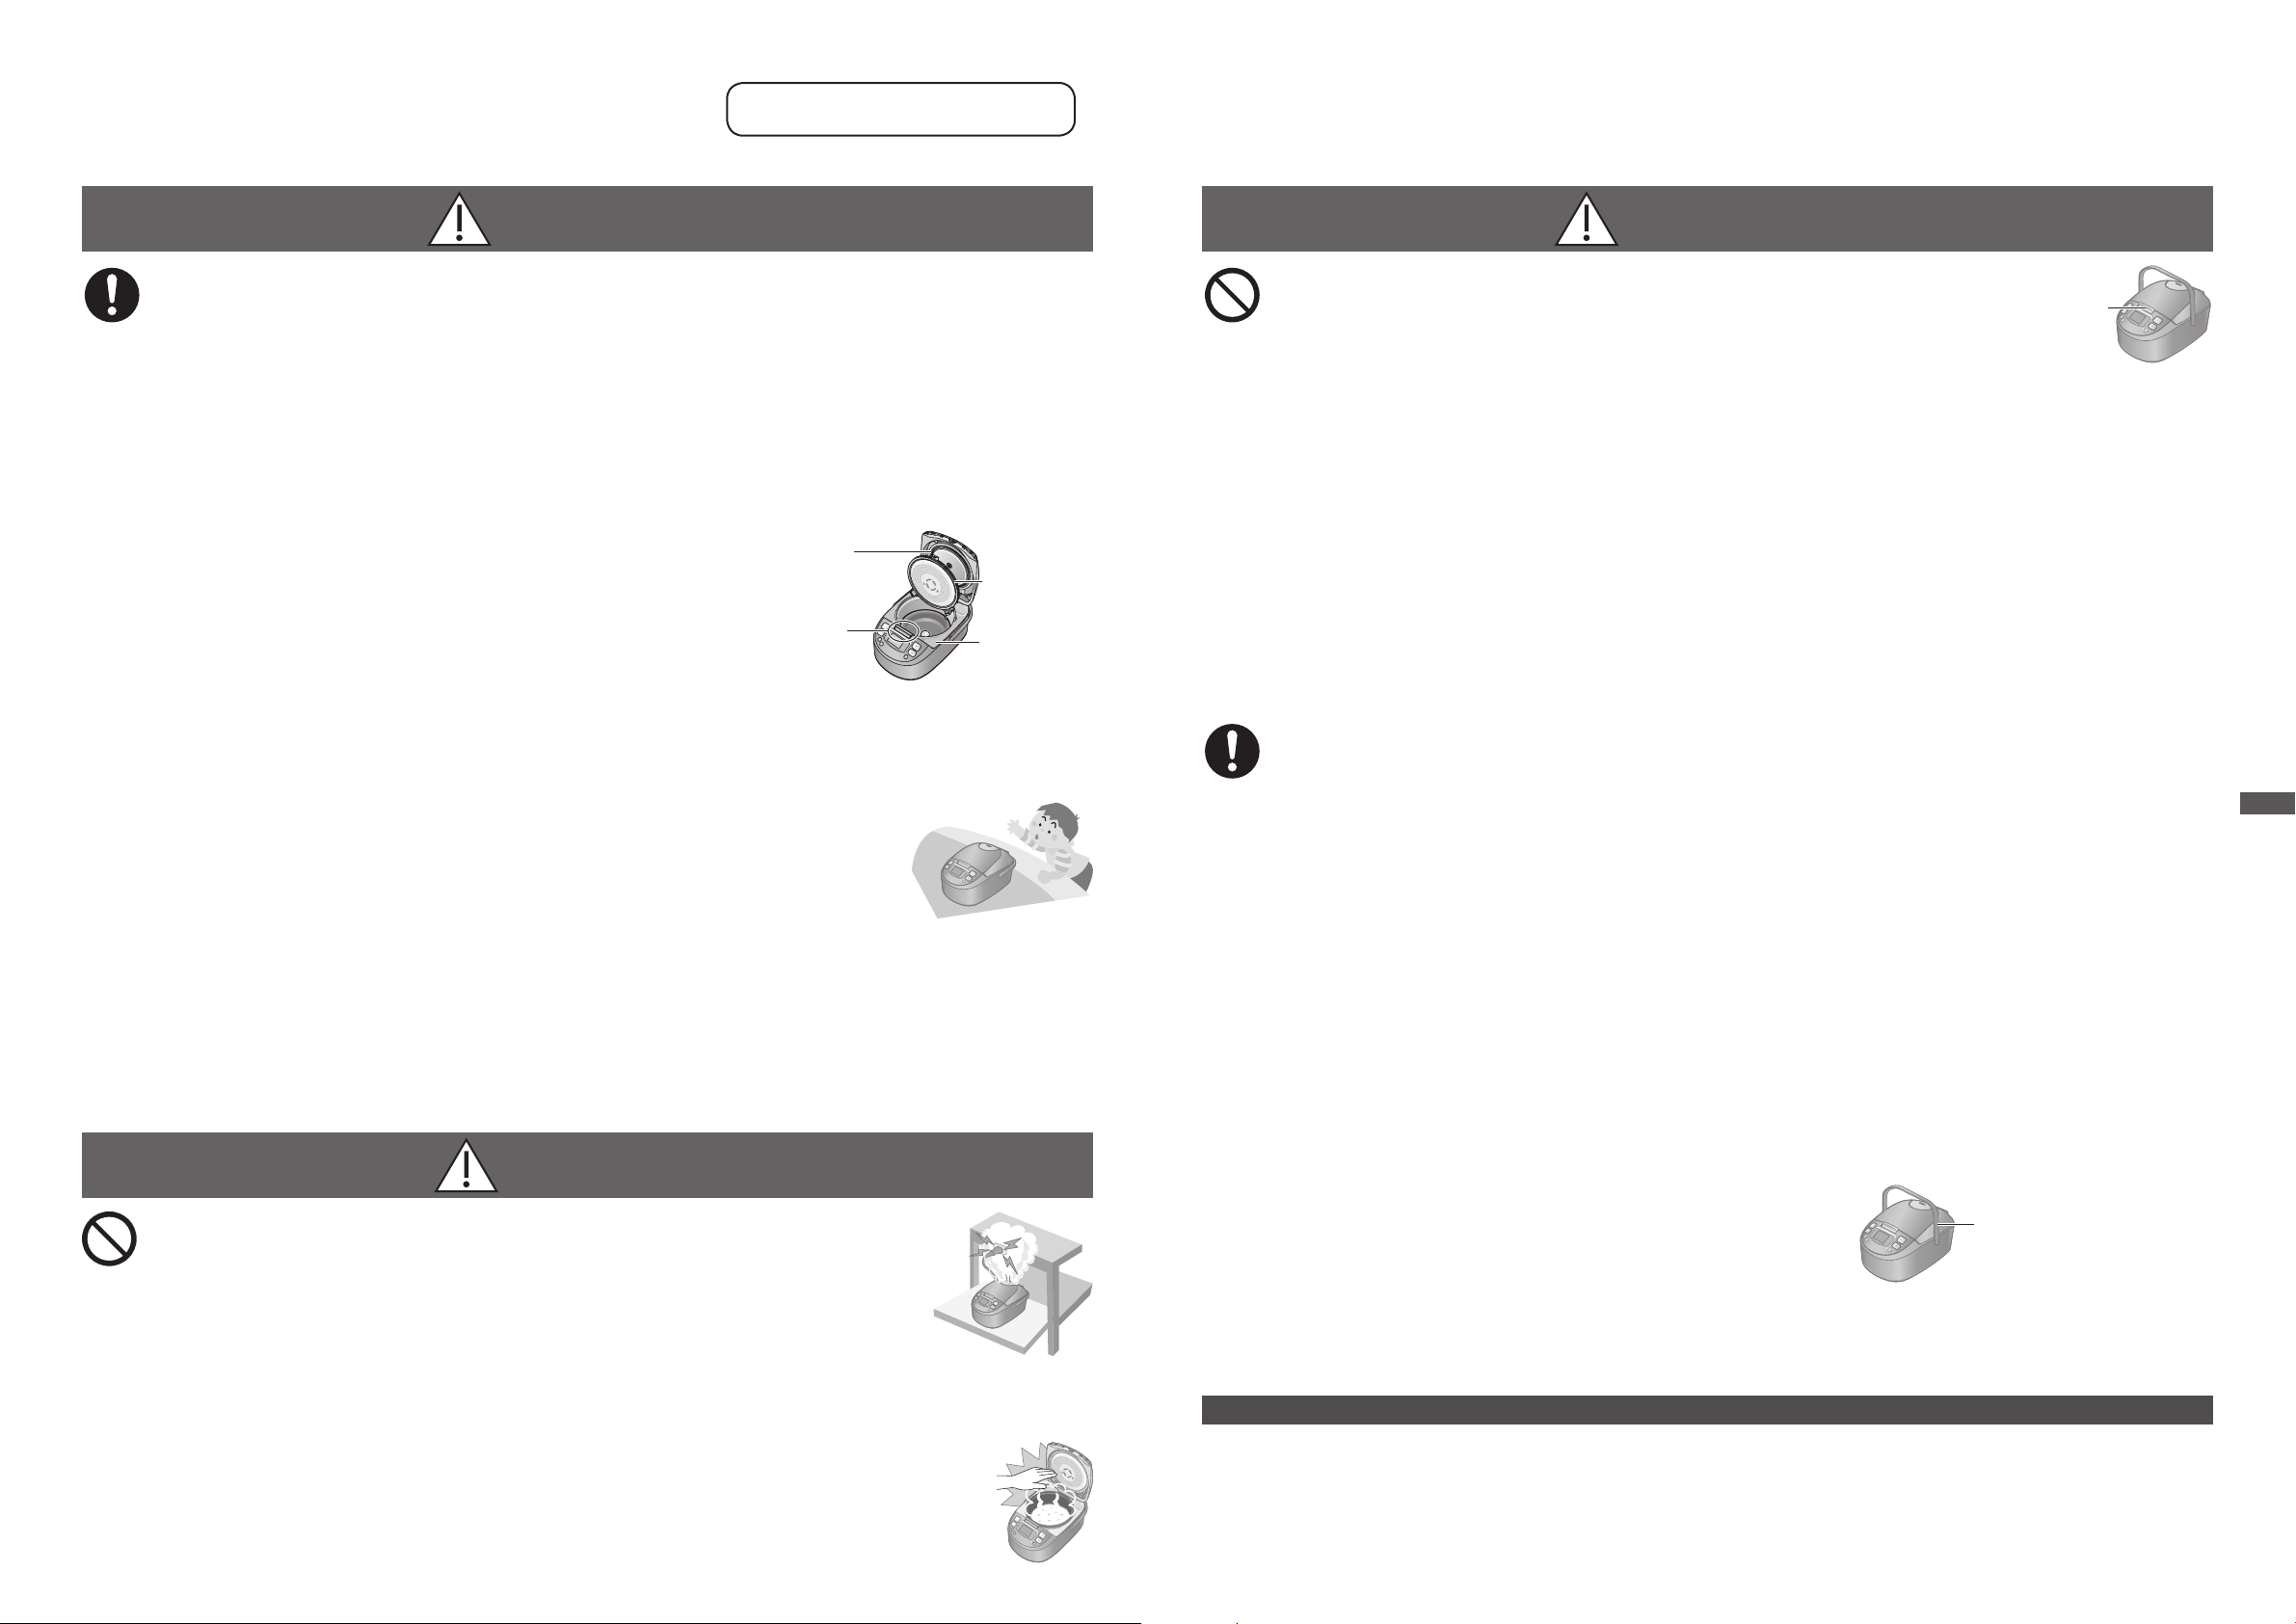
O Close the Outer Lid slowly and firmly until it clicks.
To prevent a burn or injury by steam leaking or the opening of
(
the Outer Lid.
•OTo ensure that the Outer Lid can be closed, remove foreign
objects such as rice grains on the Clear Frame, Packing of
the Inner Lid, Packing of the Outer Lid, the edge of the Inner
Pan or around the Hook Button.
O Keep the power cord out of reach of children.
•ODo not let the power cord hang over the edge of the table or countertop.
(Pulling on the power cord may result in the appliance falling from the table or countertop, causing an injury.)
Packing of
the Outer Lid
)
Around the
Hook Button
Packing of
the Inner Lid
Clear Frame
CAUTION
O Do not touch the Hook Button while moving the appliance.
(It may cause the Outer Lid to open, resulting in a burn.)
O Do not use the appliance on following places.
•OPlaces where it may be splashed with water or near a heat source.
(It may cause an electric shock, electrical leakage or fire.)
•OOn an uneven surface or on non-heat-resistant carpet.
(It may cause an injury, burn or fire.)
•ONear a wall or furniture.
(It may cause discolouration, deformation or damage.)
O« Open the Outer Lid in an area away from surrounding objects such as the wall or furniture.
•OOn aluminium sheet or electronic carpet.
(Aluminium materials may generate heat and cause smoking or a fire.)
O Do not turn on the appliance without rice and water inside.
(It may cause a burn.)
O Do not use the cord set (for an instrument plug and power plug) that is not
specified for use with this appliance. Also do not transfer it.
(It may cause an electric shock, electrical leakage or fire.)
O Be sure to hold the power plug or the instrument plug when unplugging the power
plug or the instrument plug.
(Otherwise it may cause an electric shock, or fire caused by short circuit.)
Hook Button
O Always keep children away from the appliance.
(It may cause a burn, injury or electric shock.)
•OChildren do not realize dangers that are likely to occur because of improper use of
electrical appliances.
O Be careful not to trip over or become entangled with the power cord while in use.
(Otherwise it may result in an injury, or the damaged power cord causing a fire or electric shock.)
O Use a power outlet which you are sure includes an earth.
•OThe power plug of this appliance is designed for a power outlet with an earth.
Use of a power outlet without an earth may result in a malfunction or electric shock due to electrical
(
leakage.
)
CAUTION
O Do not expose the power plug to steam.
•ODo not expose the power plug to steam when it is plugged in.
(It may cause an electric shock, or fire caused by short circuit.)
O« When using a cabinet with sliding table, use the appliance where the power plug
cannot be exposed to steam.
O Always switch off and unplug the appliance from the power outlet when it is not in
use or before removing the Inner Pan.
Otherwise it may cause a burn, injury, or electric shock or fire caused by short circuit due to the insulation
(
deterioration.
O Unplug and allow the appliance to cool down fully before cleaning and storing it.
•ODo not move the appliance while it is hot.
(Touching hot elements may cause a burn.)
O If using the appliance on a kitchen shelf etc., ensure that the steam is not confined
within a closed space.
(It may cause discolouration or deformation.)
•OIf using a slide-out shelf, pull the shelf out fully to ensure that the shelf above is not exposed to steam.
O If using the appliance on a slide-out table etc., ensure that the shelf is capable of
supporting 10 kg or more for the 1.0 L model, or 13 kg or more for the 1.8 L model.
(It may cause a burn or injury due to the appliance falling.)
O Hold the Handle when moving the appliance.
(Otherwise it may cause a burn or injury.)
O Please consult a doctor if you are using an implanted pacemaker.
•OThe operation of this appliance may affect your pacemaker.
Handle
Safety Precautions
)
O Do not use a deformed Inner Pan or an unspecified pan.
(It may cause a burn or injury due to overheat or malfunction.)
O Do not touch heating elements while the appliance is in use or after
cooking.
•OThe Steam Cap, Inner Lid, metal parts, such as the Clear Frame, and Inner Pan.
(It may cause a burn.)
O« Use a dry cloth or oven mitts when removing the Inner Pan while it is hot.
4 5
Includes if the power plug is removed, or the power circuit breaker is tripped during use.
OOIf power is interrupted, the Warm Jar will return to the state it was in before interruption.
OOIf the power stops for a long period of time, the Warm Jar will return to the following state when power resumes.
Cooking: Continues cooking.
The rice may be cooked in an unsatisfactory way.
* It will start cooking immediately if the set time of the timer has elapsed. The rice may not be cooked by the set time.
For further details on “Timer Setting Restriction”, see P. 26.
If the power stops during use
Keeping warm: Continues keeping the rice warm.
Page 4
Notes on Use Part Names/Accessories
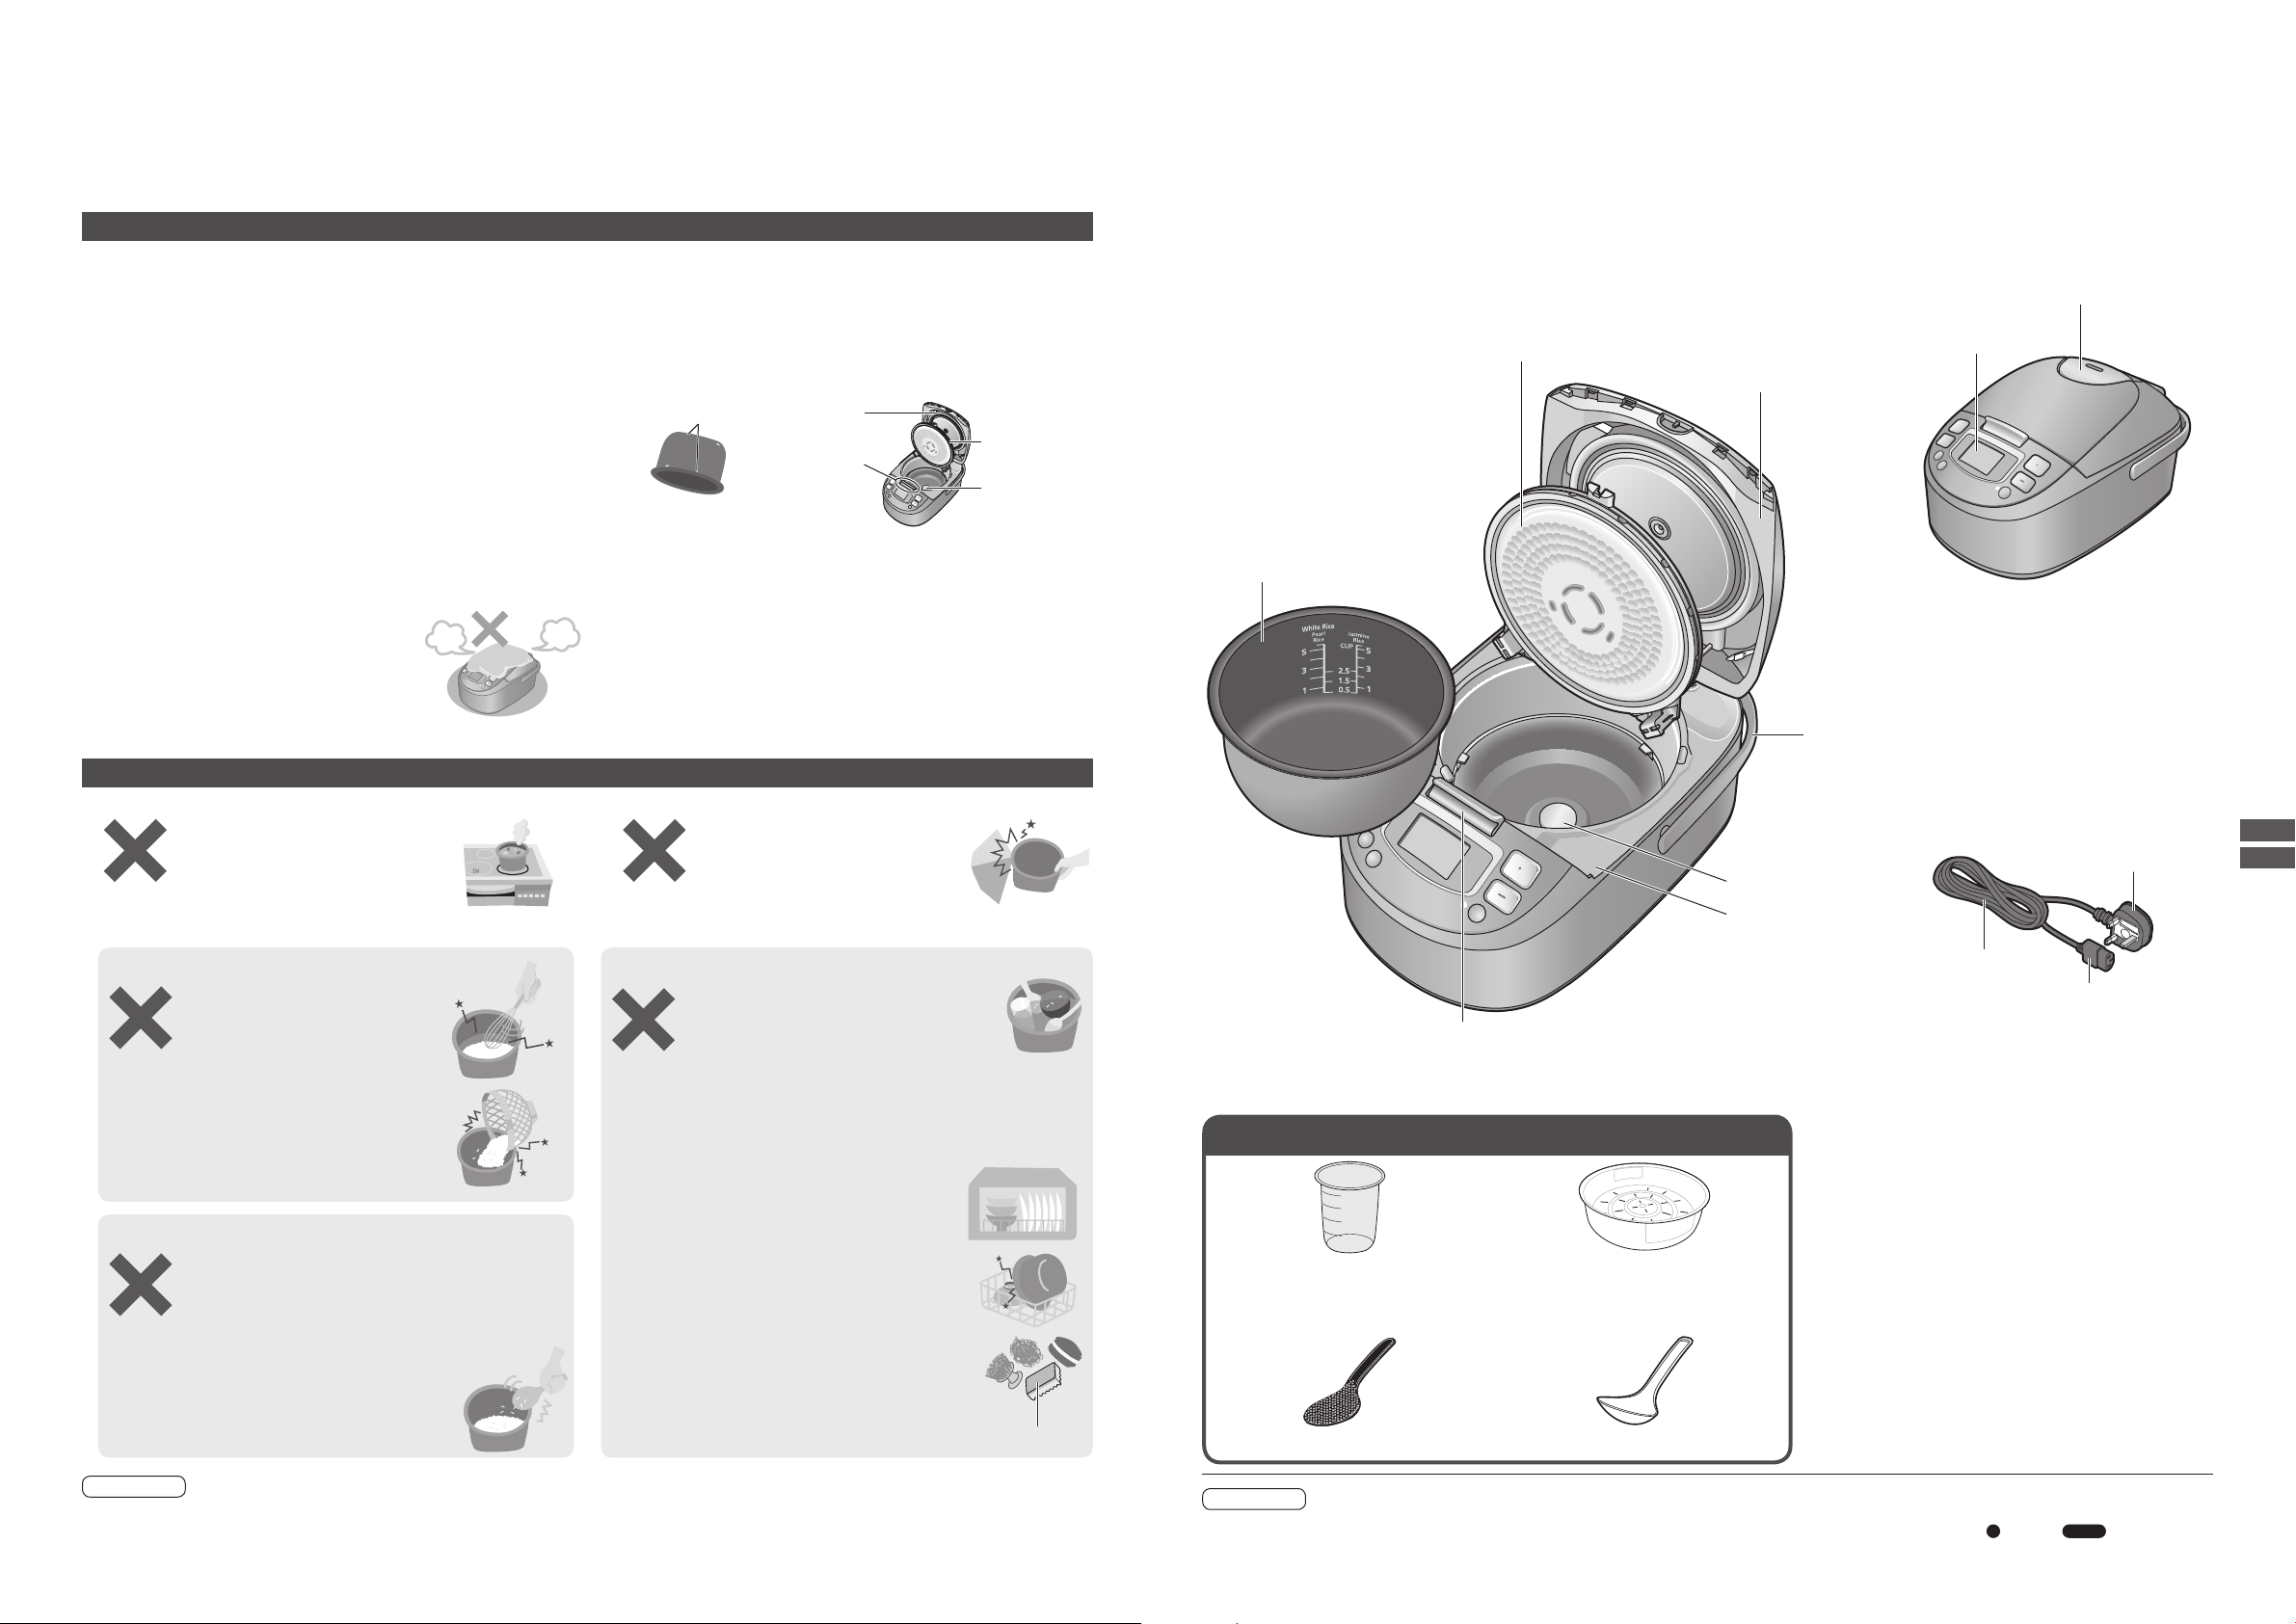
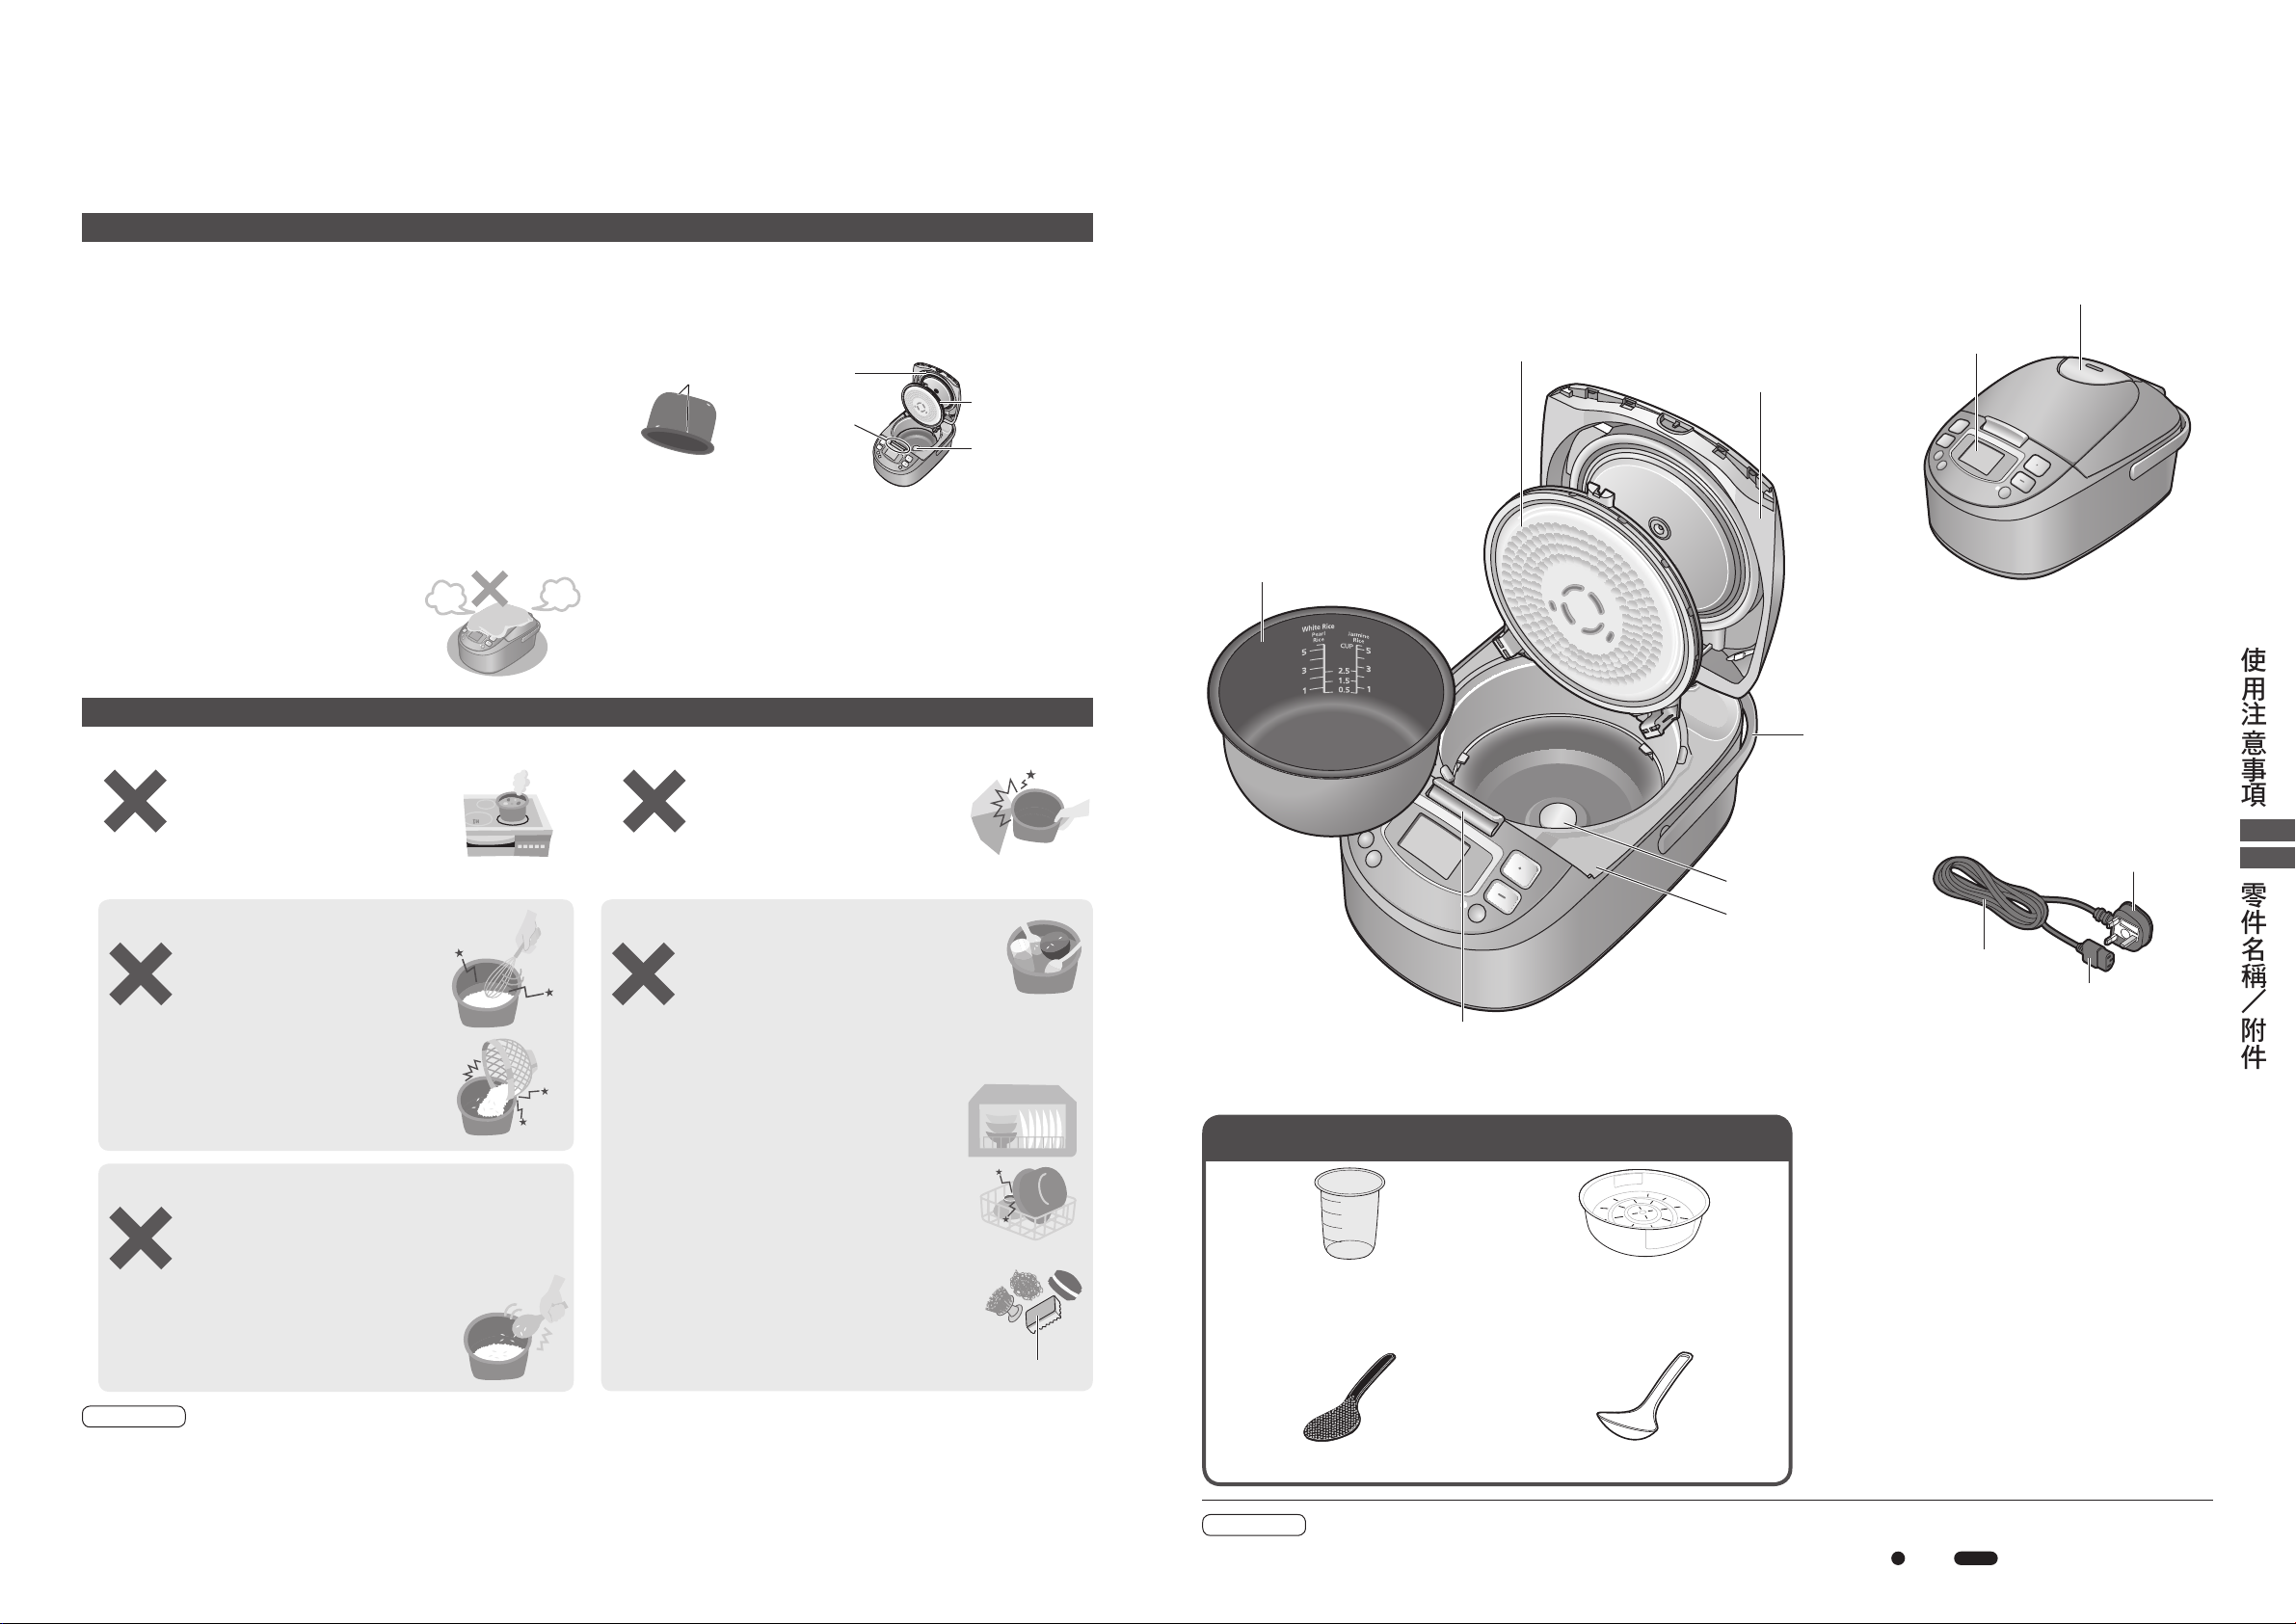
Accessories
Measuring Cup (1)
(Approx. 180 mL)
OOSame for all rice.
Steaming Basket (1)
Rice Scoop (1) Ladle (1)
To keep the product in good condition over the long term, please observe the following.
About the Warm Jar
OQ Do not use the Warm Jar on an IH hob.
(Doing so may damage the Warm Jar or hob.)
OQ Do not use in a location subject to direct sunlight.
(Doing so may result in discolouration.)
OQ Do not use in a location (on a carpet, plastic bag,
aluminium foil, fabric etc.) where the bottom of the
Warm Jar (the Intake and Exhaust Vents) is
restricted.
(Doing so may damage the Warm Jar.)
OQ Periodically check the Intake and Exhaust Vents at
the bottom of the Warm Jar and then remove any
dust etc. (P. 19)
OQ Do not use the Warm Jar outdoors.
An unstable power supply may cause the
(
Warm Jar to develop a fault.
OQ Do not cover the top of the Warm
Jar when it is in use.
OODishcloths etc.
Steam may be conned near the
Warm Jar and cause the Outer Lid or
(
buttons to deform or stop operating.
)
)
OQ Do not use the Warm Jar with foreign objects such
as rice grains or other dirt stuck to it.
• Doing so may result in an error message being
displayed, and the rice being burnt or otherwise
cooked in an unsatisfactory way.
(
• This may cause steam to leak during cooking, and
cause damage to the appliance.
Brim part or bottom
(Inner Pan)
OQ Do not place the Warm Jar near devices vulnerable
to magnetic fields.
OORadios, televisions, hearing aids etc.
(Noise may be heard or volume levels reduced.)
OOIC cards/bank cards etc.
(Records held on the card may be lost or damaged.)
OQ Do not bring magnets close to the Warm Jar.
(Doing so may result in faulty operation.)
Packing of
the Outer Lid
Around the
Hook Button
)
Packing of
the Inner Lid
Pan Sensor
OQ Before using the Warm Jar for the first time, please wash the accessories, Inner Pan, Inner Lid and Steam
Cap. (P. 18–19)
Steam Cap (Taste Catcher)
Inner Lid
OOThe Outer Lid cannot be closed if the
Inner Lid has not been attached.
Outer Lid
Inner Pan
Handle
Display
Notes on Use Part Names/Accessories
About the Inner Pan
OQ Do not use the Inner Pan except in the Warm Jar.
OODo not use on a gas hob or
IH hob, or in a microwave.
OQ Observe the following to prevent peeling or scratching of the inner coating.
During preparation
OODo not use a whisk or
other tool when washing
the rice.
OODo not allow a metal
strainer etc. to contact
the inner coating.
OQ Do not strike against hard objects.
Doing so may scratch or
(
dent the outer surface.
When cleaning (P. 18–19)
OO
Do not use as a washing-up bowl.
Do not put spoons or other
cutlery into the Inner Pan.
OOAfter cooking with seasoning, do not
leave the food in the Inner Pan.
«After cooking casserole rice etc.,
remove it from the Inner Pan as soon as
possible and wash the Inner Pan.
OO
Do not use a dish dryer or
dishwasher/dryer.
)
Pan Sensor
Clear Frame
Power Cord
Instrument Plug
Hook Button
OOPress the Hook Button to
open the Outer Lid.
Cord Set
Power Plug
When rice is cooked
OODo not mix salt or sprinkle etc. with
the rice while it is in the Inner Pan.
OODo not mix vinegar with the rice while
it is in the Inner Pan (for sushi etc.).
OODo not use a metal ladle
(for congee etc.).
OODo not tap or hit the Inner
Note
6 7
Pan (when serving etc.).
OOThe following do not affect performance or human health.
[Outer surface] Shallow scratches, small dents or bumps.
[Inner surface] Peeling of inner coating.
A new Inner Pan can be purchased if the Inner Pan has changed shape or you are concerned
about the condition of the Inner Pan.
OOAfter washing, do not leave
on other crockery to dry.
OODo not wash or scrub with
an abrasive, a metal scourer,
a nylon scourer impregnated
with polish etc..
«Wash using a soft sponge.
Do not wash using the scouring pad.
Note
OOAs an aid for the visually impaired, the “Start” and “Cancel/Off” buttons have raised parts “ ” and “ ”.
Page 5
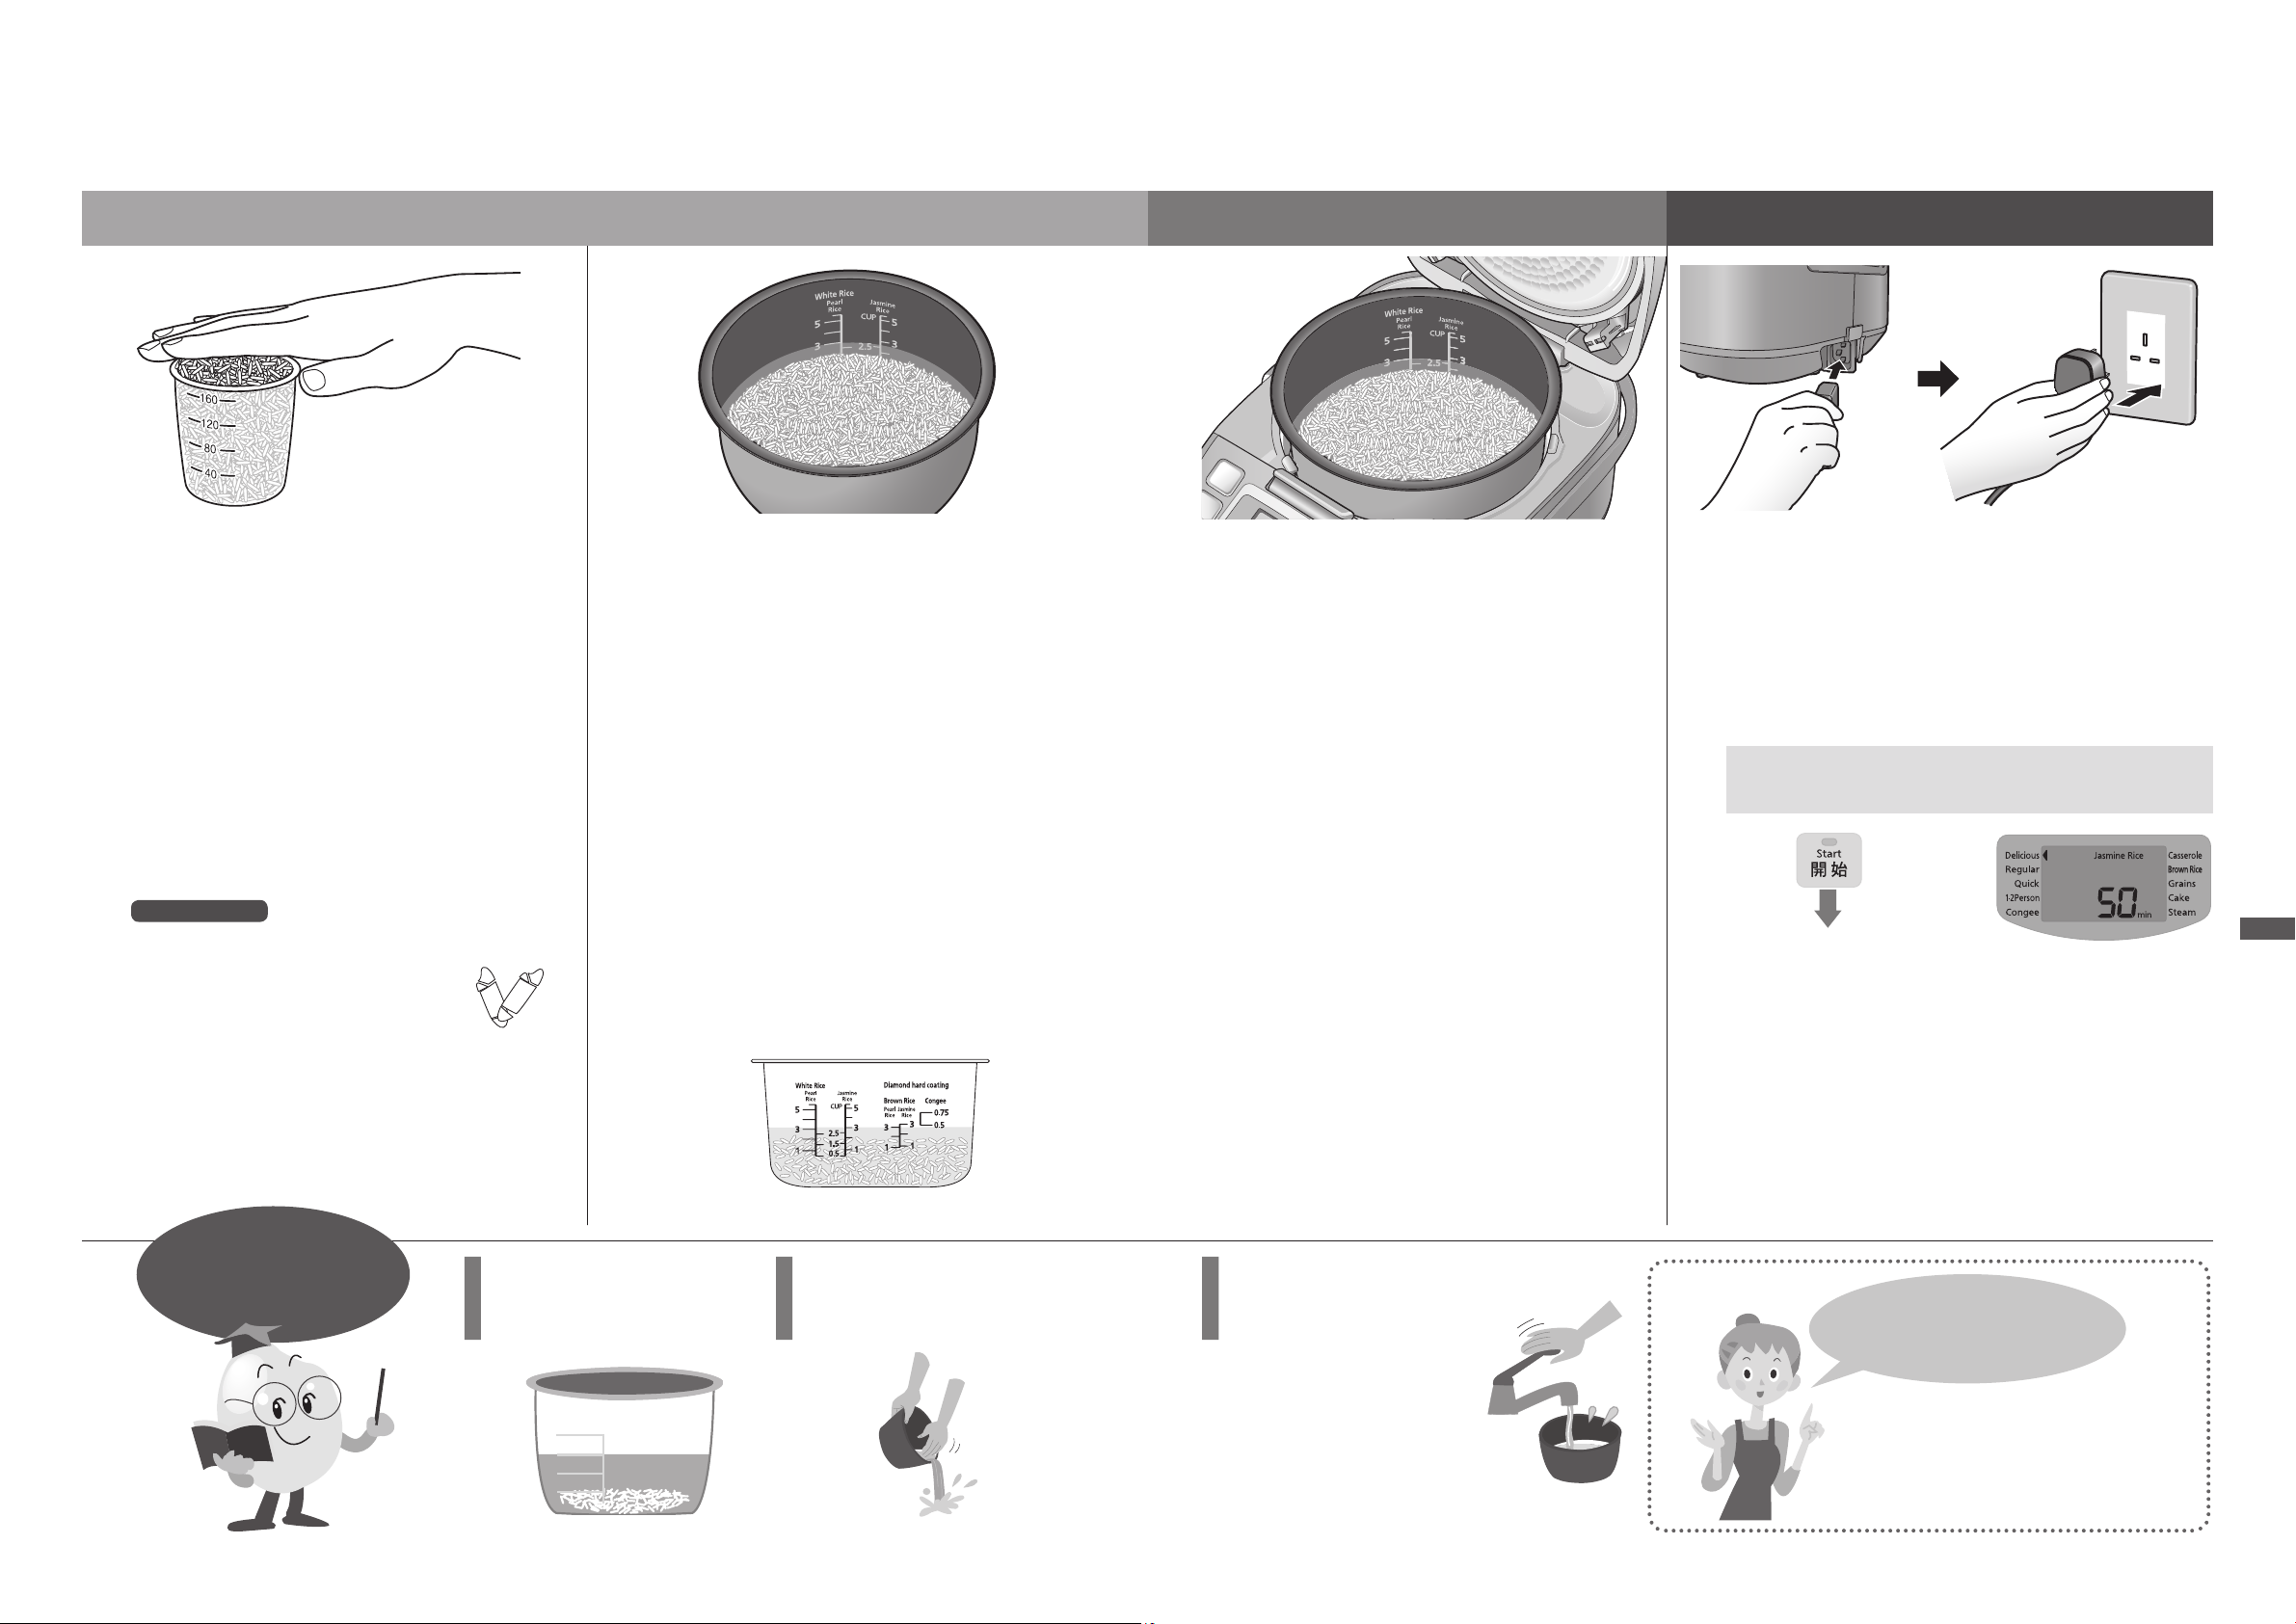
Cooking Rice
Washing the rice and adding water Setting up Cooking
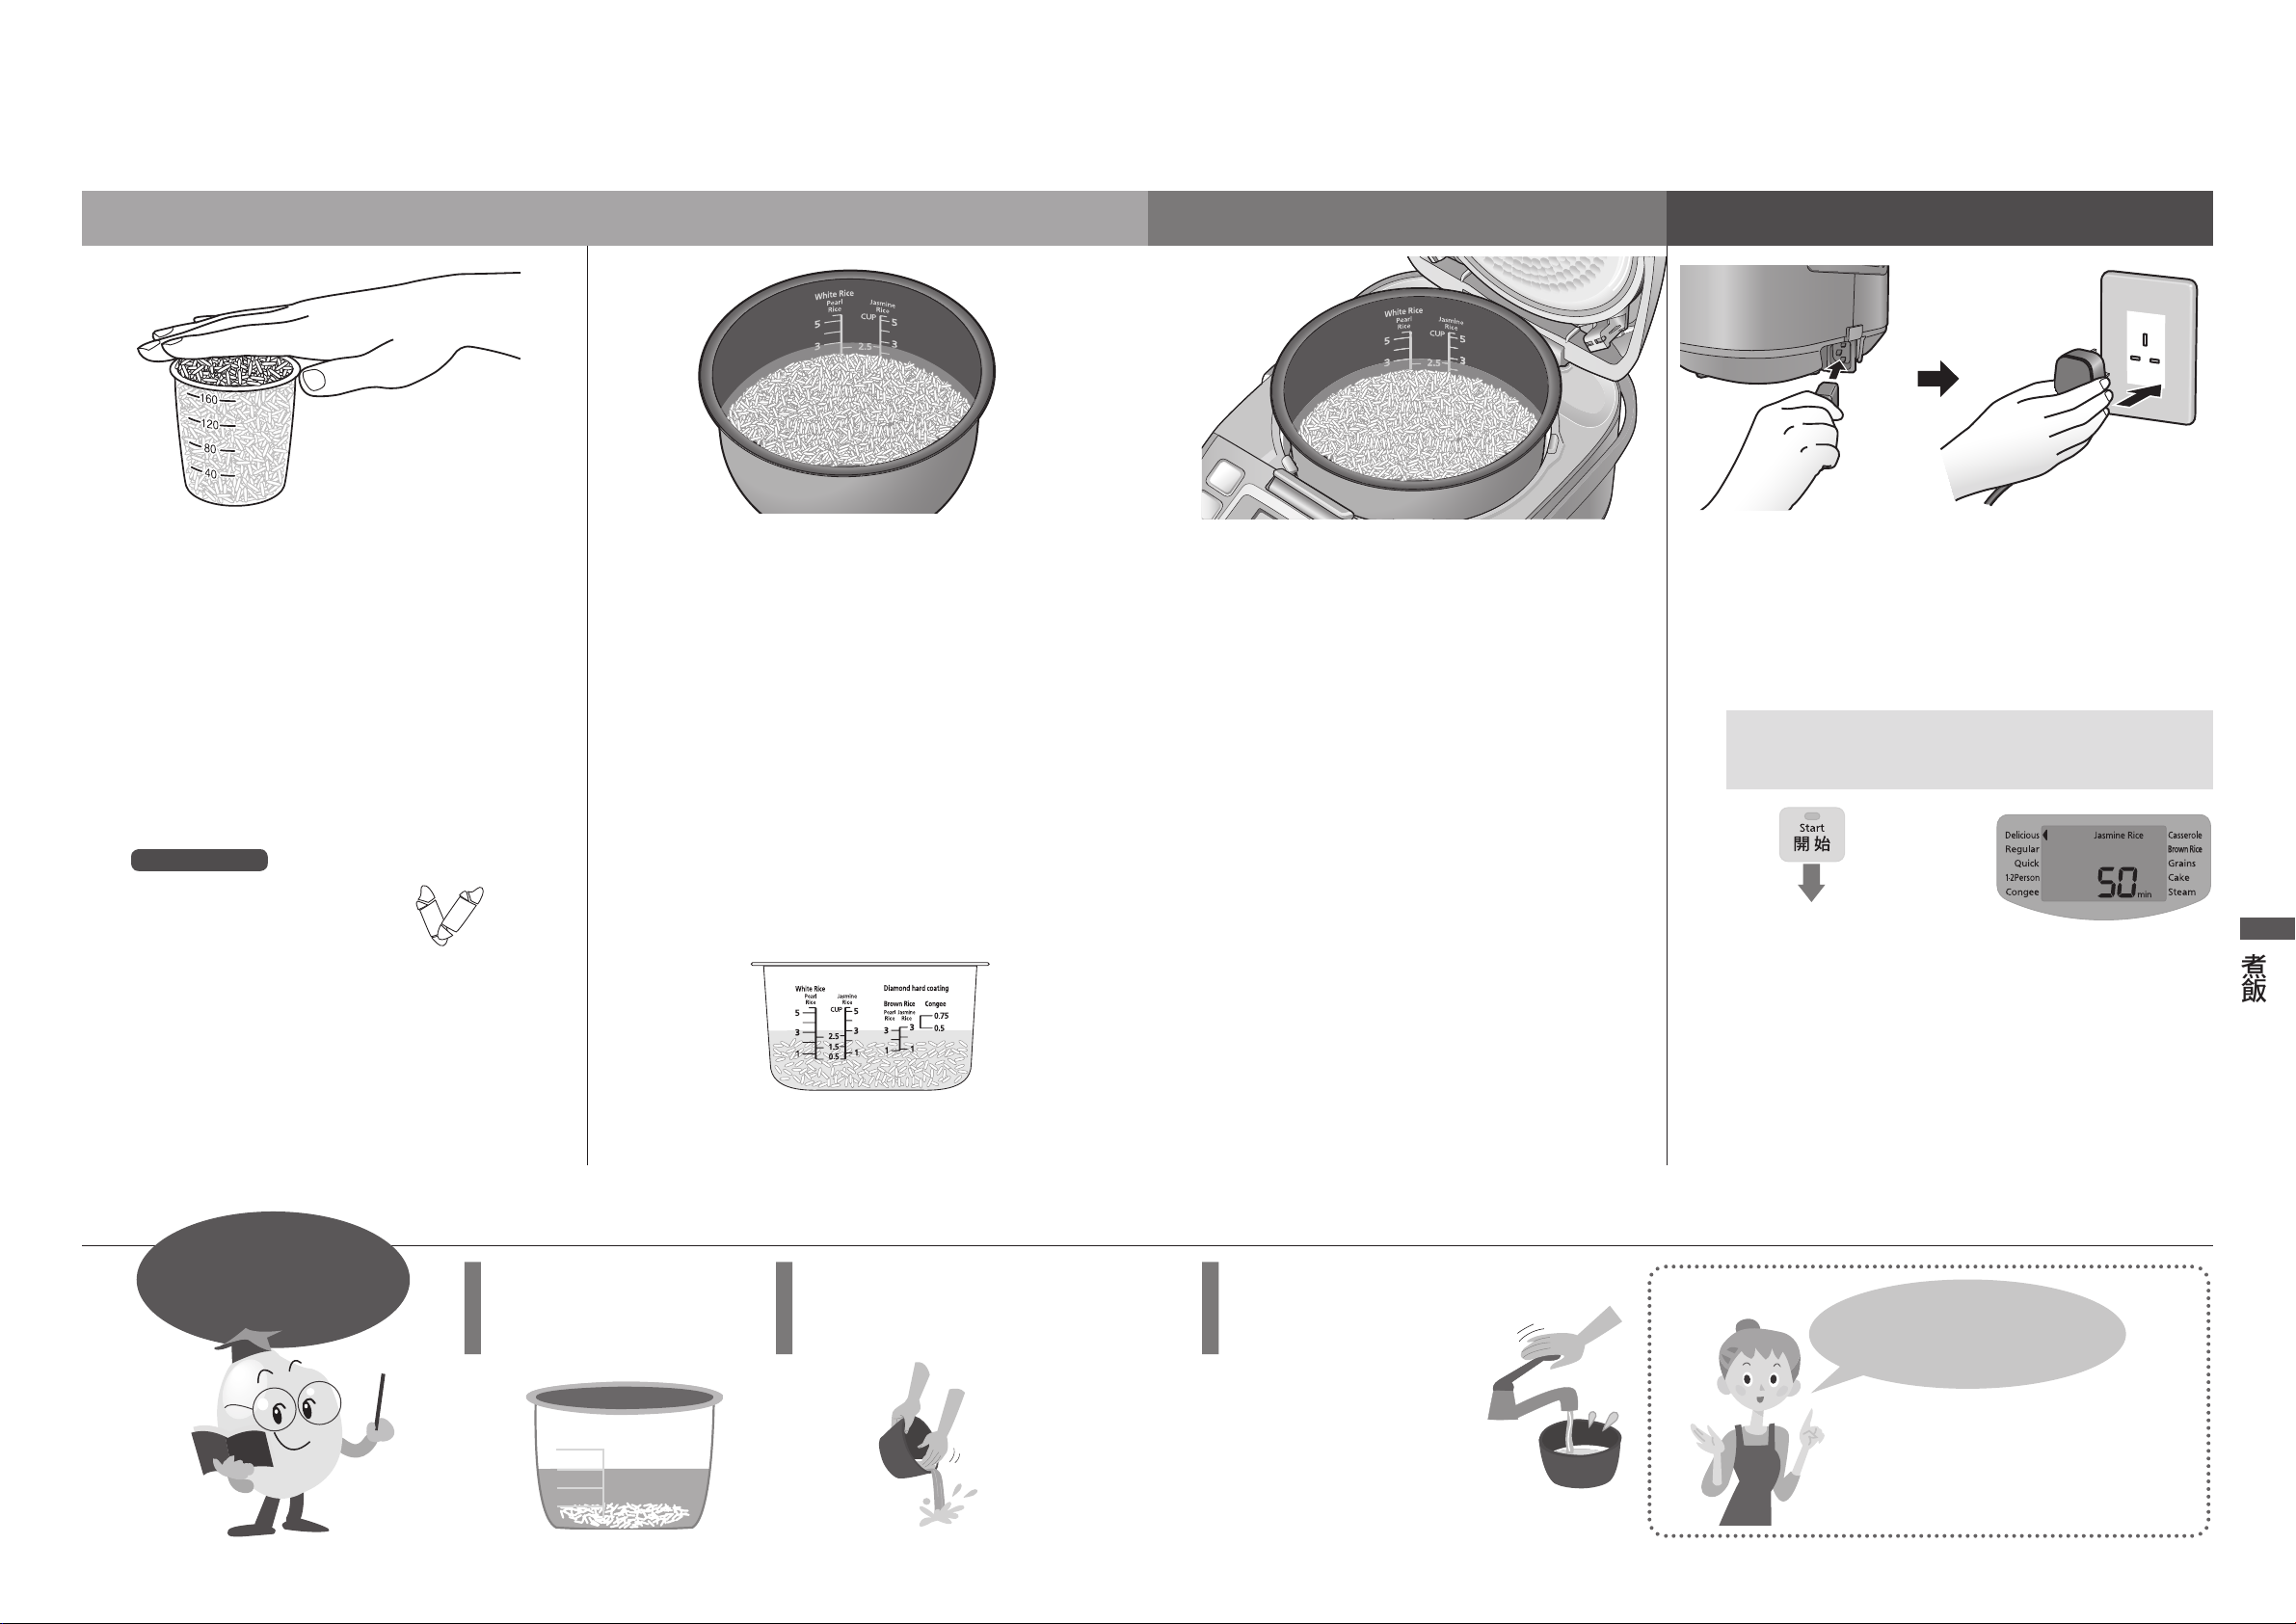
Measure the rice
1
OOMeasure by levelling off in the supplied measuring
cup.
(Approx. 180 mL/cup)
Wash the rice
2
First, add plenty of water, stir, and quickly throw
away the water.
Repeat this process 2 to 5 times, stirring gently to
wash the rice each time.
It is acceptable if the cooking water is slightly
(
cloudy.
Put the washed rice in the Inner Pan.
(The rice can be washed in the Inner Pan.)
Precaution
OODo not leave the rice in a strainer for any length of
time.
The rice grains may break,
causing the rice to stick or burn
(
when cooked.
Add water
3
)
)
OOAdd water up to the mark (Water Level) for the
desired cooking program. (P. 10)
Ensure that the Inner Pan is on a level surface
(
and check the marks on both sides.
OOAdd the correct amount of water for the number of
cups of rice.
Adjust water by approximately 1 to 2 mm from the
Water Level according to your preference.
Adding too much water may cause liquid to spill
out, increase the cooking time or adversely
(
affect the avour of the rice.
•OUse a little less water than indicated for new-
crop rice.
•OUse a little less water than indicated for harder
rice and a little more than indicated for softer
rice.
OOEnsure the rice is level.
OOSoaking the rice is not required.
When the “Start” button is pressed, the water
(
will be absorbed automatically.
Using the “Jasmine Rice/Delicious”
program with 3 cups of rice
)
)
)
Place the Inner Pan in the
Warm Jar
4
OOWipe away any water etc. on the outside of
the Inner Pan.
Close the Outer Lid
5
OOCheck that the Inner Lid and Steam Cap are
set in place. (P. 18–19)
Insert the Power Plug
6
OOPlease connect the Instrument Plug to the body rst
and then connect the Power Plug. Make sure that both
plugs are rmly connected.
Check the program and press the
“Start” button.
7
By default, the program is set as “Jasmine Rice/
Delicious” at the time of purchase.
When changing it. (P. 11)
Press .
Cooking starts.
OOWhen the buzzer sounds after cooking, the steaming
stage has nished. Mix the rice immediately.
(This is to allow excess moisture to evaporate.)
OOAutomatically switches to the keep warm function.
(P. 13)
Cooking Rice
The Inner Pan in the illustration is the 1.0 L model.
Three rules
for delicious rice
Measure out the water and
rice correctly.
Wash the rice gently.
Heavy-handed washing of the rice
can result in the grains splitting,
causing the rice to stick or burn.
Use suitable water.
We recommend the use of
tap water or ltered tap
water.
OOUse of alkaline water (with
a pH higher than 9) may
result in sticky or yellowcoloured rice.
OOUse of hard mineral water
(with hardness of 100 or
above) may result in dry or
hard rice.
Things to look out!
OOWhere possible, choose recently
processed rice.
OOAfter opening a bag of rice, use it
promptly.
OOKeep rice in the fridge.
8 9
Page 6
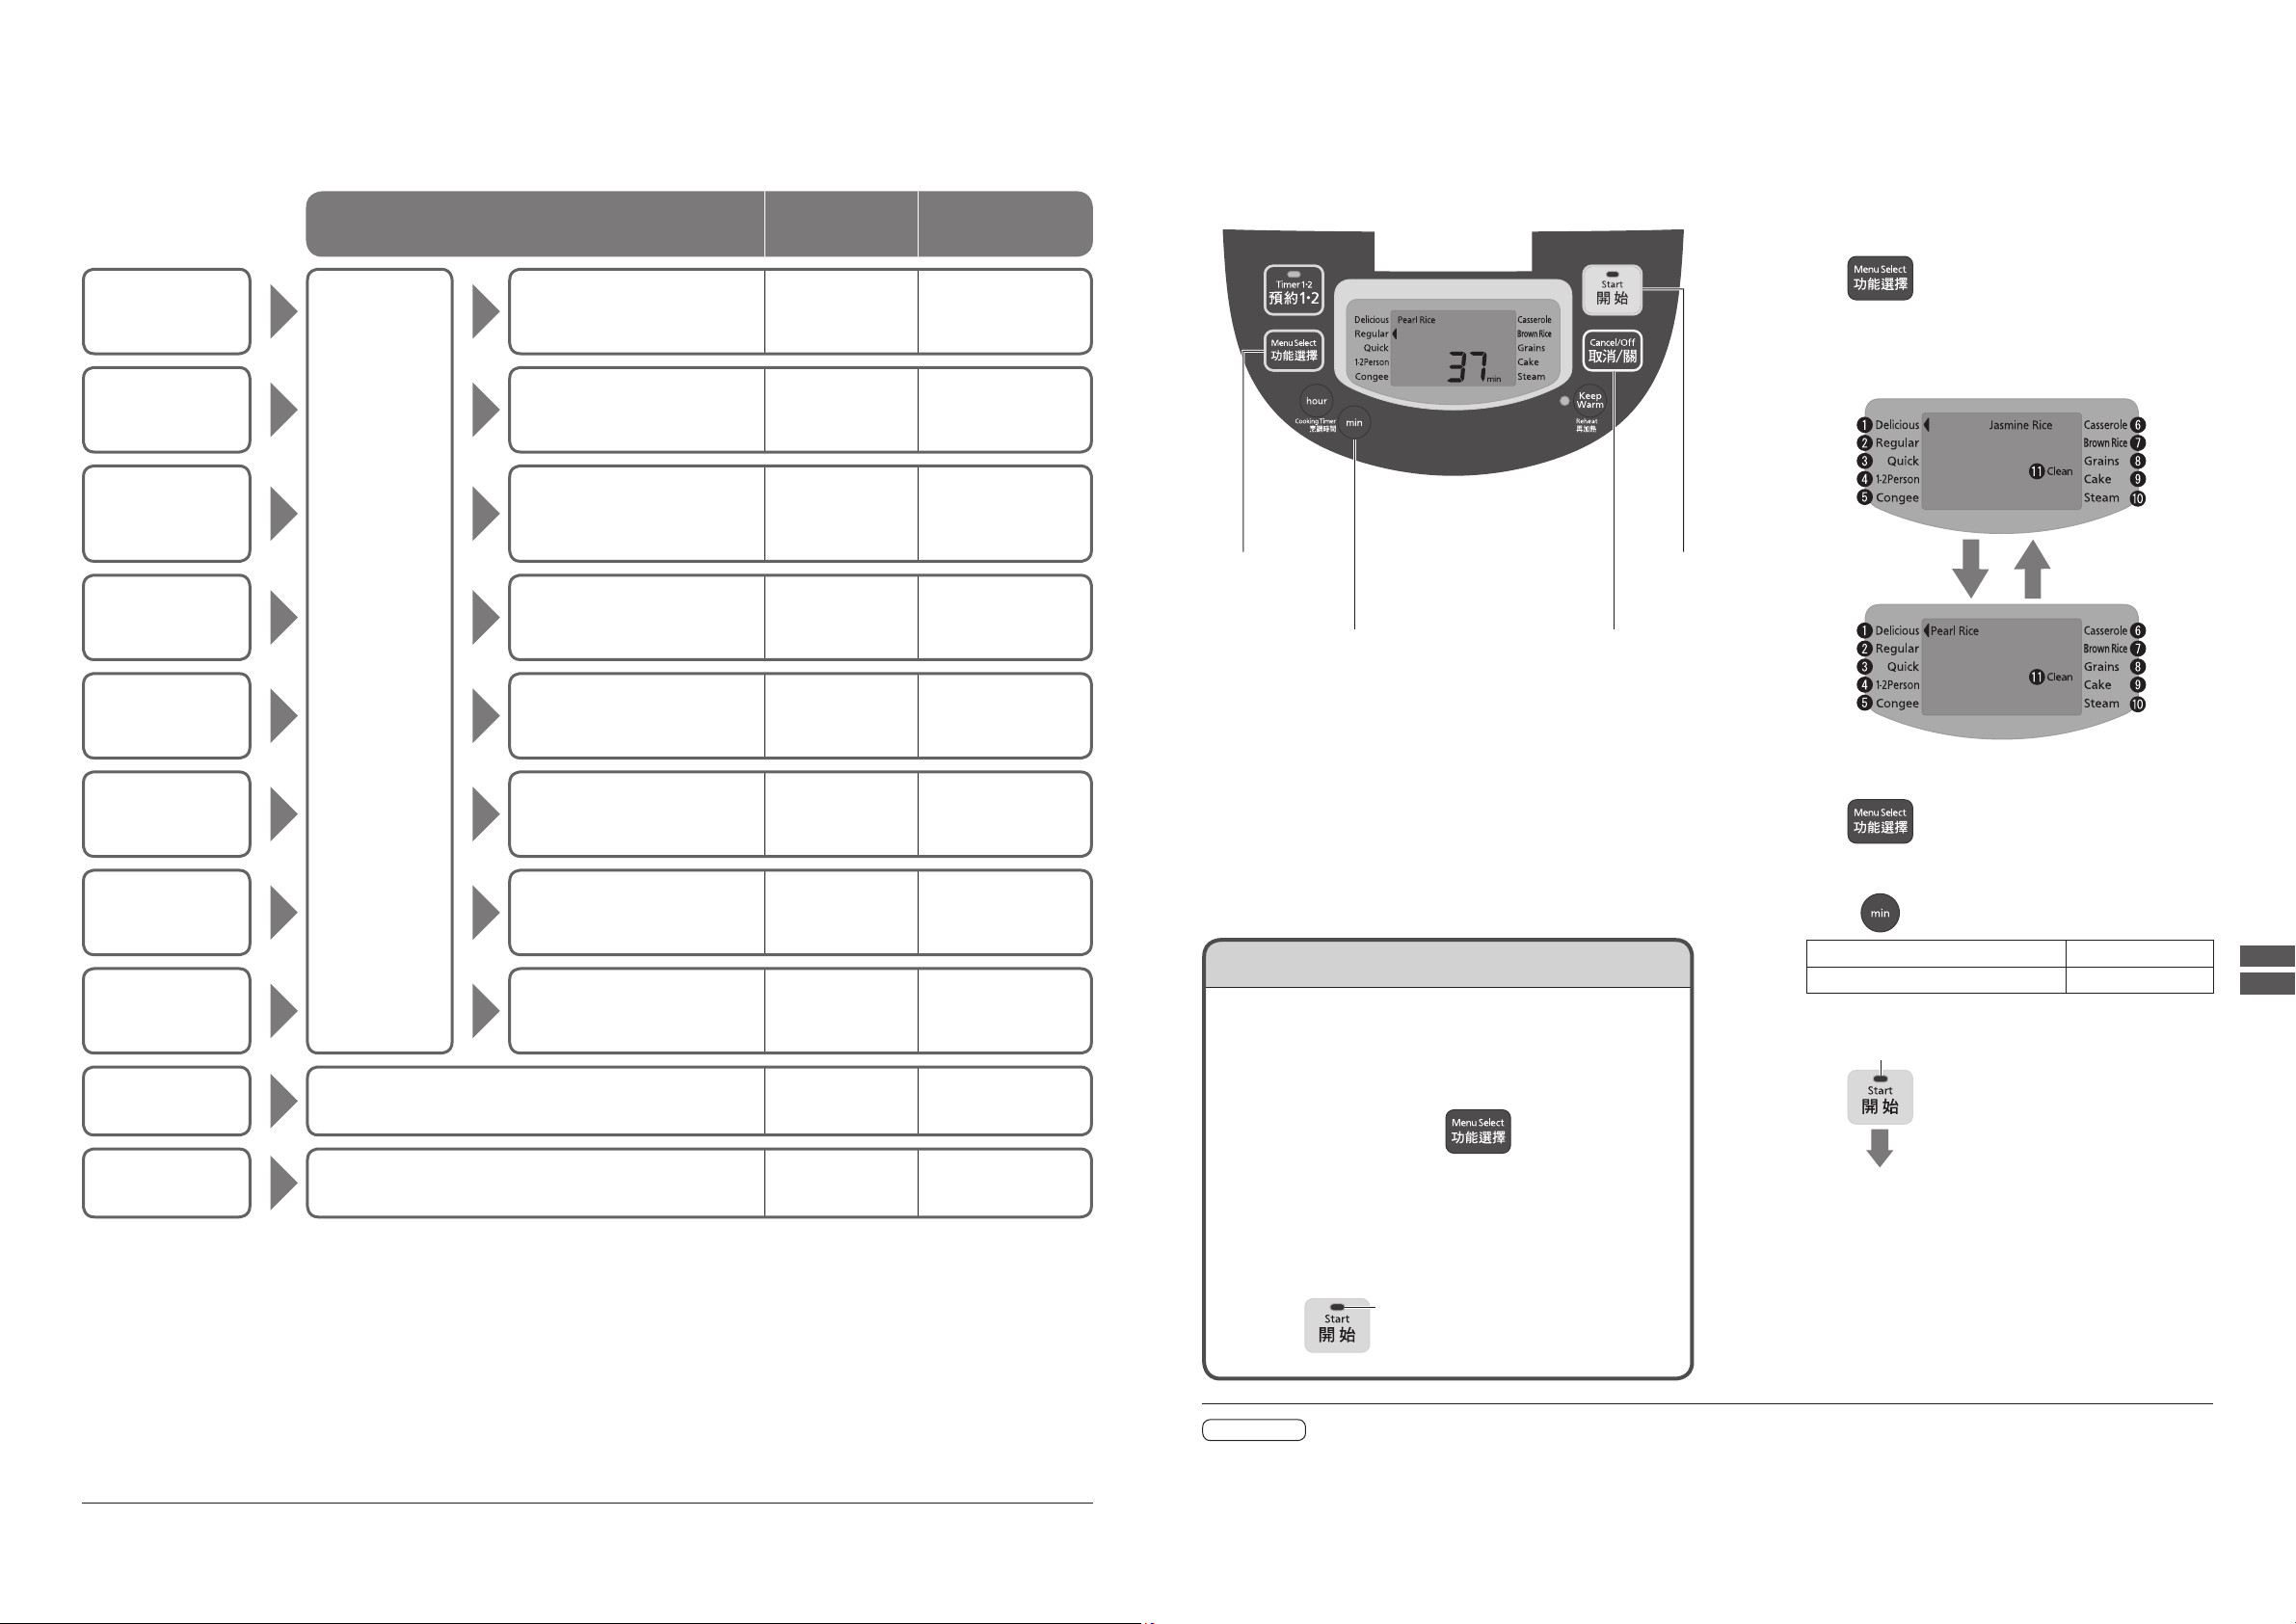
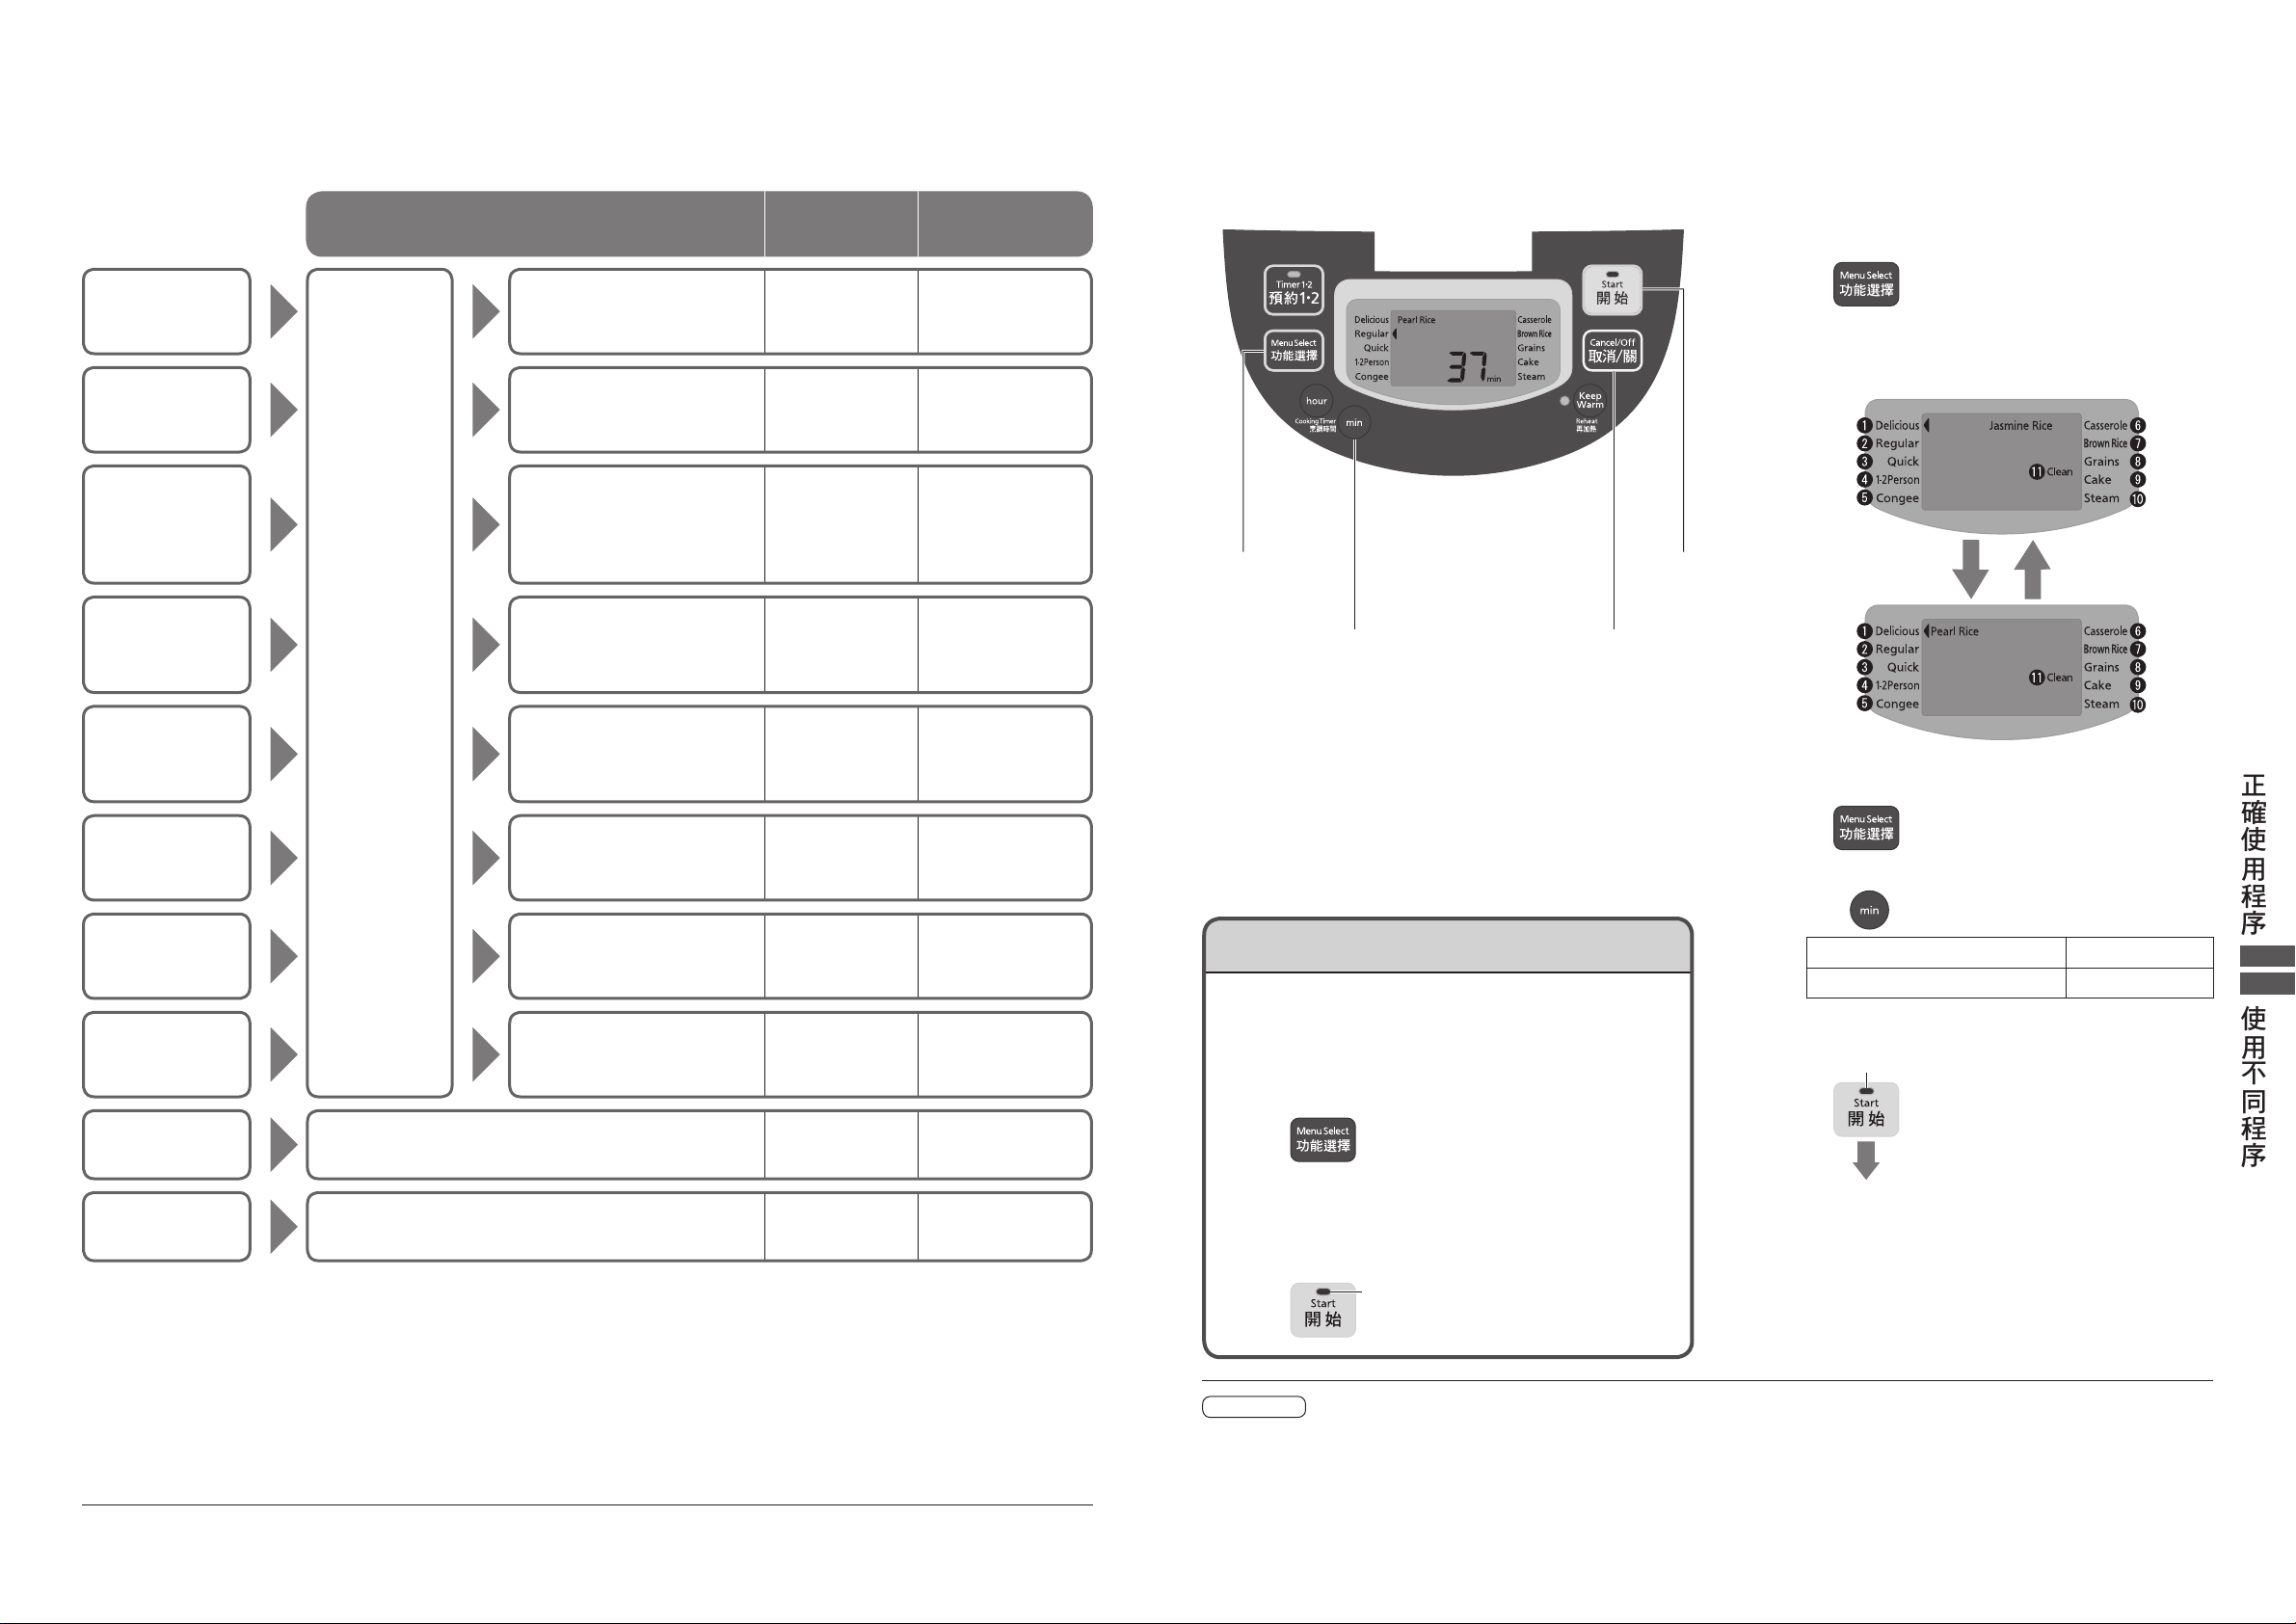
Using the Programs Correctly
Program
Water Level
of Inner Pan
Cooking time
(approx.)
Best avour
Pearl Rice
Jasmine
Rice
Delicious
This is the default setting.
White Rice
Pearl Rice/
(
Jasmine Rice
)
50 min
Regular cooking
Regular
White Rice
Pearl Rice/
(
Jasmine Rice
)
37 min
Quick cooking
Quick
Rice will be slightly harder.
You can soften the rice by
soaking it before cooking.
White Rice
Pearl Rice/
(
Jasmine Rice
)
19 min–33 min
Cook small
amount
1-2Person
1.0 L model (0.5 to 1.5 cups)
1.8 L model (1 to 2.5 cups)
White Rice
Pearl Rice/
(
Jasmine Rice
)
50 min
Cook congee
Congee
1.0 L model (0.5 to 0.75 cup)
1.8 L model (0.5 to 1.5 cups)
Congee
Setting time
1 h–4 h
Cook casserole
rice
Casserole
White Rice
Pearl Rice/
(
Jasmine Rice
)
50 min
Cook brown rice
Brown Rice
Brown Rice
Pearl Rice/
(
Jasmine Rice
)
1 h 35 min–
1 h 55 min
Cook rice of
various grains
Grains
White Rice*
Pearl Rice/
(
Jasmine Rice
)
45 min–55 min
Bake a cake
Cake
—
Setting time
40 min–60 min
Steam
Steam
—
Setting time
1 min–60 min
Do I have to select a program every time?
OOThe “Delicious” and “Regular” settings under “Pearl
Rice” or “Jasmine Rice” are stored.
For other programs, the following operation allows
you to call up the most recently used program.
(The “Cake” and “Steam” programs cannot be called up.)
1
Press and hold down
(for approximately 2 seconds)
OYou will hear a “beep” as soon as you press the
button, but continue to hold it down. You will
hear a second “beep” and the most recently
used program will appear.
2
Press
Flashing
Using Different Programs
OOFor “Cake” and “Steam” programs (P. 12)
Select a type of rice
Press .
1
OOThe “◄” position moves each time the “Menu
Select” button is pressed, and changes
between “Jasmine Rice” and “Pearl Rice” after
“◄” goes through one cycle.
1,2 3
OOTo cancel an operation OOTo set the cooking time
when selecting the
“Congee” program in
step 2
Using the Programs Correctly Using Different Programs
Select a menu
2
Press and set “◄” to a menu.
OOWhen the “Congee” program is selected, set
the cooking time.
Press .
Allowable timer setting Unit
1 h–4 h 30 min
Press the “Start” button
Flashing
3
Press
*Adjust the amount of water to suit kinds of grains or your taste.
OOThere are two water levels for White Rice or Brown Rice: “Pearl Rice” and “Jasmine Rice.” Select the correct water
level to suit the type of rice being cooked.
OOThe actual cooking time will vary according to the amount of rice, amount of water, voltage, temperature, water
temperature and rice quality.
OOThe cooking time for “Casserole”, “Grains” will vary according to the ingredients used.
OODo not mix brown and white rice. (Rice will not cook properly.)
10 11
Notes
OO“Clean” is displayed when it is selected.
OOTo make it easier to distinguish between decision points (for instance, the “Menu Select” button being at “Jasmine
Rice/Delicious”), the beeping sound has been changed to “beep-beep”.
OOThe display changes according the selected cooking program. For the “Quick”, “Brown Rice” and “Grains” settings,
the Warm Jar will display the current time until approximately 10 minutes before the rice is ready. It will then switch to
show the time until the rice is ready.
Cooking starts.
OOWhen the buzzer sounds after cooking, the
steaming stage has nished. Mix the rice
immediately.
(This is to allow excess moisture to evaporate.)
OOAutomatically switches to the keep warm
function. (P. 13)
OOTo cook congee continuously, leave the Outer
Lid opened and allow to cool the Warm Jar
without the Inner Pan for 5 minutes or more.
.
Page 7
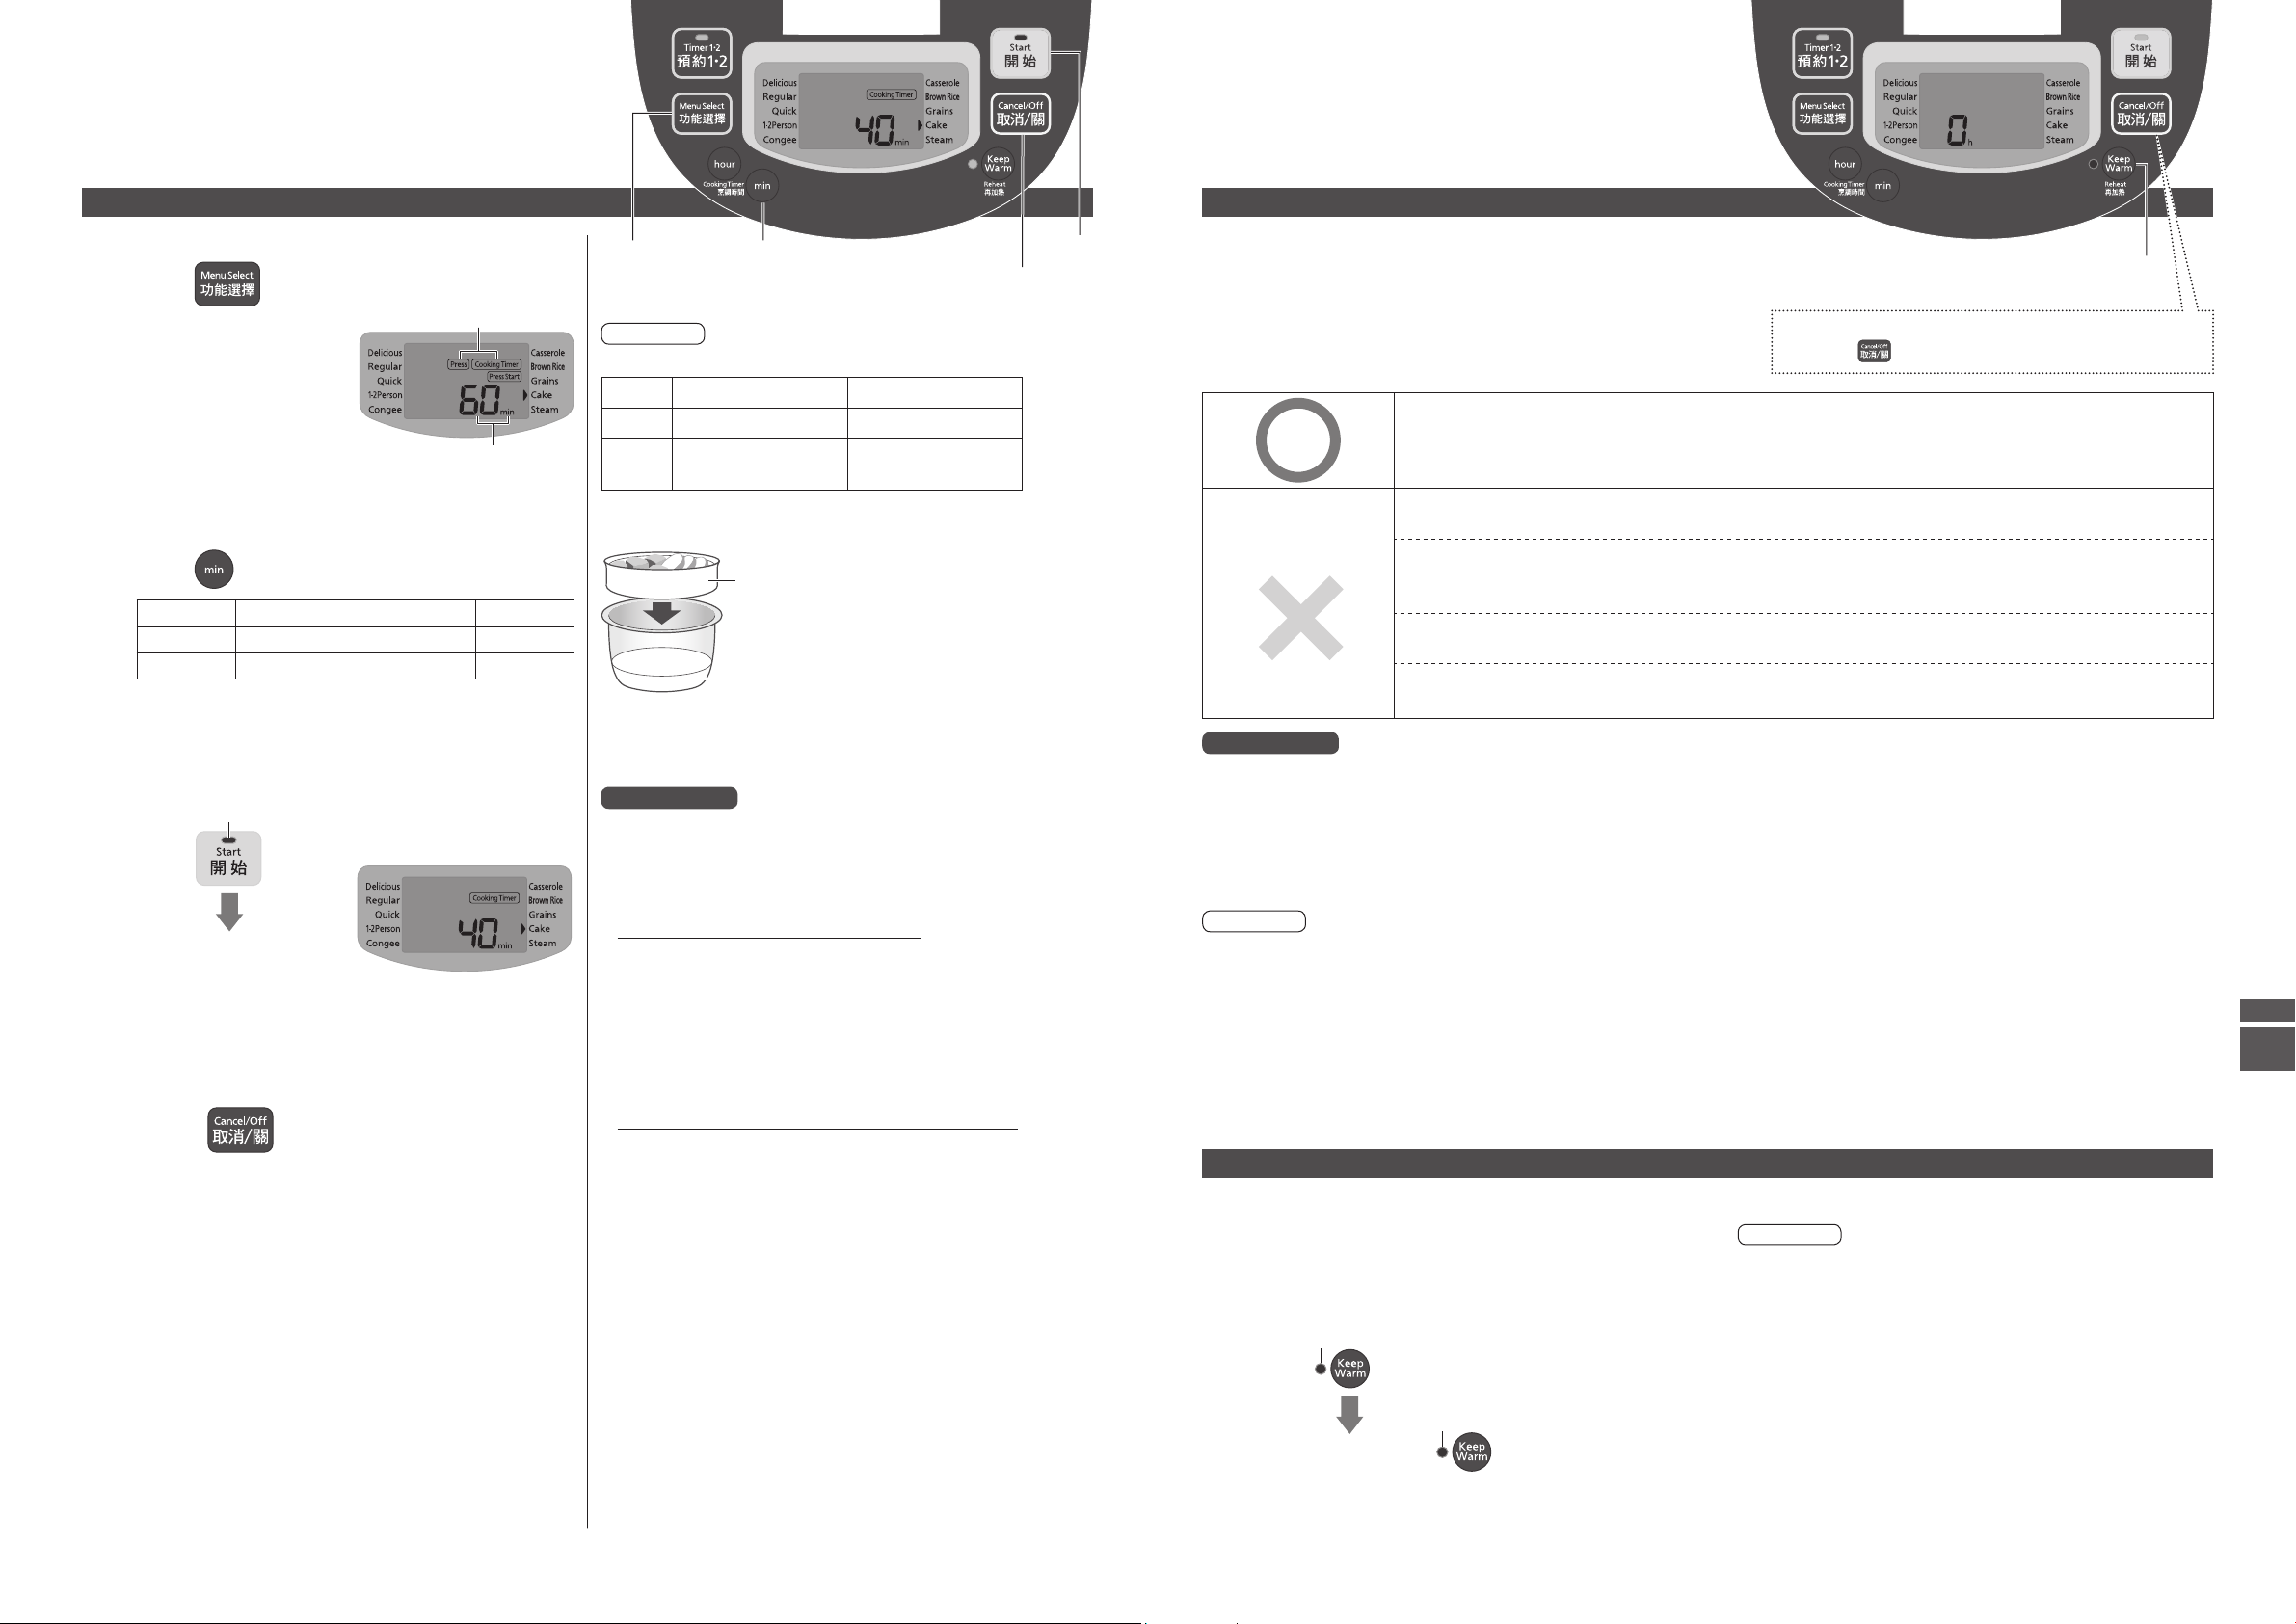
Cooking
Keeping Warm
Cook
Select a cooking menu
Press , set “►” to a cooking menu.
1
Flashing
Bake a cake : “Cake”
Steam : “Steam”
Set the cooking time
Press .
2
Menu Allowable timer setting Unit
Cake 40 min–60 min 1 min
Steam 1 min–60 min 1 min
* Countdown of the steam setting time begins when
the Warm Jar starts releasing steam.
Press the “Start” button
3
Press
Flashing
.
Flashing
1 32
Note
Available capacity
Menu 1.0 L 1.8 L
Cake Dough Max 600 g Dough Max 900 g
Steam Quantity of water
500 mL
How to use the Steaming Basket
Steaming Basket
Water
Precautions
When steaming…
OOPlease do not block the hole in the Inner Lid with
ingredients.
OOTo redo an operation
Quantity of water
600 mL
Keep Warm (Automatic)
OOOnce the rice is cooked, all programs switch
automatically to the keep warm function.
(Please mix the rice immediately after cooking ends.)
OOTo turn off the keep warm function
Press and then remove the Power Plug.
OODelicious
OO1-2Person
OOCongee
If congee is kept warm, it may become very sticky.
The Warm Jar will
switch automatically
to the keep warm
function, but we do
not recommend this.
Precautions
OODo not use the keep warm function for more than 12 hours.
(To prevent odour or rice becoming yellow or dry.)
OODo not cancel the keep warm function or remove the Power Plug while leaving the rice in the Warm Jar.
(To prevent odour and condensation.)
OODo not use the keep warm function with the Rice Scoop still in the Warm Jar.
(To prevent odour.)
OOCasserole
Use of the keep warm function can also cause the Inner Lid to rust, adversely affect the
avour of the rice.
OOBrown Rice OOGrains
Flavour can be adversely affected.
OOCake OOSteam
It may cause odour, rot or rusting the Inner Lid.
OORegular OOQuick
OOTo reheat from the keep warm state
OOTo return to the keep warm state
Cooking Keeping Warm
Cooking starts.
OOWhen cooking nishes, the Warm Jar
automatically switches to the keep warm
function, so please turn off the Warm Jar.
Press .
After cooking...
OODo not use the keep warm function.
(It may cause odours, rot or rusting the Inner Lid.)
OOThe inside of the Outer Lid and the vicinity of the Inner
Pan will be hot after cooking, so please be careful when
removing cooked food.
OOWhen the Outer Lid is opened after cooking, water
droplets may drop from the Inner Lid onto the Clear
Frame.
Wipe these away with a well-wrung cloth.
OOAlways wash the Inner Lid and the Steam Cap.
Wipe the inner surface of the Outer Lid, the attaching
portion of the Steam Cap and the Packing. When
cooking recipes with a high meat content, the fats and
proteins of the meat can contaminate the Inner Lid and
inner surface of the Outer Lid.
(It may cause odour, rot or rusting the Inner Lid.)
Notes
OOA keep warm time of up to 23 hours is displayed in 1 hour units (“0” is displayed for times of less than 1 hour).
The keep warm function will continue for more than 24 hours, however the display will switch to the current time.
OORemoving the Power Plug without pressing the “Cancel/Off” button will return to the keep warm function when the
Power Plug is connected next.
Reheat (manual)
OORice to be heated to high temperature from the keep warm state.
In the keep warm state
Mix the rice
1
Press the “Keep Warm” (Reheat) button
2
Lighting
Press .
Flashing (Approx. 5 min–7 min)
Reheat starts.
Notes
OOReheat cannot be used in the following situations.
•OWhen the rice is cold (buzzer beeps 4 times).
•OWhen the keep warm function is not in use.
OOReheating two or more times will adversely affect the
avour of the rice.
OOWhen the buzzer sounds, mix the rice immediately.
The rice is now ready to be eaten.
12 13
Page 8
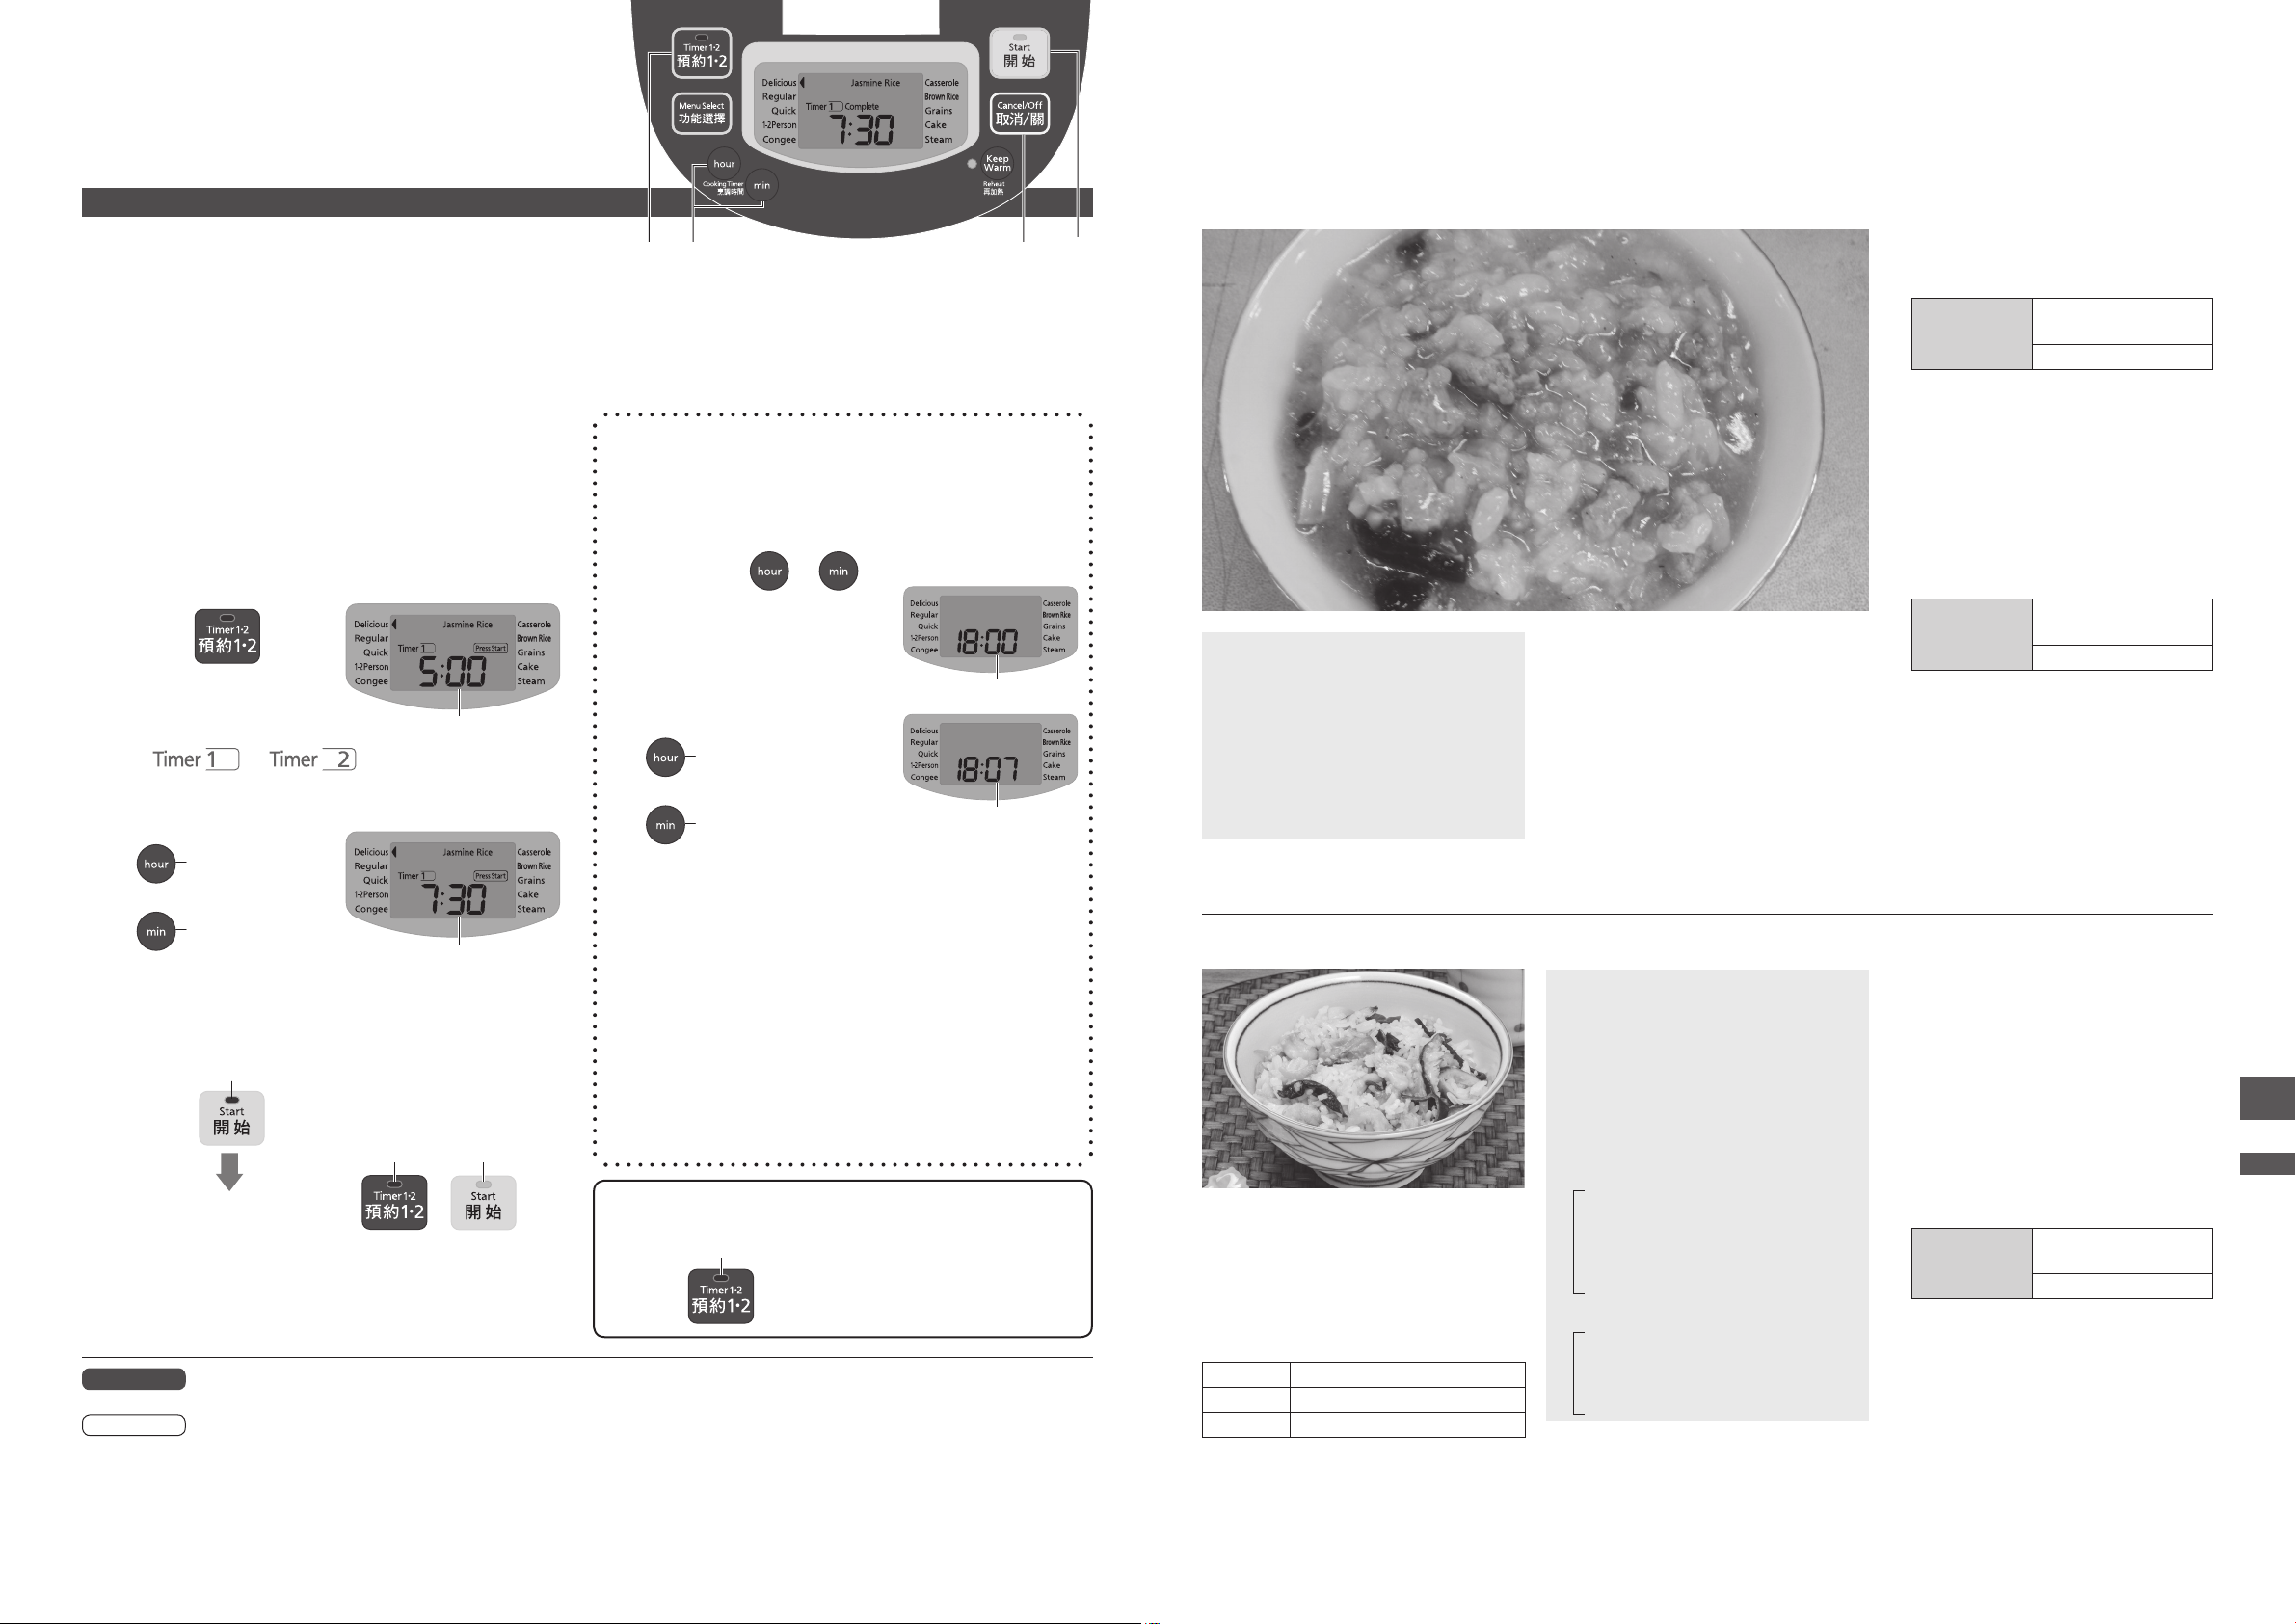
Using the Timer Congee/Casserole
Timer
OOTwo timers can be set. (These are stored until changed.)
You may nd it convenient to store often used times, using,
for example, “Timer 1” for breakfast and “Timer 2” for your
evening meal.
For example: Setting to 7:30 am
Check that the current time is correct
1
OOIf the time is incorrect, set it by following the
procedure on the right.
Check the program
(Set to desired program. Step 1–2 on P. 11)
2
OO
When using the timer for the “Congee” program,
rst set the cooking time and then press “Timer
1●2” button. Under timer mode, press “min”
button to check the set cooking time.
Select “Timer 1” or “Timer 2”
3
Press .
OOEach press of
the button changes
the selection.
↔
Flashing
Set the time at which the rice is to be
ready
4
Forward
(units of 1 hour)
OOTo redo an operation
3 54
OOTo cancel a setting
When the current time is incorrect
OOThe time is displayed in 24-hour clock format.
Insert the Power Plug
1
Hold down or for 1 second or more
2
OORelease your nger when
you hear a “beep”.
Flashing
Set the time
3
Forward
(units of 1 hour)
Forward
(units of 1 min)
OOHold down to cycle through time faster.
When the ashing
stops, the time is set.
Pork and Century Egg Congee
Ingredients (Serves 2 to 3):
White rice. . . . . . . . . . . . . . . . ½ cup
Meat broth (cooled) ........5 cups
Century egg ................1 pc
Cooked lean pork ..........125 g
Seasoning:
Salt ..................... 1 tsp
Pepper .................To taste
Sesame oil ..............To taste
Method:
Marinate the cooked lean pork with
the salt for 1 hour and then cut into
thin strips. Dice the century egg
and put aside for later use.
Wash the white rice and then pour
into the Inner Pan together with the
meat broth and close the Outer Lid.
Select the program and set
cooking time to 1 hour and
30 minutes.
Pearl Rice/
Menu Select
Press the “Start” button.
When the buzzer sounds, press
the “Cancel/Off” button, open the
Outer Lid*, add the lean pork and
century egg to the Inner Pan and
close the Outer Lid.
* When open the Outer Lid, please
note that the cooked food gets hot.
Select the program and set
cooking time to 1 hour.
Menu Select
Press the “Start” button.
When the buzzer sounds, the
congee may be served after it has
been seasoned.
Jasmine Rice
Congee
Pearl Rice/
Jasmine Rice
Congee
Using the Timer Congee/Casserole
Forward
(units of 10 min)
OOHold down to cycle
through time faster.
Flashing
Press the “Start” button
5
Press
Precaution
Notes
14 15
Flashing
.
OffLighting
Setting ends.
OO
When the buzzer sounds after cooking, the steaming
stage has nished. Mix the rice immediately.
(This is to allow excess moisture to evaporate.)
OOAutomatically switches to the keep warm
function. (P. 13)
OODo not set the timer to 13 hours or longer (8 hours or longer when the water temperature is high).
(Doing so may cause the rice to ferment and generate undesirable odours.)
OOIf there is insufcient time for the timer setting, the timer will not allow the setting, and cooking will start
immediately. (See “Timer Setting Restriction” on P. 26.)
OOThe timer cannot be used with the “Quick”, “Casserole”, “Cake” or “Steam” program.
OOWhen cooking with the timer, the time until the rice is ready is not displayed.
OOWhen cooking with the timer, the rice may absorb excess water. This can result in the rice becoming
soft or burnt.
Reduce the amount of water slightly if the rice is soft.
(Reduce water by approximately 1 to 2 mm from the Water Level.)
OOThe time cannot be set in use such as cooking/the
keep warm state/the timer and cleaning function
settings.
OOWhen the lithium battery runs down, removing the
Power Plug will result in the loss of stored data such
as the current time and timer settings. (P. 20)
OOThe lithium battery is xed inside the main body and
cannot be replaced by the user.
For a replacement of lithium battery, please consult
the dealer where you purchased the Warm Jar or a
service centre.
OQ To see the current time after setting the
timer.
Lighting
Press
OOPress and hold to display.
Chicken and Taro Casserole Rice
Ingredients (Serves 4 to 6):
White rice. . . . . . . . . . . . . . . . 3 cups
Chicken meat (diced). . . . . . . .200 g
Dried mushrooms
(soaked & sliced) ...........5 pcs
Taro (diced) ...............100 g
Dried shrimps (soaked) .......40 g
Chinese black fungus
(soaked & chopped) ..... Few pcs
Marinade:
Important Information:
OOWhen placing ingredients they
cannot go above the maximum
water level of White Rice.
OODo not open the Outer Lid while
cooking. (Cooking result may not be
satisfactory.)
Model Amount of rice (Cup*)
1.0 L 1–3
1.8 L 2–6
*
Measuring Cup provided as an accessory.
Light soy ..............1 tsp
Dark soy .............½ tsp
Sugar .................1 tsp
A
Salt .................½ tsp
Starch ..............1½ tsp
Sauce:
Light soy ..............1 tbs
Dark soy ..............1 tbs
B
Sugar ................½ tbs
Sesame oil ............½ tbs
Method:
Season diced chicken meat with A.
Deep fry diced taro root until
golden brown, drain and set aside.
Wash the white rice and place it in
the Inner Pan with water up to
“Water Level: White Rice (Pearl
Rice/Jasmine Rice) 3”. Then
place , and other ingredients
evenly on the rice and close the
Outer Lid. (Do not mix.)
Select the program.
Pearl Rice/
Menu Select
Press the “Start” button.
When the buzzer sounds, add B
and stir the rice immediately to
loosen it.
Jasmine Rice
Casserole
Page 9
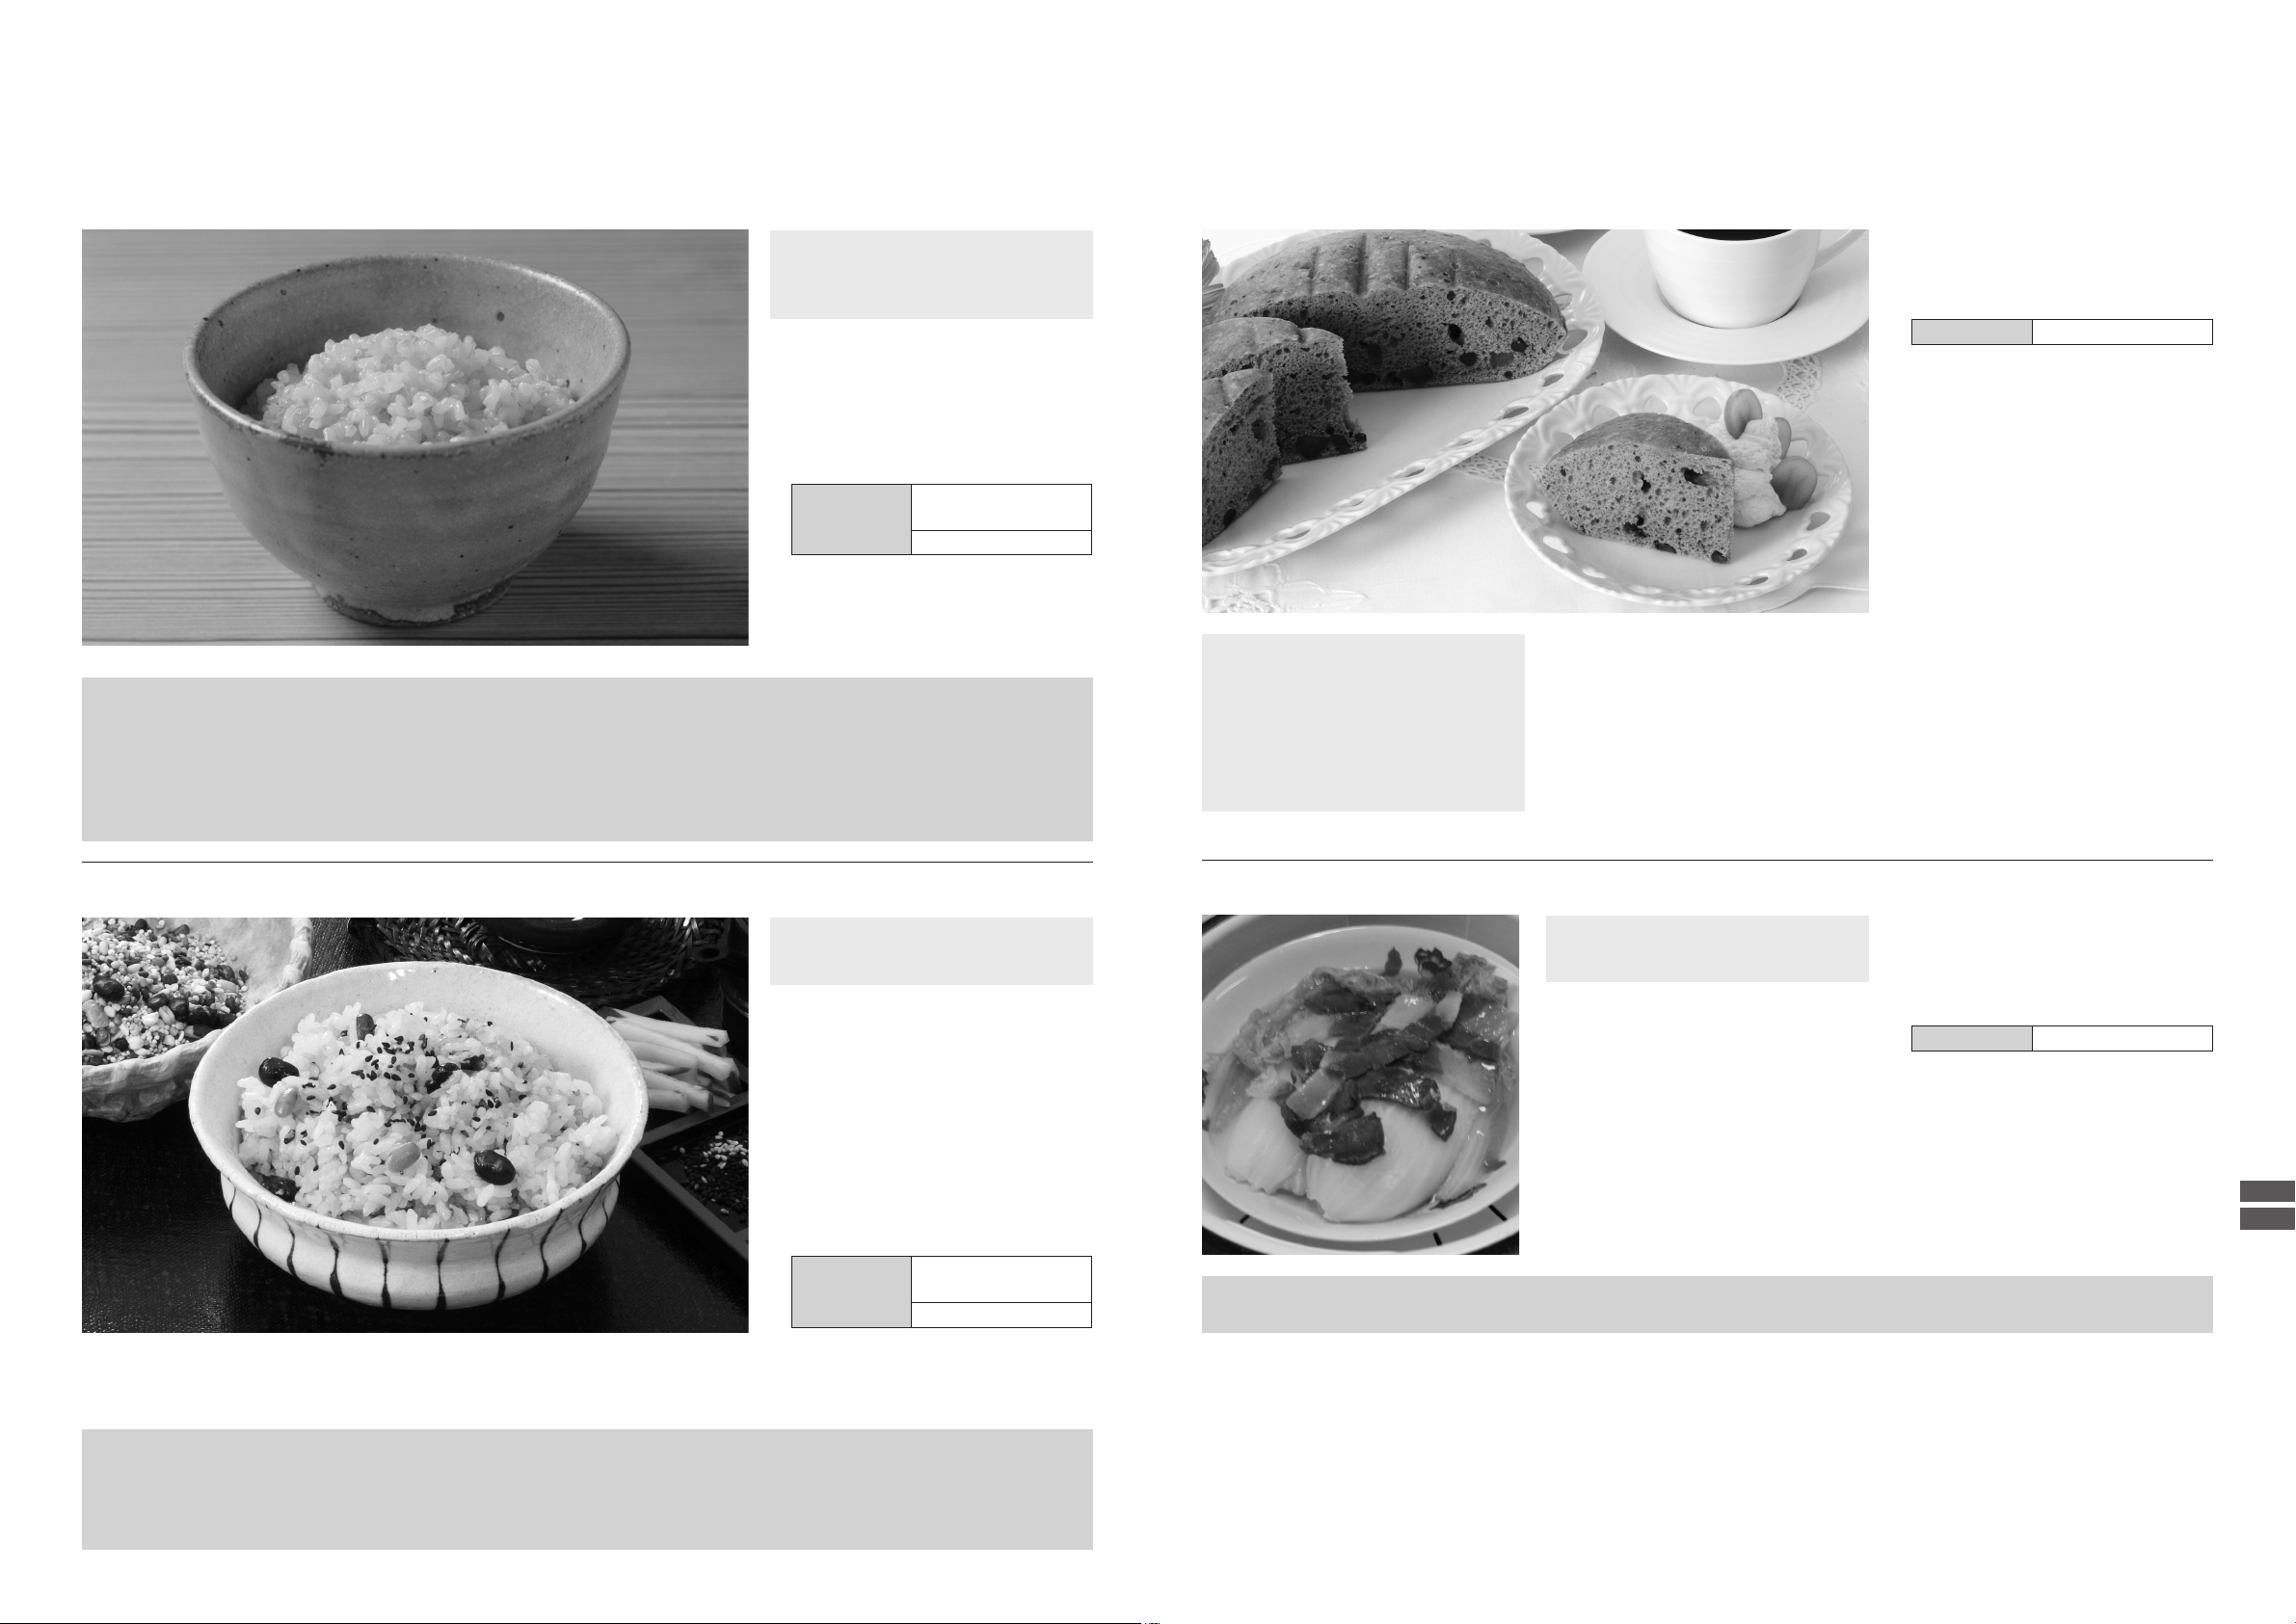
Brown Rice/Grains
Cake/Steam
Brown Rice
Ingredients (Serves 4 to 6):
Brown rice ...............3 cups
White sesame ......Small amount
Black sesame ......Small amount
Method:
Gently wash the brown rice and
remove debris and loose husk.
Add water up to “Water Level:
Brown Rice (Pearl Rice/Jasmine
Rice) 3” and close the Outer Lid.
Select the program.
Menu Select
Press the “Start” button.
When the buzzer sounds, turn it
over and mix to fluff.
Put on a plate and sprinkle on
some white and black sesame.
When cooking with other ingredients (meat, vegetables etc.)
OOMeasure the water level before adding the other ingredients.
OOThe rice takes a long time to cook so we recommend that you add rm ingredients such as beans etc.
If you wish to add dried ingredients, be sure to rehydrate them rst.
OOThe quantity of other ingredients should not exceed 75 g per cup of rice.
OOCut the ingredients into small pieces and lay them on the rice without mixing.
If you mix the ingredients with the rice, the rice will not be cooked properly.
Pearl Rice/
Jasmine Rice
Brown Rice
Soy Milk Cake
Ingredients (Serves 4 to 6):
Butter or salad oil. . . . Small amount
Pancake mixture ...........200 g
Eggs ....................2 pcs
Soy milk ................100 mL
Salad oil .................. 3 tbs
Raisins ....................70 g
(May be substituted for other dry fruit.)
Method:
Lightly smear the inside of the
Inner Pan with butter or salad oil.
Mix the ingredients until texture is
smooth. (Do not mix in the Inner
Pan.)
Pour into the Inner Pan and
close the Outer Lid.
Select the program and set the
cooking time to 40 minutes.
Menu Select Cake
Press the “Start” button.
When the buzzer sounds, remove
the Inner Pan from the Warm Jar
and turn it upside down to remove
the cake. Then allow to cool on
plate or mesh.
*
When using the 1.8 L model,
increasing the quantity of ingredients
1.5-fold and setting the cooking time
to 60 minutes is recommended for a
nice, uffy cake.
Multigrain Rice
Ingredients (Serves 4 to 6):
White rice. . . . . . . . . . . . . . . . 3 cups
Multigrain ..................30 g
Method:
Wash the white rice and add water
up to “Water Level: White Rice
(Pearl Rice/Jasmine Rice) 3”.
Gently wash the multigrain and
place on .
Add another 30 mL of water* and
close the Outer Lid.
* Adjust the amount of water
depending on the type of
multigrain and preferences.
Select the program.
Menu Select
Press the “Start” button.
When the buzzer sounds, turn it
over and mix to fluff.
Arrange in a dish.
To cook multigrain rice...
OOIf you wish to add beans or dried ingredients such as cloud ear mushrooms, be sure to rehydrate them rst.
OOThe proportion of the other grain in the rice is 10% or below.
(If too much other grain is added, the rice will not be cooked properly.)
OOIf you wish to cook multigrain rice softer, you add some more water or soak it in water in advance.
Jasmine Rice
Pearl Rice/
Grains
Salted Meat Steamed with Chinese Cabbage
Ingredients (Serves 4 to 6):
Chinese cabbage. . . . . . . . . . .100 g
Salted meat (Chinese ham) ....35 g
Method:
Break the chinese cabbage into
individual pieces and wash these
pieces. Slice the salted meat and
place aside.
Arrange the individual pieces of
cabbage in layers on the plate and layer
the sliced salted meat at the very top
(try to use the fatty parts of the meat).
Pour 2.5 cups of water in the Inner Pan.
Precaution
OOPlease do not block the hole in the Inner Lid with ingredients.
Set the attached Steaming Basket,
put “” on it and close the Outer
Lid.
Select the program and set the
cooking time to 13 minutes.
Menu Select Steam
Press the “Start” button.
Note:
When chinese cabbage is
unavailable, the heart of the bok choy
may be used instead.
Brown Rice/Grains Cake/Steam
16 17
Page 10
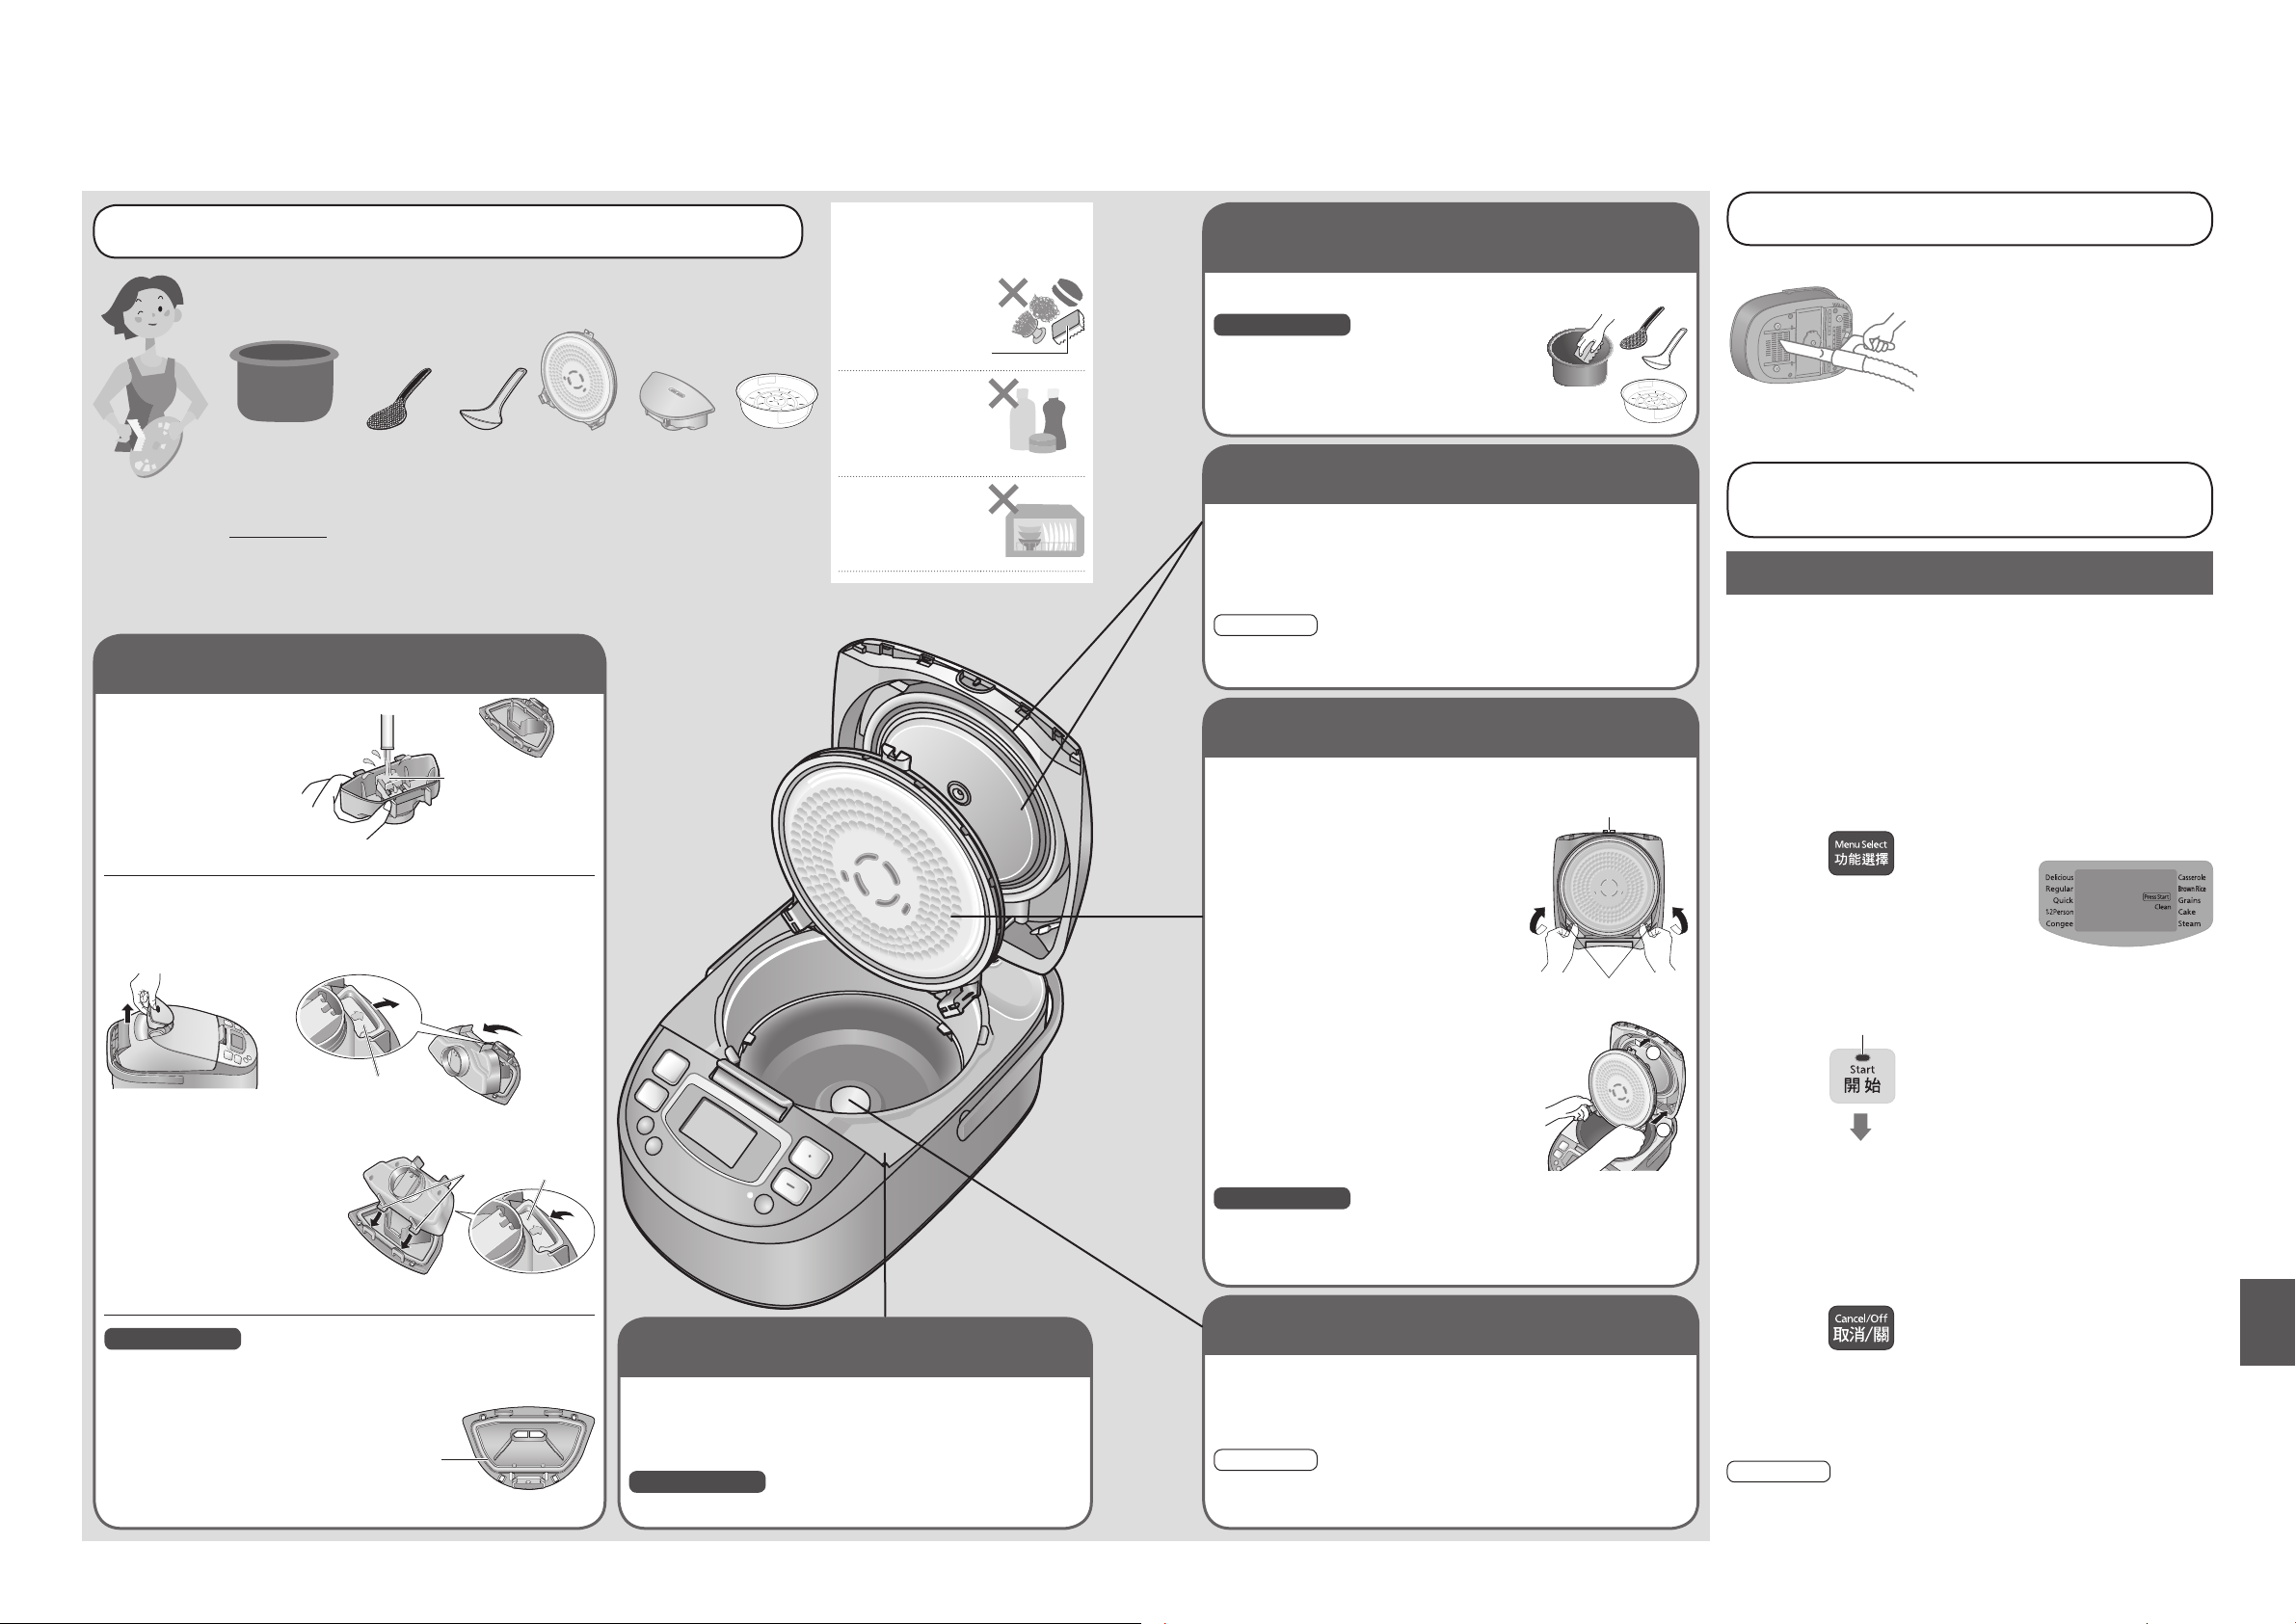
Steam Cap
Remove and rinse.
OO
Dew and dirt tend to remain
in the Steam Cap, so please
wash it after each use.
(
This may cause
odours or rot.
OQ Removing
Pull up to remove.Remove the lever in the “⇨”
direction to open.
Lever
OQ Attaching (In the reverse order to removing.)
Insert the shaft and close
the lever securely until
you hear a “click”.
Attach on the Outer Lid.
(
Ensure that it has
been attached rmly.
Precautions
OODo not remove the Packing.
(This may cause steam to leak.)
OOIf the Packing came off, please
reattach along the groove.
•O
Shaking makes
a noise because
of the ball inside.
•O
Do not disassemble.
)
Shaft
Lever
)
Packing
inserts along
groove.
Cleaning
Clear Frame
Wipe with a well-wrung cloth.
OORemove any dirt such as rice from the around the
Hook Button.
Precaution
OODo not wash by pouring in water etc.
Inner Pan (P. 6) • Rice Scoop •
Ladle • Steaming Basket
Wash with a mild washing-up liquid.
Precaution
OODo not use the Inner Pan as a
washing-up bowl.
(
Since this may result in
peeling of the inner coating.
)
Pan Sensor
Wipe with a well-wrung cloth.
OOIf the dirt is hard to remove, dab a mild washing-up
liquid on a nylon scourer and wipe gently.
Note
OO
Using the Pan Sensor while they are dirty may result in
the rice being burnt or cooked in an unsatisfactory way.
Inner Surface of Outer Lid • Packing
Wipe with a well-wrung cloth.
OORemove the Steam Cap and wipe the inner surface
of the Outer Lid, the attaching portion of the Steam
Cap and the Packing.
Note
OOMay become dirty easily when increasing the amount
of water or cooking brown rice etc.
Inner Lid
Remove and wash with a mild washing-up
liquid.
OORemove any dirt such as rice from
the packing.
OQ Removing
Hold both Inner Lid knobs and pull
forward to remove the xture.
OQ Attaching
OOInsert the Fixture into the groove at
the top.
Press on both Inner Lid knobs into
the Outer Lid until you hear a
“click”.
Precaution
OOAfter cooking with seasoning (for casserole rice etc.)
or baking a cake, please wash promptly.
(Since this may cause odours, rot, or rust.)
Fixture
Inner Lid knobs
OO
For cleaning, remove the Power Plug and ensure that the main body has cooled down.
OO
The Packing attached to both the main body and the Inner Lid cannot be removed.
Do not pull by using excessive force or puncture with sharp-pointed objects.
(This may cause defects, delamination and damage.)
OOAfter washing, wipe with a dry cloth.
When using for the first time & on every use
O After removing, wash with a soft sponge.
O After using seasoning, such as casserole rice, wash
*When using a washing-up liquid, check the precautions of it.
Inner Pan Inner LidRice Scoop Steaming
Ladle Steam Cap
Basket
promptly.
(Since these can cause odours, rot, or rust.)
<Do not use any of the following>
Metal scourers, nylon
scourers impregnated with
an abrasive etc.
Do not wash using
the scouring pad.
Benzine, thinner,
polish, bleach,
antibacterial
alcohol etc.
Dishwasher/
dryer or dish
dryer
●
●
●
Regular checks
OOCheck around once a month and clean if dirty!
Bottom of Warm Jar
(Intake/Exhaust Vents)
Remove dust and foreign
objects using a vacuum
cleaner etc..
When the cleanliness of the
Warm Jar is a concern
Cleaning function
If odour is hard to remove or the dirt does not come
off the Inner Lid or Steam Vent....
Preparation
Pour water into the Inner Pan.
1.0 L model, “Pearl Rice/Jasmine Rice” Water Level: 3–4
(
1.8 L model, “Pearl Rice/Jasmine Rice” Water Level: 6–8
Put the lnner Pan in the main body and close the
Outer Lid.
Display “Clean”
1
Press .
OO“Clean” will be displayed
when selected.
)
1
18 19
●
2
●
Press the “Start” button
2
Press
Cleaning function starts.
Flashing
.
When the buzzer sounds after
approximately 45 minutes, press the
3
“Cancel/off” button
Press .
OOAfter the water in the Inner Pan has cooled, wash
the Inner Pan, Inner Lid and Steam Cap.
Note
OOIt may not be possible to completely remove odour or
dirt.
Cleaning
Page 11
Does my Warm Jar have a fault?
Check here!
Page
OO
The remaining cooking
time displayed stops.
OO
The cooking time is
longer than expected.
OOIf rice is cooked one after the other, the cooking time may lengthen
(by up to around 45 minutes).
OOIs the quantity of water in the Inner Pan too much?
If the quantity of water is increased, the cooking time may lengthen
(by up to around 15 minutes).
—
—
Steam is emitted
from a section other
than the Steam Vent.
OOIs there rice stuck to the the Packing of the Inner Lid, Packing of
the Outer Lid or the edge of the Inner Pan?
OOHave you washed the Inner Lid each time and attached it correctly?
OOIs the Inner Pan deformed in some way?
→
A new Inner Pan can be purchased if the Inner Pan has changed shape.
OOIs the Packing of the Inner Lid, Packing of the Outer Lid deformed,
peeling, or torn?O
→ If steam leaks out, please contact the dealer where you
purchased the Warm Jar.
OODid you close the Outer Lid slowly and rmly until it clicked?
—
19
—
—
—
The Warm Jar is
making a noise.
OOWhirring noise… Sound of fan that allows heat to escape operating.
OOHigh-pitched noise…Sound of IH (induction heating).
You may sometimes hear this when keeping warm.
OOHissing noise…Sound of steam jetting out.
When opening/closing the Outer Lid
OOClacking noise… Sound of the ball in the Steam Cap rolling.
—
—
—
—
Cooking begins
immediately despite
use of timer.
OOIs the current time correct?
(The time is displayed in 24-hour clock format.)
OO
Has the timer been set to a time outside the “Timer Setting Restriction”?
14
26
I have set the timer
but cooking doesn’t
start.
OOWhen using the timer, the rice is soaked before cooking starts, and
so the soaking time after cooking starts is shorter.
Consequently, cooking starts slightly later than might be expected.
—
The rice is not
ready at the time set
on the timer.
OOIs the current time correct?
(The time is displayed in 24-hour clock format.)
OOHave you pressed the “Start” button?
OO
Has the timer been set to a time outside the “Timer Setting Restriction”?
14
14
26
A button operation
is not working.
OOButton operations will not work when e.g. cooking/the keep warm
state/the timer and cleaning function settings are in use.
→ Press the “Cancel/Off” button.
—
The “Keep Warm”
(Reheat) button
does not respond.
OOIs the keep warm function switched off?
OOIs the rice cold? (Buzzer will sound 4 times.)
Reheating is not possible if the temperature is 50 °C or lower.
—
—
“7:30” always
appears when
inserting the Power
Plug.
OO The lithium battery has run down.
The current time or set time cannot be stored, however you can cook
rice or use the keep warm function. The current time must be set on
each occasion that you use the timer.
The lithium battery is xed inside the main body and cannot be
replaced by the user.
→ For a replacement of lithium battery, consult the dealer where
you purchased the Warm Jar or a service centre.
—
Sparks were visible
at the Power Plug.
OOSometimes small sparks can be seen when inserting or removing
the Power Plug. This is a phenomenon particular to IH (induction
heating) techniques and not indicative of a fault.
—
Check the following before asking for a service.
What does this mean?
Symptom
Cooking
Cooking/Keep Warm State
Timer
Error message Check here!
OOIs the Inner Pan set properly?
OSet the provided Inner Pan.
OOTurn off the error message by pressing the “Cancel/Off” button.
(After a while, the message turns off even without pressing the button.)
OOOperate it again.
OOIs the foreign object or dirt attached to the bottom part of the Inner Pan, Inner
Lid or Pan Sensor? (P. 18–19)
→ Remove the foreign object or dirt and press the “Cancel/Off” button.
OOIs there too much water in the Inner Pan?
→ Press the “Cancel/Off” button.
(Upon next cooking, reduce the amount of water slightly.)
OOHas the keep warm function been in use for more than 96 hours?
→ Press the “Cancel/Off” button.
OOIs the Outer Lid open?
OOIs the Steam Cap (Taste Catcher) tted? (P. 18)
→ If the Steam Cap has been lost, please purchase another one from your
dealer.
Rice can be cooked or kept warm without the Steam Cap tted, however
•O
The rice may not taste good. (The rice will become dry if it is being kept warm.)
•OCongee may not cook properly.
•OLiquid may spill out.
•O“U15” may be displayed again after the rice has been cooked.
OOIs the foreign object or dirt attached to the inside of the Steam Cap?
→ Remove the foreign object or dirt. (P. 18)
Does my Warm Jar have a fault? / What does this mean?
OO
Is the Intake or Exhaust Vent on the bottom of the Warm Jar blocked by dust
etc.?
→ Remove the dust using the following procedure.
OPress the “Cancel/Off” button and then remove the Power Plug.
OOnce the body has cooled down, remove the Inner Pan.
OORemove the dust from the Intake/Exhaust Vents on the bottom of the
Warm Jar. (P. 19)
OOIs the Warm Jar being used on a carpet etc.? (P. 6)
→ Do not use the Warm Jar in a location where the bottom of the Warm Jar is
restricted.
If none of the methods described above brings an improvement, please consult your dealer for a repair.
Other
OOTry removing the Power Plug and reinserting it.
If “H○○” appears again, this is a malfunction.
→
Please consult your dealer and inform them of the error message (the twodigit number after the “H”).
■If you mistakenly add water or rice to the main body, please unplug and contact your dealer.
20 21
Page 12
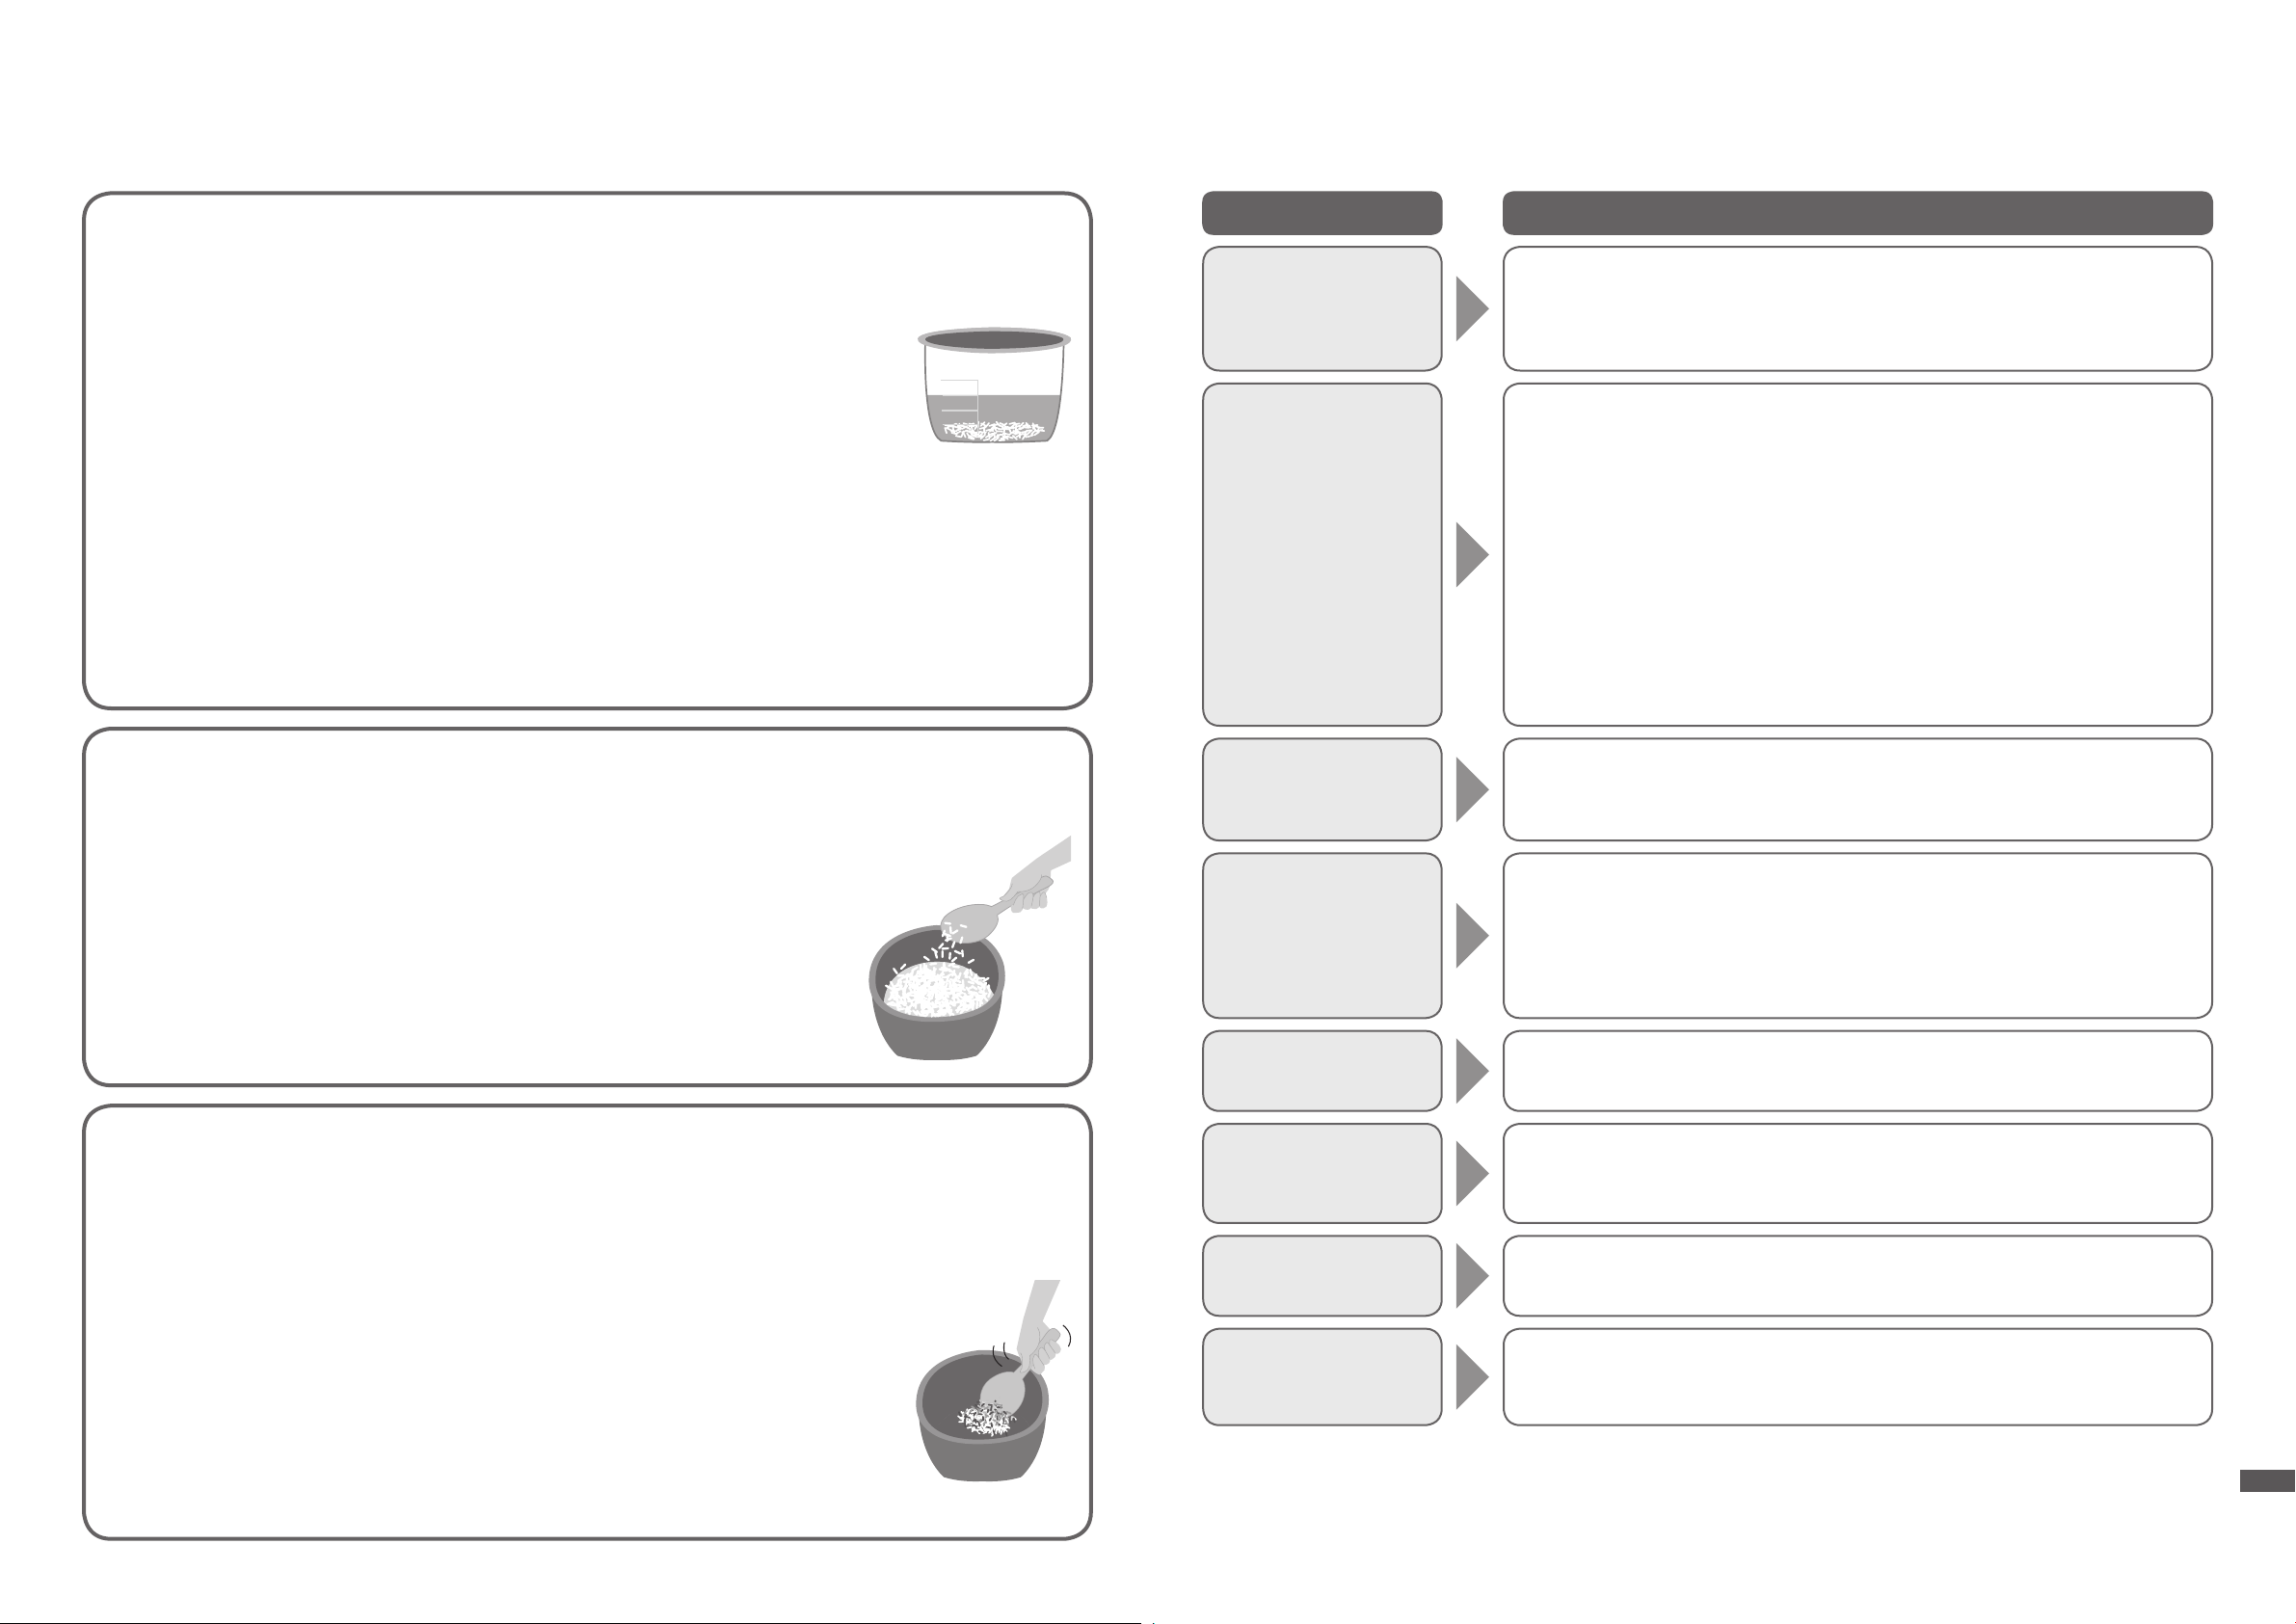
What to do when...
OOWhen the rice is cooked, are you mixing it immediately? (To allow excess
moisture to evaporate.)
OO
During the keep warm state, did you turn the keep warm function off with rice still
in the Warm Jar, or remove the Power Plug and leave the rice in the Warm Jar?
OOA layer of mist may form depending on the cooking method.
OO
During the keep warm state, did you turn the keep warm function off with rice still
in the Warm Jar, or remove the Power Plug and leave the rice in the Warm Jar?
OOHas the keep warm function been in operation for 12 hours or more?
OOAfter cooking rice with seasoning such as casserole rice, an odour may remain.
OODid you add cold rice during the keep warm state?
OOHas the rice been processed and washed properly?
OO
Are you using the keep warm function with the Rice Scoop still in the Warm Jar?
OO
Are you cleaning and maintaining your Warm Jar correctly each time you use it?
Failure to correctly clean and maintain your Warm Jar may spoil the aroma and
avour of your meals.
Continuing to use your Warm Jar without cleaning it correctly will spoil your meals.
OOAfter baking a cake, an odour may remain.
→ When the smell becomes noticeable,
Carefully wash the Inner Pan, Inner Lid and Steam Cap. (P. 18–19)
If this does not remove the odour, use the Cleaning function. (P. 19)
OOHas the keep warm function been in operation for 12 hours or more?
OOHave you reheated repeatedly?
OOHas the rice been processed and washed properly?
OOWith certain types of rice, a yellow colour will be left on the rice after cooking.
OOHas the keep warm function been in operation for 12 hours or more?
OOHave you reheated repeatedly?
OOIs the Steam Cap attached correctly?
OOIs there rice stuck to the the Packing of the Inner Lid, Packing of the Outer Lid
or edge of the Inner Pan?
OOIs the Inner Pan deformed in some way?
→ A new Inner Pan can be purchased if the Inner Pan has changed shape.
OOHave you been soaking the rice for long periods?
(When using the timer, for example.)
OOHave you used the keep warm function on the congee?
OOAre you washing the rice too much, causing the rice grains to break?
OOHas the rice been washed properly?
(
Starch in the rice dissolves and reforms as a thin lm on the surface. It is not
harmful.
)
OODepending on the type of rice, soft rice or sticky rice may stick easily.
OOWas the rice spread evenly before cooking?
OOThis may be caused by the strong heating power that is characteristic of IH
(Induction Heating). This is not a malfunction.
OOThe Warm Jar does not have a fault.
Check the following before asking for a service.
Symptom Check here!
Rice is too sticky
OOHave you measured the quantities of rice and water correctly? (P. 8)
OOAre there many broken grains in the rice?
OOHave you been soaking the rice for long periods? (When using the timer, for example.)
→ When using the timer, try reducing the amount of water slightly.
(Reduce water by approximately 1 to 2 mm from the Water Level.)
● Are you using hot water to wash the rice?
● Are you using more than the specied amount of rice with the “1-2Person” program
for small amounts? (1.0 L model: 0.5 to 1.5 cups, 1.8 L model: 1 to 2.5 cups)
● Are you using too much force to wash the rice?
(It may cause the rice grains to break, and the rice may be sticky when cooked.)
● When the rice is cooked, are you mixing it immediately? (To allow excess moisture to evaporate.)
● When cooking new-crop rice, are you using less water than normal?
(Reduce water by approximately 1 to 2 mm from the Water Level.)
● Are you leaving the rice in the strainer after washing?
(P. 8 This may cause the rice grains to break, and the rice may be sticky when cooked.)
● Do you prefer harder rice?
•OReduce the amount of water slightly.
(Reduce water by approximately 1 to 2 mm from the Water Level.)
Rice is too hard
OOHave you measured the quantities of rice and water correctly? (P. 8)
OOAre you using the “Quick” program?
● Do you prefer softer rice?
•OIncrease the amount of water slightly.
(Increase water by approximately 1 to 2 mm from the Water Level.)
•OTry soaking the rice (for 30 minutes to 2 hours) before cooking.
(soft)
(dry)
Condensation
appears.
Rice smells odour.
Rice has a yellow
colour.
Rice is dry.
Congee is sticky.
Rice is burnt
OOHas the rice been processed and washed properly?
OOIs there dirt or foreign object stuck to the Pan Sensor, bottom of the Inner Pan or inside the main
body?
OOAre you using the timer? (Have you been soaking the rice for long periods?)
22 23
● Are you using too much force to wash the rice?
(It may cause the rice grains to break, and the rice may burn when cooked.)
● Are there many broken grains in the rice?
● Are you leaving the rice in the strainer after washing?
(P. 8 This may cause the rice grains to break, and the rice may burn when cooked.)
● Cooking rice with seasoning such as casserole rice may be easily burnt.
● A golden brown colour on the rice at the bottom of the Inner Pan is not indicative of a fault.
→ If there is no improvement after following the above-described steps, see “If burning is
a concern”. (P. 25)
A thin film is formed.
Rice sticks to the
Inner Pan.
The surface of the
cooked rice has a
concave shape.
What to do when...
Page 13
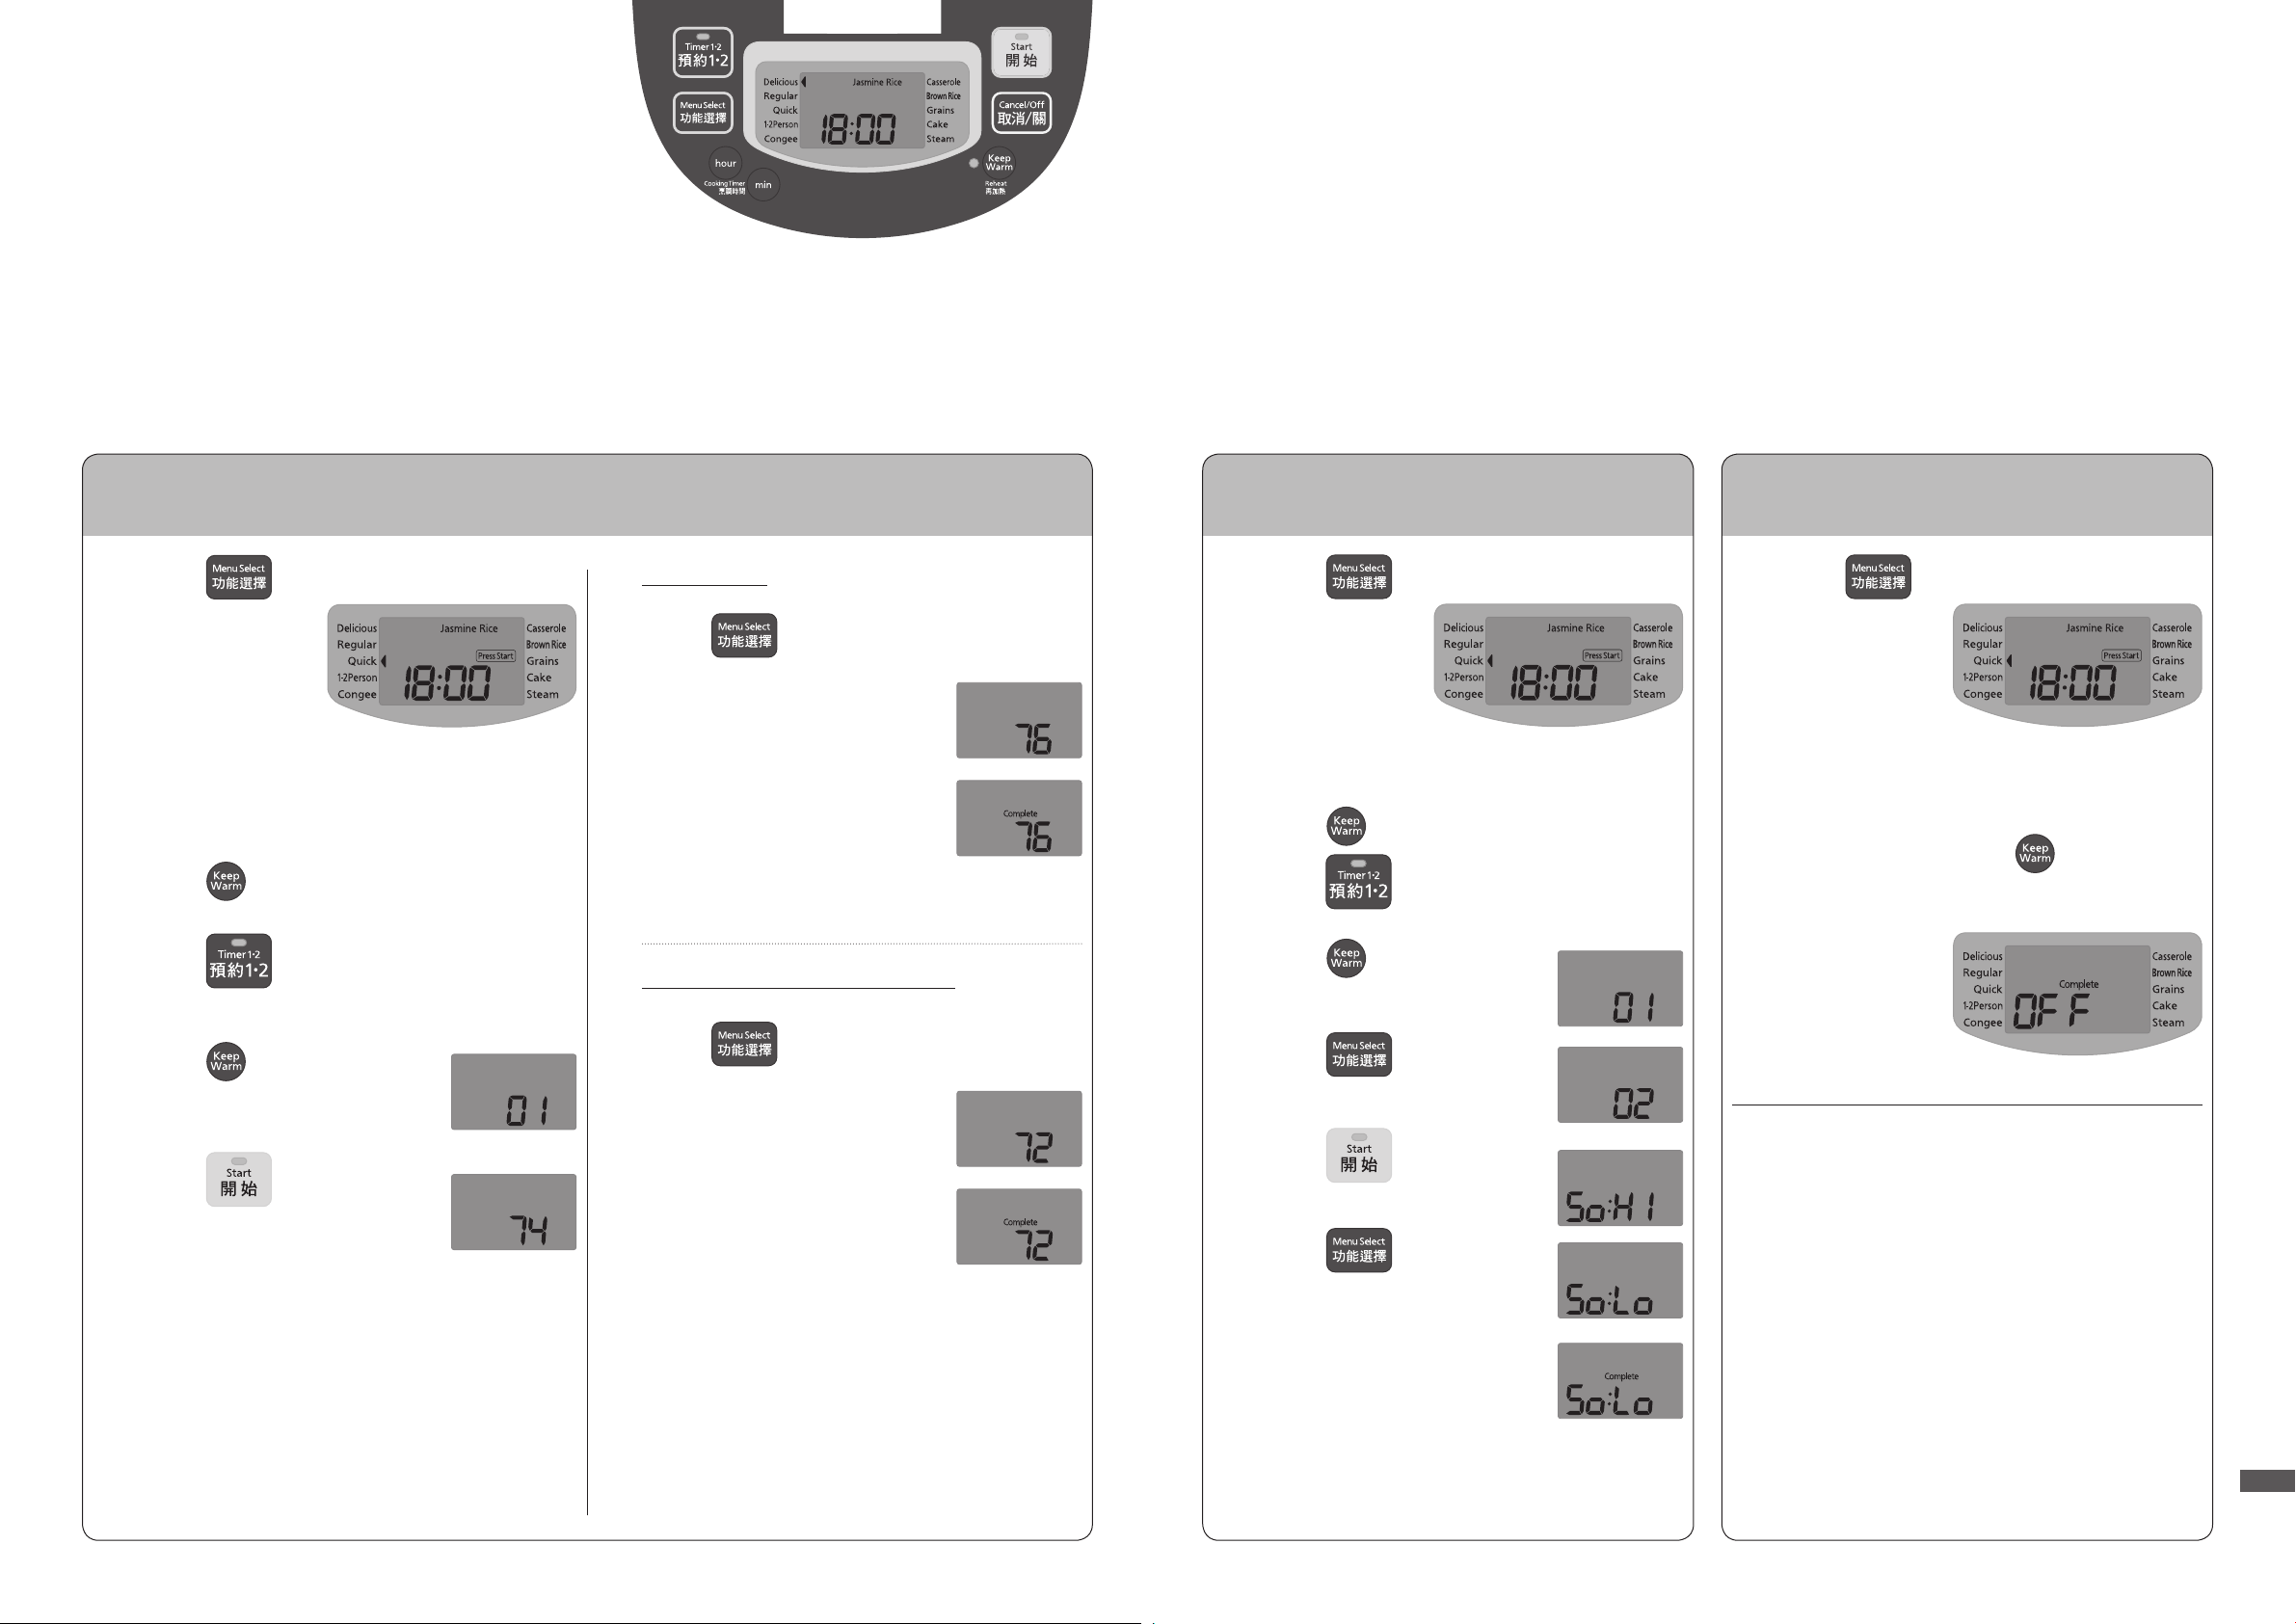
If burning is a concern.
1
Press and set “◄” to “Quick”.
OOSelect “Quick” under “Pearl Rice” or “Jasmine
Rice”.
2
Press .
You will not hear a beep.
Press
.
You will not hear a beep.
Press .
3
Press .
Selec t “02”.
Press .
4
Press .
Set to “So:Lo”.
After 10 seconds
( Setting ends automatically.)
To stop the buzzer sounding
(end sound) during cooking,
reheating and cleaning.
1
Press and set “◄” to “Quick”.
OOSelect “Quick” under “Pearl Rice” or “Jasmine
Rice”.
2
Press and hold down .
(for approximately 5 seconds)
OOThis change does not switch off the button sounds.
What to do when...
If you want to change the keep warm temperature.
(74→76→72)
1
Press and set “◄” to “Quick”.
OOSelect “Quick” under “Pearl Rice” or “Jasmine
Rice”.
2
Press .
You will not hear a beep.
Press .
You will not hear a beep.
Press .
3
Press .
OOThe default setting is “74”.
4
When it smells
Press .
Set to “76”.
After 10 seconds
(Setting ends
automatically.)
When colour has changed or it is dry
Press .
Set to “72”.
After 10 seconds
(Setting ends
automatically.)
OOIf the suggestions on P. 22–23 do not bring about any improvement,
you can change the settings.
OOSteps 2, 3 and 4 must each be completed within 16 seconds.
When no operation is performed for 16 seconds, the display returns
to the current time. (Setting cannot be made.)
→ Please restart the procedure.
OOAfter the setting is completed, the display returns to the current time.
OOTo go back to the previous setting, follow the procedure again.
24 25
What to do when...
Page 14
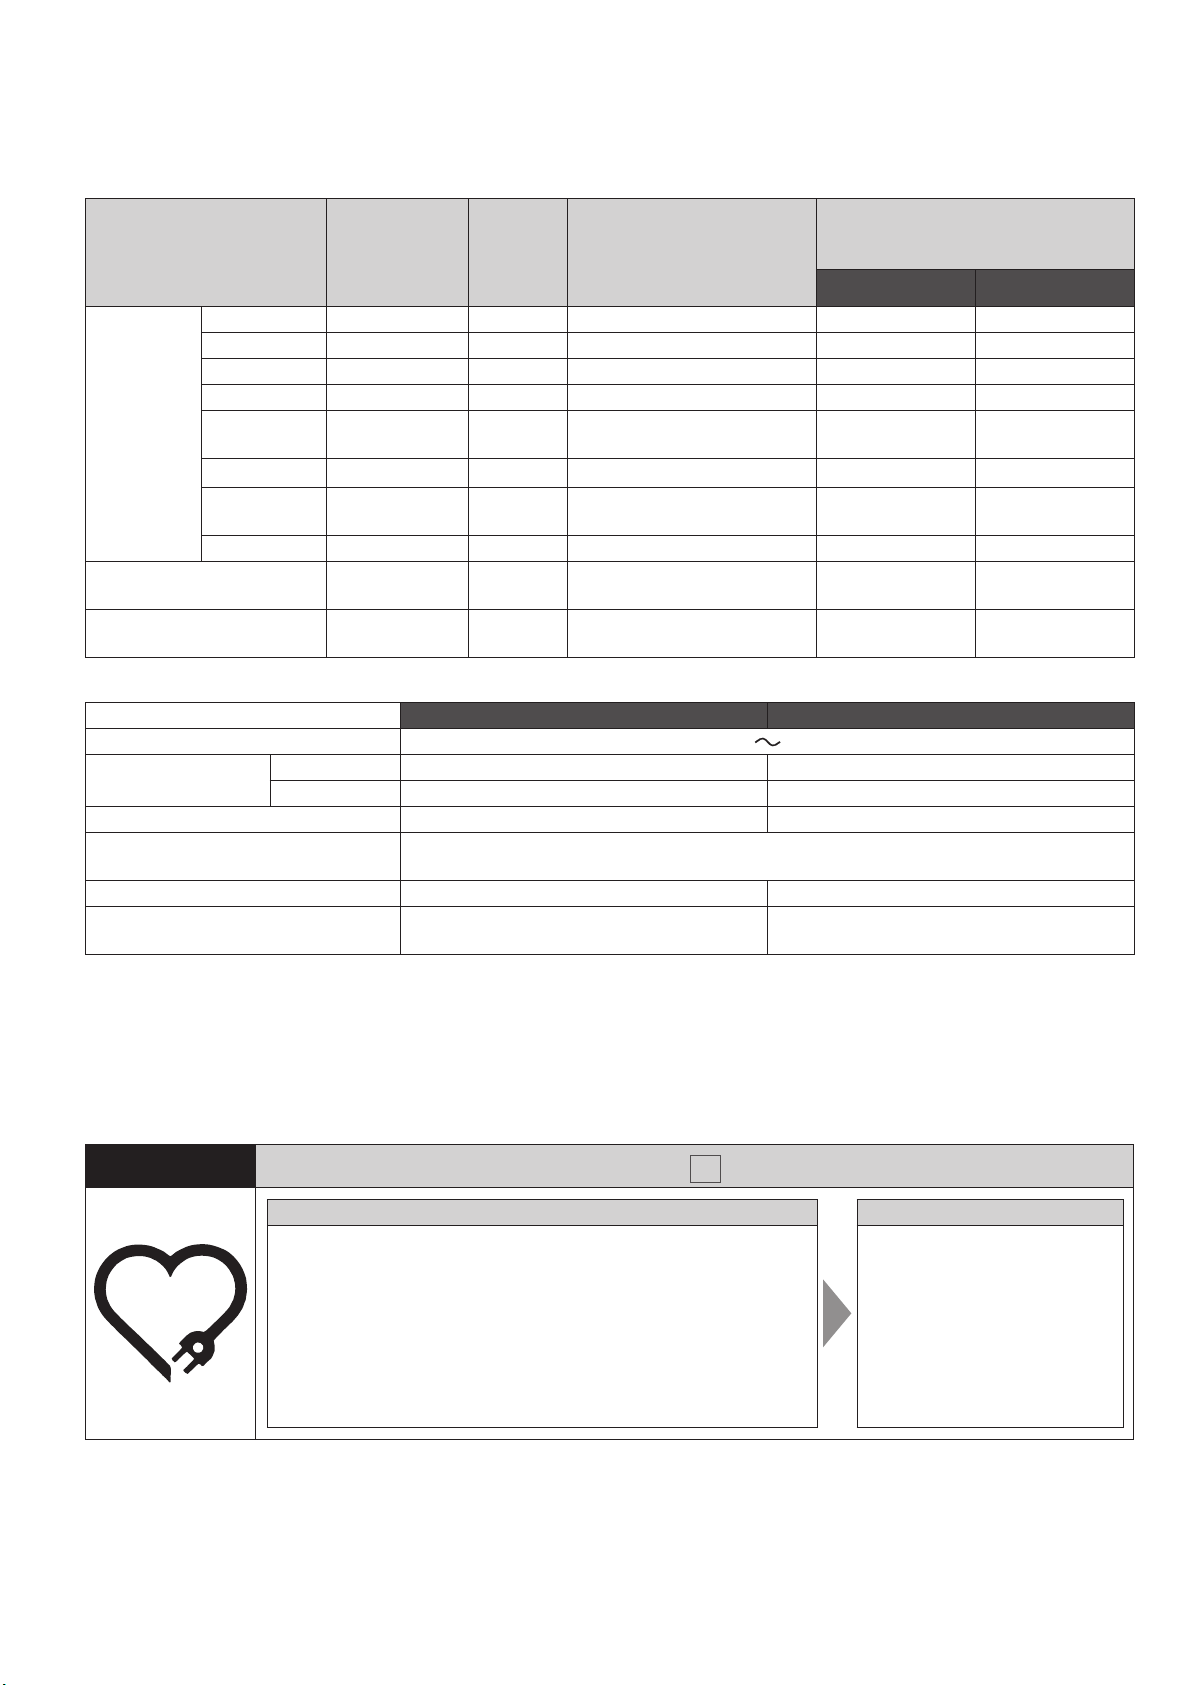
Specifications
Program
Delicious 50 min
Regular 37 min
Quick 19 min–33 min
Pearl Rice
Jasmine
Rice
Cake
Steam
* With “×”, the Warm Jar will switch automatically to the keep warm function, but we do not recommend this. (P. 13)
Power consumption
(Approx.)
Rated capacity of the Inner Pan 3.0 L 5.0 L
Length of the Power Cord
Size (Width × Depth × Height)
1
the power consumed per hour during the keep warm state. (Room temperature 20 °C, maximum amount of rice.)
*
*2 the height with the Outer Lid open.
OOPower consumption is the maximum instantaneous electric capacity.
OOWhen the power is “Off”, the Warm Jar consumes approximately 1.6 W (plugged in state).
OOThis product was designed for Hong Kong.
It is not suitable for use in countries or regions of differing mains frequency or voltage. Moreover, after sales service
is not available.
1-2Person 50 min
Congee
Casserole 50 min
Brown Rice
Grains 45 min–55 min
Power source 220 V
Cooking 1100 W 1300 W
Keeping warm
(Approx.)
Weight (Approx.) 4.6 kg 5.7 kg
(Approx.)
Approximate
cooking time
Setting time
1 h–4 h
1 h 35 min–
1 h 55 min
Setting time
40 min–60 min
Setting time
1 min–60 min
25.5 cm × 36.6 cm × 21.0 cm (40.2 cm*
Keep
Warm
Function
○
○
○
○
×
×
×
×
×
×
710 W (27.6 Wh*1) 650 W (32.8 Wh*1)
Timer Setting Restriction
*
From 60 min before done 0.5–5.5 1–10
From 50 min before done 0.5–5.5 1–10
─ 0.5–5.5 1–10
From 60 min before done 0.5–1.5 1–2.5
Cooking time + 1 min or
more before done
─ 1–3 2–6
From 130 min before done 1–3 (1–2) 1–7 (1–5)
From 60 min before done 0.5-4 1–8
─
─
SR-FC108 SR-FC188
50 Hz
1.0 m
2
) 28.4 cm × 39.2 cm × 24.3 cm (45.6 cm*2)
Cooking Capacity (Cup)
( ) is for when other
ingredients are added.
SR-FC108 SR-FC188
0.5–0.75 0.5–1.5
Dough Max
600 g
Quantity of water
500 mL
Dough Max
Quantity of water
600 mL
900 g
26
Checks
Printed in Japan
Check your well-used IH Electronic Warm Jar!
Have you noticed any of the following? Stop using the Warm Jar
OOThe power plug and the power cord become abnormally
hot.
OOThe power cord is damaged or power failure happens
when the power cord is touched.
OOThe main body is deformed or is abnormally hot.
OOSmoke emanates from the main body or a burning odour
is detected.
OOThe main body is cracked, is loose or rattles.
OOThe fan in the bottom does not rotate while cooking.
Panasonic Corporation
Web Site: http://www.panasonic.com.hk
© Panasonic Corporation 2018
To prevent accidents,
stop using the Warm Jar,
remove the power plug,
and ask your dealer to
perform inspection.
RZ19HK49
F0818T0
Page 15
HK
使用說明書
本使用說明書全篇使用
SR- FC108
的 圖 解。
目錄
檢查及
預防措施
1.0 L
1.8 L
微型電腦飯煲
IH
型號
SR-FC108
型號
SR-FC188
安全注意事項
使用注意事項
零件名稱/附件
家用
頁
2
6
7
多謝購買
此 產 品的 用 途 只 限 家 庭 使 用。
OO
使用產品前請仔細閱讀使用說明書以確保安全及正確使用。
OO
請確保閱讀「安全注意事項」再使用(第
OO
請將保用證與使用說明書保存在一處安全地方。
OO
附加保用證
Panasonic
產 品。
2–5
頁)。
日常使用
清洗
詳細資料
煮飯
正確使用程序
使用不同程序
烹調
保溫
保溫/再加熱
OO
使用預約功能
當目前時間有誤
OO
食譜
粥/煲 仔飯
OO
糙米 飯 /什穀米
OO
蛋糕/蒸
OO
清洗
首次使用時及每次使用後
OO
定期檢查
OO
當微型電腦飯煲的潔淨有問題時
OO
我的微型電腦飯煲有故障嗎?
這 是 什 麼意 思?
下一步應該怎樣…
規格
8
10
11
12
13
14
15
16
17
18
20
21
22
26
Page 16
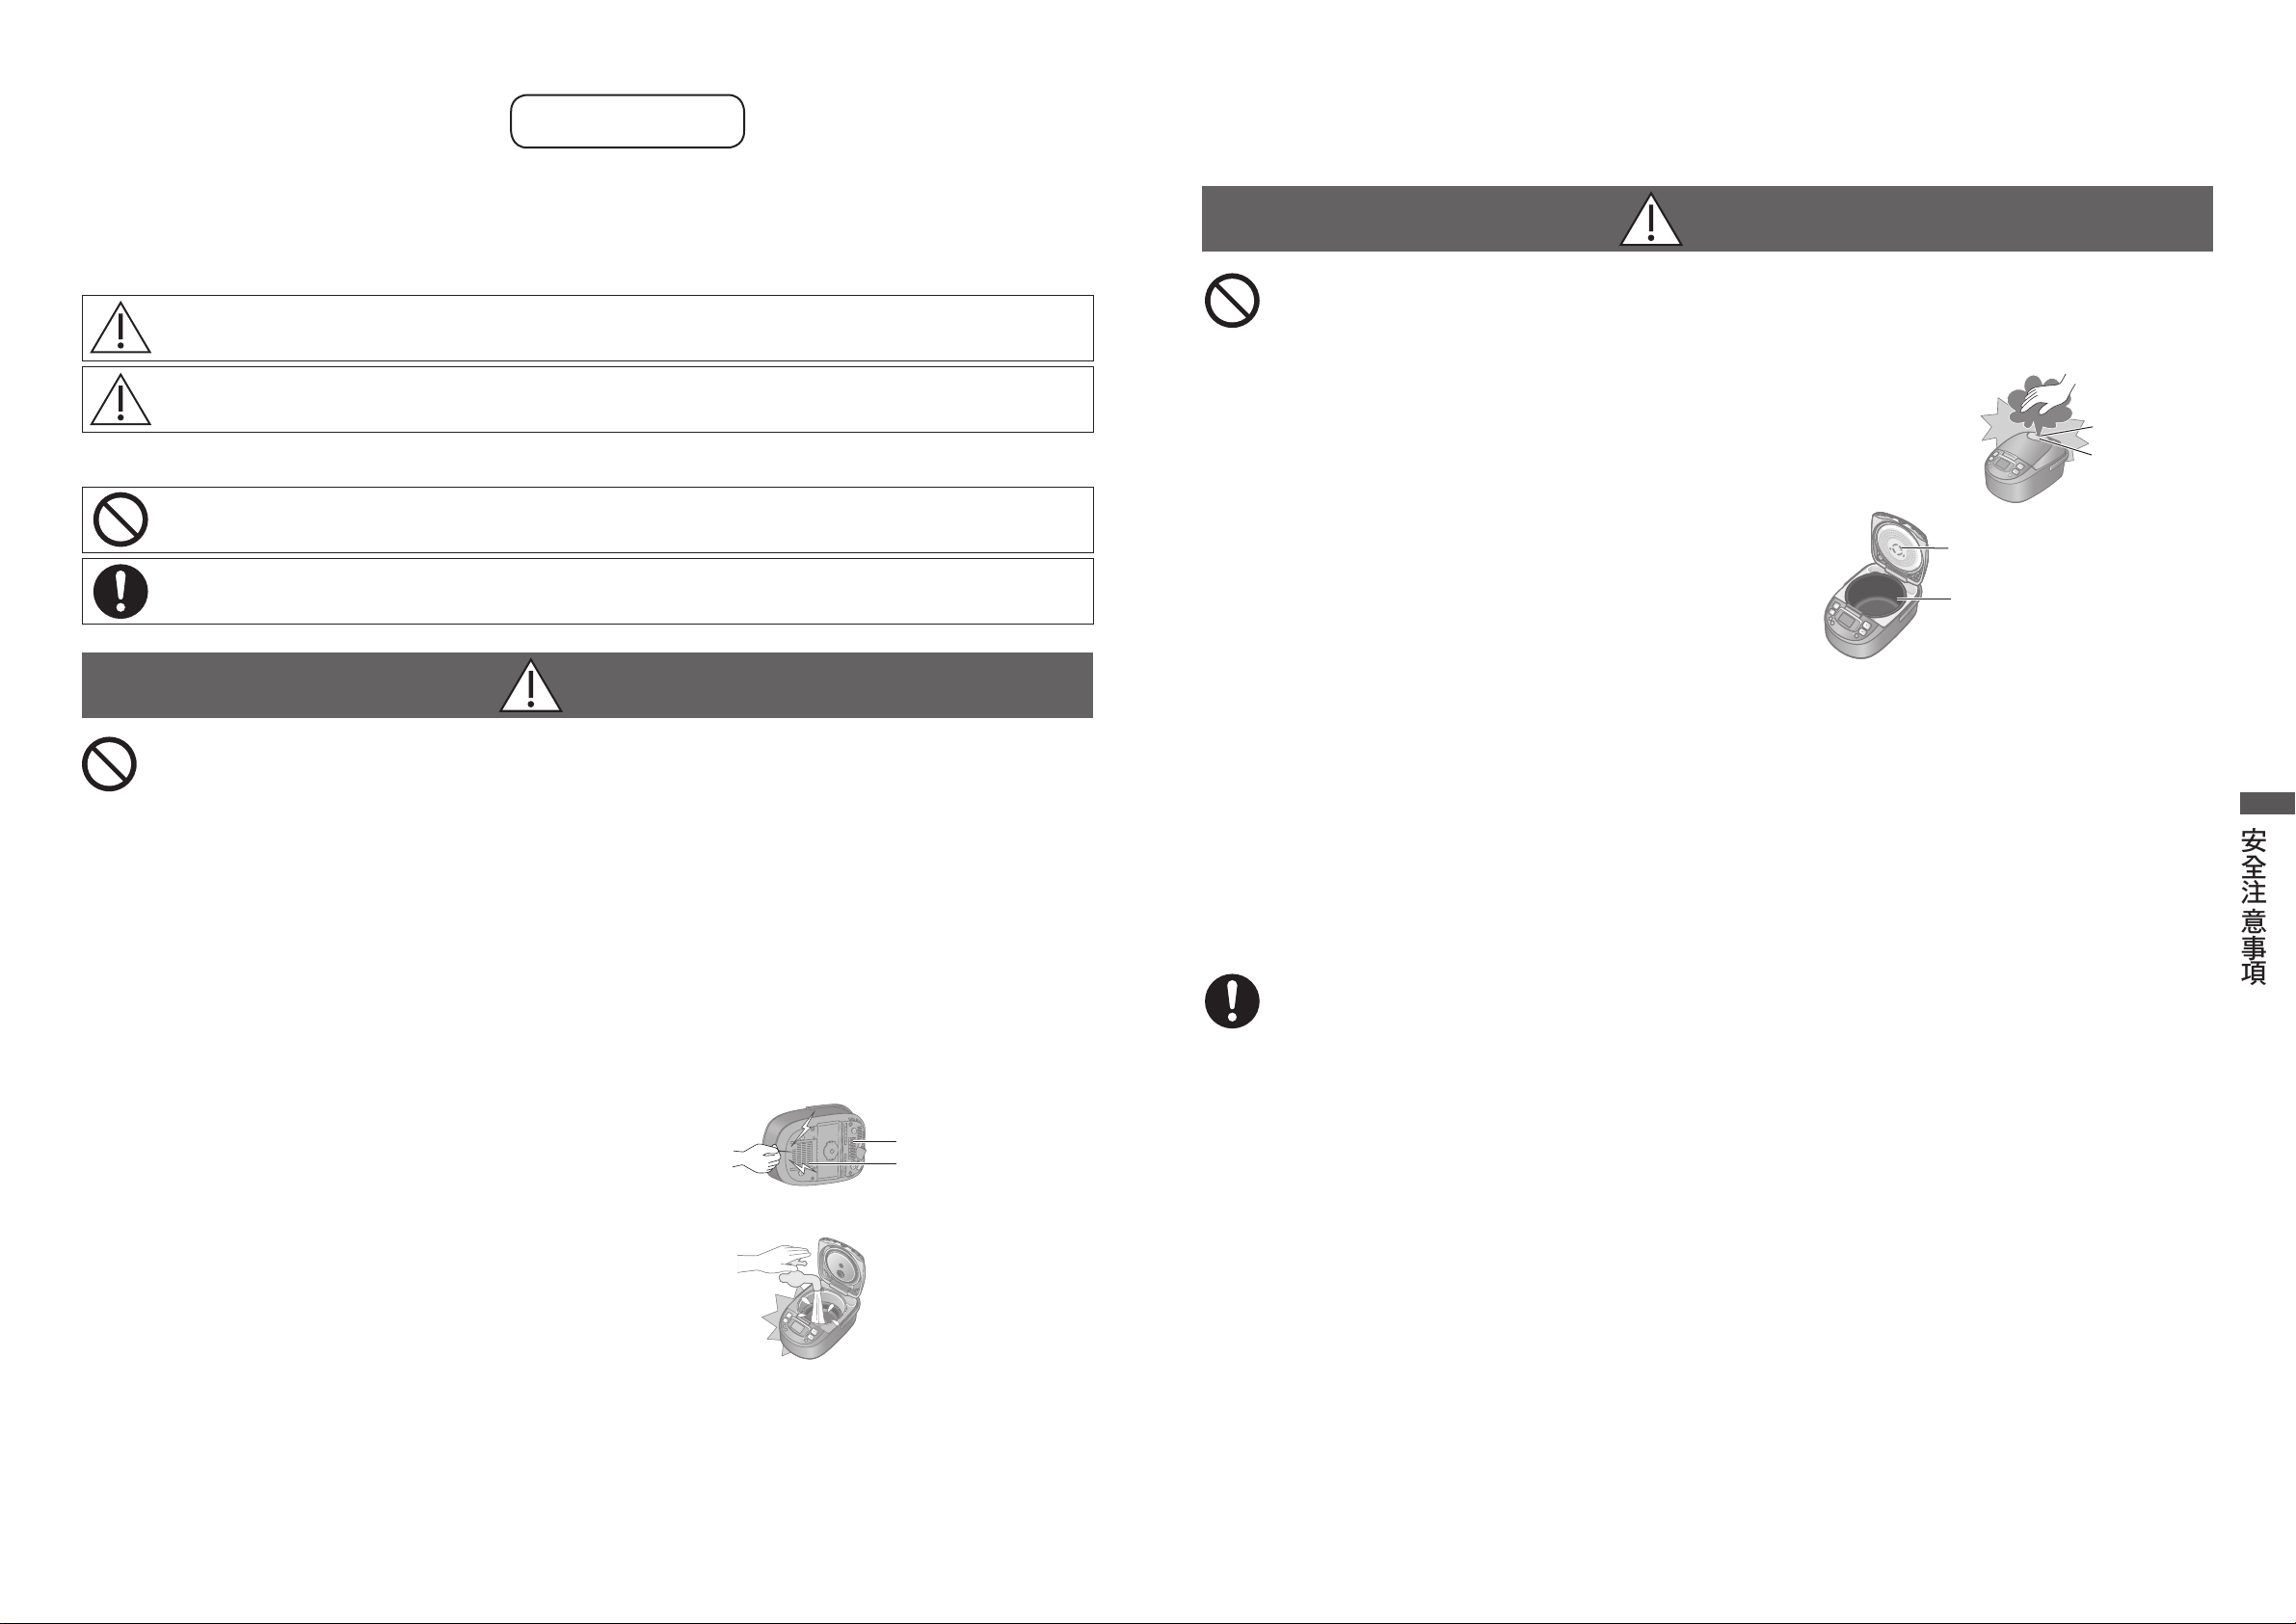
安全注意事項
請確保按照以下說明
為防止使用者及他人造成意外或受傷,以及財產受損,請按照以下說明。
以下圖表顯示錯誤操作可導致的損壞程度。
OQ
警 告:
注 意:
符 號 已 分 類 並 解 釋 如 下。
OQ
表 示 嚴 重 傷 亡。
表示受傷風險或財產損壞。
此 符 號 表 示 禁 止 使 用。
此符號表示必須達到要符合的需求。
警告
如電源線或電源插頭已損壞或電源插座與電源插頭的接口鬆脫,請勿使用產品。
O
(否則可能會導致觸電或因短路導致火災。)
如供應電源線已損壞,必須用製造商或其服務代理商提供的特別電源線或配件更換。
O«
請勿損壞電源線或電源插頭。
O
嚴 格 禁 止 進 行 以下 操作。
•O
損毀、更改、觸摸或放置靠近加熱元件、強行彎曲、扭曲、拖曳、在尖銳物件拖曳、將重型物件放置在上、將電源線
束成一紮、抓住電源線及拉扯電源線以移動產品。
(否則可能會因電源線和電源插頭破損而導致火災和觸電。)
請勿以濕手插入或拔掉電源插頭。
O
處理電源插頭或開啟產品前請永遠確保手是乾燥的。
•O
( 否 則 可 能 會 導 致 觸 電 或 受 傷 。)
警告
請勿使用產品於使用說明書記載以外的任何用途。
O
( 否 則 可 能 會 導 致 火 災 、燒 傷 、 受 傷 或 觸 電 。)
對於不當使用產品或未能遵守使用說明書,
•O
請勿在使用中或剛使用後將臉靠近或用手觸摸蒸氣口和美味感應裝置。
O
對 兒 童 加 強 注 意。
•O
( 否 則 可 能 會 導 致 燒 傷 。)
請勿放置任何東西在內鍋以阻擋蓋加熱板的孔。
O
(否則可能會蒸氣洩漏或食材噴出,導致燒傷或受傷。)
<嚴禁進行的烹調例子>
烹調盛載於膠袋內的材料或調味料。
•O
使用鋁箔等直接蓋在食材上進行烹調。
•O
請勿在烹調時開啟外蓋或移動產品。
O
(否則可能會蒸氣洩漏或食材噴出,導致燒傷或受傷。)
請勿將水或其他液體潑灑在連接器(如本體插頭)上。
O
(否則可能會導致觸電或因短路導致火警。)
請勿讓任何人舔本體插頭。
O
對 兒 童 加 強 注 意。
•O
( 否 則 可 能 會 導 致 觸 電 或 受 傷 。)
本產品不適合供下列人士(包括小孩)使用:身體官能或心智能力退化者,或是經驗與使用知識
O
缺乏者,除非有負責他們安全的人員在旁監督,或指示產品的使用方法,方可使用。請看管好兒
童以免讓他們將產品當成玩具。
( 否 則 可 能 會 導 致 燒 傷 、受 傷 或 觸 電 。)
Panasonic
將 不 承 擔 任 何責 任。
蒸氣口
美味感應裝置
蓋加熱板的孔
內鍋
安全注意事項
請勿在吸氣孔、排氣孔或隙縫間插入任何物件。
O
特別是金屬物件例如引線或電線。
•O
(否則可能會導致觸電或因操作故障導致受傷。)
請勿用水清洗本體、將產品浸入水中或讓水濺濕。
O
(否則可能會導致觸電或因短路導致火災。)
如水濺入產品內請聯絡授權經銷商。
O«
請勿自行更改、拆解或修理產品。
O
( 否 則 可 能 會 導 致 火 災 、觸 電 或 受 傷 。)
請 聯 絡 授 權 經 銷 商 查 詢 維 修 事 宜。
O«
排氣孔
吸氣孔
只限使用規格為10安培及
O
(將其他裝置插入相同的電源插座可能導致電力過熱而引起火災。)
只限使 用規格至少為10安 培 的 延 長電 線。
•O
將本體插頭及電源插頭穩固地插入。
O
( 否 則 可 能 會 導 致 冒 煙 、 火 災 或 觸 電 。)
定期清潔電源插頭。
O
(弄髒的電源插頭可能會因濕氣及外物積聚而導致絕緣不足引起火災。)
拔掉電源插頭,然後使用乾布擦拭。
O«
伏 特 交 流電的 電 源 插 座。
220
2 3
Page 17
安全注意事項
請確保按照以下說明
警告
如發生異常情況或故障請立即停止使用,並將電源插頭拔掉。
O
( 否 則 可 能 會 導 致 冒 煙 、 火 災 或 觸 電 。)
例如:發生異常情況或故障
電源插頭及電源線異常發熱。
•O
電源線損毀或碰到電源線後發生間歇性斷電。
•O
本 體 變 形或 異常 發 熱。
•O
本體冒煙或發出焦味。
•O
本體破裂、鬆動或發出異常聲響。
•O
烹 調 時 底 部風 扇 不 旋 轉。
•O
請即時聯絡授權經銷商進行檢查或維修。
O«
慢慢合上外蓋直至喀噠一聲。
O
(為預防由蒸氣洩出或開啟外蓋而導致的燙傷或傷害。)
為確保外蓋合上、請清除附在上框、蓋加熱板的密封墊或
•O
外蓋的密封墊、內鍋的邊緣、開蓋按鈕周邊的外物例如米飯等。
請將電源線遠離兒童。
O
請勿讓電源線懸掛在放置產品的餐桌或工作枱邊緣。
•O
(拖拽電源線可能導致產品從餐桌或工作桌上掉下而導致受傷。)
請將產品遠離兒童。
O
( 否 則 可 能 會 導 致 燒 傷 、受 傷 或 觸 電 。)
兒童對不正確使用電子產品而引發的危險是沒有意識的。
•O
外蓋的
密封墊
開蓋按鈕
周邊
注意
移動產品時請勿觸摸開蓋按鈕。
O
(否則可能導致外蓋開啟而導致燙傷。)
請 勿 在 以下 地 方 使 用產 品。
O
可讓水濺濕或靠近熱源的地方。
•O
( 否 則 可 能 會 導 致 觸 電 、漏 電 或 火 災 。)
不 平 坦 的 表 面 或 非 耐 熱 的 地 毯 上。
•O
( 否 則 可 能 會 導 致 受 傷 、 燙 傷 或 火 災 。)
靠 近 牆 壁 或 傢俱。
•O
( 否 則 可 能 會 導 致 變 色 、 變 形 或 損 壞 。)
外蓋開啟的地方不能碰觸到周圍的物體,如牆壁或家具。
O«
鋁 板 或 電 子 墊 子上。
•O
蓋加熱板的
密封墊
上框
(鋁材料可能會產生熱力及引致冒煙或火災。)
內鍋沒有米或水的情況下請勿開啟電源。
O
( 否 則 可 能 會 導 致 燒 傷 。)
請勿使用此產品沒有指定可使用的電源線配件(即指本體插頭及電源插頭)。
O
開蓋按鈕
並 且切 勿 將 它 轉 換。
( 否 則 可 能 會 導 致 觸 電 、漏 電 或 火 災 。)
拔掉電源插頭或本體插頭時請確保握住電源插頭或本體插頭。
O
( 否 則 可 能 會 導 致 觸 電 或 短 路 引 致 火 災 。)
取出內鍋前或不使用產品時切記關掉電源,然後將電源插頭從電源插座拔掉。
O
(否則可能會導致燒傷、受傷、因絕緣退化而導致的觸電或短路引起火災。)
安全注意事項
拔掉電源插頭然後允許產品完全冷卻才進行清洗及保存。
O
使 用產 品 時 請小 心 放 置電 源 線 以 免 絆 倒。
O
( 否 則 可 能 會 導 致 受 傷 , 或 損 壞 電 源 線 而 引 起 火 災 或 觸 電 。)
確保您使用接地電源插座。
O
產品的電源插頭是為接地電源插座而設。
•O
(使 用無 接地 的電 源插 座 可 能因 漏電導致故障或觸電。)
注意
請勿將電源插頭暴露在蒸氣中。
O
電源插頭接上電源後,請勿將電源插頭暴露在蒸氣中。
•O
(否則可能會導致觸電或因短路導致火災。)
使用有拉桌的櫥櫃時,請在不會將電源插頭暴露在蒸氣中的
O«
情 況 使 用 產 品。
產品未冷卻前請勿將它移動。
•O
(觸摸加熱元件可能會導致燙傷。)
如在廚房架上等地方使用產品時,請確保蒸氣在封閉空間內可以向外散發。
O
( 否 則 可 能 會 導 致 變 色 或 變 形 。)
使用有拉桌的櫥櫃時,請確保拉桌全部拉出以防止上層架子暴露在蒸氣 下。
•O
欲使用滑動台時,使用台架的耐重強度為
O
( 這 可 能 因 產 品 掉 下 而 導 致 燒 傷 或 受 傷 。)
搬 運 產品 時 請 提 握手 柄。
O
( 否 則 可 能 會 導 致 燒 傷 或 受 傷 。)
如您使用植入起搏器請向醫生查詢。
O
此 產品 的 操 作 可能 影 響 您 的 起搏 器。
•O
10 k
以 上(
g
1.0 L
時)或
手柄
13 k
以 上(
g
1.8 L
時)的 產 品。
使用期間電源中斷
請勿使用非指定的內鍋及變形的內鍋。
O
(否則可能會因過熱或故障導致燙傷或受傷。)
使用中或使用後請勿觸摸加熱元件。
O
美 味 感 應 裝 置、蓋 加 熱 板、內 鍋 及內 鍋 附 近 的 金 屬 零 件,例 如 上 框 等。
•O
( 否 則 可 能 會 導 致 燒 傷 。)
請用乾布或隔熱手套取出熱內鍋。
O«
4 5
包括電源插頭已拔掉,或使用電源斷路器時絆倒。
如遇瞬間電力中斷,產品將返回電源停止前的狀態。
OO
如電源中斷了很長時間,電源恢復後產品可能返回以下狀態。
OO
烹 調 狀 態: 繼 續 烹調。
米 飯 可 能 以 不 理 想 的方 式 烹調。
如預約設定時間已過,煮飯便會即時開始。米飯可能未在設定時間內完成烹調。
*
若要瞭解「預約設定限制」的進一步詳情,請參考第26頁。
保溫狀態:繼續將米飯保溫
Page 18
使用注意事項
附件
量杯(1)
(約
180 mL
)
OO
所 有 米 種 都 共 通。
蒸 籠(1)
飯勺(1) 粥勺(1)
零件名稱/附件
若要長時間保持產品在良好情況,請留意以下事項。
關於微型電腦飯煲
請勿在電磁爐上使用微型電腦飯煲。
OQ
(否則會損壞電磁爐或微型電腦飯煲。)
請勿在直接暴曬陽光的地方下使用微型電腦飯煲。
OQ
( 否 則 可 能 會 導 致 變 色 。)
請勿在微型電腦飯煲底部(吸氣孔及排氣孔)受到阻塞的
OQ
地方(例如地毯、膠袋、鋁箔及布料等)下使用微型電腦飯煲。
(否則會損壞微型電腦飯煲。)
定期檢查微型電腦飯煲底部的吸氣孔及排氣孔,並且清除
OQ
所 有 灰 塵。(第19頁)
請 勿在 戶外 使 用微 型電 腦 飯 煲。
OQ
(不穩定電源供應可能會導致微型電腦飯煲發生故障。)
使用微型電腦飯煲時請勿覆蓋其頂部。
OQ
洗 碗 布 等。
OO
否則可能會因蒸氣悶住,使外蓋和按鈕
(
變 形 而 無 法 操 作。
)
關於內鍋
請勿在微型電腦飯煲以外使用內鍋。
OQ
請勿在煤氣或電磁爐或微波
OO
爐 內 使 用內 鍋。
有異物如米飯或污垢阻塞的情況下,請勿使用微型電腦飯
OQ
煲。
否則可能會顯示錯誤訊息,米被煮焦或烹調出現問題。
•
(
否則烹調時可能會出現蒸氣外漏而損傷本體。
•
邊緣或底部
(內鍋)
請勿將微型電腦飯煲放置在容易受電磁場影響的裝置附近。
OQ
無線電、電視、助聽器等。
OO
(有可能聽到噪音或減低聲量。)
卡/銀 行 卡等。
IC
OO
(儲存在卡上的記錄可能會遺失或損壞。)
請勿帶磁石物件靠近微型電腦飯煲。
OQ
( 否 則 可 能 會 導 致 故 障 。)
請 勿將 內 鍋 與硬 物 件撞 擊。
OQ
否則可能導致外層表面刮花
(
或 凹 痕。
外蓋的
密封墊
開蓋按鈕
周邊
)
蓋加熱板的
密封墊
內鍋感應器
)
首 次使 用 微 型 電 腦 飯 煲 前,請清 洗 附 件、內 鍋、蓋 加 熱 板 及 美 味 感 應 裝 置。(第
OQ
內鍋
蓋加熱板
若 未 裝 好 則無 法 關閉 外 蓋。
OO
外蓋
18–19
頁)
美味感應裝置
顯示屏
使用注意事項
手柄
留意以下情況以避免削去或刮花內鍋塗層。
OQ
準備烹調時
請勿使用攪拌器或其他工具
OO
洗 米。
請勿使用金屬網漏等物件接
OO
觸 內 鍋 塗 層。
煮好米飯後
請 勿 在 內 鍋攪 拌 鹽或 香 鬆 等。
OO
請勿將醋放入內鍋中的米飯
OO
( 製 作 壽 司 等 食 物 )。
請勿使用金屬杓子( 烹 調 粥 等 食 物 )。
OO
請勿敲打內鍋( 盛 飯 時 )。
OO
附註
以下清況不會影 響其性能或健康。
OO
外層表面]淺 的 刮 痕、細 小 凹 痕 或 碰 撞。
[
內層表面]內 鍋 塗 層 剝 落。
[
如內鍋變形或您擔心其狀況,是可以購買新的內鍋。
清洗時(
第
頁)
18–19
請 勿 將 內 鍋 用 作 為 洗 碗 工 具。
OO
請勿將湯匙或其他餐具放入內鍋中。
使用調味烹調後,請勿將食物留在內鍋中。
OO
烹調煲仔飯後,請盡快清除內鍋中的食物
«
然後進行清洗。
請勿使用乾碗機或洗碗機/
OO
烘 乾機 進 行 清 洗。
請勿在清洗後將內鍋放在其他
OO
餐 具上 烘 乾。
請勿使用浸入光劑的砂紙、金屬
OO
清潔球、尼龍清潔球等清洗或擦
洗 內 鍋。
使 用軟 海 棉 進 行 清 洗。
«
請 勿使 用百 潔 布 進 行 清 洗。
開蓋按鈕
按 下開 蓋 按 鈕 以 開啟 外 蓋。
OO
內鍋感應器
上框
電源插頭
零件名稱/附件
電源線
本體插頭
電源線配件
附註
有關視覺受損人士的協助,「
OO
( 開 始 )」 及 「
Start
Cancel/Off
(取 消/ 關)」按 鈕 附 有「 」及「 」的 凸 起 部 份 。
6 7
Page 19
煮飯
洗米然後加水 設定程序 烹調
1
2
量米
用附贈的量杯量米至相應的刻度。
OO
(大約
180 mL
/量杯)
洗米
首先加大量的水、攪拌,然後迅速將水倒掉。
重複此步驟
( 烹 調 的 水 可 以 保 持 小 許 白 色 。)
洗 米 後 放 進 內鍋。
( 可 以 在 內 鍋 洗 米 。)
預防措施
請 勿 讓 米 留 在 網 漏 內。
OO
米 粒 可能 斷 開,導 致 烹 調
(
時米飯黏住或產生飯焦。
次,每次洗米時輕輕攪拌。
2–5
)
加水
3
加 水 至 所 要 烹 調 程 序 的 位 置 ( 水 位 線 )。( 第10頁)
OO
(請確保內鍋在平面上然後檢查兩側的水位線位置。)
根 據 米 量 並 加 水 到 相 應 的 位 置。
OO
按您的口味由水位線調整水量約1至
加入過多水量會造成食材噴出以及炊飯時間增長,
(
導 致口 味 變 差。
新收割的米可因應而減去小量水。
•O
要煮出較硬的米飯,可加入比水位顯示較少一點的
•O
水量,要煮出較軟的米飯,可加入比水位顯示較多
一 點的 水 量。
請 確 保 米已 水 平 放 置。
OO
無 須 將 米 浸 泡。
OO
( 按 下「
Start
選 擇「
Delicious
(開始)」按鈕時,水將會自動吸取。)
Jasmine Rice
( 美 味 模 式 )」 烹 調 使 用3量杯米
(茉莉米)/
2 mm
。
)
將內鍋放置在微型電腦飯煲內
4
清 除 任 何 在內 鍋 外 的水 漬。
OO
合上外蓋
5
請確認蓋加熱板和美味感應裝置已裝好。
OO
(第
18–19
頁)
插入電源插頭
6
7
請首先將本體插頭連接本體然後連接至電源插頭。
OO
請 確 保 兩 個 插 頭 已 確 實連 接。
檢查程序然後按下「
在購買時,預設值已將程序設定為「
(茉莉米)/
要 改 變 預 設 值 時(第11頁)
按下
烹 調 開始。
Delicious
。
(美味模式)」。
( 開 始 )」 按 鈕
Start
Jasmine Rice
煮飯
當 烹 調 完 成 鈴 聲 提 示 時,蒸 煮 步 驟 已完 成。將 飯 即 時 翻 鬆。
OO
( 可 蒸 發 多 餘 水 份 。)
會 自 動 保 溫 。( 第13頁)
OO
烹調美味米飯的
三項原則
圖表中的內鍋是
正確 量 水 及 量 米。 輕輕洗米。
過度用力洗米可能導致米粒斷開、
導致烹調時米飯黏住或產生飯焦。
1.0 L
型 號。
使用適合的水。
我們建議使用自來水或
過 濾 自 來 水。
使 用 含 鹼 水(pH值高於9)
OO
可能導致米飯稍軟或變黃。
使用硬礦泉水
OO
(有
100
可 能 導 致 米 飯乾 燥 或 硬。
或以上硬度)
注 意 事 項!
如可以,選擇最近製成的米。
OO
開啟袋裝米後,請即時使用。
OO
將米存放在雪櫃內。
OO
8 9
Page 20
正確使用程序
程序
內鍋的水位線
烹調時間
(大 約)
最佳味道
Pearl Rice
(珍 珠米)
Jasmine
Rice
(茉莉米)
Delicious
(美味 模式)
此為預設模式。
White Rice
Pearl Rice
/
(
Jasmine Rice
)
50
分鐘
標準烹調
Regular
(標 準)
White Rice
Pearl Rice
/
(
Jasmine Rice
)
37
分鐘
快速烹調
Quick
(快 速 煮 飯)
米 飯 將會 稍 微 變 硬。
您可以 將米浸泡使它軟化再
烹 調。
White Rice
Pearl Rice
/
(
Jasmine Rice
)
19
分鐘
–33
分鐘
烹調少量米飯
1-2Person
(少量)
1.0 L
型 號(
0.5至1.5
量杯)
1.8 L
型 號(1至
2.5
量杯)
White Rice
Pearl Rice
/
(
Jasmine Rice
)
50
分鐘
烹調粥
Congee
(粥)
1.0 L
型 號(
0.5至0.75
量杯)
1.8 L
型 號(
0.5至1.5
量杯)
Congee
設定時間
1
小時–4小時
烹調煲仔飯
Casserole
(煲仔飯)
White Rice
Pearl Rice
/
(
Jasmine Rice
)
50
分鐘
烹調糙米飯
Brown Rice
(糙米 飯)
Brown Rice
Pearl Rice
/
(
Jasmine Rice
)
1
小時35分鐘
–
1
小時55分鐘
烹調不同什穀米
Grains
(什 穀 米)
White Rice*
Pearl Rice
/
(
Jasmine Rice
)
45
分鐘
–55
分鐘
焗蛋糕
Cake
(蛋糕)
—
設定時間
40
分鐘
–60
分鐘
蒸
Steam
(蒸)
—
設定時間
1
分鐘
–60
分鐘
我 需 要 每 次 選 擇 程 序 嗎?
OO
在「
Pearl Rice
(珍 珠 米)」或「
Jasmine Rice
(茉莉米)」
下 選 擇「
Delicious
( 美 味 模 式 )」 及 「
Regular
( 標 準 )」
程 序 已儲 存。
至於其他程序,以下操作允許您選擇最近使用程序。
(無法叫出「
Cake
(蛋糕)」 及「
Steam
(蒸)」 程 序。)
1
長按
(大約2秒)
O
當您按下按鈕您將會聽到「嗶」一聲,不過繼續按住。
您 將 會 聽 到 第 二 個「嗶」一 聲,然 後 最 近 使 用 程 序
將 會顯 示。
2
按下
閃動
使用不同程序
用 於「
OO
( 蛋 糕 )」 及 「
Cake
( 蒸 )」 程 序 時 (第12頁)
Steam
1,2 3
在步驟2中 選 擇「
OO
程序時設置烹調時間
Congee
( 粥 )」
若要取消操作
OO
選擇一個米種
1
按下
每 次 按 下「
OO
位 置 會 移 動 ,且「◄」跑 過 一 個 循 環 後 會 在「
( 茉 莉 米 )」 和 「
Rice
。
Menu Select
Pearl Rice
( 功 能 選 擇 )」 按 鈕 時 , 「◄」
( 珍 珠 米 )」 之 間 轉 換 。
Jasmine
選擇一個功能
2
3
按下
選 擇「
OO
按下
按 下「
按下
,將「◄」設 定 為 某 個 功 能。
Congee
可允許烹調時間 設 定 單位
Start
閃動
( 粥 )」 程 序 時 , 設 定 烹 調 時 間 。
。
小時–4小時
1
( 開 始 )」 按鈕
。
30
分鐘
*
10 11
調整水量以適應什穀米的種類及您的口味。
White Rice
OO
確的水位線以適應煮飯類型。
烹調的實際時間會根據米量、水量、電壓、室溫、水溫、米質的不同而變化。
OO
「
Casserole
OO
請勿將糙米與白米一起烹調。(烹調效果可能未如理想。)
OO
(白 米)或
( 煲 仔 飯 )」 、 「
Brown Rice
Grains
「
Pearl Rice
(糙 米 飯 )有 兩 個 水 位 線:
(什穀米)」的烹調時間會根據使用的食材而變化。
珍珠米)」和「
(
Jasmine Rice
(茉 莉米)
」。選 擇 正
附註
「
(清洗)」會於選擇時出現。
Clean
OO
為了讓 選擇 功能 時更 容易分 辨(例 如「
OO
模式)」),嗶一聲已變更為「嗶嗶」。
顯示屏幕根據已選烹調程序變更。
OO
請 注 意「
分 鐘 才 表 示 烹 調 完 成。之後 將 轉 換 顯 示 時 間 直 至 烹 調 完 成。
10
( 快 速 煮 飯 )」 、 「
Quick
Menu Select
Brown Rice
( 糙 米 飯 )」 及 「
(功能選擇)」按 鈕 顯 示 為「
(什穀米)」程序,微型電腦飯煲將顯示目前時間直至
Grains
烹 調 開 始。
當烹調完成鈴聲提示時,蒸煮步驟已完成。
OO
將飯即時翻鬆。
(可 蒸 發 多餘 水份。)
會 自 動 保 溫 。( 第13頁)
OO
連續烹調粥時,請在取出內鍋並打開外蓋的狀態下,
OO
將微 型電腦飯煲冷卻5分 鐘 以 上 再 使 用。
Jasmine Rice
(茉莉米)/
Delicious
(美味
正確使用程序
使用不同程序
Page 21
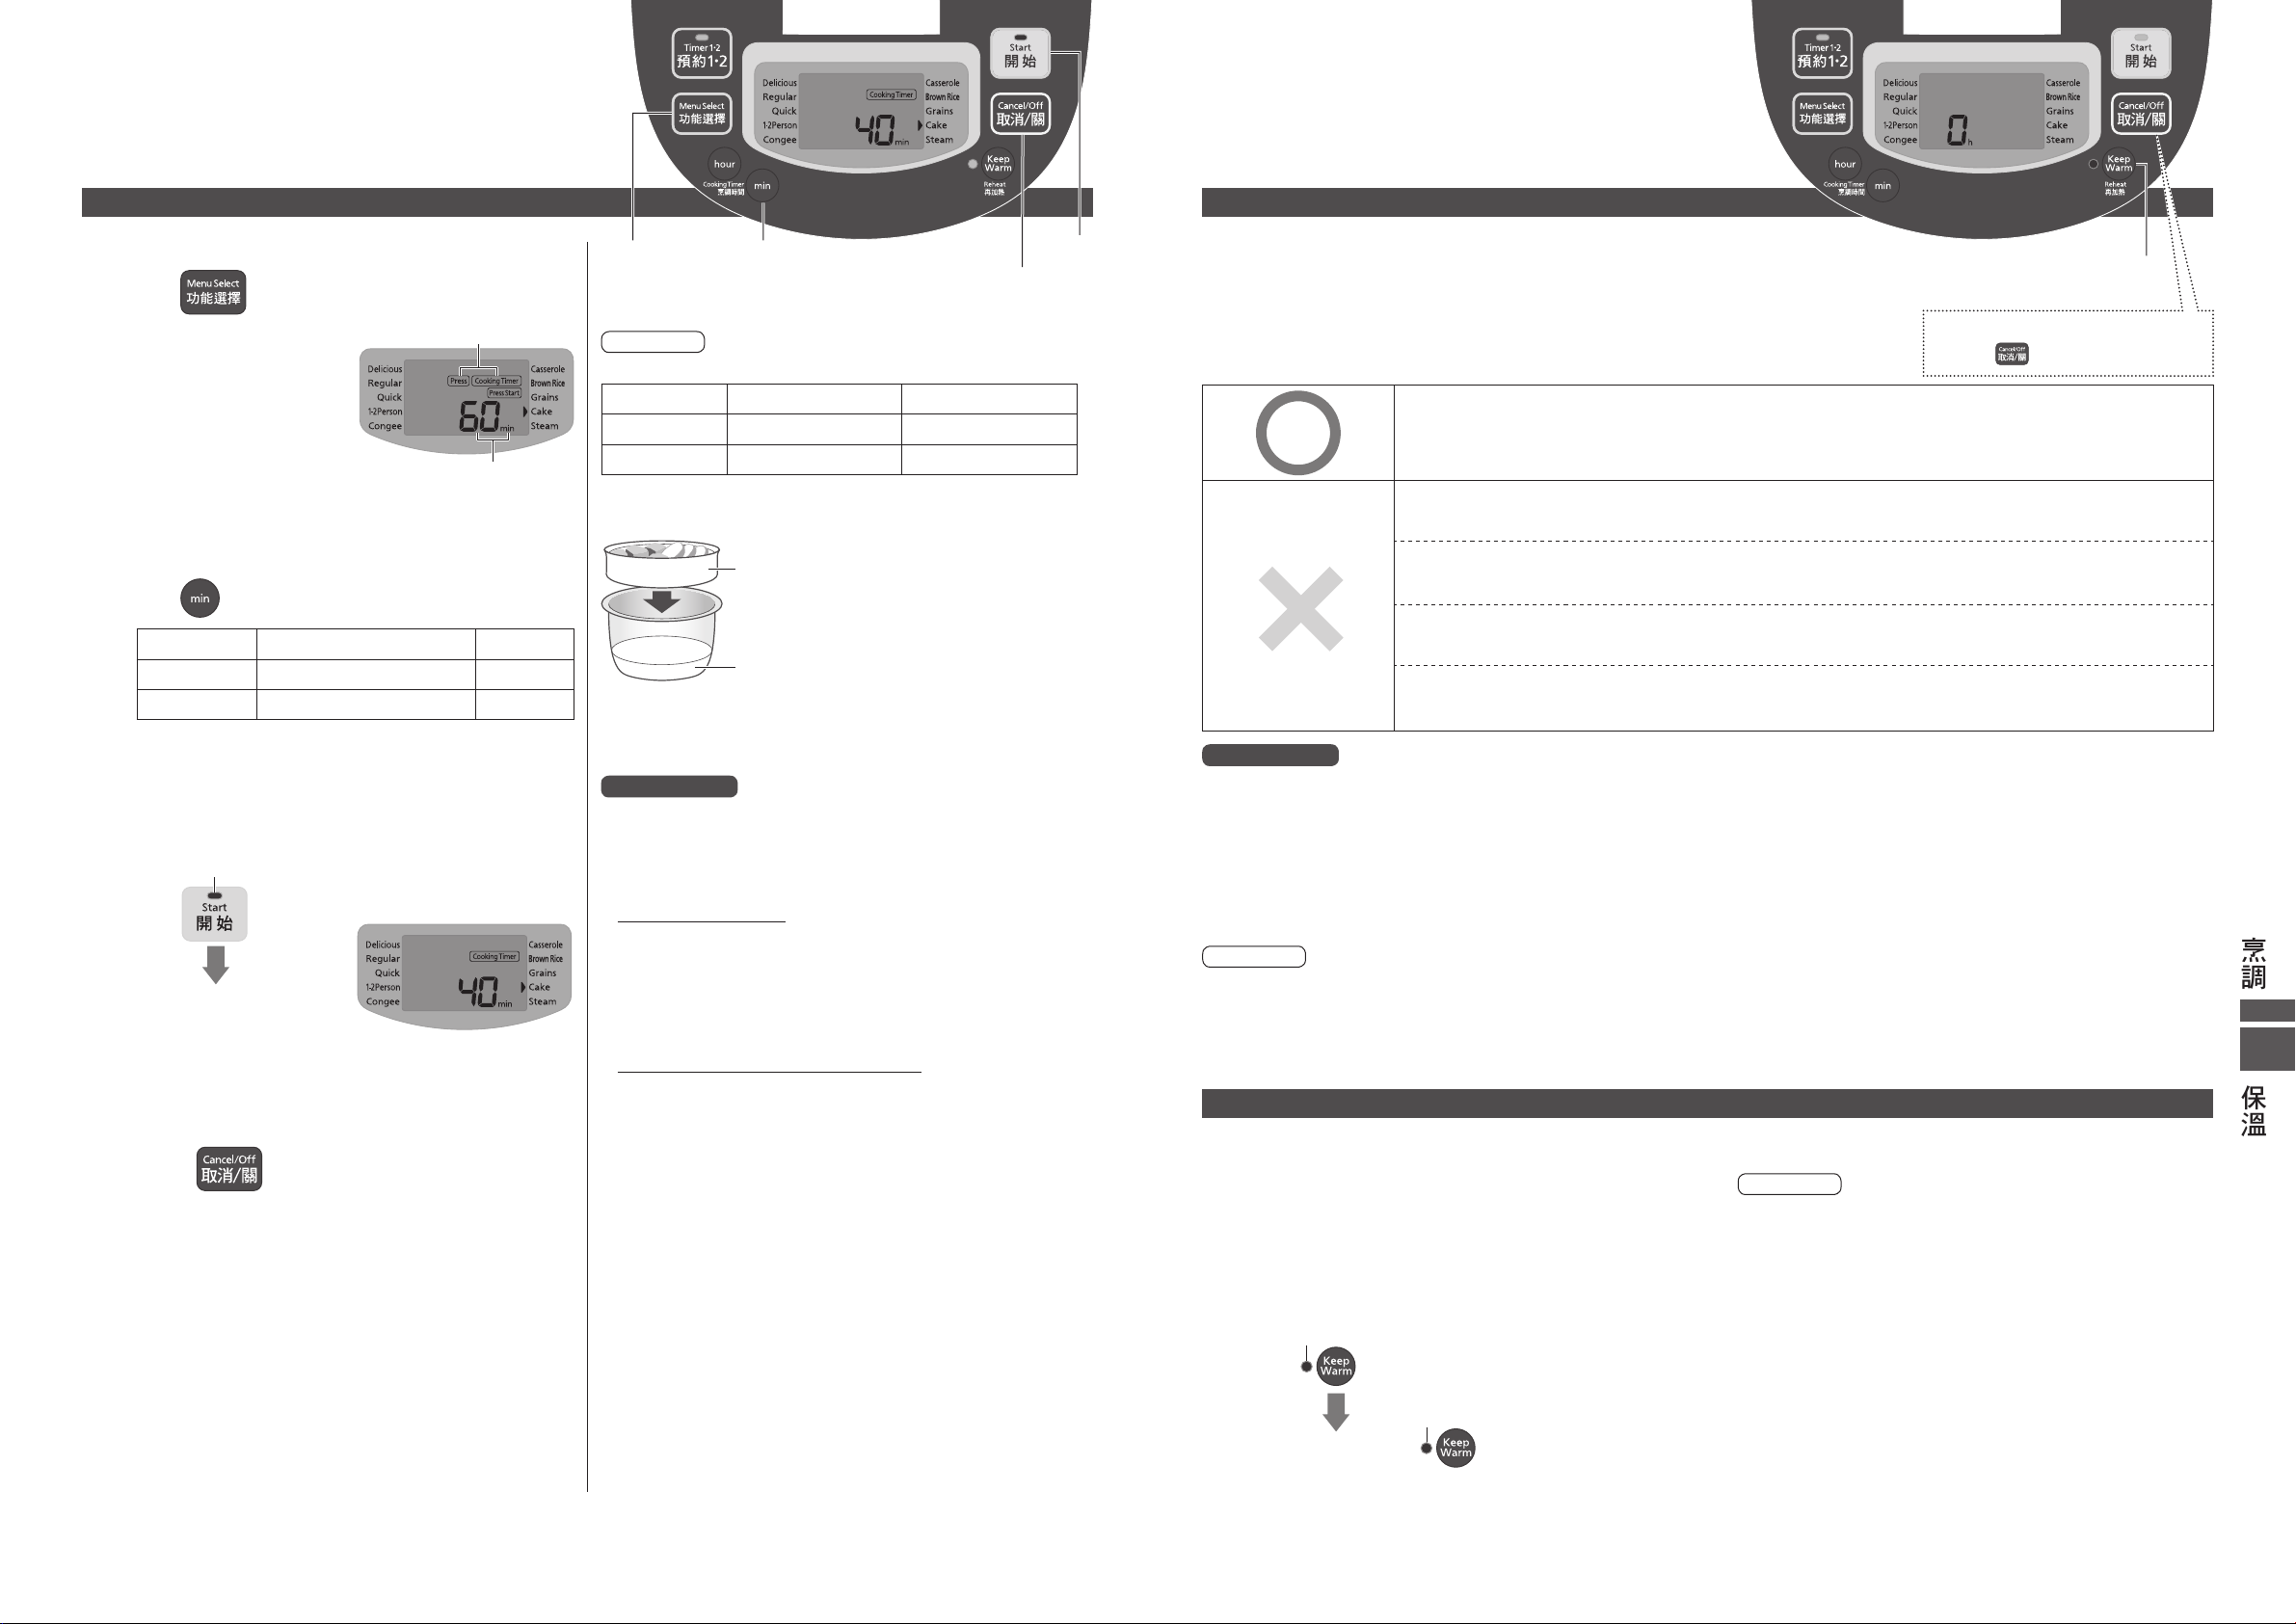
烹調 保溫
選擇一個烹調功能
按下
1
焗蛋糕 :「
蒸
:「Steam
設定烹調時間
2
按下
程序 可允許烹調時 間 設定 單位
(蛋糕)40分鐘
Cake
(蒸)1分鐘
Steam
當微型電腦飯煲開始釋放蒸氣,蒸氣倒數設定時間
*
便 開 始。
按 下「
3
按下
烹 調 開 始。
當烹調完成後,微型電腦飯煲則自動轉換至保溫功能,
OO
所以 請關 閉微 型電 腦飯 煲。
按下
烹調
,將「►」設定為某個烹調功能。
( 蛋 糕 )」
Cake
( 蒸 )」
。
分鐘
–60
分鐘
–60
( 開 始 )」 按 鈕
Start
閃動
。
。
閃動
閃動
1
1
分鐘
分鐘
1 32
附註
可用容量
程序
(蛋糕) 麵糰上限
Cake
(蒸) 水量
Steam
如何使用蒸籠
預防措施
蒸餸時…
請勿讓食材阻塞蓋加熱板的孔。
OO
烹調後…
請勿使用保溫功能。
OO
(這可能導致引發氣味,變質或蓋加熱板生銹。)
烹調後,外蓋的內側和內鍋周圍都很燙,取出煮熟的食物
OO
時 請 小 心。
烹調後打開外蓋時,水滴可能從蓋加熱板滴到上框。
OO
用擰乾水分的濕毛巾擦拭。
經 常 清 洗 蓋 加 熱 板 及 美 味 感 應 裝 置。
OO
擦拭外蓋的內部表面、美味感應裝置的配件部分及密封墊。
當烹調多肉材料時,脂肪及蛋白質可弄髒蓋加熱板及外蓋
的 內部 表 面。
(這可能導致引發氣味,變質或蓋加熱板生銹。)
1.0 L 1.8 L
g
600
500 mL
蒸籠
水
若要重設操作
OO
麵糰上限
水量
600 mL
900
g
保 溫(自 動 )
完成烹調後,所有程序隨即自動轉換為保溫功能。
OO
(完成烹調後請即時將米飯翻鬆。)
Delicious
OO
1-2Person
OO
Congee
OO
如對粥進行保溫,有可能變稠、變糊。
Casserole
OO
微型電腦飯煲 將自動
轉 換 成 保 溫 功 能,
但 不 建 議 使 用。
預防措施
請勿使用保溫功能超過12小 時。
OO
(以 免 造 成 米 飯 產 生 異 味、泛 黃、乾 硬 等。)
讓米飯留在微型電腦飯煲內的時候,請勿取消保溫功能或拔掉電源插頭。
OO
( 以 免 造 成 水 滴 冷 凝 或 產 生 異 味 。)
使用保溫功能時請將飯勺從微型電腦飯煲取出。
OO
( 以 免 造 成 異 味 。)
使用保溫功能也可能導致蓋加熱板生銹,嚴重影響米飯味道。
Brown Rice
OO
使用保溫功能也可能導致蓋加熱板生銹,嚴重影響米飯味道。
Cake
OO
這可能導致引發氣味,變質或蓋加熱板生銹。
(美味模 式)
(少量)
(粥)
(煲仔飯)
(糙 米 飯)
(蛋糕)
若要從保溫狀態再加熱
OO
若要回到保溫狀態
OO
若要關掉保溫功能
OO
按下
Regular
OO
Grains
OO
Steam
OO
(標 準)
(什 穀 米)
(蒸)
Quick
OO
然後拔掉電源插頭。
(快 速 煮 飯)
烹調
附註
保溫時間達至23小時是以1小時為單位顯示(顯示「0」即 代 表 小 於1小 時 )。
OO
超過24小時後雖然會持續保溫,但顯示會變成目前時間。
若 未 按 下「
OO
Cancel/Off
(取 消/ 關)」按鈕即拔掉電源插頭,則下次插上電源插頭時,會再開始進行保溫。
再 加 熱( 手 動)
從 保 溫 狀 態 加熱 至 高 溫 度 的米 飯。
OO
1
2
在保溫狀態下
翻鬆米飯
按 下「
Keep Warm
按鈕
亮起
( 保 溫 )」 [
Reheat
(再加熱)]
附註
再 加 熱 無 法 在 以 下情 況 下 使 用。
OO
當 米 飯 已 冷 卻( 鈴 聲 提 示 嗶4次 )。
•O
保 溫功 能並 未 啟 動。
•O
加熱超過2次將會嚴重影響米飯味道。
OO
保溫
按下
再加 熱開 始。
當 鈴 聲 提 示,即 時 翻 鬆 米 飯。
OO
米 飯 即 可 享用。
。
閃 動( 大 約5分鐘
分鐘)
– 7
12 13
Page 22
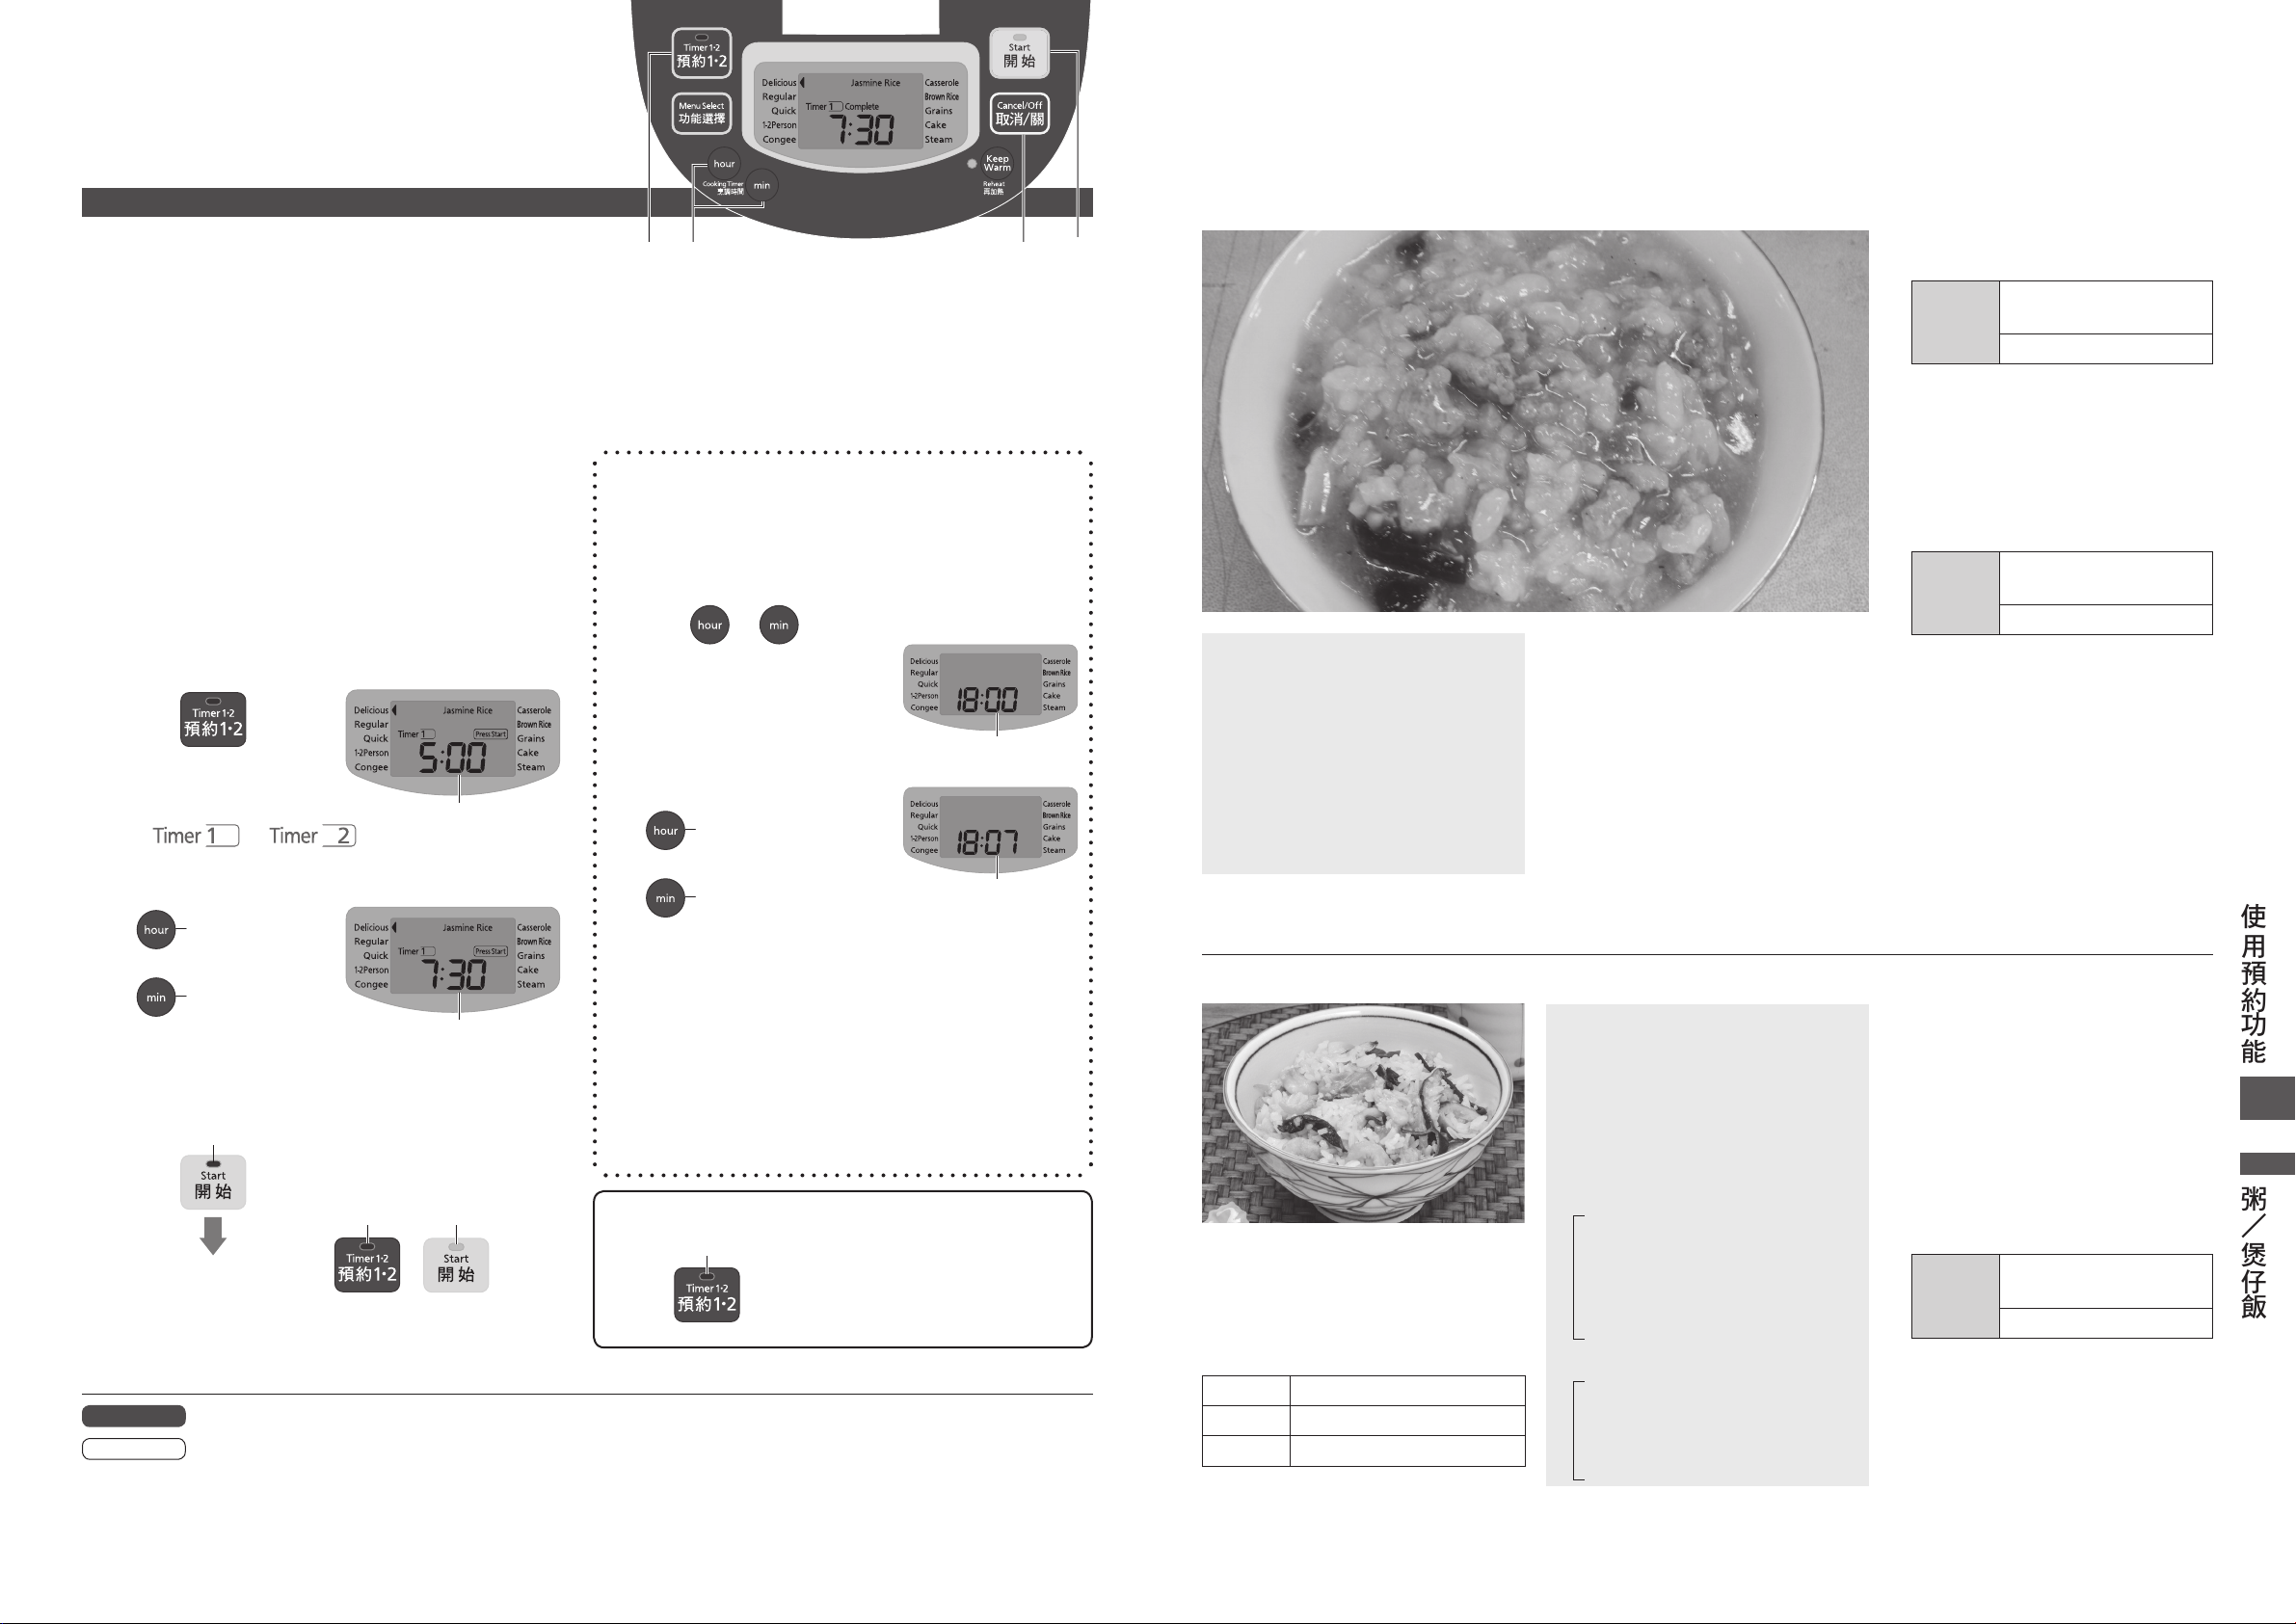
使用預約功能 粥/煲仔飯
預約
可以設 定2個 預 約 時間。(設定將儲存直至變更。)
OO
您可能覺得保存經常使用的時間較方便,
例 如 使 用「
「
Timer 2
例 如:設 定 為 早 上
Timer 1
(預 約2)」供 晚 餐 提 醒。
(預 約1)」供 早 餐 提 醒 而
7:30
檢查目前時間是正確
如時間不正確,請按以下右邊步驟設定。
1
OO
檢查程序
(設 定 為 想 要 程 序。第11頁的步驟1、2)
2
3
「
Congee
OO
間,然 後 按 下「
約 狀 態 下,按 下「
時 間。
選 擇「
「
Timer 2
按下
每個按鈕動作將變更
OO
選 擇。
( 粥 )」 程 序 使 用 預 約 時 , 首 先 設 置 烹 調 時
Timer 1
(預約2)」
。
↔
Timer 1•2
min(分)
(預 約
」按鈕以確認設定的烹調
(預約1)」 或
)」按 鈕。在 預
1•2
閃動
設定完成米飯烹調時間
4
5
預防措施
附註
向前
(單位 為 每1小 時)
向前
(單位 為 每10分鐘)
長按按鈕以加快循環時間。
OO
按 下「
按下
設 定 結 束。
烹調完成鈴聲提示時,蒸煮步驟已完成。
OO
將 飯 即 時 翻 鬆 。( 可 蒸 發多 餘 水 份。)
會 自 動 保 溫 。( 第13頁)
OO
( 開 始 )」 按 鈕
Start
閃動
。
熄滅亮起
請勿設定13小 時 以 上( 水 溫 高 時8小時以上)的預約。(以免造成米發酵、產生異味。)
OO
如預約設定的時間不足,預約將不允許設定,烹調則即時開始。(參考第26頁 的 「 預 約 設 定 限 制 」。)
OO
預約無法使用「
OO
如使用預約烹調,則不會顯示剩餘完成時間。
OO
如使用預約烹調,米可能吸收過量水分。這可能導致米飯變軟或產生飯焦。
OO
米飯太軟的話,請稍微減少水量。(減少至水位線下方大約1至
( 快 速 煮 飯 )」 、 「
Quick
閃動
Casserole
若要重設操作
OO
若要取消設定
3 54
OO
當目前時間有誤
顯示時間為24小時時 鐘 格 式。
OO
將電源插頭穩固地插入
1
按住
或 1
秒以上
2
聽 到「 嗶 」聲 時 放 開 手 指。
OO
閃動
設定時間
3
時間無法在以下情況設定,例如正在使用烹調/
OO
保溫狀態/預約/清洗功能設定。
鋰電池不足時,拔掉電源插頭將導致遺失資料,例如目
OO
前時間及預約時間的設定。(第20頁)
鋰電池已固定在本體內所以無法由顧客自行更換。
OO
若要更換鋰電池,請向您購買微型電腦飯煲的經銷商或
服 務 櫃 台 查 詢。
若要 在完成預約設定後參考目前時間。
OQ
按下
( 煲 仔 飯 )」 、 「
向前
(單位 為 每1小 時)
向前
(單位 為 每1分鐘)
長按按鈕以加快循環時間。
OO
亮起
。
Cake
長 按 即 可 顯 示。
OO
(蛋 糕 )」或「
處 。)
2 mm
閃動停止時,代表時
間 已 設 定。
( 蒸 )」 。
Steam
皮蛋瘦肉粥
材料(
白米
上 湯( 冷 卻 了的)
皮蛋
熟瘦肉
調味︰
鹽
......................1
胡椒粉
麻油
人份量):
2–3
.................... ½
...........5
......................1
................... 125
....................
.....................
雞肉及芋頭煲仔飯
重 要資 訊︰
加入材料不能超過最高
OO
(白 米)的 水 位 線。
烹調時請勿打開外蓋。
OO
( 可 影 響 烹 調 效 果 。)
型號 米 量(杯*)
1.0 L 1–3
1.8 L 2–6
附 件 中 之 量 杯。
*
White Rice
量杯
量杯
個
茶匙
少許
少許
方法︰
將熟瘦肉醃好,浸在鹽中1小時然後
切成細片。將皮蛋切成小方塊,然後
備 用。
g
洗 米 後 倒 進 內 鍋,再 加 入 肉 羹 然 後 合
上 外 蓋。
材料(
白米
雞 肉( 已 切 粒 )
乾 冬 菇(已 浸 泡 及 切 片)
芋 頭( 已 切 粒 )
蝦 米 乾( 已 浸 泡 )
黑 木 耳( 已 浸 泡 及 剁 碎 )
滷 汁︰
A
醬 料︰
B
人份量):
4–6
.....................3
淡醬油
老抽醬油
糖
鹽
澱粉
淡醬油
老抽醬油
糖
麻油
............... 1
.................. 1
..................½
...............1½
............... 1
..................½
................½
............200
.......5
............100
...........40
......
.............½
............. 1
量杯
件
少件
茶匙
茶匙
茶匙
茶匙
茶匙
湯匙
湯匙
湯匙
湯匙
選擇程序然後設定烹調時間為
小時30分 鐘。
1
Pearl Rice
功能選擇
按 下「
當鈴聲提示後按 下「
消 / 關 )」 按 鈕,打 開 外 蓋*,將 皮 蛋
及 瘦肉 加 入 內 鍋 後 合上 外 蓋。
打 開 外 蓋 時,請 注 意 食 材 正 處 於 高 溫。
*
選擇程序然後設定烹調時間為1小
時。
功能選擇
按 下「
當 鈴 聲 提 示 後,於 粥 內 加 入 調 味 料 後
即 可 享 用。
方 法︰
用A將雞肉調味。
g
g
g
將切粒芋頭炸至金黃色、洗淨然後備
用。
洗 白 米 後 放 入 內 鍋,加 水 至「 水 位
線:
White Rice(Pearl Rice
Jasmine Rice)3
及 其 他 材 料 平 鋪 在 白 米 上,合 上 外 蓋。
(不要攪動。)
選 擇程 序。
功能選擇
按 下「
當 鈴 聲 提 示 後,加 入B然後即時攪拌
翻 鬆 米 飯。
Jasmine Rice
( 開 始 )」 按 鈕。
Start
Pearl Rice
Jasmine Rice
( 開 始 )」 按 鈕。
Start
Pearl Rice
Jasmine Rice
Casserole
( 開 始 )」 按 鈕。
Start
Congee
Congee
」。 然 後 將,
( 珍 珠 米 )/
(茉 莉米)
(粥)
Cancel/Off
( 珍 珠 米 )/
(茉 莉米)
(粥)
/
( 珍 珠 米 )/
(茉 莉米)
(煲仔飯)
(取
14 15
使用預約功能
粥/煲仔飯
Page 23

蛋糕/蒸糙米飯/什穀米
糙米飯
用 其 他 材 料 烹 調 時(菜 肉 等)
加 入 其 他 材 料 前 量 水。
OO
煮飯需時很長,建議加入硬材料例如荳類等。如您想加入乾材料,請確保它已浸泡。
OO
每量杯米不應加入超過
OO
將材料切件平鋪在飯上,免攪動。
OO
如 您 將 飯 與 材 料 攪 動,烹 調 效 果 可 能 受 影 響。
75
g
其 他 材 料。
材料(
糙米
白芝麻
黑芝麻
方 法︰
輕輕洗糙米然後清除碎粒及外殼。
加 水 至「 水 位 線:
Rice/Jasmine Rice)3
外 蓋。
選 擇程 序。
功能選擇
按下「
當 鈴 聲 提 示 後,翻 鬆 米 飯。
放在碟上然後灑少許黑白芝麻。
人份量):
4–6
....................3
....................
....................
Brown Rice(Pearl
」然 後 合 上
Pearl Rice
Jasmine Rice
Brown Rice
( 開 始 )」 按 鈕。
Start
( 珍 珠 米 )/
(茉 莉米)
(糙米飯)
量杯
少量
少量
蛋糕
材料(
牛油或沙律油
薄煎餅混料
雞蛋
豆奶
沙律油
葡萄乾
( 或 者 您 可 用 其 他 乾 果 代 替 。)
人份量):
4–6
..............
...............200
......................2
...................100 mL
...................3
....................70
少量
個
湯匙
方 法︰
輕輕用牛油或沙律油塗抹內鍋。
g
g
將材料混合直至質感順滑。
(請勿在內鍋中混合。)
將
倒 入內 鍋中 然後 合上 外 蓋。
選擇程序然後設定烹調時間為
分鐘。
40
功能選擇
按 下「
當 鈴 聲 提 示 後,將 內 鍋 從 微 型 電 腦 飯
煲移走然後倒轉取出蛋糕。接著讓
它 在碟 上 或 鐵 絲 網 上 冷 卻。
如您的型號為
*
材料,並設定烹調時間為60分 鐘,讓
蛋 糕 膨脹 效 果 更 佳。
( 開 始 )」 按 鈕。
Start
1.8 L
(蛋糕)
Cake
,建 議 您 用
1.5
倍的
五穀米
烹調五穀米時…
如 果 想要 加 入 豆 類 或 乾 貨,例 如 雲 耳 菇,請 確 保它 已 浸 泡。
OO
在米粒中加入其它穀類的比例為10% 或 以下。
OO
(如果加入過多其它穀類,米就無法順利烹調。)
如果想將五穀米烹調軟一點,就多加些水或事先浸水。
OO
材料(
白米
五穀米
方法︰
洗 白 米 然 後 加 水 至「 水 位 線:
(
Pearl Rice/Jasmine Rice)3
輕輕洗五穀米然後放上。
再多加
可根據五穀米的種類和個人喜好適
*
當 調 整 水 量。
選 擇程 序。
功能選擇
按 下「
當 鈴 聲 提 示 後,翻 鬆 米 飯。
上 碟 後 即 可 享 用。
人份量):
4–6
.....................3
....................30
White Rice
的水*,然 後 合上 外 蓋。
30 mL
Grains
( 珍 珠 米 )/
(茉 莉米)
(什穀米)
Pearl Rice
Jasmine Rice
( 開 始 )」 按 鈕。
Start
」
量杯
。
金華火腿小棠菜
材料(
小棠菜
g
預防措施
請勿讓食材阻塞蓋加熱板的孔。
OO
醃 肉( 金 華 火 腿 )
方 法︰
將小棠菜切斷成塊然後洗淨。將醃肉
切 片 然 後 備 用。
將切好的小棠菜放在碟上排層,再將
醃肉切片置頂(嘗試用含脂肪的肥肉)。
將
人份量):
4–6
...................100
...........35
量 杯 水 到 入 內鍋。
2.5
g
g
裝 好 蒸 籠,將放在上面然後合上
外 蓋。
選擇程序然後設定烹調時間為13分
鐘。
功能選擇
按 下「
附註︰
如沒有小棠菜,可用白菜心代替。
( 開 始 )」 按 鈕。
Start
Steam
(蒸)
糙米飯/什穀米
蛋糕/蒸
16 17
Page 24
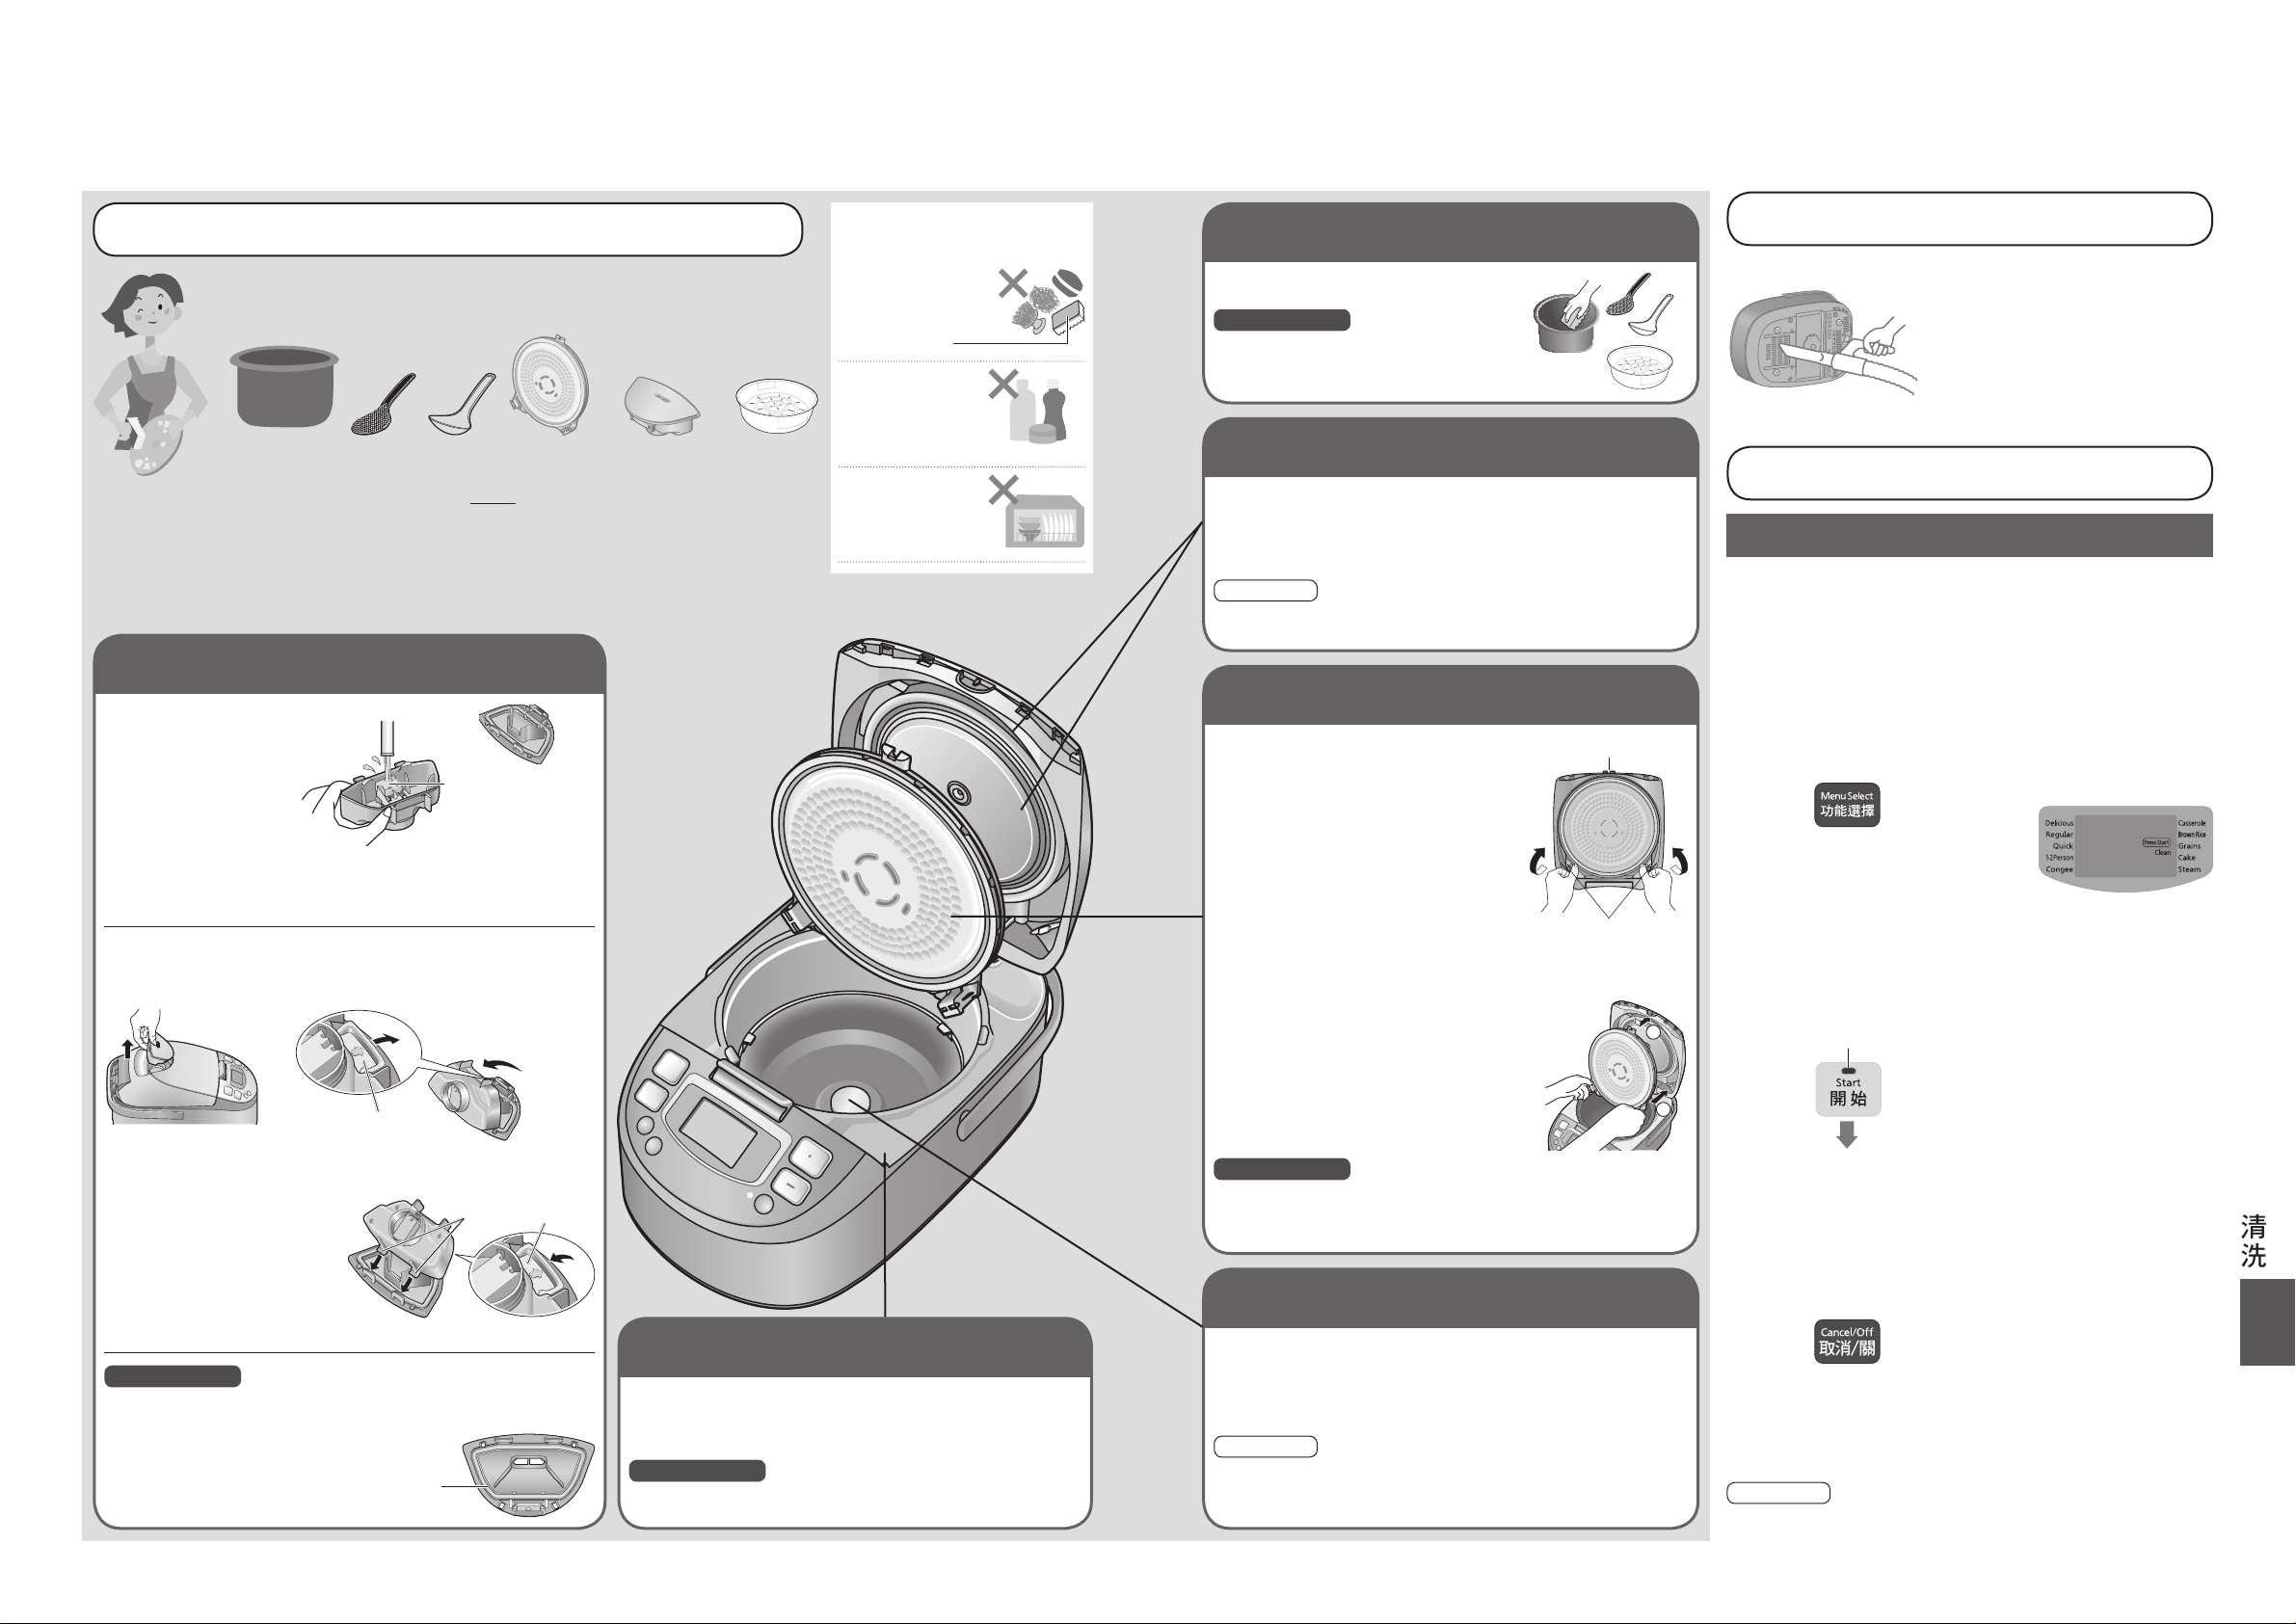
清洗
美味感應裝置
取出並沖洗乾淨。
OO
水珠和污垢容易滯留
在 美 味 感 應 裝 置 內,
所以每次使用後
請清洗乾淨。
(
因為這可能會造成
異 味或 裝 置 腐 壞。
)
OQ
拆除時
向 上拉 以 拆 除。
朝 箭 頭「⇨」方 向 拆 除 桿 打 開。
拆除桿
OQ
安裝時
(折除時的相反方向。)
插入拉桿並將拆除
桿 關 牢 固,直 到 聽 到
「咔 嚓 」聲。
插 進 外 蓋。
(確保已穩固放回原位。)
預防措施
OO
請 勿 拆 除 密 封 墊。
( 這 可 能 引 致 蒸 氣 洩 漏 。)
OO
如 密 封 墊 脫 落,確 保 沿 著 槽 安 裝。
•O
因 內 部 有 珠,如
搖 動 會 發 出聲 音。
•O
請 勿拆 卸。
拉桿
拆除桿
密封墊
沿著槽
上框
用 擰 乾 水 分 的 濕 毛 巾 擦 拭。
OO
去除開蓋按鈕周邊的米粒等異物。
預防措施
OO
請 勿將 水 倒 入 進 行 清 洗。
內鍋
(第6頁)
/飯勺/粥勺/蒸籠
用溫和清潔劑清洗。
預防措施
OO
請勿將內鍋用作為洗碗工具。
( 這 樣 可 能 削 去 內 鍋 塗 層 。)
內鍋感應器
用 擰 乾 水 分 的 濕 毛 巾 擦 拭。
OO
如污垢很難清除,用一點溫和清潔劑在尼龍擦然後輕輕
擦 拭。
附註
OO
如有污垢時使用內鍋感應器可能導致米飯燒焦或以不理
想 方 式 烹 調。
外蓋的內部表面/密封墊
用 擰 乾 水 分 的 濕 毛 巾 擦 拭。
OO
拆卸美味感應裝置然後擦拭外蓋的內部表面、美味感應
裝 置的 配件 部 分及 密 封 墊。
附註
OO
加水或炊煮糙米等時,會更容易附著污垢。
蓋加熱板
拆下後使用溫和清潔劑清洗。
OO
去除密封墊部的米粒等異物。
OQ
拆除時
抓住兩側的凸耳,朝自己方向拉,拉出
突 起 部。
OQ
安裝時
OO
將蓋加熱板的突起部插入上部的凹
槽。
將凸耳(兩側)壓 進本體(外蓋)直至
喀 噠 一 聲。
預防措施
OO
使用調味料(煲仔飯等)或烘烤蛋糕後,請即時清洗。
( 因 為 會 引 發 異 味 、 變 質 或 生 銹 。)
突起部
凸耳
清洗時,拔掉電源插頭然後確保本體已冷卻。
OO
本體和蓋加熱板的密封墊不能拆下。請勿勉強拉扯或使用尖銳物件穿刺。
OO
( 可 能 導 致 變 形 、 剝 落 或 損 壞 。)
清 洗 後,用 乾 布 擦 拭。
OO
首次使用時及每次使用後
拆除配件後,用 軟 海 棉 清 洗。
O
欲使用清潔劑時,請確認清潔劑的注意事項。
*
內鍋 蓋加熱板飯勺 蒸籠粥勺 美味感應裝置
煲仔飯等加入調味料後,即時清 洗。
O
(因 為 會 引 發 異 味、變 質 或 生 銹。)
﹤請勿使用以下東西﹥
金屬擦及滲入磨沙料的尼龍
擦 等。
大 約 每 月 檢 查 一 次,如 有 灰 塵 請 擦 拭!
OO
定期檢查
微型電腦飯煲底部
請勿使用百潔布
進 行清 洗。
揮 發 油、稀 釋 劑、
擦 亮 劑、漂 白 劑、
抗菌劑酒精等。
乾碗機或洗碗機
/烘乾 機
當微型電腦飯煲的潔淨有問題時
(吸氣孔/排氣孔)
用吸塵器吸除垃圾及異物等。
清洗功能
如很難清除氣味或污垢無法從蓋加熱板或蒸氣口中清除…
準備工作
●
將水 倒 進 內 鍋。
型 號 ,「
1.0 L
(
型 號 ,「
1.8 L
把內鍋放入本體並關上外蓋。
顯 示「
Pearl Rice/Jasmine Rice
Pearl Rice/Jasmine Rice
( 清 洗 )」
Clean
」水 位 線:
」水 位 線:
3–4
6–8
)
1
●
●
按下
「
Clean
OO
出 現。
。
(清洗)」會 於 選 擇 時
按 下「
1
18 19
●
2
●
2
按下
清 洗功 能開 始。
大約45分鐘後當蜂鳴器響時,
3
按下「
按下
等待內鍋裡的熱水冷卻後,清洗內鍋、蓋加熱板、美
OO
味 感 應 裝 置。
附註
可 能 無 法 完 全 去 除 氣 味 或污 垢。
OO
( 開 始 )」 按 鈕
Start
閃動
。
Cancel/Off
。
( 取 消 / 關 )」 按鈕
清洗
Page 25
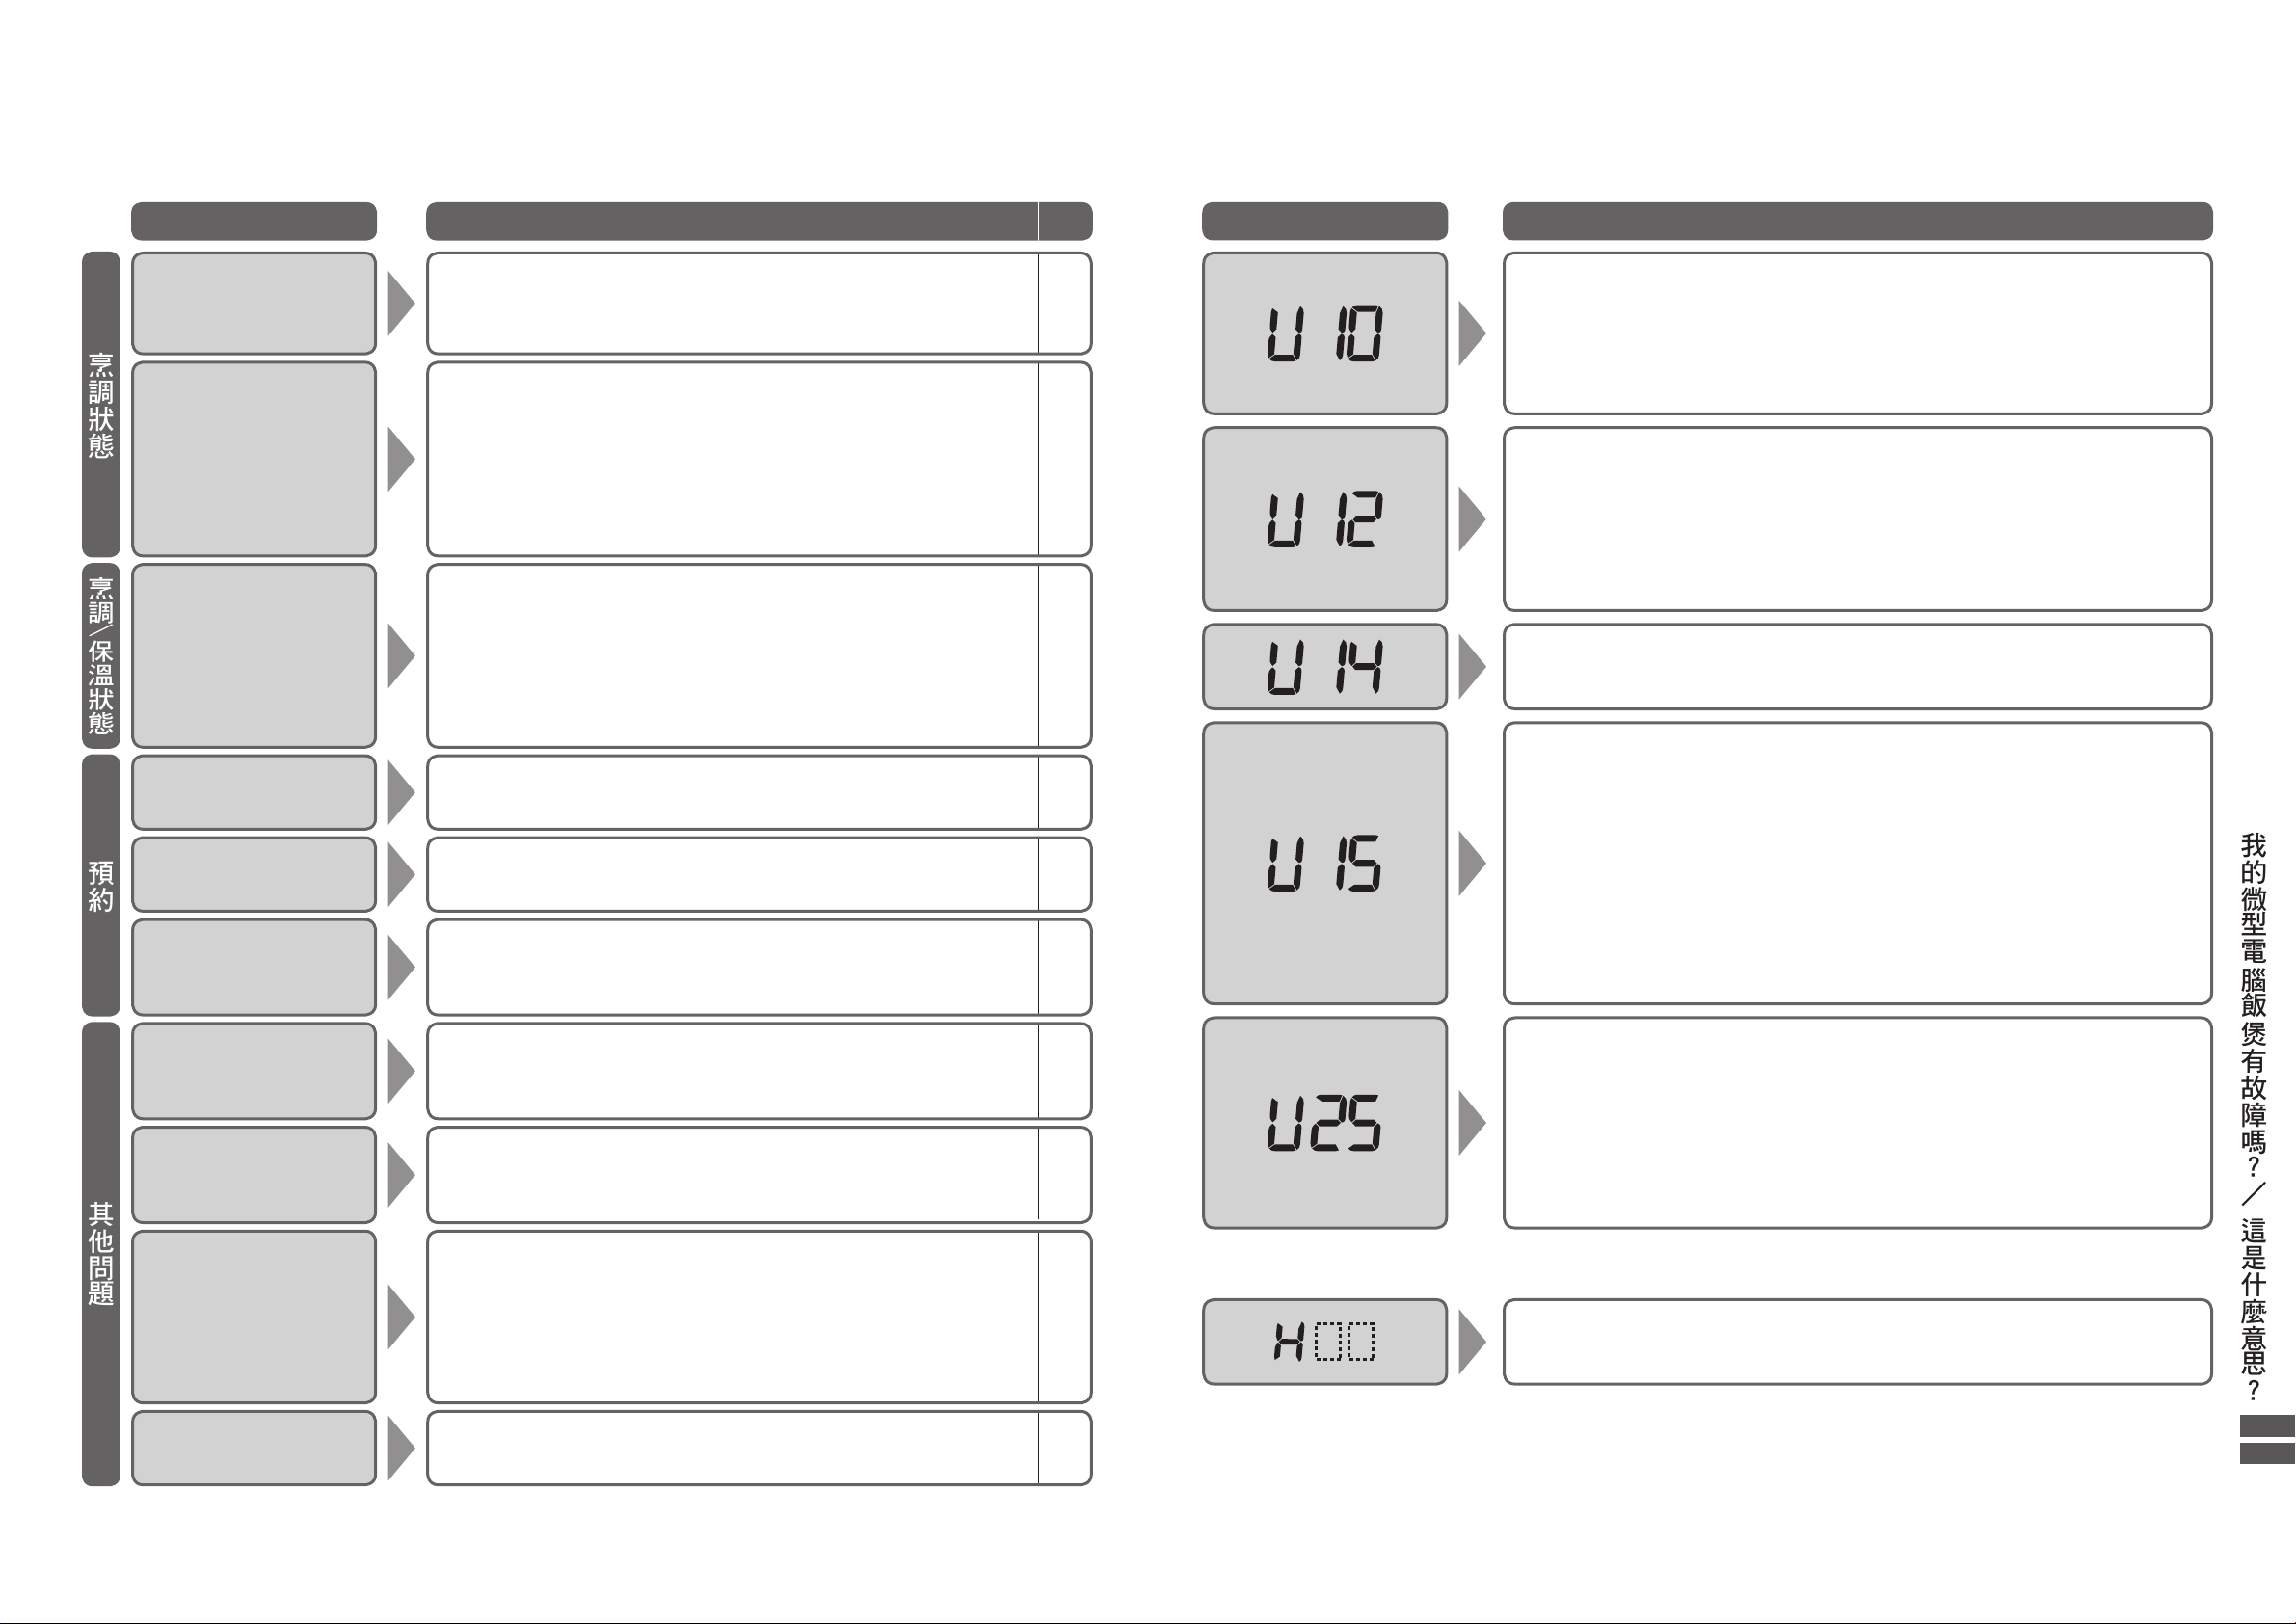
我的微型電腦飯煲有故障嗎?
在 此 檢 查!
頁
O
殘餘時間的顯示停止
不 變。
O
烹 調 時 間比 預 期 更 長。
OO
如不斷烹調米飯,烹調時間可能會較長(可能延長45分鐘)。
OO
內 鍋的 水 量 太 多了 嗎?
如水量太多,烹調時間可能會變長(最長可達15分 鐘 )。
—
—
蒸氣從其他部分散發,
不 是從 蒸 氣 口 散 發。
OO
米飯黏在蓋加熱板的密封墊、外蓋的密封墊或內鍋邊緣?
OO
您是否有每次清洗蓋加熱板然後正確裝好?
OO
內 鍋 是 否有 變 形?
→
如內鍋變形,請購買新的內鍋。
OO
蓋加熱板的密封墊或外蓋的密封墊是否有變形、剝落、破損?
→
蒸氣漏出時,請洽詢您購買微型電腦飯煲的經銷商。
OO
是否慢慢合上外蓋直至喀噠一聲?
—
19
—
—
—
微型電腦飯煲產生聲
響。
OO
呼呼聲… 散熱用的風扇操作聲。
OO
高調聲…IH聲 ( 感 應 加 熱 )。
保溫時,有時您可能會聽到這個聲音。
OO
嘶嘶聲…蒸氣噴出聲。
打 開 /合上 外蓋 時
OO
卡嗒聲… 美味感應裝置的珠滾動時發出的聲音。
—
—
—
—
即使使用了預約烹調
仍然立即開始。
OO
目前時間準確嗎?(顯示時間為24小時時 鐘 格 式 。)
OO
預約是否設定在「預約設定限制」以外?
14
26
我已設定預約但烹調
無法開始。
OO
使用預約時,烹調開始前米已浸泡,所以烹調開始後浸泡時間
會較短。因此,烹調開始時間可能會稍微比預期晚一點。
—
米飯在預約設定的時
間 未 煮 好。
OO
目前時間準確嗎?(顯示時間為24小 時 時 鐘 格 式 。)
OO
您是否有按下「
Start
( 開 始 )」 按 鈕?
OO
預約是否設定在「預約設定限制」以外?
14
14
26
按鈕操作無法運作。
OO
按鈕操作無法在以下情況運作,例如正在使用烹調/保溫狀態/
預約/清洗功能設定。
→
按下「
Cancel/Off
( 取 消 / 關 )」 按 鈕。
—
「
Keep Warm
( 保 溫 )」
[
Reheat
(再加熱)] 按
鈕 沒 有 回 應。
OO
是 否關掉 了保 溫功 能?
OO
米飯冷卻了嗎?(鈴聲將會提示4次 。)
如溫度是
50 ˚C
或更低則無法加熱。
—
—
插入電源插頭時總是
顯 示「
7:30
」。
OO
鋰 電 池 不 足。
雖然無法記憶目前時間和預約時間,但不影響炊飯和保溫的功能。
要預約炊飯時,請每次調整目前時間。
鋰電池已固定在本體內所以無法由顧客自行更換。
→ 若要更換鋰電池,請向您購買微型電腦飯煲的經銷商或服務櫃台
查 詢。
—
電 源 插 頭 出 現 火 花。
OO
插入或拔掉電源插頭時,有時小火花可能會出現。這是一種正常現象,
尤其是IH(感應加熱)技術,不屬於故障。
—
檢查以下事項再要求維修。
這 是 什 麼 意 思?
症狀
烹調狀態
烹調
/
保溫狀態
預約
錯誤訊息 在 此 檢 查!
內 鍋 放 置 正 確?
OO
將 內 鍋重 新放 置 好。
按 下「
(若 未 按 下「
再 一次 操 作。
是否有異物或污垢留在內鍋底部、蓋加熱板或內鍋感應器?
OO
(第
18–19頁)
→ 清除異物或污垢然後按下「
內 鍋 中是 否 有 太 多 水?
OO
→ 按下「
( 下 次 烹 調 時 ,稍 微 減 少 水 量 。)
保溫功能是否使用超過96小時?
OO
→ 按下「
外 蓋 打 開了 嗎?
OO
美味感應裝置固定了嗎?(第18頁)
OO
→ 如 美 味 感 應 裝 置 已 遺 失,請 從 經 銷 商 購 買。
美味感應裝置未固定也可煮飯或保溫,不過
米飯味道可能很差。(如果進行保溫,米飯會變乾燥。)
•O
或 無 法 正 常 煲 粥。
•O
液體可能會溢出。
•O
米 飯 烹 調 後「
•O
美味感應裝置內是否有異物或污垢?
OO
→ 清 除 異 物 或 污 垢 。( 第18頁)
Cancel/Off
Cancel/Off
Cancel/Off
Cancel/Off
(取 消/ 關)」按 鈕,使 錯 誤 訊 息 消 失。
(取 消/ 關)」按 鈕,錯 誤 訊 息 一 會 兒 之 後 亦 會 消 失。)
Cancel/Off
( 取 消 / 關 )」 按 鈕。
( 取 消 / 關 )」 按 鈕。
」可 能 會 再 顯 示。
U15
( 取 消 / 關 )」 按 鈕。
我的微型電腦飯煲有故障嗎?/
微型電腦飯煲底部的吸氣孔及排氣孔是否有灰塵等物質阻塞?
OO
→ 使 用以 下 步 驟 清 除 灰 塵。
按下「
Cancel/Off
微 型 電 腦 飯 煲 冷 卻 後,請 取出 內 鍋。
從微型電腦飯煲底部吸氣孔/排氣孔清除灰塵。(第19頁)
微型電腦飯煲是否有在地毯等物品上使用?(第6頁)
OO
其他問題
如 上 述 方 法 沒 有 任 何 改 善,請 向 經 銷 商 查 詢 維 修 事 宜。
■如您不小心將水或米加入本體內,請拔掉電源插頭然後聯絡經銷商。
20 21
→ 請勿在微型電腦飯煲底部受到阻塞的地方下使用微型電腦飯煲。
試 著 拔 下 電 源 插 頭 再 重 新 插 入。 如 果「H○○」再次出現,即為故障訊息。
OO
→ 請詢問您的經銷商,並告訴他們該錯誤訊息(即在「H」後的兩位數字)。
( 取 消 / 關 )」 按鈕然後拔掉電源插頭。
這是什麼意思?
Page 26
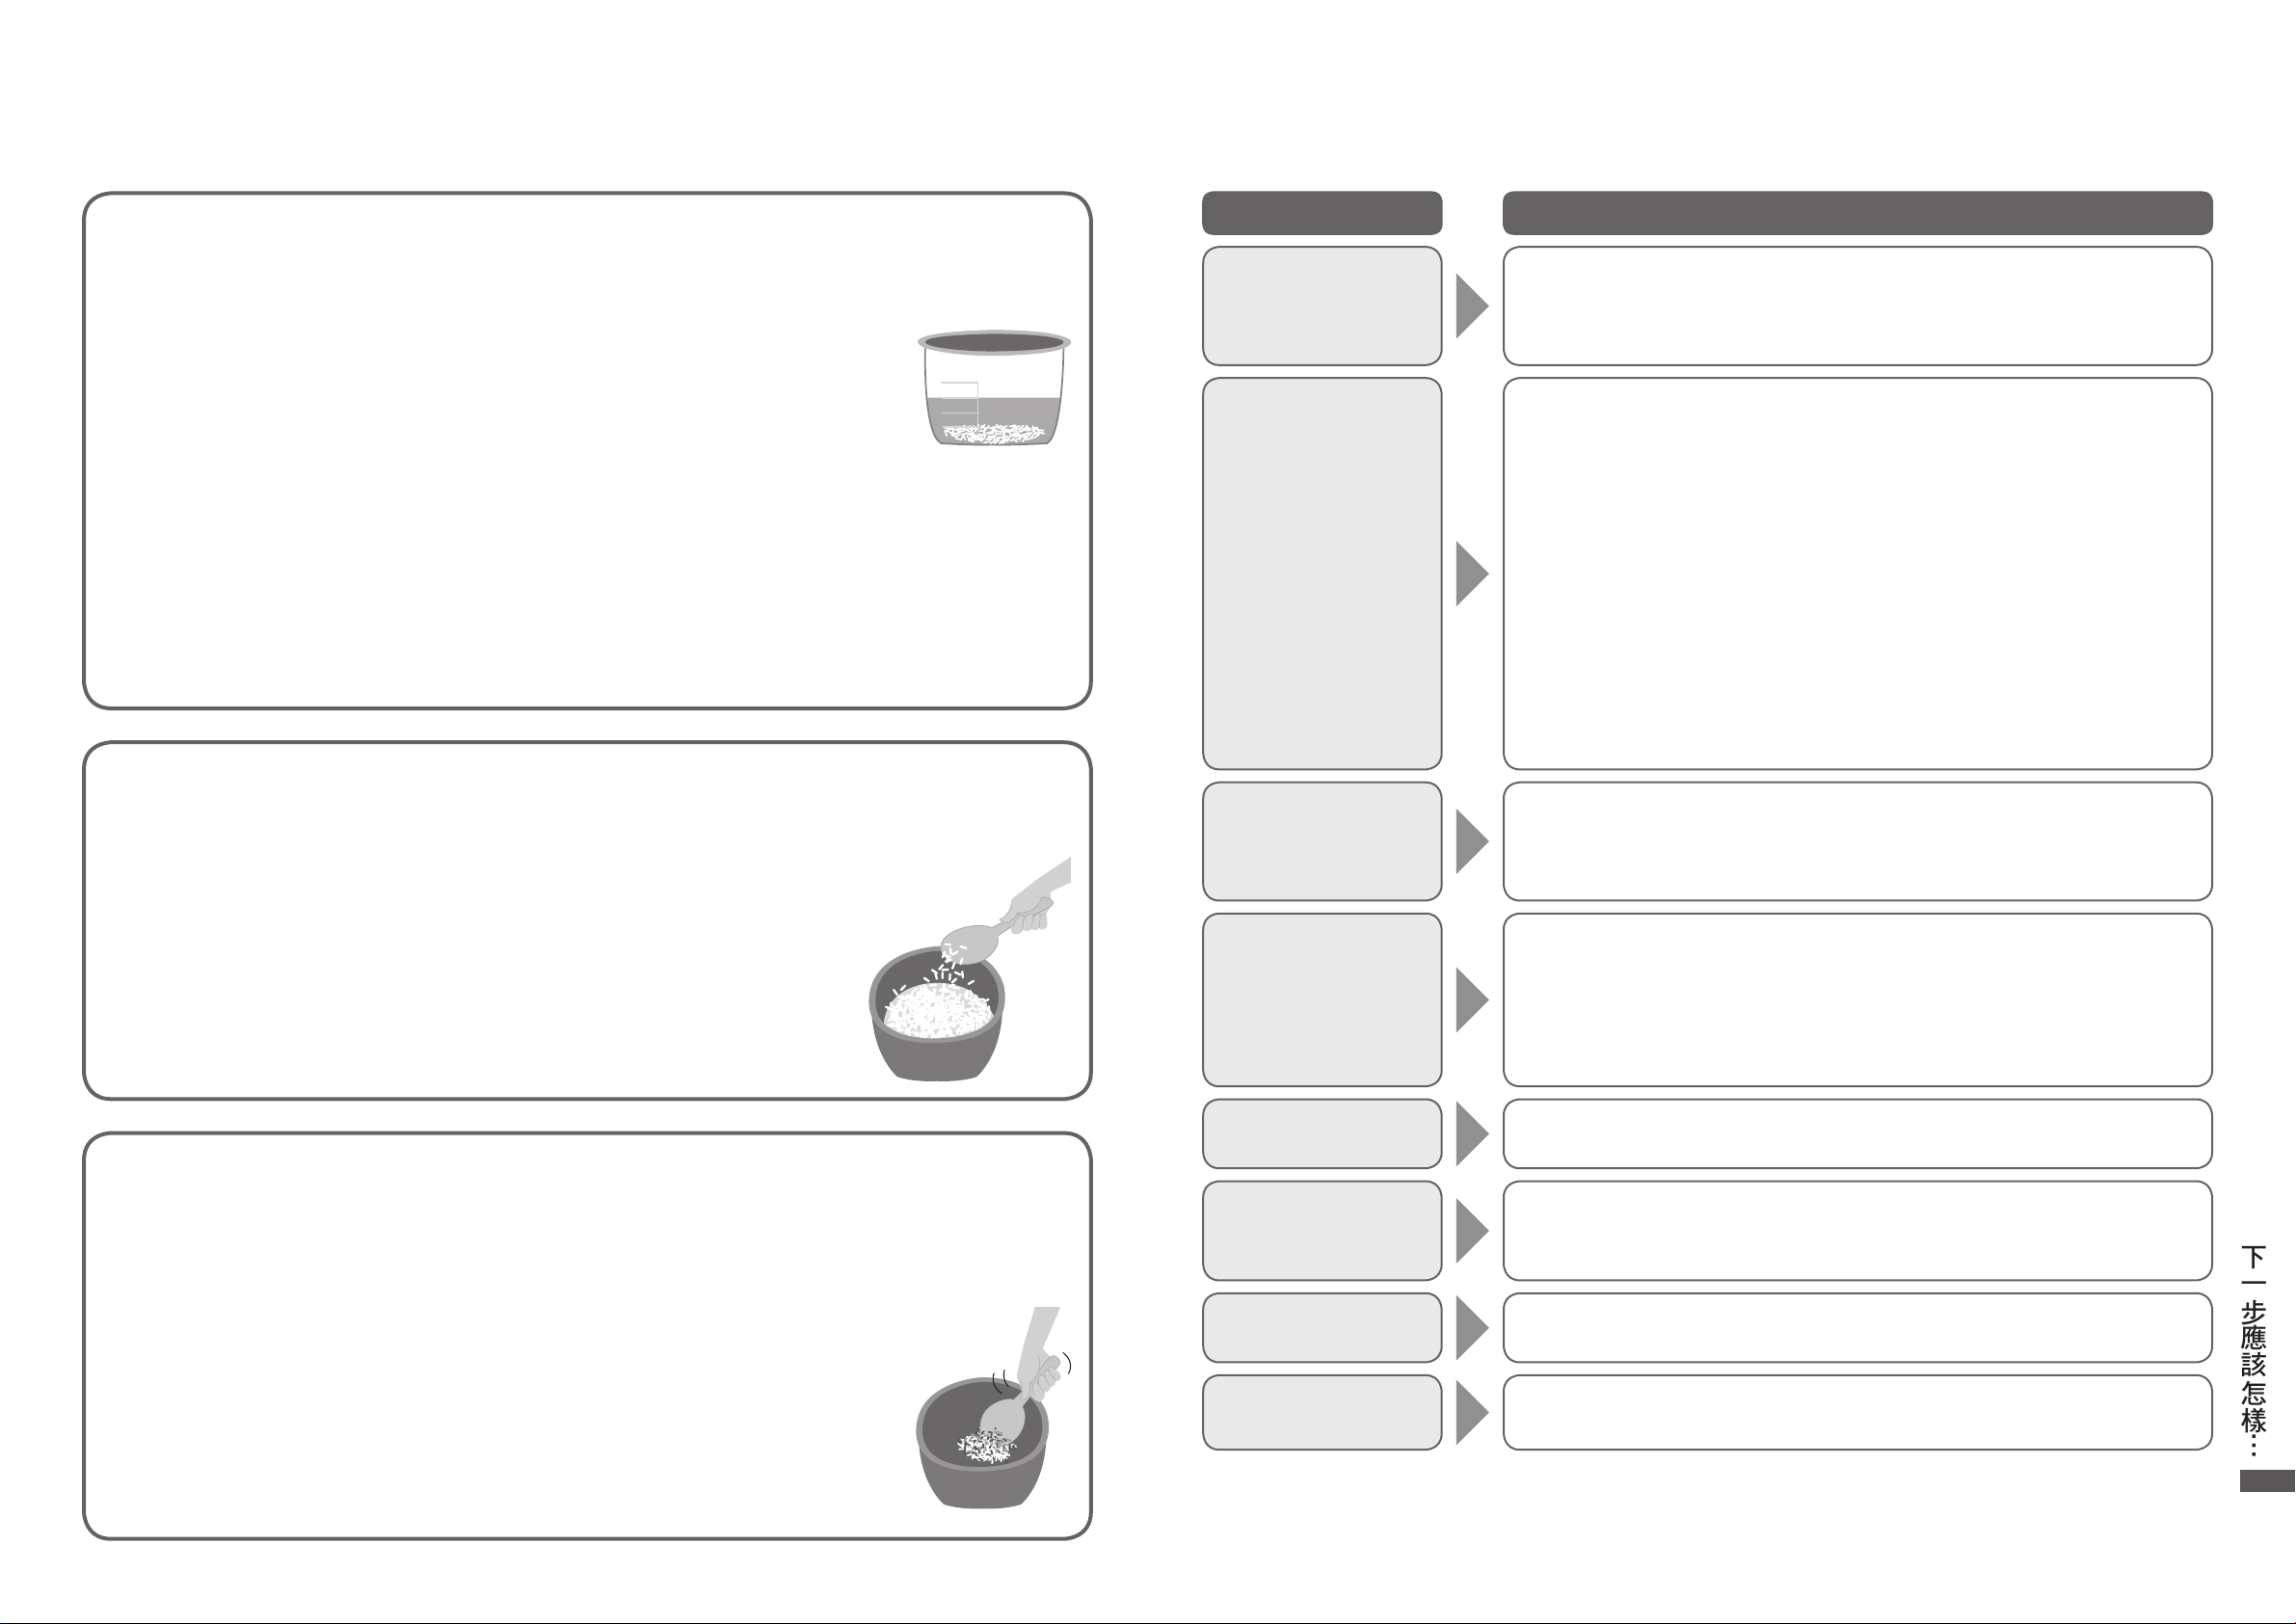
OO
煮好飯後,您是否即時翻鬆?(可 蒸 發 多餘 水份。)
OO
您是否在保溫狀態期間米飯仍然在微型電腦飯煲內時關閉了保溫按鈕或拔掉了電
源 插頭?
OO
霧層可根據烹調方式形成。
OO
您是否在保溫狀態期間米飯仍然在微型電腦飯煲內時關閉了保溫按鈕或拔掉了電
源 插頭?
OO
保溫功能是否操作12小時或 更 多?
OO
煮煲仔飯等加調味料完成後,氣味可能仍然存在。
OO
您是否有在保溫狀態時加入冷飯?
OO
是否有正確處理及洗米?
OO
使用保溫功能時您是否有將飯勺從微型電腦飯煲取出?
OO
是 否 每 次使 用 後 都 進 行 清潔 保 養?
清潔保養不妥善的話,可能導致米飯味道變差或出現氣味。
如持續使用骯髒的微型電腦飯煲,可能導致米飯品質變差。
OO
烘 烤 蛋 糕 後 有可 能 會 殘 留 異味。
→ 當明顯聞到米飯有氣味時,
小心清洗內鍋、蓋加熱板及美味感應裝置。(第
18–19
頁)
如 無 法 清 除 氣 味,請 使 用 清 洗 功 能。(第19頁)
OO
保溫功能是否操作12小時或 更 多?
OO
您是否有重複再加熱?
OO
是否有正確處理及洗米?
OO
某些米類,煮完飯後米飯可能帶有黃色。
OO
保溫功能是否操作12小時或 更 多?
OO
您是否有重複再加熱?
OO
美 味感 應 裝 置 是 否 正 確裝 好?
OO
米飯黏在蓋加熱板的密封墊、外蓋的密封墊或內鍋邊緣?
OO
內 鍋 是 否有 變 形?
→ 如內鍋變形,請購買新的內鍋。
OO
您 是 否 將米 長時 間浸 泡?(例 如 使 用 預 約 時 。)
OO
烹調粥時您是否有使用保溫功能?
OO
您是否過度洗米,導致米粒斷開?
OO
是 否 有正 確 洗 米?
(米內的澱粉溶解,然後在表面變成為薄膜。這是無害的。)
OO
軟米或糯米容易沾黏,這要視米的種類而定。
OO
烹調 前 米飯 是 否均 勻散 佈?
OO
這 可 能 因 強 力 加 熱,即 是IH(感應加熱)的特性。這不是故障。
下一步應該怎樣…
微 型 電 腦 飯 煲 沒 有 故 障。
OO
檢查以下事項才要求維修。
症狀 在 此 檢 查!
米飯太軟
您 是 否正 確量 米 和量 水?(第8頁)
OO
是否有大量斷開的米粒?
OO
您 是 否將 米 長 時間 浸泡?( 例 如 使 用 預 約 時 。)
OO
→ 使 用 預 約 時,嘗 試 稍 微 減 少 水 量。
(減少水 量 至水位線下方大約1至
您 是 否用 熱 水 洗 米?
●
您是否使用超過「
●
(
型 號:
1.0 L
洗米時是否太用力?(可能造成米粒斷裂而濕黏。)
●
煮好飯後,您是否即時翻鬆?(可 蒸 發 多餘 水份。)
●
烹調新收割米時,您是否使用低於標準水量?(減少水量至水位線下方大約1至
●
洗完米後您是否將米留在網漏內?
●
(第8頁 這可能會導致米粒斷裂,且煮熟後米飯可能會比較黏。)
如希望口感較硬
●
稍微減少水量。(減少水量至水位線下方大約1至
•O
1-2Person
0.5至1.5
:
米飯太硬
您 是 否正 確量 米 和量 水?(第8頁)
OO
您 是 否 使 用「
OO
Quick
(黏)
2 mm
(少量)」程序少量的指定米量?
量 杯,
1.8 L
型 號:1至
(乾)
( 快 速 煮 飯 )」 模 式 ?
處 。)
2.5
量杯)
2 mm
處 。)
2 mm
處 。)
冷 凝 產 生。
米 飯 有 氣 味。
米飯是黃色。
如希望口感較軟
●
稍 微 增 加 水 量。
•O
(增加水量至水位線上方大約1至
嘗試將米浸泡(30分鐘至2小時)才 烹 調 。
•O
:
處 。)
2 mm
米 飯 太 乾。
粥 變 糊。
米飯已煮焦
薄 膜 形 成。
是否有正確處理及洗米?
22 23
OO
是否有污垢或異物堵塞內鍋感應器、內鍋底部或本體內部?
OO
您 是 否使 用 預約?( 您 是 否 將 米 長 時 間 浸 泡 ?)
OO
洗米時是否太用力?(可能造成米粒斷裂而煮焦。)
●
是 否 有大 量斷開 的 米粒?
●
洗完米後您是否將米留在網漏內?
●
(第8頁 這 可 能 會 導 致 米 粒 斷 裂,且 煮 熟 後 米 飯 可 能 會 燒 焦。)
煮飯加調味料,例如煲仔飯可能很容易煮焦。
●
內鍋底部產生金黃色米飯不代表故障。
●
→ 如按照上述步驟沒有改善,請參考「如要改善飯焦」。(第25頁)
米 飯 黏 在 內 鍋 上。
烹調好的米飯表面
有 凹 形形 狀。
下一步應該怎樣…
Page 27
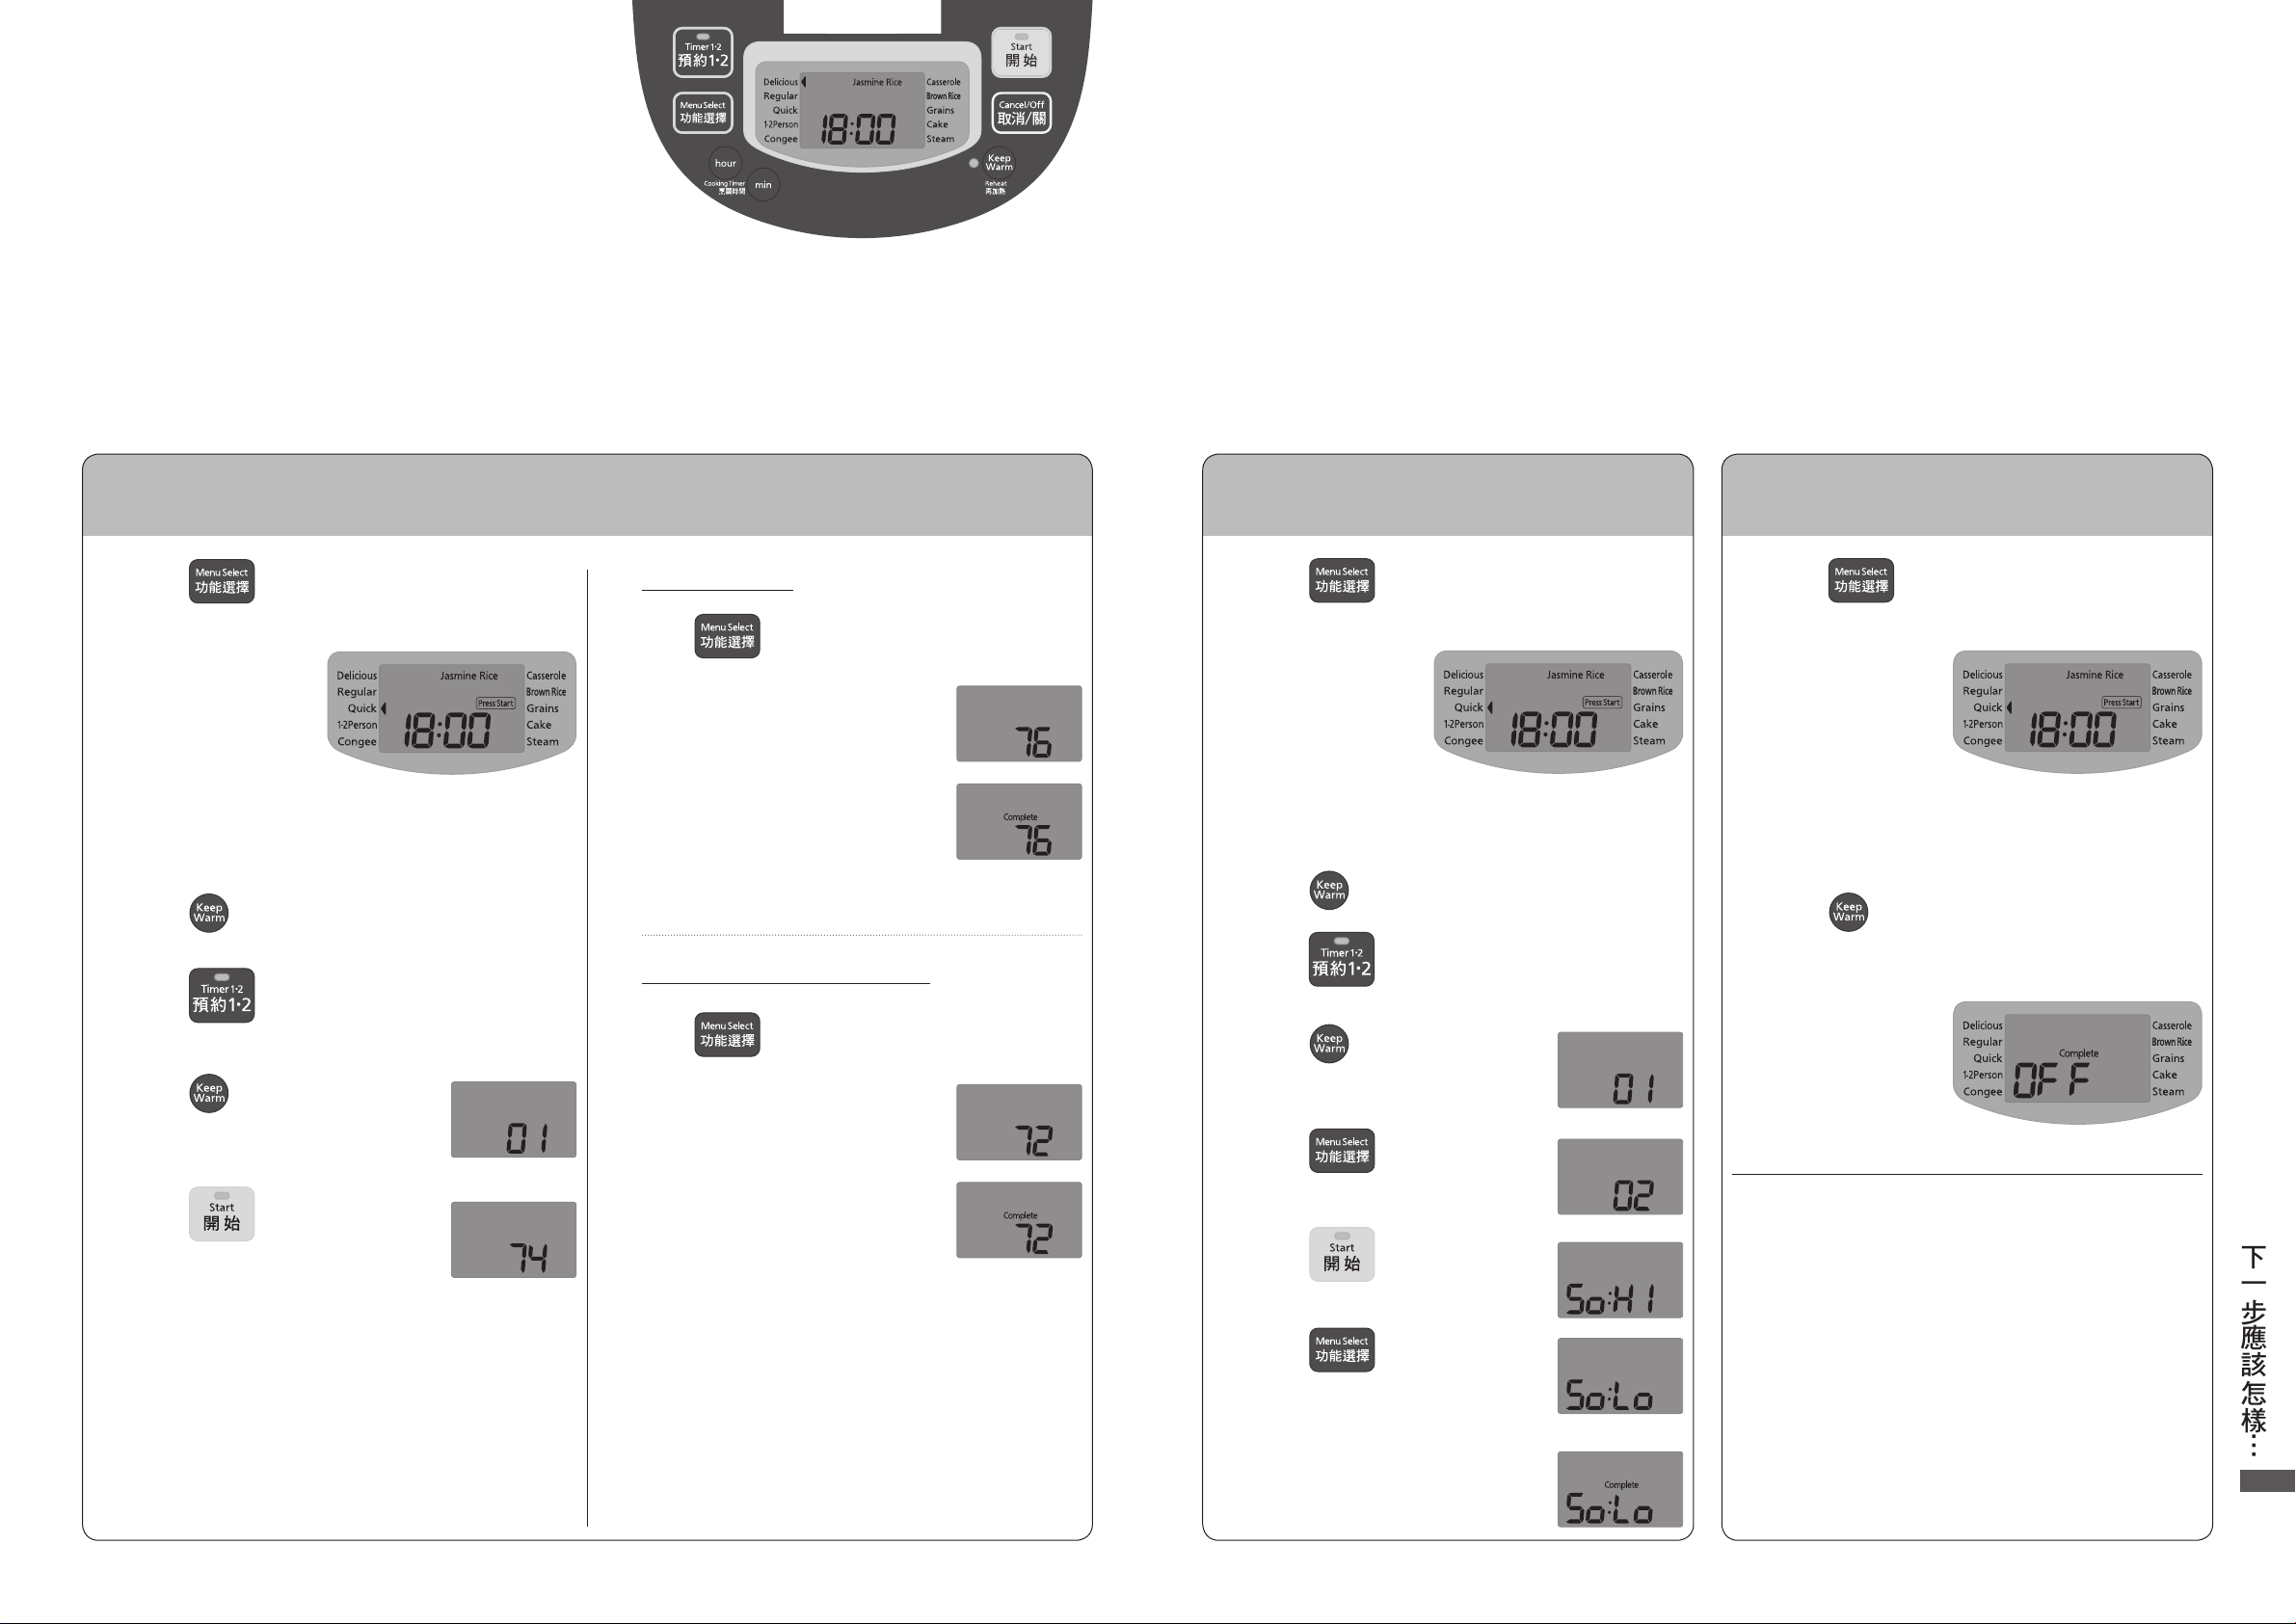
下一步應該怎樣…
如 要改 善 飯 焦。
1
按下
,並 設 定「◄」
為「
Quick
( 快 速 煮 飯 )」 。
OO
在「
Pearl Rice
(珍 珠 米)」或「
Jasmine Rice
(茉莉米)」
下 選 擇「
Quick
( 快 速 煮 飯 )」
2
按下
。
您將不會聽到嗶一聲。
按下
。
您將不會聽到嗶一聲。
按下
。
3
按下
。
選 擇「02」。
按下
。
4
按下
。
設 定 至「
So:Lo
」。
10
秒後
(設定自動結束。)
若要在烹調、再加熱及清洗時
停 止 鈴 聲 提 示 ( 結 束 聲 音 )。
1
按下
,並 設 定「◄」
為「
Quick
( 快 速 煮 飯 )」 。
OO
在「
Pearl Rice
(珍 珠 米)」或「
Jasmine Rice
(茉莉米)」
下 選 擇「
Quick
( 快 速 煮 飯 )」
2
長按
。
(大約5秒)
OO
這 個 變 更 不 會關 掉 按 鈕 聲 音。
如 果 想 要 改 變 保 溫 溫 度。
(
74→76→72
)
1
按下
,並 設 定「◄」
為「
Quick
( 快 速 煮 飯 )」 。
OO
在「
Pearl Rice
(珍 珠 米)」或「
Jasmine Rice
(茉莉米)」
下 選 擇「
Quick
( 快 速 煮 飯 )」
2
按下
。
您將不會聽到嗶一聲。
按下
。
您將不會聽到嗶一聲。
按下
。
3
按下
。
OO
預 設 值 為「74」。
4
當米飯發出米香味
按下
。
設 定 至「76」。
10
秒後
(設定自動結束。)
當米飯顏色發生變化或是米飯過乾
按下
。
設 定 至「72」。
10
秒後
(設定自動結束。)
如第
OO
步驟
OO
如16秒內沒有任何操作,顯示屏幕則回復目前時間。
( 無 法 設 定 。)
→ 請重新開始程序。
完成設定後,顯示屏幕回復目前時間。
OO
若要返回先前設定,再次按照程序進行。
OO
頁 的 建 議 沒 有 改善,您 可 以 變 更 設 定。
22–23
必須每個在16秒 內 完 成。
2–4
下一步應該怎樣…
24 25
Page 28
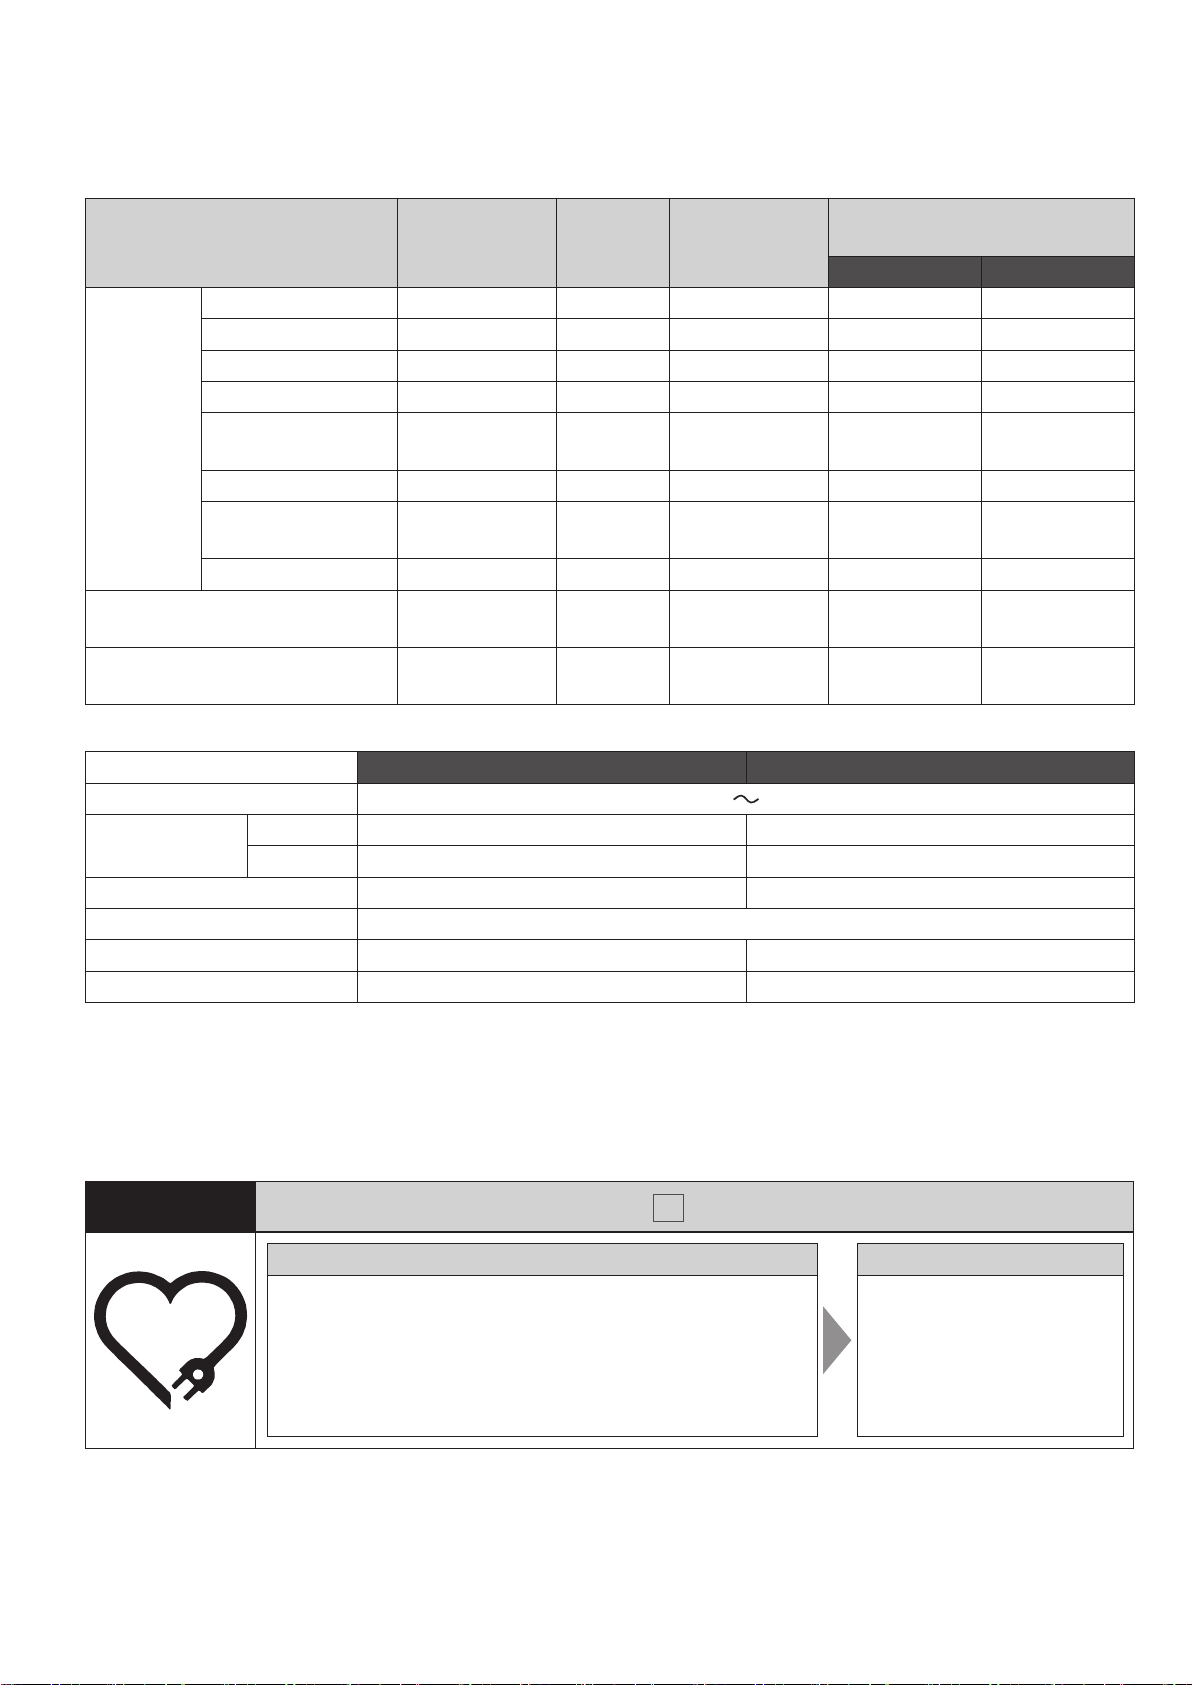
規格
Pearl Rice
(珍 珠 米)
Jasmine
Rice
(茉莉米)
)
(蛋糕
Cake
)
(蒸
Steam
「×」符
*
號 代 表 微 型 電 腦 飯 煲 將 自 動 轉 換 成 保 溫 功 能,但 不 建 議 使 用。( 第13頁)
程序 大約烹調時間 保溫功能*預約設定限制
Delicious
Quick
1-2Person
Casserole
Brown Rice
(美 味模 式)
Regular
(快 速煮 飯)
Congee
(什 穀
Grains
(標準)
(少 量)
(粥)
(煲 仔飯)
飯)
(糙 米
米)
分鐘
50
分鐘
37
分鐘
19
1
45
40
1
–33
分鐘
50
設定時間
小時–4小時
1
分鐘
50
小時35分鐘
小時55分鐘
1
分鐘
–55
設定時間
分鐘
–60
設定時間
分鐘
–60
分鐘
分鐘
分鐘
分鐘
–
○
○
○
○
×
×
×
×
×
×
完成前60分鐘
完成前50分鐘
―
完成前60分鐘
完成前烹調時間
分鐘或
+1
―
完成前
完成前60分鐘
130
―
― 水量
烹 調 容 量( 量 杯)
()用 於 添 加 其 他 食 材 時。
SR-FC108 SR-FC188
0.5–5.5 1–10
0.5–5.5 1–10
0.5–5.5 1–10
0.5–1.5 1–2.5
更長
分鐘
0.5–0.75 0.5–1.5
1–3 2–6
g
600
500 mL
)
1–3(1–2
0.5–4 1–8
麵糰上限
1–7(1–5
麵糰上限
900
水量
600 mL
)
g
SR-FC108 SR-FC188
電源
耗 電 量( 大 約)
內鍋的額定容量
電 源 線 長 度( 大 約)
重 量( 大 約)
外 形 尺 寸 ( 寬 × 深 × 高 )( 大 約 )
1
保溫狀態每小時的耗電量。(房間溫度
*
2
外蓋打開時的高度。
*
耗電量是指電力容量的上限。
OO
當 開 關 是 「 關 」, 微型電腦飯煲耗損大約
OO
這 個 微 型 電 腦 飯 煲 是 就 香 港 而 設 定。
OO
微型電腦飯煲是不適合在不同電源頻率或電壓的國家或地區使用。而且不設更換服務。
烹調時
保溫時
25.5 cm × 36
20 ˚C
1.6 W
檢查
您是否察覺到以下情況? 停止使用微型電腦飯煲
電源插頭及電源線異常發熱。
OO
電源線損毀或碰到電源線後發生間歇性斷電。
OO
本 體 變 形或 異常 發 熱。
OO
本體冒煙或發出焦味。
OO
本體破裂、鬆動或發出異常聲響。
OO
烹 調 時 底 部風 扇 不 旋 轉。
OO
110 0 W 130 0 W
710 W (27.6 Wh*
3.0 L 5.0 L
g
4.6 k
.6 cm × 21.0 cm (40.2 cm*2) 28.4 cm × 39.2 cm × 24.3 cm (45.6 cm*2)
, 最 大 米 量 。)
( 電 源 插 入 狀 態 )。
檢查您的
220 V
1
) 650 W (32.8 Wh*1)
微 型 電 腦 飯 煲!
IH
50 Hz
1.0 m
g
5.7 k
若要避免意外,請立即停止
使用微型電腦飯煲,拔 掉 電
源 插 頭,向 您 的 經 銷 商 進 行
檢 查。
26
日本印刷
Panasonic Corporation
網 站:
http://www.panasonic.com.hk
© Panasonic Corporation 2018
RZ19HK49
F0818T0
 Loading...