

Page 1
ORDER No. SM-02011
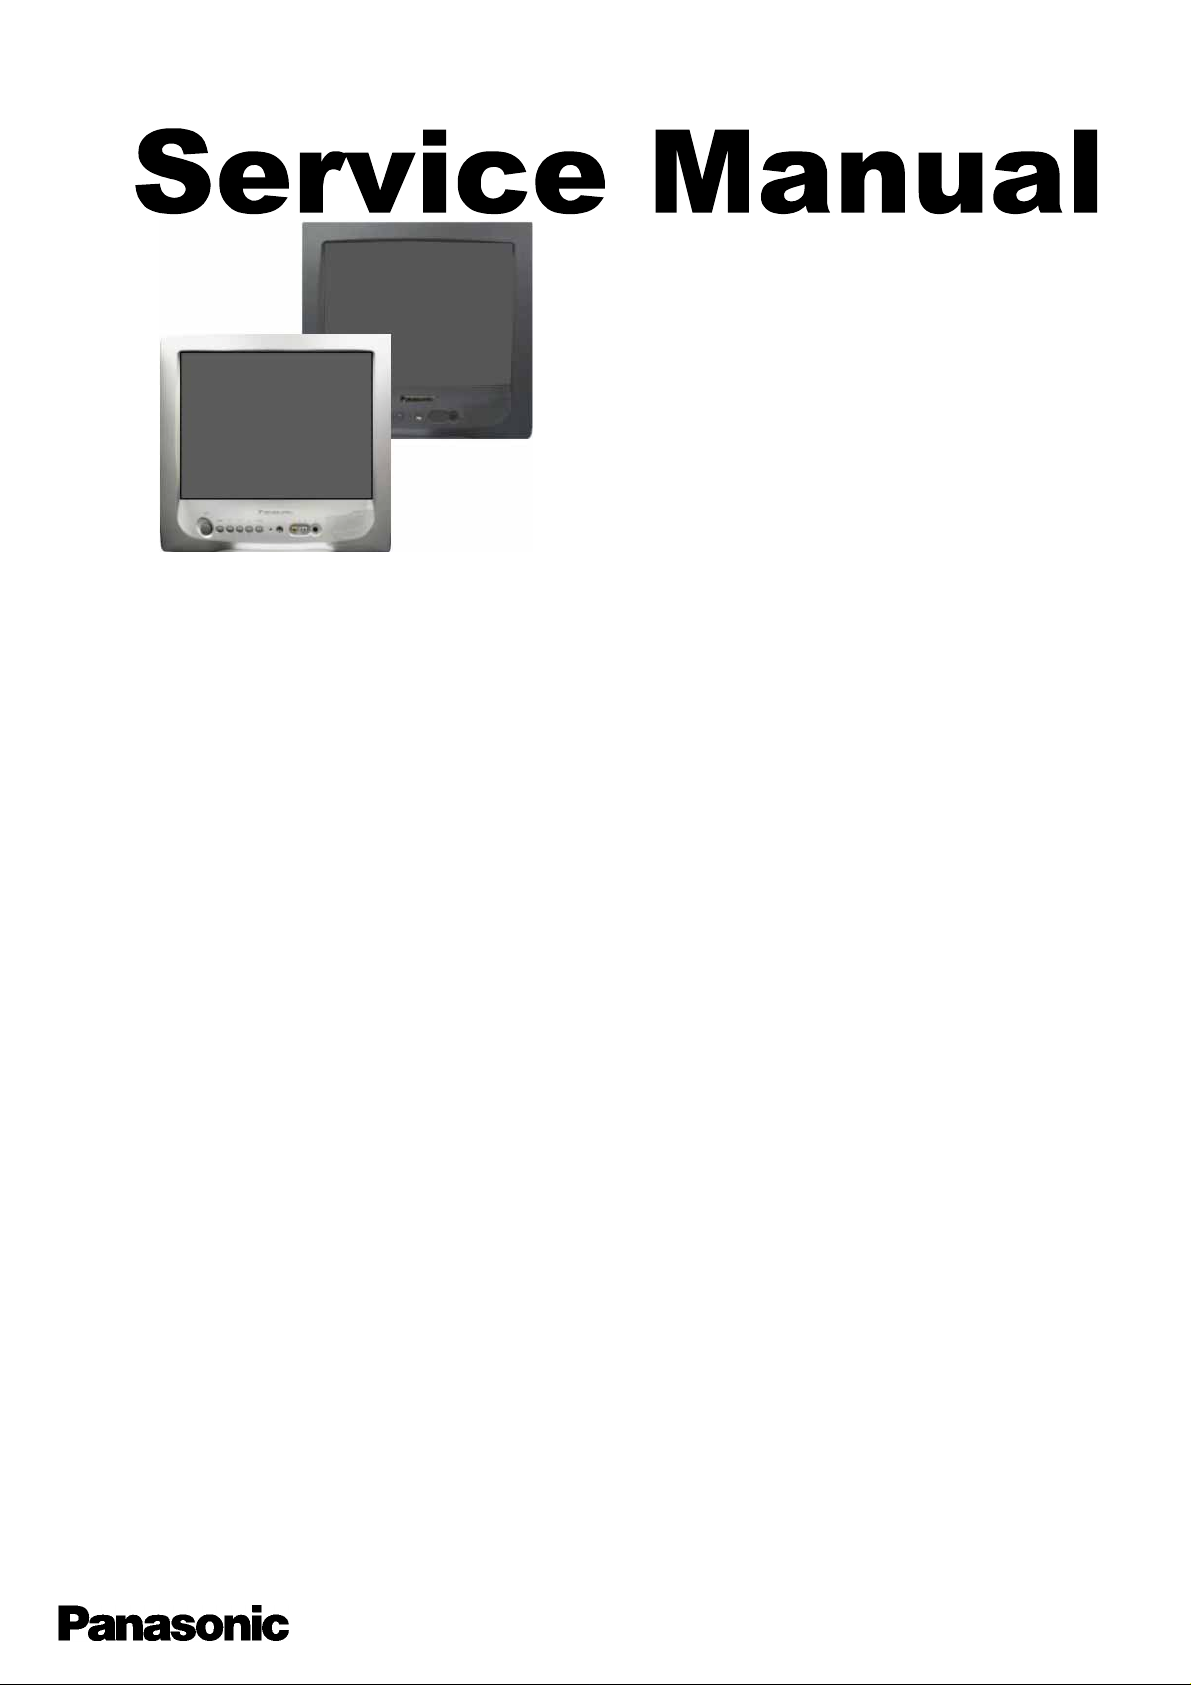
Colour Television
TX-14B4TP
TX-14B4TP/B
TC-14B4RP
TC-14B4RP/B
Z-185 Chassis
SPECIFICATIONS
Power Source: 220-240V a.c., 50Hz
Power Consumption: 39W
Stand-by Power
Consumption: 2.9W
Receiving System: SECAM B/G , D/K
PAL B/G , D/K , H , 525/60
M.NTSC
NTSC (AV only)
Receiving Channels:
VHF E2-E12 VHF H1-H2 (ITALY)
VHF A-H (ITALY) VHF R1-R2
VHF R3-R5 VHF R6-R12
UHF E21-E68 CATV (S01-S05)
CATV S1-S10 (M1-M10) CATV S11-S20 (U1-U10)
CATV S21-S41 (HYPERBAND)
Intermediate Frequency:
Video/Audio
Video 38.9MHz
Audio 33.16MHz, 33.4MHz
32.4MHz, 33.05MHz
Colour 34.47MHz (PAL)
34.5MHz, 34.65MHz (SECAM)
Terminals:
AV1 IN Video (21 pin) 1V p-p 75Ω
Audio (21 pin) 500mV rms 10kΩ
RGB (21 pin)
Audio (RCA x 1) 500mV rms 10kΩ
Video (RCA x 1) 1V p-p 75Ω
AV1 OUT Video (21 pin) 1V p-p 75Ω
Audio (21 pin) 500mV rms 1kΩ
Picture Tube:
High Voltage: 26.5
Audio Output: 2.5W
(Music Power) 8Ω Impedance
Headphones: 8Ω Impedance
Accessories
supplied : Remote Control
Dimensions:
Height: 342mm
Width: 366mm
Depth: 376mm
A34EAC01X06 34cm
± 1kV
3.5mm
2 x R6 (UM3) Batteries
Net weight: 9.6kg
Specifications are subject to change without notice.
Weights and dimensions shown are approximate.
Page 2
CONTENTS
SAFETY PRECAUTIONS..........................................................................................................................................................2
SERVICE HINTS.......................................................................................................................................................................3
ALIGNMENT PROCEDURE AND OPTION SETTINGS............................................................................................................4
WAVEFORM PATTERN TABLE...............................................................................................................................................5
BLOCK DIAGRAMS..................................................................................................................................................................6
PARTS LOCATION...................................................................................................................................................................7
REPLACEMENT PARTS LIST..................................................................................................................................................8
SCHEMATIC DIAGRAMS.......................................................................................................................................................16
CONDUCTOR VIEWS.............................................................................................................................................................18
SAFETY PRECAUTIONS
GENERAL GUIDE LINES
1. It is advisable to insert an isolation transformer in the
a.c. supply before servicing a hot chassis.
2. When servicing, observe the original lead dress in the
high voltage circuits. If a short circuit is found, replace
all parts that have been overheated or damaged by
the short circuit.
3. After servicing, see that all the protective devices
such as insulation barriers, insulation papers, shields
and isolation R-C combinations are correctly
installed.
4. When the receiver is not being used for a long period
of time, unplug the power cord from the a.c. outlet.
5. Potentials as high as 27.5kV are present when this
receiver is in operation. Operation of the receiver
without the rear cover involves the danger of a shock
hazard from the receiver power supply. Servicing
should not be attempted by anyone who is not
familiar with the precautions necessary when working
on high voltage equipment. Always discharge the
anode of the tube.
6. After servicing make the following leakage current
checks to prevent the customer from being exposed
to shock hazard.
LEAKAGE CURRENT COLD CHECK
1. Unplug the a.c. cord and connect a jumper between
the two prongs of the plug.
2. Turn on the receiver’s power switch.
3. Measure the resistance value with an ohmmeter,
between the jumpered a.c. plug and each exposed
metallic cabinet part on the receiver, such as screw
heads, aerials, connectors, control shafts etc. When
the exposed metallic part has a return path to the
chassis, the reading should be between 4M ohm and
20M ohm. When the exposed metal does not have a
return path to the chassis, the reading must be
infinite.
LEAKAGE CURRENT HOT CHECK
1. Plug the a.c. cord directly into the a.c. outlet. Do not
use an isolation transformer for this check.
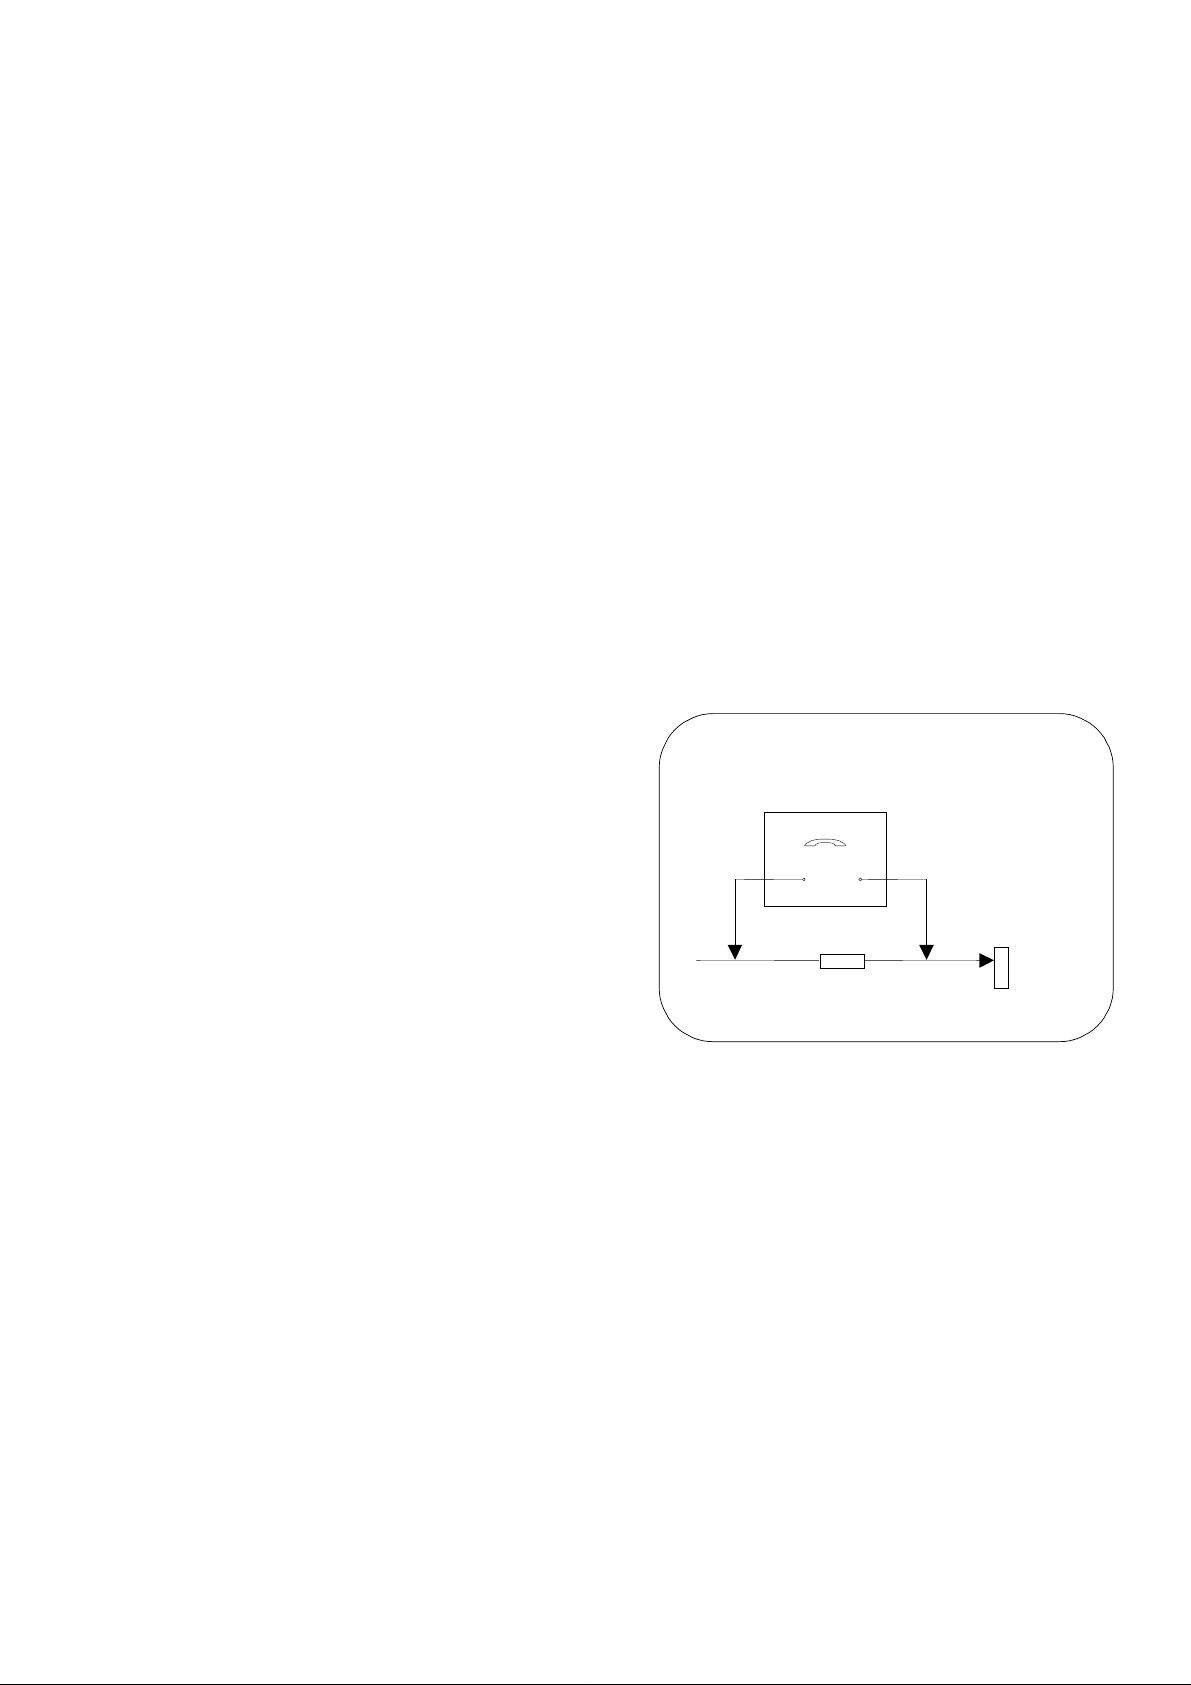
2. Connect a 2kΩ 10W resistor in series with an
exposed metallic part on the receiver and an earth,
such as a water pipe.
3. Use an a.c. voltmeter with high impedance to
measure the potential across the resistor.
4. Check each exposed metallic part and check the
voltage at each point.
5. Reverse the a.c. plug at the outlet and repeat each of
the above measurements.
6. The potential at any point should not exceed
1.4V rms. In case a measurement is outside the limits
specified, there is a possibility of a shock hazard, and
the receiver should be repaired and rechecked before
it is returned to the customer.
X-RADIATION WARNING
1. The potential sources of X-Radiation in TV sets are
the high voltage section and the picture tube.
2. When using a picture tube test jig for service, ensure
that the jig is capable of handling 27.5kV without
causing X-Radiation.
HOT CHECK CIRCUIT
a.c. VOLTMETER
2kΩ 10 Watts
TO INSTRUMENT’S EXPOSED
METALLIC PARTS
NOTE: It is important to use an accurate periodically
calibrated high voltage meter.
1. Set the brightness to minimum.
2. Measure the high voltage. The meter should indicate
26.5kV ± 1kV.
If the meter indication is out of tolerance, immediate
service and correction is required to prevent the
possibility of premature component failure.
3. To prevent any X-Radiation possibility, it is essential
to use the specified tube.
Fig. 1.
WATER PIPE
(
EARTH)
2
Page 3
SERVICE HINTS
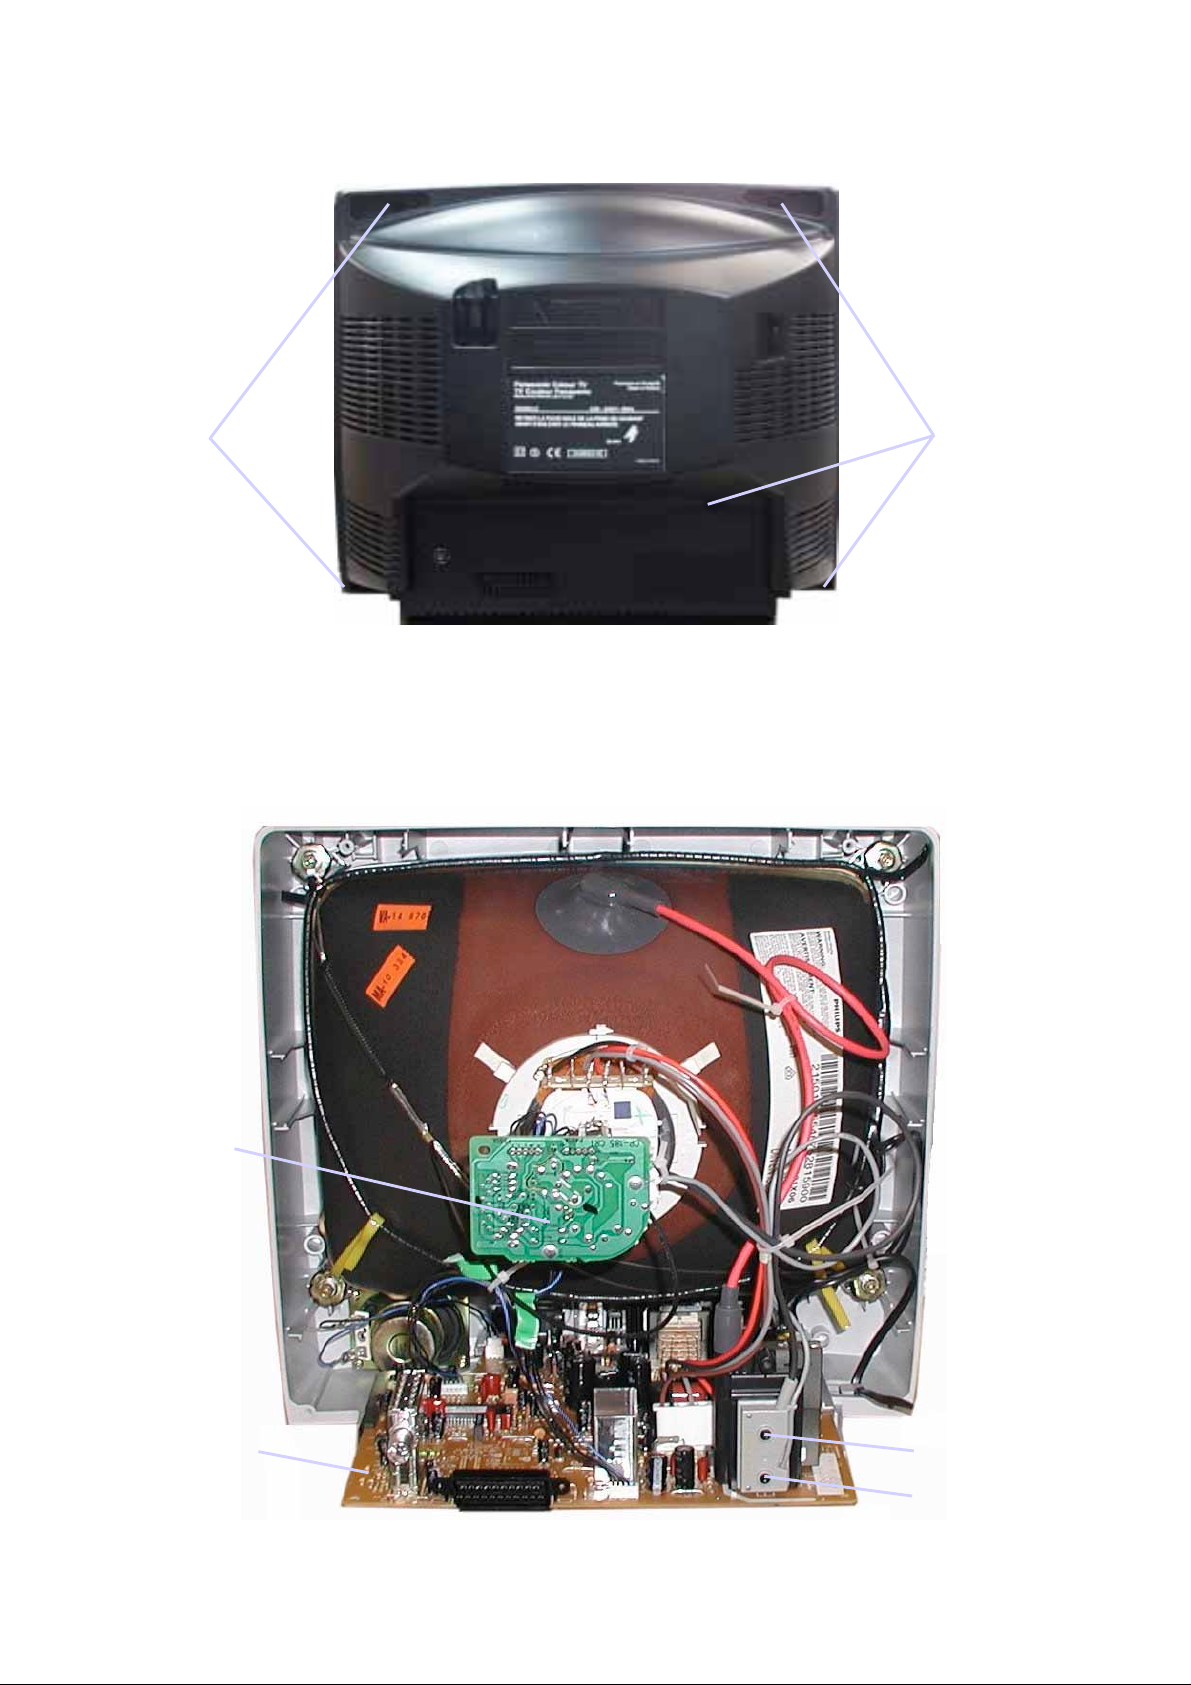
How to remove the rear cover
1. Remove the 10 screws as shown in Fig.2.
SCREWS
LOCATION OF CONTROLS
SCREWS
Fig.2.
Y-Board
E-Board
Focus
Screen
Fig.3.
3
Page 4
ALIGNMENT PROCEDURE AND OPTION SETTING
Entering SERVICE mode
Service mode is entered by selecting the “mute” remote key and local “down” simultaneously with the sharpness DAC set to
Minimum and programme position 99 selected.
Service mode 2 is selected by pressing the Recall remote key while in service mode 1.
Service mode navigation
- Up /Down remote keys :cycle through the service items available.
- -/+ remote keys :Decrement/Increment the values within range.
- TV/AV :Store the current data.
- 0 – 7 digit keys :Toggle bits 0-7 in option byte (service mode 2).
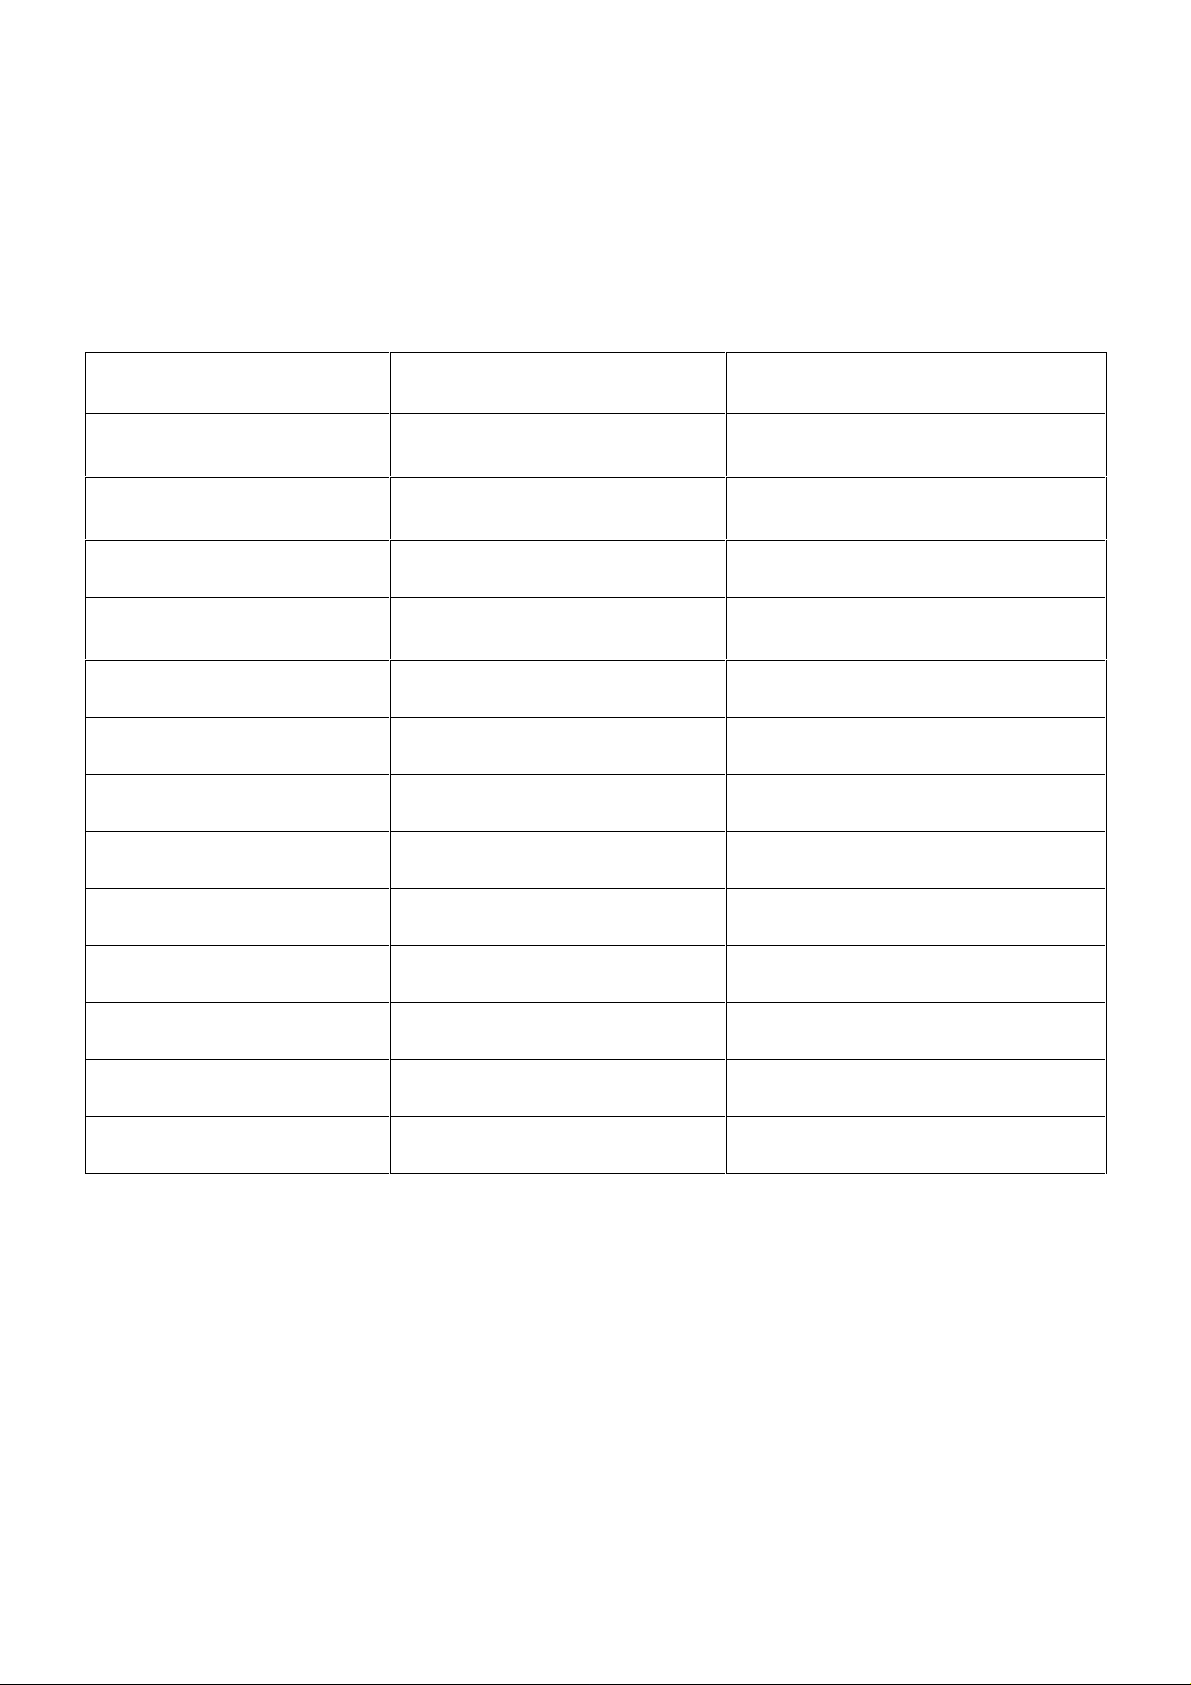
Order
1
2
3 Vertical Shift 0-63
4 Vertical amplitude 0-63
5 Horizontal shift 0-63
6 Red Cut 0-63
7 Green Cut 0-63
8 Red Drive 0-63
9 Green Drive 0-63
Item
Cut off (VG2)
Vertical slope
LED ON , LED OFF
Range
0-63
10 Blue Drive 0-63
11 AGC 0-63
12 Sub-Colour 0-63
13 Sub-Brightness 0-63
Sub-Colour: Set sub-colour to 16.
Sub-Brightness: Set sub-colour to 33.
G2 alignment: Before entering into service mode, recall the nominal picture setting :remote key “N”.
From this setting, increase brightness by 11 steps and reduce sharpness to minimum.
Tune a colour bar signal on Prg 99 and enter into SVC mode. In SVC mode , select “G2” item
and press – or + remote key to control software disable vertical deflection. The user must then
adjust G2 voltage on FBT, to find the point where LED is ON. Press – or + remote key to return
to normal SVC mode.
White balance: - Select a dark picture and adjust Red Cut and Green Cut to the desired colour temperature.
- Select a bright picture, set Blue Drive to 32 and adjust Red Drive, and Green Drive to the
desired colour temperature.
4
Page 5
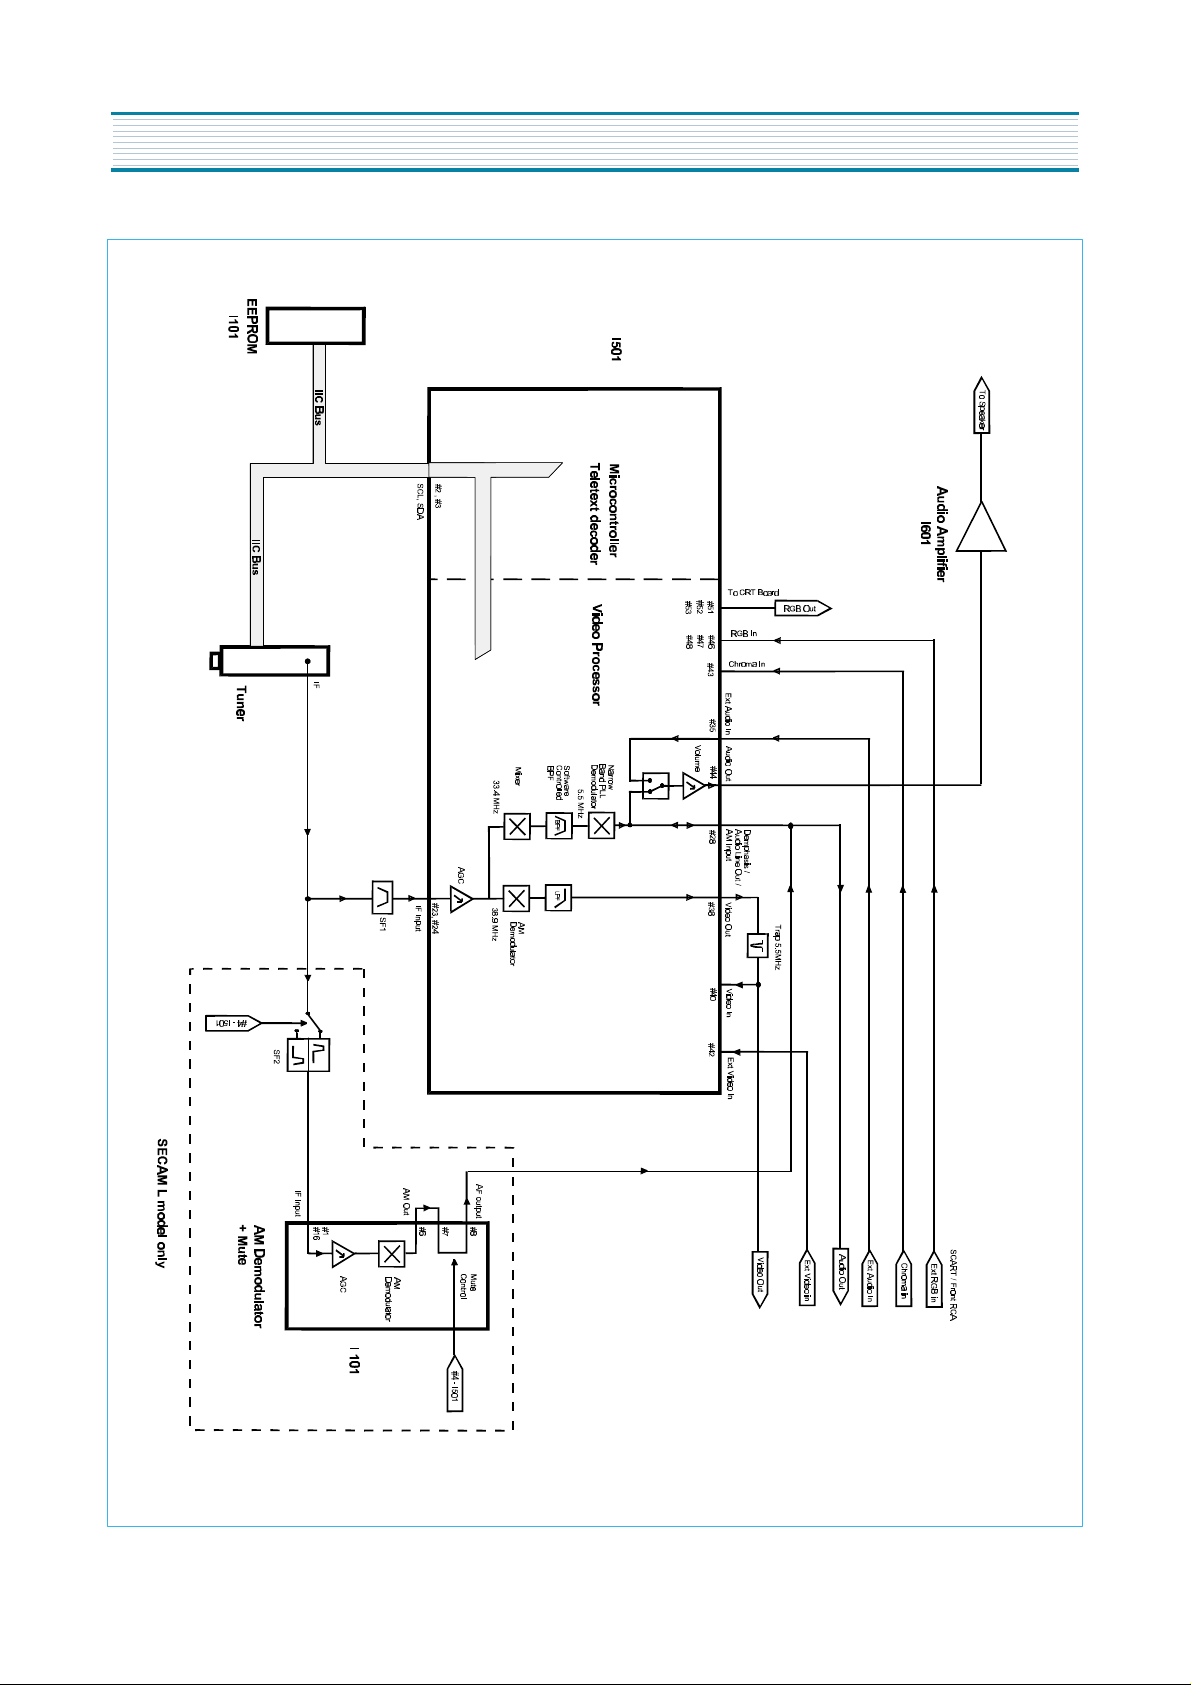
CIRCUIT BLOCK DIAGRAM
8
Page 6
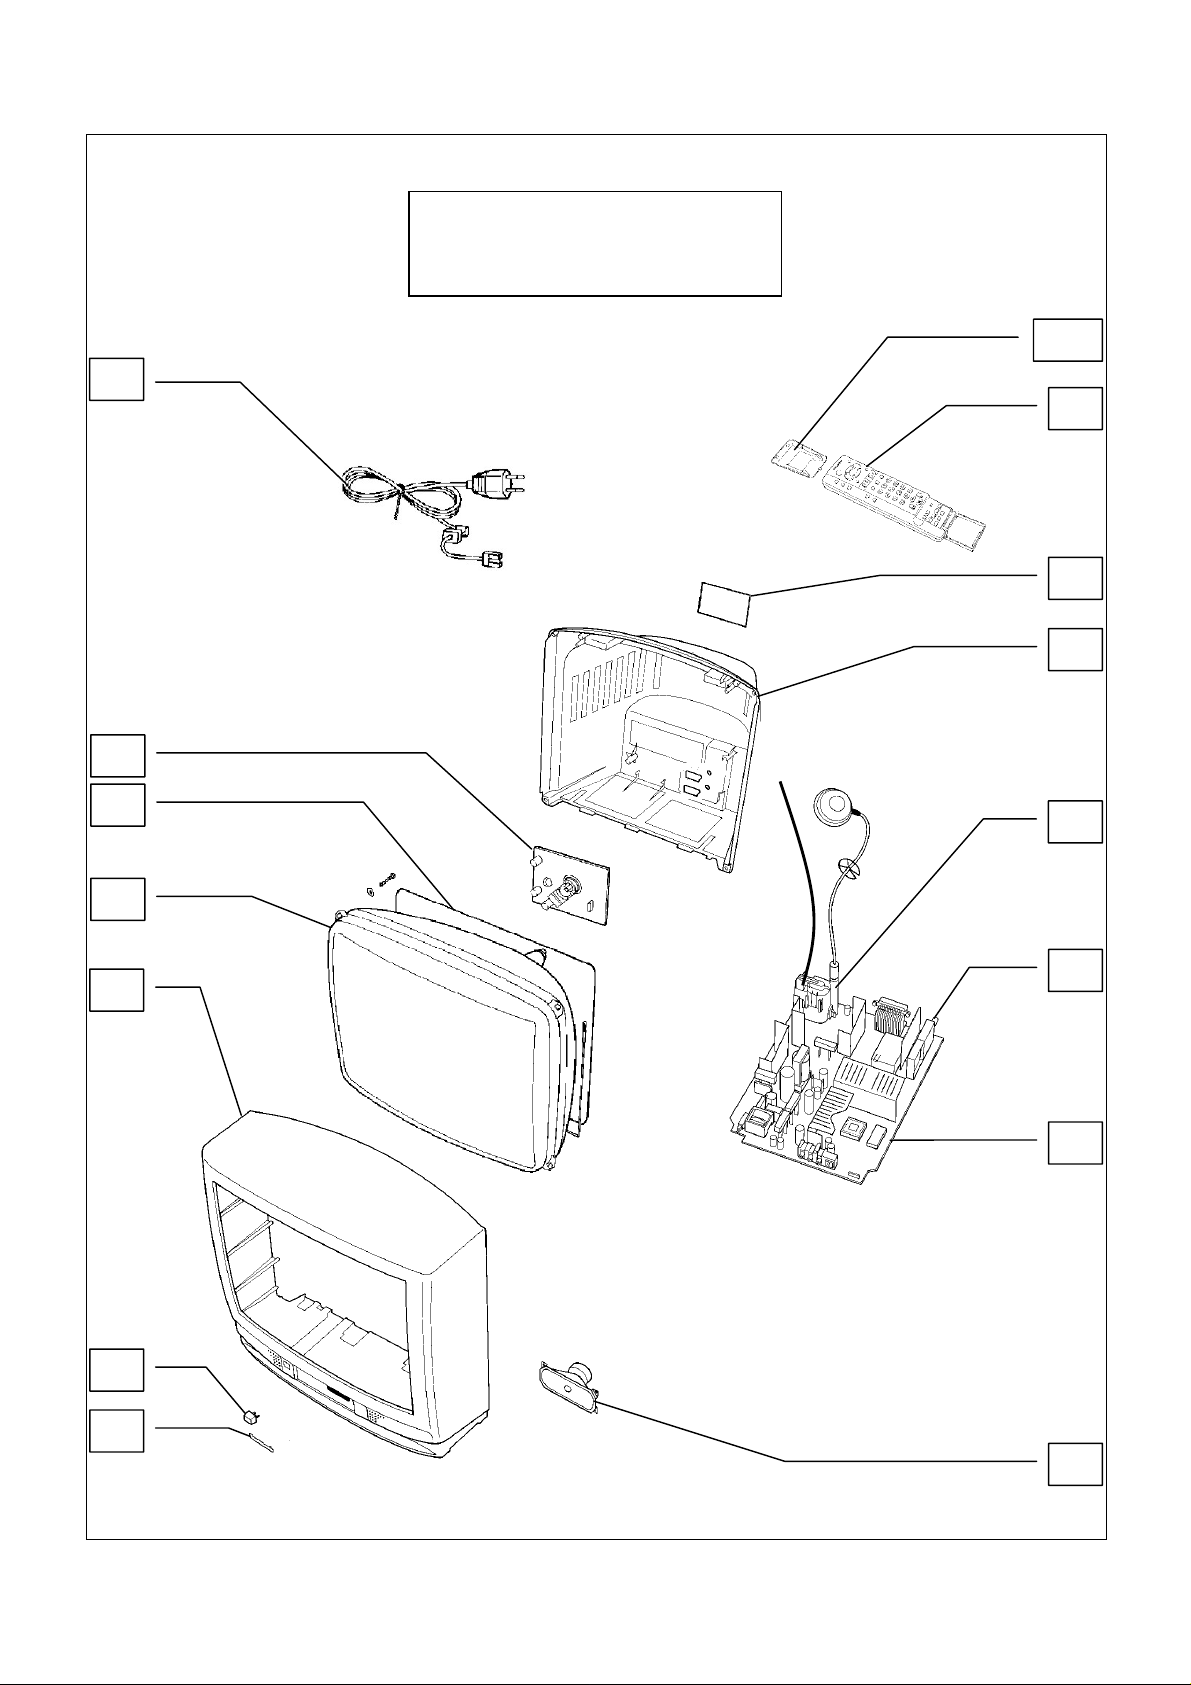
PARTS LOCATION
NOTE:
The numbers on the exploded view below
refer to the mechanical section of the
Replacement Parts List.
8 &9
2
15
12
7
10
3
6
4
5
16
11
14
13
1
7
Page 7
Components Identifie d by mark have special charac t eris t ics important for safety.
* When replacing any of these components, us e only manufacturers specified parts.
In case of ordering these spare parts, please always add the c omplete Model-Type
number to your order.
DescriptionCct Ref Parts Number DescriptionCct Ref Parts Number
COMMON PARTS
EXPLODED VIEW
SPEAKER 1 4858314010
POWER CORD 2 4859902910
Y P.C.B. 3 485Y-14B4C
F.B.T. 4 50H0000211
C.R.T 5 A34EAC01X06
DEGAUSS COIL 6 DC-1450
MISCELLANEOUS COMPONENTS
CUSHION . 4858191200
CARTON . GPBMA1V5012
ROD ANTENNA . TZS7ED008
CRT SOCKET SCT1 PCS633A
I.C.s
AM DEMODULATOR I101 TDA9830
VERTICAL AMPLIFIER I301 TDA8357J
MONO AMPLIFIER I601 TDA7267A
POWER SUPPLY SWITCHINGI801 STRF6653
OPTO COUPLER I804 KP1010C
ERROR AMPLIFIER I806 SE110N
5V REGULATOR I820 KA7805
8V REGULATOR I822 KA7808
3.3V REGULATOR I823 LP295033
RGB OUTPUT I901 TDA6107Q
FUSES
FUSE 4A250V F801 5FSCB4022R
DIODES
DIODE D101 DBAT85
DIODE D151 D1SS85TA
DIODE D341 DUZ33B
DIODE D350 DTZX12C
DIODE D360 DTZX22C
DIODE D361 DUZ33B
DIODE D403 BY228
DIODE D407 DBYW36
DIODE D408 DBYW36
DIODE D510 DTZX3V9B
DIODE D511 DTZX3V9B
DIODE D520 1N4148
DIODE D521 1N4148
DIODE D710 DTZX5V1B
DIODE D801 DBYT51J
DIODE D802 DBYT51J
DIODE D803 DBYT51J
DIODE D804 DBYT51J
REPLACEMENT PA RTS LIST
Important Safety Notice
DIODE D811 DTZX5V6B
DIODE D820 DBYW76
DIODE D821 DBYW36
DIODE D822 DTZX9V1B
DIODE D824 1N4148
DIODE D825 1N4148
DIODE D840 1N4148
DIODE D841 1N4148
DIODE D904 DBAV21
DIODE D905 DBAV21
DIODE D906 DBAV21
DIODE DA02 DTZX12C
DIODE DA05 DTZX5V6B
DIODE DA06 DTZX5V6B
DIODE DA08 DTZX5V6B
DIODE DA09 DTZX5V6B
DIODE DA10 DTZX5V6B
DIODE DA11 DTZX5V6B
DIODE DA27 DTZX5V6B
THYRISTOR I810 TX0202DA
DIODE R801 DT122B8010
TRANSISTORS
TRANS SMS T801 50M3535A1
TRANSFORMERS
TRANSFORMER T401 50D10A2
COILS
PEAKING COIL L101 5CPZ100K02
COIL L301 5CPZ109M04
COIL L350 5CPZ109M04
COIL L401 58H0000016
COIL L500 5CPZ120K02
PEAKING COIL L501 5CPZ100K02
PEAKING COIL L502 5CPZ100K02
PEAKING COIL L510 5CPZ100K02
PEAKING COIL L511 5CPZ100K02
PEAKING COIL L512 5CPZ100K02
COIL L600 5MC0000100
COIL L801 5MC0000100
COIL L802 58C9430599
COIL L803 5MC0000100
FILTERS
LINE FILTER LF801 5PLF24A1
SAW FILTER SF1 5PK9260M
SAW FILTER SF2 5PL9653M
FILTER Z501 5PYXT5R5MB
CERAMIC FILTER Z502 5PTPS65MB
FILTER Z603 5PXF1B471M
FILTER Z605 5PXF1B471M
FILTER Z606 5PXF1B471M
FILTER Z630 5PXF1B471M
8
Page 8
CRYSTALS
RESISTORS
DescriptionCct Ref Parts Number DescriptionCct Ref Parts Number
CRYSTAL X502 5XE12R000E
CARBONR101 ERD25TJ473 0.25W 5% 47K
CARBONR102 ERD25TJ472 0.25W 5% 4K7
CARBON R103 ERD25TJ123 0.25W 5% 12K
CARBONR104 ERD25TJ104 0.25W 5% 100K
CARBONR105 ERD25TJ392 0.25W 5% 3K9
CARBONR106 ERD25TJ101 0.25W 5% 100
CARBONR107 ERD25TJ101 0.25W 5% 100
CARBONR120 ERD25TJ101 0.25W 5% 100
CARBONR153 ERD25TJ222 0.25W 5% 2K2
CARBONR156 ERD25T163J 2W 5% 16K
CARBONR157 ERD25TJ562 0.25W 5% 5K6
CARBONR159 ERD25TJ222 0.25W 5% 2K2
CARBONR160 ERD25TJ682 0.25W 5% 6K8
CARBONR161 ERD25TJ102 0.25W 5% 1K
CARBONR162 ERD25TJ473 0.25W 5% 47K
CARBONR163 ERD25TJ103 0.25W 5% 10K
CARBONR164 ERD25TJ101 0.25W 5% 100
CARBONR170 ERD25TJ153 0.25W 5% 15K
CARBONR302 ERD50T159J 0.5W 5% 1R5
CARBONR310 ERD25TJ102 0.25W 5% 1K
CARBONR311 ERD25TJ102 0.25W 5% 1K
CARBONR340 ERD25TJ473 0.25W 5% 47K
CARBONR341 ERDS1TJ152 0.5W 5% 1K5
CARBONR355 ERD25TJ272 0.25W 5% 2K7
CARBONR356 ERD25TJ562 0.25W 5% 5K6
CARBON R360 ERD25TJ564 0.25W 5% 560K
CARBONR390 ERD25TJ159 0,25W 5% 1R5
CARBONR401 ERD25TJ272 0.25W 5% 2K7
CARBONR404 ERD25TJ339 0,25W 5% 3R3
CARBONR420 ERD25TJ223 0.25W 5% 22K
CARBONR501 ERD25TJ101 0.25W 5% 100
CARBONR502 ERD25TJ101 0.25W 5% 100
CARBONR505 ERD25TJ101 0.25W 5% 100
CARBONR506 ERD25TJ332 0.25W 5% 3K3
CARBONR507 ERD25TJ101 0.25W 5% 100
CARBONR508 ERD25TJ332 0.25W 5% 3K3
CARBONR509 ERD25TJ681 0.25W 5% 680
CARBONR511 ERD25TJ333 0.25W 5% 33K
CARBONR512 ERD25TJ101 0.25W 5% 100
CARBONR513 ERD25TJ101 0.25W 5% 100
CARBONR514 ERD25TJ101 0.25W 5% 100
CARBONR515 ERD25TJ153 0.25W 5% 15K
CARBON R516 ERD25TJ393 0.25W 5% 39K
CARBONR517 ERD25TJ102 0.25W 5% 1K
CARBON R518 ERD25TJ273 0.25W 5% 27K
CARBONR520 ERD25TJ183 0.25W 5% 18K
CARBONR521 ERD25TJ391 0.25W 5% 390
CARBONR522 ERD25TJ221 0.25W 5% 220
CARBONR523 ERD25TJ331 0.25W 5% 330
CARBONR524 ERD25TJ561 0.25W 5% 560
CARBONR525 ERD25TJ104 0.25W 5% 100K
CARBONR526 ERD25TJ479 0,25W 5% 4R7
CARBON R527 ERD25TJ431 0.25W 5% 430
CARBONR528 ERD25TJ221 0.25W 5% 220
CARBONR530 ERD25TJ470 0.25W 5% 47
CARBONR531 ERD25TJ102 0.25W 5% 1K
CARBONR533 ERD25TJ103 0.25W 5% 10K
CARBONR534 ERD25TJ102 0.25W 5% 1K
CARBONR535 ERD25TJ101 0.25W 5% 100
CARBONR537 ERD25TJ101 0.25W 5% 100
CARBONR538 ERD25TJ101 0.25W 5% 100
CARBONR539 ERD25TJ101 0.25W 5% 100
CARBONR555 ERD25TJ103 0.25W 5% 10K
CARBON R556 ERD25TJ822 0.25W 5% 8K2
CARBONR567 ERD25TJ101 0.25W 5% 100
CARBONR570 ERD25TJ102 0.25W 5% 1K
CARBONR571 ERD25TJ432 0,25W 5% 4K3
CARBONR572 ERD25TJ122 0.25W 5% 1K2
CARBONR573 ERD25TJ272 0.25W 5% 2K7
CARBON R575 ERD25TJ123 0.25W 5% 12K
CARBONR580 ERD25TJ561 0.25W 5% 560
CARBONR585 ERD25TJ224J 0,25W 5% 220K
CARBONR586 ERD25TJ221 0.25W 5% 220
CARBONR587 ERD25TJ101 0.25W 5% 100
CARBONR588 ERD25TJ101 0.25W 5% 100
CARBONR589 ERD25TJ101 0.25W 5% 100
CARBONR592 ERD25TJ103 0.25W 5% 10K
CARBONR593 ERD25TJ103 0.25W 5% 10K
CARBONR594 ERD25TJ103 0.25W 5% 10K
CARBONR595 ERD25TJ473 0.25W 5% 47K
CARBONR596 ERD25TJ302 0,25W 5% 3K
CARBONR597 ERD25TJ153 0.25W 5% 15K
CARBONR598 ERD25TJ153 0.25W 5% 15K
CARBONR599 ERD25TJ221 0.25W 5% 220
CARBONR601 ERD25TJ432 0,25W 5% 4K3
CARBONR602 ERD25TJ332 0.25W 5% 3K3
CARBONR610 ERD25TJ332 0.25W 5% 3K3
CARBON R710 ERD25TJ431 0.25W 5% 430
CARBONR713 ERD25TJ201J 0,25W 5% 200
CARBONR720 ERD25TJ122 0.25W 5% 1K2
CARBONR721 ERD25TJ181J 0,25W 5% 180
CARBONR722 ERD25TJ221 0.25W 5% 220
CARBONR723 ERD25TJ331 0.25W 5% 330
CARBONR724 ERD25TJ471 0.25W 5% 470
FUSIBLER804 RF02Y338K 2W 10% R33
CARBONR805 ERD50T100J 0.5W 5% 10
CARBONR806 ERD25TJ472 0.25W 5% 4K7
CARBONR807 ERD50T272J 0.5W 5% 2K7
CARBONR810 ERD25TJ102 0.25W 5% 1K
CARBONR811 RC-2Z565KP 0.5W 10% 5.6M
CARBONR817 ERD25TJ473 0.25W 5% 47K
CARBONR820 ERD25TJ102 0.25W 5% 1K
CARBONR821 ERD25TJ102 0.25W 5% 1K
CARBONR830 ERD25TJ332 0.25W 5% 3K3
CARBONR840 ERD25TJ220 0.25W 5% 22
CARBONR850 ERD50T479J 0.5W 5% 4R7
CARBONR855 ERD25TJ185 0,25W 5% 1.8M
CARBONR870 ERD25TJ222 0.25W 5% 2K2
CARBONR888 ERD25TJ103 0.25W 5% 10K
CARBONR910 ERD25TJ101 0.25W 5% 100
CARBONR911 ERD25TJ101 0.25W 5% 100
CARBONR912 ERD25TJ101 0.25W 5% 100
RESISTORR913 RC-2Z102K 0.5W 10% 1K
RESISTORR914 RC-2Z102K 0.5W 10% 1K
RESISTORR915 RC-2Z102K 0.5W 10% 1K
FUSIBLER920 RF01Y188K 1W 10% R18
CARBONR921 ERD25TJ102 0.25W 5% 1K
CARBONR922 ERD25TJ102 0.25W 5% 1K
CARBONR923 ERD25TJ102 0.25W 5% 1K
CARBONRA01 ERD25TJ680 0,25W 5% 68
CARBONRA02 ERD25TJ101 0.25W 5% 100
CARBONRA03 ERD25TJ101 0.25W 5% 100
CARBONRA04 ERD25TJ101 0.25W 5% 100
CARBON RA05 ERD25TJ334 0.25W 5% 330K
CARBON RA06 ERD25TJ750 0.25W 5% 75
CARBON RA08 ERD25TJ750 0.25W 5% 75
CARBON RA09 ERD25TJ750 0.25W 5% 75
CARBONRA10 ERD25TJ101 0.25W 5% 100
CARBONRA11 ERD25TJ183 0.25W 5% 18K
9
Page 9
CAPACITORS
DescriptionCct Ref Parts Number DescriptionCct Ref Parts Number
CARBONRA12 ERD25TJ183 0.25W 5% 18K
CARBONRA16 ERD25TJ680 0,25W 5% 68
CARBON RA19 ERD25TJ750 0.25W 5% 75
CARBONRA20 ERD25TJ473 0.25W 5% 47K
CARBONRA30 ERD25TJ183 0.25W 5% 18K
CARBONRA44 ERD25TJ104 0.25W 5% 100K
ELECTC101 ECEA1ES100 25V 10pF
ELECTC102 ECEA1ES470 25V 47pF
CERAMICC103 ECCR1H102J 50V 1nF
CERAMICC104 ECCR1H102J 50V 1nF
ELECTC106 ECEA1ES221 25V 220pF
CERAMICC120 ECCR1H102J 50V 1nF
ELECTC121 ECEA1H100 50V 10pF
CERAMICC150 ECCR1H103J 50V 10nF
ELECTC152 ECEA1H229 50V 2.2µF
CERAMICC153 CBXF1H104Z 50V 100nF
ELECTC305 ECEA1ES221 25V 220pF
MYLARC313 CMXM2A104J 100V 100nF
CERAMICC320 CBXF1H104Z 50V 100nF
CERAMICC350 ECCR1H473J 50V 47nF
CERAMICC351 ECCR1H473J 50V 47nF
MYLARC390 CMXM2A473J 100V 47nF
ELECTC401 ECEA1ES470 25V 47pF
MYLARC404 CMYH3C752J 1K6V 7.5nF
MYLARC408 CMYE2D474J 200V 470nF
ELECTC412 ECEA2CS339 160V 3.3µF
MYLARC414 CMXM2A104J 100V 100nF
ELECTC415 ECEA2CS100 160V 10pF
MYLARC417 CMXL2E104K 250V 100nF
CERAMICC418 ECCR1H102J 50V 1nF
CERAMICC420 ECCR2H222J 500V 2.2nF
ELECTC500 ECEA1H478 50V 470µF
ELECTC501 ECEA1ES100 25V 10pF
MYLARC504 CMXM2A332J 100V 3.3nF
ELECTC509 ECEA1ES470 25V 47pF
MYLARC511 CMXM2A224J 100V 220nF
MYLARC512 CMXM2A224J 100V 220nF
CERAMICC513 CBXF1H104Z 50V 100nF
ELECTC514 ECEA1ES101 25V 100pF
CERAMICC515 CBZR1C222M 16V 2200pF
CERAMICC516 CBZR1C472M 16V 4700pF
ELECTC517 ECEA1H109 50V 1µF
CERAMICC518 CBZF1H104Z 50V 100nF
ELECTC519 ECEA1H229 50V 2.2µF
CERAMICC520 ECCR1H102J 50V 1nF
CERAMICC521 ECCR1H102J 50V 1nF
CERAMICC523 ECCR1H103J 50V 10nF
MYLARC524 CMXM2A104J 100V 100nF
CERAMICC525 ECCR1H102J 50V 1nF
MYLARC526 CMXM2A104J 100V 100nF
MYLARC527 CMXM2A473J 100V 47nF
ELECTC528 ECEA1ES101 25V 100pF
CERAMICC529 CBZF1H104Z 50V 100nF
ELECTC530 ECEA1CS101 16V 100pF
CERAMICC531 ECCR1H473J 50V 47nF
ELECTC532 ECEA1ES100 25V 10pF
CERAMICC533 ECCR1H102J 50V 1nF
CERAMICC534 ECCR1H223J 50V 22nF
CERAMICC535 ECCR1H223J 50V 22nF
CERAMICC536 ECCR1H223J 50V 22nF
CERAMICC537 CBXF1H104Z 50V 100nF
ELECTC555 ECEA1CS470 16V 47µF
CERAMICC560 CBXF1H104Z 50V 100nF
ELECTC564 ECEA1ES101 25V 100pF
CERAMICC565 CBXF1H104Z 50V 100nF
SWITCHES
DIFFERENCES FOR MODEL TC--14B4RP
EXPLODED VIEW
CERAMICC570 ECCR1H472J 50V 4.7nF
CERAMICC571 ECCR1H821J 50V 820pF
CERAMICC577 ECCR1H561J 50V 560pF
CERAMICC585 ECCR1H222J 50V 2.2nF
CERAMIC C587 ECCR1H101J 50V 100pF
CERAMIC C588 ECCR1H101J 50V 100pF
CERAMIC C589 ECCR1H101J 50V 100pF
CERAMICC590 ECCR1H270J 50V 27µF
CERAMICC591 ECCR1H270J 50V 27µF
CERAMICC592 CBXF1H104Z 50V 100nF
ELECTC593 ECEA1ES101 25V 100pF
ELECTC599 ECEA1H229 50V 2.2µF
ELECTC600 ECEA1ES101 25V 100pF
ELECTC601 ECEA1H108 50V 0.1µF
ELECTC603 ECEA1CS471 16V 470µF
ELECTC650 ECEA1ES470 25V 47pF
ELECTC770 ECEA1CS101 16V 100pF
CERAMICC771 CBZF1H104Z 50V 100nF
CERAMICC803 ECCR3A472J 1KV 4.7nF
CERAMICC804 ECCR3A472J 1KV 4.7nF
ELECTC805 CEYN2G101P 400V 100µF
ELECTC806 ECEA1H330 50V 33pF
CERAMICC807 ECCR1H473J 50V 47nF
ELECTC808 ECEA1H479 50V 4.7µF
CERAMICC809 ECCR1H102J 50V 1nF
CERAMICC810 ECCR2H102J 500V 1nF
ELECTC813 ECEA2CS101 160V 100pF
ELECTC814 ECEA2CS101 160V 100pF
CERAMICC820 ECCR2H471J 500V 470pF
CERAMICC821 ECCR1H102J 50V 1nF
ELECTC823 ECEA1ES102 25V 1nF
CERAMICC824 ECCR2H471J 500V 470pF
CERAMICC830 CBZF1H104Z 50V 100nF
CERAMICC831 ECCR2H471J 500V 470pF
ELECTC832 ECEA1ES102 25V 1nF
ELECTC835 ECEA1ES470 25V 47pF
ELECTC840 ECEA1CS332 16V 3.3nF
ELECTC841 ECEA1CS222 16V 2.2nF
ELECTC844 ECEA1ES101 25V 100pF
CERAMICC850 ECCR1H821J 50V 820pF
ELECTC861 ECEA1ES102 25V 1nF
ELECTC863 ECEA1ES101 25V 100pF
CERAMICC866 ECCR2H471J 500V 470pF
ELECTC888 ECEA1CS470 16V 47µF
CERAMICC910 ECCR1H561J 50V 560pF
CERAMICC965 ECCR2H102J 500V 1nF
MYLARC968 CMXL2E104K 250V 100nF
CERAMIC CA01 ECCR1H101J 50V 100pF
CERAMIC CA02 ECCR1H101J 50V 100pF
CERAMIC CA03 ECCR1H101J 50V 100pF
ELECTCA04 ECCR1H229J 50V 2.2µF
CERAMICCA05 ECCR1H102J 50V 1nF
CERAMICDA04 CBZR1C222M 16V 2200pF
SWITCH SW700 5S50101090
SWITCH SW701 5S50101090
SWITCH SW702 5S50101090
SWITCH SW703 5S50101090
SWITCH SW704 5S50101090
SWITCH SW801 5S40101146
BACK COVER 7 4852151400
10
Page 10
DescriptionCct Ref Parts Number DescriptionCct Ref Parts Number
BATTER COVER (REMOTE) 8 UR51EC946-1
CABINET 10 4852071721
E P.C.B. 11 485E-14B4RP
MODEL LABEL 12 485ML-14B4RP
PANASONIC BADGE 13 4855623201
POWER BUTTON 14 4854943503
REMOTE CONTROL 15 EUR511380
TUNER 16 UV1316/A
MISCELLANEOUS COMPONENTS
CONTROL BUTTONS . 4851934302
AV COVER . 4857538301
BATTERY PACK . UM-3DJ-2P
INSTRUCTION BOOKS
BULGARIAN TQB8E3766M
ROMANIAN TQB8E3766N
POLISH TQB8E3766P
HUNGARIAN TQB8E3766Q
CZECH TQB8E3766R
ENGLISH TQB8E3766U
I.C.s
DECODER/VIDEO PROCESSOI501 1MS3813DD1
EAROM* I702 X24C-14B4RP
I.R. RECEIVER I703 KRT30
FUSES
FUSE G900 4SG0D00103
DIODES
DIODE D313 DBYW36
DIODE D405 DBYW36
DIODE D450 DBYW36
DIODE D591 DTZX2V4A
LED D707 DSML1216W
DIODE D805 DBYW36
DIODE D806 DBYW36
DIODE D808 DBYW36
DIODE D809 DBYW36
DIODE D810 DBYW36
DIODE D830 DBYW36
DIODE D831 DBYW36
DIODE D860 DBYW36
TRANSISTORS
TRANSISTR Q101 2SC5343Y
TRANSISTR Q152 2SC5343Y
TRANSISTR Q154 2SC5343Y
TRANSISTR Q155 2SC5343Y
TRANSISTOR Q401 2SD2499
TRANSISTR Q402 2SD1207
TRANSISTR Q501 2SA1980Y
TRANSISTR Q502 2SC5343Y
TRANSISTR Q503 2SC5343Y
TRANSISTR Q510 2SA1980Y
TRANSISTR Q511 2SA1980Y
TRANSISTR Q520 2SC5343Y
TRANSISTR Q807 2SC5343Y
TRANSISTR Q808 2SC5343Y
TRANSISTR Q809 2SC5343Y
TRANSISTR Q810 2SC5343Y
TRANSISTR Q811 2SC5343Y
RESISTORS
METALR305 RS02Y331JS 2W 5% 330
METALR350 RN-4Z1501F 0.25W 1% 1.5K
METALR351 RN-4Z1501F 0.25W 1% 1.5K
METALR415 RS02Y102JS 2W 5% 1K
METALR450 RS02Y103JS 2W 5% 10K
CARBONR591 ERD25TJ221 0.25W 5% 220
METALR802 RS02Y753JS 2W 5% 75K
METALR803 RS02Y473JS 2W 5% 47K
METALR808 RS02Y821JS 2W 5% 820
RESISTORR819 RX07C339JF 7W 5% 3R3
CARBONR829 ERD25TJ153 0.25W 5% 15K
CAPACITORS
ELECTC154 ECEA1ES479 25V 4.7µF
ELECTC155 ECEA1ES479 25V 4.7µF
ELECTC156 ECEA1ES479 25V 4.7µF
ELECTC315 ECEA2CS470 160V 47pF
ELECTC502 ECEA1ES100 25V 10pF
ELECTC522 ECEA1ES479 25V 4.7µF
CERAMICC602 ECCR1H103J 50V 10nF
FILMC801 CL1JB3474K 250V 470nF
CERAMICC812 CH1AFE472M 4kV 4700pF
DIFFERENCES FOR MODEL TC--14B4RPB
EXPLODED VIEW
BACK COVER 7 4852151400
BATTER COVER (REMOTE) 8 UR51EC946-1
CABINET 10 4852071721
E P.C.B. 11 485E-14B4RPB
MODEL LABEL 12 485ML-14B4RP
PANASONIC BADGE 13 4855623201
POWER BUTTON 14 4854943503
REMOTE CONTROL 15 EUR511380
TUNER 16 UV1316/A
MISCELLANEOUS COMPONENT S
CONTROL BUTTONS . 4851934302
AV COVER . 4857538301
BATTERY PACK . UM-3DJ-2P
INSTRUCTION BOOKS
BULGARIAN TQB8E3766M
ROMANIAN TQB8E3766N
POLISH TQB8E3766P
HUNGARIAN TQB8E3766Q
CZECH TQB8E3766R
ENGLISH TQB8E3766U
I.C.s
DECODER/VIDEO PROCESSOI501 1MS3813DD1
EAROM* I702 X24C-14B4RPB
I.R. RECEIVER I703 KRT30
FUSES
FUSE G900 4SG0D00103
DIODES
DIODE D313 DBYW36
DIODE D405 DBYW36
DIODE D450 DBYW36
DIODE D591 DTZX2V4A
LED D707 DSML1216W
DIODE D805 DBYW36
DIODE D806 DBYW36
DIODE D808 DBYW36
DIODE D809 DBYW36
DIODE D810 DBYW36
DIODE D830 DBYW36
DIODE D831 DBYW36
DIODE D860 DBYW36
TRANSISTORS
TRANSISTR Q101 2SC5343Y
TRANSISTR Q152 2SC5343Y
TRANSISTR Q154 2SC5343Y
11
Page 11
DescriptionCct Ref Parts Number DescriptionCct Ref Parts Number
TRANSISTR Q155 2SC5343Y
TRANSISTOR Q401 2SD2499
TRANSISTR Q402 2SD1207
TRANSISTR Q501 2SA1980Y
TRANSISTR Q502 2SC5343Y
TRANSISTR Q503 2SC5343Y
TRANSISTR Q510 2SA1980Y
TRANSISTR Q511 2SA1980Y
TRANSISTR Q520 2SC5343Y
TRANSISTR Q807 2SC5343Y
TRANSISTR Q808 2SC5343Y
TRANSISTR Q809 2SC5343Y
TRANSISTR Q810 2SC5343Y
TRANSISTR Q811 2SC5343Y
RESISTORS
METALR305 RS02Y331JS 2W 5% 330
METALR350 RN-4Z1501F 0.25W 1% 1.5K
METALR351 RN-4Z1501F 0.25W 1% 1.5K
METALR415 RS02Y102JS 2W 5% 1K
METALR450 RS02Y103JS 2W 5% 10K
CARBONR591 ERD25TJ221 0.25W 5% 220
METALR802 RS02Y753JS 2W 5% 75K
METALR803 RS02Y473JS 2W 5% 47K
METALR808 RS02Y821JS 2W 5% 820
RESISTORR819 RX07C339JF 7W 5% 3R3
CARBONR829 ERD25TJ153 0.25W 5% 15K
CAPACITORS
ELECTC154 ECEA1ES479 25V 4.7µF
ELECTC155 ECEA1ES479 25V 4.7µF
ELECTC156 ECEA1ES479 25V 4.7µF
ELECTC315 ECEA2CS470 160V 47pF
ELECTC502 ECEA1ES100 25V 10pF
ELECTC522 ECEA1ES479 25V 4.7µF
CERAMICC602 ECCR1H103J 50V 10nF
FILMC801 CL1JB3474K 250V 470nF
CERAMICC812 CH1AFE472M 4kV 4700pF
DIFFERENCES FOR MODEL TX--14B4TP
EXPLODED VIEW
BACK COVER 7 4852151402
BATTERY COVER (REMOTE) 9 UR51EC904A
CABINET 10 4852071723
E P.C.B. 11 485E-14B4TP
MODEL LABEL 12 485ML-14B4TP
PANASONIC BADGE 13 48556232SS01
POWER BUTTON 14 4854943506
REMOTE CONTROL 15 EUR511300
MISCELLANEOUS COMPONENTS
CONTROL BUTTON . 4851934304
AV COVER . 4857538302
INSTRUCTION BOOKS
BULGARIAN TQB8E3765M
ROMANIAN TQB8E3765N
POLISH TQB8E3765P
HUNGARIAN TQB8E3765Q
CZECH TQB8E3765R
ENGLISH TQB8E3765U
I.C.s
DECODER/VIDEO PROCESSOI501 1MS3614DD1
EAROM* I702 X24C-14B4TP
DIODES
DIODE D313 1N4937G
DIODE D405 1N4937G
DIODE D450 1N4937G
ZENER DIODE D591 DUZ2R4B
DIODE D805 1N4937G
DIODE D806 1N4937G
DIODE D808 1N4937G
DIODE D809 1N4937G
DIODE D810 1N4937G
DIODE D830 1N4937G
DIODE D831 1N4937G
DIODE D860 1N4937G
TRANSISTORS
TRANSISTOR Q401 2SD2578
TRANSISTOR Q402 KTC3209Y
RESISTORS
CARBONR591 ERD25TJ101 0.25W 5% 100
CARBONR823 ERD25TJ102 0.25W 5% 1K
CARBONR829 ERD25TJ103 0.25W 5% 10K
CARBONRA99 ERD25TJ331 0.25W 5% 330
CAPACITORS
ELECTC154 ECEA1H479 50V 4.7µF
ELECTC155 ECEA1H479 50V 4.7µF
ELECTC156 ECEA1H479 50V 4.7µF
ELECTC315 ECEA2A470 100V 47pF
ELECTC502 ECEA1H220 50V 22pF
ELECTC522 ECEA1H479 50V 4.7µF
CERAMICC602 ECCR1H223J 50V 22nF
FILMC801 CL1UC3474M 250V 470nF
CAPACITOC812 CH1BFE472M 4kV 4.7nF
DIFFERENCES FOR MODEL TX--14B4TPB
EXPLODED VIEW
BACK COVER 7 4852151402
BATTERY COVER (REMOTE) 9 UR51EC904A
CABINET 10 4852071723
E P.C.B. 11 485E-14B4TPB
MODEL LABEL 12 485ML-14B4TP
PANASONIC BADGE 13 48556232SS01
POWER BUTTON 14 4854943506
REMOTE CONTROL 15 EUR511300
MISCELLANEOUS COMPONENT S
CONTROL BUTTON . 4851934304
AV COVER . 4857538302
INSTRUCTION BOOKS
BULGARIAN TQB8E3765M
ROMANIAN TQB8E3765N
POLISH TQB8E3765P
HUNGARIAN TQB8E3765Q
CZECH TQB8E3765R
ENGLISH TQB8E3765U
I.C.s
DECODER/VIDEO PROCESSOI501 1MS3614DD1
EAROM* I702 X24C-14B4TPB
DIODES
DIODE D313 1N4937G
DIODE D405 1N4937G
DIODE D450 1N4937G
ZENER DIODE D591 DUZ2R4B
DIODE D805 1N4937G
DIODE D806 1N4937G
DIODE D808 1N4937G
DIODE D809 1N4937G
12
Page 12
TRANSISTORS
RESISTORS
CAPACITORS
DescriptionCct Ref Parts Number DescriptionCct Ref Parts Number
DIODE D810 1N4937G
DIODE D830 1N4937G
DIODE D831 1N4937G
DIODE D860 1N4937G
TRANSISTOR Q401 2SD2578
TRANSISTOR Q402 KTC3209Y
CARBONR591 ERD25TJ101 0.25W 5% 100
CARBONR823 ERD25TJ102 0.25W 5% 1K
CARBONR829 ERD25TJ103 0.25W 5% 10K
CARBONRA99 ERD25TJ331 0.25W 5% 330
ELECTC154 ECEA1H479 50V 4.7µF
ELECTC155 ECEA1H479 50V 4.7µF
ELECTC156 ECEA1H479 50V 4.7µF
ELECTC315 ECEA2A470 100V 47pF
ELECTC502 ECEA1H220 50V 22pF
ELECTC522 ECEA1H479 50V 4.7µF
CERAMICC602 ECCR1H223J 50V 22nF
FILMC801 CL1UC3474M 250V 470nF
CAPACITOC812 CH1BFE472M 4kV 4.7nF
13
Page 13
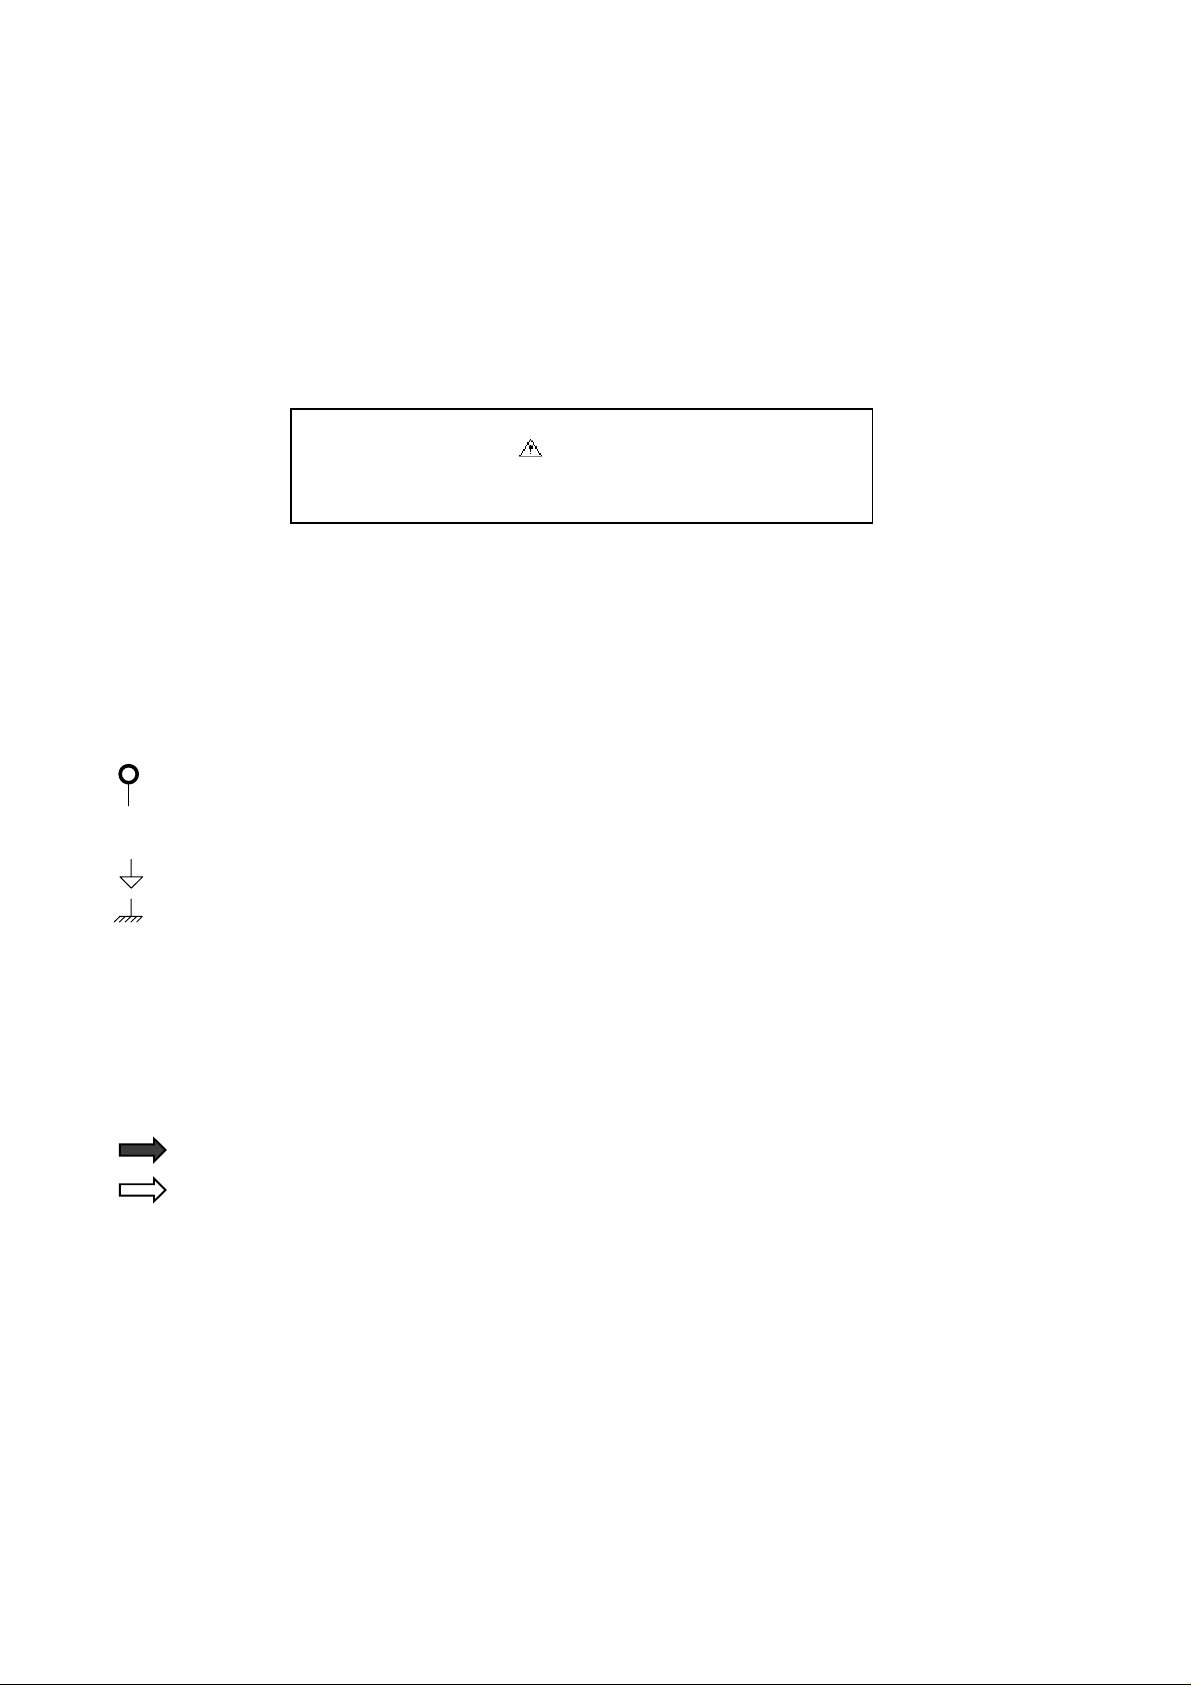
SCHEMATIC DIAGRAMS FOR MODELS
TX-14B4TP
TX-14B4TP/B
TC-14B4RP
TC-14B4RP/B
(Z-185 CHASSIS)
IMPORTANT SAFETY NOTICE
Components identified by mark have special characteristics
important for safety. When replacing any of these components, use
only manufacturer's specified parts.
NOTE
1. RESISTOR
All resistors are carbon ¼W resistor, unless marked otherwise.
Unit of resistance is OHM (Ω) (k=1,000, M=1,000,000)
2. CAPACITORS
All capacitors are ceramic 50V unless marked otherwise.
Unit of capacitance is µF unless otherwise stated.
3. COIL
Unit of inductance is µH, unless otherwise stated.
4. TEST POINT
Test Point Position
5. EARTH SYMBOL
Chassis Earth (Cold)
Line Earth (Hot)
6. VOLTAGE MEASUREMENT
Voltage is measured by a d.c. voltmeter.
Measurement conditions are as follows:
Power source a.c. 220V-240V, 50Hz
Receiving Signal Colour Bar signal (RF)
All customer controls Maximum position
7.
Indicates the Video signal path
Indicates the Audio signal path
These schematic diagrams are the latest at time of printing and are subject to change without notice.
REMARKS
a. Do not touch the hot part, or the hot and cold parts at the same time, as you are liable to a shock hazard.
b. Do not short circuit the hot and cold circuits as electrical components may be damaged.
c. Do not connect an instrument, such as an oscilloscope, to the hot and cold circuits simultaneously as this may cause
fuse failure. Connect the earth of the instruments to the earth connection of the circuit being measured.
d. Make sure to disconnect the power plug before removing the chassis.
NOTE
1. The Power Supply Circuit contains a circuit area, which uses a separate power supply to isolate the earth connection.
The circuit is defined by HOT and COLD indications in the schematic diagram. All circuits, except the Power Circuit, are
COLD.
14
Page 14
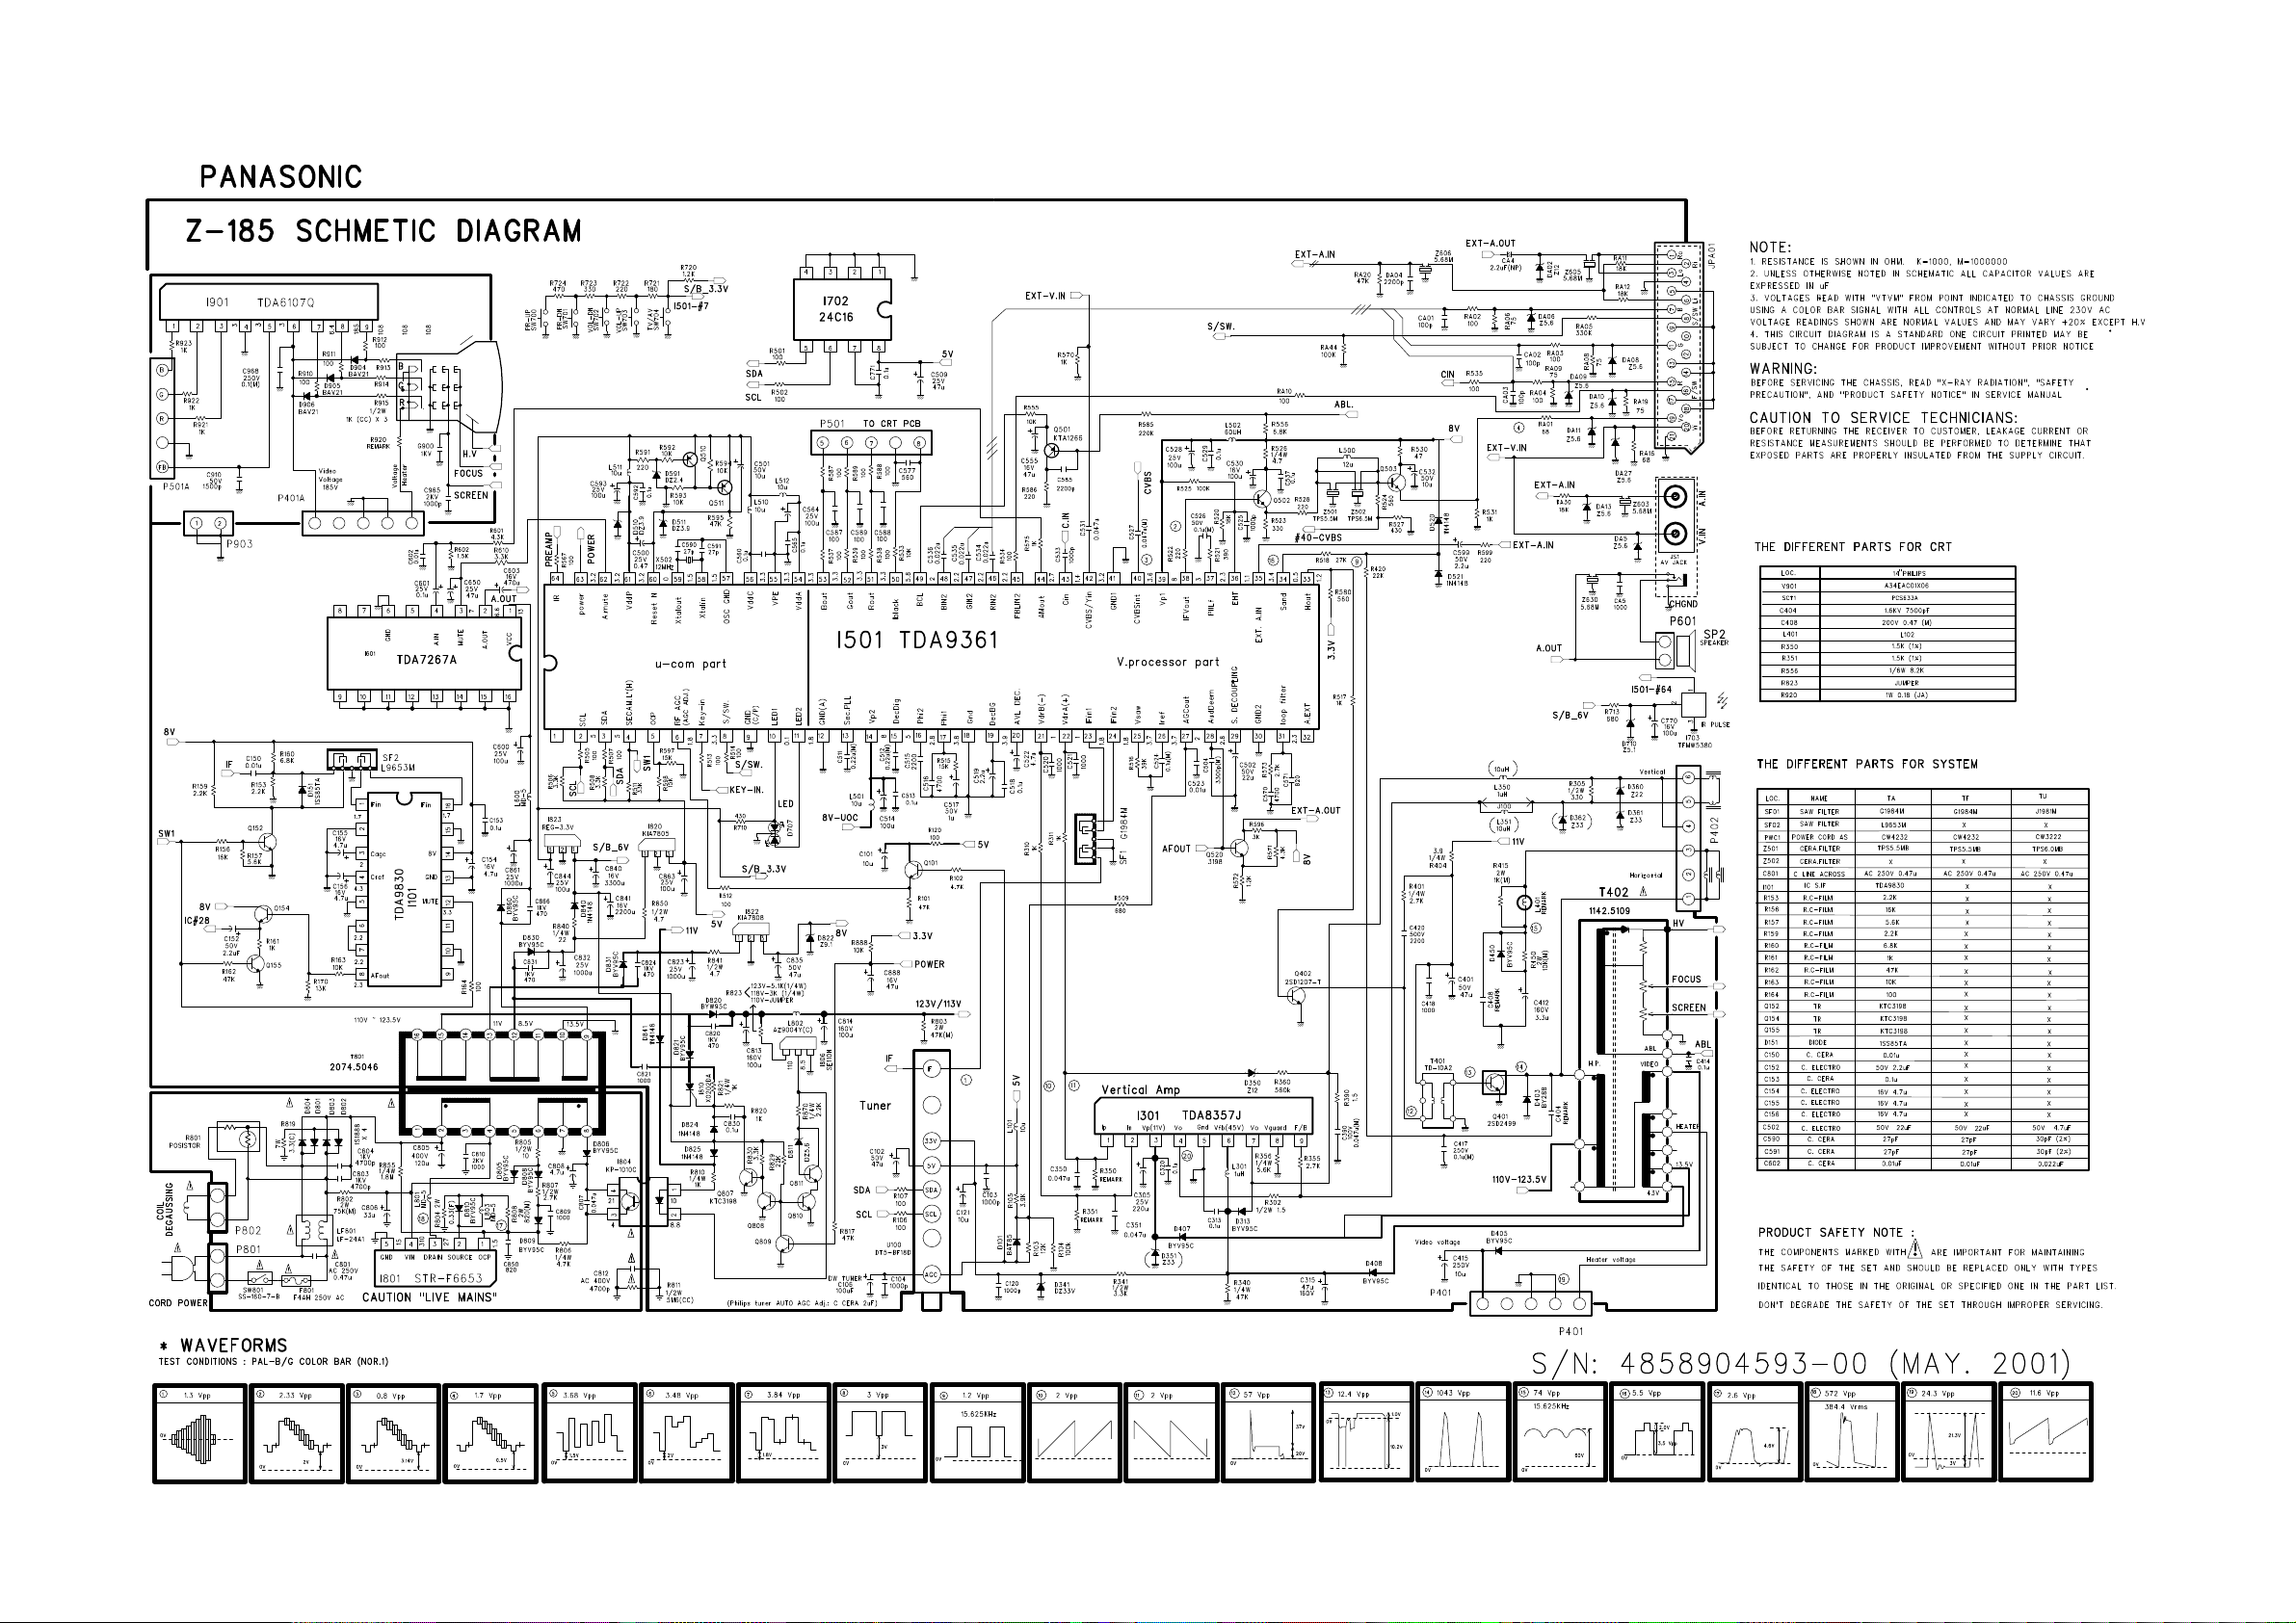
Page 15
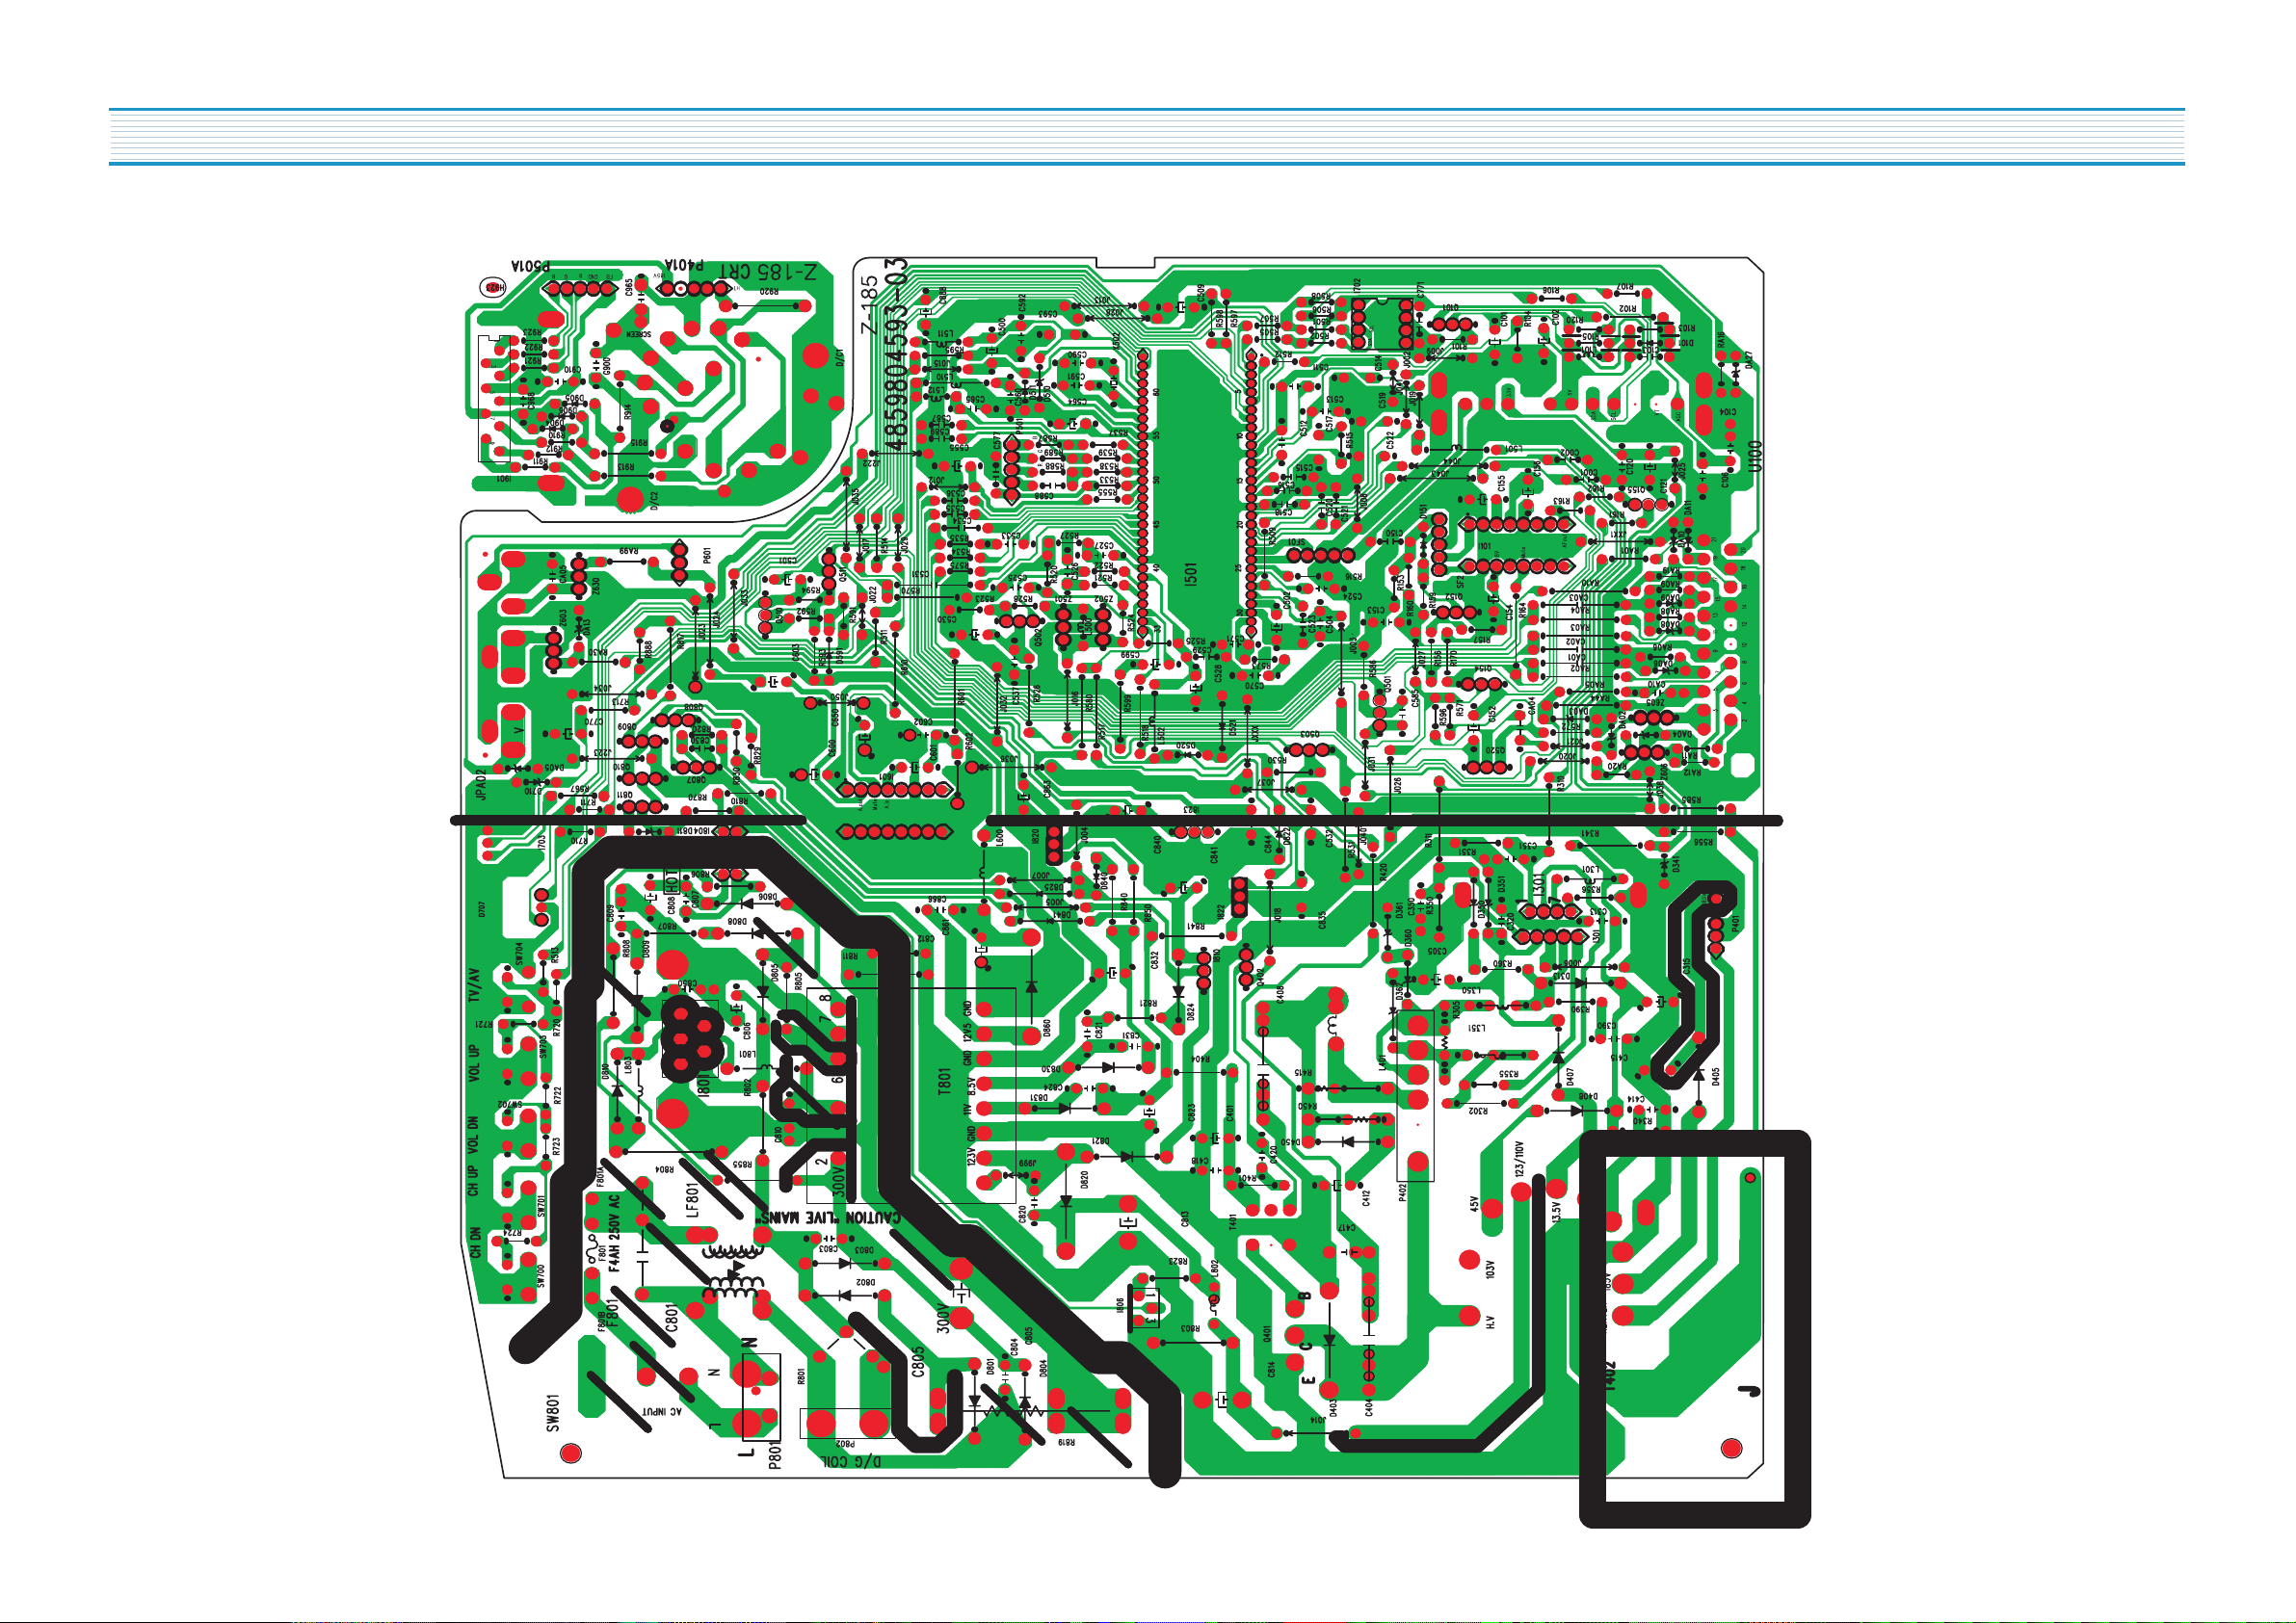
PRINTED CIRCUIT BOARD
Page 16

NOTES
15
Page 17

NOTES
16
 Loading...