

Page 1
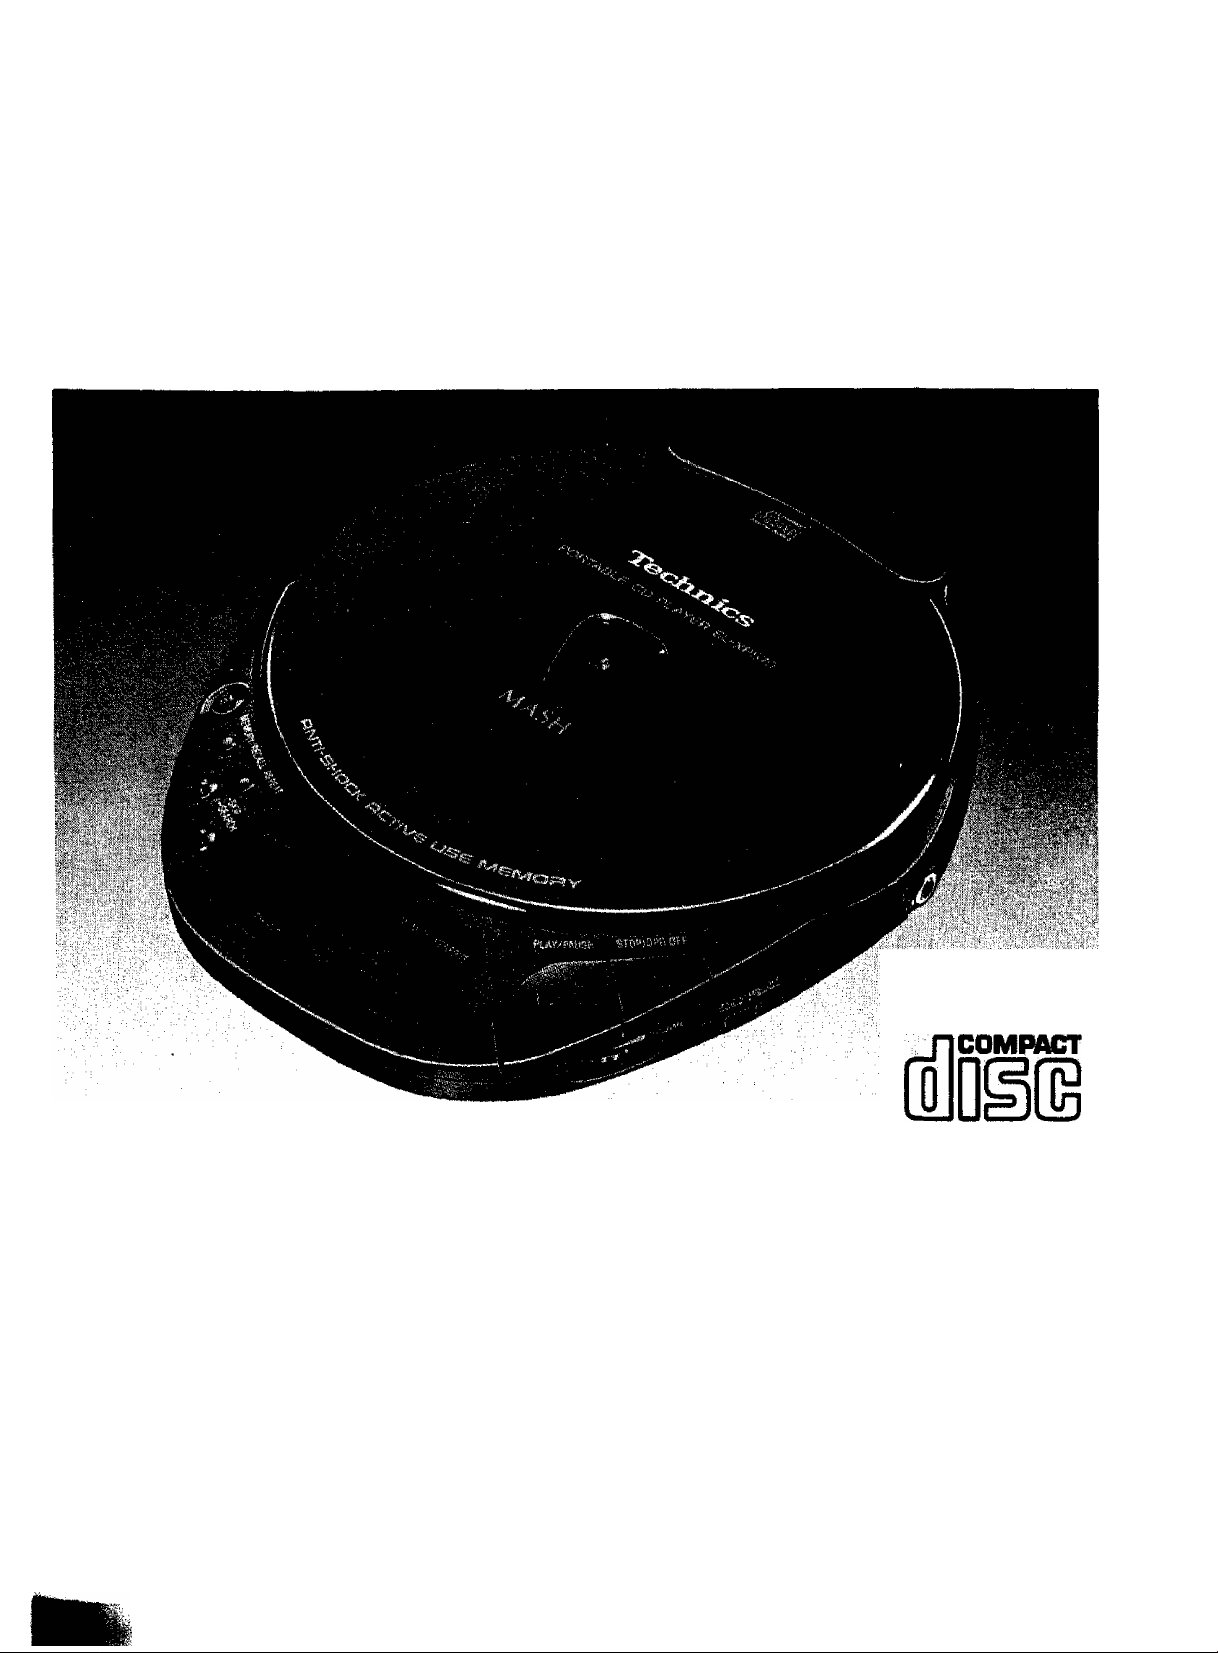
Technics
Portable CD Player
SL-XP570
Operating Instructions
•■'■■■'■..' ■.'■■:.■■■/■ . k-. :■■:■■ ■ .
DIGITAL AUDIO
Note:
The “EB” indication shown on the packing case indicates
f-
United Kingdom.
Before connecting, operating or adjusting this product,
please read these instructions completely.
■■ ■.. ;; .
rn lEBl
RQT2165-B
Page 2

Dear Customer
Thank you for purchasing this prod
uct. For optimum performance and
safety, please read these instructions
carefully.
Table of Contents
Supplied Accessories
Location of Controls
Power Source
Accidental Operation
Prevention Function
Listening to CD Tracks in Their
Original Sequence
(Normal Play).............................11
Starting Play from a Specific
Track (Skip Play)
Playing Tracks in a Particular
Sequence (Program Play)
Playing Tracks Repeatedly
(Repeat Function)
Playing Tracks in a Random
Sequence (Random Play)
Resuming Play from the Track
................................
...................
.........
.......................
...
.............
.................
____
.................
____
5
6
7
10
15
16
18
19
Played Last
(Resume Function)....................20
Anti-Shock Memory
Function
Using the Remote Control
Using the Unit with Optional
Accessories
Concerning Compact Discs
Maintenance
Cautions ........................................28
Troubleshooting Guide ................30
Specifications
...........
.........................
...........
...............................
.................................
..............................
____
21
23
24
25
27
31
Page 3
Bottom of the unit
Apparatens undersida
Komponentens underside
Produktets underside
WARNING:
TO REDUCE THE RISK OF FIRE OR
ELECTRIC SHOCK, DO NOT EX
POSE THIS APPLIANCE TO RAIN
OR MOISTURE.
ADVARSEL:
FOR AT REDUCERE RISIKOEN FOR
BRAND OG ELEKTRISKE ST0D MÄ
DETTE APPARAT IKKE UDS/ETTES
FOR REGN ELLER FUGT.
VAROITUS:
TULIPALO- JA SÄHKÖISKUVAA-
CLASS 1
LASER PRODUCT
RAN VÄLTTÄMISEKSI ÄLÄ SAATA
TÄTÄ LAITETTA ALTTIIKSISATEELLETAIKOSTEUDELLE.
LUOKAN 1 LASERLAITE KLASS1 LASER APPARAT
Marking sign is located on bottom of
the unit.
SAUTION:
The AC voltage is different accord-
ig to the area.
le sure to set the proper voltage in
rour area before use.
(For details, please refer to the page
8.)
CAUTION!
THIS PRODUCT UTILIZES A LASER.
USE OF CONTROLS OR ADJUST
MENTS OR PERFORMANCE OF
PROCEDURES OTHER THAN
THOSE SPECIFIED HEREIN MAY
RESULT IN HAZARDOUS RADIA
TION EXPOSURE.
DO NOT OPEN COVERS AND DO
NOT REPAIR YOURSELF. REFER
SERVICING TO QUALIRED PER
SONNEL.
Page 4

DANSK
NORSK
BEMÆRK!
I DETTE APPARAT ANVENDES EN
LASER,
BRUG AF BETJENINGSKNAPPER
ELLER REGULERINGER ELLER
FREMGANGSMÂDER UDOVER DE I
DENNE BETJENINGSVEJLEDNING
ANGIVNE, KAN MEDF0RE FARE
FOR BESTRÂLING. ÂBN IKKE KABINETTET OG FORS0G IKKE AT UDF0RE REPARATIONER SELV. RE-
PARATIONER MÂ KUN FORETAGES
AF KVALIFICEREDE TEKNIKERE,
SUOMI
VAROITUS!
LAITTEEN KÄYTTÄMINEN MUULLA
KUIN TÄSSÄ KÄYTTÖOHJEESSA
MAINITULLA TAVALLA SAATTAA
ALTISTAA KÄYTTÄJÄN TURVAL-
LISUUSLUOKAN 1 YLITTÄVÄLLE
NÄKYMÄTTÖMÄLLE LASERSÄTEI-
LYLLE.
ADVARSEL!
DETTE PRODUKTET ANVENDER EN
LASER.
BETJENING AV KONTROLLER,
JUSTERINGER ELLER ANDRE
INNGREP ENN DE SOM ER BESKREVENT I DENNE BRUKSANVISNING, KAN FORE TIL FARLIG
BESTRÀLING.
DEKSLER MÄ IKKE ÀPNES, OG
FORS0K ALDRI Ä REPARERE AP-
PARATET PÀ EGENHÀND.
ALT SERVICE OG REPARASJONSARBEID MÄ UTF0RES AV KVALI-
FISERT PERSONELL.
ADVARSEL: USYNLIG LASERSTRÂLING
VEO ÂBNING, NAR SIKKERHBISAF-
BRYDEIE ER UDE AF RJNKTION.
UN0GÂ UOSÆTTELSE FOR STRÂLING.
{Pâsat under apparatet)
OANGER-invisible laser
radiation when open
and interlock defeated.
AVOID DIRECT EX
POSURE TO BEAM.
(Bottom of the product)
VAROI Avattaessaja
8uo}alkHus ohitettaasaa
oiat aittiina nâkymitôn
[
l^sersiteitylle.
Ala kalso aäteesaen.
VARNINGl Oaynlig
laseratrSlnfng nfir danna
del Ir öppnad och
Sparren ar urkopplad.
Betrakta ej strSien.
AOVERSELI Usynlig
laserstrâling ndr deksel
ipnes og sikkerhedslSs
bryles. Unng|
eksponering for atralen.
(Tuotteen pohjassa)
(Apparatene undersida)
(Produktets underside)
Page 5
Check the packing carton for these ac
cessories.
© AC adaptor....................................1 pc*
@ Stereo earphones
with remote controller..................1 pc.
(3) Rechargeable batteries
© Stereo connection cable
® Power plug adaptor ......................1 pc.
(For areas except Continental Europe,
United Kingdom and Australia)
Note;
The configuration of the AC adaptor differs
according to area.
...........
..............
2 pcs.
1 pc.
Page 6
.....
Portable CD player p
® Open button (OPEN)
__ _ _ _ _
(2) Memory/recall button
(MEWIORY/RECALL)
(3) Push button (PUSH)
0
Skip/search buttons
((◄◄-SKIP/-SEARCH ►>!)
Repeat button (REPEAT)
Display
0
Play/pause button
(► 11 PLAY/PAUSE)
0 Earphones/headphones
volume control (VOLUME)
0 Stop/operation off button
(■ STOP/OPR OFF)
0 ASC/S-XBS selector
_
(ASC, S-XBS, OFF)
0 Earphones/headphones jack
(0)
Out jack (OUT)
DC in jack
(DC IN 4.5 V )
@ Anti-shock memory switch
(ANTI-SHOCK MEMORY)
® Play mode selector
(PLAY MODE)
0 Hold switch (HOLD)
Remote control Q
@ Volume control (VOLUME)
0 Remote control button
____________
0
Operation Indicator (OPR)
0 Hold switch (HOLD)
0 Slider
Slide up to prevent entangling of the
cord when the stereo earphones are
not in use.
Page 7

Rechargeable batteries
________
Make sure that the batteries have been
charged before use.
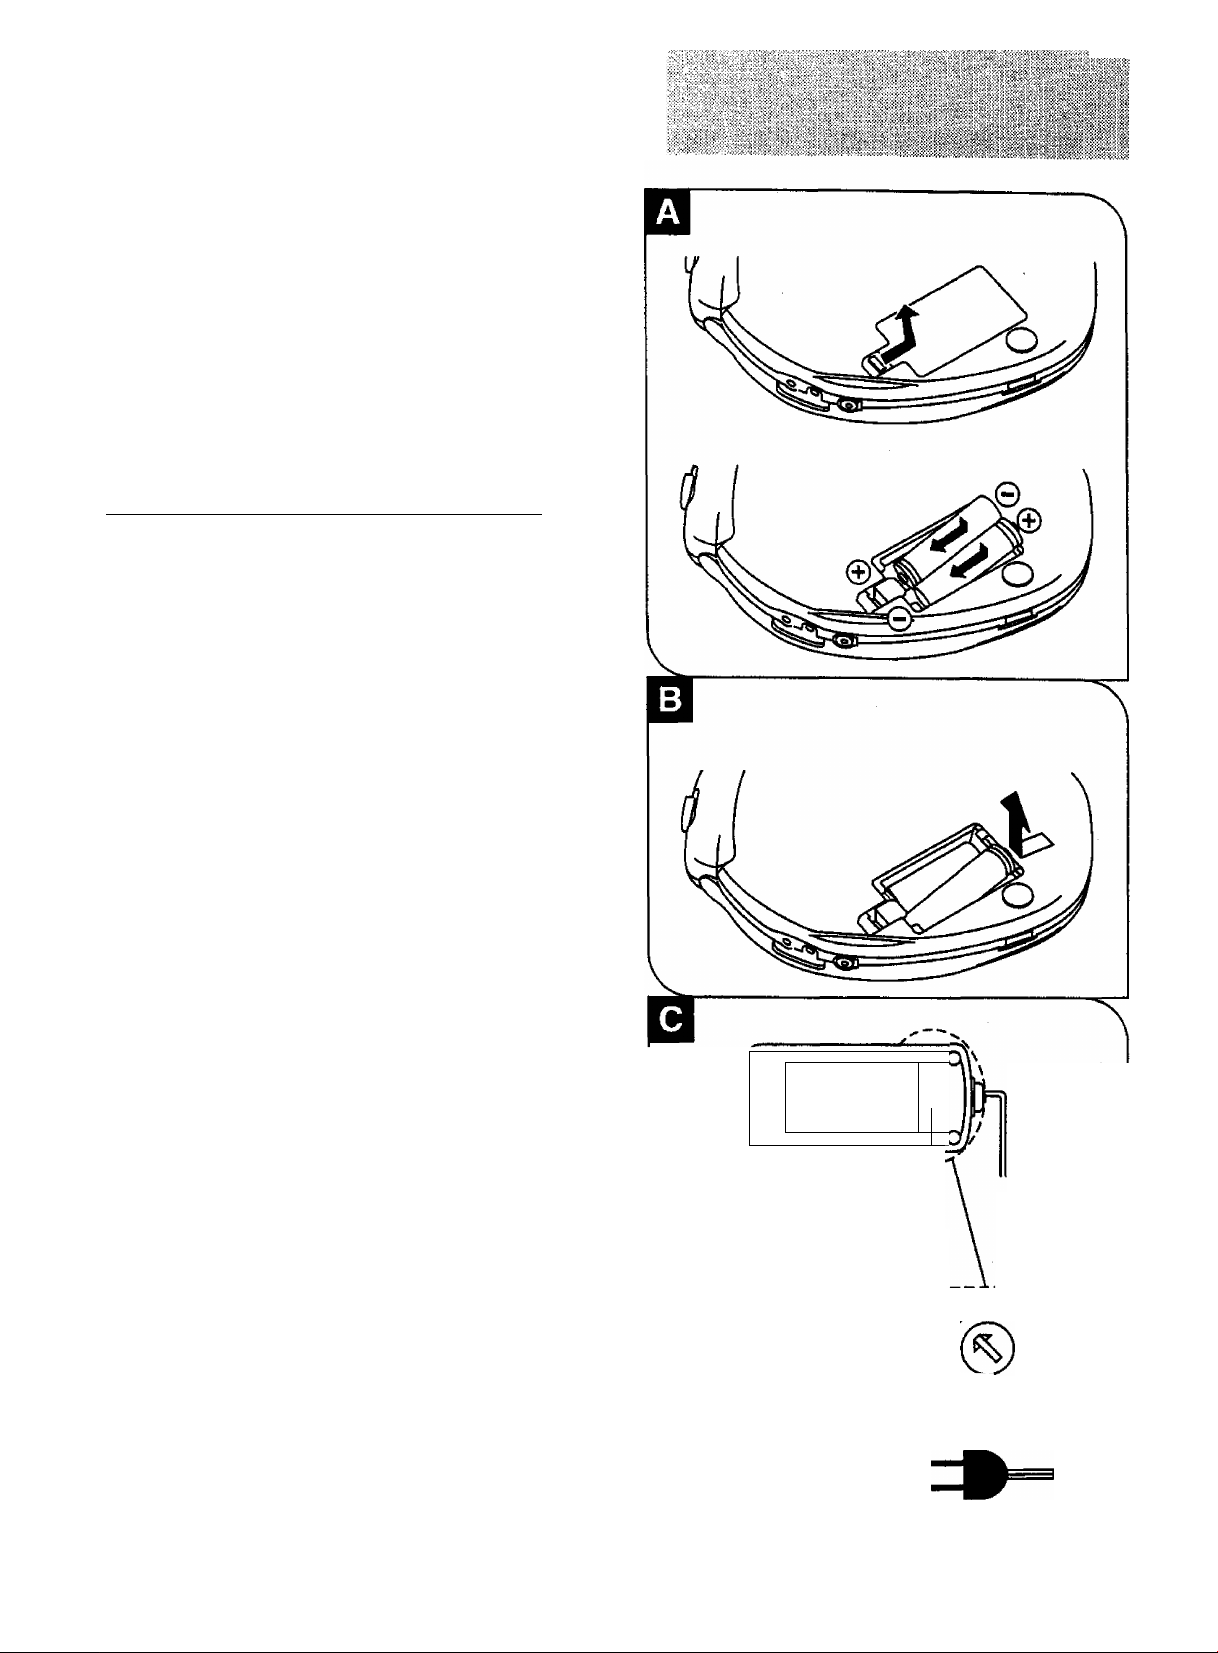
■ Recharging batteries Q
1 Instaii two rechargeable bat
teries.
2 Connect the AC adaptor.
It takes about 3 hours to fully re
charge them.
•When fully recharged, the unit can
be used for about 2 hours 30 min
utes with anti-shock memory off, or
for about 2 hours with anti-shock
memory on (when the unit is used
at 25°C on a flat and stable sur
face). The play time may be shorter
depending on the operating con
ditions.
•While recharging, the AC adaptor
and rechargeable batteries may get
warm. This is normal.
1
2
DC in jack
(DC IN 4.5
Right side of this unit
3 After completing recharging of
the batteries, disconnect the
AC adaptor from the DC in jack
and the AC power outlet.
Battery removal Q
ress and push up batteries in the direc>n of the arrow to remove them.
fYou can continue to recharge the same
Ibatteries for about 10 months (300
I times). After that, their operating time will
be shortened, and you will need to re
place them.
Ipbtain new rechargeable batteries
^^SH-CDB8D) designed exclusively for
iJhe unit.
bu can operate the unit with the AC
|adaptor while recharging the batteries,
|but it will lengthen the recharging time.
AC power outlet
Page 8
For areas except Continental Eu
rope, United Kingdom and Australia
If the power supply in your area is
110 V or 220 V, the time for complete
recharging takes 5 hours, which is dif
ferent from the time described in this
booklet.
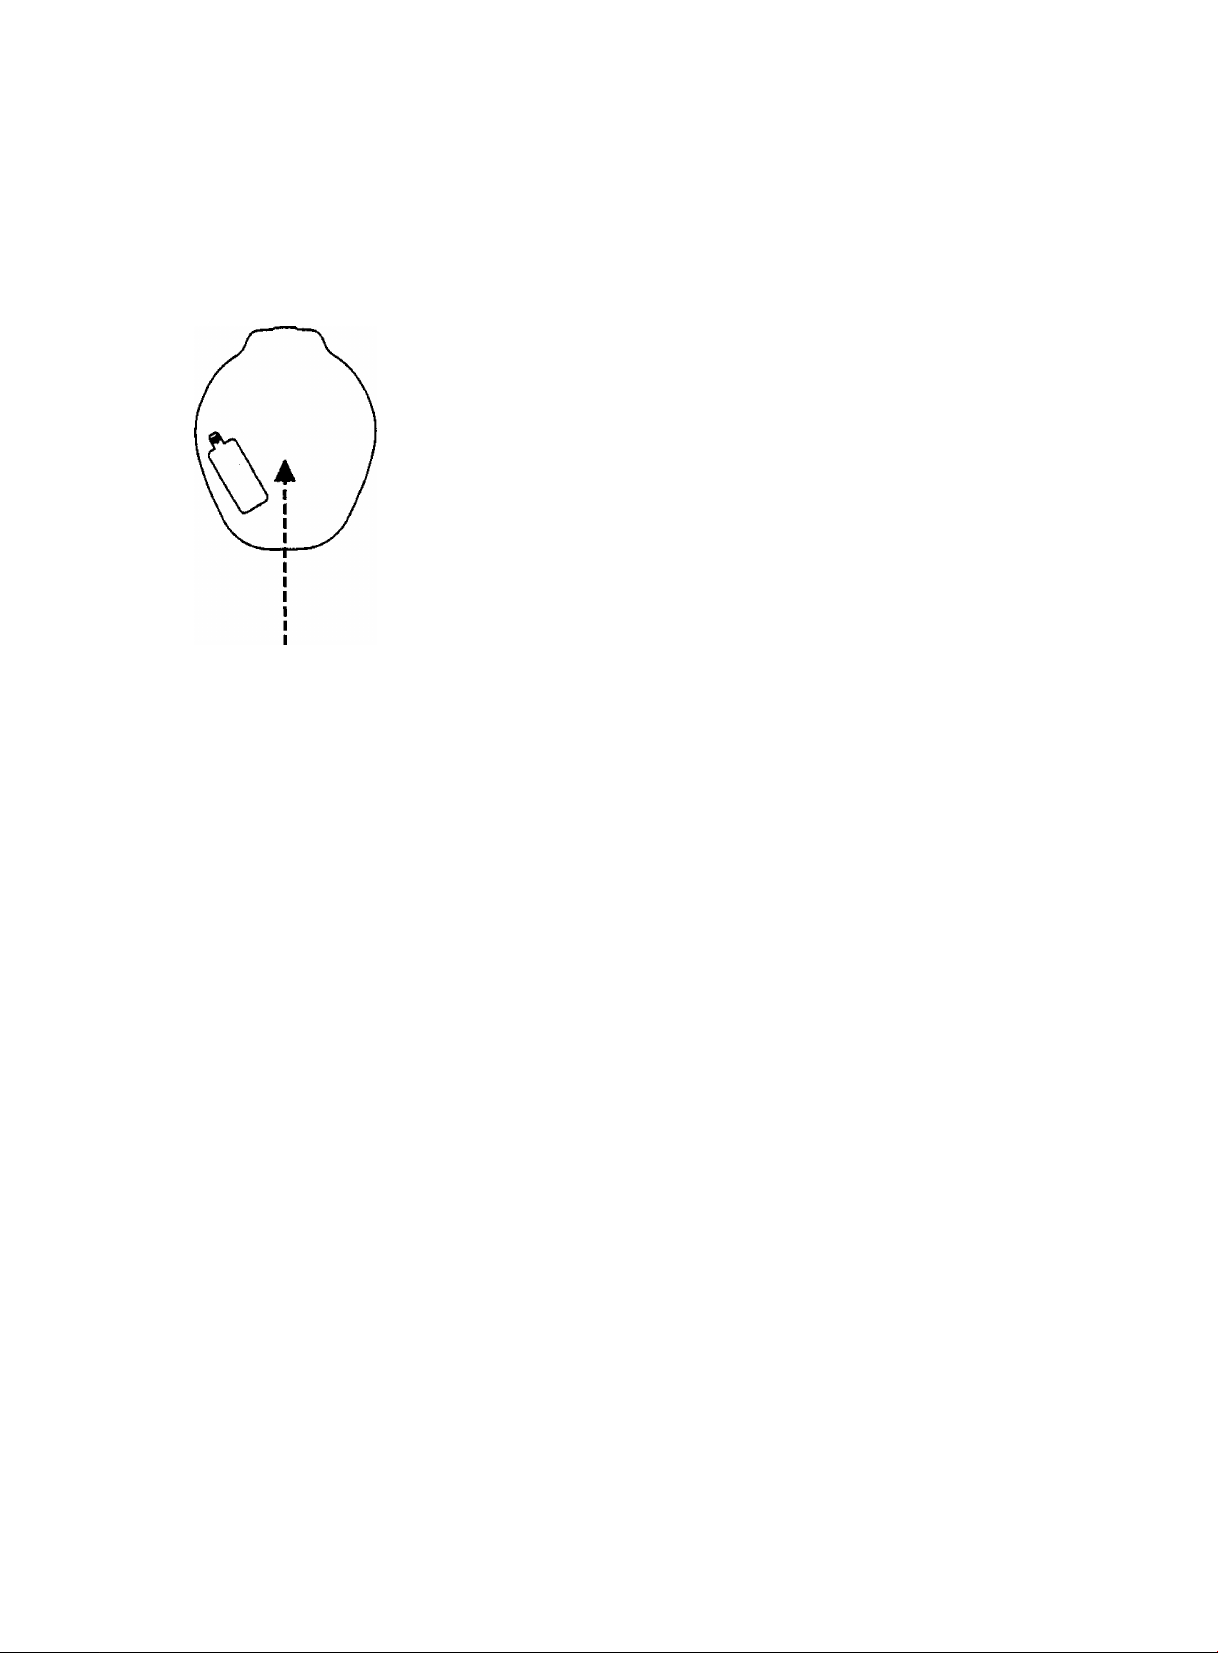
Dry cell batteries (not included)
Install two LR6 (UM-3) type alkaline
batteries as shown in the figure. Q
Make sure that the AC adaptor is discon
nected from the AC power outlet and the
unit. Two LR6 alkaline batteries will pro
vide about 7 hours of playing time with
anti-shock memory off, or about 4 hours of
playing time with anti-shock memory on
(when the unit is used at 25°C on a flat and
stable surface). The play time may be
shorter depending on the operating condi
tions.
iiiil
■ Battery removai Q
Press and push up batteries in the direc
tion of the arrow to remove them.
Be sure to do this with the power off.
AC adaptor
Before use Q
(For areas except Continental Europe,
United Kingdom and Australia)
Make sure the preset voltage of your AC
adaptor fits to your local voltage before
plugging it into the AC power outlet. If it
doesn’t, turn the AC line-voltage selector
with a screwdriver so that it corresponds to
your local voltage.
If the power plug wilt not fit your socket,
use the power plug adaptor.
p
----------------
' /
1
f
V
^
--
AC line-voltage selector
^
--------
SELECT
LINE
VOLTAGE
r220-240V
* il10-127V i
Page 9
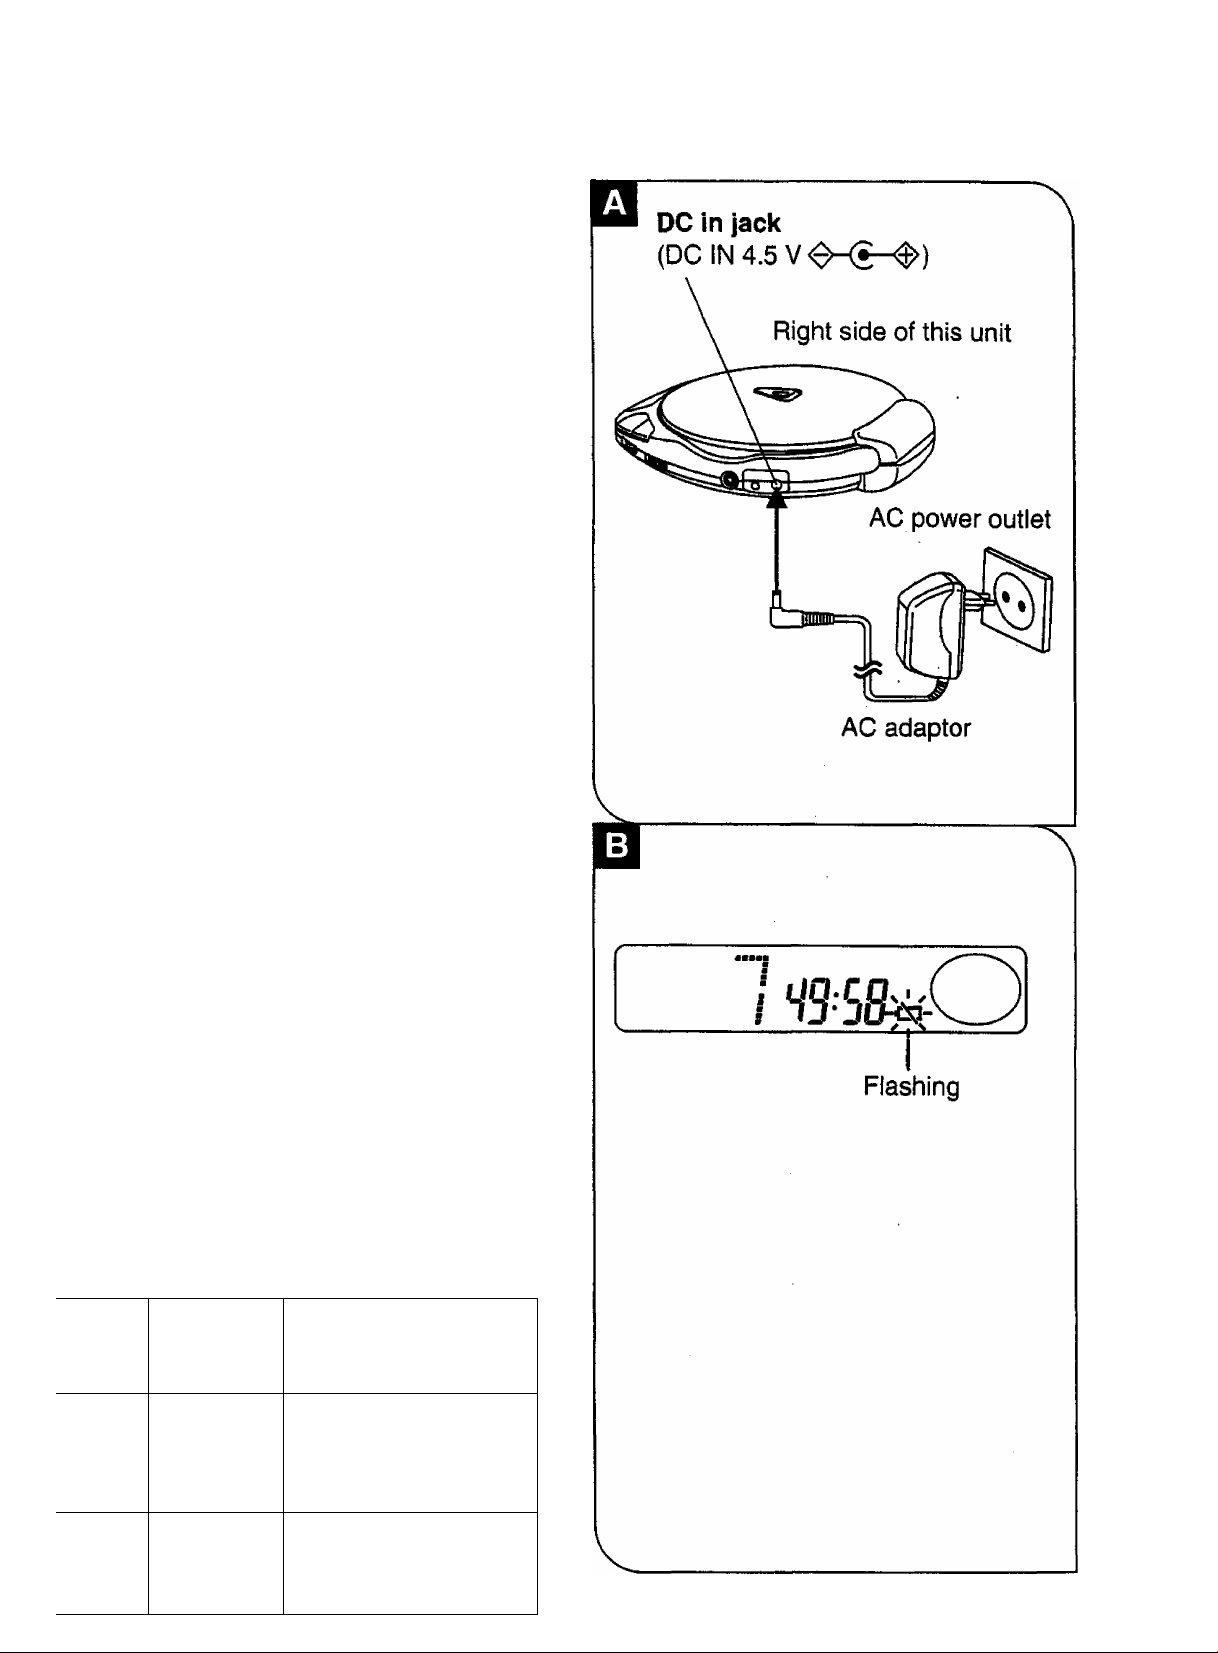
Connect the AC adaptor. Qj
Use oniy the AC adaptor provided with this
unit.
CAUTION
Do not use the AC adaptor provided
with this unit for other products.
Note:
The unit is in the standby condition when
the AC adaptor is connected. The primary
circuit is always “live” as long as the AC
adaptor is connected to an electrical outlet.
Car adaptor (not included)
CAUTION
Use only car adaptor, Model:
SH-CDC9, manufactured by
Matsushita Electric Industrial Co., Ltd.
For installations details, refer to the oper
ating Instructions for the SH-CDC9. The
rechargeable battery can be recharged
with the car adaptor.
When the car adaptor or AC adaptor is
used, the backlight of the display comes
on.
ittery indicator
le period during which the battery indica-
^r flashes differs depending on the power
)urce.
ffype
ШЬаЬ
itory
^charpable
patteries
When the
indicator
fiashes
The battery
is fully-
used.
Remedial
action
In a short while the unit
will be automatically
turned off. Recharge
the batteries.
iDry cell
|baL
¿feries
The battery
is halfused.
Play is still possible
while the indicator is
flashing.
Page 10
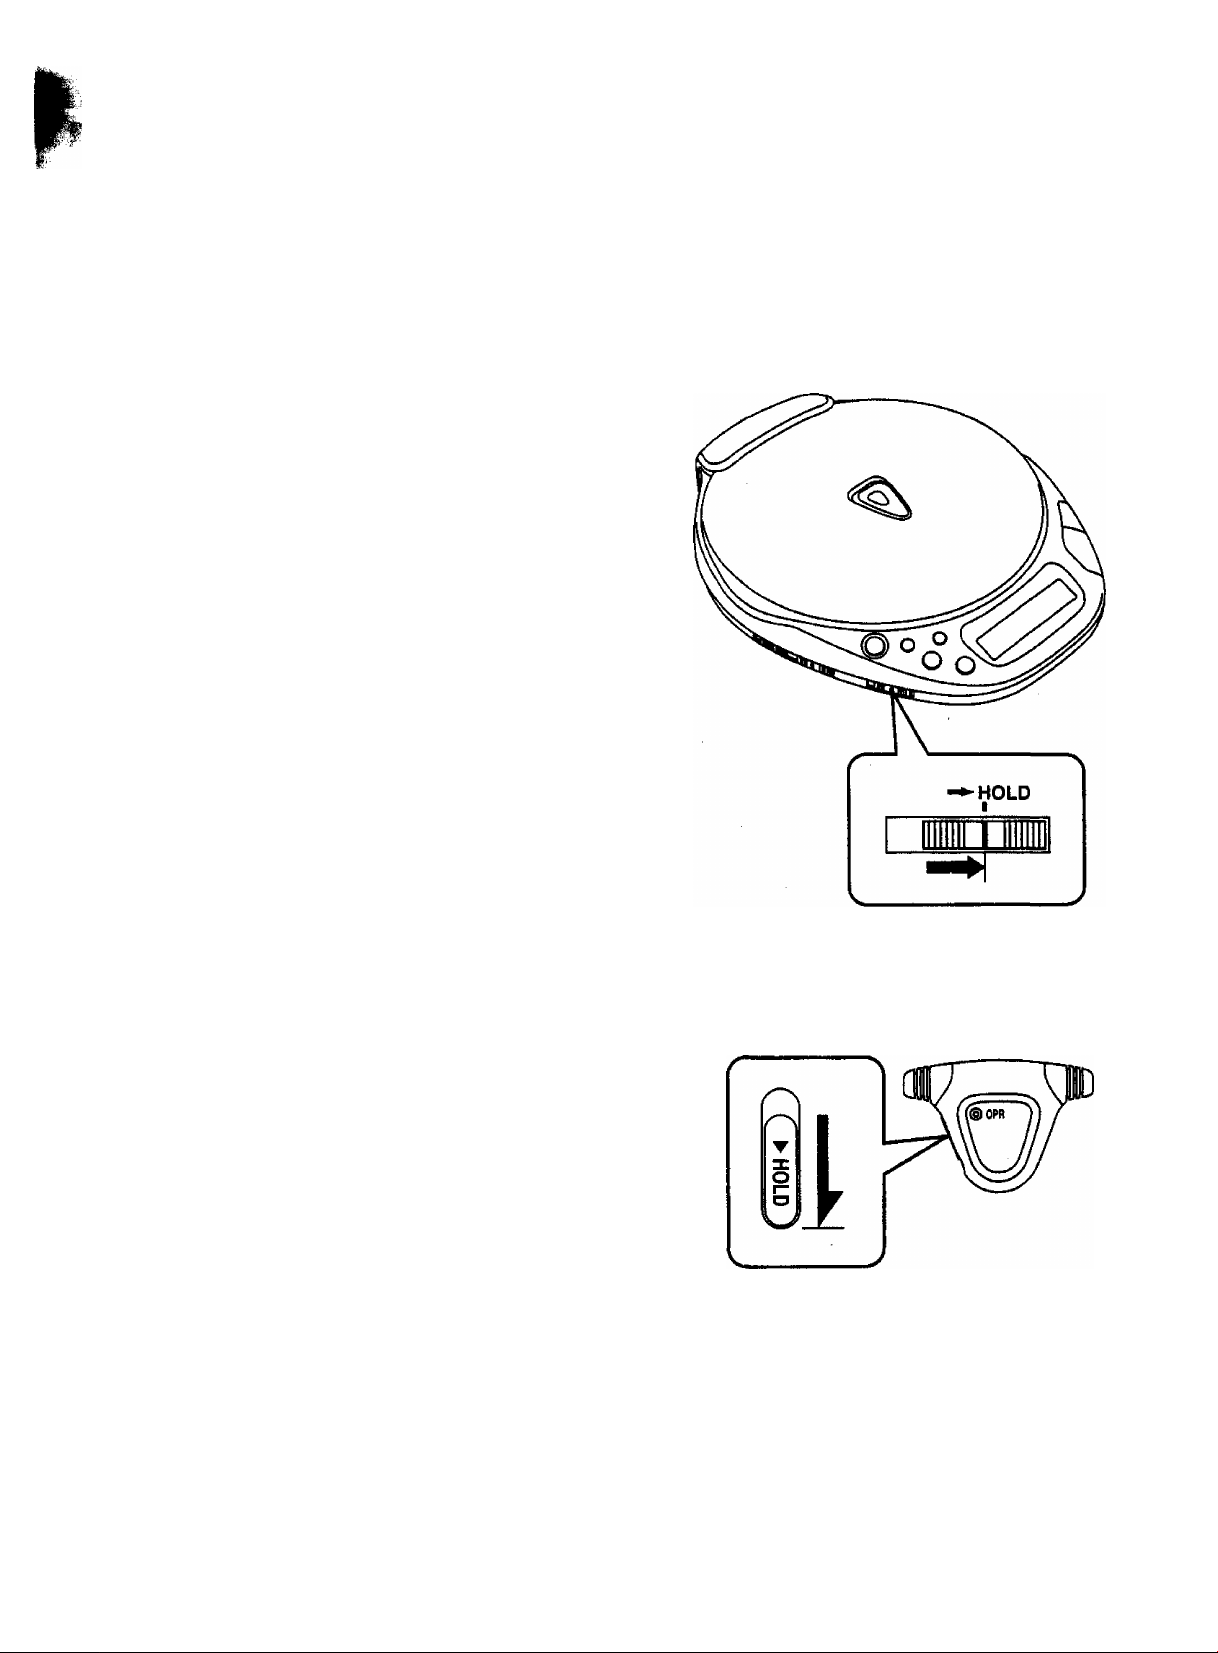
Accidental Operation Preventipn
When this function is in use, the unit will
not operate even if a control button is acci
dentally pressed. (The disc lid, however,
can still be opened and closed.)
Use this function to prevent the following
types of situations.
•While the unit is not in use, the power is
turned on and the batteries become worn
down.
•While the unit is in use, the music being
played gets turned off.
There are hold switches on both the main
unit and the remote control.
ililgj
■ To use the accidental operation
prevention function
Move the hold switch on the control source
being used (i.e., the unit or the remote
control) to the HOLD position, as shown in
the diagram.
■ To cancel the accidental opera
tion prevention function
Move the hold switch to the position oppo
site the HOLD position.
Before using the control buttons, be
sure to release the unit from the hold
state.
■ The HOLD indicator
If “ ho I d ” appears on the display when
the control buttons on the main unit are
pressed, this indicates that the unit is in
the hold mode.
ho I d
When the power is off, however, this indi
cator only appears when PLAY/PAUSE is
iressed.
O
Page 11

Press OPEN to open the disc
lid.
Insert the disc.
Press the portion near the center
hole of the disc until a “click” sound
can be heard.
3
Close the disc lid.
4
6
Release the unit from the hold
state.
5
Set PLAY MODE to NORMAL.
Connect the plug of the stereo
earphones with remote con
troller (included) to the ear-
phones/headphones jack.
(Plug In firmly.)
Press PLAY/PAUSE.
This turns on the unit and begins the
first track.
/ n.n I
I UU I
----------
Track number Elapsed playing time
in play of each track
1—r
O
Portion nearby the
center hole of the
disc.
Label must face
upward.
-►HOLD
I
RANDOM NORMAL RESUME
1
PLAY MODE
Adjust the volume level.
’he unit plays the tracks on the disc in
)rder and stops automatically when the
past track ends.
11
Page 12

■ The “ 3P[n ” display
When the disc lid is opened, this indicator
is displayed for about four minutes. It is not
displayed, however, when the power is off.
■ The “no ii/5/:” display
When the PLAY/PAUSE button Is pressed
with no disc installed or with a disc im
properly installed, this indicator is dis
played for about 30 seconds.
■ To stop play Q
Press STOP/OPR OFF in the play mode.
Total number pitying time
of tracks
me
The disc will stop rotating, and the display
will show the total number of tracks and
total playing time on the disc.
To turn off the unit:
Press STOP/OPR OFF again.
■ To temporarily stop disc play □
Press PLAY/PAUSE in the play
mode.
Flashing
To resume play:
Press PLAY/PAUSE again.
O
Automatic Shut-Off
This function, in order to prevent re
chargeable and other batteries to be
come worn down, causes the power to
automatically shut off if you leave the
unit in the stop mode or pause mode
for about four minutes.
Page 13

To skip tracks forward or backward (Skip function)
_______
Press either of -SKIP/-SEARCH,
or in the piay mode.
The pickup skips forward one track
each time you press the button.
When the button is pressed once,
the pickup skips to the beginning of
the track being played. If the button
is pressed again quickly, the pickup
skips backward one track each time
you press the button.
(During random play, you can only
skip pickup to the beginning of the
track being played.)
►During program play, the pickup skips
forward or backward in the programmed
track sequence.
To search forward or
backward (Search function)
Press and hold or in the play mode.
: To search forward
: To search backward
telease the button when you reach
le desired point.
►You can search slowly when either but
ton is first pressed and quickly when it is
then kept pressed down.
►In the program, random and one track
repeat play mode, you can search for
ward or backward only within the current
track.
13
Page 14

To change the tone quality fl
(When listening through the stereo ear
phones)
■ For extra bass sound (S-XBS)
Set ASC/S-XBS to S-XBS.
■ For a more dynamic and mellow
sound
(Smoothed treble response and more
dynamic bass)
Set ASC/S-XBS to ASC.
■ To cancel the ASC/S-XBS mode
Set ASC/S-XBS to OFF.
To release the fixed state of the disc B
After the disc has stopped rotating,
press OPEN to open the disc lid
and press PUSH.
(Do not open the disc lid during play.)
__________________
ASC S-XBS OFF
V
S-XBS
T I r
ASC
ASC S-XBS OFF
"III“
Page 15

Before operation;
© Release the unit from the hold state.
® Press PLAY/PAUSE.
@ Press STOP/OPR OFF.
For example:
To select track 3,
1 Set PLAY MODE to NORMAL.
2 Press either of -SKIP/
-SEARCH, ►N or K4 until
you reach the desired track.
: To skip forward
; To skip backward
_____
The pickup skips forward or back
ward as many tracks as the number
of times you press the button.
Press PLAY/PAUSE.
Play continues in the original se
quence from the selected track to the
final track and then stops automati
cally.
/
Track number
o
PLAY MODE
RANDOM NORMAL RESUME
Til“
15
Page 16

mm
With program play, you can program up to
24 tracks on the disc in any order you
choose.
Before operation:
® Release the unit from the hold state.
(D Press PLAY/PAUSE.
(3) Press STOP/OPR OFF.
iilliilil
1 Set PLAY MODE to NORMAL.
2 Press or to select the
track number.
: To skip forward
: To skip backward
For example:
To select track 3, press »\ 3 times.
o
Track number
Press MEMORY/RECALL to
memorize the selected track
number.
Memory indicator
Track number Program order
Repeat steps 2 and 3 until you
have completed the desired
program.
Press PLAY/PAUSE.
When all the programmed tracks
have been played, the unit will auto
matically stop.
Page 17

llliiliiiiiiisli
■ To program the same track
repeatedly
Press MEMORY/RECALL repeatedly after
step 3.
■ When the ” (full) indication is
displayed
No further tracks can be programmed.
To confirm the program B
Press MEMORY/RECALL once dur
ing play.
The display shows the programmed track
numbers in the sequence you have en
tered.
For example;
The diagram below shows a program con
sisting of tracks 3, 5 and 1.
5--0?“O
Restored to initial display
"o cancel the program play B
Tess STOP/OPR OFF.
'or your reference;
(fter all tracks have been played, the pro-
irammed selections will all be cleared
from the memory.
17
Page 18

Before operation, release the unit from
the hold state.
To repeat only one track
Press REPEAT once in the play
mode.
One track repeat indicator
•••■I vT ^ \
_____ __
i
j ^-11 o
In the stop mode:
Perform skip play after pressing REPEAT.
(See page 15.)
To repeat all tracks on the disc
Press REPEAT twice in the play or
stop mode.
All tracks repeat indicator
REPEAT
•«»«I
■■A«/ c*' 11
In the program play mode, all the pro
grammed tracks will be repeated.
Repeat indicator
.--------------------1—1
------
^
U n.n (^J
,.j U‘U I V-y
■ To cancel the repeat function
Press REPEAT once in the all
tracks repeat mode.
Each time you press REPEAT, the repeat
function will change as follows.
All tracks
repeat
Cancel —1
o
Page 19

Before operation, release the unit from
the hold state.
1 Set PLAY MODE to RANDOM.
2 Press PLAY/PAUSE.
RANDOM
Random indicator
The unit will stop automatically when the
last random selection finishes playing.
n.n I
U*U I
M To cancel the random play
Set PLAY MODE to NORMAL
The unit will return to sequential play after
the current track has finished.
Note;
You cannot use program play in the ran
dom mode. (See pages 16-17.)
For your reference:
You can select the first track using -SKIP/
-SEARCH in the stop mode. (All the
tracks are played no matter which track Is
ilayed first.)
19
Page 20

Resuming Play from the Tfabk Pla^itiistilli
When you set PLAY MODE to RESUME,
the unit resumes play from the track that
was playing when the unit stopped or was
turned off. This is useful when playing a
disc inside a car.
Before use, release the unit from the
hold state.
Set PLAY MODE to RESUME.
In the OFF mode:
If you set PLAY MODE to RESUME, the all
tracks repeat function will be automatically
activated.
All tracks repeat
Resume indicator indicator
i
RESUME
In the play or stop mode;
if you set PLAY MODE to RESUME, the all
tracks repeat function will not be activated.
Resume indicator
RESUME
The all tracks repeat function is automati
cally activated when play is resumed after
the unit has been switched off.
■ To cancel the resume mode
Set PLAY MODE to NORMAL
n.rfl ( )
uu I V
n.n I
______
uu i o
/
Notes:
•Play may start with the next track if pre
vious play stopped near the end of a
track.
•When a track is being played, if the
power is turned off and another disc is
inserted, the position of the track last
played is still in the memory, and play will
start at the same position among the
tracks on the newly inserted disc.
Page 21

This function reduces the number of
sound jumps which result from vibrations
when listening to the unit while walking,
riding In a car or train, etc.
When the anti-shock memory is in use, a
maximum of about three seconds of play
back data can be stored. As a result, even
if the unit is jolted, the stored data is uti
lized, and interruptions during playback
are minimized.
Before operation, release the unit from
the hold state.
1 Set ANTI-SHOCK MEMORY to
ON.
2 Press PLAY/PAUSE.
Storage of playback data begins, and
the memory reserve indicator displays
the data storage volume.
ANTI-SHOCK MEMORY
OFF ON
When the display shown in ® is
achieved:
This indicates that a sufficient amount of
playback data has been stored.
To cancel the anti-shock mem
ory function
rt ANTI-SHOCK MEMORY to OFF.
CiQnnp:
_ Memory reserve indicator
▼ Illuminate
®
I S:!S
21
Page 22

Anti*Shock Memoi7 Fyirtcilbn
■ The memory reserve indicator
This indicator varies based on the state of
the unit.
State of Playback
state of Unit
(State of Playback
Data)
Stable
□
Unit jolted •Normal (Stored
Jolt dies
down
Unit
B
Notes:
•When anti-shock memory is operating,
repeatedly
jolted
the disc rotation speed increases in order
to store playback data, causing a de
crease in battery life and a slight in
•Normal
(Sufficient
amount of data
is stored)
data is utilized)
•Normal (Data
storage Is begun)
• Interruptions
occur (Data is
used up)
crease in the sound of the rotating disc.
•The anti-shock memory switch can be
re-positioned during playback, but due to
the resulting change in the disc’s rotation
speed, a short interruption will be heard.
•When using functions such as random
and repeat, it may not be possible to
activate the anti-shock memory function
during the last three seconds of a track.
Page 23

............
Using the provided stereo earphones, a
variety of operations can be performed by
hand using a single button.
Before operation, release the remote
control from the hold state (as shown in
the diagram).
ii*
■ To use the remote control
(see diagram at lower right)
The remote control can be operated re
gardless of the hold mode of the unit.
■ The operation (confirmation)
tone
An operation tone (“Beep”) sounds when
ever the remote control button is pressed.
In addition, a confirmation tone sounds fol
lowing every operation (see diagram at
lower right).
•When pressing the remote control button
two or three times, do so as quickiy and
evenly as possible.
•When the button is pressed three times
and then three times again, the unit will
skip to the beginning of the previous
track.
(When the play mode switch on the unit is
the RANDOM position, however, this
aeration Is not possible.)
To adjust the volume
^hen adjusting the volume using the re-
lote control, position the volume control
>n the unit to between 5 and 7.
OPR indicator
|his indicator is illuminated when the unit
playing a track, and flashes when the
init is halted.
is not illuminated when the power is off.
23
Page 24

Using the Unit
Listening through an audio
system □
Discs can be played as part of an audio
system by connecting the portable CD
player to the system using the stereo con
nection cable (included).
• Before connecting the portable CD
player to your audio system, make sure
to turn off the power on all other system
components.
• Do not connect the cable to the turntable
(PHONO) connectors on the amplifier.
• If you have an amplifier which is equip
ped with mini phone jack, obtain the op
tional connecting cable (RP-CA102A).
Using the unit together with a
Right side of this unit
Out jack
Stereo connection
cable (included)
V
Back pane! of audio
system
To CD or AUX
terminals
car audio system □
The car kit, available as an optional acces
sory, makes it possible to listen to CDs in a
car.
The structure of the cassette adaptor
may not allow connection to some car
stereo systems.
■ What should be purchased
For connection to the car audio system:
Car stereo cassette adaptor
(SH-CDM9) ®
For securing the unit and connecting
the power supply:
•Car adaptor (SH-CDC9) ®
•Car mounting arm ©, Car mounting base
© (SH-CDF20)
For further details, refer to the Operating
Instructions of the respective products.
Page 25

lillllll
pnly compact discs having this mark can
k)6 used with this unit. Q
To remove a disc from its
I d§(B
DIGITAL AUDIO
cases_______
Press the center holder and lift the disc
holding by the edges.
______________
To hold the disc Q
Hold the disc by the edges so the surface
is not soiled with fingerprints.
Fingerprints, dirt and scratches can cause
skipping and distortion.
To store a disc in its case H
Insert the disc with the label facing up
wards and press downwards at the center.
V
V
(Correct)
V
If the surface is soiled g
Ipe gently with a soft, damp (water only)
loth.
________
¡the disc is brought from a
»Id to a warm environment,
tisture may form on the disc
)e this moisture off with a soft, dry, lint-
le cloth before using the disc.
(Incorrect)
25
Page 26

Improper disc storage:
You can damage discs if you store them in
the following places:
•Areas exposed to direct sunlight
• Humid or dusty areas
•Areas directly exposed to a heat outlet or
heating appliance
Handling precautions:
• Do not write on the label side with a
ball-point pen or other writing utensils.
• Do not use record cleaning sprays, ben
zine, thinner, static electricity prevention
liquids or any other solvent.
• Do not soil with fingerprints.
Page 27

IIIHIHIIII
J, -- C
Lens care
A soiled lens will cause audible skipping.
Disc play may not be possible if the lens is
seriously soiled.
Be sure to turn the unit off. When using the
AC adaptor, disconnect it before cieaning.
Open the disc lid and clean the lens as
shown in the figure.
Use a cotton swab to ciean away finger
prints, etc., on the lens.
Cleaning kit (SZZP1038C, not included)
for dust on the lens
lii^^iiiiÈi
Main unit
Clean it with a cloth, dampened in a mild
solution of soap and water.
Do not clean the cabinet with benzine or
thinner.
Avoid excessive moisture.
Avoid spray aerosol type cleaner. Some
leaners contain corrosive chemicais that
»ay cause internal damage and cabinet
formlty.
__________________
27
Page 28

Rechargeable batteries
________
Dry cell batteries/
• Do not use the rechargeable batteries
accompanying this unit with any other
product.
•Oniy the RP-BP60 batteries can be re
charged.
• If the power supplied by the batteries
lasts for only a very short time even after
recharging this, it means that the batter
ies are reaching the end of their service
life. Do not use them any more.
•Recharging for more than 24 hours will
reduce battery life.
•When recharging the batteries for the
first time or when recharging them after
they have not been used for a long pe
riod of time, the play time may be shorter
than usual. If this is the case, repeatedly
recharge the batteries after use. This will
restore them to their normal operational
state.
• Recharging should be performed at
0°C-40“C.
• Do not allow any metal objects to touch
the terminals of the rechargeable batter
ies, as this may cause short-circuiting
which is dangerous.
Rechargeable batteries
• Do not mix old and new batteries, or bat
teries of different types (carbon and alka
line, etc.).
•Always remove old, weak or worn-out
batteries promptly and dispose of them
properly.
• Never subject batteries to excessive heat
or flame; do not attempt to disassemble
them; and be sure they are not short-
circuited.
• if you will not use this unit for a long
period of time, remove the batteries and
store them in a cool, dark place.
• If a battery leaks, remove all batteries
and dispose of them properly.
•Thoroughly clean the battery compart
ment before inserting new batteries.
• If leaking electrolyte comes into contact
with skin or clothes, wash it off with water
immediately.
• Keep batteries out of the reach of chil
dren.
• Do not attempt to recharge alkaline or
carbon batteries.
___ __ __
To carry dry cell batteries and
rechargeable batteries around
When batteries are placed inside a pocket
or bag, do not put them together with
necklaces or other metal objects.
Contact may cause short-circuiting and
generate heat.
Page 29

..................
^C adaptor
•Use only the AC adaptor provided with
this unit.
The power source polarities of the
AC adaptor provided with this unit and
optional car adaptor (SH-CDC9) are
(polarized plug provided).
Bear in mind that the polarities of some
adaptors on the market may differ
•If you use the unit with the AC adaptor for
a long period of time, take out the re
chargeable batteries or dry cell batteries
to preserve their service life and prevent
leakage of the electrolyte.
•If you will not use the unit with the AC
adaptor for a long period of time, discon
nect it from the AC power outlet.
iprecautions for Listening with
the Headphones
•Do not play your headset at a high volume. Hearing experts advise against
continuous extended play.
»If you experience a ringing in your ears,
reduce volume or discontinue use.
to not use while operating a motorized
toicle. It may create a traffic hazard and
illegal in many areas,
tou should use extreme caution or tem-
)rari!y discontinue use in potentially
hazardous situations.
■ven if your headset is an open-air type
¡signed to let you hear outside sounds,
>n’t turn up the volume so high that you
m’t hear what’s around you.
_____________
29
Page 30

Before requesting service for this unit,
check the chart below for a possible cause
of the problem you are experiencing. Some
simple checks or a minor adjustment on
your part may eliminate the problem and
restore proper operation.
If you are in doubt about some of the check
points, or if the remedies indicated in the
chart do not solve the problem, refer to the
directory of Authorized Service Centers
(enclosed with this unit) to locate a con
venient service center, or consult your
dealer for instructions.
Problem
The disc Md does not
close.
The unit will not play.
The disc in the unit does
not play.
The disc in the unit cannot
be removed.
Probable cause(s)
The disc is not fixed properly.
The hold switch is set to
HOLD.
Moisture has formed inside
the unit.
The disc will not fit into the
pivot.
The disc is scratched.
The disc is not within
specified standards.
The disc is fixed.
Suggested remedy
Fix the disc properly.
Release the hold state.
Allow the unit to dry for about
one hour before using.
Push the disc gently until it
clicks.
Replace the disc with a new
one.
Exchange the disc for another
one.
Open the disc lid and press
PUSH.
A certain music passage
wonT play correctly.
There is noise from the
tuner or disturbance on
the TV screen.
The disc is dirty.
The disc is scratched.
Caused by high-frequency
signals of this unit.
Wipe the disc with a soft cloth.
Replace the disc with a new
one.
Use the unit farther away from
the tuner or TV.
If the tuner or TV antenna is
the indoor type, use an
outdoor antenna.
Page 31

iilililiilll
Wm
iifiiiiiilipl
Audio
No. of channels:
Frequency
response:
Output voltage:
S/N:
Wow and flutter;
DA converter:
Headphone
output level:
Pickup
Light source;
Wavelength:
Lens;
2 (left and right,
stereo)
20-20,000 Hz
(+0.5 dB, -1.5 dB)
0.7 V (50 kQ)
more than 96 dB*
Below measurable
limit
1 bit, MASH
Max. 5 mW+5 mW/
16Q (variable)
Semiconductor laser
780 nm
Glass pressed lens
General
Power supply;
Power
consumption:
Type of power
supply
AC adaptor
Battery
Dimensions
(WXHXD):
Weight;
*These specifications were measured with
anti-shock memory in the off state.
DC 4.5 V
Anti-shock memory
OFF/ON
3.7 W/4.3 W
0.6W/1.0W
140X30.9X
172.1 mm.
335 g (with batteries)
295 g
(without batteries)
Note;
Specifications are subject to change
without notice.
Weight and dimensions are approximate.
MASH is a trademark of NTT.
For United Kingdom only
This apparatus was produced to BS 800.
31
 Loading...