

Page 1
1
Dear Customer
Thank you for purchasing this product.
For optimum performance and safety,
please read these instructions carefully.
Supplied Accessories
Check the packing carton for these accessories.
Model No.
SL-SW880/SL-SW860
SL-SW861C
P
Before connecting, operating or adjusting this product, please
read these instructions completely. Please keep this manual for
future reference.
Portable CD Player
Operating Instructions
The model number and serial number
of this product can be found on either
the back or the bottom of the unit.
Please note them in the space provided below and keep for future reference.
MODEL NUMBER
SERIAL NUMBER
Precautions
Before using this unit, be sure to read the applicable
items of the operating instructions and these safety suggestions carefully.
Afterwards keep them handy for future reference. Take
special care to follow the warnings indicated on the unit
itself as well as in the operating instructions.
Safety
1. Power Source—The unit should be connected to
power supply only of the type described in the operating instructions or as marked on the unit. Use only
the AC adaptor or car adaptor described in the operating instructions when recharging.
2. Polarization—If the unit is equipped with a polarized
AC power plug (a plug having one blade wider than
the other), that plug will fit into the AC outlet only one
way. This is a safety feature. If you are unable to insert the plug fully into the outlet, try reversing the
plug. If the plug should still fail to fit, contact your
electrician to replace your obsolete outlet. Do not defeat the safety purpose of the polarized plug.
3. Care of AC adaptor— Take care that the cord of the
AC adaptor should be routed so that they are not
likely to be walked on or pinched by items placed
upon or against them. Never take hold of the AC
adaptor if your hand is wet, and always grasp the
plug body when connecting or disconnecting it.
4. Nonuse Periods— When not in use, be sure to disconnect the AC adaptor from the AC power outlet.
5. Batteries— If the set is not used for a long period of
time or is used only from an AC power source, remove all the batteries to prevent potential damage
due to possible battery leakage. Do not mix batteries
(old and new) or different types of batteries.
Installation
∫ Environment
1. Water and Moisture—Do not use this unit near
water—for example, near a bathtub, washbowl,
swimming pool, or the like. Damp basements should
also be avoided.
2. Condensation—Moisture may form on the lens in
the following conditions...
2. ≥immediately after a heater has been turned on.
2. ≥in a steamy or very humid room.
2. ≥when the unit is suddenly moved from a cold envi-
ronment to a warm one. If moisture forms inside
this unit, it may not operate properly. To correct this
problem wait about one hour for the moisture to
evaporate.
3. Heat—Never use or place this unit near a heat
source. Do not leave it in an automobile exposed to
direct sunlight for a long time with the doors and windows closed as this may deform the cabinet.
∫ Placement
1. Foreign Material— Care should be taken so that ob-
jects do not fall into and liquids are not spilled into
the unit. Do not subject this unit to excessive smoke,
dust, mechanical vibration, or shock.
2. Magnetism— The unit should be situated away from
equipment or devices that generate strong magnetic
fields.
3. Stacking— Do not place any objects, on top of the
unit.
AC adaptor (RFEA415C-1S) . . . . . . . . . . . . . . . . . . . . . . . . . . . . . . . . . 1 pc.
Stereo headphones . . . . . . . . . . . . . . . . . . . . . . . . . . . . . . . . . . . . . . . . 1 pc.
For SL-SW880 [RFEV505P-K1S (black) or RFEV505P-S1S (silver)]
For SL-SW860/SL-SW861C (RFEV708P-HS)
Hand grip (RGQT0006-K) . . . . . . . . . . . . . . . . . . . . . . . . . . . . . . . . . . . 1 pc.
SL-SW861C ONLY
Car adaptor (SH-CDC12PEY or SH-CDC10PY1) . . . . . . . . . . . . . . . . . 1 pc.
Car stereo cassette adaptor . . . . . . . . . . . . . . . . . . . . . . . . . . . . . . . . . 1 pc.
(SHCDM10B1PYK or SH-CDM10BPYK)
Use numbers indicated in parentheses when asking for replacement parts.
(Only for U.S.A) To order accessories contact 1-800-332-5368 or web
site (http://www.panasonic.com).
Panasonic Consumer Electronics Company, Division of
p
Matsushita Electric Corporation of America
One Panasonic Way Secaucus, New Jersey 07094
http://www.panasonic.com
Panasonic Sales Company, Division of Matsushita Electric of
Puerto Rico, Inc. (“PSC”)
Ave. 65 de Infantería, Km. 9.5 San Gabriel Industrial Park, Carolina, Puerto Rico 00985
Panasonic Canada Inc.
5770 Ambler Drive, Mississauga, Ontario L4W 2T3
www.panasonic.ca
c 2000 Matsushita Electric Industrial Co., Ltd.
Maintenance
(See page 5 for details.)
Clean the cabinet, panel and controls with a soft cloth
lightly moistened with mild detergent solution.
Do not use any type of abrasive pad, scouring powder
or solvent such as alcohol or benzine.
Service
1. Damage Requiring Service—The unit should be
serviced by qualified service personnel when:
1. (a) The AC adaptor is damaged; or
1. (b) Objects have fallen or liquid has been spilled
into the unit; or
1. (c) The unit has been exposed to rain; or
1. (d) The unit does not appear to operate normally or
exhibits a marked change in performance; or
1. (e) The unit has been dropped, or the enclosure
damaged.
2. Servicing— The user should not attempt to service
the unit beyond that described in the operating instructions. All other servicing should be referred to
an authorized service personnel.
2. For the address of an authorized servicenter:
2. In the U.S.A., call 1-800-211-7262, e-mail
2. [email protected], or visit
2. www.panasonic.com
2. In Canada, call 905-624-5505 or visit
2. www.panasonic.ca
,
SL-SW861C ONLY
To install this product in a car, please
refer to the “Installation Instructions”
(attached sheet).
RQT5528-P F0200ES0
Printed in Japan
The SL-SW861C model is only for
Canada.
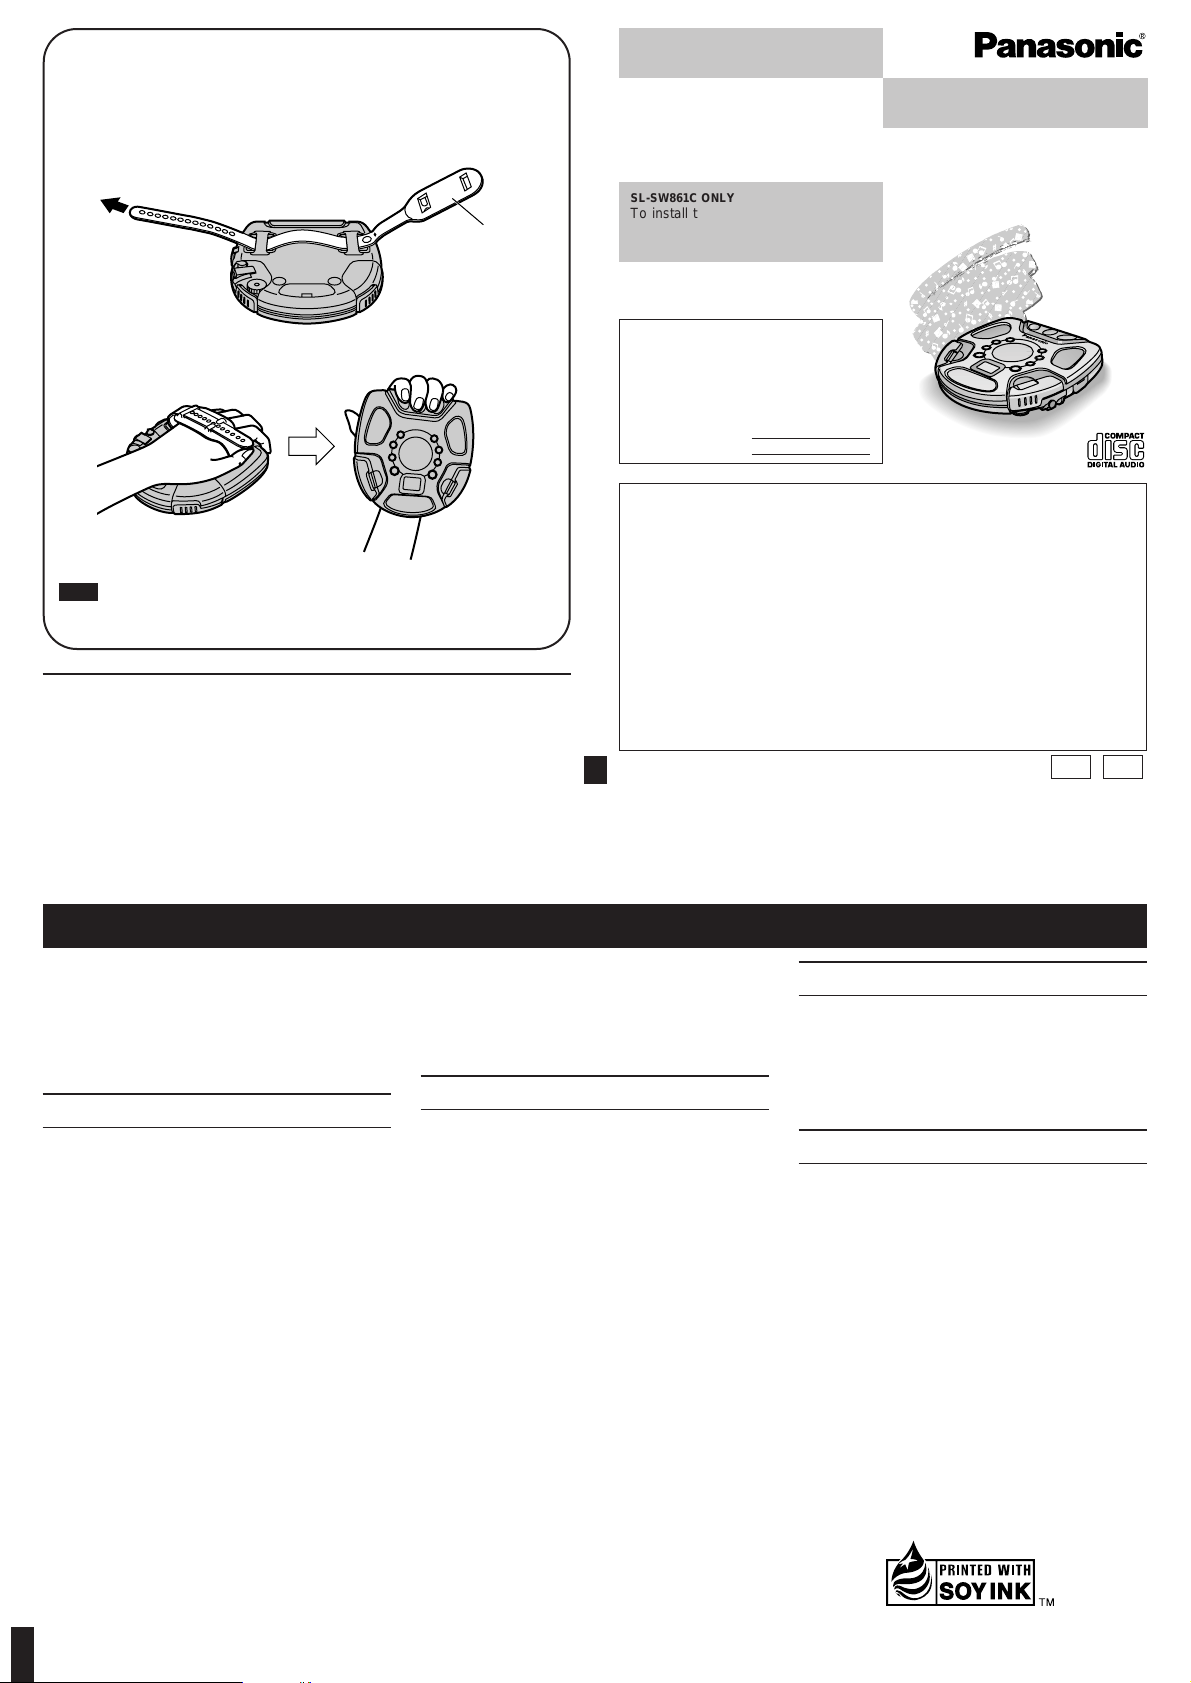
Attaching the hand grip
Attach the included hand grip to make it easier to carry while jogging.
1 Thread the strap through the loops on the bottom of
the unit.
2 Adjust the buckle and fix it in place.
Note.
To prevent sound being interrupted while jogging, turn on the anti-shock function (page 5).
Bottom of the unit
Hand grip
While jogging,
hold the unit as
shown.
PC
This manual was printed with soy based ink.
Page 2
2
3 Take off the attached rubber cap
and connect the AC adaptor.
Refer to “Using the AC adaptor” for connection instructions.
When recharging starts, the “H” charging indicator flashes on and off on the unit’s display.
4 When recharging is complete, un-
plug the AC adaptor from the
household AC outlet and the DC IN
jack.
Note.
≥Rechargeable batteries have a service life of approxi-
mately 300 charge-discharge cycles. If the operating
time on one full charge becomes noticeably shorter
than it used to be, the battery has reached the end of
its service life and should be replaced.
≥Recharging only be performed when the unit is pow-
ered off. (It is not possible to recharge the batteries
while playing a CD.)
≥The AC adaptor and rechargeable batteries may be-
come warm while recharging is in progress. This is not
a malfunction.
≥Turn the unit off before replacing the rechargeable
batteries.
Using the car adaptor
The SL-SW861C comes with a car adaptor. Be sure to
use the adaptor specially designed for this model.
(Refer to the separate installation instructions.)
Be sure to obtain the car adaptor (SH-CDC9), available
as an optional accessory for SL-SW880 and
SL-SW860. The car adaptor can be used to recharge
the unit’s batteries while in the car.
For SL-SW880/SL-SW860
Power Supply Preparations
Refer to the specifications (page 8) for information on operating times when using rechargeable batteries or dry-cell batteries.
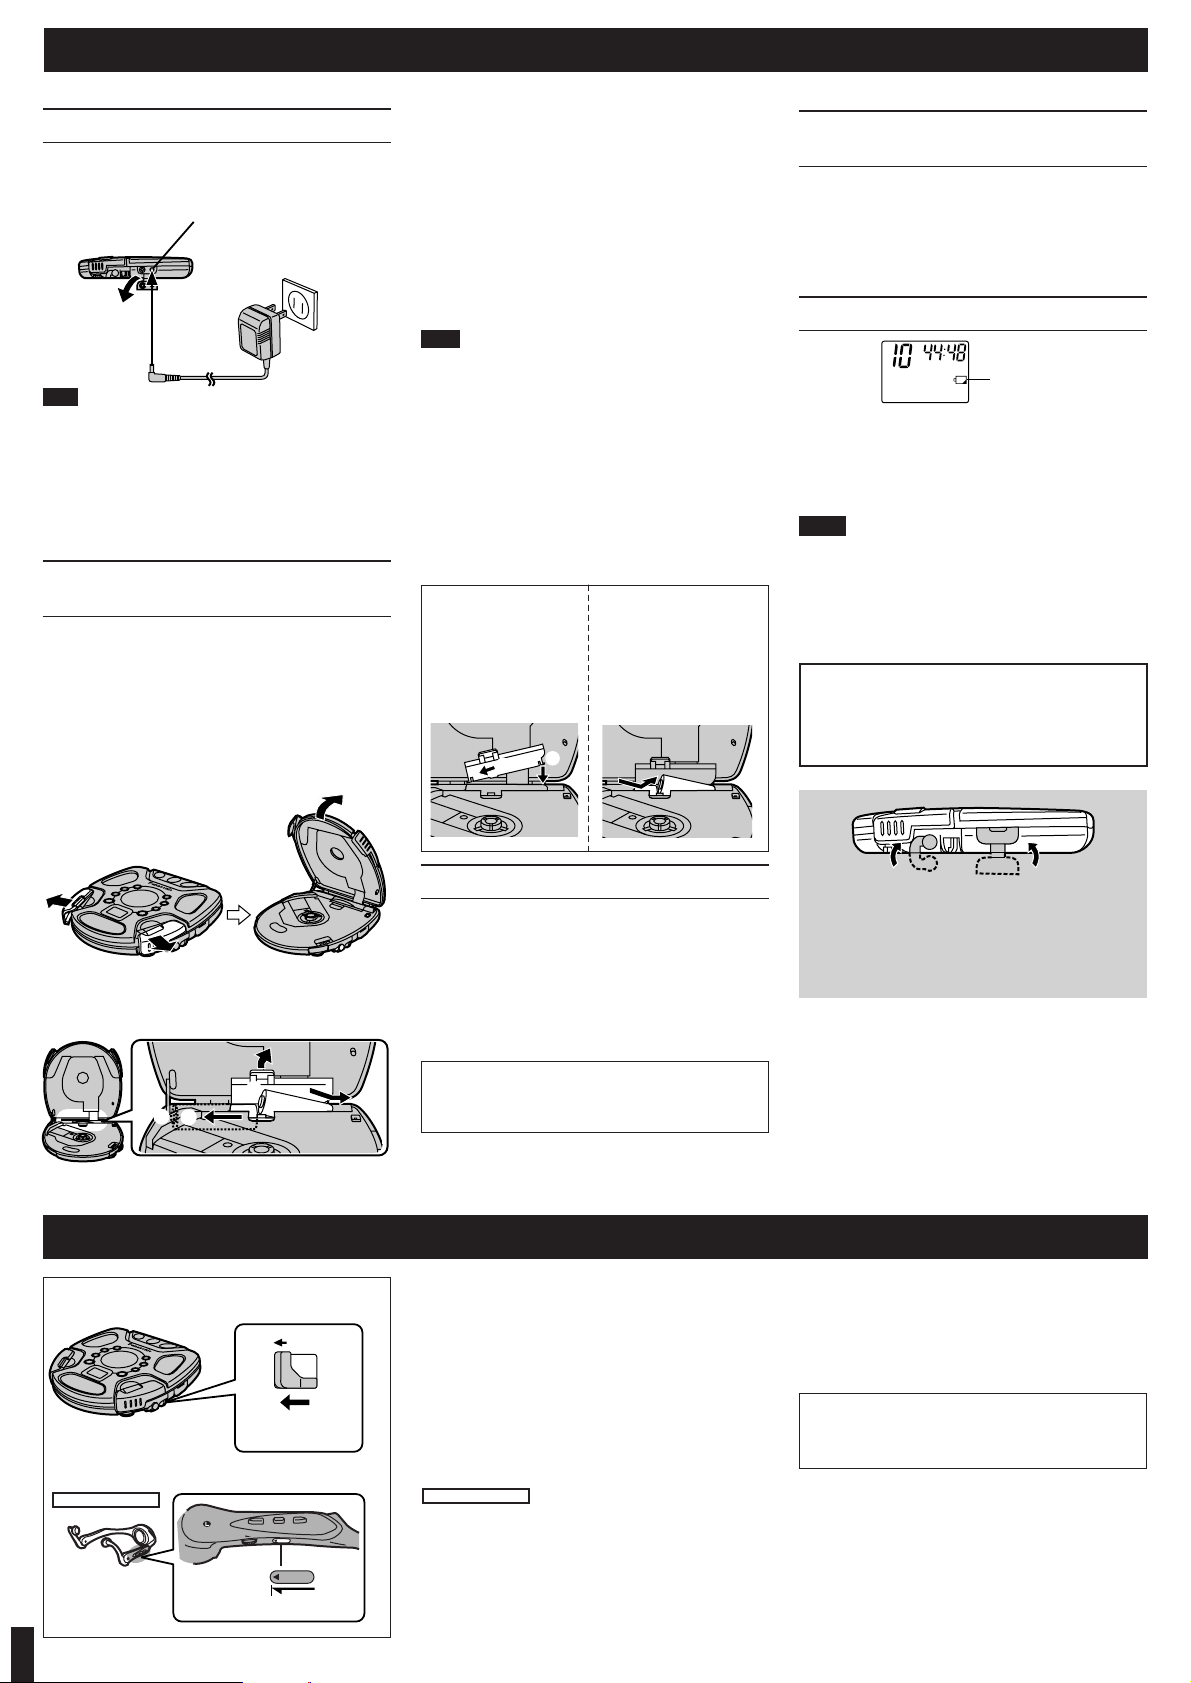
Using the AC adaptor
Take off the attached rubber cap and
connect the AC adaptor supplied.
Note.
Turn the unit off before connecting or disconnecting the
AC adaptor.
Conserving power
The AC adaptor consumes 2.0W when the unit is turned
off with [∫,OPR OFF]. To save power when the unit is
not to be used for a long time, unplug the AC adaptor
from the household AC outlet. Reprogram tracks if necessary before use.
Using rechargeable batteries
(not included)
Obtain the optional rechargeable batteries.
≥Optional batteries (P-3GAVA/2B)
Make sure to recharge the batteries before using them.
The unit cannot be used to charge rechargeable batteries other than those specifically designed for it.
Recharging procedure
1 Open the disc lid.
(Open and close dual locks firmly using both
hands at the same time.)
2 Open the battery lid, and place the
rechargeable batteries inside the
unit.
Be sure to close the battery lid properly.
Using dry-cell batteries
(not included)
After disconnecting the AC adaptor, insert two “AA”
(LR6) alkaline batteries.
The procedure for inserting and removing
dry-cell batteries is identical to that for
rechargeable batteries.
Battery indicator
This indicator flashes on and off when the batteries are
almost out of power. Power is cut off completely a short
while later.
Rechargeable batteries: Recharge batteries.
Dry-cell batteries: Replace batteries with new ones.
Note!
≥The length of time the unit will continue to operate be-
tween when the battery indicator starts flashing and
when the power is cut off differs depending on the
type of batteries used.
≥The battery indicator may not flash if rechargeable
batteries, other than those designated by Panasonic,
are used.
CAUTION:
Use only car adaptor, Model: SH-CDC9 manufactured by Matsushita Electric Industrial Co., Ltd.
Removing
batteries
Push up on the battery
in the direction
indicated by the arrow,
then lift out.
If the battery lid
comes loose
Insert the protrusions
on the lid into the
cutouts on both sides
of the compartment.
HOLD Function
This function causes the unit to ignore short, accidental
button presses. (The disc lid can still be opened and
closed.)
HOLD function prevents the following:
≥Powering on the unit accidentally (which can cause
the batteries to run down).
≥Play being cut off unexpectedly in the middle of a se-
lection.
To use the HOLD function
Set [HOLD] to the HOLD position.
The unit and the stereo headphones with a remote control have [HOLD] switches, each of which works independently.
HOLD
V
O
L
H
O
L
D
HOLD
1
2
Battery indicator
If the unit malfunctions or freezes during use,
then disconnect the power sources (the AC
adaptor or batteries).
Re-connect the power source and continue operation.
+
+
1
2
Hold mode
Side panel of the unit
Be sure to cover the headphone jack, OUT
jack and DC IN jack with the rubber caps
when they are not in use.
DC IN jack (DC IN 4.5 V K)
Household
AC outlet
Side panel of the unit
AC adaptor
“(” indication
When the unit is in hold mode, pressing any button
causes the indication “(” to appear on the display.
When the unit is powered off:
The “(” indication appears only when [1;] is
pressed.
Before operating the buttons
Be absolutely sure to move HOLD to release the
unit from the hold mode.
SL-SW880 ONLY
Hold mode
SL-SW880 ONLY
Page 3
3
Button Display/referenceOperation
To pause play
To stop play
To turn off the
unit
Skipping tracks
Searching
through tracks
Off mode
Stop mode
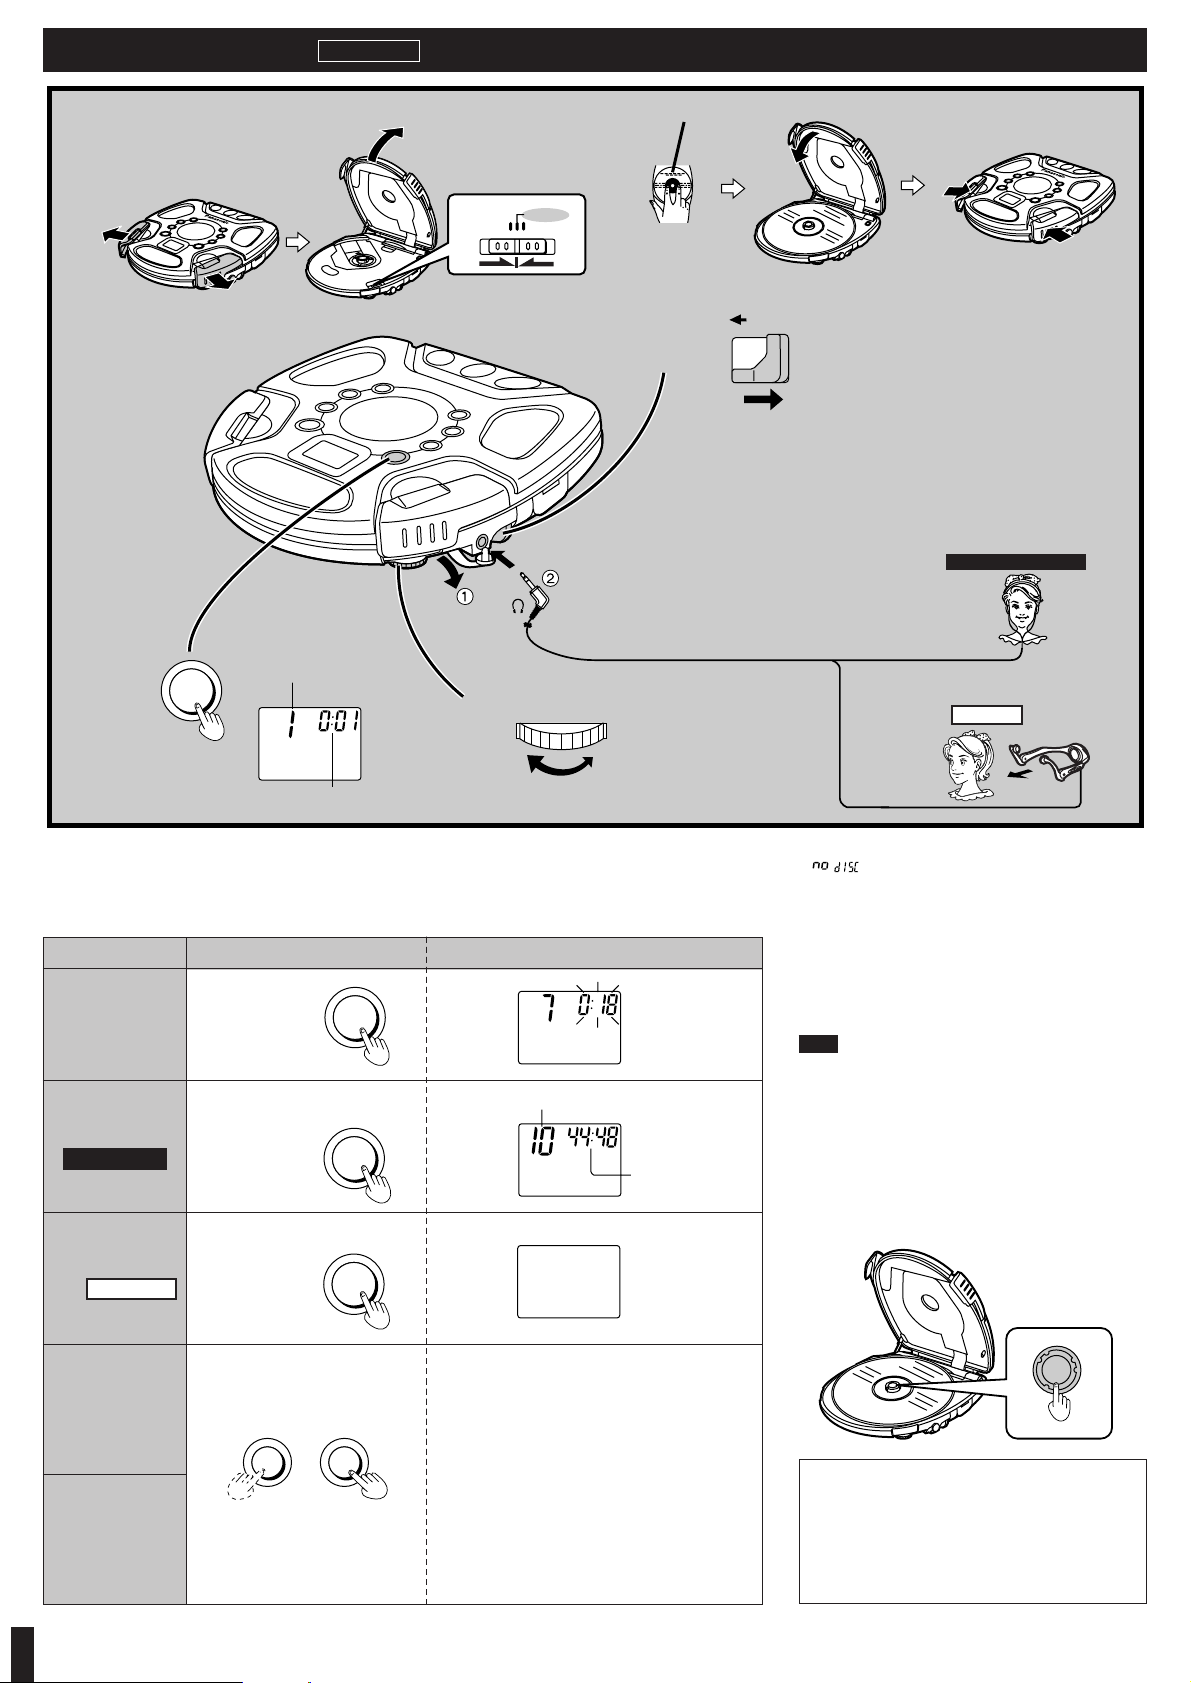
Sequential Play
Basic Play
Follow steps 1–6.
In step 3, connect the plug of the stereo headphones to the [Ë] jack, and plug in firmly until you hear the second click.
≥Play stops automatically when all the tracks have been played.
≥If the unit has been connected to the car audio system, adjust the volume level between 5 and 8 on the unit, then adjust the volume
level on the system. (The numbers indicating volume are on the bottom of the dial.)
For your reference:
“ ” indication
This indication appears for about 30 seconds if [1;] is
pressed when no disc is loaded in the unit or if the disc
is not completely seated.
“*” indication
This indication appears for about 10 minutes when the
cover is opened. (However, the indication does not appear when the unit is powered off.)
Note.
Never insert foreign objects into the unit body.
Removing discs
1 Press [∫,OPR OFF] to stop play and
disc rotation.
2 Unlock the dual locks to open the lid.
3 Press [PUSH] to release the disc.
Do not stop the disc by hand or try to remove it before it stops rotating. This can damage CDs.
≥During program play (page 4.), these buttons are
used to skip forward or back through the programmed sequence of tracks.
≥During random play (page 4.), the skip buttons
cannot be used to skip back to tracks that were
played previously in the random sequence.
≥During program play, random play or 1 track re-
peat play (page 4.), search operation is limited to
the current track only.
Press during play.
Press during play.
Press during
stop mode.
Press during play.
Press again to
restart play.
Press and hold during play.
Auto power off function
If the unit is left in stop or paused status for approximately 10 minutes, the unit powers itself off automatically in order to prevent the battery from
running down.
(If no disc is loaded in the unit, it powers itself off in
about 30 seconds.)
Label must face upward.
Track number in play
Elapsed playing time of each track
(Backward) (Forward)
Total number of tracks
Total playing time
SL-SW860/SL-SW861C
P
U
S
H
P
U
S
H
SL-SW880
Plug type:
3.5 mm (1/8 in.) stereo
1
5
1;
MODE
RESUME
6
NORMAL
RANDOM
3
2
4
HOLD
R
R
L
L
1;
OPR
OFF
∫
65
OPR
OFF
∫
:9
Page 4
For your reference:
≥If the play mode selector [MODE] is put in the
[RESUME] position, the all-track repeat function will
be activated automatically as soon as the unit is powered on.
≥If power is cut off near the end of a track (off mode),
playback may resume from the beginning of the next
track in some cases.
≥If the unit is powered off while a disc was playing and
then a new disc is inserted, play will begin from the
middle of the new disc because the unit remembers
the position where play stopped on the previous disc.
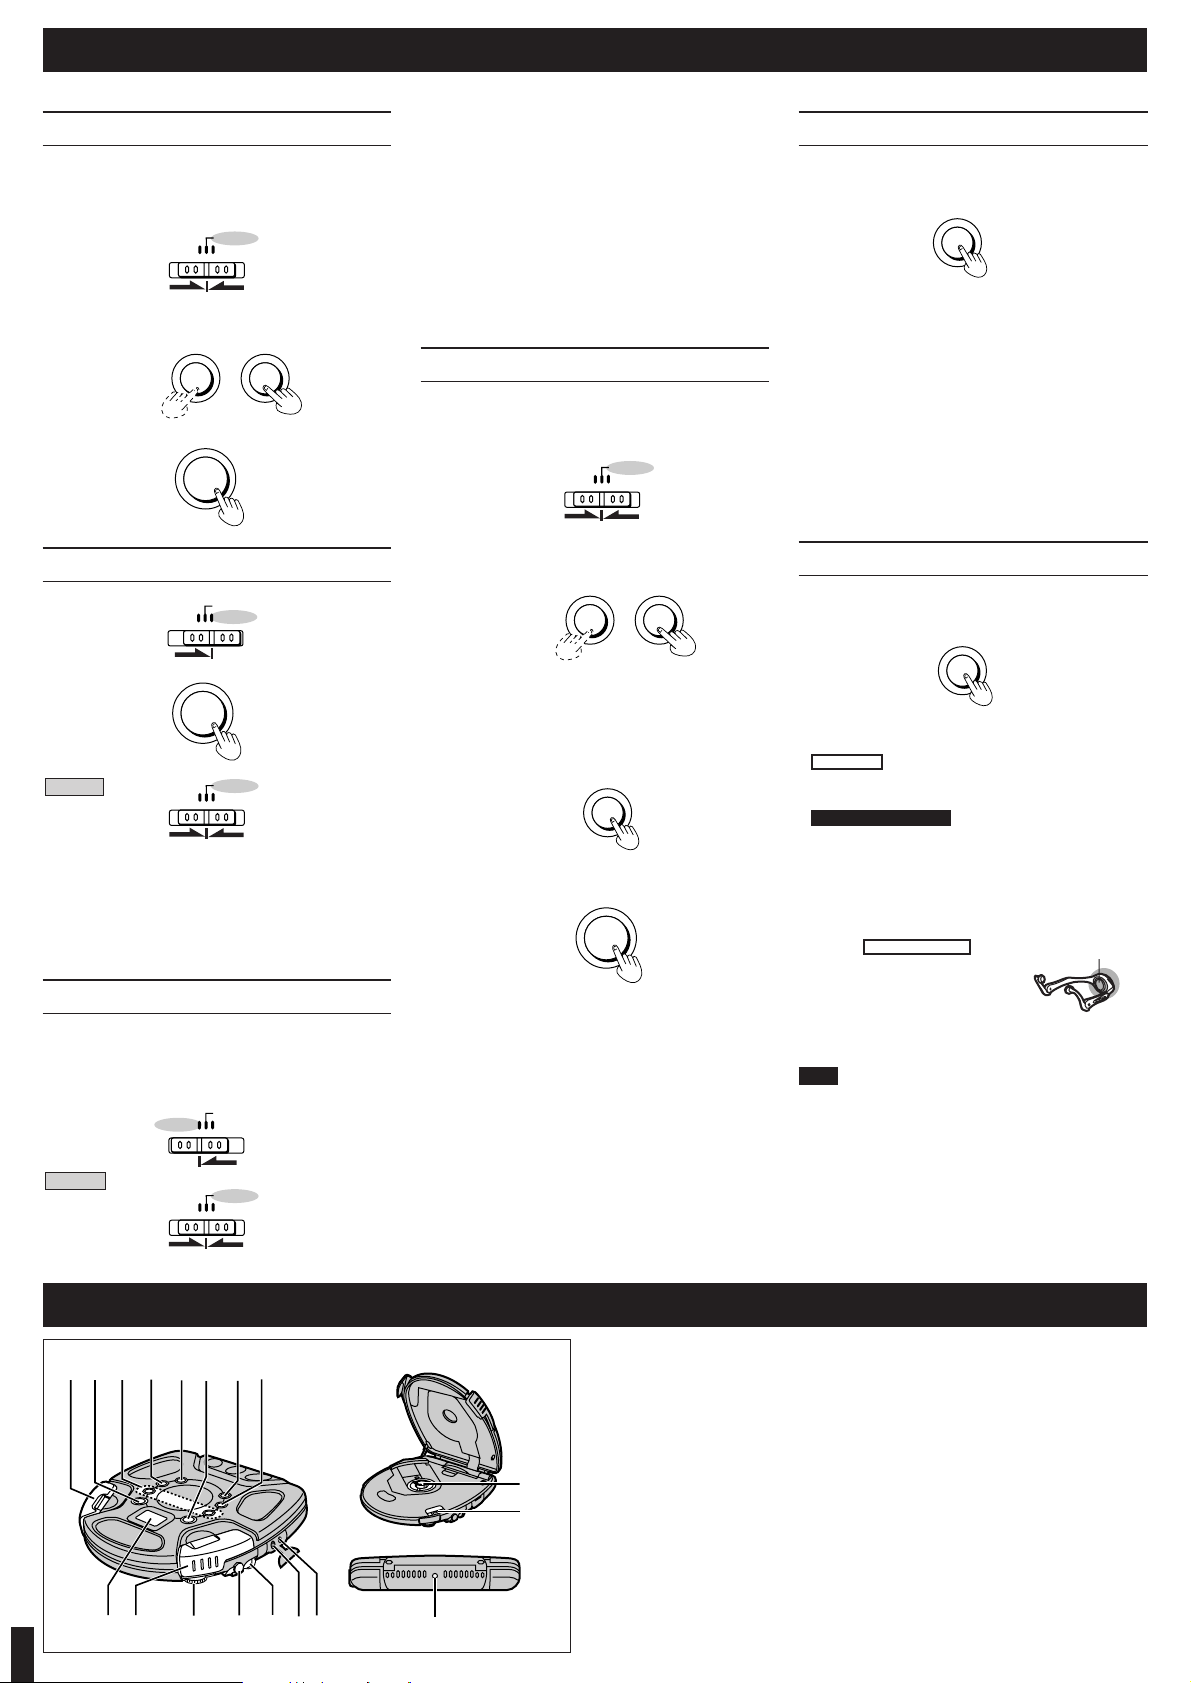
Program play
Up to 24 tracks can be entered in the programmed sequence.
Preparation: Put unit in stop mode.
1
2
Select the desired track.
3 Register in sequence.
(The indication “M” and the programmed sequence appear on the display panel.)
4 Repeat steps 2 and 3 to program all
the desired tracks.
5
∫ To program the same track in the
sequence more than once
After step 3, press [MEMORY/RECALL] the desired
number of times.
∫
If “'” is displayed
No more tracks can be programmed.
∫
To confirm the contents of the
programmed sequence
Press [MEMORY/RECALL] while the disc is playing.
(The number of the programmed tracks appear on the
display panel in sequence.)
∫
To delete the entire programmed sequence
Press [∫, OPR OFF].
Skip play
The disc plays from the specific track through to the
end, then play stops automatically.
Preparation: Put unit in stop mode.
1
2
Select the desired track.
3
Random play
1
2
For your reference:
≥It is also possible to press [9] while unit is in stop
mode to change the first track to be played. (All tracks
are played eventually, regardless of which is played
first.)
≥Program play is not possible in random mode.
Resume play
This function allows you to listen from the beginning of
the track where play stopped because the unit was
powered off (or switched to stop mode). It is useful
when listening to CDs in the car, etc.
Release
Release
Repeat function
Press while disc is playing or when unit
is in stop mode.
The setting is switched in the sequence indicated below
each time [REPEAT] is pressed.
1-track repeat (1 `)( -----------------------------]
One track is repeated. |
;|
All-track repeat (ALL `) |
All the tracks on the disc are repeated. |
;|
Cancel (No indicator is shown) --------------------------}
For your reference:
If “ALL `” is selected during program play, only the
tracks in the program are repeated.
(The indication “ALL” is not displayed.)
Changing the sound quality
Press while disc is playing or when unit
is in stop mode.
The setting is switched in the sequence indicated below
each time [EQ] is pressed.
S-XBS#VMSS#
Cancel (no indicator is shown)
^ --------------------------}
S-XBS#
Cancel (no indicator is shown)
^ ------------------------}
S-XBS :
Select this setting to boost the low-range response.
VMSS :
Boosts the low frequency range.
The VMSS unit of the included
headphones vibrate, making the
sound seem vigorous.
Raising the volume makes the VMSS effect intensify.
Note.
≥The effect may be reduced with some sources.
≥The best effect is obtained by allowing the VMSS unit
to directly contact the neck. Depending on how the
unit is worn, the effect can be reduced.
≥If you experience ringing or discomfort in your ears
while listening in VMSS mode, reduce volume or turn
the VMSS mode OFF.
4
Other Play Methods
The letters such as A in the various illustrations refer to the descriptions in the following “Location of Controls” section.
P
MODE
RESUME
RANDOM
NORMAL
C
65
:9
1;
F
P
MODE
RESUME
RANDOM
NORMAL
P
MODE
RESUME
RANDOM
NORMAL
C
65
:9
D
MEMORY/
RECALL
F
1;
P
MODE
RESUME
RANDOM
NORMAL
1;
F
P
MODE
RESUME
RANDOM
NORMAL
P
MODE
RESUME
RANDOM
NORMAL
Location of Controls
A Dual lock (OPEN)
B Stop/operation off button
(∫, OPR OFF)
C Skip/search buttons
(
:, 96, 5
)
D Memory/recall button
(MEMORY/RECALL)
E EQ button (EQ)
F Play/pause button (1;)
G Anti-shock button (A.SHOCK)
H Repeat button (REPEAT)
I DC IN jack (DC IN 4.5 V K)
J Out jack (OUT)
K Hold switch (HOLD)
L Headphone jack (Ë)
M Headphone volume control
(VOLUME)
N Display
O CD release button (PUSH)
P Play mode selector (MODE)
Q Hole for car mounting base
AB C D
F
GH
NA M L K
J
I
O
P
Q
E
Back panel of
the unit
REPEAT
H
E
EQ
SL-SW860/SL-SW861C
SL-SW880
SL-SW880 ONLY
VMSS unit
Page 5
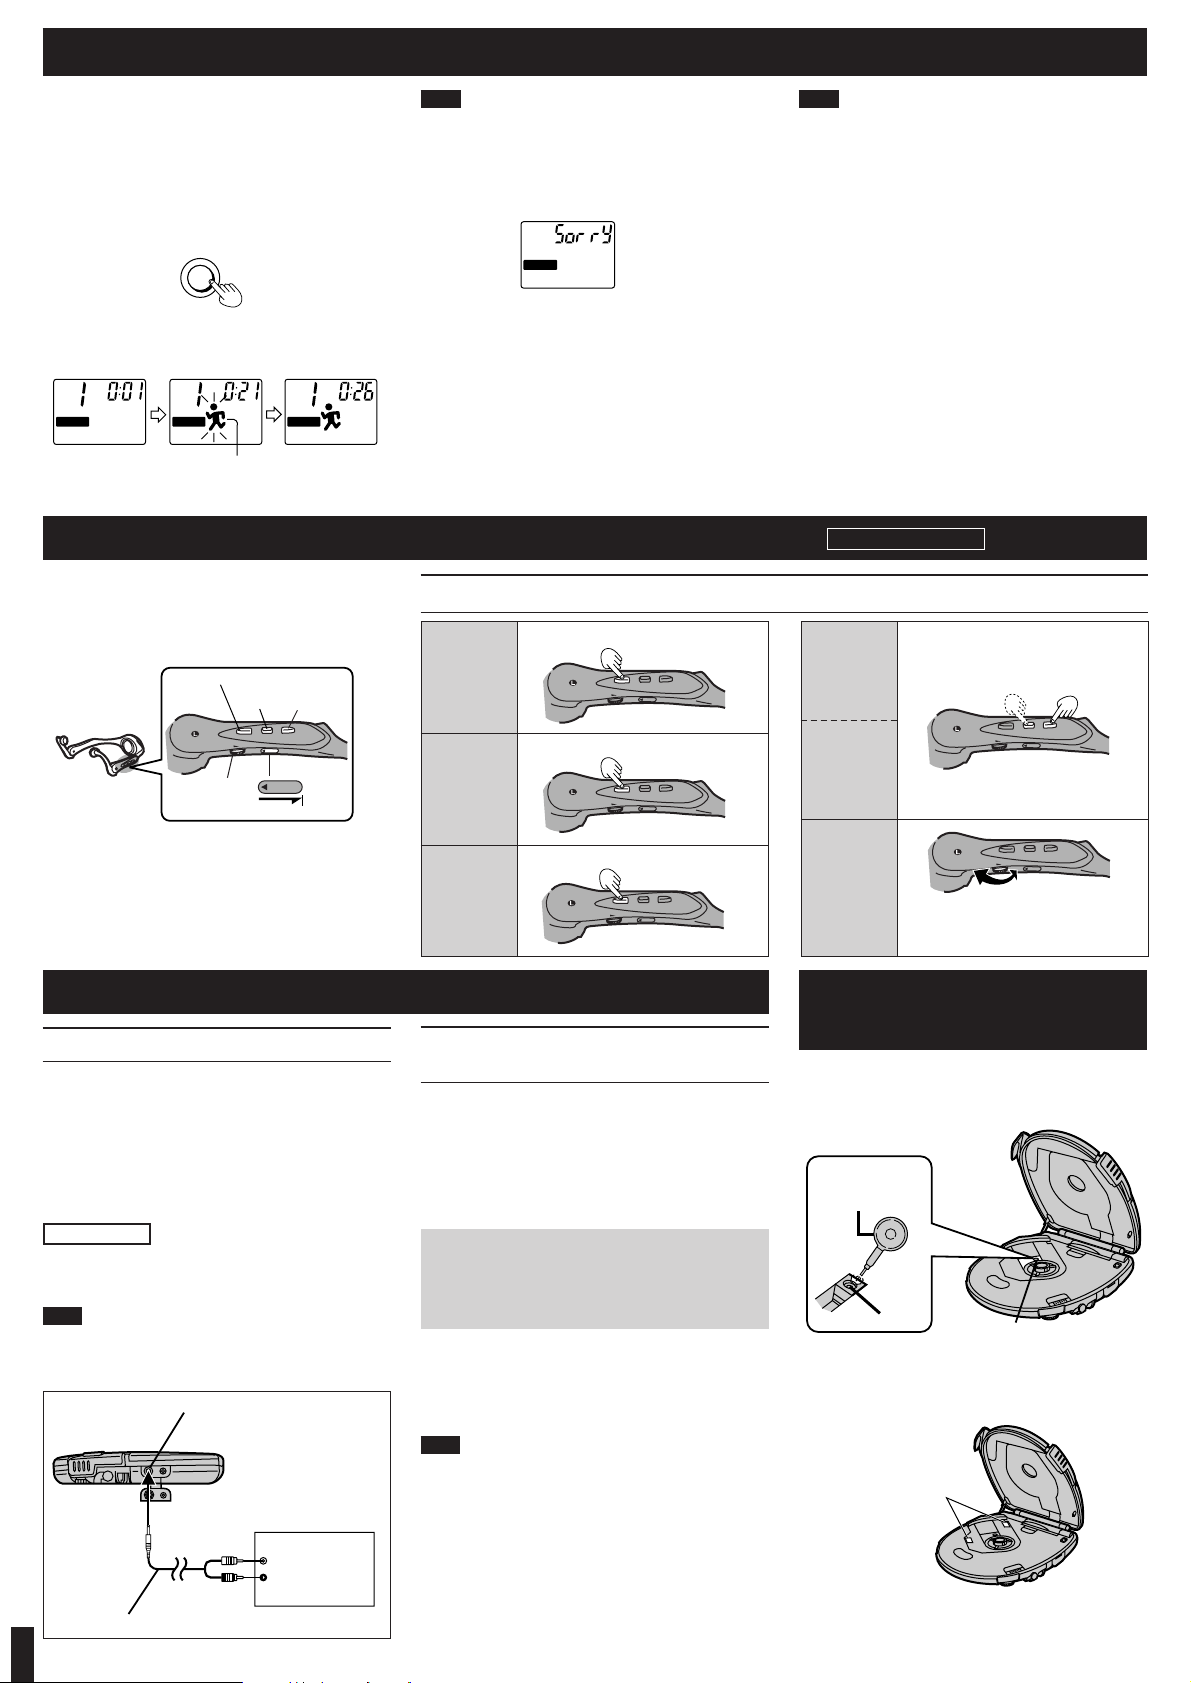
Using the unit with a car audio
system
SL-SW861C comes with a car adaptor and car stereo
cassette adaptor.
Items to be purchased
(SL-SW880/SL-SW860)
For connection to the car audio system:
Car stereo cassette adaptor (SH-CDM10A)
For securing the unit and connecting the
power supply:
≥Car adaptor (SH-CDC9)
≥Car mounting kit (SH-CDF20)
Note.
It may not be possible to use the unit with some types of
car stereo owing to restrictions imposed by the construction of the car stereo cassette adaptor.
For further details, refer to the instructions of the part
concerned.
Anti-shock works by reading audio data and storing it in
memory (up to 40 seconds worth). The unit then fills in
interruptions caused by bumps and vibrations with data
from the memory. This unit also incorporates a powerful
anti-shock mechanism that prevents skipping caused
when play speed is changed by swinging of the unit.
Press during play or stop mode.
The following indicator appears on the display panel.
Note!
Wait until the jogger indicator appears before starting to
jog.
When bumps continue repeatedly
The message “SORRY” appears on the display and
sound is interrupted.
The jogger indicator can also flash or go out under
the following conditions:
≥As the end of the last track approaches.
≥As the end of a track approaches during random play, pro-
gram play, and 1 track repeat play.
≥If the track in play or next track is extremely short.
To cancel the anti-shock function
Press [A.SHOCK] again.
Note!
≥The anti-shock setting can be changed during play,
but this may cause a slight interruption in the sound
because the disc’s rotational speed changes.
≥During anti-shock operation, the disc rotates at a high-
er rate than usual in collecting extra audio data. This
could result in a slight increase in disc rotation noise.
Listening to sound with the unit connected to an audio system
The anti-shock function uses digital signal compression
technology. It is recommended that the anti-shock function be canceled if the unit is connected to a home
audio system.
Skipping
tracks
Seaching
through tracks
To adjust the
volume
5
Using the Unit with Optional Accessories
Using the unit with an audio system
Using a stereo connection cable (not included), you can
listen to CDs through your audio system.
≥Connect the cable to the amplifier after turning off its
power.
≥Do not connect the cable to the PHONO jacks on the
amplifier.
≥Obtain the optional connecting cable if the amplifier
comes with mini-phone jacks.
≥Adjust the volume level on the amplifier.
You can connect speakers, active or otherwise, with an
impedance of 1k≠ or less to the headphone jack. Set
the unit’s volume between 5 and 8.
Note.
Sound quality changes when S-XBS or VMSS
(SL-SW880 only) is selected, but volume is reduced
by approximately fifty percent.
L
R
OUT jack
Stereo connection cable (not included)
To CD or AUX
terminals
(White)
(Red)
Side panel of the unit
Amplifier
Connect the car stereo cassette adaptor
to the unit’s headphone jack.
(When doing this, keep the unit’s VOLUME
control at a setting between 5 and 8.)
RQT5528
Maintaining the
Lens
Open the lid and clean the lens as shown in the figure.
Use a cotton swab to gently wipe off any finger-prints.
Recommended product: Lens cleaner kit (SZZP1038C)
Lens
Lens
Air blower for
camera lens
Anti-Shock Function
Using Stereo Headphones with Remote Control
SL-SW880 ONLY
To start play
To stop play
To turn off
the unit
The remote control can be operated regardless of the
HOLD mode of the unit.
Preparation: Release the remote control from the
HOLD mode.
∫ Operation confirmation tones
When an operation button is pressed, a confirmation
tone sounds. Refer to the parentheses in the illustration for the different types of confirmation tones.
How to use the remote control
Press once during off or stop mode.
Press once during play.
Press and hold during play or stop mode.
Press once during play.
Press and hold during play.
[VOL] on the remote control adjusts volume
only. To adjust the VMSS effect, use
[VOLUME] on the main unit.
V
O
L
H
O
L
D
HOLD
V
O
L
H
O
L
D
V
O
L
H
O
L
D
V
O
L
H
O
L
D
V
O
L
H
O
L
D
V
O
L
H
O
L
D
G
A.SHOCK
After about
20 seconds
A.SHOCK
Play/stop/off button
[i]
[j]
[VOL]
About
5 seconds later
The jogger indicator
starts flashing.
(Beep)
(Beep...Beep)
(Beep...Bee...p)
Forward
(Beep
Beep)
Backward
(Beep Beep
Beep)
SL-SW880 ONLY
To prevent the disc from being scratched or
damaged
Remove built up dust from the felt pads.
Felt pads
A.SHOCK A.SHOCK A.SHOCK
Page 6
6
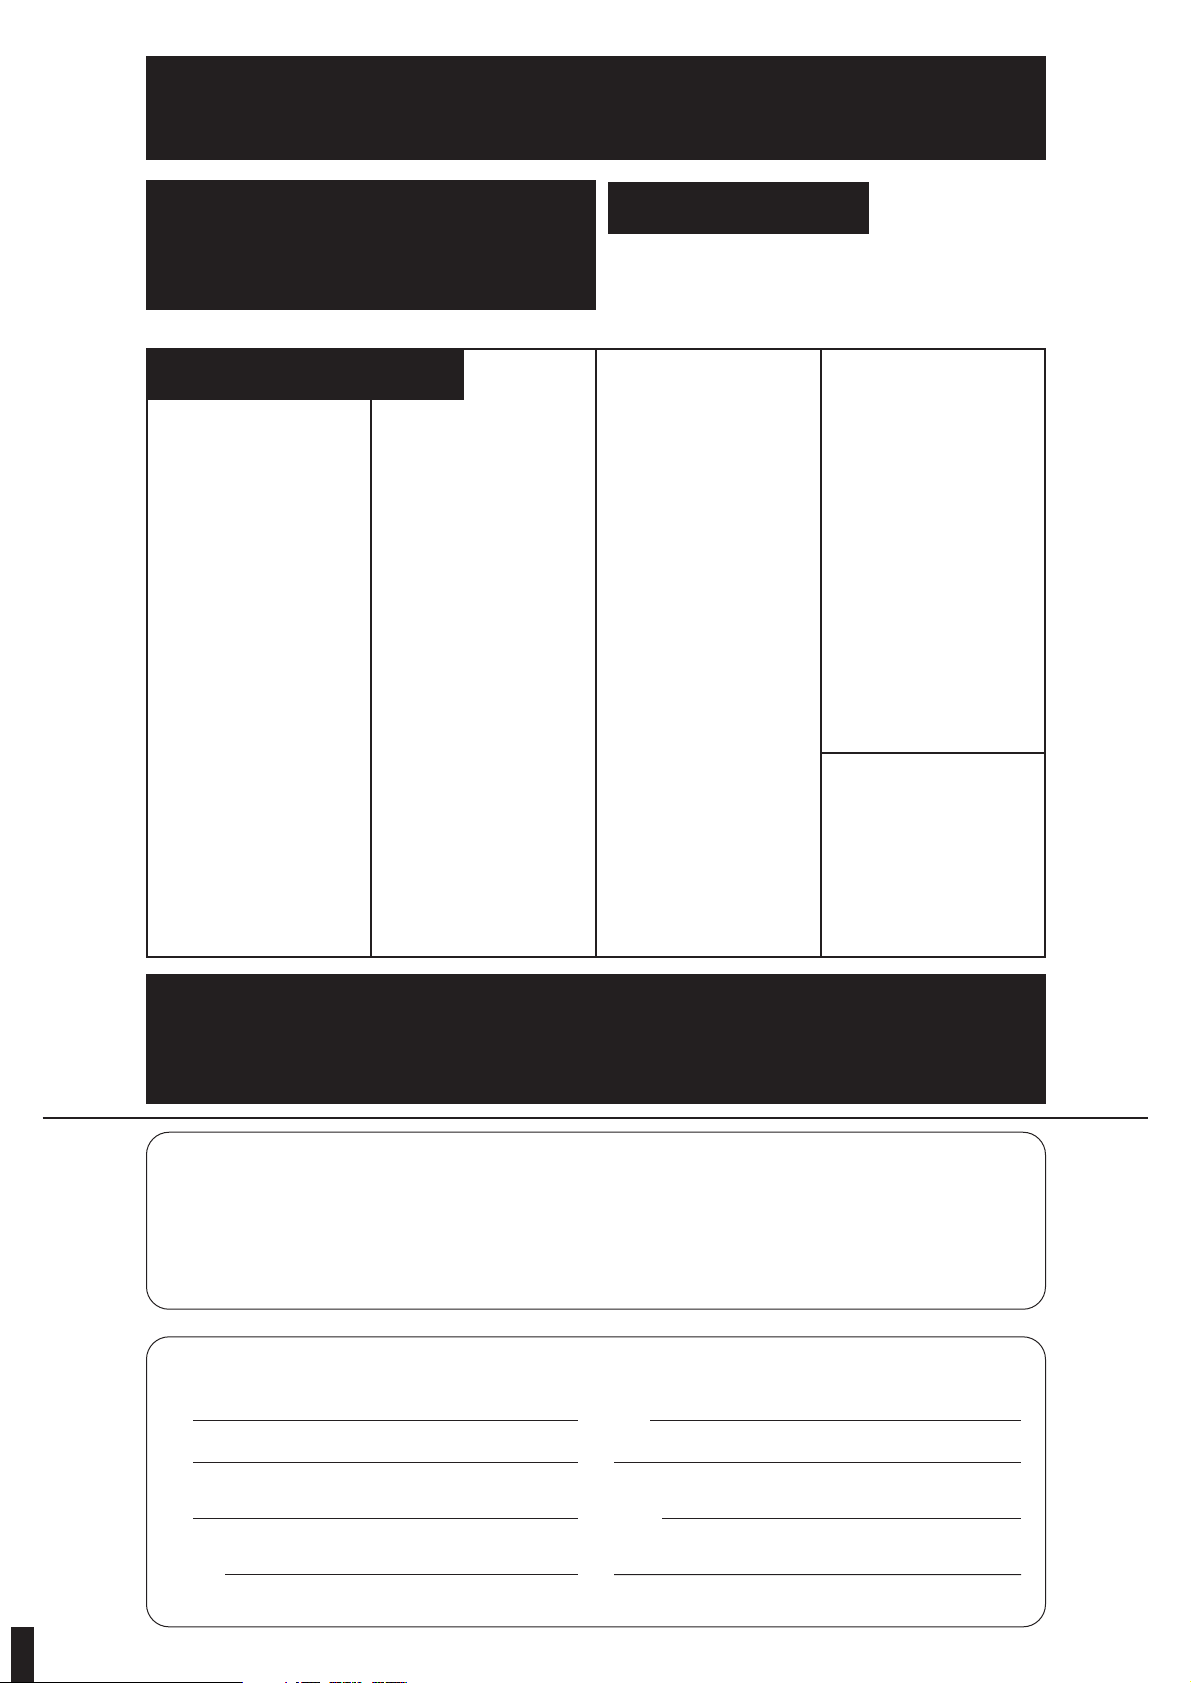
If you ship the product
Carefully pack and send it prepaid, adequately insured and preferably in the original carton.
Attach a postage-affixed letter, detailing the complaint, to the outside of the carton.
Do NOT send the product to the Executive or Regional Sales offices. They are NOT equipped to make repairs.
Model
No.
Serial
No.
or
Code
No.
Date
of
Purchase
Dealer’s
Name
Dealer’s
Address
Customer’s Record
For Product Information, Operating Assistance, Literature Request, Dealer Locations, and
all Customer Service inquiries please contact:
1-800-211-PANA (7262), Monday–Friday 9 am–9 pm; Saturday–Sunday 9 am–7 pm, EST.
Web Site: http://www.panasonic.com
You can purchase parts, accessories or
locate your nearest servicenter by visiting
our Web Site.
CALIFORNIA
6550 Katella Avenue
Cypress, CA 90630
800 Dubuque Avenue
S. San Francisco
CA 94080
20201 Sherman Way
Suite 102
Canoga Park, CA 91306
3878 Ruffin Road
Suite A
San Diego, CA 92123
COLORADO
1640 South Abilene Street
Suite D
Aurora, CO 80012
FLORIDA
3700 North 29thAvenue
Suite 102
Hollywood, FL 33020
GEORGIA
8655 Roswell Road
Suite 100
Atlanta, GA 30350
ILLINOIS
9060 Golf Road
Niles, IL 60714
1703 North Randall Road
Elgin, IL 60123
(Pick-up/Drop-off only)
MARYLAND
62 Mountain Road
Glen Burnie, MD 21061
MASSACHUSETTS
60 Glacier Drive
Suite G
Westwood, MA 02090
MICHIGAN
37048 Van Dyke Avenue
Sterling Heights, MI 48312
MINNESOTA
7850-12thAvenue South
Airport Business Center
Bloomington, MN 55425
OHIO
2236 Waycross Road
Civic Center Plaza
Forest Park, OH 45240
PENNSYLVANIA
2221 Cabot Blvd. West
Suite B
Langhorne, PA 19047
TENNESSEE
3800 Ezell Road
Suite 806
Nashville, TN 37211
TEXAS
13615 Welch Road
Suite 101
Farmers Branch
TX 75244
WASHINGTON
20425-84thAvenue South
Kent, WA 98032
HAWAII
99-859 Iwaiwa Street
Aiea, Hawaii 96701
Phone (808) 488-1996
Fax (808) 486-4369
Factory Servicenters Locations
Service in Puerto Rico
Matsushita Electric of Puerto Rico, Inc. Panasonic Sales Company/Factory Servicenter:
Ave. 65 de Infanteria, Km. 9.5, San Gabriel Industrial Park, Carolina, Puerto Rico 00985
Phone (787) 750-4300 Fax (787) 768-2910
Accessory Purchases::::::
1-800-332-5368 (Customer Orders Only)
Panasonic Services Company 20421 84th Avenue South, Kent, WA 98032
(6 am to 5 pm Monday-Friday; 6 am to 10:30 am Saturday; PST)
(Visa, MasterCard, Discover Card, American Express, Check)
ONLY FOR U.S.A.
Page 7
7
Product Service
Do not attempt to remove the cover(s) or repair the unit yourself. Refer servicing to
qualified personnel only.
Product information
For product service, product information or assistance with product operation, refer to
the servicenter directory.
User memo:
DATE OF PURCHASE
DEALER NAME
DEALER ADDRESS
TELEPHONE NUMBER
WARNING:
TO REDUCE THE RISK OF FIRE, ELECTRIC SHOCK OR PRODUCT DAMAGE, DO NOT EXPOSE THIS APPLIANCE TO RAIN,
SPLASHING, DRIPPING OR MOISTURE.
CAUTION!
THIS PRODUCT UTILIZES A LASER.
USE OF CONTROLS OR ADJUSTMENTS OR PERFORMANCE OF
PROCEDURES OTHER THAN THOSE SPECIFIED HEREIN MAY
RESULT IN HAZARDOUS RADIATION EXPOSURE.
DO NOT OPEN COVERS AND DO NOT REPAIR YOURSELF.
REFER SERVICING TO QUALIFIED PERSONNEL.
The product you have purchased is powered by a nickel-cadmium battery which is recyclable. Please call 1-800-8-BATTERY for information
on how to recycle this battery.
CAUTION:
This equipment has been tested and found to comply with the limits for a Class B
digital device, pursuant to Part 15 of the FCC Rules.
These limits are designed to provide reasonable protection against harmful interference in a residential installation. This equipment generates, uses and can radiate radio frequency energy and, if not installed and used in accordance with
the instructions, may cause harmful interference to radio communications.
However, there is no guarantee that interference will not occur in a particular installation. If this equipment does cause harmful interference to radio or television
reception, which can be determined by turning the equipment off and on, the
user is encouraged to try to correct the interference by one or more of the following measures:
≥Reorient or relocate the receiving antenna.
≥Increase the separation between the equipment and receiver.
≥Connect the equipment into an outlet on a circuit different from that to which the
receiver is connected.
≥Consult the dealer or an experienced radio/TV technician for help.
Any unauthorized changes or modifications to this equipment would void the
user’s authority to operate this device.
This device complies with Part 15 of the FCC Rules. Operation is subject to the
following two conditions: (1) This device may not cause harmful interference, and
(2) this device must accept any interference received, including interference that
may cause undesired operation.
Ni-Cd
RBRC
RBRC
THE FOLLOWING APPLIES ONLY IN THE U.S.A.
Concerning Compact Discs
Only compact discs bearing this mark can be used with this unit.
Handling precautions
≥If you are taking the CD from a cold to a
warm environment, moisture may form on the
CD. Wipe this off with a soft, dry, lint-free
cloth before using the CD.
≥Do not write on the label side with a ball-point
≥pen or other writing instrument.
≥Do not use record cleaning sprays, benzine,
thinner, static electricity prevention liquids or
any other solvent.
≥Do not attach labels or stickers to CDs. (Do
not use CDs with exposed adhesive from
tape or left over peeled off stickers.)
≥Do not use scratch-proof protectors or covers
other than those specified for use with this
unit.
Storage precautions
Be sure to store CDs in their cases to protect
them from dust, scratches, and warping.
Do not place or store CDs in the following
places
≥Locations exposed to direct sunlight
≥Humid or dusty locations
≥Locations directly exposed to a heat vent or
heating appliance
≥In the glove compartment or on the rear deck
of an automobile
If the surface is dirty
Wipe it with a damp cloth and then wipe dry.
Wipe from the center toward the outer circumference.
How to hold a disc
How to store the disc in its case
How to remove a disc from its case
Label side up
Play surface
(shiny surface)
However, continued use of irregular shape CDs can damage the unit.
Panasonic Audio Products
Limited Warranty
Panasonic Consumer Electronics Company or Panasonic Sales Company (collectively referred to as “the warrantor”) will repair this product with new or refurbished parts in the event of a defect in materials or workmanship, free of charge,
in the U.S.A. or Puerto Rico as follows ( all time periods start from the date of
original purchase ) :
COMPACT DISC PLAYERS, RADIOS, VIDEO CD PLAYERS, RADIO CASSETTE PLAYERS/RECORDERS (with and without CD Players), CASSETTE
RECORDERS, MICROCASSETTE RECORDERS/TRANSCRIBERS AND IC
RECORDERS—labor and parts for one (1) year.
ACCESSORIES—HEADPHONES, CARTRIDGES,
MICROPHONES, ADAPTERS—labor and parts for ninety (90) days.
BATTERIES—(when applicable) —New rechargeable batteries in exchange for
defective rechargeable batteries for ten (10) days. Non-rechargeable batteries
are not warranted.
RECHARGEABLE BATTERY PACKS—(when applicable)—New rechargeable
battery packs in exchange for defective rechargeable battery packs for ninety
(90) days. Non-rechargeable battery packs are not warranted.
Carry-in or mail-in service in the U.S.A. can be obtained during the warranty
period by contacting a Panasonic Services Company (PASC) Factory
Servicenter listed in the Servicenter Directory. Or call toll free, 1-800-211-7262 to
locate a PASC authorized Servicenter. Carry-in or mail-in service in Puerto Rico
can be obtained during the warranty period by calling the Panasonic Sales
Company telephone number listed in the Servicenter Directory.
This warranty is extended only to the original purchaser. A purchase receipt or
other proof of date of original purchase will be required before warranty service is
rendered.
This warranty only covers failures due to defects in materials and workmanship
which occur during normal use and does not cover normal wear to the stylus
(when applicable) or a dealer installed cartridge or stylus. The warranty does not
cover damages which occur in shipment or failures which are caused by products
not supplied by the warrantor, or failures which result from accident, misuse,
abuse, neglect, mishandling, faulty installation, misapplication, set-up adjustments, maladjustment of consumer controls, improper operation or maintenance,
improper antenna, inadequate signal reception or pick-up, alteration, modification, power line surge, improper voltage supply, lightning damage, commercial
use, such as; hotel, office, restaurant, or other business or rental use of the product, or service by anyone other than a PASC Factory Servicenter or a PASC authorized Servicenter, or damage that is attributable to acts of God.
LIMITS AND EXCLUSIONS
There are no express warranties except as listed above.
THE WARRANTOR SHALL NOT BE LIABLE FOR INCIDENTAL OR CONSEQUENTIAL DAMAGES RESULTING FROM THE USE OF THIS PRODUCT, OR
ARISING OUT OF ANY BREACH OF THIS WARRANTY, INCLUDING WITHOUT LIMITATION, DAMAGE TO TAPES, RECORDS OR DISCS. ALL EXPRESS AND IMPLIED WARRANTIES, INCLUDING THE WARRANTIES OF
MERCHANTABILITY, AND FITNESS FOR A PARTICULAR PURPOSE, ARE
LIMITED TO THE APPLICABLE WARRANTY PERIOD SET FORTH ABOVE.
Some states do not allow the exclusion or limitation of incidental or consequential
damages, or limitations on how long an implied warranty lasts, so the above exclusions or limitations may not apply to you.
This warranty gives you specific legal rights and you may also have other
rights which vary from state to state.
If a problem with this product develops during or after the warranty period, you
may contact your dealer or Servicenter. If the problem is not handled to your satisfaction, then write to the Panasonic Consumer Call Center at the company address above or call toll free 1-800-211-7262.
Panasonic Consumer Electronics
Company, Division of Matsushita
Electric Corporation of America
One Panasonic Way,
Secaucus, New Jersey 07094
Panasonic Sales Company, Division
of Matsushita Electric Corporation
of Puerto Rico, Inc.
Ave. 65 de InfanterÍa, Km. 9.5
San Gabriel Industrial Park,
Carolina, Puerto Rico 00985
ONLY FOR U.S.A.
Page 8
Audio(Anti-shock OFF)
No. of channels: 2 (left and right,
stereo)
Frequency response: 20 to 20,000 Hz
(i0.5 dB,
j1.5 dB)
Output voltage: 0.6 V (50 k≠)
S/N: More than 94 dB
§
Wow and flutter: Below
measurable limit
DA converter: 1 bit, MASH
Headphones output
level: Max.
9 mWi9 mW/
16 ≠ (adjustable)
Pickup
Light source: Semiconductor
laser
Wavelength: 780 nm
General
Operational
temperature range: 0 eC–40 eC
(32 eF–104 eF)
Rechargeable
temperature range: 5 eC–40 eC
(41 eF–104 eF)
Power supply: DC 4.5 V
Power consumption:
When recharging: Approx. 4.4 W
Play time:
[When used in hold mode with EQ
canceled, at 25 eC (77eF), on a flat,
stable surface]
The play time may be less depending on
the operating conditions.
Recharging time
(P-3GAVA/2B): About 3 hours
Dimensions
(WkHkD): 133k24.7k141.5
mm
(5
1
⁄4qk31⁄32qk
5
9
⁄16q)
Mass: 327 g (11.5 oz.)
(with batteries)
282 g (10.0 oz.)
(without batteries)
§
These specifications were measured in
the anti-shock OFF mode.
Note:
Specifications are subject to change
without notice.
Mass and dimensions are approximate.
Power consumption in standby mode : 2.0W
8
Anti-shock
OFF/ON
2.2 W/ 2.4 W
Power source
AC adaptor
≥If rechargeable battery play time is short after recharg-
ing, the batteries have reached the end of their service
life. Replace them with the recommended replacements.
≥Play time may be shorter than usual after recharging
batteries for the first time or after they have been unused for a long time. Repeatedly recharge and discharge the batteries if this occurs to restore them to
normal.
∫ Care
To prevent battery damage, electrolyte leakage and
short-circuiting, heed the following points.
≥Do not peel off the covering on batteries and do not
use if the covering has been peeled off.
≥Align the poles + and - correctly when inserting the
batteries.
≥Do not mix different types or makes of batteries or old
and new batteries.
≥Remove the batteries if you do not intend to use the
unit for a long time.
≥Do not throw into fire, short-circuit, disassemble, or
subject to excessive heat.
≥Do not attempt to recharge dry cell batteries.
≥Do not allow metal objects to touch the battery termi-
nals as this may cause short-circuiting which is dangerous.
≥When carrying batteries in a pocket or bag, ensure no
metal objects such as necklaces are placed together
with them. Contact with metal may cause short-circuiting which can cause a fire. For safety, carry the
rechargeable batteries in the battery carrying case.
Specifications Troubleshooting Guide
Before requesting service for this unit, check the chart below for a possible cause of
the problem you are experiencing. Some simple checks or a minor adjustment on
your part may eliminate the problem and restore proper operation.
If you are in doubt about some of the check points, or if the remedies indicated in the
chart do not solve the problem, refer to the directory of Authorized Service Centers
(enclosed with this unit) to locate a convenient service center, or consult your dealer
for instructions.
For detailed instructions, contact an authorized servicenter in the U.S.A. and
Panasonic Canada Inc. Customer Care Centre in Canada.
In the U.S.A., call 1-800-211-7262, e-mail [email protected],
or visit www.panasonic.com
In Canada,call 905-624-5505 or visit www.panasonic.ca
Problem
Cannot close cover.
Cannot play discs.
Cannot remove disc.
Tracks on disc do not play
in order, starting with the
first track.
Cannot hear music—too
noisy.
TV picture is distorted.
Radio reception is noisy.
Check this
Is the disc properly secured in place?
≥≥
Is the unit in HOLD status?
≥≥
Is the disc properly secured in place?
≥≥
Is there moisture condensation on the lens?
(Wait for about an hour and then try again.)
Did you press [PUSH] to release the disc?
Is the [MODE] (play mode) slider in the [NORMAL]
position?
≥≥
Is the headphone plug inserted all the way?
≥≥
Is the plug dirty?(Wipe away dirt on plug.)
≥≥
Separate the unit from mobile phones.
Are you using the unit body too near a TV or tuner?
(If the TV or tuner is connected to a simple indoor
antenna, connect it to an outdoor antenna.)
Cautions
When driving a car
In the interest of traffic safety, do not operate the unit
while driving.
Stereo headphones with remote
control
≥Do not wear the headphones with the VMSS unit to
the front.
≥Do not allow children or people who are unwell or
not in full control of their faculties to wear these
headphones.
≥If you feel nauseous while using the headphones,
discontinue use immediately.
Listening caution
Do not play your headphones or earphones at a high
volume. Hearing experts advise against continuous
extended play.
If you experience a ringing in your ears, reduce volume or discontinue use.
Do not use while operating a motorized vehicle. It
may create a traffic hazard and is illegal in many
areas.
You should use extreme caution or temporarily discontinue use in potentially hazardous situations.
Even if your headphones or earphones are the openair type designed to let you hear outside sounds,
don’t turn up the volume so high that you can’t hear
what’s around you.
Sound can be deceiving. Over time your hearing
“comfort level” adapts to higher volumes of sound. So
what sounds “normal” can actually be loud and harmful to your hearing.
Guard against this by setting your equipment at a
safe level BEFORE your hearing adapts.
To establish a safe level:
≥Start your volume control at a low setting.
≥Slowly increase the sound until you can hear it com-
fortably and clearly, and without distortion.
Once you have established a comfortable sound
level:
≥Set the dial and leave it there.
Water Resistant (Splash Proof)
This unit is splash-proof and is not designed to be used
under water.
Please note the following points to avoid possible damage to the unit and the included headphones.
≥Do not immerse in water.
≥Do not splash water onto the unit.
≥Water in the headphones jack, OUT jack, and DC
IN jack may damage the unit. Cover them with the
attached rubber caps when they are not in use.
≥To prevent water from entering the unit, the dual
locks should be locked to close the disc lid.
≥If the unit or the headphones get wet with water or
sweat, dry them with a soft cloth.
≥Do not open the disc lid near water or sand. Before
opening or closing the disc lid, be sure to wipe off
water, dust or sand on the unit and operate with a dry
hand.
≥Make sure there is no sand or dust around the disc lid.
The disc lid will not seal properly if there is, and water
may get into the unit, possibly causing a malfunction.
≥Do not expose the unit or the headphones to salt
water. If the unit and headphones are immersed in salt
water, wash them with a little fresh water then dry with
soft cloth. Never wash them under running water.
≥Do not place the unit and the headphones for a long
period of time in high temperature and high humidity
areas such as bathrooms or damp basements, etc.
Selection and care of
rechargeable /dry cell batteries
∫ Selection
As a safety precaution, the portable CD players made
by Panasonic are constructed so it is impossible to
recharge ordinary batteries.
Only batteries especially designed for this unit can be
recharged.
Special rechargeable Ni-Cd batteries:
P-3GAVA/2B (set of 2)
For details, check with your dealer.
EST. 1924
Special rechargeable
batteries
Ordinary dry cell batteries/
rechargeable batteries
SL-SW880 ONLY
Batteries used
2 alkaline batteries
Optional
rechargeable
batteries
(P-3GAVA/2B)
Anti-shock
OFF/ON
About 20 h/25 h
About 10 h/12 h
 Loading...